

Page 1
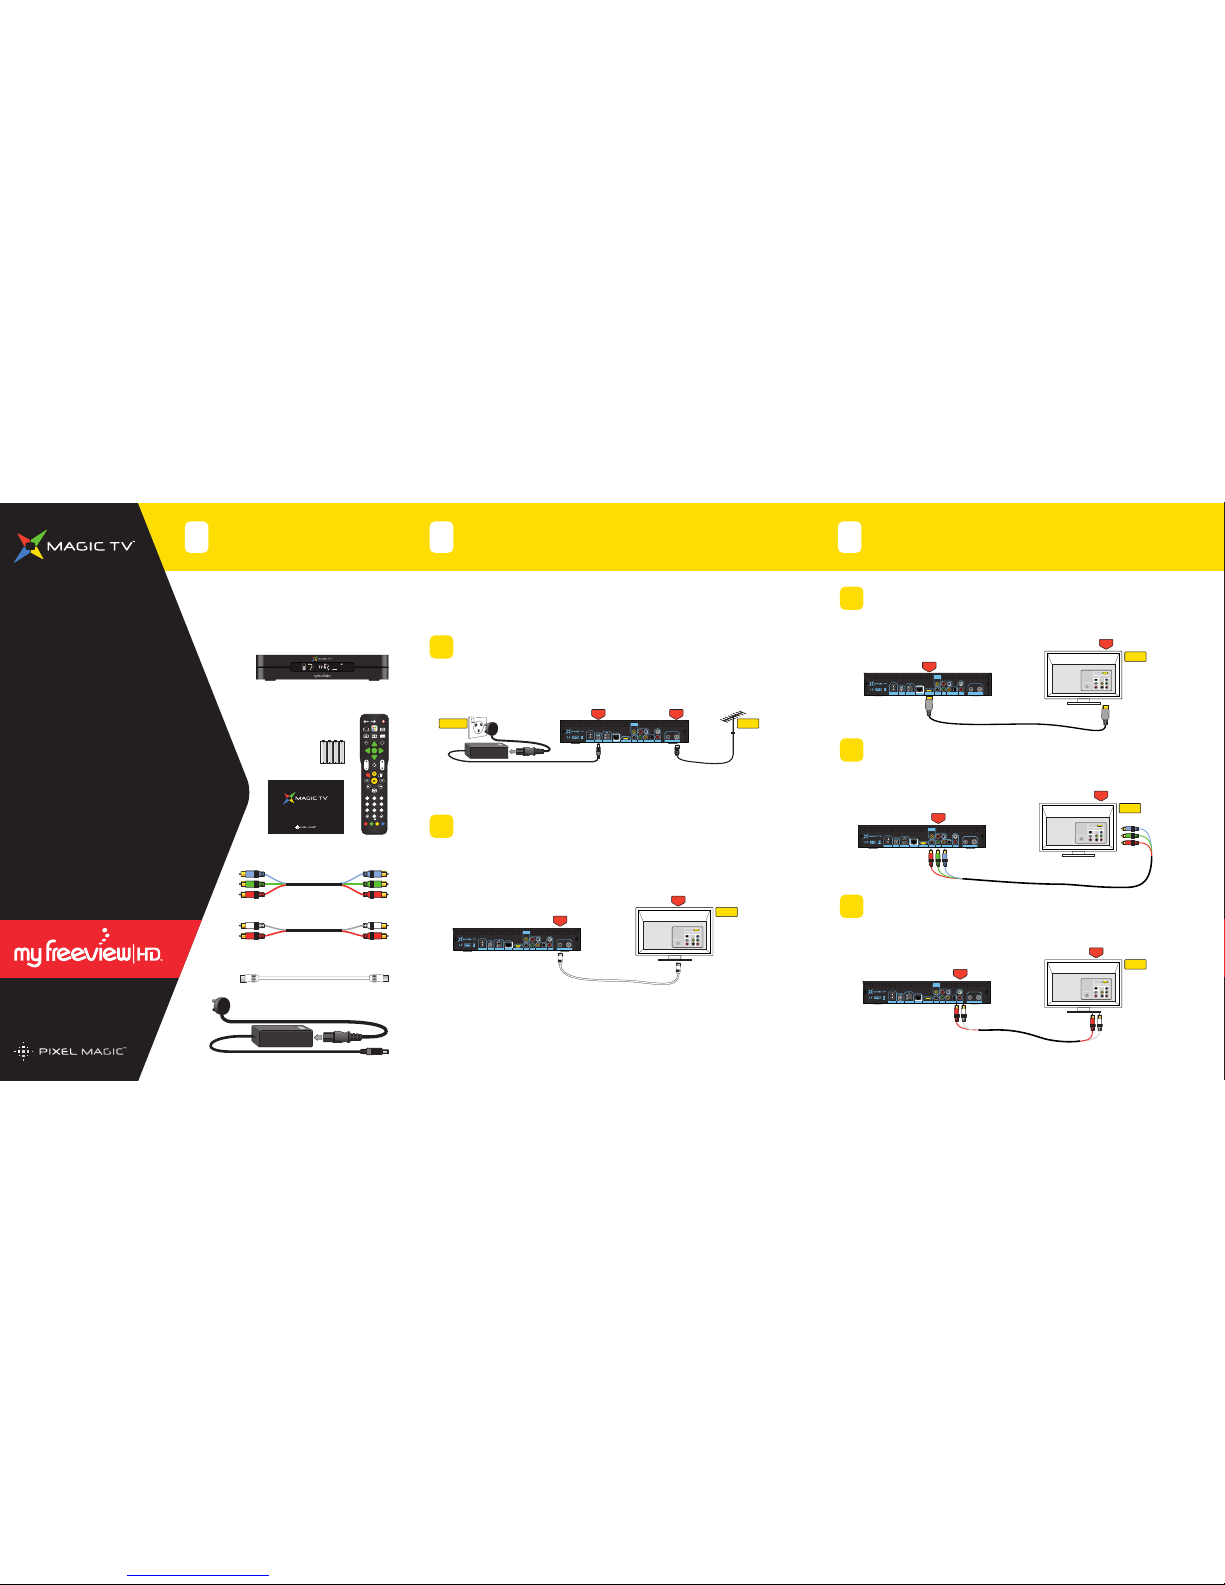
HDMI is the highest quality output from Magic TV™and can also carry multi-channel audio,
reducing cabling.
In order to get High Definition video from Magic TV™ without HDMI, Component
(YPbPr) must be used.
Not many TVs accept a digital audio signal in which case, the Stereo audio outputs of Magic TV™
can be used.
Start here
Thank you for choosing Magic TV™
This guide will provide you with simple
instructions for connecting and operating
Magic TV™
Please check that you have all of the
following:
Before starting, please take some time to read the Safety Instructions included in
the Owner's Guide
Before you start
AAA
AAA
AAA
AAA
POWER + ANTENNA
Connect the power adapter and an arial/antenna to Magic TV™. Leave the power outlet switched
off or unplugged until all the wiring work has been completed. A roof-mounted antenna is
recommended for best reception.
OPTIONAL - Antenna loopthru
If you want to retain analogue TV reception on other devices with a TV tuner (TV, VCR or DVD
recorder for example), connect the included extension cable as shown. Many devices can form part
of the antenna loop, by forming a chain. We recommend using Magic TV™ as the first component
on the chain and your television as the last.
1
Starting the wiring
2
Connecting to a TV
3
aa
VIDEO+AUDIO for HDMI-equipped HDTVs
a
VIDEO for HDTVs without HDMI
bb
AUDIO for HDTVs without HDMI
bb
Magic TV™ HDTV Personal Video Recorder
Magic TV™ Remote Control
4x AAA batteries
Component video cable
Stereo audio cable
Aerial/Antenna extension cable
100-240VAC auto-ranging power adapter
(Plug type varies, depending on country)
Owner's Guide
cc
12V DC
Ant. In
Aerial/
Antenna
100v-240v AC
Power Outlet
S-Video
12V DC
ON/OFF
HDTV Tuner
Ant.InLoop
Out
NetworkUSB HDMI YPbPr
Audio
Digital Audio
L
R
Composite
Video
Pb
Pr
Y
Ant.
Loopthru
Ant. In
Television
Other device with
a tuner on board
(
VCR or DVD recorder
for example).
OR
Audio
Video
Antenna
HDMI
INPUTS
S-Video
12V DC
ON/OFF
HDTV Tuner
Ant.InLoop
Out
NetworkUSB HDMI YPbPr
Audio
Digital Audio
L
R
Composite
Video
Pb
Pr
Y
Television
HDMI
Audio
Video
Antenna
HDMI
INPUTS
HDMI
HDMI
HDMI
S-Video
12V DC
ON/OFF
HDTV Tuner
Ant.InLoop
Out
NetworkUSB HDMI YPbPr
Audio
Digital Audio
L
R
Composite
Video
Pb
Pr
Y
Television
YPbPr
(component)
YPbPr
(component)
Audio
Video
Antenna
HDMI
INPUTS
S-Video
12V DC
ON/OFF
HDTV Tuner
Ant.InLoop
Out
NetworkUSB HDMI YPbPr
Audio
Digital Audio
L
R
Composite
Video
Pb
Pr
Y
Television
Analogue
Audio
Audio
Video
Antenna
HDMI
INPUTS
Analogue
Audio
S-Video
12V DC
ON/OFF
HDTV Tuner
Ant.InLoop
Out
NetworkUSB HDMI YPbPr
Audio
Digital Audio
L
R
Composite
Video
Pb
Pr
Y
More wiring options can be found in section 3 of the Owner’s Guide
Plug and socket type varies, depending on country.
R
LIVE
i
OK
CH
PG
VOL
1 2 3
4 5 6
7 809
GUIDE
ASPECT AUDIO
MENU
SUBTITLE
BACK INFO
REPLAY
SOURCE
SKIP
TV
ABC DEF
GHI JKL MNO
PQRS TUV WXYZ
CLEAR ENTER
TEXT
POWER
Page 2
Magic TV™ is now wired up and ready to be powered up.
Switch on the system at the mains
Switch on the devices (Magic TV™ has a power switch
on the rear panel)
Select the correct input on your TV
You will now see the Magic TV™ Guided Setup
If you cannot, refer to section 10.2 of the main Owner’s Guide
Switching on for the first time
4
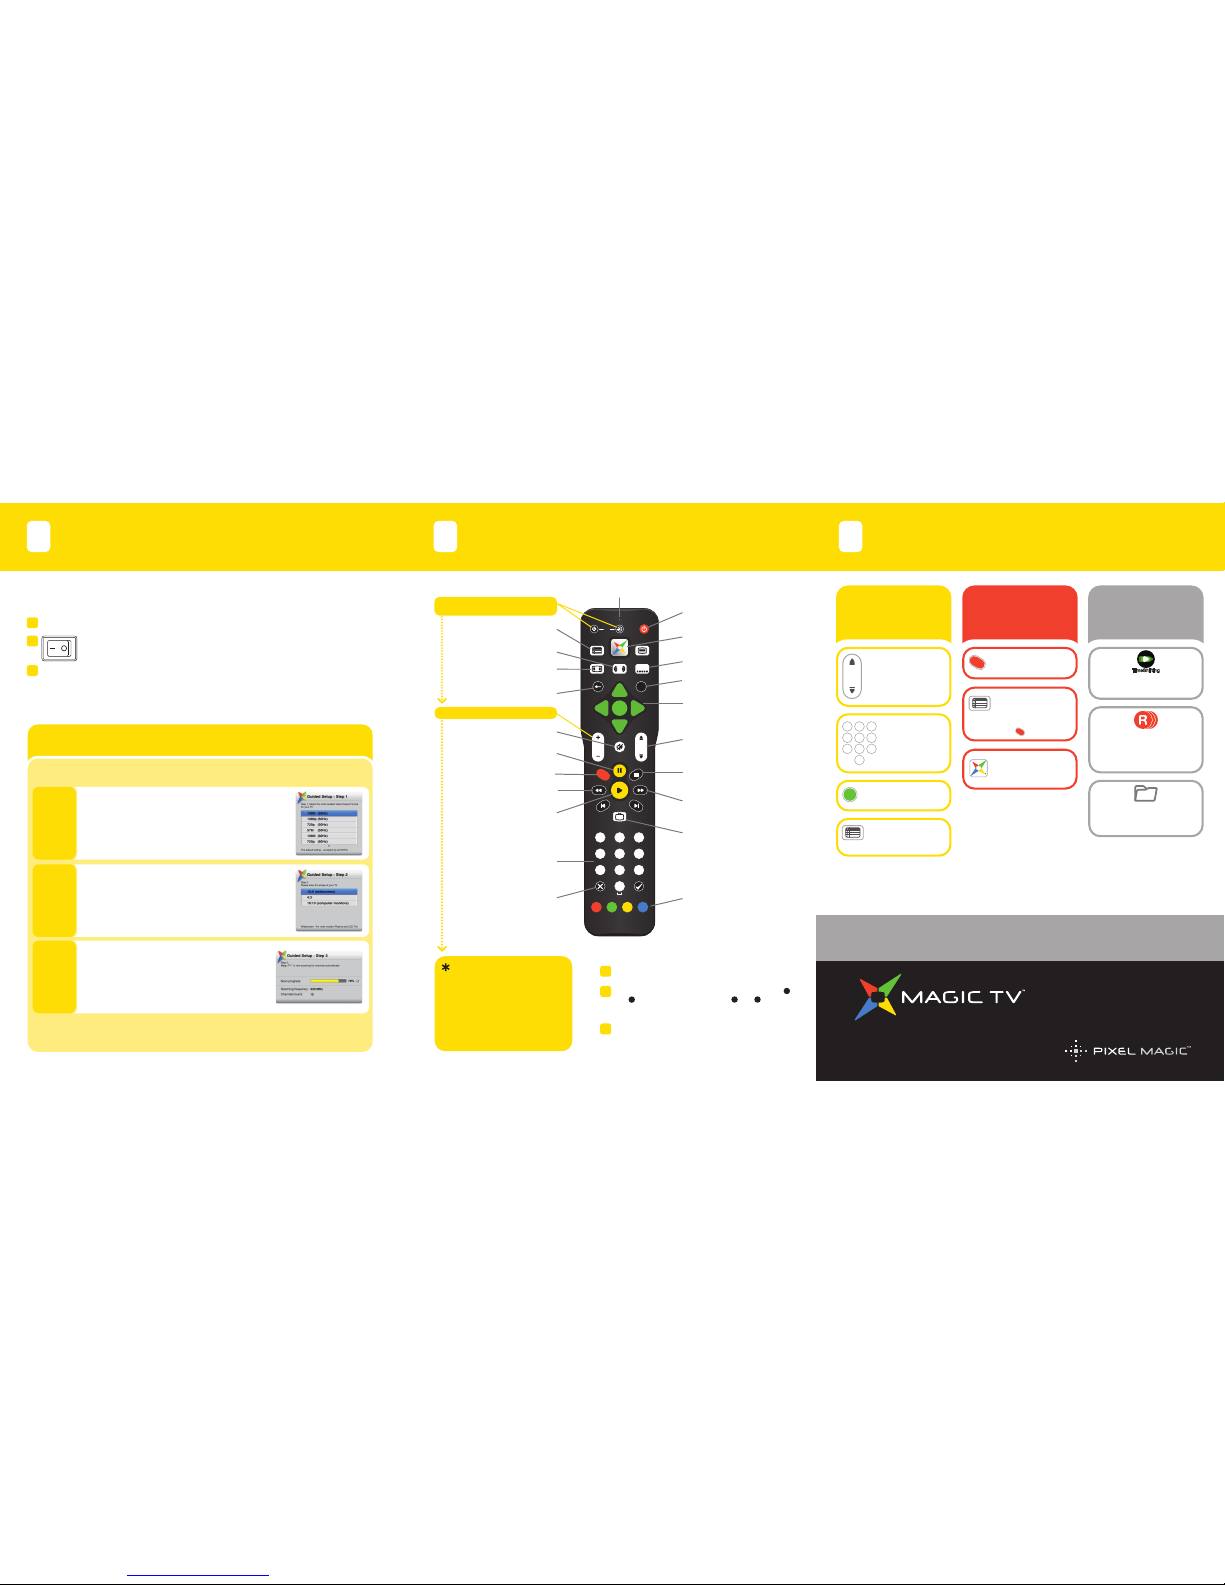
The Magic TV™ remote control
5
Tips
6
Change channel
in 4 ways:
Record in 3 ways: Other great
features:
Channel Up/Down
CH
Enter Channel
Number
1 2 3
4 5 6
7 809
Browse the Electronic
Programme Guide
(EPG)
GUIDE
For more help and support see the Owner's Guide
Email Support: support@magictv.co.nz
Other contact details for your region are
available at www.magictv.com
Step
Step
Select the best Video Output Format for your TV
Step
Please select the Aspect Ratio of your TV
Scan for channels automatically
Guided Setup is now complete
Welcome to Magic TV™ Guided Setup. Choose 'Yes' to continue
Guided Setup
© 2011 Pixel Magic Systems Ltd. All rights reserved. Magic TV and Pixel
Magic are Trademarks of Pixel Magic Systems Ltd. Freeview | HD and
MyFreeview | HD are Registered Trademarks of Freeview Ltd. All other
trademarks are properties of their respective owners. Specifications subject
to change without notice.
www.magictv. com
Press OK to show a
Channel List
OK
Press 'R' during Live TV
to record instantly
R
Highlight a
programme on the
Electronic Programme
Guide (EPG) and then
Press
GUIDE
R
Set a timer in Main
MenuRecording
Timer Recording
Pause Live TV and don't miss
a thing!
TimeShifting
Choose 'Record Whole
Series' and make sure you
don’t miss your favourite
programmes
Find recordings fast, by
adding them to folders (see
main guide section 6.8)
1
2
3
1080i (50Hz) The default setting – accepted by all HDTVs
1080p (50Hz) A good choice if your TV accepts a 1080p
HDMI input
720p (50Hz) A good choice if your ‘HD Ready ’ TV has 720 or
768 lines of resolution
576i (50Hz) Use only if your TV is Standard Definition
16:9 Choose this if your TV is widescreen (most modern
Plasma and LCD TVs)
4:3 Choose this if you have a traditionally shaped TV
16:10 Choose this if you are using a widescreen computer
monitor as your display
This step will scan through all the available frequencies
looking for channels. Once complete,
Magic TV™ will display a list of the channels found.
If no channels are found, please refer to section 10 of the
main Owner’s Guide.
Important Information
The TV Power and TV Input
buttons are not functional until
you teach the Magic TV™ remote.
For information on how to
program the learning buttons,
please see section 2.1 of the
Owner's Guide.
R
LIVE
i
OK
CH
PG
VOL
1 2 3
4 5 6
7 809
GUIDE
ASPECT AUDIO
MENU
SUBTITLE
BACK INFO
REPLAY
SOURCE
SKIP
TV
ABC DEF
GHI JKL MNO
PQRS TUV WXYZ
CLEAR ENTER
TEXT
POWER
Power On/Off
LED Indicator
Magic TV™ button (access
to all menus)
Aspect Ratio Correction
mode selection
Back
Learning buttons
TV Power & TV Input
*
Learning buttons Vol+ & Vol- *
*
Mute
Electronic Programme
Guide (EPG)
Programme information
Navigation of on-screen
menus
Channel Up/Down or
Page Up/Down when
in Menus
Pause Live TV and
Recorded Programmes
Record the current programme
Rewind Playback
Resume Playback
Alphanumeric keys
Live TV. Jump to Live TV
from any menu
Stop Playback and recording
Speed up Playback.
Press again for faster speed
Contextual navigation.
Refer to onscreen hints for
exact function
Audio track selection
Subtitle language selection
Cancel or Delete
Inserting the Batteries
Push in the ridged area of the battery cover and slide
the cover down
Insert four AAA batteries (supplied) by matching the +
and – marks on the batteries to the + and – marks in
the battery compartment. Note that two of the
batteries will slide under the casing slightly
Replace the battery door
If the batteries are working and are inserted correctly, the
LED Indicator will flash when any button is pressed.
a
b
c
 Loading...