

Page 1

Instruction Manual
ROOK
Professional Flash TriggerProfessional Flash Trigger
ReceiverReceiver
1
2
3
Ind ic ator
1
Light
5
Batte ry
compa rtmen t
2
Shutter release/test
button
6
Hot sho e foo t wi th
scr ew
4
3
7
Power /gr ou p
switc h
Chane l setti ng
5
7
6
Out pu t soc ke t
4
1
Page 2

TransmitterTransmitter
1
2
3
Indic ator
1 2
Light
5
Input /ou tp ut
socke t
for Ca no n
4
5
Shutter release/test
button
6 8
Batte ry
compa rtm en t
for Ni ko n
Gro up I ndi ca te
3
Light
Tri gge r po int
7
for So ny
6
8
7
Power /grou p setti ng
4
Chane l setti ng
for Olym pu s/
Pana so ni c
Comp at ib le
ROOK Mode l co mp at ible list as be lo w:
Model
For C an on
For N ik on
For S on y
for Oly mpu s/
Panas onic
Tran sm itter (TX)
Can on seri es came ra
Nik on seri es came ra, Sam sung se ries ca mera
Fuj ifilm s eries c amera , Pante x serie s camer a
Son y serie s camer a, Mino lta ser ies cam era
Oly mpus/ Panas onic se ries ca mera
Above brand n am e is r eg istered by th e re sp ec tive owner.
Rec eiver (R X)
Qri ginal s peedl ite,
stu dio lig ht,Me tz,
SUN PAK, Sigma
2
Page 3

Over vi ew
Than k you so much for pu rc has in g PIXE L prod uc t, ROO K is a prof ess io nal
group ing fla sh t rig ge r. TTL m ode a va ila bl e on t ran sm itt er h ot shoe a nd s ync w ith off
shoe trig ger tog eth er. Off shoe tri gge r ca n be grou pe d the fla sh and Remo te the
camer a. ROOK i s usi ng g lob al f ree FSK 2 .4G Hz w hic h is m ore s ta bil iz e.
Cau tions before use
1、Mak e sure t he cam era is powe red of f befo re ins tal l device.
2、Thi s is ele ctronic p roducts a ccessor ies ; some o f the en viro nme nt cau ses may
affe ct the w orki ng. Howev er thi s is har dly ev er to ge t this s itua tio n, don 't wor ry!
3、Thi s comp one nt can 't be st ron g vibr ati on, or m ay lea d to pro duc t fail ure .
4、For a lo ng time non -use, ple ase tu rne d off the t ran smit ter a nd the r eceiver 's
powe r and remove the battery.
5、The ba tte rie s shou ld not inst all an ti- polarit y; otherw ise the bat teri es ma y leak .
corr osi ve liq uid s, hea t or exp losion.
6、Whe n the pr oduct con nected to the dev ice, Do not pu ll the wire s.
7、Do not put it in h igh te mpe rature, s uch as a close d car un der direc t sunligh t, the
cont rol pa nel an d othe r high -tem peratur e area s.
8、kee p dry, do no t use we t hand c onta ct wi th the p rodu ct, t he pro duc t must n ot be
imme rsed in wate r or exposed to r ain, a nd thi s may lea d to not wo rk pro per ly.
9、Do not use flamma ble gases i n viol ati on of th is war nin g may ca use an e xpl osio n
or fir e.
、10 Bec ause of this prod uct is i ncluded b attery; p lease str ictl y fol low th e inst ruc tio n
for operat ion. O ther wise its may cause an explosio n, fir e or pers ona l inju ry.
Feat ur e
、
1 ROOK is a p rofes siona l group ing fla sh trig ger.
、
2 Tra nsm it ter h ot s hoe s up por t TT L and s yn c wit h off sho e flash .
、
3 Wak e-u p fu nct io n ava il abl e, t he fl as h wil l be w ake u p au tom at ica ll y.
、
4 Thr ou gh stud io ligh t to conn ect PC or U SB so ck et, t he s ync s pe ed up t o 1/ 320 s
(Sync t ime may h ave lit tle bit i nacur racy as d iff er enc e ca mer a mo del )
、
5 Ava il abl e to c ont ro l the s ho oti ng o r thr ou gh ma st er ca me ra to c on tro l
sla ve c ame ra .
3
Page 4

Specification
FSK2 .4 GH z
up to 200m
1/200S
Rec ei ve r
AAA x2
Rec ei ve r 44 .0 g (w ithout battery )
Wirel es s Fr eq ue ncy Syste m:
Operati ng D is ta nc e:
Shutter S yn c Sp ee d:
Group set ti ng : 3 diffe re nc e group (7 comb in at io ns )
Wirel es s Ch an ne l: 4
Sta nd -b y Ti me 250 hours
Tran smitter: 5 years
Pow er :
Wei gh t: Tran sm it ter 48.5g (without battery )
: :
Incl ud ed I te ms
Pl ea se check th e pa ck age and mak e su re the be lo w it ems are
already i n t he box. I f the re 's missed a nything, please co nt act w it h the
distrib ut or d ir ec tly.
Tra ns mitter 1 pc
ROOK
ROOK Rece iv er
Studio ligh t ca bl e (3 .5-3.5)
Studio ligh t ca bl e( 3.5-1/2) 1 pc
Receiver ho ld er : 1pc
Hot shoe prot ec to r:
Manual: 1 pc
1pc
1
pc
2pc
Hot s ho e pro te cto r
Recei ver hol der
4
Page 5
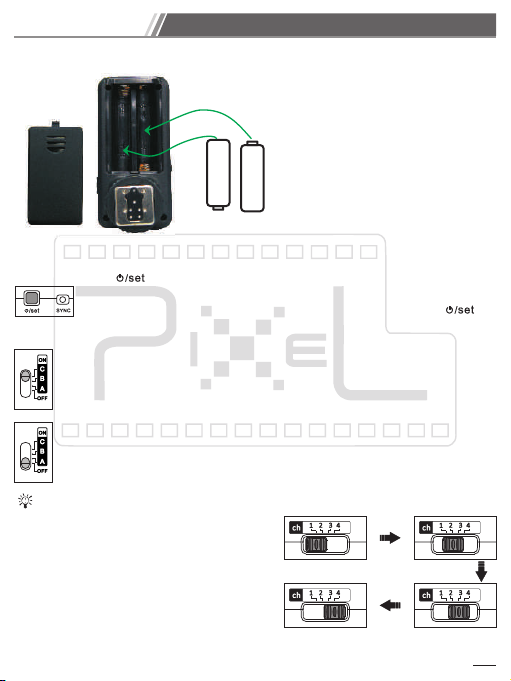
Prepare to us e
Battery Ins ta ll at ion:
Set trans mi tt er a nd r eceiver t o th e sa me c ha nnel
Pleas e locat e the bat tery ac cordi ng
+
AAA
to th e ic on in the b att er y com pa rtm en t.
+
AAA
-
Turn p ow er o n/ off:
Tra nsm it ter :
Tra nsm it ter :
Receiver:Receiver:
Hold [ ] 2 se con ds t o tur n on t ran sm itt er , the n gr oup L ED l igh t on
for 2 s ec onds, a nd sh ow w hich cu rrent l ight. I t can b e us ed tr ig ger t he
fla sh a nd co nt rol shu tte r. You c ou ld tu rn o ff po wer by pr essin g [ ]
2 secon ds agai n, th en [ LED l ig ht] b li nk re d th ree t im es. Th en po we r off .
(Tu rn
power on)
Switc h [Po we r/g ro up sw it ch] t o A or B o r C to tu rn o n rec ei ver
power ; the rec eiver w ill be st ayed in t he curr ent gro up and th e
LED lig ht blin k as red ev ery 2 sec onds.
(Tu rn
power off )
For a l on g tim e no n-use , pleas e turne d off t he t ran sm itt er a nd th e re cei ve r's
power a nd remo ve the ba ttery.
Switc h [Po we r/g ro up sw it ch] t o OF F; th e re cei ve r pow er i s off ,
and the l ight st op blin king.
Chan ne l Se tt ing:
Set transmitter and receiver to the
same channel
1.Slide the switch to change channel.
CH
1
2.Channel changing as:
CH1→ CH2→ CH3→CH4 (as figure)
CH
4
CH
CH
2
3
5
Page 6

* Transmitte r an d re ce iver must be se t as t he s am e channel.
CH
1
Trans mit ter Rec eive r Trans mit ter Rec eive r
Gr oup setti ng :
Gr ou p se tt in g on t ra ns mi tt er
1. wak e up g ro up d isp lay, an d show th e cu rr ent con tr ol lin g grou p. S lig htly p re ss
[ ] to s ho w gro up mod e wh ich s howi ng t he curr en t wo rki ng gro up .
2. Pre ss a ga in [ ] t o ch ange grou p.
3. Gro up c ha ngin g a s :
A 、B
A、B
C
→
、
4. No act ion wit hi n 2 secon ds , the gro up LED li gh t will of f.
* A、B、C LED lig ht on means t he curr ent set ti ng will b e wo rking w it h
trans mi tte r.
→
CH
1
A 、C → B、C
A
→
CH
1
→
B
CH
3
→ C → A、 B、C
Group set ti ng o n re ceiver
Put Powe r/ group s witch a t A/B/C ,
and the n tu rn on the r eceiv ers.
*Re ce iv er o nl y ge t si gn al from transmitter when the curren t group
setting of re ce iver is included in the validate gr ou p of transmitter.
Test in g:
1. Check power on or of f.
2. Check the frequency of t ransmitter and receiver.
3. Check the group sett in g of transmitter and receiver.
6
Page 7

Test in g th e receiver signal as below:
1.Ins ert f la shg un o n the r ec eiv er a nd tu rn o n the f la sh po we r; se t th e fla sh
ind ex a s min im um.
2.Ful l press t he te st b utt on
3.Trig ge r the F la sh.
How to connect the relative photo equipment
1. Ti ght t he H ot sh oe w ith s cr ew, an d th en tu rn r igh t to
rel ea se.
2. Plug t he tran smitt er on the c amera h ot shoe .
3. Ti ght t he H ot sh oe w ith s cr ew, an d th en tu rn
lef t to l ock .
Connect the transmitter to camera hot shoe
(1
( )Trans mit ter
1. Plug PC-3.5 connecting cable to transmitter 3.5mm socket.
2. Plug PC-3.5 connecting cable to camera PC socket.
Connect transmitter to camera via PC-3.5 connecting cable.
(2
*PC-3.5 con ne ct in g cable shoul d be p ur ch ased separa te ly.
7
Page 8

1. Split the protecting film on the receiver holder and stick it on
2
31
the studio light as figure.
2. Mount the receiver on the receiver holder.
3. Use 3.5-3.5 or 3.5-1/2 according to studio light socket.
4. Plug 3.5mm side into the transmitter input.
5.Insert another side into the studio light socket.
Connect the Rec ei ve r to Studio Light
1. Unlo ck the Spee dlite F la sh lock in g screw.
2. Inse rt t he S peedl ite Flash i nto the r eceiv er h ot shoe
as figu re.
3. Acco rding t o the fla sh l ockin g me thod to l ock the
speed li te on r eceiv er.
Connect the Rec ei ve r to S pe ed li te Flash
(1 (2
1.Plu g shutt er co nn ectin g
cable ( 3.5mm s ide) in to th e
recei ver soc ke t.
2.Plu g shutt er c onn ec tin g
cable ( ca mer a si de) i nt o
the cam era shu tt er re le ase
socke t.
Conne ct Rece iver to C am era
*The shutte r ca bl e sh ould be purch as ed s ep arately.
8
Page 9

Figure E xp la ination
Speed li te flas h TT L + Sp eedli te f lash tr ig ger rem ote con tr ol
By usin g of t he TT L off -came ra c ab le to tri gg er the of f-cam er a flash w he n
the Spe ed lite TT L fla sh w orks.
Spe edlite flash TT L + Studio ligh t off-cam era f las h trigger remot e con tro l
Speedlite flash TT L + Sp ee dl ite fl as h tr ig ge r remote control
Speedlite flash TT L + Sp ee dl ite fl as h tr ig ge r remote control
9
Page 10

Speedlite flash TTL + off-camera flash trigger remote control
The trans mi tt er supp or ts t he S peedl it e fl ash and wil l no t ha mper TT L
communi ca ti on of camer a. F ur therm or e, i t wi ll send t he s yn c signal an d
trigger t he o ff-ca me ra f lashgun m ea nw hile.
Spe edl ite flash TTL + Studio light off- cam era flash trigger remo te control
Speedlite flash TT L + Sp ee dl ite fl as h tr ig ge r remote control
10
Page 11

Off- ca me ra flash remote c on tr ol
Tra ns mitter inst al le d on c amera hot sho e, a nd t ri gger the flas h li gh t.
Stu di o li gh t off-c am er a fl as h tr ig ge r re mo te c on tr ol
Speedlite flash trigger remote control
11
Page 12

Tran sm itter I nput/ ou tput tr ig ger off -camera f la sh and ou tp ut flas h.
Tran sm it ter Speedli te T TL , In put/ Output sy nc hronous Trig ger,
off-came ra l ig ht synchron ou s Trigger
OFF ON
Came ra o n to p TT L, PC off-camer a sy nc t rigger.
12
Page 13

Flas h gr ou pi ng remote contr ol
Receiver A、 B、 C will oper at e wh en t ransmitte r se t at A、 B、 C .
Rece iv er A、B will oper at e wh en transmitte r se t at A、B.
13
Page 14

Rece iv er B w ill operate when tr an sm itter set at B.
Rece iv er A will o pe ra te when transmi tt er s et at A.
14
Page 15

Use under incompatible mode
When th e tr ansmi tter is inc ompat ib le with t he c amera , you sho ul d use it
as belo w:
Sligh tly pre ss the tr ans mi tte r bu tto n.
Non-c ompat ible mo de usin g metho d
is sa me a s com pa tib le m ode.
*If t he s hoo ti ng in te rva l ti me or 2 s ho oti ng t ime s
is lo nge r tha n 30s , you ne ed to pres s but ton
again , or it may m iss fla sh.
Control s ho ot in g
Rem ot e co nt ro l
1. Slig htly ha lf-pr ess rel ease bu tton, t ransm itter
and r ec eiver i ndica te ligh t as Gree n, th en t he
cam er a sta rt ing f oc us.
2. Fu ll y pre ss r ele as e butto n, tr an smi tt er
and r ec eiver a s Red, th en th e ca mer a
sta rt ing s ho ot.
* Some Ca meras w on't sh oot if th e camer a canno t focus e ven get s hooti ng sign al,
so pl ea se ad ju st th e ca mer a to “M F”
*The sh ut ter c ab le shou ld b e purch ased se parat ely.
15
Page 16

Mast er c am era control the s la ve c am era
Transmitte r
Master Came ra
Slave Camer a
Receiver
*Camera Shu tt er c ab le is purch as ed s ep ar ately.
Hal f- pre ss t he ca me ra sh oo tin g bu tto n, m ast er c ame ra a nd al l sl ave c am era s
sta rt ing foc us. F ul ly- pr ess t he c ame ra s hoo ti ng bu tt on an d al l the c am era s st art in g
shoot .
*As camera has difference reaction time, then shooting time will be little
difference.
*Some Cameras won't shoot if the camera cannot focus even get shooting
signal, so please adjust the camera to “MF”
*The camera cannot focus if the transmitter is not specific for the camera.
Now you can start to use incredible PIXEL product. If you have any
question,you can contact the local dealer or visit to http://www.pixelhk.com.
This manual information is updated at May 1, 2011. If you want to use this
product combined with others, which published after this date; please consult
with the PIXEL dealer for further information.
261 121 V10 .01
16
 Loading...