

Page 1
Owner's guideOwner's guide
Page 2

2
Safety Information
Important Safety Instructions
1. Read these instructions.
2. Keep these instructions.
3. Heed all warnings.
4. Follow all instructions.
5. Do not use this apparatus near water.
6. Clean only with a dry cloth.
7. Do not block any ventilation openings. Install in accordance with the manufacturer’s instructions.
8. Do not install near any heat sources such as radiators, heat registers, stoves, or other apparatus (including
amplifiers) that produce heat.
9. Do not expose this appliance to dripping or splashing water and no object filled with liquids (such as vases)
should be placed on this appliance.
10. Do not interfere with the safety aspects of the polarized or grounding-type plug. A polarized plug has two
blades with one wider than the other. A grounding type plug has two blades and a third grounding prong.
The wide blade or the third prong is provided for your safety. If the provided plug does not fit into your outlet,
consult an electrician for replacement of the obsolete outlet.
11. Protect the power cord from being walked on or pinched particularly at plugs and the point where they exit
from the apparatus.
12. Only use attachments/accessories specified by the manufacturer.
13. Unplug this apparatus during lightning storms or when unused for long periods of time.
14. Refer all servicing to qualified service personnel. Servicing is required when the apparatus has been damaged
in any way, such as if the power-supply cord or plug has been damaged, liquid has been spilled, objects have
fallen into the apparatus, the apparatus has been exposed to rain or moisture, does not operate normally, or
has been dropped.
Page 3

3
Additional Safety Instructions
• To ensure maximum performance, please read this manual carefully. Keep it in a safe place for future reference
• Install this unit in a cool, dry, clean place - away from windows, heat sources, sources of excessive vibration,
dust, moisture and cold. Avoid sources of humming (transformers, motors). To prevent fire or electrical shock,
do not expose the unit to rain or water
• Do not force connection wires. When moving the unit, first disconnect the power plug and the wires connected
to other equipment. Never pull on the wires themselves
• The openings on the unit cover assure proper ventilation of the unit. If these openings are obstructed, the
temperature inside the unit will rise rapidly. Therefore, avoid placing objects against these openings, and install
the unit in a well-ventilated area to prevent fire and damage
• Be sure to allow a space of at least 30 cm behind, 20 cm on both sides and 10 cm above the top panel of the
unit to prevent fire and damage
• Digital signals generated by this unit may interfere with other equipment such as tuners, receivers or TVs. Move
this unit further away from such equipment if interference is observed
• Do not attempt to clean the unit with chemical solvents; this might damage the finish. Use a clean, dry cloth
• Be sure to read section 10: Troubleshooting regarding common operating errors before concluding that the unit
is faulty
• When not planning to use this unit for long periods of time, disconnect the AC power plug from the wall outlet
• To prevent lightning damage, disconnect the AC power plug when there is an electrical storm
• Grounding or polarization - Precautions should be taken so that the grounding or polarization of an appliance is
not defeated
• This unit is not disconnected from the AC power source as long as it is connected to the wall outlet, even if this
unit itself is turned off. This state is called the standby mode. In this mode, this unit is designed to consume a
small amount of power
Page 4

4
Thank you for purchasing HD MediaBox. An exciting new world of High-Definition images and audiophile-quality
audio is now at your fingertips
Viewers can appreciate impressive resolution, dynamic contrast and vivid colors, bringing cinematic excitement and
pleasure into the home.
HD MediaBox provides the missing link between your HDTV, hi-fi, and computer network. Now, from the comfort of
your living room, you can play the movies, music, and photos stored on your computers through your TV and hi-fi.
We are confident your new player will both enhance and become integral to your home entertainment system.
Please contact your HD MediaBox retailer immediately if any of the above items are missing.
Before starting, please check the following items were included
in your package:
1. HD MediaBox High-Definition Media Player with base attached
2. Auto-Voltage Mains Transformer
3. Power Cord fitted with the correct plug for your region’s domestic power
supply
4. HD MediaBox Remote Control with 2 AAA batteries
5. VGA to 3 female RCA (Component Video) conversion cable
6. Composite A/V 3-in-1 Cable (RCA connectors)
7. USB cable
8. A Philips screwdriver and 4 screws for HDD fitting
9. This Owner’s Guide, hard copy or CDROM
Welcome
Page 5

5
Table of Contents
Safety Information 2
Important Safety Instructions 2
Additional Safety Instructions 3
Welcome 4
1. About HD MediaBox 8
1.1 Introducing HD MediaBox 8
1.2 Features & Functions of HD MediaBox 8
1.2.1 General 8
1.2.2 Video Playback 9
1.2.3 Audio Playback 9
1.2.4 Photo Display 10
1.3 An Introduction to High-Definition 10
1.3.1 HD Format Notation 11
1.3.2 Interlaced and Progressive 11
1.4 Supported Formats 11
1.4.1 A Brief Overview of Video Formats 11
1.4.2 A Brief Overview of Audio Formats 13
1.4.3 A Brief Overview of Photo Formats 14
2. Familiarizing Yourself with HD MediaBox 16
2.1 HD MediaBox Case and Stand 16
2.2 HD MediaBox Front Panel 16
2.3 HD MediaBox Rear Panel 17
2.4 HD MediaBox Remote Control 18
3. Getting Started 22
3.1 Connecting Power 22
3.2 Fitting the Remote Control Batteries 22
3.3 Adding an Internal Hard Disk Drive (Optional) 23
3.3.1 Fitting an Internal HDD 23
3.3.2 Initializing and Formatting an Internal HDD 25
3.3.2.1 NTFS and FAT32 Formatting on Windows® XP 25
3.3.2.2 Notes for HFS+ Formatting on Mac® OS X 28
4. Connections 30
4.1 Video Connections 30
4.1.1 High Definition Connections 30
4.1.2 Standard Definition Connections 31
4.2 Audio Connections 32
4.3 Computer Connections 34
4.3.1 Transferring Files to an Internally Fitted HDD using USB 34
4.3.2 Transferring Files to an Internally Fitted HDD using FTP 35
4.3.3 Connecting External USB Devices 35
4.3.4 Network Streaming 36
4.3.4.1 How to Share Folders using SMB on Windows® XP 36
4.3.4.2 How to Share Folders using NFS on Windows® XP 37
4.3.5 Infra Red Distribution 38
Page 6

6
5 HD MediaBox Setup 39
5.1 Navigation of the Setup Menus 39
5.2 Audio Setup 40
5.2.1 SPDIF Out 41
5.2.2 Screen Saver 41
5.3 Video Setup 42
5.3.1 Active Output 42
5.3.2 HDMI 43
5.3.3 SD Modes 44
5.3.4 HD RGB 44
5.3.5 HD YPbPr 45
5.3.6 HDMI Color Space 45
5.3.7 50/60Hz Auto Switch 46
5.4 System Setup 47
5.4.1 TV Refresh Rate 47
5.4.2 TV Shape 48
5.4.3 Subtitle Encoding 48
5.4.4 Slideshow 49
5.4.5 IP Setting (Internet Protocol Setting) 49
5.4.5.1 How to Input a Static IP Address 50
5.4.6 Power Key 50
5.4.7 Language 51
5.4.8 Save Profile 51
5.4.9 Software 52
6. File Browsing Mode 53
6.1 Familiarizing Yourself with File Browsing Mode 53
6.2 Navigating File Browsing Mode 55
7. Media Playing Mode 56
7.1 Info Screen 56
7.2 Repeat 57
7.3 Zoom 57
7.4 Time Search and Jump 57
7.5 Image Adjustments During Playback 58
7.5.1 Brightness 58
7.5.2 Contrast 58
7.5.3 Saturation 59
7.5.4 Vertical Position 59
7.5.5 Aspect Ratio 59
7.5.6 Subtitle Adjustments 59
7.6 Playlists and Slideshows 60
7.7 Subtitles 61
7.8 Other Active Remote Control Keys 61
8. DVD Playing Mode 62
8.1 Menu Navigation 62
8.2 Info Screen 63
8.3 Repeat 64
8.4 A-B Repeat 64
Page 7

7
9. Upgrading Firmware 65
9.1 Firmware Version Check 65
9.2 Downloading and Transferring the New Firmware 65
9.3 Updating HD MediaBox 66
10. Troubleshooting 68
10.1 Changing Video Output Without an Image 69
10.2 Recovery from Firmware Corruption 70
Support & Warranty Information 71
Product Support 71
Product Warranty 71
Page 8

8
1. About HD MediaBox
1.1 Introducing HD MediaBox
HD MediaBox is a High-Definition HDD (hard disk drive) media player, providing instant access to High-Definition
video, digital music, digital photos and DVD files either from its internal hard disk drive (HDD), your personal
computer*, USB HDD or Network Attached Storage box*.
HD MediaBox supports output resolutions of up to 1080p enabling you to set your HD media free from the
constraints of your monitor. Use any VGA, component video, DVI or HDMI equipped display device - Flat panel
displays, projectors or HDTVs.
For movies, TV shows, camcorder footage and more, HD MediaBox supports all popular formats including MPEG
1/2/4, WMV9 and XviD, as well as DVD .ISO and .VOB files. Output everything through the digital HDMI™
connection and you can go digital all the way to your screen!
As well as supporting HD files, HD MediaBox will also up-scale and deinterlace your existing standard definition
files to match the resolution of your display.
HD MediaBox is designed with high quality audio playback in mind. Equipped with 24-bit/192KHz audio DAC from
Analog Devices Inc, low noise Op Amps from Burr-Brown® (famous for their clean output and ultra-low distortion
characteristics), our own specially developed timing circuitry and FLAC lossless compression support, the HD
MediaBox can act as a high end hi-fi jukebox, storing thousands of CDs!
The Audiophile Edition (MB200) adds a low jitter TCXO (temperature compensated crystal oscillator) to dramatically
improve spaciousness, clarity, impact, and purity; providing the highest quality audio playback available in any
network media player.
Digital optical, coax, and analogue connectors are all provided to deliver this high fidelity audio into any home
theater or stereo system.
Included with HD MediaBox is a backlit Remote Control so you can keep the lights low. Combined with the small
size and fanless operation, you get a high-powered box that's also easy to live with.
* Some high bitrate HD video files may not play smoothly across the network.
1.2 Features & Functions of HD MediaBox
1.2.1 General
User-friendly On Screen Display (OSD). Allows easy navigation using the included Remote Control. All player
settings are easily accessible and browsing your files across the network is a cinch. Different media-types are colorcoded and filters can be applied to help with file identification.
Flexible Output resolutions. HD MediaBox can output at the following popular resolutions.
Digital television standards - 480p, 576p, 720p, 1080i, 1080p
PC standards - VGA, SVGA, XGA, SXGA
Plasma resolutions - 1366x768, 1280x768
NTSC and PAL support. Full support for PAL and NTSC standard definition formats is included. Simply choose
your preferred output in the settings menus (see section 5.4.1).
Internal HDD support. An internal IDE hard disk drive can be fitted inside HD MediaBox (see section 3.3).
Flexible and comprehensive AV outputs. All the popular methods of connection are supported, including HDMI
(v1.1 including embedded audio), Component (YPbPr), VGA, Optical and Coax SPDIF, and more (see section 4).
Page 9

Connectivity options
USB: HD MediaBox features three USB2.0 ports. Two of these can be used for connecting external “Mass Storage
Devices” which include external USB HDDs, thumbdisks, etc. The other USB port will connect directly to a PC or
NAS to allow files to be placed on an internal HDD (if fitted).
LAN: An RJ45 is provided to place HD MediaBox on your 10/100BASE-T Ethernet network (100BASE-T
recommended). You can now browse shared files and drives on your network that use either the SMB protocol
(Server Message Block - commonly used by Microsoft Windows®) or the NFS protocol (Network File System - the
UNIX equivalent of SMB). HD MediaBox can also access NAS (Networked Attached Storage) drives on your
network if present. (see section 4.3.4).
FTP: HD MediaBox provides FTP (File Transfer Protocol) access to the internal HDD (if fitted) to allow remote
management of the files and folders across the network (see section 5.4.5).
File system format support. HD MediaBox can read file systems formatted in FAT32, NTFS, EXT2/3 (Linux file
system) and HFS+ (Apple® Mac® file system). FAT32 and HFS+ file systems are not recommended, as they are
limited to files less than 4GB in size and High Definition video files very frequently exceed this.
Backlit Remote Control. The included Remote Control is backlit to enable use in a darkened ‘home theater’
environment.
Updateable firmware. You can update the firmware using the OSD of HD MediaBox. Firmware can be updated
from either an internal HDD (if fitted) or an external USB source (a thumbdisk for example). Firmware updates when
available can be downloaded from the Support section of the Pixel Magic website (see section 9).
1.2.2 Video Playback
Playback of Standard and High Definition video files (see section 1.4.1 for supported formats)
Scaling and deinterlacing. This function is performed automatically - all video will be rescaled to match your
chosen Output Resolution (see section 5.3 for how to set). For SD material, inverse telecine for film sources and
motion adaptive deinterlacing for video sources are supported. For HD material, the ‘bob’ method is used.
Example 1: Downscaling and deinterlacing of 1080i to match your 720p display.
Example 2: Upscaling and deinterlacing of standard definition to match your 720p display.
Auto aspect ratio detection. HD MediaBox can auto-detect whether the source material is 16:9 or 4:3, displaying
the video correctly to match the selected aspect ratio of your display.
Auto 50/60Hz detection. For those with displays that support both 50 and 60Hz refresh rates, HD MediaBox will
automatically detect the format of DVD .ISO and .IFO files and will change the output refresh rate to match. For all
other files, HD MediaBox will look for the characters “_50Hz” or “_60Hz” in the path and filename and change the
output accordingly. (See section 5.3.7).
Network Video streaming. HD MediaBox can access shared folders and drives on your network using the SMB or
NFS protocols. (see section 4.3.4)
External subtitle support. HD MediaBox supports SubRip (.srt) subtitle files. Support for special characters is
also included.
1.2.3 Audio Playback
Playback of popular audio formats (see section 1.4.2), including the FLAC lossless codec.
24bit/192KHz DAC from Analog Devices. The analog audio stereo output of HD MediaBox features a high
performance 24bit/192KHz upsampling DAC from Analog Devices. This increases the resolution of the music,
providing a more detailed and natural sound.
SHOUTcast Radio. Thousands of free Internet radio stations from around the world can be played by HD
MediaBox using the popular www.SHOUTcast.com website (see section 1.4.2).
Precision Clock. The Audiophile Edition (MB200) adds a low jitter TCXO (temperature compensated crystal
oscillator) to dramatically improve spaciousness, clarity, impact, and purity.
Playlists supported. Text files containing track information can be saved and played automatically (see section 7.6).
9
Page 10

10
HDMI audio embedding. Audio can be embedded in the HDMI signal. This provides a digital audio signal to your
external DAC (usually included in AV receivers) and reduces cabling.
“Play all” in folder option. All files in a folder can be played in alphabetical order with no pauses.
1.2.4 Photo Display
Playback of High Resolution photographs. Images of any resolution can be displayed; they will be rescaled to
match your chosen Output Resolution. See section 1.4.3 for supported formats.
Slideshows. HD MediaBox can show all files in a folder alphabetically, or you can create a text file, which lists the
order of the photos to be shown (see section 7.6). The length of time each image will be displayed is also adjustable.
1.3 An Introduction to High-Definition
High-Definition video or HD video generally refers to any video system of higher resolution than standard-definition
(SD). NTSC, PAL and current DVDs are Standard Definition.
HD television (HDTV) resolution usually contains either 1080 or 720 lines of video information. In contrast, regular
digital television and DVDs are 480 lines (like NTSC) or 576 lines (like PAL/SECAM).
High-Definition video generally has an aspect ratio of 16:9 (1.78:1). Standard-definition television (SDTV) has a 4:3
(1.33:1) aspect ratio.
HD signals require a High-Definition television or computer monitor in order to be viewed. Many displays are now
being marketed as “HD-Ready” but not all can show all of the HD video information. In order to get the most out of
HD MediaBox, a display with at least 720 lines is recommended.
Page 11

11
1.3.1 HD Format Notation
HDTV formats are referred to using a notation describing:
There are 2 main HD resolutions 720 and 1080. Usually (but not always) HD pixels are square, meaning that if the
vertical resolution is 720, to achieve a 16:9 aspect ratio, the horizontal resolution must be 1280. For 1080 the
horizontal resolution is usually 1920. Sometimes, for clarity, the full resolutions are written e.g. 1280x720p60.
Most HDTV systems support some standard resolutions and frame or field rates. The most common are:
480p60, 576p50, 720p50, 720p60, 1080i50, 1080i60
p = Progressive, i = Interlaced
HD MediaBox will initially display in 480p60 as this is THE most commonly supported resolution.
A frame or field rate can also be specified without a resolution. For example 60p means 60 progressive frames per
second and 50i means 50 fields per second.
1.3.2 Interlaced and Progressive
HD formats can be either progressive (p) or interlaced (i). Progressive means each time the image refreshes (60
times a second for NTSC, 50 times a second for PAL) the video signal contains the full resolution. However, with
interlacing, each time it refreshes you only get half the resolution (known as a field) - every odd line one field and
every even line the next. All SD video formats are interlaced, as is DVD.
Obviously progressive scan is the higher quality of the 2 systems, but also has larger file sizes.
However, many modern digital display technologies such as Plasma, LCD and DLP inherently progressive scan i.e.
they have to show all the lines of resolution at the same time. Somewhere in the video chain, some device has to
convert interlaced signals into progressive signals for these displays. This task is called Deinterlacing. Most of these
displays will include the technology to do this, however this is a very complex process and HD MediaBox may do a
better job.
Arguments are common about which looks better - 720p or 1080i? It is common for people to prefer the stability
of 720p for subject matter containing a lot of rapid motion (soccer, basketball or hockey games, for example).
You may want to experiment in your own setup to see which you prefer.
1.4 Supported Formats
1.4.1 A Brief Overview of Video Formats
All standard video formats are compressed. The amount of compression and the data rates of these standards vary
enormously. Often files made available for download, will be highly compressed (in order to save bandwidth),
resulting in a lower image quality.
MPEG-1
MPEG-1 is the designation for a group of audio and video coding standards agreed upon by MPEG (Moving
Picture Experts Group). 1.5Mbit/second data rates and 352x240 resolution are common with later improvements
allowing for up to 4Mbit/second for better quality.
Page 12

12
MPEG-1 is very common, mainly due to its ability to store an entire film on a single CD. This Video CD format is a
mass-market competitor to VHS in countries where high humidity can quickly degrade magnetic tapes.
MPEG-2
MPEG-2 is the designation for a group of audio and video coding standards agreed upon by MPEG (Moving
Picture Experts Group). MPEG-2 video is not optimized for low bit-rates (less than 1 Mbit/s), but outperforms MPEG1 at 3 Mbit/s and above.
MPEG-2 is typically used for standard definition DVDs (maximum average of 9.8 Mbit/s) and television broadcasts
(commonly a lower bit rate than DVD).
Some High-Definition files are also coded using MPEG-2, and higher bit rates do exist.
MPEG-4
MPEG-4 is the designation for a group of audio and video coding standards agreed upon by MPEG (Moving
Picture Experts Group).
In general, MPEG-4 video will look more natural than MPEG-2 at the same bit rate (all else being equal). This has
made it an incredibly popular format for bandwidth-sensitive applications such as online steaming, web downloads
and television broadcasting.
WMV9/WMVHD
Windows® Media Video (WMV) is a generic name for the set of proprietary streaming video technologies
developed by Microsoft. It is a non-standard version of MPEG-4 Part 2. WMVHD is a new addition to the technology
that adds High Definition resolutions.
XviD
XviD and some other .avi codecs use MPEG-4 Part 2 compression. XviD is popular because the codec (software to
compress the video and audio) are made available without charge.
Quality can be as good as MPEG-4, but it is common for already compressed files to be recompressed with these
codecs, resulting in further loss of image quality.
Common file extensions* .avi
Streaming over the 100BASE-T and USB2.0 supported YES
Common file extensions* .wmv .avi
Streaming over the 100BASE-T and USB2.0 supported YES
Common file extensions* .avi .mp4
Streaming over the 100BASE-T and USB2.0 supported YES
Common file extensions .mpg .m2v
Streaming over the 100BASE-T and USB2.0 supported YES
Common file extensions .mpg
Streaming over the 100BASE-T and USB2.0 supported YES
Page 13

13
DVD .ISO
An ISO image (.iso) is an informal term for a disk image of an ISO 9660 file system. Most CD/DVD authoring utilities
can create these kinds of files. In general these behave exactly as a DVD disc would when put into a DVD player.
DVD .VOB and .IFO
A VOB file (DVD-Video Object) is a file type contained in DVD-Video media. It contains the actual Video, Audio,
Subtitle and Menu contents in stream form. The maximum size of VOB files is 1GB and are therefore found in
multiples, in conjunction with .IFO and .BUP files. An .IFO is a DVD information file that stores information about
Chapters, Subtitles and Audio Tracks. In general, when the VIDEO_TS.IFO file is accessed, it will behave exactly
as a DVD disc would when inserted into a DVD player. VOB files can also be accessed directly.
.TS
This stands for Transport Stream and is an MPEG-2 video stream. It is used by some HDTV broadcasters and is
gaining popularity as a high quality High-Definition file format.
* A file extension on a file (such as .avi) does not mean that the data within that file is compatible with the player. Many file formats use similar file extensions, and
it is not necessarily an indication of what the file encoding format is. HD MediaBox supports many types of file format, but due to encoding differences, not all files
may play. † Some high bitrate HD video files may not play smoothly across the network.
1.4.2 A Brief Overview of Audio Formats
HD MediaBox supports a mixture of both compressed and uncompressed audio formats. Recently, as computer
storage costs have greatly reduced, lossless compression has become increasingly popular among those who can
discern the differences.
MP3
MP3 was developed by the Moving Picture Experts Group (MPEG). The name MP3 stands for MPEG 1 Audio Layer
3 (see section 1.4.1). It is by far the most commonly used compressed audio format. Like most modern ‘lossy’
audio compression, the MP3 process is modeled on the human hearing range. MP3 tries to reduce file size by first
removing sounds from the frequency extremes.
AAC (Advanced Audio Coding)
Also called MPEG-2 AAC or MPEG-2 NBC, this audio codec is the logical continuation of the MP3 codec created by
Fraunhofer-Gesellschaft. Due to advances in technology, AAC files encoded at a 96 kbps bit rate sound slightly
better than MP3s encoded at 128 kbps.
The AAC codec entered the mainstream when Apple® announced that the iTunes Music Store would sell its digital
music downloads in AAC format. Copy protected AAC files are not supported by this player.
Common file extensions* .aac .m4a
Streaming over the 100BASE-T and USB2.0 supported YES
Common file extensions* .mp3
Streaming over the 100BASE-T and USB2.0 supported YES
Common file extensions* .ts .tp
Streaming over the 100BASE-T and USB2.0 supported YES
†
Common file extensions* .vob .ifo
Streaming over the 100BASE-T and USB2.0 supported YES
Common file extensions* .iso
Streaming over the 100BASE-T and USB2.0 supported YES
Page 14

14
WAV or WAVE
A format developed by Microsoft and IBM for storing high quality, uncompressed audio. WAV became the standard
on PCs, but because of the large file sizes it requires (about 10MB per minute of music), most people convert WAV
files to compressed formats (MP3, WMA, and so on).
WMA
Windows® Media Audio is a ‘lossy’ format similar to MP3 and AAC. This is essentially a competing format created
and licensed by Microsoft. Microsoft claims that Windows® Media files are even better than MP3 files, and is now
positioned as a competitor to the AAC format.
* A file extension on a file (such as .avi) does not mean that the data within that file is compatible with the player. Many file formats use similar file extensions, and
it is not necessarily an indication of what the file encoding format is. HD MediaBox supports many types of file format, but due to encoding differences, not all files
may play.
FLAC
Free Lossless Audio Codec is a popular file format for audio data compression. It does not remove any information
from the audio stream and so retains CD-quality, but will compress files by 30-50%. This codec is perfect for those
who appreciate audio quality above all else and where the space saving over WAV is worthwhile.
SHOUTcast Radio
SHOUTcast is a freeware audio streaming technology, developed by Nullsoft. SHOUTcast uses MP3 or AAC
encoding of audio content and HTTP as the transport protocol to broadcast thousands of radio stations.
In order to play a radio station, HD MediaBox needs to be connected to the internet via a suitable router and to be
configured correctly (see section 5.4.5).
The information HD MediaBox needs in order to access a radio station is contained within the .psl file which can be
downloaded from the shoutcast.com website. Simply right-click on the button and “Save Link As”
(Firefox) or ”Save Target As” (Internet Explorer). It is easiest to rename the .pls file to match the name of the radio
station. This file can then be selected to play within HD MediaBox in the same way as any other audio file.
1.4.3 A Brief Overview of Photo Formats
JPEG and JPG
JPEG (pronounced jay-peg) is by far the most commonly used method of compression for photographic images.
Although a ‘lossy’ format, most digital cameras are able to save files at a compression level hard to detect. Overlycompressed files can suffer from artifacts such as ‘blocking’, ‘smearing’ and ‘blurring’. These are similar to those
found in low bit rate DVDs and Video CDs.
BMP
The name is short for bitmap and these files can be saved at various bit-depths. This relates to the number of colors shown
in the image and is commonly saved at 24-bit (referred to as true-color). 24-bit BMP files are lossless but are much larger in
file size than JPEGs. These files are used internally by the Microsoft Windows® graphics subsystem (GDI).
Common file extensions* .flac .fla
Streaming over the 100BASE-T and USB2.0 supported YES
Common file extensions* .wma
Streaming over the 100BASE-T and USB2.0 supported YES
Common file extensions* .wav
Streaming over the 100BASE-T and USB2.0 supported YES
Page 15

15
GIF
These are very common on the Internet and mostly used for line art and areas of flat color (logos, buttons and
diagrams for example). GIF files keep edges clearly defined, but JPEG is much better for photographic images
PNG
PNG (Portable Network Graphics) is a lossless compressed bitmap image format. PNG was created to both improve
upon and replace the GIF format with an image file format not requiring a patent license to use. PNG is officially
pronounced "ping" and, like GIFs and BMPs, reduces file size by reducing the number of colors. PNGs can also be
24-bit true-color and maintain all the original image information, similarly to BMPs though, file sizes will be large.
Page 16
16
2. Familiarizing Yourself with HD MediaBox
2.1 HD MediaBox Case and Stand
HD MediaBox is fanless by design, and does not require any
additional cooling, even if an internal HDD is fitted. Care should be
taken however, to ensure that HD MediaBox is not placed in very hot
environments or spaces without any airflow.
Cooling holes are included in the HD MediaBox case and attention
should be taken not to cover these holes during operation.
HD MediaBox arrives fitted with a stand for use in the vertical
position. However, HD MediaBox can also be used horizontally
without interfering with operation. This is achieved simply by
removing the included base using a flat blade screwdriver.
To provide adequate ventilation, it is recommended that small rubber
feet are used on the bottom surface.
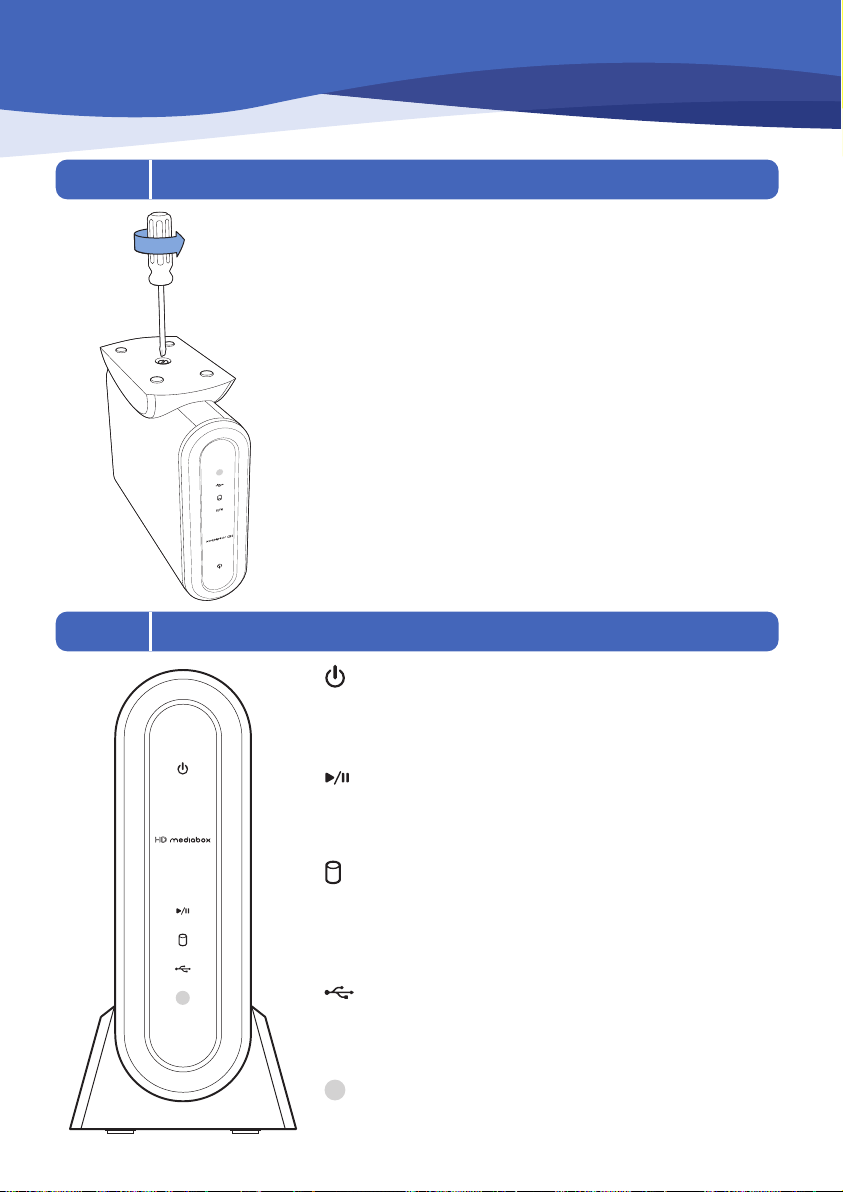
2.2 HD MediaBox Front Panel
Power indicator
The power status of HD MediaBox is shown by the color of the LED
No light - No mains power
Red - Standby
Green - Running
Play/Pause indicator
This blue LED shows the playback status of HD MediaBox.
No light - No media is playing
Blue constant light - Media is playing
Blue flashing light - Media is paused
Hard disk indicator
This orange LED shows when the internal HDD (if fitted) is being
accessed; either by HD MediaBox or by an external PC via USB. It is
normal for this light to flicker during disk accessing
No light - HDD is not being accessed
Orange light - HDD is being accessed
USB 2.0 indicator
This Blue LED shows when HD MediaBox is accessing an external USB
storage device through one of its 2 USB ports.
No light - External USB storage is not being accessed
Blue light - External USB storage is being accessed
Infra Red (IR) input sensor
This is where HD MediaBox receives its instructions from the Remote
Control. Care should be taken to avoid blocking this area.
Page 17
17
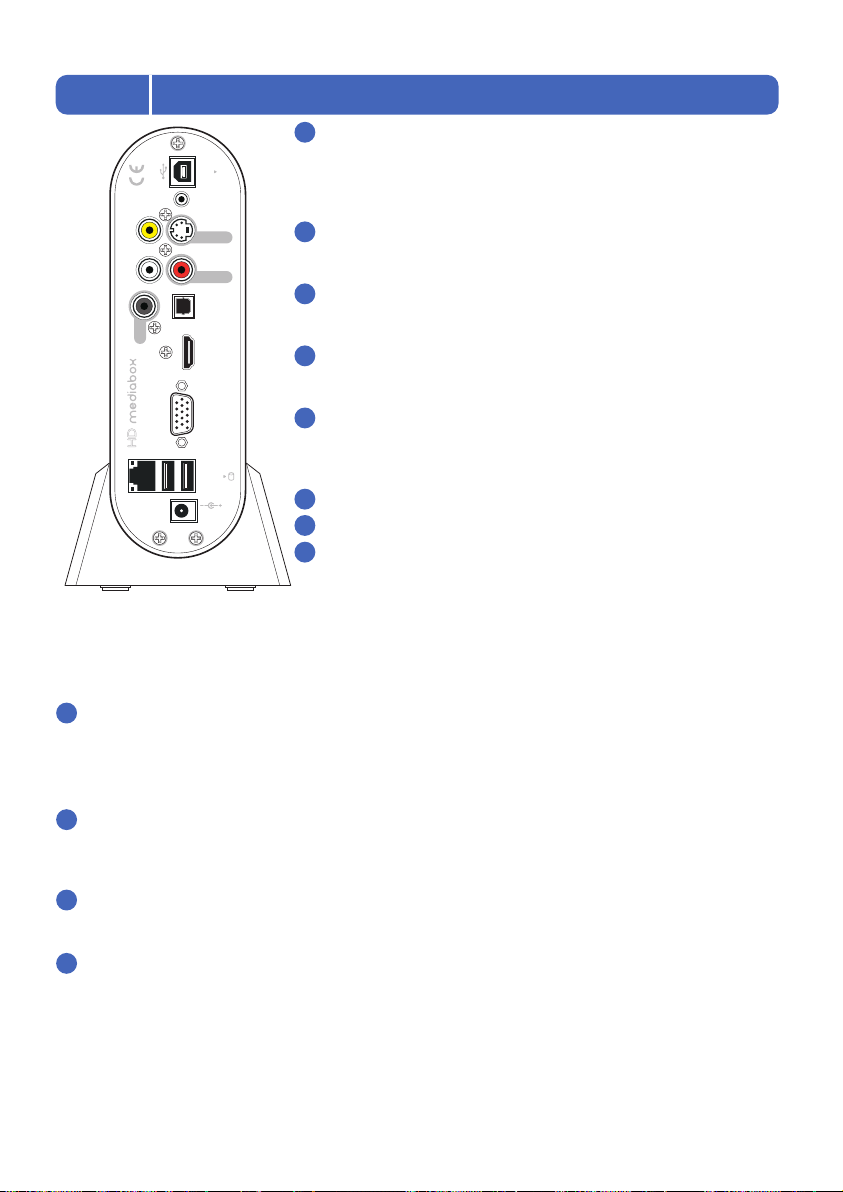
2.3 HD MediaBox Rear Panel
USB 2.0 to PC
This allows HD MediaBox to be connected to a PC using the included
USB cable. Once connected, the PC will detect the internal HDD (if fitted)
as an external USB Mass Storage Device and files can be managed like
any other HDD (see section 4.3.1).
Infra Red In/Out for room-to-room Remote Control
If HD MediaBox is not placed in sight of the Remote Control, this port
can be used to connect to an IR distribution system (see section 4.3.5).
Composite Video Output
This is the most basic of video connections and is Standard Definition
only.
S-VIDEO Output
S-Video offers a higher quality signal than Composite for compatible
equipment but is Standard Definition only.
Analog Audio Output (left/Right)
All audio on this port has benefited from a 24bit/192KHz upsampling
DAC and can carry Dolby ProLogic and ProLogic II formats (to a
compatible decoder).
Coaxial Digital Audio Output
Optical Digital Audio Output
HDMI (v1.1) Digital A/V Output
The HDMI (High Definition Multimedia Interface) can carry video and
embedded audio, and provides the best quality video and audio output
from HD MediaBox. If you are connecting to a display device that has an
HDMI terminal, this is the recommended option to use. This allows direct transmission of the video information from
HD MediaBox to the display without any digital to analogue conversion. Always use high quality HDMI cables,
especially for longer cable runs.
An HDMI > DVI cable can be used to connect HD MediaBox to a compatible DVI-equipped device.
VGA Output
This port can be configured in the setup menus to output 2 signal formats. These offer superior quality over
Composite and S-Video, and can send High Definition signals to compatible equipment.
• RGBHV (often referred to as VGA)
• YPbPr (often referred to as Component Video)
RJ45 Ethernet Network Connection
Allows HD MediaBox to be connected to a computer network for playing media files stored on shared folders
or network servers. 10 and 100-BASE-T networks are supported; however 100-BASE-T is recommended as the
bandwidth is more suited to common HD MediaBox tasks.
USB 2.0 X 2 for Mass Storage Devices
Allows HD MediaBox to be upgraded using a USB thumbdisk and expanded by attaching external USB drives
for additional media storage.
Power Adapter Input
Please use the 12v auto-sensing unit supplied with HD MediaBox.
1
2
3
4
5
6
7
8
9
10
11
12
USB PC
Ext.
IR
Composite
S-Video
L
Audio
Audio R
Digital audio
Optical
Coax
HDMI
RGBHV
or
YPbPr
2x USB
LAN
12V DC
Page 18
18
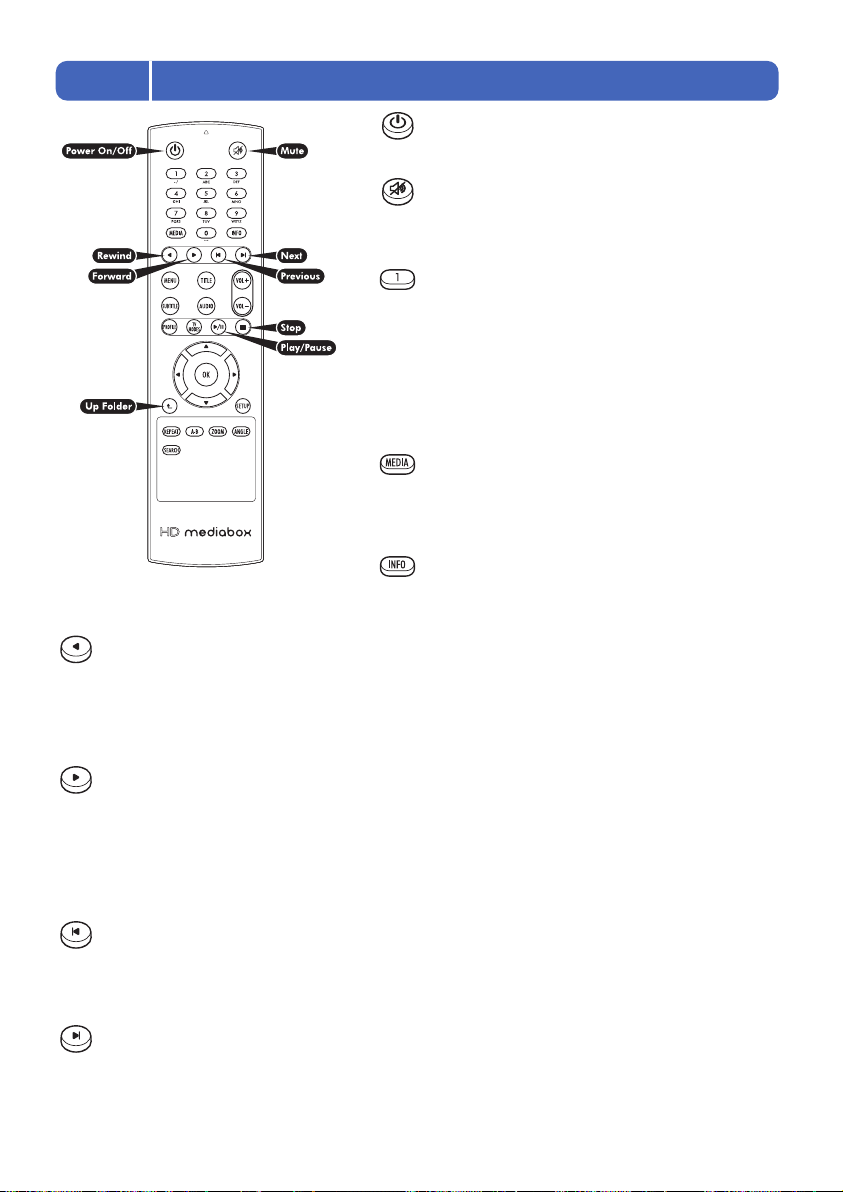
2.4 HD MediaBox Remote Control
Power On/Off
Pressing this key toggles the power of HD MediaBox on/off.
Mute
Pressing this key toggles the audio output of HD MediaBox
on/off.
Alpha/Numeric keys
These keys enter alpha/numeric values in appropriate areas
(e.g. during a Time Search).
In Media Playing Mode, pressing the numeric keys during
playback will access different parts of the file. Type of access
can be toggled between percentage of file (where 1=10%,
2=20% etc), minutes forward and minutes back (see the ANGLE
button for further details).
MEDIA
In File Browsing Mode, pressing this key cycles through the
“Display file type:” options Video/Photo/Music/All
(see section 6.1).
INFO
In Media Playing Mode and DVD playing Mode, pressing this key displays an info panel displaying information
about the file being played (see section 7.1 for Media Playing Mode and section 8.2 for DVD Playing Mode).
Rewind / Rotate Photo Counter-clockwise
When viewing video, pressing this key rewinds the media being played. Pressing it multiple times will increase the
speed of the rewind. An icon is displayed on the screen, to indicate the current speed. The Play/Pause key must be
pressed to stop rewinding.
When viewing a photo, pressing this key will rotate the image 90 degrees counter-clockwise.
Forward / Play Folder / Rotate Photo Clockwise
In File Browsing Mode, pressing this key plays the media files in the currently highlighted folder.
When viewing video, pressing this key forward winds the media being played. Pressing it multiple times will
increase the speed of the forward wind. An icon is displayed on the screen, to indicate the current speed. The
Play/Pause key must be pressed to stop rewinding.
When viewing a photo, pressing this key will rotate the image 90 degrees clockwise.
Previous
In File Browsing Mode, pressing this key goes back one page of the file list.
In Media Playing Mode, pressing this key plays the previous media file.
In DVD Playing Mode, pressing this key plays the previous chapter.
Next
In File Browsing Mode, pressing this key goes forward one page of the file list.
In Media Playing Mode, pressing this key plays the next* media file.
In DVD Playing Mode, pressing this key plays the next chapter.
* In Media Playing Mode, the sequence of next media file depends on the Repeat Mode setting (see section 7.2 for more information)
Page 19

19
MENU
In DVD Playing Mode, pressing this key enters the MAIN MENU of the DVD.
In File Browsing Mode, pressing this key will cycle through a mini-menu
• Menu level
• Thumbnail
• Player Volume
Use the Volume +/- keys to adjust the values of each menu item.
See section 6.2 for an explanation of the menu items.
TITLE
In DVD Playing Mode, pressing this key enters the TITLE MENU of the DVD (if present).
SUBTITLE
In Media Playing Mode when playing .ts files and in DVD Playing Mode, pressing this key cycles through the
SUBTITLES (if present).
AUDIO
In DVD Playing Mode, pressing this key cycles through the AUDIO TRACKS of the DVD (if more than one).
VOLUME +/-
Pressing this key changes the output volume of HD MediaBox. The default value is 16 and you can leave it at this
setting if you plan to use your amplifier to change the volume.
If a Mini Menu has been activated (e.g. Brightness, Contrast, Profile, Zoom, etc), pressing these keys will adjust the
value of the setting.
PROFILE
Pressing this key will recall a saved profile (see section 5.4.8). Pressing the key multiple times will cycle through
the currently used profile numbers (1-10).
TV MODES
Pressing this key during playback will show the current resolution on the screen.
Pressing a NUMBER key within 5 seconds will change the output resolution as follows:
0. Toggles between HDMI and DVI output formats*
1. Composite/S-video/Component (from 15pin VGA port) in 480i
2. HD YPbPr component (from 15pin VGA port) 480p
3. HD RGB (from 15pin VGA port) 480p
4. HDMI 480p
5. HDMI 720p
6. HDMI 1080i
7. N/A
8. N/A
9. Toggles between 50 and 60Hz video refresh rates
†
To select another resolution, press TV Modes followed by another NUMBER key.
* This option can provide better compatibility with DVI displays. There is no embedded audio when DVI is selected.
† This option only works when HD MediaBox is set to output 480i, 576i, 480i, 576p, 720p 1080i and 1080p
Play/Pause
In File Browsing Mode, pressing this key will play all media files listed in the current folder.
In Media or DVD Playing Modes, pressing this key will toggle between PLAY and PAUSE.
Page 20

20
Stop
In Media or DVD Playing Modes, pressing this key will STOP the file (or playlist) and return to File Browsing Mode.
In File Browsing Mode, pressing this key for 2 seconds will perform a quick system restart.
Up/Down/Left/Right
In File Browsing Mode, pressing these keys will move the highlighted item.
In DVD Playing Mode, pressing these keys will navigate the DVD menu screens.
OK
In File Browsing Mode, pressing this key will select the currently highlighted item or open the currently highlighted
folder. In DVD Playing Mode, pressing this key will select the currently highlighted item on DVD menu screens.
Up Folder
In File Browsing Mode, pressing this key will navigate up one level to the parent folder.
In Media or DVD Playing Modes, pressing this key will return the Zoom to normal (unzoomed).
Setup
In File Browsing Mode, pressing this key will open the Setup Menu.
In Media or DVD Playing Modes, pressing this key will cycle through the following sliders.
• Brightness
• Contrast
• Saturation
• Vertical Position
• Aspect Ratio
• Subtitle Delay
Use the Volume +/- keys to adjust the values of each slider.
REPEAT
In Media Playing Mode, pressing this key will cycle through the following Repeat Modes:
• Track - repeats the current media file
• All - repeats all the media files in the current folder
• Random - repeats all the media files randomly in the current folder
• Cleared - no repeat
In DVD Playing Mode, pressing this key will cycle through the following Repeat Modes:
• Track - repeats the current chapter
• All - repeats the whole DVD
• Random - repeats all chapters randomly
• Cleared - no repeat
A-B
In DVD Playing Mode:
• Pressing this key once will select point A
• Pressing this key again will select point B
DVD video will loop continuously from point A to point B
Page 21

21
ZOOM
In Media and DVD Playing Modes, pressing this key once will enter Zoom Mode and go to Zoom Level 1 (enlarged
video/photo).
Repeatedly pressing the ZOOM key will cycle through the Zoom Levels from 0 to 31.
Once Zoom Mode has been activated you can use VOL+ and VOL- to control the level of zoom.
While in Zoom Mode, pressing the Up Folder Remote Control key returns the zoom level to 0 (off).
When HD MediaBox finishes playing the current file, the zoom level resets to 0 (off), except during a slideshow of
photos, when the zoom level remains unchanged.
ANGLE
In DVD Playing Mode, pressing this key cycles through the viewing ANGLES of the DVD (if present).
In Media Playing Mode, pressing this key will toggle between skipping modes, then the number keys on the remote
control can be used to skip to different parts of the file.
%: In this setting, pressing 0 will jump to the start of the file; 1 will jump to a point 10% of the total playing
time; 2 will jump to 20%; 3 will jump to 30%; etc
Minute + : In this setting, pressing 1 will jump to a point 1 minute ahead of the current time; 2 will skip
forward 2 minutes; 3 will skip forward 3 minutes; etc. Pressing 0 provides a 30 second jump.
Minute – : In this setting, pressing 1 will jump backwards to a point 1 minute behind of the current time;
2 will skip back 2 minutes; 3 will skip back 3 minutes; etc. Pressing 0 provides a 30 second jump.
SEARCH
In Media and DVD Playing Modes, pressing this key displays a numeric entry box, which allows the media playing
point to be set. Use the Numeric Keys to enter a specific time in hh:mm:ss format (e.g. 2 hours, 17 minutes, 26
seconds would be entered as 02:17:26). When the OK key is pressed, the media file will start playing from the
specified time.
Page 22

22
3. Getting Started
3.1 Connecting Power
Caution: Use the 12v auto-sensing unit supplied with HD MediaBox. Ensure that the cable provided is suitable
for the power supply in your country. Contact your dealer immediately if you require an alternative power connector.
Connect the standard IEC power cord into the back of the auto-sensing power supply.
Then connect the 12v power connector to the back of HD MediaBox as shown in the diagram.
Plug the power cord into your power outlet and switch on.
You will see a green light on the power supply and a red LED on the front of HD MediaBox to confirm power.
Press the key on the Remote Control to turn HD MediaBox on.
3.2 Fitting the Remote Control Batteries
step 3
step 2
step 1
step 1
Turn the Remote Control over
step 3
Insert 2 AAA
batteries (provided)
in the slots taking special
care to line the positive (+) and
negative (-) ends of the batteries with
the diagram inside the compartment.
step 5
Quickly test your batteries by pressing any key - all the keys should light blue.
step 2
Remove the battery
compartment cover by
placing your thumb in the indent,
and carefully sliding it backwards.
step 4
Replace the
cover by sliding it
horizontally from the
back of the Remote Control.
It will click firmly into place.
Page 23

23
3.3 Adding an Internal Hard Disk Drive (Optional)
HD MediaBox supports one internally fitted IDE Windows® formatted Hard Disk Drive (HDD).
The IDE interface is UATA100 and is backwards compatible with lower speed interfaces. Future IDE interfaces may
also be backwards compatible with HD MediaBox. Please check the manufacturer’s specification for details.
HD MediaBox can read file systems formatted in FAT32, NTFS, EXT2/3 (Linux file system) and HFS+ (Apple(R)
Mac(R) file system). FAT32 and HFS+ file systems are not recommended, as they are limited to files less than 4GB
in size and High Definition video files very frequently exceed this.
3.3.1 Fitting an Internal HDD
To fit an IDE HDD, follow these simple steps:
step 1
Before you start, make sure you have
a) a flat clear space to work on, free of dust,
dirt and moisture
b) a Philips screwdriver (included with HD
MediaBox)
c) the 4 HDD screws (included with HD
MediaBox)
d) a supported IDE HDD
step 2
Make sure all cables are
disconnected from HD
MediaBox, including the
power supply.
step 3
Remove the 3 screws
shown in the diagram.
A
step 4
Carefully hold the edges of the back panel
and slide it out backwards. The internal
circuitry and HDD cage will come out with it.
step 5
Lay the cage on your
workspace with the rear
panel towards you and
the power connector on
the left.
step 6
Take your HDD and
make sure the jumper
is set to MASTER.
B C
step 7
Turn your HDD so that
the base (with screw
holes) is facing up and
the connectors are on
the right.
continued overleaf
Page 24

24
step 8
Carefully slide your HDD into the
cage from the left as show in the
diagram. The base of the HDD
should be touching the top
plate. Make sure point X and Y
are aligned.
X
Y
step 9
Insert the 4 HDD
screws into the holes
shown in the diagram
and tighten.
step 12
Carefully slide the
cage back into the
case, by lining up the
plates and grooves as
shown in the diagram
step 10
Turn the cage around so that you can see
the HDD connectors.
step 11
There are 2 connectors, 1 on a ribbon
cable (the IDE cable) and one with 4
wires (the POWER cable). Connect both
these cables to your HDD.
step 13
Re-insert the 3 screws into the rear panel of HD
MediaBox.
The internal HDD is now ready for use. If the HDD is
not formatted, please see the next section.
Page 25

25
3.3.2 Initializing and Formatting an Internal HDD
HD MediaBox can read file systems formatted in FAT32, NTFS, EXT2/3 (Linux file system) and HFS+ (Apple®
Mac® file system). The following section provides step-by-step instructions to guide you through the process of
creating disks containing the Windows® file systems of NTFS and FAT32. See section 3.3.2.2 for notes to help
with HFS+ disks. For Linux file systems please refer to your Linux documentation.
3.3.2.1 NTFS and FAT32 formatting on Windows® XP
Caution: Formatting a disk will erase all data currently stored.
Under Windows® XP, you can make a partition and format the HDD using the Disk Manager utility.
HD MediaBox can only read the first (Primary) partition on an internally fitted HDD.
FAT32 file systems are not recommended, as they are limited to files less than 4GB in size and High Definition
video files very frequently exceed this.
If your HDD is NEW, you may need to do one or more of the following tasks
• Initialize
• Partition
• Format
First follow the steps in section 4.3.1 to connect HD MediaBox to your computer.
Press the Start button, right-click My Computer and select Manage from the pop-up menu -
the Computer Management utility will appear
step 2
step 1
A
BC
continued overleaf
Page 26
26
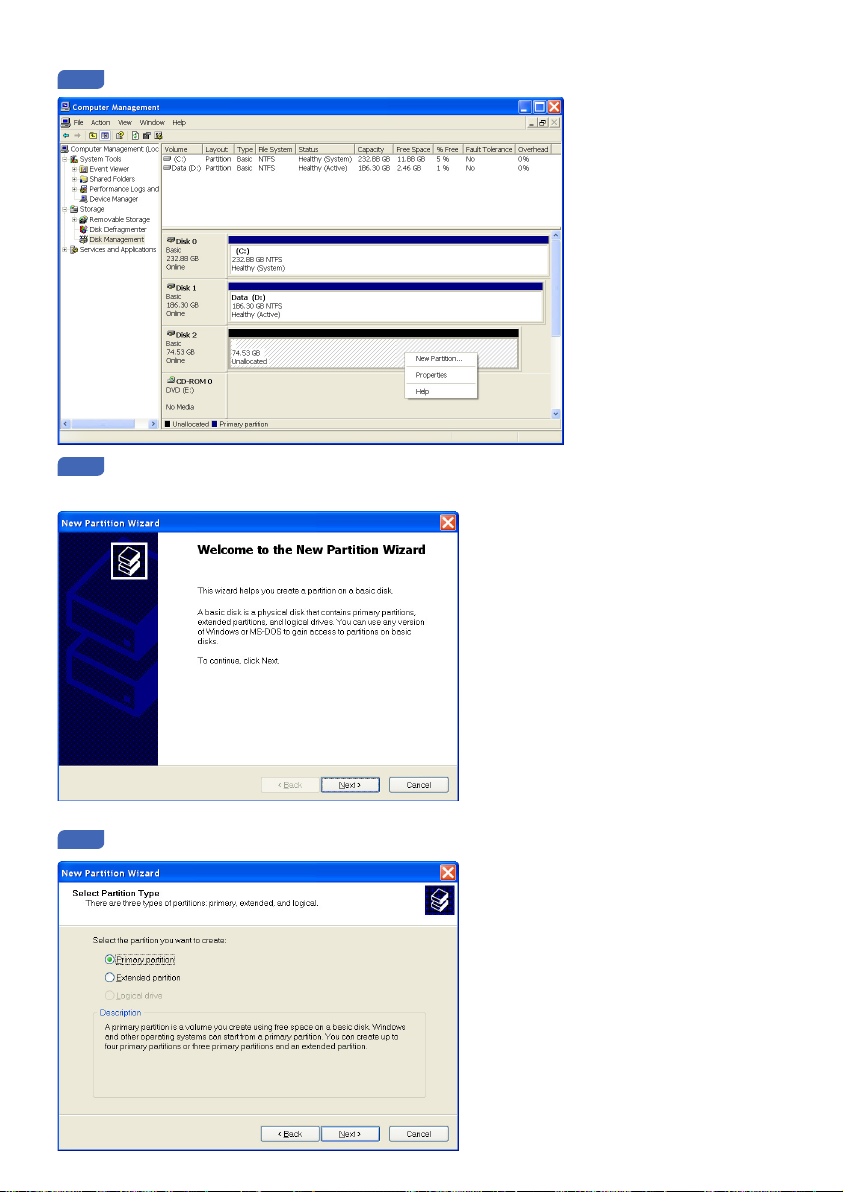
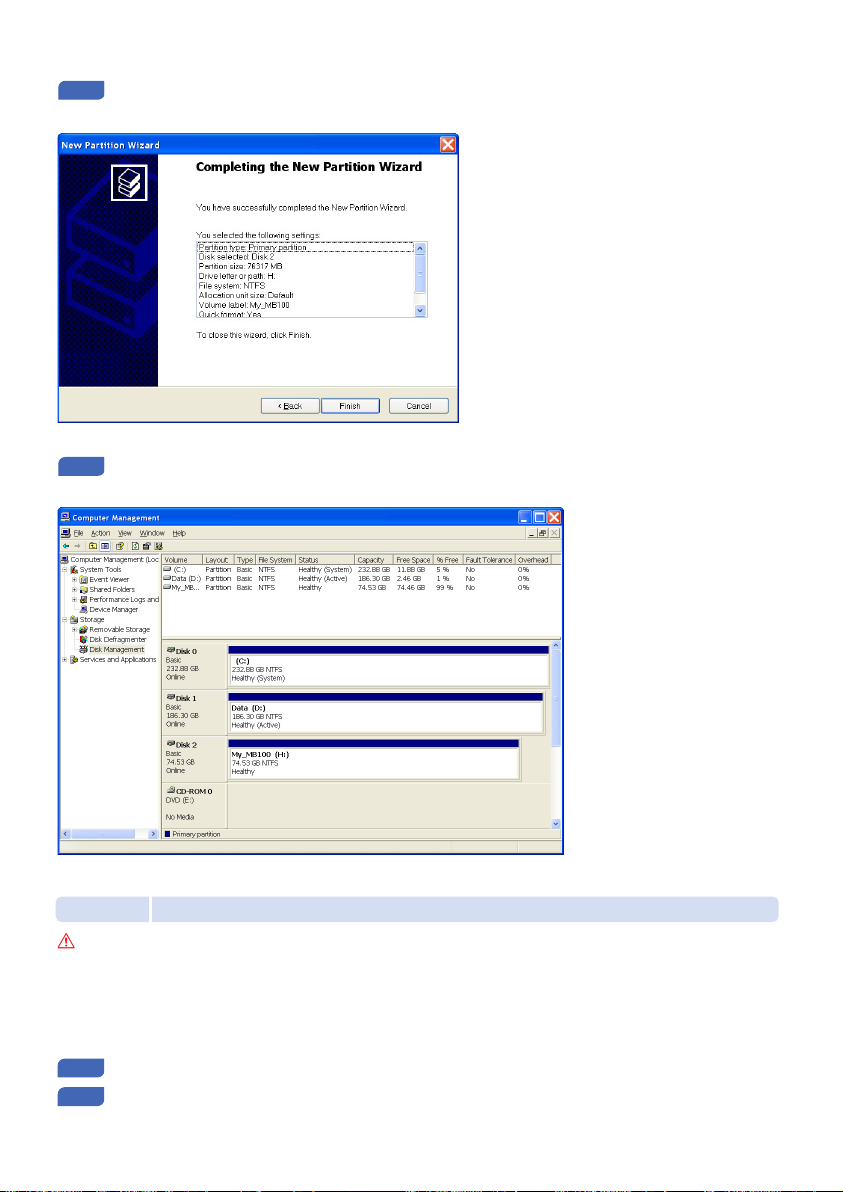
In the left hand menu choose Disk Management and you will see a list of Hard Disks appear on the right.
Right click the Unallocated disk and from the pop-up menu select New Partition to start the
New Partition Wizard.
Press Next > and select Primary Partition. Press Next > again.
step 5
step 4
step 3
Page 27

27
In the Specify Partition Size section, enter the maximum available size (FAT32 partitions are limited
to 32,000MB) and press Next >.
In the Assign Drive Letter or Path section, select a letter from the list and press Next >.
In the Format Partition section, select your preferred File system (NTFS is recommended) and press Next >.
step 8
step 7
step 6
Page 28
28
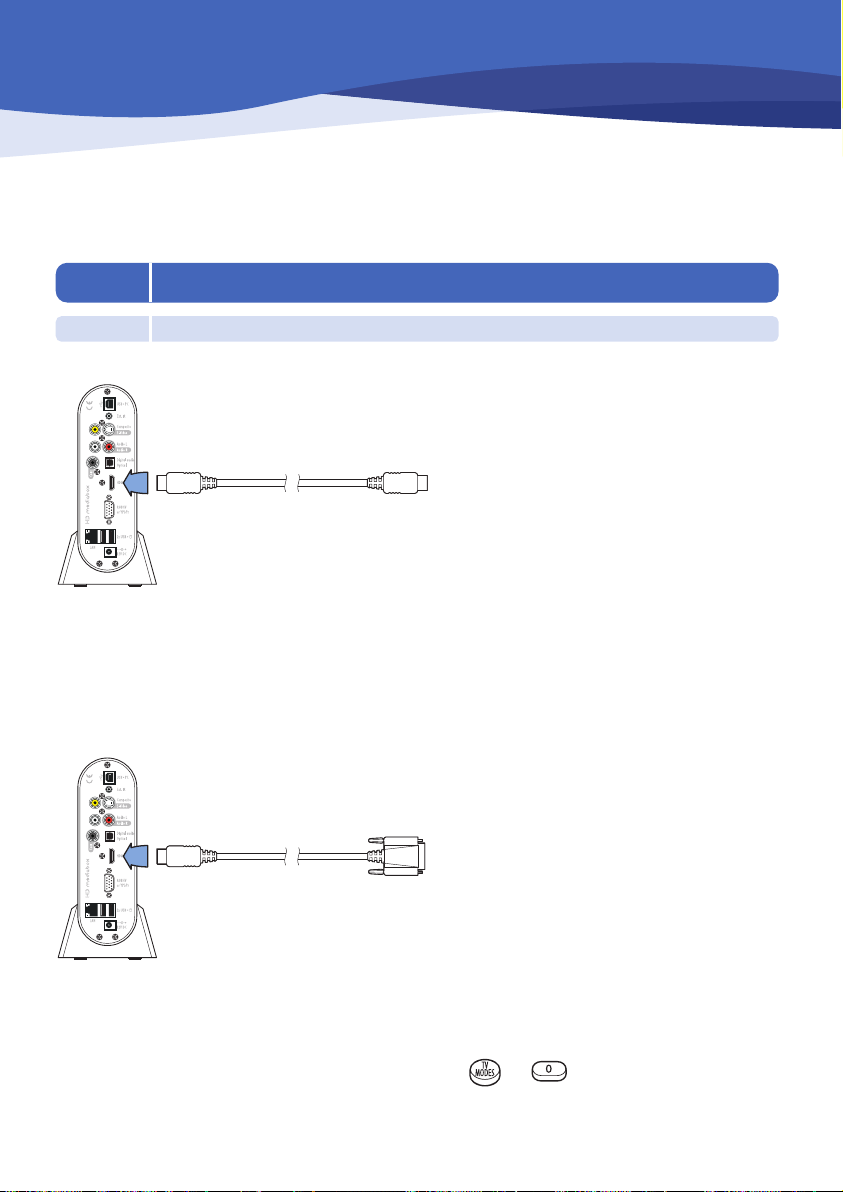
When completed, detailed information will appear as shown below. Click the Finish button to complete
the Wizard and start the formatting process.
(Please wait until the completion of the formatting process)
The Disk Management utility will now show the file system as ‘Healthy’ and the internal HD MediaBox HDD
is ready for use (see section 4.3.1).
3.3.2.2 Notes for HFS+ Formatting on Mac® OS X
Caution: Formatting a disk will erase all data currently stored.
Under OS X, you can make a partition and format the HDD using the Disk Utility. This can be found on the Mac®
OS X Install disc that came with your computer.
HD MediaBox can only read the first (Primary) partition on an internally fitted HDD.
HFS+ file systems are limited to files less than 4GB in size.
Insert the Mac® OS X Install disc, and then restart the computer while holding the C key.
When your computer finishes starting up from the disc, choose Disk Utility from the Installer menu.
(In Mac® OS X 10.4 or later, you must select your language first.)
step 2
step 1
step 10
step 9
Page 29

29
Click the Partition tab.
Select the drive you wish to make available to HD MediaBox
Ensure that the options highlighted in the image below are selected as follows.
Volume Scheme: 1 Partition
Format: Mac® OS Extended (Journaled)
Press the Options button and ensure that Master Boot Record is highlighted. Press OK.
Press Partition to complete the process.
step 7
step 6
step 5
step 4
step 3
Page 30
30
The following connection types are listed in order of quality. For best results, please use the highest quality
connection that your display device allows.
Always use high quality cables for your connections, particularly over long runs, to preserve the high quality
output that HD MediaBox provides.
4.1 Video Connections
4.1.1 High Definition Connections
HDMI
HDMI (High-Definition Multimedia Interface) is a digital connection and offers the highest quality image quality from
HD MediaBox.
If your display device has an HDMI connection, it is recommended that you use this method.
The HDMI connector can also carry embedded digital audio, so if you intend to use your display’s speakers
or your amplifier/receiver supports HDMI, this method will result in fewer cables.
DVI
DVI (Digital Visual Interface) is a common connection on High Definition displays. You can connect HD MediaBox
to a DVI-equipped display by using the HDMI connector with an HDMI-to-DVI cable. The information carried over
DVI is exactly the same as HDMI and there is no loss of signal quality using the method.
Some displays expect a different colorspace when using a DVI connection.
DVI and HDMI colorspaces can be toggled between by pressing + .
4. Connections
HDMI HDMI
(cable not included)
HDMI DVI
(cable not included)
Page 31

31
VGA (RGBHV)
Many High Definition display devices support VGA. It is a high quality analog connection with every element
of the signal (Red, Green, Blue, Horizontal Sync and Vertical Sync) transmitted through its own cable to
prevent interference. You can connect a VGA cable to HD MediaBox using the VGA connector.
If your display features separate R, G, B, H and V connectors you can use a VGA to RGBHV cable.
Check to see if your display or processor requires BNC or RCA connectors, as both are common.
High Definition Component (YPbPr)
This connection is made using the VGA connector and the supplied breakout cable. Simply connect the
included breakout cable to the HD MediaBox VGA connector and then use a standard Component cable
to link the breakout cable to your display or AV receiver.
4.1.2 Standard Definition Connections
Component (YPbPr)
This connection is made using the VGA connector and the supplied breakout cable. Simply connect the included
breakout cable to the HD MediaBox VGA connector and then use a standard Component cable to link the breakout
cable to your display or AV receiver.
VGA VGA
(cable not included)
VGA RGBHV
(cable not included)
VGA breakout cable (included) Standard Component cable (not included)
VGA breakout cable (included) Standard Component cable (not included)
Page 32

32
S-VIDEO
S-Video is a video format that works by separating the color (Chrominance) and brightness (Luminance) parts of
the video signal. This result in less interference than with the two combined (as is the case with Composite Video).
COMPOSITE VIDEO
Composite Video is the standard video connector format. Its name is derived from the fact that all color and
brightness information is combined and passed through a single cable. This connection is provided for maximum
compatibility, but is not recommended for your primary viewing connection.
4.2 Audio Connections
All Audio outputs (including HDMI embedded digital audio) are active simultaneously.
DIGITAL AUDIO
If you want to use an external device to decode the digital audio (e.g. Dolby Digital) the Digital Audio Outputs will
need to be used to connect HD MediaBox to a compatible display/receiver/amplifier.
In this instance, the Digital to Analog Conversion is performed externally to HD MediaBox.
The HD MediaBox digital audio outputs are of equal performance - choose which to use based on compatibility and
convenience.
Coaxial Digital Audio
S-Video S-Video
(cable not included)
Composite Composite
(cable included)
Coaxial Coaxial
(cable not included)
Page 33

33
Optical Digital Audio
HDMI Embedded Digital Audio
ANALOG AUDIO
Analog audio is 2-channel and can have Dolby ProLogic and ProLogic II encoded into the signal to provide
surround sound.
HD MediaBox will down-mix digital multi-channel audio to provide an analog stereo output.
When the analog audio outputs are used, the Digital to Analog Conversion is performed by the high quality DAC
onboard HD MediaBox. You may want to experiment when listening to 2-channel music, to see which provides the
highest quality conversion; HD MediaBox or your receiver/amplifier.
Optical Optical
(cable not included)
HDMI HDMI
(cable not included)
Analog L+R Analog L+R
(cable included)
Page 34

34
4.3 Computer Connections
HD MediaBox provides multiple ways of accessing your media files. You can fit an internal HDD (see section 3.3);
connect external storage devices via USB 2.0; stream your files from a computer network, or use a combination of
these for maximum flexibility.
4.3.1 Transferring Files to an Internally Fitted HDD using USB
First make sure an Internal HDD has been fitted as per section 3.3.
Plug HD MediaBox into the mains near your PC
Make sure HD MediaBox is in Standby Mode ( POWER LED will be RED)
Connect the included USB cable to the back of HD MediaBox as shown in the diagram.
Connect the other end of the included USB cable to your PC or USB hub. The blue USB LED on
the front panel of HD MediaBox will light to show the presence of a USB connection.
In Windows® XP, cancel any Autorun options and you will now see the following screen.
Choose “Open folder to view files using Windows® Explorer” and you will now see the contents of the HD
MediaBox internal HDD.
Copy or move files between HD MediaBox and your PC as you would any other folder.
While files are copying you will see the orange HDD LED and the blue USB LED on the front of HD
MediaBox flash to show activity.
When you have finished transfering files, it is important to 'Safely Remove Hardware' to prevent file corruption.
Double-click the icon in your PC's taskbar and follow the on-screen instructions.
The USB cable needs to be disconnected from HD MediaBox for it to POWER ON and play media files.
step 6
step 5
step 4
step 3
step 2
step 1
USB cable included
Page 35

35
4.3.2 Transferring Files to an Internally Fitted HDD using FTP
HD MediaBox provides FTP (File Transfer Protocol) access to the internal HDD (if fitted) to allow remote
management of the files and folders across the network.
A 10/100 Ethernet port (a 100BASE-T network is recommended) is included on the back of the unit, and HD
MediaBox will automatically configure itself via the DHCP protocol (see section 5.4.5). Simply connect a network
cable between HD MediaBox and your router before turning on HD MediaBox.
When you wish to connect to HD MediaBox from the network, you must first turn on the FTP server from within the
HD MediaBox Setup menus (see section 5.4.5).
4.3.3 Connecting External USB Devices
HD MediaBox supports the use of USB 1.0 and USB 2.0 Mass Storage Devices. This term can refer to thumbdiscs,
external HDDs with a USB interface and other devices that are seen by HD MediaBox as file storage.
HD MediaBox also supports the use of USB optical disc drives (CD, DVD, etc) however, HD MediaBox cannot play
copy protected or encrypted media. For example commercial DVDs with CSS protection or DRM cannot be played.
HD MediaBox streams the media across the USB interface, therefore the increased bandwidth of USB 2.0 is
recommended.
USB devices can be connected to, and disconnected from HD MediaBox at any time. However, if a device is
removed while HD MediaBox is accessing the drive for playback, HD MediaBox will stop the file and return to
File Browsing Mode.
Up to 2 USB devices can be connected to HD MediaBox.
USB
thumbdisk
External USB Hard
Disk Drive
(network cables not included)
Page 36

36
4.3.4 Network Streaming
HD MediaBox can be used to enjoy your existing collection of videos, photos and music by accessing shared files,
folders and drives over your Local Area Network (LAN).*
HD MediaBox uses the SMB protocol (Server Message Block - commonly used by Microsoft Windows®) to stream
files across the network and this is also supported by many NAS (Networked Attached Storage) drives.
A 10/100 Ethernet port (a 100BASE-T network is recommended) is included on the back of the unit, and HD
MediaBox will automatically configure itself via the DHCP protocol (see section 5.4.5). Simply connect a network
cable between HD MediaBox and your router before turning on HD MediaBox.
* Some high bitrate High Definition video files may not play smoothly across the network.
4.3.4.1 How to Share Folders using SMB on Windows® XP
Locate the folder you wish to share. Right-click on the folder and select ‘Sharing and Security’ from the
popup menu.
step 1
(network cables not included)
Page 37

37
Check ‘Share this folder on the network’ and type a share name (this is the name that HD MediaBox will see).
After pressing ‘OK’, the shared folder icon will now have a hand under it as shown below.
If you are using Windows® XP Professional and you have disabled "Simple File Sharing", you need to
set the permissions for the shared folders correctly. Please refer to your Windows® manual if necessary.
If your PC has a personal firewall installed, please make sure that the firewall is configured to allow other LAN users
to access the shared folders in your PC. Please refer to your personal firewall manual if necessary.
4.3.4.2 How to Share Folders using NFS on Windows® XP
Running NFS on Windows® XP is not a straightforward task and the instructions differ depending on the version of
Windows® XP being used.
A thread has been created on the Pixel Magic Forums that walks users through the process of installing and
configuring Microsoft Windows® Services for UNIX.
See http://www.pixelmagicforum.com for further details.
Other 3rd party NFS servers are also available, which although not free, may offer a more straightforward
installation
Once NFS is running on your computer, HD MediaBox needs to have NFS shares entered into the setup menus.
See section 5.4.5.
step 3
step 2
Page 38

38
4.3.5 Infra Red Distribution
Instead of using the IR receiver on the front panel of HD MediaBox, it may be convenient to use an Infra Red
distribution system. This will enable HD MediaBox to be controlled without being directly in sight of the Remote
Control.
Connect your Infra Red distribution system to HD MediaBox using an IR extension cable (not included).
(cable not included)Mini-jack Mini-jack
Page 39

5 HD MediaBox Setup
39
5.1 Navigation of the Setup Menus
Following connection of HD MediaBox to your display and audio devices, you will need to correctly configure
the settings to ensure you get the best possible video and audio output.
Make sure that your display device is connected and switched on. After HD MediaBox has been switched on
you will see the HD MediaBox logo, followed by the File Browser.
If you don’t see an image at this point, please refer to section 10: Troubleshooting.
Press the key on your Remote Control to enter Setup Mode.
Page 40

40
In general, you will only need to use the keys to navigate the setup menus.
If you want to exit Setup and return to File Browsing Mode at any time, simply press the key on your Remote
Control again.
5.2 Audio Setup
After entering Setup Mode, press the on your Remote Control.
Page 41

41
5.2.1 SPDIF Out
SPDIF (Sony/Philips Digital Interface Format) is a protocol to govern the data transferred using the Digital Audio
Outputs of HD MediaBox.
PCM: This is a stereo digital signal that a wide variety of devices can understand. Use this option if you DON’T
have a decoder/receiver/amplifier that can decode digital multi-channel audio signals.
Bit stream: This option streams the data directly from the media file, unconverted, ready for decoding by an
external decoder/receiver/amplifier. Use this option if you DO have a decoder/receiver/amplifier that can decode
digital multi-channel audio signals.
Auto: This option will automatically set the output to “Bit stream” if Dolby Digital or DTS audio is detected. PCM will
be set for all other audio codecs.
This setting has no effect on the Analog Audio Outputs.
5.2.2 Screen Saver
This setting allows you to choose which effect HD MediaBox will use when the image has been static for a long
time. This can help prevent burn-in on phosphor-based displays. To revive the display, simply press any key on the
remote control.
Progressive: When static, the image’s brightness will fade in and out.
Blank: When static, the image will be black.
Off: No screensaver will be used.
Page 42
42
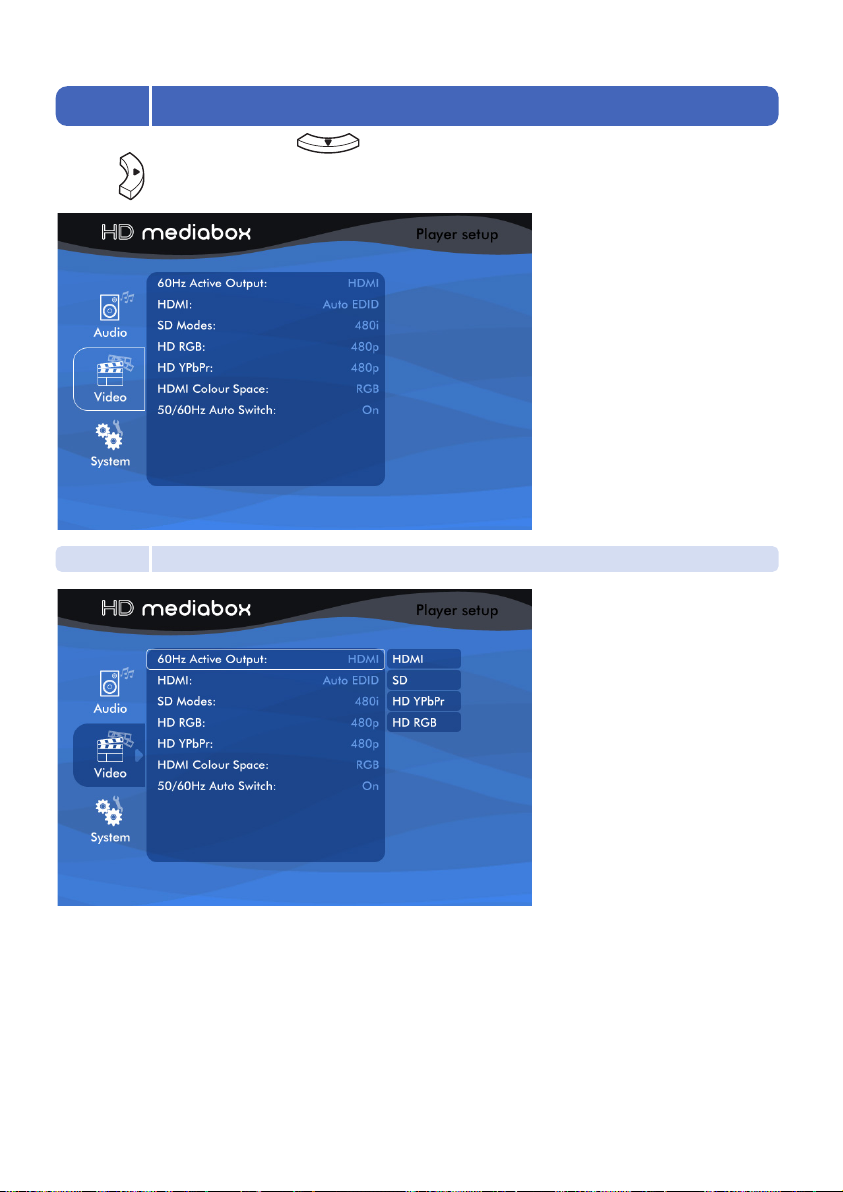
5.3 Video Setup
After entering Setup Mode, press the on your Remote Control to highlight Video,
5.3.1 Active Output
Active Output sets lets you choose which Video Output HD MediaBox should use.
HDMI: Choosing this will activate the HDMI (High Definition Multimedia Interface) port.
SD: Choosing this will change the VGA port to Standard Definition Component Video (YPbPr).
HD YPbPr: Choosing this will set the VGA port to High Definition Component output (YPbPr).
HD RGB: Choosing this will set the VGA port to High Definition RGBHV output.
then the to enter the Setup Menu.
Page 43

43
5.3.2 HDMI
This setting is applied if HDMI has been selected as your Active Output (see section 5.3.1).
HD MediaBox provides both HDTV resolutions and Computer resolutions for maximum compatibility.
It is recommended that you choose a resolution to match the native resolution of your display device
as closely as possible.
1080p is the highest resolution that HD MediaBox will output.
Auto EDID (Extended Display Identification Data): If this option is selected, HD MediaBox will attempt to ‘talk’ to
the display device over the HDMI interface and determine its native resolution.
If the resolution cannot be determined, HD MediaBox will set it’s output to 640x480 at 60Hz. In this instance, please
set the resolution manually.
480p: This is a progressive output of 720x480
720p: This is a progressive output of 1280x720
1080i: This is an interlaced output of 1920x1080
1080p: This is a progressive output of 1920x1080
All the following options are progressive:
1366x768
1280x1024
1280x768
1024x768
800x600
640x480
Page 44
44
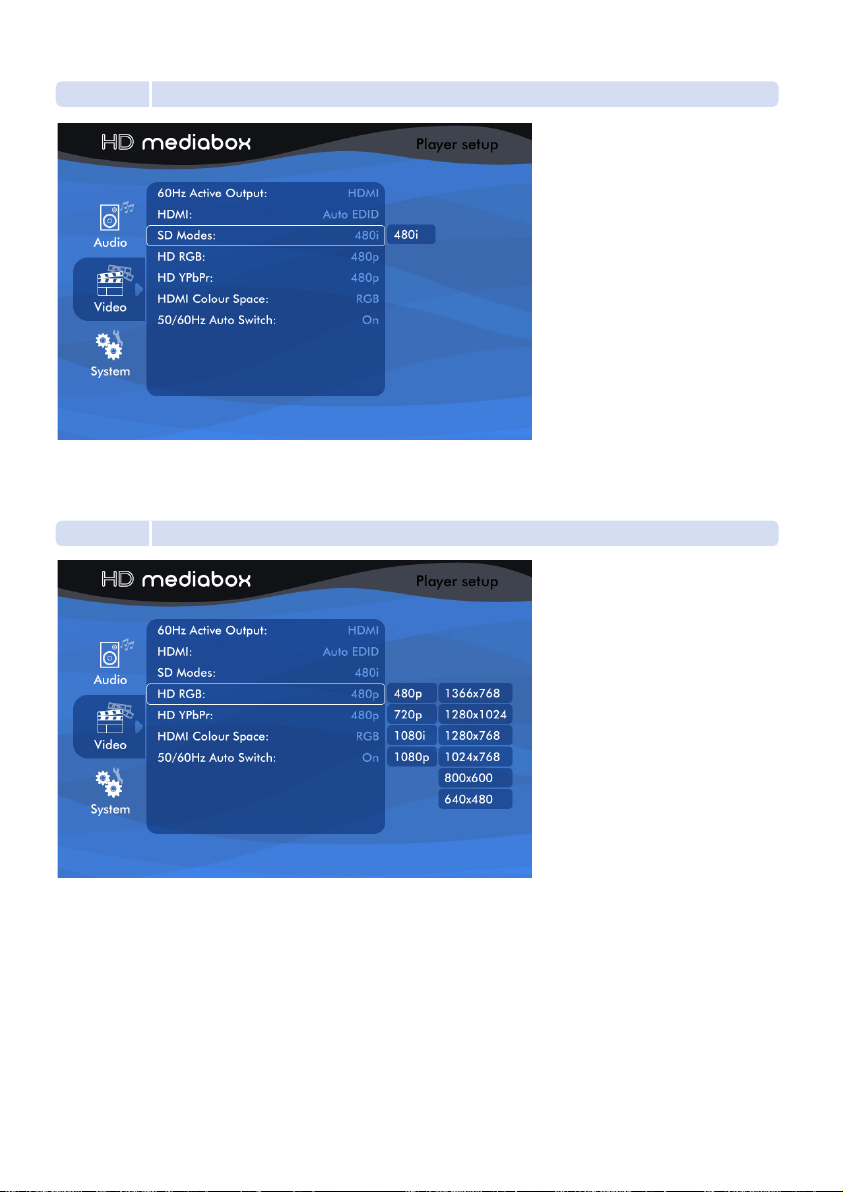
5.3.3 SD Modes
Currently this menu option is for information only. If the TV Refresh Rate (see section 5.4.1) is set at 60Hz, SD
output will automatically be set to 480i (PAL) and if 50Hz is chosen, SD output will automatically be set to 576i (PAL)
5.3.4 HD RGB
The following formats are sent to your display if HD RGB has been selected as your Active Output
(see section 5.3.1).
480p: This is a progressive output of 720x480
720p: This is a progressive output of 1280x720
1080i: This is an interlaced output of 1920x1080
1080p: This is a progressive output of 1920x1080
All the following options are progressive:
1366x768
1280x1024
1280x768
1024x768
800x600
640x480
Page 45
45
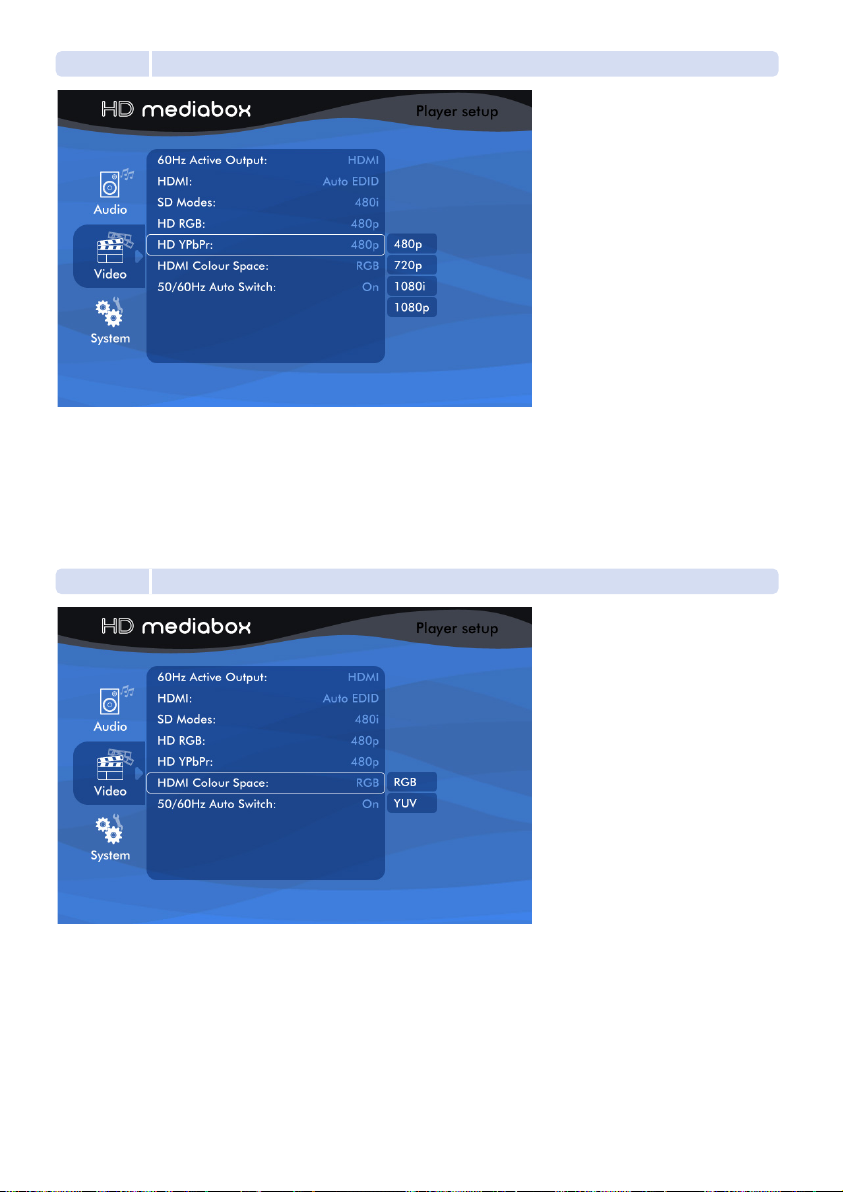
5.3.5 HD YPbPr
The following formats are sent to your display if HD YPbPr has been selected as your Active Output
(see section 5.3.1).
480p: This is a progressive output of 720x480
720p: This is a progressive output of 1280x720
1080i: This is an interlaced output of 1920x1080
1080p: This is a progressive output of 1920x1080
5.3.6 HDMI Color Space
This setting provides color space control of the HDMI output. Some displays perform better with one
or the other setting.
RGB: HD MediaBox uses RGB color space.
YUV: HD MediaBox uses YCbCr output color space.
Page 46

46
5.3.7 50/60Hz Auto Switch
When enabled, this setting enables the following auto switching features:
In DVD Playing Mode, HD MediaBox will automatically detect the frame rate of the DVD file and set the output
refresh rate to match. American and Japanese DVD files will usually play back at 60Hz and DVD files from the rest
of the world at 50Hz.
In Media Playing Mode, HD MediaBox will look for “_50Hz” and ”_60Hz” in the path and filename of the file being
played and set the output refresh rate accordingly.
This allows files to be named according to their frame rate or for the files to be organized in a folder structure that
includes the “_50Hz” and ”_60Hz” characters in the folder names.
Example 1: TV Refresh Rate (see section 5.4.1) is set to 60Hz and a file named movie1_50Hz.avi is played. HD
MediaBox will automatically set the refresh rate to 50Hz while playing the file and then return to 60Hz once finished.
Example 2: TV Refresh Rate (see section 5.4.1) is set to 60Hz and a file named movie1.avi is played from within a
folder named movies_50hz. HD MediaBox will automatically set the refresh rate to 50Hz while playing the file and
then return to 60Hz once finished.
• HD MediaBox looks for “_50Hz” first so if both “_50Hz” and ”_60Hz” exist in the pathname, the output rate
will be 50Hz.
• This feature only works when HD MediaBox is outputting a standard video format i.e. 480i, 576i, 480i, 576p,
720p 1080i and 1080p only.
• “_50Hz” and ”_60Hz” character search is not case sensitive.
Page 47

47
5.4 System Setup
After entering Setup Mode, press the twice on your Remote Control to highlight System,
5.4.1 TV Refresh Rate
Use this setting to choose the output refresh rate of HD MediaBox. Your Standard Definition display may accept
only one of these settings (usually 60Hz in America and Japan and 50Hz in the rest of the World).
Modern digital displays will probably support both refresh rates, but may have a preference. Refer to your display’s
manual for more information.
HD MediaBox will automatically set SD outputs to PAL if 50Hz is chosen and NTSC if 60Hz is chosen.
60Hz
50Hz
then the to enter the Setup Menu.
Page 48

48
5.4.2 TV Shape
Make sure this setting corresponds to the physical shape of your display. The numbers refer to the Aspect Ratio of
the display - width:height.
4:3: Use this setting if your display is not widescreen.
5:4: Use this setting in conjunction with some computer monitors.
16:9: Use this if you have either a) a widescreen display b) a 4:3 display which has a 16:9 mode activated (refer to
your display’s manual).
This setting is saved as part of a Profile (see section 5.4.8).
5.4.3 Subtitle Encoding
Use this section to select the Subtitle encoding method suitable for your media files and language choice.
UTF8: Unicode
GB2312: Chinese Simplified
Big5: Chinese Traditional
Western: Western European
Western New: This is an alternative Western European font
See section 7.7 for an explanation of subtitle use in Media Playing Mode.
This setting is saved as part of a Profile (see section 5.4.8).
Page 49

49
5.4.4 Slideshow
This setting defines the amount of time a photo is displayed for when is selected in File Browsing Mode.
5 seconds: Each photo is displayed for 5 seconds then moves to the next* file.
10 seconds: Each photo is displayed for 10 seconds then moves to the next* file.
* In Media Playing Mode, the sequence of next media file depends on the Repeat Mode setting (see section 7.2 for more information)
5.4.5 IP Setting (Internet Protocol Setting)
This setting is required for HD MediaBox to detect your network (if present).
DHCP (Dynamic Host Configuration Protocol): If your network includes a DHCP server (e.g. a broadband router),
HD MediaBox can automatically detect the network when this option is selected.
Static: Use this setting in a DHCP server is not present.
NFS: This setting is required for HD MediaBox to access NFS shares on your network.
1. Use the alphanumeric keypad on the remote control to enter the first Mount Point and IP address.
2. Move cursor to [Add] in the dialogue box and press .
3. The [Prev] and [Next] buttons can be used to navigate between 6 different NFS slots.
4. If you wish to exit the NFS pop-up, press the key.
Off: The photo will stay on until you press either the STOP, PREVIOUS, or NEXT
Remote Control keys.
Page 50

50
These shares will now be available in File Browsing Mode.
FTP: Pressing on this option will start the HD MediaBox FTP Server and open a pop-up panel.
While this pop-up is showing, remote PCs can access the internal HDD (if fitted) for file transfer and management.
To connect to HD MediaBox, an FTP client is required. You will need to enter the IP address, username and
password shown in the pop-up into your FTP client to connect to HD MediaBox.
To stop the FTP Server, select the [YES] button from the pop-up panel.
HD MediaBox is unable to perform any other functions while in FTP Server Mode.
5.4.5.1 How to Input a Static IP Address
If you don't have a DHCP server (e.g. a broadband router), you need to set the IP address of HD MediaBox
manually for network access.
Select Setup > System > IP Setting > Static and you will be presented with the following pop-up screen.
Use the number keys on the Remote Control to enter the IP Address, Subnet Mask, Default Gateway and
DNS Server addresses in the boxes provided. If you are unsure what numbers to use, please consult the settings on
Reboot HD MediaBox by using the Software > Reboot command below (see section 5.4.9), or by holding
5.4.6 Power Key
step 3
step 2
step 1
your network router and/or documentation from your Internet Service Provider. Press when you have finished.
the button for a few seconds.
Page 51

51
This setting alters the behavior of the remote control key.
5.4.7 Language
This will set the language of the HD MediaBox menus.
English: The default setting
Simplified Chinese:
Traditional Chinese:
5.4.8 Save Profile
This menu option allows you to save some of the HD MediaBox settings, for later recall.
On/Off: The remote control key will turn HD MediaBox on and off.
On: The remote control key will only turn HD MediaBox on. A programmable remote with an infrared
command of code 0x63 (device code 0x40BF) is needed to turn HD MediaBox off.
Page 52

52
The settings saved in each profile are:
• Brightness
• Contrast
• Saturation
• Subtitle Encoding
• TV Shape
• Zoom Level
When a Profile number is highlighted, a hint at the bottom of the screen will say whether the profile is already used
and if so, what the current settings are.
This feature is useful for use with different media types, from different sources, where settings are likely to vary from
file to file.
Profiles can be recalled during playback by pressing the key on the Remote Control.
5.4.9 Software
Default: Selecting this will return all HD MediaBox settings to their default factory settings (Firmware version will
remain the same)
Reboot: Selecting this will reboot (restart) HD MediaBox. This should be done after a change in IP Settings.
Upgrade: Selecting this will start the firmware upgrade process (see section 9).
Page 53
6. File Browsing Mode
53
When HD MediaBox is idle, it is in File Browsing Mode.
Here, you can browse and select your audio, video and photo files to play.
These can be stored in any of the following locations.
• An internal hard disk (if fitted)
• Shared Drives on your Local Area Network
• NAS (Network Attached Storage) drives
• External USB devices such as external hard discs or USB thumbdiscs
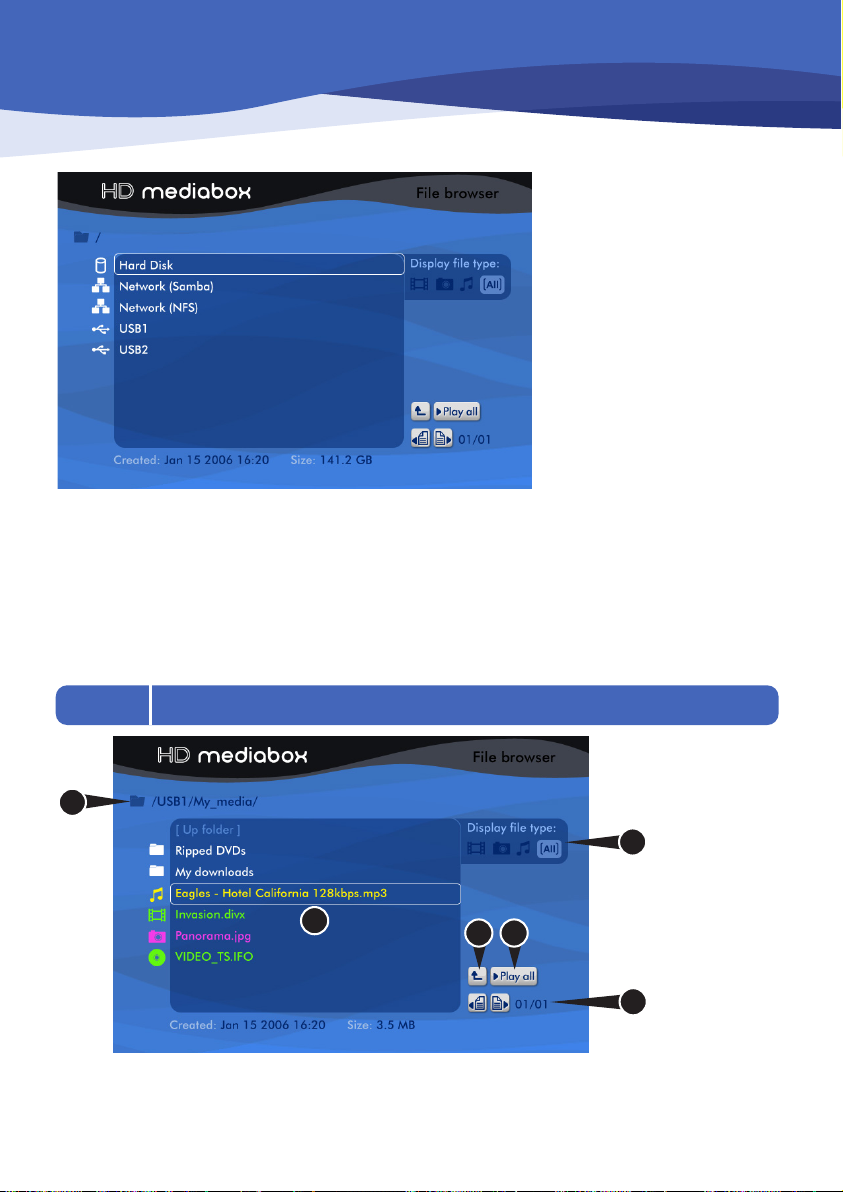
6.1 Familiarizing Yourself with File Browsing Mode
1. Current Folder path: This area shows how you’ve drilled down to get to the current folder.
2. Current folder contents: This area displays the contents of the current folder. Each page can show up to
9 items. Each item is given an icon and a color according to the following two tables.
2
3
6
1
4 5
Page 54

54
3. Filters: Selecting one of these icons will limit the ‘Current folder contents’ to files of that type. The “Play all”
function will also be limited to files of that type. e.g. If is selected, only video files will show in the file browser.
If is pressed, HD MediaBox will play all the video files in the current folder.
Created: and Size: These areas show the date the currently selected file was created and its size.
4. Up Folder: This navigates back up one level, to the parent folder.
5. Play all: This button will play all files in the current folder, one by one. Note that the sequence in which
the files will be played depends on the Repeat Mode setting (see section 7.2):
Track - repeats the current media file
All - repeats all the media files in the current folder
Random - repeats all the media files randomly in the current folder
Cleared - no repeat
6. Previous Page and Next Page: These buttons will navigate to more files in the current folder. The current
page number and total page numbers are shown to the right.
File Browser Colors
File Browser Icons
The internal Hard Disk
A Local Area Network (LAN)
A PC on your LAN
The HD MediaBox USB connections
A folder in any drive (internal, USB or shared across the network)
A video file
A DVD IFO or ISO file (see
section 1.4.1)
A supported subtitle file
An audio file
A photo file
A Shoutcast radio file
The firmware.bin, mediabox.bin, and autoplay.txt files use this icon
White Folder, drive or location
Green Video files
Yellow Music files
Pink Photo files
Page 55

55
6.2 Navigating File Browsing Mode
In general, you will only need to use the keys to navigate the File Browser. However these additional
keys can make navigation easier.
MEDIA - Pressing this key cycles through the “Display file type:” options Video/Photo/Music/All (see section 6.1).
Previous - Pressing this key goes back one page of the file list.
Next - Pressing this key goes forward one page of the file list.
Play/Pause - Pressing this key will play all media files listed in the currently OPEN folder.
Up Folder - In File Browsing Mode, pressing this key will navigate up one level to the parent folder.
Forward / Play Folder - Pressing this key plays the media files in the currently highlighted folder.
Menu - Pressing this key will cycle through a mini-menu
• Menu Level: This slider adjusts the brightness of the file browser screens.
A low setting can help with displays prone to burn-in.
• Thumbnail: If this is set to ‘On’ and the current folder has a Thumbs.db
(a Windows® XP thumbnail database) file present, HD MediaBox will show
a small thumbnail image to the right of the currently highlighted media file.
• Player Volume: This slider allows the volume to be set prior to playing a media file.
Use the Volume +/- keys to adjust the values of each menu item.
Page 56

56
After selecting a particular media file or files to play, HD MediaBox will enter Media Playing Mode.
If the file is a DVD .ISO or .IFO, HD MediaBox will enter DVD Playing Mode (see section 8).
When the file reaches the end (or the last file reaches the end if “Play All”, and Repeat Mode is defined), HD
MediaBox will return to File Browsing Mode.
7.1 Info Screen
While playing audio files, the following info screen is displayed.
While viewing video files, pressing the key on the Remote Control displays the following information panel.
Both these panels show the following information about the file being played.
7. Media Playing Mode
Page 57

57
• Name
• File Size
• Repeat Mode (see
section 7.2)
• Total length (in hh:mm:ss format)
• Time played so far (in hh:mm:ss format)
7.2 Repeat
In Media Playing Mode, pressing this key will cycle through the following Repeat Modes:
• Track - repeats the current media file
• All - repeats all the media files in the current folder
• Random - repeats all the media files randomly in the current folder
• Cleared - no repeat
The current Repeat Mode is shown on the ‘now playing’ and ‘info’ screens.
7.3 Zoom
Pressing the key once during playback will enter Zoom Mode and go to Zoom Level 1 (enlarged
video/photo).
Repeatedly pressing the key will cycle through the Zoom Levels from 0 to 31.
While in Zoom Mode, pressing the Remote Control key returns the zoom level to 0 (off).
When HD MediaBox finishes playing the current file, the zoom level resets to 0 (off), except during a slideshow of
photos, when the zoom level remains unchanged.
This feature is not active when playing audio-only files.
7.4 Time Search and Jump
Pressing the key during playback displays a pop-up panel with a numeric entry box. This allows the media
playing point to be set. Use the NUMBER keys on the Remote Control to enter a specific time in hh:mm:ss format
(e.g. 2 hours, 17 minutes, 26 seconds would be entered as 02:17:26).
When the key is pressed, the media file will start playing from the specified time.
Another way to jump to a different part of the current file is to use the NUMBER keys. Pressing 0 will jump to the
start of the file; 1 will jump to a point 10% of the total playing time; 2 will jump to 20%; 3 will jump to 30%; etc
Once Zoom Mode has been activated you can use to control the level of zoom.
Page 58

58
7.5 Image Adjustments During Playback
Pressing the key during video playback will cycle through the following sliders:
Use the keys or the keys to adjust the values of each slider.
7.5.1 Brightness
The Brightness setting adjusts the Black Level of HD MediaBox. HD MediaBox has been properly calibrated for
Black Level at the factory and it is first recommended that you try the ‘default’ level and adjust your display to
match. If a suitable image cannot be obtained, this HD MediaBox adjustment may help.
Black Level (Brightness) should be set at the point where black areas of the image look black AND where you can
see the difference between black and near-black. It is recommended that you use properly designed test material,
but if you don’t have a test pattern for adjusting black level, select a scene with lots of dark areas (for example, a
man wearing a black jacket in a dark night background), and adjust the Brightness. Use a variety of files and
formats to get a good balance.
Range = 0 to 127
7.5.2 Contrast
The Contrast setting adjusts the White Level of HD MediaBox. HD MediaBox has been properly calibrated for White
Level at the factory and it is first recommended that you try the ‘default’ level and adjust your display to match. If a
suitable image cannot be obtained, this HD MediaBox adjustment may help.
White Level (Contrast) should be set at the point where white areas of the image look white AND where you can
see the difference between white and near-white. It is recommended that you use properly designed test material,
but if you don’t have a test pattern for adjusting white level, select a scene with lots of light areas (for example, a
sunny sky with a little bit of cloud), and adjust the Contrast. Use a variety of files and formats to get a good
balance.
Range = 0 to 127
If HD MediaBox detects the presence of a subtitle .srt file (see section 7.7), the following options will become available.
Page 59

59
7.5.3 Saturation
Saturation is the level of color added to the B&W signal. HD MediaBox has been properly calibrated for Saturation
at the factory and it is first recommended that you try the ‘default’ level and adjust your display to match. If a
suitable image cannot be obtained, this HD MediaBox adjustment may help.
The aim is to achieve a colorful but natural level of saturation. Use a variety of files and formats to get a good
balance.
Range = 0 to 127
7.5.4 Vertical Position
This setting will move the image vertically up and down the display
Range = 0 to 31
7.5.5 Aspect Ratio
This works in co-operation with the Setup > System > TV Shape setting, so make sure this is set correctly first.
By default, HD MediaBox will automatically detect the Aspect Ratio (shape) of the played file. However, if the file is
unusually encoded, this setting may help correct the shape manually.
4:3 - The source file is Square format
16:9 - The source file is Widescreen format
The default setting is = Auto detect.
7.5.6 Subtitle Adjustments
If HD MediaBox detects the presence of a subtitle .srt file (see section 7.7), the following options will become
available.
Subtitle Delay: If the subtitles aren’t displayed in sync with the video image, this setting can help to align them.
The adjustments are made in 0.5 second steps and can be positive or negative.
Range = -8.0s to +8.0s
Subtitle Size: This adjusts the size of the font used for the subtitles.
Options: Tiny, Small, Normal, Large, Huge
Subtitle V Pos: Use this to move the subtitles vertically.
Range = 0 to 30
Subtitle Color: This changes the color of the subtitle text.
Options: White, Red, Green, Blue, Cyan, Magenta, Yellow, Grey
Subtitle Background: By default HD MediaBox puts a transparent black area around the text to help with visibility
against mixed color video. This setting allows you to turn this background on and off.
Page 60

60
7.6 Playlists and Slideshows
HD MediaBox can play multiple files in sequence - if these files are photos, this is often called a slideshow.
If the files in a playlist are photos, they will be shown for the amount of time set in Setup > System > Slideshow.
Playlists can be initiated in 3 different ways:
Play all:
To play multiple files in a sequence, select the ‘Play all’ function when in a folder - this will play the all the files in
sequence. You can control the the media types played by using the filters (see section 7.1) and the orders in which
they are played by setting the Repeat Mode (see section 7.2) once the file is playing.
Using this method, the first file played will be the first file in the folder (alphabetically). The selected Repeat Mode
will determine the order of subsequent files.
Repeat Mode:
Once a file is playing, you can select a Repeat Mode by pressing the key on your Remote Control.
If Random or All is selected, HD MediaBox will move onto the next file after it has finished playing the current file.
Using this method, you can specifically choose the first file to play. The selected Repeat Mode will determine the
order of subsequent files.
Autoplay:
When HD MediaBox is turned on, it searches for a file named autoplay.txt in the root of an external USB device
(if connected) and then the internal HDD (if fitted).
This autoplay.txt file can contain a list of files for HD MediaBox to play. HD MediaBox will immediately start playing
the first file from the list and then play subsequent files in the order that they appear.
You can create an autoplay.txt file using the following format:
\samplefolder1\samplemovie.avi
\samplefolder2\samplesong.mp3
\samplefolder1\samplephoto.jpg
The backslash at the beginning of these lines indicates that the files are in the same drive as the autoplay.txt
If you want files to play from different drives, the following format can be used.
usb\samplemovie.avi
hdd\samplefolder2\samplesong.mp3
net\pcname\sharedfoldername\samplephoto.jpg
usb\ = file is stored on an external USB device
hdd\ = file is stored on the internal HDD
net\ = file is stored on a shared location on the network
Important notes:
Only one USB drive can be connected for the autoplay function to work (it can be in either USB slot).
If the drive is formatted to FAT16 or FAT32 (as is common on thumbdiscs), the file and folder names can only be
8.3 format (an 8 character name followed by a 3 character file extension, e.g. testfile.jpg).
Page 61

61
7.7 Subtitles
Pressing the key cycles through the subtitles of the media file (if present).
Subtitle encoding is currently supported for .ts files. For a subtitle file to be available during playback, the files must
be in the same folder as the video file and start with the same name as the video file, for example:
If the video file is named samplevideo.ts
The subtitle files must be named as follows:
samplevideo.english.srt
samplevideo.chinese.srt
The ‘english’ and ‘chinese’ text in the examples above will be the names displayed when the key is pressed
during playback.
7.8 Other Active Remote Control Keys
Rewind / Rotate Photo Counter-clockwise
When viewing video, pressing this key rewinds the media being played. Pressing it multiple times will increase the
speed of the rewind. An icon is displayed on the screen, to indicate the current speed. The Play/Pause key must be
pressed to stop rewinding.
When viewing a photo, pressing this key will rotate the image 90 degrees counter-clockwise.
Forward / Rotate Photo Clockwise
When viewing video, pressing this key forward winds the media being played. Pressing it multiple times will
increase the speed of the forward wind. An icon is displayed on the screen, to indicate the current speed.
The Play/Pause key must be pressed to stop rewinding.
When viewing a photo, pressing this key will rotate the image 90 degrees clockwise.
Previous
Pressing this key plays the previous media file.
Next
Pressing this key plays the next media file (the sequence of next media file depends on the Repeat Mode setting see section 7.2 for more information)
AUDIO
Pressing this key cycles through the AUDIO TRACKS of the media file (if more than one).
ANGLE
Pressing this key will toggle between skipping modes, then the number keys on the remote control can be used
to skip to different parts of the file.
% : In this setting, pressing 0 will jump to the start of the file; 1 will jump to a point 10% of the total playing time;
2 will jump to 20%; 3 will jump to 30%; etc
Minute + : In this setting, pressing 1 will jump to a point 1 minute ahead of the current time; 2 will skip forward
2 minutes; 3 will skip forward 3 minutes; etc. Pressing 0 provides a 30 second jump.
Minute – : In this setting, pressing 1 will jump backwards to a point 1 minute behind of the current time; 2 will skip
back 2 minutes; 3 will skip back 3 minutes; etc. Pressing 0 provides a 30 second jump.
Page 62

62
An example of DVD menu navigation
After selecting a DVD .ISO or .IFO file, HD MediaBox will enter DVD Playing Mode.
When is pressed HD MediaBox will return to File Browsing Mode.
Most controls and features in this Mode are similar to Media Playing Mode (see section 7), with the following
differences:
8.1 Menu Navigation
Unlike the other media types played by HD MediaBox, DVD files have their own menu system and navigational
structure. Use the following keys to navigate your DVD files.
Up/Down/Left/Right
Pressing these keys will navigate the DVD file menu screens.
OK
Pressing this key will select the currently highlighted item on menu screens.
Previous
Pressing this key plays the previous chapter.
Next
Pressing this key plays the next chapter.
MENU
Pressing this key enters the MAIN MENU of the DVD. This is the menu that also appeared when the DVD file first
started playing.
TITLE
Pressing this key enters the TITLE MENU of the DVD (if present).
8. DVD Playing Mode
Page 63

63
SUBTITLE
Pressing this key cycles through the SUBTITLES of the DVD (if present). The name of the Subtitles will be visible in
the top-right of the screen.
AUDIO
Pressing this key cycles through the AUDIO TRACKS of the DVD (if more than one). The name of the Audio Tracks
will be visible in the top-right of the screen.
ANGLE
Pressing this key cycles through the viewing ANGLES of the DVD (if present). The name of the Angle will be visible
in the top-right of the screen.
8.2 Info Screen
While viewing DVD files, pressing the key on the Remote Control displays the following information panel.
This panel shows the following information about the file being played.
• Title (Total): The DVD Title Number and the Total Number of Titles.
• Chapter (Total): The DVD Chapter Number and the Total Number of Chapters.
• Chapter Time: The time played in the current chapter in hh:mm:ss format.
• Audio Output: The Audio Output as set in Setup > Audio > SPDIF Out (see section 5.2.1).
• Video Output: The video resolution as set in Setup > Video (see section 5.3).
• TV Shape: The TV Shape as set in Setup > System > TV Shape (see section 5.4.2).
• Repeat Mode: The currently selected Repeat Mode (see section 8.3).
• Audio (Total): The name of the currently selected Audio Stream and the total available on the DVD.
• Subtitle (Total): The name of the currently selected Subtitles and the total available on the DVD.
• Angle (Total): The name of the currently selected Angle and the total available on the DVD.
63
Page 64

64
8.3 Repeat
In DVD Playing Mode, pressing the key will cycle through the following Repeat Modes:
• Track - repeats the current chapter
• All - repeats the whole DVD
• Random - repeats all chapters randomly
• Cleared - no repeat
The current Repeat Mode is shown on the ‘info’ screen.
8.4 A-B Repeat
DVD video files can loop continuously from point A to point B. This feature can be useful during calibration.
During playback, pressing the key once will select point A
Pressing this key again will select point B.
HD MediaBox will now loop continuously from point A to point B.
Page 65

9. Upgrading Firmware
65
Firmware is a name given to the software stored inside HD MediaBox - it controls the functionality of HD MediaBox.
It is important that your firmware is up-to-date, as new features, bug fixes, and enhanced operation may be
available for your player.
New HD MediaBox firmware will be available on the Pixel Magic Support Download section and the Support
Forums.
http://www.pixelmagicsystems.com/support/downloads/firmware/index.htm
http://www.pixelmagicforum.com/forum
The firmware for HD MediaBox will be called MediaBox.bin and will be contained within a .zip file.
Upgrade your firmware by following these simple steps:
9.1 Firmware Version Check
Enter the SETUP menu by turning on HD MediaBox then pressing the key on the Remote Control.
The current firmware version will be displayed in the bottom right hand corner of the screen.
If the firmware available for download is newer than the version installed in your HD MediaBox (i.e. a higher
version number), continue to the next section
9.2 Downloading and Transferring the New Firmware
If the firmware available for download is newer than the version installed in your HD MediaBox, follow these steps to
bring your firmware up-to-date.
Download the new firmware zip file from the Pixel Magic website (links above) to a PC.
Unzip the file and you should see a file called MediaBox.bin
Connect HD MediaBox to this PC via the included USB cable (see section 4.3.1).
Connect HD MediaBox to a power socket and leave it in Standby Mode.
Your PC will detect HD MediaBox as an external drive (and assign it a drive letter).
Copy the newly downloaded MediaBox.bin file into the ROOT (i.e. not inside any folders) of the HD
MediaBox internal HDD.
You may also place the firmware image into the ROOT of an external USB disk (or USB thumbdisk). HD Mediabox
will look for the firmware file from any connected USB disk first and then the internal hard disk.
step 6
step 5
step 4
step 3
step 2
step 1
step 3
step 2
step 1
Page 66

66
9.3 Updating HD MediaBox
Connect your HD MediaBox to your display in the normal way.
Navigate to SETUP > System > Software and highlight the Upgrade option.
At the bottom of the screen you will see a confirmation message if MediaBox.bin has been put in the
correct location. If the firmware was found - select Upgrade
You will see a pop-up message asking you for confirmation
Caution: it is important that the power to HD MediaBox is not interrupted during the upgrade process. If power
is interrupted you may need to use the recovery process outlined in section 10.2.
step 4
step 3
step 2
step 1
Page 67

67
HD MediaBox will now start the firmware upgrade process and you will see a progress bar and percentage.
After HD MediaBox has completed upgrading the firmware, it will automatically reboot.
Congratulations. Your HD MediaBox is now ready for use - Please refer to the new firmware instructions to learn
about any new features or operational changes.
Page 68

68
Problem Possible Cause Solution
No Picture • HD MediaBox is not plugged in
• HD MediaBox has not been
switched on using the Remote
Control.
• USB>PC cable is still connected
• Video cables are not connected
• Your display is not capable of
accepting a 480p signal.
• Check power cable is connected
as per
section 3.1. And that a
green light is showing on the front
panel of HD MediaBox.
• Ensure that the USB>PC cable
is disconnected before starting
HD MediaBox
• Ensure the correct video cables
are connected between the display
device and HD MediaBox (see
section 4.1).
• Check that your display is capable of
accepting a 480p signal. If it is not,
follow the instructions in
section
10.1
to change the video output.
Network not working • Ethernet cable is not connected
• Wrong network type selected
• IP address settings incorrect
• No shared folders or drives
available on your network
• Check the network cable is
plugged in on both HD MediaBox
and your network hub. A link light
should show up on HD MediaBox
if the cable is connected correctly.
• Refer to
section 5.4.5 to check
your IP settings in the Network
settings page.
• Make sure that you have setup at
least one shared folder or drive on
your network and that it is not
password protected.
HD MediaBox cannot
obtain IP Address
• DHCP server not running • Ensure that there is a server or
device that acts as a DHCP server
on your network if you have set
DHCP in the IP Setting menu.
Remote Control not working • No batteries, or batteries are flat.
• Infra Red Receiver on HD
MediaBox is obstructed
• Ensure that there are 2 AAA size
batteries in the Remote Control
and they are inserted correctly
(see
section 3.2).
• Replace the batteries
• Ensure that the front panel of HD
MediaBox is not obstructed by any
objects and that you are pointing
the Remote Control directly at HD
MediaBox.
10. Troubleshooting
continued overleaf
Page 69

69
Problem Possible Cause Solution
Some files do not display • File format is not supported • Check that the file you are trying to
find has a supported file extension
and is in a format supported by
HD MediaBox (see
section 1.4.1).
No sound • Audio cables are not connected
• Wrong output type is selected
• Ensure that the audio cables are
connected correctly between the
HD MediaBox and your audio
device (see
section 4.2).
• Ensure that you have selected the
correct output type for your audio
connections (see
section 5.2.1).
USB device not found • Device not supported
• Device partition type is not
supported
• Ensure that the device you are
connecting is a “Mass Storage
Device”.
• Ensure that your device is
formatted as either FAT32 or NTFS
File does not play • Encoding problem • Check that the file you are
attempting to play is encoded in
a format that is supported by HD
MediaBox (see
section 1.4.1).
10.1 Changing Video Output Without an Image
Problem: No video output or unreadable video output.
Explanation: By default, HD MediaBox outputs 480p from the HDMI port, if on startup your display can’t read this
signal, you may need to change the output resolution and format without being able to see the image.
Solution: You can change the output signal using the Remote Control and the front panel LEDs.
Setup and turn on HD MediaBox by connecting power and a connection to your display.
Turn on HD MediaBox by pressing the key on the Remote Control.
The LED will light up blue during startup and then turn off once it is ready to use.
Pressing the key on the Remote Control will start the POWER LED flashing between green and red.
Pressing a NUMBER key within 5 seconds will directly select the output resolution as follows:
0. Toggles between HDMI and DVI output formats*
1. Composite/S-video/Component (from 15pin VGA port) in 480i
2. HD YPbPr component (from 15pin VGA port) 480p
3. HD RGB (from 15pin VGA port) 480p
4. HDMI 480p
5. HDMI 720p
6. HDMI 1080i
7. N/A
8. N/A
9. Toggles between 50 and 60Hz video refresh rates
†
* This option can provide better compatibility with DVI displays. There is no embedded audio when DVI is selected.
† This option only works when HD MediaBox is set to output 480i, 576i, 480i, 576p, 720p 1080i and 1080p
To select another resolution, repeat steps 4 and 5.
step 5
step 4
step 3
step 2
step 1
Page 70

70
10.2 Recovery from Firmware Corruption
Problem: HD MediaBox becomes unresponsive and doesn’t start. POWER LED turns to green and
LED lights blue, but the blue LED remains constantly lit and File Browser doesn’t display.
Explanation: This can occur if a firmware upgrade was interrupted or other firmware corruption has occurred.
Solution: The following steps allow you to reset HD MediaBox without using the on screen menus.
Transfer a known working version of the firmware onto the internal HDD using the instructions in section
9.2 or to an external USB device. Ensure that only one version of the firmware exists on any connected drives.
Remove the power connector from HD MediaBox, wait 5 seconds and re-insert the power connector.
Make sure HD MediaBox is in standby mode ( POWER LED is red) and that HD MediaBox is no longer
connected to a PC via USB.
Point the Remote Control directly at the HD MediaBox IR receiver and press the key.
Press and hold the key until the POWER LED turns green.
HD MediaBox will now begin the firmware upgrade process.
The blue LED will flash in the following pattern to show progress.
1 long 1 short = 0-19%
1 long 2 short = 20-39%
1 long 3 short = 40-59%
1 long 4 short = 60-79%
1 long 5 short = 80-100%
After completion, HD MediaBox will shutdown and can be started in the usual way.
step 6
step 5
step 4
step 3
step 2
step 1
Page 71

71
Support & Warranty Information
Product Support
Caution: Under NO circumstances should you attempt to repair or modify your HD MediaBox unit as this could
expose you to electrical shock, and/or severely damage your HD MediaBox.
Product Warranty
Pixel Magic Systems Ltd. warrants HD MediaBox for One-Year from date of purchase to the original purchaser that
this product is free from defects in materials and workmanship. If, after inspection, you discover any defects in
materials or workmanship, Pixel Magic Systems Ltd. will have the option to repair, or replace the defective Pixel
Magic Systems’ product free of charge. This one-year warranty does not cover damages from normal wear and tear
or from accidental damage, misuse, improper care, alterations or damage caused in transportation by a common
carrier or airline.
There are no other warranties expressed or implied, including, but not limited to, the implied warranties of
merchantability and the fitness for a particular purpose beyond the terms of this one-year warranty. The one-year
warranty offered by Pixel Magic Systems Ltd. herein may not be modified by any oral representations made by any
employee, agent or representative of Pixel Magic Systems Ltd.
Repair or replacement as provided under this warranty is the exclusive remedy of the consumer. Pixel Magic
Systems Ltd. shall not be liable for any incidental or consequential damages for breach of any expressed or implied
warranty on this product, except to the extent prohibited by applicable law, any implied warranty of merchantability
or fitness for a particular purpose on this product is limited in duration to the duration of this warranty. If you need
to have your Pixel Magic Systems’ product repaired or replaced under the conditions of this one-year warranty,
please contact your dealer to make suitable arrangements.
Limitation of Liability (for all customers)
BOTH YOURS AND PIXEL MAGIC SYSTEMS’ LIABILITY SHALL BE LIMITED TO THE PRICE PAID FOR PRODUCT.
IN NO EVENT SHALL EITHER YOU OR PIXEL MAGIC SYSTEMS LTD. BE LIABLE TO THE OTHER FOR ANY
INDIRECT, SPECIAL, INCIDENTAL OR CONSEQUENTIAL DAMAGES RESULTING FROM PERFORMANCE OR
FAILURE TO PERFORM UNDER THIS AGREEMENT, OR USE OF ANY GOODS OR SERVICE SOLD PURSUANT
HERETO, WHETHER DUE TO A BREACH OF CONTRACT, BREACH OF WARRANTY, NEGLIGENCE, OR
OTHERWISE. NEITHER YOU NOR PIXEL MAGIC SYSTEMS LTD. SHALL HAVE ANY LIABILITY TO THE OTHER
FOR INDIRECT OR PUNITIVE DAMAGES, OR FOR ANY CLAIM BY ANY THIRD PARTY EXCEPT AS EXPRESSLY
PROVIDED HEREIN.
HD MediaBox is designed to provide you with many years of viewing pleasure.
If for any reason you encounter a problem with your HD MediaBox unit, please
follow these steps:
1. Carefully follow the instructions shown in this manual.
2. Refer to Section 10: Troubleshooting to try and rectify the problem.
3. Contact your dealer for advice.
4. Use the Pixel Magic Support Forum http://www.pixelmagicforum.com
5. If you still cannot get the information you need, please contact our
support team using the following details.
Email: support@pixelmagicsystems.com
International Support Hotline: (852) 2607 4078
Page 72

© Copyright 2006 Pixel Magic Systems Ltd. HD MediaBox™ is a trademark of Pixel Magic Systems Ltd. All rights reserved. HDMI (High Definition
Multimedia Interface) is a trademark of HDMI Licensing LLC. BURR-BROWN® is a registered trademark of Texas Instruments Incorporated.
Windows® is a registered trademark of Microsoft Corporation. Apple® and Mac® are registered trademarks of Apple Inc.
Specifications and features subject to change without notice.
 Loading...