

Page 1
Prior to Use
Instruction Manual
"PixeBurn! for HD” enables you to write videos recorded in AVCHD
standard onto DVD or BD discs without changing the picture quality.
Connect the camcorder with your Mac to write a disc.
To Operate
Refer to the following Web site for the latest information and troubleshooting.
PIXELA CORPORATION official Web site
http://www.pixela.co.jp/
Page 2

To Front Page
Prior to Use
Description of This Document
»
Precautions
Description of This Document
▉
It is prohibited to fully or partially reproduce the content of this guide without notice.
▉
This guide does not mention basic operations of Mac. Operations are based on general
operation procedures of Mac.
Notes for Operation
Trademarks
Specifications
System Requirements
To Operate
▉
The content of this guide may be modified without notice.
▉
Parts of screen captures are modified for illustration purpose.
▉
Screen captures in this document are from the software under development. They may be
different from the actual software.
▉
Please contact our User Support Center if you have any questions.
▉
marking indicates a supplementary note or a reference relating to the topic.
Page 3

To Front Page
Prior to Use
Description of This Document
Precautions
»
Notes for Operation
»
Precautions
▉
Do not copy, modify, distribute, and conduct any other acts that infringe the copyright of this
software fully or partially without permission from the copyright owner.
Notes for Operation
Trademarks
Specifications
System Requirements
To Operate
▉
Use an AC adapter when using a notebook computer.
▉
Use the camcorder's power adapter to power the camcorder.
▉
Refer to the camcorder's instruction manual for the operation, connection, and precautions of
the camcorder.
▉
When playing back ".m2ts" or ".MTS" files, refer to the instruction manual of the playback
application for operation and precautions.
▉
Do not run other software or put the computer in Sleep mode while writing a disc.
▉
You cannot write contents on a used DVD-R, DVD-R DL, BD-R, and BD-R DL.
▉
You cannot add contents on a used DVD-RW and BD-RE. All the contents on the disc should
be erased before writing.
Page 4

To Front Page
Prior to Use
Description of This Document
Trademarks
▉
Mac and Mac OS are registered trademarks of Apple Inc.
▉
Intel is a registered trademark of Intel Corporation.
Precautions
Notes for Operation
Trademarks
»
Specifications
System Requirements
To Operate
▉
AVCHD and AVCHD logo are trademarks of Panasonic Corporation and Sony Corporation.
▉
Blu-ray is a trademark of the Blu-ray Disc Association.
▉
The company names and brand names referred to in this document are the trademarks,
registered trademarks, and products of their respective companies.
▉
The ® and TM marks have been omitted in this document.
Page 5

To Front Page
Specifications
Prior to Use
Description of This Document
Precautions
Notes for Operation
Trademarks
Specifications
»
System Requirements
To Operate
Readable files Video files recorded with the camcorder supporting AVCHD standard.
DVD-R, DVD-R DL, DVD-RW
Writable discs
▉
Writing time
Writing 4.2 GB video on a DVD-RW in double speed after
erasing existing data by [Quick erase].
Writing 10 GB video on a BD-R in double speed. Approximately 40 minutes
BD-R, BD-R DL, BD-RE, BD-RE DL
*
Writing may fail if writing volume approximates to the disc capacity.
*
8cm disc is not supported.
Operation Estimated writing time
Approximately 30 minutes
*
Use above chart as a guide. Estimated time varies according to the performance of your Mac or disc drive.
Page 6

To Front Page
System Requirements
Prior to Use
Description of This Document
Precautions
Notes for Operation
Trademarks
Specifications
System Requirements
»
To Operate
Supported OS
CPU CPU made by Intel Corporation
Memory
Hard disk capacity
Supported drive A drive supporting DVD or BD disc writing.
*
The above is the lowest system configurations to operate this software.
*
Full operation is not guaranteed even if system configurations are satisfied.
*
Better system configurations may be necessary depending on the environments, number of videos, and total volume of the
content to be written.
Leopard (Mac OS X 10.5)
Snow Leopard (Mac OS X 10.6)
Leopard: 512 MB or higher
Snow Leopard: 1 GB or higher
Installation: approximately 15 MB
Disc writing: the volume to write onto a disc + 1 GB
*
"+ 1 GB" is not needed if "Work folder location" in the Preferences is set to the
volume other than System volume
Page 7
To Front Page
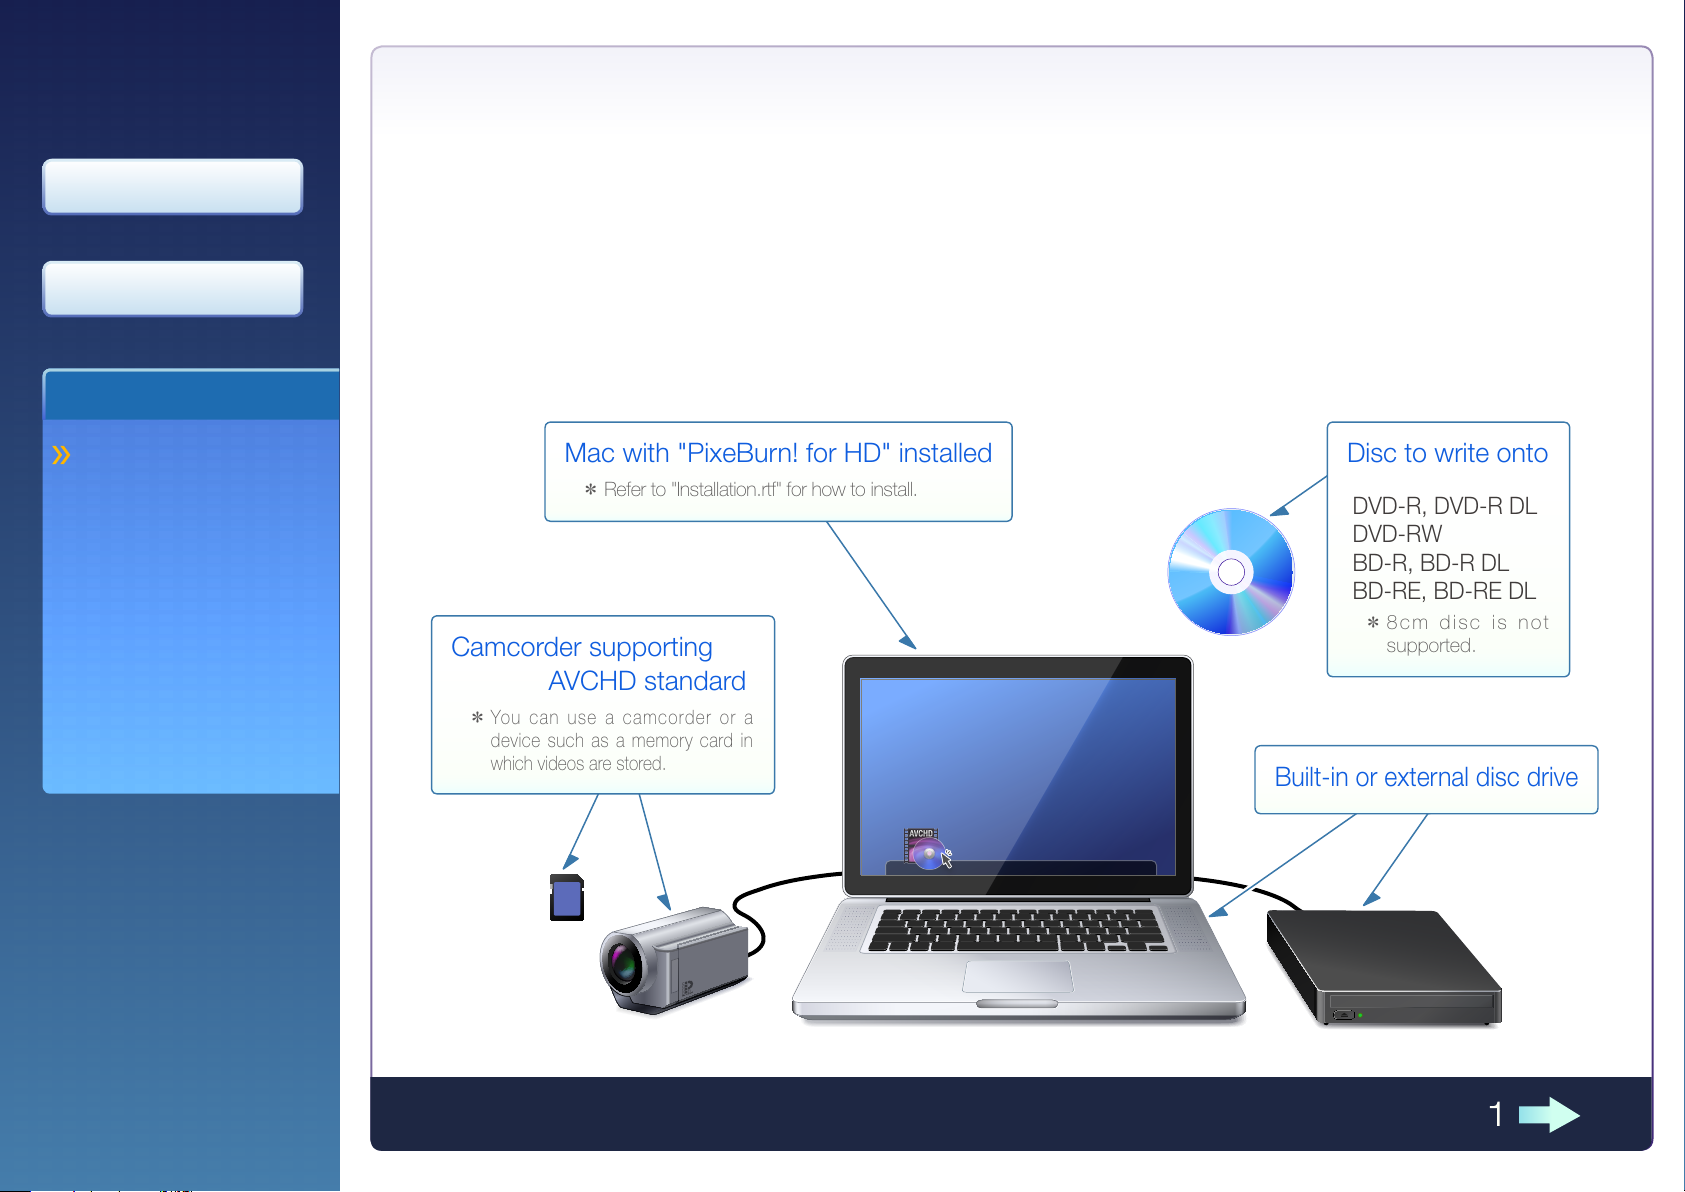
Mac with "PixeBurn! for HD" installed
Refer to "Installation.rtf" for how to install.
*
Disc to write onto
DVD-R, DVD-R DL
DVD-RW
BD-R, BD-R DL
BD-RE, BD-RE DL
8cm disc is no t
supported.
*
Camcorder supporting
AVCHD standard
You can use a camco rder o r a
device such as a memory card in
which videos are stored.
*
Built-in or external disc drive
Introduction
Before using "PixeBurn! for HD", please finish the preparations shown below.
Prior to Use
To Operate
Introduction
»
1 Select camcorder
2 Select drive
3 Set disc
4 Select movies
5 Write disc
Finish
Also, make sure to connect the camcorder, external disc drive, or other needed devices to your Mac.
1
Page 8
To Front Page
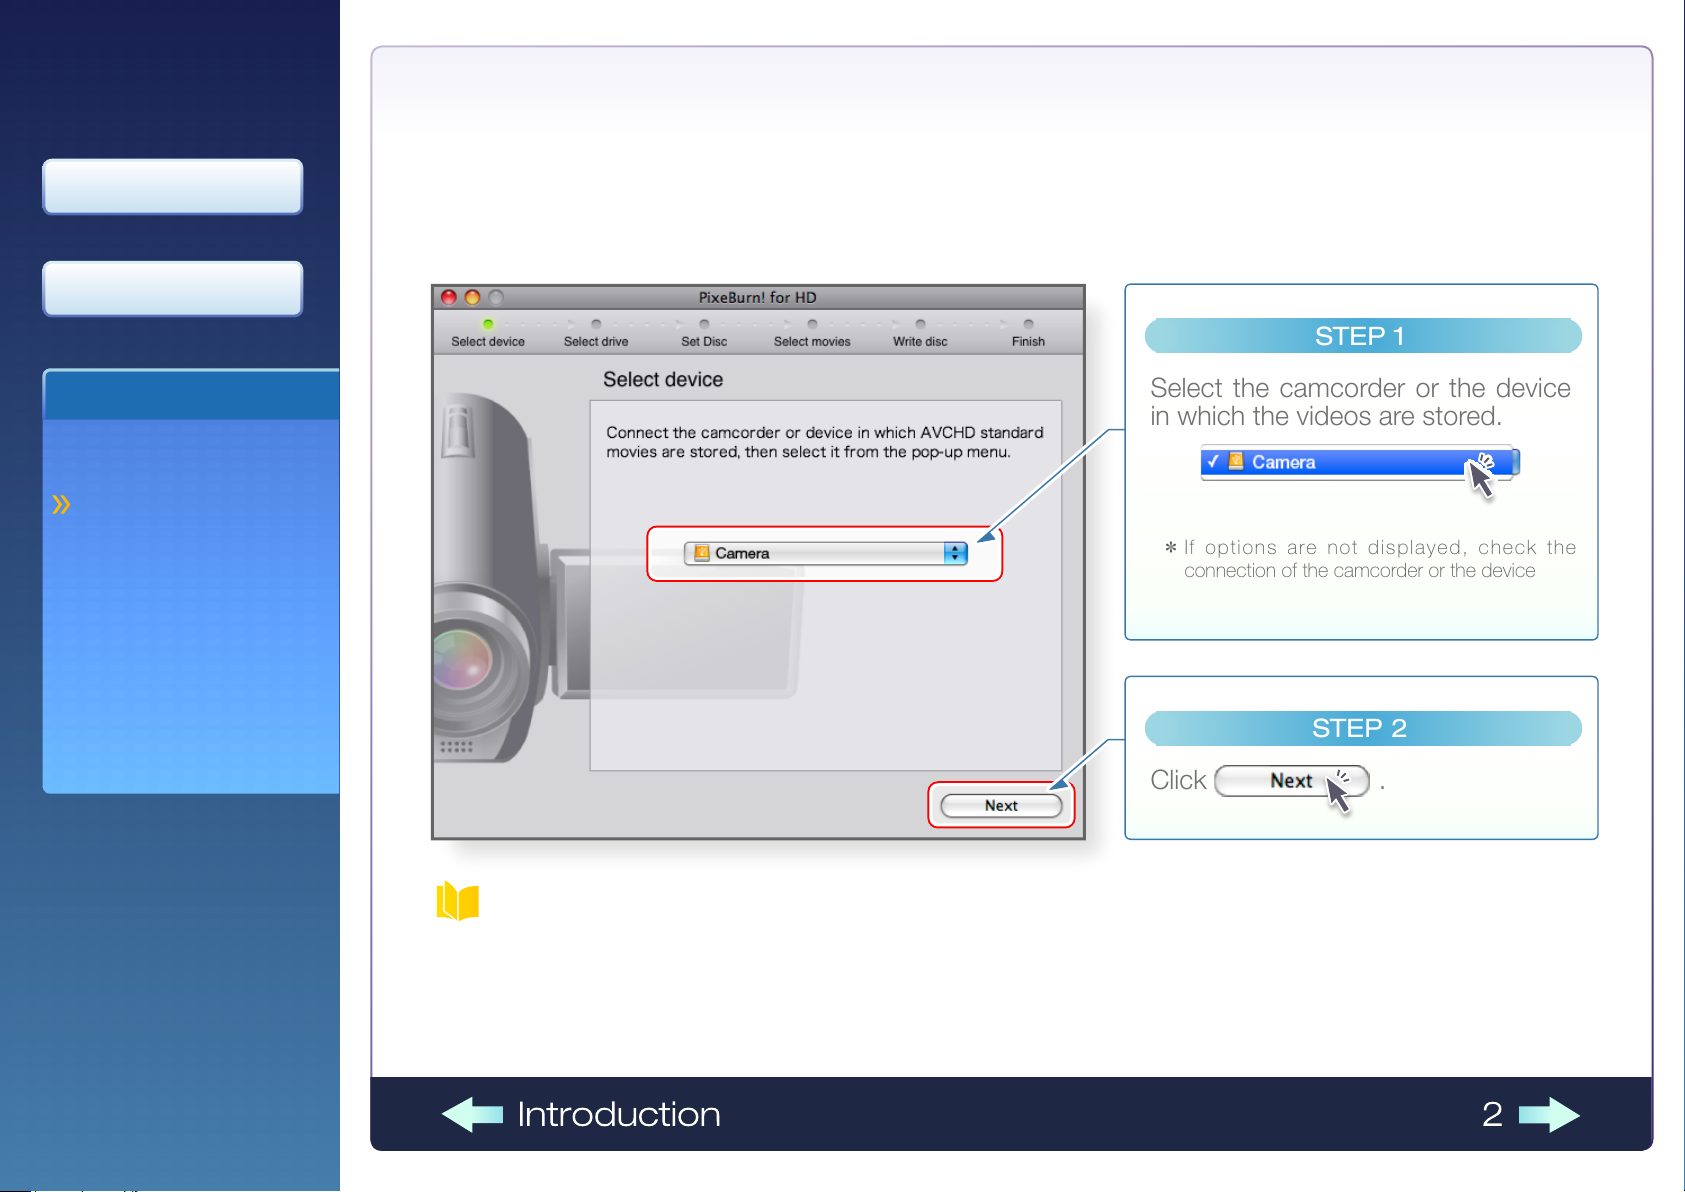
STEP 1
Select the camcorder or the device
in which the videos are stored.
If options are not displayed, check the
connection of the camcorder or the device
*
STEP 2
Click .
Prior to Use
To Operate
Introduction
1 Select camcorder
»
2 Select drive
3 Set disc
4 Select movies
5 Write disc
Finish
1
Select camcorder
Readable devices
You can use camcorders and devices, such as a memory card, that stores the videos recorded in AVCHD standard.
*
You cannot read from two or more devices.
*
When reading from a DVD or BD disc, connect another disc drive for writing, or save videos in the disc to your Mac using Disk Utility.
2Introduction
Page 9
To Front Page
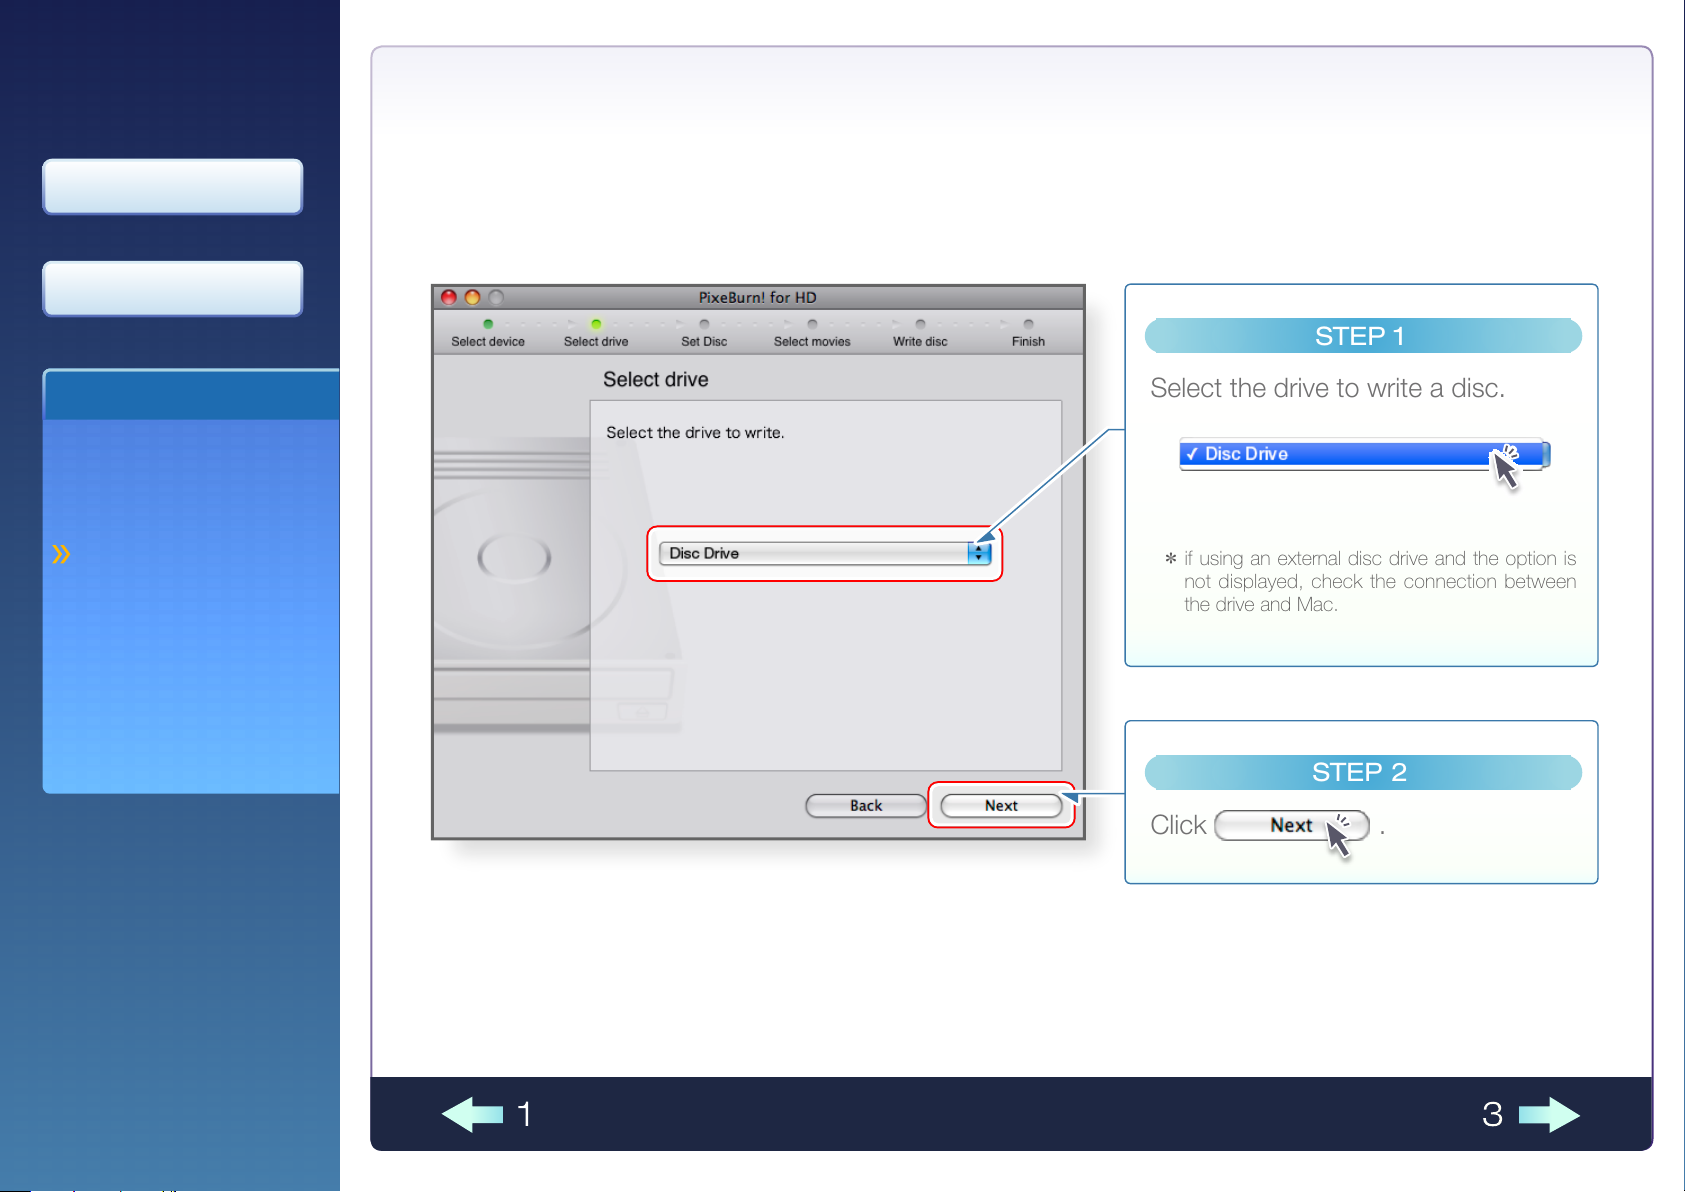
STEP 1
Select the drive to write a disc.
if using an external disc drive and the option is
not displayed, check the connection between
the drive and Mac.
*
STEP 2
Click .
Prior to Use
To Operate
Introduction
1 Select camcorder
2 Select drive
»
3 Set disc
4 Select movies
5 Write disc
Finish
2
Select drive
31
Page 10
To Front Page
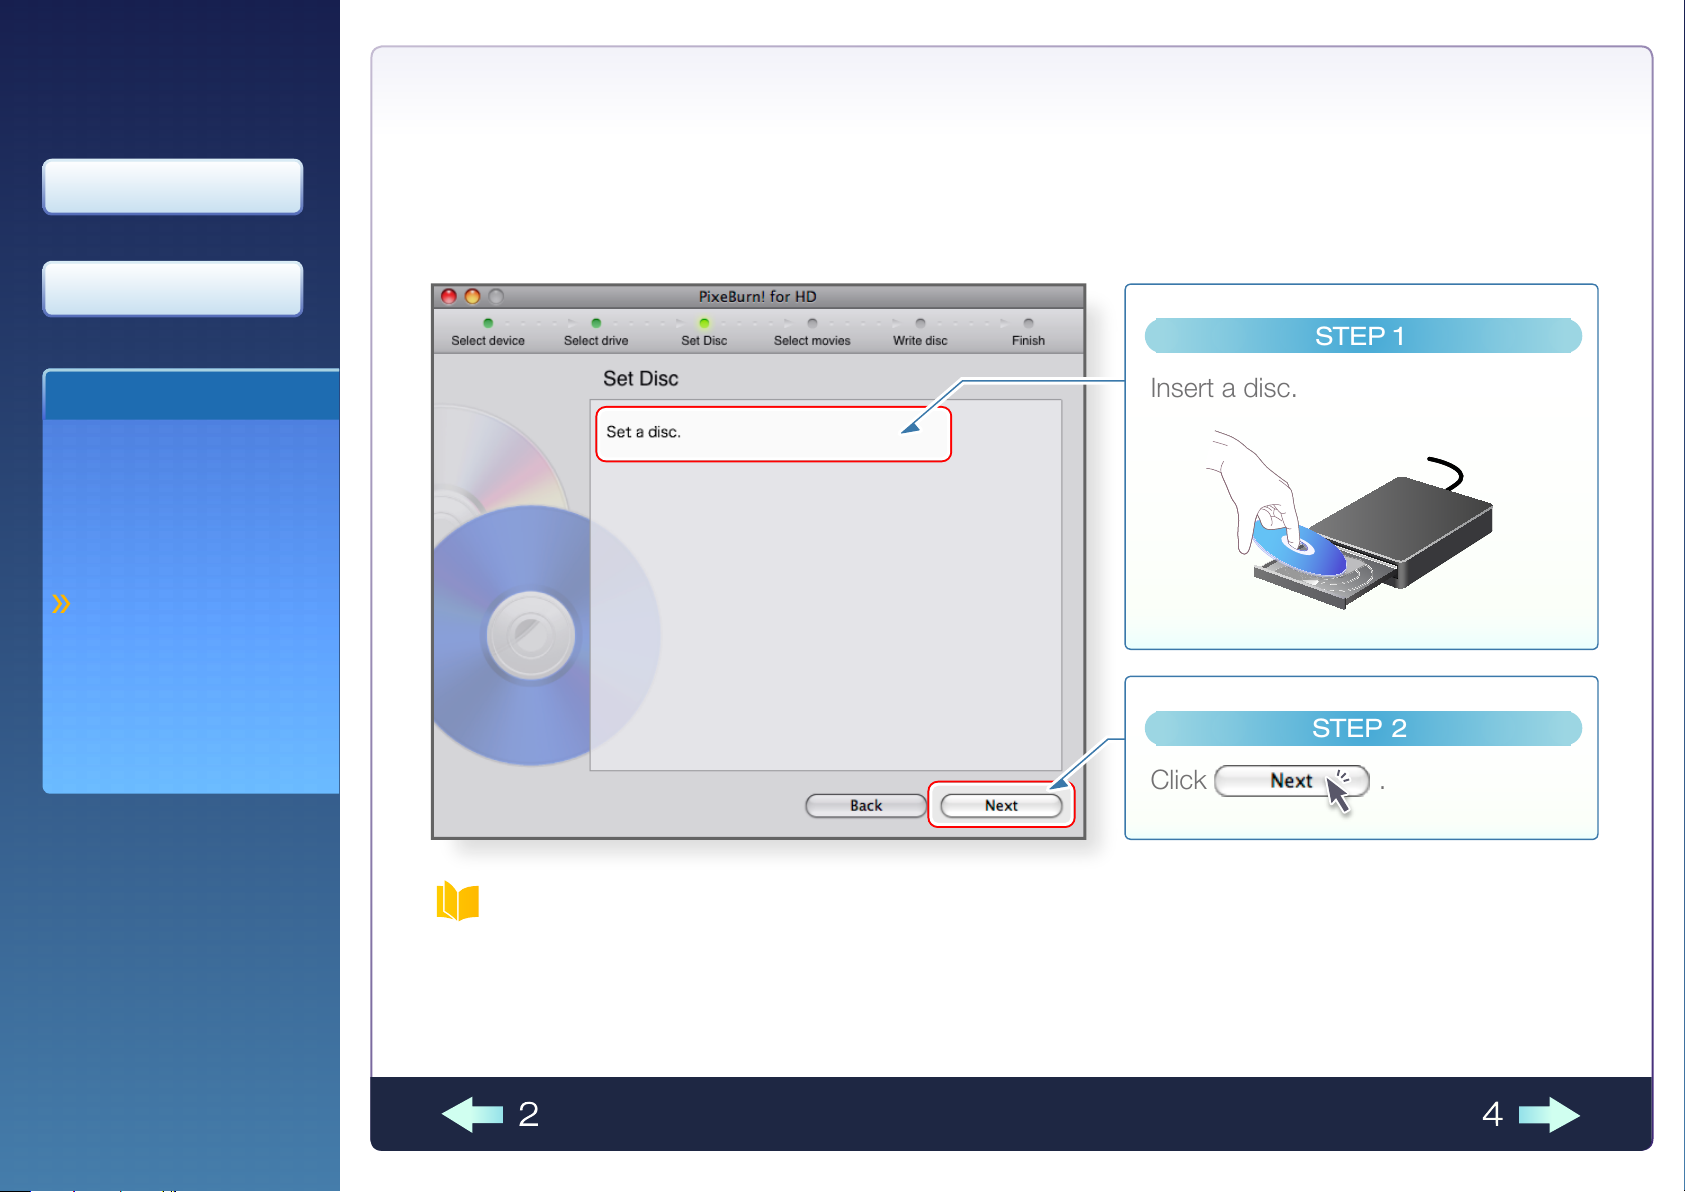
STEP 1
Insert a disc.
STEP 2
Click .
Prior to Use
To Operate
Introduction
1 Select camcorder
2 Select drive
3 Set disc
»
4 Select movies
5 Write disc
3
Set disc
Finish
Supported discs
You can use following discs:
DVD-R, DVD-R DL, DVD-RW, BD-R, BD-R DL, BD-RE, BD-RE DL
Make sure to use a disc which is supported by your disc drive.
*
8cm disc is not supported.
42
Page 11
To Front Page
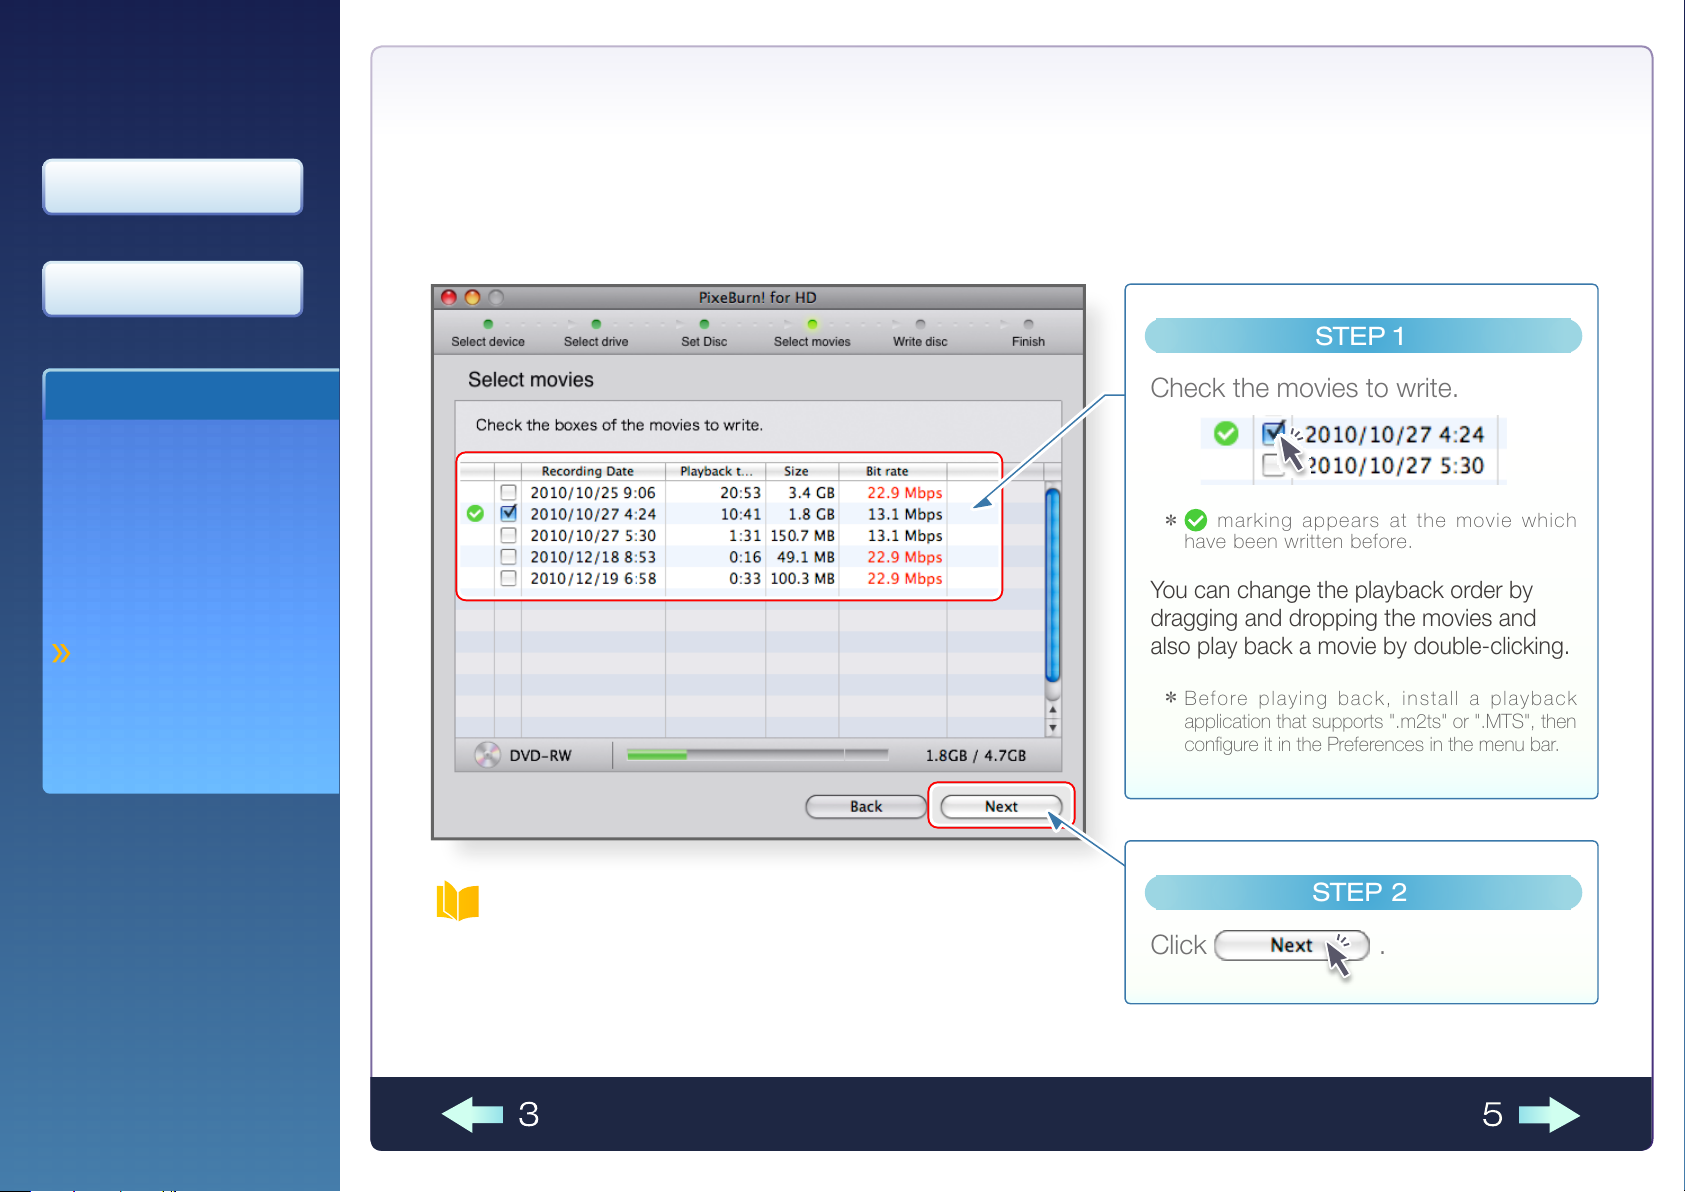
STEP 1
Check the movies to write.
mark ing appears at the mov ie which
have been written before.
You can change the playback order by
dragging and dropping the movies and
also play back a movie by double-clicking.
Befo r e pl a ying ba ck, in stall a pla y back
application that supports ".m2ts" or ".MTS", then
configure it in the Preferences in the menu bar.
*
*
STEP 2
Click .
Prior to Use
To Operate
Introduction
1 Select camcorder
2 Select drive
3 Set disc
4 Select movies
»
5 Write disc
Finish
4
Select movies
What's "Bit rate"?
"Bit rate (Mbps)" indicates the size of video and audio data transferred.
The higher the number, the better the video and audio quality.
Note that if you write a DVD disc including video of 18 Mbps or
higher, you may not be able to play it back on some players.
53
Page 12
To Front Page
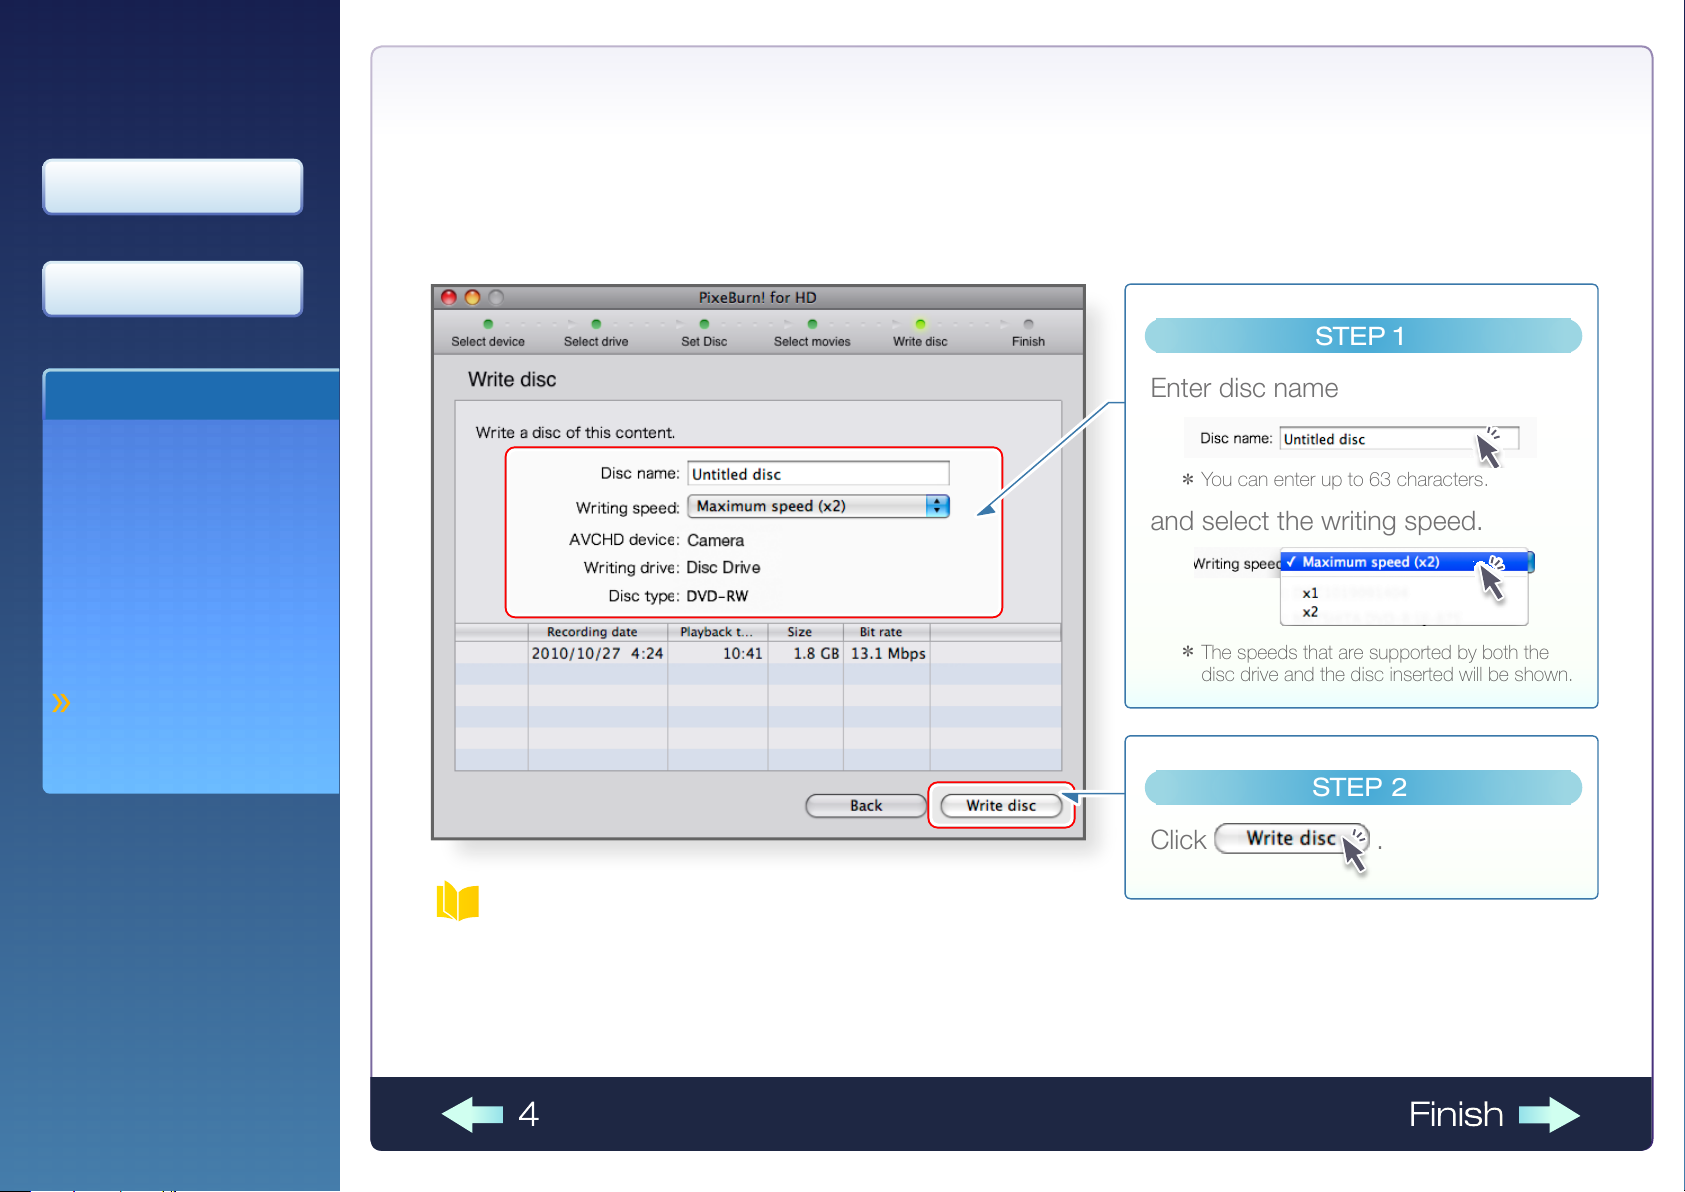
STEP 1
Enter disc name
You can enter up to 63 characters.
and select the writing speed.
The speeds that are supported by both the
disc drive and the disc inserted will be shown.
*
*
STEP 2
Click .
Prior to Use
To Operate
Introduction
1 Select camcorder
2 Select drive
3 Set disc
4 Select movies
5 Write disc
»
Finish
5
Write disc
Writing on used DVD-RW or BD-RE(DL)
The message "Erase the current disc contents?" will be displayed. Select the method to erase.
[Quick erase]: Erase within a relatively short time. This method can erase faster than [Complete erase].
[Complete erase]: Erase the recorded data completely. It may take more than 60 minutes depending on the contents.
*
Select [Complete erase] if you fail in erasing with [Quick erase] or fail in playing back the written disc.
Finish4
Page 13
To Front Page
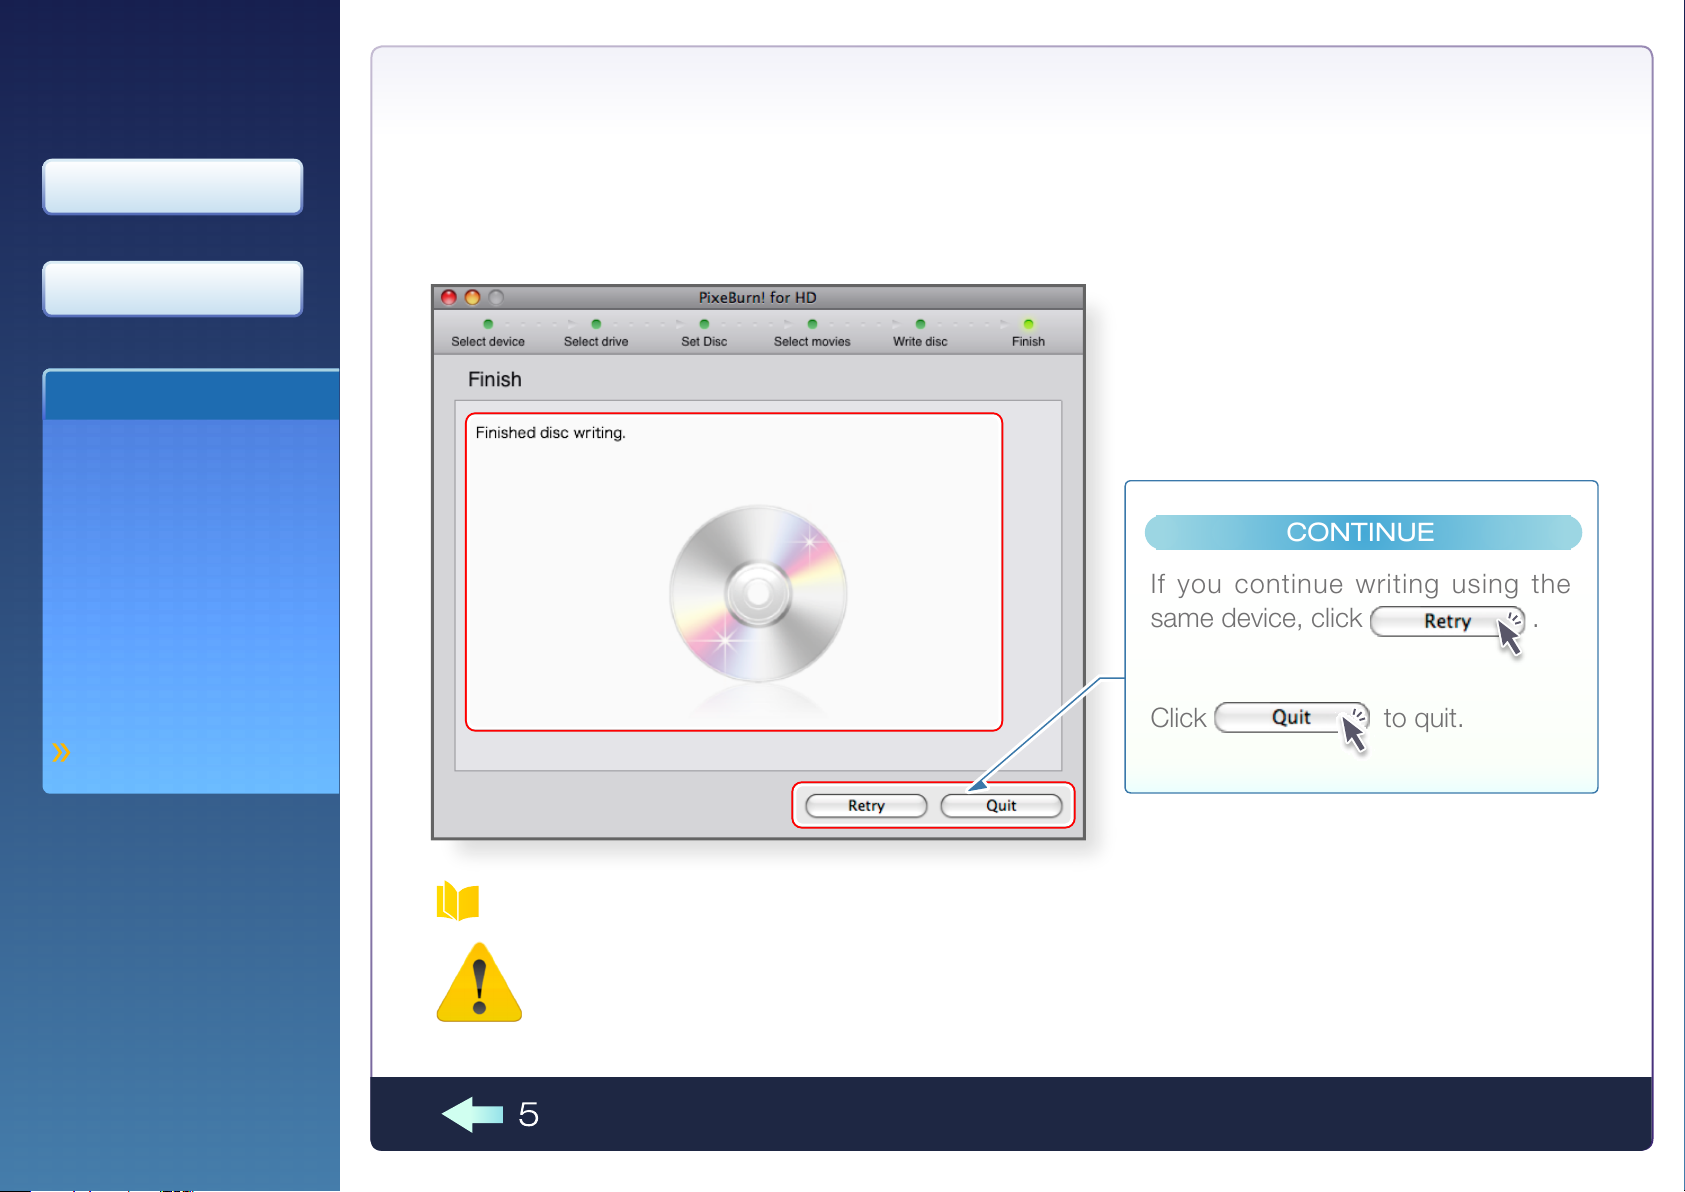
CONTINUE
If you continue writing using the
same device, click .
Click to quit.
Prior to Use
To Operate
Introduction
1 Select camcorder
2 Select drive
3 Set disc
4 Select movies
5 Write disc
Finish
»
Finish
If you failed in writing a disc...
Check the following and retry from "Prepare Disc":
Check if there is an enough space for "the volume to write onto a disc + 1 GB" in the work folder.
•
Use a disc made by other manufacturer.
•
Reduce the writing speed.
•
5
 Loading...