

Page 1

1 of 12 pages
VIS131.1 VIS131.2 Operation Manual
The digital LED controller is designed to control our LED digital tube.One controller can control 8pcs LED
digital tube.The controller together with the LED digital tube can make colorful and dynamic light scenery
effects.It can be controlled by DMX controller and Art-net.
A,Parameter Of LED digital tube controller system
LED digital tube controller specification :
Power input:AC120V/240V 60Hz/50Hz
Power consumption:350W max
Power output:DC12V,eight 3-pin output power cable with female connector.Each output power cable connect 1
LED tube
DMX input and output:3-pin male XLR socket and 3-pin female XLR socket
Types of lights can be controlled:1 meter tube light and 2 meter tube light
Weight:3.4kgs
Dimension:L49*W27*H7.2cm
2×8 character LCD display
Built-in microphone
IR remote control available
Control:512 DMX console and Art-net control
- AC120V /AC 240V input voltage switch
- LCD display for DMX addressing and work mode setting
- Universal DMX512 (1990) multiplexed digital control
- Selectable 24 jumping modes&24 dreaming modes&24 sound active modes in stand alone mode
LED digital tube specification :
Power input:DC12V,3-pin input power cable with male connector
Power consumption:18W per LED tube---(1M);36W per LED tube---(2M)
LEDs:54pcs 0.164W(3 in 1)--- (1M);108pcs 0.164W(3 in 1)---(2M)
Weight:0.26kg---(1M);0.5kg---(2M)
Dimension:Ø25*1000mm---(1M);Ø25*2000mm---(2M)
Pixels:27 pixels---(1M);54 pixels---(2M)
Each pixel of LED tube can be controlled individually via Art-net control
Color of tube:Clear PC
Visible for 360 degree
Each 3-pin input power cable can be extended to 20 meters at most
B,All the system controlled by DMX controller
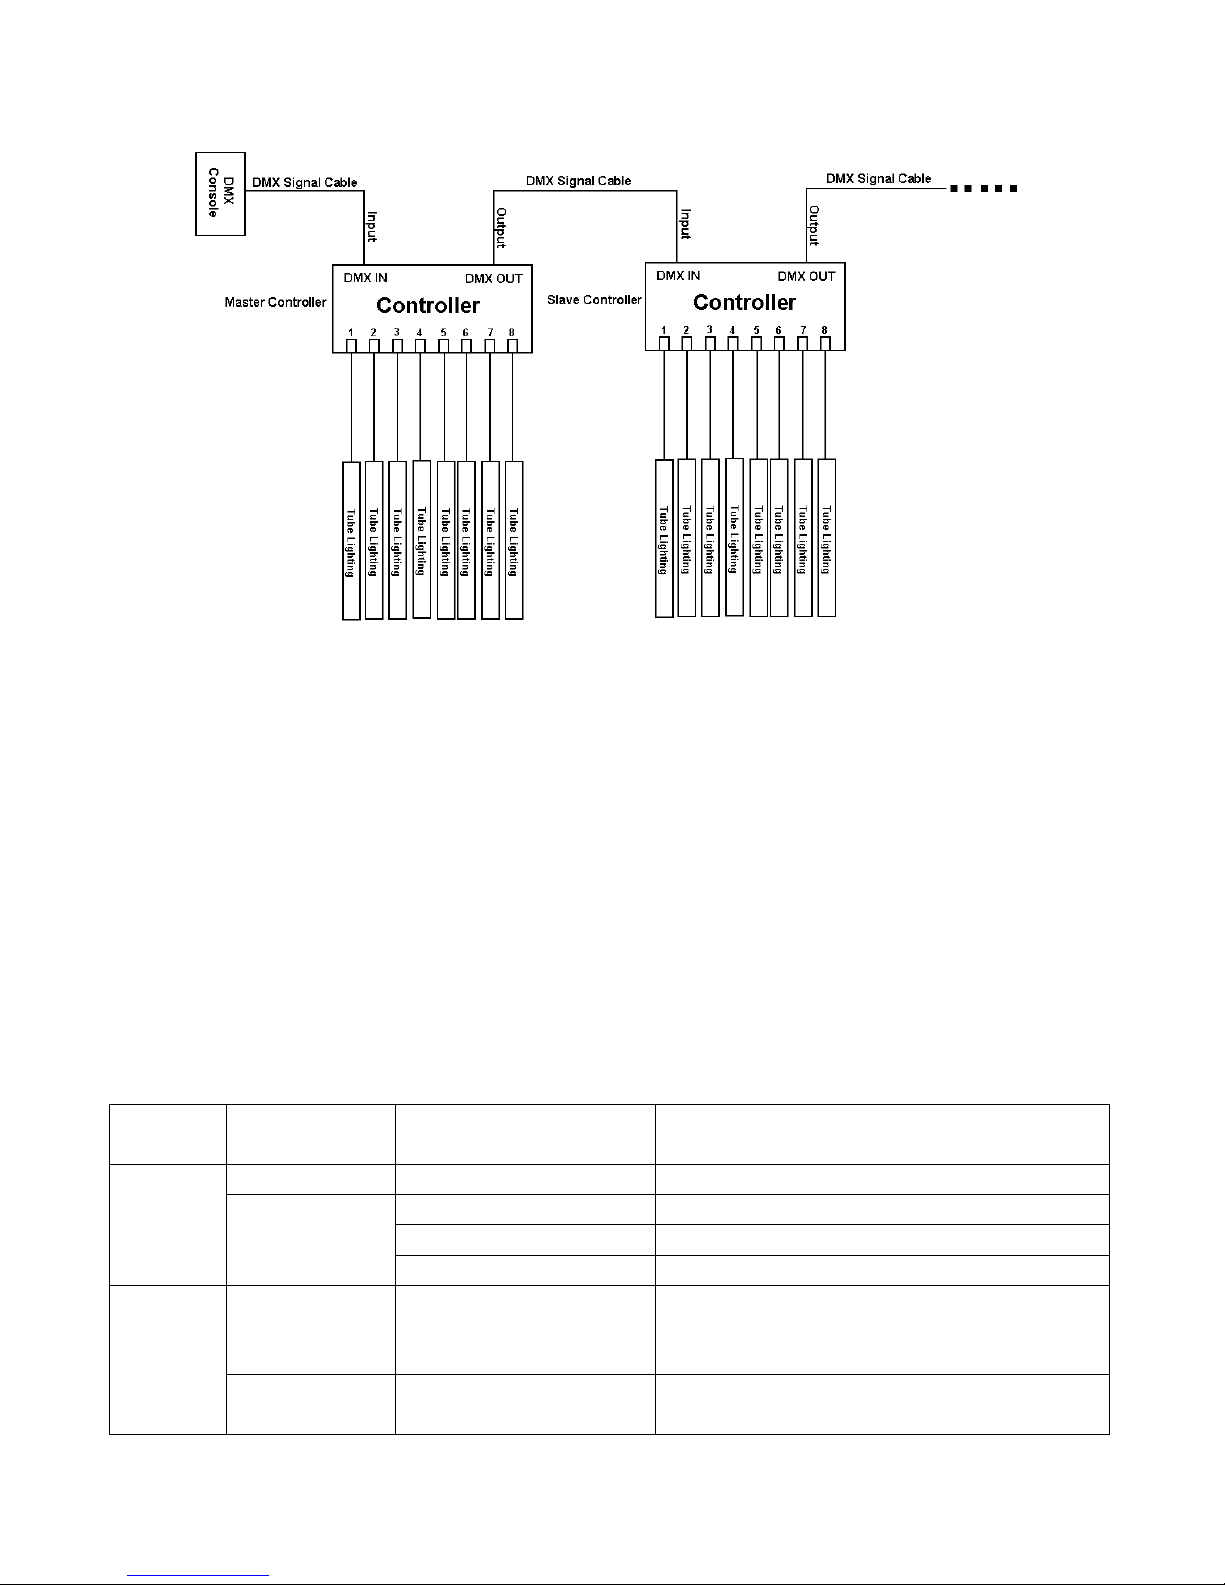
1.The link picture for the total LED digital tube controller system:
Page 2
2 of 12 pages
Note:
1) Every controller has 8 outputs,every output of the controller can link 1pc tube light.So every controller can
control 8pcs lights at most.
2) The controller can control 2 types of tube lights:1 meter tube light and 2 meter tube light.Please refer to TUBE
LIGHT TYPE SET MODE in OTHER MODE to set the controller to control the 2 different lights.The 1 meter
tube light has 27 pixels,2 meter tube light has 54 pixels.Each pixels occupies 3 channels,so each 1 meter tube light
occupies 81 channels,each 2 meter tube light occupies 162 channels.
3) Every controller can be used as Master controller or Slave controller,it must be set to slave mode when it is used
as slave controller.The tube lights connected to salve controller will act the same as the tube lights connected to
master controller.
2.Operation Of LED digital tube controller system
Connect the LED digital tube to the LED digital tube controller,and then operate the LED digital tube controller to
control the LED digital tube.It has 7 kinds of operation modes,they are as follows:
Manual dimmer color mode,Sound active mode,Auto-run program mode,Static color select mode,Other
program select mode,DMX mode,Net control mode
Here above 7 kinds running mode are selected by MODE button.
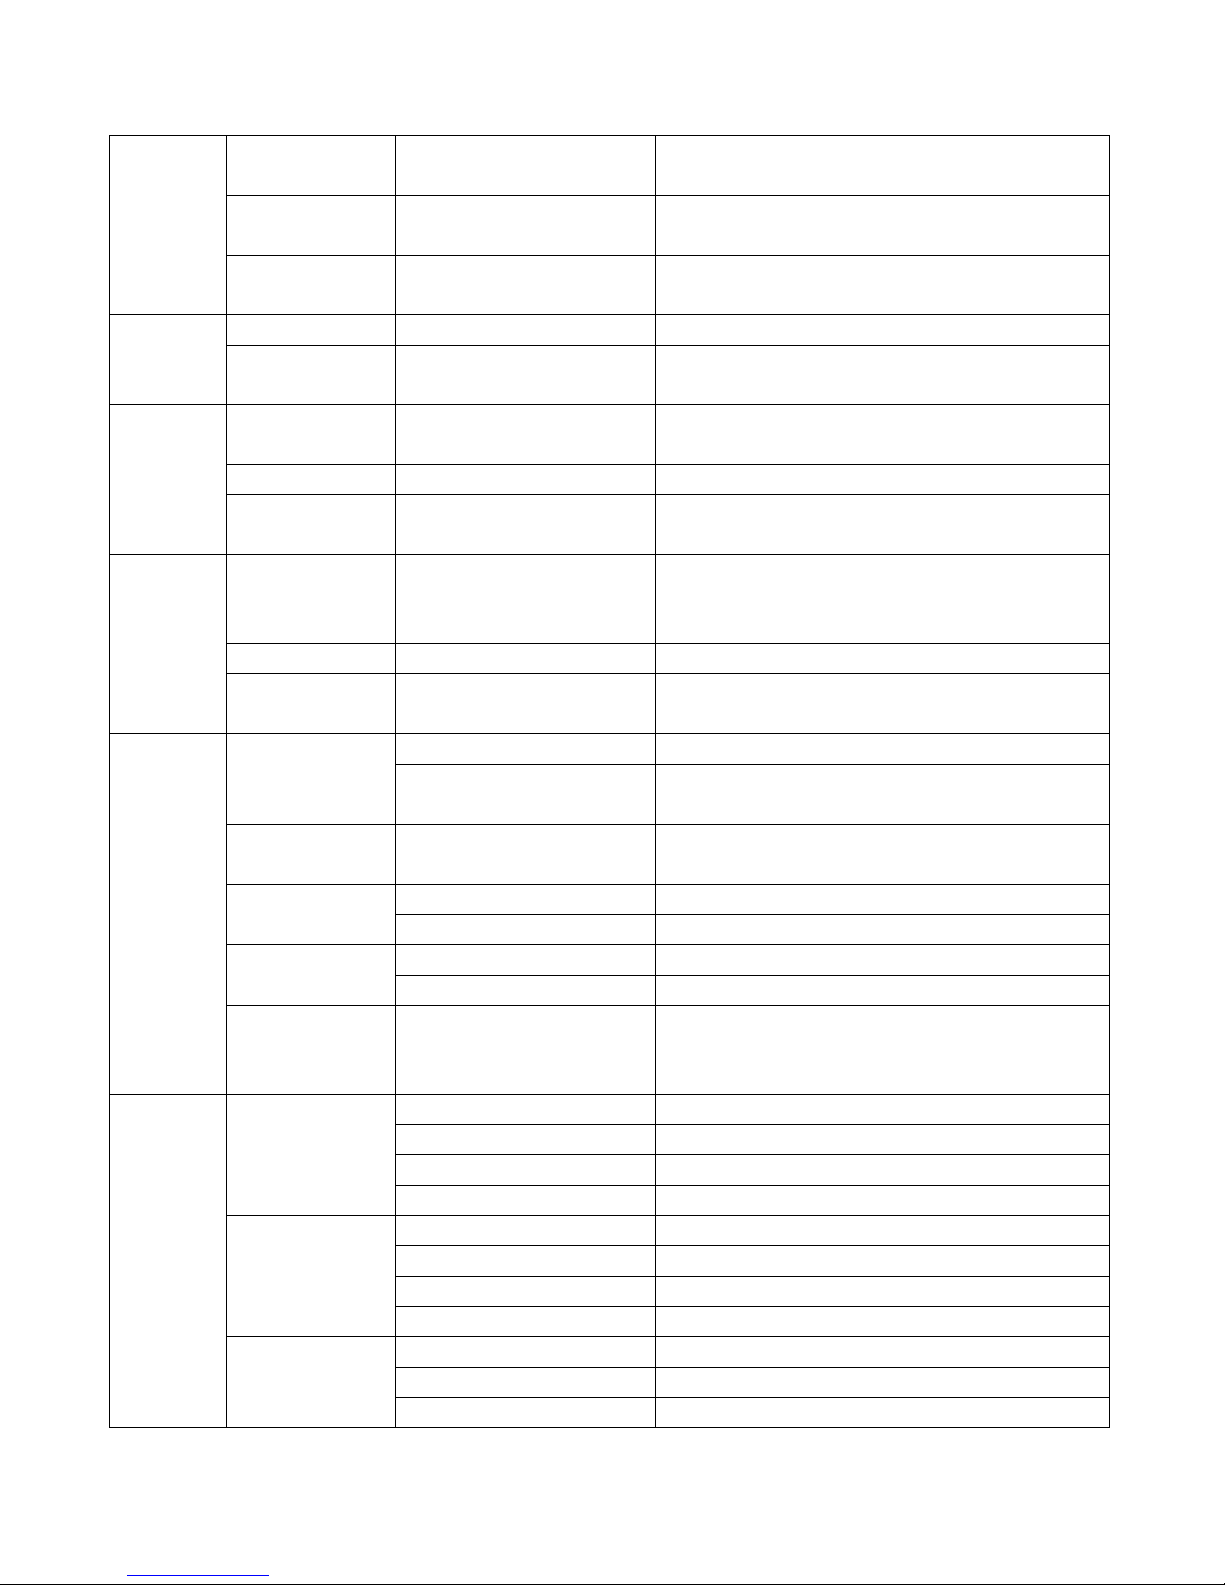
MODE
manual
SET UP manual
UP/DOWN manual
instruction
DMX
MODE
Address set
DMX MODE ADDR:×××
Sets the DMX starting address from 001 to 512
Channels set
DMX MODE CHAN: 005
The unit occupies 5 channels
DMX MODE CHAN: 007
The unit occupies 7 channels
DMX MODE CHAN: 026
The unit occupies 26 channels
DIMMER
MODE
LED tube select
MANUAL TUBE:ALL/××
TUBE:ALL is to set dimmer of all the LED
tubes,TUBE:01~08 is to set dimmer of the
corresponding single LED tube
Red dimmer
MANUAL RED:×××
Adjust the intensity of the red color,000 is off,255 is
the brightest.
Page 3
3 of 12 pages
Green dimmer
MANUAL GREN:×××
Adjust the intensity of the green color,000 is off,255 is
the brightest.
Blue dimmer
MANUAL BLUE:×××
Adjust the intensity of the blue color,000 is off,255 is
the brightest.
Flash
MANUAL STROB:××
Adjust the flash speed,00 is flash off,01 is slowest,15
is fastest
SOUND
MODE
Mode select
SOUND PROG:××
Select the 24 built-in sound active mode
Sensitivity select
SOUND SENS:××
Adjust the sensitivity of the sound-active,1 is the
lowest level,8 is the highest level
AUTO
RUN
MODE
Dreaming mode
set
AUTO RUN FADE:××
Select the 24 built-in dreaming mode
Jumping mode set
AUTO RUN SNAP:××
Select the 24 built-in jumping mode
Speed set
AUTO RUN SPEED:××
Adjust the speed of the dreaming/jumping mode
01-16,01 is the slowest speed,16 is the fastest speed
STATIC
COLOR
SELECT
MODE
LED tube select
STATIC TUBE:ALL/××
TUBE:ALL is to select static color of all the LED
tubes,TUBE:01~08 is to select static color of the
corresponding single LED tube
Color select
STATIC CLR:××
Select the 7 static colors
Flash
STATIC STROB:××
Adjust the flash speed,00 is flash off,01 is slowest,15
is fastest
OTHER
MODE
Display
on/off
OPTION BLGT:ON
LED digital tube display always on
OPTION BLGT:OFF
LED digital tube display off after 20 seconds if there
is no operation
LCD backlight
brightness
OPTION BRCO:×××
Adjust the brightness of the LCD backlight 0-100.0
means LCD backlight off,the bigger value the brighter.
IR remote
function on/off
OPTION IR:ON
IR remote function on
OPTION IR:OFF
IR remote function off
Tube light type set
mode
OPTION TUBES:27
The controller is set to control 1 meter tube light
OPTION TUBES:54
The controller is set to control 2 meter tube light
Initialization
mode
OPTION SYSRESET
Initialize the unit at the extra factory setting,now press
UP and DOWN button at the same time,you can
initialize it at extra factory setting.
NET
CONTROL
MODE
IP address set
NET MODE IP0:×××
Set the IP address section 1 from 001-255
NET MODE IP1:×××
Set the IP address section 2 from 001-255
NET MODE IP2:×××
Set the IP address section 3 from 001-255
NET MODE IP3:×××
Set the IP address section 4 from 001-255
Subnet mask set
NET MODE SW0:×××
Set the subnet mask section 1 from 001-255
NET MODE SW1:×××
Set the subnet mask section 2 from 001-255
NET MODE SW2:×××
Set the subnet mask section 3 from 001-255
NET MODE SW3:×××
Set the subnet mask section 4 from 001-255
DMX universe
output set
NET MODE U1:ЧЧЧЧЧ
Set the output DMX universe 1 from 1to 32767
NET MODE U2:ЧЧЧЧЧ
Set the output DMX universe 2 from 1to 32767
NET MODE U3:ЧЧЧЧЧ
Set the output DMX universe 3 from 1to 32767
Page 4

4 of 12 pages
NET MODE U4:ЧЧЧЧЧ
Set the output DMX universe 4 from 1to 32767
2.1 Manual dimmer color mode
Press"MODE"button,select the manual dimmer color mode.There are three modes in the sound active program
mode.You can select them by pressing the"SET UP" button.
1) LED tube select mode
Press"SET UP"button, select the LED tube select mode.At this time,the LCD displays "MANUAL TUBE:ALL/×
×",then press"UP"or "DOWN"button to select the LED tube.When"MANUAL TUBE:ALL" is displayed means
that you can set the dimming rate for all the LED tubes,When"MANUAL TUBE:01~08" is displayed means that
you can set the dimming rate for the corresponding single LED tube.For example: "MANUAL TUBE:01"represent
the LED tube 1 and so on.
2) Manual dimmer color select
Press"SET UP"button, select the manual dimmer color select mode.At this time,the LCD displays red"MANUAL
RED: ×××",press the "SET UP" again to choose different color,green"MANUAL GREN: ×××",
blue"MANUAL BLUE:×××",then press"UP"or "DOWN"button to set the dimming rate 0-255.
3) Flash speed select
Press"SET UP"to choose the flash speed select mode.At this time,the LCD displays"MANUAL STROB:××
".Press"UP"or "DOWN"button to select the flash speed 00-15,00 is flash off,01 is the slowest flash speed,15 is the
fastest flash speed.Press SET UP to choose the flash speed select mode.
2.2 Sound active mode
Press"MODE"button,select the sound active program mode.There are two modes in the sound active program
mode.You can select them by pressing the"SET UP" button.
1) Sound active program mode select
Press"SET UP"button until the LCD displays"SOUND PROG:××",then press"UP" or "DOWN" to select the
sound active program mode 1-24 under this mode.
2) Sensitivity select mode
Press"SET UP"button until the LCD displays"SOUND SENS:××",then press"UP" or "DOWN" to select the
sound active the sensitivity 1-8. 1 is off sound-active,2 is the lowest sensitivity,8 is the highest sensitivity.
2.3 Auto-run program mode
Press"MODE"button,select the auto-run program mode.There are three modes in the auto-run program mode.You
can select them by pressing the"SET UP" button.
1) Color dreaming program mode select
Press"SET UP"button until the LCD displays"AUTO RUN FADE:××",then press"UP"or "DOWN"button to
select the 24 color dreaming programs 1-24.
2) Color jumping program mode select
Press"SET UP"button until the LCD displays"AUTO RUN SNAP:××",then press"UP"or "DOWN"button to
select the 24 color jumping programs 1-24.
4) Color dreaming/jumping speed select
Press"SET UP"button until the LCD displays"AUTO RUN SPEED:××".Press"UP"or "DOWN"button to select
the color dreaming/jumping speed 01-16,01 is the slowest speed,16 is the fastest speed.
2.4 Static color select mode
Press"MODE"button,select the static color select mode.There are three modes in the static color select mode.You
can select them by pressing the"SET UP" button.
1) LED tube select mode
Press"SET UP"button, select the LED tube select mode.At this time,the LCD displays "STATIC TUBE:ALL/××
Page 5

5 of 12 pages
",then press"UP"or "DOWN"button to select the LED tube.When"STATIC TUBE:ALL" is displayed means that
you can select static color for all the LED tubes,When"STATIC TUBE:01~08" is displayed means that you can
select static color for the corresponding single LED tube.For example:"STATIC TUBE:01"represent the LED tube
1 and so on.
2) Static color select
Press"SET UP"button until the LCD displays"STATIC CLR:××",then press"UP" or "DOWN" to select static
color 0-7 under this mode.
3) Flash speed select
Press"SET UP"button until the LCD displays"STATIC STROB:××",then press"UP"or "DOWN"button to select
the static color flash speed 00-15,00 is flash off,01 is the slowest flash speed,15 is the fastest flash speed.
2.5 Other program select mode
1) LCD backlight on/off select mode
Press“MODE” button,select LCD backlight on/off mode.Press UP or DOWN to select the LCD backlight
on/off.When the LCD displays"OPTION BLGT:ON"means that the LCD backlight will on in any situation,when
the LCD displays"OPTION BLGT:OFF"means that the LCD backlight will be automatically off after 20 seconds if
there is no operation.
2) LCD backlight brightness select mode
Press“SET UP” button,select LCD backlight brightness select mode.At this time,the LCD displays"OPTION
BRCO:×××".Press UP or DOWN to adjust the LCD backlight brightness 0-100.0 means LCD backlight off,the
bigger value the brighter.
3) IR remote function on/off select mode
Press“SET UP” button ,select IR remote function on/off mode.Press UP or DOWN to select IR remote function
on/off.When the LCD displays"OPTION IR:ON"means that IR remote function is on,when the LCD
displays"OPTION IR:OFF"means that IR remote function is off.
4) Tube light type set mode
Press“SET UP” button ,select display tube light type set mode.Press UP or DOWN to select the 2 different tube
lights to be controlled by controller.When the digital tube displays"OPTION TUBES:27"means that the controller
is set to control 1 meter tube light,When the digital tube displays"OPTION TUBES:54"means that the controller is
set to control 2 meter tube light.
5) Initialization select mode
Press“SET UP” button until the LCD displays"OPTION SYSRESET",and the LCD backlight is flicker.Now press
UP and DOWN button at the same time,you can initialize it at extra factory setting.
2.6 Net control mode
1) IP address set
Press"MODE"button,select the IP address set mode.At this time,the LCD displays"NET MODE IP0:×××
",press"UP"or "DOWN"button to set the section 1 IP address.Then press SET UP button to select the section 2 IP
address"NET MODE IP1:×××",the section 3 IP address"NET MODE IP2:×××" and the section 4 IP
address"NET MODE IP3:×××" ,press"UP"or "DOWN"button to set them.
2) Subnet mask set
Press"SET UP"button,select the subnet mask set mode.At this time,the LCD displays"NET MODE SW0:×××
",press"UP"or "DOWN"button to set the section 1 Subnet mask.Then press SET UP button to select the section 2
Subnet mask"NET MODE SW1:×××",the section 3 Subnet mask"NET MODE SW2:×××" and the section 4
Subnet mask"NET MODE SW3:×××" ,press"UP"or "DOWN"button to set them from 001-255.
3) DMX universe output set
Page 6
6 of 12 pages
Press"SET UP"button,select the DMX universe output set mode.At this time,the LCD displays"NET MODE U1:×
××××",press"UP"or "DOWN"button to set the output DMX universe from 1to 32767.Then press SET UP
button to select the output DMX universe 2 "NET MODE U2:ЧЧЧЧЧ",the output DMX universe 3 "NET
MODE U3:× × ××× " and the output DMX universe 4 "NET MODE U4:××× × × ",press"UP"or
"DOWN"button to set the other 3 DMX universes.
2.7 DMX mode
You can control the devices individually via your DMX-controller.
Notice:The LED digital tube controller is under slave mode in any situation of the DMX mode(any DMX
address,any DMX channels mode) when it is combined to other LED digital tube controller but not
512DMX controller.
1) DMX address select mode
The control Board allows you to assign the DMX address which is defined as the first channel of the LED digital
tube CONTROLLER.Press“MODE”button until the LCD display is“DMX MODE ADDR:×××”, then press UP
or DOWN to set the DMX address 1-512. The LCD display will be flicker when there is no controller signal.
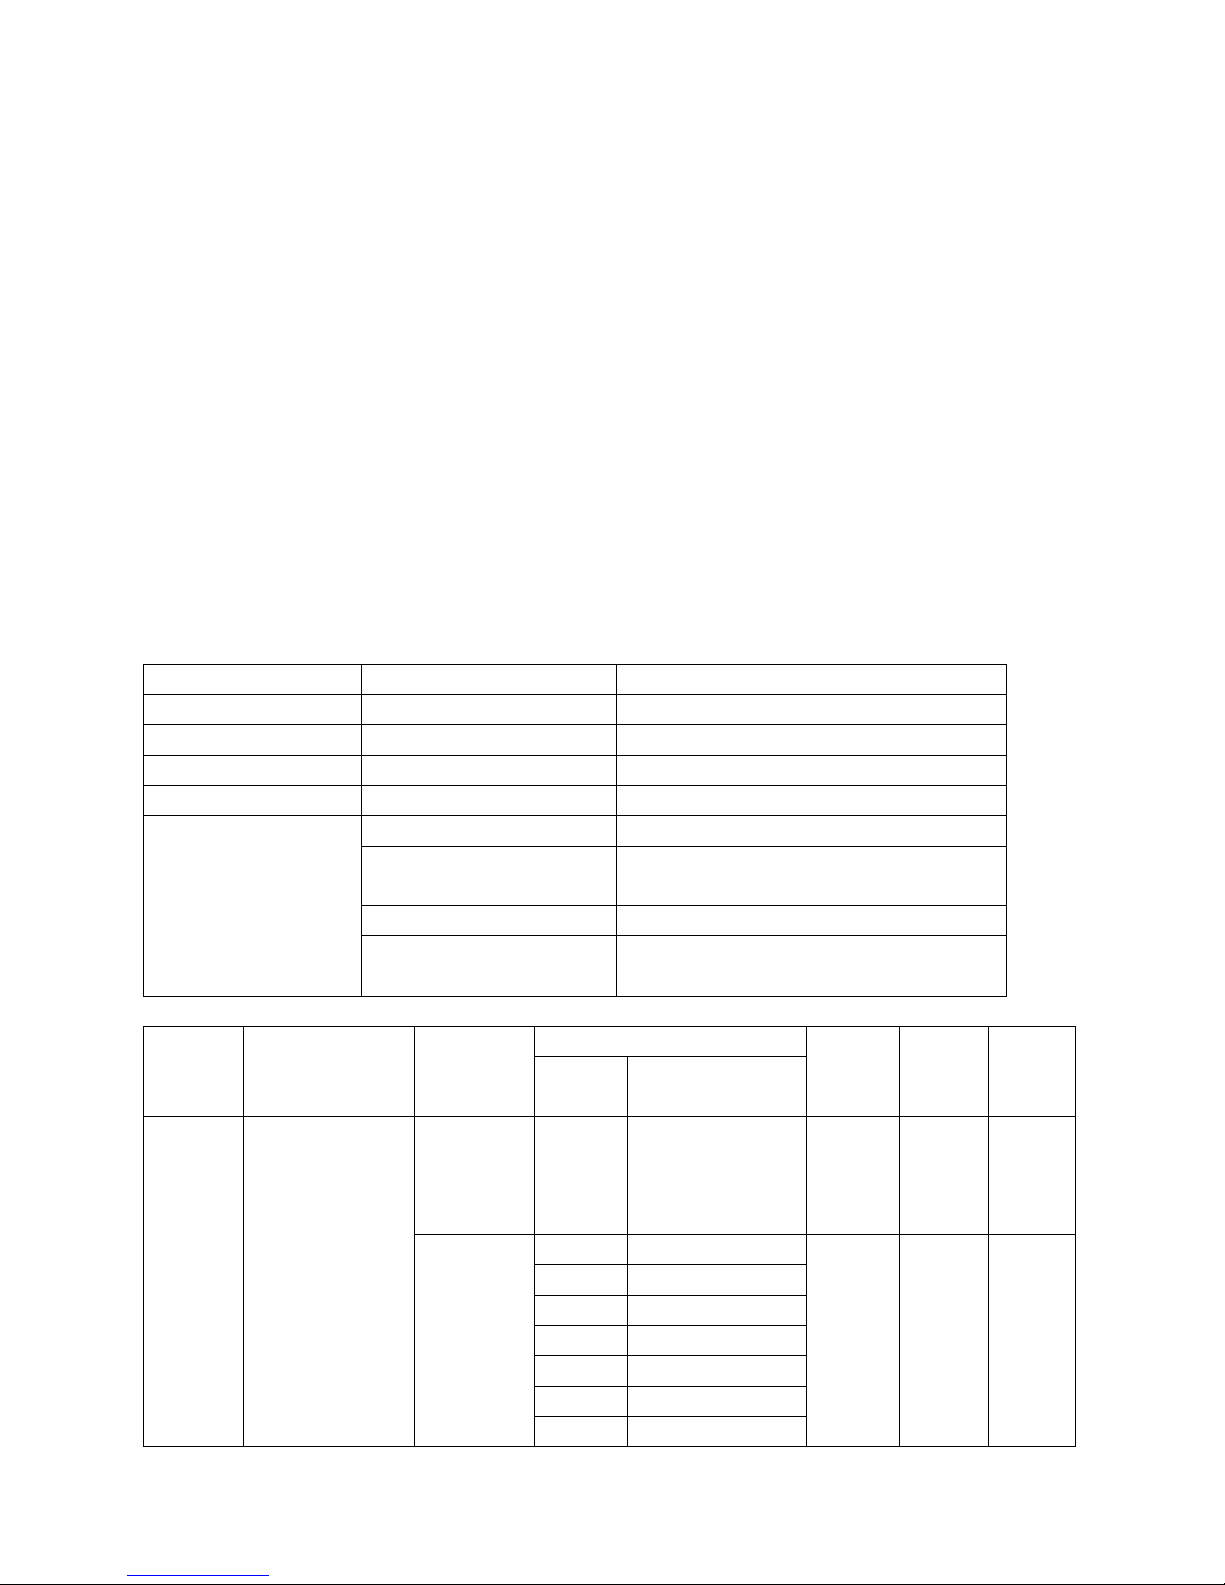
2) DMX-PROTOCOL
Press“SET UP”button until the display is“DMX MODE CHAN: 005/007/026”, then press UP or DOWN to set the
desired channels (5,7,26).There are total 3 DMX modes.
CHAN: 005 :5 channels mode
CH No.
DMX value
Function
CH1
000~255
Red(dim→bright)
CH2
000~255
Green(dim→bright)
CH3
000~255
Blue(dim→bright)
CH4
000~255
Dimming(dim→bright)
CH5
000
No function
001~005
Sound active(sound active mode 1 to sound
active mode 24 run in cycle)
006~010
No function
011~255
Strobe slowest to fastest
flash frequency is 0.1HZ-20HZ
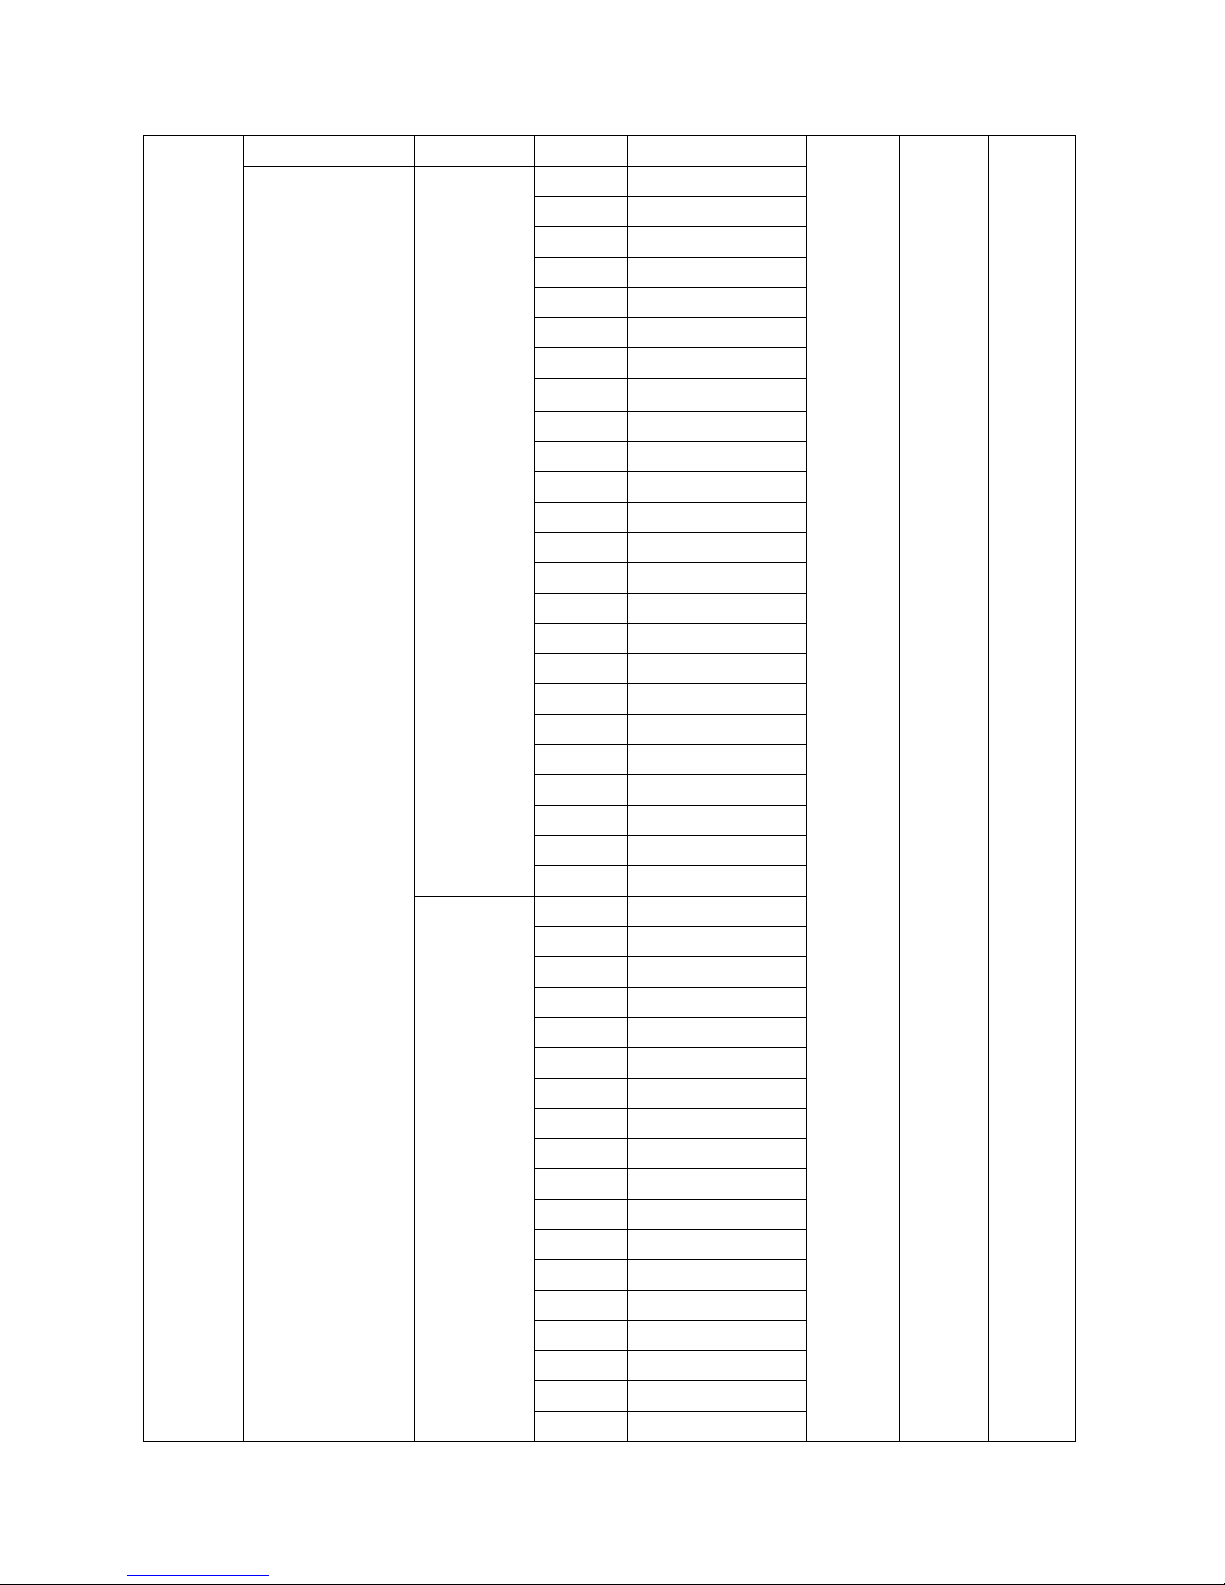
CHAN: 007 :7 channels mode
CH1
CH2
CH3
CH4
CH5
CH6
CH7
DMX
VALUE
FUNCTION
0-27=No function
28-255=Flash
(slow→
fast)
Color
dimmer
mode
(0-50)
0-255
No function
Red
0-255
(dim→
bright)
Green
0-255
(dim→
bright)
Blue
0-255
(dim→
bright)
Static color
select mode
(51-102)
0-31
BLACK
32-63
Red
64-95
Green
96-127
Blue
128-159
Yellow
160-191
Purple
192-223
Cyan
Page 7
7 of 12 pages
Dimming
0-255
(dim→
bright)
224-255
White
No
function
No
function
No
function
Speed
0-255
(slow→
fast)
Color
jumping
mode select
(103-154)
0-10
Color jumping 1
11-20
Color jumping 2
21-31
Color jumping 3
32-42
Color jumping 4
43-52
Color jumping 5
53-63
Color jumping 6
64-74
Color jumping 7
75-84
Color jumping 8
85-95
Color jumping 9
96-106
Color jumping 10
107-117
Color jumping 11
118-127
Color jumping 12
128-138
Color jumping 13
139-148
Color jumping 14
149-159
Color jumping 15
160-170
Color jumping 16
171-180
Color jumping 17
181-191
Color jumping 18
192-202
Color jumping 19
203-212
Color jumping 20
213-223
Color jumping 21
224-234
Color jumping 22
235-244
Color jumping 23
245-255
Color jumping 24
Color
dreaming
mode select
(155-206)
0-10
Color dreaming 1
11-20
Color dreaming 2
21-31
Color dreaming 3
32-42
Color dreaming 4
43-52
Color dreaming 5
53-63
Color dreaming 6
64-74
Color dreaming 7
75-84
Color dreaming 8
85-95
Color dreaming 9
96-106
Color dreaming 10
107-117
Color dreaming 11
118-127
Color dreaming 12
128-138
Color dreaming 13
139-148
Color dreaming 14
149-159
Color dreaming 15
160-170
Color dreaming 16
171-180
Color dreaming 17
181-191
Color dreaming 18
Page 8
8 of 12 pages
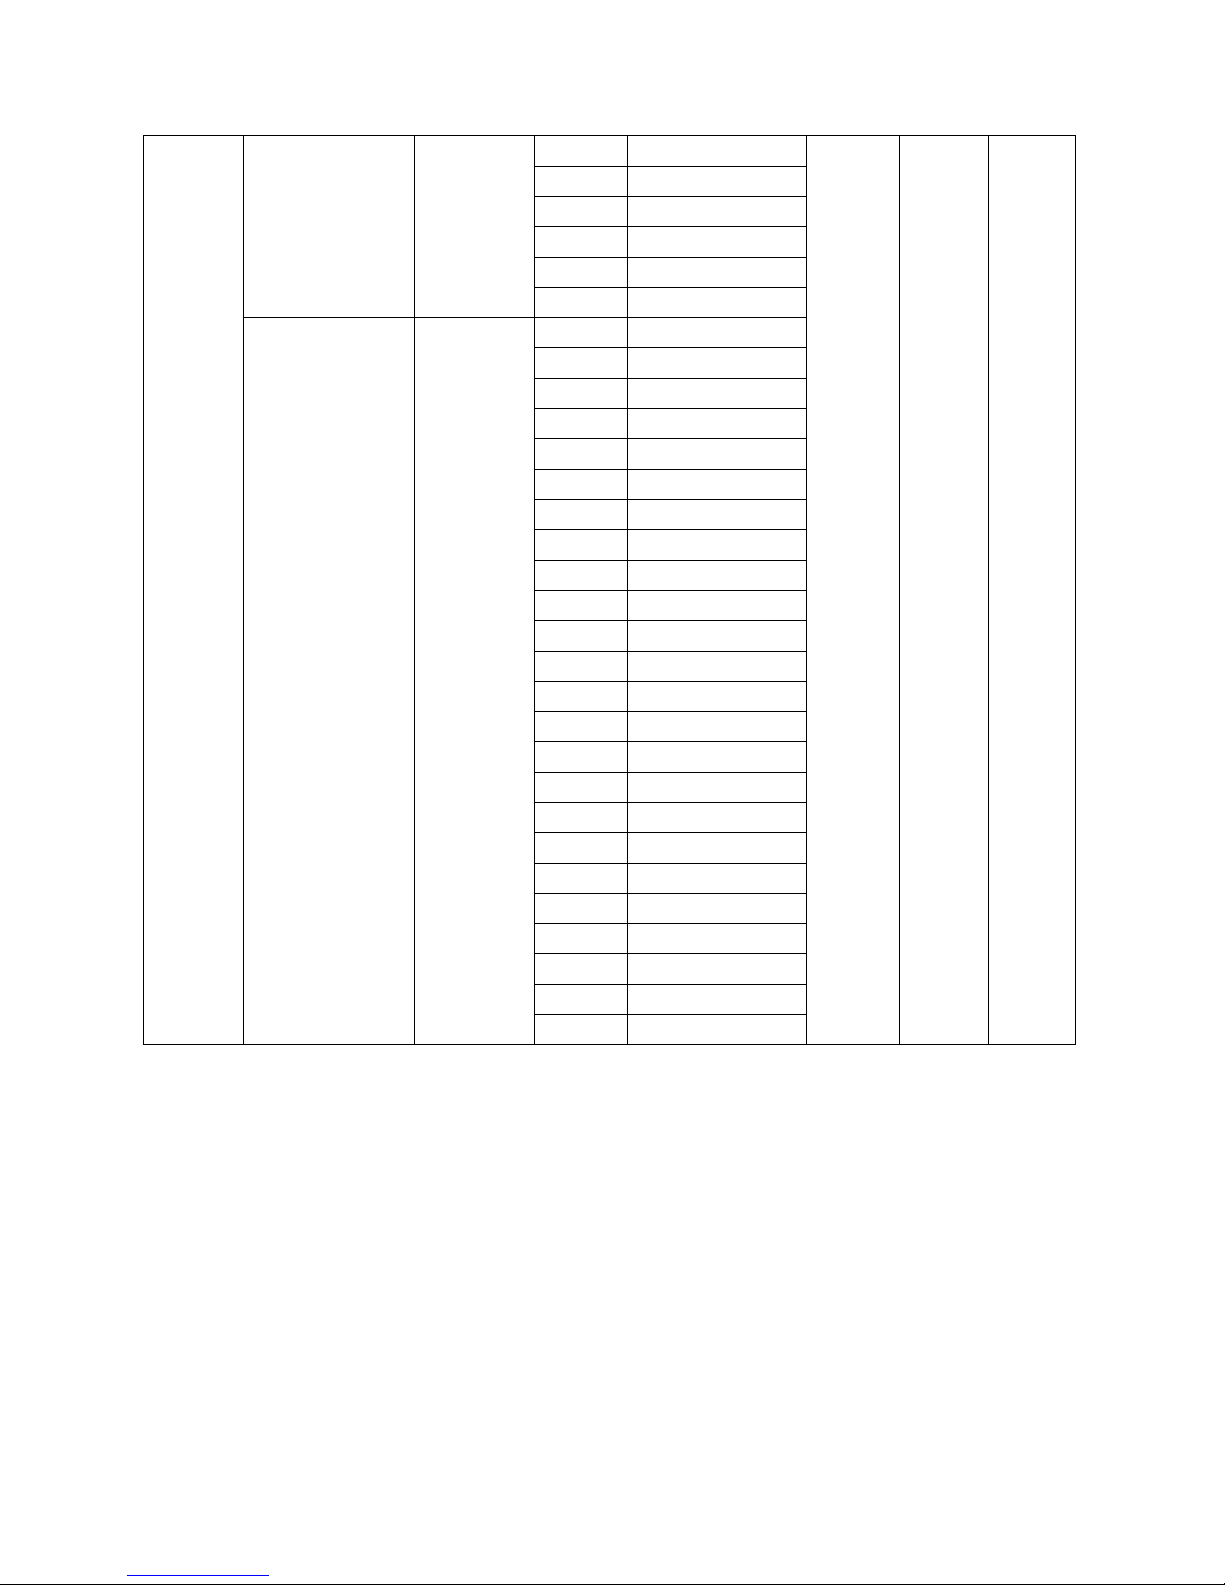
192-202
Color dreaming 19
203-212
Color dreaming 20
213-223
Color dreaming 21
224-234
Color dreaming 22
235-244
Color dreaming 23
245-255
Color dreaming 24
Sensitivity
0-31= sound
active off
32-255=
sound active on
(insensitive→
sensitive)
Sound
active mode
select
(207-255)
0-10
Sound mode 1
11-20
Sound mode 2
21-31
Sound mode 3
32-42
Sound mode 4
43-52
Sound mode 5
53-63
Sound mode 6
64-74
Sound mode 7
75-84
Sound mode 8
85-95
Sound mode 9
96-106
Sound mode 10
107-117
Sound mode 11
118-127
Sound mode 12
128-138
Sound mode 13
139-148
Sound mode 14
149-159
Sound mode 15
160-170
Sound mode 16
171-180
Sound mode 17
181-191
Sound mode 18
192-202
Sound mode 19
203-212
Sound mode 20
213-223
Sound mode 21
224-234
Sound mode 22
235-244
Sound mode 23
245-255
Sound mode 24
Priority:CH1>CH3>CH2,CH4>CH5,CH6,CH7
Note:
① When the Channel 3 fader level is between the values of 0 and 50, Channel 5 to Channel 7 will control
the Red/Green/Blue dimmer,Channel 2 will control the flash speed.
② When the Channel 3 fader level is between the values of 51 and 102,Channel 4 will select the 8 static
colors,Channel 2 will control the flash speed.
③ When the Channel 3 fader level is between the values of 103 and 154, Channel 4 fader will select the 24
color jumping mode,Channel 2 will control jumping speed.
④ When the Channel 3 fader level is between the values of 155 and 206, Channel 4 fader will select the 24
color dreaming mode,Channel 2 will control dreaming speed.
⑤ When the Channel 3 fader level is between the values of 207 and 255, the Channel 4 fader will select the
24 sound active mode,Channel 2 will control sound active sensitivity.
CHAN: 026:26 channels mode
Page 9
9 of 12 pages
CH No.
DMX value
Function
CH1
000~255
Dimming(dim→bright)
CH2
000~027
No function
028~255
Strobe(slow→fast)
CH3
000~255
Red (dim→bright)
LED tube 1
CH4
000~255
Green (dim→bright)
LED tube 1
CH5
000~255
Blue (dim→bright)
LED tube 1
┋
┋
┋
CH24
000~255
Red (dim→bright)
LED tube 8
CH25
000~255
Green (dim→bright)
LED tube 8
CH26
000~255
Blue (dim→bright)
LED tube 8
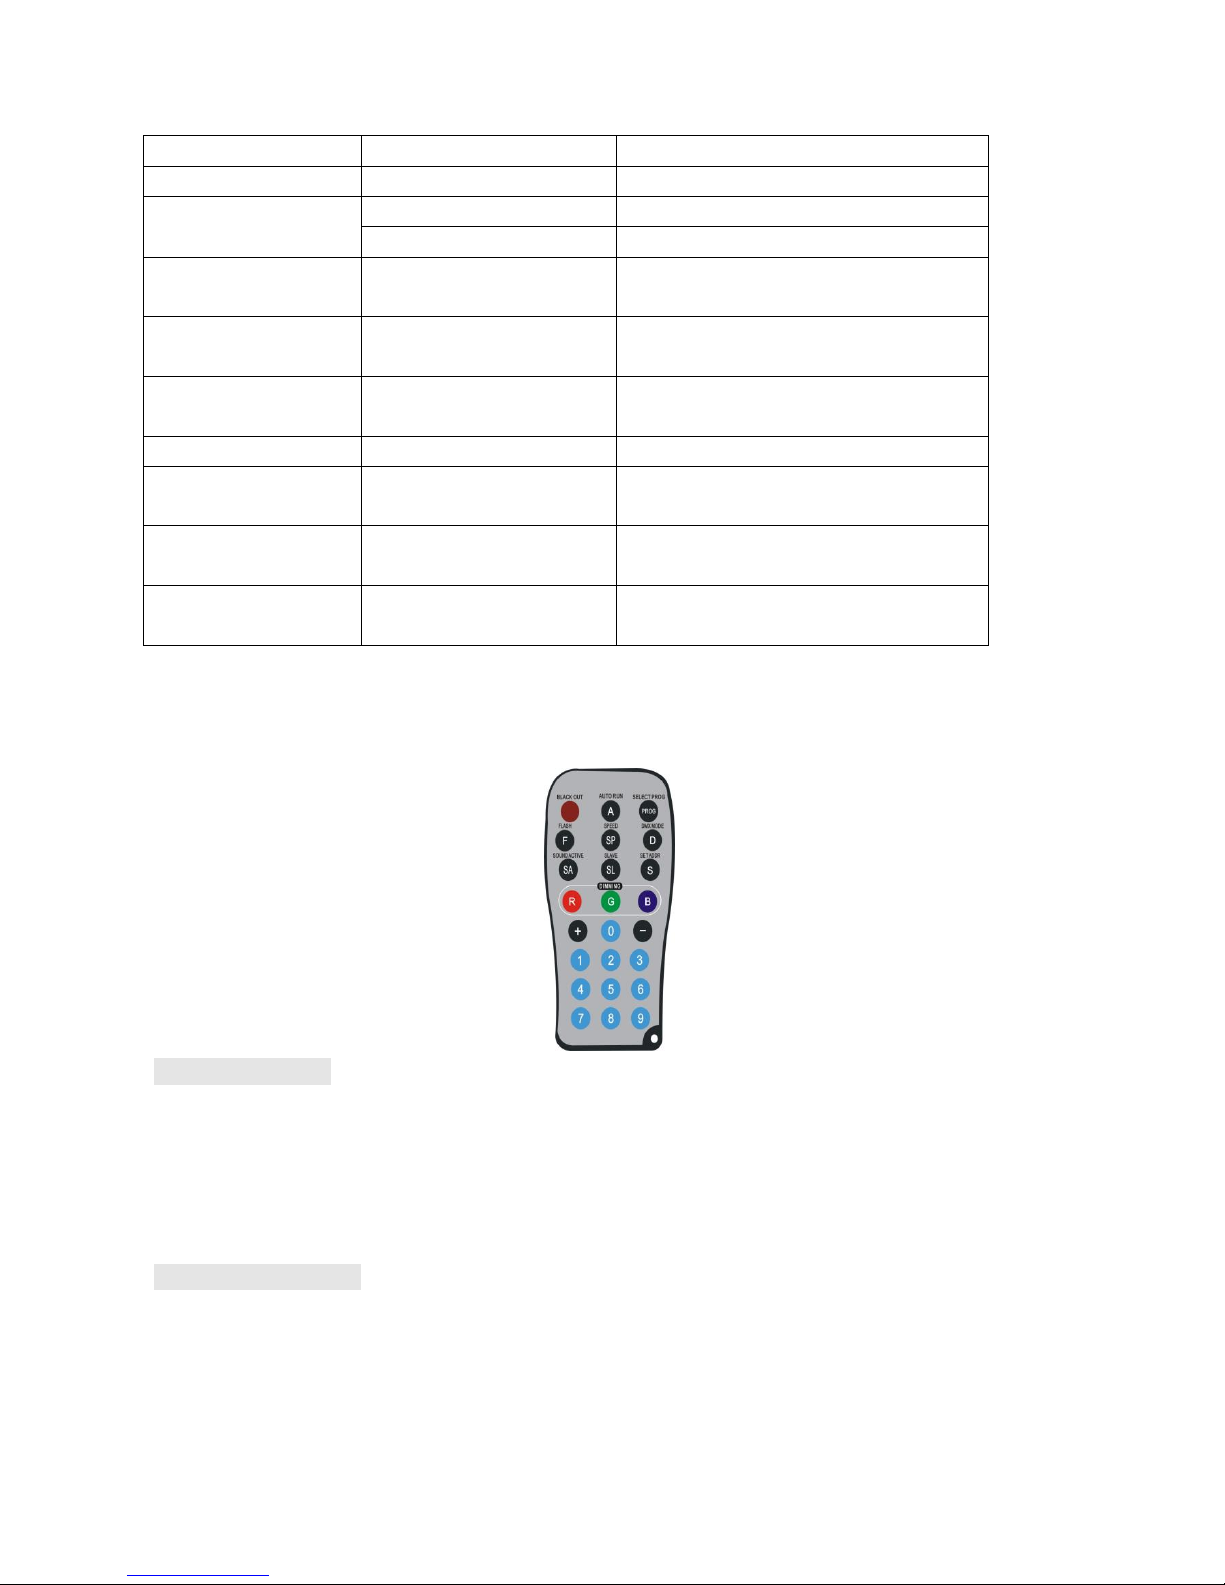
3.Operation by IR remote
You can also operate this controller by IR remote, the distance available is at most 10M.
Notice:IR remote can be used only when the unit is set to IR remote function on.
The picture of the IR remote:
AUTO RUN mode
Press AUTO RUN button to cycle among color dreaming mode and color jumping mode.Each press of this button
will change to the next mode.
1.When the controller goes into the color dreaming mode,press “+”and “-”to select the 24 color dreaming
modes.Press SPEED to set the color dreaming speed and press “+” or “-” to adjust it.
2.When the controller goes into the color jumping mode,press “+”and “-” to select the 24 color jumping
modes.Press SPEED to set the color jumping speed and press “+” or “-” to adjust it.
Select program Mode
Press SELECT PROG button to cycle among color LED tube select and static color select mode.Each press of this
button will change to the next mode.
1. When the controller goes into the LED tube select mode,press “+”and “-”to select the LED tube.When"STATIC
TUBE:ALL" is displayed means that you can select static color for all the LED tubes,When"STATIC
TUBE:01~08" is displayed means that you can select static color for the corresponding single LED tube.For
Page 10

10 of 12 pages
example:"STATIC TUBE:01"represent the LED tube 1 and so on.
2. When the controller goes into the static color select mode,press “+”and “-” to select the 7 colors.Press FLASH
to turn on flash effect to in this situation, pressing “+” and “-” buttons to adjust the flash speed.
Sound Active Mode
Press SA button to cycle among sound active program select and sensitivity select mode.Each press of this button
will change to the next mode.
1.When the controller goes into the sound active program select mode,press “+”and “-”to select the 24 sound
active modes.
2.When the controller goes into the sensitivity level select mode,press “+”and “-”to adjust the sound sensitivity
level.
M/S mode
Press SL button to switch between slave mode and net control mode.Each press of this button will change to the
next mode.
Select light program mode
Press R/G/B to choose the three different colors,and then pressing “+” and “-” buttons or put in three number
000-255 to adjust the intensity of all the LED tube lights.Press FLASH to turn on flash effect to in this situation,
pressing “+” and “-” buttons to adjust the flash speed.
DMX MODE
There are 3 DMX modes: a 5 Channel mode,7 Channel mode and 26 Channel mode.You must set the DMX
Channel mode before you address the fixture.To select your desired DMX Channel mode press the DMX mode
button, and then press the “+” or “-” buttons to scroll through the 3 DMX Channel modes.
Set ADDR
Press this button to set the DMX address or initialize the program, then the red, green and blue lights will flash 2~3
times. Please put in 3 number ,for example, 1 2 3. After the red light is on, please put in the first number. After the
first number is accessed the green light will be on, then put in the second number. When the blue light will be on,
please put in the third number. After all the three numbers are put in, the red, green and blue lights will flash 2~3
times, which indicate that the DMX address is right and it go in to the DMX MODE automatically. If the address is
wrong the red light will be on. New DMX address should be put in.
If the 951 are put in, red and green lights will be on.Put “0” to initialize the program. If the wrong address is put in,
the red light will be on, indicating new address should be put in. Then the system will run in the designed mode.
Black Out mode
Press “BLACK OUT” to set the LED lights power on or power off by pressing this button.
C,All the system controlled by ART-NET
Set the controller to NET control mode,and now all the system can be controlled by Art-net .
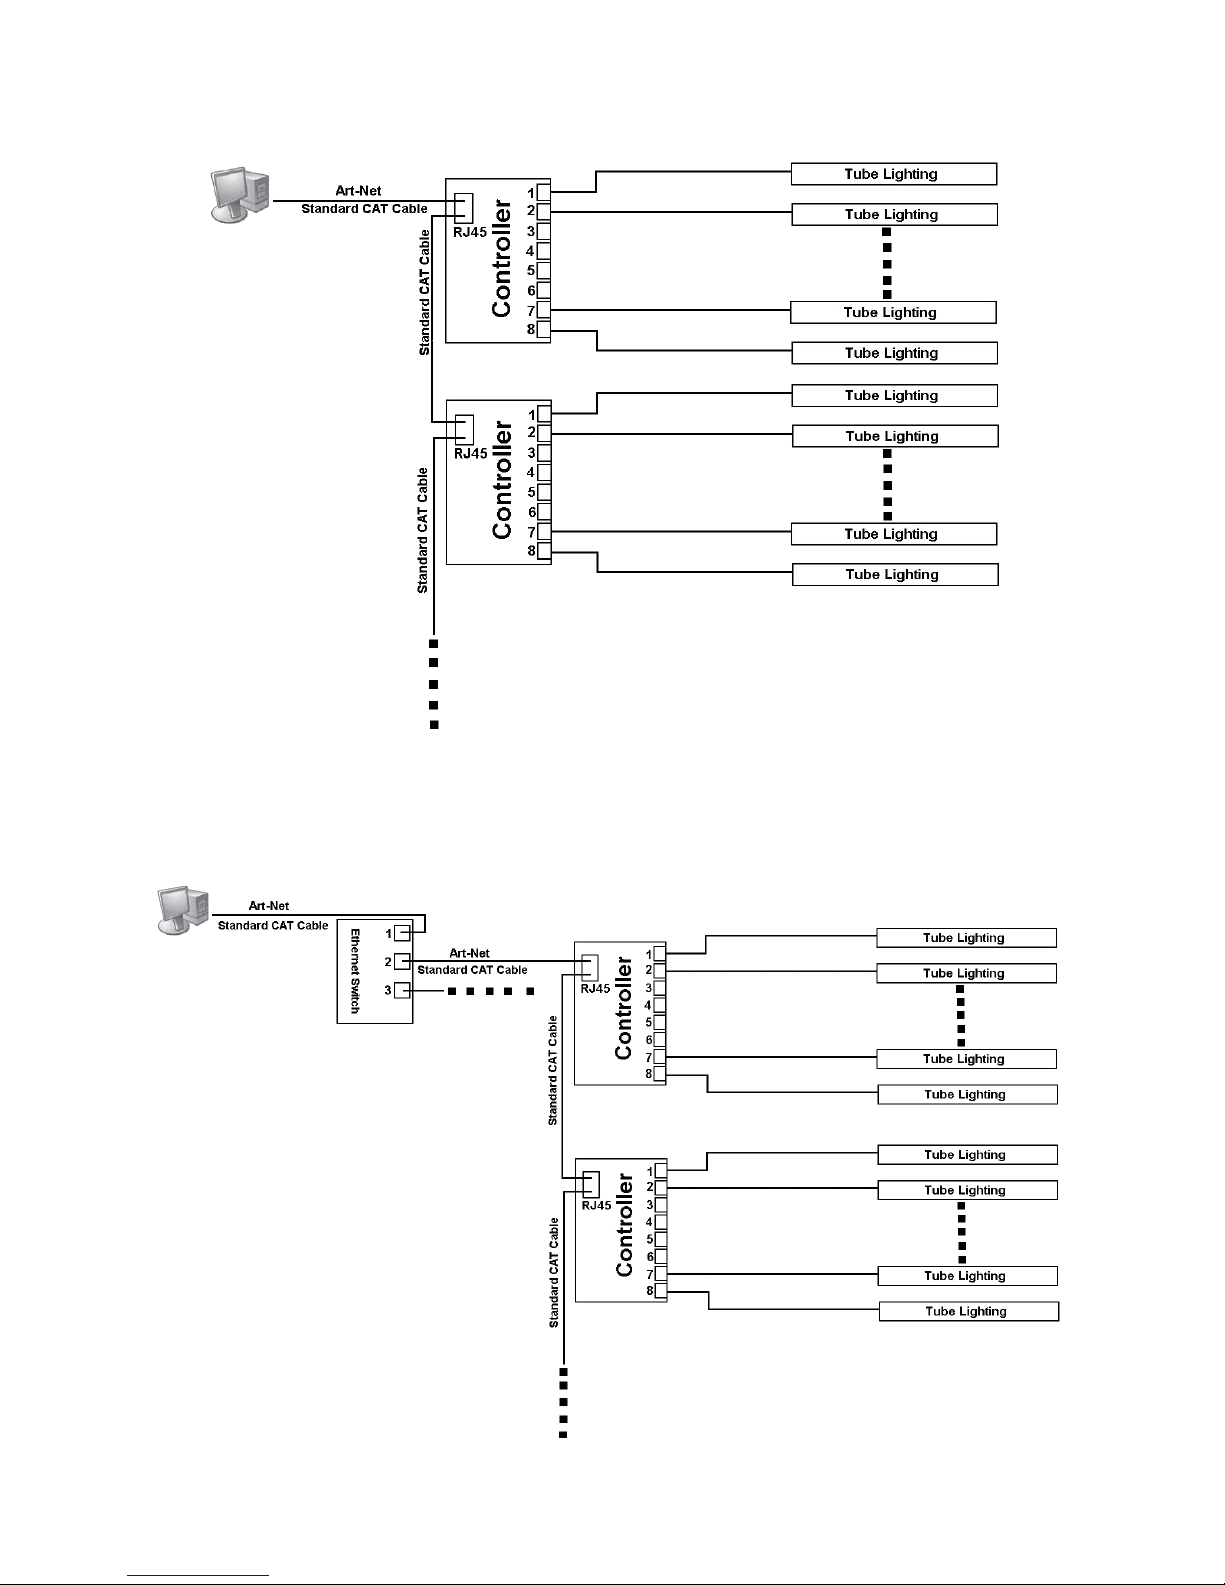
1. Installation pictures:
Installation method 1:
Page 11
11 of 12 pages
Note:Do not daisy-chain more than 50pcs LED controllers from the computer,and use an Ethernet Switch if more
than 50pcs controllers are being controlled.
Installation method 2:
Page 12

12 of 12 pages
Note:1.The Ethernet Switch must be Gigabit Switch.
2. Do not daisy-chain more than 50pcs LED controllers from a single network port of the Ethernet Switch.
3. Maximum 2 output network ports of the Ethernet Switch can be used.So the system can control 100pcs
controllers maximum.
2.Operation step
1) Install MADRIX software at your PC.
2) Connect the LED lights by standard CAT cable.
3) Set the LED lights to NET CONTROL mode.
4) Connect all the LED tube lights to the controllers.
5) Map the LED lights by Matrix Generator or Patch.
6) Control the LED lights by MADRIX software.Please refer to MADRIX user manual.
 Loading...