

Page 1

50202 V10.01
Wireless Timer Remote Control
无线定时快门线
TW-282
Page 2

Contents
Over view 03
Caut ions
TW-2 82 intr oduct ion
The na me of eac h part
Prep are for i nstal l and use
Inst all and r eplac e the bat tery 09
Fix th e recei ver(T W- 282RX ) 1
Tur ned on/ off the pow er 1
Chan nel Set ting 13
Open t he back groun d light o f displ ay
Rece iver co nnect ed with t he came ra 1 6
Shoo ting co ntrol 1 7
Sing le shoo ting
Cont inuou s shoot ing wit hin one s ec
04
05
06
09
1 5
1 7
18
1
2
1
Page 3
0
[ ]shooting
Dela y shoot ing
Tim ing pla n for sho oting 24
PIXE L TW-282 Specifications
This manual is current upd ate of 1st Se p, 200 9. Please contact
to P IXEL distri butor for fu rther i nform ation , if in teres ting of the
comb ining u sage wi th prod ucts re lease d after this day.
2
2 1
30
Overview
Thank you for purchasing high-performance PIXEL products
First o f all , thank y ou fo r pur chasi ng prod uct of PIXEL TW-282.
ways inc luded single sh ootin g, contin uous shooting within one sec , [ ]
shoo ting, user -defi ned time-d elay and ti ming plan for shooting. Low
cons umpti on of LC D dis play will mak e you be cl ear a t a glance of th e u sing
stat us and us ing pla n.
Before use this pr oduct , yo u must read and f ully unde rstan d this manu al,
then learn to use the cam era to ens ure you are famili ar with the operat ion
prop erly. Through this manua l you can easily handle the oper ation meth od
and th e atten tive th ings.
The shoot ing
2
3
Page 4
Cautions
TW-282 introduction
The batteries sho uld n ot install anti-po larit y; Otherwi se the b atter ies m ay
leak c orros ive liq uids, h eat or ex plosi on.
Make sure the camer a and recei ver (TW-282 RX) are pow ered off before
inst all it.
When c onnec ted the r emote c able wi th the de vice, do not pull the wires .
As this is an electron ic prod uct acc essor y; some o f the env ironm ent cau ses
may affe ct the wo rking . Howev er this i s hardly ever to get this situatio n.
This p roduc t can't b e stron g vibra tion, or may lead to product failu re.
For a lon g time non-u se, p lease remo ve th e battery to prevent l eakag e of
corr osive l iquid s and dam age the p roduc t.
Do not p ut it in high t emper ature , such as a clo sed car under dire ct sunl ight,
the con trol pan el and othe r high-t emper ature ar eas.
Keep dr y, don’t us e wet hand con tact wit h the produ ct, it must not be
imme rsed in wat er or expos ed to rain, an d this may lea d to not work pro perly.
Do no t use fla mmable a nd explosive g ases in v iolat ion of th is warni ng may
caus e an expl osion o r fire.
Beca use this prod uct i nclud e bat tery, re gardi ng how to use battery, please
oper ate i t str ictly acco rding to rela ted r ules, othe rwise it m ay ca use
expl osion , fire or p hysic al inju ry.
4
Using the wireless remote control technology to achieve shutter’s external
socket with camera for remote control .
FSK modulation used to improve the reliability and stability of the product,
use the global free 2.4GHz wireless channel, 99 selectable channels and
one universal channel.
Operating distance range up to 80M or above.
LCD display is showing channel, power, function mode, it' s easy to
understand and operate.
Ultra-low power standby, transmitter (TW-282TX) uses 2pcs AAA batteries,
which standby time over four years; the receiver (TW-282RX) uses 3V CR-2
lithium battery, which more than 400 hours of standby time.
Transmitter external interface which can directly output signals, it can be
connect with the shutter connect cable of camera for all function operation.
Different shutter connect cable can be connect with different brand cameras.
It can control multiple cameras simultaneously.
The camera can be
[ ] shoo ting an d
Set the parameters for timing shooting.
3
single shooting, continuous shooting within one sec,
user -defi ned del ay and ti ming pl an shoo ting.
5
Page 5
The name of each part
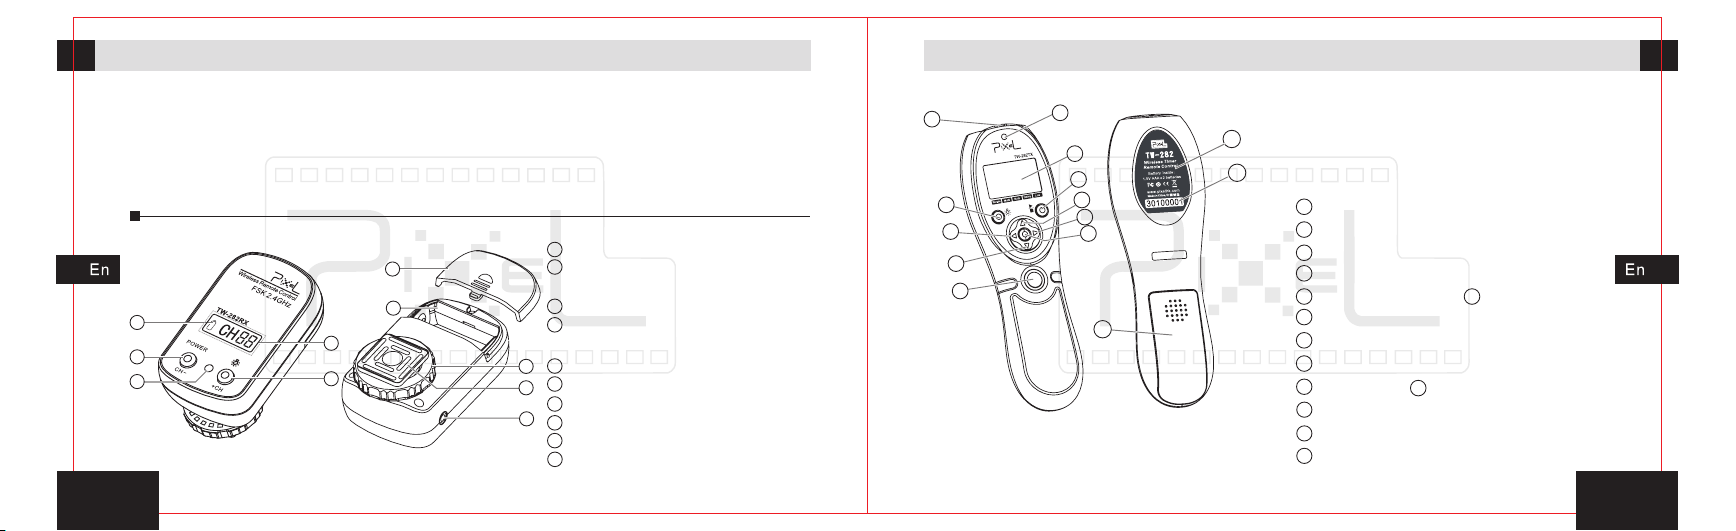
The name of each part
Plea se check all included items after open the packing, if missing, please
cont act the d ealer.
1. Tran smitt er (TW-28 2TX) -- ----- 1 pc
3. 1.5 V AAA batte ry ---- ----- ----- --
2pcs
5. Shu tter co nnect c able -- ----- --- 1pc
Here a re the na mes of ea ch part :
6
2. Rec eiver ( TW-282R X) ---- ----- - 1pc
4. CR- 2 batte ry ---- --------
Lith ium
6. Man ual(t his man ual) -- ----- ----- 1pc
Low ba ttery v oltag e icon
1
2
Powe r butto n/cha nnel
redu ce butt on
3
1
2
3
5
4
7
Rece iver (TW-282RX)
Powe r indic ator
4
Back groun d light b utton /
chan nel inc rease b utton
Chan nel display screen
5
10
6
Batt ery hat ch
9
Batt ery com partm ent
7
8
Output control signal interface
8
9
Hot sh oe fixe d mount
10
Hot sh oe fixe d nut
6
1pc
1
2
3
4
5
11
10
9
8
7
6
12
Tran smitter(TW-282TX)
14
13
1
Outp ut cont rol soc ket
2
Back groun d light b utton
3
Left m ove but ton
4
Decr ement b utton
5
Rele ase but ton
7
Right move bu tton
8
Incr ement b utton
9
Tim ing pla n start / stop button
10
Disp lay
12
Batt ery hat ch
13
Prod uct bac k stick er
14
Item c ode
6
Set button
11
Shut ter ind icato r
7
Page 6
The name of each part
Preparation for installation and use
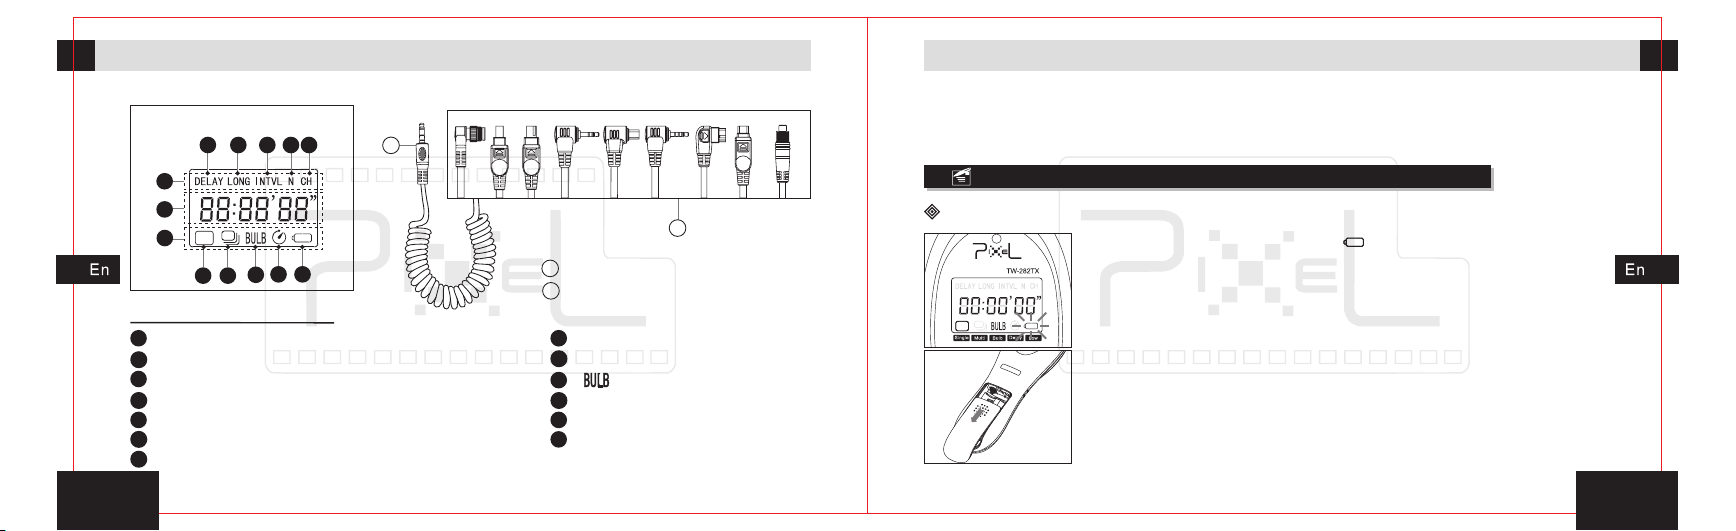
Disp lay of tr ansmi tter
10
121313
11
9
1
2
3
7
8
6
5
4
1
Disp lay of tr ansmi tter
1
Tim ing pla n funct ion are a
3
Func tion ar ea
5
Cont inuou s shoot ing wit hin one s ec icon
Dela y shoot ing ico n
7
The ic on of del ay time
9
The ic on of int erval t ime
11
The ic on of cha nnel
13
8
DC0 DC1 D C2
Shut ter con nect ca ble
E3 N3
Inpu t plug
1
Shut ter con nect pl ug
2
2
Tim e displ ay area
4
Sing le shoo ting ic on
[ ]sho oting i con
6
Low ba ttery v oltag e icon
8
The ic on of exp osure t ime
10
The ic on of tim ing sho ts
12
RS1
S1 UC1
2
CB1
Befo re use, y ou s hould read the user manual of y our camer a carefully an d
well under stand the ma nipulation and func tiona l sett ing. The function se tting
of cam era may i nflue nce thi s item’s effi ciency control of the camera.
Install and replace the battery
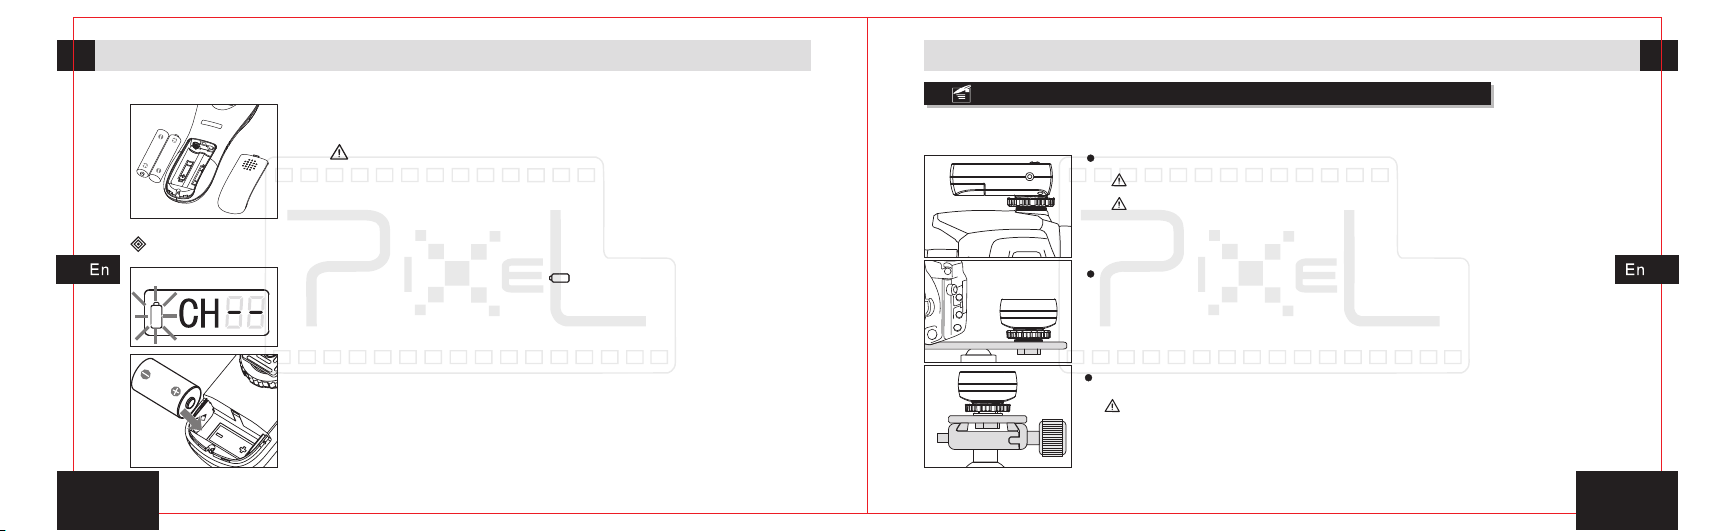
The tr ansmi tter( TW-282TX)
The low battery voltage icon[ ]will twinkle or the character
become dim obvious when the power is not enough, that
means the low battery voltage has already influence the
normal work of the device, which needs to replace the
battery in time. The transmitter uses 2pcs AAA batteries;
Please follow the steps to replace the battery if needed.
1. Sli de and op en the ba ttery h atch.
9
Page 7
Preparation for installation and usePreparation for installation and use
The re ceive r(TW-282RX )
TW-282RX
1 0
2. F ollow t he sign s of positive [+] and n egati ve [-] in the
batt ery com partm ent to in stall t he battery correctly.
You sh ou ld pay attention to the po la ri ty of battery because o f
the wr on g installation wi ll make th e device wo rk abnormally,
or even physical injury.
3. Clo se the ba ttery h atch.
The low battery voltage icon[ ]will twinkle when the power
is not enough, that means the low battery voltage has
already influenced the normal work of the device, which
needs to replace the battery in time. The receiver uses CR-2
lithium battery; Please follow the steps to replace the
battery if needed.
1. Sli de and op en the ba ttery h atch.
2. the signs o f posit ive [+] and negative [-] i n the
Foll ow
batt ery com partm ent to in stall t he battery correctly.
Fix th e receiver (TW-282RX)
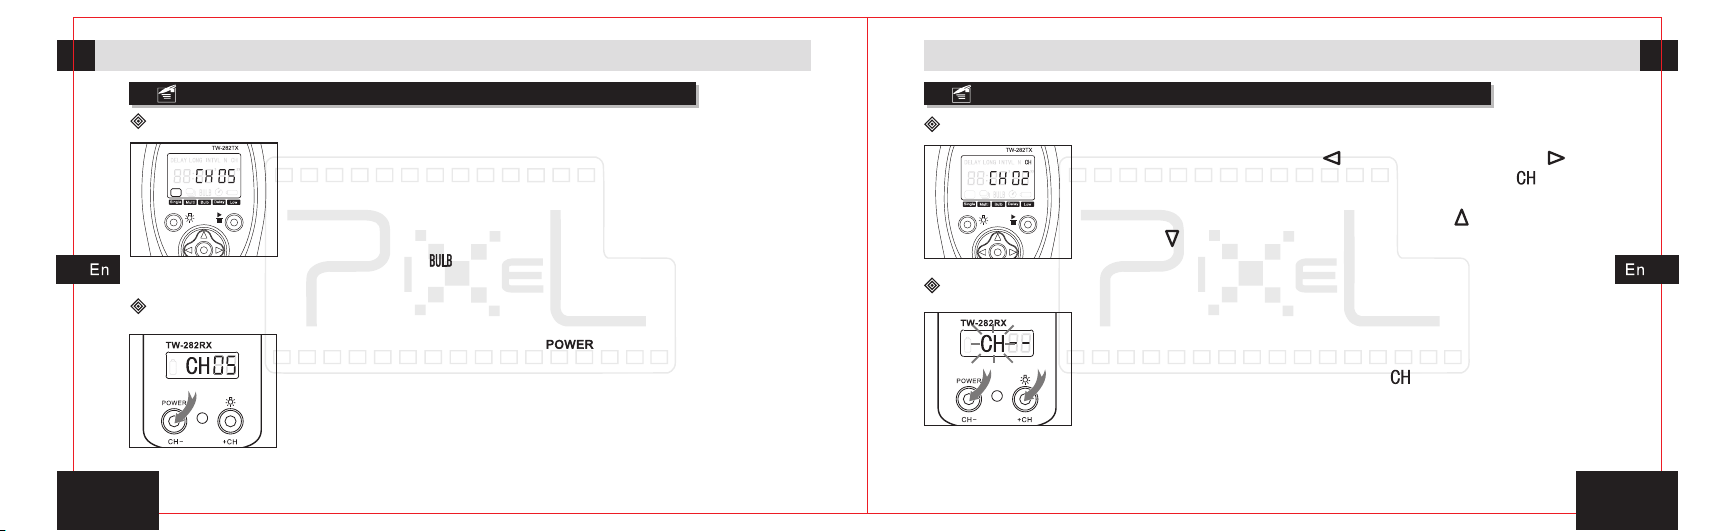
Rece iver can be fixed on the top of camera, rack of camera acces sory or tr ipod.
Fix th e recei ver on th e hot sho e of came ra.
Lock hot shoe fixed nut tightly when you fix it.
Loosen hot shoe fi xe d n ut when you remove .
forcibly pull it , in o rd er t o av oi d da ma ge t o th e re ce iv er a nd
camera.
the receiver Do no t
Fix on the rack of c amera a ccess ory.the re ceive r
Fix on the tripo d.the re ceive r
Make sure to fix firmly so that it will not slide.the receiver
1 1
Page 8
Preparation for installation and usePreparation for installation and use
Turned on/off the power
The tr ansmi tter( TW-282TX)
The re ceive r(TW-282RX )
2s
1 2
1. Press any button once, and turn on the power of transmitter.
2. Turn on the power, set
the timing plan and communication channel unchanged.
3. Th e d i s p lay sh o w s t h e s i n gle sh o o t i ng ic o n a n d
communication channel.
4. The transmitte r wi thout any operation (except timing plan or
implementing [ ] s tatus) will shut down automatic ally after
one minute.
1. Press t he po wer butt on[ ]2s, turn on th e receiver
powe r, scree n displ ay commun ication cha nnel
2. A fter t urn on the pow er, the set timin g co mmuni cation
chan nel rem ain effec tivel y.
3. The receiver does not t urn o ff auto matic ally. In th e
powe r-on s tate, pres s po wer button 2s and th e re ceive r
will b e turne d off.
transmitte r in single shooting state,
.
Channel setting
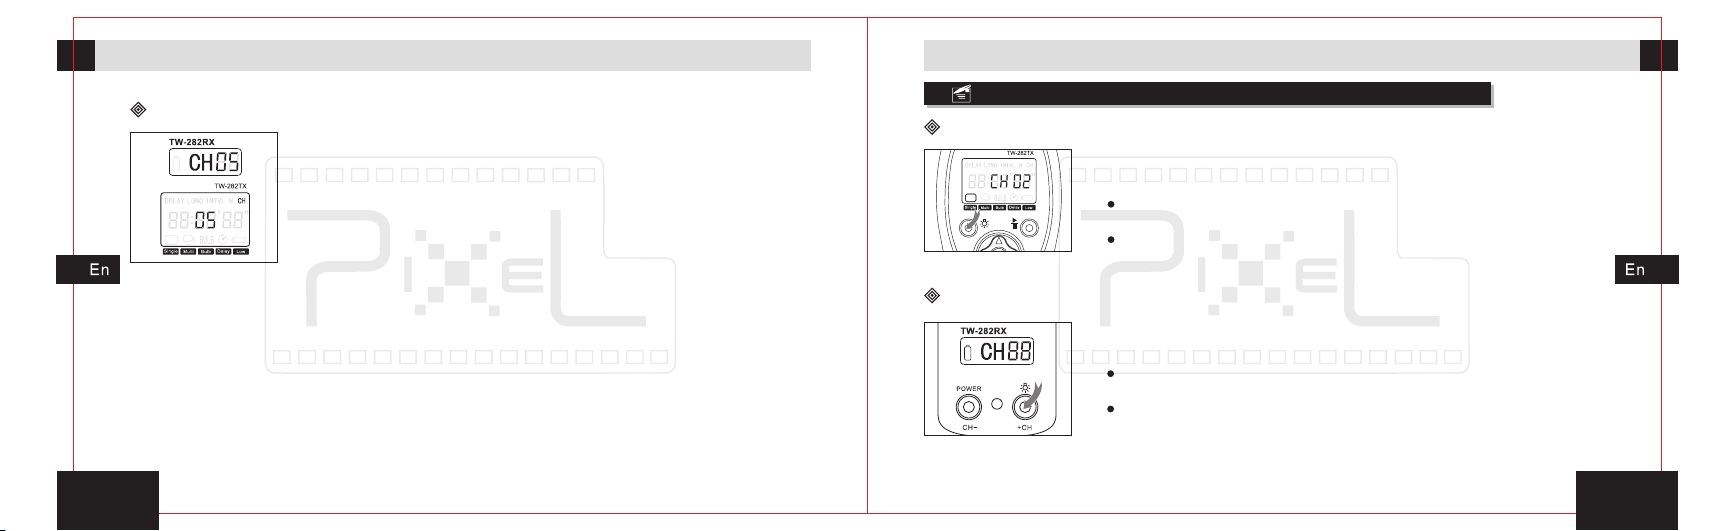
Chan nel set ting fo r trans mitte r(TW-282TX)
1. Pr ess left move but ton[ ] or right move button[ ] will
move t he func tiona l icon to t he chan nel ico n[ ].
2. Pre ss the se t butto n into th e chann el setting.
3. Thought pressi ng increm ent butto n[ ]or decrement
butt on[ ] to ad just th e chann el numb er.
Chan nel set ting fo r recei ver(T W-282RX)
1. Turn t he po wer on, the co mmuni cation cha nnel will be
defa ult[- - ]or the l ast set ting.
Pres s the butto n[+CH]a nd[ ]a t t he same tim e t o
2. CH-
ente r th e ch annel set tings , the [ ] i con on t he L CD w ill
blin ks
.
3. Set t he communication channel, press [ ]plu s one,
pres s[CH-]m inus on e.
4. 10s n o actio n exit an d save yo ur sett ings.
+CH
1 3
Page 9
Preparation for installation and usePreparation for installation and use
Chan nel mod el
1 4
1. When the transmitter's communication channel adjust
[ -- ]
to will effectively control all channels within the
region of the receiver .
2. When the receiver' s communication channel adjust
to , all transmitter in the effective reception area can
[ -- ]
control the receiver.
3. The
channels setting must be consistent .If
transmitter and receiver’s value of communication
inconsistent, the
transmitter will not be effectively controlled the receiver.
Open the background light of display
The tr ansmi tter( TW-282TX)
Pres s a nd hold the ba ckgro und ligh t b utton fo r 3 se conds ,
the ba ckgro und lig ht will b e turne d on.
3s
The re ceive r(TW-282RX )
3s
Open the back gr ou nd l ig ht a nd press the bu tt on t wi ce each 6
seconds, the background light will keep lit.
The background l ig ht wil l n ot be close by hand; it will turn off
after 6 seconds automatically without any operation.
Pres s a nd hold the ba ckgro und ligh t b utton fo r 3 se conds ,
the ba ckgro und lig ht will b e turne d on.
Open the background lig ht of the receiver and press the button
twice each 4 seconds, the background light will keep lit.
The background l ig ht wil l n ot be close by hand; it will turn off
after 4 seconds automatically without any operation.
1 5
Page 10
F
S
Wirele
Preparation for installation and use
Shooting control
Receiver connected with the camera
1. M ake sure your receiv er has been ins talle d in p lace and
to ensur e that cameras and receivers ar e shut dow n.
Sket ch map fo r selec ting fu nctio n mode:
Press
Press
Press
Press
Press
Press
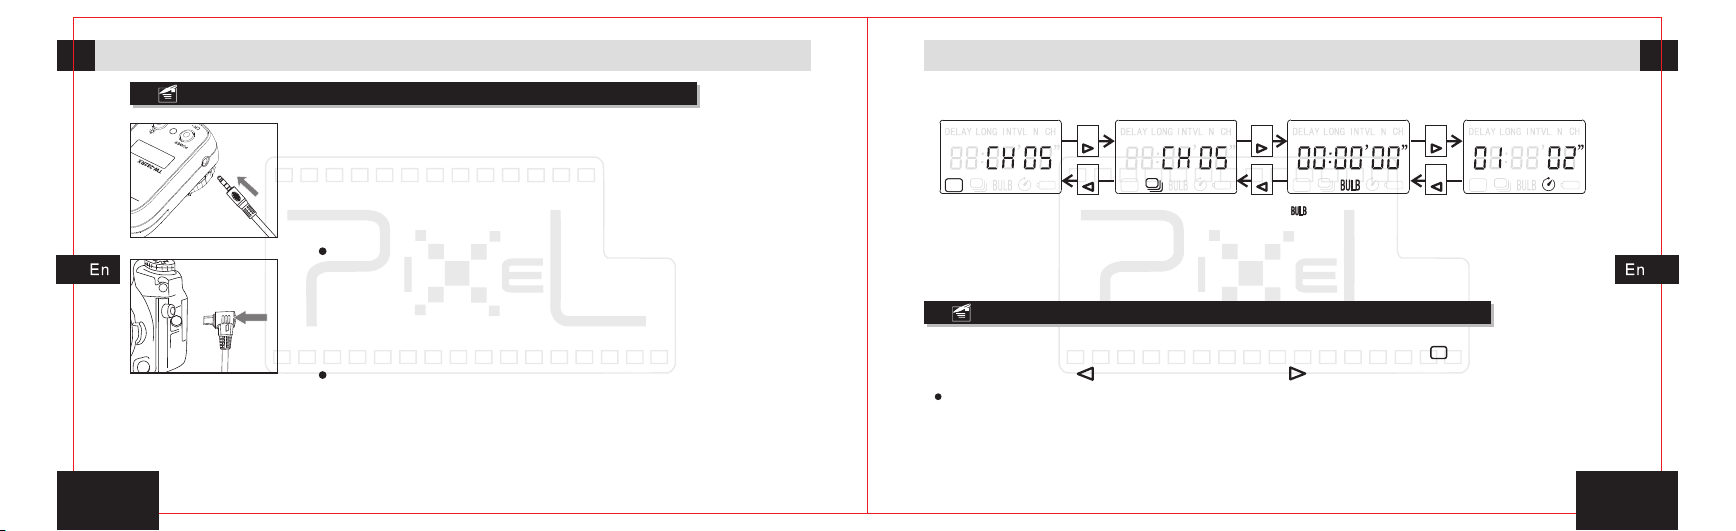
2. Fi rst, i nser t the i nput p lug of the sh utte r conn ect
ca ble in to the r e cei ver' s outp ut con trol s igna l s ocke t in
pl ace.
The timer remote control will no t be a bl e to c on tr ol t he c am er a if
the shutter connect cable didn’t insert correctly.
3. F ix the camer a on the tripo d or othe r fixed fram e.
Open
the p rotective cov er of ext ernal sh utter socket a nd put the
The instruction is unde r the pre mise th at the receive r and c amera h ave bee n
conn ected ti ghtly, and turned on the power of ca mera and receiver. The det ail
inst ructi on of rem ote sho oting w ill be sh owing as follow.
Single shooting
Conti nuo us s hoo ti ng
withi n one s ec f unc ti on
[ ]shoo ting fu nct io nSingl e sho ot ing f un cti on
Delay s hoo ti ng fu nc tio n
shut ter plug o f shut ter connect cab le in pla ce, th en make
sure i t has bee n fixed f irmly.
For most of c am era shutter s oc ke t, t he re is a m is -p lu g interface,
please note insert direction so a s to a vo id d am ag e to shutter
socket.
4. Tu rn on the r eceiv er' s pow er and th en the ca mera' s
1 6
powe r.
1. In the power-on stat e, set the s ingle sh ootin g i con [ ] by pres sing the
left m ove but ton[ ]o r right m ove but ton[ ].
In the sleeping state, press any key to wake up transmitter to enter single shoot in g mo de .
2. Half -pres s the rele ase bu tton and t ransm itter will send signa l for focu sing,
the green indicator will lit on the tr ansmitter and receiver, and the came ra is in
the fo cusin g state u ntil th e relea se or ful l-press the button.
1 7
Page 11
Shooting control
Shooting control
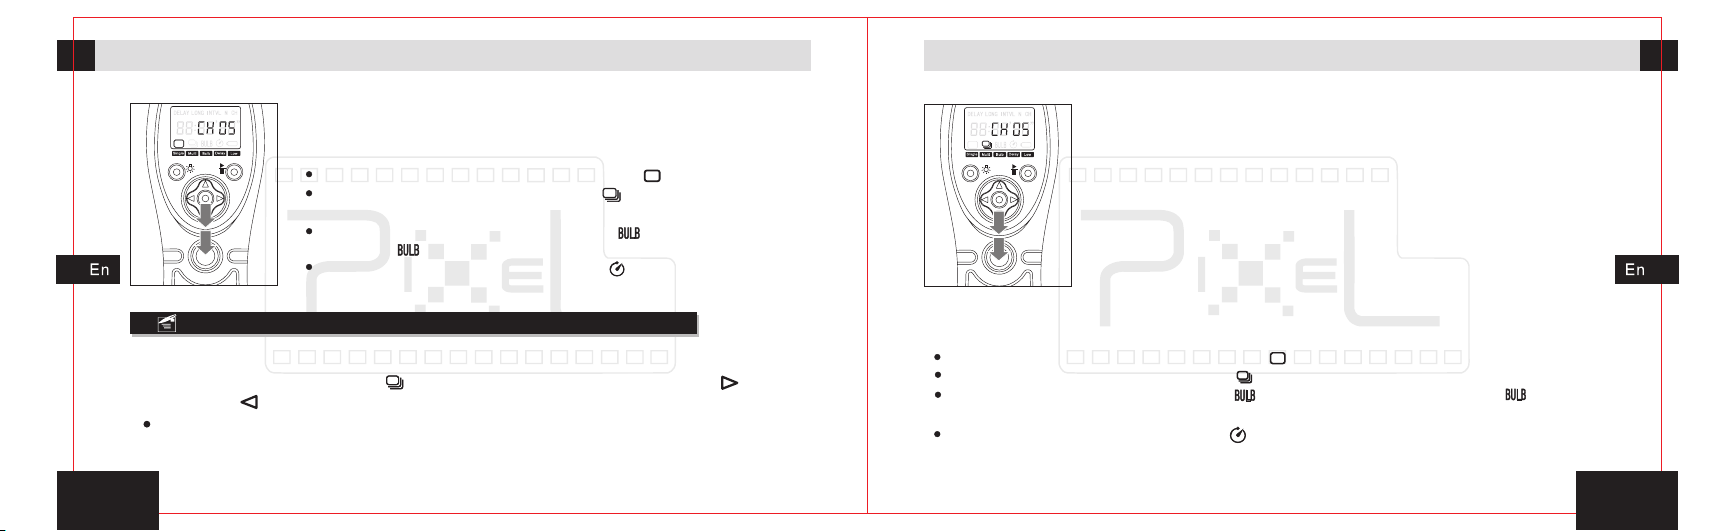
3. Full-press the release button and t ransmitter will se nd
sign al of shooting. Th e red in dicat or wi ll li ght f or a while ,
the ca mera st art sho oting .
Make sure to set the camera function to be [ ].
When the camera fun ct io n is set to be[ ], it ma y ca us e co nt in uo us
shooting.
When the camera function is set to be[ ],the camera will shoot
based on[ ]mode, it may cause underexposure or overexposure.
When t he c am er a fu nc ti on i s se t to be [ ], the camera will e xe cu te
delay shooting.
Continuous shooting within one sec
1. In the power-on state, move the transmitter’s activities icon to continuous
shooting within one sec icon[ ] by pressing the left move button[ ]or right
move button[ ].
Continuous shooting within one sec second is patent function which issued by
Pixel limited Enterprise, it'll suppor t sp ac in g co nt in uo us s ho ot in g wi th in o ne s ec a nd
never change the single shooting mode.
the firs
1 8
2. Half-press the release button and transmitter will send
signal for focusing, t he green indicator will lit on the
transmitter and re ceiver, and the camera is in the focusing
state until the release or full-press the button.
3. F ull-press th e relea se butt on, red i ndica tors of the
tran smitt er and recei ver will be lit, keep fully press the
bu tton, the transmit ter will send signa l of shoot ing
cont inuou sly, the indicators will blin k red and green l ight
in tu rn. The cam era will start to shot, and the shooting
spee d will be o ne phot o per sec .
4. Relea se the release bu tton, the transmi tter stop sendi ng signal for shoot ing
and the came ra will stop shooting.
Make sure to set the camera function to be [ ].
When the camera function is set to be [ ], i t may cause continuous shooting.
When the camera function is set to be [ ],the camera will shoot based on [ ] fu nc ti on ,
it may cause underexposure or overexposure.
When the camera function is set to be[ ], the camera will execute delay shoot in g.
1 9
Page 12
Shooting control
Shooting control
[ ]shooting
1. In the power-on state, move the transmitter' s activities
icon to [ ] shooting icon[ ] by pressing the left move
button[ ]or right move button[ ].
2. Half- press the relea se bu tton and transmitter will se nd
sign al for fo cusin g, the gr een ind icato r will li t on the
tran smitt er an d rec eiver, and the c amera is i n the focu sing
stat e until t he rele ase or fu ll-pr ess the b utton.
3. F ull-p ress th e relea se butt on, transmit ter will send[ ]
sign al. The red indi cator of tran smitter st arts flashing and
star t ti ming, th e indica tor of rece iver wil l keep ligh ting.
The t ransm itter continuous output sh ootin g signal.
Came ra ente rs into e xposu re shoo ting co ntinuously.
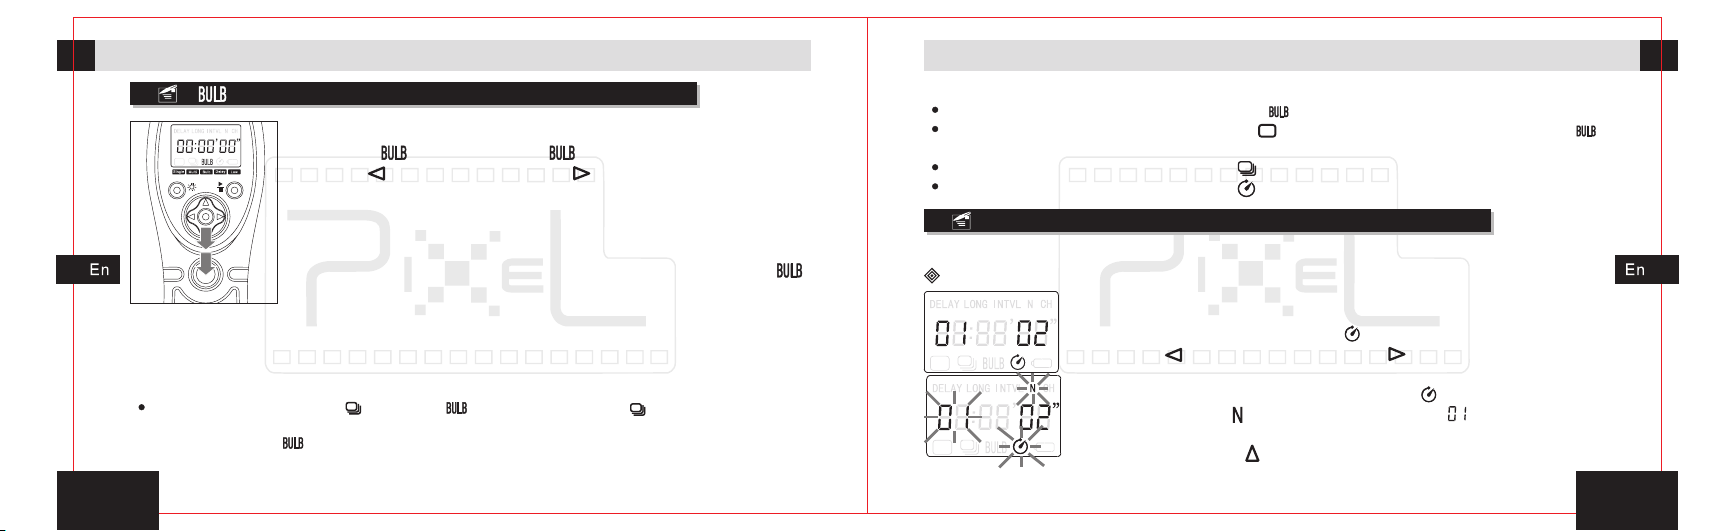
4. Press the release button again, transmitter will stop output shooting signals,
camera stop exposure shooting.
The differen ce s between [ ]mo de and[ ]mode ar e as foll ow : [ ]fu nction is t he releas e
butto n is presse d fully and keep on, ca mera sta rt s shooti ng until the releas e button is
relea se d. Wh il e[ ] function is th e cam er a wil l start shooti ng when the re lease b utton i s
press ed full y until press it ag ain, th e sho ot ing wil l sto p.
2 0
Make sure to set the camera function to be [ ].
When the camera function is set to be [ ], the camera only shoot o nc e but not[ ]
shooting.
When the camera function is set to be [ ],the camera will be continuous shootin g.
When the camera function is set to be [ ], the camera will be delay shooting once.
Delay shooting
The delay shooting function of TW-282 can user-defined the delay time and shots.
Dela y shoot ing set ting
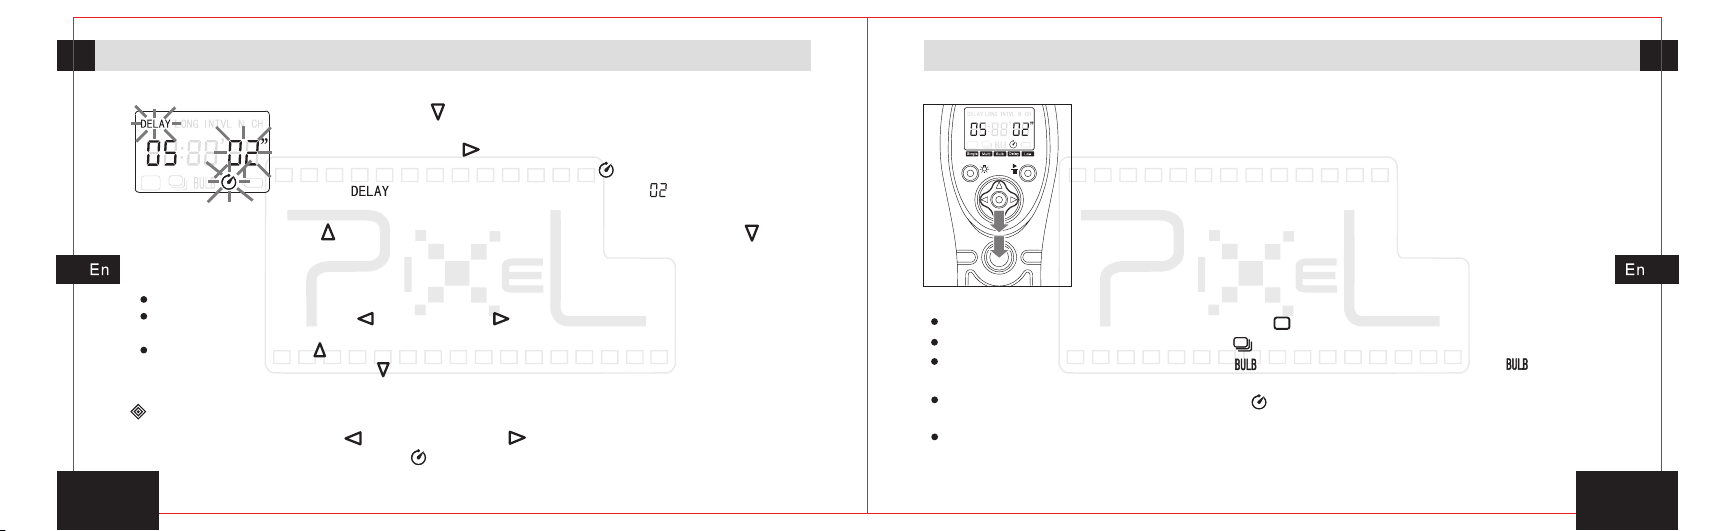
1. In th e power-on sta te, move the transmi tter’s activities
icon to del ay sho oting icon[ ] by pressi ng the move
butt on[ ]or rig ht move but ton[ ]. Pre ss the set bu tton
en ter ing the dela y se tti ng for adju sts the shoo tin g
numb ers. The delay shooti ng icon[ ], th e numbers of
shoo ting icon [ ],number of shooti ng [ ] will blink at t he
same t ime.
2. Press button[ ]settings shot number can be increased,
left
2 1
Page 13
Shooting control
Shooting control
press button [ ], settings shot number can be reduced. It
can be set between 1 to 99 sheets .
3. Pre ss button [ ]enter into the delay setti ng of del ay
shooting . delay shooting tim e
the del ay shooting i con[ ] ,
icon[ ], delay shoot ing t ime v alue[ ]will blink at the
same time.
4. Press the button[ ], set the delay time increased, press button[ ], set
the de lay tim e reduc ed. It ca n be set be tween 1 to 59 seconds.
5. After set up the new parameters, press the set button, save and exit settings.
When enter to the delay shooting set, the transmitter will save the previous sett in g.
By pressing the left button[ ]or right button[ ], convert shooting nu mb er s an d de la y
time settings.
Gently press button[ ]o nc e t o set numerical increased, hold it on, set the v al ue ra pi dl y
increased; Press the b ut to n[ ]once to se t t he nu me ri ca l reduced, ho ld on to set t he
values rapidly reduced.
Oper ate the d elay sh ootin g
1. Press t he le ft bu tton[ ]or right butt on[ ] , mov e the tran smitt er’s a ctivi ty
icon t o the del ay shoo ting ic on[ ].
2 2
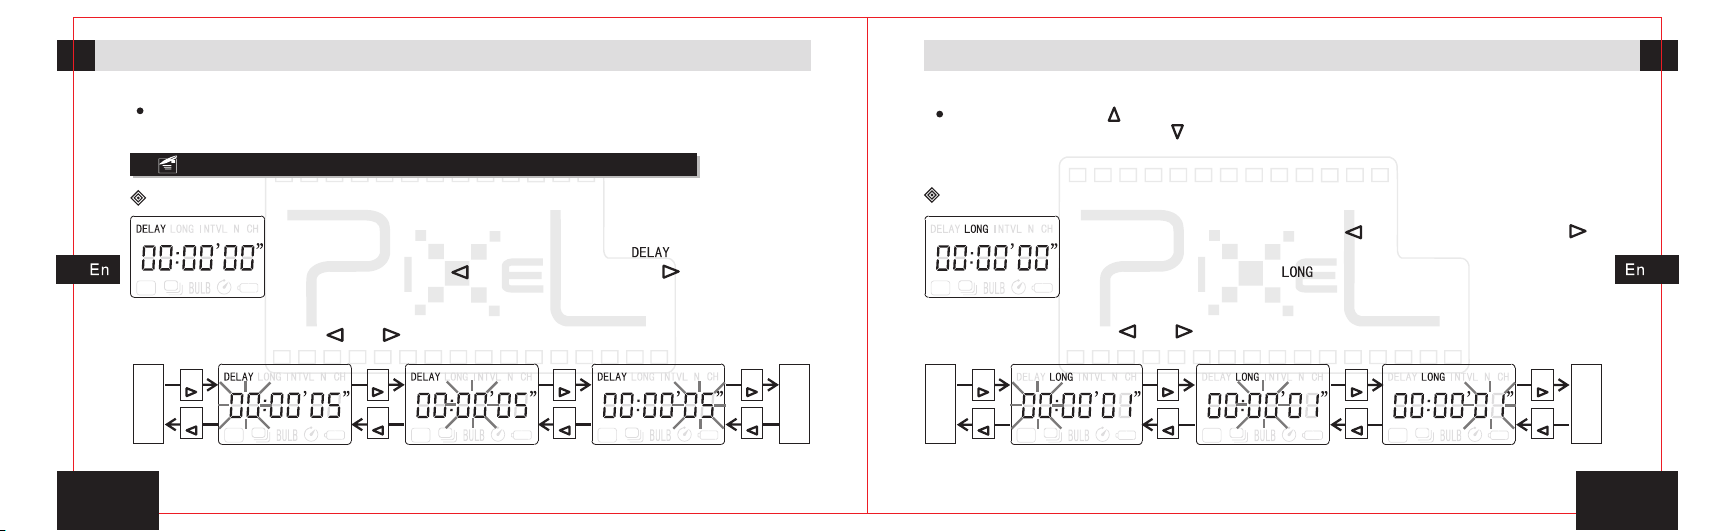
2. Half-press the release button and transmitter will send
signal for focusing, t he green indicator will lit on the
transmitter and re ceiver, and the camera is in the focusing
state until the release or full-press the button.
3. Full-pr ess the relea se bu tton, tr ansmi tter will send all
the dela y shooting info rmati on to rece iver, the t ransm itter
star ts to dela y cou ntdow n, and red indica tor b link quick ly
and en ter to th e delay s hooti ng mode .
4. When countdown is completed, receiver will follow the
setting shots output a signal per second to control shooting.
Make sure to set the camera function to be [ ].
When the camera function is set to be [ ], i t will start continuous shooting.
When the c am er a fu nc ti on i s se t to b e [ ] ,t he c am er a will shoot based on [ ] function,
it may cause underexposure or overexposure.
When the c am er a fu nc ti on i s se t to be [ ], t he c am er a wi ll p er fo rm one or more delay
shooting.
When t he c am er a le ns f ocus function is se t to b e [ M ] ,the c am er a wi ll not execute focusing
action if half-press the release button of the transmitter.
2 3
Page 14
Shooting control
Shooting control
When th e c am er a lens focus f un ct io n is set t o b e [ A ] , even receiving t he sh oo ti ng signal
the camera will not shoot at the moment as most of camera don't seize focus.
Timing plan for shooting
Dela y time se tting
1. In th e pow er-on state, move the functional activitie s
icon to the delay ti ming prog ram icon[ ]by pre ssing the
left move bu tton[ ]or right move bu tton[ ].
2. Press the set button, enter the delay time f or ‘se cond
bit’ setti ng.
3. By pressi ng button[ ]or[ ] ,enter into the set ting for minut es and hours ,
“ ” “ ”
as the sketc h map.
The
shot
number
of
timing
plan
setting
Press
Press
Del ay time o f timin g
pla n--ho urs set ting
Press
Press
Del ay time o f timin g
pla n--mi nutes s ettin g
Press
Press
Del ay time o f timin g
pla n--se conds s ettin g
Press
Press
2 4
Exposu
-re
time
of
timing
plan
setting
Gently press b utton[ ]o nc e t o set numerical increased, hold it on, set the v al ue ra pi dl y
increased; Press the b ut to n[ ]once to se t t he nu me ri ca l reduced, ho ld on to set t he
values rapidly reduced.
4. Press the set button, save and exit settings.
Expo sure ti me sett ing
1. Press left move butt on[ ]or right move b utton [ ],
move the tr ansmi tter’s act iviti es icon t o the exposure
timi ng prog ram ico n[ ].
2. Press the set button, enter the delay time fo r ‘s econd
bit’ setti ng.
3. By pressi ng button[ ]or[ ] ,enter into the set ting for minut es and hours ,
“ ” “ ”
as the sketc h map.
Delay
time
timing
plan
setting
Press
of
Press
Exp osure t ime of ti ming
pla n--ho urs set ting
Press
Press
Exp osure
tim e of timi ng E xposu re
pla n--mi nutes s ettin g
Press
Press
tim e of timi ng
pla n--se conds s ettin g
Press
Press
Interva l
time
of
timing
plan
setting
2 5
Page 15
Shooting control
Shooting control
Gently press b utton[ ]o nc e t o set numerical increased, hold it on, set the v al ue ra pi dl y
increased; Press the b ut to n[ ]once to se t t he nu me ri ca l reduced, ho ld on to set t he
values rapidly reduced.
4. Press the set button, save and exit settings.
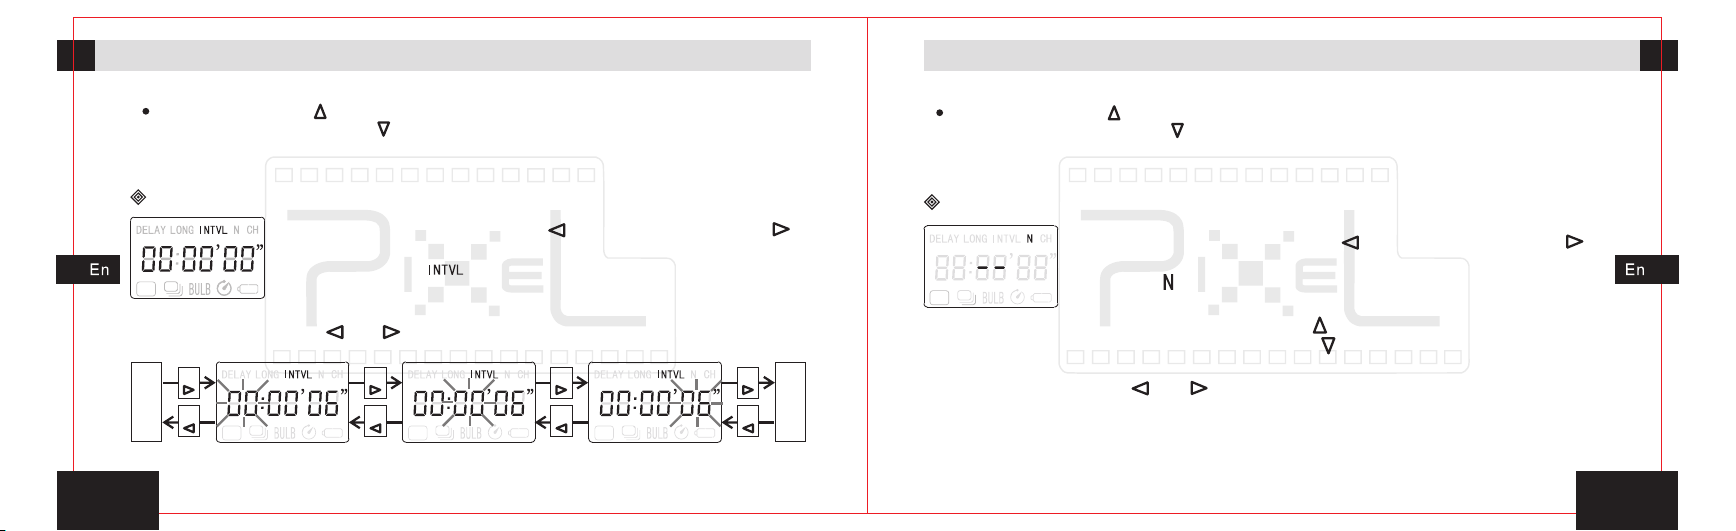
Inte rval ti me sett ing
1. Press left move butt on[ ]or right move button[ ],
move the tran smitter’s a ctivi ties ico n t o the int erval ti ming
prog ram ico n[ ].
2. P ress the set butt on, e nter the time for seco nd
inte rval “
bit” se tting .
3. By pressi ng button[ ]or[ ] ,enter into the set ting for minut es and hours ,
“ ” “ ”
as the sketc h map.
Exposu
-re
time
timing
plan
setting
Press
of
Press
Int erval t ime of ti ming
pla n--ho urs set ting
Press
Press
tim e of timi ng
Int erval
pla n--mi nutes s ettin g
Press
Press
tim e of timi ng
Int erval
pla n--se cond se tting
Press
Press
2 6
The
shot
number
of
timing
plan
setting
Gently press b utton[ ]o nc e t o set numerical increased, hold it on, set the v al ue ra pi dl y
increased; Press the b ut to n[ ]once to se t t he nu me ri ca l reduced, ho ld on to set t he
values rapidly reduced.
4. Press the set button, save and exit settings.
The shot n umber s ettin g
1. Press l eft move b utton [ ]or right move bu tton[ ],
move t he t ransm itter ’s activitie s icon to the ico n of t iming
shot s [ ].
2. P ress th e set but ton, en terin g to set the number pla n
of shot. Press butto n[ ]s ettin g shot numbe r can be
incr eased , pre ss bu tton [ ], setti ngs s hot n umber can be
decr eased . It can be s et betw een 1 to 99 s heets .
3. B y p ressing bu tton[ ]or[ ],enter into the setting f or delay time and
“ ”
“exposure t ime”, “interval time” as th e shown picture.
2 7
Page 16
Shooting control
Shooting control
Interva l
time
of
timing
plan
setting
Press
Press
Press
Press
Delay
time
timing
plan
setting
of
4. Press the set button, save and exit settings.
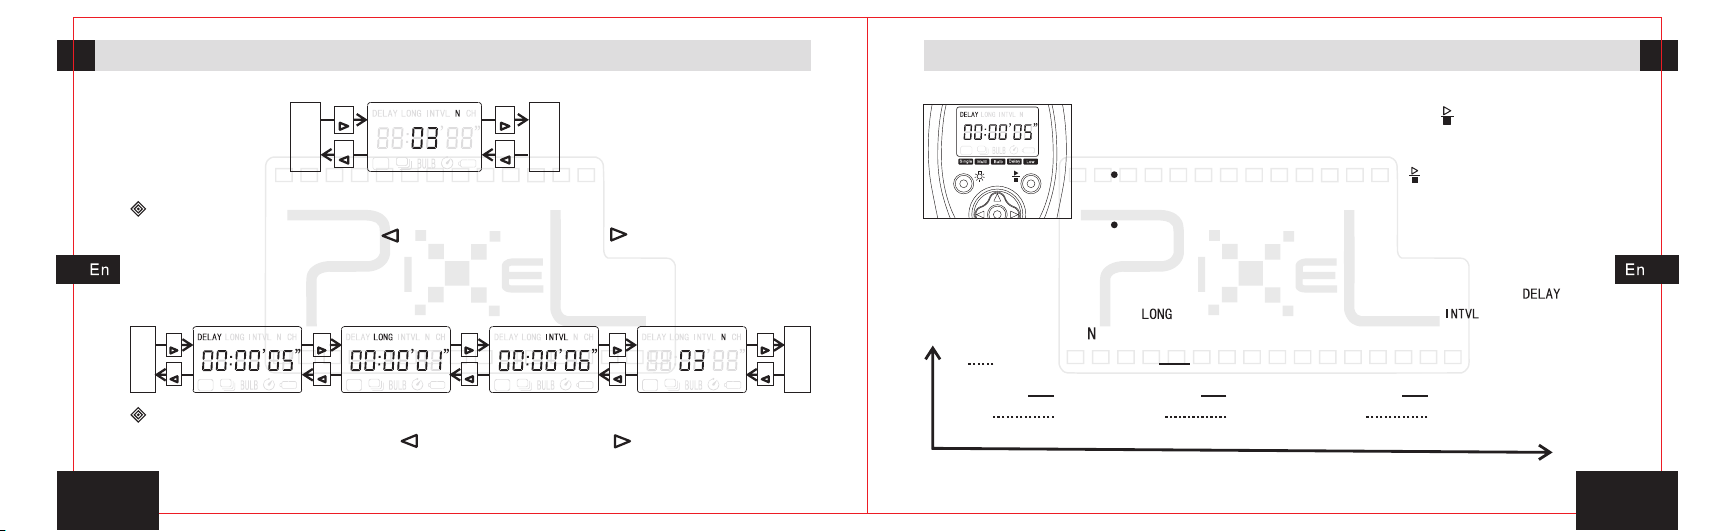
Sear ch the ti ming pl an
1. Press left move button[ ]or righ t mov e but ton[ ],move tr ansmi tter’s
acti vitie s icon to t iming p lan ico n which c an check the related timi ng proj ect.
2. When check the related projects, if ne ed ad just the p arame ters, only press
the set bu tton to ent er the rele vant pro ject settings, press the set but ton agai n
to exi t and sav e your se tting . Move th e icons sequence showed as below.
Delay
shoot
-ing
functio n
Press
Press
Press
Press
Press
Press
Press
Press
Exec ute tim ing pla n
1. Pre ss th e left move butto n[ ]or righ t mov e but ton[ ], move the a ctivities
icon to any ic on among the timing p lan shooting area.
2 8
2. Pres s th e ti ming star t/sto p bu tton[ ], the transmitter
will s ent a ll in forma tion to t he re ceive r. The tim ing plan wil l
run in t he rece iver, a nd outp ut cont rol sig nals to camera.
Pre ss the ti ming p lan st art/stop bu tto n[ ]of the t ransmitt er bef ore
the ti ming p lan ex ecuting com pletely, the tran smitter and re ceiver
wil l stop regularly sc heduled execu ting.
The t ra ns mi tt er ind ic at or and LCD wil l run the tim in g plans, but
does not se nd control commands t o the receiver, it ’s only o ffer a
reference t o u nd er st an d t he operation s ta tu s o f t he receiver.
The fo llowi ng exam ples il lustr ate the t iming plan running: delay time [ ] = 5
seco nds, ex posur e time[ ] = 1 s econd , shooting interval[ ]= 6 s econd s,
Press
Singl e
shoot
-ing
Press
func tion
shoo ting nu mber[ ] = 3 .
Focusi ng o ut put
0 1 2 3 4 5 6 7 8 9 10 11 12 13 14 15 16 17 18 19 20 21 22 23
Shooti ng o ut put
2 9
Page 17

PIXEL TW-282 Specification
Type : FS K 2.4 GHz w irele ss cont rol sys tem
Tra nsmis sion di stanc e: 80 met ers or ab ove
Chan nel: 99 c hanne ls, as we ll as ALL
Stan dby tim e: Tra nsmit ter : mor e than 4 ye ars(us ing two 1 .5V AAA bat terie s)
:
Dimensions (W × H × D)
63mm×38mm×31
Weight wit h ba tt ery Tra nsmit te:
No w you can s tart to u se uniq ue high -perf orman ce PIXE L
prod uct TW-282. I f you h ave any q uesti ons, yo u can con tact th e
loca l distr ibuto r. Or vis it the we bsite http://www.pixelhk. com.
Rece iver 400 h ours (u sing CR -2 lith ium bat tery)
( ): 70.5 g
:
Transmitter:
Receiver:
Rece iver:
149 ×49.5 ×24
mm mm mm
39.5 g
mm
3 0
 Loading...