

Page 1
Timer Remote Control
有线定时快门线
TC-252
PSM47 V 10.02
Eng lish
中文
Page 2

Contents
Overview 02
Cautions
TC-252 int ro du ct io n
The name of ea ch p ar t 0 5
07Prepare fo r in st al l an d use
Install an d re pl ac e th e battery
Connecti on w it h th e ca mera 08
Open the bac kg ro un d li ght of display
Shooting c on tr ol
Single sho ot in g
Continuo us s ho ot in g within one second 11
[ ]shoot in g
Delay shoo ti ng 14
Tim ing plan for shooting 1 7
PIXEL TC-252 S pe ci fi ca tions 2 4
This manual is cu rr en t update of 1st Mar , 2012. Please contact
to P IX EL distributor f or further in formation, if interesti ng of t he
combinin g us ag e wi th p roducts released after this day.
03
04
07
09
10
10
1 3
1
Page 3
Overview
Cautions
Thank you for purchasing high-performance PIXEL products
First of all, thank you for purchasing product of PIXEL. TC-252 is a high
quality w ir ed timer re mo te control wi th the function of singl e shooting,
continuo us shooting per second,[ ]s hooting, user-defi ne d ti me -d el ay and
timing plan for s ho oting. Lo w consumpti on of LCD d isplay wi ll make you be
clear at a gla nc e of t he u si ng status and using plan.
Before us e this product, y ou must r ead and fully und er st an d this manual,
then learn to use the camera to ens ur e you are fa mi li ar with the operation
properly. Through this manual you ca n easil y handle the operation method
and the atte nt iv e th in gs.
2
The ba tt er ies should not instal l anti-polarity; Otherwise th e batteries may
leak corro si ve l iq ui ds, heat or explosion.
Make sure th e ca me ra a nd TC-252 are po we re d off before insta ll i t.
When conne ct ed t he r em ote cable with the device, do not pull the wires.
As this is a n el ec tr on ic product accessory; some of the environment c au se s
may affect the working. However th is i s ha rd ly e ve r to get this situation.
This produ ct c an 't b e st ro ng vibration, or may lead to product failure.
For a long time non- us e, p le as e re mo ve t he b attery to prevent leakage of
corrosiv e li qu id s an d damage the product.
Do not put it in high temperature, such as a closed car under direct sunlight,
the control pa ne l and ot he r hig h-temperature areas.
Keep dry, don’ t use we t han d con ta ct with the product, it must not be
immersed in wa te r or exp os ed to ra in, and this may lead to not work prop er ly .
Do not use flammable and explosive gases in violation of this warning may
cause an exp lo si on o r fi re.
Because this prod uc t include b at te ry, regarding how to use battery, p le as e
operate it strictly according to re la te d rul es , otherwi se it ma y cause
explosio n, f ir e or p hy sical injury.
3
Page 4
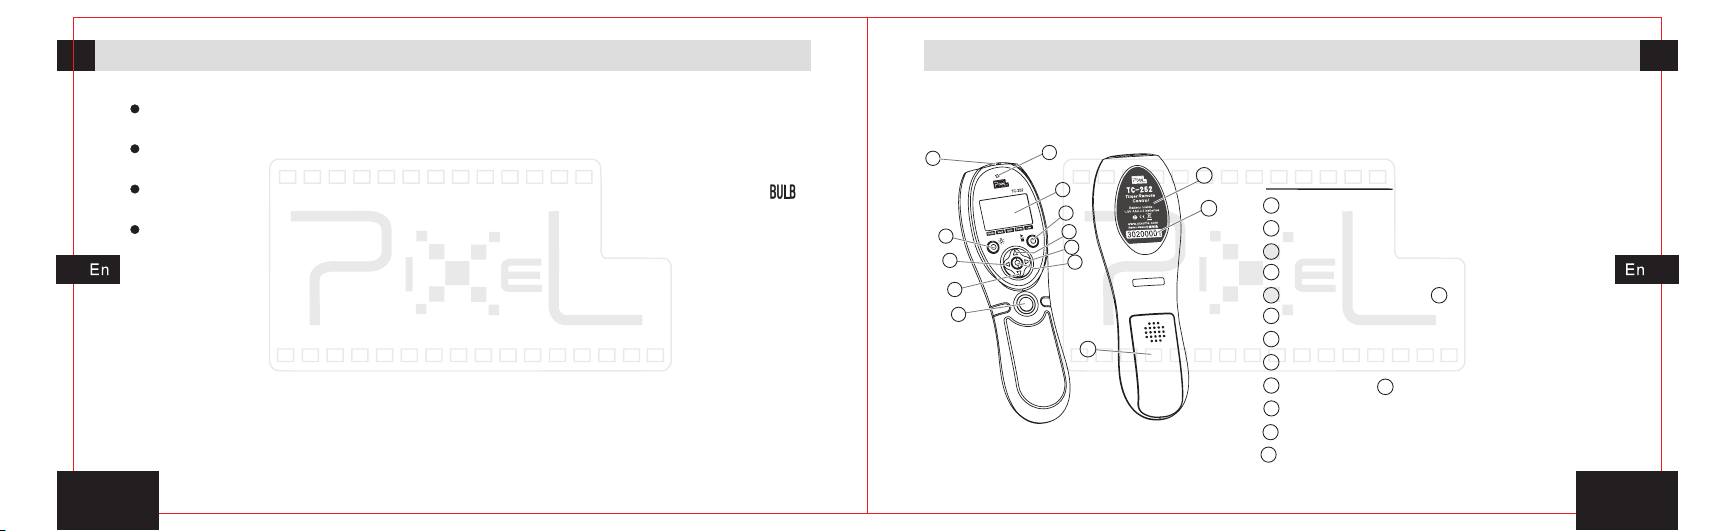
TC-252 introduction
The name of each part
LCD display shows the channe l, pow er , fu nc ti on m od e. I t’ s ea sy t o
understa nd a nd o pe ra te.
Low power cons um pt io n when s ta ndby; standby time more than 3 years
using 2pcs A AA b at te ri es .
Support singl e shoot in g, co nt in uo us shooting within one second, [ ]
shooting a nd .
user-def in ed d el ay a nd timing plan shooting
The device support to c ontrol d ifferent brand or style o f came ra s by using
different shutter connect cabl e.
Please check all inc luded items aft er open the packing, if missing, please
contact to d ea le r.
1. Timer remo te c on tr ol TC-252 ---- -- -1 pc
3. AAA battery - -- -- -- -- -- ----------------- 2pcs
2. Shutter con ne ct c ab le - ---- 1pc
4、Manual(t hi s ma nu al ) ------ 1pc
4
Here are the n am es o f ea ch p art:
1
2
3
4
5
11
10
9
8
7
6
12
13
Body
Body
1
14
Output con tr ol s oc ke t
2
Backgrou nd l ig ht b ut ton
3
Left move bu tt on
4
Decremen t bu tt on
5
Release bu tt on
7
Right move b ut to n
8
Incremen t bu tt on
9
Tim ing plan start/ stop button
10
Display
12
Battery co ve r
13
Product ba ck s ti ck er
14
Item code
6
Set button
11
Shutter in di ca to r
5
Page 5

The name of each part
Preparation for installation and use
Display
10
9
1
2
3
5
4
13
12
11
7
8
6
1
Display
1
Tim ing plan function area
3
Function a re a
5
Continuous shooting within one second icon
Delay shoo ti ng i co n
7
The icon of de la y ti me
9
The icon of in te rv al t im e
11
6
DC0 DC1 DC2
E3 N3
Shutter co nn ec t ca bl e
1
Input plug
Shutter co nn ec t pl ug
2
2
Tim e display area
4
Single sho ot in g ic on
[ ]shooting ic on
6
Low batter y vo lt ag e ic on
8
The icon of ex po su re t im e
10
The icon of ti mi ng s ho ts
12
RS1
S1 UC1
Before use, you sh ou ld read the us er ma nual of your camera carefully;
understa nd the manip ul at io n and functional set ti ng . T he fun ct ion setting of
camera may i nf lu en ce t he efficie nc y co nt ro l of the camera.
Install and rep lace the ba ttery
The lo w battery voltage ico n[ ] will twinkle or the ch ar ac te r
become dim obvious when the power is not enough, that
2
means the low battery vo lt ag e has al ready i nf lu ence th e
normal work of the device, which needs to replace the battery
in time. The timer remote control uses 2pcs of AAA batteries;
Please follow the steps to replace the battery if needed.
1. Slide and o pe n th e ba tt ery cover.
2. Accordin g to t he s ig ns o f po sitive [+] and negative [-] in
the batter y co mp ar tm en t to install the battery correctly.
You shoul d pay a ttent io n to the p olari ty of b atter y becau se of
the wrong installa tion will make the devic e wo rk abno rmally,
or even phy sical inj ury.
3. Close the b at te ry c ov er.
7
Page 6

Preparation for installation and usePreparation for installation and use
Connection wi th the came ra
1. First, fix th e ca me ra o n th e tripod or other fixed bracket.
2. Open prot ec ti ve cover of external shutter socket and
put the shutter plug of shutter connect cab le in place,
then make su re i t ha s be en f ix ed firmly.
For most of camer a shutte r sock et , ther e is mis- pl ug int er face,
please no te inse rt direct ion so as t o avoid dam age to sh utter
socket.
3. In se rt the input plug of shutter co nn ect cable i nt o the
output con tr ol s oc ke t of TC-252.
The tim er remo te cont rol wil l not b e able to contro l the c amera i f
the shutt er conn ec t cable h as n' t in sert co rr ectly.
4. Open the ca me ra p ow er.
8
Open the backgr ound ligh t of display
Press and hold t he backgr ou nd light button for 3 seconds,
3s
the backgr ou nd l ig ht w ill be turned on.
Open th e backg ro und lig ht and pr ess the b utton t wice e ach 6
seconds , the backg round l ig ht will k ee p lit.
The ba ckgroun d ligh t will not be clo se by hand ; it wi ll turn o ff
after 6 sec onds au to matic al ly with ou t any ope ration.
9
Page 7

Shooting control Shooting control
Sketch map f or s el ec ti ng f unction mode:
Single sho oti ng fu nct ion
Press
Press
Continuo us sh oot ing
within one s eco nd fu nct ion
Press
Press
[ ]shootin g fun cti on
Press
Press
Delay shoo tin g fun cti on
The instr uc ti on is under the premise that the timer remote co nt ro l a nd camera
have been c on ne ct ed tightly, a nd turned on the power of camera a nd timer
remote control . The detail instruction of remote s ho ot in g w il l be showing as
follow.
Single shooti ng
1. In the power-on state, set the single shooting icon [ ] as the function
one by press in g th e le ft m ove button[ ]or right move button[ ].
In the slee ping st at e, pres s an y key to wa ke up timer r emote con trol to e nt er sing le
shootin g mode.
In the slee ping stat e, it can f oc us and sh ot u nder th e single mo de withou t wake up.
1 0
Part of the cameras ca n' t s upport t o w ake up th e e xternal sh utter, i t' s una ble to wa ke up
the exter nal shu tt er and ta ke p hoto wh en t he came ra is dorma nt.
2. Half-press the release button, the green li gh t lit, and
the ca me ra i s in the focusing state u nt il t he release or fullpress the bu tt on .
3. Full-pres s t he rel ease button, re d l ight will light fo r a
while, the c am er a st ar t sh ooting.
Make sure t o set the c am era fun ct ion to be [ ] .
When th e camera fu nctio n is set to be[ ], it may ca use con ti nuous
shootin g.
When the camera function is set to be[ ],the camera will shoot
based on[ ]mode, it may cause underexposure or overexposure.
When the ca me ra functi on i s set to be [ ], t he c amera wil l ex ecute
delay sho oting.
Continuous sh ooting wi thin one second
1. In the power-on state, move the activities icon to continuous shooting within
1 1
Page 8

Shooting control Shooting control
one second icon[ ]as the function one by pressing the move button[ ]or
left
right move button[ ].
Continu ous shoot ing wit hi n one sec on d is one pa te nt func tion whic h issued by P ixel
limited E nterpri se, it' ll suppo rt spacin g conti nu ous sho ot ing wit hi n one sec ond and
never cha nge the sin gle sho t mo de of the c am era.
2. Half-press the release button, the green light lit, and
the camera is in the focusing state until release or full-press
the button.
3. Full-press the r el ea se button, red in dicator will be light,
keep fully press the button, the indicator will flash red and
green i n turn. The sho ot in g spee d will be o ne photo per
second.
4. Release the release button, the camera will st op
shooting .
Make sure t o set the c am era fun ct ion to be [ ] .
When the ca mera fu nc tion is s et t o be [ ], it ma y cause con tinuous s hooting .
When the ca mera fu nc tion is s et t o be [ ],th e camera wi ll shoot ba sed on [ ] func tion,
1 2
it may caus e underex posur e or o verex po sure.
When the ca mera fu nc tion is s et t o be[ ], th e camera wi ll execut e delay sho oting.
[ ]shooting
1. In the power-on state, move the activities icon to [ ] shooting icon[ ]
by pressin g th e le ft m ov e bu tton[ ]or right move button[ ].
2. Half-press the release bu tt on , t he green light lit, and
the ca me ra is in th e focusing state unti l the release or fu ll press the bu tt on .
3. Fu ll -p re ss the release bu tt on , the red light starts
flashing and start tim in g, the ti me r remote cont ro l
continuo us output s ho oting si gn al, th e red l ig ht keep
flashing . Ca me ra e nt er into [ ] shooting.
4. Pres s t he rel ease button again, timer remote c on tr ol
will stop ou tp ut s ho ot ing signals, camera stop [ ] shoot.
1 3
Page 9

Shooting control Shooting control
The differenc es between [ ] mod e and[ ]mo de ar e as fo llow: [ ]func tion is the re lea se
butto n is pr essed full y and keep on, shoo t every seco nd and stop sh oot ing unt il th e re lea se
butto n is relea sed. W hile[ ] functio n is the c amera will start shooti ng whe n t he rel ease
butto n is pre ssed fully un til press it again , the shootin g wil l stop.
Make sure t o set the c am era fun ct ion to be [ ] .
When the cam era func tion is set to be [ ], the camera on ly sho ot onc e but not[ ]
shootin g.
When the ca mera fu nc tion is s et t o be [ ],th e camera wi ll be conti nuous sho oting.
When the ca mera fu nc tion is s et t o be [ ], the c amera wil l be delay sh ooting on ce.
Delay shootin g
The delay shooting function of TC-252 can user-defined the delay time and shots.
Delay shoo ti ng s et ti ng
1. In the power-on state, move the activities icon to delay
shooting icon[ ] b y p re ss in g t he m ov e b ut to n[ ]or
left
right move bu tton[ ] . Press the set b ut to n entering the
1 4
delay setting for adjusts the shooting numbers. Then the
numbers of shooting ico n [ ],number o f shooting [ ] wi ll
blink at the s am e ti me .
2. Press button[ ]settings shot number can be increased,
press button [ ], settings shot number can be reduced. It
can be set between 1 to 99 sheets .
3. Press button[ ]enter into the delay setting of delay
shooting. The delay shooting time icon[ ], delay shooting
time[ ]will blink at the same time.
4. Press th e button[ ], se t the delay time in cr ea se d,
press button[ ], se t the del ay time reduc ed . It can be set
between 1 to 5 9 se co nd s.
5. After set up the new parameters, press the set button, save and exit settings.
When ente r to the de la y shoot in g set, ti me r remot e control w ill save th e previou s setti ng .
By pressi ng the left b utton [ ]o r right b utton[ ], c onvert sh ooting nu mbers a nd d elay
time sett ings.
Gently p ress but ton[ ] on ce to set numeric al incre ased, ho ld it on, se t the val ue rapid ly
increas ed; Press the butto n[ ]once to se t th e nu me rical reduced , ho ld on to set t he
values ra pidly red uced.
1 5
Page 10

Shooting control Shooting control
Operate th e de la y sh oo ti ng
1. P re ss the left button[ ]or right bu tt on [ ], mo ve the
activity i co n to t he d el ay s hooting icon[ ].
2. Half-press th e release b utton, the green light li t, an d
the ca me ra is in th e focusing state unti l the release or fu ll press the bu tt on .
3. Full-press th e release b ut to n, timer remote control
start t o d el ay countdown, red indicator bli nk qu ic kly and
enter to the d el ay s ho ot ing mode.
4. W he n countdown is compl et ed , timer remote control
will follow the s et ting shots ou tp ut a signal per second to
control sh oo ti ng .
When runn ing the del ay shoo ti ng, pre ss t he laun ch b utton a gain, the d elay shoo ting
will stop .
Make sure t o set the c am era fun ct ion to be [ ] .
When the ca mera fu nc tion is s et t o be [ ], it wi ll start co ntinuou s shootin g.
When the ca me ra func ti on is set to be [ ], the cam er a will shoo t ba sed on [ ] fun ction ,
it may caus e underex posur e or o verex po sure.
1 6
When th e camer a funct io n is se t to be [ ], th e camer a will pe rform o ne or mor e delay
shootin g.
When the came ra l ens focus f un ction i s se t to b e [ M ],th e ca mera will not e xe cute focu sing
action if h alf-p re ss the re le ase but to n of the ti mer remot e control .
When the ca me ra lens foc us functio n i s s et to be [ A ] , e ven receiv ing the sho ot ing sign al
the camer a will not sh oot at th e mo ment wh en m ost of ca mera don' t seize foc us.
Timing plan for shooting
Delay time s et ti ng
1. In the power- on state, move the functional activities
icon to th e delay timing progr am icon[ ]by pr essing the
left move but ton[ ]or right move b utton[ ].
2. Press the set b ut to n, e nt er the delay time for ‘second
bit’ setting.
3. By pressing bu tton[ ]or[ ],ente r into the setting fo r m inutes and h ours ,
“exposure ti me”, “interval time”,“sh ots number” as the ske tch map.
“ ” “ ”
1 7
Page 11

Shooting control Shooting control
The
shot
number
of
timing
plan
setting
Press
Press
Del ay time o f timin g
pla n--ho urs set ting
Press
Press
Del ay time o f timin g
pla n--mi nutes s ettin g
Press
Press
Del ay time o f timin g
pla n--se conds s ettin g
Gently p ress but ton[ ] on ce to set numeric al incre ased, ho ld it on, se t the val ue rapid ly
increas ed; Press the butto n[ ]once to se t th e nu me rical reduced , ho ld on to set t he
values ra pidly red uced.
4. Press the set button, save and exit settings.
Exposure t im e se tt in g
1. Press le ft mo ve button[ ]or right move button[ ],
move t im er r emote control’s activities icon to th e ex posure
timing pro gr am i co n[ ] .
2. Press the set bu tt on , ente r t he t im e f or
exposure
“second bit” s et ti ng .
3. By pressin g button[ ]or[ ],en ter into the sett ing for minutes and hours ,“ ” “ ”
1 8
Press
Press
Exposu
-re
time
of
timing
plan
setting
“ ” “ ” “ ”delay time , interval tim e , shots numb er as the sketch map.
Press
Delay
time
of
timing
Press
plan
setting
Exp osure t ime of ti ming
pla n--ho urs set ting
Gently p ress but ton[ ] on ce to set numeric al incre ased, ho ld it on, se t the val ue rapid ly
increas ed; Press the butto n[ ]once to se t th e nu me rical reduced , ho ld on to set t he
values ra pidly red uced.
Press
Press
Exp osure
tim e of timi ng Exp osur e
pla n--mi nutes s ettin g
Press
Press
tim e of timi ng
pla n--se conds s ettin g
Press
Press
4. Press the set button, save and exit settings.
Interval tim e se tt in g
1. Press le ft mo ve button[ ]or right move button[ ],
move t im er remote c on tr ol ’s a ct iv it ie s icon to the int er va l
timing pro gr am i co n[ ] .
2. P re ss the set bu tt on, enter the ti me for s ec on d
interval “
bit” settin g.
Interva l
time
of
timing
plan
setting
1 9
Page 12

Shooting control Shooting control
3. By pressing bu tton[ ]or[ ],ente r into the setting fo r m inutes and h ours ,
“ ” “ ”
“delay time”, “ex posure time”,“shots n umber” as the sketch m ap.
Exposu
-re
time
of
timing
plan
setting
Press
Press
Int erval t ime of ti ming
pla n--ho urs set ting
Press
Press
Press
Press
Int erval
tim e of timi ng Int erval
pla n--mi nutes s ettin g
tim e of timi ng
pla n--se cond se tting
Press
Press
Gently p ress but ton[ ] on ce to set numeric al incre ased, ho ld it on, se t the val ue rapid ly
increas ed; Press the butto n[ ]once to se t th e nu me rical reduced , ho ld on to set t he
values ra pidly red uced.
4. Press the set button, save and exit settings.
The shot number setting
1. Press le ft mo ve button[ ]or right move button[ ],
move timer re mo te control’s acti vi ti es icon to the icon of
timing sho ts [ ] .
2 0
The
shot
number
of
timing
plan
setting
2. P re ss the set button, entering to se t the number plan to s ho t.
Press button
[ ] se tting s ho t number can be in cr ea se d, press bu tt on [ ], settings shot
number can b e de cr ea se d. It can be set between 1 to 99 sheets.
3. By pressing button[ ]or[ ],enter into the s etting for delay time and
“ ”
“exposure ti me”, “interval time” as t he shown picture.
Interva l
time
of
timing
plan
setting
Press
Press
Press
Press
Delay
time
timing
plan
setting
of
4. Press the set button, save and exit settings.
Search the t im in g pl an
1. Pr es s l eft move button[ ]or right move b ut to n[ ],m ov e timer remote
control’s activities icon to th e timing plan icon which can che ck the r el ated
timing pro je ct .
2. Wh en check th e related p ro jects, if n eed adjust th e parameters, only press
the set button t o enter the relevant pr oj ect setti ng s, press the set bu tt on again
to exit and sa ve y ou r se tt in g. Sequence to move the icons showed as below.
2 1
Page 13

Shooting control Shooting control
Delay
shoot
-ing
functio n
Press
Press
Press
Press
Press
Press
Press
Press
Execute ti mi ng p la n
1. Press the left m ove but ton[ ]or right move button[ ], move t o any icon
among the tim ing plan shooting a rea.
2. Press the timing s ta rt /s to p button[ ], the timer r em ot e
control w il l execute t im in g plan, indic at or fla sh red once
and task sta rt e xe cu ti ng .
Press the t iming pla n st art/s to p butto n[ ] o f ti me r remot e co ntrol
before the timi ng p lan e xe cutin g com pletely , the ti me r remote
control w ill stop re gular ly s chedu le d execu ti ng.
When executi ng th e t im ing plan shooti ng, it can take singl e sho t
by press ing the r el ease but ton and w ou ld not in fluence the timi ng
plan.
2 2
Press
Singl e
shoot
-ing
Press
func tion
The follow in g ex am pl es illustrate the timing plan running: delay time[ ] = 5
seconds, e xp os ur e ti me [ ] = 1 second, shooting interval[ ]= 6 seconds,
shooting n um be r[ ] = 3 .
Focusing ou tp ut Shooting ou tp ut
0 1 2 3 4 5 6 7 8 9 10 11 12 13 14 15 16 17 18 19 20 21 22 23
2 3
Page 14

PIXEL TC-252 Specifications
Standby ti me : More than 3 ye ar s
Using batt er y: 1.5V ×2AAA
Dimensio ns (W ×H ×D ):149mm×49.5mm×24mm
Weight(with batteries):70. 5g
Now yo u can start to use un iq ue hig h- pe rf or ma nce PI XE L
product TC -2 52 . If yo u have an y questions, yo u can c on tact the
local dist ri bu to r. O r vi sit the website http://www.pixelhk.com.
2 4
 Loading...