

Page 1

PIXEL
Rigging Manual
Nearwater Boats
10 Nearwater Road
Rowayton, CT 06853
www.sailpixel.com
For the dealer nearest you,
Call 203-855-8923
Page 2
Getting Started
Unpacking and getting ready
When rigging your PIXEL for the first time, we recommend doing so when
it is secured on the trailer where you can easily walk around the boat and so
that someone can get in the boat to help step the mast. Make sure there are
no overhead power lines or other objects that the mast could get tangled in.
Remember that the mast measures 18 feet above the boat and allow plenty of
room for raising it
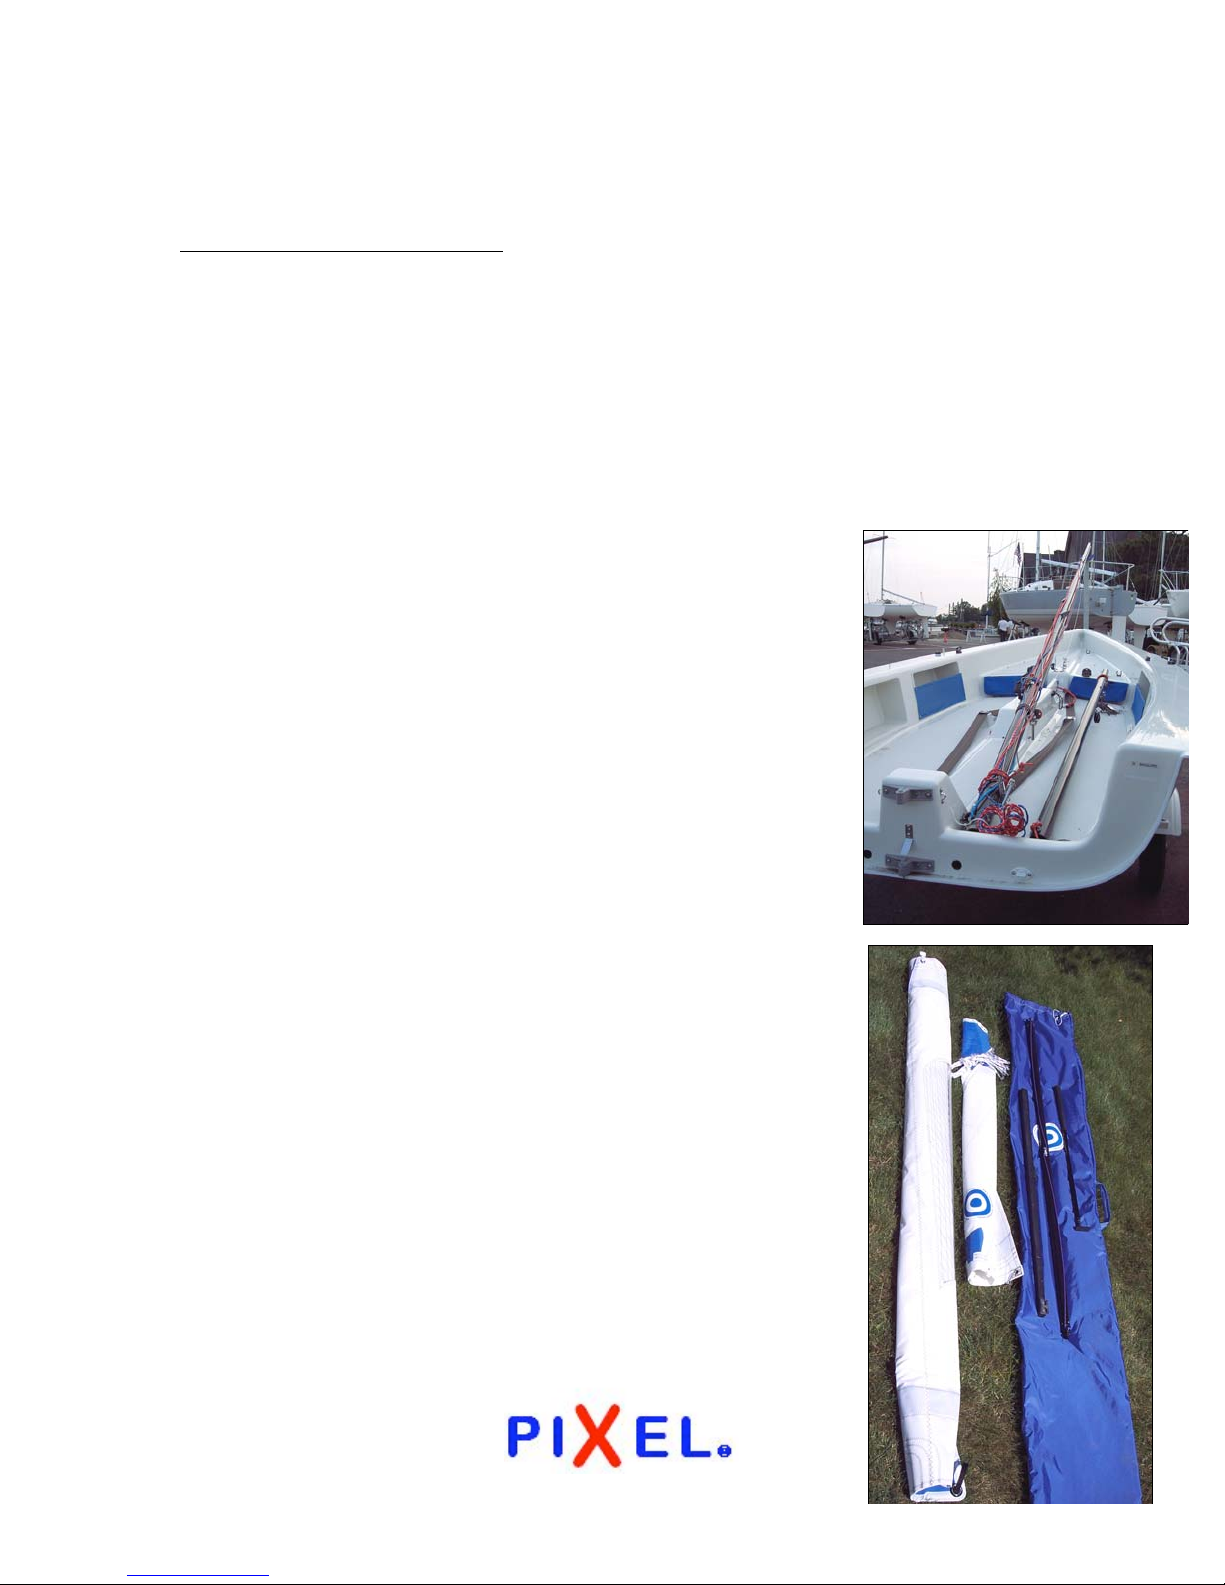
When you receive your new PIXEL, you will find the following:
1.)Hull, with the following attached:
Hiking Straps
Centerboard and Control Lines (Up & Down)
Capsize Recovery System
Locker covers and tail bags
2
2.) Mast (with spreaders, and halyards attached)
3.) Boom (with mainsail outhaul and boom vang attached)
4.) Sail Bag
Mainsail
Jib, with jib sheets and tack shackle attached
Spinnaker Pole
Tiller
Hiking Stick (Tiller extension)
Page 3
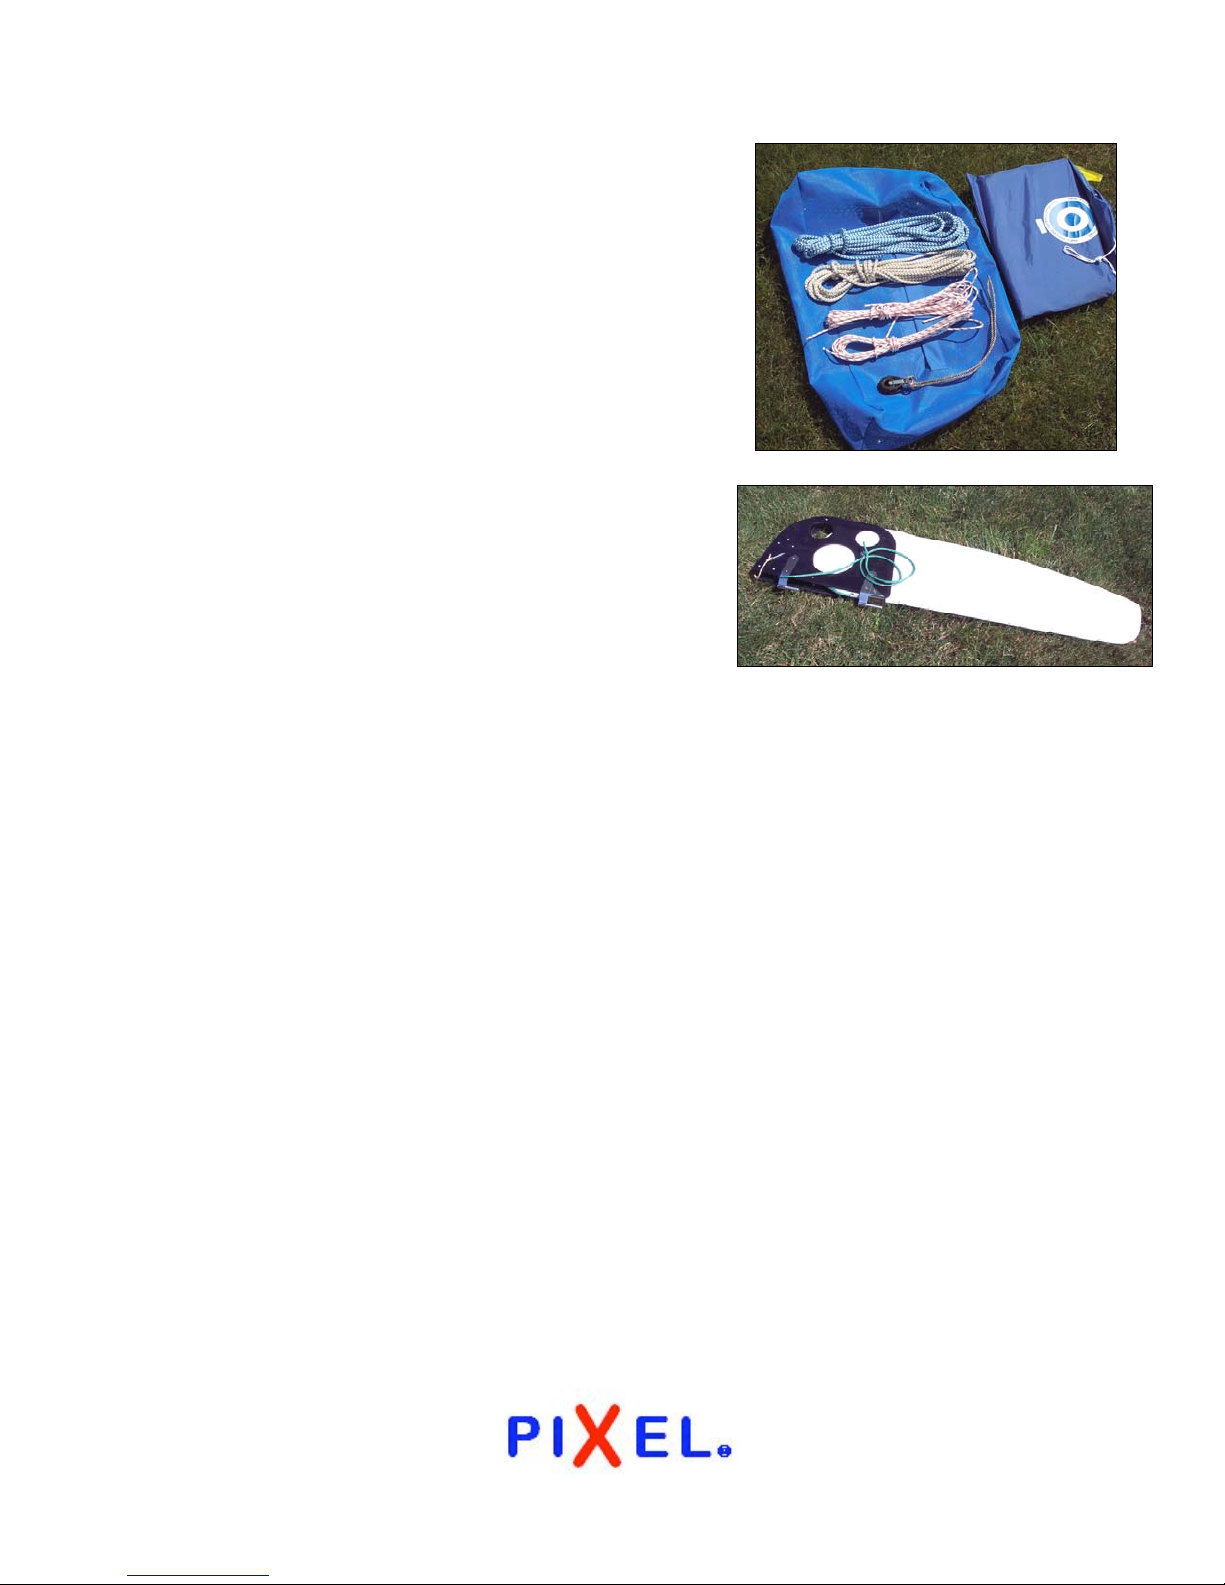
5.) Spinnaker Turtle
Main Sheet
Tow Line
2 Spinnaker Sheets
Traveler Block
Spinnaker
6.) Rudder (with preventer line attached)
3
You Will Need
Tools
To rig your Pixel you will need the following:
Phillips head screwdriver
Electrical Tape
Knife or snips to cut wire ties
Knots
You will need to tie the following knots. If you need help, see
http://www.sailingusa.info/sailing_knots.htm
Figure 8
Bowline
NOTE: All lines with loose ends should be tied with a figure 8 knot prior to
sailing to prevent losing them.
Page 4
Assembly
Hardware
All hardware on the PIXEL has been installed for you. Pixel Class Rules
prohibit alterations or additions to the hardware supplied with the boat.
Mast Set Up
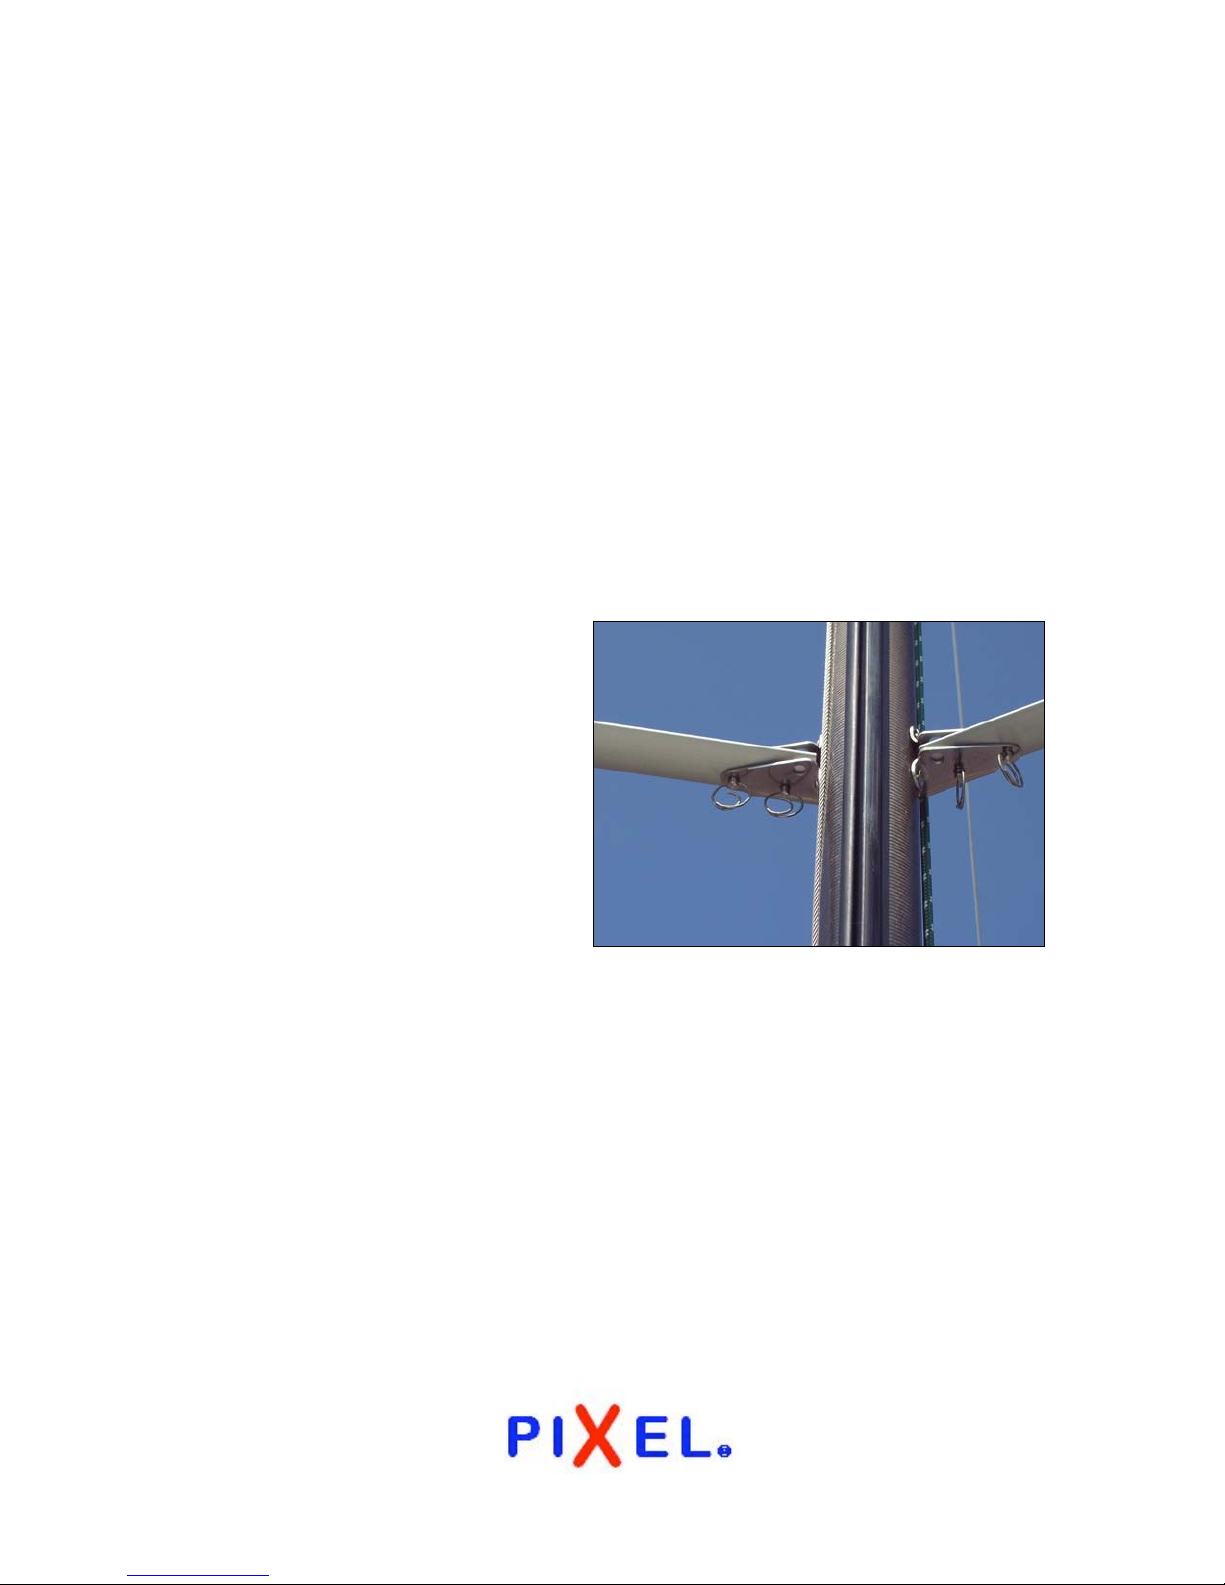
Attach the spreaders
The mast is delivered with the spreaders wire-tied to the mast near the
spreader bracket. Remove the wire ties and install the spreaders. Each
spreader is installed into the spreader bracket with 2 clevis pins, held in
place by cotter rings. Remove the cotter rings and clevis pins, position the
spreader with the tapered side
facing aft, then reinstall the clevis
pins through the bracket and holes
in the spreader and secure with the
cotter rings.
It is a good idea to tape over the
cotter rings with electrical tape, to
prevent chafe on the sails and as
an extra security for the clevis
pins. Next, the shrouds must be
attached to the outboard end of
each spreader. To do this, remove the Phillips head machine screw at the
outer end of the spreader, and carefully slide out the spreader end fitting.
This fitting has a slot in it where the shroud should be installed. Once the
shroud is in the slot, slide the end fitting back into the spreader and refasten
with the machine screw. Note that the machine screw should be installed
from the top of each spreader. Tape over the screw head and the end of the
spreader for chafe protection and as security to prevent the machine screw
from being lost.
4
Page 5
Position the Mast
The headstay, shrouds and halyards on the mast will be secured with line or
perhaps a plastic wire tie for transit. Remove these so that the halyards are
loose and accessible. Position the mast on the boat with the butt end in the
mast step, the top of the mast lying off the transom and the ends of the
spreaders pointing downward towards the
cockpit.
5
Prior to raising the mast, make sure all halyards
are clear of the two fairleads on the forward side
of the mast. Otherwise, the only way to clear
them is to lower the mast and start over again.
(If you have questions as to what lines are what,
please read the section on the next page “Setting Up the Halyards”.)
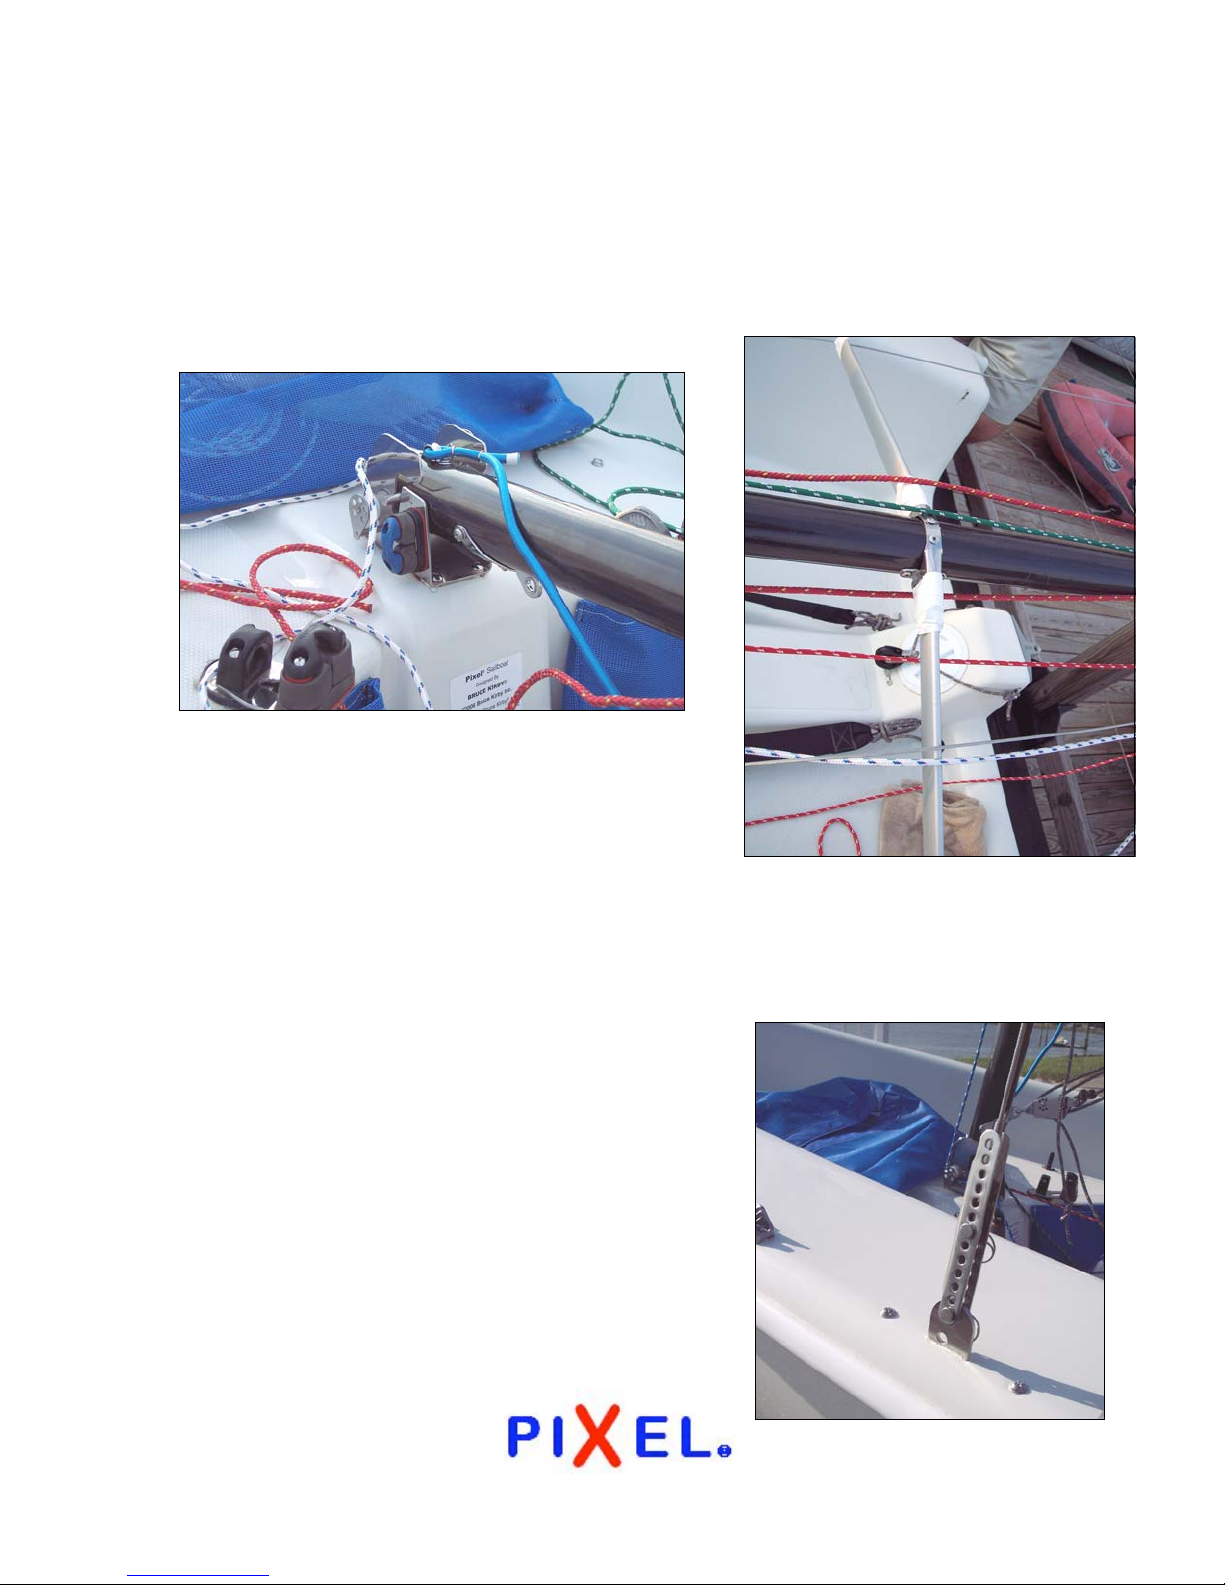
Attach the port and starboard shrouds
Verify that you have the correct shroud and that it is clear of any halyards
wrapped around the mast. Connect the shroud
adjuster to the chainplate on each side, making
sure that the leading edge of the shroud adjuster
is rounded and closed. The open edge of the
shroud adjuster should face aft.
Note that there are two holes in the chainplates.
The shroud adjuster is attached to the top hole.
(The bottom hole is used to hoist the boat using
the lifting bridle. See note at end of Rigging
Guide.) Make the connection with the clevis pin
placed through the top hole in the chainplate,
then secured with the cotter ring. Note that the
Page 6
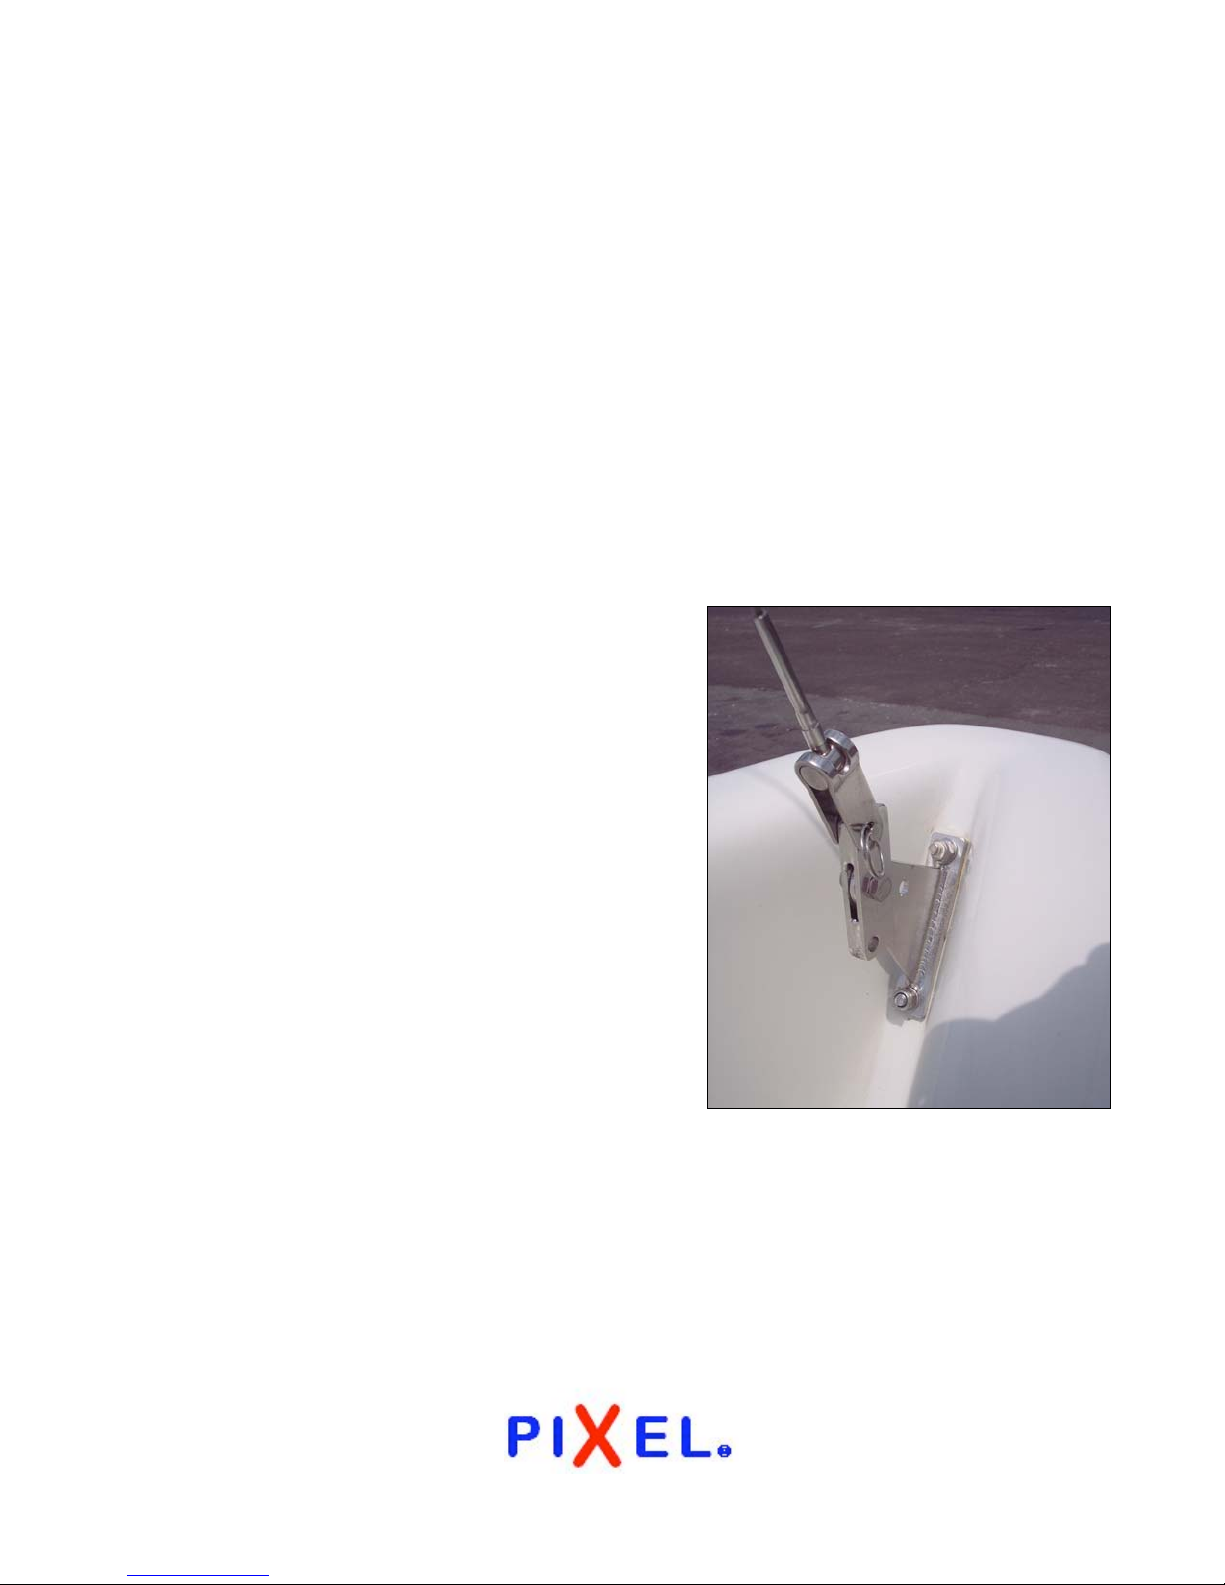
two cotter rings on the shroud adjuster should be on the cockpit side of the
fitting, not the outside. For normal setup of the rig, there should be 4 or 5
holes showing on the shroud adjuster between the clevis pin at the chainplate
and the clevis pin for the shroud. Now is the time to make any adjustment,
before the mast is raised.
Raising and stepping the mast
Before raising the mast, locate the headstay and the clevis pin and cotter ring
that attach it to the boat. Remove the cotter ring and clevis pin and place
them very near the headstay toggle on the boat, up in the very bow. If you
are tall enough or have a partner who can climb in the boat and “walk the
mast up” while you pull on the headstay, then simply pull on the headstay
until the mast is in position. (If you are not tall enough, tie your tow line to
the head stay and use that to pull the mast
up.) The mast will rotate up on the pin at the
base of the mast which has been placed in
the slot on the mast step. The mast will need
to have pressure applied to it from behind,
near the gooseneck, in order to attach the
headstay to the toggle at the bow. (You
should need to “work” for the last inch to
connect the headstay to the toggle.) The
headstay toggle is a unique tuning
adjustment for the Pixel. The headstay is
attached to the forward hole in the toggle. It
is attached with a clevis pin secured with a
cotter ring.
Once the mast is up and the headstay and
shrouds are secured, you are ready to sort
out the halyards and other control lines on the mast.
6
Setting up the halyards
All lines on the Pixel are color coded.
Page 7
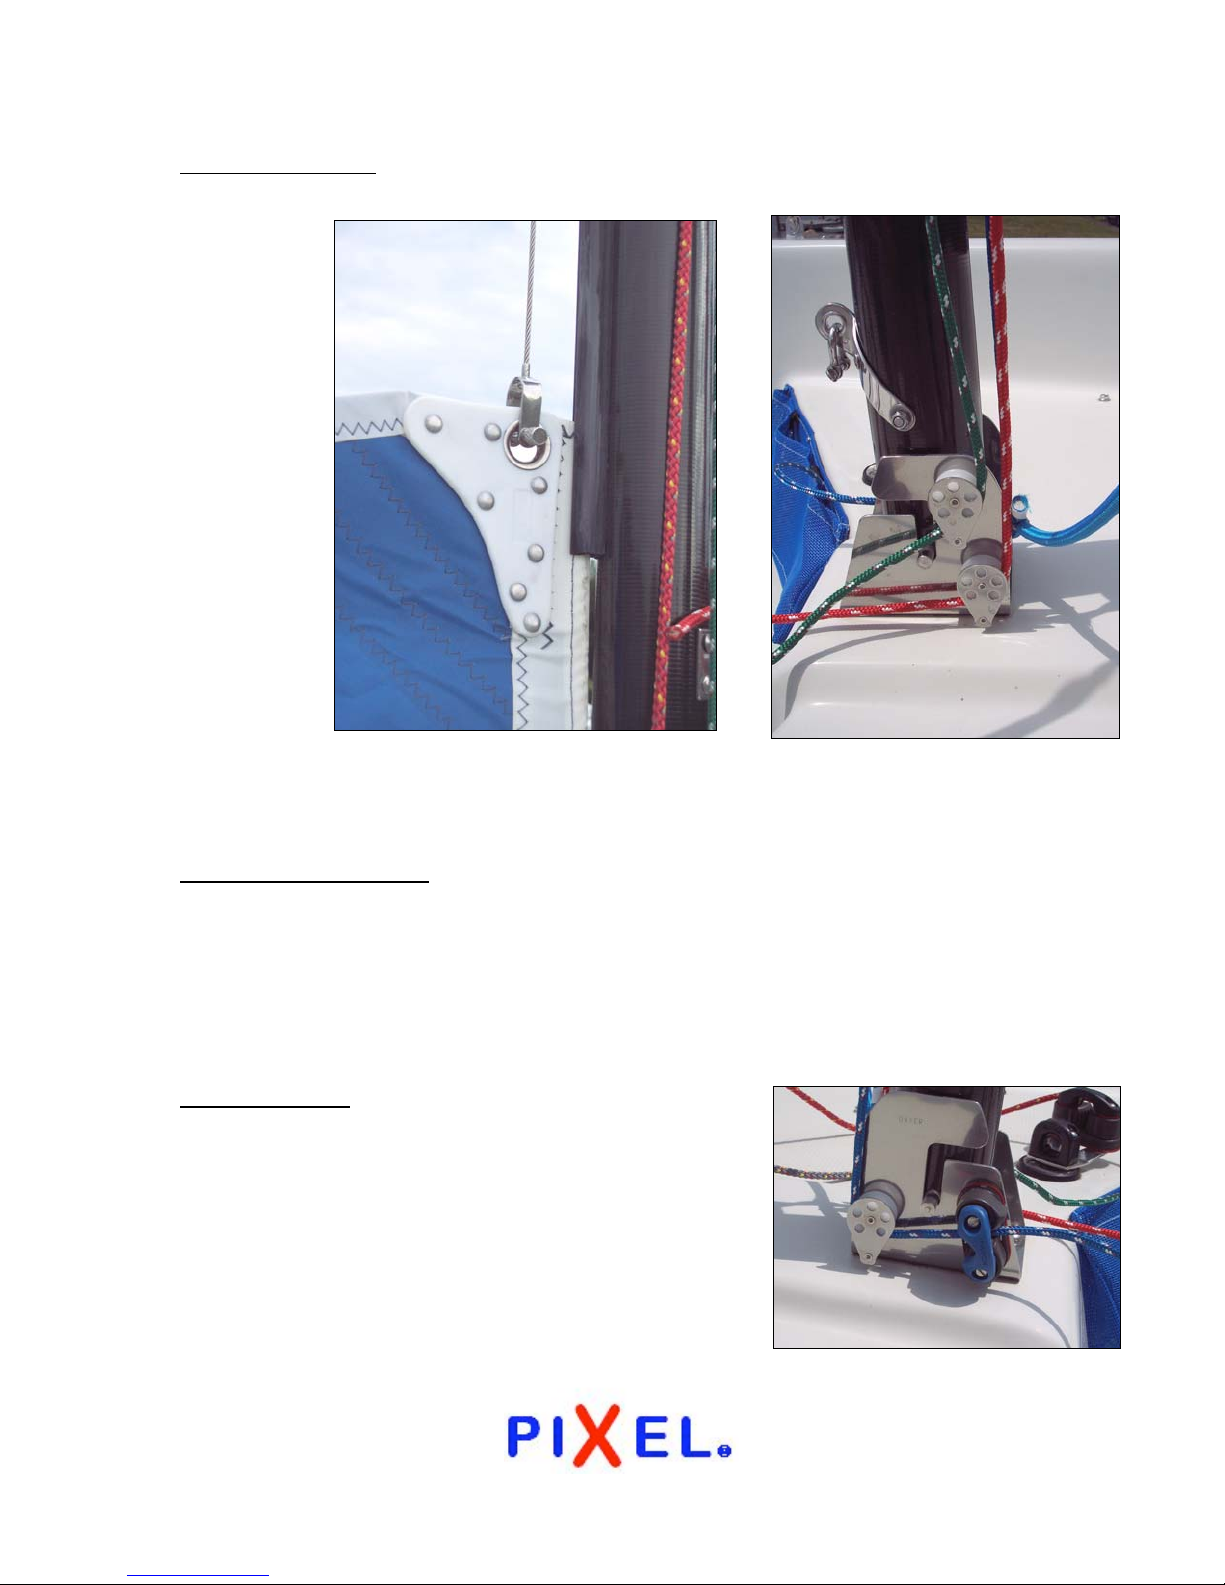
The main halyard has 2 parts; a wire part which attaches to the sail with a
shackle, and a green rope tail.
The main
halyard tail
leads down
from the
top of the
mast,
through 2
fairleads on
the front of
the mast,
then down
past the
mainsail
halyard
lock and
the main
halyard
clamcleat, then through the upper sheave on the right side of the mast step.
Once through the sheave, the halyard tail is coiled and placed in the tailbag.
7
The spinnaker halyard is red. It leads down the front of the mast, to the
lower sheave on the starboard side of the mast step, then aft, to a camcleat
with a red top on the starboard side of the centerboard trunk, back near the
mainsheet block. It is intended for the skipper to raise and lower the
spinnaker. The block at the top of the mast for the spinnaker is a swivel
block.
The jib halyard is blue, or white with a blue fleck.
It leads down the front of the mast, to the sheave
and camcleat with the blue top on the port side of
the maststep. Note that the jib halyard block up on
the mast is NOT a swivel block. The halyard part
that will attach to the jib is the outer part as you
look at the block. The part nearest the mast is the
part that leads through the sheave in the mast step.
All halyards should have a stopper knot in the end
of the tail, usually a figure eight knot.
Page 8
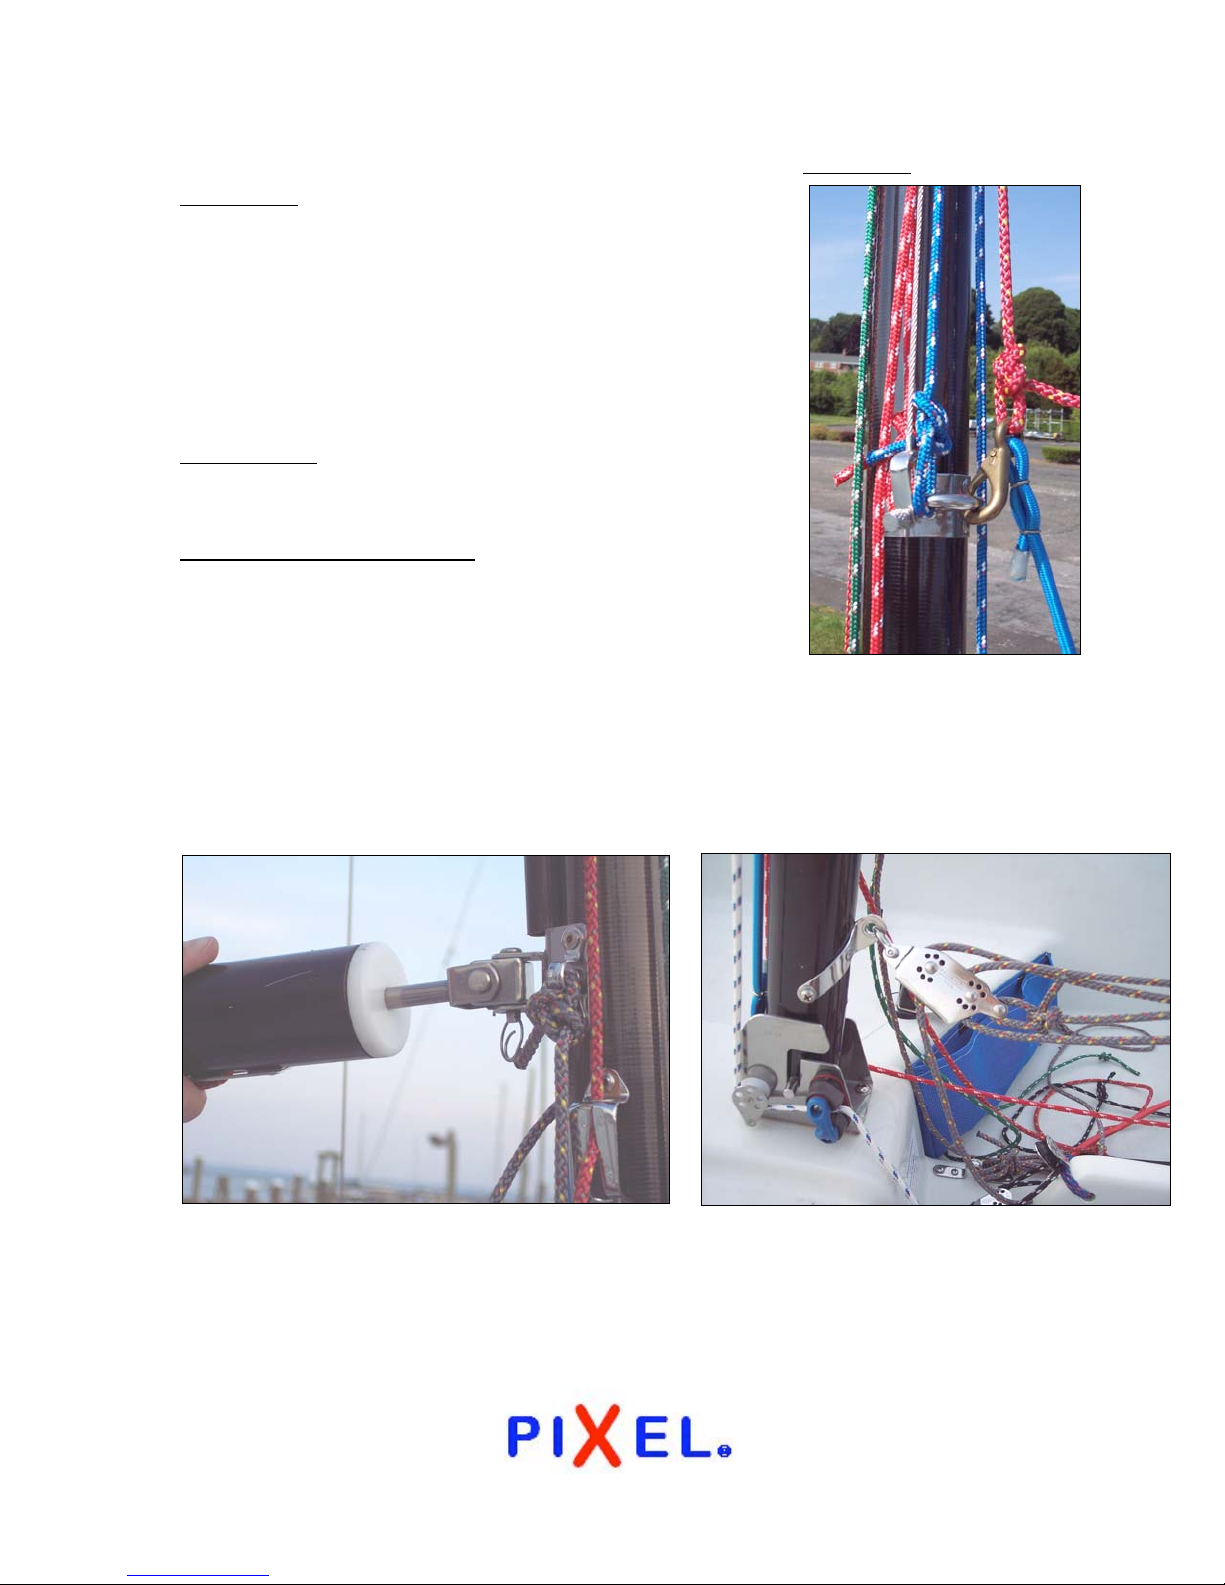
In addition to the halyards on the mast, there is also the spinnaker
toppinglift, which is red with a gold fleck. This line
leads down to a V cleat near the gooseneck. The
other end is tied with a bowline into a snap hook
which is snapped into the spinnaker pole ring on the
mast.
Also secured into the snap hook is a length of blue
shockcord, which is also attached to the base of the
mast in the front. This is the spinnaker foreguy.
The foreguy is permanently attached so you never
have to think about it.
The mainsail Cunningham (aka mainsail downhaul) is
a gray line attached to the mast with a bowline,
through an eye near the gooseneck. The Cunningham
goes up through a grommet in the mainsail, then
down to a V cleat on the other side of the mast. The Cunningham acts as the
mainsail downhaul. It should be eased when the mainsail is hoisted, then
tightened to control mainsail luff tension.
8
Rigging the boom
The forward end of the boom has a hole in it, into which the pin on the
gooseneck is installed. Note that there is nothing to hold the boom onto the
gooseneck pin. The boom vang is attached to the boom, with a double v-jam
becket block which attaches to the mast near the base, on a bale like the
vang attachment point on the boom. The vang block is attached to the mast
bale (eye) by a bow shackle. Unscrew the pin from the shackle, pass the
body of the shackle through the hole in the bail, then screw the shackle pin
Page 9
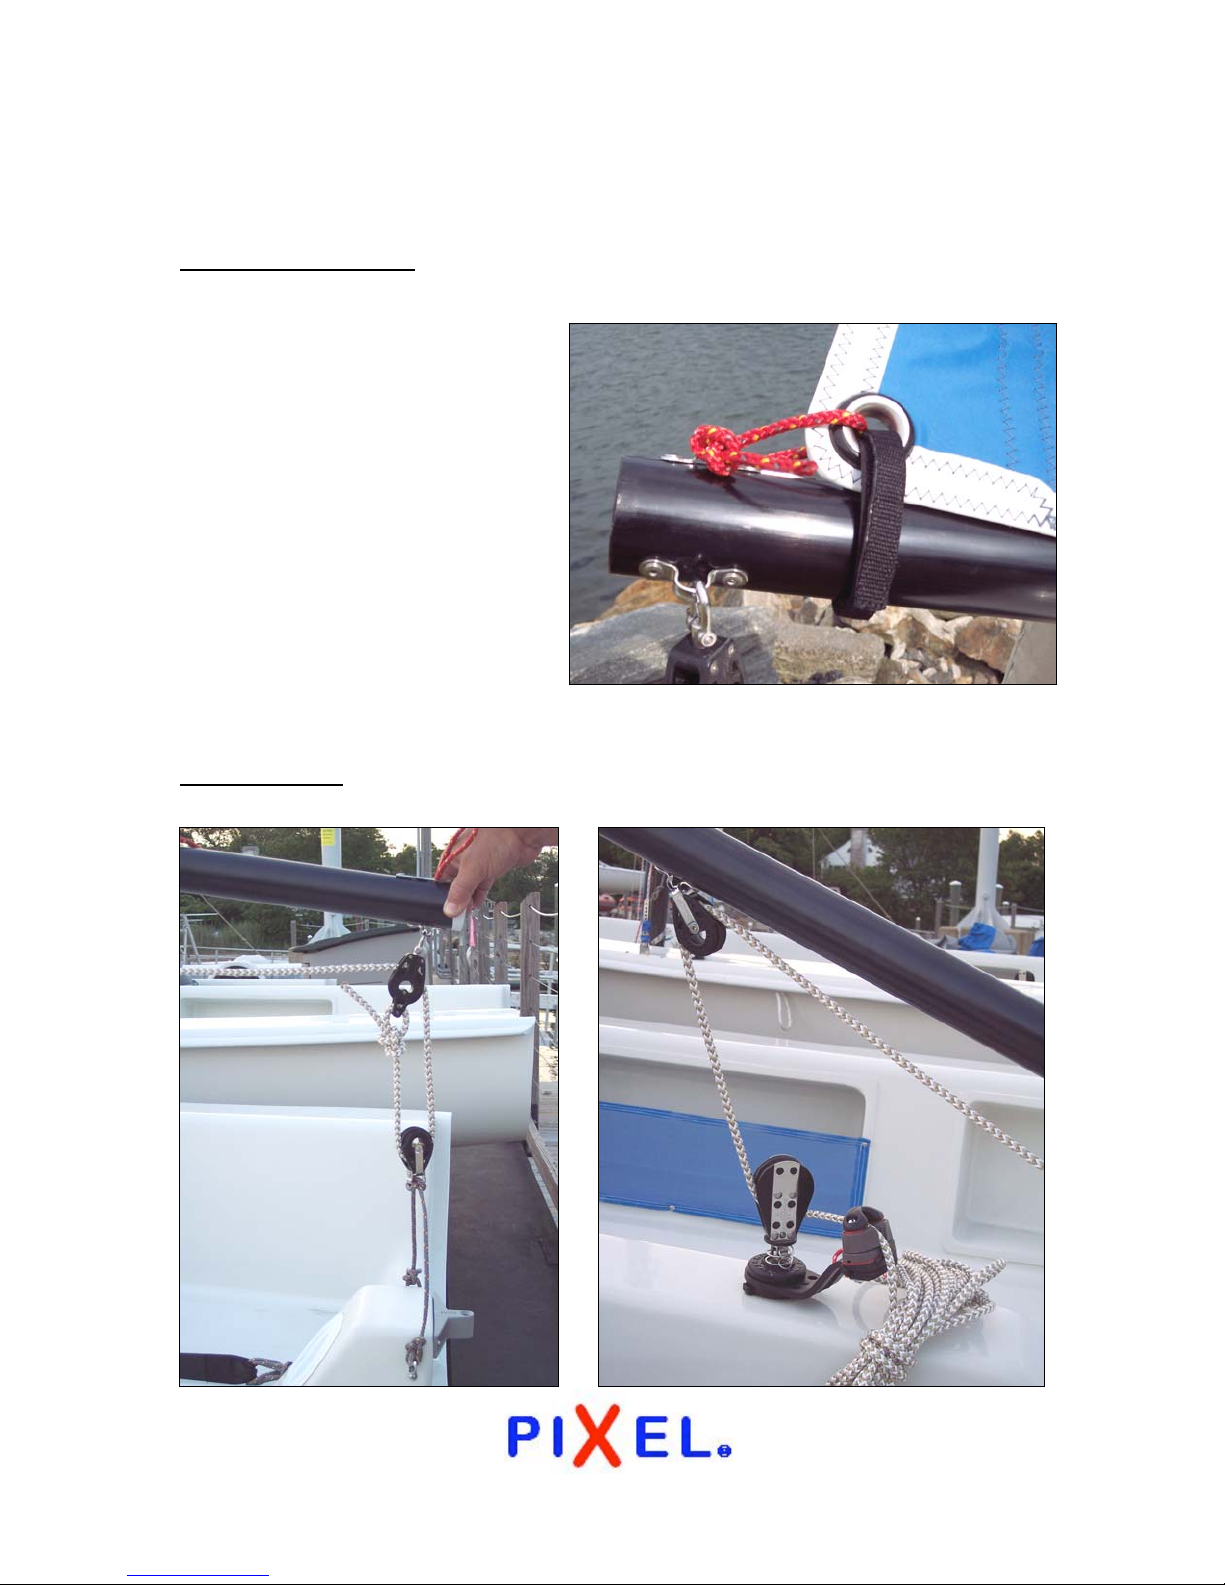
through the holes in the V-jam vang block. Be sure to tighten the shackle
pin securely, so the pin doesn’t fall out while sailing.
The mainsail outhaul, a red line with gold fleck, runs through the boom. At
the aft end of the boom, the outhaul leads out of the boom, goes through the
clew(rear) grommet on the
mainsail, then is tied with a
bowline through the eyestrap
adjacent to the outhaul sheave.
This gives the outhaul a 2:1
mechanical advantage. The
forward end of the outhaul exits
the boom just aft of the
gooseneck on the bottom side of
the boom. It then leads back to
a V cleat just forward of the
boom vang bale located on the
boom.
9
The mainsheet is a blue/white line which is attached to the becket block on
the aft end of the boom, then leads down to the mainsheet traveler. The
Page 10
10
traveler is a short (3 foot) length of gray line with a single block in the
middle. The line is attached to each side of the rudder pedestal, to eyestraps,
with bowlines. The mainsheet goes through the traveler then back up to the
becket block on the boom end. From there, it leads to the mid-boom
mainsheet block, then down to the mainsheet ratchet block on the
centerboard trunk. Be sure to install the mainsheet through the ratchet block
so the block clicks, then through the camcleat, and end with a figure 8 knot.
Now you are ready to put the sails on.
The Mainsail
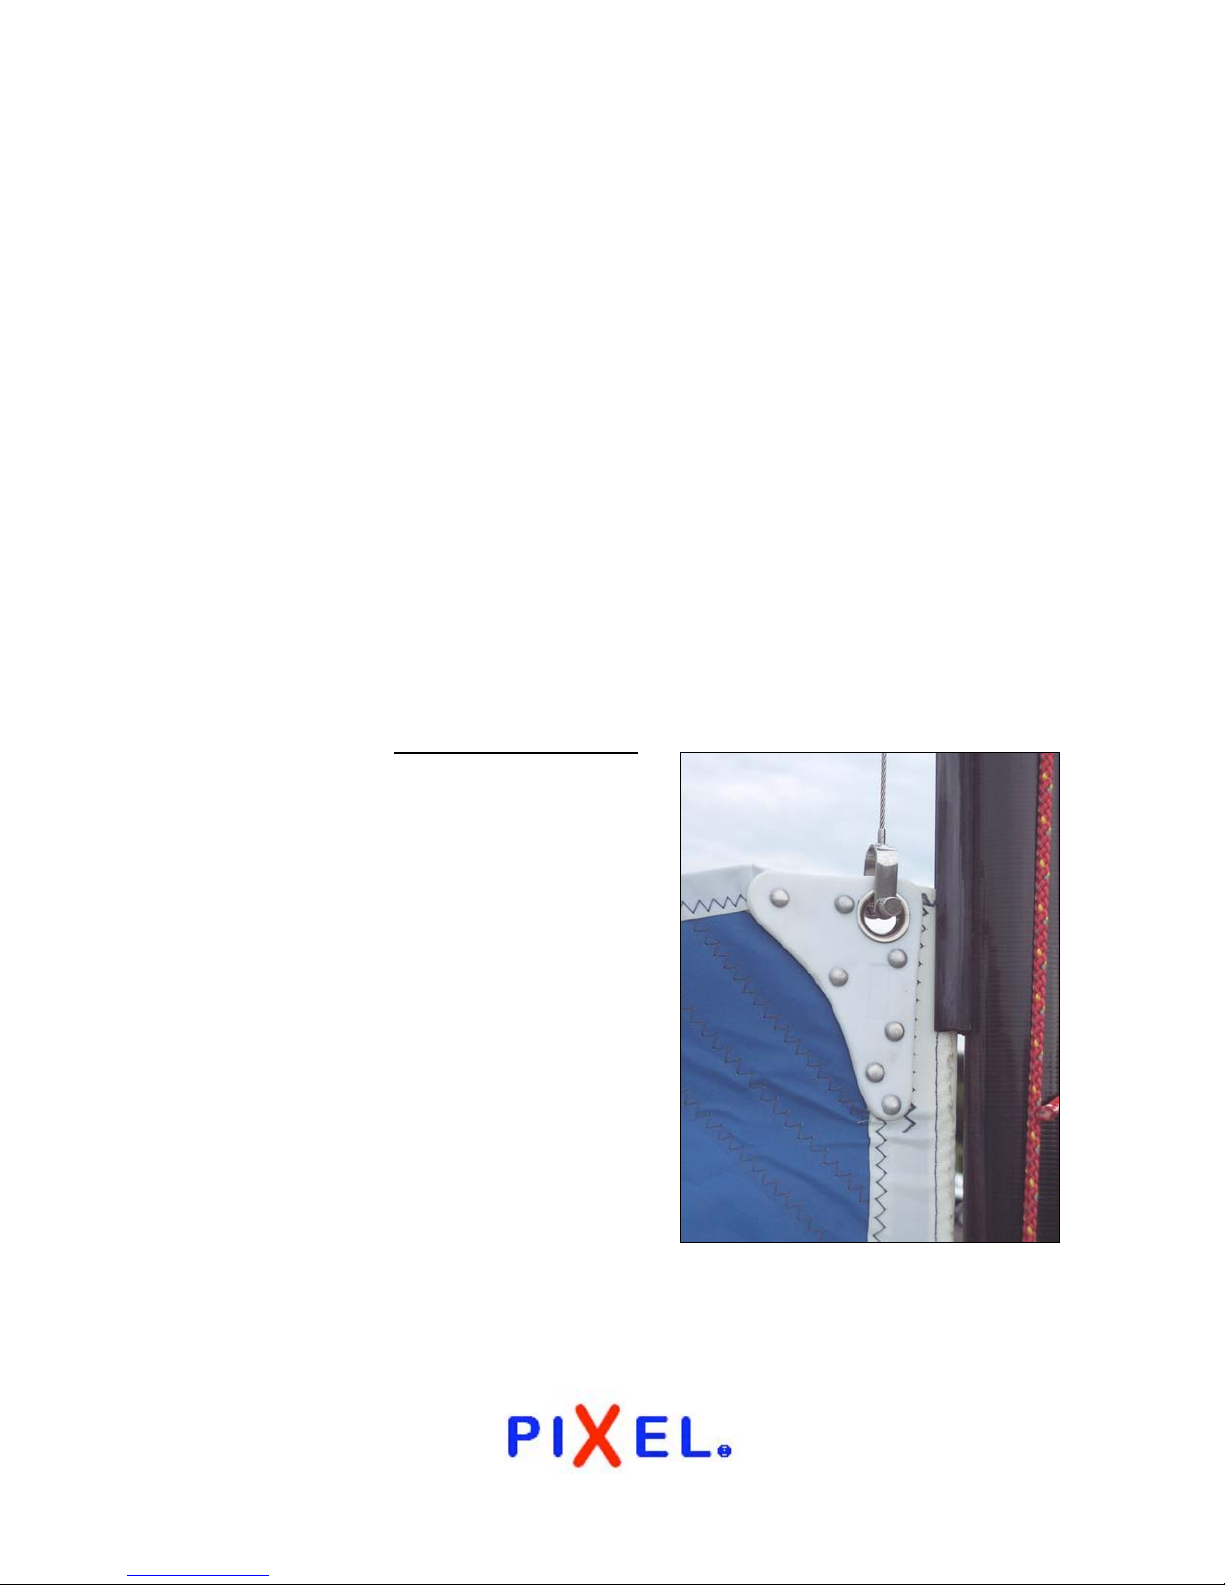
The mainsail is a loose-footed sail, so it is only attached to the boom at the
clew, or back corner. First, locate the tack of the sail, or front lower corner.
There is one sail slide near the tack, which slides into the short length of
sailtrack just above the gooseneck. There is a grommet in the mainsail about
6” above the tack. This is for the downhaul, or Cunningham (see above).
Next, rig the outhaul, by passing the red outhaul line through the clew
grommet, then tying the end of the outhaul to the eyestrap with a bowline.
You will find a Velcro strap through the clew grommet of the mainsail. (See
photo above under The Mainsail Outhaul).
This strap should go around the boom and
secure back on itself. Its purpose is to
hold the clew of sail down to the boom.
The main job of the outhaul is to control
foot tension on the sail, being pulled taut
in a heavier breeze and eased in lighter
winds. The Velcro strap needs no
adjustment once set up for the day.
Now attach the halyard shackle to the
head (top) of the sail. Check carefully to
make sure the halyard is clear and not
tangled in other lines. Once the halyard is
attached, you are ready to raise the sail.
Remember to ease the vang, the downhaul
and the sheet to be able to raise the
mainsail completely. When fully hoisted,
place the halyard ball lock (ball on the halyard wire) into the halyard lock on
the mast.
Page 11
11
The Jib
The jib lives in the sailbag with the mainsail. Locate the tack (bottom front
corner) of the jib, which has a long shackle in the sail grommet. The shackle
should be attached to the rear (aft)
hole in the headstay toggle. Next,
locate the jib sheets, attached to
the clew of the sail, and lead them
through their respective
fairlead/camcleats, found on the
deck each side of the mast step.
Remember to tie figure 8 knots in
the ends of the jib sheets.
Next, attach the plastic clips from the jib luff onto the headstay by holding
clip vertically, turn 90 degrees counter-clockwise, push on cable and turn
back 90 degrees clockwise. Last, tie the jib halyard into the grommet in the
head of the jib, and it is ready to hoist.
The Spinnaker
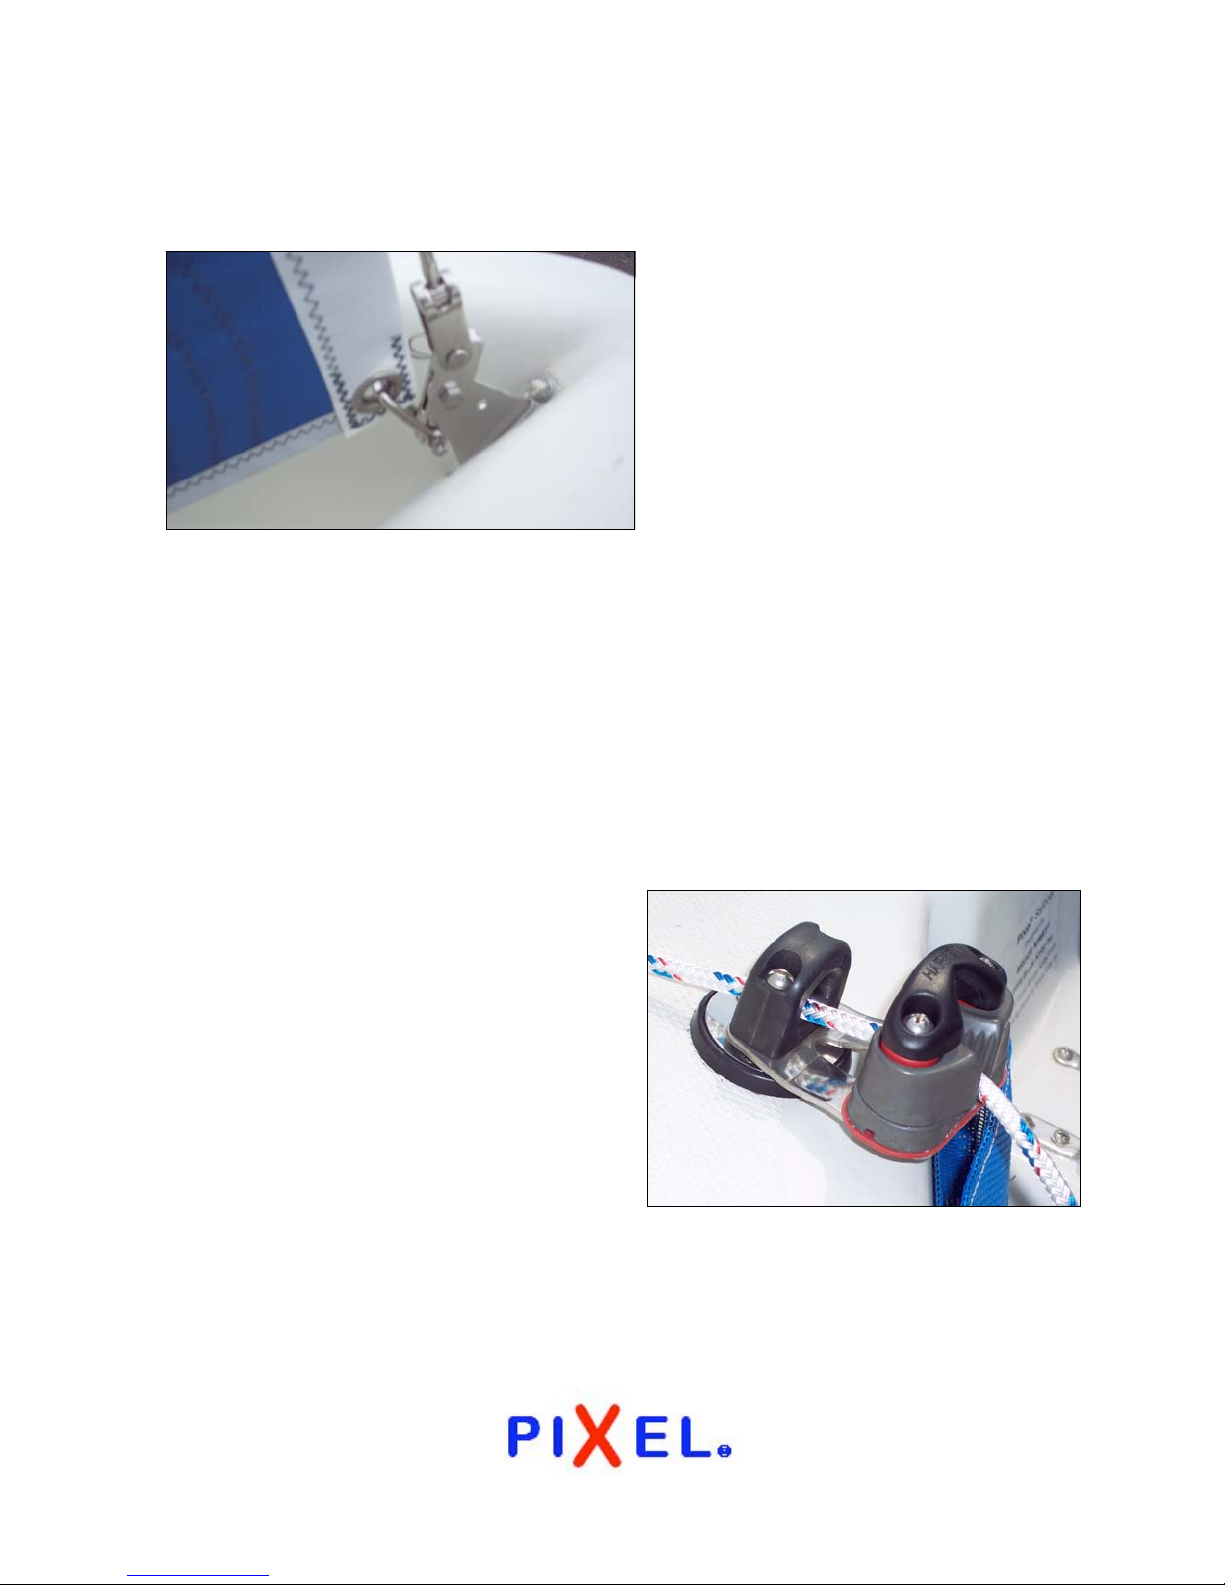
The spinnaker should be packed into the spinnaker turtle (the large blue
mesh bag). The turtle snaps onto 6 snaps on the deck forward of the mast.
Spinnaker sheets are found in the turtle. They are white line with a red
fleck. These lines lead from the sail
back to the Harken blocks tied onto the
deck on either side, then forward to the
cheek blocks just aft of the chainplates,
then inboard to the camcleat. There is
a clamcleat with a hook just forward of
the shroud on each side. These
clamcleats are used as guy hooks for
the afterguy on the side where the
spinnaker pole is attached to the sail.
The Rudder/Tiller/Hiking Stick
The rudder is a “kick-up” design, intended to fold upward in shallow water.
There is a green line attached to the rudder, which should be cleated on the
tiller port side, used to hold the rudder in the down position. When entering
shallow water, it is advisable to loosen this line. If the rudder rotates more
Page 12
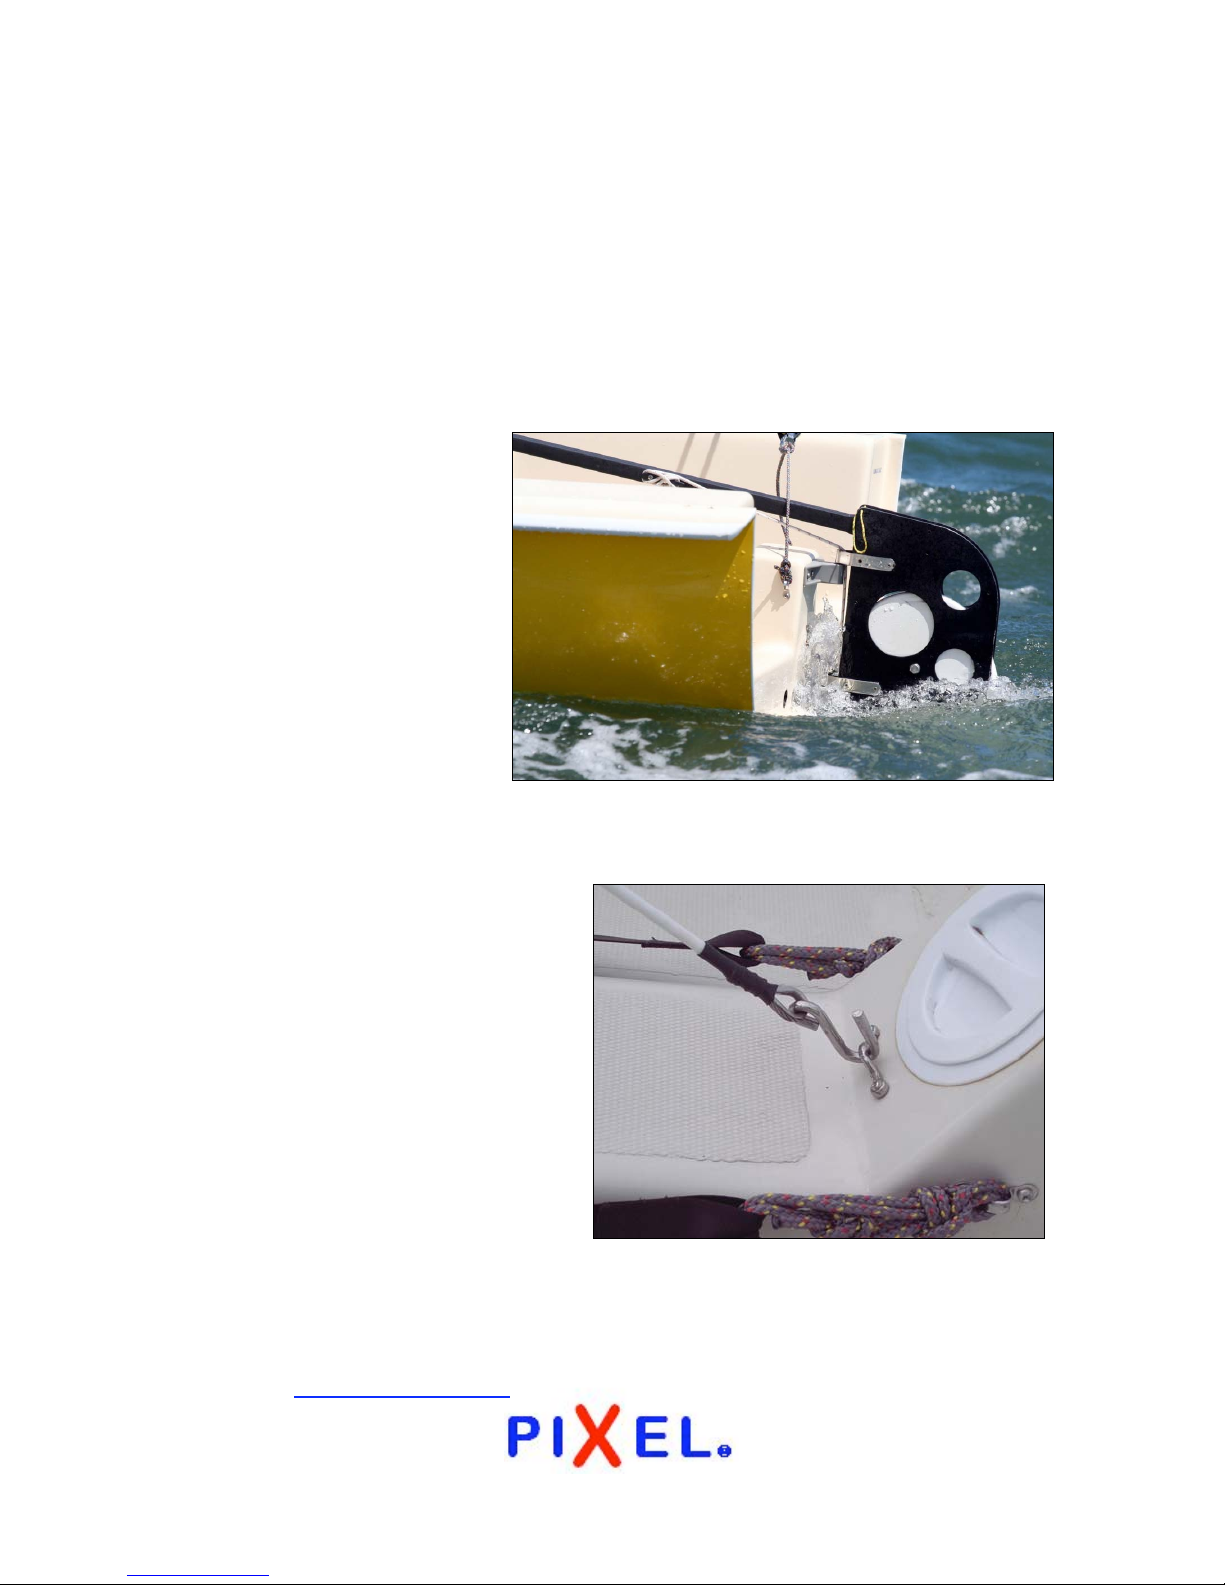
freely than desired, the bolt that holds the rudder into the rudderhead may be
tightened to create more friction.
The rudder is installed onto the boat using 2 pintles. When installing the
rudder, be sure the stainless steel “keeper” pops into position just above the
lower pintle, holding the rudder in place in case of capsize. A line should
also be tied through the lower pintle fitting or the rudder head, then led to
the aft lifting eye and tied. This is to assure you do not lose the rudder if it
comes loose during a capsize.
The tiller is inserted into
the top of the rudderhead,
and held in place by a
cotter pin attached to the
rudderhead with a short
length of string, which
should be placed in the
hole in the tiller. The
hiking stick is inserted into
the bracket on the forward
end of the tiller. The
hiking stick can be
removed at the end of sailing for the day.
12
NOTE: To use a PIXEL lifting
bridle, place a hook through the
lowest hole in each shroud
chainplate being careful to feed
the hook from the inside of the
boat to the outside. The third hook
is fed from the inside to the
outside as well using the strap eye
just below the inspection port on
the aft pedestal. Always make
sure your bridle is clear aloft to
hoist the boat.
You are now ready to sail your PIXEL! Always wear your PFD and enjoy!
PIXEL Class Rules available at our website or JSA of LIS website.
We welcome your thoughts and comments. Please send them to us via our
website: www.sailpixel.com 6-06
 Loading...