

Page 1
Tha nk you so much fo r p urcha sing PIX EL produ ct, ROOK is a pro fessi onal
grou ping fl ash tr igger. TT L mode av ailab le on tra nsmi tter ho t shoe an d sync wi th off
shoe tri gger toge ther. Off shoe trigg er c an b e gr ouped the flas h an d Rem ote the
came ra. ROO K is usin g globa l free FS K 2.4GH z which i s more st abili ze.
1、Make su re the camer a is powere d off before i nstall de vice.
2、This is el ectron ic produc ts access ories; so me of the envi ronment c auses may
affect t he working . However t his is hardl y ever to get th is situati on, don't w orry!
3、This co mponent c an't be stro ng vibrat ion, or may l ead to prod uct failu re.
4、For a long t ime non-u se, pleas e turned off t he transm itter and t he receiv er's
power an d remove the ba ttery.
5、The bat teries sh ould not ins tall anti -polar ity; othe rwise the ba tterie s may leak.
corros ive liqui ds, heat or ex plosio n.
6、When th e product co nnecte d to the devic e, Do not pul l the wires.
7、Do not put i t in high temp eratur e, such as a clo sed car und er direct su nlight , the
contro l panel and oth er high-t emperat ure areas.
8、keep dr y, do not use wet ha nd contac t with the pro duct, the p roduct mu st not be
immers ed in water or ex posed to rai n, and this ma y lead to not wor k properly.
9、Do not use f lammabl e gases in vi olation o f this warn ing may caus e an explos ion
or fire.
、10 Becau se of this pro duct is inc luded bat tery; ple ase stric tly follo w the instr uction
for oper ation. Oth erwise its m ay cause an exp losion, f ire or perso nal injury.
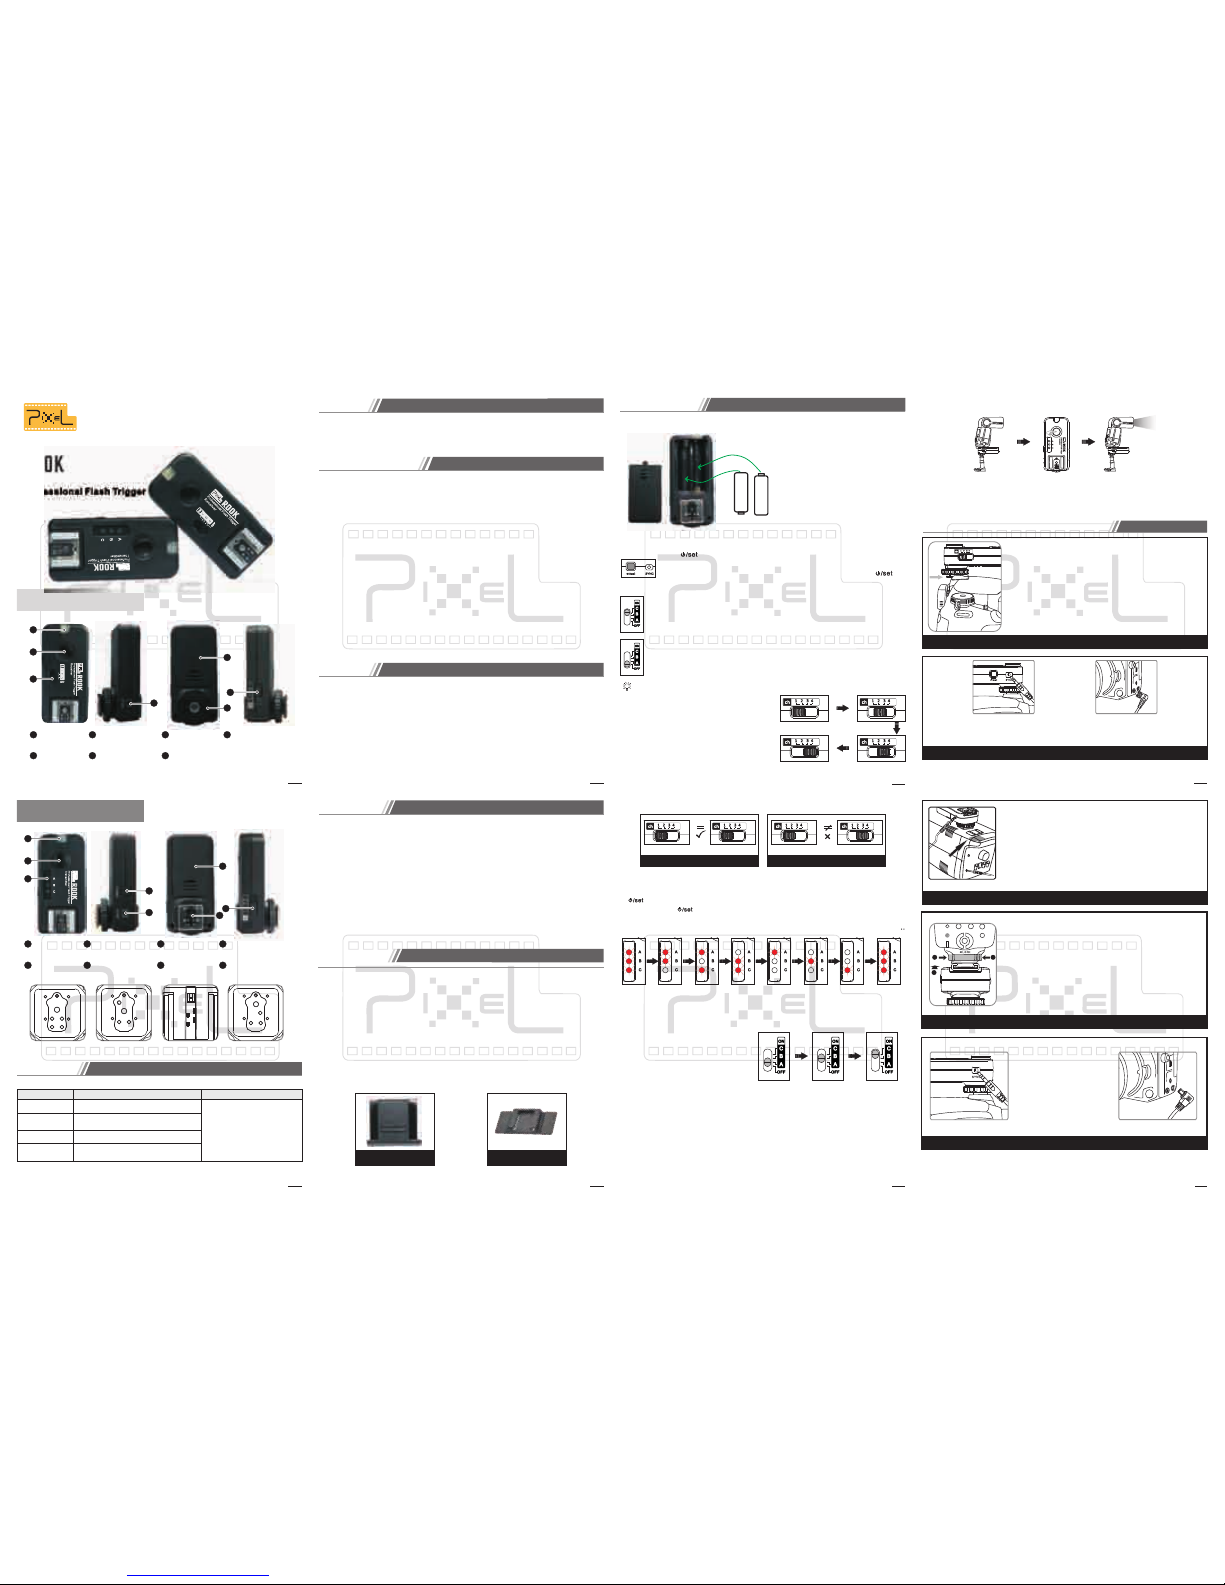
Ove rview
1 ROOK i s a profe ssion al grou ping fl ash tri gger.
2 Trans mitte r hot sh oe supp ort TTL a nd sync w ith off sh oe flas h.
3 Wake- up func tion av aila ble, th e flash w ill be wa ke up aut omati cally.
4 Thro ugh stu dio lig ht to con nect PC o r USB soc ket, th e sync sp eed up to 1 /320s
(Syn c time ma y have li ttle bi t inacu rracy a s diffe rence c amera m odel )
5 Avai lable t o contr ol the sh ootin g or thro ugh mas ter cam era to co ntrol
slav e camer a.
、
、
、
、
、
3
Instruction Manual
ROOK
1
Powe r/gro up
swit ch
Chan el sett ing
Indi cator
Ligh t
Batt ery
comp artme nt
1
1
2
2
3
3
4
5
76
7
Outp ut sock et
4
5
6
Sony se ries ca mera , Minol ta seri es came ra
ROO K Model c ompat ible li st as bel ow:
Trans mitte r(TX)
Rece iver( RX)
Cano n serie s camer a
Nikon s eries c amera , Samsu ng seri es came ra
Fujif ilm ser ies cam era, Pa ntex se ries ca mera
Com patib le
2
1
2
3
4
5
7
6
8
Trigg er poi nt
Grou p Indic ate
Ligh t
Chan el sett ing
Powe r/gro up sett ing
Batt ery
comp artme nt
1 2
3
4
5
7
6 8
Inpu t/out put
sock et
Hot sh oe prot ector
Inc luded I tems
Specification
4
Bat tery In stall ation :
Set t ransm itter a nd rece iver to t he same c hanne l
5
AAA
+
-
AAA
+
-
Plea se loca te the ba ttery a ccord ing
to the i con in th e batte ry comp artme nt.
Cha nnel Se tting :
Set transmitter and receiver to the
same channel
1.Slide the switch to change channel.
2.Channel changing as:
CH1→ CH2→ CH3→CH4 (as figure)
CH
1
CH
4
CH
2
CH
3
For a lo ng time n on-us e, plea se turn ed off th e trans mitte r and the r eceiv er's
powe r and rem ove the b atter y.
* Tran smitt er and re ceive r must be s et as the s ame cha nnel.
* A、B、C LED li ght on me ans the c urren t setti ng will b e worki ng with
tran smitt er.
4. No ac tion wi thin 2 se conds , the gro up LED li ght wil l off.
*Rec eiver o nly get s ignal f rom tra nsmit ter whe n the cur rent gro up
set ting of re ceive r is incl uded in t he vali date gro up of tra nsmit ter.
Testi ng:
1. Ch eck pow er on or off.
2. Ch eck the f requen cy of tra nsmit ter and r eceiv er.
3. Ch eck the g roup set ting of t ransm itter a nd rece iver.
6
Gro up sett ing:
Gro up sett ing on t ransm itte r
1.wa ke up gr oup di splay, a nd show t he cur rent co ntro lling g roup . Sligh tly pr ess
[ ] to sh ow grou p mode w hich sh owin g the cur rent w orkin g grou p.
2. Pr ess ag ain [ ] to ch ange g roup.
3. Gr oup ch angin g a s :
CH
1
CH
1
CH
1
CH
3
Gro up sett ing on re ceive r
Put Po wer/g roup swi tch at A/ B/C,
and th en turn o n the rec eiver s.
3.Tri gger th e Flash .
1.In sert fl ashgu n on the re ceive r and tur n on the fl ash pow er; set t he flas h
inde x as mini mum.
2.Fu ll pres s the tes t butto n
1. Tig ht the Ho t shoe wi th scre w, and the n turn ri ght to
rele ase.
2. Plu g the tra nsmit ter on th e camer a hot sho e.
3. Tig ht the Ho t shoe wi th scre w, and the n turn
left t o lock.
Con nect th e trans mitte r to came ra hot sh oe
1. Plug PC-3.5 connecting cable to transmitter 3.5mm socket.
2. Plug PC-3.5 connecting cable to camera PC socket.
Con nect tr ansmi tter to c amera v ia PC-3 .5 conn ectin g cable .
7
How to connect the relative photo equipment
Testi ng the re ceive r signa l as belo w:
(2(1
1. Split the protecting film on the receiver holder and stick it on
the studio light as figure.
2. Mount the receiver on the receiver holder.
3. Use 3.5-3.5 or 3.5-1/2 according to studio light socket.
4. Plug 3.5mm side into the transmitter input.
5.Insert another side into the studio light socket.
Con nect th e Receiv er to Stu dio Lig ht
2
31
1. Unl ock the S peedl ite Fla sh lock ing scr ew.
2. Ins ert th e Speed lite Fl ash into t he rece iver ho t shoe
as fig ure.
3. Acc ordin g to the fl ash loc king me thod to l ock the
spee dlite o n recei ver.
Con nect th e Receiv er to Spe edlit e Flash
1.Pl ug shut ter con necti ng
cabl e (3.5m m side) i nto the
rece iver so cket.
2.Pl ug shut ter con necti ng
cabl e (came ra side ) into
the ca mera sh utter r eleas e
sock et.
Conn ect Rec eiver t o Camer a
8
(1 (2
Caut ions befo re use
Rece iver ho lder
for C anon
for N ikon
for S ony
for O lympu s/
Pan asoni c
For So ny
for Ol ympus /
Pana sonic
For Ni kon
For Ca non
Mode l
Abo ve bran d name is r egist ered by t he resp ectiv e owner.
Qrig inal sp eedli te,
stud io ligh t,Met z,
SUNPA K,Sig ma
Olym pus/P anaso nic ser ies cam era
Fea ture
Pre pare to u se
*PC -3.5 co nnect ing cab le shou ld be pur chase d separ ately.
( )Transm itter
Transm itter Recei ver Transm itter Recei ver
*Th e shutt er cabl e shoul d be purc hased s epara tely.
Wire less Fr equen cy Syst em:
Ope ratin g Dista nce:
Shu tter Sy nc Spee d:
1/2 00S
Gro up sett ing: 3 diff erenc e group ( 7 combi natio ns)
Wire less Ch annel : 4
Stan d-by Ti me 250 h ours
: :
Tra nsmit ter: 5y ears
Powe r:
AAA x 2
Weig ht: Trans mitte r 48.5g ( witho ut batt ery)
Rece iver 44 .0g (wi thout b atter y)
F SK2.4 GHz
up to 2 00m
Rece iver
Ple ase che ck the pa ckage a nd make su re the be low ite ms are
alr eady i n the box. If the re's missed anyt hing, pleas e con tact w ith t he
dis tribu tor dir ectly.
ROO K
ROO K Receiv er
1pc
1
Stu dio lig ht cabl e (3.5- 3.5)
pc
Stu dio lig ht cabl e(3.5 -1/2) 1pc
Rec eiver h older : 1pc
Hot s hoe pro tecto r:
2pc
Man ual: 1pc
Tran smitt er 1p c
A、B
、
C
→
A 、B→A 、C → B 、C → A
→
B
→ C → A、 B、C
Turn po wer on/ off:
Trans mitte r:
(Tur n
pow er off)
Hold [ ] 2 s econd s to turn o n trans mitte r, then g roup LE D light o n
for 2 se conds , and sho w which c urren t light . It can be u sed tri gger th e
flas h and con trol sh utter . You coul d turn off p ower by p ressi ng [ ]
2 seco nds aga in, the n [LED li ght] bl ink red t hree ti mes.T hen pow er off.
Swit ch [Pow er/gr oup swi tch] to A o r B or C to tur n on rece iver
powe r; the re ceive r will be s tayed i n the cur rent gr oup and t he
LED li ght bli nk as red e very 2 se conds .
Swit ch [Pow er/gr oup swi tch] to O FF; the r eceiv er powe r is off,
and th e light s top bli nking .
(Tur n
pow er on)
Hot sh oe foot w ith
scre w
Indi cator
Ligh t
Shutter release/test
button
Shutter release/test
button
Page 2
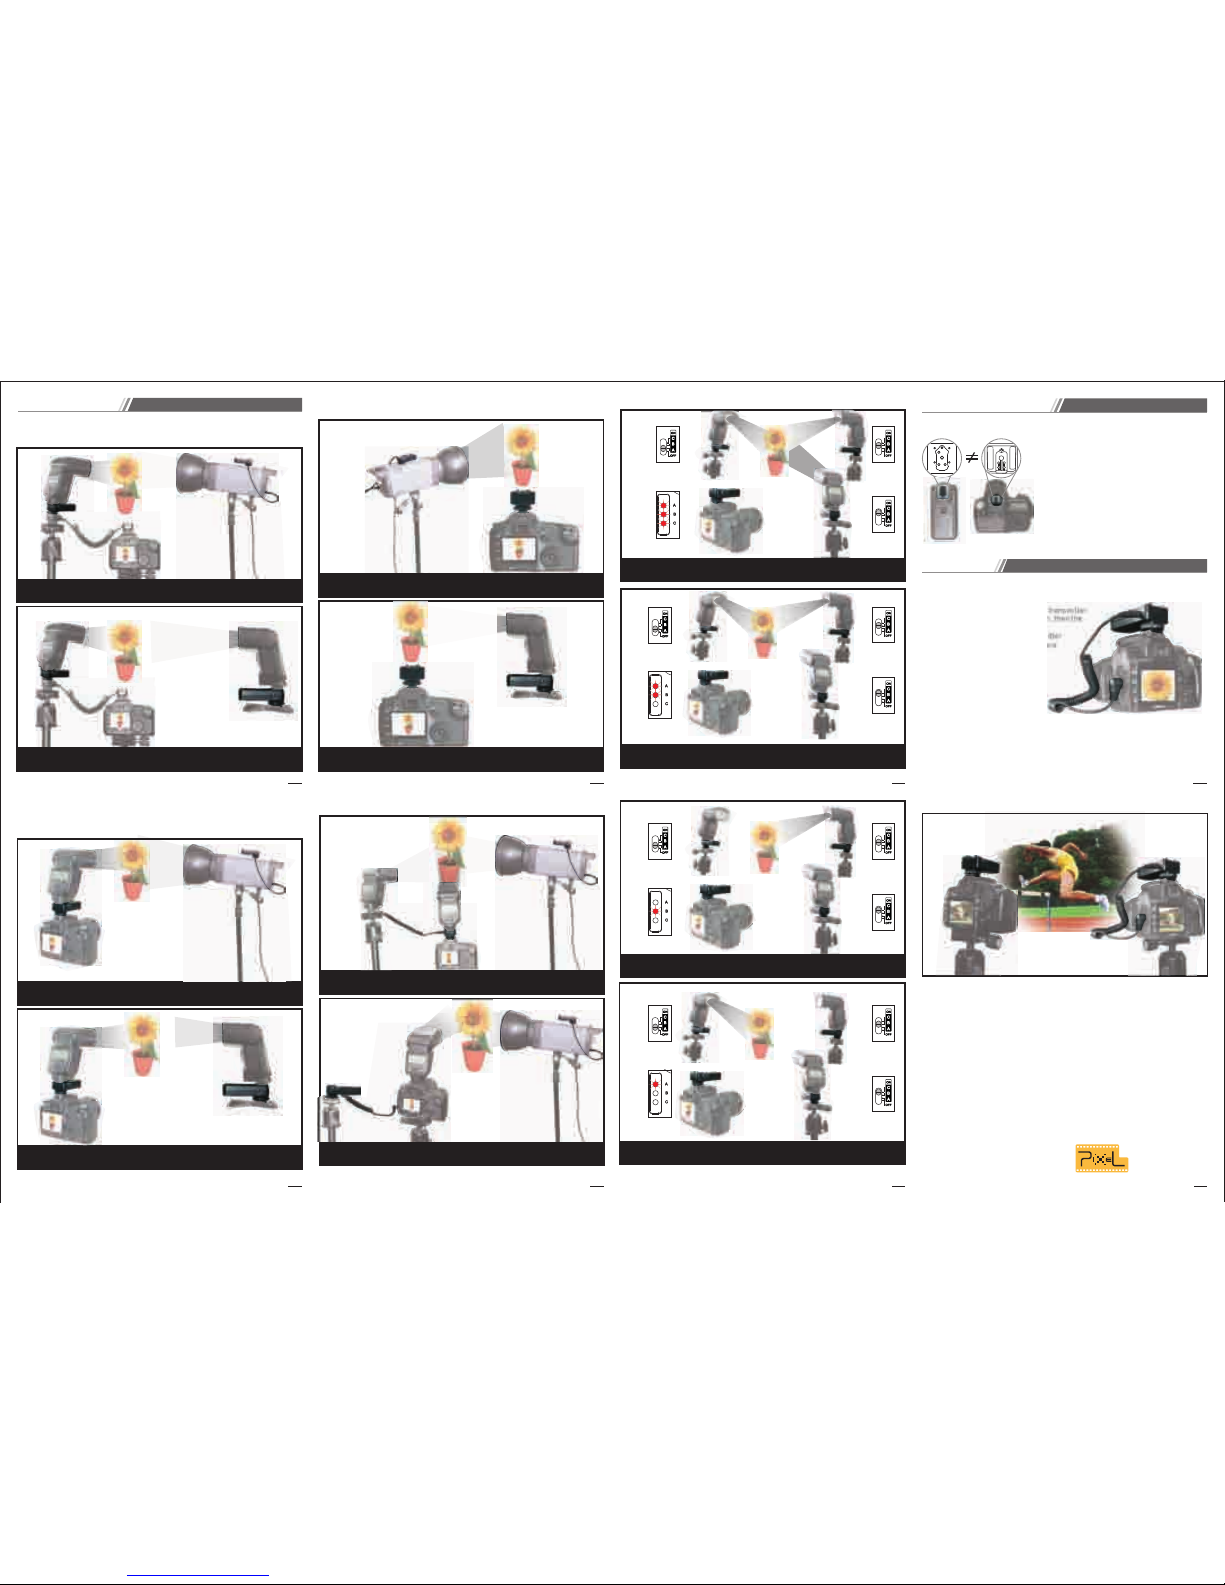
Spee dlite f lash T TL + Spee dlite f lash tr igger re mote co ntrol
By usi ng of the T TL off-c amera c able to t rigge r the off -came ra flas h when
the Sp eedli te TTL fla sh work s.
9
10
11
12
Spe edlit e flash T TL + Spee dlite f lash tr igger r emote c ontro l
OFF ON
13
14
16
Tran smitt er
Con trol sh ootin g
* Some C amera s won't s hoot if t he came ra cann ot focu s even ge t shoot ing sig nal,
so ple ase adj ust the c amera t o “MF”
Slig htly pr ess the t ransm itter b utton .
Non- compa tible m ode usi ng meth od
is sam e as comp atibl e mode.
15
1. Sli ghtly h alf-p ress re lease b utton , trans mitte r
and re ceive r indic ate lig ht as Gre en, the n the
came ra star ting fo cus.
2. Ful ly pres s relea se butt on, tra nsmit ter
and re ceive r as Red, t hen the c amera
star ting sh oot.
Speed lite flash TTL + off-c amera flash tr igger remote co ntrol
The tr ansm itter s uppor ts the Sp eedli te flas h and wil l not ham per TTL
com munic ation o f camer a. Furt hermo re, it wi ll send t he sync s ignal a nd
tri gger th e off-ca mera fl ashgu n meanw hile.
Speed lite fla sh TTL + Studi o light off- camera fl ash trig ger remot e control
Spe edlit e flash T TL + Spee dlite f lash tr igger r emote c ontro l
Stud io ligh t off-ca mera fl ash tri gger re mote co ntrol
Spe edlit e flash t rigge r remot e contr ol
Use under inc ompatible mode
When t he tran smitt er is inc ompat ible wi th the ca mera, y ou shou ld use it
as bel ow:
Remo te cont rol
Mas ter cam era con trol th e slave c amera
Cam era on to p TTL, PC o ff-ca mera sy nc trig ger.
Off -came ra flas h remot e contr ol
Tran smitt er inst alled o n camer a hot sho e, and tr igger t he flas h light .
Fig ure Exp laina tion
Fla sh grou ping re mote co ntrol
Half -pres s the cam era sho oting b utton , maste r camer a and all s lave ca meras
star ting fo cus. Fu lly-p ress th e camer a shoot ing but ton and a ll the ca meras s tarti ng
shoo t.
Now you can start to use incredible PIXEL product. If you have any
question,you can contact the local dealer or visit to http://www.pixelhk.com.
This manual information is updated at May 1, 2011. If you want to use this
product combined with others, which published after this date; please consult
with the PIXEL dealer for further information.
*As camera has difference reaction time, then shooting time will be little
difference.
*Some Cameras won't shoot if the camera cannot focus even get shooting
signal, so please adjust the camera to “MF”
*The camera cannot focus if the transmitter is not specific for the camera.
*The s hutte r cable s hould b e purch ased se parate ly.
Spee dlite fl ash TTL + Stu dio ligh t off-cam era flas h trigge r remote co ntrol
Spe edlit e flash T TL + Spee dlite f lash tr igger r emote c ontro l
Rec eiver A、 B、 C wi ll oper ate whe n trans mitte r set at A、 B、 C.
Rec eiver A、 B wi ll oper ate whe n trans mitte r set at A、B .
Rec eiver B w ill ope rate wh en tran smitt er set at B .
Rec eiver A wi ll oper ate whe n trans mitte r set at A.
2611 21 V10. 01
Sla ve Came ra
Mas ter Cam era
Rec eiver
*Ca mera Sh utter c able is p urcha sed sep arate ly.
Trans mitte r Input /outp ut trig ger off -came ra flas h and out put fla sh.
Trans mitte r Speed lite TT L, Inpu t/Out put syn chron ous Trig ger,
off- camer a light sy nchro nous Tri gger
*If th e shoot ing int erval t ime or 2 sh ootin g times
is lon ger than 30 s, you nee d t o press bu tton
agai n, or it ma y miss fl ash.
 Loading...