

Page 1
Http: // www.pix elhk.com
PIXEL .INC
Thi s ma nu al is cur re nt u pd ate of 1s t Au gu st , 2010.
Pleas e co nt ac t to PI XE L se rv ic e cen te r fo r fu rt her
infor ma ti on , if in te re st in g of th e co mb in in g usa ge w it h
produ ct s re le ase d af te r th is d ay.
Wired Live View Remote Control
LV-1 22
En
中文
Made in China
50150 V 10 .0 2
Page 2
Contents
Over view
Caut ions be fore us e
LV-12 2 fea tures
Incl uded it ems
LV-12 2 the n ame of ea ch part
How to u se LV- 122
Inst all bat tery
Conn ectin g Devic e
Use LV- 122
Live Vie w
Shoo ting
Devi ce char ge
PIXE L LV-122 Spe cific ati on s
01
02
03
04
05
08
08
09
11
12
13
20
21
En
Page 3
Overview
Firs t o f a ll, than k y ou for purc has in g the hig h- per forma nce PIXE L produ ct LV122, which c an monit or the s cop e of cam era lens by wire d rea l-tim e c ontro l, Which
supp ort sin gle ,1s t co ntinu ous , [ BU LB] and del ay shoo ting. I t wi ll be goo d as sis t on
the c ondit ion that you ar e i nconv enien t to wait for shoo ting a nd get the phot o f rom
came ra lens .
Pleas e com plete ly re ad th is p rod uct a nd c ame ra ma nuals b efore u se th is pr oduct ;
make sure you can famili ar to cont rol a nd us e it corre ctly. You can e asily to
unde rstan d “how to us e” and “c on dit ion” fro m this in struc tion ma nual.
1
Cautions before use
Make sure the camera and LV-122 are powered off before install device.
As this is an electronic product accessory; some of the environment causes may affect the
working. However this is hardly ever to get this situation.
When connected the remote cable with the device, do not pull the wires.
This product can't be strong vibration, or may lead to product failure.
For a long time non-use, please turned off the product’s power and remove the battery.
Do not put it in high temperature, such as a closed car under direct sunlight, the control panel
and other high-temperature areas.
Keep dry, do not use wet hand contact with the product, the product must not be immersed in
water or exposed to rain, and this may lead to not work properly.
Do not use flammable gases in violation of this warning may cause an explosion or fire.
Because this product include battery, regarding how to use and charge battery, please
operate it strictly according to related rules, otherwise may cause explosion, fire or physical
injury.
EnEn
2
Page 4
LV-122 features Included items
LV-122 getti ng t he i mag e fr om l ens, we guara ntee the shoo tin g ra nge and resul t
same a s the cam era.
Real -time m onito r the s ce nes c aptur ed by cam era len s.
Supp ort sin gle, 1s t con ti nuo us, BUL B and del ay shoo ting.
With 3.0 -inch TFT disp lay and the reso lutio n is 960×2 40, which can adjus t the
brig htnes s.
Use 3.7 V 120 0mA h cha rgeab le lithi um batte ry wh ich is e ner gy-sa ving and
envi ronme ntal pr ote ct ion .
With great compati bilit y whi ch can change connect ing cab le to be suitabl e for
differ ent cam eras.
3
Please check all included items a fte r o pen the pac kin g, and PIXEL LV-1 22
with the fol low ing i tem s:
1
LV-122 1PC
2
BL-6 F lith ium bat tery 1P C
3
AC-5 E
4
USB ch arging cable
5
Conn ectin g cable C L-1 7 1PC
6
Manual 1P C
7
1PC
Char ger
1PC
EnEn
中文
4
Page 5
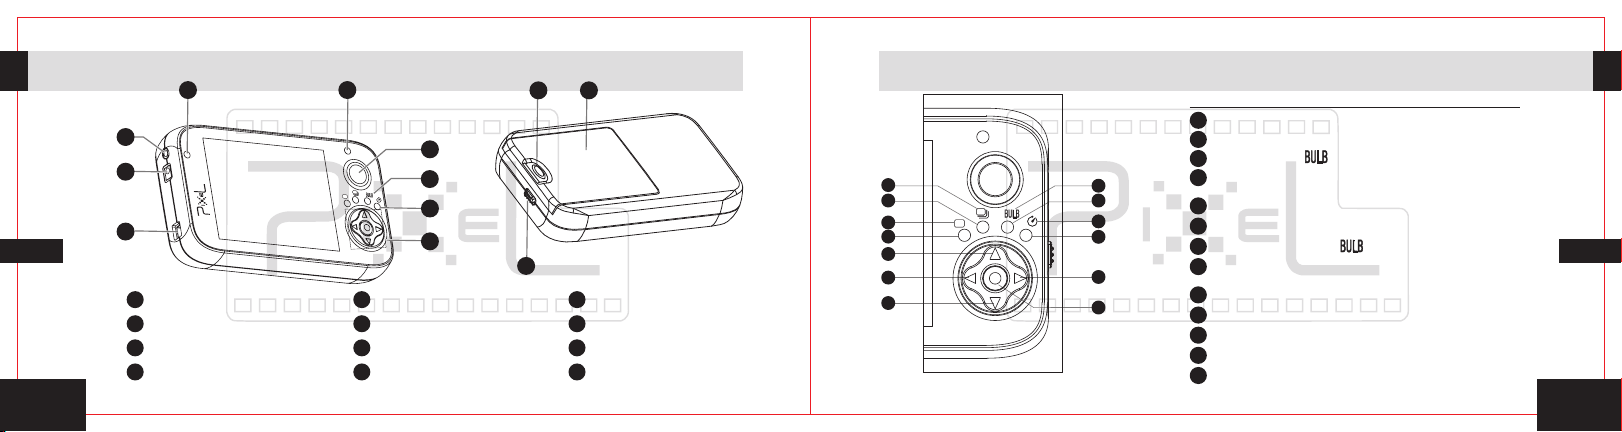
The name of each part
9
L
V
-
12
1
2
3
1 2
Video ou tput so cket
4
Func tion bu tton
Shut ter rel ease bu tto n
7 8 9
Batt ery hat ch
10 11 12
5
2
8
7
6
5
4
Char ging so cket
Func tion in dicat or
Shut ter ind icato r
Lock r eleas e butto n
12
10
F
OF
ON
b
f
a
e
c
g
d
h
i
j
m
3
Mini U SB sock et
65
Func tion ic on
Char ge indi cator
Powe r switc h
l
k
Func tion ic on, ind ica to r and b utton
Icon f or sing le shoo t
a
Icon f or 1st co ntinu ous s ho ot
b
Icon f or [ ] shoo t
c
Icon f or dela y shoot
d
Indi cator f or sing le sh oo t
e
Indicator for continuous shoot every second
f
g
Indi cator f or [ ] shoo t
Indi cator f or dela y sho ot
h
Scre en inte nsity +
i
Button for right move
j
Scre en inte nsity -
k
Button for left move
l
m
On/o ff f or scre en
EnEn
6
11
The name of each part
Page 6
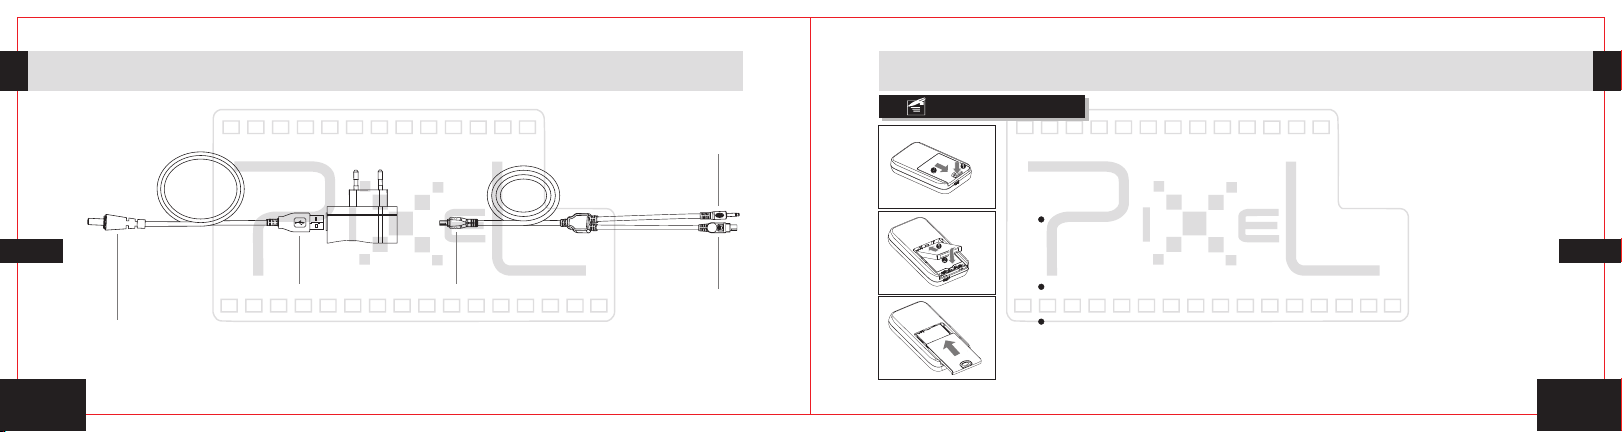
The name of each part
Char ge r
AC-5 E
USB pl ug
Char ge plug
Mini U SB p lug
CL-17 Connecting cable
Shut ter plu g
AV plug
How to use LV-122
Install battery
1. Press the loc k re lea se b utton on th e en d of bat tery ha tch, and
slid e batte ry hatc h to op en i t.
F
F
O
ON
2. Install the ba tte ry in p lace according to the fi gur e.
Put on e en d of the ba tt ery wit h me ta l conta ct w hich wi ll m atch wi th
meta l pr obe in th e ba ttery s oc ket and the n pr ess the o th er end.
3. Clo se the ba ttery h atch.
BL-6 F l it hium b at tery sta nd by time o ve r t han 500 h ours. Working
time m or e than 4 ho ur s when op en t he LCD disp la y.
When th e batt er y powe r i s low, t he cha rg e indi ca tor ke ep s twin kl e,
Wi re d l iv e v ie w r em ot e c on tr o l ne eds t o r ep lace batte ri es or
rech ar ge as soo n as p ossib le t o ensure no rm al shoo ti ng.
EnEn
7
8
Page 7
How to useLV-122
LV
-
122
How to useLV-122
Connect with camera
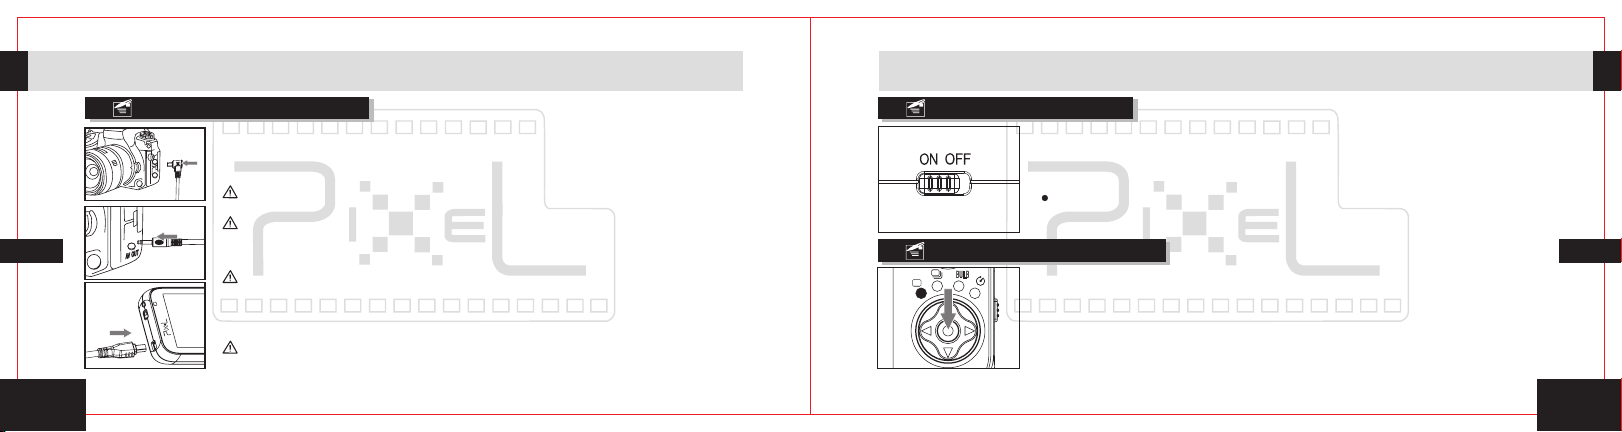
1. Make sure camera and remote are turned off. Open camera shutter
plug protective cover and put the shutter plug of connecting cable CL17 in place, then make sure it has been fixed firmly.
For most of camera shutter socket, there is mis-plug interface, please note
insert direction so as to avoid damage to shutter socket and cable socket.
Differ en t CL-17 cab le s hutte r pl ug will m at ch with d iffe re nt came ra .
2. Open AV socket protective cover and insert connecting cable CL-17 AV
plug into AV output socket in camera, then make sure it insert firmly.
AV output and external shutter use the same interface for some cameras,
so you don't need this step.
3. Insert Mini USB plug of connecting cable CL-17 into Mini USB socket
of Wired live view remote control and make sure it inserts fully.
9
There is mis-plug interface in Mini USB plug of CL-17 cable, please note
insert direction so as to avoid damage to the Wired live view remote
control socket and cable plug.
Turn on the power
Slid e Power switch to [ON ] to turn on wired Live vie w remot e
cont rol (LV-122 ) and to [O FF] t o tu rn off it .
When b at tery po we r is low, th e ch arge indi ca tor wil l fl ash red .
Turn on display screen
When you turn on wired Live v iew remo te con trol, the defa ult
mode of LC D is off and you can tu rn it on by pre ssing LC D
butt on. You can t urn off b y pr ess ing it ag ain.
EnEn
10
Page 8
11
LV-122
How to use LV-122
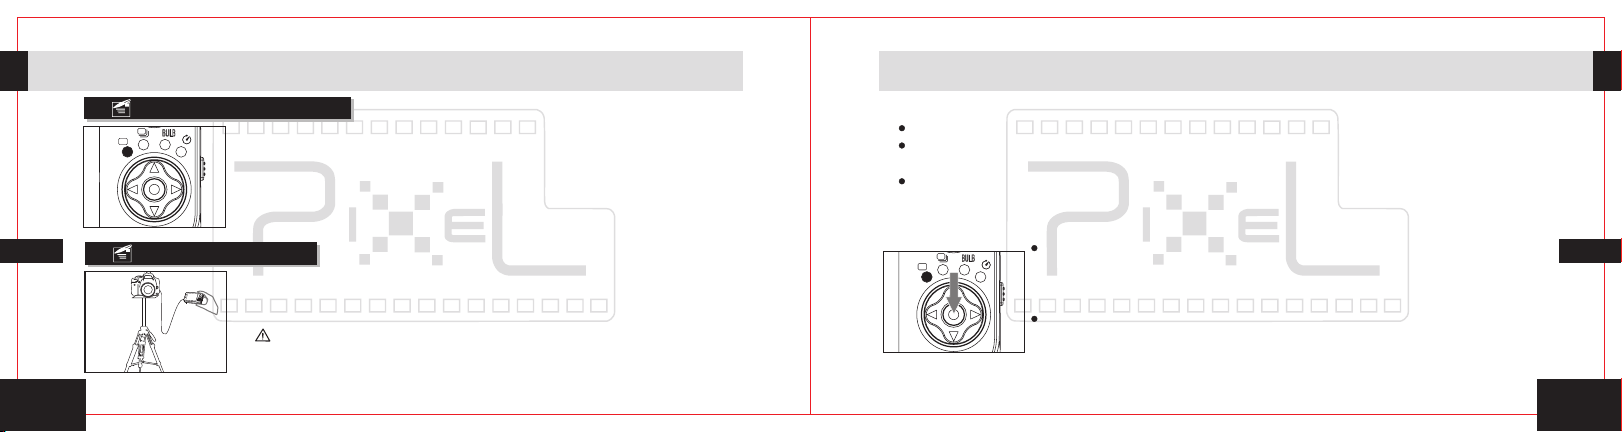
Adjust LCD b rig htn ess
Afte r tur n on the L CD, i t d ef aul t to be da rkest brig htnes s.
Incr ease brig htnes s by pre ssing the but ton of L C D b right nes s
+, decr eas e bright ness by pre ssi ng the butt on of LCD
brig htnes s -. Ther e is fo ur s tep o f brigh tness .
How to use LV-1 22
In some s pecial occasio n, using the wired li ve view remote
control along with elevating tripod, you can shoo t wi th e nviable
altitude and angle.
When us e the w ired l ive vi ew rem ote co ntr ol alo ng with
elev at ing tr ipod, pleas e make sure c onnec ti ng t he m fi rm ly s o as
to avo id t hat the c am era fal l off fr om e levat in g tripo d.
Live View
1. Ope n the Liv e Vi ew mode o n cam era.
When you want to real-time monitor, you have to turn on the monitoring function(Lv)of camera.
Please read the camera instruction for turn on the live view mode, because there is difference
turn on method for each camera.
Because of some camera without real-time monitoring function, you couldn't real-time monitor
when you use this product with these cameras, you can preview the photo after shooting.
2. Ope n the dis play of t he .Wire d live vi ew remo te co nt rol
Afte r yo u conne ct t he with c am era,
turn on i t and o pe n th e moni to ring f uncti on , at th is m om ent pl ease
pres s the screen dis pl ay but ton of the wir ed liv e view re mot e
cont rol, it w ill dis pl ay the scen e fr om came ra .
If t he ca me ra wi thout r eal-t im e m on itori ng func tion, the scree n of
the wired live view remo te co ntrol will disp la y the p revie w pic tu re
of las t sh ootin g, o r the con te nt of camer a at t hat mom en t.
wire d live vi ew re mote co ntrol
EnEn
12
Page 9
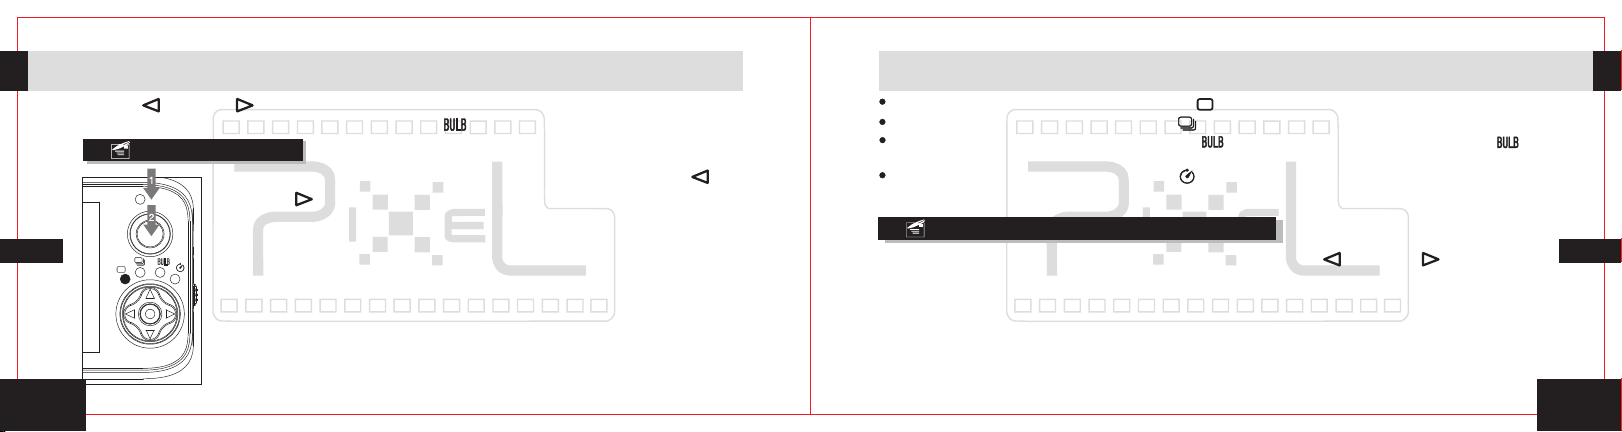
Shooting
By left [ ] or right [ ] movingorto set shooting mode, the shooting mode is as following:
single shooting, continuous shooting per second, [ ] shooting and delay shooting.
Single shooting
1. When th e W ired liv e vie w r emote cont rol is o n, by le ft [ ] or
righ t [ ] mo ving to make the i ndica tor o f s ingle shoo ting on. A t
this momen t, the shutt er rel ease b utton has the fu nctio n of
sing le shoo ting.
2. H alf-p res s the s hutte r rel ease bu tton, the sh utt er indi cate light
on a s gre en co lor. The c amera is f ocusi ng st atus until rele ase o r
full p ress th e butto n.
3. F ull pre ss th e shutt er re lease b utton , the s hutte r ind icate l ight
on as re d color. The c ame ra i s tak ing pic ture.
Shooting
Make s ur e set the c am era fun ct ion to be [ ].
When t he c amera f un ction i s se t to be [ ], may co nt inuou s sh ootin g.
When the cam er a functio n is set to b e [ ],th e came ra w il l shoot based on[ ]
func ti on, may c au se unde re xposure o r ov erexp os ure.
When t he c amera f un ction i s se t to b e [ ], the ca me ra will p ro cess de la y shoot in g.
1sec continuous shooti ng
1. When th e is o n, by le ft or r ight movi ng o r
to make the ind icato r o f c ontin uous sho oting per sec ond on. At t hat mome nt the
shut ter rel ease bu tto n is i n the s tatus o f conti nuous s hooti ng per se cond.
2. H alf-p res s the s hutte r rele ase bu tto n, the shutt er ind icate lig ht on a s gree n colo r.
The ca mera is f ocusi ng st at us un til rel ease or f ull pre ss the bu tton.
Wire d liv e v iew r emote cont rol [ ] [ ]
EnEn
13
14
Page 10
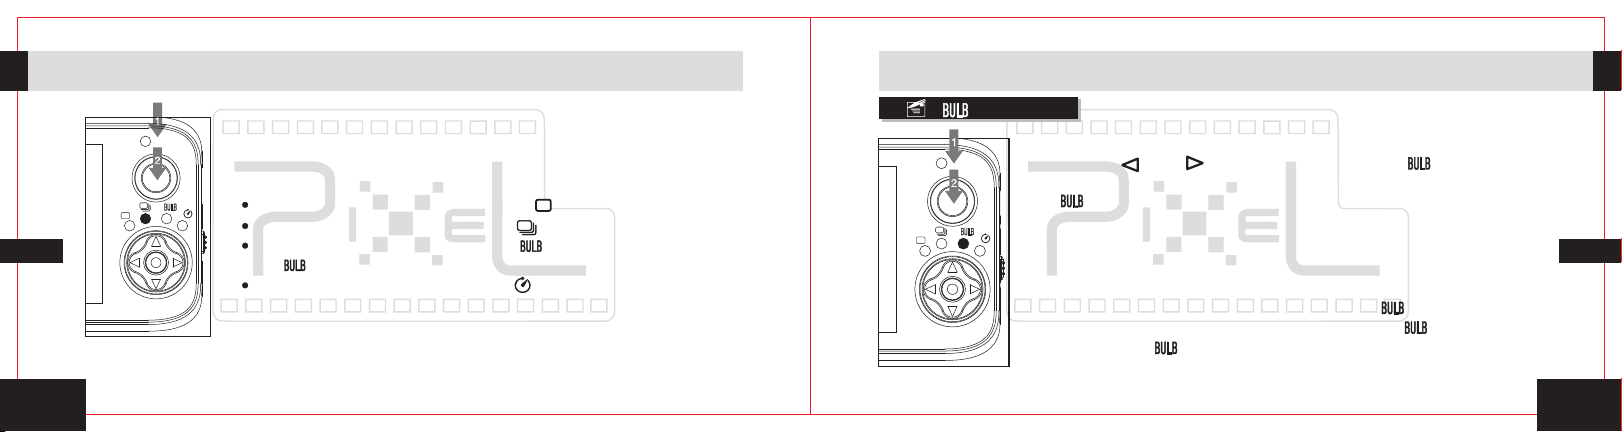
Shooting
Shooting
15
3. Full press then hold the shu tter relea se butto n, the shu tter
indi cate lig ht on red color as each second. The cam era keep
shoo ting once as each second until ful ly r ele as e the shu tter
butt on.
Make sure set the camera function to be [ ].
When the camera function is set to be [ ], may continuous shooting.
When the camera function is set to be [ ],the camera will shoot based
on [ ] function, may cause underexposure or overexposure.
When the camera function is set to be[ ], the camera will process delay
shooting.
[ ] shooting
1. When the wir ed li ve view remot e con tro l is on, b y l eft o r rig ht
[ ]sho oting .
2. Hal f- pre ss t he s hut te r relea se b utt on , the shutt er indi cate ligh t
3. Fu ll p ress t he s hutte r rele ase butto n, the shu tter i ndica te l ight
4. Pres s the sh utter re lease bu tton again , s top [ ] si ngal, th e
movi ng [ ] or [ ] to make the indi cator of [ ] shoot ing o n,
at tha t momen t the shu tter re lea se butt on is in th e statu s of
on as gr een col or. The c amera i s focus ing s ta tus u ntil re lease
or ful l press t he butt on.
on as re d color. The c ame ra i s ent ering t o [ ] mode.
came ra stop [ ] m ode.
EnEn
16
Page 11
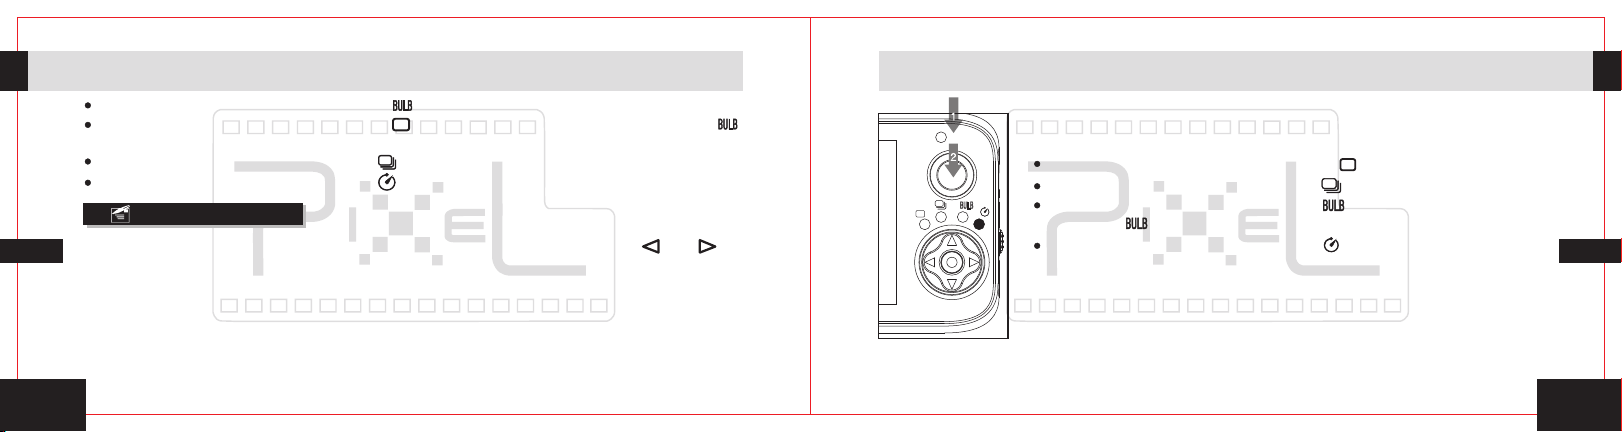
Make sure set the camera function to be [ ].
When the camera function is set to be [ ], the camera only shoot one time but not [ ]
shooting.
When the camera function is set to be [ ],the camera will be continuous shooting.
When the camera function is set to be [ ], the camera will l will be delay shooting one time.
Delay shooting
1. W hen the is on , b y lef t o r rig ht movin g [ ] or[ ] to
make the ind icato r of delay shoo tin g on, at t hat m oment th e shu tter relea se bu tto n
is in th e statu s of dela y sho ot ing .
2. Hal f-pre ss the sh utt er r ele ase but ton, th e shutt er indi cate li ght o n as g ree n color .
The ca mera is f ocusi ng st at us un til rel ease or f ull pre ss the bu tton.
wire d l ive v iew remo te co ntr ol
ShootingShooting
3. F ull p ress th e shu tter relea se bu tton, the sh utter indi cate light
flas h the red c olor a s 8 t imes. Th e came ra t akes t he pic ture as
the la st red li ght fla shi ng .
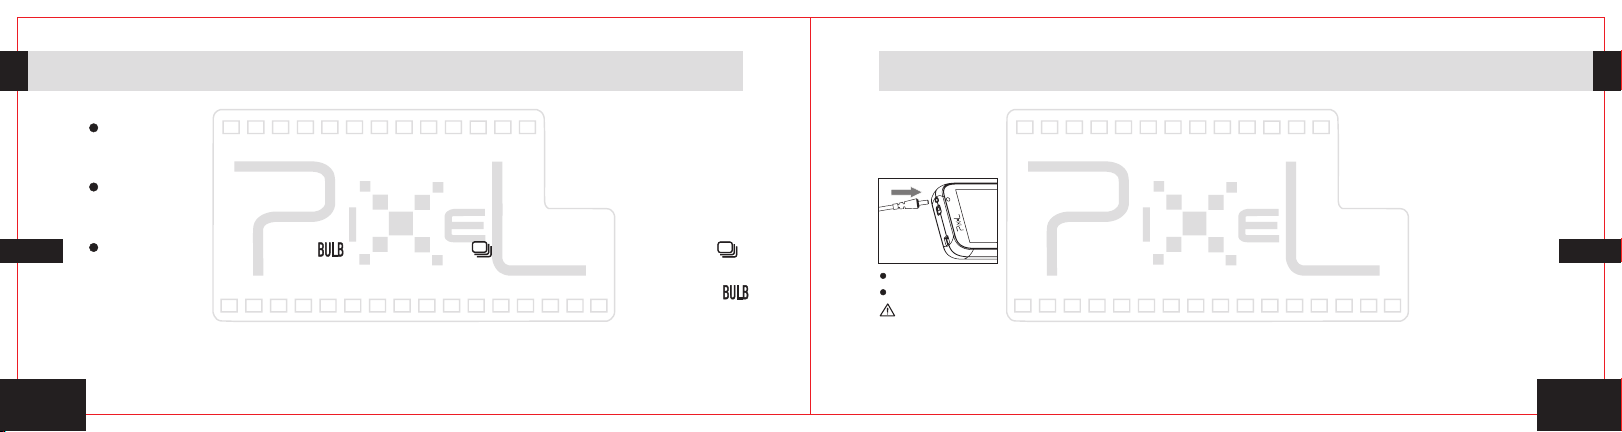
Make sure set the camera function to be [ ].
When the camera function is set to be [ ], may continuous shooting.
When the camera function is set to be [ ],the camera will shoot
based on [ ] function, may cause underexposure or overexposure.
When the camera function is set to be [ ],the delay time of delay
shooting will increase.
EnEn
17
18
Page 12
Shooting
L
V-122
When s hooti ng shou ld pa y at ten tion to t he foll owing i tem:
When the ca mera lens fo cu s func tio n is set to be [ MF ],the camera will not
exec ute fo cusin g a ction if half- press the shut ter re lease bu tton o f t he view
rece iver.
When the camer a le ns foc us fun ction is set to be [ AF ], even recei ving the
shoo ting s ignal the came ra wil l not sho ot at t he momen t when most of c amera
don' t seize f ocus.
The di ff erenc e bet we en [ ] fu nctio n and [ ] fun ction a re as f ol low ing: [ ]
func tion is , the s hutte r relea se butt on is pre sse d fully a nd keep o n, shoo t eve ry
seco nd and st op shoo tin g un til t he shut ter rel ease bu tton wa s relea sed. Wh ile [ ]
func tion is, the ca mera wil l star t shooti ng whe n the shu tter releas e button is
pres sed ful ly unti l pre ss i t aga in, the s hooti ng will s top.
19
Device charge
When the battery power of device is low, the indicator
transmitter or the charge indicator of the view receiver) will flash red, you should replace
battery or recharge.
There are a AC charger and a USB charger in the attachment which can charge the device
with these two modes.
1. Insert charge plug of charger into the charge socket of the device and
make sure it insert fully. And insert into AC power with other end of
charger and turn on device, after about four seconds, the indicator (the
power indicator of the view transmitter or the charge indicator of the
view receiver) will flash green and start to charge the battery.
The indicator will not flash when charge on the condition you turn off the device, but it can be charged.
You also charge the battery by USB included in the pack.
Please confirm the input voltage of charge is coherent with local voltage, otherwise may cause
destroy of product even estate lost or physical injury .
2. After charge, the indicator
indicator of the Wired live view remote control) will keep green showing it charge fully.
(the power indicator of the view transmitter or the charge
(the power indicator of the view
EnEn
20
Page 13
PIXEL LV-122 Specifications
LCD: 3 i nch
Reso lutio n: 960 X 24 0
Stan dby tim e: 5 00 ho urs
Workin g time: 4 hours
Func tion: S ingle , 1sec co nti nu ous , BULB, 3 sec del ay
:
CL-1 7
Conn ectin g cable l ength
Dime nsion s: 1 02mm ×61mm×19mm
En
Weight : 76.5g ( w ith bat tery )
N ow y ou can st art to use uniq ue high -perf orman ce PIXE L pr odu ct LV-12 2.If yo u
have any quest ions, you ca n co ntact the lo cal distr ibuto r. Or visi t the websit e
http ://ww w.pixe lhk .c om.
21
3000mm
 Loading...