

Page 1
Knight TR-331
Flashgun I-TTL Trigger
Product Manual
闪光灯I-TTL同步器
En
中文
Http: // www.pixel hk.com
PIXEL .INC
Mad e in Chin a
st
Thi s man ual is c urren t updat e of 1 Feb , 201 0.
Ple ase con tact to P IXEL se rvic e cente r for fur ther
inf ormat ion, if i ntere sting o f the com binin g usage
wit h produ cts rel eased a fter th is day.
507 03 V10. 02
Page 2

11
12
01
02
03
05
06
07
09
09
09
10
Overv iew
About h igh -pe rform anc e of kn ight TR-33 1
Cauti ons b efo re use
Inclu ded i tem s
Compa tib le de vice
The nam e of ea ch pa rt
Basic o per ati on
How t o use the t ransm itter o f Knigh t TR- 331TX
Ins tall th e batte ry
Con nect th e camer a with Kn ight TR -33 1TX
Rem ove Kni ght TR- 331 TX from t he ca mer a
Tur n on th e Kni ght T R-3 31T X and cam era ’s po wer
En
Contents
Page 3
13
16
17
18
18
19
21
22
23
24
24
25
26
27
1
Fun ction m ode set ting
Set K night T R-3 31TX ch ann el
Tur n on th e LCD b ack light o f Kni ght T R-3 31T X
How t o use the r eceiv er of Kni ght TR- 331 RX
Ins tall th e batte ry
Ins tall th e recei ver
Tur n on th e Kni ght T R-3 31R X power
Fun ction m ode set ting
Kni ght TR- 331 RX chan nel s ett ing
Tur n on th e LCD b ack light o f Kni ght T R-3 31R X
Con nect Kn ight TR -33 1RX wit h the f las h
Rem ove the f lash fr om Knig ht TR-3 31R X
The f lashg un operat ion
PIXEL TR -33 1 Spe cific ati ons
EnEn
Overview
First of all ,Thank you for purchasing the high-performance PIXEL Knight TR-331
product, which enables Nikon cameras and flash execute high-speed synchronous
photography, as well various creative flash functions, it includes the highest performance
I-TTL , BL, FP and other functions, the maximum shutter synchronization speed up to
1/8000s.
Please completely read this product and camera manuals before use this product,
make sure you can familiar to control and use it correctly. You can easily to understand
“how to use” and “condition” from this instruction manual.
And t he devic e sup por t to s et gr oup s(5 g rou ps in t ota l), a lso s upp ort
to co ntr ol ea ch gr oup i ndi vid ual ly, inc lud e 32 fl ash mode s.
Page 4
1
32
Knigh t TR -331 Fe ature s
EnEn
1. Knig ht TR -33 1pr oduct w ill n ot su pport t he cr eat ive CLS s yst em of N ikon
wirel ess f las hgun.
2. Make sure the camera and flash are powered off before install TR-331 device
3. This is electronic products accessories; some of the environment causes may affect
the working. However this is hardly ever to get this situation, don’t worry!
4. This component can’t be strong vibration, or may lead to product failure.
5. For a long time non-use, please turned off the transmitter and the receiver's power
and remove the battery.
6. The batteries should not install anti-polarity; otherwise the batteries may leak
corrosive liquids, heat or explosion.
7. When connected the remote cable with the device, Do not pull the wires.
8. Do not put it in high temperature, such as a closed car under direct sunlight, the
control panel and other high-temperature areas.
9. keep dry, do not use wet hand contact with the product, the product must not be
immersed in water or exposed to rain, and this may lead to not work properly.
1
0. Do not use flammable gases in violation of this warning may cause an explosion or
fire.
Cautions before use
About high-performance of Knight TR-331
Knigh t TR- 331 u se gl obal fr ee FS K 2.4 GHz wir ele ss ch annel ,1 5 sel ect ab le
chann els .
Knigh t TR- 331 s upp ort to se t 5 gro ups a nd each g rou p con sist of m ult ipl e
units . Sup por t to cont rol e ach g roup in div idu ally an d 32 di ffe ren t flash
modes c an be s et at m ost.
Knigh t TR- 331 TX is c onven ien t to us e, You just n eed t o set t he acti ve gr oup
as OFF/ ON.
Knigh t TR- 331 RX is a lso con ven ien t to use, You jus t ne ed to s et gr oup a s
group A, g rou p B, gr oup C, gr oup D o r gro up E.
When us ing t he de vice wi th ot her i ncomp ati ble I -TTL fla shg un , you w oul d
not nee d to se t the u nits, K nig ht TR -33 1 will do t hat a uto matic all y.
Knigh t TR- 331 w ill o nly sup por t SB- 900 and S B-8 00 to f lash in m anu al mo de.
Other f las hgu n model w ill n ot al low to fl ash i n man ual mod e.
The max imu m con trol di sta nce s up to 80M .
Ultra -lo w pow er cons ump tio n for sta ndb y; th e stand by ti me of t ransm itt er
Page 5
1
54
Knight TR-331T X
Knigh tTR -33 1RX
1
2
4
5
6
1 2 3
4
5
1set
1set
2pcs
1pc
1pc
1pc
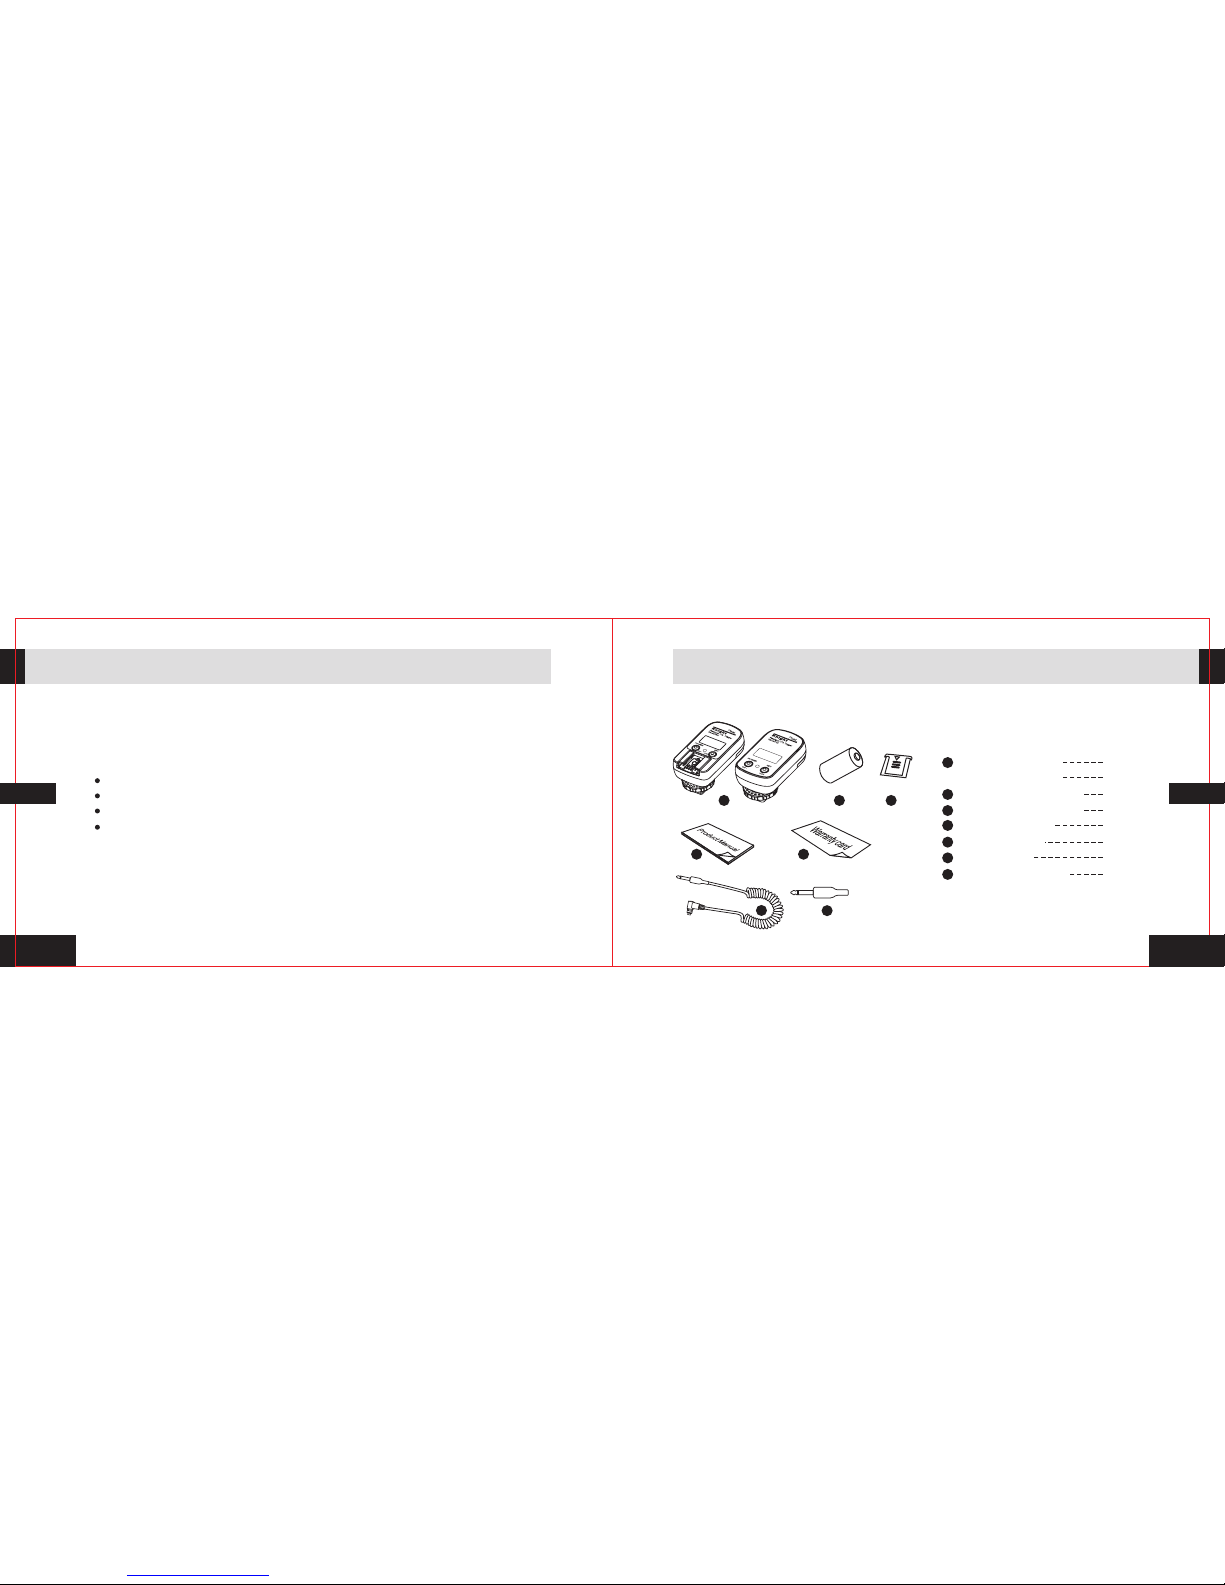
CR-2 Li thi um ba ttery
Produ ct ma nua l
PC+3. 5 cable
War ran ty ca rd
7
7
1pc
3.5 t o 6.3 swi tch plu g
6
3
1pc
Hot shoe prot ective cove r
EnEn
Knigh t TR- 331 TX is m ore tha n 100 0 hou rs, the r ece ive r Knigh t TR- 331 RX
stand by ti me is m ore tha n 500 h our s.
Knigh t TR-331 Functions
Simultaneously control multiple flash or studio lights.
Support for flash’s auto-focus feature.
Sup por t a var iety of shu tte r spe eds , its ma x up to 1 / 8000s .
Thr oug h the P C socket co ntr ols t he studio ligh ts an d oth er brands f las h wit h
PC in ter fac e.
About high-performance of Knight TR-331
Included items
Please check all the below items in Knight TR-331 packaging before use.
Page 6
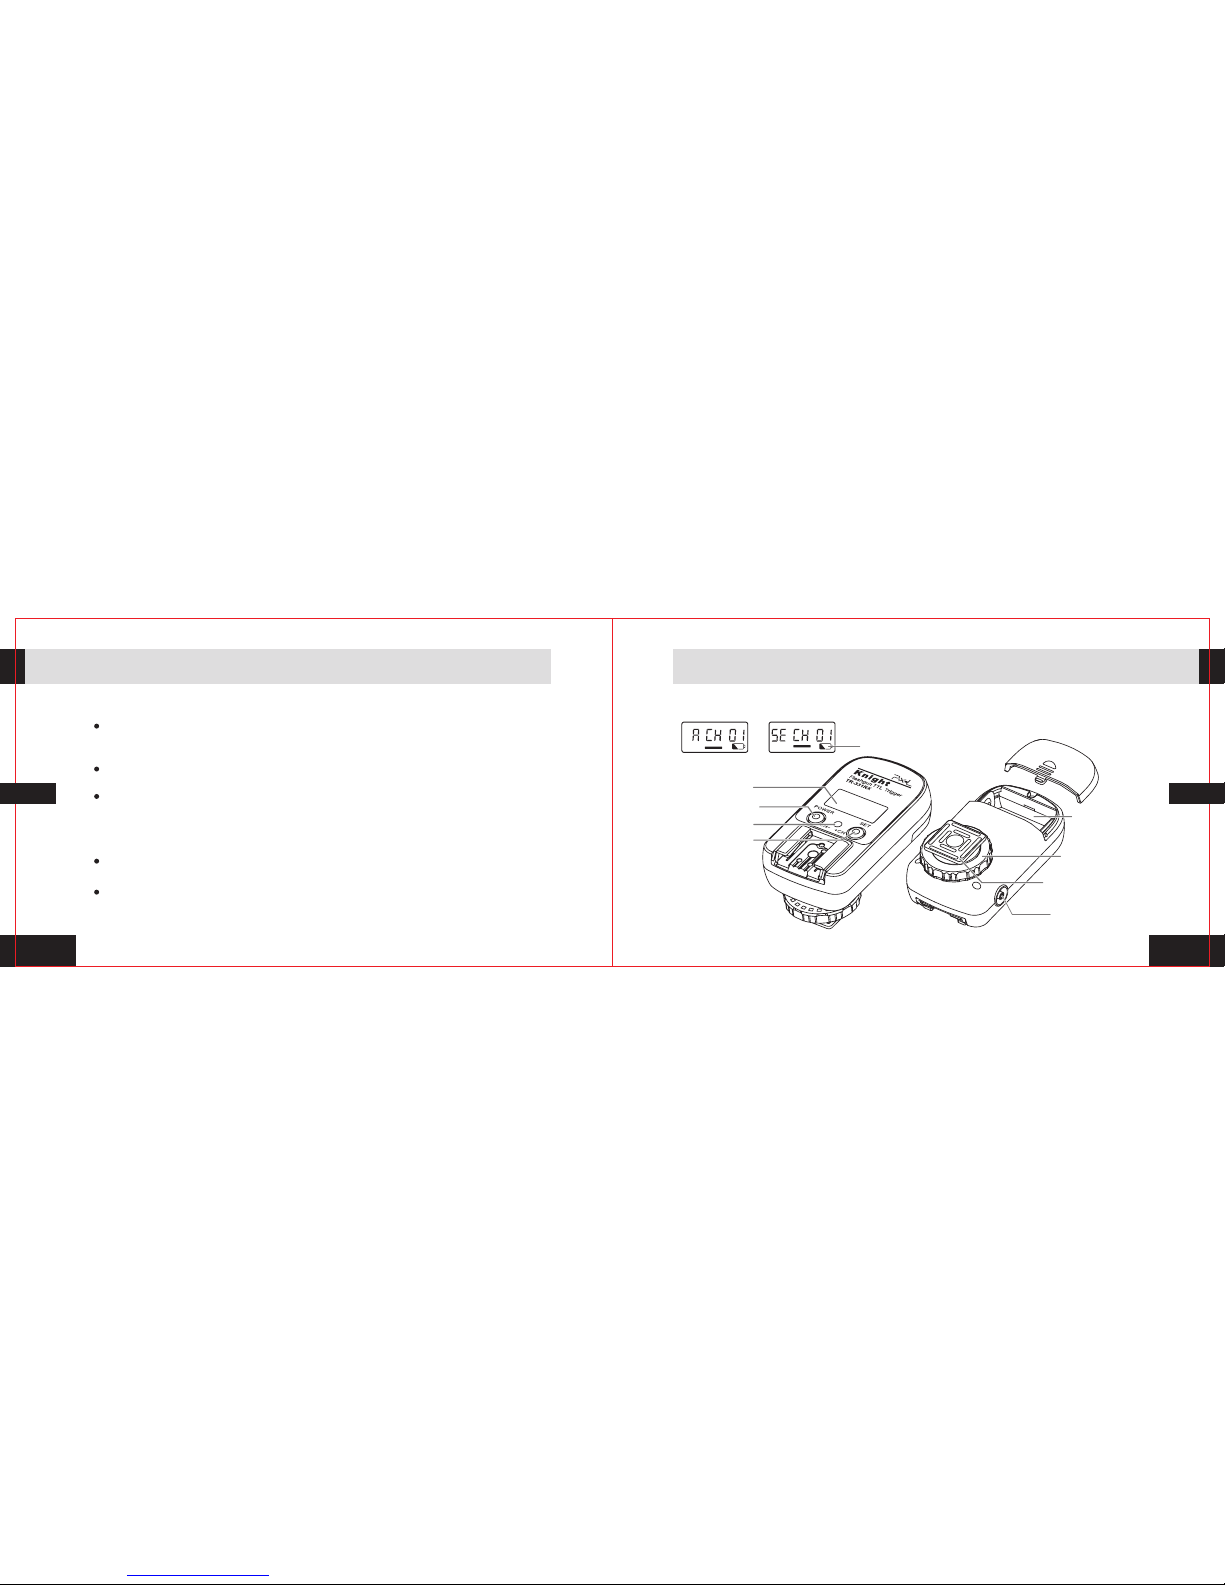
1
76
POW ER/CH -
SET /CH+
LED
LCD
Knight TR-331RX
Fix ed nut of
hot s hoe
Batte ry hatch
The f ixed mo unt
of ho t shoe
Low -volt age sig ns
Set m ode
Set c hanne l
EnEn
Compatible device
Knigh t TR -331T X compatible device
Compatible with Nikon CLS DSLR cameras
D3, D700, D2 series, D300, D200, D90, D80, D70 series, D5000, D60, D50,
D40 series, F6 and so on.
D3000 ,
Compatible with Nikon I-TTL COOLPIX Camera
COOLPIX8800, COOLPIX8400, COOLPIX P5000, COOLPIX P5100 and so on.
Compatible with other DSLR camera
compatible with Fujifilm and Nikon flash camera.
Knight TR-331RX compatible device
Compatible with Nikon's flash
SB-900, SB-800, SB-600, SB-400.
Compatible with other brands flash
Compatible with Nissin & Nikon camera's flash.
PC socket
The name of each part
Page 7
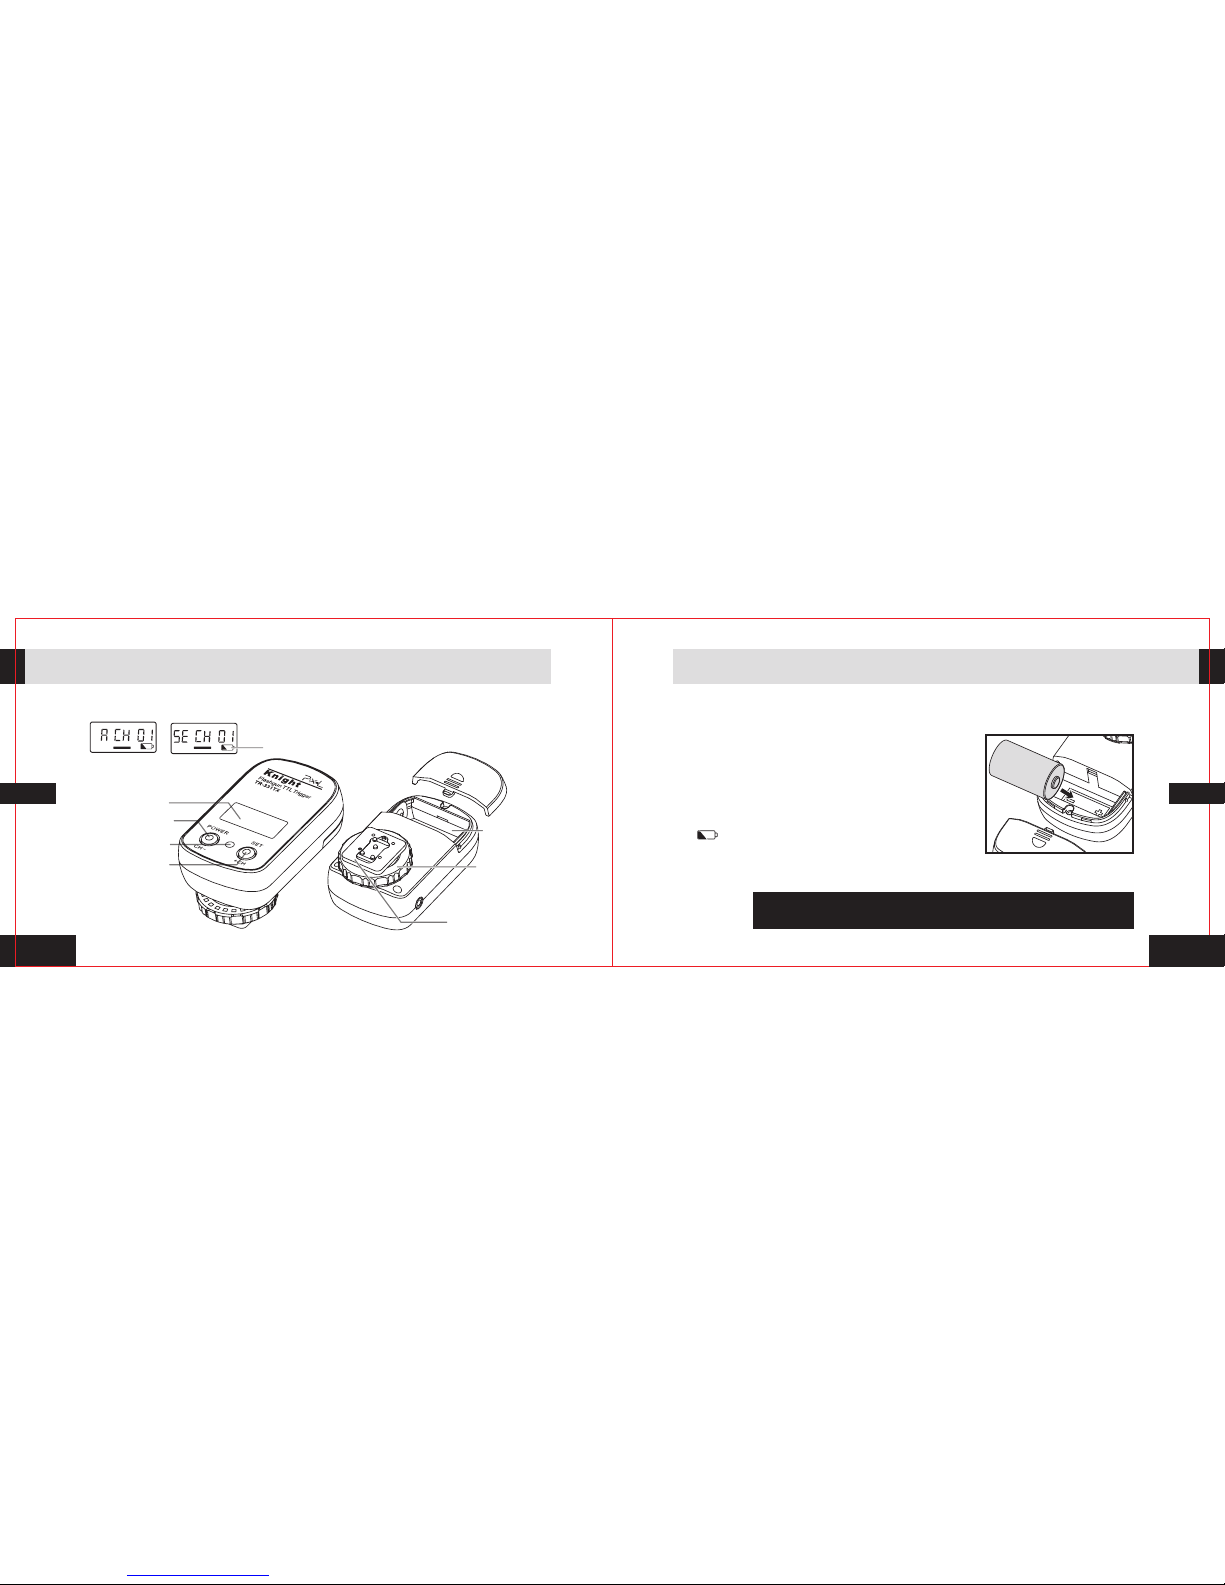
98
LCD
Knigh t TR-3 31TX
Batte ry hatch
LED
POW ER/CH -
SET /CH+
Set m ode
Set c hanne l
Low -volt age sig ns
EnEn
The name of each part
Fix ed nut of
hot s hoe
Hot shoe acc esso ry
How to use the transmitter of Knight TR-331TX
Slide the battery hatch cover, open it. 1.
Insta ll th e bat tery
3. Close the battery hat ch.
4. When the battery power is low, the LCD is displayed
[ ]as shown, Knight T R-331TX need to replace the
batteries as soon as possible to ensure normal flash
shooting.
5. Long-term non-use transmitter Knight TR-331TX, turn off the power and remove the
battery.
2. According to the figure signs [+] and [-]install the
battery correctly, or contrast the product Knight
TR-331TX sign [+] and [-] for battery inserting.
Batte ry re qui red: 3V C R-2 l ith ium bat ter y, sta ndb y
time mo re th an 10 00 hour s
Basic op er at ion
Page 8
3
2
1 11 0
1
1
2
EnEn
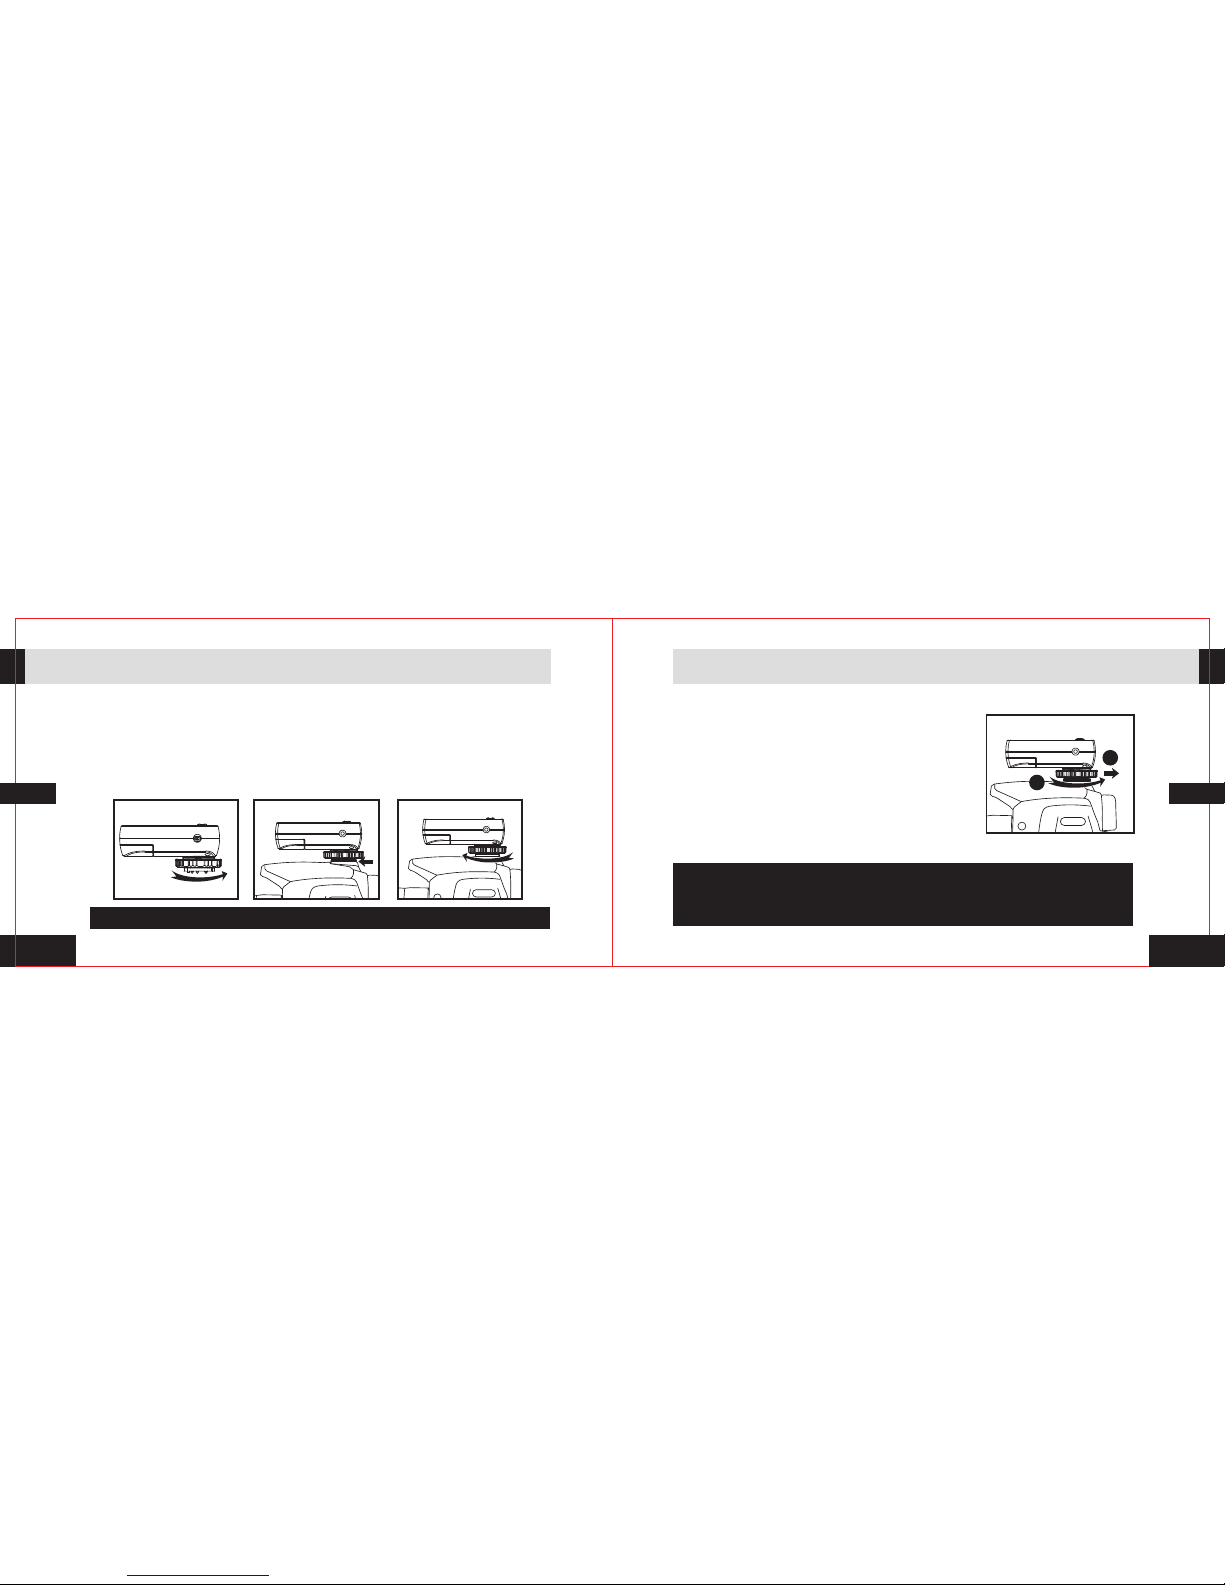
Connect the camera with Knight TR-331TX
How to use t he t ra nsmitter of Knight TR-331TX
1. Please make sure the camera and the transmitter’s power supply had been turned off
before installed Knight TR-331TX.
2 Loose the hot shoe nut by rotating to right according to picture 1.
3. Follow picture2 to insert the Knight TR-331TX hot shoe accessory to the camera's
accessory shoe
4. Follow picture 3 to rotate the fixed hot shoe nut to the left for locking.
.
Lock the fixed nut hot shoe of transmitter in place to prevent the products slide from the camera
How to use t he t ra nsmitter of Knight TR-331TX
1.
power had been turned off before remove TR-331TX.
2. Loose the hot shoe nut by rotating to right according
to figure 1.
3. Pull out Knight TR-331TX hot shoe mount from the
camera accessory shoe.
Please make sure the camera and Knight TR-331TX
Knight TR-331TX hot shoe nut is not loosed, please loose it, and gently pulls it
from the camera's accessory shoe, do not forcibly pull it.
If Knight TR-331TX can’t pull out from the camera's hot shoe:
Remove Knight TR-331TX from the camera
Page 9
1 312
2s 2s
Funct io n mode se tting
EnEn
How to use t he t ra nsmitter of Knight TR-331TX
How to use t he t ra nsmitter of Knight TR-331TX
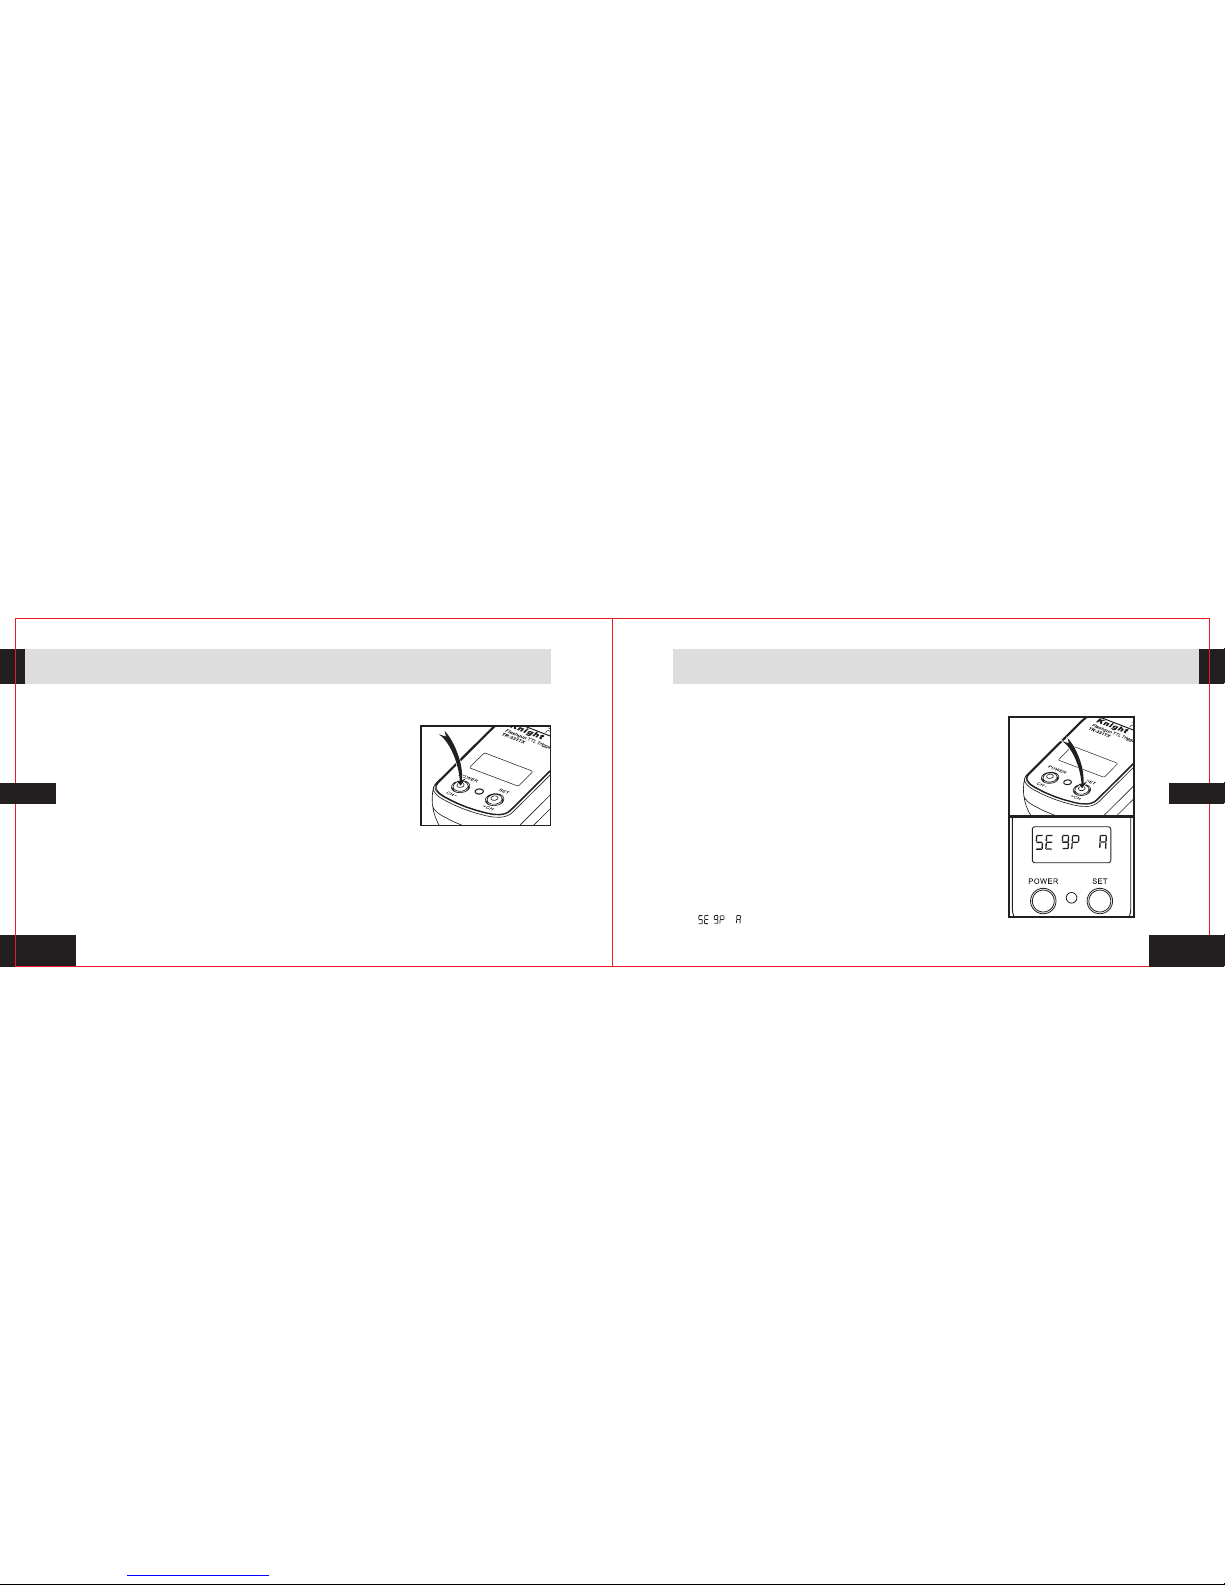
Turn o n th e Knigh t TR-33 1T X and cam era’s powe r
1.
2. Turn on the Knight TR-331TX power, follow the figure to hold
[ POWER ] for 2s then release.
3. If Knight TR-331TX power is on, hold [POWE R] for 2s
then release, Knig ht TR-331TX will enter into power
off mode.
4. All gro up wi ll be d efaul ted a s TTL mo de afte r tur n
on the po wer o f Kni ght TR-331 TX.
Turn on the Knight TR-331TX and camera power.
2s
A. Make s ure y our c amera h as be en sh ut down o r in
stand by mo de wh en set th e fun cti on. Thi s pro duc t
can't sup por t to se t the fun cti on mo de with t he
camer a in wo rki ng stat e.
B. When t he Kn igh t TR- 331pr odu ct do esn’t w ork
norma lly, y ou ca n try t o pow er o ff an d the n re- sta rt
the dev ice .
C. Turn on t he Kn igh t TR- 331TX p owe r and h old [SE T]
butto n for 2 s to se t the fun cti on mo de.
D. Knig ht TR -33 1 sup port to s et fi ve di ffe ren t gr oup s,
the fac tor y def ault se tti ng of t hem is wo rki ng
under T TL mo de.
E. Hold t he bu tto n [SET ]fo r 2s , ent er to s et di ffe re nt
funct ion m ode o f group s, LC D dis play wi ll sh ow
[ ];g en tly p res s [SE T] but ton o nce a gain to
Page 10
1 514
EnEn
set fun cti on mo de of nex t gro up an d the LCD s how a s [ ]. You’ ll
need to s et al l the g roups f rom g rou p A to group E re spe cti vely.
F. You c an pr ess [ POW ER] gen tl y to se t the p arame ter o f eac h group , the
funct ion m ode i nclud e OFF a nd TT L.
If se t group A as OF F mode, a ll rece ivers o f group A wil l not par ticip ate to fl ash.
If th e group A was s et as TTL mo de, all r eceiv ers of gr oup A will fl ash und er TTL mod e,
whe n the fla shgun n ot supp ort to TT L will fl ash in ma nual mo de, the s ame as th e
fla shgun w hich is n ot comp atibl e with th e devic es.
G. The de vic e wil l autom ati cal ly save t he se tti ng and st and by af ter 4s wi tho ut
any ope rat ion .O r press [ POW ER] a nd [S ET] a t the s ame t ime to sa ve th e
setti ng an d exi t.
H. When c omp let e the fun cti on se tting , you w ill n eed to us e the c ame ra
after t he de vic e exit th e set tin g mode.
1. When u sin g the e xtern al fl ash gun whi ch co mpa tible w ith N iko n th e fol low ing
funct ion s can b e reali zed .
Kni ght ser ies p rod uct s wou ld no t sup por t the cre ati ve CL S sys tem o f Nik on
fla shgun .
Kni ght wou ld no t sup por t Nik on SB -60 0 and v ice fac tor y fla shg un to f las h
in ma nual mo de, i t’l l onl y sup por t the m to fl ash in TTL mode .
The d evice w ill s upp ort t he I- TTL , FP, BL, M , GN fl ash m ode o f the f las hgun.
I-T TL fu nct ion w ill s upp ort a ll functio n mod e and s hut ter s pee d of Ni kon
cam era, the syn c spe ed wi ll up t o 1/8 000 s.
I-T TL mo de wi ll su ppo rt to s et th e paramete r of ex pos ure c omp ens ati on,
FV lo ck, red-ey e red uct ion f las h mod e/r ed-ey e red uct ion s low s ync ,
rea r-cur tai n fla sh sy nc, I SO ph oto s ens ibili ty an d ele ctr omo tio n zoo ming
thr ough ca mer a.
How to use t he t ra nsmitter of Knight TR-331TX
How to use t he t ra nsmitter of Knight TR-331TX
The ext ern al fl ashgu n wil l be ab le to fla sh in m anu al mode , the s hut te r
sync sp eed w ill u p to 1/32 0s.
When us ing s tud io ligh t, it w ill b e able to f las h thr ough co nne ct wi th P C
outpu t soc ket , the syn c spe ed wi ll up to1 /80 00s .
2. When u sin g the i ncomp ati ble f lashg un or s tud io ligh t, th e fol lo win g
funct ion s wil l be real ize d.
Page 11
2s
1 716
POW ER
SET
Kni ght TR-3 31RX
Kni ght TR-3 31TX
EnEn
How to use t he t ra nsmitter of Knight TR-331TX
How to use t he t ra nsmitter of Knight TR-331TX
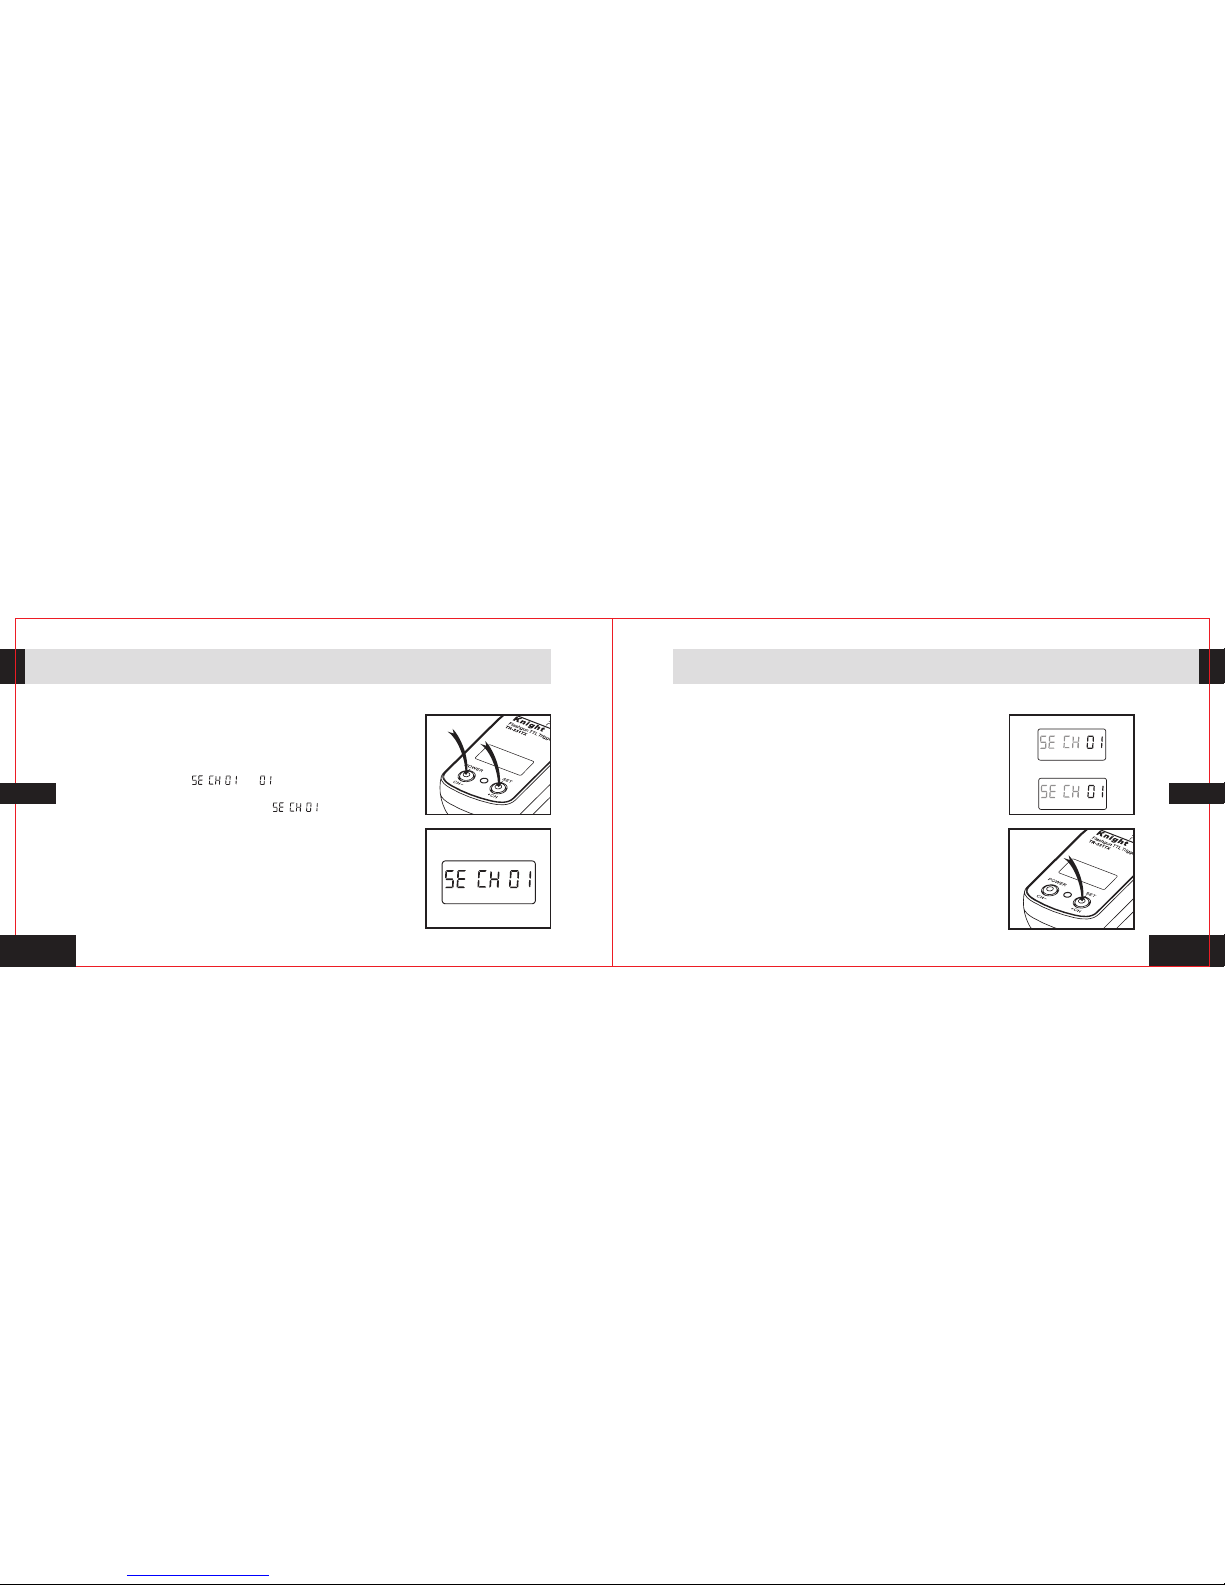
Set Knight TR-331TX channel
1.
and button 2s at same time for communicate
channel setting of the transmitter.
2. After pressed the [ CH- ] and [ +CH ] button, LCD
display shown [ ] , " " means channel
number, such as shown , enter the setting mode.
Turn on the Knight TR-331TX power ,press
[ +CH ]
[ CH- ]
3. When the LCD display shown [ ] , Press[ CH- ]
or [ +CH ] to set of wireless channel, press[ CH- ] to
reduce the number, [ +CH ] to increase the numbers.
The channel can be set from 01-15, Avoid multiple sets
in the same area at the same time using the Knight
TR-331 device then mutual interference will occurred.
4. Press the button[ CH- ] and [ +CH] again, the mode will
be saved and enter to stand-by mode in 4s when no
action.
5. Please confirm whether the channel is corresponded
with the receiver or not after the setting of Knight
TR-331TX channel.
Tur n on th e Kni ght TR-331 TX po wer, i t is avai lab le to
open th e LCD 's ba cklig ht th rou gh pres s [SE T] bu tto n,
the bac kli ght w ill tur n off i n 4s au tom atica lly w hen n o
actio n on [P OWER] a nd [S ET].
Turn on the LC D backligh t of Knight TR-331TX
Page 12
1 918
2
1
1
2
Insta ll Kn igh t TR- 331RX r ece ive r on the tr ipo d.
EnEn
How to use t he r ec eiver of Knight TR-331RX
How to use t he r ec eiver of Knight TR-331RX
Insta ll t he batt ery
1.
2. According to the figure signs [+] and [-] install the battery,
or contrast Knight TR-331RX product sign [+] and [-] for
the battery inserting.
3. Close the battery hatch.
4. When the battery power is low, the LCD is displayed
[ ] as shown, Knight TR-331RX need to replace
the batteries as soon as possible to ensure normal flash shooting.
Slide the battery hatch , open it.
Battery required: 3V CR-2 lithium battery, standby time more than 500 hours
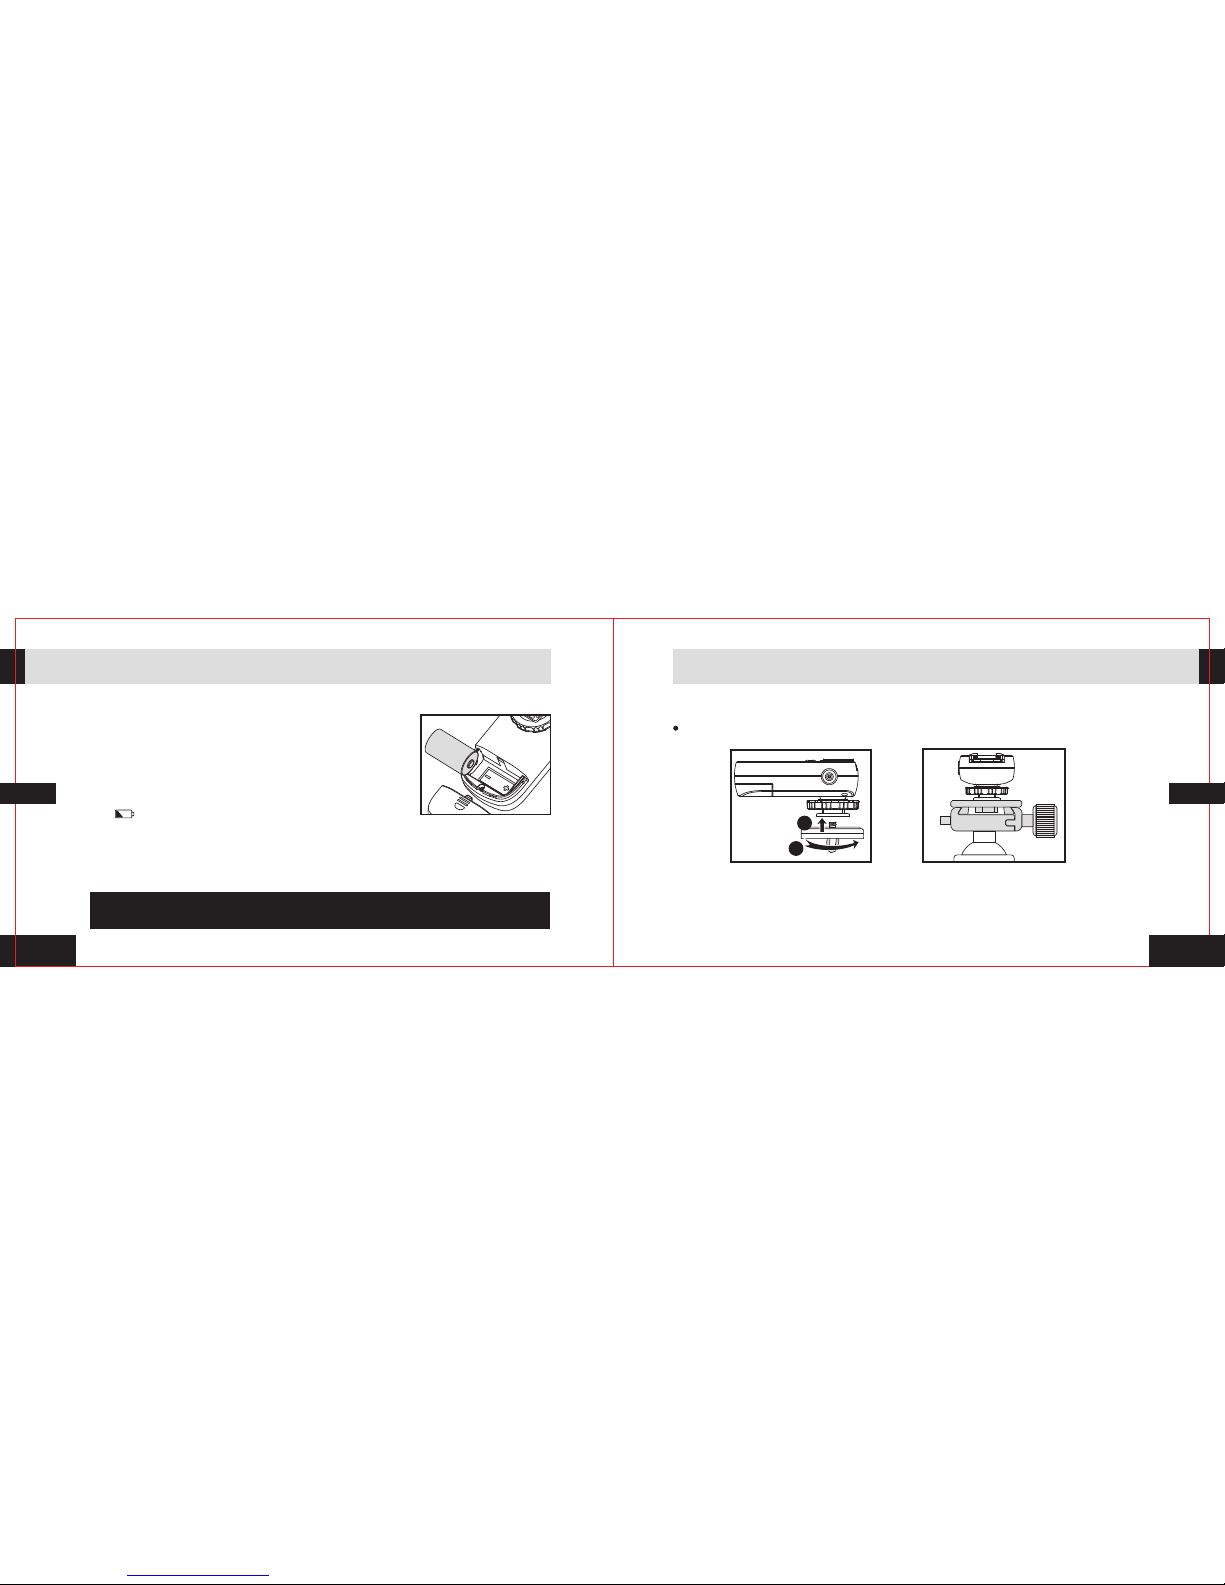
Insta ll t he Rece iver
1. Follow picture 1to insert
the receiver screw nut on
the tripod, make it tightly.
2. Follow picture 2 to install
the receiver on the tripod.
Page 13
2 120
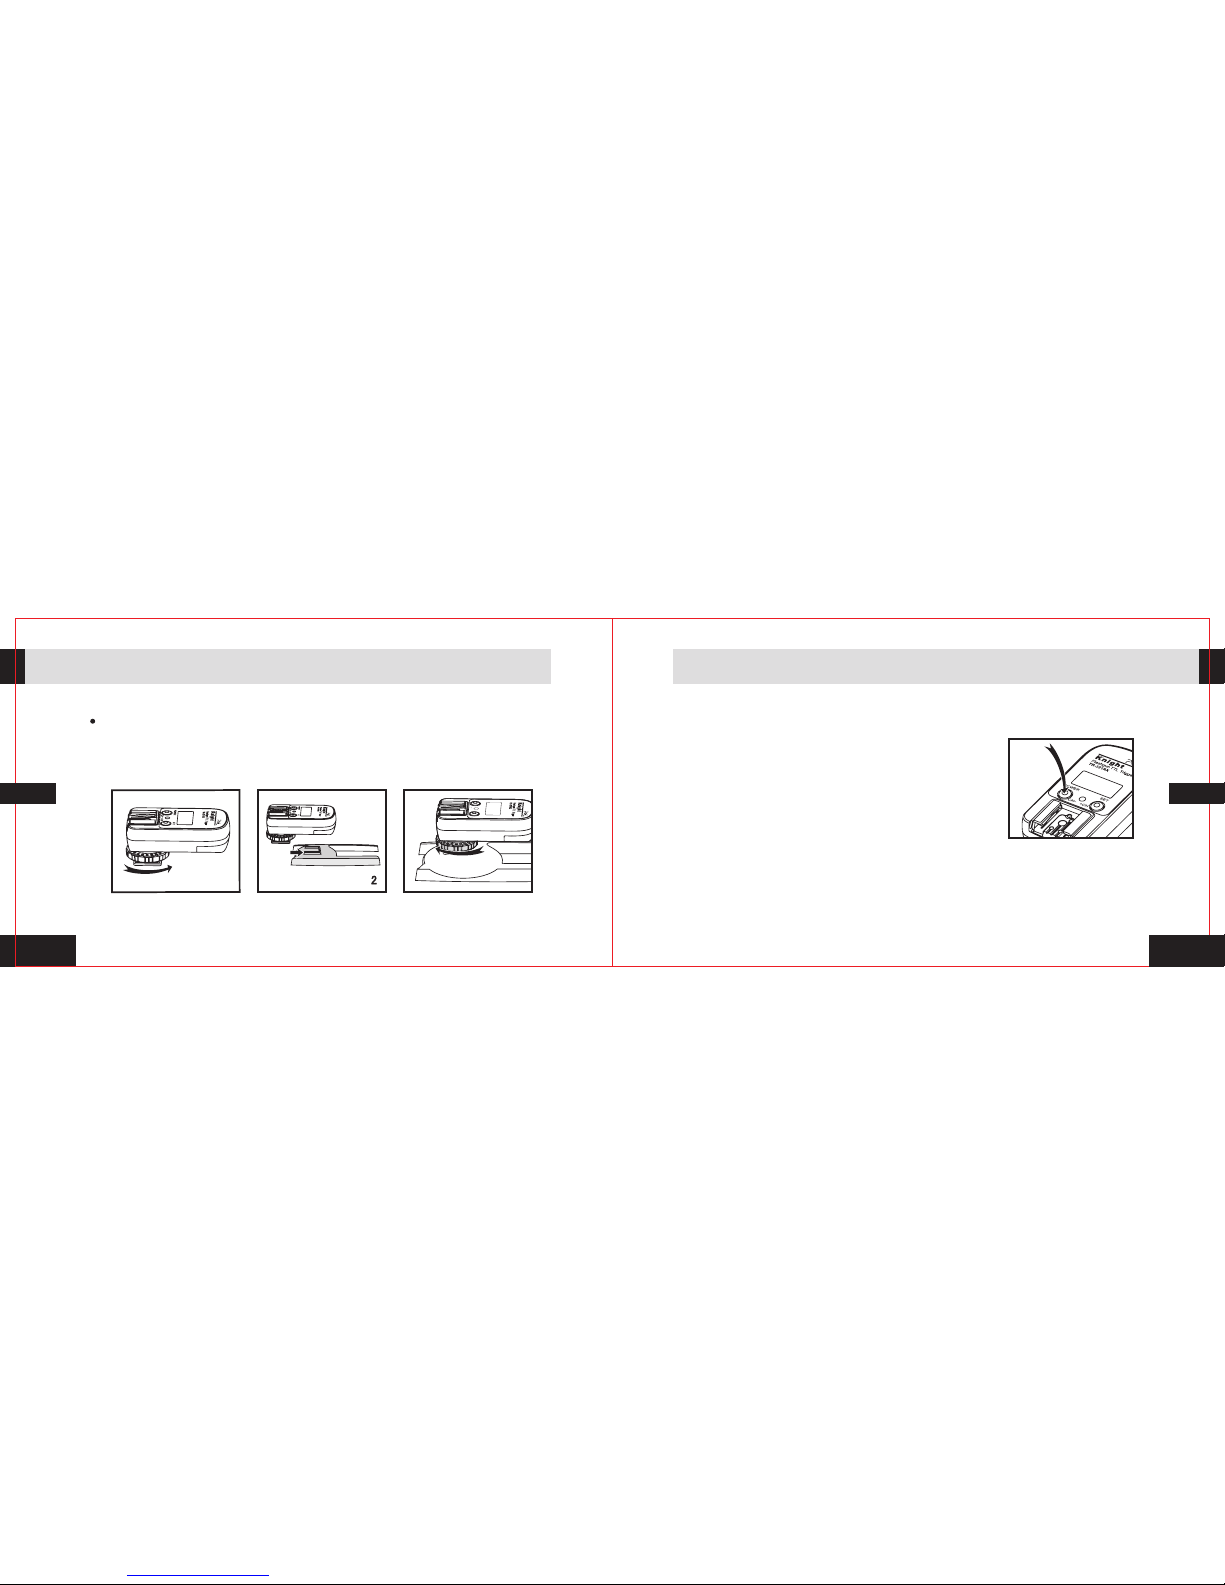
Insta ll Kn igh t TR- 331RX r ece ive r on the fl ash b rac ket
3
S
E
T
POWER
CH
+
CH
1
Turn o n th e Knigh t TR-33 1R X power
2s
EnEn
How to use t he r ec eiver of Knight TR-331RX
How to use t he r ec eiver of Knight TR-331RX
1 Loose the hot shoe nut by rotating to right according to picture 1. .
2 Install Knight TR-331RX hot shoe to flash bracket according to picture 2..
3 Rotate the fixed shoe nut to the left for locking tightly according to picture 3..
Turn on the Knight TR-331RX power then set the function mode and channel before
install the flashgun for receiver.
1. Turn on the power of Knight TR-331RX, hold [
button for 2s then the power is turned on.
2. If the Knight TR-331RX power is turned on, hold [POW ER]
for 2s will turn off the receiver power then enter into
the shutdown mode.
3. For long time non-use of recei ver Knight TR-331RX , turn
off the power and remove the battery.
4. All wil l be de fau lted as g rou p A after t urn o n the
power o f Kni ght T R-3 31RX.
POWER]
Page 14
2 322
2s
2s
EnEn
How to use t he r ec eiver of Knight TR-331RX
How to use t he r ec eiver of Knight TR-331RX
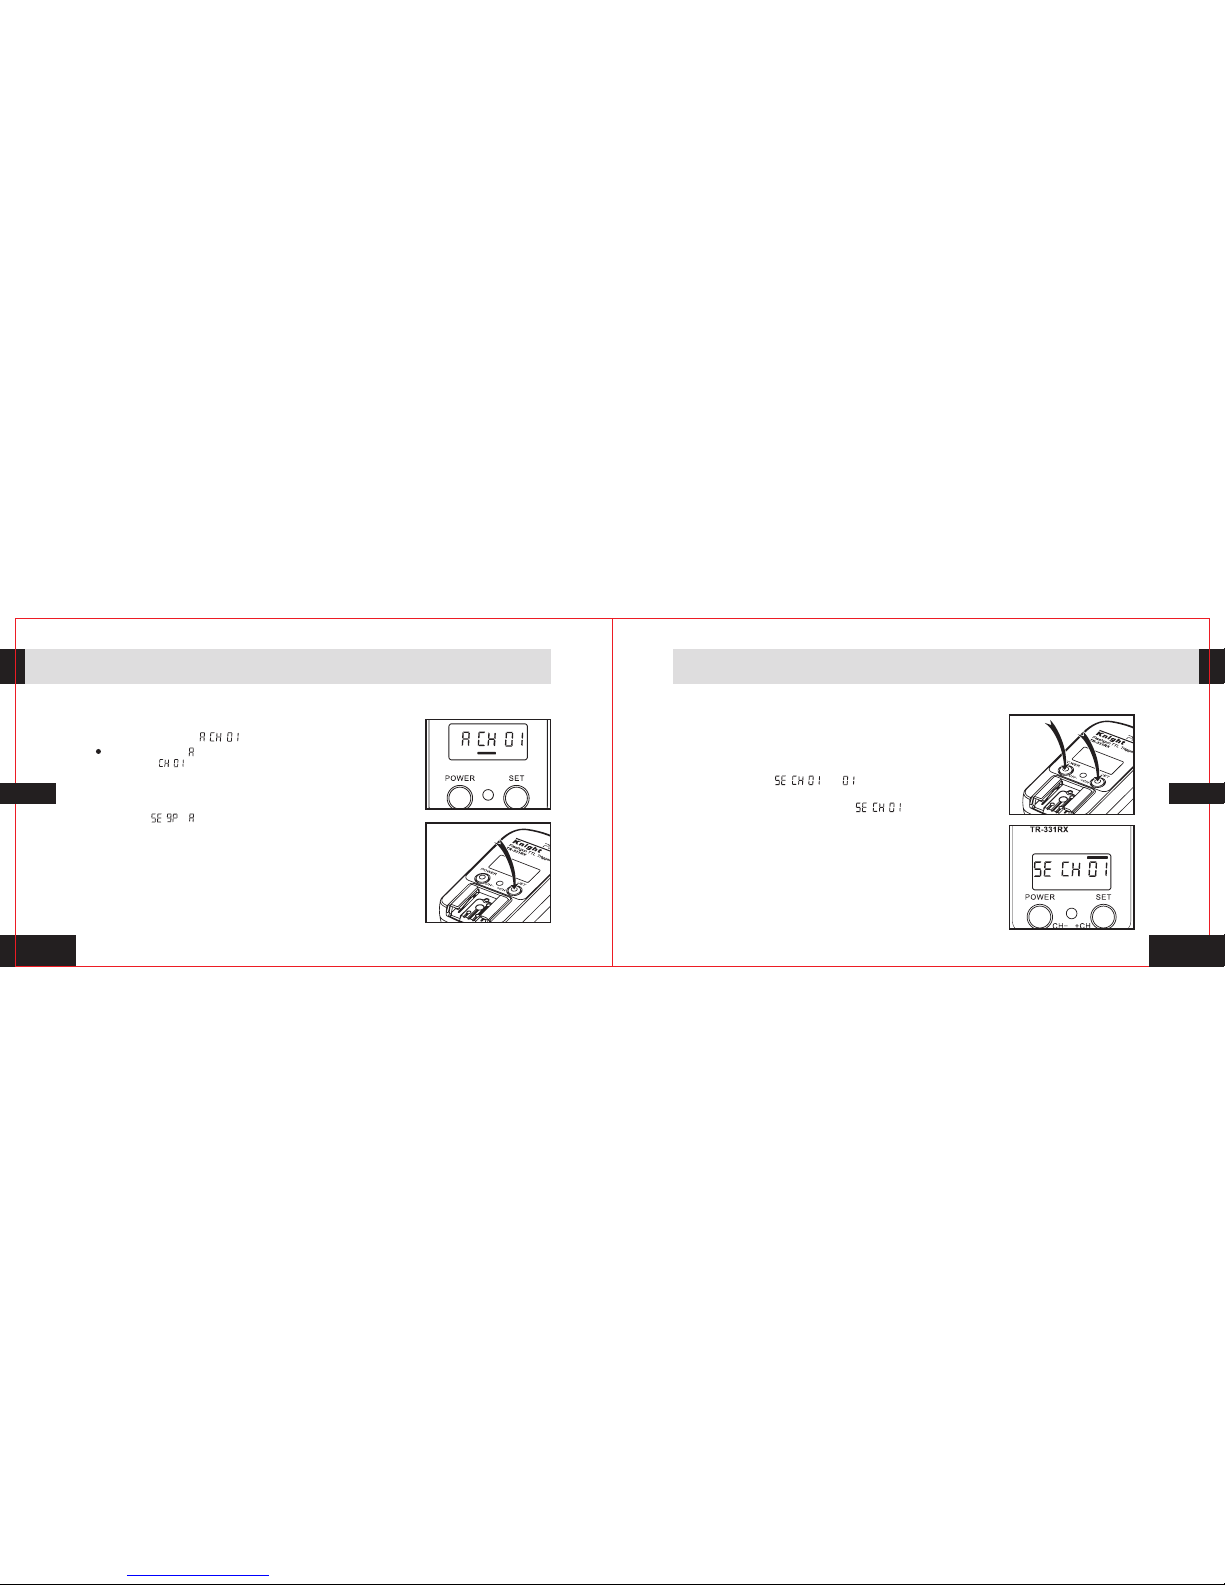
1. When f irs t ins tall th e bat ter ies in th e rec eiv er, the
LCD wil l sho w[ ], a s shown .
Function mode setting
The f irst le tter “ ” me ans tha t the rec eiver w as set as
gro up A, “ ” mean s the com munic ating c hanne l of the
dev ice, 15 f reque ncy cha nnels c an be sel ectab le.
2. Pres s [ SET ] b utt on an d hol d fo r 2s to s et th e
group m ode o f Kni ght TR-331 RX, t he LC D will
show [ ], t he re cei ver def aul t as gr oup A.
3. Slig htl y pre ss [SET] o r [PO WER] butt on to s et th e
next gr oup , 5 gro ups A to E wi ll ne ed to be se t.
4. Pres s [SE T] an d [PO WER ] at th e sam e tim e to s ave
the set tin g and e xit.
5. It's ava ila ble t o set all t he fu nct ions th rou gh
trans mit ter w hich in sta lle d on the ca mer a.
Knight TR-331RX channel setting
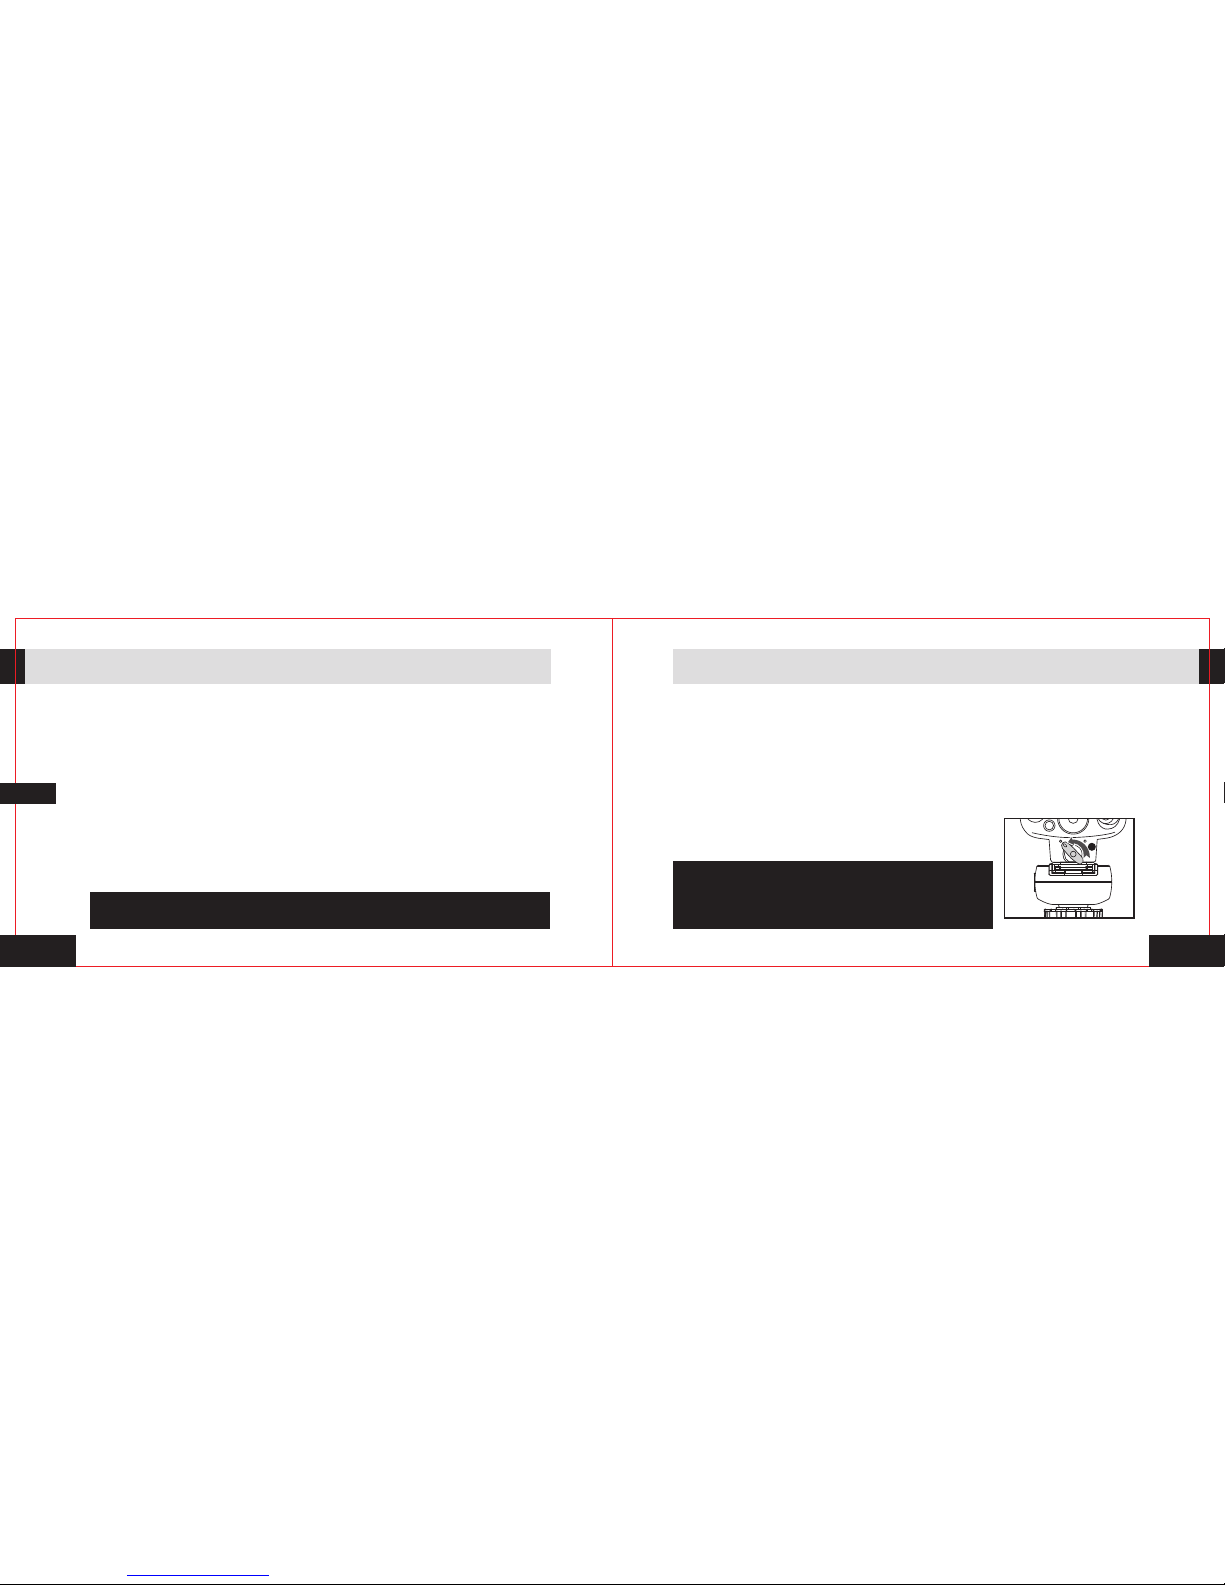
1.
and button 2s at same time for communicate
channel setting of the receiver.
2. After pressed the [ CH- ] and [ +CH ] button, LCD
display shown [ ] , " " means channel
number, such as shown , enter the setting mode.
Turn on the Knight TR-331RX power ,press
[ +CH ]
[ CH- ]
3. When the LCD display shown [ ] , Press[ CH- ]
or [ +CH ] to set of wireless channel, press[ CH- ] to
reduce the number, [ +CH ] to increase the numbers.
The channel can be set from 01-15, Avoid multiple sets
in the same area at the same time using the Knight
TR-331 device then mutual interference will occurred.
4. Press the button[ CH- ] and [ +CH] again, the mode will
be saved and enter to standby mode in 4s when no any
action.
Page 15
2 4
1
En
How to use t he r ec eiver of Knight TR-331RX
How to use t he r ec eiver of Knight TR-331RX
5. Please confirm whether the channel is corresponded with the transmitter or not after
the setting of Knight TR-331RX channel.
Turn on the LCD backlight of Knight TR-331RX
Turn on the Knight TR-331RX power, it is available to open the LCD's backlight through
press [SET ], the backlight will turn off in 4s automatically when no action on [POWE R]
and [SET ].
Connect Knight TR-331RX with the flash
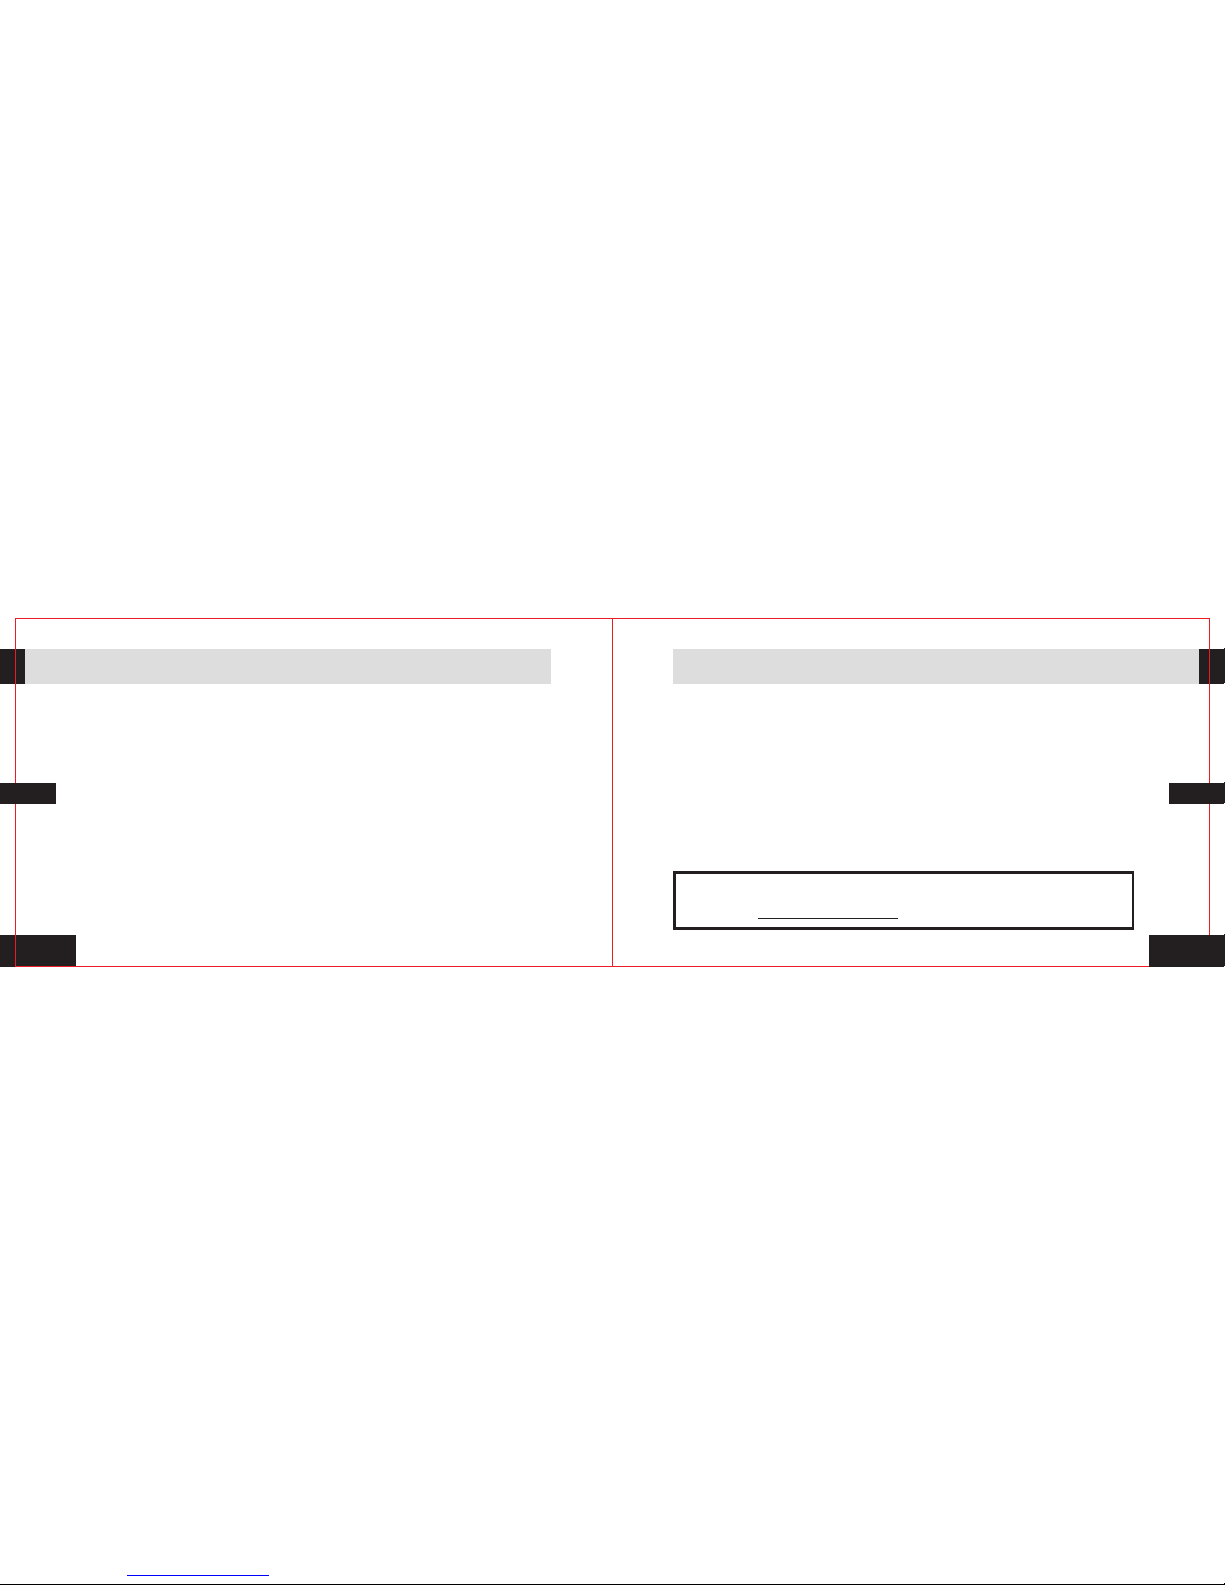
1 Please make sure the fla sh’s power is turn ed off before install the flash into
Knight TR-3 31RX, confirm the power of Knight TR-331RX is turned on, Set the
function mode and channel.
2. The receiver does not support the flash hot-drawing and hot-plug in the installation
.
Lock the flash to the right position, please lock the rod clockwise by rotation until to
the signs of installation mount.
Remove the flash from Knight TR-331RX
or removal of flash, the flash must be inserted or pulled out in the off state.
3. Insert the flash and mount into the hot shoe of Knight TR-331RX.
4. Rotate the flash bar to the locked position.
2 5
If the flash can’t be pulled out from the hot shoe:
Installation lock of flash was still inserted on Knight TR-331RX
hot shoe, rotate 90 degrees of flash lock rod to the left again,
and gently pull out the flash from the TR-331RX hot shoe, do
not forcibly pull it.
1 Please make sure the flash’s power is off before remove the flash.
2. Follow the figure to rotate the flash lock rod 90 degrees to the left.
3. Pull out the flash from the hot shoe mount of Knight TR-331RX.
.
Page 16
2 726
EnEn
How to use t he r ec eiver of Knight TR-331RX
The flashgun operation
1 Adjust the flash head after the flash installed.
2. Turn on the flash power.
3. Select the flashgun’s mode.
4. Make sure the flash or camera light has been lit in the preparation before shooting.
.
Using FSK 2.4GHz wireless remote control system
Operation distance: 80 meters
Channel: 15
Transmitter standby time: 1000 hours (using the CR -2 Lithium battery)
Receiver standby time: 500 hours (using the CR-2 lithium battery)
Dimension (W × H × D):
Transmitter: 38 × 63 × 30mm
Receiver: 38 × 70 × 30 mm
Weight: Transmitter: 34g (with battery)
Receiver: 38g (with battery)
PIXEL TR-331 Specifications
Type :
Now you can start to use unique high-performance PIXEL product Knight
TR-331, If you have any questions you can contact the local distributor. Or visit
the website
http: //w ww.p ixelh k.c om.
 Loading...