

Page 1
Instruction Manual
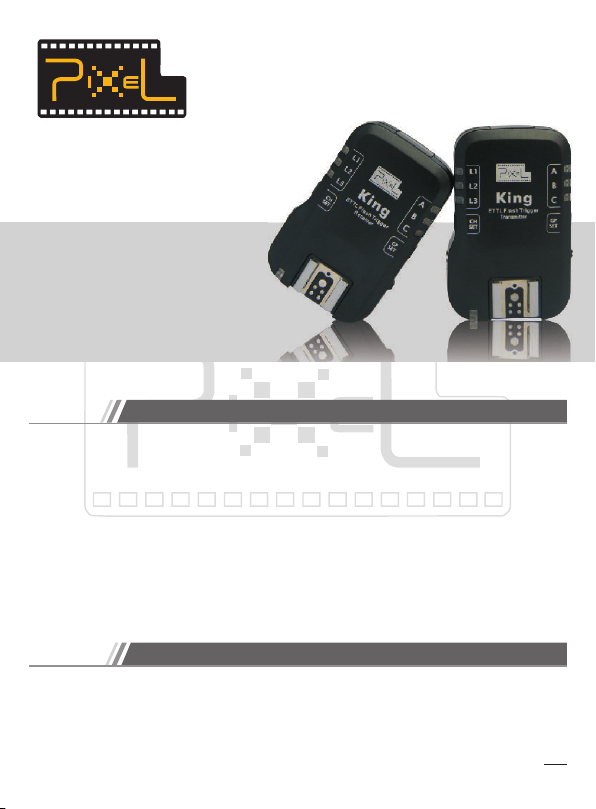
King
Flash E -TTL Trigge r
For Cano n
Overvi ew
Thank yo u for pu rchasin g PIXE L prod uct
Thank you for pur chas ing the Pixe l prod uct --- King . K ing achi eves h igh- sync flash
shooti ng w ith Cano n ca mera s an d ot her crea tive lig hti ng funct ion incl uding E- TTL II,
E-TTL, FP… etc. Kin g s upports shu tter spe eds up to 1/8 000 s. King h as 3 differen t
groups ; each gr oup can u se m ulti ple unit s an d set eac h as indi vidu al p ower set ting s.
When using the EOS EXI I seri es flas h, you can se t the flas h powe r in the cam era
menu, di rect ly.
Please read thi s inst ruction manual com ple tely an d ensu re prop er oper atio ns with
your fla shgu n before us ing th is produc t.
Cautio ns
1.
Make sur e the ca mera and fl ash ar e powered o ff bef ore in stallin g the Ki ng.
2.
As an elec tron ic acc esso ry this may be affe cted by rare enviro nmen tal causes.
Normal w orki ng operat ions s hould not b e affe cted b y this.
1
Page 2
Drops or s hock s will lead t o prod uct failu re.
3.
4.
When not i n us e fo r lo ng d uration s, p leas e tu rne d off the tr ansm itte r and the
receiv er's p ower and re move t he batter y.
5.
The ba tter ies should be in stalled co rrectly. Re vers e po larity may ca use
batter ies to l eak corro sive l iquids, h eat or e xplosio n.
6.
When con nect ing the cab le wit h the devic e, do no t pull dire ctly o n the wires .
7.
Do no t store in a high temp era ture , suc h as an enc lose d car un der direct
sunlig ht, th e dashboa rd and o ther high -tem peratur e area s.
8.
Keep dr y, do not c ontact w et ha nds w ith t he pr oduct. D o not imme rse i n wat er
or expos ed to ra in as this ma y lead t o failure o f the de vice.
9.
Do not use near fla mmab le gase s. Failure to foll ow this war ning may caus e
explos ion or f ire.
10.
This pro duct i ncl udes b atterie s; ple ase stric tly fo llo w the in structi on for p rop er
operat ion. F ailure to f ollo w this may ca use ex plosion s, fir e or person al inj ury.
Includ ed it ems
Please chec k the listed items belo w in t he pa ckage, p leas e con tac t you r dea ler i f
there ar e miss ing items .
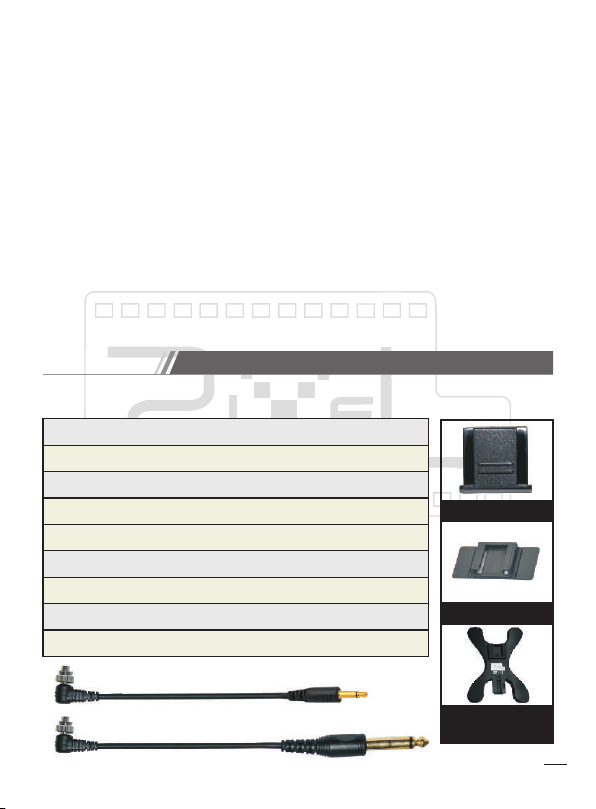
King Tran smit ter
King Rec eive r
PC-1/4 C onne cting Cab le (6. 35mm)
PC-3.5 C onne cting Cab le
USB 2.0 Ca ble
Hot Shoe P rote ctor
Receiv er Hol der
Univer sal Fl ash Holde r SF-1 8
Instru ctio n Manual
1pc
1pc
1pc
1pc
1pc
2pcs
1pc
1pc
1pc
Hot Sho e Prot ector
Receiver Holder
PC-3.5 C onne cting Cab le
PC-1/4 C onne cting Cab le (6. 35mm)
Universal Flash
Holder SF-18
2
Page 3
King Bas ic
Wireless System
System M ode
Distan ce Ran ge
Wirele ss Cha nnel
Performance
Flash Mo de
Sync Mod e
Group Co ntro l
Functi on
Sync Spe ed
Compat ible F lash
Focusi ng lig ht
Tri gge r Mod e
Tra nsmi tter
Receiv er
Socket
Tra nsmi tter
Receiv er
Power
Suitab le Bat tery
Standb y
Digita l FSK 2. 4GHz
Up to 100M
7
E-TTL、TT L、M
1st Curt ain, 2 nd Curtai n, Hig h Speed Syn c
3 different gr oups ( 7 diff erent com bina tions)
King sup port s flash zoo ming , focal len gth, I SO,
shutte r spee d, FV lock an d FP
1/8000 S
Flashg un, St udio ligh t and ou tdoor lig ht
Tra nsmi tter supp ort wi th focusi ng lig ht
Input su ppor t PC and Hot sh oe.
Output s uppo rt TTL , Hot shoe an d conn ecting ca ble so cket.
USB, PC, C able i nput sock et, Ho t shoe inpu t
USB, PC, C able o utput soc ket, H ot shoe out put
Tra nsmi tterAA x 2pc s(su pport 1.2 V rech argeabl e batt ery)
or DC 5V pow er
Receiv erAA x 2p cs(supp ort 1. 2V rechar geab le batter y)or
DC 5V powe r
Tra nsmi tter 300Hr s AA 1.2V 2 400mAH re char geable ba tter y( )
Receiv er 200 Hrs(AA 1. 2V 240 0mAH rech arge able batt ery)
3
Page 4
Functi on
Suppor t flas h power in ca mera m enu
Suppor t EV
Suppor t FE loc k
Suppor t came ra group se ttin g
Suppor t 3 flas hes outpu t as dif fere nt power
Suppor t flas h group set ting o n transmi tter
Suppor t 1st Cu rtain, 2n d Curt ain and Hig h spee d sync
Suppor t High s peed sync f or stu dio and out door l ight
Support well known brand flashes for High speed sync and TTL. (Metz, Sigma, Sunpak, Nissin)
Support well known brand flashes for trigger. (Does not support high speed sync and TTL flash)
Suppor t firm ware upgr ade
Suppor t mult i receive r cont rol
Suppor t flas h focusin g ligh t
When Kin g is use d with EOS EX II fla sh, flash p ower c an be adjus ted in c amera men u.
Follow c amer a instruc tion s for above u sage .
Device d oes no t support:
Do not sup port f lashes us ing mi xed modes , such a s E-TTL and M to gether
No suppo rt for s trobe mod e
No suppo rt for C anon wire less f lash syst em
No suppo rt for b racket ex posu re
No support for directly controlling flash mode and power for EX series flash as camera menu
Receiv er doe s not suppo rt cam era shutt er and f lash trig ger at t he same tim e.
Tra nsmi tter's ho t shoe i s NOT used fo r flas hgun
4
Page 5
Compat ibl e Device
King tra nsmi tter comp atib le with
For the ca mera c o patibl e list , please ki ndly t o visit our w ebsi te
http:/ /www .pi xel hk. com
m
King rec eive r compati ble wi th
Canon EO S flas h
Canon EO S 580E XII、580EX、4 30EX II、430EX、32 0EX、27 0EXII、220 EX Fla sh
Afterm arke t flash
Metz, Si gma, S unpak, Ni ssin
Studio a nd out door flas h
Suppor t exte rnal flas h cont rol in came ra men u
45 0D、500 D、550 D、600D、4 0D、50 D、60D、7D、
5D M ark II、1 D Mar k III、1D M ark I V、1Ds Ma rk II I
This fun ctio n can be cont roll ed the flas h dire ctly from c amer a menu.
Sup port camera external flash cont rol fl ashg un
Ca non 58 0EX II、 4 30EX I I
58 0EX、 43 0EX、
AF -48、AF -50、A F-58
Metz
* All brand name(s), lo go(s ) are tr adem arks o f thir d part y comp any re gist ered w orld wide
and were subject(s ) as pro vide d for in form atio n purp oses o nly.
Using no n comp atible wi th men u setting c amer a model as be low:
1、Canon 10 D、20D、30 D、5D、300D、350 D、1D、1D Ma rk II.
2、Above ca mera m odel do not h ave ex ternal fl ash fu nction se ttin g in camera m enu;
you can on ly set t he channe l and gr oup on tran smit ter.
5
Page 6
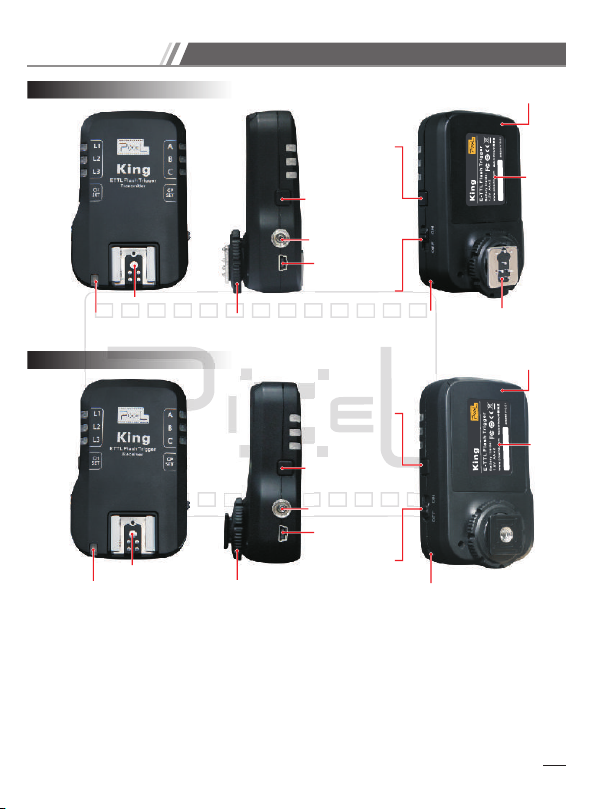
Name of ea ch pa rt
Transmi tter
Channel
{
Ind icator
Ope ration Indicator
Receiv er
Channel
Ind icator
Ope ration Indicator
Name of ea ch par t
Eyelet : Use st rap or lany ard to h old the dev ice
Hot Shoe : Transmit ter si de---On ly for u se with N-E TTL (flash p ower c ontroll er).
Receiv er sid e---For a ttac hing to the f lash gun.
Hot Shoe
{
Hot Shoe
Gro up
{
Ind icator
Mounting Foot
Gro up
{
Ind icator
Mounting Foot
Gro up setting
button (GP SET)
Channel setting
button (CH SET)
PC sync socket
USB Socket
Power Switch
Gro up setting
button (GP SET)
Channel setting
button (CH SET)
PC sy nc socket
USB Socket
Power Switch
Battery Compartment
Eye let
Tri gger p in
Battery Compartment
Eye let
Sti cker
Sti cker
Channe l sett ing butto n (CH SE T): Set the d evic e channel . Slig htly pres s the
button to che ck the curr ent st atus; pre ss aga in or hold fo r 2sec t o enter set ting m ode.
6
Page 7
Group setti ng bu tton (GP S ET): Set t he devic e gro up. S ligh tly p ress the butt on
to check t he cur rent stat us; pr ess again o r hold f or 2sec to en ter se tting mod e.
Channe l Indi cator/G roup I ndicato r: The se indica tor li ghts show t he gro up or
channe l work ing statu s.
Operat ion I ndic ator: Pow er, wi reless commu nica tion or co mmand ind ica tor.
Indica tor dis play s as re d when turn ing on t he devi ce; ind icat or disp lays as blue
when the d evic e communi cate w ith camer a.
Batter y Comp artment : Comp artment f or 2pc s AA batter y, 1.2V t o 1.6V
Receiv er Loc k Ring: Sui tabl e to attach o n trip od or screw n ut.
PC Socke t: PC ou tput sock et
Power Swit ch: Swit ch t o OF F to turn off th e de vice; switc h to ON to turn on the
device .
Transmi tter M ounting F oot: I nput inte rfac e connect ion wi th camera h ot sho e.
UBS Sock et: Us ed for firm ware u pgrade, D C 5V pow er supply, shutt er rem
Sticke r: Sho wing prod uct S/ N number, ba tter y type on the s tick er.
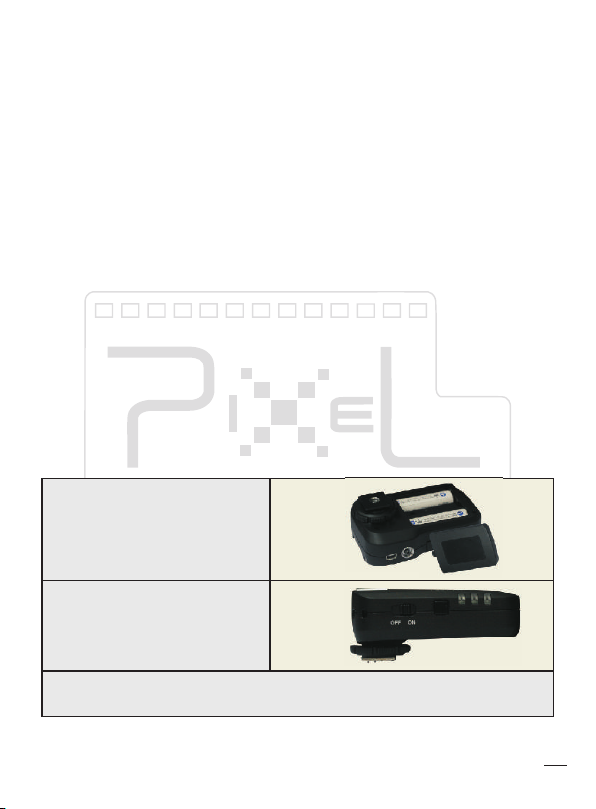
1、Power
Tra nsmi tter and re ceiv er are
using 2p cs AA batt ery which a re
compat ible w ith 1.2V ba tter y;
also sup port s 5V DC power
suppli ed thr ough USB so cket .
King is us ing 2- steps pow er
switch ; swit ch to OFF to tu rn off
and swit ch to ON t o turn on.
The sett ing wi ll be saved a fter t he power is o ff, ev en the d iffe rent sett ing on
each cha nnel .
7
Page 8
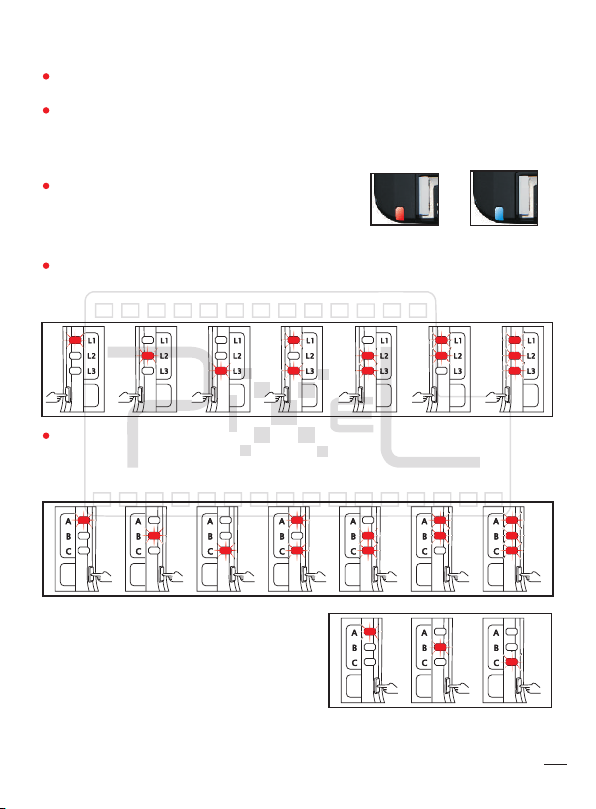
2. Chann el or Gr oup:
Slight ly pre ss CH SET and GP SET but ton to chec k the cu rrent sta tus an d enter
settin g mode .
Settin g: Pre ss CH SET and GP SET to ch ange the ch anne l and group a fter
enteri ng set ting mode ; LED wi ll turn off and exi t from s etting mo de aft er 3sec.
3、Operat ion In dicator
Op er ation i ndica to r i s a 2 co lo r LED .
Indica tor will sho w r ed when the receive r i s
under st andb y mod e; indica tor wi ll sh ow blu e
when com muni cating wi th cam era.
Channe l i ndic ator has 3 r ed indi cato rs whic h a re L1, L2, and L3. Tran smit ter
and receive r use the same settin g met hod a nd ca n be s et as 7 di ffer ent
Standb y
Commun icat ing
channe ls. [L 1]、[L2]、[L3 ]、[L1、L3 ]、[L2、L3]、[L1、L 2]、[L1、L 2、L3].
CH
SET
Group ind ica tor are 3 red i ndic ators w hich are A, B an d C. Tr ansm itter
andrec eive r us e th e sa me setti ng m etho d an d tr ansm itte r ca n be se t as
CH
SET
CH
SET
CH
SET
CH
SET
CH
SET
7different g roup s. [A]、[B]、[C ]、[A、C]、[B、C ]、[A、B]、[A、B、C].
GP
SET
GP
SET
GP
SET
GP
SET
GP
SET
GP
SET
GP
SET
Receiv er can b e set as 3 differen t grou ps.
[A]、[B]、[C ].
GP
SET
GP
SET
GP
SET
CH
SET
8
Page 9

4、Socket
PC Sync So cket:
PC sync so cket o n receive r is for c onnecti ng wit h studio or o utdo or light. S ome
flashe s can wo rk with hig h spee d sync (we wi ll ind icate the c ompa tible fla shes o n
our webs ite) .PC sync so cket o n transmi tter i s not funct ioni ng at this mo ment ; we
will upd ate th e informa tion o n the websi te htt p://www .pix elhk.co m
USB Sock et
A. Upgra de the f irmware t hrou gh this soc ket
B. 5V DC pow er sup ply throu gh thi s socket
C. Th e socket on r ecei ver also wo rks wi th shutte r cont rol, comp atib le cables a re
shown on h ttp: //www.pi xelh k.com
5、Hot Shoe
Hot Shoe:
Tra nsmi tter hot sh oe is no t support f or fla shgun. This is fo r PIXE L prod uct NETTL acce ssory whi ch can b e control led fl ash power f or eac h group. Pl ease
kindly t o read y this acce ssor y instruc tion f or more inf orma tion.
Attach t he fla sh on recei ver ho t shoe whic h can be a djusted f lash o utput thr ough
the hot sh oe pin s.
Flashg un att ached on re ceiv er hot shoe . When u sing non co mpat ible flas h, thi s is
only man ual tr igger and s hutt er speed up t o 1/25 0S.
Hot Shoe F oot
Attach t rans mitter ho t shoe f oot on came ra. Wh en using wi th Can on EOS came ra
which ca n be con trolled t he fla sh by E-TTL or m anually t o adju st the flas h powe r.
When not u sing C anon EOS ca mera w hich cann ot be co ntrolle d the fl ash by ETTL; onl y manu ally trig ger an d the shutt er spe ed up to 1/25 0S.
9
Page 10
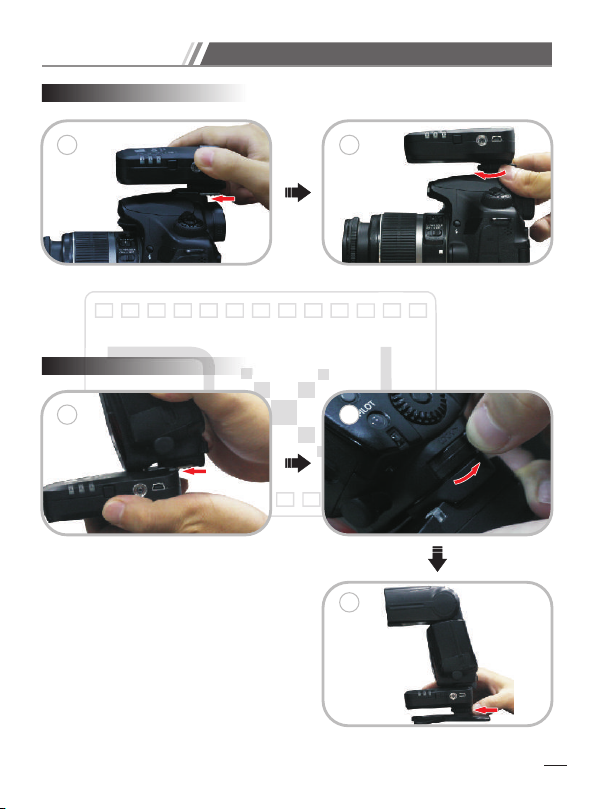
Device I nst allatio n
Transmi tter I nstalla tion
A
1. Loose n the tr ansmitt er loc k ring to the r ight a nd insert i nto ca mera hot sh oe;
tighte n the tr ansmitt er loc k ring to the l eft.
Receiv er Ins tallati on
C
1. Loose n the fl ashgun lo ck swi tch.
2. Inser t flas hgun to rec eive r hot shoe.
3. Follo w the fl ashgun lo ckin g system to
lock the f lash .
4. Inser t this r eceiver o n the mu lti use fla sh
holder a nd tig ht the tran smit ter lock ri ng
to the lef t.
B
D
E
10
Page 11
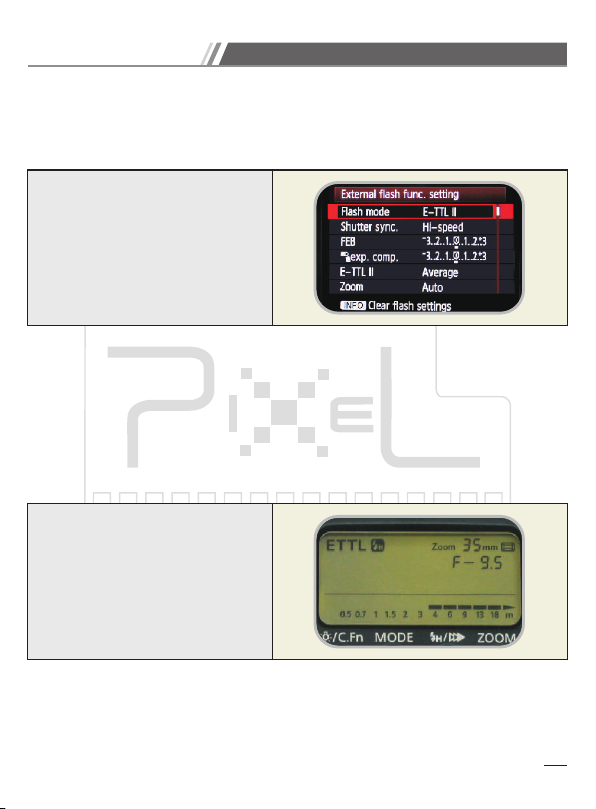
Device O per ation Mod e
A. Transm itte r side: Cha nnel a s L1, Group a s ALL ; Rece ive r side :
Channe l as L1, G roup as A
B. Transm itte r Operati on Mod e:
1. ransm itte r and camer a set as E -TTL
2. Tu rn on tr ansmitt er and t he status a s belo w:
1.E-TTL II F lash Mode : E-TT L II
2.Shutt er syn c.: Hi-sp eed
3.Exp. Co mp.: 0
3. Separ ate to p urchase N -ETT L and us e on tra nsmitte r hot sh oe.
4. Set the c hann el and grou p thro ugh CH SET and GP SET bu tton.
5. The set ting w ill be save d afte r the power i s off, e ven th e diff erent set ting o n each
channe l.
C. Recei ver Si de Operat ion Mo de:
1. Recei ver wi ll follow t he tra nsmitte r data t o set the fla sh mod e, output , sync s peed,
EV, zo om…e tc.
2. The ind icat or flashe s as blu e when work ing no rmal.
3. Recei ver de fault set ting f rom facto ry.
1.E-TTL II F lash Mode : E-TT L II
2.Shutt er syn c.: Hi-sp eed
3.Exp. Co mp.: 0
D. Th is produc t cann ot suppor t Cano n externa l flas h wireles s func tion.
E. Th is device s uppo rts to set th e flas h output th roug h camera.
(This is o nly co mpatibl e with t he camera a nd fla sh which is s uppo rted this m ode)
11
Page 12
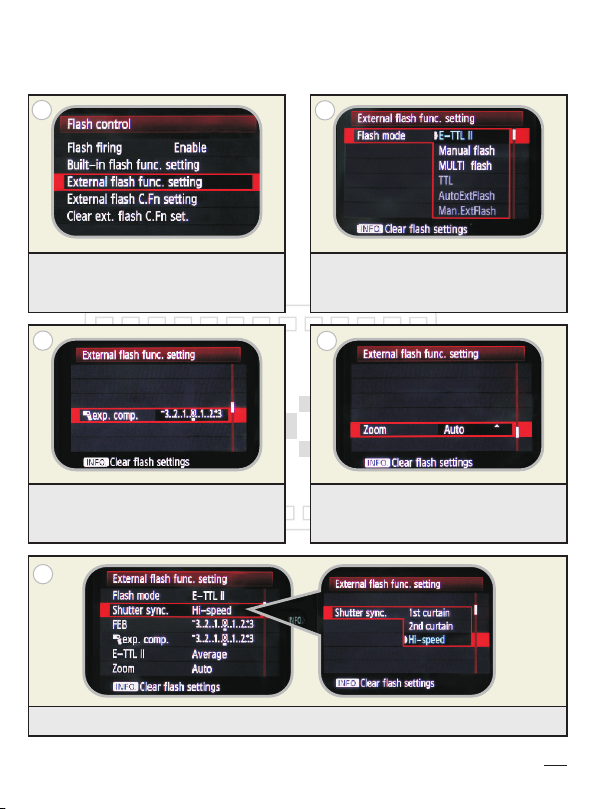
The inst ruct ion as belo w is onl y for the com pati ble flash a nd cam era.
Extern al fla sh functi on set ting in cam era me nu:
E-TTL II mode:
A
After th e inst allatio n, pre ss MENU
button a nd ent er to Exter nal fl ash
functi on set ting.
C
Exposu re com pensati on set ting can
be set as sh ort- cut menu or c amer a
button . (Dep end on the ca mera m odel)
E
B
Switch f lash m ode to manu al fla sh
or E-TTL II
D
Zoom set ting : Auto or Ma nual
Shutte r sync s etting: 1 st cur tain, 2nd c urta in, hi-sp eed. ( Default a s hi-s peed)
12
Page 13
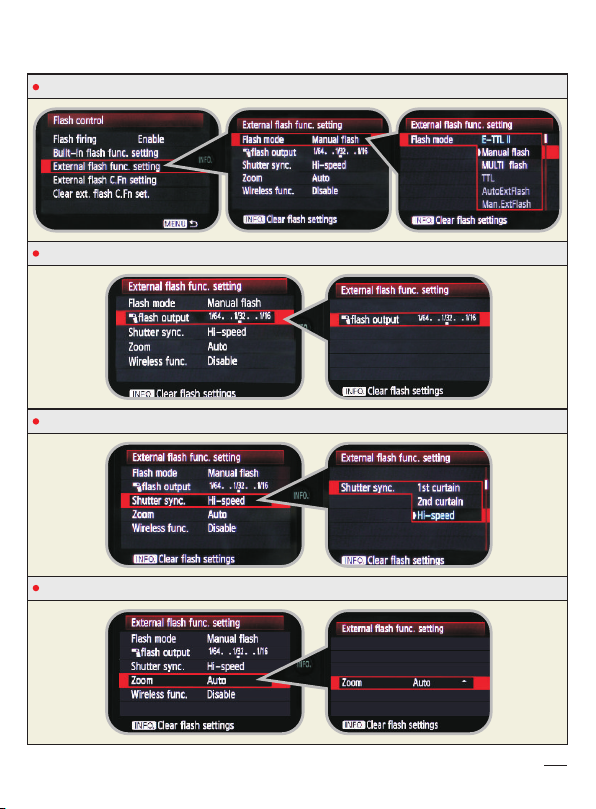
Manual M ode:
When usi ng wit h studio li ght, t he flash mo de in ca mera manu al mus t be set as TTL mo de
Switch f lash m ode to manu al fla sh or E-TTL II
Flash po wer se tting(4 30EX I I flash min i outp ut as 1/64. )
Shutte r sync s etting: 1 st cur tain, 2nd c urta in, hi-sp eed. ( Default a s hi-s peed)
Zoom set ting : Auto or Ma nual
13
Page 14
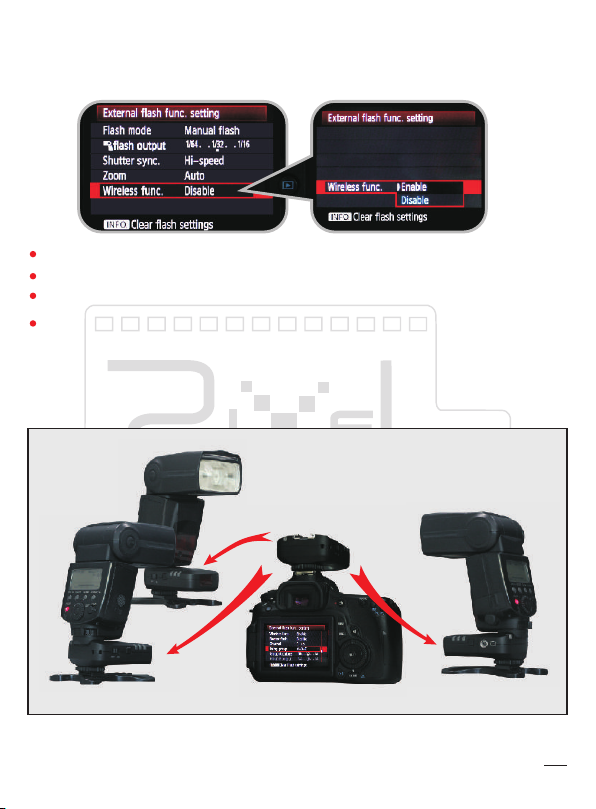
Wir ele ss fun ctio n in ex tern al fla sh contro l:
Set this m ode in e xternal f lash c ontrol me nu.( This is onl y supp ort with so me
compat ible c amera and f lash )
Set each f lash g roup powe r thro ugh camer a menu .
Set this m ode in e xternal f lash c ontrol me nu.
Master f lash i n this menu i s not su pport.
1CH is cor resp onded wit h L1; 2 CH i s corresp onde d with L2; 3 CH i s corr esponde d
with L3; 4 C H is cor respond ed wit h L1,L2,L 3.
Manual ly set t ransmit ter gr oup. Pres s GP SET b utto n for 2sec to e nter s etting
mode.
14
Page 15
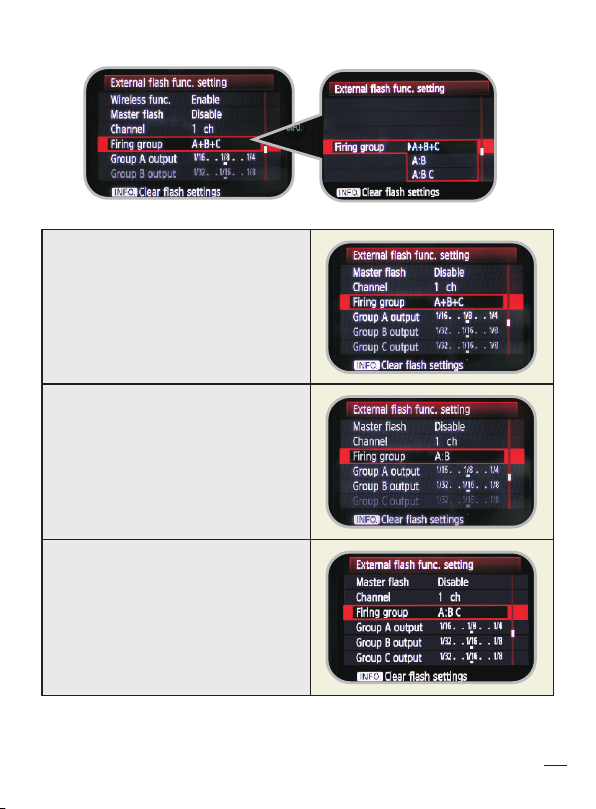
3 differ ent fl ash group s unde r M mode:
a) A+B+C(AL L)
1. 3 group s are us ing the sam e sett ing.
2. This se ttin g method is s ame as
menu.
3. Tr ansm itter can b e turn ed off o r on
the grou p, but c annot set f lash
power on t rans mitter.
b) A:B
1. This se ttin g means is tu rned o ff
group C ou tput .
2. Set gro up A and B o utput as
different po wer.
3. Group A out put is s ame as cont ent
settin g.
c) A:B C
1. This mo de is tu rned on all t he
groups a nd dif fere nt power se ttin g
for each g roup .
2. Group A out put is s ame as cont ent
settin g.
3. Flash c anno t use expos ure
compen sati on when pow er out put
under M mo de.
15
Page 16
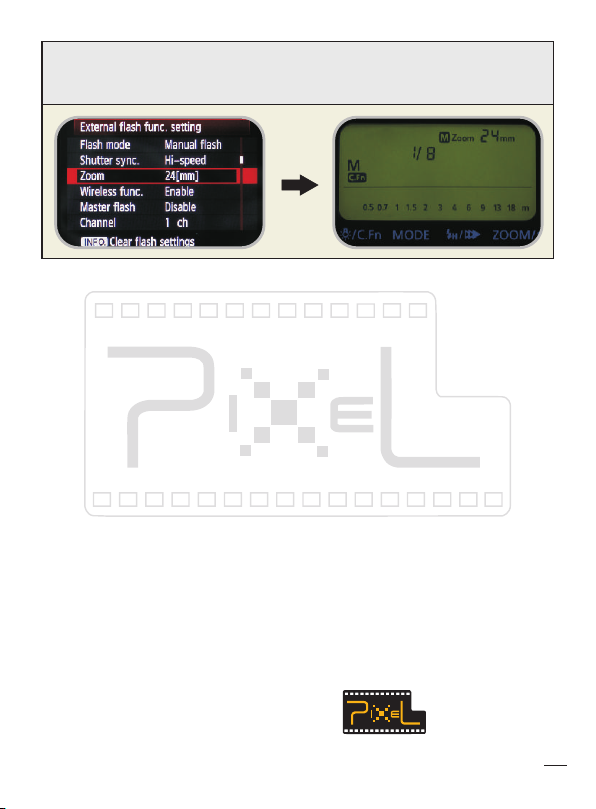
d) Transm itte r Operati on Mod e
1. The upd ated i nformat ion wi ll be sent to r ecei ver after e very s etting is d one.
2. Tr ansm itter and c amer a set as M
Above se ttin g only work w ith Ki ng output s etti ng which is n ot sup port Cano n
origin al wir eless fla sh mod e. Tho se functi ons ar e work with t he com patible f lash .
Thank you fo r p urch asing P IXEL produ ct a nd rea d t his in stru ction m anual
carefu lly. If y ou have any q uest ion p leas e kindly to c ontact ou r loca l dea ler or v isit
to http: //ww w.pixelh k.co m
This i nstr uction manu al i s up dated a t 01 st J uly, 2011. Plea se c ontact the PIXE L
seller to g et t he info rmat ion if you want to use this prod uct com bine d with othe r
latest p rodu ct, which p ubli shed afte r this d ate.
Firmwa re upg rade link : http //: www.pi xelhk.c om/d own/kin g
PSM15 V1 0.02
16
 Loading...