

Page 1
FCC Warning Statement:
Changes or modifications not expressly approved by the party responsible
for compliance could void the user’s authority to operate the equipment. This
equipment has been tested and found to comply with the limits for a Class B
digital device, pursuant to Part 15 of the FCC Rules. These limits are designed
to provide reasonable protection against interference in a residential installation. This equipment generates uses and can radiate radio frequency energy
and, if not installed and used in accordance with the instructions, may cause
harmful interference to radio communications. However, there is no guarantee that interference will not occur in a particular installation. If this equipment
does cause interference to radio or television reception, which can be determined by turning the equipment off and on, the user is encouraged to try to
correct the interference by one or more of the following measures:
-- Reorient or relocate the receiving antenna.
-- Increase the separation between the equipment and receiver.
-- Connect the equipment into an outlet on a circuit different from that to which
the receiver is connected.
-- Consult the dealer or an experienced radio/TV technician for help.
Warm tips: Please read the manual carefully before operation. The technical parameters in
the instruction manual refer to the calculation data tested under a specific working environment and the normal temperature (23°C). The company reserves the interpretation right of the
instruction manual and the right of improving the products described in the instruction manual
without the prior notice. The document has been carefully checked for accuracy. The company isn’t liable to any consequences due to the differences caused by printing or translation.
The products’ photos in the document maybe a little different from the appearance of actual
products and thus the actual products shall prevail. As the product updates continuously, there
maybe some differences in different batches, all in kind prevail, hope kindly understand.
Thank you for purchasing the PIXAPRO LEDS300D
The LEDS300D LED studio light, has a high CRI of ≥95. It features step-less
power adjustment and supports a 2.4GHz wireless remote control. Built-in
professional cooling system with super-silent fan. The S300D also features
an S-type mount, enabling it to be used with a wide range of different lighting modifiers for a large array of lighting possibilities. It can meet the lighting
demands in professional and commercial photography, video and film.
Page 2
Structure & Function
Installation & Usage
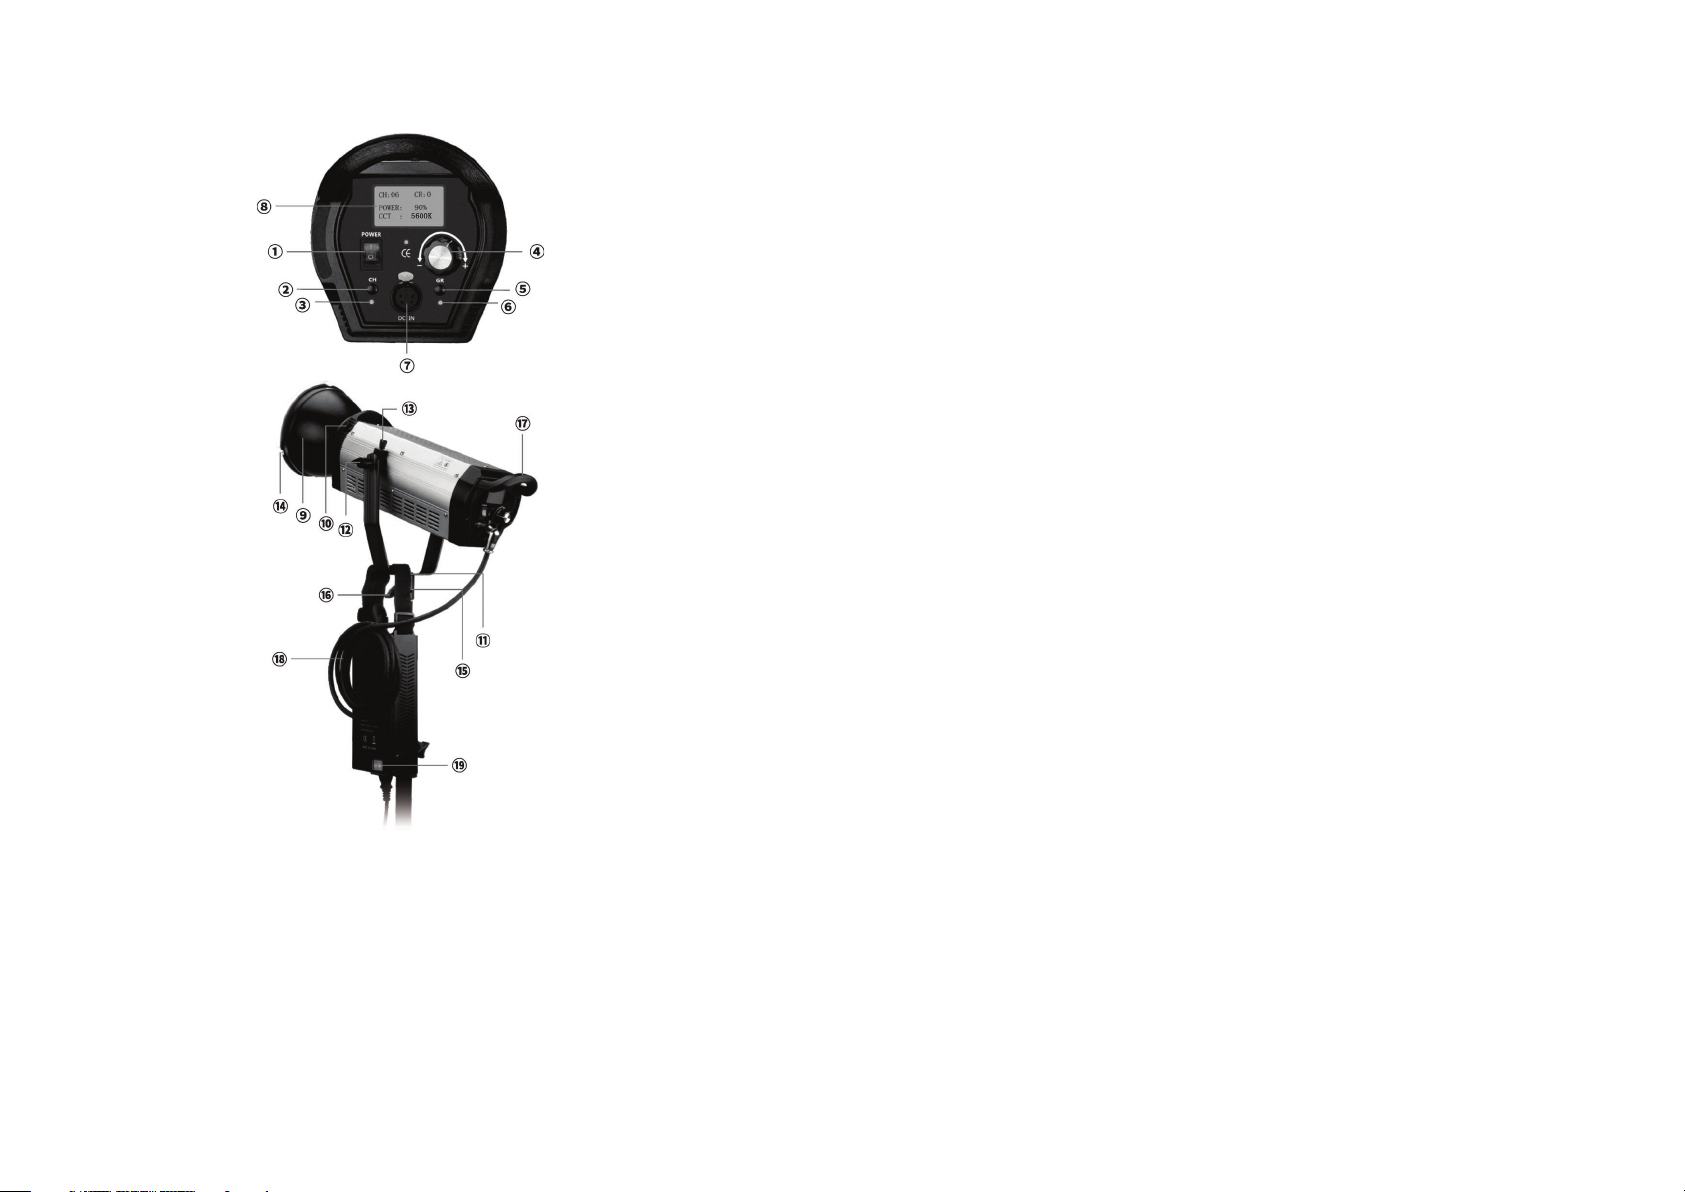
1. Mounting the Reflector: Align the three lugs on the standard reflector
[9] with the bayonet on the S300D head. Now place the reflector inside
the slot, and rotate clockwise until you hear a “click”. The reflector is
now securely fixed onto the S300D head. If you need to take the reflector off, pull the modifier release button [10] back, and rotate reflector in
an anti-clockwise direction, then you should be ale to take the reflector
off.
2. Plug the power adapter into the DC Power Socket [7] , then connect to
an AC power source.
3. First switch on the power adapter [19], and the switch should light up
red. Now turn on the power switch on the main head [1],which will light
up red.
4. The dot matrix LCD screen [8] should display your current channel,
group, power output and colour temperature settings.
5. Press [2] to set up channel [3], becomes red.
6. Rotate the control-dial [4], to set your channel (1-16 channels) (Note: it
will exit the menu if left idle for 5 seconds.)
7. Switch [5] to set up group,becomes red.
8. Rotate the control dial [4], to set your group (A,B,C,D and E - 5 groups).
1. Power Switch
2. Channel Button (CH)
3. Channel Indicator (Red)
4. C Dial
5. Group Button (GR)
6. Group Indicator (Red)
7. DC 60V Power Socket
8. Dot-Matrix LCD Screen
9. Standard Reflector Dish
10. Modifier Release Button
11 . U-Type Yoke Bracket
12. Locking Wing-Nut
13. Umbrella Screw
14. White Diffuser
15. Stand-Mount
16. Stand-Mount Locking Screw
17. Handle
18. Connecting Cable
19. Power Adapter Switch
Repair & Maintenance
1. Please ensure that you disconnect the power supply when replacing
accessories and maintaining the unit.
2. Please shut off the switches and power after use, and remove the power
adapter cable.
3. Please put it back into the box after use and store in a cool and dry
environment.
4. If the LEDS300D develops a fault, please contact info@essentialphoto.
co.uk with your order number.
5. Two Year Warranty.
Page 3
Remote Control
adjust power output value, OFF ( turned off) -100% (Max. power); Pressthe corresponding colour temperature button, then press [14] and [15] to
adjust its value (3200K-6500K), if LED light colour temperature can not
be adjusted, please ignore this function.
8. All functions setting or operation have been done, standby for 5 seconds
or press button [10] to enter or exit the operation.
9. The remote can onlt control the S300D, if the channels match on both the
remote controls and the light.
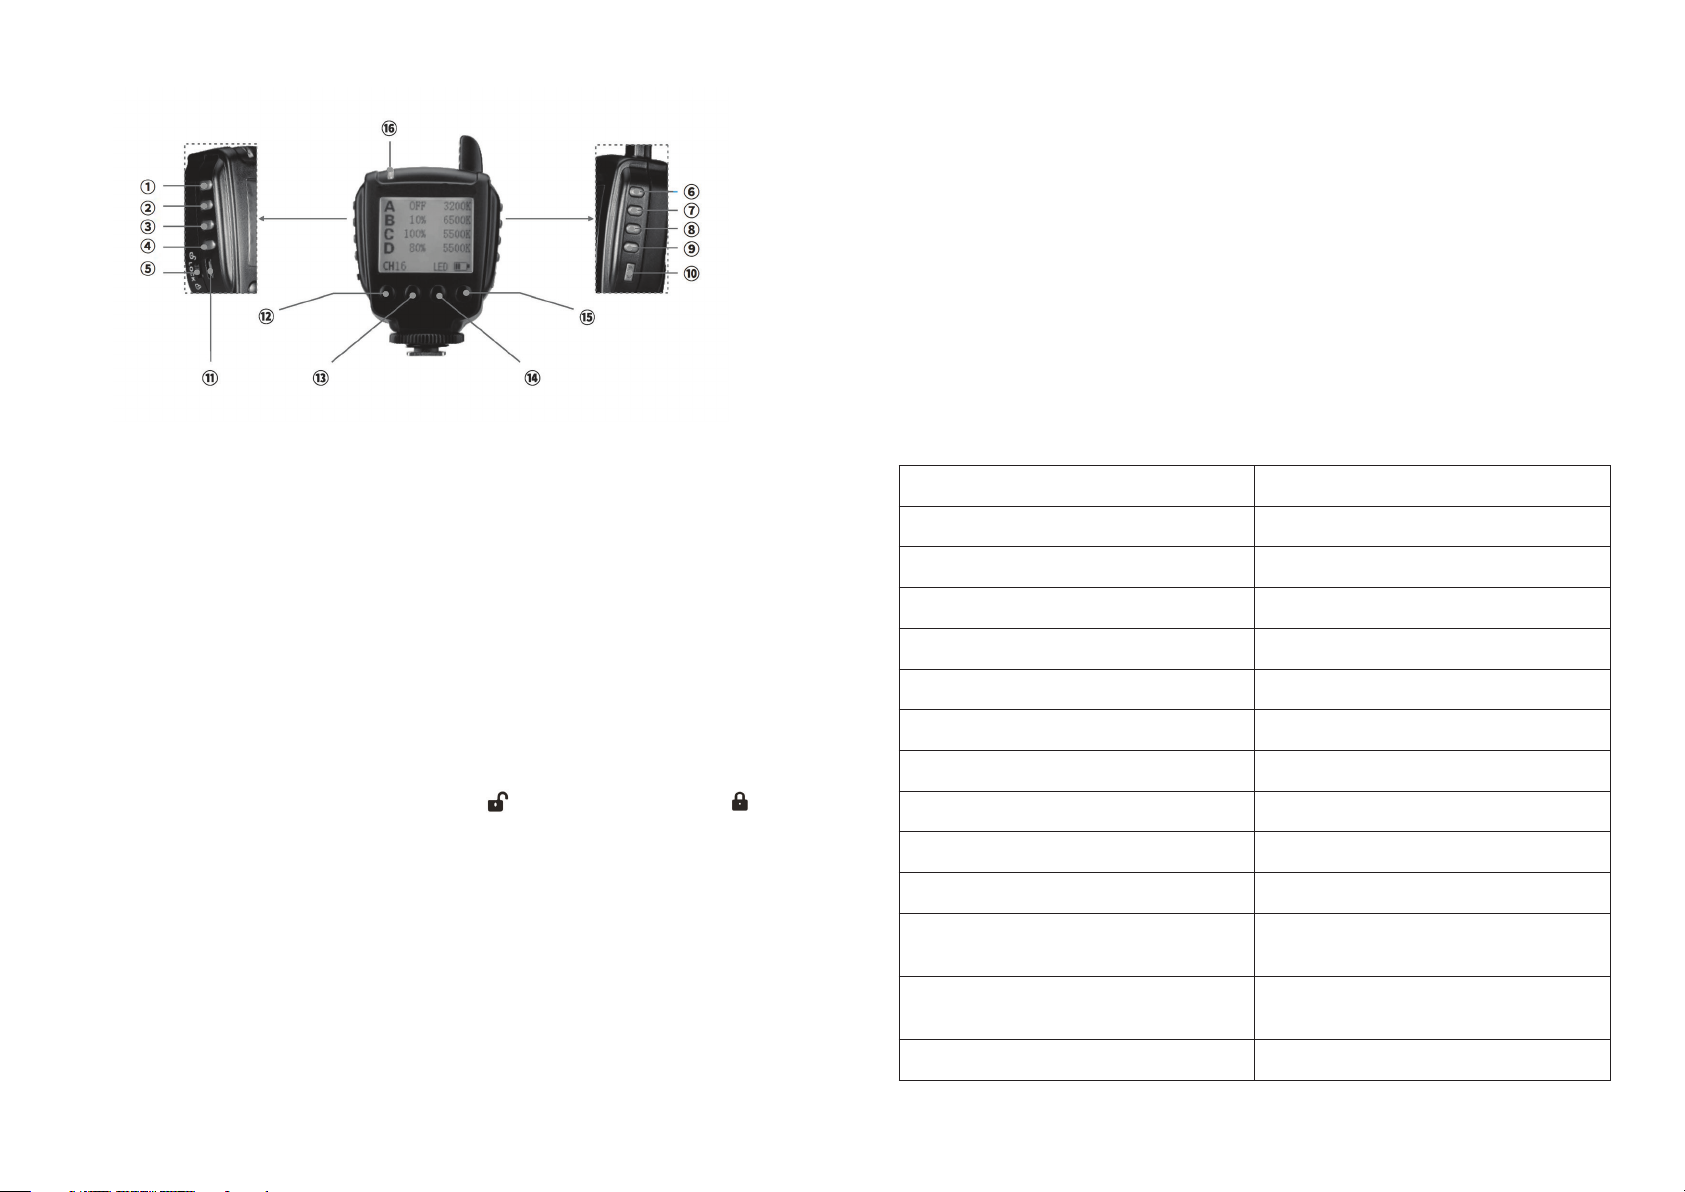
1. Group A Button
2. Group B Button
3. Group C Button
4. Group D/E Button
5. Screen Lock
6. Group A colour temp. button
7. Group B colour temp. button
8. Group C colour temp. button
9. Group D/E colour temp. button
10. Power Switch/Enter
11 . USB System Upgrade Socket
12. Channel Setting Button
13. Buzz Button
14. Power Adjustment Button (-)
15. Power Adjustment Button (+)
16. Status Indicator
1. Install two batteries (please ensure the batteries have been instered in the
correct orientation) securely replace the battery over.
2. Press button [10] for 2 seconds, turn on the remote control power, and
press button [10] again for 2 seconds to turn off the power.
3. Turn on the screen [5] lock switch, turn to is unlocked, and turn to is
locked.
4. Press button [14] for 2 seconds to enter into LED light mode. (button [14]
shows LED, that is LED light mode).
5. Press button [12] to set up channel, then press buttons [14] and [15] to
set channel (1-16 channels). Please ensure that the channel on the light
matches the channel that has been set on the remote.
6. Press [1]/[2]/[3]/[4] to enter groups A/B/C/D/E, press button [4] for
2 seconds to switch between groups D and E.
7. After setting the same group as LED light : Press [14] and [15] button to
Specifications
LED Chip Type COB
COB LED Beam Angle 12 0°
Colour Temperature 5600±200K
CRI ≥95
TLCI ≥95
Power adjustment Stepless (10-100%)
Power display LCD dot matrix display
Remote control Built-in 2. 4Ghz receiver
Channel, Group 16 Channels, A/B/C/D/E groups
Control distance 100m
Working temperature 0-45° C
Cooling System Aluminum alloy housing + Copper
tube + Triple cooling fan
Power Supply Input AC 90-240V /
Output DC 60V-5A
Dimensions 58. 5x27x25cm
Page 4
Trouble Shooting
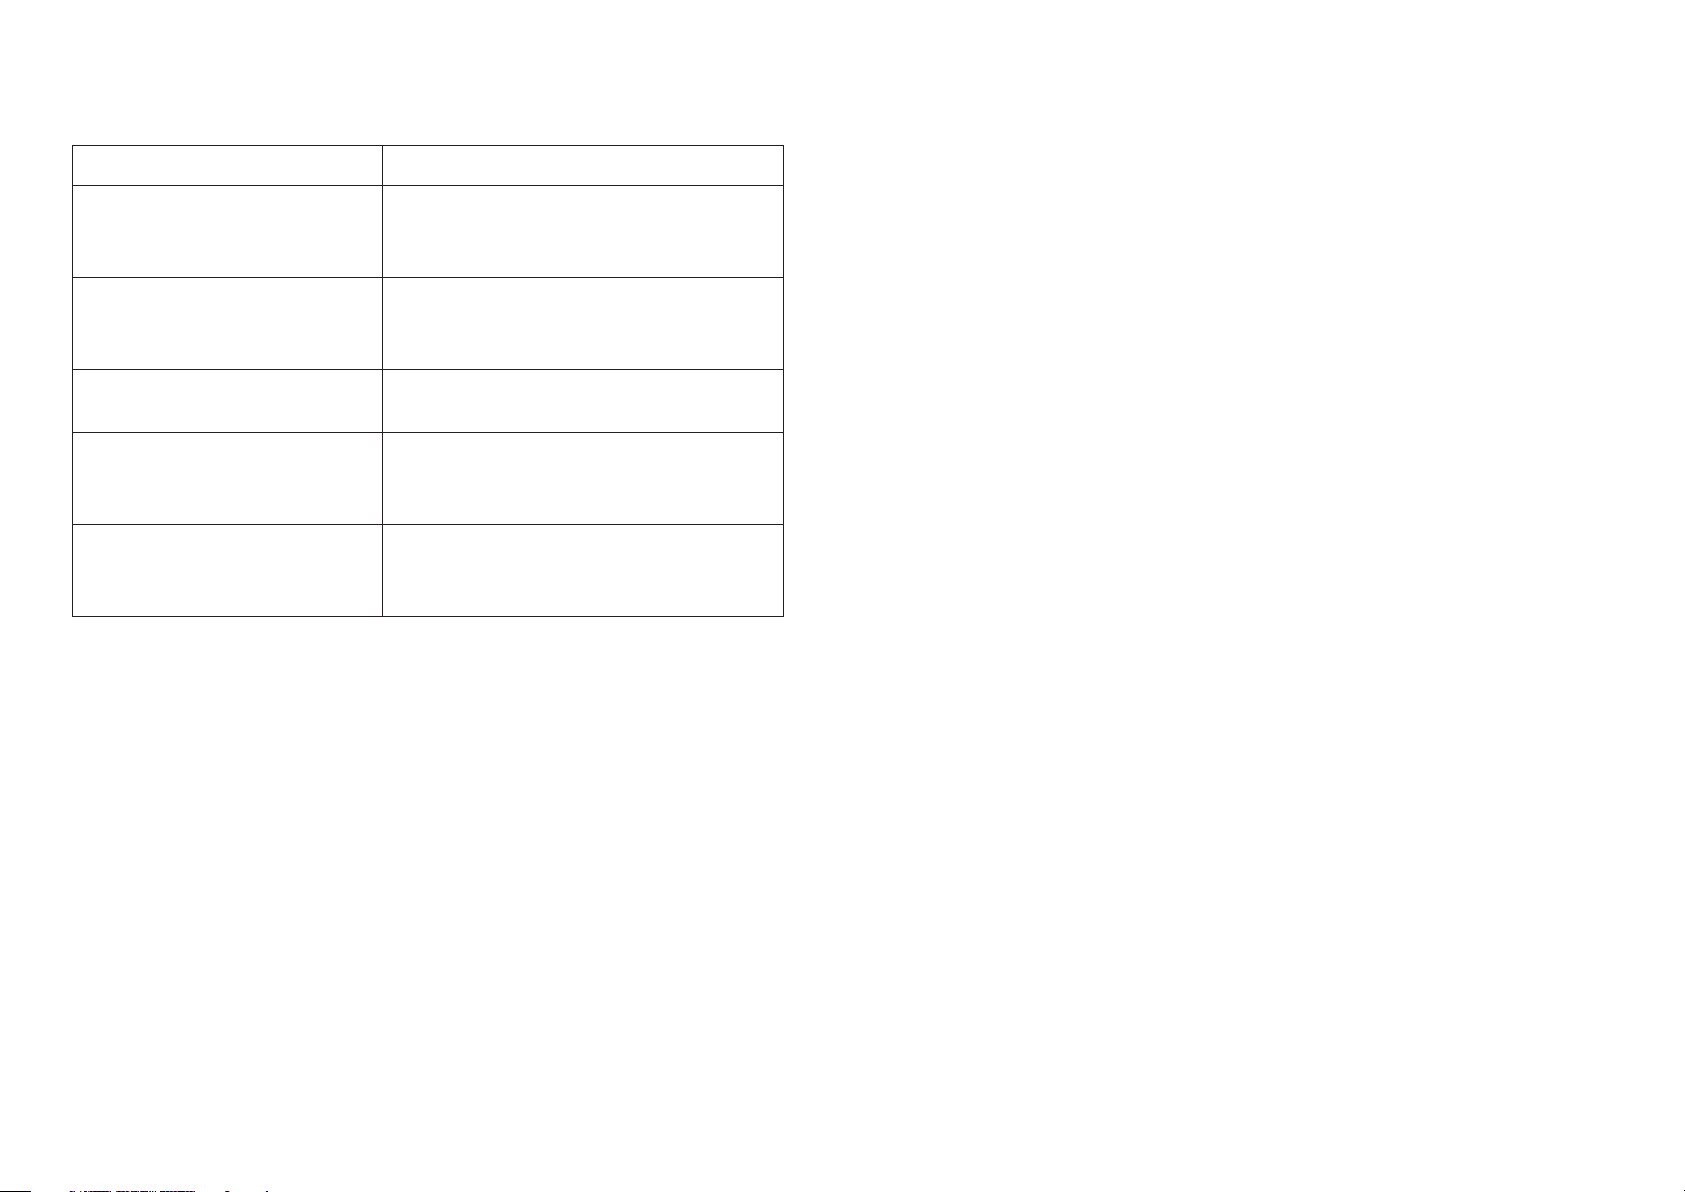
Problem Solution
The adapter indicator is on, but
the LED S300D doesn’t power
on.
The Adapter doesn’t power on Check to see if the power adapter switch
The LCD display doesn’t power onThe LCD screen is damaged. Please con-
The Remote control doesn’t
work
The LED S300D doesn’t receive
a signal from the Rmote control.
Please check the connecting cable for
any loose connection, or to see if it is
damaged.
is damaged, or to see if the plug is properly inserted.
tact [email protected]
Check to see if the indicator light is dam-
aged. If damaged, please contact info@
essentialphoto.co.uk.
Please check to see if the channels match
on both your Remote Control, and on
your S300D LED head.
PIXAPRO® LTD.
50 Popes Lane,
Oldbury,
West Midlands,
B69 4PA
Tel: 0121 552 3113
Web: www.essentialphoto.co.uk
E-mail: [email protected]
 Loading...