

Page 1
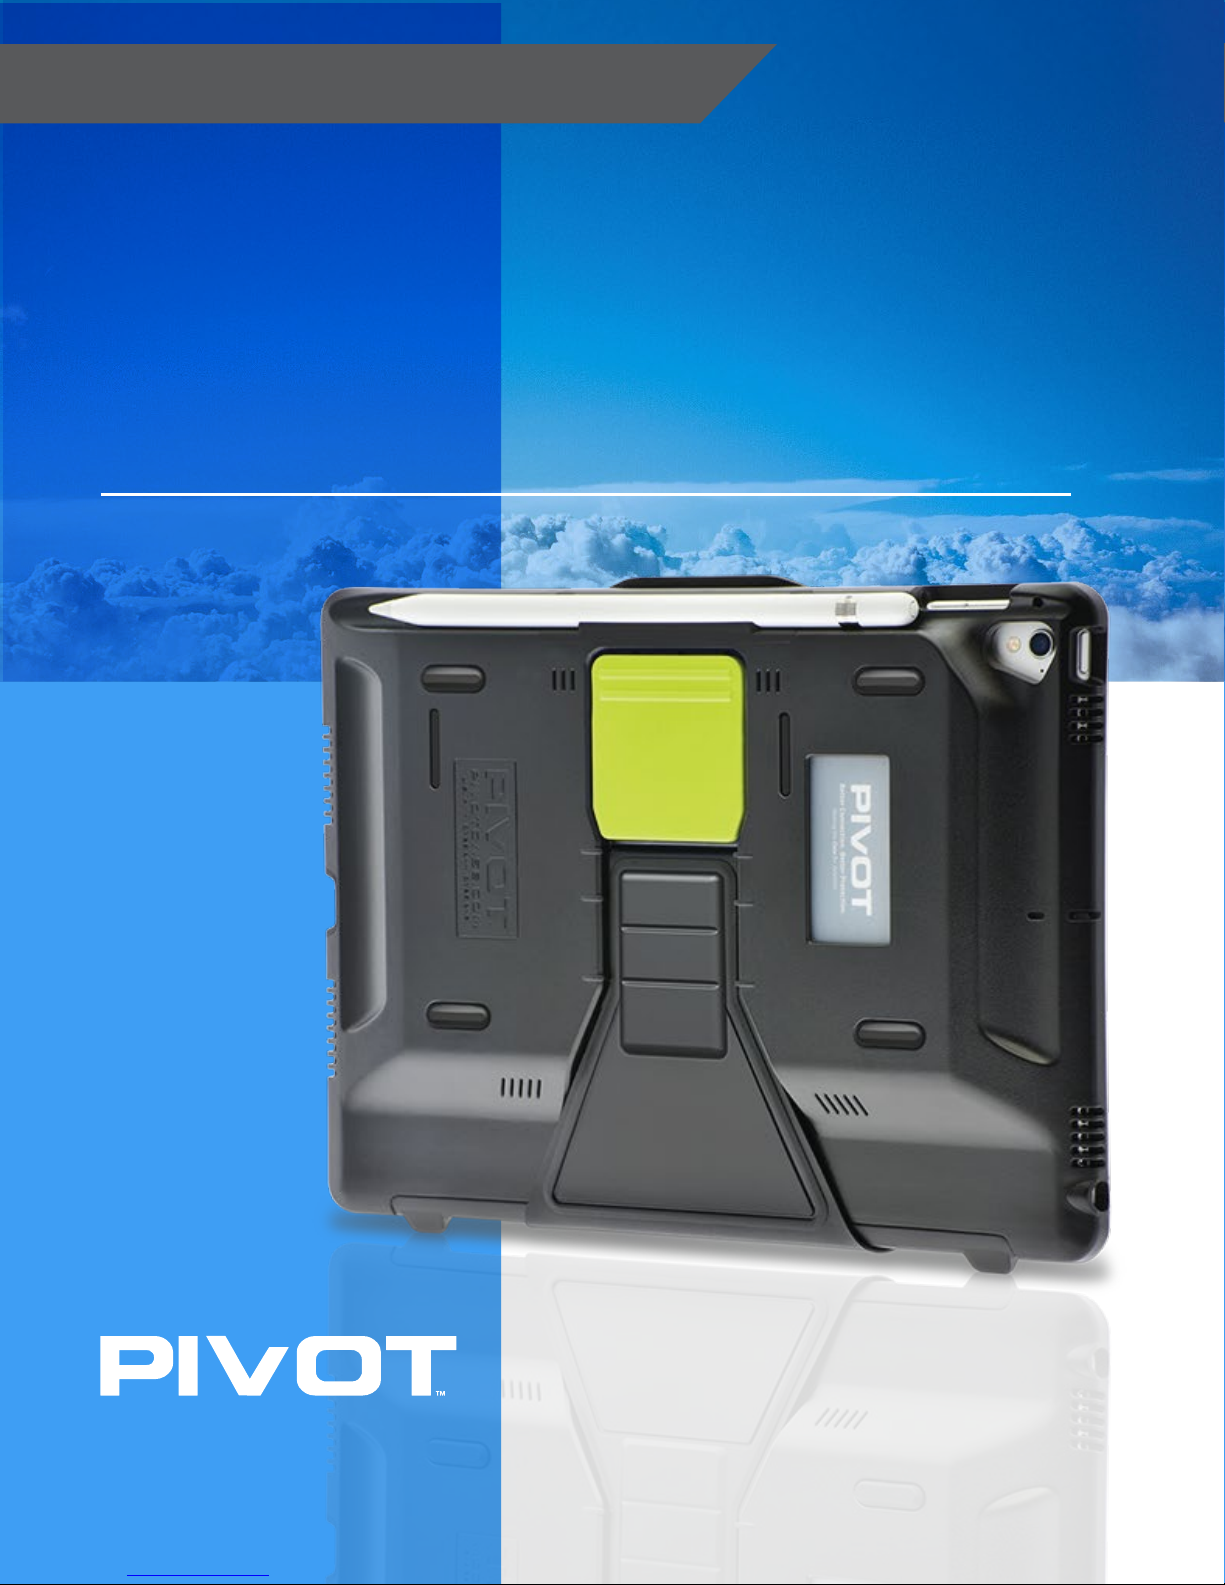
ADVANCE RELEASE! (Product coming F/W 2017)
User Guide
OMNI 97
For iPad 9.7”, iPad Pro 9.7” and iPad Air 2
Better Connection. Better Protection.
[ Issued 09.07.2017. Version R1 ]
16.
Page 2

OMNI 97 | User Guide
For iPad 9.7”, iPad Pro 9.7” and iPad Air 2
Read Before Use
For optimal performance and maximum satisfaction with your PIVOT case, please follow
this set of simple recommendations to ensure proper deployment and superior device
protection.
WARNING: Your PIVOT case is designed to hold your device firmly to protect against
accelerated impacts. Once installed, your device will be held securely on all sides. It is not
intended to come out easily. When you get a PIVOT case, it means you’re getting the
best. PIVOT products maximize protection and minimize the need to remove the device
from your PIVOT case.
If you need to remove your device, please refer to this document or visit PIVOT online for
instructions to avoid unnecessary damage to your device and PIVOT case.
Air Cushion Lightweight
Tough Protection
Thermal Control
A-Z
Keyboard Compatible Stylus Support
1.
[ Issued 09.07.2017. Version R1 ]
Page 3
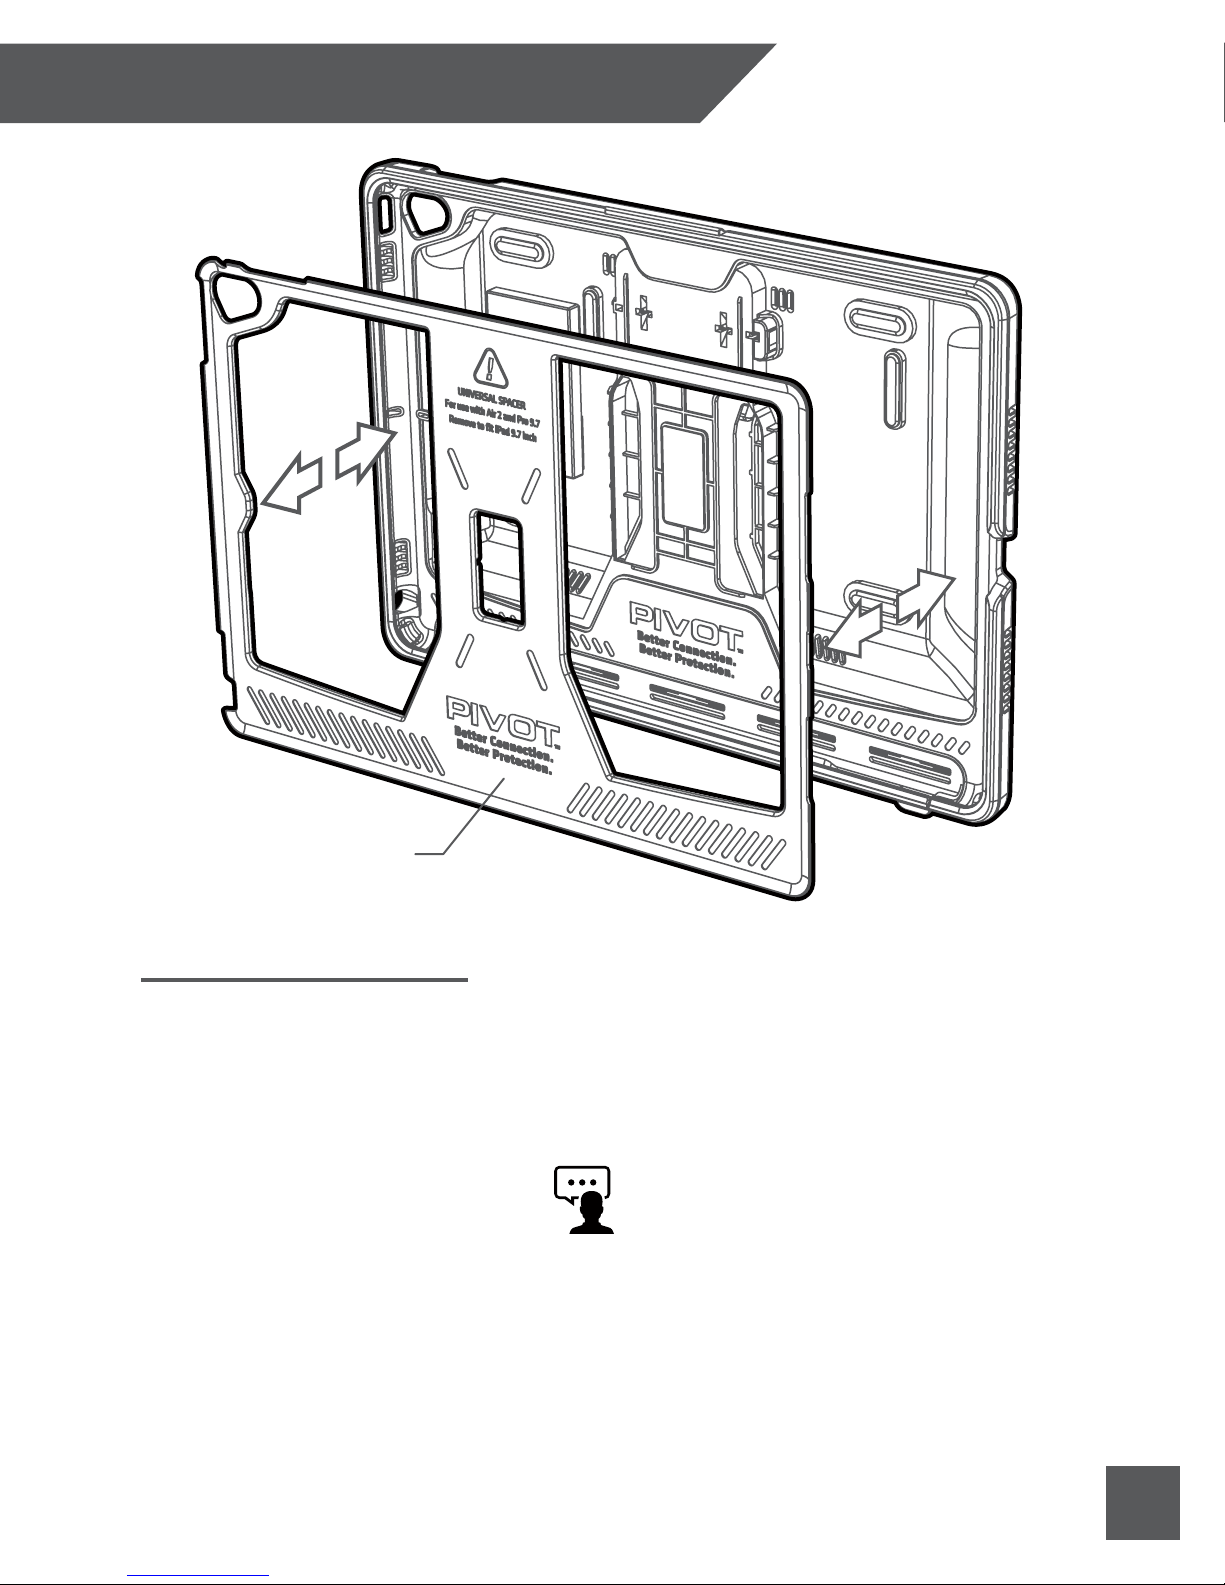
OMNI 97 CASE OVERVIEW:
Universal Spacer
Device Compatibility
The PIVOT OMNI 97 is a multi-generational device solution. With the use of the PIVOT Universal
Spacer, the OMNI 97 fits the Apple™ iPad 9.7”, iPad Pro 9.7” and the Air 2. Features such as
camera, audio jack openings and button access have been shifted to accommodate the various
locations of these features across the dierent devices. Use the Universal Spacer insert in the
following device configurations:
Use Universal Spacer:
iPad Pro 9.7”
iPad Air 2
Remove Universal Spacer:
iPad 9.7”
The Universal Spacer fits perfectly into place to fill the dierence between device dimensions,
while all three devices retain full button functionality and operation.
Did You Know?
Not all OMNI 97 compatible devices share the same
features or locations of buttons, speakers and
cameras. For this reason, the access openings in
the OMNI 97 case are designed to accommodate
the features of all three device types.
2.
Page 4
2
4
!
3
WARNING!
Do not use excessive force or
tools of any kind during install or
removal of device. Doing so may
cause damage or personal injury.
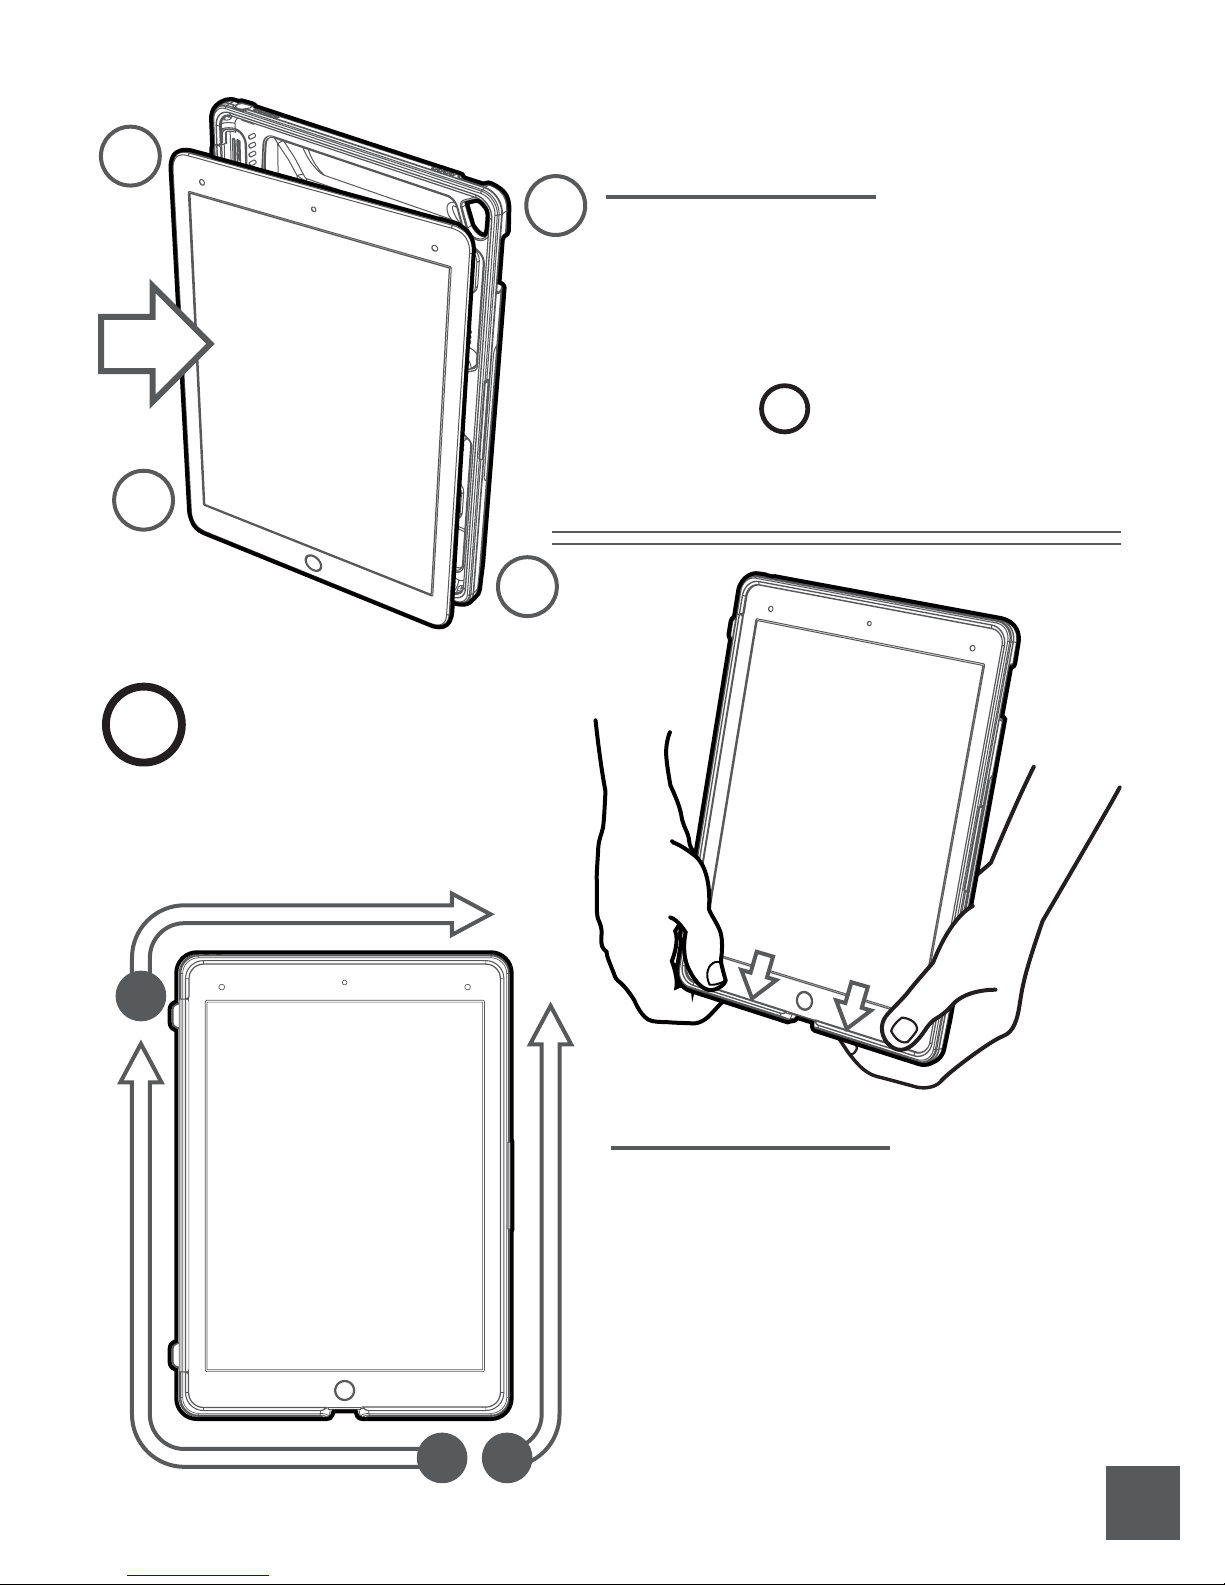
Installing Device
1
Align device camera and buttons with the
corresponding access points in the case body and
press the corners of the device into the case in the
order shown. The device will snap securely into the
case’s perimeter seal.
!
Pro Tip!
Open the ID window and write
your info on the ID card before
installing the device.
2
Top
Left
Bottom
Removing Device
Beginning with the bottom edge near the charging
Right
1
3
port, press firmly using your thumbs to disengage
the case seal. Continue carefully pressing around the
edges of the case to release the device in the order
shown. Do not attempt to pry or force the device
from the case.
1. Start at the bottom and move left
2. Continue around the top edge
3. Release the right edge to remove device
3.
Page 5
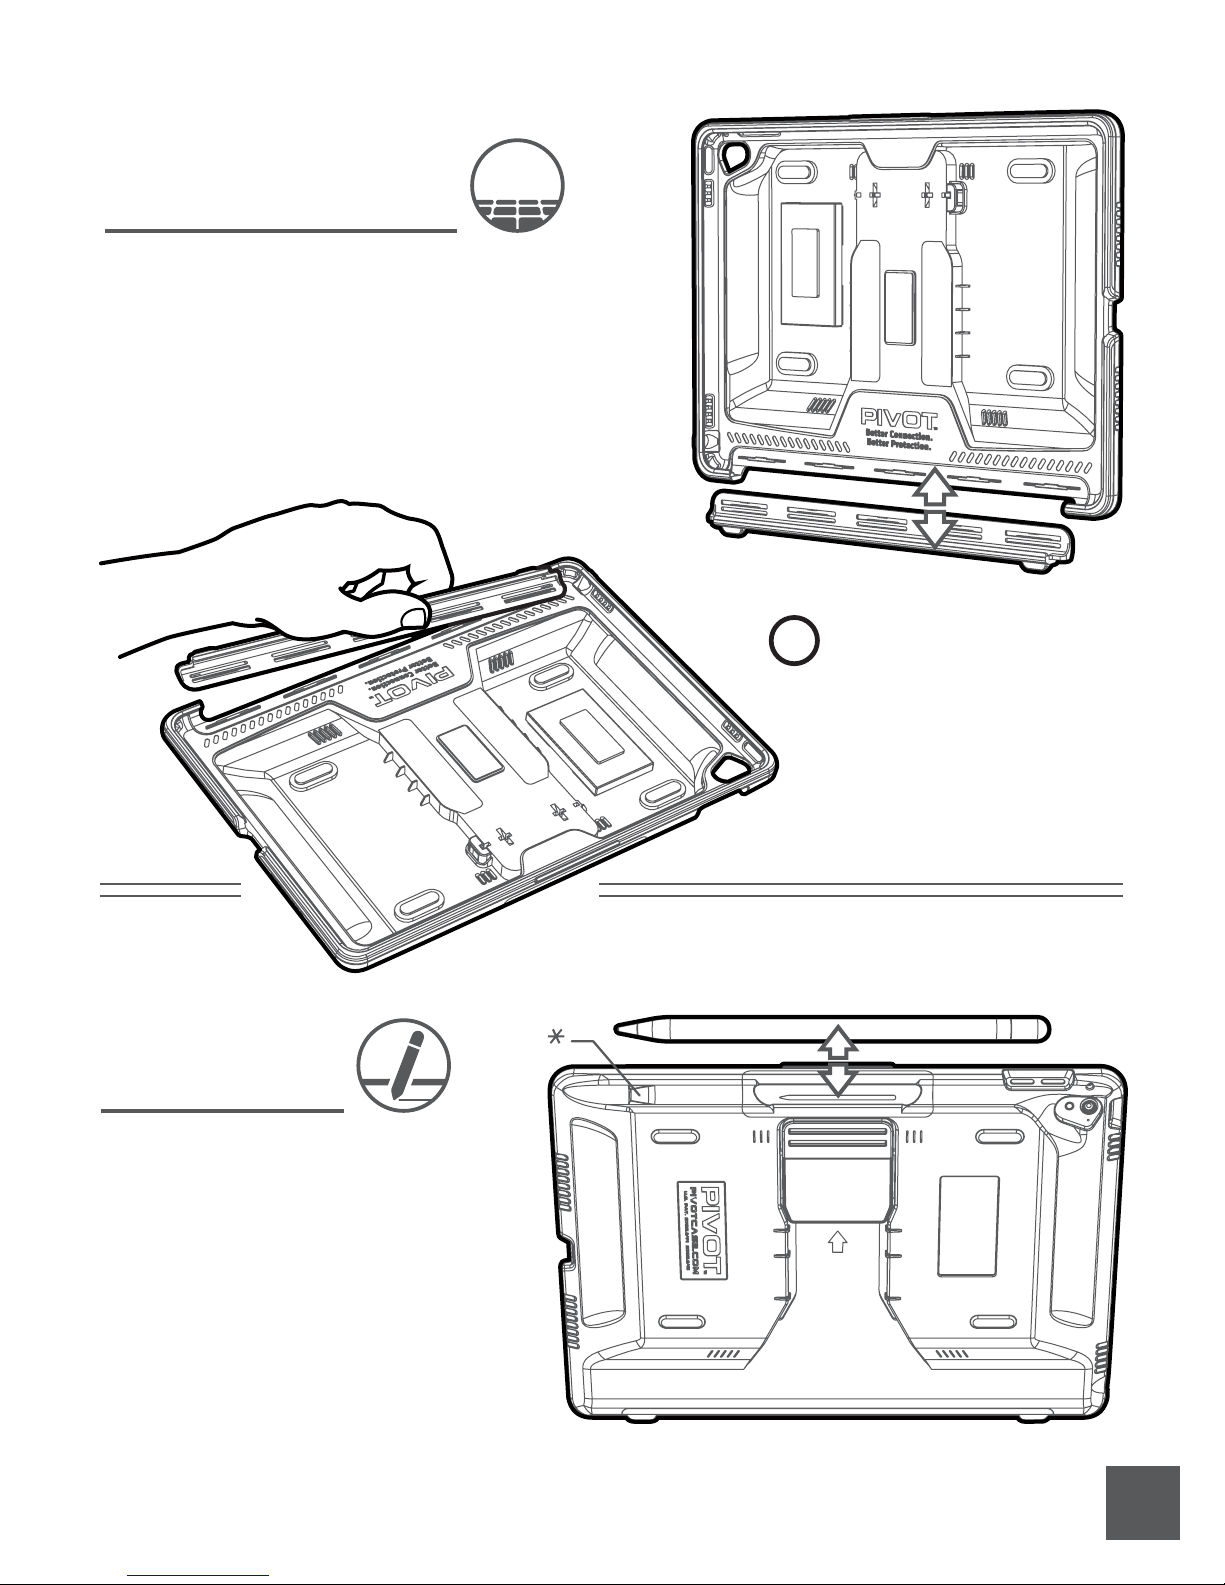
Keyboard Compatible
A-Z
To convert for use with the Apple™ Smart Keyboard,
simply remove the protective side edge to reveal the Smart
Connector. Using your thumb and forefinger, begin
disengaging the clips by gripping the side edge firmly and
rocking with mild force until the clip gently unlocks. Start
with one end and continue releasing the clips as you move
across the full length. Do not use excessive force or
attempt to rip the parts apart.
Pro Tip!
!
Store any removable parts in
a safe and memorable
location so they are available
if you need them in the future.
Stylus Support
The Apple™ Pencil and similarly sized
stylus wands snap firmly into the
integrated stylus channel.
Please follow the orientation shown here
for the most secure grip. The pencil tip
cradle* is specifically designed for the
Apple Pencil to prevent leverage that may
result in accidental release from the stylus
channel.
4.
Page 6
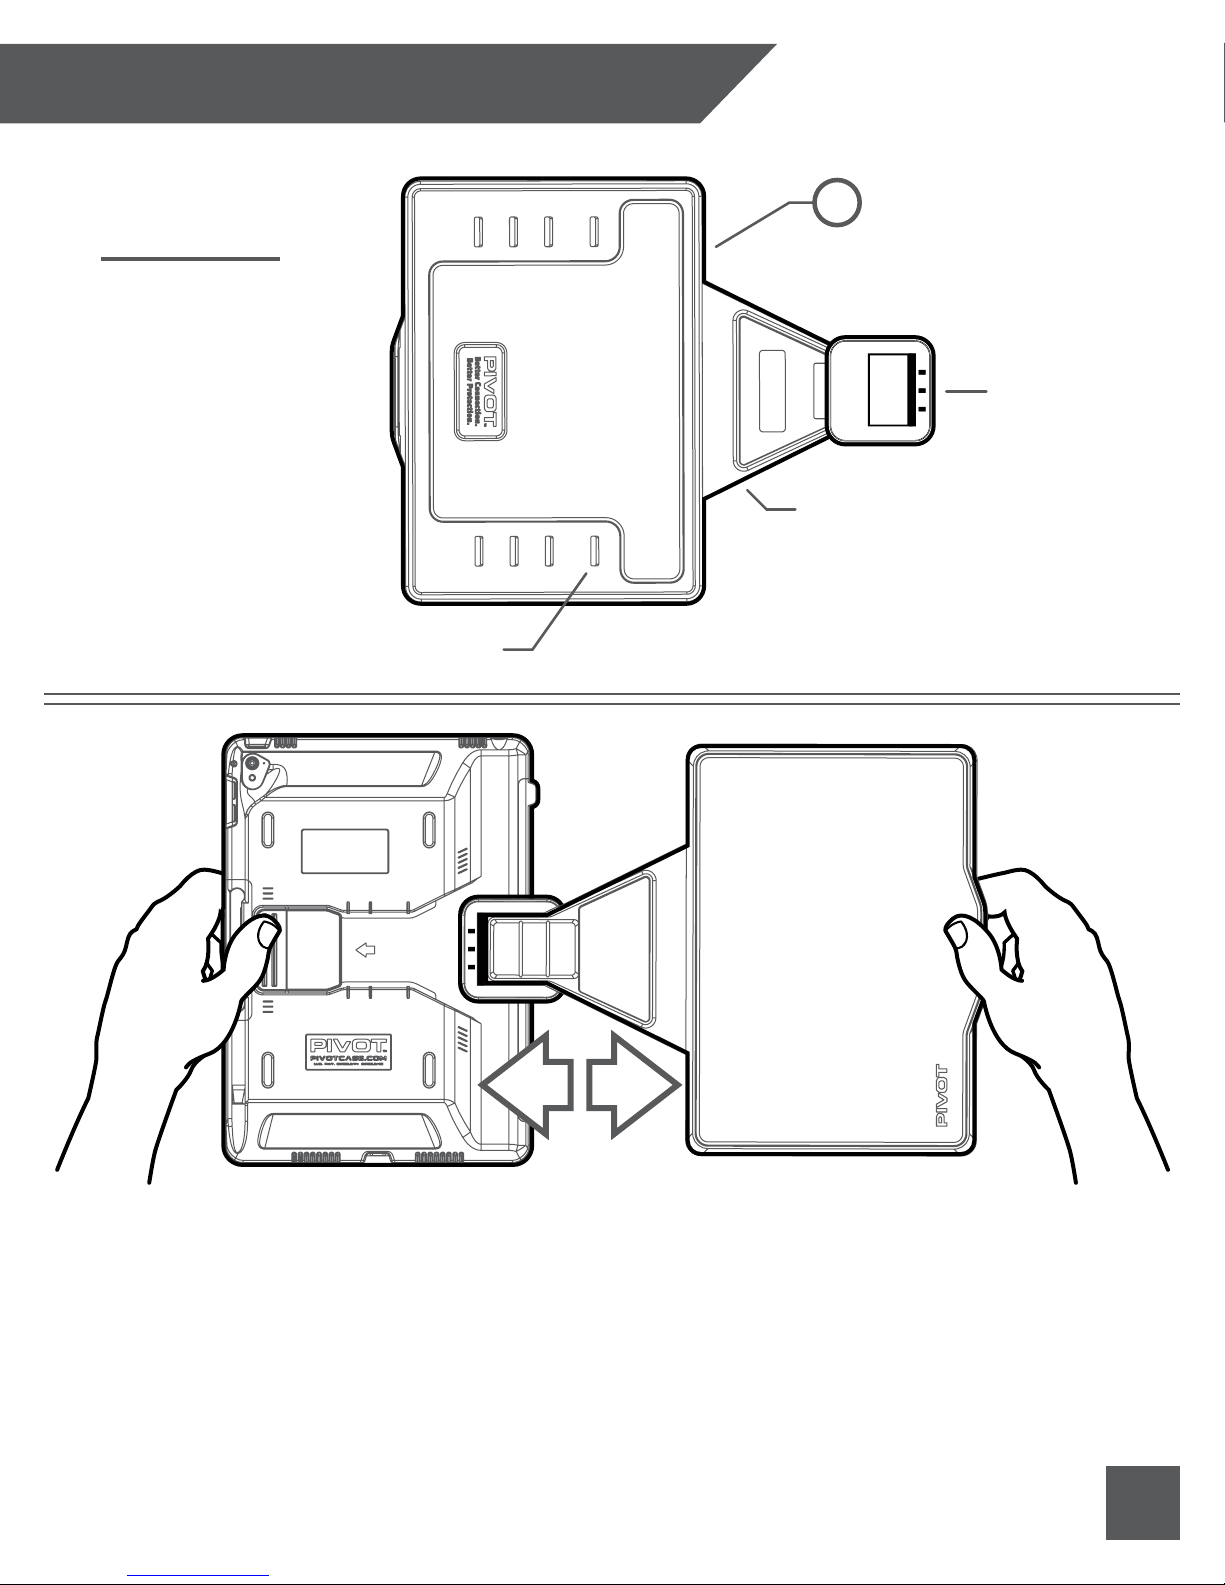
PIVOT FOLIO COVER GUIDE
Folio Cover
Includes the main Folio
Cover with Viewing Slots,
Kickstand Hinge and the
folio Mounting Plate.
(Viewing Slots)
1
Pivot Case Folio (PCF)
(Mounting Plate)
(Kickstand Hinge)
Assembly:
Align the folio cover with the back of the Pivot case as shown. Ensure the folio’s mounting plate
is placed flat against the back of the case with the three slots directed towards the clip. Slide the
folio into the mounting channel and secure with the clip.
Removal:
Disengage the folio cover from the Pivot mounting channel by pressing the clip on the back of the
case, which will release the folio. With the clip pressed, gently pull the folio cover out of the
mounting channel. Store the folio in a safe and memorable location.
5.
Page 7
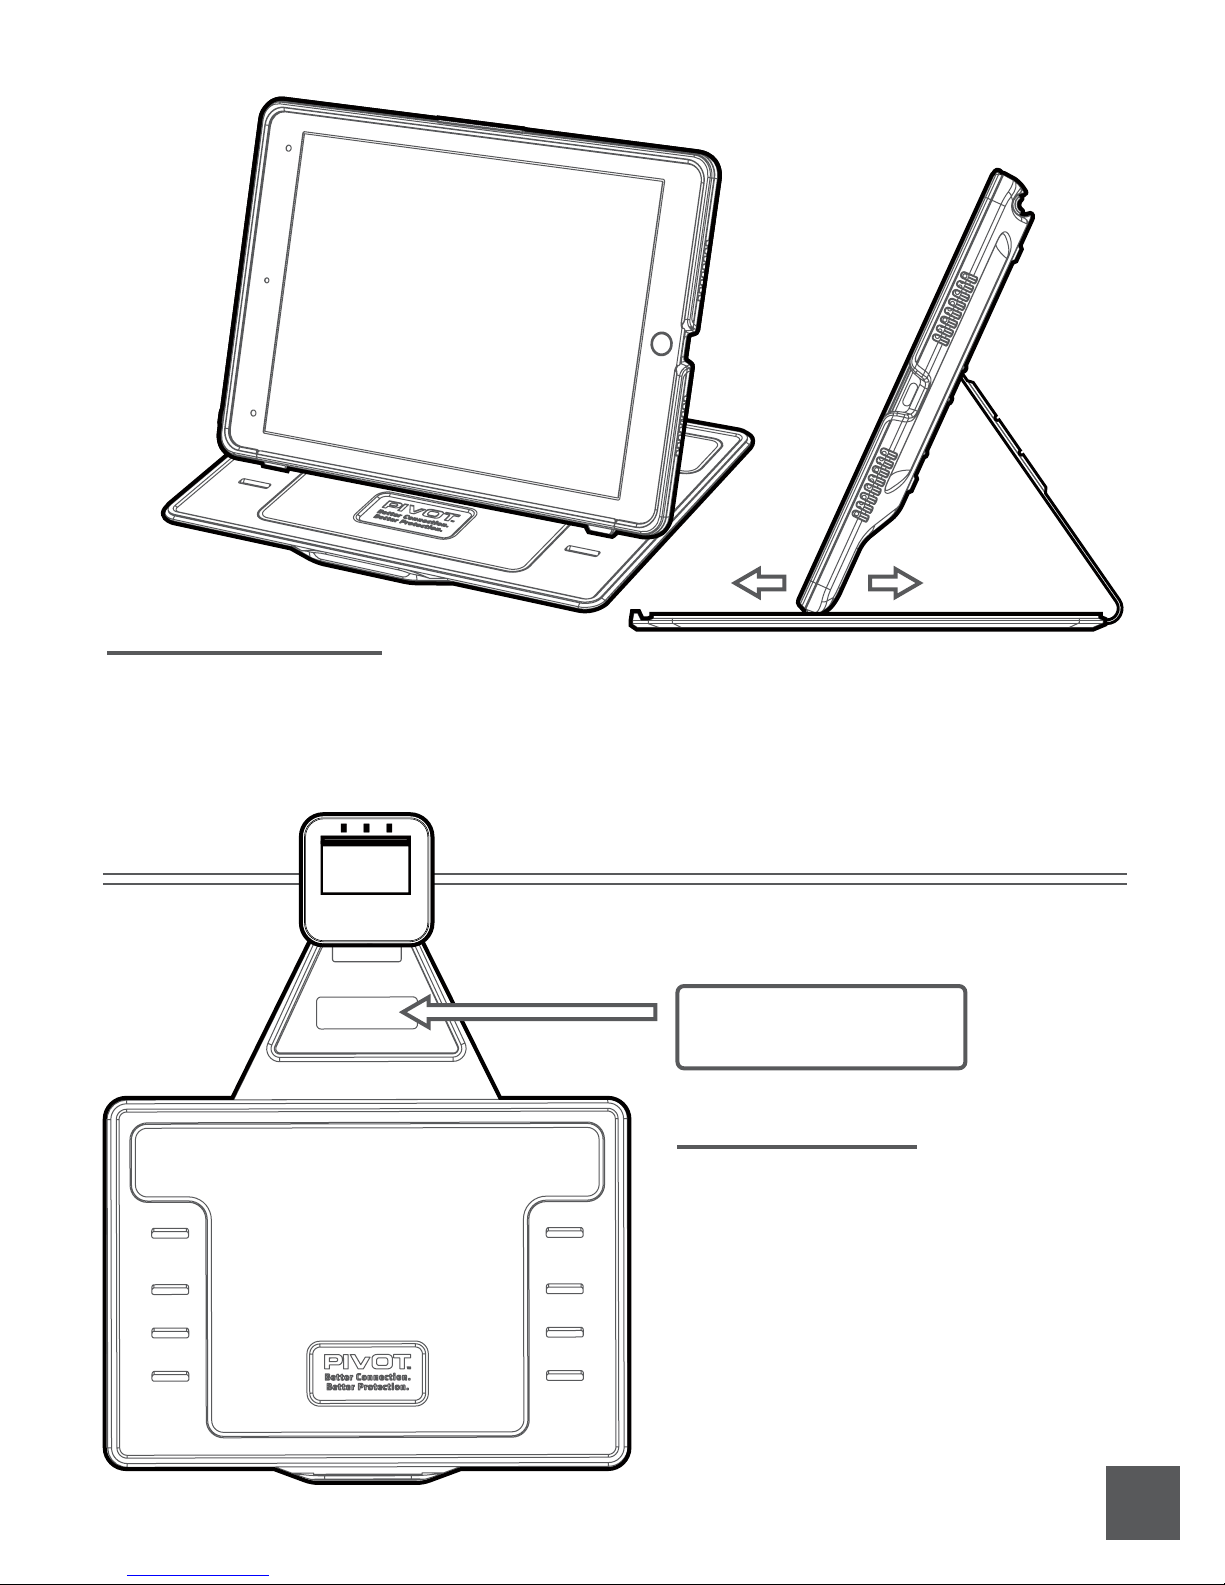
Kickstand Hinge
Use your folio cover for convenient viewing in four dierent
angles. Open the folio cover and fold into the position show.
Engage the flanges on the edge of the case with the viewing slots
for superior stability.
Label Area
1/2” x 1 3/4”
Folio I.D. Label
The folio cover includes an I.D. labeling area
ready for use with standard adhesive labels.
Download the label template from the
manufacturer’s website and create your I.D.
label using ink jet or laser printers.
Recommended: Avery Template 5167
6.
Page 8
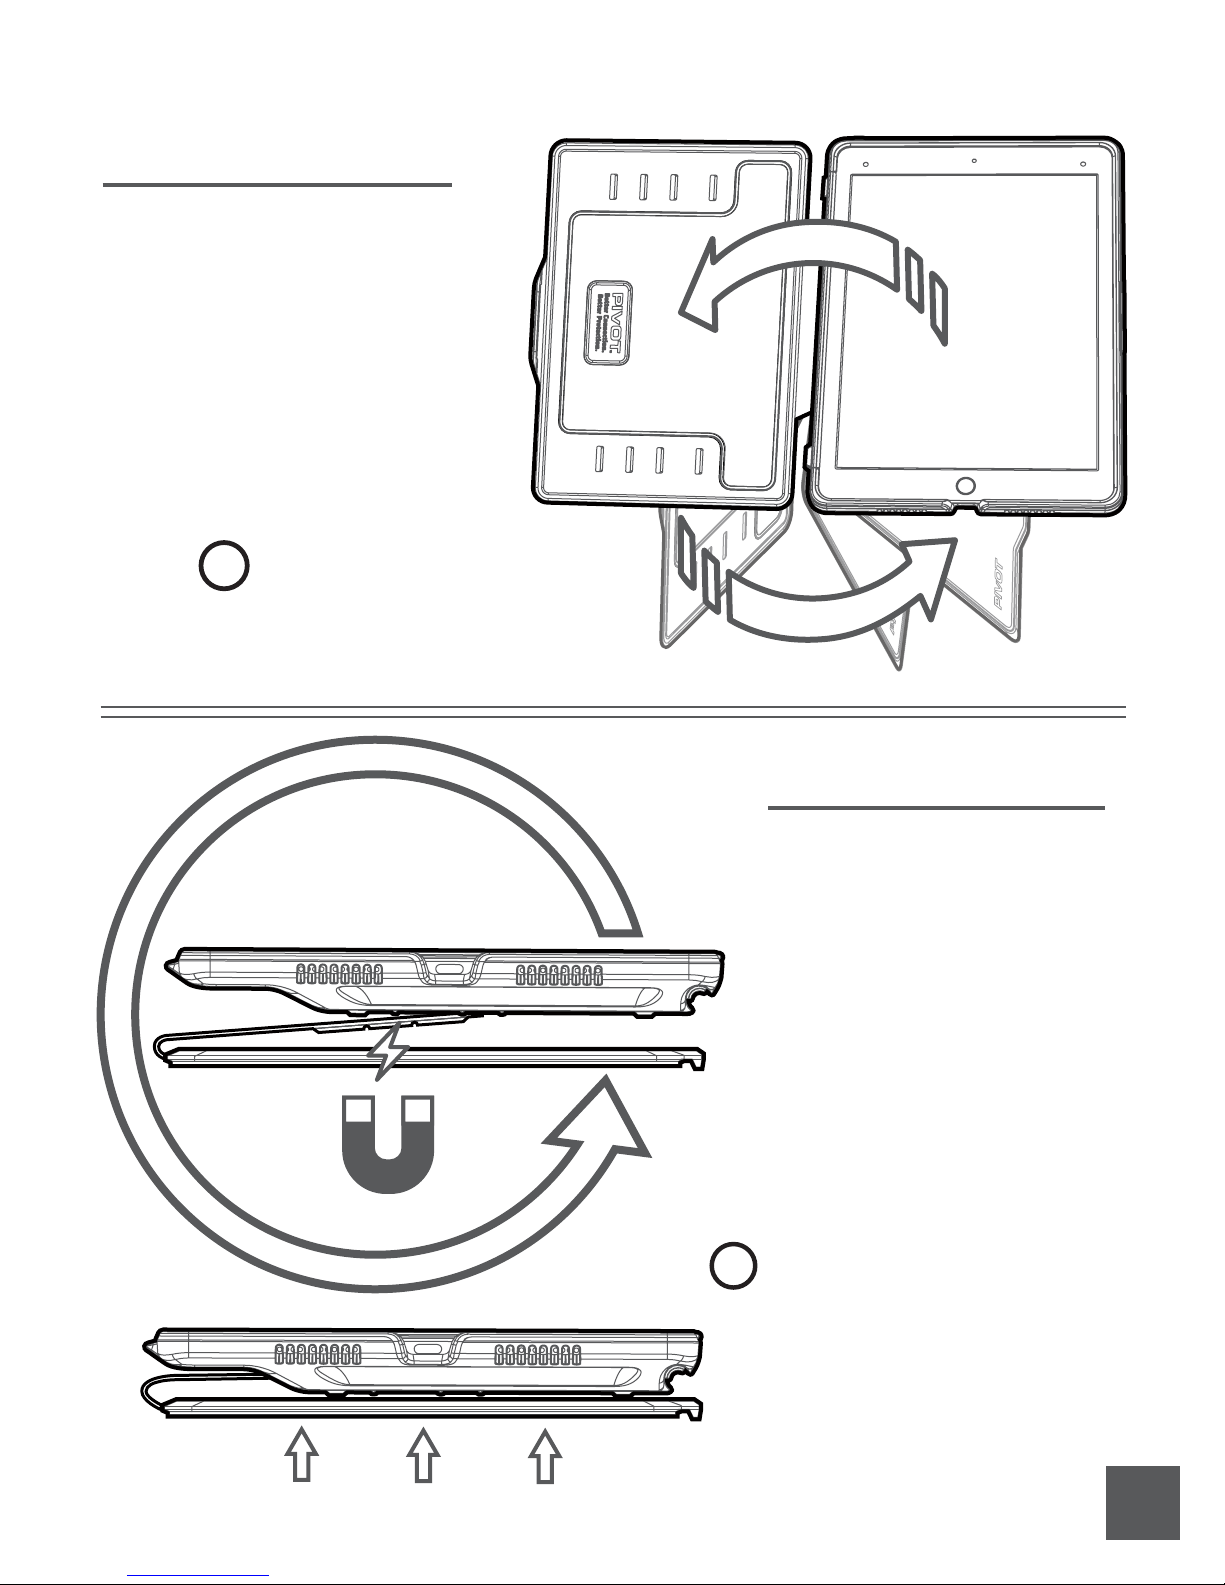
Using The Folio Cover
The OMNI 97 Folio Cover is easy and
intuitive to use. Simply follow the
instructions below when opening and
closing your cover.
1. Release the folio latch at the front
right edge
2. Open the cover
3. For hand-held viewing, fold the cover
back as illustrated, just like a book
Pro Tip!
!
Continuously rotate the cover
around until the magnets engage
with the back of the case.
Magnetic Folio Cover
An added convenience feature of the
OMNI 97 Folio Cover is the magnetic
assist when in hand-held viewing
mode. Magnets react to help hold
the cover in a comfortable position
while the user is holding it.
Open the Folio Cover like a book to
feel the magnets engage. This is the
correct and intended position of the
folio when in hand-held viewing
mode. Any other position is incorrect
and could result in damage to the
cover.
!
Pro Tip!
The Folio Cover includes magnets to
activate the auto-sleep/wake
feature of the iPad. Manage this
feature in the device settings menu.
7.
Page 9
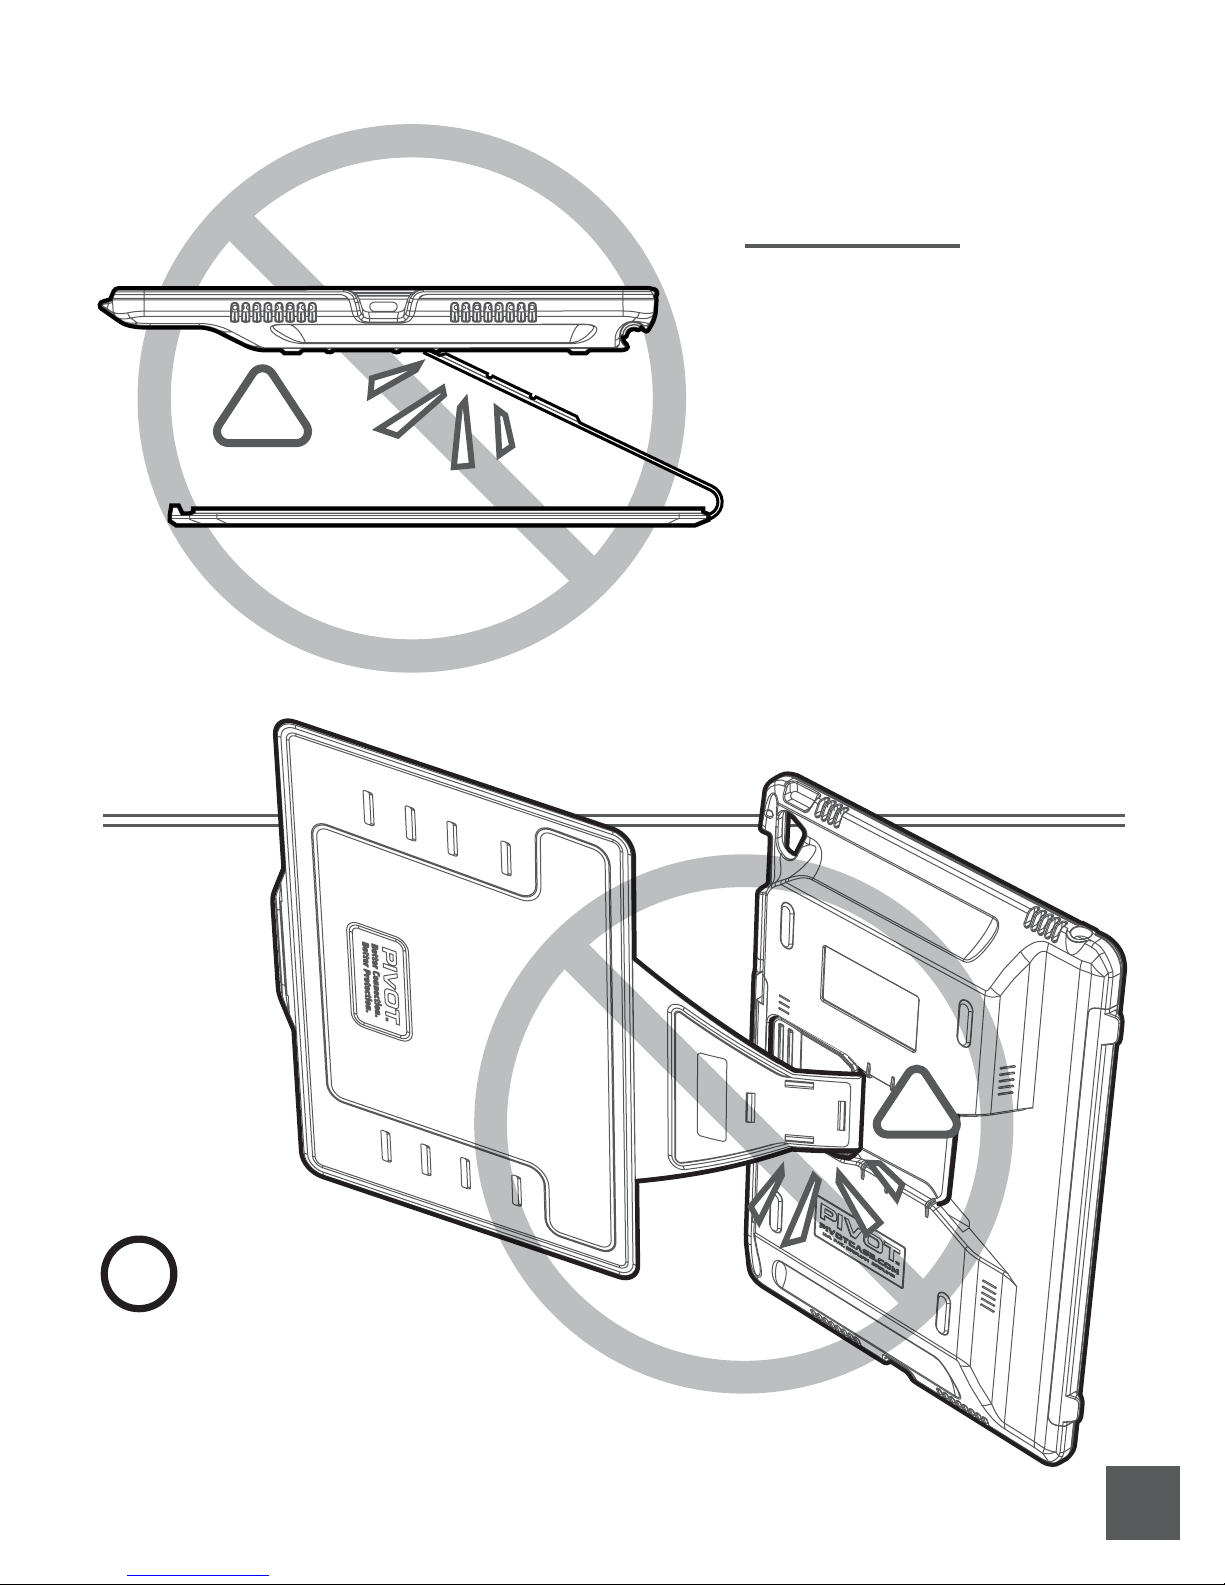
!
Incorrect Use
The Folio Cover is designed to protect
the device during transit and provide
convenience features when in viewing
mode. It is very durable if used as
intended. However, the folio can be
damaged if misused and put under
repeated stress.
Do not fold the Folio Cover beyond the
intended angles indicated by the
viewing slots on the inside of the cover
or fold incorrectly when in hand-held
mode. Doing so may result in damage
to the magnetic convenience features.
!
WARNING!
Do not use excessive force when
using the Folio Cover. Do not bend the
cover backwards over the Pivot Clip. The
Folio Cover is not intended to bend this way.
This type of misuse can cause damage and is
not covered under warranty.
!
8.
Page 10
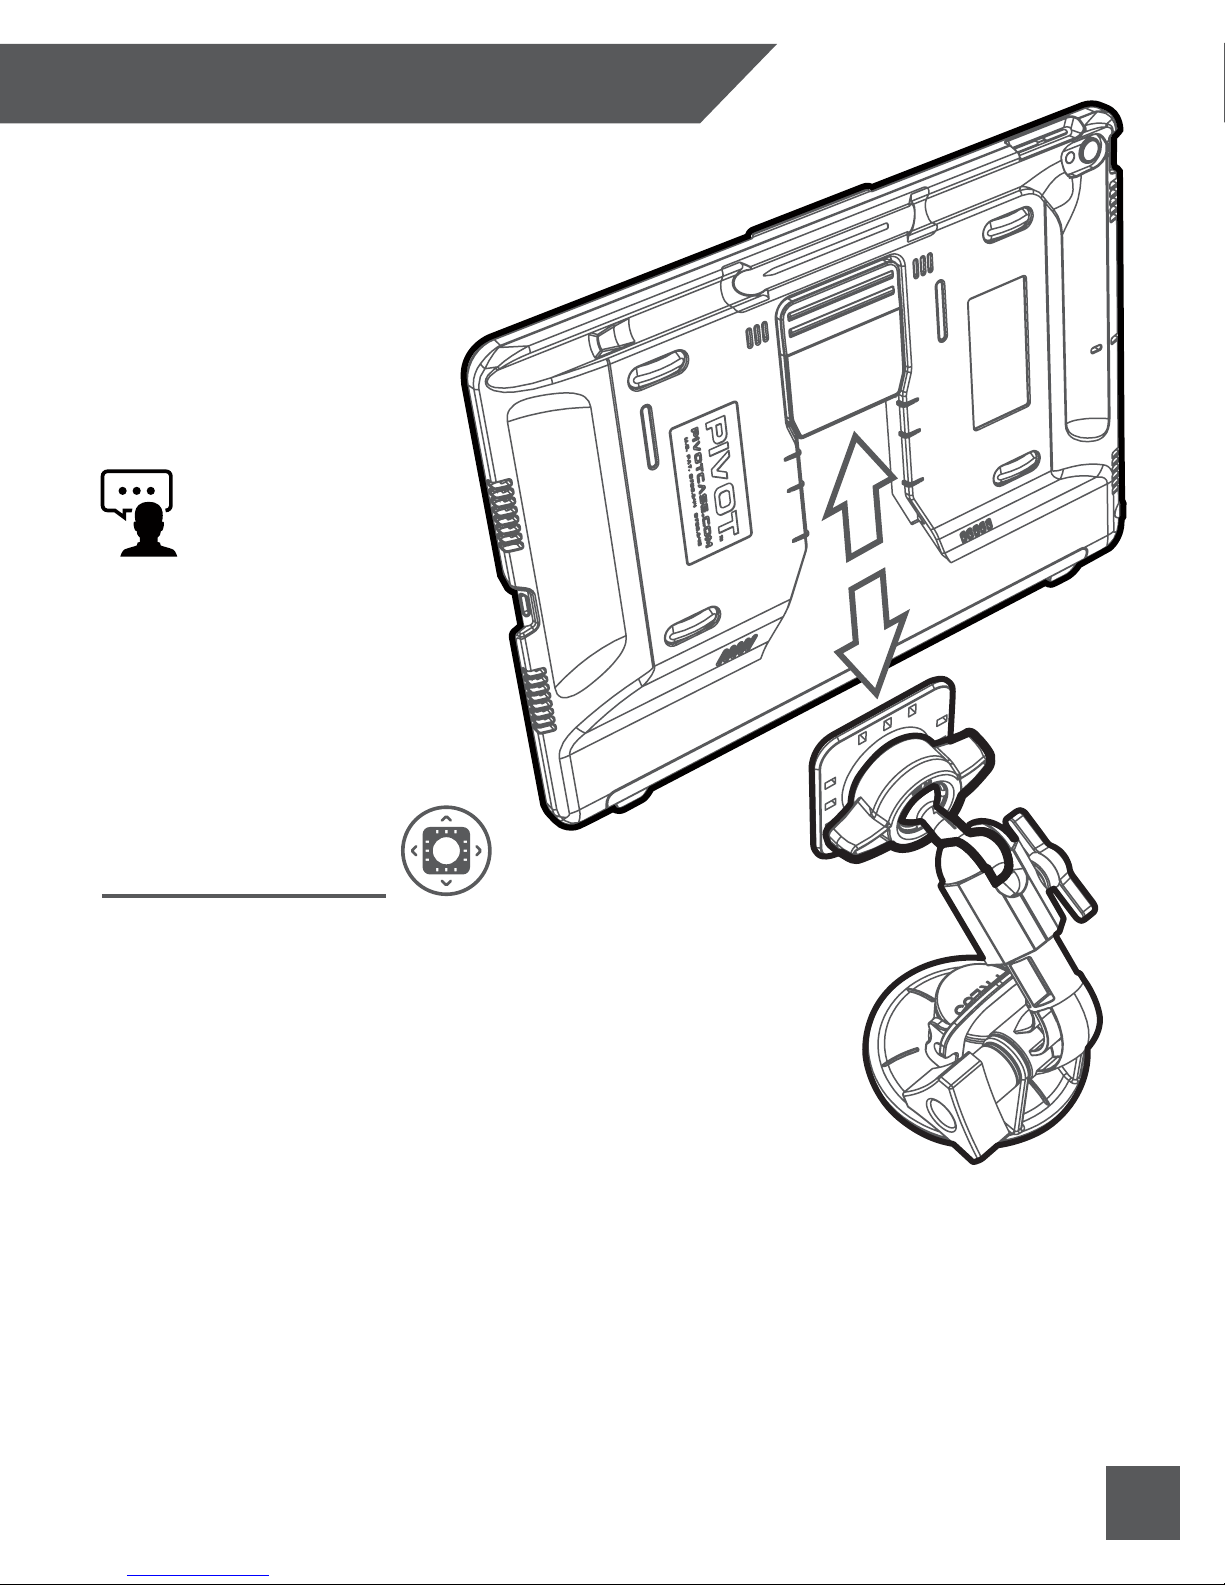
MOUNTING SOLUTION GUIDE
Did You Know?
PIVOT Mounting Solutions
are interchangeable. Each
PIVOT Mounting Solution
case will always connect
securely with every PIVOT
Mount.
Universal Mounts
Your PIVOT case is designed to work with a wide variety of patented
PIVOT Mounting Solutions. Prior to connecting the PIVOT case to
the mount, confirm the mount is in the correct location and is fully
secure. Adjust the mount to the desired orientation and tension for
your device type. Position the mounting plate to promote a parallel
orientation to the case during the install. Follow the steps listed
below for secure mount connection every time:
1. Raise the PIVOT case ABOVE the mounting plate to ensure all
corners of the mounting plate are below the widest opening of the
mounting channel on the case body.
2. Next, lower the case body onto the mounting plate. You will feel the
mounting plate being guided into the case’s mounting channel.
3. The connection is complete when you hear the audible “CLICK” of the clip and
mounting plate engaging. It is not necessary to depress the clip during install as it is
designed to lock onto the mounting plate when properly inserted.
(Depress the PIVOT Clip and reverse this process to unmount the case.)
9.
Page 11
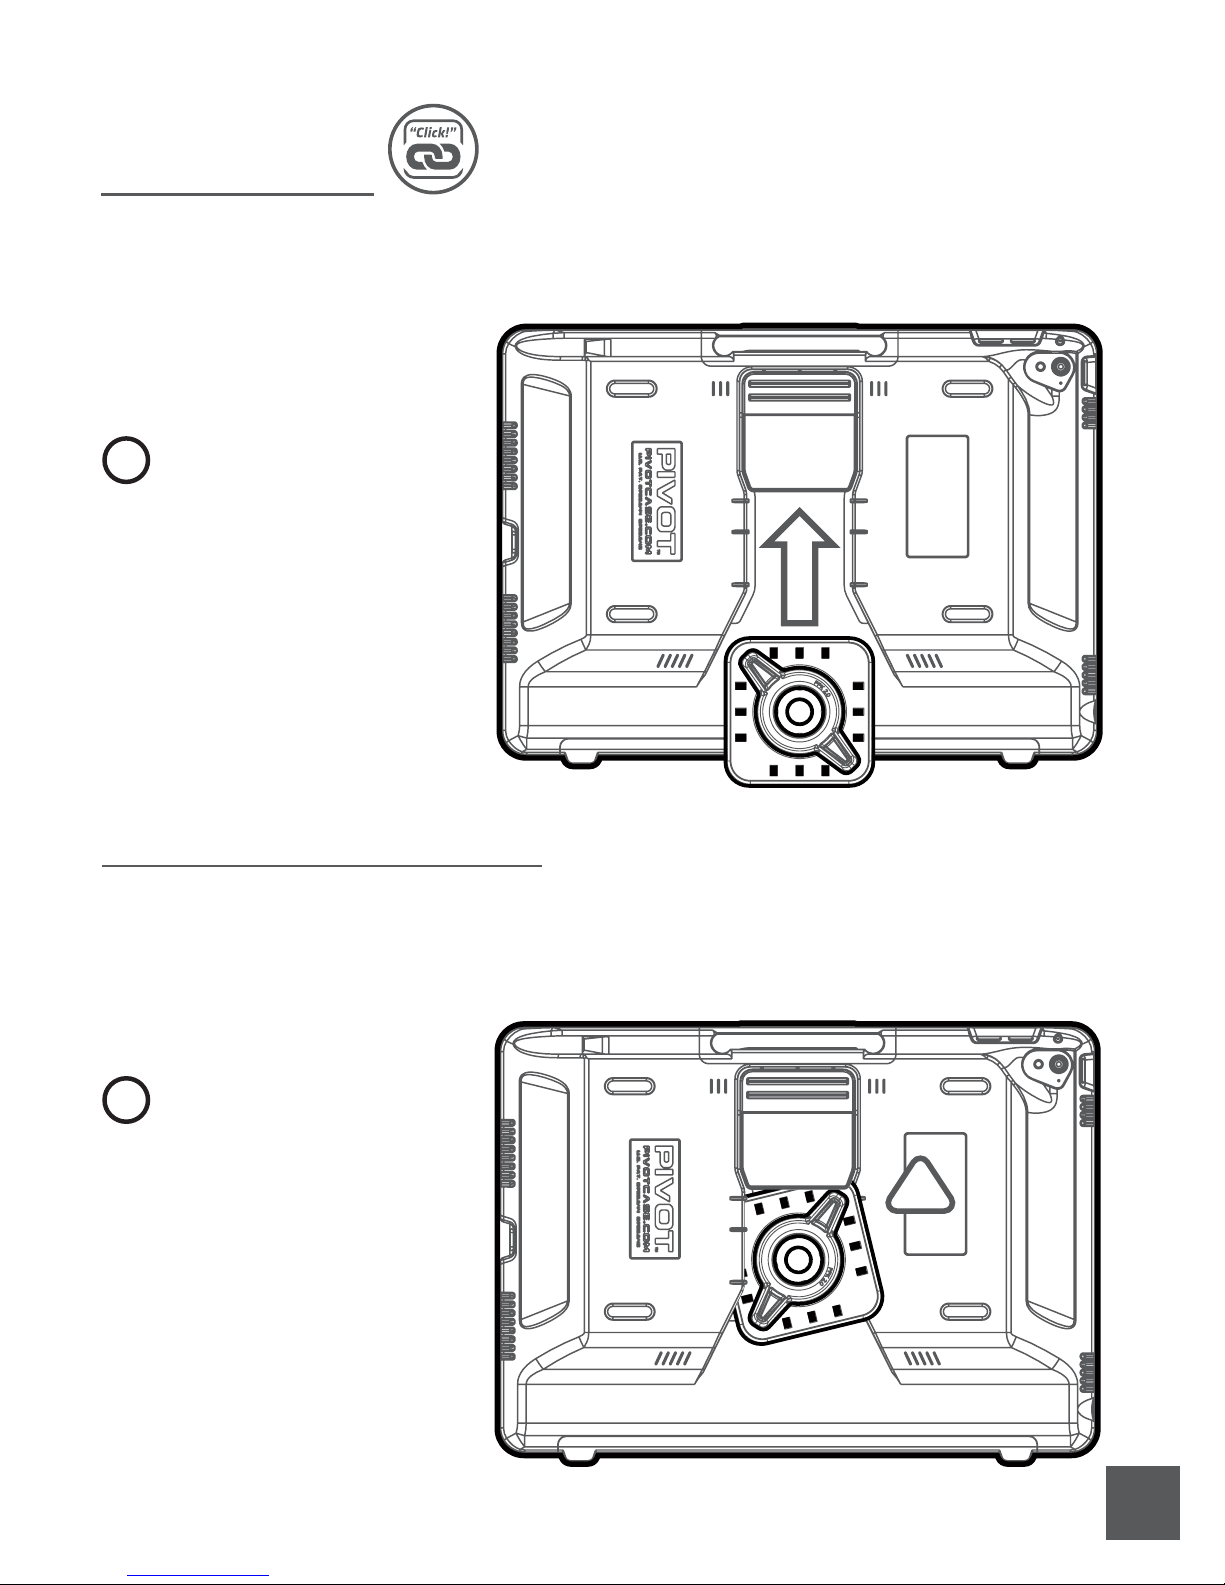
Click! Connection
With PIVOT’s audible engagement, be confident when hearing the “Click!” your
connection is locked in place. If there is no “Click!” sound heard during your installation,
you may have a misalignment and should reattempt.
!
Pro Tip!
It is not necessary to
depress the clip
during install. If the
clip is depressed,
holding it in the
release position, there
won’t be an audible
“Click!”
Incorrect Mount Alignment
Shown below is an example of an incorrect alignment of the mounting plate and PIVOT
case. The clip is not properly engaged with the mounting plate and is not holding the case
in the locked position. The mounting plate is not fully inserted into the mounting channel
and will not support the weight of the case and device.
!
Pro Tip!
If you feel resistance on the
mounting plate as it enters
the mounting channel, you
may be engaging the
“speed bumps” along the
outer edges. They are
designed to provide tactile
feedback, which indicates
misalignment.
!
10.
Page 12
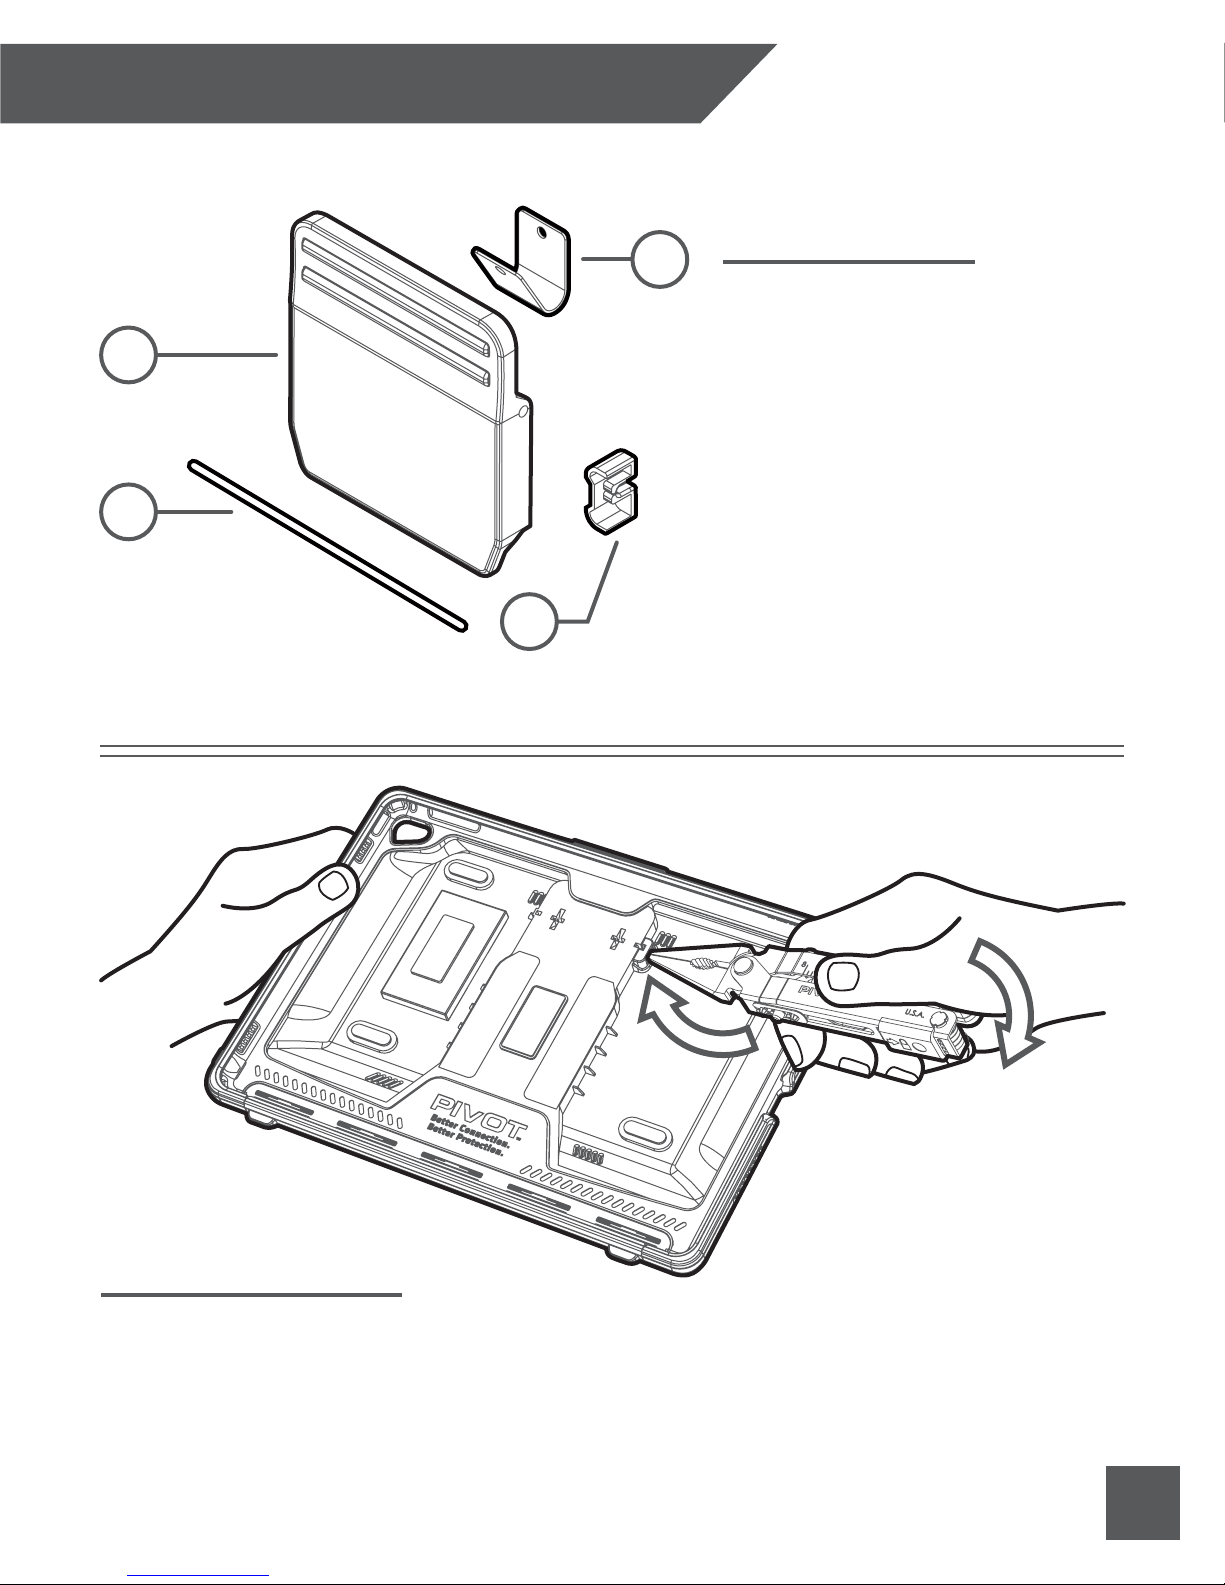
PIVOT CLIP REPLACEMENT GUIDE
1
Pivot Clip
2
Hinge Pin
3
4
Flex
Spring
Getting Started
Before beginning any clip replacement
procedure, please ensure you have a
compatible Pivot Clip Kit. The PIVOT
OMNI 97 case uses the PCK-2 Assembly,
Gen 2.0. It is not compatible with older
version of the PIVOT clip.
Required:
1 Unit PCK-2 Assembly, Gen 2.0
1pc Pivot Clip
1pc Hinge Pin
1pc Hinge Cap
1pc Flex Spring
Hinge Cap
Remove Hinge Cap
a) Remove device. Follow instructions on pivotcase.com for your case and device type.
b) Remove the hinge cap using blunt end of pliers’ nose and mild leverage to pry the
small cap o. There is a small ledge on the edge of the cap for this purpose.
11.
Page 13
!
Pro Tip!
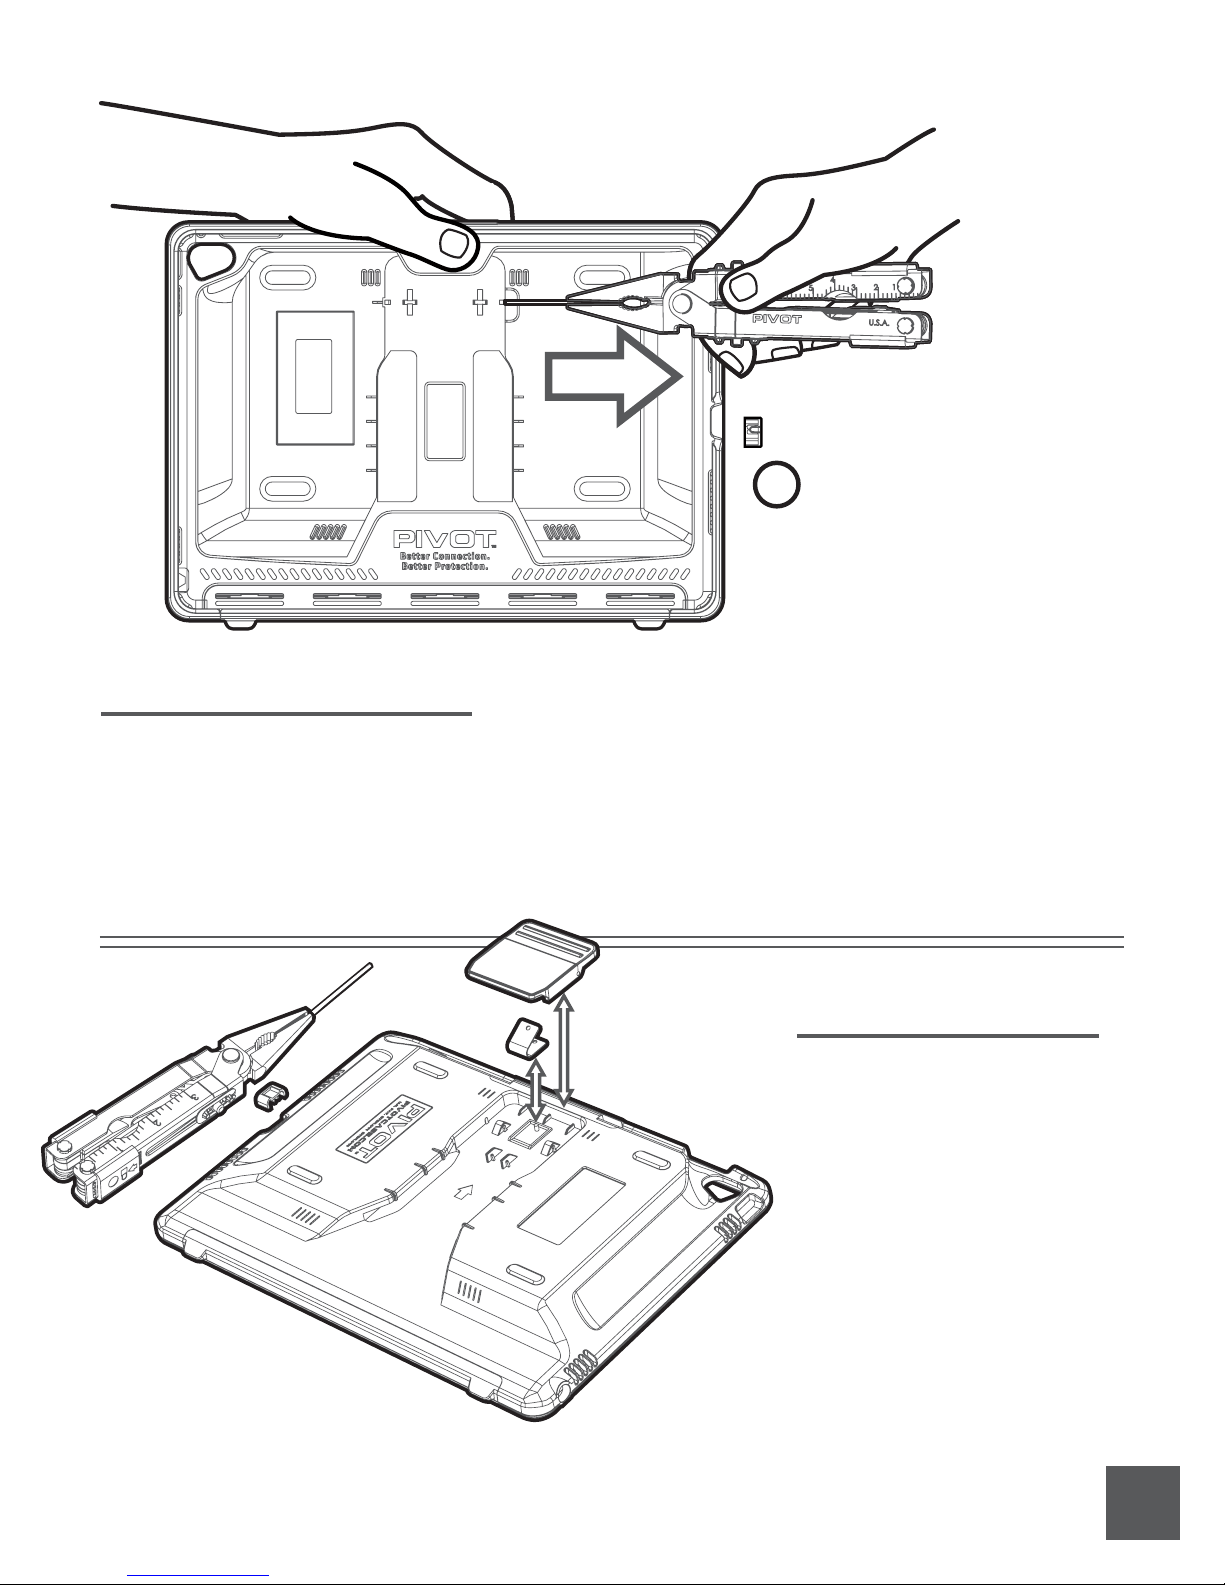
After the hinge pin has been
removed, relieve pressure on the
clip slowly until the spring is no
longer under tension. This will
ensure the clip and spring can be
removed safely.
Remove Hinge and Clip
c) With one hand, hold the clip firmly against the case, apply even pressure to the clip.
d) Using pliers with other hand, pull the hinge pin out. (Be careful, the clip is under spring tension.)
e) Remove clip while holding the spring in place. Replace spring if necessary.
Installing New Clip
f) Install new clip, hold it down
firmly while applying even
pressure.
g) Reinstall hinge pin, ensure it is
inserted all the way.
h) Replace hinge pin cap... DONE!
12.
Page 14
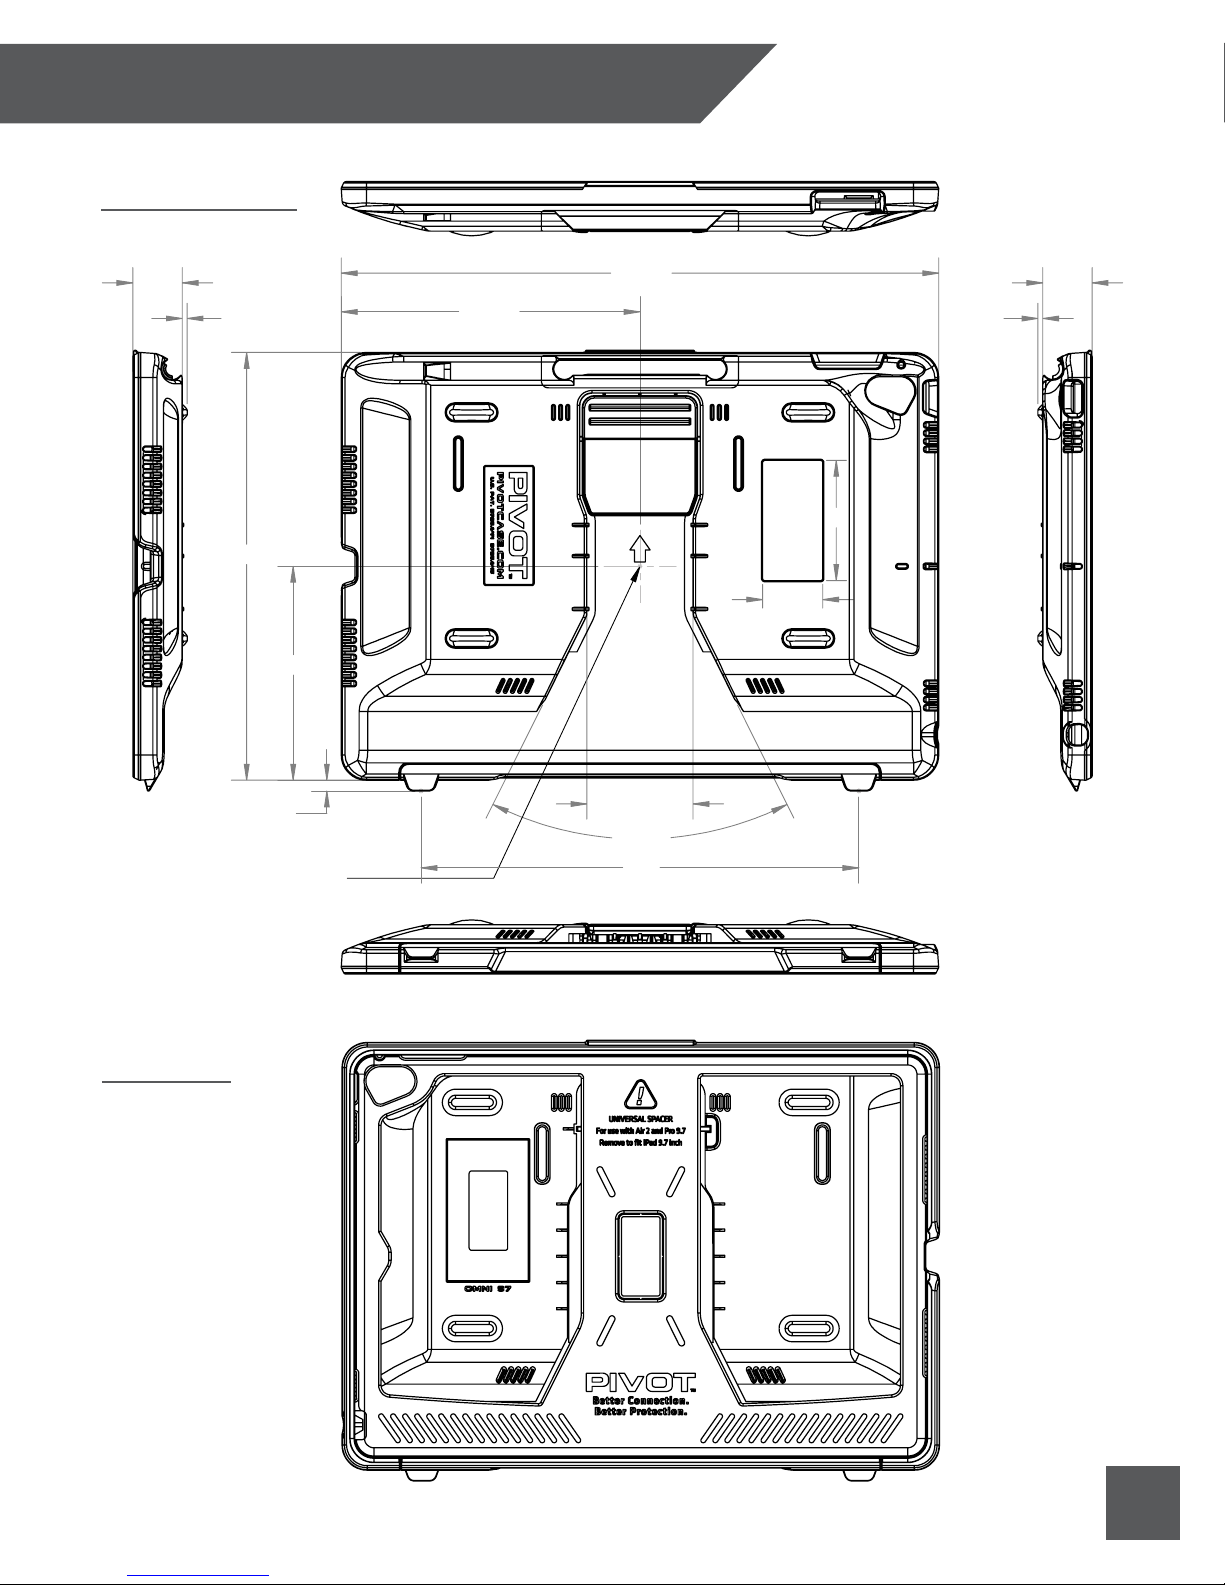
TECH SPECS (For Reference Only)
Orthographic Views:
20.55
2
177.85
88.93
4.46
Center axis of PIVOT rotation
124.19
248.40
44.13
53.00°
182
20.55
2
50
25
Interior View:
13.
Page 15

Thank you.
Additional Information
To learn more about your PIVOT case, please visit pivotcase.com for instructional videos, product
support and additional information about PIVOT products. You’ll find valuable online resources
provided to enhance your user experience and see the complete line of PIVOT products.
Learn more at:
PIVOTCASE.COM
PIVOT SUPPORT
If you have questions please contact PIVOT Support.
www.pivotcase.com/support
1-888-4-FLYBOYS (1-888-435-9269)
www.youtube.com/c/pivotcasevideo
TM and © 2017 FlyBoys Inc. All rights reserved.
Designed in USA. Printed in USA.
14.
 Loading...