

Page 1

Kit Materials
• 1 quarter sheet of card stock with circles and blades printed on it • 1 piece of small tubing
• 1 motor with lightbulb attached (pre-soldered) • 1 rubber band
• 1 sheet of wooden laser-cut parts
If anything is missing from the list of materials, call 800-358-4983.
Materials and Tools Required (not included)
• White glue, preferably with a ne-point applicator tip • Waxed paper
• Glue stick • Masking tape
• Scissors • Hobby knife or single-hole punch
• Electric fan or source of wind
User Guide
P.O. Box 1708 • Pittsburg, KS 66762
www.pitsco.com
Toll-Free Orders 800-835-0686
Wind Gen
59739 V0213
V0210
32897
Kit
Page 2
Cautionary and Warning Statement
• This kit is designed and intended for educational purposes only.
• Use only under the direct supervision of an adult who has read and understood the instructions provided in
this user guide.
• Read warnings on packaging and in manual carefully.
• Always exercise caution when using sharp tools.
How Windmills Work
Move a conductor through a magnetic eld to cause free electrons in the conductor
to ow. This ow of electrons is electricity and it is the principle at work here. In this
kit, a small lightbulb proves that windmills can generate electrical power.
How does it work? A DC (direct current) motor contains permanent magnets that
provide a magnetic eld. It also contains an armature, a series of coiled wires that
rotate within the magnetic elds. When the shaft of the motor is turned by wind
blowing on the wind generator blades, the wires in the armature pass through the
magnetic eld, pushing electrons through the wires to produce electricity.
It’s also important to understand pitch. Pitch refers to the angle of the blade away
from the plane of rotation. By bending the blade back a little, the wind moves the
blade easier. Without any pitch, the wind may not move the blades much at all.
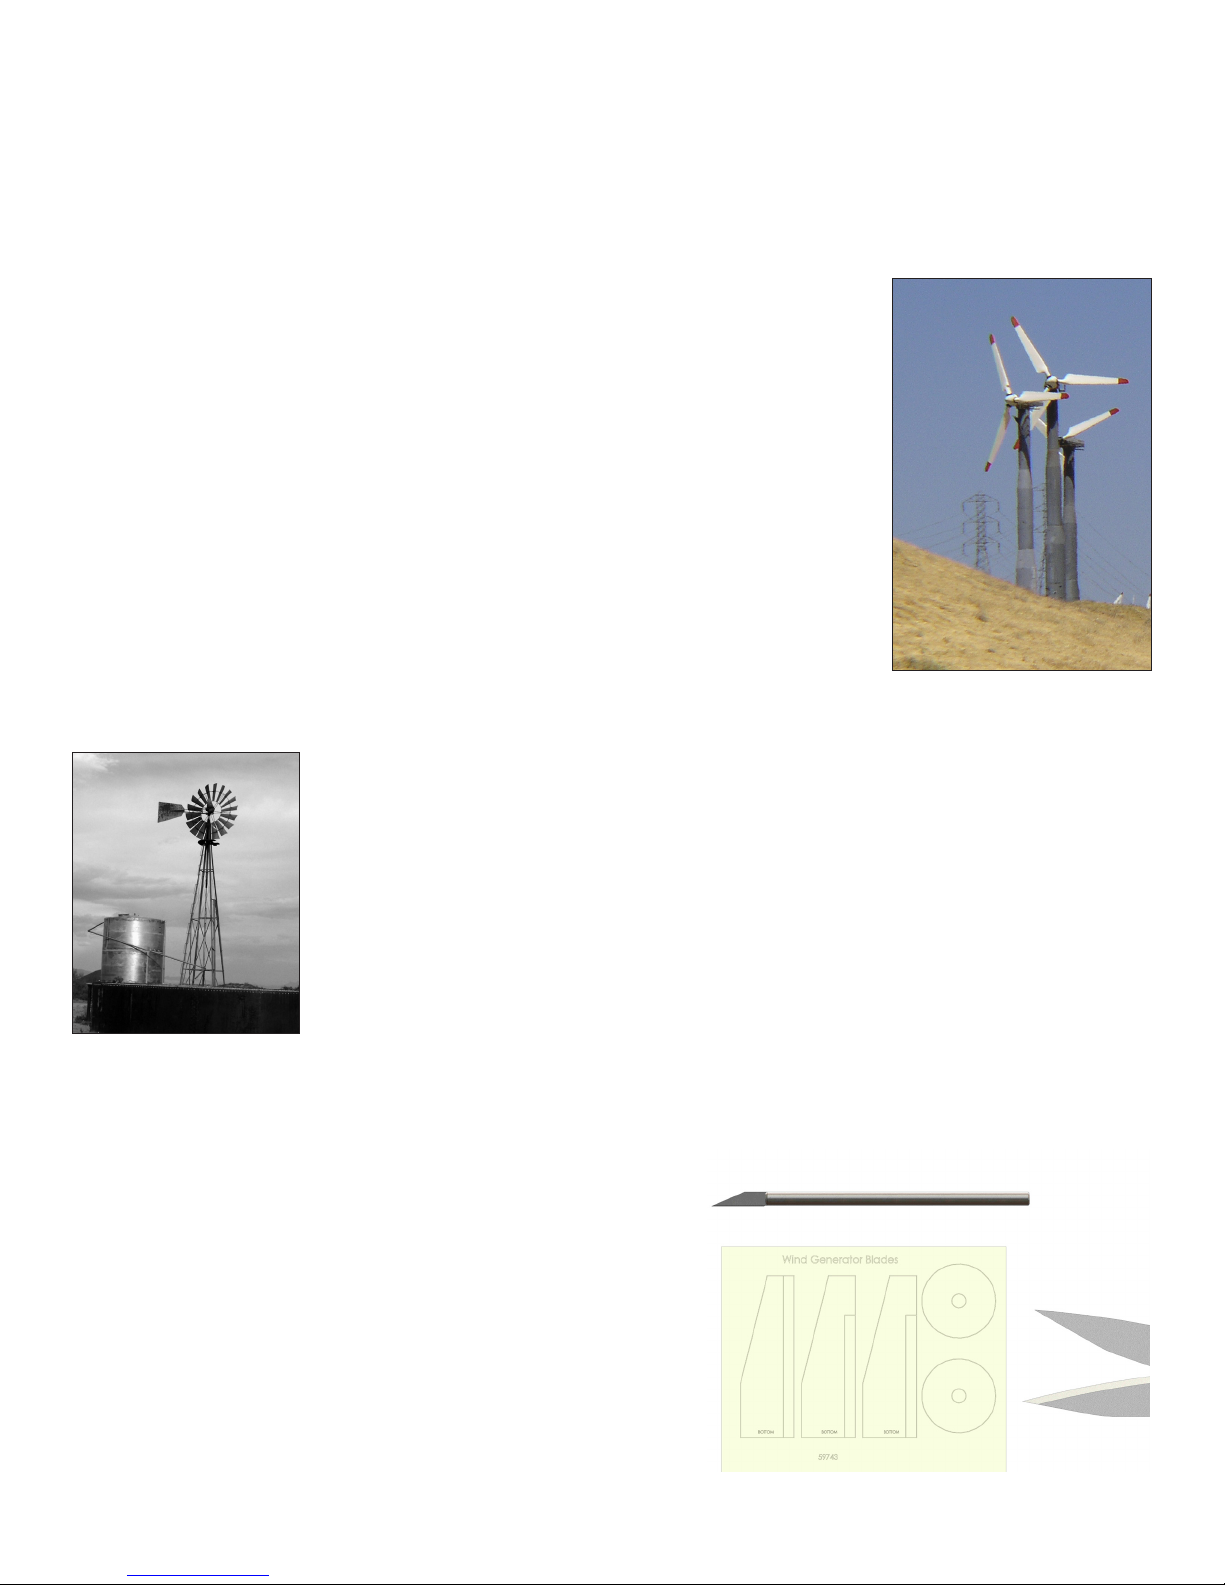
Modern windmills
Winds of Time – Windmills in History
Photo courtesy of MorgueFile.com
Windmills made agriculture and ranching possible in remote, rural areas of the prairies.
They harnessed the power of the wind to draw water from wells, moving a sucker rod
up and down inside a cylinder below water level. This motion pushed water up a pipe
and into a holding tank. The water was used for livestock, household needs, and crop
irrigation.
Use of windmills declined as electricity from coal-burning plants came to rural areas in
the 1930s. Today, we are rediscovering the eciency of wind power as large, modern
turbines are turning up across the country and in coastal waters. In 2011, the United
States’ production of wind-generated electricity reached 47,000 megawatts, or enough
Older windmill
Photo courtesy of MorgueFile.com
to power 12 million homes for a year. The Department of Energy says that 20 percent
of the United States’ total electricity could come from wind energy by 2030 with
continued tax credits.
Building the Wind Generator
1. On the area where you intend to work, spread a piece of
waxed paper and tape it down to the surface. This will
prevent glue from getting on the work surface.
2. Using scissors, carefully cut out the circles and the blades
from the card-stock sheet. Using a hobby knife or hole
punch, cut out the small circle in the middle of each cardstock circle. You can cut or punch the circle a little bigger
than it is drawn.
Step 2
Scissors
3. Carefully, pop out the laser-cut parts from the wooden sheet.
Find the three Part 6s and Part 5. Set aside all the other parts.
Wind Gen Kit User Guide 59739 V0213
Page 3
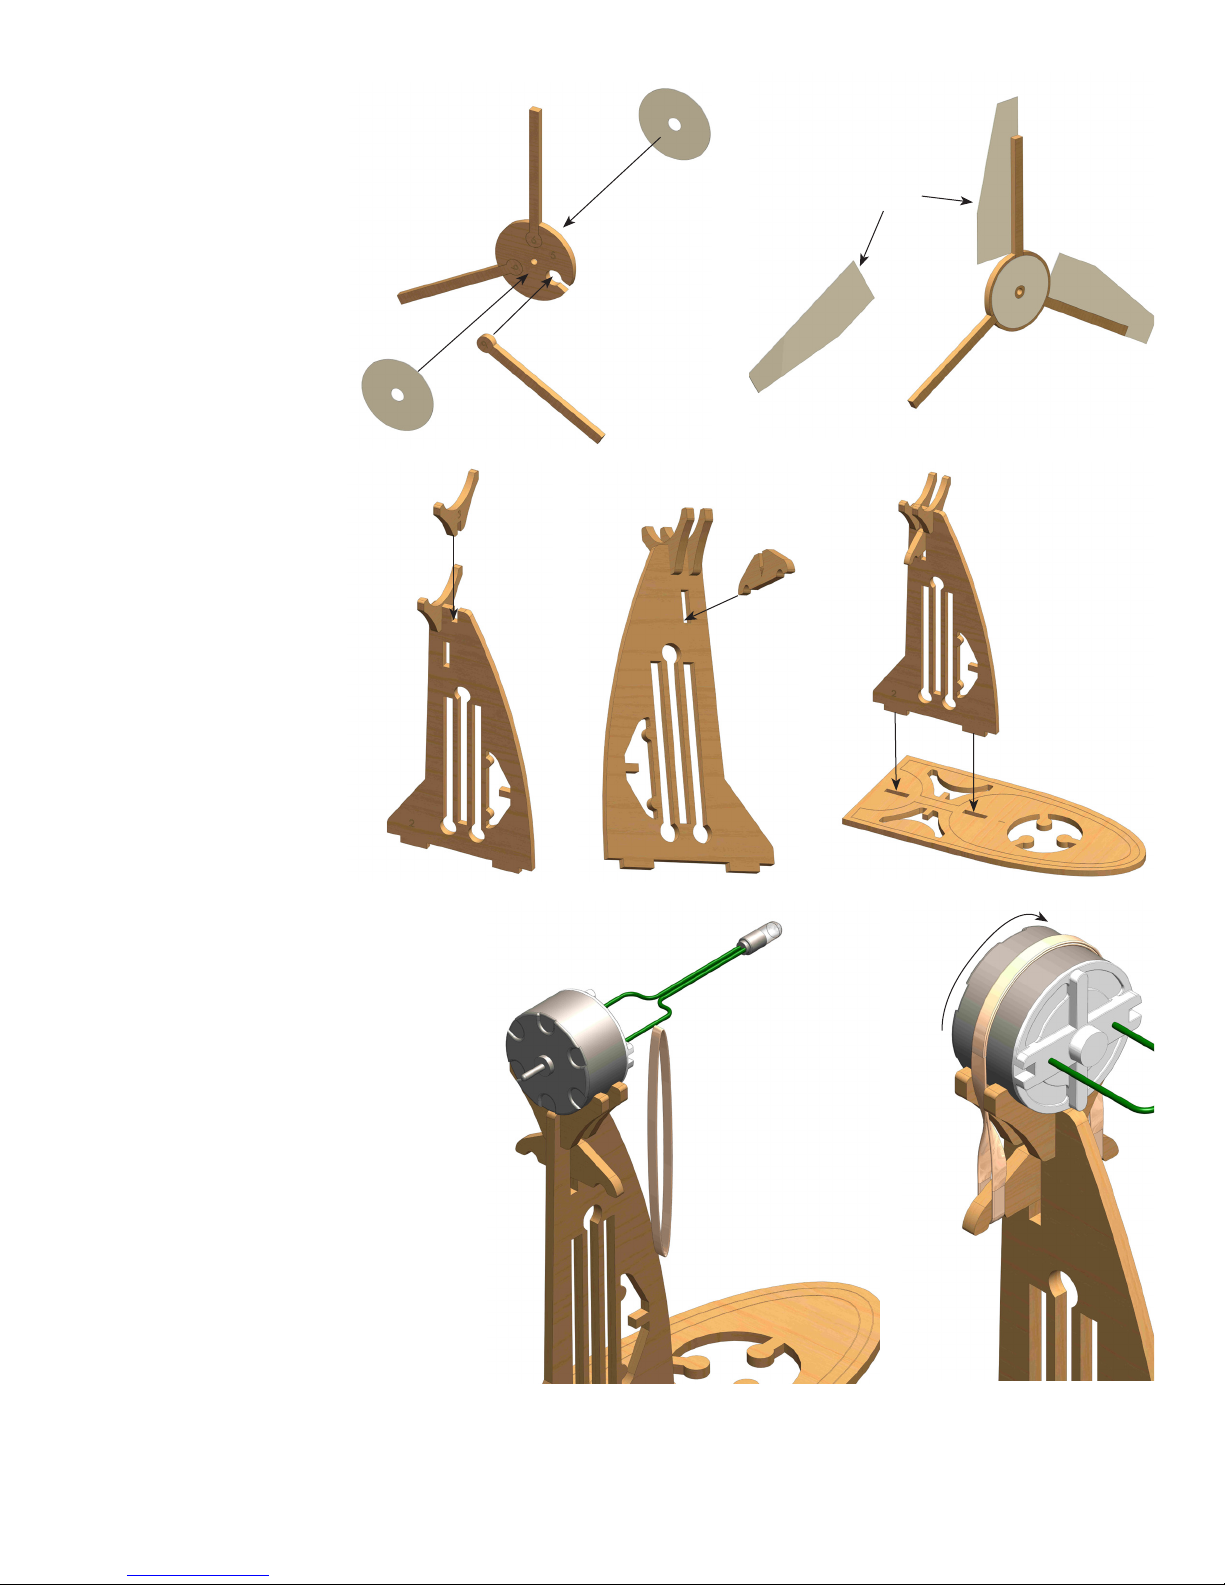
4. Glue the rounded end
of each Part 6 into one
of the holes around the
perimeter of Part 5.
5. When dry, glue a cardstock circle centered
over Part 5. Press it
rmly down and turn
it over. Repeat with the
other circle.
6. Using a glue stick,
glue the blades on the
edges of the Part 6s.
Make sure the printed
side of the blades is
facing down and the
straight side is aligned
with the edge of the
Part 6s. Let dry.
7. Find Parts 2, 3, and
4. Glue the two Part
3s on top of Part 2 as
shown.
Steps 4-5
6
Card stock
circle
Step 7
3
3
6
6
5
Step 8
Card stock
circle
Step 6
Blades
Blade
Step 9
4
8. Glue Part 4 onto Part
2 in the slot under the
Part 3s as shown.
2
9. Glue the other end of
Part 2 into Part 1 as
shown; this makes the stand.
Let it dry.
10. Place the motor on top of the stand
with the motor post facing toward
the straight edge of Part 1. Loop one
end of the rubber band over one side
of Part 4, pull it over the motor, and
hook the other end on the other side.
Step 10
Motor
Rubber
band
1
2
Step 10
Rubber
band
Wind Gen Kit User Guide 59739 V0213
Page 4
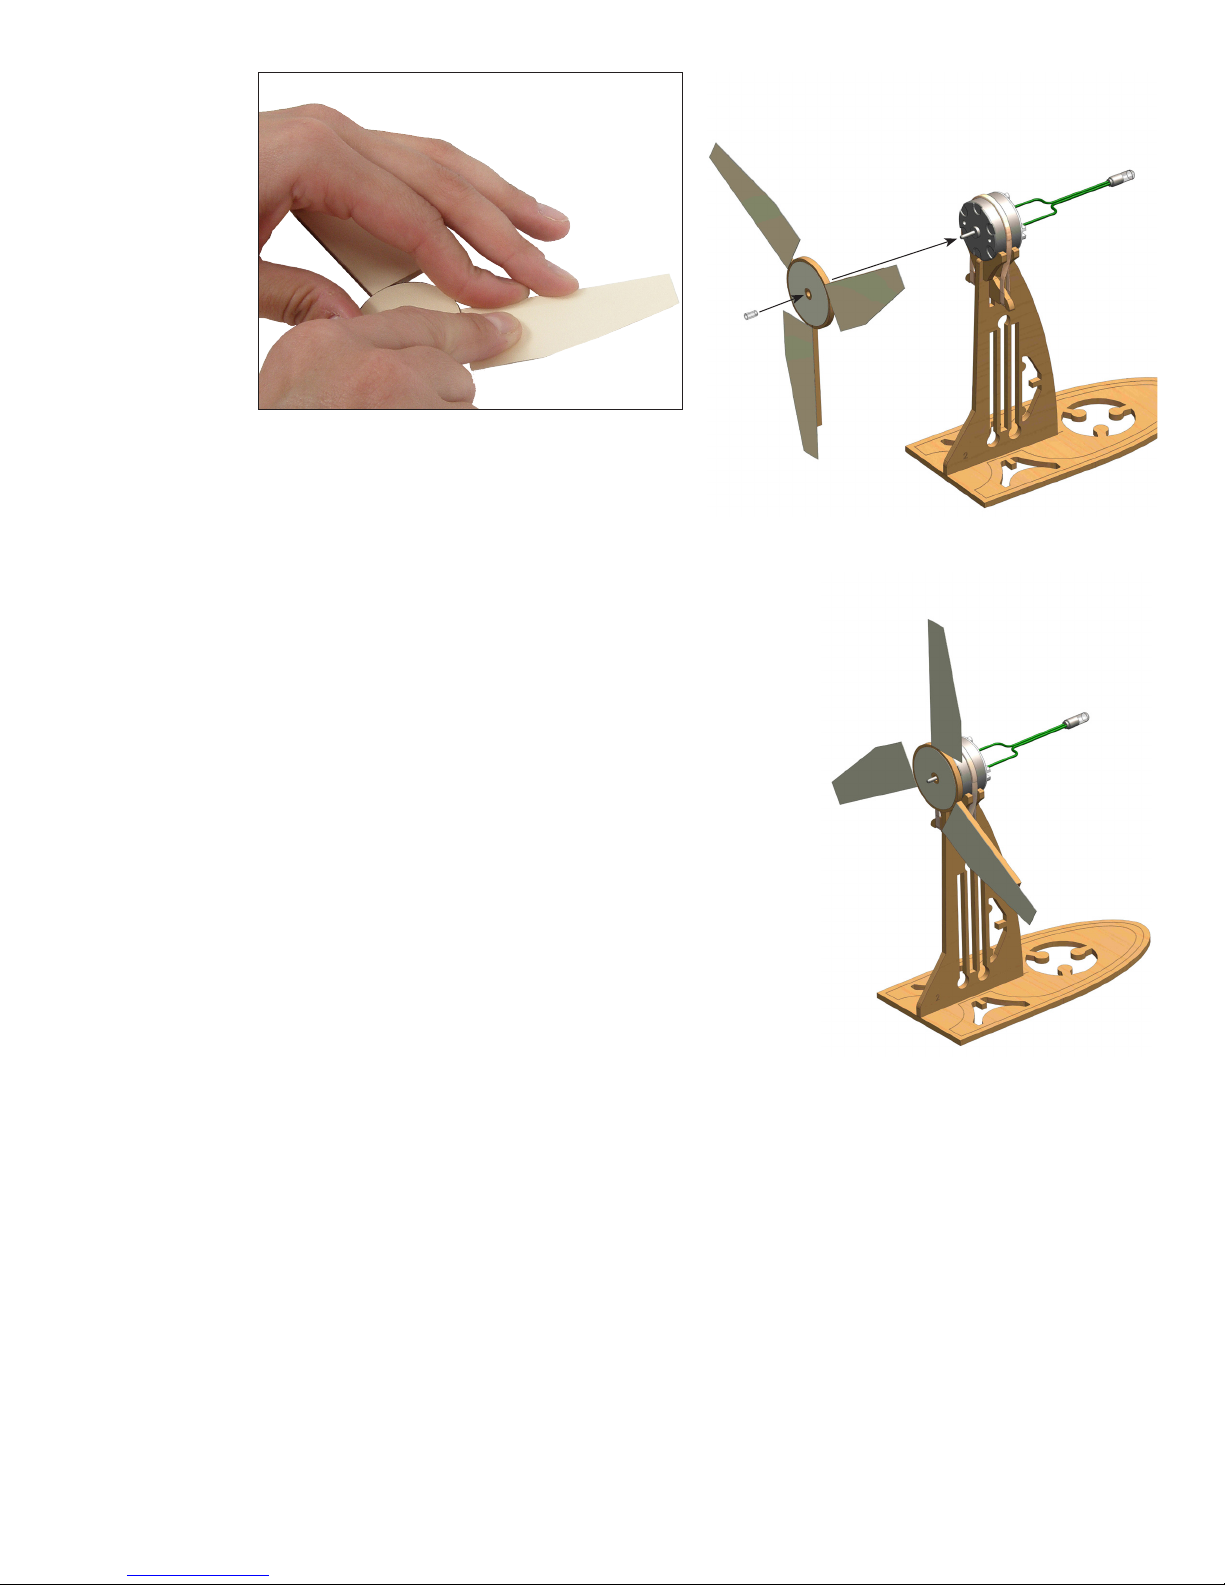
11. When the
blades are
dry, take
the blade
assembly and
rub along the
edge where
a blade is
attached to a
Part 6. Repeat
this for all
three blades.
This will
create a slight pitch in the blade so the wind can move
the blade easier.
12. Push the piece of tubing through the center hole on the
blade assembly. Note: If the tubing is longer than 1/4", trim it to that length.
Step 11
Steps 12-13
13. Push the blade assembly onto the motor post until the post extends just
past the front of the blade assembly. Be sure the unprinted side of the
assembly is facing forward.
Completed model
Using the Wind Generator
1. Set the wind generator in front of a fan. It is recommended to secure the
Wind Generator to the table or oor with masking tape to keep it from
blowing over.
2. Turn on the fan to a low setting, making sure the wind generator is close
to the fan and in the middle of the airow. If the wind generator does
not turn, set the fan to a higher setting.
3. Watch as the wind generator starts to turn and lights the bulb.
Experiments
• Use a multimeter to measure the voltage at dierent wind speeds and
record the results in a data table. Graph the results.
• Wire two or more wind generators together in series and in parallel to see what eect there is on
the bulb lighting.
• Measure the voltage of dierent numbers of windmills wired in series and in parallel. Record the
measurements in a data table and graph the results.
• Have a class of students build a wind farm. Wire it in series and parallel to produce a voltage of nine
volts. Use the wind farm to power a radio, motors, or other nine-volt items.
• Have students describe how a large-scale wind farm could provide power for homes and industry.
Wind Gen Kit User Guide 59739 V0213
 Loading...