

Page 1

pi-top
pi-top [4] DIY Edition - Installing the Raspberry Pi 4
Click here to
watch our
installation
video
Installing the Raspberry Pi 4
pi-top.com | © 2020 CEED Ltd. Page 1
Last updated: 16/10/2020
Page 2

pi-top
What’s in the box?
• pi-top [4]
Raspberry Pi 4 not included!
• 2 Thermal Pads
• 1 USB Plug
• 1 DSI Cable
• 1 CSI Cable
• 2 Male-to-Male GPIO Extenders
• 1 Screwdriver
• Magnetic HAT Fixings
• Warranty Pamphlet
OLED Screen
SD card slot
Speaker
GPIOs
Raspberry Pi Camera
and Screen Ribbon slot
2x USB 3.0 ports*
pi-top [4] DIY Edition - Installing the Raspberry Pi 4
Having trouble?
pi-top.com
/support
Gigabit
Ethernet port*
USB 2.0 port*
Programmable
buttons
Audio jack
Power switch
Power Supply not included!
You can use your own 15V 36W
USB-C PD power supply, or you can
purchase our pi-top Power Supply.
pi-top.com | © 2020 CEED Ltd. Page 2
USB-C Power port
pi-top [4]
Display port
Micro HDMI port
Page 3

pi-top
pi-top [4] DIY Edition - Installing the Raspberry Pi 4
Removing the Raspberry Pi 4 enclosure from the pi-top
Remove the 2 screws from
1
the base of the pi-top [4].
Keep all of the screws safe as you’ll
be needing them later.
Carefully lift o the lid of
2
the pi-top [4].
Gently unclasp the silver
3
ribbon cable from the
connector.
Above: Base of pi-top [4]
Left: pi-top [4] lid
Remove these 3 screws
4
(highlighted by green
circles).
Carefully slide out the
5
Raspberry Pi 4 enclosure
in the direction of the
pink arrow.
You may need to wiggle the chassis
left to right to ease the connectors
free. Take care not to forcefully pull
it out.
pi-top.com | © 2020 CEED Ltd. Page 3
Page 4
pi-top
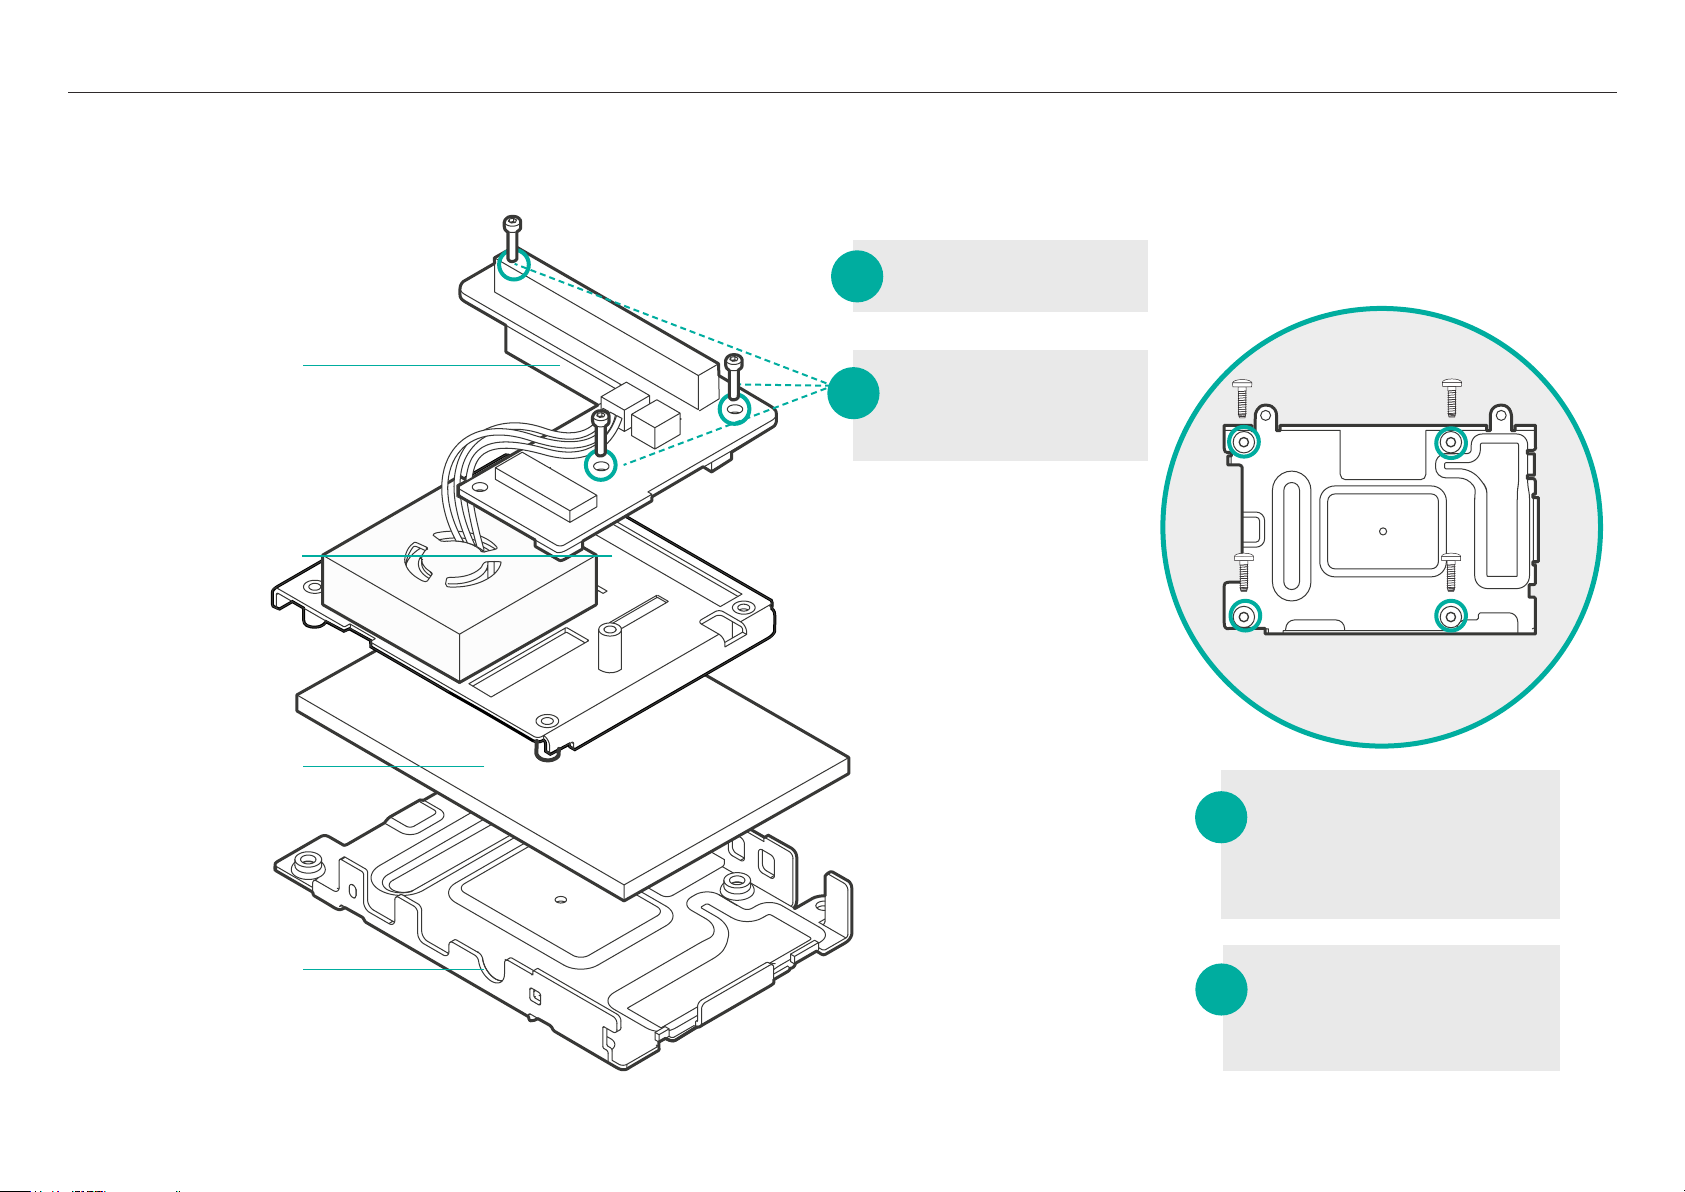
Disassembling the Raspberry Pi 4 enclosure
Unplug the fan.
6
pi-top [4] DIY Edition - Installing the Raspberry Pi 4
Mezzanine PCB
Upper Chassis
with cooling
fan attached
DIY Edition Card
Remove these 3
7
screws and lift o the
Mezzanine PCB.
Above: Base of
Lower Chassis
Flip over the chassis and
8
remove these 4 screws
from the base of the
Lower Chassis.
Lower Chassis
Lift o the Upper
9
Chassis and take out
the DIY Edition Card.
pi-top.com | © 2020 CEED Ltd. Page 4
Page 5

pi-top
pi-top [4] DIY Edition - Installing the Raspberry Pi 4
Inserting the Raspberry Pi 4
10
11
12
Peel o the protective lm
on the large thermal pad
and stick it onto the center
of the Lower Chassis.
Peel o the protective lm
on the small thermal
pad and stick it onto the
Raspberry Pi 4 CPU.
Lift the clasp of the DSI
connector and gently insert
the black DSI cable. Once
correctly inserted, close the
clasp to secure it in place.
DSI
Above: Lower Chassis
with Thermal Pad
Raspberry Pi 4
Top tip: This is the most dicult
part of the assembly process, we
highly recommend referencing
the assembly video.
Place the Upper Chassis on
15
top of the Raspberry Pi 4,
feeding the DSI and CSI cables
through their respective slots.
Push gently in place.
(the black DSI cable should slot through the
small slot, and the white CSI cable through
the larger one).
16
DSI
CSI
Left: Raspberry Pi 4
sandwiched between the
Upper and Lower Chassis,
with the DSI and CSI
cables fed through slots.
Reinsert the 4 screws into the
base of the Lower Chassis and
make sure they are tightened
in place.
13
connector and gently insert
the white CSI cable. Once
correctly inserted, close the
CSI
clasp to secure it in place.
Lift the clasp of the CSI
14
Place the Raspberry Pi 4 into
the Lower Chassis.
pi-top.com | © 2020 CEED Ltd. Page 5
Above: Base of
Lower Chassis
Page 6

pi-top
Attaching the Mezzanine PCB
Raspberry Pi 4
17
Lift the clasp on connector J5 on
the base of the Mezzanine PCB
and insert the black DSI cable.
Secure the clasp.
pi-top [4] DIY Edition - Installing the Raspberry Pi 4
Mezzanine PCB
DSI
18
19
Lift the clasp on connector J6
on the base of the Mezzanine
PCB and insert the black DSI
cable. Secure the clasp.
Flip the Mezzanine PCB over
and align the 40 pin female
port to the Raspberry Pi GPIO
pins. Make sure the pins are
correctly aligned and then push
gently until the PCB is securely
connected.
CSI
A
Reinsert these 3 screws on
20
the Mezzanine PCB and
make sure they are
securely fastened.
Connecting the fan
21
B
Option A
This connects to
the micro-controller
on the pi-top [4] to
automatically regulate
the temperature.
Note: this will only work
correctly if pi-topOS is running
on the SD Card. This is because
the MCU needs Raspberry Pi
CPU temperature data.
Option B
Connect to this port
if you want to run
your own operating
system and control it
through GPIO PIN 12
(BCM pin number).
pi-top.com | © 2020 CEED Ltd. Page 6
Page 7
pi-top
pi-top [4] DIY Edition - Installing the Raspberry Pi 4
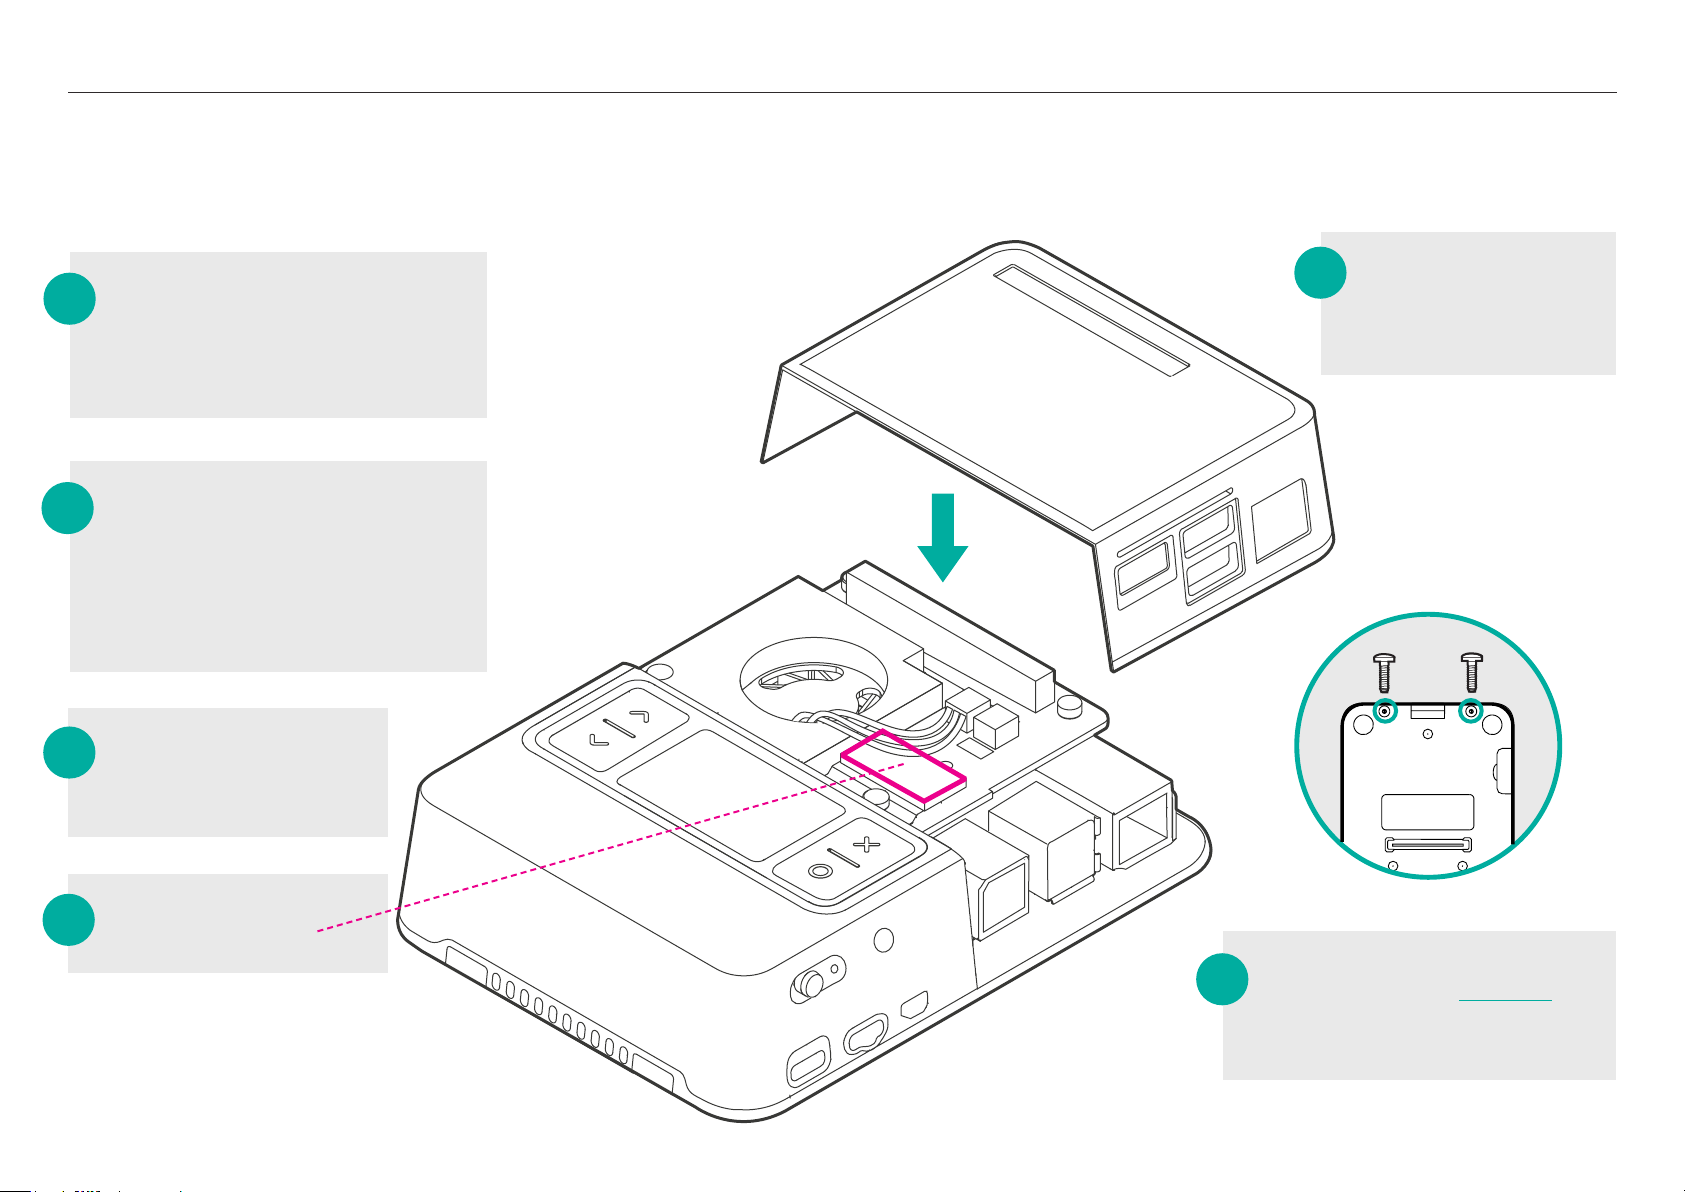
Reattaching the Raspberry Pi 4 chassis to the [4]
22
23
24
Insert the provided USB Plug into
the bottom left USB port.
It is important to remember this step before
you insert the Raspberry Pi enclosure in to the
pi-top [4]!
Carefully slide the Raspberry Pi 4
chassis back into the pi-top.
This step is the exact opposite of Step 5. Top tip: it
helps to use the USB Plug (Step 22) and the audio
jack as alignment indicators. Take care to lift the
silver ribbon cable out of the way as you carry out
this process.
Reinsert these 3 screws
to secure the chassis to
the pi-top [4].
Left: pi-top [4] lid
26
Click the pi-top [4] lid
in place and secure
with 2 screws at the
base of the pi-top.
Reconnect the silver
Above: Base of pi-top [4]
25
ribbon cable.
Insert an SD Card - we
27
recommend using pi-topOS
because all pi-top [4] hardware
drivers are pre-installed.
pi-top.com | © 2020 CEED Ltd. Page 7
Page 8

Raspberry Pi made simple,
robust and modular.
Having trouble?
Check out pi-top.com/support
for more information
Click here to
watch our
installation
video
pi-top.com
© 2020 CEED Ltd.
 Loading...