

Page 1

!
PH2
PRODUCT GUIDE
Page 2
!
!
Page!2!
User manual contents:
!
User manual contents: ........................................................................... 2!
Infrared heating ...................................................................................... 3!
Safety information ................................................................................. 4!
Description and accessories ................................................................. 7!
Installation .............................................................................................. 8!
Commissioning .................................................................................... 11!
Cleaning, maintenance and service .................................................... 13!
Technical information .......................................................................... 15!
!
Page 3

!
!
Page!3!
Infrared heating
All Pitley heaters uses the latest infrared technology for optimal
comfort, just like being outside in the sun.
This infrared heater does not need air or another medium to transfer
energy heat. This means that you will feel 100% heat from the patio
heater even if outside conditions are windy
Features on the PH2 heater:
1. Multiple control options - control the heater using the included
remote control or on the heater itself
2. Heaters are water resistant thanks to the IP65 standard (total
dust and spray water protection)
3. High-quality 1500W Ultra Low Glare heating unit for perfect
heating, minimized brightness (glow) and longer product life
Page 4

!
!
Page!4!
Safety information
Please read the user manual carefully and store the manual where it
can be accessed by all users.
IMPORTANT SAFETY INFORMATION
Below, we have summarised the most important safety information
to prevent any possible risks, such as injuries, fire or electric shocks
when handling electrical heaters. Please read this information
carefully before commissioning the heater. Always observe the
following safety information:
• Ensure that flammable objects, such as chairs, tents, tarpaulins
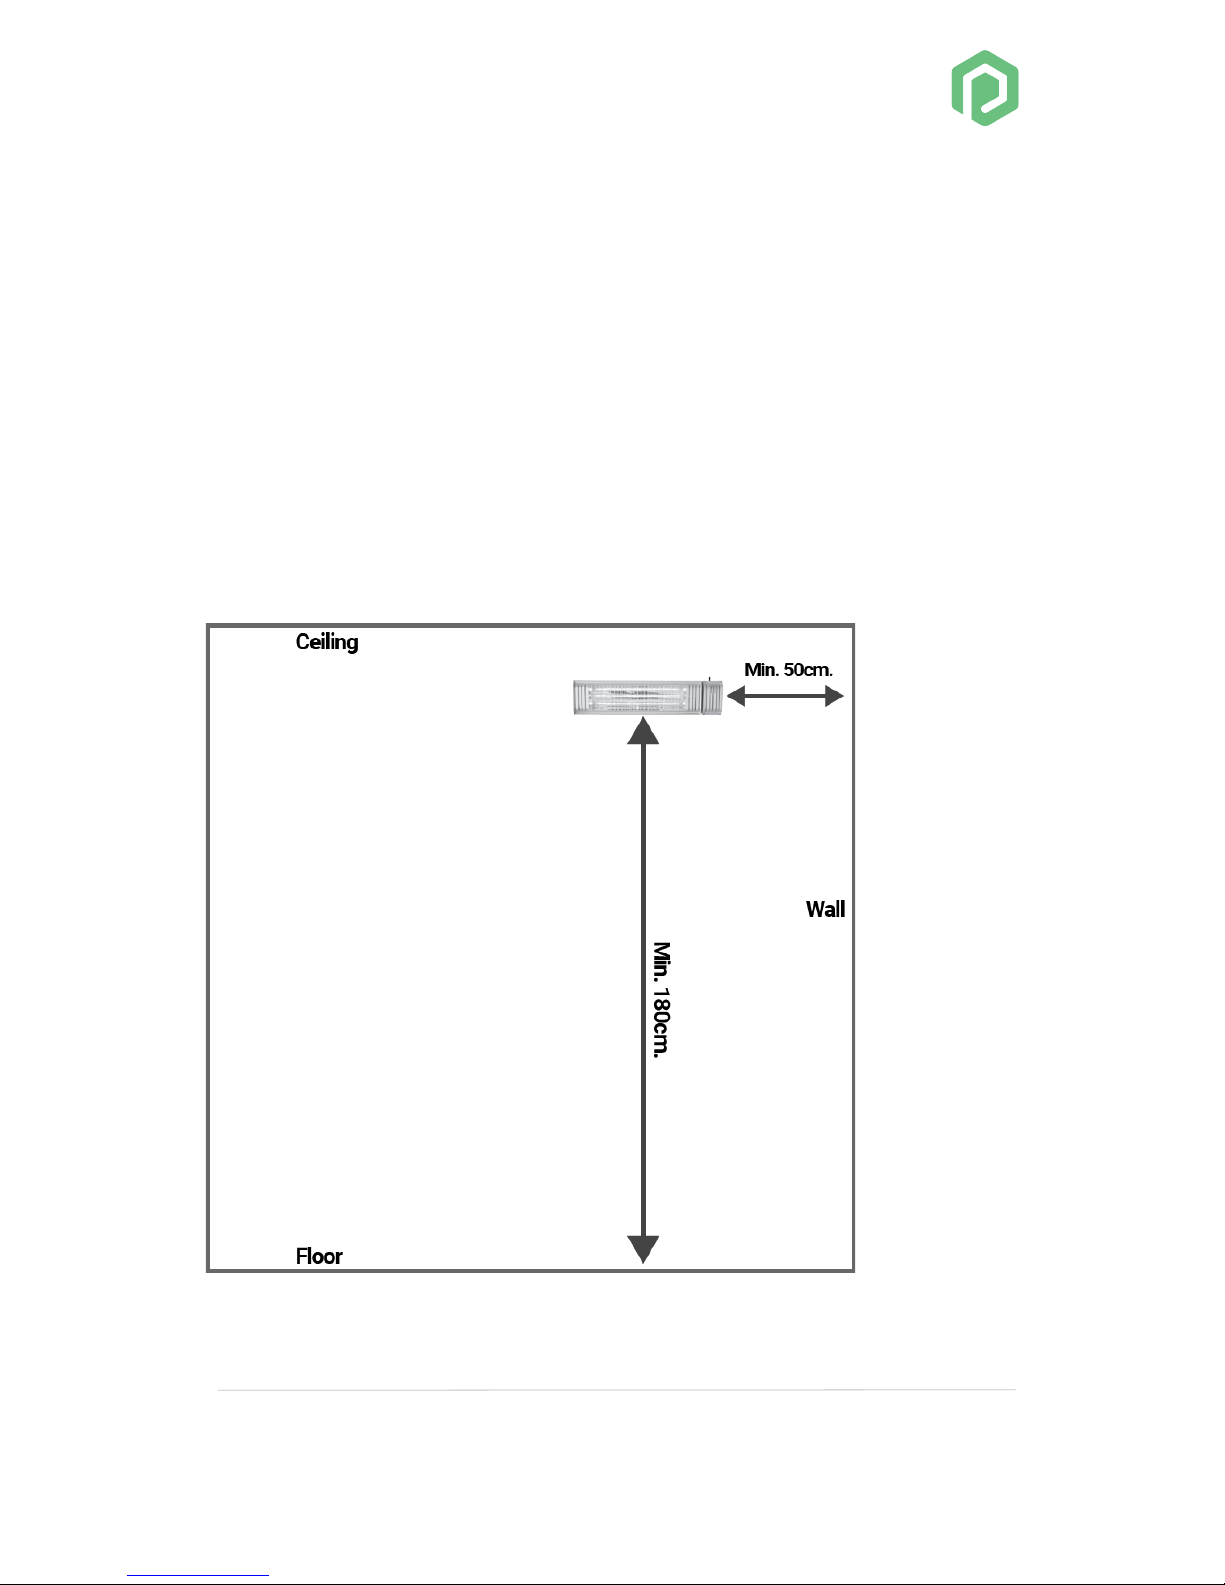
and curtains are at least 1 metre away from the heater and
cannot be blown into contact with the heater by the wind, as the
heater generates a high level of heat.
• Do not cover the heater with a blanket or other flammable
objects.
• The heater is designed to be installed on walls, eaves or ceilings
at a height of 180 cm. above the floor.
• Although the heater is IP65 class protected, please handle water
carefully. Ensure that you do not touch the heater with wet
hands. The heater must not be placed in close proximity to
swimming pools, baths or showers, and must not be operated
directly from these places. It must be positioned so that it
cannot fall into baths, showers, containers full of liquids, etc.
Page 5

!
!
Page!5!
• Heaters must not be within reach nor accessible to children
and/or disabled persons. Children and/or disabled persons
must always be supervised when near heaters. The same
applies to pets.
• Both the front and the heater chassis will become very hot when
operated.
• Never directly touch the heater during operation, and allow it to
cool down before touching it. Disregarding this safety
information may result in burns and injuries.
• Never touch the plug with wet hands and ensure that the socket
is clean and free of dust.
• When plugging the heater on and off, always make sure to plug
in or out by pulling by the plug and not pulling by the cable.
• When cleaning, repositioning, maintaining or installing the
heater, turn off the heater completely and always unplug it from
the socket.
• Never insert any objects or your fingers into the heater
openings.
• Never operate the heater near flammable liquids or other
flammable and highly combustible materials such as paints, e.g.
lacquers, petrol, gas pipes, gas tanks or spray cans.
• Check the power cable and plug regularly to ensure they are in
good condition.
• Look for any possible damage to the heater. This is particularly
important if the heater has fallen down or has been damaged in
any other way. If you notice any faults or damage to the chassis,
bars, cables or plug, switch the heater off immediately and
Page 6

!
!
Page!6!
disconnect it from the power supply. There is a serious risk of
injury, fire and other damage.
• Do not leave the heater unattended when it is switched on.
Ensure that the heater cannot be switched on by automatic
timers and similar devices if it is unattended.
• Only use the heater for its intended purpose, as described in this
user manual. Deviating from this user manual may result in
damage or injuries to people, animals and objects. This
automatically results in the warranty being voided, and dealers,
manufactures and/or importers shall not assume any liability.
Page 7
!
!
Page!7!
Description and accessories
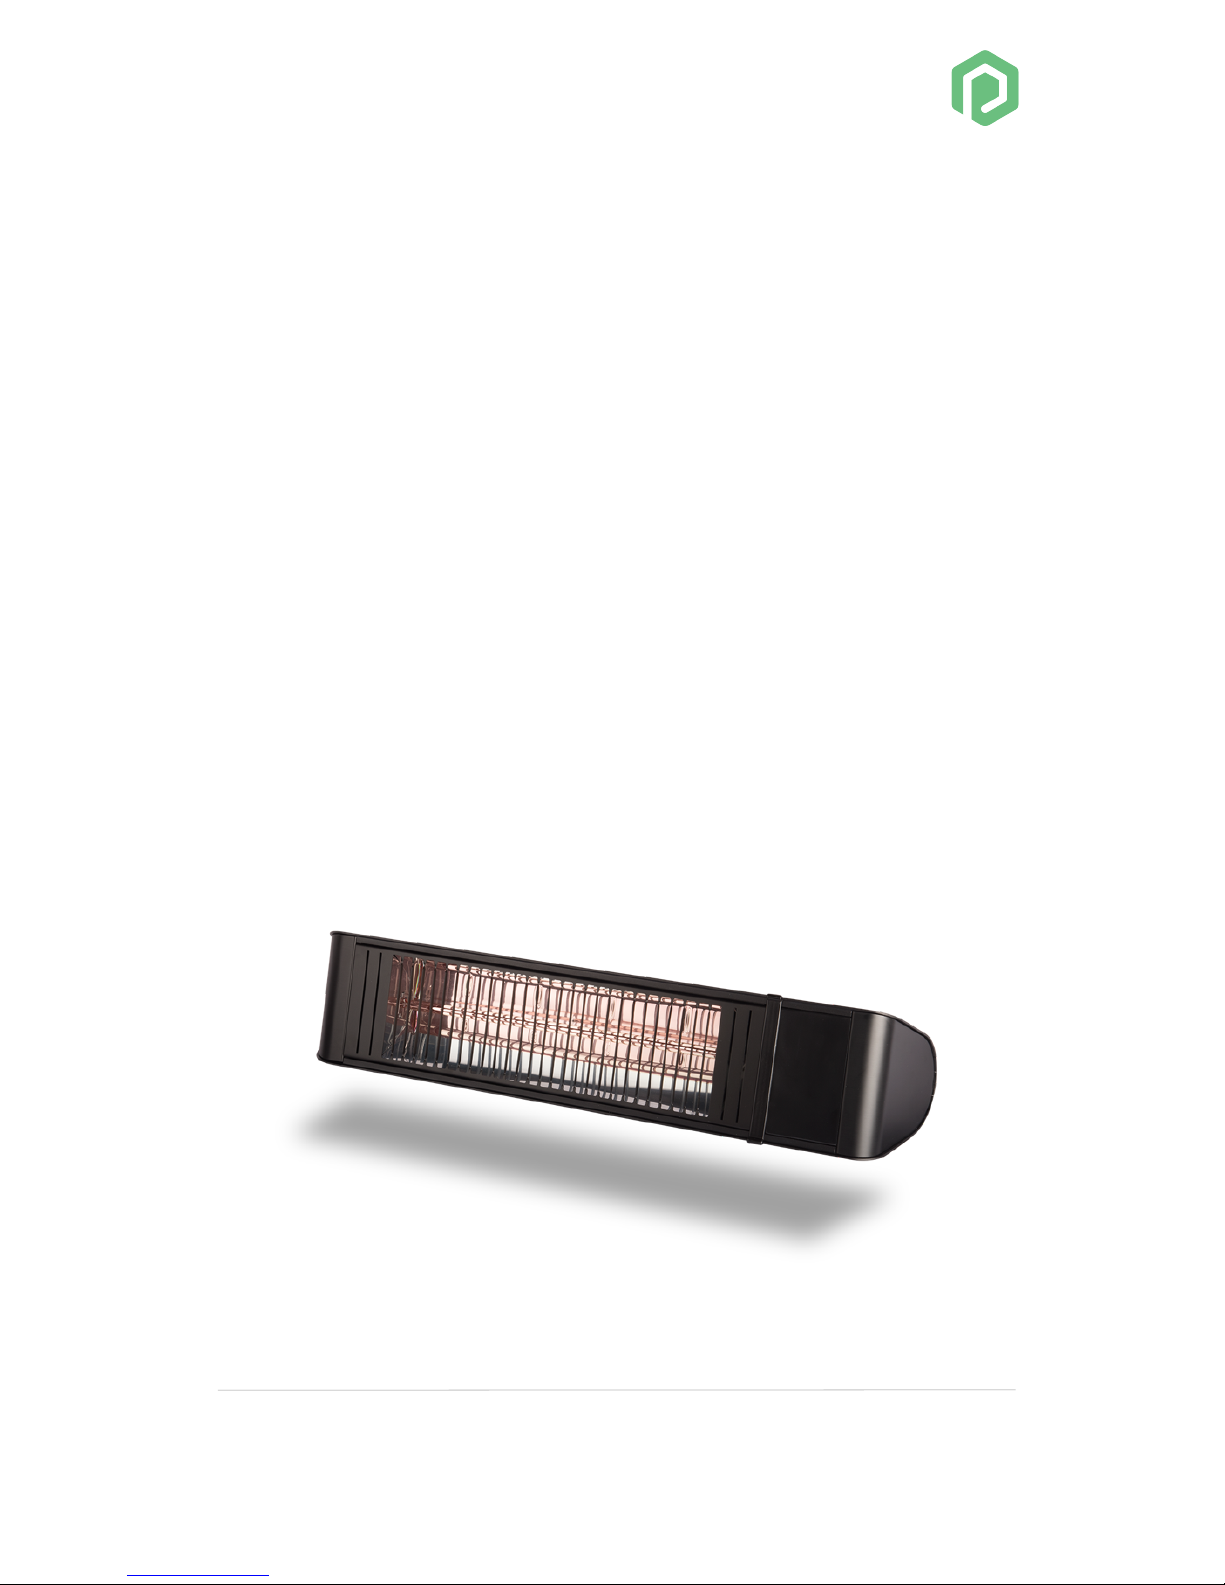
The Pitley PH2 comes with a remote control, and can be installed in
a variety of ways.
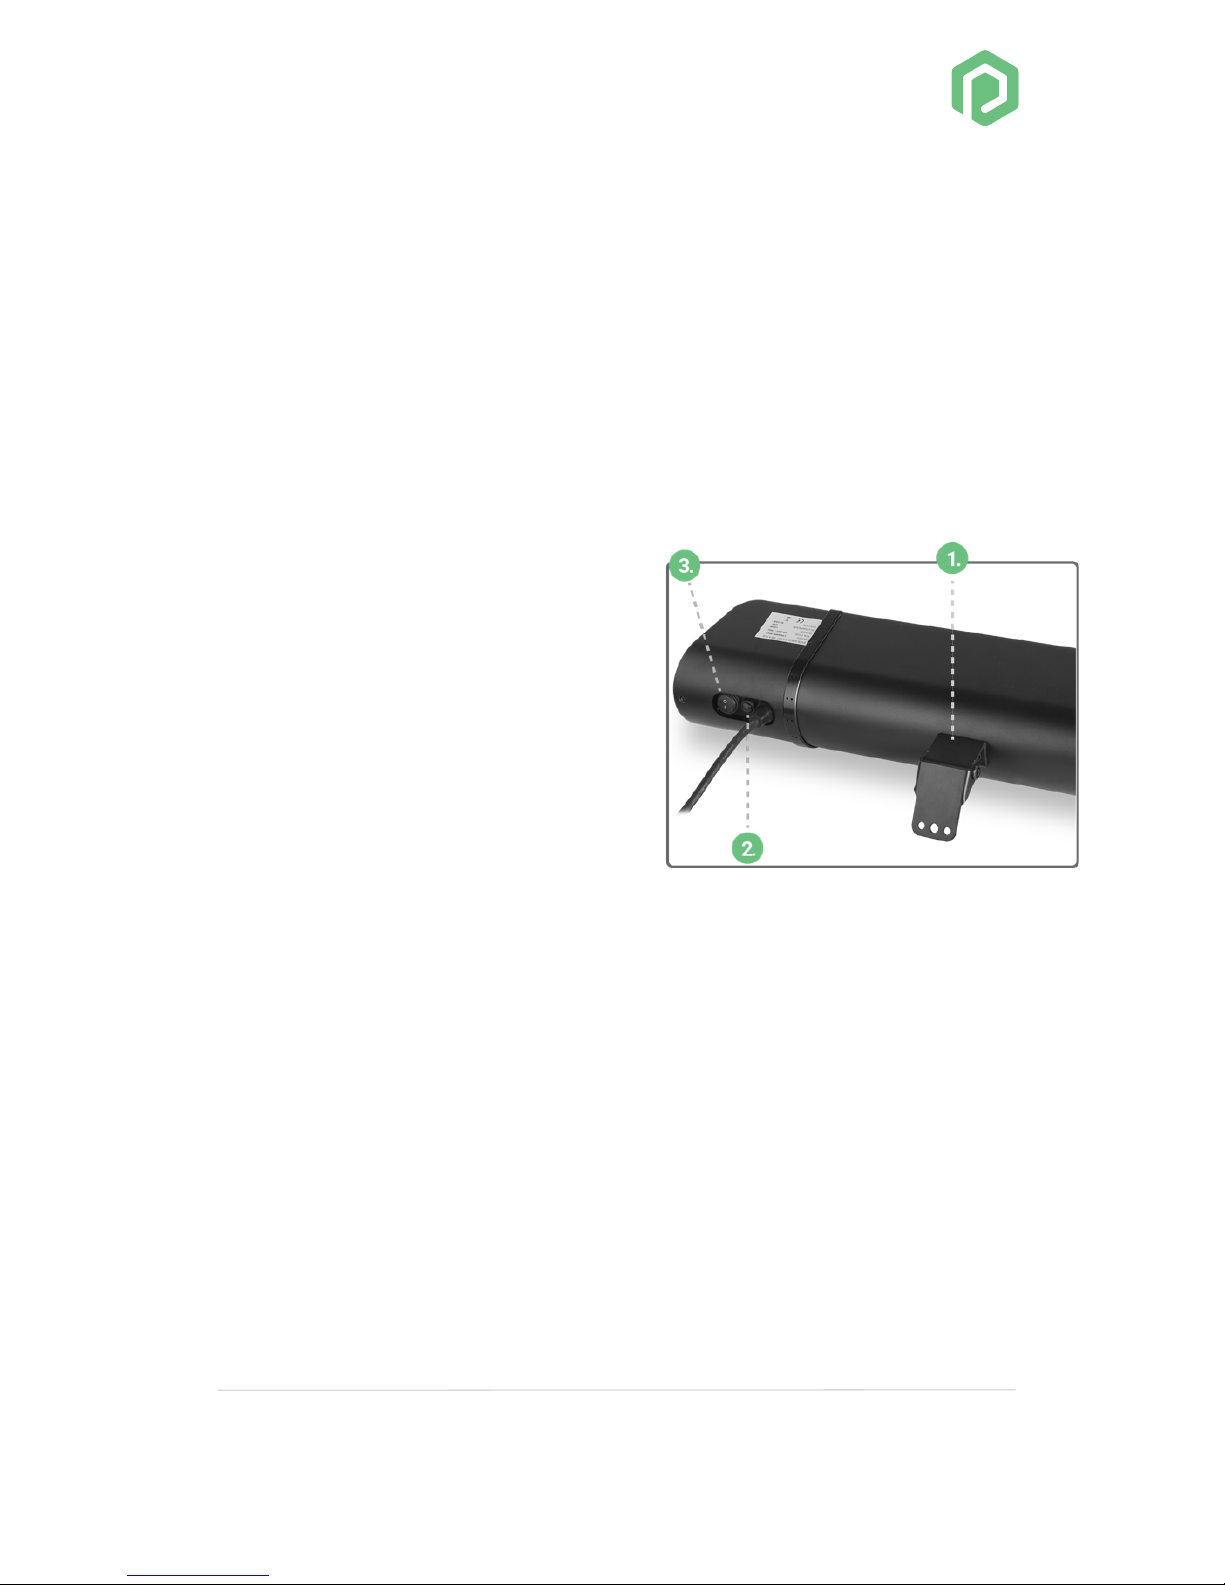
Pitley infrared heater:
1. Initial heating bracket to fit installation bracket
2. Reset / control switch
3. Power-on/off button
Accessories:
1. Wall-, ceiling, eaves installation
bracket
2. Screws with metal dowels for
wall installation
3. 2 wing screws and nuts
4. Allen key for positioning the main screw for the installation
brackets
5. Remote control
!
Page 8

!
!
Page!8!
Installation
Step 1)
Remove the heater from its packaging and remove any packaging
materials from the heater and accessories. It is particularly
important to remove the foam strips that protect the bars during
transport. Carefully pull these strips away from the heater in the
direction of the arrow. If you have tested the heater function before
installing it, allow it to cool before installing it.
Step 2)
Next, carefully choose where you want to install the heater.
The heater can be installed under the following circumstances:
o On the wall using the wall/ceiling bracket
o On the ceiling using the wall/ceiling bracket
o To the eaves of the house using wall/ceiling bracket
Step 3)
Depending on the installation method chosen (wall, ceiling, brick,
etc.), select the right installation bracket.
Step 4)
Using the Allen key, undo the long screw on the bracket at the back
of the heater and insert the chosen installation bracket. Then tighten
the long screw using the Allen key so that the installation bracket is
secured correctly. You can also use this screw later to adjust the
angle of the heater once it has been installed on the wall or ceiling.
Page 9
!
!
Page!9!
Step 5)
Position the heater where it is to be installed and mark the drill holes
where the installation bracket will later be screwed to the wall, ceiling
or eaves. Then secure the installation bracket to the wall, ceiling or
eaves using the screws and metal dowels supplied. Then screw the
heater back on the installation bracket. The heater is now hanging
securely on the wall or ceiling.
!!!!
!
!
Step 6)
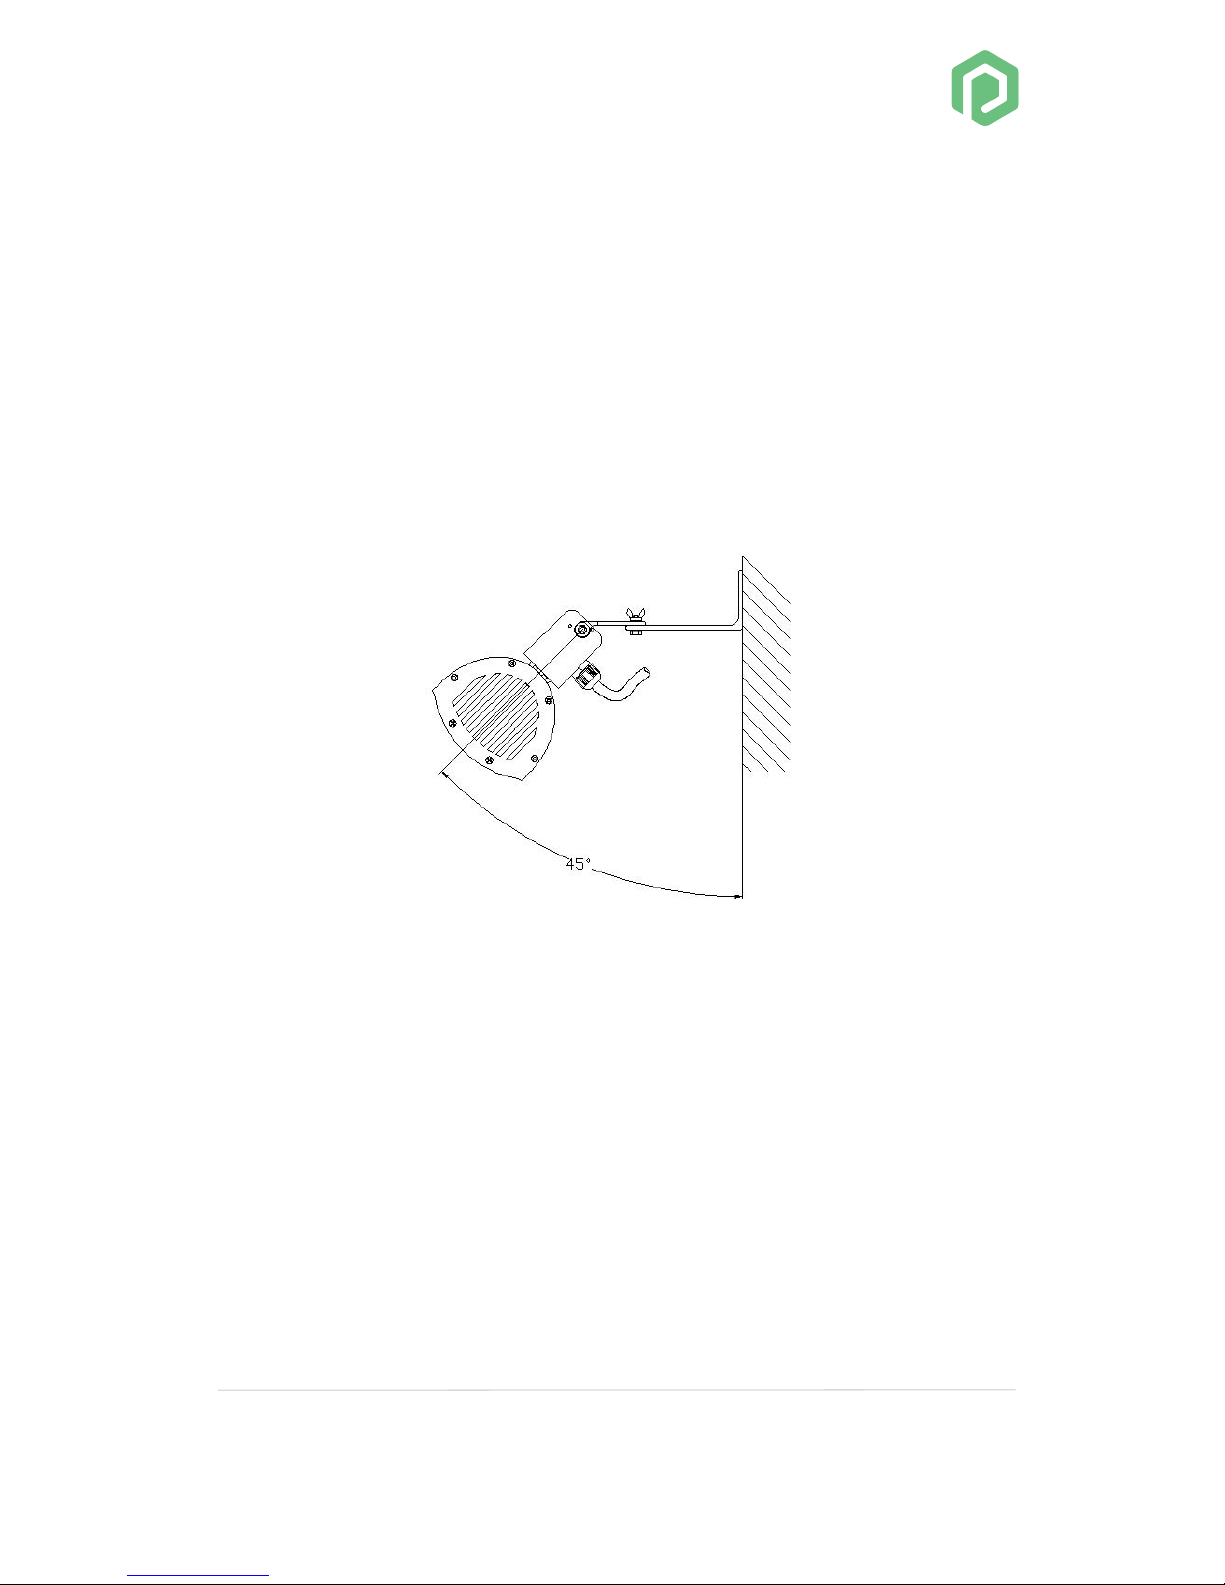
Now use the Allen key to adjust the bracket screw on the back of the
heater to set the desired angle for the heater. When angle is chosen,
make sure that no flammable objects are in the proximity of the
chosen angle. Then tighten the screws.
Step 7)
Ensure that the power cable is always directed away from the heater
and is not wound around the heater. This may cause a fire if the
cable heats up by coming into direct contact with the heater and
Page 10
!
!
Page!10!
heating area. It must also be checked that the heater is only plugged
into sockets that are protected by statutory fuses and groundings.
Under certain circumstances, it may be beneficial to install the
heater permanently – route the cable securely and connect it directly
to the power source so that it can be operated using a wall switch.
When doing so, the heater must only be installed by a qualified
electrician who can guarantee installation and correct conditions.
!
Page 11

!
!
Page!11!
Commissioning
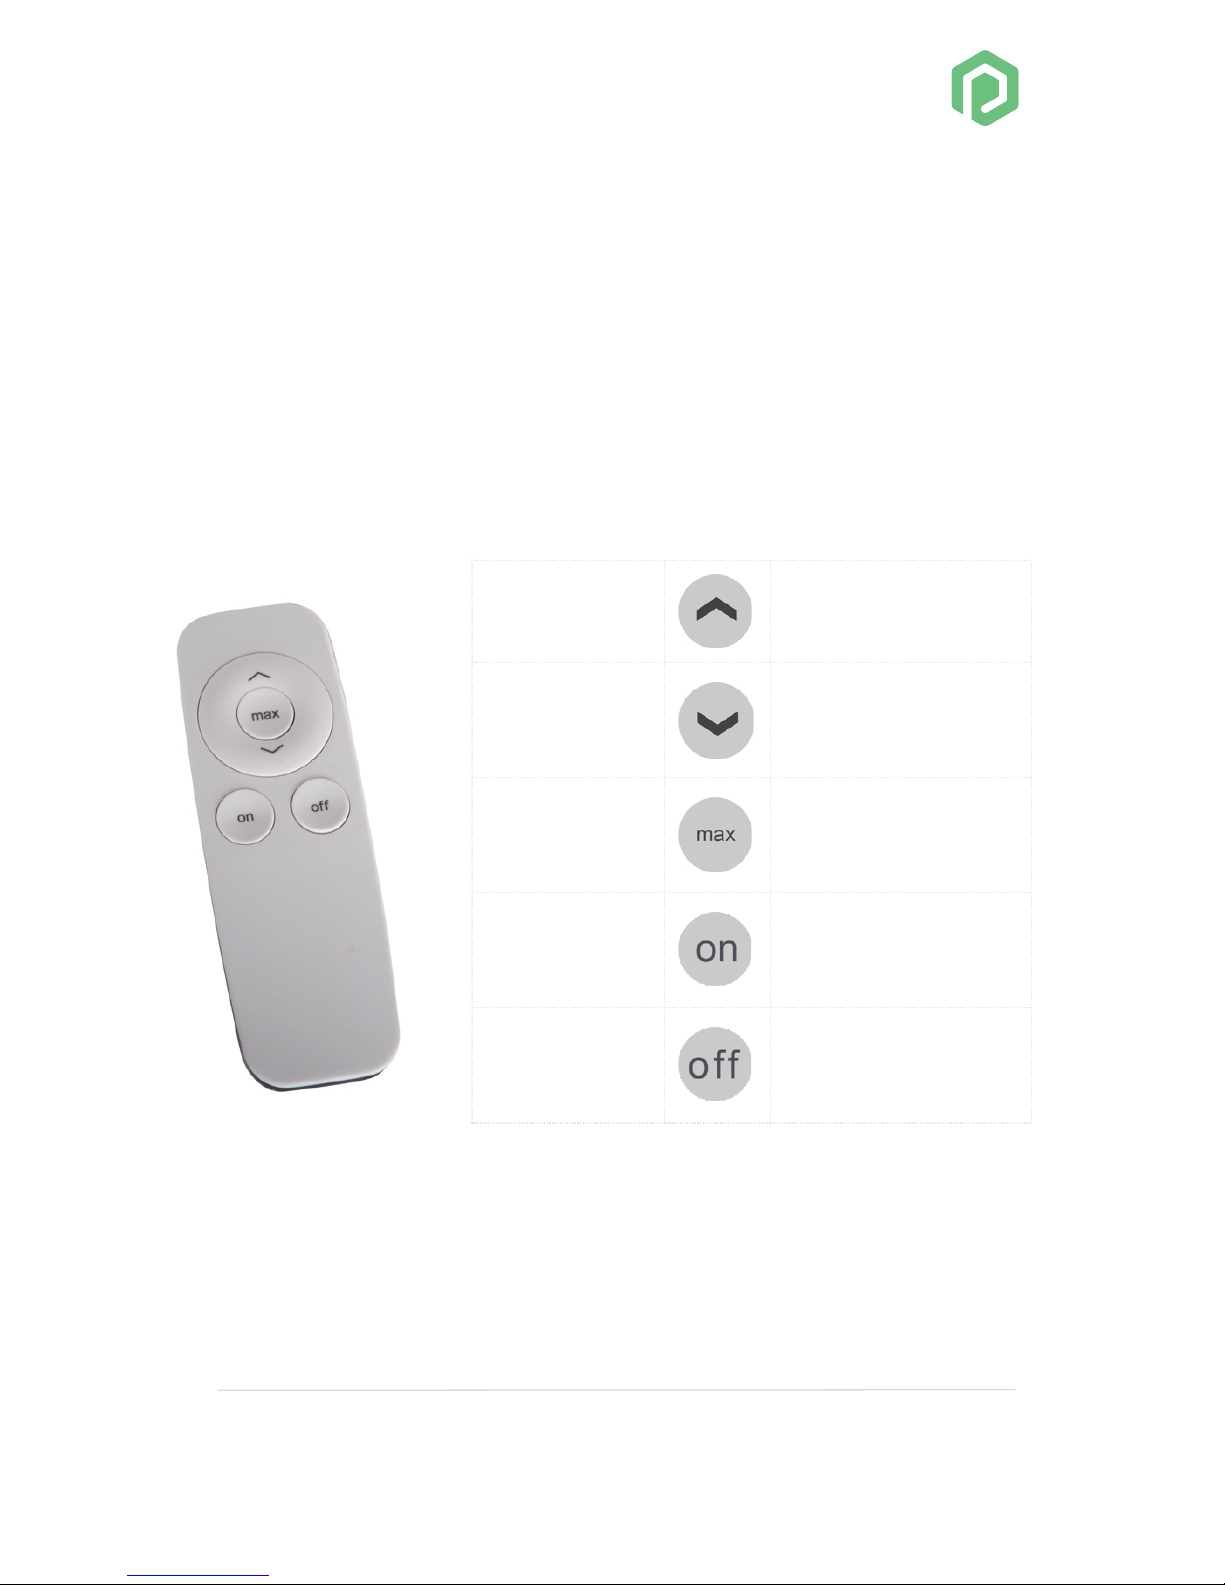
After switching the heater on using the On/off switch you can control
the heater using the remote control.
Operation using the remote control:
1. Insert two AAA 1.5V batteries in the remote control. When using
the infrared remote control, always point it directly at the heater
as it does not work if there are any obstacles between the
remote control and the heater.
2. Plug the heater into the socket
3. Then press the On/Off switch (3.) on the side of the heater. The
switch must be in the “I” position. The blue LED (7.)
4. Switching on: Now press the “On” button on the remote control
to switch on the heater. The heater first switches on at 33%,
“Gentle start”. After 4 seconds, it returns to the heating setting
that was last selected. When the heater is used for the first time,
it switches to the maximum setting after 4 seconds. The LED
that was previously blue is now red (7.).
5. Dimming: Using the arrow keys, you can dim the heater to
increase and decrease the intensity. Alternatively, the heater can
also be dimmed by pressing the reset button directly.
6. Switching off: Use the “Off” button to switch the heater off
again. The LED display switches from red back to blue. Then
switch the “On/off switch” to “0” to switch the heater off
Page 12
!
!
Page!12!
completely. For safety, we also recommend unplugging the
heater.
Caution:
If you switch the heater off using the remote control, the heater
enters standby mode and is easy enabled again.
Up arrow
Heating level up
Down arrow
Heating level down
Max level
Heater goes to
maximum heating
level
Turn heater
on
!
Heater turns on.
Soft 4 second
start.
Turn heater
off
!
Heater turns off
and go to standby
mode.
Page 13

!
!
Page!13!
Cleaning, maintenance and service
Cleaning
The Pitley heater has been designed so that the robust chassis does
not require any maintenance. Switch off and unplug the heater
before cleaning it.
Only clean it when it is cool. When cleaning, use a microfibre cloth
and avoid using aggressive cleaning agents, scouring sponges or
stiff brushes. Do not use any flammable cleaning agents. Once you
have cleaned the heater, allow it to dry before switching it on again.
Maintenance
In general, the heater does not require any maintenance. As the
heater has been sealed as per IP65, it must not be opened by
unauthorised persons. If there seems to be a problem, contact your
dealer.
Service and repair
If you notice any damage or a fault with your heater, it must be
checked and repaired by a specialist. This may be a qualified
electrician or your dealer. Damage or defects arising from
unauthorised repairs, as well as modifications to the heater, misuse,
negligence, and improper or inadequate maintenance will be voided
warranty. Dealers and the manufacturer shall not be liable for misuse
or improper handling.
Page 14

!
!
Page!14!
Disposal
The heater must not be disposed of together with your normal
household waste. Please take the heater to your local recycling
centre to dispose of it.
Electrical information
Before commissioning, please ensure that you are using slow-blow
fuses for the Pitley electrical circuit. Please ask your electrician if
you have any questions.
!
Page 15

!
!
Page!15!
Technical information
Type: Pitley Infrared Heater
Chassis Material: Aluminium
Work locations: Perfect for indoor and outdoor
Heat area: indoor up to 25m2 and outdoor 6-12m2
Protection class: IP65, dust, rain, waterproof
Operation: Buttons on heater and remote control
Infrared element: Ultra-Low-Glare heater
Output: 0 - 1500W
Special functions: Soft start. Overheating protection
Mounting system: Wall/ceiling/eaves mounting + anchors, screws
Voltage: 220-240V ~ 50 Hz
Dimensions (LxWxH): 65,6cm x 14cm x 11cm
Weight: 3,5 Kg
Pivoting range: 100°, vertical
Beam Angle: Approx. 40° concentrate beam
Remote range: Up to 6 m
Batteries remote: 2 x AAA batteries (included)
Page 16

 Loading...