

Page 1

PITE 3932T Battery Charger/Discharger
1
PITE 3932T Battery Ch arger/Discharger
User Manual
P-120323-V1.1
4/F, Bldg A, Chiwan Industrial Park, Shaodi Rd.,
Chiwan, Shekou Area, Shenzhen, China
TEL: +86-755-2680 5759
FAX: +86-755-2688 0310
www.pitetech.com
Page 2

PITE 3932T Battery Charger/Discharger
2
Catalogue
1. INTRODUCTION ............................................................................................................. 3
1.1. Accessories ........................................................................................................... 3
1.2. Safety Information ................................................................................................. 4
1.3 Precautions ............................................................................................................. 5
2. OVERVIEW ...................................................................................................................... 5
2.1 About PITE 3932T .................................................................................................. 5
2.2 Display and Keypad................................................................................................ 6
2.3 Features.................................................................................................................. 6
2.4 Speci f icat ions .......................................................................................................... 6
2.5 Measurement Flowchart ......................................................................................... 7
2.6 Definition of Abbreviation ........................................................................................ 7
3. MEASURE PREPARATION ............................................................................................ 8
4. MEASUREMENT ............................................................................................................. 8
4.1 Power On and Off ................................................................................................... 8
4.2 Cell Charge ............................................................................................................. 9
4.3 Cell Discharge ...................................................................................................... 11
4.4 Cell Activation ....................................................................................................... 13
4.5 Cell Resist a nce ..................................................................................................... 17
4.6 Data Management ................................................................................................ 17
4.7 System Management ........................................................................................... 18
4.7.1 Time Setting ............................................................................................... 18
4.7.2 System Update ........................................................................................... 19
4.7.3 System Language ...................................................................................... 19
5. ANALYZING SOFTWARE ............................................................................................. 19
5.1 Installing the So f t ware .......................................................................................... 19
5.2 Software Startup ................................................................................................... 19
5.3 Main Operation ..................................................................................................... 21
5.3.1 Read the Data ............................................................................................ 21
5.3.2 Analyzing for Discharging .......................................................................... 22
5.3.3 Analyzing for Charging ............................................................................... 23
5.3.4 Analyzing for Activation .............................................................................. 23
6. SERVICE AND MAINTENANCE ................................................................................... 24
6.1. Cleaning .............................................................................................................. 24
6.2 Storag e ................................................................................................................. 25
6.3 Trouble-shooting ................................................................................................... 25
7. CONTA CT PITE ............................................................................................................. 25
Page 3
PITE 3932T Battery Charger/Discharger
3
1. INTRODUCTION
This Users Manual gives full in formation on how to use PITE 393 2T Battery
Charger/Discharger safely and effectively. Ple ase r ead the manual carefully so as to
obtain maximum performance of the unit and its accessories.
WARNING: Read this manual completely before c onnecting and powering on the unit
to avoid possible damage cause d by improper use of this instru me nt .
1.1. Accessories
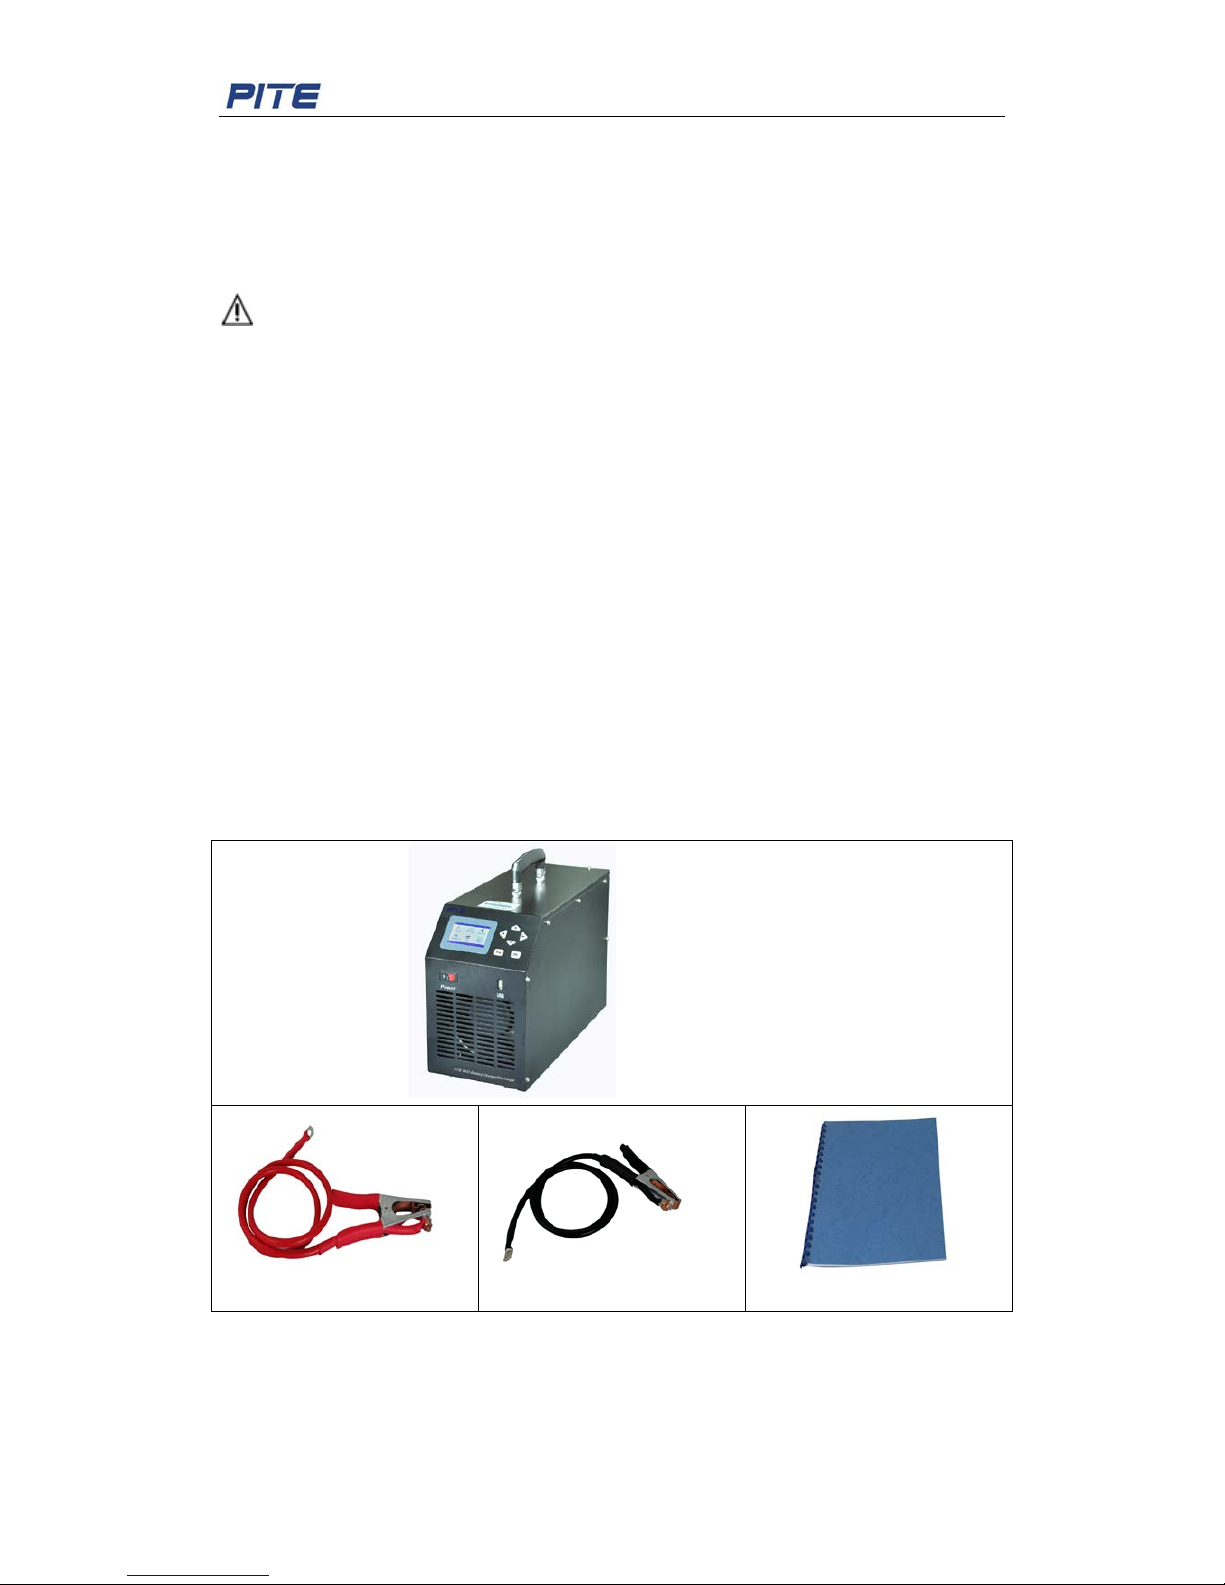
After receiving the PITE 3932T, please check it carefully as below:
Ensure that no damage occurred during transportation. Upon any damage or failure
of operation based on this instr ument, please contact your supplier immediately .
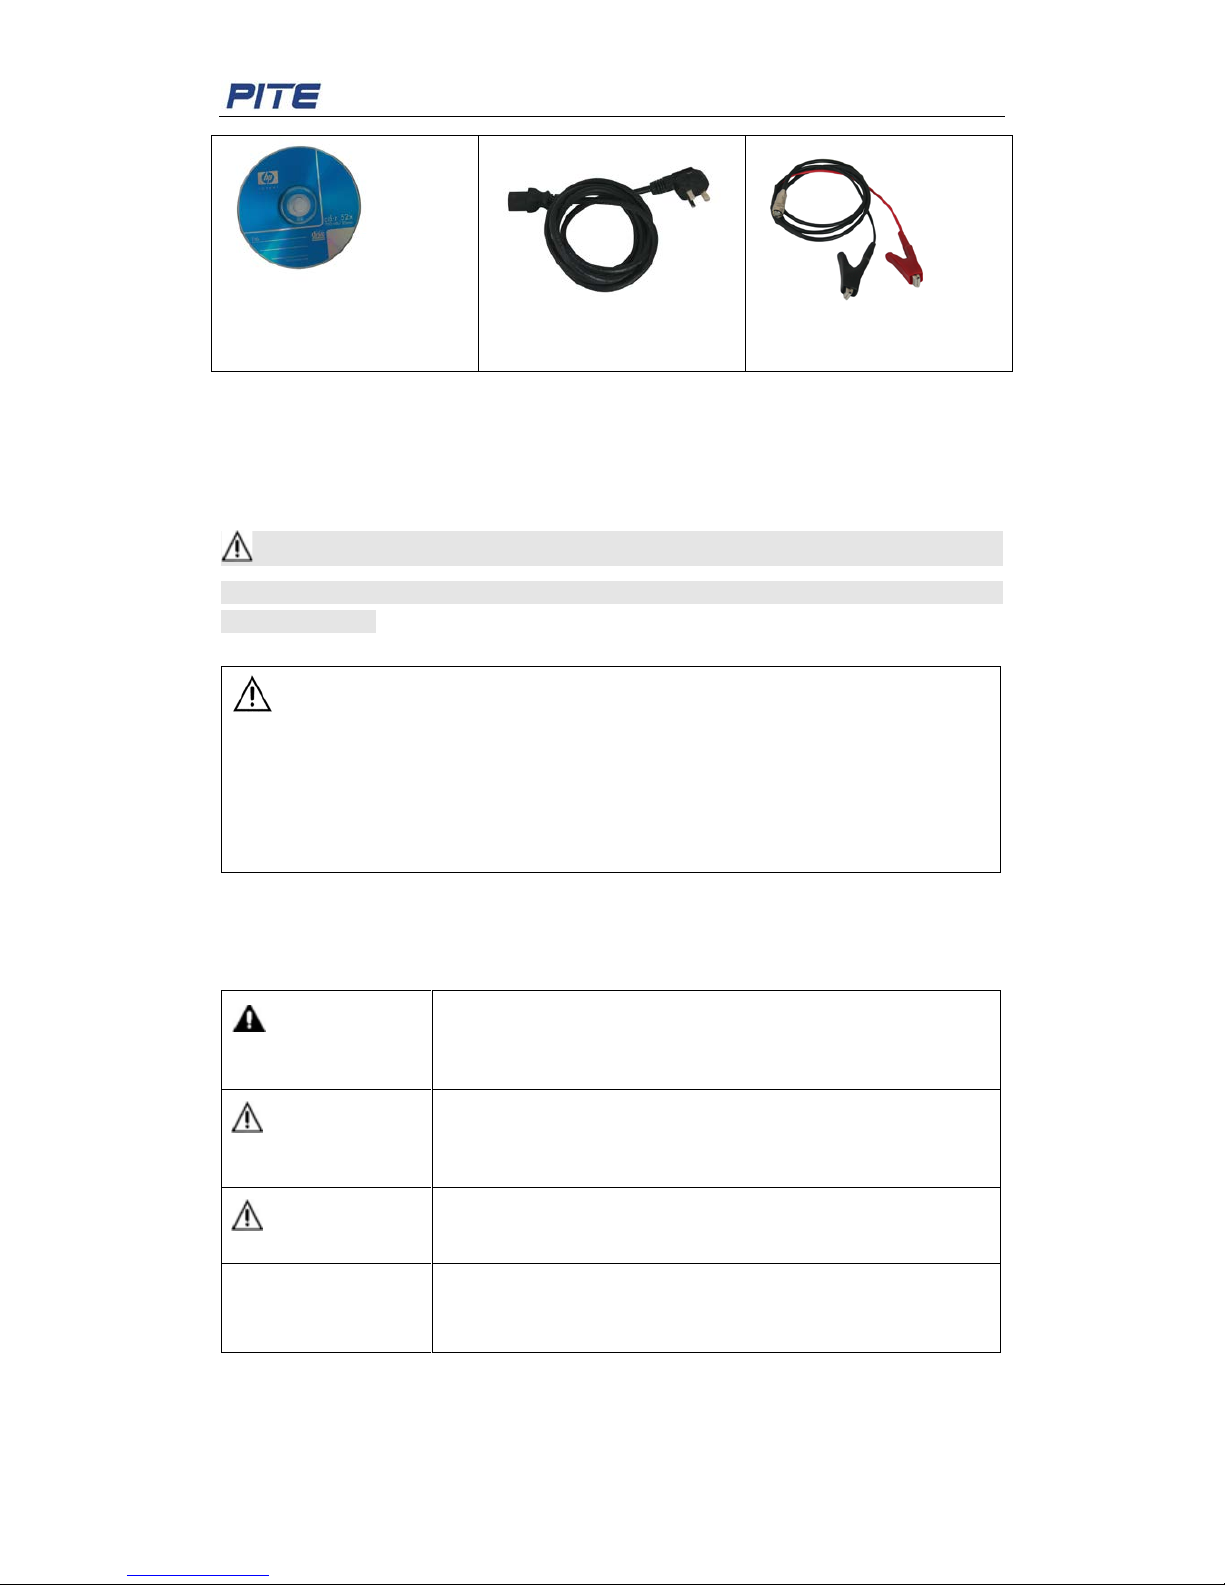
Make sure you have each items below
1. PITE 3932T main unit (1)
2. Carrying case (1)
3. Voltage testing lead with two clamps (1)
4. Load cable (black & red) (2)
5. User Manual (1)
6. Analyzing software CD (1)
7. AC power cord (1)
PITE 3932T main body
Red load cable
Black load cable
Users manual
Page 4
PITE 3932T Battery Charger/Discharger
4
Analyzing Software CD
AC power Cord
Volt age te sting lead w ith tw o
clamps
1.2. Safety Information
For your protection, please read this safety information completely before operating the
PITE 3932T. Carefully observe all warnings, precauti ons and instructions.
WARNING: Servicing described in this manual is to be done only by qualified
personnel. To avoid electrical shock, do not service the instrument unless you are
qualified to do so.
DANGER
Safety testing has been done on this instrument thoroughly
before shipment. However, mi shandling during use c oul d r esult
in injury or other bad consequences, as well as damage to the
instrument. Make sure th a t y ou unders t and t he instr uct ions a nd
precautions in the
manual before use. We disclaim any
responsibility for accidents or injuries not resulted directly from
instrument defects.
Safety Symbols
Description of symbols us ed in this manual.
DANGER
Indicates correct operation to prevent an extreme hazard that
could result in seri
ous injury or other bad consequences to
users.
WARNING
Indicates correct operation to prevent a significant hazard that
could result in serious injury or other bad consequences to
users.
CAUTION
Indicates correct operation to prevent possible injury to users
or damage to the instrume nt .
NOTE
Indicates advisory items related to perfor
mance or correct
operation of the instrument.
Page 5

PITE 3932T Battery Charger/Discharger
5
1.3 Precautions
To avoid electrical shock or fire, r ead these precautions first before using the unit:
Except as explained in th is m anual, do not att empt t o ser v ice this e quip ment yourse lf.
Do not operate the PITE 3932T around explosive gas or vapor.
Use only insulated load cables, and test leads as supplied w it h t he PITE 3932T
Before use, inspect the PITE 3932T, load cables, test leads and accessories for
mechanical damage and repl ac e w hen damaged. Look for crac ks or missing plastic.
Pay special attention to the insulation surrounding the con nec t or s.
Remove all clamps, test le ads and accessories that are not in use.
Do not apply input voltages above the rating of the instrument.
Before use, check that the selected/indicated voltage ranges on the PITE 3932T
matches the local line pow er voltage and frequency.
Proper installation is esse nt ial to t he c or rect functioning of your ana lyzing software
CD. If you have any questions about i ns t allation, please contact us for assistance.
After testing battery, ther e is hig h t emperature inside the main body of PITE 3932T.
Therefore, please keep th e unit powered on to evaporate the heat for at least 5
minutes. Do not shut down t he unit r ig ht after testing. This is very important ensure
the good performance of all elec t r oni c par ts inside the main body.
This manual describes the general installation and u se of the test equipment. If your
system has features or accessories not addressed in t his man ual, please contact us.
2. OVERVIEW
2.1 About PITE 3932T
PITE 3932T is a compact unit for daily maintenance of single cell, especially for old cells.
It plays three roles: charger, discharger and activator, which will facilitate your
maintenance for batteries. These three functions could be used individually or
comprehensively. When used comprehensively, lag-out battery will experience low-volt
constant current charging and discharging singly or in multi-ci rcles (1~99). By activating
the disabled active material on battery electrode plate, it amends the battery malfunction
caused by chemical failure and thus boosts the capacity of old battery. Activation curve
and certain parameters (e.g.: voltage and resistance) will display on screen as activation
ends.
Battery activation is very significant for resources utilization and efficiency increasing.
However, it is important to know that not all weak batteries could be activated by PITE
3932T. It can only amend the weak batteries whose bad condi tion is caused by chemical
malfunction instead of phys ica l f ai lure such as short-circuit of electrode plate.
Page 6
PITE 3932T Battery Charger/Discharger
6
2.2 Display and Keypad
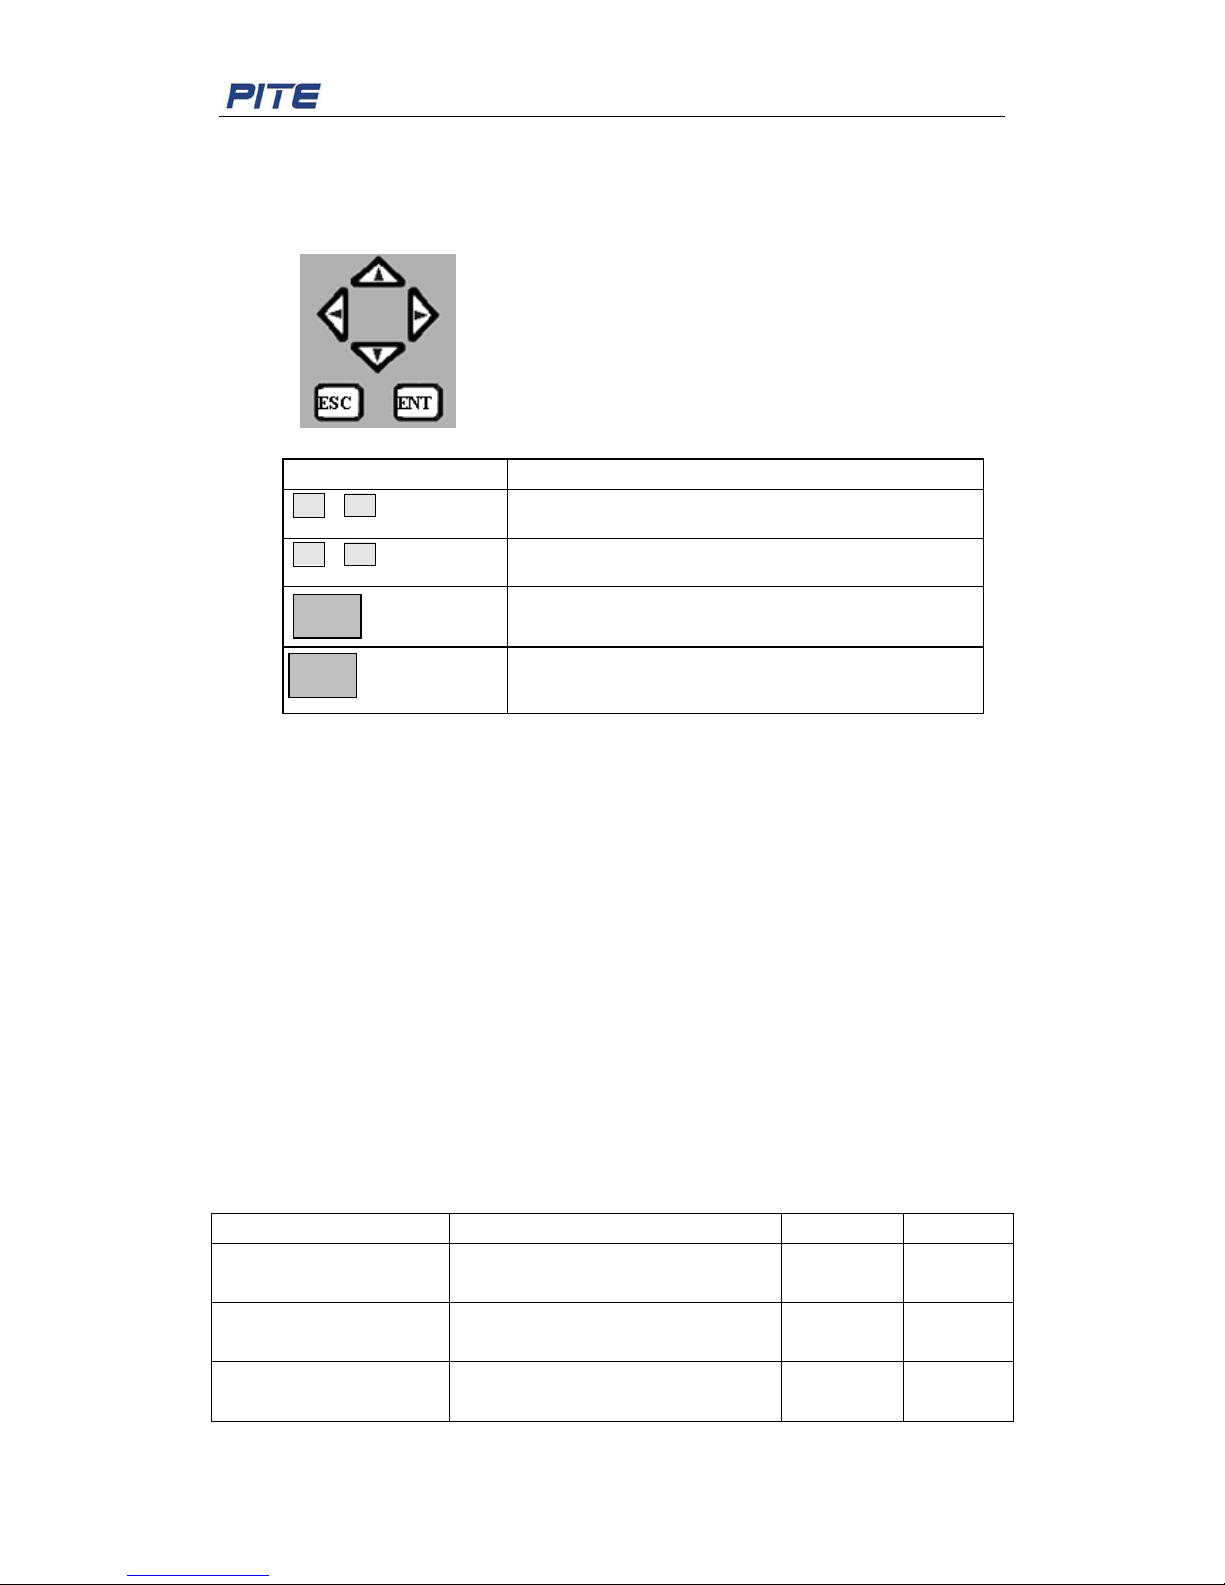
PITE 3932T main body has two ways of operation, by touch screen and keypad.
Both ways have same operation e ffect. Operation of keypad will be as below:
Keys Operation:
Key
Functions
▼ ▲ Change the numbers of para meter s
◄ ► Move to orient different options for changing.
1. Confirm the selection or opt ion
2. Confirm input
1. Return to the previous page
2. End testing.
2.3 Features
Portable device
User friendly
Well designed and easy-to-do
Powerful functions with 3 in 1 (discharger, charger and activator)
Accurate data result s and vivid waveforms
Integrated functions for d i splaying, controlling and loading
Password management in key parts
Safety circuits to prevent damage to cells
Longtime monitoring of cell co ndition
Direct USB drive for data transferring
Convenient analysis sof t ware in PC
Software system updatable
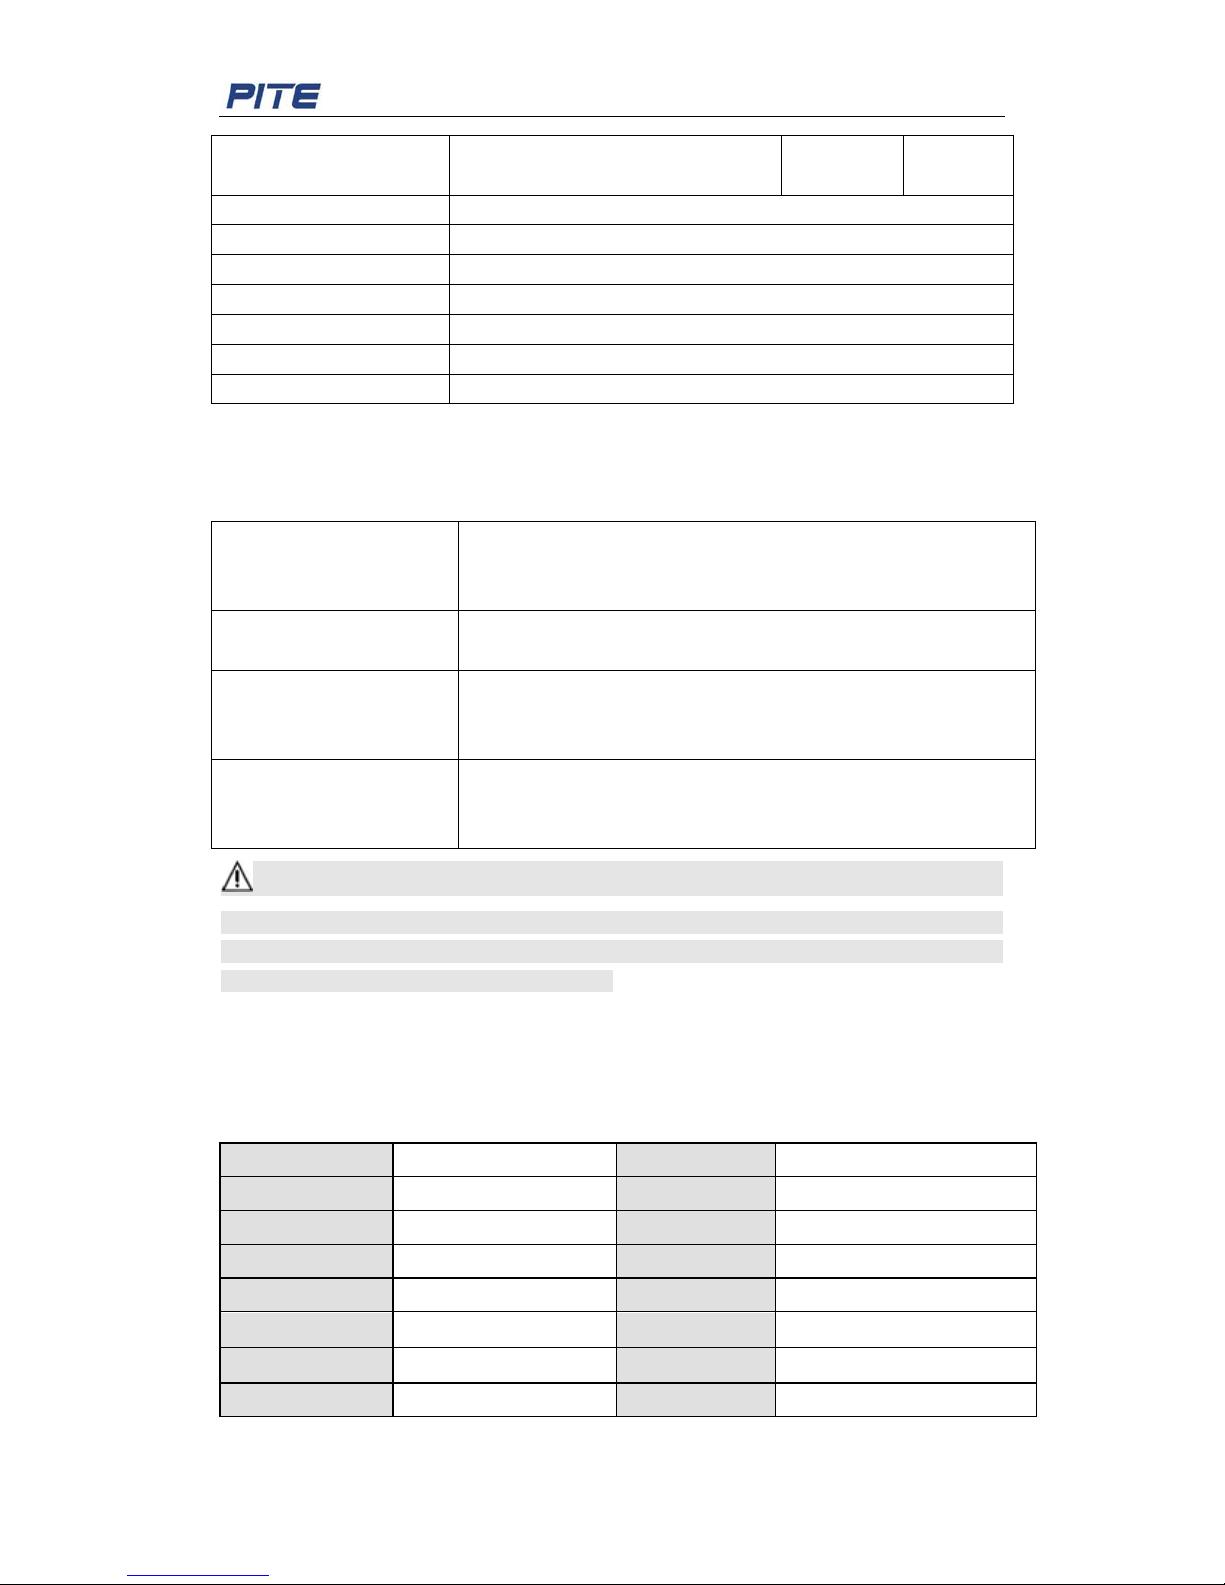
2.4 Specifications
Te ch nical S pecifi catio n
Measurement Mode
Resolution
Accuracy
Charging Curre nt 1-100A (cell: 2V) 1-30A (cell: 12V)
1-30A(cell:6V)
1A 1A
Discharging Curr ent
1-100A(cell:2V) 1-30A(cell:12V )
1-30A(cell:6V)
1A 1A
Charging Voltage 1.7-2.4V(2V) 5.4-7.2V(6V)
10.2-15V(12V)
0.1V 0.25%
ENT
ESC
Page 7
PITE 3932T Battery Charger/Discharger
7
Discharging Voltage
1.7-2.4V(2V) 5.4-7.2V(6V)
10.2-15V(12V)
0.1V
0.25%
Power Supply
AC 220V±10%
LCD Display
128*64 pixels
Operating Temperature
5℃~50℃
Operating Humidity
5%~90%RH
Dimension
40x30x20cm
Net Weight
10Kg
Communication Port
USB
2.5 Measurement Flowchart
The measurement workflow is described be low
Measurement
Preparations
1. Connect AC power cord
2. Connect testing leads
3. Turn the power on
Start M easurement
1. Select measuring mode
2. Read testing results
Ending of Measurement
1. Disconnect the testing lea ds from the testing cell
2. Turn off the power
3. Pulling out the AC power cord
Data uploading
1. To load the measuring data to PC, insert a USB drive in
PITE 3932T and transfer the data
2. Data system managem ent on PC
WARNING: There are high voltage and current in the cell and PITE 3932T
components. Only qualified personnel can perf orm all these measuring procedure. Pay
attention to electrical and chemical safety precautions in cell installation and removing,
testing leads connection a nd measurements.
2.6 Definition of Abbreviat ion
Below are the definitions of all the abbreviated words used in the operating software of
PITE 3932T Battery Char ger / Discharger.
Abbreviation
Full name
Abbreviation
Full name
Act-res activation result I current
adj adjust imin short time
Alr already M minute
C
capacity
Paral
Parallel
calib
calibration
param
parameter
Case
acquisition case
pls
please
CHG
charge
S
second
Page 8
PITE 3932T Battery Charger/Discharger
8
comm communication span time span
cyc
cycling
StableU
voltage-stabilization
del
delete
strg/stg
string
dir
direction
syst
system
DIS
discharge
T
time
EX
exit
tot
total
Factory
Factory parameter
U
voltage
H
hour
3. MEASURE PREPARATION
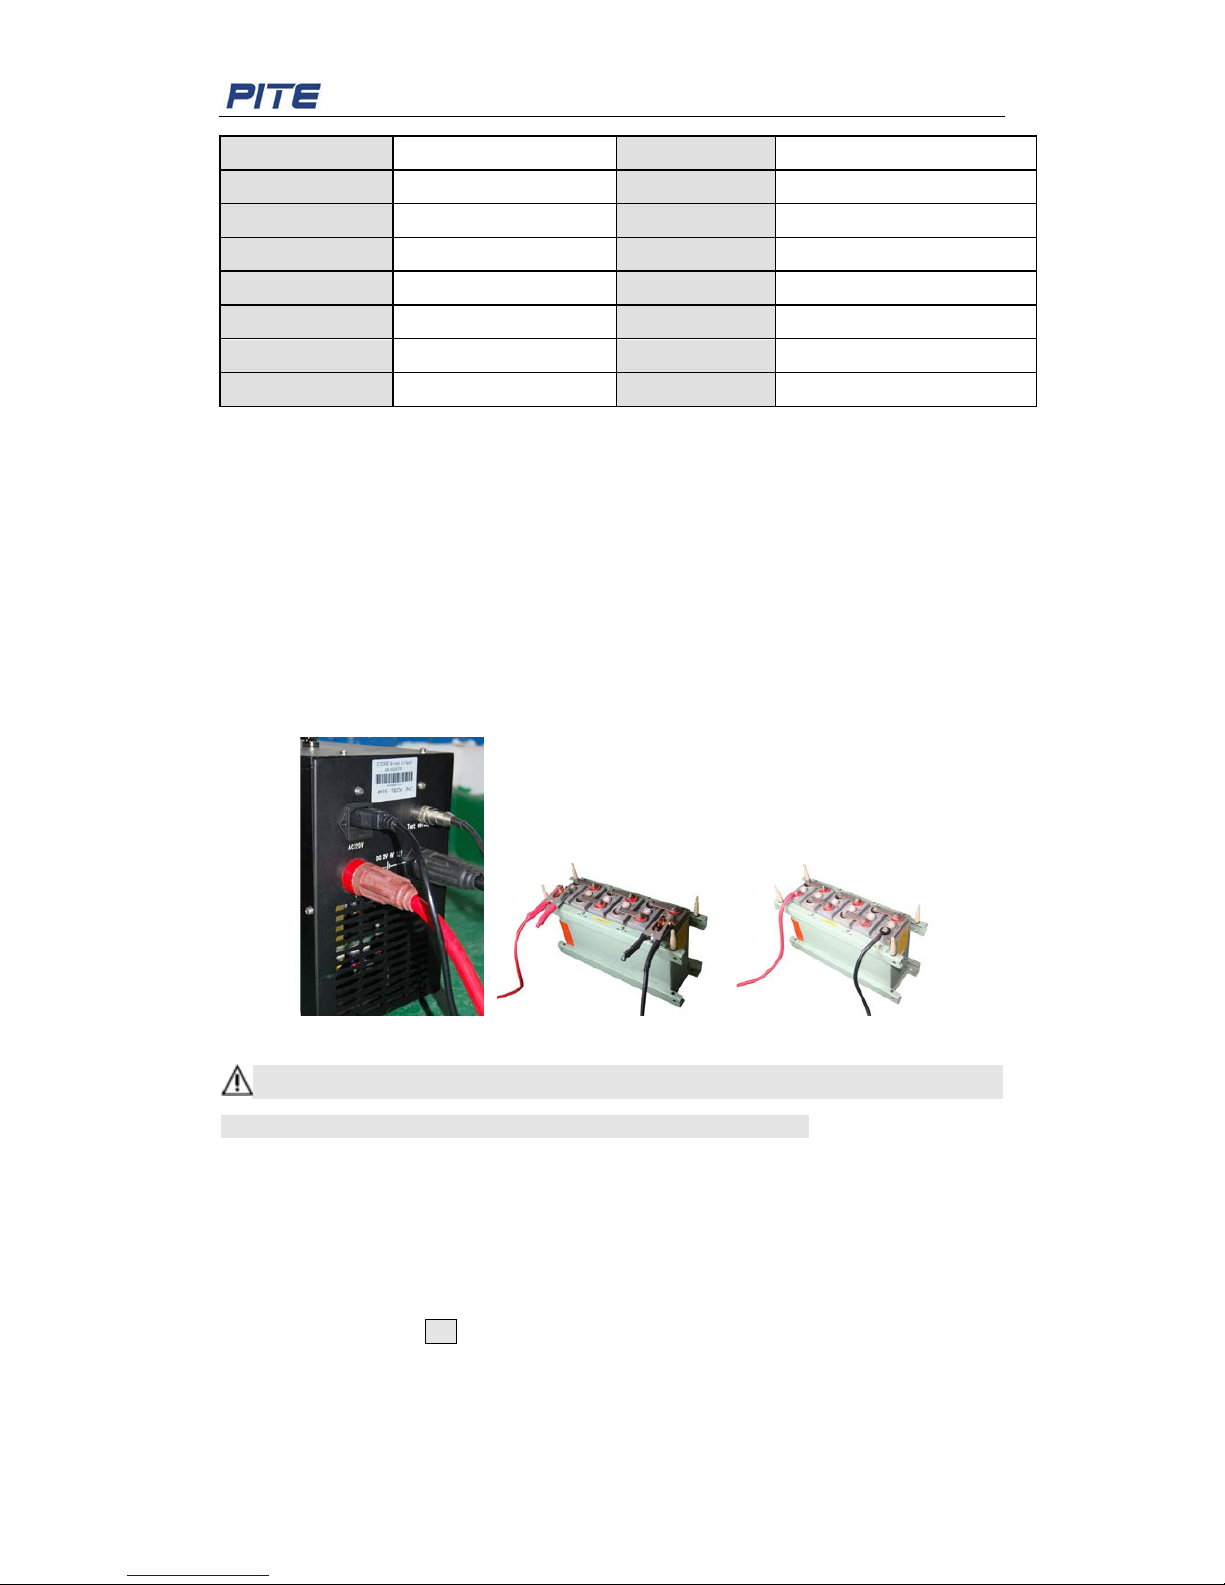
This section describes ho w to connect t esting leads and AC power cord prop erly in correct
sequence:
1. Connect the PITE 3932T to an appropriate AC power supply via power cord.
2. Connect the black load cable with PIT E 3932T main unit and negative pole of cell, and
red cable the positive pole. Please DO NOT connect them reversely.
3. Connect one end (one-port-one-cable) of the voltage testing lead with unit. And
connect the other two ends w ith c el ls: t he black clamp with negat iv e pole and red with
positive.
Fig.3.1.1 Fig.3.1.2 Fig.3.1.3
WARNING: Make sure that these cables are correctly connected; otherwise the PITE
3932T may not w or k prop er ly and m ay become significant damage.
4. MEASUREMENT
4.1 Power On and Off
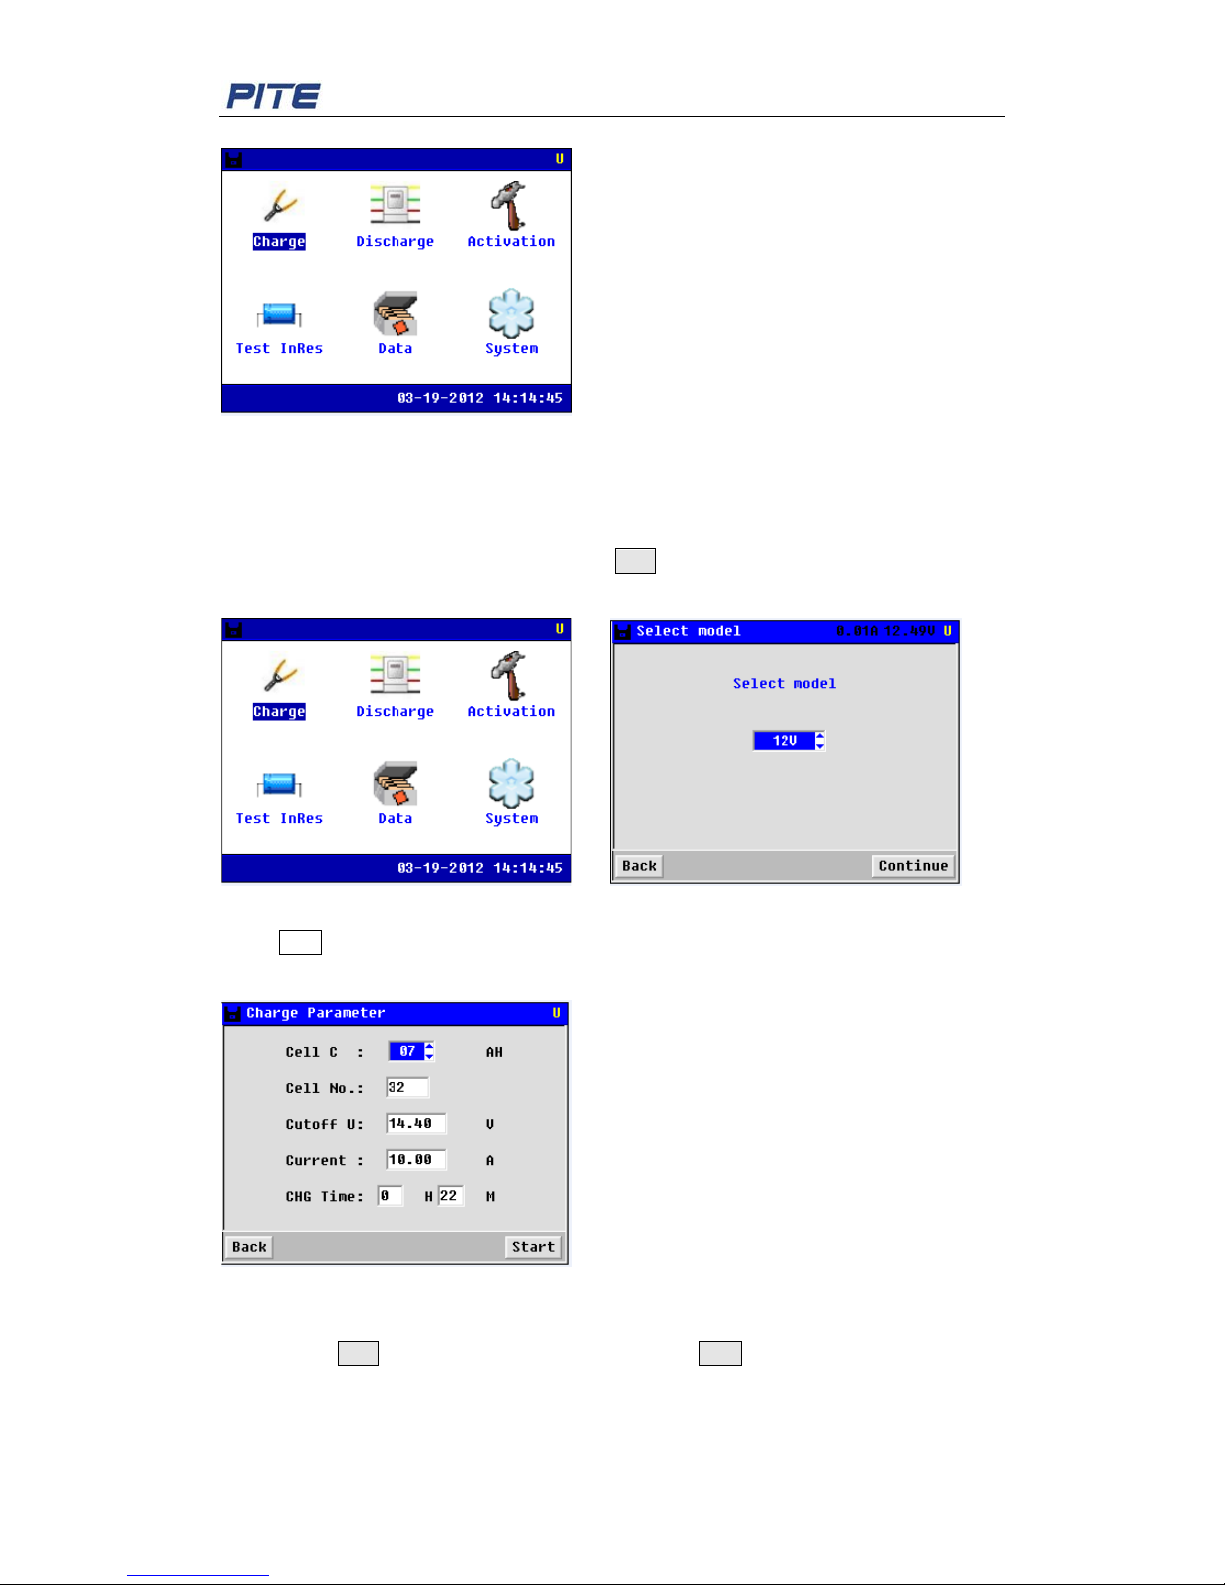
Press power switch to ON. After initialization of about 10 seconds, you will come to the
main menu as below:
Page 9
PITE 3932T Battery Charger/Discharger
9
Fig. 4.1
4.2 Cell Charge
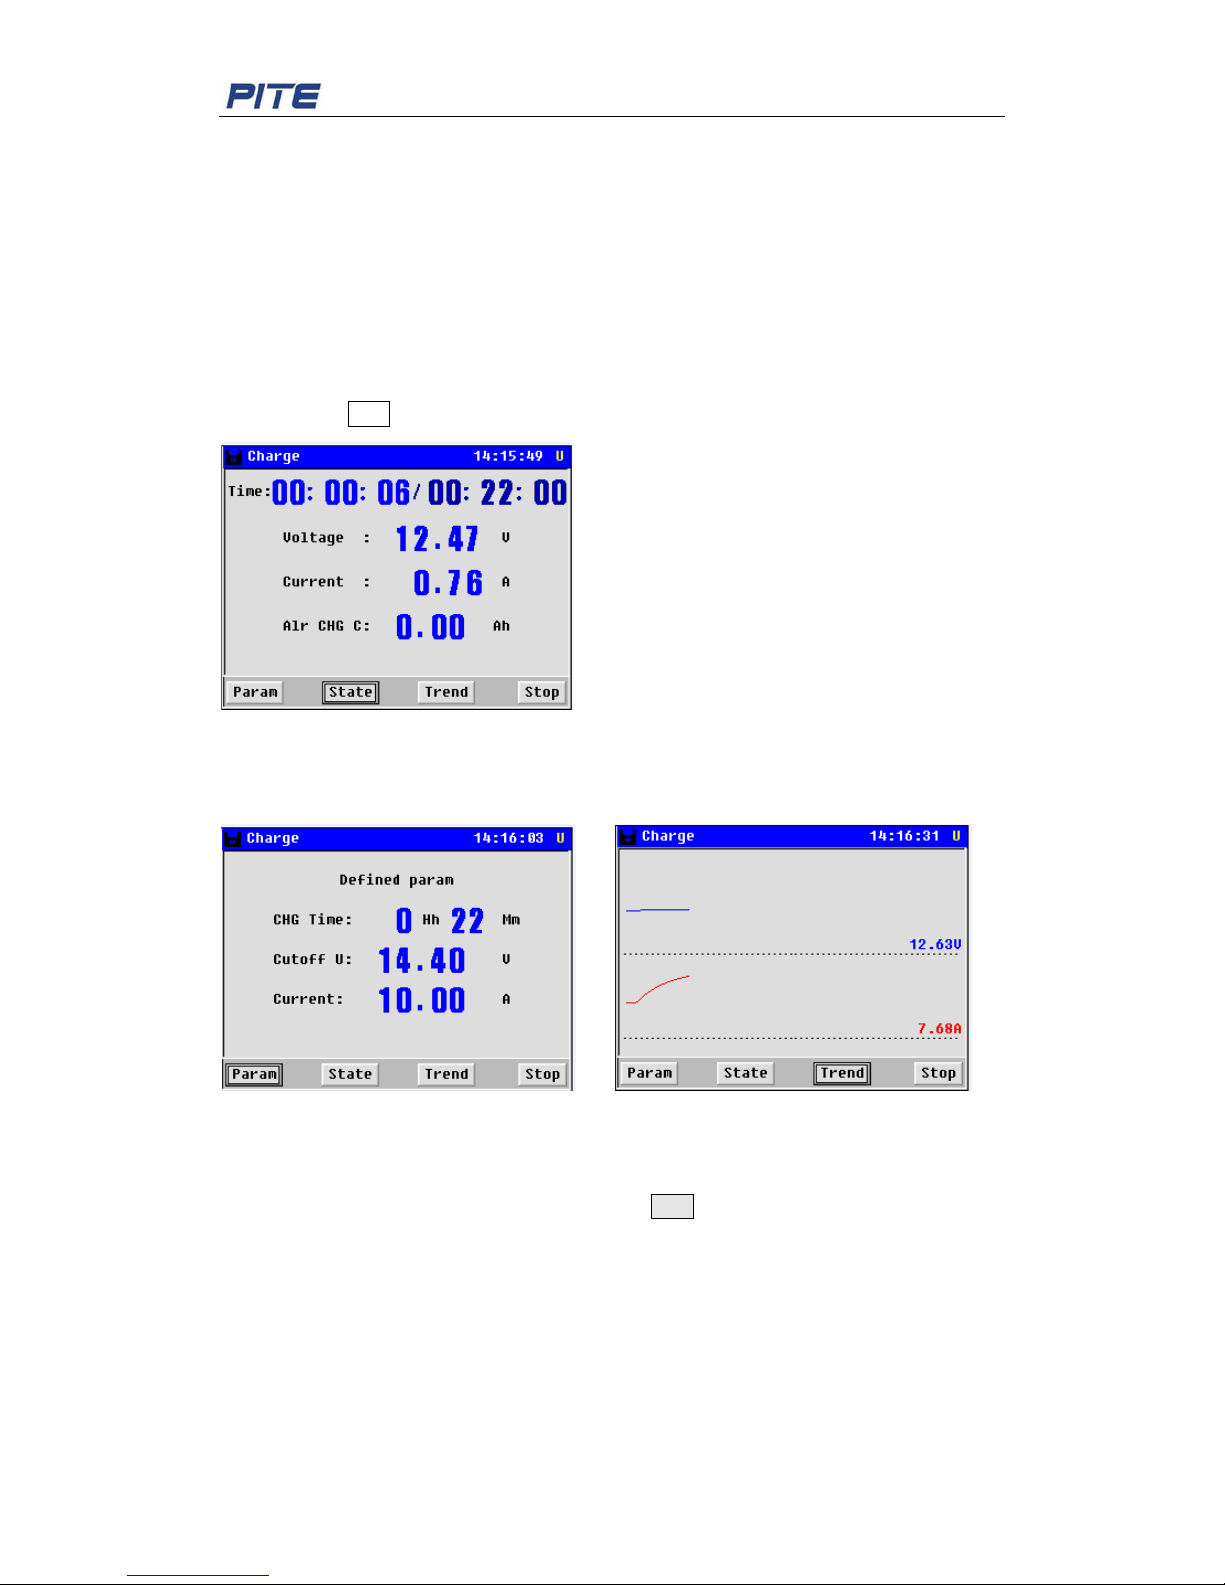
To charge one single battery, please connect the testing leads well and select [Charge] in
main menu to enter cell charge mode. Press ENT to confirm:
NOTE: The PITE 3932T has 3 options for di fferent battery types: 2V, 6V and 12V.
Fig. 4.2.1 Fig. 4.2.2
Press ESC to go back to upper menu, or press [continue] to continuing charge mode,
screen will display as below:
Fig. 4.2.3
Use the arrow keys for different parameters setting. Charge time should not exceed 48
hours. Press ENT or [Start] to start charging, or press ESC to go back.
NOTE:
Page 10
PITE 3932T Battery Charger/Discharger
10
1. Setting of cutoff voltage is for the protection of cell. Correct setting of cutoff voltage
value will prevent the cell from over charging or over discharging and thus avoid
damage to the cell. Following sett i ngs are for your reference:
2V cell---Cutoff discharge voltage:1.8 V; cutoff ch ar ge voltage: 2.45V
12V cell---Cutoff discharge voltage:10. 8 V; cutoff charge voltage: 14.5 V
2. Also pay attention to the current setting for cell of small capacity. You are suggested to
charge and discharge it with speed of 0.1C, which means that working current is 0.1
time of cell capacity.
After pressing ENT, the PITE 3932T will enter charging status as below:
Fig. 4.2.4
You can click [Param] to check the charging para me ter. Or you can click [Trend] to check
the current & voltag e charging curve
Fig. 4.2.5 Fig. 4.2.6
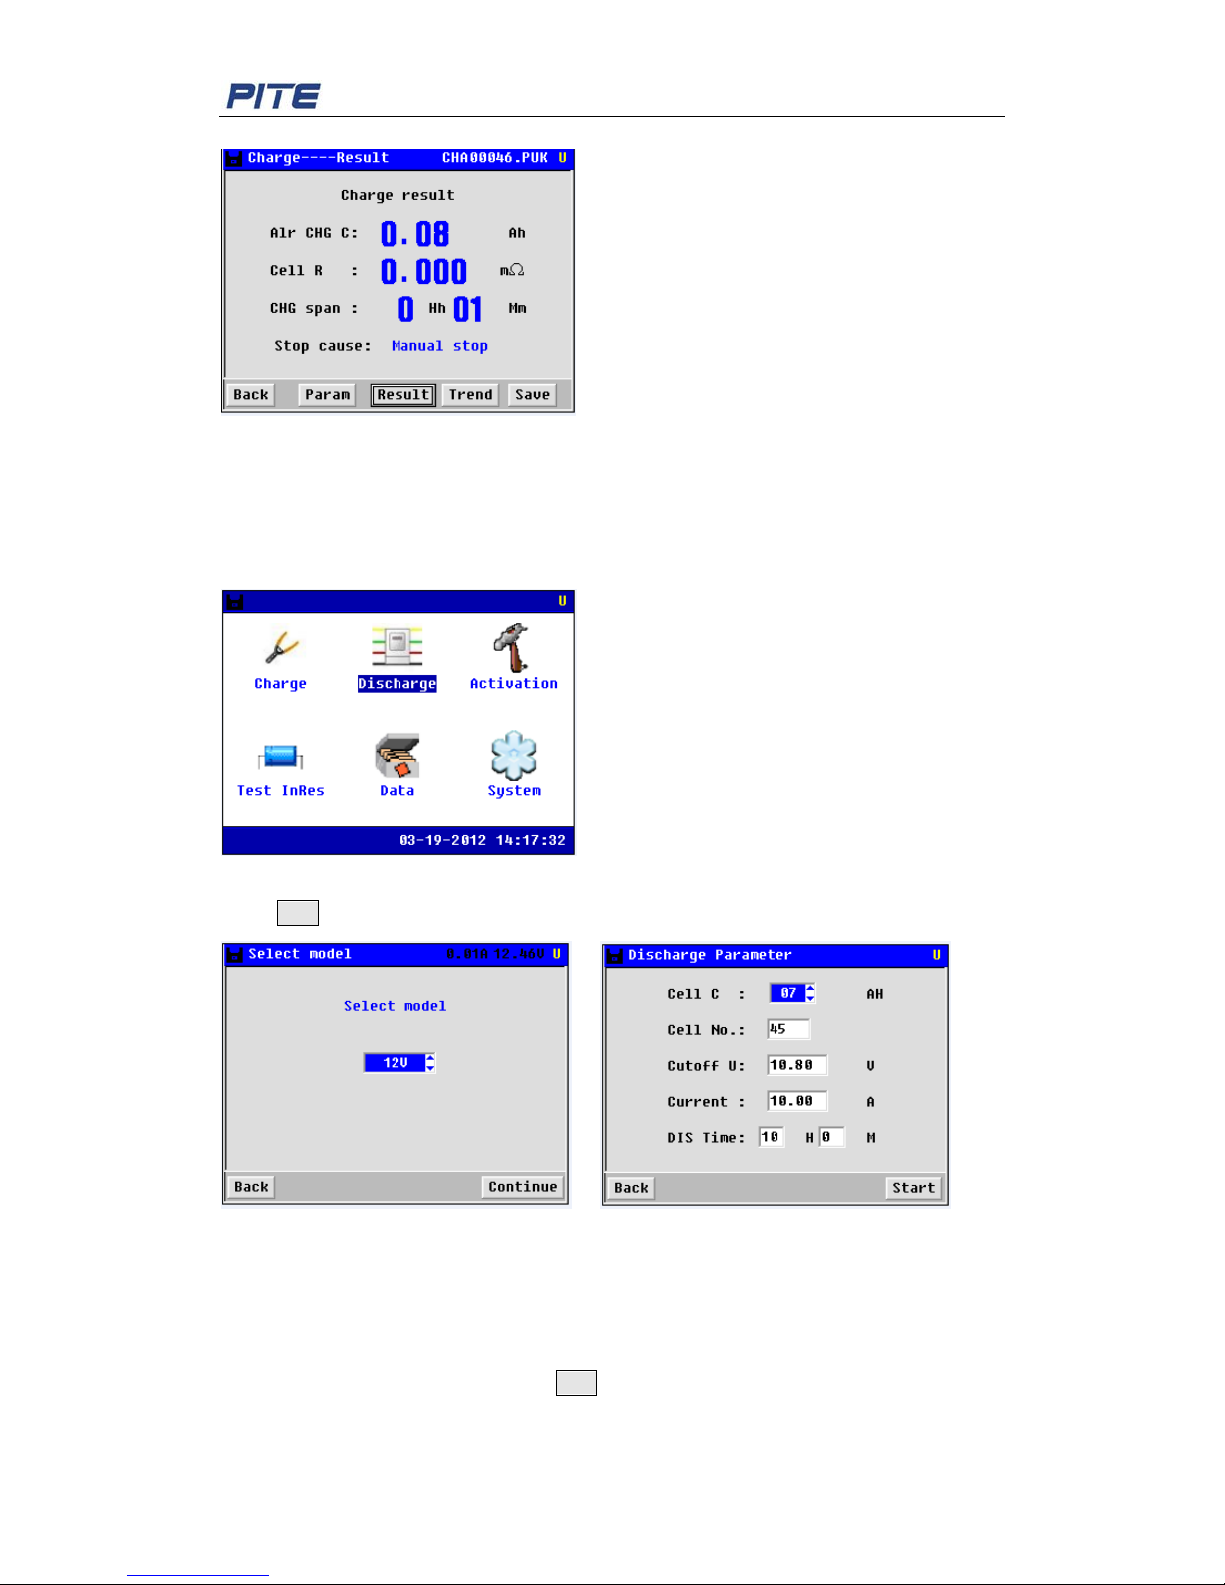
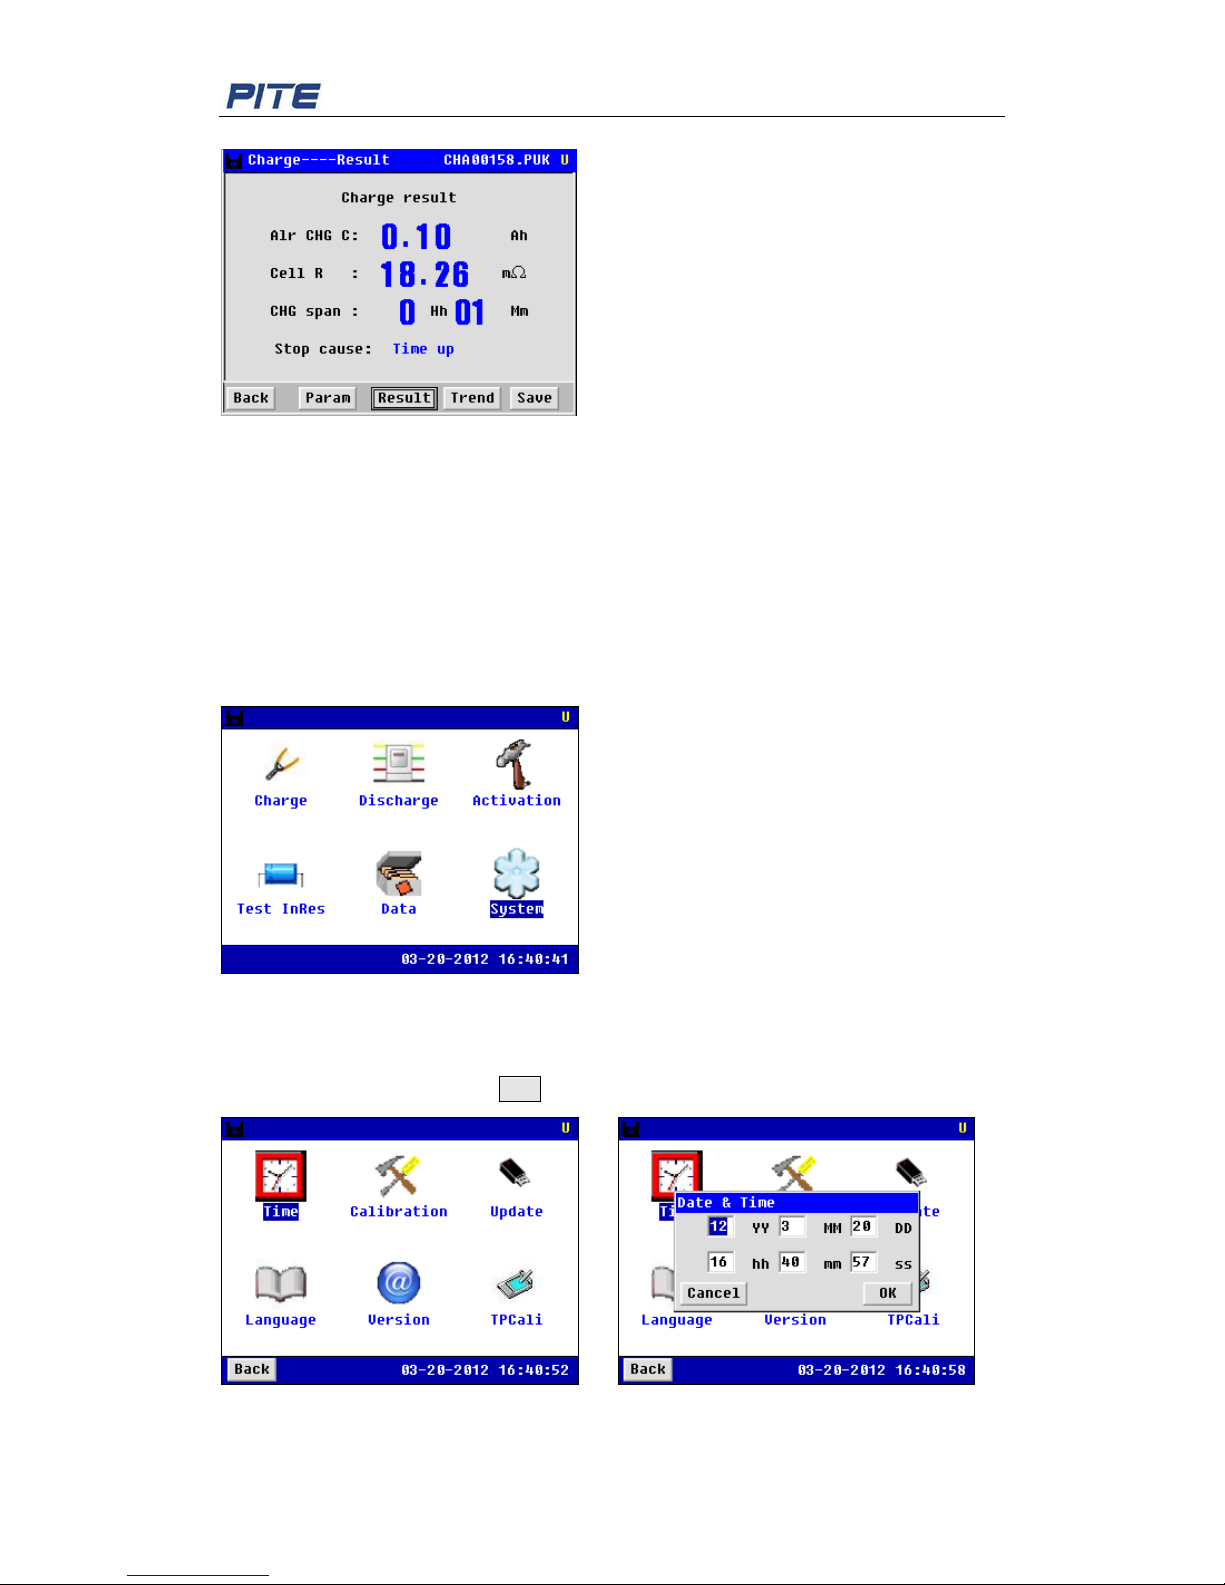
After charging is done, wait for 5 minutes for resistance testing and then it will show the
charging result to you as below screen. Press ← or → arrow key to choose the item you
want to check, such as [Param], [Trend] , Press ESC or [Back] to go back to cell charge
menu.
Page 11
PITE 3932T Battery Charger/Discharger
11
Fig. 4.2.7
4.3 Cell Discharge
To have a discharge testing, please connect the testing leads well and go to main menu
and choose [Discharge] as below:
Fig. 4.3.1
Press ENT to go to parameter s set ting screen as below, choose the cell voltage type first:
Fig. 4.3.2 Fig. 4.3.3
There are five parameters f or setting including cell capacity, cell number, cutoff voltage,
discharge current and discharge t ime. Press ←/→ to orient different parameters and ↑/↓ to
change the setting values.
NOTE: Total discharge time should not exceed 48 hours.
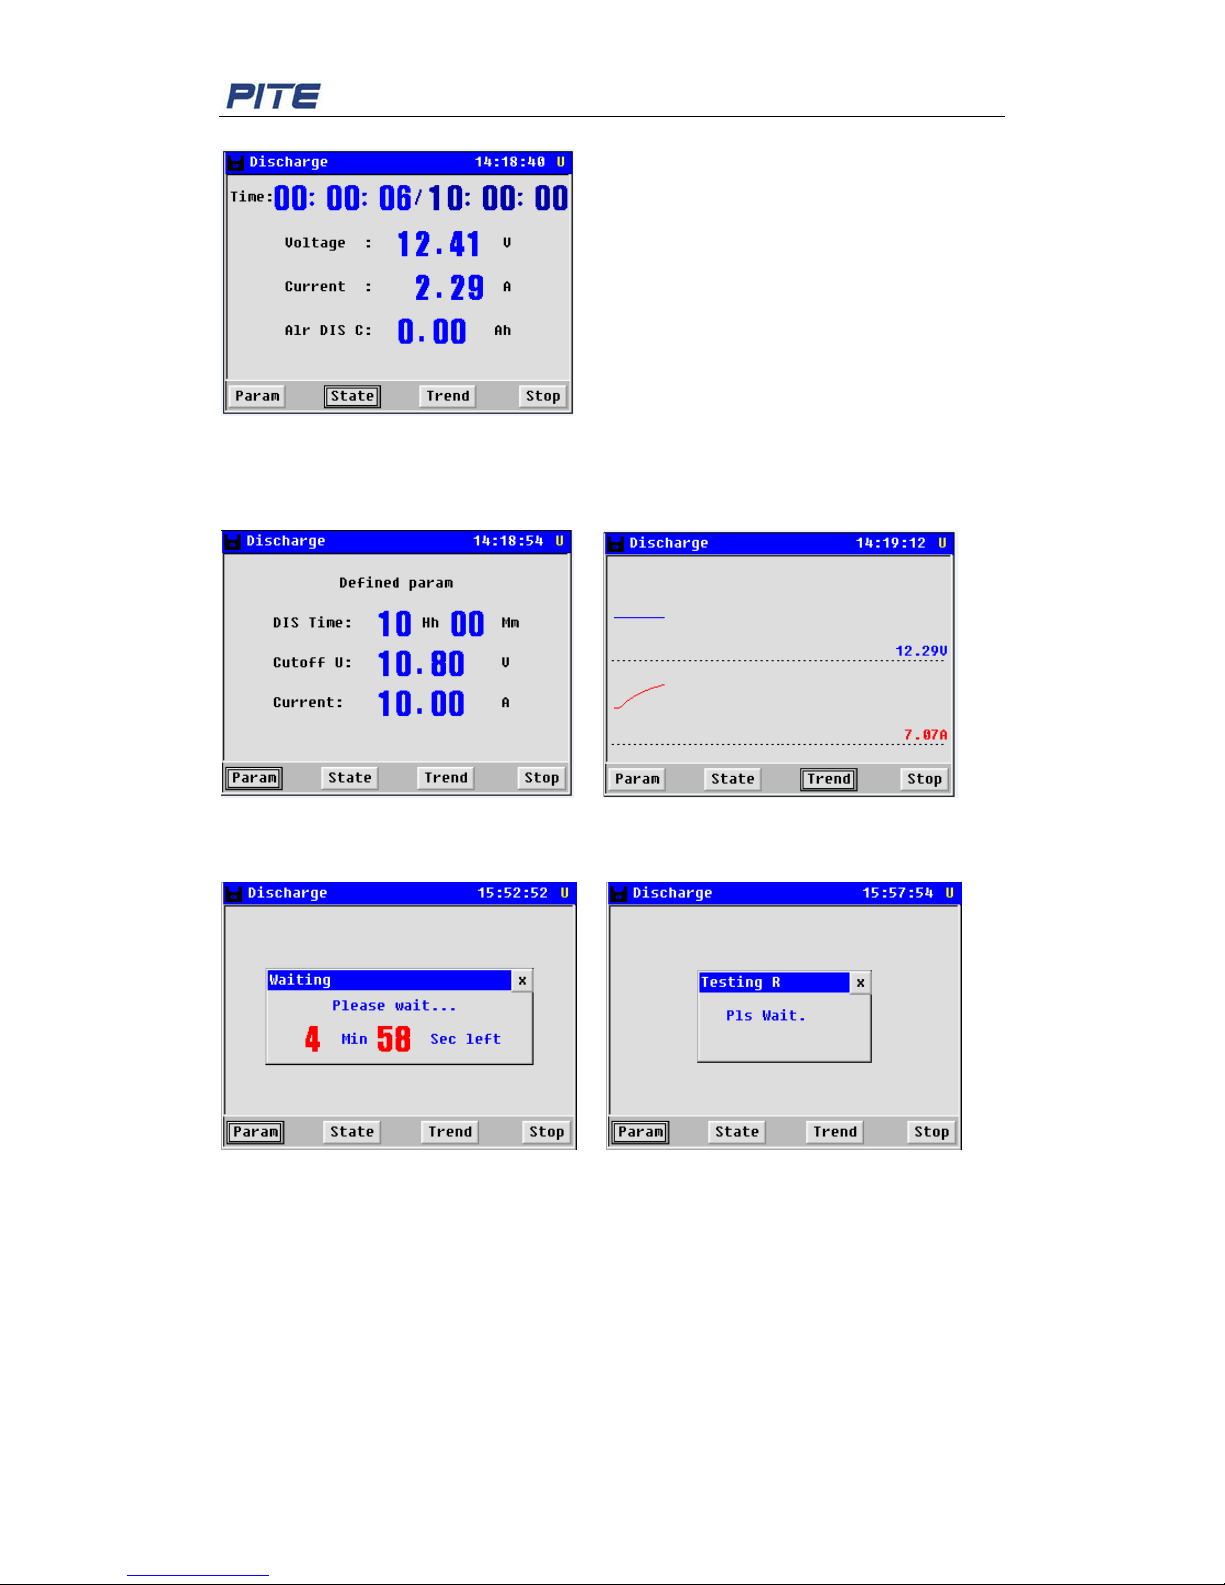
After the above setting, please press ENT or [Start] for discharge confirmation. You will
see the discharge statu s as below:
Page 12
PITE 3932T Battery Charger/Discharger
12
Fig. 4.3.4
You can click [Param] to check the discharging parameter. Or you can click [Trend] to
check the current & volt age discharging curve.
Fig. 4.3.5 Fig. 4.3.7
When discharging finished, wait 5 minutes for resistance testing as in the below screen
Fig. 4.3.8 Fig. 4.3.9
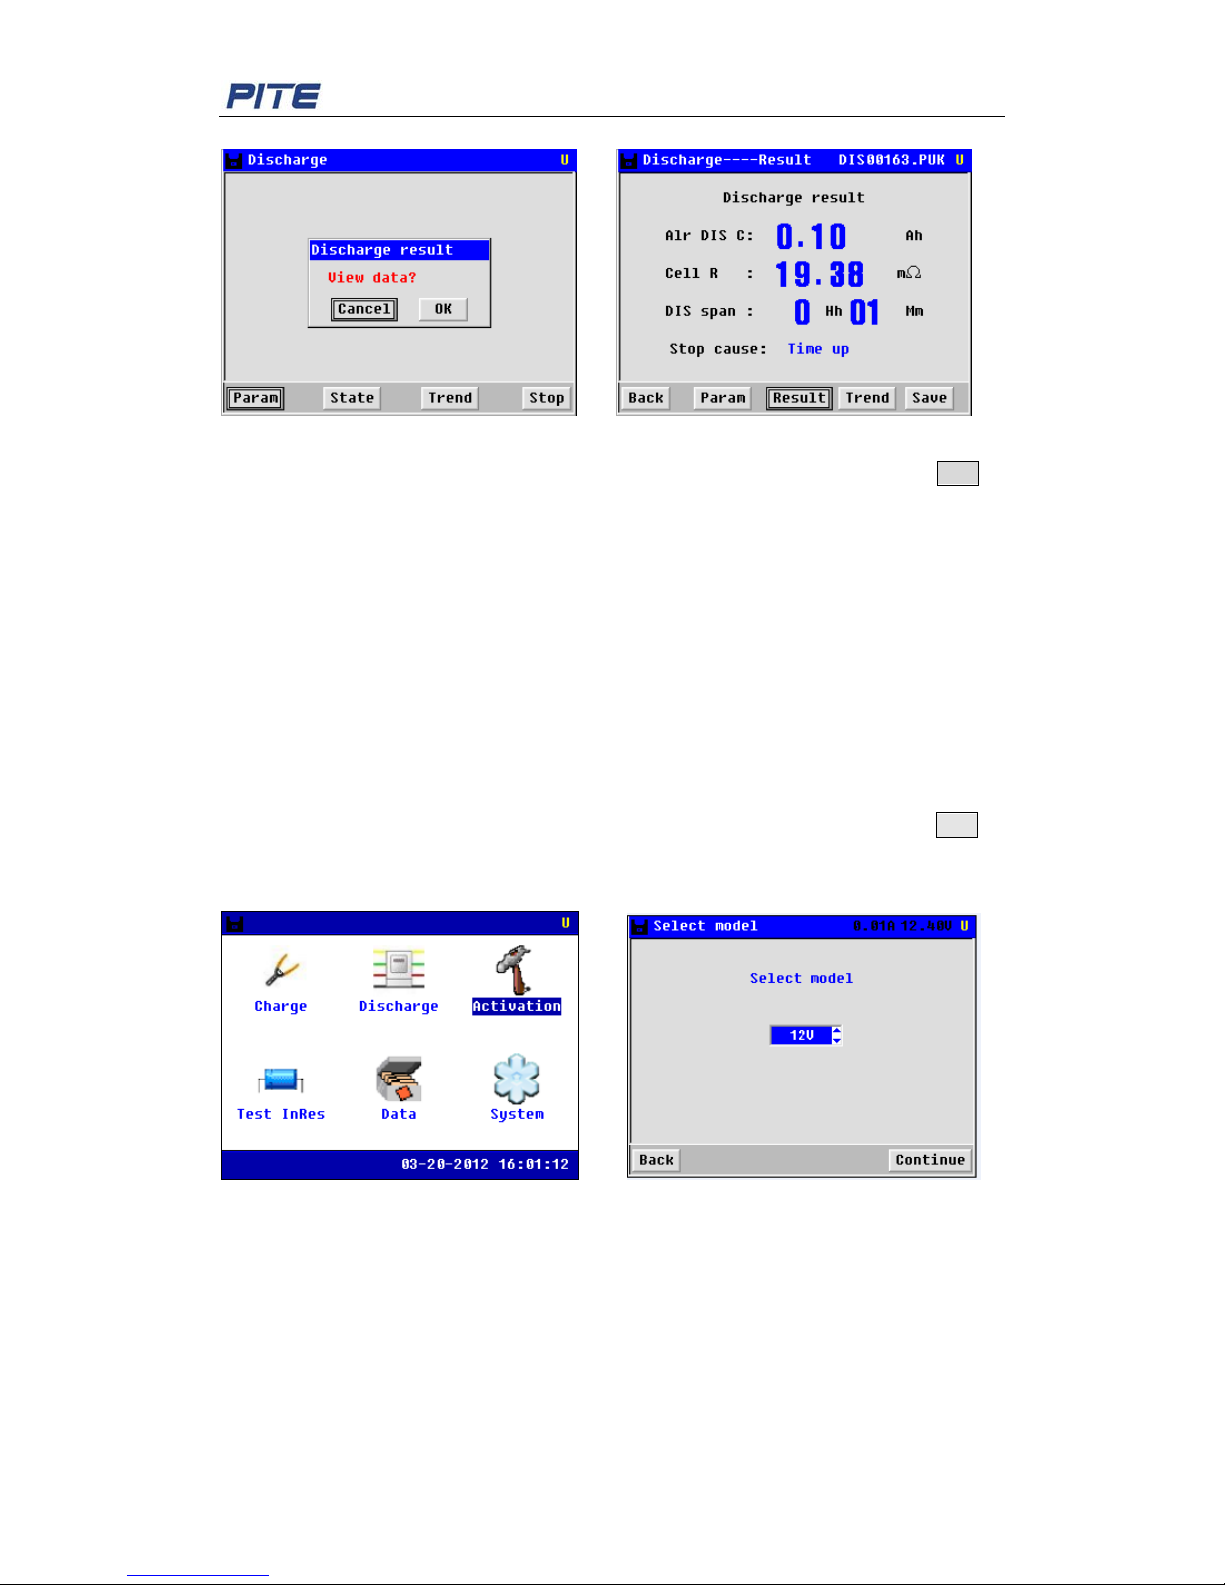
After testing resistance, press [OK] to view discharging result in the below screen:
Page 13
PITE 3932T Battery Charger/Discharger
13
Fig. 4.3.10 Fig. 4.3.11
Press ↓ arrow key to page down, you will see changing curve of current. Press ESC to
return back to the upper menu.
4.4 Cell Activation
Like the function of charge and discharge, setting for activation parameters is necessary
before operation of activation. Selection of cell type could be 2V, 6V or 12V. Also set cell
serial number, discharge voltage lower limit, charge voltage upper limit and cycle times in
the same way by using arrow keys. Maximum activation cyc l e is 9.
Activation process is:
Test battery resistance→Discharging→Test battery resistance→Charging
Highlight and select [Activate] in main menu by using the arrow keys. Press ENT to
confirm. PITE 3932T allows 3 options: 2v, 6v and 12v, choose the right model for the
battery.
Fig. 4.4.1 Fig. 4.4.2
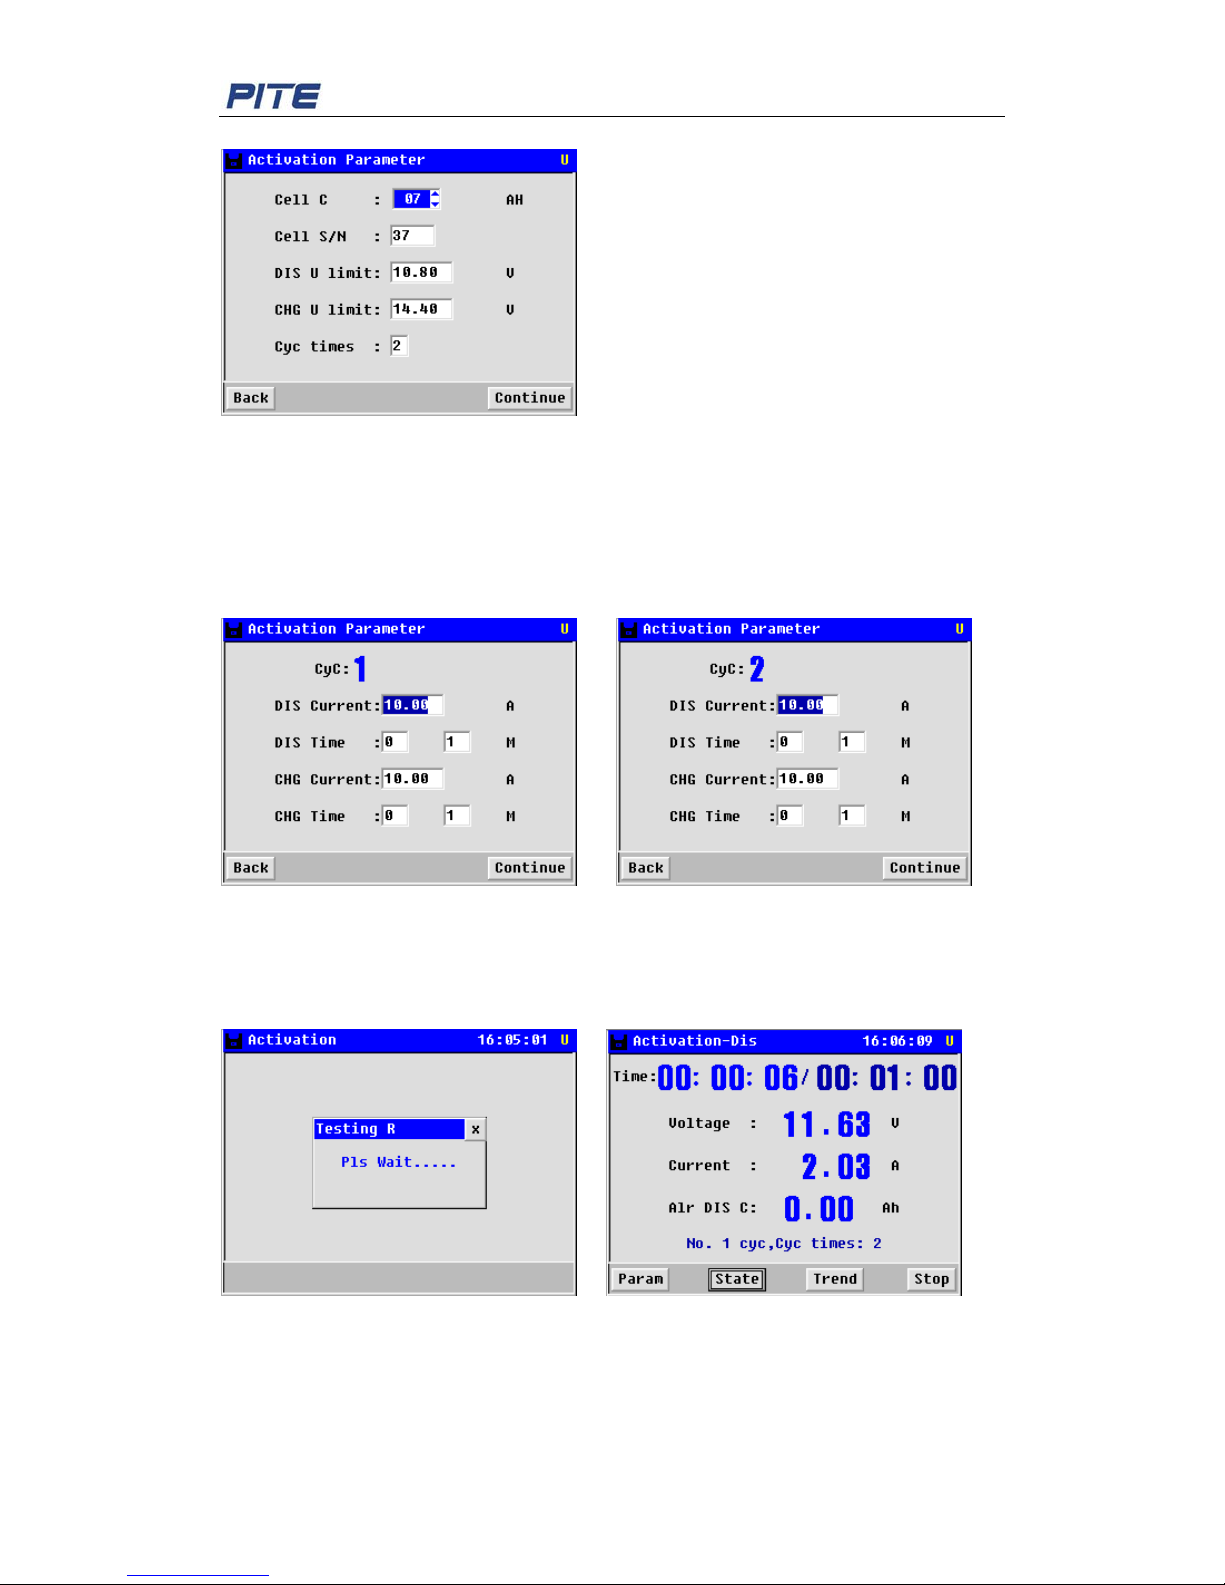
Press [Continue] to next step, it will show the below page, Use the arrow keys for setting
different para m et er s. After parameter setting , press [Continue].
Page 14
PITE 3932T Battery Charger/Discharger
14
Fig. 4.4.3
If the cycles are more than 1, press [Continue] to set the parameters of each cycle after
the previous setting (In the below screen, I have set the cycle time). Parameters in each
cycle include discharge current, discharge time, charge current and charge time. In all
cycles of activation, char ge time a nd dischar ge time should not exceed 18 h ours. And tot al
cycle time should not exceed 10 0 hours .
Fig. 4.4.4 Fig. 4.4.5
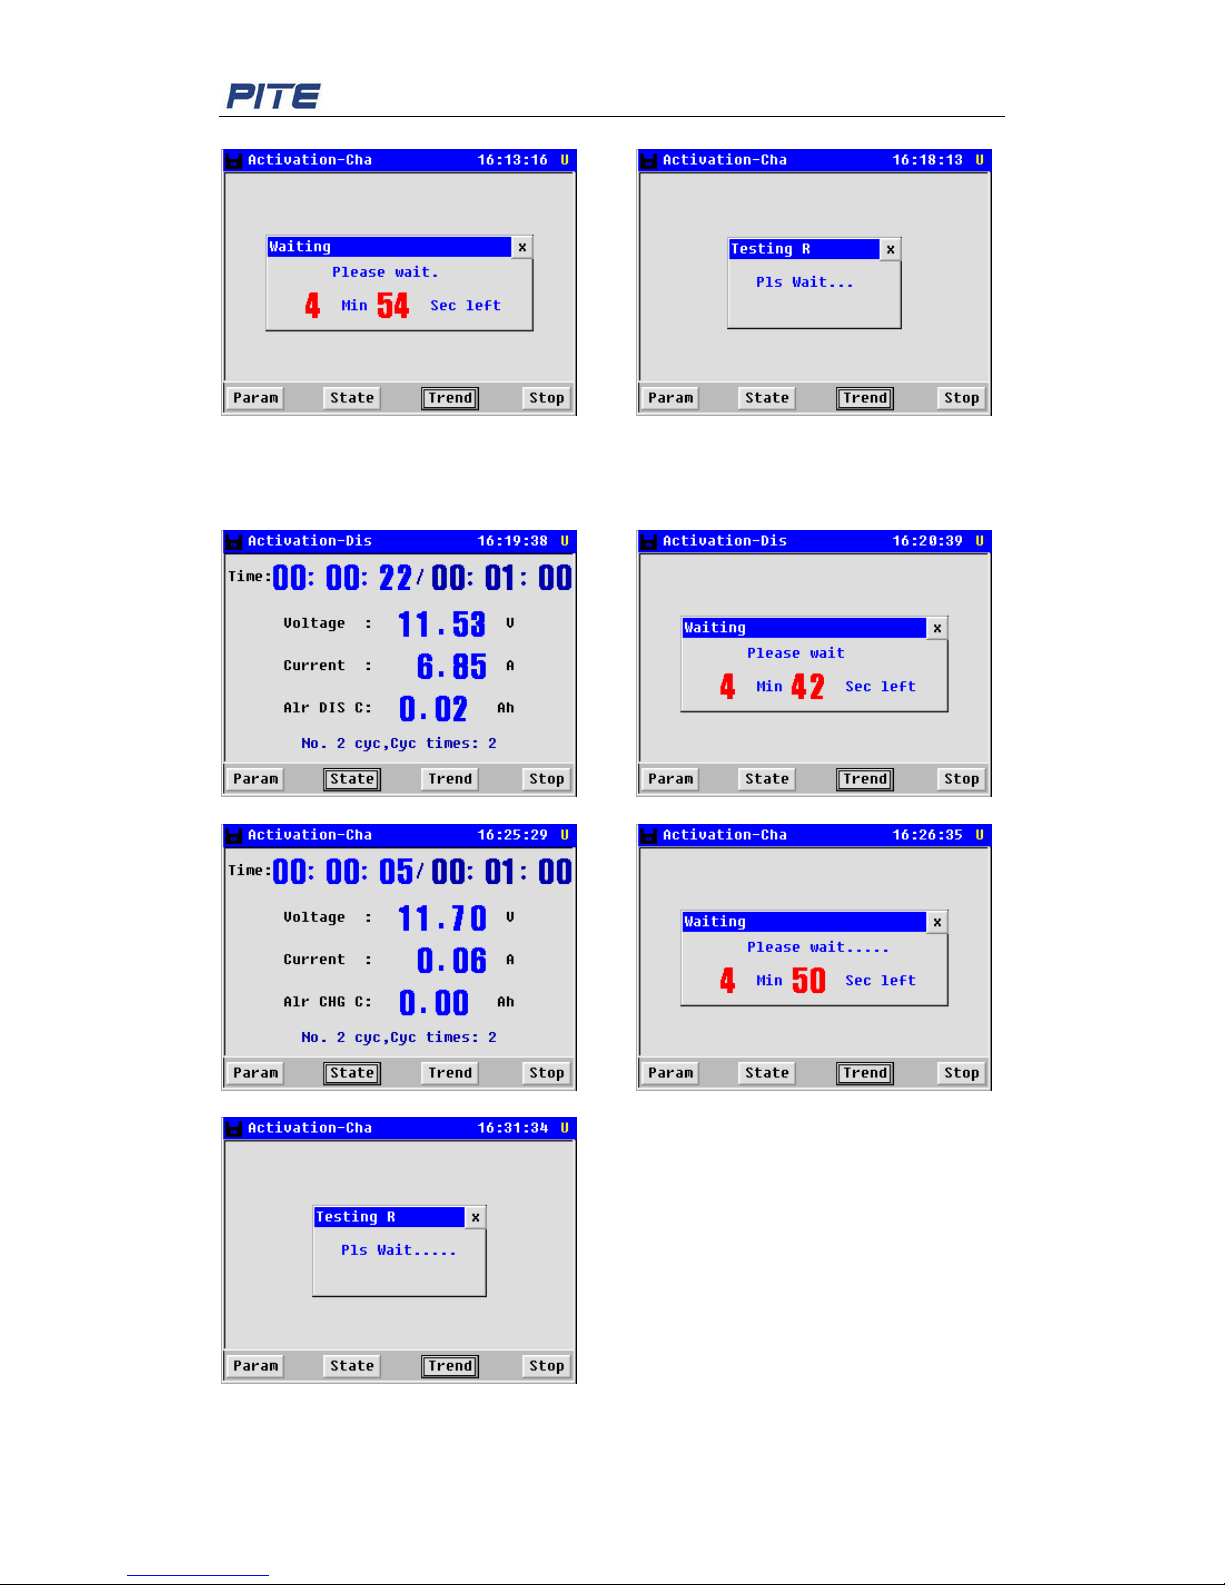
After all the settings are confirmed, Press [Continue] and please wait 5 minutes, it is
testing resistance of the battery. When finishing resistance testing, it begin to dischar ging,
it will show the testing state as below.
Fig. 4.4.6 Fig. 4.4.7
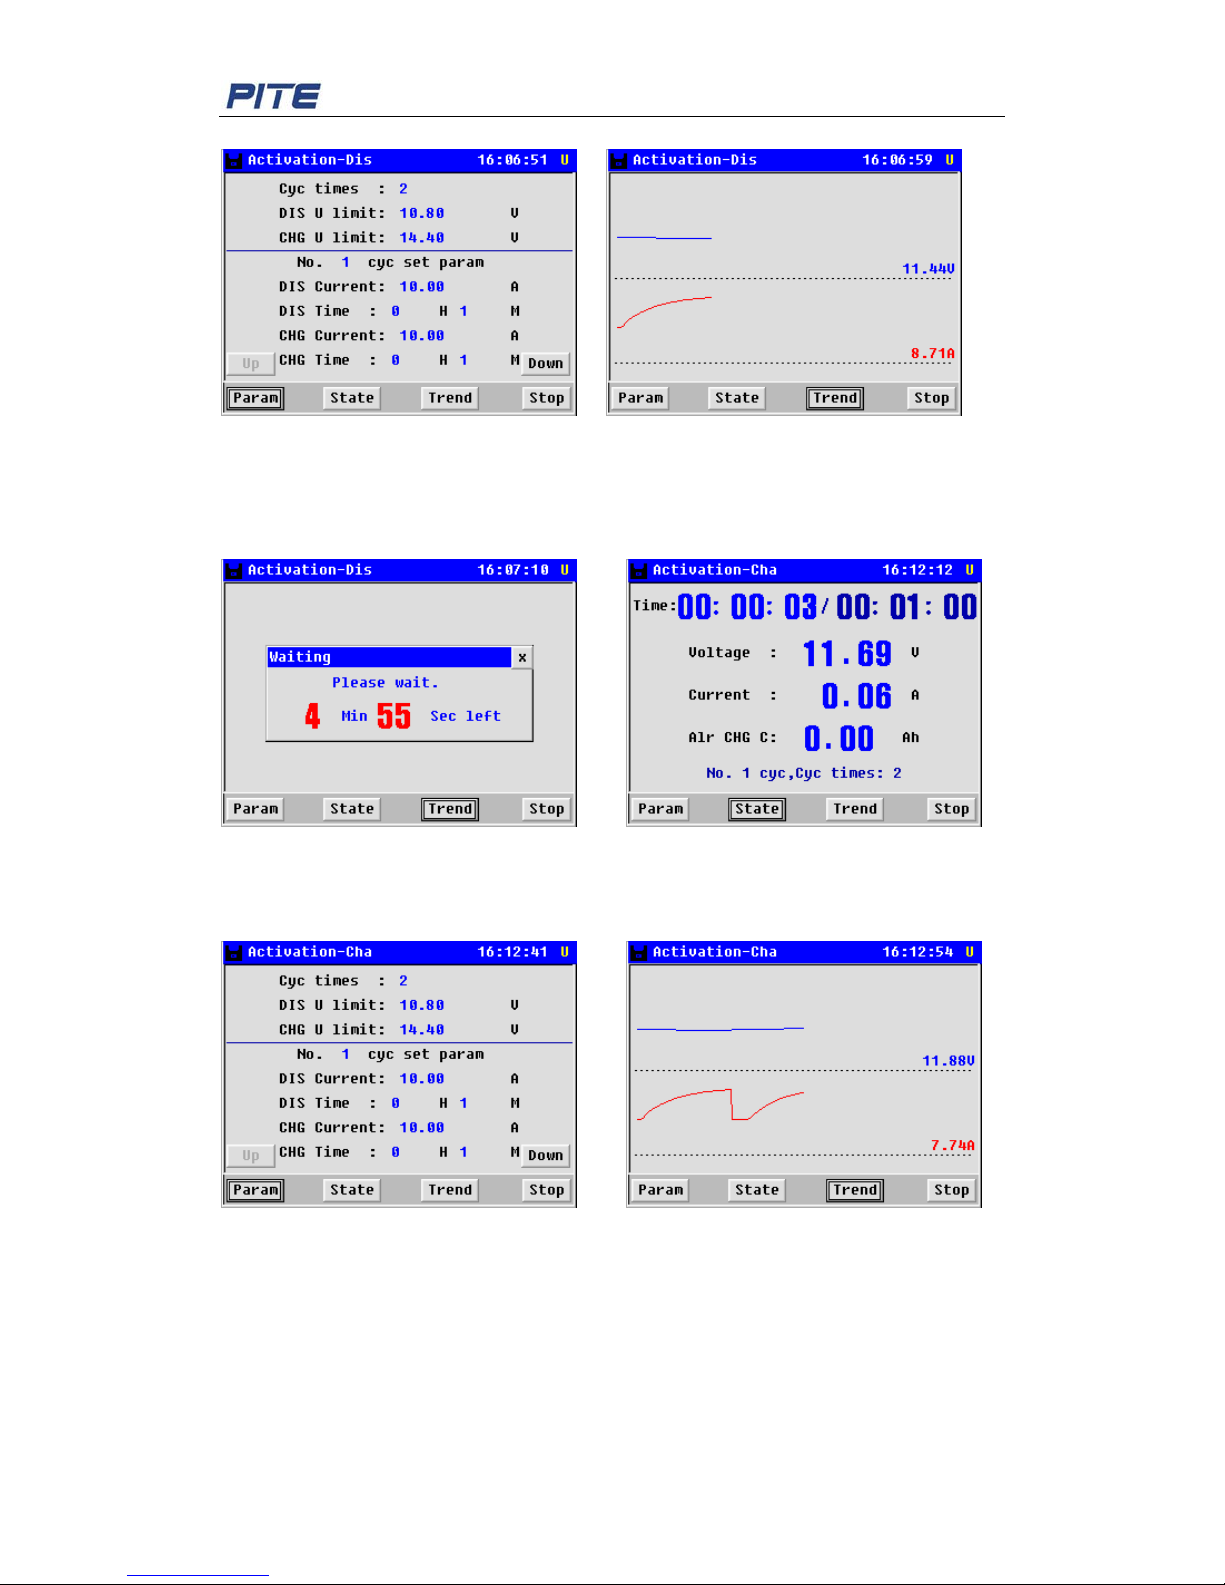
You can press [Param] to check the activation-discharge param eters, or you can press
[Trend] to check the Voltage&Current curve.
Page 15
PITE 3932T Battery Charger/Discharger
15
Fig. 4.4.8 Fig. 4.4.9
When fi nishing activa tion-discharging, please wait for 5 minutes, it will test the battery
resistance again, when finished resistance testing, it begin to activation-charging, below
shows the charging state
Fig. 4.4.10 Fig. 4.4.11
You can press [Param] to check the activation-charge parameters, or you can press
[Trend] to check the Voltage&Current curve.
Fig. 4.4.12 Fig. 4.4. 13
When cycle 1 finished, it begins cycle 2.
It will test the battery resistance first
Page 16
PITE 3932T Battery Charger/Discharger
16
Fig. 4.4.14 Fig. 4.4.15
Then it will proceed with discharge→resistance testing→ charge → resistance testing as
the same in cycle 1.
Fig. 4.4.16
Page 17
PITE 3932T Battery Charger/Discharger
17
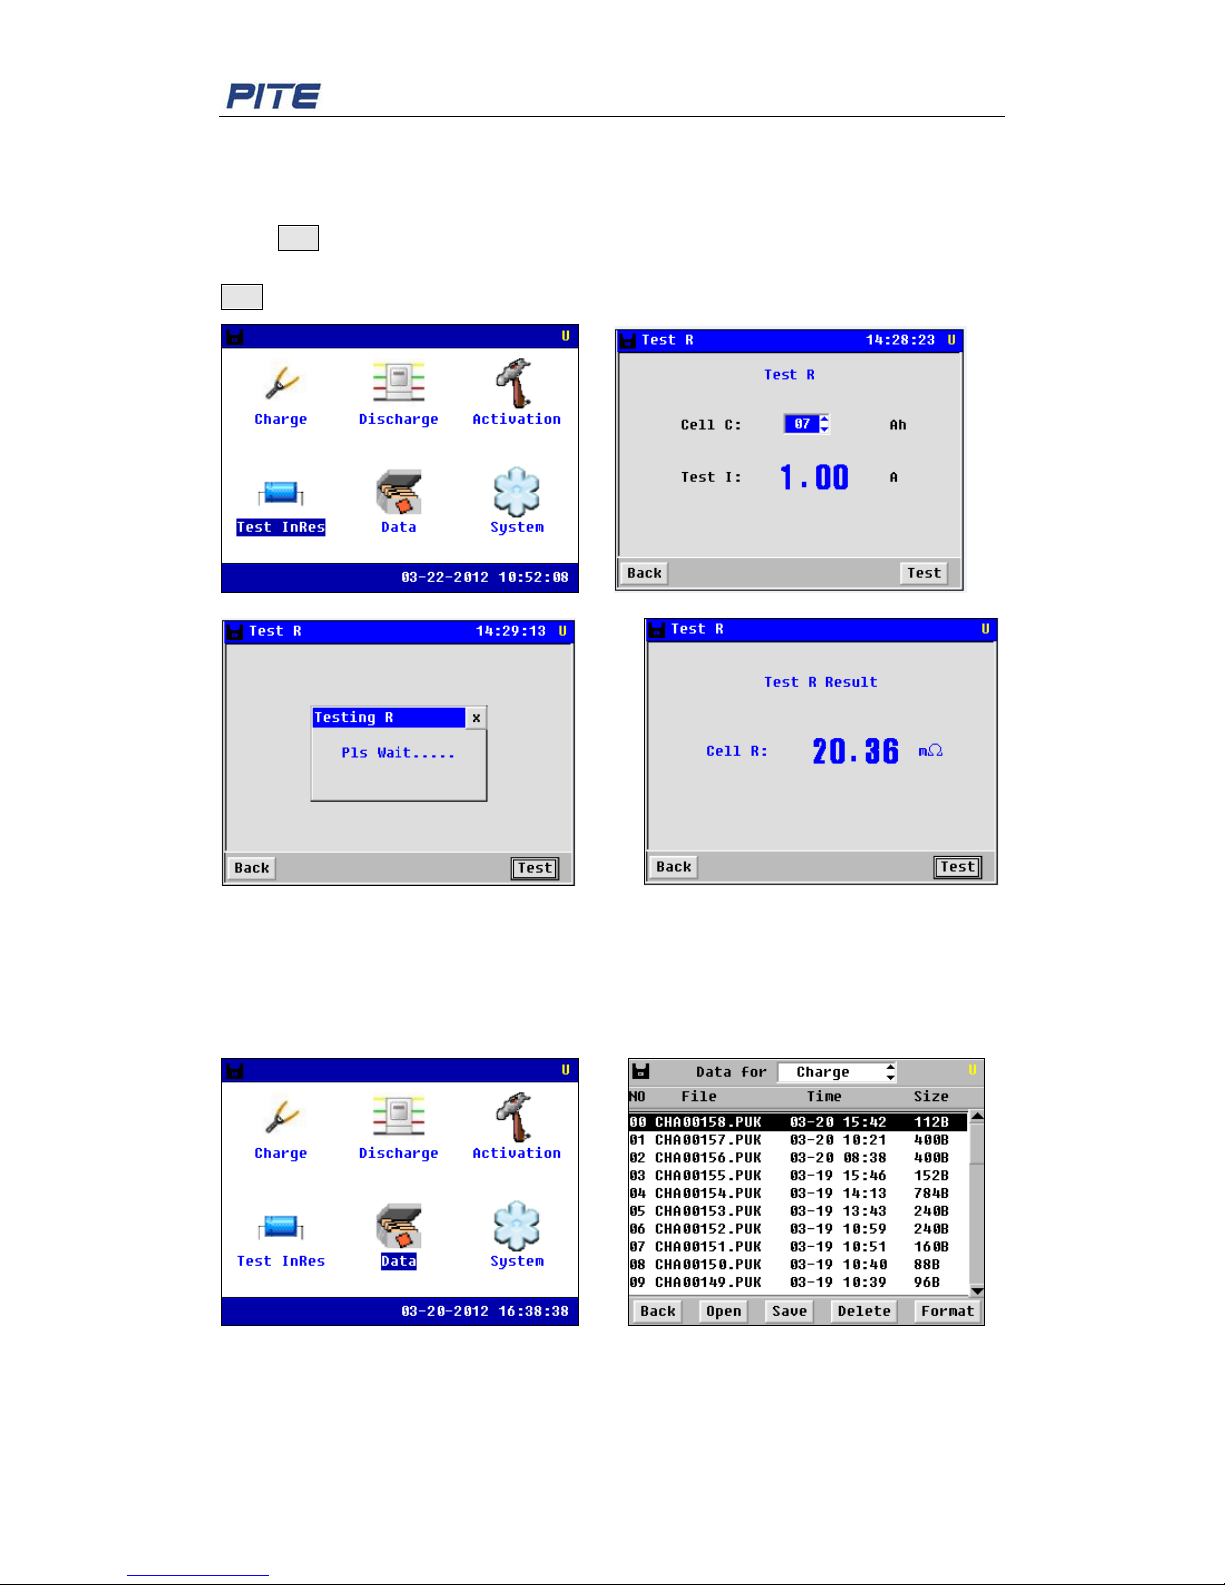
4.5 Cell Resistance
It is for testing internal resistance of battery. Select [Test InRes] in the main menu, and
Press ENT to confirm. It will show the below screen. Setting of capacity and current is for
the calculation of testing resistance. After inputting the capacity value, press [Test] or
ENT to begin resistance test. Resistanc e value will come out in 15 to 20 se conds.
Fig. 4.5
4.6 Data Management
Please return to the main me nu as below for data management: Choose the item in "Data
for" option, it has three choices: charger, discharger and activator
Fig. 4.6.1
Use arrow keys to select data, and doubl e click what you choose, you will see data for
previous operations:
Page 18
PITE 3932T Battery Charger/Discharger
18
Fig. 4.6.2
If you want to save the dat a t o US B, you can click [save] button, it will transfer the dat a to
USB. Make sure that the USB drive has already been i nserted in the PITE 3932T main
unit.
In the same screen as above, select [Delete] and relevant t est ing date for data deleting.
4.7 System Management
Please return main menu, you will see the option [System] for management.
Fig. 4.7
4.7.1 Time Setting
After enter [System], select [Time] as below, Use arrow keys on main unit and orient and
change the numbers and pr ess ENT to save the numbers as below:
Fig. 4.7.1
Page 19
PITE 3932T Battery Charger/Discharger
19
4.7.2 System Update
Save the updating program (PITE3932.bin and SCRIPT00.TXT)got from PITE in USB
drive and insert the USB drive in the PITE 3932T main unit. After restarting the main unit,
the program will be updated automatically. It is simple and convenient.
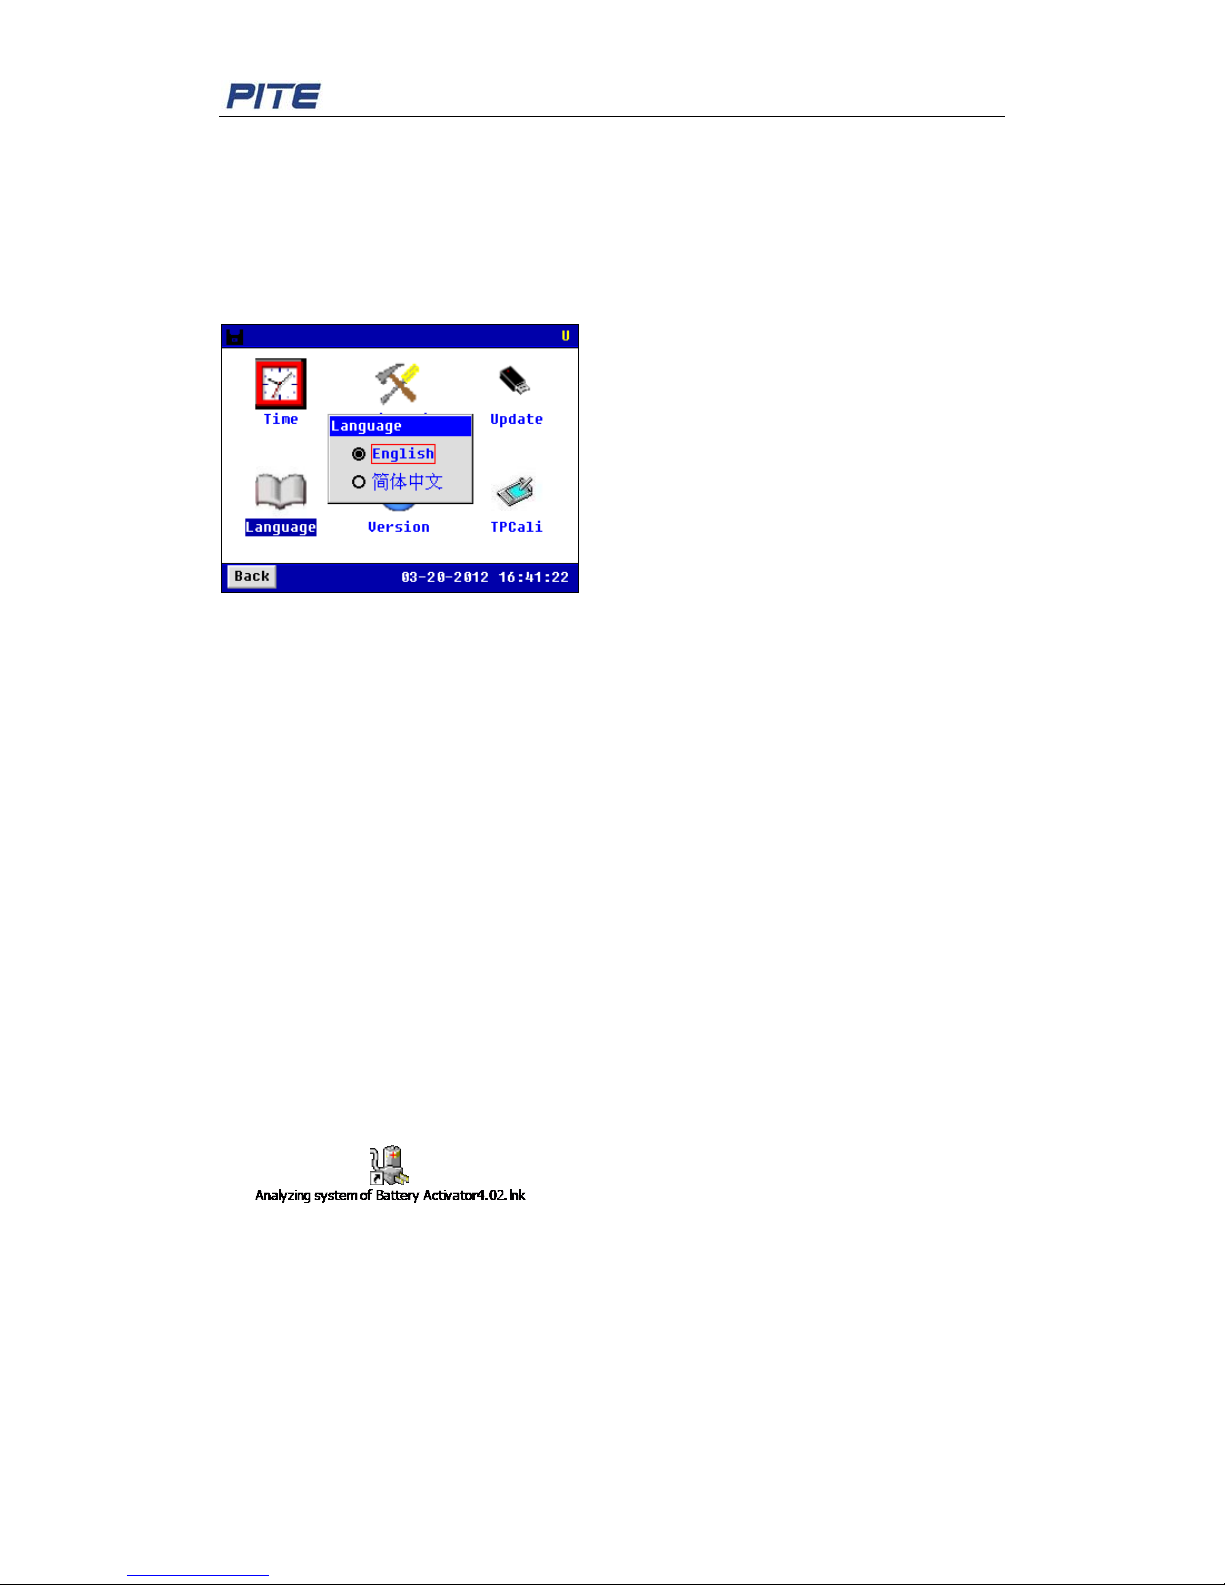
4.7.3 System Language
Please return to system m enu and choose [Language], change the language you need.
Fig. 4.7.3
5. ANALYZING SOFTWARE
Testing data saved in the PITE 3932T could be transferred to a personal computer via
USB drive for data analyzing. Before the analyzing, please install the following software
first. NOTE: You are recommended to run this software in Operation System of Windows
XP.
5.1 Installing the Software
1. Start the PC.
2. Stop all applications that ar e r unning on the PC (recommende d) .
3. Insert the CD for analyzing software of PITE 3932T into the CD-ROM drive.
Note: If the [install] dialog is not displayed automatically, run the installation program in
the following location: X:\ setup.exe. ("X" indicates the CD-ROM drive. “X” may vary by
computers.)
4. Once the computer detects the CD-R, screen of [install] will pop up. Fol low the screen
instructions to install the progra m. After instal lation, y ou will find PITE 3932T program icon
on the PC desktop.
5.2 Software Startup
A. Double click the software icon on desktop. A window will pop up to remind you
connecting the central database first. This database will be used to save the data when
this analyzing softwar e is r unning. Click [OK] to start in the fo llowing step.
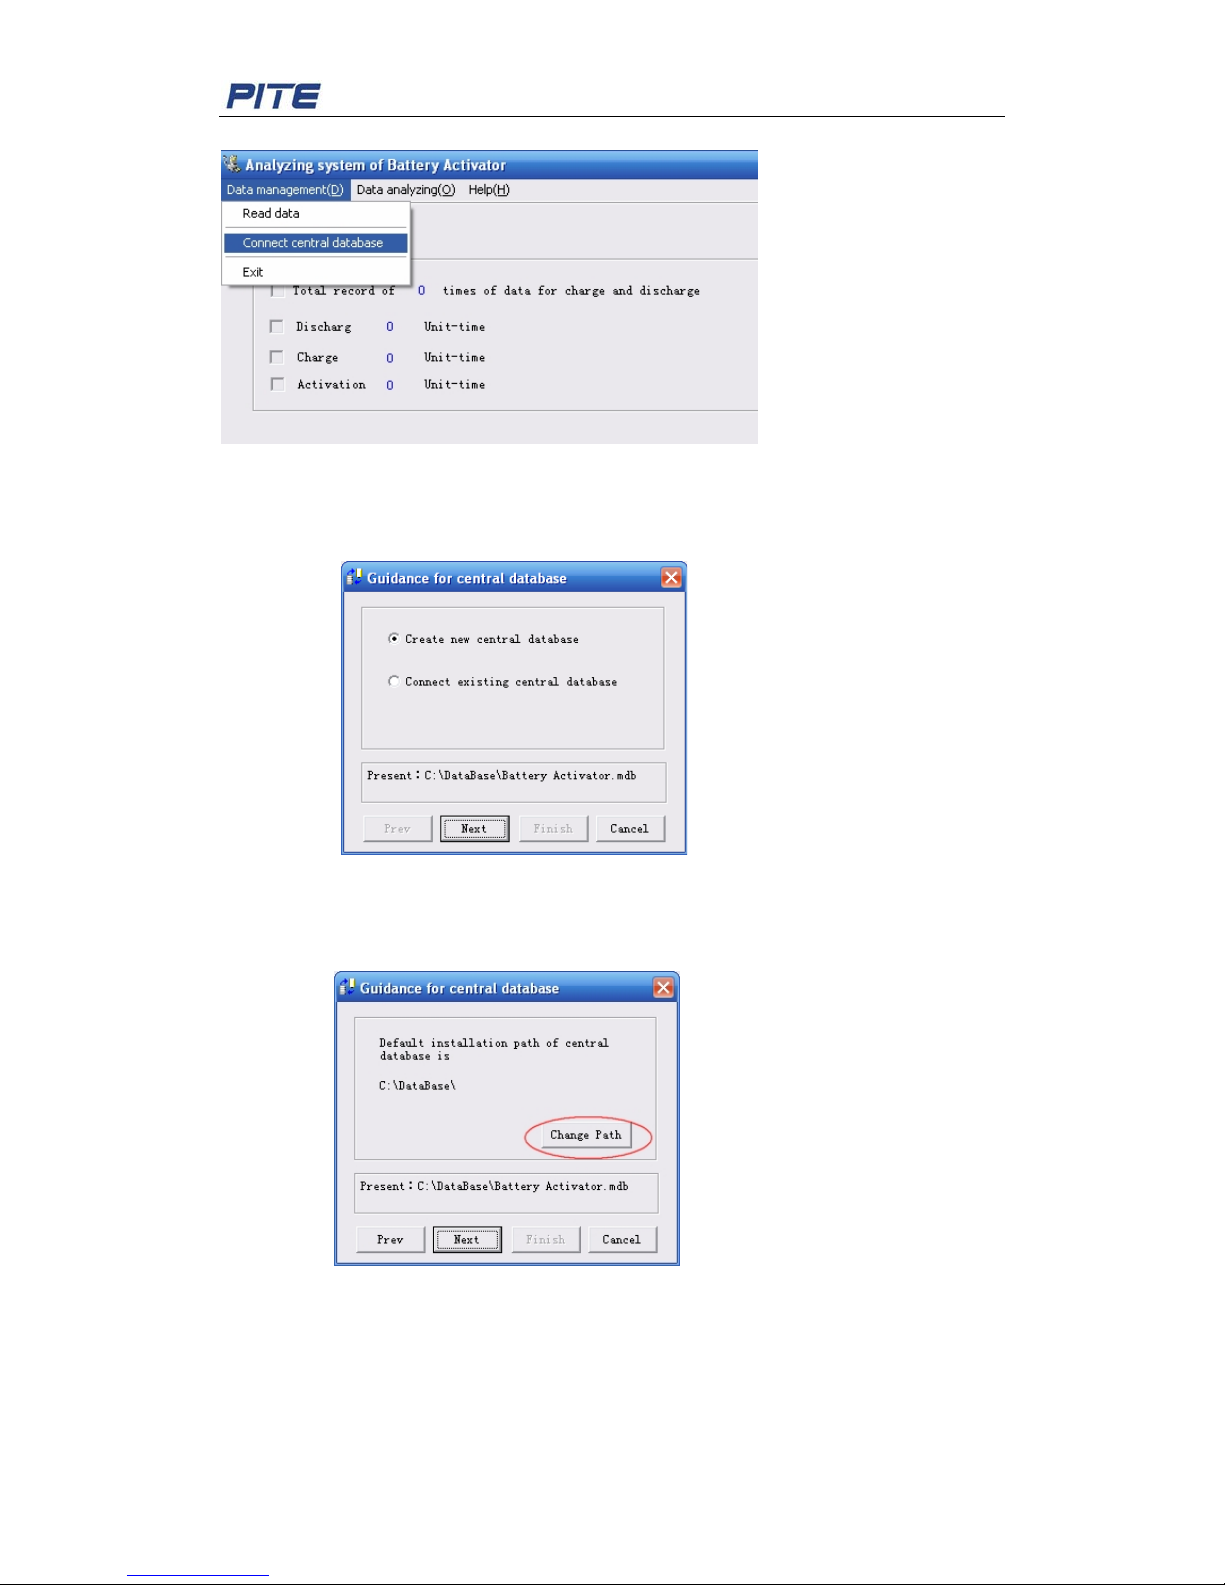
B. Click [Data Management] → [Connect central database]:
Page 20
PITE 3932T Battery Charger/Discharger
20
Fig.5.2.B
C. Select [Create new central database] and follow the screen instructions to install the
default database
Fig.5.2.C1
Note: Click [Change Path] to change the installation path for databas e, cli ck [Next] and
then [Finish] t o complete the setting.
Fig.5.2.C2
D. Or you could select [Con nect existing central database], click [Next] an d t hen
[Finish] to confirm the path setting.
Page 21
PITE 3932T Battery Charger/Discharger
21
5.3 Main Opera tion
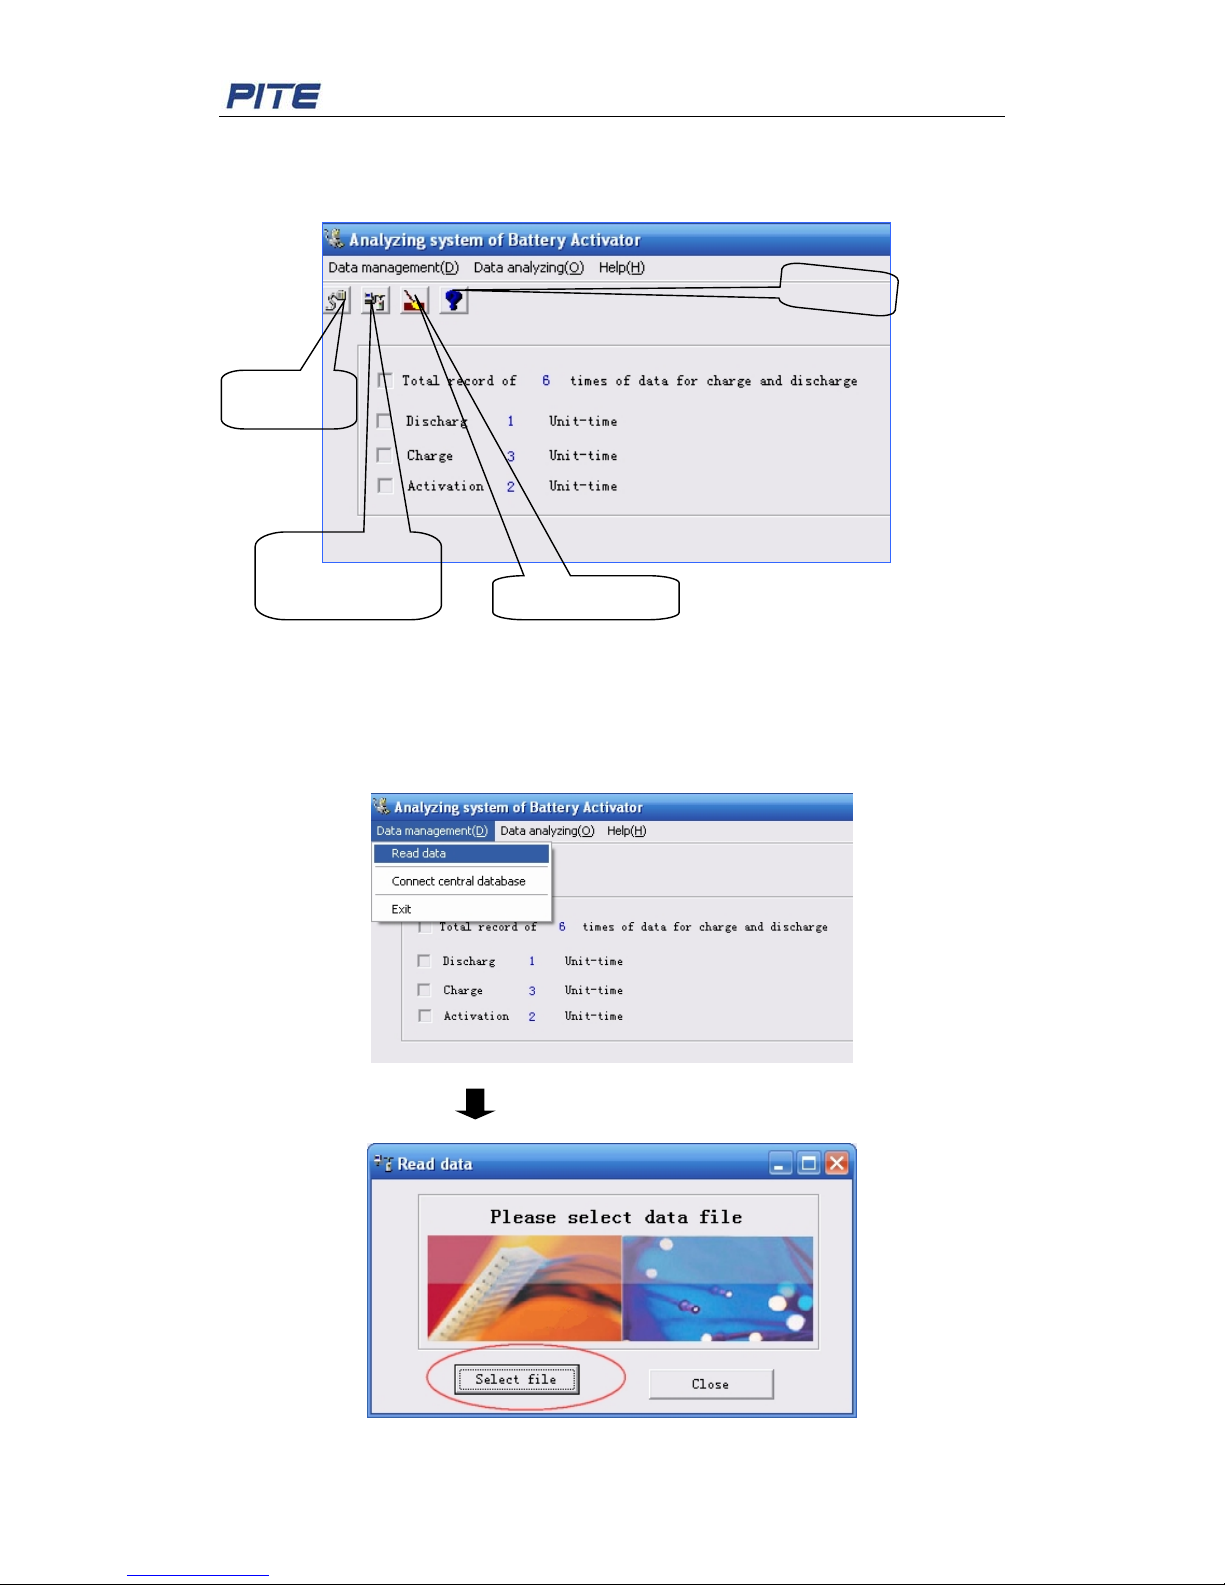
The main screen and definition of main menu are as below:
Fig.5.3
5.3.1 Read the Data
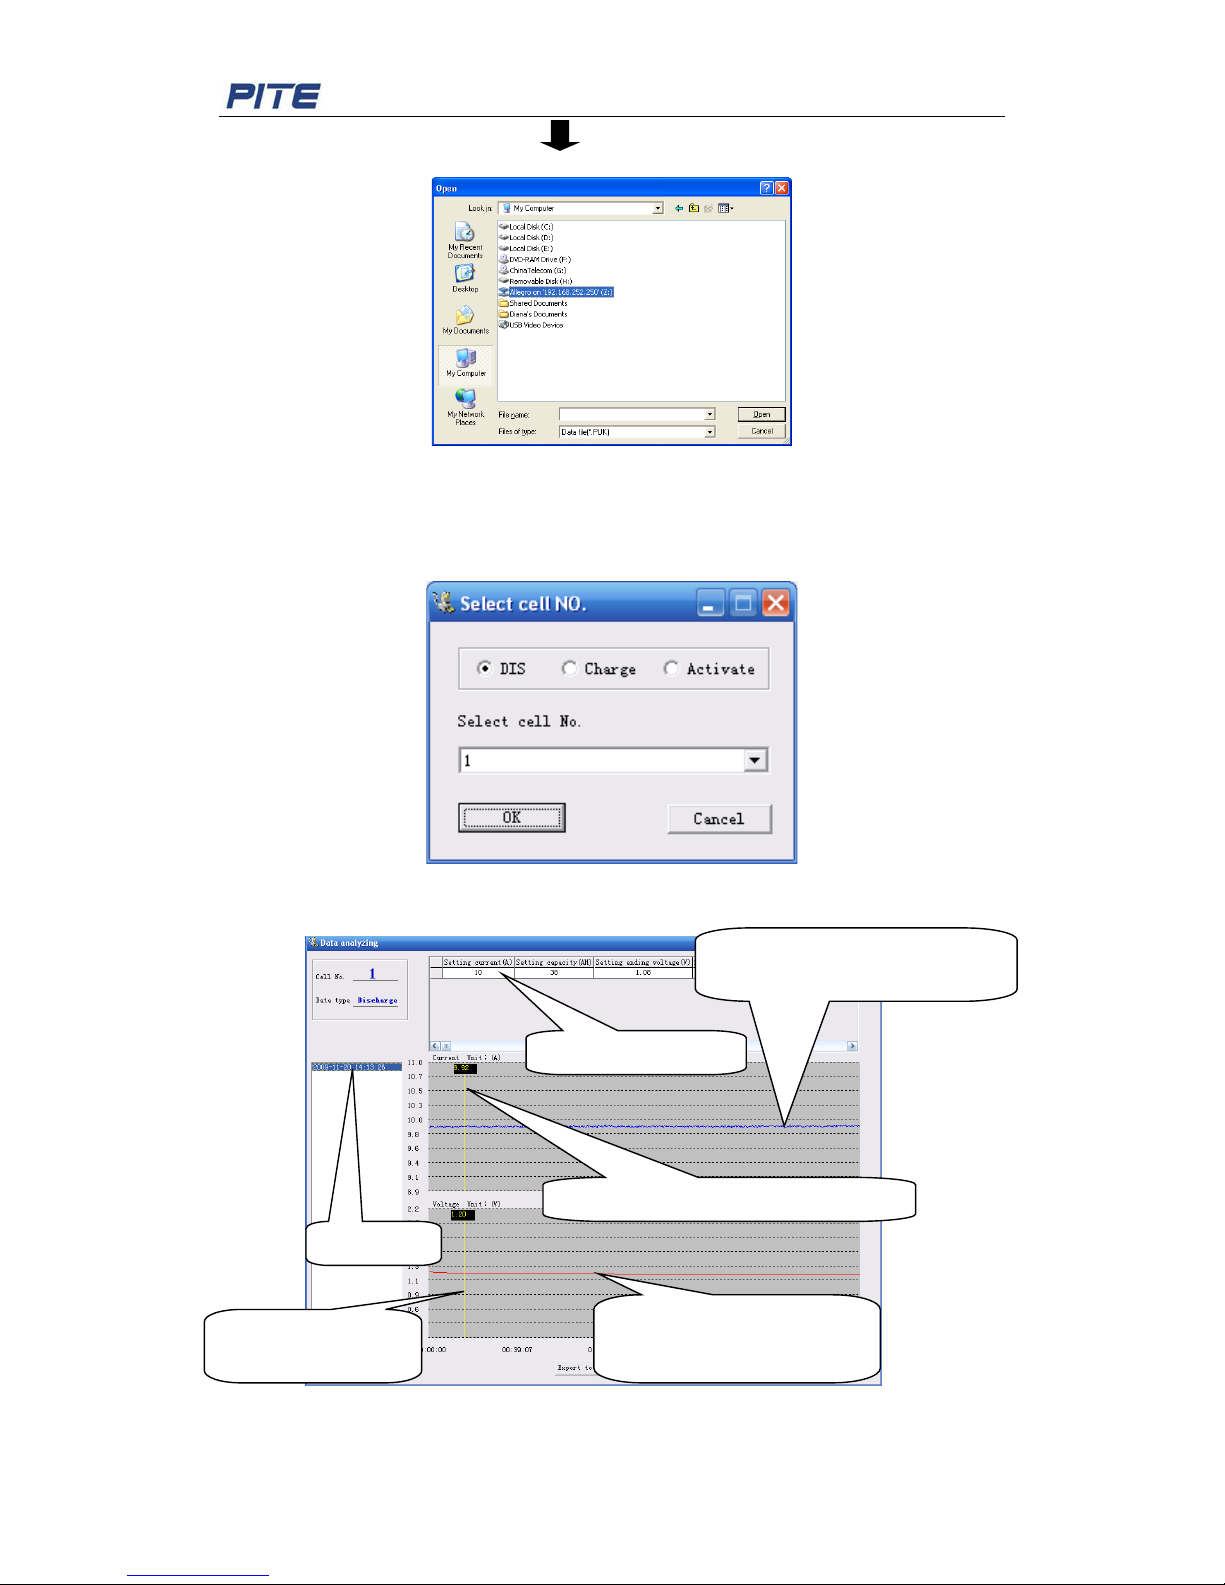
To view the data saved in USB drive, please firstly insert the USB drive in the PC, select
[Read data] on analyzing software and select the data with format of “.PUK” (Charge,
Discharge and Activation data). Screens are as below:
Read data
Connect central
database
Data analyzing
About
Page 22
PITE 3932T Battery Charger/Discharger
22
Fig.5.3.1
5.3.2 Analyzing for Discharging
To begin analyzing the data of Discharging, firstly select [Data analyzing], select [DIS]
and then cell number in the drop-down option as below:
Fig.5.3.2
After the above selection, click [OK] to go the follow i ng step:
Fig. 5.3.2
Voltage changing curve during
discharging
Current changing curve
during discharging
Real current value
at the cursor
Real voltage value at the cursor
Testing time
Working parameter
Page 23
PITE 3932T Battery Charger/Discharger
23
To export the testing data in a report, please click the but ton Export to Word at the bottom.
Input necessary for station number, string number and so on to continue, the testing data
will be generated as a report in the format of Microsoft word. This is same operation for
testing data of chargin g and activation mentioned below.
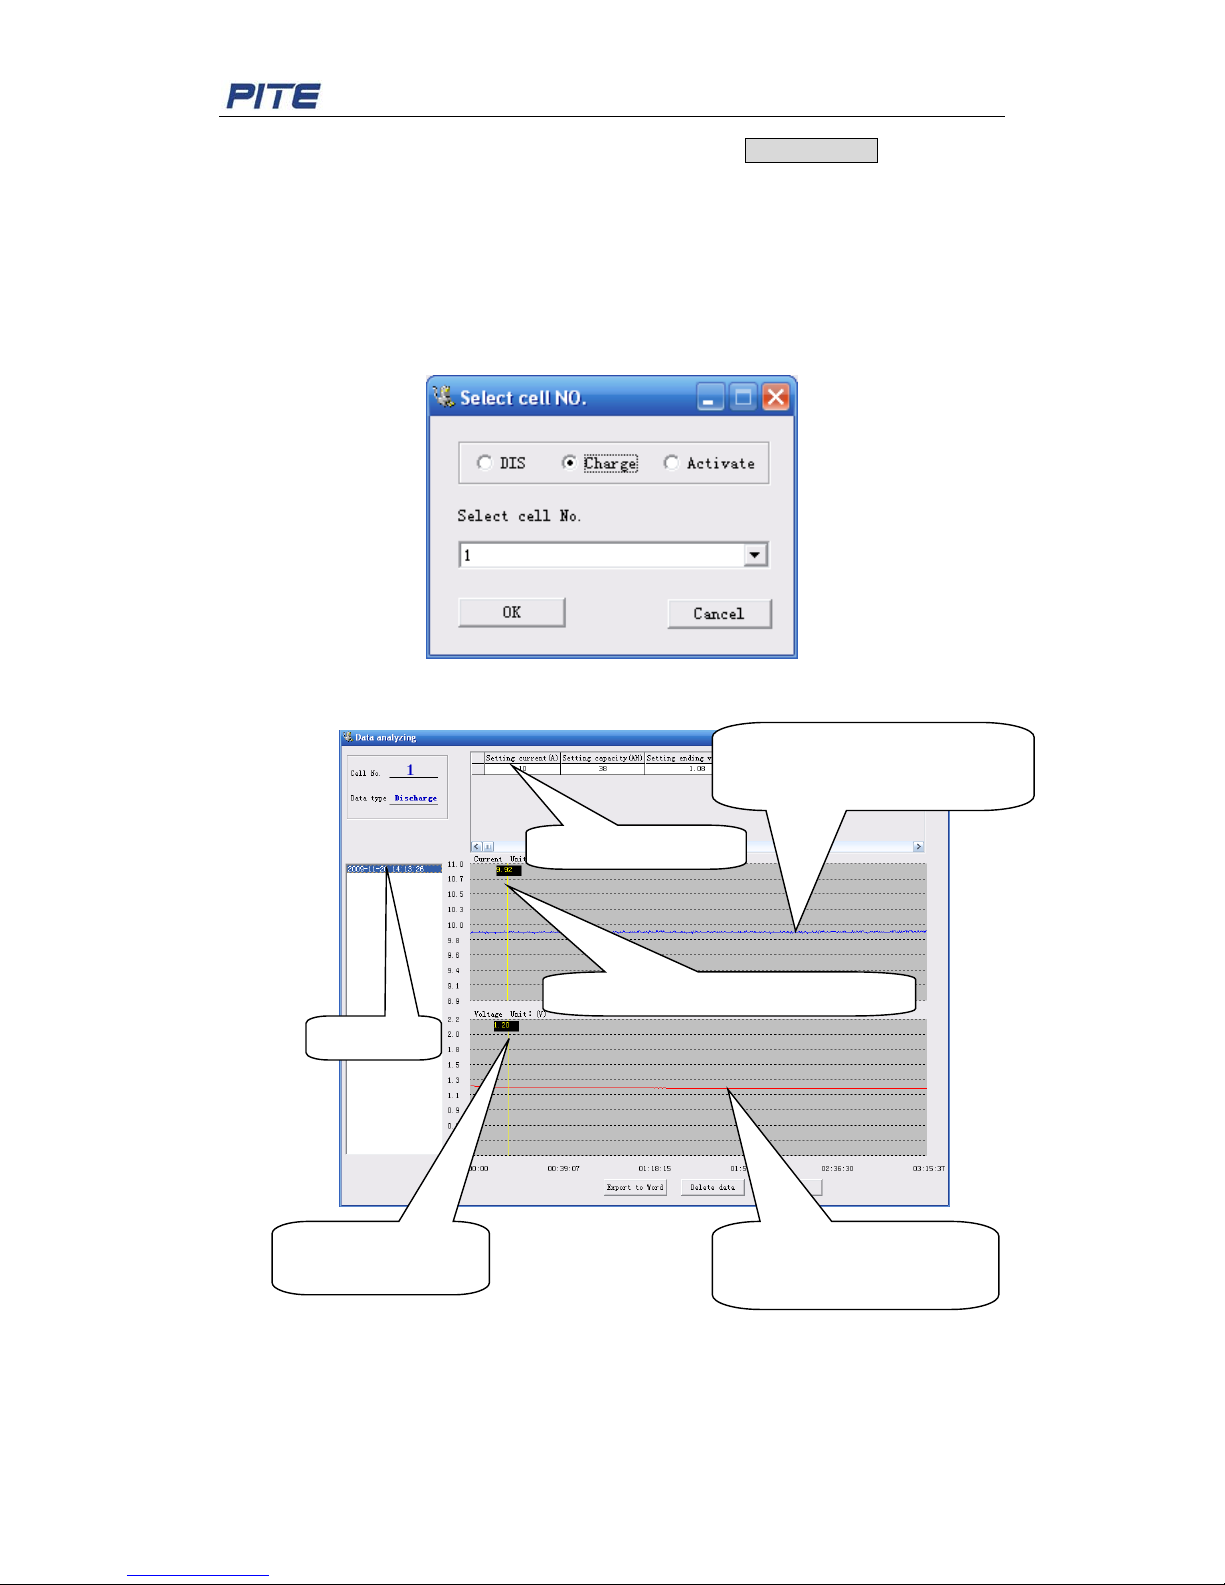
5.3.3 Analyzing for Charging
To begin analyzing the data of Charging, firstly select [Data analyzing], select [Charge]
and then cell number in the drop-down option as below:
Fig.5.3.3.1
After the above selecti on, cli ck [OK] to go the following step:
Fig.5.3.3.2
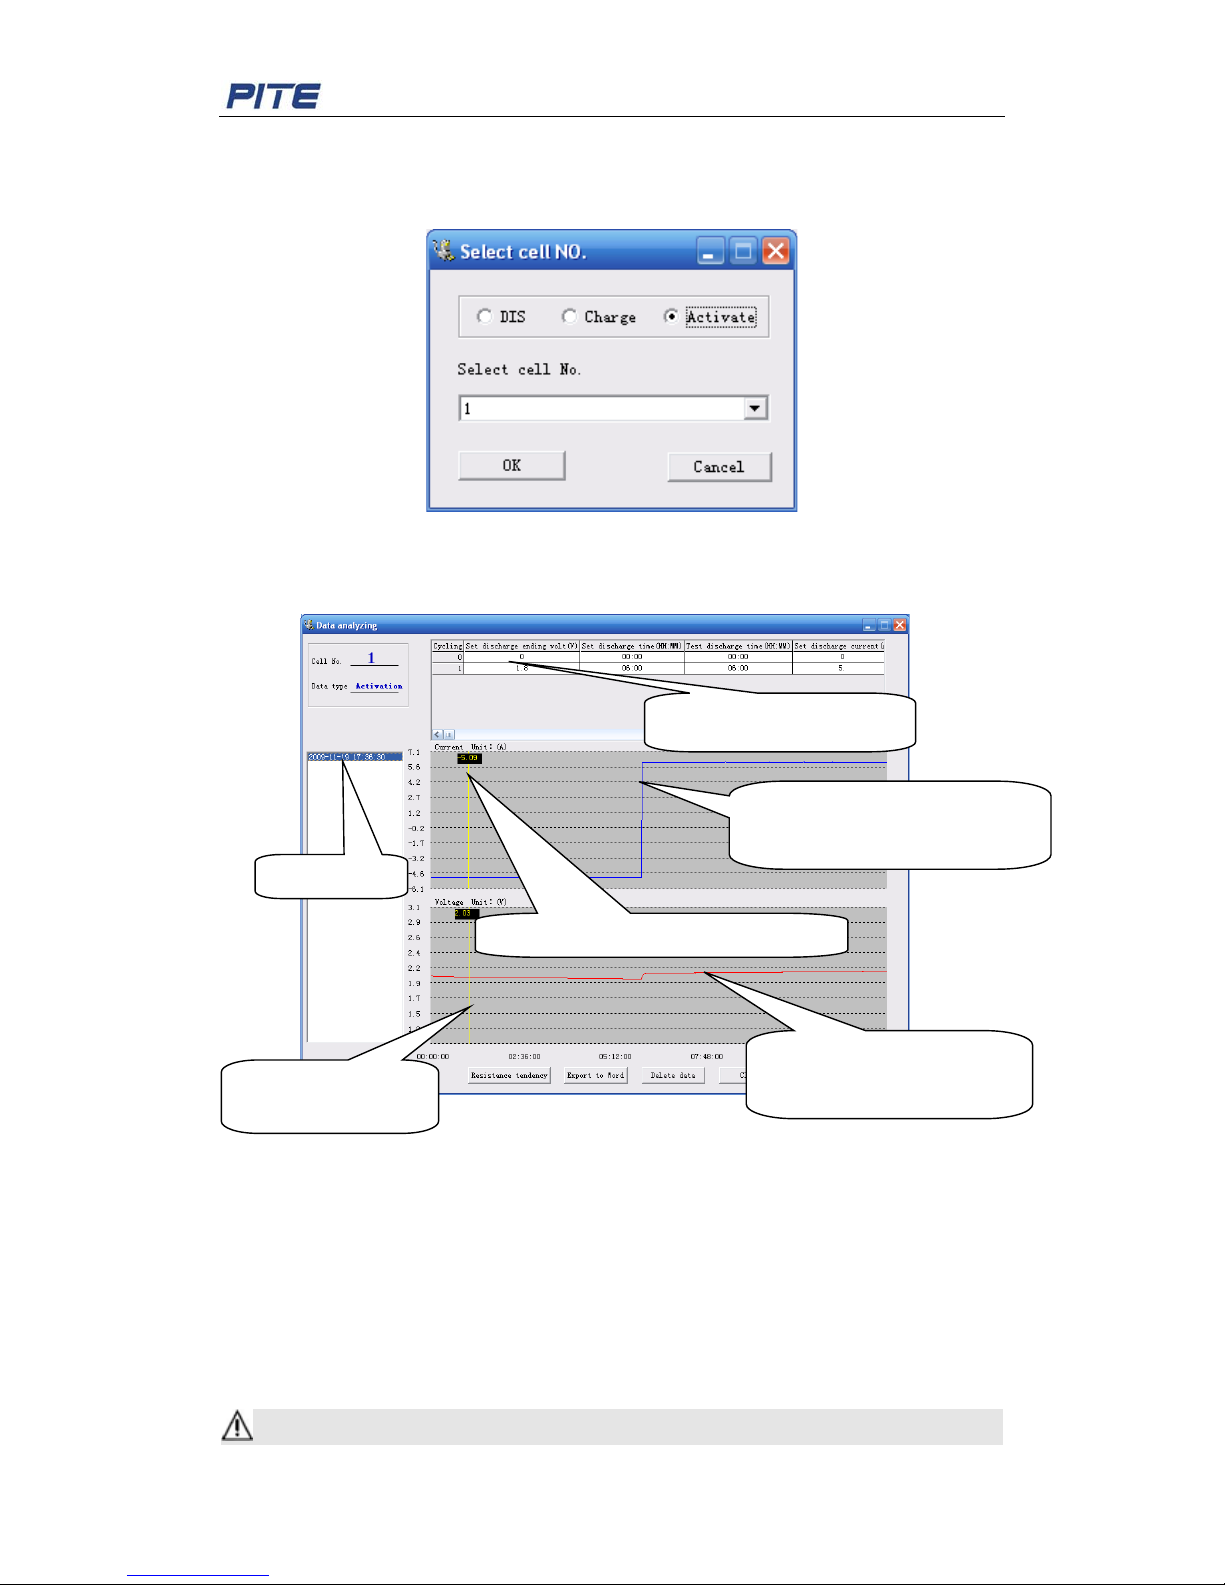
5.3.4 Analyzing for Activation
To begin analyzing the data of Activat io n, firstly select [Data analyzing], select [Activate]
Voltage changing curve during
charging
Current changing curve
during charging
Real current value
at the cursor
Real voltage value at the cursor
Testing time
Working parameter
Page 24
PITE 3932T Battery Charger/Discharger
24
and then cell number in the drop-down option as below:
Fig.5.3.4.1
After the above selecti on, cli ck [OK] to go the following step:
Fig.5.3.4.2
6. SERVICE AND MAINTENANCE
6.1. Cleaning
Clean PITE 3932T main unit and its accessories with damp cloth and a mild soap. Do not
use abrasives, solvent s , or alcoh ol, as t hey can deform or discolor the PITE 3932T and
the accessories.
WARNING: For y our own safet y, make sure that the main unit and acces sor ies are not
Testing time
Activation parameter
Real voltage value at the cursor
Voltage changing curve during
activation
Real current value
at the cursor
Current changing curve
during activation
Page 25

PITE 3932T Battery Charger/Discharger
25
working and disconnected with the power supply before cleaning.
6.2 Storage
After using PITE 3932T, put the main unit and all its accessories into the carrying case,
store the case in ventilating place under proper temperature and humidity. Never expose
the PITE 3932T and its accessories to water, high humidity, or dampness.
6.3 Trouble-shooting
If the PITE 3932T appears to be operating unusually try the follow i ng solutions:
The PITE 3932T can not start up
The PITE 3932T may not be connected to the power supply. If so, connect it with
the AC p ow er cor d.
The PITE 3932T keeps on beeping when powering up
The AC power cord may not be correctly connected. I f so, try to connect it proper ly
No signals after the PITE 3932T is on
The PITE 3932T may not be properly connected. If so, make sure it is well
connected.
The PITE 3932T can not communicate to PC
The interface cables may not properly be connected. If so, check them and
connect them again to ensure t hey are well connected.
The buttons of the PITE 3932T ca n not work
The buttons may be stuck in the but t on holes. If so, check and press it t o let t hem
work properly.
The charge/dis charge/activation functions can not be executed after setup
The time setup may be i ncorrect. If so, check and make sure the setup time is no
more than 48 hours
The USB drive can not be detected after it is inserted to the PC
The USB drive may not be well inserted. If so, reinsert it correctly.
The USB drive may not be in FAT format. If so, format the USB drive.
And if other problems occur r ed, contact your dealer or our representatives.
7. CONTACT PITE
PITE TECH. INC.
4/F, Bldg A, Chiwan Industrial Park, Shaodi Rd., Chiwan, Shekou Area, Shenzhen, China
TEL: +86-755-2680 5759 FAX: +86-755-2688 0310
[email protected] www.pitetech.com
 Loading...