

Page 1
VoIPon www.voipon.co.uk [email protected] Tel: +44 (0)1245 808195 Fax: +44 (0)1245 600030
Page 2

VoIPon www.voipon.co.uk [email protected] Tel: +44 (0)1245 808195 Fax: +44 (0)1245 600030
Page 3

Table of Contents
VoIPon www.voipon.co.uk [email protected] Tel: +44 (0)1245 808195 Fax: +44 (0)1245 600030
Table of Contents
Introduction . . . . . . . . . . . . . . . . . . . . . . . . . . . . . . . . . . 9
Safety Information . . . . . . . . . . . . . . . . . . . . . . . . . . . . 10
General Information. . . . . . . . . . . . . . . . . . . . . . . . . . . . . . . . . . . . . .13
Network Service . . . . . . . . . . . . . . . . . . . . . . . . . . . . . . . . . . . . . . . .13
Shared Memory. . . . . . . . . . . . . . . . . . . . . . . . . . . . . . . . . . . . . . . . .14
Get Help . . . . . . . . . . . . . . . . . . . . . . . . . . . . . . . . . . . . . . . . . . . . . .14
Access codes. . . . . . . . . . . . . . . . . . . . . . . . . . . . . . . . . . . . .14
1. Getting started. . . . . . . . . . . . . . . . . . . . . . . . . . . . . . . 17
1.1 Installing the SIM Card and the Battery. . . . . . . . . . . . . . . . . . . . . . .17
1.2 Charging the battery . . . . . . . . . . . . . . . . . . . . . . . . . . . . . . . . . . . . .19
1.3 Power on / off the Phone Device. . . . . . . . . . . . . . . . . . . . . . . . . . . .19
1.4 Installation and use of the CHARGER CRADLE. . . . . . . . . . . . . . . .20
1.5 Alphabetic and numeric keys . . . . . . . . . . . . . . . . . . . . . . . . . . . . . .22
1.6 Camera Lens. . . . . . . . . . . . . . . . . . . . . . . . . . . . . . . . . . . . . . . . . . .24
1.7 MMS, WAP and E-mail SETUP. . . . . . . . . . . . . . . . . . . . . . . . . . . . .24
1.8 How to select the preferred network . . . . . . . . . . . . . . . . . . . . . . . . .26
1.9 Keypad basics. . . . . . . . . . . . . . . . . . . . . . . . . . . . . . . . . . . . . . . . . .27
1.10 Menus . . . . . . . . . . . . . . . . . . . . . . . . . . . . . . . . . . . . . . . . . . . . . . . .28
1.11 How to Use Scroll and Direction Keys. . . . . . . . . . . . . . . . . . . . . . . .28
1.12 How to input text . . . . . . . . . . . . . . . . . . . . . . . . . . . . . . . . . . . . . . . .28
1.13 Phone USER INTERFACE . . . . . . . . . . . . . . . . . . . . . . . . . . . . . . . .30
1.13.1 Icons. . . . . . . . . . . . . . . . . . . . . . . . . . . . . . . . . . . . . . . . . . . .30
1.14 Popup windows . . . . . . . . . . . . . . . . . . . . . . . . . . . . . . . . . . . . . . . . .32
0
2. Idle Mode. . . . . . . . . . . . . . . . . . . . . . . . . . . . . . . . . . . 33
2.1 Status indicator . . . . . . . . . . . . . . . . . . . . . . . . . . . . . . . . . . . . . . . . .33
2.2 Signal bar . . . . . . . . . . . . . . . . . . . . . . . . . . . . . . . . . . . . . . . . . . . . .33
2.3 Mobile operator name and WLAN network name . . . . . . . . . . . . . . .34
2.4 Soft notifications . . . . . . . . . . . . . . . . . . . . . . . . . . . . . . . . . . . . . . . .35
2.5 Active profile . . . . . . . . . . . . . . . . . . . . . . . . . . . . . . . . . . . . . . . . . . .35
2.6 Time & Date . . . . . . . . . . . . . . . . . . . . . . . . . . . . . . . . . . . . . . . . . . .35
2.7 Soft keys . . . . . . . . . . . . . . . . . . . . . . . . . . . . . . . . . . . . . . . . . . . . . .36
2.8 Wallpaper . . . . . . . . . . . . . . . . . . . . . . . . . . . . . . . . . . . . . . . . . . . . .36
2.9 Power Saving . . . . . . . . . . . . . . . . . . . . . . . . . . . . . . . . . . . . . . . . . .36
3. Call Functions . . . . . . . . . . . . . . . . . . . . . . . . . . . . . . . 37
3.1 Making A Call . . . . . . . . . . . . . . . . . . . . . . . . . . . . . . . . . . . . . . . . . .37
3.1.1 Making A Call Using the Contacts . . . . . . . . . . . . . . . . . . . . .38
3
Page 4

Table of Contents0
VoIPon www.voipon.co.uk [email protected] Tel: +44 (0)1245 808195 Fax: +44 (0)1245 600030
3.1.2 Last Number Redialing. . . . . . . . . . . . . . . . . . . . . . . . . . . . . .38
3.1.3 Calling Your Voice Mailbox . . . . . . . . . . . . . . . . . . . . . . . . . .38
3.2 Speed Dialing . . . . . . . . . . . . . . . . . . . . . . . . . . . . . . . . . . . . . . . . . .38
3.2.1 Navigation Key. . . . . . . . . . . . . . . . . . . . . . . . . . . . . . . . . . . .39
3.3 Answering or rejecting an incoming call . . . . . . . . . . . . . . . . . . . . . .39
3.3.1 Single call connected mode. . . . . . . . . . . . . . . . . . . . . . . . . .39
3.3.2 Multi call connected mode . . . . . . . . . . . . . . . . . . . . . . . . . . .40
3.4 Call Waiting . . . . . . . . . . . . . . . . . . . . . . . . . . . . . . . . . . . . . . . . . . . .44
3.5 Multi Calls . . . . . . . . . . . . . . . . . . . . . . . . . . . . . . . . . . . . . . . . . . . . .44
4. Menu Functions. . . . . . . . . . . . . . . . . . . . . . . . . . . . . . 45
4.1 Accessing A Menu Function . . . . . . . . . . . . . . . . . . . . . . . . . . . . . . .45
4.1.1 By Navigating the Direction Key. . . . . . . . . . . . . . . . . . . . . . .45
4.1.2 By Using a shortcut (camera, name) . . . . . . . . . . . . . . . . . . .45
4.2 List of Menu Functions . . . . . . . . . . . . . . . . . . . . . . . . . . . . . . . . . . .46
4.2.1 Messages. . . . . . . . . . . . . . . . . . . . . . . . . . . . . . . . . . . . . . . 46
4.2.2 Call History. . . . . . . . . . . . . . . . . . . . . . . . . . . . . . . . . . . . . . .47
4.2.3 Contacts. . . . . . . . . . . . . . . . . . . . . . . . . . . . . . . . . . . . . . . . .47
4.2.4 WLAN. . . . . . . . . . . . . . . . . . . . . . . . . . . . . . . . . . . . . . . . . . .48
4.2.5 WAP Service . . . . . . . . . . . . . . . . . . . . . . . . . . . . . . . . . . . . 49
4.2.6 Voice Mail. . . . . . . . . . . . . . . . . . . . . . . . . . . . . . . . . . . . . . . 49
4.2.7 Camera . . . . . . . . . . . . . . . . . . . . . . . . . . . . . . . . . . . . . . . . 49
4.2.8 Settings . . . . . . . . . . . . . . . . . . . . . . . . . . . . . . . . . . . . . . . . 50
4.2.9 Organizer . . . . . . . . . . . . . . . . . . . . . . . . . . . . . . . . . . . . . . . 52
4.2.10 Applications . . . . . . . . . . . . . . . . . . . . . . . . . . . . . . . . . . . . . 52
4.2.11 Gallery . . . . . . . . . . . . . . . . . . . . . . . . . . . . . . . . . . . . . . . . . 52
5. Messages . . . . . . . . . . . . . . . . . . . . . . . . . . . . . . . . . . 53
5.1 Short Message Service (SMS) . . . . . . . . . . . . . . . . . . . . . . . . . . . . .53
5.1.1 Inbox . . . . . . . . . . . . . . . . . . . . . . . . . . . . . . . . . . . . . . . . . . .53
5.1.2 Writing and Sending Messages . . . . . . . . . . . . . . . . . . . . . . .53
5.1.3 Draft . . . . . . . . . . . . . . . . . . . . . . . . . . . . . . . . . . . . . . . . . . . .54
5.1.4 Outbox. . . . . . . . . . . . . . . . . . . . . . . . . . . . . . . . . . . . . . . . . .55
5.1.5 Templates . . . . . . . . . . . . . . . . . . . . . . . . . . . . . . . . . . . . . . .55
5.1.6 Settings . . . . . . . . . . . . . . . . . . . . . . . . . . . . . . . . . . . . . . . . .55
5.1.7 Memory Status. . . . . . . . . . . . . . . . . . . . . . . . . . . . . . . . . . . .55
5.2 Multimedia Message Service . . . . . . . . . . . . . . . . . . . . . . . . . . . . . .56
5.2.1 Inbox . . . . . . . . . . . . . . . . . . . . . . . . . . . . . . . . . . . . . . . . . . .57
5.2.2 Write Message. . . . . . . . . . . . . . . . . . . . . . . . . . . . . . . . . . . .57
5.2.3 Outbox . . . . . . . . . . . . . . . . . . . . . . . . . . . . . . . . . . . . . . . . . .58
5.2.4 Sent items . . . . . . . . . . . . . . . . . . . . . . . . . . . . . . . . . . . . . . .59
5.2.5 Draft . . . . . . . . . . . . . . . . . . . . . . . . . . . . . . . . . . . . . . . . . . . .59
5.2.6 MMS Settings. . . . . . . . . . . . . . . . . . . . . . . . . . . . . . . . . . . . .59
5.2.6.1 Change active settings. . . . . . . . . . . . . . . . . . . . . . .60
4
Page 5

Table of Contents
VoIPon www.voipon.co.uk [email protected] Tel: +44 (0)1245 808195 Fax: +44 (0)1245 600030
5.2.7 Memory Status. . . . . . . . . . . . . . . . . . . . . . . . . . . . . . . . . . . .60
5.3 E-mail . . . . . . . . . . . . . . . . . . . . . . . . . . . . . . . . . . . . . . . . . . . . . . . .61
5.3.1 Configuring a new E-mail account . . . . . . . . . . . . . . . . . . . . .63
5.4 Voice Mail . . . . . . . . . . . . . . . . . . . . . . . . . . . . . . . . . . . . . . . . . . . . .64
5.4.1 Dial Voice Mail . . . . . . . . . . . . . . . . . . . . . . . . . . . . . . . . . . . .64
5.4.2 Set Voice Mail . . . . . . . . . . . . . . . . . . . . . . . . . . . . . . . . . . . .64
5.5 Cell broadcast . . . . . . . . . . . . . . . . . . . . . . . . . . . . . . . . . . . . . . . . . .65
5.5.1 Inbox settings. . . . . . . . . . . . . . . . . . . . . . . . . . . . . . . . . . . . .65
5.5.2 Reading messages . . . . . . . . . . . . . . . . . . . . . . . . . . . . . . . .65
5.5.3 Add a channel . . . . . . . . . . . . . . . . . . . . . . . . . . . . . . . . . . . .65
5.5.4 Channel lists. . . . . . . . . . . . . . . . . . . . . . . . . . . . . . . . . . . . . .65
6. Call History . . . . . . . . . . . . . . . . . . . . . . . . . . . . . . . . . 67
6.1 Missed Calls . . . . . . . . . . . . . . . . . . . . . . . . . . . . . . . . . . . . . . . . . . .67
6.2 Received Calls . . . . . . . . . . . . . . . . . . . . . . . . . . . . . . . . . . . . . . . . .67
6.3 Dialed Calls . . . . . . . . . . . . . . . . . . . . . . . . . . . . . . . . . . . . . . . . . . . .67
6.4 Delete all call. . . . . . . . . . . . . . . . . . . . . . . . . . . . . . . . . . . . . . . . . . .68
6.5 Call timers . . . . . . . . . . . . . . . . . . . . . . . . . . . . . . . . . . . . . . . . . . . . .68
0
7. Contacts . . . . . . . . . . . . . . . . . . . . . . . . . . . . . . . . . . . 69
7.1 Search. . . . . . . . . . . . . . . . . . . . . . . . . . . . . . . . . . . . . . . . . . . . . . . .69
7.2 Add New Entry . . . . . . . . . . . . . . . . . . . . . . . . . . . . . . . . . . . . . . . . .70
7.3 Group Setting . . . . . . . . . . . . . . . . . . . . . . . . . . . . . . . . . . . . . . . . . .70
7.4 Speed Dial. . . . . . . . . . . . . . . . . . . . . . . . . . . . . . . . . . . . . . . . . . . . .71
7.5 Memory Status . . . . . . . . . . . . . . . . . . . . . . . . . . . . . . . . . . . . . . . . .71
7.6 My Number . . . . . . . . . . . . . . . . . . . . . . . . . . . . . . . . . . . . . . . . . . . .71
8. WLAN . . . . . . . . . . . . . . . . . . . . . . . . . . . . . . . . . . . . . 73
8.1 WLAN status . . . . . . . . . . . . . . . . . . . . . . . . . . . . . . . . . . . . . . . . . . .73
8.2 WLAN settings. . . . . . . . . . . . . . . . . . . . . . . . . . . . . . . . . . . . . . . . . .75
8.2.1 Select WLAN Profile. . . . . . . . . . . . . . . . . . . . . . . . . . . . . . . .75
8.2.2 WLAN Access Setup . . . . . . . . . . . . . . . . . . . . . . . . . . . . . . .76
8.2.3 WLAN profile rename. . . . . . . . . . . . . . . . . . . . . . . . . . . . . . .78
8.3 SIP status . . . . . . . . . . . . . . . . . . . . . . . . . . . . . . . . . . . . . . . . . . . . .78
8.4 SIP settings . . . . . . . . . . . . . . . . . . . . . . . . . . . . . . . . . . . . . . . . . . . .78
8.5 NAT Settings . . . . . . . . . . . . . . . . . . . . . . . . . . . . . . . . . . . . . . . . . . .81
8.5.1 RPORT. . . . . . . . . . . . . . . . . . . . . . . . . . . . . . . . . . . . . . . . . .81
8.5.2 STUN . . . . . . . . . . . . . . . . . . . . . . . . . . . . . . . . . . . . . . . . . . .82
9. WAP Service . . . . . . . . . . . . . . . . . . . . . . . . . . . . . . . . 83
9.1 Configuring a new WAP account. . . . . . . . . . . . . . . . . . . . . . . . . . . .84
10. Voice Mail . . . . . . . . . . . . . . . . . . . . . . . . . . . . . . . . . . 85
5
Page 6

Table of Contents0
VoIPon www.voipon.co.uk [email protected] Tel: +44 (0)1245 808195 Fax: +44 (0)1245 600030
10.1 Dial Voice Mail. . . . . . . . . . . . . . . . . . . . . . . . . . . . . . . . . . . . . . . . . .85
10.2 Set Voice Mail . . . . . . . . . . . . . . . . . . . . . . . . . . . . . . . . . . . . . . . . . .85
11. Camera . . . . . . . . . . . . . . . . . . . . . . . . . . . . . . . . . . . . 87
12. Settings . . . . . . . . . . . . . . . . . . . . . . . . . . . . . . . . . . . . 89
12.1 Profile . . . . . . . . . . . . . . . . . . . . . . . . . . . . . . . . . . . . . . . . . . . . . . . .89
12.2 Preferred Network . . . . . . . . . . . . . . . . . . . . . . . . . . . . . . . . . . . . . . .90
12.3 Language . . . . . . . . . . . . . . . . . . . . . . . . . . . . . . . . . . . . . . . . . . . . .90
12.4 GPRS setup . . . . . . . . . . . . . . . . . . . . . . . . . . . . . . . . . . . . . . . . . . .90
12.4.1 GPRS Attached . . . . . . . . . . . . . . . . . . . . . . . . . . . . . . . . . . .91
12.4.2 Data Count. . . . . . . . . . . . . . . . . . . . . . . . . . . . . . . . . . . . . . .91
12.4.3 GPRS Attach or Detach. . . . . . . . . . . . . . . . . . . . . . . . . . . . .91
12.5 Tones . . . . . . . . . . . . . . . . . . . . . . . . . . . . . . . . . . . . . . . . . . . . . . . .91
12.5.1 Ring Tone. . . . . . . . . . . . . . . . . . . . . . . . . . . . . . . . . . . . . . . .91
12.5.2 SMS and Alarm tone . . . . . . . . . . . . . . . . . . . . . . . . . . . . . . .92
12.5.3 Keypad tone. . . . . . . . . . . . . . . . . . . . . . . . . . . . . . . . . . . . . .92
12.5.4 Power On/Off, WLAN, Battery alert . . . . . . . . . . . . . . . . . . . .92
12.6 Display. . . . . . . . . . . . . . . . . . . . . . . . . . . . . . . . . . . . . . . . . . . . . . . .92
12.6.1 Wallpaper. . . . . . . . . . . . . . . . . . . . . . . . . . . . . . . . . . . . . . . .92
12.6.2 Backlight Timer and Backlight Level . . . . . . . . . . . . . . . . . . .93
12.7 Clock . . . . . . . . . . . . . . . . . . . . . . . . . . . . . . . . . . . . . . . . . . . . . . . . .93
12.8 Call Settings . . . . . . . . . . . . . . . . . . . . . . . . . . . . . . . . . . . . . . . . . . .94
12.8.1 Answering mode . . . . . . . . . . . . . . . . . . . . . . . . . . . . . . . . . .94
12.8.2 Auto redial . . . . . . . . . . . . . . . . . . . . . . . . . . . . . . . . . . . . . . .94
12.8.3 Incall timer . . . . . . . . . . . . . . . . . . . . . . . . . . . . . . . . . . . . . . .94
12.8.4 Call summary . . . . . . . . . . . . . . . . . . . . . . . . . . . . . . . . . . . . .94
12.9 Network Service . . . . . . . . . . . . . . . . . . . . . . . . . . . . . . . . . . . . . . . .95
12.9.1 Call Divert. . . . . . . . . . . . . . . . . . . . . . . . . . . . . . . . . . . . . . . .95
12.9.2 Call Barring . . . . . . . . . . . . . . . . . . . . . . . . . . . . . . . . . . . . . .96
12.9.3 Call Waiting . . . . . . . . . . . . . . . . . . . . . . . . . . . . . . . . . . . . . .96
12.9.4 Network Select. . . . . . . . . . . . . . . . . . . . . . . . . . . . . . . . . . . .96
12.9.5 Band Mode. . . . . . . . . . . . . . . . . . . . . . . . . . . . . . . . . . . . . . .96
12.9.6 Number Transmitted . . . . . . . . . . . . . . . . . . . . . . . . . . . . . . .97
12.10 Security . . . . . . . . . . . . . . . . . . . . . . . . . . . . . . . . . . . . . . . . . . . . . . .97
12.11 Auto Key Guard. . . . . . . . . . . . . . . . . . . . . . . . . . . . . . . . . . . . . . . . .98
12.12 Restore Factory. . . . . . . . . . . . . . . . . . . . . . . . . . . . . . . . . . . . . . . . .98
13. Organizer. . . . . . . . . . . . . . . . . . . . . . . . . . . . . . . . . . . 99
13.1 Alarm. . . . . . . . . . . . . . . . . . . . . . . . . . . . . . . . . . . . . . . . . . . . . . . . .99
13.2 When the alarm time expires. . . . . . . . . . . . . . . . . . . . . . . . . . . . . .100
13.3 Calendar . . . . . . . . . . . . . . . . . . . . . . . . . . . . . . . . . . . . . . . . . . . . .101
13.4 To-do list . . . . . . . . . . . . . . . . . . . . . . . . . . . . . . . . . . . . . . . . . . . . .102
6
Page 7

Table of Contents
VoIPon www.voipon.co.uk [email protected] Tel: +44 (0)1245 808195 Fax: +44 (0)1245 600030
13.5 Scheduled Power on/off . . . . . . . . . . . . . . . . . . . . . . . . . . . . . . . . .102
14. Applications . . . . . . . . . . . . . . . . . . . . . . . . . . . . . . . . 105
14.1 Games. . . . . . . . . . . . . . . . . . . . . . . . . . . . . . . . . . . . . . . . . . . . . . .105
14.1.1 Launch a game . . . . . . . . . . . . . . . . . . . . . . . . . . . . . . . . . .105
14.1.2 Tone and Background Music . . . . . . . . . . . . . . . . . . . . . . . .106
14.2 Calculator . . . . . . . . . . . . . . . . . . . . . . . . . . . . . . . . . . . . . . . . . . . .106
14.3 Currency . . . . . . . . . . . . . . . . . . . . . . . . . . . . . . . . . . . . . . . . . . . . .107
14.4 Stop watch. . . . . . . . . . . . . . . . . . . . . . . . . . . . . . . . . . . . . . . . . . . .107
14.5 Count Down. . . . . . . . . . . . . . . . . . . . . . . . . . . . . . . . . . . . . . . . . . .108
14.6 World Time . . . . . . . . . . . . . . . . . . . . . . . . . . . . . . . . . . . . . . . . . . .108
15. Gallery . . . . . . . . . . . . . . . . . . . . . . . . . . . . . . . . . . . . 109
16. Care and Maintenance . . . . . . . . . . . . . . . . . . . . . . . 111
16.1 Information on the batteries. . . . . . . . . . . . . . . . . . . . . . . . . . . . . . .111
16.2 Product care guidelines. . . . . . . . . . . . . . . . . . . . . . . . . . . . . . . . . .114
0
17. Certifications . . . . . . . . . . . . . . . . . . . . . . . . . . . . . . . 115
17.1 Certification information (SAR) . . . . . . . . . . . . . . . . . . . . . . . . . . . .116
FAQ . . . . . . . . . . . . . . . . . . . . . . . . . . . . . . . . . . . . . . . . . . 117
A.1 Frequently Asked Questions and Troubleshooting Guide. . . . . . . .117
A.2 Configuration troubleshooting . . . . . . . . . . . . . . . . . . . . . . . . . . . . .122
Glossary . . . . . . . . . . . . . . . . . . . . . . . . . . . . . . . . . . . . . . . 127
Copyright. . . . . . . . . . . . . . . . . . . . . . . . . . . . . . . . . . . . . . . 131
7
Page 8

Table of Contents0
VoIPon www.voipon.co.uk [email protected] Tel: +44 (0)1245 808195 Fax: +44 (0)1245 600030
8
Page 9

Chapter
VoIPon www.voipon.co.uk [email protected] Tel: +44 (0)1245 808195 Fax: +44 (0)1245 600030
Introduction
Please read the following notices before installing or using your mobile device.
Read the installation instructions before connecting the system to the power
source.
Icons shown in this document have the following meaning:
Warning:
Remind you to be very cautious when you use certain functions or make
certain setup for they may cause harm if you are not handling it with care.
Forbidden:
Do not do it. It is extremely dangerous.
0
Information:
Additional information or tips to certain functions are provided to help you learn
more about the products.
9
Page 10

Chapter0
VoIPon www.voipon.co.uk [email protected] Tel: +44 (0)1245 808195 Fax: +44 (0)1245 600030
Safety Information
Warning:
Ultimate disposal of this product should be handled according to the applicable
national laws and regulations.
Do not work on the system or connect or disconnect cables during periods of
lightning activity.
There is the danger of explosion if the battery is replaced incorrectly. Replace
the battery only with the same or equivalent type recommended by the
manufacturer. Dispose of used batteries according to the manufacturer’s
instructions.
Before using the telephone, carefully read the “warnings” contained in Care
and maintenance chapter. Contact the Client Assistance Center nearer to you
for further information.
Do not place credit cards or other magnetic storage media near the device,
because information stored on them may be erased.
Your phone may cause TV or radio interference (for example, when using a
telephone in close proximity to receiving equipment). The FCC or Industry
Canada can require you to stop using your telephone if such interference
cannot be eliminated. If you require assistance, contact you local service
provider.
Medical devices
Operation of any radio transmitting equipment, including wireless phones, may
interfere with the functionality of inadequately protected medical devices.
Consult a physician or the manufacturer of the medical device to determine if
they are adequately shielded from external RF energy or if you have any
questions. Switch off your device in health care facilities when any regulations
posted in these areas instruct you to do so. Hospitals or health care facilities
may be using equipment that could be sensitive to external RF energy.
10
Page 11

Chapter
VoIPon www.voipon.co.uk [email protected] Tel: +44 (0)1245 808195 Fax: +44 (0)1245 600030
Pacemakers
Pacemaker manufacturers recommend that a minimum separation of 15.3
centimeters (6 inches) be maintained between a wireless phone and a
pacemaker to avoid potential interference with the pacemaker. Persons with
pacemakers should do the following:
• Always keep the device more than 15.3 centimeters (6 inches) from the
pacemaker
• Not carry the device in a breast pocket
• Hold the device to the ear opposite the pacemaker to minimize the poten-
tial for interference.
• If you suspect interference, switch off your device, and move the device
away.
0
Hearing aids
Some digital wireless devices may interfere with some hearing aids. If
interference occurs, consult your service provider.
Vehicles
RF signals may affect improperly installed or inadequately shielded electronic
systems in motor vehicles such as electronic fuel injection systems, electronic
antiskid (antilock) braking systems, electronic speed control systems, and air
bag systems. For more information, check with the manufacturer, or its
representative, of your vehicle or any equipment that has been added.
Only qualified personnel should service the device, or install the device in a
vehicle. Faulty installation or service may be dangerous and may invalidate
any warranty that may apply to the device. Check regularly that all wireless
device equipment in your vehicle is mounted and operating properly. Do not
store or carry flammable liquids, gases, or explosive materials in the same
compartment as the device, its parts, or enhancements. For vehicles equipped
with an air bag, remember that air bags inflate with great force. Do not place
objects, including installed or portable wireless equipment in the area over the
11
Page 12

Chapter0
VoIPon www.voipon.co.uk [email protected] Tel: +44 (0)1245 808195 Fax: +44 (0)1245 600030
air bag or in the air bag deployment area. If in-vehicle wireless equipment is
improperly installed, and the air bag inflates, serious injury could result.
Potentially explosive environments
Switch off your device when in any area with a potentially explosive
atmosphere, and obey all signs and instructions. Potentially explosive
atmospheres include areas where you would normally be advised to turn off
your vehicle engine. Sparks in such areas could cause an explosion or fire
resulting in bodily injury or even death. Switch off the device at refueling points
such as near gas pumps at service stations. Observe restrictions on the use
of radio equipment in fuel depots, storage, and distribution areas; chemical
plants; or where blasting operations are in progress. Areas with a potentially
explosive atmosphere are often, but not always, clearly marked. They include
below deck on boats, chemical transfer or storage facilities, vehicles using
liquefied petroleum gas (such as propane or butane), and areas where the air
contains chemicals or particles such as grain, dust, or metal powders.
Children
Do not allow children to play with the device or its accessories. The device and
its accessories contain small parts that may detach and become a choking
hazard.
Emergency calls
Note: some networks may require that a valid SIM card is properly inserted in
the device.
EXPORT restrictions
This device may contain technology or software subject to export laws and
regulations from the US and other countries. Diversion contrary to law is
prohibited.
12
Page 13

Chapter
VoIPon www.voipon.co.uk [email protected] Tel: +44 (0)1245 808195 Fax: +44 (0)1245 600030
General Information
This WLAN/ GSM Dual mode phone supports both GSM 900/1800/1900 and
VoIP call via Wi-Fi 802.11b/g (WLAN at 2.4GHz).
The Dual mode phone allows users to make or receive phone calls as long as
they are in the coverage of IEEE 802.11b or 11g wireless Access Points.
The Dual mode phone described in this guide is approved for use on the GSM
900/1800/1900 network. Contact your service provider if you wish to learn
more about the networks.
Network Service
To use the phone you must have service from a wireless service provider.
Many of the features in this phone depend on features in the wireless network
to function. These network services may not be available on all networks or
you may need to make special arrangements with your service provider before
you can use the network services. Your service provider may need to give you
additional instructions for their use and explain what charges will apply. Some
networks may have limitations that affect how you can use Network Services.
For example, some networks may not support all language-dependent
characters and services.
0
Your service provider may request that certain features be disabled or not
activated in your device. If so, they will not appear in your device menu.
Contact your service provider for further information.
The Dual mode phone described in this guide is approved for use on the GSM
900/1800/1900 network. Tri-band is a network-dependent feature. Check with
your local service provider if you can subscribe to and use this feature.
This phone supports WAP 2.0 protocols (HTTP and SSL) that run on TCP/IP
protocols. Some features of this phone, such as MMS (Multimedia Messaging
Service), browsing, e-mail, instant messages, and music downloading via
browser or over MMS, require network support for these technologies.
13
Page 14

Chapter0
VoIPon www.voipon.co.uk [email protected] Tel: +44 (0)1245 808195 Fax: +44 (0)1245 600030
Shared Memory
The following features in this device may share memory: contacts, text
messages (SMS and MMS), WAP (download and cache), ring tones, calendar,
and gallery (camera images, sounds, and misc.). Use of one or more of these
features may reduce the memory available for the remaining features sharing
memory. Your phone may display a message that the memory is full when you
try to use a shared memory feature. In this case, delete some of the
information or entries stored in the shared memory features before continuing.
Get Help
If you need help, Customer Service Center is available for assistance. Before
contacting us, please have your Internal Mobile Identification Number (IMEI)
available so that we may retrieve relevant information to help you. You may
find the IMEI label in the battery compartment or on the giftbox label.
Access codes
1 PIN and PIN2 codes (4 to 8 digits)
• The PIN (Personal Identification Number) code protects your SIM card
against unauthorized use.
• The PIN code is usually supplied with the SIM card. Set the phone to
request the PIN code each time the phone is switched on.
• The PIN2 code may be supplied with the SIM card (GSM phase II).
This code controls access to some of the more advanced features of
the phone (for example: fixed dialing lists a restricted list of numbers
the phone can call, which is handy if you lend the phone to a kid). The
default code is set by the service provider, but you are able to change
this code.
If you key in an incorrect PIN code three times in succession, the phone may
display PIN blocked or PIN code blocked, for example, and ask you to enter
the PUK code. You will need to require a PUK code from your network/service
provider before you can resume the receiving/making calls and reading text
functions.
14
Page 15

Chapter
VoIPon www.voipon.co.uk [email protected] Tel: +44 (0)1245 808195 Fax: +44 (0)1245 600030
2 PUK and PUK2 codes (8 digits)
PUK stands for Personal Unblocking Key. If you have entered your PIN code
incorrectly 3 times, your SIM card will be blocked and you will be unable to
make and receive calls/text. The PUK code is required to change a blocked
PIN, and the PUK2 code is required to change a blocked PIN2 code. If the
codes are not supplied with the SIM card, contact your local service provider
for the codes. If the PUK code is entered 10 times incorrectly, the card is
permanently disabled and the SIM card has to be changed.
3 Barring password
The 4-digit barring password is required when using the Call barring service.
You can obtain the password from your service provider.
0
15
Page 16

Chapter0
VoIPon www.voipon.co.uk [email protected] Tel: +44 (0)1245 808195 Fax: +44 (0)1245 600030
16
Page 17
Chapter
VoIPon www.voipon.co.uk [email protected] Tel: +44 (0)1245 808195 Fax: +44 (0)1245 600030
1. Getting started
1.1 Installing the SIM Card and the Battery
Keep all miniature SIM cards out of the reach of small children.
The SIM card and its contacts can easily be damaged by scratches or bending,
so be careful when handling, inserting or removing the card.
Before installing the SIM card, always make sure that the phone is switched
off and disconnected from any enhancement and then remove the battery.
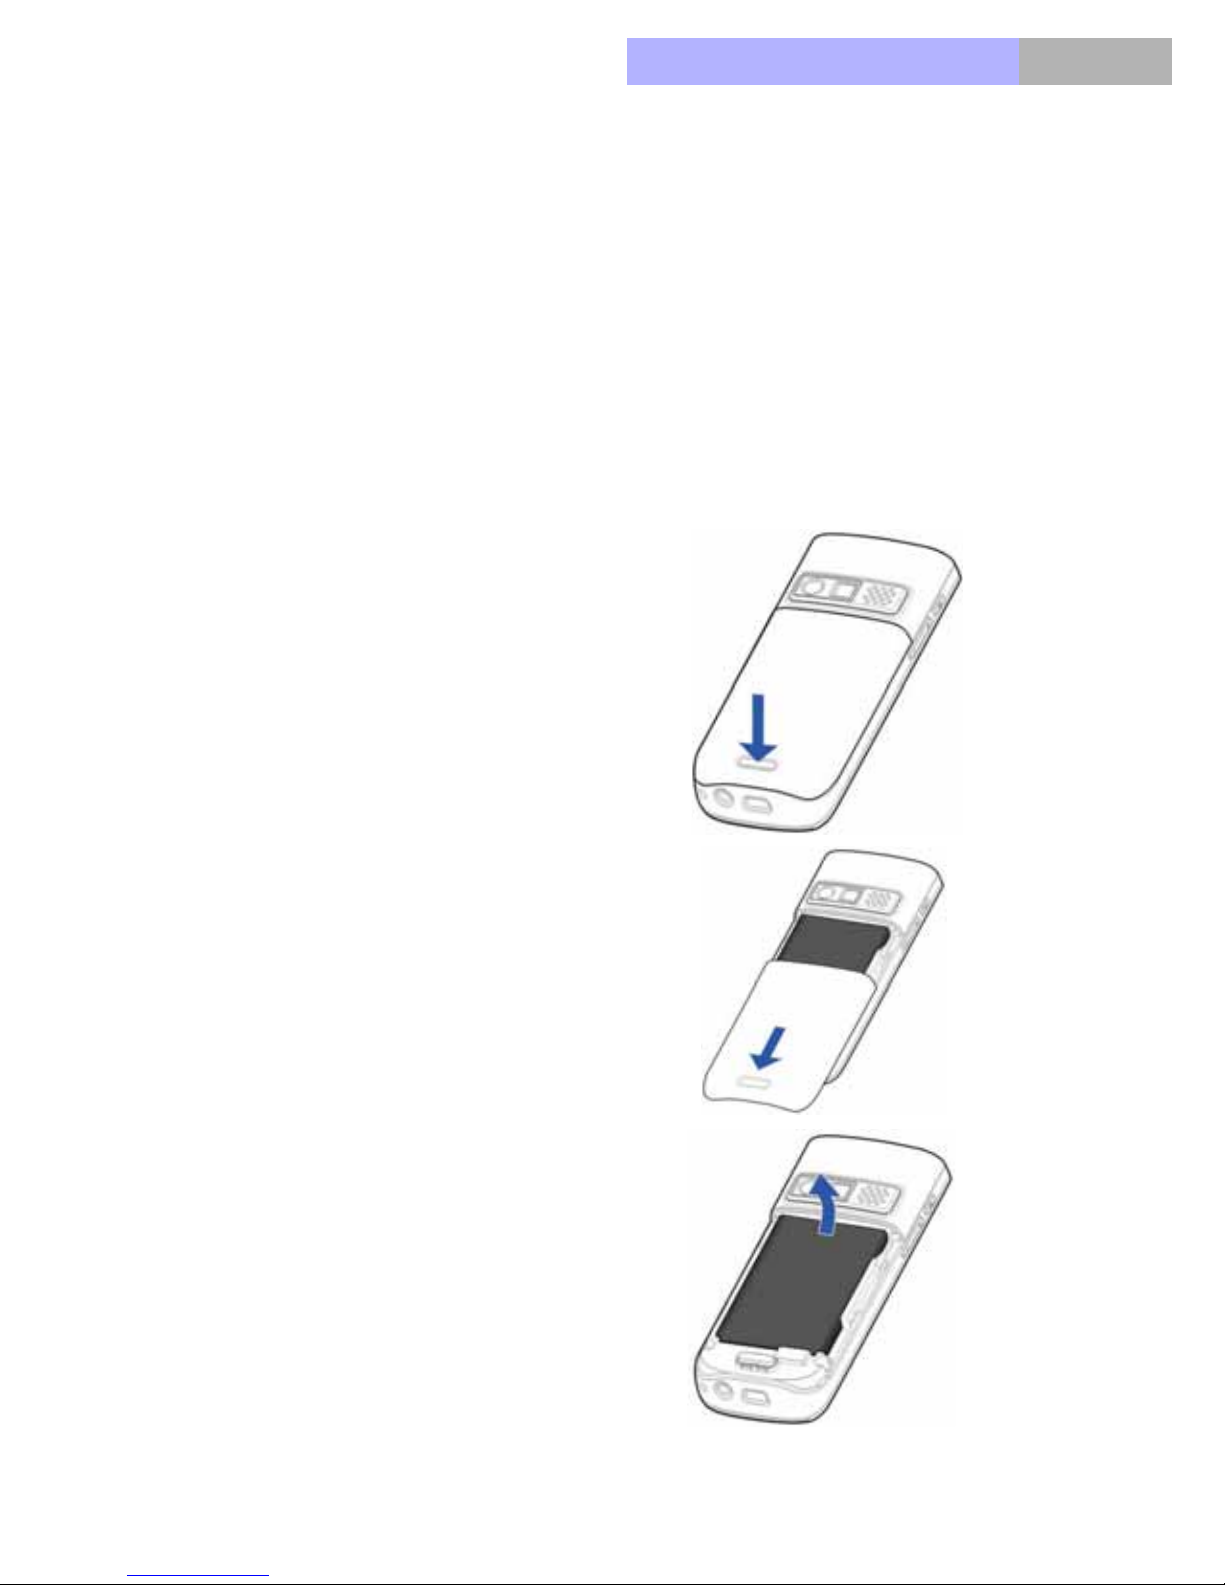
To remove the back cover of the
phone: With the back of the phone
facing you, push the back cover
release button.
1
The SIM card and its contents can be
easily damaged by scrathes or in case
it is bent. So, be careful when slide the
back cover to remove it from the
phone.
Remove the battery by lifting it as
shown.
17
Page 18
Chapter1
VoIPon www.voipon.co.uk [email protected] Tel: +44 (0)1245 808195 Fax: +44 (0)1245 600030
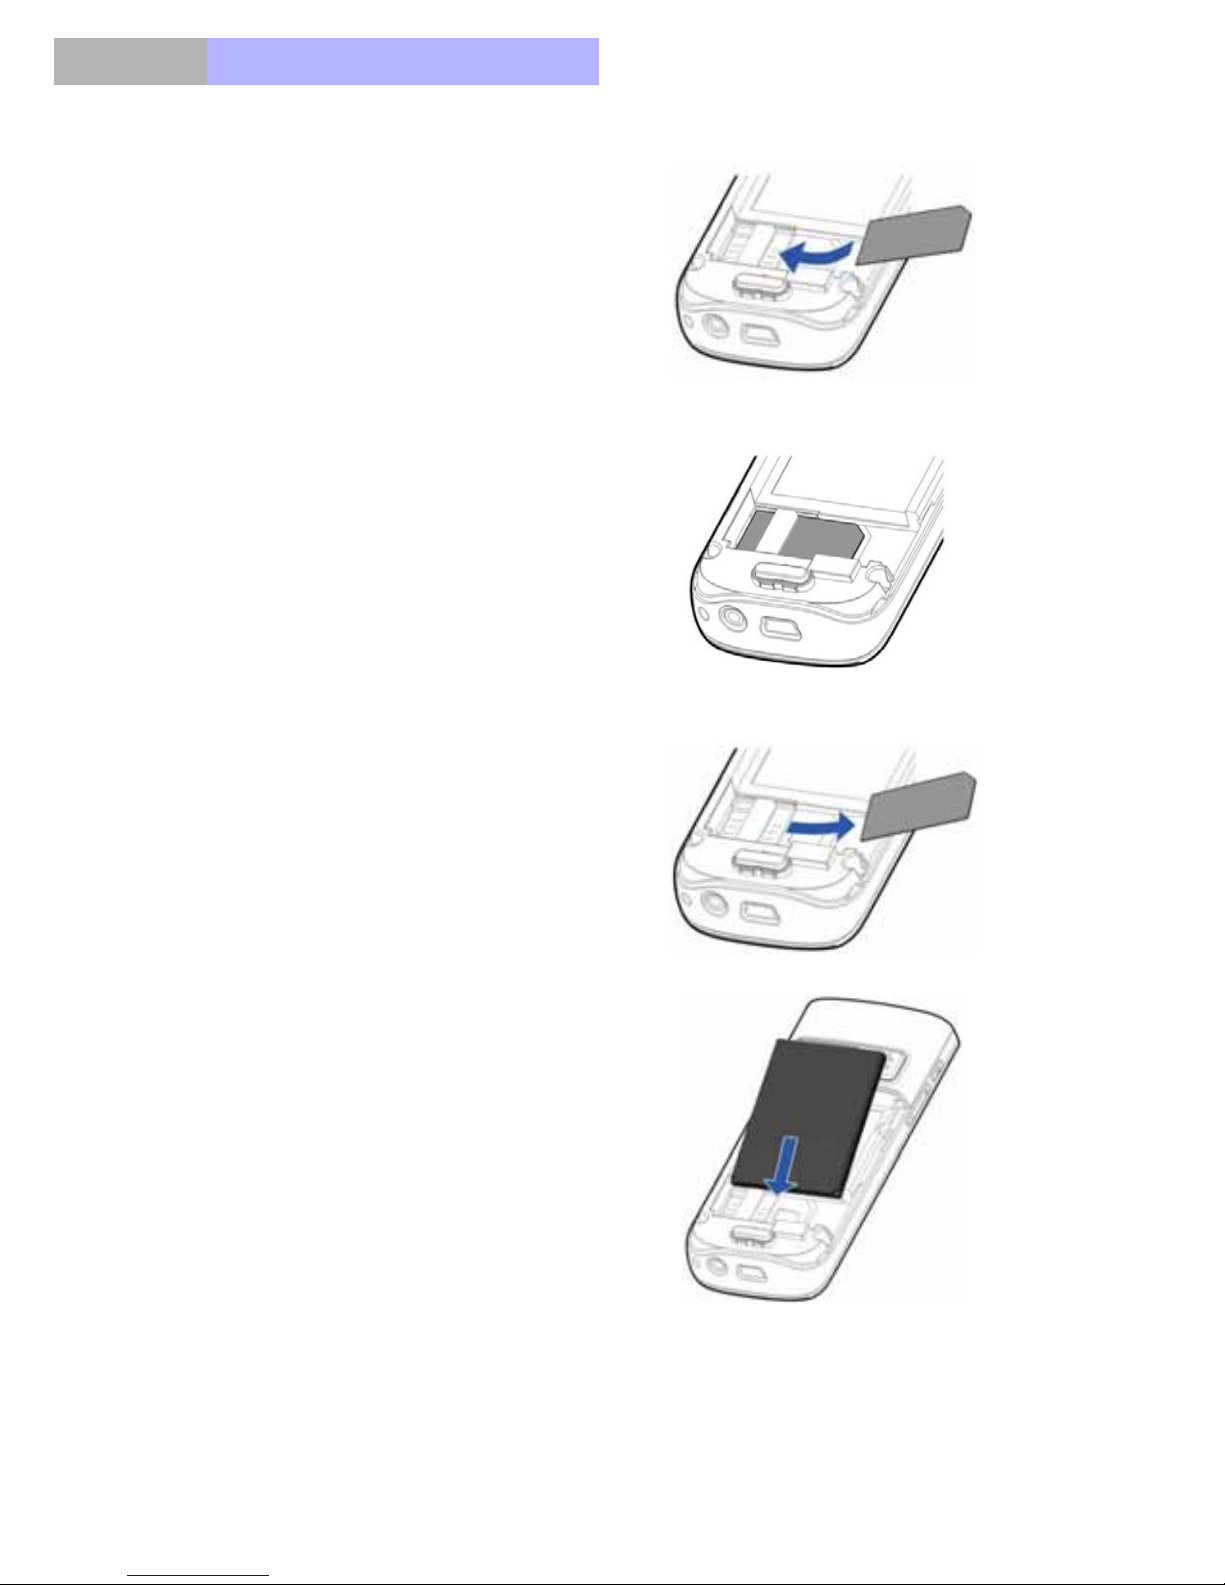
Insert the SIM card into the SIM card
holder. Make sure that the SIM card is
properly inserted and that the golden
contact area on the card is facing
downwards.
To release the SIM card, simply pull it
out from the holder.
Replace the battery (7).
Slide the back cover into its place (8).
18
Page 19
1.2 Charging the battery
VoIPon www.voipon.co.uk [email protected] Tel: +44 (0)1245 808195 Fax: +44 (0)1245 600030
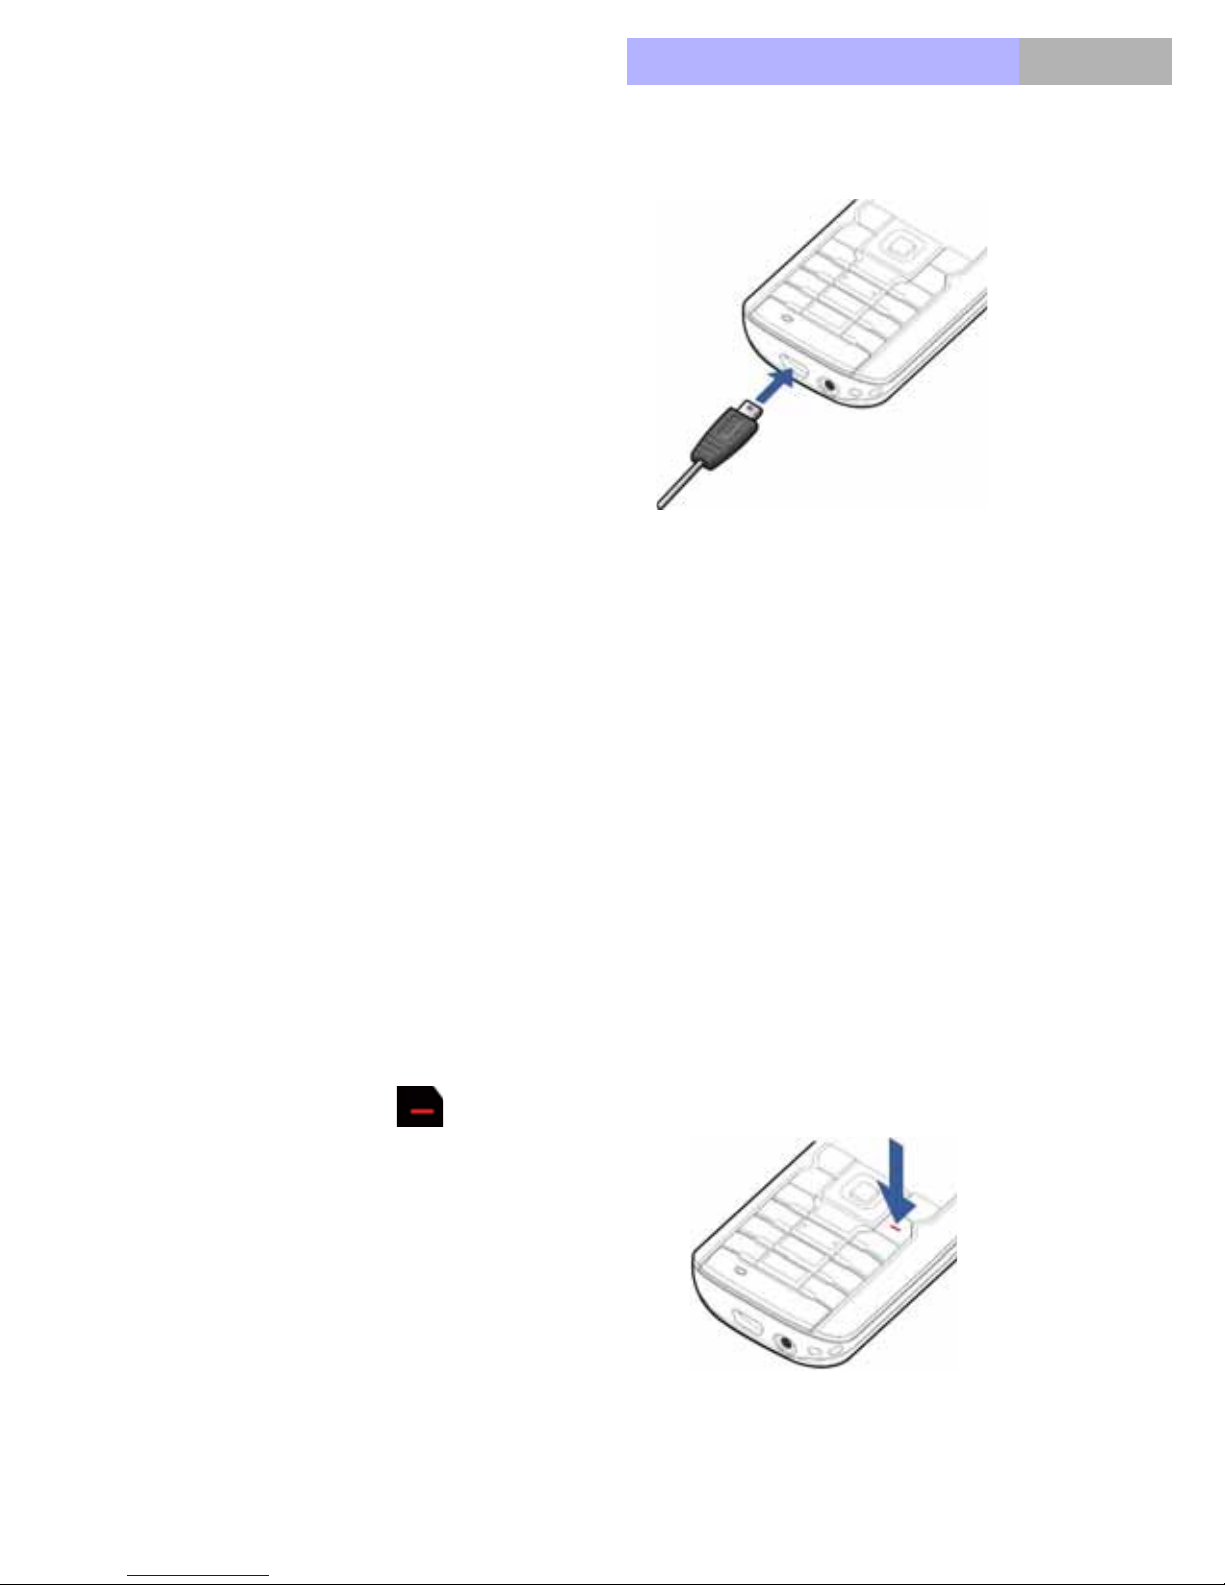
Connect the lead from the charger to
the mini USB port on the bottom of
your phone.
Connect the charger to an AC wall
socket. If the battery is completely flat,
it may take a few minutes before the
charging indicator appears on the
display or before any calls can be
made.
The charging time depends on the
charger and the battery used. It takes
approximately two hours while the
phone is in idle mode. It requires at
least 8 hours if the battery is first
charged.
Chapter
1
You can use the phone while the
charger is connected.
If included in the package, you can use
the cradle accessory to keep the
phone constantly under charge.
1.3 Power on / off the Phone Device
Press the red key and hold it for 5
seconds to switch on the phone
device. To turn off, follow the same
step.
19
Page 20
Chapter1
VoIPon www.voipon.co.uk [email protected] Tel: +44 (0)1245 808195 Fax: +44 (0)1245 600030
1.4 Installation and use of the CHARGER CRA-
DLE
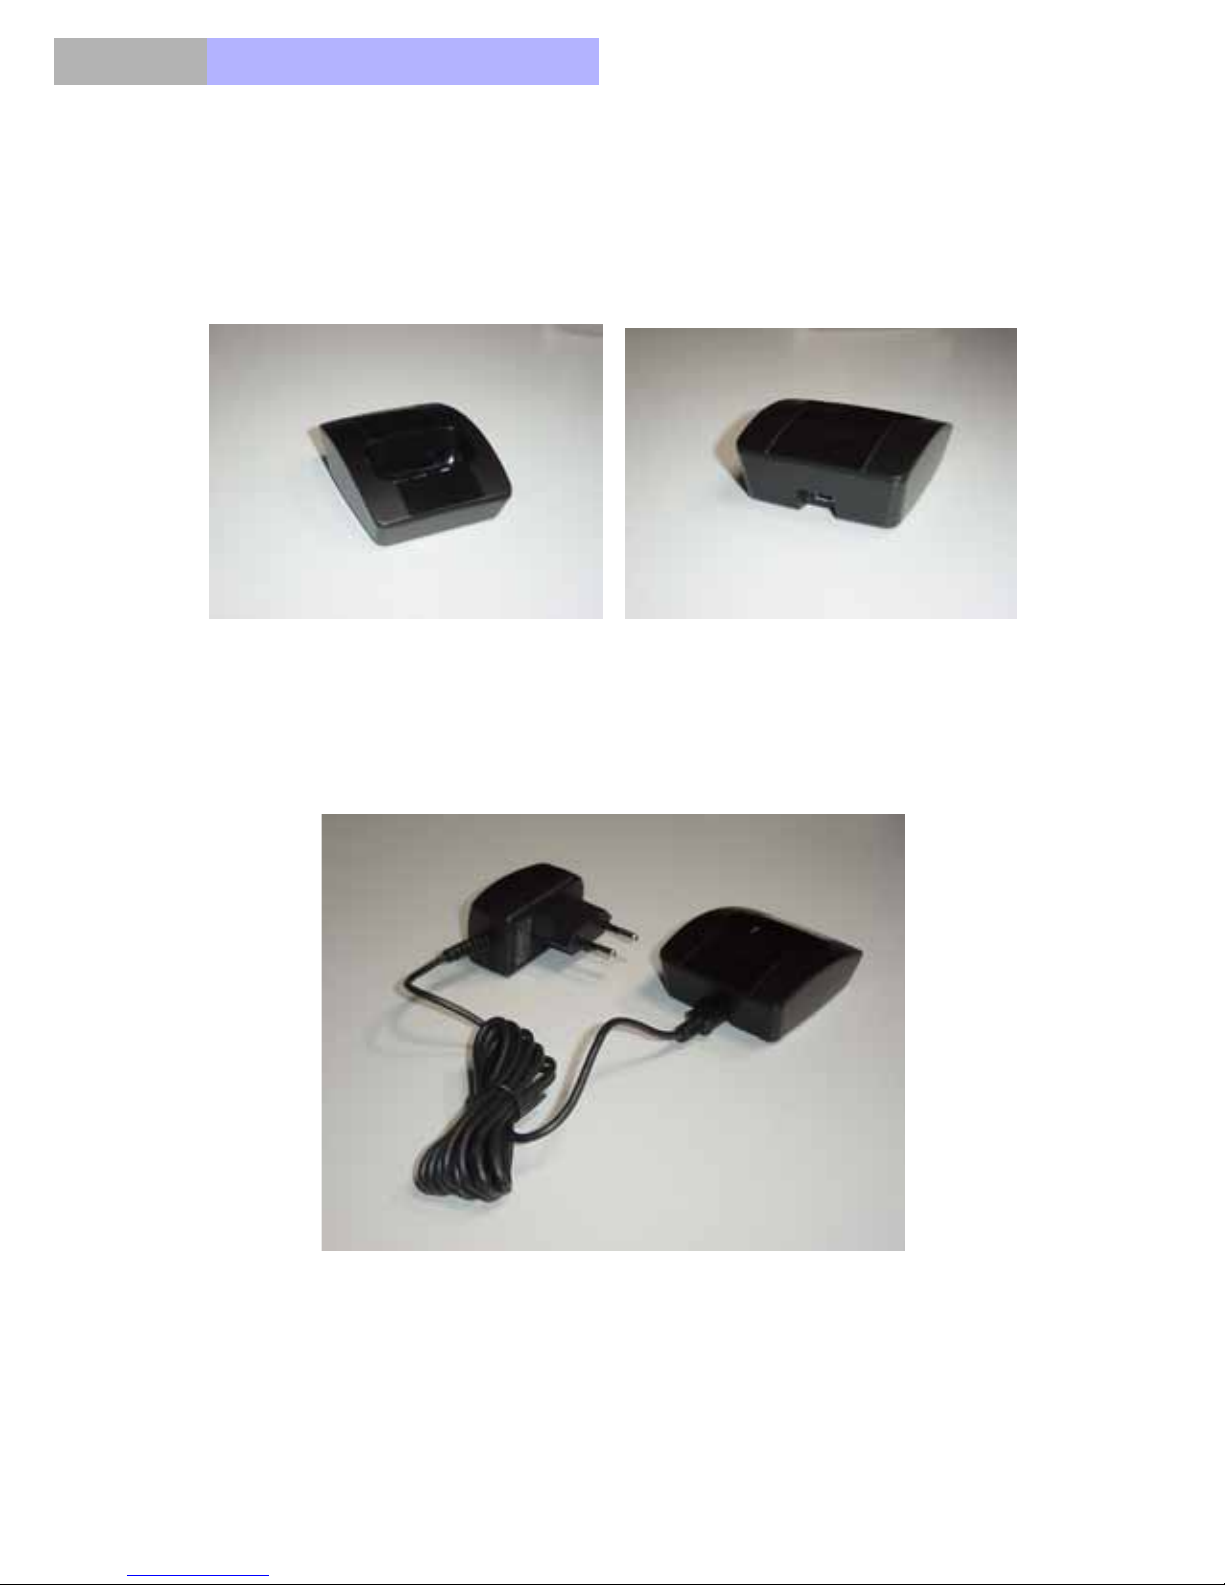
If included in your package, the cradle accessory can be used to keep the
phone constantly under charge.
Cradle charger: front view Cradle charger: rear view
Plug the power adapter’s mini-USB male connector into the female connector
on the back of the cradle as shown in the figure below.
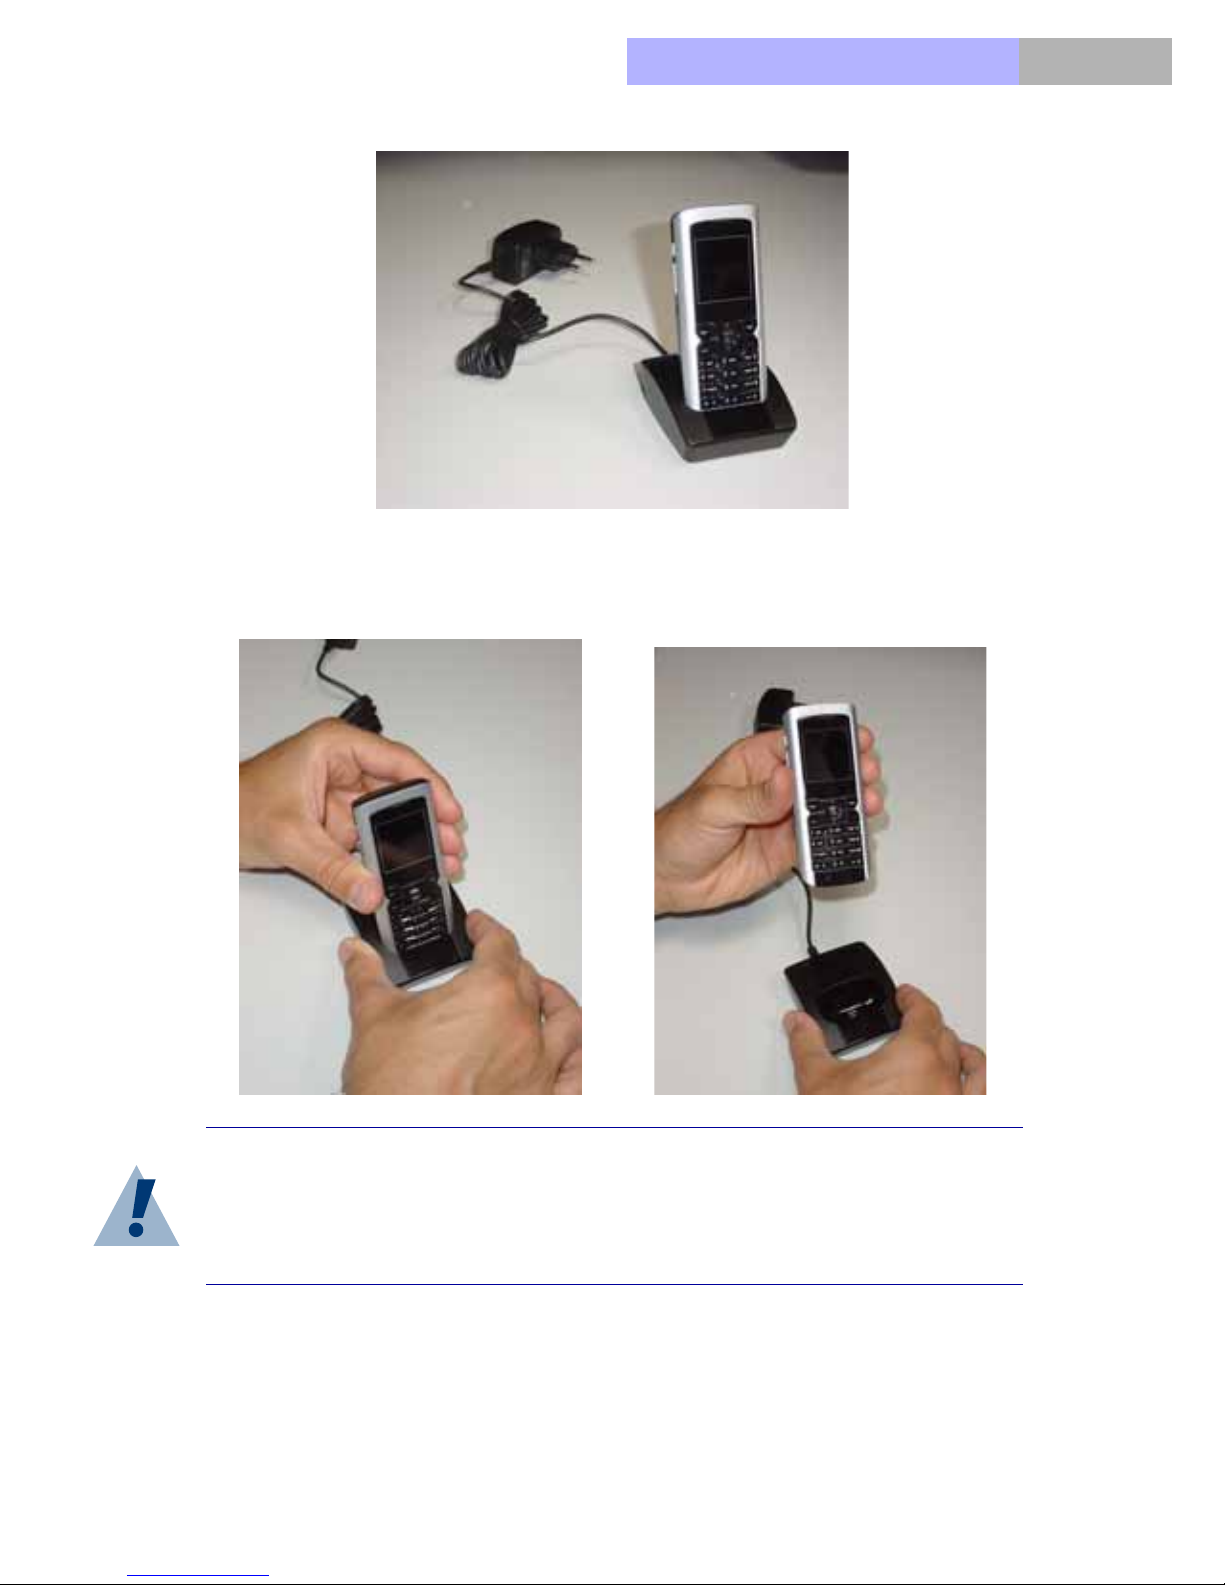
When placing the handset into the cradle, slide the phone fully downwards
until the handset remain firmly blocked (this indicates that the phone connector
is fully mated inside the cradle, and the “Charging” message is displayed); if
this is not the case, the phone may not be charged.
20
Page 21
Chapter
VoIPon www.voipon.co.uk [email protected] Tel: +44 (0)1245 808195 Fax: +44 (0)1245 600030
To detach the handset from the cradle, keep the cradle in place with one hand
and gently pull the handset with the other hand.
1
Warning:
Do not tilt or flex the handset when inserting / extracting it from the cradle
because this could damage the handset’s connector.
21
Page 22
Chapter1
VoIPon www.voipon.co.uk [email protected] Tel: +44 (0)1245 808195 Fax: +44 (0)1245 600030
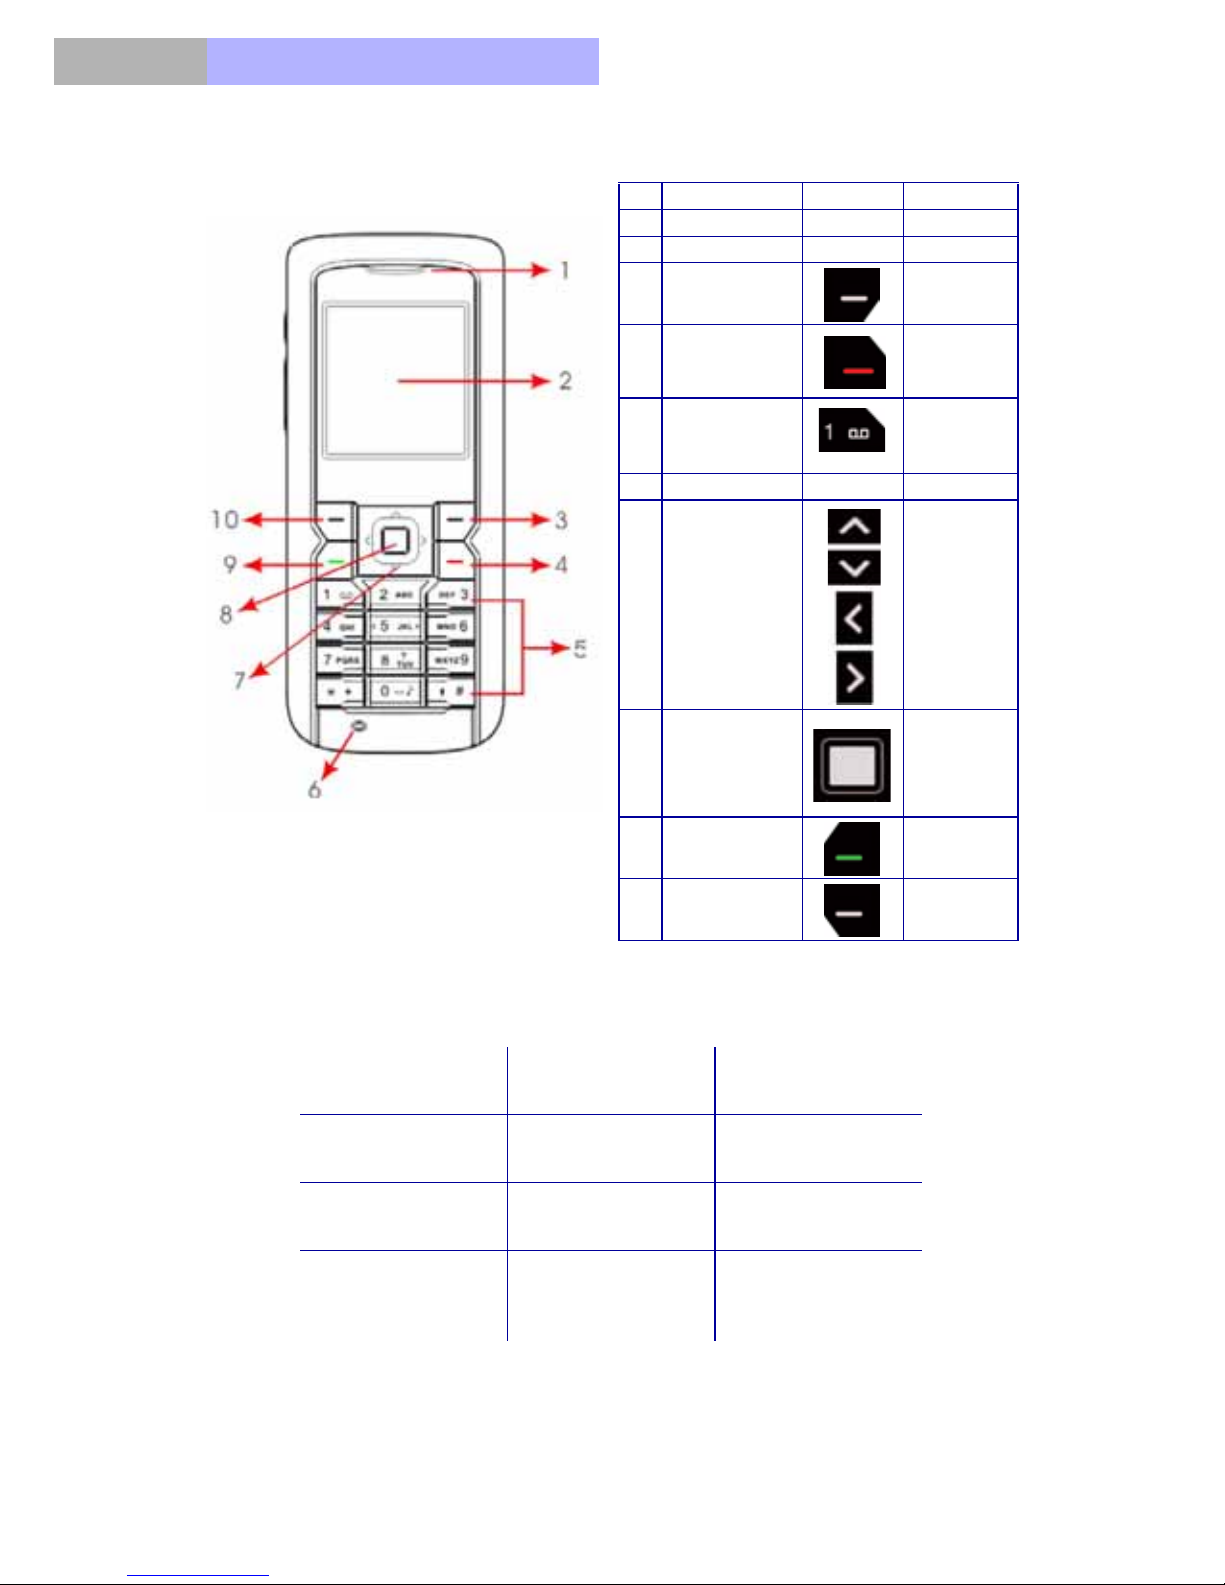
Phone Device and Key Pad
Nr. Key name Ic. Descrip.
1 Receiver
2 Screen
3
Right soft key
4
Red Key
5
Alphabetic
and numeric
keys
6 Microphone
7 Scroll up and
down key, shift
right and left key
8
OK Key
9 Green Key Answer
10 Left soft key
Power
on/off;
Cancel;
Confirmation OK;
Middle soft
key
1.5 Alphabetic and numeric keys
1
Recorder sign
4
GHI
7
PQRS
*
Bell sign
22
2
ABC
5
JKL
8
TUV
0
+ sign
3
DEF
6
MNO
9
WXYZ
#
Keylock sign
Page 23

Chapter
VoIPon www.voipon.co.uk [email protected] Tel: +44 (0)1245 808195 Fax: +44 (0)1245 600030
Short press sequence Long press
1
Green key
Red key
Short press
(Idle Mode)
1 . , ' ? ! & / @ : 1
2
3
4
5
6
7
Answer calls, dial
numbers, access
dialed number list
Exit menu to idle mode, end calls Power on/off;
Cancel
Short press
sequence
(lower case)
a, b, c, 2, ä, à, â, ã,
á, ç
Short press
sequence
(capital case)
A, B, C, 2, Ä, À, Â,
Ã, Á, Ç
Long press
(Idle mode)
d, e, f, 3, €, è, é, ë, ê D, E, F, 3, €, È, É, Ë,
Ê
g, h, i, 4, ï, î, ì, í G, H, I, 4, Ï, Î, Ì, Í
j, k, l, 5, £ J, K, L, 5, £
m, n, o, 6, ö, ô, ò, ó, ñM, N, O, 6, Ö, Ô, Ò,
Ó, Ñ
p, q, r, s, 7, $, ß P, Q, R, S, 7, $, ß
8
9
*
0
# # <input method
t, u, v, 8, ü, û, ù, ú T, U, V, 8, Ü, Û, Ù, Ú
w, x, y, z, 9 W, X, Y, Z, 9
. , ? ! @ : ; - + # * ( ) '
" _ & % / < > = $ £ €
0 <space> +
change>
Mute/
unmute
Keypad lock/
unlock
* input method change sequence: abc, ABC, Zi-Abc, Zi-abc, Zi-ABC, and 123
23
Page 24
Chapter1
VoIPon www.voipon.co.uk [email protected] Tel: +44 (0)1245 808195 Fax: +44 (0)1245 600030
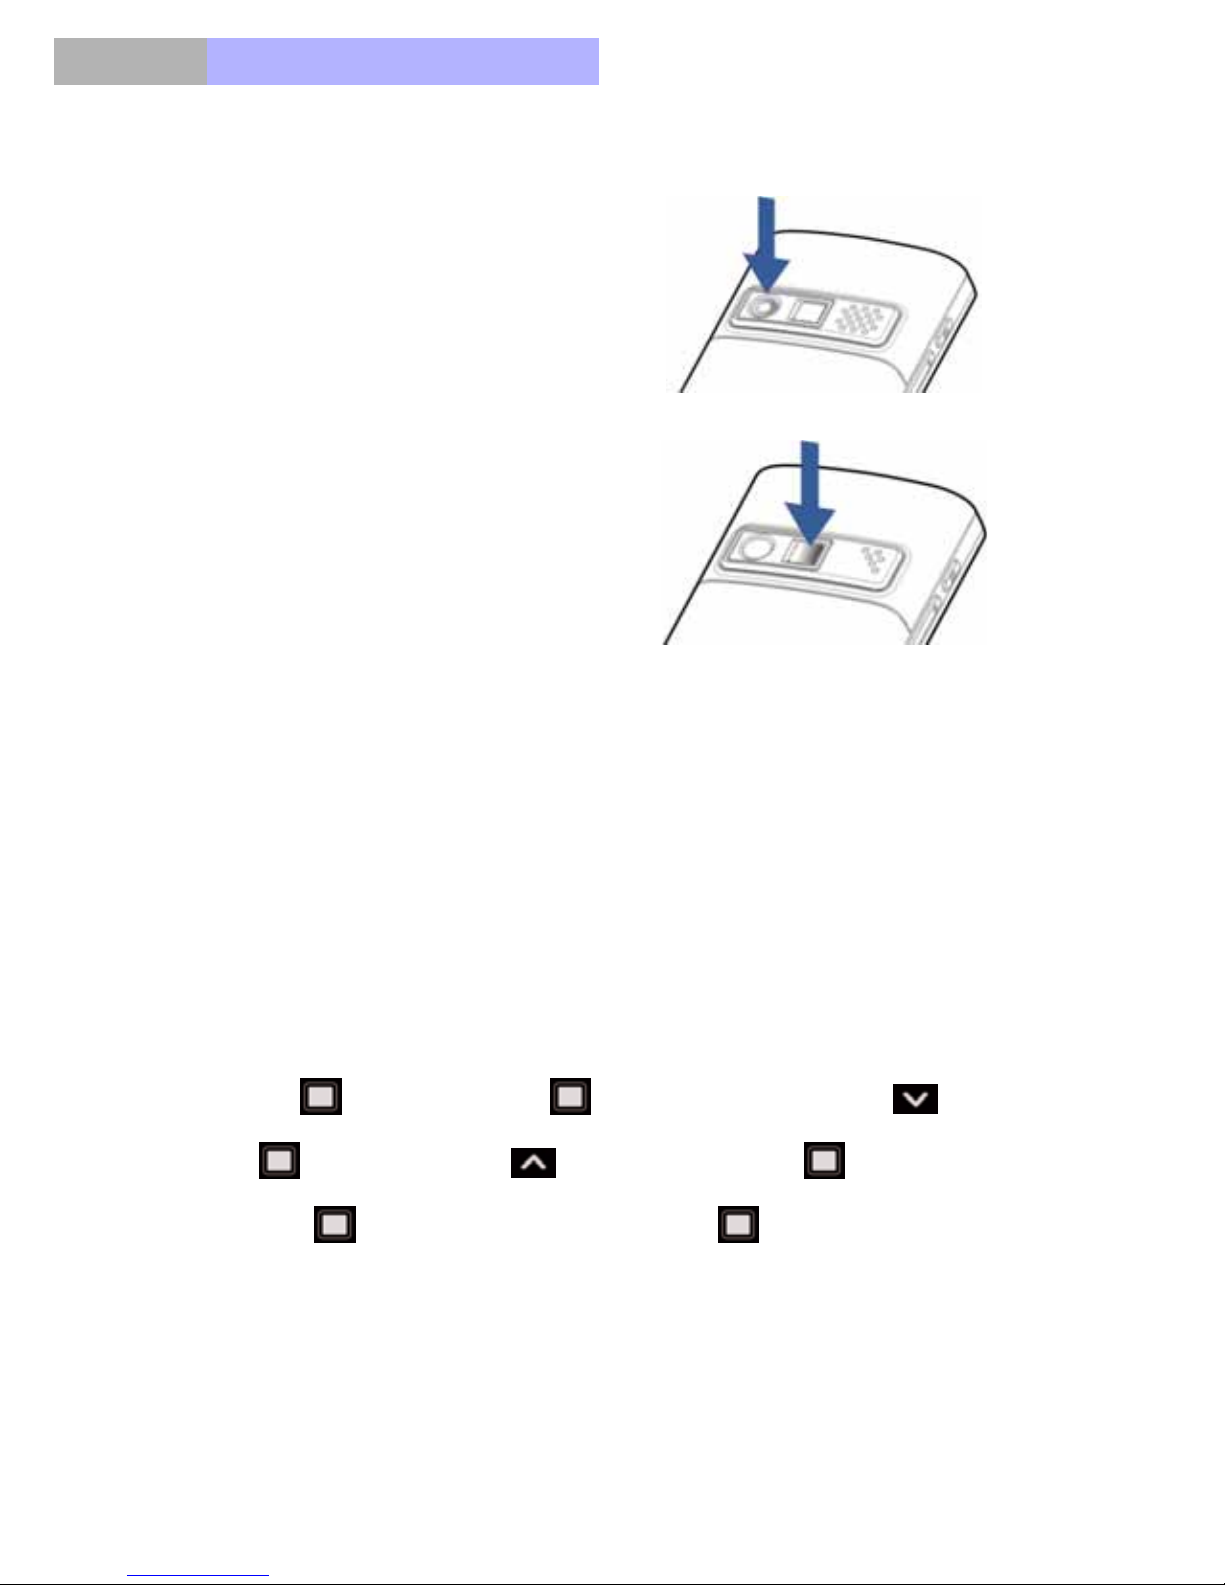
1.6 Camera Lens
Camera lens is on the back of the
phone device.
The mirror is useful to take a picture of
yourself.
1.7 MMS, WAP and E-mail SETUP
To utilize the data services of MMS, WAP and E-mail, the phone needs to be
configured with parameters that are specific for each mobile service provider.
The phone already includes a number of pre-set configurations related to the
prevalent mobile operators’ service profiles. To find and select the one
corresponding to your subscription, look for it through the following sequence:
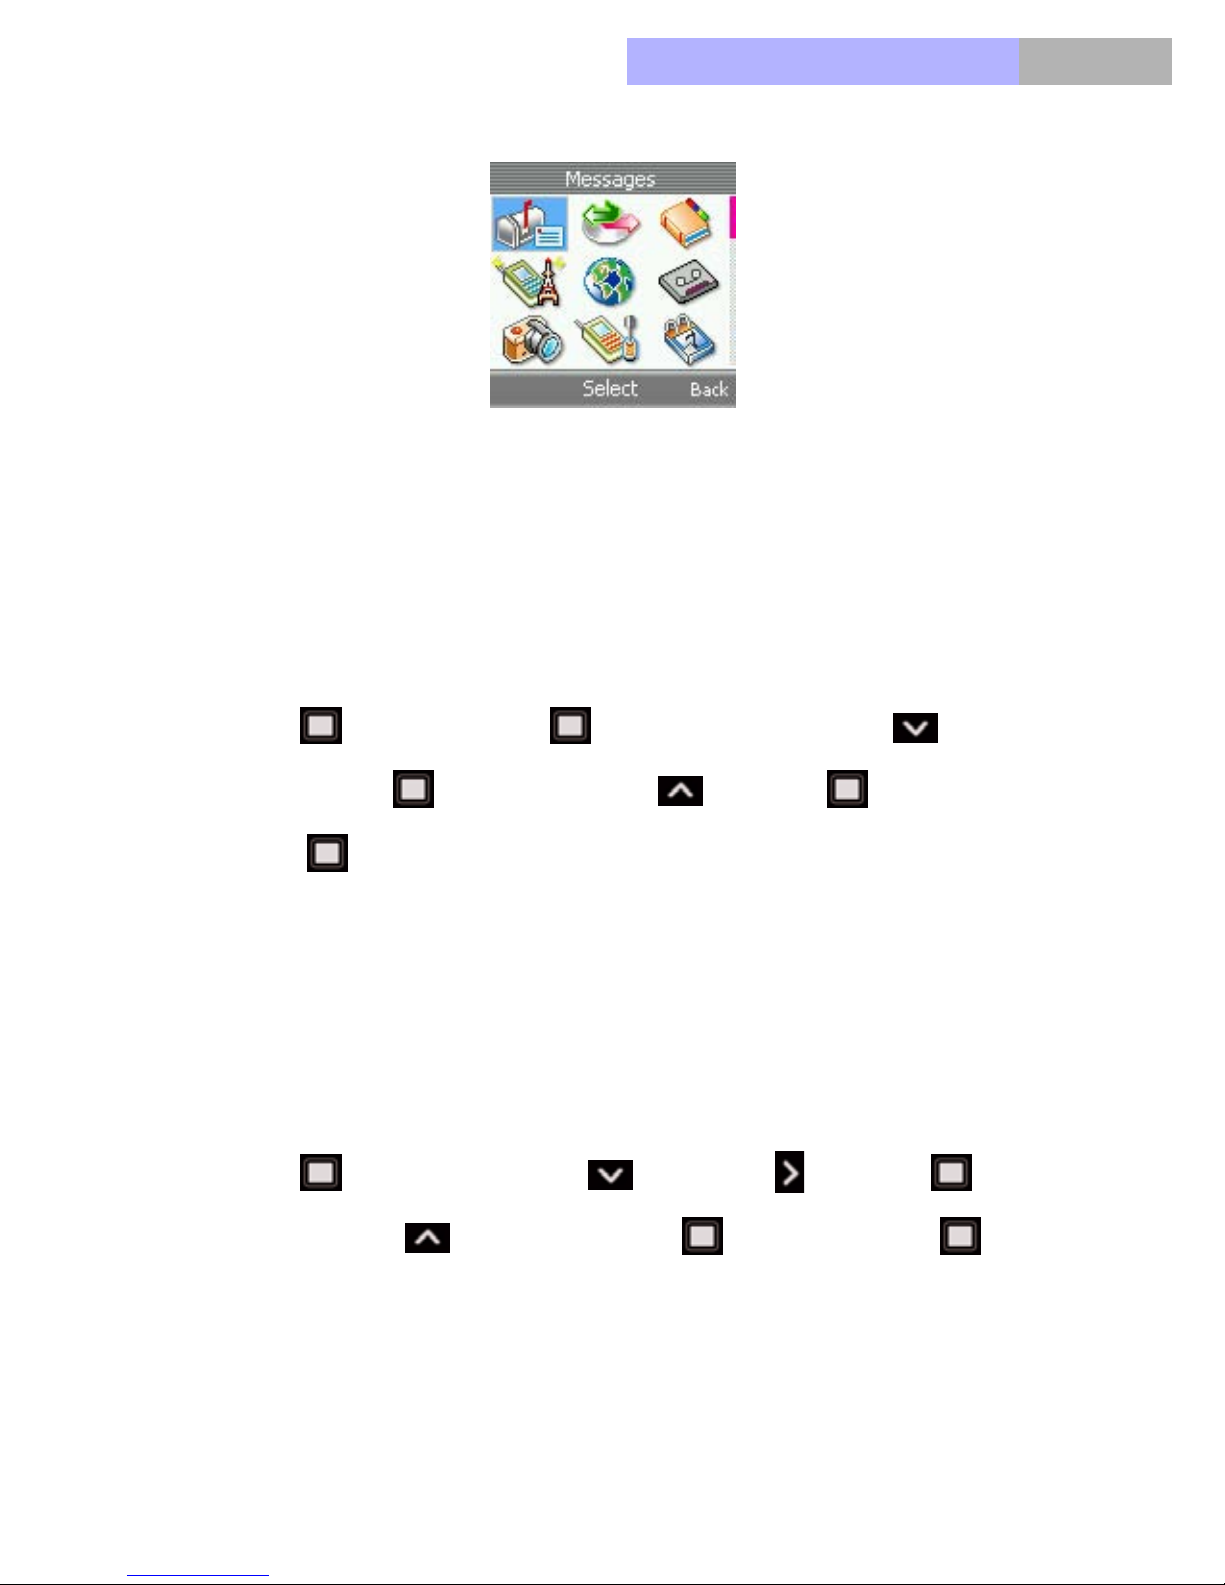
For MMS:
OK Key (Menu) > OK Key (Messages) > Scroll down > OK
Key (MMS) > Scroll up (two times) > OK Key (MMS Settings)
>OK Key (Connection Settings) > OK Key (Active Settings)
24
Page 25
Chapter
VoIPon www.voipon.co.uk [email protected] Tel: +44 (0)1245 808195 Fax: +44 (0)1245 600030
Press Select to activate the service profile corresponding to your subscription.
If your subscription profile is not among the pre-set ones, please make sure
you get the necessary parameters values from your mobile service provider
and refer to chapter 5 of this guide to configure your specific settings.
1
For E-MAIL:
OK Key (Menu) > OK Key (Messages) > Scroll down (two
times) > OK Key (E-mail) > Scroll up > OK Key (Settings) >
OK Key (Active Settings)
Press Select to activate the service profile corresponding to your subscription.
If your subscription profile is not among the pre-set ones, please make sure
you get the necessary parameters values from your mobile service provider
and refer to chapter 5 of this guide to configure your specific settings.
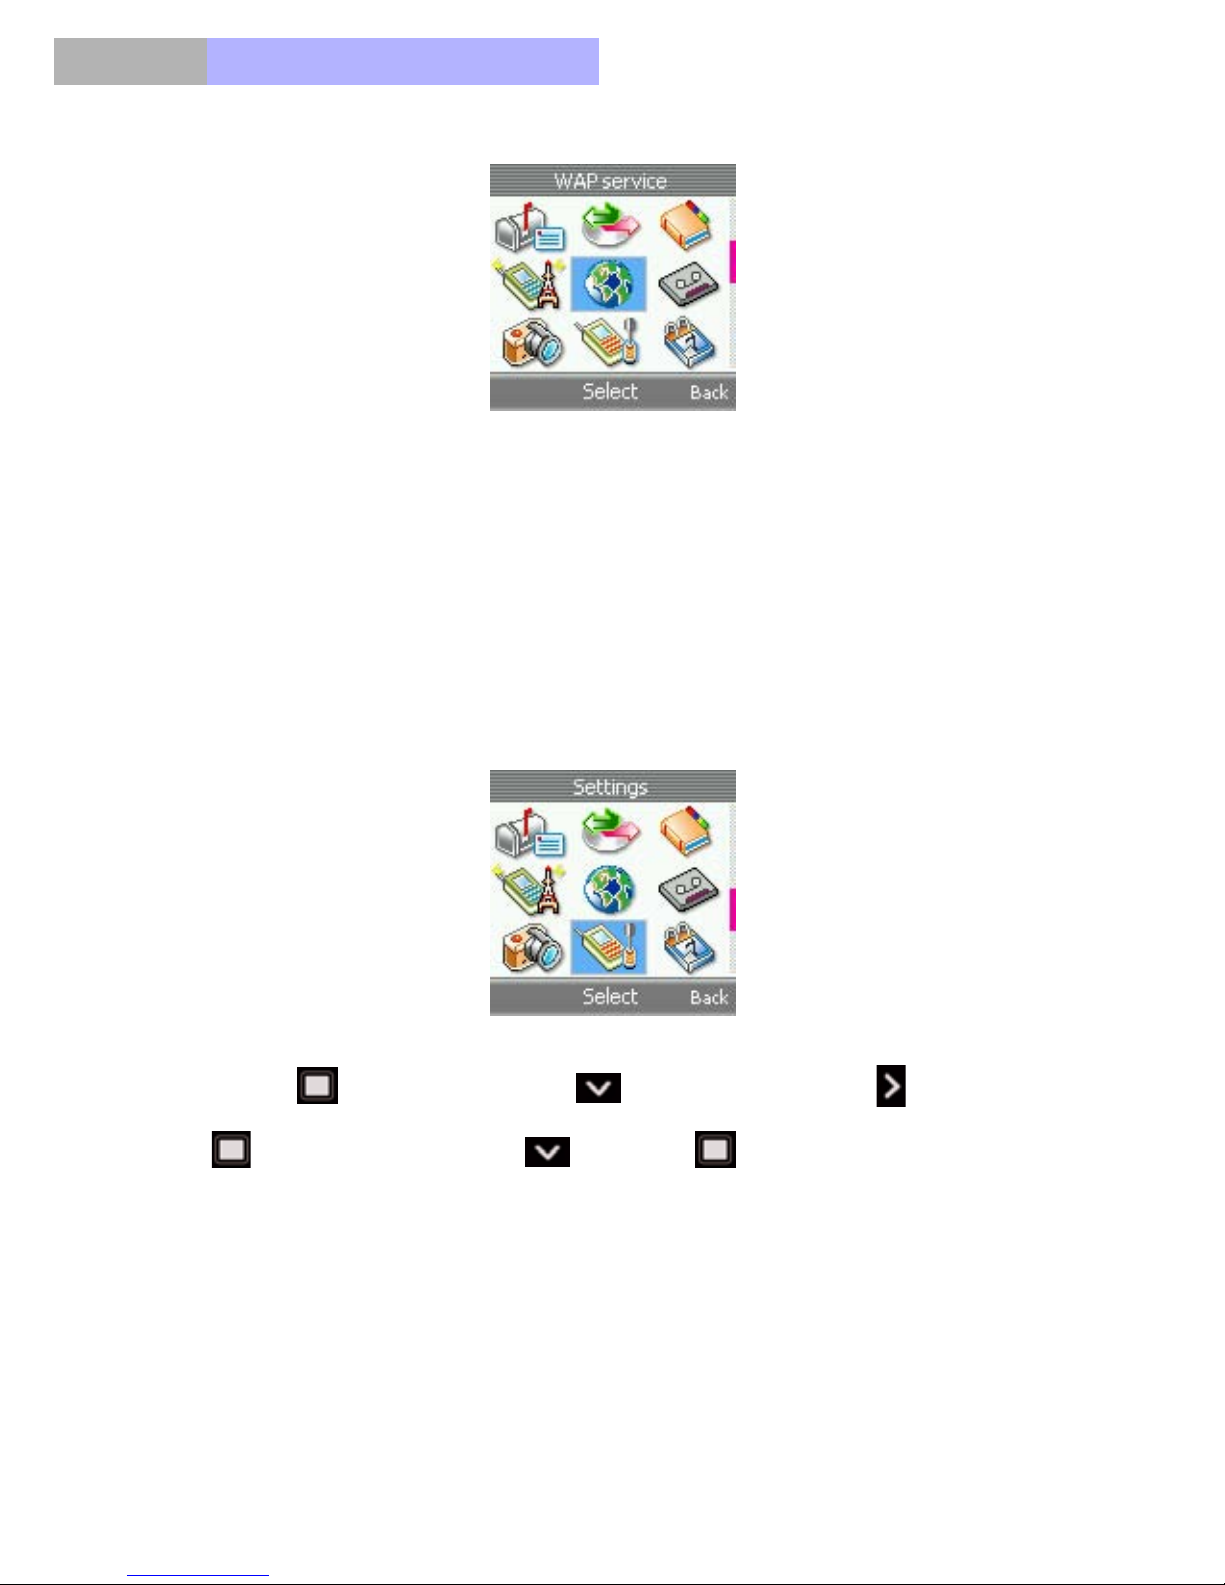
For WAP:
OK Key (Menu) > Scroll down > Shift right > OK Key
(WAP) > Scroll up
(Settings) > OK Key (Profile) > OK Key
(Active Settings)
25
Page 26
Chapter1
VoIPon www.voipon.co.uk [email protected] Tel: +44 (0)1245 808195 Fax: +44 (0)1245 600030
Press Select to activate the service profile corresponding to your subscription.
If your subscription profile is not among the pre-set ones, please make sure
you get the necessary parameters values from your mobile service provider
and refer to page of this guide to configure your specific settings.
1.8 How to select the preferred network
The preferred network setting allows you to select the network, WLAN or
GSM.
OK Key (Menu) > Scroll down (two times) > Shift right > OK Key
(Settings) > Scroll down > OK Key (Preferred Network)
• GSM only - the next call will go via GSM. Call will not be dialed out if GSM
network is not available.
• WLAN only - the next call will go via WLAN. Call will not be dialed out if
WLAN network is not available.
• GSM preferred - the next outgoing call will go via GSM network unless
you manually select call via WLAN for the call.
26
Page 27

Chapter
VoIPon www.voipon.co.uk [email protected] Tel: +44 (0)1245 808195 Fax: +44 (0)1245 600030
• WLAN preferred - the next outgoing call will go via WLAN unless you
manually select call via GSM for the call.
1.9 Keypad basics
This guide uses certain terms for the steps that you are asked to perform:
• “Press” means to press and release a key quickly. For example, press 5
means press the key on the keypad that is marked with the number 5 and
the letters “JKL” ( ).
• Press the numeric key once to enter the first character on a key. Press it
twice to enter the second character and so on and so forth.
• “Press and hold” means to press and hold a key for 2-3 seconds, then
release the key.
• : Soft keys are used to select a menu option. To select an option,
1
press the soft key below the menu item on the phone screen.
• : This 4-way navigation key includes left, right, up and down four
directions. The 4-way navigation and soft key is also used to move the
cursor up and down, left and right when writing text, using the calendar,
and in some game applications.
• : Press the Green key to place a call or to answer an incoming call.
• : Press the Red key to end a call or press and hold to return to the
idle screen.
• When creating messages, press pound key to switch between
uppercase, lowercase, digit, and Zi text (smart entry modes). The sign of
different mode appears at the top-left corner of the screen to indicate the
mode.
• To enter space between characters, press .
• Press start to display the symbol table. Use the four-way directions
to select the desired symbol and press OK Key to insert the symbol
into your text.
27
Page 28

Chapter1
VoIPon www.voipon.co.uk [email protected] Tel: +44 (0)1245 808195 Fax: +44 (0)1245 600030
1.10 Menus
Features of the phone are grouped according to the functions and are
accessed through the main menus. Each main menu contains submenus,
which you can make use of and customize your own features. You can access
these menus and submenus by using the scroll and direction keys.
1.11 How to Use Scroll and Direction Keys
• At the start screen, press OK key key to enter into the “Menu”. Press
the scroll and direction key to browse through each submenu.
• When you arrive at a submenu, press OK key to enter into the sub-
menu.
• Press right select key from the submenu level to return to the previ-
ous menu. Keep pressing right select key to return to the start
screen.
1.12 How to input text
The text input modes can be categorized into alphabetical mode and
numerical mode. Alphabetical modes are used to input characters and
numerical mode is used to input numbers. There are two ways to input
characters: Traditional multi-tap method and predictive input (Zi).
You can change the key-in method (options from ABC, Zi text, 123, to Symbol)
by pressing the pound key. The keypad of stands for space bar
while keying in message.
The text editor can be classified according to the purpose and input mode:
• Message editor
- Full screen with background picture.
- With input method indicator.
- A small area for displaying scroll bar is reserved beyond the editor
area at the right of screen.
- Show scroll bar if input content length is over one page.
- Examples: write SMS, E-Mail letter, and MMS .
28
Page 29

Chapter
VoIPon www.voipon.co.uk [email protected] Tel: +44 (0)1245 808195 Fax: +44 (0)1245 600030
• Non-scroll editor
- Full screen with background picture.
- With input method indicator.
- No space is reserved for scroll bar; the whole window body is reserved
for editor.
- The input content is not allowed to overstep one page.
- Examples: input filename, input mobile phone number in phonebook.
VoIP settings.
• Hidden input editor (password)
- Not full screen, normally within one page; the size of rectangle
depends on the expected length of input.
- The input is hidden.
- Example: PIN/PIN 2 code, PUK/PUK 2 code.
1
29
Page 30
Chapter1
VoIPon www.voipon.co.uk [email protected] Tel: +44 (0)1245 808195 Fax: +44 (0)1245 600030
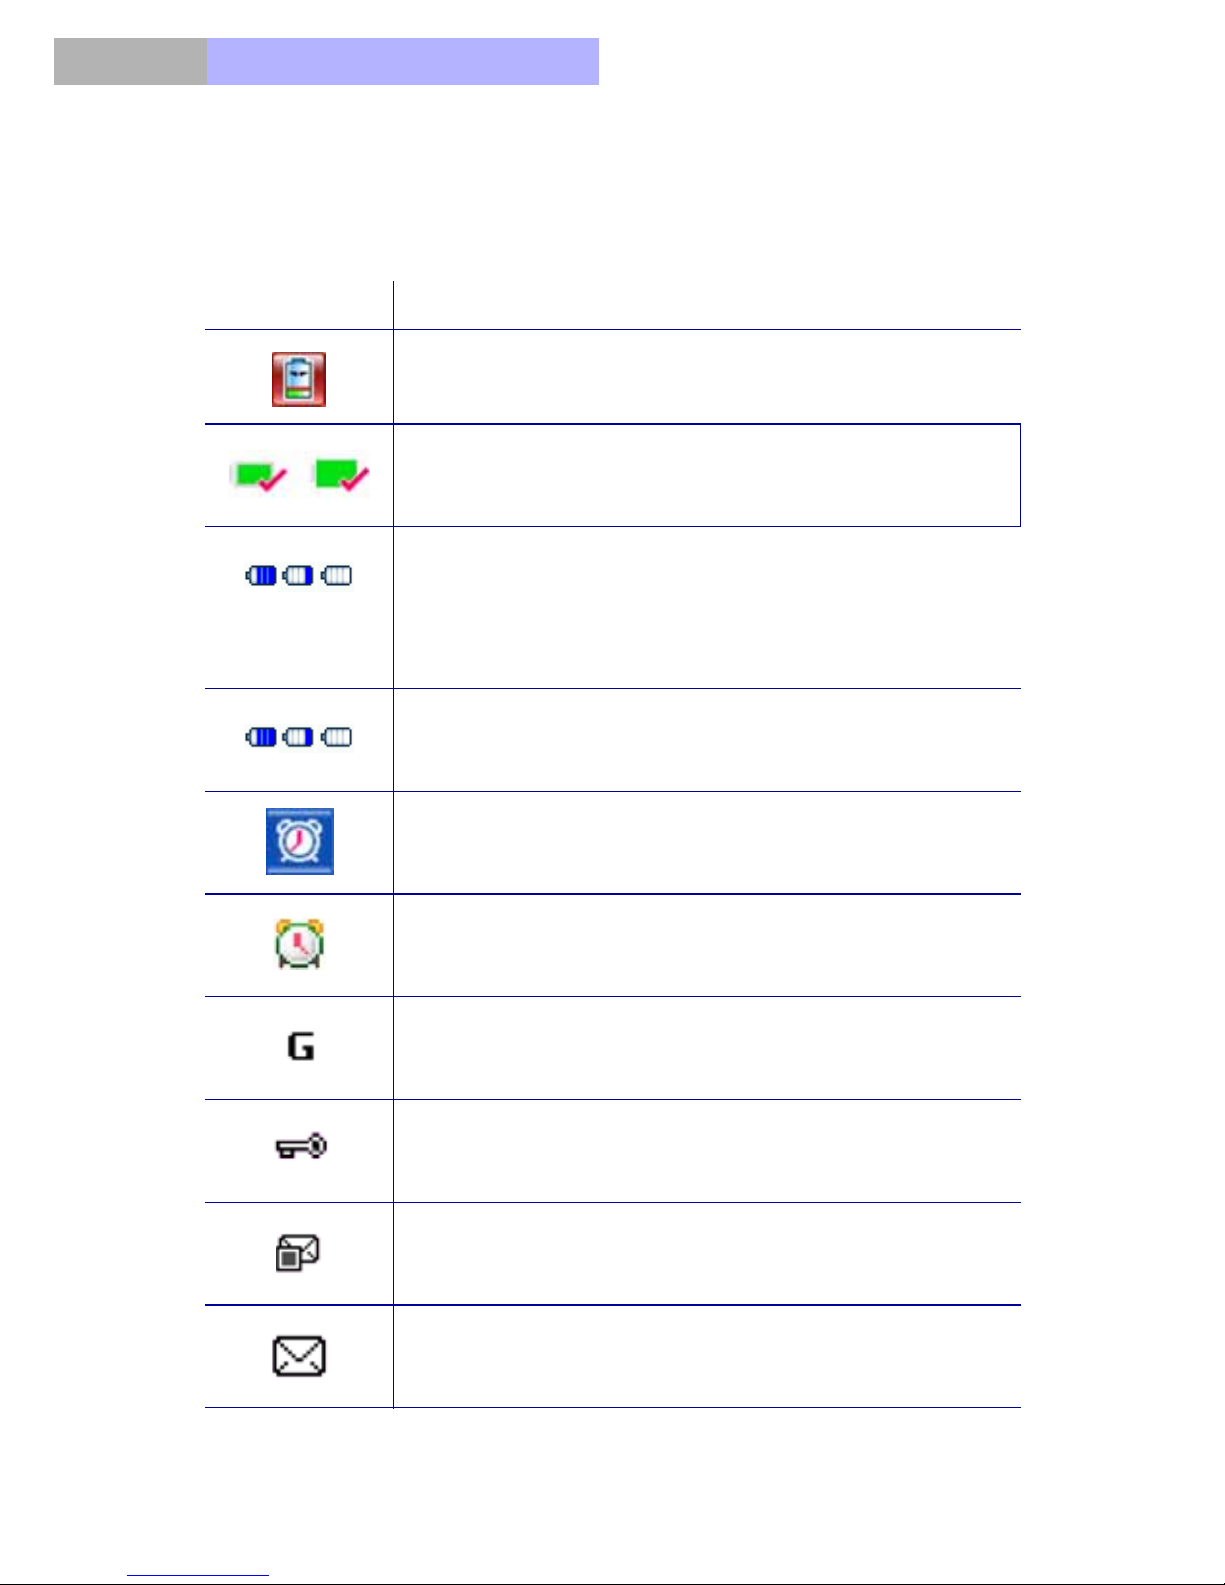
1.13 Phone USER INTERFACE
1.13.1 Icons
Icon Definition
Battery low. Remind you the phone is running out of
power.
Power charge OK.
Power is charging. The icons show when the phone
is charging power. When the power is fully charged,
the power charge OK icon as shown above
appears.
Battery level. The higher the bar, the more power is
left in the battery.
Alarm Clock
Alarm is set.
GPRS function is activated.
Keylock. The phone keypad is locked.
MMS. Multimedia message service.
Short Message Service. Remind you have got a
short message in the SMS inbox.
30
Page 31
Chapter
VoIPon www.voipon.co.uk [email protected] Tel: +44 (0)1245 808195 Fax: +44 (0)1245 600030
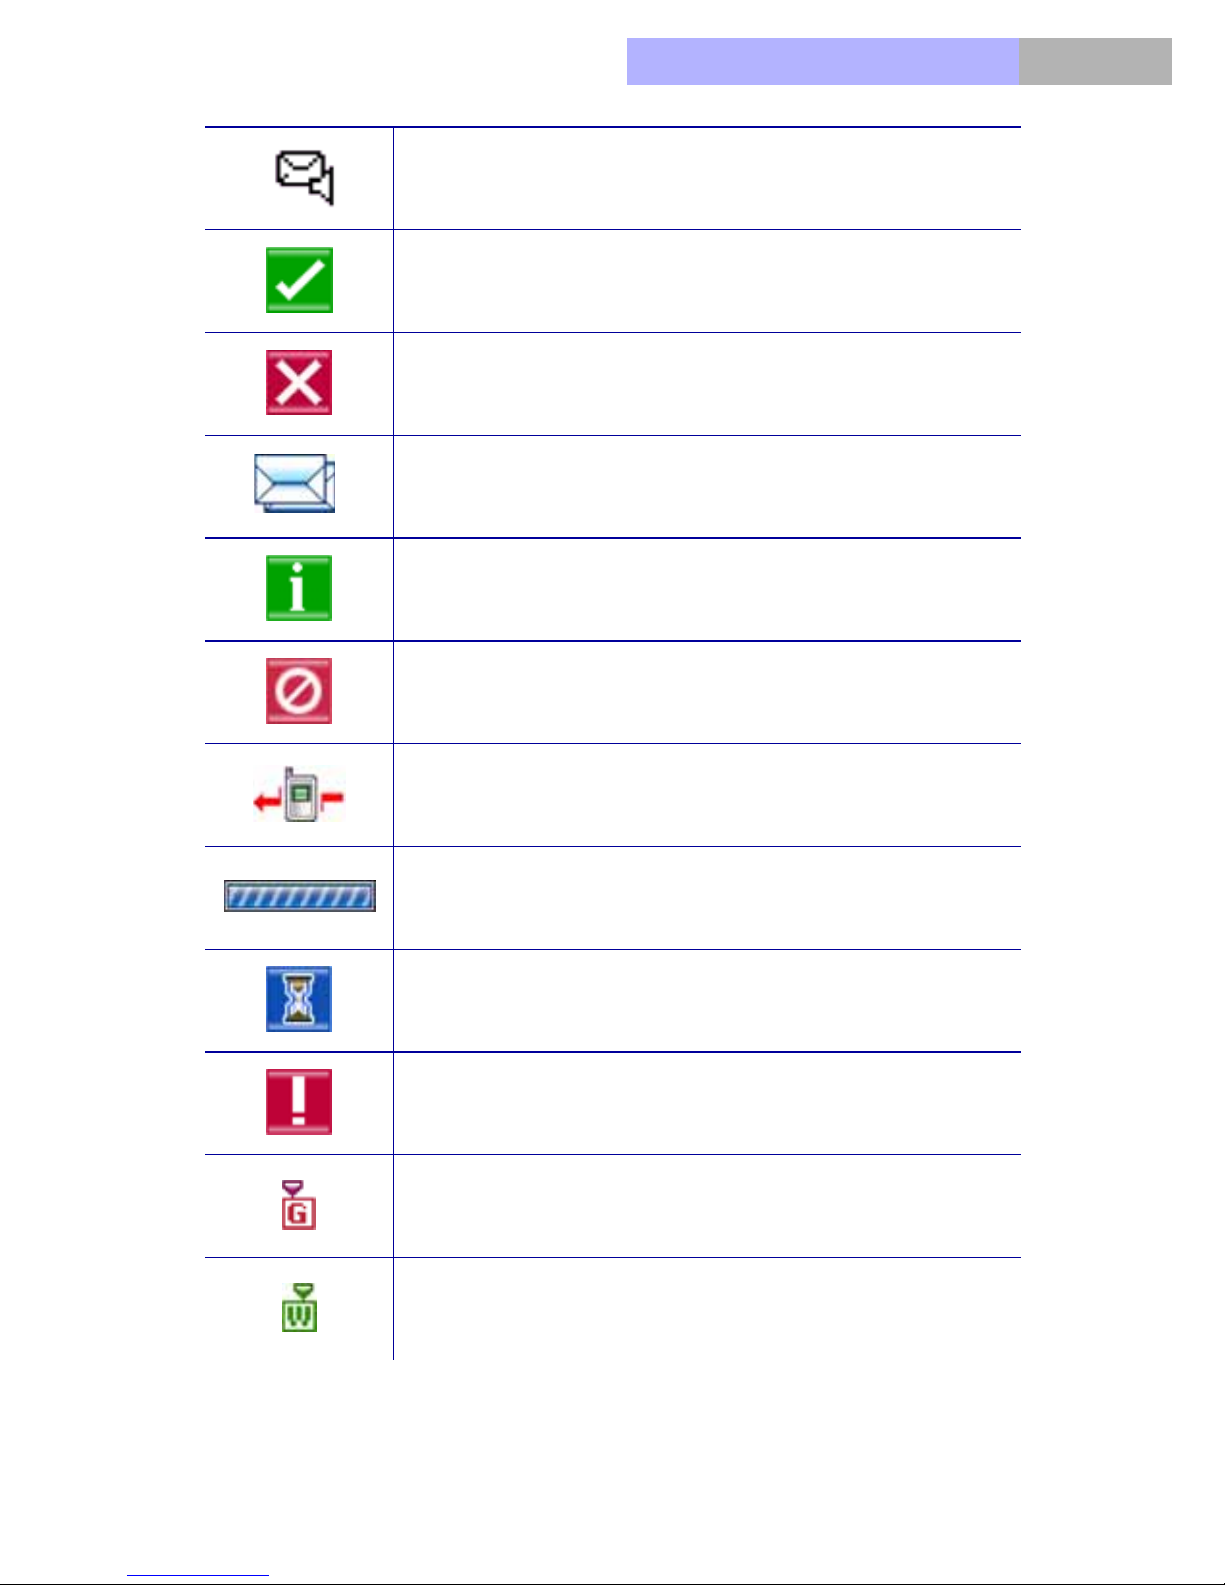
Voice mail. Remind you have got a voice message
in the voice mailbox.
Confirm
Error
Incoming short message
Information
1
Invalid card
Missed call
SMS, MMS or e-mail sending in progress.
Requesting for network service.
Warning, wrong operation or Memory is full.
The phone is using GSM-based network.
The phone is using WLAN-based network.
31
Page 32

Chapter1
VoIPon www.voipon.co.uk [email protected] Tel: +44 (0)1245 808195 Fax: +44 (0)1245 600030
1.14 Popup windows
It uses the pop-up notes to inform the user the current activities of the phone,
network, or mobile service without requiring any user action, with exception of
a user response note. Notes typically disappear automatically after 2 seconds
timeout period except waiting notes, progressing notes, and confirmation
notes.
There are several types of popup window:
• Error Notes:
Inform the user something is wrong.
• Waiting Notes:
Inform the user to wait until an operation is completed. User is able to
cancel the operation by pressing red key . The waiting note should
be displayed if the processing time is more than 2 seconds.
• Warning Notes:
Inform the user about an error event, or a situation that may cause harm
to the user, for example, “Call failed”, “Battery low”.
• Information Notes:
Inform the user about the state of the phone, network, or application, e.g.,
“Call timer: x”, “Call cost: x”.
• Confirmation Notes:
Notify the user of successful actions if there is no other indication about
the accomplished operation, e.g., “Keypad is unlocked”.
• Permanent Notes:
They cannot be interrupted by the user with key presses. They stay on the
display until dismissed by the phone, e.g., “Invalid card”.
• Confirm Queries:
A Confirm Query is used when the UI requires the user’s confirmation for
proceeding with an operation. It forces the user to choose between
accepting and declining an operation.
• Progressing:
The progress control shows the user about the progress of the operation,
it provides an option for the user to interrupt the operation. It can be used
for provisioning and downloading.
32
Page 33

Chapter
VoIPon www.voipon.co.uk [email protected] Tel: +44 (0)1245 808195 Fax: +44 (0)1245 600030
2. Idle Mode
When the phone is ready for use, and you have not keyed in any characters,
the phone is in idle mode. The following items appear on the idle screen of the
mobile phone during the idle mode.
2.1 Status indicator
Status icons include:
Call connected
Key-guard is enabled
GPRS indicator
2
MMS received
SMS received
Stopwatch
Countdown
Alarm ON
Battery
2.2 Signal bar
Signal bar indicates the strength of the received signals. It is represented with
6 levels. (GSM/WLAN) GSM at left side, WLAN at right side. At the bottom of
each signal bar, an icon marked with either G ( ) or W () indicates the
current active network. An active network is the network that the next outgoing
call will go through. It also means that the phone will smartly decide which
network should be “active” depending on the strength of the signal and the
preference of the network set by the user.
33
Page 34
Chapter2
VoIPon www.voipon.co.uk [email protected] Tel: +44 (0)1245 808195 Fax: +44 (0)1245 600030
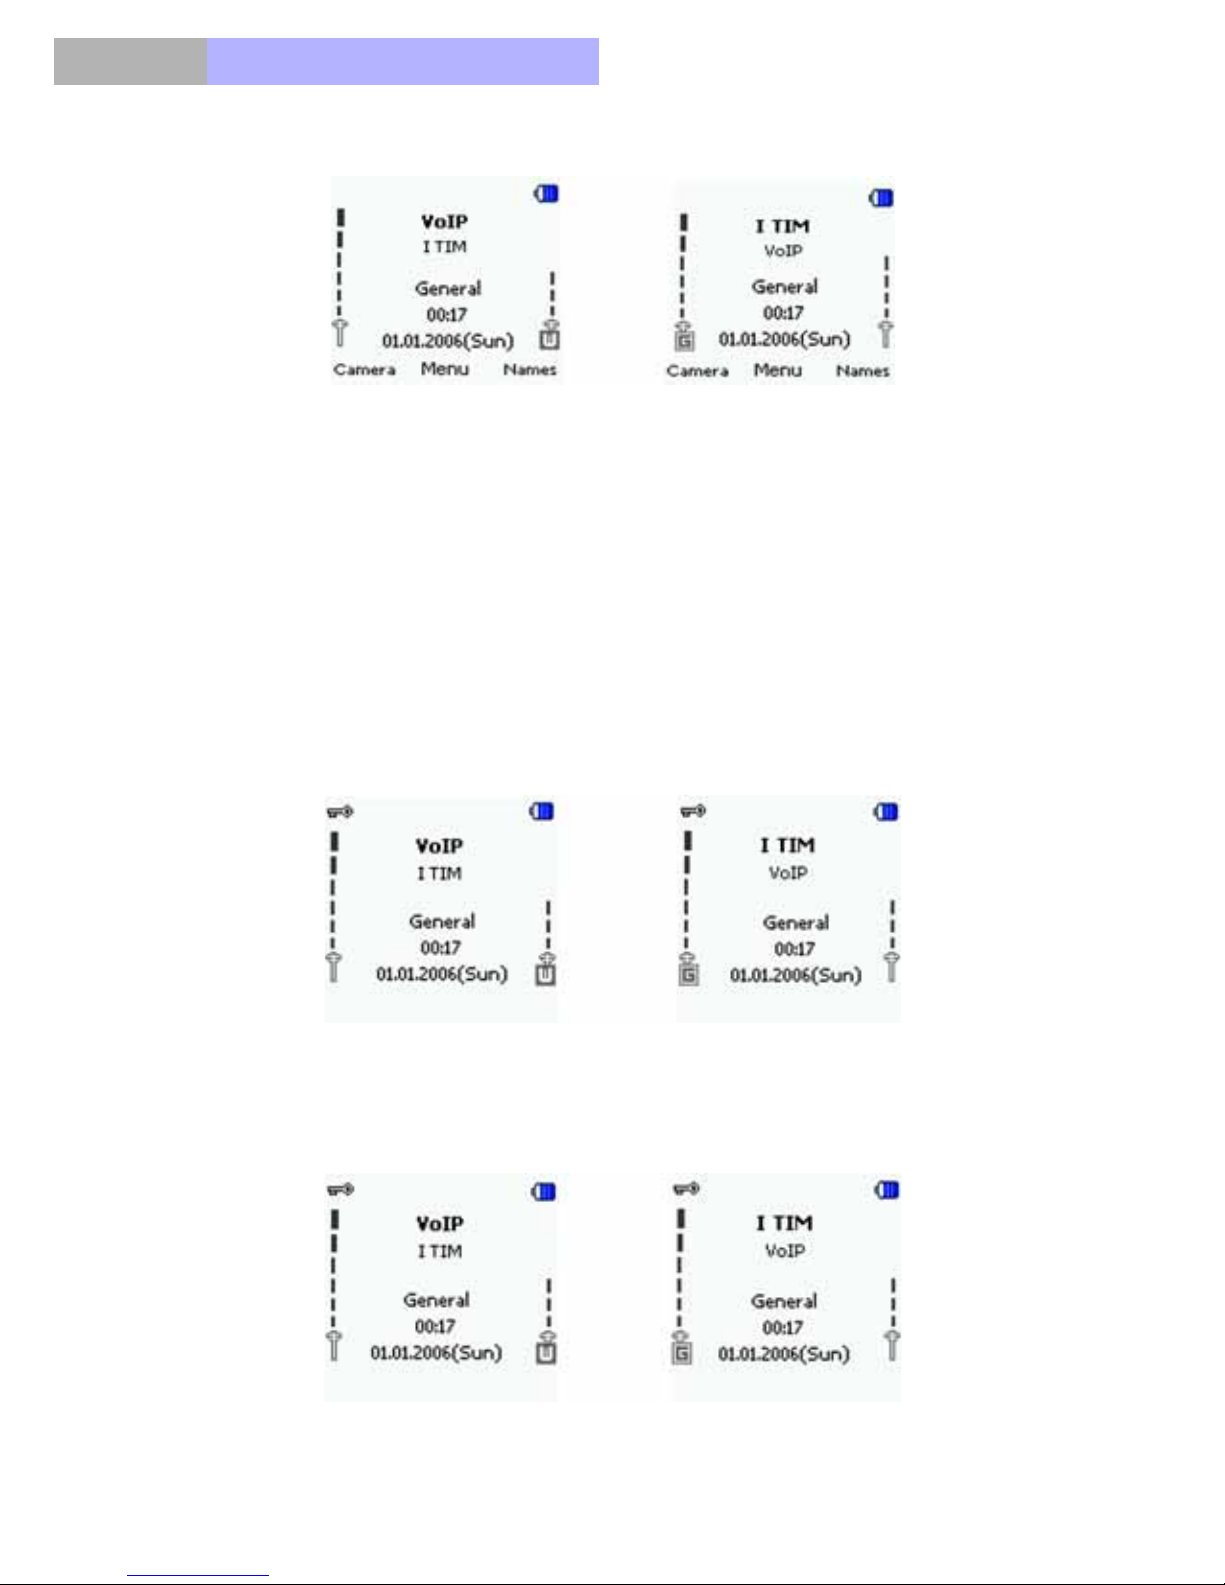
WLAN active GSM active
2.3 Mobile operator name and WLAN network
name
Operator and WLAN network name will both display in the idle mode when
user selects GSM preferred or WLAN preferred in Settings/Preferred network.
In WLAN preferred mode, the WLAN network name will be shown above the
GSM operator name. The “active” network will be shown in boldface.
In GSM preferred mode, the GSM operator name will be shown above the
WLAN network name. The “active” network will be shown in boldface.
34
Page 35
Chapter
VoIPon www.voipon.co.uk [email protected] Tel: +44 (0)1245 808195 Fax: +44 (0)1245 600030
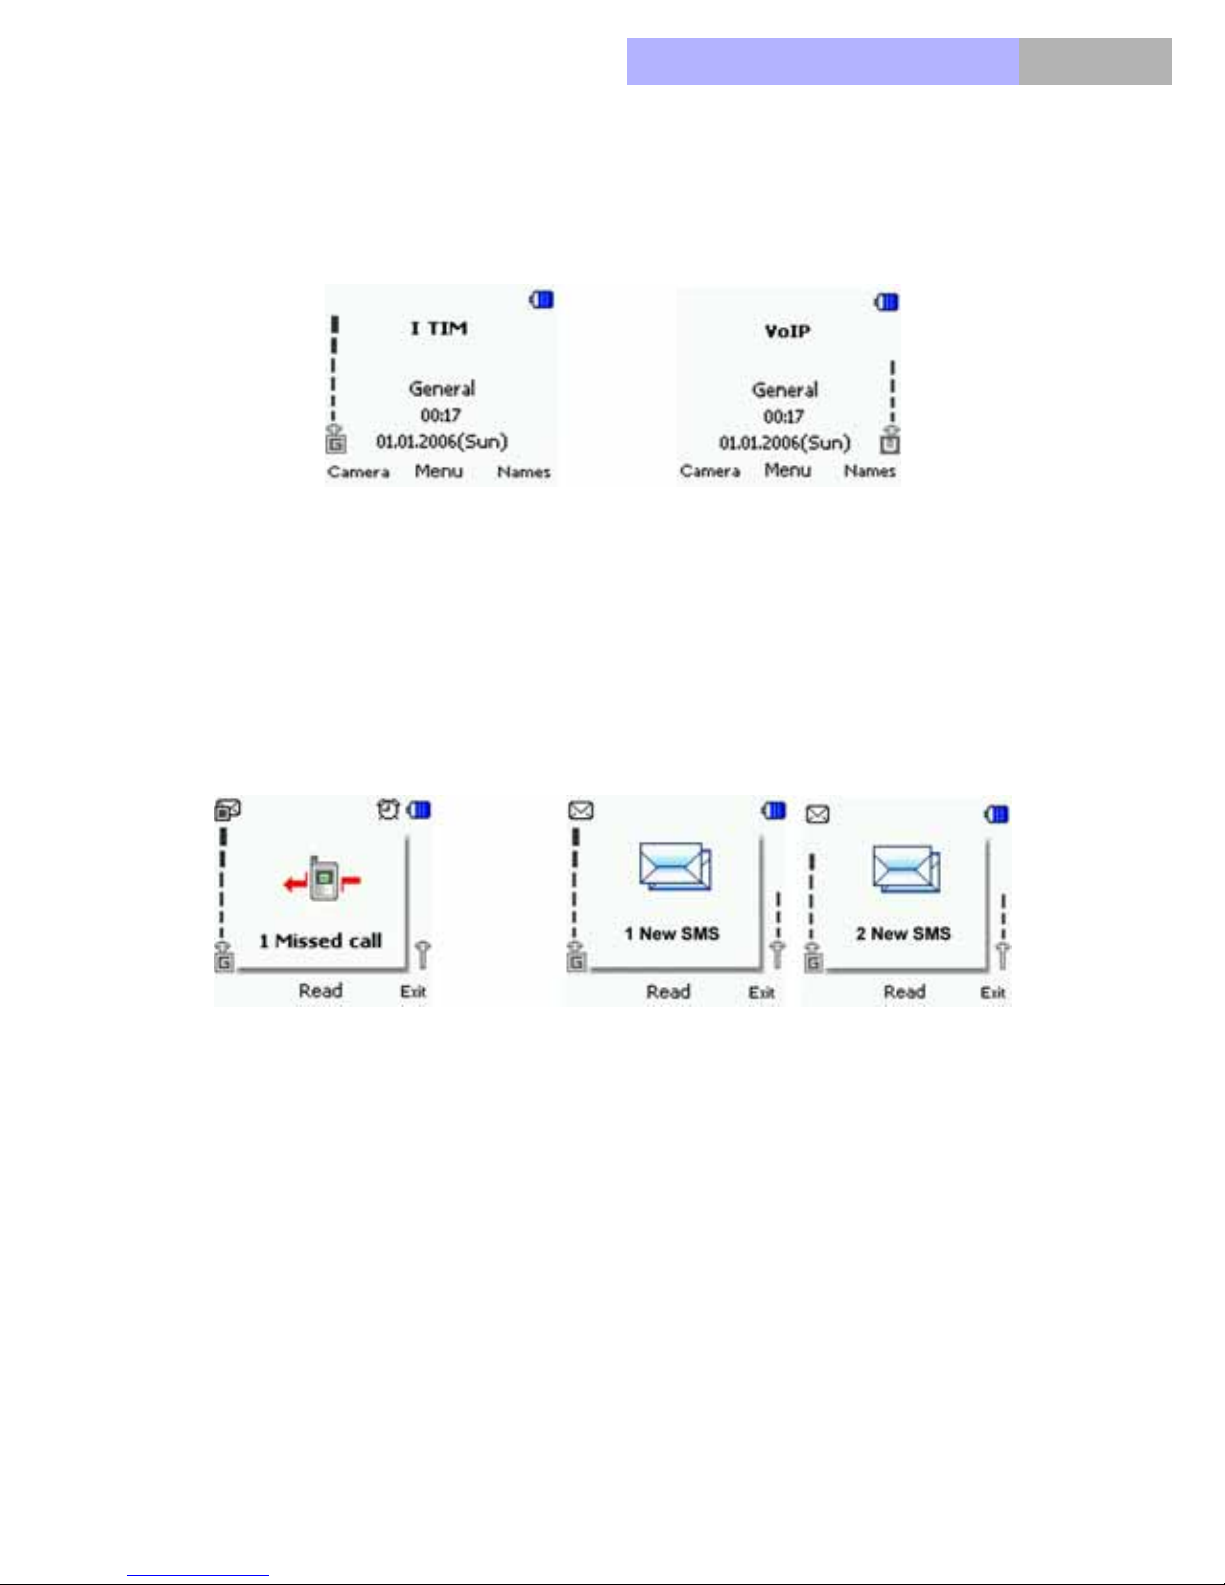
En modo WLAN solo o en GSM solo, se muestra una sola barra de señal,
correspondiente al nombre WLAN o al nombre del proveedor de GSM.
GSM only WLAN only
2.4 Soft notifications
2
In WLAN only or GSM only mode, there will be only one signal bar displayed,
mapping its corresponding WLAN name or GSM operator name.
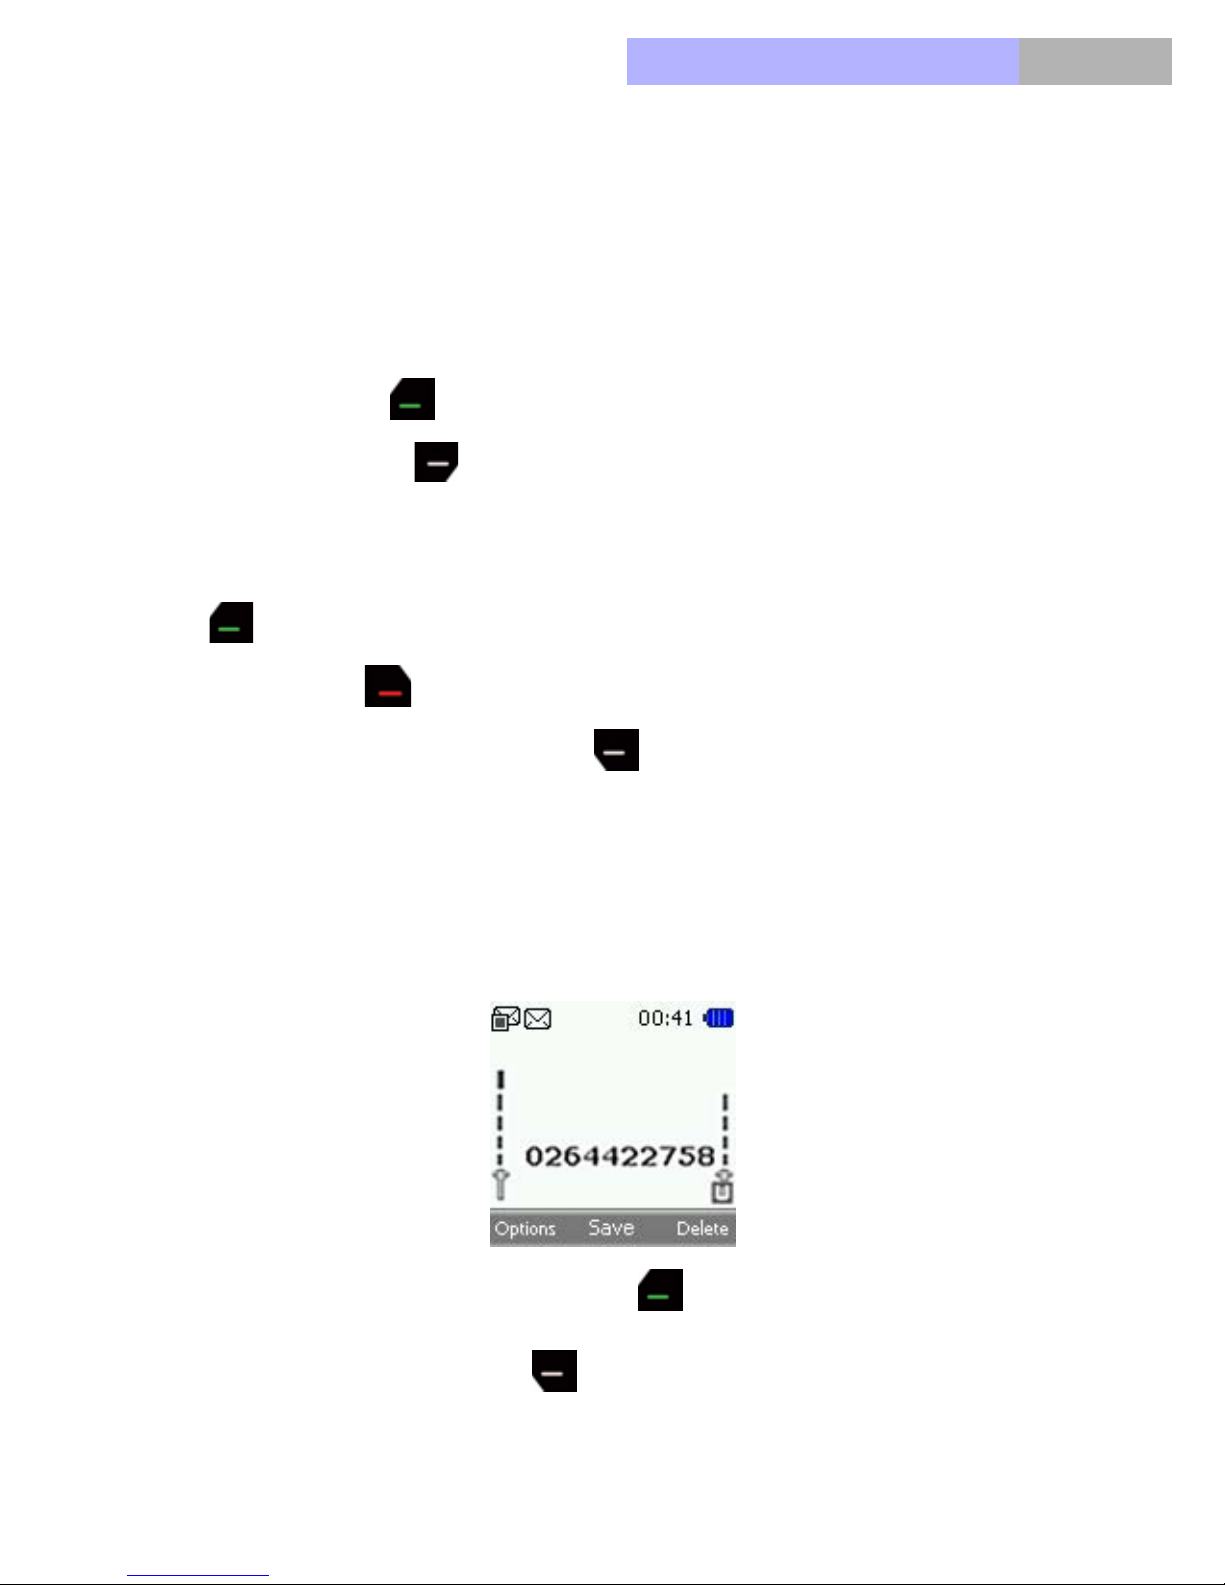
Missed calls Messages received
2.5 Active profile
The selected profile, General/Silent/Meeting/Outdoor/User1/User2, from
Settings/Profile is show in the middle of the main zone.
2.6 Time & Date
It shows the current time, date and the weekday using the format set in
Settings/Clock/Date display and Time Format.
35
Page 36

Chapter2
VoIPon www.voipon.co.uk [email protected] Tel: +44 (0)1245 808195 Fax: +44 (0)1245 600030
2.7 Soft keys
The left soft key in idle mode is a shortcut to Camera.
Press OK Key to take a picture. Press left soft key (Options) to enter
Options page, and set the Effect, Size, Quality, Self timer, Shutter sound of the
picture in this page.
OK Key in idle mode is the shortcut key to enter Menu.
The right soft key in idle mode is Names to access the Contacts/
Phonebook.
2.8 Wallpaper
You can select different wallpaper from Settings/Display/Wallpaper, and can
also select images from the Gallery which were captured to set as a wallpaper.
2.9 Power Saving
For power saving, the screen is turned off when no function of the phone has
been used for a certain period of time. You can set the backlight off time (10/
20/30/60 seconds) in Settings/Display/Backlight timer.
Press any key to turn the screen back on.
36
Page 37
Chapter
VoIPon www.voipon.co.uk [email protected] Tel: +44 (0)1245 808195 Fax: +44 (0)1245 600030
3. Call Functions
This chapter explores how to make a call, how to answer/reject a call, and the
functions available during a call.
3.1 Making A Call
To make a phone call, key in the phone number, including the area code, and
press green Key to call the number. If you key in an incorrect character,
press right soft key (Delete) to delete it.
For international calls, press the international access code (it varies according
to the service provider) and then key in the country code, the area code without
the leading 0, if necessary, and the phone number, and then press green Key
to call the number.
3
Press red Key to end a call or to cancel the call attempt.
You can always use the left soft key (Options) to select the network for
the outgoing call if both GSM and WLAN network are available and you wish
to use the network other than the preferred one.
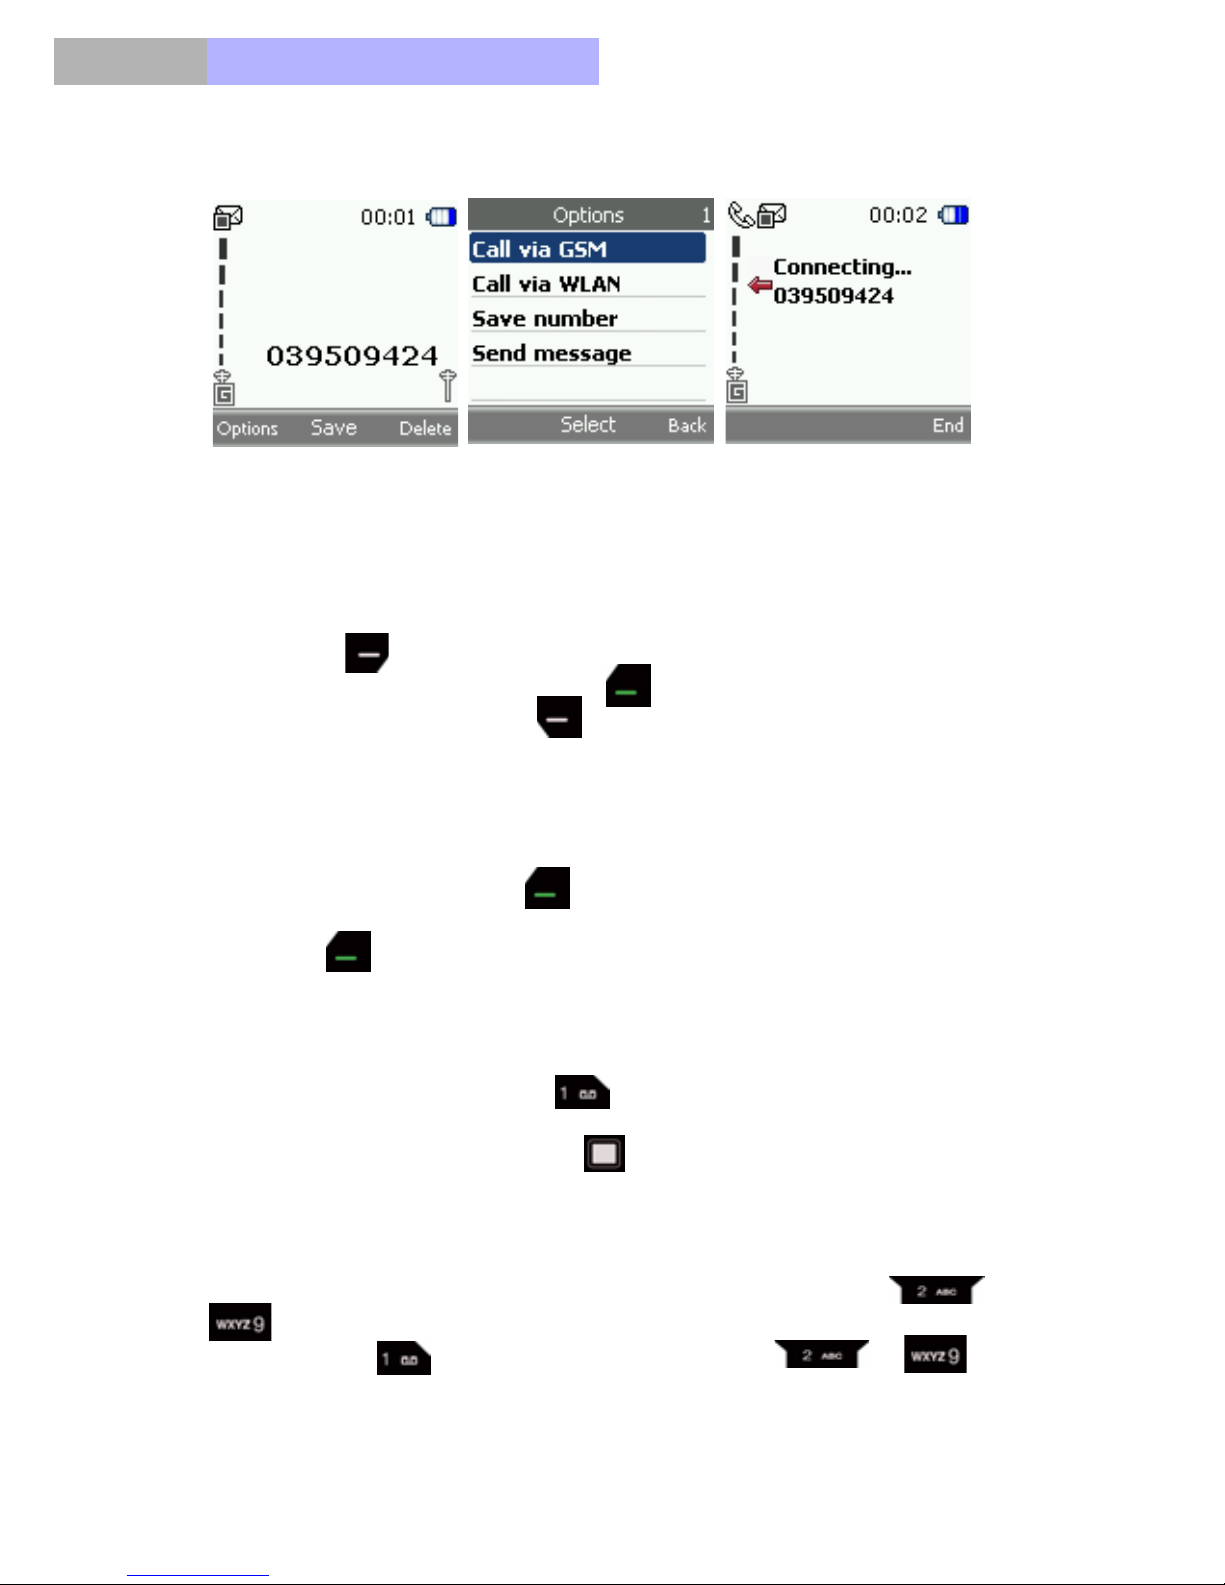
• In the following case, WLAN mode is active, the next outgoing call will be
out via WLAN.
• Digit number entry. Press Green key .
• You can press left soft key (Options) to select “Call via GSM” to
route the outgoing call to GSM network.
37
Page 38
Chapter3
VoIPon www.voipon.co.uk [email protected] Tel: +44 (0)1245 808195 Fax: +44 (0)1245 600030
Digit number Select “Options” Outgoing call
3.1.1 Making A Call Using the Contacts
To search for a name/phone number that you have saved in Contacts, press
right soft key (Names) to quick access the phonebook and select the one
you want to call, and press Green key to call the number using the active
network, or select left soft key (Options) to select the network to use if
both GSM and WLAN are available. See Contact chapter for more information.
3.1.2 Last Number Redialing
In idle mode, press Green key once to access the list of numbers you last
called or attempted to call. Scroll to the number or name you want, and press
Green key to call the number.
3.1.3 Calling Your Voice Mailbox
In idle mode, long press keypad to call the voice mailbox. If the phone
asks to set voice mail, please key in the voice mail box number provided by
service provider and press OK key .
3.2 Speed Dialing
Before you can use speed dialing, assign a phone number, from to
, to one of the speed-dialing keys. Call the number in either of the
following ways: is reserved for voice mail, while to can
be set up for speed dialing.
38
Page 39

Chapter
VoIPon www.voipon.co.uk [email protected] Tel: +44 (0)1245 808195 Fax: +44 (0)1245 600030
If Speed dialing is set to on, press and hold a speed-dialing key until the call
is started.
3.2.1 Navigation Key
By default, the Left navigation key is the shortcut to SMS message writing.
Press it and you are directly led to the text writing screen under Message
>SMS> Write Message.
The Right navigation key is the shortcut for connecting to WLAN AP.
The Down navigation key is the shortcut for the phone book access.
Press the key to directly search for the contact person you want.
Press Up navigation key is the shortcut for WAP service directly.
3
For more information on how to set up the speed dial function, see Contacts >
Speed Dial.
3.3 Answering or rejecting an incoming call
Press Green key or OK key to answer an incoming call, and press
Red key to end the call.
Press Red key to reject an incoming call.
If a compatible headset supplied with the headset key is connected to the
phone, you can answer and end a call by pressing the key.
There are two cases in call connected, single call connected and multi call
connected.
3.3.1 Single call connected mode
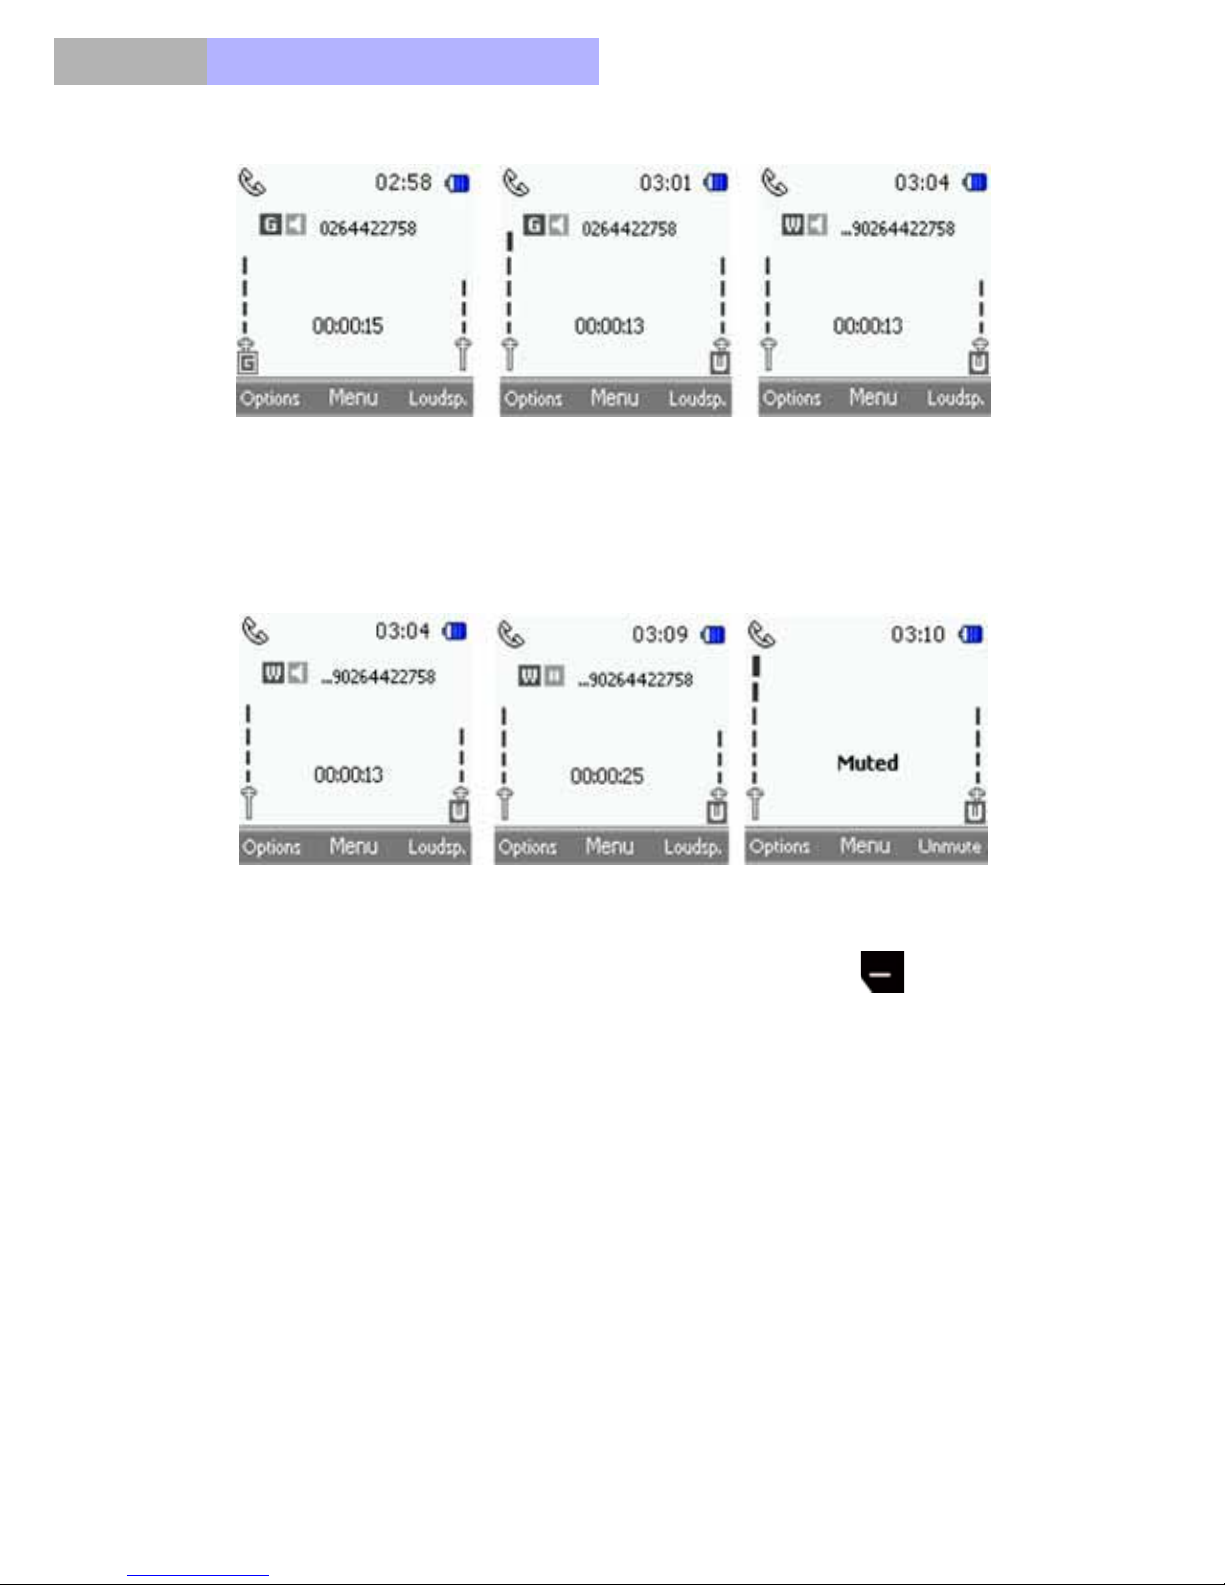
a) Single in GSM, GSM active and GSM currently connected
b) Single in GSM, WLAN active and GSM currently connected
c) Single in WLAN, WLAN active
39
Page 40
Chapter3
VoIPon www.voipon.co.uk [email protected] Tel: +44 (0)1245 808195 Fax: +44 (0)1245 600030
(a) (b) (c)
In the single connected mode, there are 4 elements in the main zone, including
signal bar, call state icon, name / number of the remote side, and call timer.
On line Hold Muted
In the single call connected mode, you can press left soft key (Options)
to hold or mute the call: by holding the call, the two remote sides can’t hear
each other (middle picture above); by muting the call, you can hear the remote
side while the remote side can’t hear you.
3.3.2 Multi call connected mode
During a call, the user can accept another incoming call or make another
outgoing call. In this case, the screen will be in multi-connected mode. As in
the following example, with one call active, and the other on hold, the user can
also combine two GSM calls into one conference call, as shown in later
section.
40
Page 41
Chapter
VoIPon www.voipon.co.uk [email protected] Tel: +44 (0)1245 808195 Fax: +44 (0)1245 600030
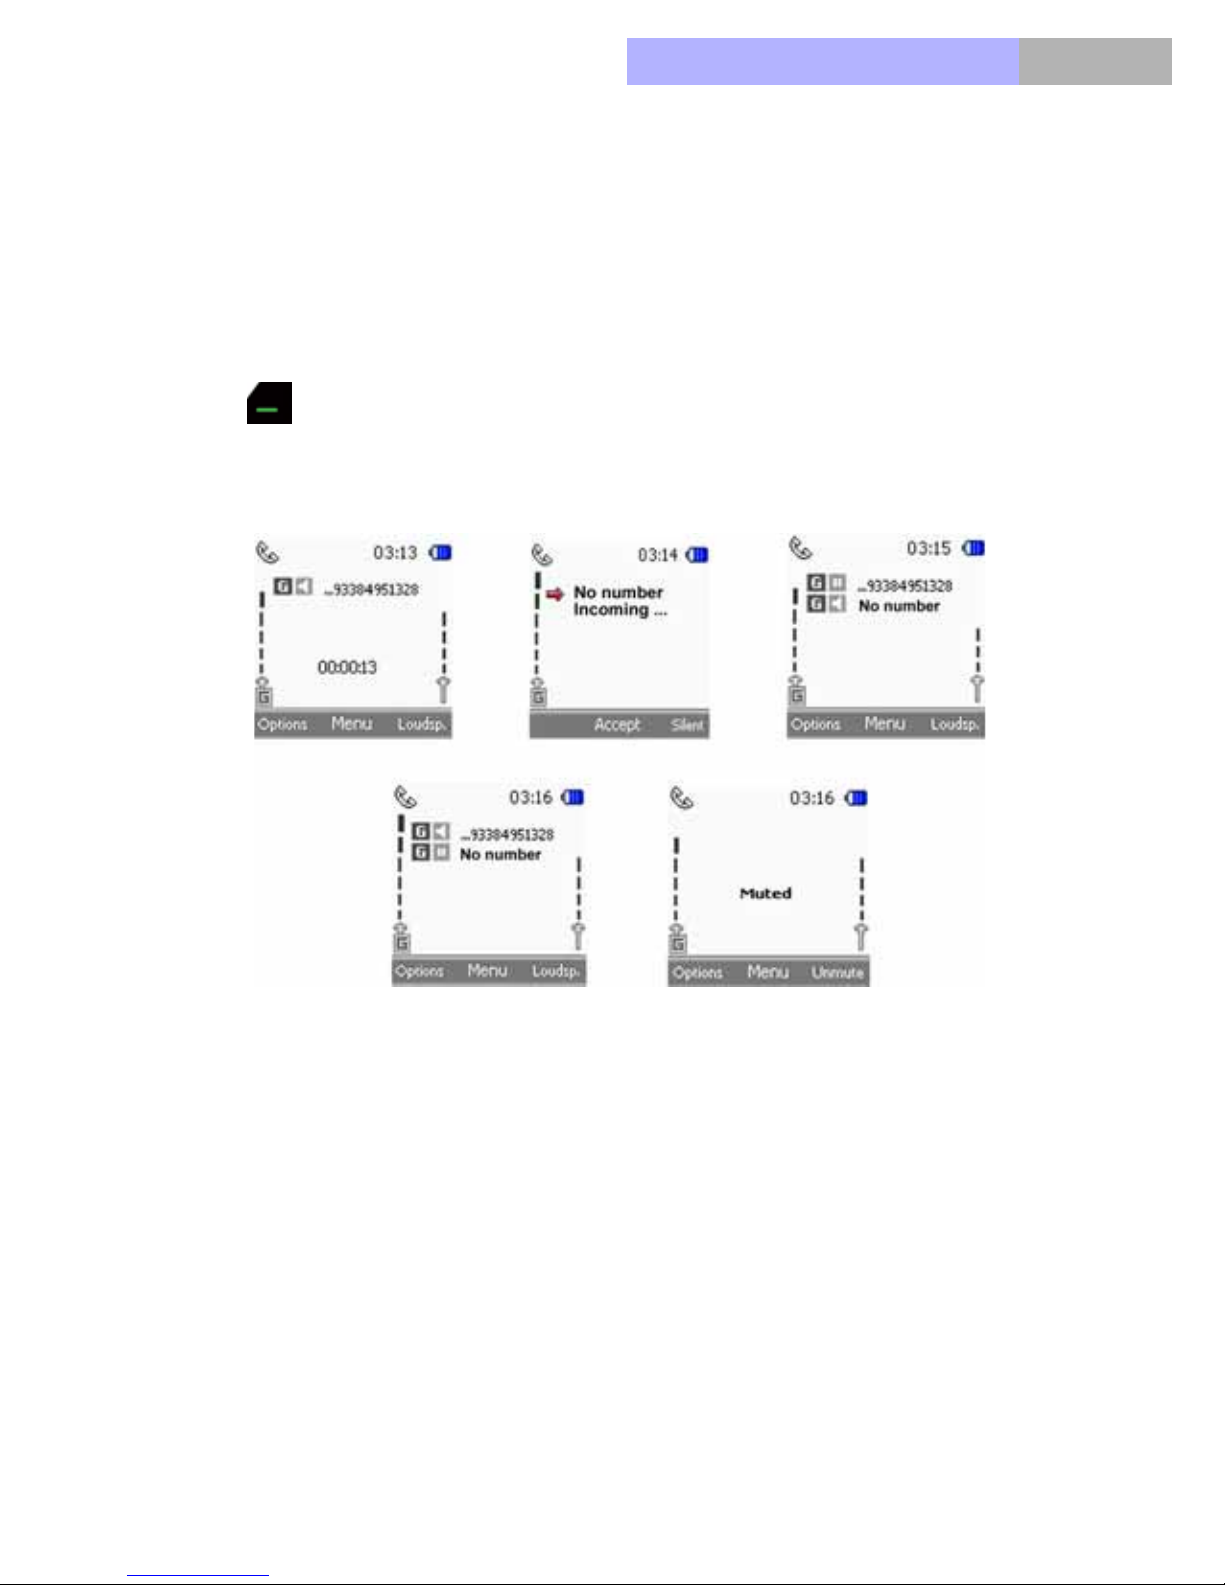
A connected call can accept any incoming calls; the user can also make a new
call in connected mode. DP-L10 would auto make 2 calls into multi-connected
mode, one call is on line, another on hold, unless user makes two GSM calls
into one conference call.
a) Two GSM calls in multi mode
A GSM connected call > Alan incoming > 2 GSM > multi-call > Green key
to Swap call >mute
3
Reject a call will show the Call end on Pop-up window
41
Page 42
Chapter3
VoIPon www.voipon.co.uk [email protected] Tel: +44 (0)1245 808195 Fax: +44 (0)1245 600030
Information:
1. If the loud speaker is already turned on, and a new incoming call is
accepted, the phone would still keep loud speaker on.
2. The newly accepted call will be the activated one and the first call will be
put on hold.
3. If a third incoming call is accepted, the third call will make the active call
hang on in multi-call. On hold call will be still on hold. The current “active
call” will be terminated, the call on hold will still be on hold and the third
incoming call will be the active call.
4. The active call will be terminated if the user presses the “End key”.
Pressing ”End key” in multi-call, the active call will be hung on.
5. If the user wants to swap the “active” and the “on hold” calls, the user can
simply press “Send key”, or select the swap item in Options. Within 2 calls,
only press “ Send key” to swap them, or select swap item in options lists.
6. In muted mode, the user still can do call control, like swap or hold.
7. In call connected mode, if user presses “end all calls”, DP-L10 will notify
the user of the call time of the last call, then it will go back to Idle mode.
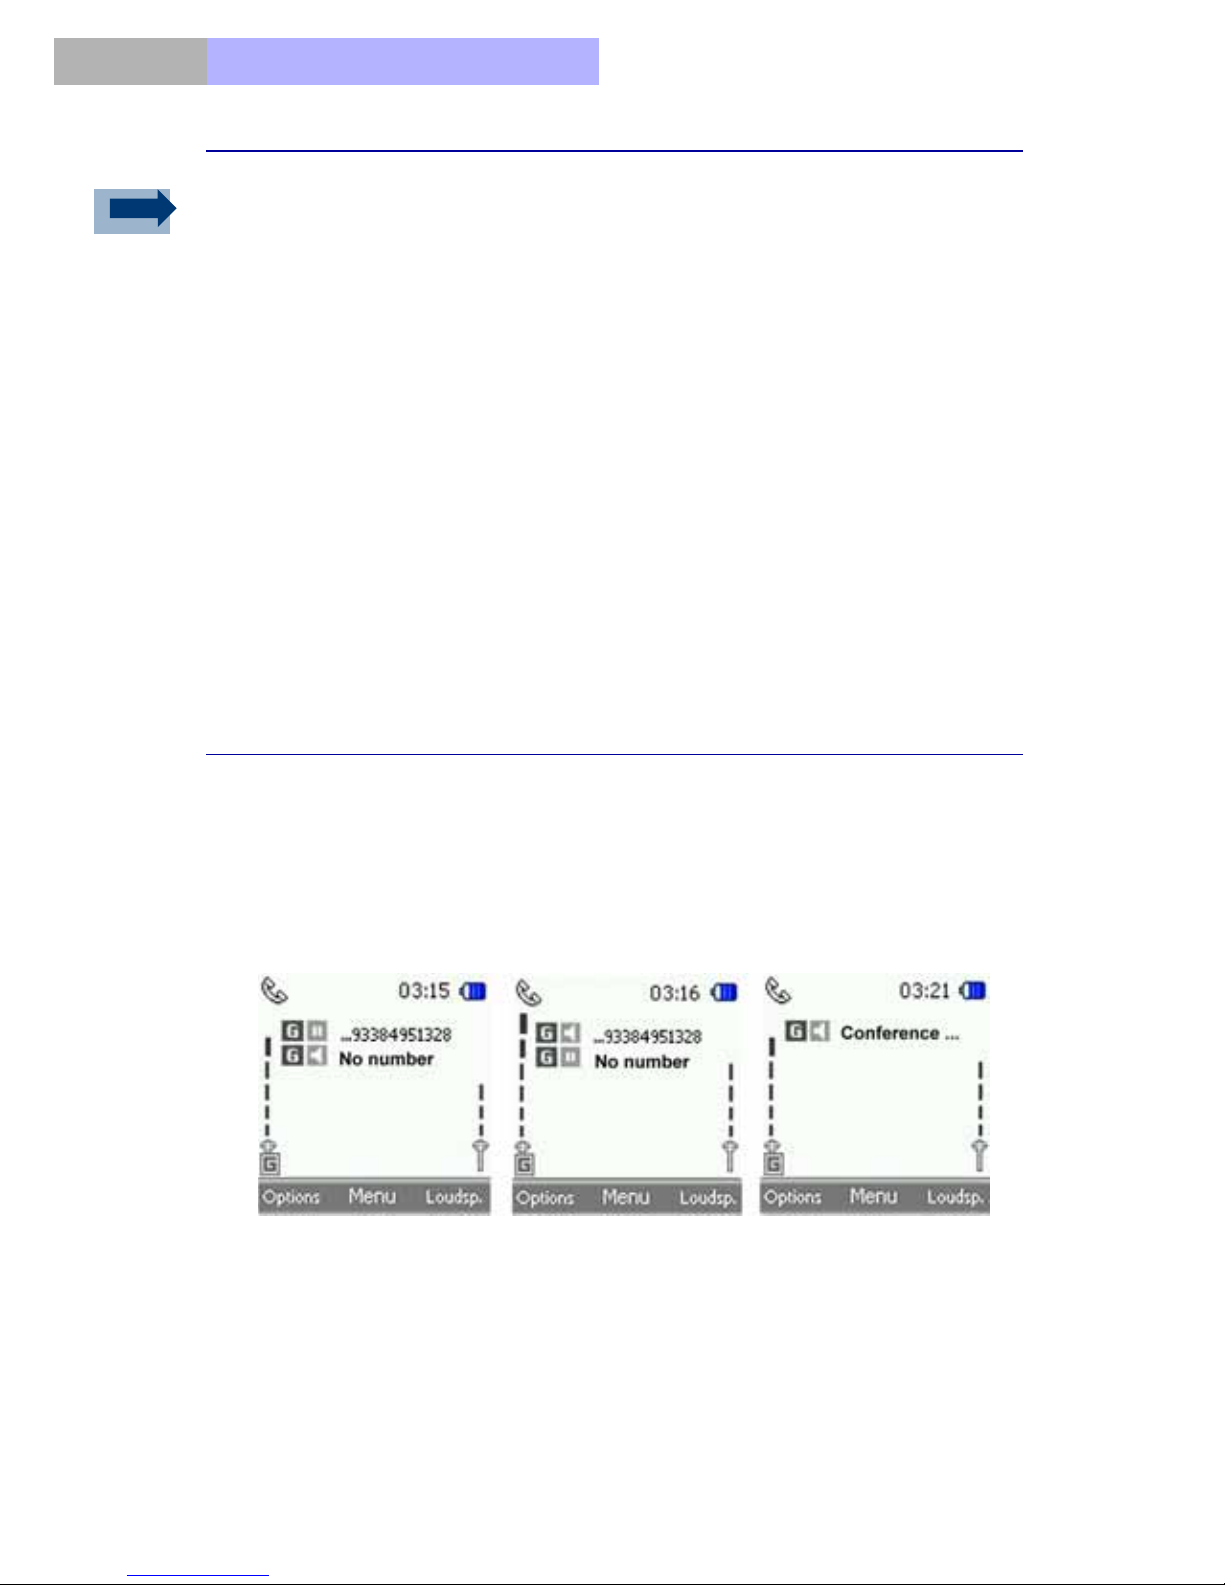
b) Two GSM calls merged into one conference call (please note that your
service provider may not support this service).
1. User can merge two GSM calls to a conference call by selecting “start
conference” in the options lists.
2 GSM calls swap the call conference call
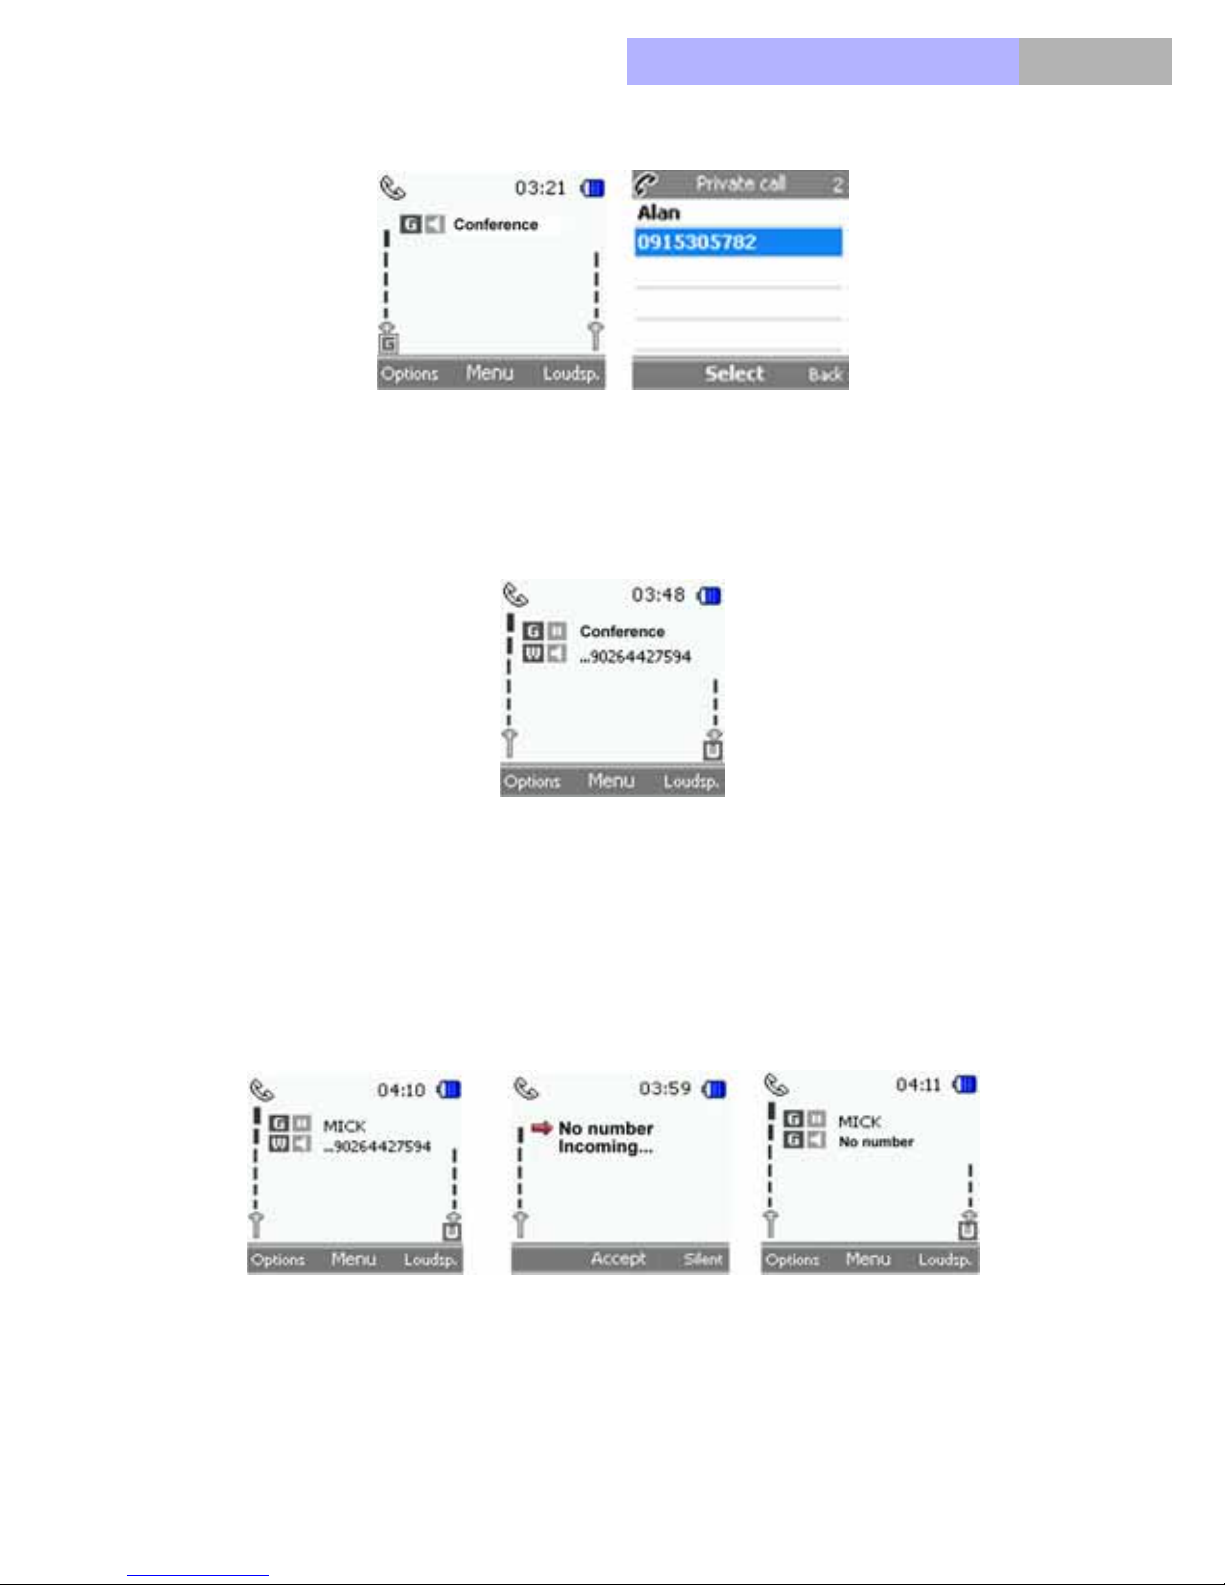
2. User can also privatize any call from either call in a conference, by
selecting “Private Calls”:
42
Page 43
A conference Private call
VoIPon www.voipon.co.uk [email protected] Tel: +44 (0)1245 808195 Fax: +44 (0)1245 600030
c) A GSM conference and a WLAN call (Different net)
Chapter
3
d) 1 GSM call and 1 WiFi WLAN call on line
In this case if any new GSM or WLAN incoming call is accepted by the
user, the active call will be terminated.
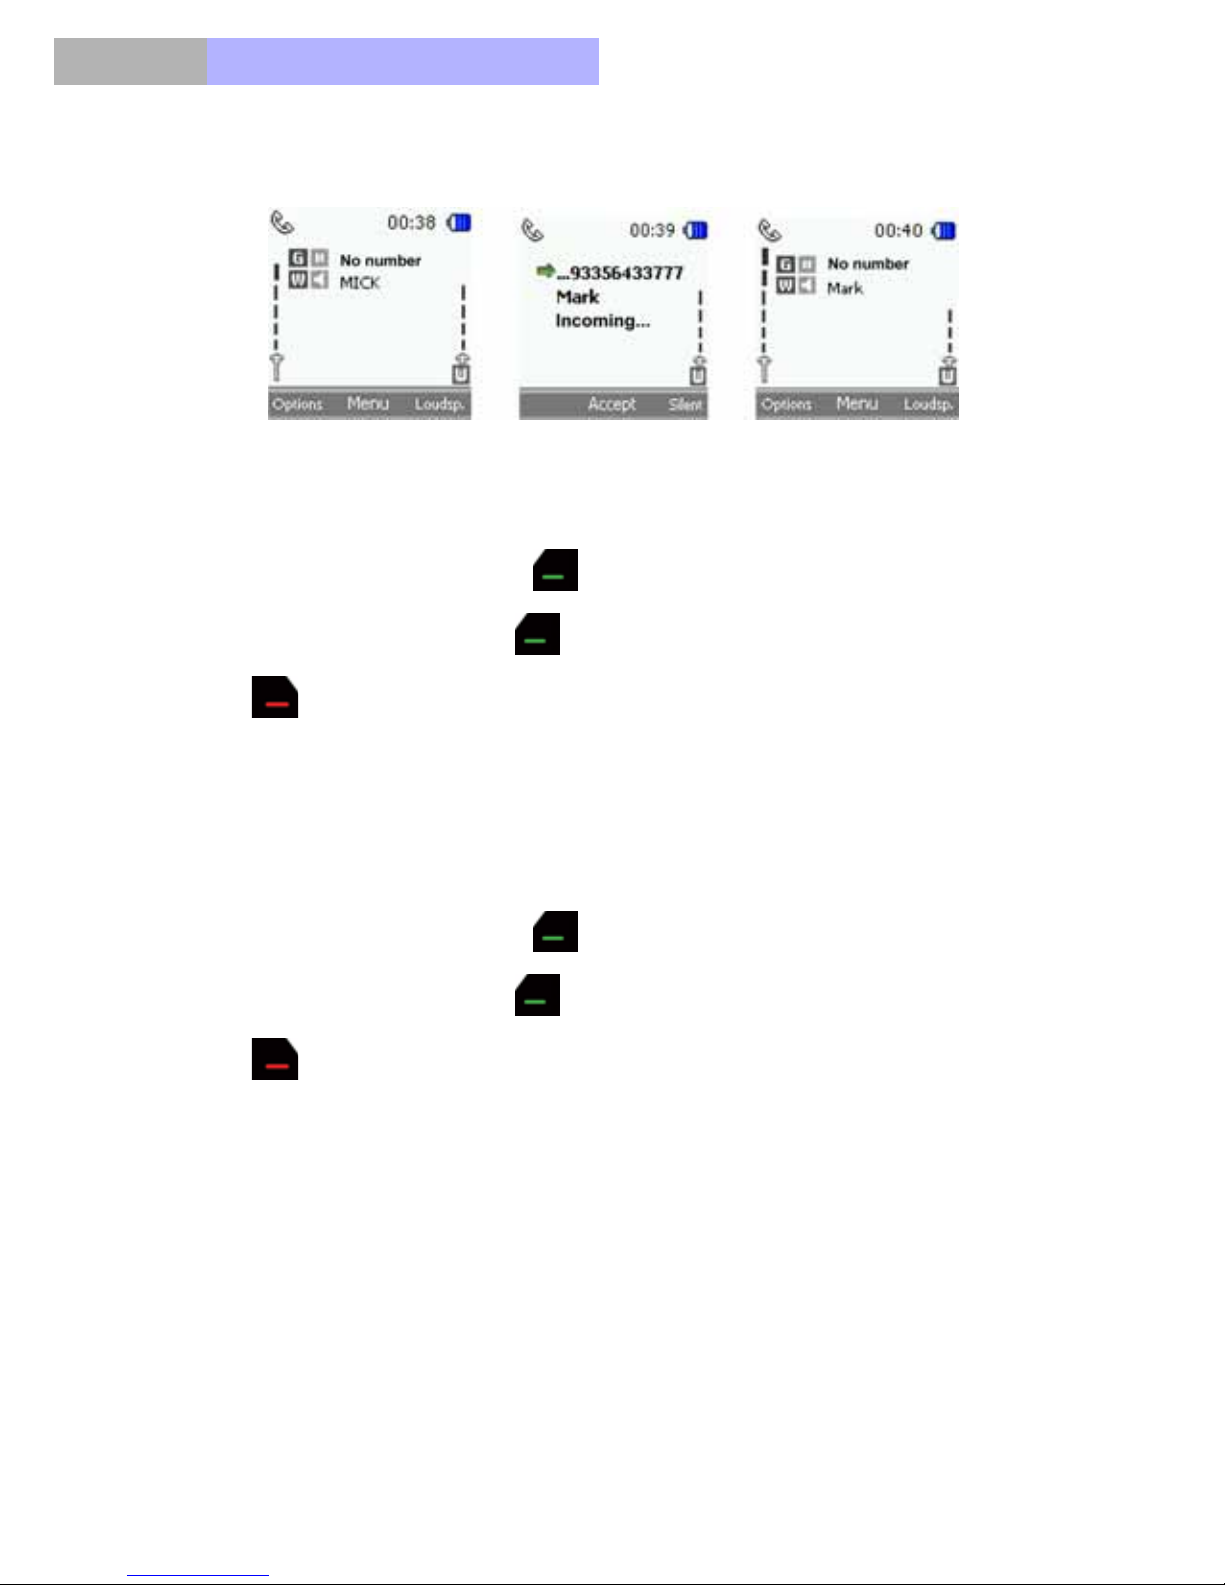
Case 01: Accept Incoming number via GSM
43
Page 44
Chapter3
VoIPon www.voipon.co.uk [email protected] Tel: +44 (0)1245 808195 Fax: +44 (0)1245 600030
Case 02: Accept Incoming call via WiFi
3.4 Call Waiting
During a call, press Green key to answer the waiting call. The first call is
put on hold. Press Green key to swap the active/on-hold calls. Press Red
key to end the active call.
To activate the Call waiting function, see Settings > Network Service > Call
Waiting
3.5 Multi Calls
During a call, press Green key to answer the waiting call. The first call is
put on hold. Press Green key to swap the active/on-hold calls. Press Red
key to end the active call.
44
Page 45

Chapter
VoIPon www.voipon.co.uk [email protected] Tel: +44 (0)1245 808195 Fax: +44 (0)1245 600030
4. Menu Functions
The phone offers you an extensive range of functions, which are grouped into
menus. Before you get into each of the functions of the menu, we will first
describe how to access each menu function.
4.1 Accessing A Menu Function
You can access a menu function by either scrolling the navigation direction
key, or pressing a key that has been setup as a shortcut.
4.1.1 By Navigating the Direction Key
• To access the menu, press OK key that represents the Menu.
• Scroll through the menu and select, for example, Message by pressing
4
OK key .
• If the menu contains submenus, scroll to the one that you want, for exam-
ple SMS, and press OK key .
• If the selected submenu contains further submenus, repeat step 3. Select
the next submenu, for example Write Message.
• Select the setting of your choice.
• Press right soft key (Back) to return to the previous menu level.
4.1.2 By Using a shortcut (camera, name)
• The right soft key (Names) is the shortcut to “Contacts” – same as
OK key > right navigation key (two times) > OK key
• The left soft key Camera is the shortcut to “Camera” – same as OK
key > down navigation key (two times) > OK key
45
Page 46

Chapter4
VoIPon www.voipon.co.uk [email protected] Tel: +44 (0)1245 808195 Fax: +44 (0)1245 600030
4.2 List of Menu Functions
4.2.1 Messages
SMS MMS
• Inbox
• Write Message
• Draft
• Outbox
• Te mp la te s
• Settings
• Memory status
• Inbox
• Write message
• Outbox
• Sent items
• Draft
• MMS settings
• Memory status
E-mail Voice mail
• Create e-mail
• Retrieve
• Disconnect
• Inbox
• Other folders
• Memory status
• Settings
• Dial Voice Mail
• Set Voice Mail
Cell broadcast
• Receiving settings
• Read broadcast
• Add channel
• Channel list
46
Page 47

Chapter
VoIPon www.voipon.co.uk [email protected] Tel: +44 (0)1245 808195 Fax: +44 (0)1245 600030
4.2.2 Call History
Missed calls Received calls
Dialed calls Delete all calls
• Missed calls
• Received calls
• Dialed calls
• Delete all
Call timers
• Last Call
• All Incoming
• All Outgoing
4
4.2.3 Contacts
Search Add new
• Save to SIM
• Save to Phone
Group settings Speed Dial
Memory Status My number
• GSM
• VoIP
47
Page 48

Chapter4
VoIPon www.voipon.co.uk [email protected] Tel: +44 (0)1245 808195 Fax: +44 (0)1245 600030
4.2.4 WLAN
WLAN status WLAN settings
• Active settings
• Edit act. settings
SIP status SIP settings
• User name
• Password
• Domain name
• Local port
• Proxy server
• Proxy port
• Register server
• Register port
• Register period
• Outbound server
• Outbound port
• RTP audio port
• RTP pkt. period
• Preferred codec
NAT settings
• RPORT
• STUN
48
Page 49

Chapter
VoIPon www.voipon.co.uk [email protected] Tel: +44 (0)1245 808195 Fax: +44 (0)1245 600030
4.2.5 WAP Service
Homepage Bookmarks
Download links Go To Address
• http://www.
• http://wap.
• Other
Service inbox Settings
• Profile
• Security Settings
• Service Inbox
• Immage display
• Cache
• Cookies
4
4.2.6 Voice Mail
Dial voice mail Set voice mail
4.2.7 Camera
49
Page 50

Chapter4
VoIPon www.voipon.co.uk [email protected] Tel: +44 (0)1245 808195 Fax: +44 (0)1245 600030
4.2.8 Settings
Profile Preferred Network
• General
• Silent
• Home
• Outdoor
• User Def 1
• User Def 2
• GSM only
• WLAN only
• GSM preferred
• WLAN preferred
Language GPRS setup
• GPRS attached
• Data count
• GPRS attach
• GPRS detach
Tones Display
• Ring tone
• SMS tone
• Alarm tone
• Keypad tone
• Power on/off
• WLAN alert
• Battery alert
• Wallpaper
• Backlight timer
• Backlight level
Clock
• Set date
• Set time
• Date display
• Time format
50
Page 51

Call settings Network service
VoIPon www.voipon.co.uk [email protected] Tel: +44 (0)1245 808195 Fax: +44 (0)1245 600030
Chapter
4
• Answering mode
• Auto redial
• Incall timer
• Call summary
• Call divert
• Call barring
• Call waiting
• Network select
• Band mode
• Number transmitted
Security Auto key guard
• Enable PIN
• Change PIN
• Change PIN2
• Handset code
• Fixed dialing
• On
• Off
Restore factory
51
Page 52

Chapter4
VoIPon www.voipon.co.uk [email protected] Tel: +44 (0)1245 808195 Fax: +44 (0)1245 600030
4.2.9 Organizer
Alarm Calendar
To-do list Scheduled on/off
• Power on
• Power off
4.2.10 Applications
Games Calculator
Currency Stop watch
Count down World time
4.2.11 Gallery
Images Sound
Misc. Memory status
52
Page 53

Chapter
VoIPon www.voipon.co.uk [email protected] Tel: +44 (0)1245 808195 Fax: +44 (0)1245 600030
5. Messages
Message is the first option of the Menu. There are five sub-menus under the
Message menu: SMS, MMS (Multimedia message), Email, Voic e Mail, and
Call Broadcast.
You can read, write, send and save text, multimedia, SMS (short message
service) and e-mail messages. All messages are organized into folders.
Before you can send a message, you need to save some message settings.
To select the language for reading and writing messages, go to Settings >
language, and select the language you want to use. For Detail, see chapter
“Settings”.
5.1 Short Message Service (SMS)
5
You can send and receive multi-part messages, which consist of several ordinary text messages (network service) by using the SMS (Short Message Service).
The text messages function uses shared memory. Using any such features
may reduce the memory available for any features sharing memory. This is
especially true with heavy use of any of the features.
There are seven sub-menus under the SMS menus: Inbox, Write Message,
Draft, Outbox, Templates, Settings and Memory status.
5.1.1 Inbox
All the incoming messages are stored in Inbox folder with detailed date, time
and sender of each message shown. You can use left soft key (Options)
to reply, call (via GSM or WLAN), and delete the selected message, or delete
all messages in the Inbox.
5.1.2 Writing and Sending Messages
The message text area can accommodate 160 characters. To write a message, follow the steps below:
a) Press OK key to access Menu > Messages > SMS, and scroll to
Write Message.
53
Page 54

Chapter5
VoIPon www.voipon.co.uk [email protected] Tel: +44 (0)1245 808195 Fax: +44 (0)1245 600030
Information:
To start writing messages quickly, press left navigation key in idle mode.
b) Key in a message. You can change the key-in method (options from ABC,
Zitext, 123) key #, and you can also input the symbols by pressing the star
key when writing message. The keypad of digit 0 stands for
space bar while keying in message.
c) You can press left soft key to elaborate the message. There are four
options: Group send, Save, Insert template and Cancel.
- Group send refers to the receivers’ names you are about to key in, or
the ones you’ve set up previously. You can also select the list from
your phonebook for the message you are currently keying in. Press
OK key to enter new names, or to search names from phone-
book.
- Save refers to save the text you just keyed in and keep it in the Draft
until next time you send it out.
- Insert Template means insert the text you created before to save time.
This applies to certain GENERAL INFORMATIONS, which can be
reused and suits many different occasions and people. Press OK key
to enter and scroll up and down to select the proper template.
Press left soft key to enter new template, edit existing templates,
or delete templates. Press OK key to save the changes after
done.
- Exit editor means exit the message you just wrote, by using this func-
tion, the message will not saved in automatic draft.
5.1.3 Draft
Draft is the place where the messages in process are kept. Message is put in
the Draft when you save the text you just keyed in. The message is kept In
the Draft until it is sent out. Sent messages are kept in the Outbox.
54
Page 55

Chapter
VoIPon www.voipon.co.uk [email protected] Tel: +44 (0)1245 808195 Fax: +44 (0)1245 600030
5.1.4 Outbox
Outbox is the place where the messages sent out are saved. The time the
message was sent out and the receiver information are shown to remind you.
5.1.5 Templates
This function allows you to add your text to save time...
5.1.6 Settings
It is where you set up message reply path (setting up which ISP is used
to send message. On means you want to use the caller’s ISP, while off
means you will use your own network to send out message), save the
phone number of service center, check the status of the messages,
5
and decide to save the messages in the phone or in the SIM card. It
covers
Storage,
key and press
Service Center, Validity Period, Status Report, Long Message, SMS
and Reply Path. Scroll up and down by pressing the navigation
OK key to enter the option you are after.
Information:
When sending messages via the SMS network service, your phone
may display the words
message has been sent by your phone to the message center number
programmed into your phone. This is not an indication that the
message has been received at the intended destination. For more
details about SMS services, check with your service provider.
Message sent. This is an indication that the
5.1.7 Memory Status
This function shows memory usage for SIM and phone.
55
Page 56

Chapter5
VoIPon www.voipon.co.uk [email protected] Tel: +44 (0)1245 808195 Fax: +44 (0)1245 600030
5.2 Multimedia Message Service
Information:
This function can be used only if it is supported by your network
operator or service provider. Only phones that offer compatible
multimedia message features can receive and display multimedia
messages.
A multimedia message can contain text, sound and a picture or a video clip.
The phone supports multimedia messages that are up to 100 kB in size. If the
maximum size is exceeded, the phone may not be able to receive the
message. Depending on the network, you may receive a text message that
includes an Internet address where you can view the multimedia message.
If the message contains a picture, the phone scales it down to fit the display
area.
Dual Mode telephone supports the following formats: JPEG, GIF, WBMP,
BMP, MIDI, WAV and AMR.
The phone does not necessarily support all variations of the aforementioned file formats. If a received message contains any unsupported elements, they may be replaced with the file name and the text
Object format not supported.
Note that you are not able to receive any multimedia messages if you have a
call in progress, a game or another Java application running, or an active
browsing session over GSM data. Because delivery of multimedia messages
can fail for a variety of reasons, do not rely solely upon them for essential
communications.
The function provided by the MMS feature include: Inbox, Write mes-
sage, Outbox, Sent items, Draft, MMS settings, Memory status.
After you select the MMS menu, the system will check first whether the settings for GPRS are complete. If not, system will pop up a window to notify
User. User can still edit mail information.
56
Page 57
Chapter
VoIPon www.voipon.co.uk [email protected] Tel: +44 (0)1245 808195 Fax: +44 (0)1245 600030
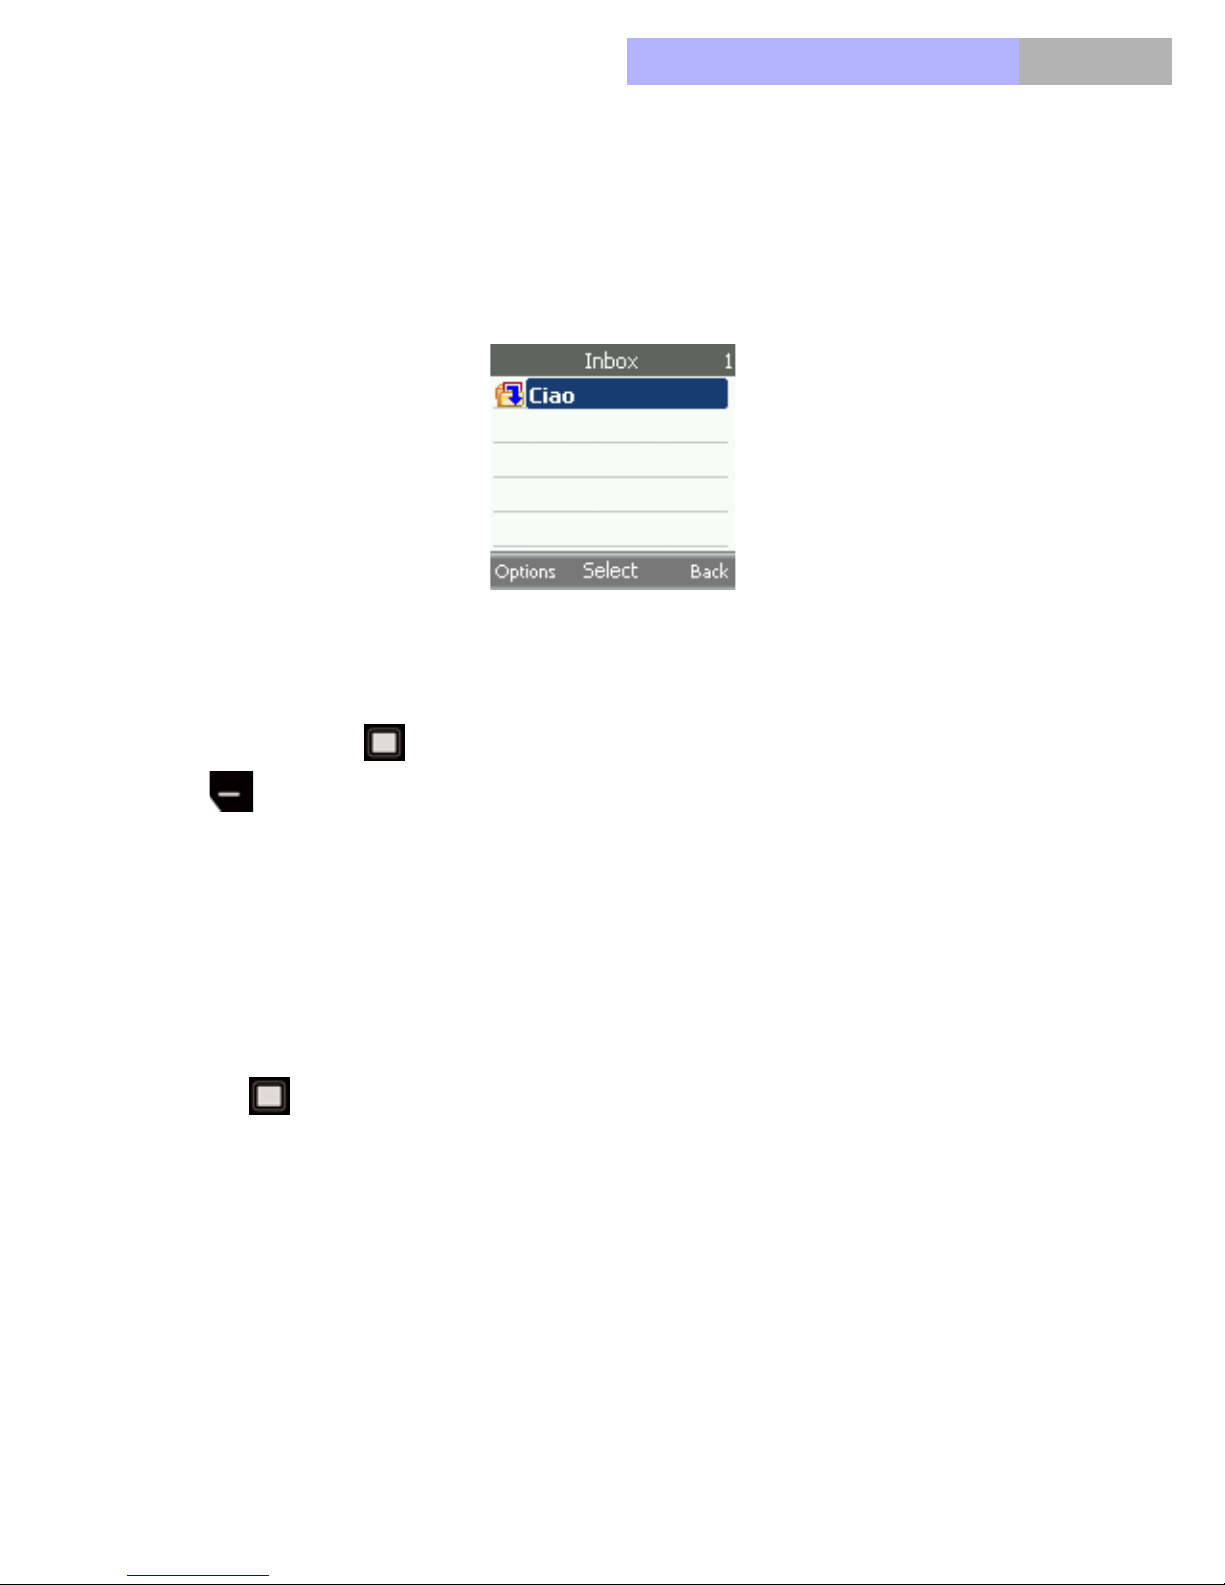
5.2.1 Inbox
There are “Read” and “Unread” MMS in the “Inbox”. The unread MMSs have
higher priority than read MMSs. The ordering sequence of unread MMS is that
the latter have higher priority. Once an unread MMS is retrieved, it will be put
as the first one in read MMS.
5
5.2.2 Write Message
Press OK key to start creating multimedia message. The left soft key
(Options) offers you options to elaborate the message. The option
includes Insert, Delete, Subject, Preview, Slide list, Slide timing, Message
Type, Save, and Exit Editor.
- Insert allows you to include picture (from camera or gallery) or sound
(from gallery) into the message you are editing..
- Delete allows you to remove the picture or sound from the message you
are editing.
- Subject is the title of the message. Enter the subject and press OK key
to save it.
- Preview allows you to see how the MMS is edited and you can check
page by slide or a specific slide.
- Slide List refers to adding/deleting slide to the message, go to which slide
of the message (if it contains more than one slide).
- Slide Timing To edit slide timing.
- Message Type defines the nature of the message. There are four types:
Personal, Advertisement, Informational and Automatic.
- Save is to save the messages and pages you edited.
57
Page 58
Chapter5
VoIPon www.voipon.co.uk [email protected] Tel: +44 (0)1245 808195 Fax: +44 (0)1245 600030
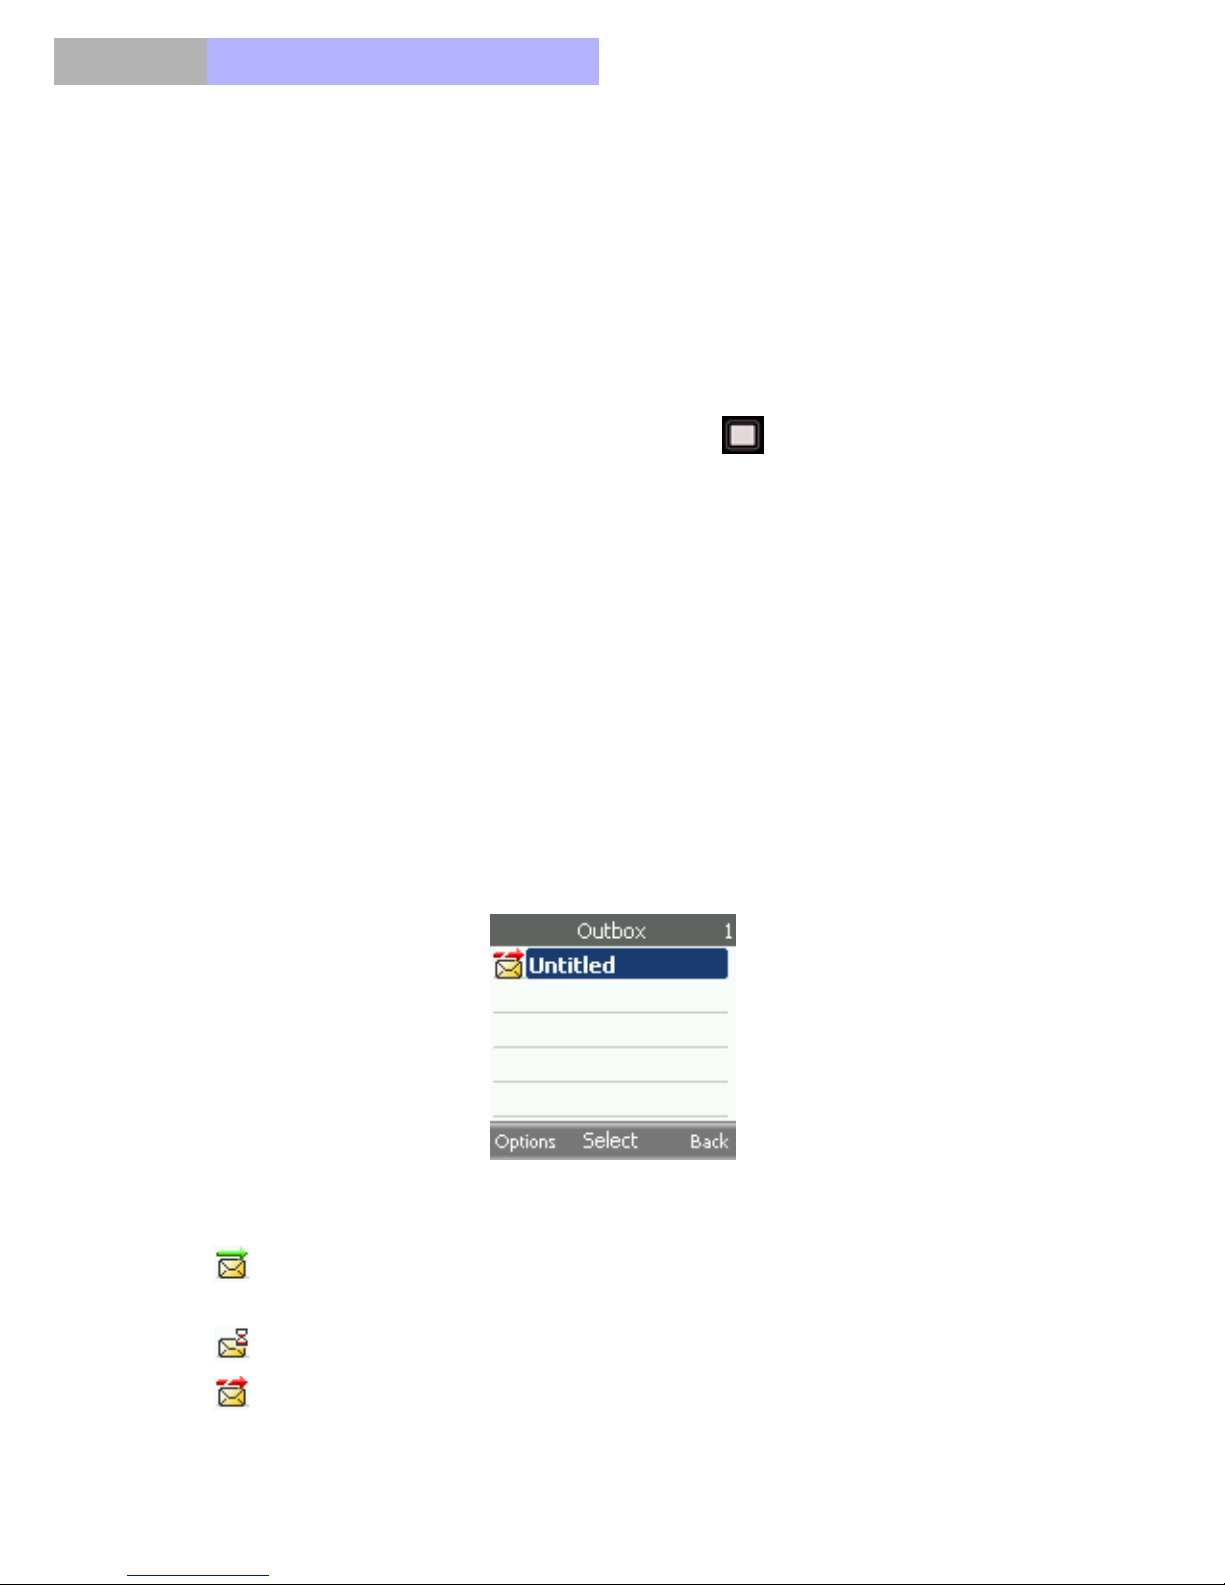
5.2.3 Outbox
Outbox records the messages you ever sent out. The time the message was
sent out and the receiver information are shown to remind you.
Equivalent to the outbox in PC email. All mail placed in outbox will be sent out
by the system automatically.
The MMSs in the Outbox can be in the following states.
a) After User finishes editing and press OK key (Send), the system will
put the MMS in the Outbox and send it out in the background.
b) When an MMS is successfully sent, system will pop up a window to notify
User with ”1 MMS message has been sent”, the mail will then be removed
from Outbox to Sent items, indicating such email has been sent out.
c) MMS being transmitted out cannot be edited in the Outbox.
d) When MMS cannot be sent out due to setting of GPRS not complete,
system will pop up a window to notify User that GPRS are not complete.
MMS will be put in Outbox if GPRS setting is not complete.
e) There are three retry in the Outbox. If an MMS is not sent out after three
retries, system will notify User with a pop-up window, and such MMS will
be marked w/ an Icon, until User enters Outbox to take actions.
The ordering sequence in Outbox is that the earliest going out will appear as
the first.
Icon indicators include:
MMS in transmission, there will be Icon showing in the Title bar or Status
bar.
MMS waiting to be sent
MMS failing in sending
58
Page 59

Chapter
VoIPon www.voipon.co.uk [email protected] Tel: +44 (0)1245 808195 Fax: +44 (0)1245 600030
5.2.4 Sent items
MMS being sent successfully will be moved to Sent items if “Save sent
messages” setting is enabled. The latest sent MMS will appear as the first one.
5.2.5 Draft
The message that you have worked on it but is yet to finish is stored in Draft.
Or you can create drafts for different occasions for future MMS editing. The
MMS saved last is on the first line of the List menu.
5.2.6 MMS Settings
5
MMS-Settings is used to set up a variety of delivery relevant features. There
are Connection settings, Read reports, Delivery report, Save sent messages,
Sender visibility, Expiry time, Automatic download, Filter, and SMIL Layout.
- Connection settings gives you options for delivering the MMS.
- Read Report provides you the information when receivers receive your
messages. Turn on Send Report to agree the system to send the “Read
report” to the sender whenever the sender requests. A pop-up message
will show up to confirm sending “Read report” even if this setting is set to
“On”. Turn on Request Report to request receivers to send a “Read
report” back.
-If Delivery Report is on, you will receive a delivery report once the MMS is
sent.
- Turn on the Save Sent Message feature and your phone will automatically
save the MMS you just sent to Sent items.
- If you select Hide in Select visibility feature, the receiver of your MMS will
not know who sent the MMS from.
- Expiry time allows you five sets of effectiveness time frames of the MMS
you wish to send. If it surpasses the selected time frame, the MMS will be
disabled and it will not be sent out. The options are 1 Hour, 12 Hours, 24
Hours, 1 Week and Maximum.
- If the Automatic download feature is turned on, your phone will download
automatically any MMS received. If Home only is chosen, the phone will
download any MMS received only while you are in the home network, no
download while roaming.
59
Page 60

Chapter5
VoIPon www.voipon.co.uk [email protected] Tel: +44 (0)1245 808195 Fax: +44 (0)1245 600030
- Filter will bar the MMS that you do not want to receive from being sent to
you. You can choose to deny Advertisement MMS or Anonymous MMS.
- SMIL Layout allows you to decide whether you want the image you
included in the MMS to be located on Top or Bottom of the text.
5.2.6.1 Change active settings
Through this menu you can set a new service profile based on the parameters
provided by your service provider:
Setting’s name: can be set as desired (it is suggested you use the service
provider’s name)
Homepage: this is the default MMS homepage specified by your provider
(e.g. ‘ http://mms.vodafone.it/servlets/mms’)
Connection type: this is specified by your provider (typically ‘Proxy‘)
Proxy address: this is the proxy IP address for WAP service (e.g. ‘
10.128.201.076 ‘)
Data bearer: set GPRS if only GSM network is available, choose WLAN if
under WLAN coverage: this will allow highest connectivity speed.
Bearer settings
Access point: this is the service access node (e.g. ‘ wap.vodafone.it)
Authentication type (e.g. ‘ Normal ‘)
Username: (normally empty, unless provided by the service provider)
Password: (normally empty, unless provided by the service provider)
5.2.7 Memory Status
The memory status of Inbox, Outbox, Draft, and Sent Items are shown here.
You can delete used or undesired MMS to accommodate more new ones.
60
Page 61

Chapter
VoIPon www.voipon.co.uk [email protected] Tel: +44 (0)1245 808195 Fax: +44 (0)1245 600030
5.3 E-mail
Information:
This function can be used only if it is supported by your network operator or
service provider. Only phones that offer compatible E-Mail feature can the
phone send or receive the e-mail normally.
The Dual Mode phone supports E-mail function via GPRS and WLAN. By setting your Dual Mode phone, you can send E-mail to your E-mail account into
Internet even if you are not in your home or office. You can edit, send and
read E-mail by using your Dual Mode phone, and can also use PC to save or
delete your E-mail, the Dual Mode phone supports POP3 and IMAP4 E-Mail
Server.
Before sending and downloading an E-Mail, you need first do the followed
operation:
5
Apply for a new E-mail account or use your present E-mail account (Please
consult with your E-mail service provider.).
Please consult with your Internet operator or E-mail service provider about the
correct E-mail setting. You can also set by the E-mail configuration received in
the configuration message.
Then you can do the E-mail settings in your phone according to configuration
information provided by your E-mail service provider.
The E-mail functions include the following submenus:
Create e-mail
You can first edit E-mail and then connect the E-Mail server; and also can first
connect the E-mail server then write or send the mail.
1. OK key (two times) (Messages) > Scroll down (two times) (E-
mail) > OK key (Create E-mail)
2. Input the recipient mail address and subject, and input Cc and Bcc mail
address if want to send the mail to others.
61
Page 62

Chapter5
VoIPon www.voipon.co.uk [email protected] Tel: +44 (0)1245 808195 Fax: +44 (0)1245 600030
Press left soft key (Options) to input the mail content, add new recipient,
add Cc and Bcc.
After message editing, press Ok key (Menu), you can choose to send
now or send later.
Retrieve
You can download the e-mail from server manually or automatically by setting
the polling intervals. If leave copy on is set, the mail will be kept in the server
after download; otherwise, it will be deleted from the server after download.
Disconnect
You can always disconnect the link when downloading or sending mail by
using this function.
Inbox
When you have downloaded mail form your mail account, the mail will be
saved in Inbox. Enter Inbox to view the mail, press left soft key to reply
or delete the mail if you want.
Other folders
Other folders include Draft, Archive, Outbox and Sent items. All of the 4
folders’ maximum storage is 20.
- Draft saved the mail that was not sent out successfully
- Archive arranges and stores the mail
- Outbox stored the mail that was not sent out at present
- Sent items memorize the mail that was sent out already.
Memory satus
Display shows the memory status of the 4 folders. Always check the memory
status after sending or downloading the mail and be aware of the memory of
the each folder left for use.
62
Page 63

Chapter
VoIPon www.voipon.co.uk [email protected] Tel: +44 (0)1245 808195 Fax: +44 (0)1245 600030
Settings
Active settings: Select and set the profile. You can also clear the profile in the
Options page by selecting Clear profile.
5.3.1 Configuring a new E-mail account
Through this menu you can set a new service account based on the
parameters provided by your service provider:
Mailbox name: can be set as desired
E-mail address: input here the e-mail address (e.g. [email protected])
My name: Input the name before @, e.g. Mark
Out SMTP server: the SMTP server ad dress for outgoing mail; (e.g.
smtp.yahoo.com)
In POP3 serve: the POP3 serve r add ress for incoming mail; (e.g.
POP3.yahoo.com)
POP3 user name: typically coincides with the e-mail address or with
the user part of the address
POP3 password: input the password for mail access (appears as
‘******’)
Leave copy: <on> leaves a copy of the downloaded mails on the
server fo rsuccessive access (e.g. from a PC); <off> disables this
option. Warning: all mails downloaded to the phone will only be
readable via the phone menu.
Polling interval: ‘manual’ enables the manual retrieve of mails
‘5 minutes’ (automatic retrieve every 5 min)
‘30 minutes’ (automatic retrieve every 30 min)
‘60 minutes’ (automatic retrieve every 60 min)
‘2 hours’ (automatic retrieve every 2 hours)
‘3 hours’ (automatic retrieve every 3 hours)
‘4 hours’ (automatic retrieve every 4 hours)
‘12 hours’ (automatic retrieve every 12 hours)
Other settings
Incl. Signature
Use SMTP auth: (<yes> enables auth entication on the SMTP server)
SMTP user name: (to be input if <yes> was selected in the previous
menu)
SMTP password: (to be input if <yes> was selecte d in the previous
menu)
5
63
Page 64

Chapter5
VoIPon www.voipon.co.uk [email protected] Tel: +44 (0)1245 808195 Fax: +44 (0)1245 600030
Out (SMTP) port: TCP port of the mail server – default = 25
In (POP3) port: TCP port of the mail server – default = 110
Reply-to address
Retrive e-mails (default = 10)
Data bearer: ‘GPRS’ enables connection over GPRS; ‘WLAN
only’enables connection ove r WLAN
Bearer settings
Access point
Authentication type (‘Normal’ or ‘ Secure’)
Username (input only if ‘Secure’ authenticatio n typ e is selected)
Password (input only if ‘Secure’ authentication type is selected))
SMPT Connection settings
POP3 Connection settings
Warning:
the E-mail may contain virus or other elements that will be harmful to your PC
or cellular phone, if you do not certain the sender’s identity, please do not open
the accessories.
5.4 Voice Mail
Your service provider will provide you with a voice mailbox if you subscribe to
this specific service. When a voice message is received, your phone will notify
you by beeping, displaying a message on the idle screen, or both.
5.4.1 Dial Voice Mail
Your service provider may have already saved your voice mailbox number to
your phone and notified you when you first subscribed. If so, dial the assigned
number to listen to the voice message in idle mode. Or select Menu >
Message > Voice Mail > Dial Voice Mail and press OK key to check.
5.4.2 Set Voice Mail
Default short cut for accessing the voice mail is long press on . After
entering into this function, dial the number that your service provider set for
64
Page 65

Chapter
VoIPon www.voipon.co.uk [email protected] Tel: +44 (0)1245 808195 Fax: +44 (0)1245 600030
voice mail to listen the voice mail. If you do not save the number, you will have
to redial it every time the phone is switched on.
5.5 Cell broadcast
Your cellular telephone uses this function for sending information to clients in
this section. The information is classified according to type. For this reason the
data is transmitted through various channels. If the cell broadcast feature is
activated this telephone can be used to receive these types of messages.
5.5.1 Inbox settings
By scrolling either up to down you can choose whether or not to activate
certain functions (Active/Not Active); press the OK Key to activate a
function.
5
5.5.2 Reading messages
Messages that have been received can be saved.
5.5.3 Add a channel
Enter the new ID channel that you wish to add. Press the OK Key to save
the new entry.
5.5.4 Channel lists
All of the channels that you have viewed and memorized are listed. Press the
OK Key to view the available channels and press the OK Key to
eliminate the channels you no longer need.
65
Page 66

Chapter5
VoIPon www.voipon.co.uk [email protected] Tel: +44 (0)1245 808195 Fax: +44 (0)1245 600030
66
Page 67
Chapter
VoIPon www.voipon.co.uk [email protected] Tel: +44 (0)1245 808195 Fax: +44 (0)1245 600030
6. Call History
The phone registers the phone numbers of missed, received and dialed calls,
and the approximate length of your calls.
The phone registers missed and received calls only if the network supports
these functions, and the phone is switched on and within the network’s service
area.
When you press Options in the Missed Calls, Received Calls and Dialed Calls
menu, you can, for example, call the number, save the number in Contacts, or
delete the phone number from the list.
6.1 Missed Calls
Press OK key (Menu), select Call History and select Missed Calls to view
6
the last 20 calls that someone tried to reach you. The caller name and time of
all the missed calls are shown here. The number at the end of the (name or)
phone number indicates the amount of call attempts from that caller.
Information:
When a note about missed calls is displayed, press OK key to access the
list of missed call phone numbers. Scroll to the number you would like to call
back and press to call.
6.2 Received Calls
Press OK Key (Menu), select Call History and select Received Calls to
view the list of the last 20 phone numbers from which you have most recently
accepted calls/network service.
6.3 Dialed Calls
This feature allows you to view the list of the 20 phone numbers that you have
most recently called or attempted to call. Press OK key (Menu), select
Call History and select Dialed Calls to view the list.
67
Page 68

Chapter6
VoIPon www.voipon.co.uk [email protected] Tel: +44 (0)1245 808195 Fax: +44 (0)1245 600030
Information:
In idle mode, press OK key once to access the list of dialed numbers.
Scroll to the number or name you want, and press to call the number.
6.4 Delete all call
Press OK key (Menu), select Call History and select Call Timer to the
missed calls, received calls, dialed calls, or delete all calls.
6.5 Call timers
Press OK key (Menu), select Call History and select Call Timer to check
the time of last call, all incoming calls and all outgoing calls take. You may
delete the record by pressing OK key to reset the timer.
68
Page 69

Chapter
VoIPon www.voipon.co.uk [email protected] Tel: +44 (0)1245 808195 Fax: +44 (0)1245 600030
7. Contacts
You can save names and phone numbers in the phone’s memory and in the
SIM card’s memory. Contacts use shared memory.
The phone’s memory may save up to 500 names with numbers and text notes
about each name. You can also save an image (photos or downloaded image)
for all the contacts. The number of names that can be saved depends on the
length of the names, and the number and length of the phone numbers and
text items.
The phone supports SIM cards that can save up to 100 (up to 250 names for
some network operators’ SIM card) names and phone numbers. Names and
numbers saved in the SIM card’s memory.
There are 6 sub-menus under Contacts: Search, Add new, Group settings,
Speed dial, Memory status and My Number.
7
7.1 Search
Press Ok key (Menu) and select Contacts and Search, or to quickly find
a contact name, press right soft key in idle mode.
To search for a contact number, press OK key to decide you want to
search by name or by position. After decided, key in the first characters of the
name you are searching for in the pop-up window.
Press the up /down navigation key to scroll through the names in
the list, and left /right navigation key to move the cursor in the pop-up
window.
Scroll to the contact name you want, and press left soft key (Options)
(left soft key) to view how you want to react to the selected contact. The
options include send a message, edit the selected contact’s information, call
the contact, copy the contact’s information to the phone, delete its information,
set up a specific ring tone for the contact, and select a photo for it.
69
Page 70
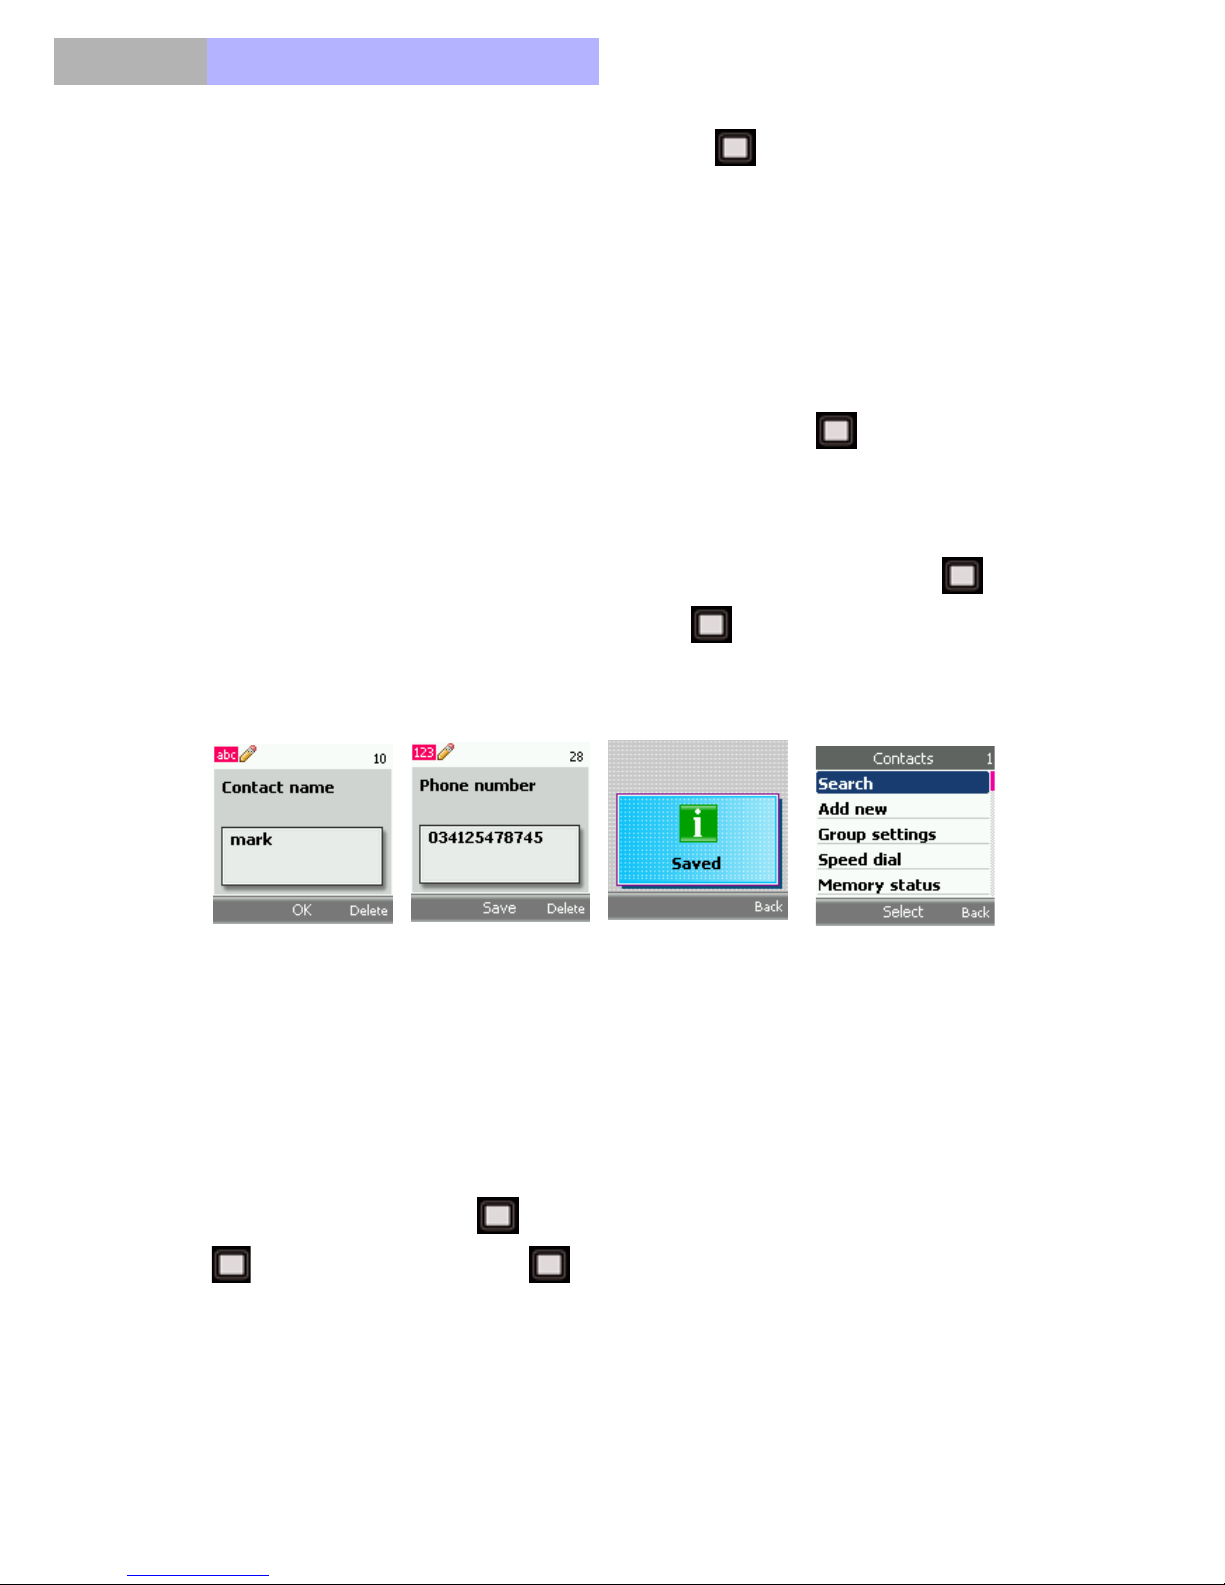
Chapter7
VoIPon www.voipon.co.uk [email protected] Tel: +44 (0)1245 808195 Fax: +44 (0)1245 600030
Scroll to the option you want and press OK key to enter.
The figures below show the options.
7.2 Add New Entry
Whenever you have a new contact, select if you want to save it to SIM card or
phone before entering the contact’s information.
Select Save to SIM or Save to Phone, and press OK key to enter the
name and the number. While Save to Phone, you can record the contact’s
name, mobile phone number, home number, office number, IP phone number
and e-mail address, and home address whereas while Save to SIM, you can
only record contact’s name and mobile phone number. Press OK key to
key in the information and then press OK key again to save the change.
Save to SIM or Phone
7.3 Group Setting
You can group the contacts into groups and give each group with different
names.
Press Contact > Group Setting. There is no group created in your phone by
default, so press OK key (Add new) to name a group and press OK key
to save it. Press OK key to set the melody (from factory melody or
My Music) and SMS tone (from factory melody or My Music) for this group
Once you named the group, you can start picking up group members from the
contacts.
70
Page 71
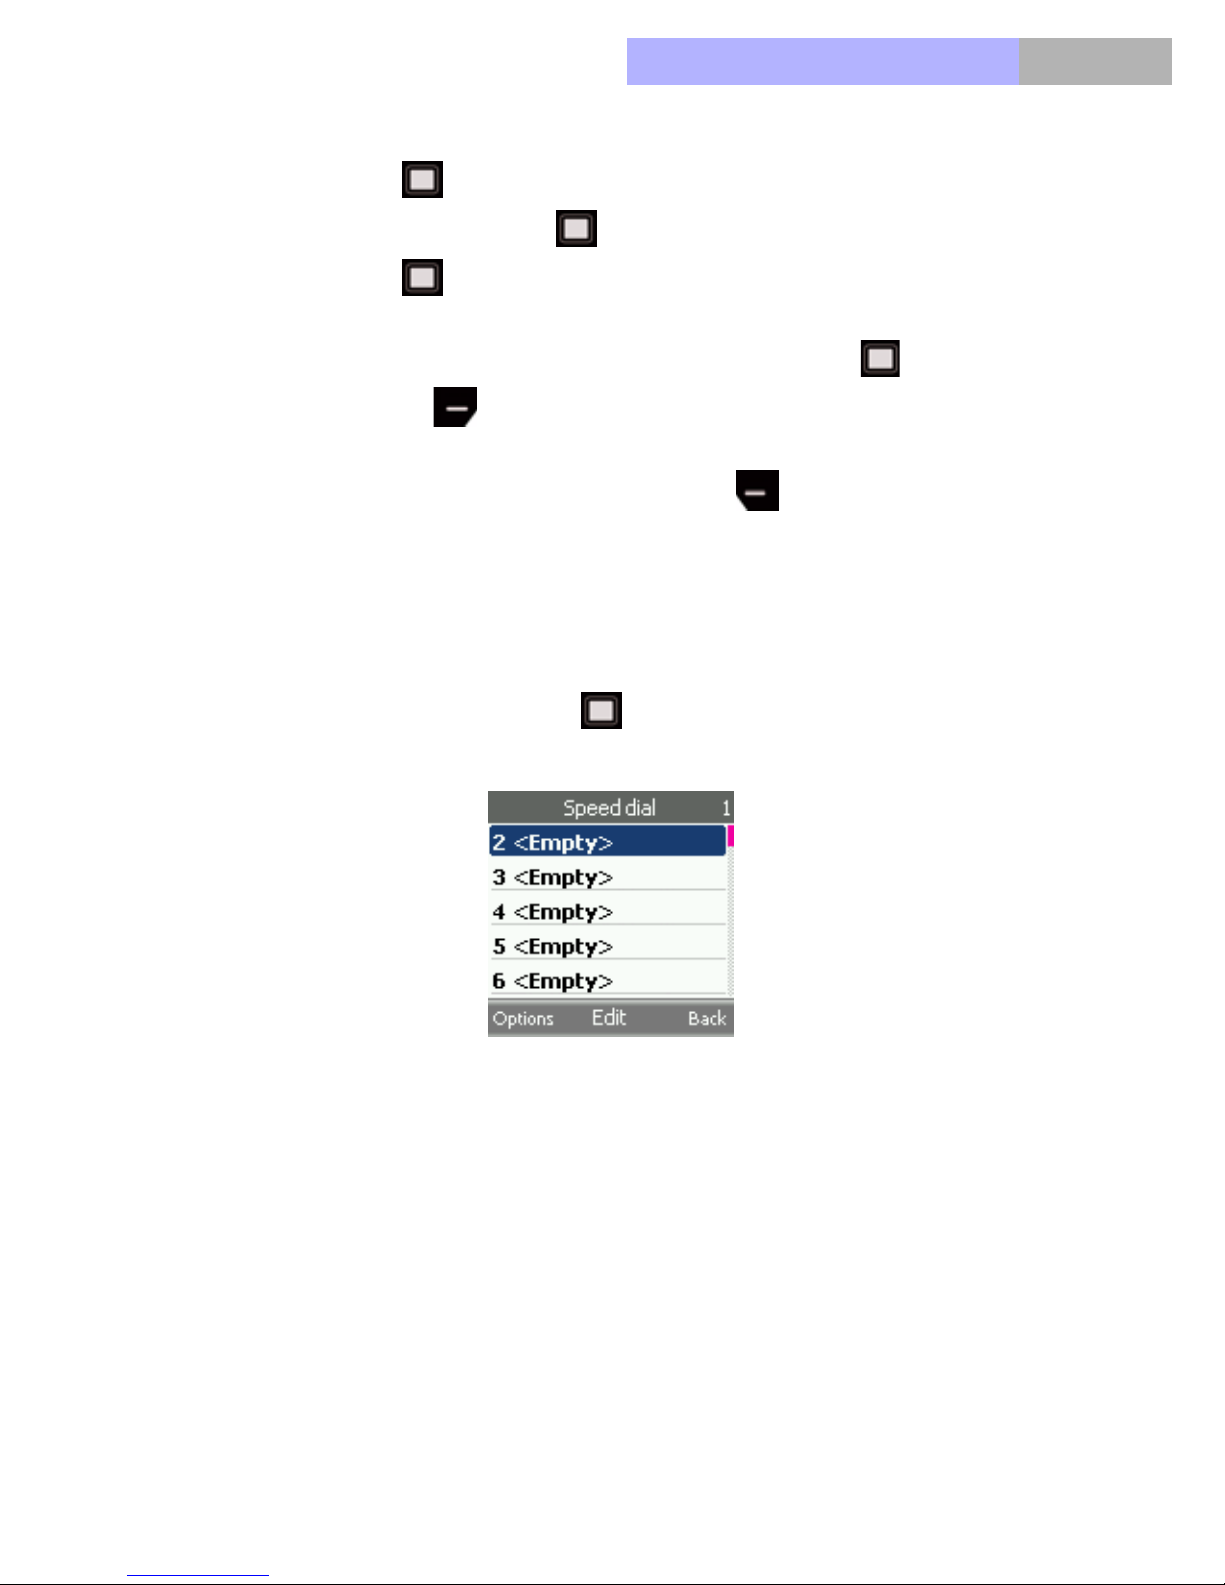
Chapter
VoIPon www.voipon.co.uk [email protected] Tel: +44 (0)1245 808195 Fax: +44 (0)1245 600030
a) Press OK key (Edit) to enter into the group and scroll down to
“Member” and press OK key (Change).
b) Press OK key (Add new) to select the members for this group from
your phone book.
c) Repeat this move until you finish selecting. Press OK key to save
and right soft key to back to the previous level.
Once the group is set, you can press left soft key (Options) to add new
entry or clear the whole group.
7.4 Speed Dial
7
Digit 2 to 9 are reserved for speed dial. Press Contacts > Speed Dial to enter
into this feature, and press OK key (Edit) to select the ones you want to
set up as speed dial member from the phone book.
7.5 Memory Status
It shows how many contacts are saved to the phone and to the SIM card, which
reminds you the left available memory both phone and SIM card still possess.
7.6 My Number
Shows your GSM and VoIP numbers for reference purpose.
71
Page 72

Chapter7
VoIPon www.voipon.co.uk [email protected] Tel: +44 (0)1245 808195 Fax: +44 (0)1245 600030
72
Page 73

Chapter
VoIPon www.voipon.co.uk [email protected] Tel: +44 (0)1245 808195 Fax: +44 (0)1245 600030
8. WLAN
The Dual mode phone has been pre-configured to work with any open wireless
network. The phone will obtain an IP address automatically once it recognizes
and connects to the WLAN network.
Any modifications made to the internal configuration of this device, not
expressly approved by your service provider will void the warranty of this
device.
The WLAN settings interface allows you to check WLAN network status, and
set profiles. It includes five functions, WLAN status, WLAN settings, SIP
status, SIP settings, and NAT settings.
8.1 WLAN status
8
You can fast set up when it is ready in idle mode, see which network displayed
when select the corresponding wireless network (GSM and WLAN).
• Telephone MAC: MAC address of Dual Mode telephone
• SSID: connected WLAN names (WLAN Modem, Access-Point)
• Auth. type: protection used (WEP, WPA, WPA2 or none)
• BSSID: MAC Address ofconnected WLAN Modem (Access-points)
• Channel: channel used. Available values 1-13; it depends on the WLAN
Modem.
• Signal lenght
• IP Telephone
• Subnet mask
• Gateway
• DHCP Server
• Main DNS Server
• Sec. DNS Server
• WMMstatus
Example 1: the bar that above the G-symbol (1) left displays the GSM
network’s strength. To make the network usable, there should be at least three
bars displayed on the screen.
73
Page 74
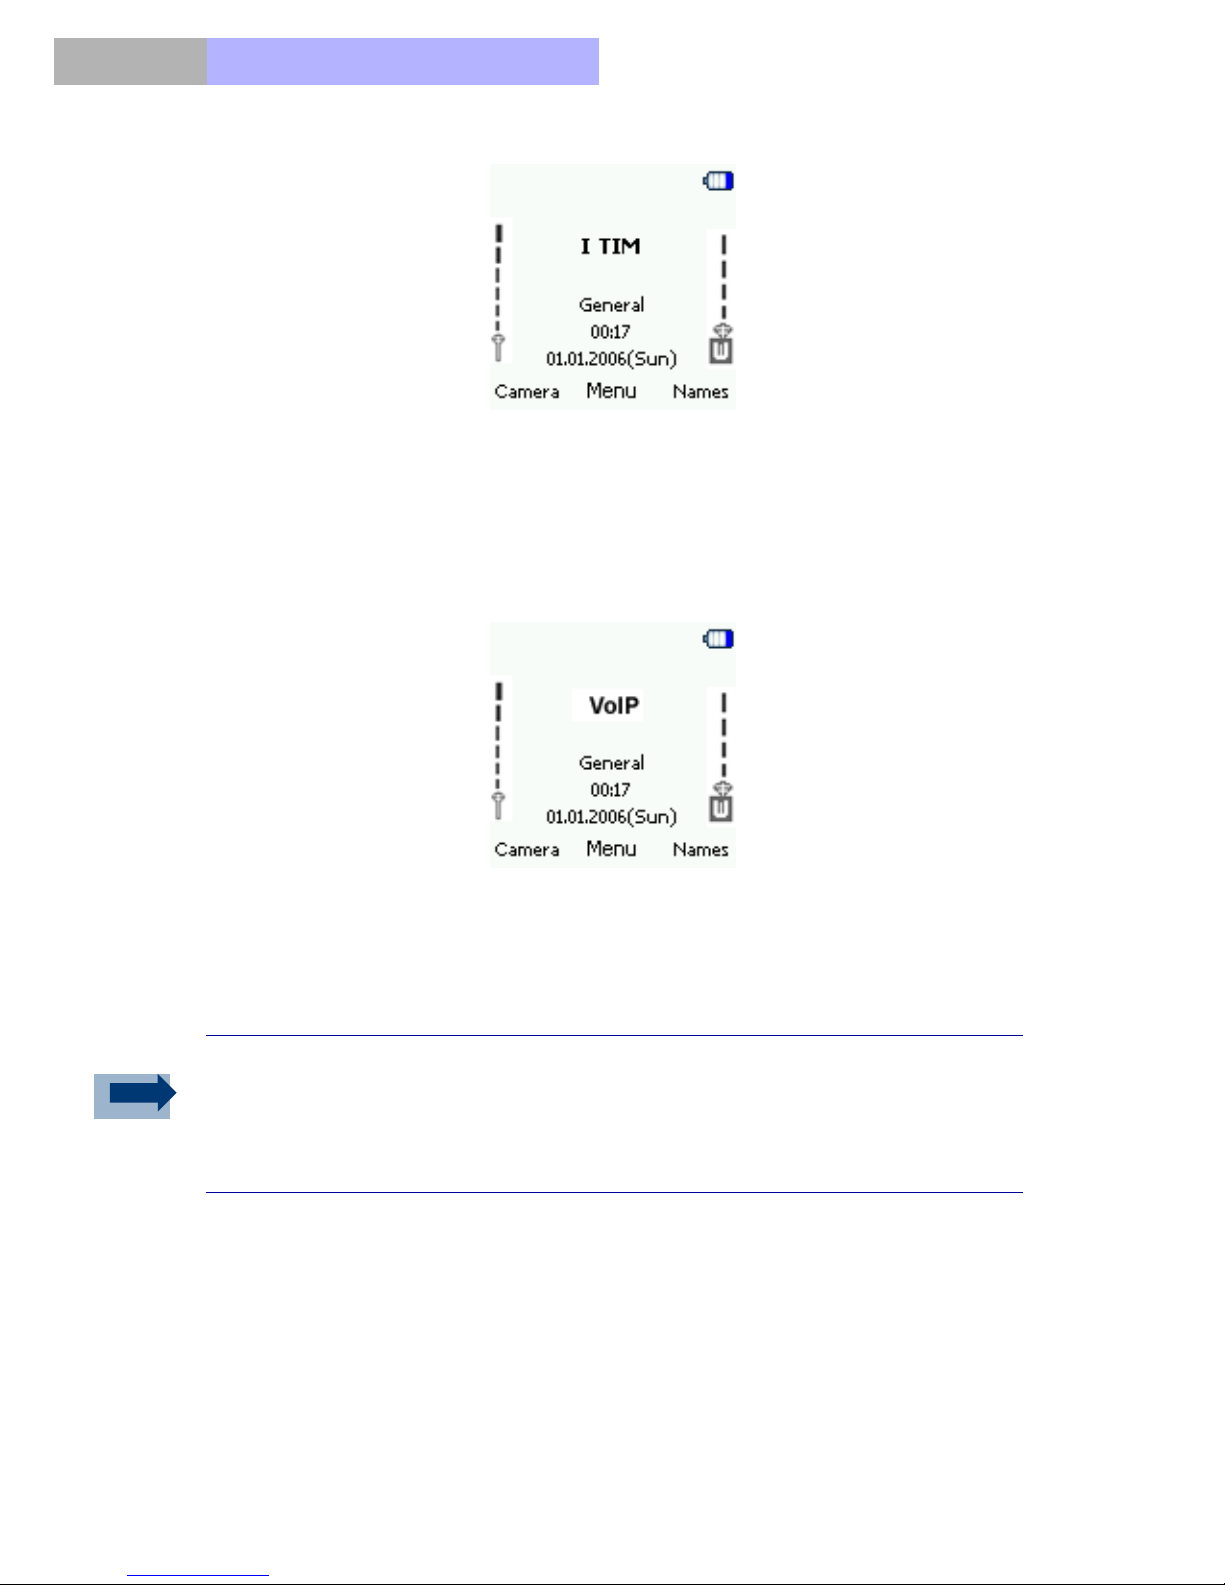
Chapter8
VoIPon www.voipon.co.uk [email protected] Tel: +44 (0)1245 808195 Fax: +44 (0)1245 600030
In the middle, it displays the corresponding network supplier (2) name.
Example 2: the bar above the W-symbol (3) right displays the WLAN AP/
Router signal strength. To make the network usable, there should be at least
3 bars displayed.
Only when W-symbol (3) right is displayed, the WLAN access to will be
recognized, and the phone will be registered.
WLAN status shows the MAC address of the phone and SSID.
Information:
If there is no links/access from the fitted and suitable profile, all the wireless
information in the phone will be recognized as “Not Available”.
74
Page 75

Chapter
VoIPon www.voipon.co.uk [email protected] Tel: +44 (0)1245 808195 Fax: +44 (0)1245 600030
8.2 WLAN settings
To use the Dual mode phone, you can use different WLAN profiles. To setup
the profile with security rule used, the corresponding WLAN-AP (access point)
information should be given. When you are in the WLAN area and have a
predefined profile, select the profile, DP-L10 will register to the WLAN
automatically.
8.2.1 Select WLAN Profile
Before you set the access to WLAN network, select a profile, and check if the
profile is set and active.
A WLAN network can be added either when the network is detected (the
Network Indicator icon is showing in the idle screen) or manually by entering
setting information.
8
1. Press OK key (Menu) > Scroll down (WLAN) > OK key >
Scroll down (WLAN Settings)
2. Press OK key (Active settings) to select a profile
All Profile: The submenu set the All Profile from Active settings.
Information:
Use this profile only when you want DP-L10 to select the profile automatically.
When you want to set one profile for one AP, do not select the profile (All
profile)
- Home: when you set a WLAN in house, use this profile and save the
- Office: when you set a WLAN in office, use this profile and save the
- Hotspot: Set the WLAN in the Hotspot when you have the operator of the
- Profile 4 to 5: you can still take 2 more profile in use. Press OK key.
.
Home-WLAN info.
Office-WLAN info.
Hotspot.
You can change the profile title/name, read the Chapter WLAN Profile
Rename.
75
Page 76

Chapter8
VoIPon www.voipon.co.uk [email protected] Tel: +44 (0)1245 808195 Fax: +44 (0)1245 600030
Information:
Activate the WLAN network only when it has searched AP/Routers in the
wireless area. This would save your consumption of battery power.
8.2.2 WLAN Access Setup
You can set up the access to WLAN via any broadband access device (DSL,
Cable, or company LAN) as long as the network is reliable.
- SSID: (Service Set Identifier) the name of the network, it is expressed by
the alphanumeric characters.
a) Set SSID by site survey
1. Press Menu > WLAN > WLAN settings > Edit act. settings > SSID &
security > SSID > Site survey
The display shows a list of all APs which are found nearby with good signal
strength.
2. Select the AP’s SSID
b) Set SSID manually
1. Press Menu > WLAN > WLAN settings > Edit act. settings > SSID &
security > SSID > Manual
2. Input SSID in the SSID edit window
- Security Setting: for WLAN security and encryption setting
a) Set security
1. Press Menu > WLAN > WLAN settings > Edit act. settings > SSID &
security > SSID > Security
The display shows the security items to be set.
Open:= It sets no encryption.
WEP:= WEP encryption, for WEP key settings. The key must be entered in
hexadecimal or ASCII format: A-F and 0-9. On the right top corner, a counter
decrements and reaches zero as all characters have been entered.
76
Page 77
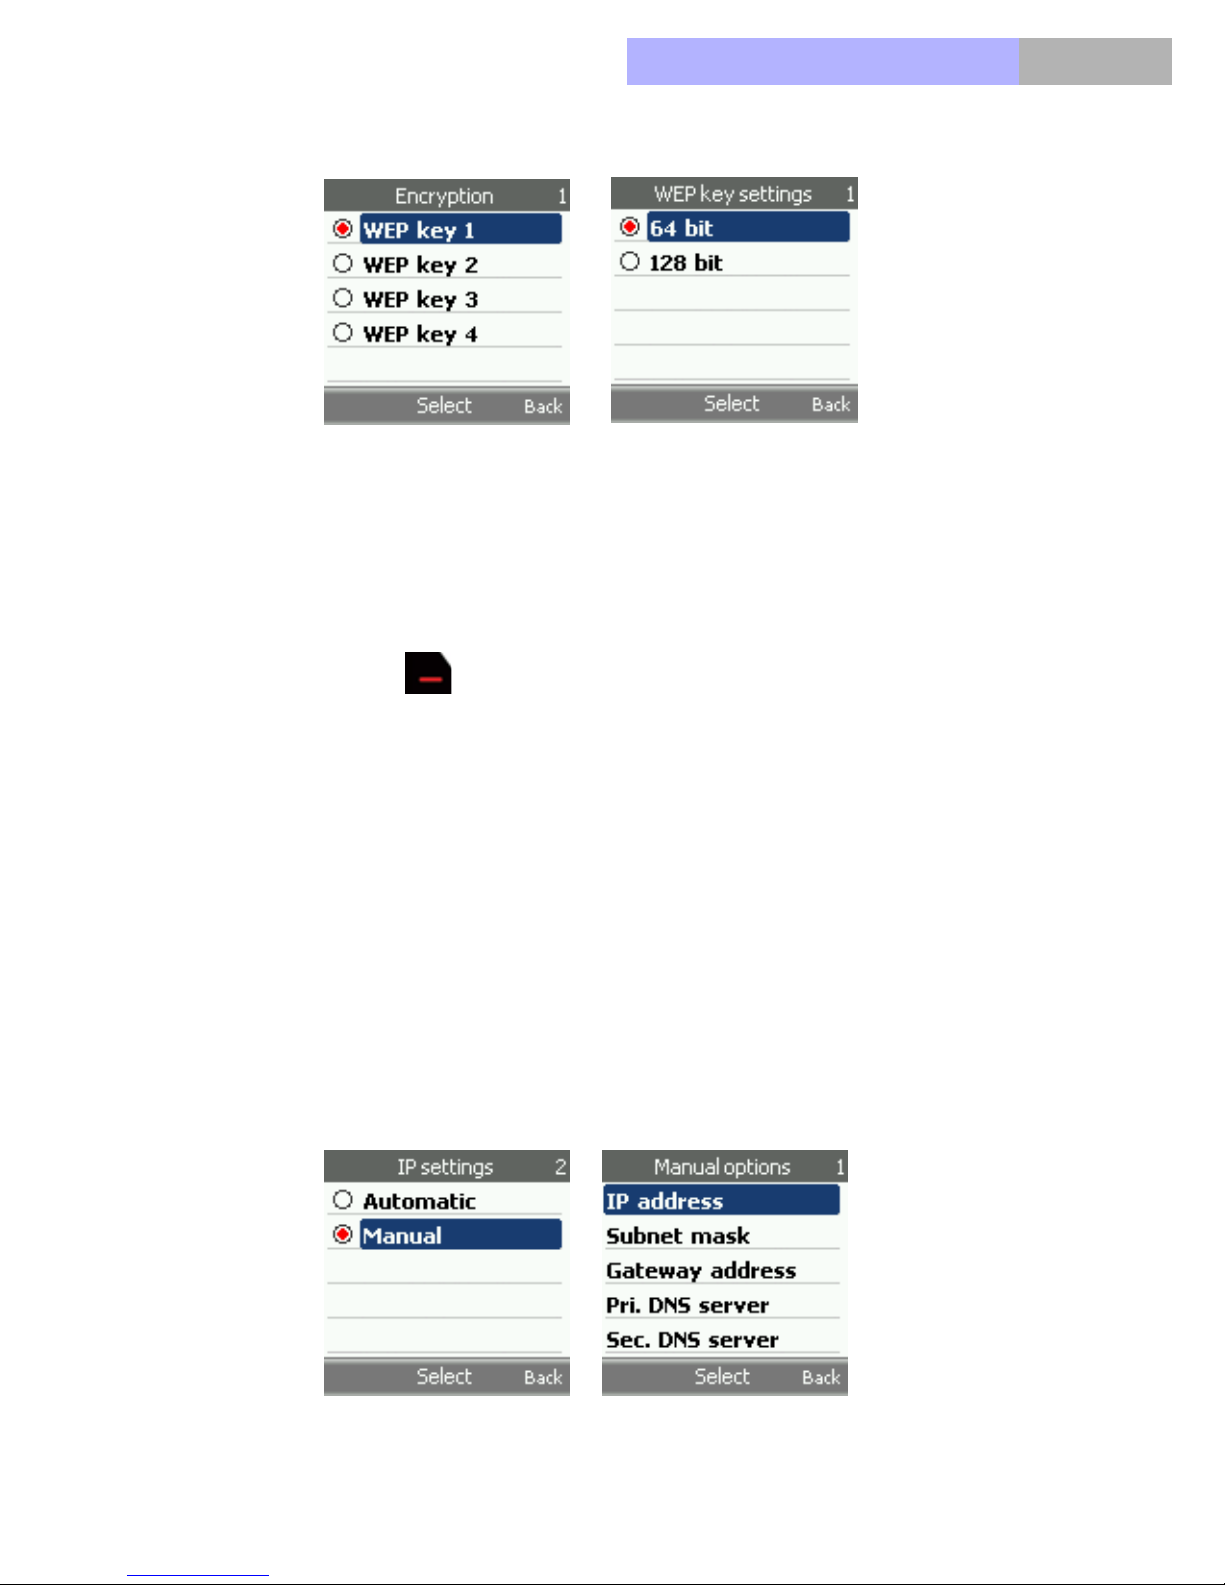
Chapter
VoIPon www.voipon.co.uk [email protected] Tel: +44 (0)1245 808195 Fax: +44 (0)1245 600030
WPA-PSK TKIP= WPA key setting
WPA2-PSK AES=.WPA2 key setting
2. Select WEP key 1/2/3/4, depth of the encryption, and input the key until it
is done.
3. Select WPA or WPA2 key for input.
8
4. Press Red key to end the WLAN settings. If all inputs are completed,
you will see the display of WLAN signal strength and “VoIP unregistered”
in the idle mode.
- IP address: IP address of the phone. To assign a static IP address turn
the DHCP off
You can choose the Automatic option to let the phone receive addressing from
the AP, or choose the Manual to set the IP address by hand.
Please refer to your Service Provider for further information.
Press Menu > WLAN > WLAN settings > Edit act. settings > IP settings >
Manual
77
Page 78

Chapter8
VoIPon www.voipon.co.uk [email protected] Tel: +44 (0)1245 808195 Fax: +44 (0)1245 600030
It will display the setting of different IP-info.
Press UP/Down key to select the items in the menu page.
Information:
When completing the settings, a bar above the W-Symbol should be displayed.
If not, check that your broadband connection is active and repeat the previous
steps.
8.2.3 WLAN profile rename
You can rename the WLAN-Profile and to do it, you must first activate the
Profile.
Before you rename a profile, please read the chapter: Select WLAN profile.
If you have activated the renamed profile, the display will appear and display
in the idle mode.
1. Select WLAN Status > WLAN settings > Edit act. settings > Rename
2. Press OK key
3. In the input area locate the profile name for activating. You can delete the
profile name by pressing the right soft key . Input a new profile name.
4. If have input the Name, press OK key .
8.3 SIP status
SIP status shows the SIP registry information. You can view the registry status
of your terminal via this feature.
8.4 SIP settings
SIP is a VoIP signaling protocol and is used for setting up communications
sessions such as conferencing, telephony, and instant messaging on the
Internet.
Press Menu, and select WLAN and SIP Settings.
78
Page 79

Chapter
VoIPon www.voipon.co.uk [email protected] Tel: +44 (0)1245 808195 Fax: +44 (0)1245 600030
To make the phone ready for VoIP call, you will need the following information
from your service provider for your broadband device:
8
Username User name used in
the name field of the
SIP URI for the IP
phone and for
registering the
phone at the
registrar.
Password
Auth. name
Depends on specific
Password used to
register the IP phone
with the SIP proxy.
Passwords are
encrypted and display
as asterisks when
entering.
service
implementation.
max. 30 characters,
numeric or
alphabetic
max. 12 characters,
numeric or
alphabetic
Domain name The corresponding
SIP domain name.
Local port The port number of
the local SIP server
Proxy server IP address of the
SIP proxy server. Up
to 64 alphanumeric
characters.
Proxy port SIP proxy server’s
port number.
Register server
IP address of the SIP
register server.
Up to 64 alphanumeric
characters.
e.g. sip.Pirelli.com
Default: 5060
e.g. sip.Pirelli.com
Default: 5060
e.g. sip.Pirelli.com
79
Page 80

Chapter8
VoIPon www.voipon.co.uk [email protected] Tel: +44 (0)1245 808195 Fax: +44 (0)1245 600030
Register port SIP register port
Default: 5060
number.
Register period Default: 3600
Outbound server The IP address of
the outbound proxy
server
Outbound port The port number of
You can use either a
dotted IP address or
a DNS name
The default is 5060.
the outbound proxy
server
RTP audio port The Real-Time
.
Default: 9000
Transport Protocol
port base configured
for the IP phone
.
RTP pkt.period Default:20
Preferred codec
Voice codec:
G.711U
G.711A
G.726-32
G.726-16
G.729 (this codec may
be available in
alternative to G.726;
please check with your
service provider).
1. From the idle mode, press OK key (Menu) > Scroll down
(WLAN) > OK key > Scroll down (four times) (SIP settings) >
OK key
2. Enter Username, Password, and all the information provided by your
service provider.
When all the settings are correct, and the DP-L10 successfully registers to the
network, the bold VoIP indication will remain displayed.
80
Page 81

Chapter
VoIPon www.voipon.co.uk [email protected] Tel: +44 (0)1245 808195 Fax: +44 (0)1245 600030
Information:
If VoIP is not displayed when all the settings are completed, please repeat the
above steps.
If you encounter any problems, make sure that your IP Router or ISP is not
blocking any traffic, specifically on the RTP ports. Also ensure that the router
is not blocking UDP traffic. You can contact your network administrator or ISP
for more information.
For additional assistance please refer to your Service Provider’s Help Desk.
8.5 NAT Settings
8
These settings are relevant to the ability of the phone to traverse the AP’s NAT
(Network Address Translation function).
PAT (Port Address Translation function).
8.5.1 RPORT
Select from the main menu with the Up / Down / Left / Right :
WLAN Status > NAT Settings
1. From the idle mode, press OK key (Menu) > Scroll down
(WLAN) > OK key > Scroll up (NAT settings) > OK key
(Rport)
2. Select Enable/Disable
3. Press Right soft key to end the Rport settings.
81
Page 82

Chapter8
VoIPon www.voipon.co.uk [email protected] Tel: +44 (0)1245 808195 Fax: +44 (0)1245 600030
8.5.2 STUN
1. From idle mode, press the OK key (Menu) > Scroll down
(WLAN) > OK key > Scroll up (NAT settings) > OK key >
Scroll down > OK key (STUN)
2. Enter the Enable, it will display the STUN options menu, select these
items with the arrow key UP / Down .
82
Page 83

Chapter
VoIPon www.voipon.co.uk [email protected] Tel: +44 (0)1245 808195 Fax: +44 (0)1245 600030
9. WAP Service
WAP (Wireless Application Protocol) is an open and standard protocol for
wireless application. It is mainly used to provide digital mobile phone and other
wireless terminal devices with wireless communication and information
service for.
This phone supports WAP protocols that run on TCP/IP protocols. Some
features of this device, such as multimedia messages and Web browser
require network support for these technologies.
The device is able to receive service messages sent by your service provider.
Service messages are notifications of, for example, news headlines, and they
may contain a text message or the address of a WAP service.
The WAP service can be available via GPRS or WLAN.
9
Homepage
You can set Homepage in Settings, e.g. http:// www.yahoo.com . By setting
the homepage, you can open the homepage by press OK key , and press
the arrow key to view the web browser.
Bookmarks
• You can have the Bookmarks opened from the main menu or in the
options menu. Press the arrow key UP / Down in the book-
marks to select the site that you want to visit.
• You can have the page info, edit page, edit address, delete, and send
function in the options page.
Download Links
• This function will allow you to enter some websites, you can input any
websites you want in this menu, e.g. you can input http://www.yahoo.com
and press OK key to enter.
Go To Address
You can use this feature when you want to visit certain websites.
83
Page 84

Chapter9
VoIPon www.voipon.co.uk [email protected] Tel: +44 (0)1245 808195 Fax: +44 (0)1245 600030
Service Inbox
Your phone will sometimes receive some service message from the service
provider, an indication tone will have if received, and also “1 WAP message
received “ icon displayed on Idle, the service message will be saved
automatically in Service Inbox, enter Service Inbox, you can view the message
content.
Settings
1. Profile
• Active settings
• Edit active settings
2. Security settings: Enter: Settings > Security settings, you can find a
Certificate List, select OK key in order to display the lists.
3. Inbox Service
4. Image display
5. Cache
6. Cookies: select On/Off or press OK key to select Clear cookies.
9.1 Configuring a new WAP account
Through this menu you can set a new service profile based on the parameters
provided by your service provider:
Setting’s name can be set as desired (it is suggested you use the service
provider’s name).
Homepage: this is the default WAP homepage specified by your provider
(e.g. ‘http://wap.yahoo.com’)
Connection type: this is specified by your provider (typically ‘Proxy‘)
Proxy address: this is the proxy IP address for WAP service (e.g. ‘
10.128.201.076 ‘)
Port: the port number (e.g. ‘80‘)
Data bearer: set GPRS if only GSM network is available, choose WLAN if
under WLAN coverage: this will allow highest connectivity speed.
Bearer settings. Access point: this is the service access node (e.g.
‘wap.providername.it‘)
Access point: access service (for ex. wap.providername.it)
Authentication type (e.g. ‘ Normal ‘)
Username: (normally empty, unless provided by the service provider)
Password: (normally empty, unless provided by the service provider)
84
Page 85

Chapter
VoIPon www.voipon.co.uk [email protected] Tel: +44 (0)1245 808195 Fax: +44 (0)1245 600030
10. Voice Mail
10.1 Dial Voice Mail
Dial to your voice box.
10.2 Set Voice Mail
You might contact your service providers for the number of voice mail.
10
85
Page 86

Chapter10
VoIPon www.voipon.co.uk [email protected] Tel: +44 (0)1245 808195 Fax: +44 (0)1245 600030
86
Page 87
Chapter
VoIPon www.voipon.co.uk [email protected] Tel: +44 (0)1245 808195 Fax: +44 (0)1245 600030
11. Camera
You can take photos with the phone’s built-in camera. The camera lens is on
the back of the phone, and the display of the phone works as a viewfinder. The
camera produces pictures in JPEG format. If there is not enough memory to
take a new photo, you need to free some by deleting old photos
Information:
Obey all local laws governing the taking of pictures. Do not use this feature
illegally.
Press OK key (Menu) > Scroll down (two times) (Camera) >
OK key .
11
Press Capture when taking a photo, a shutter sound is heard. Press OK key
to save the photo, and you will be led to the screen that requires you to
key in the name of the photo. Enter the name and press OK key to save
the name for the photo. You can take another photo by press left soft key
(Back).
Information:
Left soft key allows quick access to Camera.
There are six options under Camera: Gallery, Effect, Size, Quality, Self Timer,
and Shutter sound.
Press left soft key Options and enter Gallery to view photo saved in the
Gallery menu. Under the Gallery’s option, you may Set the photos as
Wallpaper, Delete the photo, Rename the photo, and check the Details (width,
height and size) of the photo.
Press left soft key (Options) and Scroll down (Effect) to select
different effect for your photo.
87
Page 88

Chapter11
VoIPon www.voipon.co.uk [email protected] Tel: +44 (0)1245 808195 Fax: +44 (0)1245 600030
Press left soft key (Options) and Scroll down (Size) to select the
photo size.
Press left soft key (Options) and Scroll down (Quality) to select
High, Mid or Low. High provides the best image quality but occupies more
memory.
Press left soft key (Options) and Scroll up (Self Timer) to turn On or
Off. While the self-timer is running, it produces a beeping sound. The live
image appears on the display, and you can use the display as a viewfinder.
Press Options and Shutter sound to tone to On or Off.
88
Page 89

Chapter
VoIPon www.voipon.co.uk [email protected] Tel: +44 (0)1245 808195 Fax: +44 (0)1245 600030
12. Settings
Settings provide various functional settings of the phone itself. The tone, the
language, the wireless connection, the screen display, clock, answering mode,
etc. are set up in this menu.
12.1 Profile
Your phone has various setting profiles, for which you can customize the
phone tones for different events and environments. Initially, personalize the
profiles to your own like and then you only need to activate a profile to use it.
Available profiles are General, Silent, Home, Outdoor, UserDef 1, and
UserDef 2.
UserDef 1 and UserDef 2 are for you to define a proper name for the specific
situation.
12
Press Ok key (Menu) > Scroll down (two times) > Shift right key
(Settings) > Ok key (Profiles). Scroll to a profile and press Ok key
to activate the selected profile.
You can Personalize the profile you activated by selecting different Ring tone,
SMS tone, Alarm tone, Keypad tone, and Power on/off Alert, WAN alert, and
Battery alert.
Press left soft key (Options) and select Personalize. Scroll up and down
to select the one you want to change.
You may also Rename the profile by pressing the left soft key (Options)
and scroll down to Rename. Enter the new name you wish and press Ok key
to save the change.
89
Page 90
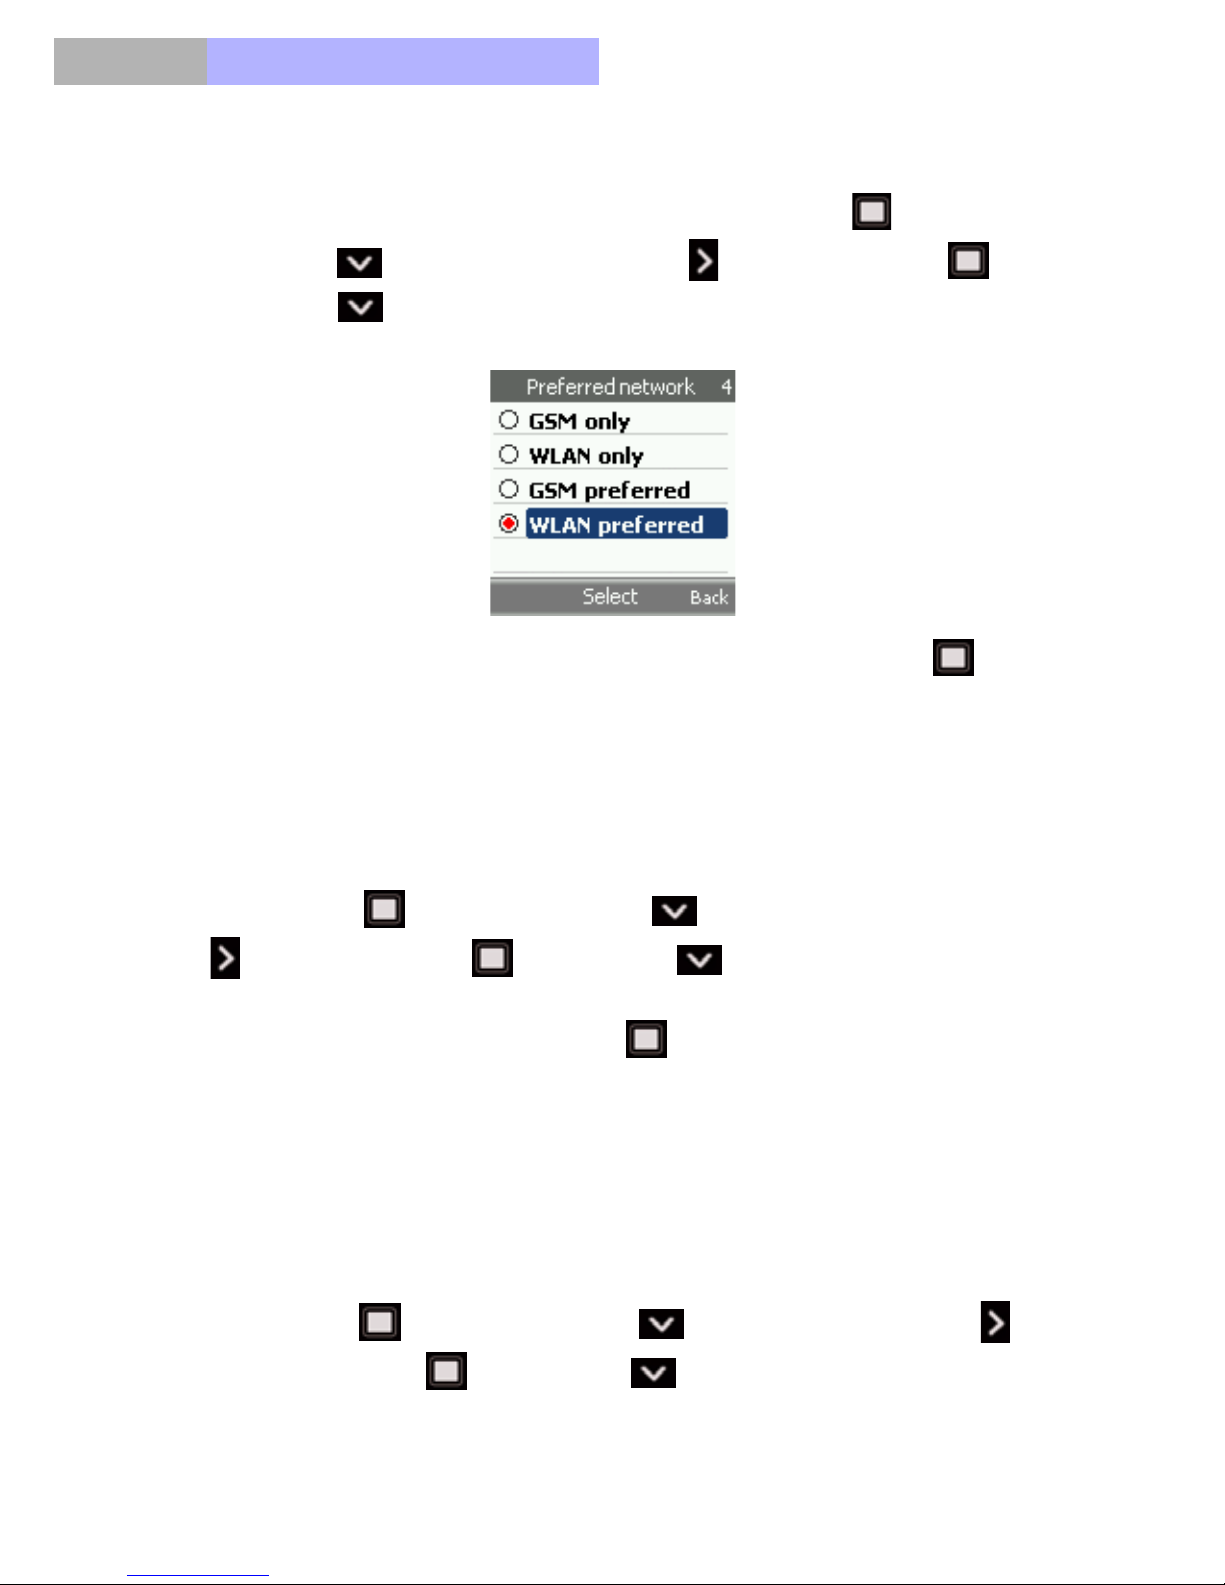
Chapter12
VoIPon www.voipon.co.uk [email protected] Tel: +44 (0)1245 808195 Fax: +44 (0)1245 600030
12.2 Preferred Network
Select your preferred network for your phone. Press OK key (Menu) >
Scroll down (two times) > Shift right key (Settings) > OK key >
Scroll down (Preferred network).
Select one from the four networks that you prefer and press OK key to
activate it.
12.3 Language
This phone device provides you with the default language option: English.
Press OK key (Menu) > Scroll down
(Settings) > OK key > Scroll down (two times) (Language).
Scroll to a language and press OK key to confirm.
(two times) > Shift right key
12.4 GPRS setup
The General Packet Radio Service (GPRS) provides users with packet data
services (similar to the Internet) using the GSM digital radio network. It is used
to support the connection with WAP and MMS services.
Press OK key (Menu) > Scroll down
(Settings) > OK key > Scroll down (three times) (GPRS setup).
90
(two times) > Shift right key
Page 91

Chapter
VoIPon www.voipon.co.uk [email protected] Tel: +44 (0)1245 808195 Fax: +44 (0)1245 600030
12.4.1 GPRS Attached
Select GPRS Attached and press OK key to enter to this feature. Choose
Any time or When needed based on your actual need.
The difference between Any time or When needed lies in that Any time is
connected to GPRS whenever you switch on the phone, while When needed
means you connect to GPRS only when you want to use this function.
12.4.2 Data Count
The data of incoming and outgoing messages are shown here.
12.4.3 GPRS Attach or Detach
12
The third and fourth option is attach to or detach from the GPRS connection,
respectively. Scroll and press OK key to activate the desired option.
12.5 Tones
Press OK key (Menu) > Scroll down (two times) > Shift right key
(Settings) > OK key > Scroll down (four times) (Tones).
Note that the settings you make will change the settings in the active profile.
There are sub-menus under the Tones. They are Ring tone, SMS Tone, Alarm
tone, Keypad tone, and Power on/off, WLAN alert, and Battery alert.
12.5.1 Ring Tone
Select Ring tone to choose how the phone notifies you of an incoming voice
call. The options are Alert type, melody, My music, and volume.
The Alert Type provides you with options of Ringing, Vibrating, Vibrate then
ring, Vibrate and ring, and silent. Scroll up and down to select the one that suits
you most. Press right soft key (Back) to return to upper level.
The factory default offers 25 pieces of Melody for your choice.
91
Page 92

Chapter12
VoIPon www.voipon.co.uk [email protected] Tel: +44 (0)1245 808195 Fax: +44 (0)1245 600030
My Music is the melody you created or downloaded. You may contact your
service providers for download information.
Press right navigation key to increase the Volume and the left navigation
key to decrease the Volume.
12.5.2 SMS and Alarm tone
SMS tone and alarm Tone have the identical options and operational method
as Ring Tone does. Refer to Ring tone to use these two features.
12.5.3 Keypad tone
The keypad tone is also set up here under the Settings menu. Scroll up and
down to select the keypad tone from Off (Silent), Click, DTMF (every key has
its unique sound).
12.5.4 Power On/Off, W LAN, Battery alert
It is the melody that sounds when you switch on/off the phone, out of WLAN
range, or when battery is low.
12.6 Display
This submenu provides different background images for your phone during the
idle mode and the light level you want your phone screen to display.
Select Display and press OK key to enter this feature.
12.6.1 Wallpaper
Select Wallpaper to set up your phone to display a background image, known
as wallpaper, when the phone is in idle mode.
Scroll to Select wallpaper to select wallpaper from Gallery or the pre-installed
wallpaper. .
92
Page 93

Chapter
VoIPon www.voipon.co.uk [email protected] Tel: +44 (0)1245 808195 Fax: +44 (0)1245 600030
Scroll to Select gallery enter into Gallery. Select Images to display a list of the
pictures you took using the phone’s camera. Scroll up and down to choose
your wallpaper from the list and press OK key to activate your soft.
Scroll to on/off to turn on/off the display of the wallpaper you selected.
12.6.2 Backlight Timer and Backlight Level
Backlight is the light that helps you to read the screen with ease, but it
consumes the battery power. Backlight timer defines the duration the backlight
stays on from the last activity. You may select the timer that satisfies your need
and save the power. You have the options of 10 seconds, 20 seconds, 30
seconds and 60 seconds. Press OK key to activate your soft after done.
Backlight level feature controls how luminous you want the screen to display.
12
Select Backlight level and press right navigation key to increase the
backlight from level one to level five. Press left navigation key to darken
the backlight.
12.7 Clock
The time and the date are setup under this submenu.
First setup the date by enter the current date. Key in the digits representing
today’s date and press navigation key to move to left or right. Press OK key
to activate the changes.
Date display allows you to select different date format that you want to be
shown on the idle mode screen. Scroll up and down to pick your choice from
the three options.
The setup method of Time setting is identical to Set date and Date display,
only that it is for time. Follws the step above to set the time.
Time format allows you to change the time format as 12 hours or 24 hours.
93
Page 94
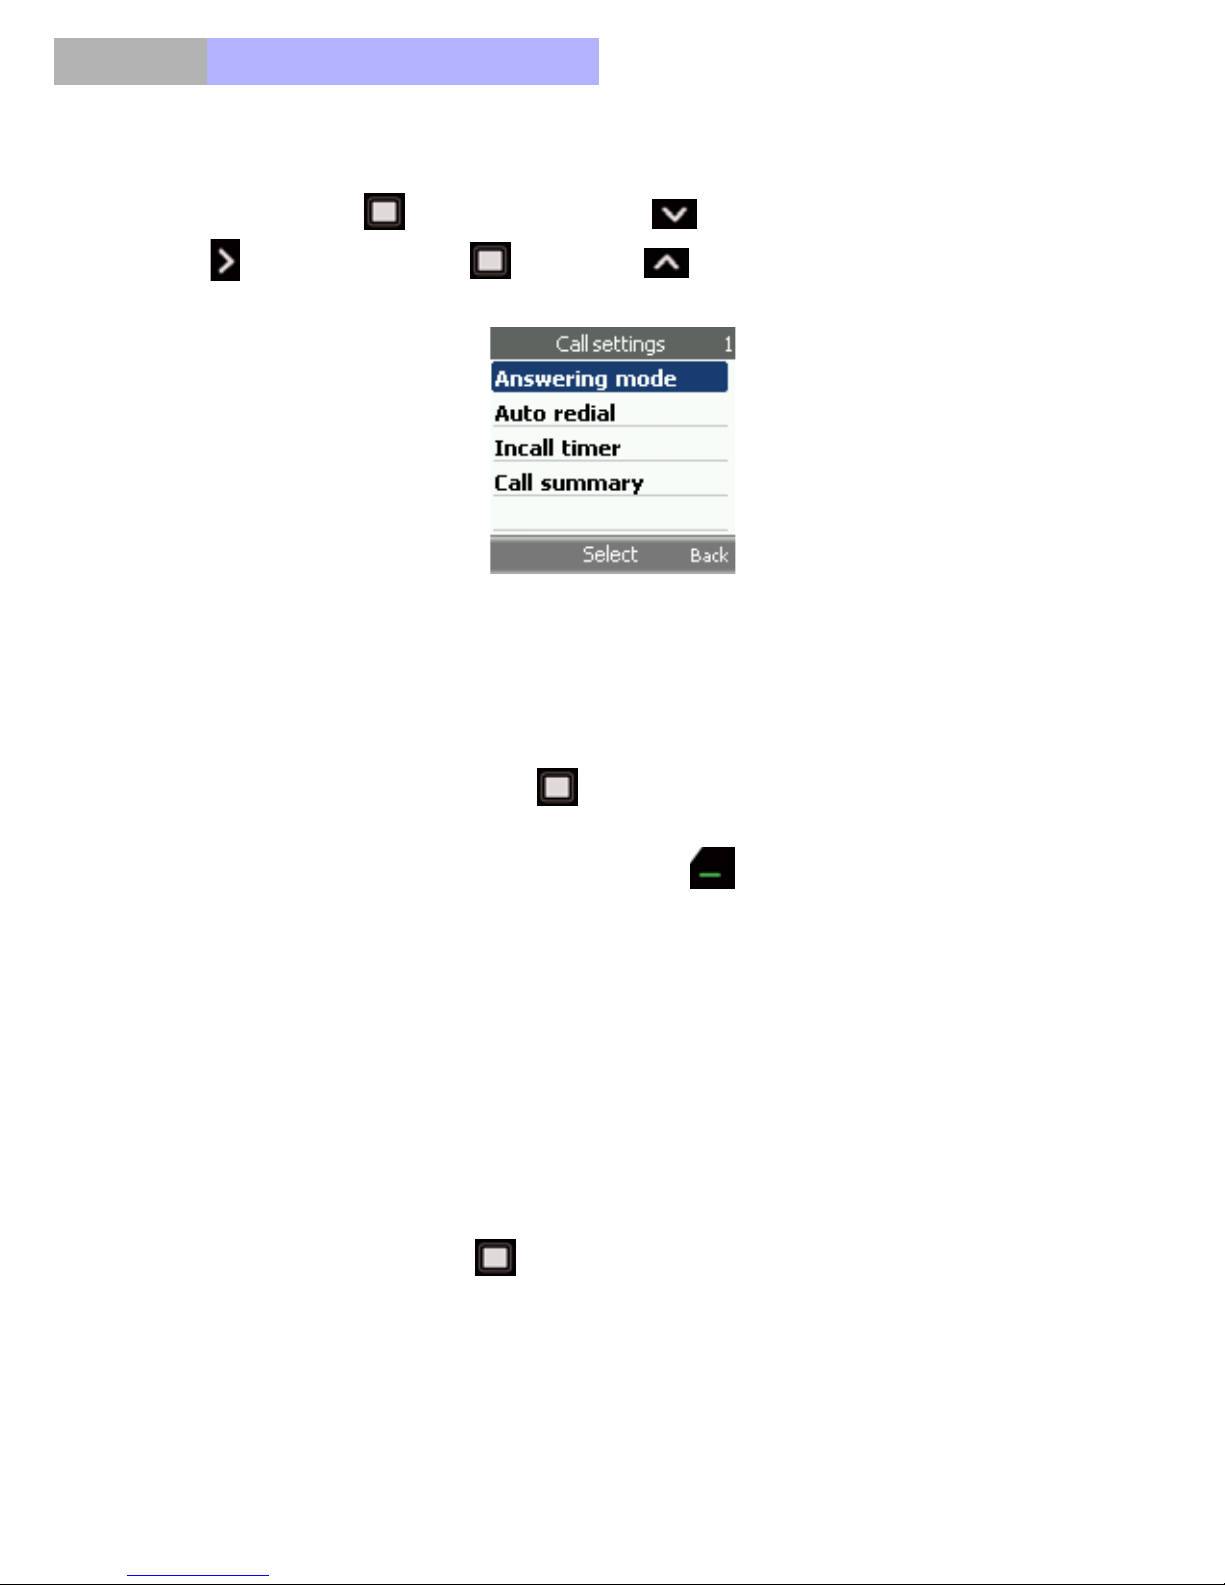
Chapter12
VoIPon www.voipon.co.uk [email protected] Tel: +44 (0)1245 808195 Fax: +44 (0)1245 600030
12.8 Call Settings
Press OK key (Menu) > Scroll down (two times) > Shift right key
(Settings) > OK key > Scroll up (Call Setting).
12.8.1 Answering mode
The first sub-menu is Answering mode, which is to decide what key you press
in order to answer the phone. Choose from Normal answer, Any key answer,
or Auto answer. Press OK key to activate the setting.
Normal Answer is to answer the phone using or Green key, while Any
Key Answer is to answer the phone using any key on the keypad. Auto Answer
means the phone will automatically answer the incoming call after 5 seconds.
12.8.2 Auto redial
The second sub-menu Auto Redial is to activate or not the auto-redial function.
12.8.3 Incall timer
Incall Timer is to set On or Off the timer when the phone is in use. Select On
or Off and press OK key to activate the setting.
12.8.4 Call summary
Call summary is to set On or Off the call summary after the phone call.
94
Page 95

Chapter
VoIPon www.voipon.co.uk [email protected] Tel: +44 (0)1245 808195 Fax: +44 (0)1245 600030
12.9 Network Service
Press OK key (Menu) > Scroll down (two times) > Shift right key
(Settings) > OK key > Scroll up (four times) (Network Service).
12.9.1 Call Divert
With Call Divert, you can direct your incoming calls to another number, for
example, to your voice mailbox number, a fax number or another phone
number. Divert options not supported by your SIM card or your network
operator may not be shown.
Select the divert option you want from If not reachable, If busy, if no reply to
divert voice calls when your number is busy or when you reject an incoming
call.
12
To set the divert setting to on, select one from the three options mentioned
above and then select whether the call is diverted to Voice, Fax, or Data, if this
is available for the divert option. After you made the decision of call divert
destination, press OK key to Set Divert, meaning activating the divert
destination. You may also scroll to Check Status and press OK key to
check if this function is set on or not. Several divert options may be active at
the same time.
To set the divert setting to off, select Cancel Divert to check whether call divert
is activated or not.
If you activate All Calls, it means the phone will not filter any incoming calls and
divert them all to your selected destination.
Cancel All will disable the divert All Calls function. Follow the previous
paragraph to operate the two functions.
95
Page 96

Chapter12
VoIPon www.voipon.co.uk [email protected] Tel: +44 (0)1245 808195 Fax: +44 (0)1245 600030
12.9.2 Call Barring
Call barring service (network service) to restrict incoming calls to and outgoing
calls from your phone, including both domestic and international calls. A
barring password is required.
Scroll from the softs and press OK key to enter into this soft. You can
Check Status, Set Bar, or Cancel the call barring by pressing OK key .
12.9.3 Call Waiting
Activate this function and the network will notify you of an incoming call while
you have a call in progress.
Select Call waiting and press OK key to enter into this soft. You can then
Check status to see if this function is set on, Activate, or Cancel the call waiting
by pressing OK key .
12.9.4 Network Select
This feature is to select the GSM Service Provider. Select Network select and
press OK key to choose from Automatic or Manual.
If you select Automatic, your phone will automatically search any available
network that helps send and receive signals. Note that not all available
networks can be connected and you are recommended to select Automatic.
If you select Manual, the system will search for all available networks in your
area. Select your option and press OK key to confirm.
12.9.5 Band Mode
This feature is to set up the band that your phone network is operating on. You
can select from Automatic, 900&1800, 900, 1800, or 1900. Select your option
and press OK key to confirm.
96
Page 97
Chapter
VoIPon www.voipon.co.uk [email protected] Tel: +44 (0)1245 808195 Fax: +44 (0)1245 600030
12.9.6 Number Transmitted
Select On or Automatic and press OK key to confirm if you do not want
the receivers to know your phone number, otherwise, select No.
12.10 Security
Information:
When security features that restrict calls are in use (call barring), calls may be
possible to certain emergency numbers in some networks (e.g. 112, 911 or
other official emergency numbers).
12
Press OK key (Menu) > Scroll down (two times) > Shift right key
(Settings) > OK key > Scroll up (three times) (Security).
Enable PIN: you are required to enter the phone password when you switch
the phone on.
Change PIN: This feature allows you to change your current PIN to a new one,
provided that the PIN Check feature is enabled. You must enter the current
PIN before you can specify a new one. Once you have entered a new PIN, you
are asked to confirm it by entering it again.
Change PIN2: The Change PIN2 feature allows you to change your current
PIN2 to a new one. You must enter the current PIN2 before you can specify a
new one. Once you have entered a new PIN2, you are asked to confirm it by
entering it again.
Information:
Not all SIM cards have a PIN2. If your SIM card does not, this menu option is
not displayed.
Handset code: When the Phone Lock feature is enabled, the phone is locked
and you must enter the 4-digit phone password each time the phone is
97
Page 98

Chapter12
VoIPon www.voipon.co.uk [email protected] Tel: +44 (0)1245 808195 Fax: +44 (0)1245 600030
switched on. The password is factory set to 0000. To change the phone
password, once the correct password has been entered, you can use the
phone until you switch it off.
Fixed dialing: To restrict your outgoing calls and text messages to selected
phone numbers if this function is supported by your SIM card. The PIN2 code
is required. When the fixed dialing is on, GPRS connections are not possible
except while sending text messages over a GPRS connection. In this case, the
recipient’s phone number and the message center number have to be
included on the fixed dialing list.
12.11 Auto Key Guard
Key Guard allows you to keep the phone in your pocket or purse without the
worry of accidentally dialing a number.
Press OK key (Menu) > Scroll down
(Settings) > OK key > Scroll up (two times) (Auto key guard).
Select On to activate the automatic key guard. Select Off to deactivate this
function. .
(two times) > Shift right key
12.12 Restore Factory
To reset some of the menu settings to their original values, press OK key
(Menu) > Scroll down (two times) > Shift right key (Settings) > OK
key > Scroll up (Restore factory). Before you are allowed to restore
the factory setting, you are asked to enter the handset code. Enter handset
code and confirm if you want to reset the configuration.
Information:
Note that the data you have keyed in or downloaded, for example, the names
and phone numbers saved in contacts are not deleted.
98
Page 99

Chapter
VoIPon www.voipon.co.uk [email protected] Tel: +44 (0)1245 808195 Fax: +44 (0)1245 600030
13. Organizer
The Organizer menu has the following features:
1. Set the alarm so that the phone rings at a specific time, such as to remind
you of an appointment.
2. View the calendar and organize your schedule.
3. Define a list of things to do.
4. Setup the time for the phone to ring on specific time or switch on the
phone automatically when it was switched off.
13.1 Alarm
This feature allows you to set up to five alarms. You can:
1. Set the alarm to ring at a specific time.
2. Set the phone to switch on automatically and ring the alarm even if the
phone is switched off.
13
The following options are available:
a) Daily: the alarm rings every day at the same time.
b) Weekdays: the alarm rings on Monday to Friday at the same time.
c) Weekend: the alarm rings only on weekend at the same time.
d) Given date: the alarm rings only once then deactivated.
Press OK key (Menu) > Scroll down (two times) > Shift right key
(two times) (Organizer) > OK key (Alarm).
Press OK key (Select) to start setting. The first item is to choose the
frequency of the alarm from Once, Daily, Week Day or Weekend. Press OK
key to enter into the four sub-options and scroll up and down to select
one that suits your need.
Once the daily alarm is set up, press the downward navigation key and
press OK key to enter into the second item: time setting. Key in the time
and press OK key to save the change. Follow these steps to set up the
third option, date of alarm setting, and alarm On or Off.
99
Page 100
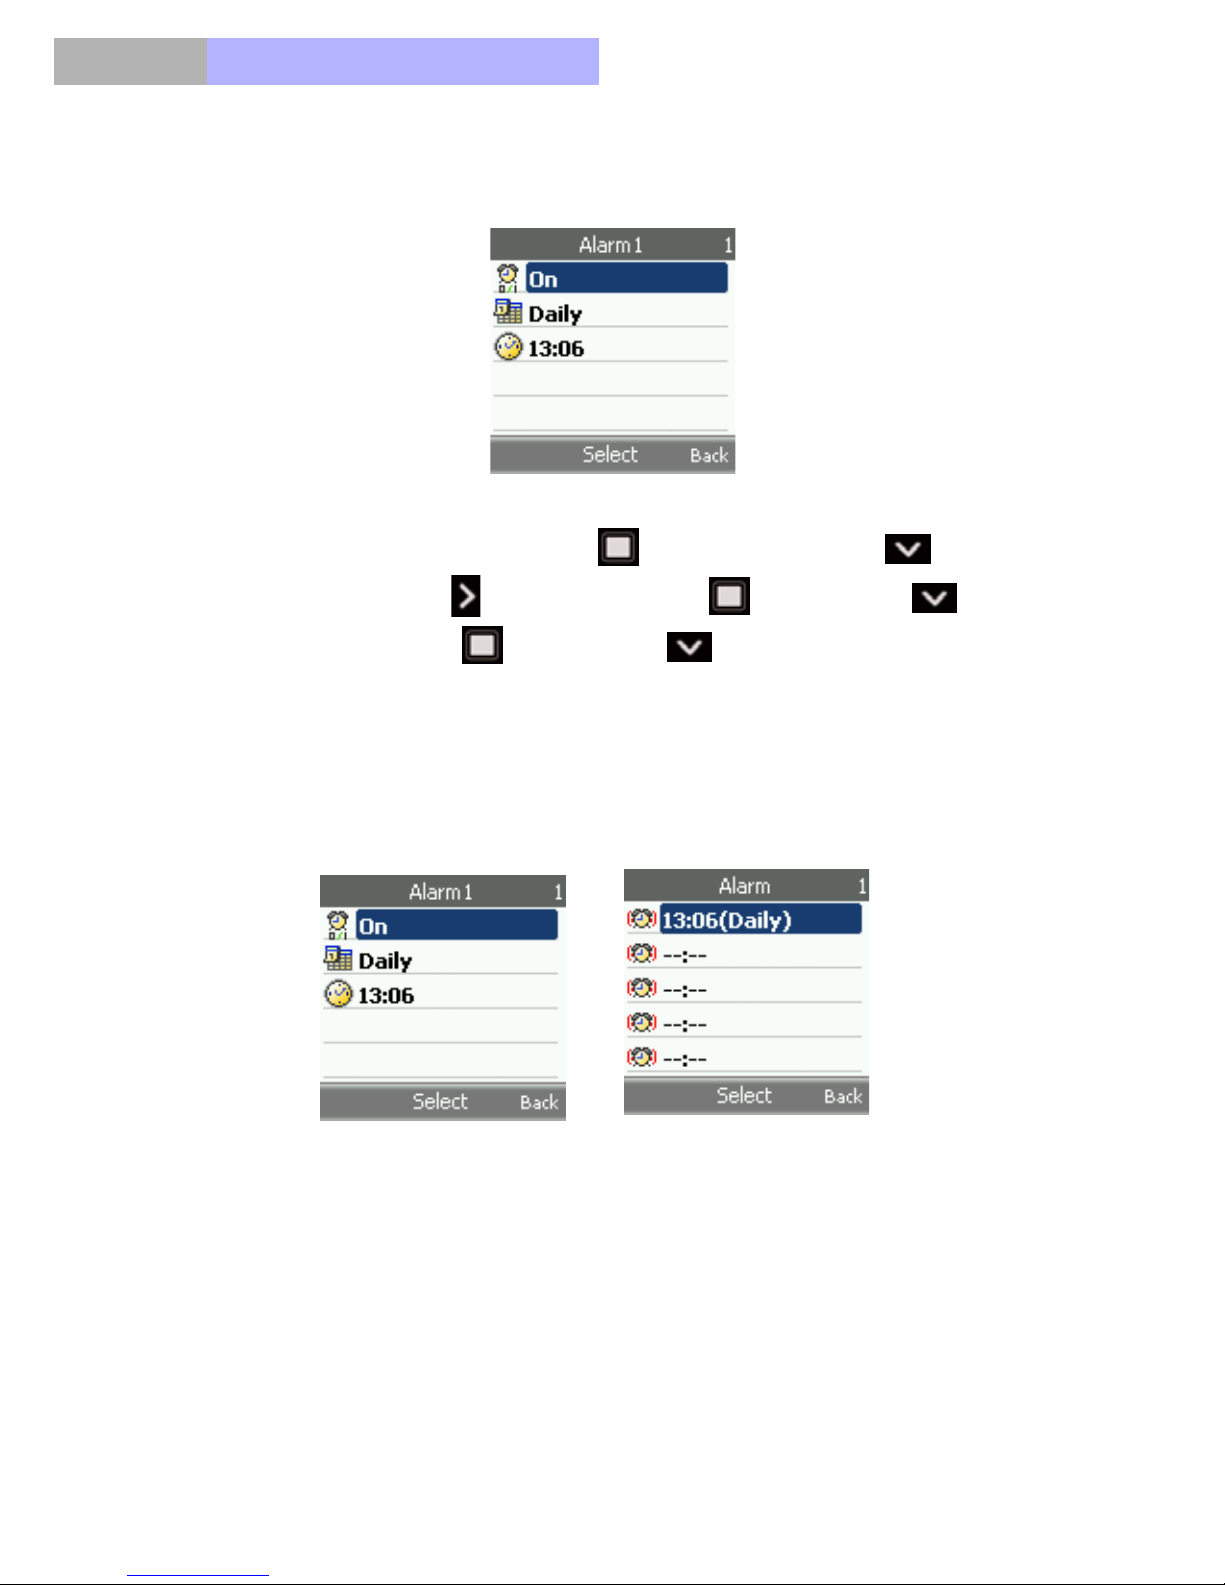
Chapter13
VoIPon www.voipon.co.uk [email protected] Tel: +44 (0)1245 808195 Fax: +44 (0)1245 600030
You have to choose on for the alarm On or Off item, or all the settings will not
work.
To set the alarm tone, press OK key (Menu) > Scroll down (two
times) > Shift right key (Settings) > OK key > Scroll down (four
times) (tone) > OK key > Scroll down (two times) (alarm).
13.2 When the alarm time expires
The phone will sound an alert tone, and shows Alarm and the time and the
current time on the display.
Press Stop to stop the alarm or press Snooze to reschedule the alarm in next
10 minutes.
If the alarm time is reached while the phone is switched off, the phone switches
itself on and starts sounding the alarm tone. If you press Stop, the phone asks
whether you want to switch the phone on. Press No to keep the phone
switched-off or Yes to make phone switch-on.
100
 Loading...