

Page 1
!
1
Piper User Manual
!
!
!
! !
USER MANUAL
Congratulations on your recent Piper
purchase! With this guide, you will learn
how to operate Piper and all its features
effectively. It includes information that
will help you take advantage of the
numerous smart home security and
automation services that Piper offers,
along with installation instructions for a
quick and seamless setup.
!
Page 2

!
2
Piper User Manual
!
Table of Contents
Unboxing Piper 4
Piper Details 5
Setup Instructions 6
Product Requirements 6
Piper Installation 7
Piper Mobile App Setup 8
Piper Setup: iOS 8
Piper Setup: Android 12
Multiple Pipers 16
Multi Piper Setup 17
Multi Piper Mobile App Setup 18
Multi Piper Setup: iOS 18
Multi Piper Setup: Android 22
The Piper Mobile App 26
Dashboard 26
Piper View 26
Live Video 27
Security Panel 28
Notable States 31
Activity in Armed Modes 31
Siren Activated 32
Not Connected to Piper 33
Events 34
Timeline 34
Video Clips 35
Event Features 36
Home Vitals 37
Rules 38
Armed Security Mode Rules 38
Notification Rules 41
Automation Rules 42
Settings 46
My Details 47
Piper Options 48
Trusted Circle 51
“Notify Trusted Circle” Security Rule 52
Wireless Accessories 53
Video Settings 53
Multi Piper Management 53
Smart Arming with Life360 (Beta) 53
Page 3

!
3
Piper User Manual
Features 54
Wireless Accessories 54
What are Wireless Accessories? 54
What is Z-Wave? 54
Purchasing Wireless Accessories 54
Updates 54
Adding Wireless Accessories 55
Removing Wireless Accessories 55
Smart Arming with Life360 (Beta) 60
What is Life360? 56
What is Smart Arming? 56
Smart Arming Setup 56
Icons 57
Dashboard and Main Navigation 57
Events 58
Security Events and Wireless Accessories 58
Weather 59
!
! !
Page 4

!
4
Piper User Manual
Unboxing Piper
!
!
Before starting, please ensure your Piper purchase contains each of the items listed below.
If any are missing, con ta c t y o u r Piper retailer or the Piper sup port line for your region available
at getpiper.com/contact-us.
Each box includes:
• Piper
• Quick start guide
• Power adapter with 6 foot (1.8m) cord
• 3 x AA alkaline batteries
• Optional wall mount
• Battery door screw
!
Page 5
!
5
Piper User Manual
Piper Details
!
!
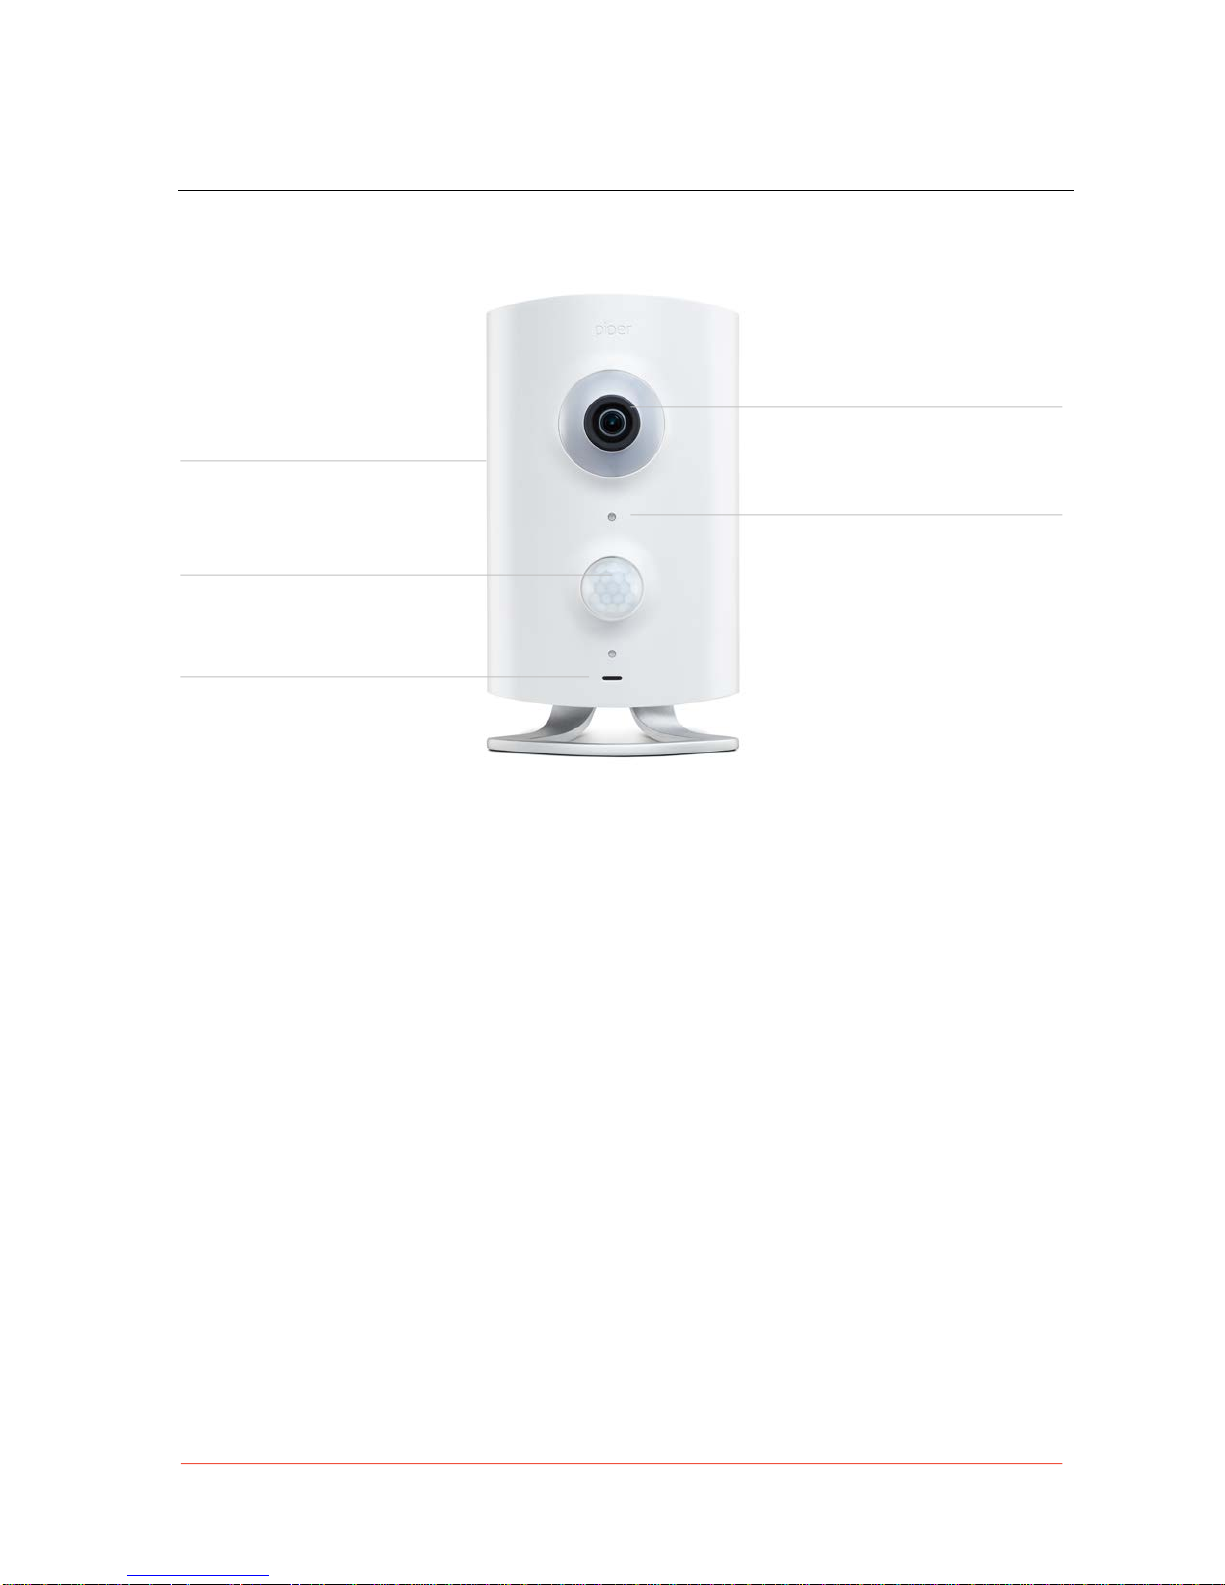
Piper has the following features:
• Panoramic HD video with a 180° fisheye field of view. You can ac ce s s p a n , tilt, a n d
zoom features while viewing live video, even in quad-view or with night vision activated.
• Built-in environmental sen sors detect sound , motion, brightness , h umidity, and the
indoor and outd o or temperature.
• Microphone and speaker allow for interactive two-way audio while viewing live video.
• Powerful 105 dB siren sounds during emergencies or when manually activated.
• 802.11b/g/n Wi-Fi.
• Z-Wave radio for wireless accessories.
• Dimensions (with stand): 6.14" x 3.27" x 2.68" (156mm x 83mm x 68mm)
Note: To learn more about live video features, refer to the Live Video section.
Intruder-deterrent siren
Hear the powerful 105 dB siren when
a security mode Is breached
Motion and sound detection
Make sure no one slips by undetected
with precise built-in motion sensor and
high quality microphone
Two-way audio
Use the audio system to check in and
interact with your family or pets
Pan, tilt, zoom with a 180° view
See the entire room with a panoramic
view on live or recorded immersive video
Stay in tune with your home’s vitals
Ambient light, temperature and humidity
sensors ensure that you always come
back to a safe and comfortable home.
Page 6

!
6
Piper User Manual
Setup Instructions
!
Product Requirements
The minimum requirements necessary for Piper to function are as follows:
• Power source
• Internet connection w ith Wi-Fi (Minimum upload speed of 0.8 Mbps)
• Supported iOS or Android device
• iOS: Apple devic es running at least iOS 8
• Android: Devices running at least 4.1.x
Page 7
!
7
Piper User Manual
Piper Installation
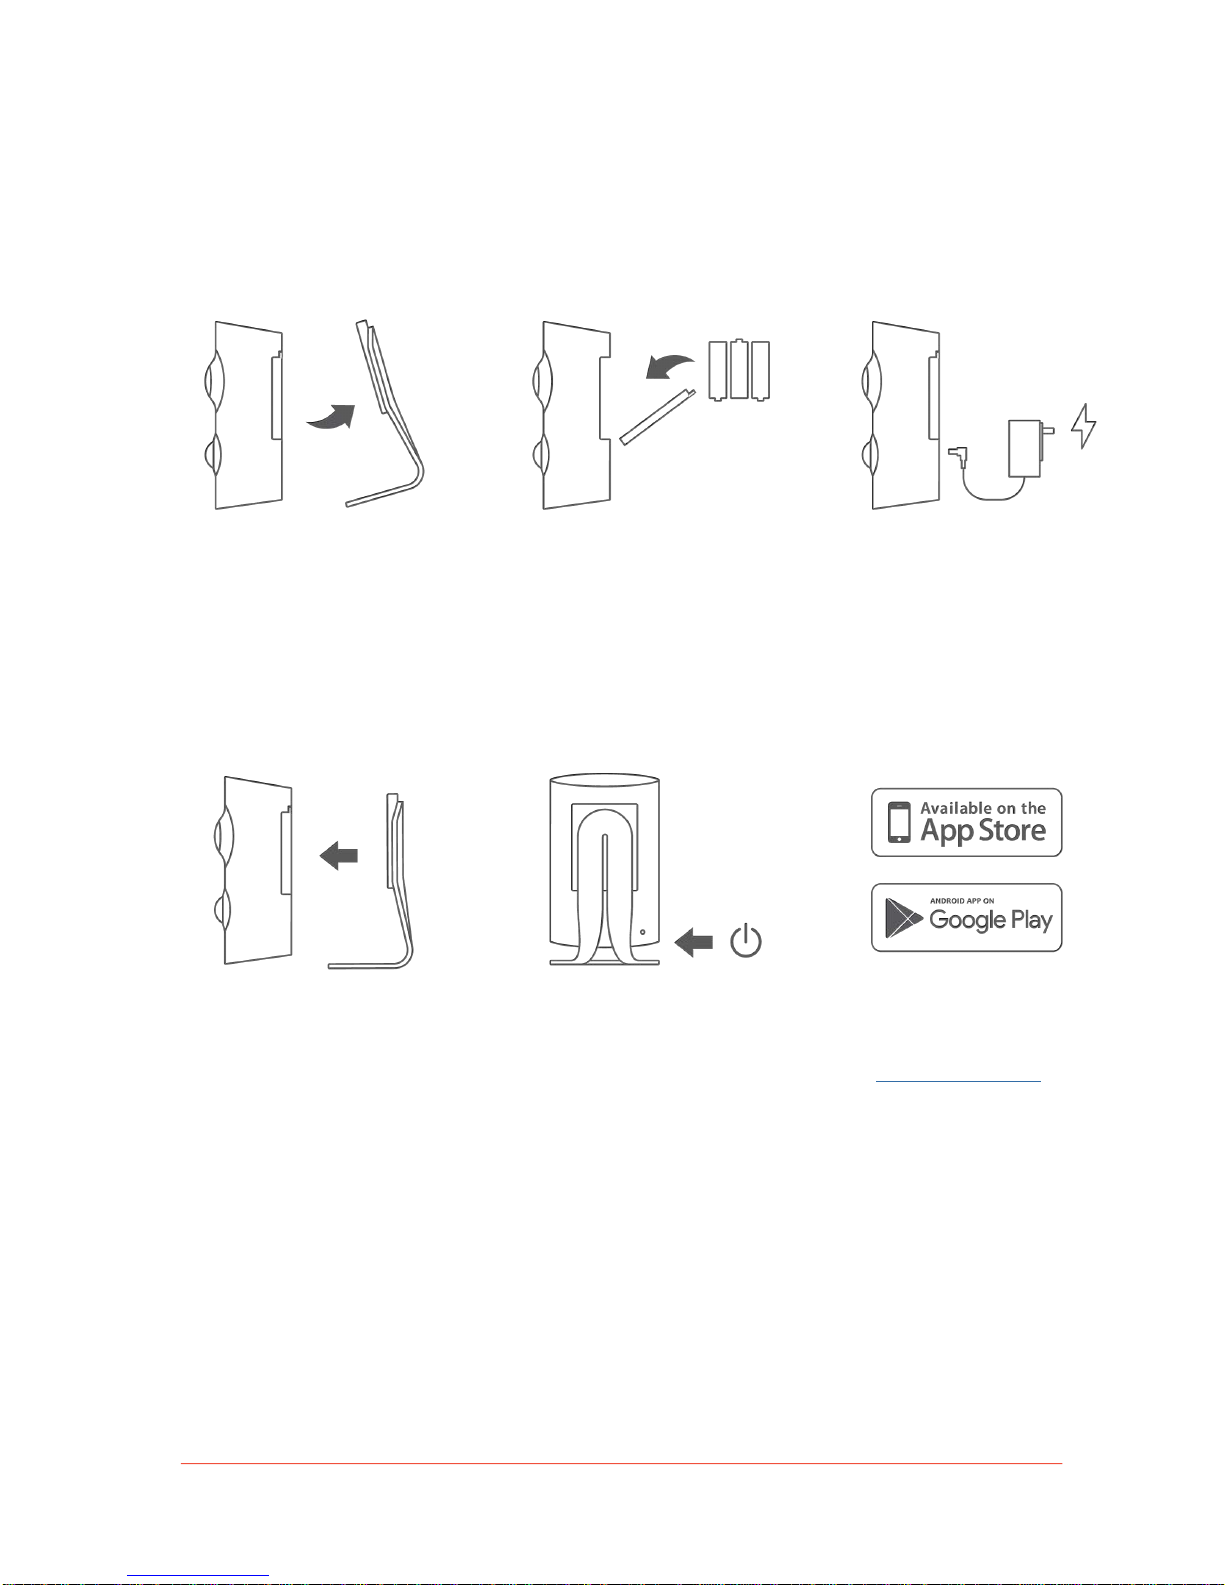
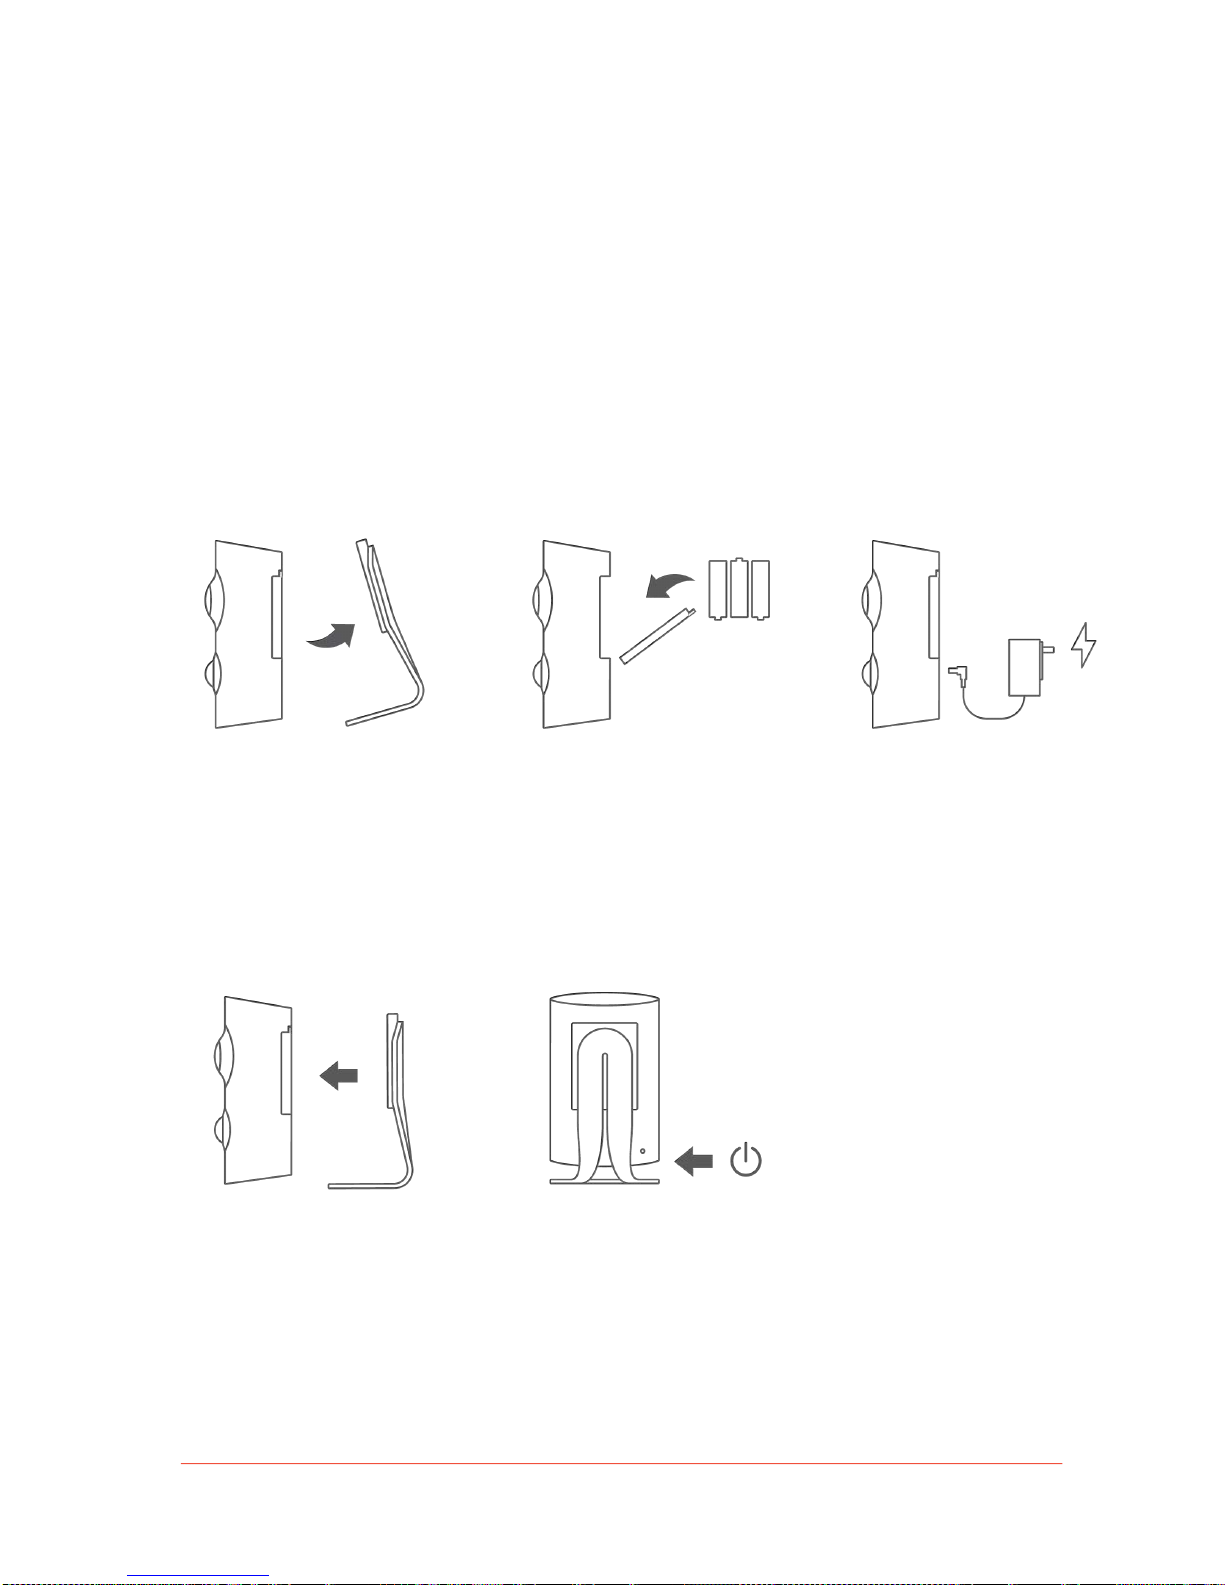
Follow these steps to begin the installation of Piper:
1.
2.
3.
detachable stand.
4.
Re-attach the stand (or affix the optional
wall mount) and position your Piper in the
desired location. For optimal viewing
capacity, we recommend placing Piper
in a high traffic area.
back of Piper and insert the provided
AA batteries. Close the battery door
and secure it with the provided screw.
5.
Press the power button on the back
of Piper, located on the bottom-right.
Note: Piper’s LED light will be yellow
while starting up.
and plug the opposite end to an
electrical outlet.
6.
When your Piper’s LED light turns
blue, download the Piper app
from getpiper.com/download and
create an account.
Page 8
!
8
Piper User Manual
Piper Mobile App Setup
You are now ready to connect your mobile device to Piper.
• For setup instructions using an iOS device, go to Piper Setup: iOS.
• For setup instructions using an Android device, go to Piper Setup: Android.
Piper Setup: iOS
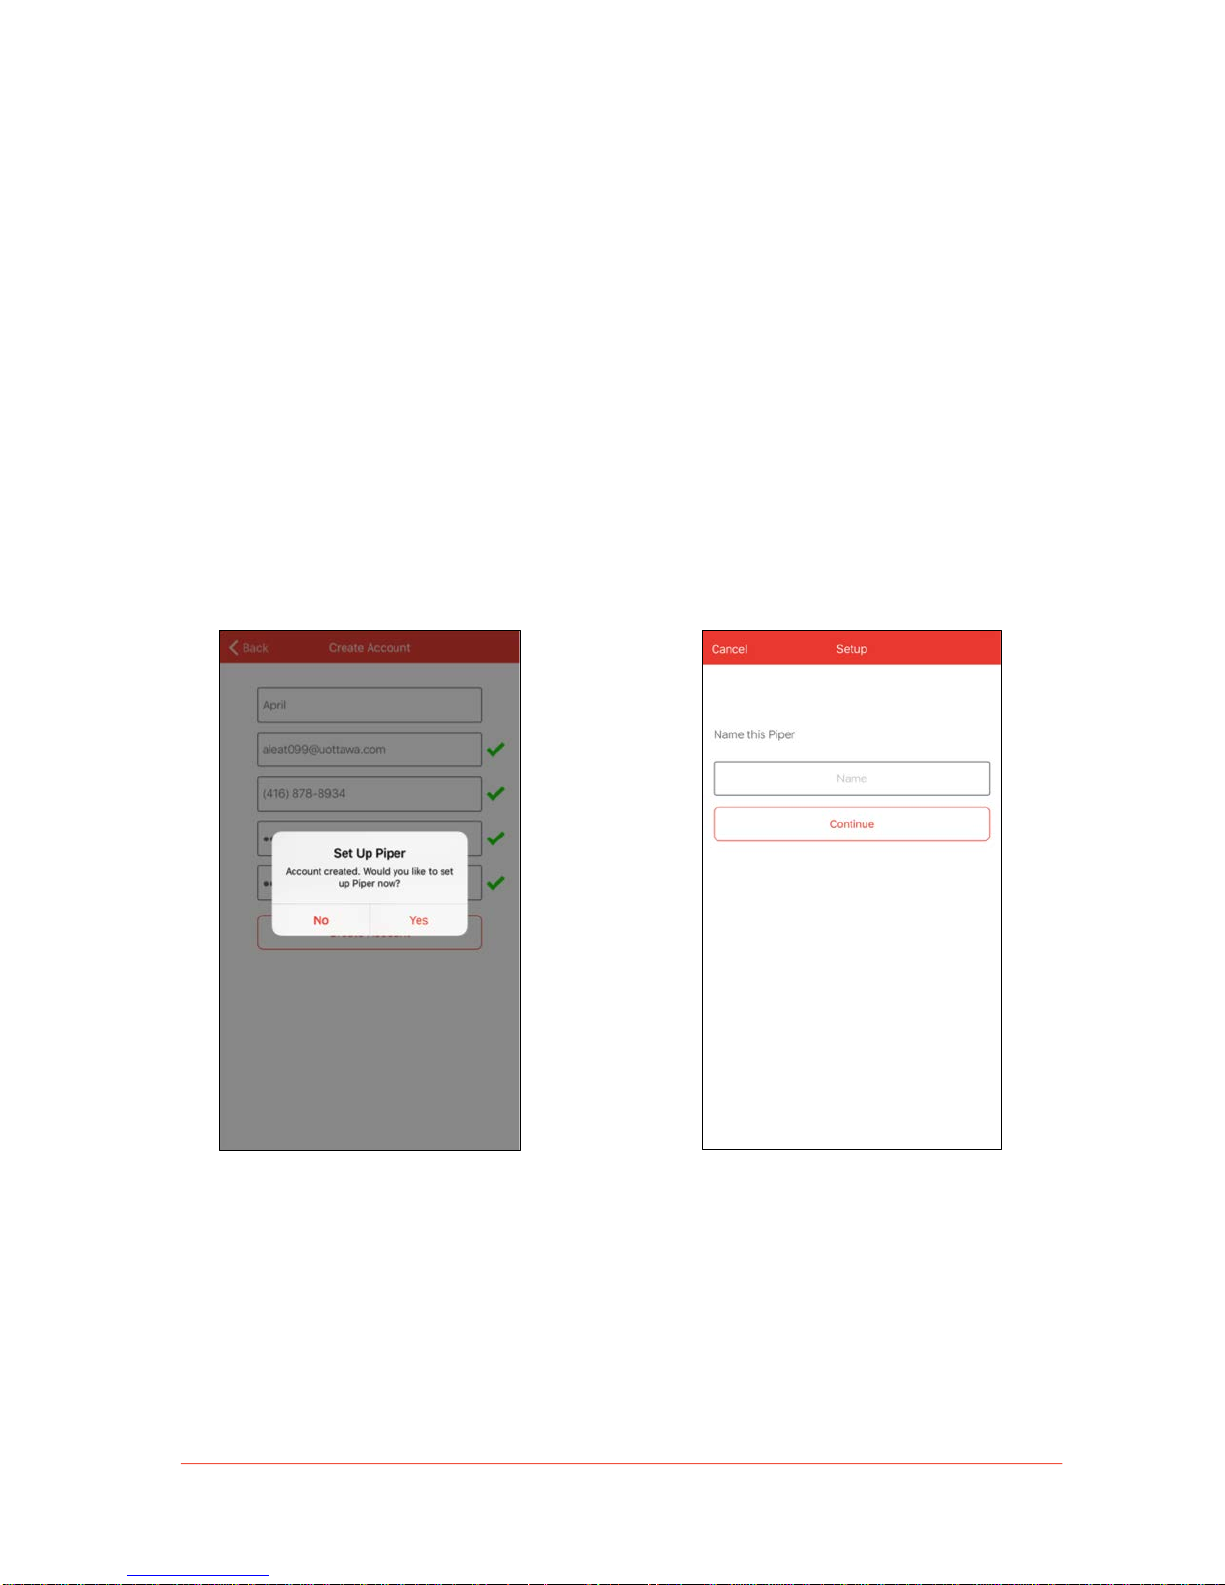
Follow these steps to set up Piper from your Apple iOS device:
1. Confirm the prompt to start setup after
creating your Piper account.
2. Name your Piper and tap “Continue”
to proceed.
! !
Page 9
!
9
Piper User Manual
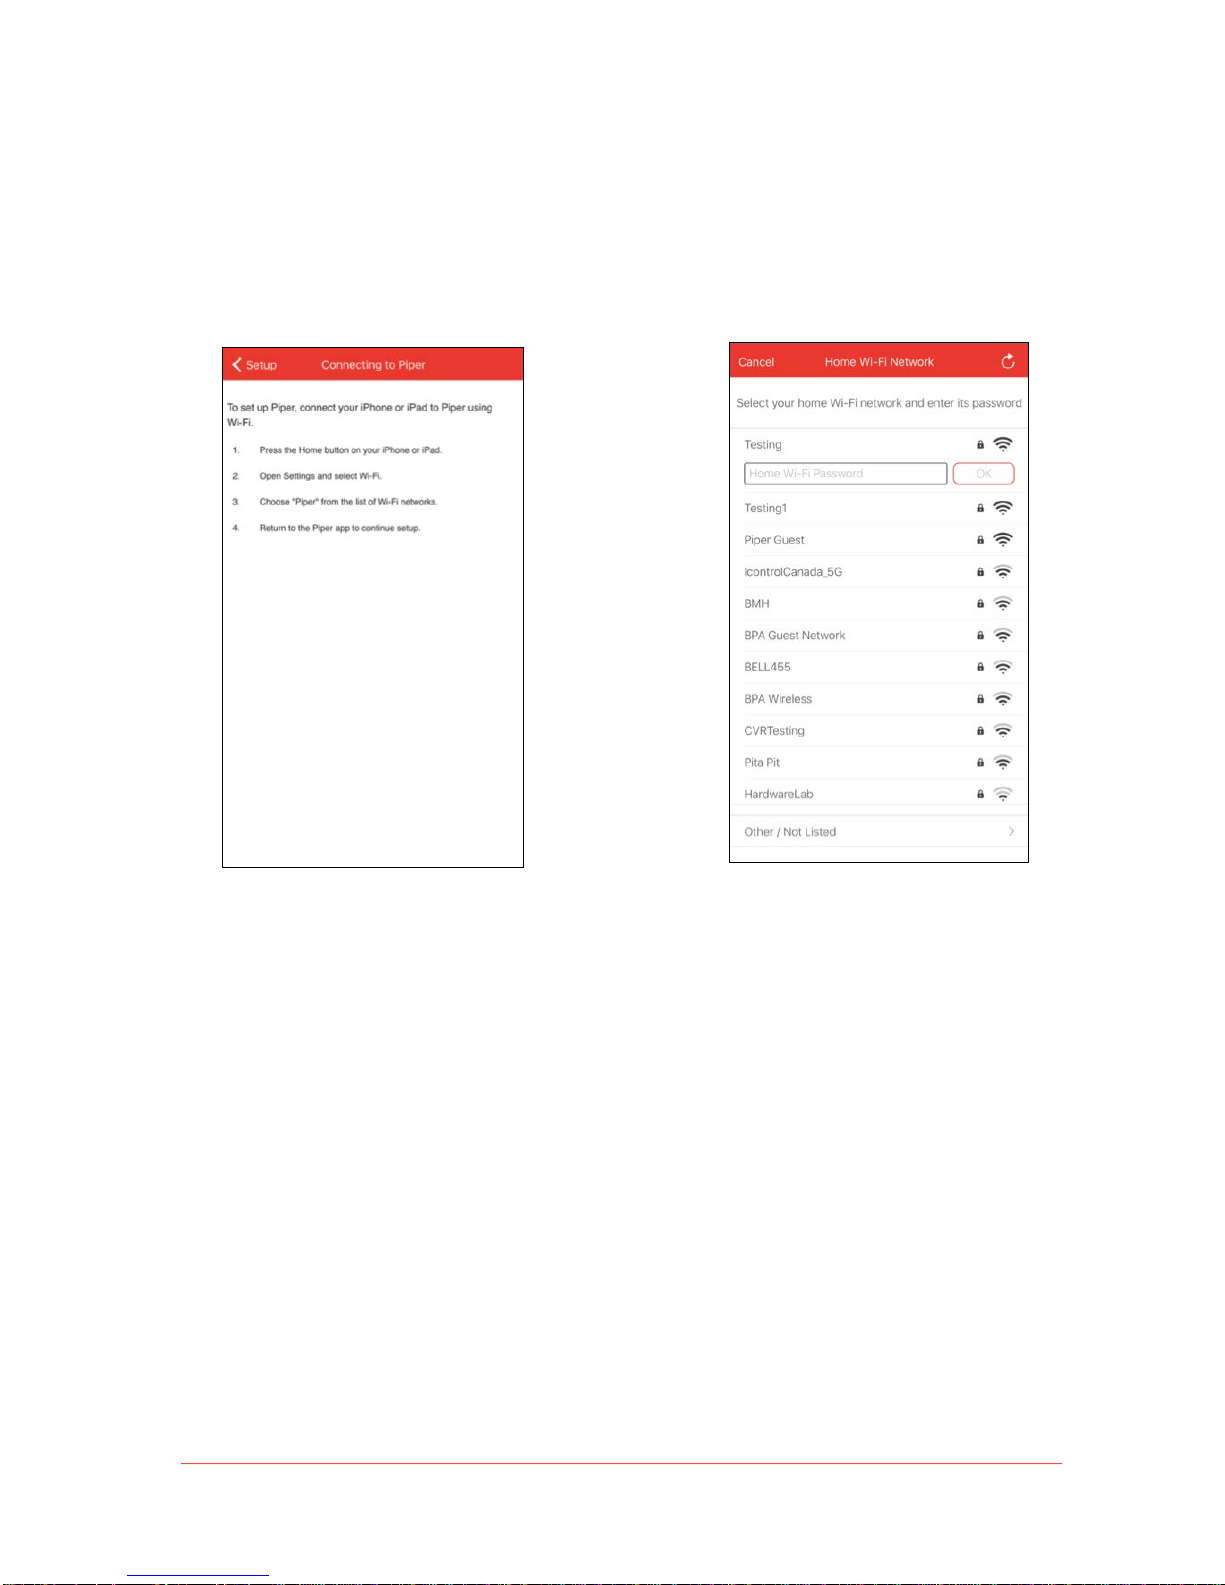
3. Open your iOS device’s settings and go
to the Wi-Fi screen. Select “Piper” from
the list of networks.
Note: In this step, your mobile device
is connecting to your Pipe r v ia Wi-Fi
to set it up.
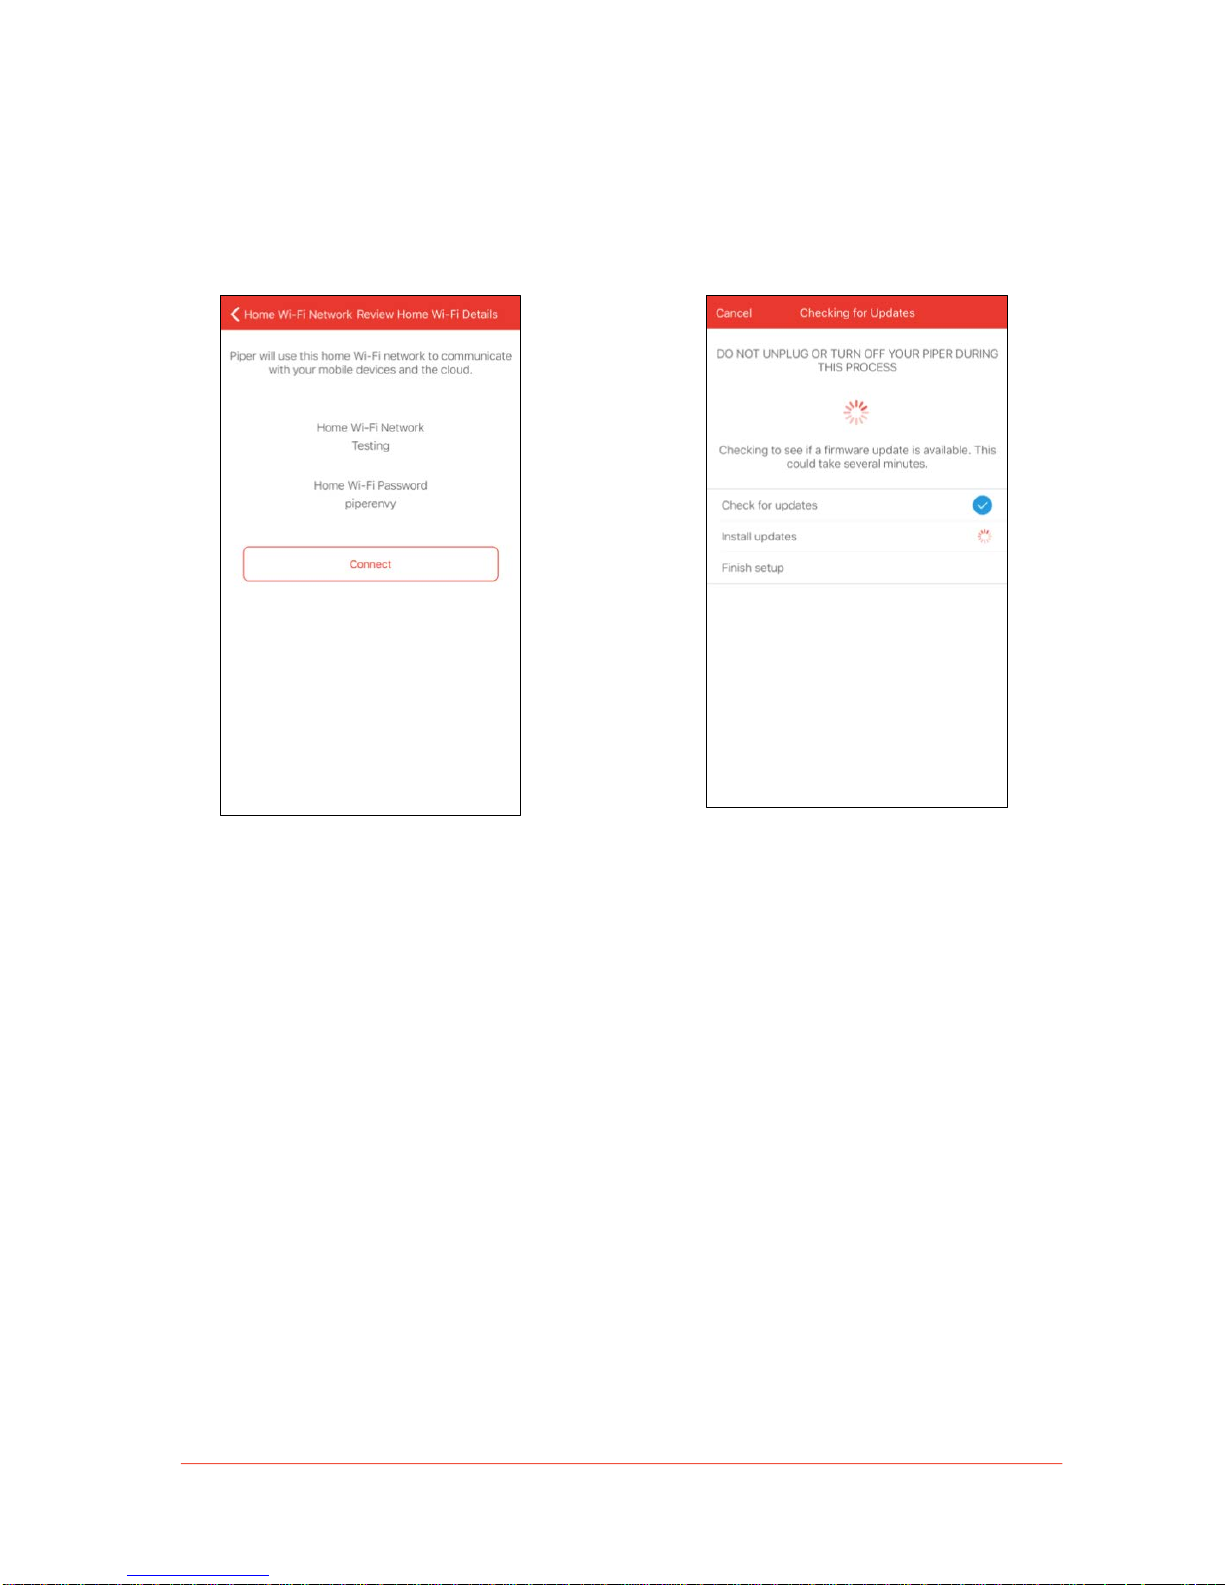
4. Once your mobile device has connected
to the “Piper” Wi-Fi network, return to
the Piper app. Select your home Wi-Fi
network from the list that will appear and
enter the password.
! !
Page 10
!
10
Piper User Manual
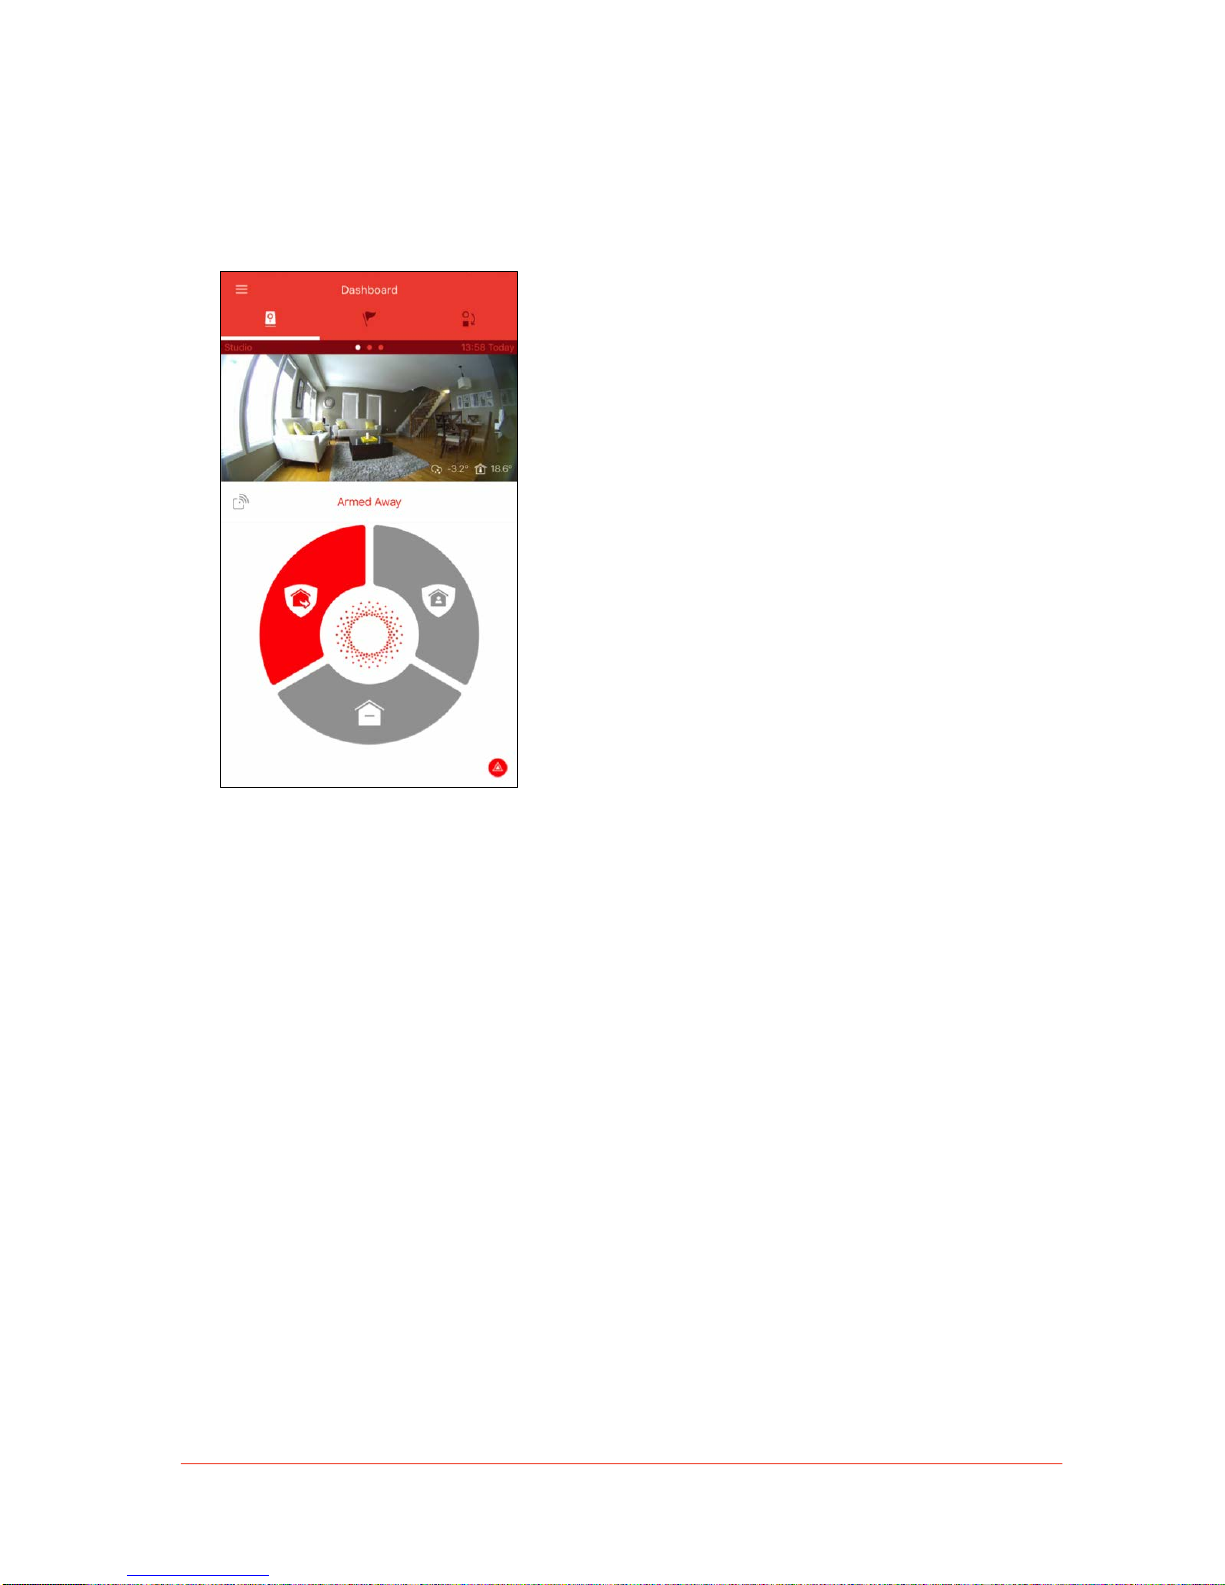
5. Confirm your home Wi-Fi network
information before tapping “Conn ect.”
6. Your Piper will automatically update to
the latest firmware if necessary, a n d
then finish setup.
Note: This may take up to 10 minutes or
more. Do not unplug or turn off Piper
during this process.
! !
Page 11
!
11
Piper User Manual
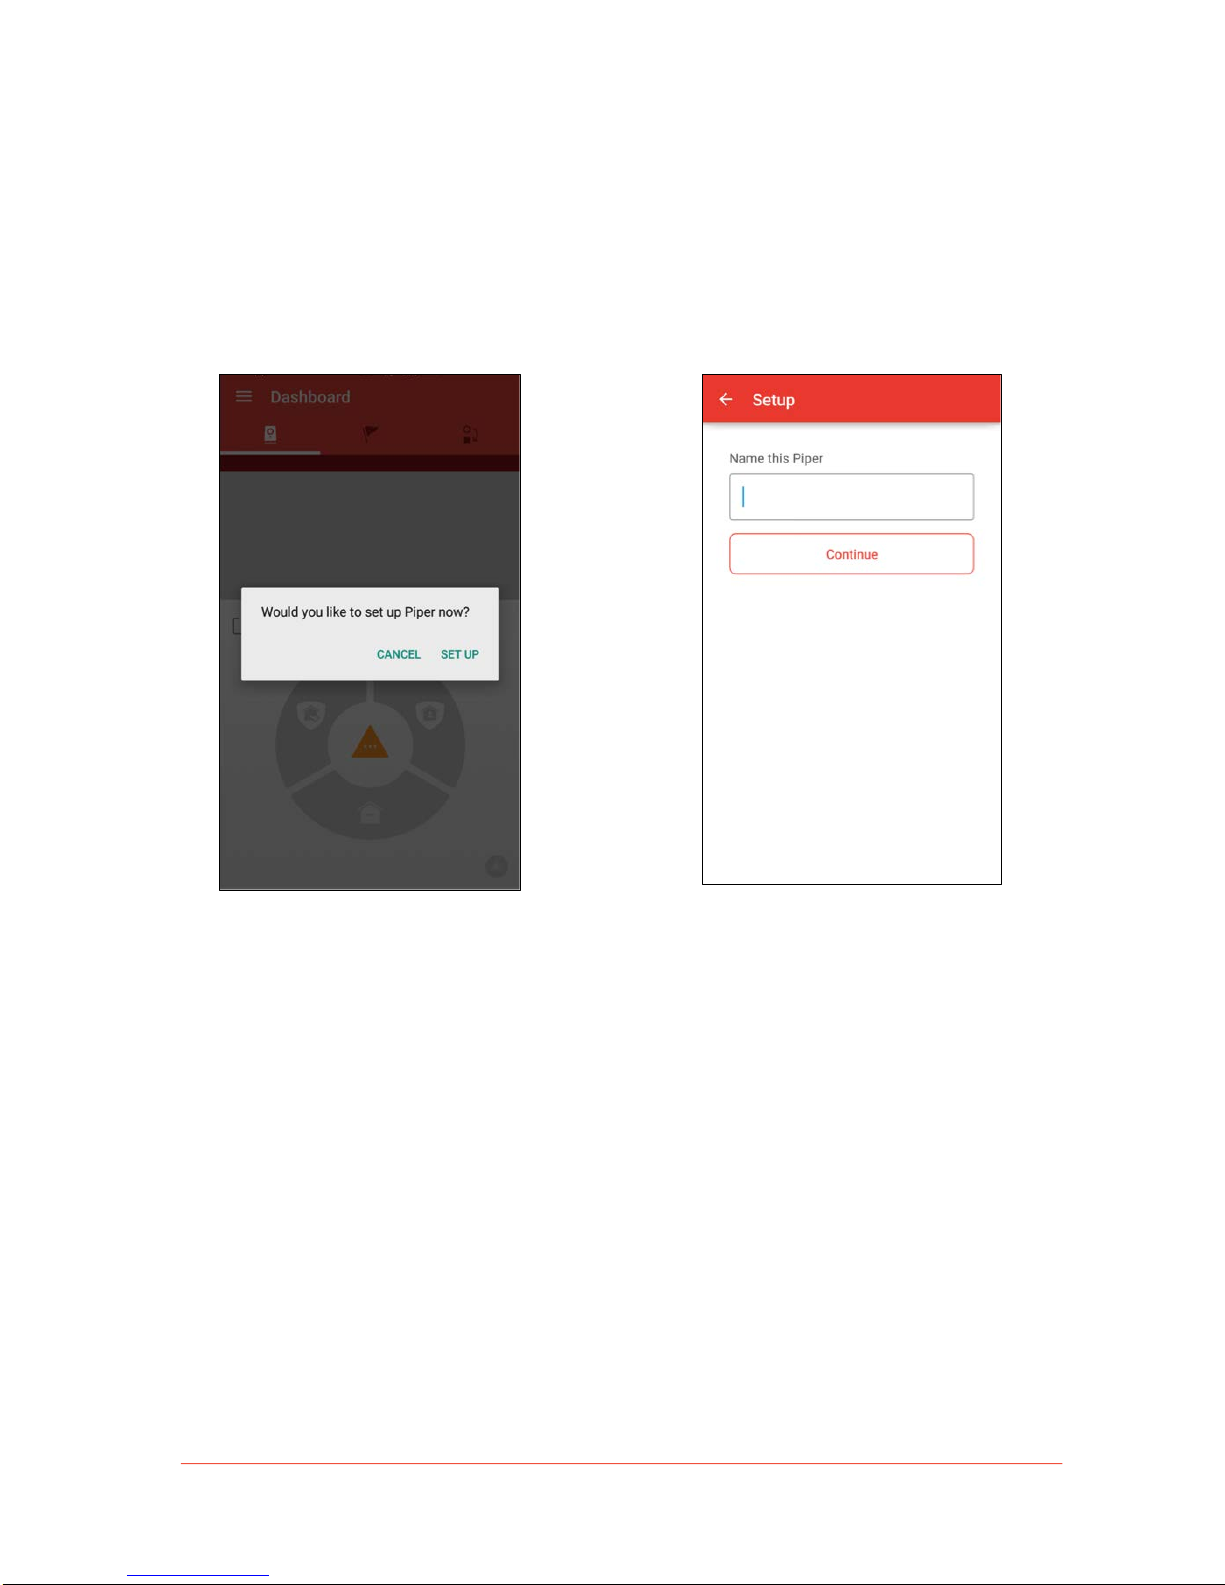
7. The Dashboard screen will appear after
setup has finished.
Note: Your Piper’s LED light should
now be green.
You will receive two notices of confirmation:
• A text message from a number that Piper will use to contact you. Be sure to add this
number to your contacts.
• A welcome email with links to various tutorial videos.
Note: To access Piper, family members can download the app and sign in with the
account owner’s login information.
Page 12
!
12
Piper User Manual
Piper Setup: Android
Follow these steps to set up Piper from your Android device:
1. Confirm the prompt to start setup after
creating your Piper account.
2. Name your Piper and tap “Continue”
to proceed.
Page 13
!
13
Piper User Manual
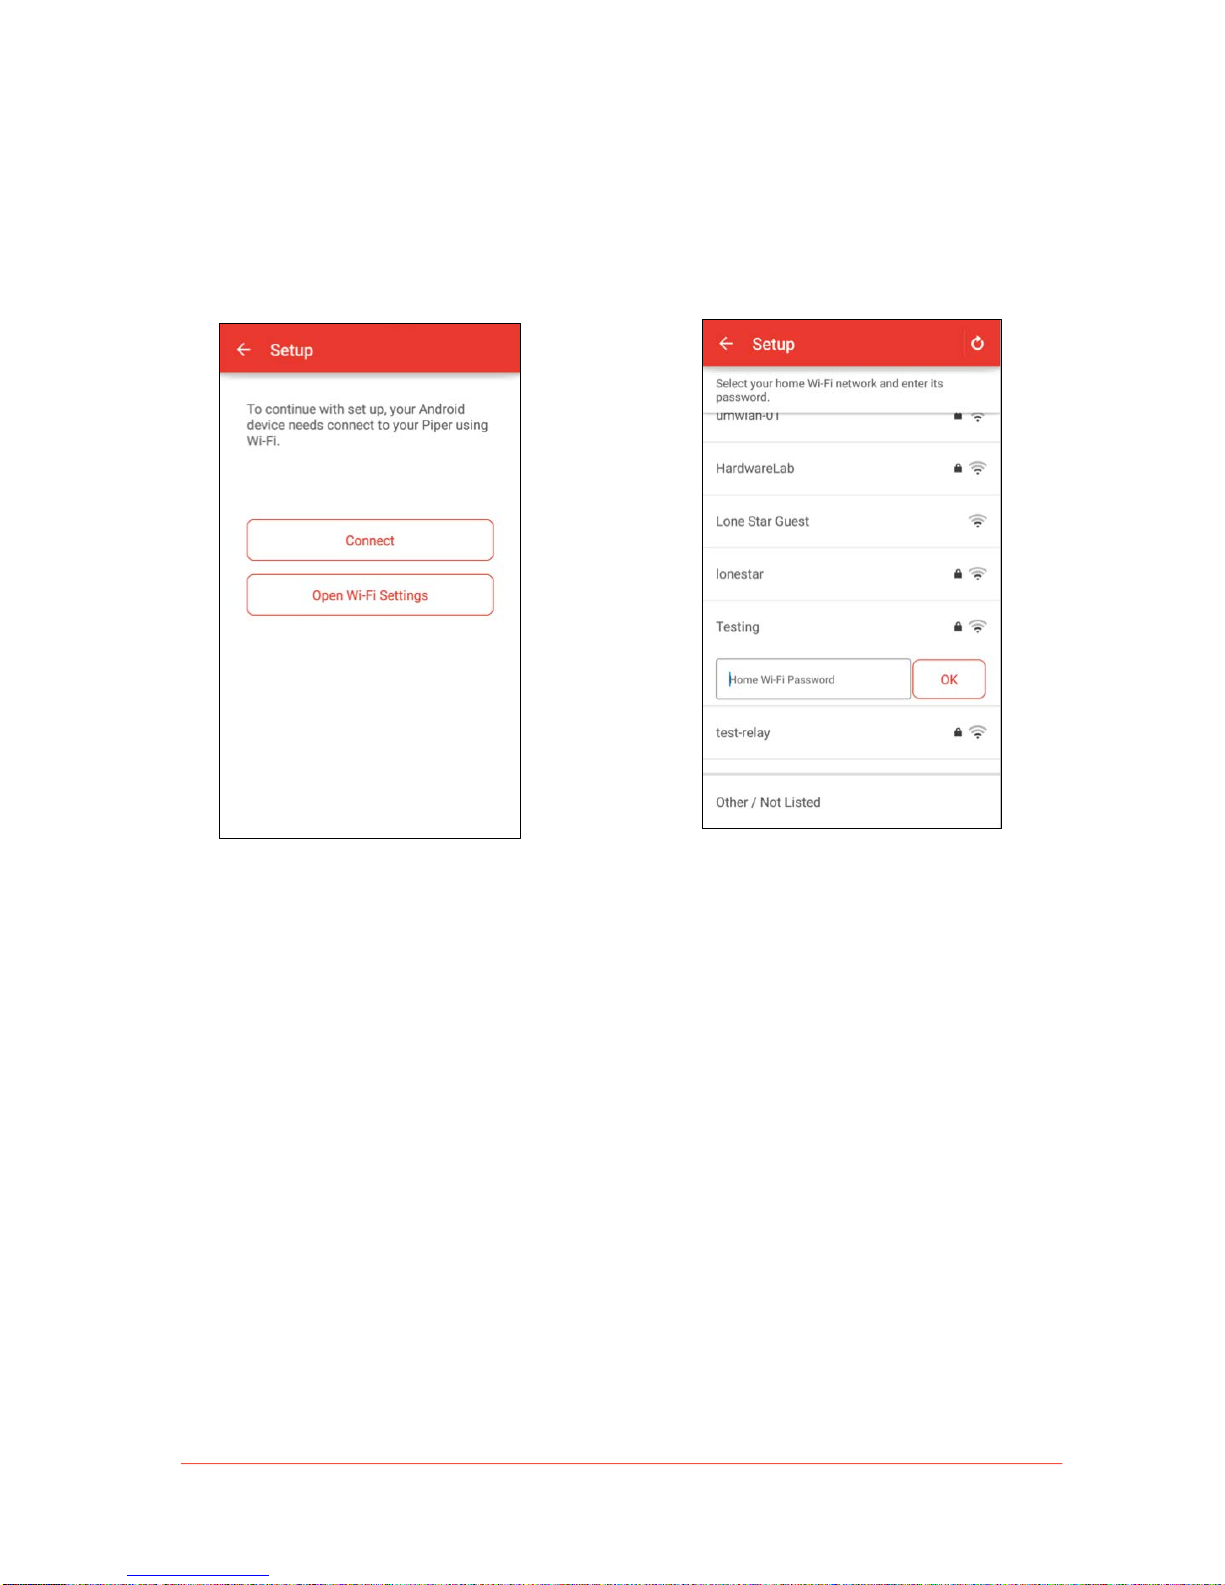
3. Connect your Android device to the “Piper”
Wi-Fi network by selecting “Connect.”
Note: In this step, your mobile device is
connecting to your Piper via Wi-Fi to set
it up.
Note: If you have the “Smart Switch
Network” feature enabled on your mobile
device, it will not connect to the “Piper”
Wi-Fi network. To disable this feature
found on certain Android devices, go to
your mobile device’s Wi-Fi settings.
4. A list of nearby Wi-Fi networks will
appear. Select your home Wi-Fi
network from the list and enter the
password.
Page 14
!
14
Piper User Manual
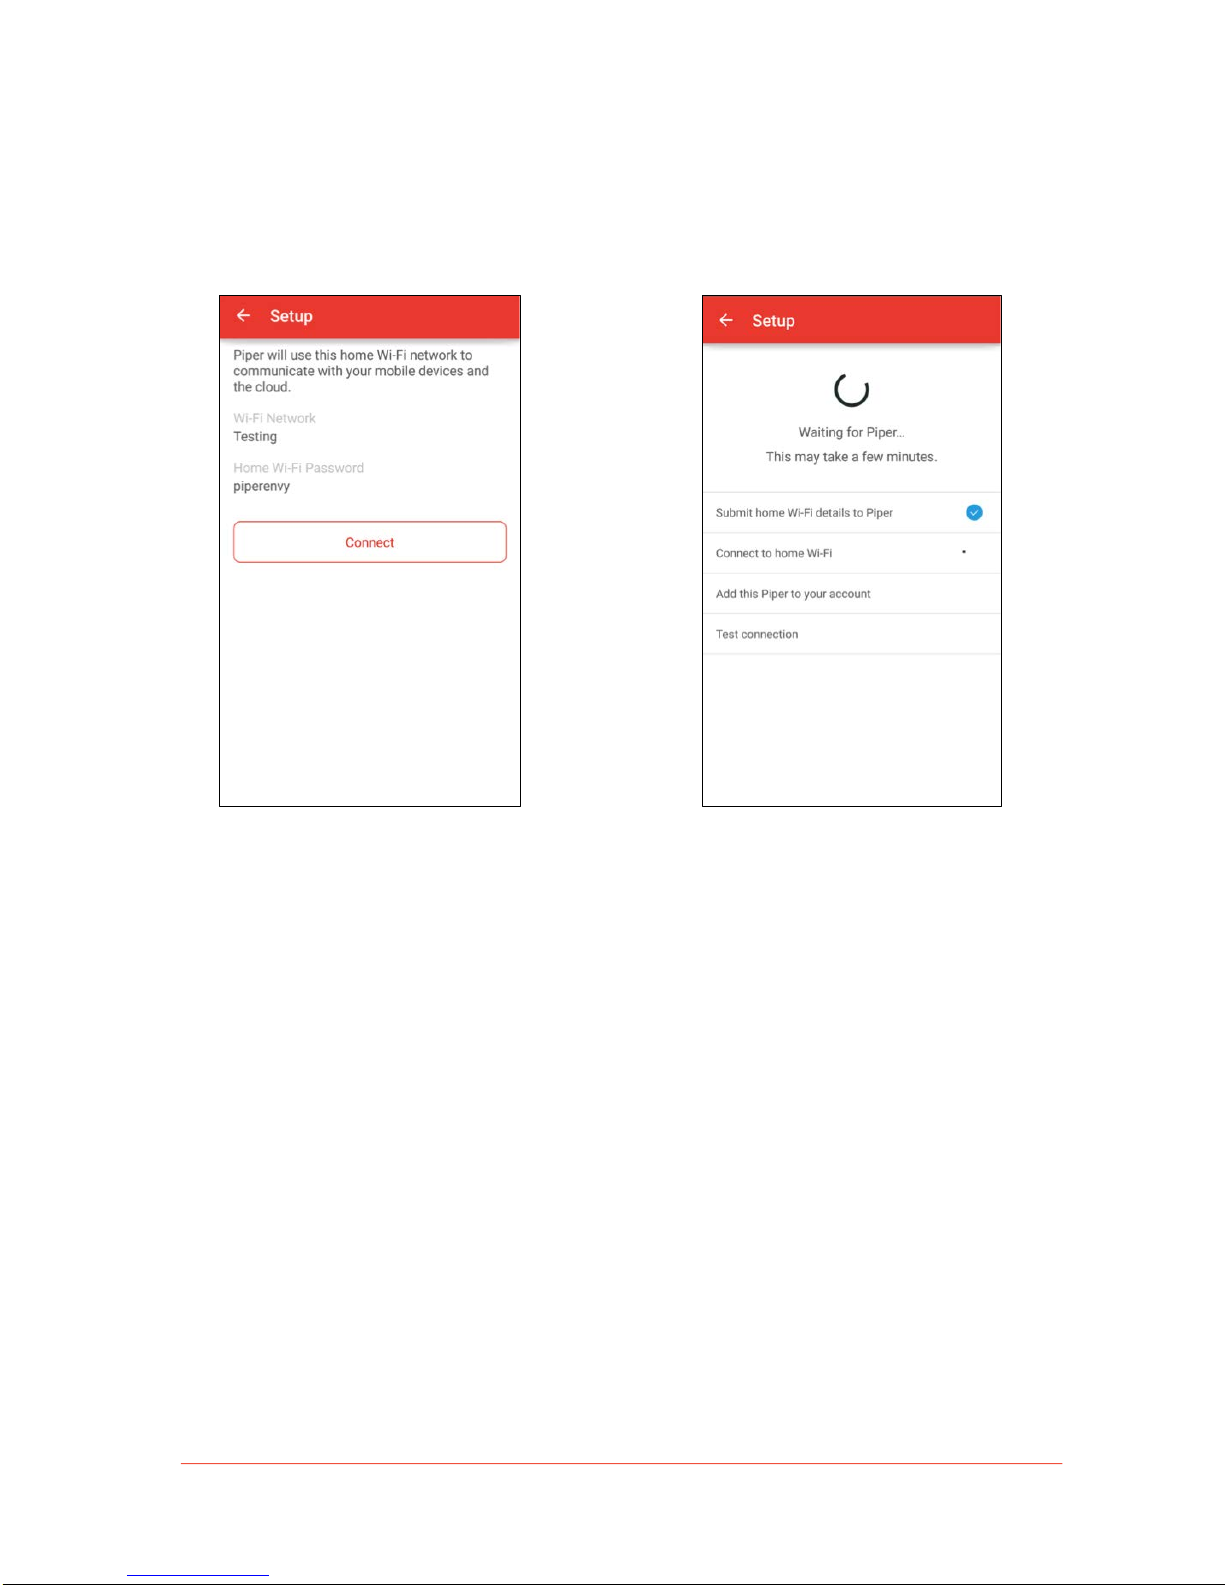
5. Confirm your home Wi-Fi network information
before tapping “Connect.”
6. Your Piper will automatically update to
the latest firmware if necessary, a n d th e n
finish setup.
Note: This may take up to 10 minutes
or more. Do not unplug or turn off Piper
during this process.
Page 15
!
15
Piper User Manual
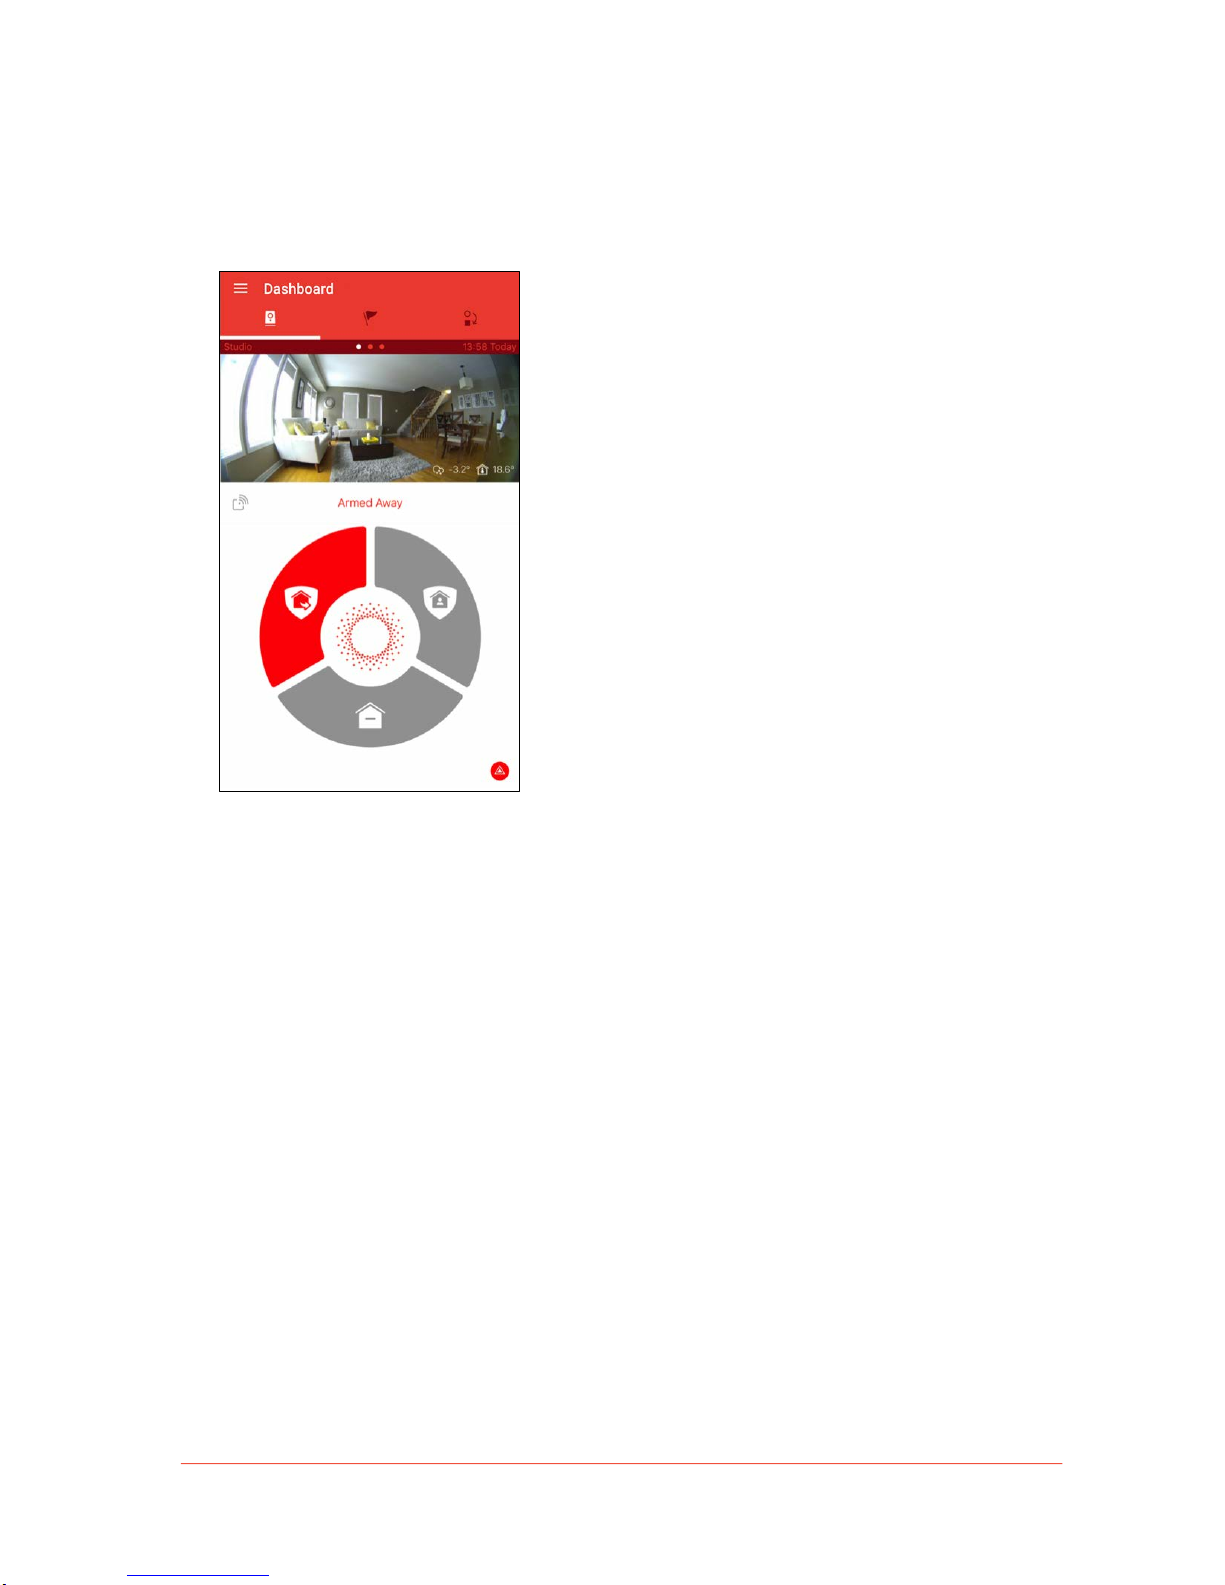
7. The Dashboard screen will appear after
setup has finished.
Note: Your Piper’s LED light should
now be green.
You will also receive two notices of confirmation:
• A text message from a number that Piper will use to contact you. Be sure to add this
number to your contacts.
• A welcome email with links to various tutorial videos.
Note: To access Piper, family members can download the app and sign in with the
account owner’s login information.
Page 16

!
16
Piper User Manual
Multiple Pipers
For enhanced security, you can install multiple Pipers on a home network to arm different floors
or high traffic areas. A maximum of five Pipers sharing the same home Wi-Fi network can be
linked to one acc ount. All Pipers con f ig ured under the sa me account follow the security mod e,
notification and automation rules set in the Piper mobile app.
You can monitor live video, view environmental sensor data, and receive security notifications
from each Piper.
Page 17
!
17
Piper User Manual
Multi Piper Setup
To set up additional Pipers on a network using the same account, please follow the ste p s
below. iOS and Android devices follow separate instructions after the physical installation of
your Piper.
Note: The initial piper must be set up b efore additional Pip ers can be added.
Follow these steps to add an additional Piper to your network:
1.
2.
3.
detachable stand.
4.
Re-attach the stand (or affix the optional
wall mount) and position your Piper in the
desired location. For optimal viewing
capacity, we recommend placing Piper
in a high traffic area.
back of Piper and insert the provided
AA batteries. Close the battery door
and secure it with the provided screw.
5.
Press the power button on the back
of Piper, located on the bottom-right.
Piper’s LED light will be yellow
while starting up.
and plug the opposite end to an
electrical outlet.
Page 18
!
18
Piper User Manual
Multi Piper Mobile App Setup
You are now ready to connect your mobile device to the new Piper.
• For setup instructions using an iOS device, go to Multi Piper Setup: iOS.
• For setup instructions using an Android device, go to Multi Piper Setup: Android.
Multi Piper Setup: iOS
Follow these steps to set up Piper from your Apple iOS device:
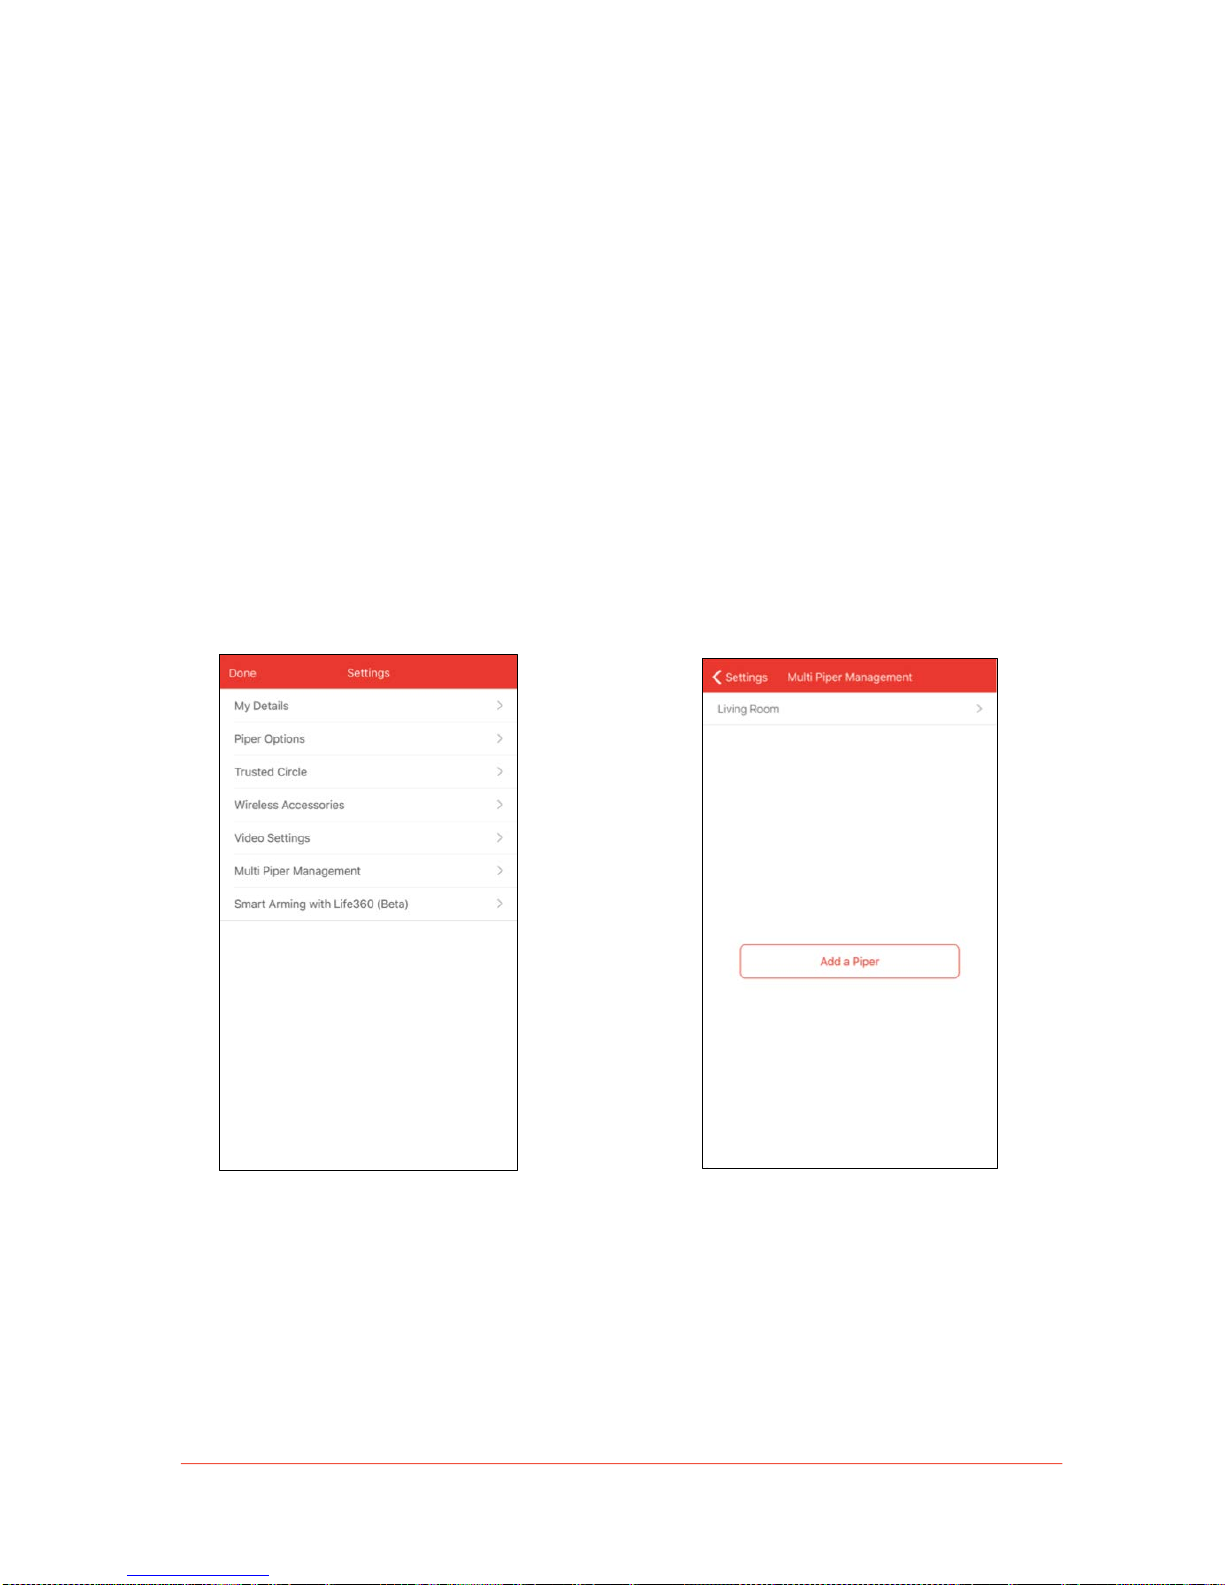
1. When Piper’s LED light turns blue, open
the Piper app, tap the App Menu icon and
go to Settings > Multi Piper Management.
2. Select “Add a Piper.”
Page 19
!
19
Piper User Manual
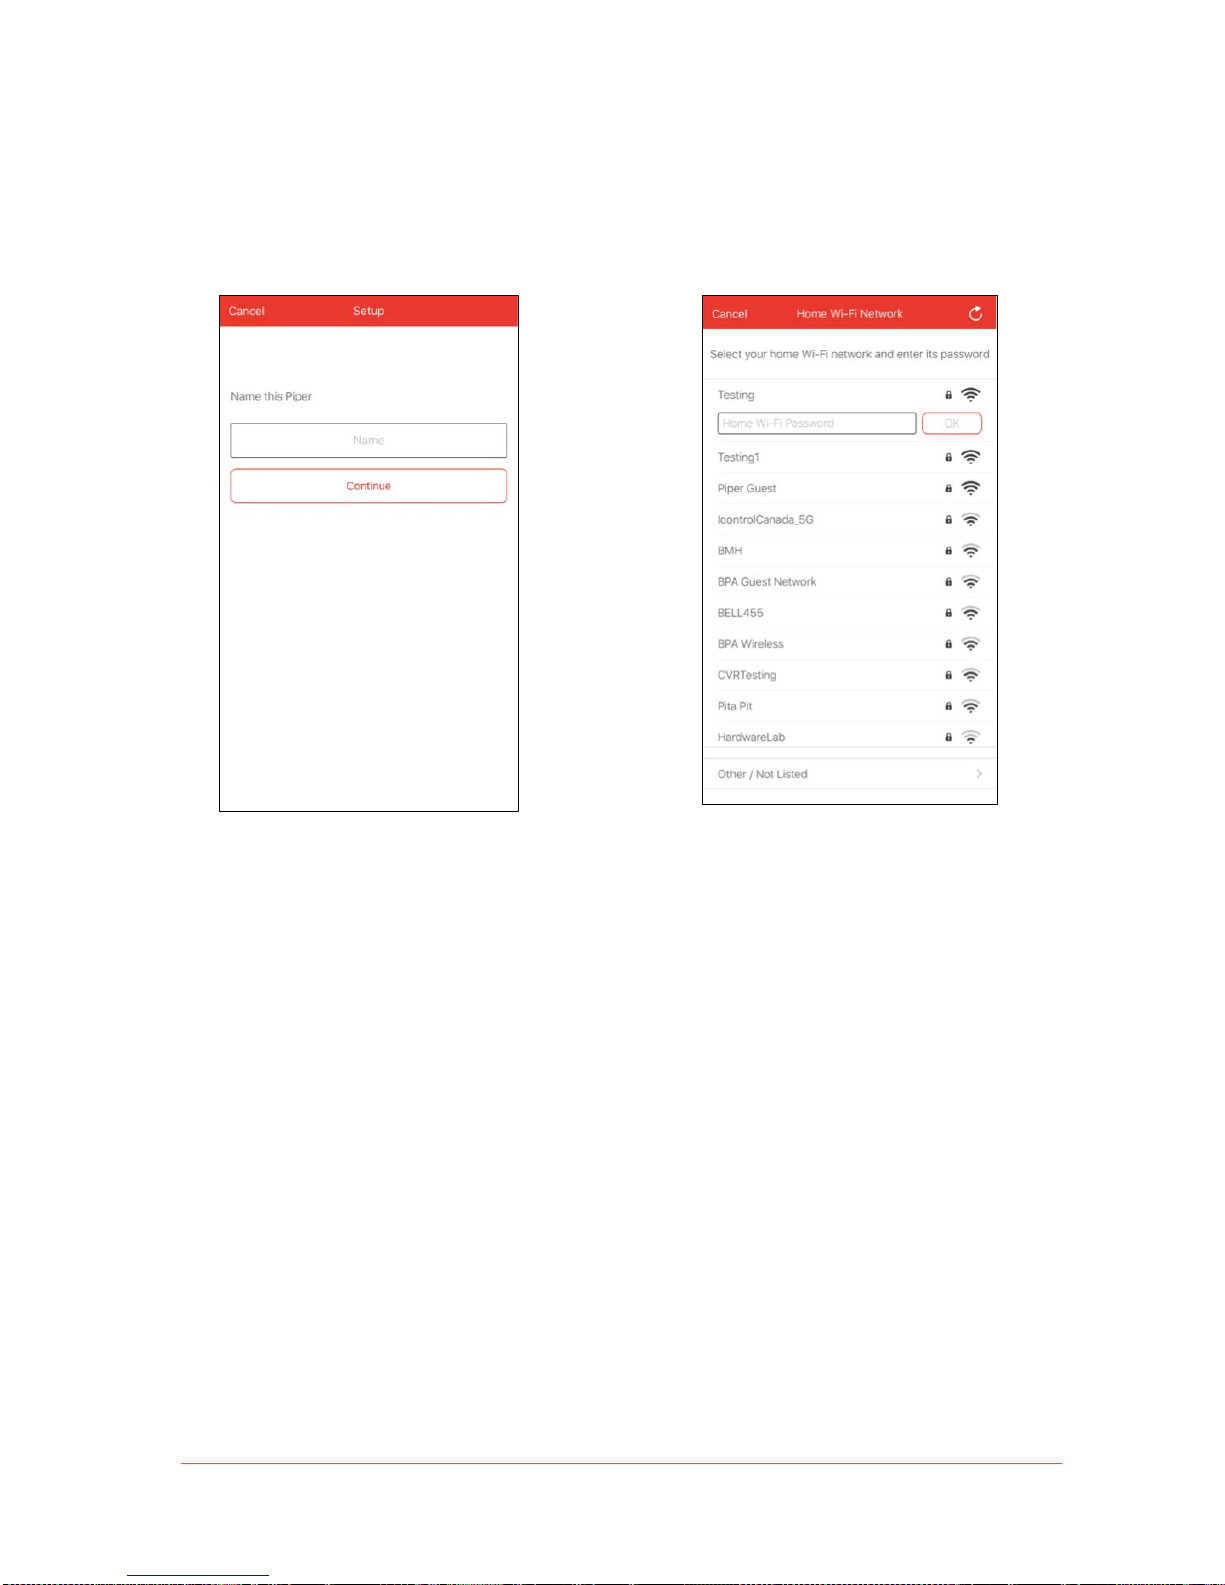
3. Give the new Piper a name and tap
“Continue” to proceed.
4. Open your iOS device’s settings and
go to the Wi-Fi screen. Select “Piper”
from the list of networks.
Note: In this step, your mobile device
is connecting to your Pipe r via Wi-Fi to
set it up.
Page 20
!
20
Piper User Manual
5. Once your mobile device has connected
to the “Piper” Wi-Fi network, return to
the Piper app.
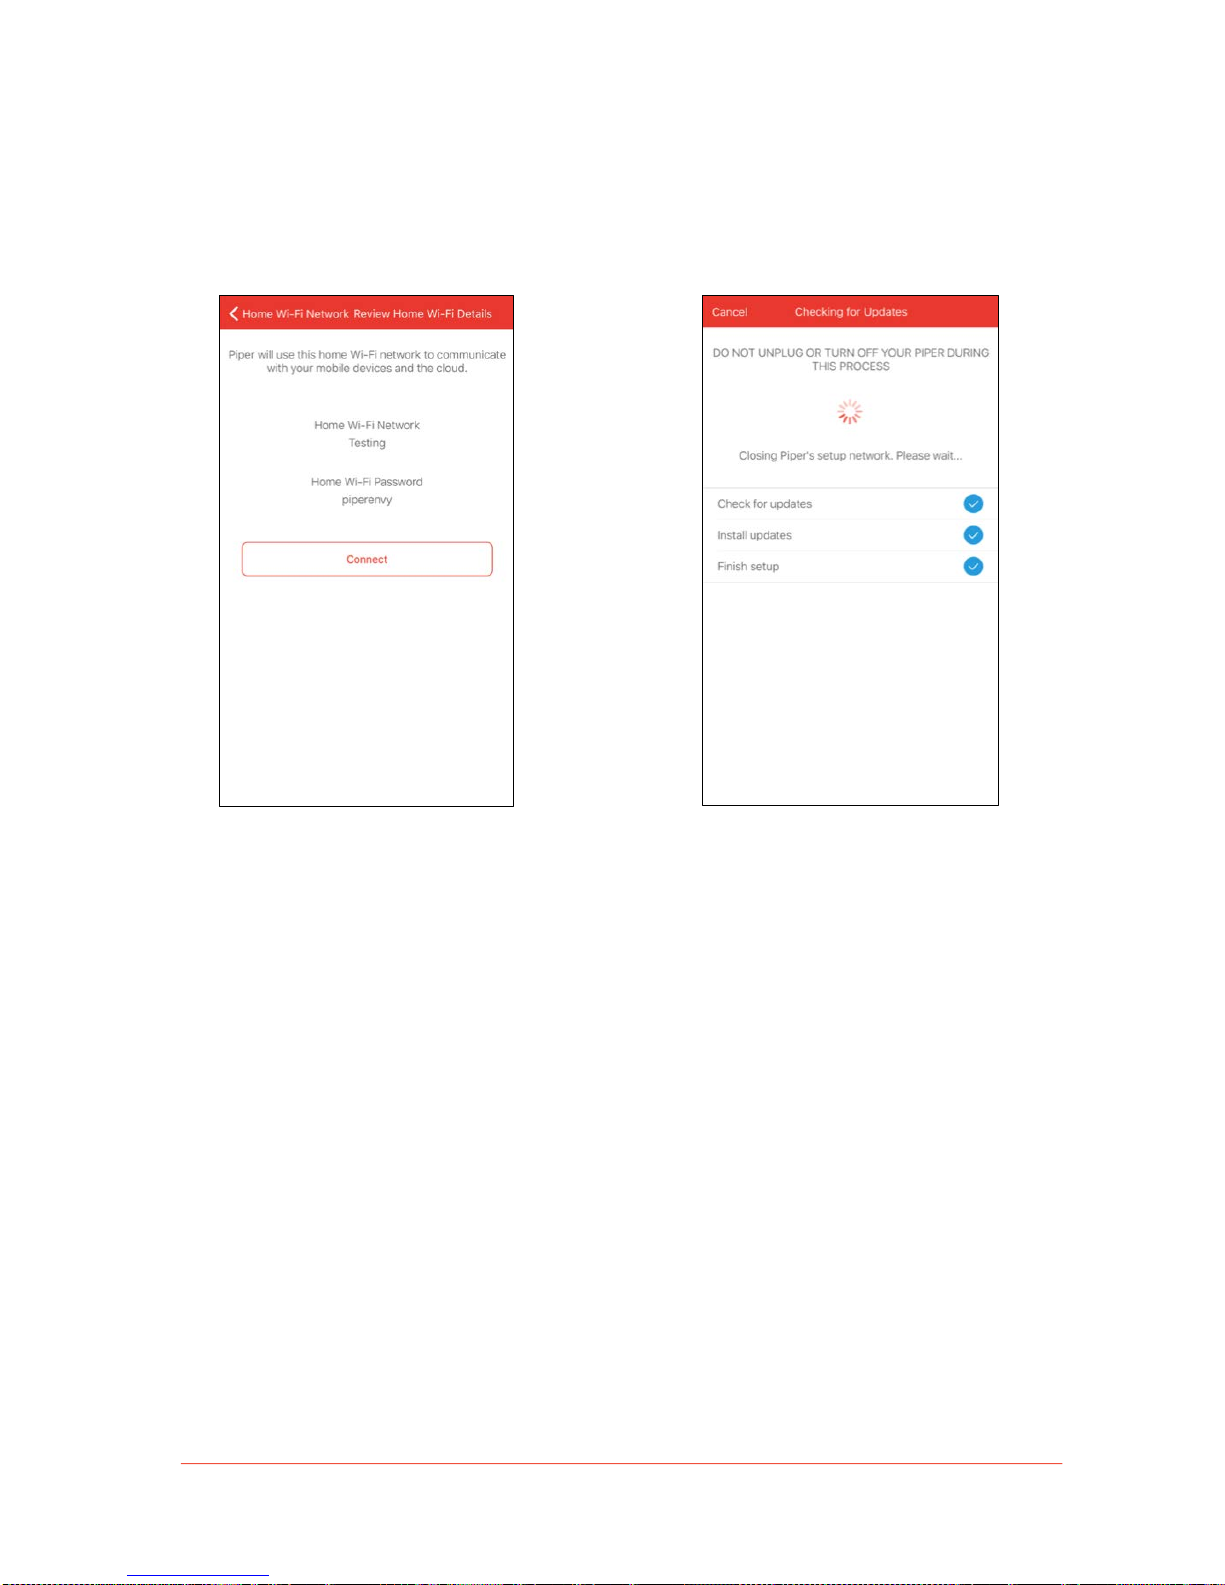
6. Your Piper will automatically update to
the latest firmware if necessary, a n d th e n
finish setup.
Note: This process may take up to 10
minutes or more. Do not unplug or turn
off your Piper during this process.
Page 21
!
21
Piper User Manual
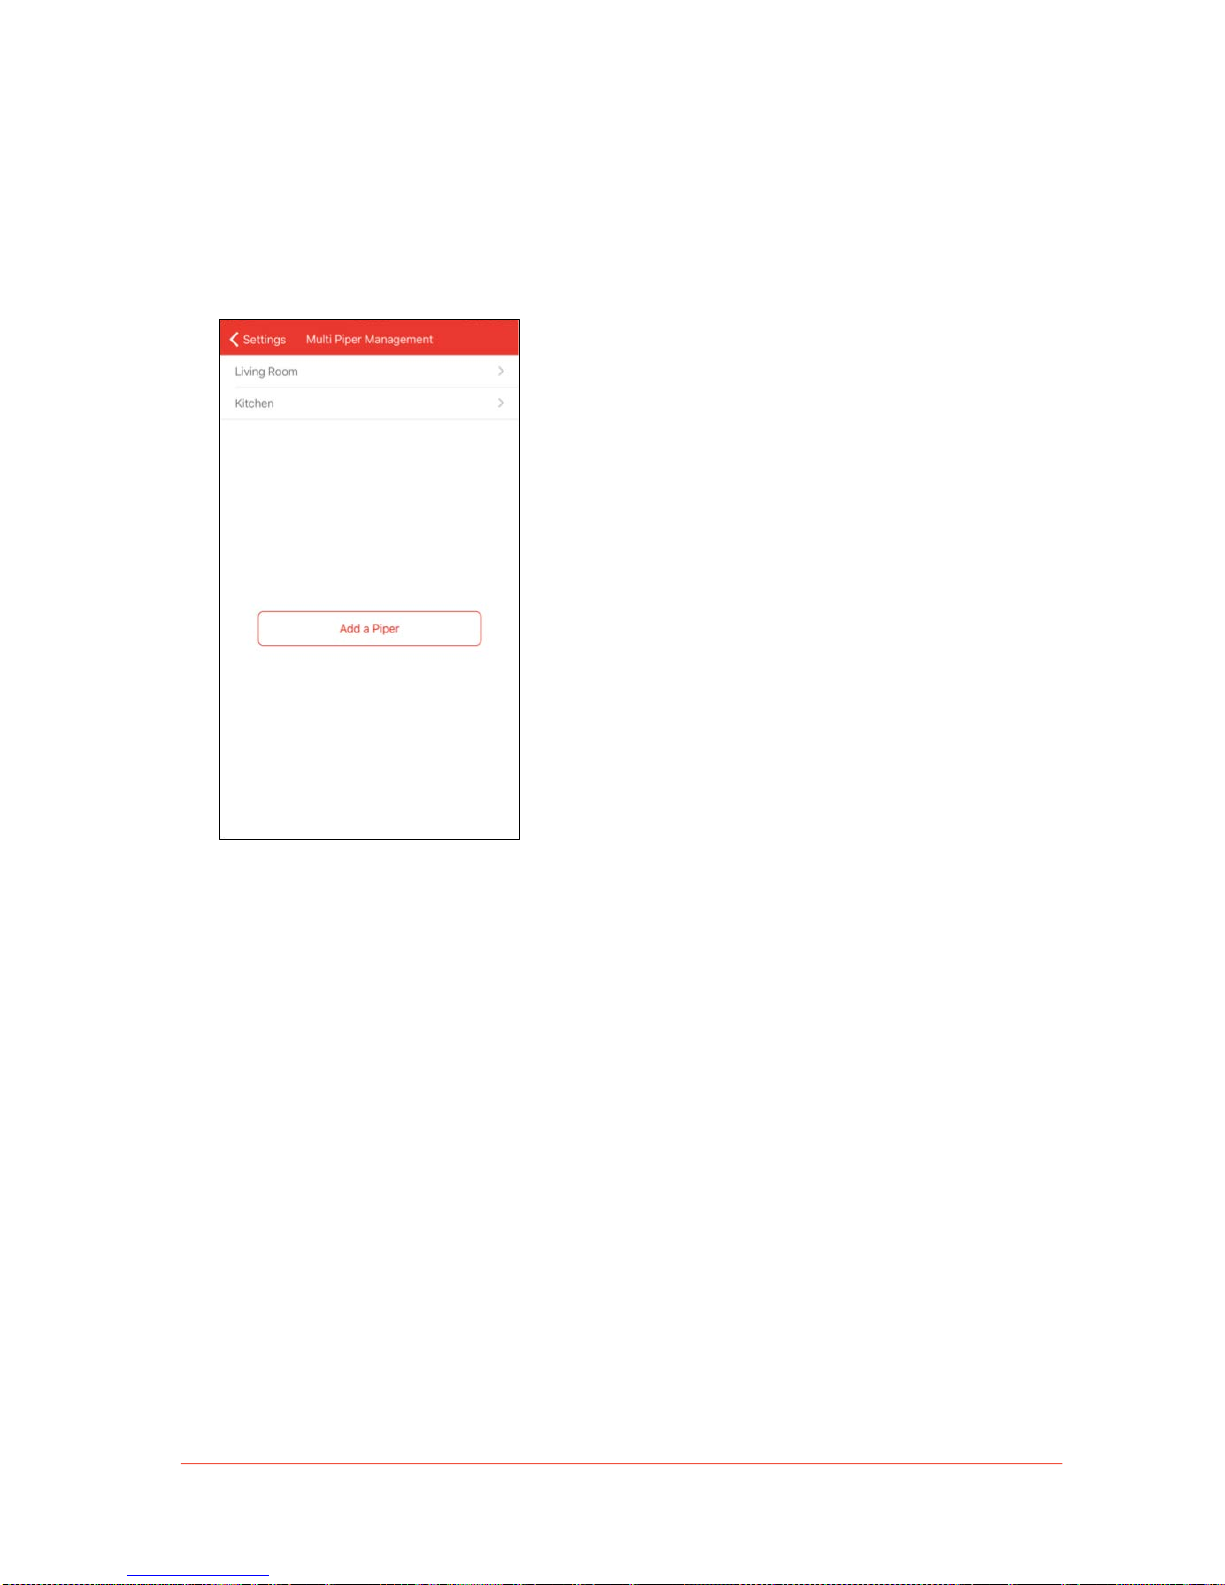
7. The name of the new Piper should now
appear on the Multi Piper Management
screen.
The setup of all additional Pipers follows the same instructions as listed above. After each
successful installation, the Dashboard screen will appear.
Page 22
!
22
Piper User Manual
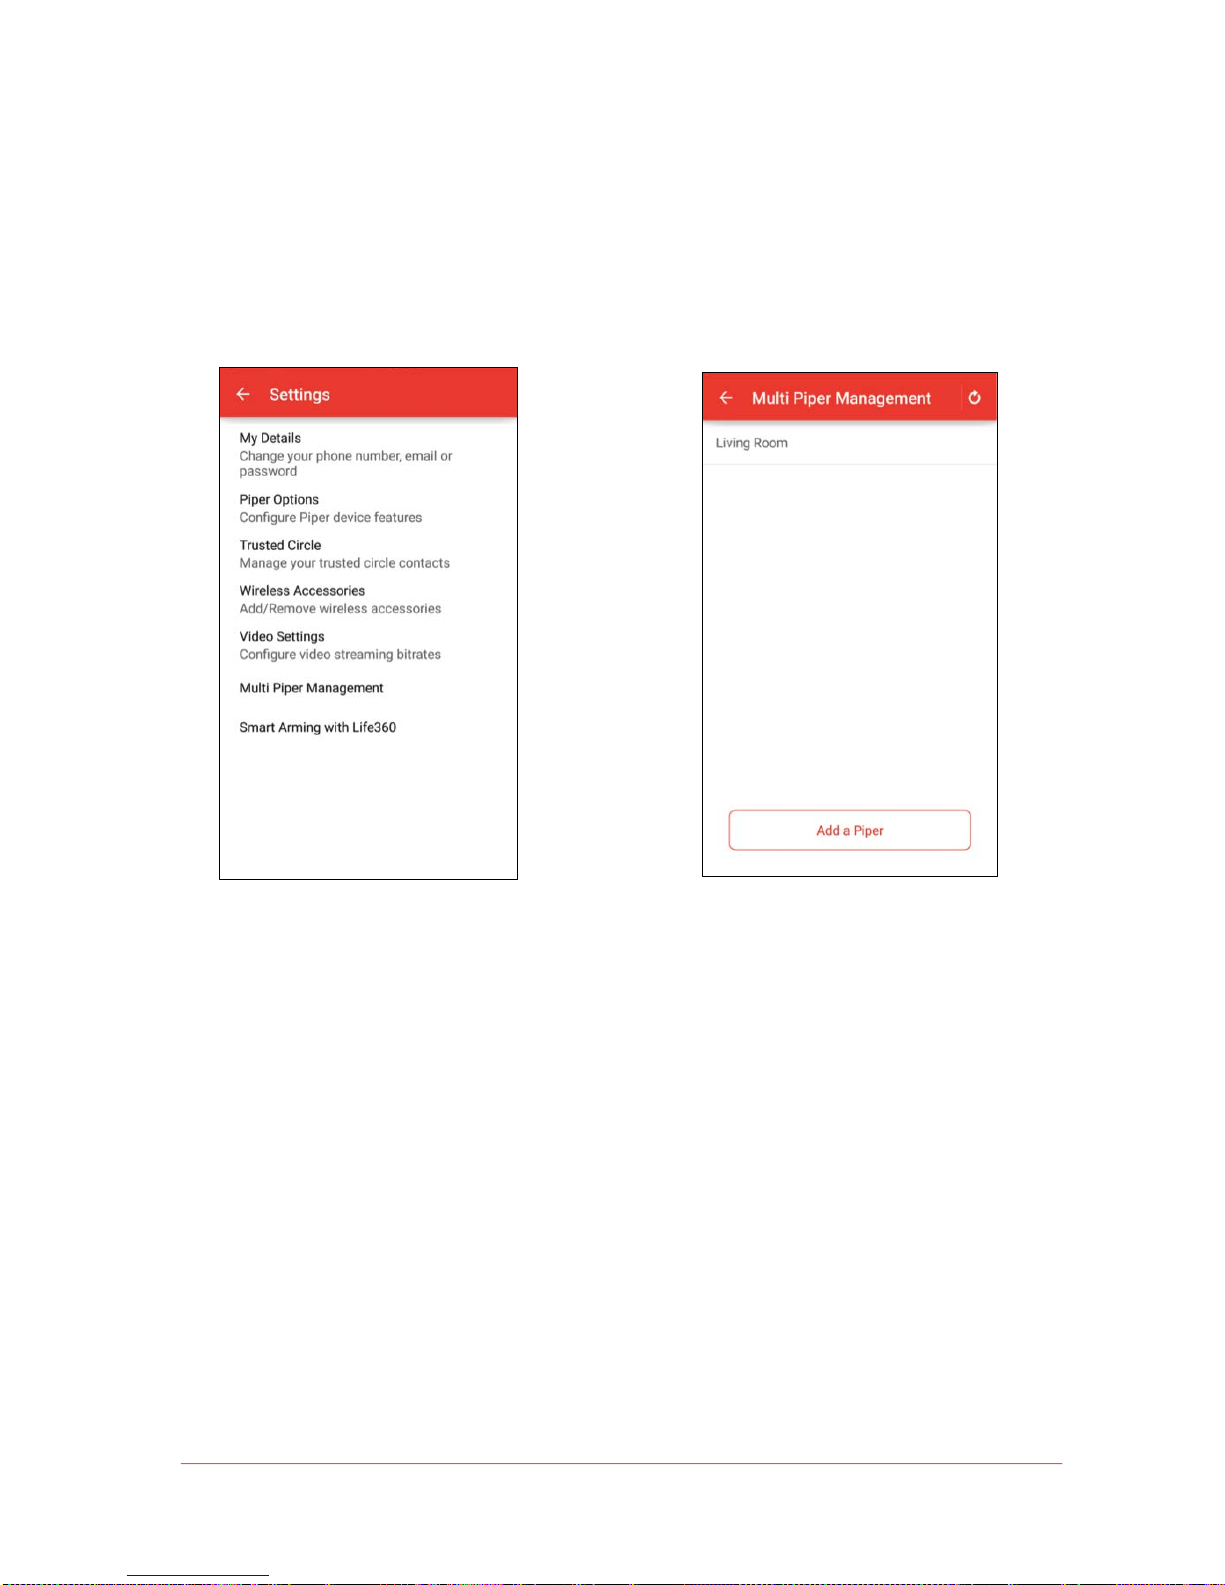
Multi Piper Setup: Android
Follow these steps to set up Piper from your Android device:
1. When Piper’s LED light turns blue, open
the Piper app, tap the App Menu icon and
go to Settings > Multi Piper Management.
2. Select “Add a Piper.”
Page 23
!
23
Piper User Manual
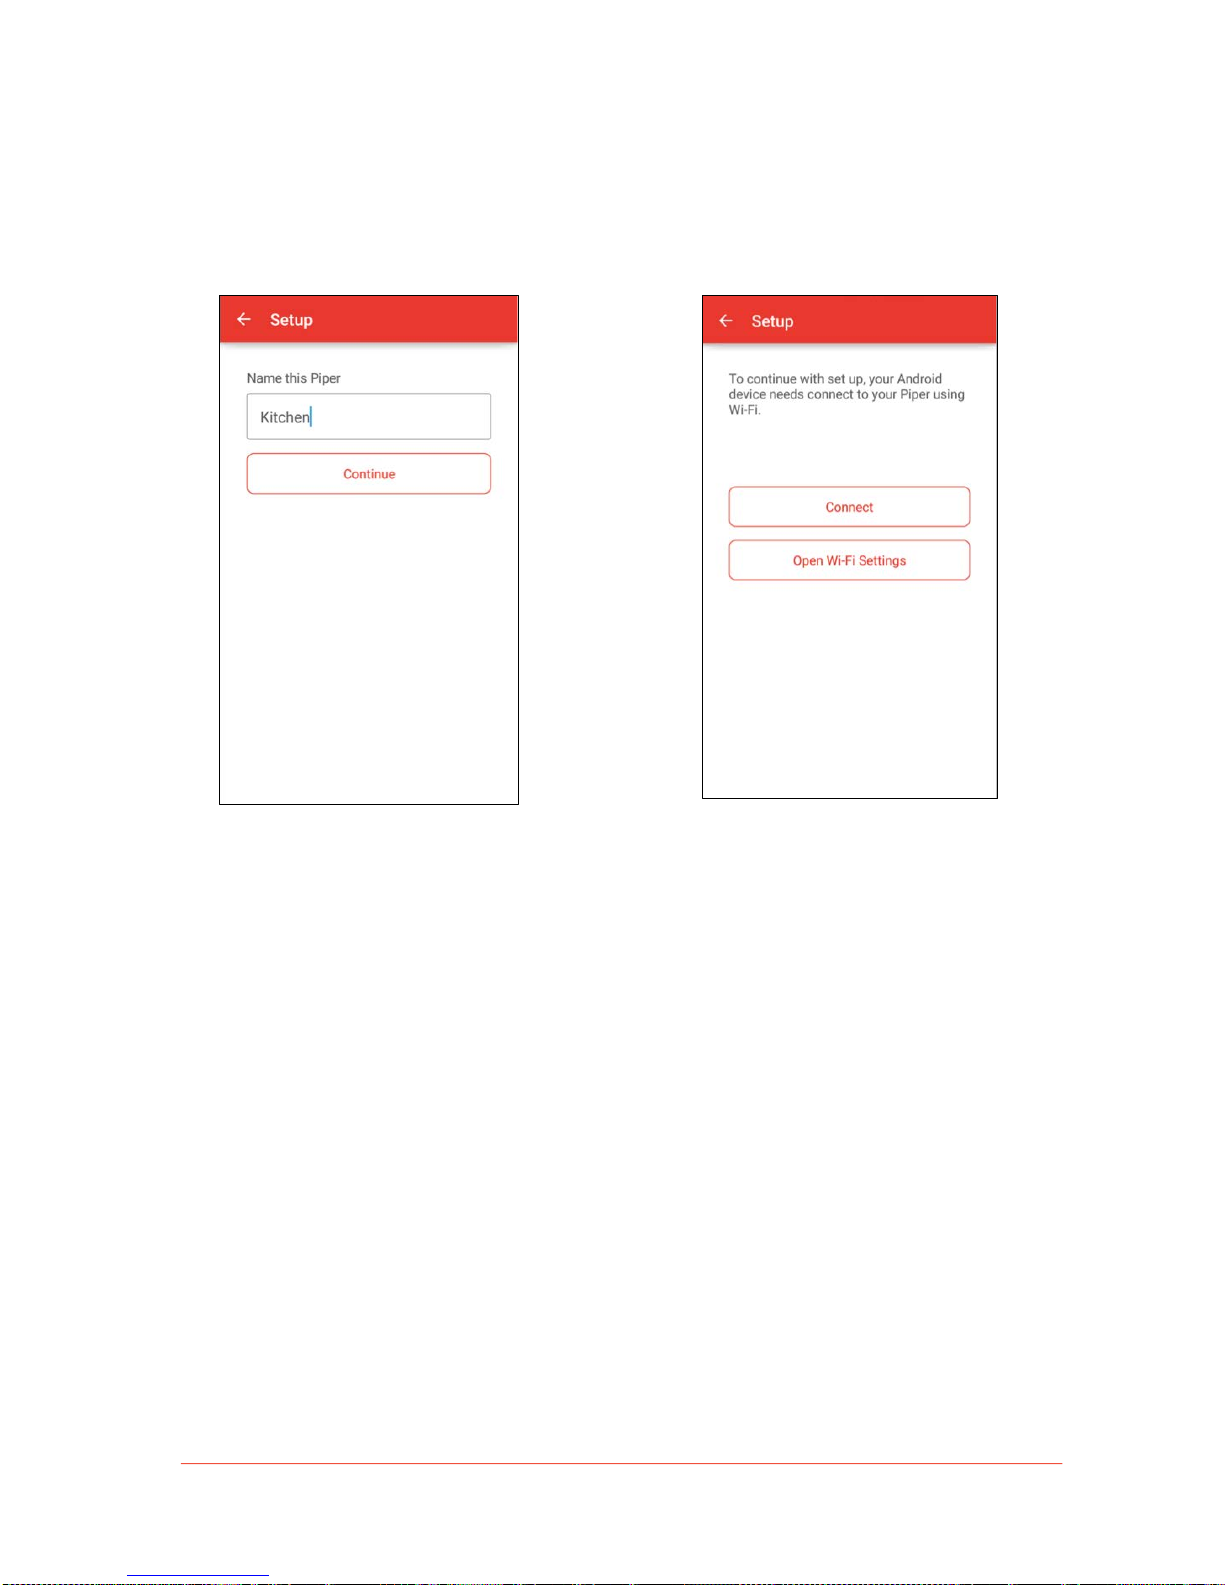
3. Give the new Piper a name and tap
“Continue” to proceed.
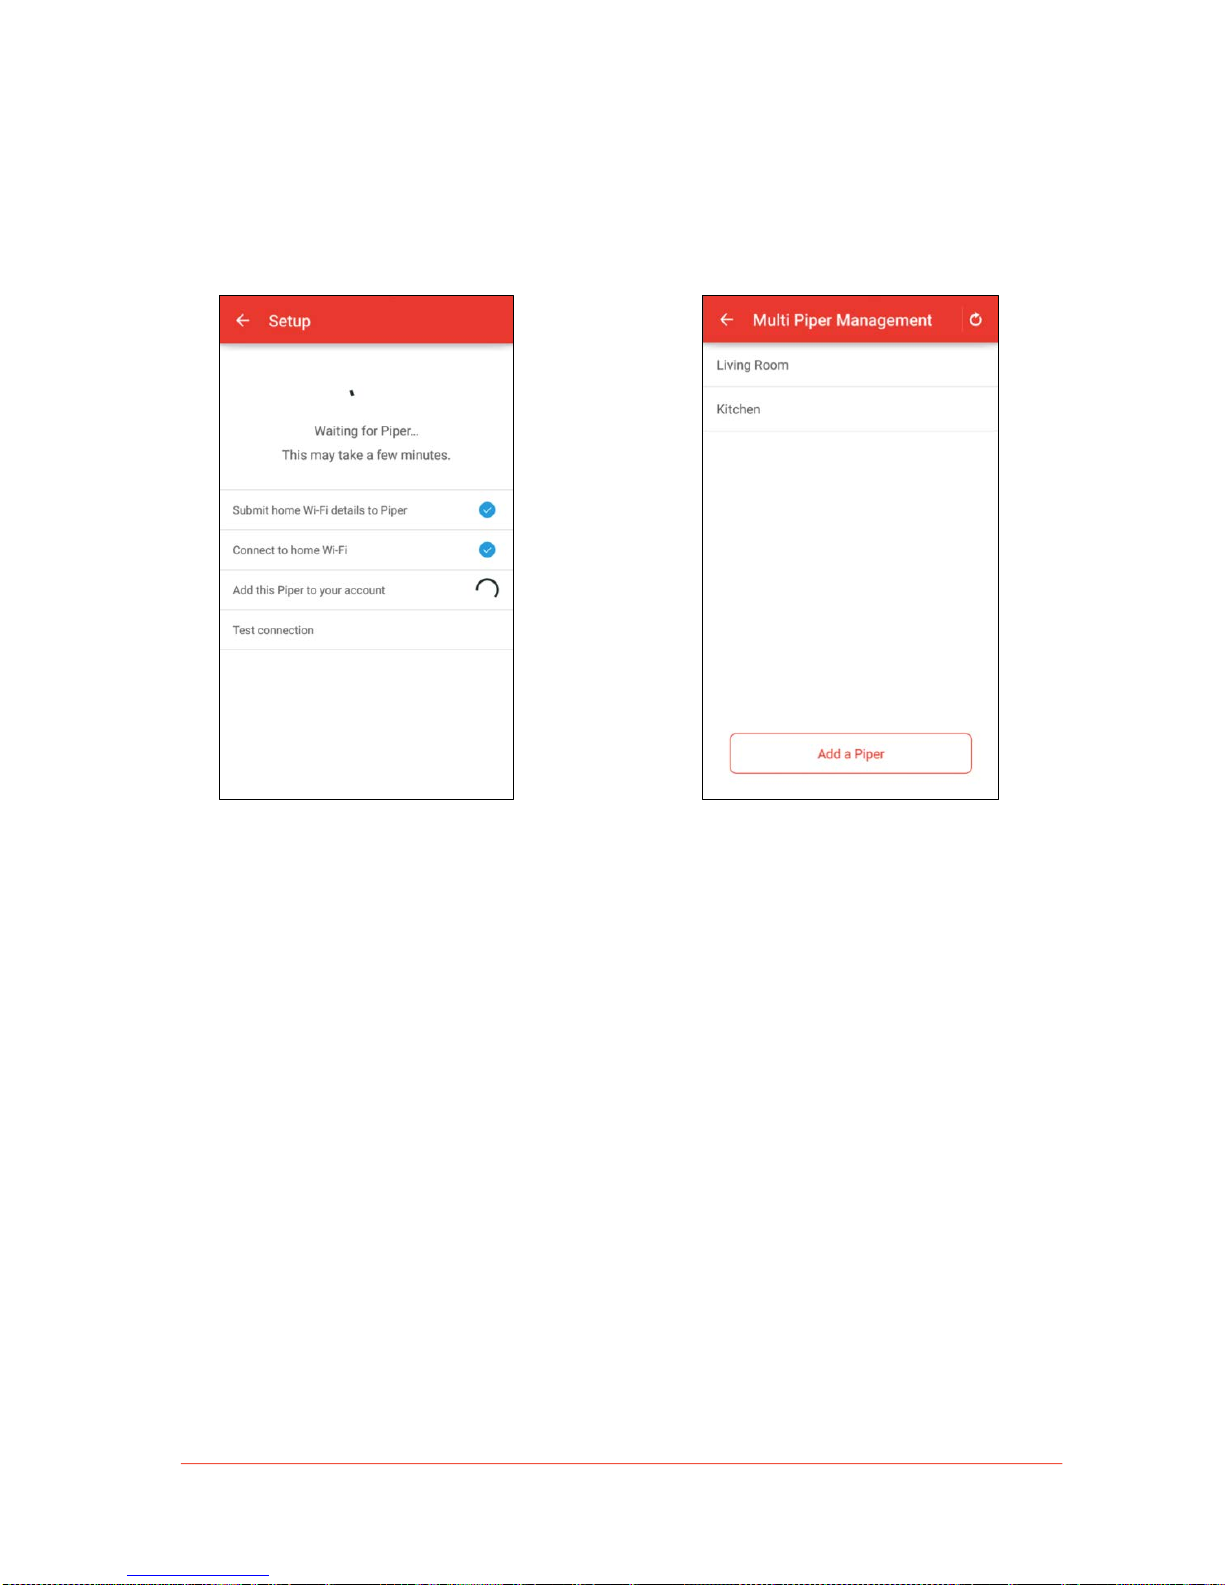
4. Connect your Android device to the
“Piper” Wi-Fi network by selecting
“Connect.”
Note: In this step, your mobile device
is connecting to your Pipe r v ia Wi-Fi to
set it up.
Page 24
!
24
Piper User Manual
5. Your Piper will automatically update to
the latest firmware if necessary, a n d
then finish setup.
Note: This process may take up to 10
minutes or more. Do not unplug or turn
off your Piper during this process.
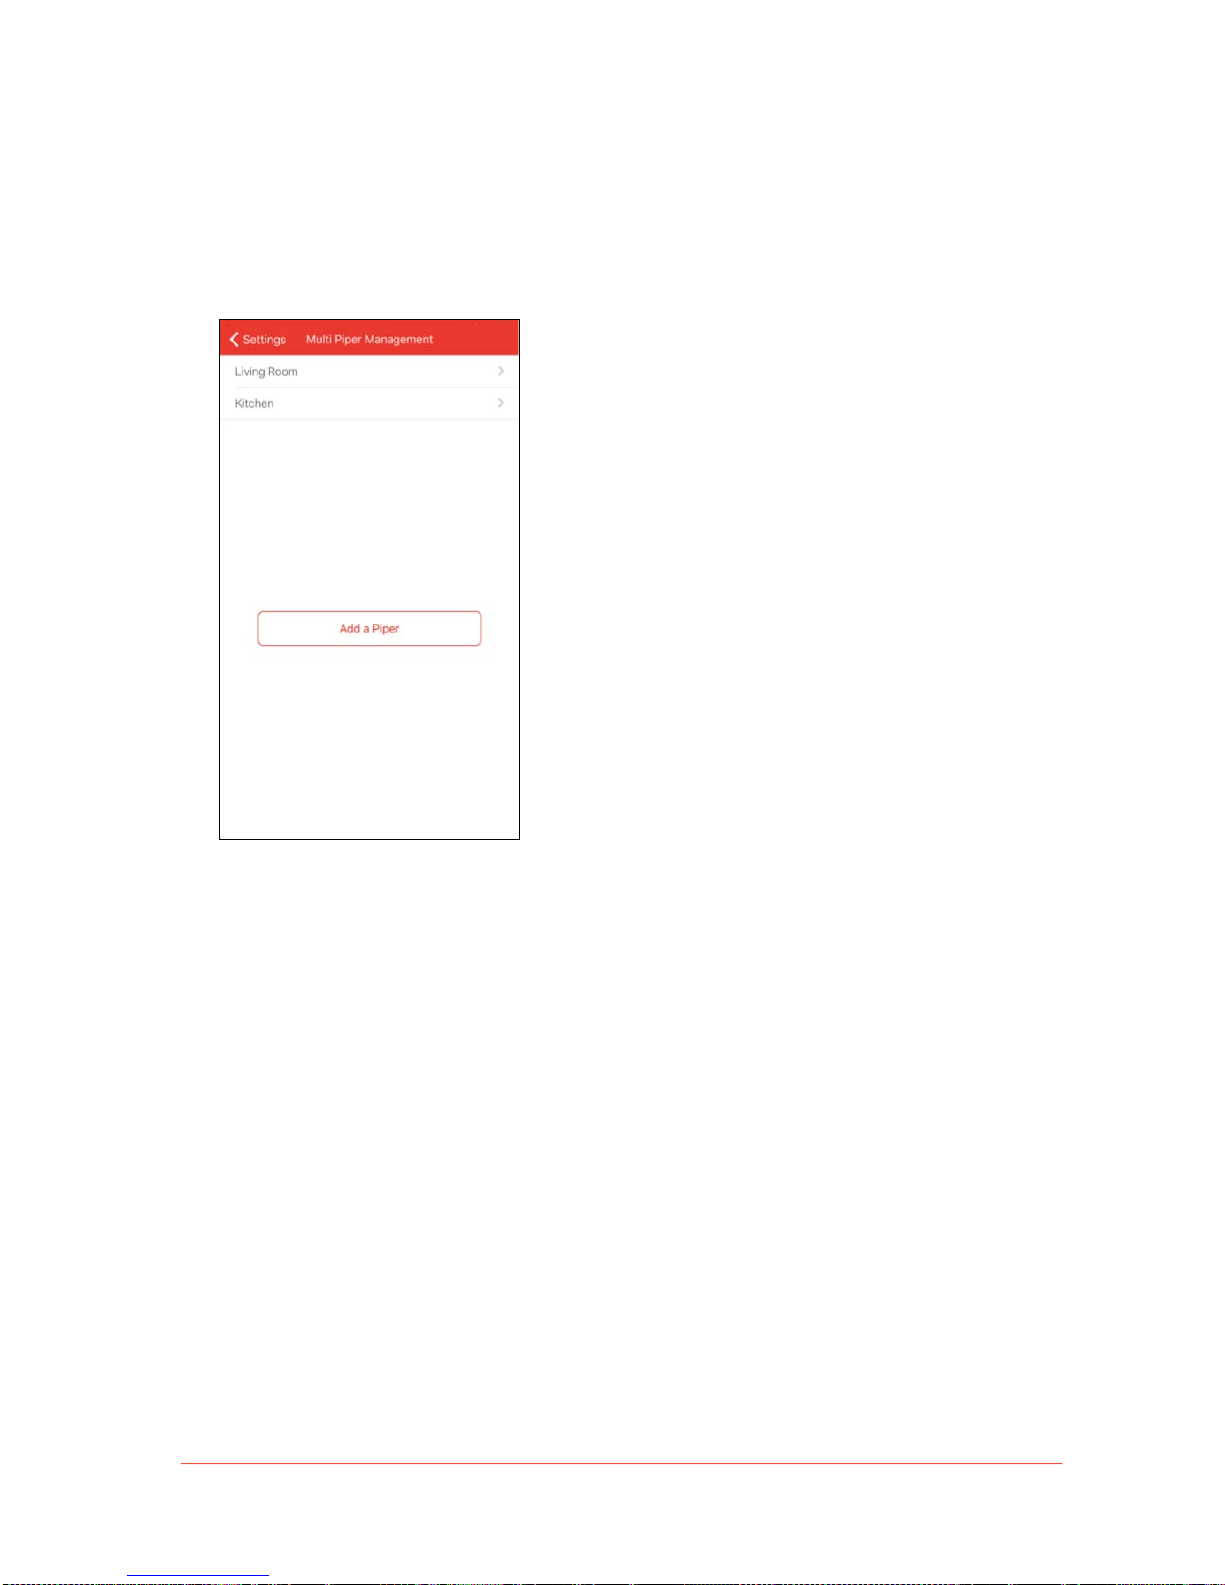
6. The name of the new Piper should now
appear on the Multi Piper Management
screen.
Page 25
!
25
Piper User Manual
7. The name of the new Piper should now
appear on the Multi Piper Management
screen.
The setup of all additional Pipers follows the same instructions as listed above. After each
successful installation, the Dashboard screen will appear.
!
Page 26
!
26
Piper User Manual
The Piper Mobile App
!
The Piper mobile app is divided into three tabs—Dashboard, Events, and Rules—which cover
the present, past, and fu ture states of your home respectively. This sectio n e x p a nds on the
different features found in each tab and how to access them.
Dashboard
The Dashboard displays information about the present state of your home: the current
security mode, the status of your wireless accessories, and the latest snapshot captured
by Piper.
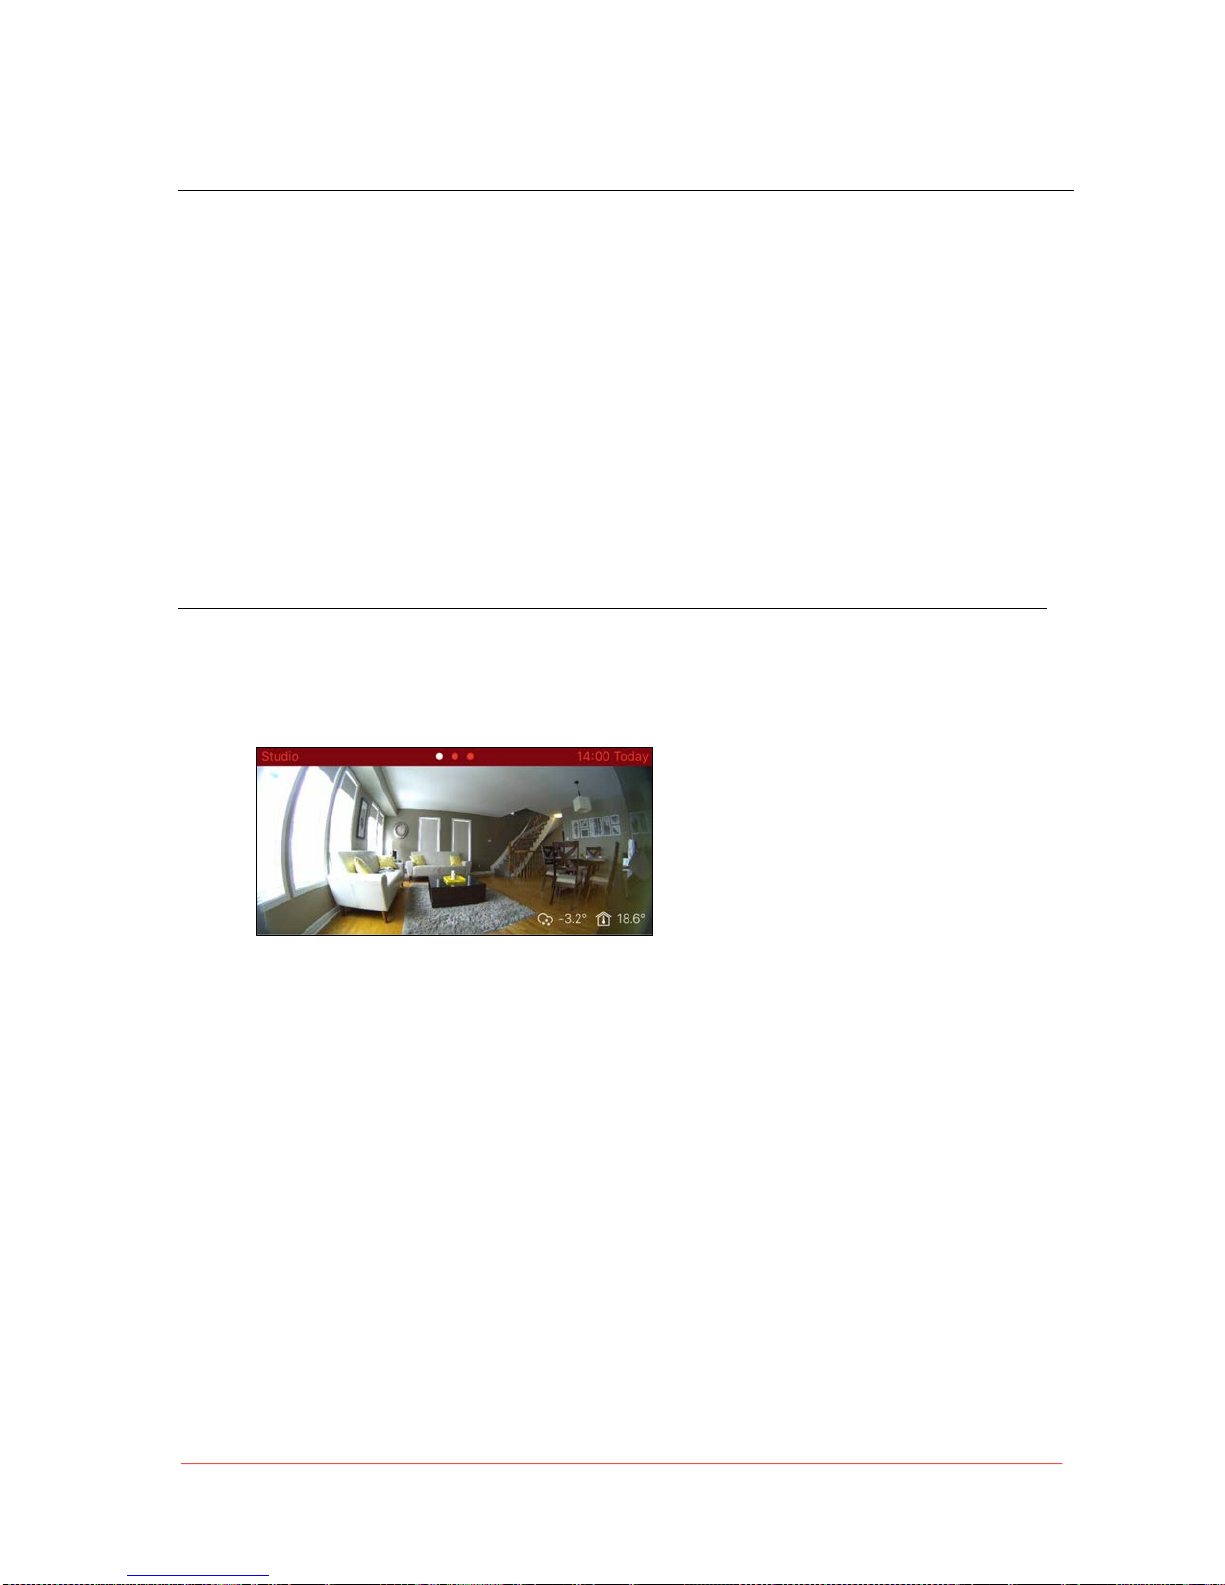
Piper View
The image at the top of the Dashboard
displays the latest snapshot captured
by Piper.
• Above the video snapshot is the name of the Piper in question (left) and the time it was
taken (right).
• If you’ve set up more th an one Piper, you can s w ip e le ft to v ie w their snapshots. Pipers
appear in the order they were initially set up.
• Current weather, as well as indoor and outdoor temperatures are displayed on the lower
right-hand corner of the snapshot.
Note: A description of all icons used in the Piper mobile app can be found at the end of
this document.
Page 27
!
27
Piper User Manual
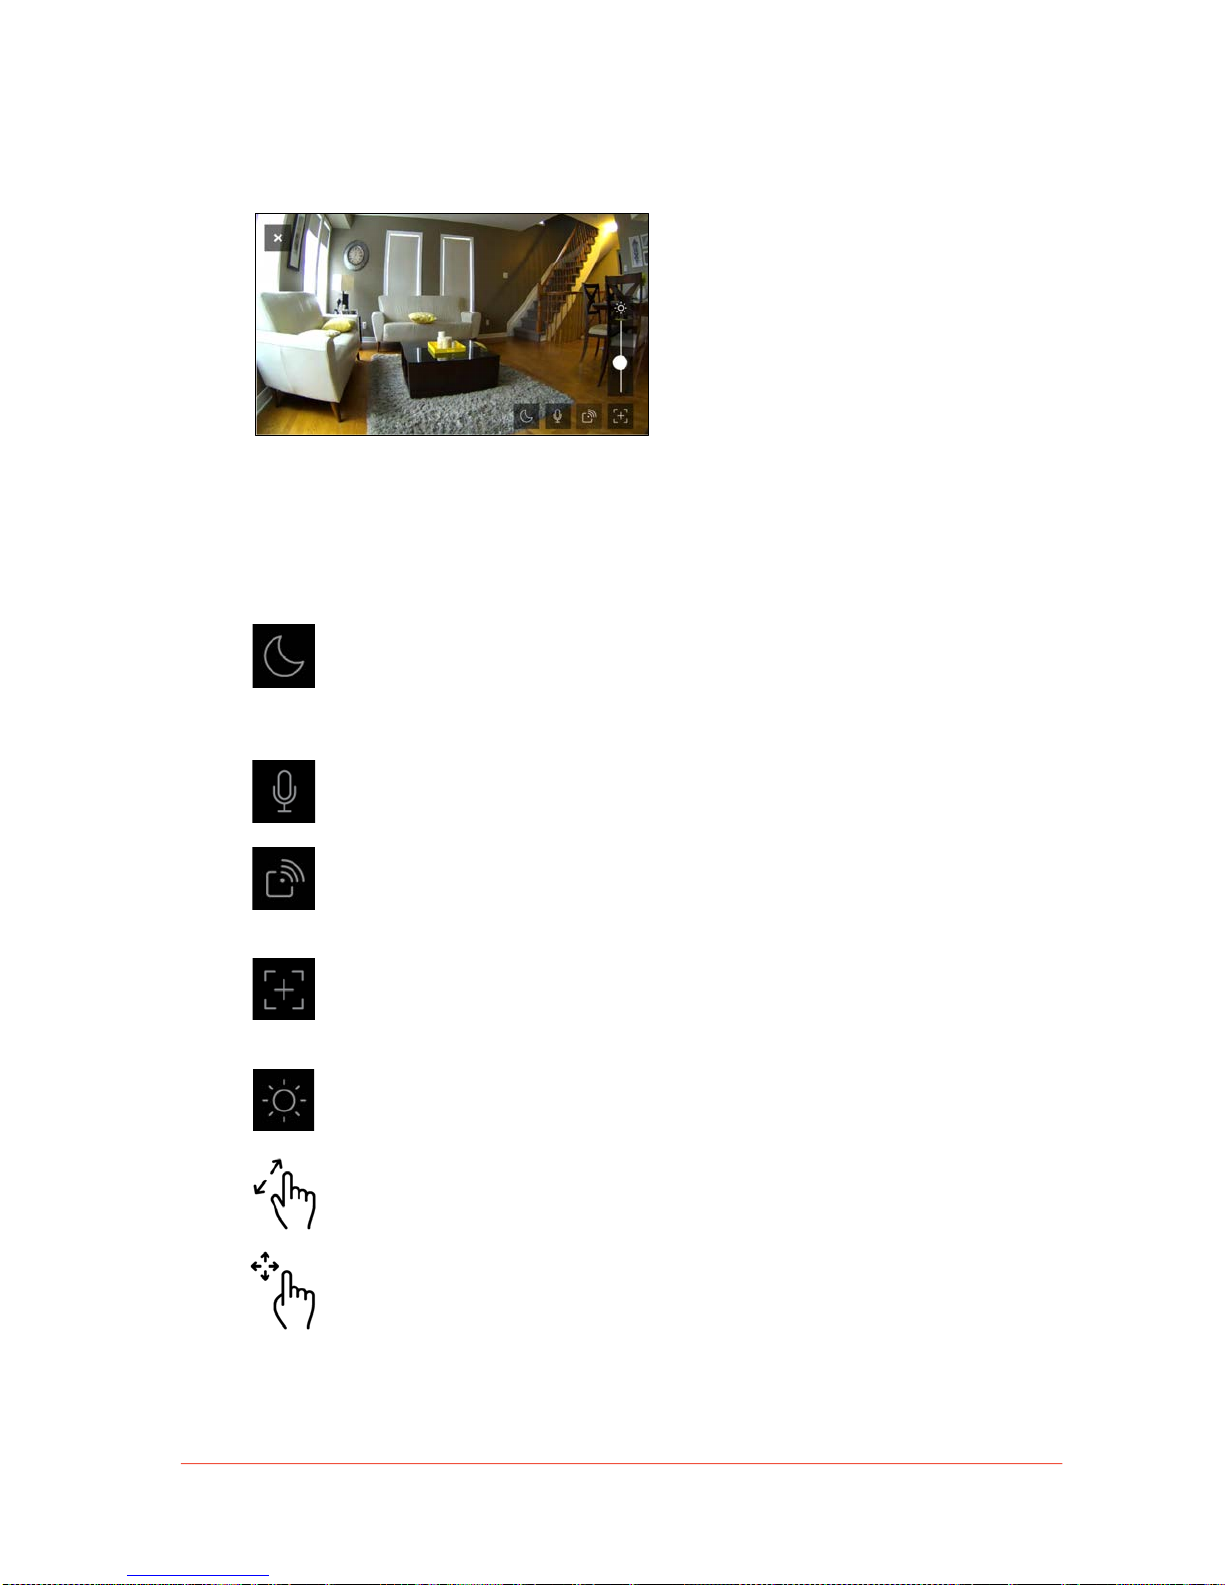
Live Video
Live video allows you to monitor what
Piper is currently viewing. To watch live
video from a Piper, tap its video
snapshot.
• Multiple features can be accessed while viewing live video. To bring up live video
features, tap the screen once. The icons automatically disappear after a fe w moments.
Tap on this icon to change your Piper’s night vision settings manually or
automatically. When set to ‘Auto’, Piper activates night vision if the ambient
light level has gon e below the visible threshold, and automatically de-activates
night vision when there’s enough light.
To use two-way audio, tap and hold the microphone icon while speaking into
your mobile device. Release the icon when you’re done s p eaking.
Tap on the Wireless Accessory icon to display a list of connected wireless
accessories. You can turn switches on or off and adjust dimmer levels. Tap the
video once to dismiss these controls.
The quad-view icon divides live video into four screens. This enables you to
focus in on specific area s o f a ro om while maintaining a c c e s s to z o o m, pan,
and tilt features within each quadrant.
You can use the brightness slider to adjust the brightness level of live video.
Drag the slider down to decrease brightn e s s, or up to increase brightness.
Zoom in: Place two fingers on the area you would like to enlarge and separate
fingers to expand the liv e v id e o . Z o om out: Perform the op p o s ite a c tio n b y
pinching or bringing fingers back together on the screen.
Pan/Tilt: Slide finger across the screen from top to bottom or side to side.
Page 28
!
28
Piper User Manual
Wireless
Accessory
Security
Mode
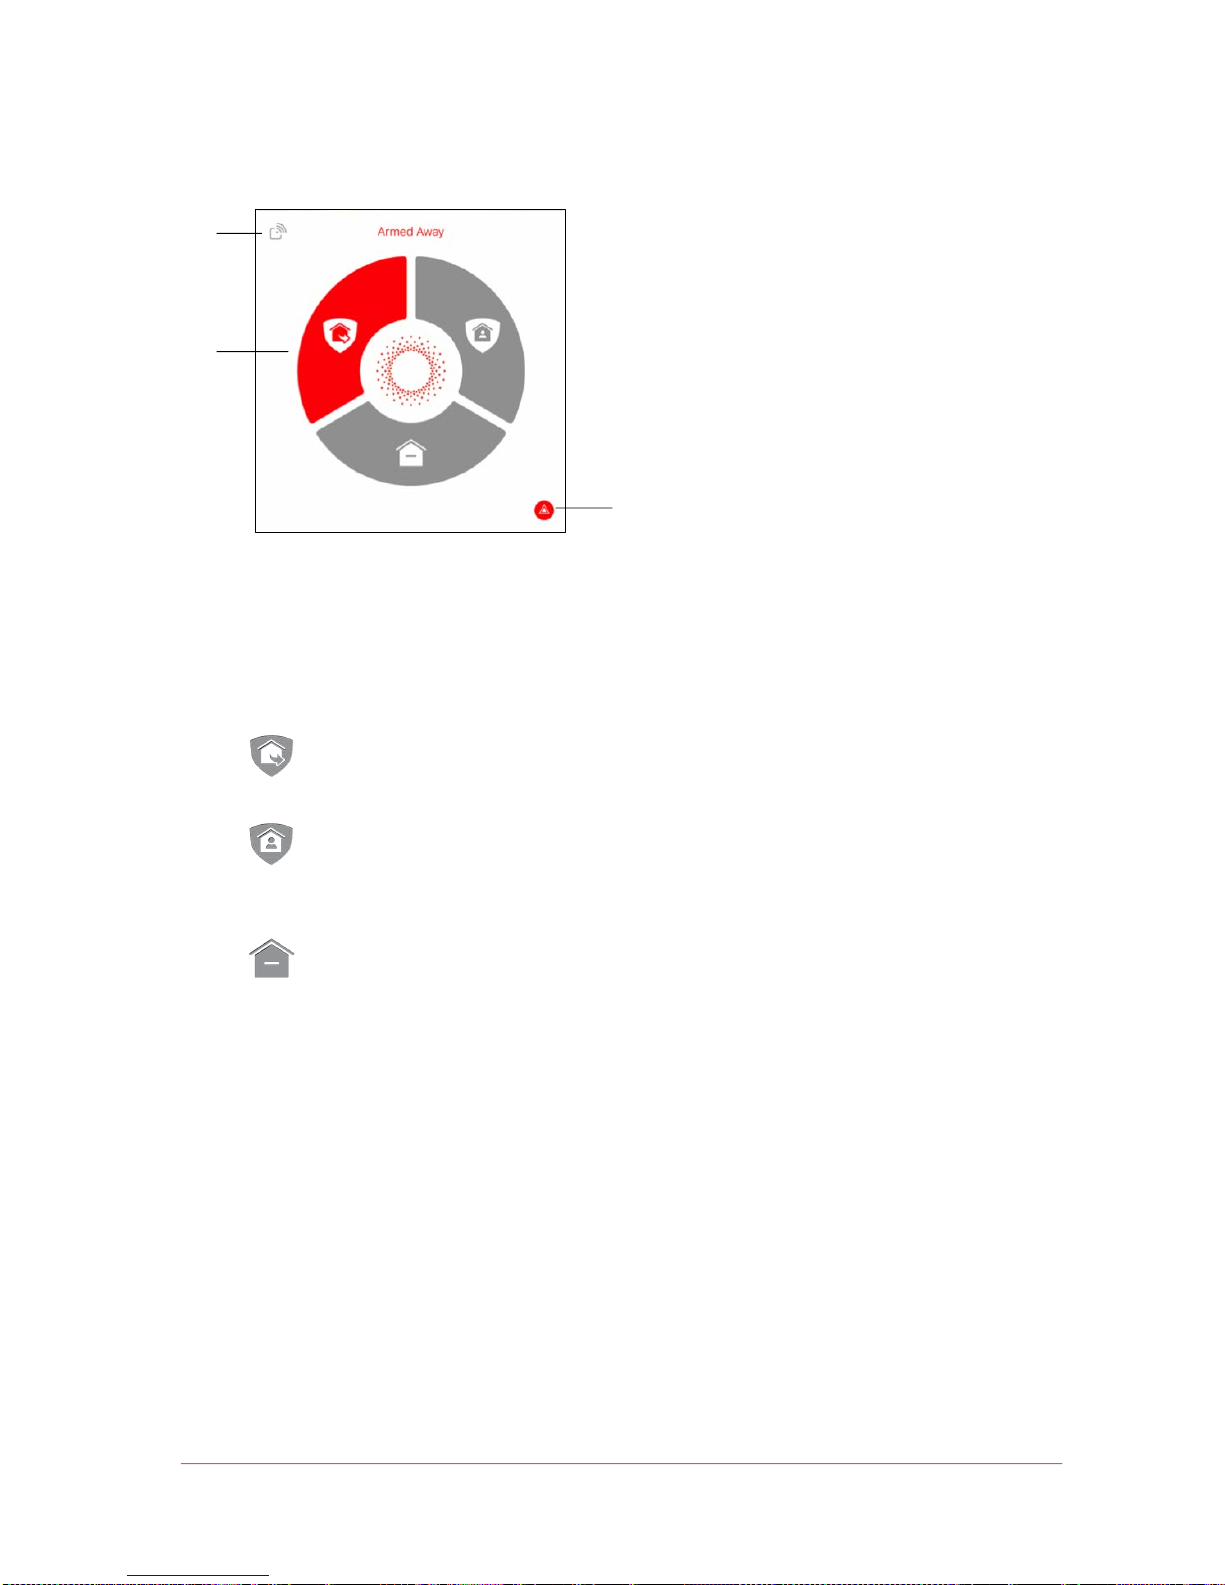
Security Panel
The Security Panel is the area beneath Piper
View and contains the Security Mode Wheel,
the Wireless Access o ry Drawer, and the
Panic Button.
• Security Mode Wheel: Tap on one of the three modes in the wheel to arm or disarm
your Piper. Your corresponding security mode rules, which are defined in the Rules
tab, go into effect once a c tiv e .
Armed Away Mode: Piper is armed after a countdown. This mode is
recommended for when no one is at home.
Armed Stay Mode: Piper is armed immediately. This mode is recommended
for when you want y o u r h o me secured when y o u ’re a t h o me. This is especially
useful when you’re going to bed.
Disarmed Mode: Piper’s security is disarmed. Only notifications and
automations may happen when Piper is disarmed.
Note: To learn more about security rules and how to enable rules for Piper in
Armed Away and Armed Stay Mode, please refer to the Rules section.
Panic Button!
Page 29
!
29
Piper User Manual
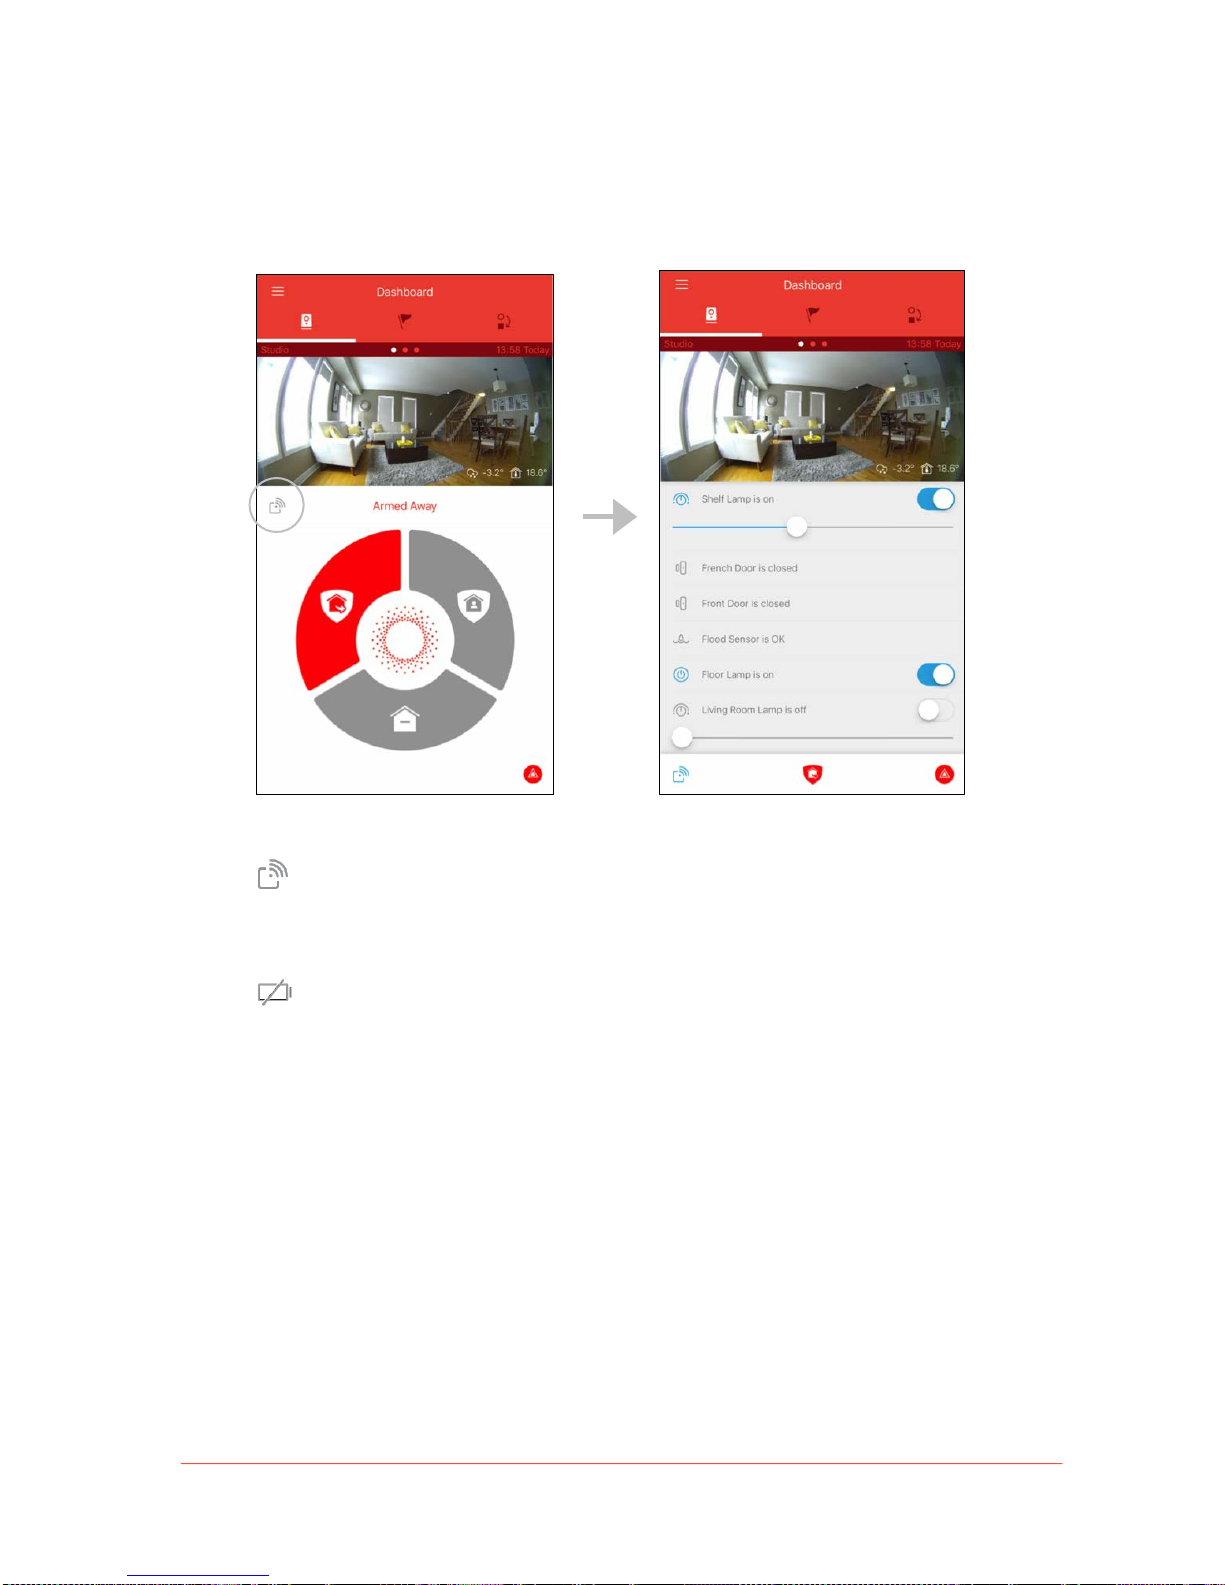
• Wireless Accessory Drawer: Tap the Wireless Accessory icon on the top left-hand
corner of the Security Panel to open the Wireless Accessory Drawer. This will reveal a
list of wireless acc e s sories connected to your Piper syste m.
From the Wireless Accessory Drawer, users can view the current state of
sensor accessories (such as door/window sensors) and control wireless
accessories with an on/off switch or dimmer (such as a light bulb).
A battery icon will appear beside sensor accessories when either a battery is
dead or running low.
Note: To learn more about wireless accessories including product information
and set up instructions, see Wireless Accessories.
Page 30
!
30
Piper User Manual
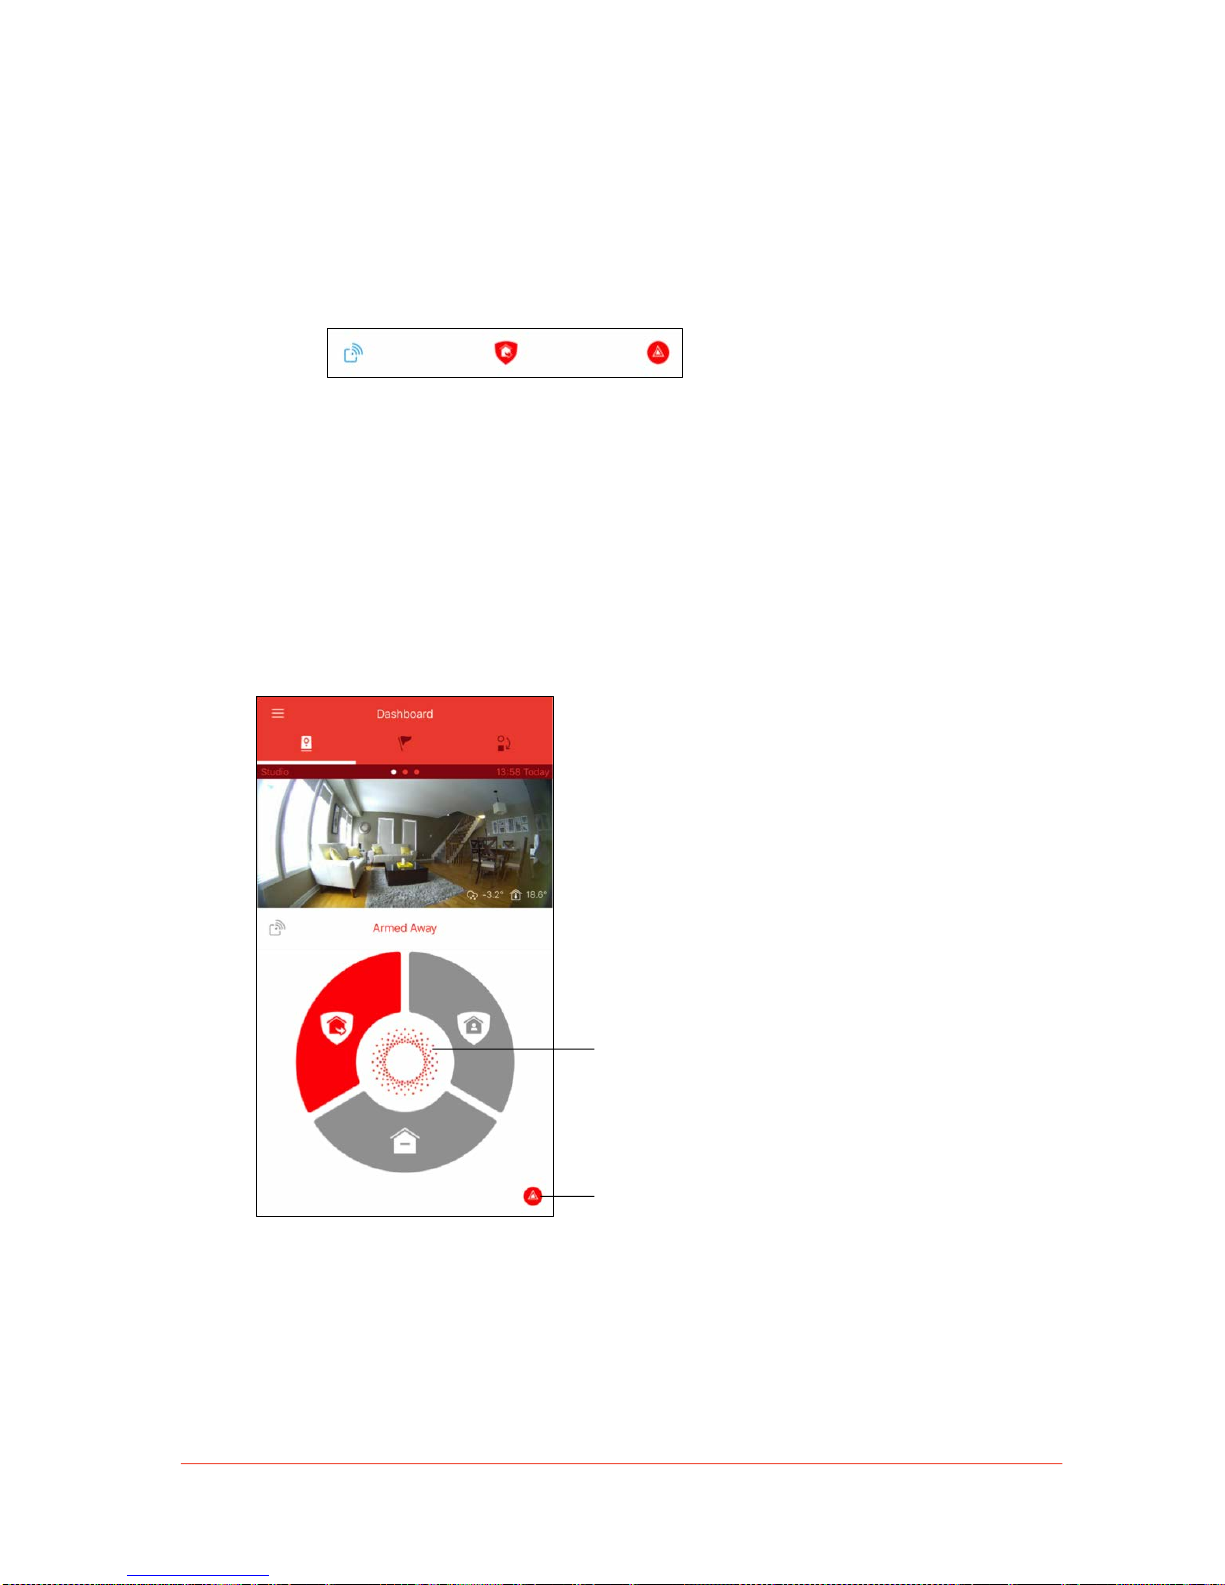
• Security Bar: When the Wireless Accessory Drawer is open, a minimized version of
the Security Panel is a cc e s s ib le a t th e b o tto m of the Dashboard.
From the Security Bar, you can close the Wireless Accessory Drawer, change
the security mode tha t y o u r P ip e r is in , a n d a c t iv a te the siren using th e Panic
button.
To expand the Security Panel, tap on the drawer icon or swipe the Security
Bar upwards.
• Panic Button: Located on the bottom right-hand corner of the Dashboard, you can
press and swipe the Panic Button icon left to manually activate the siren.
Tap on the Notable State icon in the Security
Mode Wheel (see Notable States section for
details) or siren deactivation icon on the
bottom right-hand corner.
Using the Panic Button will bypass the Siren
Lockout feature and sound the siren for 4
minutes regardless of Piper’s operating
mode.
Page 31
!
31
Piper User Manual
Notable States
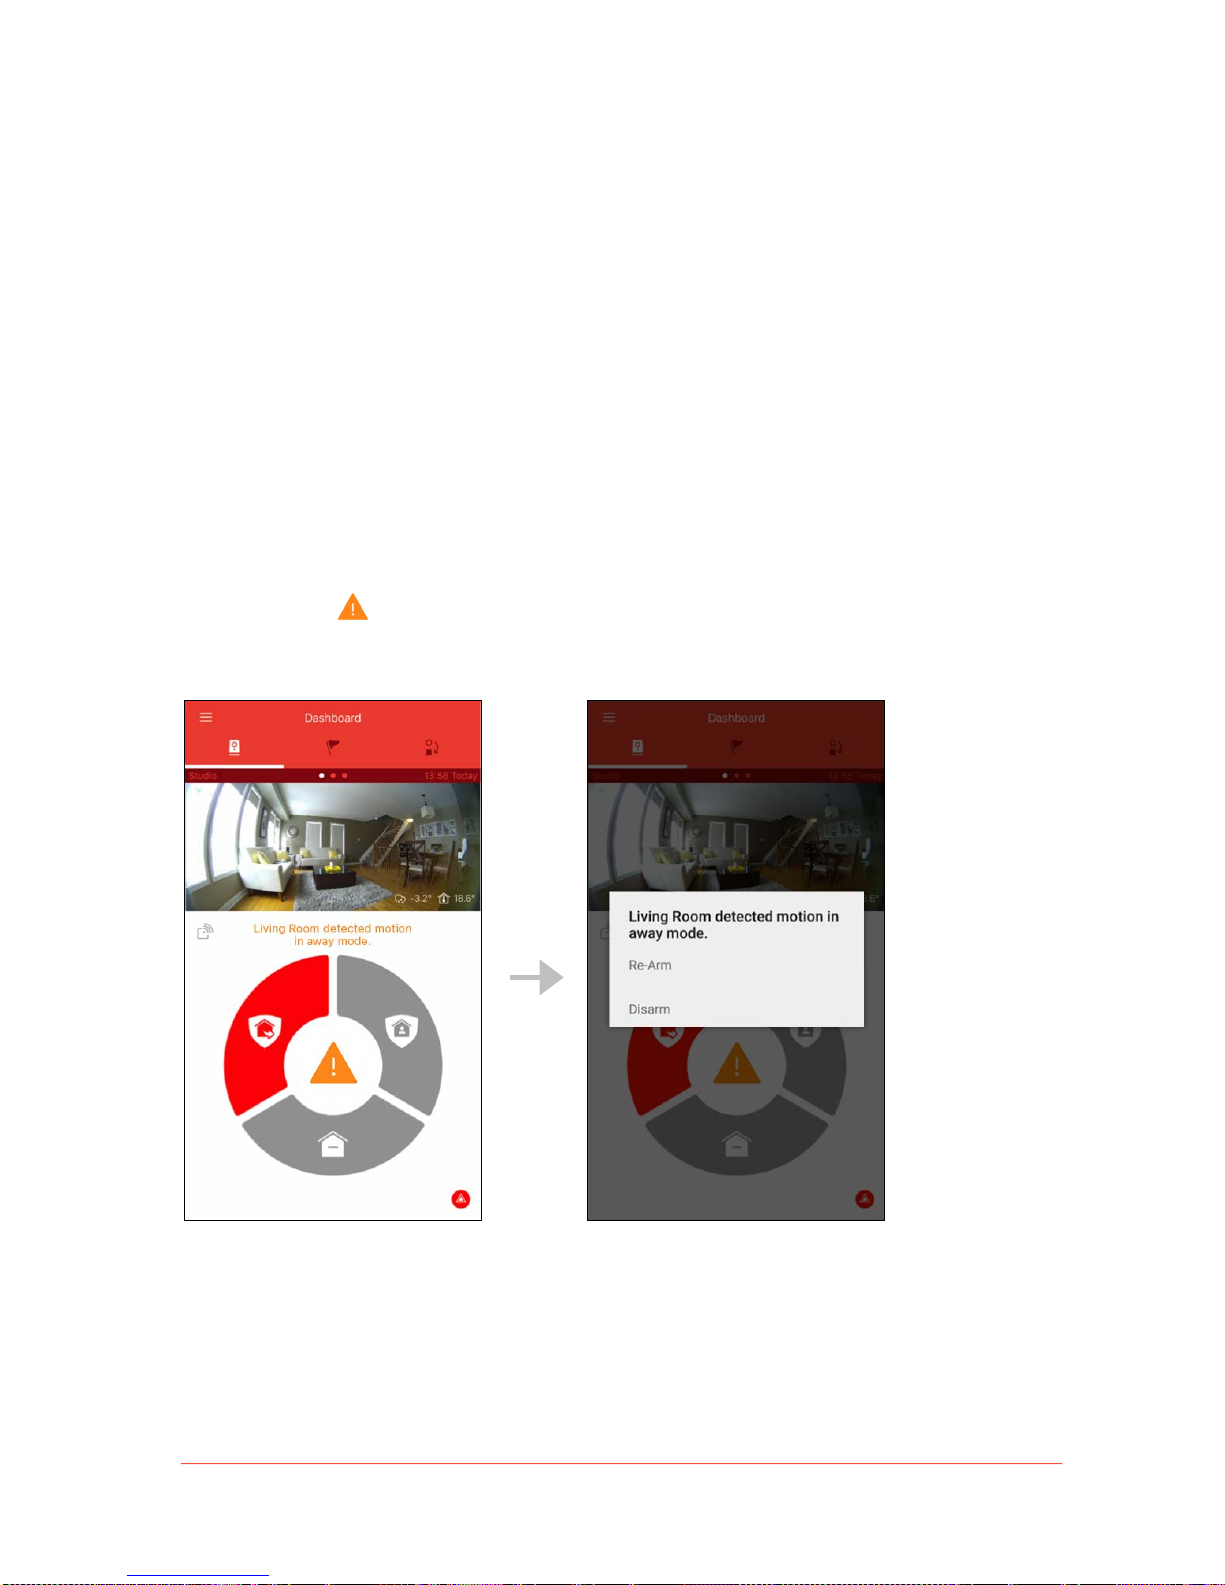
Piper can enter a notable state when one of three events take place: when activity is
detected in an armed mode, when the siren is activated, or when Piper cannot be reached.
Piper’s notable state will be displayed on the Security Panel. Additionally, the Piper emblem
located in the center of the Security Mode Wheel will be replaced with a Notable State icon.
Tap on this icon to see how to resolve the issue.
Activity in Armed Modes
When Piper detects activity while in an armed mode, a description of the security event will
be displayed above the Security Mode Wheel and a relevant Notable State icon is displayed.
Tap on this icon to re-arm or disarm Piper.
Page 32
!
32
Piper User Manual
Siren Activated
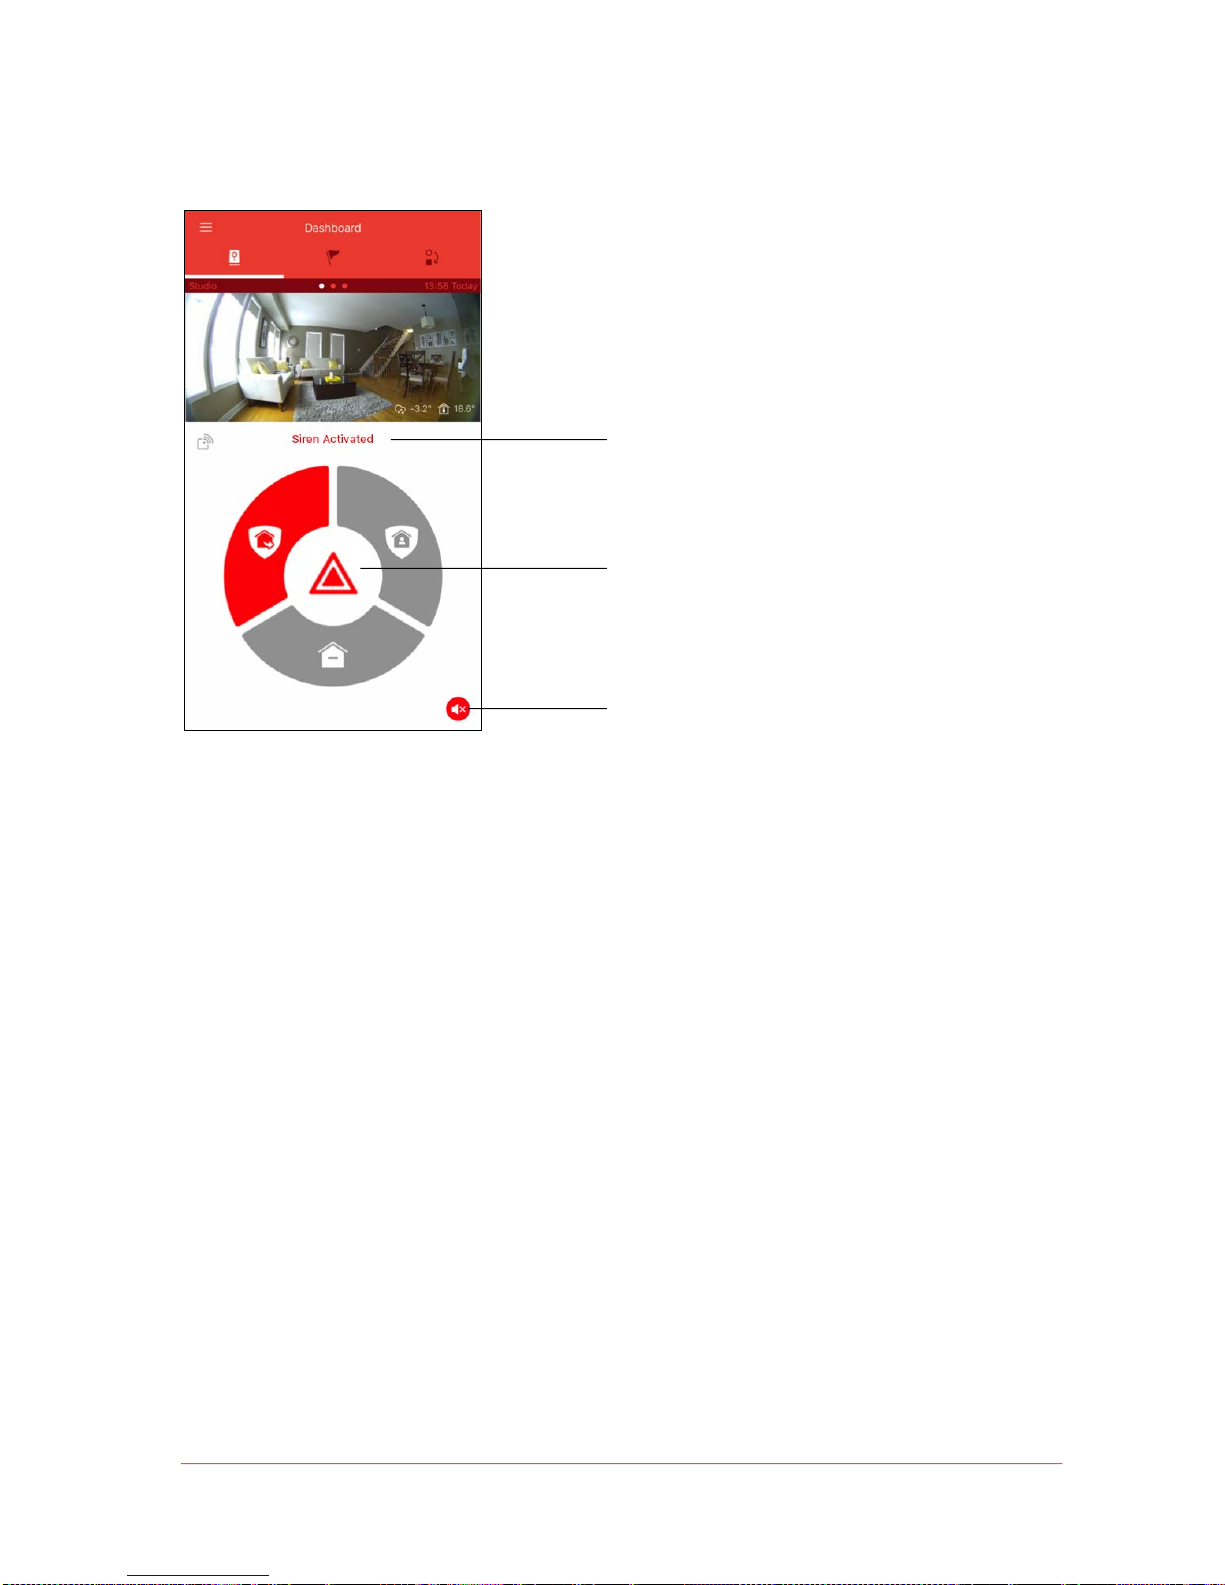
When the siren is activated by using the
Panic Button, “Siren Activated” will be
displayed above the Security Mode Wheel.
Tap on the notable state icon to deactivate
the siren.
When the siren is activated, the Panic
Button will be replaced with a Deactivate
Siren icon that you can tap to quickly
deactivate the siren.
Page 33
!
33
Piper User Manual
Not Connected to Piper
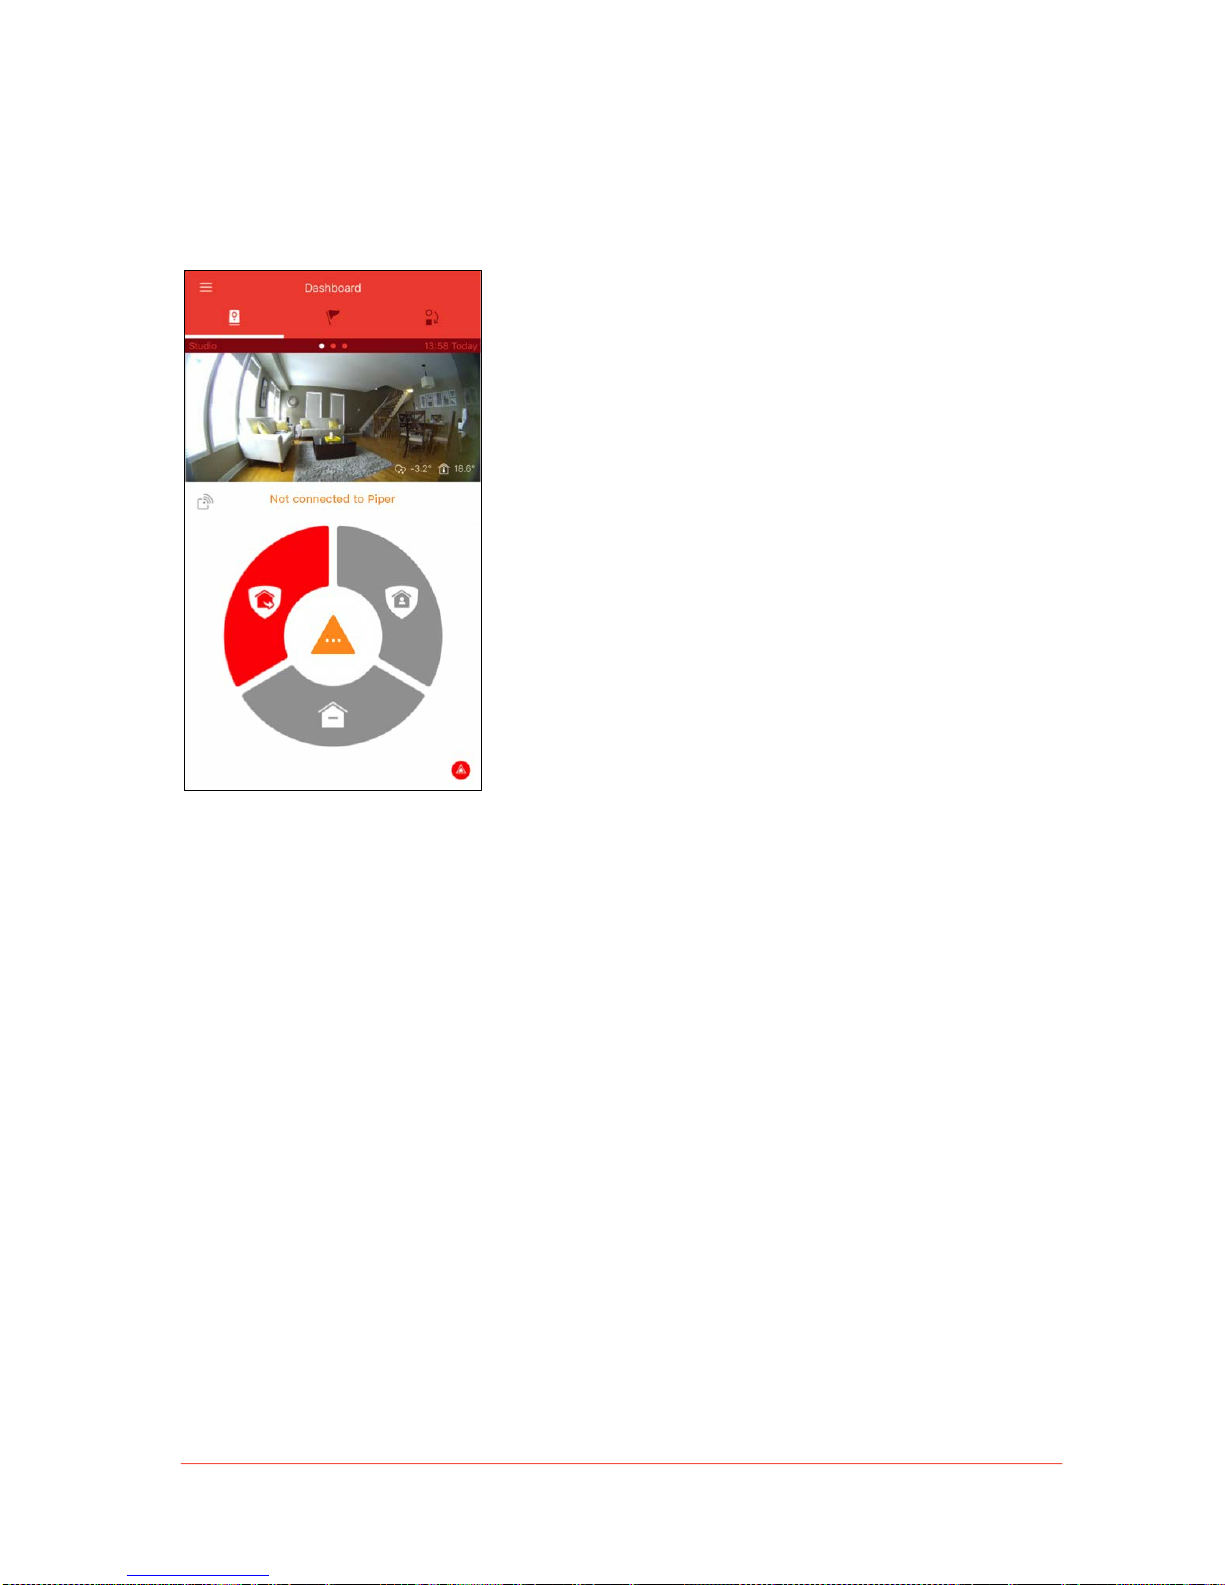
When Piper cannot be reached from your mobile device, tap on the notable state icon to see
three options: Retry, Tr o u b le shoot, and Ignore.
Page 34
!
34
Piper User Manual
Events
Using the Events tab, you can review past activity in the Timeline and Video Clips sections,
as well as graphed data in Home Vitals.
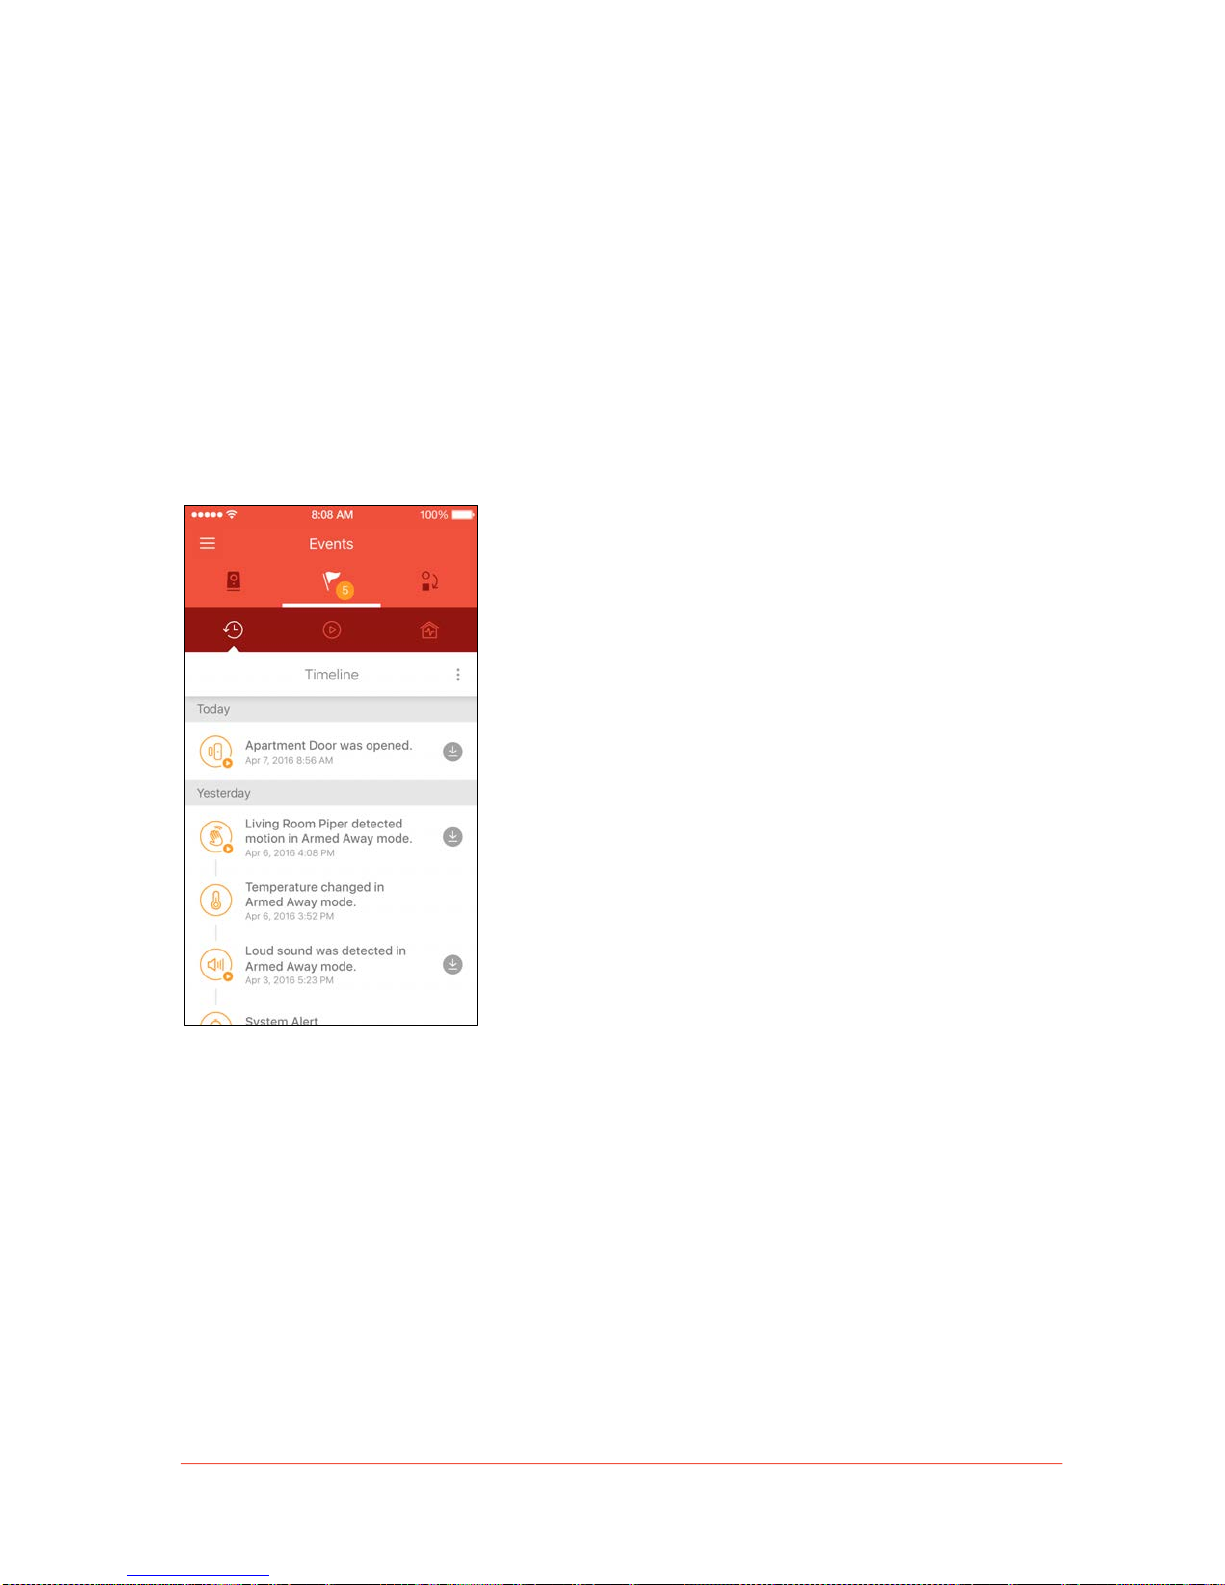
Timeline
Timeline is the leftmost section in Events. This is a list of recent notable events detected by
your Piper. A maximum of 1000 events will be available.
Page 35
!
35
Piper User Manual
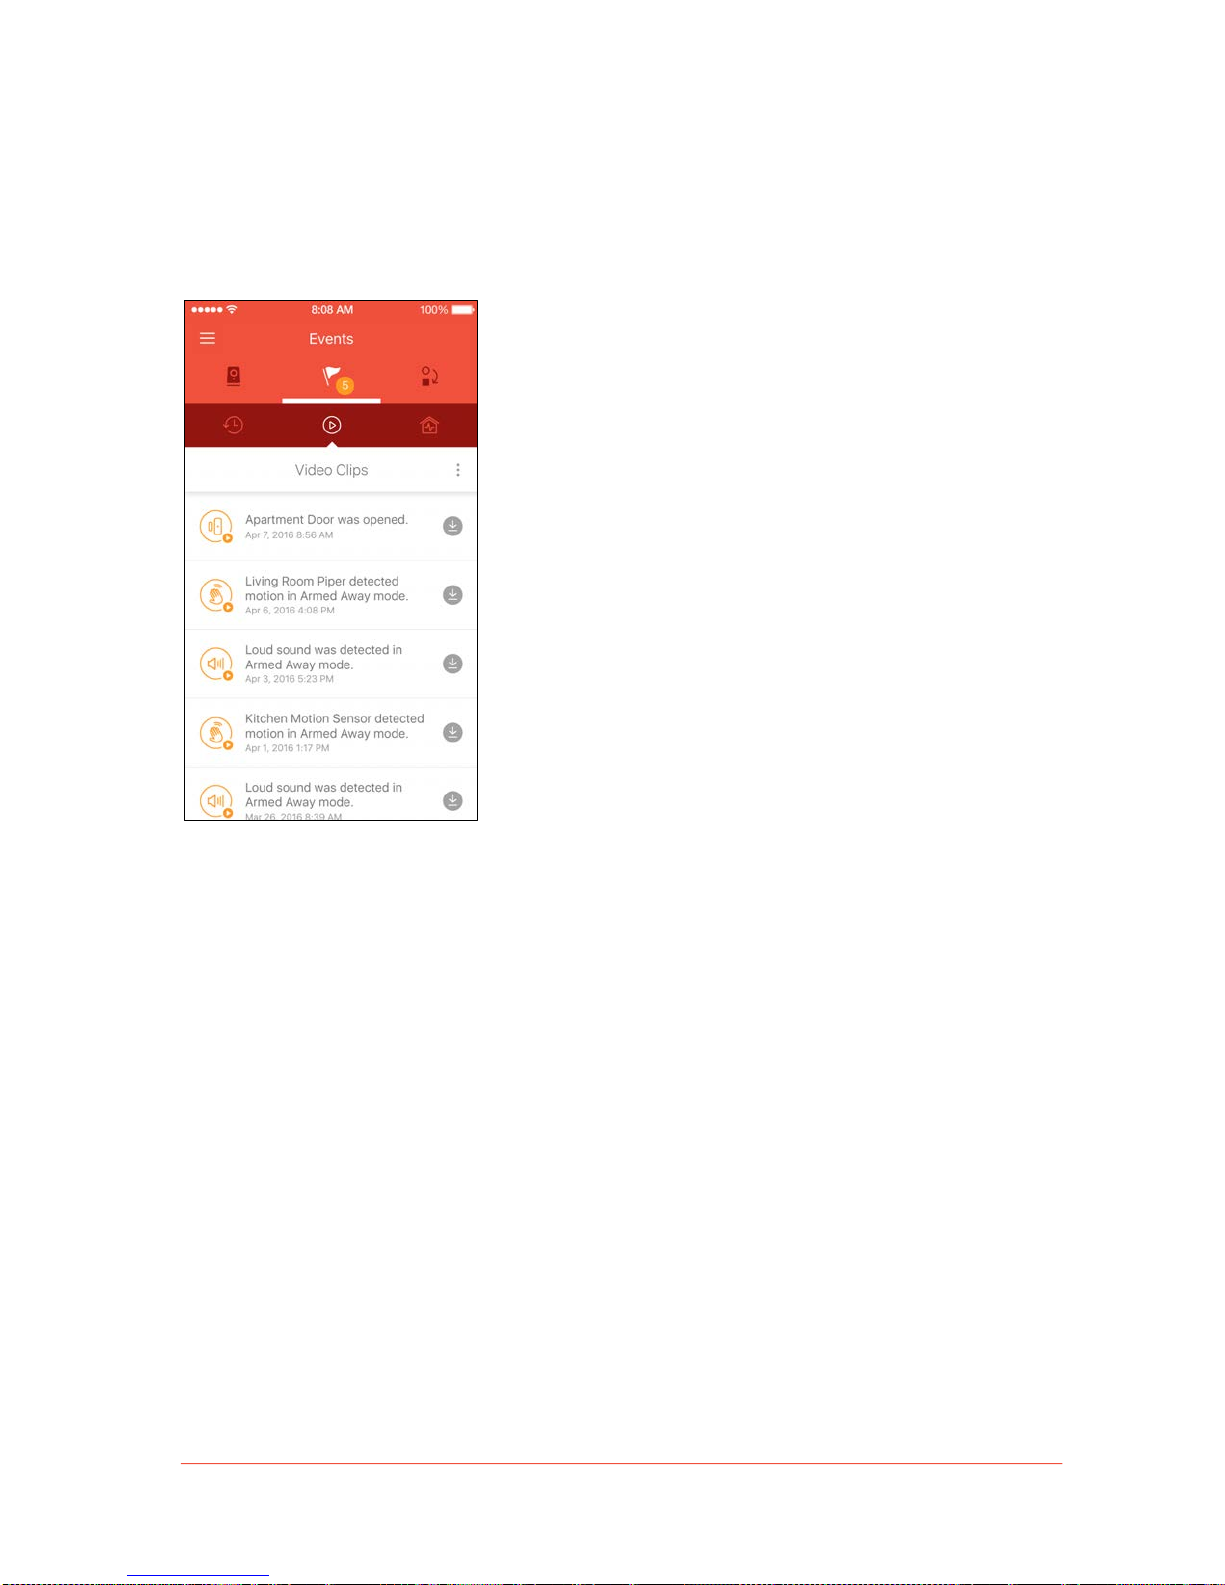
Video Clips
Video Clips is the center section in Events. You can review video clips recorded during
certain security events, and save the clips onto your mobile device. You can define what
activity you want Piper to record from the Rules tab.
Page 36
!
36
Piper User Manual
Event Features
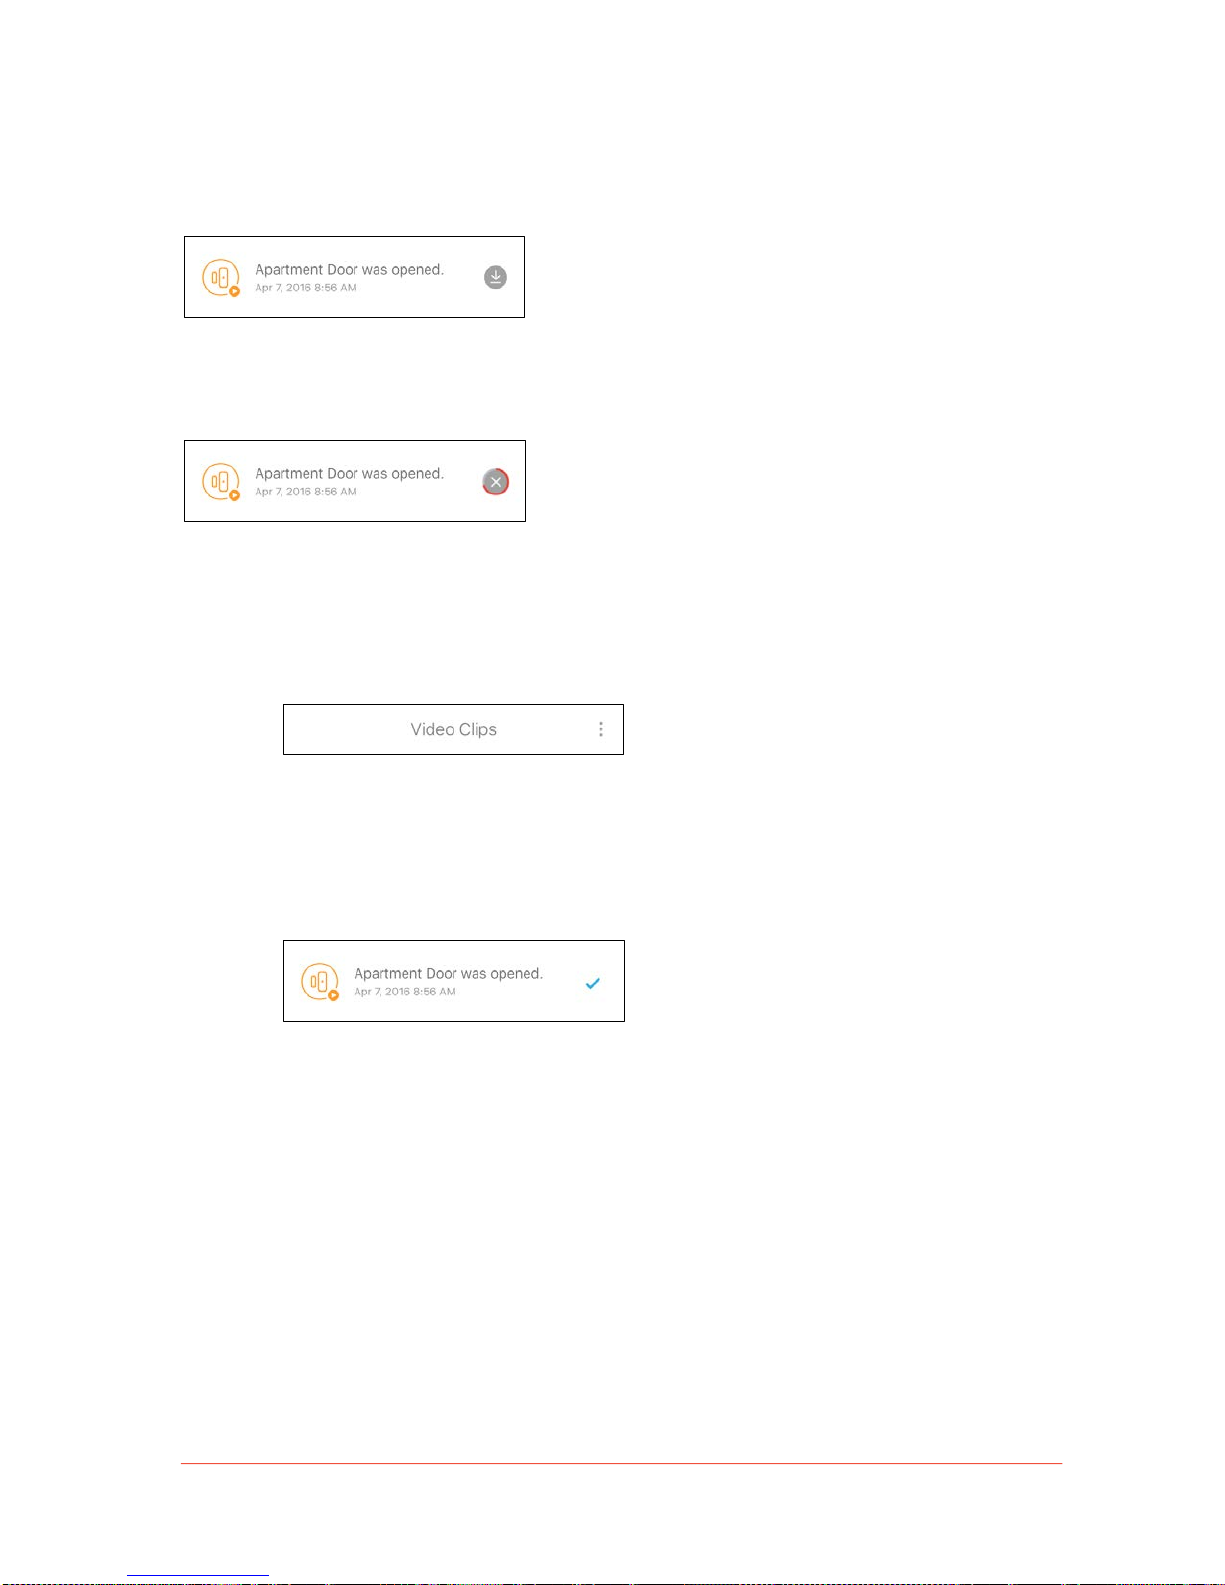
• To view: Tap on an event in Video Clips to view recorded video footage.
• To download: To download recorded video clips directly onto your mobile device, tap the
downward facing arrow next to the video you wish to save.
• To delete or mark as read:
• To delete or mark events as read, tap on the Context Menu icon located on the
top-right corner of the list.
• This icon allows users to select specific events or automatically select all events in
Timeline or Video Clips.
• The selected events (highlighted in blue) can now be deleted or marked as read.
• Mark as read: All read events will remain in the Timeline (unless deleted). Unread
events will be displayed in bold, and the badge on the Events tab icon shows the
unread event count.
• Delete: Before erasing the selected events, a dialogue box will appear asking you
to confirm the action. D e le te d e v e n ts c a n n o t b e re c o v e r e d .
Page 37
!
37
Piper User Manual
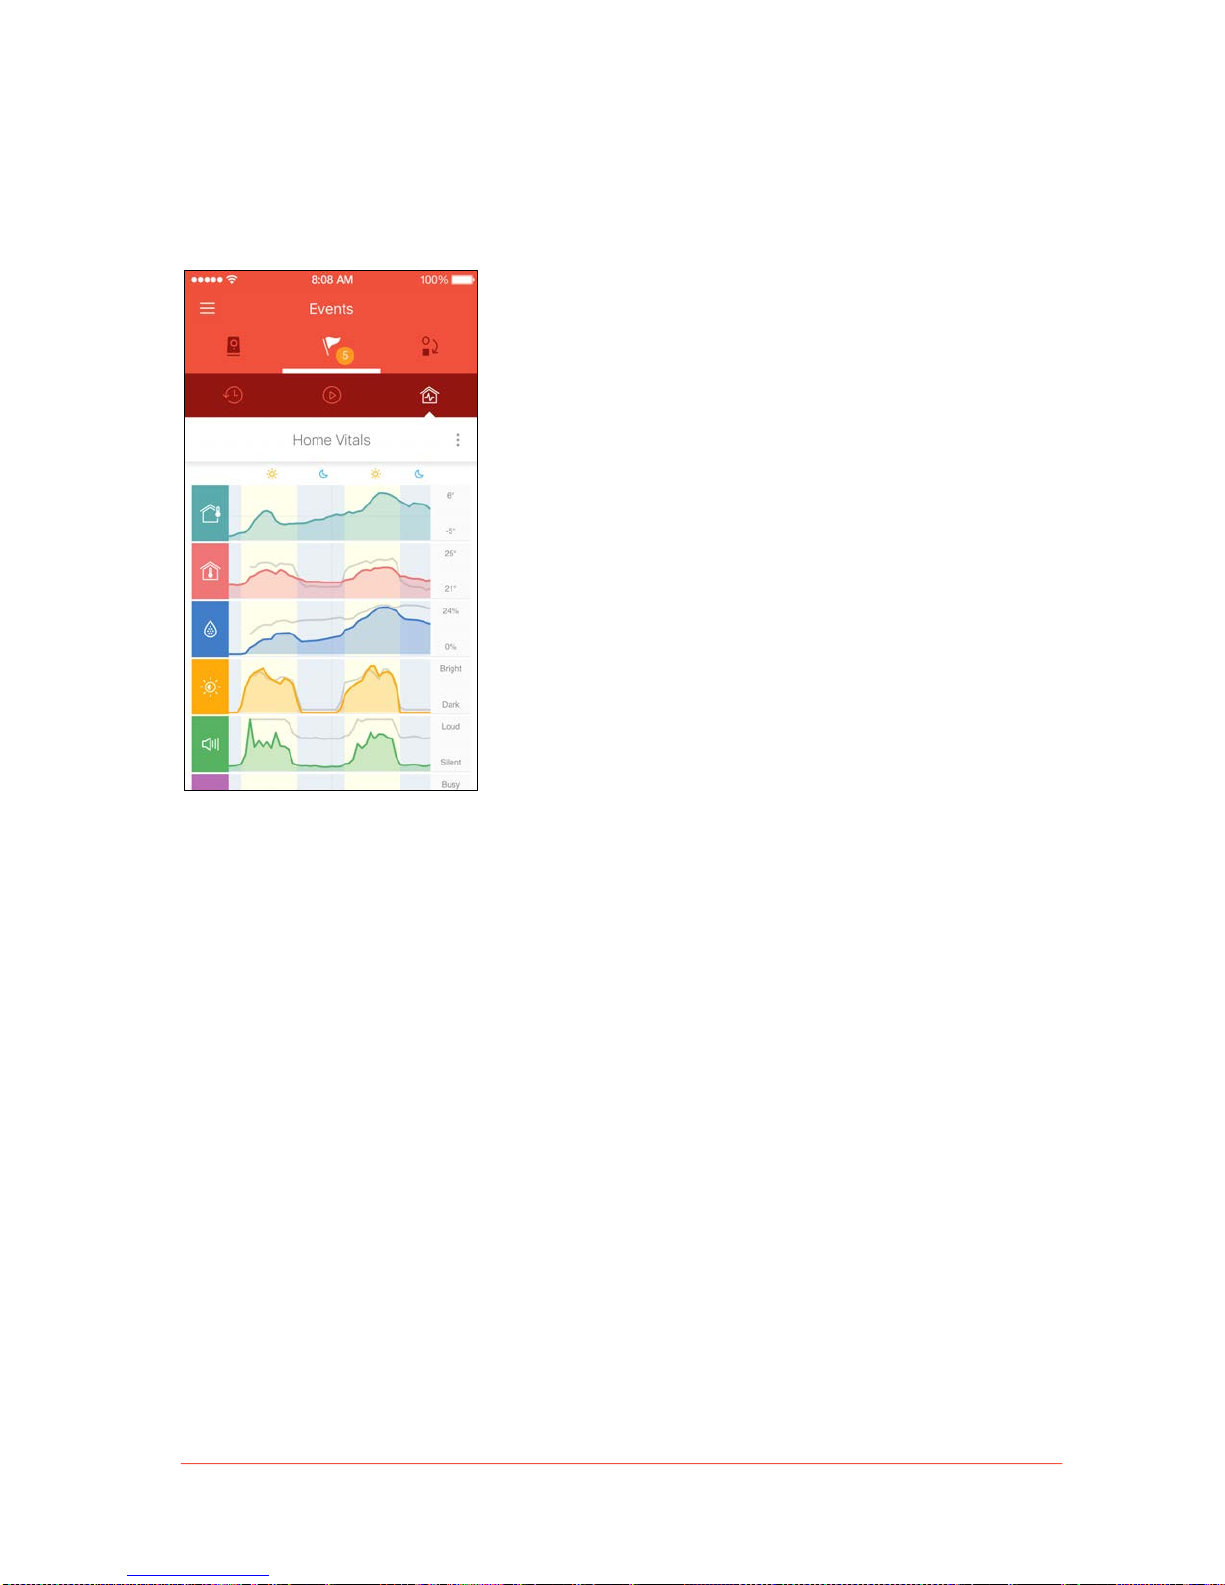
Home Vitals
The rightmost section in the Events tab is the Home Vitals screen. Here, users can monitor
specific vitals that Piper records throughout the course of the day.
• Piper records the temperature, relative humidity, ambient light, sound level, and movement
of the area it monitors. This information is presented in a graph, which displays a history of
the past 48 hours.
• The Context Menu icon on the right-hand side of the Home Vitals screen allows users to
view the vitals of individual Pipers in a home. Tap on this icon to view a list of all Pipers
linked to one acc ount. Select the name o f a Piper to view the vitals of the area it monitors.
Other Pipers’ vital graphs will show up in grey, with the vitals of the selected Piper appearing
in color.
• The numbers on the right hand side represent the highest and lowest values of the vitals
detected by Piper’s environmental sensors.
Page 38

!
38
Piper User Manual
Rules
!
In the Rules tab, users can set armed security mode rules, notification rule s , a n d a u to mation
rules for wireless accessories. The se rule s a ctiva te w he n an ev e nt o cc urs or a sp e cified
condition is met. Piper automatically prioritizes security events, or events that may
compromise the safety of your home.
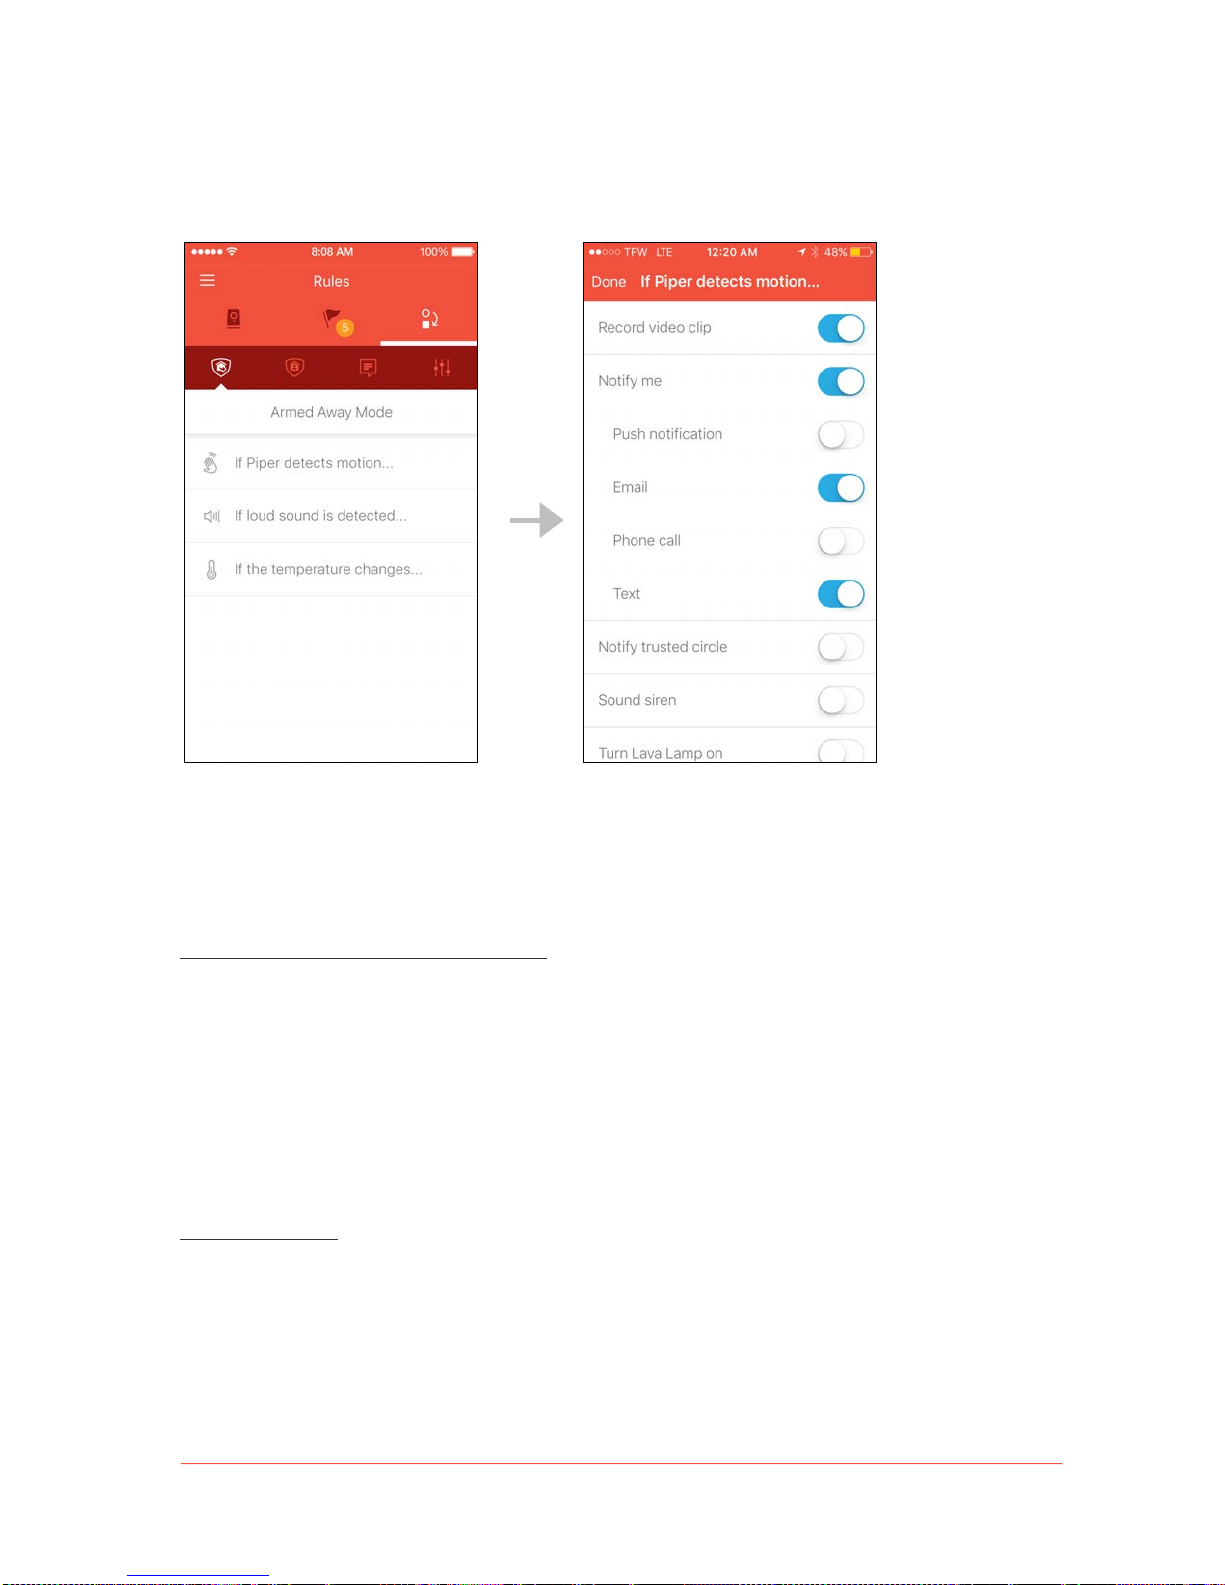
Armed Security Mode Rules (Armed Away/Armed Stay)
Your Piper detects three main security events:
If Piper detects motion…
If the temperature cha n g e s …
If loud sound is detecte d …
If you have added w ire le s s s e n s o r a c c e s sories to your Piper, these s e n s o rs c a n trig g e r a s
security events as well. For example:
If Door Sensor open s …
If Flood Sensor detec ts w a te r …
Page 39
!
39
Piper User Manual
Tap on an event (such as “If Piper detects motion…”) to view a list of customizable
security actions.
Security rules are a set of actions that respond to breached security events. When events
are detected, the security rules set by you will be activated. Rules will only activate if the
event is breached in the specific security mode they are set for.
To set security rules, follow these steps:
1. Select the security mode for which you would like to set rules.
2. Tap on the event you would like to set security rules for.
3. Enable the desired security rule by toggling the control.
Note: Piper cannot be armed if there are no rules associated with the security mode. If you
try to switch Piper to an a rmed mode without any rules, a dialogue bo x will notify you.
More about rules:
• When the “Record video clip” security rule is activated, Piper will automatically record a 35-
second clip of the security event taking place—the first 5 seconds prior to the event, a n d th e
proceeding 30 seconds of footage.
Page 40

!
40
Piper User Manual
• Security rules chosen by the user will be applied to all Pipers on the same account. Owners
with multiple Pipers cannot set customizable security rules for different Pipers in a home.
• If the siren is activated du rin g a s e c u rity e v e n t, it w ill s o u n d fo r 4 minutes before
automatically turning off.
Note: If a security rule is triggered while in an armed mode, Piper will enter a notable state
and display information on the Dashboard. For more information, see the Notable States
section.
Page 41
!
41
Piper User Manual
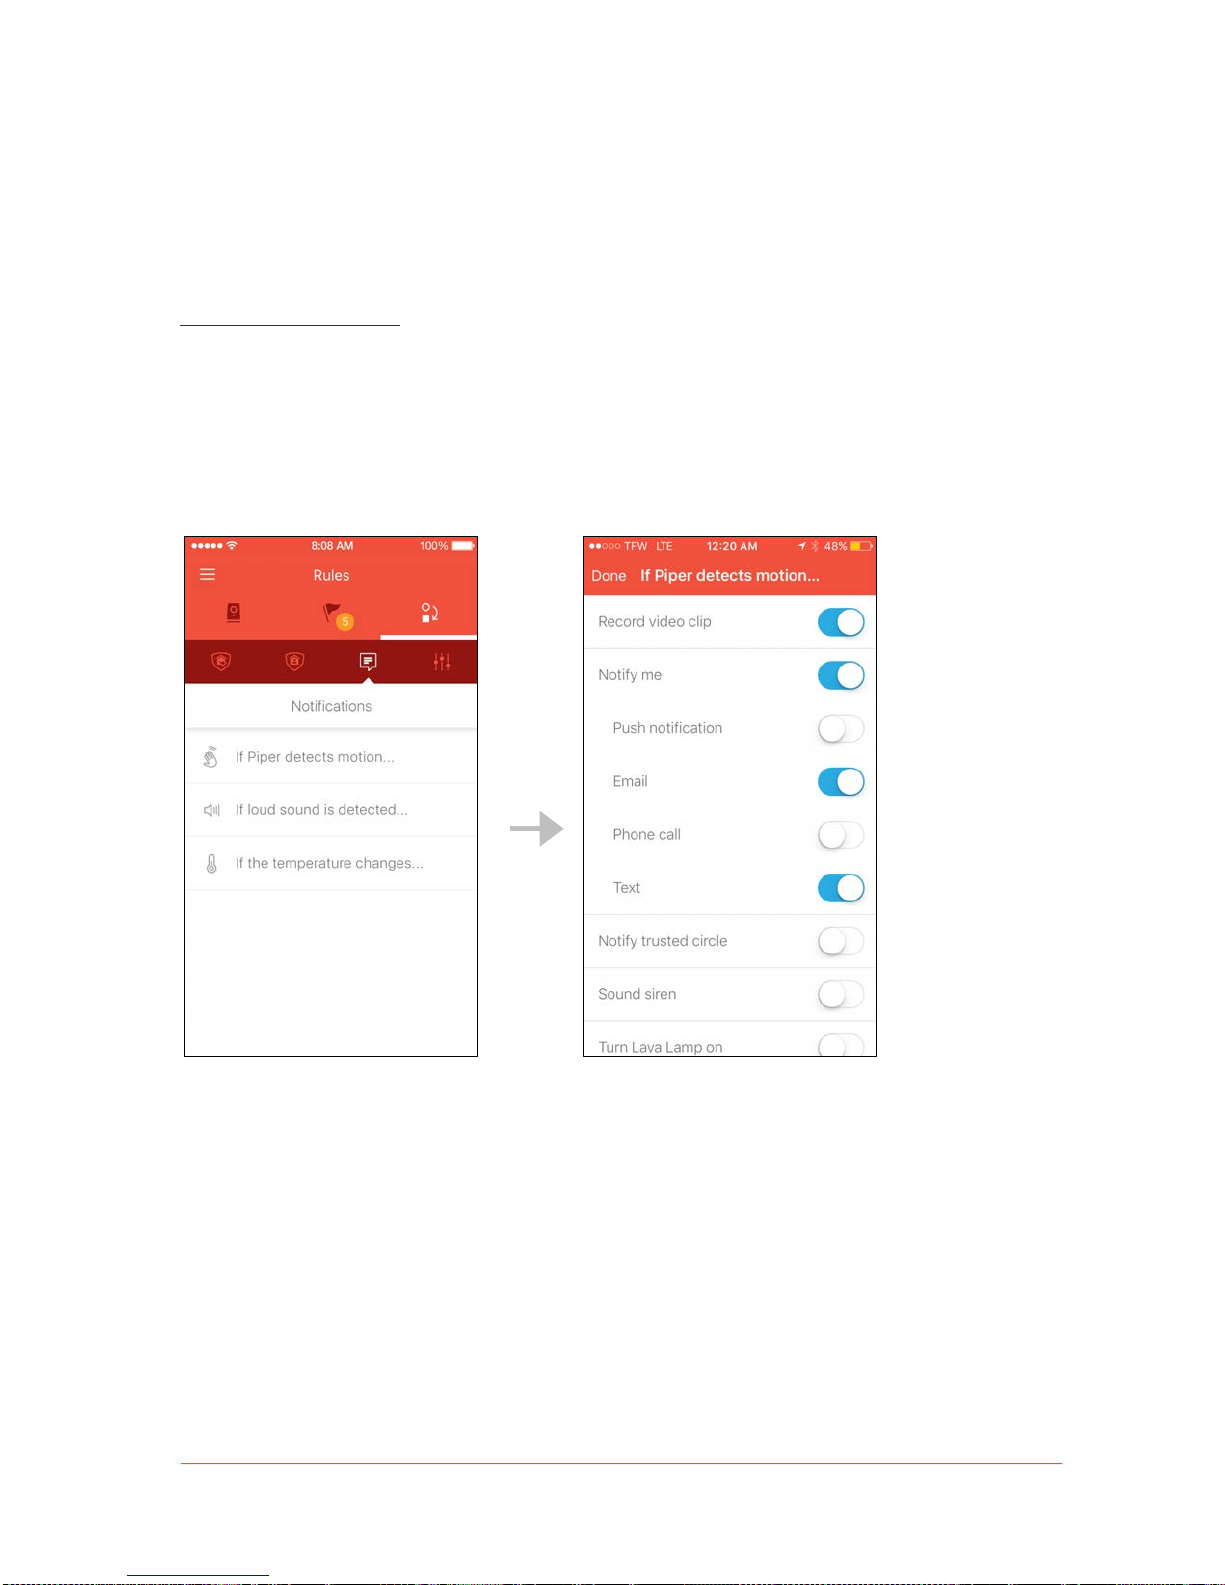
Notification Rules
You can receive a notification when a specific event is detected, regardless of the security
mode Piper is in. You can choose to receive this notification directly to the mobile app (via
push a notification) or via an email.
To set Notification rules:
1. Go to the Notifications section of the Rules screen.
2. Tap on the event for which you would like to receive notifications and toggle the control to
enable the setting.
3. Select how you wish to be notified.
Page 42
!
42
Piper User Manual
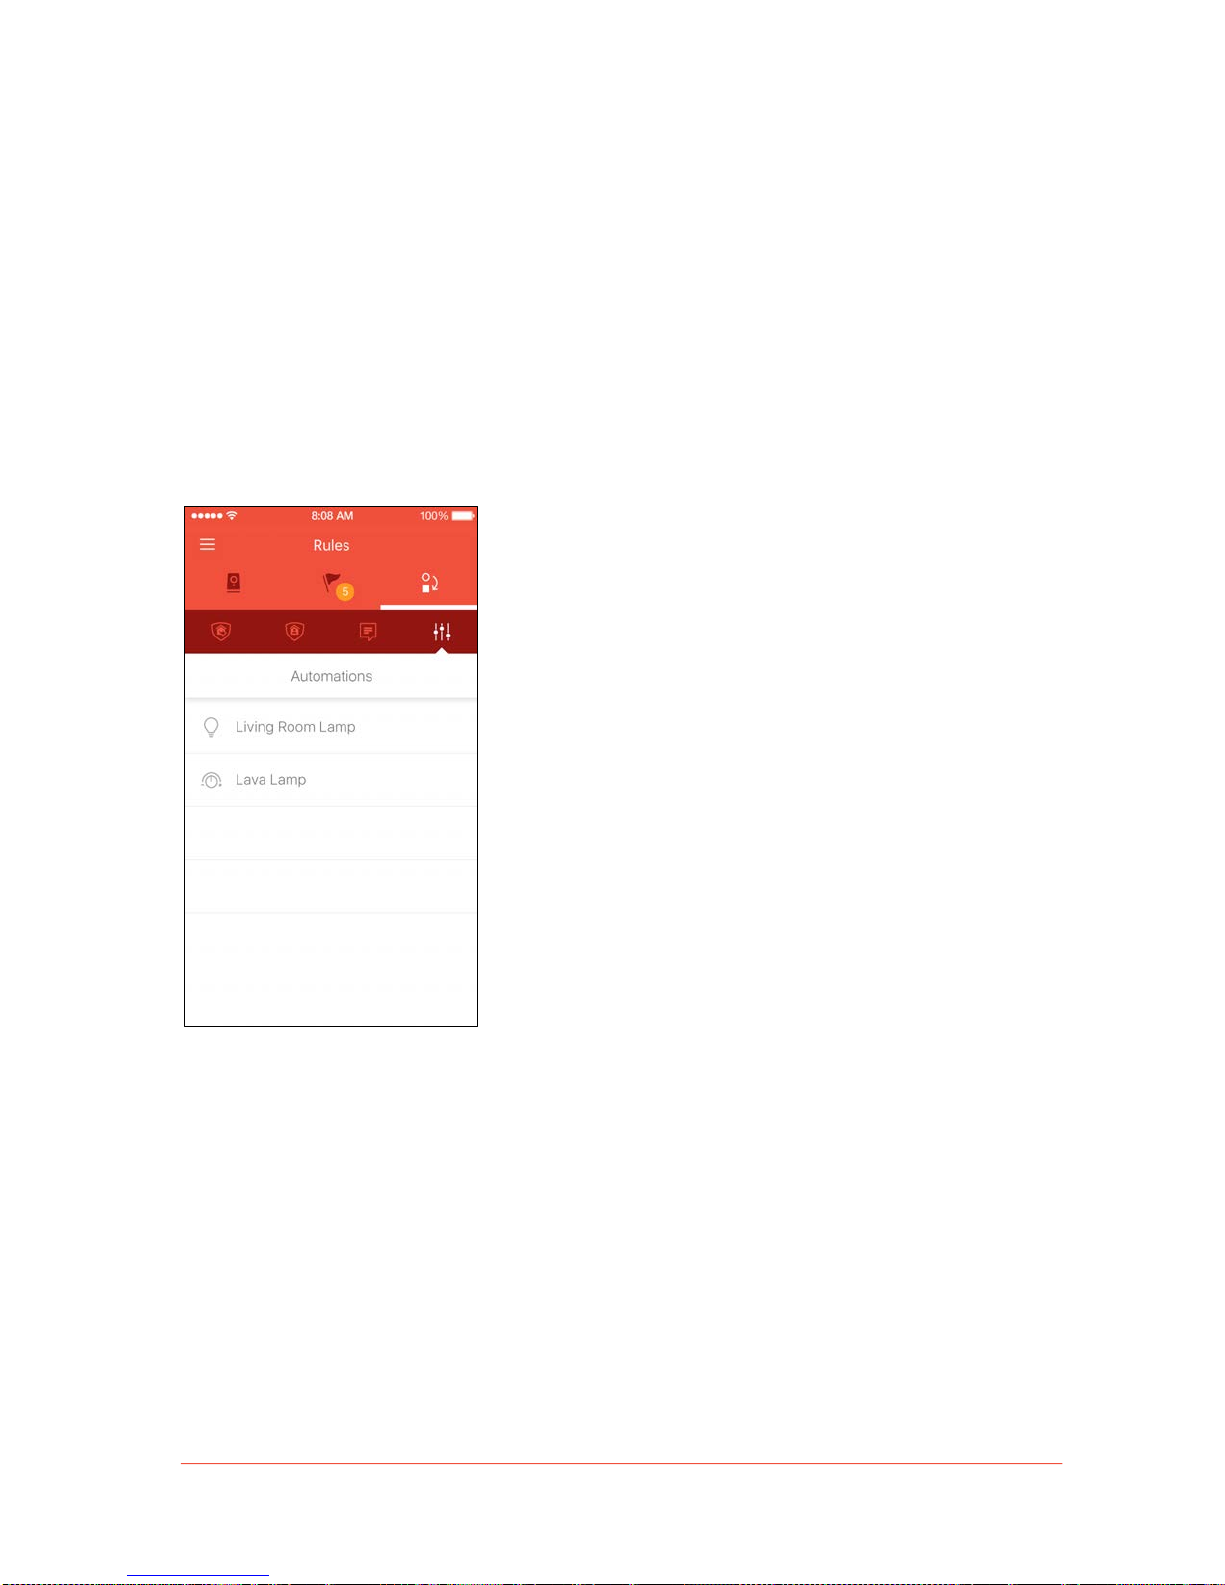
Automation Rules
• The Automations section of the Rules tab allows you to customize automations for wireless
accessories connected to household appliances.
• Automations displays a list of the control accessories currently connected with the Piper
system. Tap on an accessory’s name to view or edit the rules assigned to it.
• There are three automation types for accessories: Schedule, Temperature, and Ambient Light.
• Select an accessory’s automation type to open its settings.
Page 43
!
43
Piper User Manual
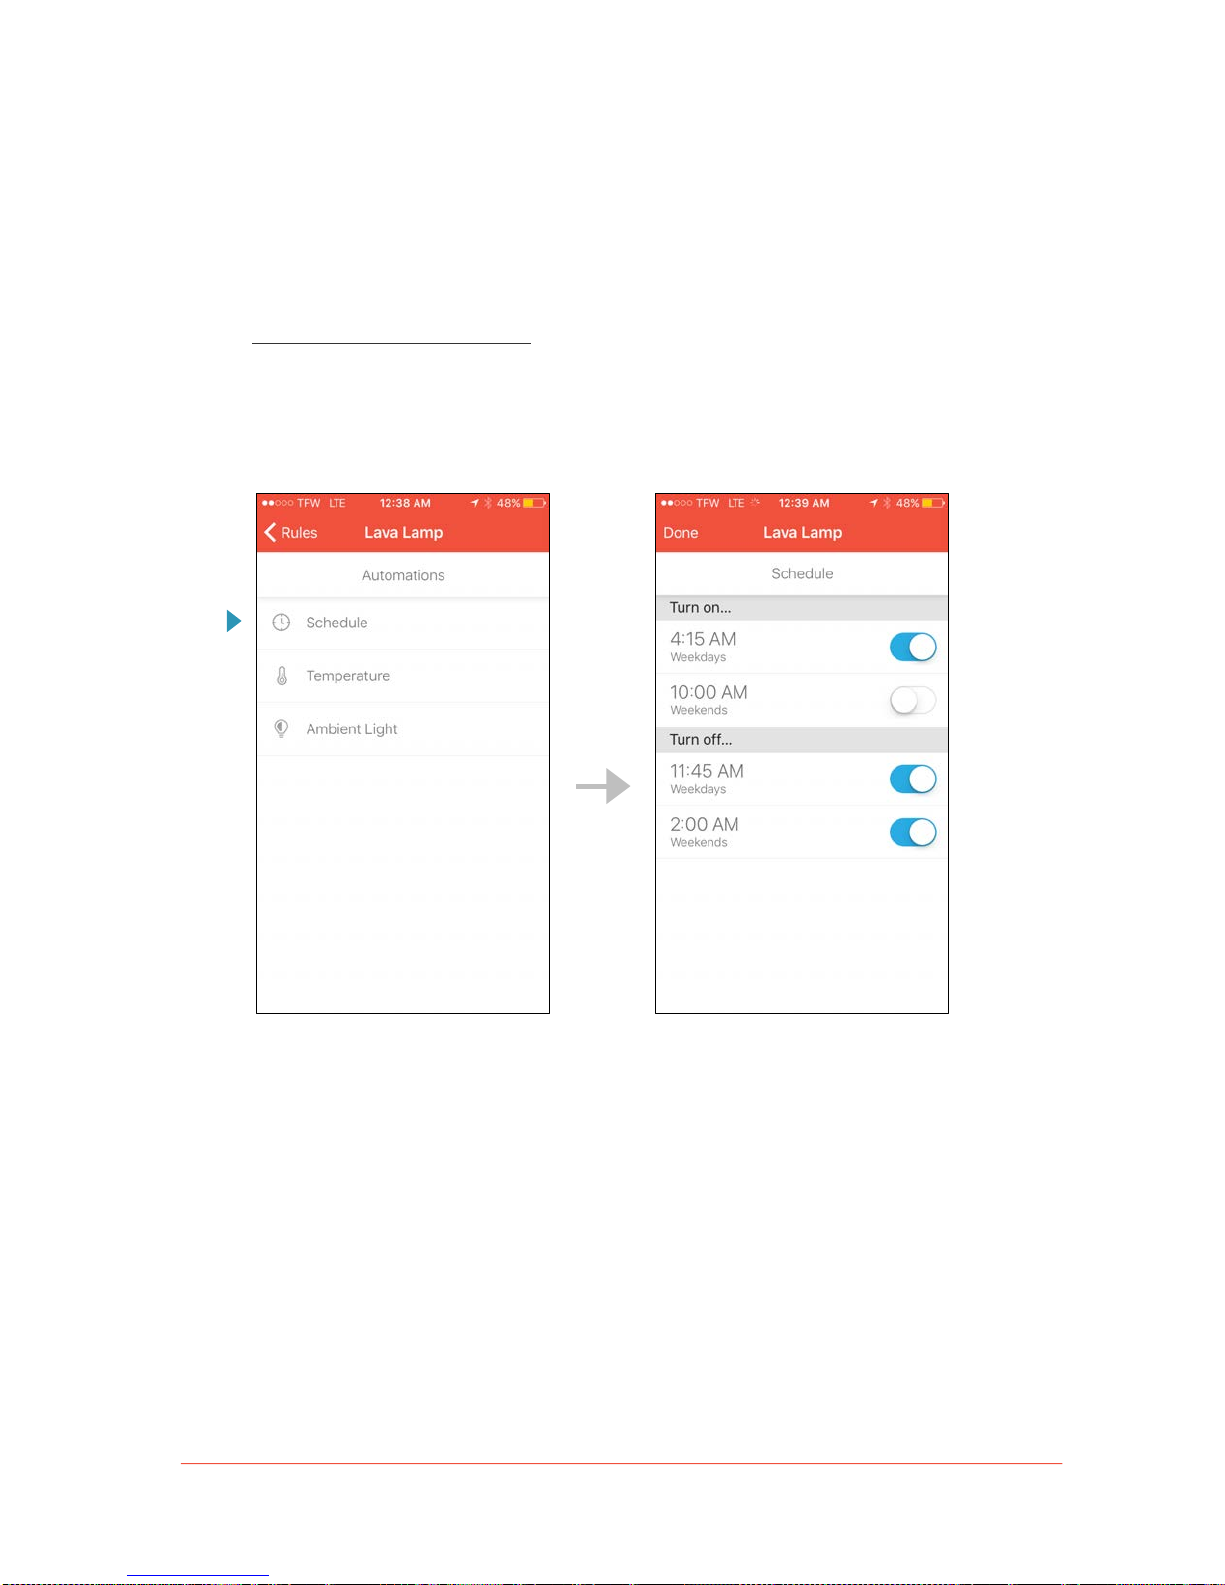
Schedule
Use the Schedule automation type to set "turn on" and " tu rn o ff" times for the
household appliance that is plugged into the associated wireless accessory.
Independent settings fo r weekdays and wee k e n d s c a n b e c o n fig u re d .
To set a Schedule automation:
1. Enable "turn on" and "turn off" times by toggling the schedule you wish to s e t.
2. Tap on the time to adjust the hour and minutes.
Page 44
!
44
Piper User Manual
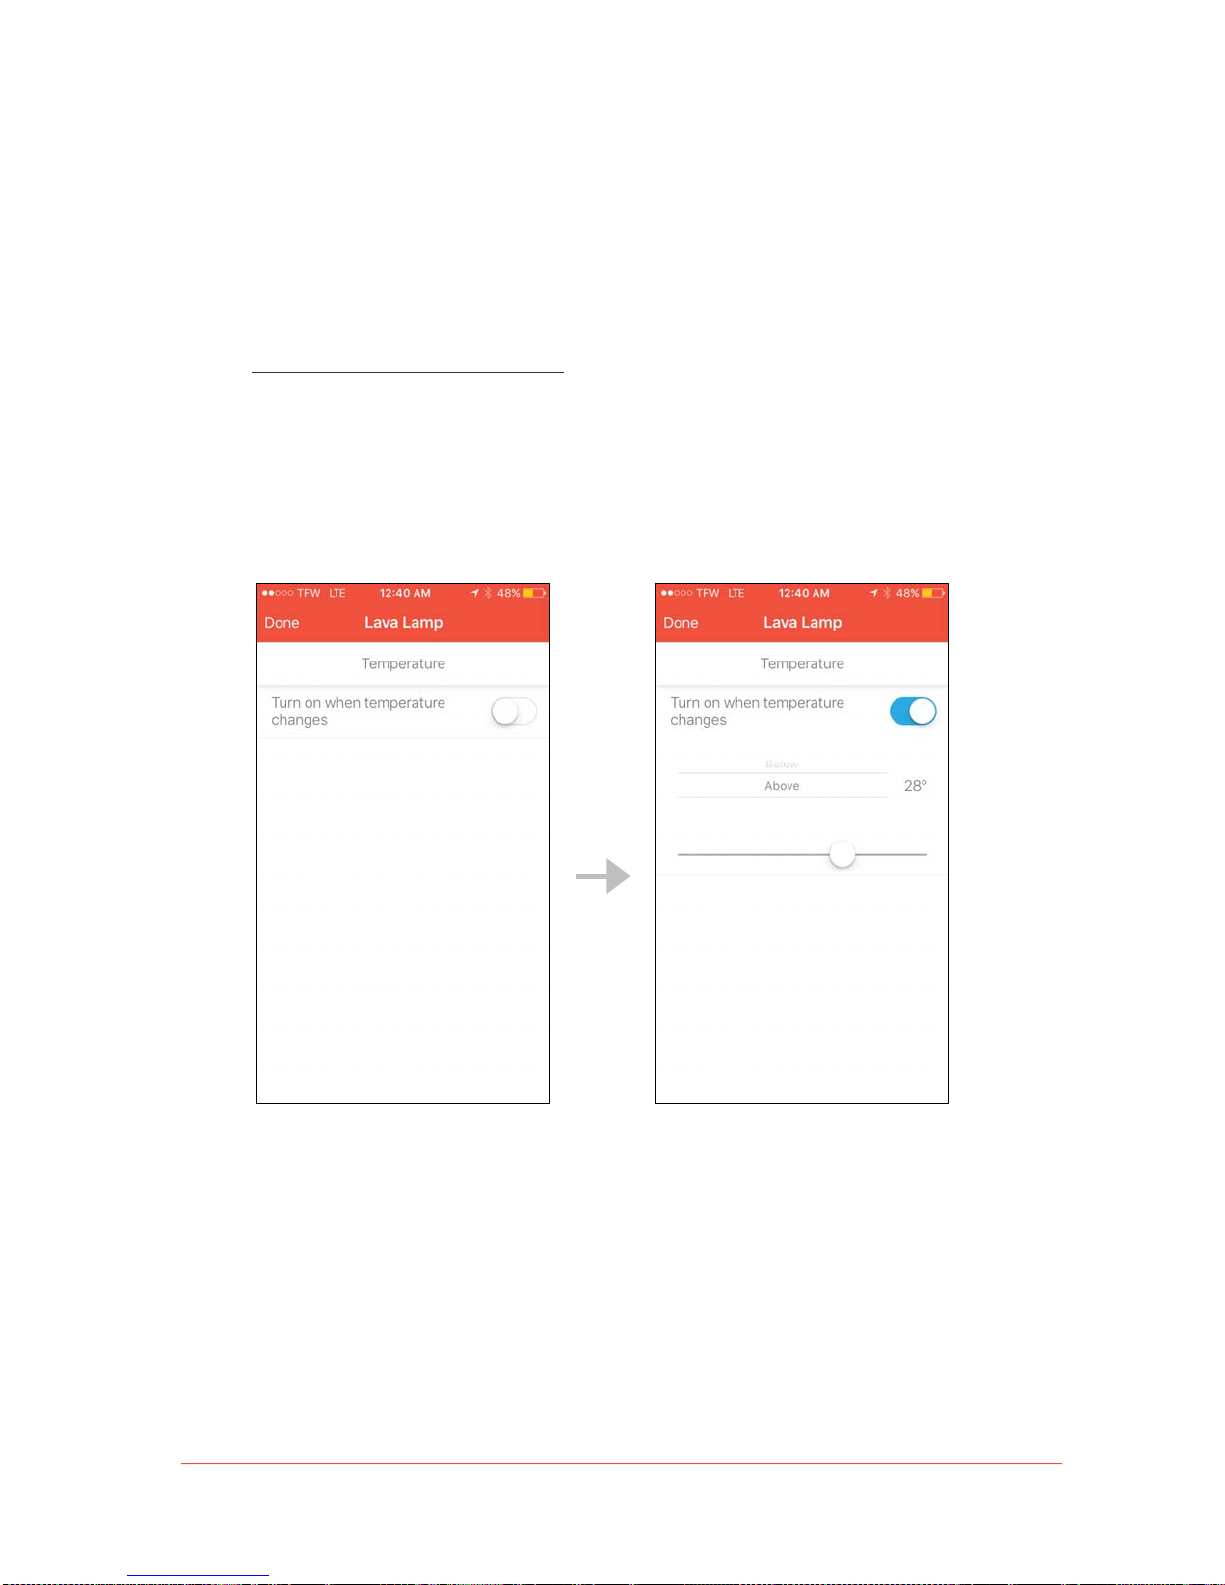
Temperature
A threshold temperature can be set for the automatic activation of either a space
heater or air conditioner that is plugged into the associated wireless accessory. The
appliance will be automatically turned off when the temperature goes back to being
above or below the threshold.
To set a Temperature automation:
1. Toggle the checkbox to turn on temperature automatio n ru le .
2. Choose whether your household appliance should activate when the room
temperature goes a b o v e o r fa lls b e lo w the temperature thres h o ld .
3. Set the threshold temperature.
Page 45
!
45
Piper User Manual
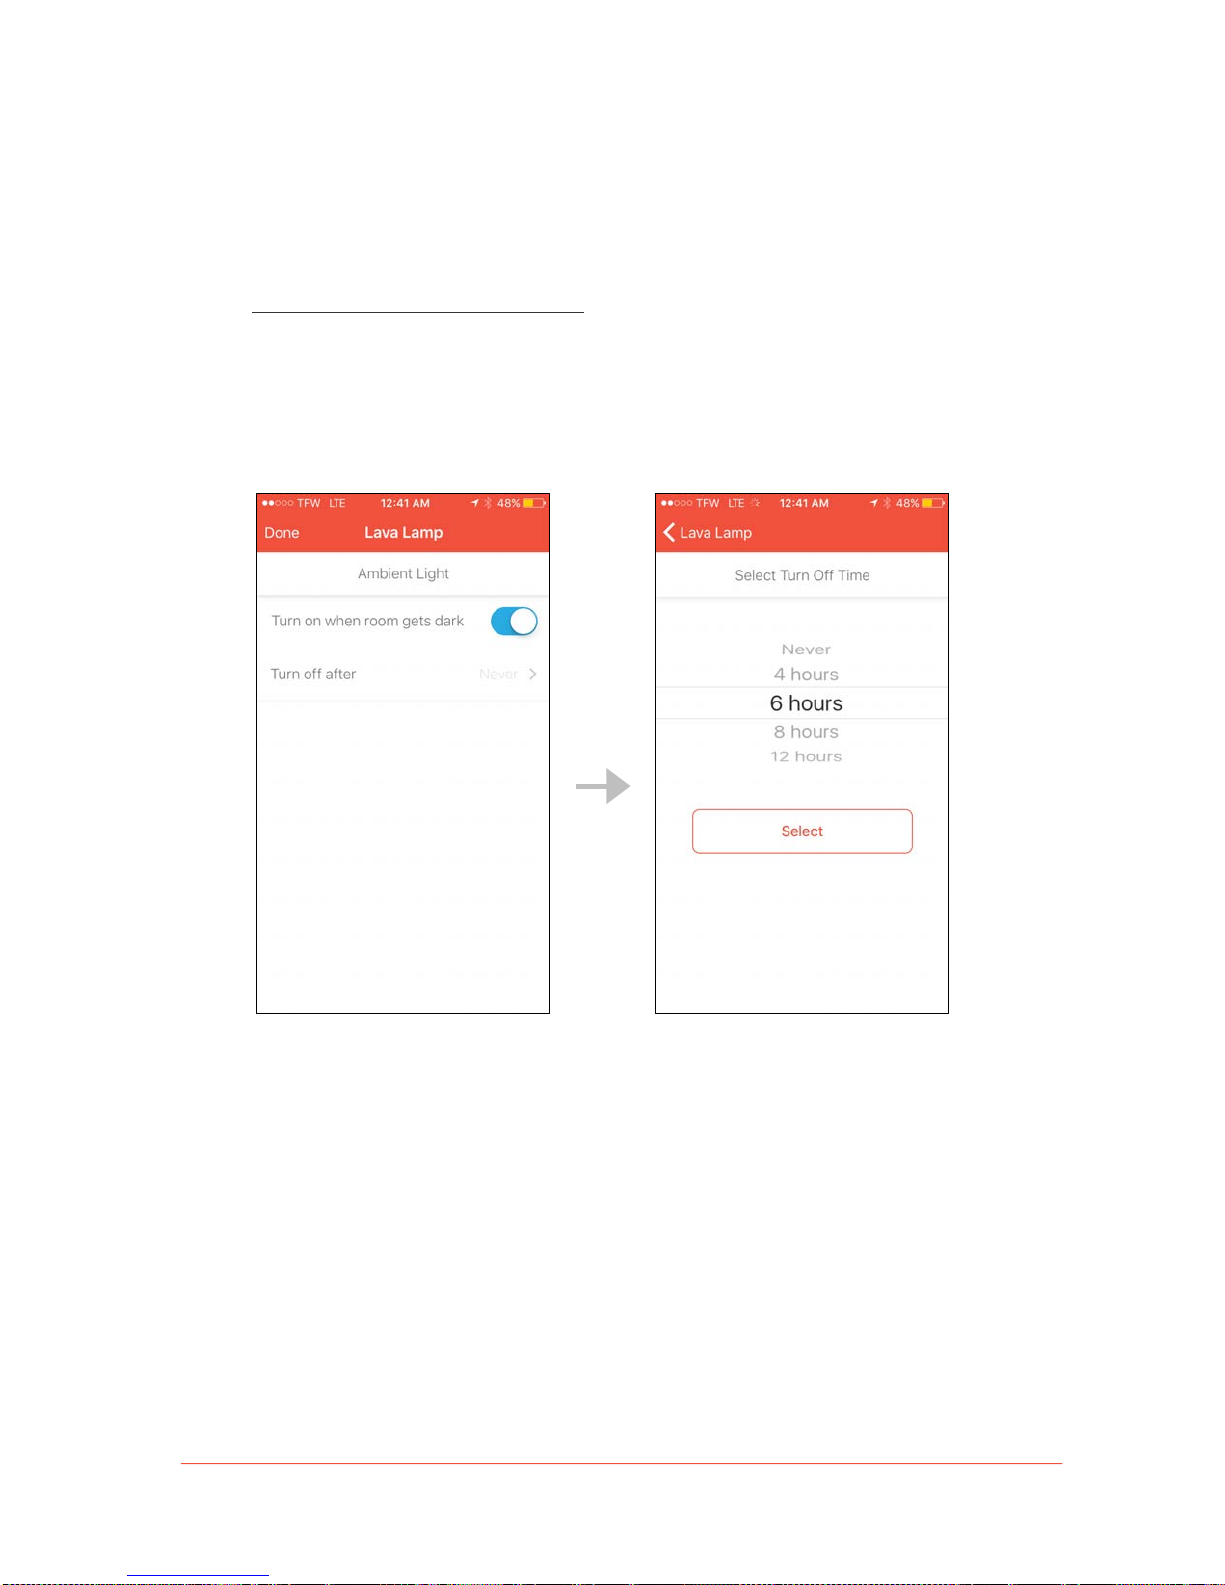
Ambient Light
This category turns a light or other appliance on automatically when Piper detects
that the ambient light ha s d e c re a s e d , a n d its e n v iro n ment is dark.
To set an Ambient Light automation:
1. Toggle the control on to enable the Ambient Light automation rule.
2. Enable “Turn off after” and tap on the desired number of hours to choose when the
connected appliance should be switched off.
Page 46
!
46
Piper User Manual
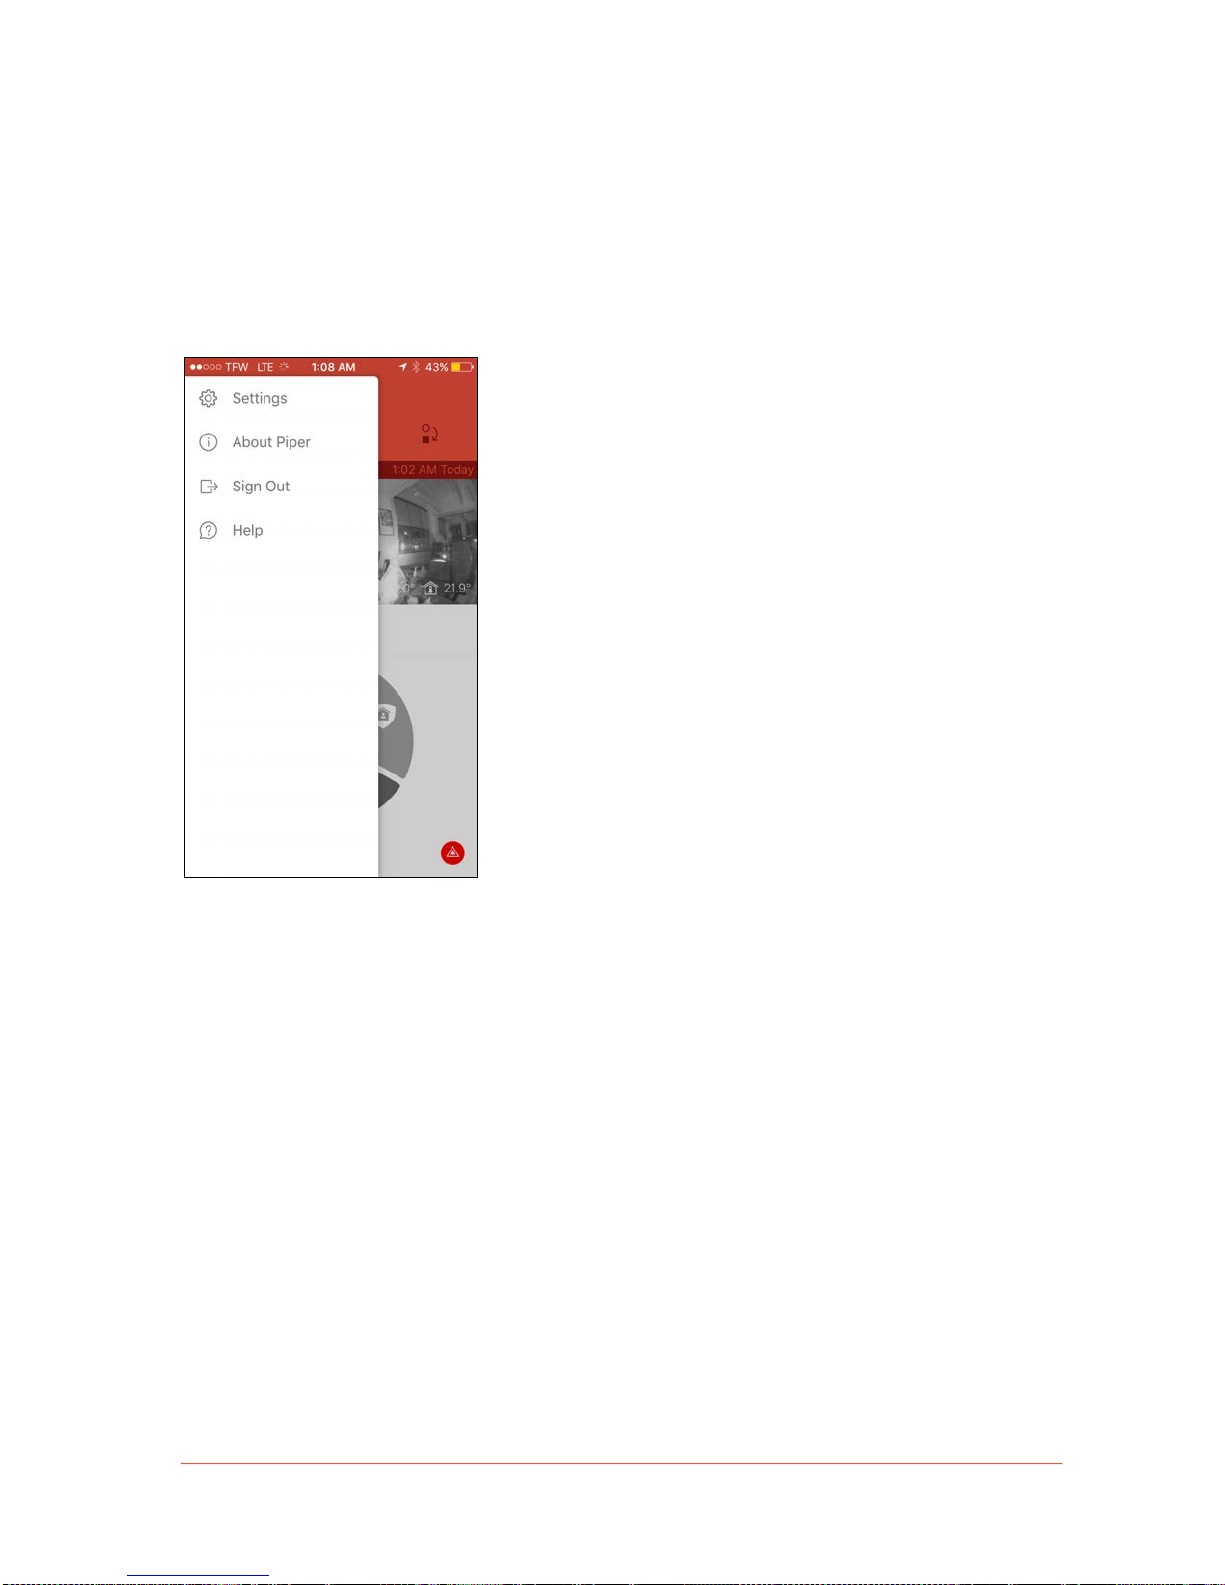
Settings
The App Menu icon is on the top left-hand corner of the Piper app. Tap on this icon to view a
list of options, including the Settings screen. From Settings, you can modify account
information, customize preferences, and enable ad ditional security fea tu r e s.
Page 47
!
47
Piper User Manual
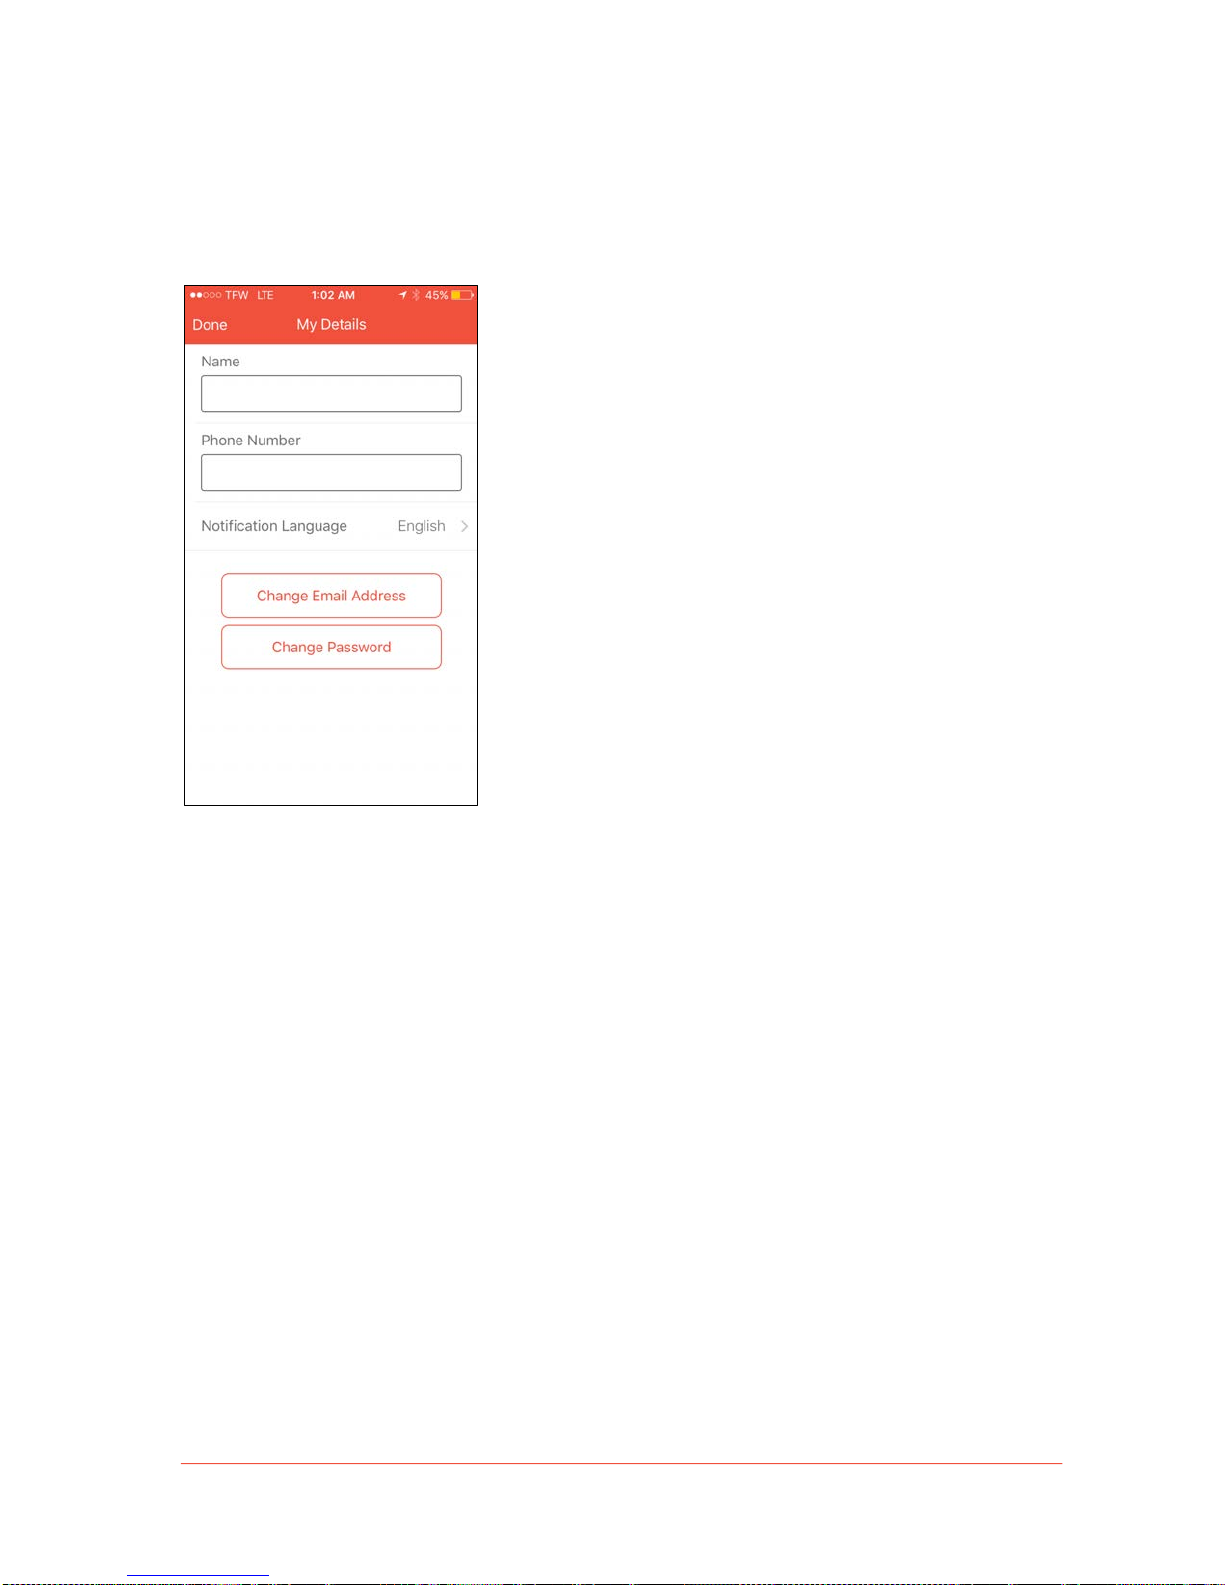
My Details
On this screen, you can update personal information, change your password, and change
the notification languag e .
Page 48
!
48
Piper User Manual
Piper Options
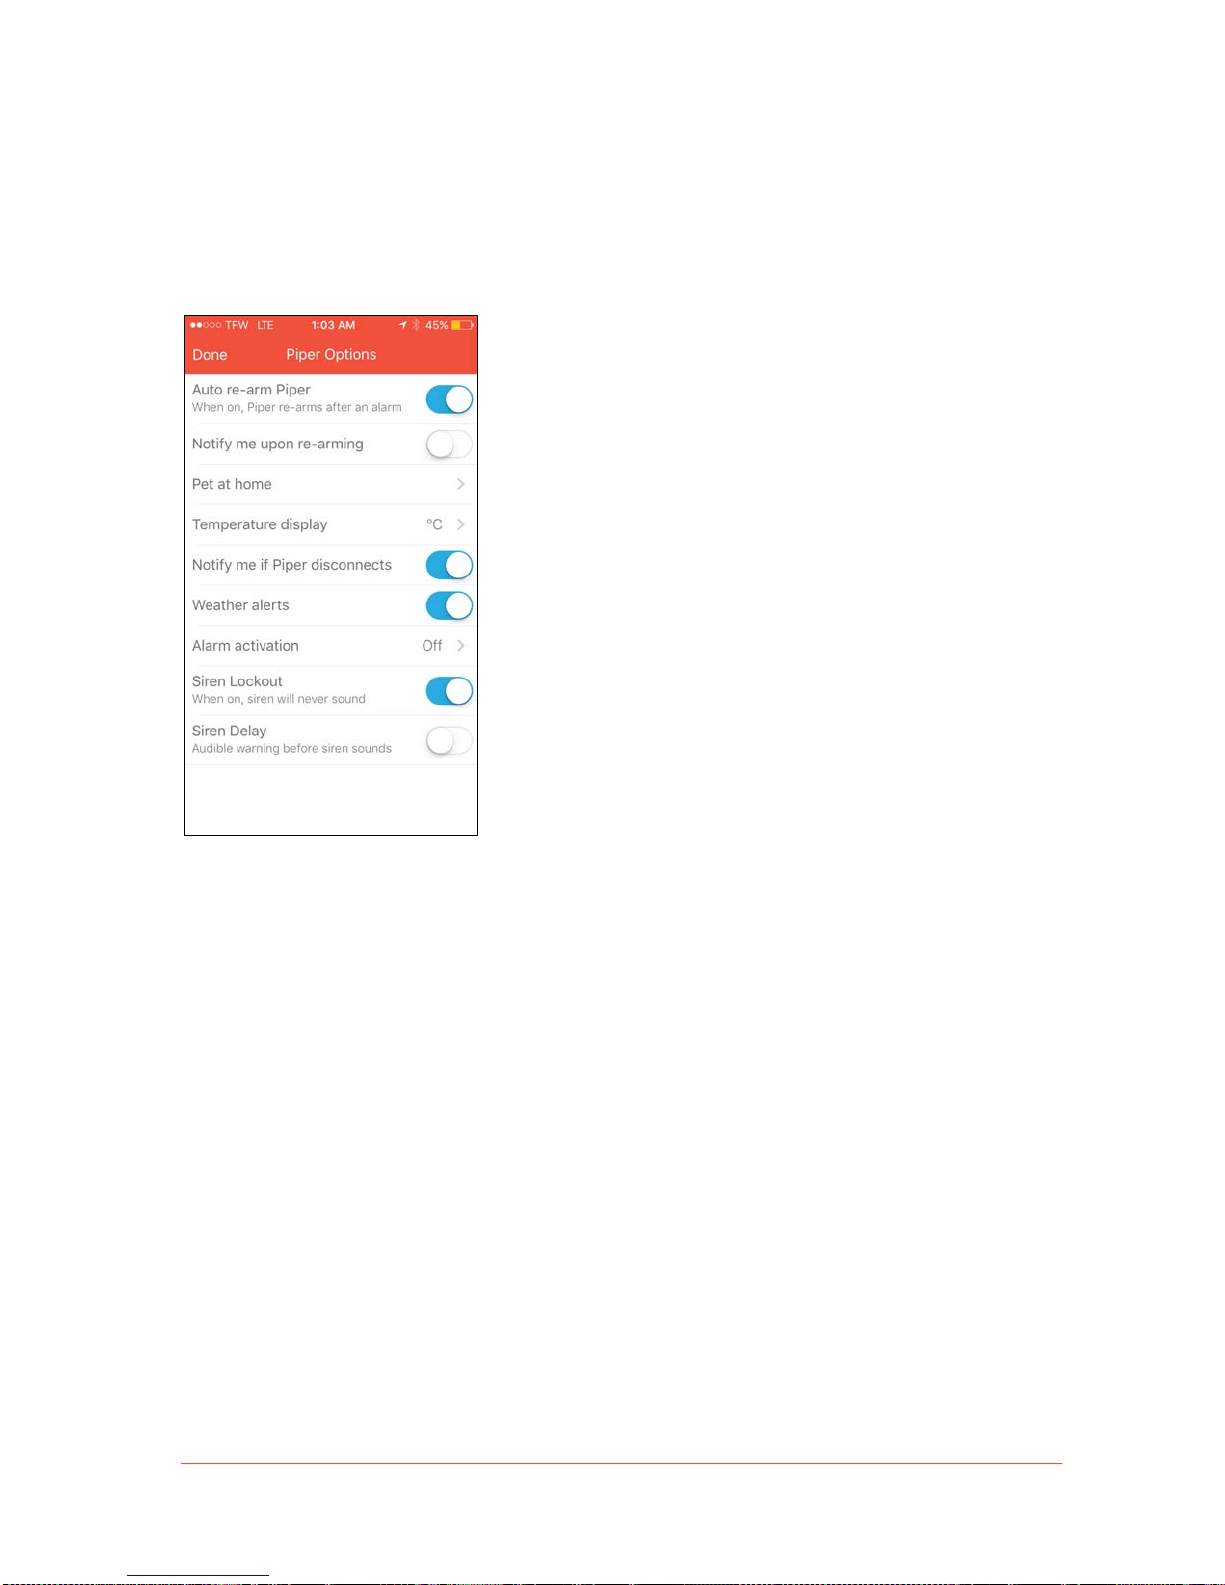
Various Piper settings can be adjusted, including the main Piper’s name, auto re-arming
options, motion sensor sensitivity for pets, temperature units, disconnection notifications,
siren settings, and weather alerts.
Note: Switches for settings appear blue when on/active, and grey when off/inactive.
• Auto re-arm Piper: By enabling this feature, Piper will automatically re-arm itself to
its prior armed m ode 5 minutes after an event is dete c ted.
• Automatic re-arming:
• Users will continue to receive notifications if security events are
detected once Piper has re-armed itself.
• To set this preference, go to Settings > Piper Options and select
“Auto re-arm Piper.”
Page 49
!
49
Piper User Manual
• Manual re-arming:
• If Piper is not automatica lly o r manually re-armed after a security rule is
triggered, you will not rec e iv e n o tifica tio n s when events are dete c te d .
• You can also manually re-arm Piper by opening the app and setting Piper
back to Armed Away or Armed Stay security mode.
• Auto re-arm Notifications:
• Users can be notified with a notification to their mobile device ( v ia a
push message) each time Piper automatically re-arms itself.
• Go to “Notify me upon re-arming” located beneath “Auto re-arm
Piper” to enable this notification on.
Note: The “Auto re-arm Piper” feature must be enabled before users can turn on notifications
for auto-rearming.
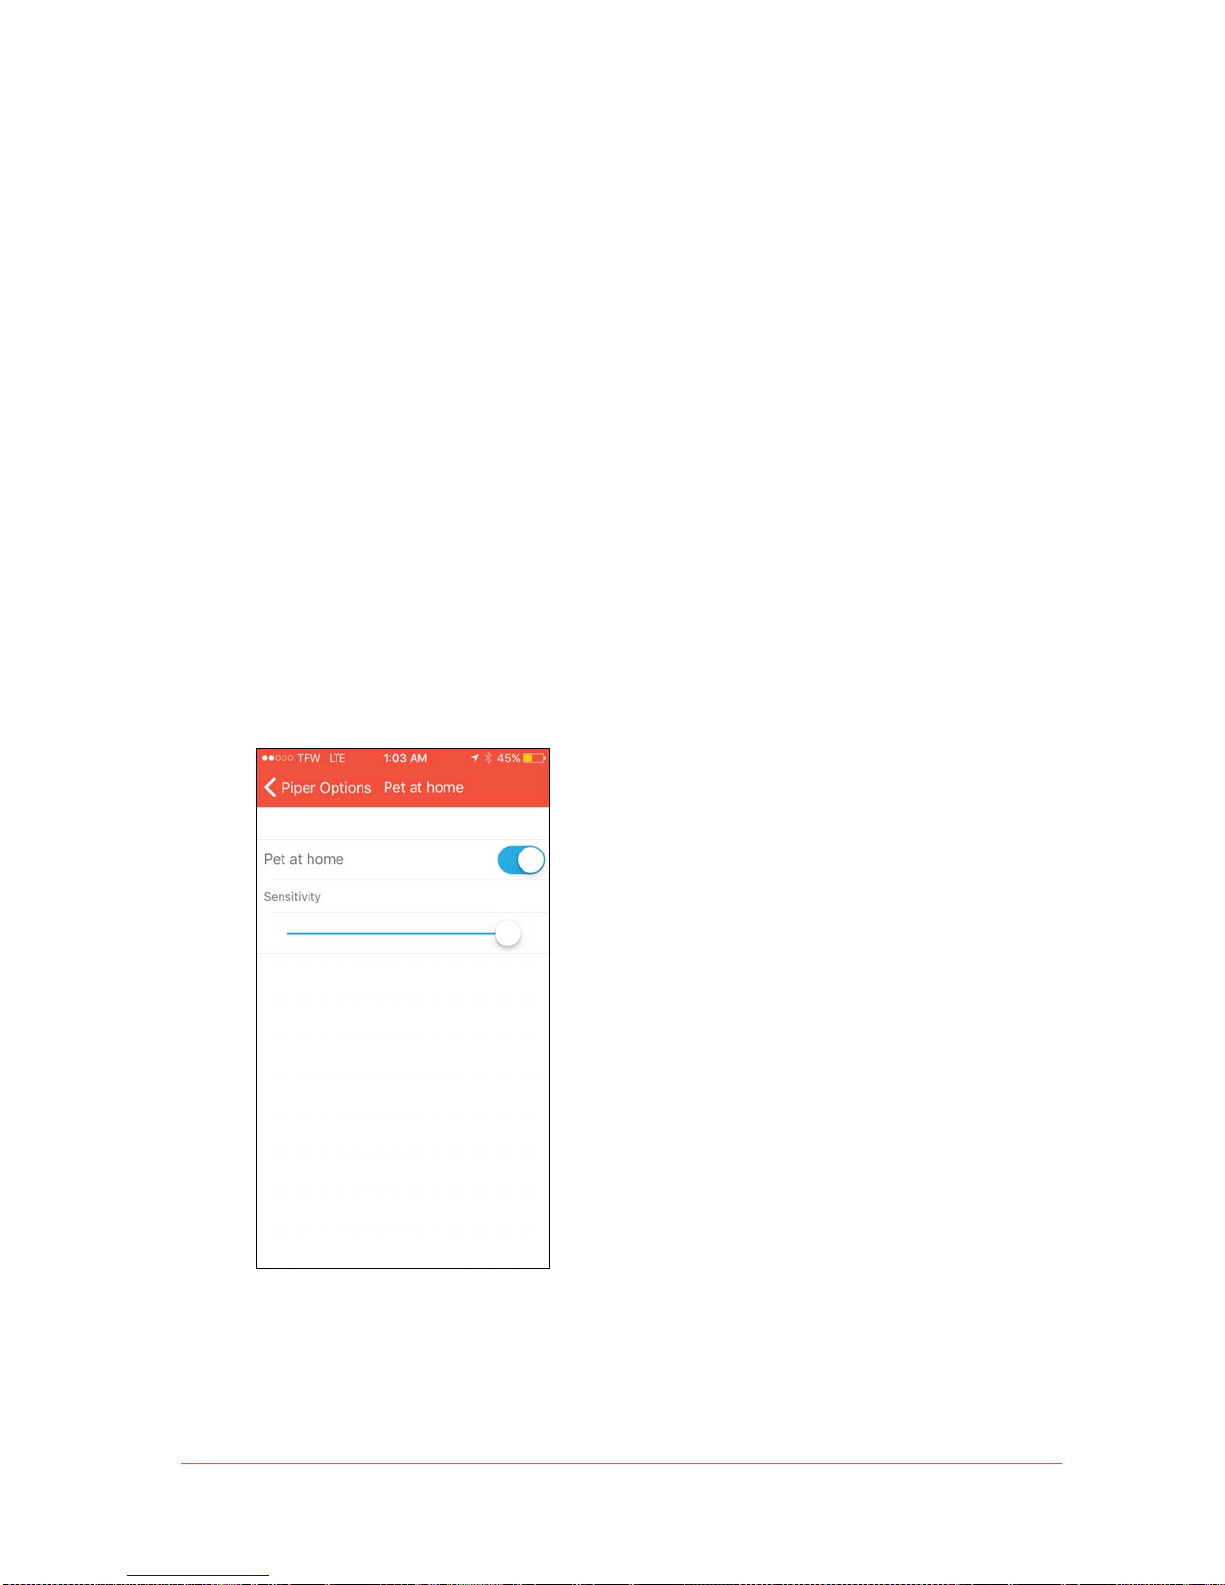
• Pet at Home: The motion sensor’s sensitivity can be adjusted to exclude pets based
on their size to avoid false triggers and unnecessary notifications.
Page 50
!
50
Piper User Manual
• Temperature Display: Choose between displaying the indoor and outdoor
temperature in Celsiu s o r F a h r e n h e it.
• Weather Alerts: Piper can notify you of any local weather alerts. In order to receive
these events, enable th is fe a tu re .
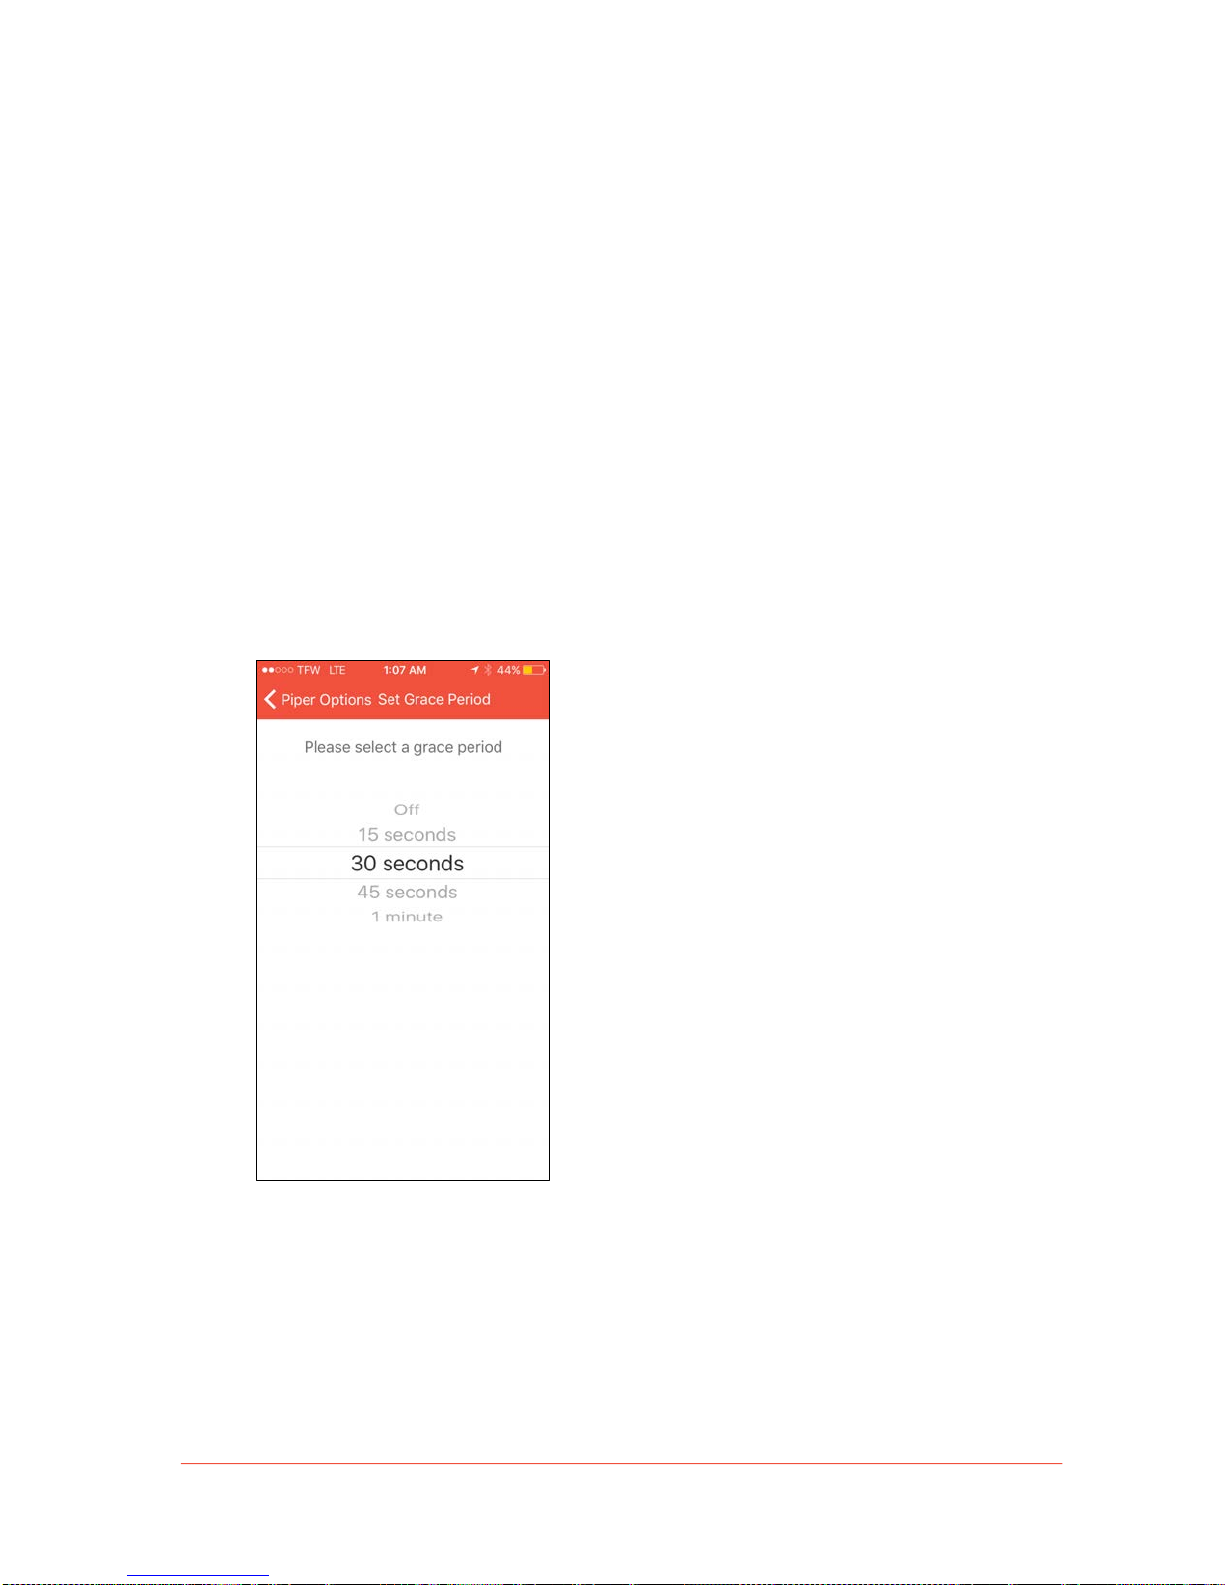
• Alarm Activation: When Piper is set to an armed mode, a sound will chime in
advance of activation to notify anyone close by. Once the chiming stops, Piper is
armed with security rules. You adjust the length of this grace period or disable it
completely.
• Siren Lockout: This setting ensures the siren is always off except when a ctivated via
the Panic Button (ava ila b le o n th e Dashboard).
• Siren Delay: An audible warning will chime 10 seconds before a siren sounds in
armed security modes to warn those close by.
Page 51
!
51
Piper User Manual
Trusted Circle
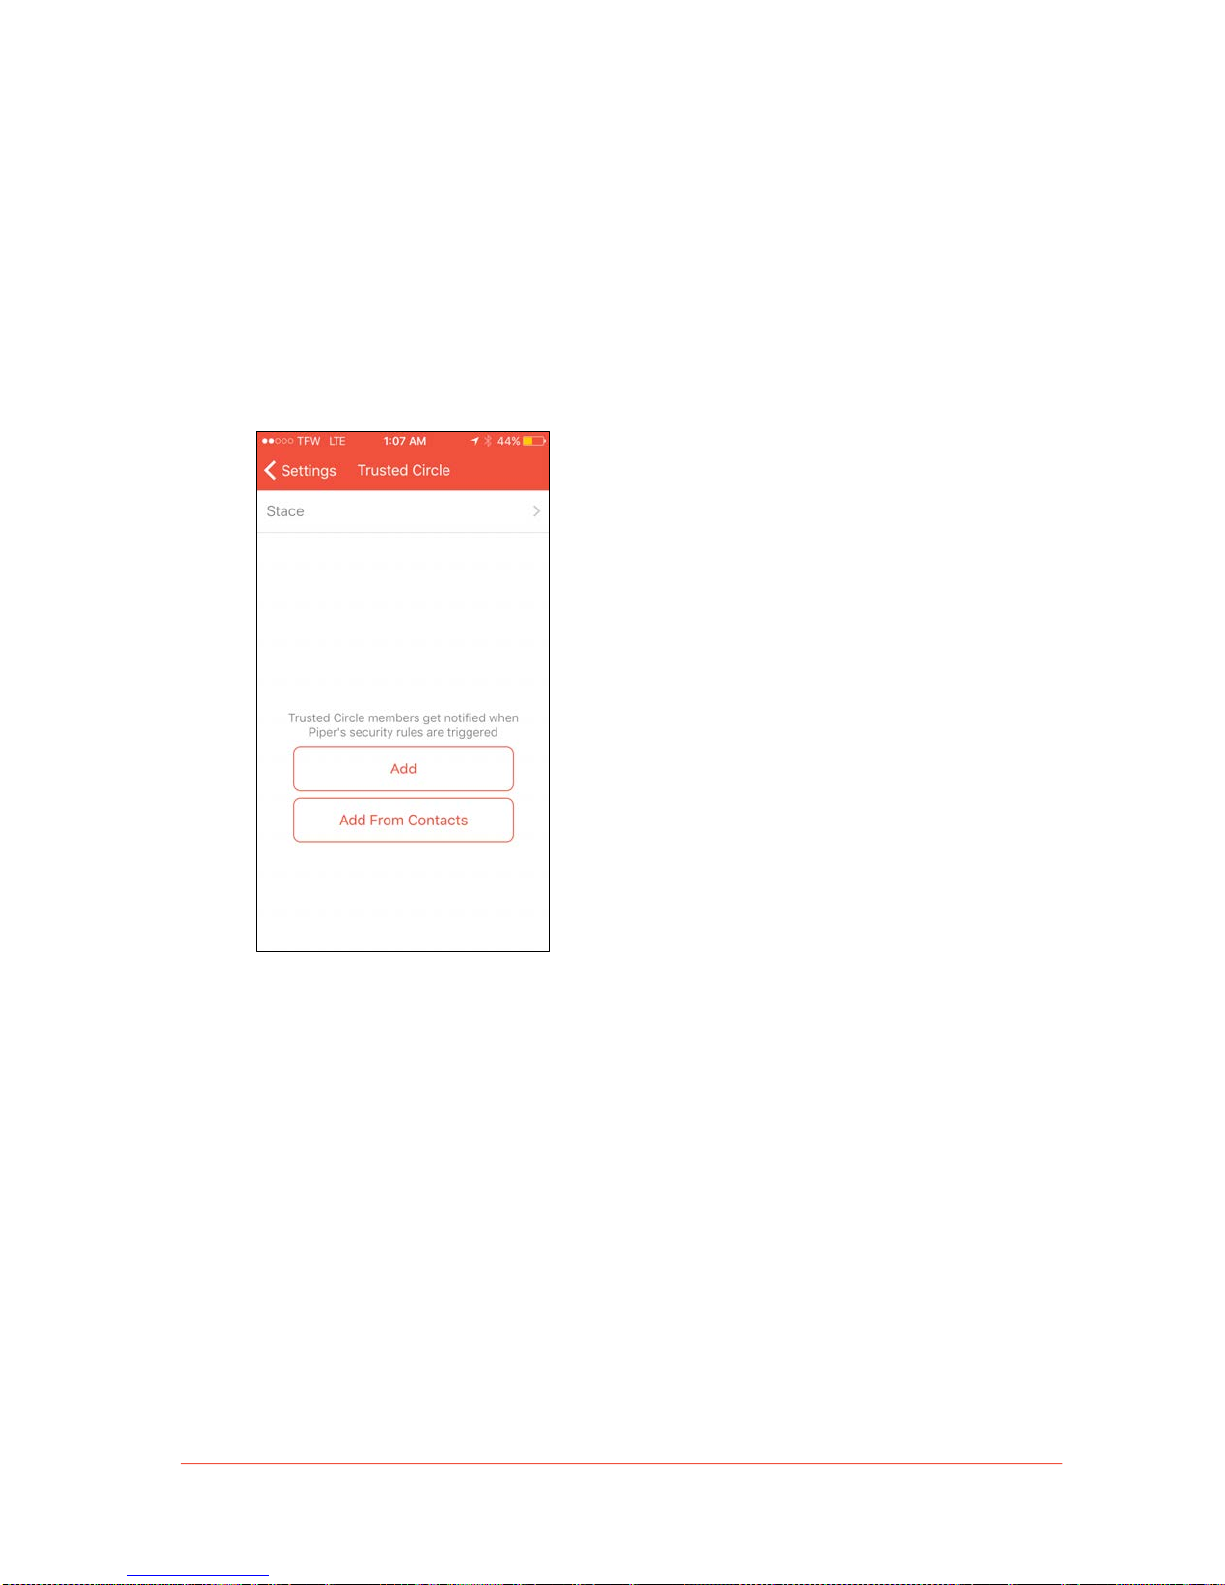
The Trusted Circle is comprised of individuals who will receive notifications if specific security
rules are triggered. In the Rules tab, us ers ca n cu sto m ize the a lerts th eir T rus ted C ircle
members receive.
• To manually add a Trusted Circle member, tap “Add.” Fill out the form with the new
contact’s information and choose how Piper should notify this person. Tap “Save” in
the upper-right corner to ad d th is co n tac t to yo u r Tru ste d C ircle.
• To add a Trusted Circle member from your device’s address book, tap on the “Add
from Contacts” button to view a list. Select the person you’d like to add to your
Trusted Circle, and choose how the member will receive notifications. Finish by
saving the entry.
Note: A maximum of four contacts can be added to your Trusted Circle.
Page 52
!
52
Piper User Manual
“Notify Trusted Circle” Security Rule
With “Notify Trusted Circle” enabled as a security rule action, the members in your Trusted
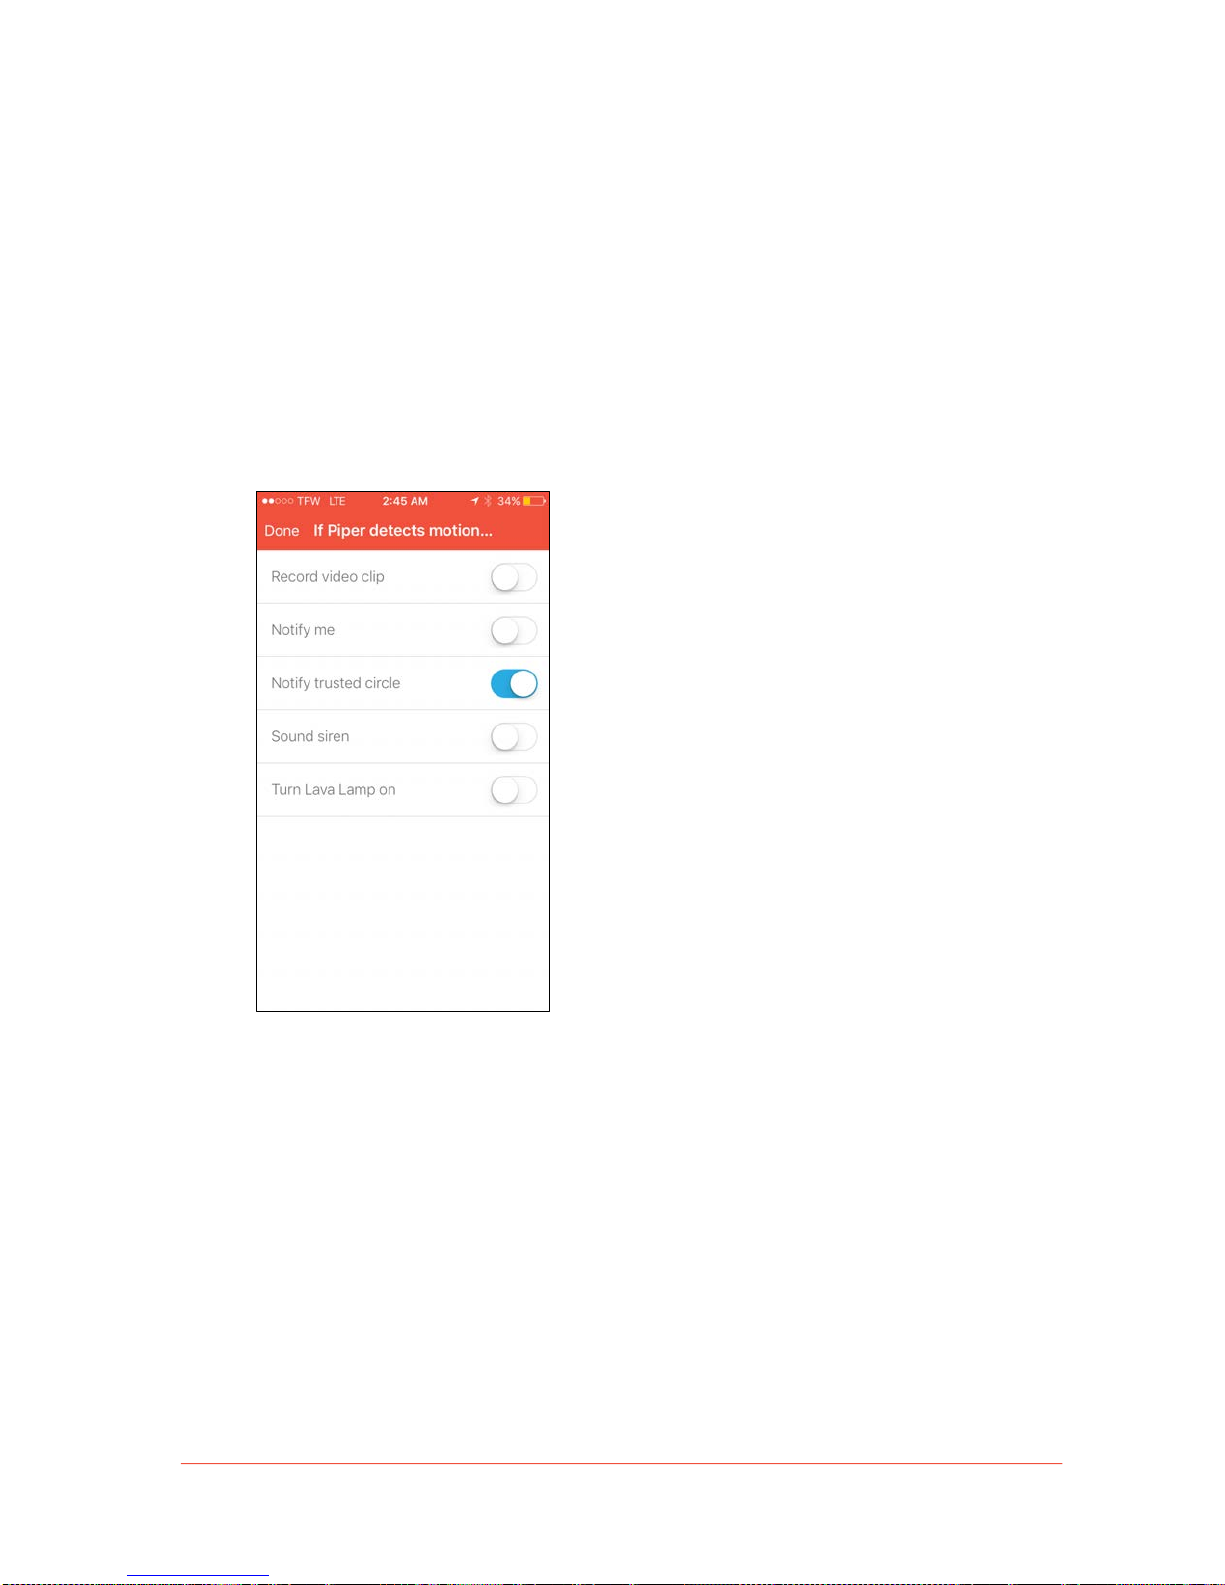
Circle will receive a notification whenever a configured security event is triggered.
To set “Notify Trusted Circle” as a security rule, follow these steps:
1. Go to the Rules tab and select a security mode.
2. Choose an event. This will bring up a list of applicable security rules.
3. Toggle on the “Notify trusted circle” rule.
Page 53

!
53
Piper User Manual
Wireless Accessories
The Wireless Accessories screen allows you to connect new wireless accessories, remove
existing ones, and shop for more. Controls for your existing accessories (e.g. turn on/off)
may be found in the Wireless Accessory Drawer on the Dashboard. To learn more about
wireless accessories, including setup instructions, removal, and where to purchase new
accessories, please refer to the Wireless Accessories section.
Video Settings
Piper can adjust the bandwidth utilization of live video based on settings applicable to your
mobile device’s connection (Wi-Fi or 3G/LTE). Setting the video’s quality alters how much
bandwidth is needed to stream live video. Drag the handle on the slider to the left to
decrease the video quality. Drag it to the right to increase the quality.
Multi Piper Management
Instructions for the set up o f a d d itio n a l P ip e rs o n th e same network can b e fo u n d in
the Multiple Pipers section.
Smart Arming with Life360 (Beta)
Smart Arming is a security feature available to all Piper users. To learn more about this
feature, along with set-up instructions, please refer to the Smart Arming section.
!
!
!
Page 54

!
54
Piper User Manual
Features
!
Wireless Accessories
What are Wireless Accessories?
Wireless accessories inform you of change s in your home by way of sensors and let you
control the state of your household appliances remotely. Piper also lets you set an
automation schedule or turn your appliances on or off based on temperature or ambient light
levels in your home.
What is Z-Wave?
Similar to Wi-Fi and Bluetooth, Z-Wave is a form of wireless communication used in home
automation devices. Piper uses Z-Wave to talk to various wireless accessories.
Purchasing Wireless Accessories
To view a list of accessories that Piper currently supports, visit our website at getpiper.com.
Wireless accessories that are compatible with Piper may be found on our website under
Support. Wireless accessories are available for purchase directly through our online store
at store.getpiper.com. You can also open the mobile version of our on lin e s to re fro m the
Piper app. This can be accessed under Settings > Wireless Accessories. Tapping ‘Shop’ on
this screen takes you to o u r s to re o n y o ur mobile device.
Wireless accessories can also be purchased through the retailer and in select electronic
stores.
Note: Piper is compatible with most On/Off (Open/Close) wireless accessories with Z-Wave
technology designe d fo r y o u r region.
Updates
Piper continues to expand the range of home automation accessories it supports. You can
stay informed by signing up for updates online at getpiper.com/contact-us.
Page 55

!
55
Piper User Manual
Adding Wireless Accessories
Adding wireless accessories is done by "inclusion" process, informing the Z-Wave enabled
wireless accessory in question to be included to your Piper system at home. To add a
wireless accessory to Piper, follow these step s :
1. Open the App Menu and go to Settings > Wireless Accessories.
2. Select “Add.”
3. Tap “Start.”
4. Wait for the prompt before pressing the button on the wireless accessory you
wish to add.
5. Press and release the button on the wireless accessory for one second. Do not
hold it down. Refer to the wireless accessory’s manual for more detailed
instructions on how to connect it to a Z-Wave controller such as Piper.
6. Wait for Piper to connect and finish by giving your wireless accessory an
identifying name .
Once the accessory has been successfully added to your Piper system, it will appear in the
Wireless Accessory Drawer, available on the Dashboard. You can customize security rules
or automation rules based on the type of wireless accessory. To learn how to set up rules
using wireless accessories, refer to the Rules section.
Note: To connect additional wireless accessories to Piper, repeat the steps outlined above.
Removing Wireless Accessories
Removing wireless accessories is done by "exclusion" process, informing the Z-Wave
enabled wireless accessory in question to be excluded from your Piper system at home. To
remove wireless accessorie s from Piper, follow these steps:
1. Open the App Menu and go to Settings > Wireless Accessories.
2. Select “Remove.”
3. Tap “Start.”
4. Wait for the prompt before pressing the button on the accessory you wish to remove.
5. Press and release the button on the wireless accessory for one second. Do not hold
it down. Refer to t h e wireless access o r y ’s manual for more detailed instructions on
how to remove it from a Z-Wave controller such as Piper.
6. For increased accuracy, we recommend completing the removal process with your
mobile device in close proximity to the wireless accessory you wish to remove.
7. The wireless accessory should now be removed from the Piper system and will no
longer appear in the app.
Page 56

!
56
Piper User Manual
Smart Arming with Life360 (Beta)
What is Life360?
Life360 is a mobile app that uses geo-location technology to detect where you and your
family members are . As Piper strives to provid e n e w ways to protect your h o me, we are
pleased to collaborate with Life360 to introduce Smart Arming.
What is Smart Arming?
Smart Arming with Life360 notifies you when the last family member has left the house.
When your home is empty, you can keep it secure by setting your Piper to Armed Away
Mode. By tapping on the Smart Arming notification, you can automatically set Piper back to
Armed Away Mode and enable the corresponding security rules.
On iOS, swiping the Smart Arming notification will reveal a button to quickly arm your Piper.
On Android, the re-arm button will appear in the Smart Arming notification itself.
Smart Arming Setup
To enable Smart Arming, follow these steps:
1. Download the free Life360 app and cre a te a n a c c o u n t. Personalize by inviting family
members and adding locations, including Piper’s home address. Invited members will
receive a text message with a link to cre a te a Life3 6 0 a cc o un t.
2. Login to your Life360 account from the Piper app by going to the App Menu, and
selecting Settings > Smart Arming with Life360 (Beta)
3. Select the address where your Piper is located (typically your home address) from
your list of places and the corresponding family circle and then tap “Save."
4. Finish by tapping “Enable Smart Arming.”
Note: All members of a circle must enable the location setting on their mobile device for
Smart Arming to work. Additionally, there must already be a rule set for Armed Away mode
to enable Smart Arming.
! !
Page 57

!
57
Piper User Manual
Icons
!
Dashboard and Main Navigation
Dashboard tab
Rules tab
Events tab
App menu
Settings
About Piper
Sign out
Help
Armed Away mode
Armed Stay mode
Disarmed mode
Piper is offline
Activity in armed modes
Siren activated
Panic button
Deactivate siren
Wireless Accessory
!
!
Video!
Microphone
Single view
Quad view
Night vision
Play video
Pause video
Close video
Brightness
!
!
Page 58

!
58
Piper User Manual
Events
Timelines
Video clips
Download
Notification badge
Context menu
Mark as read
Delete
Home vitals
Rules
Armed Away mode
Armed Stay mode
Notifications
Automations
Security Events and Wireless Accessories
Motion
Loud sound
Temperature change
Smoke
Water
Door/window sensor
Generic sensor
Announcement
System event
Switch
Dimmer
Dimmable light bulb
Low battery
Dead battery
!
Page 59

!
59
Piper User Manual
Weather
Outdoor temperature
Indoor temperature
Clear day
Clear night
Partly cloudy day
Partly cloudy night
Cloudy
Sleet
Rain
Snow
Fog
Wind
!
!
 Loading...