

PIONEER DJ TORAIZ AS-1 Operating Instructions Manual

English
Analog Synthesizer
Synthétiseur
TORAIZ AS-1
analogique
Analogsynthesizer
TAS-1
Sintetizzatore
analogico
Analoge synthesizer
Sintetizador
analógico
Sintetizador
analógico
Аналоговый
синтезатор
http://pioneerdj.com/support/
The Pioneer DJ site shown above offers FAQs, information on software, and various other types of information
and services to allow you to use your product in greater comfort.
Le site Pioneer DJ indiqué ci-dessus propose une FAQ, des informations sur le logiciel et divers types
d’informations et de services qui permettent une utilisation plus confortable de ce produit.
Die oben angegebene Pioneer DJ-Website enthält häufig gestellte Fragen, Informationen über Software und
andere wichtige Informationen und Dienste, die Ihnen helfen, Ihr Produkt optimal zu verwenden.
Il sito Pioneer DJ indicato qui sopra offre una sezione FAQ, informazioni sul software ed informazioni e servizi
di vario tipo, per permettere un uso più confortevole dei nostri prodotti.
Op bovengenoemde Pioneer DJ website vindt u FAQ's, informatie over software, en andere informatie en
diensten voor nog meer gebruiksgemak van uw product.
El sitio de asistencia Pioneer DJ mostrado arriba ofrece las preguntas frecuentes, información del software y
varios otros tipos de información y servicios que le permitirán usar su producto con mayor confort.
O site de suporte da Pioneer DJ mostrado acima oferece FAQs, informações sobre o software e outros tipos
de informações e serviços para permitir utilizar o produto com um maior conforto.
На указанном выше сайте поддержки Pioneer DJ содержатся раздел часто задаваемых вопросов,
информация по программному обеспечению, а также различные другие типы информации и услуг,
позволяющие использовать ваше изделие более лучшим образом.
Français Deutsch
Italiano Nederlands Español Português
Русский
Operating Instructions (Quick Start Guide)
Mode d’emploi (Guide de démarrage rapide)
Bedienungsanleitung (Kurzanleitung)
Istruzioni per l’uso (Guida di avvio veloce)
Handleiding (Snelstartgids)
Manual de instrucciones (Guía de inicio rápido)
Manual de instruções (Guia de início rápido)
Инструкции по эксплуатации (Краткое руководство пользователя)
Thank you for buying this Pioneer DJ product. Please read through these operating instructions so you will know how to operate your model properly.
CAUTION
After you have finished reading the instructions, put them away in a safe place for future reference.
In some countries or regions, the shape of the power plug and power outlet may sometimes differ from that shown in the explanatory drawings.
However the method of connecting and operating the unit is the same.
TO PREVENT THE RISK OF ELECTRIC SHOCK, DO NOT
REMOVE COVER (OR BACK). NO USER-SERVICEABLE
PARTS INSIDE. REFER SERVICING TO QUALIFIED
SERVICE PERSONNEL.
D3-4-2-1-1_B1_En
WARNING
This equipment is not waterproof. To prevent a fire or
shock hazard, do not place any container filled with
liquid near this equipment (such as a vase or flower
pot) or expose it to dripping, splashing, rain or
moisture.
D3-4-2-1-3_A1_En
WARNING
To prevent a fire hazard, do not place any naked flame
sources (such as a lighted candle) on the equipment.
D3-4-2-1-7a_A1_En
Operating Environment
Operating environment temperature and humidity:
+5 °C to +35 °C (+41 °F to +95 °F); less than 85 %RH
(cooling vents not blocked)
Do not install this unit in a poorly ventilated area, or in
locations exposed to high humidity or direct sunlight (or
strong artificial light).
D3-4-2-1-7c*_A2_En
CAUTION
This product is evaluated in moderate and tropical
climate condition.
D3-8-2-1-7a_A1_En
VENTILATION CAUTION
When installing this unit, make sure to leave space
around the unit for ventilation to improve heat radiation
(at least 5 cm at rear, and 3 cm at each side).
D3-4-2-1-7d*_A1_En
CAUTION
The switch on this unit will not completely shut off
all power from the AC outlet. Since the power cord
serves as the main disconnect device for the unit,
you will need to unplug it from the AC outlet to shut
down all power. Therefore, make sure the unit has
been installed so that the power cord can be easily
unplugged from the AC outlet in case of an accident.
To avoid fire hazard, the power cord should also be
unplugged from the AC outlet when left unused for a
long period of time (for example, when on vacation).
D3-4-2-2-2a*_A1_En
When using this product, confirm the safety
information shown on the bottom of the unit.
D3-4-2-2-4_B1_En
WARNING
Store small parts out of the reach of children and
infants. If accidentally swallowed, contact a doctor
immediately.
D41-6-4_A1_En
POWER-CORD CAUTION
Handle the power cord by the plug. Do not pull out the
plug by tugging the cord and never touch the power
cord when your hands are wet as this could cause a
short circuit or electric shock. Do not place the unit, a
piece of furniture, etc., on the power cord, or pinch the
cord. Never make a knot in the cord or tie it with other
cords. The power cords should be routed such that they
are not likely to be stepped on. A damaged power cord
can cause a fire or give you an electrical shock. Check
the power cord once in a while. When you find it
damaged, ask your nearest service center or your
dealer for a replacement.
S002*_A1_En
The graphical symbol placed on the product
means alternating current.
The graphical symbol placed on the product
means direct current.
The graphical symbol placed on the product
means Class II equipment.
D3-8-2-4_A1_En
If you want to dispose this product, do not mix it with general household waste. There is a separate collection system for used
electronic products in accordance with legislation that requires proper treatment, recovery and recycling.
Private households in the member states of the EU, in Switzerland and Norway may return their used electronic products free of charge to
designated collection facilities or to a retailer (if you purchase a similar new one).
For countries not mentioned above, please contact your local authorities for the correct method of disposal.
By doing so you will ensure that your disposed product undergoes the necessary treatment, recovery and recycling and thus prevent potential
negative effects on the environment and human health.
En
2
K058b_A1_En

Contents
How to read this manual
Thank you for buying this Pioneer DJ product.
Be sure to read this manual and the Operating Instructions available on
the Pioneer DJ site. Both documents include important information that
you should understand before using this product.
In particular, be sure to read “IMPORTANT SAFETY INSTRUCTIONS.”
! In this manual, the names of buttons, controls and terminals
indicated on the product, and program options appearing on the
unit display, etc., are indicated within square brackets ([ ]). (e.g.
[GLOBAL] button, [PHONES] terminal, [OSCILLATOR 1])
! Please note that the screens and specifications of the software
described in this manual as well as the external appearance and
specifications of the hardware are currently under development and
may differ from the final specifications.
! Please note that depending on the operating system version, web
browser settings, etc., operation may differ from the procedures
described in this manual.
This manual provides brief descriptions regarding the names of the parts
of the unit, the connections between the unit and peripherals, and basic
operations.
For more detailed instructions on using the unit, see the Operating
Instructions for this unit.
! To learn how to obtain the Operating Instructions for this unit, see
Viewing the Operating Instructions on page 5.
Before starting
Features ........................................................................................................ 5
What’s in the box ......................................................................................... 5
Viewing the Operating Instructions ........................................................... 5
Part names
Control panel ................................................................................................ 6
Rear Panel .................................................................................................... 7
Connections
Connecting inputs and outputs ................................................................. 8
Operation
Choosing and playing a program ............................................................... 9
Editing a program ........................................................................................ 9
Saving an edited program ........................................................................... 9
Initializing a program to create a sound from scratch ........................... 10
Additional information
Troubleshooting ......................................................................................... 11
Changing the settings ............................................................................... 11
Precautions regarding our repair services ..............................................11
About trademarks and registered trademarks ....................................... 11
Specifications.............................................................................................11
En
3

A message from Dave Smith
En
4

Before starting
English
Features
The TORAIZ AS-1 is a fully programmable monophonic analog
synthesizer that features discrete analog filters based on the acclaimed
Prophet-6 polyphonic synthesizer designed by Dave Smith Instruments
LLC. Its built-in 64-step sequencer and extensive library of preset sounds
make it an inspiring and expressive musical tool. And its easy-to-use
control panel packs a tremendous amount of sound-creation power and
versatility into a compact, robust metal chassis that is equally suited to
studio or stage.
What’s in the box
! AC adaptor
! Power cord
! Operating Instructions (This Quick Start Guide)
Viewing the Operating Instructions
Various instructions are sometimes provided as files in the
PDF-format.
Adobe® Reader® must be installed in order to view PDF-format files.
1 Launch a web browser on your computer and
access the Pioneer DJ site below.
http://www.pioneerdj.com/
2 Click [Support].
3 Click [FIND TUTORIALS & MANUALS].
4 Click [TORAIZ AS-1] in the [PRODUCTION] category.
5 Click on the desired language from the list.
En
5

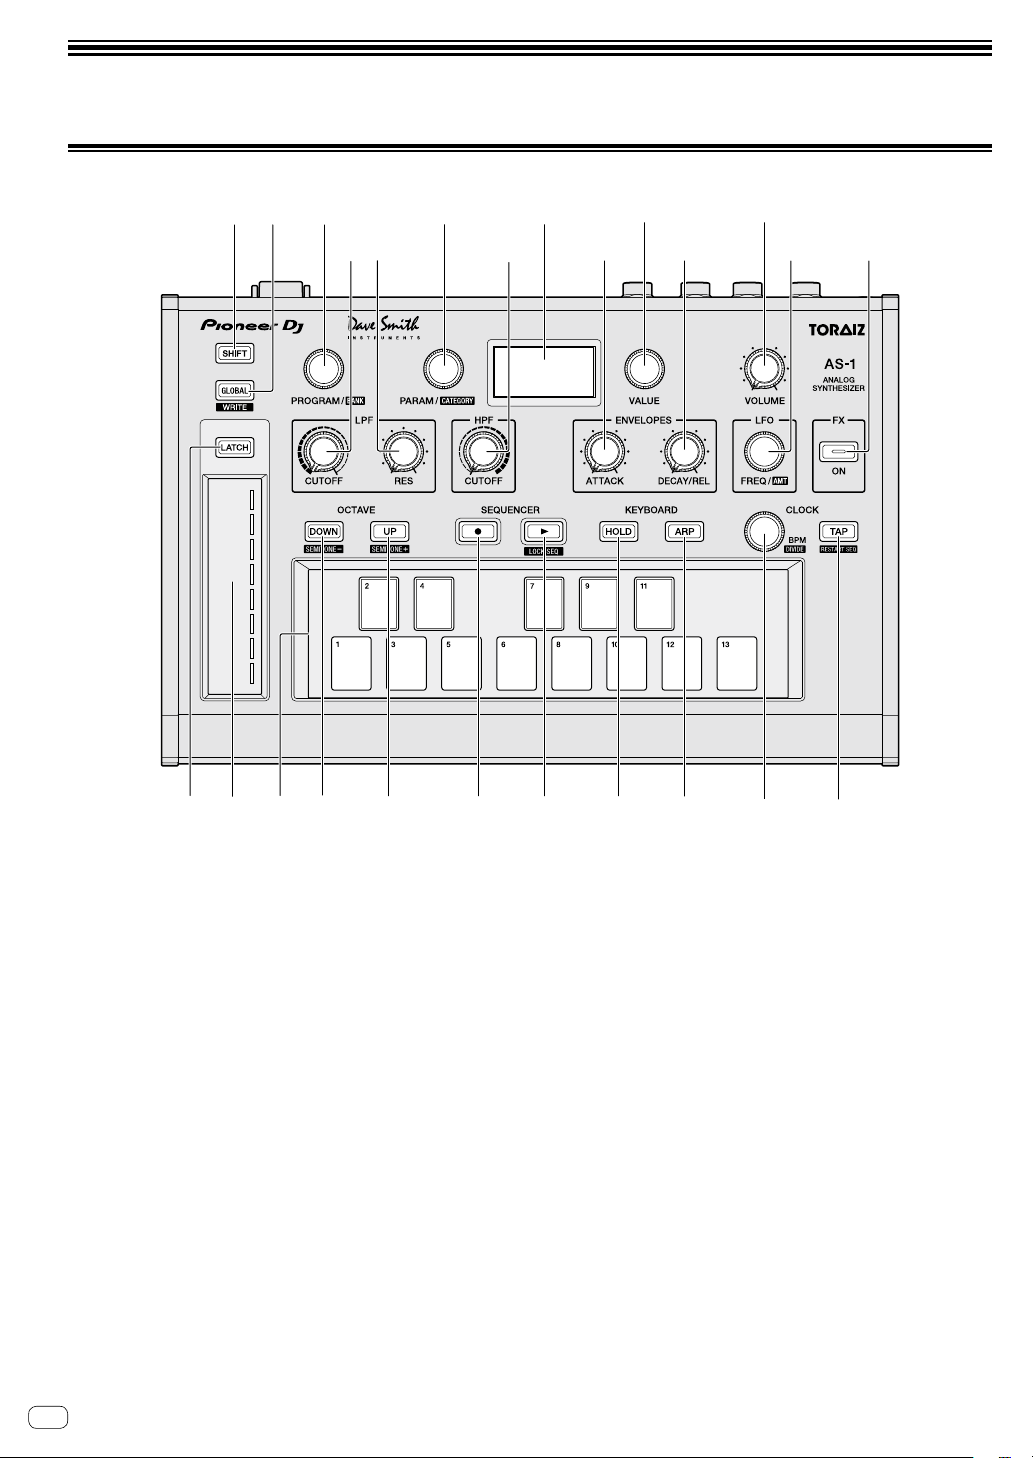
Part names
Control panel
1
2
3
8
9
4 5
a b c
6 7
d
e
i
h
g
f
1 SHIFT button
2 GLOBAL button
3 PROGRAM/BANK control
4 PARAM/CATEGORY control
5 Display
6 VALUE control
7 VOLUME control
8 LPF CUTOFF control
9 LPF RESONANCE control
a HPF CUTOFF control
b ENVELOPE ATTACK control
c ENVELOPE DECAY/RELEASE control
d LFO FREQ/AMOUNT control
kj
l
e FX ON/OFF button
f LATCH button
g Slider
h Keyboard
i OCTAVE DOWN button
j OCTAVE UP button
k SEQUENCER record button
l SEQUENCER play button
m HOLD button
n ARP button
o CLOCK BPM/DIVIDE control
p CLOCK TAP button
onm
p
En
6

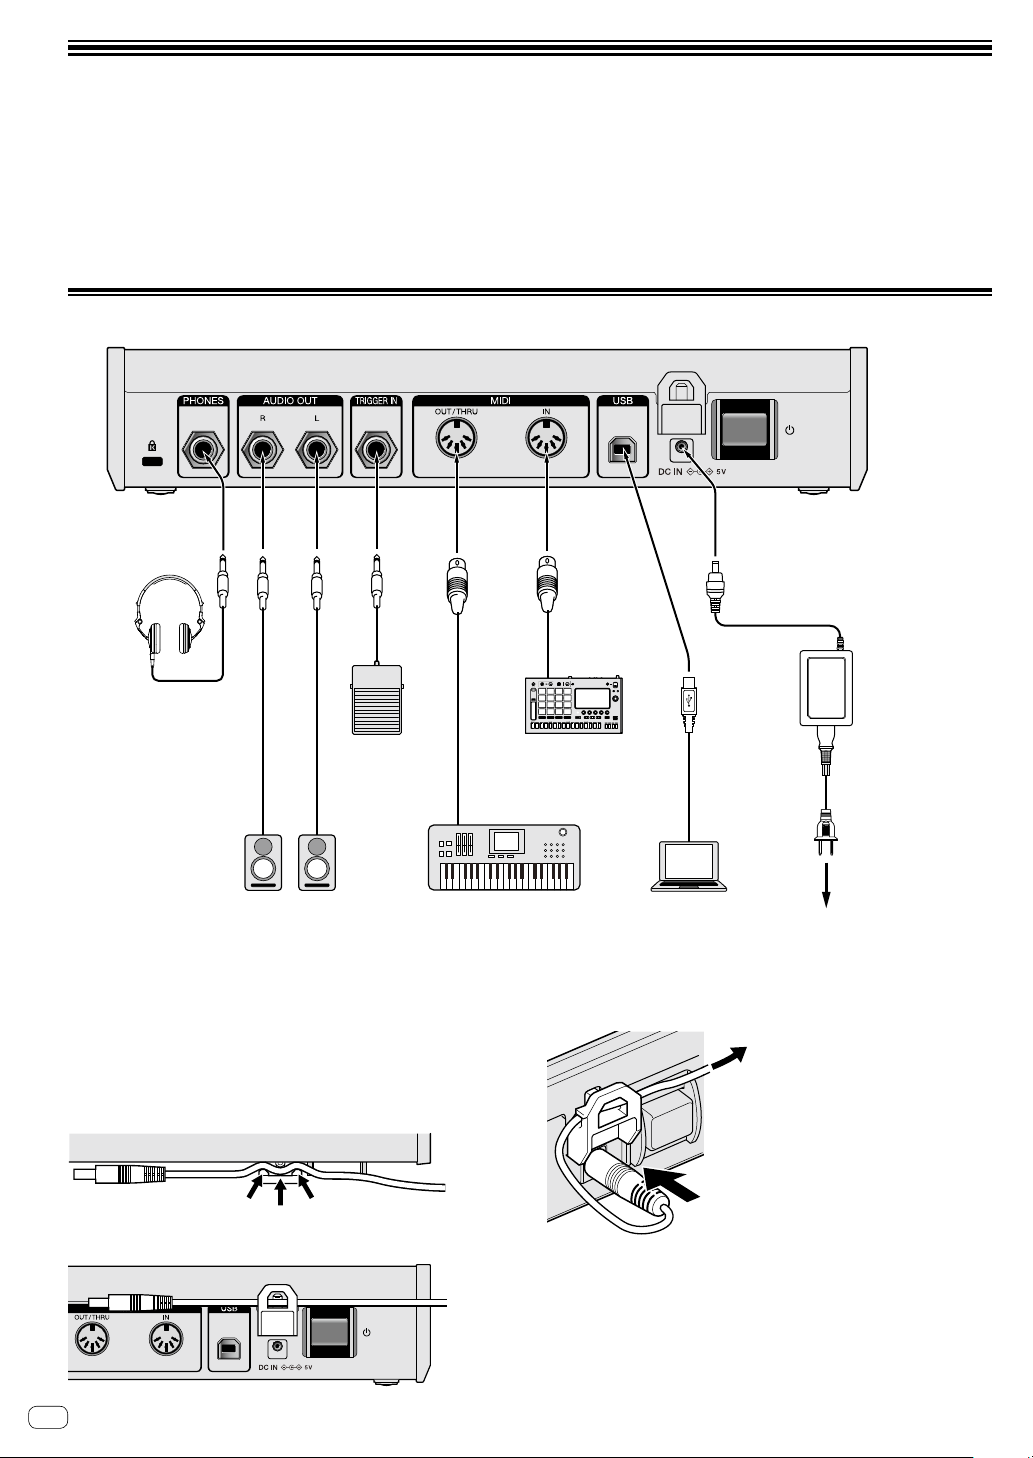
Rear Panel
21 3 4 5
8
9
a
English
b6 7
1 Kensington lock slot
2 PHONES output
3 AUDIO OUT R
4 AUDIO OUT L
5 TRIGGER IN
6 MIDI OUT/THRU
7 MIDI IN
8 USB-B terminal
9 Cable hook
a DC IN terminal
b u button
This switch is between off and on for this product.
En
7
Connections
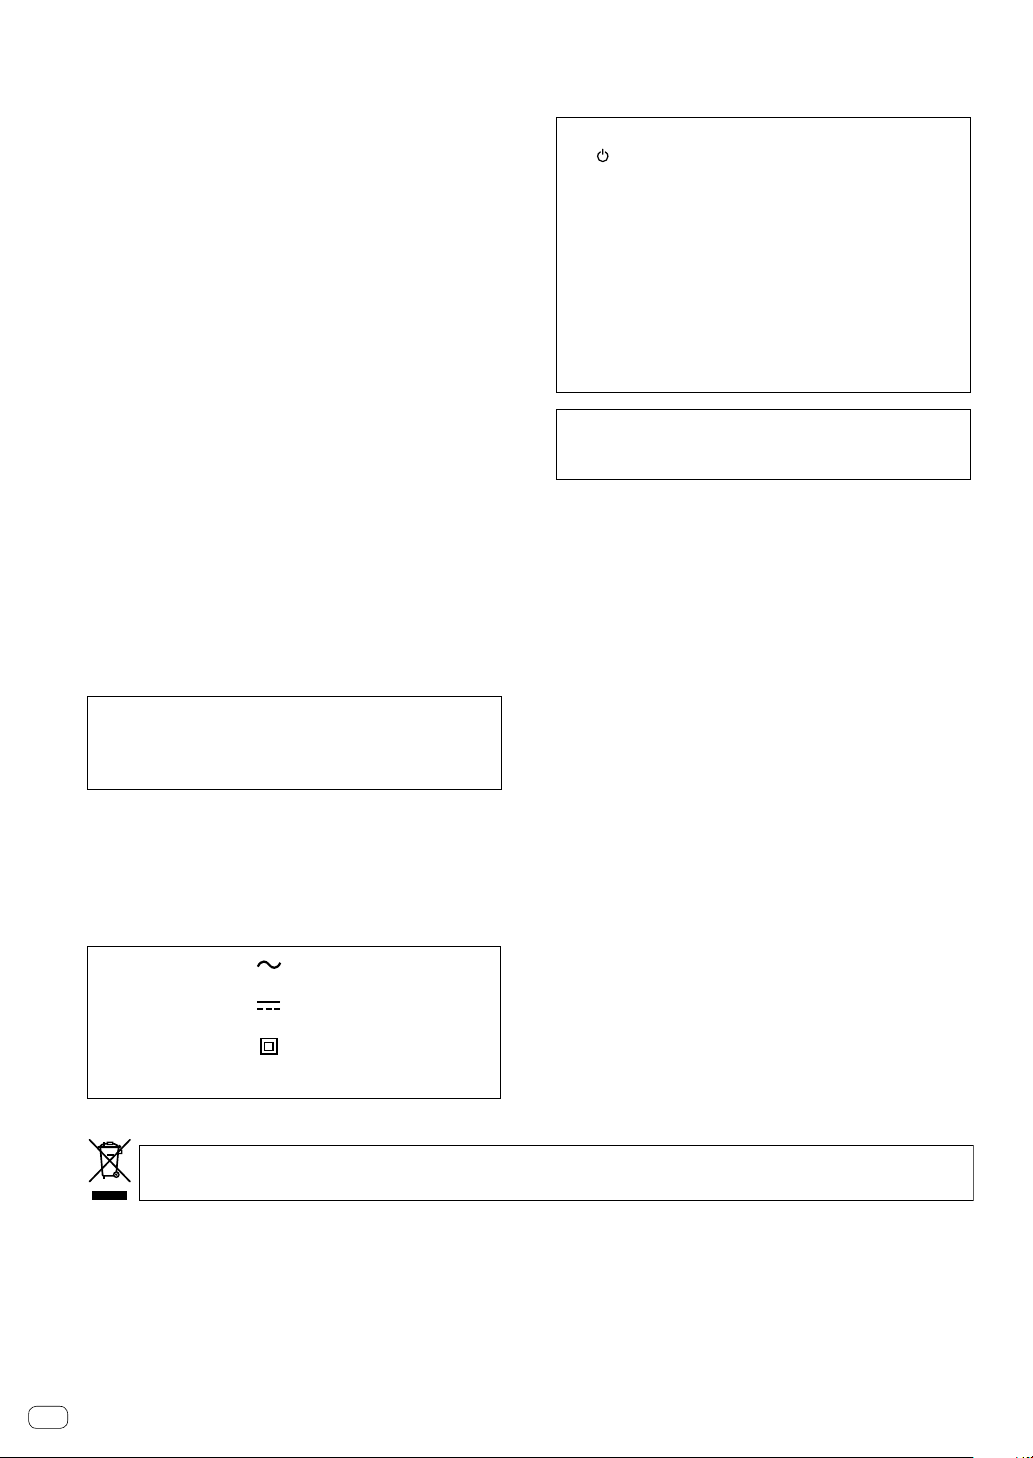
! Be sure to turn off the power and unplug the power cord from the power outlet whenever making or changing connections.
! Connect the power cord after all the connections between devices have been completed.
! Be sure to use the included power cord and AC adaptor.
! Refer to the operating instructions for components to be connected.
! Connect this unit and your computer directly using a USB cable.
— Use a USB cable which conforms to USB 2.0.
— USB hubs cannot be used.
Connecting inputs and outputs
Headphones
AC adaptor
(included)
Foot switch
How to use the cable hook
Hook the connection cable of the AC power adaptor to avoid accidentally
disconnecting it from the unit.
! If the connection cable of the AC power adaptor is unplugged while
you are playing the synthesizer, the sound will stop abruptly.
1 Fit the connection cable of the AC adaptor into the
cable hook.
Secure the cable into place.
MIDI keyboard,
sequencer, etc.
ComputerSynthesizer, sound module, etc.Powered speakers
To power outlet
Power cord
(included)
2 Connect the plug of the connection cable to the
[DC IN] terminal. If the cable on the left side of the
cable hook is too long, tighten it moderately.
Pull gently to tighten.
Plug in.
En
8
Operation
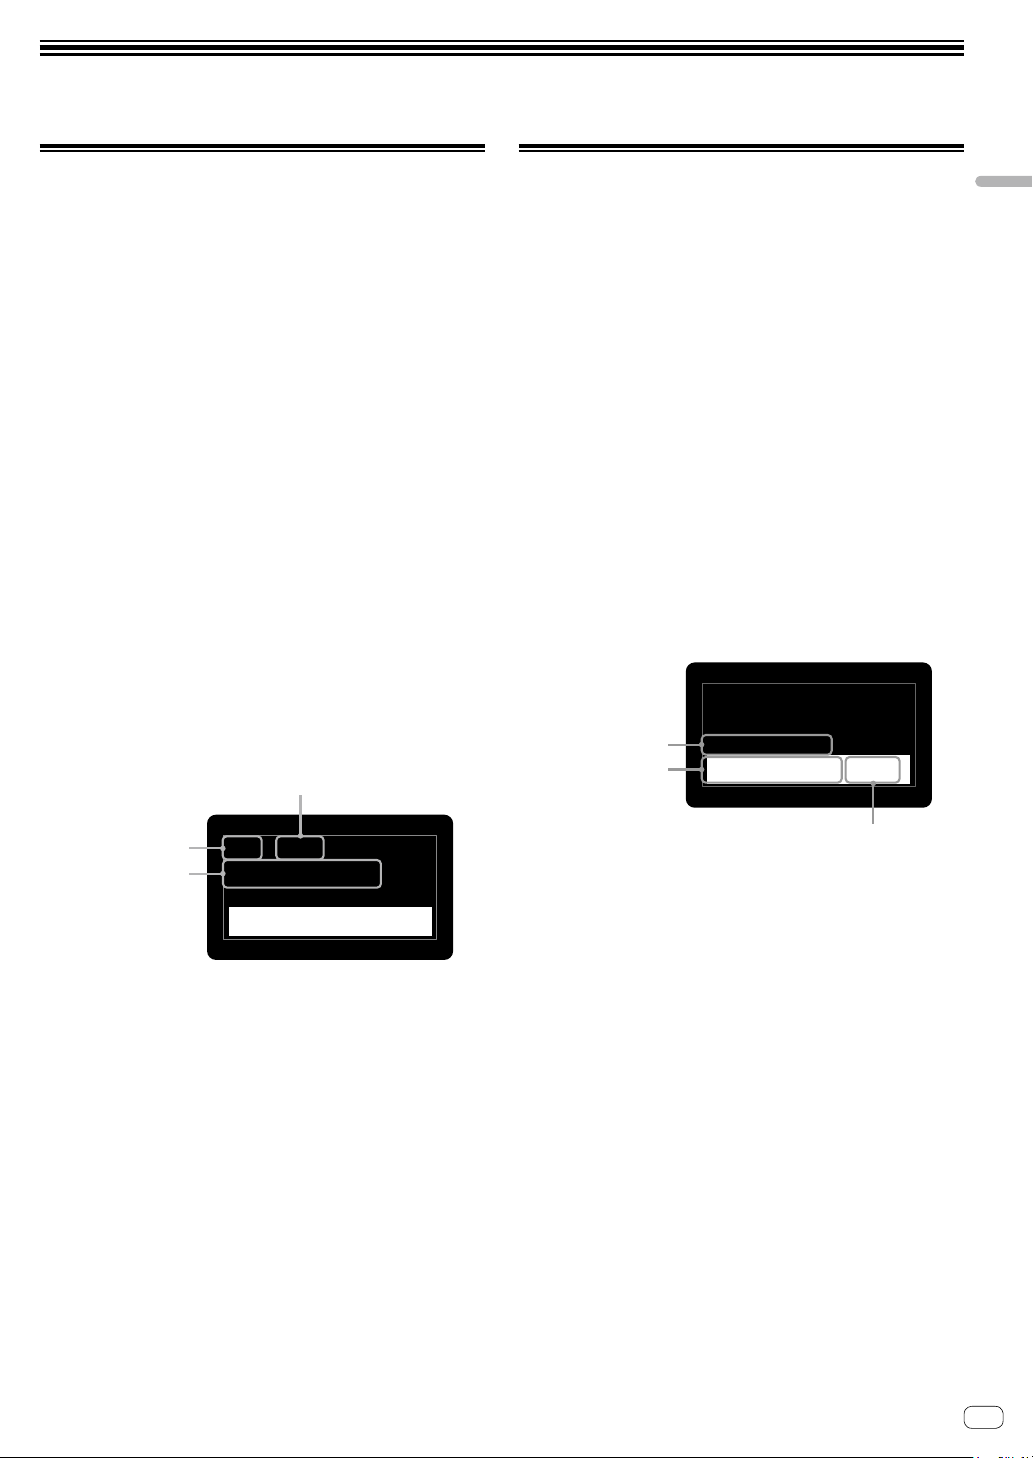
Program number
English
Choosing and playing a program
The TORAIZ AS-1 has ten banks ([F1]-[F5] and [U1]-[U5]) each of which
stores 99 programs. To recall the desired program, select a bank and a
program number in that order.
! The programs in the banks [F1]-[F5] are read only and the programs
in the banks [U1]-[U5] are rewritable. Though you can edit any
program in any bank, you can only save a program to a user bank
[U1]-[U5].
(“F” represents “Factory bank” and “U” represents “User bank.”)
! When you purchase this product, the programs in the banks
[U1]-[U5] are identical with the programs in the banks [F1]-[F5].
1 Press the [u] button on the rear panel to turn on
the unit.
The main screen appears in the display.
2 Turn on the external devices connected to the
[AUDIO OUT] (e.g. powered speakers, power
amplifier, audio mixer, etc.).
3 Press and hold the [SHIFT] button and turn the
[PROGRAM/BANK] control to select a bank number.
The bank numer in the display changes when you turn the control.
! If you press and hold the [SHIFT] button, it turns On only while you
are pressing the button. To turn it off, simply release the button.
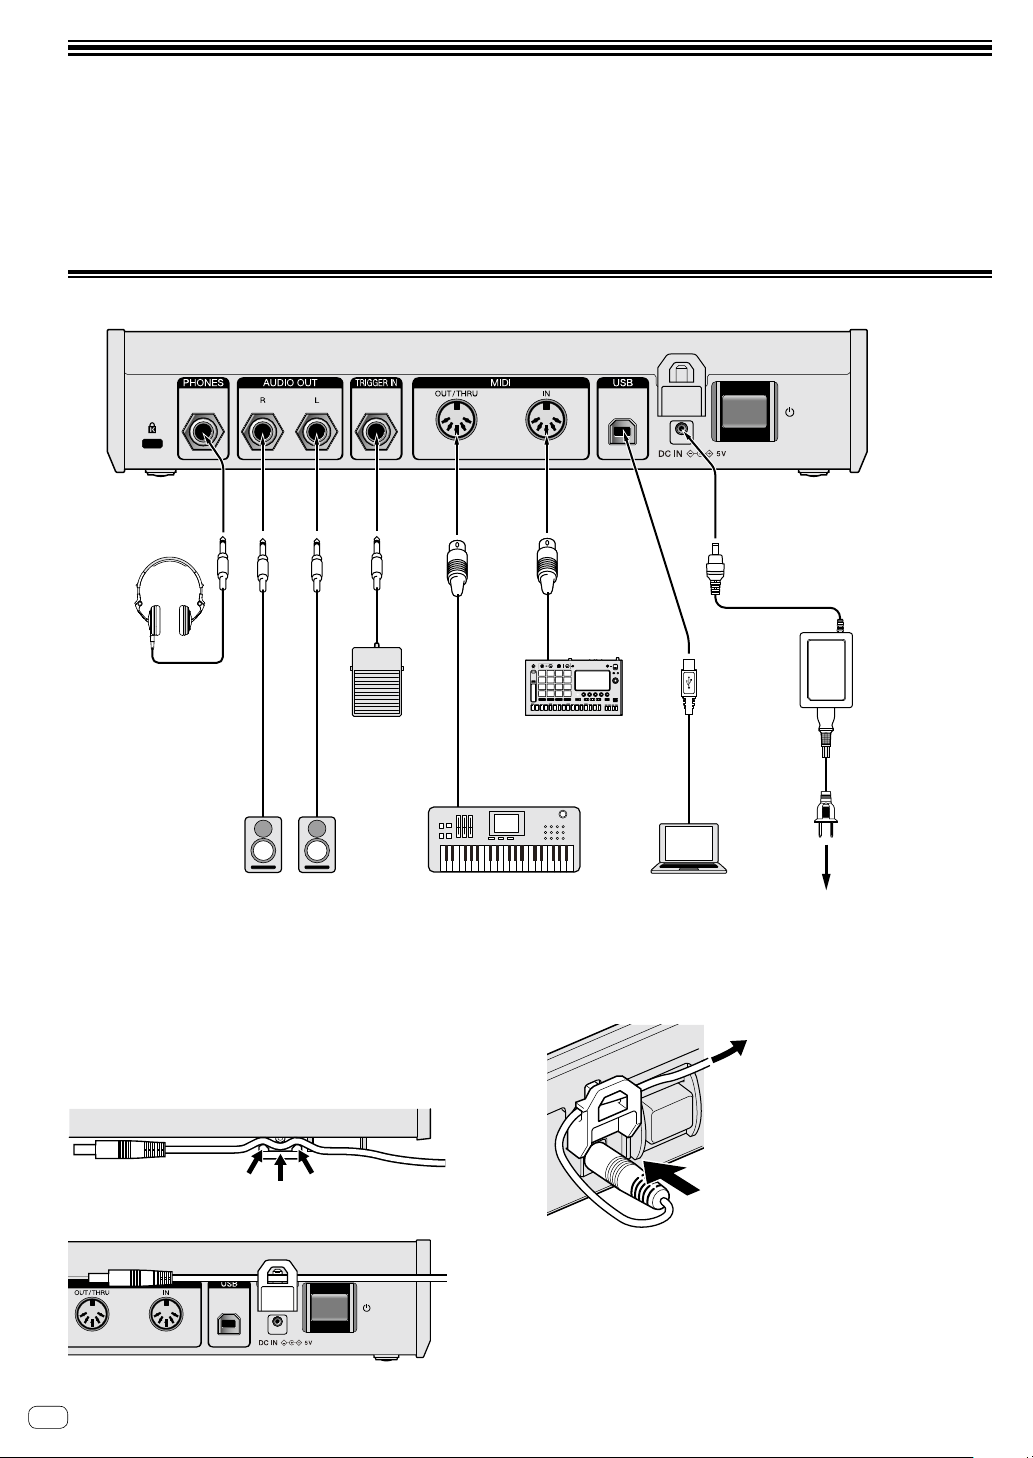
Bank number
Program name
U5
P27
Basic Program
AMP ENVELOPE
BPM
:
120
Attack 0
2 Operate the [LPF CUTOFF], [LPF RES], [HPF
CUTOFF], [ENVELOPE ATTACK], [ENVELOPE DECAY/
REL], [LFO FREQ/AMT] controls and/or [FX] button.
The sound changes as you adjust the parameter.
3 Press and hold the [SHIFT] button and turn the
[PARAM/CATEGORY] control to choose the desired
category.
The category name in the display changes when you turn the control.
! See step 3 in “Choosing and playing a program” for how to turn on/
off the [SHIFT] button.
:
U5
P27
BPM
120
Basic Program
Category name
Parameter name
4 Turn off the [SHIFT] button and turn the [PARAM/
CATEGORY] control to choose the desired parameter
name.
The parameter name in the display changes when you turn the control.
! See step 3 in “Choosing and playing a program” for how to turn on/
off the [SHIFT] button.
5 Turn the [VALUE] control to adjust the parameter
value.
The sound changes as you adjust the parameter value shown in the
display.
AMP ENVELOPE
Attack 0
Parameter value
4 Turn off the [SHIFT] button and turn the
[PROGRAM/BANK] control to select the desired
program.
The program number and program name in the display change when
you turn the control.
5 Play the keyboard.
The synthesizer plays the corresponding sound.
! If the [HOLD] button is On (lit), the sound plays continuously.
Each press of the [HOLD] button turns it On or Off in turn.
! If the [ARP] button is On (lit), any held notes are arpeggiated.
Each press of the [ARP] button turns it On or Off in turn.
Editing a program
There are two ways to edit a program.
! Use the controls and buttons of the top panel to directly adjust the
main parameters (as shown in step 2 below).
! Choose the desired parameter shown in the display and adjust the
detailed parameters (as shown in steps 3 to 5 below).
For details of the controls, buttons and parameters, please refer to the
Operating Instructions.
1 Choose a program you wish to edit.
Follow steps 3 and 4 in “Choosing and playing a program.”
Saving an edited program
1 Press and hold the [SHIFT] button and press the
[GLOBAL/WRITE] button.
The following screen appears in the display and the [GLOBAL/WRITE]
button flashes. (The [SHIFT] button turns off automatically.)
! See step 3 in “Choosing and playing a program” for how to turn on/
off the [SHIFT] button.
U5
P27
Basic Program
Press Write to Save
Attack 0
or Hold to Cancel
TB
2 Press the [GLOBAL/WRITE] button again.
The currently selected program is overwritten by the edited program.
! Do not turn off the unit while the program is saved in order to protect
the internal data.
! To cancel saving, press the [HOLD] button instead of the [GLOBAL/
WRITE] button. The display returns to the main screen without
saving the edited program.
En
9

Initializing a program to create a
sound from scratch
When you wish to create a sound from scratch, you can let a simple
basic program consisting of a single oscillator assist you. To perform
this, select a program and initialize it prior to your sound creation.
1 Select a program you wish to initialize.
! Follow steps 3 and 4 in “Choosing and playing a program.”
2 Turn off the [SHIFT] button, and press the
[GLOBAL/WRITE] button.
The [GLOBAL SETTING] screen appears in the display and the[GLOBAL/
WRITE] button lights up.
! See step 3 in “Choosing and playing a program” for how to turn on/
off the [SHIFT] button.
3 Turn the [PARAM/CATEGORY] control until the
[Basic Program] screen appears in the display.
When the [Basic Program] is selected, the [LATCH] button flashes.
22.
Basic Program
Press Latch to
Load Basic Patch
0
4 Press the [LATCH] button.
The currently selected program is initialized and the display returns to
the main screen.
! To create a sound, follow steps 2 to 5 in “Editing a program.”
For details such as parameter settings, please refer to the Operating
Instructions.
! To cancel initializing, press the [GLOBAL/WRITE] button again
instead of the [LATCH] button. The display returns to the main
screen without initializing the program.
10
En

Additional information
English
Troubleshooting
! If there seems to be a problem with this product, check the items in
the “Troubleshooting” section in the Operating Instructions of this
unit, or access the Pioneer DJ site and check [FAQ] for the [TORAIZ
AS-1].
http://pioneerdj.com/support/
Also, check the connected devices. If the problem cannot be
resolved, ask your nearest Pioneer authorized service center or your
dealer to carry out repair work.
! This unit may not operate properly due to static electricity or other
external influences. In such cases, normal operation may be restored
by unplugging the power cord then plugging it back in.
Changing the settings
! For details on how to change the settings of this unit, see “Changing
the settings” in the Operating Instructions.
Precautions regarding our repair
services
! When we repair your unit, we may need to reset the unit to factory
default depending on the unit conditions. Since we do not back up
your settings prior to repair, we recommend that you back up your
original settings like your edited programs as System Exclusive files
via MIDI interface using the software which can handle MIDI System
Exclusive Messages such as DAW software and MIDI utility software,
etc.
About trademarks and registered
trademarks
! "Pioneer DJ" is a trademark of PIONEER CORPORATION, and is used
under license.
! Dave Smith Instruments and Prophet are registered trademarks of
Dave Smith Instruments LLC.
Specifications
AC adapter
Power ............................................................ AC 100 V to 240 V, 50 Hz/60 Hz
Rated current ......................................................................................... 0.4 A
Rated output ................................................................................. DC 5 V, 2 A
Power consumption (standby) ........................................................ 0.075 W
General - Main Unit
Power consumption ............................................................ DC 5 V, 1500 mA
Main unit weight ................................................................................... 1.4 kg
Max. dimensions
........................... 267.4 mm (width) x 68.6 mm (height) x 177.7 mm (depth)
Tolerable operating temperature ........................................ +5 °C to +35 °C
Tolerable operating humidity ...................... 5 % to 85 % (no condensation)
Input/Output terminals
AUDIO OUT R output terminal
1/4” TS jack ........................................................................................1 set
AUDIO OUT L output terminal
1/4” TS jack ........................................................................................1 set
PHONES output terminal
1/4” stereo phone jack ......................................................................1 set
MIDI OUT/THRU output terminal
5P DIN ...............................................................................................1 set
MIDI IN input terminal
5P DIN ...............................................................................................1 set
TRIGGER IN input terminal
1/4” TS jack ........................................................................................1 set
USB terminal
B type .................................................................................................1 set
! The specifications and design of this product are subject to change
without notice.
! © 2017 Pioneer DJ Corporation. All rights reserved.
En
11
Nous vous remercions d’avoir acquis un produit Pioneer DJ. Veuillez lire attentivement ce mode d’emploi afin de connaître la manière d’utiliser
ATTENTION
Milieu de fonctionnement
l’appareilcomme il convient. Cela fait, conservez le mode d’emploi de façon à pouvoir vous y référer en cas de nécessité.
Dans certains pays ou certaines régions, la forme de la fiche et de la prise d’alimentation est un peu différente de ce qui est montré dans les
illustrations. Toutefois, l’appareil se raccorde et fonctionne de la même façon.
POUR ÉVITER TOUT RISQUE D’ÉLECTROCUTION, NE
PAS ENLEVER LE COUVERCLE (NI LE PANNEAU
ARRIÈRE). AUCUNE PIÈCE RÉPARABLE PAR
L’UTILISATEUR NE SE TROUVE À L’INTÉRIEUR.
CONFIER TOUT ENTRETIEN À UN PERSONNEL
QUALIFIÉ UNIQUEMENT.
AVERTISSEMENT
Cet appareil n’est pas étanche. Pour éviter les risques
d’incendie et de décharge électrique, ne placez près de
lui un récipient rempli d’eau, tel qu’un vase ou un pot
de fleurs, et ne l’exposez pas à des gouttes d’eau, des
éclaboussures, de la pluie ou de l’humidité.
AVERTISSEMENT
Pour éviter les risques d’incendie, ne placez aucune
flamme nue (telle qu’une bougie allumée) sur
l’appareil. D3-4-2-1-7a_A1_Fr
PRÉCAUTION DE VENTILATION
Lors de l’installation de l’appareil, veillez à laisser un
espace suffisant autour de ses parois de manière à
améliorer la dissipation de chaleur (au moins 5 cm à
l’arrière et 3 cm de chaque côté).
D3-4-2-1-1_B1_Fr
D3-4-2-1-3_A1_Fr
ATTENTION
Ce produit a été testé dans des conditions de climats
tempéré et tropical.
D3-8-2-1-7a_A1_Fr
D3-4-2-1-7d*_A1_Fr
Le symbole graphique indiqué sur le produit
représente le courant alternatif.
Le symbole graphique indiqué sur le produit
représente le courant continu.
Le symbole graphique indiqué sur le produit
représente un équipement de Classe II.
D3-8-2-4_A1_Fr
Lorsque vous utilisez ce produit, vérifiez les
informations concernant la sécurité sous l’appareil.
D3-4-2-2-4_B1_Fr
Température et humidité du milieu de fonctionnement :
De +5 °C à +35 °C (de +41 °F à +95 °F) ; Humidité
relative inférieure à 85 % (orifices de ventilation non
obstrués)
N’installez pas l’appareil dans un endroit mal ventilé ou
un lieu soumis à une forte humidité ou en plein soleil
(ou à une forte lumière artificielle).
D3-4-2-1-7c*_A1_Fr
ATTENTION
L’interrupteur de cet appareil ne coupe pas
complètement celui-ci de sa prise secteur. Comme le
cordon d’alimentation fait office de dispositif de
déconnexion du secteur, il devra être débranché au
niveau de la prise secteur pour que l’appareil soit
complètement hors tension. Par conséquent, veillez à
installer l’appareil de telle manière que son cordon
d’alimentation puisse être facilement débranché de
la prise secteur en cas d’accident. Pour éviter tout
risque d’incendie, le cordon d’alimentation sera
débranché au niveau de la prise secteur si vous
prévoyez une période prolongée de non utilisation
(par exemple avant un départ en vacances).
D3-4-2-2-2a*_A1_Fr
AVERTISSEMENT
Gardez les pièces de petite taille hors de la portée des
bébés et des enfants. En cas d’ingestion accidentelle,
veuillez contacter immédiatement un médecin.
D41-6-4_A1_Fr
NOTE IMPORTANTE SUR LE CABLE
D’ALIMENTATION
Tenir le câble d’alimentation par la fiche. Ne pas
débrancher la prise en tirant sur le câble et ne pas
toucher le câble avec les mains mouillées. Cela risque
de provoquer un court-circuit ou un choc électrique. Ne
pas poser l’appareil ou un meuble sur le câble. Ne pas
pincer le câble. Ne pas faire de noeud avec le câble ou
l’attacher à d’autres câbles. Les câbles d’alimentation
doivent être posés de façon à ne pas être écrasés. Un
câble abîmé peut provoquer un risque d’incendie ou un
choc électrique. Vérifier le câble d’alimentation de
temps en temps. Contacter le service après-vente le
plus proche ou le revendeur pour un remplacement.
S002*_A1_Fr
Si vous souhaitez vous débarrasser de cet appareil, ne le mettez pas à la poubelle avec vos ordures ménagères. Il existe un système de
collecte séparé pour les appareils électroniques usagés, qui doivent être récupérés, traités et recyclés conformément à la législation.
Les habitants des états membres de l’UE, de Suisse et de Norvège peuvent retourner gratuitement leurs appareils électroniques usagés aux
centres de collecte agréés ou à un détaillant (si vous rachetez un appareil similaire neuf).
Dans les pays qui ne sont pas mentionnés ci-dessus, veuillez contacter les autorités locales pour savoir comment vous pouvez vous débarrasser
de vos appareils.
Vous garantirez ainsi que les appareils dont vous vous débarrassez sont correctement récupérés, traités et recyclés et préviendrez de cette façon
les impacts néfastes possibles sur l’environnement et la santé humaine.
Fr
2
K058b_A1_Fr

Sommaire
Comment lire ce manuel
Merci d’avoir acheté ce produit Pioneer DJ.
Veuillez lire ce manuel et le mode d’emploi disponible sur le site Pioneer
DJ. Ces deux documents comprennent des informations importantes
que vous devez connaître avant d’utiliser ce produit.
En particulier, veillez à lire les « CONSIGNES DE SÉCURITÉ
IMPORTANTES ».
! Dans ce manuel, les noms de boutons, commandes et prises
indiqués sur le produit, ainsi que les options de programme
apparaissant sur l’affichage de l’appareil, etc. sont indiqués
entre crochets ([ ]). (ex. : bouton [GLOBAL], prise [PHONES],
[OSCILLATOR 1])
! Remarque : les écrans et les spécifications du logiciel décrits
dans ce manuel, ainsi que l’aspect externe et les caractéristiques
techniques du matériel, sont en cours de développement ; ils
peuvent donc différer des spécifications finales.
! Veuillez noter que selon la version du système d’exploitation, les
réglages du navigateur web, etc., le fonctionnement peut être
différent des marches à suivre indiquées dans ce mode d’emploi.
Ce manuel décrit brièvement les noms des pièces de cet appareil, les
raccordements entre cet appareil et des périphériques, ainsi que les
opérations de base.
Pour des instructions plus détaillées sur l’utilisation de cet appareil,
reportez-vous au mode d’emploi de cet appareil.
! Pour en savoir plus sur l’obtention du mode d’emploi de cet appareil,
reportez-vous à la section Affichage du mode d’emploi à la page 5.
Avant le démarrage
Caractéristiques ........................................................................................... 5
Contenu du carton d’emballage ................................................................ 5
Affichage du mode d’emploi ...................................................................... 5
Noms des pièces
Panneau de commande .............................................................................. 6
Panneau arrière ........................................................................................... 7
Raccordements
Raccordement des entrées et des sorties ................................................. 8
Fonctionnement
Choix et lecture d’un programme .............................................................. 9
Édition d’un programme ............................................................................. 9
Sauvegarde d’un programme édité ......................................................... 10
Initialisation d’un programme pour créer un son à partir de zéro ........ 10
Informations complémentaires
En cas de panne ........................................................................................ 11
Modification des paramètres....................................................................11
Précautions à prendre concernant nos services de réparation ............ 11
À propos des marques commerciales et des marques déposées ........11
Spécifications.............................................................................................11
Fr
3
Message de Dave Smith
Fr
4

Avant le démarrage
Caractéristiques
Le TORAIZ AS-1 est un synthétiseur analogique monophonique
entièrement programmable qui possède des filtres analogiques discrets
basés sur le très réputé synthétiseur polyphonique Prophet-6 conçu
par Dave Smith Instruments LLC. Son séquenceur 64 pas intégré et sa
vaste bibliothèque de sons prédéfinis en font un outil musical inspirant
et expressif. Par ailleurs, son panneau de commande convivial offre une
capacité et une polyvalence de création sonore considérables dans un
châssis métallique compact et robuste convenant aussi bien au studio
qu’à la scène.
Contenu du carton d’emballage
! Adaptateur secteur
! Cordon d’alimentation
! Mode d’emploi (ce Guide de démarrage rapide)
Affichage du mode d’emploi
Les différents modes d’emploi sont parfois fournis sous forme de
fichiers PDF.
Adobe® Reader® doit être installé pour pouvoir consulter les fichiers
au format PDF.
1 Lancez un navigateur web sur votre ordinateur et
accédez au site Pioneer DJ suivant.
http://www.pioneerdj.com/
2 Cliquez sur [Aide].
3 Cliquez sur [TROUVER LES TUTORIELS &
MANUELS].
4 Cliquez sur [TORAIZ AS-1] dans la catégorie
[PRODUCTION].
5 Cliquez sur la langue souhaitée dans la liste.
Français
Fr
5
Noms des pièces
Panneau de commande
1
2
3
8
9
4 5
a b c
6 7
d
e
i
h
g
f
1 Bouton SHIFT
2 Bouton GLOBAL
3 Commande PROGRAM/BANK
4 Commande PARAM/CATEGORY
5 Affichage
6 Commande VALUE
7 Commande VOLUME
8 Commande LPF CUTOFF
9 Commande LPF RESONANCE
a Commande HPF CUTOFF
b Commande ENVELOPE ATTACK
c Commande ENVELOPE DECAY/RELEASE
d Commande LFO FREQ/AMOUNT
kj
l
e Bouton FX ON/OFF
f Bouton LATCH
g Curseur
h Clavier
i Bouton OCTAVE DOWN
j Bouton OCTAVE UP
k Bouton d’enregistrement SEQUENCER
l Bouton de lecture SEQUENCER
m Bouton HOLD
n Bouton ARP
o Commande CLOCK BPM/DIVIDE
p Bouton CLOCK TAP
onm
p
Fr
6

Panneau arrière
21 3 4 5
8
9
a
b6 7
Français
1 Fente de verrouillage Kensington
2 Sortie PHONES
3 AUDIO OUT R
4 AUDIO OUT L
5 TRIGGER IN
6 MIDI OUT/THRU
7 MIDI IN
8 Prise USB-B
9 Crochet pour câble
a Prise DC IN
b Bouton u
Sur ce produit, cet interrupteur bascule entre Off
(Marche) et On (Arrêt).
Fr
7
Raccordements
! Veillez à toujours éteindre les appareils et à débrancher le cordon d’alimentation de la prise secteur avant de raccorder un appareil ou de changer
les raccordements.
! Lorsque tous les appareils ont été raccordés, vous pouvez brancher le cordon d’alimentation.
! Veillez à utiliser le cordon d’alimentation et l’adaptateur secteur fournis.
! Reportez-vous au mode d’emploi des composants devant être raccordés.
! Raccordez cet appareil et votre ordinateur directement avec un câble USB.
— Utilisez un câble USB conforme à la norme USB 2.0.
— Les concentrateurs USB ne peuvent pas être utilisés.
Raccordement des entrées et des sorties
Adaptateur
secteur
Casque
(fourni)
Pédale de
commande
Comment utiliser le crochet pour câble
Accrochez le câble de raccordement de l’adaptateur secteur afin d’éviter
de le débrancher accidentellement de l’appareil.
! Si le câble de raccordement de l’adaptateur secteur se débranche
pendant que vous jouez du synthétiseur, le son s’interrompt
brusquement.
1 Faites passer le câble de raccordement de
l’adaptateur secteur dans le crochet pour câble.
Fixez solidement le câble.
Clavier MIDI,
séquenceur, etc.
OrdinateurSynthétiseur, module de sons, etc.Haut-parleurs amplifiés
À une prise d’alimentation
Cordon
d’alimentation
(fourni)
2 Branchez la fiche du câble de raccordement dans
la prise [DC IN]. Si le câble du côté gauche du crochet
pour câble est trop long, tendez-le légèrement.
Tirez délicatement sur
celui-ci pour le tendre.
Branchez-le.
Fr
8
Fonctionnement
Choix et lecture d’un programme
Le TORAIZ AS-1 dispose de dix banques ([F1]-[F5] et [U1]-[U5]) ayant
chacune 99 programmes en mémoire. Pour rappeler le programme de
votre choix, sélectionnez une banque et un numéro de programme dans
cet ordre.
! Seule la lecture des programmes des banques [F1]-[F5] est possible,
mais les programmes [U1]-[U5] sont réinscriptibles. Bien que vous
puissiez éditer n’importe quel programme de n’importe quelle
banque, vous ne pouvez enregistrer un programme que dans une
banque d’utilisateur [U1]-[U5].
(« F » signifie « Banque d’usine » et « U » signifie « Banque
d’utilisateur ».)
! Lorsque vous achetez ce produit, les programmes des banques
[U1]-[U5] sont identiques aux programmes des banques [F1]-[F5].
1 Appuyez sur le bouton [u] du panneau arrière
pour mettre l’appareil sous tension.
L’écran principal s’affiche.
2 Allumez les dispositifs externes raccordés
à [AUDIO OUT] (ex.: haut-parleurs amplifiés,
amplificateur de puissance, table de mixage audio,
etc.).
3 Maintenez le bouton [SHIFT] enfoncé et tournez la
commande [PROGRAM/BANK] pour sélectionner un
numéro de banque.
Le numéro de banque affiché change lorsque vous tournez la
commande.
! Si vous maintenez le bouton [SHIFT] enfoncé, il ne s’active que
pendant la durée de la pression. Pour le désactiver, il suffit de
relâcher le bouton.
Numéro de programme
Édition d’un programme
Il y a deux façons d’éditer un programme.
! Utilisez les commandes et les boutons du panneau supérieur pour
régler directement les principaux paramètres (comme indiqué à
l’étape 2 ci-dessous).
! Choisissez un paramètre de votre choix affiché à l’écran et
ajustez les paramètres détaillés (comme indiqué aux étapes 3 à 5
ci-dessous).
Pour plus de détails sur les commandes, boutons et paramètres,
reportez-vous au mode d’emploi.
1 Choisissez un programme que vous désirez éditer.
Suivez les étapes 3 et 4 de la section « Choix et lecture d’un
programme ».
2 Actionnez les commandes [LPF CUTOFF], [LPF RES],
[HPF CUTOFF], [ENVELOPE ATTACK], [ENVELOPE
DECAY/REL], [LFO FREQ/AMT] et/ou le bouton [FX].
Le son change à mesure que vous ajustez le paramètre.
3 Maintenez le bouton [SHIFT] enfoncé et tournez la
commande [PARAM/CATEGORY] pour sélectionner la
catégorie de votre choix.
Le nom de catégorie affiché change lorsque vous tournez la commande.
! Pour savoir comment activer/désactiver le bouton [SHIFT], suivez
l’étape 3 de la section « Choix et lecture d’un programme ».
:
U5
P27
BPM
120
Basic Program
Nom de catégorie
Nom de
paramètre
AMP ENVELOPE
Attack 0
Français
Numéro de
banque
Nom de
programme
U5
P27
Basic Program
AMP ENVELOPE
BPM
:
120
Attack 0
4 Désactivez le bouton [SHIFT] et tournez la
commande [PROGRAM/BANK] pour sélectionner le
programme de votre choix.
Le numéro de programme et le nom de programme affichés changent
lorsque vous tournez la commande.
5 Jouez sur le clavier.
Le synthétiseur joue le son correspondant.
! Si le bouton [HOLD] est activé (allumé), le son est joué en continu.
Chaque pression sur le bouton [HOLD] l’active ou le désactive à tour
de rôle.
! Si le bouton [ARP] est activé (allumé), toutes les notes tenues sont
arpégées.
Chaque pression sur le bouton [ARP] l’active ou le désactive à tour
de rôle.
Valeur de paramètre
4 Désactivez le bouton [SHIFT] et tournez la
commande [PARAM/CATEGORY] pour sélectionner le
nom de paramètre de votre choix.
Le nom de paramètre affiché change lorsque vous tournez la
commande.
! Pour savoir comment activer/désactiver le bouton [SHIFT], suivez
l’étape 3 de la section « Choix et lecture d’un programme ».
5 Tournez la commande [VALUE] pour ajuster la
valeur du paramètre.
Le son change à mesure que vous ajustez la valeur du paramètre
affichée à l’écran.
Fr
9

Sauvegarde d’un programme édité
1 Maintenez le bouton [SHIFT] enfoncé et appuyez
sur le bouton [GLOBAL/WRITE].
L’écran suivant apparaît et le bouton [GLOBAL/WRITE] clignote. (Le
bouton [SHIFT] s’éteint automatiquement.)
! Pour savoir comment activer/désactiver le bouton [SHIFT], suivez
l’étape 3 de la section « Choix et lecture d’un programme ».
U5
P27
Basic Program
Press Write to Save
Attack 0
or Hold to Cancel
TB
2 Appuyez une nouvelle fois sur le bouton [GLOBAL/
WRITE].
Le programme actuellement sélectionné est écrasé par le programme
édité.
! Pour protéger les données internes, ne mettez pas l’appareil hors
tension pendant la sauvegarde du programme.
! Pour annuler la sauvegarde, appuyez sur le bouton [HOLD] au lieu
du bouton [GLOBAL/WRITE]. L’écran principal réapparaît sans
sauvegarder le programme édité.
Initialisation d’un programme pour
créer un son à partir de zéro
Lorsque vous souhaitez créer un son à partir de zéro, vous pouvez
bénéficier de l’assistance d’un simple programme de base comprenant
un oscillateur unique. Pour ce faire, sélectionnez un programme et
initialisez-le avant de commencer votre création sonore.
1 Choisissez un programme que vous désirez
initialiser.
! Suivez les étapes 3 et 4 de la section « Choix et lecture d’un
programme ».
2 Désactivez le bouton [SHIFT] et appuyez sur le
bouton [GLOBAL/WRITE].
L’écran [GLOBAL SETTING] s’affiche et le bouton [GLOBAL/WRITE]
s’allume.
! Pour savoir comment activer/désactiver le bouton [SHIFT], suivez
l’étape 3 de la section « Choix et lecture d’un programme ».
3 Tournez la commande [PARAM/CATEGORY]
jusqu’à ce que l’écran [Basic Program] s’affiche.
Une fois [Basic Program] sélectionné, le bouton [LATCH] clignote.
! Pour annuler l’initialisation, appuyez sur le bouton [GLOBAL/
WRITE] au lieu du bouton [LATCH]. L’écran principal réapparaît sans
initialiser le programme.
22.
Basic Program
Press Latch to
Load Basic Patch
0
4 Appuyez sur le bouton [LATCH].
Le programme actuellement sélectionné est initialisé et l’écran principal
réapparaît.
! Pour créer un son, suivez les étapes 2 à 5 de la section « Édition d’un
programme ».
Pour plus de détails, par exemple sur le réglage des paramètres,
reportez-vous au mode d’emploi.
Fr
10

Informations complémentaires
En cas de panne
! S’il semble y avoir un problème avec ce produit, consultez les
articles de la section « En cas de panne » dans le mode d’emploi de
cet appareil ou accédez au site Pioneer DJ pour consulter la [FAQ]
du [TORAIZ AS-1].
http://pioneerdj.com/support/
Vérifiez également les dispositifs raccordés. Si vous ne pouvez pas
résoudre le problème, adressez-vous au service après-vente agréé
Pioneer le plus proche ou à votre revendeur pour effectuer une
réparation.
! Cet appareil peut ne pas fonctionner correctement en raison de
l’électricité statique ou d’autres influences extérieures. Le cas
échéant, le fonctionnement normal peut être rétabli en débranchant,
puis rebranchant le cordon d’alimentation.
Modification des paramètres
! Pour plus de détails sur la modification des paramètres de cet
appareil, reportez-vous à la section « Modification des paramètres »
du mode d’emploi.
Précautions à prendre concernant
nos services de réparation
! Pour réparer votre appareil, il se peut que nous devions rétablir les
réglages par défaut de l’appareil en fonction de son état. Puisque
nous ne sauvegardons pas vos paramètres avant de procéder
à la réparation, nous vous recommandons de sauvegarder vos
paramètres d’origine, tels que vos programmes édités, sous forme
de fichiers System Exclusive via l’interface MIDI, à l’aide d’un logiciel
pouvant gérer des messages MIDI System Exclusive (ex. : le logiciel
DAW et le logiciel Midi Utility, etc.).
Spécifications
Adaptateur secteur
Alimentation .................................................. 100 V à 240 V CA, 50 Hz/60 Hz
Courant nominal .................................................................................... 0,4 A
Puissance nominale .....................................................................5 V CC, 2 A
Consommation (en veille) ................................................................. 0,075 W
Caractéristiques générales – Appareil principal
Consommation .................................................................... 5 V CC, 1500 mA
Poids de l’appareil principal ................................................................. 1,4 kg
Dimensions max.
.............267,4 mm (largeur) x 68,6 mm (hauteur) x 177,7 mm (profondeur)
Température de fonctionnement tolérée ............................ +5 °C à +35 °C
Humidité de fonctionnement tolérée .......5 % à 85 % (sans condensation)
Prises d’entrée/sortie
Prise de sortie AUDIO OUT R
Jack TS de 1/4” ..................................................................................1 jeu
Prise de sortie AUDIO OUT L
Jack TS de 1/4” ..................................................................................1 jeu
Prise de sortie PHONES
Jack stéréo de 1/4” ............................................................................1 jeu
Prise de sortie MIDI OUT/THRU
5P DIN ...............................................................................................1 jeu
Prise d’entrée MIDI IN
5P DIN ...............................................................................................1 jeu
Prise d’entrée TRIGGER IN
Jack TS de 1/4” ..................................................................................1 jeu
Prise USB
Type B ................................................................................................1 jeu
! Les caractéristiques et la présentation peuvent être modifiées, sans
avis préalable, dans un souci d’amélioration.
! © 2017 Pioneer DJ Corporation. Tous les droits réservés.
Français
À propos des marques commerciales
et des marques déposées
! « Pioneer DJ » est une marque commerciale de PIONEER
CORPORATION qui est utilisée sous licence.
! Dave Smith Instruments et Prophet sont des marques déposées de
Dave Smith Instruments LLC.
Fr
11
Vielen Dank, dass Sie sich für dieses Pioneer DJ-Produkt entschieden haben. Bitte lesen Sie diese Bedienungsanleitung gründlich durch, um sich mit
derBedienung des Geräts vertraut zu machen. Nachdem Sie die Bedienungsanleitung gelesen haben, legen Sie sie griffbereit zum Nachschlagen ab.
In manchen Ländern oder Regionen können sich die Formen von Netzstecker und Netzsteckdose von denen in den Erklärungszeichnungen
unterscheiden. Das Verfahren zum Anschließen und Bedienen des Geräts sind aber gleich.
ACHTUNG
UM SICH NICHT DER GEFAHR EINES ELEKTRISCHEN
SCHLAGES AUSZUSETZEN, DÜRFEN SIE NICHT DEN
DECKEL (ODER DIE RÜCKSEITE) ENTFERNEN. IM
GERÄTEINNEREN BEFINDEN SICH KEINE VOM
BENUTZER REPARIERBAREN TEILE. ÜBERLASSEN
SIE REPARATUREN DEM QUALIFIZIERTEN
KUNDENDIENST.
D3-4-2-1-1_B1_De
WARNUNG
Dieses Gerät ist nicht wasserdicht. Zur Vermeidung der
Gefahr von Brand und Stromschlag keine Behälter mit
Flüssigkeiten (z.B. Blumenvasen und -töpfe) in die
Nähe des Gerätes bringen und dieses vor Tropfwasser,
Spritzwasser, Regen und Nässe schützen.
D3-4-2-1-3_A1_De
WARNUNG
Keine Quellen offener Flammen (z.B. eine brennende
Kerze) auf dieses Gerät stellen.
D3-4-2-1-7a_A1_De
ACHTUNG
Der -Schalter dieses Gerätes trennt das Gerät nicht
vollständig vom Stromnetz. Um das Gerät vollständig
vom Netz zu trennen, muss der Netzstecker aus der
Netzsteckdose gezogen werden. Daher sollte das
Gerät so aufgestellt werden, dass stets ein
unbehinderter Zugang zur Netzsteckdose
gewährleistet ist, damit der Netzstecker in einer
Notsituation sofort abgezogen werden kann. Um
Brandgefahr auszuschließen, sollte der Netzstecker
vor einem längeren Nichtgebrauch des Gerätes,
beispielsweise während des Urlaubs, grundsätzlich
von der Netzsteckdose getrennt werden.
D3-4-2-2-2a*_A1_De
WARNUNG
Kleine Teile außerhalb der Reichweite von Kleinkindern
und Kindern aufbewahren. Bei unbeabsichtigtem
Verschlucken ist unverzüglich ein Arzt aufzusuchen.
D41-6-4_A1_De
ACHTUNG
Dieses Produkt wurde unter moderaten und
tropischen Klimabedingungen getestet.
D3-8-2-1-7a_A1_De
Betriebsumgebung
Betriebstemperatur und Betriebsluftfeuchtigkeit:
+5 °C bis +35 °C, 85 % rel. Feuchte max.
(Ventilationsschlitze nicht blockiert)
VORSICHTSHINWEIS ZUR BELÜFTUNG
Bei der Aufstellung dieses Gerätes muss für einen
ausreichenden Freiraum gesorgt werden, um eine
einwandfreie Wärmeabfuhr zu gewährleisten
(mindestens 5 cm hinter dem Gerät und jeweils 3 cm
Eine Aufstellung dieses Gerät an einem unzureichend
belüfteten, sehr feuchten oder heißen Ort ist zu
vermeiden, und das Gerät darf weder direkter
Sonneneinstrahlung noch starken Kunstlichtquellen
ausgesetzt werden.
D3-4-2-1-7c*_A1_De
an der Seite des Gerätes).
D3-4-2-1-7d*_A1_De
Das auf diesem Produkt angebrachte Piktogramm
verweist auf Wechselstrom.
Das auf diesem Produkt angebrachte Piktogramm
verweist auf Gleichstrom.
Das auf diesem Produkt angebrachte Piktogramm
verweist auf ein Gerät der Klasse II.
D3-8-2-4_A1_De
VORSICHT MIT DEM NETZKABEL
Fassen Sie das Netzkabel immer am Stecker. Ziehen Sie
nicht am Kabel selbst, und fassen Sie das Netzkabel
niemals mit nassen Händen an, da dies einen
Kurzschluss oder elektrischen Schlag verursachen
kann. Stellen Sie nicht das Gerät, Möbelstücke o.ä. auf
das Netzkabel; sehen Sie auch zu, dass es nicht
eingeklemmt wird. Machen Sie niemals einen Knoten
in das Netzkabel, und binden Sie es nicht mit anderen
Kabeln. Das Netzkabel sollte so gelegt werden, dass
Bei Verwendung dieses Produktes machen Sie sich
bitte mit der Sicherheitsinformationen auf der
Unterseite des Gerätes vertraut.
D3-4-2-2-4_B1_De
niemand darauf tritt. Ein beschädigtes Netzkabel kann
einen Brand oder elektrischen Schlag verursachen.
Prüfen Sie das Netzkabel von Zeit zu Zeit. Sollte es
beschädigt sein, wenden Sie sich an Ihre nächste
Kundendienststelle oder Ihren Händler, um es zu
ersetzen.
S002*_A1_De
Mischen Sie dieses Produkt, wenn Sie es entsorgen wollen, nicht mit gewöhnlichen Haushaltsabfällen. Es gibt ein getrenntes
Sammelsystem für gebrauchte elektronische Produkte, über das die richtige Behandlung, Rückgewinnung und Wiederverwertung
gemäß der bestehenden Gesetzgebung gewährleistet wird.
Privathaushalte in den Mitgliedsstaaten der EU, in der Schweiz und in Norwegen können ihre gebrauchten elektronischen Produkte an
vorgesehenen Sammeleinrichtungen kostenfrei zurückgeben oder aber an einen Händler zurückgeben (wenn sie ein ähnliches neues Produkt
kaufen).
Bitte wenden Sie sich in den Ländern, die oben nicht aufgeführt sind, hinsichtlich der korrekten Verfahrensweise der Entsorgung an die örtliche
Kommunalverwaltung.
Auf diese Weise stellen Sie sicher, dass das zu entsorgende Produkt der notwendigen Behandlung, Rückgewinnung und Wiederverwertung
unterzogen wird, und so mögliche negative Einflüsse auf die Umwelt und die menschliche Gesundheit vermieden werden.
De
2
K058b_A1_De

Inhalt
Zum Lesen dieser Anleitung
Vielen Dank, dass Sie sich für dieses Pioneer DJ-Produkt entschieden
haben.
Bitte achten Sie darauf, sowohl diese Anleitung als auch die auf der
Pioneer DJ-Site verfügbare Bedienungsanleitung zu lesen. Beide
Dokumente enthalten wichtige Informationen, die Sie verstehen sollten,
bevor Sie dieses Produkt benutzen.
Lesen Sie insbesondere „WICHTIGE SICHERHEITSHINWEISE“.
! In dieser Anleitung werden die Namen von auf dem Produkt
angezeigten Tasten, Steuerelementen und Anschlüssen sowie
von Programmoptionen auf dem Gerätedisplay usw. in eckigen
Klammern angegeben ([ ]). (Z. B. Taste [GLOBAL], Anschluss
[PHONES], [OSCILLATOR 1])
! Bitte beachten Sie, dass die Bildschirme und Spezifikationen der
in dieser Anleitung beschriebenen Software ebenso wie die äußere
Erscheinung und die Spezifikationen der Hardware aktuell in der
Entwicklung sind und sich von den endgültigen Spezifikationen
unterscheiden können.
! Bitte beachten Sie, dass je nach der Version des Betriebssystems,
den Webbrowser-Einstellungen usw. die Bedienung sich von den
in dieser Anleitung beschriebenen Verfahren leicht unterscheiden
kann.
Diese Anleitung bietet eine kurze Beschreibung zu den Namen der Teile
des Geräts, den Verbindungen zwischen dem Gerät und
Peripheriegeräten und der grundlegenden Bedienung.
Ausführlichere Hinweise zum Gebrauch des Geräts finden Sie in der
Bedienungsanleitung für dieses Gerät.
! Unter Aufrufen der Bedienungsanleitung auf Seite 5 erfahren Sie,
wie Sie die Bedienungsanleitung erhalten können.
Bevor Sie anfangen
Merkmale ...................................................................................................... 5
Lieferumfang ................................................................................................ 5
Aufrufen der Bedienungsanleitung ........................................................... 5
Teilenamen
Bedienpult .................................................................................................... 6
Rückseite ...................................................................................................... 7
Anschlüsse
Anschließen an die Eingänge und Ausgänge .......................................... 8
Bedienung
Programm auswählen und wiedergeben .................................................. 9
Ein Programm bearbeiten .......................................................................... 9
Ein bearbeitetes Programm speichern ................................................... 10
Initialisieren eines Programms zur Neuerstellung eines Sounds ........ 10
Zusätzliche Informationen
Störungssuche ........................................................................................... 11
Ändern der Einstellungen ......................................................................... 11
Vorsichtshinweise zu unserem Reparaturservice .................................. 11
Über Marken und eingetragene Marken ................................................. 11
Technische Daten ...................................................................................... 11
De
3

Eine Botschaft von Dave Smith
De
4

Bevor Sie anfangen
Merkmale
Der TORAIZ AS-1 ist ein voll programmierbarer monophoner
Analogsynthesizer mit diskreten Analogfiltern, der auf dem
hochgelobten polyphonen Prophet-6-Synthesizer aufbaut, welcher
von Dave Smith Instruments LLC gestaltet wurde. Sein eingebauter
64-stufiger Sequencer und seine umfangreiche Bibliothek
voreingestellter Sounds machen ihn zu einem inspirierenden und
ausdrucksstarken musikalischen Werkzeug. Sein übersichtliches
Bedienpult birgt eine riesige Menge an Sound-Kreativität und
Vielseitigkeit in einem kompakten, robusten Metallgehäuse, das
gleichermaßen im Studio wie auf der Bühne glänzt.
Lieferumfang
! Netzteil
! Netzkabel
! Bedienungsanleitung (diese Kurzanleitung)
Aufrufen der Bedienungsanleitung
Verschiedene Hinweise können in Form von Dateien im PDF-Format
verfügbar sein.
Um PDF-Dateien zu öffnen, muss Adobe® Reader® installiert sein.
1 Starten Sie einen Webbrowser auf Ihrem
Computer und gehen Sie zu der unten angegebenen
Pioneer DJ-Website.
http://www.pioneerdj.com/
2 Klicken Sie auf [Support].
3 Klicken Sie auf [TUTORIALS &
BEDIENUNGSANLEITUNGEN].
4 Klicken Sie auf [TORAIZ AS-1] in der Kategorie
[PRODUKTION].
5 Klicken Sie in der Liste auf die gewünschte
Sprache.
Deutsch
De
5

Teilenamen
Bedienpult
1
2
3
8
9
4 5
a b c
6 7
d
e
i
h
g
f
1 SHIFT-Taste
2 GLOBAL-Taste
3 PROGRAM/BANK-Regler
4 PARAM/CATEGORY-Regler
5 Anzeige
6 VALUE-Regler
7 VOLUME-Regler
8 LPF CUTOFF-Regler
9 LPF RESONANCE-Regler
a HPF CUTOFF-Regler
b ENVELOPE ATTACK-Regler
c ENVELOPE DECAY/RELEASE-Regler
d LFO FREQ/AMOUNT-Regler
kj
l
e FX ON/OFF-Taste
f LATCH-Taste
g Schieberegler
h Keyboard
i OCTAVE DOWN-Taste
j OCTAVE UP-Taste
k SEQUENCER-Aufnahmetaste
l SEQUENCER-Wiedergabetaste
m HOLD-Taste
n ARP-Taste
o CLOCK BPM/DIVIDE-Regler
p CLOCK TAP-Taste
onm
p
De
6
 Loading...