

PIONEER DJ rekordbox Operation Manual
rekordbox
TM
LIGHTING mode Operation Guide

1
Contents
1 Before Start .................................................................................................................. 3
1.1 Before getting started............................................................................................... 3
1.2 System requirements ............................................................................................... 3
1.3 Overview of LIGHTING mode .................................................................................. 4
2 Terms ........................................................................................................................... 6
3 Steps to easily control lighting ..................................................................................... 9
3.1 Connect equipment ................................................................................................ 10
3.2 Activate rekordbox dj or start trial .......................................................................... 10
3.3 Install rekordbox 5.2.0 or later ............................................................................... 11
3.4 Download data used in LIGHTING mode .............................................................. 11
3.5 Assign your fixtures (LIGHTING mode) ................................................................. 12
3.6 Perform phrase analysis ........................................................................................ 14
3.7 Play phrase-analyzed tracks (PERFORMANCE mode) ........................................ 14
4 Using rekordbox with a controller .............................................................................. 15
5 Customize lighting control ......................................................................................... 16
5.1 Change relation between scenes and phrases per track (PERFORMANCE mode)
16
5.2 Change relation between phrases and scenes (LIGHTING mode) ...................... 17
5.3 Change relation between scenes and phrases per track (LIGHTING mode) ....... 17
5.4 Create a new scene (LIGHTING mode) ................................................................ 19
5.5 Edit scenes (LIGHTING mode) .............................................................................. 20
5.6 Delete scenes (LIGHTING mode).......................................................................... 21
5.7 Reset scenes (LIGHTING mode)........................................................................... 22
5.8 Edit scenes per track (LIGHTING mode)............................................................... 23
5.9 Details of editing in LIGHTING mode .................................................................... 24
5.9.1 Setting anchor ................................................................................................. 24
5.9.2 Setting color .................................................................................................... 26
5.9.3 Setting color transition .................................................................................... 30
5.9.4 Setting strobe .................................................................................................. 33
5.9.5 Setting moving head pattern .......................................................................... 34
6 Part names ................................................................................................................ 38
6.1 Global section ........................................................................................................ 38
Fixture Library screen ................................................................................................ 38
6.2 ..................................................................................................................................... 38
6.3 Macro Mapping screen .......................................................................................... 40

2
6.4 Scene editor screen ............................................................................................... 41
Macro editor screen ................................................................................................... 44
6.5 ..................................................................................................................................... 44
7 Preferences ............................................................................................................... 47
8 Online support site ..................................................................................................... 48

3
1 Before Start
1.1 Before getting started
This Operation Guide explains rekordbox LIGHTING mode and related features. For
instructions on rekordbox in general, go to rekordbox.com [Support] > [manual] and see
the rekordbox Operating Instructions.
1.2 System requirements
Regarding the supported OS and required system (minimum operating environment), please
refer to rekordbox.com [Support] > [System requirements].
4
1.3 Overview of LIGHTING mode
The Lighting mode is a mode to assign fixtures and edit scenes. Select Lighting mode from
the global section .
The contents of the Lighting mode are as follows.
・Fixture Library screen:
You can assign and select settings for your fixtures.
5
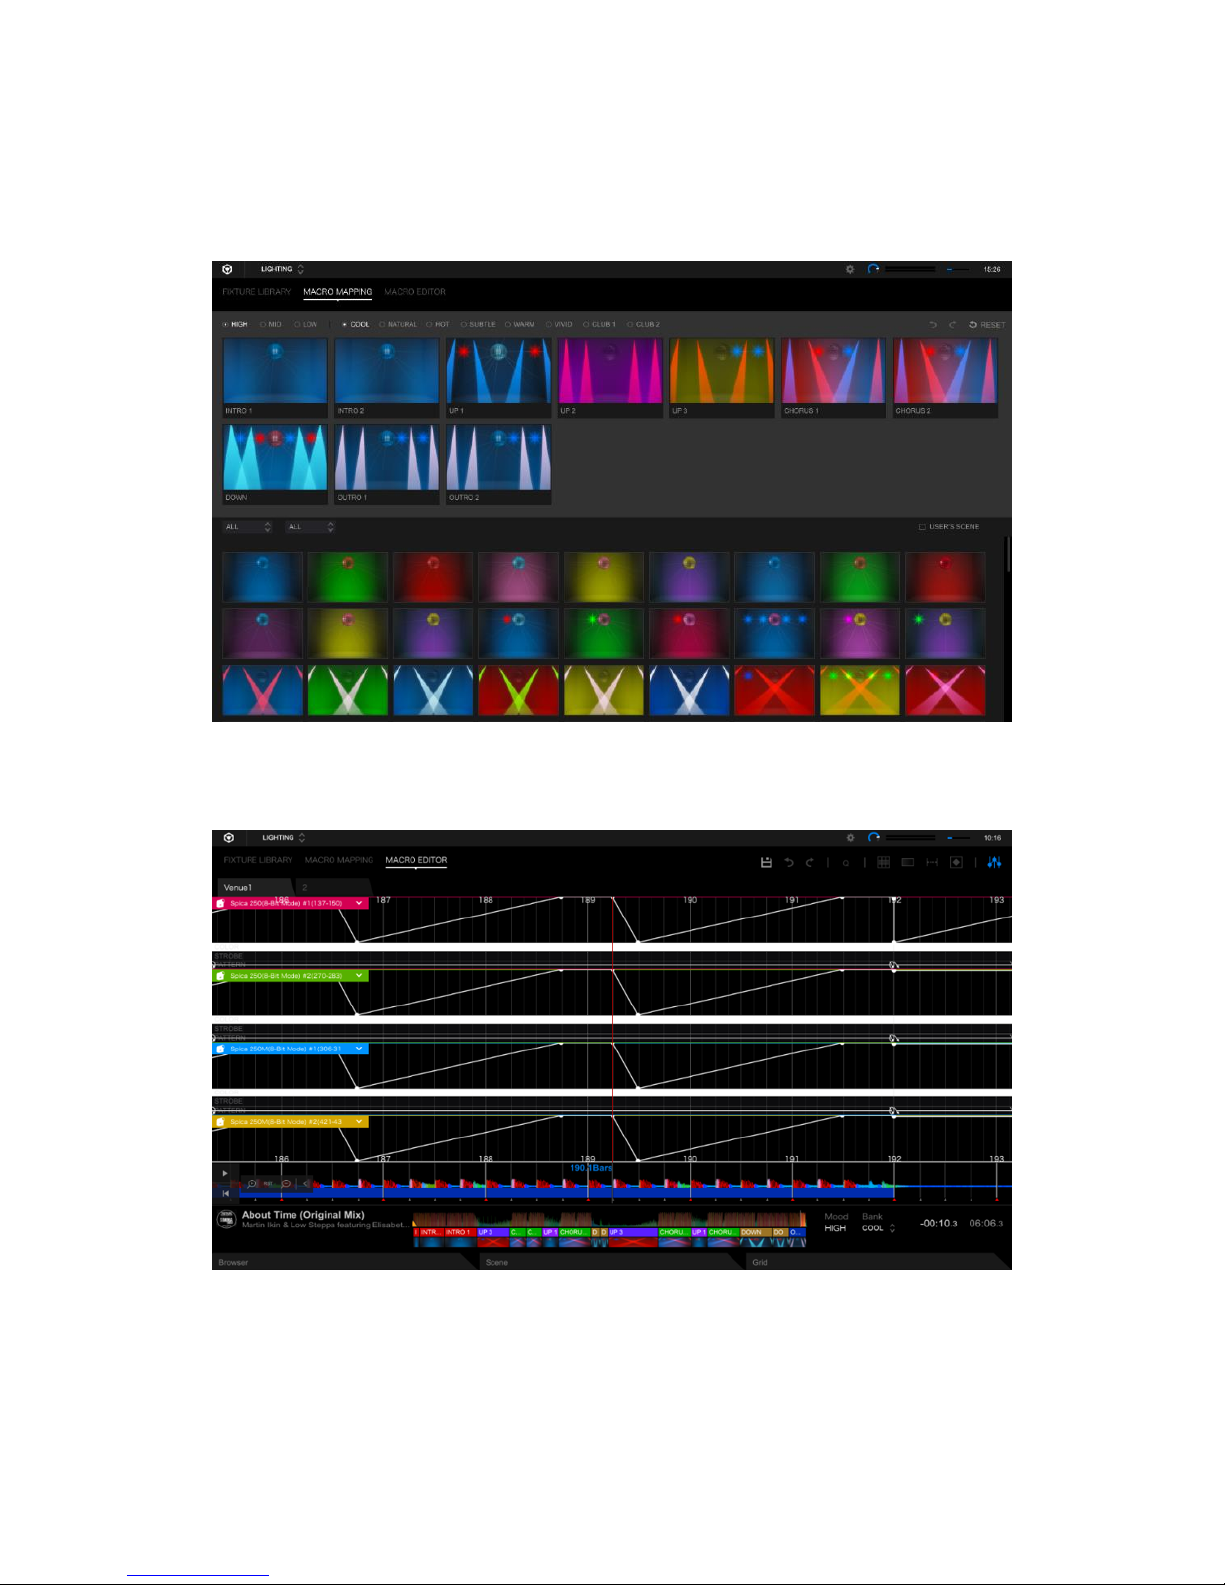
・Macro Mapping screen:
You can change relations between scenes and phrases.
・Macro Editor screen:
You can quickly edit scenes to match the flow of the track.
Please see the overview of LIGHTING mode at rekordbox.com.
6
* Select PERFORMANCE mode to perform scenes in sync with tracks. For details, please see 3.
Steps to easily control lighting.
2 Terms
The major terms used in this operation guide are explained as below.
DMX/DMX512:
DMX512 is a communication protocol used for controlling stage lighting equipment (fixtures).
DMX interface:
This is the hardware for converting the lighting control signals sent from the computer into the
DMX 512 signals and transmitting it to the connected fixtures.
Address:
It is a number assigned to control multiple fixtures individually on the DMX.
Universe:
It is a unit of DMX addresses. 1 universe means 512 addresses.
Fixture Library:
The fixture library is the list of fixture profiles including manufacturers, models, DMX channels,
categories, etc. provided by AtlaBase Ltd.
Venue:
The venue allows you to separately save DMX channel assignment information (1 universe) of
multiple fixtures according to your needs.
7
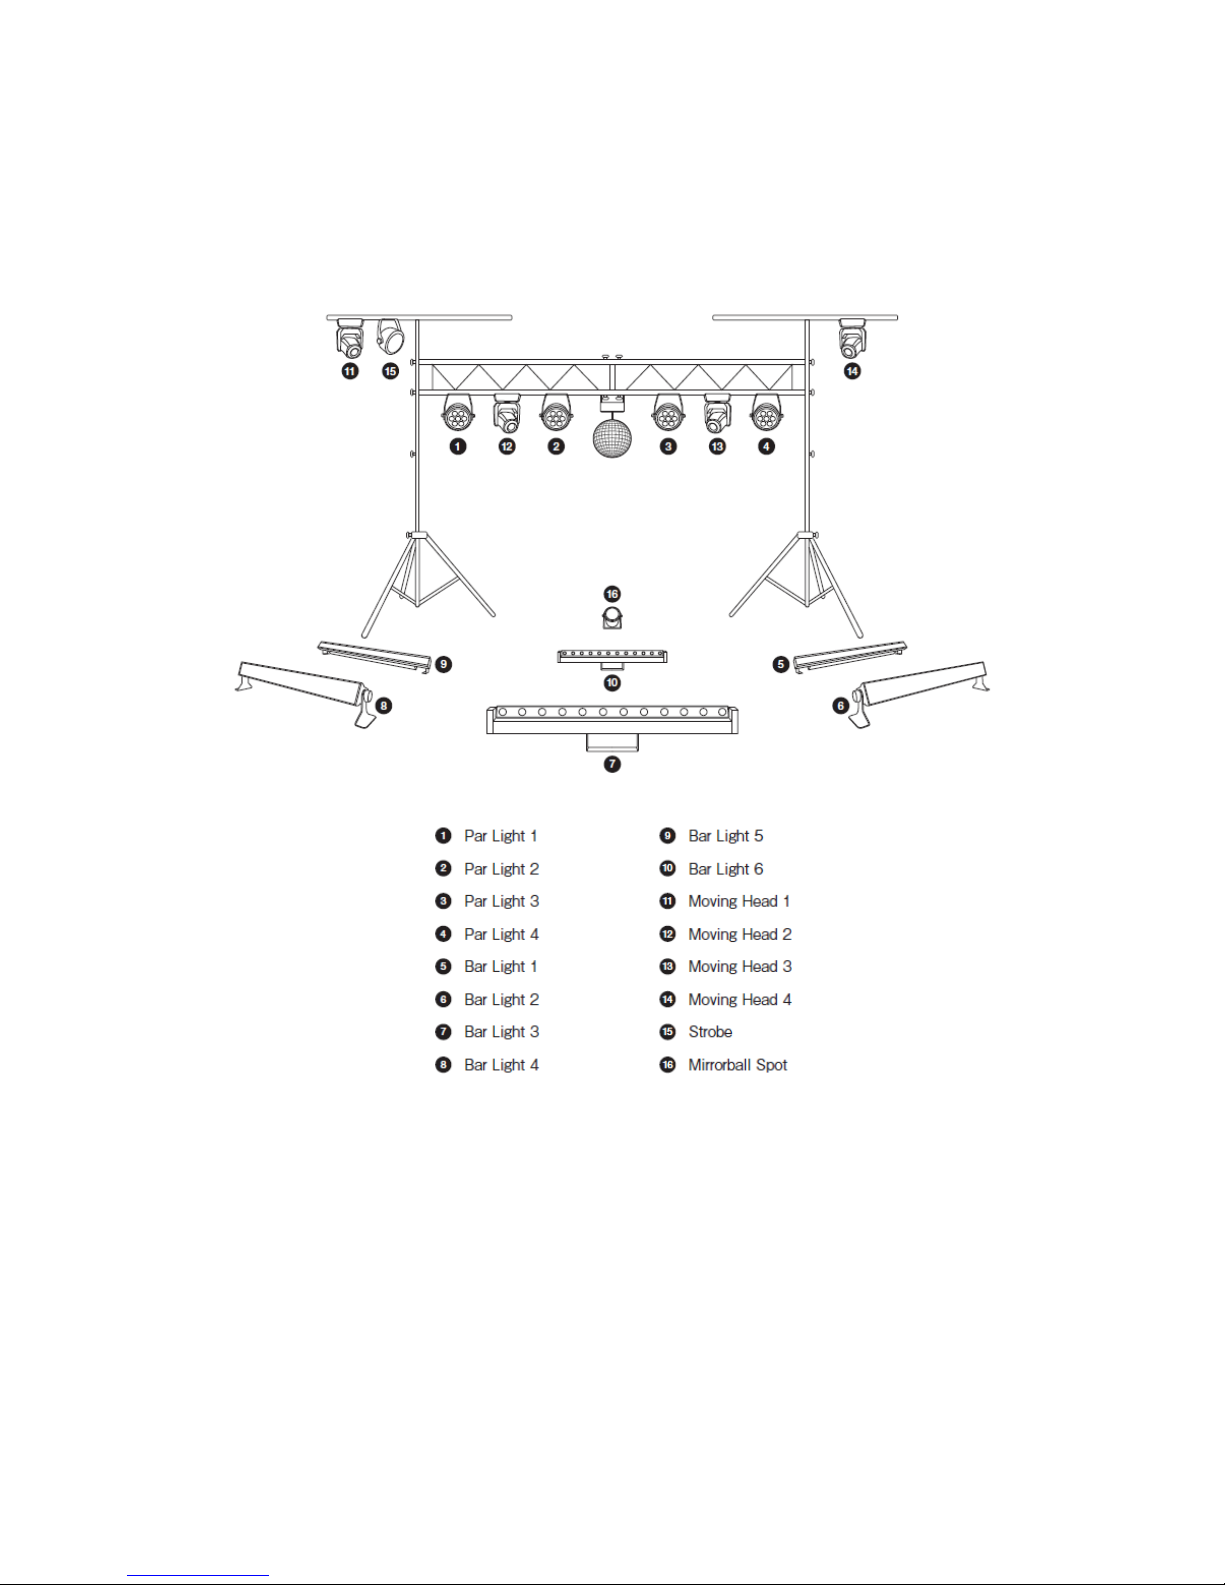
Lighting package:
The lighting package is a set of 16 fixtures which has a predetermined positional relationship
as shown below.
Lighting packages consist of the following categories of fixtures.
・Par Light
・Par Light(Simple)
・Bar Light
・Bar Light(Simple)
・Moving Head
・Moving Head(Simple)
・Strobe

8
・Mirrorball Spot
* Scenes pre-set in rekordbox are created with this lighting package as the target. By making
the same configuration, you can play your scene close to the original scene.
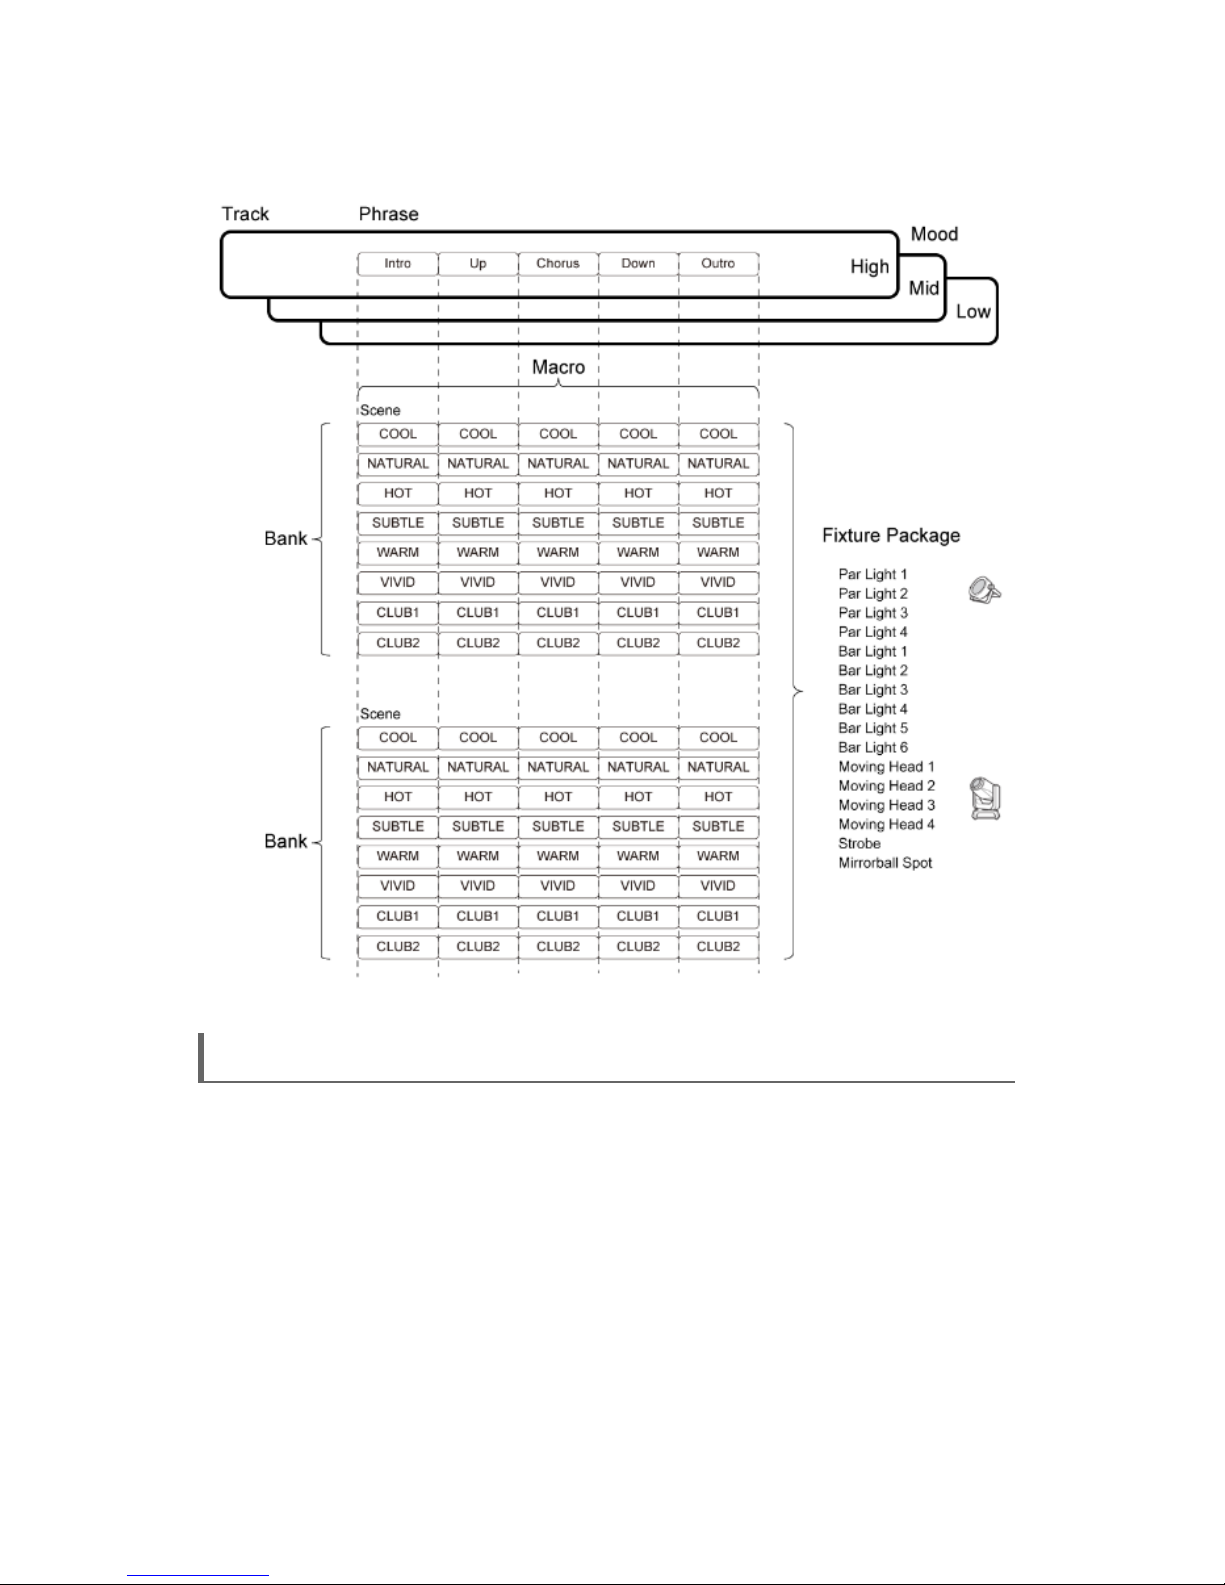
Scene:
Scene means lighting effects composed of multiple different types of fixtures. Up to 16 kinds of
lighting effects information can be saved per one scene.
Macro:
The macro means relation of multiple scenes.
Bank:
The bank is a variation of scenes consisting of
COOL/NATURAL/HOT/SUBTLE/WARM/VIVID/CLUB 1/CLUB 2.
Mood:
The mood is a classification of music based on audio information including tempo, rhythm, kick
drum and sound density. It is classified as HIGH /MID/LOW.
Phrase analysis:
Phrase analysis is to analyze the structure of tracks and define each composition as a phrase.
Phrases are categorized as below: Intro/Up/Down/Chorus/Bridge/Verse/Outro.
Phrase:
Phrases are composition of music such as: Intro/Up/Down/Chorus/Bridge/Verse/Outro.
9
3 Steps to easily control lighting
Below is the procedure for executing the scene in sync with tracks.。
3.1 Connect equipment (page 10)
3.2 Activate rekordbox dj or start trial (page 10)
3.3 Install rekordbox 5.2.0 or later (page 11)
3.4 Download data used in LIGHTING mode (page 11)
3.5 Assign your fixtures (LIGHTING mode)(page 12)
3.6 Preform phrase analysis(page 14)
3.7 Play phrase analyzed tracks (PERFORMANCE mode) (page 14)
10
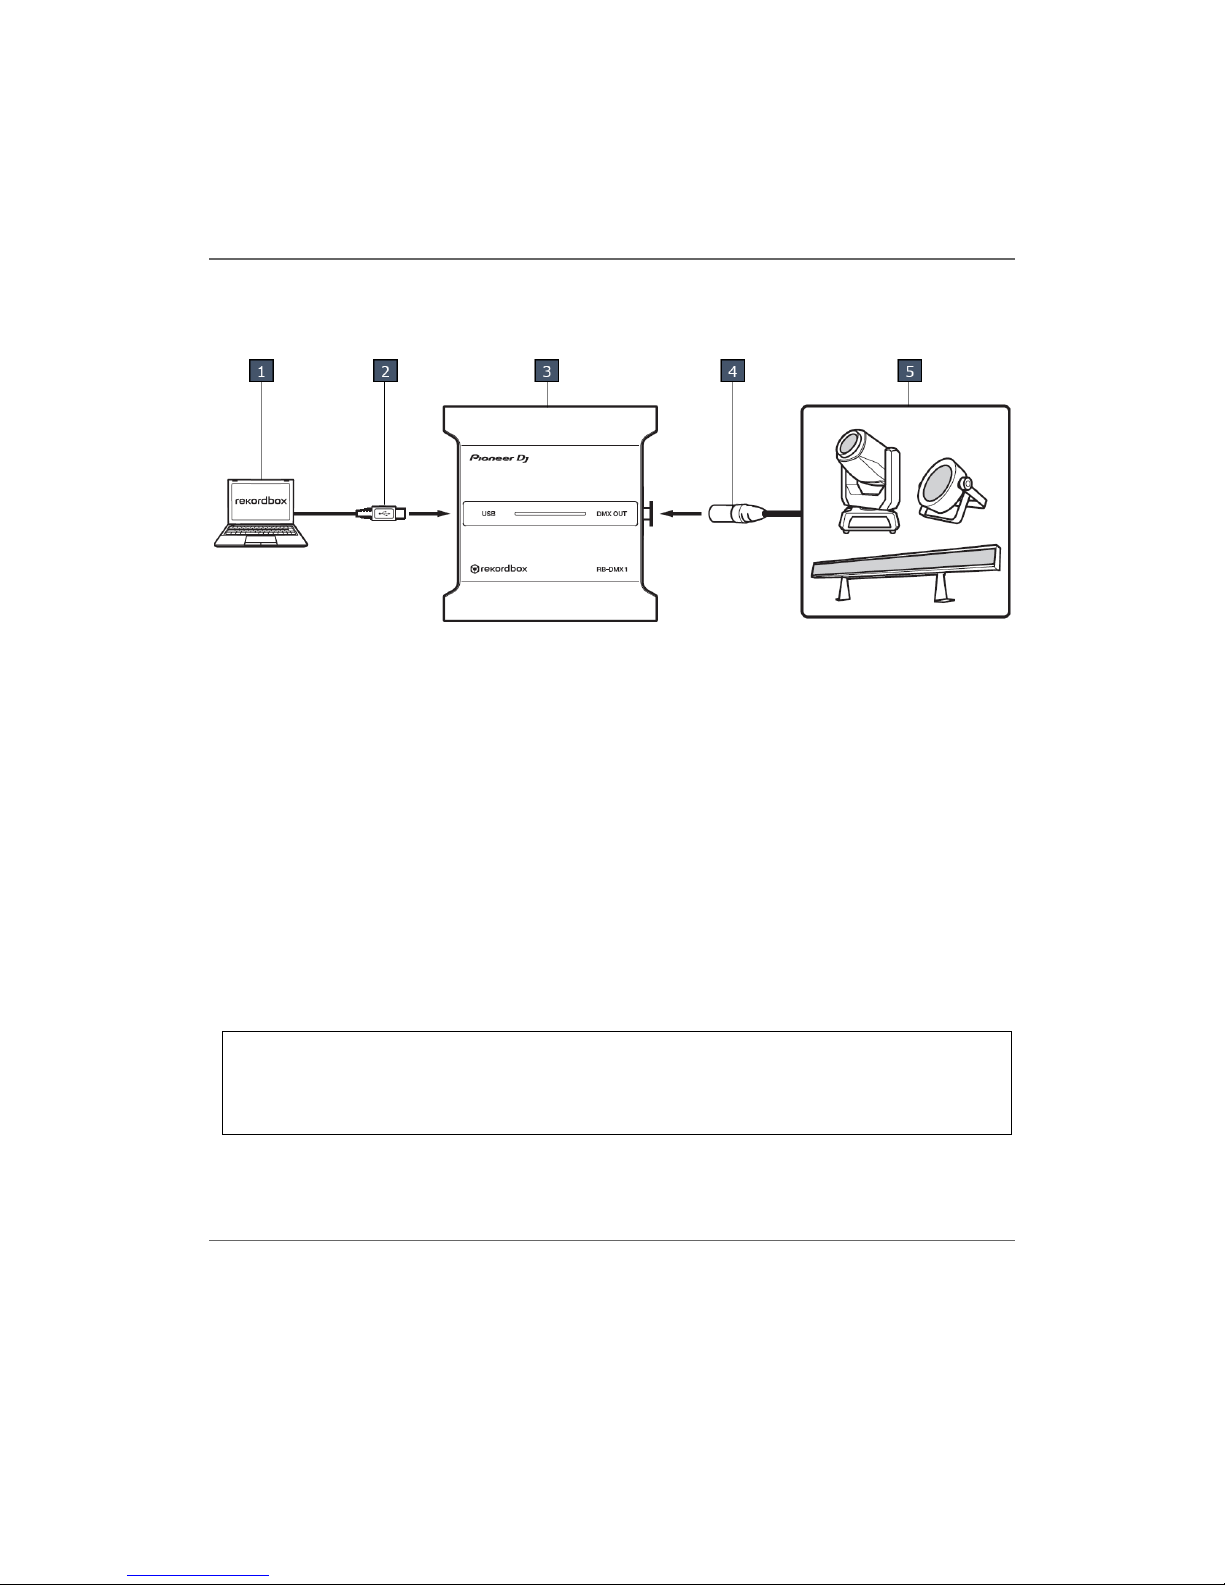
3.1 Connect equipment
Connect devices according to the connection diagram shown below
[1] Computer where rekordbox is installed
[2] USB cable
[3] rekordbox supported DMX interface (*)
[4] DMX cable(XLR 3-pin)
[5] Your fixtures
*See rekordbox.com for the DMX interface compatible with rekordbox.
*Please note that you can ONLY use the DMX interface compatible with rekordbox.
You may be unable to properly operate the device depending on USB connection status.
This could be due to band width of USB port and USB hub on your computer. Changing USB
hub or port could solve the problem.
3.2 Activate rekordbox dj or start trial
To use rekordbox LIGHTING mode, you need to activate rekordbox dj or start trial.
(see the following 1 ~ 4)
1. Activate rekordbox dj license key bundled with Pioneer DJ product*.
11
*Please refer to rekordbox.com > [DJ units with bundled license keys].
2. Purchase rekordbox dj Plus Pack and activate rekordbox dj license key.
3. Subscribe to rekordbox dj (with monthly payment).
4. Start trial.
For details on how to activate rekordbox dj or start trial, go to rekordbox.com > [Support] >
[Manual] and see rekordbox instruction.
3.3 Install rekordbox 5.2.0 or later
rekordbox LIGHTING mode can be used on rekordbox 5.2.0 and later. Please update
rekordbox to the latest version if you haven’t already.
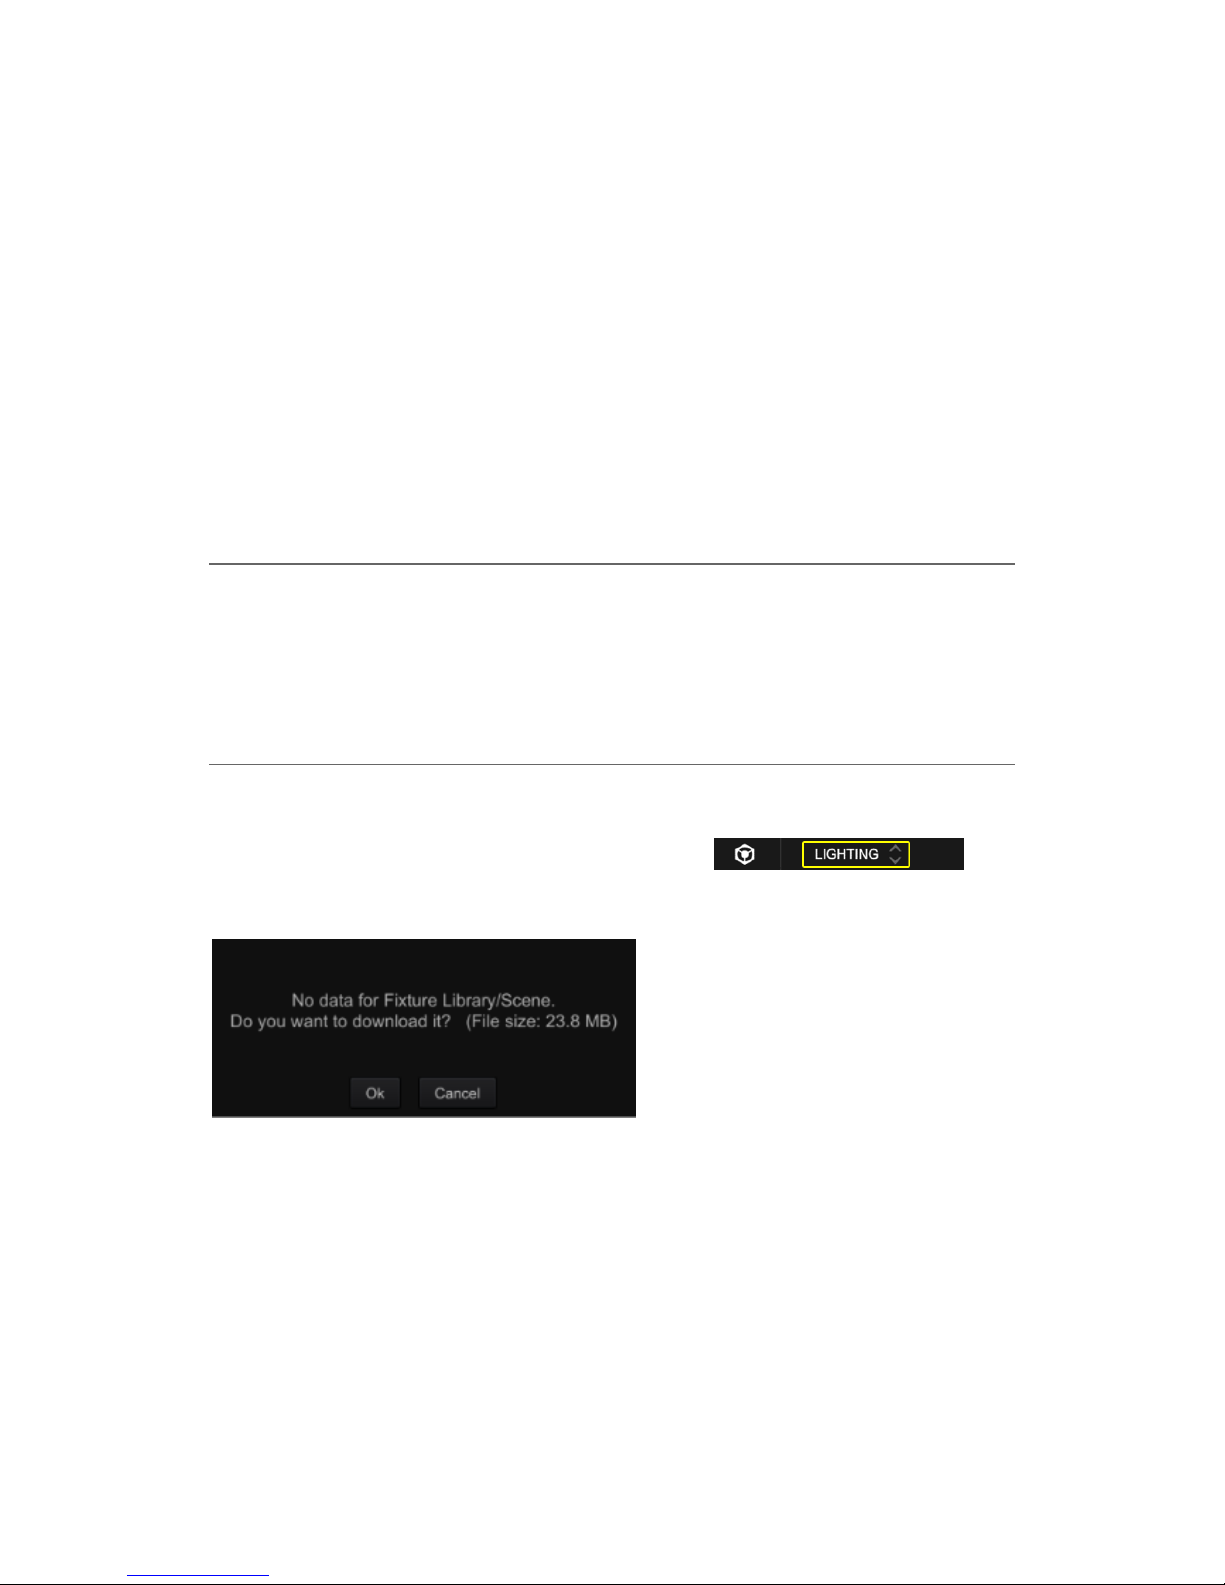
3.4 Download data used in LIGHTING mode
To use LIGHTING mode, you need to download fixture library and scene data.
When you select LIGHTING mode in the global section , the
following dialog appears. Follow the instructions to download the necessary data.
* Your computer must be connected to the internet to download data.
* Open PERFORMANCE mode > [Preferences] > [Lighting] and tick [Enable Lighting function].
12
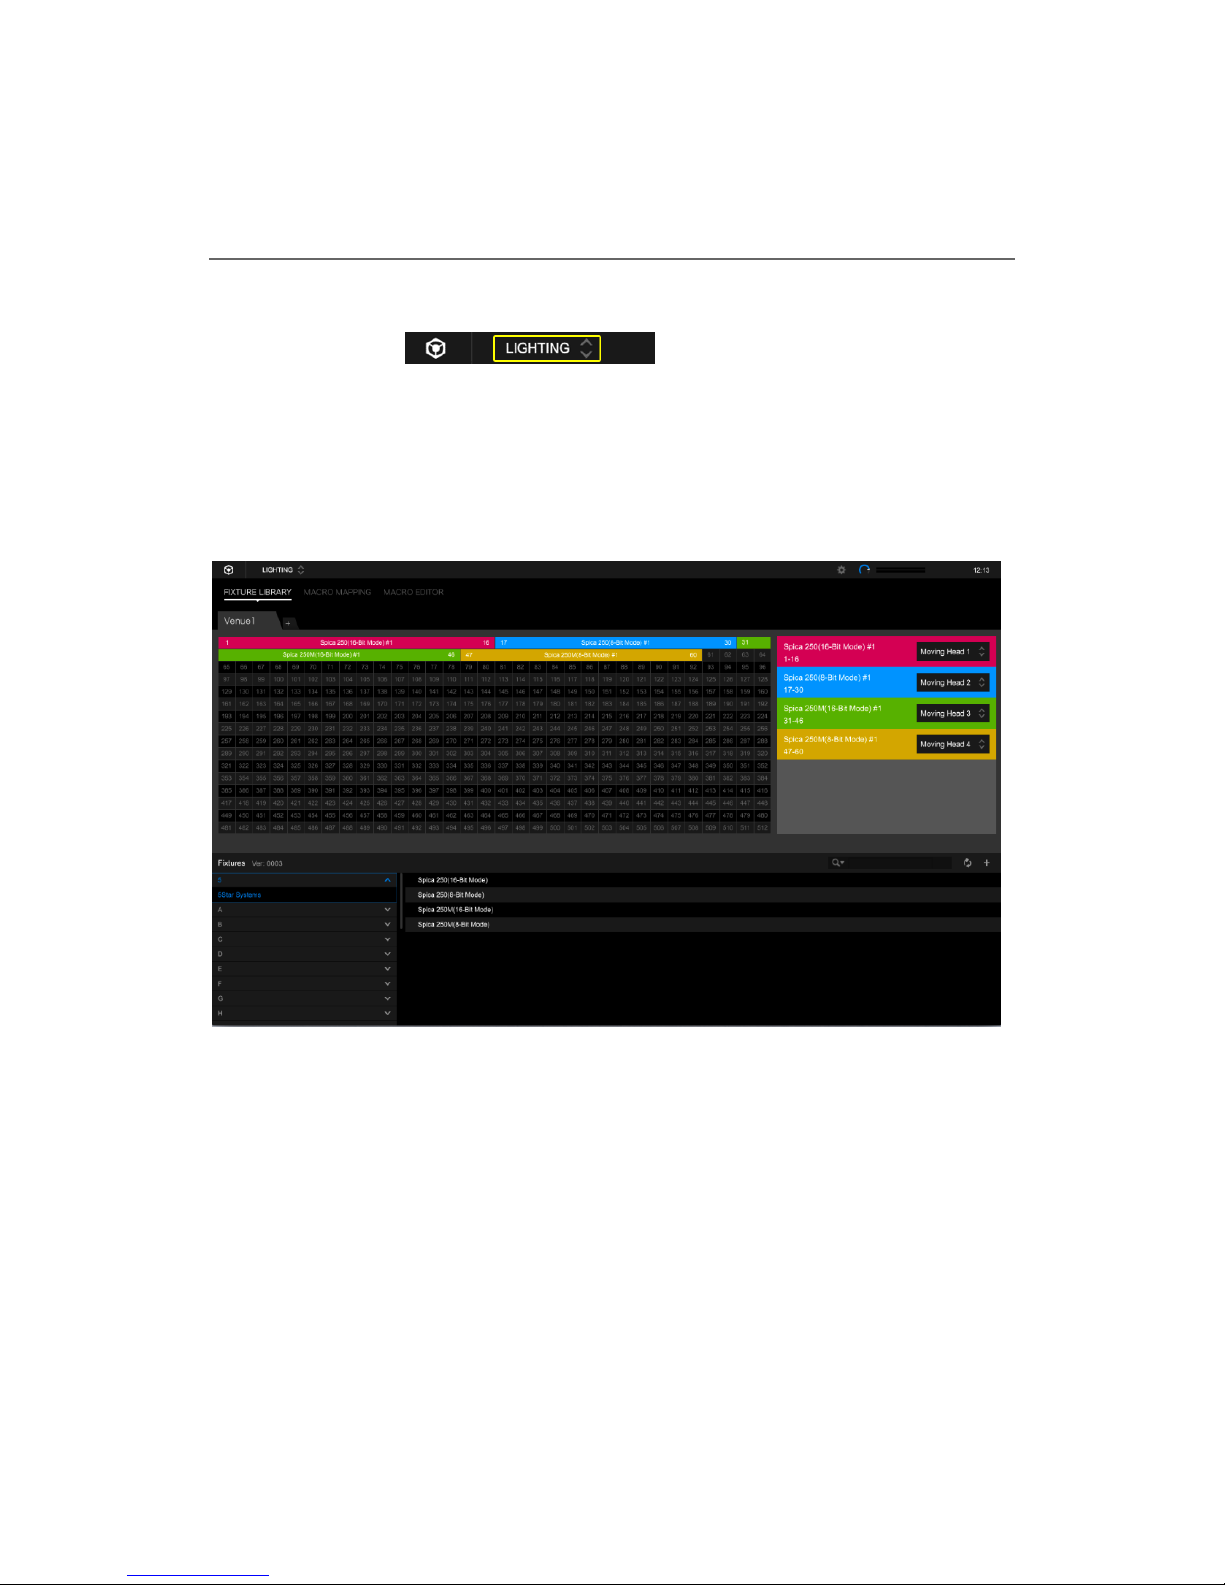
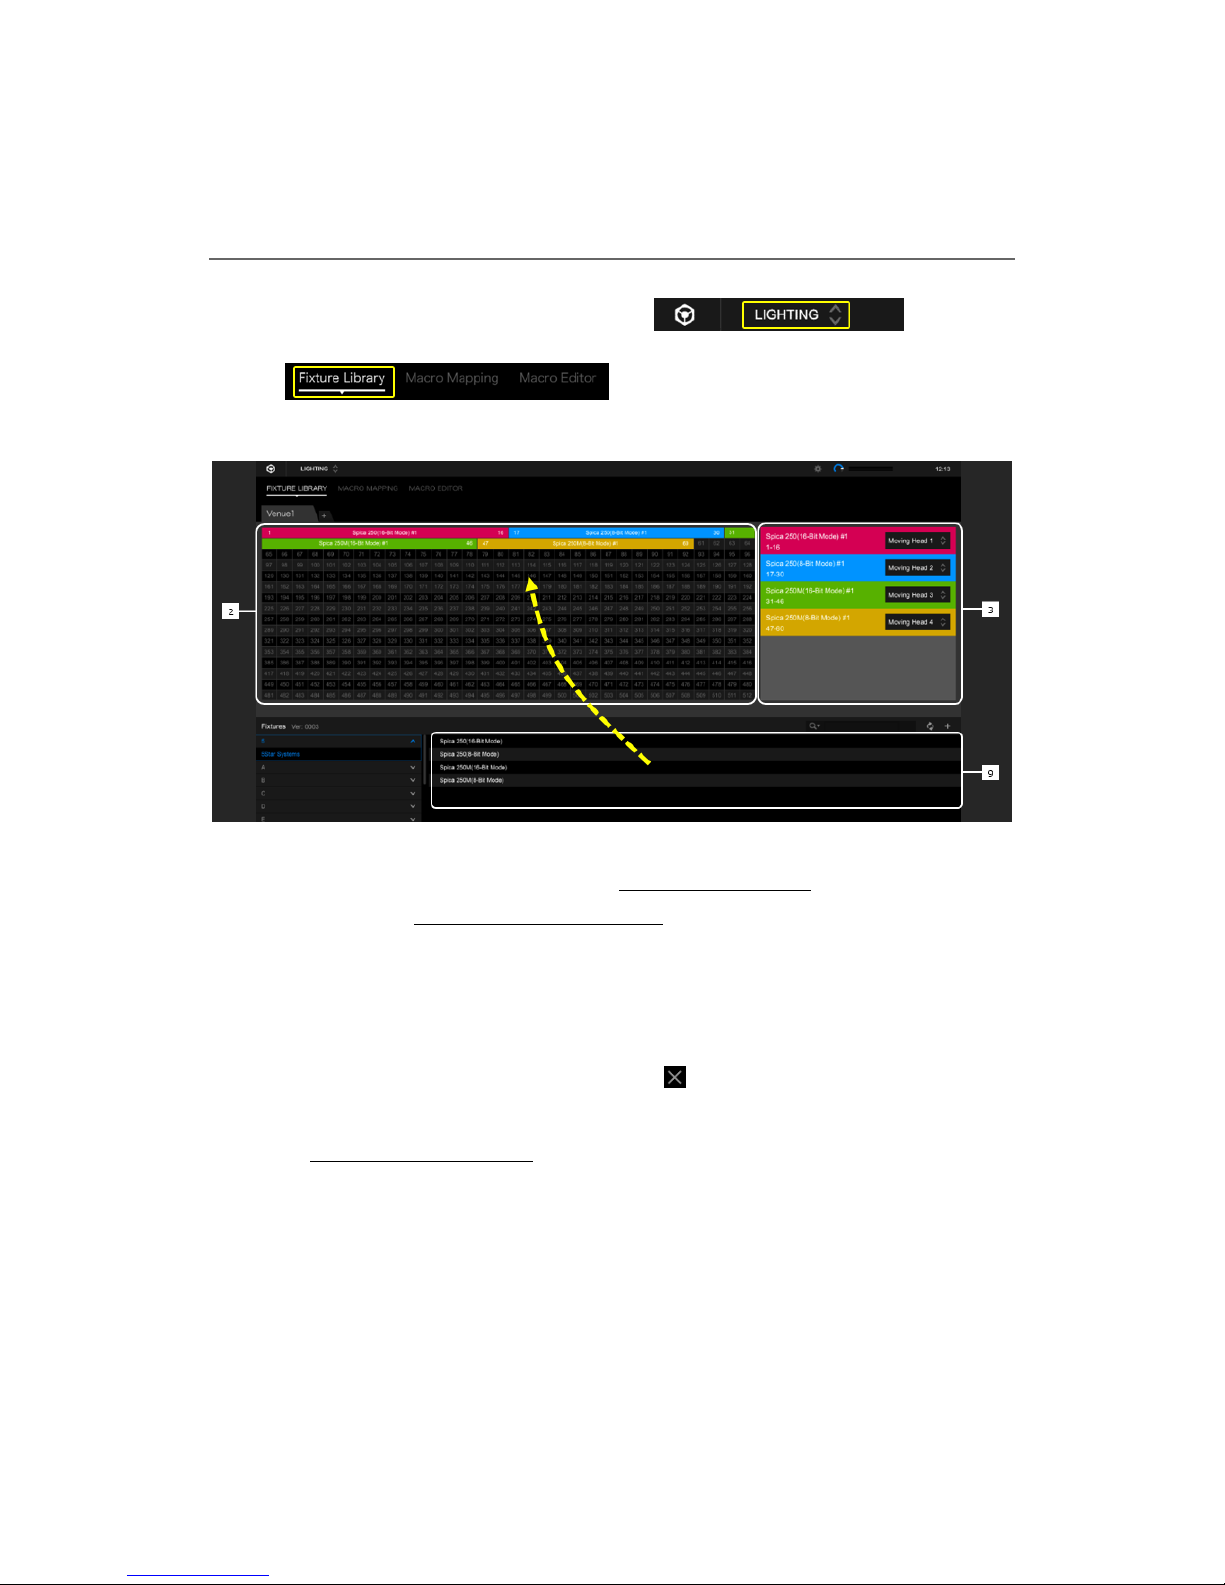
3.5 Assign your fixtures (LIGHTING mode)
1. Select LIGHTING Mode in the global section and click
to show LIGHTING mode FIXTURE LIBRARY
screen.
2 Select a fixture from the list displayed in the fixture display area [9] and drag & drop it to a
DMX address in the lighting device assign area [2].
*For the DMX address, please set the same address as the setting value of each fixture.
The selected fixture is registered in rekordbox, and the DMX address is fixed at the same time.
* To change the address, click with the mouse and drag it to an address you would like to fix.
* To delete assignment, click it by a mouse and click .
3 In the category selection area [3], select a category from the drop-down menu.
13
The category of the assigned fixture is fixed.
*If you assign no category, select [No Assign].
*Simple category
You can use Simply category for Par Light, Bar Light and Moving Head.
When you select the Simple category, the pre-set scene is applied which is optimized when there
are 2 lighting devices assigned to each category.
14
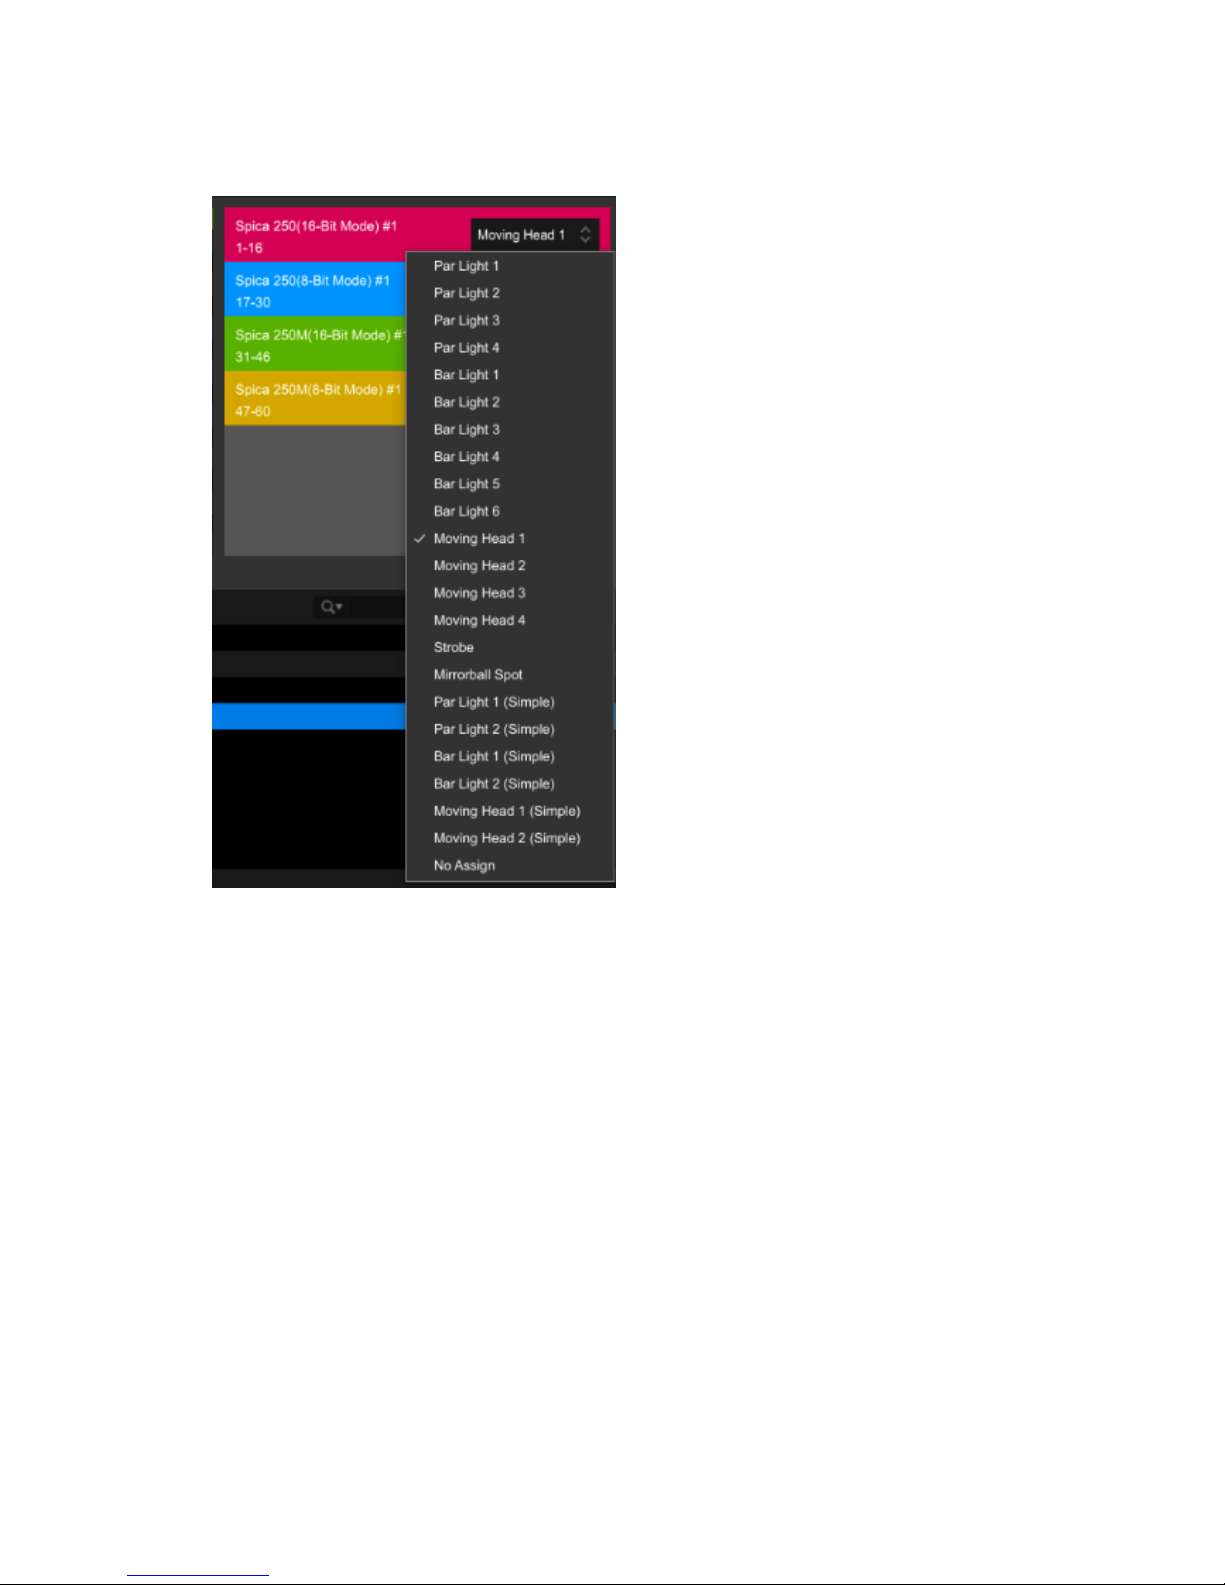
* Moving Head initial position setting
Right-click category selection area [3]. Click to show the
dialog below (this is enabled only when the category is Moving Head/Moving Head(Simple)) and
you can set Moving Head initial position
*When the Moving Head is connected, you can check the initial position.
3.6 Perform phrase analysis
For details on how to analyze phrases of tracks, refer to rekordbox.com > [Support] > [manual]
> [rekordbox Operating Instructions].
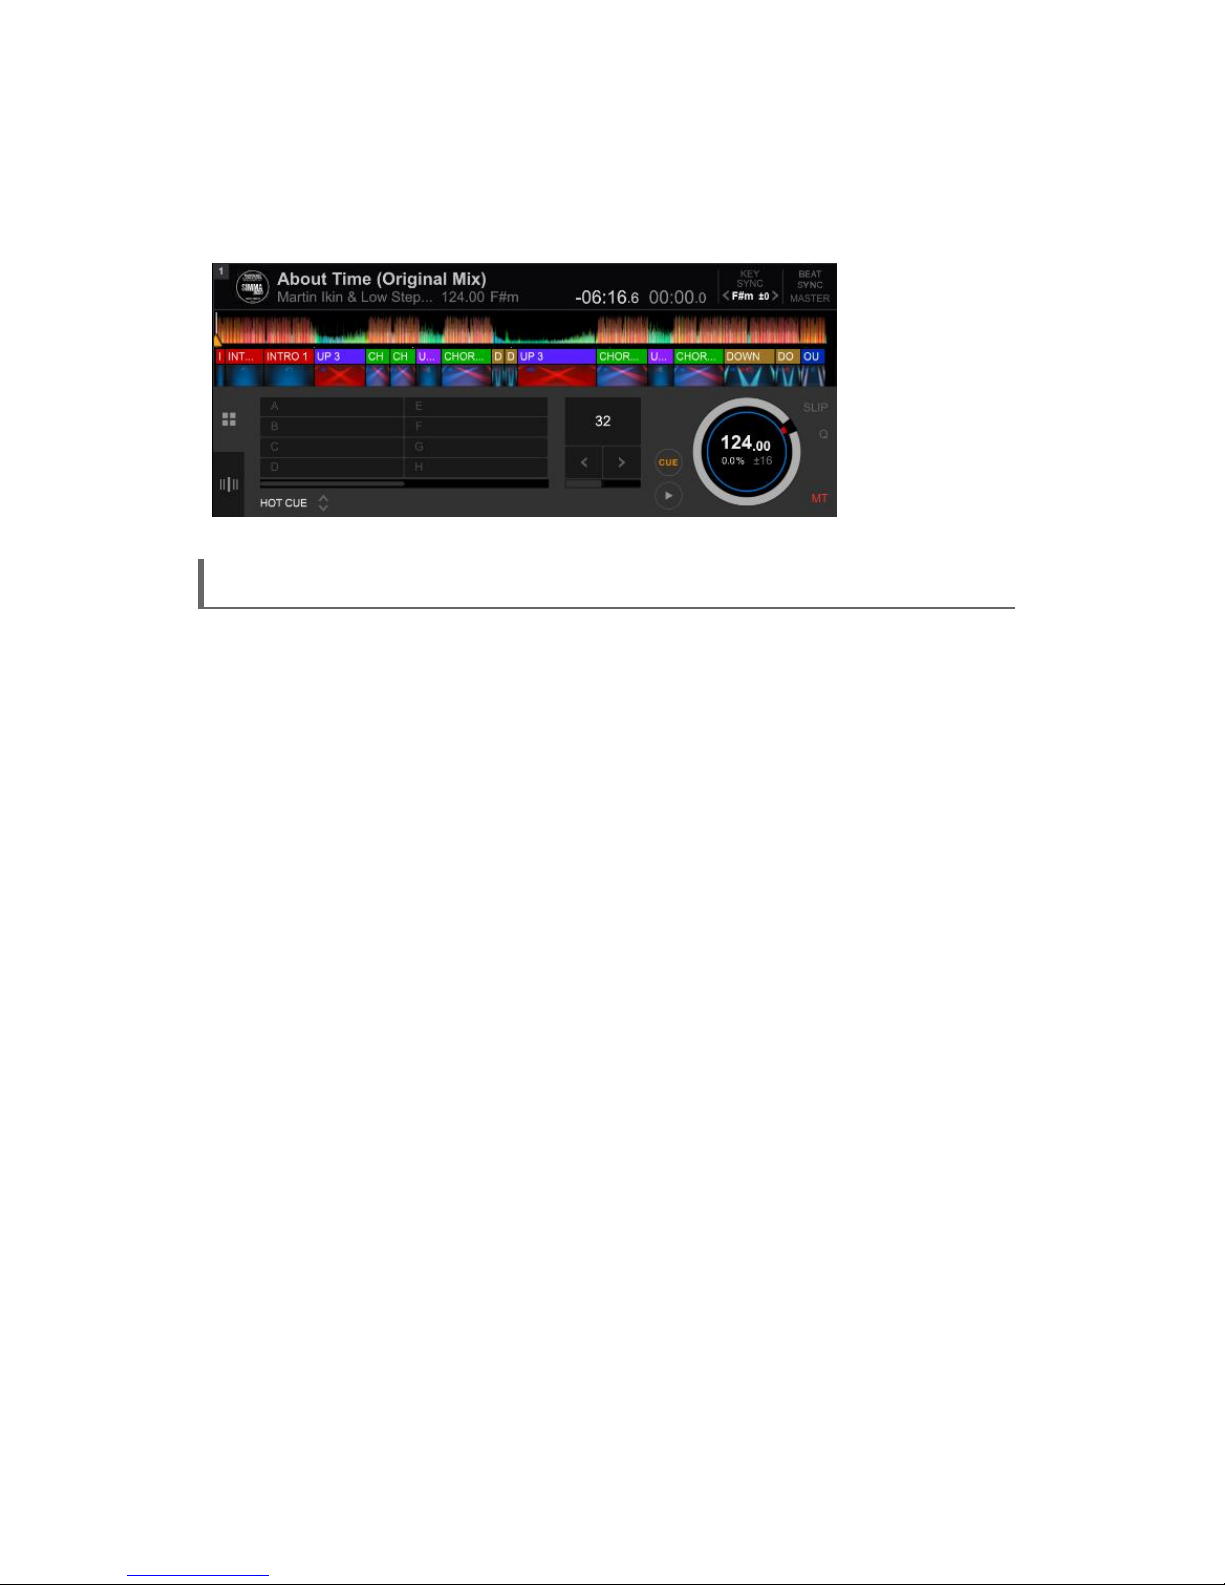
3.7 Play phrase-analyzed tracks (PERFORMANCE mode)
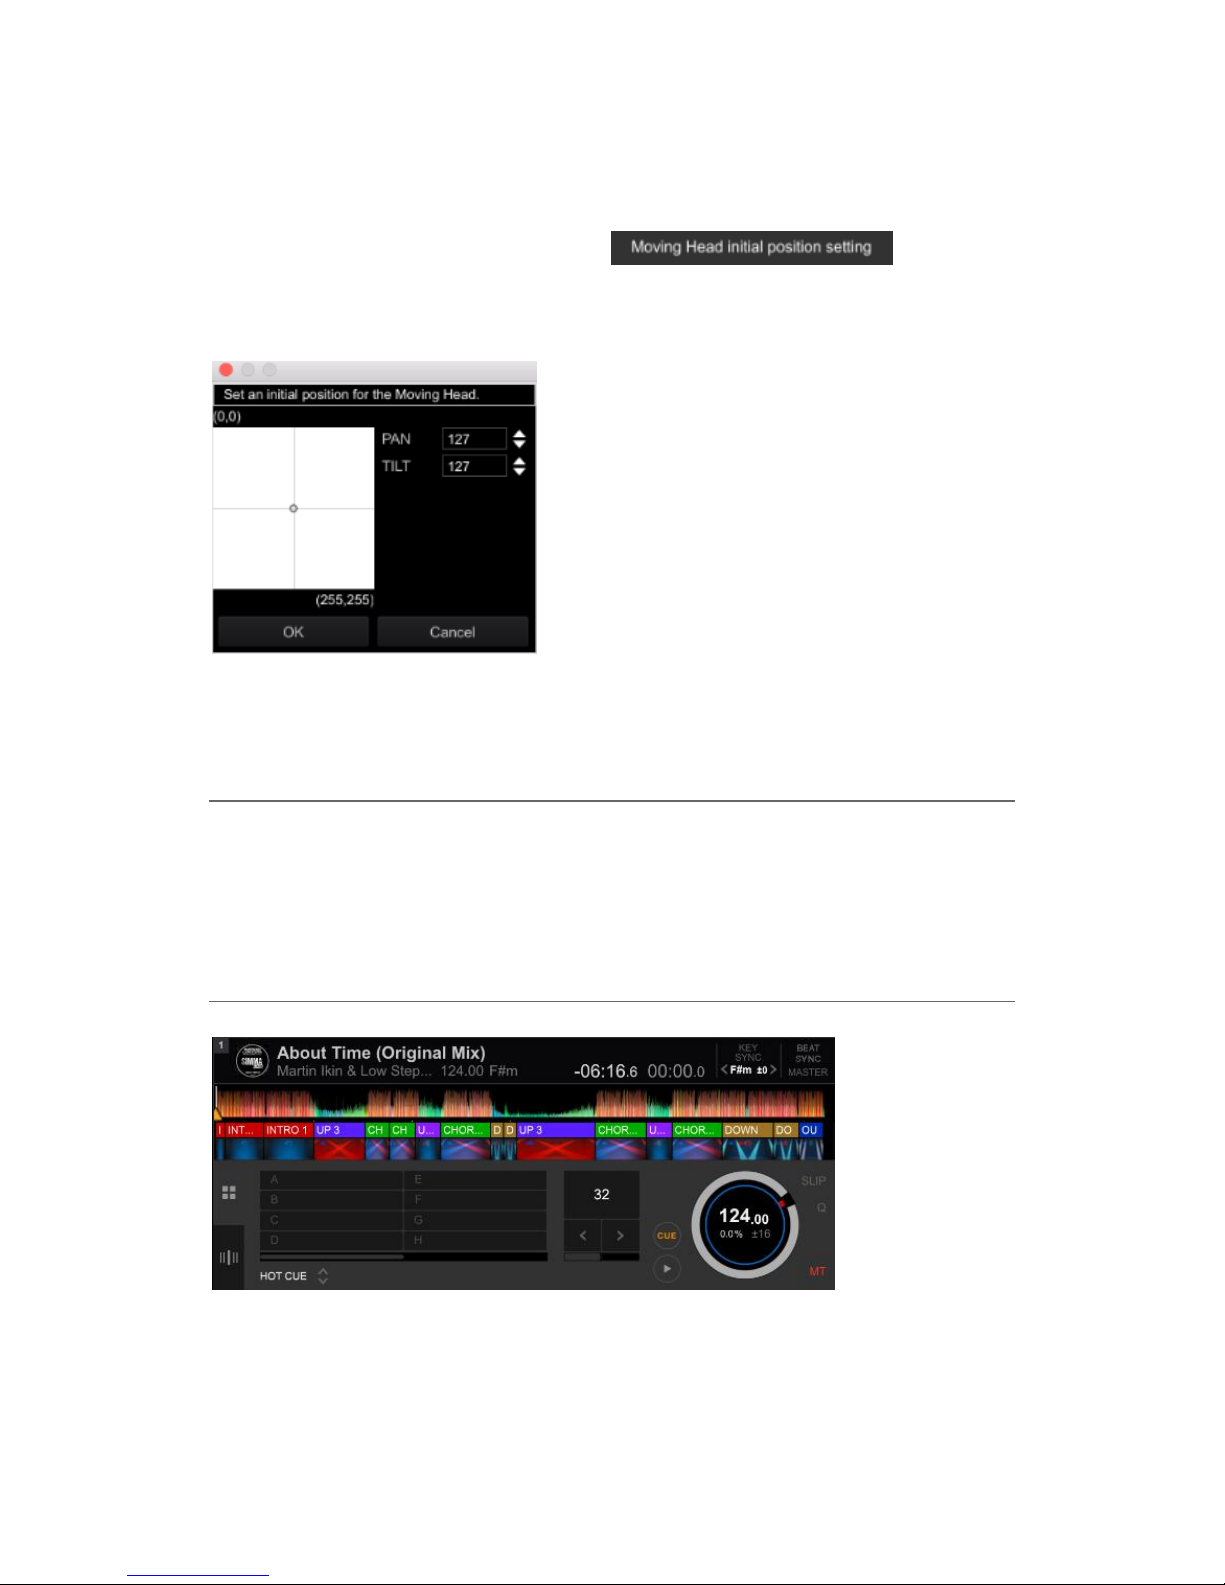
1 Load and play a phrase-analyzed track on deck 1 or deck 2 in PERFORMANCE mode.
The scene related to the phrases will be played in sync with a track.
 Loading...