

Pioneer DJ DJM850 User Manual

DJ MIXER
DJM-850-K
DJM-850-S
DJM-850-W
http://pioneerdj.com/support/
The Pioneer website shown above offers FAQs, information on software and various other types of information
and services to allow you to use your product in greater comfort.
Operating Instructions

Thank you for buying this Pioneer product. Please read through these operating instructions so you will know how to operate your model properly. After
you have finished reading the instructions, put them away in a safe place for future reference.
In some countries or regions, the shape of the power plug and power outlet may sometimes differ from that shown in the explanatory drawings.
However the method of connecting and operating the unit is the same.
IMPORTANT
CAUTION
RISK OF ELECTRIC SHOCK
DO NOT OPEN
The lightning flash with arrowhead symbol,
within an equilateral triangle, is intended to
alert the user to the presence of uninsulated
“dangerous voltage” within the product’s
enclosure that may be of sufficient
magnitude to constitute a risk of electric
shock to persons.
Read these instructions.
1)
Keep these instructions.
2)
Heed all warnings.
3)
Follow all instructions.
4)
Do not use this apparatus near water.
5)
Clean only with dry cloth.
6)
Do not block any ventilation openings. Install in
7)
CAUTION:
TO PREVENT THE RISK OF ELECTRIC
SHOCK, DO NOT REMOVE COVER (OR
BACK). NO USER-SERVICEABLE PARTS
INSIDE. REFER SERVICING TO QUALIFIED
SERVICE PERSONNEL.
accordance with the manufacturer’s
instructions.
Do not install near any heat sources such as
8)
radiators, heat registers, stoves, or other
apparatus (including amplifiers) that produce
heat.
Do not defeat the safety purpose of the polarized
9)
or grounding-type plug. A polarized plug has two
blades with one wider than the other. A
grounding type plug has two blades and a third
grounding prong. The wide blade or the third
prong are provided for your safety. If the provided
plug does not fit into your outlet, consult an
electrician for replacement of the obsolete outlet.
Protect the power cord from being walked on or
10)
pinched particularly at plugs, convenience
receptacles, and the point where they exit from
the apparatus.
11)
Only use attachments/accessories specified by
the manufacturer.
12)
Use only with the cart, stand, tripod, bracket, or
table specified by the manufacturer, or sold with
the apparatus. When a cart is used, use caution
when moving the cart/apparatus combination to
avoid injury from tip-over.
13)
Unplug this apparatus during lightning storms
or when unused for long periods of time.
14)
Refer all servicing to qualified service personnel.
Servicing is required when the apparatus has
been damaged in any way, such as power-supply
cord or plug is damaged, liquid has been spilled
or objects have fallen into the apparatus, the
apparatus has been exposed to rain or moisture,
does not operate normally, or has been dropped.
The exclamation point within an equilateral
triangle is intended to alert the user to the
presence of important operating and
maintenance (servicing) instructions in the
literature accompanying the appliance.
D3-4-2-1-1_A1_En
D3-7-13-69_En
NOTE:
This equipment has been tested and found to comply with the limits for a Class B digital device, pursuant to Part 15
of the FCC Rules. These limits are designed to provide reasonable protection against harmful interference in a
residential installation. This equipment generates, uses, and can radiate radio frequency energy and, if not installed
and used in accordance with the instructions, may cause harmful interference to radio communications. However,
there is no guarantee that interference will not occur in a particular installation. If this equipment does cause
harmful interference to radio or television reception, which can be determined by turning the equipment off and on,
the user is encouraged to try to correct the interference by one or more of the following measures:
— Reorient or relocate the receiving antenna.
— Increase the separation between the equipment and receiver.
— Connect the equipment into an outlet on a circuit different from that to which the receiver is connected.
— Consult the dealer or an experienced radio/TV technician for help.
En
2
D8-10-1-2_A1_En

FEDERAL COMMUNICATIONS COMMISSION DECLARATION OF CONFORMITY
This device complies with part 15 of the FCC Rules. Operation is subject to the following two conditions: (1) This
device may not cause harmful interference, and (2) this device must accept any interference received, including
interference that may cause undesired operation.
Product Name: DJ MIXER
Model Number: DJM-850-K, DJM-850-S, DJM-850-W
Responsible Party Name: PIONEER ELECTRONICS (USA) INC.
SERVICE SUPPORT DIVISION
Address: 1925 E. DOMINGUEZ ST. LONG BEACH, CA 90810-1003, U.S.A.
Phone: 1-800-421-1404
URL: http://www.pioneerelectronics.com
D8-10-4*_C1_En
WARNING
This equipment is not waterproof. To prevent a fire or
shock hazard, do not place any container filled with
liquid near this equipment (such as a vase or flower
pot) or expose it to dripping, splashing, rain or
moisture.
D3-4-2-1-3_A1_En
WARNING
Before plugging in for the first time, read the following
section carefully.
The voltage of the available power supply differs
according to country or region. Be sure that the
power supply voltage of the area where this unit
will be used meets the required voltage (e.g., 230 V
or 120 V) written on the side panel.
D3-4-2-1-4*_A1_En
WARNING
This product equipped with a three-wire grounding
(earthed) plug - a plug that has a third (grounding) pin.
This plug only fits a grounding-type power outlet. If you
are unable to insert the plug into an outlet, contact a
licensed electrician to replace the outlet with a properly
grounded one. Do not defeat the safety purpose of the
grounding plug.
D3-4-2-1-6_A1_En
WARNING
To prevent a fire hazard, do not place any naked flame
sources (such as a lighted candle) on the equipment.
D3-4-2-1-7a_A1_En
VENTILATION CAUTION
When installing this unit, make sure to leave space
around the unit for ventilation to improve heat radiation
(at least 5 cm at rear, and 3 cm at each side).
WARNING
Slots and openings in the cabinet are provided for
ventilation to ensure reliable operation of the product,
and to protect it from overheating. To prevent fire
hazard, the openings should never be blocked or
covered with items (such as newspapers, table-cloths,
curtains) or by operating the equipment on thick carpet
or a bed.
D3-4-2-1-7b*_A1_En
Operating Environment
Operating environment temperature and humidity:
+5 °C to +35 °C (+41 °F to +95 °F); less than 85 %RH
(cooling vents not blocked)
Do not install this unit in a poorly ventilated area, or in
locations exposed to high humidity or direct sunlight (or
strong artificial light)
D3-4-2-1-7c*_A1_En
If the AC plug of this unit does not match the AC
outlet you want to use, the plug must be removed
and appropriate one fitted. Replacement and
mounting of an AC plug on the power supply cord of
this unit should be performed only by qualified
service personnel. If connected to an AC outlet, the
cut-off plug can cause severe electrical shock. Make
sure it is properly disposed of after removal.
The equipment should be disconnected by removing
the mains plug from the wall socket when left unused
for a long period of time (for example, when on
vacation).
D3-4-2-2-1a_A1_En
CAUTION
The POWER switch on this unit will not completely
shut off all power from the AC outlet. Since the power
cord serves as the main disconnect device for the
unit, you will need to unplug it from the AC outlet to
shut down all power. Therefore, make sure the unit
has been installed so that the power cord can be
easily unplugged from the AC outlet in case of an
accident. To avoid fire hazard, the power cord should
also be unplugged from the AC outlet when left
unused for a long period of time (for example, when
on vacation).
D3-4-2-2-2a*_A1_En
WARNING: Handling the cord on this product or
cords associated with accessories sold with the
product may expose you to chemicals listed on
proposition 65 known to the State of California and
other governmental entities to cause cancer and
birth defect or other reproductive harm.
D36-P5_B1_En
This product is for general household purposes. Any
failure due to use for other than household purposes
(such as long-term use for business purposes in a
restaurant or use in a car or ship) and which requires
repair will be charged for even during the warranty
period.
K041_A1_En
Information to User
Alterations or modifications carried out without
appropriate authorization may invalidate the user’s
right to operate the equipment.
D8-10-2_A1_En
En
3

This Class B digital apparatus complies with
Canadian ICES-003.
D8-10-1-3_A1_En
CAUTION
This product satisfies FCC regulations when shielded
cables and connectors are used to connect the unit
to other equipment. To prevent electromagnetic
interference with electric appliances such as radios
and televisions, use shielded cables and connectors
for connections.
D8-10-3a_A1_En
The Safety of Your Ears is in Your Hands
Get the most out of your equipment by playing it at a
safe level – a level that lets the sound come through
clearly without annoying blaring or distortion and, most
importantly, without affecting your sensitive hearing.
Sound can be deceiving. Over time, your hearing
“comfort level” adapts to higher volumes of sound, so
what sounds “normal” can actually be loud and
harmful to your hearing. Guard against this by setting
your equipment at a safe level BEFORE your hearing
adapts.
ESTABLISH A SAFE LEVEL:
• Set your volume control at a low setting.
• Slowly increase the sound until you can hear it
comfortably and clearly, without distortion.
• Once you have established a comfortable sound
level, set the dial and leave it there.
BE SURE TO OBSERVE THE FOLLOWING
GUIDELINES:
• Do not turn up the volume so high that you can’t
hear what’s around you.
• Use caution or temporarily discontinue use in
potentially hazardous situations.
• Do not use headphones while operating a motorized
vehicle; the use of headphones may create a traffic
hazard and is illegal in many areas.
S001a_A1_En
POWER-CORD CAUTION
Handle the power cord by the plug. Do not pull out the
plug by tugging the cord and never touch the power
cord when your hands are wet as this could cause a
short circuit or electric shock. Do not place the unit, a
piece of furniture, etc., on the power cord, or pinch the
cord. Never make a knot in the cord or tie it with other
cords. The power cords should be routed such that they
are not likely to be stepped on. A damaged power cord
can cause a fire or give you an electrical shock. Check
the power cord once in a while. When you find it
damaged, ask your nearest PIONEER authorized
service center or your dealer for a replacement.
IMPORTANT NOTICE
THE MODEL NUMBER AND SERIAL NUMBER OF
THIS EQUIPMENT ARE ON THE REAR OR BOTTOM.
RECORD THESE NUMBERS ON PAGE 31 FOR
FUTURE REFERENCE.
S002*_A1_En
D36-AP9-1_A1_En_PSV
En
4

Contents
How to read this manual
The names of displays, menus, and buttons in this manual are enclosed
in brackets. (e.g. [MASTER] channel, [ON/OFF], [File] menu)
Before start
Features ....................................................................................................... 6
What’s in the box ........................................................................................ 6
Connections
Rear panel ................................................................................................... 7
Connecting input terminals ....................................................................... 8
Connecting output terminals .................................................................... 8
Connecting to the control panel ................................................................ 9
About the driver software and setting utility software ............................. 9
Operation
Basic Operation ........................................................................................ 15
Advanced Operations ............................................................................... 17
Types of effects
BEAT COLOR FX/SOUND COLOR FX effect types ................................. 19
Types of BEAT EFFECT .............................................................................. 19
List of MIDI Messages
Changing the settings
About the auto standby function ............................................................. 24
About the talk over function..................................................................... 24
Setting preferences .................................................................................. 24
Additional information
Troubleshooting ........................................................................................ 25
Block Diagram .......................................................................................... 27
About trademarks and registered trademarks ...................................... 28
Specifications............................................................................................ 28
En
5

Before start
Features
This unit is a 4-channel DJ mixer carrying over the technology of the
Pioneer DJM series, the world standard for club sound. It is not only
equipped with a variety of functions for DJ performances, including
USB sound card, BEAT COLOR FX, SOUND COLOR FX and BEAT
EFFECT, it also uses a high sound quality, high reliability design and a
panel layout with high operability to provide powerful support for all DJ
performances.
24 bit/96 kHz STEREO 4-IN 4-OUT SOUND
CARD
This unit is equipped with a 24 bit/96 kHz stereo 4-in 4-out compatible
USB sound card.
This unit supports ASIO/Core Audio standards, so it can be used not
only for DJ performances with DJ software but also with a wide variety of
other software applications, including for software for creating music.
! Four sets of stereo sound from a single computer can be input to the
respective channels and mixed.
! Up to four sets of stereo sound can be output to the computer from
the respective channels (channels 1 to 4, REC OUT, crossfader sides
A and B and microphone).
! The sampling rate can be switched between 96 kHz, 48 kHz and
44.1 kHz.
BEAT COLOR FX/SOUND COLOR FX
This unit inherits and further evolves the SOUND COLOR FX feature
popular on the DJM series. This feature offers four types of effects, and
effects can be achieved simply by turning the [COLOR] control provided
for each channel, enabling improvisational performances. The BEAT
COLOR FX function that changes the effect in association with the
sound of the respective channels makes for even more dynamic performances than before.
The simple, straightforward layout of the control panel not only makes
for easy DJ performances, it also allows DJs using it for the first time to
operate it without hesitation.
What’s in the box
! Driver software CD-ROM
! USB cable
! Power cord
! Operating instructions (this document)
BEAT EFFECT
This unit also inherits the BEAT EFFECT feature popular on the DJM
series, equipped with 13 types of effects. The BEAT COLOR FX and
SOUND COLOR FX effects can be combined to create some 100 different
effects, letting the DJ produce a wide variety of sounds.
HIGH SOUND QUALITY
Efforts have been made to improve and enhance sound quality for the
digital/analog inputs/outputs. 96 kHz sampling and sound processing
with a 24 bit high sound quality A/D converter and a 32 bit high sound
quality D/A converter reproduce the source faithfully and provide powerful, high grade club sound.
BUILD QUALITY
This unit uses the high performance channel faders of the DJM900nexus and the “P-LOCK Fader Cap” mechanism for locking the fader
knobs. Frequently used controls with optimized internal structures using
metal shafts and other measures are taken to achieve smooth operation
and high endurance.
STANDARD LAYOUT
This unit carries over the control panel layout of the Pioneer DJM series,
the world standard in DJ mixers.
En
6
Connections
Be sure to turn off the power and unplug the power cord from the power outlet whenever making or changing connections.
Refer to the operating instructions for the component to be connected.
Connect the power cord after all the connections between devices have been completed.
Be sure to use the included power cord.
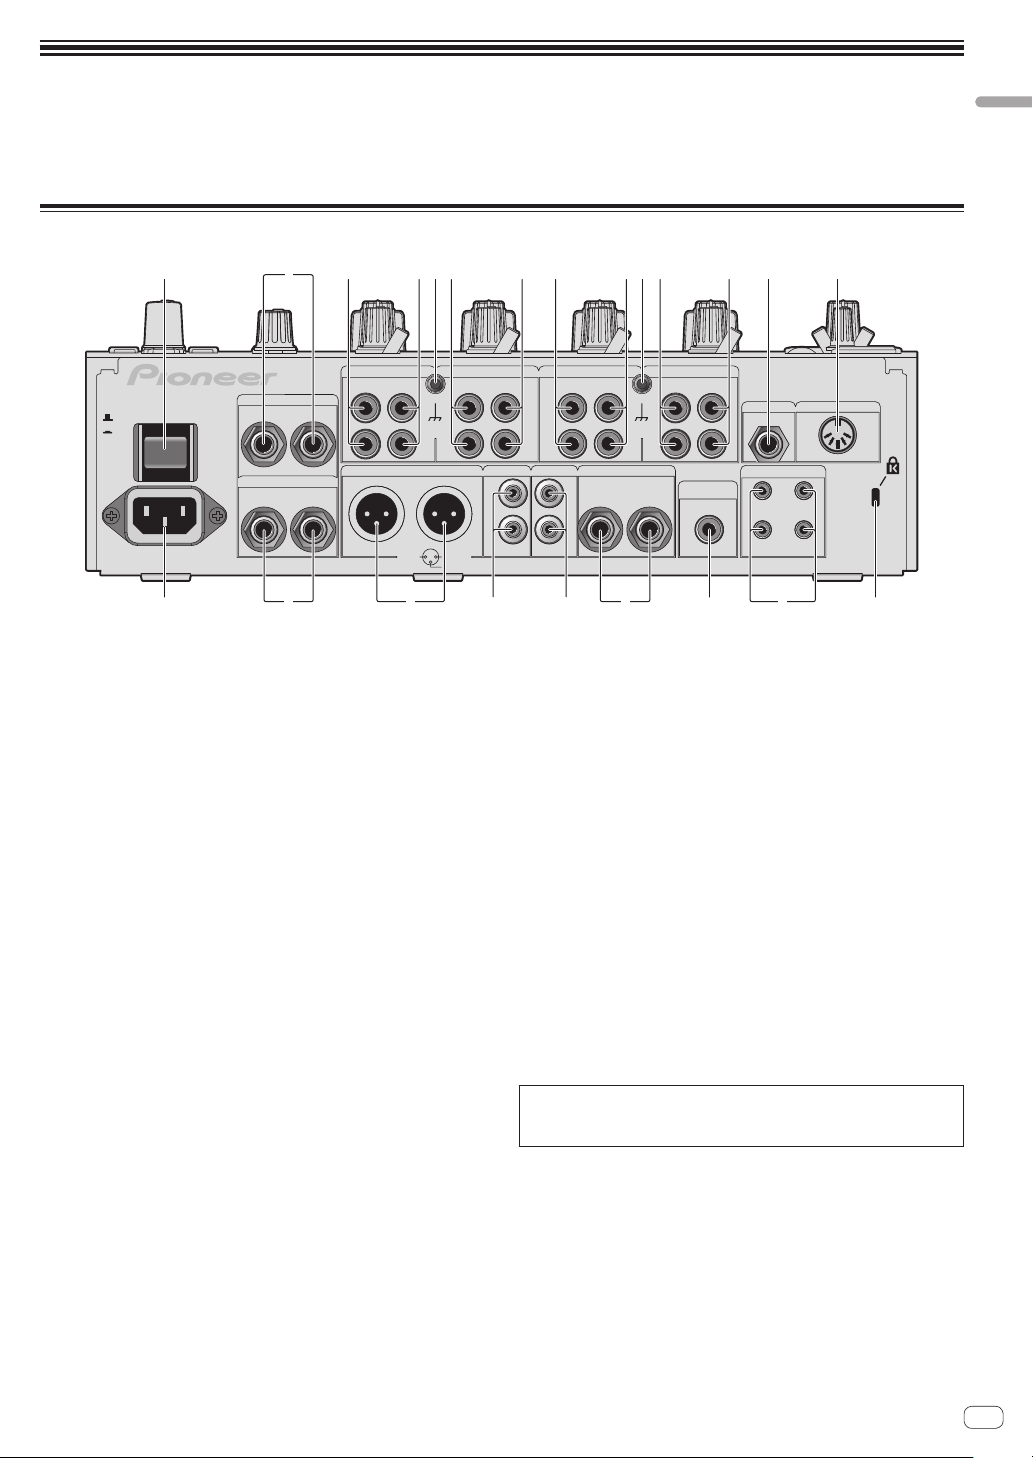
Rear panel
1 34646434 55 7 82
Connections
CH 4CH 3
PHONO CD/ LINE
L
SIGNAL GNDSIGNAL GND
R
MASTER1
R
1 GND
OFF
ON
POWER
AC IN
RETURN
R
SEND
L
LR
(MONO)
(MONO)
1 POWER button (page 15)
Turns this unit’s power on and off.
2 RETURN terminals (page 8)
Connect to the output terminal of an external effector. When the [L
(MONO)] channel only is connected, the [L (MONO)] channel input
is simultaneously input to the [R] channel.
3 PHONO terminals (page 8)
Connect to a phono level (MM cartridge) output device. Do not input
line level signals.
To connect a device to the [PHONO] terminals, remove the shortcircuit pin plug inserted in the terminals.
Insert this short-circuit pin plug into the [PHONO] terminals when
nothing is connected to them to cut external noise.
4 CD/LINE terminals (page 8)
Connect to a DJ player or a line level output component.
5 SIGNAL GND terminal (page 8)
Connects an analog player’s ground wire here. This helps reduce
noise when the analog player is connected.
6 LINE terminals (page 8)
Connect to a cassette deck or a line level output component.
7 MIC2 terminal (page 8)
Connects a microphone here.
8 MIDI OUT terminal (page 8)
Connects this to the MIDI IN terminal on an external MIDI
sequencer.
9 Kensington security slot
a CONTROL terminal (page 8)
This is a Ø 3.5 mm mini phone jack type DJ player control terminal.
If you connect a Pioneer DJ player using a control cable (supplied
with a DJ player), you can start playback of control other operations
of the DJ player with the fader of this unit.
LINE CD/LINE
L
2 HOT
3 COLD
LR
PHONO
CH 1
CD/LINE
L
R
DIGITAL
MASTER OUT
CH3
CH4
MIC2
CONTROL
MIDI OUT
CH1
CH2
CH 2
LINE CD/LINE
L
L
R
L
RR
REC OUTMASTER2
BOOTH
TRS
L
R
de b 9h acg f
b DIGITAL MASTER OUT terminal (page 8)
Outputs the master channel audio signals.
c BOOTH terminals (page 8)
Output terminals for a booth monitor, compatible with balanced or
unbalanced output for a TRS connector.
d REC OUT terminals (page 8)
These are output terminals for recording.
e MASTER2 terminals (page 8)
Connect to a power amplifier, etc.
f MASTER1 terminals (page 8)
Connect to a power amplifier, etc.
g SEND terminals (page 8)
Connect to the input terminal of an external effector. When the [L
(MONO)] channel only is connected, a monaural audio signal is
output.
h AC IN
Connects to a power outlet using the included power cord. Wait until
all connections between the equipment are completed before connecting the power cord.
Be sure to use the included power cord.
WARNING
The short-circuit pin plugs out of the reach of children and infants. If
accidentally swallowed, contact a doctor immediately.
En
7
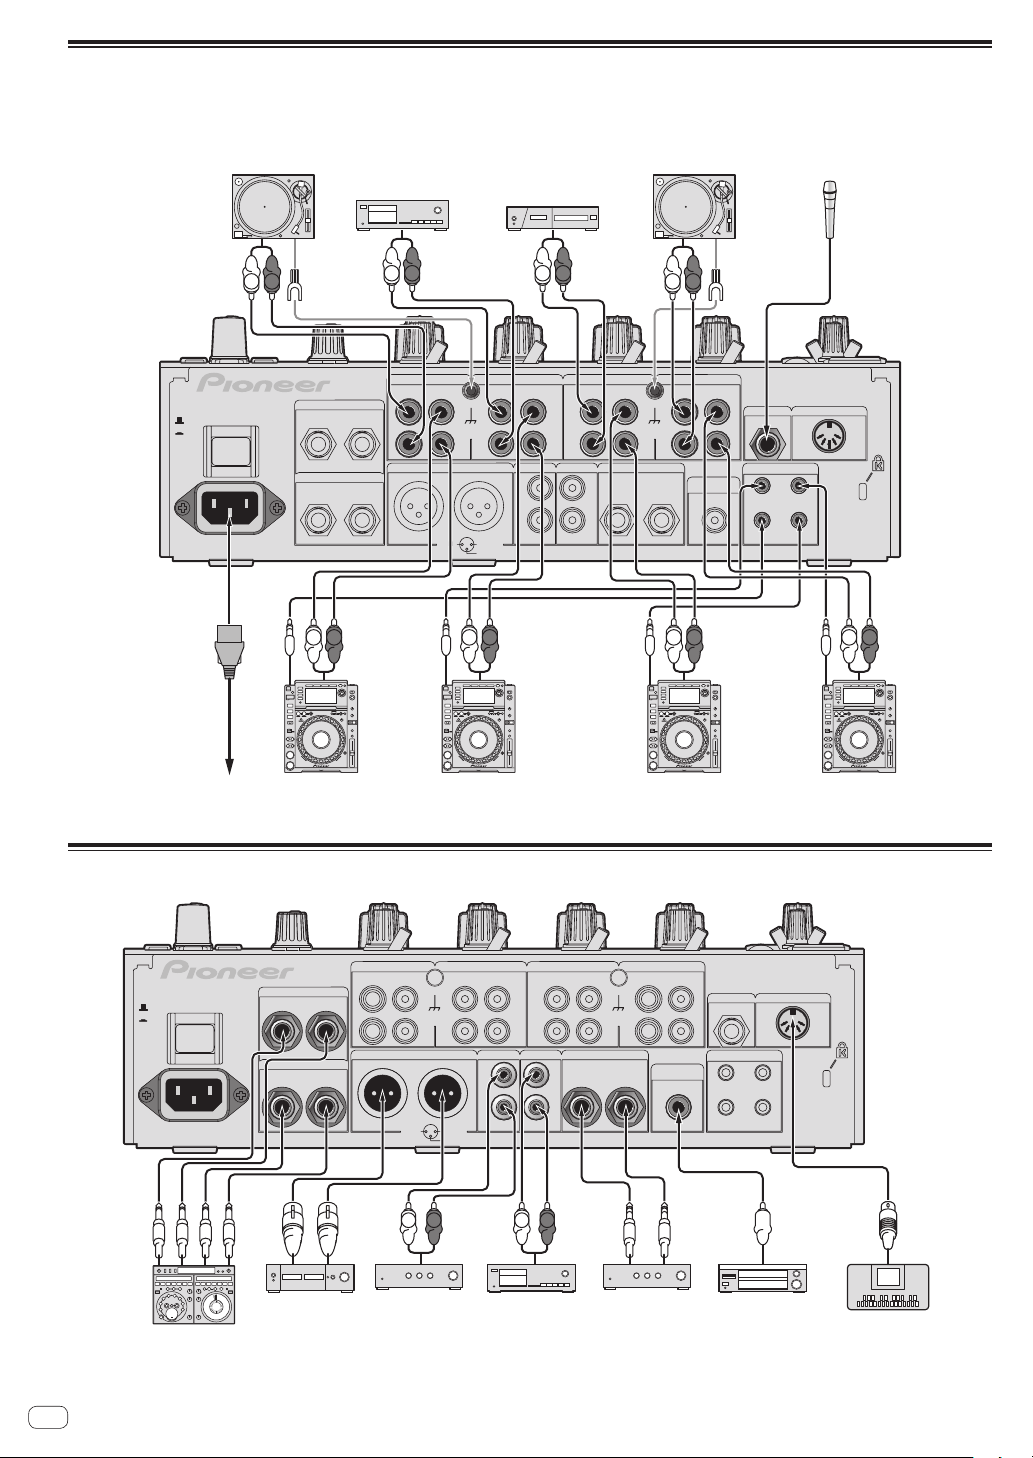
Connecting input terminals
Microphones
Cassette deck, CD player, etc.
Analog player
! When creating a DVS (Digital Vinyl System) combining a computer, audio interface, etc., be careful in connecting the audio interface to this unit’s
input terminals and in the settings of the input selector switches.
Also refer to the operating instructions of the DJ software and audio interface.
Analog player
(line level output devices)
L
L
LR
(MONO)
(MONO)
R
CH 4CH 3
PHONO CD/LINE
L
SIGNAL GNDSIGNAL GND
R
MASTER1
R
1 GND
L
L
R
RETURN
OFF
POWER
ON
AC IN
! To use the fader start function, connect a control cable (page 15).
R
SEND
R
L
LINE CD/LINE
L
L
L
R
2 HOT
3 COLD
R
L
R
REC OUTMASTER2
CH 2
LINECD/LINE
L
RR
BOOTH
L
R
L
R
CH 1
PHONO
TRS
LR
MASTER OUT
R
L
CD/LINE
L
R
DIGITAL
Pioneer DJ playersPioneer DJ playersTo power outlet
CH3
CH4
MIC2
CONTROL
MIDI OUT
CH1
CH2
R
L
Connecting output terminals
CH 4CH 3
PHONO CD/LINE
RETURN
R
L
SEND
LR
(MONO)
(MONO)
OFF
POWER
ON
AC IN
L
R
MASTER1
Power amplifier Power amplifier
External effector
1
1 Also connect the external effector to the [RETURN] terminal (input terminal).
En
8
LINE CD/LINE
L
SIGNAL GNDSIGNAL GND
R
1 GND
L
L
L
R
2 HOT
3 COLD
R
Cassette deck, etc.
recording device)
CH 2
LINECD/LINE
L
RR
REC OUTMASTER2
L
R
R
L
(analog input
CH 1
PHONO
CD/LINE
L
LR
R
DIGITAL
MASTER OUT
BOOTH
TRS
Power amplifier
(for booth monitor)
MIC2
CONTROL
CH3
CH4
Digital audio
input device
MIDI OUT
CH1
CH2
MIDI sequencer

Connecting to the control panel
6
Be sure to connect using the included USB cable.
Computers
Microphones
1
2
Headphones
3
1 MIC1 terminal (page 16)
Connects a microphone here.
2 USB terminal (page 11)
Connect the computer.
3 PHONES terminal (page 15)
Connect headphones here.
MICUSB
MIC1
MIC 1
MIC 2
MIXING
CUE
LEVEL
PHONES
0
0
MASTER
0
LEVEL
CD/LINE PHONO
OVER
10
7
4
2
1
0
About the driver software and
setting utility software
The driver software is required to input and output the sound of a computer using this unit’s built-in USB sound card. Prepare a computer
on which a Windows or Mac operating system is installed and the proprietary driver software provided by Pioneer. When the driver software
is installed, the settings utility software is installed at the same time.
Change the settings of the settings utility and the computer according to
your environment.
Software end user license agreement
This Software End User License Agreement (“Agreement”) is between
you (both the individual installing the Program and any single legal
entity for which the individual is acting) (“You” or “Your”) and PIONEER
CORPORATION (“Pioneer”).
TAKING ANY STEP TO SET UP OR INSTALL THE PROGRAM MEANS
THAT YOU ACCEPT ALL OF THE TERMS OF THIS LICENSE AGREEMENT.
PERMISSION TO DOWNLOAD AND/OR USE THE PROGRAM IS
EXPRESSLY CONDITIONED ON YOUR FOLLOWING THESE TERMS.
TRIM
HI
-
26
/
WRITTEN OR ELECTRONIC APPROVAL IS NOT REQUIRED TO MAKE
THIS AGREEMENT VALID AND ENFORCEABLE. IF YOU DO NOT
AGREE TO ALL OF THE TERMS OF THIS AGREEMENT, YOU ARE NOT
AUTHORIZED TO USE THE PROGRAM AND MUST STOP INSTALLING IT
9
OR UNINSTALL IT, AS APPLICABLE.
1 Definitions
1 “Documentation” means written documentation, specifications
and help content made generally available by Pioneer to aid in
installing and using the Program.
2 “Program” means all or any part of Pioneer’s software licensed to
You by Pioneer under this Agreement.
2 Program license
1 Limited License. Subject to this Agreement’s restrictions,
Pioneer grants to You a limited, non-exclusive, nontransferable,
BATHRU
license (without the right to sublicense):
a To install a single copy of the Program on the hard disk
drive of Your computer, to use the Program only for Your
personal purpose complying with this Agreement and the
Documentation (“Authorized Use”);
b To use the Documentation in support of Your Authorized Use;
and
c To make one copy of the Program solely for backup pur-
poses, provided that all titles and trademark, copyright and
restricted rights notices are reproduced on the copy.
2 Restrictions. You will not copy or use the Program or
Documentation except as expressly permitted by this Agreement.
You will not transfer, sublicense, rent, lease or lend the Program,
or use it for third-party training, commercial time-sharing or
service bureau use. You will not Yourself or through any third
party modify, reverse engineer, disassemble or decompile the
Program, except to the extent expressly permitted by applicable
law, and then only after You have notified Pioneer in writing of
Your intended activities. You will not use the Program on multiple
processors without Pioneer’s prior written consent.
3 Ownership. Pioneer or its licensor retains all right, title and
interest in and to all patent, copyright, trademark, trade secret
and other intellectual property rights in the Program and
Documentation, and any derivative works thereof. You do not
acquire any other rights, express or implied, beyond the limited
license set forth in this Agreement.
4 No Support. Pioneer has no obligation to provide support,
maintenance, upgrades, modifications or new releases for the
Program or Documentation under this Agreement.
Connections
En
9

3 Warranty disclaimer
THE PROGRAM AND DOCUMENTATION ARE PROVIDED “AS IS”
WITHOUT ANY REPRESENTATIONS OR WARRANTIES, AND YOU
AGREE TO USE THEM AT YOUR SOLE RISK. TO THE FULLEST EXTENT
PERMISSIBLE BY LAW, PIONEER EXPRESSLY DISCLAIMS ALL
WARRANTIES OF ANY KIND WITH RESPECT TO THE PROGRAM AND
DOCUMENTATION, WHETHER EXPRESS, IMPLIED, STATUTORY,
OR ARISING OUT OF COURSE OF PERFORMANCE, COURSE OF
DEALING OR USAGE OF TRADE, INCLUDING ANY WARRANTIES
OF MERCHANTABILITY, FITNESS FOR A PARTICULAR PURPOSE,
SATISFACTORY QUALITY, ACCURACY, TITLE OR NON-INFRINGEMENT.
4 Damages and remedies for breach
You agree that any breach of this Agreement’s restrictions would cause
Pioneer irreparable harm for which money damages alone would be
inadequate. In addition to damages and any other remedies to which
Pioneer may be entitled, You agree that Pioneer may seek injunctive
relief to prevent the actual, threatened or continued breach of this
Agreement.
5 Termination
Pioneer may terminate this Agreement at any time upon Your breach of
any provision. If this Agreement is terminated, You will stop using the
Program, permanently delete it from the computer where it resides, and
destroy all copies of the Program and Documentation in Your possession, confirming to Pioneer in writing that You have done so. Sections
2.2, 2.3, 2.4, 3, 4, 5 and 6 will continue in effect after this Agreement’s
termination.
6 General terms
1 Limitation of Liability. In no event will Pioneer or its subsidiaries
be liable in connection with this Agreement or its subject matter,
under any theory of liability, for any indirect, incidental, special,
consequential or punitive damages, or damages for lost profits,
revenue, business, savings, data, use, or cost of substitute procurement, even if advised of the possibility of such damages or if
such damages are foreseeable. In no event will Pioneer’s liability
for all damages exceed the amounts actually paid by You to
Pioneer or its subsidiaries for the Program. The parties acknowledge that the liability limits and risk allocation in this Agreement
are reflected in the Program price and are essential elements of
the bargain between the parties, without which Pioneer would
not have provided the Program or entered into this Agreement.
2 The limitations or exclusions of warranties and liability contained
in this Agreement do not affect or prejudice Your statutory rights
as consumer and shall apply to You only to the extent such limitations or exclusions are permitted under the laws of the jurisdiction where You are located.
3 Severability and Waiver. If any provision of this Agreement is held
to be illegal, invalid or otherwise unenforceable, that provision
will be enforced to the extent possible or, if incapable of enforcement, deemed to be severed and deleted from this Agreement,
and the remainder will continue in full force and effect. The
waiver by either party of any default or breach of this Agreement
will not waive any other or subsequent default or breach.
4 No Assignment. You may not assign, sell, transfer, delegate or
otherwise dispose of this Agreement or any rights or obligations
under it, whether voluntarily or involuntarily, by operation of law
or otherwise, without Pioneer’s prior written consent. Any purported assignment, transfer or delegation by You will be null and
void. Subject to the foregoing, this Agreement will be binding
upon and will inure to the benefit of the parties and their respective successors and assigns.
5 Entire Agreement. This Agreement constitutes the entire agree-
ment between the parties and supersedes all prior or contemporaneous agreements or representations, whether written or
oral, concerning its subject matter. This Agreement may not be
modified or amended without Pioneer’s prior and express written
consent, and no other act, document, usage or custom will be
deemed to amend or modify this Agreement.
6 You agree that this Agreement shall be governed and construed
by and under the laws of Japan.
Cautions on Installation
! Before installing the driver software, be sure to turn off the power of
this unit and disconnect the USB cable from both this unit and your
computer.
! If you connect this unit to your computer without installing the driver
software first, an error may occur on your computer depending on
the system environment.
! If you have discontinued the installation process in progress, step
through the installation process again from the beginning according
to the following procedure.
! Read Software end user license agreement carefully before installing
this unit’s proprietary driver software.
! Before installing the driver software, terminate all other programs
running on your computer.
! The driver software is compatible with the following OSs.
Supported operating systems
Mac OS X 10.5 / 10.6 / 10.7
32-bit
®
7 Home Premium/Professional/Ultimate
Windows
®
Windows Vista
Ultimate
Windows
Windows® XP Professional x64 Edition is not supported.
! The included CD-ROM includes installation programs in the follow-
ing 12 languages.
English, French, German, Italian, Dutch, Spanish, Portuguese,
Russian, Simplified Chinese, Traditional Chinese, Korean, and
Japanese
When using operating systems in other languages, follow the
instructions on the screen to select [English (English)].
Home Basic/Home Premium/Business/
®
XP Home Edition/Professional (SP3 or later)
version
64-bit
version
32-bit
version
64-bit
version
32-bit
version
1
1
1
1
1
1
Installing the driver software
About the installation procedure (Windows)
Read Cautions on Installation carefully before installing the driver
software.
! To install or uninstall the driver software, you need to be authorized
by the administrator of your computer. Log on as the administrator of
your computer before proceeding with the installation.
1 Insert the included CD-ROM into the computer’s CD
drive.
2 Double-click [DJM-850_X.XXX.exe].
The driver installation screen appears.
3 When the language selection screen appears, select
[English] and click [OK].
You can select one from multiple languages depending on the system
environment of your computer.
4 Carefully read the Software end user license
agreement and if you consent to the provisions, put a
check mark in [I agree.] and click [OK].
If you do not consent to the provisions of the Software end user license
agreement, click [Cancel] and stop installation.
5 Proceed with installation according to the instructions
on the screen.
If [Windows Security] appears on the screen while the installation is
in progress, click [Install this driver software anyway] and continue
with the installation.
10
En
 Loading...