

Pioneer DJ DDJSZ2 User Manual
DJ Controller
DDJ-SZ2
http://pioneerdj.com/support/
http://serato.com/
For FAQs and other support information for this product, visit the above site.
Operating Instructions
Contents
How to read this manual
! Thank you for buying this Pioneer DJ product.
Be sure to read this manual and the “Operating Instructions (Quick
Start Guide)” included with the unit. Both documents include
important information that you should understand before using this
product.
! In this manual, names of screens and menus displayed on the prod-
uct and on the computer screen, as well as names of buttons and
terminals, etc., are indicated within brackets. (e.g.: [CUE] button,
[Files] panel, [MIC1] terminal)
! Please note that the screens and specifications of the software
described in this manual as well as the external appearance and
specifications of the hardware are currently under development and
may differ from the final specifications.
! Please note that depending on the operating system version, web
browser settings, etc., operation may differ from the procedures
described in this manual.
This manual consists mainly of explanations of functions of this unit
as hardware. For detailed instructions on operating the Serato DJ
software, see the Serato DJ software manual.
! The Serato DJ software manual can be downloaded from “Serato.
com”. For details, see Downloading the Serato DJ software manual
(p. 34 ).
! The latest version of Operating Instructions (this document) can
be downloaded from the Pioneer DJ support site. For details, see
Acquiring the manual (p. 34 ).
Before start
Features ....................................................................................................... 3
What’s in the box ........................................................................................ 4
Installing the software ................................................................................ 4
Connections and part names
Connections ................................................................................................ 7
Part names and functions ....................................................................... 10
Basic Operation
Connections .............................................................................................. 15
Starting the system ................................................................................... 16
Quitting the system .................................................................................. 18
Advanced Operation
Using the performance pads ................................................................... 19
Pitch play mode
Using the slip mode .................................................................................. 21
Using the fader start function.................................................................. 22
Using the sampler velocity mode ............................................................ 22
Adjusting the crossfader’s operating load
Analyzing tracks ........................................................................................ 23
Using effects ............................................................................................. 23
Using the SOUND COLOR FX function .................................................. 24
Using the oscillator function ................................................................... 24
Types of effects
Using external inputs ............................................................................... 25
........................................................................................ 21
............................................. 22
.......................................................................................... 25
Changing the settings
Launching utilities mode ......................................................................... 27
Utilities modes
About the setting utility software ............................................................ 29
.......................................................................................... 27
Additional information
Troubleshooting ........................................................................................ 31
Signal flow ................................................................................................. 33
Acquiring the manual .............................................................................. 34
Using as a controller for other DJ software
About trademarks and registered trademarks ...................................... 35
Cautions on copyrights ............................................................................ 35
............................................ 34
En
2
Before start
Before start
Features
This unit features carefully arranged interfaces for various operations
including “BIG JOG”, which gives you total control over scratch play,
“PERFORMANCE PADS”, which can be used to add arrangements to
music with beats, rolling and other dynamic actions produced using
HOT CUE, SAMPLER and other functions, and “4-CHANNEL MIXER”,
which supports multi-track mixing with the 4-deck function, providing
unique DJ performance tools when using “Serato DJ”.
Also, the unit provides “SOUND COLOR FX” and “OSCILLATOR” functions so that original arrangements can be added to the music being
played back.
Furthermore, numerous input and output terminals support a variety
of DJ styles. Featuring aluminum material for the top panel, the design
makes the unit look high quality, which is appropriate in a variety of
scenes such as nightclubs, home parties, etc.
BIG JOG
We have achieved the shortest time required from when jog is operated
until when the control signal is transferred to the software. Additionally,
“BIG JOG”, a large sized jog, allows the DJ to play scratches as they wish
with smooth operability.
At the center of the jog, the “ON JOG DISPLAY” displays the playback
status of music and the current playback position so that the DJ can perform scratching more accurately. Also, the unit is equipped with “JOG
FEELING ADJUST”, which is popular in the CDJ Series. It is possible to
adjust the operation load and back spin continuous time during scratch
play to match particular tastes.
MULTI-COLOR PERFORMANCE PADS
“PERFORMANCE PADS”, a large rubber pad used to assign and operate
functions such as HOT CUE and SAMPLER, is positioned at the front of
the unit.
Music can be arranged by dynamic actions such as beating and rolling
and the volume can be stronger or weaker depending on the strength of
the beat.
Also, each pad has built-in multi-color illumination that can be used to
instantaneously understand the selected pad mode and playing status of
each pad through illumination colors and lit condition.
4-CHANNEL MIXER
The unit includes “4-CHANNEL MIXER”, which allows the DJ to independently operate songs being played back with four decks. Four songs can
be mixed to create a highly individualistic DJ mix.
Level meters are located near the master unit and the operation interface of each channel, so that input and output levels can be understood
instantly.
Furthermore, this unit retains the control panel layout of the Pioneer DJ
DJM series, the world standard in DJ mixers.
The simple, easy-to-understand control panel layout not only facilitates
DJ performances but also makes it easy for DJs using the unit for the
first time to operate it without hesitation, so it can be used without worry
as a permanently installed mixer in the club.
The USB selector located at the top side can be used to switch between
the two sound cards with a single action. When one DJ takes over from
another, this function provides a smooth transition between the two
computers without sound being interrupted.
FLEXIBLE CONNECTIVITY
Four external input systems and two MIC input systems are provided to
connect to a CD player or analog turntable.
Mixing is possible without going through a computer, so the unit can be
used as a single DJ mixer as well.
In addition, two MASTER OUT systems and one BOOTH OUT system are
provided to handle professional PA device output.
All kinds of party scenes and DJ playing styles are supported.
DURABLE FADER
A slide structure is used for the crossfader and channel fader, in which
the fader knob is supported by two metal shafts.
This achieves smooth operability without wobble and also high
durability.
Also, effects on inside the faders caused by liquid and dust are
minimized.
An independently developed “MAGVEL CROSS FADER” magnetic system is incorporated for the crossfader to support scratch play, which
provides high durability of more than 10,000,000 operations, and fine
operability.
HIGH SOUND QUALITY
Leveraging the audio circuit of Pioneer audio devices for clubs, the unit
provides powerful sound quality faithful to the original. It also reduces
contact resistance through use of an AC inlet having a wide contact area
with the power cable, and achieves stable and powerful sound even in
the DJ booth in a loud environment.
By adopting a high performance D/A converter and low jitter crystal
oscillator made by Wolfson Microelectronics, the unit reproduces clear
and powerful club sound faithful to the original.
PROFESSIONAL QUALITY DESIGN
Aluminum material on the top panel and jog plate provides a sense of
high quality design.
This unit is an essential part of DJ performance in clubs and home party
scenes.
SERATO FLIP
This unit is equipped with a dedicated operation interface for the
“SERATO FLIP” function that enables recording HOT CUE operation
patterns and playing back recorded HOT CUE operation patterns so the
DJ can intuitively operate the “SERATO FLIP” function. It allows the DJ
to perform differently from normal playback by, for example, repeating or
skipping specific sections.
PLUG AND PLAY DUAL USB PORT
Two USB sound cards are provided to connect the unit to up to two
computers at the same time.
The sound cards of the unit and all buttons and controls are set to be
linked with “Serato DJ” beforehand so that the DJ can begin playing
using “Serato DJ” without going through the need to make troublesome
settings.
KEY SHIFT AND KEY SYNC
Dedicated interfaces are provided for the “KEY SHIFT” function which
allows you to control the key of tracks and the “KEY SYNC” function
which automatically corrects the key to match the tracks you wish to
mix. This facilitates the arrangement of tracks by changing the key, and
smooth mixing that matches the key of the tracks.
En
3
SOUND COLOR FX
The unit is equipped with four “SOUND COLOR FX” functions
(ECHO, JET, PITCH, and FILTER), achieving a wide range of musical
arrangements.
By simply turning the control, it is possible to create the effect you want,
and a variety of remix can be achieved such as adding original arrangements to the music.
Also, BPM information can be obtained from “Serato DJ”, making it
possible to add the ECHO effect linked with the BPM of the song being
played back.
OSCILLATOR
The unit is equipped with the “OSCILLATOR” function for generating
four types of sound (NOISE, DROP, LASER, and SIREN). Operation is
simple. Just press the button of the sound type you wish to output. You
can take music to an entirely new level by superimposing oscillator
sound over the track you are playing back or further emphasizing the
climax of the music. Also, you can change the tone by simply turning
the [OSCILLATOR PARAMETER] control, making it possible to generate
oscillator sound that is matched to the track.
SLIP MODE
This unit is equipped with a Slip Mode function by which the sound
continues in the background while such operations as looping, scratching and hot cueing are being performed. This allows DJ performances
without changing the original track’s development after such playback
operations as looping, scratching and hot cueing are completed.
NEEDLE SEARCH
Points can be searched for simply by touching the touch pad with a
finger. This makes for intuitive, speedy searching with the sense of
touching the music directly.
What’s in the box
! Power cord x1
! USB cable1 x1
! Warranty (for some regions) 2 x1
! Operating Instructions (Quick Start Guide) x1
1 Only one USB cable is included with this unit.
To connect two units, use a cable conforming to USB 2.0 standards.
2 Products for Europe only. (The corresponding information is provided
on the back cover of “Operating Instructions (Quick Start Guide)” for
Japan, and on the last page of both the English and French versions
of the “Operating Instructions (Quick Start Guide)” for the North
American region.)
Installing the software
Before installing the software
For the latest version of the Serato DJ software, access Serato.com
and download the software from there.
! For details, refer to Installation Procedure (Windows) or Installation
procedure (Mac OS X).
! The user is responsible for preparing the computer, network
devices and other elements of the Internet usage environment
required for a connection to the Internet.
About the driver software
This driver software is an exclusive driver for outputting audio signals
from a computer.
! First read the Software end user license agreement on page 34
carefully.
Checking the latest information on the driver software
For detailed information on this unit’s designated driver software, see
the Pioneer DJ support site below.
http://pioneerdj.com/support/
Obtaining the driver software
1 Access the Pioneer DJ site.
http://pioneerdj.com/
2 Click the [Support] icon.
3 Click the [Software & Firmware Updates] icon.
4 Click the [DDJ-SZ2] icon in the [CONTROLLER]
category.
5 Click the [Drivers] icon.
6 Click the [Downloadlink] icon and save the file.
En
4
About the Serato DJ software
Serato DJ is a DJ software application by Serato. DJ performances are
possible by connecting the computer on which this software is installed
to this unit.
Minimum operating environment
Supported operating systems CPU and required memory
32-bit
Mac OS X: 10.11, 10.10
and 10.9
Windows: Windows® 10,
Windows® 8.1, Windows® 7
version
64-bit
version
32-bit
version
64-bit
version
Others
USB port
Display resolution Resolution of 1280 x 720 or greater
Internet connection
!
For the latest system requirements and compatibility as well as to acquire the
latest operating system, see [Software Info] of [DDJ-SZ2] on the [FAQ] page of
the Pioneer DJ support site below.
http://pioneerdj.com/support/
! Operating System support assumes you are using the latest point release for
that version.
! Operation is not guaranteed on all computers, even if all the required operating
environment conditions indicated here are fulfilled.
! Depending on the computer’s power-saving settings, etc., the CPU and hard
disk may not provide sufficient processing capabilities. For notebook comput-
ers in particular, make sure the computer is in the proper conditions to provide
constant high performance (for example by keeping the AC power connected)
when using Serato DJ.
! Use of the Internet requires a separate contract with a provider offering Internet
services and payment of provider fees.
A USB 2.0 port is required to connect the computer
with this unit.
An Internet connection is required for registering
the “Serato.com” user account and downloading the
software.
Obtaining the Serato DJ software
®
processor, Core™ i3, i5 and i7
Intel
1.07 GHz or better
4 GB or more of RAM
®
Intel
processor, Core™ i3, i5 and i7
1.07 GHz or better
4 GB or more of RAM
®
processor, Core™ i3, i5 and i7
Intel
1.07 GHz or better
4 GB or more of RAM
®
Intel
processor, Core™ i3, i5 and i7
1.07 GHz or better
4 GB or more of RAM
!
The personal information input when registering a new user
account may be collected, processed and used based on the
privacy policy on the Serato website.
5 Click the link in the e-mail message sent from “Serato.
com”.
This takes you to the Serato DJ download page. Proceed to step 7.
6 Log in.
Input the e-mail address and password you have registered to log in to
“Serato.com”.
7 Download the Serato DJ software from the download
page.
Installation Procedure (Windows)
Do not connect this unit and the computer until installation is
completed.
First read the Software end user license agreement on page 34
!
carefully.
! Log on as the user which was set as the computer’s administrator
before installing.
! If any other programs are running on the computer, quit them.
1 Double-click the downloaded driver software (DDJSZ2_X.XXX.exe).
2 Proceed with installation according to the instructions
on the screen.
If [Windows Security] appears on the screen while the installation is
in progress, click [Install this driver software anyway] and continue
with the installation.
When the installation program is completed, a completion message
appears.
After installing the driver software, install the Serato DJ software.
3 Unzip the downloaded Serato DJ software file.
4 Double-click the unzipped software file to launch the
installer.
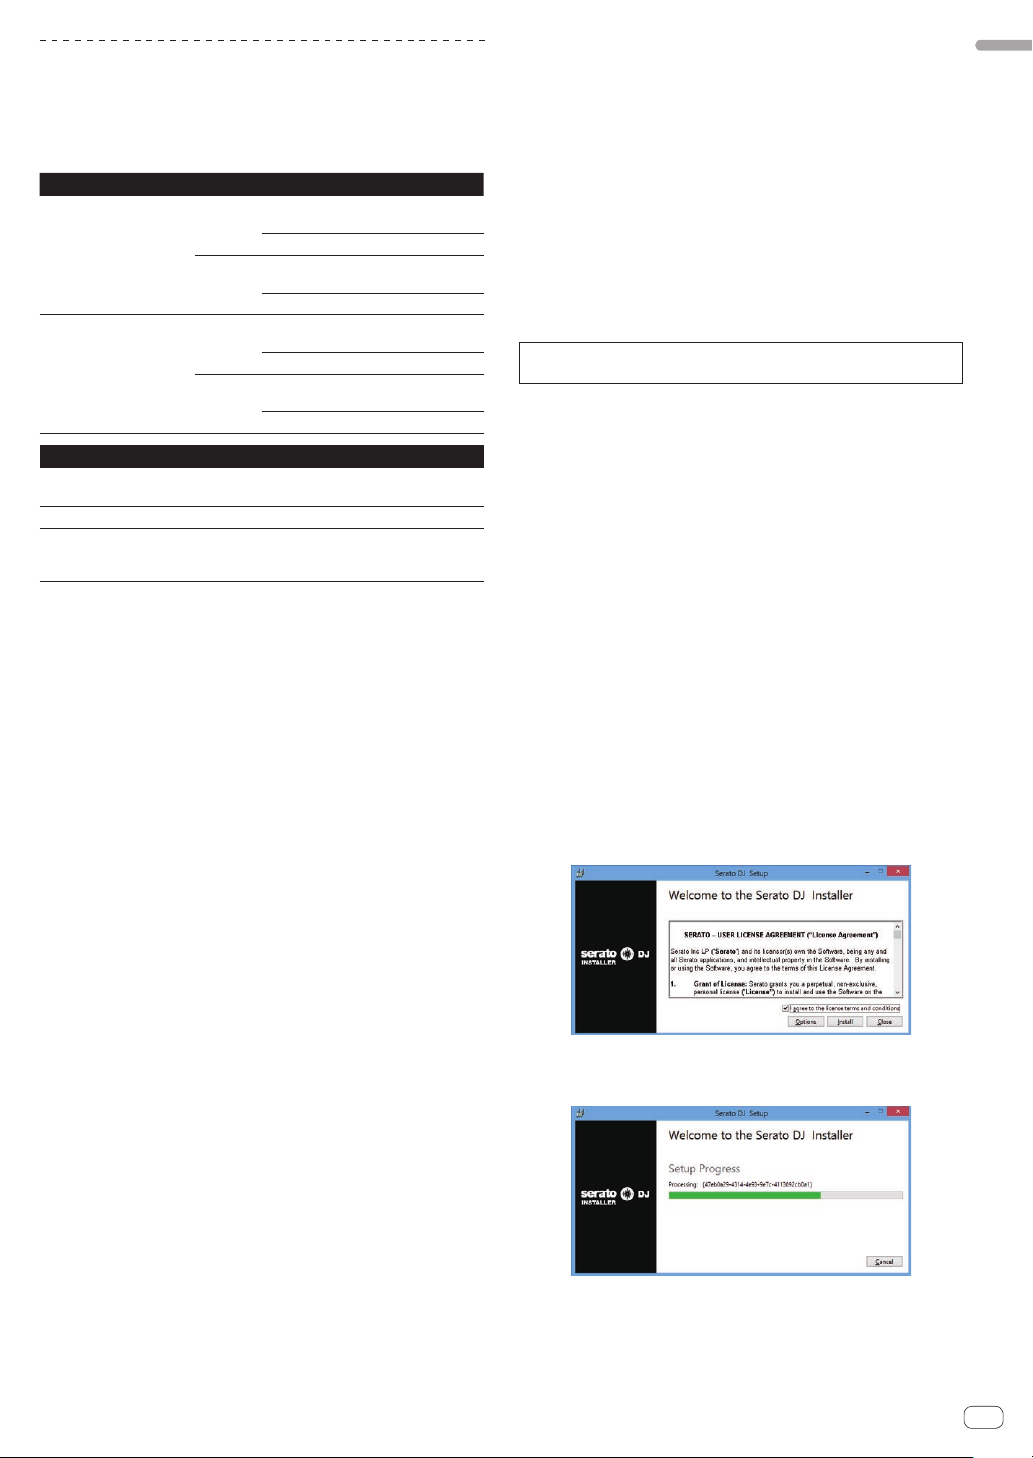
5 Read the terms of the license agreement carefully,
and if you agree, select [I agree to the license terms and
conditions], then click [Install].
Before start
1 Access the Serato site.
http://serato.com/
2 Click the [Serato DJ] icon of [DJ PRODUCTS].
The Serato DJ download page appears.
! The download page is subject to change without notice.
3 Click the [DOWNLOAD SERATO DJ] icon.
4 Create an account on “Serato.com.”
! If you have already registered a user account on “Serato.com”,
proceed to step 6.
! If you have not completed registering your user account, do so
following the procedure below.
— Following the instructions on the screen, input your e-mail
address and the password you want to set, then select the
region in which you live.
— If you check [E-mail me Serato newsletters], newsletters
providing the latest information on Serato products will be
sent from Serato.
—
Once user account registration is completed, you will receive
an e-mail at the e-mail address you have input. Check the
contents of the e-mail sent from “Serato.com”.
! Be careful not to forget the e-mail address and password speci-
fied when you performed user registration. They will be required
for updating the software.
! If you do not agree to the contents of the license agreement, click
[Close] to cancel installation.
Installation begins.
The message of successful installation appears once installation is
completed.
En
5
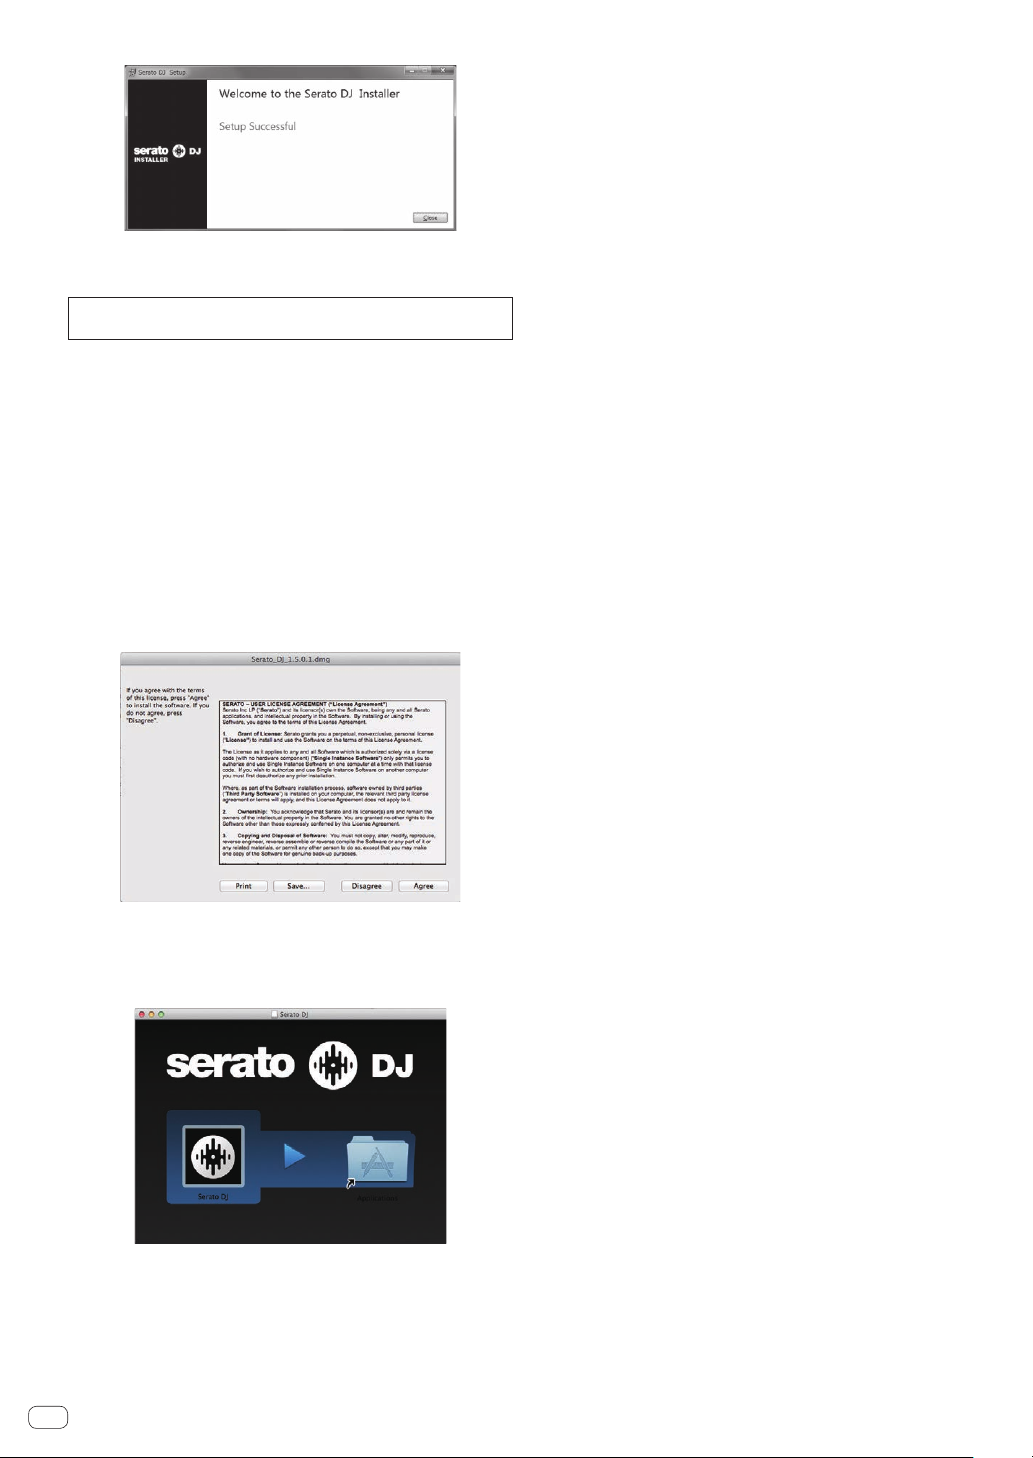
6 Click [Close] to quit the Serato DJ installer.
Installation procedure (Mac OS X)
Do not connect this unit and the computer until installation is
completed.
If any other programs are running on the computer, quit them.
!
1 Double-click the downloaded driver software
(DDJ-SZ2_M_X.X.X.dmg).
2 Double-click [DDJ-SZ2_AudioDriver.pkg].
3 Proceed with installation according to the instructions
on the screen.
4 Unzip the downloaded Serato DJ software file.
5 Double-click the unzipped software file to launch the
installer.
6 Read the terms of the license agreement carefully,
and if you agree, click [Agree].
! If you do not agree to the contents of the usage agreement, click
[Disagree] to cancel installation.
7 If the following screen appears, drag and drop the
[Serato DJ] icon on the [Applications] folder icon.
En
6
Connections and part names
5 5
3 9 db c e6 7 6 7 a2 4881
Connections
! Connect the power cord after all the connections between devices have been completed.
Be sure to turn off the power and unplug the power cord from the power outlet whenever making or changing connections.
Refer to the operating instructions for the component to be connected.
! Be sure to use the included power cord.
! Be sure to use the USB cable included with this product or the one that conforms to USB 2.0.
Names of Parts
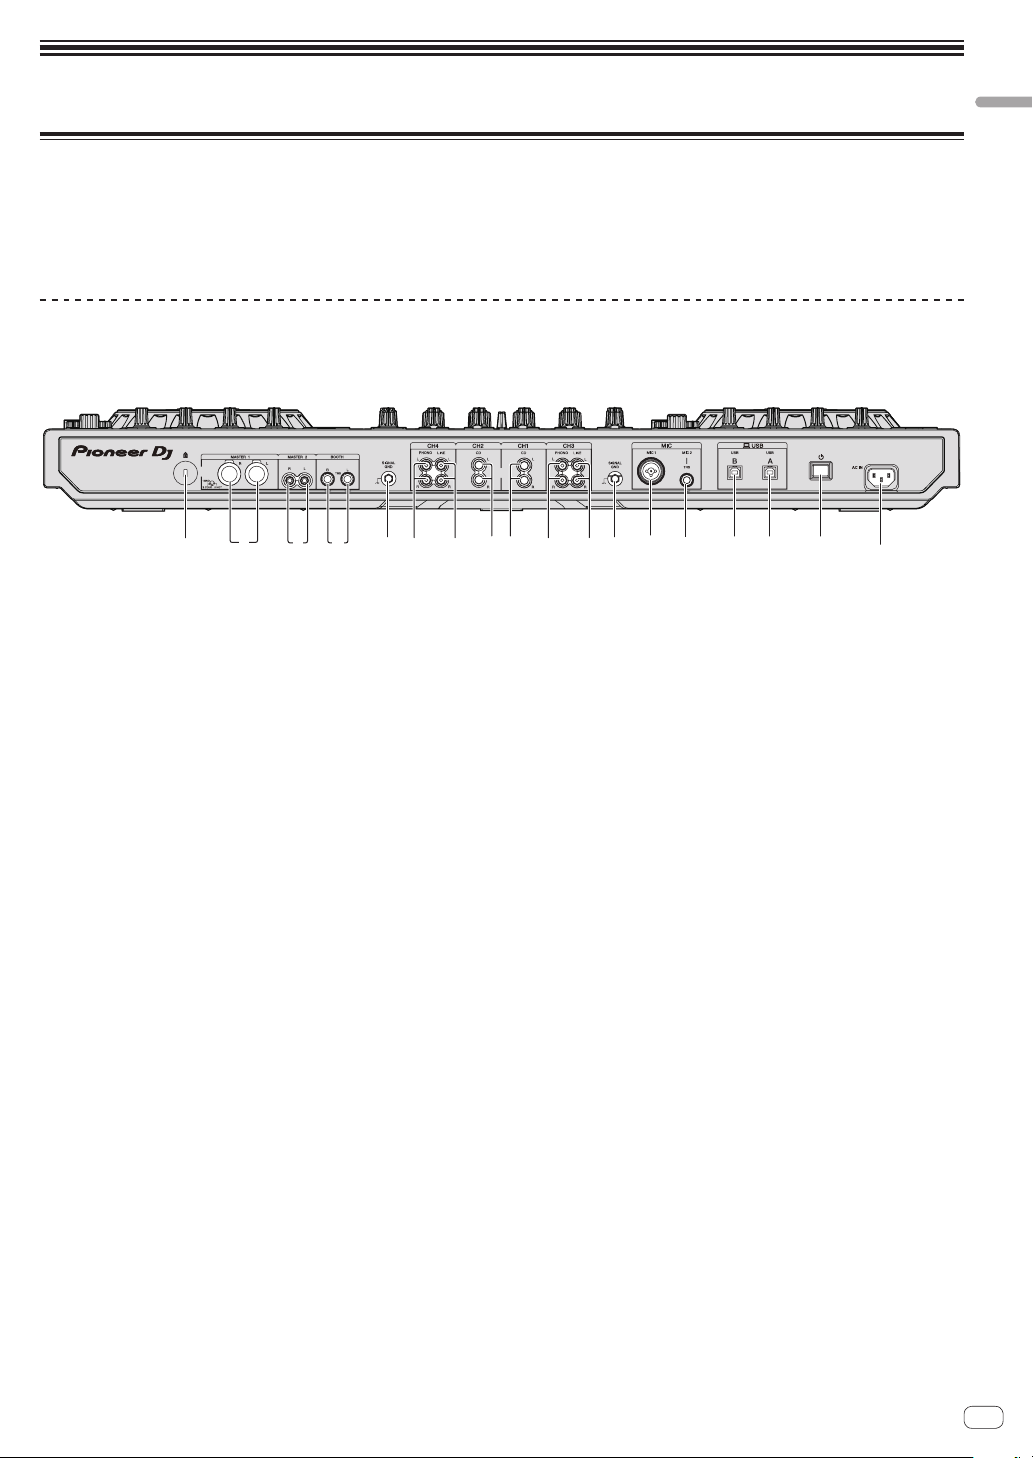
Rear panel
Connections and part names
1 Kensington security slot
2 MASTER 1 terminals
Connect powered speakers, etc., here.
! Compatible with XLR connector type balanced outputs.
3 MASTER 2 terminals
Connect to a power amplifier, etc.
! Compatible with RCA pin-jack type unbalanced outputs.
4 BOOTH terminals
These are the output terminals for a booth monitor. Compatible with
balanced or unbalanced output for 1/4” TRS connectors.
The master channel sound can be output from the [BOOTH] output
terminals regardless of the audio level set for the master channel.
The volume level can be adjusted with the [BOOTH MONITOR]
control.
! The sound will be distorted if the level is raised too high when
using unbalanced outputs.
5 SIGNAL GND terminal
Connects an analog player’s ground wire here. This helps reduce
noise when the analog player is connected.
6 PHONO terminals
Connect to a phono level (MM cartridge) output device. Do not input
line level signals.
You need to set the [LINE, PHONO, USB] selector switch on top
!
of the unit to [PHONO] beforehand.
7 LINE terminals
Connect to a DJ player or other line level device.
! You need to set the [LINE, PHONO, USB] selector switch on top
of the unit to [LINE] beforehand.
8 CD terminals
Connect to a DJ player or other line level device.
! You need to set the [CD, USB] selector switch on top of the unit to
[CD] beforehand.
9 MIC1 terminal
Connects a microphone here.
!
Either an XLR connector or a phones plug (Ø 6.3 mm) can be
used.
a MIC2 terminal
Connects a microphone here.
Compatible with a 1/4” TS jack.
b USB-B terminal
Connect to a computer.
! Connect this unit to your computer directly via a USB cable
included with this product or the one that conforms to USB 2.0.
! A USB hub cannot be used.
c USB-A terminal
Connect to a computer.
! Connect this unit to your computer directly via a USB cable
included with this product or the one that conforms to USB 2.0.
! A USB hub cannot be used.
d u switch
This switches this unit’s power between on and standby.
e AC IN terminal
Connect the power cord after all the connections between devices
have been completed.
Be sure to use the included power cord.
En
7
Front panel
12
T
DJ player
1 PHONES jacks
Connect headphones here.
Compatible with a 1/4” TRS jack and 3.5 mm stereo mini jack.
There are two input jacks, a 1/4” TRS jack and a 3.5 mm stereo
!
mini jack, but do not use both of them simultaneously. If both are
used simultaneously, when one is disconnected or connected,
the volume of the other may increase or decrease suddenly.
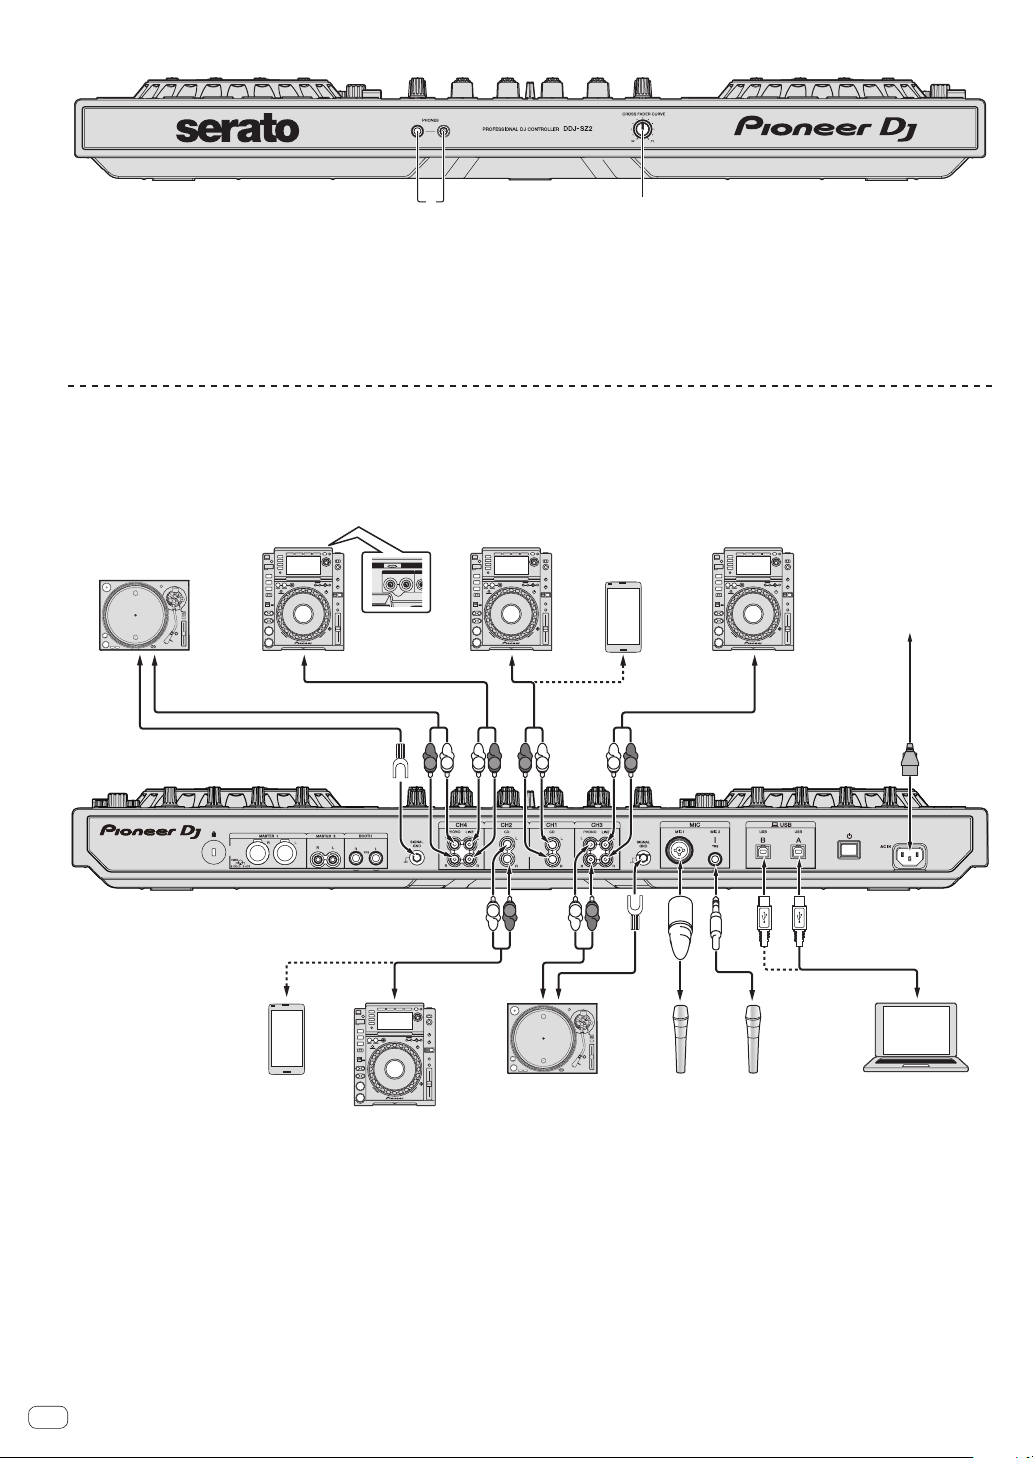
Connecting the input/output terminals
Connecting input terminals
Rear panel
DJ player DJ player
Analog player
AUDIO OUTRLCON
R
LRL
2 CROSS FADER CURVE selector switch
This switches the crossfader curve characteristics.
The further the control is turned clockwise, the sharper the curve
!
rises.
! The further the control is turned counterclockwise, the more
gradually the curve rises.
DJ player
Mobile device
Power cord
(included)
L
R
L
R
To power outlet
R
L
Mobile device
En
8
Analog player
R
L
Microphone Microphone
Computer
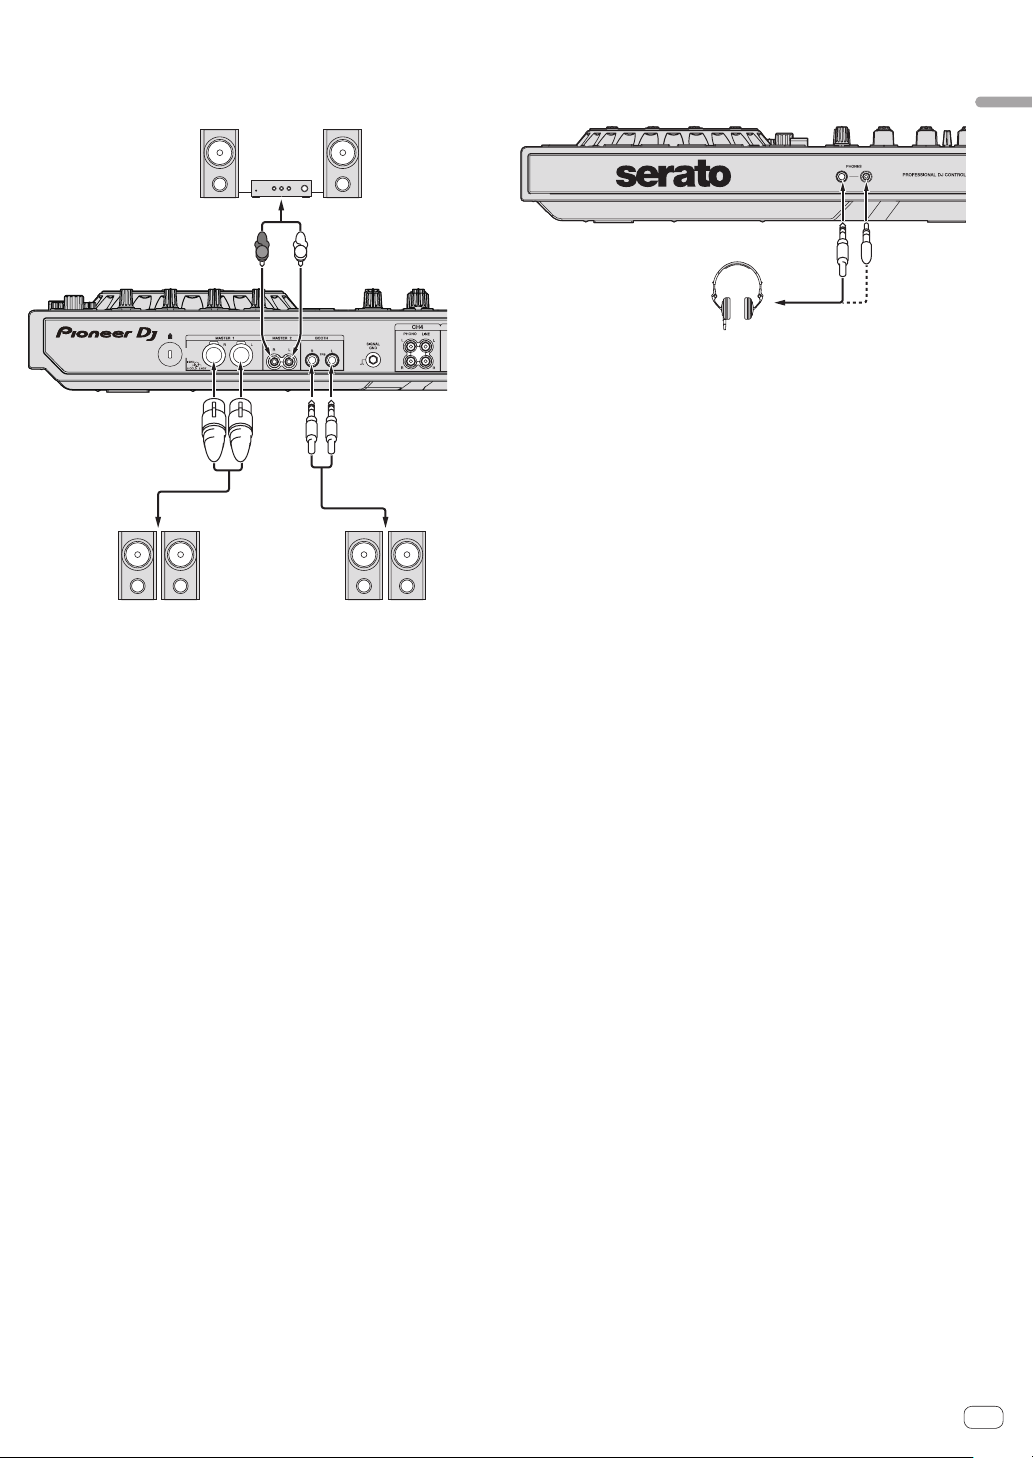
Connecting output terminals
Component, amplifier, powered speaker, etc.
powered speakers, etc.
Power amplifier (for booth monitor),
powered speakers, etc.
Headphones
Rear panel
Power amplifier,
Front panel
Connections and part names
L
R
En
9
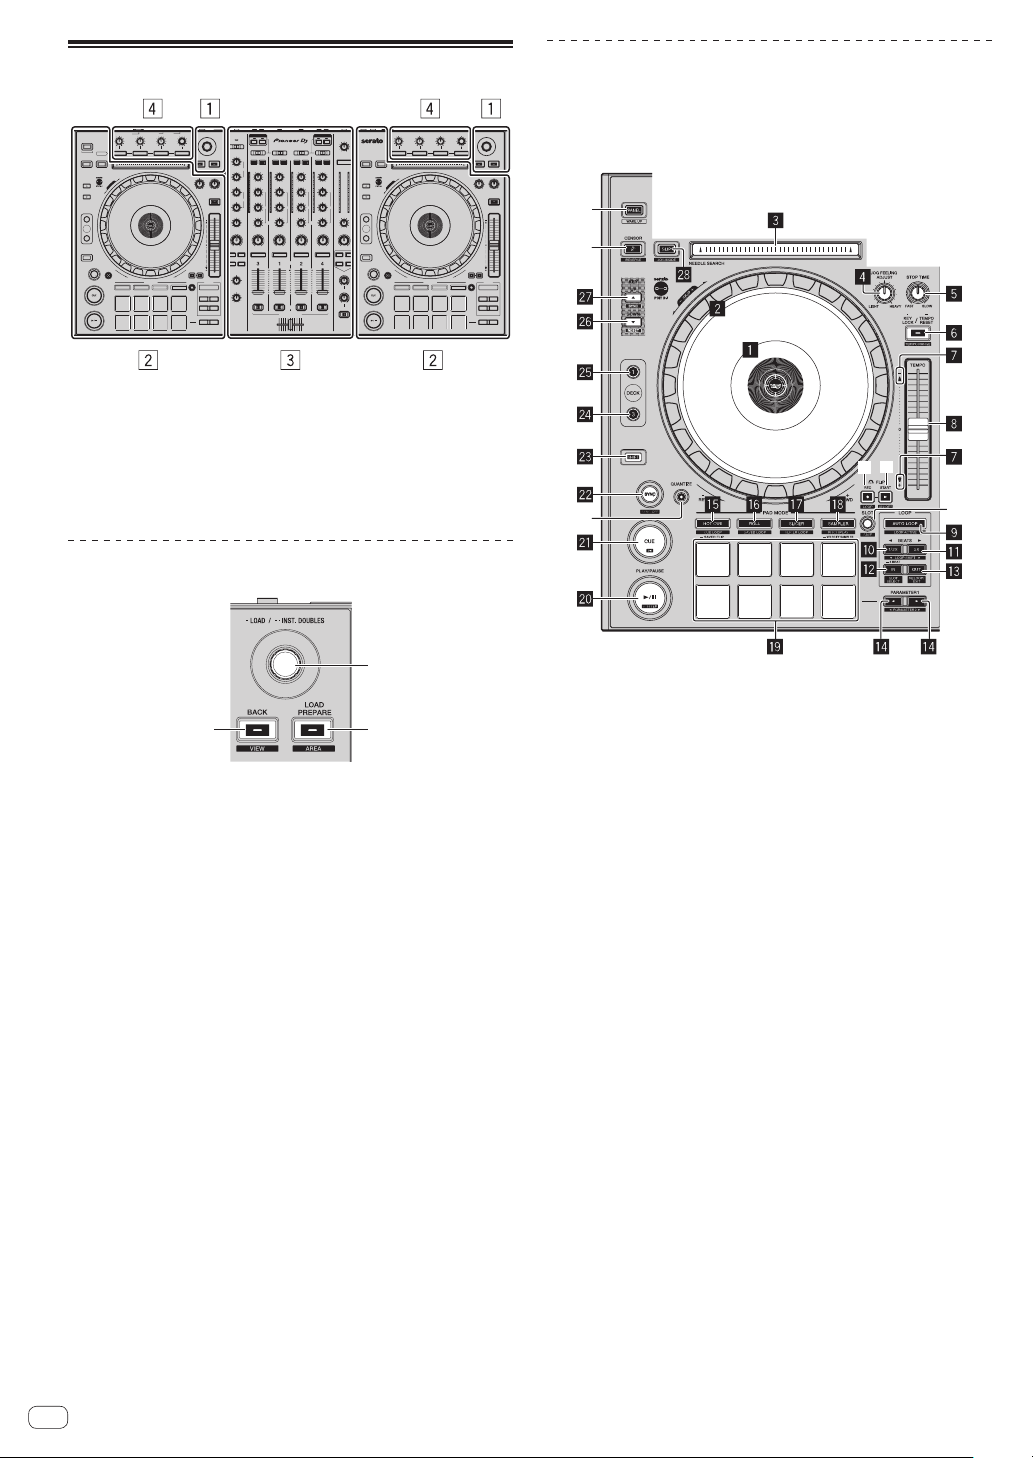
Part names and functions
1
32
t
v
u
w
1 Browser section
2 Deck section
3 Mixer section
4 Effect section
Browser section
Deck section
This section is used to control the four decks. The buttons and controls
for operating decks 1 and 3 are located on the left side of the controller,
those for operating decks 2 and 4 are located on the right side of the
controller.
y
x
1 Rotary selector
Turn:
The cursor in the library or on the [CRATES] panel moves up and
down.
Press:
The selected tracks are loaded to the respective decks.
! When the rotary selector is pressed twice, the tracks loaded in
the selected deck on the opposite side are loaded into the deck
whose rotary selector was pressed. When this is done while
a track is playing, the track is played from the same position.
(Instant Double)
2 BACK (VIEW) button
Press:
The cursor moves between the [CRATES] panel and library each time
the button is pressed.
[SHIFT] + press:
Switches the Serato DJ layout.
3 LOAD PREPARE (AREA) button
Press:
Loads tracks to the [Prepare] panel.
[SHIFT] + press:
Selects and opens the [Files] panel, [Browse] panel, [Prepare] panel
or [History] panel.
1 Jog dial display section
= Jog dial display section (p. 14 )
2 Jog dial
Turn top:
When the vinyl mode is on, the scratch operation is possible.
When the vinyl mode is off, the pitch bend operation (adjustment of
the playing speed) is possible.
Turn outer section:
The pitch bend operation (adjustment of the playing speed) is
possible.
[SHIFT] + Turn top:
The playback position skips in sync with the beat. (Skip mode)
! The skip mode cannot be used with tracks for which no beatgrid
is set. For details on setting beatgrids, see the Serato DJ software
manual.
! To use the skip mode, [SYNC PREFERENCES] in the Serato DJ
[SETUP] menu must be switched to [Smart Sync].
3 NEEDLE SEARCH pad
By touching the pad, you can jump to the desired position in the
track loaded in the deck.
4 JOG FEELING ADJUST control
This adjusts the load applied when the jog dial is spun.
The load gets heavier when turned clockwise, lighter when turned
counterclockwise.
5 STOP TIME control
When the [PLAY/PAUSEf] button is pressed, the speed of playback stop can be changed.
6 KEY LOCK button
Press:
Turns the key lock function on and off.
When the key lock function is on, the key does not change even when
the playing speed is changed with the [TEMPO] slider.
The sound is digitally processed, so the sound quality decreases.
10
En
[SHIFT] + press:
[
±8 %
][
±16 %
][
±50 %
]
The [TEMPO] slider’s range of variation switches each time the but-
ton is pressed.
Press for over 1 second:
Sets the tempo (BPM) of the currently playing track back to its origi-
nal tempo.
7 Takeover indicator
When decks are switched while the sync function is off, the posi-
tion of the controller’s [TEMPO] slider may not match the soft-
ware’s tempo (pitch). To regain control of the tempo from the control-
ler, adjust using the [TAKEOVER] indicator as reference. Slowly move
the [TEMPO] slider in the direction in which the [TAKEOVER] indica-
tor lights. When moved to the position at which the [TAKEOVER]
indicator turns off, the [TEMPO] slider’s position matches the
software’s tempo (pitch) and the tempo can once again be controlled
with the [TEMPO] slider.
8 TEMPO slider
Use this to adjust the track playing speed.
When the deck is switched, if the value controlled by Serato DJ and
the [TEMPO] slider position of the unit are different, you cannot oper-
ate the [TEMPO] slider unless it is moved to the position controlled
by Serato DJ.
! The default setting of the [TEMPO] slider of deck 3 and 4 of
Serato DJ is ±0.0 %.
9 AUTO LOOP button
Press:
Turns the auto loop function on and off.
During loop playback, this operation cancels looping.
!
[SHIFT] + press:
Switches looping between active and non-active. (Loop Active)
!
Even if looping is active, if there is no playback position in that
loop, loop playback is not performed.
When the playback position enters the active loop, loop playback
!
starts.
! During loop playback, this operation cancels looping.
a LOOP 1/2X button
Press:
Select the auto loop beat.
During loop playback, the length of loop playback is split in half each
time this button is pressed.
[SHIFT] + press:
During loop playback, moves the loop to the left by the amount equal
to its length. (Loop Shift)
b LOOP 2X button
Press:
Select the auto loop beat.
During loop playback, the length of loop playback is doubled each
time this button is pressed.
[SHIFT] + press:
During loop playback, moves the loop to the right by the amount
equal to its length. (Loop Shift)
c LOOP IN button
Press:
Loop In Point is set.
When this button is pressed during loop playback, the loop in point
can be fine-adjusted using the jog dial.
[SHIFT] + press:
The loop slot switches.
When loops are stored in loop slots ahead of time, they can be called
out later.
! Up to eight loops can be set in the loop slots.
! When you select the number of the loop slot at which you want to
store the loop then set a loop, the loop is automatically stored.
!
When a new loop is set after a loop has been stored, the loop is
overwritten and the slot is updated.
! When the number of the loop slot whose loop you want to call out
is selected and the [LOOP OUT] button is pressed while pressing
the [SHIFT] button (reloop), playback of the stored loop starts.
d LOOP OUT button
Press:
The loop out point is set, and loop playback begins.
When this button is pressed during loop playback, the loop out point
can be fine-adjusted using the jog dial.
[SHIFT] + press:
Cancels loop playback. (Loop Exit)
After loop playback is canceled, playback returns to the previously
set loop in point and loop playback resumes. (Reloop)
e PARAMETERc button, PARAMETERd button
These set the various parameters for when using the performance
pads.
= Using the performance pads (p. 19 )
f HOT CUE mode button
Press:
Sets the hot cue mode.
= Using hot cues (p. 19 )
[SHIFT] + press:
Sets the hot loop mode.
= Using the cue loop (p. 20 )
Press for over 1 second:
Sets the saved flip mode.
For details, see “Serato Flip Manual” from [Software Info] on the
Pioneer DJ support site below.
http://pioneerdj.com/support/
g ROLL mode button
Press:
Sets the roll mode.
= Using the Roll function (p. 19 )
[SHIFT] + press:
Sets the saved loop mode.
= Using the saved loop (p. 20 )
h SLICER mode button
Press:
Sets the slicer mode.
! To cancel the slicer mode, press one of the [ROLL] mode,
[SAMPLER] mode or [HOT CUE] mode buttons.
[SHIFT] + press:
Sets the slicer loop mode.
i SAMPLER mode button
Press:
Sets the sampler mode.
[SHIFT] + press:
Sets the pitch play mode.
! For details, see Pitch play mode on page 21 .
Press for over 1 second:
Turns the sampler velocity mode on and off.
For details on the sampler velocity mode, see Using the sampler
velocity mode on page 22 .
j Performance pads
Various performances can be achieved using the pads.
Using the performance pads (p. 19 )
=
k PLAY/PAUSE f button
Press:
Use this to play/pause tracks.
When the [PLAY/PAUSE f] button is pressed during Cue
!
Sampler, playback continues from that point.
En
Connections and part names
11
 Loading...