

Pioneer DJ DDJ-1000 Operating Instructions
DJ Controller
Contrôleur pour DJ
DJ Controller
DJ Controller
DDJ-1000
DJ Controller
Controlador DJ
Controlador para DJ
pioneerdj.com/support/
rekordbox.com
For FAQs and other support information for this product, visit the above site.
Pour les FAQ et autres informations de support sur ce produit, consultez le site ci-dessus.
Häufig gestellte Fragen und weitere Support-Informationen für dieses Produkt finden Sie auf der oben
genannten Seite.
Per la sezione FAQ e altre informazioni di supporto per questo prodotto, visitare il sito indicato sopra.
Bezoek de bovenstaande website voor vaak gestelde vragen en andere informatie over ondersteuning voor dit
product.
Para consultar las preguntas más frecuentes y otras informaciones de asistencia para este producto, visite el
sitio indicado anteriormente.
Para obter informações sobre as FAQs e outras informações de apoio relativas a este produto, consulte o site
indicado acima.
Ответы на часто задаваемые вопросы и другую дополнительную информацию о данном изделии см.
на указанном выше сайте.
Français Deutsch ItalianoEnglish
Nederlands
Operating Instructions (Quick Start Guide)
Mode d’emploi (Guide de démarrage rapide)
Bedienungsanleitung (Kurzanleitung)
Istruzioni per l’uso (Guida di avvio veloce)
Handleiding (Snelstartgids)
Manual de instrucciones (Guía de inicio rápido)
Manual de instruções (Guia de início rápido)
Инструкции по эксплуатации
(Краткое руководство пользователя)
РусскийPortuguêsEspañol

Thank you for buying this Pioneer product. Please read through these operating instructions so you will know how to operate your model properly. After
CAUTION
TO PREVENT THE RISK OF ELECTRIC SHOCK, DO NOT
REMOVE COVER (OR BACK). NO USER
PA
SERVICE PERSONNEL.
WARNING
This equipment is not waterproof
shock hazard, do not place any container filled with
liquid near this equipment (such as a vase or flower
pot) or expose it to dripping, splashing, rain or
moisture
WARNING
To
sources (such as a lighted candle) on the equipment.
P
designated collection facilities or to a retailer (if you purchase a similar new one).
Fo
By doing so you will ensure that your disposed product undergoes the necessar
negative effects on the environment and human health.
Operating Envir
Operating environment temperature and humidit
+5 °C to +35 °C (+41 °F to +95 °F); less than 85 %RH
(cooling vents not blocked)
Do not install this unit in a poorly ventilated area, or in
locations exposed to high humidity or direct sunlight (or
strong artificial light).
WARNING
Store small parts out of the reach of children and
infants. If accidentally swallowed, contact a doctor
immediately
you have finished reading the instructions, put them away in a safe place for future reference.
In some countries or regions, the shape of the power plug and power outlet may sometimes differ from that shown in the explanatory drawings.
However the method of connecting and operating the unit is the same.
If you want to dispose this product, do not mix it with general household waste. There is a separate collection system for used
electronic products in accordance with legislation that requires proper treatment, recovery and recycling.
rivate households in the member states of the EU, in Switzerland and Norway may return their used electronic products free of charge to
r countries not mentioned above, please contact your local authorities for the correct method of disposal.
RTS INSIDE. REFER SERVICING TO QUALIFIED
-SERVICEABLE
D3-4-2-1-1_B1_En
. To prevent a fire or
.
D3-4-2-1-3_A1_En
prevent a fire hazard, do not place any naked flame
D3-4-2-1-7a_A1_En
onment
y:
CAUTION
The switch on this unit will not completely shut off
all power from the AC outlet. Since the power cord
serves as the main disconnect device for the unit,
you will need to unplug it from the AC outlet to shut
down all power. Therefore, make sure the unit has
been installed so that the power cord can be easily
unplugged from the AC outlet in case of an accident.
D3-4-2-1-7c*_A2_En
To avoid fire hazard, the power cord should also be
unplugged from the AC outlet when left unused for a
long period of time (for example, when on vacation).
D3-4-2-2-2a*_A1_En
y treatment, recovery and recycling and thus prevent potential
K058b_A1_En
POWER-CORD CAUTION
Handle the power cord by the plug. Do not pull out the
plug by tugging the cord and never touch the power
cord when your hands are wet as this could cause a
short circuit or electric shock. Do not place the unit, a
piece of furniture, etc., on the power cord, or pinch the
cord. Never make a knot in the cord or tie it with other
cords. The power cords should be routed such that they
are not likely to be stepped on. A damaged power cord
can cause a fire or give you an electrical shock. Check
the power cord once in a while. When you find it
damaged, ask your nearest service center or your
dealer for a replacement.
S002*_A1_En
CAUTION
This product is evaluated in moderate and tropical
climate condition.
D3-8-2-1-7a_A1_En
The graphical symbol placed on the product
means alternating current.
The graphical symbol placed on the product
means direct current.
The graphical symbol placed on the product
means Class II equipment.
D3-8-2-4_A1_En
VENTILATION CAUTION
When installing this unit, make sure to leave space
around the unit for ventilation to improve heat radiation
(at least 5 cm at rear, and 5 cm at each side).
When using this product, confirm the safety
information shown on the bottom of the unit.
D3-4-2-1-7d*_A1_En
D3-4-2-2-4_B1_En
.
En
2
D41-6-4_A1_En

Before start
English
How to read this manual
! Thank you for purchasing this Pioneer DJ product.
This manual provides brief descriptions of the connection between
the unit and your computer, and the audio output. For more instructions on how to use this product, refer to the Operating Instructions
for this product.
Read this manual and the Operating Instructions before using the
product. Both contain important information that you should understand to properly use the product.
! In this manual, names of buttons and terminals, menus of this prod-
uct and your computer, etc., are enclosed in square brackets ([ ])
(e.g. [File], [CUE] button, [PHONES] output terminal).
! Screens, external appearance, and software and hardware specifica-
tions described in this manual are based on the product that is still
under development and may differ from the final specifications.
! Depending on your operating system, the web browser settings,
etc., the procedures described in this manual may differ from actual
operations.
Features
This unit is an all-in-one DJ controller designed specifically for rekordbox dj. Its interfaces incorporating various controls such as “BIG JOG”,
“PERFORMANCE PADS”, and “4-CHANNEL MIXER” are positioned with
room to spare to allow for more individualistic DJ performances using
rekordbox dj. Also, numerous input and output terminals support a variety of DJ styles, and the design makes the unit look high quality, which is
appropriate in a variety of scenes such as nightclubs and home parties.
Accessories
! AC adapter
! Power cord
! USB cable
! Operating Instructions (Quick Start Guide) (this document)
! rekordbox dj license key card
1 One USB cable is included with this unit.
To connect two units, separately prepare a cable that conforms to
the USB 2.0 standard.
Cautions
The license key cannot be reissued. Be careful not to lose it.
1
Viewing the manuals
Viewing the Operating Instructions for
this unit
1 Launch a web browser on a computer and access the
following Pioneer DJ site.
pioneerdj.com
2 Click [Support].
3 Click [Tutorials, manuals & documentation].
4 Click [DDJ-1000] in the [DJ CONTROLLER] category.
5 Click the desired language from the Operating
Instructions list.
Download the manual as necessary.
Viewing the rekordbox introduction
1 Launch a web browser on the computer and access
the site below.
rekordbox.com/manual
2 Click the required language of the rekordbox
introduction.
En
3

rekordbox
! rekordbox
rekordbox is music management software for DJs to prepare tracks
and perform DJ play.
! rekordbox dj
The DJ performance functions of rekordbox are called rekordbox dj.
Enter the license key on the rekordbox dj license key card included
with this product to use rekordbox dj.
Operating environment
Supported
operating systems
Mac: macOS High
Sierra 10.13/Sierra
10.12 (latest update),
OS X 10.11/10.10 (latest
update)
Windows: 32-bit version or 64-bit version of
Windows 10, Windows
8.1, or Windows 7 (latest
service pack)
Others
USB port
Display resolution 1 280 x 768 or greater
Internet connection
! For information on the latest system requirements, compatibility, and supported
operating systems of rekordbox, see the site below.
rekordbox.com/system
! Operation on all computers is not guaranteed, even if the computers meet the
required operating environment.
! The CPU and hard disc may not provide sufficient processing capabilities
depending on the power-saving setting, etc. on the computer. Confirm that
the computer meets the conditions to provide constant high-performance (for
example, connecting the computer to a power outlet to maintain a stable power
supply) especially when using rekordbox on a laptop.
! A separate contract with an Internet service provider and payment of the utiliza-
tion fee are required to access the Internet.
! Use the latest version/service pack of the operating system.
CPU and required memory
Intel® processor Core™ i7, i5, i3
Intel® processor Core™ 2 Duo 2.0 GHz or better
4 GB or more of RAM
®
processor Core™ i7, i5, i3
Intel
Intel® processor Core™ 2 Duo 2.0 GHz or better
4 GB or more of RAM
A USB 2.0 port is required to connect a computer to
this unit.
An Internet connection is required for registering the
rekordbox user account and downloading the software.
Preparing rekordbox
Install the software by following the procedure below when you use
rekordbox for the first time or if you are using rekordbox 4.x or an earlier
version.
If you have already installed rekordbox Ver. 5.x, update it to the latest
version from rekordbox Update Manager. In this case, the following
installation procedure is not required. For details on the update procedure, access the site below and see “ rekordbox Introduction”.
rekordbox.com/manual
Installing rekordbox
1 Launch a web browser on the computer and
download rekordbox from the site below.
rekordbox.com/download
When downloading a Windows version, select either the 32-bit version or
64-bit version to match your computer.
2 Double-click the downloaded file to unzip it.
3 Double-click the unzipped file to launch the installer.
4 Carefully read the Software End User License
Agreement, and proceed with the installation by
following the instructions on the screen if you agree to
the terms.
! If you do not agree to the license agreement, cancel the
installation.
5 When the installation completion screen appears,
close the installer by following the instructions on the
screen.
The installation is completed.
En
4

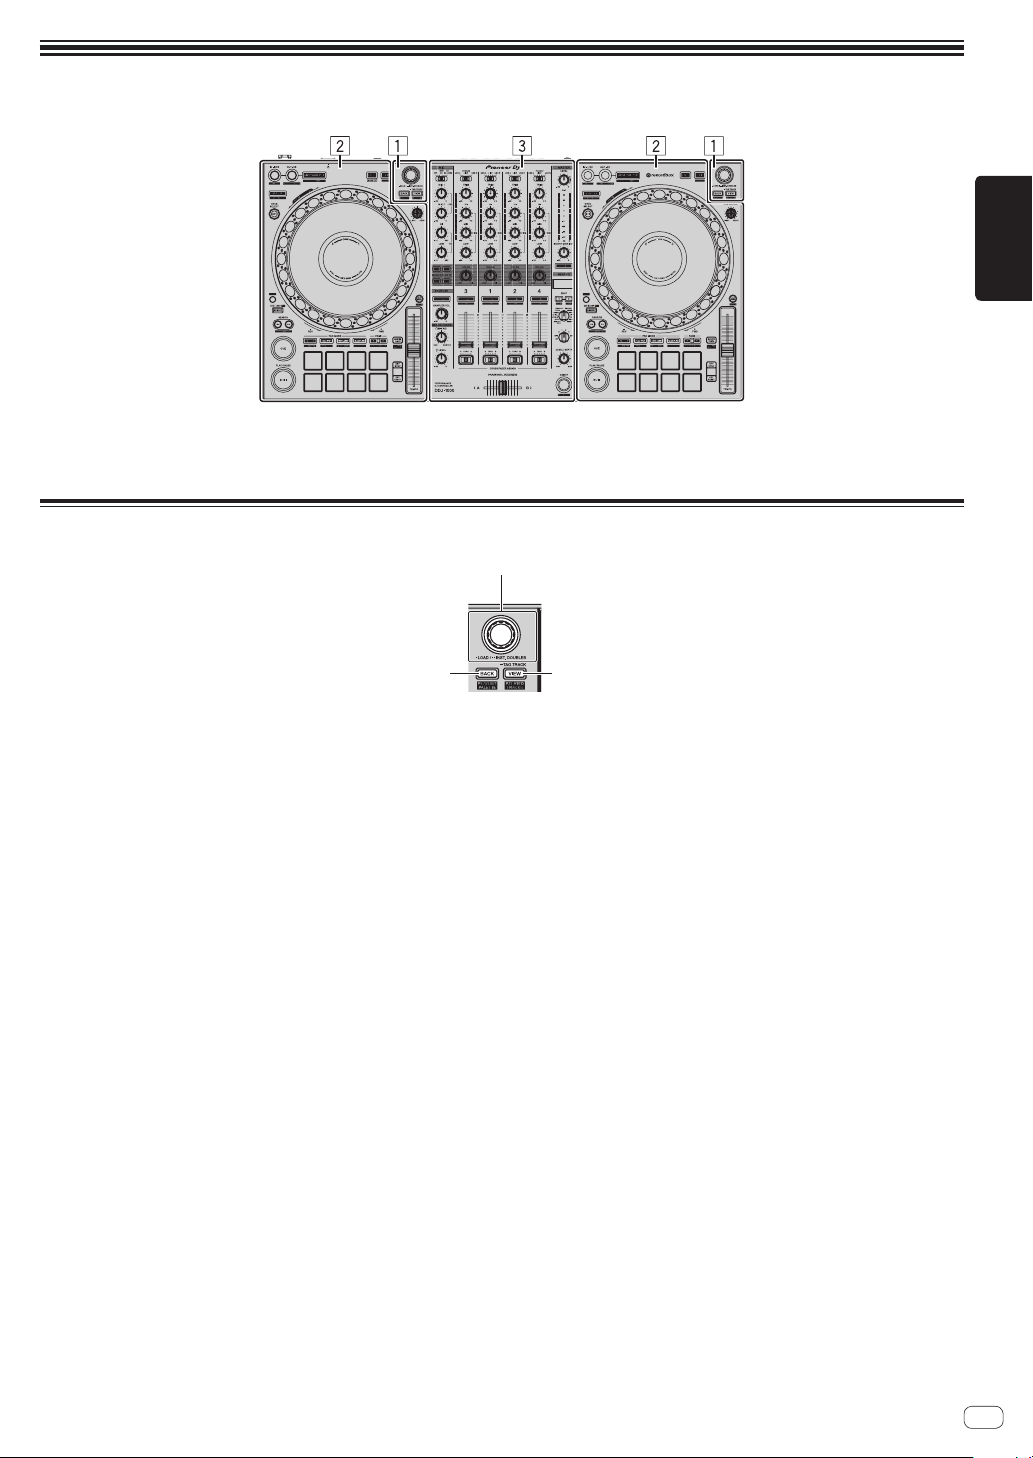
Part names
1
2 3
For details on the buttons and controls, see Part names and functions in the Operating Instructions.
English
1 Browser section
2 Deck sections
Browser section
1 Rotary selector
2 BACK button
3 VIEW button
3 Mixer section
En
5
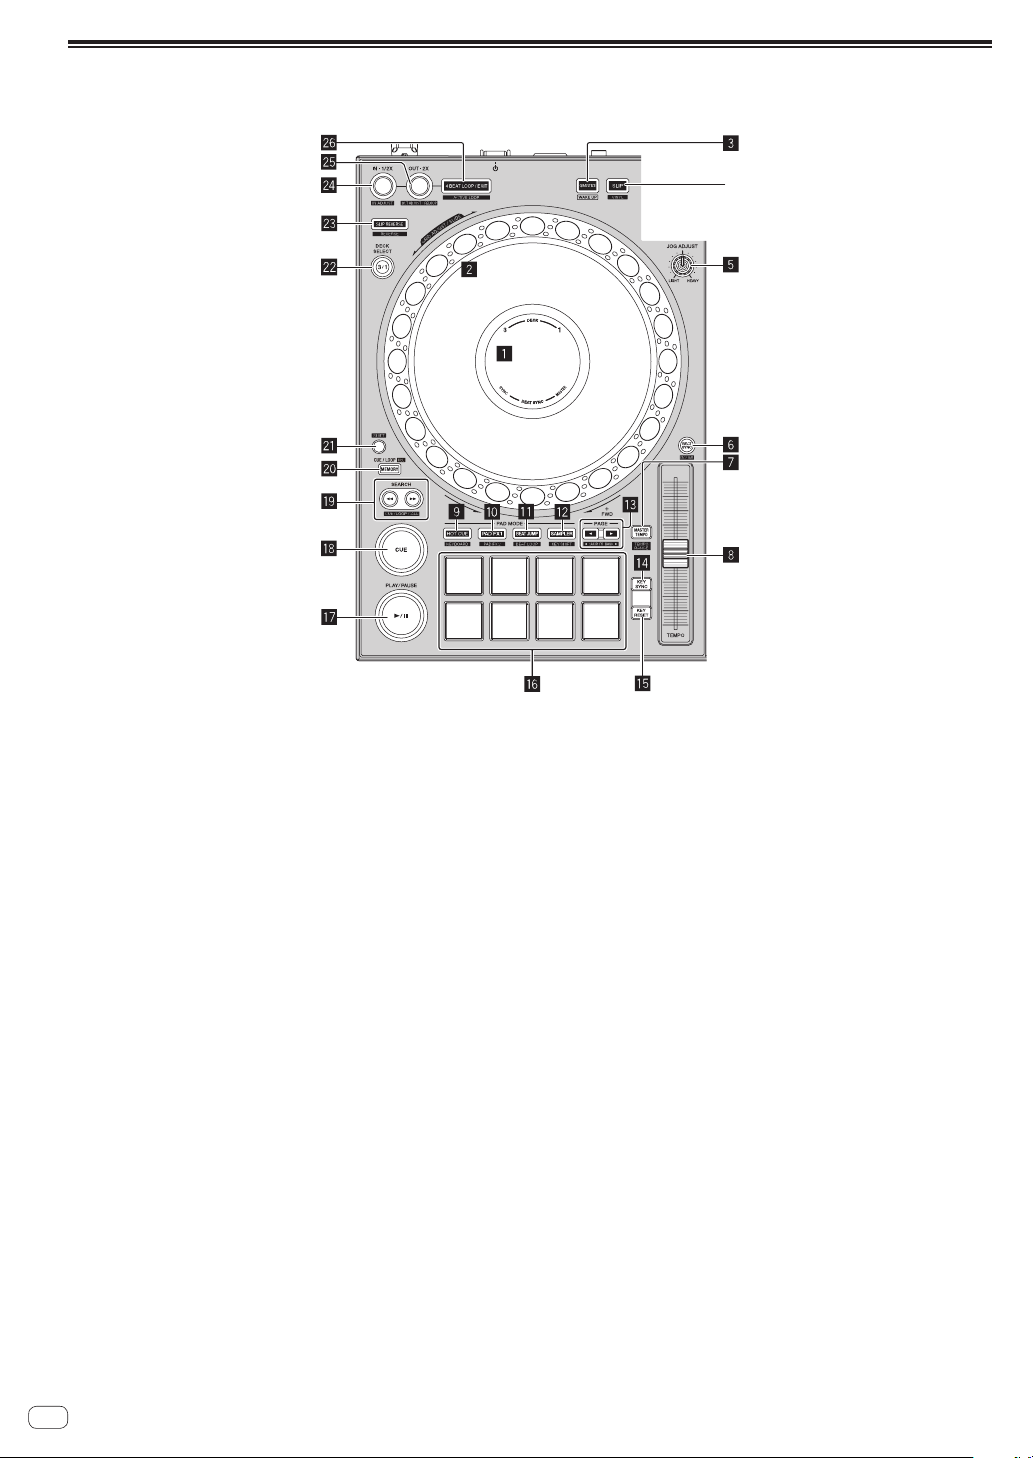
Deck sections
4
The deck sections are used to control the four decks. The buttons and controls for operating decks 1 and 3 are located on the left side of the controller,
and those for operating decks 2 and 4 are located on the right side of the controller.
1 Jog dial display section
2 Jog dial
3 QUANTIZE button
4 SLIP button
5 JOG FEELING ADJUST control
6 BEAT SYNC button
7 MASTER TEMPO button
8 TEMPO slider
9 HOT CUE mode button
a PAD FX1 mode button
b BEAT JUMP mode button
c SAMPLER mode button
d PAGE c, d button
KEY SYNC button
e
f KEY RESET button
g
Performance pads
h PLAY/PAUSE f button
i CUE button
SEARCH m, n buttons
j
k
MEMORY button
l SHIFT button
m
DECK selector button
n SLIP REVERSE button
o LOOP IN, LOOP 1/2X button
p LOOP OUT, LOOP 2X button
q 4 BEAT LOOP/EXIT button
En
6
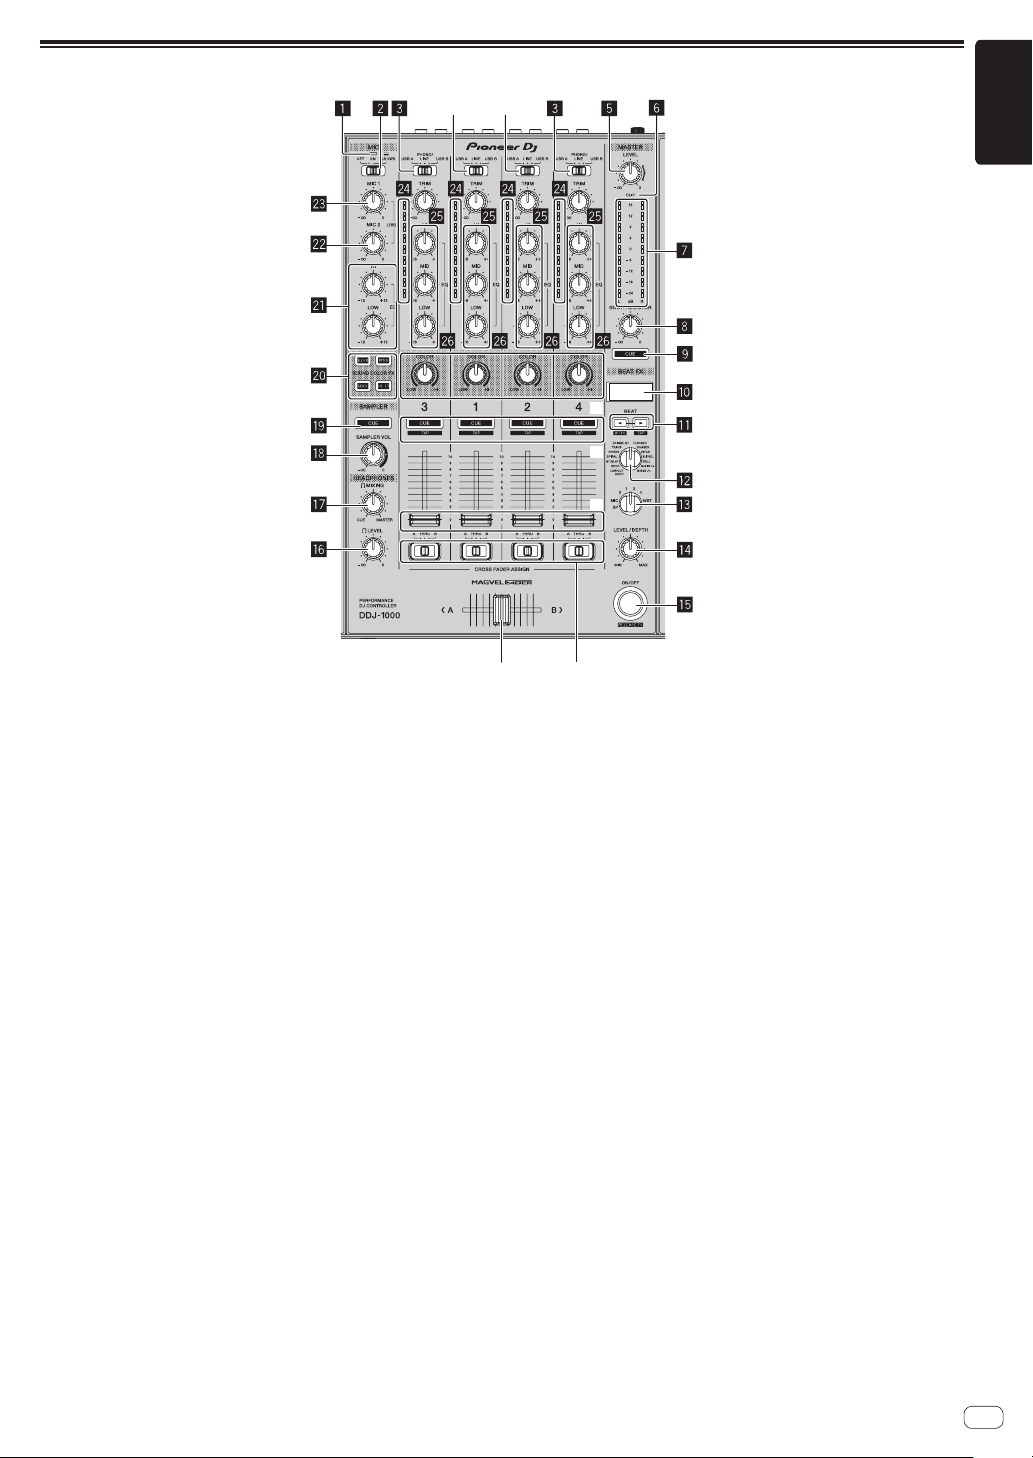
Mixer section
4
4
u
v
English
r
s
t
1 Microphone indicator
2 OFF, ON, TALK OVER selector switch
3 USB A, PHONO/LINE, USB B selector switch
4 USB A, LINE, USB B selector switch
5 MASTER LEVEL control
6 CLIP indicator
7 Master level indicator
8 BOOTH MONITOR LEVEL control
9 MASTER CUE button
a Effect section display
b BEAT c, d buttons
c BEAT FX SELECT control
d BEAT FX CH SELECT control
e BEAT FX LEVEL/DEPTH control
f BEAT FX ON/OFF button
g HEADPHONES LEVEL control
h HEADPHONES MIXING control
i SAMPLER VOL control
j SAMPLER CUE button
k SOUND COLOR FX SELECT buttons
l
MIC EQ (HI, LOW)controls
m MIC2 LEVEL control
n
MIC1 LEVEL control
o Channel level indicator
p TRIM control
q EQ (HI, MID, LOW) control
r COLOR control
s Headphones CUE button
t Channel fader
u Crossfader assign selector switch
v Crossfader
En
7
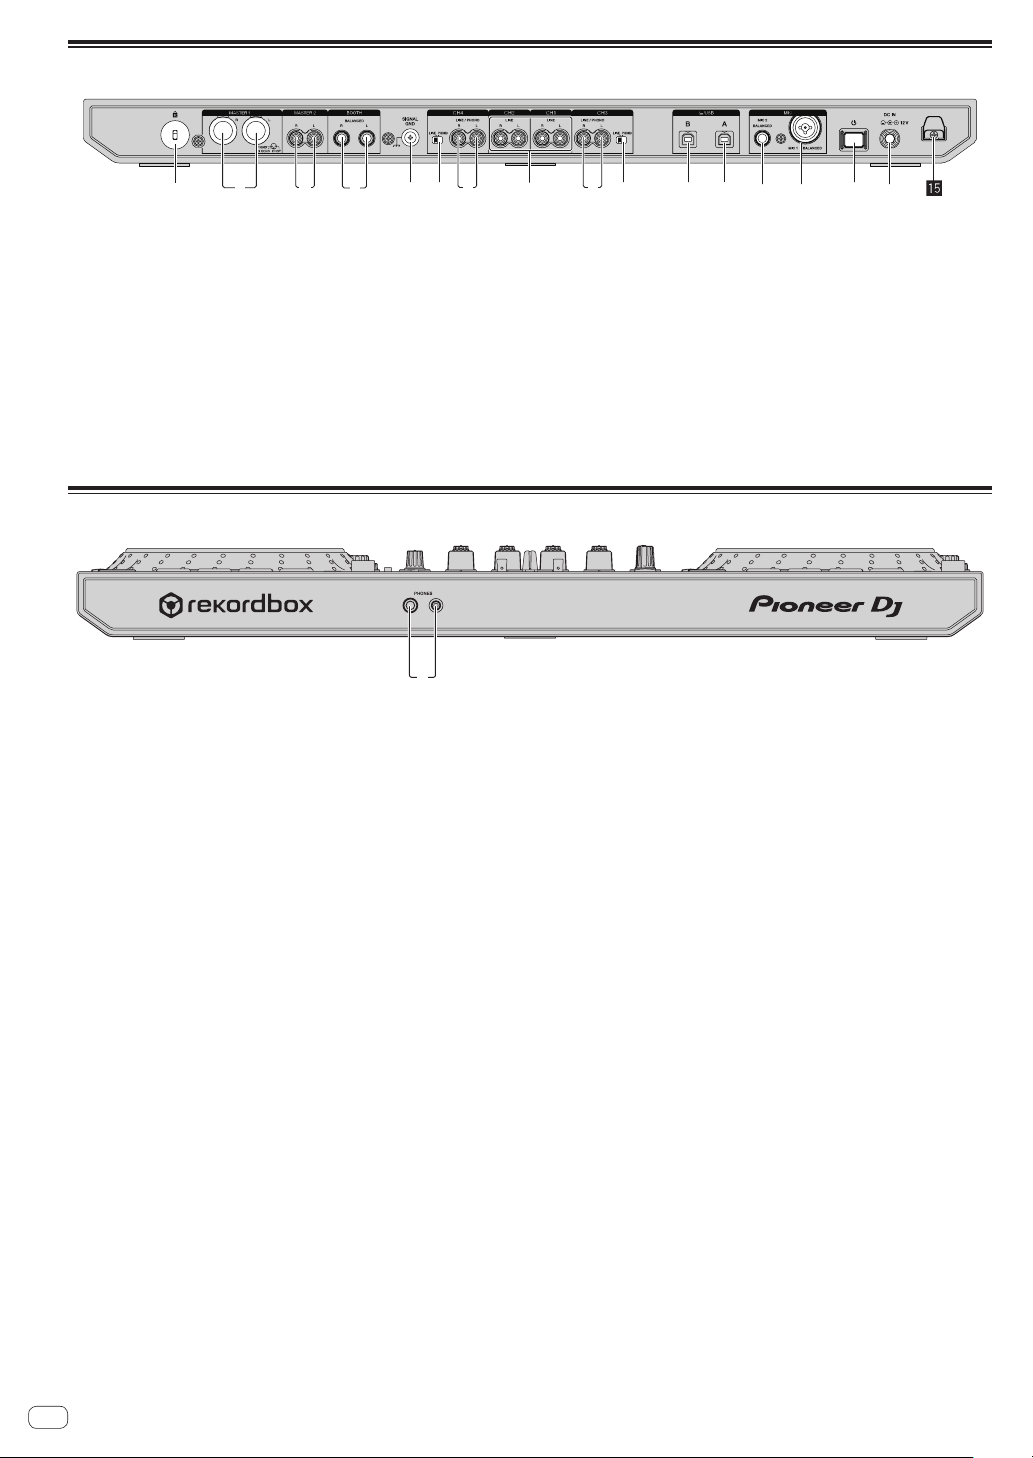
Rear panel
2 7 731 4 66 89abcde5
1
1 Kensington security slot
2 MASTER 1 output terminal
3 MASTER 2 output terminal
4 BOOTH output terminals
5 SIGNAL GND terminal
6 LINE/PHONO switch
7 LINE/PHONO input terminals
8 LINE input terminals
Front panel
1 PHONES output terminals
9 USB terminals (USB B)
a USB terminals (USB A)
b MIC2 input terminals
c MIC1 input terminals
d u switch
This switch is used to switch between standby and on.
e DC IN terminal
f DC cord hook
En
8
Operation
device
To power outlet
R
! Connect the power cord to a power outlet after all the connections are completed.
Turn off this unit and disconnect the power cord from the power outlet before connecting components or changing the connections.
Refer to the operating instructions for the components to be connected.
! Be sure to use the included power cord and AC adapter.
! Be sure to use the USB cable included with this product or one that conforms to USB 2.0.
! Do not use a USB hub.
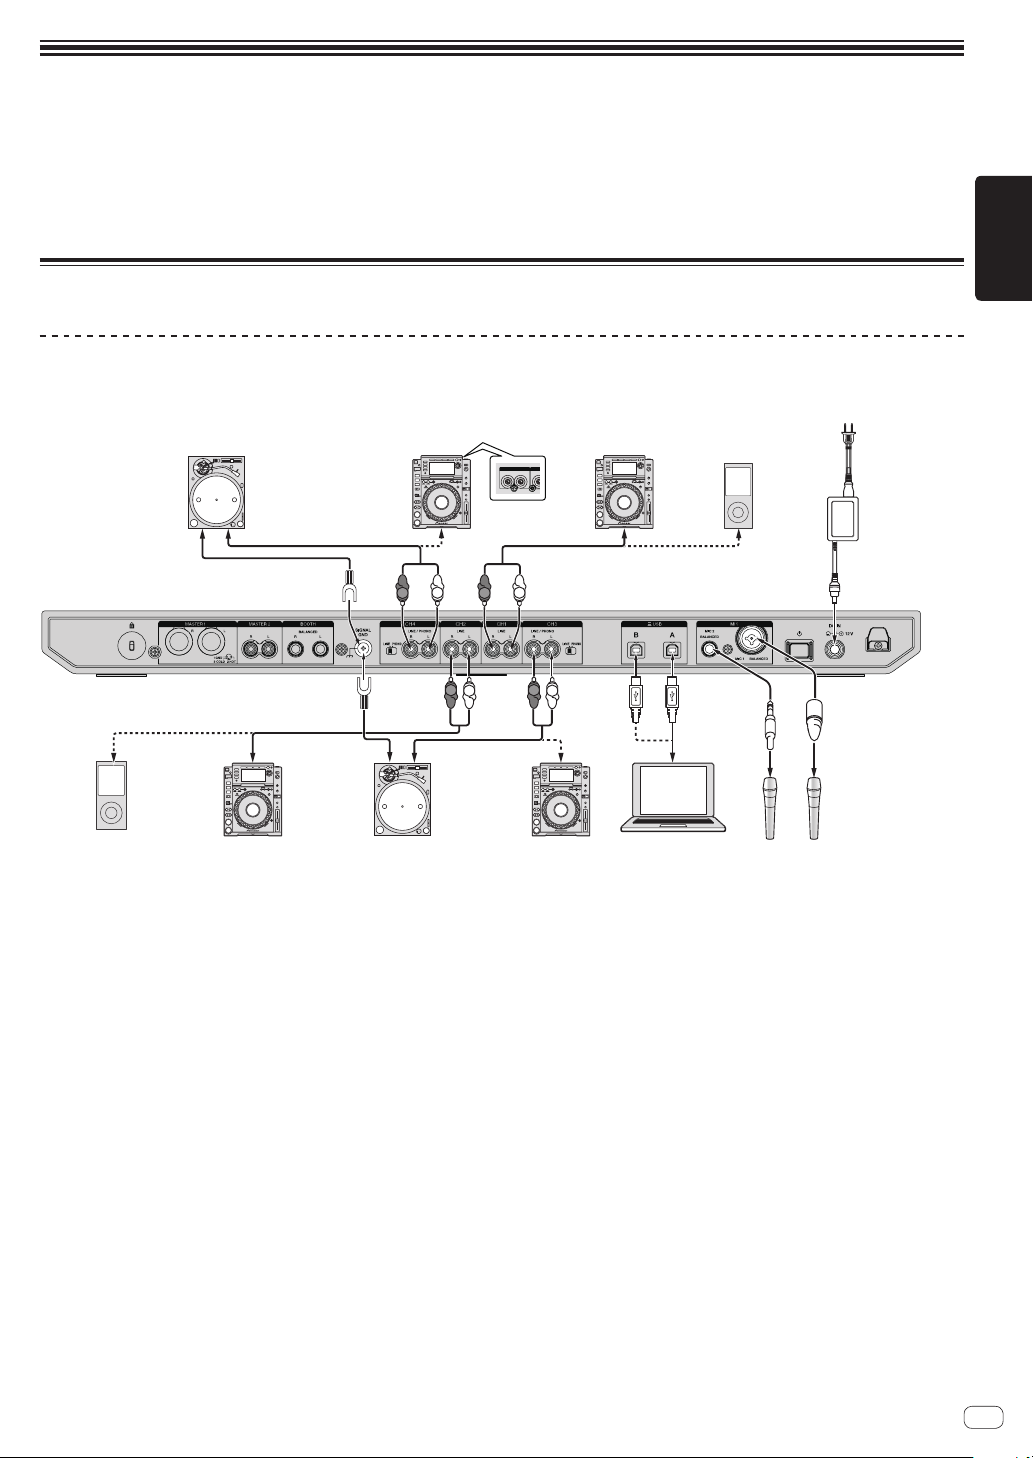
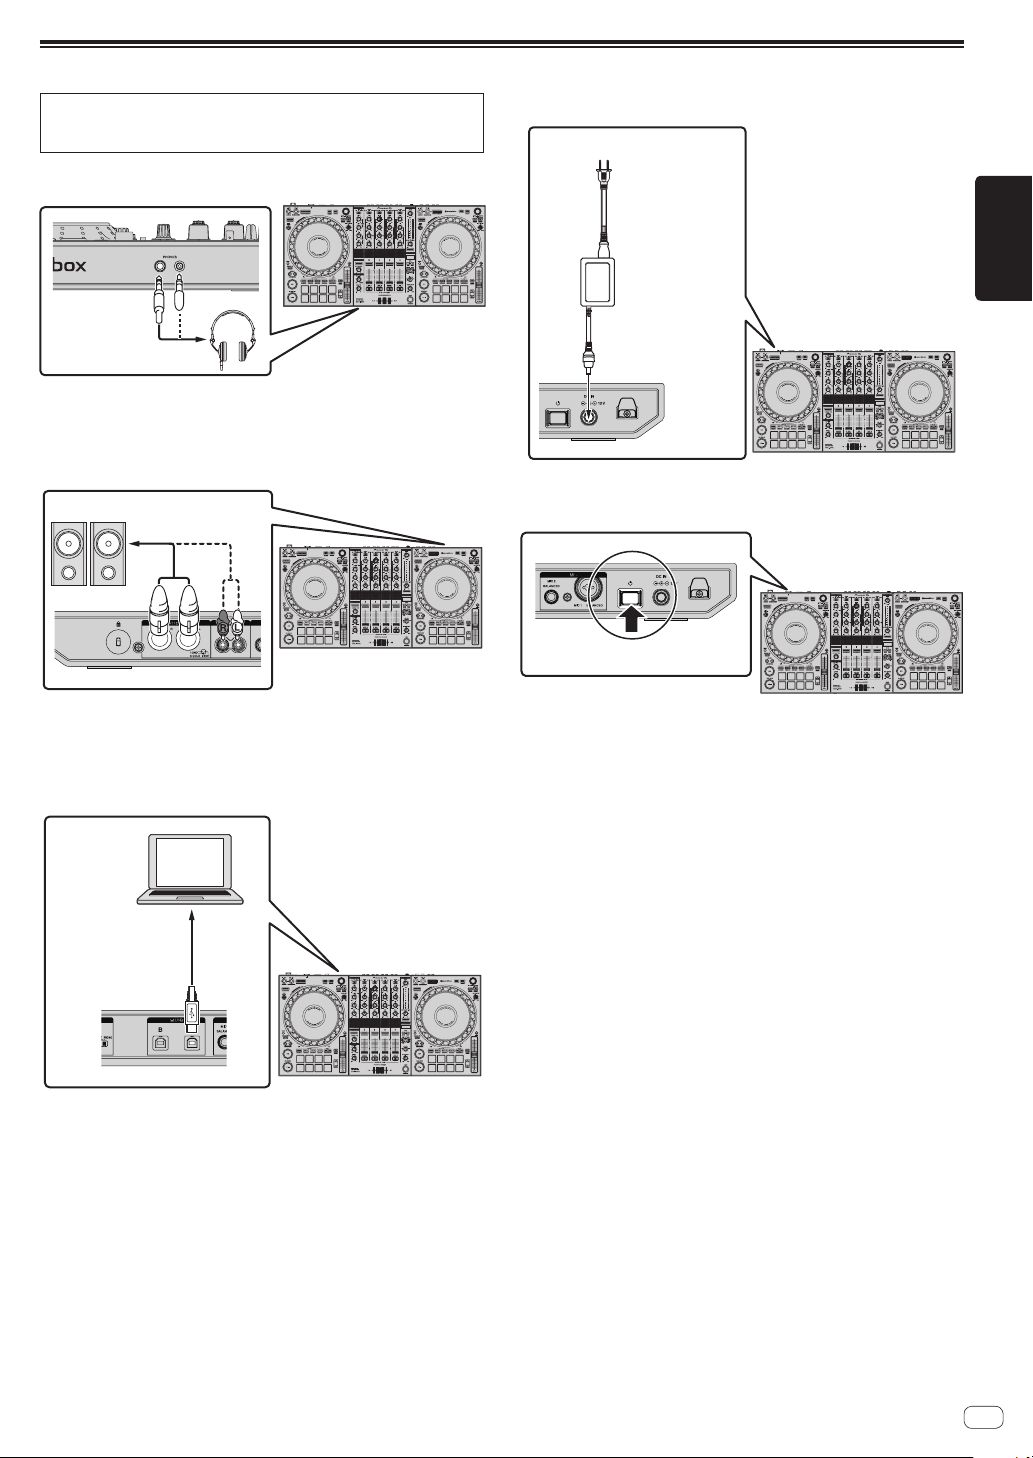
Example of connections
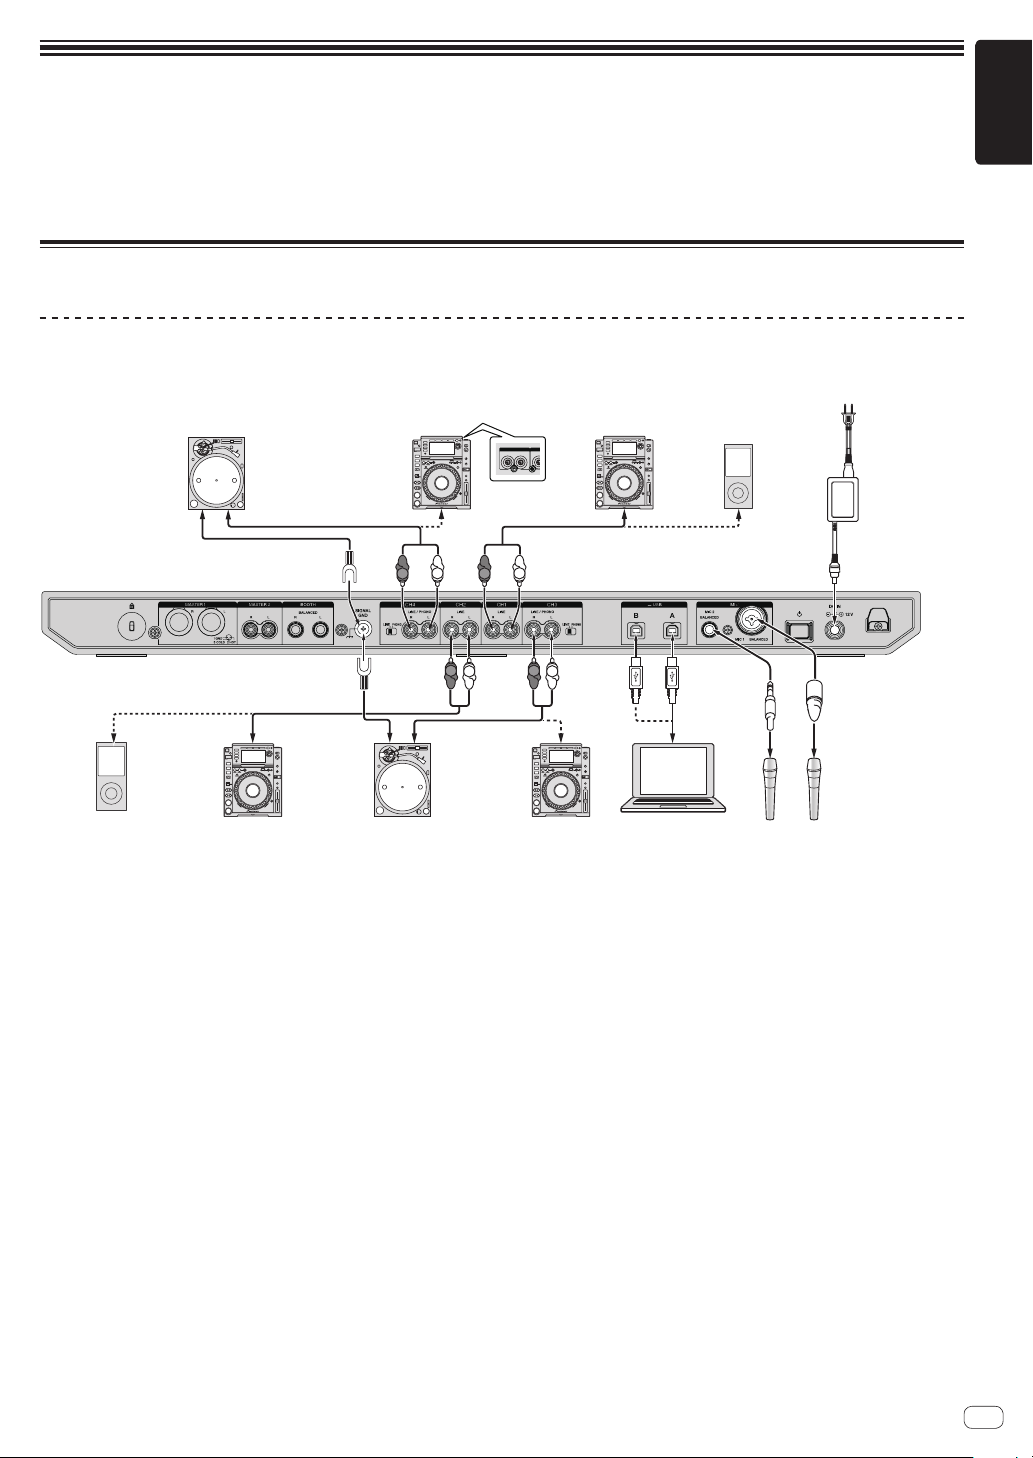
Connecting input terminals
Rear panel
*1
Analog player
*2
DJ player
AUDIO OUT
R L
DJ player
CONT
Portable audio
device
Power cord
㸦
included
AC adapter
(included)
English
㸧
Portable audio
DJ player
R
*1
Analog player
L
R
L
R
L
R
*2
DJ player
L
Computer
! *1 When connecting an analog player, switch the [LINE/PHONO] switch beside the terminals to [PHONO].
*2 When connecting a DJ player, switch the [LINE/PHONO] switch beside the terminals to [LINE].
Microphone
En
9
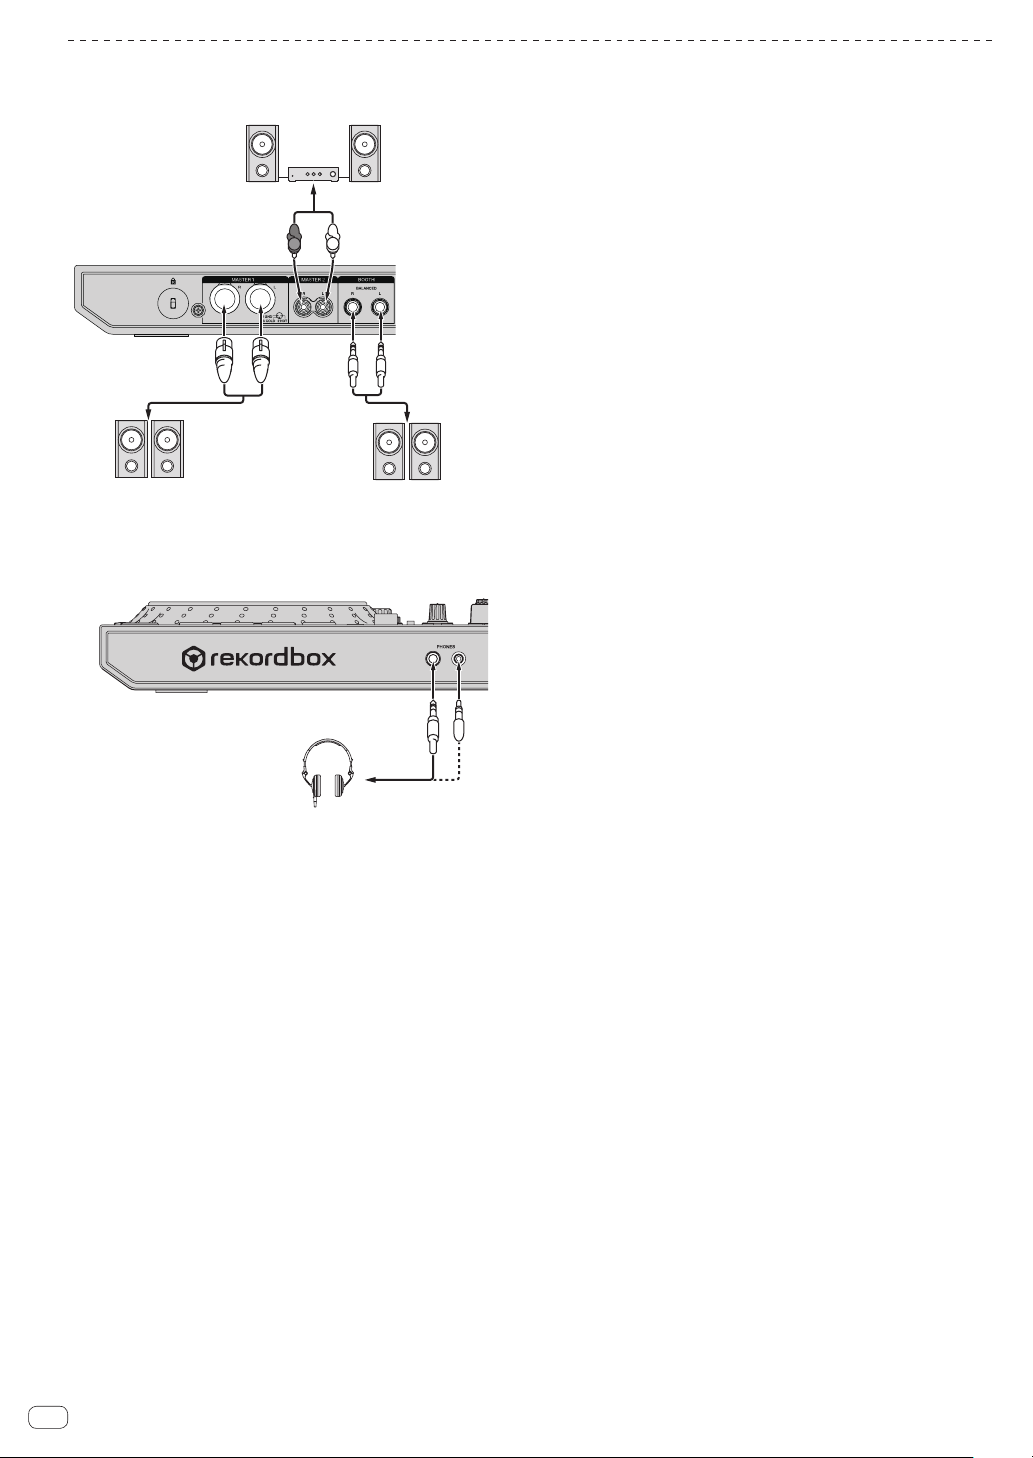
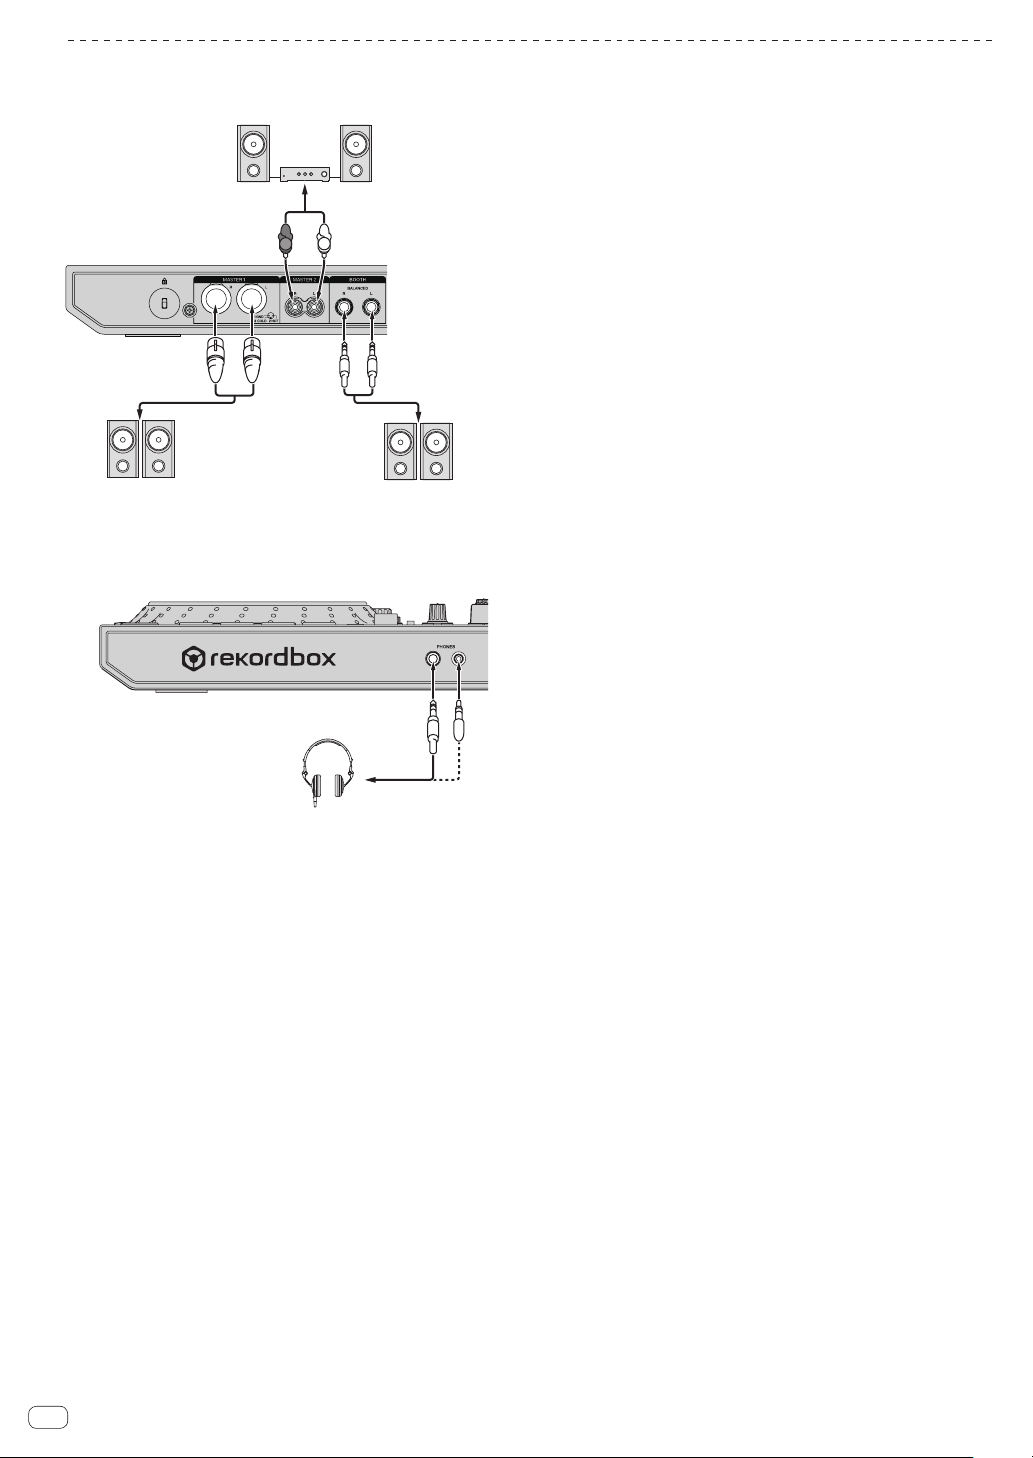
Connecting output terminals
powered speakers, etc.
Headphones
Rear panel
Component, amplifier,
powered speaker, etc.
L
R
Power amplifier,
powered speakers, etc.
Power amplifier
(for booth monitor),
Front panel
1 Be sure to use the [MASTER 1] output terminals for a balanced
output. If they are connected to an unbalanced input (such as RCA)
using an XLR to RCA converter cable (or converter adapter), etc., the
sound quality may be lowered or noise may occur.
For connection with an unbalanced input (such as RCA), use the
[MASTER 2] output terminals.
2 Be careful not to accidentally insert the power cord plug of
another unit into a [MASTER 1] output terminals.
Do not connect terminals capable of supplying phantom power
to the [MASTER 1] output terminals.
3 Be sure to use the [BOOTH] output terminals for a balanced output.
If they are connected to an unbalanced input (such as an RCA or TS
terminal) with an TRS to RCA converter cable (or converter adapter),
TS cable, etc., the sound quality may be lowered or noise may occur.
10
En
Connections
English
For more information on how to use this product with rekordbox dj,
refer to this product's Operating Instructions that is available on the
Pioneer DJ site.
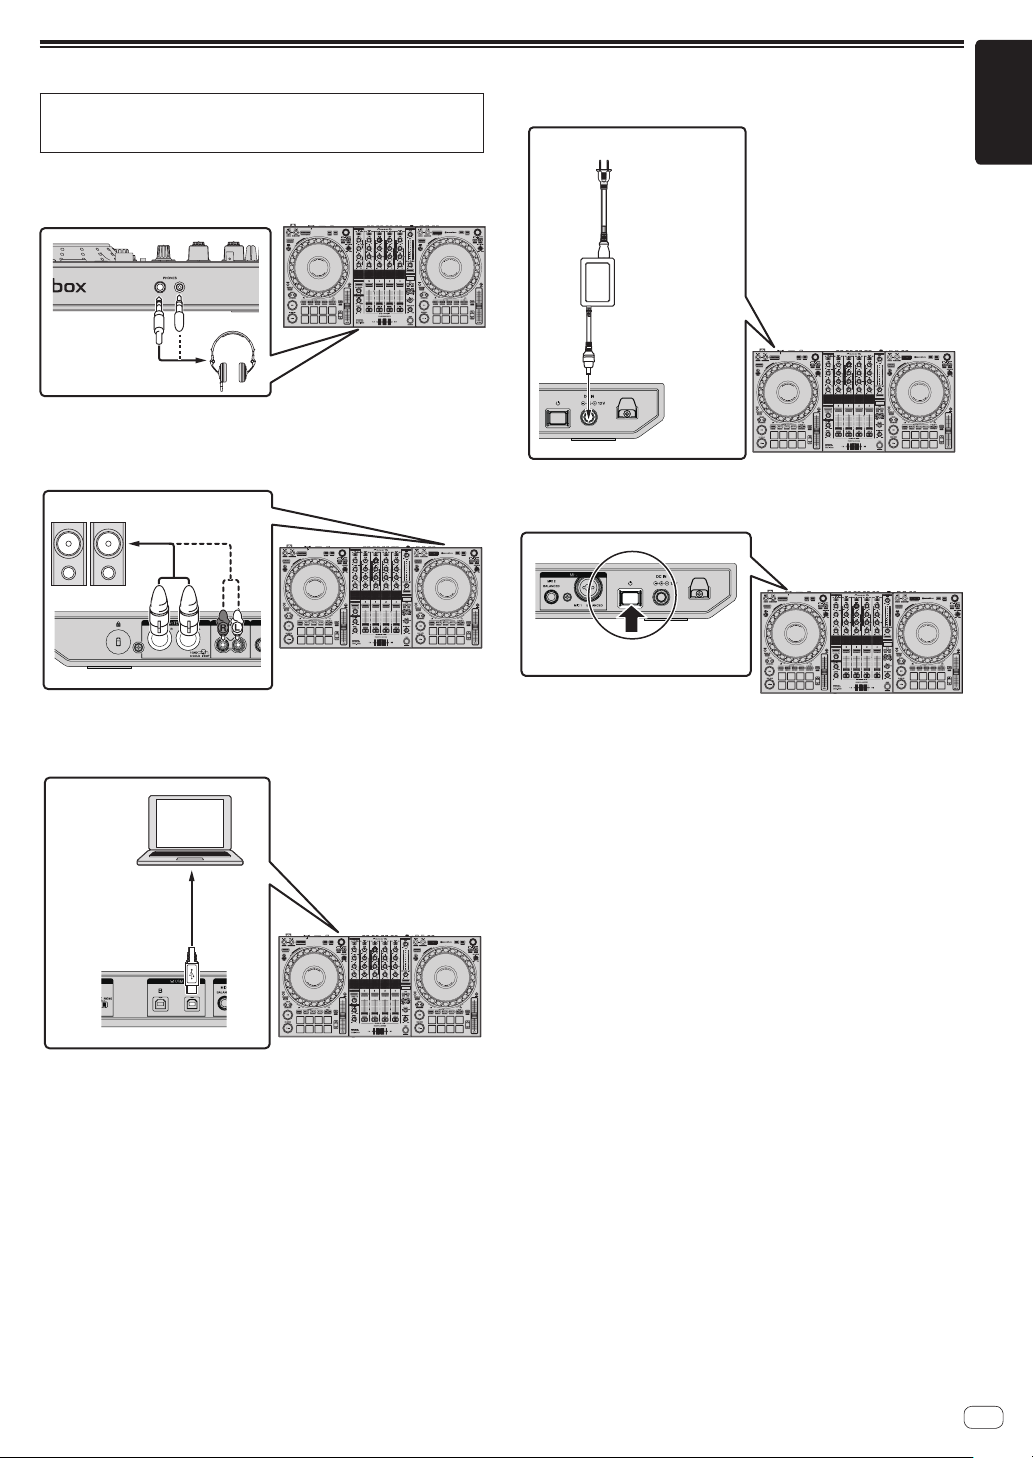
1 Connect headphones to the [PHONES] output
terminals.
2 Connect devices such as powered speakers, a power
amplifier, and components to the [MASTER 1] or
[MASTER 2] output terminals.
Powered speakers, etc.
5
Connect the AC adapter.
To power outlet
Power cord
㸦
AC adapter
(included)
included
㸧
6 Press the [u] switch on the rear panel of this unit to
turn this unit on.
! To output the sound from the [BOOTH] output terminals, con-
nect devices such as speakers to the [BOOTH] output terminals.
3 Connect this unit to your computer using a USB cable.
USB cable
㸦
included
㸧
4 Turn the computer on.
This unit turns on.
! For Windows
[Installing device driver software] may appear when this unit
is connected to the computer for the first time or connected to a
different USB port on the computer. Wait for a while until [Your
devices are ready for use] appears.
7 Turn on the devices connected to the output
terminals (powered speakers, power amplifier,
components, etc.).
! If a microphone, DJ player or other external device is connected
to the input terminals, turn on the connected device.
En
11
Starting the system
Launching rekordbox
Account registration and activation work for rekordbox dj are required at
first startup. For details on each work procedure, access the site below
and see “rekordbox Introduction”.
rekordbox.com/manual
For Mac
Open the [Applications] folder in Finder, and double-click the [rekordbox] icon.
For Windows 10
From the [Start] menu, click [Pioneer] > [rekordbox] icon.
For Windows 8.1
Click the [rekordbox] icon in [Apps view].
For Windows 7
Click the [Start] menu > [All Programs] > [Pioneer] > [rekordbox
X.X.X] > the [rekordbox] icon in order.
Checking audio settings
Check that the [Audio] settings in [Preferences] of rekordbox are set as
follows.
For Mac
[Audio]: [DDJ-1000]
[Output channels]:
[Master Output]: [DDJ-1000: MASTER]
[Headphones Output]: [DDJ-1000: HEADPHONE]
For Windows
[Audio]: [DDJ-1000 ASIO]
[Output channels]:
[Master Output]: [DDJ-1000 ASIO: MASTER]
[Headphones Output]: [DDJ-1000 ASIO:HEADPHONE]
! If PC MASTER OUT is enabled, the “+ Name of audio device in
computer” information will also be displayed after [MASTER] of the
[Master Output] item in the [Audio] settings.
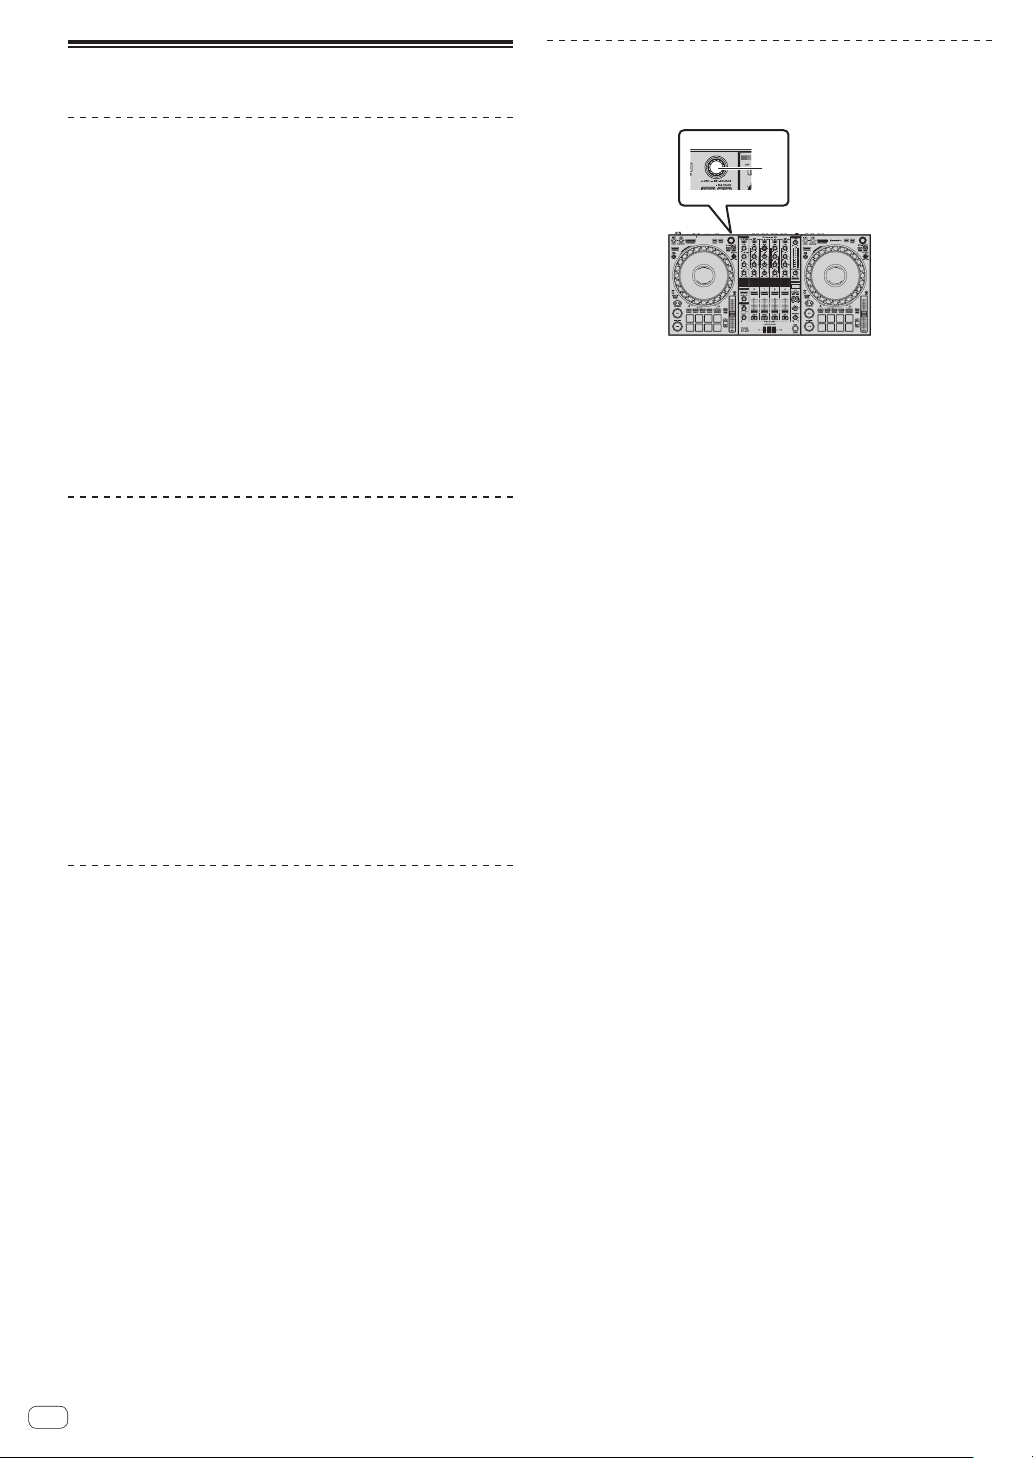
Loading tracks into a deck
The following describes the procedure for loading tracks into deck 1 (left
side) as an example.
1
Rotary selector
1
% Turn the rotary selector of deck 1 (left side) to select a
track in [Collection] and then press the rotary selector.
The track is loaded into deck 1.
Adding music files to [Collection]
A list of track files managed by rekordbox is displayed on the
[Collection] screen.
Register the track files on the computer as the collection of music for
rekordbox and analyze them to enable those tracks to be used with
rekordbox.
1 Click [Collection] in the tree view.
A list of the tracks registered in [Collection] is displayed.
2 Open Finder or Windows Explorer, and drag and drop
track files or folders containing track files to the track
list.
The track files are added to [Collection], and the waveform analysis
of the track files starts. Wait until the analysis of all the track files is
finished.
En
12

Playing a music file
The following describes the procedure for outputting the sound of deck 1
(left side) as an example.
4
1 USB A, LINE, USB B selector switch
2 TRIM control
3 EQ (HI, MID, LOW) control
4 Headphones CUE button
5 Channel fader
6 HEADPHONES MIXING control
7 HEADPHONES LEVEL control
8 Crossfader assign selector switch
9 Crossfader
a MASTER LEVEL control
b BOOTH MONITOR LEVEL control
c MASTER CUE button
1 Set the following as specified.
Part Operation
USB A, LINE, USB B selector switch
TRIM control
EQ (HI, MID, LOW) control Center position
COLOR control Center position
Channel fader Move it forward.
MASTER LEVEL control
Crossfader Center position
Crossfader assign selector switch [THRU] position
USB A
Rotate it clockwise until it
stops.
Rotate it clockwise until it
stops.
2 Press the [PLAY/PAUSE f] button to play the track.
3 Rotate the [TRIM] control.
Adjust the [TRIM] control to confirm that the channel level indicator
lights up in orange at the highest volume.
4 Move the channel fader forward.
5 Rotate the [MASTER LEVEL] control to adjust the
sound level of the speakers.
Adjust the level of the sound output from the [MASTER 1] and
[MASTER 2] output terminals to an appropriate level.
! To output sound from the computer’s speaker, adjust the vol-
ume of the computer’s speaker instead of the [MASTER LEVEL]
control.
Monitoring sound with headphones
Set the following as specified.
Part Operation
HEADPHONES MIXING control Center position
HEADPHONES LEVEL control
Rotate it clockwise until it
stops.
1 Press the headphones [CUE] button for channel 1.
2 Rotate the [HEADPHONES LEVEL] control.
Adjust the level of sound output from the headphones to an appropriate
level.
Note
This unit and rekordbox dj include many functions to allow for more
individualistic DJ performances. For details on each function, access the
site below and see the “rekordbox Manual”.
rekordbox.com/manual
Turning off the system
1 Close rekordbox.
2 Press the [u] switch on the rear panel of this unit to
set the unit to standby.
3
Disconnect the USB cable from the computer.
English
En
13

Additional information
Changing the settings
! For details on changing the settings of this unit, see Changing the
settings in the Operating Instructions.
Troubleshooting
! If you think that there is something wrong with this unit, check
the items in the “Troubleshooting” section of this unit’s operating
instructions and access the Pioneer DJ support site and check
[FAQ].
pioneerdj.com/support/
Some problems occur due to the connected components. If the prob-
lem cannot be resolved after checking the connected components,
contact the service center or your dealer for repairs.
! This unit may not operate properly due to static electricity or other
external influences. In such cases, disconnect the power cord, wait
for approximately one minute, and connect it again to restore normal
operation.
Trademarks and registered
trademarks
! Pioneer DJ is a trademark of the PIONEER CORPORATION and is
used under license. rekordbox and KUVO are trademarks or registered trademarks of the Pioneer DJ Corporation.
! rekordbox is a trademark or registered trademark of the Pioneer DJ
Corporation.
! Windows is a registered trademark of Microsoft Corporation in the
United States and other countries.
! Mac, macOS, OS X, and Finder are trademarks of Apple Inc., regis-
tered in the U.S. and other countries.
! Intel and Intel Core are trademarks of Intel Corporation in the U.S.
and/or other countries.
The names of companies and products mentioned herein are trademarks or registered trademarks of their respective owners.
Cautions on copyrights
rekordbox restricts playback and duplication of copyright-protected
music contents.
! When coded data, etc., for protecting the copyright is embedded in
the music contents, it may not be possible to operate the program
normally.
! When rekordbox detects that coded data, etc., for protecting the
copyright is embedded in the music contents, processing (playback,
reading, etc.) may stop.
Recordings you have made are for your personal enjoyment and according to copyright laws may not be used without the consent of the copyright holder.
! Music recorded from CDs, etc., is protected by the copyright laws of
individual countries and by international treaties. It is the full respon-
sibility of the person who has recorded the music to ensure that it is
used legally.
! When handling music downloaded from the Internet, etc., it is the
full responsibility of the person who has downloaded the music to
ensure that it is used in accordance with the contract concluded
with the download site.
14
En

Specifications
AC adapter
Power requirements .................................... AC 220 V to 240 V, 50 Hz/60 Hz
Rated current ......................................................................................... 0.9 A
Rated output ............................................................................... DC 12 V, 3 A
Power consumption (standby) ............................................................. 0.4 W
General – Main Unit
Power consumption .........................................................DC 12 V, 2 000 mA
Main unit weight ................................................................................... 6.0 kg
Max. external dimensions
.............................. 708 mm (width) x 73.4 mm (height) x 361.4 mm (depth)
Tolerable operating temperature ........................................ +5 °C to +35 °C
Tolerable operating humidity ...................... 5 % to 85 % (no condensation)
Audio Section
Sampling rate ....................................................................................44.1 kHz
D/A converter .........................................................................................32-bit
A/D converter .........................................................................................24-bit
Frequency characteristic
USB, LINE, MIC1, MIC2 .................................................. 20 Hz to 20 kHz
S/N ratio (rated output, A-WEIGHTED)
USB ................................................................................................ 112 dB
LINE ................................................................................................. 96 dB
PHONO............................................................................................ 85 dB
MIC1 ................................................................................................ 80 dB
MIC2 ................................................................................................ 80 dB
Total harmonic distortion (20 Hz to 20 kHzBW)
USB ...............................................................................................0.002 %
LINE ..............................................................................................0.005 %
Standard input level / Input impedance
LINE .................................................................................. –12 dBu/47 kW
PHONO.............................................................................–52 dBu/47 kW
MIC1 ................................................................................ –57 dBu/3.3 kW
MIC2 ................................................................................ –57 dBu/3.3 kW
Standard output level / Load impedance / Output impedance
MASTER 1 ..................................................+6 dBu/10 kW/330 W or less
MASTER 2 ..................................................+2 dBu/10 kW/680 W or less
BOOTH .......................................................+6 dBu/10 kW/330 W or less
PHONES .........................................................+8 dBu/32 W/10 W or less
Rated output level / Load impedance
MASTER 1 .......................................................................... 25 dBu/10 kW
MASTER 2 .......................................................................... 21 dBu/10 kW
BOOTH ............................................................................... 25 dBu/10 kW
Crosstalk
LINE ................................................................................................. 82 dB
Channel equalizer characteristic
HI .....................................................................–26 dB to +6 dB (20 kHz)
MID ....................................................................–26 dB to +6 dB (1 kHz)
LOW ..................................................................–26 dB to +6 dB (20 Hz)
Microphone equalizer characteristic
HI ...................................................................–12 dB to +12 dB (10 kHz)
LOW ..............................................................–12 dB to +12 dB (100 Hz)
Input / Output terminals
LINE input terminals
RCA pin jacks .................................................................................. 2 sets
LINE/PHONO input terminals
RCA pin jacks .................................................................................. 2 sets
MIC input terminals
XLR connector & 1/4” TRS jack ........................................................1 set
1/4” TRS jack .....................................................................................1 set
MASTER output terminals
XLR connector...................................................................................1 set
RCA pin jacks ....................................................................................1 set
BOOTH output terminal
1/4” TRS jack .....................................................................................1 set
PHONES output terminal
1/4” stereo jack .................................................................................1 set
3.5 mm stereo mini jack ...................................................................1 set
USB terminals
............................................................................................... 2 sets
B type
—
The specifications and design of this product are subject to
change without notice.
! © 2017 Pioneer DJ Corporation. All rights reserved.
English
En
15

Nous vous remercions d’avoir acquis un produit Pioneer. Veuillez lire attentivement ce mode d’emploi afin de connaître la manière d’utiliser l’appareil
comme il convient. Cela fait, conservez le mode d’emploi de façon à pouvoir vous y référer en cas de nécessité.
Dans certains pays ou certaines régions, la forme de la fiche et de la prise d’alimentation est un peu différente de ce qui est montré dans les illustrations. Toutefois, l’appareil se raccorde et fonctionne de la même façon.
Si vous souhaitez vous débarrasser de cet appareil, ne le mettez pas à la poubelle avec vos ordures ménagères. Il existe un système de
collecte séparé pour les appareils électroniques usagés, qui doivent être récupérés, traités et recyclés conformément à la législation.
Les habitants des états membres de l’UE, de Suisse et de Norvège peuvent retourner gratuitement leurs appareils électroniques usagés aux
centres de collecte agréés ou à un détaillant (si vous rachetez un appareil similaire neuf).
Dans les pays qui ne sont pas mentionnés ci-dessus, veuillez contacter les autorités locales pour savoir comment vous pouvez vous débarrasser
de vos appareils.
Vous garantirez ainsi que les appareils dont vous vous débarrassez sont correctement récupérés, traités et recyclés et préviendrez de cette façon
les impacts néfastes possibles sur l’environnement et la santé humaine.
K058b_A1_Fr
ATTENTION
POUR ÉVITER TOUT RISQUE D’ÉLECTROCUTION, NE
PAS ENLEVER LE COUVERCLE (NI LE PANNEAU
ARRIÈRE). AUCUNE PIÈCE RÉPARABLE PAR
L’UTILISATEUR NE SE TROUVE À L’INTÉRIEUR.
CONFIER TOUT ENTRETIEN À UN PERSONNEL
QUALIFIÉ UNIQUEMENT.
D3-4-2-1-1_B1_Fr
AVERTISSEMENT
Cet appareil n’est pas étanche. Pour éviter les risques
d’incendie et de décharge électrique, ne placez près de
lui un récipient rempli d’eau, tel qu’un vase ou un pot
de fleurs, et ne l’exposez pas à des gouttes d’eau, des
éclaboussures, de la pluie ou de l’humidité.
D3-4-2-1-3_A1_Fr
AVERTISSEMENT
Pour éviter les risques d’incendie, ne placez aucune
flamme nue (telle qu’une bougie allumée) sur
l’appareil.
D3-4-2-1-7a_A1_Fr
Milieu de fonctionnement
Température et humidité du milieu de fonctionnement :
De +5 °C à +35 °C (de +41 °F à +95 °F) ; Humidité
relative inférieure à 85 % (orifices de ventilation non
obstrués)
N’installez pas l’appareil dans un endroit mal ventilé ou
un lieu soumis à une forte humidité ou en plein soleil
(ou à une forte lumière artificielle).
ATTENTION
L’interrupteur de cet appareil ne coupe pas
complètement celui-ci de sa prise secteur. Comme le
cordon d’alimentation fait office de dispositif de
déconnexion du secteur, il devra être débranché au
niveau de la prise secteur pour que l’appareil soit
complètement hors tension. Par conséquent, veillez à
installer l’appareil de telle manière que son cordon
d’alimentation puisse être facilement débranché de
la prise secteur en cas d’accident. Pour éviter tout
risque d’incendie, le cordon d’alimentation sera
débranché au niveau de la prise secteur si vous
prévoyez une période prolongée de non utilisation
(par exemple avant un départ en vacances).
D3-4-2-1-7c*_A1_Fr
D3-4-2-2-2a*_A1_Fr
NOTE IMPORTANTE SUR LE CABLE
D’ALIMENTATION
Tenir le câble d’alimentation par la fiche. Ne pas
débrancher la prise en tirant sur le câble et ne pas
toucher le câble avec les mains mouillées. Cela risque
de provoquer un court-circuit ou un choc électrique. Ne
pas poser l’appareil ou un meuble sur le câble. Ne pas
pincer le câble. Ne pas faire de noeud avec le câble ou
l’attacher à d’autres câbles. Les câbles d’alimentation
doivent être posés de façon à ne pas être écrasés. Un
câble abîmé peut provoquer un risque d’incendie ou un
choc électrique. Vérifier le câble d’alimentation de
temps en temps. Contacter le service après-vente le
plus proche ou le revendeur pour un remplacement.
S002*_A1_Fr
ATTENTION
Ce produit a été testé dans des conditions de climats
tempéré et tropical.
D3-8-2-1-7a_A1_Fr
Le symbole graphique indiqué sur le produit
représente le courant alternatif.
Le symbole graphique indiqué sur le produit
représente le courant continu.
Le symbole graphique indiqué sur le produit
représente un équipement de Classe II.
D3-8-2-4_A1_Fr
PRÉCAUTION DE VENTILATION
Lors de l’installation de l’appareil, veillez à laisser un
espace suffisant autour de ses parois de manière à
améliorer la dissipation de chaleur (au moins 5 cm à
l’arrière et 5 cm de chaque côté).
D3-4-2-1-7d*_A1_Fr
Lorsque vous utilisez ce produit, vérifiez les
informations concernant la sécurité sous l’appareil.
D3-4-2-2-4_B1_Fr
AVERTISSEMENT
Gardez les pièces de petite taille hors de la portée des
bébés et des enfants. En cas d’ingestion accidentelle,
veuillez contacter immédiatement un médecin.
D41-6-4_A1_Fr
Fr
2
Informations préliminaires
Comment lire ce manuel
! Merci d’avoir acheté ce produit Pioneer DJ.
Ce manuel décrit brièvement le branchement entre l’appareil et votre
ordinateur, et de la sortie audio. Pour plus d’instructions sur l’utilisation de ce produit, consultez le mode d’emploi de ce produit.
Lisez ce manuel et le mode d’emploi avant d’utiliser le produit. Ces
deux documents contiennent des informations importantes que vous
devez comprendre pour utiliser correctement le produit.
! Dans ce manuel, les noms de touches et de prises, de menus de
ce produit et de votre ordinateur, etc., sont entre crochets ([ ]) (ex.
[Fichier], touche [CUE], prise de sortie [PHONES]).
! Les écrans, l’aspect externe et les spécifications du matériel et du
logiciel décrits dans ce manuel sont basés sur le produit qui est
encore en cours de développement et peuvent être différents des
spécifications définitives.
! Selon votre système d’exploitation, des paramètres du navigateur
Web, etc., les procédures décrites dans ce manuel peuvent être
différentes des opérations réelles.
Caractéristiques
Cet appareil est un contrôleur DJ tout-en-un conçu spécialement pour
rekordbox dj. Ses interfaces composées de diverses commandes,
comme “BIG JOG”, “PERFORMANCE PADS” et “4-CHANNEL MIXER”,
sont suffisamment espacées pour permettre des performances DJ
plus individualisées à l’aide de rekordbox dj. De plus, les nombreuses
prises d’entrée et de sortie prennent en charge divers styles DJ et le
design de cet appareil lui donne un aspect haut de gamme adapté à
diverses scènes, telles que les boîtes de nuit et les soirées à domicile.
Accessoires
! Adaptateur secteur
! Cordon d’alimentation
! Câble USB
! Mode d’emploi (Guide de démarrage rapide) (le présent document)
! Carte de clé de licence rekordbox dj
1 Un câble USB est fourni avec cet appareil.
Pour connecter deux appareils, préparez séparément un câble
conforme à la norme USB 2.0.
Attention
La clé de licence ne peut pas être redélivrée. Veillez à ne pas la perdre.
1
Affichage des manuels
Affichage du mode d’emploi de cet
appareil
1 Lancez un navigateur Web sur un ordinateur et
accédez au site de Pioneer DJ suivant.
pioneerdj.com
2 Cliquez sur [Aide].
3 Cliquez sur [Tutoriels, manuels & documentation].
4 Cliquez sur [DDJ-1000] dans la catégorie
[CONTRÔLEUR DJ].
Cliquez sur la langue souhaitée dans la liste de
5
modes d’emploi.
Téléchargez le manuel si nécessaire.
Affichage de l’introduction de rekordbox
1 Lancez un navigateur Web sur l’ordinateur et accédez
au site ci-dessous.
rekordbox.com/manual
2 Cliquez sur la langue souhaitée de l’introduction de
rekordbox.
Français
Fr
3

rekordbox
! rekordbox
rekordbox est un logiciel de gestion musicale permettant aux DJ de
préparer des morceaux et d’exécuter des prestations DJ.
! rekordbox dj
Les fonctions de prestations DJ de rekordbox s’appellent
rekordbox dj. Saisissez la clé de licence sur la carte de clé de licence
rekordbox dj fournie avec ce produit pour utiliser rekordbox dj.
Environnement opérationnel
Systèmes d’exploitation
pris en charge
Mac : macOS High Sierra
10.13/Sierra 10.12 (dernière
mise à jour), OS X 10.11/10.10
(dernière mise à jour)
Windows : version 32 bits ou
version 64 bits de Windows
10, Windows 8.1 ou Windows
7 (dernier service pack)
Divers
Port USB
Résolution de l’écran 1 280 x 768 ou plus
Connexion Internet
! Pour les toutes dernières informations sur la configuration requise, la compati-
bilité et les systèmes d’exploitation pris en charge de rekordbox, reportez-vous
au site ci-dessous.
rekordbox.com/system
! Le fonctionnement sur tous les ordinateurs n’est pas garanti, même lorsque les
conditions de fonctionnement mentionnées ci-dessus sont remplies.
! La capacité de traitement du processeur et du disque dur peut être insuffisante
en fonction du réglage d’économie d’énergie de l’ordinateur, etc. Vérifiez
que l’ordinateur remplit les conditions pour fournir une performance optimale
(par exemple en raccordant l’ordinateur à une prise murale pour garantir la
stabilité de l’alimentation), surtout si vous utilisez rekordbox sur un ordinateur
portable.
! Un contrat séparé avec un fournisseur de services Internet et le paiement de
droits sont nécessaires pour accéder à Internet.
! Utilisez la dernière version/le dernier Service Pack du système d’exploitation.
Processeur et mémoire requise
Processeur Intel
Processeur Intel® Core™ 2 Duo 2,0 GHz ou
supérieur
4 Go ou plus de RAM
Processeur Intel
Processeur Intel® Core™ 2 Duo 2,0 GHz ou
supérieur
4 Go ou plus de RAM
Un port USB 2.0 est indispensable pour raccorder cet
ordinateur à cet appareil.
Une connexion Internet est nécessaire pour l’enregistrement du compte utilisateur de rekordbox et pour le
téléchargement du logiciel.
®
Core™ i7, i5, i3
®
Core™ i7, i5, i3
Préparation de rekordbox
Installez le logiciel en procédant de la façon suivante lorsque vous utilisez rekordbox pour la première fois ou si vous utilisez rekordbox 4.x ou
une version antérieure.
Si vous avez déjà installé rekordbox Ver. 5.x, mettez-le à jour vers la
dernière version depuis Gestionnaire de mise à jour de rekordbox.
Dans ce cas, la procédure d’installation suivante n’est pas nécessaire.
Pour plus d’informations sur la procédure de mise à jour, accédez au
site ci-dessous et consultez “Introduction de rekordbox”.
rekordbox.com/manual
Installation de rekordbox
1 Lancez un navigateur Web sur l’ordinateur et
téléchargez rekordbox depuis le site ci-dessous.
rekordbox.com/download
Si vous téléchargez une version Windows, sélectionnez la version 32 bits
ou la version 64 bits correspondant à votre ordinateur.
2 Double-cliquez sur le fichier téléchargé pour le
décompresser.
Double-cliquez sur le fichier décompressé pour lancer
3
le programme d’installation.
4
Lisez attentivement l’Accord de licence du logiciel et
procédez à l’installation en suivant les instructions qui
apparaissent à l’écran si vous acceptez les conditions.
! Si vous n’acceptez pas le contenu de l’accord de licence, annu-
lez l’installation.
5 Lorsque l’écran de fin de l’installation apparaît,
fermez le programme d’installation en suivant les
instructions qui apparaissent à l’écran.
L’installation est terminée.
Fr
4
Noms des éléments
1
2 3
Pour des instructions détaillées sur les touches et commandes, reportez-vous à Noms des éléments et fonctions dans le mode d’emploi.
Français
1 Section d’exploration
2 Sections Platines
Section d’exploration
1 Sélecteur rotatif
2 Touche BACK
3 Touche VIEW
3 Section Mixeur
Fr
5

Sections Platines
4
Les sections Platines permettent de contrôler les quatre platines. Les touches et commandes d’utilisation des platines 1 et 3 se trouvent sur le côté
gauche du contrôleur, et celles des platines 2 et 4 se trouvent sur le côté droit du contrôleur.
1 Section d’affichage de la molette jog
2 Molette jog
3 Touche QUANTIZE
4 Touche SLIP
5 Commande JOG FEELING ADJUST
6 Touche BEAT SYNC
7 Touche MASTER TEMPO
8 Curseur TEMPO
9 Touche de mode HOT CUE
a Touche de mode PAD FX1
b Touche de mode BEAT JUMP
c Touche de mode SAMPLER
d Touche PAGE c, d
Touche KEY SYNC
e
f Touche KEY RESET
g
Pads performance
h Touche PLAY/PAUSE f
i Touche CUE
Touches SEARCH m, n
j
k
Touche MEMORY
l Touche SHIFT
m
Touche de sélecteur DECK
n Touche SLIP REVERSE
o Touche LOOP IN, LOOP 1/2X
p Touche LOOP OUT, LOOP 2X
q Touche 4 BEAT LOOP/EXIT
Fr
6

Section Mixeur
4
4
u
v
Français
r
s
t
1 Indicateur du microphone
2 Sélecteur OFF, ON, TALK OVER
3 Sélecteur USB A, PHONO/LINE, USB B
4 Sélecteur USB A, LINE, USB B
5 Commande MASTER LEVEL
6 Indicateur CLIP
7 Indicateur de niveau principal
8 Commande BOOTH MONITOR LEVEL
9 Touche MASTER CUE
a Écran de la section des effets
b Touches BEAT c, d
c Commande BEAT FX SELECT
d Commande BEAT FX CH SELECT
e Commande BEAT FX LEVEL/DEPTH
f Touche BEAT FX ON/OFF
g Commande HEADPHONES LEVEL
h Commande HEADPHONES MIXING
i Commande SAMPLER VOL
j Touche SAMPLER CUE
k Touches SOUND COLOR FX SELECT
l
Commandes MIC EQ (HI, LOW)
m Commande MIC2 LEVEL
n
Commande MIC1 LEVEL
o Indicateur de niveau de canal
p Commande TRIM
q Commande EQ (HI, MID, LOW)
r Commande COLOR
s Touche CUE de casque
t Fader de canal
u Sélecteur d’affectation de crossfader
v Crossfader
Fr
7

Panneau arrière
2 7 731 4 66 89abcde5
1
1 Fente de sécurité Kensington
2 Prise de sortie MASTER 1
3 Prise de sortie MASTER 2
4 Prises de sortie BOOTH
5 Prise SIGNAL GND
6 Commutateur LINE/PHONO
7 Prises d’entrée LINE/PHONO
8 Prises d’entrée LINE
Face avant
1 Prises de sortie PHONES
9 Prises USB (USB B)
a Prises USB (USB A)
b Prises d’entrée MIC2
c Prises d’entrée MIC1
d Commutateur u
Sert à mettre cet appareil en marche et en veille.
e Prise DC IN
f Crochet de cordon DC
Fr
8
Fonctionnement
portable
À une prise
R
! Branchez le cordon d’alimentation à une prise électrique lorsque tous les raccordements sont terminés.
Éteignez cet appareil et débranchez le cordon d’alimentation de la prise électrique avant de raccorder des appareils ou de changer les
branchements.
Reportez-vous au mode d’emploi des appareils à raccorder.
! Veillez à utiliser le cordon d’alimentation et l’adaptateur secteur fournis.
! Veillez à utiliser le câble USB fourni avec ce produit ou un câble conforme à USB 2.0.
! N’utilisez pas de concentrateur USB.
Exemple de raccordements
Raccordement des prises d’entrée
Panneau arrière
*1 Lecteur analogique
AUDIO OUT
R L
Lecteur DJ*2 Lecteur DJ
CONT
Dispositif audio
portable
d’alimentation
Cordon
d’alimentation
(fourni)
Adaptateur
secteur (fourni)
Français
Dispositif audio
Lecteur DJ
L
R
R
*1 Lecteur analogique
L
R
L
R
L
*2 Lecteur DJ
Ordinateur
Microphone
! *1 Lors du raccordement d’un lecteur analogique, basculez le commutateur [LINE/PHONO] en regard des prises sur [PHONO].
*2 Lors du raccordement d’un lecteur DJ, basculez le commutateur [LINE/PHONO] en regard des prises sur [LINE].
Fr
9
Raccordement des prises de sortie
(pour le moniteur de cabine),
enceintes amplifiées, etc.
Casque
Panneau arrière
Composants, amplificateurs,
enceintes alimentées, etc.
L
R
Amplificateur de puissance,
enceintes amplifiées, etc.
Amplificateur de puissance
Face avant
1 Veillez à utiliser les prises de sortie [MASTER 1] pour une sortie
symétrique. En cas de raccordement à une entrée asymétrique (par
exemple RCA) à l’aide d’un câble de conversion XLR à RCA (ou d’un
adaptateur), etc., la qualité du son peut être réduite ou du bruit peut
être produit.
Pour le raccordement à une entrée asymétrique (par exemple RCA),
utilisez les prises de sortie [MASTER 2].
2 Veillez à ne pas insérer accidentellement une fiche de cor-
don d’alimentation d’un autre appareil dans l’une des prises de
sortie [MASTER 1].
Ne raccordez pas des prises pouvant fournir une alimentation
fantôme aux prises de sortie [MASTER 1].
3 Veillez à utiliser les prises de sortie [BOOTH] pour une sortie symé-
trique. En cas de raccordement à une entrée asymétrique (par
exemple une prise RCA ou TS) avec un câble de conversion TRS à
RCA (ou un adaptateur), un câble TS, etc., la qualité du son peut être
réduite ou du bruit peut être produit.
10
Fr
Raccordements
Pour plus d’informations sur l’utilisation de ce produit avec
rekordbox dj, reportez-vous au mode d’emploi du produit qui est disponible sur le site de Pioneer DJ.
1 Raccordez le casque aux prises de sortie [PHONES].
2 Raccordez des dispositifs tels que des haut-parleurs
amplifiés, un amplificateur de puissance et des
composants sur les prises de sortie [MASTER 1] ou
[MASTER 2].
Enceintes amplifiées, etc.
Raccordez l’adaptateur secteur
5
À une prise
d’alimentation
Cordon
d’alimentation
(fourni)
Adaptateur
secteur (fourni)
6 Appuyez sur le commutateur [u] sur le panneau
arrière de cet appareil pour le mettre sous tension.
Français
! Pour que le son soit restitué par les prises de sortie [BOOTH],
raccordez des dispositifs tels que des haut-parleurs sur les prises
de sortie [BOOTH].
3 Raccordez cet appareil à votre ordinateur à l’aide d’un
câble USB.
Câble USB
(fourni)
4 Allumez l’ordinateur.
Allumez cet appareil.
! Sous Windows
[Installation du pilote logiciel de périphérique] peut appa-
raître lorsque cet appareil est raccordé pour la première fois
à l’ordinateur ou raccordé à un autre port USB de l’ordinateur.
Patientez quelques instants jusqu’à ce que [Vos périphériques
sont prêts à être utilisés.] apparaisse.
7 Allumez les appareils raccordés aux prises de sortie
(enceintes amplifiées, amplificateur de puissance,
composants, etc.).
! Si un microphone, un lecteur DJ ou autre dispositif externe est
raccordé aux prises d’entrée, allumez le dispositif connecté.
Fr
11

Ouverture du système
Lancement de rekordbox
L’enregistrement du compte et l’opération d’activation pour rekordbox dj
sont nécessaires au premier démarrage. Pour plus d’informations sur
chaque procédure, accédez au site ci-dessous et consultez “Introduction
de rekordbox”.
rekordbox.com/manual
Pour Mac
Ouvrez le dossier [Application] dans le Finder, puis double-cliquez
sur l’icône [rekordbox].
Sous Windows 10
Dans le menu [Démarrer], cliquez sur [Pioneer] > icône [rekordbox].
Sous Windows 8.1
Cliquez sur l’icône [rekordbox] dans [affichage Applications].
Pour Windows 7
Cliquez sur le menu [Démarrer] > [Tous les programmes] > [Pioneer]
> [rekordbox X.X.X] > icône [rekordbox], dans cet ordre.
Vérification des réglages audio
Vérifiez que les réglages [Audio] dans [Préférences] de rekordbox sont
réglés comme suit.
Pour Mac
[Audio] : [DDJ-1000]
[Voies de sortie] :
[Master Output] : [DDJ-1000 : MASTER]
[Headphones Output] : [DDJ-1000 : HEADPHONE]
Pour Windows
[Audio] : [DDJ-1000 ASIO]
[Voies de sortie] :
[Master Output] : [DDJ-1000 ASIO : MASTER]
[Headphones Output] : [DDJ-1000 ASIO :HEADPHONE]
! Si PC MASTER OUT est activé, les informations “+ Nom du dispositif
audio sur l’ordinateur” seront également affichées après [MASTER]
de l’élément [Master Output] dans les réglages [Audio].
Chargement de morceaux sur une platine
Le chargement de morceaux sur la platine 1 (à gauche) par exemple s’effectue de la façon suivante.
1
1 Sélecteur rotatif
% Tournez le sélecteur rotatif de la platine 1 (à gauche)
pour sélectionner un morceau dans [Collection], puis
appuyez sur le sélecteur rotatif.
Le morceau est chargé sur la platine 1.
Ajout de fichiers de musique à [Collection]
La liste des fichiers de morceaux gérés par rekordbox est affichée
sur l’écran [Collection].
Enregistrez les fichiers de morceaux sur l’ordinateur en tant que collection de musique de rekordbox et analysez-les pour pouvoir utiliser ces
morceaux avec rekordbox.
1 Cliquez sur [Collection] dans l’arborescence.
La liste des morceaux enregistrés dans [Collection] s’affiche.
2 Ouvrez le Finder ou l’Explorateur Windows, puis
faites glisser et déposez les fichiers de morceaux ou les
dossiers contenant les fichiers de morceaux dans la liste
des morceaux.
Les fichiers de morceaux sont ajoutés à [Collection] et l’analyse de
forme d’onde des fichiers de morceaux démarre. Attendez que l’analyse
de tous les fichiers de morceaux soit terminée.
Fr
12

Lecture d’un fichier de musique
La restitution du son de la platine 1 (à gauche) par exemple s’effectue de
la façon suivante.
4
1 Sélecteur USB A, LINE, USB B
2 Commande TRIM
3 Commande EQ (HI, MID, LOW)
4 Touche CUE de casque
5 Fader de canal
6 Commande HEADPHONES MIXING
7 Commande HEADPHONES LEVEL
8 Sélecteur d’affectation de crossfader
9 Crossfader
a Commande MASTER LEVEL
b Commande BOOTH MONITOR LEVEL
c Touche MASTER CUE
1 Réglez les éléments suivants tel que spécifié.
Élément Opération
Sélecteur USB A, LINE, USB B
Commande TRIM
Commande EQ (HI, MID, LOW) Position centrale
Commande COLOR Position centrale
Fader de canal Déplacez vers l’avant.
Commande MASTER LEVEL
Crossfader Position centrale
Sélecteur d’affectation de crossfader Position [THRU]
USB A
Tournez dans le sens des
aiguilles d’une montre
jusqu’à l’arrêt de la commande.
Tournez dans le sens des
aiguilles d’une montre
jusqu’à l’arrêt de la commande.
2 Appuyez sur la touche [PLAY/PAUSE f] pour lire le
morceau.
3 Tournez la commande [TRIM].
Réglez la commande [TRIM] pour vérifier que l’indicateur de niveau de
canal s’allume en orange au volume maximum.
4 Déplacez le fader de canal vers l’avant.
5 Tournez la commande [MASTER LEVEL] pour régler le
niveau sonore des enceintes.
Réglez le niveau de la sortie audio des prises [MASTER 1] et
[MASTER 2] au niveau approprié.
! Pour restituer le son sur le haut-parleur de l’ordinateur, réglez le
volume du haut-parleur de l’ordinateur plutôt que la commande
[MASTER LEVEL].
Contrôle du son par un casque
Réglez les éléments suivants tel que spécifié.
Élément Opération
Commande HEADPHONES MIXING Position centrale
Commande HEADPHONES LEVEL
Tournez dans le sens des
aiguilles d’une montre
jusqu’à l’arrêt de la commande.
1 Appuyez sur la touche [CUE] de casque pour canal 1.
2 Tournez la commande [HEADPHONES LEVEL].
Réglez le niveau du son restitué par le casque d’écoute au niveau
approprié.
Remarque
Cet appareil et rekordbox dj présentent une grande variété de fonctions
permettant des performances DJ plus individualisées. Pour plus d’informations sur chaque fonction, accédez au site ci-dessous et consultez le
“rekordbox Manual”.
rekordbox.com/manual
Fermeture du système
1 Fermez rekordbox.
2 Appuyez sur le commutateur [u] sur le panneau
arrière de cet appareil pour mettre l’appareil en veille.
Débranchez le câble USB de l’ordinateur.
3
Français
Fr
13

Informations supplémentaires
Changement des réglages
! Pour des instructions détaillées sur le changement des réglages
de cet appareil, reportez-vous à Changement des réglages dans le
mode d’emploi.
En cas de panne
! Si vous pensez que cet appareil subit un dysfonctionnement, consul-
tez les entrées de la section “En cas de panne” dans le mode d’emploi de cet appareil et accédez au site de support Pioneer DJ puis
consultez [FAQ].
pioneerdj.com/support/
Des problèmes surviennent en raison des composants raccordés.
Si le problème persiste malgré la vérification des composants rac-
cordés, contactez le service après-vente ou votre revendeur pour les
réparations.
! De l’électricité statique ou des influences externes ont peut-être
déréglé cet appareil. Dans ce cas, il est possible de le remettre en
fonctionnement en débranchant le cordon d’alimentation, en patien-
tant une minute environ, puis en le rebranchant.
Marques commerciales et marques
déposées
! Pioneer DJ est une marque commerciale de PIONEER
CORPORATION qui est utilisée sous licence. rekordbox et KUVO
sont des marques commerciales ou des marques déposées de
Pioneer DJ Corporation.
! rekordbox est une marque commerciale ou une marque déposée de
Pioneer DJ Corporation.
! Windows est une marque déposée de Microsoft Corporation aux
États-Unis et dans d’autres pays.
! Mac, macOS, OS X et Finder sont des marques commer-
ciales d’Apple Inc. déposées aux États-Unis et dans d’autres pays.
! Intel et Intel Core sont des marques commerciales d’Intel
Corporation aux États-Unis et/ou dans d’autres pays.
Les noms de sociétés et de produits mentionnés ici sont des marques
commerciales ou des marques déposées de leurs détenteurs respectifs.
Précautions concernant les
droits d’auteur
rekordbox limite la lecture et la copie de contenus musicaux protégés
par des droits d’auteur.
! Si des données codées sont insérées dans le contenu musical, par
exemple pour la protection des droits d’auteur, le programme risque
de ne pas fonctionner normalement.
! Lorsque rekordbox détecte que des données codées sont insé-
rées dans le contenu musical, par exemple pour la protection des
droits d’auteur, l’opération en cours (lecture d’un morceau, lecture
de données, etc.) peut s’arrêter.
Les enregistrements effectués sont destinés à votre usage personnel et,
conformément aux lois sur les droits d’auteur, il se peut que leur utilisation soit soumise au consentement du détenteur des droits.
! La musique enregistrée à partir de CD, etc. est protégée par les lois
sur les droits d’auteur de divers pays et par des traités internatio-
naux. La personne qui effectue des enregistrements de musique est
responsable de leur utilisation légale.
! Lorsque de la musique est téléchargée d’Internet, etc., la personne
qui a effectué le téléchargement est responsable de l’utilisation
de cette musique conformément à l’accord conclus avec le site de
téléchargement.
14
Fr

Spécifications
Adaptateur secteur
Alimentation .................................................. CA 220 V à 240 V, 50 Hz/60 Hz
Courant nominal .................................................................................... 0,9 A
Sortie nominale ...........................................................................CC 12 V, 3 A
Consommation (en veille) ..................................................................... 0,4 W
Caractéristiques générales – Appareil principal
Consommation ................................................................. 12 V CC, 2 000 mA
Poids de l’appareil principal ................................................................. 6,0 kg
Dimensions maximales .......... 708 mm (L) × 73,4 mm (H) × 361,4 mm (P)
Température de fonctionnement tolérée ............................. +5 °C à +35 °C
Humidité de fonctionnement tolérée .......5 % à 85 % (sans condensation)
Section audio
Fréquence d’échantillonnage ..........................................................44,1 kHz
Convertisseur N/A ................................................................................32 bits
Convertisseur A/N ................................................................................24 bits
Caractéristiques des fréquences
USB, LINE, MIC1, MIC2 ................................................... 20 Hz à 20 kHz
Rapport S/B (sortie nominale, A-WEIGHTED)
USB ................................................................................................ 112 dB
LINE ................................................................................................. 96 dB
PHONO............................................................................................ 85 dB
MIC1 ................................................................................................ 80 dB
MIC2 ................................................................................................ 80 dB
Distorsion harmonique totale (20 Hz à 20 kHzBW)
USB ...............................................................................................0,002 %
LINE ..............................................................................................0,005 %
Niveau d’entrée standard / Impédance d’entrée
LINE .................................................................................. –12 dBu/47 kW
PHONO.............................................................................–52 dBu/47 kW
MIC1 ................................................................................ –57 dBu/3,3 kW
MIC2 ................................................................................ –57 dBu/3,3 kW
Niveau de sortie standard / Impédance de charge / Impédance de sortie
MASTER 1 ............................................. +6 dBu/10 kW/330 W ou moins
MASTER 2 ............................................. +2 dBu/10 kW/680 W ou moins
BOOTH .................................................+6 dBu/10 kW/330 W maximum
PHONES ...................................................+8 dBu/32 W/10 W maximum
Niveau de sortie nominal / Impédance de charge
MASTER 1 .......................................................................... 25 dBu/10 kW
MASTER 2 .......................................................................... 21 dBu/10 kW
BOOTH ............................................................................... 25 dBu/10 kW
Diaphonie
LINE ................................................................................................. 82 dB
Caractéristiques de l’égaliseur de canal
HI ......................................................................–26 dB à +6 dB (20 kHz)
MID ..................................................................... –26 dB à +6 dB (1 kHz)
LOW ...................................................................–26 dB à +6 dB (20 Hz)
Caractéristiques de l’égaliseur de microphone
HI ....................................................................–12 dB à +12 dB (10 kHz)
LOW ...............................................................–12 dB à +12 dB (100 Hz)
Prises d’entrée/sortie
Prises d’entrée LINE
Prises RCA ...................................................................................... 2 jeux
Prises d’entrée LINE/PHONO
Prises RCA ...................................................................................... 2 jeux
Prises d’entrée MIC
Connecteur XLR et jack TRS de 1/4” ................................................1 jeu
Jack TRS de 1/4” ...............................................................................1 jeu
Prises de sortie MASTER
Connecteur XLR ................................................................................1 jeu
Prises RCA ........................................................................................1 jeu
Prise de sortie BOOTH
Jack TRS de 1/4” ...............................................................................1 jeu
Prise de sortie PHONES
Jack stéréo de 1/4” ...........................................................................1 jeu
Mini jack stéréo de 3,5 mm ..............................................................1 jeu
Prises USB
.............................................................................................. 2 jeux
Type B
— Les caractéristiques et la présentation peuvent être modifiées,
sans avis préalable, dans un souci d’amélioration.
!
© 2017 Pioneer DJ Corporation. Tous droits de reproduction et de
traduction réservés.
Français
Fr
15
Vielen Dank, dass Sie sich für dieses Pioneer-Produkt entschieden haben. Bitte lesen Sie diese Bedienungsanleitung gründlich durch, um sich mit der
Netzkabel; sehen Sie auch zu, dass es nicht eingeklemmt
Bedienung des Geräts vertraut zu machen. Nachdem Sie die Bedienungsanleitung gelesen haben, legen Sie sie griffbereit zum Nachschlagen ab.
In manchen Ländern oder Regionen können sich die Formen von Netzstecker und Netzsteckdose von denen in den Erklärungszeichnungen unterscheiden. Das Verfahren zum Anschließen und Bedienen des Geräts sind aber gleich.
Mischen Sie dieses Produkt, wenn Sie es entsorgen wollen, nicht mit gewöhnlichen Haushaltsabfällen. Es gibt ein getrenntes
Sammelsystem für gebrauchte elektronische Produkte, über das die richtige Behandlung, Rückgewinnung und Wiederverwertung
gemäß der bestehenden Gesetzgebung gewährleistet wird.
Privathaushalte in den Mitgliedsstaaten der EU, in der Schweiz und in Norwegen können ihre gebrauchten elektronischen Produkte an
vorgesehenen Sammeleinrichtungen kostenfrei zurückgeben oder aber an einen Händler zurückgeben (wenn sie ein ähnliches neues Produkt
kaufen).
Bitte wenden Sie sich in den Ländern, die oben nicht aufgeführt sind, hinsichtlich der korrekten Verfahrensweise der Entsorgung an die örtliche
Kommunalverwaltung.
Auf diese Weise stellen Sie sicher, dass das zu entsorgende Produkt der notwendigen Behandlung, Rückgewinnung und Wiederverwertung
unterzogen wird, und so mögliche negative Einflüsse auf die Umwelt und die menschliche Gesundheit vermieden werden.
K058b_A1_De
ACHTUNG
UM SICH NICHT DER GEFAHR EINES ELEKTRISCHEN
SCHLAGES AUSZUSETZEN, DÜRFEN SIE NICHT DEN
DECKEL (ODER DIE RÜCKSEITE) ENTFERNEN. IM
GERÄTEINNEREN BEFINDEN SICH KEINE VOM
BENUTZER REPARIERBAREN TEILE. ÜBERLASSEN
SIE REPARATUREN DEM QUALIFIZIERTEN
KUNDENDIENST.
D3-4-2-1-1_B1_De
WARNUNG
Dieses Gerät ist nicht wasserdicht. Zur Vermeidung der
Gefahr von Brand und Stromschlag keine Behälter mit
Flüssigkeiten (z.B. Blumenvasen und -töpfe) in die
Nähe des Gerätes bringen und dieses vor Tropfwasser,
Spritzwasser, Regen und Nässe schützen.
D3-4-2-1-3_A1_De
WARNUNG
Keine Quellen offener Flammen (z.B. eine brennende
Kerze) auf dieses Gerät stellen.
D3-4-2-1-7a_A1_De
Betriebsumgebung
Betriebstemperatur und Betriebsluftfeuchtigkeit:
+5 °C bis +35 °C, 85 % rel. Feuchte max.
(Ventilationsschlitze nicht blockiert)
Eine Aufstellung dieses Gerät an einem unzureichend
belüfteten, sehr feuchten oder heißen Ort ist zu
vermeiden, und das Gerät darf weder direkter
Sonneneinstrahlung noch starken Kunstlichtquellen
ausgesetzt werden.
D3-4-2-1-7c*_A1_De
VORSICHT MIT DEM NETZKABEL
Fassen Sie das Netzkabel immer am Stecker. Ziehen Sie
nicht am Kabel selbst, und fassen Sie das Netzkabel
niemals mit nassen Händen an, da dies einen
Kurzschluss oder elektrischen Schlag verursachen kann.
Stellen Sie nicht das Gerät, Möbelstücke o.ä. auf das
wird. Machen Sie niemals einen Knoten in das
Netzkabel, und binden Sie es nicht mit anderen Kabeln.
Das Netzkabel sollte so gelegt werden, dass niemand
darauf tritt. Ein beschädigtes Netzkabel kann einen
Brand oder elektrischen Schlag verursachen. Prüfen Sie
das Netzkabel von Zeit zu Zeit. Sollte es beschädigt sein,
wenden Sie sich an Ihre nächste Kundendienststelle
oder Ihren Händler, um es zu ersetzen.
ACHTUNG
Dieses Produkt wurde unter moderaten und
tropischen Klimabedingungen getestet.
D3-8-2-1-7a_A1_De
Das auf diesem Produkt angebrachte Piktogramm
verweist auf Wechselstrom.
Das auf diesem Produkt angebrachte Piktogramm
verweist auf Gleichstrom.
Das auf diesem Produkt angebrachte Piktogramm
verweist auf ein Gerät der Klasse II.
D3-8-2-4_A1_De
S002*_A1_De
ACHTUNG
Der -Schalter dieses Gerätes trennt das Gerät nicht
vollständig vom Stromnetz. Um das Gerät vollständig
vom Netz zu trennen, muss der Netzstecker aus der
Netzsteckdose gezogen werden. Daher sollte das
Gerät so aufgestellt werden, dass stets ein
unbehinderter Zugang zur Netzsteckdose
gewährleistet ist, damit der Netzstecker in einer
Notsituation sofort abgezogen werden kann. Um
Brandgefahr auszuschließen, sollte der Netzstecker
vor einem längeren Nichtgebrauch des Gerätes,
beispielsweise während des Urlaubs, grundsätzlich
von der Netzsteckdose getrennt werden.
D3-4-2-2-2a*_A1_De
De
2
VORSICHTSHINWEIS ZUR BELÜFTUNG
Bei der Aufstellung dieses Gerätes muss für einen
ausreichenden Freiraum gesorgt werden, um eine
einwandfreie Wärmeabfuhr zu gewährleisten
(mindestens 5 cm hinter dem Gerät und jeweils 5 cm
an der Seite des Gerätes).
D3-4-2-1-7d*_A1_De
Bei Verwendung dieses Produktes machen Sie sich
bitte mit der Sicherheitsinformationen auf der
Unterseite des Gerätes vertraut.
D3-4-2-2-4_B1_De
WARNUNG
Kleine Teile außerhalb der Reichweite von Kleinkindern
und Kindern aufbewahren. Bei unbeabsichtigtem
Verschlucken ist unverzüglich ein Arzt aufzusuchen.
D41-6-4_A1_De
 Loading...