

Page 1

Tablet PC
Quick Guide
Page 2
2
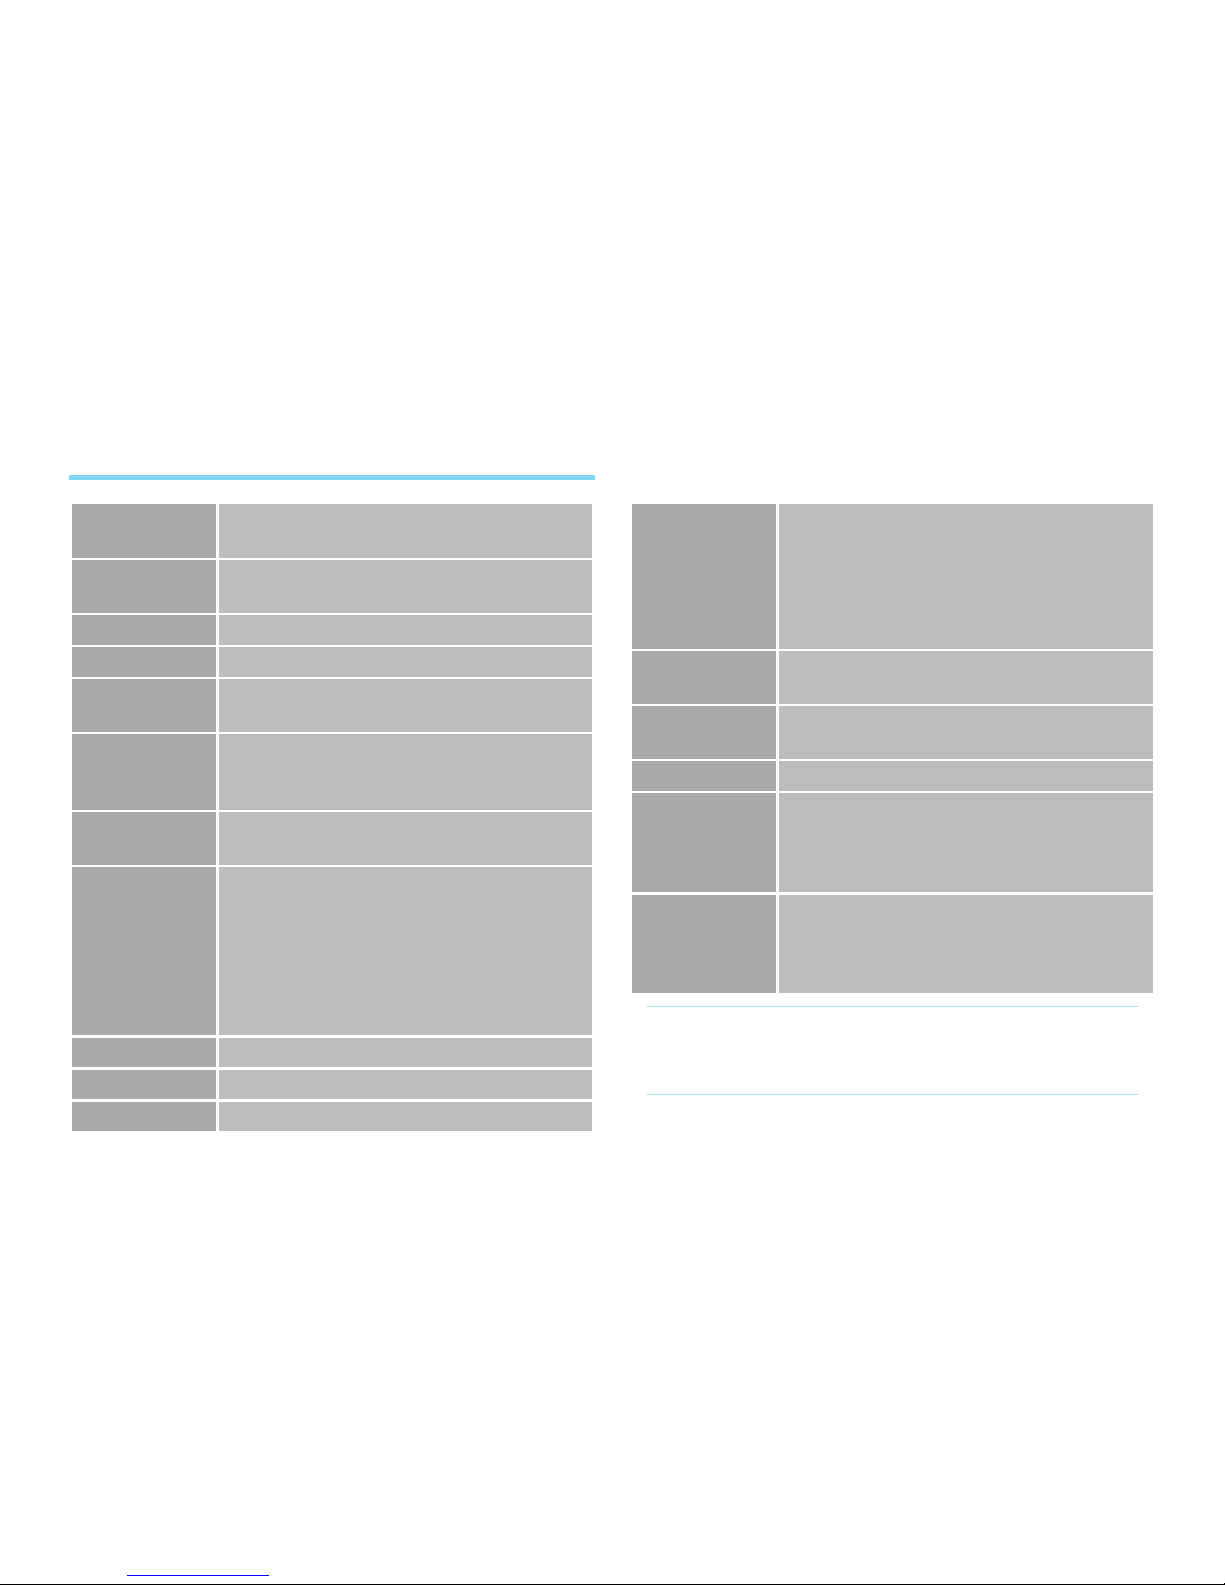
Dimensions /
Weight
264 x 176.4 x 13.8mm / ~820g•
Processor
nVIDIA T20•
1 GHz dual core•
OS Android•
Memory RAM: LPDDR2 1GB•
Storage
eMMC Flash 8GB/16GB/32GB/64GB •
Display
10.1” LCD (1280x800) Wide-view•
Capacitive multi-touch screen •
(supports 10 point gestures)
Camera
Rear: 5M pixel CMOS (Auto-focus)•
Front: 2M pixel CMOS (Fixed-focus)•
WWAN
Optional 3G module card for data •
transmission (3G version only)
Default supports UMTS: •
- GSM/GPRS/EDGE Quad-band
(850/900/1800/1900)
- WCDMA/HSPA Tri-band
(2100/1900/850)
WLAN 802.11 b/g/n•
Bluetooth BT 2.1 + EDR•
GPS Embedded•
I/O Ports
3.5” Audio jack•
Micro USB port•
Micro HDMI port•
Docking connector / Charger port•
SIM card slot•
microSD card slot•
Audio
Built-in microphone•
Built-in stereo speakers•
Battery*
26.6 Whr •
Video playback > 8 hrs
AC Adapter 19V / 30W•
User
Interface
Rotation locker•
Volume Up/Down keys•
Power key•
Camera key•
Sensors
Ambient light sensor•
3-axis accelerometer•
e-Compass•
Gyro Sensor•
*CAUTION: The battery should only be replaced by a
manufacturer-approved service facility. Any attempt to
remove or replace your battery may damage the product.
Product Specications
Page 3
3
Features
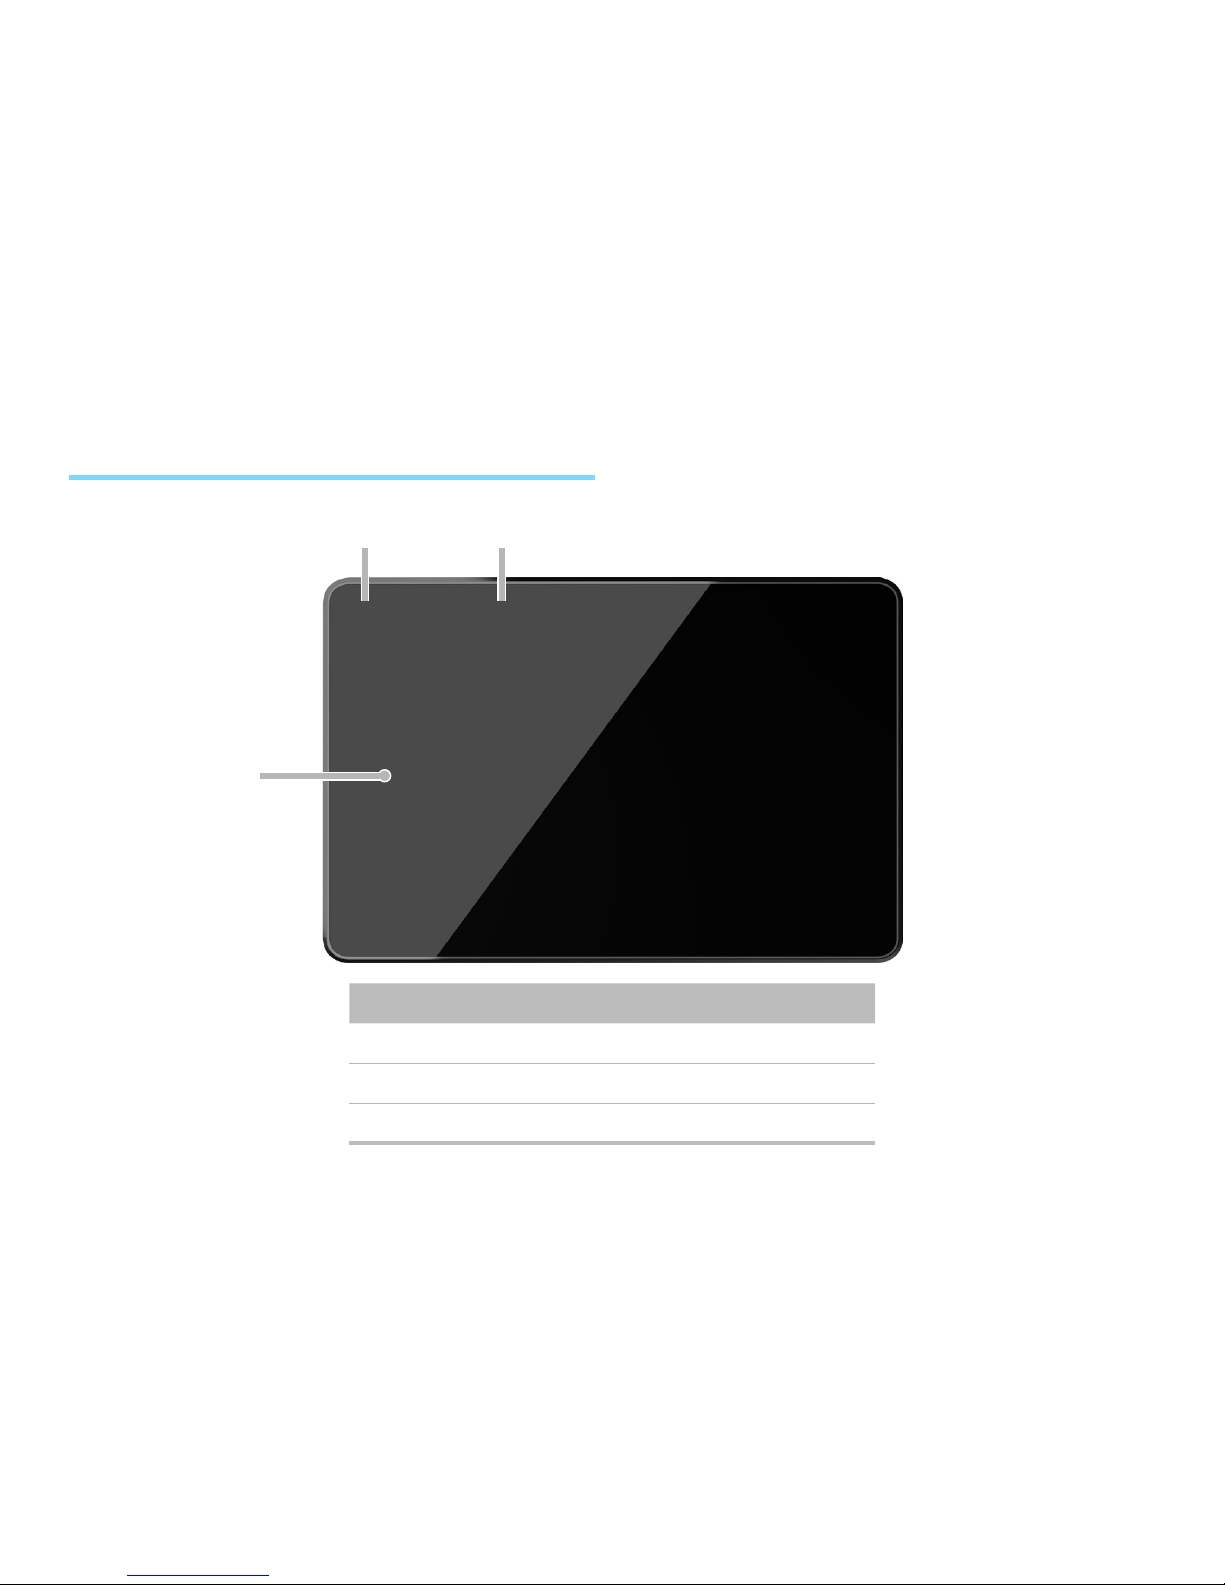
Front View
# Feature
1 10.1” LCD multi-touch screen
2 LED charging indicator
3 Front-facing camera
1
32
Page 4
4
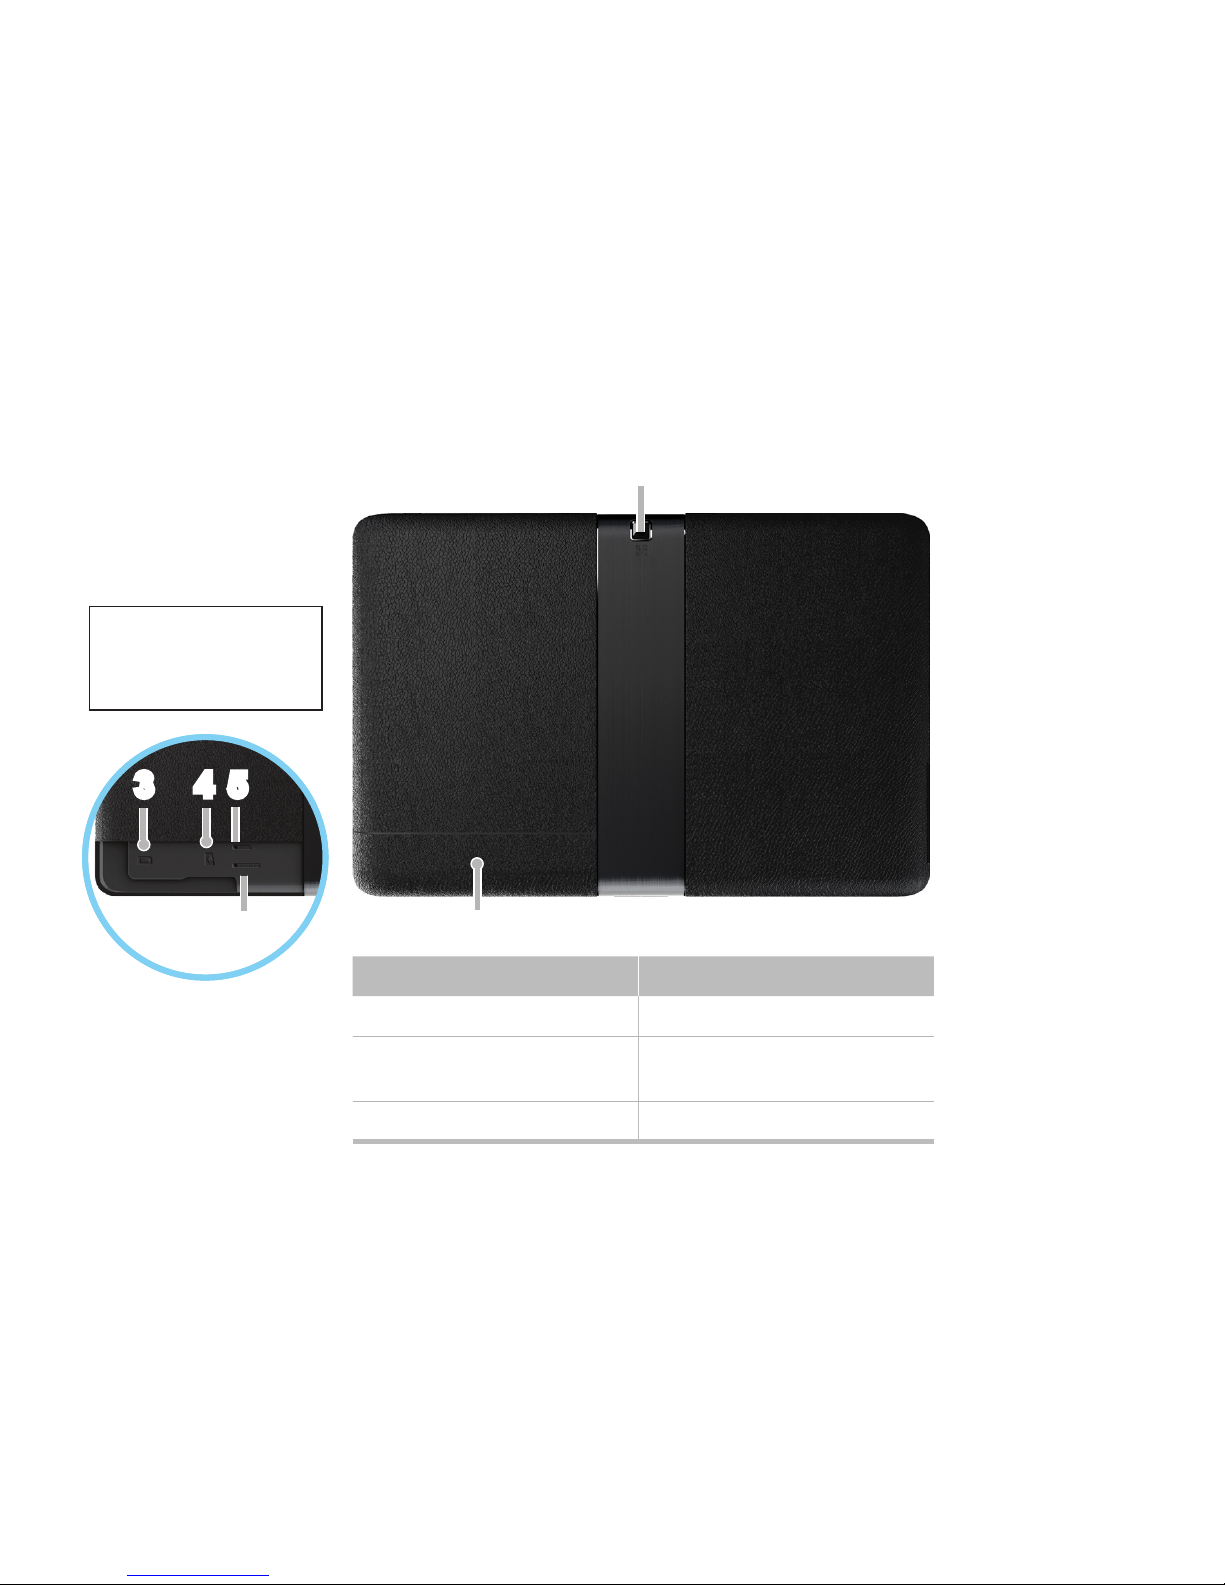
Rear View
# Feature # Feature
1 Rear-facing camera 4 microSD card slot
2
SIM card / Memory
card compartment
5 Reset button
3 SIM card slot 6 Recovery button
2
1
To open compartment:
press down on the cover
then slide the cover to
the left.
53 4
66
Page 5
5
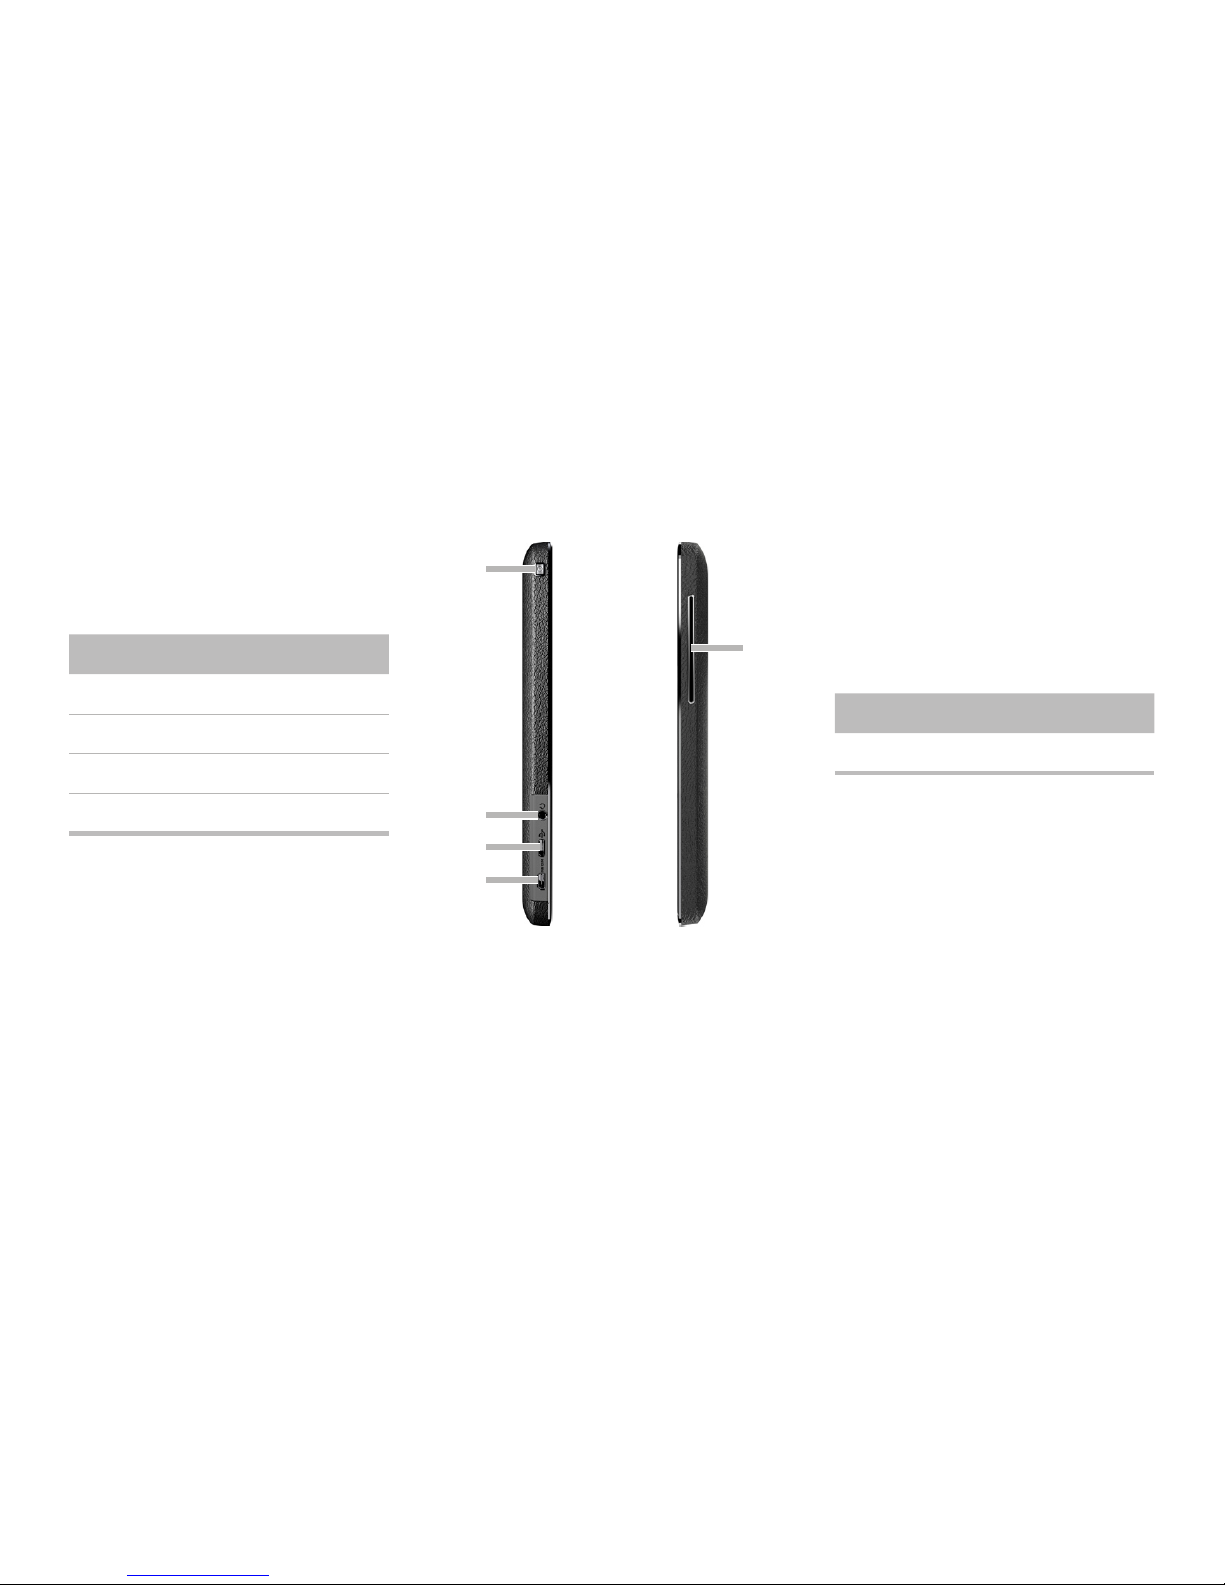
Side Views
Left Side Right Side
# Feature
1 Power key
2 3.5” audio jack
3 Micro USB port
4 Micro HDMI port
# Feature
5 Stereo speakers
1
2
3
4
5
Page 6
6
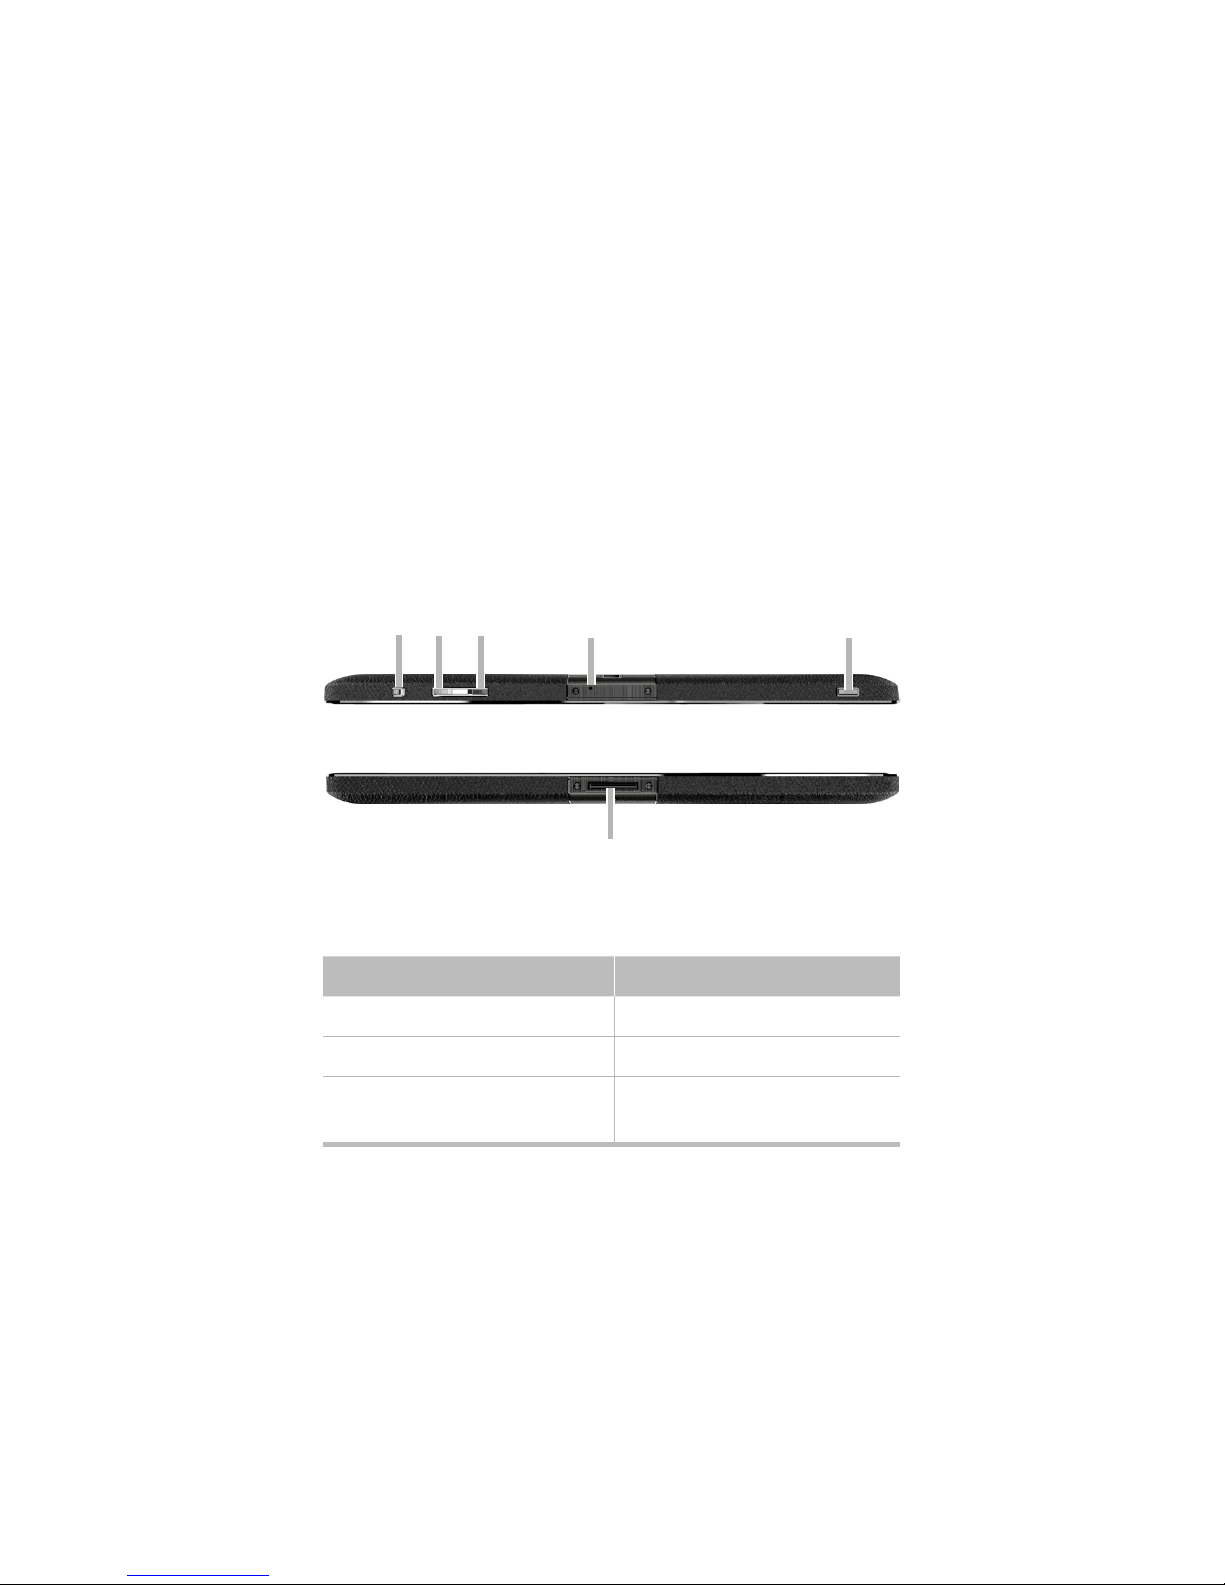
Side Views (cont.)
Top Side
Bottom Side
# Feature # Feature
1 Rotation lock switch 4 Microphone
2 Volume increase key 5 Shutter / Camera key
3 Volume decrease key 6
Dock connector /
Charger port
1 2 4
6
3 5
Page 7
7
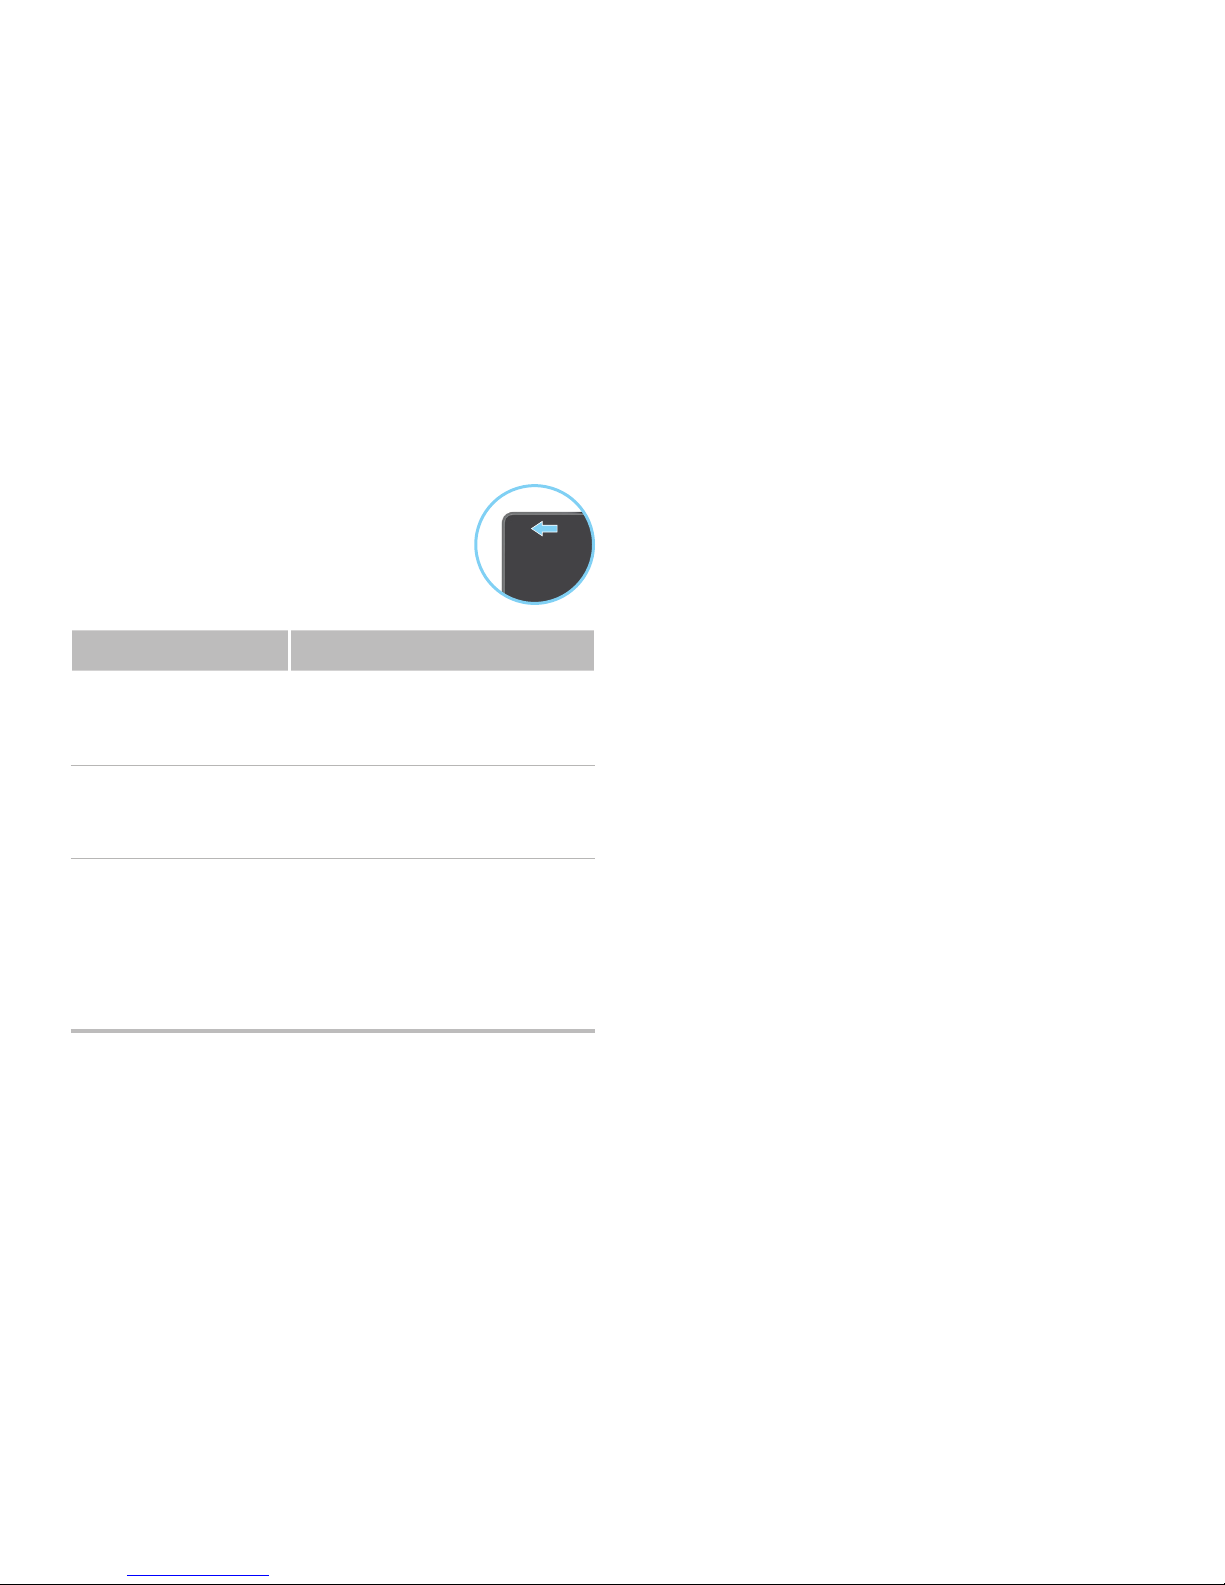
LED Indicator
The LED Indicator located on the front
side of your tablet will notify you of
the status of your tablet’s battery. The
following table shows each possible
indicator states:
LED State Battery Level (%)
Green
(when connected to
charger)
Approx 100%
Red
(when connected to
charger)
0% to under 100%
Blinking Red
(only shows when
not connected to
charger, will not
show when tablet
is off)
Less then approx 10%
(charge as soon as
possible)
Page 8
8
Getting Started
Charging Your Tablet
WARNING: The battery comes partially charged.
You must completely charge the battery (about 5
hours) before using your tablet for the rst time.
After the rst charge you may use your device
while charging.
CAUTION: When charging your tablet, make
sure to use only the charger that came with your
tablet.
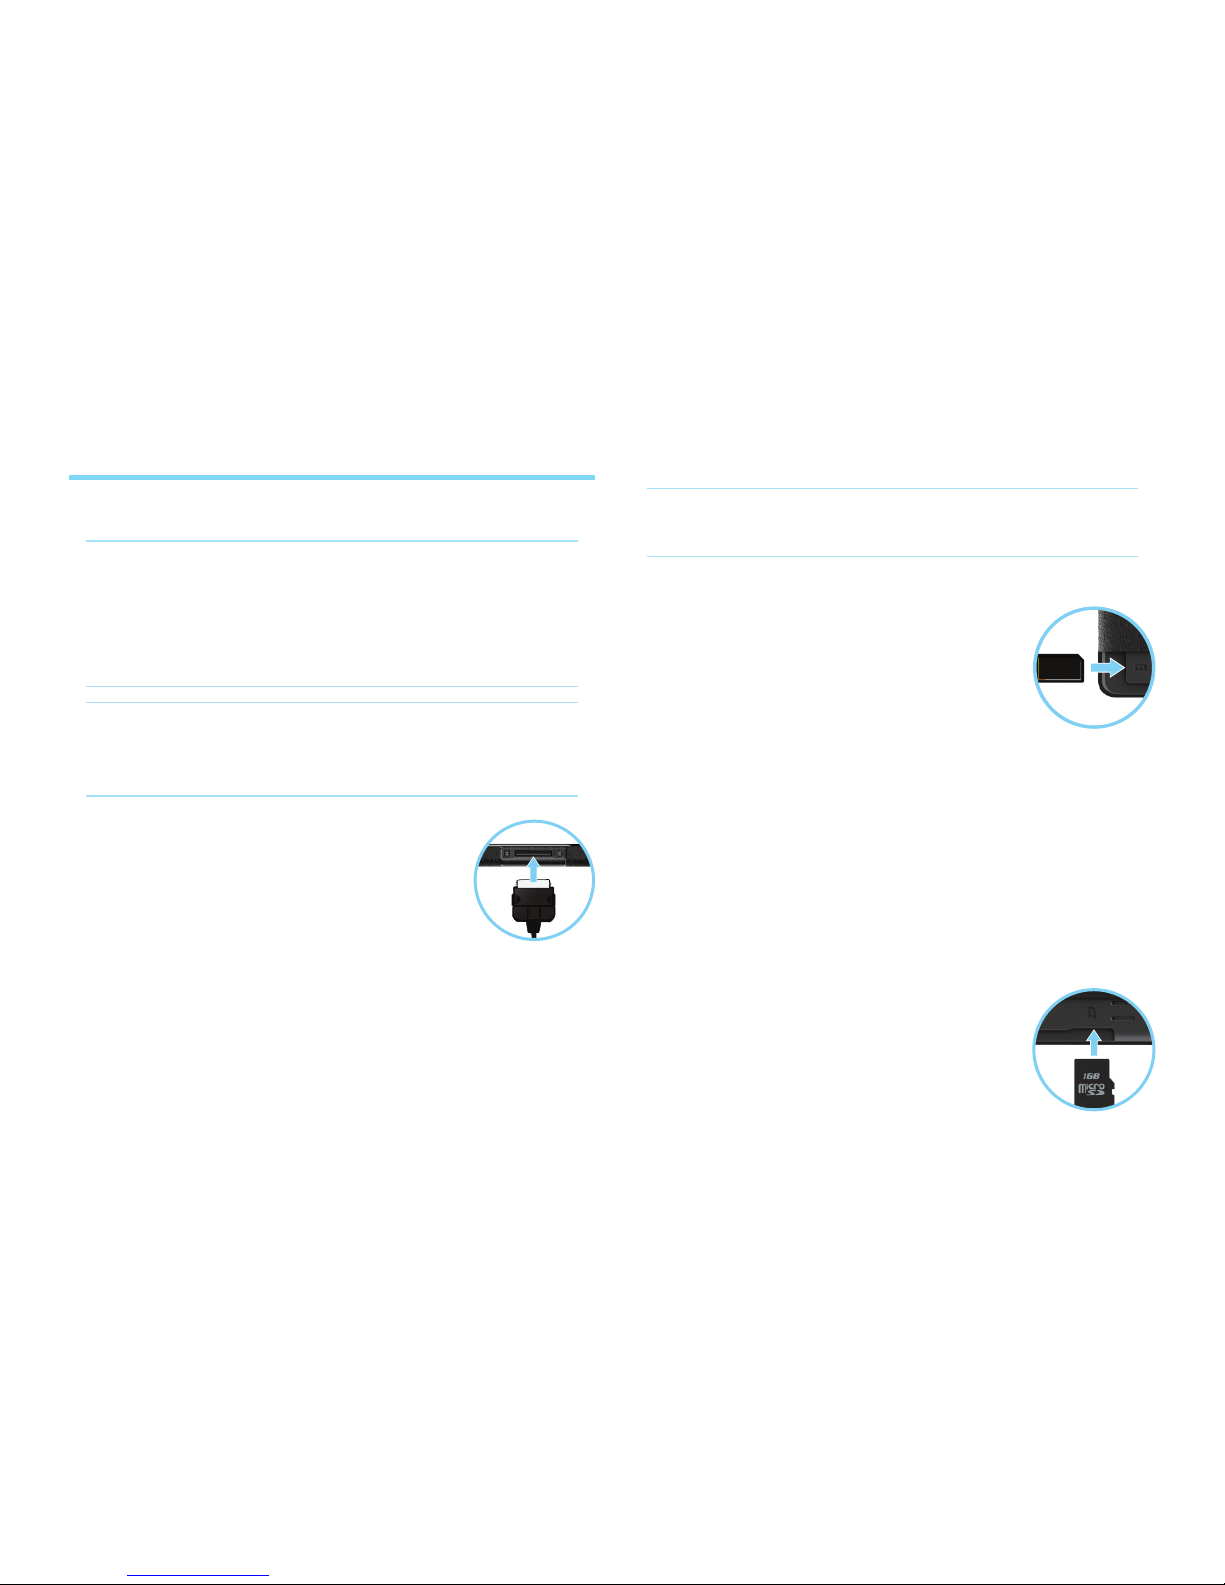
1. Plug the charger to the Docking
connector / Charger port at the
bottom of your tablet.
2. Plug the charger to an electrical
outlet to start charging the battery.
Installing the SIM Card
(3G version only)
Your Subscriber Identity Module (SIM) card
identiesyoutothewirelessnetwork.Yourtablet’s
mobile broadband connection will not work without
a SIM card.
To insert the SIM card:
1. Open the SIM and memory card slot
cover.
2. Insert the SIM card into the SIM card
slot. Gently press the card in until it is
fully inserted and then close the cover.
If you need to remove the SIM card:
1. Open the SIM and memory card slot cover.
2. Gently press the SIM card in and then release.
The card will pop out of the slot.
Installing a Memory Card
Your tablet includes an extendable microSD card
slot that allows you extra storage.
To insert a Memory Card:
1. Open the SIM and memory card slot
cover.
2. Insert the memory card into the
memory card slot. Press the memory
card in until it is fully inserted.
3. Close the SIM and memory card slot cover.
CAUTION: Please be sure to power off your
tablet before inserting or removing the SIM card.
Page 9
9
connect your tablet to other Bluetooth-enabled
devices such as Bluetooth stereo headsets, or
Bluetooth keyboards for quick and easy text entry.
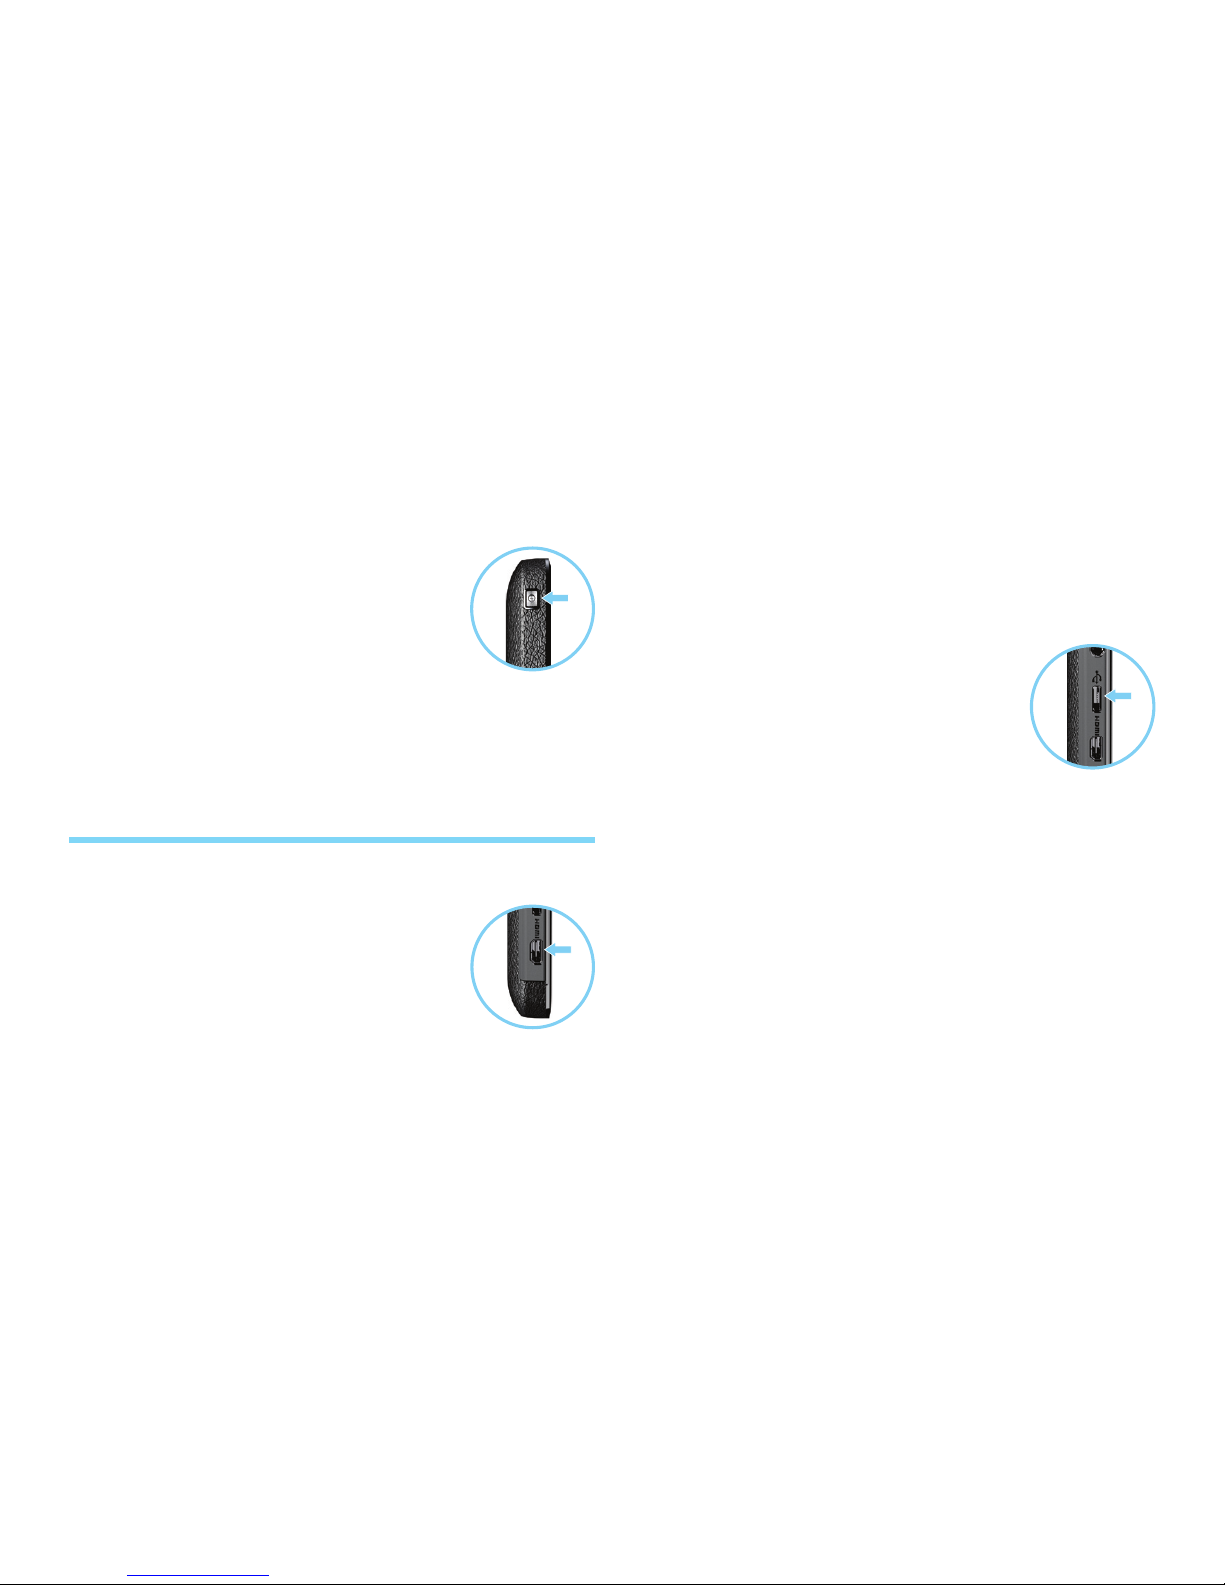
USB Connection
A Micro USB connection allows you
to transfer HD video, music, pictures,
photos and other media content
between your tablet and a computer.
Use the USB cable that came with
your tablet to make the connection and
do the following:
Microsoft•
™
Windows™ XP, Windows Vista, and
Windows 7 - On your computer, click Start,
open your list of programs, and select Windows
Explorer.Thendraganddroplesfromyour
computer to your tablet.
Apple•
™
Macintosh™ - Use Android File Transfer.
(You can download it from http://www.android.
com/letransfer.)
Powering On
1. Press and hold the Power key on the
side of your tablet to turn it on.
Powering Off
1. Press and hold the Power key on
the side of your tablet for several
seconds.
2. Use the touchscreen to conrm that you want to
Power off your tablet.
Understanding Your Tablet
HDMI
®
Your tablet’s Micro HDMI port allows
you to connect it to other HDMIenabled devices in order to share
photos, videos, and other media
content.
Bluetooth® Wireless
Bluetooth wireless technology allows you to
Page 10

10
Troubleshooting
Forced Reboot
In the event that your tablet becomes unresponsive
(either the display freezes, or the machine will not
power on), you may try a forced reboot.
To force your tablet to reboot:
1. Open the SIM and memory card slot
cover on the rear of your tablet.
2. Locate the Reset button in the SIM /
Memory card compartment.
3. Using a pointed instrument press the
Reset button (for about one second).
System Recovery
In certain circumstances you may need to revert
your tablet back to its original factory settings,
doing so will also erase all the data saved on your
tablet. To revert your tablet to factory settings and
erase all the data on your device (data stored
on your SD card, if installed at the time of the
recovery, will not be affected), use the Recovery
button below the Reset button on the rear of your
tablet.
To run System Recovery while the tablet is
Powered off:
1. Open the SIM and memory card slot
cover on the rear of your tablet.
2. Connect the power and micro USB
cable to the device and PC.
3. Press and hold the Recovery button,
then press the Power button for 3
seconds.
4. Release the Power and Recovery buttons.
5. Run the image download application for a
rmware update.
To run System Recovery while the tablet is
Powered on (could be in suspend mode or LCD
on):
1. Open the SIM and memory card slot cover on the
rear of your tablet.
2. Connect the power and micro USB cable to the
device and PC.
3. Press and hold the Recovery button, then press
the Reset button for 1 second.
4. Release the Recovery and Reset buttons.
5. Run the image download application for rmware
update.
 Loading...