

Page 1

STEREO DVD CASSETTE DECK RECEIVER
AMPLI-TUNER /LECTEUR/DVD
DOUBLE PLATINE A CASSETTE
XR-A9700DV
XR-VS100D
SPEAKER SYSTEM
ENCEINTES ACOUSTIQUES
S-A9700V
S-VS100V
Operating Instructions
Mode d’emploi
Page 2
Thank you for buying this Pioneer product.
Please read through these operating instructions so you will know how to operate your model properly. After you
have finished reading the instructions, put them away in a safe place for future reference.
In some countries or regions, the shape of the power plug and power outlet may differ from that shown in the
explanatory drawings. However, the method of connecting and operating the unit is the same.
WARNING: TO PREVENT FIRE OR SHOCK
HAZARD, DO NOT EXPOSE THIS APPLIANCE TO
RAIN OR MOISTURE.
IMPORTANT NOTICE
[For U.S. model]
The serial number for this equipment is located on the
rear panel. Please write this serial number on your
enclosed warranty card and keep it in a secure area. This
is for your security.
Demo Function
The demo function is intended primarily for store
displays and shows off the various features of the
unit. The unit goes into demo mode automatically
after plugging the unit in. The demo mode stops
when either the STANDBY/ON button or one of the
function buttons is pressed.
T o switch the demo mode off completely, press the
P.BASS (DEMO) button for more than 3 seconds while
in standby mode. Follow the same procedure if you
want to swith the demo mode on again at any time.
[For Canadian model]
CAUTION: TO PREVENT ELECTRIC SHOCK DO
NOT USE THIS (POLARIZED) PLUG WITH AN
EXTENSION CORD, RECEPTACLE OR OTHER
OUTLET UNLESS THE BLADES CAN BE FULLY
INSERTED TO PREVENT BLADE EXPOSURE.
THE STANDBY/ON BUTTON IS SECONDARY CONNECTED
AND THEREFORE DOES NOT SEPARATE THE UNIT FROM
MAINS POWER IN STANDBY POSITION.
[For Canadian model]
This Class B digital apparatus complies with Canadian
ICES-003.
[FOR U.S. MODEL]
CAUTION
• Use of controls or adjustments or performance of procedures other than those specified herein may result in hazardous radiation exposure.
• The use of optical instruments with this product will increase eye hazard.
Information to User
Alteration or modifications carried out without appropriate authorization may invalidate the user’s right to operate the
equipment.
This equipment has been tested and found to comply with the limits for a Class B digital device, pursuant to Part 15 of the FCC Rules.
These limits are designed to provide reasonable protection against harmful interference in a residential installation. This equipment
generates, uses, and can radiate radio frequency energy and, if not installed and used in accordance with the instructions, may cause
harmful interference to radio communications. However, there is no guarantee that interference will not occur in a particular installation.
If this equipment does cause harmful interference to radio or television reception, which can be determined by turning the equipment
off and on, the user is encouraged to try to correct the interference by one or more of the following measures:
– Reorient or relocate the receiving antenna.
– Increase the separation between the equipment and receiver.
– Connect the equipment into an outlet on a circuit different from that to which the receiver is connected.
– Consult the dealer or an experienced radio/TV technician for help.
IMPORTANT
CAUTION
RISK OF ELECTRIC SHOCK
DO NOT OPEN
The lightning flash with arrowhead symbol, within
an equilateral triangle, is intended to alert the user
to the presence of uninsulated "dangerous voltage"
within the product's enclosure that may be of
sufficient magnitude to constitute a risk of electric
shock to persons.
CAUTION:
TO PREVENT THE RISK OF ELECTRIC SHOCK, DO
NOT REMOVE COVER (OR BACK). NO USERSERVICEABLE PARTS INSIDE. REFER SERVICING
TO QUALIFIED SERVICE PERSONNEL.
The exclamation point within an equilateral
triangle is intended to alert the user to the
presence of important operating and
maintenance (servicing) instructions in the
literature accompanying the appliance.
Page 3
IMPORTANT SAFETY INSTRUCTIONS
READ INSTRUCTIONS — All the safety and
operating instructions should be read before
the product is operated.
RETAIN INSTRUCTIONS — The safety and
operating instructions should be retained for
future reference.
HEED WARNINGS — All warnings on the product
and in the operating instructions should be
adhered to.
FOLLOW INSTRUCTIONS — All operating and
use instructions should be followed.
CLEANING — Unplug this product from the wall
outlet before cleaning. The product should be
cleaned only with a polishing cloth or a soft dry
cloth. Never clean with furniture wax, benzine,
insecticides or other volatile liquids since they
may corrode the cabinet.
ATTACHMENTS — Do not use attachments not
recommended by the product manufacturer as
they may cause hazards.
WATER AND MOISTURE — Do not use this
product near water — for example, near a
bathtub, wash bowl, kitchen sink, or laundry
tub; in a wet basement; or near a swimming
pool; and the like.
ACCESSORIES — Do not place this product on an
unstable cart, stand, tripod, bracket, or table.
The product may fall, causing serious injury to
a child or adult, and serious damage to the
product. Use only with a cart, stand, tripod,
bracket, or table recommended by the
manufacturer, or sold with the product. Any
mounting of the product should follow the
manufacturer’s instructions, and should use a
mounting accessory recommended by the
manufacturer.
CART — A product and cart combination should be
moved with care. Quick stops, excessive force,
and uneven surfaces may cause the product
and cart combination to overturn.
VENTILATION — Slots and openings in the cabinet
are provided for ventilation and to ensure reliable
operation of the product and to protect it from
overheating, and these openings must not be
blocked or covered. The openings should never
be blocked by placing the product on a bed, sofa,
rug, or other similar surface. This product should
not be placed in a built-in installation such as a
bookcase or rack unless proper ventilation is
provided or the manufacturer’s instructions have
been adhered to.
POWER SOURCES — This product should be
operated only from the type of power source
indicated on the marking label. If you are not
sure of the type of power supply to your home,
consult your product dealer or local power
company.
LOCATION – The appliance should be installed
in a stable location.
NONUSE PERIODS – The power cord of the
appliance should be unplugged from the
outlet when left un-used for a long period of
time.
GROUNDING OR POLARIZATION
÷ If this product is equipped with a polarized
alternating current line plug (a plug having one
blade wider than the other), it will fit into the outlet
only one way. This is a safety feature. If you are
unable to insert the plug fully into the outlet, try
reversing the plug. If the plug should still fail to fit,
contact your electrician to replace your obsolete
outlet. Do not defeat the safety purpose of the
polarized plug.
÷ If this product is equipped with a three-wire
grounding type plug, a plug having a third
(grounding) pin, it will only fit into a grounding type
power outlet. This is a safety feature. If you are
unable to insert the plug into the outlet, contact
your electrician to replace your obsolete outlet.
Do not defeat the safety purpose of the grounding
type plug.
POWER-CORD PROTECTION — Power-supply cords
should be routed so that they are not likely to be
walked on or pinched by items placed upon or
against them, paying particular attention to cords
at plugs, convenience receptacles, and the point
where they exit from the product.
OUTDOOR ANTENNA GROUNDING — If an outside
antenna or cable system is connected to the
product, be sure the antenna or cable system is
grounded so as to provide some protection against
voltage surges and built-up static charges. Article
810 of the National Electrical Code, ANSI/NFPA
70, provides information with regard to proper
grounding of the mast and supporting structure,
grounding of the lead-in wire to an antenna
discharge unit, size of grounding conductors,
location of antenna-discharge unit, connection to
grounding electrodes, and requirements for the
grounding electrode. See Figure A.
LIGHTNING — For added protection for this product
during a lightning storm, or when it is left
unattended and unused for long periods of time,
unplug it from the wall outlet and disconnect the
antenna or cable system. This will prevent damage
to the product due to lightning and power-line
surges.
POWER LINES — An outside antenna system should
not be located in the vicinity of overhead power
lines or other electric light or power circuits, or
where it can fall into such power lines or circuits.
When installing an outside antenna system,
extreme care should be taken to keep from
touching such power lines or circuits as contact
with them might be fatal.
OVERLOADING — Do not overload wall outlets,
extension cords, or integral convenience
receptacles as this can result in a risk of fire or
electric shock.
GROUND
CLAMP
ELECTRIC
SERVICE
EQUIPMENT
Fig. A
OBJECT AND LIQUID ENTRY — Never push
objects of any kind into this product through
openings as they may touch dangerous voltage
points or short-out parts that could result in a
fire or electric shock. Never spill liquid of any
kind on the product.
SERVICING — Do not attempt to service this
product yourself as opening or removing covers
may expose you to dangerous voltage or other
hazards. Refer all servicing to qualified service
personnel.
DAMAGE REQUIRING SERVICE — Unplug this
product from the wall outlet and refer servicing
to qualified service personnel under the
following conditions:
÷ When the power-supply cord or plug is
damaged.
÷ If liquid has been spilled, or objects have fallen
into the product.
÷ If the product has been exposed to rain or
water.
÷ If the product does not operate normally by
following the operating instructions. Adjust only
those controls that are covered by the operating
instructions as an improper adjustment of other
controls may result in damage and will often
require extensive work by a qualified technician
to restore the product to its normal operation.
÷ If the product has been dropped or damaged in
any way.
÷ When the product exhibits a distinct change in
performance — this indicates a need for service.
REPLACEMENT PARTS — When replacement
parts are required, be sure the service technician
has used replacement parts specified by the
manufacturer or have the same characteristics
as the original part. Unauthorized substitutions
may result in fire, electric shock, or other
hazards.
SAFETY CHECK — Upon completion of any service
or repairs to this product, ask the service
technician to perform safety checks to
determine that the product is in proper operating
condition.
WALL OR CEILING MOUNTING — The product
should not be mounted to a wall or ceiling.
HEAT — The product should be situated away from
heat sources such as radiators, heat registers,
stoves, or other products (including amplifiers)
that produce heat.
ANTENNA
LEAD IN
WIRE
ANTENNA
DISCHARGE UNIT
(NEC SECTION 810-20)
GROUNDING CONDUCTORS
(NEC SECTION 810-21)
GROUND CLAMPS
POWER SERVICE GROUNDING
ELECTRODE SYSTEM
(NEC ART 250, PART H)
English
NEC — NATIONAL ELECTRICAL CODE
Page 4
÷
÷
÷
Energy-saving design
This system is designed to use less than 1W of electricity when power is switched to Standby.
Regarding the exact value of the Power Consumption
in standby mode, refer to specifications on page 59.
POWER-CORD CAUTION
Handle the power cord by the plug. Do not pull out the
plug by tugging the cord and never touch the power
cord when your hands are wet as this could cause a
short circuit or electric shock. Do not place the unit, a
piece of furniture, etc., on the power cord, or pinch the
cord. Never make a knot in the cord or tie it with other
cords. The power cords should be routed such that
they are not likely to be stepped on. A damaged power
cord can cause a fire or give you an electrical shock.
Check the power cord once in a while. When you find
it damaged, ask your nearest PIONEER authorized
service center or your dealer for a replacement.
Selecting fine audio equipment such as the unit you’ve just purchased is
only the start of your musical enjoyment. Now it’s time to consider how you
can maximize the fun and excitement your equipment offers. This manufacturer and the Electronic Industries Association’s Consumer Electronics
Group want you to get the most out of your equipment by playing it at a safe
level. One that lets the sound come through loud and clear without
annoying blaring or distortion-and, most importantly, without affecting
your sensitive hearing.
Sound can be deceiving. Over time your hearing “comfort level” adapts
to higher volumes of sound. So what sounds “normal” can actually be loud
and harmful to your hearing. Guard against this by setting your equipment
at a safe level BEFORE your hearing adapts.
To establish a safe level:
Start your volume control at a low setting.
Slowly increase the sound until you can hear it comfortably and
clearly, and without distortion.
Once you have established a comfortable sound level:
Set the dial and leave it there.
Taking a minute to do this now will help to prevent hearing damage or
loss in the future. After all, we want you listening for a lifetime.
[For Australian model]
CAUTION
This product contains a laser diode of higher class than 1.
To ensure continued safety, do not remove any covers
or attempt to gain access to the inside of the product.
Refer all servicing to qualified personnel.
The following caution label appears on your unit.
Location: rear of the unit
CLASS 1
LASER PRODUCT
We Want You Listening For A Lifetime
Used wisely, your new sound equipment will provide a lifetime of fun
and enjoyment. Since hearing damage from loud noise is often undetectable until it is too late, this manufacturer and the Electronic Industries
Association’s Consumer Electronics Group recommend you avoid prolonged exposure to excessive noise. This list of sound levels is included for
your protection.
Decibel
Level Example
30 Quiet library, soft whispers
40 Living room, refrigerator, bedroom away from traffic
50 Light traffic, normal conversation, quiet office
60 Air conditioner at 20 feet, sewing machine
70 Vacuum cleaner, hair dryer, noisy restaurant
80 Average city traffic, garbage disposals, alarm clock
THE FOLLOWING NOISES CAN BE DANGEROUS UNDER
CONSTANT EXPOSURE
90 Subway, motorcycle, truck traffic, lawn mower
100 Garbage truck, chain saw, pneumatic drill
120 Rock band concert in front of speakers, thunderclap
140 Gunshot blast, jet plane
180 Rocket launching pad
Information courtesy of the Deafness Research Foundation.
at two feet.
Page 5

1 Before You Start
Checking what’s in the box......................................... 6
Putting the batteries in the remote ............................. 6
Using the remote control............................................. 6
Finding a suitable location ......................................... 7
Avoiding condensation problems ................................ 7
Handling discs ............................................................. 8
Contents
Storing discs................................................................. 8
Discs to avoid ............................................................... 8
Using cassette tapes ..................................................... 8
Erase protection ........................................................... 8
2 Connecting up
Understanding the Rear Panel ..................................... 9
Connecting the Speakers...............................................9
Connecting to Your TV................................................ 10
Setting the TV format ................................................ 11
Connecting the Radio Antennas ................................. 11
Connecting Auxiliary Components.............................12
Connecting an external AV amplifier ........................ 12
Connecting the Power ................................................. 12
3 Controls and Displays
Front Panel Controls ................................................... 13
Disc and amplifier section......................................... 13
Tuner and tape deck section ...................................... 14
Display ......................................................................... 15
Remote Control Unit ................................................... 16
Switching On and Setting the Clock........................... 18
4 Getting Started
A Disc Primer............................................................... 19
Surround sound modes ............................................. 19
TV screen formats ...................................................... 19
Titles, chapters and tracks......................................... 19
Multilingual discs...................................................... 19
Menu language.......................................................... 19
DVD Regions .............................................................. 20
DVD video copy protection......................................... 20
Video CD PBC mode................................................... 20
Disc and player restrictions ....................................... 20
Setting Up Using the Setup Navigator ........................ 21
Playing Discs ............................................................... 23
Watching a DVD disc ................................................. 23
Watching a Video CD disc.......................................... 24
Playing an audio CD ................................................. 25
Freeze-frame, frame advance and slow-motion....... 26
Accessing tracks directly ............................................ 27
Using Dolby Virtual..................................................... 27
Using the On-screen Menus........................................ 28
Basic and Expert setup menus .................................. 29
Changing the OSD menu language.......................... 29
Player menus and disc menus .................................. 29
5 Watching Multilingual DVD Discs
Switching Languages on Playback............................. 30
Switching audio language during playback............. 30
Selecting subtitle language during playback ........... 30
Setting Language Preferences..................................... 30
Setting your preferred audio language ..................... 31
Setting your preferred subtitle language................... 31
Setting subtitle display preferences ........................... 31
Changing default subtitles ........................................ 32
Switching off Auto Language .................................... 32
Selecting the disc menu language ............................ 32
Language Code List..................................................... 33
6 More Disc Functions
Playing Tracks at Random ......................................... 34
Repeating Tracks......................................................... 34
Programming the Track Order ................................... 35
Displaying Disc Information ...................................... 37
Resuming Playback (Last Memo function)............... 37
Changing Camera Angles ........................................... 38
Changing the Picture Quality..................................... 39
Restricting Access to Discs........................................... 39
Playing locked discs................................................... 40
Changing your password........................................... 40
Setting Preferences for a Disc...................................... 40
Clearing memorized settings..................................... 40
7 Sound and Picture Settings
Listening at Low Volume............................................. 41
Changing the Sound Output Settings......................... 41
Miscellaneous Settings ................................................ 42
Changing the still frame ........................................... 42
Hiding the on-screen messages................................. 42
Setting the on-screen display position ...................... 42
Setting the OSD background color............................ 42
8 Using the Tuner
Tuning in Stations....................................................... 43
Improving poor FM reception ................................... 43
Changing the frequency step..................................... 43
Memorizing Stations for Quick Recall ....................... 44
Listening to memorized stations ............................... 44
9 Using the Tape Deck
Playing Cassette Tapes ................................................ 45
Using Dolby NR. ........................................................ 46
Resetting the tape counter......................................... 46
Relay play .................................................................. 47
Making Tape Recordings ............................................ 47
Automatically recording a CD ................................... 48
Copying tapes............................................................. 49
Improving AM tape recordings.................................. 49
10 Using Sound Modes
Using the Sound Morph.............................................. 50
Memorizing your own settings.................................. 51
Changing the sound display...................................... 51
11 Using the Timer
Setting the Wake-up Timer......................................... 52
Setting the Sleep Timer............................................... 53
Setting the Record Timer............................................ 53
Canceling the Timer ................................................... 54
12 Additional Information
Troubleshooting.......................................................... 55
Screen format/TV settings ......................................... 57
Resetting all DVD Settings........................................... 57
Terms........................................................................... 58
Specifications .............................................................. 59
English
Page 6
1 Before You Start
Checking what’s in the box
Thank you for buying this Pioneer product. Before starting to set up your new stereo
system, please check that you received the following supplied accessories:
• Remote control unit
• FM antenna
• AM loop antenna
• AA/R6P dry cell batteries (x2)
• Power cord
• Speaker cords (x2)
• Video cord
• Warranty card
1
2
3
Putting the batteries in the remote
1 Open the battery compartment cover on the back of the remote control unit.
2 Insert two AA/R6P dry cell batteries into the battery compartment following
the indications (ª, ·) inside the compartment.
3 Close the cover of the battery case.
CAUTION:
• Remove the battery if the remote is not going to be used for a month or more.
• Remove dead batteries promptly—they can leak and damage the unit.
Using the remote control
Keep in mind the following when using the remote control unit:
• Make sure that there are no obstacles in between the remote and the remote
sensor on the unit.
• Use within the operating range and angle, as shown in the diagram left.
• Remote operation may become unreliable if strong sunlight or fluorescent
light is shining on the unit’s remote sensor.
• Remote controllers for different devices can interfere with each other. Avoid
using remotes for other equipment located nearby this unit.
• Replace the battery when you notice a fall off in the operating range of the
remote.
6
En
Page 7

1 Before You Start
Finding a suitable location
We want you to enjoy using your new stereo system for years to come, so please bear in
mind the following points when choosing a suitable location for the system
components and speakers:
Do...
✔ Use in a well-ventilated room.
✔ Place on a solid, flat, level surface, such as a table, shelf or stereo rack.
✔ Leave at least 10cm(3-15/16 inch) either side of the unit, 15cm(5-7/8 inch)
at the back, and 25cm(9-13/16 inch) overhead for proper ventilation.
Don’t...
✗ Use in a place exposed to high temperatures or humidity, including near
radiators and other heat-generating appliances.
✗ Place on a window sill or other place where any of the components or
speakers will be exposed to direct sunlight.
✗ Use in an excessively dusty or damp environment.
✗ Place directly on top of any appliance which becomes hot in use.
✗ Use near a television or monitor as you may experience interference—
especially if the television uses an indoor antenna.
✗ Use in a kitchen or other room where the unit may be exposed to smoke or
steam.
✗ Place on an unstable surface, or one that is not large enough to support all
four of the unit’s feet, or the whole footprint of each speaker.
✗ Block the cooling fan on the rear of the unit. Don’t cover the unit with cloth,
or use on thick carpet, etc.
✗ Put obejects on top of the speakers.
English
Avoiding condensation problems
Condensation may form inside the unit if it is brought into a warm room from
outside, or if the temperature of the room rises quickly. Although the condensation
won’t damage the unit, it may temporarily impair its performance. For this reason
you should leave it to adjust to the warmer temperature for about an hour before
switching on and using.
7
En
Page 8
1 Before You Start
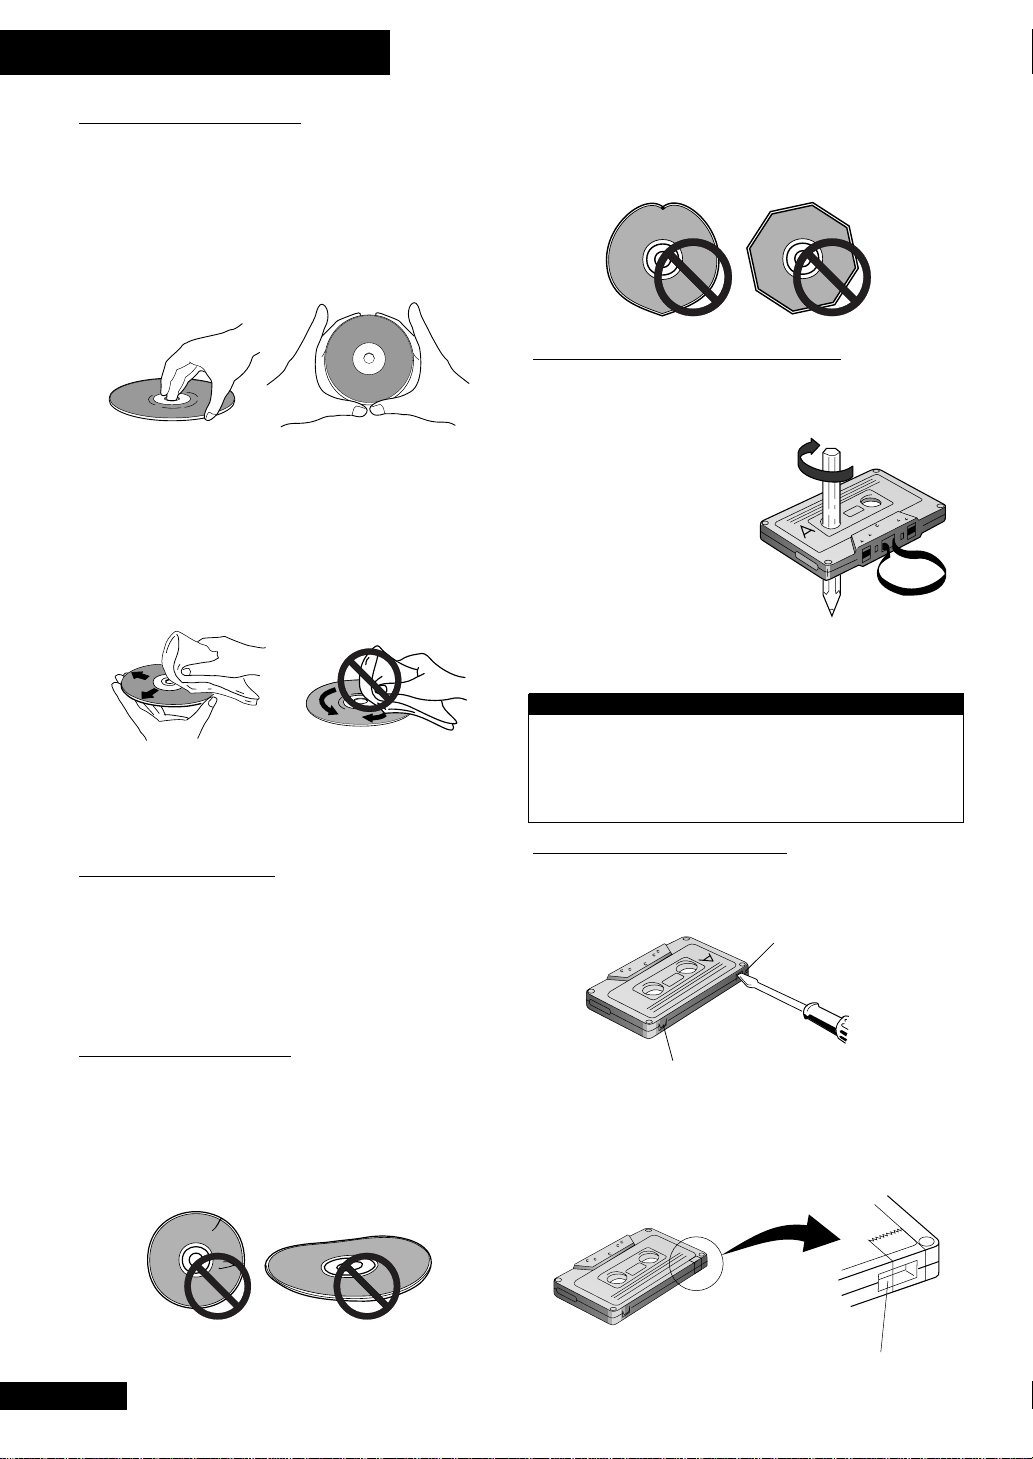
Handling discs
When holding discs of any type, take care not to leave
fingerprints, dirt or scratches on the disc surface. Hold the disc
by its edge or by the center hole and edge. Damaged or dirty
discs can affect playback performance. Take care also not to
scratch the label side of the disc. Although not as fragile as the
recorded side, scratches can still result in a disc becoming
unusable.
Should a disc become marked with fingerprints, dust, etc., clean
using a soft, dry cloth, wiping the disc lightly from the center to
the outside edge as shown in the diagram below. If necessary,
use a cloth soaked in alcohol, or a commercially available CD
cleaning kit to clean a disc more thoroughly. Never use benzine,
thinner or other cleaning agents, including products designed
for cleaning vinyl records.
Wipe lightly from the
center of the disc using
straight strokes
Don’t wipe the disc
surface using circular
strokes
This unit is designed for use with conventional, fully circular
DVD, Video CD and audio CDs only. Use of shaped discs is not
recommended for this product. Pioneer disclaims all liability
arising in connection with the use of shaped discs.
Using cassette tapes
The tape of a cassette is quite easily damaged and loose tape can
jam in the tape deck mechanism. If the tape has become
unwound, use a pen or pencil
to wind it back on to the spool.
When not using cassettes,
always store in the case. Store
cassettes away from magnetic
fields, excessive heat, humidity,
dust or oil.
Before recording on a tape,
wind the tape on past the leader tape (about the first 3 or 4
seconds of each side).
Avoid using tapes longer than 90 minutes:
Since tapes longer than 90 minutes are so thin,
they are more susceptible to jamming in the tape
deck mechanism and other trouble such as
irregular winding.
Storing discs
Although CDs, Video CDs and DVDs are more durable than vinyl
records, you should still take care to handle and store discs
correctly. When you're not using a disc, return it to its case and
store upright. Avoid leaving discs in excessively cold, humid, or
hot environments (including under direct sunlight).
Discs to avoid
Discs spin at high speed inside the player during playback. If
you can see that a disc is cracked, chipped, warped, or otherwise
damaged, don't risk using it—you could end up damaging the
unit.
8
En
Erase protection
You can protect an important recording against accidental
erasure by breaking the erase-protect tab(s) with a small
screwdriver.
For side B
If you want to re-record on an erase-protected cassette, cover the
space left by the broken tab with self-adhesive tape.
Note: If you're using Type II (High/C
you don't also cover the tape-type detection holes.
Tape-type detection hole
For side A
rO
) tapes, make sure
2
Page 9
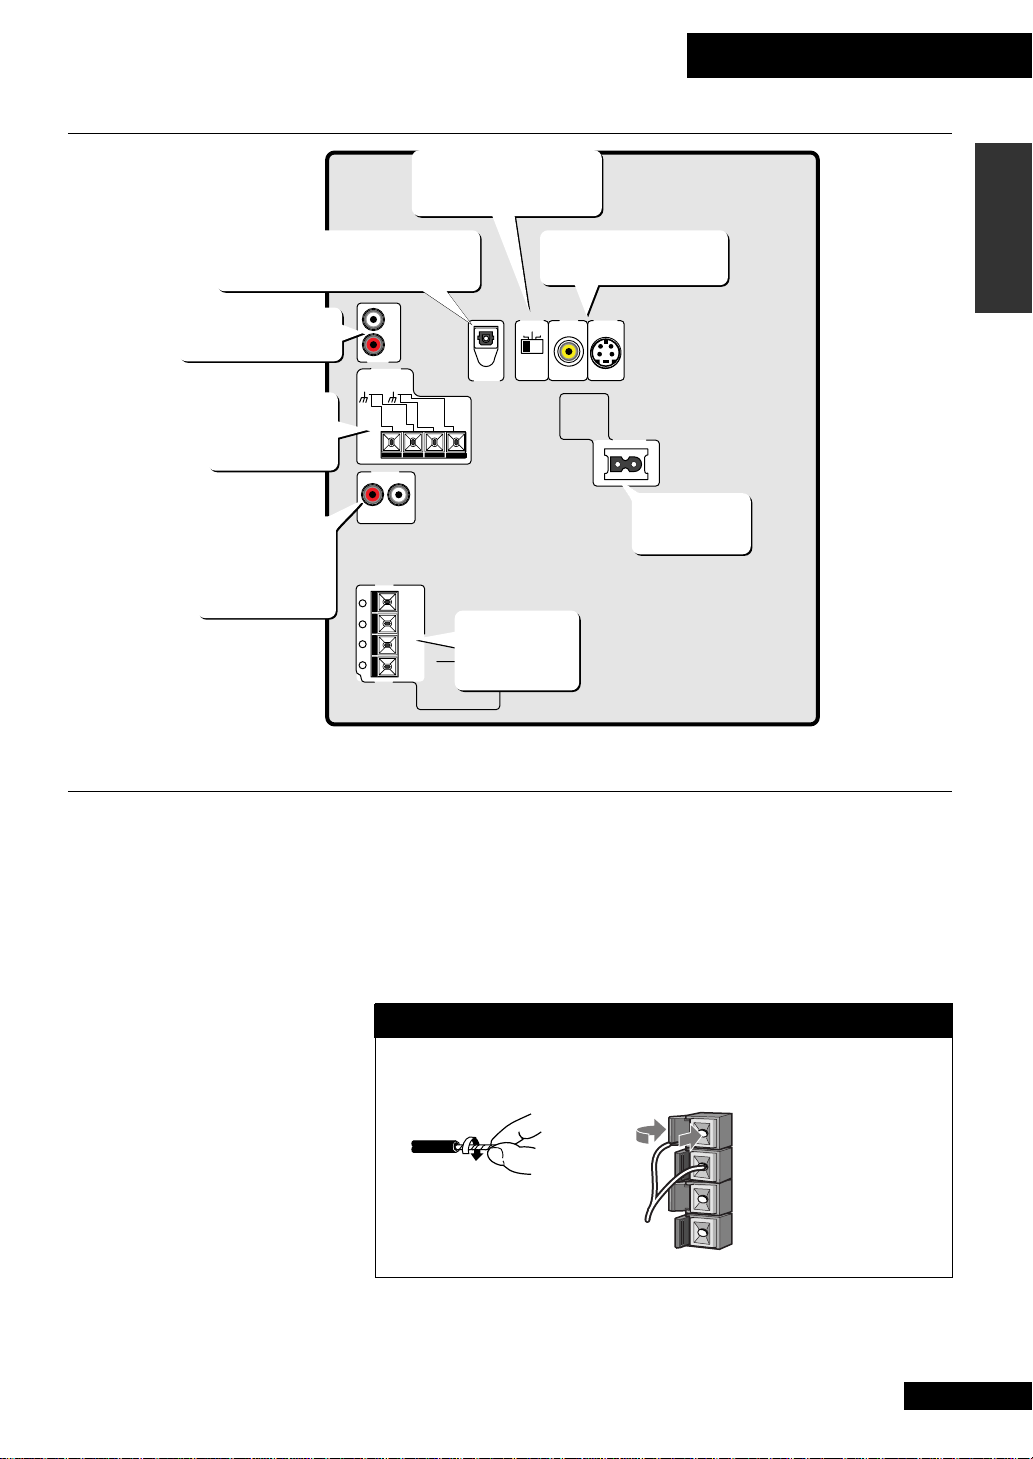
2 Connecting Up
Understanding the Rear Panel
Connect an external AV amp
or digital recorder here
Plug in an external
audio source here
Connect the
AM and FM
antennas here
Connect to the
analog inputs
of an external
recorder here
AUX IN
AM
LOOP
ANTENNA
R
+
-
+
Select the TV picture
format in your region
L
R
ANTENNA
REC OUT
UNBAL
FM
75Ω
L
L
OPTICAL
DIGITAL
Connect the
main front
R
speakers here
English
Connect your TV and
VCR to these outputs
TV
VIDEO
SYSTEM
PAL
AUTO
OUT
S-VIDEO
OUT
NTSC
OUT
AC INLET
Connect to a
power outlet
Connecting the Speakers
Important: Before making or changing any rear panel connections, make sure
that all the components are switched off and unplugged from the power supply.
To get the best sound from the system, it’s important that you connect the two strands
of speaker wire for each speaker to the correct speaker terminal. To help you match up
the wires and terminals correctly, the supplied speaker cord is color coded: connect the
black half of the cord to the black (–) terminals, and the red half to the red (+)
terminals.
Front speaker terminals
Note: Make sure that the bare speaker wires cannot touch each other, or come
into contact with other metal parts once the unit is switched on.
Twist the exposed wire
strands together.
Pull open the tab and
insert the twisted wire fully
into the terminal.
Snap the tab shut again to
secure the speaker cord.
En
9
Page 10
2 Connecting Up
VIDEO
IN
VIDEO
OUT
V V
Pioneer
CAUTION!
Do not connect the
supplied speakers to any
other amplifier. This may
result in malfunction or fire.
If you wish to connect
speakers other than the
ones supplied to this
system, use only speakers
with a nominal impedance
of between 6Ω and 16Ω.
Refer to the instructions
that came with your
speakers if you are unsure
of their impedance before
connecting them and
switching on.
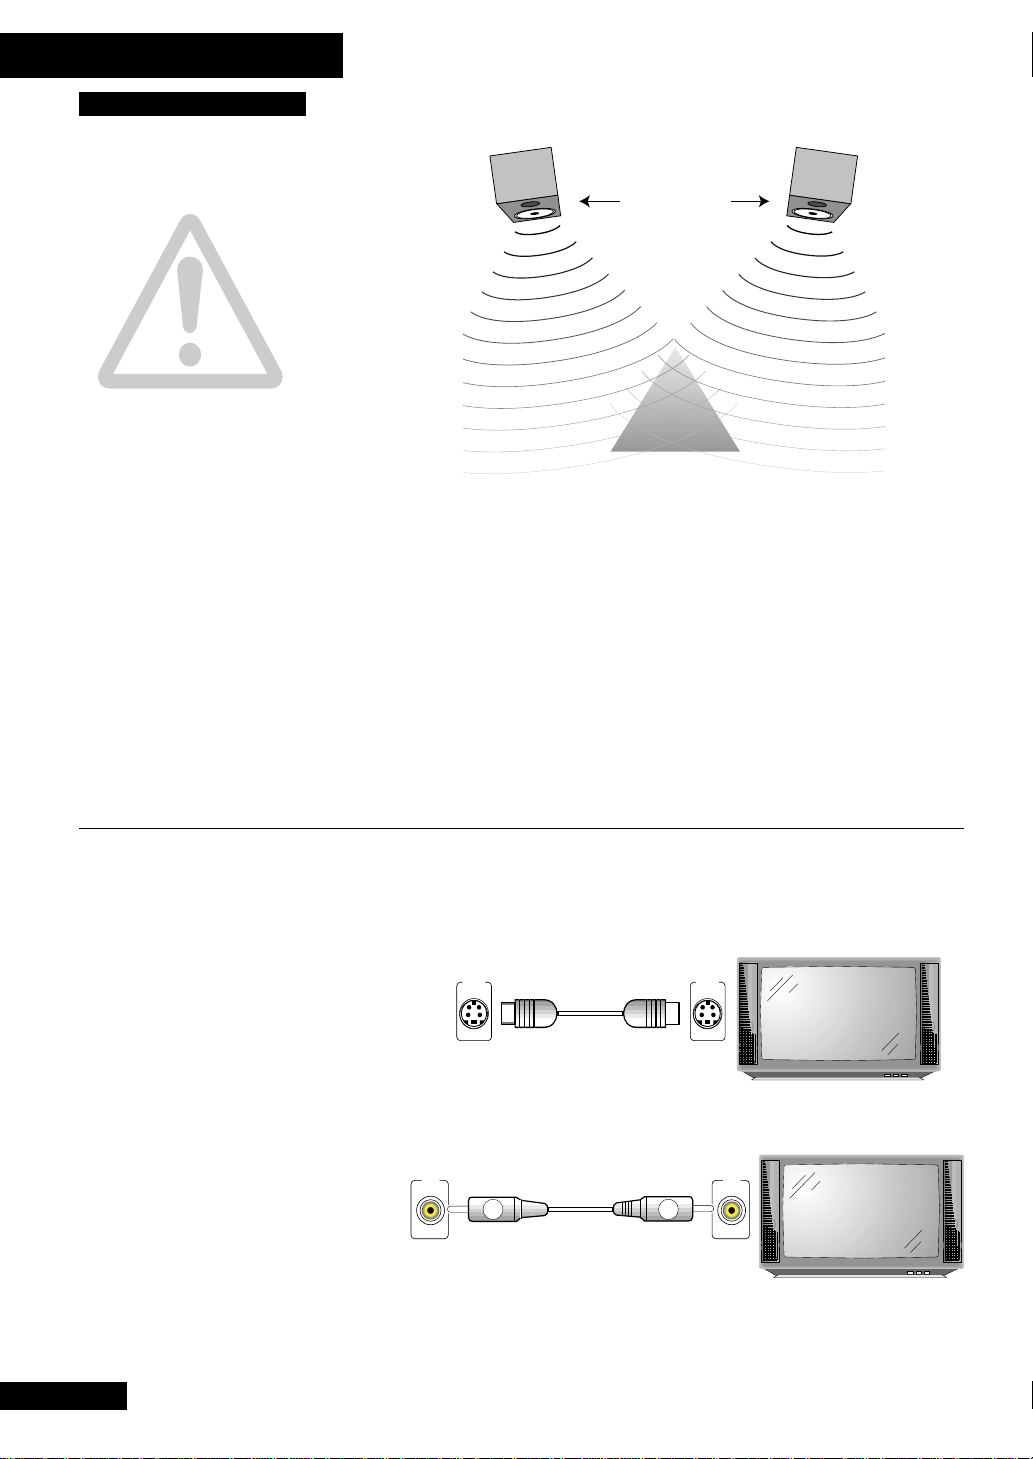
Front
left
2–3 meters
(78-3/4~118-1/8inch)
Front
right
Listening
position
Ideally, speakers should be at about ear-level when you’re listening to them. Putting
the speakers on the floor, or mounting them very high on a wall is not recommended.
For the best stereo effect, place the front speakers 2–3 meters(78-3/4~118-1/8inch)
apart, and choose as your listening position a point within the shaded triangle in the
diagram above.
The front speakers supplied with this system are magnetically shielded. However,
placing them extremely close to a television may result in color distortion on the
screen. If this happens, move the speakers a little further away and switch off the
television for 15–30 minutes.
Connecting to Your TV
This system has two video outputs: one standard VIDEO OUT and one S-VIDEO. If
your TV has an S-Video input, we recommend using an S-Video cord (not supplied,
but available from any video equipment retailer) to connect this unit to the TV. This
should give you a better picture than using the standard-type video cord.
S-VIDEO
OUT
This
unit
If your TV has only a standard video input, use the supplied video cord to connect this
unit to the TV.
This
unit
S-VIDEO
IN
Pioneer
Note: Placing the main unit too close to your TV may cause interference, especially
if you’re using an indoor antenna. If you notice interference, move the unit further
10
En
away from the TV.
Page 11
Setting the TV format
TV
SYSTEM
PAL
NTSCAUTO
Set the TV SYSTEM switch to match the TV system in your country or region. If you
have a multi-system TV that can display both PAL and NTSC signals, set this switch to
AUTO. This will allow you to watch both PAL and NTSC Video CDs and DVD discs.
This system can convert NTSC to PAL, so if you’ve set the
you’ll be able to watch any PAL or NTSC disc.
This system will also convert PAL to NTSC, but only for Video CDs. If you’ve set the
TV SYSTEM switch to NTSC, you’ll be able to watch any PAL or NTSC Video CD, but
only NTSC DVD discs.
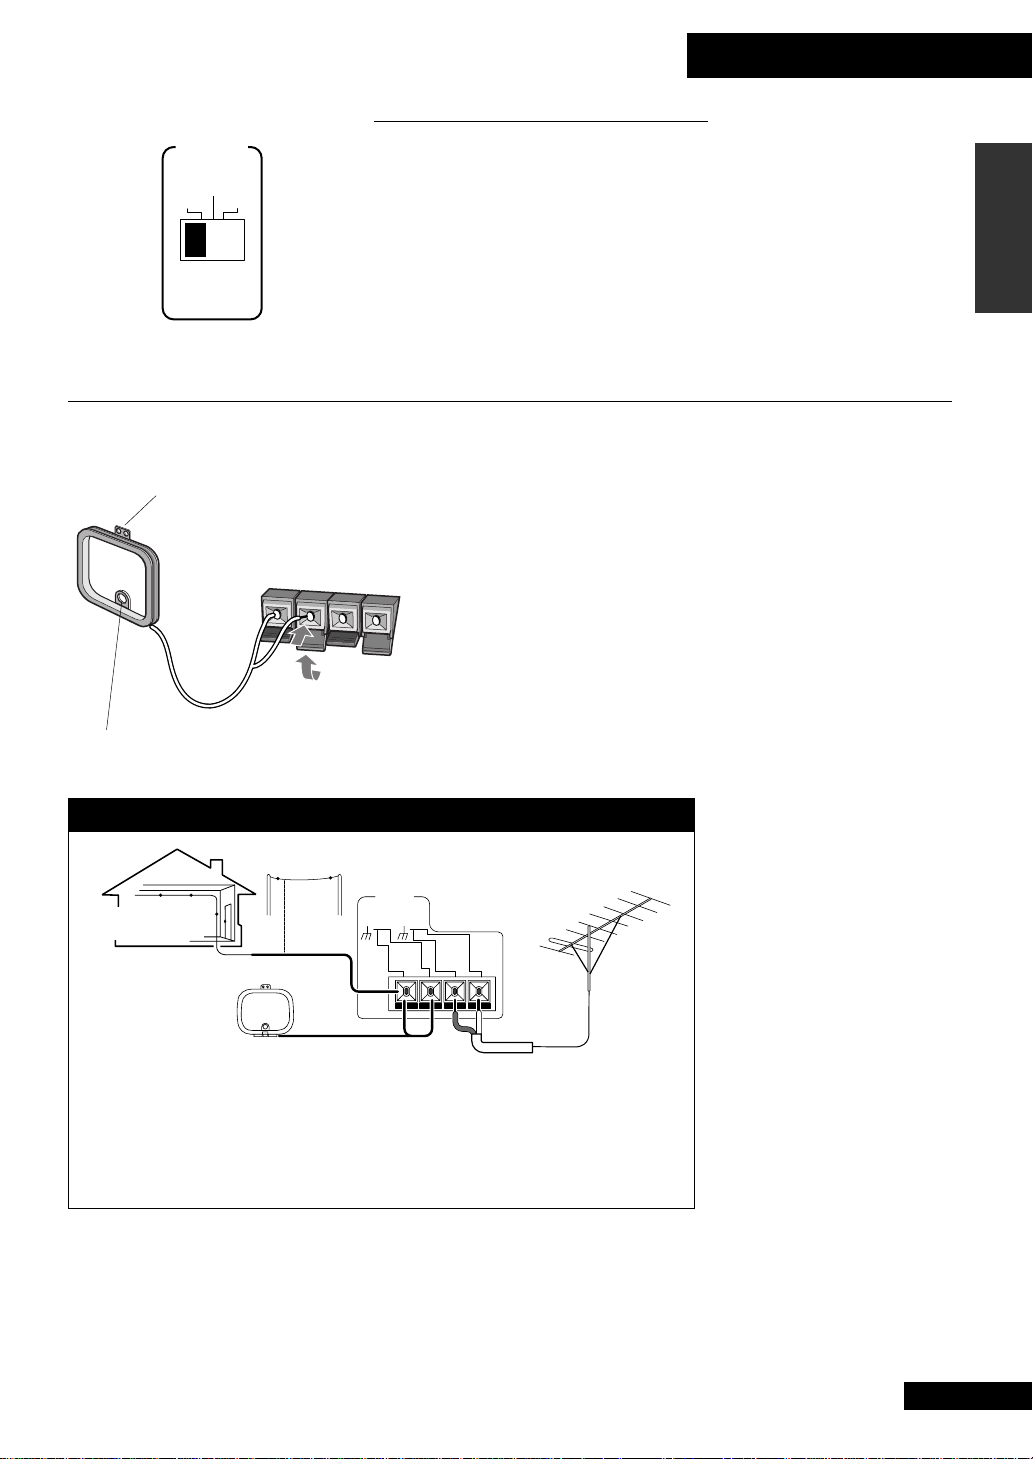
Connecting the Radio Antennas
Connecting the supplied antennas will allow you to listen to both AM and FM radio
broadcasts. If you find that reception quality is poor, an outdoor antenna should give
Holes for fixing antenna to wall
Hole for stabilizing antenna
Connecting external antennas
Outdoor type
Indoor type
External AM antenna
Use 5–6 meters(196-7/8~236-1/4inch) of
vinyl-insulated wire and set up either
indoors or outdoors. Leave the AM loop
antenna connected.
you better sound quality—see the Connecting external antennas box below for
more on how to do this.
Before making or changing antenna connections, make sure that the power is
switched off and the unit disconnected from the wall power outlet.
1 Pull off the protective shields of both AM antenna wires.
2 Pull open both tabs and insert one wire fully into each terminal.
3 Snap the tabs shut to secure the AM antenna wires.
Place the AM antenna on a flat surface and point in the direction giving the best
reception. If necessary, stabilize with a pen or pencil through the hole near the base.
Avoid placing near computers, television sets or other electrical appliances and do not
let it come into contact with metal objects.
ANTENNA
FM
AM
UNBAL
LOOP
75Ω
ANTENNA
External FM antenna
Use 75Ω coaxial cable to hook up an
external FM antenna.
See Connecting external antennas above for connection details.
Note: The signal earth (H) is designed to reduce noise that occurs when an
antenna is connected. It is not an electrical safety earth.
2 Connecting Up
English
TV SYSTEM switch to PAL,
It’s also possible to fix the AM
antenna to a wall using two small
screws or pins through the two holes
at the top of the loop. Before fixing,
make sure that the reception is
satisfactory.
Connect the FM wire antenna in the
same way as the AM loop antenna.
For best results, extend the FM
antenna fully and fix to a wall or
door frame. Don’t drape loosely or
leave it coiled up.
The supplied FM antenna is a
simple means of receiving FM
stations; using a dedicated, outdoor
FM antenna will usually give you
better reception and sound quality.
11
En
Page 12
2 Connecting Up
R
L
R
L
OUT (PLAY)
(OPT.)
DIGITAL
IN
AUX IN
R
L
IN (RECORD)
OPTICAL
DIGITAL
OUT
REC OUT
L
R
L
R
L
R
Playback
L
R
L
R
Recording
Recording
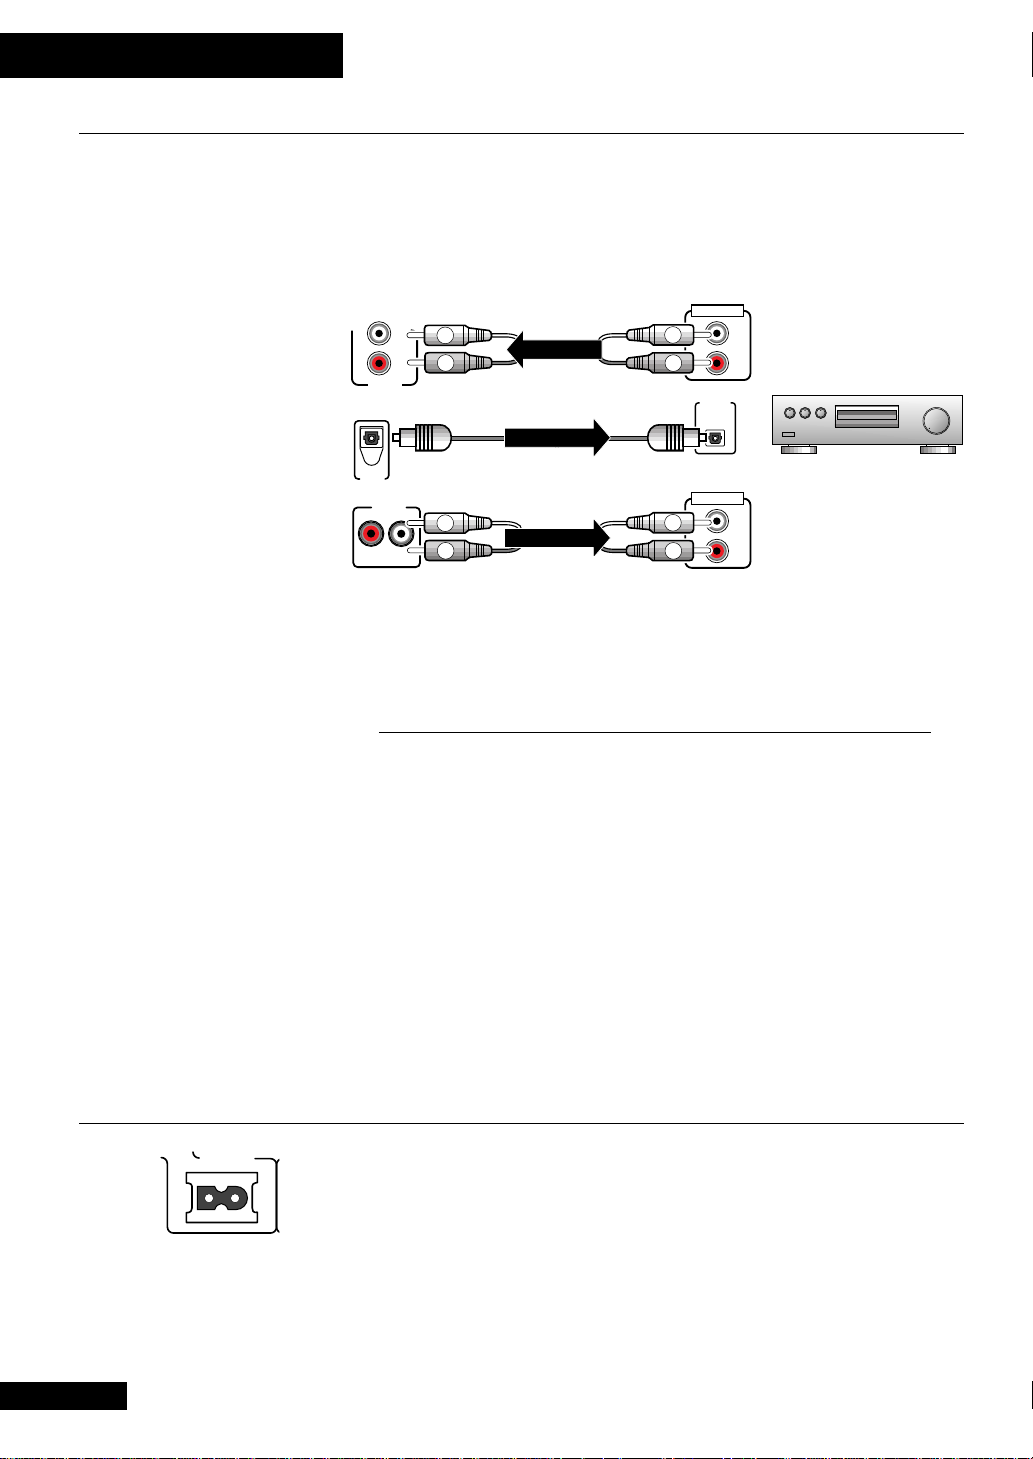
Connecting Auxiliary Components
This system has a complete set of stereo analog inputs and outputs, as well as an optical
digital output. Use these to connect an external component, such as an MD, CD-R or
DAT recorder. Connect the analog inputs and outputs using standard stereo cords; use
an optical digital cord when connecting up components using optical digital jacks.
(Note: connecting cords are not supplied, but should be available from any audio
retailer.)
Digital recorder
MD, CD-R, DAT, etc.
Connecting all three sets of plugs allows for the greatest flexibility when recording. For
CDs you’ll be able to make digital copies over the optical digital link. For digital copyprotected material (such as most CD-R and DVD discs), you’ll still be able to record
via the analog
REC OUT plugs.
Connecting an external AV amplifier
Another use for the optical digital output is to connect this system to an external AV
amplifier with built-in Dolby Digital, DTS and/or MPEG decoder. This will allow you to
enjoy true multi-channel surround sound with many DVD discs. Use a standard digital
optical cord (available from any good audio retailer) to connect the optical digital out
of this system to a suitable optical digital input on your AV amplifier—check the
manual supplied with the amplifier if you’re not sure which input to use.
Note: Although you can play any DVD disc that has a Dolby Digital or MPEG
soundtrack using just this unit, you will hear only a stereo downmix of the full
surround soundtrack. For full Dolby Digital/MPEG surround sound, connect this unit
to a Dolby Digital/MPEG compatible AV amplifier.
DVD discs with DTS soundtracks are only playable on this unit when connected to a
DTS compatible AV amplifier.
Connecting the Power
AC INLET
After making sure that everything is connected properly, plug in the power cord to the
AC INLET, and the other end to a mains power outlet.
Congratulations! You’re done setting up.
12
En
Page 13
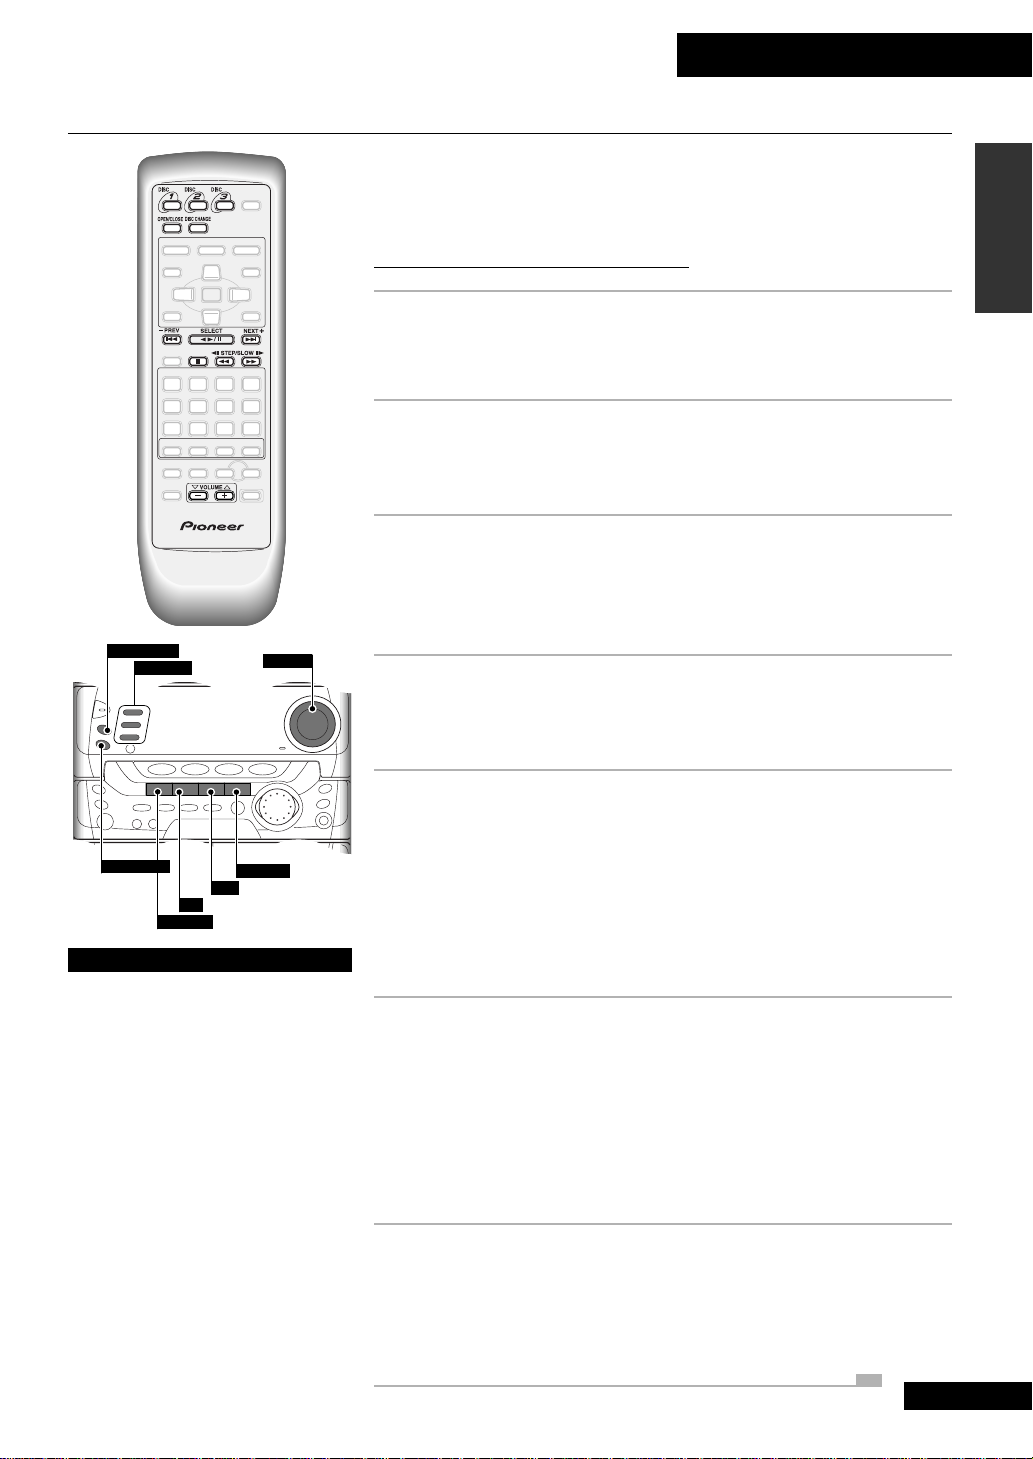
Front Panel Controls
3 Controls and Displays
2
3
4
5
6789
Disc and amplifier section
1 DISC-1,2,3 select buttons & indicators –
press to select discs in the player directly
2 STANDBY/ON button – press to switch the unit
between standby and on.
3 DISC CHANGE button – press to select the next
disc in the player
4 OPEN/CLOSE button – press to open and close
the disc tray
5 BASS BLASTER button – switch on to boost the
bass
6 PRESET button – press to switch between Preset
sound modes (use the
adjustment)
7 EQUALIZER button – press to switch between
Equalizer modes (use the
adjustment)
8 ZOOM SURROUND button – press to switch
between Zoom Surround modes (use the
for smooth adjustment)
S.M.JOG dial for smooth
S.M.JOG dial for smooth
S.M.JOG dial
1
DYNAMIC POWER SUPPLY AMPLIFIER
9 P.BASS (DEMO) button – press to switch
10 SET button – use to enter timer settings made with
11 SOUND MORPHING JOG (S.M.JOG) – use
12 PHONES jack (Headphones) – plug in a pair
13 TIMER / CLOCK ADJ button – use to start
14 DISPLAY button – use to switch the display mode
15 Control buttons – use to control disc playback
16 function select button (TAPE I/II,
17 Volume control (VOLUME) – use to adjust the
Front panel shown is the XR-A9700DV. All controls are
applicable to the XR-VS100D and the XR-A9700DV.
17
16
15
P
R
H
O
I
N
M
G
D
N
J
U
O
O
G
S
14
13
12
11
10
between P.Bass modes (use the S.M.JOG dial for
smooth adjustment)
S.M.JOG dial
the
to change Preset, Equalizer, Zoom Surround and P.Bass
modes. Also used when setting the timer.
of headphones to this jack
setting the clock/timer
TUNER/BAND, AUX, DVD/CD – use to select
the source function
volume of the source material
English
13
En
Page 14
3 Controls and Displays
18
19
20
21
22
23
24 25
Tuner and tape deck section
18 TUNER/BAND function button – press to
switch to tuner function and to switch between AM and
FM
19 TAPE I/II function button – press to switch to
tape function and to switch between tape decks I and II.
20 Dolby NR ON/OFF button – press to switch
Dolby Noise Reduction on/off
21 FREQ / STATION button – press to switch
between tuning and preset station modes
22 REC / STOP button – press to start/stop tape
recording
23 ASES / COPY button – press to start automatic
CD/tape recording
24 0 EJECT (tape I) – press to open the cassette door
of deck I
25 0 EJECT (tape II) – press to open the cassette
door of deck II
26 Control buttons – use to control tape playback,
for manual tuning and to change preset stations
DYNAMIC POWER SUPPLY AMPLIFIER
26
P
R
H
O
I
N
M
G
D
N
J
U
O
O
G
S
14
En
Page 15
Display
3 Controls and Displays
6
7
8
9
1 Character display
2 ¶ REC – lights when recording to tape
3 Timer – lights when either the record timer or the
wake up timer has been set
4 3 – lights when the current tape direction is forwards
5 Tape I, II – indicates which tape deck is currently
selected
6 2 – lights when the current tape direction is reverse
7 Disc function – lights when the function is set to
CD/DVD/Video CD
8 3 – lights when a disc is playing
9 ASES – lights during automatic recording of a CD
10 Angle – lights during scenes on DVD discs that are
recorded with multiple camera angles
11 [RPT (-1)] – highlights during repeat play mode
(-1 lights when in single track repeat mode)
12 [PGM] – highlights during program playback mode
13 [RDM] – highlights during random playback mode
14 LAST MEMO – lights when a resume playback
point was memorized for the loaded disc
15 96kHz – lights when a DVD disc is playing that
contains 96kHz audio
2453
1
1716 19 2 0181513 14111012
16 CONDITION – lights when a DVD disc is loaded
that has had preferences set for language, screen, etc.
17 DOLBY DIGITAL – lights when a Dolby Digital
DVD disc is playing
18 Sound morphing / sound level display
19 [EQ] – highlights when EQ is active
20 [SURR.] – highlights when zoom surround is active
21 [P.BASS] – highlights when P.Bass is active
22 B.B. – lights when Bass Blaster is switched on
23 Sleep timer – lights when sleep timer has been set
24 FM mono – lights when the tuner is set to mono FM
mode using the remote’s
25 FM stereo – lights when the tuner is receiving a
stereo FM broadcast in auto stereo mode
26 Beat cut 2 indicator – lights when beat cut is
switched on for recording AM broadcasts to tape
27 Tuned indicator – lights when the tuner is
receiving a broadcast
28 2NR – lights when Dolby Noise Reduction is
switched on
MONO button
2728
21
English
26
25
24
23
22
15
En
Page 16
3 Controls and Displays
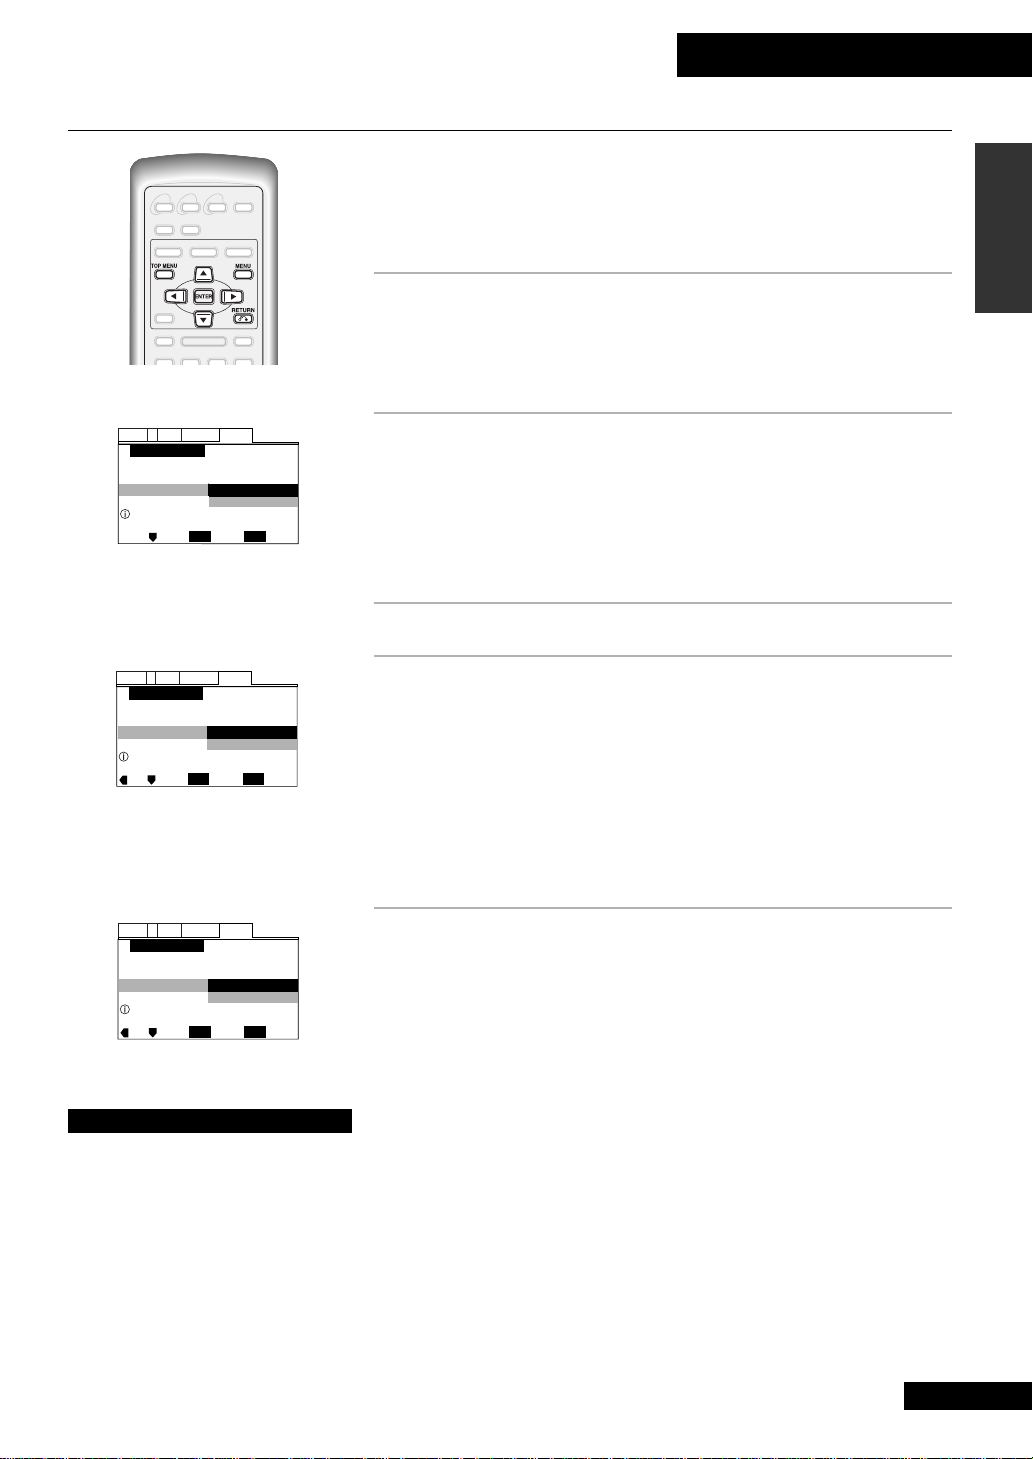
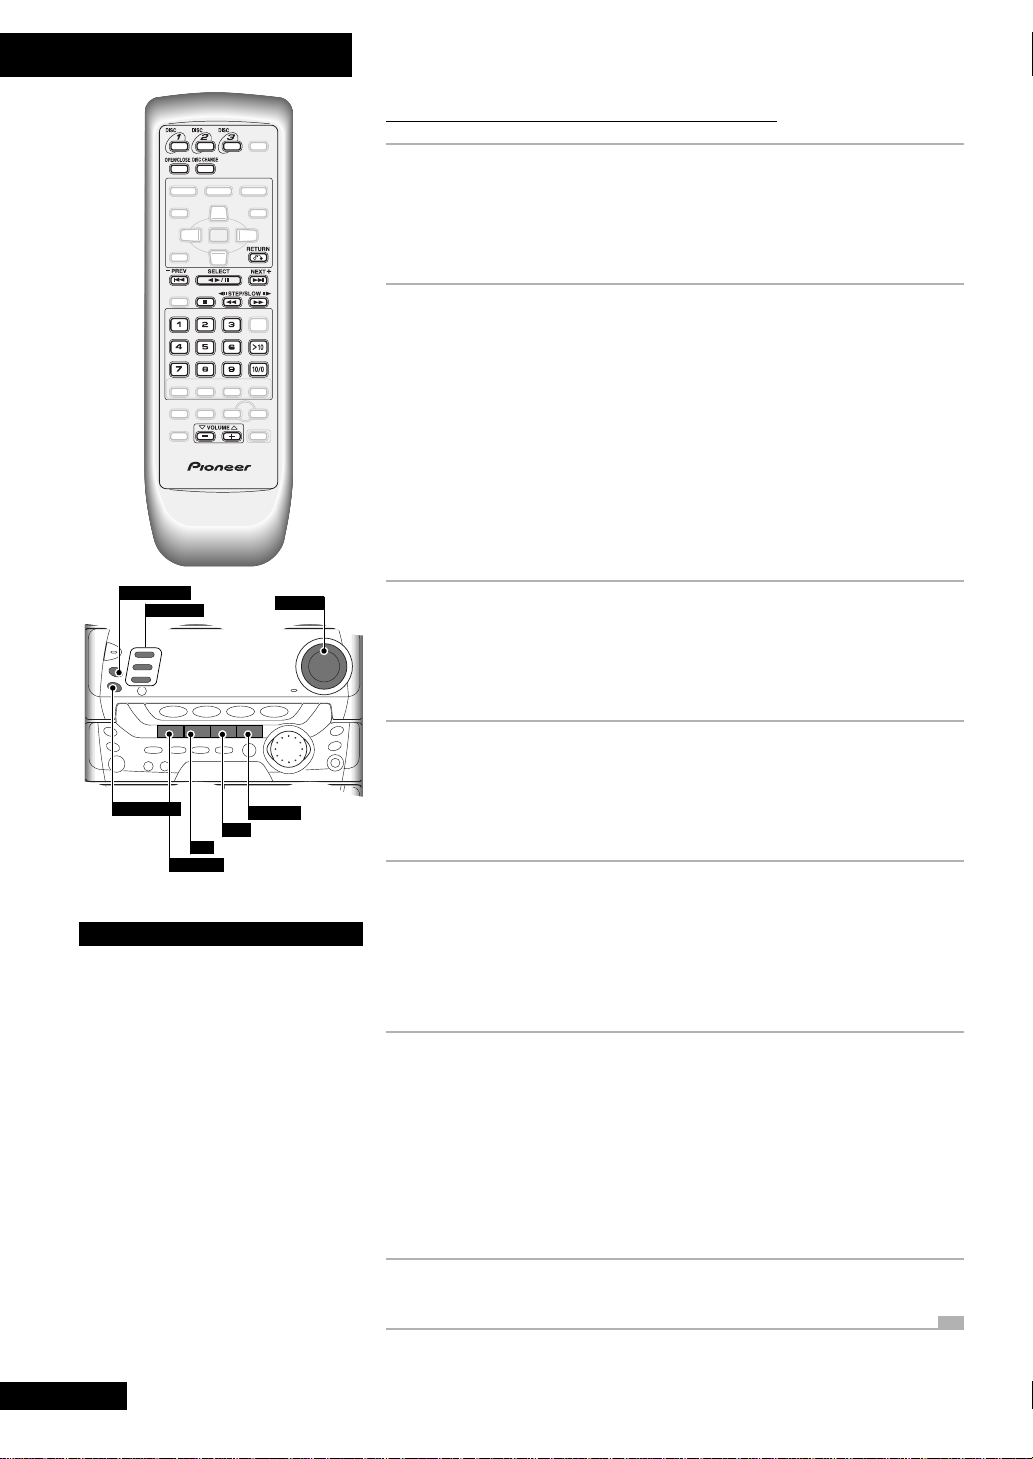
Remote Control Unit
1
2
34
○○○○○○○○○○○○○○○○○○○○○○○○○○○○○○○○○○○○○○○○○○○○○○○○○○○○○○○○
5
6
8
10
11
○○○○○○○○○○○○○○○○○○○○○○○○○○○○○○○○○○○○○○○○○○○○○○○○○○○○○○○○
12 13
7
9
10
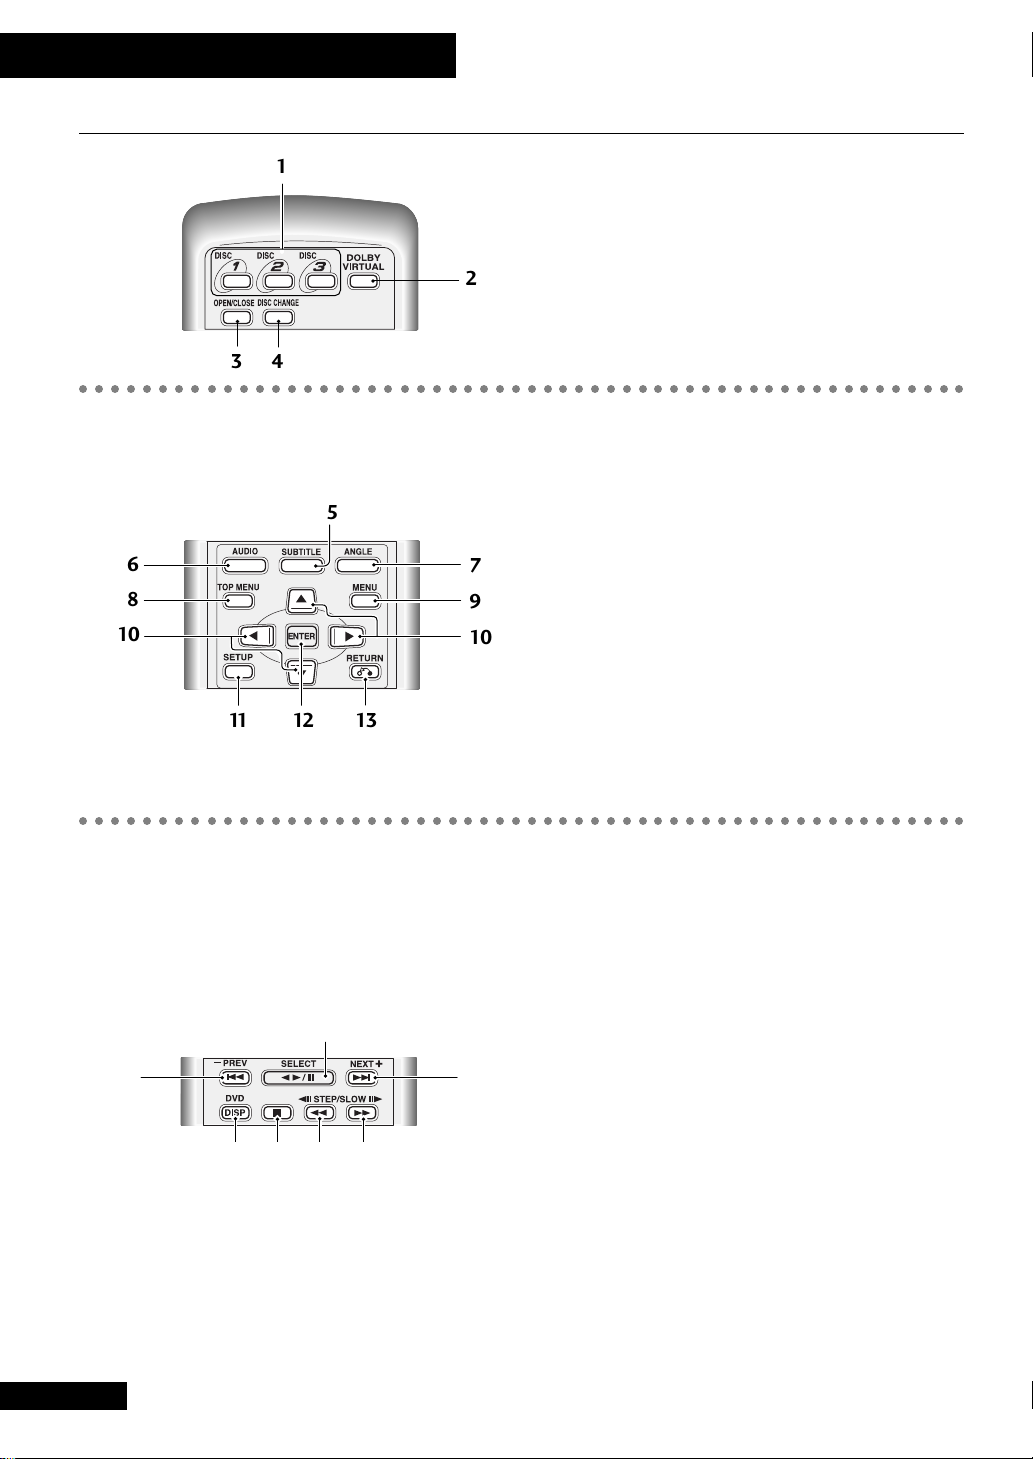
1 DISC select buttons (1-3) – Use to select discs in
the player directly
2 DOLBY VIRTUAL – Press to switch on/off Dolby
Virtual
3 OPEN/CLOSE button – press to open/close the disc
tray
4 DISC CHANGE button – press to select the next disc
in the player
5 SUBTITLE – press to switch the subtitle language of
DVD discs during playback
6 AUDIO – press to switch the audio language of DVD
discs, or the channel of CDs/Video CDs, during playback
7 ANGLE – press to switch camera angle on DVD discs
recorded with multiple cameras angles
8 TOP MENU – press to display the top menu of a DVD disc
9 MENU – press to display the disc menu of a DVD disc
10 Cursor buttons ( 25∞ 3) – use to navigate the
on-screen menus
11 SETUP – press to display the system setup menu for
access to various sound, picture and language options
12 ENTER – use to select items from on-screen menus
13 RETURN – press to exit from a menu screen
16
En
15
14
17 18 1 9 2 0
2
14 SELECT
or pause one already playing
15 – PREV 4 – use to skip back tracks/chapters on a
disc or tape/switch menu screens on a Video CD PBC
menu/tune to radio stations
16 NEXT + ¢ – use to skip forward tracks/chapters on
a disc or tape/switch menu screens on a Video CD PBC
menu/tune to radio stations
17 DVD DISP – press to display disc information on-screen
16
18 7 – press to stop a disc or tape currently playing
19 1 – use to scan backward on a disc, or fast-rewind a
tape
[shift] e – use for reverse frame-advance and slow
motion reverse playback of a DVD disc
20 ¡ – use to scan forward on a disc, or fast-forward a
tape
[shift] E – use for frame advance and slow motion
forward playback of a DVD or Video CD
6 – press to start playing a disc or tape,
Page 17
3 Controls and Displays
○○○○○○○○○○○○○○○○○○○○○○○○○○○○○○○○○○○○○○○○○○○○○○○○○○○○○○○○
21 Number buttons
CONDITION ([shift] 1) – press to memorize the
current DVD disc preferences
LAST MEMO ([shift] 2) – press to memorize the
current position on a DVD disc
SEARCH MODE ([shift] 3)– use to select the disc
search mode (track, chapter, title or time)
RPT ([shift] 4) – use to select a repeat mode for discs
RPT A-B ([shift] 5) – press to mark the start and end
points of a loop to repeat when playing discs
RDM ([shift] 6) – press to start random playback of
tracks/discs loaded
21
123
456
78
22
23
9
24
MONO ([shift] 7) – press to listen to a stereo FM
broadcast in mono (sound quality is usually improved)
SLEEP ([shift] 8) – press to set up the sleep timer
PGM ([shift] 9) – press to start programming a playlist
22 CLEAR – press to clear or cancel various operations
23 >10 – Use to select numbers over 10
24 10/0 – use as zero or 10 when entering numbers
[shift] PBC – press to switch Video CD playback control
on or off
○○○○○○○○○○○○○○○○○○○○○○○○○○○○○○○○○○○○○○○○○○○○○○○○○○○○○○○○
English
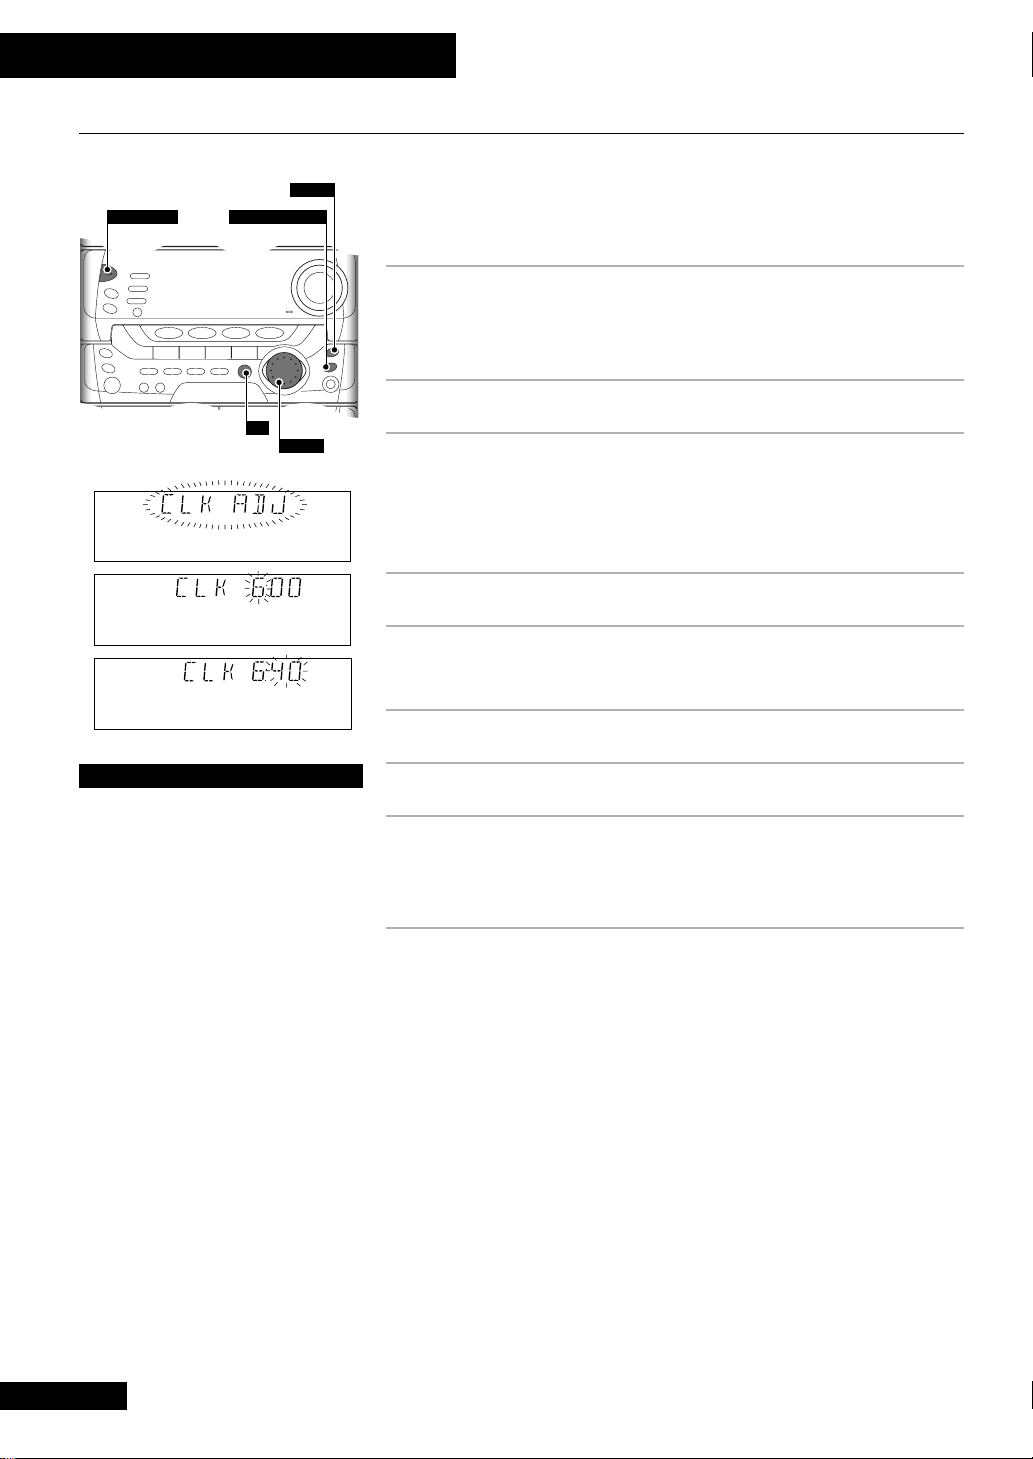
25 TAPE I/II – press to switch to the tape function and to
switch between tape decks I and II
26 BAND – use to switch between FM and AM bands
27 AUX – press to switch the source to the auxiliary inputs
25 26 27 28
28 DVD / CD – press to switch the source to CD/DVD/Video
CD
○○○○○○○○○○○○○○○○○○○○○○○○○○○○○○○○○○○○○○○○○○○○○○○○○○○○○○○○
29 30 31
29 DISP – press to switch the display mode
30 MORPHING – press to switch the sound morphing
JOG buttons)
32
33
34
mode (adjust using the
31 JOG buttons – use to adjust the sound morphing
32 SHIFT – use together with other buttons to access the
[shift] functions
33 STANDBY/ON button – press to switch the unit
between on and standby modes
34 VOLUME buttons – use to adjust the overall volume
level
17
En
Page 18
3 Controls and Displays
Switching On and Setting the Clock
If you’ve followed the instructions to here, you should now have your system installed
with everything connected up and plugged in. After switching on, the first thing to do
is to set the clock. This only needs to be done once (unless all power to the unit is cut)
and will enable you to use the timer features.
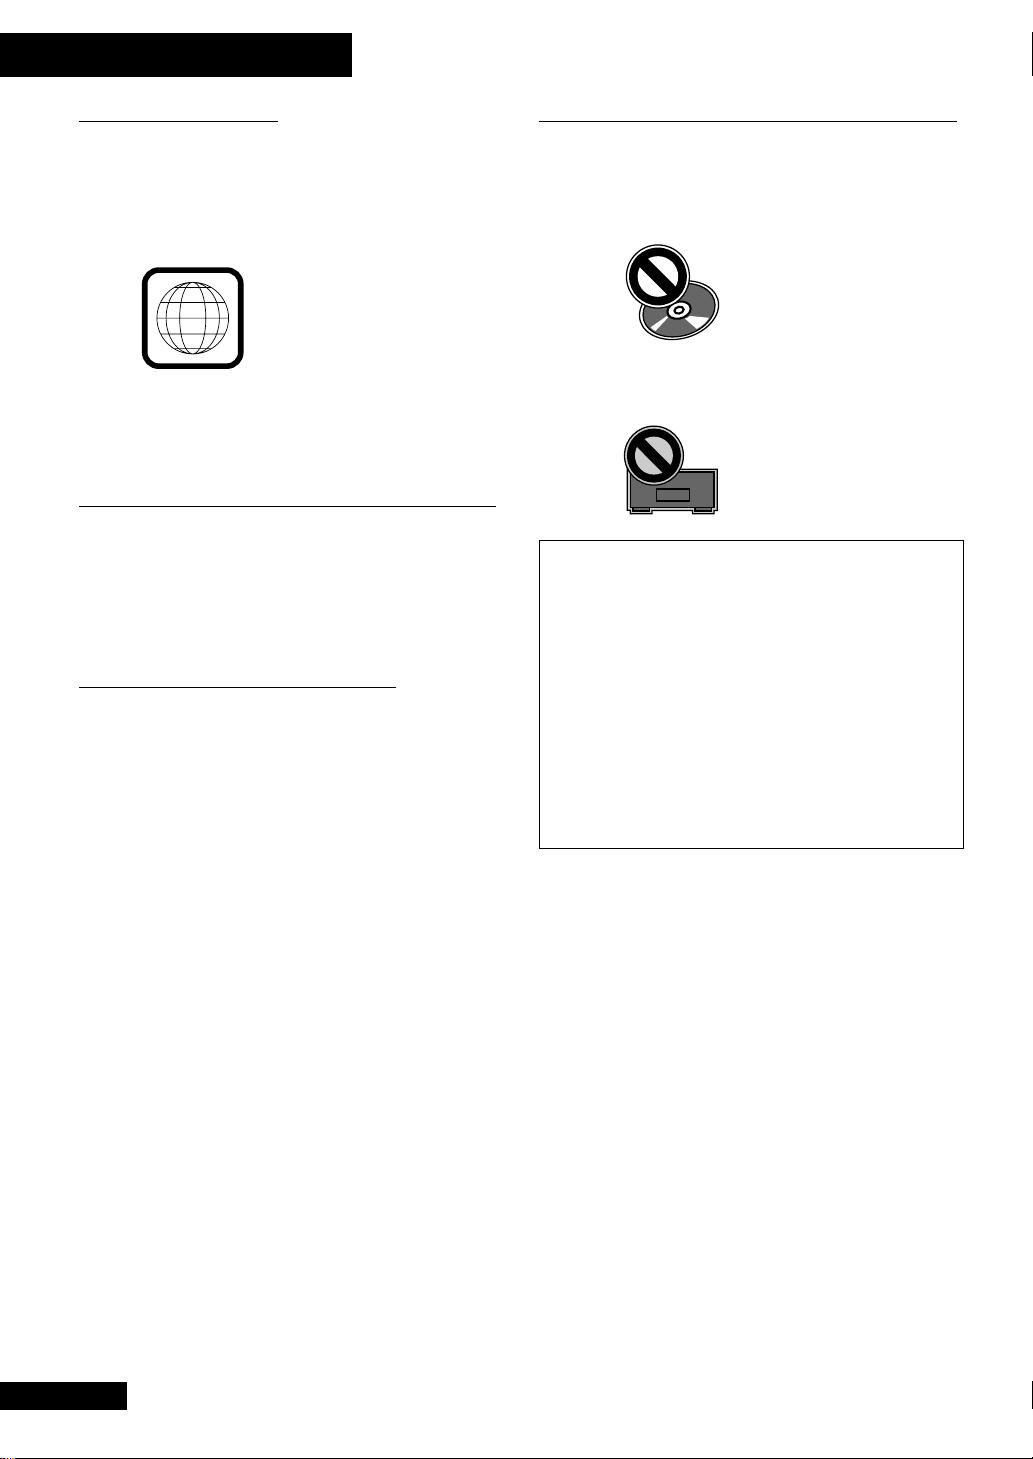
1 Press STANDBY/ON to switch on.
STANDBY/ON
DISPLAY
TIMER/CLOCK ADJ
Pressing again switches the unit back into standby mode.
Note: the system uses less than 1W of power in standby mode.
SET
S.M.JOG
Tip
There are a number of buttons
other than STANDBY/ON which will
switch the unit on. Pressing any of
the function buttons when the unit
is in standby mode will turn the unit
on and switch to that function.
Pressing the disc tray OPEN/CLOSE
button will also switch the power
on and select the DVD/CD
function.
If you press
loaded, the disc will also start
playing. Likewise, if there is a tape
loaded and you press TAPE I/II, the
tape will begin playing.
Pressing ` (
will switch on the power and start
playing the last selected function.
DVD/CD with a disc
2
6 on the remote)
2 Press TIMER/CLOCK ADJ.
3 Turn the S.M.JOG until CLK ADJ (clock adjust)
appears in the display.
If this is the first time you’ve switched on the unit, CLK ADJ should already
be displayed.
4 Press SET.
5 Use the S.M.JOG to set the hour.
The time is in 24-hour clock format (i.e., 13:00 is 1pm).
6 Press SET.
7 Use the S.M.JOG to set the minute.
8 Press SET to finish.
Press DISPLAY to show the current time. The display will revert to it’s
previous state after about five seconds.
18
En
Page 19

A Disc Primer
4 Getting Started
This system will play DVD, Video CD and audio CD discs. Look
for one of the logos shown below on the disc box or on the disc
itself to check that it’s compatible.
DVD disc logo
Video CD disc logo
Audio CD disc logo
Other disc formats, including DVD-RAM, DVD-ROM, CD-RW,
CDV and CD-ROM, are not playable on this system.
Most of the information on these pages relates to DVD and
Video CD. If you’re new to either of these formats we strongly
recommend reading this section before proceeding since it
introduces terms and concepts used throughout the manual.
Surround sound modes
Many DVD discs are recorded with mutichannel surround
sound. There are two formats, Dolby Digital and DTS—this
system is compatible with both. Look for the logos shown below
on the disc box or the disc itself to check whether that disc
features surround sound.
Dolby Digital logo
1
DTS logo
This system plays all sound through the front speakers.
However, using Dolby Virtual you can get the impression of
surround sound—see page 27 for more on using Dolby Virtual.
For true surround sound, connect to a Dolby Digital/DTS
compatible AV amplifier (see page 12) with surround speakers.
TV screen formats
At present there are two television screen formats in use:
conventional and widescreen. They are often known by their
aspect ratio (the width of the screen relative to the height). A
conventional screen is 4:3 (i.e., almost a square), a widescreen
is 16:9 (i.e., nearly twice as wide as it is high). Movies on DVD
are often recorded in widescreen format (since that's how
they're presented in movie theaters). If you watch these discs on
a 4:3 set, you have two options: you can either watch in
letterbox format—in which case you'll see black bars at the
top and bottom of the screen—or you can switch to pan & scan
format. Pan & scan chops the sides off the picture to make it fit
onto a 4:3 screen. Even though the picture looks larger on the
screen (because it uses the whole height of the screen), you're
actually seeing less of the movie (because the sides are lost).
Titles, chapters and tracks
Ordinary music CDs and Video CDs are divided into tracks to
make finding a particular piece on the disc easier. The same
things on DVDs are called chapters (as in chapters of a book).
Because of the huge capacity available, DVD discs collect
together groups of chapters into titles (again, as in book titles).
∞ DVD
∞ Title 1
3
3
etc.
∞ Title 2
3
3
etc.
etc.
Chapter 1
Chapter 2
Chapter 1
Chapter 2
∞ Video CD
3
Track 1
3
Track 2
3
Track 3
3
Track 4
etc.
∞ CD
3
Track 1
3
Track 2
3
Track 3
3
Track 4
etc.
Multilingual discs
As well as audio and video, DVD discs can carry subtitles. Unlike
a video tape, where the subtitles are simply recorded on top of
the picture, DVD subtitles are separate from the main video, so
you can switch them on or off as you like. Not only that, but
some discs will let you choose between several different subtitle
languages—it just depends what the disc maker has included
on the disc.
DVD is not limited to a single audio language either . So, a Frenchlanguage film could include the original dialog in French, a
local language (say, Mandarin), and an English soundtrack.
You can mix and match these audio and subtitle languages at
will, selecting the original soundtrack with local language
subtitles, or a dubbed version with no subtitles. Exactly what's
available depends entirely on the disc, though.
Menu language
Finding your way around the contents of a DVD disc is aided by
the use of on-screen displays, which appear on your TV. Some
discs have their own specific menus, while others rely on
standard menus in the player (some discs use a combination of
the two). The player lets you choose between several different
menu languages, but this only applies to the player menus—
disc dependent menus may only be available in one language.
English
19
En
Page 20
4 Getting Started
DVD Regions
All DVD discs sold contain one or more region codes. Your DVD
player also has a region code which corresponds to the country/
region in which you bought it. You can find the region code of
your player by looking on the rear panel—you should see a
symbol that looks something like this:
2
You’ll find a similar mark on all DVD disc boxes, indicating
which regions it is compatible with. This unit will only play
discs with compatible region codes.
Example region code
DVD video copy protection
Some DVD discs contain a video copy protection signal that
prevents high quality copying to video tape. If the video signal
from this system is fed to your TV via a VCR, you may notice
some picture disturbance with some discs. Connect directly to
your TV to avoid this.
Video CD PBC mode
Some Video CDs contain menus from which you can navigate
the contents of the disc. When you load these discs into the
player they start playing under what’s called playback control
(PBC). Usually, the first thing you’ll see is a menu from which
you can select a part of the disc to watch. Under PBC, features
such as repeat, program and random play are not available.
Disc and player restrictions
The DVD format gives disc makers a lot of flexibility and
control over how material on a disc is presented. If you try and
do something that the disc currently playing does not permit,
the following symbol appears on-screen:
Disc restriction
If you attempt an operation that the player cannot carry out
with the currently loaded disc, this symbol appears:
Player restriction
* Manufactured under licence from Dolby Laboratories.
“Dolby”, “AC-3” and the double-D symbol are trademarks
of Dolby Laboratories. Confidential unpublished works,
1992-1997 Dolby Laboratories, Inc. All rights reserved.
** “DTS” and “DTS Digital” are trademarks of Digital Theater
Systems, Inc.
This product incorporates copyright protection technology
that is protected by method claims of certain US patents and
other intellectual property rights owned by Macrovision
Corporation and other rights owners. Use of this copyright
protection technology must be authorized by Macrovision
Corporation, and is intended for home and other limited
viewing uses only unless otherwise authorized by Macrovision
Corporation. Reverse engineering or disassembly is prohibited.
20
En
Page 21
4 Getting Started
Setting Up Using the Setup Navigator
Audio1 GeneralLanguageVideo2
Setup Navigator
Setup Navigator
Setting up using the Setup Navigator
Move
ENTER
Start
Not Used
Select
SETUP
Exit
Setup Navigator starts here
Audio1 GeneralLanguageVideo2
Setup Navigator
Language
OSD Language
Setup player's OSD language
Move
ENTER
English
Español
Select
SETUP
Exit
Select a menu language
The Setup Navigator simplifies setup by asking you some questions about your system
and making the necessary settings for you. Before moving on to playing discs, we
strongly recommend using the Setup Navigator as described here.
1 Switch on this unit and your TV.
Use either the power switch on the front panel, or the remote control.
The Setup Navigator will not work if there is a disc playing. If there is a disc
loaded, press 7 (stop).
2 Press SETUP.
If this is the first time you've used the system, you'll be prompted to enter the
Setup Navigator. (If this screen does not appear, read Using the On-screen
Menus on page 28, then select General > Setup Navigator.)
In this and the following screens, the yellow text near the bottom of the screen
gives you more information on the highlighted option.
3 Press ENTER to start the Setup Navigator.
4 Select your preferred on-screen display (OSD)
menu language.
Note: The choice available in your country/region may vary from the
illustration, left.
Use the 5 and ∞ (cursor up and down) buttons to switch between options,
then press
If you press
2 (left cursor) button and make your selection again.
ENTER to select it.
ENTER on the wrong option by mistake, go back by pressing the
English
Audio1 GeneralLanguageVideo2
Setup Navigator
TV Connection
TV Type
Widescreen (16:9)
Move
Standard (4:3)
ENTER
Select
SETUP
Exit
Widescreen TV
16:9 aspect ratio
Select a TV Type
Note
The language choices available in
your country/region may differ
from those shown in the
illustrations throughout this
manual.
5 Select the TV Type that corresponds to your TV.
See page 19 if you're unsure of the difference between widescreen and
standard TVs.
Continued.
21
En
Page 22

4 Getting Started
Audio1 GeneralLanguageVideo2
Setup Navigator
Amp Connection
Digital Jack
Compatible with Dolby Digital
Move
Dolby Digital
Dolby Digital/DTS
Dolby Digital/MPEG
Dolby D/DTS/MPEG
PCM
Not Connected
ENTER
Select
SETUP
Exit
Select an amplifier type
Audio1 GeneralLanguageVideo2
Setup Navigator
Move
ENTER
Valid
Invalid
Redo
Select
SETUP
Exit
Exit Setup Navigator
Confirm setup adjustments
Confirm to complete setup
6 Select the Amp Connection that corresponds
to your system.
If you haven't connected the optical digital output of this unit to an amplifier,
choose the last option, Not Connected.
If you have connected this system to an AV amplifier with an optical digital
cord, select the digital audio formats it is compatible with—see page 41 of
this manual, and the manual that came with the amp, for more information
on the different audio options.
Remember: Press
ENTER to select the highlighted option. Press 2 to go
back to the previous question.
7 Choose VALID to confirm the setup.
To exit the Setup Navigator without making the changes you just input, select
Invalid. To start again, select Redo.
8 You're done setting up!
Press SETUP to exit the menu screen.
Note: The next time you press
use the Setup Navigator—just press ENTER to select Not Used.
SETUP , you’ll be asked whether you want to
22
En
Page 23
Playing Discs
4 Getting Started
DISC CHANGE
DISC-1,2,3
VOLUME
Here, we'll run through the basics you need to play DVD, CD and Video CD discs,
including the playback controls. Other functions, including those for watching
multilingual discs, are covered later—see pages 30 to 33.
Watching a DVD disc
1 With the system switched on, press OPEN/CLOSE.
The disc tray ejects. Place a DVD disc with the label face up, into disc 1’s disc
guide in the disc tray. Make sure that it's seated properly.
2 Press 26 .
Alternatively, press
The disc tray closes and the disc starts playing from title 1, chapter 1.
3 Use the VOLUME 5 and ∞ buttons to adjust
the volume (or the front panel volume control).
On the remote, press and hold for continuous adjustment. The display
indicates the current volume as you adjust it.
4 To freeze the frame, press 26 .
Alternatively, press
To resume playback, press
23
on the front panel.
23
on the front panel.
2
6 or
23
again.
English
OPEN/CLOSE
4 · 1
Changing discs
The disc tray has space for up to
three discs. To switch discs use the
DISC CHANGE or DISC buttons.
Press DISC CHANGE to stop the
current disc (if it’s playing) and
start the next disc playing.
To select a disc directly and start
it playing, use the three DISC
buttons.
When the disc tray is open, press
DISC CHANGE to rotate the disc tray
for access to all three discs.
To load/change discs during
playback, press OPEN/CLOSE to
access the two discs not currently
playing.
¡ · ¢
2 3
7
5 To scan backward or forward, press and hold
1 or ¡ .
On the front panel, these buttons are marked
Release the button to resume normal playback. (If the disc continues in scan
2
mode, press
Note: with DVD, fast-forward playback appears much smoother than fast-
reverse playback. This is due to the way the picture is recorded on the disc.
6 (remote) or
23
4 ·1
(front panel) to resume playback.)
and
¡ ·¢
.
6 To skip back or forward to another chapter,
press 4 or ¢.
On the front panel, these buttons are marked
Pressing ¢ once skips to the start of the next chapter on the disc. Further
presses take you to subsequent chapters.
Pressing 4 once takes you to the beginning of the current chapter. Further
presses skip to the start of previous chapters.
4 ·1
and
¡ ·¢
.
7 To stop playback, press 7 .
Notice that the display shows RESUME. This means that if you press
again, playback will start from the point it was last stopped.
If you press 7 twice to stop playback, the disc will start again from the
2
beginning when
6 is next pressed.
2
6
23
En
Page 24
4 Getting Started
Watching a Video CD disc
1 Load a Video CD into a spare disc tray.
Make sure the disc is label face up and seated properly in the disc guide.
Note: Do not use an adapter when playing 8cm Video CD singles. The disc
tray has guides for both 12cm and 8cm discs.
2 Press 26 .
Alternatively, press
Depending on the Video CD, the unit may go into Playback Control (PBC)
mode (the front panel display indicates PBC). These discs feature on-screen
menus from which you can select what you want to watch by pressing the
corresponding number on the remote. Other menu navigation buttons vary
according to the disc—look for the navigation instructions on-screen or on
the disc box. You can call up the menu at any time during playback of the
disc by pressing
PBC (SHIFT+10/0) to switch PBC mode on/off.
Press
23
on the front panel.
RETURN.
DISC CHANGE
DISC-1,2,3
OPEN/CLOSE
7
4 · 1
Changing discs
The disc tray has space for up to
three discs. To switch discs use the
DISC CHANGE or DISC buttons.
Press DISC CHANGE to stop the
current disc (if it’s playing) and
start the next disc playing.
To select a disc directly and start
it playing, use the three DISC
buttons.
When the disc tray is open, press
DISC CHANGE to rotate the disc tray
for access to all three discs.
To load/change discs during
playback, press OPEN/CLOSE to
access the two discs not currently
playing.
VOLUME
¡ · ¢
2 3
3 Use the VOLUME 5 and ∞ buttons to adjust
the volume (or the front panel volume control).
On the remote, press and hold for continuous adjustment. The display
indicates the current volume as you adjust it.
4 To freeze the frame, press E (SHIFT+ ¡).
If the Video CD is not in PBC mode, you can also use the 26 button
(
23
on the front panel).
2
6 or
23
To resume playback, press
.
5 To scan backward or forward, press and hold
1 or ¡ .
On the front panel, these buttons are marked
Release the button to resume normal playback. (If the disc continues in scan
2
mode, press
6 (remote) or
23
4 ·1
(front panel) to resume playback.)
and
¡ ·¢
.
6 To skip back or forward to another track,
press 4 or ¢.
On the front panel, these buttons are marked
Pressing ¢ once skips to the start of the next track on the disc. Further
presses take you to subsequent tracks.
Pressing 4 once takes you to the beginning of the current track. Further
presses skip to the start of previous tracks.
4 ·1
and
¡ ·¢
.
7 To stop playback, press 7 .
24
En
Page 25

Playing an audio CD
4 Getting Started
DISC CHANGE
DISC-1,2,3
VOLUME
1 Load an audio CD into a spare disc tray.
Make sure the disc is label face up and seated properly in the disc guide.
Note: Do not use an adapter when playing 8cm CD singles. The disc tray
has guides for both 12cm and 8cm discs.
2 Press 26 .
Alternatively, press
23
on the front panel.
3 Use the VOLUME 5 and ∞ buttons to adjust
the volume (or the front panel volume control).
On the remote, press and hold for continuous adjustment. The display
indicates the current volume as you adjust it.
4 To pause playback, press 26 .
Alternatively, press
To resume playback, press
23
on the front panel.
2
6 or
23
again.
5 To scan backward or forward, press and hold
1 or ¡ .
On the front panel, these buttons are marked
Release the button to resume normal playback. (If the disc continues in scan
2
mode, press
6 (remote) or
23
4 ·1
(front panel) to resume playback.)
and
¡ ·¢
.
English
OPEN/CLOSE
4 · 1
Changing discs
The disc tray has space for up to
three discs. To switch discs use the
DISC CHANGE or DISC buttons.
Press DISC CHANGE to stop the
current disc (if it’s playing) and
start the next disc playing.
To select a disc directly and start
it playing, use the three DISC
buttons.
When the disc tray is open, press
DISC CHANGE to rotate the disc tray
for access to all three discs.
To load/change discs during
playback, press OPEN/CLOSE to
access the two discs not currently
playing.
¡ · ¢
2 3
7
6 To skip back or forward to another track,
press 4 or ¢.
On the front panel, these buttons are marked
Pressing ¢ once skips to the start of the next track/chapter on the disc.
Further presses take you to subsequent tracks.
Pressing 4 once takes you to the beginning of the current track. Further
presses skip to the start of previous tracks.
You can use the track skip buttons while the disc is paused, too. The track
number changes while the disc remains paused.
4 ·1
and
¡ ·¢
7 To stop playback, press 7 .
.
25
En
Page 26
4 Getting Started
Freeze-frame, frame advance and
slow-motion
DVD / Video CD
If you played a DVD or Video CD is the last section, you should have seen a freezeframe when you paused the disc in step 4 (unless you loaded a DVD disc that didn't
allow this feature). Once paused, you can advance frame-by-frame, or resume
playback in variable-speed slow-motion (from half-speed, down to one-sixteenth
speed). Because of the way DVD discs are made, it's not possible to go in the reverse
direction with quite such control, but you can still step back a little at a time through
the scenes on a disc after pausing. Video CD does not support reverse single-frame or
slow-motion playback at all.
Load a DVD or Video CD and set it playing, then follow the steps below to get a feel for
these controls.
1 Press E (SHIFT+¡) to freeze the picture.
Unless you are playing a Video CD in PBC mode, you can also use the
button (` on the front panel) to freeze the picture.
2 Press (but don't hold) E (SHIFT+¡) again
to advance a single frame.
Each press takes you a frame further. Depending on what your watching, it
may take several presses before you notice any change on the screen!
If you loaded a DVD, try pressing e (
direction. Notice that in reverse the disc is backed up several (sometimes quite a
few) frames at a time.
SHIFT+1) to go in the other
2
6
26
En
3 Press 26 to resume normal playback.
4 Press and hold E (SHIFT+¡) until slow-
motion playback starts.
Adjust the speed of playback using the e and E buttons (e – slower,
E – faster).
There are four slow-motion speeds: 1/16, 1/8, 1/4 and 1/2.
5 Press 26 again to resume normal playback.
6 If you're playing a DVD disc, press e for
slow-motion reverse playback.
Notice that in reverse, playback appears a little jumpy—this is a limitation of
DVD discs in general. You can't adjust the speed of reverse playback.
Page 27
4 Getting Started
TIP
Some DVD discs have their own
menus from which you can
select titles and/or chapters.
Access it from the MENU or TOP
MENU
button, then make your
selection using the cursor
buttons (
25∞3
) and ENTER.
Accessing tracks directly
DVD / Video CD / CD
You can jump directly to any track on an audio CD or Video CD by simply inputting
the track number using the remote’s number buttons.
For DVDs (and for audio CDs and Video CDs) several options for direct access to
different parts of the disc are available from the
1 Press SEARCH MODE (SHIFT +3) repeatedly
to switch between:
TITLE - CHAPTER/TRACK - TIME - OFF
Note: Title search is possible only with DVD discs. Time search is possible
only with DVD discs and Video CDs that are playing (the Video CD must not be
in PBC mode).
2 Use the number buttons to input a title/
chapter/track number, or time location.
For example, press 4 to select title/chapter/track 4.
Press 1, 2 to select title/chapter/track 12.
Enter times as minutes and seconds:
Press 2, 2, 3, 0 to select 22 minutes, 30 seconds.
Press 8, 0, 0, 0 to select 1 hour 20 minutes (80 minutes).
SEARCH MODE button:
English
3 (Re)start playback.
Press 26 on the remote or
Using Dolby Virtual
Dolby Virtual is designed to simulate surround sound from just two front speakers. You
can use it with Video CD, CD and DVD discs—although you may hear a more
dramatic effect with some discs than others.
DOLBY VIRTUAL button on the remote control to switch on or off as
Use the
required.
“TruSurround” and the
States and selected foreign countries.
Tru Surround technology is incorporated under license from SRS Labs, Inc.
23
on the front panel.
symbol are trademarks of SRS Labs, Inc. in the United
27
En
Page 28
4 Getting Started
Using the On-screen Menus
This system makes use of your TV to display on-screen menus from which you can
change various player settings. In the following sections you’ll often access these
menus, so we recommend working through this page to get a feel for how to use them.
menu tabs
2
Language
Video
Audio1
Dolby Digital Out – Dolby Digital
DTS Out – Off
96kHz PCM Out – 96kHz 3 48kHz
MPEG Ou
Setup audio
Digital output format/tone adjust
Move
information
highlighted
item
Audio1 GeneralLanguageVideo2
TV Screen
Picture Quality -
Setup picture according to TV
Move
General
t – MPEG 3 PCM
SETUP
settings
4:3(Letter Box)
4:3(Pan&Scan)
16:9(Wide)
SETUP
Exit
Exit
1 Press SETUP.
Each of the tabs at the top of the screen represents a different menu. At the
moment you're looking at the AUDIO 1 menu.
2 Use the 2 and 3 (cursor left/right) buttons to
switch between menu tabs.
There are five menu tabs: AUDIO 1, AUDIO 2, VIDEO, LANGUAGE and
GENERAL. As you switch between them the list of options changes.
To exit the menu system at any time, press
SETUP.
3 Press the ∞ (cursor down) button to highlight
the first item in a menu.
The screen, left, shows the first item of the Video menu highlighted,
TV Screen, with it’s three possible settings. The current setting is marked
with a colored box (blue means applicable only to DVD discs; yellow means
applicable to Video CD and DVD; a green box means applicable to any
format).
To get back to the tabs at the top of the screen, press either 2 or
RETURN.
4 Use the 5 and ∞ (cursor up/down) buttons to
highlight different menu items.
As you highlight each menu item, you’ll see the possible settings.
28
En
Audio1 GeneralLanguageVideo2
Picture Quality -
Setup picture according to TV
TV Screen
Move
4:3(Letter Box)
4:3(Pan&Scan)
16:9(Wide)
highlighted
setting
SETUP
Exit
5 Press 3 to highlight the first setting for the
current menu item.
Use the 5 and ∞ (cursor up/down) buttons to highlight different settings.
To go back to the menu item list, press either 2 or RETURN.
6 Select the highlighted setting by pressing
ENTER.
After pressing enter, you are returned to the menu item list. To get back to the
tabs at the top of the screen, press either 2 or RETURN. Press SETUP to exit
the setup menu completely.
Important: Throughout this manual we’ll use a shorthand for
describing how to select options from the setup menu. For example,
to describe switching the Picture Quality setting to Animation:
Press SETUP and select Video > Picture Quality > Animation.
Page 29
Audio1 GeneralLanguageVideo2
Setup Menu Mode
Setup Navigator
Parental Lock – Level 8
Change menu mode
Move
Expert
Basic
SETUP
Exit
4 Getting Started
Basic and Expert setup menus
The setup menu that you saw on the previous page gives you the basic options you'll
need to play DVD discs. There are, however, several more advanced options available.
You can get access to these by switching the Setup Menu Mode to Expert:
SETUP and select General > Setup Menu mode > Expert.
Press
Look at the menu screens and you'll notice that several items have been added to each,
and that the yellow information text does not appear as you highlight different items.
If you'd prefer to work with the basic menu, switching to expert only when necessary,
set the Setup Menu Mode back to Basic:
Select General > Setup Menu Mode > Basic.
Changing the OSD menu language
The on-screen display (OSD) menus are available in several languages. Here’s how to
change it:
English
Audio1 GeneralLanguageVideo2
OSD Language English
Audio Language - English
Subtitle Language - Japanese
Auto Language - Japanese
Setup player's OSD language
Move
English
Español
SETUP
Exit
Press SETUP and select LANGUAGE > OSD
LANGUAGE, then your preferred language.
Note: The choice available in your country/region may vary from the
illustration, left.
Player menus and disc menus
Some DVDs have their own menus programmed onto the disc. Access these by pressing
the MENU or TOP MENU button. Although they look a little different to the player
menus you saw above, you navigate them in the same way. Use the 5, ∞, 2 and 3
keys to highlight the option you want, then press ENTER. Sometimes it's also possible
to select options directly using the number buttons. In this case it's not usually
necessary to press ENTER.
29
En
Page 30
5 Watching Multilingual DVD Discs
Switching Languages on Playback
Some DVD discs are recorded with soundtracks and/or subtitles in several languages. A
disc might contain the original soundtrack, a dubbed version, plus subtitles in three or
four languages. You're free to select any combination: the original soundtrack with no
subtitles; original soundtrack with subtitles; or dubbed soundtrack and subtitles. The
only limitation is what is recorded on the disc.
Switching audio language during
playback
Once a multilingual DVD disc is playing, you can switch the soundtrack language by
pressing AUDIO. Press repeatedly to cycle through all the different languages
available on the disc.
You may also be able to select an audio language from the disc menu of a multilingual disc: Press
Selecting subtitle language
during playback
Once a subtitled DVD disc is playing, you can switch the subtitle language by pressing
SUBTITLE. Press repeatedly to cycle through all the languages available on the disc.
To switch subtitles off, press
You may also be able to select a subtitle language from the disc menu of a multilin-
gual disc: Press
TOP MENU and follow the on-screen displays.
SUBTITLE then CLEAR.
TOP MENU and follow the on-screen displays.
30
En
Setting Language Preferences
You can set up the player with your preferred language settings so the player
automatically switches languages for you whenever you load a disc.
The DVD standard recognizes 136 languages. You can select any of these as your
preferred language, but that doesn't mean that you'll always be able to watch a disc in
that language—it just depends what is recorded on the disc.
Out of the box, the player's default settings are:
Audio language - English
Subtitle language - English
Auto language - On
This last setting means that the player selects the original soundtrack whenever
possible: if the original soundtrack is in your preferred language, then it won't also
show the subtitles; if it's a foreign-language soundtrack but there are subtitles
available in your preferred language, then it will select those.
Remember: you can still switch languages at anytime during playback.
Page 31

5 Watching Multilingual DVD Discs
Setting your preferred audio language
The default setting is English. If your preferred audio language is English you do
not need to set this.
English
Audio1 GeneralLanguageVideo2
OSD Language – English
Audio Language - English
Subtitle Language - Japanese
Auto Language - Japanese
Setup audio language
Audio1 GeneralLanguageVideo2
Audio Language
List of Languages
ja: Japanese
Setup audio language
Move
Move
ENTER
English
Spanish
Other
Code (0~2)
1001
Select
SETUP
RETURN
SETUP
Exit
Return
Exit
Press SETUP and select LANGUAGE >
AUDIO LANGUAGE, then your choice of
language.
If your preferred language is something other than English or Spanish,
choose OTHER.
Selecting OTHER languages:
You can select a language either from the list on-screen, or by inputting a
language code. You can find a list of these on page 33.
• To select from the list, use the ∞ and 5 buttons to display the next/previous
item on the list of languages. Stop on the one you want and press
ENTER.
• To select using codes, move the cursor over to the first number of the fourdigit code and input the code for your preferred language.
Note: if your preferred audio and subtitle languages are different, the Auto
Language feature will not operate.
Setting your preferred subtitle language
The default setting is English. If your preferred subtitle language is English you do
not need to set this.
Audio1 GeneralLanguageVideo2
OSD Language – English
Audio Language – English
Subtitle Language Japanese
Auto Language - English
Setup disc's subtitle language
Move
English
Spanish
Other
SETUP
Exit
Press SETUP and select LANGUAGE >
SUBTITLE LANGUAGE, then your choice of
language.
If your preferred language is something other than English or Spanish,
choose OTHER.
See Selecting OTHER languages above for how to select a different language.
Note: If your preferred audio and subtitle languages are different, the auto
language feature will not operate.
Setting subtitle display preferences
By default, the player displays subtitles according to the preferred language settings
and the auto language setting. You can change this so that the player leaves all
subtitles off, or displays the normal dialog subtitles and extra captions (called assistive
subtitles), that explain scenes on the disc.
Note: To access this option, the setup menu must be set to expert. (Press
select General > Setup Menu Mode > Expert.)
SETUP and
31
En
Page 32

5 Watching Multilingual DVD Discs
Audio1 GeneralLanguageVideo2
OSD Language – English
Audio Language – English
Subtitle Language – Spanish
Auto Language –
DVD Language -
Subtitle Display
Audio1 GeneralLanguageVideo2
OSD Language – English
Audio Language – English
Subtitle Language – Spanish
Auto Language
DVD Language –
Subtitle Display
Audio1 GeneralLanguageVideo2
OSD Language – English
Audio Language – English
Subtitle Language – Spanish
Auto Language
Subtitle Off -
ENTER
Move
Subtitle Off
Move
Move
On
English
On
Off
On
Assist Subtitle
Selected Subtitle
Enter
– On
English
With Audio
- On
Selected Subtitle
Selected Subtitle
On
On
Off
SETUP
SETUP
SETUP
Exit
Exit
Exit
Press SETUP and select LANGUAGE >
SUBTITLE DISPLAY, then your preferred setting.
Selecting Assist Subtitle turns on both dialog and assistive subtitles—
you cannot display only the assistive subtitles.
If you select Off, you can still display subtitles during playback by pressing
SUBTITLE (see Selecting subtitle language during playback on page 30).
Changing default subtitles
A small number of discs show default subtitles, regardless of your language preferences. The Subtitle Off setting overrides this.
Note: To access this option, the setup menu must be set to expert. (Press
SETUP and
select General > Setup Menu Mode > Expert.)
Press SETUP and select LANGUAGE >
SUBTITLE OFF, then your preferred setting.
Select With Audio to get subtitles in the same language as the preferred
audio language. For subtitles in the same language as the preferred subtitle
language, choose Selected Subtitle.
Switching off Auto Language
The factory setting for Auto Language is On. This means that discs that are originally
in your preferred language will play without subtitles. When the original soundtrack is
in a foreign language, you'll get subtitles in your preferred language. If you want to
override the Auto Language feature, here's how to switch it off:
Press SETUP and select LANGUAGE > AUTO
LANGUAGE > OFF.
Auto Language remains off until you switch it back on.
32
En
Audio1 GeneralLanguageVideo2
OSD Language – English
Audio Language – English
Subtitle Language Japanese
Auto Language
DVD Language
Subtitle Display
Subtitle Off
Move
- On
w/ Subtitle Language
English
English
- On
Spanish
Other
- Selected Subtitle
SETUP
Exit
Selecting the disc menu language
Some multilingual discs have disc menus recorded in several languages. If you have
this kind of disc loaded, here's how to switch language.
Note: To access this option, the setup menu must be set to expert. (Press
select General > Setup Menu Mode > Expert.)
Press SETUP and select LANGUAGE > DVD
LANGUAGE, then your choice of language.
w/Subtitle Language automatically sets it to the same as your preferred
subtitle language.
Choose Other if you want to select a language not shown. See Selecting
OTHER languages on page 31 for how to select a different language.
You may also be able to select a disc menu language from the disc menu
itself: Press
TOP MENU and follow the on-screen displays.
SETUP and
Page 33

5 Watching Multilingual DVD Discs
Language Code List
Language Language LanguageCode Code Code
Japanese ( ja ) 1001
English ( en ) 0514
French ( fr) 0618
German ( de ) 0405
Italian ( it ) 0920
Spanish ( es ) 0519
Dutch ( nl ) 1412
Russian ( ru ) 1821
Chinese ( zh ) 2608
Korean ( ko ) 1115
Greek ( el ) 0512
Afar ( aa ) 0101
Abkhazian ( ab ) 0102
Afrikaans ( af ) 0106
Amharic ( am ) 0113
Arabic ( ar ) 0118
Assamese ( as ) 0119
Aymara ( ay ) 0125
Azerbaijani ( az ) 0126
Bashkir ( ba ) 0201
Byelorussian ( be ) 0205
Bulgarian ( bg ) 0207
Bihari ( bh ) 0208
Bislama ( bi ) 0209
Bengali ( bn ) 0214
Tibetan ( bo ) 0215
Breton ( br ) 0218
Catalan ( ca ) 0301
Corsican ( co ) 0315
Czech ( cs ) 0319
Welsh ( cy ) 0325
Danish ( da ) 0401
Bhutani ( dz ) 0426
Esperanto ( eo ) 0515
Estonian ( et ) 0520
Basque ( eu ) 0521
Persian ( fa ) 0601
Finnish ( fi ) 0609
Fiji ( fj ) 0610
Faroese ( fo ) 0615
Frisian ( fy ) 0625
Irish ( ga ) 0701
Scots-Gaelic ( gd ) 0704
Galician ( gl ) 0712
Guarani ( gn ) 0714
Gujarati ( gu ) 0721
Hausa ( ha ) 0801
Hindi ( hi ) 0809
Croatian (hr ) 0818
Hungarian ( hu ) 0821
Armenian ( hy ) 0825
Interlingua ( ia ) 0901
Interlingue ( ie ) 0905
Inupiak ( ik ) 0911
Indonesian ( in ) 0914
Icelandic ( is ) 0919
Hebrew ( iw ) 0923
Yiddish ( ji ) 1009
Javanese ( jw ) 1023
Georgian ( ka ) 1101
Kazakh ( kk ) 1111
Greenlandic ( kl ) 1112
Cambodian ( km ) 1113
Kannada ( kn ) 1114
Kashmiri ( ks ) 1119
Kurdish ( ku ) 1121
Kirghiz ( ky ) 1125
Latin ( la ) 1201
Lingala (ln ) 1214
Laothian ( lo ) 1215
Lithuanian ( lt ) 1220
Latvian ( lv ) 1222
Malagasy ( mg ) 1307
Maori ( mi ) 1309
Macedonian ( mk ) 1311
Malayalam ( ml ) 1312
Mongolian ( mn ) 1314
Moldavian ( mo ) 1315
Marathi ( mr ) 1318
Malay ( ms ) 1319
Maltese ( mt ) 1320
Burmese ( my ) 1325
Nauru ( na ) 1401
Nepali ( ne ) 1405
Norwegian ( no ) 1415
Occitan ( oc ) 1503
Oromo ( om ) 1513
Oriya ( or ) 1518
Panjabi ( pa ) 1601
Polish ( pl ) 1612
Pashto, Pushto ( ps ) 1619
Portuguese ( pt ) 1620
Quechua ( qu ) 1721
Rhaeto-Romanc
Kirundi ( rn ) 1814
Romanian ( ro ) 1815
Kinyarwanda ( rw ) 1823
Sanskrit ( sa ) 1901
Sindhi ( sd ) 1904
Sangho ( sg ) 1907
Serbo-Croatian ( sh ) 1908
Singhalese ( si ) 1909
Slovak ( sk ) 1911
Slovenian ( sl ) 1912
Samoan ( sm ) 1913
Shona ( sn ) 1914
Somali ( so ) 1915
Albanian ( sq ) 1917
Serbian ( sr ) 1918
Siswati ( ss ) 1919
Sesotho ( st ) 1920
Sundanese ( su ) 1921
Swedish ( sv ) 1922
Swahili ( sw ) 1923
Tamil ( ta ) 2001
Telugu ( te ) 2005
Tajik ( tg ) 2007
Thai ( th ) 2008
Tigrinya ( ti ) 2009
Turkmen ( tk ) 2011
Tagalog ( tl ) 2012
Setswana ( tn ) 2014
Tonga ( to ) 2015
Turkish ( tr ) 2018
Tsonga ( ts ) 2019
Tatar ( tt ) 2020
Twi ( tw ) 2023
Ukrainian ( uk ) 2111
Urdu ( ur ) 2118
Uzbek ( uz ) 2126
Vietnamese ( vi ) 2209
Volapük ( vo ) 2215
Wolof ( wo ) 2315
Xhosa ( xh ) 2408
Yoruba ( yo ) 2515
Zulu ( zu ) 2621
e ( rm ) 1813
English
33
En
Page 34

6 More Disc Functions
Playing Tracks at Random
DVD / Video-CD / CD
Use the random play function to play titles/chapters/tracks in a random order. How
random play works depends on the disc currently in the play position. If the ‘current’
disc is a DVD, you can play either the titles or chapters on that disc at random. If the
‘current’ disc is an audio or Video CD, you can play either the tracks on that disc, or
all the tracks on all the CDs and Video CDs loaded at random (DVD discs loaded will
be ignored). When all tracks/chapters/discs have played, the disc stops. Pressing 7
before this stops the disc and cancels random playback. (To cancel random playback
but keep the current disc playing, press CLEAR.)
To start random playback of chapters (DVD
only)/tracks on the current CD or Video CD,
press RDM (SHIFT+6), then ENTER.
To start random playback of titles (DVD only)/
tracks on all CDs and Video CDs loaded, press
RDM (SHIFT+6) twice, then ENTER.
Note: during random play, the 4 and ¢ buttons function a little differently
to normal: 4 – returns to the beginning of the current track/chapter. You can't go
back futher than this. ¢ – selects another track/chapter at random from those
remaining.
Repeating Tracks
DVD / Video-CD / CD
You can set the player to repeat individual tracks on CDs or Video-CDs, chapters or
titles on DVD discs, a whole disc, or all the discs loaded in the player. It's also possible
to loop a section of a disc.
You can use the repeat together with the programming mode to repeat the tracks/
chapters in the playlist (see the following page for how to program a playlist).
Press RPT (SHIFT+4) during playback to select
a repeat mode:
Each press switches the repeat mode:
For DVD: Repeat Chapter – Repeat Title – Repeat Off
For audio/Video CD: Repeat Track – Repeat 1 Disc – Repeat All
In program play mode: Program Repeat – Repeat off
Note: The Repeat All function repeats all tracks on all audio and Video
CDs loaded. If, during repeat play, the unit encounters a DVD disc, it will start
playing, but the repeat mode will be canceled.
To resume normal playback, press
CLEAR.
34
En
Page 35

6 More Disc Functions
To repeat a section of a disc:
Press RPT A-B (SHIFT+5) once at the start of the section you want to
repeat, then again at the end. Playback immediately jumps back to the start
point and plays the loop round and round.
To resume normal playback, press
CLEAR.
Note: You can't loop a section of a DVD disc where the start point falls in
one title and the end point in another.
To repeat a section of a disc once only:
Press RPT A-B (SHIFT+5) at the start of the section you want to repeat.
2
6 at any time to repeat from the beginning of the section.
Press
Programming the Track Order
DVD / Video CD / CD
This mode lets you program a sequence (a playlist) of up to 24 tracks/chapters to play
from any of the discs loaded in the disc changer. The discs can be any combination of
DVD, Video CD and audio CD, and the order any you choose. Chapters/tracks can
appear more than once in the playlist, or can be left out entirely.
The on-screen display used to program the playlist is shown below:
English
12 34
Step
1
9
8
7
2
3
4
5
6
¢4
Title
Disc Chap
Track
2
6
1
5
3
226
3
Page
Move
--
PLAY
Disc
Title
Total
Play
Program
3
DVD
2
9
Chapter
PROGRAM
5
Exit
6
1 – Step number (1-6, 7-12, 13-18, 19-24)
2 – Disc number (1, 2 or 3)
3 – Title number (DVD), or track number (Video CD, CD)
4 – Chapter number (DVD only)
5 – Details of disc in current step (example shows 9 chapters in title 2 of the DVD disc
loaded in disc tray 3)
6 – Current cursor position
7 – Steps yet to be programmed
8 – Current step indicator
9 – Steps already programmed
35
En
Page 36

6 More Disc Functions
1 Press PGM (SHIFT+9).
2 Enter a disc number (1,2 or 3).
3 Move the cursor to the TITLE/TRACK field (3)
Tip
To edit any item in the
playlist, position the cursor
on the item you want to
change, then enter a new
value using the number
buttons.
To delete a whole step,
position the cursor
anywhere on the step you
want to delete and press
CLEAR.
4 If the current disc is a DVD, move the cursor to
5 Press ENTER.
6 Repeat steps 2-5 to add more items to the
7 Press PGM (SHIFT+9) to exit programming
The program screen appears showing the first six steps in the playlist.
Navigate around this screen using the cursor buttons. Jump to the next six
steps using the ¢ button; to the previous six steps using the 4 button.
You can use either the DISC buttons, or the number buttons.
Note: if this is the first step you’re programming, the number of the disc
that is currently in the play position will appear automatically.
If the unit has already read the contents of the disc you want to program, the
disc details appear in the box on the right of the screen (type of disc, number
of titles/chapters/tracks, etc.). If the unit hasn’t yet read the disc then ? ? ?
appears in the box for disc type.
and enter a title or track number.
For DVDs, this number will be a disc title; for Video CDs and audio CDs, a
track number.
For example, to enter title/track 6, press 6. To enter title/track 14, press 1, 4.
To clear an entry, press
CLEAR.
the CHAPTER field and enter a chapter number.
The cursor moves down to the disc number field in the next step.
playlist.
mode, or PLAY to start the playlist playing
directly.
36
En
Notes:
• The playlist remains active even if you open the disc tray and change discs. If a
step in the playlist cannot be played (because the track number is too high, for
example), that step is automatically skipped.
• To delete the playlist, stop playback, then press
• When using program play with some DVD discs, the disc may not play exactly as
programmed.
CLEAR.
Page 37

6 More Disc Functions
Displaying Disc Information
2
Play
Title
Play
2
Chapter
2
Play
Chapter
Play
2
Tr. Rate :
Display off
2
Play
Track
2
Play
All
Display off
2–1 0.24
1–1 1.19
1–1 1.19
1–1 1.32
1 0.03
–3.29/
1/2 0.15
0.29–0.05/
2.181.19/
2.18–0.59/
3.32
6.32–6.15/
DVD/Video CD/CD
English
You can display disc information on-screen using the DVD DISP button.
When a disc is stopped, pressing
DVD DISP shows the playing time of each track/
chapter/title on the disc. Press DVD DISP again to switch the display off.
During playback, several different screens are available—switch between them by
DVD DISP :
pressing
Note: To prevent damage to your TV screen, the disc information screen will
automatically switch off after 80 minutes.
DVD discs
Title info: (top) disc number / title and chapter number / elapsed title time
(bottom) remaining title time / total title time
Chapter info 1: (top) disc number / title and chapter number / elapsed title time
(bottom) elapsed chapter time / total chapter time
Chapter info 2: (top) disc number / title and chapter number / elapsed title time
(bottom) remaining chapter time / total chapter time
8.9
Technical info: (top) disc number / title and chapter number / elapsed disc time
(bottom) level meter showing data transmission rate
Audio CDs
Track info: (top) disc number / track number / elapsed track time
(bottom) remaining track time / total track time
Disc info: (top) disc number / track number / tracks on disc / elapsed disc time
(bottom) remaining disc time / total disc time
Video CDs
These displays are only available when playing Video CDs in non-PBC mode.
(Press PBC on the remote to switch off PBC mode.)
2
Play
Play
All
Track
5/10 20.19
2
5 20.19
22.57–2.38/
4.40 2.38/
Disc info: (top) disc number / track number / tracks on disc / elapsed disc time
(bottom) remaining disc time / total disc time
Track info 1: (top) disc number / track number / elapsed disc time
(bottom) elapsed track time / total track time
2
Play
Display off
Track
5 20.19
4.40 –2.02/
Track info 2: (top) disc number / track number / elapsed disc time
(bottom) remaining track time / total track time
Resuming Playback (Last Memo function)
DVD / Video CD
If you watch only part of a DVD disc with the intention of picking up later where you
left off, you can use this feature to have the player memorize the position. Next time
you play the disc, playback will resume from that point. The player can memorize the
positions of up to five discs. (Memorizing a sixth causes the first to be deleted.)
You can use this feature to a limited extent with Video CDs, too. The player will
memorize the position as long as the disc remains in the player.
37
En
Page 38

6 More Disc Functions
1 At the point from which you want to resume play-
2 Press 7 to stop the disc.
When you want to resume playback of the disc:
1 Switch on and load or select the disc (if
2 Press LAST MEMO to start playback.
back next time, press LAST MEMO (SHIFT+2).
The LAST MEMO indicator lights in the display.
If you're playing a DVD disc, you can remove or change the disc. If it's a Video
CD, you must leave the disc in the player for the function to work. Either way,
you can safely switch the system into standby mode.
necessary).
The LAST MEMO indicator should be lit.
Clear the LAST MEMO indicator by pressing CLEAR.
Changing Camera Angles
DVD
Some discs feature scenes shot from a number of angles with different cameras—look
for the multi-angle mark on the disc box to check whether a disc features this. During
the multi-angle scenes a icon appears on-screen (if you'd rather this icon didn't
appear, you can switch it off—see Hiding the multi-angle icon below).
Switch between the available angles using the
You may also be able to select the camera angle from the disc menu of a disc
TOP MENU and follow the on-screen displays.
Audio1 GeneralLanguageVideo2
TV Screen –
Picture Quality –
Still Picture –
On Screen Display – On
OSD Position – Normal
Angle Indicator
Move
16:9(Wide)
Standard
Field
On
Off
SETUP
Exit
containing multi-angle scenes: Press
Hiding the multi-angle icon
To access this setting, the Setup Menu Mode must be set to Expert. (Press
SETUP and select General > Setup Menu Mode > Expert.)
Press SETUP and select VIDEO > ANGLE
INDICATOR > OFF.
The angle indicator remains hidden until you select ON to switch it back on.
ANGLE button.
38
En
Page 39

6 More Disc Functions
Changing the Picture Quality
Using this feature you can change the character of the picture to suit the material
you're watching.
Standard mode does not adjust the picture at all. In Animation mode the colors
become bolder (more saturated). Changing to Cinema mode increases the contrast
(the blacks are blacker; the whites, whiter).
Audio1 GeneralLanguageVideo2
TV Screen – 16:9(Wide)
Picture Quality
Still Picture -
On Screen Display -
OSD Position
Angle Indicator
Adjust picture quality
Move
Cinema
Animation
Standard
– Normal
– On
SETUP
Exit
Press SETUP and select VIDEO > PICTURE
QUALITY, then one of the settings.
The mode remains set until you change it again.
Note: How much difference you observe between the settings will depend on
the material your watching.
Restricting Access to Discs
DVD
You can restrict access to certain discs using the parental lock feature. Once set, the
player will ask for a four-digit password if a restricted disc is loaded, giving you a
degree of control over what your children watch.
There are eight levels of access: 1 through 8. Setting the level at 1 means that any disc
that has any kind of restriction will need the password in order to watch it, while
setting it at level 8 gives unlimited access.
DVD discs are also rated from 1 to 8. Discs rated 1 (or with no rating) are suitable for
any age of viewer and contain no offensive material. As a guide, discs rated 2 may
contain scenes that some parents would feel are unsuitable for children. Discs rated 8,
on the other hand, will almost certainly contain material that is unsuitable for
children. Since a disc's rating is up to the disc manufacturer, it is not possible to give a
definitive guide of what kind of material each level covers. Always check the disc box
for parental lock details.
Audio1 GeneralLanguageVideo2
Setup Menu Mode
Setup Navigator
Setup viewing restrictions
Audio1 GeneralLanguageVideo2
Parental Lock: Register Code Number
Enter 4–Digit Code
Move
Audio1 GeneralLanguageVideo2
Parental Lock: Register Code Number
Enter 4–Digit Code
Move
+/–
Parental Lock
Move
––––
1019
– Basic
Level Change
Password Change
SETUP
SETUP
Return
ENTER
SETUP
Return
Exit
Exit
Exit
Be careful: Not all discs that you may consider inappropriate for your children are
rated. Unrated discs will always play without requiring the password first.
Initially, the parental level is set to 8 (no restrictions). Here's how to change it:
1 Press SETUP and select GENERAL > PARENTAL
LOCK > LEVEL CHANGE.
2 You're prompted for the password.
If this is the first time you've used this feature (or you've reset the unit to its
factory settings), any number you input here will become your password.
3 Use the number buttons to input your pass-
word, then press ENTER.
If you forget your password, you can always reset the unit—see page 57.
English
39
En
Page 40

6 More Disc Functions
Audio1 GeneralLanguageVideo2
Parental Lock: Level Change
1
234 6785
Level
Set Parental Lock
ENTER
Move
Audio1 GeneralLanguageVideo2
Setup Menu Mode – Basic
Setup Navigator
Parental Lock
Setup viewing restrictions
ENTER
Move
Return
SETUP
ExitSelect
Level Change
Password Change
SETUP
ExitSelect
4 Select a parental level.
As you move leftward, more levels are locked (more discs will require the
password before they'll play). Moving rightward unlocks levels (fewer discs
will require the password).
Note: you can't lock level 1.
5 Press ENTER to set the new parental level.
Playing locked discs
When you try to play a disc whose parental lock level is higher than that set in the
player, you'll be asked to input the password before you can watch it. Use the number
keys to enter the password, then press ENTER. Access is granted until you stop the disc.
Changing your password
Changing the password requires you to enter the existing password first. If you've
forgotten it, reset the unit (see page 57 for how to do this), then change the level (the
number you enter will become the new password).
1 Press SETUP and select GENERAL > PARENTAL
LOCK > PASSWORD CHANGE.
2 Input your existing password and press ENTER.
40
En
3 Input a new password and press ENTER.
If you change your mind before pressing ENTER, press RETURN to exit this
screen.
Setting Preferences for a Disc
DVD
Using this function you can have the player memorize all the settings you've made for
a particular disc, such as subtitle and audio language, aspect ratio, and so on. When
you next play the disc, the player will recognize it and set your preferences accordingly.
The player can store settings for up to 15 discs. The next disc you memorize settings
for will overwrite the settings of the least recently memorized.
CONDITION (SHIFT+1) during playback to memorize these settings:
Press
Picture quality Audio language
OSD position Multi-angle
Subtitles Parental lock leve
CONDITION indicator lights in the display when a disc is loaded whose settings
The
have been memorized.
Clearing memorized settings
Press CONDITION (SHIFT+1) then CLEAR while the on-screen message reads
Condition Memory to clear the memorized settings for that disc (the CONDI-
TION indicator disappears). The memorized settings remain for now, but will not be
recalled when you load that disc again.
Page 41

7 Sound and Picture Settings
Listening at Low Volume
DVD
The problem with simply turning down the volume if you want to watch at low
volume is that you can easily lose the low level sounds—including some of the
dialog. Switching on the Audio DRC (Dynamic Range Compression) function can
help things by bringing up the low level sounds, while keeping the lid on the high
level peaks.
Note: How much difference you can hear between the settings will depend on the
material your watching.
Press SETUP and select AUDIO 2 > AUDIO
Audio2 GeneralLanguageVideo1
Dynamic playback at low volume
Audio DRC
Move
Large
Medium
Small
Off
SETUP
Exit
DRC, then the level you want:
Large: maximum compression
Medium: moderate compression
Small: minimal compression
Off: no compression—you'll hear the original dynamics
Note: The Audio DRC setting remains in effect until you set it to something else.
Changing the Sound Output Settings
The Audio 1 section of the setup menu contains various options concerning digital
audio output. You only need to set any of these if you want to use an external
component (such as a digital recorder or AV amplifier with a digital input) connected
to the optical digital output on the rear panel of this system.
2
Language
DTS Out -
t – MPEG 3 PCM
Language
DTS Out
t – MPEG 3 PCM
Language
DTS Out –
t - PCM
General
Dolby Digital
Dolby Digital 3 PCM
SETUP
Exit
General
Dolby Digital
Off
DTS
SETUP
Exit
General
Dolby Digital
Off
96kHz 3 48kHz
96kHz
SETUP
Exit
Audio 1 > Dolby Digital Out >
Dolby Digital – Select if you connect an external Dolby Digital decoder or
an AV amplifier with built-in Dolby Digital decoder.
Dolby Digital 3 PCM – Select if you connect an MD, DAT or CD
recorder—these components can generally only record Dolby Digital discs if
the audio is converted to PCM format. Select this option also if you connect
an AV amplifier without a built-in Dolby Digital decoder.
Audio 1 > DTS Out >
Off – Select if you connect an MD, DAT or CD recorder—these components
can generally only record PCM format audio. Select this option also if you
connect an AV amplifier without a built-in DTS decoder.
DTS – Select if you connect an external DTS decoder or an AV amplifier with
built-in DTS decoder.
Audio 1 > 96kHz PCM Out >
96kHz 3 48kHz – Select if you connect an AV amplifier, or MD, DAT or
CD recorder that is not compatible with 96kHz audio (at present, most aren't,
but be sure to check your recorder's manual).
96kHz – Select if you connect an AV amplifier, or MD, DAT or CD recorder
that is compatible with 96kHz audio (at present, most aren't, but be sure to
check your recorder's manual).
Video
Audio1
Dolby Digital Out
96kHz PCM Out – 96kHz 3 48kHz
MPEG Ou
Switch Dolby Digital audio mode
Move
2
Video
Audio1
Dolby Digital Out –
96kHz PCM Out - 96kHz>48kHz
MPEG Ou
Switch DTS audio output mode
Move
2
Video
Audio1
Dolby Digital Out –
96kHz PCM Out
MPEG Ou
Switch 96 kHz audio output mode
Move
English
41
En
Page 42

7 Sound and Picture Settings
2
Language
Dolby Digital
DTS Out – Off
t
MPEG
MPEG 3 PCM
General
SETUP
Exit
Audio 1 > MPEG Out
MPEG – Select if you connect an MPEG audio decoder or an AV amplifier
with built-in MPEG audio decoder.
MPEG 3 PCM – Select if you connect an MD, DAT or CD recorder—these
components can generally only record MPEG audio if it is first converted to
Video
Audio1
Dolby Digital Out –
96kHz PCM Out – 96kHz 3 48kHz
MPEG Ou
Switch MPEG audio output mode
Move
PCM format. Select this option also if you connect an AV amplifier without a
built-in MPEG audio decoder.
Miscellaneous Settings
To access the settings below, the Setup Menu Mode must be set to Expert.
(Press SETUP and select General > Setup Menu Mode > Expert.)
Changing the still frame
Audio1 GeneralLanguageVideo2
TV Screen –
Picture Quality -
Still Picture
On Screen Display -
OSD Position
Angle Indicator
Move
16:9(Wide)
Standard
Field
Frame
- Normal
Auto
– On
SETUP
Exit
When you pause a disc, the resulting still frame can be shakey. The DVD player can
display still frames using two different processes—Field or Frame.
The Field setting produces a more stable image, free of shake. Frame stills are
sharper, but are more prone to shake. The default setting is Auto, which means that
the player decides, according to the disc loaded.
Press
SETUP and select Video > Still Picture, then your prefered setting.
Audio1 GeneralLanguageVideo2
TV Screen –
Picture Quality –
Still Picture –
On Screen Display
OSD Position
Angle Indicator
Audio1 GeneralLanguageVideo2
Picture Quality –
On Screen Display – On
Audio1 GeneralLanguageVideo2
Setup Menu Mode – Expert
Background Color
- Normal
Move
TV Screen –
Still Picture –
OSD Position
Angle Indicator-
Move
Parental Lock – Level 8
Move
16:9(Wide)
Standard
Field
On
Off
– On
16:9(Wide)
Standard
Field
Wide
Normal
Blue
Black
Blue
SETUP
SETUP
SETUP
Exit
Exit
Exit
Hiding the on-screen messages
If you prefer not to see the operation indicators (PLAY, STOP, RESUME, etc.) on your
TV screen, here's how to turn them off.
SETUP and select Video > On Screen Display > Off.
Press
The on-screen displays remain hidden until you switch them back on again.
Setting the on-screen display position
If you have a widescreen TV, set the OSD Position to Wide. This ensures that
you'll be able to read the on-screen messages without them disappearing off the top of
the screen. Otherwise, leave this on the default setting of Normal.
Press
SETUP and select Video > OSD Position > Wide.
Setting the OSD background color
You can switch the background color of the on-screen displays from the default blue,
to black. This color is used anytime the player is not displaying video from a disc on
the screen.
Press
SETUP and select General > Background Color, then the color
of your choice.
42
En
Page 43

Tuning in Stations
8 Using the Tuner
The tuner can receive both FM and AM broadcasts, and lets you memorize your
favorite stations so you don't have to manually tune in every time you want to listen.
1 Press BAND to switch to tuner mode.
If you’re using the front panel controls, press TUNER/BAND.
Press repeatedly to switch between FM and AM.
2 Tune to a station.
There are three tuning modes—step, auto, and high-speed:
1
Step tuning: Press the
frequency band in either direction (front panel:
Auto tuning: Press and hold the
display starts to move, then release. The tuner will stop on the next station it
finds. Repeat to search for other stations.
High-speed tuning: Press and hold the
frequency display starts to move rapidly. Keep the button held down until you
reach the frequency you want. If necessary, fine tune the frequency using the
step tuning method.
When you're tuned into a station, the tuned indicator lights in the display.
If the station is FM stereo, the stereo indicator lights.
or ¡ button repeatedly to step through the
4 ·1
1
or ¡ button until the frequency
1
and
¡ ·¢
or ¡ button until the
)
English
4 · 1
TUNER/BAND
¡
·
¢
Improving poor FM reception
If you're listening to an FM station in stereo but the reception is weak, you can
improve the sound quality by switching to mono:
Press MONO (SHIFT+7).
The mono indicator ( )lights when the tuner is in mono reception mode.
Press again to switch back to auto-stereo mode (the
receiving a stereo broadcast).
indicator lights when
Changing the frequency step
As its default setting, the tuner jumps in steps of 50kHz and 9kHz when tuning in FM
and AM stations respectively. If you find that this is unsuitable in your area (if you
can’t tune into stations successfully), you can change the frequency steps to 100kHz
for FM and 10kHz for AM. Here’s how to switch the setting:
1 Switch the power into standby.
2 Press and hold FREQ/STATION for about
three seconds.
43
En
Page 44

8 Using the Tuner
Memorizing Stations for Quick Recall
You can store up to 24 station presets (memories) so that you always have easy access
to your favourite stations without having to tune in manually each time.
If the unit is unplugged from the power supply completely, memorized stations will
remain for several days, after which you’ll have to memorize them again.
Note: The following instructions assume that you are already familiar with tuning
into radio stations—see the previous page for detailed tuning instructions.
7
4 · 1
TUNER/BAND
·
¢
¡
(STOP/ST.MEMORY)
1 Tune into a radio station on either the AM or
FM band.
See the previous page for detailed instructions on how to do this.
2 Press 7 (STOP/ST.MEMORY).
The frequency display starts blinking.
3 Choose a station memory in which to store the
station's frequency.
There are 24 memory locations; each can store one station. Use the
and
¡ ·¢
buttons to step through the locations available.
4 ·1
4 Press 7 (STOP/ST.MEMORY) again to
memorize the station.
Listening to memorized stations
1 Press BAND to switch to tuner mode.
If you’re using the front panel controls, press TUNER/BAND.
44
En
FREQ/STATION
4 · 1
TUNER/BAND
¡
·
¢
2 Press FREQ/STATION (front panel only).
This switches the tuner to the preset station mode.
3 Use the number buttons or 4 and ¢ to
select a previously memorized station.
For example, to select preset 6, press 6; to select 24, press >10, 2, 4.
On the front panel, use the
the station presets.
4 ·1
and
¡ ·¢
buttons to switch between
Page 45

Playing Cassette Tapes
9 Using the Tape Deck
4 · 1
This unit has two tape decks; one exclusively for playback, the other for both
recording and playback. Other features include auto-reverse, relay play, Dolby B Noise
Reduction and auto tape select. Auto-reverse lets you play or record a tape without
physically taking it out and turning it over. Using relay play, you can listen to two
complete tapes back-to-back for up to 3 hours of continuous music.Dolby B NR
reduces tape hiss on tapes recorded using Dolby B NR (which includes almost all
commercially recorded tapes). Auto tape select means that the deck automatically
detects the type of tape you’re playing/recording—normal (Type I), or high-position
(Type II/IV)—so there’s no need to check the tape type and switch manually.
English
1 Press TAPE I/II to switch to tape mode.
Press repeatedly to switch between tape decks I and II.
If there’s only one tape loaded, the player automatically selects that deck.
2 Press EJECT on the front panel to open one of
the cassette doors.
Remember: both decks can play tapes, but only deck I records.
3 Load a cassette tape then push the cassette
door shut.
Use a tape that's already recorded on so you can hear something in the
2 3
¡
·
7
¢
following steps!
4 Press 26 to start playback.
On the front panel, press
The side of the tape you'll hear is whichever is forward facing when you load
it. This is the 'forward' (3 ) direction, while the other side is 'reverse'
(2 ). The forward indicator is shown in the display.
23
.
0 EJECT 0 EJECT
5 To play the other side of the tape, press 26.
On the front panel, press
2
Each time you press
playing. Pressing 26 when the tape is stopped starts playback on the side
it was playing previously.
The current tape direction is indicated in the display.
6 during playback, the other side of the tape starts
23
.
6 To skip back or forward a track on the tape,
press
On the front panel, press
be playing when you do this).
¢
playing (in other words, to the start of the next track), then resumes playback.
4
playing (in other words, to the start of the current track), then resumes
playback.
4
or
¢
.
4 ·1
and
¡ ·¢
searches for the next blank space between tracks on the side currently
searches for the previous blank space between tracks on the side currently
(the tape should
45
En
Page 46

9 Using the Tape Deck
Tip
If this unit is located near
a television that is switched
on, you may notice some
noise when playing back
tapes. Switching off the
television (or moving this
unit further from the
television) will solve the
problem.
By pressing 4 or ¢ more than once, the player will skip several tracks at
once (to a maximum of 15). For example, press ¢ twice to skip forward two
tracks.
Note: Track search is unlikely to work reliably in the following cases:
• if the space between tracks is less than about 4 seconds
• if the recording is particularly noisy so the spaces are not recognized
• if the recording contains frequent silences, such as a language study tape.
• if the recording contains sections of very quiet material, such as some
classical music recordings
7 To stop the tape, press 7.
8 To rewind or fast forward the tape, press
¡
.
On the front panel, press
be stopped when you do this).
To stop the tape, press 7. Alternatively, press
4 ·1
and
¡ ·¢
2
6 to start playback directly.
(the tape should
1
or
2 NR
* Dolby noise reduction
manufactured under
license from Dolby
Laboratories Licensing
Corporation.
* “DOLBY”, and the
double-D symbol are
trademarks of Dolby
Laboratories Licensing
Corporation.
7
Using Dolby* NR.
For best sound quality, tapes that are recorded with Dolby NR should be played with
Dolby NR switched on. This includes virtually all commercially produced tapes—look
for the double–D symbol (2) on the inlay card, or on the cassette tape itself. To
switch Dolby NR on and off:
Press 2 NR to switch ON or OFF as required.
Press to switch ON (2 NR indicator lit); press again to switch OFF.
Note: This function is only accessible from the front panel—don’t confuse
DOLBY VIRTUAL button on the remote with Dolby NR.
the
Resetting the tape counter
The tape counter indicates the current location of the tape. The counter increases
when the tape is traveling forwards and decreases when it’s traveling in reverse
(playing or fast winding). The tape counter returns to zero automatically when you
eject a tape. To reset it manually:
Press 7 while the tape is stopped.
The counter returns to 0000.
46
En
Page 47

9 Using the Tape Deck
Relay play
Both tape decks are auto-reverse and will play a tape repeatedly until you press 7 or
the tape has played eight times all the way through. If two tapes are loaded, each will
be played alternately (for a maximum of eight times through each tape).
TAPE II
2
TAPE I
3
TAPE II
3
TAPE I
2
Making Tape Recordings
You can make tape recordings from any source in the system, and also from an
external component connected to the AUX IN inputs. If you're recording from CD it's
more convenient to use the ASES mode—see Automatically recording a CD below.
Once recording has started, you can't switch to another component until either the
recording has stopped, or you pause the recording. So, for example, you can't switch
over to the tuner while you're recording a CD.
Unlike some tape decks, there's no need to set recording levels—the deck sets the
right level automatically. Also, when recording, the volume, tone and balance controls
have no effect on the recording. This means that you can record something with the
volume turned right down, if you want.
Before recording, check that the cassette erase tabs have not been broken, and that the
tape is either a type I (normal position) or type II (high position/C
record on type IV (metal) tapes using this deck.
If you're recording from the start of a tape, it's a good idea to wind the tape on a little
so that you don't accidently start recording over the leader tape. You can either do this
by hand, or load the tape into the deck and play the tape for 5–6 seconds.
rO
)—you can't
2
English
TAPE I
2 NR
REC/STOP
1 Load a cassette into tape deck I.
In order to follow these instructions more easily, load the cassette with side A
facing front.
7
2 3
2 Check the recording direction.
If you start recording in the 3 directon, both sides of the tape will be recorded
(unless the erase protect tab for side B is missing). If you switch sides and
start recording in the 2 direction, then recording will start from side B and
stop when the end of the tape is reached.
2
If you need to change the direction, press
6 twice, then 7.
3 Turn Dolby NR on or off as required.
Using Dolby NR improves the sound quality of tape recordings that are going
to be played on Dolby NR equipped players. If the tape is not going to be
played on a Dolby NR equipped player (or if you're not sure), you should
leave Dolby NR off.
4 Select the function you plan to record.
For example, press DVD /CD to record a CD, DVD or Video CD disc.
47
En
Page 48

9 Using the Tape Deck
Tip
Sometimes when recording
from the AUX inputs
(especially from a CD or MD
player), the signal level can be
too high for the tape deck to
record without distortion. If
this happens, reduce the
auxiliary signal level: switch the
system into standby then press
the DOLBY NR button for about
three seconds until the display
shows ATT ON. You should now
be able to record without
distortion. (When you select
the AUX mode, the display will
show AUX ATT .) To switch back
to AT T OFF, follow the same
procedure.
5 Prepare the source for recording.
For example, load the CD or tune in the radio station. If you’re recording a
disc, make sure that you’ve selected the correct disc and that it’s stopped.
6 Press REC/STOP.
The deck starts recording.
7 Start the source playing (if necessary).
8 When you’re ready to stop recording, press
REC/STOP again.
Automatically recording a CD
Auto Synchro Editing System, or ASES for short makes sure that when recording a
complete CD, a track isn’t spread over two sides of a tape. If the tape runs out midway
through a CD track, the same track is automatically recorded from the beginning
again on the other side.
Note: this feature will not work with Video CD or DVD.
TAPE I
2 NR
ASES/COPY
7
1 Prepare tape deck I for recording.
Load a blank cassette, wind on past the leader, and switch Dolby NR on or off
as required.
2 Load a CD.
Make sure that you’ve selected the correct disc and that it’s stopped.
If you want to record the tracks in a different order, use the program play
feature—see page 35 for how to do this.
3 Press ASES/COPY to start recording.
4 If you want to stop recording before the end of
the CD, press 7.
Note: ASES may not work correctly if the first side of the tape finishes at the same
time as a CD track ends. If this happens, stop the recording then resume on the other
side without ASES.
48
En
Page 49

TAPE I/II
2 NR
TAPE I TAPE II
7
ASES/COPY
9 Using the Tape Deck
Copying tapes
Here’s how to copy a tape from TAPE II to TAPE I:
English
1 Press TAPE I/II.
2 Load a the tape you’re recording from into
deck II.
Recording starts in the 3 direction, so take care over which way you load the
tape.
3 Prepare tape deck I for recording.
Load a blank cassette, wind on past the leader, and switch Dolby NR on or off
as required—for best results, switch on if the tape you’re recording was
recorded using Dolby NR.
Note: It’s not possible to switch Dolby NR on and off independently for each
deck.
4 Press ASES/COPY to start recording.
Recording starts in the 3 direction and continues onto the other side, unless
the erase-protect tab is broken on the TAPE I cassette.
REC / STOP
5 If you want to stop recording before the end of
the tape is reached, press 7 .
Improving AM tape recordings
Recording AM broadcasts on cassette tape can result in noisy recordings. If you
experience this, switch on the beat cut function:
1 Switch the power into standby.
2 Press REC/STOP for about 3 seconds.
Release when the display reads B.CUT 2.
Note: Switch beat cut off again by following the same procedure (the display reads
B.CUT 1 when off).
49
En
Page 50

10 Using Sound Modes
Using the Sound Morph
Use the sound morph modes to change the character of the music you’re listening to,
to emphasize the bass, or simulate a live club space, for example. You can adjust the
sound in real time by turning the S.M.JOG dial (or using the JOG buttons on the
remote control).
1 Press MORPHING to select a mode.
BASS BLASTER
S.M.JOG
Each press switches the sound morph mode:
PRESET – EQUALIZER – ZOOM SURROUND –
P.BASS – BASS BLASTER
If you’re using the front panel controls, select these modes directly.
PRESET mode
Press PRESET to switch between modes, or the S.M.JOG to morph from one
mode to the next:
ALL FLAT – the original, uneffected sound
CLUB – the live sound of a small club
HALL – a rich, expansive concert hall sound
DOME – a powerful, stadium-like sound
USER 1–3 – use to store your own settings (see page 51)
50
En
PRESET
EQUALIZER
ZOOM SURROUND
P.BASS(DEMO)
EQUALIZER mode
Press EQUALIZER to switch between modes, or the S.M.JOG to morph from
one mode to the next:
FLAT – the original, uneffected sound
TECHNO – emphasized highs for electronic music
HIP HOP – deep bass for heavy beats
SOUL – brings out the vocal frequencies in the mix
ROCK – strong mid frequencies for driving guitar sounds
ZOOM SURROUND mode
Zoom surround alters the apparent location of the speakers, either closer
together or further apart than they actually are.
ZOOM SURROUND to switch between modes, or the S.M.JOG to
Press
morph from one mode to the next:
OFF – the original, uneffected sound
NEAR+1–5 – five different ‘close’ settings
FA R+1–5 – five different ‘wide’ settings.
P.BASS mode
Switch on P.Bass to extend the bass further still.
P.BASS to switch between modes, or the S.M.JOG to morph from one
Press
mode to the next:
OFF – the original, uneffected sound
MID – boosts lower-mid frequencies
WIDE – accentuates bass and lower-mid frequencies
LOW – boosts low bass only
Page 51

EQUALIZER
ZOOM SURROUND
P.BASS(DEMO)
SET
S.M.JOG
10 Using Sound Modes
BASS BLASTER mode
Bass Blaster produces a powerful, pumping bass sound.
Press BASS BLASTER (main unit) to switch on/off as required.
Memorizing your own settings
You can memorize up to three different combinations of Equalizer, Zoom Surround,
and P.Bass settings. Access them from the PRESET mode (see the previous page).
Note: if the unit is unplugged from the power supply, settings will remain intact for
several days, after which they are lost.
1 Adjust the EQUALIZER, ZOOM SURROUND
and P.BASS to your liking.
Note: the Bass Blaster setting is not stored as a user preset.
2 Push and hold the SET button for about three
seconds.
USER 1 flashes in the display
3 Select USER 1, 2 or 3 by turning the S.M. JOG.
English
S.M.JOG
DISPLAY
4 Push the SET button again to store the settings.
Changing the sound display
There are six different sound level displays on the main unit. Use the DISPLAY button
(DISP on the remote) and the S.M.JOG dial/JOG buttons to switch between them.
1 Press DISP (DISPLAY on the front panel) until
the main unit’s display reads DISP.
2 Use the S.M.JOG dial/JOG buttons to cycle
through the six different display types.
Stop on one you like.
51
En
Page 52

11 Using the Timer
Setting the Wake-up Timer
The clock must be set to the correct time for the wake-up timer to work properly.
Use the wake-up timer to set a time for the system to switch on and start playing your
choice of source. The wake-up timer remains active (so the system will switch on
everyday at the time you set), until you reset it. Here’s how to set it:
1 Select the source you want played.
For example, press tuner/band to select the radio as your source.
2 Prepare the source.
For example, tune in the radio station you want to wake up to.
If you’ve selected a CD or tape, make sure that it is stopped.
3 Set the volume.
Remember that things tend to sound louder first thing in the morning...
4 Press TIMER/CLOCK ADJ.
STANDBY/ON
S.M.JOG
SET
TIMER/CLOCK ADJ
5 Turn the S.M.JOG dial until the display shows
TIMER, then press SET.
6 Set the switch-on time.
Use the S.M.JOG to set the hour, then press SET.
Set the minute in the same way, pressing
SET when you’re done.
7 Set the switch-off time.
Use the S.M.JOG to set the hour, then press SET.
Set the minute in the same way, pressing
The switch-on and switch-off times are confirmed in the display after pressing
SET this last time.
SET when you’re done.
8 Switch the system into standby mode.
9 Press TIMER/CLOCK ADJ.
10 Turn the S.M.JOG dial until the display shows
WAKE UP, then press SET.
Wake up timer setup is complete!
52
En
Note: you cannot set both the wake-up timer and the record timer simultaneously.
Page 53

Setting the Sleep Timer
11 Using the Timer
The sleep timer switches off the system after a specified time so you can fall asleep
without worrying about it.
Note: if you set the sleep timer while either the wake-up or record timer is active, the
earlier switch off time takes priority.
Press SLEEP (SHIFT+8) to select a switch-off
time.
Press repeatedly to switch between:
AUTO SLEEP – system switches off after the current source has finished
playing (you can’t set this if you’re listening to the radio, playing a DVD or
Video CD in PBC mode, or any disc in repeat play mode).
SLEEP 90 – system switches off after 90 minutes
SLEEP 60 – system switches off after an hour
SLEEP 30 – system switches off after 30 minutes
SLEEP 0 (OFF) – cancels the sleep timer
If you’ve already set the sleep timer, but want to check how much time is left, press
SLEEP. The remaining time is displayed momentarily (don’t press SLEEP again while
the time is displayed or you’ll change the sleep timer to a different setting).
English
Setting the Record Timer
The clock must be set to the correct time for the record timer to work properly.
You can set the timer to record something off the radio. For example, you might want
to record a program that is broadcast while you're at work. During the actual
recording, the volume is automatically set to minimum. After the recording has
finished, the record timer is canceled.
Note: you cannot set both the wake-up timer and the record timer simultaneously.
1 Set up the tape deck.
Load a cassette tape into TAPE I, wind on past the leader tape, and switch on/
off Dolby NR as required.
2 Press TUNER/BAND to select the tuner.
3 Tune in the station you want to record.
See page 43 for more detailed instructions on this.
4 Press TIMER/CLOCK ADJ.
5 Turn the S.M.JOG dial until the display shows
TIMER, then press SET.
0 EJECT
STANDBY/ON
S.M.JOG
TUNER/BAND
SET
TIMER/CLOCK ADJ
53
En
Page 54

11 Using the Timer
Note
There is no way to edit the
timer settings once made.
If you make a mistake, work
through the rest of the
settings, then start over.
6 Set the record start time.
Use the S.M.JOG to set the hour, then press SET.
Set the minute in the same way, pressing
SET when you’re done.
7 Set the record end time.
Use the S.M.JOG to set the hour, then press SET.
Set the minute in the same way, pressing
The switch-on and switch-off times are confirmed in the display after pressing
SET this last time.
SET when you’re done.
8 Switch the system into standby mode.
9 Press TIMER/CLOCK ADJ.
10 Turn the S.M.JOG dial until the display shows
REC, then press SET.
The record timer indicator lights in the display and record timer setup is
complete!
Canceling the Timer
Here’s how to cancel the wake-up or record timer (whichever has been set):
S.M.JOG
SET
TIMER/CLOCK ADJ
While in standby mode, press TIMER/CLOCK
ADJ.
Turn the S.M.JOG until the display shows OFF, then press SET.
54
En
Page 55

Troubleshooting
12 Additional Information
Incorrect operations are often mistaken for trouble and malfunctions. If you think there is something wrong with this component,
check the points below. Sometimes the trouble may lie in another component. Investigate the other components and electrical
appliances being used. If the trouble cannot be rectified even after carrying out the checks listed below, ask your nearest Pioneer
authorized service center or your dealer to carry out repair work.
Symptom
No sound from speakers
Disc is not accepted by the player (it
automatically ejects after closing the
disc tray)
Disc won't play
Discs (DVD, Video CD, CD)
xxxxx mark appears on screen
xxxxx mark appears on screen
Player settings have reverted to the
factory defaults
Remedy
• Check that the speaker cords and power cord is connected properly. (p.9~12)
• Check that the funtion is set to the source you want to play.(p.13~14)
• Check that the disc is clean and in good condition. Do not try and play damaged
discs. (p.8)
• Check that the disc is seated properly in the disc guide in the disc tray.
• Check that the disc is loaded with the label side face up.
• Check that the DVD region number is compatible with the player. (p.20)
• There may be condensation inside the unit. Leave for about an hour before trying
again. (p.7)
• The current disc does not allow the operation. (p.20)
• The player does not allow the operation (p.20)
• Power to the player may have been cut (by power failure, etc.) If this happens, all
player settings revert to the factory default.
• The player may have been reset. (p.57)
English
No picture
Picture appears stretched or squeezed
Noise/interference in the picture, or
picture is dark
VCR recording of a disc contains noise/
interference
Noticeable difference between CD and
DVD volume
• Check that the TV is connected up properly to this unit, and that the TV's input is
set correctly. (p.10)
• Check the aspect ratio setting. (p.21, 57)
• If you have a widescreen TV, check the aspect settings of your TV.
• If you are playing a disc with Copyguard copy protection, make sure that the video
output from this unit does not pass through a VCR before reaching your TV.
• On some TVs the effects of the Copyguard copy protection system found on some
discs may be apparent. (p.20)
• If the disc is copy-protected using the Copyguard system, you cannot record it onto
video tape.(p.20)
• This is not a malfunction, but a result of the different recording methods used.
55
En
Page 56

12 Additional Information
Symptom
Cassette door will not open
Cannot record
Sound is muffled or previous recording
Tape Deck
is still audible underneath new one
Sound is unnaturally bright
Music search does not work
Sound is distorted or noisy
Tuner
Remedy
• If the power cord was disconnected during playback or recording, the cassette door
will not open—plug the power cord back in.
• Check that the cassette still has it's erase-protect tabs intact, or that they are
covered with self-adhesive tape, etc. (p.8)
• Clean the tape heads using a head cleaning cassette, or head cleaning kit.
• Check that you are not using a Type IV (metal) tape. Always use Type I (normal)
or Type II (CrO2) tapes.
• If the recording was not made with Dolby NR switched on, check that Dolby NR is
switched off during playback. (p.46)
• If the recording was made with Dolby NR switched on, check that Dolby NR is also
switched on during playback. (p.46)
• The spaces between songs may be too short for music search to work. (p.45–46)
• Make sure that the tape is playing when using music search—it will not work
from stop mode.
• Check that the antenna are connected properly. (p.11)
• Experiment with the position and direction of the antenna.
•
Check that the antenna is not near fluorescent light, or other electrical appliances.
Sound is in mono only
Timer does not work
Other
Remote control does not operate the
unit
• Check that the tuner is not in FM mono mode. (p.43)
• Check that the time has been set. (p.18)
• Check that you are using the remote within the usable distance and angle. (p.6)
• Check that there isn't a fluorescent light shining onto the remote sensor on the
unit.
• Replace the remote's batteries. (p.6)
56
En
Page 57

12 Additional Information
Screen formats/TV settings
Several combinations of player setting, disc type and TV setting are possible. The tables
below show the effects of the various settings.
English
When viewing a wide screen TV or monitor
DVD screen size format Setting and Appearance
Wide screen format DVD
Please note that there are some
wide screen letter box formats that
place black bars at the top and
bottom of the screen. This is not a
malfunction.
Standard screen format DVD
When viewing a standard screen
format DVD on a wide screen TV,
black bars may be automatically
placed at the side of the screen to
adjust to the DVD format.
Standard screen format DVD
(unnatural stretched effect)
If you are viewing a standard
screen format DVD on a wide
screen TV, the picture may appear
‘stretched’ on the screen. To
remedy this condition, change
your wide screen TV to display a
standard (4:3) screen. Refer to
the instructions supplied with your
wide screen TV or monitor for
more information.
“Wide” setting
“Wide” setting
“Wide” setting
When viewing a standard size TV or monitor
DVD screen size format Setting and Appearance
Wide screen format DVD
The Letter box presentation places
black bars at the top and bottom
portions of the screen to provide
the full wide screen presentation
of a movie on a standard TV (4:3
aspect ratio).
Wide screen format DVD
The Pan & Scan presentation
crops both sides of the wide
screen presentation to use the full
standard TV screen.
Standard screen format DVD
If you have a standard TV, the
standard screen format will be
presented regardless of the
setting.
Wide screen format DVD
(unnatural squeezed effect)
If you are viewing a wide screen
format DVD on a standard TV and
the [TV Screen] setting is set to
“Wide”, the picture may appear
‘squeezed’ on the screen. To
remedy this condition, select
either “Letter Box” or ”Pan &
Scan”.
“Letter Box” setting
“Pan & Scan” setting
Any setting
“Wide” setting
Resetting all DVD settings
STANDBY/ON
7
Resetting the system returns all setup menu settings (such as picture, audio and
language preferences) to their original, factory defaults. Doing this also clears the last
memo and condition memory, and resets the parental lock password.
1 If the unit is on, switch it into standby mode.
2 Hold down 7 (on the front panel only) and
switch the power back on.
57
En
Page 58

12 Additional Information
Terms
Analog audio
A direct representation of sound by continously variable voltage.
Compare this to digital audio which is an indirect representation of sound. See also Digital audio.
Aspect Ratio
The width of a TV screen relative to its height. Conventional TVs
are 4:3; widescreen models are 16:9.
Chapter (DVD only)
The DVD equivalent of a track on an ordinary audio CD. See
also Title.
Condition memory (DVD only)
A set of preferences (picture, sound, language, and so on) for a
particular disc that is stored in the player. These preferences are
then set automatically whenever you load that disc. You can
store preferences for up to 25 discs.
Digital audio
An indirect representation of sound by numbers. During
recording, the sound is measured at discrete intervals (44,100
times a second for CD audio) by an analog-to-digital converter,
generating a stream of numbers. On playback, a digital-toanalog converter generates an analog signal based on these
numbers. See also Sampling frequency and Analog.
Dolby Digital (DVD only)
A surround sound system developed by Dolby Laboratories
containing up to six channels of digital audio (front left and
right, surround left and right, center and low-frequency
channels). See also DTS.
DTS (DVD only)
A surround sound system developed by Digital Theater Systems
as an alternative to Dolby Digital. DTS discs contain up to eight
channels of digital audio. See also Dolby Digital.
Dynamic range
The difference between the quietest and loudest sounds possible
in an audio signal (without distorting or getting lost in noise).
Dolby Digital and DTS soundtracks are capable of a very wide
dynamic range, delivering dramatic cinema-like effects.
MPEG audio (DVD only)
A two-channel (stereo) audio format used on some DVD discs.
This unit can convert MPEG audio to PCM format for wider
compatibility with digital recorders and AV amplifiers. See also
PCM audio.
MPEG video
The video format used for Video CDs and DVDs. Video CD uses
the older MPEG 1 standard, while DVD uses the newer and
much better quality MPEG 2 standard.
Multi-angle (DVD only)
Scenes on a disc that were filmed simultaneously from more
than one angle. During these scenes, you can switch between
the various angles. Especially good for sports programs and
tutorial discs.
Optical digital output
A jack that outputs digital audio in the form of light pulses.
Connect components with optical digital jacks using a special
optical cord, available from good audio dealers.
Parental lock (DVD only)
A feature that gives you some control over which discs can be
watched using this unit. Discs with parental codes higher than
the level you set for the player will not play without first entering
a password.
PCM (Pulse Code Modulation)
The most common system of encoding digital audio, found on
CDs and DAT. Excellent quality, but requires a lot of data
compared to formats such as Dolby Digital and MPEG audio.
For compatibility with digital audio recorders (CD, MD and
DAT) and AV amplifiers with digital inputs, this unit can convert
Dolby Digital and MPEG audio to PCM. See also Digital audio.
PBC (PlayBack Control) (Video CD only)
A system of navigating a Video CD through on-screen menus
recorded onto the disc. Especially good for discs that you would
normally not watch from beginning to end all at once—
karaoke discs, for example.
Regions (DVD only)
These associate discs and players with particular areas of the
world. This unit will only play discs that have compatible region
codes. You can find the region code of your unit by looking on
the rear panel. Some discs are compatible with more than one
region (or all regions). Check when you buy a DVD disc overseas
that it will play in your home country.
Sampling frequency
The rate at which sound is measured to be turned into digital
audio data. The higher the rate, the better the sound quality, but
the more digital information is generated. Standard CD audio
has a sampling frequency of 44.1KHz, which means 44,100
samples (measurements) per second. See also Digital audio.
Title (DVD only)
A collection of chapters on a DVD disc. See also Chapter.
58
En
Page 59

Specifications
12 Additional Information
[ U.S. and Canadian models ]
Continuous Average Power Output is 100
Watts* per channel, min., at 6 ohms from 60
Hertz to 15,000 Hertz, with no more than
5.0%** total harmonic distorsion.
* Measured pursuant to the Federal Trade Commission's Trade
Regulation rules on Power Output Claims for Amplifiers.
**Measured bu Audio Spectrum Analyzer.
Continuous Power Output
XR-A9700DV (RMS).............................................140 W + 140 W
XR-VS100D(RMS)................................................140 W + 140 W
(1 kHz, T.H.D. 10 %, 6 Ω)
FM tuner section
Frequency Range........................................ 87.5 MHz to 108 MHz
Antenna input ..................................................75 Ω unbalanced
AM tuner section
FrequencyRange
With 9 kHz step.......................................... 531 kHz to 1,602kHz
With 10 kHz step........................................ 530 kHz to 1,700kHz
Antenna input ........................................................ Loop antenna
Disc section
Digital audio characteristics......................DVD fs: 96 kHz, 24 bit
Type..................................................DVD system,Video CD system
and Compact Disc digital audio system
Frequency response ............................................... 4 Hz to 44 kHz
S/N ratio ...............................................................................95 dB
Dynamic range..................................................................... 95 dB
Total harmonic distortion................................................ 0.005 %
Wow and Flutter ....................................... Limit of measurement
(±0.001 % W.PEAK) or less (EIAJ)
Cassette deck section
Systems ................................................. 4 track, 2-channel stereo
Heads ............................................. Recording/playback head x 1
......................................................................... Playback head x 1
............................................................................... Erase head x 1
Motor ..............................................................DC servo motor x 1
Tape types .......... TYPE I (Normal) tape / TYPE II (HIGH/CrO
2) tape
Miscellaneous
Power Requirements
US and Canadian models ....................................AC 120V, 60 Hz
Australian models .......................................... AC 240V, 50/60 Hz
Power Consumption
US and Canadian models ............................................... 170 W
Australian models ...........................................................870 W
Power Consumption in standby mode ................................... 1 W
Dimensions............. 10-5/8 (W) x 12-5/8 (H) x 13-3/8 (D) inch
............................................... 270 (W) x 320 (H) x 339 (D) mm
Weight (without package) .................................. 9.3 kg (20.5lbs)
Speaker system
Enclosure......Bass-reflex bookshelf type(magnetically shielded)
System........................................20 cm(7-7/8inch) 3-way system
Loudspeakers
Woofer.............................................. 20 cm(7-7/8inch) cone type
Mid-range.......................................6.6 cm(2-5/8inch) cone type
Tweeter ........................... 2.4(15/16inch) cm ceramic dome type
Nominal Impedance .............................................................. 6 Ω
Frequency Response ............................................ 38 Hz to 20 kHz
Maximum power.................................................................150 W
Dimensions........... 10-1/4 (W) x 12-5/8 (H) x 9-15/16 (D) inch
................................................260 (W) x 320 (H) x 252 (D) mm
Weight.................................................................... 4.5 kg (9.9lbs)
Accessories
Operating instructions ................................................................ 1
Remote control unit.................................................................... 1
Size AA/R6P dry cell batteries ..................................................... 2
FM antenna ................................................................................. 1
AM loop antenna ......................................................................... 1
Power Cord .................................................................................. 1
Video Cord ................................................................................... 1
Speaker Cord ............................................................................... 2
Warranty card.............................................................................. 1
Note: Specifications and design subject to possible modification without notice, due to improvement.
English
59
En
Page 60

Nous vous remercions pour cet achat d’un produit
Pioneer.
Nous vous demandons de lire soigneusement ce mode
d’emploi; vous serez ainsi à même de faire fonctionner
l’appareil correctement. Après avoir bien lu le mode
d’emploi, rangez-le dans un endroit sûr pour pouvoir
vous y référer ultérieurement.
Dans certains pays ou certaines régions, la forme de la
fiche d’alimentation et de la prise d’alimentation peut
différer de celle qui figure sur les schémas, mais les
branchements et le fonctionnement de l’appareil
restent les mêmes.
ATTENTION: AFIN DE PREVENIR TOUS RISQUES DE
CHOC ELECTRIQUE OU D‘INCENDIE, NE PAS EXPOSER
CET APPAREIL A L‘HUMIDITE OU A LA PLUIE.
REMARQUE IMPORTANTE
Le numéro de série de cet appareil se trouve sur son
panneau arrière. Pour s’y référer en cas de besoin, prière
d’inscrire ce numéro sur la carte de garantie inclue et de la
conserver dans un endroit sûr.
ATTENTION: POUR PREVENIR LES CHOCS
ELECTRIQUES NE PAS UTILISER CETTE FICHE
POLARISEE AVEC UN PROLONGATEUR, UNE PRISE DE
COURANT OU UNE AUTRE SORTIE DE COURANT, SAUF
SI LES LAMES PEUVENT ETRE INSERESS A FOND SANS
EN LAISSER AUCUNE PARTIE A DECOUVERT.
Fonction Démonstration
Destinée surtout à la
présentation en magasin, la
fonction Démonstration donne
un aperçu des fonctions de
l’appareil. Celui-ci passe
automatiquement en mode
Démonstration lors de son
premier branchement. Pour
arrêter ce mode, appuyez sur le
bouton
des boutons de fonction.
Pour mettre le mode
Démonstration complètement
hors service, appuyez sur le
bouton
plus de 3 secondes, l’appareil
étant en mode Attente.
Procédez de la même façon
pour remettre le mode
Démonstration en service
ultérieurement.
STANDBY/ON ou sur un
P.BASS (DEMO) pendant
[Pour le modèle Canadien]
Cet appareil numérique de la Classe B est conforme à la norme
NMB-003 du Canada.
Design économe en énergie
Cet appareil est conçu pour consommer moins de 1 W
d’électricité lorsqu’il est commuté au mode Attente.
Pour connaître la valeur exacte de la Consommation
électrique en mode Attente, reportez-vous à la Fiche
technique à la page 59.
NOTE IMPORTANTE SUR LE CABLE
D’ALIMENTATION
Tenir le câble d’alimentation par la fiche. Ne pas
débrancher la prise en tirant sur le câble et ne pas toucher
le câble avec des mains mouillées. Cela risque de
provoquer un court-circuit ou un choc électrique. Ne pas
poser l’appareil ou un meuble sur le câble. Ne pas pincer
le câble. Ne pas faire de nœud avec le câble ou l’attacher
à d’autres câbles. Les câbles d’alimentation doivent être
posés de façon à ne pas être écrasés. Un câble abîmé
peut constituer un risque d’incendie ou un choc
électrique. Vérifier le câble d’alimentation de temps en
temps. Contacter le service après-vente PIONEER le plus
proche ou le revendeur pour un remplacement.
Page 61

1 Avant la mise en service
Vérification du contenu de l’emballage...................... 6
Mise en place des piles dans la télécommande........... 6
Utilisation de la télécommande .................................. 6
Choix d’un emplacement adéquat.............................. 7
Pour éviter des problèmes de condensation................ 7
Maniement des disques ............................................... 8
Table des
Rangement des disques ............................................... 8
Disques à éviter ............................................................ 8
Utilisation des cassettes ............................................... 8
Protection contre effacement ...................................... 8
2 Branchements
Aperçu du panneau arrière ........................................... 9
Branchement des haut-parleurs................................... 9
Branchement du téléviseur......................................... 10
Réglage du format de télévision................................ 11
Branchement des antennes radio ............................... 11
matières
Branchement de composants auxiliaires ................... 12
Branchement d’un amplificateur AV externe ........... 12
Branchement sur le secteur ........................................ 12
3 Commandes et affichages
Commandes du panneau avant ................................. 13
Section Disque et Amplificateur ................................ 13
Section Tuner et Platine-cassette............................... 14
Affichage...................................................................... 15
Télécommande............................................................ 16
Mise sous tension et réglage de l’horloge................... 18
4 Démarches de base
Introduction aux disques............................................ 19
Modes de son Surround ............................................. 19
Formats d’écran de télévision.................................... 19
Titres, chapitres et plages .......................................... 19
Disques multilingues................................................. 19
Langue de menu........................................................ 19
Régions DVD .............................................................. 20
Protection anti-piratage de DVD vidéo...................... 20
Mode PBC de CD vidéo............................................... 20
Restrictions dues au disque et au lecteur.................. 20
Utilisation du Navigateur de Configuration............... 21
Lecture de disques ....................................................... 23
Lecture d’un disque DVD ........................................... 23
Lecture d’un disque CD vidéo.................................... 24
Lecture d’un CD audio .............................................. 25
Gel d’image, lecture image par image et ralenti...... 26
Accès direct aux plages .............................................. 27
Utilisation de Dolby Virtual......................................... 27
Utilisation des Menus sur écran.................................. 28
Menus de réglage de base (Basic) et avancé (Expert)
Changement de la langue de menu OSD ................. 29
Menus du lecteur et Menus de disque ....................... 29
5 Lecture de disques DVD multilingues
Changement de langue pendant la lecture................ 30
Changement d’une langue audio pendant la lecture ....
Sélection d’une langue de sous-titres pendant la
lecture ........................................................................ 30
Réglage des préférences de langue ............................. 30
Réglage de votre langue audio préférée.................... 31
Réglage de votre langue de sous-titres préférée........ 31
Réglage des préférences d’affichage de sous-titres ... 31
Changement des sous-titres par défaut..................... 32
Mise hors service du Réglage de Langue Automatique ....
Sélection de la langue du menu de disque............... 32
Liste des codes de langue ............................................ 33
6 Autres fonctions des disques
Lecture aléatoire des plages ........................................ 34
Répétition des plages................................................... 34
Programmation de l’ordre des plages ........................ 35
Affichage des informations du disque ........................ 37
Reprise de la lecture (Fonction “Last Memo”) .......... 37
Changement de l’angle de caméra............................. 38
Changement de la qualité de l’image ........................ 39
Limitation de l’accès aux disques............................... 39
Lecture d’un disque verrouillé .................................. 40
Changement de votre code secret .............................. 40
Réglage des préférences pour un disque..................... 40
Annulation des réglages mémorisés.......................... 40
7 Réglages Son et Image
Ecoute à un niveau réduit .......................................... 41
Changement des réglages de sortie sonore................. 41
Réglages divers ............................................................ 42
Changement de l’image fixe ..................................... 42
Suppression des messages sur écran ......................... 42
Réglage de la position d’affichage sur écran............ 42
Réglage de la couleur du fond de l’écran ................. 42
8 Utilisation du tuner
Syntonisation des stations........................................... 43
Amélioration de la réception FM............................... 43
Changement du palier de fréquence......................... 43
Mémorisation des stations pour rappel rapide ........... 44
Ecoute des stations mémorisées ................................ 44
9 Utilisation de la platine-cassette
Lecture d’une cassette ................................................. 45
Utilisation du circuit Dolby NR................................. 46
Remise à zéro du compteur de bande....................... 46
Lecture à relais........................................................... 47
Enregistrement sur bande........................................... 47
Enregistrement automatique d’un CD...................... 48
Copies de bandes........................................................ 49
Pour améliorer l’enregistrement AM sur bande ....... 49
10 Utilisation des modes sonores
Utilisation du façonnage sonore................................. 50
Mémorisation de vos propres réglages ...................... 51
Changement de l’affichage du son ........................... 51
11 Utilisation de la minuterie
... 29
Programmation de la minuterie de réveil.................. 52
Programmation du chronorupteur ............................ 53
Programmation de la minuterie d’enregistrement ... 53
Annulation de la minuterie ........................................ 54
30
12 Informations complémentaires
Guide de dépannage.................................................... 55
Réglages de format d’écran/téléviseur...................... 57
Réinitialisation de tous les réglages DVD ................... 57
Glossaire ...................................................................... 58
Fiche technique........................................................... 59
32
Français
Page 62

1 Avant la mise en service
Vérification du contenu de
l’emballage
Merci de votre achat de cet appareil Pioneer. Avant de commencer à installer votre
nouvelle chaîne stéréo, assurez-vous que tous les accessoires suivants sont présents :
• Télécommande
• Antenne FM
• Antenne cadre AM
• Piles sèches AA/R6P (x2)
• Cordon d’alimentation
• Cordon de haut-parleurs (x2)
• Cordon vidéo
• Garantie
1
Mise en place des piles dans la
télécommande
2
3
1 Ouvrez le couvercle du logement des piles à l’arrière de la télécommande.
2 Installez les deux piles AA/R6P dans le logement en respectant les polarités
ª et ·, indiquées à l’intérieur.
3 Refermez le couvercle du logement des piles.
ATTENTION:
• Retirez les piles de la télécommande si vous prévoyez de ne pas l’utiliser
pendant un mois ou plus.
• Retirez les piles usées sans tarder, car elles peuvent suinter et endommager la
télécommande.
Utilisation de la télécommande
Gardez à l’esprit les points suivants lorsque vous utilisez la télécommande :
• Assurez-vous qu’aucun obstacle ne se trouve entre la télécommande et le
capteur de ses signaux sur l’appareil.
• Utilisez la télécommande à la distance et dans l’angle d’exploitation, illustrés
sur le dessin de gauche.
• Le contrôle à distance de l’appareil deviendra peu fiable si la lumière du soleil
ou d’une lampe fluorescente brille sur le capteur de télécommande de celuici.
• Les télécommandes d’appareils différents peuvent exercer des interférences
l’une sur l’autre. Evitez donc d’utiliser la télécommande d’un autre appareil
près de celui-ci.
• Remplacez les piles lorsque vous constatez une réduction de la portée de la
télécommande.
6
Fr
Page 63

1 Avant la mise en service
Choix d’un emplacement adéquat
Nous souhaitons que vous puissiez bénéficier longtemps de votre nouvelle chaîne
stéréo et nous conseillons donc de choisir un endroit approprié pour ses composants et
les haut-parleurs en tenant compte des points suivants :
Points conseillés...
✔ Choisir un endroit bien ventilé.
✔ Choisir une surface solide, plate et de niveau, comme une table, une étagère
ou une baie stéréo.
✔ Laisser au-moins 10 cm de chaque côté de l’appareil, 15 cm à l’arrière et 25
cm au-dessus pour permettre une bonne ventilation.
Points déconseillés...
✗ Utiliser dans un endroit très chaud ou très humide, près de radiateurs ou
d’autres appareils, dégageant de la chaleur.
✗ Placer près d’une fenêtre ou tout autre endroit où un des composants ou les
haut-parleurs seraient exposés directement au soleil.
✗ Utiliser dans un endroit extrêmement poussiéreux ou humide.
✗ Poser directement sur un appareil devenant chaud pendant son utilisation.
✗ Utiliser près d’un téléviseur ou d’un moniteur, car des interférences peuvent
en résulter, surtout si le téléviseur utilise une antenne intérieure.
✗ Utiliser dans une cuisine ou une pièce où l’appareil serait exposé à de la
fumée ou à de la vapeur.
✗ Poser sur une surface instable ou trop petite pour soutenir les quatre pieds de
l’appareil ou toute la base de chaque haut-parleur.
✗ Bloquer le ventilateur de refroidissement à l’arrière de l’appareil. Recouvrir
l’appareil d’un linge, ou l’utiliser sur un tapis épais, etc.
✗ Poser des objets sur le dessus des haut-parleurs.
Français
Pour éviter des problèmes de
condensation
Une condensation peut se former à l’intérieur de l’appareil s’il est transporté de
l’extérieur vers une pièce chauffée ou si la température de la pièce monte rapidement.
Si une condensation ne risque pas d’endommager l’appareil, elle peut réduire
temporairement ses performances. C’est pourquoi, avant de le mettre sous tension et
de l’utiliser, il est conseillé de le laisser environ une heure pour s’adapter
éventuellement à une température plus chaude.
7
Fr
Page 64

1 Avant la mise en service
Maniement des disques
Quel que soit son type, lorsque vous tenez un disque, prenez soin
de ne pas laisser de traces de doigts, de poussière ou de griffes
sur ses surfaces. Tenez le disque par son arête ou par le trou
central et l’arête. Un disque souillé ou endommagé peut affecter
les performances de lecture. Même si elle n’est pas aussi délicate
que la face enregistrée, veillez à ne pas abîmer la face étiquetée,
car des griffes sur celle-ci pourraient provoquer une instabilité
du disque.
Si un disque est souillé par des traces de doigts, de la poussière,
etc., nettoyez-le avec un linge doux et sec en frottant
délicatement du centre vers l’arête, comme indiqué sur
l’illustration ci-dessous. Au besoin, effectuez un nettoyage plus
approfondi avec un linge trempé dans de l’alcool ou un produit
de nettoyage pour CD, disponible dans le commerce. N’utilisez
jamais de benzine, diluant ou autre agent de nettoyage, y
compris les produits conçus pour le nettoyage de disques en
plastique.
Frottez légèrement par
petits coups droits en
partant du centre.
Ne frottez pas la
surface selon un
mouvement circulaire.
Cet appareil est conçu pour utiliser des disques DVD, CD vidéo
ou CD audio de forme circulaire uniquement. L’emploi de CD
d’autres formes sur cet appareil n’est pas recommandé. Pioneer
décline toute responsabilité en cas de troubles, découlant de
l’emploi de disques non circulaires.
Utilisation des cassettes
La bande d’une cassette peut s’abîmer facilement et elle risque
de provoquer un bourrage du mécanisme si elle est allongée. Si
elle ressort de la cassette, faites tourner une des bobines au
moyen d’un crayon, par exemple.
Lorsqu’une cassette n’est pas
utilisée, rangez-la dans son étui
en la protégeant contre les
champs magnétiques, la chaleur,
l’humidité et la poussière.
Avant d’enregistrer une bande,
faites-la défiler au-delà de son
amorce (environ 3 ou 4 secondes au début de chaque face).
Evitez les bandes de plus de 90 minutes:
Comme le ruban des cassettes de plus de 90
minutes est très mince, il a facilement tendance
à s’enrouler autour du mécanisme de défilement
et de provoquer des ennuis, tels qu’un
enroulement irrégulier.
Rangement des disques
Bien que les CD, CD vidéo et DVD soient plus résistants que les
disques en plastique, ils doivent quand même être manipulés et
rangés correctement. Si un disque n’est plus utilisé, remettez-le
dans son étui et rangez-le verticalement. Evitez de laisser vos
disques dans un endroit très humide, très froid ou très chaud (y
compris en plein soleil).
Disques à éviter
Les disques tournent à grande vitesse dans l’appareil pendant
leur lecture. N’utilisez jamais un disque fissuré, craquelé,
gondolé ou endommagé de quelque façon, car vous pourriez
abîmer l’appareil.
8
Fr
Protection contre effacement
Pour protéger un enregistrement important contre un
effacement fortuit, il suffit de briser la (les) languette(s) antieffacement à l’aide d’un petit tournevis.
Pour la face A
Pour la face B
Si vous souhaitez enregistrer sur une cassette ainsi protégée,
recouvrez la cavité de la languette par un morceau de ruban
adhésif.
Remarque: Si vous utilisez des bandes de Type II (High/
), veillez à ne pas recouvrir les orifices de détection du type
CrO
2
de bande.
Orifice de détection du type de bande
Page 65

Aperçu du panneau arrière
Choisir le format
d’image télévisée de
sa région
2 Branchements
Brancher ici un ampli AV externe
ou une platine numérique
Brancher ici une
source audio externe
AUX IN
AM
LOOP
ANTENNA
ANTENNA
L
R
UNBAL
FM
75Ω
OPTICAL
DIGITAL
OUT
Brancher votre téléviseur et
magnétoscope sur ces sorties
VIDEO
SYSTEM
AUTO
TV
PAL
S-VIDEO
OUT
NTSC
OUT
Brancher ici les
antennes AM
et FM
Brancher ici les
REC OUT
R
L
AC INLET
Brancher sur une
prise secteur
entrées analogiques d’une
platine externe
+
L
-
+
R
Brancher ici les
haut-parleurs
avant principaux
Branchement des haut-parleurs
Important: Avant d’effectuer ou de changer les connexions sur le panneau
arrière, mettez tous les composants hors tension et débranchez-les au niveau de
l’alimentation secteur.
Pour obtenir des sons excellents de votre chaîne, vous devez raccorder les deux torons
du fil de chaque haut-parleur sur la borne correcte. Pour vous aider à faire
correspondre correctement les fils et les bornes, le cordon de haut-parleur fourni a un
code-couleur: branchez la moitié noire du cordon sur la borne noire (–) et la moitié
rouge sur la borne rouge (+).
Français
Bornes de haut-parleurs avant
Remarque: Assurez-vous que des fils de haut-parleur dénudés ne se touchent
pas ou qu’ils n’entrent pas en contact avec d’autres parties métalliques lorsque
l’appareil est sous tension.
Torsadez les torons du
fil exposé.
Ouvrez l’ergot et insérez le
fil torsadé à fond dans la
borne.
Refermez l’ergot pour
immobiliser le cordon de
haut-parleur.
9
Fr
Page 66

2 Branchements
VIDEO
IN
VIDEO
OUT
V V
Pioneer
ATTENTION !
Ne branchez pas les hautparleurs fournis sur un
autre amplificateur car ceci
pourrait provoquer une
défaillance, voire un
incendie. Si vous désirez
utiliser des haut-parleurs
autres que ceux qui sont
fournis avec cette chaîne,
choisissez uniquement des
unités ayant une
impédance nominale
comprise entre 6 et 16 Ω.
En cas de doute sur leur
impédance, reportez-vous
aux explications qui
accompagnent les hautparleurs avant de les
brancher et de les mettre
en service.
Avant
gauche
2 à 3 mètres
Avant
droit
Position
d’écoute
Idéalement parlant, les haut-parleurs doivent se trouver presque au niveau des
oreilles. Il n’est pas conseillé de les poser sur le plancher ou de les accrocher en
hauteur sur un mur. Pour obtenir un excellent effet stéréo, séparez les haut-parleurs
avant de 2 à 3 mètres et, comme position d’écoute, choisissez un point situé dans le
triangle hachuré sur le schéma ci-dessus.
Les haut-parleurs avant, fournis avec cette chaîne, sont magnétiquement blindés.
Toutefois, une distorsion des couleurs de l’écran se produira s’ils sont disposés tout
près d’un téléviseur. Si ce phénomène se produit, écartez un peu les haut-parleurs et
mettez le téléviseur hors tension pendant 15 à 30 minutes.
Branchement du téléviseur
Cette chaîne possède deux sorties vidéo: une VIDEO OUT standard et une S-VIDEO.
Si votre téléviseur possède une entrée S-Vidéo, nous conseillons d’utiliser un cordon SVidéo (non fourni mais disponible chez tous les détaillants d’appareils vidéo) pour
raccorder cet appareil au téléviseur. Vous obtiendrez ainsi une image de meilleure
qualité qu’avec le cordon stéréo standard.
S-VIDEO
Cet
OUT
appareil
Si votre téléviseur a seulement une entrée vidéo standard, utilisez le cordon vidéo
fourni pour raccorder cet appareil au téléviseur.
Cet
appareil
S-VIDEO
IN
Pioneer
Remarque: Des interférences risquent de se produire si l’unité principale est placée
trop près du téléviseur. Si vous constatez des parasites, écartez cet appareil et le
10
Fr
téléviseur.
Page 67

2 Branchements
Réglage du format de télévision
TV
SYSTEM
PAL
NTSCAUTO
Réglez le sélecteur TV SYSTEM de manière à correspondre au système de télévision de
votre pays ou région. Si vous possédez un téléviseur multi-système, capable d’afficher
les signaux PAL et NTSC, réglez ce sélecteur sur
AUTO. Vous pourrez ainsi reproduire
les disques CD vidéo et les disques DVD aussi bien du format PAL que NTSC.
Ce système peut convertir les signaux NTSC en PAL; par conséquent, en réglant le
sélecteur
TV SYSTEM sur PAL, vous pourrez restituer n’importe quel disque PAL ou
NTSC.
Ce système peut aussi convertir les signaux PAL en NTSC, mais seulement ceux des CD
vidéo. Si vous réglez le sélecteur
TV SYSTEM sur NTSC, vous pourrez restituer
n’importe quel CD vidéo du format PAL ou NTSC, mais seulement les disques DVD du
format NTSC.
Branchement des antennes radio
En branchant les antennes fournies, vous pourrez écouter les émissions radio AM et
Orifices de fixation de l’antenne
sur un mur
Orifice de stabilisation de
l’antenne
Branchement d’antennes extérieures
Type extérieur
Type intérieur
Antenne AM extérieure
Installez à l’intérieur ou à l’extérieur un fil
à gaine de vinyle de 5 à 6 mètres. Dans ce
cas, ne débranchez pas l’antenne cadre AM.
FM. Si la qualité de réception laisse à désirer, le branchement d’une antenne
extérieure devrait l’améliorer. (Voir l’encart “Branchement d’antennes extérieures”
ci-dessous sur la façon de procéder.)
Avant d’effectuer ou de modifier les branchements d’antenne, assurez-vous que
l’appareil est hors tension et qu’il est débranché au niveau de la prise secteur.
1 Enlevez la gaine protectrice au bout des deux fils d’antenne AM.
2 Ouvrez les ergots et insérez à fond un fil dans chacune des bornes.
3 Refermez les ergots pour immobiliser les fils d’antenne AM.
Posez l’antenne AM sur une surface plate et orientez-la dans la direction qui procure
la meilleure réception. Au besoin, stabilisez l’antenne à l’aide d’un crayon, glissé dans
l’orifice de sa base. Evitez de placer l’antenne près d’un ordinateur, téléviseur ou tout
autre appareil électrique et ne la laissez pas entrer en contact avec des objets
métalliques.
Vous pouvez aussi fixer l’antenne
AM sur une paroi en plaçant deux
petites vis ou des épingles dans les
deux orifices en haut du cadre.
ANTENNA
AM
LOOP
ANTENNA
FM
UNBAL
75Ω
Avant la fixation, assurez-vous que
la réception est satisfaisante.
Branchez l’antenne à fil FM de la
même façon que l’antenne cadre
AM. Pour obtenir d’excellents
résultats, déployez au maximum
l’antenne FM et fixez-la sur un mur
ou une porte. Ne faites pas pendre le
Antenne FM extérieure
Utilisez un câble coaxial de 75 Ω pour le
branchement à une antenne FM
extérieure.
fil et ne le laissez pas bobiné.
L’antenne FM fournie est un moyen
facile de recevoir les stations FM.
Toutefois, l’emploi d’une antenne
FM extérieure réservée améliorera
habituellement la réception et la qualité du son. Reportez-vous à “Branchement
d’antennes extérieures” en ce qui concerne les détails des connexions.
Remarque: La borne de mise à la terre (H) est destinée à réduire les parasites
produits lorsqu’une antenne est raccordée, mais il ne s’agit pas d’une prise de terre de
sécurité électrique.
Français
11
Fr
Page 68

2 Branchements
R
L
R
L
OUT (PLAY)
(OPT.)
DIGITAL
IN
AUX IN
R
L
IN (RECORD)
OPTICAL
DIGITAL
OUT
REC OUT
L
R
L
R
L
R
L
R
L
R
Lecture
Enregistrement
Enregistrement
Branchement de composants auxiliaires
Cette chaîne possède un jeu complet d’entrées et de sorties stéréo analogiques, ainsi
qu’une sortie opto-numérique. Servez-vous de ces bornes pour raccorder un
composant externe, tel qu’une platine numérique MD, CD-R ou DAT. Raccordez les
entrées et les sorties analogiques au moyen de cordons stéréo standards. Utilisez un
cordon opto-numérique pour raccorder des composants sur les prises opto-numériques.
(Remarque: Les cordons de branchement ne sont pas fournis, mais ils sont
disponibles chez tous les détaillants d’appareils audio.)
Platine numérique
MD, CD-R, DAT, etc.
Le fait de raccorder les trois jeux de bornes assure une polyvalence maximale lors de
l’enregistrement. Pour les CD, vous pourrez réaliser des copies numériques grâce à la
liaison opto-numérique. Dans le cas de supports numériques protégés contre la copie
(tels que la plupart des disques CD-R et DVD), vous pourrez les enregistrer via les
REC OUT analogiques.
bornes
12
Fr
Branchement d’un amplificateur AV externe
Une autre utilisation de la sortie opto-numérique consiste à raccorder cette chaîne à un
amplificateur AV externe, incorporant un décodeur Dolby Digital, DTS et/ou MPEG.
Vous pourrez alors profiter du véritable son “surround” multi-canaux qu’offrent de
nombreux disques DVD. Servez-vous d’un cordon opto-numérique standard (disponible
chez les bons détaillants d’appareils audio) pour raccorder la sortie opto-numérique de
cette chaîne à l’entrée opto-numérique appropriée de votre ampli AV. En cas de doute
sur la borne d’entrée à utiliser, consultez le manuel fourni avec l’amplificateur.
Remarque: Bien que vous puissiez reproduire n’importe quel disque DVD,
comportant une piste sonore Dolby Digital ou MPEG, en vous servant de cet appareil,
vous n’obtiendrez qu’un mélange stéréo dilué de la véritable piste sonore surround.
Pour bénéficier d’un son surround Dolby Digital/MPEG réel, raccordez cet appareil à
un amplificateur AV compatible Dolby Digital/MPEG.
Les disques DVD comportant une piste sonore DTS ne peuvent être reproduits sur cet
appareil que s’il est raccordé à un amplificateur AV compatible DTS.
Branchement sur le secteur
AC INLET
Après vous être assuré que chaque élément est correctement raccordé, branchez une
extrémité du cordon d’alimentation sur la prise
AC INLET et l’autre dans une prise du
secteur.
Félicitations car vous avez terminé l’installation !
Page 69

3 Commandes et affichages
Commandes du panneau avant
Le panneau avant illustré ici est celui du XR-A9700DV.
1
Toutes les commandes s’appliquent au XR-VS100D et au XR-A9700DV.
2
3
4
P
R
H
O
I
N
M
G
D
N
J
U
O
O
G
S
17
16
15
14
13
Français
5
DYNAMIC POWER SUPPLY AMPLIFIER
6789
Section Disque et Amplificateur
1 Sélecteurs et voyants DISC-1,2,3 – Pour
sélectionner directement les disques dans le lecteur.
2 Bouton STANDBY/ON – Pour mettre l’appareil
sous tension ou en mode d’attente.
3 Bouton DISC CHANGE – Pour sélectionner le
disque suivant dans le lecteur.
4 Bouton OPEN/CLOSE – Pour ouvrir et fermer
le plateau du disque.
5 Bouton BASS BLASTER – Pour renforcer les
sons graves.
6 Bouton PRESET – Pour permuter entre les modes
sonores préréglés. (Utilisez la bague
effectuer un réglage précis).
7 Bouton EQUALIZER – Pour permuter entre les
modes Equalizer. (Utilisez la bague
effectuer un réglage précis).
8 Bouton ZOOM SURROUND – Pour permuter
entre les modes Zoom Surround. (Utilisez la bague
S.M.JOG pour effectuer un réglage précis).
S.M.JOG pour
S.M.JOG pour
12
11
10
9 Bouton P.BASS (DEMO) – Pour permuter entre
les modes P.Bass. (Utilisez la bague
S.M.JOG pour
effectuer un réglage précis).
10 Bouton SET – Pour valider les réglages de
minuterie, effectués par la bague
S.M.JOG.
11 Bague SOUND MORPHING JOG
(S.M.JOG) – Pour changer les modes Preset,
Equalizer, Zoom Surround et P.Bass. Elle sert aussi au
réglage de la minuterie.
12 Prise PHONES (Casque) – Brancher un casque
sur cette prise.
13 Bouton TIMER / CLOCK ADJ – Pour
commencer le réglage de l’horloge / minuterie.
14 Bouton DISPLAY – Pour changer le mode
d’affichage.
15 Boutons de contrôle – Pour contrôler la lecture
d’un disque.
16 Sélecteurs de fonction (TAPE I/II,
TUNER/BAND, AUX, DVD/CD) – Pour
choisir la fonction de source.
17 Commande VOLUME – Pour ajuster le volume
sonore de la source.
13
Fr
Page 70

3 Commandes et affichages
18
19
20
21
DYNAMIC POWER SUPPLY AMPLIFIER
22
23
24 25
Section Tuner et Platine-cassette
18 Bouton de fonction TUNER/BAND – Pour
choisir la fonction Tuner et alterner entre les gammes
AM et FM.
19 Bouton de fonction TAPE I/II – Pour choisir
la fonction Bande et alterner entre les platines I et II.
20 Bouton Dolby NR ON/OFF – Pour mettre le
circuit réducteur de bruit Dolby en/hors service.
21 Bouton FREQ / STATION – Pour alterner entre
les modes de syntonisation et de préréglage des stations.
22 Bouton REC / STOP – Pour lancer/arrêter
l’enregistrement sur bande.
23 Bouton ASES / COPY – Pour lancer
l’enregistrement automatique d’un CD ou d’une bande.
24 0 EJECT (cassette I) – Pour ouvrir le volet de
cassette de la Platine I.
25 0 EJECT (cassette II) – Pour ouvrir le volet de
cassette de la Platine II.
26 Boutons de contrôle – Pour contrôler la lecture
d’une cassette, effectuer un accord manuel et pour
changer les stations préréglées.
26
P
R
H
O
I
N
M
G
D
N
J
U
O
O
G
S
14
Fr
Page 71

Affichage
3 Commandes et affichages
6
7
8
9
1 Affichage alphanumérique
2 ¶ REC – S’allume pendant l’enregistrement sur
bande.
3 Voyant de minuterie – S’allume lorsque la
minuterie d’enregistrement ou la minuterie de réveil a
été programmée.
4 3 – S’allume lorsque la cassette défile vers l’avant.
5 Cassette I, II – Indique quelle platine-cassette est
actuellement en service.
6 2 – S’allume lorsque la cassette défile vers l’arrière.
7 Fonction Disque – S’allume lorsque la fonction
choisie est CD/DVD/CD vidéo.
8 3 – S’allume pendant la lecture d’un disque.
9 ASES – S’allume pendant l’enregistrement
automatique d’un CD.
10 Voyant d’angle – S’allume pendant les scènes des
disques DVD, enregistrées avec de multiples angles de
caméra.
11 [RPT (–1)] – En surbrillance en mode de lecture
répétée (–1 s’allume en mode de lecture répétée d’une
plage).
12 [PGM] – En surbrillance en mode de lecture
programmée.
13 [RDM] – En surbrillance en mode de lecture
aléatoire.
14 LAST MEMO – S’allume lorsqu’est mémorisé un
point de reprise de lecture sur le disque installé.
15 96kHz – S’allume à la lecture d’un disque DVD,
contenant des sons à 96 kHz.
2453
1
1716 19 2 0181513 14111012
16 CONDITION – S’allume lorsqu’est installé un
disque DVD pour lequel sont définies des préférences de
langue, écran, etc.
17 DOLBY DIGITAL – S’allume à la lecture d’un
disque DVD Dolby Digital.
18 Affichage de façonnage sonore / niveau
sonore
19 [EQ] – En surbrillance lorsque EQ est actif.
20 [SURR.] – En surbrillance lorsque Zoom Surround
est actif.
21 [P.BASS] – En surbrillance lorsque P.Bass est actif.
22 B.B. – S’allume lorsque le mode Bass Blaster est en
service.
23 Chronorupteur – S’allume lorsque le
chronorupteur est programmé.
24 FM mono – S’allume lorsque le tuner est réglé en
mode FM mono par le bouton
télécommande.
25 FM stéréo – S’allume lorsque le tuner reçoit une
émission FM stéréo en mode auto stéréo.
26 Voyant de suppression de battement 2 –
S’allume lorsque la suppression de battement est
activée à l’enregistrement d’une émission AM sur
cassette.
27 Voyant d’accord – S’allume lorsque le tuner
reçoit une émission.
28 2NR – S’allume lorsque le circuit réducteur de
bruit Dolby est en service.
MONO de la
2728
21
26
25
24
23
22
Français
15
Fr
Page 72

3 Commandes et affichages
Télécommande
1
2
○○○○○○○○○○○○○○○○○○○○○○○○○○○○○○○○○○○○○○○○○○○○○○○○○○○○○○○○
6
8
10
○○○○○○○○○○○○○○○○○○○○○○○○○○○○○○○○○○○○○○○○○○○○○○○○○○○○○○○○
15
34
5
11
17 18 1 9 2 0
12 13
14
7
9
10
16
1 Sélecteurs DISC (1-3) – Pour choisir directement
les disques dans le lecteur.
2 DOLBY VIRTUAL – Pour mettre le circuit Dolby
Virtual en/hors service.
3 OPEN/CLOSE – Pour ouvrir/fermer le plateau du
disque.
4 DISC CHANGE – Pour choisir le disque suivant dans
le lecteur.
5 SUBTITLE – Pour changer la langue des sous-titres des
disques DVD pendant la lecture.
6 AUDIO – Pour changer la langue audio des disques
DVD, ou le canal des CD/CD vidéo, pendant la lecture.
7 ANGLE – Pour changer l’angle de caméra sur les
disques DVD, enregistrés avec angles multiples.
8 TOP MENU – Pour afficher le menu central d’un disque
DVD.
9 MENU – Pour afficher le menu-disque d’un disque DVD.
10 Boutons du curseur (25∞ 3) – Pour parcourir
les menus sur écran.
11 SETUP – Pour afficher le menu de configuration du
système, donnant accès aux diverses options de son, image
et langue.
12 ENTER –
13 RETURN – Pour quitter un écran de menu.
14 SELECT
d’une bande, ou pour interrompre une lecture en cours.
15 – PREV 4 – Pour sauter en arrière des plages/
chapitres sur un disque ou une bande, changer les écrans
de menu sur le Menu PBC d’un CD vidéo, ou accorder les
stations radio.
16 NEXT + ¢ – Pour sauter en avant des plages/
chapitres sur un disque ou une bande, changer les écrans
de menu sur le Menu PBC d’un CD vidéo, ou accorder les
stations radio.
17 DVD DISP – Pour afficher des informations du disque
sur l’écran.
18 7 – Pour arrêter un disque ou une bande en cours de
lecture.
19 1 – Pour une exploration d’un disque vers l’arrière,
ou un rembobinage rapide d’une bande.
[shift] e – Pour une lecture image par image en
marche arrière et une lecture au ralenti en arrière sur un
disque DVD.
20 ¡ – Pour une exploration d’un disque vers l’avant, ou
une avance rapide d’une bande.
[shift] E – Pour une lecture image par image en
marche avant et une lecture au ralenti en avant sur un
disque DVD ou un CD vidéo.
Pour sélectionner les rubriques des menus sur écran.
2
6 – Pour lancer la lecture d’un disque ou
16
Fr
Page 73

3 Commandes et affichages
○○○○○○○○○○○○○○○○○○○○○○○○○○○○○○○○○○○○○○○○○○○○○○○○○○○○○○○○
21 Touches numériques
CONDITION ([shift] 1) – Pour mémoriser les
préférences actuelles d’un disque DVD.
LAST MEMO ([shift] 2) – Pour mémoriser la
position actuelle sur un disque DVD.
SEARCH MODE ([shift] 3)– Pour choisir le mode
de recherche (plage, chapitre, titre, heure) à utiliser sur le
disque.
RPT ([shift] 4) – Pour choisir le mode de répétition sur
un disque.
123
21
○○○○○○○○○○○○○○○○○○○○○○○○○○○○○○○○○○○○○○○○○○○○○○○○○○○○○○○○
456
78
9
22
23
24
25 26 27 28
○○○○○○○○○○○○○○○○○○○○○○○○○○○○○○○○○○○○○○○○○○○○○○○○○○○○○○○○
29 30 31
32
33
34
RPT A-B ([shift] 5) – Pour marquer le point initial et
le point final d’une boucle à répéter à la lecture d’un
disque.
RDM ([shift] 6) – Pour lancer la lecture aléatoire des
plages/disques installés.
MONO ([shift] 7) – Pour écouter une émission FM
stéréo en mono (en général, la qualité du son est améliorée).
SLEEP ([shift] 8) – Pour programmer le
chronorupteur.
PGM ([shift] 9) – Pour programmer une liste de lecture.
22 CLEAR – Pour effacer ou annuler diverses opérations.
23 >10 – Pour choisir des numéros au-delà de 10.
24 10/0 – Pour entrer un zéro ou un 10 dans un numéro.
[shift] PBC – Pour mettre la commande de lecture CD
vidéo (PBC) en service et hors service.
25 TAPE I/II – Pour passer à la fonction Cassette ou pour
permuter entre les Platines I et II.
26 BAND – Pour permuter entre les gammes FM et AM.
27 AUX – Pour utiliser une entrée auxiliaire comme source.
28 DVD / CD – Pour utiliser un CD/DVD/CD vidéo comme
source.
29 DISP – Pour changer le mode d’affichage.
30 MORPHING – Pour changer le mode de façonnage
sonore (ajuster à l’aide des boutons
JOG).
31 Boutons JOG – Pour ajuster le façonnage du son.
32 SHIFT – A utiliser en même temps que d’autres touches
pour accéder aux fonctions [shift].
33 Bouton STANDBY/ON – Pour mettre l’appareil
sous tension ou en mode d’attente.
34 Boutons VOLUME – Pour ajuster le niveau de
volume d’ensemble.
Français
17
Fr
Page 74

3 Commandes et affichages
Mise sous tension et réglage de l’horloge
Si vous avez bien suivi les explications jusqu’ici, tous les éléments de votre système
doivent maintenant être correctement raccordés. Après la mise sous tension, la
première chose à faire est d’ajuster l’horloge à l’heure actuelle. Ce réglage ne devra
être fait qu’une fois (sauf si vous coupez complètement l’alimentation de l’appareil)
et il vous permettra d’utiliser les fonctions de la minuterie.
1 Appuyez sur STANDBY/ON pour mettre
l’appareil sous tension.
Une nouvelle poussée sur le bouton fait repasser l’appareil en mode Attente.
Remarque: En mode Attente, la consommation électrique du système est
inférieure à 1 W.
2 Appuyez sur TIMER/CLOCK ADJ.
3 Tournez la bague S.M.JOG jusqu’à ce que CLK
ADJ (réglage horloge) apparaisse sur
l’affichage.
Lors de la première mise sous tension de l’appareil, CLK ADJ doit déjà être
affiché.
STANDBY/ON
DISPLAY
TIMER/CLOCK ADJ
SET
S.M.JOG
Conseil pratique
En plus de STANDBY/ON , divers
boutons mettront l’appareil sous
tension. Ainsi, une poussée sur
un des sélecteurs de fonction
alors que l’appareil est en mode
Attente mettra celui-ci sous
tension et fera passer à cette
fonction. De même, une poussée
sur le bouton
plateau du disque mettra
l’appareil sous tension et
sélectionnera la fonction DVD/
CD.
Si vous appuyez sur
qu’un disque est installé sur le
plateau, sa lecture commencera.
De même, si une cassette est
installée et que vous appuyez sur
TAPE I/II, la lecture de la bande
commencera.
Une poussée sur ` (ou
de la télécommande) mettra
l’appareil sous tension et mettra
en service la fonction utilisée en
dernier lieu.
OPEN/CLOSE du
DVD /CD alors
2
6
4 Appuyez sur SET.
5 Utilisez la bague S.M.JOG pour régler l’heure.
L’heure est indiquée en cycle de 24 heures (c.à.d. que 13:00 signifie 1 h de
l’après-midi).
6 Appuyez sur SET.
7 Utilisez la bague S.M.JOG pour régler les
minutes.
8 Appuyez sur SET pour terminer le réglage.
Appuyez sur DISPLAY pour afficher l’heure actuelle. L’affichage revient à
l’état antérieur après 5 secondes environ.
18
Fr
Page 75

4 Démarches de base
Introduction aux disques
Cet appareil peut reproduire des disques DVD, CD vidéo et CD
audio. Vérifiez si un des logos illustrés ci-dessous figure sur
l’étui du disque ou sur le disque lui-même pour savoir s’il est
compatible avec ce système.
Logo de disque DVD
Logo de disque CD vidéo
Logo de disque CD audio
Les autres formats de disque, notamment les DVD-RAM, DVDROM, CD-RW, CDV et CD-ROM, ne peuvent pas être reproduits
par ce système.
La majeure partie des informations de ce manuel concerne les
disques DVD et CD vidéo. C’est pourquoi, si vous n’êtes pas un
habitué de ces formats, nous conseillons vivement de lire cette
section avant de continuer car elle vous expliquera des termes
et concepts, utilisés dans tout ce manuel.
Modes de son Surround
Beaucoup de disques DVD comportent des sons “surround”
multi-canaux. Il en existe deux formats - Dolby Digital et DTS
- acceptés par ce système. Vérifiez si un des logos illustrés cidessous figure sur l’étui du disque ou le disque lui-même pour
savoir si ce disque possède des sons “surround”.
Logo Dolby Digital
1
Logo DTS
Ce système reproduit tous les sons par les haut-parleurs avant.
Cependant, en utilisant Dolby Virtual, vous aurez l’impression
d’un son Surround. Reportez-vous à la page 27 pour des détails
sur Dolby Virtual. Pour un véritable son Surround, raccordez
l’appareil à un amplificateur AV compatible Dolby Digital/DTS
(voir page 12) avec des haut-parleurs surround.
Formats d’écran de télévision
A présent, deux formats d’écran de télévision sont utilisés: écran
standard et écran large. On les distingue souvent par leur
rapport de cadrage (rapport entre largeur et hauteur de
l’écran). Le rapport d’un écran standard est 4:3 (c.à.d. presque
carré), tandis que celui de l’écran large est 16:9 (c.à.d. presque
deux fois plus large que haut). Les films sur disques DVD sont
souvent enregistrés en format écran large (le même que dans
les salles de cinéma). Pour regarder ces disques sur un écran
4:3, vous avez deux options: soit vous le regardez en format
“letterbox”, auquel cas des bandes noires apparaissent dans le
haut et le bas de l’écran, soit vous passez au format “pan &
scan” qui coupe les deux côtés de l’image pour qu’elle
convienne à l’écran 4:3. Bien que l’image semble plus grande
sur l’écran (car elle utilise toute la hauteur de l’écran), en
réalité, vous en voyez moins (car les deux côtés sont perdus).
Titres, chapitres et plages
Les CD de musique ordinaires et les CD vidéo sont divisés en
plages pour faciliter la localisation d’une section donnée sur le
disque. Les mêmes sections sont appelées chapitres sur les DVD
(comme les chapitres d’un livre). Du fait de l’énorme capacité
disponible, les disques DVD réunissent des groupes de chapitres
en titres (ici aussi, comme les titres de livres).
∞ DVD
∞ Titre 1
3
3
etc.
∞ Titre 2
3
3
etc.
etc.
Chapitre 1
Chapitre 2
Chapitre 1
Chapitre 2
∞ CD vidéo
3
Plage 1
3
Plage 2
3
Plage 3
3
Plage 4
etc.
∞ CD
3
Plage 1
3
Plage 2
3
Plage 3
3
Plage 4
etc.
Disques multilingues
Comme les disques audio et vidéo, les disques DVD peuvent
comporter des sous-titres. A la différence d’une bande vidéo où
les sous-titres sont simplement enregistrés sur l’image, les soustitres des DVD sont séparés des signaux vidéo principaux et il est
donc possible de les faire apparaître ou disparaître à volonté. De
plus, certains disques vous permettent de choisir entre plusieurs
langues de sous-titres. Ceci dépend de ce que le fabricant du
disque y a enregistré.
Notez aussi que les sons d’un disque DVD ne sont pas limités à une
seule langue. Par exemple, un film en langue française peut
comporter les dialogues originaux en français, une langue locale
(comme le chinois) et une piste sonore en anglais.
Vous pouvez mélanger et faire correspondre ces langues de sons et
de sous-titres à volonté, en sélectionnant la piste sonore originale
avec des sous-titres en langue locale, ou une version doublée sans
sous-titres. Bien entendu, ce qui est disponible dépend totalement
de ce qui a été enregistré sur le disque.
Langue de menu
Il vous sera possible de parcourir le contenu d’un disque DVD
en faisant appel aux affichages sur écran qui apparaissent sur
le téléviseur. Certains disques possèdent leur propres menus,
tandis que d’autres dépendent des menus standards du lecteur
(certains disques combinent les deux). Le lecteur vous permet
de choisir entre plusieurs langues de menu, mais ceci vaut
seulement pour les menus de lecteur. Les menus dépendant du
disque sont disponibles seulement en une langue.
Français
19
Fr
Page 76

4 Démarches de base
Régions DVD
Tous les disques DVD en vente dans le commerce contiennent
un (ou plusieurs) code(s) de région. Votre lecteur DVD aussi
possède un code de région, correspondant au pays/région où
vous l’avez acheté. Vous trouverez le code de région de votre
lecteur sur son panneau arrière. Cherchez-y un symbole
semblable à celui-ci:
2
Vous trouverez un symbole comparable sur tous les étuis de
disque DVD, signalant dans quelles régions ces disques sont
compatibles. Cet appareil peut reproduire seulement les
disques, portant un code de région compatible.
Exemple de code de région
Protection anti-piratage de
DVD vidéo
Certains disques DVD comportent des signaux de protection
afin d’éviter une copie de bonne qualité sur une bande vidéo. Si
les signaux vidéo de cet appareil sont fournis à votre téléviseur
via un magnétoscope, vous constaterez certaines perturbations.
Effectuez une connexion directe sur votre téléviseur pour éviter
cet écueil.
Mode PBC de CD vidéo
Certains CD vidéo contiennent des menus à partir desquels vous
pouvez explorer le contenu du disque. Lorsque vous installez
un de ces disques dans le lecteur, il commence par reproduire
ce qu’on appelle le contrôle de lecture (PBC). En général, la
première chose qui apparaît est un menu sur lequel vous
pouvez choisir la section du disque à regarder. En mode PBC,
les fonctions comme la lecture répétée, programmée ou
aléatoire ne sont pas disponibles.
Restrictions dues au disque
et au lecteur
Le format DVD laisse aux fabricants de disques une grande
souplesse dans la façon de présenter les informations audiovisuelles sur un disque. Si vous tentez une démarche que
n’autorise pas le disque en cours de lecture, le symbole suivant
apparaît sur l’écran:
Restriction due
au disque
Si vous tentez une démarche que le lecteur ne peut pas
accomplir avec le disque actuellement installé, ce symbole
apparaît:
Restriction due
au lecteur
* Fabriqué sous licence de Dolby Laboratories.
“Dolby”, “AC-3” et le symbole double D sont des marques
de commerce de Dolby Laboratories. Œuvres
confidentielles non publiées. © 1992-1997 Dolby
Laboratories. Tous droits réservés.
** “DTS” et “DTS Digital” sont des marques de fabrique de
Digital Theater Systems, Inc.
Cet appareil incorpore une technologie de protection des
droits d’auteur, protégée en vertu des revendications de
plusieurs brevets américains et autres droits sur la propriété
intellectuelle, détenus par Macrovision Corporation et d’autres
ayants-droit. L’emploi de cette technologie de protection des
droits d’auteur doit être autorisé par Macrovision Corporation;
cet emploi est limité à des utilisations privées et limitées, sauf
autorisation contraire de Macrovision Corporation. Toute
rétro-ingéniérie ou démontage est interdit.
20
Fr
Page 77

4 Démarches de base
Utilisation du Navigateur de Configuration
Le Navigateur de Configuration simplifie la mise en marche en vous posant quelques
questions sur votre système et en apportant les réglages requis à votre place. Avant de
passer à la lecture des disques, nous conseillons vivement d’utiliser le Navigateur de
Configuration comme expliqué ici.
1 Mettez cet appareil et votre téléviseur sous
tension.
Utilisez l’interrupteur d’alimentation du panneau avant ou de la
télécommande.
Le Navigateur de Configuration ne fonctionne pas si un disque est en cours de
lecture. Si un disque est installé, appuyez sur 7 (arrêt).
Français
Audio1 GeneralLanguageVideo2
Setup Navigator
Setup Navigator
Setting up using the Setup Navigator
Move
ENTER
Start
Not Used
Select
SETUP
Exit
Le Navigateur de Configuration
commence ici.
Audio1 GeneralLanguageVideo2
Setup Navigator
Language
OSD Language
Setup player's OSD language
Move
ENTER
English
Español
Select
SETUP
Exit
Choisir un menu de langue.
Audio1 GeneralLanguageVideo2
Setup Navigator
TV Connection
TV Type
Widescreen (16:9)
Move
Standard (4:3)
ENTER
Select
SETUP
Exit
Widescreen TV
16:9 aspect ratio
2 Appuyez sur SETUP.
Lors de sa première mise en service, le système vous invite à saisir le
Navigateur de Configuration. (Si cet écran n’apparaît pas, reportez-vous à
“Utilisation des Menus sur écran” à la page 28, puis sélectionnez
General > Setup Navigator.)
Sur cet écran et les suivants, le texte en jaune dans le bas de l’écran vous
donne plus d’informations sur l’option mise en relief.
3 Appuyez sur ENTER pour lancer le Navigateur
de Configuration.
4 Sélectionnez la langue de menu préférée pour
l’affichage sur écran (OSD).
Remarque: Le choix disponible dans votre pays/région peut être différent
de celui de l’illustration de gauche.
Utilisez les boutons 5 et ∞ (curseur Haut et Bas) pour choisir l’option
voulue, puis appuyez sur
Si, par erreur, vous appuyez sur
ENTER pour la valider.
ENTER à la mauvaise option, revenez en
arrière en appuyant sur le bouton 2 (curseur à gauche) et recommencez
votre sélection.
5 Sélectionnez le Type de téléviseur,
correspondant à votre téléviseur.
Reportez-vous à la page 19 pour des explications sur l’écran standard (4:3) et
large (16:9).
Choisir un type de téléviseur.
Remarque
Il se peut que le choix des
langues, disponibles dans votre
pays/région, soit différent de
celui qui est présenté sur les
illustrations de ce manuel.
(à suivre)
21
Fr
Page 78

4 Démarches de base
Audio1 GeneralLanguageVideo2
Setup Navigator
Amp Connection
Digital Jack
Compatible with Dolby Digital
Move
Dolby Digital
Dolby Digital/DTS
Dolby Digital/MPEG
Dolby D/DTS/MPEG
PCM
Not Connected
ENTER
Select
SETUP
Exit
Choisir un type d’ampli.
Audio1 GeneralLanguageVideo2
Setup Navigator
Move
ENTER
Valid
Invalid
Redo
Select
SETUP
Exit
Exit Setup Navigator
Confirm setup adjustments
Confirmer la configuration.
6 Sélectionnez le branchement d’ampli (Amp
Connection) qui correspond à votre système.
Si vous n’avez pas raccordé la sortie opto-numérique de cet appareil à un
amplificateur, choisissez la dernière option: Not Connected.
Si vous avez raccordé cet appareil à un amplificateur AV par un cordon optonumérique, sélectionnez le format audio-numérique compatible. Reportezvous à la page 41 de ce manuel et consultez le manuel qui accompagne
l’ampli pour des informations sur les différentes options audio.
Rappel: Appuyez sur
ENTER pour sélectionner l’option mise en relief.
Appuyez sur 2 pour revenir à l’option précédente.
7 Choisissez VALID pour confirmer la
configuration.
Pour quitter le Navigateur de Configuration sans valider les changements que
vous venez d’apporter, choisissez Invalid. Pour recommencer, choisissez
Redo.
8 La configuration est ainsi terminée !
Appuyez sur SETUP pour quitter l’écran de menu.
Remarque: Lorsque vous appuyez sur
demandé si vous voulez utiliser le Navigateur de Configuration. Appuyez
simplement sur
ENTER pour sélectionner Not Used.
SETUP la fois suivante, il vous est
22
Fr
Page 79

Lecture de disques
Vous trouverez ci-après les démarches de base et les commandes de lecture, nécessaires
à la reproduction de disques DVD, CD et CD vidéo. Les autres fonctions, comme celles
de la lecture de disques multilingues, sont présentées plus loin. Cf. pages 30 à 33.
Lecture d’un disque DVD
1 Le système étant sous tension, appuyez sur
OPEN/CLOSE.
Le plateau du disque ressort. Posez un disque DVD, son étiquette vers le haut,
sur le guide de disque 1 du plateau. Assurez-vous que le disque est bien calé.
2 Appuyez sur 26 .
Ou bien appuyez sur
Le plateau du disque se referme et la lecture commence au Titre 1, Chapitre 1.
3 Servez-vous des boutons VOLUME 5 et ∞
pour ajuster le volume (ou de la commande de
volume du panneau avant).
Sur la télécommande, maintenez la poussée pour un ajustement continu.
DISC CHANGE
DISC-1,2,3
VOLUME
L’affichage indique le niveau actuel en cours de réglage.
4 Pour geler l’image, appuyez sur 26 .
Ou bien appuyez sur
Pour reprendre la lecture, appuyez à nouveau sur 26 ou sur
4 Démarches de base
23
du panneau avant.
23
du panneau avant.
23
Français
.
OPEN/CLOSE
4 · 1
Changement de disques
Le plateau de disque peut accepter
jusqu’à 3 disques. Pour changer les
disques, utilisez le bouton
CHANGE
Appuyez sur
arrêter le disque actuel (si la lecture
est en cours) et commencez la
lecture du disque suivant.
Pour choisir un disque directement
et commencer sa lecture, utilisez les
trois sélecteurs
Quand le plateau de disque est
ouvert, appuyez sur
pour faire tourner le plateau et avoir
accès aux 3 disques.
Pour installer/changer des disques
pendant la lecture, appuyez sur
OPEN/CLOSE
disques non en cours de lecture.
ou
DISC
DISC CHANGE
pour avoir accès aux 2
2 3
7
.
DISC
.
DISC CHANGE
¡ · ¢
DISC
pour
5 Pour une exploration vers l’arrière ou l’avant,
maintenez le bouton 1 ou ¡ enfoncé.
Sur le panneau avant, ces boutons portent la marque 4·1 et
¡·¢ .
Relâchez le bouton pour revenir à la lecture normale. (Si le disque continue
2
en mode Exploration, appuyez sur
(panneau avant) pour reprendre la lecture.)
Remarque: Avec les DVD, la lecture accélérée en marche avant est plus douce
qu’en marche arrière. Ceci tient à la façon d’enregistrer les images sur le disque.
6 (télécommande) ou sur
23
6 Pour sauter à un autre chapitre en arrière ou
en avant, appuyez sur 4 ou ¢ .
Sur le panneau avant, ces boutons portent la marque 4·1 et
¡·¢ .
Une seule poussée sur ¢ fait sauter au début du chapitre suivant sur le
disque. Les poussées suivantes font passer aux chapitres suivants.
Une seule poussée sur 4 fait sauter au début du chapitre actuel. Les
poussées suivantes font passer aux chapitres précédents.
7 Pour arrêter la lecture, appuyez sur 7 .
Notez que l’affichage indique RESUME. Ceci signifie que, si vous appuyez à
nouveau sur
dernier lieu.
Si vous appuyez deux fois sur 7 pour arrêter la lecture, le disque
recommencera à son début lors de la prochaine poussée sur
2
6 , la lecture reprendra au point où elle avait été arrêtée en
2
6 .
23
Fr
Page 80

4 Démarches de base
Lecture d’un disque CD vidéo
1 Installez un CD vidéo dans un guide libre du
2 Appuyez sur 26 .
DISC CHANGE
DISC-1,2,3
VOLUME
3 Servez-vous des boutons VOLUME 5 et ∞
plateau.
Assurez-vous que le disque est bien calé dans le guide, son étiquette étant
dirigée vers le haut.
Remarque: N’utilisez pas d’adaptateur à la lecture de singles CD vidéo de
8 cm. Le plateau du disque possède des guides pour disques de 12 cm et 8 cm.
Ou bien appuyez sur
Selon le CD vidéo, il se peut que l’appareil passe en mode Contrôle de
Lecture (PBC) (le panneau avant affiche alors PBC). Ces disques possèdent
des menus sur écran par lesquels vous pouvez choisir ce que vous voulez
regarder en appuyant sur les boutons correspondants de la télécommande.
Les boutons de navigation des autres menus varient selon les disques.
Recherchez les instructions de navigation sur l’écran ou sur l’étui du disque.
Vous pouvez appeler ce menu à tout moment pendant la lecture du disque en
appuyant sur
Appuyez sur
23
de la télécommande.
RETURN.
PBC (SHIFT+10/0) pour mettre le mode PBC en/hors service.
pour ajuster le volume (ou de la commande de
volume du panneau avant).
Sur la télécommande, maintenez la poussée pour effectuer un ajustement
continu. L’affichage indique le niveau actuel en cours de réglage.
OPEN/CLOSE
2 3
7
4 · 1
Changement de disques
Le plateau de disque peut
accepter jusqu’à 3 disques. Pour
changer les disques, utilisez le
bouton
Appuyez sur
arrêter le disque actuel (si la
lecture est en cours) et
commencez la lecture du disque
suivant.
Pour choisir un disque directement
et commencer sa lecture, utilisez
les trois sélecteurs
Quand le plateau de disque est
ouvert, appuyez sur
pour faire tourner le plateau et
avoir accès aux 3 disques.
Pour installer/changer des disques
pendant la lecture, appuyez sur
OPEN/CLOSE pour avoir accès aux
2 disques non en cours de lecture.
DISC CHANGE ou DISC.
DISC CHANGE pour
DISC.
24
Fr
¡ · ¢
DISC CHANGE
4 Pour geler l’image, appuyez sur E
(SHIFT+ ¡).
Si le CD vidéo n’est pas en mode PBC, vous pouvez aussi utiliser le bouton
2
6 (ou
Pour reprendre la lecture, appuyez sur
23
sur le panneau avant).
2
6 ou
23
.
5 Pour une exploration vers l’arrière ou l’avant,
maintenez le bouton 1 ou ¡ enfoncé.
Sur le panneau avant, ces boutons portent la marque 4·1 et ¡·¢ .
Relâchez le bouton pour revenir à la lecture normale. (Si le disque continue
2
en mode Exploration, appuyez sur
(panneau avant) pour reprendre la lecture.)
6 (télécommande) ou sur
23
6 Pour sauter à une autre plage en arrière ou en
avant, appuyez sur 4 ou ¢ .
Sur le panneau avant, ces boutons portent la marque 4·1 et ¡·¢ .
Une seule poussée sur ¢ fait sauter au début de la page suivante sur le
disque. Les poussées suivantes font passer aux plages suivantes.
Une seule poussée sur 4 fait sauter au début de la plage actuelle. Les
poussées suivantes font passer aux plages précédentes.
7 Pour arrêter la lecture, appuyez sur 7 .
Page 81

4 Démarches de base
Lecture d’un CD audio
1 Installez un CD audio dans un guide libre du
plateau.
Assurez-vous que le disque est bien calé dans le guide, son étiquette étant
dirigée vers le haut.
Remarque: N’utilisez pas d’adaptateur à la lecture de singles CD vidéo de
8 cm. Le plateau du disque possède des guides pour disques de 12 cm et 8 cm.
DISC CHANGE
DISC-1,2,3
OPEN/CLOSE
7
4 · 1
Changement de disques
Le plateau de disque peut
accepter jusqu’à 3 disques. Pour
changer les disques, utilisez le
bouton
Appuyez sur
arrêter le disque actuel (si la
lecture est en cours) et
commencez la lecture du disque
suivant.
Pour choisir un disque directement
et commencer sa lecture, utilisez
les trois sélecteurs
Quand le plateau de disque est
ouvert, appuyez sur
pour faire tourner le plateau et
avoir accès aux 3 disques.
Pour installer/changer des disques
pendant la lecture, appuyez sur
OPEN/CLOSE pour avoir accès aux
2 disques non en cours de lecture.
DISC CHANGE ou DISC.
DISC CHANGE pour
VOLUME
¡ · ¢
2 3
DISC.
DISC CHANGE
2 Appuyez sur 26 .
Ou bien appuyez sur
23
du panneau avant.
3 Servez-vous des boutons VOLUME 5 et ∞
pour ajuster le volume (ou de la commande de
volume du panneau avant).
Sur la télécommande, maintenez la poussée pour effectuer un ajustement
continu. L’affichage indique le niveau actuel en cours de réglage.
4 Pour interrompre la lecture, appuyez sur
2
6 .
Ou bien appuyez sur
Pour reprendre la lecture, appuyez à nouveau sur
23
du panneau avant.
2
6 ou sur
23
.
5 Pour une exploration vers l’arrière ou l’avant,
maintenez le bouton 1 ou ¡ enfoncé.
Sur le panneau avant, ces boutons portent la marque 4·1 et
¡·¢ .
Relâchez le bouton pour revenir à la lecture normale. (Si le disque continue
2
en mode Exploration, appuyez sur
(panneau avant) pour reprendre la lecture.)
6 (télécommande) ou sur
23
6 Pour sauter à une autre plage en arrière ou en
avant, appuyez sur 4 ou ¢ .
Sur le panneau avant, ces boutons portent la marque 4·1 et
¡·¢.
Une seule poussée sur ¢ fait sauter au début de la page/chapitre suivant
sur le disque. Les poussées suivantes font passer aux plages suivantes.
Une seule poussée sur 4 fait sauter au début de la plage actuelle. Les
poussées suivantes font passer aux plages précédentes.
Vous pouvez utiliser les boutons de saut de plage pendant la pause du disque
également. Le numéro de plage change, tandis que le disque reste en mode de
pause.
7 Pour arrêter la lecture, appuyez sur 7 .
Français
25
Fr
Page 82

4 Démarches de base
Gel d’image, lecture image par image
et ralenti
Disque DVD/CD vidéo
Si vous avez reproduit un DVD ou un CD vidéo comme expliqué à la section
précédente, vous avez dû voir une image “gelée” lorsque vous avez effectué une pause
à l’étape 4 (sauf si le disque DVD utilisé n’autorisait pas cette fonction). A partir de la
pause, vous pouvez effectuer une avance image par image ou reprendre la lecture au
ralenti variable (de la moitié de la normale à un-seizième de la normale). En raison
du mode de fabrication des disques DVD, il n’est pas possible d’effectuer une lecture en
arrière par cette commande, mais vous pouvez quand même reculer un peu à la fois
sur les scènes du disque après avoir effectué une pause. Les disques CD vidéo ne
permettent aucune lecture image par image en arrière ou au ralenti.
Installez un DVD ou un CD vidéo, lancez sa lecture, puis effectuez les étapes suivantes
pour vous familiariser avec ces commandes.
1 Appuyez sur E (SHIFT+¡) pour geler
l’image.
A moins que vous ne fassiez la lecture d’un CD vidéo en mode PBC, vous
2
pouvez aussi utiliser le bouton
geler l’image.
6 (ou ` sur le panneau avant) pour
26
Fr
2 Appuyez à nouveau (sans maintenir) E
(SHIFT+ ¡) pour avancer d’une image à la fois.
Chaque poussée fait avancer d’une image. Selon ce que vous regardez,
plusieurs poussées seront parfois nécessaires pour constater un changement
sur l’écran.
Si vous avez installé un DVD, essayez d’appuyer sur e (
pour aller dans l’autre sens. Notez qu’en marche arrière, le disque recule de
plusieurs images (parfois beaucoup) d’un seul coup.
SHIFT+1)
3 Appuyez sur 26 pour repasser à la lecture
normale.
4 Appuyez et maintenez E (SHIFT+ ¡)
jusqu’à ce que commence la lecture au ralenti.
Ajustez la vitesse de lecture par les boutons e et E (e – plus lent,
E – plus rapide).
Quatre vitesses de ralenti sont disponibles: 1/16, 1/8, 1/4 et 1/2 de la normale.
5 Appuyez à nouveau sur 26 pour repasser à
la lecture normale.
6 Si vous reproduisez un disque DVD, appuyez
sur e pour une lecture au ralenti en marche
arrière.
Notez qu’en marche arrière, la lecture est un peu irrégulière. Il s’agit là d’une
contrainte inhérente aux disques DVD. Un réglage de la vitesse de la lecture
en marche arrière n’est pas possible.
Page 83

4 Démarches de base
Conseil pratique
Certains disques DVD ont
leurs propres menus sur
lesquels vous pouvez choisir
les titres et/ou les chapitres.
Accédez à ces menus par le
bouton
TOP MENU, puis effectuez
votre choix à l’aide des
boutons curseurs (25∞3)
et
MENU ou le bouton
ENTER.
Accès direct aux plages
Disques DVD/CD vidéo/CD
Vous pouvez sauter directement à n’importe quelle plage sur un CD audio ou un CD
vidéo en composant simplement le numéro de plage par les touches numériques de la
télécommande.
Sur les DVD (et sur les CD audio et les CD vidéo), plusieurs options d’accès direct aux
différentes parties du disque sont disponibles par le bouton
1 Appuyez de façon répétée sur SEARCH MODE
(SHIFT + 3) pour permuter entre:
TITLE - CHAPTER/TRACK - TIME - OFF
(TITRE - CHAPITRE/PLAGE - HEURE - HORS SERVICE)
Remarque: La recherche de titres est possible seulement sur les disques
DVD. La recherche horaire est possible seulement sur les disques DVD et CD
vidéo en cours de lecture (le CD vidéo ne peut pas être en mode PBC).
2 Servez-vous des touches numériques pour
entrer un numéro de titre / chapitre / plage,
ou une position horaire.
Par exemple, appuyez sur 4 pour choisir le titre / chapitre / plage 4.
Appuyez sur 1, 2 pour choisir le titre / chapitre / plage 12.
Entrez la valeur horaire en minutes et secondes:
Appuyez sur 2, 2, 3, 0 pour entrer 22 minutes 30 secondes.
Appuyez sur 8, 0, 0, 0 pour entrer 1 heure 20 minutes (80 minutes).
SEARCH MODE.
Français
3 Lancez (ou relancez) la lecture.
Appuyez sur 26 de la télécommande ou sur
Utilisation de Dolby Virtual
La fonction Dolby Virtual est conçue pour simuler le son “surround” à partir de
seulement deux haut-parleurs avant. Vous pouvez l’utiliser avec les disques CD vidéo,
CD et DVD. Cependant, l’effet obtenu avec certaines sources sera plus dramatique
qu’avec d’autres.
Servez-vous du bouton
commande en/hors service selon les besoins.
“TruSurround” et le symbole
aux États-Unis et d’autres pays étrangers.
La technologie TruSurround est incorporée sous licence de SRS Labs, Inc.
DOLBY VIRTUAL de la télécommande pour mettre cette
sont des marques de fabrique de SRS Labs, Inc.
23
du panneau avant.
27
Fr
Page 84

4 Démarches de base
Utilisation des Menus sur écran
Ce système utilise votre téléviseur pour afficher des menus sur écran à partir desquels
vous pouvez changer divers paramètres du lecteur. Dans les sections suivantes, vous
utiliserez souvent ces menus et, par conséquent, nous conseillons de lire attentivement
cette page pour vous familiariser avec leur emploi.
onglets de menu
2
Language
Video
Audio1
Dolby Digital Out – Dolby Digital
DTS Out – Off
96kHz PCM Out – 96kHz 3 48kHz
MPEG Ou
Setup audio
Digital output format/tone adjust
Move
information
rubrique
accentuée
Audio1 GeneralLanguageVideo2
TV Screen
Picture Quality -
Setup picture according to TV
Move
General
t – MPEG 3 PCM
SETUP
réglages
4:3(Letter Box)
4:3(Pan&Scan)
16:9(Wide)
SETUP
Exit
Exit
1 Appuyez sur SETUP.
Chaque onglet en haut de l’écran représente un menu différent. En ce
moment, vous regardez le menu
AUDIO 1.
2 Servez-vous des boutons 2 et 3 (curseur à
gauche/droite) pour passer d’un onglet de
menu à un autre.
Il existe 5 onglets de menu: AUDIO 1, AUDIO 2, VIDEO, LANGUAGE et
GENERAL. La liste des options change lorsque vous passez de l’un à l’autre.
Pour quitter le menu à n’importe quel moment, appuyez sur
SETUP.
3 Appuyez sur le bouton ∞ (curseur en bas) pour
accentuer la première rubrique d’un menu.
A gauche, l’écran indique la première rubrique du menu Video accentué:
TV Screen et ses trois réglages possibles. Le réglage actuel est marqué par
un cadre coloré (cadre bleu: applicable aux disques DVD seulement; cadre
jaune: applicable aux CD vidéo et DVD; cadre vert: applicable à tous les
formats).
Pour repasser aux onglets en haut de l’écran, appuyez sur 2 ou sur
RETURN.
4 Appuyez sur les boutons 5 et ∞ (curseur
haut/bas) pour accentuer les différentes
rubriques de menu.
Les réglages possibles apparaissent à mesure que vous accentuez chaque
rubrique de menu.
28
Fr
Audio1 GeneralLanguageVideo2
Picture Quality -
Setup picture according to TV
TV Screen
Move
4:3(Letter Box)
4:3(Pan&Scan)
16:9(Wide)
réglage
accentué
SETUP
Exit
5 Appuyez sur 3 pour accentuer le premier
réglage pour la rubrique de menu actuelle.
Servez-vous des boutons 5 et ∞ (curseur haut/bas) pour accentuer les
différents réglages. Pour repasser à la liste des rubriques de menu, appuyez
sur 2 ou
RETURN.
6 Validez le réglage accentué en appuyant sur
ENTER.
Après la poussée sur Enter, vous repassez à la liste des rubriques. Pour repasser
aux onglets en haut de l’écran, appuyez sur 2 ou sur
SETUP pour quitter complètement le menu de configuration.
Important: Dans ce manuel, nous utiliserons un raccourci pour
indiquer comment choisir les options sur le menu de réglage. Par
exemple, pour décrire comment changer le réglage Picture Quality
au paramètre Animation, on écrira: Appuyez sur
sélectionnez Video > Picture Quality > Animation.
RETURN. Appuyez sur
SETUP et
Page 85

Audio1 GeneralLanguageVideo2
Setup Menu Mode
Setup Navigator
Parental Lock – Level 8
Change menu mode
Audio1 GeneralLanguageVideo2
OSD Language English
Audio Language - English
Subtitle Language - Japanese
Auto Language - Japanese
Setup player's OSD language
Move
Move
Expert
Basic
English
Español
SETUP
SETUP
Exit
Exit
4 Démarches de base
Menus de réglage de base (Basic) et
avancé (Expert)
Le menu de réglage présenté à la page précédente vous donne les options de base,
nécessaires à la lecture des disques DVD. Cependant, plusieurs autres options avancées
sont disponibles. Vous pourrez avoir accès à celles-ci en commutant Setup Menu
Mode sur Expert:
Appuyez sur
Observez les écrans de menu et vous remarquerez que plusieurs rubriques ont été
ajoutées à chacun, et que le texte d’information en jaune n’apparaît pas lorsque vous
mettez les différentes rubriques en surbrillance.
Si vous préférez travailler avec le menu de base, en commutant sur Expert seulement
quand c’est nécessaire, ramenez Setup Menu Mode à Basic:
Sélectionnez General > Setup Menu Mode > Basic.
Changement de la langue de menu OSD
Les menus d’affichage sur écran (OSD) sont disponibles en plusieurs langues. Voici
comment vous pouvez en sélectionner une:
SETUP et sélectionnez General > Setup Menu Mode > Expert.
Appuyez sur SETUP et sélectionnez
LANGUAGE > OSD LANGUAGE, puis votre
langue préférée.
Remarque: Le choix disponible dans votre pays/région peut être différent
de celui de l’illustration de gauche.
Français
Menus du lecteur et Menus de disque
Certains disque DVD ont leurs propres menus déjà programmés. Accédez à ces menus
en appuyant sur le bouton
différents des menus du lecteur, la navigation s’y accomplit de la même façon. Servezvous des boutons 5, ∞, 2 et 3 pour accentuer l’option souhaitée, puis appuyez sur
ENTER. Il est souvent possible aussi de sélectionner directement les options par les
touches numériques. Dans ce cas, il n’est habituellement pas nécessaire d’appuyer sur
ENTER.
MENU ou TOP MENU. Bien qu’ils semblent un peu
29
Fr
Page 86

5 Lecture de disques DVD multilingues
Changement de langue pendant la lecture
Certains disques DVD sont enregistrés avec des pistes sonores et/ou des sous-titres en
plusieurs langues. Ainsi, un disque peut contenir la piste son originale, une version
doublée, plus des sous-titres en trois ou quatre langues. Vous avez le loisir de choisir
n’importe quelle combinaison: la piste son originale sans sous-titres, la piste son
originale avec sous-titres, ou la piste son doublée et des sous-titres. La seule limite est
ce qui a été enregistré sur le disque.
Changement d’une langue audio
pendant la lecture
Une fois qu’un disque DVD multilingue est en cours de lecture, vous pouvez changer
la langue de la piste sonore en appuyant sur
parcourir toutes les langues disponibles sur le disque.
Vous pourrez aussi choisir une langue audio à partir du menu-disque d’un disque
multilingue. Appuyez sur
Sélection d’une langue de sous-titres
pendant la lecture
Une fois qu’un disque DVD à sous-titres est en cours de lecture, vous pouvez changer
la langue des sous-titres en appuyant sur
parcourir toutes les langues disponibles sur le disque.
Pour éteindre les sous-titres, appuyez sur
Vous pourrez aussi choisir une langue de sous-titres à partir du menu-disque d’un
disque multilingue. Appuyez sur TOP MENU et suivez les indications sur écran.
TOP MENU est suivez les indications sur écran.
SUBTITLE. Appuyez de façon répétée pour
SUBTITLE, puis sur CLEAR.
AUDIO. Appuyez de façon répétée pour
30
Fr
Réglage des préférences de langue
Vous pouvez programmer le lecteur selon vos réglages de langue préférés, de sorte
qu’il choisisse automatiquement ces paramètres lorsque vous installez un disque.
La norme DVD reconnaît 136 langues parmi lesquelles vous pouvez choisir celle que
vous préférez, mais cela ne veut pas dire que vous pourrez toujours écouter un disque
dans cette langue. En effet, votre choix reste limité à ce qui a été enregistré sur le
disque.
Au déballage de l’appareil, les réglages par défaut du lecteur sont:
Langue audio (dialogues) - Anglais
Langue des sous-titres - Anglais
Réglage de langue automatique - En service
Ce dernier paramètre signifie que le lecteur choisit la piste sonore originale chaque
fois que c’est possible: si la piste sonore originale est enregistrée dans votre langue
préférée, l’appareil ne fournira pas les sous-titres; si la piste sonore est enregistrée dans
une langue étrangère mais que des sous-titres sont disponibles dans votre langue
préférée, l’appareil choisira ceux-ci.
Rappel: Vous pouvez changer de langue à tout moment pendant la lecture.
Page 87

5 Lecture de disques DVD multilingues
Réglage de votre langue audio préférée
Le réglage par défaut est l’anglais. Si votre langue audio préférée est l’anglais, les
démarches suivantes sont superflues.
Audio1 GeneralLanguageVideo2
OSD Language – English
Audio Language - English
Subtitle Language - Japanese
Auto Language - Japanese
Setup audio language
Audio1 GeneralLanguageVideo2
Audio Language
List of Languages
ja: Japanese
Setup audio language
Move
Move
ENTER
English
Spanish
Other
Code (0~2)
1001
Select
SETUP
RETURN
SETUP
Exit
Return
Exit
Appuyez sur SETUP et sélectionnez
LANGUAGE > AUDIO LANGUAGE, puis la
langue de votre choix.
Si votre langue préférée est autre que l’anglais ou l’espagnol, choisissez OTHER.
Sélection d’une autre langue (OTHER):
Vous pouvez choisir une langue soit par la liste sur écran, soit par saisie du
code de cette langue. Vous en trouverez la liste à la page 33.
• Pour choisir une langue sur la liste, servez-vous des boutons ∞ et 5 pour
afficher la rubrique suivante/précédente sur la liste des langues. Arrêtez-vous
à la langue voulue et appuyez sur
ENTER.
• Pour une sélection par le code de la langue, amenez le curseur à la première
case du code à 4 chiffres et entrez le code de la langue voulue.
Remarque: Si vos préférences pour la langue audio et la langue des sous-titres
sont différentes, la fonction “Réglage de Langue Automatique” n’agira pas.
Réglage de votre langue de sous-titres
préférée
Le réglage par défaut est l’anglais. Si votre langue préférée pour les sous-titres est
l’anglais, les démarches suivantes sont superflues.
Français
Audio1 GeneralLanguageVideo2
OSD Language – English
Audio Language – English
Subtitle Language Japanese
Auto Language - English
Setup disc's subtitle language
Move
English
Spanish
Other
SETUP
Exit
Appuyez sur SETUP et sélectionnez
LANGUAGE > SUBTITLE LANGUAGE, puis la
langue de votre choix.
Si votre langue préférée est autre que l’anglais ou l’espagnol, choisissez OTHER.
En ce qui concerne la façon de choisir une langue différente, reportez-vous à
“ Sélection d’une autre langue (OTHER)” ci-avant.
Remarque: Si vos préférences pour la langue audio et la langue des sous-titres
sont différentes, la fonction “Réglage de Langue Automatique” n’agira pas.
Réglage des préférences d’affichage
de sous-titres
Par défaut, le lecteur affiche les sous-titres en tenant compte des réglages de langue
préférée et du réglage de langue automatique. Vous pouvez changer ces paramètres de
sorte que le lecteur ignore tous les sous-titres, ou qu’il affiche les sous-titres de
dialogues normaux et des titres supplémentaires (appelés sous-titres d’aide), qui
expliquent les scènes sur le disque.
Remarque: Pour avoir accès à cette option, le menu de configuration doit être
réglé sur Expert. (Appuyez sur
Mode > Expert.)
SETUP et sélectionnez General > Setup Menu
31
Fr
Page 88

5 Lecture de disques DVD multilingues
Audio1 GeneralLanguageVideo2
OSD Language – English
Audio Language – English
Subtitle Language – Spanish
Auto Language –
DVD Language -
Subtitle Display
Audio1 GeneralLanguageVideo2
OSD Language – English
Audio Language – English
Subtitle Language – Spanish
Auto Language
DVD Language –
Subtitle Display
Subtitle Off -
ENTER
Move
Subtitle Off
Move
On
English
On
Off
On
Assist Subtitle
Selected Subtitle
Enter
– On
English
With Audio
- On
Selected Subtitle
Selected Subtitle
SETUP
SETUP
Exit
Exit
Appuyez sur SETUP et sélectionnez LANGUAGE >
SUBTITLE DISPLAY, puis votre réglage préféré.
Le fait de sélectionner Assist Subtitle fait apparaître les sous-titres des
dialogues et les sous-titres d’aide. Il n’est pas possible d’afficher seulement les
sous-titres d’aide.
Si vous sélectionnez Off, il reste possible d’afficher les sous-titres pendant la
lecture en appuyant sur
SUBTITLE (Reportez-vous à “Sélection d’une langue
de sous-titres pendant la lecture” à la page 30).
Changement des sous-titres par défaut
Un petit nombre de disques affichent les sous-titres par défaut, quelles que soient vos
préférences de langue. Le réglage “Subtitle Off” annule cette situation.
Remarque: Pour avoir accès à cette option, le menu de configuration doit être
réglé sur Expert. (Appuyez sur
SETUP et sélectionnez General > Setup Menu
Mode > Expert.)
Appuyez sur SETUP et sélectionnez LANGUAGE >
SUBTITLE OFF, puis votre réglage préféré.
Sélectionnez With Audio pour obtenir les sous-titres dans la même langue
que la langue audio préférée. Pour obtenir les sous-titres dans la même langue
que la langue préférée des sous-titres, choisissez Selected Subtitle.
Mise hors service du Réglage de
32
Fr
Audio1 GeneralLanguageVideo2
OSD Language – English
Audio Language – English
Subtitle Language – Spanish
Auto Language
Audio1 GeneralLanguageVideo2
OSD Language – English
Audio Language – English
Subtitle Language Japanese
Auto Language
DVD Language
Subtitle Display
Move
Subtitle Off
Move
On
On
Off
- On
w/ Subtitle Language
English
English
- On
Spanish
Other
- Selected Subtitle
SETUP
SETUP
Exit
Exit
Langue Automatique
Le réglage en usine pour Langue Automatique est “On” (en service). Cela signifie
que les disques qui, d’origine, sont dans votre langue préférée seront reproduits sans
sous-titres. Lorsque la piste sonore originale est dans une langue étrangère, vous
obtiendrez les sous-titres dans votre langue préférée. Si vous souhaitez annuler la
fonction Langue Automatique, voici comment procéder:
Appuyez sur SETUP et sélectionnez
LANGUAGE > AUTO LANGUAGE > OFF.
La fonction Langue Automatique reste hors service jusqu’à ce qu’elle soit à
nouveau mise en service.
Sélection de la langue du menu de disque
Certains disques multilingues possèdent des menus-disque enregistrés en plusieurs
langues. Si un tel disque est installé, voici comment changer la langue.
Remarque: Pour avoir accès à cette option, le menu de configuration doit être
réglé sur Expert. (Appuyez sur
Mode > Expert.)
Appuyez sur SETUP et sélectionnez LANGUAGE >
DVD LANGUAGE, puis la langue de votre choix.
Le paramètre w/Subtitle Language règle automatiquement le menuécran à la même langue que votre langue préférée pour sous-titres.
Choisissez Other si vous désirez choisir une langue non affichée. Reportezvous à “Sélection d’une autre langue (OTHER)” à la page 31 sur la façon
de choisir une langue différente.
Vous avez aussi la possibilité de choisir une langue de menu de disque à partir
du menu de disque lui-même. Appuyez sur
affichages sur écran.
SETUP et sélectionnez General > Setup Menu
TOP MENU et suivez les
Page 89

5 Lecture de disques DVD multilingues
Liste des codes de langue
Langue Langue LangueCode Code Code
Japonais (ja) 1001
Anglais (en) 0514
Français (fr) 0618
Allemand (de) 0405
Italien (it) 0920
Espagnol (es) 0519
Hollandais (nl) 1412
Russe (ru) 1821
Chinois (zh) 2608
Coréen (ko) 1115
Grec (el) 0512
Afar (aa) 0101
Abkhasien (ab) 0102
Afrikaans (af) 0106
Amharique (am) 0113
Arabe (ar) 0118
Assamois (as) 0119
Aymara (ay) 0125
Azeri (az) 0126
Bashkir (ba) 0201
Biélorusse (be) 0205
Bulgare (bg) 0207
Bihar (bh) 0208
Bislama (bi) 0209
Bengali (bn) 0214
Tibétain (bo) 0215
Breton (br) 0218
Catalan (ca) 0301
Corse (co) 0315
Tchèque (cs) 0319
Gallois (cy) 0325
Danois (da) 0401
Bhutan (dz) 0426
Esperanto (eo) 0515
Estonien (et) 0520
Basque (eu) 0521
Perse (fa) 0601
Finnois (fi) 0609
Fidjien (fj) 0610
Faroesien (fo) 0615
Frison (fy) 0625
Irlandais (ga) 0701
Ecossais-gaélique (gd) 0704
Galicien (gl) 0712
Guaranien (gn) 0714
Gujaratien (gu) 0721
Hausa (ha) 0801
Hindi (hi) 0809
Croate (hr) 0818
Hongrois (hu) 0821
Armémien (hy) 0825
Interlingua (ia) 0901
Interlingue (ie) 0905
Inupiak (ik) 0911
Indonésien (in) 0914
Islandais (is) 0919
Hébreu (iw) 0923
Yiddish (ji) 1009
Javanais (jw) 1023
Géorgien (ka) 1101
Kazakh (kk) 1111
Groenlandais (kl) 1112
Cambodgien (km) 1113
Kannada (kn) 1114
Cachemirois (ks) 1119
Kurde (ku) 1121
Kirgiz (ky) 1125
Latin (la) 1201
Lingala (ln) 1214
Laotien (lo) 1215
Lithuanien (lt) 1220
Letton (lv) 1222
Malgache (mg) 1307
Maori (mi) 1309
Macédonien (mk) 1311
Malayalam (ml) 1312
Mongol (mn) 1314
Moldave (mo) 1315
Marathi (mr) 1318
Malaisien (ms) 1319
Malte (mt) 1320
Birman (my) 1325
Naruru (na) 1401
Népalais (ne) 1405
Norvégien (no) 1415
Occitan (oc) 1503
Oromo (om) 1513
Oriya (or) 1518
Panjabi (pa) 1601
Polonais (pl) 1612
Pashto, Pushto (ps) 1619
Portugais (pt) 1620
Quechua (qu)
Rheato-roman (rm) 1813
Kirundi (rn) 1814
Roumain (ro) 1815
Kinyarwanda (rw) 1823
Sanscrit (sa) 1901
Sindhi (sd) 1904
Sangho (sg) 1907
Serbo-croate (sh) 1908
Cingalais (si) 1909
Slovaque (sk) 1911
Slovène (sl) 1912
Samoan (sm) 1913
Shona (sn) 1914
Somalien (so) 1915
Albanais (sq) 1917
Serbe (sr) 1918
Siswati (ss) 1919
Sesotho (st) 1920
Soudanais (su) 1921
Suédois (sv) 1922
Swahili (sw) 1923
Taloul (ta) 2001
Telugu (te) 2005
Tajik (tg) 2007
Thailandais (th) 2008
Tigrinya (ti) 2009
Turkmène (tk) 2011
Tagalog (tl) 2012
Setswana (tn) 2014
Tonga (to) 2015
Turc (tr) 2018
Tsonga (ts) 2019
Tatar (tt) 2020
Twi (tw) 2023
Ukrainien (uk) 2111
Urdy (ur) 2118
Ouzbek (uz) 2126
Vietnamien (vi) 2209
Volapük (vo) 2215
Wolof (wo) 2315
Xhosa (xh) 2408
Yoruba (yo) 2515
Zoulou (zu) 2621
1721
Français
33
Fr
Page 90

6 Autres fonctions des disques
Lecture aléatoire des plages
DVD / CD vidéo / CD
Servez-vous de la fonction de lecture aléatoire pour reproduire les titres / chapitres /
plages des disques dans un ordre imprévisible. Cependant, le fonctionnement de cette
lecture aléatoire dépend du disque actuellement à la position de lecture. Si le disque
“actuel” est un DVD, vous pouvez reproduire ses titres ou chapitres en ordre aléatoire.
Si le disque “actuel” est un CD audio ou CD vidéo, vous pouvez reproduire de façon
aléatoire soit les plages sur ce disque, soit toutes les plages sur tous les CD et les CD
vidéo installés (les disques DVD installés seront ignorés). Quand tous les plages /
chapitres / disques ont été lus, le disque s’arrête. Une poussée sur 7 avant la fin arrête
le disque et annule la lecture aléatoire. (Pour annuler la lecture aléatoire mais faire
continuer la lecture du disque actuel, appuyez sur
Pour lancer la lecture aléatoire des chapitres
(DVD seulement)/plages sur le CD ou le CD
vidéo actuel, appuyez sur RDM (SHIFT+6),
puis ENTER.
Pour lancer la lecture aléatoire des titres (DVD
seulement)/plages sur tous les CD et CD vidéo
installés, appuyez deux fois sur RDM
(SHIFT+6), puis ENTER.
CLEAR.)
34
Fr
Remarque: Pendant la lecture aléatoire, les boutons 4 et ¢ fonctionnent
un peu différemment que d’habitude: le bouton 4 fait revenir au début de la
plage/chapitre actuel, mais vous ne pouvez pas aller au-delà. Le bouton ¢ choisit
au hasard un autre plage/chapitre parmi ceux qui restent.
Répétition des plages
DVD / CD vidéo / CD
Vous pouvez faire en sorte que la platine reproduise des plages individuelles sur les CD ou
les CD vidéo, des chapitres ou des titres sur les disques DVD, tout un disque, ou tous les
disques installés dans la platine. Il est également possible de définir une boucle sur un
disque. Vous pouvez combiner la répétition avec le mode de programmation pour répéter
des plages/chapitres d’une liste de lecture. (Consultez la page suivante sur la façon de
programmer une telle liste de lecture.)
Appuyez sur RPT (SHIFT+4) pendant la lecture
pour sélectionner un mode de répétition:
Le mode de répétition change à chaque poussée.
Pour DVD: Repeat Chapter – Repeat Title – Repeat Off
(Répétition Chapitre – Répétition Titre – Répétition Hors
service)
Pour CD audio/vidéo: Repeat Track – Repeat 1 Disc – Repeat All
(Répétition Plage – Répétition Disque 1 – Répétition Tout)
En mode de lecture programmée: Program Repeat – Repeat off
(Répétition Programme – Répétition Hors service)
Remarque: La fonction Repeat All (Répétition Tout) répète toutes
les plages de tous les CD audio et vidéo installés. Si, au cours de la lecture répétée,
l’appareil arrive à un disque DVD, il en commencera la lecture, mais le mode de
répétition sera annulé.
Pour revenir à la lecture normale, appuyez sur
CLEAR.
Page 91

6 Autres fonctions des disques
Pour répéter une section d’un disque:
Appuyez une fois sur RPT A-B (SHIFT+5) au début de la section à répéter,
puis une nouvelle fois à la fin. L’appareil revient immédiatement au début de
la section et il répète la lecture de la même boucle.
Pour revenir à la lecture normale, appuyez sur
CLEAR.
Remarque: Sur un DVD, il n’est pas possible de définir une boucle dont le
point initial se trouve sur un titre et le point final sur un autre titre.
Pour répéter une seule fois une section d’un
disque:
Appuyez sur RPT A-B (SHIFT+5) au début de la section à répéter.
Appuyez sur
section.
2
6 à n’importe quel moment pour revenir au début de cette
Programmation de l’ordre des plages
DVD / CD vidéo / CD
Ce mode vous permet de programmer une séquence (une liste de lecture) d’un
maximum de 24 plages/chapitres, choisis parmi les disques installés dans le changeur
de disques. Vous pouvez combiner des disques DVD, CD vidéo et CD audio et les utiliser
dans l’ordre de votre choix. Des chapitres/plages peuvent apparaître plusieurs fois sur
la liste, mais vous pouvez aussi les ignorer.
L’affichage sur écran, utilisé pour programmer la liste, est le suivant.
Français
12 34
Step
1
9
8
7
2
3
4
5
6
¢4
Title
Disc Chap
Track
2
6
1
5
3
226
3
Page
Move
--
PLAY
Disc
Title
Total
Play
Program
3
DVD
2
9
Chapter
PROGRAM
5
Exit
6
1 – Numéro d’étape (1-6, 7-12, 13-18, 19-24)
2 – Numéro du disque (1, 2 ou 3)
3 – Numéro du titre (DVD) ou numéro de plage (CD vidéo, CD)
4 – Numéro de chapitre (DVD seulement)
5 – Détails du disque à l’étape actuelle (L’exemple indique qu’il y a 9 chapitres dans
le titre 2 du disque DVD, installé sur le plateau 3)
6 – Position actuelle du curseur
7 – Etape encore à programmer
8 – Indication d’étape actuelle
9 – Etape déjà programmée
35
Fr
Page 92

6 Autres fonctions des disques
1 Appuyez sur PGM (SHIFT+9).
L’écran de programmation apparaît, indiquant les 6 premières étapes de la
liste de lecture. Déplacez-vous sur l’écran à l’aide des boutons de curseur.
Sautez aux 6 étapes suivantes par poussée sur le bouton ¢, ou aux 6
étapes précédentes par le bouton 4.
2 Entrez un numéro de disque (1, 2 ou 3).
Vous pouvez utiliser les boutons DISC ou les touches numériques.
Remarque: S’il s’agit de la première étape de la programmation, le
numéro du disque qui se trouve actuellement à la position de lecture
apparaîtra automatiquement.
Si l’appareil a déjà lu le contenu du disque que vous voulez programmer, les
détails apparaissent dans la case sur la droite de l’écran (type de disque,
nombre de titres / chapitres / plages, etc.). Si l’appareil n’a pas encore lu le
contenu du disque, “???” apparaît en regard du type de disque dans la case.
3 Amenez le curseur à la zone TITLE/TRACK (3)
et entrez un numéro de titre ou de plage.
Pour les DVD, ce numéro sera un titre de disque; pour les CD vidéo et les CD
audio, ce sera un numéro de plage.
Par exemple, pour entrer le titre/plage 6, appuyez sur 6. Pour entrer le titre/
Conseil pratique
Pour modifier un élément
sur la liste de lecture,
amenez le curseur à
l’élément que vous voulez
changer, puis entrez la
nouvelle valeur par les
touches numériques.
Pour effacer toute une
étape, amenez le curseur
à un point de l’étape à
effacer et appuyez sur
CLEAR.
plage 14, appuyez sur 1, 4.
Pour annuler une entrée, appuyez sur CLEAR.
4 Si le disque actuel est un DVD, amenez le
curseur à la zone CHAPTER et entrez un
numéro de chapitre.
5 Appuyez sur ENTER.
Le curseur descend à la zone de numéro de disque dans l’étape suivante.
6 Répétez les étapes 2 à 5 pour ajouter d’autres
éléments sur la liste de lecture.
36
Fr
7 Appuyez sur PGM (SHIFT+9) pour quitter le
mode de programmation, ou sur PLAY pour
commencer directement la lecture de la liste
programmée.
Remarque:
• La liste programmée reste en mémoire même si vous ouvrez le plateau du disque et
que vous changez les disques. Si une étape de la liste ne peut pas être exécutée (par
exemple, parce que le numéro de plage n’existe pas sur le disque), cette étape sera
automatiquement sautée.
• Pour annuler la liste de lecture, arrêtez la lecture, puis appuyez sur
• Si vous utilisez la lecture programmée sur certains disques DVD, il se peut que la
lecture ne soit pas exactement celle que vous avez programmée.
CLEAR.
Page 93

6 Autres fonctions des disques
Affichage des informations du disque
DVD / CD vidéo / CD
Vous pouvez afficher sur l’écran les informations du disque en utilisant le bouton
DVD DISP.
2
Play
Title
Play
Chapter
Play
Chapter
Play
Tr. Rate :
2–1 0.24
1–1 1.19
2
2
1–1 1.19
2
1–1 1.32
Affichage éteint
Le disque étant arrêté, une poussée sur
chaque plage / chapitre / titre sur le disque. Une nouvelle poussée sur
disparaître les informations affichées.
Pendant la lecture, plusieurs écrans sont disponibles. Permutez entre ceux-ci par
poussée sur
DVD DISP :
Remarque: Pour éviter d’endommager l’écran de votre téléviseur, l’écran
d’informations du disque s’éteint automatiquement après 80 minutes.
0.29–0.05/
Disques DVD
Info Titre: (haut) numéro de disque / numéro de titre et chapitre / durée écoulée
2.181.19/
sur titre (bas): durée restante sur titre / durée totale du titre
Info 1 Chapitre: (haut) numéro de disque / numéro de titre et chapitre / durée
2.18–0.59/
écoulée sur titre (bas): durée écoulée sur chapitre / durée totale de chapitre
Info 2 Chapitre: (haut) numéro de disque / numéro de titre et chapitre / durée
8.9
écoulée sur titre (bas): durée restante sur chapitre / durée totale de chapitre
Info technique: (haut) numéro de disque / numéro de titre et chapitre / durée
écoulée sur disque (bas): indicateur du taux de transmission des données
DVD DISP affiche la durée de lecture de
DVD DISP fait
Français
2
Play
Play
All
Track
1 0.03
–3.29/
2
1/2 0.15
Affichage éteint
3.32
6.32–6.15/
CD audio
Info Plage: (haut) numéro de disque / numéro de plage / durée écoulée sur plage
(bas): durée restante sur plage / durée totale de plage
Info Disque: (haut) numéro de disque / numéro de plage / plages sur disque /
durée écoulée sur disque (bas): durée restante sur disque / durée totale du disque
CD vidéo
2
Play
Play
Play
All
Track
Track
5/10 20.19
2
5 20.19
2
5 20.19
Affichage éteint
22.57–2.38/
4.40 2.38/
4.40 –2.02/
Ces informations sont disponibles seulement à la lecture de CD vidéo en mode
non-PBC. (Pour annuler le mode PBC, appuyez sur
PBC de la télécommande.)
Info Disque: (haut) numéro de disque / numéro de plage / plages sur disque /
durée écoulée sur disque (bas): durée restante sur disque / durée totale du disque
Info 1 Plage: (haut) numéro de disque / numéro de plage/ durée écoulée sur disque
(bas): durée écoulée sur plage / durée totale de plage
Info 2 Plage: (haut) numéro de disque / numéro de plage/ durée écoulée sur disque
(bas): durée restante sur plage/ durée totale de plage
Reprise de la lecture (Fonction “Last Memo”)
DVD / CD vidéo
Si vous reproduisez une partie d’un DVD avec l’idée de poursuivre ultérieurement sa
lecture à partir du point où vous l’avez arrêtée, faites mémoriser ce dernier point par
la platine. Lors de la prochaine lecture du disque, l’appareil reprendra la lecture à ce
point. La platine peut mémoriser de tels points sur 5 disques au maximum. (Le fait
d’en mémoriser un sixième effacera le premier.)
Dans une certaine mesure, cette fonction est utilisable avec des CD vidéo aussi. Dans
ce cas, la position est mémorisée pourvu que le disque reste dans la platine.
37
Fr
Page 94

6 Autres fonctions des disques
1 Au point où vous voulez continuer la lecture la fois
prochaine, appuyez sur LAST MEMO (SHIFT+2).
Le voyant LAST MEMO s’allume sur l’affichage.
2 Appuyez sur 7 pour arrêter le disque.
Si vous reproduisez un disque DVD, vous pouvez retirer ou changer le disque.
S’il s’agit d’un CD vidéo, il faut que le disque reste dans la platine pour que la
fonction agisse. Dans les deux cas, vous pouvez sans problème faire passer le
système au mode Attente.
Lorsque vous voulez continuer la lecture du disque:
1 Mettez sous tension et (au besoin) installez ou
sélectionnez le disque.
Le voyant LAST MEMO doit être allumé.
2 Appuyez sur LAST MEMO pour lancer la
lecture.
Eteignez le voyant LAST MEMO en appuyant sur CLEAR.
Changement de l’angle de caméra
DVD
Certains disques contiennent des scènes filmées selon des angles différents par
plusieurs caméras. Vérifiez si le voyant “multi-angles” se trouve sur l’étui du disque
pour savoir si cette fonction est présente sur le disque. Pendant les scènes multi-
apparaît sur l’écran. (Si vous préférez faire disparaître cette
SETUP et sélectionnez General
Audio1 GeneralLanguageVideo2
TV Screen –
Picture Quality –
Still Picture –
On Screen Display – On
OSD Position – Normal
Angle Indicator
Move
16:9(Wide)
Standard
Field
On
Off
SETUP
angles, une icône
icône, reportez-vous à “Suppression de l’icône multi-angles” ci-après.)
Pour passer d’un angle de caméra à un autre, servez-vous du bouton ANGLE.
Vous pouvez également choisir l’angle de caméra à partir du menu de disque si le
disque comporte des scènes multi-angles. Appuyez sur TOP MENU et suivez les
affichages sur écran.
Suppression de l’icône multi-angles
Pour avoir accès à ce réglage, le Mode Menu de Configuration (Setup Menu
Mode) doit être réglé sur Expert. (Appuyez sur
> Setup Menu Mode > Expert.)
Exit
Appuyez sur SETUP et sélectionnez VIDEO >
ANGLE INDICATOR > OFF.
L’indicateur d’angle reste caché jusqu’à ce que vous choisissiez ON pour le
faire réapparaître.
38
Fr
Page 95

6 Autres fonctions des disques
Changement de la qualité de l’image
Cette fonction vous permet de modifier l’aspect des images pour mieux convenir à ce
que vous regardez.
Le mode Standard ne change nullement l’image. En mode Animation, les
couleurs deviennent plus nettes (plus saturées). En mode Cinema, le contraste est
renforcé (les noirs deviennent plus noirs et les blancs plus blancs).
Audio1 GeneralLanguageVideo2
TV Screen – 16:9(Wide)
Picture Quality
Still Picture -
On Screen Display -
OSD Position
Angle Indicator
Adjust picture quality
Move
Cinema
Animation
Standard
– Normal
– On
SETUP
Exit
Appuyez sur SETUP et sélectionnez VIDEO >
PICTURE QUALITY, puis un des réglages.
Le mode reste valide jusqu’à ce qu’il soit changé.
Remarque: La différence observable entre les réglages dépend du contenu
du disque regardé.
Limitation de l’accès aux disques
DVD
Vous pouvez restreindre l’accès à certains disques en utilisant la fonction de blocage
parental. Lorsque cette fonction est en service, un code secret de 4 chiffres est
nécessaire si un disque interdit est installé, ce qui vous donne un certain contrôle sur
ce que regardent vos enfants.
Il existe 8 niveaux d’accès, de 1 à 8. Un réglage au niveau 1 signifie que tout disque,
comportant une certaine restriction, nécessitera l’entrée du code secret pour être
reproduit, tandis qu’un réglage au niveau 8 laisse un accès illimité.
Les disques DVD aussi sont classifiés de 1 à 8. Les disques classés 1 (ou sans
classement) ne contiennent rien de répréhensible et conviennent à tout âge. Des
disques classés 2 peuvent comporter des scènes que certains parents jugeront
inadéquates pour leurs enfants. En revanche, les disques classés 8 contiennent
certainement des passages inappropriés pour les enfants. Comme le classement d’un
disque dépend du fabricant de celui-ci, il est impossible de donner une explication
exacte du contenu de chaque niveau. Reportez-vous aux détails sur le blocage
parental, figurant sur l’étui du disque.
Audio1 GeneralLanguageVideo2
Setup Menu Mode
Setup Navigator
Parental Lock
Setup viewing restrictions
Move
– Basic
Level Change
Password Change
SETUP
Exit
Attention: Tous les disques que vous pourriez juger inadéquats pour vos enfants ne
sont pas classés. Des disques non classés seront lisibles sans exiger d’abord l’entrée du
code secret.
Le blocage parental est réglé par défaut au niveau 8 (pas de restriction). Voici
comment le changer:
Français
Audio1 GeneralLanguageVideo2
Parental Lock: Register Code Number
––––
Enter 4–Digit Code
Move
Audio1 GeneralLanguageVideo2
Parental Lock: Register Code Number
1019
Enter 4–Digit Code
Move
+/–
Return
Return
SETUP
ENTER
SETUP
Exit
Exit
1 Appuyez sur SETUP et sélectionnez GENERAL >
PARENTAL LOCK > LEVEL CHANGE.
2 Vous êtes invité à entrer le code secret.
Si vous utilisez cette fonction pour la première fois (ou si vous avez
réinitialisé l’appareil aux paramètres d’usine), le nombre que vous entrerez
ici deviendra votre code secret.
3 Servez-vous des touches numériques pour
entrer le code secret, puis appuyez sur ENTER.
Si vous oubliez votre code secret, vous pourrez toujours l’annuler. Reportezvous à la page 57.
39
Fr
Page 96

6 Autres fonctions des disques
Audio1 GeneralLanguageVideo2
Parental Lock: Level Change
1
234 6785
Level
Set Parental Lock
ENTER
Move
Audio1 GeneralLanguageVideo2
Setup Menu Mode – Basic
Setup Navigator
Parental Lock
Setup viewing restrictions
ENTER
Move
Return
SETUP
ExitSelect
Level Change
Password Change
SETUP
ExitSelect
4 Sélectionnez le niveau de blocage parental.
En allant vers la gauche, vous fermez plus de verrous (plus de disques
exigeront l’entrée du code secret pour être lus). En allant vers la droite, vous
ouvrez les verrous (moins de disques exigeront l’entrée du code secret).
Remarque: Le niveau 1 ne peut pas être verrouillé.
5 Appuyez sur ENTER pour définir le nouveau
niveau de blocage parental.
Lecture d’un disque verrouillé
Si vous essayez de reproduire un disque dont le niveau de blocage parental est plus
élevé que celui qui est défini sur la platine, celle-ci vous demandera d’entrer le code
secret avant de pouvoir regarder le disque. Servez-vous des touches numériques pour
l’entrer, puis appuyez sur
ENTER. L ’accès est alors autorisé jusqu’à l’arrêt du disque.
Changement de votre code secret
Le changement du code secret exige l’entrée préalable du code existant. Si vous l’avez
oublié, réinitialisez l’appareil (reportez-vous à la page 57 à ce sujet), puis changez le
niveau (le nombre entré deviendra le nouveau code secret).
1 Appuyez sur SETUP et sélectionnez GENERAL >
PARENTAL LOCK > PASSWORD CHANGE.
2 Entrez le code secret existant et appuyez sur
ENTER.
40
Fr
3 Entrez un nouveau code secret et appuyez sur
ENTER.
Si vous changez d’idée avant d’appuyer sur ENTER, appuyez sur RETURN
pour quitter cet écran.
Réglage des préférences pour un disque
DVD
Grâce à cette fonction, vous pouvez mémoriser dans la platine tous les réglages définis
pour un disque donné, tels que la langue des sous-titres et de la piste son, le rapport
largeur/hauteur d’écran, etc. La prochaine fois que vous reproduirez ce disque, la
platine le lira en tenant compte de ces préférences.
La platine peut mémoriser les préferences de 15 disques au maximum. Le seizième
disque dont vous allez mémoriser les réglages effacera ceux du premier (le plus
anciennement mémorisé).
Appuyez sur
Qualité d’image Langue de piste son
Position OSD (affichage sur écran) Multi-angles
Sous-titres Niveau de blocage parental
Le voyant
réglages ont été mémorisés.
Annulation des réglages mémorisés
Appuyez sur CONDITION (SHIFT+1), puis sur CLEAR pendant que le message sur
écran indique Condition Memory afin d’effacer les réglages mémorisés pour ce
disque (le voyant
moment, mais ils ne seront plus rappelés à la prochaine utilisation de ce disque.
CONDITION (SHIFT+1) pendant la lecture pour mémoriser ces réglages:
CONDITION s’allume sur l’affichage quand est installé un disque dont les
CONDITION disparaît). Les réglages mémorisés subsistent pour le
Page 97

7 Réglages Son et Image
Ecoute à un niveau réduit
DVD
Lorsque vous abaissez simplement le volume sonore pendant que vous regardez un
disque, vous risquez de perdre les sons de niveau réduit et notamment les dialogues.
En mettant en service la fonction Audio DRC (Compression de Plage Dynamique),
vous pouvez améliorer l’écoute en renforçant les sons de niveau réduit tout en
atténuant les crêtes du niveau.
Remarque: La différence audible entre les différents réglages dépend de ce qui a été
enregistré sur le disque.
Appuyez sur SETUP et sélectionnez AUDIO
2 > AUDIO DRC, puis le niveau souhaité:
Audio2 GeneralLanguageVideo1
Dynamic playback at low volume
Audio DRC
Move
Large
Medium
Small
Off
SETUP
Exit
Large: compression maximale
Medium: compression modérée
Small: compression minimale
Off: pas de compression— la dynamique originale est audible.
Remarque: Le réglage Audio DRC reste valide jusqu’à ce qu’il soit changé.
Français
Changement des réglages de sortie sonore
La section Audio 1 du menu de configuration propose diverses options de sortie
audionumérique. Il suffit de régler celles-ci si vous désirez utiliser un composant externe
(tel qu’une platine numérique ou un amplificateur AV, doté d’une entrée numérique),
raccordé sur la sortie opto-numérique du panneau arrière de cette chaîne.
2
Language
DTS Out -
t – MPEG 3 PCM
Language
DTS Out
t – MPEG 3 PCM
Language
DTS Out –
t - PCM
General
Dolby Digital
Dolby Digital 3 PCM
SETUP
Exit
General
Dolby Digital
Off
DTS
SETUP
Exit
General
Dolby Digital
Off
96kHz 3 48kHz
96kHz
SETUP
Exit
Audio 1 > Dolby Digital Out >
Dolby Digital – A sélectionner si vous raccordez un décodeur Dolby
Digital ou un amplificateur AV à décodeur Dolby Digital incorporé.
Dolby Digital 3 PCM – A sélectionner si vous raccordez une platine
MD, DAT ou CD. En général, ces composants ne peuvent enregistrer les
disques Dolby Digital que si le son est converti au format PCM. Sélectionnez
cette option également si vous raccordez un amplificateur AV sans décodeur
Dolby Digital incorporé.
Audio 1 > DTS Out >
Off – A sélectionner si vous raccordez une platine MD, DAT ou CD. En
général, ces composants ne peuvent enregistrer que les sons en format PCM.
Sélectionnez cette option également si vous raccordez un amplificateur AV
sans décodeur DTS incorporé.
DTS – A sélectionner si vous raccordez un décodeur DTS externe ou un
amplificateur à décodeur DTS incorporé.
Audio 1 > 96kHz PCM Out >
96kHz 3 48kHz – A sélectionner si vous raccordez un amplificateur AV
ou une platine MD, DAT ou CD qui n’est pas compatible avec le son 96kHz (à
présent, la plupart ne le sont pas, mais vérifiez ce point dans le manuel de la
platine).
96kHz – A sélectionner si vous raccordez un amplificateur AV ou une
platine MD, DAT ou CD qui est compatible avec le son 96kHz (à présent, la
plupart ne le sont pas, mais vérifiez ce point dans le manuel de la platine).
Video
Audio1
Dolby Digital Out
96kHz PCM Out – 96kHz 3 48kHz
MPEG Ou
Switch Dolby Digital audio mode
Move
2
Video
Audio1
Dolby Digital Out –
96kHz PCM Out - 96kHz>48kHz
MPEG Ou
Switch DTS audio output mode
Move
2
Video
Audio1
Dolby Digital Out –
96kHz PCM Out
MPEG Ou
Switch 96 kHz audio output mode
Move
41
Fr
Page 98

7 Réglages Son et Image
2
Language
Dolby Digital
DTS Out – Off
t
MPEG
MPEG 3 PCM
General
SETUP
Audio 1 > MPEG Out
Exit
Video
Audio1
Dolby Digital Out –
96kHz PCM Out – 96kHz 3 48kHz
MPEG Ou
Switch MPEG audio output mode
Move
Réglages divers
Pour avoir accès aux réglages ci-dessous, le Mode Menu de Configuration (Setup
Menu Mode) doit être réglé sur Expert. (Appuyez sur
General > Setup Menu Mode > Expert.)
MPEG – A sélectionner si vous raccordez un décodeur audio MPEG ou un
amplificateur AV avec décodeur audio MPEG incorporé.
MPEG 3 PCM – A sélectionner si vous raccordez une platine MD, DAT ou
CD. En général, ces composants n’enregistrent les sons MPEG que s’ils sont
convertis d’abord au format PCM. Sélectionnez cette option également si vous
raccordez un amplificateur AV sans décodeur audio MPEG incorporé.
SETUP et sélectionnez
Audio1 GeneralLanguageVideo2
TV Screen –
Picture Quality -
Still Picture
On Screen Display -
OSD Position
Angle Indicator
Move
Audio1 GeneralLanguageVideo2
TV Screen –
Picture Quality –
Still Picture –
On Screen Display
OSD Position
Angle Indicator
Move
Audio1 GeneralLanguageVideo2
TV Screen –
Picture Quality –
Still Picture –
On Screen Display – On
OSD Position
Angle Indicator-
Move
16:9(Wide)
Standard
Field
Frame
- Normal
Auto
– On
16:9(Wide)
Standard
Field
On
- Normal
Off
– On
16:9(Wide)
Standard
Field
Wide
Normal
SETUP
SETUP
SETUP
Exit
Exit
Exit
Changement de l’image fixe
Lorsque vous effectuez une pause du disque, il arrive que l’image soit instable. La
platine DVD peut afficher les images fixes en utilisant deux procédés différents: Field
ou Frame.
Le réglage Field procure une image plus stable, sans vacillement. Avec le réglage
Frame, l’image fixe est plus nette, mais elle a plus tendance à vaciller. Le réglage par
défaut est Auto; dans ce cas, la platine décide en fonction du disque qui y est placé.
Appuyez sur
SETUP et sélectionnez Video > Still Picture, puis votre
réglage préféré.
Suppression des messages sur écran
Si vous préférez ne pas voir les messages de fonctionnement (PLAY, STOP, RESUME,
etc.) sur l’écran de votre téléviseur, voici comment les faire disparaître.
Appuyez sur
SETUP et sélectionnez Video > On Screen Display >
Off.
Les messages sur écran restent cachés jusqu’à ce que vous les fassiez à
nouveau apparaître.
Réglage de la position d’affichage sur écran
Si vous utilisez un téléviseur à écran large (16/9), réglez le paramètre OSD
Position sur Wide. Vous pourrez ainsi lire les messages sans qu’ils disparaissent
dans la bande du haut de l’écran. Sinon, laissez ce paramètre sur Normal (réglage
par défaut).
Appuyez sur
SETUP et sélectionnez Video > OSD Position > Wide.
42
Fr
Audio1 GeneralLanguageVideo2
Setup Menu Mode – Expert
Parental Lock – Level 8
Background Color
Move
Blue
Black
Blue
SETUP
Exit
Réglage de la couleur du fond de l’écran
Vous pouvez changer la couleur de fond des affichages sur écran du bleu (réglage par
défaut) au noir. Cette couleur est utilisée chaque fois que la platine n’affiche pas des
images d’un disque sur l’écran.
Appuyez sur
puis la couleur de votre choix.
SETUP et sélectionnez General > Background Color,
Page 99

8 Utilisation du tuner
Syntonisation des stations
Le tuner peut capter les émissions FM et AM et il vous permet de mémoriser vos
stations préférées pour éviter de devoir les syntoniser chaque fois manuellement.
1 Appuyez sur BAND pour passer au mode Tuner.
Si vous utilisez les commandes du panneau avant, appuyez sur TUNER/
BAND.
Appuyez de façon répétée pour permuter entre FM et AM.
TUNER/BAND
2 Faites l’accord sur une station.
Il existe trois modes de syntonisation: par palier, automatique et rapide.
Accord par palier: Appuyez de façon répétée sur le bouton
pour parcourir la bande de fréquence dans un sens ou dans l’autre (panneau
4·1
avant:
Accord automatique: Maintenez le bouton
relâchez-le lorsque l’affichage des fréquences commence à changer. Le tuner
s’arrête à la première station qu’il peut syntoniser. Au besoin, continuez la
recherche d’autres stations.
Accord rapide: Maintenez le bouton
le lorsque l’affichage des fréquences commence à changer rapidement.
Maintenez la poussée sur le bouton jusqu’à atteindre la fréquence souhaitée.
Au besoin, effectuez une syntonisation précise par la méthode d’accord par
palier.
Lorsqu’une station est syntonisée, le voyant d’accord s’allume sur l’affichage.
S’il s’agit d’une station FM stéréo, le voyant stéréo s’allume.
et ¡·¢ )
1
ou ¡ enfoncé, puis
1
ou ¡ enfoncé, puis relâchez-
1
ou
¡
Amélioration de la réception FM
Si la réception d’une station FM en stéréo est faible, vous pourrez améliorer la qualité
du son en passant en monophonie:
Français
4 · 1
¡
·
¢
Appuyez sur MONO (SHIFT+7).
Le voyant mono ( )s’allume lorsque le tuner est en mode de réception
monaurale. Une nouvelle poussée fait repasser au mode auto stéréo (le voyant
s’allume à la réception d’une émission stéréo).
Changement du palier de fréquence
Le tuner effectue la recherche des stations par paliers de 50 kHz (sur la bande FM) et
de 9 kHz (sur la bande AM), qui sont ses réglages par défaut. Si ces valeurs ne
conviennent pas dans votre région (si vous n’arrivez pas à syntoniser les stations),
vous pouvez changer le palier d’accord à 100 kHz pour FM et à 10 kHz pour AM. Voici
comment procéder:
1 Placez l’appareil en mode Attente.
2 Maintenez le bouton FREQ/STATION enfoncé
pendant 3 secondes environ.
43
Fr
Page 100

8 Utilisation du tuner
Mémorisation des stations pour rappel rapide
Vous pouvez mémoriser jusqu’à 24 stations préréglées que vous retrouverez facilement
sans devoir les syntoniser manuellement par la suite.
Si l’appareil est débranché complètement de la source d’alimentation électrique, les
stations mémorisées seront préservées pendant quelques jours. Après quoi vous devrez
recommencer leur mémorisation.
Remarque: Les explications suivantes supposent que vous sachiez déjà comment
syntoniser les stations radio. Consultez la page précédente à ce sujet.
TUNER/BAND
1 Faites l’accord sur une station radio de la
bande AM ou FM.
Consultez la page précédente à ce sujet.
7
4 · 1
·
¢
¡
(STOP/ST.MEMORY)
2 Appuyez sur 7 (STOP/ST.MEMORY).
L’affichage de fréquence commence à clignoter.
3 Choisissez une position dans laquelle la
fréquence de station sera mémorisée.
La mémoire comporte 24 positions, pouvant recevoir chacune une station.
4·1
Servez-vous des boutons
disponibles.
et ¡·¢ pour faire le tour des positions
4 Appuyez à nouveau sur 7 (STOP/ST.MEMORY)
pour mémoriser la station.
Ecoute des stations mémorisées
1 Appuyez sur BAND pour passer au mode
Tuner.
Si vous utilisez les commandes du panneau avant, appuyez sur TUNER/
BAND.
2 Appuyez sur FREQ/STATION (panneau avant
seulement).
Le tuner passe ainsi au mode des stations préréglées.
44
Fr
FREQ/STATION
4 · 1
TUNER/BAND
¡
·
¢
3 Servez-vous des touches numériques ou des
boutons 4 et ¢ pour sélectionner une
station préalablement mémorisée.
Par exemple, pour sélectionner la station préréglée 6, appuyez sur 6; pour
sélectionner la 24, appuyez sur >10, 2, 4.
Sur le panneau avant, servez-vous des boutons 4·1 et ¡·¢
pour passer d’une station préréglée à une autre.
 Loading...