

Page 1

Operating Instructions
Pioneer USB D/A Converter (for Windows)
Page 2
About these Operating Instructions
Procedure continues.
Installing the driver software
When a USB cable is used to connect the unit’s
the computer can be played.
In order to use this function, a dedicated driver (software program) must be installed in the
computer. These Operating Instructions contain important information necessary for playing
files on the computer, including instructions about how to install the driver and how to perform
troubleshooting in event of problems.
USB
port to a computer, audio files located on
Computer Environment
To utilize this driver, your computer must be equipped with a USB port supporting USB Rev2.0 HS.
For information regarding supported computer operating systems and playback software, please
consult the Pioneer website (the download page for this driver).
Note
• To play music files from a computer, it is recommended that all computer applications be closed
except for the music player application.
• The sampling frequencies and number of quantization bits that can be output by your computer
may differ depending on the computer’s operating system and the version of playback software
used.
• The number of bits shown on the unit’s display is not the number of bits of the music file, but the
value as set by your computer.
Note
• This driver program is supported for use with Windows Vista, Windows XP, Windows 7, Windows 8 and
Windows 8.1 operating systems.
1 Download the driver program.
The driver software can be downloaded from the Pioneer website.
• When downloading the driver program, designate the folder where you wish the program to be
saved.
• Depending on the browser program used or its settings, it may not be possible to designate the
folder for saving downloads. In this case, the file will be saved to a folder location previously
designated by the program.
• The driver program will be downloaded in compressed ZIP format.
The downloaded compressed file will have a name like “Pioneer_USBDAC_WinDriver_****.
zip”,
where “****” will indicate the program’s package number.
2 Following completion of the download, decompress the compressed le.
The downloaded file is compressed. Decompress the downloaded file.
After decompression, the folder holding the driver program will be named “Pioneer_
USBDAC_WinDriver_****”, where “****” will indicate the program’s package number.
Once the compressed file is decompressed, the above folder will be displayed. Double click
on this folder to display the file
• For more information regarding the software used to open the compressed file, please consult
your software publisher or computer vendor.
“
Setup.exe”.
Microsoft, Windows and Windows Vista are either registered trademarks or trademarks of
Microsoft Corporation in the United States and/or other countries.
2
Page 3
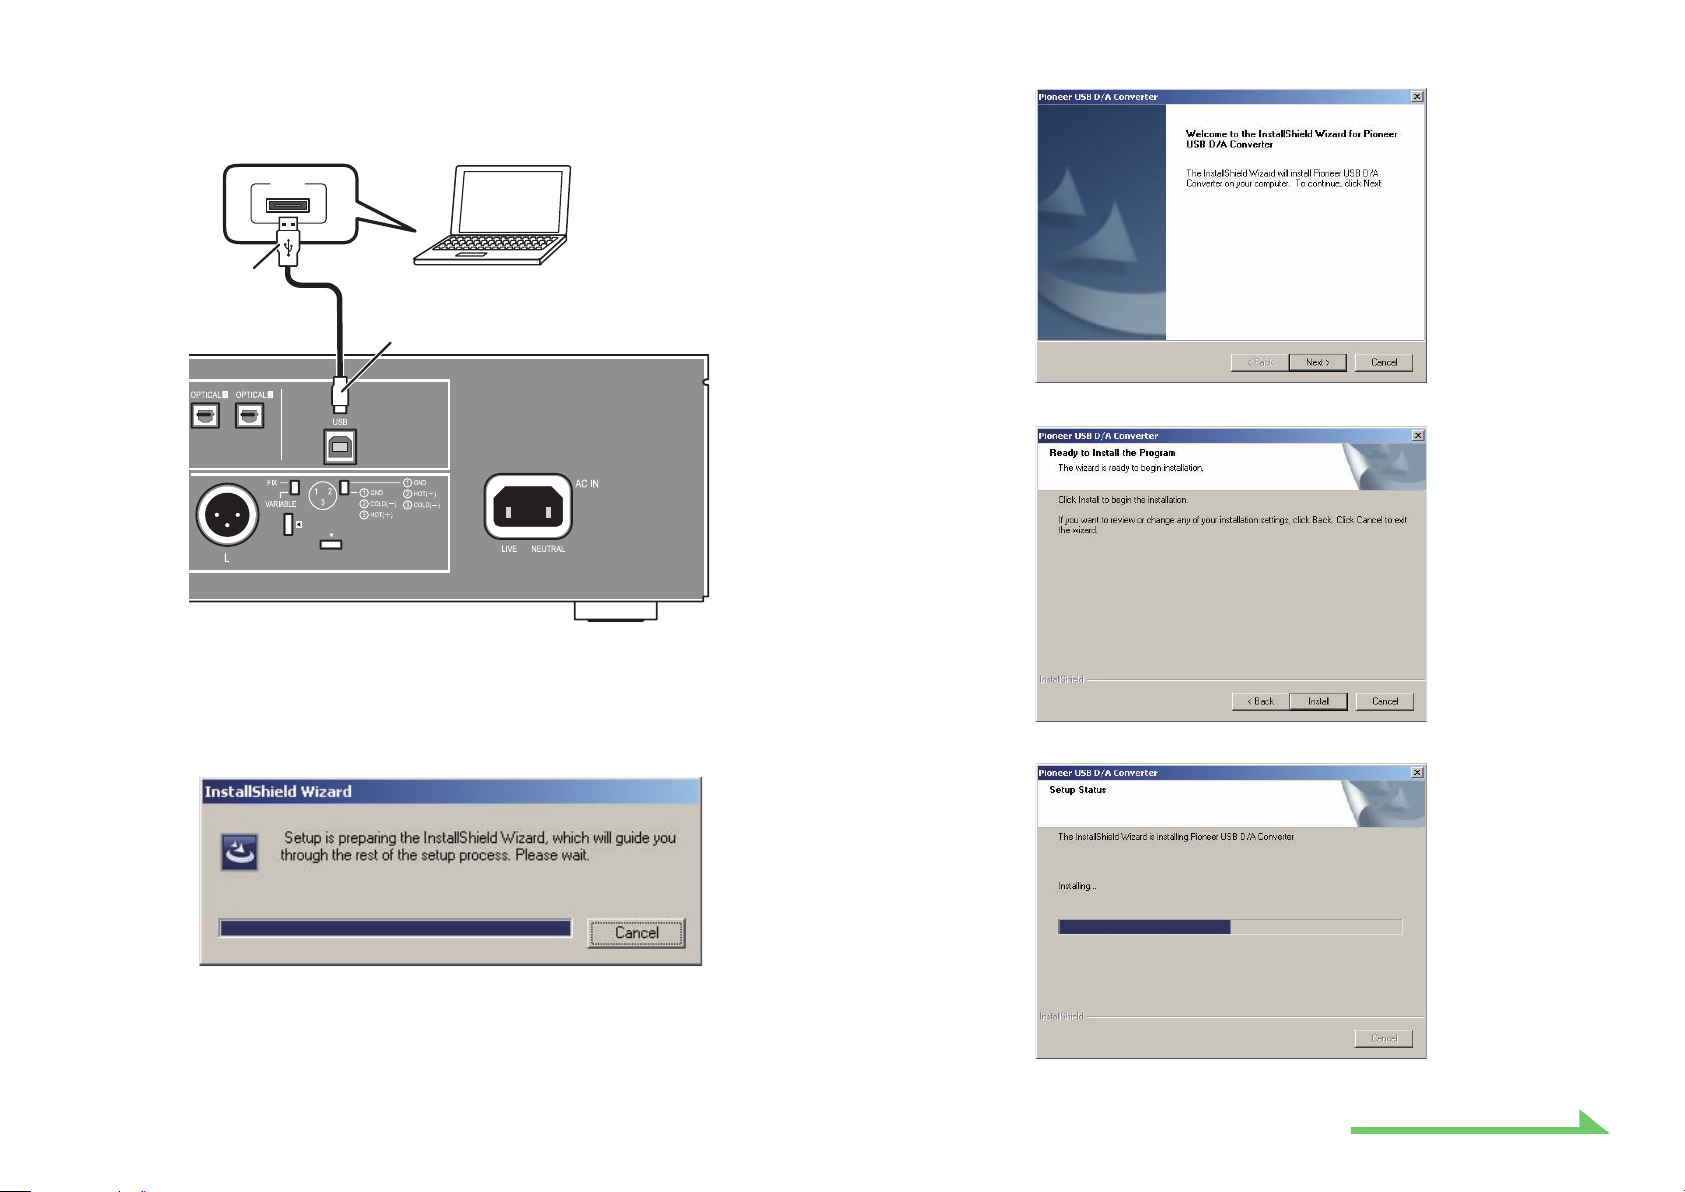
3 Use a proper USB cable to connect a computer to a device equipped with
Procedure continues.
USB connector, then turn on the power.
For more information regarding connections, check the Operating Instructions for this
device.
USB
A–type
B–type
6 Click on [Next].
7 Click on [Install].
* The illustration may appear differently, depending on the model used.
4 Switch the unit to the input source corresponding to the USB port.
5 In the decompressed folder, double click on “Setup.exe” to execute it.
The InstallShield wizard will appear.
• If an older version of this driver program is found on the computer, the InstallShield wizard
will display a “delete” option. In this event, follow the on-screen instructions to delete the older
version, then reboot your computer and once again install the new driver program.
• The menu illustrations shown in these Operating Instructions may differ from those actually
displayed.
The following screen will appear; wait until the step 8 instructions appear.
If the message “Windows protected your PC” appears, click on “More info” and then press
“Run anyway”.
3
Page 4
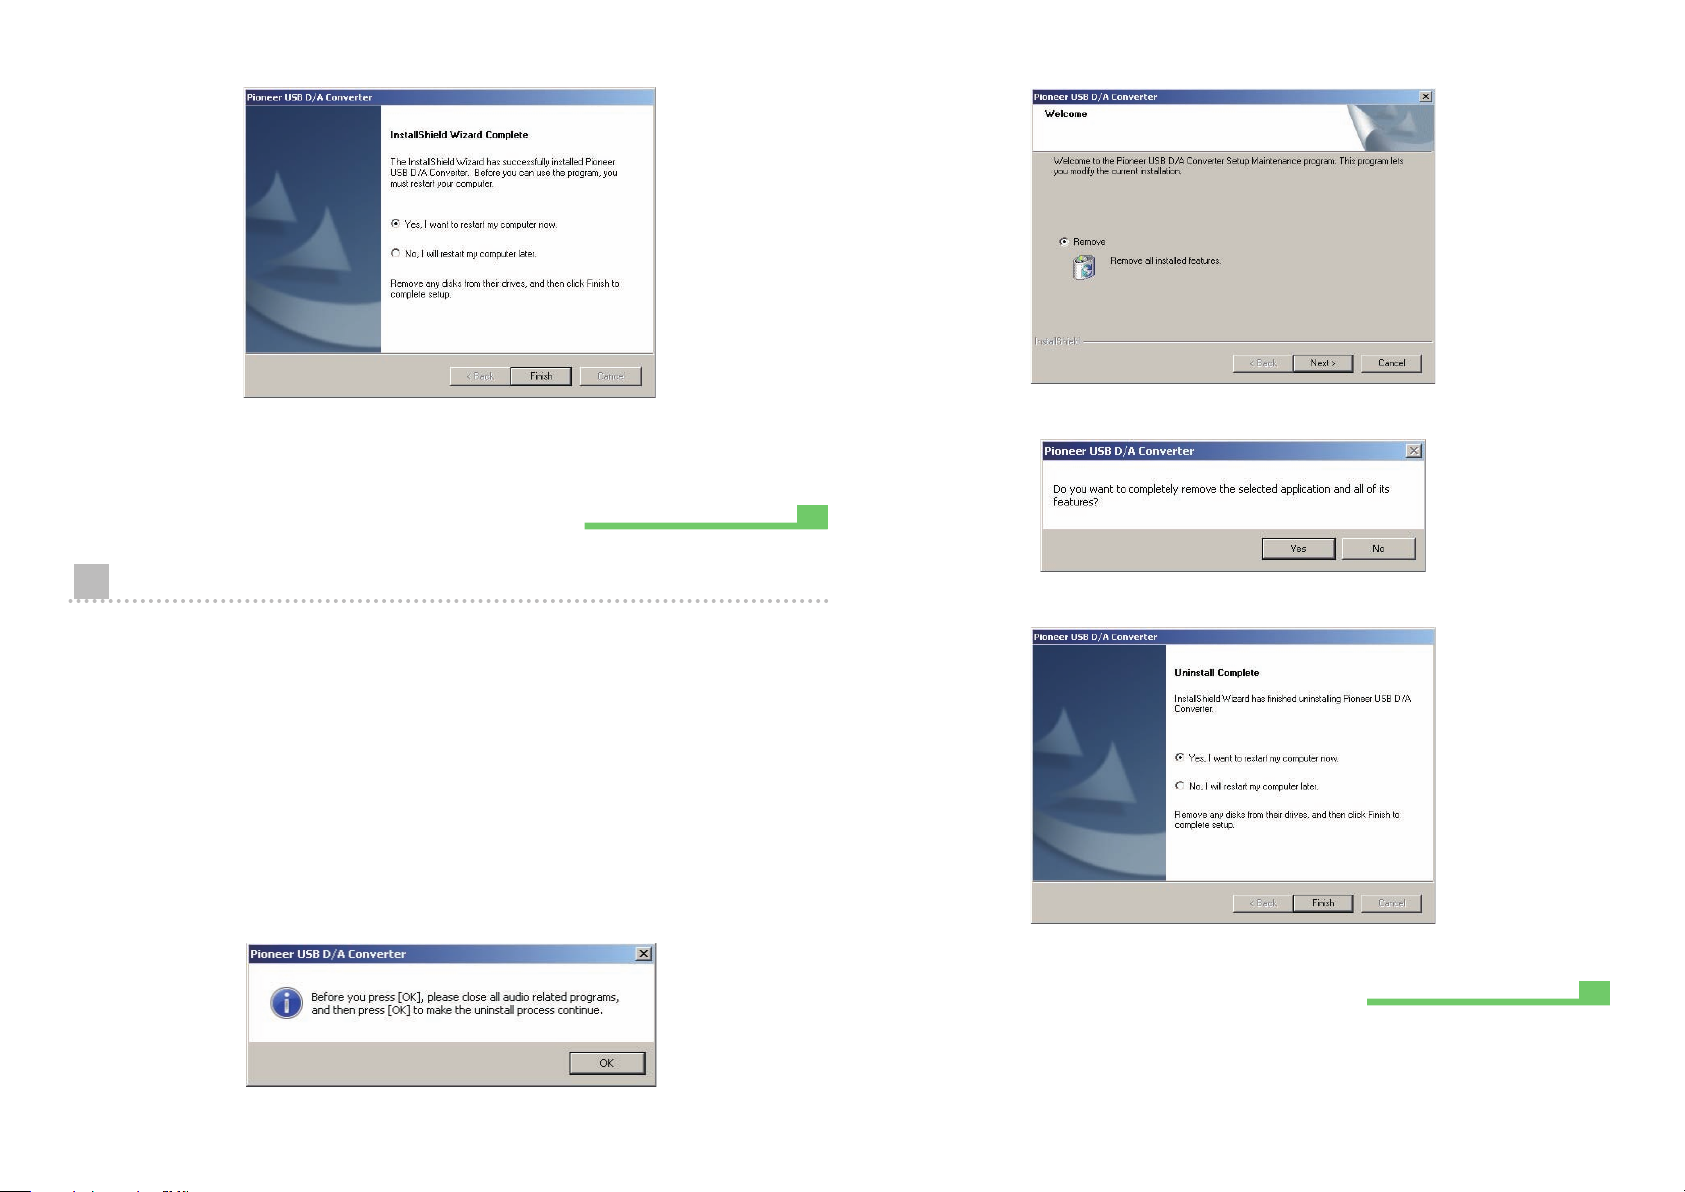
8 Click on [Finish].
Procedure finished.
Procedure finished.
5 Click [Next] and proceed to the uninstall execution screen.
The driver installation is completed.
9 Reboot your computer to nalize installation of the driver.
To uninstall the driver
If you wish to uninstall (delete) the driver at any time after installing it, perform the following
operation on your computer.
1 Click on the [Start] button at lower left of your monitor screen, then click on
([Settings] ) [Control Panel].
In the case of Windows 8 or Windows 8.1, simultaneously press the [Windows] key and [X]
key, then select “Programs and functions”, and proceed to step 3.
2 From the Control Panel menu, click on [Add or Remove Programs].
3 Select [Pioneer USB D/A Converter], then click on either [Remove] or
[Uninstall].
The uninstaller dialog will appear.
4 Click [OK] and proceed to the uninstall screen.
6 Click [Next] to execute the uninstall process.
7 Click on [Finish], then reboot your computer.
The driver software will be uninstalled.
4
Page 5
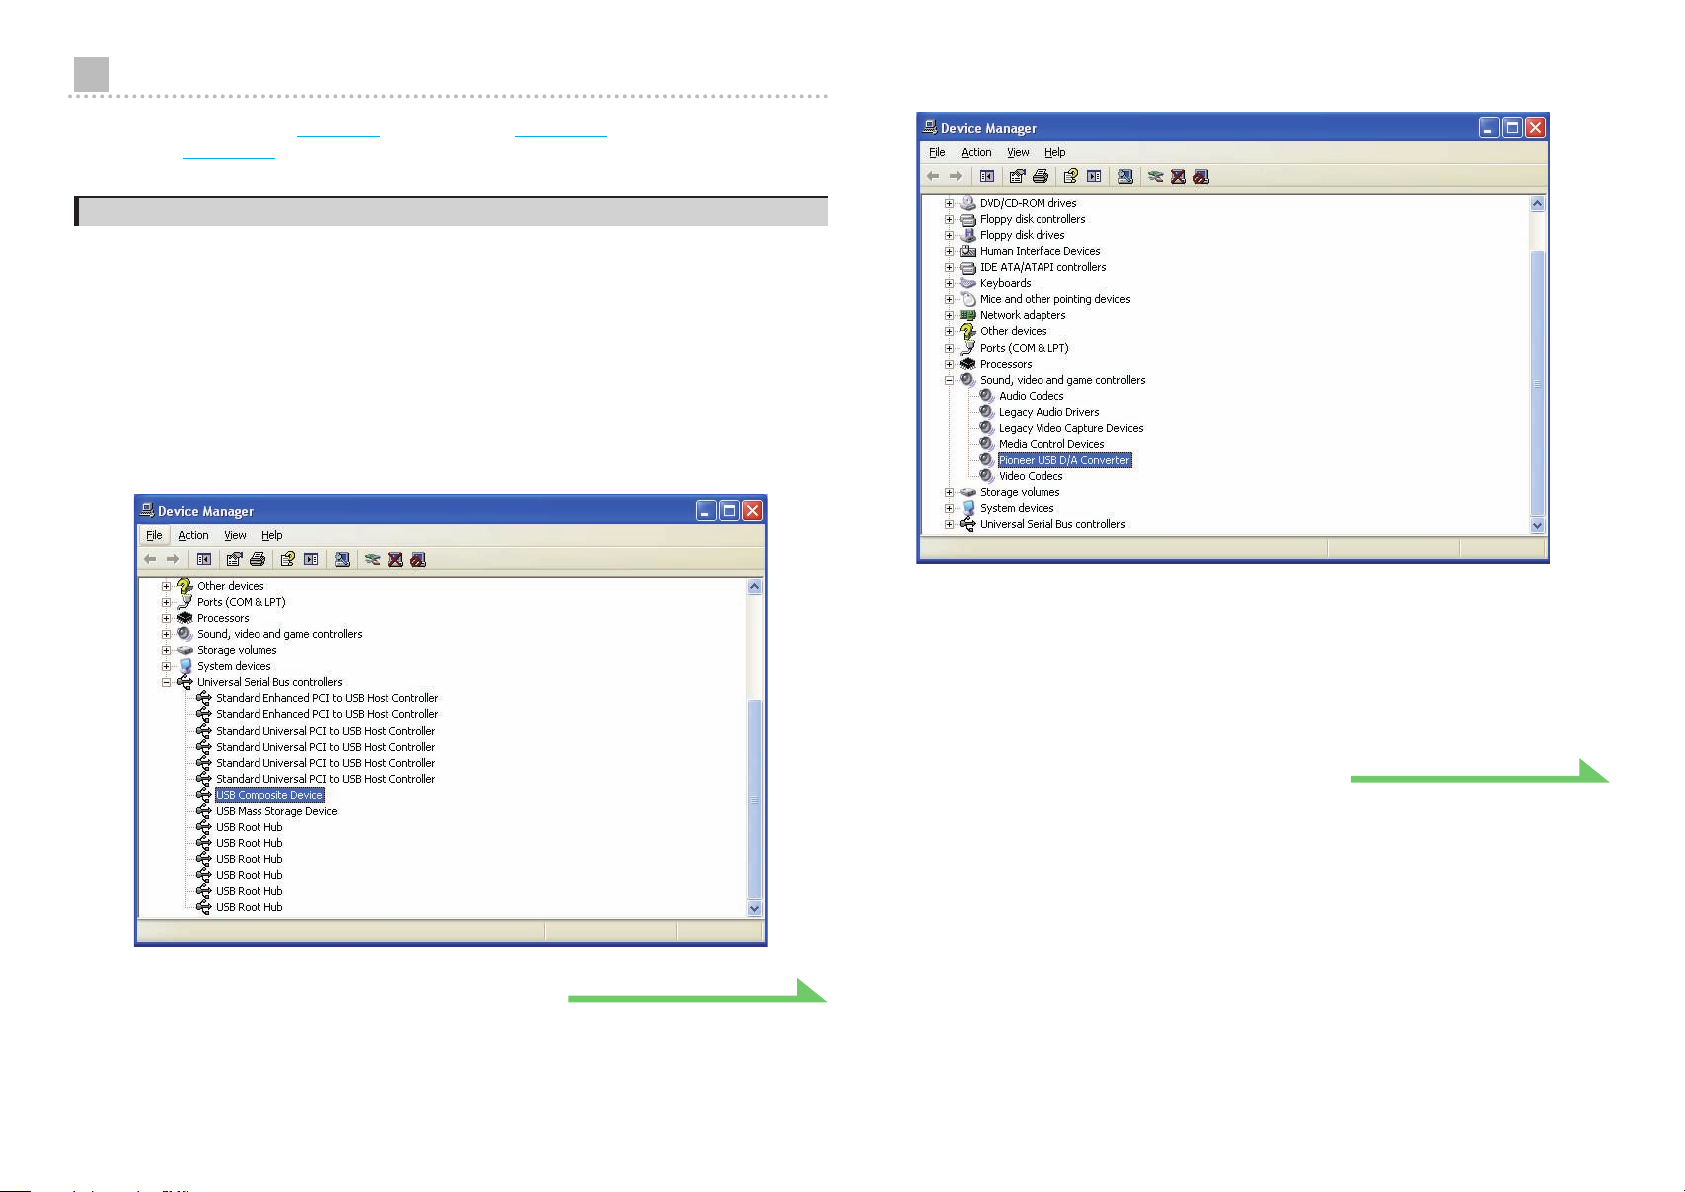
Troubleshooting (Windows XP)
Procedure continues.
Procedure continues.
4 Click on [Sound, video and game controllers] and conrm that [Pioneer USB
D/A Converter] is listed.
When using Windows Vista,
Windows 8.1,
see page 15
see page 7
.
; for Windows 7,
see page 11
; for Windows 8 or
1. No sound
Do not boot your computer’s music player program if the power is turned off to the device with the
USB
port, or if the
Boot your computer’s music playing program only after switching the input to the
For information about the name of inputs supported by the
Instructions for this device.
1 Click on [Start] ([Settings] ) [Control Panel] [System].
2 Click on the [Hardware] tab then click on [Device Manager].
3 Click on [Universal Serial Bus controllers] and conrm that [USB Composite
Device] is listed.
USB
port has not been selected as the input source.
USB
port, see the Operating
USB
port.
If the [Pioneer USB D/A Converter] does not appear, confirm that the
selected as input source. Then try reconnecting the cable or turning the power off and then
on again; when this is done, the [Pioneer USB D/A Converter] should be recognized.
USB
port has been
5 Click on [Start] ([Settings] ) [Control Panel] [Sound, Speech, and
Audio Devices] [Sounds and Audio Devices].
6 Open the sound and audio Properties.
5
Page 6
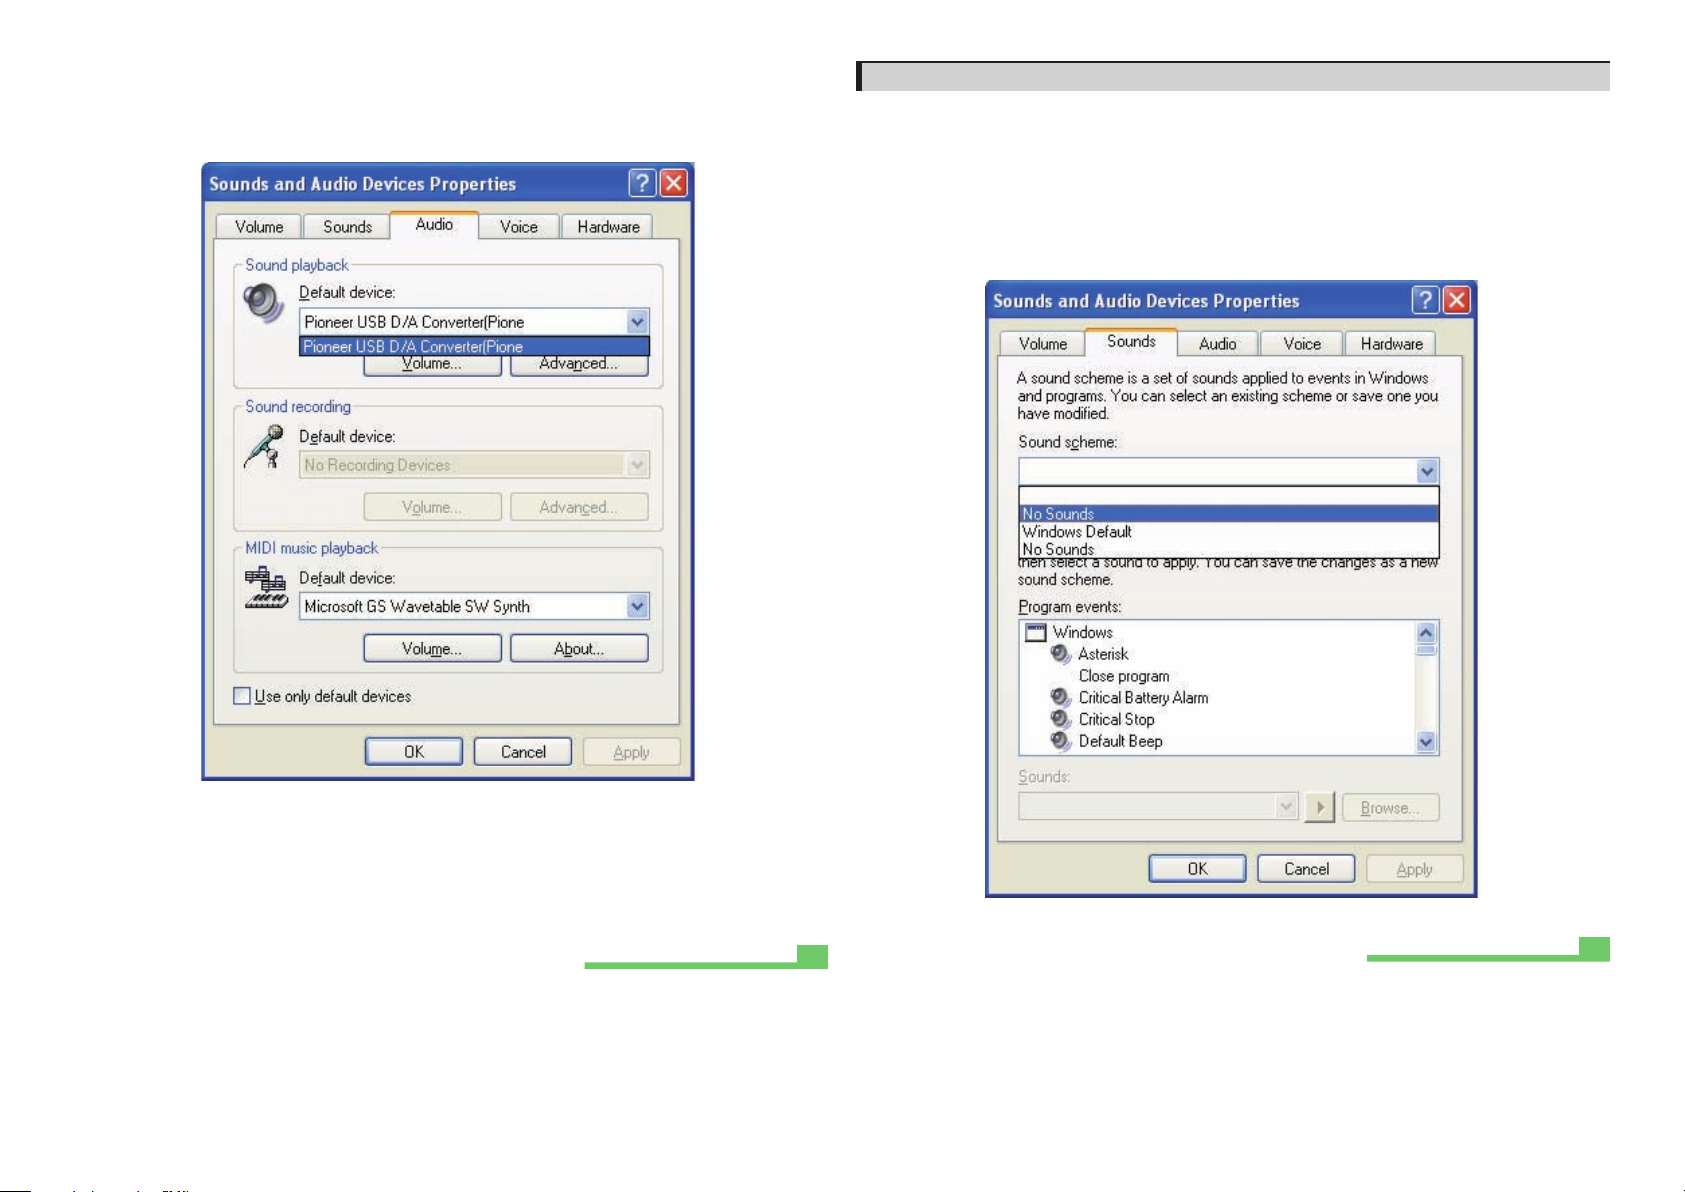
7 Click on the [Audio] tab, then conrm that [Pioneer USB D/A Converter] is
Procedure finished.
Procedure finished.
listed as the [Default device] for [Sound playback].
If another device has been selected, open the drop-down menu and select [Pioneer USB
D/A Converter], then click on [Apply] to change the selection.
2. To disable the operating system’s sound scheme
Under default OS settings, computer events may be accompanied by audio signals and beeps
that are audible through the speakers attached to the device. In the event you do not wish to
hear such non-music signals, follow the instructions listed below:
1 Click [Start] [Control Panel]
[Sounds and Audio Devices].
2 Click on the [Sounds] tab, and for the [Sound scheme], select [No Sounds],
then click on [Apply].
8 To enable the new setting, reboot your computer.
9 Conrm that your media player’s sound volume is set to Maximum.
In the event your media player requires an output plugin setting, confirm that [Pioneer USB
D/A Converter] is selected.
6
Page 7

Troubleshooting (Windows Vista)
Procedure continues.
Procedure continues.
3 Click on [Sound, video and game controllers] and conrm that [Pioneer USB
D/A Converter] is listed.
When using Windows XP,
Windows 8.1,
see page 15
see page 5
.
; for Windows 7,
see page 11
; for Windows 8 or
1. No sound
Do not boot your computer’s music player program if the power is turned off to the device with the
USB
port, or if the
Boot your computer’s music playing program only after switching the input to the
For information about the name of inputs supported by the
Instructions for this device.
1 Click on [Start] [Control Panel] [System and Maintenance] [System].
2 From the [Tasks] list, click on [Device Manager].
USB
port has not been selected as the input source.
USB
port, see the Operating
USB
port.
If the [Pioneer USB D/A Converter] does not appear, confirm that the
selected as input source. Then try reconnecting the cable or turning the power off and then
on again; when this is done, the [Pioneer USB D/A Converter] should be recognized.
USB
port has been
4 Click on [Universal Serial Bus controllers] and conrm that [USB Composite
Device] is listed.
7
Page 8
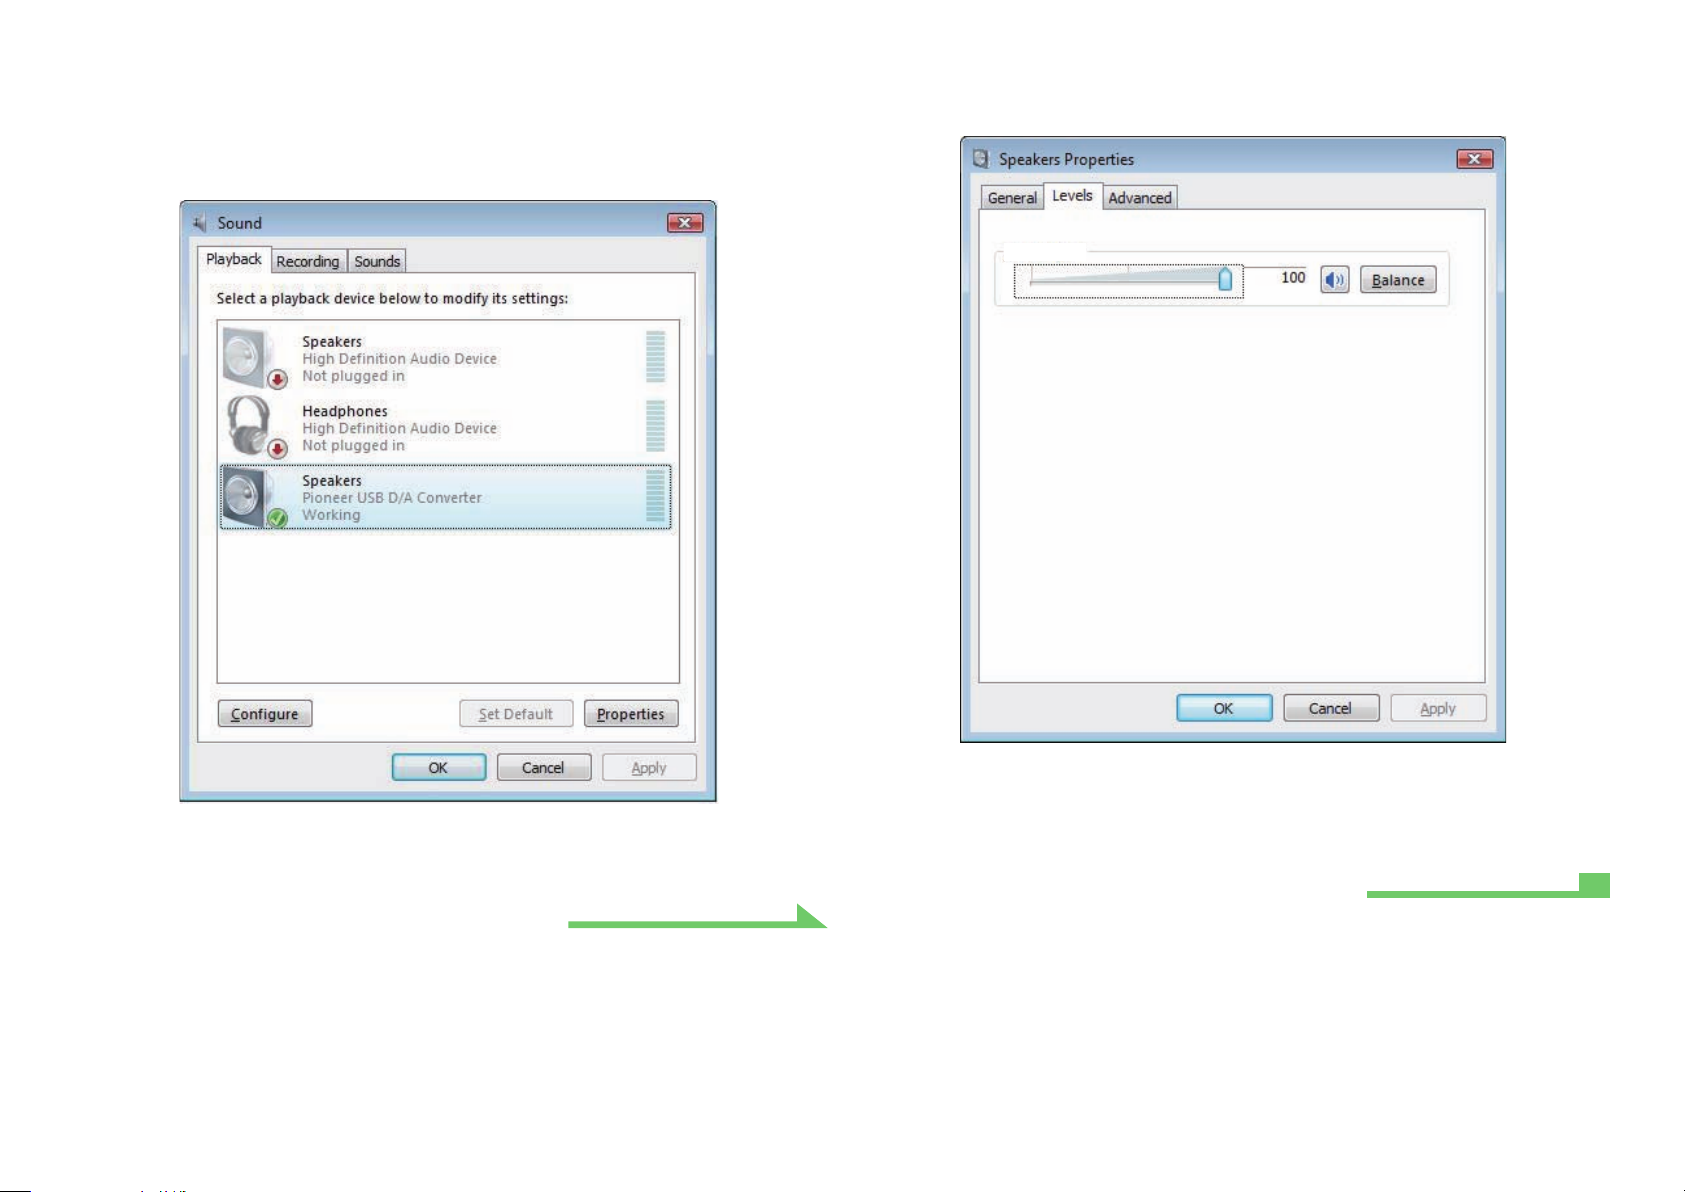
5 Click on [Start] [Control Panel] [Hardware and Sound] [Sound].
Procedure finished.
Procedure continues.
6 Under the [Playback] tab, conrm that for [Speakers], [Pioneer USB D/A
Converter] is checked as the default device.
If another device has been selected, select [Pioneer USB D/A Converter], and click to [Set
Default].
8 Under the [Levels] tab, set the [Speakers] level to maximum.
If the Speaker Mute indicator (at the left side of the Balance button) is lighted, click it to turn
it off.
Speakers
7 Double click on [Speakers] ([Pioneer USB D/A Converter]), and display its
Properties.
8
9 Conrm that your media player’s sound volume is set to Maximum.
In the event your media player requires an output plugin setting, confirm that [Pioneer USB
D/A Converter] is selected.
Page 9

2. To disable the operating system’s sound scheme
Procedure finished.
Procedure continues.
3.
To set the sampling frequency for audio data output from your computer
Under default OS settings, computer events may be accompanied by audio signals and beeps
that are audible through the speakers attached to the device. In the event you do not wish to
hear such non-music signals, follow the instructions listed below:
1 Click [Start] [Control Panel] [Hardware and Sound] [Sound].
2 Click on the [Sounds] tab, and for the [Sound scheme], select [No Sounds],
then click on [Apply].
By synchronizing the sampling frequency of playback files with the transmission sampling rate,
sound can be transmitted without the need for frequency conversion.
When a high sampling frequency is set on a computer with inadequate processing capacity,
audio playback may be disrupted. In this event, the bit rate and frequency should be set to low
values such as 2-channel, 24-bit, 44100 Hz.
1 Click on [Start] [Control Panel] [Hardware and Sound] [Sound].
2 Under the [Playback] tab, for [Speakers], double click on [Pioneer USB D/A
Converter] to display the Properties.
9
Page 10

3 Under the [Advanced] tab, select for [Default Format] the desired output
Procedure finished.
sampling rate, then click on [Apply].
10
Page 11

Troubleshooting (Windows 7)
Procedure continues.
Procedure continues.
4 Click on [Universal Serial Bus controllers], and conrm that [USB Composite
Device] is listed.
When using Windows XP,
Windows 8.1,
see page 15
see page 5
.
; for Windows Vista,
see page 7
; for Windows 8 or
1. No sound
Do not boot your computer’s music player program if the power is turned off to the device with the
USB
port, or if the
Boot your computer’s music playing program only after switching the input to the
For information about the name of inputs supported by the
Instructions for this device.
1 Click on [Start] [Control Panel] [System].
2 Under [System], click on [Device Manager].
3 Click on [Sound, video and game controllers] and conrm that [Pioneer USB
D/A Converter] is listed.
USB
port has not been selected as the input source.
USB
port, see the Operating
USB
port.
5 Click on [Start] [Control Panel] [Hardware and Sound] [Sound].
If the [Pioneer USB D/A Converter] does not appear, confirm that the
selected as input source. Then try reconnecting the cable or turning the power off and then
on again; when this is done, the [Pioneer USB D/A Converter] should be recognized.
USB
port has been
11
Page 12

6 Under the [Playback] tab, conrm that for [Speakers], [Pioneer USB D/A
Procedure finished.
Procedure continues.
Converter] is checked as the [Default Device].
If another device has been selected, select [Pioneer USB D/A Converter], and click on [Set
Default].
8 Under the [Levels] tab, set the [Speakers] level to maximum.
If the Speaker Mute indicator (at the left side of the Balance button) is lighted, click it to turn
it off.
7 Double click on [Speakers] ([Pioneer USB D/A Converter]), and display its
Properties.
12
9 Conrm that your media player’s sound volume is set to Maximum.
In the event your media player requires an output plugin setting, confirm that [Pioneer USB
D/A Converter] is selected.
Page 13

2. To disable the operating system’s sound scheme
Procedure finished.
Procedure continues.
3.
To set the sampling frequency for audio data output from your computer
Under default OS settings, computer events may be accompanied by audio signals and beeps
that are audible through the speakers attached to the device. In the event you do not wish to
hear such non-music signals, follow the instructions listed below:
1 Click [Start] [Control Panel] [Hardware and Sound] [Sound].
2 Click on the [Sounds] tab, and for the [Sound scheme], select [No Sounds],
then click on [Apply].
By synchronizing the sampling frequency of playback files with the transmission sampling rate,
sound can be transmitted without the need for frequency conversion.
When a high sampling frequency is set on a computer with inadequate processing capacity,
audio playback may be disrupted. In this event, the bit rate and frequency should be set to lower
values such as 2-channel, 24-bit, 44100 Hz.
1 Click on [Start] [Control Panel] [Hardware and Sound] [Sound].
2 Under the [Playback] tab, for [Speakers], double click on [Pioneer USB D/A
Converter] to display the Properties.
13
Page 14

3 Under the [Advanced] tab, select for [Default Format] the desired output
Procedure finished.
sampling rate, then click on [Apply].
14
Page 15

Troubleshooting (Windows 8/8.1)
Procedure continues.
Procedure continues.
3 Click on [Universal Serial Bus controllers], and conrm that [USB Composite
Device] is listed.
When using Windows XP,
page 11
.
see page 5
; for Windows Vista,
see page 7
; for Windows 7,
see
1. No sound
Do not boot your computer’s music player program if the power is turned off to the device with the
USB
port, or if the
Boot your computer’s music playing program only after switching the input to the
For information about the name of inputs supported by the
Instructions for this device.
1 Simultaneously press the [Windows] key and [X] key, then select
[Device manager].
2 Click on [Sound, video and game controllers] and conrm that [Pioneer USB
D/A Converter] is listed.
USB
port has not been selected as the input source.
USB
port, see the Operating
USB
port.
4 Simultaneously press the [Windows] key and [X] key; select [Control Panel],
then click on [Hardware and sound] [Manage audio devices].
If the menu items noted above do not appear, confirm that the Control Panel’s View by item
is set to “Category”.
If the [Pioneer USB D/A Converter] does not appear, confirm that the
selected as input source. Then try reconnecting the cable or turning the power off and then
on again; when this is done, the [Pioneer USB D/A Converter] should be recognized.
USB
port has been
15
Page 16

5 Under the [Playback] tab, conrm that for [Speakers], [Pioneer USB D/A
Procedure finished.
Procedure continues.
Converter] is checked as the [Default Device].
If another device has been selected, select [Pioneer USB D/A Converter], and click on [Set
Default].
7 Under the [Levels] tab, set the [Speakers] level to maximum.
If the Speaker Mute indicator (at the left side of the Balance button) is lighted, click it to turn
it off.
6 Double click on [Speakers] ([Pioneer USB D/A Converter]), and display its
Properties.
16
8 Conrm that your media player’s sound volume is set to Maximum.
In the event your media player requires an output plugin setting, confirm that [Pioneer USB
D/A Converter] is selected.
Page 17

2. To disable the operating system’s sound scheme
Procedure finished.
Procedure continues.
3.
To set the sampling frequency for audio data output from your computer
Under default OS settings, computer events may be accompanied by audio signals and beeps
that are audible through the speakers attached to the device. In the event you do not wish to
hear such non-music signals, follow the instructions listed below:
1 Simultaneously press the [Windows] key and [X] key; select [Control Panel],
then click on [Hardware and sound] [Manage audio devices].
If the menu items noted above do not appear, confirm that the Control Panel’s View by item
is set to “Category”.
2 Click on the [Sounds] tab, and for the [Sound scheme], select [No Sounds],
then click on [Apply].
By synchronizing the sampling frequency of playback files with the transmission sampling rate,
sound can be transmitted without the need for frequency conversion.
When a high sampling frequency is set on a computer with inadequate processing capacity,
audio playback may be disrupted. In this event, the bit rate and frequency should be set to lower
values such as 2-channel, 24-bit, 44100 Hz.
1 Simultaneously press the [Windows] key and [X] key; select [Control Panel],
then click on [Hardware and sound] [Manage audio devices].
If the menu items noted above do not appear, confirm that the Control Panel’s View by item
is set to “Category”.
2 Under the [Playback] tab, for [Speakers], double click on [Pioneer USB D/A
Converter] to display the Properties.
17
Page 18

3 Under the [Advanced] tab, select for [Default Format] the desired output
Procedure finished.
<ARB7574-A>
© 2014 PIONEER HOME ELECTRONICS CORPORATION.
All rights reserved.
PIONEER HOME ELECTRONICS CORPORATION
1-1, Shin-ogura, Saiwai-ku, Kawasaki-shi, Kanagawa 212-0031, Japan
http://pioneer.jp
PIONEER ELECTRONICS (USA) INC.
P. O. BOX 1540, Long Beach, California 90801-1540, U.S.A. TEL: (800) 421-1404
http://www.pioneerelectronics.com/PUSA
PIONEER ELECTRONICS OF CANADA, INC.
340 Ferrier Street, Unit 2, Markham, Ontario L3R 2Z5, Canada TEL: 1-877-283-5901, 905-479-4411
http://www.pioneerelectronics.ca
PIONEER EUROPE NV
Haven 1087, Keetberglaan 1, B-9120 Melsele, Belgium TEL: 03/570.05.11
http://www.pioneer.eu
PIONEER ELECTRONICS ASIACENTRE PTE. LTD.
253 Alexandra Road, #04-01, Singapore 159936 TEL: 65-6472-7555
http://www.pioneer.com.sg
PIONEER ELECTRONICS AUSTRALIA PTY. LT D.
5 Arco Lane, Heatherton, Victoria, 3202, Australia, TEL: (03) 9586-6300
http://www.pioneer.com.au
PIONEER ELECTRONICS DE MEXICO S.A. DE C.V.
Blvd.Manuel Avila Camacho 138 10 piso Col.Lomas de Chapultepec, México, D.F. 11000 TEL: 55-9178-4270
http://pioneer-mexico.com
Pioneer China Holding Co., Ltd.
4F,126 Jiangchang No.3 Road, Shibei Industrial Zone, Shanghai, 200436, P.R.China TEL: 86-21-26066666
http://www.pioneerchina.com/home/
Pioneer (HK) Ltd.
5/F., 909 Cheung Sha Wan Road, Kowloon, Hong Kong TEL: 852-2848-6488
http://www.pioneerhongkong.com.hk/ct/index.php
Pioneer High Fidelity Taiwan Co., Ltd.
8F., No. 407, Ruiguang Rd., Neihu Dist., Taipei City 114, Taiwan (R.O.C.) TEL: 02-2657-3588
http://www.pioneer-twn.com.tw/
K002_B3_En
sampling rate, then click on [Apply].
18
Page 19

PIONEER HOME ELECTRONICS CORPORATION
1-1, Shin-ogura, Saiwai-ku, Kawasaki-shi, Kanagawa 212-0031, Japan
http://pioneer.jp
PIONEER ELECTRONICS (USA) INC.
P. O. BOX 1540, Long Beach, California 90801-1540, U.S.A. TEL: (800) 421-1404
http://www.pioneerelectronics.com/PUSA
PIONEER ELECTRONICS OF CANADA, INC.
340 Ferrier Street, Unit 2, Markham, Ontario L3R 2Z5, Canada TEL: 1-877-283-5901, 905-479-4411
http://www.pioneerelectronics.ca
PIONEER EUROPE NV
Haven 1087, Keetberglaan 1, B-9120 Melsele, Belgium TEL: 03/570.05.11
http://www.pioneer.eu
PIONEER ELECTRONICS ASIACENTRE PTE. LTD.
253 Alexandra Road, #04-01, Singapore 159936 TEL: 65-6472-7555
http://www.pioneer.com.sg
PIONEER ELECTRONICS AUSTRALIA PTY. LT D.
5 Arco Lane, Heatherton, Victoria, 3202, Australia, TEL: (03) 9586-6300
http://www.pioneer.com.au
PIONEER ELECTRONICS DE MEXICO S.A. DE C.V.
Blvd.Manuel Avila Camacho 138 10 piso Col.Lomas de Chapultepec, México, D.F. 11000 TEL: 55-9178-4270
http://pioneer-mexico.com
Pioneer China Holding Co., Ltd.
4F,126 Jiangchang No.3 Road, Shibei Industrial Zone, Shanghai, 200436, P.R.China TEL: 86-21-26066666
http://www.pioneerchina.com/home/
Pioneer (HK) Ltd.
5/F., 909 Cheung Sha Wan Road, Kowloon, Hong Kong TEL: 852-2848-6488
http://www.pioneerhongkong.com.hk/ct/index.php
Pioneer High Fidelity Taiwan Co., Ltd.
8F., No. 407, Ruiguang Rd., Neihu Dist., Taipei City 114, Taiwan (R.O.C.) TEL: 02-2657-3588
http://www.pioneer-twn.com.tw/
K002_B3_En
© 2014 PIONEER HOME ELECTRONICS CORPORATION.
All rights reserved.
<ARB7574-A>
 Loading...