

Pioneer S-LX70-LR User Manual [en, es, fr]

Operating Instructions | Mode d’emploi |
Manual de instrucciones
|
Speaker System
Enceintes acoustiques
Sistemas de parlantes
S-LX -LR

Thank you for buying this Pioneer product. Please read through
T
these operating instructions so you will know how to operate your
model properly. After you have finished reading the instructions,
put them away in a safe place for future reference.
Before you start
• The nominal impedance of this speaker system is 6 Ω. Connect
the speaker system to an amplifier with a load impedance of 6
Ω
(a model with “6 Ω” displayed on the speaker output
terminals).
In order to prevent damage to the speaker system resulting from
input overload, please observe the following precautions:
• Do not supply power to the speaker system in excess of the
maximum permissible input.
• When using a graphic equalizer to emphasize loud sounds in
the high-frequency range, do not use excessive amplifier
volume.
• Do not try to force a low-powered amplifier to produce loud
volumes of sound (the amplifier’s harmonic distortion will be
increased, and you may damage the speaker).
Care of the speaker cabinets
• With normal use, wiping with a soft cloth should be sufficient
to keep the cabinet clean. If necessary, clean with a cloth
dipped in a neutral cleanser diluted five or six times with water,
and wrung out well. Do not use furniture wax or cleansers.
Never use alcohol, thinners, benzine, insecticide sprays or
other chemicals on or near this unit since these will corrode the
surfaces. When using chemically-treated cloths, be sure to
carefully read their accompanying instruction manual.
Caution
Installation
• Do not place the speaker on an unstable surface, as doing so
may cause the speaker to fall and cause damage or bodily
injury.
• Switch off and unplug your AV equipment and consult the
instructions when connecting up components. Make sure you
use the correct connecting cables.
• When placing this unit, avoid areas where it may be likely to fall
and cause injury in the event of a natural disaster (such as an
earthquake). For more information, see page 6.
• Pioneer is not responsible for any accidents or damage that
result from improper installation, misuse or modification of the
product, or natural disasters.
Using the speakers
• Do not use the speaker to output distorted sound for long
periods of time. This can result in damages to the speaker and
poses a potential fire hazard.
• Do not sit or stand on the speaker, or let children play on the
speaker. Doing so could provoke the speaker to fall, causing
damages or bodily injury.
CAUTION
hese speaker terminals carry HAZARDOUS LIVE voltage. To
prevent the risk of electric shock when connecting or
disconnecting the speaker cables, disconnect the power cord
before touching any uninsulated parts.
Cleaning the glossy finish of the speaker system
• When cleaning the finish of the speaker system, gently wipe it
with a dry soft cloth; the supplied cleaning cloth.
• If you use a dusty or hard cloth or if you rub the screen hard, the
finish of the product will be scratched.
• If you clean the surface of the speaker system with a wet cloth,
water droplets on the surface may enter into the product,
resulting in malfunction.
2
En
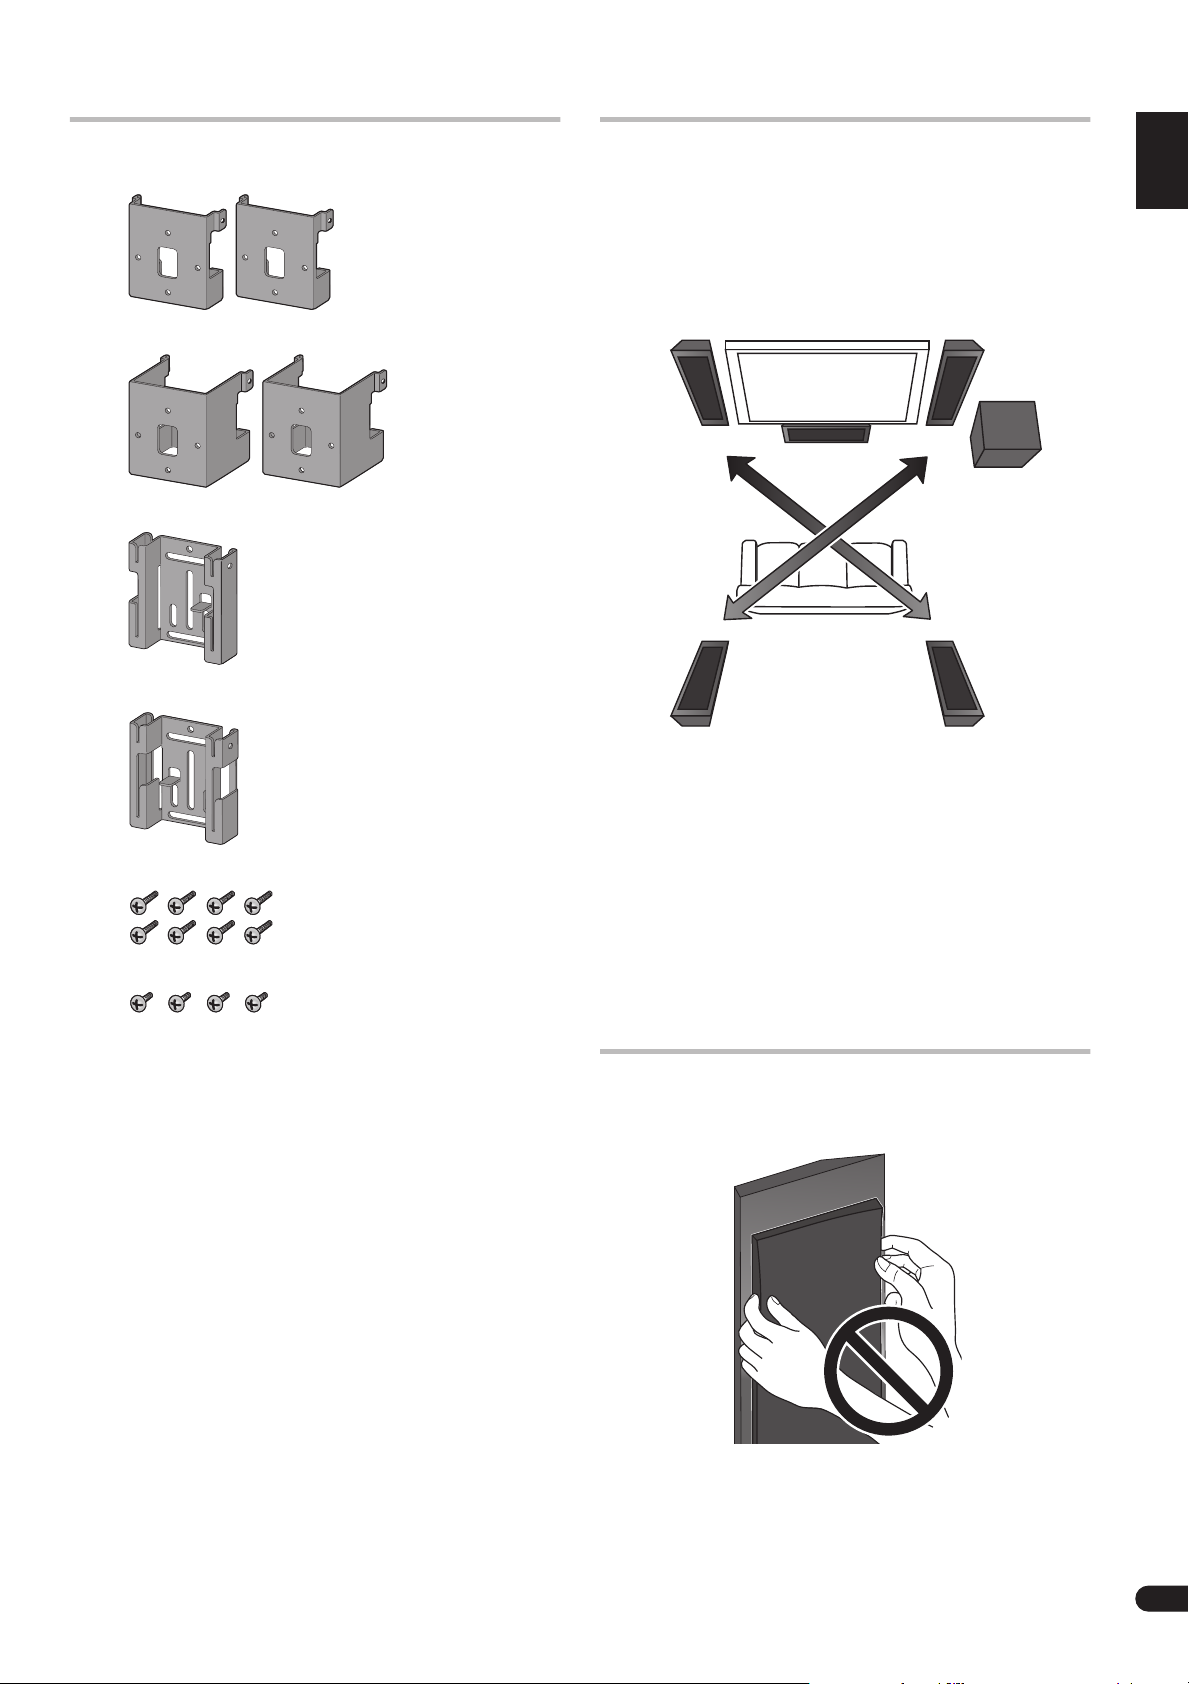
Confirm your accessories
• Bracket (for speakers/S) x 2
• Bracket (for speakers/L) x 2
• Bracket (for wall/Left) x 1
• Bracket (for wall/Right) x 1
When using for home theater
systems
Combine this speaker system with a Pioneer plasma television to
enjoy excellent acoustics that match your interior.
This speaker system can be used as surround speakers of a home
theater system.
Arrange speakers as illustrated below.
Front left
Interchangeable
(Center)
Front right
Interchangeable
(Subwoofer)
E
ng
li
s
h
F
r
a
n
ç
a
i
s
E
s
p
a
ñ
o
l
• Screw (long) x 8
• Screw (short) x 4
• Cleaning cloth x 1
• Wall mounting template (Left) x 1
• Wall mounting template (Right) x 1
• Operating instructions
Surround left
So far as possible, place the front left and front right speakers on
the same plane as the TV screen.
Place the left and right speakers equal distances from your
listening position for good stereo sound. Use speaker cords of the
same length for each speaker.
The front right speaker and the surround left speaker are
interchangeable. The front left speaker and the surround right
speaker are also interchangeable.
When using this speaker system as surround speakers, place the
front right speaker as the surround left speaker, and the front left
speaker as the surround right speaker.
• S-LX70C is recommended for the center speaker.
• S-LX70W is recommended for the subwoofer.
Surround right
Speaker system grill
The speaker system grill cannot be removed. Do not try to forcibly
remove it since doing so may damage the grille.
En
3
Installing the speakers
This speaker system cannot be placed directly on the surface of
floors or shelves. Always attach to a wall using the supplied
brackets, or use speaker stand CP-LX70 (floor stand) (sold
separately) or CP-LX70TS (tabletop stand) (sold separately) when
placing on the surface of floors or shelves.
• This speaker system is magnetically shielded. However,
depending on the installation location, color distortion may
occur if the speaker system is installed extremely close to the
screen of a television set. If this happens, turn the power switch
of the television set OFF, and turn it ON after 15 to 30 minutes.
If the problem persists, place the speaker system away from the
television set.
Mounting on walls
• Make sure that the wall you intend to mount the speakers on
is strong enough to support them.
• Remember that the speaker system is heavy. Improper
installation of the speakers could cause them to fall and
cause damage or injuries to persons nearby.
• Mounting screws are not supplied. Use screws suitable for
the wall material and support the weight of the speaker.
If you are unsure of the qualities and strength of the walls,
consult a professional for advice.
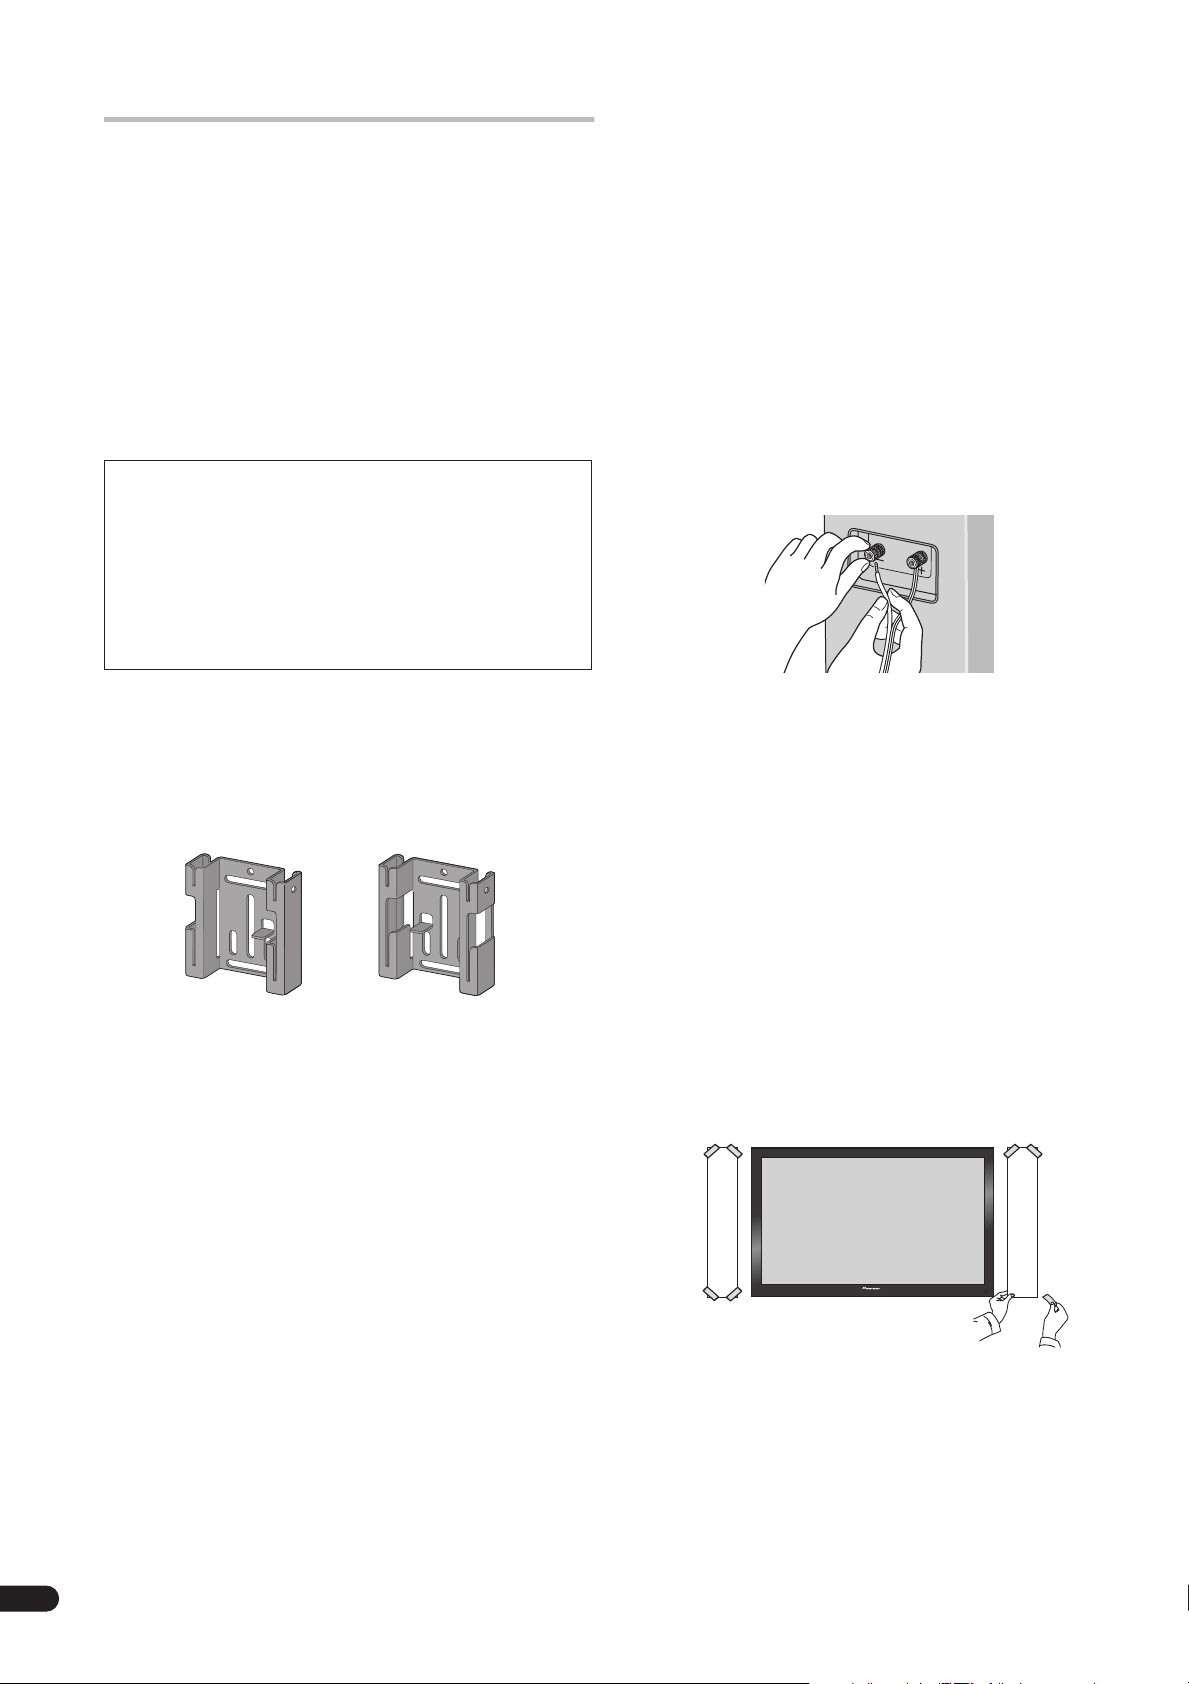
1 Connect speaker cables.
• Speaker cables are not included with this speaker system.
This speaker does not include speaker cables used for connecting
to an amplifier. Take the following factors into consideration when
choosing speaker cables so that you can get the most from your
speaker system:
• Use heavy-gauge speaker cable if possible, and keep the cables
to the minimum necessary length.
• If the length of cable required for left and right speakers differs,
use cables of the same length, matched to the longer distance.
• Cables have differing characteristics. Keep this in mind when
using any cable.
• Connections at speaker and amplifier terminals should be
made as tight and secure as possible to help reduce contact
resistance.
When mounting the speakers onto walls using the brackets,
connect the speaker cables before attaching speakers onto the
brackets.
Once decided on the location of installation (such as the wall space
to the left and right of the TV), attach the speakers following the next
procedures.
Two types of brackets (for speakers) are supplied. When using
alongside with a Pioneer plasma television, use the L-type brackets.
When attaching flush against the wall, use the S-type brackets.
The left and right wall brackets are shaped differently. Be sure to
install the correct bracket on each side.
Bracket (for wall/Left) Bracket (for wall/Right)
• If the cables’ wires happen to be pushed out of the terminals,
allowing the wires to come into contact with each other, it
places an excessive additional load on the amp. This may cause
the amp to stop functioning, and may even damage the amp.
• After connecting the plugs, pull lightly on the cables to make
sure that the ends of the cables are securely connected to the
terminals. Poor connections can create noise and interruptions
in the sound.
• When using a set of speakers connected to an amplifier, you
won’t be able to obtain the normal stereo effect if the polarity
(
+
, –) of one of the speakers (left or right) is reversed.
2 Paste the supplied wall mounting template on the area of
installation.
• The left and right wall mounting templates are shaped
differently.
Attach the template level to the ground using an adhesive such as
tape. Make sure the template is straight to avoid mounting the
speaker crookedly. Pasting the template too close to the TV may
cause the TV to get in the way of the speaker when installing. Make
sure the template and TV do not overlap.
Template (Left) Template (Right)
4
En
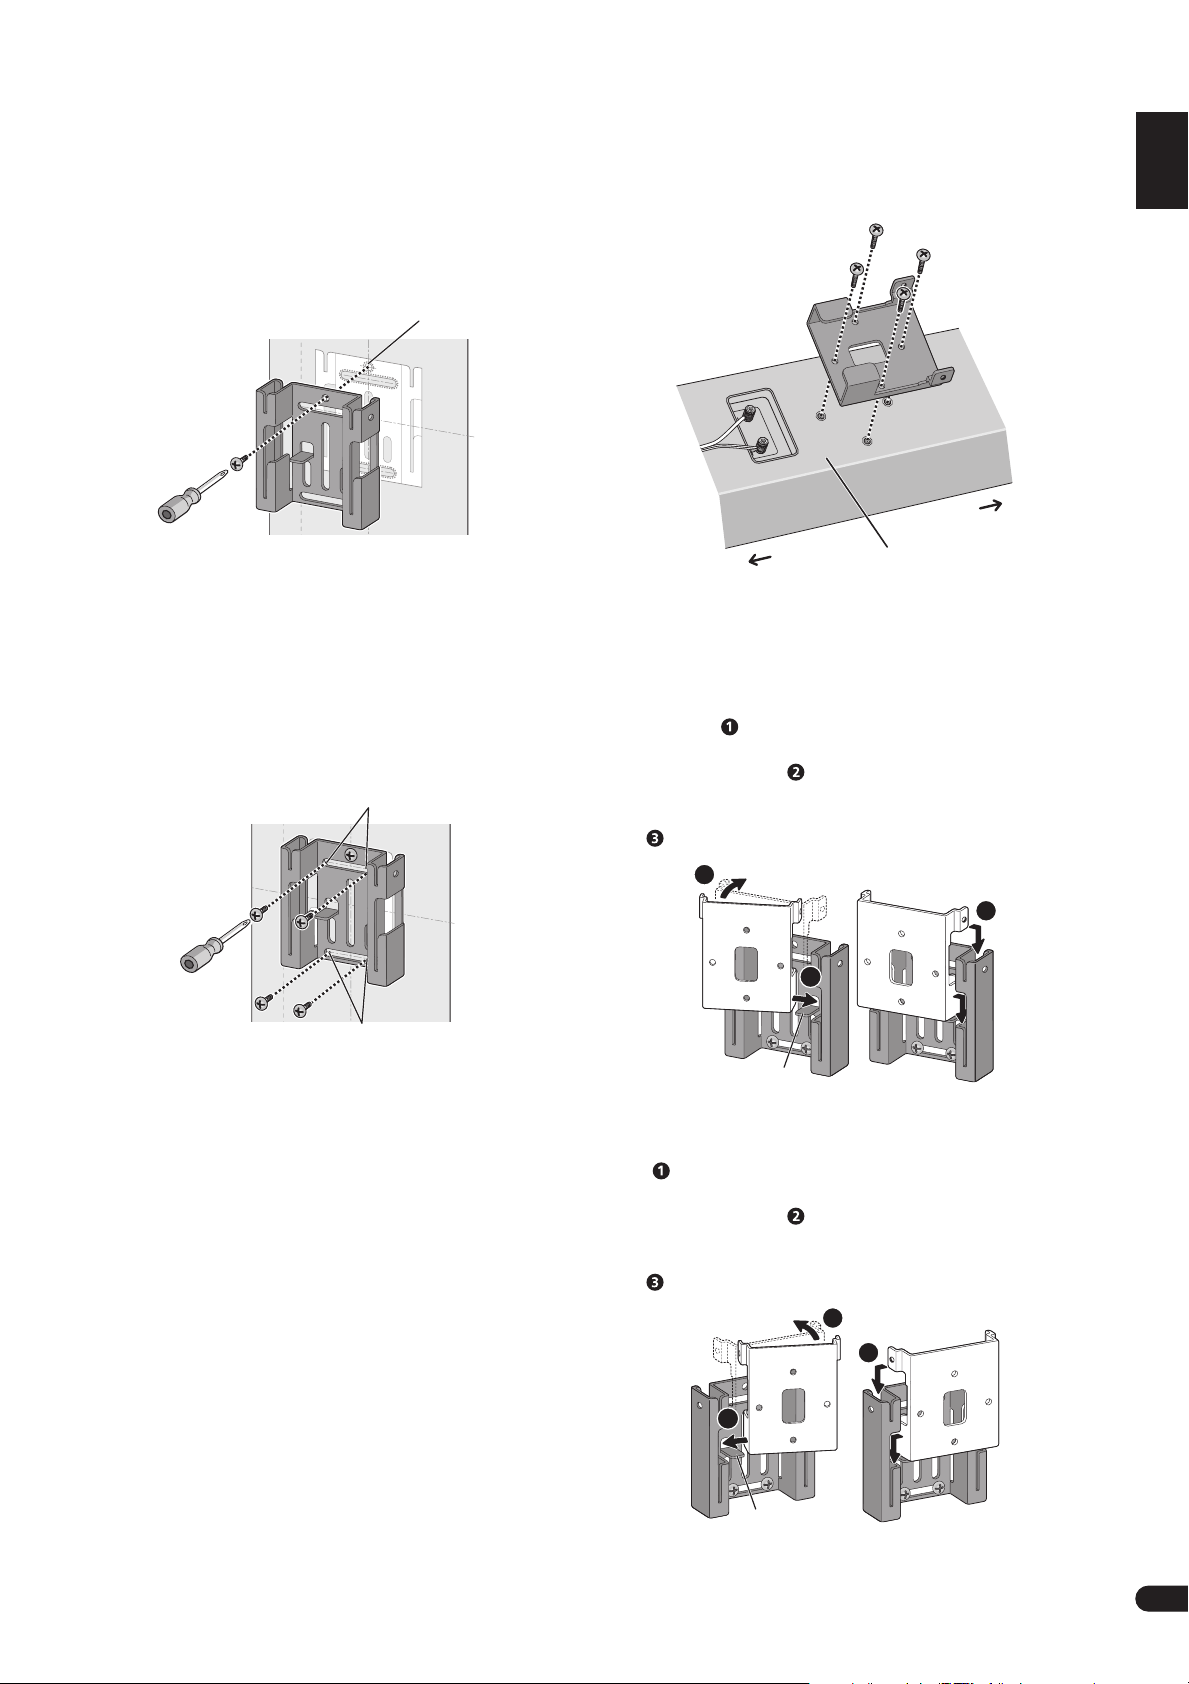
3 Temporarily attach the bracket (for wall) to the specified
location on the template.
Align the bracket (for wall) to the specified location on the template,
and temporarily attach with a screw (6 mm diameter screw
recommended) at location [A].
Adjust the attachment position of the bracket so that it is aligned
with the template.
• The following illustration is an example of attaching the right
bracket (for wall).
[A]
5 Attach the bracket (for speaker) onto speaker.
Attach the bracket on with supplied screws (long) at the 4 screw
holes.
The brackets have a direction in which it should be attached. Attach
correctly using the following illustration as a reference.
To p
E
ng
li
s
h
F
r
a
n
ç
a
i
s
E
s
p
a
ñ
o
l
4 Attach the bracket (for wall).
Attach bracket with screws (6 mm diameter screws recommended)
at the 4 locations [B] (recommended). Firmly tighten the screw [A]
that was used to temporarily attach the bracket to the wall as well.
To avoid speaker from wobbling or falling off, firmly attach bracket
at multiple locations.
• Afterwards, remove the template by tearing along the
perforations.
• The following illustration is an example of attaching the bracket
with screws at five locations: Screw location [A] and the 4
corners of screw location [B] (recommended).
[B]
[B]
Bottom
6 Attach speaker onto bracket (for wall).
• The following illustration does not show the speaker attached to
the bracket (for speakers) for description purposes.
• Mounting the left speaker
Place the bottom right edge of the bracket (attached on the
speaker) on top of the guide of the left bracket (for wall) from a
diagonal angle ( ).
Bring left side of both brackets together so that they become
horizontal to each other ( ).
Move slightly to the right and slide down until stops, while aligning
the right protruding section to the groove of the left bracket (for
wall) ( ).
2
Guide
• Mounting the right speaker
Place the bottom left edge of the bracket (attached on the speaker)
on top of the guide of the right bracket (for wall) from a diagonal
angle ( ).
Bring right side of both brackets together so that they become
horizontal to each other ( ).
Move slightly to the left and slide down until stops, while aligning
the left protruding section to the groove of the right bracket (for
wall) ( ).
Back of speaker
3
1
2
3
1
Guide
5
En
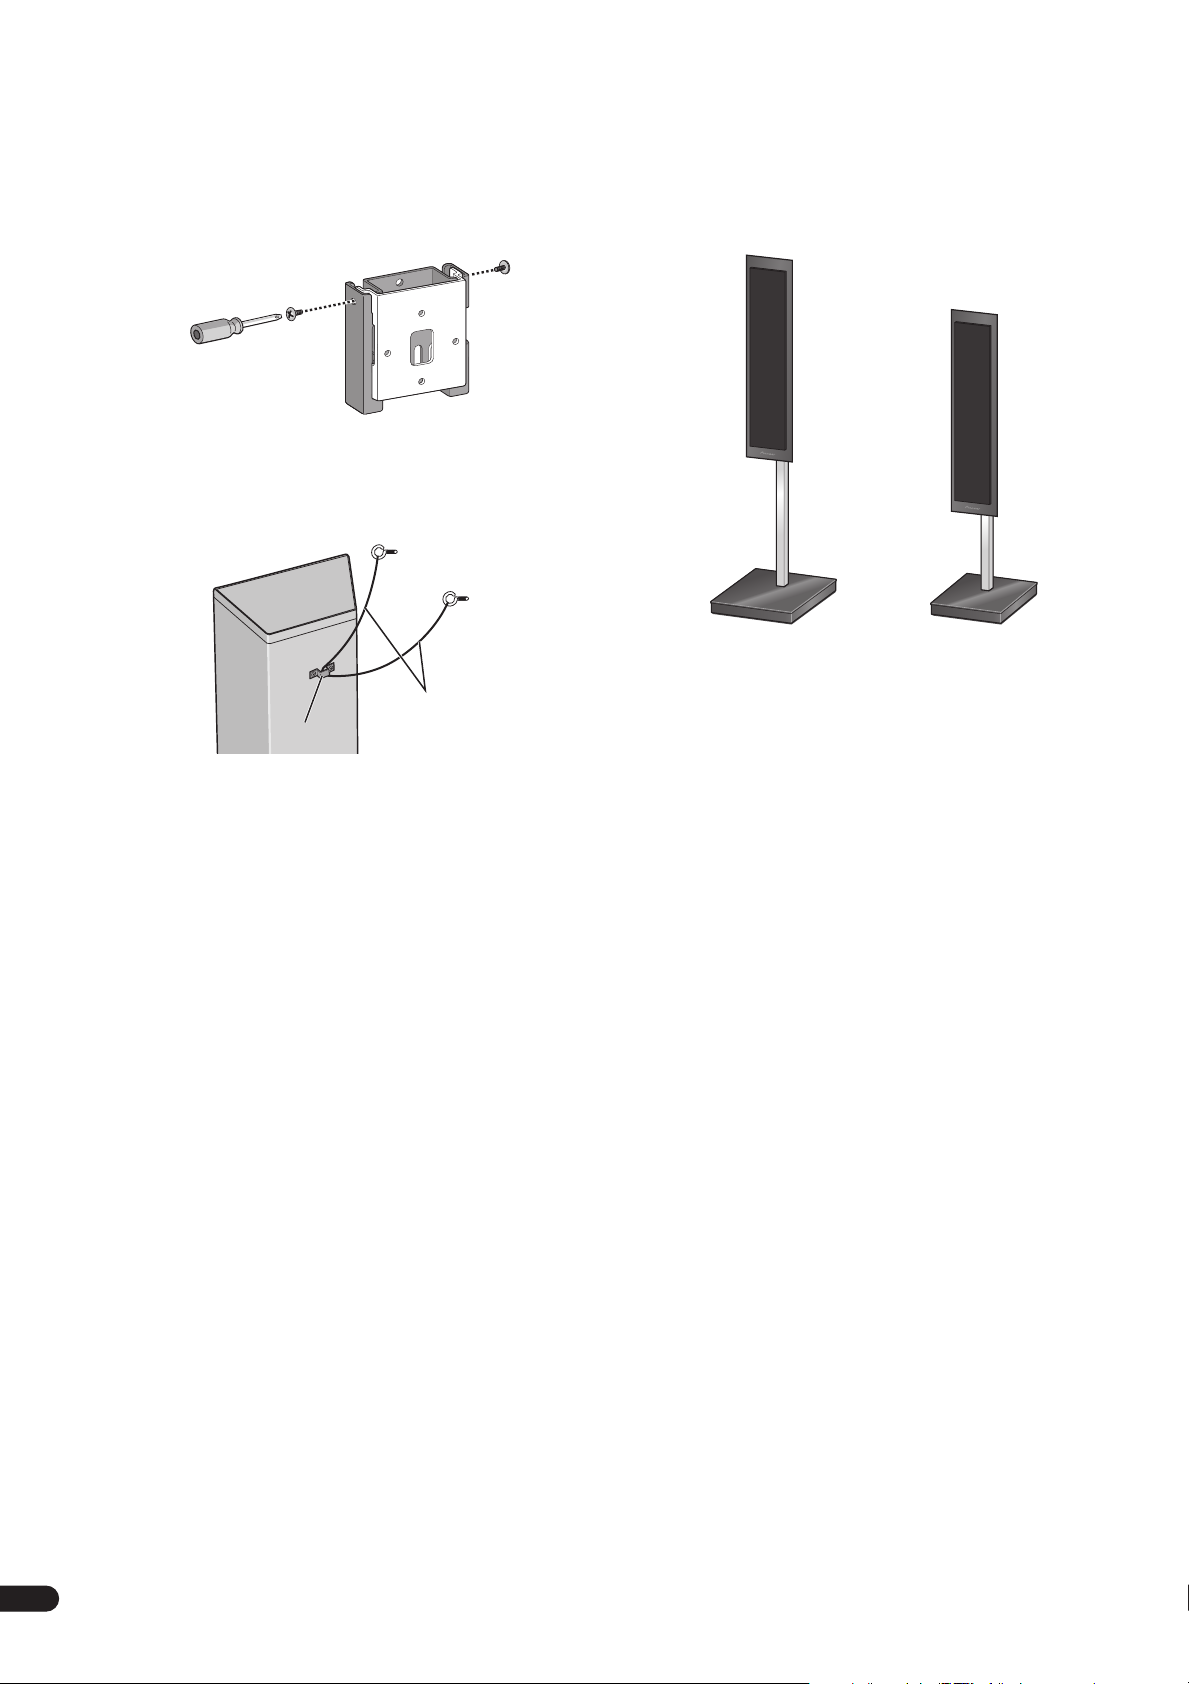
7 Secure brackets together with screws.
Secure the brackets together by using the supplied screws (short)
at the screw holes located on the top of the left and right side of the
brackets.
If you cannot secure both sides (due to such cases as lack of space
to use a screwdriver), make sure that one side is secured with a
screw.
8 Secure speaker to wall with a cord.
Screw two picture hooks or similar into the wall behind the speaker.
Pass a thick cord (not provided) around the hooks and through the
metal catch so that the speaker is stabilized (make sure to test that
it supports the weight of the speaker).
Using separately sold stands
This speaker system can be placed on the floor by using speaker
stand CP-LX70 (floor stand). They can also be placed on shelves by
using speaker stand CP-LX70TS (tabletop stand).
For further information on attachment, refer to the instruction
manual of CP-LX70 or CP-LX70TS.
When using CP-LX70 When using CP-LX70TS
Sufficiently thick
Metal catch
cord (not provided)
• Do not attach the metal catch directly to the wall. It should only
be used in conjunction with reinforced string to prevent the
speaker from falling.
6
En

Specifications
Enclosure. . . . . . . . . . . . . . . . .Closed-box type (magnetically shielded)
Configuration. . . . . . . . . . . . . . . . . . . . . . . . . . . . . . . . . . . . . . . . . . .2-way
Woofer . . . . . . . . . . . . . . . . . . . . . . . . . . . . . . . . . . . . . . . . 13 cm cone x2
Tweeter. . . . . . . . . . . . . . . . . . . . . . . . . . . . . . . . . . . . . . . . . 2.5 cm dome
Nominal impedance. . . . . . . . . . . . . . . . . . . . . . . . . . . . . . . . . . . . . . 6
Frequency response . . . . . . . . . . . . . . . . . . . . . . . . . .40 Hz to 50 000 Hz
Sensitivity. . . . . . . . . . . . . . . . . . . . . . . . . . . . . . . . . . . . . . . . . . . . . 82 dB
Maximum input power . . . . . . . . . . . . . . . . . . . . . . . . . . . . . . . . . . 130 W
Crossover frequency. . . . . . . . . . . . . . . . . . . . . . . . . . . . . . . . . . . 1.7 kHz
Exterior dimensions . . . . . . . . 175 mm (W) x 722 mm (H) x 70 mm (D)
(Excluding protrusions)
Weight . . . . . . . . . . . . . . . . . . . . . . . . . . . . . . . . . . . . . . . . . 5.2 kg (each)
Supplied accessories
Bracket (for speakers/S). . . . . . . . . . . . . . . . . . . . . . . . . . . . . . . . . . . . . 2
Bracket (for speakers/L). . . . . . . . . . . . . . . . . . . . . . . . . . . . . . . . . . . . . 2
Bracket (for wall/Left) . . . . . . . . . . . . . . . . . . . . . . . . . . . . . . . . . . . . . . . 1
Bracket (for wall/Right) . . . . . . . . . . . . . . . . . . . . . . . . . . . . . . . . . . . . . 1
Screw (long) . . . . . . . . . . . . . . . . . . . . . . . . . . . . . . . . . . . . . . . . . . . . . . 8
Screw (short). . . . . . . . . . . . . . . . . . . . . . . . . . . . . . . . . . . . . . . . . . . . . . 4
Cleaning cloth. . . . . . . . . . . . . . . . . . . . . . . . . . . . . . . . . . . . . . . . . . . . . 1
Wall mounting template (Left). . . . . . . . . . . . . . . . . . . . . . . . . . . . . . . . 1
Wall mounting template (Right) . . . . . . . . . . . . . . . . . . . . . . . . . . . . . . 1
Operating instructions
• Appearance and specifications are subject to change without
notice.
E
ng
li
s
h
F
Ω
r
a
n
ç
a
i
s
E
s
p
a
ñ
o
l
Control Technology.
The Technology enables high-grade 5.1ch with no delay in the bass
area.
is a trademark placed on a product with Pioneer’s Phase
Published by Pioneer Corporation.
Copyright © 2007 Pioneer Corporation.
All rights reserved.
7
En

Nous vous remercions d’avoir acheté ces enceintes acoustiques
Pioneer. Veuillez lire attentivement ce mode d’emploi de manière à
pouvoir utiliser votre modèle correctement. Après avoir lu ces
explications, conservez-les en lieu sûr pour éventuellement les
consulter plus tard.
Avant de commencer
• L’impédance nominale de ces enceintes acoustiques est de 6
Ω
. Raccordez ces enceintes à un amplificateur dont
l’impédance de charge est de 6
est indiqué sur les bornes de sortie des enceintes).
Pour éviter d’endommager les enceintes par une surcharge à
l’entrée, observez les précautions suivantes :
• Ne fournissez pas aux enceintes acoustiques un courant
électrique dépassant l’entrée maximale autorisée.
• Si vous utilisez un égaliseur graphique pour accentuer les sons
dans la plage des hautes fréquences, n’élevez pas trop le
volume de l’amplificateur.
• N’essayez pas de pousser un amplificateur à faible puissance
à produire un puissant volume sonore, car la distorsion
harmonique de l’amplificateur en serait distordue et vous
pourriez endommager les enceintes.
Entretien des coffrets des enceintes
• Normalement, il suffit de frotter le coffret de ces enceintes avec
un chiffon doux pour maintenir leur propreté. Au besoin,
trempez le chiffon dans un détergent neutre dilué de 5 à 6 fois
son volume d’eau et essorez bien le chiffon avant de l’utiliser
pour frotter le coffret. N’utilisez pas de cire ou de détergent
pour mobilier. N’utilisez jamais d’alcool, de diluant, benzine,
bombe insecticide ou autres produits chimiques à proximité de
cet appareil car ces produits détérioreraient le fini de surface.
Lors de l’utilisation d’un chiffon traité chimiquement, faites
bien attention de lire le manuel d’instructions qui
l’accompagne.
Ω
(un modèle pour lequel “6 Ω”
Attention
Installation
• Ne placez pas l’enceinte sur une surface instable, car elle
pourrait tomber et provoquer des dégâts ou des blessures.
• Mettez votre système audiovisuel hors tension et débranchezle, puis consultez le mode d’emploi avant de brancher des
composants. Prenez soin d’utiliser correctement les cordons
de raccordement.
• Lors de l’installation de l’appareil, évitez les endroits d’où il
pourrait tomber et provoquer des blessures lors d’une
catastrophe naturelle, telle qu’un séisme. Pour en savoir plus,
voir page 6.
• Pioneer ne peut être tenu responsable pour tout accident ou
dommage résultant d’une installation incorrecte, d’une
mauvaise utilisation, de modifications apportées au produit ou
de désastres naturels.
Utilisation des enceintes
• N’utilisez pas les enceintes pour produire des sons distordus
pendant une longue période. Cela pourrait endommager les
enceintes et créer des risques d’incendie.
• Ne montez pas et ne vous asseyez pas sur les enceintes et ne
laissez pas des enfants jouer sur celles-ci. Cela pourrait
provoquer la chute des enceintes et entraîner des dommages
ou des blessures corporelles.
ATTENTION
Les bornes des haut-parleurs sont sous une tension ACTIVE
DANGEREUSE. Pour éviter tout risque de décharge électrique
lors du branchement et du débranchement des câbles de hautparleur, débranchez le cordon d’alimentation avant de toucher
des parties non isolées.
Nettoyage du fini brillant des enceintes acoustiques
• Lors du nettoyage du fini des enceintes acoustiques, frottez
doucement avec un chiffon doux et sec; le chiffon de nettoyage
fourni.
• Si vous utilisez un chiffon poussiéreux ou dur ou si vous frottez
les enceintes trop fort, le fini du produit peut être rayé.
• Si vous nettoyez la surface des enceintes acoustiques avec un
chiffon mouillé, des gouttes d’eau à la surface peuvent pénétrer
dans le produit et entraîner un mauvais fonctionnement.
2
Fr
 Loading...