

Page 1
SOFTWARE ENTERTAINMENT CONTROLLER
CONTRÔLEUR POUR LOGICIEL DE MIX DJ
SOFTWARE-UNTERHALTUNGS-STEUERGERÄT
UNITÀ DI CONTROLLO PER SOFTWARE D’INTRATTENIMENTO
SOFTWARE-ENTERTAINMENT BEDIENINGSEENHEID
CONTROLADOR DE SOFTWARE MULTIMEDIA
ПРОГРАММНЫЙ РАЗВЛЕКАТЕЛЬНЫЙ ПУЛЬТ
SEP-C1
Operating Instructions
Mode d’emploi
Bedienungsanleitung
Istruzioni per l’uso
Handleiding
Manual de instrucciones
Page 2

Thank you for buying this Pioneer product.
Please read through these operating instructions so you will know how to operate your model properly. After you have finished reading
the instructions, put them away in a safe place for future reference.
In some countries or regions, the shape of the power plug and power outlet may sometimes differ from that shown in the explanatory
drawings. However the method of connecting and operating the unit is the same.
WARNING
IMPORTANT
CAUTION
RISK OF ELECTRIC SHOCK
DO NOT OPEN
The lightning flash with arrowhead symbol,
within an equilateral triangle, is intended to
alert the user to the presence of uninsulated
"dangerous voltage" within the product's
enclosure that may be of sufficient
magnitude to constitute a risk of electric
shock to persons.
1)
Read these instructions.
2)
Keep these instructions.
3)
Heed all warnings.
4)
Follow all instructions.
5)
Do not use this apparatus near water.
6)
Clean only with dry cloth.
7)
Do not block any ventilation openings.
Install in accordance with the
CAUTION:
TO PREVENT THE RISK OF ELECTRIC
SHOCK, DO NOT REMOVE COVER (OR
BACK). NO USER-SERVICEABLE PARTS
INSIDE. REFER SERVICING TO QUALIFIED
SERVICE PERSONNEL.
Only use attachments/accessories
11)
specified by the manufacturer.
Use only with the cart, stand, tripod,
12)
bracket, or table specified by the
manufacturer, or sold with the apparatus.
When a cart is used, use caution when
moving the cart/apparatus combination to
avoid injury from tip-over.
manufacturer’s instructions.
8)
Do not install near any heat sources such
as radiators, heat registers, stoves,
or other apparatus (including amplifiers)
that produce heat.
9)
Do not defeat the safety purpose of the
polarized or grounding-type plug.
A polarized plug has two blades with one
wider than the other. A grounding type
plug has two blades and a third grounding
prong. The wide blade or the third prong
are provided for your safety. If the provided
plug does not fit into your outlet, consult
an electrician for replacement of the
obsolete outlet.
10)
Protect the power cord from being walked
on or pinched particularly at plugs,
convenience receptacles, and the point
where they exit from the apparatus.
NOTE: This equipment has been tested and found to comply with the limits for a Class B digital device, pursuant to
Part 15 of the FCC Rules. These limits are designed to provide reasonable protection against harmful interference in
a residential installation. This equipment generates, uses, and can radiate radio frequency energy and, if not
installed and used in accordance with the instructions, may cause harmful interference to radio communications.
However, there is no guarantee that interference will not occur in a particular installation. If this equipment does
cause harmful interference to radio or television reception, which can be determined by turning the equipment off
and on, the user is encouraged to try to correct the interference by one or more of the following measures:
– Reorient or relocate the receiving antenna.
– Increase the separation between the equipment and receiver.
– Connect the equipment into an outlet on a circuit different from that to which the receiver is connected.
– Consult the dealer or an experienced radio/TV technician for help.
Unplug this apparatus during lightning
13)
storms or when unused for long periods of
time.
Refer all servicing to qualified service
14)
personnel. Servicing is required when the
apparatus has been damaged in any way,
such as power-supply cord or plug is
damaged, liquid has been spilled or
objects have fallen into the apparatus, the
apparatus has been exposed to rain or
moisture, does not operate normally, or
has been dropped.
The exclamation point within an equilateral
triangle is intended to alert the user to the
presence of important operating and
maintenance (servicing) instructions in the
literature accompanying the appliance.
D3-4-2-1-1_En-A
P1-4-2-2_En
D8-10-1-2_En
This equipment is not waterproof. To prevent a fire
or shock hazard, do not place any container filled
with liquid near this equipment (such as a vase or
flower pot) or expose it to dripping, splashing, rain
or moisture.
IMPORTANT NOTICE
THIS EQUIPMENT IS LOCATED ON THE BOTTOM.
PLEASE WRITE THIS SERIAL NUMBER ON YOUR
ENCLOSED WARRANTY CARD AND KEEP IN A
SECURE AREA. THIS IS FOR YOUR SECURITY.
Information to User
Alteration or modifications carried out without
appropriate authorization may invalidate the user’s
right to operate the equipment.
CAUTION: This product satisfies FCC regulations
when shielded cables and connectors are used to
connect the unit to other equipment. To prevent
electromagnetic interference with electric appliances
such as radios and televisions, use shielded cables
and connectors for connections.
This Class B digital apparatus complies with
Canadian ICES-003.
Cet appareil numérique de la Classe B est conforme
à la norme NMB-003 du Canada.
WARNING: Handling the cord on this product or
cords associated with accessories sold with the
product will expose you to chemicals listed on
proposition 65 known to the State of California and
other governmental entities to cause cancer and
birth defect or other reproductive harm.
Wash hands after handling
WARNING
To prevent a fire hazard, do not place any naked
flame sources (such as a lighted candle) on the
equipment.
VENTILATION CAUTION
When installing this unit, make sure to leave space
around the unit for ventilation to improve heat
radiation (at least 5 cm at rear, and 3 cm at each
side).
WARNING
Slots and openings in the cabinet are provided for
ventilation to ensure reliable operation of the
product, and to protect it from overheating. To
prevent fire hazard, the openings should never be
blocked or covered with items (such as newspapers,
table-cloths, curtains) or by operating the
equipment on thick carpet or a bed.
– THE SERIAL NUMBER FOR
This product complies with the Low Voltage Directive
2006/95/EC and EMC Directive 2004/108/EC.
K015 En
D3-4-2-1-3_B_En
D1-4-2-6-1_En
D8-10-2_En
D8-10-3a_En
D8-10-1-3_EF
D36-P4_A_En
D3-4-2-1-7a_A_En
D3-4-2-1-7b_A_En
D3-4-2-1-9a_A_En
If you want to dispose this product, do not mix it with general household waste. There is a separate collection system for used
electronic products in accordance with legislation that requires proper treatment, recovery and recycling.
Private households in the member states of the EU, in Switzerland and Norway may return their used electronic products free of charge to
designated collection facilities or to a retailer (if you purchase a similar new one).
For countries not mentioned above, please contact your local authorities for the correct method of disposal.
By doing so you will ensure that your disposed product undergoes the necessary treatment, recovery and recycling and thus prevent potential
negative effects on the environment and human health.
K058_A_En
Page 3
Operating Environment
Operating environment temperature and humidity:
+5 ºC – +35 ºC (+41 ºF – +95 ºF); less than 85 %RH
(cooling vents not blocked)
Do not install this unit in a poorly ventilated area, or in
locations exposed to high humidity or direct sunlight (or
strong artificial light)
D3-4-2-1-7c_A_En
FEDERAL COMMUNICATIONS COMMISSION DECLARATION OF CONFORMITY
This device complies with part 15 of the FCC Rules. Operation is subject to the following two conditions: (1) This
device may not cause harmful interference, and (2) this device must accept any interference received, including
interference that may cause undesired operation.
Product Name: SOFTWARE ENTERTAINMENT CONTROLLER
Model Number: SEP-C1
Responsible Party Name:
PIONEER ELECTRONICS SERVICE, INC.
Address: 1925 E. DOMINGUEZ ST. LONG BEACH, CA 90801-1760, U.S.A.
Phone: 1-800-421-1404
S001_En
Selecting fine audio equipment such as the unit
you’ve just purchased is only the start of your
musical enjoyment. Now it’s time to consider how
you can maximize the fun and excitement your
equipment offers. This manufacturer and the
Electronic Industries Association’s Consumer
Electronics Group want you to get the most out of
your equipment by playing it at a safe level. One that
lets the sound come through loud and clear without
annoying blaring or distortion-and, most importantly,
without affecting your sensitive hearing.
Sound can be deceiving. Over time your hearing
“comfort level” adapts to higher volumes of sound.
So what sounds “normal” can actually be loud and
harmful to your hearing. Guard against this by
setting your equipment at a safe level BEFORE your
hearing adapts.
To establish a safe level:
• Start your volume control at a low setting.
• Slowly increase the sound until you can hear it
comfortably and clearly, and without distortion.
Once you have established a comfortable sound
level:
• Set the dial and leave it there.
Taking a minute to do this now will help to prevent
hearing damage or loss in the future. After all, we
want you listening for a lifetime.
We Want You Listening For A Lifetime
Used wisely, your new sound equipment will
provide a lifetime of fun and enjoyment. Since
hearing damage from loud noise is often
undetectable until it is too late, this manufacturer
and the Electronic Industries Association’s
Consumer Electronics Group recommend you avoid
prolonged exposure to excessive noise. This list of
sound levels is included for your protection.
Decibel
Level Example
30 Quiet library, soft whispers
40
Living room, refrigerator, bedroom away from traffic
50 Light traffic, normal conversation, quiet office
60 Air conditioner at 20 feet, sewing machine
70 Vacuum cleaner, hair dryer, noisy restaurant
80
Average city traffic, garbage disposals, alarm clock
at two feet.
THE FOLLOWING NOISES CAN BE DANGEROUS
UNDER CONSTANT EXPOSURE
90
Subway, motorcycle, truck traffic, lawn mower
100 Garbage truck, chain saw, pneumatic drill
120 Rock band concert in front of speakers,
thunderclap
140 Gunshot blast, jet plane
180 Rocket launching pad
Information courtesy of the Deafness Research Foundation.
When using this product follow the instructions
written on the underside of the unit, which
concern rated voltage, etc.
D3-4-2-2-4_En
Page 4

CONTENTS
http://www.prodjnet.com/support/
The Pioneer website listed above provides answers to frequently
asked questions, information about software, and other up-to-date
data of assistance to our customers.
CONTENTS
FEATURES ....................................................................5
SPECIFICATIONS ..........................................................7
COMFIRM ACCESSORIES.............................................7
INSTALLATION GUIDELINES........................................8
CONNECTIONS.............................................................9
PARTS AND THEIR FUNCTIONS..................................10
FRONT PANEL ............................................................................. 10
REAR PANEL ............................................................................... 12
ABOUT DJS SOFTWARE .............................................13
SOFTWARE END USER LICENSE AGREEMENT....................... 13
COPYRIGHT WARNING............................................................... 14
SYSTEM REQUIREMENTS (Minimum Operating
Environment)................................................................................ 14
INSTALLING DJS SOFTWARE .................................................... 15
NOTES REGARDING TRIAL PERIOD AND USER
REGISTRATION ............................................................................ 15
REGARDING ONLINE SUPPORT................................................ 16
DISCLAIMER ................................................................................ 16
ABOUT THE DRIVER PROGRAM.................................17
SOFTWARE END USER LICENSE AGREEMENT....................... 17
DRIVER INSTALLATION .............................................................. 17
USING DJ SOFTWARE ................................................20
PREPARING YOUR DJ SOFTWARE PROGRAM ....................... 21
CONTROLLING YOUR COMPUTER USING THE DEDICATED
COMMUNICATIONS PROTOCOL............................................... 21
USING MIDI FOR COMPUTER CONTROL ................................. 22
MIDI MESSAGE TABLE ............................................................... 23
USING THE UTILITY....................................................25
SETTING METHOD....................................................................... 25
SETTINGS ..................................................................................... 25
TO PERFORM A FACTORY RESET ............................................. 26
TROUBLESHOOTING...................................................27
ABOUT THE LCD SCREEN.......................................................... 27
ABOUT OEL (ORGANIC EL) SCREENS...................................... 27
SEP-C1 UPDATES........................................................................ 27
DISCLAIMER ..............................................................28
4
En
Page 5

FEATURES
FEATURES
This unit is a professional mobile DJ software entertainment controller featuring a wide range of the performance functions demanded at
parties and events, together with superb operational characteristics.
Continuing the tradition of Pioneer’s CDJ series of players in its panel layout, functions, and operations, the unit can be connected to a
computer using USB bus power, allowing genuine DJ play of music tracks loaded in the accessory DJS software program without the
need to operate mouse or keyboard.
External Monitor
English
Special I/F DJ software
PIONEER DJS
OUT
Audio I/F Unit
MIDI I/F DJ software
USB bus-power
CUE/LOOP
MEMORY CALL
TRACK SEARCH
Video
EJECT
TIME
A.CUE
IN/CUE
OUT/ADJUST
LOOP
HOT LOOP
SEARCH
QUE
RELOOP/EXIT
TEMPO
MASTER
6/10/16WIDE
TEMPO
BROWSE MIX EFFECT UTILITY
MT
PITCH BEND
S
C
R
A
T
C
H
J
O
G
B
R
E
A
K
0
A
LOAD
FWD TEMPOREV
EJECT
TIME
A.CUE
CUE/LOOP
IN/CUE
OUT/ADJUST
MEMORY CALL
TRACK SEARCH
SEARCH
QUE
B
LOAD
SEP-C1
LOOP
HOT LOOP
RELOOP/EXIT
TEMPO
MASTER
6/10/16WIDE
TEMPO
MT
PITCH BEND
S
C
R
A
T
C
H
J
O
G
B
R
E
A
K
0
FWD TEMPOREV
SEP-C1
Power amplifier
Mixer
Speaker
5
En
Page 6
FEATURES
VARIOUS DJ SOFTWARE CONTROL
The accessory Pioneer DJS software program as well as other DJ
programs can be operated freely without the need for a control
disc. MIDI-type DJ programs are also supported.
MEMO
• Most of the data regarding button and TEMPO adjust slider
operations on this unit can be output to external devices using
USB MIDI or dedicated formats. In order to use this unit to
control DJ software, it is necessary to install a driver program.
HIGH FUNCTION DISPLAY
Center Display
Features a wide 4.3” color LCD display with high luminance for
easy visibility. The intelligent GUI and rotary selector dial allows for
no-stress track selection.
Controller Display A/B
The elapsed time and tempo display feature top-quality, area-color
full-segment OEL displays with high response and terrific visibility.
In concert with the center display, these displays and indicators
encourage no-stress DJ play in a wide variety of lighting
environments.
JOG DIAL
Furnished with large 80 mm jog dial with scratch function,
allowing operations with the same sense of touch as an analog
turntable.
MONITOR OUT
By outputting the center display’s BROWSE screen to a larger
external monitor, operations can be performed with greater ease.
DJS FUNCTION SUPPORT
Using the accessory DJS software program allows not only DJ
play, but a wide variety of other control operations as well,
including track selection and mixing using the center display.
DJ CONTROL
In addition to basic functions like tempo control, cue operations,
and loop play, most DJ play functions of DJS are supported by the
unit including scratch and pitch bend using the jog dial.
TRACK INFORMATION
When playing tracks using DJS, time, title, artist name and other
track information can be shown on the display.
BROWSE CONTROL
The unit can control DJS track lists or play lists. Lists can also be
viewed on the center display and track selection performed
without looking at the computer screen.
MIX CONTROL
The DJS mixer function can be controlled. A single button can be
used to perform mixing, selecting from four mix modes.
EFFECT CONTROL
DJS effects can be controlled. Selection of effects and effect beat
switching, level/tempo adjustment can all be performed using the
unit’s rotary selector and buttons.
MEMO
• When controlling other (non-DJS) brands of DJ software,
consult the individual program’s operating instructions for
information regarding function support.
6
En
Page 7
SPECIFICATIONS / COMFIRM ACCESSORIES
SPECIFICATIONS
1 General
Model . . . . . . . . . . . . . . . . . . . . . . . . . . . . . . . . . . . . . . . . . . . SEP-C1
Name . . . . . . . . . . . . . . . . . . . . . Software entertainment controller
Power voltage. . . . . . . . . . . . . . . . . . . . . . . DC 5 V (USB bus-power)
Current consumption . . . . . . . . . . . . . . . . . . . . . . . . . . . . . . 600 mA
Power consumption . . . . . . . . . . . . . . . . . . . . . . . . . . . . . . . . . . 3 W
Operating temperature . . . . . . +5 °C to +35 °C (+41 °F to +95 °F)
Operating humidity . . . . . 5 % to 85 % RH (without condensation)
Mass (Weight) . . . . . . . . . . . . . . . . . . . . . . . . . . . . . . 1.7 kg (3.75 lb.)
Maximum external dimensions
. . . . . . . . . . . . . . . 482.6 mm (W) x 133.0 mm (H) x 83.5 mm (D)
19.0 in (W) x 5.24 in (H) 3.29 in (D)
2 USB Upstream Section
Connector. . . . . . . . . . . . . . . . . . . .USB B-type port (PC connector)
3 Video Output Section
Output connector . . . . . . . . . . . . . . . . . . . . . . . . . . . . . . . .RCA jack
Composite output level . . . . . . . . . . . . . . . . . . . . . . . . .1 Vp-p (75 Ω)
4 Center Display Section
Type . . . . . . . . . . . . . . . . . . . . . . . . . . TFT LCD active matrix display
Size . . . . . . . . . . . . . . . . . . . . . . . . . . . . . . . . . . . . . . . . . 4.3” (WIDE)
Supported languages. . . . . . . . . . . 9 languages including English,
5 Controller Display A/B Section
Type . . . . . . . . . . . . . . . . . . . . . . . . . OEL (Organic EL) Full segment
6 Other Connectors
5 V connector . . . . . . . . . . . . . . . . . . . . . . . . . . . . . . . . . . . . .DC jack
Specifications and appearance are subject to change without
notice.
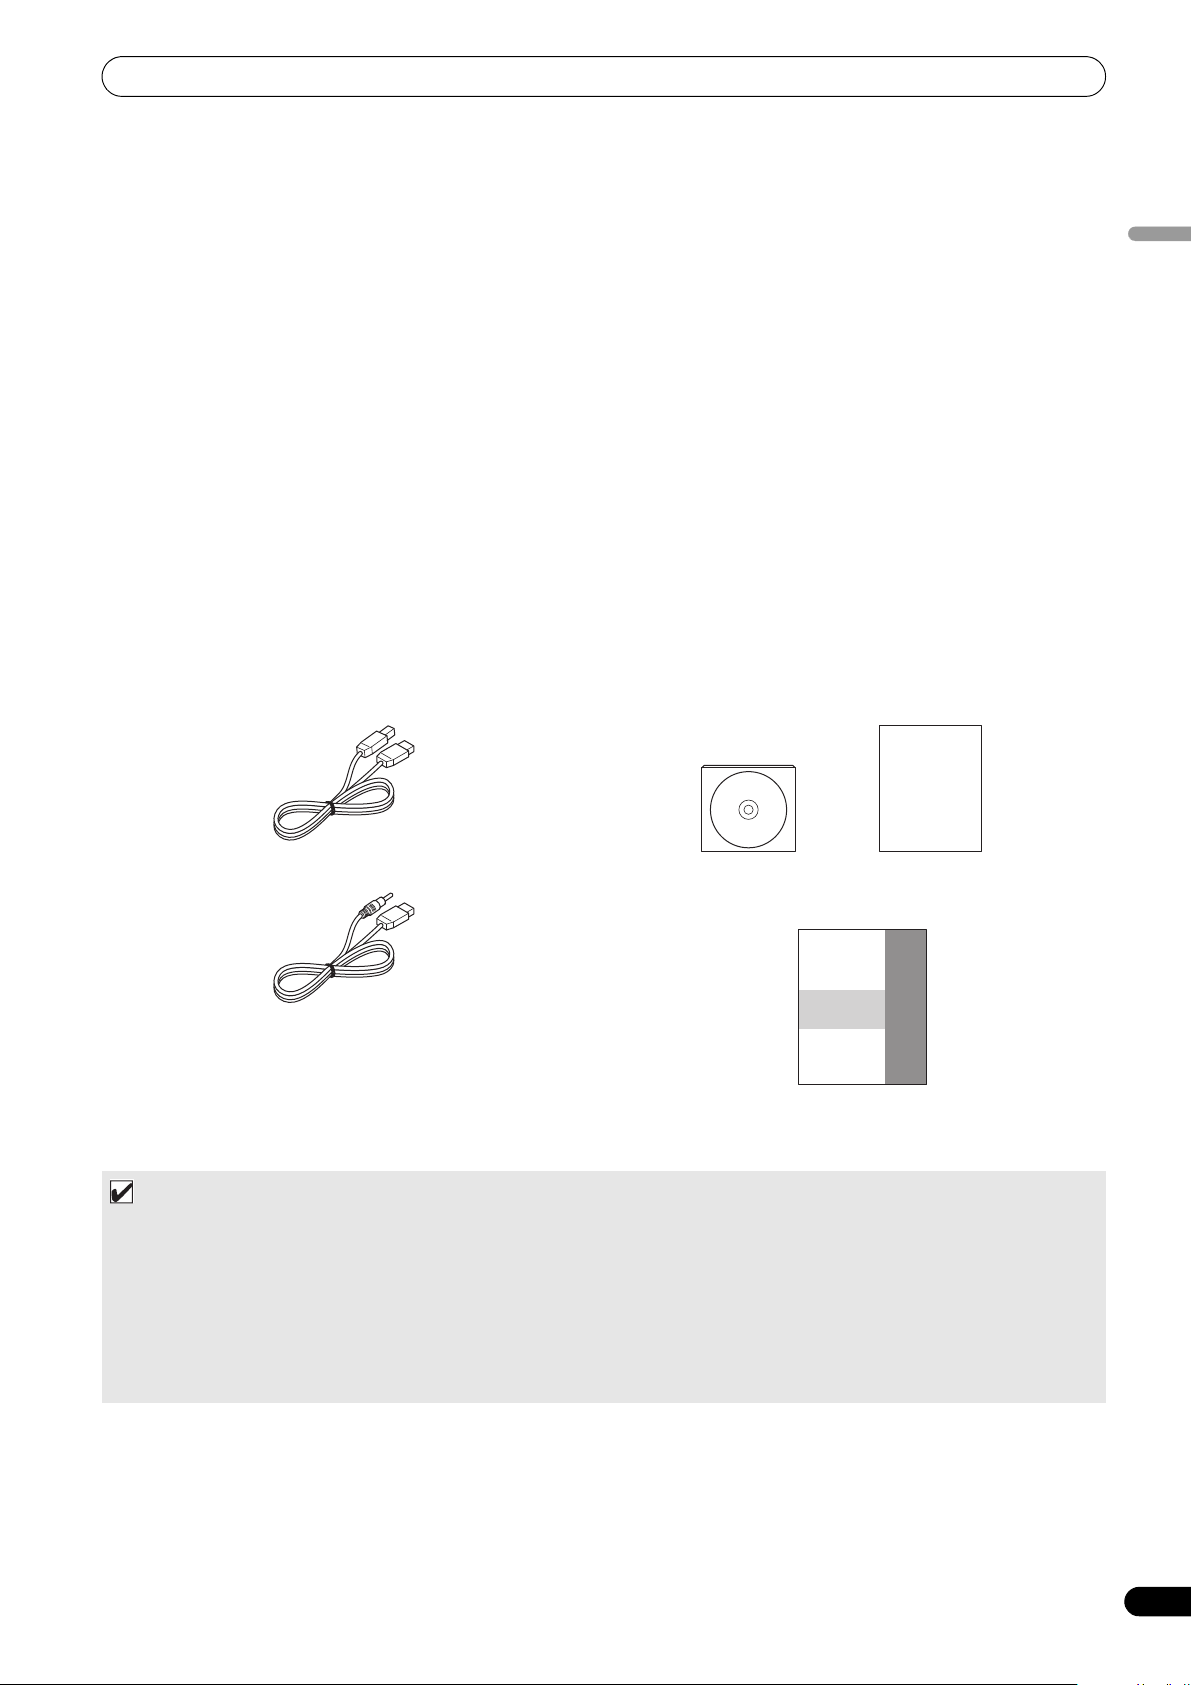
COMFIRM ACCESSORIES
Confirm that all furnished accessories are present.
English
Japanese, and Chinese (simplified Mandarin)
USB cable
USB auxiliary power cable
MEMO
• Three instruction manuals are furnished (including the one you are reading). Please study these manuals in accord with your
manner of use:
– SEP-C1 Operating Instructions (this manual)
Read this first.
– SEP-C1 DJS Control Guide (PDF file recorded on accessory CD-ROM)
Basic operation instructions when using DJS together with the SEP-C1.
– DJS User’s Manual (PDF file recorded on accessory CD-ROM)
Full functional explanation and operation manual for DJS software.
DJS: 1 Set
CD-ROM DJS installation key sticker
Operating Instructions (this manual)
SEP-C1
Warranty card
En
7
Page 8
INSTALLATION GUIDELINES
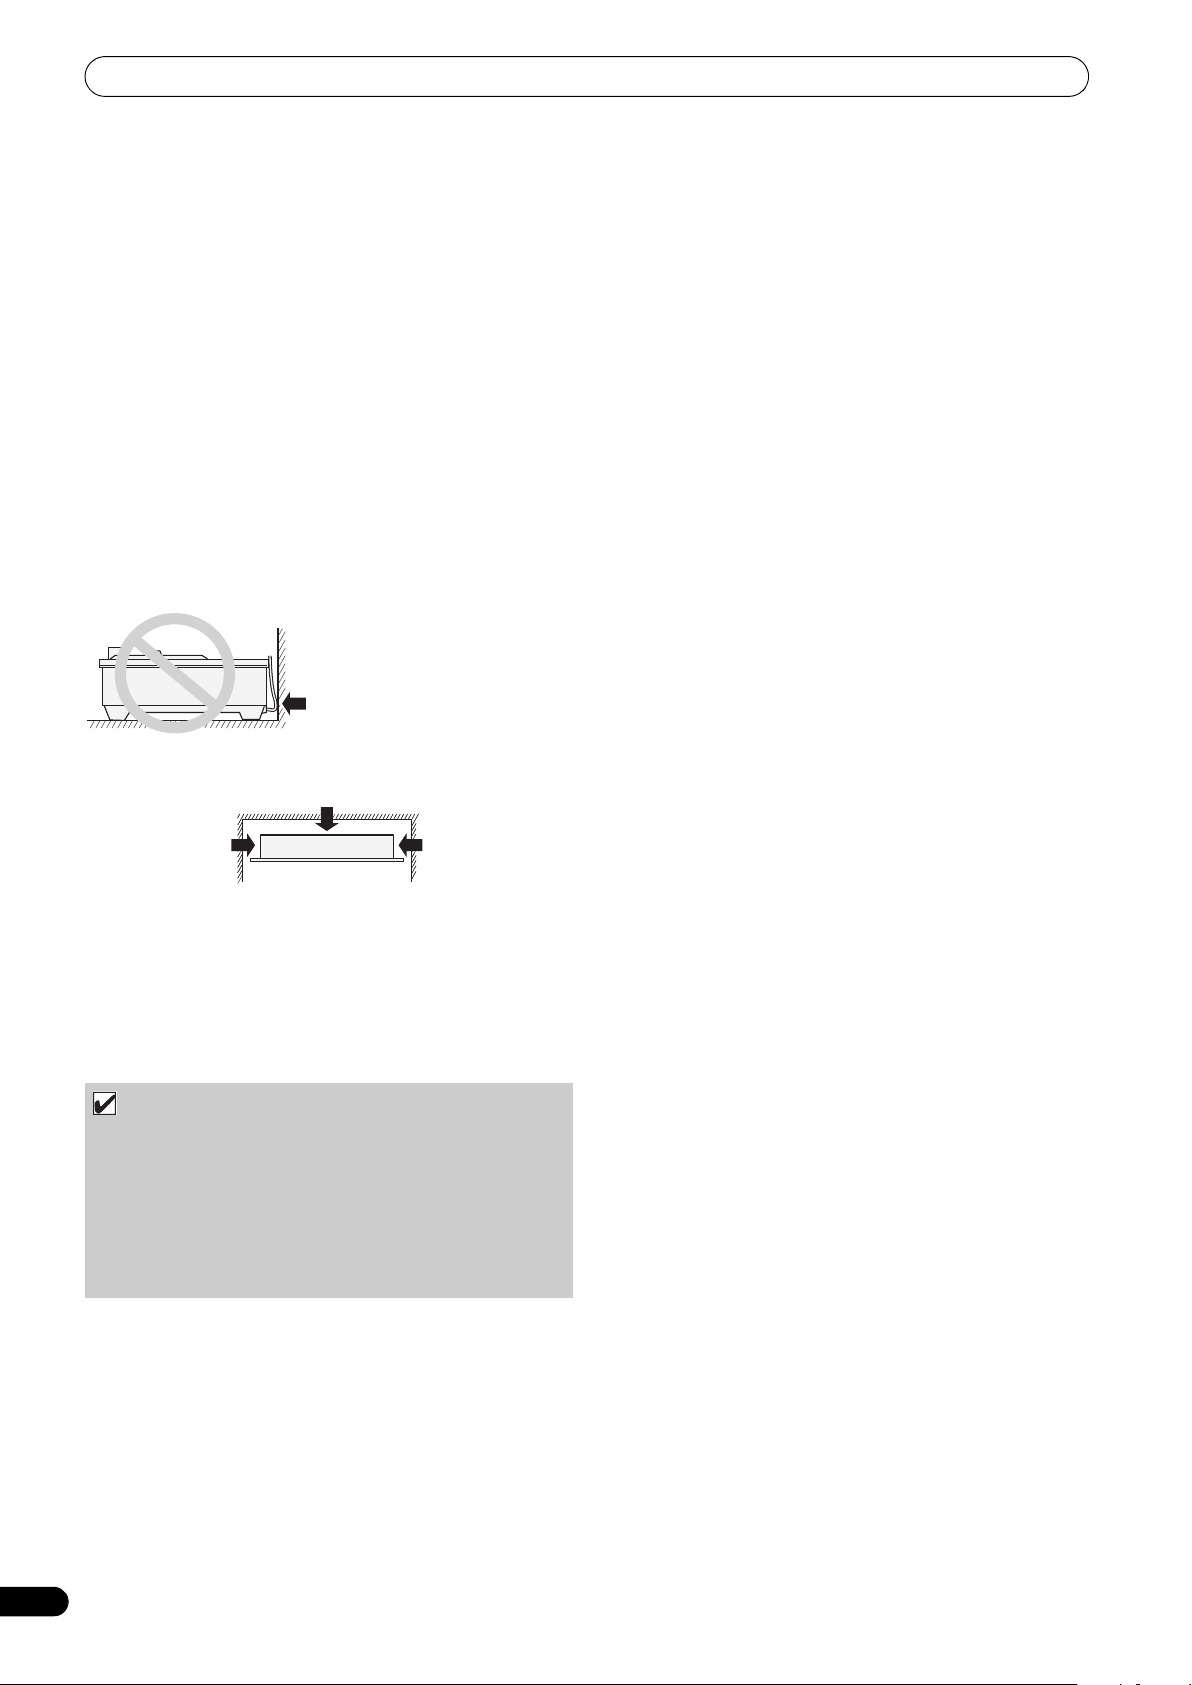
Do not allow contact
with vibrating surfaces.
To assure proper
heat-dissipation, be
sure to maintain this
open space.
To assure proper
heat-dissipation, be
sure to maintain this
open space.
To assure proper heatdissipation, be sure to
maintain this open space.
INSTALLATION GUIDELINES
• Placing and using the unit for long periods on heat-generating
sources such as amplifiers or near spotlights, etc. will affect
product performance. Avoid placing the unit on heat-generating
sources.
• Install this unit as far as possible away from tuners and TV sets.
A unit installed in close proximity to such equipment may cause
noise or degradation of the picture. Noise may be noticeable
when an indoor antenna is used. In such cases, make use of an
outdoor antenna or turn off power to the unit.
• When the unit is used in a loud-sound environment, e.g., near a
speaker, sound skip may occur. Install the unit away from the
speaker or reduce the listening volume.
• Place this unit on a level surface and a stable platform.
• Do not place heavy objects on top of the unit.
Be sure the unit, including USB cable, does not touch vibrating
materials. Any cause of vibration other than the insulators may
cause sound skip.
Take special care when using the unit while it is installed in a
carrying case.
About carrying cases
The jog dial is equipped with a delicate switch. If the unit is placed
in a carrying case, take precautions to prevent any pressure from
being exerted on the surface of the jog dial.
Condensation
When this unit is brought into a warm room from previously cold
surroundings or when the room temperature rises sharply,
condensation may form inside the unit and impair its
performance. In such cases, allow the unit to stand for about an
hour or raise the room temperature gradually.
Cleaning the unit
To clean the unit wipe with a polishing or a soft, dry cloth. For
stubborn dirt, moisten a soft cloth with a weak solution of neutral
detergent (diluted in five to six parts water), wring the cloth well,
and wipe away the dirt. Use a dry cloth to wipe the surface dry. Do
not use volatile liquids such as benzene or thinner which will
damage to the unit.
Cleaning the Jog Dial
To clean the jog dial wipe with a polishing or a soft, dry cloth. For
stubborn dirt, moisten a soft cloth with a weak solution of neutral
detergent (diluted in five to six parts water), wring the cloth well,
and wipe away the dirt. Use a dry cloth to wipe the surface dry.
Applying alcohol, paint thinner, benzene, insecticides, or other
stringent substances to the jog dial may cause the markings or
finishing of the dial to peel or become discolored, and the use of
any such substances should accordingly be avoided.
Installing the SEP-C1 in an EIA rack
The screw holes on the front panel of the SEP-C1 are designed for
use in attaching the unit to a 19-inch EIA rack.
This unit complies with 3U specifications. Maximum depth of unit
is 83.5 mm.
• Attach the unit to the rack using screws of the appropriate size
(screws not provided with the unit).
NOTE
• Do not install the unit immediately above a power amplifier,
since damage may occur from the heat produced by the
amplifier, or humming or other noise may be caused.
• When transporting the unit, remove the unit from its rack.
Attempting to move the rack with the unit installed may
result in damage to the unit.
• If the unit must be moved while still in its rack, take
precautions to protect the unit from vibration and impact.
8
En
Page 9
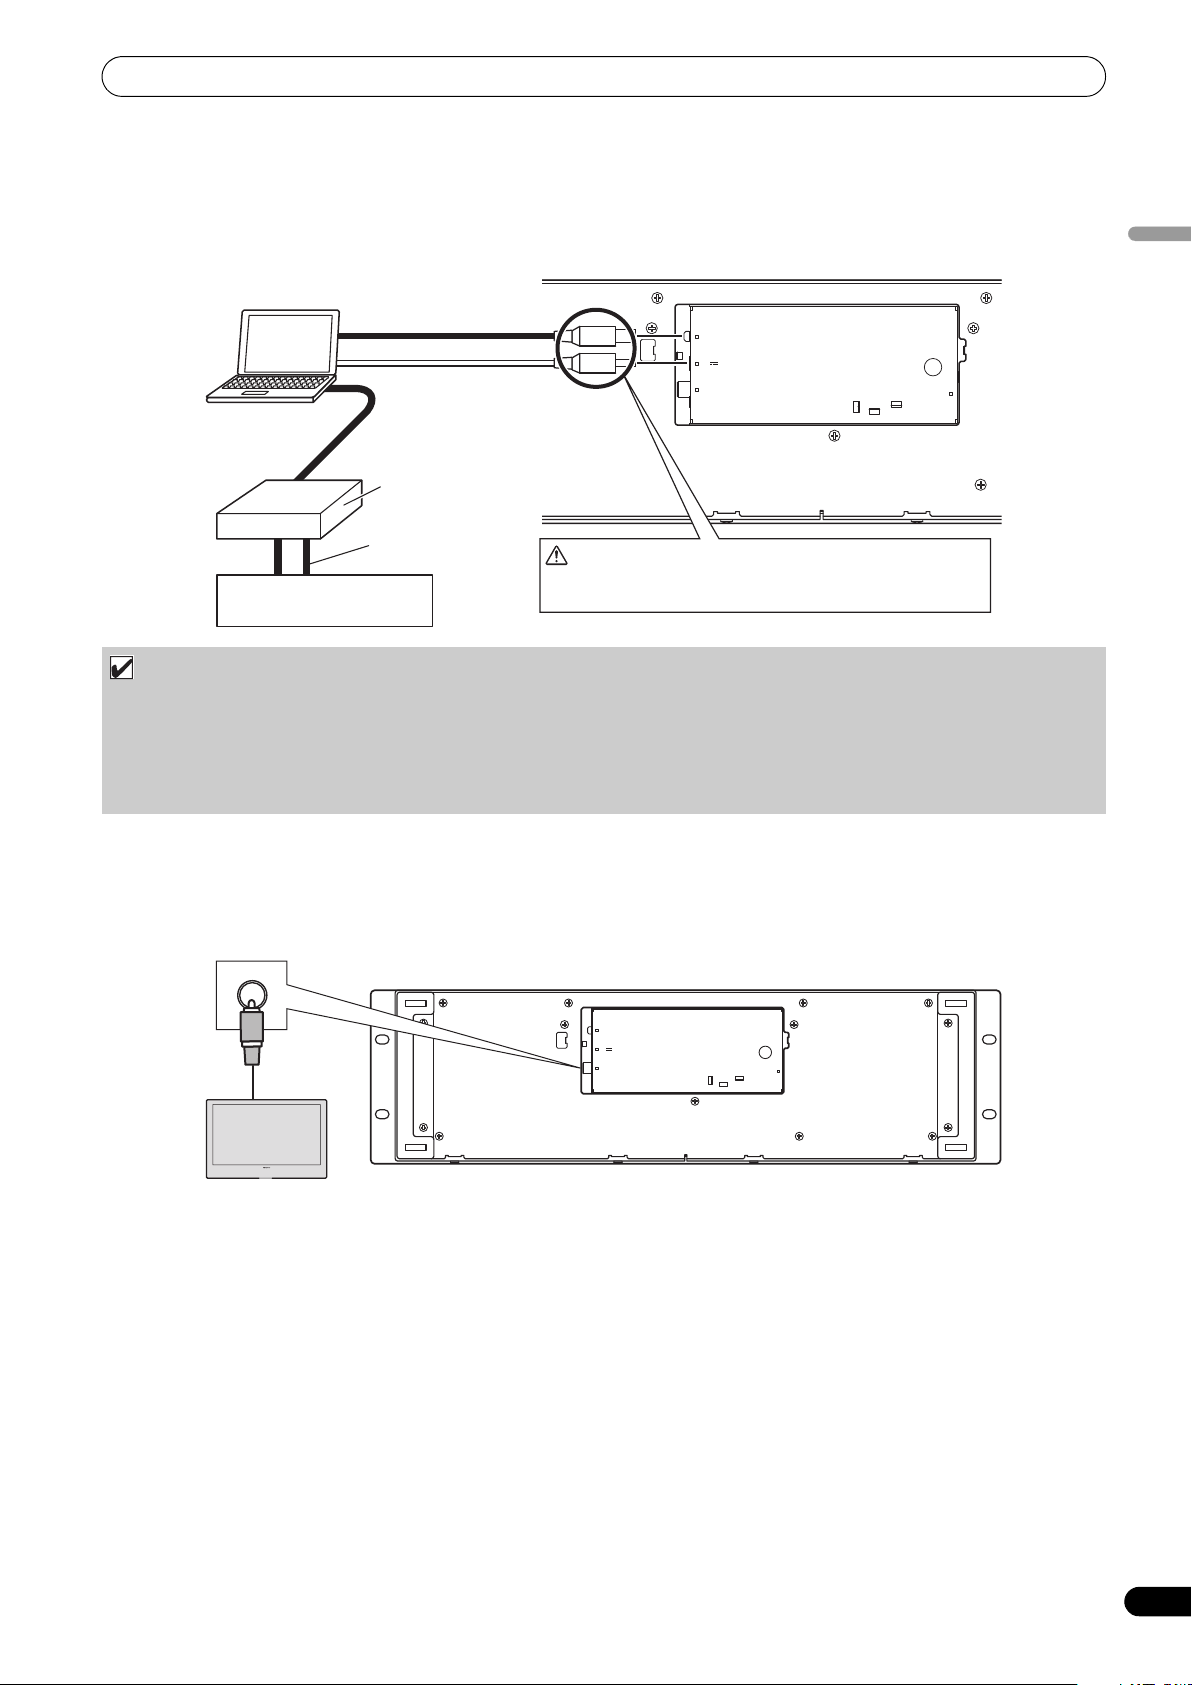
CONNECTIONS
CONNECTIONS
Use the accessory USB auxiliary power cable and the normal USB cable to connect the unit to the computer (connect the USB auxiliary
power cable first).
English
Computer
Accessory USB cable
Accessory USB auxiliary
power cable.
PC
5V
MONITOR OUT
REMOTE
CONTROL
Audio interface (sold separately)
Audio cable
Do not connect the USB auxiliary power cable or USB
cable until the driver software has been installed in the
Mixer
computer.
NOTE
• Do not connect anything to the 5 V connector other than the accessory USB auxiliary power cable.
• Always use the accessory USB auxiliary power cable and USB cable only.
• Always connect the accessory USB auxiliary power cable and USB cable to one and the same computer.
• Do not connect this unit to a computer through a USB hub.
• Do not connect this unit to a computer through a CardBus-supported USB interface card.
Connection to external monitor (pin-jack connector)
Use these connections when you wish to output the center display images to a large screen. After connecting this unit to the external
monitor, the unit’s settings must be changed (see the item “MONITOR OUT” in the topic “[1] DISPLAY” under the section “USING THE
UTILITY” on P. 25).
External monitor
PC
5V
MONITOR OUT
REMOTE
CONTROL
9
En
Page 10
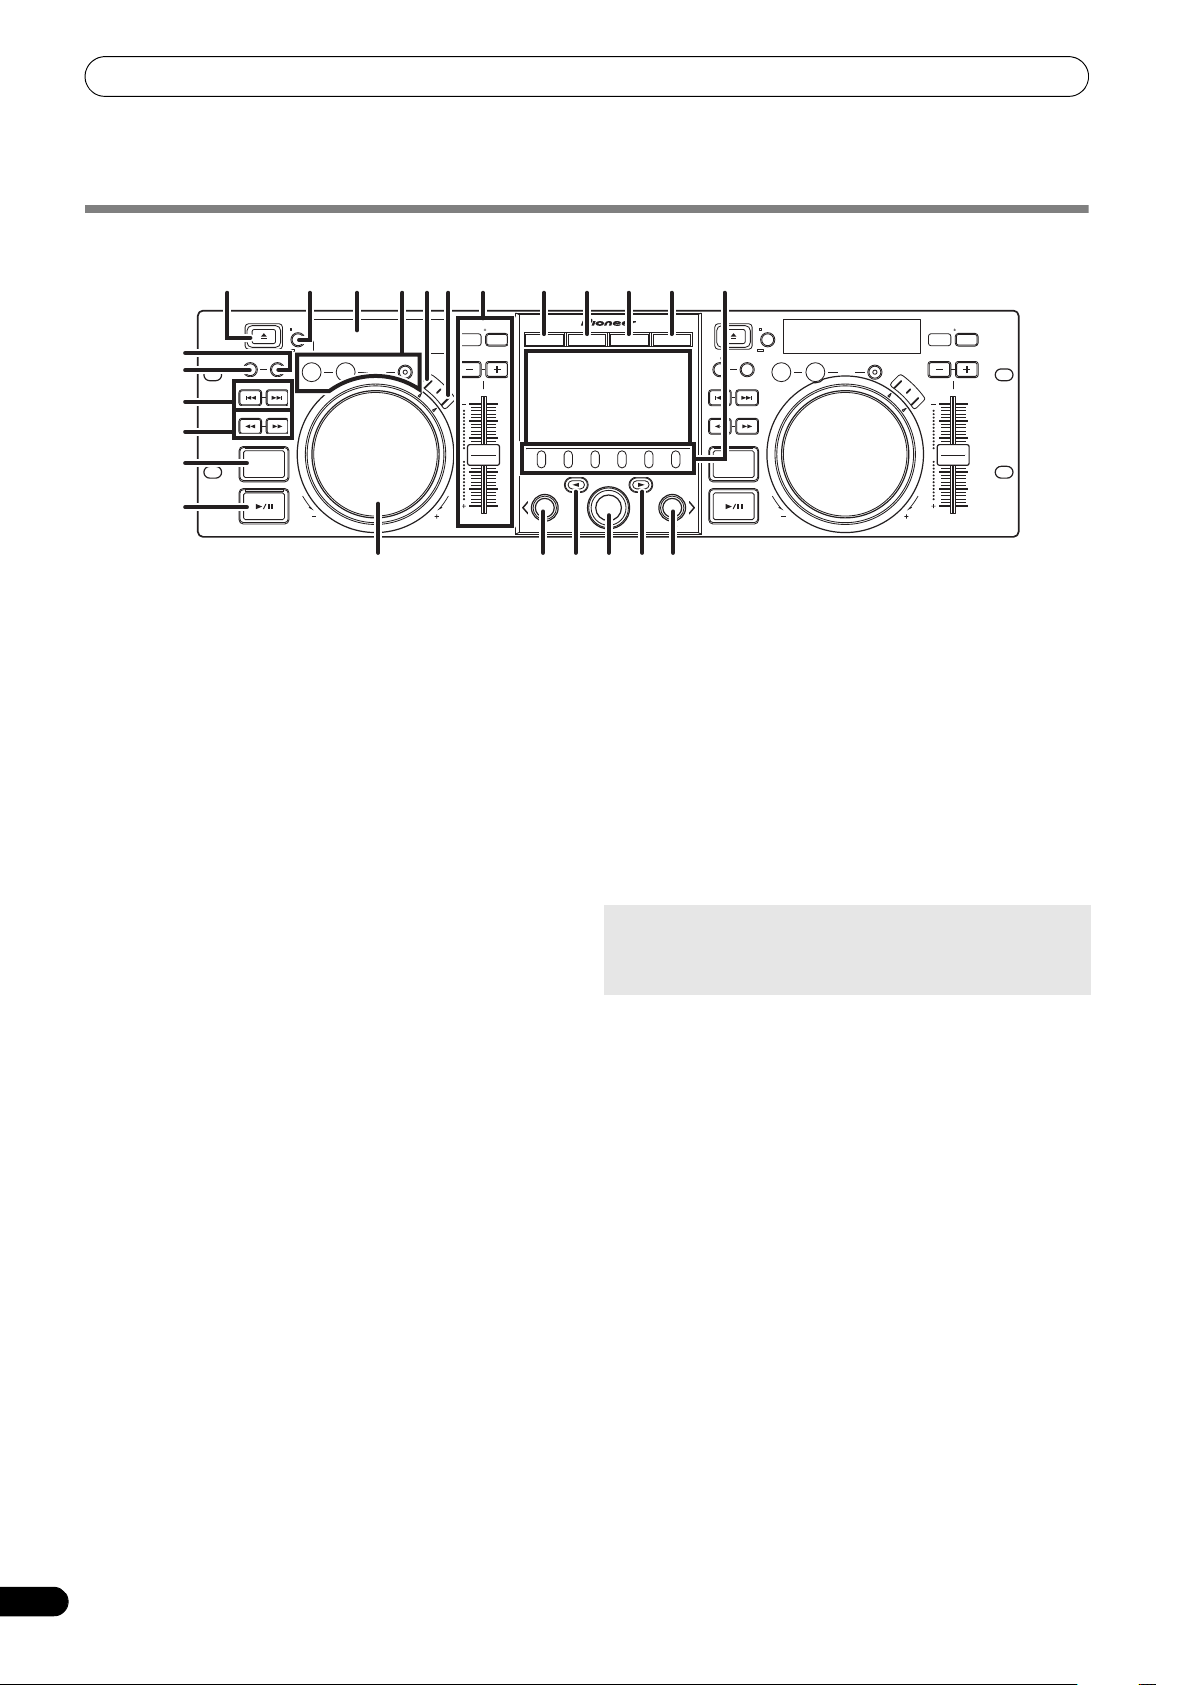
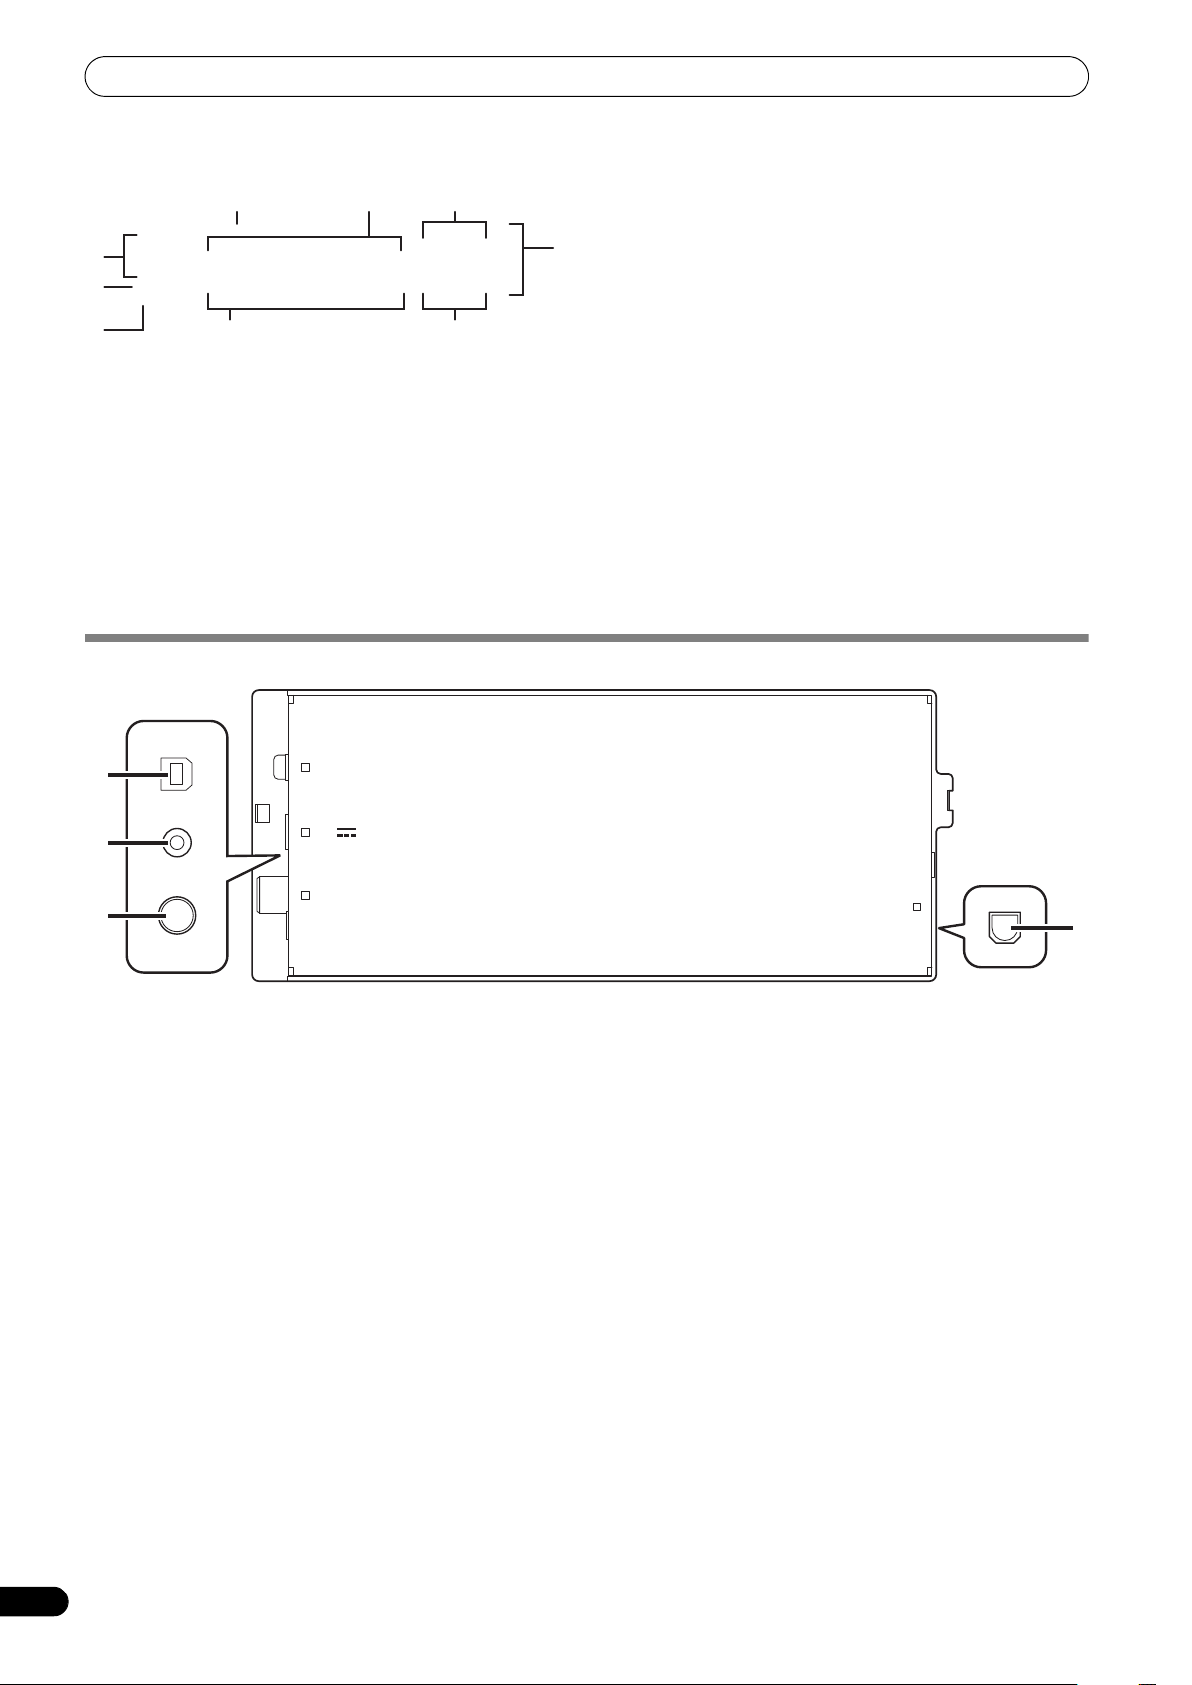
PARTS AND THEIR FUNCTIONS
PARTS AND THEIR FUNCTIONS
FRONT PANEL
17
16
1
MEMORY CALL
4
5
6
7
8 23 2 3 11 12 13 14
EJECT
CUE/LOOP
TRACK SEARCH
SEARCH
QUE
TIME
A.CUE
IN/CUE
HOT LOOP
OUT/ADJUST
RELOOP/EXIT
LOOP
S
C
R
A
T
C
H
TEMPO
MASTER
6/10/16WIDE
TEMPO
MT
PITCH BEND
J
O
G
B
R
E
A
K
0
FWD TEMPOREV
BROWSE MIX EFFECT UTILITY
A
LOAD
19 15 21
18109
EJECT
TIME
A.CUE
CUE/LOOP
MEMORY CALL
22
B
LOAD
SEP-C1
2024
19
TRACK SEARCH
SEARCH
QUE
IN/CUE
HOT LOOP
OUT/ADJUST
RELOOP/EXIT
LOOP
S
C
R
A
T
C
H
TEMPO
MASTER
6/10/16WIDE
TEMPO
MT
PITCH BEND
J
O
G
B
R
E
A
K
0
FWD TEMPOREV
This section explains the use of the unit when controlling DJS. Depending on the DJ software program used, some functions may not be
supported or may require different operations than those described in this manual.
1EJECT () button
Not used during DJS control.
2 Loop control buttons
Loop-in button (IN/CUE)
Use to set loop-in points. When this button is pressed during
loop playback, playback returns to the loop-in point and
recommences.
Loop-out button (OUT/ADJUST)
Use to set loop-out points. If this button is pressed during loop
playback, the jog dial or SEARCH buttons can be used to adjust
the position of the out point.
RELOOP/EXIT button
Press this button during loop playback to cancel loop play.
When the unit is not in loop play mode, pressing the button will
cause loop play to begin from the previously set loop-in point.
3 TEMPO control section
TEMPO control range button (±6/10/16/WIDE):
Each time the button is pressed, the variable range of the
TEMPO adjust slider changes.
MASTER TEMPO button and indicator (MT):
Each time the button is pressed, the master tempo function
alternates ON/OFF.
TEMPO adjust slider:
From the center detent position, pull the slider towards you (+)
to increase the tempo, and push the slider away from you (–)
to slow down the tempo.
PITCH BEND +/– buttons:
When pressed during play, the pitch bend function is enabled.
Pressing the “+” button accelerates the pitch bend speed, and
pressing the “–” button decelerates the pitch bend speed.
The speed of the pitch change can be modified by holding the
button depressed while rotating the jog dial.
4 TRACK SEARCH (, ) buttons
Use to perform track search.
5SEARCH (, ) buttons
Use to perform fast forward and reverse.
6 CUE button and indicator
Use to set cue points. Also when a cue point has been set,
7 Play/pause () button and indicator
Use to start and pause playback.
8 Time mode/auto cue button (TIME/A.CUE)
TIME:
Each time the button is pressed, the display’s time display
alternates between the current track’s elapsed playing time,
and the remaining time (REMAIN).
A.CUE:
When held depressed for one second or more, the AUTO CUE
function alternates ON/OFF.
AUTO CUE function
Whenever a track is set or track search is performed, this
function automatically sets a cue point and cue standby
immediately before the point where music starts.
9 SCRATCH button
Press to set the scratch mode ON/OFF.
10 JOG BREAK button
Not used during DJS control.
11 BROWSE button
Use to switch to the BROWSE screen.
12 MIX button
Use to switch to the MIX screen.
13 EFFECT button
Use to switch to the EFFECT screen.
14 UTILITY button
Use to switch to the UTILITY screen (P. 25).
15 Rotary selector dial
When in the BROWSE and UTILITY screens, rotating the dial
allows track selection and movement of the cursor between
selection items. Press the dial to confirm the selection.
For operations in the MIX and EFFECT screens, consult the
DJS Control Guide.
16 CUE/LOOP MEMORY button
Not used during DJS control.
17 CUE/LOOP CALL button
Not used during DJS control.
pressing the CUE button sets the unit to the cue standby mode.
10
En
Page 11
PARTS AND THEIR FUNCTIONS
18 Function buttons (F1 to F6, from left)
Use to select modes and categories.
Selectable items differ depending on the screen or menu.
For details, consult the DJS Control Guide.
19 LOAD A/B buttons
When in the BROWSE screen, press to set selected track in
controller A/B.
For operations in the MIX and EFFECT screens, consult the
DJS Control Guide.
20 Select up () button
When in the BROWSE and UTILITY screens, each time the
button is pressed the menu moves up (to left) one level in the
current menu hierarchy.
For operations in the MIX and EFFECT screens, consult the
DJS Control Guide.
21 Select down () button
When in the BROWSE and UTILITY screens, each time the
button is pressed the menu moves down (to right) one level in
the current menu hierarchy.
For operations in the MIX and EFFECT screens, consult the
DJS Control Guide.
22 Center display (P. 11)
23 Display A / Display B (P. 12)
24 Jog dial (+FWD / –REV)
When scratch mode is ON:
Touch the surface of the dial and rotate to perform scratch
play.
When scratch mode is OFF:
Use to perform pitch bend. Acceleration (+FWD) and
deceleration (–REV) are performed in proportion to the amount
of dial rotation. When rotation of the dial is stopped, playback
returns to its previous speed.
Center Display
3
1
2
1 Main menu display
The center display’s menus are changed by using the
BROWSE button, MIX button, EFFECT button, and UTILITY
button. The function buttons, select up ()/down() buttons,
LOAD A/B buttons, and the rotary selector dial are used to
manipulate the contents of each menu.
BROWSE screen
Use to display DJS track lists or playlists and to select tracks.
For details, consult the DJS Control Guide’s “Using DJS Lists.”
MIX screen
Use to perform DJS mixer operations. For details, consult the
DJS Control Guide’s “DJS Mixer Operations.”
EFFECT screen
Use to perform DJS effecter operations. For details, consult the
DJS Control Guide’s “DJS Effecter Operations.”
UTILITY
Use to make unit settings (P. 25).
2 Function tab
Displays items that can be changed using the six function
buttons. Items displayed differ depending on the contents
shown on the main menu display.
3 A/B track information display
Displays track information and current status for tracks
playing on controller A/B.
screen
English
Track name Play status
Artist name
Play status
Indicates track is currently playing.
Indicates track is currently paused.
Indicates track is currently in cue standby
condition.
MEMO
• This unit can display names of titles and artists in Western
European languages, Russian, Simplified Mandarin
Chinese, and Japanese, but some languages may not be
supported, depending on the DJ software program used.
Consult the operating instructions for your DJ software
program for more information about supported languages.
11
En
Page 12
PARTS AND THEIR FUNCTIONS
1
8
4
6
2
7
3
5
9
PC
MONITOR OUT
5V
REMOTE
CONTROL
1
2
3
4
Display A/Display B
1 Track number display
“DJS” is displayed during DJS control.
2 TEMPO control range display (±6, ±10, ±16, WIDE)
Displays the selected variable range mode of the TEMPO
adjust slider.
3 TEMPO change ratio display
Displays the change in tempo produced by the operation of the
TEMPO adjust slider.
4 A.CUE indicator
Lights when the Auto Cue function is ON.
REAR PANEL
5 Time display
Displays the current track’s elapsed time ([REMAIN] indicator
is off), or remaining time ([REMAIN] indicator is lighted), in
minutes [M], seconds [S], and frames [F].
6 Playing address display
To provide a quick intuitive grasp of the relative progress of a
track’s playback (either elapsed time or remaining time), a bar
graph is used to represent the full length of the track.
• Elapsed time display: Starts with all segments off, then
gradually lights from left to right.
• Remaining time display: Starts with all segments on, then
gradually goes off from left to right.
• When 30 seconds of remaining playing time is reached, the
graph begins to flash slowly.
• When 15 seconds of remaining playing time is reached, the
graph begins to flash quickly.
7 BPM display
Shows the currently playing track’s BPM (Beats Per Minute)
8 MEMO indicator
Not displayed during DJS control.
9 REMAIN indicator
Lights when the time display is set for remaining time.
1 PC connector: USB port (type B)
Use the accessory USB cable to connect this port to a
computer.
2 5 V connector
Use the accessory USB auxiliary power cable to connect to a
computer.
12
En
3 Video output connector (MONITOR OUT)
Use a video cable to connect to an external display.
4 Remote control connector (REMOTE CONTROL)
Not used with this unit.
Page 13

ABOUT DJS SOFTWARE
ABOUT DJS SOFTWARE
Pioneer DJS is a software program that allows the use of MP3 files to control DJ play from a computer. Load the program into your
computer from the supplied CD-ROM disc.
MEMO
• DJS is not equipped with functions for recording DJ play.
3 WARRANTY DISCLAIMER
SOFTWARE END USER LICENSE
AGREEMENT
This Software End User License Agreement (“Agreement”) is
between you (both the individual installing the Program and any
single legal entity for which the individual is acting) (“You” or
“Your”) and PIONEER CORPORATION (“Pioneer”).
TAKING ANY STEP TO SET UP OR INSTALL THE PROGRAM
MEANS THAT YOU ACCEPT ALL OF THE TERMS OF THIS LICENSE
AGREEMENT. PERMISSION TO DOWNLOAD AND/OR USE THE
PROGRAM IS EXPRESSLY CONDITIONED ON YOUR FOLLOWING
THESE TERMS. WRITTEN OR ELECTRONIC APPROVAL IS NOT
REQUIRED TO MAKE THIS AGREEMENT VALID AND
ENFORCEABLE. IF YOU DO NOT AGREE TO ALL OF THE TERMS
OF THIS AGREEMENT, YOU ARE NOT AUTHORIZED TO USE THE
PROGRAM AND MUST STOP INSTALLING IT OR UNINSTALL IT,
AS APPLICABLE.
1 DEFINITIONS
1.1 “Documentation” means written documentation,
specifications and help content made generally available
by Pioneer to aid in installing and using the Program.
1.2 “Program” means all or any part of Pioneer’s software
licensed to You by Pioneer under this Agreement.
2 PROGRAM LICENSE
2.1 Limited License. Subject to this Agreement’s restrictions,
Pioneer grants to You a limited, non-exclusive, nontransferable, license (without the right to sublicense):
(a) To install a single copy of the Program on the hard
disk drive of Your computer, to use the Program only
for Your personal purpose complying with this
Agreement and the Documentation (“Authorized
Use”);
(b) To use the Documentation in support of Your
Authorized Use; and
(c) To make one copy of the Program solely for backup
purposes, provided that all titles and trademark,
copyright and restricted rights notices are reproduced
on the copy.
2.2 Restrictions. You will not copy or use the Program or
Documentation except as expressly permitted by this
Agreement. You will not transfer, sublicense, rent, lease
or lend the Program, or use it for third-party training,
commercial time-sharing or service bureau use. You will
not Yourself or through any third party modify, reverse
engineer, disassemble or decompile the Program, except
to the extent expressly permitted by applicable law, and
then only after You have notified Pioneer in writing of Your
intended activities. You will not use the Program on
multiple processors without Pioneer’s prior written
consent.
2.3 Ownership. Pioneer or its licensor retains all right, title
and interest in and to all patent, copyright, trademark,
trade secret and other intellectual property rights in the
Program and Documentation, and any derivative works
thereof. You do not acquire any other rights, express or
implied, beyond the limited license set forth in this
Agreement.
2.4 No Support. Pioneer has no obligation to provide support,
maintenance, upgrades, modifications or new releases
for the Program or Documentation under this Agreement.
THE PROGRAM AND DOCUMENTATION ARE PROVIDED “AS
IS” WITHOUT ANY REPRESENTATIONS OR WARRANTIES,
AND YOU AGREE TO USE THEM AT YOUR SOLE RISK. TO THE
FULLEST EXTENT PERMISSIBLE BY LAW, PIONEER
EXPRESSLY DISCLAIMS ALL WARRANTIES OF ANY KIND
WITH RESPECT TO THE PROGRAM AND DOCUMENTATION,
WHETHER EXPRESS, IMPLIED, STATUTORY, OR ARISING
OUT OF COURSE OF PERFORMANCE, COURSE OF DEALING
OR USAGE OF TRADE, INCLUDING ANY WARRANTIES OF
MERCHANTABILITY, FITNESS FOR A PARTICULAR
PURPOSE, SATISFACTORY QUALITY, ACCURACY, TITLE OR
NON-INFRINGEMENT.
4 DAMAGES AND REMEDIES FOR BREACH
You agree that any breach of this Agreement’s restrictions
would cause Pioneer irreparable harm for which money
damages alone would be inadequate. In addition to damages
and any other remedies to which Pioneer may be entitled, You
agree that Pioneer may seek injunctive relief to prevent the
actual, threatened or continued breach of this Agreement.
5 TERMINATION
Pioneer may terminate this Agreement at any time upon Your
breach of any provision. If this Agreement is terminated, You
will stop using the Program, permanently delete it from the
computer where it resides, and destroy all copies of the
Program and Documentation in Your possession, confirming
to Pioneer in writing that You have done so. Sections 2.2, 2.3,
2.4, 3, 4, 5 and 6 will continue in effect after this Agreement’s
termination.
6 GENERAL TERMS
6.1 Limitation of Liability. In no event will Pioneer or its
subsidiaries be liable in connection with this Agreement
or its subject matter, under any theory of liability, for any
indirect, incidental, special, consequential or punitive
damages, or damages for lost profits, revenue, business,
savings, data, use, or cost of substitute procurement,
even if advised of the possibility of such damages or if
such damages are foreseeable. In no event will Pioneer’s
liability for all damages exceed the amounts actually paid
by You to Pioneer or its subsidiaries for the Program. The
parties acknowledge that the liability limits and risk
allocation in this Agreement are reflected in the Program
price and are essential elements of the bargain between
the parties, without which Pioneer would not have
provided the Program or entered into this Agreement.
6.2 The limitations or exclusions of warranties and liability
contained in this Agreement do not affect or prejudice
Your statutory rights as consumer and shall apply to You
only to the extent such limitations or exclusions are
permitted under the laws of the jurisdiction where You are
located.
6.3 Severability and Waiver. If any provision of this Agreement
is held to be illegal, invalid or otherwise unenforceable,
that provision will be enforced to the extent possible or, if
incapable of enforcement, deemed to be severed and
deleted from this Agreement, and the remainder will
continue in full force and effect. The waiver by either party
of any default or breach of this Agreement will not waive
any other or subsequent default or breach.
English
13
En
Page 14

ABOUT DJS SOFTWARE
6.4 No Assignment. You may not assign, sell, transfer,
delegate or otherwise dispose of this Agreement or any
rights or obligations under it, whether voluntarily or
involuntarily, by operation of law or otherwise, without
Pioneer’s prior written consent. Any purported
assignment, transfer or delegation by You will be null and
void. Subject to the foregoing, this Agreement will be
binding upon and will inure to the benefit of the parties
and their respective successors and assigns.
6.5 Entire Agreement. This Agreement constitutes the entire
agreement between the parties and supersedes all prior
or contemporaneous agreements or representations,
whether written or oral, concerning its subject matter.
This Agreement may not be modified or amended without
Pioneer’s prior and express written consent, and no other
act, document, usage or custom will be deemed to amend
or modify this Agreement.
6.6 You agree that this Agreement shall be governed and
construed by and under the laws of Japan.
COPYRIGHT WARNING
The use of DJS is restricted with regard to the playing and
copying of copy-protected music contents.
• The program may not operate properly if copy-protect encryption
data is embedded in recorded media.
• Ripping, playback, and other operations may stop if copy-protect
encryption data is detected to be embedded in recorded media.
• Due to copy-protection technology for recorded media (CPRM),
writing (“check-out”) to SD memory cards is limited to three
times for each music content.
• To write (“check-out”) music contents to SD memory cards, the
reader/writer used must support the SD memory card’s “copyprotection for recorded media” technology. For details, consult
the operating instructions for the reader/writer you intend to
use.
• The music contents that you write (“check-out”) to SD memory
cards can be played back only on players supporting the “SDaudio standard.” For details, consult the operating instructions
for the player you intend to use.
The materials you record are for your own listening enjoyment,
and cannot be used for other purposes without permission from
the copyright owner.
• Music recorded from CDs and other media may be protected by
the copyright laws of individual countries as well as by
international convention. You are solely responsible for the
lawful use of the recordings you make.
SYSTEM REQUIREMENTS (Minimum
Operating Environment)
Use of DJS requires a PC/AT computer fulfilling the following
minimum operating conditions:
CPU: 1.5 GHz or more Intel
processor.
However, in the case of Windows Vista
1.5 GHz or above Intel Core
Memory:
512 MB or more RAM
However, when running Windows Vista
Hard disc:
250 MB of free HD space (excluding space necessary for storing
MP3 and other music files)
Optical drive:
Disc drive capable of reading CD-ROM, and playing music CD (CD-
DA)
Display:
XGA (1024x768) or above, with HighColor (16-bit) or greater video
adapter and monitor.
Sound:
2-channel or more audio output (internal or external sound card or
audio unit).
Input device:
Keyboard, mouse (or equivalent pointing device)
Internet connection:
Connection speed 56 kbps or above recommended. Microsoft
Internet Explorer 5.5 or above, or other web browser supporting
128-bit SSL.
• When this unit is connected to a computer and used in
conjunction with the DJS software, the computer must be
equipped with two USB ports complying with USB 1.1 or later.
For details, consult the section “CONNECTIONS” (P. 9).
NOTE
• Even if your computer is equipped with the memory
capacity specified in the operating environment noted
above, other software and services running in the computer
at the time may cause insufficient memory that can result
in degradation of the program’s functions or performance.
In this case, close any other services or programs running
so as to free up more of your computer’s memory, or
increase the amount of memory installed in your computer.
• DJS operation may not function properly when combined
with other software programs installed on your computer.
• Full functionality is not guaranteed with all computers even
when the above operating environment conditions are
fulfilled.
• The DJS software program is not supported by Macintosh
computers (including those equipped with Intel CPUs).
®
Pentium M® (or compatible)
®
TM
2 Duo (or compatible).
, the processor must be a
®
, 1 GB or more RAM
®
14
En
Page 15
ABOUT DJS SOFTWARE
INSTALLING DJS SOFTWARE
Precautions regarding installation
• Before installing DJS, please read the “SOFTWARE END USER
LICENSE AGREEMENT” and “SYSTEM REQUIREMENTS
(Minimum Operating Environment)”.
• DJS is supported by the following Microsoft
versions:
Windows Vista
Windows Vista
Windows Vista
Windows Vista
Windows
Windows
Windows
• DJS is not supported by Microsoft’s 64-bit operating systems
(Windows
bit editions).
• The accessory CD-ROM includes installation programs and
user’s manuals in the following eight languages: English,
French, German, Italian, Dutch, Spanish, Chinese (simplified
Mandarin), Japanese.
• When using DJS on a computer whose Windows
language is other than one of those listed above, follow the
menu instructions to select [English].
• Installation and uninstallation of DJS require administrator’s
rights on the computer concerned. You must log on as
administrator before installing the software.
Installation Procedure
1 When the accessory CD-ROM installation disc is loaded in
your computer’s DVD/CD drive, the installation menu will
automatically appear. Follow the menu instructions to install
the DJS software.
• If the installation menu does not automatically appear, click
on [START] [My Computer (or Computer)] and select
the optical disc drive, and double click on the [Install] icon.
2 When the installation menu appears, click on the [Install DJS]
button.
• If a trial version of DJS is currently installed on the
computer, in place of the [Install DJS] button, the [Uninstall
DJS trial version of DJS] button will appear. Click on that
button to uninstall the trial version, then once again click on
the [Install DJS] button.
• To display the user’s manual, click on the [Display DJS
User’s Manual] button. Adobe Reader
display the user’s manual.
• To install Adobe Reader
Reader] button. If your computer already has an older
version of Adobe Reader
version of Adobe Reader
Adobe Reader] button.
• To close the installation menu, click on the [Exit] button.
®
Home Basic
®
Home Premium
®
Ultimate
®
Business
®
XP Home Edition
®
XP Professional
®
2000 Professional (SP4)
®
XP Professional x64 edition and Windows Vista® 64-
®
, click on the [Install Adobe
®
installed, uninstall the older
®
before clicking on the [Install
®
Windows®
®
display
®
is required to
3 When the screen for selecting the language appears, select
[English], then click on [OK].
• Depending on your computer operating environment, more
than one language may be available.
• When you click on the [OK] button, the [Preparing to install
DJS...] message will appear.
When preparations are completed, the [Commencing
installation of DJS...] message will appear. Follow the
instructions in the message to complete DJS installation.
• To cancel installation, click on the [Cancel] button.
4 When DJS installation is completed, reboot the computer in
accord with the instructions that appear on the screen.
MEMO
• When using this unit in conjunction with the DJS software
program, the software driver must be installed in the computer
before connecting the computer to the SEP-C1. For details, see
P. 17
DJS User’s Manual (PDF)
When installation of DJS is completed, the user’s manual can be
viewed from the Windows [START] menu if desired. Click on
[START] [View All Programs] [DJS] [User’s Manual].
It is recommended to read the user’s manual in order to gain a
basic understanding of DJS features before actually starting the
program.
NOTES REGARDING TRIAL PERIOD AND
USER REGISTRATION
DJS can be used without registration for a 60-day trial period after
installation.
This period represents the time you can use DJS without officially
registering it. When the trial period is over, DJS can no longer be
used, so be sure to complete user registration before that period
has elapsed.
Online registration can be completed for users connected to the
Internet. For details regarding user registration procedures,
consult the DJS user’s manual contained on the accessory CDROM disc.
The Pioneer Group collects personal user information for the
following purposes:
1. To provide after service for the product.
2. To inform users via email of important information and events
regarding the product.
3. To collect survey data from customers and reflect those results
into product development.
• Personal information collected from customers is handled and
managed in accordance with our personal information privacy
policy.
• For more information regarding Pioneer’s personal information
privacy policy, see the following Pioneer website:
http://www.prodjnet.com/privacy.html
English
15
En
Page 16
ABOUT DJS SOFTWARE
Users without Internet connections should enter the necessary
information on the “User registration card” and return it via mail
to Pioneer. After the completed “User registration card” is
received, we will send the “Registration ID” (installation key)
necessary for unlocking the software beyond the trial period. For
detailed instructions regarding the user registration procedure,
please consult the DJS user’s manual included in the accessory
CD-ROM.
NOTE
• An installation key (Registration ID) can be used on the DJS
software installed on a single computer. In the event you
replace your computer or otherwise need to reinstall the
DJS software, a new user’s registration and “Registration
ID” must be issued to unlock the software beyond the trial
period. Also, the initial “Registration ID” issued by Pioneer
will be needed in the event of reregistration or after-service
enquiries, so be sure to store the registration information in
a safe place even after completion of the registration
procedure.
The address on the “User registration card” is as follows. The
address may differ depending on your location of residence,
however, so please be careful to send the card to the correct
location:
<User Registration Card Address>
North America
PIONEER ELECTRONICS (USA) INC.
BUSINESS SOLUTIONS DIVISION, PRO AUDIO GROUP
2265 East 220th Street, Long Beach, CA 90810, U.S.A
Europe
PIONEER EUROPE NV
MULTIMEDIA DIVISION
Pioneer House, Hollybush Hill, Stoke Poges, Slough SL2 4QP U.K.
South Asia, Southeast Asia
PIONEER ELECTRONICS ASIACENTRE PTE. LTD.
MULTIMEDIA DEPARTMENT
253 Alexandra Road, #04-01, Singapore 159936
HongKong
PIONEER (HK) LIMITED
SALES AND MARKETING DEPARTMENT
Suite 901-906, 9th Floor World Commerce Centre, Harbour City 11
Canton Road, Tsim Sha Tsui Kowloon, Hong Kong
Taiwan
PIONEER HIGH FIDELITY TAIWAN CO., LTD.
SALES DIVISION, INDUSTRIAL ELECTRONIC SECTION
13F, No. 44, Sec. 2, Jhongshan N. Road, Taipei City, Taiwan
Oceania
PIONEER ELECTRONICS AUSTRALIA PTY. LTD.
178-184 Boundary Road, Braeside, Victoria 3195, Australia
Middle East, Africa
PIONEER GULF, FZE.
Lob 11-017, Jabel Ali Free Zone, P.O.Box 61226, Jabel Ali, Dubai,
U.A.E.
Central & South America
PIONEER INTERNATIONAL LATIN AMERICA, S.A.
SALES DEPARTMENT
Plaza Credicorp Bank Panama, 50 Street, #120, 14th Floor
P.O. Box 0816-01361, Panama, Rep of Panama
Mexico
PIONEER ELCTRONICS DE MEXICO, S.A. DE C.V.
Blvd. Manuel Avila Camacho No. 138, Piso 10, Col. Lomas de
Chapultepec, Mexico, D.F. C.P. 111000 Deleg. Miguel Hidalgo
REGARDING ONLINE SUPPORT
Before making direct enquiries regarding DJS operating
procedures and other technical matters, please read the DJS
user’s manual furnished on the accessory CD-ROM, together with
the FAQ section on the DJS support website.
See the DJS user’s manual for information regarding how to
access the DJS support website. To access the support site, you
will need the “Login name” and “Password” which you specified
at the time of user registration.
When making an enquiry to the DJS support website regarding
malfunctions, please furnish your name, product name,
registration ID (install key), computer type and specifications
(CPU, installed memory, other connected peripherals, etc.), the
operating system and version used, and concrete information
regarding the symptoms observed.
Support is furnished only to customers who have completed the
user registration process. Please take care to safely preserve the
“Login name” and “Password” you specified during registration,
as well as your “Registration ID.”
If you experience problems with installation or user registration,
please consult the following website:
<Enquiries regarding installation and user registration>
http://www.prodjnet.com/djs/support/
NOTE
• For technical information regarding use of this unit with
your computer, peripheral components, or other nonPioneer products, please consult your sales dealer or the
manufacturers of the respective components.
Further version updates are anticipated to improve the
functionality and performance of DJS.
Officially registering this product allows you to access Pioneer’s
support website, as well as to download updated versions of the
program. We encourage users to take advantage of this update
service to constantly utilize the latest version of the program.
DISCLAIMER
Pioneer shall not be held responsible for reissuing license keys
or registration IDs in the event of loss. Be sure to store your
registration information and passwords safely in a separate
location for future access.
Note that the SD memory card transmission function (check-
out/check-in) is not supported by Windows Vista
The music CD ripping function of this software program is not
supported for music CD that do not display one of these logo
marks.
®
.
16
En
Page 17

ABOUT THE DRIVER PROGRAM
ABOUT THE DRIVER PROGRAM
This unit is designed to control Pioneer DJS and other DJ software when connected to a computer. When connecting this unit to a
Windows computer for use with DJ software, the software driver program must first be loaded into the computer.
MEMO
• Drivers for Macintosh OS as well as updated information regarding other manufacturers’ DJ software can be found on the following
website:
http://www.prodjnet.com/support/
Using the accessory CD-ROM to install the application
SOFTWARE END USER LICENSE
AGREEMENT
When installing or using the driver software, be sure to first read
the “SOFTWARE END USER LICENSE AGREEMENT” (P. 13). By
installing and using the software, you agree to be bound by the
terms of the Agreement.
DRIVER INSTALLATION
Before installing (IMPORTANT)
• Before installing this driver, be sure to read the “SOFTWARE
END USER LICENSE AGREEMENT”.
• This unit can be connected to a computer running one of the
following operating system environments:
Windows Vista
Windows Vista
Windows
Windows
It may be necessary to use the Windows update facility in order
to install the most recent Service Pack.
• The driver installation program is provided in 10 languages
(English, French, German, Italian, Dutch, Spanish, Russian,
Chinese (simplified), Chinese (traditional), and Japanese). If
using a version of Windows in another language, follow the
onscreen instructions to select [English] as the language.
• You must have administrator privileges on your computer in
order to install the driver software. Log on as the user set as the
computer’s administrator before attempting driver installation.
• If any other Windows programs are running, close them before
beginning driver installation.
®
Home Basic, Windows Vista® Home Premium,
®
Ultimate, Windows Vista® Business,
®
XP Home Edition, Windows® XP Professional, or
®
2000 Professional.
1 Boot the computer and log in with administrator’s privileges.
2 Load the accessory CD-ROM in the computer’s CD/DVD drive.
3 Open the computer’s [START]
Computer)] menu, then access the CD-ROM and double-click
on the folder [SEP-C1].
4 After opening the [SEP-C1] folder, double click on the driver
installation program [MEP-7000[SEP-C1]_#.###.exe].
(#.### indicates the driver version.)
5 When the [Language Selections] menu appears, select
[English], then click on [OK].
• To interrupt the installation process, click on the [Cancel]
button.
6 When the [License] screen appears, read the “Software End
User License Agreement”, click on the [I agree.] box, then
click on [OK].
[My Computer (or
English
NOTE
• Before installing the driver software, disconnect the USB
auxiliary power cable and USB cable connecting this unit to
the computer.
• If this unit is connected to a computer without first
installing the driver, errors may occur on the computer,
depending on the computer environment involved.
• In the event the driver installation is interrupted midway
through, follow the procedures below to reinstall the driver
from the beginning.
• If you do not agree with the terms of the “Software End User
License Agreement”, click on the [Cancel] button to
terminate the installation.
17
En
Page 18

ABOUT THE DRIVER PROGRAM
7 Follow the instructions that appear on the screen.
•If the [Windows Security] screen appears during
installation, click on [Install this driver software anyway]
to continue the installation process.
<For Windows XP>
•If the [Hardware Installation] screen appears during
installation, click on [Continue Anyway] to continue the
installation process.
8 When installation is completed, the [Installation is now
complete.] message will appear. Click on the [Finish] button
to complete the process.
Connecting this unit to the computer
1 Connect the USB auxiliary power cable to this unit and the
computer.
2 Connect the USB cable to this unit and the computer.
When first connecting this unit to the computer, and when
disconnecting and reconnecting the computer USB port, the
computer may display the message [Installing device driver
software]. In this case, wait until the computer displays the
message [Your devices are ready to use].
<For Windows XP>
• During the installation process, if the computer displays the
message [Can Windows connect to Windows Update to
search for software?] select [No, not this time], then click
on the [Next] button to continue the installation process.
<For Windows 2000>
•If the [Digital Signature Not Found] screen appears during
installation, click on the [Yes] button to continue the
installation process.
• During installation, if the computer displays the message
[What do you want the wizard to do?] select [Install the
software automatically (Recommended)], then click on
the [Next] button to continue the installation process.
•If the [Hardware Installation] screen appears during
installation, click on [Continue Anyway] to continue the
installation process.
18
En
Page 19

ABOUT THE DRIVER PROGRAM
<For Windows 2000>
•If the [Digital Signature Not Found] screen appears during
installation, click on the [Yes] button to continue the
installation process.
Most recent version of driver
Consult the following website regarding the latest driver versions.
http://www.prodjnet.com/support/
When using this unit to control DJS software
Please read the sections “USING DJ SOFTWARE” (P. 20) and the
“DJS Control Guide” (PDF file) before attempting to actually use
this unit to operate DJS. The “DJS Control Guide” can be found
under the name [manual_SEP-C1_control_en.pdf] in the [SEP-
C1\English] folder of the accessory CD-ROM.
English
Confirming the driver version
To confirm the version of the loaded driver, click on Windows
[START] [View All Programs] [Pioneer] [MEP-
7000[SEP-C1]] [MEP-7000[SEP-C1] Version Display Utility].
MEMO
• This screen also allows you to confirm the version of the
firmware currently installed. Note, however, that the firmware
version will not be displayed if the SEP-C1 is not connected to
a computer, or if the computer is not communicating properly
with the SEP-C1.
19
En
Page 20
USING DJ SOFTWARE
USING DJ SOFTWARE
By loading the accessory DJS software or another DJ software to a computer connected to this unit via USB cable, the unit can be used
to operate the DJ software program.
Supported DJ softwares
DJS Included as an accessory with the SEP-C1, the all-in-one DJ software program “DJS” allows immediate use of
Communicationsupported DJ
software
MIDI-supported DJ
software
DJ software.
Commercially available DJ softwares supporting the SEP-C1’s dedicated communications protocol can be
operated even without the use of a control disc. For latest information regarding supported DJ software, please
consult the following Pioneer website:
http://www.prodjnet.com/support/
The SEP-C1 outputs data regarding button and TEMPO adjust slider status in universal MIDI format, so DJ
softwares with MIDI support can be used to assign the unit’s MIDI messages, thus using the MIDI
communication for control.
Style of Play
The unit can be made to operate as a DJ software manipulator. When the SEP-C1 is used as a manipulator, you can control your DJ
software without need for either mouse or keyboard, using the same layout, functions, and ease of operation transmitted from the Pioneer
CDJ series.
USB auxiliary power cable
Computer
USB cable
20
En
Page 21
USING DJ SOFTWARE
PREPARING YOUR DJ SOFTWARE PROGRAM
Before using your DJ software program, you must prepare your computer and the DJ software. Do not connect the SEP-C1 to your
computer until you have loaded the software driver!
Dedicated
Step DJS
Confirm computer’s setup and operating
environment.
Turn on computer power.
Install the driver.
Bus-power connection between this unit
and computer.
Confirm “Correct USB connection to
computer?”.
Install the DJ software program. See P.13 of this manual (“ABOUT DJS
Startup the DJ software. See the DJS User’s Manual (PDF file on
Operate for DJ play. See the DJS Control Guide for basic
See P.13 of this manual (“ABOUT DJS
SOFTWARE”).
Computer operating system support is limited
to Windows Vista, Windows XP, Windows
2000 or later version. DJS supports only the
Microsoft Windows OS.
See P.17 of this manual (“ABOUT THE DRIVER PROGRAM”).
See P.9 of this manual (“CONNECTIONS”).
See P.19 of this manual (“ABOUT THE DRIVER PROGRAM, Confirming the driver version”).
SOFTWARE”)
accessory CD-ROM).
operating techniques.
communication-
supported
DJ software
Consult the instruction manual for your DJ
software.
Computer operating system support is limited
to Windows Vista, Windows XP, Windows
2000 or Mac OS version 10.3.9 or later.
Consult the instruction manual for your DJ
software.
Consult the instruction manual for your DJ
software.
MIDI-supported
DJ software
English
MEMO
• Installation of a special software driver is necessary in order to use a DJ software program (a driver for Windows computers is included
on the accessory CD-ROM). Updated versions of drivers and drivers for MAC OS can be found on Pioneer’s website.
http://www.prodjnet.com/support/
CONTROLLING YOUR COMPUTER USING
THE DEDICATED COMMUNICATIONS
PROTOCOL
The SEP-C1 can be used to control not only the accessory DJS
software, but other DJ software programs supporting the SEP-C1’s
dedicated communications protocol.
1 Connect to the computer.
The center display will show the [PRO DJ] logo.
MEMO
• Some DJ software programs do not support the
aforementioned track information displays.
2 Start the DJ software program.
When communication is established with the DJ software, the
buttons, jog dial, and TEMPO adjust slider can be used to
control operation, and the SEP-C1’s center display, and
displays A/B will show the currently playing track’s time data
and title, together with the name of artist.
21
En
Page 22
USING DJ SOFTWARE
For DJS:
Control can be performed while viewing the center display’s
BROWSE, EFFECT, and MIX screens. For details of actual
operation, consult the chapter on “Manipulator Style”
operation of the SEP-C1 DJS Control Guide (PDF file on
accessory CD-ROM).
MEMO
• While the UTILITY screen is being displayed on the center
display, the center display’s buttons and rotary selector dial
cannot be used to control DJ software.
USING MIDI FOR COMPUTER CONTROL
MIDI (Musical Instrument Digital Interface) is a standardized
protocol used to govern data transmission between electronic
musical instruments and computers.
The SEP-C1 uses the MIDI message format to output its operating
data and status to a computer connected by USB cable. By using
a DJ software program with USB MIDI support to assign the MIDI
messages output by the SEP-C1, the SEP-C1 can be used to
control the DJ software.
For more information regarding messages output by the SEP-C1,
consult the section “MIDI MESSAGE TABLE” (P. 23).
Setting a MIDI channel
MIDI channel setting can be performed from the UTILITY screen.
1 Press the UTILITY button.
2 Press the [PC] function button.
The center display will show the MIDI channel setting menu.
• Controller A uses the same channel as the center display,
while controller B uses a different channel. (Factory defaults
are for Controller A and center display to be set to Channel
1, and Controller B set to Channel 2).
3 Either press the rotary selector dial, or press the select down
(
) button.
The icon will move to the right.
4 Turn the rotary selector dial to change the value.
Values between 1 and 16 can be set.
5 Press the rotary selector dial to confirm the value selected.
• Press the select up () button to cancel the selection and
return to the UTILITY screen.
1 Connect to the computer.
The center display will show the [PRO DJ] logo.
2 Start the DJ software program.
When communication is established with the DJ program, the
SEP-C1 operates as a MIDI controller, and the status of
controller A/B and center display section’s buttons and
controls are output as MIDI messages.
MEMO
• While the UTILITY screen is being displayed on the center
display, the center display’s MIDI messages are not output.
22
En
Page 23
USING DJ SOFTWARE
MIDI MESSAGE TABLE
Interface Name
JOG DIAL General
TEMPO ADJUST SLIDER VR Bn 1D dd 0 to 127 0 at – side, 127 at + side
PLAY/PAUSE SW 9n 00 dd OFF=0, ON=127
CUE SW 9n 01 dd OFF=0, ON=127
SEARCH FWD SW 9n 02 dd OFF=0, ON=127
SEARCH REV SW 9n 03 dd OFF=0, ON=127
TRACK SEARCH Next SW 9n 04 dd OFF=0, ON=127
TRACK SEARCH Prev SW 9n 05 dd OFF=0, ON=127
LOOP IN SW 9n 06 dd OFF=0, ON=127
LOOP OUT SW 9n 07 dd OFF=0, ON=127
RELOOP SW 9n 08 dd OFF=0, ON=127
MEMORY SW 9n 0A dd OFF=0, ON=127
Controller A
CALL SW 9n 0B dd OFF=0, ON=127
TIME/A.CUE SW 9n 0E dd OFF=0, ON=127
TEMPO RANGE SW 9n 10 dd OFF=0, ON=127
MT SW 9n 11 dd OFF=0, ON=127
SCRATCH SW 9n 12 dd OFF=0, ON=127
JOG BREAK SW 9n 13 dd OFF=0, ON=127
PITCH BEND + SW 9n 14 dd OFF=0, ON=127
PITCH BEND – SW 9n 15 dd OFF=0, ON=127
JOG TOUCH SW 9n 20 dd OFF=0, ON=127
JOG DIAL General
TEMPO ADJUST SLIDER VR Bn+1 1D dd 0 to 127 0 at – side, 127 at + side
PLAY/PAUSE SW 9n+1 00 dd OFF=0, ON=127
CUE SW 9n+1 01 dd OFF=0, ON=127
SEARCH FWD SW 9n+1 02 dd OFF=0, ON=127
SEARCH REV SW 9n+1 03 dd OFF=0, ON=127
TRACK SEARCH Next SW 9n+1 04 dd OFF=0, ON=127
TRACK SEARCH Prev SW 9n+1 05 dd OFF=0, ON=127
LOOP IN SW 9n+1 06 dd OFF=0, ON=127
LOOP OUT SW 9n+1 07 dd OFF=0, ON=127
RELOOP SW 9n+1 08 dd OFF=0, ON=127
Controller B
MEMORY SW 9n+1 0A dd OFF=0, ON=127
CALL SW 9n+1 0B dd OFF=0, ON=127
TIME/A.CUE SW 9n+1 0E dd OFF=0, ON=127
TEMPO RANGE SW 9n+1 10 dd OFF=0, ON=127
MT SW 9n+1 11 dd OFF=0, ON=127
SCRATCH SW 9n+1 12 dd OFF=0, ON=127
JOG BREAK SW 9n+1 13 dd OFF=0, ON=127
PITCH BEND + SW 9n+1 14 dd OFF=0, ON=127
PITCH BEND – SW 9n+1 15 dd OFF=0, ON=127
JOG TOUCH SW 9n+1 20 dd OFF=0, ON=127
Interface
Type
Purpose
Controller
Purpose
Controller
Message
MSB
Bn 10 dd Linear value with respect to speeds from stop to 4x, 64 at
stop; FWD direction: 65 (0.06x) to 127 (x4); REV direction: 63
(0.06x) to 0 (4x).
Bn+1 10 dd Linear value with respect to speeds from stop to 4x, 64 at
stop; FWD direction: 65 (0.06x) to 127 (x4); REV direction: 63
(0.06x) to 0 (4x).
Comments
English
23
En
Page 24

USING DJ SOFTWARE
Interface Name
ROTARY SELECTOR DIAL General
SELECT DOWN (>) SW 9n 31 dd OFF=0, ON=127
SELECT UP (<) SW 9n 32 dd OFF=0, ON=127
ROTARY SELECTOR DIAL
PUSH
LOAD A SW 9n 34 dd OFF=0, ON=127
LOAD B SW 9n 35 dd OFF=0, ON=127
BROWSE SW 9n 36 dd OFF=0, ON=127
MIX SW 9n 37 dd OFF=0, ON=127
EFFECT SW 9n 38 dd OFF=0, ON=127
F1 SW 9n 39 dd OFF=0, ON=127
Center display section
F2 SW 9n 3A dd OFF=0, ON=127
F3 SW 9n 3B dd OFF=0, ON=127
F4 SW 9n 3C dd OFF=0, ON=127
F5 SW 9n 3D dd OFF=0, ON=127
F6 SW 9n 3E dd OFF=0, ON=127
Interface
Type
Purpose
Controller
SW 9n 33 dd OFF=0, ON=127
Message
MSB
Bn 4F dd 98 to 127, 1 to 30 (± 1 to ± 30), transmits count value
difference from previous time. When ± 30 or more, becomes
± 30.
• n = channel number
• Grayed-out portions are not output during display of the UTILITY screen.
Comments
24
En
Page 25
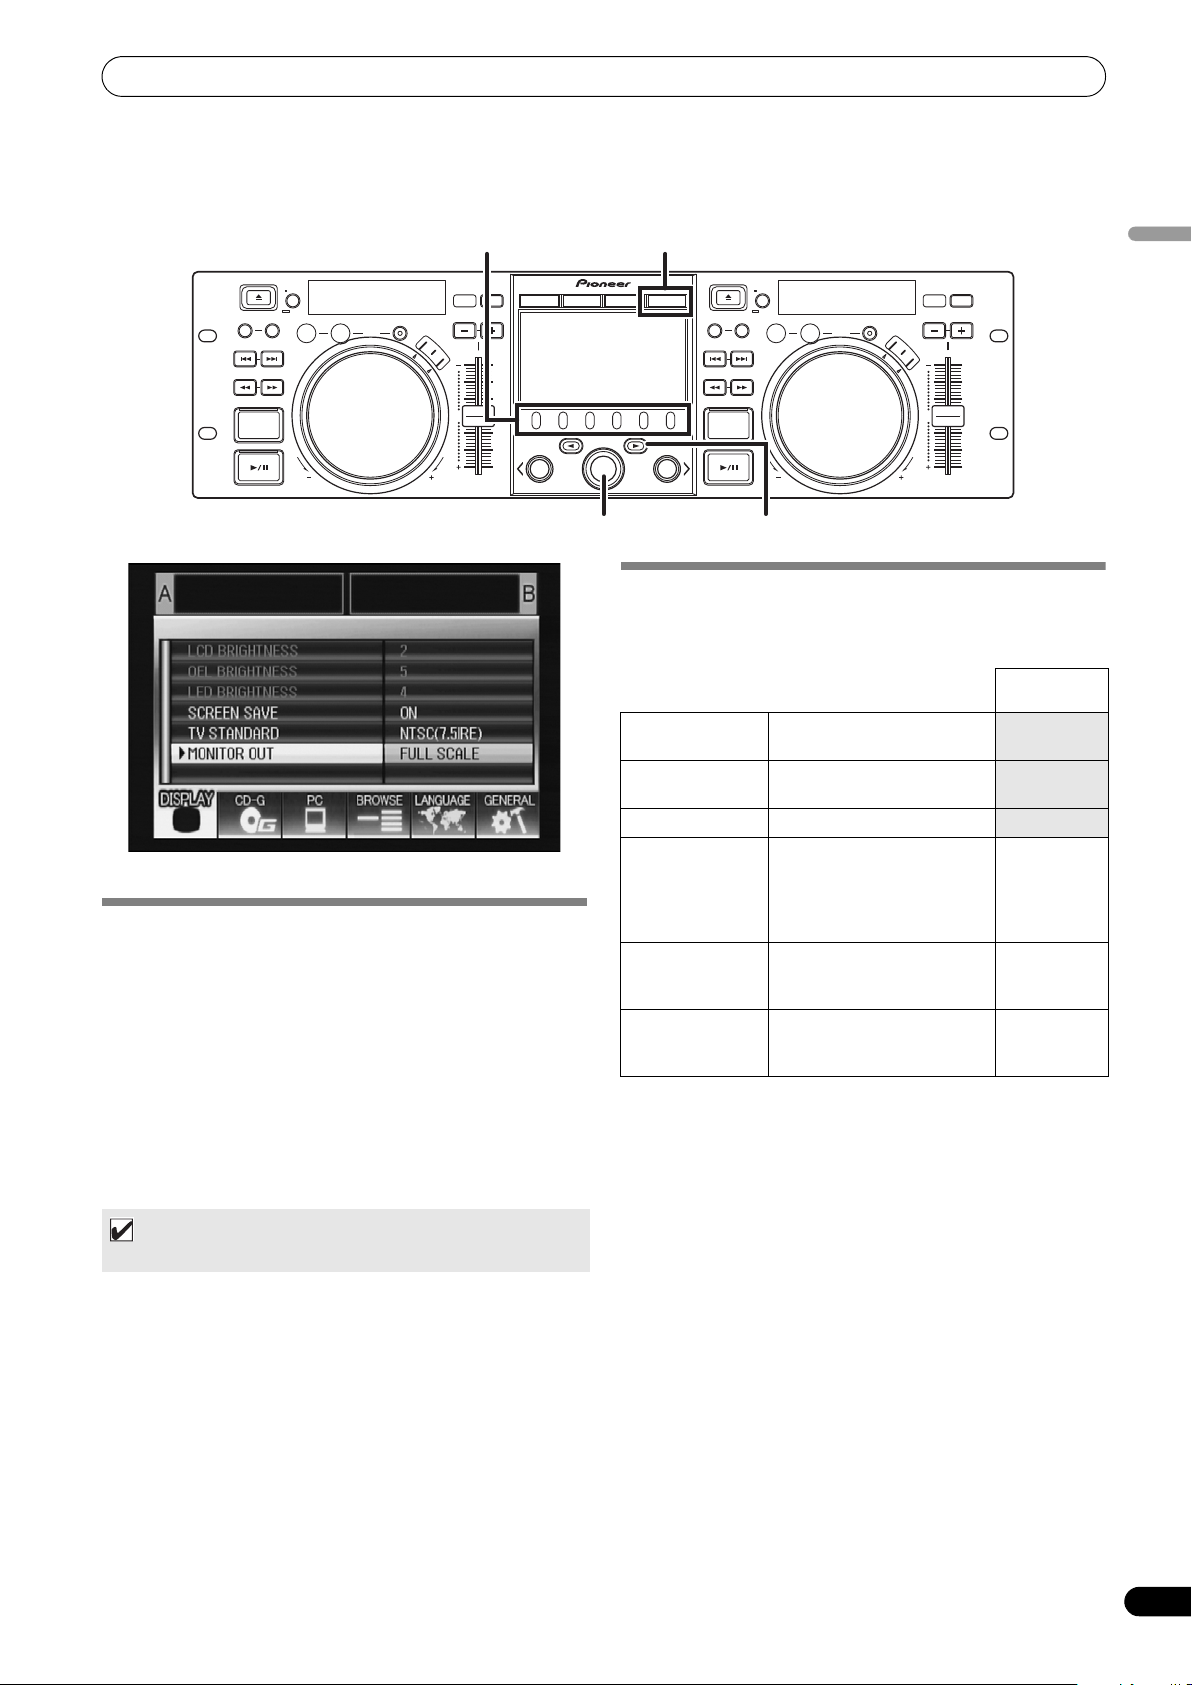
USING THE UTILITY
USING THE UTILITY
Press the UTILITY button to display the UTILITY screen and make unit settings.
Function buttons
BROWSE MIX EFFECT UTILITY
SETTING METHOD
1 Use the function buttons to select the item you wish to set
[DISPLAY/PC/LANGUAGE/GENERAL].
2 Rotate the rotary selector dial to align the cursor with the
desired setting item.
3 Press either the select down (
dial to move the
4 Turn the rotary selector dial to select the desired setting
value.
5 Press the rotary selector dial to confirm the new setting
value.
Also, to reset a setting to its default value, press the select up
() button.
MEMO
• Grayed-out CD-G and BROWSE cannot be set on this unit.
icon to the right side.
) button or the rotary selector
UTILITY
Select down () buttonRotary selector dial
SETTINGS
[1] DISPLAY
Use to perform settings for center display and external output.
Factory
default setting
LCD BRIGHTNESS Displays brightness of center
OEL BRIGHTNESS Displays brightness of
LED BRIGHTNESS Displays brightness of LEDs.
SCREEN SAVE *1After the set time without
TV STANDARD Sets signal format for
MONITOR OUT Sets center display aspect
*1 Screen saver operation
• The screensaver operates when five minutes have passed
without a track being loaded in either controller.
• The screensaver also operates after 100 minutes passes
without any button input when either one or both of the
controllers is in pause mode (including cue standby or END
display).
• The screen saver is disabled when a track is set with DJ
software other than DJS.
• During operation of the screensaver, pressing a button or
performing any other command operation will cancel the
screensaver.
display.
display A/B.
user operation, the LCD and
OEL screens are dimmed in
order to preserve the
displays.
monitor output (PAL, NTSC
(7.5 IRE), NTSC (0 IRE).
ratio to letterbox, full-screen,
or OFF.
ON
NTSC (7.5
IRE)
OFF
English
[2] PC
The MIDI channel can be set (P. 22).
25
En
Page 26

USING THE UTILITY
[3] LANGUAGE
Set the language to be used.
Factory
default setting
LANGUAGE Select display language from
nine available (English,
French, German, Italian,
Spanish, Dutch, Russian,
Simplified Chinese,
Japanese).
[4] GENERAL
Use to confirm LOAD LOCK settings and unit version.
LOAD LOCK
VERSION INFO Displays SEP-C1 version
*2 The LOAD LOCK function is disabled when a track is set with
DJ software other than DJS.
*2
Locks the LOAD button so
that it is disabled during
playback.
information.
English
Factory
default setting
OFF
TO PERFORM A FACTORY RESET
All unit settings can be restored to their factory default values by
using the UTILITY screen (P. 25).
1 While holding the UTILITY button depressed, connect the
unit to the computer (turn power ON).
The button must be depressed for five seconds or more.
2 Confirm message.
After the boot-up screen appears, a message will be displayed:
[The settings have been reset to factory defaults].
3 Disconnect from computer and reconnect.
26
En
Page 27
TROUBLESHOOTING
TROUBLESHOOTING
If you believe the unit is failing to work properly, check the following troubleshooting table for tips. Sometimes simple mistakes in setup
or operation may appear like serious problems. There are also times when the problem in question may be caused by something else other
than the unit, and at times like these you should check any other electronic devices being used at the same time.
If the problem in question continues to persist even after checking the troubleshooting table below and taking whatever corrective action
is recommended, contact your nearest Pioneer Service Station or contact the store from which you purchased the unit for further
assistance.
Description of problem Possible cause of problem Recommended action
Unit is not recognized even
when connected to computer.
During playback, tracks
cannot be loaded.
Track information characters
are garbled.
Television screen is disrupted,
or noise is heard during FM
broadcasts.
• Driver software is not installed properly.
If the unit is not connected properly to the
computer the version display utility cannot be
used to display the firmware version. To confirm
the firmware version, see the section “ABOUT
THE DRIVER PROGRAM, Confirm the driver
version” (P. 19).
• The USB auxiliary power cable is not connected. • Connect the USB auxiliary power cable to the
• LOAD LOCK is set to ON. • Use UTILITY screen to set LOAD LOCK to OFF.
• A non-supported language font has been used. • Use a supported language font to input
• This unit’s track information function cannot be
displayed by DJ software.
• Adverse influence from the unit. • Either turn the unit’s power OFF, or separate
• Install the driver software. If it has already been
installed, uninstall it, then install it again.
computer first, followed by the USB cable.
information. Supported languages include
western European languages, Russian,
Simplified Mandarin Chinese, and Japanese.
• Consult the operating instructions for your DJ
software program for more information about
languages supported by the program.
farther from the television.
English
ABOUT THE LCD SCREEN
• Some LCD monitors may display so-called “hot pixels” or “dead pixels” (constantly bright pixels or pixels that are permanently
off). This is a phenomenon characteristic of LCD displays and is not considered a malfunction.
• When used in cold regions, the screen may appear dark for a while after the power is first turned on. As the unit warms up with
time, the screen will return to normal brightness.
• Avoid viewing the LCD screen in direct sunlight, since the light reflected off the screen may make the image difficult to view.
ABOUT OEL (ORGANIC EL) SCREENS
• The two screens (displays A/B) may display slightly different color characteristics, but this is not a malfunction.
SEP-C1 UPDATES
Software for this unit may be updated to improve operation or functionality. For details consult the following support website:
http://www.prodjnet.com/support/
27
En
Page 28
DISCLAIMER
Supply of this product only conveys a license for private, non-commercial use and does not convey a license nor imply any right to
use this product in any commercial (i.e. revenue-generating) real
time broadcasting (terrestrial, satellite, cable and/or any other media), broadcasting/streaming via internet, intranets and/or other
networks or in other electronic content distribution systems, such
as pay-audio or audio-on-demand applications. An independent
license for such use is required. For details, please visit
http://www
.mp3licensing.com.
MPEG Layer-3 audio coding technology licensed from Fraunhofer
IIS and Thomson multimedia.
DISCLAIMER
• Pioneer and DJS are trademarks or registered trademarks of the Pioneer Corporation.
• Microsoft and Windows are registered trademarks of Microsoft Corporation, registered in the U.S. and other countries.
Windows’ official name is “Microsoft Windows Operating System”.
• Pentium is a registered trademark of Intel Corporation, U.S.A.
• Adobe and Reader are registered trademarks or trademarks of Adobe Systems Incorporated, registered in the United States of
America and other countries.
• Apple, Macintosh and Mac OS are trademarks of Apple Inc., registered in the U.S. and other countries.
• All other brand, product and company names are the trademarks or registered trademarks of their respective owners.
NOTE
• The DJ software program “DJS” not covered by the terms of free repair on the unit Warranty. When installing or using the DJS
program, be sure to read and understand the terms of the End User License Agreement (P. 13).
28
En
Published by Pioneer Corporation.
Copyright © 2008 Pioneer Corporation.
All rights reserved.
Page 29
T
j
Nous vous remercions pour cet achat d’un produit Pioneer.
Nous vous demandons de lire soigneusement ce mode d’emploi; vous serez ainsi à même de
faire fonctionner l’appareil correctement. Après avoir bien lu le mode d’emploi, le ranger dans
un endroit sûr pour pouvoir s’y référer ultérieurement.
Dans certains pays ou certaines régions, la forme de la fiche d’alimentation et de la prise
d’alimentation peut différer de celle qui figure sur les schémas, mais les branchements et le
fonctionnement de l’appareil restent les mêmes.
K015 Fr
IMPORTANT
ATTENTION
DANGER D´ELECTROCUTION
NE PAS OUVRIR
Ce symbole de l’éclair, placé dans un
triangle équilatéral, a pour but d’attirer
l’attention de l’utilisateur sur la présence, à
l’intérieur du coffret de l’appareil, de
“tensions dangereuses” non isolées d’une
grandeur suffisante pour représenter un
risque d’électrocution pour les êtres
humains.
Si vous souhaitez vous débarrasser de cet appareil, ne le mettez pas à la poubelle avec vos ordures ménagères. Il existe un système de
collecte séparé pour les appareils électroniques usagés, qui doivent être récupérés, traités et recyclés conformément à la législation.
Les habitants des états membres de l’UE, de Suisse et de Norvège peuvent retourner gratuitement leurs appareils électroniques usagés aux
centres de collecte agréés ou à un détaillant (si vous rachetez un appareil similaire neuf).
Dans les pays qui ne sont pas mentionnés ci-dessus, veuillez contacter les autorités locales pour savoir comment vous pouvez vous débarrasser
de vos appareils.
Vous garantirez ainsi que les appareils dont vous vous débarrassez sont correctement récupérés, traités et recyclés et préviendrez de cette façon
les impacts néfastes possibles sur l’environnement et la santé humaine.
ATTENTION:
POUR ÉVITER TOUT RISQUE
D’ÉLECTROCUTION, NE PAS ENLEVER LE
COUVERCLE (NI LE PANNEAU ARRIÈRE).
AUCUNE PIÈCE RÉPARABLE PAR
L’UTILISATEUR NE SE TROUVE À
L’INTÉRIEUR. CONFIER TOUT ENTRETIEN À
UN PERSONNEL QUALIFIÉ UNIQUEMENT.
Ce point d’exclamation, placé dans un
triangle équilatéral, a pour but d’attirer
l’attention de l’utilisateur sur la présence,
dans les documents qui accompagnent
l’appareil, d’explications importantes du
point de vue de l’exploitation ou de
l’entretien.
D3-4-2-1-1_Fr
K058_A_Fr
AVERTISSEMENT
Cet appareil n’est pas étanche. Pour éviter les
risques d’incendie et de décharge électrique, ne
placez près de lui un récipient rempli d’eau, tel
qu’un vase ou un pot de fleurs, et ne l’exposez pas
à des gouttes d’eau, des éclaboussures, de la pluie
ou de l’humidité.
D3-4-2-1-3_A_Fr
AVERTISSEMENT
Pour éviter les risques d’incendie, ne placez aucune
flamme nue (telle qu’une bougie allumée) sur
l’appareil.
D3-4-2-1-7a_A_Fr
PRÉCAUTION DE VENTILATION
Lors de l’installation de l’appareil, veillez à laisser
un espace suffisant autour de ses parois de manière
à améliorer la dissipation de chaleur (au moins 5 cm
à l’arrière et 5 cm de chaque côté).
AVERTISSEMENT
Les fentes et ouvertures du coffret sont prévues
pour la ventilation, pour assurer un fonctionnement
stable de l’appareil et pour éviter sa surchauffe.
Pour éviter les risques d’incendie, ne bouchez
amais les ouvertures et ne les recouvrez pas
d’objets, tels que journaux, nappes ou rideaux, et
n’utilisez pas l’appareil posé sur un tapis épais ou
un lit.
D3-4-2-1-7b_A_Fr
Milieu de fonctionnement
empérature et humidité du milieu de fonctionnement :
De +5 à +35ºC (de +41 à +95ºF); Humidité relative
inférieure à 85% (orifices de ventilation non obstrués)
N’installez pas l’appareil dans un endroit mal ventilé ou
un lieu soumis à une forte humidité ou en plein soleil
(ou à une forte lumière artificielle).
D3-4-2-1-7c_A_Fr
Ce produit est conforme à la directive relative à la
basse tension 2006/95/CE et à la directive relative à
la compatibilité électromagnétique 2004/108/CE.
D3-4-2-1-9a_A_Fr
Lorsque vous utilisez ce produit, respectez les
instructions inscrites sur le fond à propos de la
tension nominale et d’autres paramètres.
D3-4-2-2-4_Fr
Page 30

CONTENU
http://www.prodjnet.com/support/
Le site Web de Pionner ci-dessus fournit des réponses aux
questions souvent posées, des informations au sujet des logiciels
et d’autres données mises à jour afin de venir en aide à notre
clientèle.
CONTENU
CARACTÉRISTIQUES.....................................................5
FICHE TECHNIQUE........................................................7
VÉRIFICATION DES ACCESSOIRES...............................7
DIRECTIVES D’INSTALLATION.....................................8
CONNEXIONS...............................................................9
LES ORGANES ET LEURS FONCTIONS........................10
PANNEAU AVANT ....................................................................... 10
PANNEAU ARRIÈRE ................................................................... 12
À PROPOS DU LOGICIEL DJS .....................................13
ACCORD DE LICENCE DU LOGICIEL ........................................ 13
AVERTISSEMENT SUR LES COPYRIGHTS ................................ 14
EXIGENCES DU SYSTÈME (Environnement d’exploitation
minimal) ....................................................................................... 14
INSTALLATION DU LOGICIEL DJS ............................................. 15
REMARQUES SUR LA PÉRIODE D’ESSAI ET
L’INSCRIPTION DE L’UTILISATEUR ........................................... 15
À PROPOS DE L’AIDE EN LIGNE ............................................... 16
DÉCHARGE DE RESPONSABILITÉ............................................ 16
À PROPOS DU PROGRAMME PILOTE.........................17
ACCORD DE LICENCE UTILISATEUR FINAL POUR
LOGICIEL ...................................................................................... 17
INSTALLATION DU PILOTE......................................................... 17
UTILISATION DU LOGICIEL DJ ...................................20
PRÉPARATION DE VOTRE PROGRAMME
INFORMATIQUE DJ..................................................................... 21
CONTRÔLE DE VOTRE ORDINATEUR VIA LE PROTOCOLE DE
COMMUNICATIONS SPÉCIALISÉ.............................................. 21
UTILISATION DE MIDI POUR CONTRÔLER
L’ORDINATEUR ........................................................................... 22
TABLEAU DES MESSAGES MIDI............................................... 23
UTILISATION DE L’ÉCRAN UTILITY............................25
MÉTHODE DE RÉGLAGE ............................................................ 25
PARAMÈTRES.............................................................................. 25
RÉINITIALISATION AUX VALEURS PAR DÉFAUT .................... 26
GUIDE DE DÉPANNAGE.............................................27
À PROPOS DE L’ÉCRAN LCD (À CRISTAUX LIQUIDES) ......... 27
À PROPOS DES ÉCRANS OEL (DIODES
ÉLECTROLUMINESCENTES ORGANIQUES)............................. 27
MISES À JOUR DU SEP-C1 ........................................................ 27
DÉCHARGE DE RESPONSABILITÉ ..............................28
4
Fr
Page 31

CARACTÉRISTIQUES
CARACTÉRISTIQUES
Cet appareil est un contrôleur de logiciel pour DJ mobiles professionnels, disposant d’une large gamme de fonctions pratiques, exigées
lors de soirées et autres manifestations, et d’autres caractéristiques de fonctionnement superbes.
Préservant la tradition des lecteurs de la série CDJ de Pioneer par l’agencement de son panneau, ses fonctions et son fonctionnement,
l’unité peut être raccordée à un ordinateur utilisant une alimentation par bus USB; elle autorise alors une lecteur DJ authentique de
plages musicales chargées dans le logiciel DJS accessoire sans devoir recourir à une souris ou un clavier.
Moniteur externe
Français
Logiciel I/F DJ Spécial
PIONEER DJS
OUT
Unité I/F Audio
Logiciel MIDI I/F DJ
Bus-alimentation USB
CUE/LOOP
MEMORY CALL
TRACK SEARCH
Vidéo
EJECT
TIME
A.CUE
IN/CUE
OUT/ADJUST
LOOP
HOT LOOP
SEARCH
QUE
RELOOP/EXIT
TEMPO
MASTER
6/10/16WIDE
TEMPO
BROWSE MIX EFFECT UTILITY
MT
PITCH BEND
S
C
R
A
T
C
H
J
O
G
B
R
E
A
K
0
A
LOAD
FWD TEMPOREV
EJECT
TIME
A.CUE
CUE/LOOP
IN/CUE
OUT/ADJUST
MEMORY CALL
TRACK SEARCH
SEARCH
QUE
B
LOAD
SEP-C1
LOOP
HOT LOOP
RELOOP/EXIT
TEMPO
MASTER
6/10/16WIDE
TEMPO
MT
PITCH BEND
S
C
R
A
T
C
H
J
O
G
B
R
E
A
K
0
FWD TEMPOREV
SEP-C1
Amplificateur
de puissance
Power amplifier
Haut-parleurTable de mixage
5
Fr
Page 32

CARACTÉRISTIQUES
DIVERSES COMMANDES DE LOGICIEL DJ
Le logiciel DJS Pioneer fourni comme accessoire et d’autres
programmes DJ peuvent être utilisés librement sans recours à un
disque de contrôle. Les programmes DJ de type MIDI sont
également pris en compte.
NOTE
• La plupart des données relatives aux opérations des boutons et
curseurs de réglage TEMPO de cette unité peuvent être
transmises à des dispositifs externes par MIDI USB ou formats
spécialisés. Pour utiliser cet appareil afin de contrôler le
logiciel DJ, il est nécessaire d’installer un programme pilote.
ÉCRAN TRÈS FONCTIONNEL
Ecran central
Un grand écran LCD couleur 4,3”, d’une luminance élevée pour
améliorer la visibilité. L’interface utilisateur graphique (GUI)
intelligent et le sélecteur rotatif assurent une sélection simplifiée
des plages.
Écran de contrôleur A/B
Les indications de durée écoulée et de tempo apparaissent sur des
affichages OEL (électroluminescence organique) à segments
couleurs, assurant une excellente réponse et une visibilité
superbe. Tout comme l’écran central, ces affichages et
indicateurs autorisent une lecture DJ sans stress dans une large
gamme de situations d’éclairage.
BAGUE JOG
L’appareil est doté d’une grande bague Jog de 80 mm à fonction
scratch, ce qui autorise des opérations avec le même sens du
toucher qu’avec une platine-disque analogique.
SORTIE MONITEUR
En transmettant l’écran BROWSE de l’écran central vers un plus
grand moniteur externe, les opérations pourront être accomplies
avec plus de commodité.
PRISE EN COMPTE DE FONCTIONS DJS
L’emploi du logiciel DJS accessoire permet non seulement la
lecture DJ, mais aussi un large éventail d’autres opérations,
notamment la sélection de plage et le mixage au moyen de l’écran
central.
CONTRÔLE DJ
Outre les fonctions de base, telles que le contrôle du tempo, les
opérations à repère et la lecture à boucle, la plupart des fonctions
de lecture DJ du DJS sont prises en compte par l’appareil,
notamment "scratch" et "pitch bend" au moyen de la bague Jog.
INFORMATIONS SUR LES PLAGES
A la lecture des plages au moyen de DJS, la durée, le titre, le nom
d’artiste et d’autres informations peuvent être indiqués sur
l’écran.
CONTRÔLE NAVIGATION
L’appareil peut aussi contrôler les listes de plages DJS et les listes
de lecture. Les listes peuvent être affichées sur l’écran central et la
sélection des plages peut s’effectuer sans regarder l’écran de
l’ordinateur.
CONTRÔLE DE MIXAGE
La fonction mixage DJS peut être contrôlée. Un seul bouton suffit
pour effectuer le mixage, par sélection entre 4 modes de mixage.
CONTRÔLE D’EFFET
Des effets DJS peuvent être contrôlés. La sélection des effets et la
commutation de battement d’effet et le réglage niveau/tempo
peuvent être effectués au moyen du sélecteur rotatif et des
boutons de cet appareil.
NOTE
• Lorsque vous contrôlez un logiciel DJ (non DJS) d’autres
marques, consultez les instructions de fonctionnement du
programme en question pour des informations sur la prise en
compte des fonctions.
6
Fr
Page 33

FICHE TECHNIQUE / VÉRIFICATION DES ACCESSOIRES
FICHE TECHNIQUE
1 Données d’ordre général
Modèle . . . . . . . . . . . . . . . . . . . . . . . . . . . . . . . . . . . . . . . . . . SEP-C1
Appellation. . . . . . . . . . . . . . . . Contrôleur pour logiciel de MIX DJ
Tension . . . . . . . . . . . . . . . . . . . . . . CC 5 V (bus-alimentation USB)
Consommation . . . . . . . . . . . . . . . . . . . . . . . . . . . . . . . . . . . 600 mA
Consommation électrique . . . . . . . . . . . . . . . . . . . . . . . . . . . . . 3 W
Température de fonctionnement . . . . . . . . . . . .De +5 °C à +35 °C
Humidité de fonctionnement
. . . . . . . . . . . . . . . . . . . . . . 5 % à 85 % RH (sans condensation)
Masse (Poids) . . . . . . . . . . . . . . . . . . . . . . . . . . . . . . . . . . . . . .1,7 kg
Dimensions externes maximales
. . . . . . . . . . . . . . . . 482,6 mm (L) x 133,0 mm (H) x 83,5 mm (P)
2 Section USB Upstream
Connecteur. . . . . . . . . . . . . . . . . Port USB Type B (connecteur PC)
3 Section de sortie vidéo
Connecteur de sortie. . . . . . . . . . . . . . . . . . . . . . . . . . . . . Prise RCA
Niveau de sortie composite . . . . . . . . . . . . . . . . . . . . .1 Vp-p (75 Ω)
4 Section Écran central
Type . . . . . . Affichage matriciel actif TFT à cristaux liquides (LCD)
Taille . . . . . . . . . . . . . . . . . . . . . . . . . . . . . . . . . . . . . . . 4,3” (largeur)
Langues prises en compte . . . . . . . . . . . 9 langues dont l’anglais,
le japonais et le chinois (mandarin simplifié)
5 Section Écran de contrôleur A/B
Type . . . . . . .OEL (Electroluminescent organique) Tous segments
6 Autres connecteurs
Connecteur 5 V . . . . . . . . . . . . . . . . . . . . . . . . . . . . . . . . . . . Prise CC
Spécifications et aspect sous réserve de changements sans avis
préalable.
VÉRIFICATION DES ACCESSOIRES
Vérifiez que tous les accessoires fournis sont présents.
Français
Câble USB
Câble d’alimentation auxiliaire USB
NOTE
• Trois modes d’emploi sont fournis (y compris celui que vous êtes en train de lire). Lisez ces manuels selon votre façon
d’employer l’appareil :
– Mode d’emploi du SEP-C1 (ce manuel)
Lisez ce livret d’abord.
– Guide de contrôle SEP-C1 DJS (Fichier PDF enregistrée sur le CD-ROM fourni)
Mode d’emploi de base à l’emploi du DJS avec le SEP-C1.
– Mode d’emploi du DJS (Fichier PDF enregistrée sur le CD-ROM fourni)
Manuel complet d’explication et de fonctionnement pour Logiciel DJS
DJS: 1 jeu
CD-ROM Vignette d’installation DJS
Mode d’emploi (ce manuel)
SEP-C1
Carte de garantie
7
Fr
Page 34

DIRECTIVES D’INSTALLATION
Evitez tout contact
avec des surfaces en
vibration.
Pour permettre une bonne
dissipation de chaleur,
maintenez cet espace dégagé.
Pour permettre une
bonne dissipation de
chaleur, maintenez
cet espace dégagé.
Pour permettre une
bonne dissipation de
chaleur, maintenez
cet espace dégagé.
DIRECTIVES D’INSTALLATION
• Placer ou utiliser l’unité pendant de longues périodes sur un
appareil dégageant de la chaleur, tel qu’un amplificateur ou un
projecteur, etc., peuvent en altérer ses performances. Evitez de
placer l’unité sur des sources générant de la chaleur.
• Installez cette unité aussi loin que possible de syntoniseurs et de
téléviseurs. Une unité installée à proximité de tels appareils peut
provoquer des parasites ou une détérioration des images. Ces
parasites sont particulièrement prononcés si une antenne
intérieure est installée. Dans ce cas, utilisez une antenne
extérieure ou coupez l’alimentation de l’unité.
• Si vous utilisez cet appareil dans un environnement bruyant, par
exemple à proximité d’enceintes acoustiques, des erreurs de
lecture peuvent survenir. Dans ce cas, éloignez l’appareil des
enceintes ou réduisez le niveau de sortie.
• Placez cet appareil sur une surface plate et stable.
• Ne déposez pas d’objets pesants sur cet appareil.
Veillez à ce que l’unité, y compris le câble USB, ne touche pas des
pièces en vibration. Toute cause de vibration, non coupée par les
isolateurs, peut entraîner des pertes de lecture.
Soyez particulièrement vigilant quand vous utilisez l’unité installée
dans sa valise de transport.
À propos des cartons de transport
La bague Jog est munie d’un commutateur délicat. Si l’appareil
est placé dans un emballage, veillez à ce qu’aucune pression ne
soit exercée sur la surface de la bague Jog.
Condensation
Lorsque l’unité est transporté d’un endroit froid dans une pièce
chaude ou si la température de la pièce augmente brusquement,
de la condensation risque de se former à l’intérieur de l’unité et
d’amoindrir ses performances. Dans ce cas, n’utilisez pas
l’appareil pendant une heure environ ou augmentez
progressivement la température de la pièce.
Nettoyage de l’unité
Pour nettoyer l’unité, essuyez-le avec un chiffon doux et sec. Si elle
est très sale, imbibez le chiffon d’une solution de détergent doux,
obtenue en diluant un volume de détergent dans 5 ou 6 volumes
d’eau, essorez bien le linge, puis enlevez la saleté. Utilisez aussi un
chiffon sec pour sécher la surface. N’utilisez pas de produits
volatiles comme de la benzine ou du diluant qui peuvent
endommager l’appareil.
Nettoyage de la bague Jog
Pour nettoyer la bague Jog, essuyez-la avec un chiffon doux et sec.
Si elle est très sale, imbibez le chiffon d’une solution de détergent
doux, obtenue en diluant un volume de détergent dans 5 ou 6
volumes d’eau, essorez bien le linge, puis enlevez la saleté. Utilisez
aussi un chiffon sec pour sécher la surface.
Evitez d’utiliser de l’alcool, un diluant pour peinture, du benzène,
des insecticides ou toute autre substance agressive sur la bague
Jog, car vous risqueriez d’endommager ou de décolorer ses
marques ou sa finition.
Installation du SEP-C1 dans un bâti EIA
Les orifices pour vis du panneau avant du SEP-C1 sont réservés à
la fixation de l’appareil dans un bâti EIA de 48 cm (19 pouces).
Cette unité est conforme aux spécifications 3U. La profondeur
maximale de l’unité est de 83,5 mm.
• Fixez l’appareil sur le bâti en utilisant des vis de dimensions
appropriées (ces vis ne sont pas fournies avec l’appareil).
REMARQUE
• N’installez pas l’appareil juste au-dessus d’un ampli de
puissance, car des dégâts pourraient résulter de la chaleur
produite par l’ampli; un ronflement et d’autres parasites
risquent aussi d’être causés.
• Pour transporter l’appareil, retirez-le de son bâti. Vous
risquez d’endommager l’appareil si vous le transportez
installé dans son bâti.
• Si l’appareil doit être déplacé en restant dans son bâti,
veillez à bien le protéger contre les vibrations et les chocs.
8
Fr
Page 35

CONNEXIONS
CONNEXIONS
Utilisez le câble d’alimentation auxiliaire USB fourni comme accessoire et le câble USB normal pour raccorder l’unité à l’ordinateur
(branchez d’abord le câble d’alimentation auxiliaire USB).
Ordinateur
Câble USB fourni
Cordon d’alimentation
auxiliaire USB fourni
PC
5V
MONITOR OUT
REMOTE
CONTROL
Interface audio (vendue séparément)
Câble audio
Ne connectez pas le câble d’alimentation auxiliaire USB
ou le câble USB avant que le logiciel pilote n’ait été
Table de mixage
installé sur l’ordinateur.
REMARQUE
• Sur le connecteur 5 V, ne branchez rien d’autre que le câble d’alimentation auxiliaire USB fourni comme accessoire.
• Utilisez toujours le câble d’alimentation auxiliaire USB fourni comme accessoire et le câble USB uniquement.
• Connectez toujours le câble d’alimentation auxiliaire USB fourni comme accessoire et le câble USB sur un seul et même
ordinateur.
• Ne branchez pas cet appareil sur un ordinateur via un hub USB.
• Ne branchez pas cet appareil sur un ordinateur via une carte d’interface USB acceptant CardBus.
Connexion à un moniteur externe (connecteur à broches)
Utilisez ces connexions si vous souhaitez obtenir les images de l’écran central sur un plus grand écran. Après avoir raccordé l’appareil à
un moniteur externe, les réglages de l’appareil doivent être changés (cf. la rubrique “SORTIE MONITEUR” dans l’article “[1] DISPLAY
(Écran)” de la section “UTILISATION DE L’ÉCRAN UTILITY” à la page 25).
Français
Moniteur externe
PC
5V
MONITOR OUT
REMOTE
CONTROL
9
Fr
Page 36

LES ORGANES ET LEURS FONCTIONS
LES ORGANES ET LEURS FONCTIONS
PANNEAU AVANT
17
16
1
MEMORY CALL
4
5
6
7
8 23 2 3 11 12 13 14
EJECT
CUE/LOOP
TRACK SEARCH
SEARCH
QUE
TIME
A.CUE
IN/CUE
HOT LOOP
OUT/ADJUST
RELOOP/EXIT
LOOP
S
C
R
A
T
C
H
TEMPO
MASTER
6/10/16WIDE
TEMPO
MT
PITCH BEND
J
O
G
B
R
E
A
K
0
FWD TEMPOREV
BROWSE MIX EFFECT UTILITY
A
LOAD
19 15 21
18109
EJECT
TIME
A.CUE
CUE/LOOP
MEMORY CALL
22
B
LOAD
SEP-C1
2024
19
TRACK SEARCH
SEARCH
QUE
IN/CUE
HOT LOOP
OUT/ADJUST
RELOOP/EXIT
LOOP
S
C
R
A
T
C
H
TEMPO
MASTER
6/10/16WIDE
TEMPO
MT
PITCH BEND
J
O
G
B
R
E
A
K
0
FWD TEMPOREV
Cette section explique l’emploi de l’unité lors du contrôle DJS. Selon le programme logiciel DJ utilisé, il se peut que certaines fonctions
ne soient pas prises en compte ou qu’elles exigent des opérations différentes de celles décrites dans ce manuel.
1 Bouton EJECT ()
Non utilisé pendant le contrôle DJS.
2 Boutons de contrôle de boucle
Bouton de début de boucle (IN/CUE)
A utiliser pour poser le point initial d’une bouche. Quand ce
bouton est actionné pendant la lecture à boucle, la lecture
revient au point initial de la boucle et elle y recommence.
Bouton de fin de boucle (OUT/ADJUST)
A utiliser pour poser le point final d’une bouche. Quand ce
bouton est actionné pendant la lecture à boucle, la bague Jog
et les boutons SEARCH peuvent servir pour ajuster la position
du point final.
Bouton RELOOP/EXIT
Appuyez sur ce bouton pendant la lecture à boucle pour
annuler celle-ci. Si l’unité n’est pas en mode de lecture à
bouche, une pression sur le bouton fera commencer la lecture
en boucle au point initial préalablement posé.
3 Section de contrôle de TEMPO
Bouton de plage de contrôle du TEMPO (±6/10/16/WIDE):
Chaque poussée sur le bouton fait changer la plage variable
du curseur de réglage TEMPO.
Bouton et voyant MASTER TEMPO (MT)
À chaque pression sur le bouton, la fonction du tempo
principal est alternativement activée et désactivée.
Curseur de réglage TEMPO
À partir de la position centrale à déclic, tirez le curseur vers
vous (+) pour accroître le tempo ou éloignez le curseur de
vous (–) pour ralentir le tempo.
Boutons PITCH BEND +/– :
Une pression pendant la lecture active la fonction Pitch Bend
(changement de hauteur tonale). Une poussée sur le bouton
“+” accélère la vitesse Pitch Bend, tandis qu’une poussée sur
le bouton “–” ralentit cette vitesse.
La vitesse de changement de la hauteur tonale peut être
modifiée en maintenant la pression sur le bouton et en
tournant la bague Jog.
4 Boutons TRACK SEARCH (, )
A utiliser pour effectuer une recherche de plage.
5 Boutons SEARCH (, )
A utiliser pour effectuer une avance et un recul rapide.
6 Bouton et voyant CUE
A utiliser pour poser les points de repère (cue). De plus, quand
un point de repère a été posé, une pression sur le bouton CUE
règle l’unité en mode d’attente au point de repère (cue
standby).
7 Bouton et voyant de Lecture/Pause ()
A utliser pour commander la lecture et la pause.
8 Bouton Mode horaire/Auto cue (TIME/A.CUE)
TIME :
À chaque poussée sur ce bouton, l’affichage horaire de l’écran
change entre la durée de lecture écoulée sur la plage actuelle
et la durée restante (REMAIN).
A.CUE
Une pression maintenue sur le bouton active et désactive
alternativement la fonction AUTO CUE.
Fonction AUTO CUE (Repère automatique)
Quand une plage est définie ou qu’une recherche de plage
est effectuée, cette fonction pose automatiquement un point
de repère et l’unité se place immédiatement en attente au
point ou la lecture doit commencer.
9 Bouton SCRATCH
Appuyez pour activer ou désactiver le mode Scratch.
10 Bouton JOG BREAK
Non utilisé pendant le contrôle DJS
11 Bouton BROWSE (Navigation)
Utilisez pour sélectionner l’écran BROWSE.
12 Bouton MIX
Utilisez pour passer à l’écran MIX.
13 Bouton EFFECT
Utilisez pour passer à l’écran EFFECT.
14 Bouton UTILITY
Utilisez pour passer à l’écran UTILITY (page 25).
15 Sélecteur rotatif
A l’emploi des écrans BROWSE et UTILITY, la rotation de cette
bague permet une sélection des plages et assure le
mouvement du curseur parmi les options. Appuyez sur la
bague pour valider la sélection.
Au sujet de l’emploi des écrans MIX et EFFECT, consultez le
Guide de contrôle DJS.
10
Fr
Page 37

LES ORGANES ET LEURS FONCTIONS
Nom de la plage État de lecture
Nom d’Artiste
16 Bouton CUE/LOOP MEMORY
Non utilisé pendant le contrôle DJS.
17 Bouton CUE/LOOP CALL
Non utilisé pendant le contrôle DJS.
18 Boutons de fonction (F1 à F6 à partir de la gauche)
Pour sélectionner les modes et les catégories.
Les rubriques pouvant être sélectionnées varient selon l’écran
ou le menu.
Pour plus de détails, consultez le Guide de contrôle DJS.
19 Boutons LOAD A/B
A l’emploi de l’écran BROWSE, appuyez pour placer la plage
sélectionnée dans le contrôleur A/B.
Au sujet de l’emploi des écrans MIX et EFFECT, consultez le
Guide de contrôle DJS.
20 Bouton de sélection Haut ()
A l’emploi des écrans BROWSE et UTILITY, chaque pression
sur le bouton fait monter le menu d’un niveau vers le haut (vers
la gauche) dans la hiérarchie actuelle des menus.
Au sujet de l’emploi des écrans MIX et EFFECT, consultez le
Guide de contrôle DJS.
21 Bouton de sélection Bas ()
A l’emploi des écrans BROWSE et UTILITY, chaque pression
sur le bouton fait descendre le menu d’un niveau vers le bas
(vers la droite) dans la hiérarchie actuelle des menus.
Au sujet de l’emploi des écrans MIX et EFFECT, consultez le
Guide de contrôle DJS.
22 Écran central (page 11)
23 Écran A/Écran B (page 12)
24 Bague Jog (+FWD/–REV)
Quand le mode Scratch est en service (ON) :
Touchez la surface de la bague et tournez pour effectuer une
lecture Scratch.
Quand le mode Scratch est hors service (OFF) :
Utilisez pour effectuer le Pitch bend. L’accélération (+FWD) et
la décélération (–REV) s’accomplissent selon le degré de
ro tatio n de la b ague. Quand l a rotation de la bague est arrêtée,
la lecture revient à la vitesse antérieure.
Écran central
3
1
2
1 Écran de menu principal
Les menus de l’écran central changent au moyen du bouton
BROWSE, du bouton MIX, du bouton EFFECT et du bouton
UTILITY. Les boutons de fonction, les boutons de sélection
Haut ()/Bas (), les boutons LOAD A/B et le sélecteur rotatif
permettent de manipuler le contenu de chaque menu.
Écran BROWSE
Utilisez pour afficher les listes de plages DJS ou les listes de
lecture et pour choisir les plages. Pour plus de détails,
consultez “Utilisation des listes DJS” dans le Guide de contrôle
DJS.
Écran MIX
Utilisez pour effectuer des opérations de mixage DJS. Pour
plus de détails, consultez “Opérations de mixage DJS” dans le
Guide de contrôle DJS.
Écran EFFECT
Utilisez pour effectuer des opérations de l’effecteur DJS. Pour
plus de détails, consultez “Opérations d’effecteur DJS” dans le
Guide de contrôle DJS.
Écran
UTILITY
Pour effectuer les réglages sur l’appareil (page 25).
2 Onglet de fonction
Pour afficher les rubriques qui peuvent être changées par les
six boutons de fonction. Les rubriques affichées diffèrent selon
le contenu indiqué sur l’écran de menu principal.
3 Affichage d’information de plage A/B
Pour afficher les informations de plage et l’état actuel des
plages reproduites sur le contrôleur A/B.
Français
Etat de lecture
Indique la plage en cours de lecture.
Indique la plage actuellement en mode Pause.
Indique la plage actuellement en mode Attente de
top.
NOTE
• Cette unité peut afficher les noms de titres et d’artistes
dans les langues d’Europe occidentale, en russe, chinois
mandarin simplifié et japonais, mais selon le logiciel DJ
utilisé, il se peut que certaines langues ne soient pas prises
en compte. Consultez le mode d’emploi de votre logiciel DJ
pour obtenir plus de détails sur les langues prises en
compte.
11
Fr
Page 38

LES ORGANES ET LEURS FONCTIONS
1
8
4
6
2
7
3
5
9
PC
MONITOR OUT
5V
REMOTE
CONTROL
1
2
3
4
Écran A/Écran B
1 Affichage du numéro de plage
L’indication “DJS” apparaît pendant le contrôle DJS.
2 Affichage de la portée du contrôle TEMPO (±6, ±10, ±16,
WIDE)
Affiche la portée variable choisie pour le curseur de réglage
TEMPO.
3 Affichage du taux de changement du TEMPO
Affiche le changement produit sur le Tempo par l’action du
curseur de réglage TEMPO.
4Voyant A.CUE
S’allume quand la fonction Auto Cue est activée (ON).
5 Affichage horaire
Il affiche la durée écoulée (le voyant [REMAIN] est éteint) ou la
durée restante (le voyant [REMAIN] est allumé) sur la plage
actuelle en minutes [M], secondes [S], and cadres [F].
6 Affichage d’adresse de lecture
Pour illustrer de façon rapide et intuitive la progression relative
de la lecture de la page (soit en temps écoulé, soit en temps
restant), une barre graphique représente la longueur totale de
la plage.
• Affichage de durée écoulée : Tous les segments sont éteints
au début et ils s’allument progressivement de la gauche
vers la droite.
• Affichage de durée restante : Tous les segments sont
allumés au début et ils s’éteingnent progressivement de la
gauche vers la droite.
• Quand la durée de lecture restante atteint 30 secondes, le
graphique clignote lentement.
• Quand la durée de lecture restante atteint 15 secondes, le
graphique clignote rapidement.
7 Affichage BPM
Il indique le BPM (Battements Par Minute) de la plage en
cours de lecture.
8Voyant MEMO
Non affiché pendant le contrôle DJS.
9Voyant REMAIN
Il s’allume quand l’affichage horaire est réglé pour la durée
restante.
PANNEAU ARRIÈRE
1 Connecteur PC : Port USB (type B)
Utilisez le câble USB accessoire pour raccorder ce port à un
ordinateur.
2 Connecteur 5 V
Utilisez le câble d’alimentation auxiliaire USB accessoire pour
raccorder ce port à un ordinateur.
3 Connecteur de sortie vidéo (MONITOR OUT)
Utilisez un câble vidéo pour la connexion à un affichage
externe.
4 Connecteur de télécommande (REMOTE CONTROL)
Non utilisé sur cette unité.
12
Fr
Page 39

À PROPOS DU LOGICIEL DJS
À PROPOS DU LOGICIEL DJS
Pioneer DJS est un logiciel qui permet d’utiliser des fichiers MP3 pour contrôler la lecture DJ à partir d’un ordinateur. Chargez le logiciel
sur votre ordinateur à partir du disque CD-ROM fourni.
NOTE
• Le DJS est doté des fonctions pour l’enregistrement de la lecture DJ.
2.4 Pas d’assistance. Pioneer n’a aucune obligation de
ACCORD DE LICENCE DU LOGICIEL
Cet accord de licence du logiciel (“accord”) est entre vous (aussi
bien la personne installant le programme que toute entité légale
unique pour laquelle cette personne agit) (“vous” ou “votre”) et
PIONEER CORPORATION (“Pioneer”).
TOUTE MESURE PRISE EN VUE DE CONFIGURER OU
D’INSTALLER LE PROGRAMME SIGNIFIE QUE VOUS ACCEPTEZ
TOUS LES TERMES DE CET ACCORD DE LICENCE.
L’AUTORISATION DE TÉLÉCHARGER ET/OU D’UTILISER LE
PROGRAMME EST EXPRESSÉMENT CONDITIONNÉE À VOTRE
RESPECT DE CES TERMES. AUCUNE APPROBATION ÉCRITE OU
ÉLECTRONIQUE N’EST NÉCESSAIRE POUR VALIDER ET
EXÉCUTER CET ACCORD. SI VOUS N’ACCEPTEZ PAS LA TOTALITÉ
DES TERMES DE CET ACCORD, VOUS N’ÊTES PAS AUTORISÉ À
UTILISER LE PROGRAMME ET VOUS DEVEZ ARRÊTER SON
INSTALLATION OU LE DÉSINSTALLER, COMME APPLICABLE.
1 DÉFINITIONS
1.1 Le mot “documentation” signifie la documentation écrite,
les spécifications et l’aide fournies par Pioneer pour aider
à installer et à utiliser le programme.
1.2 Le mot “programme” signifie la totalité ou toute partie du
logiciel Pioneer et dont Pioneer vous concède la licence
par cet accord.
2 LICENCE DE PROGRAMME
2.1 Licence limitée. Sous réserve des restrictions stipulées
dans cet accord, Pioneer vous concède une licence
limitée, non-exclusive, non-transférable (sans le droit de
sous-licencier):
(a) Pour installer une seule copie du programme sur le
disque dur de votre ordinateur, pour utiliser le
programme seulement pour votre besoin personnel
conformément à cet accord et à la documentation
(“Utilisation autorisée”) ;
(b) Pour utiliser la documentation d’assistance à votre
utilisation autorisée ; et
(c) Pour faire une copie du programme seulement à des
fins de sauvegarde, pourvu que tous les titres et
marques, copyright et avertissements de droits
limités soient reproduits sur cette copie.
2.2 Restrictions. Vous ne pouvez pas copier ou utiliser le
programme ou la documentation de façon autre que celle
expressément permise par cet accord. Vous ne pouvez
pas transférer, sous-licencier, louer, louer à crédit bail ou
prêter le programmme, ou l’utiliser pour la formation
d’une tierce partie, dans une activité commerciale de
service informatique en temps partagé ou d’assistance.
Vous ne pouvez pas, vous-même ou par l’intermédiaire
d’une tierce partie, modifier, désosser, désassembler ou
décompiler le programme, sauf dans la limite
expressément permise par la loi en vigueur et, le cas
échéant, seulement après que vous ayez informé Pioneer
par écrit de vos intentions. Vous ne pouvez pas utiliser le
programme sur plusieurs processeurs sans le
consentement écrit préalable de Pioneer.
2.3 Propriété. Pioneer ou son concédant garde tout droit, titre
et intérêt dans et sur tout brevet, copyright, marque,
secret commercial et autres droits de propriété
intellectuelle liés au programme et à la documentation,
ainsi qu’à tout produit qui en dérive. Vous ne faites
l’acquisition d’aucun droit, explicite ou implicite, hors de
la licence limitée décrite dans cet accord.
3 EXCLUSION DE GARANTIE
4 DOMMAGES-INTÉRÊTS ET RECOURS POUR INFRACTION
5 RÉSILIATION
6 CONDITIONS GÉNÉRALES
fournir une assistance, une maintenance, des mises à
niveau, des modifications ou des nouvelles versions pour
le programme ou la documentation liés à cet accord.
LE PROGRAMME ET LA DOCUMENTATION SONT FOURNIS
“TELS QUELS” SANS CONDITION OU GARANTIE D’AUCUNE
SORTE, ET VOUS ACCEPTEZ DE LES UTILISER À VOS
RISQUES ET PÉRILS. DANS LA MESURE PERMISE PAR LA
LOI, PIONEER EXCLUT EXPLICITEMENT TOUTE GARANTIE DE
TOUTE SORTE DU PROGRAMME ET DE LA
DOCUMENTATION, EXPRESSE, IMPLICITE, OFFICIELLE, OU
ÉMANANT DE L’UTILISATION, DE LA TRANSACTION OU DE
L’ÉCHANGE, Y COMPRIS LES GARANTIES DE QUALITÉ
MARCHANDE, D’ADÉQUATION À UN USAGE PARTICULIER,
DE QUALITÉ, DE PRÉCISION, DE TITRE OU DE
NONCONTREFACON.
Vous acceptez que toute infraction aux restrictions de cet
accord causerait à Pioneer un mal irréparable pour lequel des
dommages-intérêts seuls seraient inadéquats. En plus des
dommages-intérêts et autres recours auxquels Pioneer peut
avoir droit, vous acceptez que Pioneer puisse saisir la justice
pour empêcher toute infraction ou tout risque d’infraction ou
pour faire cesser toute infraction à cet accord.
Pioneer peut résilier cet accord à tout moment sur votre
infraction à n’importe quelle de ses clauses. Si cet accord est
résilié, vous devez arrêter d’utiliser le programme, le
supprimer définitivement de l’ordinateur où il réside, et
détruire toutes les copies du programme et de la
documentation en votre possession, avec confirmation écrite
à Pioneer de l’exécution de ces obligations. Les sections 2.2,
2.3, 2.4, 3, 4, 5 et 6 resteront en vigueur après la résiliation de
cet accord.
6.1 Limitation de responsabilité. En aucun cas Pioneer ou ses
filiales ne seront responsables au sujet de cet accord ou
de son contenu, quel que soit le fondement invoqué, de
quelque dommage que ce soit, indirect, direct, spécial,
induit ou à valeur répressive, ou de dommages en raison
de perte de bénéfices, de revenu, d’affaires, d’économies,
de données, d’utilisation, ou de coût d’acquisition d’un
produit de substitution, même s’ils sont prévenus de la
possibilité de tels dommages ou si ces dommages sont
prévisibles. En aucun cas la responsabilité de Pioneer
pour tous dommages ne dépassera le montant que vous
avez payé à Pioneer ou à ses filiales pour le programme.
Les parties admettent que les limites de responsabilité et
l’affectation de risque dans cet accord sont reflétées dans
le prix du programme et sont des éléments intrinsèques
du marché entre les parties, sans lesquels Pioneer
n’aurait pas fourni le programme et n’aurait pas été partie
prenante de cet accord.
6.2 Les limitations ou exclusions de garantie et de
responsabilité contenues dans cet accord n’affectent ni
n’entravent vos droits légaux comme consommateur et
vous seront applicables seulement dans la mesure où de
telles limitations ou exclusions sont permises sous les
lois de la juridiction où vous êtes situé.
Français
13
Fr
Page 40

À PROPOS DU LOGICIEL DJS
6.3 Caractère facultatif et renonciation. Si une clause de cet
accord s’avère être illégale, invalide ou inapplicable d’une
manière ou d’une autre, elle sera appliquée dans la
mesure du possible ou, si elle est totalement inapplicable,
sera considérée comme coupée et supprimée de cet
accord, et le reste continuera d’être en vigueur. La
renonciation par une partie ou l’autre à tout défaut ou
manquement de cet accord ne donnera pas lieu à la
suppression d’un défaut ou manquement autre ou
ultérieur.
6.4 Pas de cession. Vous ne pouvez pas céder, vendre,
transférer, déléguer ou altérer d’une manière ou d’une
autre cet accord ou tous droits ou obligations qui s’y
rapportent, que ce soit volontairement ou
involontairement, par action légale ou autre, sans le
consentement écrit préalable de Pioneer. Toute cession,
tout transfert ou toute délégation émanant de votre part
sera nul et non avenant. Sujet aux faits précités, cet
accord engagera et liera les parties et leurs successeurs
et délégués respectifs.
6.5 Accord complet. Cet accord constitue l’intégralité de
l’accord entre les parties et remplace tous les accords ou
propositions antérieurs ou actuels, écrits ou verbaux, en
ce qui concerne son contenu. Cet accord ne peut pas être
modifié ou amendé sans le consentement écrit préalable
de Pioneer, et aucun autre acte, document, usage ou
convention ne pourra amender ou modifier cet accord.
6.6 Vous acceptez que cet Accord soit régi par les lois du
Japon et interprété selon celles-ci.
AVERTISSEMENT SUR LES COPYRIGHTS
L’emploi du logiciel DJS est limité à la lecture et la copie de
contenus musicaux protégés contre la copie.
• Il se peut que le programme ne fonctionne pas correctement si
les données de cryptage anticopie sont incorporées dans le
support enregistré.
• L’extraction audio, la lecture et d’autres opérations peuvent
s’arrêter si l’appareil détecte que les données de cryptage
anticopie sont incorporées dans le support enregistré.
• Du fait de la technologie anticopie pour supports enregistrés
(CPRM), l’écriture (“extraction”) sur cartes mémoire SD est
limitée à 3 fois pour chaque contenu musical.
• Pour écrire (“extraction”) le contenu musical sur des cartesmémoires SD, le lecteur/graveur utilisé doit prendre en compte
la technologie de “protection anticopie des cartes SD”. Pour
plus de détails, consultez le mode d’emploi du lecteur/graveur
que vous souhaitez utiliser.
• Le contenu musical que vous écrivez (“extraction”) sur les
cartes-mémoire SD peut être reproduit uniquement sur des
lecteurs, prenant en charge la “norme SD-audio.” Pour plus de
détails, consultez le mode d’emploi du lecteur que vous
souhaitez utiliser.
Les informations que vous enregistrez sont limitées à votre
divertissement personnel et elles ne peuvent pas être utilisées à
d’autres fins sans l’autorisation du détenteur des copyrights.
• La musique enregistrée à partir de CD et d’autres supports peut
être protégée par des lois sur les copyrights de pays particuliers
et par des conventions internationales. Vous êtes le seul
responsable de l’utilisation légale des enregistrements que vous
réalisez.
EXIGENCES DU SYSTÈME
(Environnement d’exploitation
minimal)
L’emploi du logiciel DJS suppose un ordinateur PC/AT,
remplissant les conditions minimales d’exploitation suivantes :
Unité de traitement centrale : Processeur Intel
1,5 GHz ou plus (ou compatible) .
Cependant, dans le cas de Windows Vista
un Intel Core
Mémoire :
RAM de 512 MB ou plus
Cependant, avec Windows Vista
Disque dur :
250 MB d’espace libre sur disque dur (sans compter espace
nécessaire à la mémorisation de MP3 et autres fichiers de
musique)
Lecteur optique :
Lecteur capable de lire des CD-ROM et de lire des CD de musique
(CD-DA)
Affichage :
XGA (1024x768) ou supérieur, avec adaptateur et moniteur
HighColor (16-bits) ou supérieur.
Son :
Sortie audio 2 voies ou plus (carte-son interne ou externe ou unité
audio).
Dispositif de saisie :
Clavier, souris (ou dispositif de pointage équivalent)
Connexion Internet :
Vitesse de connexion de 56 kbps ou supérieure recommandée
Microsoft
navigateur web prenant en charge SSL 128-bits.
• Si cette unité est raccordée à un ordinateur et utilisée en
conjonction avec le logiciel DJS, l’ordinateur doit être muni de
deux ports USB, conformes à USB 1.1 ou ultérieur. Pour les
détails, consultez la section “CONNEXIONS” (page 9).
REMARQUE
TM
2 Duo (ou compatible) de 1,5 GHz ou plus.
®
®
Internet Explorer 5.5 ou supérieur ou un autre
®
, RAM de 1 GB ou plus
• Même si votre ordinateur dispose de la capacité de
mémoire spécifiée dans les exigences mentionnées ciavant, d’autres logiciels et services tournant en même
temps sur l’ordinateur peuvent provoquer une insuffisance
de mémoire et entraîner une dégradation des fonctions ou
des performances du logiciel. Dans ce cas, refermez les
autres services ou programmes en cours, de manière à
dégager de l’espace sur la mémoire de l’ordinateur ou bien
augmenter la capacité de la mémoire de votre ordinateur.
• Il se peut que les fonctions du DJS n’agissent pas
correctement quand elles sont combinées à d’autres
logiciels, installés sur votre ordinateur.
• Une fonctionnalité complète n’est pas garantie avec tous
les ordinateur, même si les exigences de l’environnement
d’exploitation sont respectées.
• Le logiciel DJS n’est pas pris en charge par les ordinateurs
Macintosh (y compris ceux équipés d’une Unité centrale
Intel).
®
Pentium M®
, le processeur doit être
14
Fr
Page 41

À PROPOS DU LOGICIEL DJS
INSTALLATION DU LOGICIEL DJS
Précautions relatives à l’installation
• Avant d’installer le DJS, veuillez lire “ACCORD DE LICENCE DU
LOGICIEL” et “EXIGENCES DU SYSTÈME (Environnement
d’exploitation minimal)”.
• DJS est prisd en charge par les versions suivantes de
Microsoft
• Le logiciel DJS n’est pas pris en charge par les systèmes
d’exploitation à 64 bits de Microsoft (édition Windows
Professionnel x64 et éditions Windows Vista
• Le CD-ROM fourni comprend les programmes d’installation et
les modes d’emploi dans les 8 langues suivantes : Anglais,
Français, Allemand, Italien, Néerlandais, Espagnol, Chinois
(Mandarin simplifié) et Japonais.
• Pour utiliser DJS sur un ordinateur dont la langue d’affichage
Windows
les instructions du menu pour sélectionner [
• L’installation et la désinstallation du DJS supposent les droits
d’administrateur sur l’ordinateur concerné. Vous devez vous
relier comme administrateur avant d’installer le logiciel.
1 Quand le CD-ROM d’installation fourni est installé dans le
2 Quand le menu d’installation apparaît, cliquez sur le bouton
®
Windows® :
®
Windows Vista
Windows Vista
Windows Vista
Windows Vista
Windows
Windows
Windows
®
Édition Familiale Basique
®
Édition Familiale Premium
®
Édition Intégrale
®
Professional
®
XP Édition Familiale
®
XP Professionnel
®
2000 Professionnel (SP4)
®
®
64-bits).
est autre qu’une de celles indiquées ci-dessus, suivez
English (Anglais)
XP
Démarches d’installation
lecteur DVD/CD de votre ordinateur, le menu d’installation
apparaît automatiquement. Suivez les instructions du menu
pour installer le logiciel DJS.
• Si le menu d’installation n’apparaît pas automatiquement,
cliquez sur [Démarrer] [Poste de travail (ou
Ordinateur)] et sélectionnez le lecteur de disque optique,
puis double-cliquez sur l’icone [Install].
[Installer DJS].
• Si une version d’essai du DJS est déjà installée sur
l’ordinateur, au lieu du bouton [
bouton [
apparaîtra. Cliquez sur ce bouton pour désinstaller la version
d’essai, puis cliquez à nouveau sur le bouton [
• Pour affichier le mode d’emploi, cliquez sur le bouton
[Afficher le Mode d’emploi de DJS]. Adobe Reader
nécessaire pour afficher le Mode d’emploi.
• Pour installer Adobe Reader
[Installer Adobe Reader]. Si une ancienne version de
Adobe Reader
désinstallez l’ancienne avant de cliquer sur le bouton
[Installer Adobe Readerr].
• Pour refermer le menu d’installation, cliquez sur le bouton
[Sortir].
Désinstaller la version d’essai de DJS
®
est déjà installée sur votre ordinateur,
Installer DJS
®
, cliquez sur le bouton
], c’est le
] qui
Installer DJS
®
est
3 Lorsque l’écran de sélection de la langue apparaît,
sélectionnez [Français], puis cliquez sur [OK].
• Selon l’environnement d’exploitation de votre ordinateur,
plusieurs langues sont disponibles.
• Quand vous cliquez sur le bouton [OK], le message
[Préparation pour l’installation de DJS...] apparaît.
Lorsque les préparations sont terminées, le message
[Commencemet de l’installation de DJS...] apparaît.
Suivez les instructions du message pour terminer
l’installation du logiciel DJS.
• Pour annuler l’installation, cliquez sur le bouton [Annuler].
4 Quand l’installation du DJS est terminée, redémarrez
l’ordinateur conformément aux instructions qui apparaissent
sur l’écran.
NOTE
• Si vous utilisez cet appareil avec le logiciel DJS, le pilote doit
].
être installé sur l’ordinateur avant de connecter celui-ci au
SEP-C1. Pour des détails, cf. page 17.
Mode d’emploi du DJS (fichier PDF)
Quand l’installation du DJS est terminée, le mode d’emploi peut
être consulté au besoin via le menu [Démarrer] de Windows.
Cliquez sur [Démarrer] [Voir Tous Programmes] [DJS]
[Mode d’emploi].
Il est conseillé de lire le mode d’emploi afin d’acquérir une
compréhension de base des fonctions du DJS avant de lancer
réellement le programme.
REMARQUES SUR LA PÉRIODE D’ESSAI ET
L’INSCRIPTION DE L’UTILISATEUR
Le logiciel DJS peut être utilisé sans inscription pendant une
période d’essai de 60 jours à compter de son installation.
Cette période représente à la durée d’utilisation du DJS, permise
sans inscription officielle. Quand la période d’essai est terminée,
le DJS ne peut plus être utilisé; veillez donc à effectuer l’inscription
comme utilisateur avant la fin de cette période.
L’inscription en ligne est possible pour les utilisateurs raccordés
à Internet. Pour des détails sur les démarches d’inscription,
consultez le mode d’emploi du DJS, compris sur le CD-ROM
fourni comme accessoire.
Le Groupe Pioneer recueille les informations personnelles de
ses utilisateurs dans les buts suivants :
1. Fournir un service après-vente de ses produits.
2. Informer les utilisateurs par courriel de données et
manifestations importantes relatives aux produits.
3. Recueillir des données d’enquête auprès des clients et
répercuter les résultats dans la mise au point des produits.
• Les informations personnelles obtenues des clients sont gérées
].
en conformité avec notre politique relative au respect des
informations personnelles.
• Pour plus d’informations au sujet de la politique de respect des
informations personnelles de Pioneer, consultez le site web
suivant de Pioneer :
http://www.prodjnet.com/privacy.html
Français
15
Fr
Page 42

À PROPOS DU LOGICIEL DJS
Les utilisateurs sans connexion Internet devront fournir les
informations nécessaires sur la “Carte d’Inscription Client” et la
renvoyer chez Pioneer par la poste. Après que la “Carte
d’Inscription Client” dument remplie est reçûe, nous enverrons
la “Registration ID” (clé d’inscription) indispensable pour
débloquer le logiciel au-delà de la période d’essai. Pour des
détails sur les démarches d’inscription client, consultez le mode
d’emploi du DJS, compris sur le CD-ROM fourni comme
accessoire.
REMARQUE
• Une clé d’installation (ID d’Inscription) peut être utilisée sur
le logiciel DJS, installé sur un seul ordinateur. Au cas ou
vous remplacez votre ordinateur ou si vous devez réinstaller
le logiciel DJS, une nouvelle inscription client et un
nouveau “ID d’inscription” devront être délivrés pour
débloquer le logiciel au-delà de la période d’essai. De plus,
le “ID d’inscription” initial, délivré par Pioneer, sera
nécessaire dans le cas d’une ré-inscription ou de
demandes de services après-vente ; par conséquent,
rangez ces informations sur l’inscription dans un endroit
sûr après avoir terminé les démarches d’inscription.
L’adresse d’envoi de la “Carte d’Inscription Client” est la
suivante. L’adresse peut être différente selon l’endroit de votre
résidence ; veillez donc à envoyer la carte à l’adresse correcte.
<Adresse d’envoi de la Carte d’Inscription Client>
Amérique du Nord
PIONEER ELECTRONICS (USA) INC.
BUSINESS SOLUTIONS DIVISION, PRO AUDIO GROUP
2265 East 220th Street, Long Beach, CA 90810, U.S.A
Europe
PIONEER EUROPE NV
MULTIMEDIA DIVISION
Pioneer House, Hollybush Hill, Stoke Poges, Slough SL2 4QP U.K.
(Royaume-Uni)
Asie du Sud, Asie du Sud-Est
PIONEER ELECTRONICS ASIACENTRE PTE. LTD.
MULTIMEDIA DEPARTMENT
253 Alexandra Road, #04-01, Singapore 159936
Hong Kong
PIONEER (HK) LIMITED
SALES AND MARKETING DEPARTMENT
Suite 901-906, 9th Floor World Commerce Centre, Harbour City 11
Canton Road, Tsim Sha Tsui Kowloon, Hong Kong
Taïwan
PIONEER HIGH FIDELITY TAIWAN CO., LTD.
SALES DIVISION, INDUSTRIAL ELECTRONIC SECTION
13F, No. 44, Sec. 2, Jhongshan N. Road, Taipei City, Taiwan
Océanie
PIONEER ELECTRONICS AUSTRALIA PTY. LTD.
178-184 Boundary Road, Braeside, Victoria 3195, Australia
Moyen-Orient, Afrique
PIONEER GULF, FZE.
Lob 11-017, Jabel Ali Free Zone, P.O.Box 61226, Jabel Ali, Dubai,
U.A.E.
Amérique Centrale et du Sud
PIONEER INTERNATIONAL LATIN AMERICA, S.A.
SALES DEPARTMENT
Plaza Credicorp Bank Panama, 50 Street, #120, 14th Floor
P.O. Box 0816-01361, Panama, Rep of Panama
Mexique
PIONEER ELCTRONICS DE MEXICO, S.A. DE C.V.
Blvd. Manuel Avila Camacho No. 138, Piso 10, Col. Lomas de
Chapultepec, Mexico, D.F. C.P. 111000 Deleg. Miguel Hidalgo
À PROPOS DE L’AIDE EN LIGNE
Avant d’effectuer une demande directe de renseigmement à
propos des démarches de fonctionnement du DJS ou d’autres
questions techniques, consultez le mode d’emploi du DJS, présent
sur le CD-ROM fourni, ainsi que la section FAQ du site web
d’assistance pour le DJS.
Consultez le Mode d’emploi du DJS à propos des information
sur la façon d’accéder au site web d’assistance pour le DJS.
Pour accéder au site d’assistance. vous aurez besoin du “Nom
d’utilisateur” et du “Mot de passe” que vous avez spécifié au
moment de l’inscription client.
Lors d’une demande de renseignements auprès du site web
d’assistance au DJS à propos de défaillances, signalez votre
nom, nom du produit, ID d’inscription (clé d’installation), type
d’ordinateur et ses spécifications (Carte de traitement centrale,
mémoire installée et autres périphériques raccordés, etc.), le
système d’exploitation et sa version, et autres informations
concrètes à propos des symptômes observés.
Une assistance est fournie uniquement aux utilisateurs qui ont
effectué leur inscription comme client. Veillez à conserver
soigneusement le “Nom d’utilisateur” et le “Mot de passe” que
vous avez spécifié lors de l’inscription, ainsi que votre “ID
d’inscription.”
Si vous rencontrez des problèmes à l’installation ou à
l’inscription comme client, veuillez consulter le site web
suivant :
<Renseignements relatifs à l’installation et à l’inscriptionclient>
http://www.prodjnet.com/djs/support/
REMARQUE
• Pour des informations techniques relatives à l’emploi de
l’appareil avec votre ordinateur, des périphériques et
d’autres produits non-Pioneer, veuillez consulter votre
revendeur ou les fabricants des composants respectifs.
Des mises à jour de cette version sont à prévoir pour améliorer
le fonctionnement et les performances du DJS.
L’inscription officielle de ce produit vous permettra d’accéder au
site web d’assistance de Pioneer et de télécharger des versions
mises à jour de ce logiciel. Nous encourageons nos clients à
tirer parti de ce service de mise à jour afin d’utiliser toujours la
version la plus récente du logiciel.
DÉCHARGE DE RESPONSABILITÉ
Pioneer ne sera pas tenu responsable d’une nouvelle délivrance
des clés de licence et ID d’inscription en cas de perte. Veillez à
ranger les informations d’inscription et les mots de passe en
lieu sûr et séparé afin de pouvoir vous y référer ultérieurement.
Notez que la fonction de transmission de carte mémoire SD
(extraction/archivage) n’est pas prise en charge par Windows
®
.
Vista
La fonction Extraction audio de CD de musique de ce logiciel
n’est pas prise en charge pour les CD de musique qui ne portent
pas un des logos ci-dessous.
16
Fr
Page 43

À PROPOS DU PROGRAMME PILOTE
À PROPOS DU PROGRAMME PILOTE
Cette unité est conçue pour contrôler le DJS et d’autres logiciels DJ lors d’une connexion à un ordinateur. Lors de laconnexion de cette
unité à un ordinateur Windows pour son utilisation avec un logiciel DJ, le pilote de logiciel doit d’abord être chargé sur votre ordinateur.
NOTE
• Les pilotes pour le Système d’exploitation (OS) de Macintosh et des informations mises à jour à propos du logiciel DJ d’autres
fabricants sont disponiblse sur le site web suivant :
http://www.prodjnet.com/support/
Utilisation du CD-ROM fourni pour installer
ACCORD DE LICENCE UTILISATEUR FINAL
POUR LOGICIEL
Avant d’installer ou d’utiliser le logiciel de pilotage, veillez à lire
“ACCORD DE LICENCE DU LOGICIEL” (page 13). En installant et
utilisant le logiciel, vous acceptez d’être tenu par les clauses de
l’Accord.
INSTALLATION DU PILOTE
Avant l’installation (IMPORTANT !)
• Avant d’installer ce pilote, veillez à lire “ACCORD DE LICENCE
DU LOGICIEL”.
• Cette unité peut être raccordée à un ordinateur fonctionnant sur
un des systèmes d’exploitation suivants :
Windows Vista
Édition Familiale Premium, Windows Vista
Windows Vista
Windows
Il se peut qu’il soit nécessaire d’utiliser la mise à jour Windows
pour installer l’Ensemble de Modifications le plus récent.
• Le programme d’installation du pilote est fourni en 10 langues
(Anglais, Français, Allemand, Italien, Néerlandais, Espagnol,
Russe, Chinois (simplifié), Chinois (traditionnel) et Japonais). Si
vous utilisez une version de Windows dans une autre langue,
suivez les instructions sur écran pour choisir [English
(Anglais)] comme langue.
• Vous devez avoir les privilèges d’administrateur sur votre
ordinateur afin de pouvoir installer le logiciel de pilotage.
Effectuez la connexion comme utilisateur défini comme
administrateur de l’ordinateur avant d’essayer d’installer le
pilote.
• Si des programmes Windows sont en cours, fermez-les avant de
commencer l’installation du pilote.
®
Édition Familiale Basique, Windows Vista®
®
Professional, Windows® XP Édition Familiale,
®
XP Professional, ou Windows® 2000 Professional.
®
Édition Intégrale,
l’application
1 Amorcez l’ordinateur et lancez la session avec les privilèges
d’Administrateur.
2 Placez le CD-ROM fourni dans le lecteur de CD/DVD de votre
ordinateur.
3 Ouvrez le menu [Démarrer]
Ordinateur)], puis accéder au CD-ROM et double-cliquez sur
le dossier [SEP-C1].
4 Après avoir ouvert le dossier [SEP-C1], double-cliquez sur le
programme d’installation du pilote [MEP-7000[SEPC1]_#.###.exe].
(#.### indique la version du pilote.)
5 Lorsque le menu [Sélection de langue] apparaît, sélectionnez
[Français], puis cliquez sur [OK].
• Pour interrompre le processus d’installation, cliquez sur le
bouton [Annuler].
6 Quand l’écran [Licence] apparaît, lisez “Accord de licence du
logiciel”, cliquez sur la case [D’accord], puis cliquez sur [OK].
[Poste de travail (ou
Français
REMARQUE
• Avant d’installer le logiciel pilote, débranchez le câble
d’alimentation auxiliaire USB et le câble USB raccordant
cette unité à l’ordinateur.
• Si cette unité est raccordée à un ordinateur sans installer
d’abord le pilote, des erreurs risquent de se produire sur
l’ordinateur, selon l’environnement de celui-ci.
• Si l’installation du pilote est interrompue, suivez les
démarches ci-après pour le réinstaller depuis le début.
• Si vous n’acceptez pas les termes de l’Accord de licence du
logiciel, cliquez sur le bouton [Annuler] pour abandonner
l’installation.
17
Fr
Page 44

À PROPOS DU PROGRAMME PILOTE
7 Suivez les instructions qui apparaissent à l’écran.
• Si l’écran [Sécurité de Windows] apparaît pendant
l’installation, cliquez sur [Installer ce pilote quand même]
pour continuer les démarches d’installation.
<Pour Windows XP>
• Si l’écran [Installation matérielle] apparaît pendant
l’installation, cliquez sur [Continuer] pour continuer les
démarches d’installation.
8 Lorsque l’installation est terminée, le message [L’installation
est maintenant terminée] apparaîtra. Cliquez sur le bouton
[Terminer] pour achever les démarches.
Connexion de cette unité à l’ordinateur
1 Connectez le câble d’alimentation auxiliaire USB sur cette
unité et sur l’ordinateur.
2 Connectez le câble USB sur cette unité et sur l’ordinateur.
Lors de la première connexion de cette unité à l’ordinateur, ou
lors du débranchement et du rebranchement au port USB de
l’ordinateur, ce dernier peut afficher le message [Installation
du pilote logiciel de périphérique]. Dans ce cas, attendez
que l’ordinateur affiche le message [Vos périphériques sont
prêts à être utilisés.].
<Pour Windows XP>
• Pendant l’installation, si l’ordinateur affiche le message
[Autorisez-vous Windows à se connecter à Windows
Update pour rechercher des mises à jour ?] sélectionnez
[Non, pas pour cette fois], puis cliquez sur le bouton
[Suivant] pour continuer les démarches d’installation.
18
Fr
<Pour Windows 2000>
• Si l’écran [Signature numérique non trouvée] apparaît
pendant l’installation, cliquez sur [Oui] pour continuer les
démarches d’installation.
(recommandé)], puis cliquez sur le bouton [Suivant] pour
continuer les démarches d’installation.
• Pendant l’installation, si l’ordinateur affiche le message
[Quelle tâche voulez-vous que l’Assistant exécute ?]
sélectionnez [Installer le logiciel automatiquement
Page 45

À PROPOS DU PROGRAMME PILOTE
Confirmation de la version du pilote
Pour vérifier la taille du périphérique chargé, dans Windows
cliquez sur [Démarrer] [Voir Tous Programmes] [Pioneer]
[MEP-7000[SEP-C1]] [Utilitaire d’affichage de version de
MEP-7000 [SEP-C1] ].
Français
• Si l’écran [Installation matérielle] apparaît pendant
l’installation, cliquez sur [Continuer] pour continuer les
démarches d’installation.
<Pour Windows 2000>
• Si l’écran [Signature numérique non trouvée] apparaît
pendant l’installation, cliquez sur [Oui] pour continuer les
démarches d’installation.
NOTE
• Cet écran vous permet aussi de vérifier la version du
micrologiciel actuellement installé. Notez toutefois que la
version du micrologiciel ne sera pas affichée si le SEP-C1 n’est
pas raccordé à un ordinateur, ou si l’ordinateur ne
communique pas correctement avec le SEP-C1.
Version la plus récente du pilote
Consultez le site web suivant pour connaître les plus récentes
versions du pilote.
http://www.prodjnet.com/support/
À l’emploi de cette unité pour contrôler le logiciel DJS
Lisez les sections “UTILISATION DU LOGICIEL DJ” (page 20) et le
“Guide de contôle DJS” (fichier PDF) avec d’essayer d’utiliser cet
appareil pour faire fonctionner le DJS. Le “Guide de contôle DJS”
se trouve sous le nom [manual_SEP-C1_control_fr.pdf] dans le
dossier [SEP-C1\French] du CD-ROM fourni comme accessoire.
19
Fr
Page 46

UTILISATION DU LOGICIEL DJ
UTILISATION DU LOGICIEL DJ
En chargeant le logiciel DJS fourni ou un autre logiciel DJ sur un ordinateur raccordé à cette unité via un câble USB, l’unité peut servir
pour faire fonctionner le logiciel DJ.
Logiciels DJ pris en charge
DJS Inclus comme accessoire avec le SEP-C1, le programme informatique DJ tout-en-un “DJS” permet une
Logiciel DJ accepté
par communication
Logiciel DJ accepté
MIDI
utilisation immédiate du logiciel DJ.
Des logiciels DJ en vente dans le commerce, prenant en compte le protocole de communication spécialisé du
SEP-C1 peuvent être utilisés même sans recours à un disque de contrôle. Pour des informations récentes sur
les logiciels DJ prise en compte, consultez le site web suivant de Pioneer :
http://www.prodjnet.com/support/
Le SEP-C1 fournit les données au sujet de l’état du bouton et du curseur de réglage TEMPO en format MIDI
universel ; des logiciels DJ acceptant MIDI peuvent donc servir pour attribuer des messages MIDI de l’unité, en
utilisant ainsi la communication MIDI pour le contrôle.
Style de lecture
Cette unité peut fonctionner comme un manipulateur de logiciel DJ. Si le SEP-C1 est utilisé comme manipulateur, vous pouvez contrôler
le logiciel DJ sans une souris ou un clavier, mais en bénéficiant du même agencement, fonctions et facilité d’exploitation, hérités de la
série CDJ de Pioneer.
Câble d'alimentation
auxiliaire USB
Ordinateur
Câble USB
20
Fr
Page 47

UTILISATION DU LOGICIEL DJ
PRÉPARATION DE VOTRE PROGRAMME INFORMATIQUE DJ
Avant d’utiliser votre programme informatique DJ, vous devez préparer votre ordinateur et le logiciel DJ. Ne connectez pas le SEP-C1 à
votre ordinateur avant d’avoir chargé le pilote de logiciel.
Logiciel DJ
Étape DJS
Vérifiez la configuration et l’environnement
d’exploitation de l’ordinateur.
Mettez l’ordinateur sous tension.
Installez le pilote de périphérique.
Connexion alimentation-bus entre cette
unité et l’ordinateur.
Confirmez “Connexion USB correcte sur
l’ordinateur ?”.
Installez le logiciel DJ. Cf. la P.13 de ce manuel (“À PROPOS DU
Lancez le logiciel DJ. Cf. le mode d’emploi du DJS (fichier PDF sur
Effectuez la lecture DJ. Cf. le Guide de contrôle DJS pour les
Cf. la P.13 de ce manuel (“À PROPOS DU
LOGICIEL DJS”).
La prise en charge du système d’exploitation
d’ordinateur est limité à Windows Vista,
Windows XP, Windows 2000 ou aux versions
ultérieures. Le DJS accepte seulement le
système d’exploitation Microsoft Windows.
Cf. la P.17 de ce manuel (“À PROPOS DU PROGRAMME PILOTE”).
Cf. la P.9 de ce manuel (“CONNEXIONS”).
Cf. la P.19 de ce manuel (“À PROPOS DU PROGRAMME PILOTE, Confirmation de la
version du pilote”).
LOGICIEL DJS”).
le CD-ROM fourni).
techniques fondamentales d’utilisation.
compatible par
communication
spéciale
Consultez le mode d’emploi de votre Logiciel
DJ.
La prise en charge du système d’exploitation
d’ordinateur est limité à Windows Vista,
Windows XP, Windows 2000 ou Mac OS
version 10.3.9 ou ultérieure.
Consultez le mode d’emploi de votre Logiciel
DJ.
Consultez le mode d’emploi de votre logiciel
DJ.
Logiciel DJ
compatible MIDI
Français
NOTE
• L’installation d’un pilote spécial est requis pour utiliser un programme informatique DJ (un pilote pour ordinateurs Windows est prévu
sur le CD-ROM fourni comme accessoire). Vous trouverez des versions mises à jour pour les pilotes ainsi que des pilotes pour MAC
OS sur le site web de Pioneer.
http://www.prodjnet.com/support/
2 Lancez le programme informatique DJ.
CONTRÔLE DE VOTRE ORDINATEUR VIA
LE PROTOCOLE DE COMMUNICATIONS
SPÉCIALISÉ
Le SEP-C1 peut servir pour contrôler non seulement le logiciel DJS
fourni, mais aussi d’autres programmes informatiques DJ,
Quand la communication est établie avec le logiciel DJ, les
boutons, la bague Jog et le curseur de réglage TEMPO
peuvent servir pour le contrôle, tandis que l’écran central du
SEP-C1 et les écrans A/B indiquent les données horaires et le
titre de la plage en cours de lecture, ainsi que le nom de
l’artiste.
prenant en compte le protocole de communications spécialisé du
SEP-C1.
1 Connectez à l’ordinateur.
L’écran central affichera le logo [PRO DJ].
NOTE
• Certains programmes informatiques DJ ne prennent pas en
charge les affichage d’informations sur les plages ci-dessus
mentionnés.
21
Fr
Page 48

UTILISATION DU LOGICIEL DJ
Pour le logiciel DJS
Le contrôle peut être assuré en observant les écrans BROWSE,
EFFECT et MIX de l’écran central. Pour des détails sur le
fonctionnement proprement dit, consultez le chapitre relatif à
l’emploi du “Style Manipulateur” du Guide de contrôle DJS du
SEP-C1 (fichier PDF sur le CD-ROM fourni).
NOTE
• Pendant que l’écran UTILITY est affiché sur l’écran central, les
boutons et le sélecteur rotatif de l’écran central peuvent servir
pour contrôler le logiciel DJ.
UTILISATION DE MIDI POUR CONTRÔLER
L’ORDINATEUR
MIDI (Musical Instrument Digital Interface) est un protocole
normalisé, destiné à gérer la transmission de données entre des
instruments de musique électroniques et des ordinateurs.
Le SEP-C1 fait appel au format de message MIDI pour fournir les
données et l’état d’exploitation à un ordinateur, connecté par un
câble USB. En utilisant un programme informatique DJ acceptant
USB MIDI pour attribuer les message MIDI fournis par le SEP-C1,
ce dernier peut être utilisé pour contrôler le logiciel DJ.
Pour plus de renseignements sur les messages fournis par le SEPC1, consultez la section “TABLEAU DES MESSAGES MIDI” (page
23).
Réglage d’un canal MIDI
Le réglage du canal MIDI peut s’effectuer sur l’écran UTILITY.
1 Appuyez sur le bouton UTILITY.
2 Appuyez sur le bouton de fonction [PC].
L’écran central affichera le menu de réglage du canal MIDI.
• Le Contrôleur A utilise le même canal que l’écran central,
tandis que le Contrôleur B utilise un canal différent. (Les
réglages par défaut pour le Contrôleur A et l’écran central
doivent être effectués au Canal 1 et le Contrôleur B au Canal
2).
3 Appuyez soit sur le sélecteur rotatif, soit sur le bouton de
sélection Bas (
L’icone se déplacera vers la droite.
4 Tournez le sélecteur rotatif pour modifier la valeur.
Des valeurs entre 1 et 16 peuvent être définies.
5 Tournez le sélecteur rotatif pour confirmer la valeur
sélectionnée.
• Appuyez sur le bouton de sélection Haut () pour annuler la
sélection et revenir à l’écran UTILITY.
).
1 Connectez à l’ordinateur.
L’écran central affichera le logo [PRO DJ].
2 Lancez le programme informatique DJ.
Quand la communication est établie avec le programme DJ, le
SEP-C1 agit comme contrôleur MIDI ; l’état du contrôleur A/B
et les boutons et commandes de l’écran central sont fournis
comme messages MIDI.
NOTE
• Pendant que l’écran UTILITY est affiché sur l’écran central, les
messages MIDI de l’écran central ne sont pas fournis.
22
Fr
Page 49

UTILISATION DU LOGICIEL DJ
TABLEAU DES MESSAGES MIDI
Nom d’interface
JOG DIAL Contrôle
TEMPO ADJUST SLIDER VR Bn 1D dd 0 à 127 0 au côté – , 127 au côté +
PLAY/PAUSE SW 9n 00 dd OFF=0, ON=127
CUE SW 9n 01 dd OFF=0, ON=127
SEARCH FWD SW 9n 02 dd OFF=0, ON=127
SEARCH REV SW 9n 03 dd OFF=0, ON=127
TRACK SEARCH Suivante SW 9n 04 dd OFF=0, ON=127
TRACK SEARCH Précédente SW 9n 05 dd OFF=0, ON=127
LOOP IN SW 9n 06 dd OFF=0, ON=127
LOOP OUT SW 9n 07 dd OFF=0, ON=127
RELOOP SW 9n 08 dd OFF=0, ON=127
MEMORY SW 9n 0A dd OFF=0, ON=127
Contrôleur A
CALL SW 9n 0B dd OFF=0, ON=127
TIME/A.CUE SW 9n 0E dd OFF=0, ON=127
TEMPO RANGE SW 9n 10 dd OFF=0, ON=127
MT SW 9n 11 dd OFF=0, ON=127
SCRATCH SW 9n 12 dd OFF=0, ON=127
JOG BREAK SW 9n 13 dd OFF=0, ON=127
PITCH BEND + SW 9n 14 dd OFF=0, ON=127
PITCH BEND – SW 9n 15 dd OFF=0, ON=127
JOG TOUCH SW 9n 20 dd OFF=0, ON=127
JOG DIAL Contrôle
TEMPO ADJUST SLIDER VR Bn+1 1D dd 0 à 127 0 au côté – , 127 au côté +
PLAY/PAUSE SW 9n+1 00 dd OFF=0, ON=127
CUE SW 9n+1 01 dd OFF=0, ON=127
SEARCH FWD SW 9n+1 02 dd OFF=0, ON=127
SEARCH REV SW 9n+1 03 dd OFF=0, ON=127
TRACK SEARCH Suivante SW 9n+1 04 dd OFF=0, ON=127
TRACK SEARCH Précédente SW 9n+1 05 dd OFF=0, ON=127
LOOP IN SW 9n+1 06 dd OFF=0, ON=127
LOOP OUT SW 9n+1 07 dd OFF=0, ON=127
RELOOP SW 9n+1 08 dd OFF=0, ON=127
MEMORY SW 9n+1 0A dd OFF=0, ON=127
Contrôleur B
CALL SW 9n+1 0B dd OFF=0, ON=127
TIME/A.CUE SW 9n+1 0E dd OFF=0, ON=127
TEMPO RANGE SW 9n+1 10 dd OFF=0, ON=127
MT SW 9n+1 11 dd OFF=0, ON=127
SCRATCH SW 9n+1 12 dd OFF=0, ON=127
JOG BREAK SW 9n+1 13 dd OFF=0, ON=127
PITCH BEND + SW 9n+1 14 dd OFF=0, ON=127
PITCH BEND – SW 9n+1 15 dd OFF=0, ON=127
JOG TOUCH SW 9n+1 20 dd OFF=0, ON=127
Type
d’interface
général
général
Message
MSB
Bn 10 dd Valeur linéaire en relation aux vitesses de Arrêt à 4x, 64 à
Arrêt; Sens AVANT : 65 (0,06x) à 127 (x4); Sens ARR : 63
(0,06x) à 0 (4x).
Bn+1 10 dd Valeur linéaire en relation aux vitesses de Arrêt à 4x, 64 à
Arrêt; Sens AVANT : 65 (0,06x) à 127 (x4); Sens ARR : 63
(0,06x) à 0 (4x).
Commentaires
Français
23
Fr
Page 50

UTILISATION DU LOGICIEL DJ
Nom d’interface
ROTARY SELECTOR DIAL Contrôle
SELECT DOWN (>) SW 9n 31 dd OFF=0, ON=127
SELECT UP (<) SW 9n 32 dd OFF=0, ON=127
ROTARY SELECTOR DIAL
PUSH
LOAD A SW 9n 34 dd OFF=0, ON=127
LOAD B SW 9n 35 dd OFF=0, ON=127
BROWSE SW 9n 36 dd OFF=0, ON=127
MIX SW 9n 37 dd OFF=0, ON=127
EFFECT SW 9n 38 dd OFF=0, ON=127
Section Écran central
F1 SW 9n 39 dd OFF=0, ON=127
F2 SW 9n 3A dd OFF=0, ON=127
F3 SW 9n 3B dd OFF=0, ON=127
F4 SW 9n 3C dd OFF=0, ON=127
F5 SW 9n 3D dd OFF=0, ON=127
F6 SW 9n 3E dd OFF=0, ON=127
Type
d’interface
général
SW 9n 33 dd OFF=0, ON=127
Message
MSB
Bn 4F dd 98 à 127, 1 à 30 (± 1 à ± 30), transmet la différence de valeur
du compte par rapport à la fois précédente. Quand ± 30 ou
plus, devient ± 30.
• n = numéro de canal
• Les portions en gris ne sont pas obtenues pendant l’affichage de l’écran UTILITY.
Commentaires
24
Fr
Page 51

UTILISATION DE L’ÉCRAN UTILITY
UTILISATION DE L’ÉCRAN UTILITY
Appuyez sur le bouton UTILITY pour afficher l’écran UTILITY et effectuer les réglages nécessaires.
Boutons de fonction
MÉTHODE DE RÉGLAGE
1 Servez-vous des boutons de fonction pour sélectionner la
rubrique que vous voulez régler [DISPLAY/PC/LANGUAGE/
GENERAL].
2 Tournez le sélecteur rotatif pour amener le curseur en regard
de la rubrique de réglage souhaitée.
3 Appuyez soit sur le bouton de sélection Bas (
sélecteur rotatif pour déplacer l’icone
4 Tournez le sélecteur rotatif pour sélectionner la valeur de
réglage souhaitée.
5 Tournez le sélecteur rotatif pour confirmer la nouvelle valeur
de réglage.
Pour ramener un réglage à sa valeur par défaut, appuyez sur le
bouton de sélection Haut ().
NOTE
• Les paramètres CD-G et BROWSE en gris ne peuvent pas être
définis sur cette unité.
), soit sur le
vers le côté droit.
UTILITY
Bouton de sélection Bas ()Sélecteur rotatif
PARAMÈTRES
[1] DISPLAY (Écran)
Utilisez pour effectuer les réglages pour l’écran central et la sortie
externe.
Réglage par
défaut
LUMINOSITÉ LCD Indique la luminonisté de
LUMINOSITÉ OEL Indique la luminosité des
LUMINOSITÉ LED Indique la luminosité des
ÉCONOMISEUR
*1
ÉCRAN
STANDARD
TÉLÉVISION
SORTIE
MONITEUR
*1 Fonction Économie d’écran
• L’économiseur d’écran agit si 5 minutes s’écoulent sans
qu’une plage soit chargée sur un des deux Contrôleurs.
• L’économiseur d’écran agit aussi si 100 minutes s’écoulent
sans aucune action sur les boutons, alors qu’un ou les deux
Contrôleurs est/sont en mode Pause (y compris l’affichage
Cue Standby et End).
• L’économiseur d’écran est désactivé quand une plage est
définie avec un logiciel DJ autre que DJS.
• Pendant que fonctionne l’économiseur d’écran, une
pression sur un bouton ou toute autre commande le
désactivera.
l’écran central.
écrans A/B.
diodes LED.
Après une durée définie sans
aucune activité de l’appareil,
la luminosité des écrans LCD
et OEL est atténuée pour leur
protection.
Définit le format du signal
pour la sortie sur moniteur
(PAL, NTSC (7.5 IRE), NTSC
(0 IRE)).
Définit le rapport hauteurlargeur de l’écran central sur
letterbox, plein écran ou
éteint.
ALLUMÉ
NTSC (7.5
IRE)
ÉTEINT
Français
25
Fr
Page 52

UTILISATION DE L’ÉCRAN UTILITY
[2] PC
Les canaux MIDI peuvent être réglés (page 22).
[3] LANGUAGE (Langue)
Pour définir la langue à utiliser.
Réglage par
défaut
LANGUE Sélectionnez la langue de
l’affichage parmi les 9
suivantes (Anglais, Français,
Allemand, Italien, Espagnol,
Néerlandais, Russe, Chinois
simplifié, Japonais).
[4] GENERAL
Utilisez pour confirmer les réglages VERROUILLAGE EN
CHARGEMENT et la version de l’unité
VERROUILLAGE
EN
CHARGEMENT
INFORMATION
VERSION
Verrouille le bouton LOAD de
sorte qu’il soit désactivé
*2
pendant la lecture.
Pour afficher les infos sur la
version du SEP-C1.
Anglais
Réglage par
défaut
ÉTEINT
*2 Le "Verrouillage en chargement" est désactivé quand une
plage est définie avec un logiciel DJ autre que DJS.
RÉINITIALISATION AUX VALEURS PAR
DÉFAUT
Il est possible de ramener tous les réglages à leurs valeurs par
défaut en se servant de l’écran UTILITY (page 25).
1 En maintenant le bouton UTILITY enfoncé, connectez l’unité
sur l’ordinateur (mettez sous tension).
Le bouton doit être enfoncé pendant 5 secondes ou davantage.
2 Confirmez le message.
Quand l’écran d’amorçage apparaît, un message sera affiché.
[Les réglages ont été réinitialisés aux valeurs par défaut].
3 Débranchez de l’ordinateur et rebranchez.
26
Fr
Page 53

GUIDE DE DÉPANNAGE
GUIDE DE DÉPANNAGE
Si vous pensez que l’unité ne fonctionne pas correctement, reportez-vous aux conseils du tableau de dépistage des pannes ci-dessous. Il
se peut que de simples erreurs de configuration ou d’exploitation soient prises pour des problèmes sérieux. Il arrive aussi qu’un problème
soit causé par un composant autre que cette unité ; dans ce cas, vérifiez les autres composants électriques utilisés en même temps que
cet appareil.
Si le problème persiste après l’examen du tableau ci-dessous et la prise des éventuels remèdes recommandés, adressez-vous au service
technique Pioneer le plus proche ou au revendeur auprès duquel vous avez acquis l’unité.
Description du problème Causes possibles du problème Action recommandée
L’unité n’est pas
reconnue,même après avoir
été raccordée à un ordinateur.
Pendant la lecture, il n’est pas
possible de charger des
plages.
Les caractères d’information
sur les plages sont
embrouillés.
L’écran de télévision est
perturbé ou des parasites sont
audibles pendant les
émissions FM.
• Le logiciel pilote n’est pas correctement installé.
Si l’unité n’est pas raccordée correctement à
l’ordinateur, l’utilitaire d’affichage de version ne
permettra pas d’afficher la version du
micrologiciel. Pour vérifier la version du
micrologiciel, cf. la section (“À PROPOS DU
PROGRAMME PILOTE, Confirmation de
version du pilote”) (page 19).
• Le câble d’alimentation auxiliaire USB n’est pas
connecté.
• La fonction VERROUILLAGE EN CHARGEMENT
est activée.
• Une lpolice d’une langue non prise en compte a
été utilisée.
• La fonction d’informations de plage de cette
unité ne peut pas être affichée par le logiciel DJ.
• Influence négative provenant de cette unité. • Coupez l’alimentation de l’unité ou placez-la à
• Installez correctement le pilote. S’il a déjà été
installé, désinstallez-le, puis installez-le une
nouvelle fois.
• Connectez le câble d’alimentation auxiliaire
USB sur l’ordinateur d’abord , puis le câble
USB.
• Sur l’écran UTILITTY, réglez ce paramètre sur
désactivé.
• Utiliser une police d’une langue prise en compte
pour saisir les informations. Les langues prises
en compte comprennent celles de l’Europe
occidentale, le russe, le chinois mandarin
simplifié et le japonais.
• Consultez le mode d’emploi de votre logiciel DJ
pour obtenir plus de détails sur les langues
prises en compte par le programme.
l’écart du téléviseur.
Français
À PROPOS DE L’ÉCRAN LCD (À CRISTAUX LIQUIDES)
• Il se peut que certains écrans présentent ce qu’on appelle des pixels “actifs” ou des pixels “morts” (des pixels constamment
allumés ou restant éteints). Ce phénomène est une caractéristique des écrans LCD et ne doit pas être considéré comme un
problème.
• Lors d’un emploi dans un milieu froid, il se peut que l’écran semble foncé lors de la mise sous tension. Mais l’écran retrouvera
sa luminosité normale à mesure qu’il s’échauffe.
• Évitez de placer l’écran LCD en plein soleil, car la lumière réfléchie par l’écran peut dégrader la visibilité des images.
À PROPOS DES ÉCRANS OEL (DIODES ÉLECTROLUMINESCENTES ORGANIQUES)
• Il se peut que les caractéristiques des couleurs des deux écrans (A/B) soient légèrement différentes, mais il ne s’agit pas d’une
défaillance.
MISES À JOUR DU SEP-C1
Il se peut que le logiciel pour cet appareil fasse l’objet de mises à jour pour en améliorer l’exploitation et/ou les fonctions. Pour plus de
détails, consultez le site web d’assistance ci-dessous :
http://www.prodjnet.com/support/
27
Fr
Page 54

DÉCHARGE DE RESPONSABILITÉ
La fourniture de cet appareil vous confère uniquement le droit à
son utilisation privée et non commerciale. Elle n’accorde ni
n’implique aucun droit à une utilisation de cet appareil en vue
d’une radiodiffusion (par réseau terrestre, satellite, câble et/ou tout
autre support) en temps réel et commerciale (c.à.d. productrice de
revenus), diffusion/émission en continu via internet, intranet, et/ou
d’autres réseaux ou par d’autres systèmes de distribution
électronique de contenu, tels que des applications audio à
prépaiement ou audio à la demande. Une licence distincte est
requise pour ce genre d’applications. Pour plus d’informations,
consultez le site http://www.mp3licensing.com.
Technologie de codage audio MPEG Couche 3, sous licence de
Fraunhofer IIS et Thomson multimeida.
DÉCHARGE DE RESPONSABILITÉ
• Pioneer et DJS sont des marques commerciales ou des marques déposées de Pioneer Corporation.
• Microsoft et Windows sont des marques déposées de Microsoft Corporation, enregistrées aux États-Unis et d’autres pays. Le
nom officiel de Windows est “Système d’Exploitation Microsoft Windows.”
• Pentium est une marque déposée de Intel Corporation, U.S.A.
• Adobe et Reader sont des marques déposées ou des marques de commerce de Adobe Systems Incorporated, enregistrées aux
États-Unis et d’autres pays.
• Apple, Macintosh et Mac OS sont des marques de fabrique d’Apple Inc., enregistrées aux États-Unis et d’autres pays.
• Tous les autres noms de marque, de produit et d’entreprise sont les marques de commerce ou les marques déposées de leurs
propriétaires respectifs.
REMARQUE
• Le logiciel “DJS” n’est pas couvert par les termes de la Garantie de réparation gratuite de l’appareil. Avant l’installation et l’utilisation
du logiciel DJS, veillez à lire et à comprendre les termes de l’Accord de licence du logiciel (page 13).
28
Fr
Publication de Pioneer Corporation.
© 2008 Pioneer Corporation.
Tous droits de reproduction et de traduction réservés.
Page 55

Wir danken lhnen für den Kauf dieses Pioneer-Produkts.
Lesen Sie sich bitte diese Bedienungsanleitung durch. Dann wissen Sie, wie Sie lhr Gerät richtig
bedienen. Bewahren Sie sie an einem sicheren Platz auf, um auch zukünftig nachschlagen zu können.
In manchen Ländern oder Verkaufsgebieten weichen die Ausführungen von Netzstecker oder
Netzsteckdose u.U. von den in den Abbildungen gezeigten ab; die Anschluß- und
Bedienungsverfahren des Gerätes sind jedoch gleich.
K015 Ge
WICHTIG
CAUTION
RISK OF ELECTRIC SHOCK
DO NOT OPEN
Das Blitzsymbol in einem Dreieck weist den
Benutzer darauf hin, dass eine
Berührungsgefahr mit nicht isolierten Teilen
im Geräteinneren, die eine gefährliche
Spannung führen, besteht. Die Spannung
kann so hoch sein, dass sie die Gefahr eines
elektrischen Schlages birgt.
Mischen Sie dieses Produkt, wenn Sie es entsorgen wollen, nicht mit gewöhnlichen Haushaltsabfällen. Es gibt ein getrenntes
Sammelsystem für gebrauchte elektronische Produkte, über das die richtige Behandlung, Rückgewinnung und Wiederverwertung
gemäß der bestehenden Gesetzgebung gewährleistet wird.
Privathaushalte in den Mitgliedsstaaten der EU, in der Schweiz und in Norwegen können ihre gebrauchten elektronischen Produkte an
vorgesehenen Sammeleinrichtungen kostenfrei zurückgeben oder aber an einen Händler zurückgeben (wenn sie ein ähnliches neues Produkt
kaufen).
Bitte wenden Sie sich in den Ländern, die oben nicht aufgeführt sind, hinsichtlich der korrekten Verfahrensweise der Entsorgung an die örtliche
Kommunalverwaltung.
Auf diese Weise stellen Sie sicher, dass das zu entsorgende Produkt der notwendigen Behandlung, Rückgewinnung und Wiederverwertung
unterzogen wird, und so mögliche negative Einflüsse auf die Umwelt und die menschliche Gesundheit vermieden werden.
ACHTUNG:
UM SICH NICHT DER GEFAHR EINES
ELEKTRISCHEN SCHLAGES AUSZUSETZEN,
DÜRFEN SIE NICHT DEN DECKEL (ODER
DIE RÜCKSEITE) ENTFERNEN. IM
GERÄTEINNEREN BEFINDEN SICH KEINE
VOM BENUTZER REPARIERBAREN TEILE.
ÜBERLASSEN SIE REPARATUREN DEM
QUALIFIZIERTEN KUNDENDIENST.
Ein Ausrufezeichen in einem Dreieck weist
den Benutzer auf wichtige Bedienungs- und
Wartungsanweisungen in den Dokumenten
hin, die dem Gerät beiliegen.
D3-4-2-1-1_Ge
K058_A_Ge
WARNUNG
Dieses Gerät ist nicht wasserdicht. Zur Vermeidung
der Gefahr von Brand und Stromschlag keine
Behälter mit Flüssigkeiten (z.B. Blumenvasen und
-töpfe) in die Nähe des Gerätes bringen und dieses
vor Tropfwasser, Spritzwasser, Regen und Nässe
schützen.
D3-4-2-1-3_A_Ge
WARNUNG
Keine Quellen offener Flammen (z.B. eine
brennende Kerze) auf dieses Gerät stellen.
D3-4-2-1-7a_A_Ge
VORSICHTSHINWEIS ZUR BELÜFTUNG
Bei der Aufstellung dieses Gerätes muss für einen
ausreichenden Freiraum gesorgt werden, um eine
einwandfreie Wärmeabfuhr zu gewährleisten
(mindestens 5 cm hinter dem Gerät und jeweils 5
cm an der Seite des Gerätes).
WARNUNG
Im Gerätegehäuse sind Ventilationsschlitze und
andere Öffnungen vorgesehen, die dazu dienen,
eine Überhitzung des Gerätes zu verhindern und
einen zuverlässigen Betrieb zu gewährleisten. Um
Brandgefahr auszuschließen, dürfen diese
Öffnungen auf keinen Fall blockiert oder mit
Gegenständen (z.B. Zeitungen, Tischdecken und
Gardinen) abgedeckt werden, und das Gerät darf
beim Betrieb nicht auf einem dicken Teppich oder
Bett aufgestellt sein.
D3-4-2-1-7b_A_Ge
Betriebsumgebung
Betriebstemperatur und Betriebsluftfeuchtigkeit:
5 ºC bis 35 ºC, 85 % rel. Feuchte max.
(Ventilationsschlitze nicht blockiert)
Eine Aufstellung dieses Gerät an einem unzureichend
belüfteten, sehr feuchten oder heißen Ort ist zu
vermeiden, und das Gerät darf weder direkter
Sonneneinstrahlung noch starken Kunstlichtquellen
ausgesetzt werden.
D3-4-2-1-7c_A_Ge
Dieses Produkt erfüllt die Niederspannungsrichtilie
2006/95/EC und die EMV-Richtinie 2004/108/EC.
D3-4-2-1-9a_A_Ge
Beim Gebrauch dieses Gerätes unbedingt die
Anweisungen bezüglich der Nennspannung usw.
auf dem Aufkleber befolgen, der sich an der
Unterseite des Gerätes befindet.
D3-4-2-2-4_Ge
Page 56

INHALTSVERZEICHNIS
http://www.prodjnet.com/support/
Auf der oben angegebenen Pioneer-Website werden unseren
Kunden Antworten auf häufig gestellte
Fragen, Informationen über Software und weitere Unterstützung
mit neuesten Daten angeboten.
INHALTSVERZEICHNIS
MERKMALE..................................................................5
TECHNISCHE DATEN ....................................................7
ÜBERPRÜFEN DES MITGELIEFERTEN ZUBEHÖRS ........7
HINWEISE ZUR AUFSTELLUNG.....................................8
ANSCHLÜSSE ...............................................................9
LAGE UND FUNKTION DER TEILE..............................10
FRONTPLATTE ............................................................................. 10
RÜCKWAND ................................................................................ 12
HINWEISE ZUR DJS-SOFTWARE.................................13
SOFTWARE-LIZENZVEREINBARUNG........................................ 13
WARNHINWEISE ZUM URHEBERRECHTSSCHUTZ ............... 14
SYSTEMANFORDERUNGEN (Mindestanforderungen an die
Betriebsumgebung) .................................................................... 14
INSTALLIEREN DER DJS-SOFTWARE ....................................... 15
HINWEISE ZUR PROBEFRIST UND BENUTZER-
REGISTRIERUNG ......................................................................... 16
HINWEISE ZUR ONLINE-UNTERSTÜTZUNG ............................ 16
AUSSCHLUSSKLAUSEL ............................................................. 16
HINWEISE ZUM TREIBERPROGRAMM .......................17
SOFTWARE-LIZENZVEREINBARUNG........................................ 17
INSTALLATION DES TREIBERS.................................................. 17
VERWENDUNG VON DJ-SOFTWARE..........................20
VORBEREITEN DES DJ-SOFTWAREPROGRAMMS ................. 21
STEUERUNG DES COMPUTERS ÜBER DAS SPEZIAL-
KOMMUNIKATIONSPROTOKOLL.............................................. 21
MIDI-STEUERUNG DES COMPUTERS ...................................... 22
MIDI-MELDUNGSTABELLE......................................................... 23
GEBRAUCH DES UTILITY-BILDSCHIRMS....................25
EINSTELLVERFAHREN................................................................ 25
EINSTELLUNGEN......................................................................... 25
AUSFÜHREN EINER RÜCKSTELLUNG ..................................... 26
STÖRUNGSBESEITIGUNG...........................................27
HINWEISE ZUM LCD-BILDSCHIRM .......................................... 27
HINWEISE ZU OEL-(ORGANISCHEN EL-)BILDSCHIRMEN ..... 27
AKTUALISIERUNG DES SEP-C1................................................. 27
AUSSCHLUSSKLAUSEL...............................................28
4
Ge
Page 57

MERKMALE
MERKMALE
Dieses professionelle, auf mobilen Einsatz hin konzipierte DJ-Software-Unterhaltungs-Steuergerät zeichnet sich durch eine breite Palette
an Darbietungsfunktionen für Parties und Veranstaltungen sowie erstklassige Betriebseigenschaften aus.
Dieses Gerät, das die Tradition von Pioneers CD-Spielern der CDJ-Modellreihe hinsichtlich des Layouts seines Bedienfelds, seiner
Funktionen und Bedienungsverfahren fortsetzt, kann an einen Personalcomputer mit Spannungsversorgung über den USB-Bus
angeschlossen werden. Ein derartiger Anschluss gestattet eine zünftige DJ-Wiedergabe der Musiktitel des mitgelieferten DJSSoftwareprogramms, ohne dass eine Betätigung von Maus oder Tastatur erforderlich ist.
externer Monitor
DJ-Software mit
Spezialschnittstelle
PIONEER DJS
OUT
Audio-Schnittstellengerät
DJ-Software mit
MIDI-Schnittstelle
USB-Bus-
Spannungsversorgung
CUE/LOOP
MEMORY CALL
TRACK SEARCH
Videosignal
Deutsch
EJECT
TIME
A.CUE
OUT/ADJUST
IN/CUE
LOOP
HOT LOOP
SEARCH
QUE
RELOOP/EXIT
TEMPO
MASTER
6/10/16WIDE
TEMPO
BROWSE MIX EFFECT UTILITY
MT
PITCH BEND
S
C
R
A
T
C
H
J
O
G
B
R
E
A
K
0
A
LOAD
FWD TEMPOREV
SEP-C1
Leistungsverstärker
EJECT
TIME
A.CUE
CUE/LOOP
OUT/ADJUST
MEMORY CALL
IN/CUE
TRACK SEARCH
SEARCH
QUE
B
LOAD
SEP-C1
LOOP
HOT LOOP
RELOOP/EXIT
TEMPO
MASTER
6/10/16WIDE
TEMPO
MT
PITCH BEND
S
C
R
A
T
C
H
J
O
G
B
R
E
A
K
0
FWD TEMPOREV
Mischpult
Lautsprecher
5
Ge
Page 58

MERKMALE
STEUERUNG DIVERSER DJ-SOFTWARE
Das mitgelieferte Pioneer DJS-Softwareprogramm sowie andere
DJ-Programme können uneingeschränkt bedient werden, ohne
dass eine Steuer-Disc benötigt wird. Der Einsatz von DJProgrammen, die mit MIDI arbeiten, wird ebenfalls unterstützt.
ZUR BEACHTUNG
• Die meisten Betriebsdaten im Zusammenhang mit einer
Betätigung von Tasten und TEMPO-Gleitbahnreglern an
diesem Gerät können über USB MIDI oder Spezialformate an
externe Geräte ausgegeben werden. Um dieses Gerät zur
Steuerung von DJ-Software verwenden zu können, muss ein
Treiberprogramm installiert werden.
HOCHLEISTUNGSFÄHIGES DISPLAY
Zentrales Display
Dank seiner hohen Leuchtdichte ist das 4,3 Zoll breite Farb-LCDDisplay bequem ablesbar. Die intelligente grafische
Benutzerschnittstelle (GUI) und das Wahlrad gestatten eine
bequeme Titelwahl.
Display von Steuergerät A/B
Die Anzeige der verstrichenen Spielzeit und des Tempos erfolgt
jeweils auf einem hochwertigen Bereichsfarben-Vollsegment-OELAnzeigefeld, das sich durch ein schnelles Ansprechverhalten und
hervorragende Ablesbarkeit auszeichnet. In Verbindung mit dem
zentralen Display sorgen diese Displays und Anzeigen für eine
stressfreie DJ-Wiedergabe unter einem breiten Bereich von
Beleuchtungsbedingungen.
JOGSCHEIBE
Die großdimensionierte Jogscheibe mit einem Durchmesser von
80 mm verfügt über eine Scratch-Funktion, die eine Bedienung mit
dem gleichen taktilen Gefühl wie bei Scratch-Wiedergabe mit
einem Plattenspieler ermöglicht.
MONITORAUSGANG
Durch Ausgabe des BROWSE-Bildschirms des zentralen Displays
an einen großen externen Monitor lassen sich die
Bedienungsvorgänge weiter erleichtern.
UNTERSTÜTZUNG DER DJS-FUNKTIONEN
Zusätzlich zur DJ-Wiedergabe ermöglicht der Einsatz des
mitgelieferten DJS-Softwareprogramm eine bequeme Steuerung
zahlreicher Betriebsvorgänge über das zentrale Display,
einschließlich der Wahl und des Mischens von Titeln.
UMFASSENDE DJ-WIEDERGABE-STEUERMÖGLICHKEITEN
Neben grundlegenden Funktionen wie der Steuerung des
Wiedergabetempos, der Cue-Operationen und der
Schleifenwiedergabe unterstützt dieses Gerät auch die meisten
anderen DJ-Wiedergabefunktionen von DJS, einschließlich von
Scratch-Wiedergabe und Tonhöhenbeugung unter Verwendung
der Jogscheibe.
TITELINFORMATIONEN
Bei der Wiedergabe von Titeln mit DJS können Spielzeit, Titel- und
Interpretennamen sowie weitere Titelinformationen auf dem
Bildschirm angezeigt werden.
STEUERUNG VON SUCHVORGÄNGEN
Dieses Gerät ist zur Steuerung von DJS-Titellisten und Playlists im
Stande. Da Listen außerdem auf dem zentralen Display des
Gerätes angezeigt werden, braucht der Bildschirm des Computers
bei der Titelwahl nicht betrachtet zu werden.
STEUERUNG DER MISCHFUNKTION
Die DJS-Mischpultfunktion kann gesteuert werden. Der
Mischvorgang kann über eine einzige Taste ausgeführt werden,
wobei vier verschiedene Mischmodi zur Verfügung stehen.
STEUERUNG VON EFFEKTEN
Die DJS-Effekte können gesteuert werden. Mit dem Wahlrad und
den Tasten des Gerätes sind die Wahl von Effekten, die
Umschaltung des Effekt-Beats sowie Einstellungen von
Lautstärkepegel und Tempo möglich.
ZUR BEACHTUNG
• Bei der Steuerung von anderen DJ-Softwareprogrammen als
DJS schlagen Sie bitte im Benutzerhandbuch des
betreffenden Programms nach, um zu ermitteln, welche
Funktionen unterstützt werden.
6
Ge
Page 59

TECHNISCHE DATEN / ÜBERPRÜFEN DES MITGELIEFERTEN ZUBEHÖRS
TECHNISCHE DATEN
1 Allgemeine Daten
Modellnummer . . . . . . . . . . . . . . . . . . . . . . . . . . . . . . . . . . . SEP-C1
Bezeichnung . . . . . . . . . . . . .Software-Unterhaltungs-Steuergerät
Versorgungsspannung . . . . 5 V Gleichspannung (über USB-Bus)
Stromverbrauch. . . . . . . . . . . . . . . . . . . . . . . . . . . . . . . . . . . 600 mA
Leistungsaufnahme. . . . . . . . . . . . . . . . . . . . . . . . . . . . . . . . . . . 3 W
Betriebstemperatur . . . . . . . . . . . . . . . . . . . . . . . . . . . 5 °C bis 35 °C
Betriebsluftfeuchtigkeit. . . . . . . . . . . . . . 5 % bis 85 % rel. Feuchte
(ohne Kondensatbildung)
Masse (Gewicht) . . . . . . . . . . . . . . . . . . . . . . . . . . . . . . . . . . . .1,7 kg
Maximale Außenabmessungen
. . . . . . . . . . . . . . . . 482,6 mm (B) x 133,0 mm (H) x 83,5 mm (T)
2 USB-Upstream-Teil
Buchsenausführung . . . . . . . . . . USB-Buchse Typ B (PC-Buchse)
3 Video-Ausgangsteil
Ausgangsbuchse. . . . . . . . . . . . . . . . . . . . . . . . . . . . . Cinchbuchse
FBAS-Ausgangspegel . . . . . . . . . . . . . . . . . . . . . . . . . .1 Vs-s (75 Ω)
4 Zentrales Display-Teil
Ausführung. . . . . . . . . . . . . . . . . . . . . TFT-LCD-Aktivmatrix-Display
Größe . . . . . . . . . . . . . . . . . . . . . . . . . . . . . . . . . . . . . 4,3 Zoll (Breite)
Unterstützte Anzeigesprachen . . . .9 Sprachen einschließlich von
Englisch, Japanisch und Chinesisch (vereinfachtes Mandarin)
5 Display-Teil von Steuergerät A/B
Ausführung. . . . . . . . . OEL (organisches EL) Vollsegment-Display
6 Sonstige Buchsen
5 V-Buchse . . . . . . . . . . . . . . . . . . . . . . . . . . . . .Gleichstrombuchse
Änderungen der technischen Daten und äußeren Aufmachung
bleiben im Sinne der ständigen Produktverbesserung jederzeit
vorbehalten.
ÜBERPRÜFEN DES MITGELIEFERTEN
Deutsch
ZUBEHÖRS
Bitte vergewissern Sie sich nach dem Auspacken, dass die nachstehend aufgeführten Zubehörartikel vollständig im Verpackungskarton
vorhanden sind.
USB-Kabel
USB-Hilfsspannungskabel
DJS: 1 Satz
CD-ROM DJS-Installationsschlüssel-
Aufkleber
Vorliegende Bedienungsanleitung
SEP-C1
Garantiekarte
ZUR BEACHTUNG
• Drei Handbücher gehören zum Lieferumfang dieses Gerätes (einschließlich der vorliegenden Bedienungsanleitung). Bitte
lesen Sie diese Handbücher je nach Anwendungszweck wie folgt:
– SEP-C1 Bedienungsanleitung (vorliegendes Handbuch)
Bitte lesen Sie diese Bedienungsanleitung zuerst.
– SEP-C1 DJS-Steuerungsanleitung (PDF-Datei auf der mitgelieferten CD-ROM)
Dies ist die grundlegende Bedienunganleitung bei gemeinsamem Gebrauch der DJS-Software mit dem SEP-C1.
– DJS-Benutzerhandbuch (PDF-Datei auf der mitgelieferten CD-ROM)
Dieses Handbuch enthält ausführliche Erläuterungen der Funktionen und Bedienung der DJS-Software.
7
Ge
Page 60

HINWEISE ZUR AUFSTELLUNG
Kontakt mit vibrierenden
Oberflächen verhindern.
Für ausreichende
Wärmeabfuhr diesen
Freiraum einhalten.
Für ausreichende
Wärmeabfuhr diesen
Freiraum einhalten.
Für ausreichende
Wärmeabfuhr diesen
Freiraum einhalten.
HINWEISE ZUR AUFSTELLUNG
• Durch Aufstellung und Betrieb des Gerätes über längere Zeit
hinweg auf Wärmequellen wie einem Verstärker oder in der
Nähe von Punktleuchten usw. wird die Geräteleistung
beeinträchtigt. Vermeiden Sie eine Aufstellung des Gerätes auf
Wärmequellen.
• Stellen Sie dieses Gerät in einem möglichst großen Abstand von
einem Tuner oder Fernsehgerät auf. Wenn das Gerät in zu
großer Nähe derartiger Geräten aufgestellt wird, kann der
Rundfunk- und Fernsehempfang durch Rauschen
beeinträchtigt werden. Derartige Störungen machen sich
besonders stark bemerkbar, wenn eine Zimmerantenne
verwendet wird. In einem solchen Fall empfiehlt es sich, eine
Außenantenne anzuschließen oder das Gerät auszuschalten.
• Wenn das Gerät in einem Bereich mit starken Geräuschquellen
verwendet wird, zum Beispiel in der Nähe eines Lautsprechers,
können Tonaussetzer auftreten. In einem solchen Fall stellen Sie
das Gerät in einem größeren Abstand vom Lautsprecher auf,
oder verringern Sie die Lautstärke.
• Stellen Sie dieses Gerät auf einer ebenen, stabilen und
waagerechten Unterlage auf.
• Stellen Sie keine schweren Gegenstände auf dieses Gerät.
Stellen Sie sich, dass das Gerät, einschließlich des USB-Kabels,
keine vibrierenden Gegenstände berührt. Andere mechanische
Schwingungen als die der Isolatoren können Tonaussetzer
verursachen.
Besondere Vorsicht ist geboten, wenn das Gerät beim Betrieb in
einem Tragekoffer untergebracht ist.
Hinweise zu Tragekoffern
Die Jogscheibe ist mit einem empfindlichen Schalter ausgestattet.
Wenn das Gerät in einem Tragekoffer untergebracht wird, muss
dafür gesorgt werden, dass kein Druck auf die Oberfläche der
Jogscheibe ausgeübt werden kann.
Kondensatbildung
Wenn dieses Gerät aus einer kalten Umgebung in ein warmes
Zimmer gebracht wird oder die Raumtemperatur schnell ansteigt,
kann sich Kondensat im Inneren des Gerätes bilden, wodurch die
Leistung beeinträchtigt wird. In einem solchen Fall empfiehlt es
sich, vor der Inbetriebnahme des Gerätes ca. eine Stunde zu
warten, bis es sich der Raumtemperatur angeglichen hat, bzw. die
Raumtemperatur langsam zu erhöhen.
Reinigen des Gerätes
Reinigen Sie die Außenflächen des Gerätes mit einem weichen,
trockenen Tuch. Bei hartnäckiger Verschmutzung tauchen Sie ein
weiches Tuch in eine Lösung aus einem Teil eines neutralen
Reinigungsmittels und 5 bis 6 Teilen Wasser, und wringen Sie das
Tuch vor dem Gebrauch gründlich aus. Reiben Sie anschließend
mit einem trockenen Tuch nach. Verwenden Sie auf keinen Fall
leichtflüchtige Lösungsmittel wie Benzol oder Farbverdünner zur
Reinigung, da derartige Substanzen eine Beschädigung des
Gerätes verursachen können.
Reinigen der Jogscheibe
Reinigen Sie die Jogscheibe mit einem weichen, trockenen Tuch.
Bei hartnäckiger Verschmutzung tauchen Sie ein weiches Tuch in
eine Lösung aus einem Teil eines neutralen Reinigungsmittels
und 5 bis 6 Teilen Wasser, und wringen Sie das Tuch vor dem
Gebrauch gründlich aus. Reiben Sie anschließend mit einem
trockenen Tuch nach.
Verwenden Sie auf keinen Fall Alkohol, Farbverdünner, Benzol,
Insektizide oder andere Lösungsmittel zum Reinigen der
Jogscheibe, da derartige Substanzen die Beschriftung oder das
Finish anlösen können, was ein Abblättern oder eine Verfärbung
zur Folge haben kann.
Einbau des SEP-C1 in ein EIA-Gestell
Die Schraubenbohrungen an der Frontplatte des SEP-C1 dienen
zur Befestigung des Gerätes an einem 19-Zoll EIA-Gestell.
Dieses Gerät entspricht 3-HE-Maßen. Die maximale Tiefe des
Gerätes beträgt 83,5 mm.
• Verwenden Sie Schrauben einer geeigneten Größe (nicht
mitgeliefert), um das Gerät im Gestell zu montieren.
HINWEIS
• Stellen Sie das Gerät nicht direkt oberhalb eines
Leistungsverstärkers auf, da die vom Verstärker erzeugte
Wärme eine Beschädigung verursachen oder Brummen
und Rauschen auftreten kann.
• Entfernen Sie das Gerät vor einem Transport aus dem
Gestell. Wird das Gerät im Gestell montiert transportiert,
kann es dadurch beschädigt werden.
• Falls sich ein Transport des Gerätes im Gestell nicht
vermeiden lässt, müssen geeignete Maßnahmen zum
Schutz des Gerätes vor mechanischen Schwingungen und
Erschütterungen getroffen werden.
8
Ge
Page 61

ANSCHLÜSSE
ANSCHLÜSSE
Verbinden Sie das Gerät über das mitgelieferte USB-Hilfsspannungskabel und das normale USB-Kabel mit einem Personalcomputer
(schließen Sie das USB-Hilfsspannungskabel zuerst an).
Personalcomputer
mitgeliefertes USB-Kabel
mitgeliefertes
USB-Hilfsspannungskabel
PC
5V
MONITOR OUT
REMOTE
CONTROL
Audioschnittstelle
(separat erhältlich)
Audiokabel
Schließen Sie das USB-Hilfsspannungskabel bzw. das
USB-Kabel erst nach Installation der Treibersoftware auf
Mischpult
dem Personalcomputer an.
HINWEIS
• Schließen Sie ausschließlich das mitgelieferte USB-Hilfsspannungskabel an die 5V-Buchse an.
• Verwenden Sie ausschließlich das mitgelieferte USB-Hilfsspannungskabel und das mitgelieferte USB-Kabel zum Herstellen
dieser Anschlüsse.
• Schließen Sie das mitgelieferte USB-Hilfsspannungskabel und das mitgelieferte USB-Kabel stets an den gleichen
Personalcomputer an.
• Schließen Sie dieses Gerät nicht über einen USB-Verteiler an einen Personalcomputer an.
• Schließen Sie dieses Gerät nicht über eine USB-Schnittstellenkarte mit CardBus-Unterstützung an einen Personalcomputer
an.
Deutsch
Anschließen an einen externen Monitor (Cinchbuchse)
Stellen Sie diesen Anschluss her, wenn das Bild des zentralen Displays an einen großen Bildschirm ausgegeben werden soll. Nach
Anschluss dieses Gerätes an einen externen Monitor müssen die Einstellungen des Gerätes geändert werden (siehe den Absatz
„MONITORAUSGANG“ unter „[1] DISPLAY“ im Abschnitt „GEBRAUCH DES UTILITY-BILDSCHIRMS“ auf S. 25).
PC
5V
MONITOR OUT
externer Monitor
REMOTE
CONTROL
Ge
9
Page 62

LAGE UND FUNKTION DER TEILE
LAGE UND FUNKTION DER TEILE
FRONTPLATTE
17
16
1
MEMORY CALL
4
5
6
7
8 23 2 3 11 12 13 14
EJECT
CUE/LOOP
TRACK SEARCH
SEARCH
QUE
TIME
A.CUE
IN/CUE
HOT LOOP
OUT/ADJUST
RELOOP/EXIT
LOOP
S
C
R
A
T
C
H
TEMPO
MASTER
6/10/16WIDE
TEMPO
MT
PITCH BEND
J
O
G
B
R
E
A
K
0
FWD TEMPOREV
BROWSE MIX EFFECT UTILITY
A
LOAD
19 15 21
18109
EJECT
TIME
A.CUE
CUE/LOOP
MEMORY CALL
22
B
LOAD
SEP-C1
2024
19
TRACK SEARCH
SEARCH
QUE
IN/CUE
HOT LOOP
OUT/ADJUST
RELOOP/EXIT
LOOP
S
C
R
A
T
C
H
TEMPO
MASTER
6/10/16WIDE
TEMPO
MT
PITCH BEND
J
O
G
B
R
E
A
K
0
FWD TEMPOREV
In diesem Abschnitt wird die Bedienung des Gerätes bei der Steuerung von DJS erläutert. Je nach dem verwendeten DJSoftwareprogramm kann es vorkommen, dass bestimmte Funktionen nicht unterstützt werden oder die erforderlichen
Bedienungsverfahren von den in dieser Anleitung beschriebenen Verfahren verschieden sind.
1 EJECT-Taste ()
Bei DJS-Steuerung wird diese Taste nicht verwendet.
2 LOOP-Funktionstasten
Taste für Festlegung des Schleifen-Anfangspunkts (IN/
CUE)
Diese Taste dient zur Festlegung des SchleifenAnfangspunkts. Wird diese Taste während der
Schleifenwiedergabe gedrückt, so wird unmittelbar an den
Schleifen-Anfangspunkt zurückgekehrt und die
Schleifenwiedergabe erneut gestartet.
Taste für Festlegung des Schleifen-Endpunkts (OUT/
ADJUST)
Diese Taste dient zur Festlegung des Schleifen-Endpunkts.
Wenn diese Taste während der Schleifenwiedergabe gedrückt
wird, kann die Position des Schleifen-Endpunkts mit der
Jogscheibe oder den SEARCH-Tasten korrigiert werden.
RELOOP/EXIT-Taste
Durch Drücken dieser Taste während der
Schleifenwiedergabe wird diese aufgehoben. Wenn diese
Taste bei deaktiviertem Schleifenwiedergabe-Modus gedrückt
wird, startet die Schleifenwiedergabe unmittelbar an dem
vorher festgelegten Schleifen-Anfangspunkt.
3 Tempo-Steuerbereich
TEMPO-Bereichswahltaste (±6/10/16/WIDE):
Bei jeder Betätigung dieser Taste wird der Reihe nach
zwischen den verschiedenen Regelbereichen des TEMPO-
Gleitbahnreglers umgeschaltet.
MASTER TEMPO-Taste und -Anzeige (MT):
Bei jeder Betätigung dieser Taste wird die Master-TempoFunktion abwechselnd ein- und ausgeschaltet.
TEMPO-Gleitbahnregler:
Um das Wiedergabetempo zu erhöhen, schieben Sie diesen
Gleitbahnregler nach unten (in Richtung „+“), um es zu
verringern, schieben Sie den Regler nach oben (in
Richtung „–“).
PITCH BEND-Tasten +/–:
Betätigen Sie eine dieser Tasten während der Wiedergabe, um
die Tonhöhenbeugungs-Funktion zu aktivieren. Durch
Betätigen der „+“-Taste wird die Geschwindigkeit der
Tonhöhenbeugung erhöht, durch Betätigen der „–“-Taste wird
sie verringert.
Die Geschwindigkeit der Tonhöhenbeugung kann geändert
werden, indem die Jogscheibe gedreht wird, während die
betreffende Taste gedrückt gehalten wird.
4 TRACK SEARCH-Tasten (, )
Diese Tasten dienen zur Ausführung eines Titelsprungs in
Vorwärts- oder Rückwärtsrichtung.
5 SEARCH-Tasten (, )
Diese Tasten dienen zur Ausführung eines Suchlaufs in
Vorwärts- oder Rückwärtsrichtung.
6 CUE-Taste und -Anzeige
Diese Taste dient zur Festlegung eines Cue-Punktes. Wenn ein
Cue-Punkt bereits festgelegt wurde, schaltet das Gerät nach
Drücken der CUE-Taste auf Cue-Bereitschaft.
7 Wiedergabe-/Pausentaste und -Anzeige ()
Diese Taste dient zum Starten und Pausieren der Wiedergabe.
8 Zeit-Modus-/Cue-Automatik-Taste (TIME/A.CUE)
TIME:
Bei jeder Betätigung dieser Taste wird die Zeitanzeige des
Displays abwechselnd zwischen der verstrichenen Spielzeit
des laufenden Titels und der Restspielzeit (REMAIN)
umgeschaltet.
A.CUE:
Bei jedem mindestens 1 Sekunde langen Gedrückthalten
dieser Taste wird die Cue-Automatik-Funktion abwechselnd
ein- und ausgeschaltet.
Cue-Automatik-Funktion
Wenn ein Titel eingestellt oder ein Titelsprung ausgeführt,
legt diese Funktion automatisch einen Cue-Punkt an der
Stelle unmittelbar vor Einsetzen des Tons fest, wonach das
Gerät an dieser Stelle auf Cue-Bereitschaft schaltet.
10
Ge
9 SCRATCH-Taste
Drücken Sie diese Taste, um den SCRATCH-Modus ein- oder
auszuschalten.
Page 63

LAGE UND FUNKTION DER TEILE
10 JOG BREAK-Taste
Bei DJS-Steuerung wird diese Taste nicht verwendet.
11 BROWSE-Taste
Diese Taste dient zum Umschalten auf den BROWSEBildschirm.
12 MIX-Taste
Diese Taste dient zum Umschalten auf den MIX-Bildschirm.
13 EFFECT-Taste
Diese Taste dient zum Umschalten auf den EFFECTBildschirm.
14 UTILITY-Taste
Diese Taste dient zum Umschalten auf den UTILITY-Bildschirm
(S. 25).
15 Wahlrad
Wenn momentan der BROWSE- oder der UTILITY-Bildschirm
angezeigt wird, kann das Wahlrad gedreht werden, um Titel zu
wählen oder den Cursor zwischen Einstellposten zu bewegen.
Drücken Sie auf das Wahlrad, um die Auswahl zu bestätigen.
Einzelheiten zu den Bedienungsverfahren auf dem MIX- und
EFFECT-Bildschirm finden Sie in der DJSSteuerungsanleitung.
16 CUE/LOOP MEMORY-Taste
Bei DJS-Steuerung wird diese Taste nicht verwendet.
17 CUE/LOOP CALL-Taste
Bei DJS-Steuerung wird diese Taste nicht verwendet.
18 Funktionstasten (F1 bis F6, von links nach rechts)
Diese Tasten dienen zur Wahl von Modi und Kategorien.
Die zur Auswahl stehenden Posten sind je nach dem
momentan angezeigten Bildschirm oder Menü verschieden.
Einzelheiten hierzu finden Sie in der DJS-
Steuerungsanleitung.
19 LOAD A/B-Tasten
Wenn momentan der BROWSE-Bildschirm angezeigt wird
und Sie diese Taste drücken, wird der gewählte Titel in
Steuergerät A/B eingestellt.
Einzelheiten zu den Bedienungsverfahren auf dem MIX- und
EFFECT-Bildschirm finden Sie in der DJSSteuerungsanleitung.
20 Taste Ebene aufwärts ()
Wenn momentan der BROWSE- oder der UTILITY-Bildschirm
angezeigt wird, so wird bei jeder Betätigung dieser Taste auf
die nächsthöhere Menüebene (nach links) zurückgekehrt.
Einzelheiten zu den Bedienungsverfahren auf dem MIX- und
EFFECT-Bildschirm finden Sie in der DJSSteuerungsanleitung.
21 Taste Ebene abwärts ()
Wenn momentan der BROWSE- oder der UTILITY-Bildschirm
angezeigt wird, so wird bei jeder Betätigung dieser Taste auf
die nächsttiefere Menüebene (nach rechts) weitergeschaltet.
Einzelheiten zu den Bedienungsverfahren auf dem MIX- und
EFFECT-Bildschirm finden Sie in der DJSSteuerungsanleitung.
22 Zentrales Display (S. 11)
23 Display A/Display B (S. 12)
24 Jogscheibe (+FWD/–REV)
Bei aktiviertem SCRATCH-Modus
Berühren Sie die Oberfläche der Jogscheibe, und drehen Sie
die Jogscheibe dann, um die Scratch-Wiedergabe
auszuführen.
Bei deaktiviertem SCRATCH-Modus
Die Jogscheibe dient zur Ausführung der Tonhöhenbeugung.
Das Ausmaß der Beschleunigung (+FWD) und
Verlangsamung (–REV) des Wiedergabetempos entspricht
jeweils dem Drehwinkel der Jogscheibe. Wenn die Jogscheibe
zum Stillstand kommt, wird das ursprüngliche
Wiedergabetempo wiederhergestellt.
Zentrales Display
3
1
2
1 Hauptmenübildschirm
Mit den Tasten BROWSE, MIX, EFFECT und UTILITY wird
zwischen den verschiedenen Menüs des zentralen Displays
umgeschaltet. Die Funktionstasten, die Tasten Ebene aufwärts
()/abwärts (), die LOAD A/B-Tasten und das Wahlrad
werden zum Manipulieren des Inhalts jedes Menüs verwendet.
BROWSE-Bildschirm
Dieser Bildschirm dient zur Anzeige von DJS-Titellisten oder
Playlists sowie zur Titelwahl. Einzelheiten hierzu finden Sie im
Abschnitt „Verwendung von DJS-Listen“ der DJSSteuerungsanleitung.
MIX-Bildschirm
Dieser Bildschirm dient zur Ausführung von DJS-MischpultOperationen. Einzelheiten hierzu finden Sie im Abschnitt
„DJS-Mischpult-Operationen“ der DJS-Steuerungsanleitung.
EFFECT-Bildschirm
Dieser Bildschirm dient zur Ausführung von DJS-EffektgerätOperationen. Einzelheiten hierzu finden Sie im Abschnitt
„DJS-Effektgerät-Operationen“ der DJS-Steuerungsanleitung.
UTILITY-
Auf diesem Bildschirm werden Geräteeinstellungen
vorgenommen (S. 25).
2 Funktionsregister
Hier werden Posten angezeigt, die mit den sechs
Funktionstasten geändert werden können. Die jeweils
angezeigten Posten richten sich nach dem aktuellen Inhalt
des Hauptmenübildschirms.
3 A/B-Titelinformations-Anzeigebereich
Hier werden Titelinformationen sowie der aktuelle Status von
Titeln angezeigt, die momentan auf Steuergerät A/B laufen.
Wiedergabestatus
Bildschirm
Titelname Wiedergabestatus
Interpretenname
Dieses Symbol zeigt an, dass ein Titel momentan
wiedergegeben wird.
Dieses Symbol zeigt an, dass die Wiedergabe
eines Titels momentan pausiert ist.
Dieses Symbol zeigt an, dass sich ein Titel
momentan im Cue-Bereitschaftszustand befindet.
Deutsch
11
Ge
Page 64

LAGE UND FUNKTION DER TEILE
1
8
4
6
2
7
3
5
9
PC
MONITOR OUT
5V
REMOTE
CONTROL
1
2
3
4
ZUR BEACHTUNG
• Dieses Gerät ist zwar zur Anzeige von Titel- und
Interpretennamen in westeuropäischen Sprachen,
Russisch, vereinfachtem Mandarin-Chinesisch und
Japanisch im Stande, doch das jeweils verwendete DJSoftwareprogramm unterstützt möglicherweise nicht alle
dieser Sprachen. Einzelheiten zu den von Ihrem DJSoftwareprogramm unterstützten Sprachen finden Sie in
dessen Benutzerhandbuch.
Display A/Display B
1 Titelnummern-Anzeigefeld
Bei DJS-Steuerung wird „DJS“ angezeigt.
2 Tempo-Regelbereichsanzeigen (±6, ±10, ±16, WIDE)
Hier wird der momentan für den TEMPO-Gleitbahnregler
gewählte Regelbereich angezeigt.
3 TEMPO-Änderungsfaktor-Anzeigefeld (%)
Hier wird das aktuelle Ausmaß der durch eine Betätigung des
TEMPO-Gleitbahnreglers verursachten Beeinflussung des
Originaltempos als Prozentwert angezeigt.
4 A.CUE-Anzeige
Diese Anzeige leuchtet bei aktivierter Cue-AutomatikFunktion.
5 Zeitanzeigefeld
Hier werden die verstrichene Spielzeit des laufenden Titels (die
[REMAIN]-Anzeige ist ausgeschaltet) oder die Restspielzeit
(die [REMAIN]-Anzeige leuchtet) in Minuten [M], Sekunden
[S] und Felder [F] angezeigt.
6 Wiedergabeadressen-Anzeigefeld
Eine Balkengrafik, die der Länge des kompletten Titels
entspricht, ermöglicht eine bequeme visuelle Kontrolle des
relativen Fortschritts der Wiedergabe (entweder der
verstrichenen oder der Restspielzeit) des laufenden Titels.
• Anzeige der verstrichenen Spielzeit: Zu Beginn der
Wiedergabe sind alle Segmente der Balkengrafik
ausgeschaltet und leuchten dann der Reihe nach auf.
• Anzeige der Restspielzeit: Zu Beginn der Wiedergabe
leuchten alle Segmente der Balkengrafik und erlöschen
dann der Reihe nach.
• Die Balkengrafik beginnt zu blinken, sobald nur noch 30
Sekunden Restspielzeit verbleiben.
• Sobald nur noch 15 Sekunden Restspielzeit verbleiben,
beginnt die Balkengrafik in einem schnellerem Tempo zu
blinken.
7 BPM-Anzeigefeld
Hier wird der BPM-Wert (Beats Per Minute = Schläge pro
Minute) des laufenden Titels angezeigt.
8MEMO-Anzeige
Bei DJS-Steuerung erscheint diese Anzeige nicht.
9 REMAIN-Anzeige
Diese Anzeige leuchtet, wenn das Zeitanzeigefeld auf Anzeige
der Restspielzeit eingestellt ist.
RÜCKWAND
1 PC-Buchse: USB-Buchse (Typ B)
Verbinden Sie diese Buchse über das mitgelieferte USB-Kabel
mit der USB-Buchse eines Personalcomputers.
2 5V-Buchse
Verbinden Sie diese Buchse über das mitgelieferte USBHilfsspannungskabel mit der USB-Buchse eines
Personalcomputers.
3 Video-Ausgangsbuchse (MONITOR OUT)
Verbinden Sie diese Buchse über ein Videokabel mit einem
externen Display.
4 Fernsteuerungsbuchse (REMOTE CONTROL)
Diese Buchse wird nicht mit diesem Gerät verwendet.
12
Ge
Page 65

HINWEISE ZUR DJS-SOFTWARE
HINWEISE ZUR DJS-SOFTWARE
Bei Pioneers DJS handelt es sich um ein Softwareprogramm, das den Gebrauch von MP3-Dateien zur Steuerung der DJ-Wiedergabe über
einen Personalcomputer gestattet. Installieren Sie das Programm von der mitgelieferten CD-ROM auf dem Computer.
ZUR BEACHTUNG
• DJS ist nicht mit Funktionen zur Aufzeichnung der DJ-Wiedergabe ausgestattet.
2.3 Eigentum. Pioneer oder sein Lizenzgeber behält sich alle
SOFTWARE-LIZENZVEREINBARUNG
Diese Software-Lizenzvereinbarung („Vereinbarung“) wird
zwischen Ihnen (sowohl einem Einzelbenutzer, der das Programm
installiert, und einer einzigen juristischen Person, für die der
Einzelbenutzer handelt) („Sie“ oder „Ihr“) und der PIONEER
CORPORATION („Pioneer“) abgeschlossen.
FALLS SIE SCHRITTE DURCHFÜHREN, DAS PROGRAMM
EINZURICHTEN ODER ZU INSTALLIEREN, BEDEUTET DIES,
DASS SIE ALLEN BESTIMMUNGEN DIESER
LIZENZVEREINBARUNG ZUSTIMMEN. DIE ERLAUBNIS, DAS
PROGRAMM HERUNTERZULADEN UND/ODER ZU BENUTZEN,
HÄNGT AUSDRÜCKLICH VON IHRER BEFOLGUNG DIESER
BESTIMMUNGEN AB. ES IST KEINE GESCHRIEBENE ODER
ELEKTRONISCHE GENEHMIGUNG ERFORDERLICH, DAMIT
DIESE VEREINBARUNG IN KRAFT TRITT UND DURCHSETZBAR
IST. FALLS SIE NICHT ALLEN BESTIMMUNGEN DIESER
VEREINBARUNG ZUSTIMMEN, IST ES IHNEN NICHT ERLAUBT,
DIESES PROGRAMM ZU BENUTZEN UND SIE MÜSSEN DIE
INSTALLATION ABBRECHEN BZW. DAS PROGRAMM
DEINSTALLIEREN.
1 DEFINITIONEN
1.1 „Dokumentierung“ bedeutet die schriftliche
Dokumentierung, die technischen Daten und der HilfeInhalt, die von Pioneer allgemein zur Verfügung gestellt
werden, um Ihnen bei den Installation und dem
Gebrauchs des Programms behilflich zu sein.
1.2 „Programm“ bedeutet die gesamte Pioneer-Software,
oder einen Teil davon, die Sie gemäß dieser Vereinbarung
unter Lizenz von Pioneer erhalten.
2 PROGRAMMLIZENZ
2.1 Beschränkte Lizenz. Entsprechend den Einschränkungen
dieser Vereinbarung erteilt Ihnen Pioneer eine
beschränkte, nicht ausschließliche, nicht übertragbare
Lizenz (ohne das Recht auf eine Unterlizenz):
(a) Zur Installation einer einzigen Kopie dieses
Programms auf der Festplatte Ihres Computers, um
das Programm ausschließlich für Ihren persönlichen
Gebrauch entsprechend dieser Vereinbarung und der
Dokumentierung („Autorisierter Gebrauch“) zu
verwenden;
(b) Zur Verwendung der Dokumentierung für die
Unterstützung des autorisierten Gebrauchs; und
(c) Zur Anfertigung einer Programmkopie ausschließlich
für Sicherungszwecke, vorausgesetzt, dass alle Titel
und Warenzeichen, das Copyright und alle Hinweise
auf eingeschränkte Rechte auf der Kopie reproduziert
werden.
2.2 Einschränkungen. Sie dürfen das Programm oder die
Dokumentierung nicht kopieren oder verwenden, außer
wie ausdrücklich durch diese Vereinbarung erlaubt. Sie
dürfen das Programm nicht übertragen, unterlizenzieren,
mieten, vermieten oder verleihen bzw. für das Training
von Dritten, das kommerzielle Timesharing oder die
Verwendung in einem Service-Büro gebrauchen. Sie
dürfen das Programm weder selbst noch durch Dritte
abändern, rekonstruieren, auseinander nehmen oder
dekompilieren, außer bis zu dem vom geltenden Gesetz
zugelassenen Ausmaß, und auch dann nur, nachdem Sie
Pioneer schriftlich von ihren beabsichtigten Tätigkeiten
informiert haben. Sie dürfen das Programm nicht auf
mehreren Prozessoren installieren, ohne vorher die
schriftliche Zustimmung von Pioneer eingeholt zu haben.
3 GARANTIE-VERZICHTSERKLÄRUNG
4 SCHADENSERSATZ UND RECHTSBEHELFE FÜR
5 BEENDIGUNG
6 ALLGEMEINE BESTIMMUNGEN
Rechte, Titel und Anteile am gesamten Patent, das
Urheberrecht, Warenzeichen, Geschäftsgeheimnis und
die Rechte des geistigen Eigentums am Programm und
der Dokumentierung, sowie allen Derivaten davon, vor.
Sie erwerben keine weiteren Rechte, weder ausdrücklich
noch impliziert, die über die beschränkte Lizenz, die in
dieser Vereinbarung angeführt ist, hinausgehen.
2.4 Keine Unterstützung. Pioneer ist nicht verpflichtet, das
Programm oder die Dokumentierung unter dieser
Vereinbarung zu unterstützen, warten, aktualisieren,
verändern oder neue Veröffentlichungen
bekanntzugeben.
DAS PROGRAMM UND DIE DOKUMENTIERUNG WERDEN
„WIE VORHANDEN“ ANGEBOTEN, OHNE JEGLICHE
DARSTELLUNGEN ODER GARANTIEN, UND SIE STIMMEN
DAMIT ÜBEREIN, SIE AUF EIGENES RISIKO ZU
VERWENDEN. BIS ZU DEM VOM GESETZ ZUGELASSENEN
MASS STREITET PIONEER AUSDRÜCKLICH ALLE
GARANTIEN JEGLICHER ART MIT BEZUG AUF DAS
PROGRAMM UND DIE DOKUMENTIERUNG AB, SEIEN SIE
AUSDRÜCKLICH, IMPLIZIERT, SATZUNGSGEMÄSS ODER
SICH AUS EINEM LEISTUNGSKURS ERGEBEND, BZW.
EINEM HANDELSKURS ODER GEBRAUCH,
EINSCHLIESSLICH ALLER GARANTIEN DER
VERMARKTBARKEIT, EIGNUNG FÜR EINEN BESTIMMTEN
ZWECK, AUSREICHENDER QUALITÄT, GENAUIGKEIT, DES
TITELS ODER DER NICHTVERLETZUNG.
VERTRAGSBRUCH
Sie stimmen damit überein, dass jede Verletzung der
Einschränkungen dieser Vereinbarung Pioneer irreparable
Schäden zufügen würde, für die eine monetäre Entschädigung
allein unzureichend wäre. Zusätzlich zu den
Schadensersatzforderungen und anderen Rechtbehelfen, zu
denen Pioneer berechtigt sein kann, stimmen Sie damit
überein, dass Pioneer das Recht hat, eine richterliche
Verfügung einzureichen, um den tatsächlichen, drohenden
oder wiederholten Vertragsbruch dieser Vereinbarung zu
verhindern.
Pioneer kann diese Vereinbarung jederzeit beenden, falls Sie
irgendwelche Bestimmungen verletzt haben. Falls diese
Vereinbarung beendet wird, dürfen Sie das Programm nicht
weiter verwenden und müssen es von dem Computer, auf dem
es installiert ist, dauerhaft löschen sowie alle in Ihrem Besitz
befindlichen Kopien des Programms und der
Dokumentierung zerstören und Pioneer dann schriftlich davon
informieren. Die Abschnitte 2.2, 2.3, 2.4, 3, 4, 5 und 6 bleiben
auch nach der Beendigung dieser Vereinbarung weiterhin in
Kraft.
6.1 Beschränkung der Haftbarkeit. Unter keinen Umständen
sind Pioneer oder seine Tochtergesellschaften in
Zusammenhang mit dieser Vereinbarung oder ihrem
Inhalt, unter keiner Haftbarkeitstheorie, haftbar für
indirekte Schäden, Folgeschäden, spezielle oder
nachfolgende Schäden sowie verschärften
Schadensersatz oder für Schadensersatz für verlorene
Profite, Einkommen, Geschäfte, Ersparnisse, Daten, den
Gebrauch oder die Kosten für den Erwerb eines
Ersatzprogramms, selbst wenn Pioneer auf die
Möglichkeit einer solchen Schadensersatzforderung
Deutsch
13
Ge
Page 66

HINWEISE ZUR DJS-SOFTWARE
aufmerksam gemacht wurde bzw. eine solche
Schadensersatzforderung vorhersehbar ist. Unter keinen
Umständen wird die Haftbarkeit von Pioneer für alle
Schadensersatzforderungen den Betrag überschreiten,
den Sie Pioneer oder seinen Tochtergesellschaften für
den Erwerb des Programms bezahlt haben. Die
Vertragsparteien geben zu, dass die Haftbarkeitsgrenzen
und die Risikoverteilung, die in dieser Vereinbarung
angeführt sind, im Programmpreis widerspiegelt sind und
einen wesentlichen Teil des Abkommens zwischen den
Parteien darstellen, da Pioneer dieses Programm
anderenfalls nicht angeboten noch auch diese
Vereinbarung abgeschlossen hätte.
6.2 Die in dieser Vereinbarung enthaltenen Beschränkungen
oder Ausschlüsse der Garantien und Haftbarkeit betreffen
oder beeinträchtigen Ihre gesetzlichen Rechte als Kunde
nicht und gelten für Sie nur in dem Maße, in dem solche
Beschränkungen oder Ausschlüsse unter den Gesetzen
der Gerichtsbarkeit an Ihrem Wohnort erlaubt sind.
6.3 Trennbarkeit und Verzicht. Falls irgendeine Bestimmung
dieser Vereinbarung als illegal, ungültig oder auf andere
Weise nicht durchsetzbar eingestuft wird, wird diese
Bestimmung bis zum erlaubten Maße durchgesetzt oder,
falls eine Durchsetzung nicht möglich ist, als trennbar
angesehen und daher aus dieser Vereinbarung
ausgeschlossen, während die restlichen Bestimmungen
der Vereinbarung weiterhin voll in Kraft bleiben. Der
Verzicht einer der Parteien im Falle eines Versäumnisses
oder Vertragsbruchs dieser Vereinbarung bedeutet nicht,
dass im Falle eines späteren Versäumnisses oder
Vertragsbruchs ebenfalls ein Verzicht erfolgt.
6.4 Keine Übereignung. Sie dürfen diese Vereinbarung oder
irgendwelche darin enthaltenen Rechte oder Pflichten
nicht übereignen, verkaufen, übertragen, delegieren oder
sich ihrer auf andere Weise entledigen, weder gewollt
noch ungewollt, sei es gesetzmäßig oder auf andere
Weise, ohne vorher die schriftliche Zustimmung von
Pioneer eingeholt zu haben. Jede angebliche
Übereignung, Übertragung oder Delegation durch Sie ist
null und nichtig. Vorbehaltlich des Obengenannten ist
diese Vereinbarung für die Parteien und ihre jeweiligen
Nachfolger und Rechtsnachfolger bindend .
6.5 Gesamte Vereinbarung. Diese Vereinbarung stellt die
gesamte Vereinbarung zwischen den Parteien dar und
löst alle vorherigen oder gleichzeitigen Vereinbarungen
oder Vertretungen bezüglich des Inhalts, seien sie
schriftlich oder mündlich, ab. Diese Vereinbarung darf
ohne die vorherige und ausdrückliche schriftliche
Zustimmung von Pioneer nicht modifiziert oder berichtigt
werden, und keine weitere Akte, kein Dokument,
Verwendung oder Gewohnheitsrecht kann diese
Vereinbarung berichtigen oder modifizieren.
6.6 Sie erklären Ihr Einverständnis damit, dass diese
Vereinbarung durch japanische Gesetzgebung geregelt
und gemäß dieser ausgelegt wird.
WARNHINWEISE ZUM
URHEBERRECHTSSCHUTZ
Der Gebrauch von DJS unterliegt Einschränkungen hinsichtlich
der Wiedergabe und des Kopierens von Musikinhalt, der mit
Kopierschutz versehen ist.
• Wenn Kopierschutz-Verschlüsselungsdaten in Aufzeichnungen
auf Datenträgern eingebettet sind, arbeitet dieses Programm
möglicherweise nicht einwandfrei.
• Ripping, Wiedergabe und andere Betriebsvorgänge werden u.U.
gestoppt, wenn eingebettet KopierschutzVerschlüsselungsdaten in Aufzeichnungen auf Datenträgern
erkannt werden.
• Aufgrund von Kopierschutz-Technologie für bespielte
Datenträger (CPRM) ist das Schreiben („Check-out“) auf SDSpeicherkarten auf maximal drei Schreibvorgänge pro
Musikinhalt beschränkt.
• Um Musikinhalt auf SD-Speicherkarten schreiben („Check-out“)
zu können, muss das verwendete Lese-/Schreibgerät die
„Kopierschutz-Technologie für bespielte Datenträger“ der SDSpeicherkarte unterstützen. Einzelheiten hierzu finden Sie in der
Bedienungsanleitung des jeweils verwendeten Lese-/
Schreibgerätes.
• Musikinhalt, der auf SD-Speicherkarten geschrieben wird
(„Check-out“) kann nur mit einem Player wiedergegeben
werden, der die Norm „SD-Audio“ unterstützt. Einzelheiten
hierzu finden Sie in der Bedienungsanleitung des jeweils
verwendeten Players.
Urheberrechtlich geschütztes Tonmaterial darf ausschließlich
für den Privatgebrauch aufgezeichnet werden; Verwendung zu
anderen Zwecken ohne schriftliche Genehmigung des Inhabers
der Urheberrechte ist gesetzlich verboten.
• Musiktitel, die von CDs und anderen Datenträgern
aufgezeichnet werden, unterliegen möglicherweise dem
Urheberrechtsschutz durch die Gesetzgebung einzelner Länder
sowie durch internationale Abkommen. Sie allein sind für einen
den gesetzlichen Auflagen entsprechenden Gebrauch der von
Ihnen erstellten Aufzeichnungen verantwortlich.
SYSTEMANFORDERUNGEN
(Mindestanforderungen an die
Betriebsumgebung)
DJS kann nur auf einem PC/AT-Computer eingesetzt werden, der
die folgenden Mindestanforderungen an die Betriebsumgebung
erfüllt:
Zentraleinheit: Intel
mit einer Taktfrequenz von mindestens 1,5 GHz
Bei Einsatz unter Windows Vista
Typs Intel Core
Taktfrequenz von mindestens 1,5 GHz erforderlich.
Arbeitsspeicher:
Mindestens 512 MB RAM
Bei Einsatz unter Windows Vista
Festplattenlaufwerk:
250 MB freier Speicherplatz (zusätzlich zu dem zur Speicherung
von MP3- und anderen Musikdateien benötigten Speicherplatz)
Optisches Laufwerk:
Zum Lesen von CD-ROM-Discs und zum Abspielen von Musik-CDs
(CD-DA) geeignetes Disc-Laufwerk
Display:
XGA (1024 x 768) oder höhere Auflösung, mit Videoadapter und
Monitor mit HighColor (16 Bit) oder höherer Auflösung
Sound:
Audioausgang mit mindestens 2 Kanälen (interne oder externe
Soundkarte oder Audiogerät)
Eingabegerät:
Tastatur, Maus (oder gleichwertige Zeigevorrichtung)
Internet-Anschluss:
Eine Datenübertragungsgeschwindigkeit von mindestens 56 kBit/
s wird empfohlen. Microsoft
Version oder ein anderer Web Browser mit Unterstützung von 128Bit SSL
• Wenn dieses Gerät an einen Personalcomputer angeschlossen
ist und in Verbindung mit der DJS-Software betrieben wird,
muss der Personalcomputer über zwei USB-Buchsen gemäß
USB 1.1 oder einer neueren Version verfügen. Einzelheiten
hierzu finden Sie im Abschnitt „ANSCHLÜSSE“ (S. 9).
®
Pentium M® (oder kompatibler) Prozessor
®
TM
2 Duo (oder ein kompatibler Prozessor) mit einer
jedoch ist ein Prozessor des
®
: mindestens 1 GB RAM
®
Internet Explorer 5.5 oder neuere
14
Ge
Page 67

HINWEISE ZUR DJS-SOFTWARE
HINWEIS
• Selbst wenn der verwendete Personalcomputer über die in
den obigen Systemanforderungen angegebene
Speicherkapazität verfügt, können Funktionen oder
Leistung des Programms beeinträchtigt werden, wenn
andere Softwareanwendungen und Dienste, die
gleichzeitig auf dem Computer laufen, übermäßig viel
Speicherplatz verbrauchen. Beenden Sie in einem solchen
Fall die anderen momentan laufenden Dienste oder
Programme, um für ausreichend freien Platz im
Arbeitsspeicher zu sorgen, oder installieren Sie zusätzliche
Arbeitsspeicherkapazität.
• Bei Kombination mit anderen auf dem Personalcomputer
installierten Softwareprogrammen arbeitet DJS
möglicherweise nicht einwandfrei.
• Die Tatsache, dass der verwendete Personalcomputer die
obigen Systemanforderungen erfüllt, bietet dennoch keine
Gewähr für eine uneingeschränkte Funktionalität beim
Betrieb der Software auf dem betreffenden Computer.
• Das DJS-Softwareprogramm wird nicht von MacintoshComputern unterstützt (selbst wenn diese mit einer IntelZentraleinheit ausgerüstet sind).
INSTALLIEREN DER DJS-SOFTWARE
Vorsichtshinweise zur Installation
• Bitte lesen Sie unbedingt die Abschnitte „SOFTWARELIZENZVEREINBARUNG“ und „SYSTEMANFORDERUNGEN
(Mindestanforderungen an die Betriebsumgebung)“, bevor Sie
mit der Installation von DJS beginnen.
• DJS wird von den folgenden Versionen von Microsoft
Windows
•DJS wird nicht von Microsofts 64-Bit-Betriebssystemen
unterstützt (Windows
Windows Vista
®
unterstützt:
Windows Vista
Windows Vista
Windows Vista
Windows Vista
®
Windows
Windows
Windows
XP Home Edition
®
XP Professional
®
2000 Professional (SP4)
®
Home Basic
®
Home Premium
®
Ultimate
®
Business
®
®
XP Professional x64-Version und
64-Bit-Versionen).
• Die mitgelieferte CD-ROM enthält Installationsprogramme und
Benutzerhandbücher in den folgenden acht Sprachen:
Englisch, Französisch, Deutsch, Italienisch, Holländisch,
Spanisch, Chinesisch (vereinfachtes Mandarin) und Japanisch.
• Bei Verwendung von DJS auf einem Personalcomputer, dessen
®
Windows
-Anzeigesprache keiner der oben aufgeführten
Sprachen entspricht, folgen Sie den Menüanweisungen, um
[English (Englisch)] zu wählen.
• Zur Installation und Deinstallation von DJS ist eine
Administrator-Berechtigung auf dem betreffenden
Personalcomputer erforderlich. Bevor Sie die Software
installieren können, müssen Sie sich als Administrator
anmelden.
Installationsverfahren
1 Wenn die mitgelieferte CD-ROM-Installations-Disc in das
DVD/CD-Laufwerk des Personalcomputers eingelegt wird,
erscheint das Installationsmenü automatisch auf dem
Bildschirm. Folgen Sie den Menüanweisungen, um die DJSSoftware zu installieren.
• Falls das Installationsmenü nicht automatisch erscheint,
klicken Sie auf [Start] [Arbeitsplatz (oder Computer)],
wählen Sie das optische Laufwerk, und doppelklicken Sie
dann auf das Symbol [Install].
®
2 Sobald das Installationsmenü erscheint, klicken Sie auf die
Schaltfläche [Installieren Sie DJS].
• Falls eine Probeversion von DJS momentan auf dem
Personalcomputer installiert ist, erscheint statt der
Schaltfläche [
Deinstallieren Sie die Probeversion von DJS
[
Installieren Sie DJS
] die Schaltfläche
]. Klicken Sie
auf diese Schaltfläche, um die Probeversion zu deinstallieren,
und dann auf die Schaltfläche [
Installieren Sie DJS
].
• Um das Benutzerhandbuch anzuzeigen, klicken Sie auf die
Schaltfläche [Öffnen Sie die DJS Bedienungsanleitung].
Adobe Reader
®
wird zur Anzeige des Benutzerhandbuchs
benötigt.
®
• Um Adobe Reader
Schaltfläche [Installieren Sie den Adobe Reader]. Falls
bereits eine ältere Version von Adobe Reader
Personalcomputer installiert ist, müssen Sie die alte Version
von Adobe Reader
zu installieren, klicken Sie auf die
®
auf dem
®
deinstallieren, bevor Sie auf die
Schaltfläche [Installieren Sie den Adobe Reader] klicken.
• Um das Installationsmenü zu schließen, klicken Sie auf die
Schaltfläche [Abbrechen].
3 Wenn der Bildschirm zur Wahl der Anzeigesprache erscheint,
wählen Sie [Deutsch], und klicken Sie dann auf [OK].
• Je nach der Betriebsumgebung des Personalcomputers
stehen u.U. mehrere Sprachen zur Verfügung.
• Wenn Sie auf die Schaltfläche [OK] klicken, erscheint die
Meldung [Vorbereitung zum Installieren von DJS...].
Nach Abschluss der Vorbereitungen erscheint die Meldung
[Beginn der DJS-Installation...]. Folgen Sie den
Anweisungen, die auf dem Bildschirm erscheinen, um die
Installation von DJS abzuschließen.
• Um die Installation abzubrechen, klicken Sie auf die
Schaltfläche [Abbrechen].
4 Führen Sie nach beendeter Installation von DJS
entsprechend den Anweisungen, die auf dem Bildschirm
erscheinen, einen System-Neustart aus.
ZUR BEACHTUNG
• Bei Verwendung dieses Gerätes in Verbindung mit dem DJSSoftwareprogramm muss der Software-Treiber auf dem
Personalcomputer installiert werden, bevor der
Personalcomputer an den SEP-C1 angeschlossen wird.
Einzelheiten hierzu finden Sie auf S. 17
DJS-Benutzerhandbuch (PDF)
Nach beendeter Installation von DJS können Sie auf Wunsch das
Benutzerhandbuch vom Windows [START]-Menü aus anzeigen.
Klicken Sie auf [START] [Alle Programme anzeigen] [DJS]
[Bedienungsanleitung].
Es empfiehlt sich, das Benutzerhandbuch vor Starten des
Programms zu lesen, um sich mit den verschiedenen Funktionen
von DJS vertraut zu machen.
Deutsch
15
Ge
Page 68

HINWEISE ZUR DJS-SOFTWARE
HINWEISE ZUR PROBEFRIST UND
BENUTZER-REGISTRIERUNG
Nach der Installation dürfen Sie DJS innerhalb einer Probefrist von
60 Tagen benutzen, ohne sich registrieren zu müssen.
Innerhalb dieses Zeitdauer können Sie DJS verwenden, ohne eine
offizielle Registrierung auszuführen. Da DJS nach Ablauf der
Probefrist nicht weiter benutzt werden kann, sollten Sie nicht
vergessen, die Benutzer-Registrierung vor Ablauf dieser Frist
auszuführen.
Benutzer mit Internet-Anschluss können eine Online-
Registrierung ausführen. Einzelheiten zum
Registrierungsverfahren finden Sie im DJS-Benutzerhandbuch
auf der mitgelieferten CD-ROM.
Die Pioneer-Gruppe sammelt die persönlichen Informationen
von Benutzern zu den folgenden Zwecken:
1. Für Kundendienstleistungen im Zusammenhang mit dem
Produkt
2. Zur Benachrichtigung von Benutzern per E-Mail über wichtige
Informationen und Veranstaltungen im Zusammenhang mit
dem Produkt
3. Für Umfragen unter Kunden, deren Ergebnisse bei der
Entwicklung neuer Produkte berücksichtigt werden
• Die Handhabung und Verwaltung von persönlichen
Informationen, die von Kunden gesammelt wurden, erfolgt auf
der Grundlage von Pioneers Datenschutzprinzipien.
• Weitere Informationen zu Pioneers Fimenpolitik hinsichtlich des
Datenschutzes finden Sie auf der folgenden Pioneer-Website:
http://www.prodjnet.com/privacy.html
Benutzer ohne Internet-Anschluss können die erforderlichen
Informationen auf der beiliegenden „BenutzerregistrierungsKarte“ eintragen und diese an Pioneer einsenden. Nach Erhalt
der ausgefüllten „Benutzerregistrierungs-Karte“ schickt Pioneer
dem Kunden den zur Freigabe der Software nach Ablauf der
Probefrist erforderlichen „Registrierungs-ID“
(Installationsschlüssel). Detaillierte Anweisungen zur
Benutzerregistrierung finden Sie im DJS-Benutzerhandbuch
auf der mitgelieferten CD-ROM.
HINWEIS
• Der Installationsschlüssel (Registrierungs-ID) kann für die
auf einem einzigen Personalcomputer installierte DJSSoftware verwendet werden. Wenn der Personalcomputer
später ausgewechselt wird oder aus einem anderen Grund
eine Neuinstallation der DJS-Software erforderlich wird,
muss die Benutzerregistrierung erneut ausgeführt und ein
neuer „Registrierungs-ID“ erhalten werden, um die
Software nach Ablauf der Probefrist freizugeben. Da der
ursprünglich von Pioneer erhaltene „Registrierungs-ID“
außerdem bei einer Neuregistrierung sowie bei einer
Kontaktaufnahme mit dem Kundendienst benötigt wird,
bewahren Sie die Registrierungsinformationen nach
Abschluss des Registrierungsverfahrens bitte sorgfältig
auf.
Auf der „Benutzerregistrierungs-Karte“ ist die nachstehend
aufgeführte Kontaktadresse angegeben. Da je nach Ihrem
Wohnort eine andere Adresse zutreffend sein kann, achten Sie
bitte darauf, die Karte an die richtige Adresse abzuschicken:
<Adresse zum Einsenden der Benutzerregistrierungs-Karte>
Nordamerika
PIONEER ELECTRONICS (USA) INC.
BUSINESS SOLUTIONS DIVISION, PRO AUDIO GROUP
2265 East 220th Street, Long Beach, CA 90810, U.S.A
Europa
PIONEER EUROPE NV
MULTIMEDIA DIVISION
Pioneer House, Hollybush Hill, Stoke Poges, Slough SL2 4QP U.K.
HINWEISE ZUR ONLINE-UNTERSTÜTZUNG
Bitte lesen Sie das auf der mitgeliefert en CD-R OM enth alten e DJSBenutzerhandbuch sowie den FAQ-Teil (Häufig gestellte Fragen)
auf der DJS-Unterstützungs-Website, bevor Sie sich direkt mit
Fragen zur Bedienung von DJS und anderen technischen
Problemen an den Online-Kundendienst wenden.
Informationen darüber, wie Sie auf die DJS-Unterstützungs-
Website zugreifen können, finden Sie im DJSBenutzerhandbuch. Für den Zugriff auf die UnterstützungsWebsite benötigen Sie den „Anmeldungsnamen“ und das
„Passwort“, den/das Sie zum Zeitpunkt der
Benutzerregistrierung gewählt haben.
Wenn Sie sich mit Anfragen hinsichtlich von
Funktionsstörungen an die DJS-Unterstützungs-Website
wenden, geben Sie bitte Ihren Namen, den Produktnamen, den
Registrierungs-ID (Installationsschlüssel), Typ und
Spezifikationen des verwendeten Personalcomputers
(Zentraleinheit, installierter Arbeitsspeicher, angeschlossene
Peripheriegeräte usw.), das verwendete Betriebssystem und
seine Version sowie konkrete Information bezüglich der
festgestellten Störungssymptome an.
Bitte beachten Sie, dass technische Unterstützung nur Kunden
angeboten wird, die das Benutzerregistrierungs-Verfahren
ausgeführt haben. Bitte bewahren Sie den bei der Registrierung
angegebenen „Anmeldungsnamen“ und Ihr „Passwort“
gemeinsam mit Ihrem „Registrierungs-ID“sorgfältig auf.
Falls Probleme bei der Installation oder Benutzerregistrierung
auftreten, wenden Sie sich bitte an die folgende Website:
<Bei Anfragen im Zusammenhang mit der Installation und
Benutzerregistrierung>
http://www.prodjnet.com/djs/support/
HINWEIS
• Für technische Informationen hinsichtlich der Verwendung
dieses Gerätes mit einem Personalcomputer, zu
Peripheriegeräten oder Geräten anderer Fabrikate wenden
Sie sich bitte an Ihren Fachhändler bzw. den Hersteller des
betreffenden Gerätes.
Zukünftige Programm-Updates zum Zweck einer Verbesserung
der Funktionalität und Leistung von DJS stehen zu erwarten.
Die offizielle Registrierung dieses Produkts gestattet es Ihnen
nicht nur, auf Pioneers Unterstützungs-Website zuzugreifen,
sondern auch Programm-Updates herunterzuladen. Pioneer
empfiehlt Benutzern, von diesem Aktualisierungsdienst
Gebrauch zu machen, um stets die neueste Version des
Programms zur Verfügung zu haben.
AUSSCHLUSSKLAUSEL
Im Falle eines Verlusts ist Pioneer nicht dazu verpflichtet, dem
Kunden erneut einen Lizenzschlüssel oder Registrierungs-ID
auszustellen. Bitte bewahren Sie Ihre
Registrierungsinformationen und Ihr Passwort für spätere
Bezugnahme an einem sicheren Ort auf.
Bitte beachten Sie, dass die Datenübertragungsfunktion für SD-
Speicherkarten (Check-out/Check-in) von Windows Vista
unterstützt wird.
Die Ripping-Funktion dieser Software steht ausschließlich bei
Musik-CDs zur Verfügung, die mit einem der nachstehend
abgebildeten Logos gekennzeichnet sind.
®
nicht
16
Ge
Page 69

HINWEISE ZUM TREIBERPROGRAMM
HINWEISE ZUM TREIBERPROGRAMM
Bei Anschluss an einen Personalcomputer ist dieses Gerät auf die Steuerung von Pioneers DJS und anderen DJ-Softwareprogrammen
ausgelegt. Bevor dieses Gerät zur Steuerung von DJ-Software an einen Windows-Computer angeschlossen wird, muss das SoftwareTreiberprogramm auf dem Personalcomputer installiert werden.
ZUR BEACHTUNG
• Treiber für Macintosh OS sowie neueste Informationen zur DJ-Software anderer Hersteller sind von der folgenden Website erhältlich:
http://www.prodjnet.com/support/
Installation von der mitgelieferten CD-ROM
SOFTWARE-LIZENZVEREINBARUNG
Bitte lesen Sie vor der Installation und Verwendung der
Treibersoftware unbedingt die „SOFTWARELIZENZVEREINBARUNG“ (S. 13). Durch die Installation und den
Gebrauch dieser Software erklären Sie Ihr Einverständnis mit den
Bedingungen der Vereinbarung.
INSTALLATION DES TREIBERS
Vor der Installation (WICHTIG)
• Bitte lesen Sie vor der Installation dieses Treibers unbedingt die
„SOFTWARE-LIZENZVEREINBARUNG“.
• Dieses Gerät kann an einen Personalcomputer angeschlossen
werden, der unter einem einer folgenden Betriebssysteme läuft:
Windows Vista
Windows Vista
Windows
Windows
Zur Installation des neuesten Service Pack muss
möglicherweise vom Windows Update-Dienst Gebrauch
gemacht werden.
• Das Treiber-Installationsprogramm wird in 10 Sprachen
geliefert (Englisch, Französisch, Deutsch, Italienisch,
Holländisch, Spanisch, Russisch, Chinesisch (vereinfacht),
Chinesisch (traditionell) und Japanisch). Bei Verwendung von
Windows in einer anderen Sprache folgen Sie den
Anweisungen, die auf dem Bildschirm erscheinen, zur Wahl von
[English (Englisch)] als Sprache.
• Zur Installation der Treibersoftware auf dem Computer ist eine
Administrator-Berechtigung erforderlich. Bitte melden Sie sich
als Benutzer mit Administrator-Berechtigung auf dem
Computer an, bevor Sie mit der Installation des Treibers
beginnen.
• Falls momentan andere Windows-Anwendungen laufen,
beenden Sie diese, bevor Sie mit der Installation des Treibers
beginnen.
®
Home Basic, Windows Vista® Home Premium,
®
Ultimate, Windows Vista® Business,
®
XP Home Edition, Windows® XP Professional oder
®
2000 Professional.
1 Starten Sie den Computer, und melden Sie sich mit
Administrator-Berechtigung an.
2 Legen Sie die mitgelieferte CD-ROM in das CD/DVD-
Laufwerk des Computers ein.
3 Klicken Sie auf die Schaltfläche [START] von Windows und
dann auf [Arbeitsplatz (oder Computer)], greifen Sie auf die
CD-ROM zu, und doppelklicken Sie auf den Ordner [SEP-C1].
4 Nach Öffnen des Ordners [SEP-C1] doppelklicken Sie auf das
Treiber-Installationsprogramm [MEP-7000[SEPC1]_#.###.exe].
(Die Treiberversion wird durch #.### vertreten.)
5 Wenn das Menü [Sprachenwahl] erscheint, wählen Sie
[Deutsch], und klicken Sie dann auf [OK].
• Um die Installation abzubrechen, klicken Sie auf die
Schaltfläche [Abbrechen].
6 Wenn der Bildschirm [Lizenz] erscheint, lesen Sie bitte die
„Software-Lizenzvereinbarung“ vollständig durch,
aktivieren Sie anschließend das Kontrollkästchen [Ich stimme
zu], und klicken Sie dann auf [OK].
Deutsch
HINWEIS
• Trennen Sie vor der Installation der Treibersoftware das
USB-Hilfsspannungskabel und das USB-Kabel ab, mit
denen dieses Gerät mit dem Personalcomputer verbunden
ist.
• Wenn dieses Gerät ohne vorherige Installation des Treibers
an einen Computer angeschlossen wird, können je nach
Betriebsumgebung Fehler am Computer auftreten.
• Falls die Treiberinstallation unterbrochen wird, gehen Sie
wie nachstehend beschrieben vor, um den
Installationsvorgang erneut zu beginnen.
• Falls Sie mit den Bedingungen der „SoftwareLizenzvereinbarung“ nicht einverstanden sind, klicken Sie
auf die Schaltfläche [Abbrechen], um die Installation zu
beenden.
17
Ge
Page 70

HINWEISE ZUM TREIBERPROGRAMM
7 Folgen Sie den Anweisungen, die auf dem Bildschirm
erscheinen.
• Falls der Bildschirm [Windows-Sicherheit] während der
Installation erscheint, klicken Sie auf [Diese
Treibersoftware trotzdem installieren], um den
Installationsvorgang fortzusetzen.
<Für Windows XP>
• Falls der Bildschirm [Hardwareinstallation] während der
Installation erscheint, klicken Sie auf [Installation
fortsetzen], um den Installationsvorgang fortzusetzen.
8 Nach beendeter Installation erscheint die Meldung [Die
Installation ist jetzt abgeschlossen]. Klicken Sie auf die
Schaltfläche [Beenden], um den Vorgang abzuschließen.
Anschließen dieses Gerätes an den Computer
1 Schließen Sie das USB-Hilfsspannungskabel an dieses Gerät
und an den Personalcomputer an.
2 Schließen Sie das USB-Kabel an dieses Gerät und an den
Personalcomputer an.
Wenn dieses Gerät zum ersten Mal an einen
Personalcomputer angeschlossen oder ein erneuter
Anschluss an der USB-Buchse des Computers hergestellt
wird, erscheint u.U. die Meldung [Installieren von
Gerätetreibersoftware] auf dem Monitor des Computers. In
einem solchen Fall warten Sie bitte einfach, bis die Meldung
[Die Geräte können jetzt verwendet werden.] angezeigt
wird.
<Für Windows XP>
• Falls die Meldung [Soll eine Verbindung mit Windows
Update hergestellt werden, um nach Software zu
suchen?] während des Installationsvorgangs auf dem
Bildschirm erscheint, markieren Sie das Optionsfeld [Nein,
diesmal nicht], und klicken Sie dann auf die Schaltfläche
[Weiter], um den Installationsvorgang fortzusetzen.
<Für Windows 2000>
• Falls der Bildschirm [Digitale Signatur nicht gefunden]
während der Installation erscheint, klicken Sie auf [Ja], um
den Installationsvorgang fortzusetzen.
• Falls die Meldung [Wie möchten Sie vorgehen?] während
der Installation auf dem Bildschirm erscheint, markieren Sie
das Optionsfeld [Software automatisch installieren
(empfohlen)], und klicken Sie dann auf die Schaltfläche
[Weiter], um den Installationsvorgang fortzusetzen.
18
Ge
Page 71

HINWEISE ZUM TREIBERPROGRAMM
• Falls der Bildschirm [Hardwareinstallation] während der
Installation erscheint, klicken Sie auf [Installation
fortsetzen], um den Installationsvorgang fortzusetzen.
<Für Windows 2000>
• Falls der Bildschirm [Digitale Signatur nicht gefunden]
während der Installation erscheint, klicken Sie auf [Ja], um
den Installationsvorgang fortzusetzen.
Vor Einsatz dieses Gerätes zur Steuerung der DJSSoftware
Bitte lesen Sie den Abschnitt „VERWENDUNG VON DJSOFTWARE“ (S. 20) und die „DJS-Steuerungsanleitung“ (PDFDatei), bevor Sie versuchen, dieses Gerät zur Steuerung von DJS
zu verwenden. Die DJS-Steuerungsanleitung befindet sich in der
Datei [manual_SEP-C1_control_de.pdf] im Ordner [SEP-
C1\German] der mitgelieferten CD-ROM.
Deutsch
Überprüfen der Treiberversion
Um die Version des installierten Treibers zu überprüfen, klicken
Sie auf die Schaltfläche [START] von Windows und dann auf [Alle
Programme anzeigen] [Pioneer] [MEP-7000[SEP-C1]]
[MEP-7000 [SEP-C1] Versionanzeige-Dienstprogramm].
ZUR BEACHTUNG
• Dieser Bildschirm gestattet außerdem eine Überprüfung der
Version der momentan installierten Firmware. Bitte beachten
Sie jedoch, dass die Firmware-Version nur dann angezeigt
wird, wenn der SEP-C1 an einen Computer angeschlossen ist
und dieser einwandfrei mit dem SEP-C1 kommuniziert.
Neueste Treiberversion
Informationen zur jeweils neuesten Treiberversion finden Sie auf
der folgenden Website:
http://www.prodjnet.com/support/
19
Ge
Page 72

VERWENDUNG VON DJ-SOFTWARE
VERWENDUNG VON DJ-SOFTWARE
Nach Installation der mitgelieferten DJS-Software oder einer anderen DJ-Software auf einem über USB-Kabel an dieses Gerät
angeschlossenen Personalcomputer kann das Gerät zur Steuerung des DJ-Softwareprogramms verwendet werden.
Unterstützte DJ-Software
DJS Das zum Lieferumfang des SEP-C1 gehörende komplette DJ-Softwareprogramm „DJS“ gestattet Ihnen den
Mit SpezialKommunikationsprotokoll kompatible
DJ-Software
MIDI-kompatible DJSoftware
sofortigen Gebrauch von DJ-Software.
Handelsübliche DJ-Softwareprogramme, die das Spezial-Kommunikationsprotokoll des SEP-C1 unterstützen,
können verwendet werden, ohne dass eine Steuerdisc erforderlich ist. Neueste Informationen zur unterstützten
DJ-Software finden Sie auf der folgenden Pioneer-Website:
http://www.prodjnet.com/support/
Da der SEP-C1 Daten über den Status der Tasten und des TEMPO-Gleitbahnreglers im Universal-MIDI-Format
ausgibt, kann MIDI-kompatible DJ-Software zur Zuweisung der MIDI-Meldungen dieses Gerätes verwendet
werden, indem die MIDI-Kommunikation zur Steuerung eingesetzt wird.
Einsatzmethoden
Dieses Gerät kann als ein DJ-Softwaremanipulator eingesetzt werden. Bei Einsatz des SEP-C1 als Manipulator kann die DJ-Software ohne
den Gebrauch einer Maus oder Tastatur mit dem gleichen Bedienfeld-Layout, den gleichen Funktionen und dem gleichen hohen
Bedienungskomfort gesteuert werden, der vielen Diskjockeys von der Pioneer CDJ-Modellreihe her vertraut ist.
USB-Hilfsspannungskabel
Personalcomputer
USB-Kabel
20
Ge
Page 73

VERWENDUNG VON DJ-SOFTWARE
VORBEREITEN DES DJ-SOFTWAREPROGRAMMS
Vor der Inbetriebnahme eines DJ-Softwareprogramms müssen Sie den Personalcomputer und die DJ-Software wie nachstehend
beschrieben vorbereiten. Schließen Sie den SEP-C1 auf keinen Fall an den Computer an, bevor Sie die Treibersoftware installiert haben!
DJ-Software mit
Schritt DJS
Überprüfen Sie die Einrichtung und
Betriebsumgebung des Personalcomputers.
Schalten Sie den Personalcomputer ein.
Installieren Sie den Treiber.
Bus-Spannungsversorgungsanschluss
zwischen diesem Gerät und dem
Personalcomputer.
Prüfen Sie nach, dass der USB-Anschluss an den
Personalcomputer korrekt hergestellt wurde.
Installieren Sie das DJ-Softwareprogramm. Siehe S. 13 dieses Handbuchs („HINWEISE
Starten Sie die DJ-Software. Siehe das DJS-Benutzerhandbuch (PDF-
Führen Sie die DJ-Wiedergabe aus.
Siehe S. 13 dieses Handbuchs („HINWEISE ZUR
DJS-SOFTWARE“).
Die folgenden Betriebssysteme werden unterstützt:
Windows Vista, Windows XP, Windows 2000 oder
eine neuere Version. DJS unterstützt ausschließlich
das Betriebssystem Microsoft Windows.
Siehe S. 17 dieses Handbuchs („HINWEISE ZUM TREIBERPROGRAMM“).
Siehe S. 9 dieses Handbuchs („ANSCHLÜSSE“).
Siehe S. 19 dieses Handbuchs („HINWEISE ZUM TREIBERPROGRAMM, Überprüfen der
Treiberversion“).
ZUR DJS-SOFTWARE“).
Datei auf der mitgelieferten CD-ROM).
Einzelheiten zu den grundlegenden
Bedienungsverfahren finden Sie in der DJSSteuerungsanleitung.
Spezial-
Kommunikations-
unterstützung
Bitte schlagen Sie im Benutzerhandbuch
Ihrer DJ-Software nach.
Die folgenden Betriebssysteme werden
unterstützt: Windows Vista, Windows XP,
Windows 2000 oder Mac OS Version 10.3.9
oder eine neuere Version.
Bitte schlagen Sie im Benutzerhandbuch
Ihrer DJ-Software nach.
Bitte schlagen Sie im Benutzerhandbuch
Ihrer DJ-Software nach.
DJ-Software mit
MIDI-Unterstützung
Deutsch
ZUR BEACHTUNG
• Zum Gebrauch eines DJ-Softwareprogramms ist die Installation einer Spezial-Treibersoftware erforderlich (die mitgelieferte CD-ROM
enthält einen Treiber für Windows-Computer). Treiber-Updates und Treiber für MAC OS sind auf Pioneers Website erhältlich.
http://www.prodjnet.com/support/
2 Starten Sie das DJ-Softwareprogramm.
STEUERUNG DES COMPUTERS ÜBER DAS
SPEZIAL-KOMMUNIKATIONSPROTOKOLL
Der SEP-C1 kann zur Steuerung nicht nur der mitgelieferten DJSSoftware, sondern auch von anderen DJ-Softwareprogrammen
verwendet werden, die das Spezial-Kommunikationsprotokoll des
SEP-C1 unterstützen.
Nachdem die Kommunikation mit der DJ-Software aufgebaut
worden ist, können die verschiedenen Tasten, die Jogscheibe
und der TEMPO-Gleitbahnregler zur Steuerung des Betriebs
verwendet werden, und die Zeitdaten und der Name des
laufenden Titels werden zusammen mit dem
Interpretennamen auf dem zentralen Display des SEP-C1 und
Displays A/B angezeigt.
1 Schließen Sie das Gerät an einen Personalcomputer an.
Das Logo [PRO DJ] erscheint auf dem zentralen Display.
ZUR BEACHTUNG
• Bei bestimmten DJ-Softwareprogrammen wird die Anzeige der
oben genannten Titelinformationen nicht unterstützt.
21
Ge
Page 74

VERWENDUNG VON DJ-SOFTWARE
Für DJS:
Die Steuerung kann unter Beobachtung der Bildschirme
BROWSE, EFFECT und MIX des zentralen Displays ausgeführt
werden. Einzelheiten zur Bedienung finden Sie im Kapitel über
den Manipulatortyp-Betrieb der DJS-Steuerungsanleitung des
SEP-C1 (PDF-Datei auf der mitgelieferten CD-ROM).
ZUR BEACHTUNG
• Während der UTILITY-Menübildschirm auf dem zentralen
Display erscheint, können die Tasten des zentralen Displays
und das Wahlrad nicht zur Steuerung der DJ-Software
verwendet werden.
MIDI-STEUERUNG DES COMPUTERS
Bei MIDI (Musical Instrument Digital Interface) handelt es sich um
ein genormtes Protokoll, das die Übertragung von Daten zwischen
elektronischen Musikinstrumenten und Personalcomputern
regelt.
Der SEP-C1 verwendet das MIDI-Meldungsformat zur Ausgabe
seiner Betriebs- und Statusdaten an einen über USB-Kabel
angeschlossenen Personalcomputer. Wenn ein DJSoftwareprogramm mit USB MIDI-Unterstützung zur Zuweisung
der vom SEP-C1 ausgegebenen MIDI-Meldungen verwendet wird,
kann der SEP-C1 zur Steuerung der DJ-Software eingesetzt werden.
Weitere Informationen zu den vom SEP-C1 ausgegebenen
Meldungen finden Sie in der „MIDI-MELDUNGSTABELLE“ (S. 23).
Einstellen des MIDI-Kanals
Die Einstellung des MIDI-Kanals wird auf dem UTILITY-Bildschirm
vorgenommen.
1 Drücken Sie die UTILITY-Taste.
2 Drücken Sie die Funktionstaste [PC].
Daraufhin erscheint das MIDI-Kanal-Einstellmenü auf dem
zentralen Display.
• Steuergerät A verwendet den gleichen Kanal wie das
zentrale Display, während Steuergerät B einen anderen
Kanal verwendet. (In der Standardeinstellung ist Kanal 1
Steuergerät A und dem zentralen Display zugewiesen, und
Kanal 2 ist Steuergerät B zugewiesen).
3 Drücken Sie entweder das Wahlrad oder die Taste Ebene
abwärts (
Daraufhin verschiebt sich das Symbol nach rechts.
4 Drehen Sie das Wahlrad, um den Wert zu ändern.
Der Einstellbereich beträgt 1 bis 16.
5 Drücken Sie das Wahlrad, um die Auswahl zu bestätigen.
• Um die Auswahl zu stornieren und auf den UTILITY-
).
Bildschirm zurückzukehren, drücken Sie die Taste Ebene
aufwärts ().
22
Ge
1 Schließen Sie das Gerät an einen Personalcomputer an.
Das Logo [PRO DJ] erscheint auf dem zentralen Display.
2 Starten Sie das DJ-Softwareprogramm.
Nachdem die Kommunikation mit der DJ-Software aufgebaut
worden ist, arbeitet der SEP-C1 als MIDI-Controller, und der
Status von Steuergerät A/B sowie der Status der Tasten und
Regler des zentralen Displays werden als MIDI-Meldungen
ausgegeben.
ZUR BEACHTUNG
• Während der UTILITY-Menübildschirm auf dem zentralen
Display erscheint, werden die MIDI-Meldungen des zentralen
Displays nicht ausgegeben.
Page 75

VERWENDUNG VON DJ-SOFTWARE
MIDI-MELDUNGSTABELLE
Schnittstellenbezeichnung
JOG DIAL Allzweck-
TEMPO ADJUST SLIDER VR Bn 1D dd 0 bis 127 0 auf Seite „–“, 127 auf Seite „+“
PLAY/PAUSE Schalter 9n 00 dd Aus = 0, Ein = 127
CUE Schalter 9n 01 dd Aus = 0, Ein = 127
SEARCH FWD Schalter 9n 02 dd Aus = 0, Ein = 127
SEARCH REV Schalter 9n 03 dd Aus = 0, Ein = 127
TRACK SEARCH nächster Schalter 9n 04 dd Aus = 0, Ein = 127
TRACK SEARCH voriger Schalter 9n 05 dd Aus = 0, Ein = 127
LOOP IN Schalter 9n 06 dd Aus = 0, Ein = 127
LOOP OUT Schalter 9n 07 dd Aus = 0, Ein = 127
RELOOP Schalter 9n 08 dd Aus = 0, Ein = 127
MEMORY Schalter 9n 0A dd Aus = 0, Ein = 127
Steuergerät A
CALL Schalter 9n 0B dd Aus = 0, Ein = 127
TIME/A.CUE Schalter 9n 0E dd Aus = 0, Ein = 127
TEMPO RANGE Schalter 9n 10 dd Aus = 0, Ein = 127
MT Schalter 9n 11 dd Aus = 0, Ein = 127
SCRATCH Schalter 9n 12 dd Aus = 0, Ein = 127
JOG BREAK Schalter 9n 13 dd Aus = 0, Ein = 127
PITCH BEND + Schalter 9n 14 dd Aus = 0, Ein = 127
PITCH BEND – Schalter 9n 15 dd Aus = 0, Ein = 127
JOG TOUCH Schalter 9n 20 dd Aus = 0, Ein = 127
JOG DIAL Allzweck-
TEMPO ADJUST SLIDER VR Bn+1 1D dd 0 bis 127 0 auf Seite „–“, 127 auf Seite „+“
PLAY/PAUSE Schalter 9n+1 00 dd Aus = 0, Ein = 127
CUE Schalter 9n+1 01 dd Aus = 0, Ein = 127
SEARCH FWD Schalter 9n+1 02 dd Aus = 0, Ein = 127
SEARCH REV Schalter 9n+1 03 dd Aus = 0, Ein = 127
TRACK SEARCH nächster Schalter 9n+1 04 dd Aus = 0, Ein = 127
TRACK SEARCH voriger Schalter 9n+1 05 dd Aus = 0, Ein = 127
LOOP IN Schalter 9n+1 06 dd Aus = 0, Ein = 127
LOOP OUT Schalter 9n+1 07 dd Aus = 0, Ein = 127
RELOOP Schalter 9n+1 08 dd Aus = 0, Ein = 127
MEMORY Schalter 9n+1 0A dd Aus = 0, Ein = 127
Steuergerät B
CALL Schalter 9n+1 0B dd Aus = 0, Ein = 127
TIME/A.CUE Schalter 9n+1 0E dd Aus = 0, Ein = 127
TEMPO RANGE Schalter 9n+1 10 dd Aus = 0, Ein = 127
MT Schalter 9n+1 11 dd Aus = 0, Ein = 127
SCRATCH Schalter 9n+1 12 dd Aus = 0, Ein = 127
JOG BREAK Schalter 9n+1 13 dd Aus = 0, Ein = 127
PITCH BEND + Schalter 9n+1 14 dd Aus = 0, Ein = 127
PITCH BEND – Schalter 9n+1 15 dd Aus = 0, Ein = 127
JOG TOUCH Schalter 9n+1 20 dd Aus = 0, Ein = 127
Schnitt-
stellentyp
Controller
Controller
Meldung
MSB
Bn 10 dd Lineare Werte entsprechend den Geschwindigkeiten von
Stopp bis 4x, 64 bei Stopp; Vorwärtsrichtung: 65 (0,06x) bis
127 (x4); Rückwärtsrichtung: 63 (0,06x) bis 0 (4x).
Bn+1 10 dd Lineare Werte entsprechend den Geschwindigkeiten von
Stopp bis 4x, 64 bei Stopp; Vorwärtsrichtung: 65 (0,06x) bis
127 (x4); Rückwärtsrichtung: 63 (0,06x) bis 0 (4x).
Bemerkungen
Deutsch
23
Ge
Page 76

VERWENDUNG VON DJ-SOFTWARE
Schnittstellenbezeichnung
ROTARY SELECTOR DIAL Allzweck-
SELECT DOWN (>) Schalter 9n 31 dd Aus = 0, Ein = 127
SELECT UP (<) Schalter 9n 32 dd Aus = 0, Ein = 127
ROTARY SELECTOR DIAL
PUSH
LOAD A Schalter 9n 34 dd Aus = 0, Ein = 127
LOAD B Schalter 9n 35 dd Aus = 0, Ein = 127
BROWSE Schalter 9n 36 dd Aus = 0, Ein = 127
MIX Schalter 9n 37 dd Aus = 0, Ein = 127
EFFECT Schalter 9n 38 dd Aus = 0, Ein = 127
F1 Schalter 9n 39 dd Aus = 0, Ein = 127
Zentrales Display-Teil
F2 Schalter 9n 3A dd Aus = 0, Ein = 127
F3 Schalter 9n 3B dd Aus = 0, Ein = 127
F4 Schalter 9n 3C dd Aus = 0, Ein = 127
F5 Schalter 9n 3D dd Aus = 0, Ein = 127
F6 Schalter 9n 3E dd Aus = 0, Ein = 127
Schnitt-
stellentyp
Controller
Schalter 9n 33 dd Aus = 0, Ein = 127
Meldung
MSB
Bn 4F dd 98 bis 127, 1 bis 30 (±1 bis ±30), überträgt die
Zählstanddifferenz gegenüber dem vorigen Mal. Wenn der
Wert ±30 oder mehr beträgt, wird ±30 verwendet.
Bemerkungen
•n = Kanalnummer
• Bei Anzeige des UTILITY-Bildschirms werden Meldungen auf einem grauen Hintergrund nicht ausgegeben.
24
Ge
Page 77

GEBRAUCH DES UTILITY-BILDSCHIRMS
GEBRAUCH DES UTILITY-BILDSCHIRMS
Drücken Sie die UTILITY-Taste, um den UTILITY-Bildschirm aufzurufen, auf dem verschiedene Geräteparameter eingestellt werden
können.
Funktionstasten
EINSTELLVERFAHREN
1 Wählen Sie mit den Funktionstasten den Posten, der
eingestellt werden soll [DISPLAY/PC/LANGUAGE/GENERAL].
2 Drehen Sie das Wahlrad, um den Cursor auf den
gewünschten Einstellposten zu führen.
3 Drücken Sie entweder die Taste Ebene abwärts (
Wahlrad, um das Symbol
4 Drehen Sie das Wahlrad zur Wahl des gewünschten
Einstellwerts.
5 Drücken Sie das Wahlrad, um den neuen Einstellwert zu
bestätigen.
Um die Standardeinstellung eines Postens
wiederherzustellen, drücken Sie die Taste Ebene aufwärts ().
ZUR BEACHTUNG
• Die grau dargestellten Posten CD-G und BROWSE können
nicht an diesem Gerät eingestellt werden.
nach rechts zu verschieben.
) oder das
UTILITY
Taste Ebene abwärts ()Wahlrad
EINSTELLUNGEN
[1] DISPLAY
Hier können Einstellungen für das zentrale Display und die externe
Ausgabe vorgenommen werden.
Standardeinstellung
LCD HELLIGKEIT Dieser Posten dient zur
OEL HELLIGKEIT Dieser Posten dient zur
LED HELLIGKEIT Dieser Posten dient zur
BILDSCHIRMSCH
*1
ONER
TV NORM Dieser Posten dient zur
MONITORAUSG
ANG
*1 Bildschirmschoner-Betrieb
• Der Bildschirmschoner wird aktiviert, wenn innerhalb von 5
Minuten kein Titel in ein Steuergerät geladen wurde.
• Der Bildschirmschoner wird auch dann aktiviert, wenn
innerhalb von 100 Minuten keine Tastenbetätigung
stattgefunden hat und sich ein oder beide Steuergeräte im
Pausenzustand (einschließlich Cue-Bereitschaft oder ENDAnzeige) befinden.
• Der Bildschirmschoner-Betrieb ist gesperrt, wenn ein Titel
mit einer anderen DJ-Software als DJS eingestellt wird.
• Wenn bei aktiviertem Bildschirmschoner eine Taste
gedrückt oder ein anderer Befehl ausgeführt wird, führt dies
dazu, dass der Bildschirmschoner-Betrieb aufgehoben wird.
Einstellung der Helligkeit des
zentralen Displays.
Einstellung der Helligkeit von
Display A/B.
Einstellung der Helligkeit der
LED-Anzeigen.
Wenn innerhalb der
eingestellten Zeitdauer kein
Bedienungsvorgang
stattgefunden hat, werden
die LCD- und OEL-Displays
zur Schonung abgedunkelt.
Einstellung des
Signalformats für
Monitorausgabe (PAL, NTSC
(7.5 IRE), NTSC (0 IRE).
Dieser Posten dient zur
Einstellung des
Bildseitenverhältnisses des
zentralen Display auf
Letterbox, volle
Bildschirmgröße oder Aus.
EIN
NTSC (7.5
IRE)
AUS
Deutsch
25
Ge
Page 78

GEBRAUCH DES UTILITY-BILDSCHIRMS
[2] PC
Hier kann der MIDI-Kanal eingestellt werden (S. 22).
[3] LANGUAGE
Hier wird die zu verwendende Sprache eingestellt.
Standardeinstellung
SPRACHE Wählen Sie die
Anzeigesprache unter den
insgesamt 9 verfügbaren
Sprachen aus (Englisch,
Französisch, Deutsch,
Italienisch, Spanisch,
Holländisch, Russisch,
vereinfachtes Chinesisch,
Japanisch).
[4] GENERAL
Hier können die Einstellung der LADESPERRE-Funktion und die
Versionsinformationen des Gerätes überprüft werden.
LADESPERRE
VERSIONS INFO Dieser Posten dient zur
*2
Dieser Posten ermöglicht ein
Sperren der LOAD-Taste,
damit sie während der
Wiedergabe
funktionsunfähig ist.
Anzeige der Version des SEPC1.
Englisch
Standardeinstellung
AUS
*2 Die LADESPERRE-Funktion ist gesperrt, wenn ein Titel mit
einer anderen DJ-Software als DJS eingestellt wird.
AUSFÜHREN EINER RÜCKSTELLUNG
Auf dem UTILITY-Bildschirm können alle Einstellungen des
Gerätes auf ihre Standardeinstellungen zurückgesetzt werden (S.
25).
1 Halten Sie die UTILITY-Taste gedrückt, während Sie das
Gerät an den Personalcomputer anschließen (einschalten).
Die Taste muss mindestens 5 Sekunden lang gedrückt
gehalten werden.
2 Überprüfen Sie die angezeigte Meldung.
Nach Erscheinen des Startbildschirms wird die folgende
Meldung angezeigt: [Die Einstellungen sind auf die
werkseitigen Voreinstellungen zurückgesetzt worden.].
3 Trennen Sie das Gerät einmal vom Personalcomputer an, und
schließen Sie es dann erneut an.
26
Ge
Page 79

STÖRUNGSBESEITIGUNG
STÖRUNGSBESEITIGUNG
Wenn Sie vermuten, dass eine Funktionsstörung des Gerätes vorliegt, überprüfen Sie bitte die Hinweise der nachstehenden Tabelle. In
vielen Fällen ist eine vermeintliche Störung auf eine falsche Einrichtung des Gerätes oder einen Bedienungsfehler zurückzuführen. Da
die Störungsursache auch bei einem anderen Gerät liegen kann, sollten Sie alle anderen gleichzeitig betriebenen elektronischen Geräte
ebenfalls überprüfen.
Falls sich eine Störung anhand der in der nachstehenden Tabelle angegebenen Abhilfemaßnahmen nicht beseitigen lässt, wenden Sie
sich bitte an eine Pioneer-Kundendienststelle oder Ihren Fachhändler.
Störung Mögliche Ursache Abhilfemaßnahme
Nach Anschluss an einen
Personalcomputer wird das
Gerät nicht erkannt.
Während der Wiedergabe
können Titel nicht geladen
werden.
Titelinformationen erscheinen
mit fehlerhaften Zeichen.
Gestörter Fernsehempfang
oder verrauschter UKWEmpfang
• Die Treibersoftware wurde nicht richtig
installiert.
Das Versionsinformations-Dienstprogramm
zeigt die Firmware-Version nur dann, wenn das
Gerät einwandfrei an den Personalcomputer
angeschlossen ist. Um die Firmware-Version zu
überprüfen, schlagen Sie bitte im Abschnitt
„HINWEISE ZUM TREIBERPROGRAMM,
Überprüfen der Treiberversion“ nach (S. 19).
• Das USB-Hilfsspannungskabel ist nicht
angeschlossen.
• Der Posten LADESPERRE ist auf EIN eingestellt. • Stellen Sie den Posten LADESPERRE auf dem
• Eine nicht unterstützte Sprache wurde zur
Eingabe der Informationen verwendet.
• Die Titelinformationen dieses Gerätes werden
nicht von der DJ-Software angezeigt.
• Dabei handelt es sich um Störeinstreuungen,
die von diesem Gerät erzeugt werden.
• Installieren Sie die Treibersoftware richtig. Falls
die Treibersoftware bereits installiert wurde,
führen Sie eine Deinstallation und dann eine
Neuinstallation aus.
• Schließen Sie zuerst das USBHilfsspannungskabel, dann das USB-Kabel an
den Personalcomputer an.
UTILITY-Bildschirm auf AUS ein.
• Geben Sie Titelinformationen in einer
unterstützten Sprache ein. Dieses Gerät
unterstützt westeuropäische Sprachen,
Russisch, vereinfachtes Mandarin-Chinesisch
und Japanisch.
• Einzelheiten zu den von Ihrem DJSoftwareprogramm unterstützten Sprachen
finden Sie in dessen Benutzerhandbuch.
• Schalten Sie dieses Gerät entweder aus, oder
sorgen Sie für einen größeren Abstand zum
gestörten Fernsehgerät bzw. Tuner.
Deutsch
HINWEISE ZUM LCD-BILDSCHIRM
• Bei LCD-Bildschirmen kann es grundsätzlich vorkommen, dass sog. „Hot Pixel“ oder „tote Pixel“ (ständig leuchtende oder
permanent inaktive Pixel) vorhanden sind. Dies ist technisch bedingt; es handelt sich dabei nicht um eine Funktionsstörung.
• Bei Einsatz in einer kalten Umgebung kann es vorkommen, dass der Bildschirm nach dem Einschalten der Stromzufuhr eine
Zeitlang dunkel bleibt. Sobald sich das Gerät aufgewärmt hat, wird die normale Helligkeit der Bildschirmanzeige
wiederhergestellt.
• Vermeiden Sie eine Betrachtung des LCD-Bildschirms in direkter Sonneneinstrahlung, da Lichtreflexionen die
Bildschirmanzeige schwer ablesbar machen können.
HINWEISE ZU OEL-(ORGANISCHEN EL-)BILDSCHIRMEN
• Die Farbeigenschaften der beiden OEL-Bildschirme (Display A und B) weichen u.U. geringfügig voneinander ab, doch handelt
es sich dabei nicht um eine Funktionsstörung.
AKTUALISIERUNG DES SEP-C1
Die Software dieses Gerätes wird eventuell in Zukunft aktualisiert, um den Betrieb oder die Funktionalität des Gerätes zu verbessern.
Einzelheiten hierzu finden Sie auf der folgenden Unterstützungs-Website:
http://www.prodjnet.com/support/
27
Ge
Page 80

AUSSCHLUSSKLAUSEL
Durch den Verkauf dieses Gerätes wird dem Käufer lediglich eine
Lizenz zur Nutzung für den Privatgebrauch erteilt, nicht aber eine
Lizenz zum Gebrauch zu gewerblichen Zwecken wie EchtzeitSendung (über Bodensendestation, Satellit, Kabel und/oder andere
Medien), Broadcasting/Streaming über Internet, Intranets und/oder
andere Netzwerke oder in einem anderen elektronischen
Inhaltsverteilungssystem, z.B. Pay-Audio- oder Audio-on-DemandAnwendungen. Für Nutzung zu derartigen Zwecken ist die Erteilung
einer separaten Lizenz erforderlich. Einzelheiten hierzu finden Sie
unter der Internet-Adresse http://www.mp3licensing.com.
MPEG Layer-3 Audiocodierungs-Technologie unter Lizenz von
Fraunhofer IIS und Thomson Multimedia.
AUSSCHLUSSKLAUSEL
• Bei „Pioneer“ und „DJS“ handelt es sich Marken bzw. eingetragene Marken der Pioneer Corporation.
• Bei „Microsoft“ und „Windows“ handelt es sich um eingetragene Marken der Microsoft Corporation in den Vereinigten Staaten
und anderen Ländern. Die offizielle Bezeichnung von Windows ist „Microsoft Windows Operating System“.
• Bei „Pentium“ handelt es sich um eine eingetragene Marke der Intel Corporation, U.S.A.
• Bei „Adobe“ und „Reader“ handelt es sich um Marken bzw. eingetragene Marken von Adobe Systems Incorporated in den
Vereinigen Staaten und anderen Ländern.
• Bei „Apple“, „Macintosh“ und „Mac OS“ handelt es sich um eingetragene Marken von Apple Inc. in den Vereinigten Staaten und
anderen Ländern.
• Bei allen sonstigen in dieser Anleitung erwähnten Markennamen, Produktbezeichnungen und Firmennamen handelt es sich
um Marken bzw. eingetragene Marken der betreffenden Unternehmen.
HINWEIS
• Die auf der Garantiekarte im Lieferumfang angegebenen Bedingungen hinsichtlich einer kostenlosen Reparatur dieses Gerätes
erstrecken sich nicht auf das DJ-Softwareprogramm „DJS“. Bitte lesen Sie die Software-Lizenzvereinbarung (S. 13) aufmerksam
durch, bevor Sie das DJS-Programm installieren oder verwenden.
28
Ge
Veröffentlicht von Pioneer Corporation.
Urheberrechtlich geschützt © 2008 Pioneer Corporation.
Alle Rechte vorbehalten.
Page 81

Questo prodotto è conforme con la Direttiva Bassa
Tensione 2006/95/CE e con la Direttiva EMC
2004/108/CE.
D3-4-2-1-9a_A_It
Condizioni ambientali di funzionamento
Gamma ideale della temperatura ed umidità
dell’ambiente di funzionamento:
da +5 a +35 °C, umidità relativa inferiore all ‘85%
(fessure di ventilazione non bloccate)
Non installare l’apparecchio in luoghi poco ventilati, o
in luoghi esposti ad alte umidità o alla diretta luce del
sole (o a sorgenti di luce artificiale molto forti).
D3-4-2-1-7c_A_It
ATTENZIONE
Per evitare il pericolo di incendi, non posizionare
sull’apparecchio dispositivi con fiamme vive (ad
esempio una candela accesa, o simili).
D3-4-2-1-7a_A_It
AVVERTENZA PER LA VENTILAZIONE
Installare l’apparecchio avendo cura di lasciare un
certo spazio all’intorno dello stesso per consentire
una adeguata circolazione dell’aria e migliorare la
dispersione del calore (almeno 5 cm sul retro, e 5
cm su ciascuno dei lati).
ATTENZIONE
L’apparecchio è dotato di un certo numero di
fessure e di aperture per la ventilazione, allo scopo
di garantirne un funzionamento affidabile, e per
proteggerlo dal surriscaldamento. Per prevenire
possibili pericoli di incendi le aperture non devono
mai venire bloccate o coperte con oggetti vari (quali
giornali, tovaglie, tende o tendaggi, ecc.), e
l’apparecchio non deve essere utilizzato
appoggiandolo su tappeti spessi o sul letto.
D3-4-2-1-7b_A_It
Il punto esclamativo in un triangolo
equilatero serve ad avvisare l’utilizzatore
della presenza di importanti istruzioni di
funzionamento e manutenzione riportate nel
libretto allegato al prodotto.
Il simbolo del lampo con terminale a forma
di freccia situato all’interno di un triangolo
equilatero serve ad avvisare l’utilizzatore
della presenza di una “tensione pericolosa”
non isolata nella struttura del prodotto che
potrebbe essere di un’intensità tale da
provocare scosse elettriche all’utilizzatore.
IMPORTANTE
ATTENZIONE:
PER EVITARE IL RISCHIO DI SCOSSE
ELETTRICHE, NON RIMUOVERE IL
COPERCHIO (O IL RETRO). NON CI SONO
PARTI INTERNE LA CUI MANUTENZIONE
POSSA ESSERE EFFETTUATA
DALL’UTENTE. IN CASO DI NECESSITÀ,
RIVOLGERSI ESCLUSIVAMENTE A
PERSONALE DI SERVIZIO QUALIFICATO.
CAUTION
RISK OF ELECTRIC SHOCK
DO NOT OPEN
D3-4-2-1-1_It
ATTENZIONE
Questo apparecchio non è impermeabile. Per
prevenire pericoli di incendi o folgorazioni, non
posizionare nelle vicinanze di questo apparecchio
contenitori pieni di liquidi (quali vasi da fiori, o
simili), e non esporre l’apparecchio a sgocciolii,
schizzi, pioggia o umidità.
D3-4-2-1-3_A_It
Grazie per aver acquistato questo prodotto Pioneer.
Leggere attentamente questo manuale di istruzioni per familiarizzarsi con l’uso dell’apparecchio.
Conservare poi il manuale per ogni eventuale futuro riferimento.
I modelli disponibili in alcuni paesi o regioni possono avere la forma della spina del cavo
d’alimentazione e della presa ausiliaria di corrente diversa da quella mostrata nelle illustrazioni,
ma il loro modo di collegamento e funzionamento è lo stesso.
K015 It
K058_A_It
Se si vuole eliminare questo prodotto, non gettarlo insieme ai rifiuti domestici. Esiste un sistema di raccolta differenziata in conformità
alle leggi che richiedono appositi trattamenti, recupero e riciclo.
I privati cittadini dei paesi membri dell’UE, di Svizzera e Norvegia, possono restituire senza alcun costo i loro prodotti elettronici usati ad appositi
servizi di raccolta o a un rivenditore (se si desidera acquistarne uno simile).
Per i paesi non citati qui sopra, si prega di prendere contatto con le autorità locali per il corretto metodo di smaltimento.
In questo modo, si è sicuri che il proprio prodotto eliminato subirà il trattamento, il recupero e il riciclo necessari per prevenire gli effetti
potenzialmente negativi sull’ambiente e sulla vita dell’uomo.
Per il corretto uso di questo apparecchio
attenersi alle istruzioni indicate sulla parte
inferiore dell’apparecchio stesso, e concernenti
la tensione nominale ed altre caratteristiche
tecniche.
D3-4-2-2-4_It
Page 82

INDICE
http://www.prodjnet.com/support/
Il sito Web Pioneer menzionato dà risposte a domande poste di
frequente, informazioni sul software ed altri dati aggiornati per
assistere la clientela.
INDICE
CARATTERISTICHE .......................................................5
CARATTERISTICHE TECNICHE ......................................7
CONTROLLO DEGLI ACCESSORI ..................................7
NORME DI INSTALLAZIONE.........................................8
COLLEGAMENTI...........................................................9
PARTI E LORO FUNZIONE ..........................................10
PANNELLO ANTERIORE............................................................. 10
PANNELLO POSTERIORE........................................................... 12
IL SOFTWARE DJS......................................................13
CONTRATTO DI LICENZA D'USO DEL SOFTWARE .................. 13
AVVERTENZA SUI DIRITTI D'AUTORE ....................................... 14
SISTEMA RICHIESTO
(ambiente operativo minimo richiesto)...................................... 14
INSTALLAZIONE DEL SOFTWARE DJS ..................................... 15
NOTE SUL PERIODO DI PROVA E SULLA REGISTRAZIONE
DELL'UTENTE ............................................................................... 16
IL SUPPORTO IN LINEA.............................................................. 16
DENUNCIA DI RESPONSABILITÀ.............................................. 16
IL DRIVER...................................................................17
CONTRATTO DI LICENZA D'USO DEL SOFTWARE .................. 17
INSTALLAZIONE DEL DRIVER.................................................... 17
USO DI SOFTWARE DJ ...............................................20
PREPARAZIONE DEL PROPRIO SOFTWARE DJ ..................... 21
CONTROLLO DEL COMPUTER ATTRAVERSO IL
PROTOCOLLO DI CONTROLLO DEDICATO .............................. 21
USO DI MIDI PER IL CONTROLLO DEL COMPUTER ............... 22
TABELLA DEI MESSAGGI MIDI .................................................. 23
USO DI UTILITY ..........................................................25
METODO DI IMPOSTAZIONE ..................................................... 25
IMPOSTAZIONI ............................................................................ 25
PER TORNARE ALLE IMPOSTAZIONI PREDEFINITE ............... 26
DIAGNOSTICA............................................................27
LO SCHERMO LCD...................................................................... 27
GLI SCHERMI OEL (ORGANIC EL) ............................................. 27
AGGIORNAMENTI DELL'SEP-C1 ................................................ 27
DENUNCIA DI RESPONSABILITÀ ...............................28
4
It
Page 83

CARATTERISTICHE
CARATTERISTICHE
Questa è un'unità di controllo per entertainment per software DJ professionale e mobile che possiede una vasta gamma di funzioni adatte
all'uso a feste ed eventi, oltre che una vasta gamma di eccezionali caratteristiche operative.
Continuando la tradizione dei lettori Pioneer della serie CDJ nella disposizione del suo pannello, nelle sue funzioni e nelle sue operazioni,
questa unità può venire alimentata attraverso il bus USB di un computer, permettendo una vera e propria riproduzione DJ di brani caricati
nel software DJS accessorio, senza l'uso di mouse o tastiere.
Monitor esterno
Software DJ di interfaccia
PIONEER DJS
OUT
Unità di interfaccia audio
Software DJ MIDI
di interfaccia
Alimentazione
dal bus USB
CUE/LOOP
MEMORY CALL
TRACK SEARCH
Video
EJECT
TIME
A.CUE
IN/CUE
OUT/ADJUST
LOOP
HOT LOOP
SEARCH
QUE
RELOOP/EXIT
TEMPO
MASTER
6/10/16WIDE
TEMPO
BROWSE MIX EFFECT UTILITY
MT
PITCH BEND
S
C
R
A
T
C
H
J
O
G
B
R
E
A
K
0
A
LOAD
FWD TEMPOREV
EJECT
TIME
A.CUE
CUE/LOOP
IN/CUE
OUT/ADJUST
MEMORY CALL
TRACK SEARCH
SEARCH
QUE
B
LOAD
SEP-C1
LOOP
HOT LOOP
RELOOP/EXIT
TEMPO
MASTER
6/10/16WIDE
TEMPO
MT
PITCH BEND
S
C
R
A
T
C
H
J
O
G
B
R
E
A
K
0
FWD TEMPOREV
Italiano
SEP-C1
Amplificatore di potenza
Mixer
Diffusore
5
It
Page 84

CARATTERISTICHE
CONTROLLO DI VARIO SOFTWARE DJ
È possibile controllare sia il software accessorio DJS di Pioneer,
sia altri software per DJ senza la necessità di un disco di controllo.
Sono supportati anche i programmi DJ di tipo MIDI.
PROMEMORIA
• La maggior parte dei dati sull'uso dei tasti e dei cursori di
regolazione TEMPO di questa unità deve venire mandata a
dispositivi esterni usando apparecchi MIDI USB e formati
particolari. Per poter fare uso di questa unità per controllare
software DJ è necessario installare un driver.
DISPLAY DI GRANDE PRATICITÀ
Display centrale
Questa unità possiede un display a LCD a colori da 4,3” di grande
luminosità e visibilità. L'interfaccia grafico intelligente e la
manopola selettrice permettono di scegliere brani con facilità.
Display di controllo A/B
I display del tempo trascorso e del tempo sono OEL a trattini
continui, a colori e della massima qualità, capaci di grande
risposta ed eccezionale visibilità. In concerto col display centrale,
questi display ed indicatori facilitano la performance del DJ in una
grande varietà di illuminazioni.
MANOPOLA DI COMANDO
Dotata di una manopola di comando da ben 80 mm, permettendo
di suonare come se si usasse un giradischi.
USCITA MONITOR
Mandando la schermata BROWSE sul display centrale di un
monitor esterno di grandi dimensioni, questa unità può venire
controllata con maggiore comodità.
SUPPORTO DI FUNZIONI DJS
L'uso del software accessorio DJS permette non solo la
riproduzione DJ, ma anche una grande varietà di operazioni di
controllo, compresi la scelta dei brani ed il missaggio, usando il
display centrale.
CONTROLLO DJ
Oltre a funzioni base come il controllo del tempo, le operazioni cue
e la riproduzione loop, la maggior parte delle funzioni di
riproduzione DJ del software DJS sono supportate dall'unità,
comprese le operazioni di scratch e cambio dell'altezza usando la
manopola di comando.
INFORMAZIONI SUI BRANI
Quando si riproducono dei brani usando il software DJS, il tempo,
il titolo ed altre informazioni possono venire visualizzati sul display.
ESPLORAZIONE DEI BRANI
Questa unità può controllare liste di brani DJS o playlist. Le liste
possono anche venire viste col display centrale, e la scelta dei
brani può venire eseguita senza guardare lo schermo del
computer.
CONTROLLO DEL MISSAGGIO
È possibile controllare la funzione di mixer di DJS. Un singolo
pulsante può venire usato per eseguire il missaggio, scegliendo
una di quattro modalità di missaggio.
CONTROLLO DEGLI EFFETTI
È possibile controllare gli effetti DJS. La selezione di effetti e
l'attivazione di effetti di tempo, la regolazione del livello e del tempo
possono tutte venir fatte usando la manopola selettrice ed i
pulsanti di quest'unità.
PROMEMORIA
• Se si controlla software DJ di altre marche (non DJS), per
quanto riguarda le funzioni che supporta, consultarne le
istruzioni per l'uso.
6
It
Page 85

CARATTERISTICHE TECNICHE / CONTROLLO DEGLI ACCESSORI
CARATTERISTICHE TECNICHE
1 Generali
Modello. . . . . . . . . . . . . . . . . . . . . . . . . . . . . . . . . . . . . . . . . . SEP-C1
Nome . . . . . . . . . Unità di controllo per software d'intrattenimento
Voltaggio di alimentazione . . . . .C.c. a 5 V (prodotta dal bus USB)
Consumo di corrente. . . . . . . . . . . . . . . . . . . . . . . . . . . . . . . 600 mA
Consumo . . . . . . . . . . . . . . . . . . . . . . . . . . . . . . . . . . . . . . . . . . . 3 W
Temperatura di lavoro . . . . . . . . . . . . . . . . . . . . .Da +5 °C a +35 °C
Umidità di lavoro . . . . . . Dal 5% all'85% di U.R. (senza condensa)
Massa (peso) . . . . . . . . . . . . . . . . . . . . . . . . . . . . . . . . . . . . . . .1,7 kg
Dimensioni esterne massime
. . . . . . . . . . . . . . . . 482,6 mm (L) x 133,0 mm (A) x 83,5 mm (P)
2 Sezione USB in su
Connettore . . . . . . . . . . . . . . . Porta USB di tipo B (connettore PC)
3 Sezione di uscita video
Connettore di uscita . . . . . . . . . . . . . . . . . . . . . . . . . . . . Presa RCA
Livello di uscita video composito . . . . . . . . . . . . . . . . .1 Vp-p (75 Ω)
4 Sezione display centrale
Tipo . . . . . . . . . . . . . . . . . . . . . . . .Display a matrice attiva LCD TFT
Dimensioni . . . . . . . . . . . . . . . . . . . . . . . . . . . . . . . . 4,3” (larghezza)
Lingue supportate . . . . . . . . . . . . . . . 9 lingue, comprese l'inglese,
il giapponese ed il cinese (cinese semplificato)
5 Sezione display di controllo A/B
Tipo . . . . . . . . . . . . . . . . . . . . . . . . . OEL (Organic EL) Full segment
6 Altri connettori
Connettore 5 V . . . . . . . . . . . . . . . . . . . . . . . . . . . . . . . . Presa a c.c.
Caratteristiche tecniche ed aspetto soggetti a modifiche senza
preavviso.
CONTROLLO DEGLI ACCESSORI
Controllare che gli accessori seguenti siano tutti presenti.
Cavo USB
Cavo di alimentazione ausiliaria USB
PROMEMORIA
• Sono in dotazione tre manuali di istruzioni (compreso quello che state leggendo). Studiare i manuali come necessario per
poter usare la macchina:
– Istruzioni per l'uso SEP-C1 (questo manuale)
Da leggersi per primo.
– Guida ai comandi di DJS SEP-C1 (file PDF contenuto nel CD-ROM allegato)
Istruzioni base per l'uso del DJS insieme al SEP-C1.
– Manuale dell'utente DJS (file PDF contenuto nel CD-ROM allegato)
Dettagliata spiegazione del funzionamento e dell'uso del software DJS.
DJS: 1 corredo
CD-ROM Adesivo numero di
serie per l’installazione DJS
Istruzioni per l'uso (questo manuale)
SEP-C1
Scheda di garanzia
Italiano
7
It
Page 86

NORME DI INSTALLAZIONE
Non mettere in contatto
con superfici in
vibrazione.
Per assicurarsi una
buona dissipazione
del calore,
mantenere questo
spazio aperto.
Per assicurarsi una
buona dissipazione
del calore,
mantenere questo
spazio aperto.
Per assicurarsi una buona
dissipazione del calore,
mantenere questo spazio aperto.
NORME DI INSTALLAZIONE
• Usando o conservando questa unità in luoghi esposti a
temperature elevate, ad esempio su amplificatori di potenza o
vicino a riflettori si può danneggiarlo. Evitare di installare questa
unità sopra apparecchi che generino grandi quantità di calore.
• Posizionare questa unità quanto più lontano possibile da
sintonizzatori o apparecchi televisivi. Una unità molto vicina a
simili apparecchi può causare disturbi e interferenze, o il
deterioramento dell'immagine televisiva. Queste interferenze si
notano in modo particolare quando si fa uso di una antenna
interna. Se del caso, utilizzare una antenna esterna o evitare di
usare questa unità.
• Se l’apparecchio viene usato in ambienti rumorosi, ad esempio
vicino a diffusori, la riproduzione può saltare. In tal caso,
allontanare i diffusori o ridurre il volume di ascolto.
• Porre l’apparecchio su di una superficie a livello e stabile.
• Non posare oggetti pesanti in cima all'unità.
Controllare che l'unità, compreso il suo cavo USB, non tocchi
materiali che vibrano. Il lettore possiede un ammortizzatore che
assorbe le vibrazioni, ma è ugualmente prudente evitare di usare il
lettore in luoghi esposti a vibrazioni, dato che possono far saltare
la riproduzione.
Fare particolarmente attenzione quando si usa questa unità
tenendola installata in una borsa da trasporto.
Le custodie per il trasporto
La manopola di comando è un apparecchio delicato. Se l'unità
viene messa in una custodia per il trasporto, prendere precauzioni
per evitare che la superficie della manopola di comando sia
sottoposta a pressioni.
Condensa
Quando l'apparecchio viene portato improvvisamente da un luogo
freddo a uno caldo, o se la temperatura ambiente aumenta
improvvisamente, all’interno dell’apparecchio può formarsi della
condensa che può impedire all’apparecchio di fornire il massimo
delle proprie prestazioni. In tali casi, lasciare l’apparecchio inattivo
per circa un’ora per consentire l’adattamento progressivo alla
temperatura ambiente, o aumentare la temperatura della stanza in
modo graduale.
Pulizia dell'apparecchio
Pulire l'apparecchio con un panno soffice e pulito. Per lo sporco
più tenace, inumidire il panno con un detergente debole diluito in
5 o 6 sei parti di acqua e strizzarlo bene. Usare poi un panno
asciutto per asciugare il lettore. Non usare mai sostanze chimiche
volatili come benzina o solventi, che esse possono danneggiare le
finiture dell’apparecchio.
Pulizia della manopola di comando
Pulire la manopola di comando con un panno soffice e pulito. Per
lo sporco più tenace, inumidire il panno con un detergente debole
diluito in 5 o 6 sei parti di acqua e strizzarlo bene. Usare poi un
panno asciutto per asciugare il lettore.
Non utilizzare alcool, solventi, benzina, insetticidi o altre sostanze
di questo tipo poiché possono danneggiare la manopola per la
ricerca facendone deteriorare i simboli o la finitura oppure
provocandone lo staccamento.
Installazione dell'SEP-C1 in un mobile EIA
I fori delle viti sul pannello anteriore dell'SEP-C1 devono essere
impiegati per il collegamento dell’apparecchio ad un mobile EIA
da 19".
Questa unità soddisfa le specifiche 3U. La profondità massima
dell'unità è di 83,5 mm.
• Fissare l'unità al rack usando viti di dimensioni adatta (le viti non
sono in dotazione).
• Non installare questa unità immediatamente sopra un
amplificatore di potenza, dato che il calore prodotto
dall'amplificatore può causare danni, oppure si possono
avere interferenze e rumore.
• Nel trasportare questa unità, rimuoverla dal suo mobile.
Tentando di muovere il mobile con quest'unità installata si
possono causare danni.
• Se l'unità deve venire mossa mentre si trova ancora nel suo
mobile, prendere precauzioni per proteggere l'apparecchio
da vibrazioni ed urti.
8
It
NOTE
Page 87

COLLEGAMENTI
COLLEGAMENTI
Usare il cavo di alimentazione ausiliaria USB ed il cavo USB normale per collegare l'unità al computer (collegando per primo il cavo di
alimentazione ausiliaria USB).
Computer
Cavo USB in dotazione
Cavo di alimentazione
ausiliaria USB in dotazione
PC
5V
MONITOR OUT
REMOTE
CONTROL
Interfaccia audio (da acquistarsi
separatamente)
Cavo audio
Non collegare il cavo di alimentazione ausiliaria USB o il
cavo USB prima di avere installato il driver nel proprio
Mixer
computer.
NOTE
• Non collegare nulla al connettore da 5 V che non sia il cavo di alimentazione ausiliaria USB.
• Usare sempre e solo il cavo di alimentazione ausiliaria USB ed il cavo USB.
• Collegare sempre il cavo di alimentazione ausiliaria USB ed il cavo USB allo stesso computer.
• Non collegare questa unità ad un computer via hub USB.
• Non collegare questa unità ad un computer con una scheda di interfaccia USB di tipo CardBus.
Collegamento ad un monitor esterno (connettore a spinotto)
Usare questi collegamenti per mandare le immagini del display centrale ad uno schermo più grande. Collegata questa unità ad un
monitor esterno, le impostazioni di questa unità devono venire cambiate (vedi la voce “USCITA MONITOR” in “[1] DISPLAY” della sezione
“USO DI UTILITY” di pag. 25).
Italiano
Monitor esterno
PC
5V
MONITOR OUT
REMOTE
CONTROL
9
It
Page 88

PARTI E LORO FUNZIONE
PARTI E LORO FUNZIONE
PANNELLO ANTERIORE
17
16
1
MEMORY CALL
4
5
6
7
8 23 2 3 11 12 13 14
EJECT
CUE/LOOP
TRACK SEARCH
SEARCH
QUE
TIME
A.CUE
IN/CUE
HOT LOOP
OUT/ADJUST
RELOOP/EXIT
LOOP
S
C
R
A
T
C
H
TEMPO
MASTER
6/10/16WIDE
TEMPO
MT
PITCH BEND
J
O
G
B
R
E
A
K
0
FWD TEMPOREV
BROWSE MIX EFFECT UTILITY
A
LOAD
19 15 21
18109
EJECT
TIME
A.CUE
CUE/LOOP
MEMORY CALL
22
B
LOAD
SEP-C1
2024
19
TRACK SEARCH
SEARCH
QUE
IN/CUE
HOT LOOP
OUT/ADJUST
RELOOP/EXIT
LOOP
S
C
R
A
T
C
H
TEMPO
MASTER
6/10/16WIDE
TEMPO
MT
PITCH BEND
J
O
G
B
R
E
A
K
0
FWD TEMPOREV
Questa sezione spiega l'uso dell'unità insieme a DJS. A seconda del software DJ usato, alcune funzioni possono non essere disponibili o
possono richiedere operazioni differenti da quelle descritte in questo manuale.
1 Tasto EJECT ()
Non usato per il controllo DJS.
2 Tasti di controllo dei loop
Tasto di inizio di un ciclo (IN/CUE)
Viene usato per impostare il punto di inizio di un ciclo.
Premendo questo tasto durante la riproduzione ciclica, questa
ritorna al punto di inizio del ciclo e ricomincia.
Tasti di fine di un ciclo (OUT/ADJUST)
Viene usato per impostare il punto di fine di un ciclo. Se
questo tasto viene premuto durante la riproduzione ciclica, la
manopola di comando o i tasti SEARCH possono venire usati
per regolare la posizione del punto di uscita.
Tasto RELOOP/EXIT
Premere questo pulsante durante la riproduzione ciclica per
cancellarla. Quando l'unità non si trova nella modalità di
riproduzione ciclica, premendo il pulsante si fa iniziare la
riproduzione ciclica dal punto di inizio in memoria.
3 Sezione di controllo TEMPO
Tasti della gamma di controllo TEMPO (±6/10/16/WIDE):
Ad ogni pressione del tasto, la gamma di variabilità del cursore
TEMPO cambia.
Tasto ed indicatore MASTER TEMPO (MT):
Ad ogni pressione del tasto, la funzione di tempo principale
viene attivata e disattivata.
Cursore di regolazione TEMPO:
Dalla posizione neutrale centrale, tirare questo cursore verso
di sé (+) per aumentare il tempo ed allontanarlo (–) per
diminuirlo.
Tasti PITCH BEND +/–:
Se vengono premuti durante la riproduzione, viene attivata la
funzione di cambio dell'altezza dei suoni. Premendo il tasto
“+” si accelera la variazione dell'altezza, mentre premendo
quello “–” essa decelera.
La velocità di cambiamento dell'altezza dei suoni può venire
modificata tenendo premuto il tasto mentre si ruota la
manopola di comando.
4 Tasti TRACK SEARCH (, )
Vengono usati per eseguire la ricerca i brani.
5 Tasti SEARCH (, )
6 Tasto ed indicatore CUE
Viene usato per memorizzare punti cue. Se un punto cue è
stato impostato, premendo il tasto CUE si por ta q ues ta un ità in
modalità di pausa presso il punto cue.
7 Tasto ed indicatore di riproduzione/pausa ()
Viene usato per avviare e portare in pausa la riproduzione.
8 Tasto della modalità del tempo/Auto Cue (TIME/A.CUE)
TIME:
Ad ogni pressione del tasto, l'indicazione del tempo del display
passa dal tempo di riproduzione trascorso del brano attuale a
al tempo rimanente (REMAIN).
A.CUE:
Quando viene premuto per un secondo o più, la funzione
AUTO CUE viene attivata e disattivata.
Funzione AUTO CUE
Se un brano viene impostato o viene eseguita la ricerca di
brani, questa funzione automaticamente imposta un punto
cue e la modalità di attesa presso un punto cue.
9 Tasto SCRATCH
Premere per attivare o disattivare la modalità scratch.
10 Tasto JOG BREAK
Non usato per il controllo DJS.
11 Tasto BROWSE
Da usare per passare alla schermata BROWSE.
12 Tasto MIX
Da usare per passare alla schermata MIX.
13 Tasto EFFECT
Da usare per passare alla schermata EFFECT.
14 Tasto UTILITY
Da usare per passare alla schermata UTILITY (pag. 25).
15 Manopola selettrice
Nelle schermate BROWSE e UTILITY, girando la manopola si
permette la scelta dei brani ed il movimento del cursore da una
voce all'altra. Premere la manopola per confermare la scelta
fatta.
Per quanto riguarda le schermate MIX ed EFFECT, consultare
la Guida ai comandi di DJS.
Vengono usati per l'avanzamento o il ritorno rapidi.
10
It
Page 89

PARTI E LORO FUNZIONE
Nome di un brano Stato della riproduzione
Nome dell’artista
16 Tasto CUE/LOOP MEMORY
Non usato per il controllo DJS.
17 Tasto CUE/LOOP CALL
Non usato per il controllo DJS.
18 Tasti di funzione (da F1 a F6, da sinistra)
Da usare per scegliere modalità e categorie.
Le voci sceglibili differiscono a seconda della schermata o del
menu.
Per dettagli, consultare la Guida ai comandi di DJS.
19 Tasti LOAD A/B
Nella schermata BROWSE, premere questi tasti per impostare
il brano scelto nel controller A/B.
Per quanto riguarda le schermate MIX ed EFFECT, consultare
la Guida ai comandi di DJS.
20 Tasto di selezione verso l'alto ()
Nelle schermate BROWSE ed UTILITY, ad ogni pressione del
tasto il menu si muove di un livello gerarchico in su (o verso
sinistra).
Per quanto riguarda le schermate MIX ed EFFECT, consultare
la Guida ai comandi di DJS.
21 Tasto di selezione verso il basso ()
Nelle schermate BROWSE ed UTILITY, ad ogni pressione del
tasto il menu si muove di un livello gerarchico in basso (o verso
destra).
Per quanto riguarda le schermate MIX ed EFFECT, consultare
la Guida ai comandi di DJS.
22 Display centrale (pag. 11)
23 Display A/Display B (pag. 12)
24 Manopola di comando (+FWD/–REV)
Se la modalità scratch è ON:
Toccare la superficie della manopola e girare per eseguire la
riproduzione scratch.
Se la modalità scratch è OFF:
Serve per la modifica dell'altezza del suono. L'accelerazione
(+FWD) e la decelerazione (–REV) vengono eseguite in
proporzione alla quantità di rotazione della manopola.
Quando la manopola si ferma, la riproduzione torna alla
velocità normale.
Display centrale
3
1
2
1 Schermata del menu principale
I menu del display centrale vengono cambiati premendo i tasti
BROWSE, MIX, EFFECT e UTILITY. I tasti di funzione, di
selezione verso l'alto ()/il basso (), i tasti LOAD A/B e la
manopola selettrice permettono di manipolare il contenuto di
ciascun menu.
Schermata BROWSE
Da usare per visualizzare la lista dei brani DJS o dei playlist, e
per scegliere dei brani. Per dettagli, consultare “Uso delle liste
DJS” della Guida ai comandi di DJS.
Schermata MIX
Da usare per eseguire operazioni di missaggio DJS. Per
dettagli, consultare “Operazioni di missaggio DJS” della Guida
ai comandi di DJS.
Schermata EFFECT
Da usare per eseguire operazioni di effetto DJS. Per dettagli,
consultare “Operazioni di effetto DJS” della Guida ai comandi
di DJS.
Schermata
Da usare per impostare i parametri dell'unità (pag. 25).
2 Scheda funzione
Visualizza le voci che possono venire modificate usando i sei
pulsanti di funzione. le voci visualizzate dipendono da quanto
visualizzato nella schermata del menu principale.
3 Display delle informazioni sui brani A/B
Visualizza informazioni sui brani e lo stato attuale dei brani in
riproduzione del controller A/B.
UTILITY
Italiano
Stato della riproduzione
Indica il brano attualmente in riproduzione.
Indica il brano attualmente in pausa.
Indica che un brano è attualmente in modalità di
pausa presso un punto cue.
PROMEMORIA
• Questa unità può visualizzare nomi di titoli ed artisti in
lingue dell'europa occidentale, in russo, cinese
semplificato ed in giapponese, ma alcune lingue possono
non venire supportate dal programma DJ particolare usato.
Per maggiori dettagli sulle lingue supportate, consultare le
istruzioni per l'uso del proprio software DJ.
11
It
Page 90

PARTI E LORO FUNZIONE
1
8
4
6
2
7
3
5
9
PC
MONITOR OUT
5V
REMOTE
CONTROL
1
2
3
4
Display A/Display B
1 Indicazione del numero di brano
“DJS” viene visualizzato durante il controllo di DJS.
2 Visualizzazione della gamma di controllo TEMPO (±6, ±10,
±16, WIDE)
Visualizza la modalità della camma di variabilità scelta per il
cursore TEMPO.
3 Display del rapporto di cambiamento TEMPO
Visualizza il cambiamento del tempo prodotto dall'uso del
cursore TEMPO.
4 Indicatore A.CUE
Si illumina se la funzione Auto Cue è attivata.
PANNELLO POSTERIORE
5 Display del tempo
Visualizza il tempo trascorso del brano (indicatore [REMAIN]
spento) o il tempo rimanente (indicatore [REMAIN] acceso), in
minuti [M], secondi [S] e frame [F].
6 Display dell'indirizzo di riproduzione
Per dare una comprensione intuitiva del progresso relativo
della riproduzione di un brano (tempo trascorso o tempo
rimanente), viene usata una barra che rappresenta l'intero
brano.
• Display del tempo trascorso: Inizia con tutti i segmenti
spenti, che gradualmente si accendono da sinistra a destra.
• Display del tempo rimanente: Inizia con tutti i segmenti
accesi, che gradualmente si spengono da sinistra a destra.
• Quando rimangono solo 30 secondi di riproduzione, il
grafico inizia a lampeggiare lentamente.
• Quando rimangono solo 15 secondi di riproduzione, il
grafico inizia a lampeggiare velocemente.
7 Display BPM
Indica il valore BPM (battute per minuto) del brano attuale.
8 Indicatore MEMO
Non visualizzato per il controllo di DJS.
9 Indicatore REMAIN
Si illumina quando il display del tempo visualizza il tempo
rimanente.
1 Connettore PC: porta USB (tipo B)
Usare il cavo USB in dotazione per collegare questa porta ad
un computer.
2 Connettore a 5 V
Usare il cavo di alimentazione ausiliaria USB in dotazione per
collegare questa porta ad un computer.
12
It
3 Connettore di uscita video (MONITOR OUT)
Usare un cavo video per collegarsi ad un display esterno.
4 Connettore di telecomando (REMOTE CONTROL)
Non usato con quest'unità.
Page 91

IL SOFTWARE DJS
IL SOFTWARE DJS
Pioneer DJS è un programma che permette l'uso di file MP3 per controllare la riproduzione DJ da un computer. Installare il programma
nel proprio computer dal CD-ROM in dotazione.
PROMEMORIA
• DJS non possiede funzioni di registrazione della riproduzione DJ.
2.3 Proprietà. Pioneer o i propri concessori di licenza
CONTRATTO DI LICENZA D'USO DEL
SOFTWARE
Il presente Contratto di licenza d'uso del software (d'ora in avanti
semplicemente chiamato “Contratto”) è stipulato tra l'utente finale
(sia esso la persona fisica che installa il software o qualsiasi
singola persona giuridica in nome della quale la persona fisica
agisce) e PIONEER CORPORATION (d'ora in avanti
semplicemente chiamata “Pioneer”).
QUALSIASI AZIONE INTRAPRESA PER INSTALLARE O AVVIARE
IL PROGRAMMA COMPORTA L'ACCETTAZIONE DEI TERMINI DEL
CONTRATTO. L'AUTORIZZAZIONE DI SCARICARE E/O USARE IL
PROGRAMMA È ESPRESSAMENTE CONDIZIONATA
DALL'ACCETTAZIONE DA PARTE DELL'UTENTE DEI TERMINI DI
SEGUITO RIPORTATI. PER RENDERE VALIDO E APPLICABILE IL
CONTRATTO NON È NECESSARIA ALCUNA APPROVAZIONE
FORNITA PER ISCRITTO O IN FORMA ELETTRONICA. QUALORA
L'UTENTE NON ACCETTI TUTTI E CIASCUNO DEI TERMINI DEL
CONTRATTO NON POTRÀ USARE IL PROGRAMMA, NON LO
DOVRÀ INSTALLARE O SARÀ TENUTO A DISINSTALLARLO
SECONDO QUANTO PERTINENTE.
1 DEFINIZIONI
1.1 Per “Documentazione” s'intendono i documenti scritti, le
caratteristiche tecniche e il contenuto della guida resi
pubblicamente disponibili da Pioneer per fornire
assistenza durante l'installazione e l'uso del Programma.
1.2 Per “Programma” s'intende tutto o parte del software
concesso in licenza da Pioneer all'utente in virtù del
Contratto.
2 LICENZA DEL PROGRAMMA
2.1 Limitazione di licenza. In dipendenza dalle restrizioni del
Contratto, Pioneer concede all'utente la licenza limitata,
non esclusiva e non trasferibile (priva di qualsiasi diritto di
concessione in sublicenza a terzi) di:
(a) Installare una singola copia del Programma nel disco
fisso del proprio computer e di usare il Programma
stesso esclusivamente per uso personale e in
ottemperanza al Contratto e alla Documentazione
fornita (d'ora in avanti semplicemente chiamato “uso
autorizzato”);
(b) Usare la Documentazione fornita a supporto dell'uso
autorizzato da parte dell'utente; e
(c) Eseguire una copia del Programma esclusivamente a
titolo di riserva e a condizione che essa rechi tutti i
titoli, i marchi e gli avvisi relativi ai diritti d'autore e alla
restrizione dei diritti.
2.2 Restrizioni. All'utente non è concesso copiare od usare il
Programma o la Documentazione salvo nei casi
esplicitamente previsti dal Contratto. All'utente non è
concesso trasferire, cedere in sublicenza, cedere a
pagamento o in prestito il Programma, né usarlo per
l'addestramento di terze parti, partecipazione
commerciale o fornitura di servizi. All'utente stesso o ad
altri per proprio conto non è concesso modificare,
decodificare, disassemblare o decompilare il
Programma, salvo quanto esplicitamente consentito dalla
legge applicabile e in ogni caso solo dopo che egli abbia
notificato Pioneer per iscritto le attività cui intende dar
luogo. All'utente non è concesso usare il programma su
più computer senza avere prima ottenuto l'autorizzazione
scritta di Pioneer.
3 NEGAZIONE DI GARANZIA
4 DANNI E PROVVEDIMENTI CONTRO LE VIOLAZIONI
5 CESSAZIONE
6 TERMINI GENERALI
mantengono tutti i diritti, titoli e interessi in tutti e verso
tutti i diritti brevettuali, di copyright, di marchio, di secreto
industriale ed altri diritti ancora relativi alla proprietà
intellettuale nel Programma e nella Documentazione,
nonché in ogni derivato di questi. L'utente non acquisisce
alcun altro diritto, sia esso esplicito o implicito, oltre quelli
previsti dal Contratto.
2.4 Negazione di assistenza. Pioneer non è soggetta ad alcun
obbligo di fornire supporto, manutenzione,
aggiornamenti, modifiche o nuove versioni del
Programma o della Documentazione in virtù del
Contratto.
IL PROGRAMMA E LA DOCUMENTAZIONE SONO FORNITI
“NELLO STATO IN CUI SI TROVANO” SENZA ALCUNA
DICHIARAZIONE O GARANZIA, E L'UTENTE ACCETTA DI
USARLI A SOLO PROPRIO RISCHIO. PER QUANTO E NELLA
TOTALE MISURA CONSENTITA DALLA LEGGE, PIONEER
ESPLICITAMENTE NEGA QUALSIVOGLIA TIPO DI GARANZIA
SUL PROGRAMMA E LA DOCUMENTAZIONE, SIA ESSA
ESPLICITA, IMPLICITA, STATUTARIA O DERIVANTE
DALL'ESECUZIONE, LA TRANSAZIONE O L'USO
COMMERCIALE, COMPRESA OGNI GARANZIA SULLA
COMMERCIABILITÀ, IDONEITÀ AD IMPIEGHI PARTICOLARI,
REQUISITI QUALITATIVI, PRECISIONE, TITOLO O NON
VIOLAZIONE.
L'utente concorda che qualsiasi violazione delle restrizioni
specificate nel Contratto arrecherebbe a Pioneer un danno
irreparabile per il quale il solo rimborso in denaro risulterebbe
inadeguato. Oltre ai danni e a qualsiasi altro provvedimento
cui Pioneer potrebbe avere diritto, l'utente concorda che
Pioneer stessa ricerchi allevio ingiuntivo allo scopo di
prevenire la violazione effettiva, minacciata o continua del
Contratto.
Pioneer ha tuttavia la facoltà di porre termine al Contratto in
qualsiasi momento qualora l'utente ne violi anche solo una
delle clausole. Alla cessazione del Contratto l'utente è tenuto a
cessare l'uso del Programma, rimuoverlo permanentemente
dal computer in cui è installato e distruggere tutte le copie
dello stesso nonché della Documentazione in proprio
possesso, dando quindi conferma scritta a Pioneer di avere
provveduto a ciò. Le sezioni 2.2, 2.3, 2.4, 3, 4, 5 e 6
continueranno tuttavia a rimanere valide anche in seguito alla
cessazione del Contratto.
6.1 Limite di responsabilità. In nessun caso Pioneer o le
proprie sussidiarie assumeranno responsabilità, in
relazione al Contratto o all'oggetto da esso trattato e per
qualsivoglia ipotesi di responsabilità, per i danni indiretti,
accessori, speciali, conseguenziali o punitivi, oppure per
perdita di profitto, reddito, lavoro, risparmio, dati, uso o
per costi di acquisti sostitutivi, anche qualora esse sono
state informate della possibilità del verificarsi di tali danni
o qualora questi siano prevedibili. In nessun caso la
responsabilità di Pioneer per qualsivoglia tipo di danno
eccederà il valore già pagato dall'utente a Pioneer stessa
o alle proprie sussidiarie per il Programma. Le parti
riconoscono che i limiti di responsabilità e l'allocazione
dei rischi nel Contratto sono riflessi nel prezzo del
Programma e sono elementi essenziali della transazione
tra le parti, senza i quali Pioneer non avrebbe fornito il
Programma stesso né avrebbe stipulato il Contratto.
Italiano
13
It
Page 92

IL SOFTWARE DJS
6.2 I limiti o le esclusioni di garanzia e di responsabilità
stabiliti nel Contratto non hanno effetto né pregiudicano i
diritti conferiti per legge all’utente e si applicano solo
nella misura in cui tali limiti o esclusioni sono consentiti
dalle leggi di giurisdizione del luogo in cui l’utente stesso
risiede.
6.3 Separazione e rinuncia. Qualora una qualsiasi delle
clausole del Contratto venga dichiarata illecita, non valida
o altrimenti non applicabile, essa sarà applicata per
quanto possibile o, qualora tale capacità non sia
praticabile, sarà esclusa e rimossa dal Contratto stesso
ferma restando la totale validità ed effetto delle rimanenti
clausole. La rinuncia di una delle parti alla rivendicazione
su qualsivoglia inadempienza o violazione del Contratto
non comporta la rinuncia alla rivendicazione su eventuali
inadempienze o violazioni successive.
6.4 Divieto di cessione. All'utente non è concesso cedere,
vendere, trasferire, delegare o altrimenti disporre del
Contratto o di qualsiasi diritto od obbligo da esso
derivante, sia volontariamente sia involontariamente, per
effetto di legge o in altro modo, senza avere prima
ottenuto l'autorizzazione scritta di Pioneer. Qualsiasi
cessione, trasferimento o delega dichiarata sarà resa
nulla e inefficace. Per quanto precede, il Contratto
vincolerà e deriverà vantaggio alle parti nonché ai
rispettivi successori e aventi diritto.
6.5 Indivisibilità del Contratto. Il presente Contratto
costituisce l'intero accordo tra le parti e supera gli altri
eventuali accordi o dichiarazioni, precedenti o
contemporanei, siano essi forniti in forma scritta o
verbale, relativi all'oggetto dello stesso. Il Contratto non
potrà essere modificato o corretto senza la preventiva ed
esplicita autorizzazione scritta di Pioneer e nessun altro
atto, documento, uso o consuetudine potrà essere posto
in essere per modificarlo o correggerlo.
6.6 Vi dichiarate d'accordo che il presente Contratto deve
venire governato ed interpretato dalle leggi in vigore in
Giappone.
AVVERTENZA SUI DIRITTI D'AUTORE
L'uso di DJS ha restrizione riguardanti la riproduzione e la copia
di musica protetta da diritti d'autore.
• Il programma può non funzionare correttamente se dei dati di
crittazione per la protezione dalla copia sono incorporati nel
supporto registrati.
• Il ripping, la riproduzione e le altre operazioni possono fermarsi
se dei dati protetti dalla copia vengono rilevati nel supporto
registrato.
• A causa della tecnologia di protezione dalla copia usata per i
supporti registrati (CPRM), la scrittura su schede di memoria
SD è limitata a tre volte per ciascun file.
• Per poter scrivere musica su schede SD, il lettore/scrittore usato
deve supportare la tecnologia di protezione dalla duplicazione
per schede SD. Per maggiori dettagli, consultare le istruzioni
per l'uso del lettore/scrittore da usare.
• La musica che si memorizza su scheda SD può venire riprodotta
solo su lettori che supportano gli standard audio SD. Per
maggiori dettagli, consultare le istruzioni per l'uso del lettore da
usare.
Il materiale che registrate è di uso personale e non deve venire
usato per altri fini se non dietro permesso del detentore dei
diritti.
• La musica registrata da CD ed altri supporti può essere protetta
da leggi sui diritti d'autore di certi paesi e da convenzioni
internazionali. Siete personalmente responsabile della legalità
dell'uso fatto delle vostre registrazioni.
SISTEMA RICHIESTO (ambiente
operativo minimo richiesto)
L'uso di DJS richiede un computer PC/AT dalle seguenti
caratteristiche minime:
CPU: Processore Pentium M
Tuttavia, nel caso di Windows Vista
TM
2 Duo Intel (o compatibile) da 1,5 GHz o più.
Core
Memoria:
512 MB di RAM o più
Nel caso di Windows Vista
Disco fisso:
250 MB di spazio libero (escluso lo spazio per MP3 ed altri file
musicali)
Unità disco ottica:
Unità disco capace di leggere CD-ROM e riprodurre CD musicali
(CD-DA)
Display:
XGA (1024x768) o più, con scheda video e monitor con colore a 16-
bit o più
Suono:
Ingresso audio per 2 canali o più (scheda audio interna o unità
audio esterna).
Dispositivi di ingresso dati:
Tastiera e mouse (o puntatore equivalente)
Connessione a Internet:
Si raccomanda una velocità da almeno 56 kbps. Microsoft
Internet Explorer 5.5 o successivo, o altro web browser che
supporti SSL a 128 bit.
• Se questa unità viene collegata ad un computer ed usata con
DJS, il computer deve possedere due porte USB compatibili
almeno con USB 1.1. Per dettagli, vedi la sezione
“COLLEGAMENTI” (pag. 9).
NOTE
• Anche se il vostro computer possiede memoria sufficiente
come specificato qui sopra, il software e i servizi che girano
nel computer possono renderla insufficiente, facendo
funzionare il programma in modo insoddisfacente. In tal
caso, chiudere tali servizi o programmi per liberare
memoria o aumentare la memoria installata.
• DJS può non funzionare adeguatamente se combinato con
altri programmi installati nel computer.
• La piena funzionalità non è garantita con tutti i computer
anche se le condizioni operative menzionate sono tutte
state soddisfatte.
• Il software DJS non è utilizzabile in ambiente operativo Mac
OS (compresi i computer con processore Intel).
®
Intel® da 1,5 GHZ (o compatibile)
®
, il processore deve essere un
®
, 1 GB di RAM o più
®
14
It
Page 93

IL SOFTWARE DJS
INSTALLAZIONE DEL SOFTWARE DJS
Precauzioni per l'installazione
• Prima di installare DJS, leggere “CONTRATTO DI LICENZA
D'USO DEL SOFTWARE” e “SISTEMA RICHIESTO (ambiente
operativo minimo richiesto)”.
• DJS supporta le seguenti versioni di Microsoft
®
Windows Vista
Windows Vista
Windows Vista
Windows Vista
Windows
Windows
Windows
• DJS non è supportato dai sistemi operativi Microsoft a 64 bit
(Windows
Home Basic
®
Home Premium
®
Ultimate
®
Business
®
XP Home Edition
®
XP Professional
®
2000 Professional (SP4)
®
XP Professional x64 Edition e Windows Vista ® 64-
bit Edition).
• Il CD-ROM accessorio include i programmi di installazione e i
manuale dell'utente nelle seguenti otto lingue: Inglese,
francese, tedesco, italiano, olandese, spagnolo, cinese (cinese
semplificato)
• Se si usa DJS con una versione di Windows
lingue indicate, seguire le istruzioni date dal menu e scegliere
[English (Inglese)].
• L'installazione e la rimozione di DJS richiedono privilegi di
amministratore per il computer interessato. Per installare il
programma ci si deve registrare come amministratori.
Procedura di installazione
1 Il menu di installazione appare automaticamente quando il
CD-ROM viene caricato nell'unità DVD/CD del computer.
Seguire le istruzioni ed installare il software DJS.
• Se il menu di installazione non appare automaticamente,
fare clic su [START] [Risorse del computer (o
Computer)] e scegliere l'unità disco, quindi fare clic
sull'icona [Install].
2 Apparso il menu di installazione, fare clic su [Installare DJS].
®
Windows®:
®
che non sia delle
3 Quando appare la schermata di scelta della lingua, scegliere
[Italiano] e fare clic su [OK].
• A seconda dell'ambiente operativo, può essere disponibile
più di una lingua.
• Facendo clic su [OK] appare il messaggio [Preparazione
all'installazione di DJS...].
A preparativi completati, appare il messaggio [Avvio
dell'installazione di DJS ...]. Seguire le istruzioni del
messaggio e completare l'installazione di DJS.
• Per cancellare l'installazione, fare clic sul tasto [Annulla].
4 Ad installazione di DJS completata, riavviare il computer
seguendo le istruzioni che appaiono sullo schermo.
PROMEMORIA
• Se si usa questa unità insieme a DJS, prima di collegare l'SEPC1 al computer è necessario installare su di esso il driver
necessario. Per dettagli, vedi pag. 17.
Manuale dell'utente di DJS (PDF)
Finita l'installazione di DJS, il manuale dell'utente può se
desiderato venire visualizzato dal menu [START] di Windows. Fare
clic su [START] [Tutti i programmi ] [DJS] [Manuale
dell'utente].
Si raccomanda di leggere per prima cosa il manuale per
comprendere in linea di massima come funzione DJS prima di
usarlo.
Italiano
• Se una versione di prova di DJS è al momento installata,
invece di [Installare DJS] appare il tasto [Rimuovere la
versione di prova di DJS]. Fare clic sul tasto per rimuovere
la versione di prova e di nuovo su [Installare DJS].
• Per visualizzare il manuale dell'utente, fare clic su
[Visualizzare il manuale dell'utente di DJS ]. La
visualizzazione del manuale dell'utente richiede Adobe
®
Reader
• Per installare Adobe Reader
Adobe Reader]. Se il computer possiede già una versione
più vecchia di Adobe Reader
.
®
, fare clic su [Installare
®
rimuoverla prima di fare clic
su [Installare Adobe Reader].
• Per chiudere il menu di installazione, fare clic sul tasto
[Esci].
15
It
Page 94

IL SOFTWARE DJS
NOTE SUL PERIODO DI PROVA E SULLA
REGISTRAZIONE DELL'UTENTE
DJS può venire usato senza registrazione per 60 giorni di prova
dopo l'installazione.
Questo è il periodo in cui potete usare DJS senza registrarlo. Alla
fine del periodo di prova DJS non funziona più, ed è quindi
importante registrarlo prima che il periodo di prova spiri.
La registrazione in linea può venire completata via Internet. Per
dettagli sulle procedure di registrazione dell'utente, consultare il
manuale dell'utente di DJS contenuto nel CD-ROM allegato.
Pioneer Group raccoglie informazioni personale ai seguenti fini:
1. Per fornire assistenza per il prodotto
2. Per informare gli utenti via mail di novità importanti ed eventi
riguardanti il prodotto.
3. Per raccogliere dati statistici da usare per migliorare i prodotti
• Le informazioni di carattere personale ricevute dai clienti sono
gestite in accordo con le nostre norme sulla privacy.
• Per maggiori informazioni sulle norme Pioneer sulla privacy
delle informazioni personali, vedi il seguente sito Web di
Pioneer:
http://www.prodjnet.com/privacy.html
Gli utenti privi di connessione a Internet devono riempire la
“scheda di registrazione utenti” e inviarla a Pioneer. Ricevuta la
“scheda di registrazione utenti”, manderemo un “ID di
registrazione” (numero di serie) necessario per attivare il
programma oltre il periodo di prova. Per dettagli sulle
procedure di registrazione dell'utente, consultare il manuale
dell'utente di DJS contenuto nel CD-ROM allegato.
NOTE
• Il numero di serie (ID di registrazione) può venire usato per
una sola copia di DJS installata in un solo computer. Se il
computer viene sostituito o si deve reinstallare DJS, è
necessario registrarsi di nuovo ed ottenere un nuovo “ID di
registrazione” per attivare il programma oltre il periodo di
prova. Inoltre, “ID di registrazione” emesso da Pioneer è
necessario per ottenerne un altro o per ottenere assistenza
postvendita, quindi non mancare di conservarlo al sicuro
anche dopo aver completato la procedura di registrazione.
L'indirizzo della “scheda di registrazione dell'utente” è il
seguente. L'indirizzo da usare può differire a seconda della
propria residenza, ma fare attenzione a mandare la cartolina
all'indirizzo giusto.
<Indirizzo di invio della scheda di registrazione dell'utente>
America settentrionale
PIONEER ELECTRONICS (USA) INC.
BUSINESS SOLUTIONS DIVISION, PRO AUDIO GROUP
2265 East 220th Street, Long Beach, CA 90810, U.S.A (Stati Uniti)
Europa
PIONEER EUROPE NV
MULTIMEDIA DIVISION
Pioneer House, Hollybush Hill, Stoke Poges, Slough SL2 4QP U.K.
(Regno Unito)
IL SUPPORTO IN LINEA
Prima di fare domande sulle norme di uso di DJS e su altri
problemi tecnici, leggere il manuale dell'utente presente nel CDROM allegato e la sezione FAQ del sito Web di supporto tecnico.
Per dettagli sulle modalità di accesso al sito di supporto di DJS,
consultare il manuale dell'utente di DJS. Per avere accesso al
sito di supporto sarà necessario usare il “nome utente ” e il
“password” specificati dall'utente al momento della
registrazione.
Nel porre domande presso il sito di supporto di DJS a proposito
di guasti, fornire il proprio nome, nome del prodotto, ID di
registrazione (numero di serie) del programma, tipo di computer
e sua caratteristiche tecniche (CPU, memoria, altre periferiche
collegate, ecc.), il sistema operativo ed informazioni concrete
sul problema accusato.
Il supporto tecnico è fornito solo a clienti che hanno completato
il processo di registrazione. Fare attenzione a conservare il
“nome utente” ed il “password” scelti durante la registrazione,
oltre all'“ID di registrazione.”
Se si avessero problemi con l'installazione o la registrazione,
consultare il seguente sito Web.
<Domande riguardanti l'installazione e la registrazione
degli utenti>
http://www.prodjnet.com/djs/support/
NOTE
• Per informazioni tecniche riguardanti l'uso di questa unità
con un computer, delle periferiche o altri prodotti non
Pioneer, consultare il proprio negoziante o i fabbricanti dei
rispettivi componenti.
Verranno emessi aggiornamenti per migliorare le funzioni e le
prestazioni del programma DJS.
La registrazione vi permette di avere accesso al sito di supporto
Pioneer e di scaricare aggiornamenti del programma.
Incoraggiamo gli utenti a servirsi di questo servizio di
aggiornamento per tenere aggiornato il proprio programma.
DENUNCIA DI RESPONSABILITÀ
Pioneer non può venire considerata responsabile della
riassegnazione di numeri di serie o ID di registrazione in caso di
perdita. Conservare le proprie informazioni di registrazione e
password in un luogo sicuro.
Tenere presente che la funzione di funzione di trasmissione
delle schede SD (check-out/check-in) non è supportata da
Windows Vista
La funzione di rippaggio di questo programma non è utilizzabile
per CD musicali che non portano uno di questi logo.
®
.
16
It
Page 95

IL DRIVER
IL DRIVER
Questa unità, se collegata ad un computer, può controllare DJS di Pioneer ed altri programmi DJ. Prima di collegare questa unità ad un
computer che usi Windows per usare software DJ. è necessario installarne il driver.
PROMEMORIA
• I driver per Mac OS ed informazioni aggiornare sui fabbricanti di altro software DJ sono disponibili presso il seguente sito web:
http://www.prodjnet.com/support/
Usare il CD-ROM accessorio per installare l'applicativo.
CONTRATTO DI LICENZA D'USO DEL
SOFTWARE
Prima di installare il driver, non mancare di leggere l'“CONTRATTO
DI LICENZA D'USO DEL SOFTWARE” (pag. 13). Installando ed
usando il software vi dichiarate tenuti e rispettare i termini
dell'Accordo.
INSTALLAZIONE DEL DRIVER
Prima dell'installazione (IMPORTANTE)
• Prima di installare il driver, non mancare di leggere
“CONTRATTO DI LICENZA D'USO DEL SOFTWARE”.
• Questa unità può venire collegata ad un computer che utilizzi
uno dei seguenti sistemi operativi:
Windows Vista
Windows Vista
Windows
Windows
Potrebbe anche risultar necessario l'uso di Windows Update per
installare il Service Pack più recente.
• Il programma di installazione del driver viene fornito in 10 lingue
(inglese, francese, tedesco, italiano, olandese, spagnolo, russo,
cinese (semplificato), cinese (tradizionale) e giapponese). Se si
usa Windows di una versione non inclusa, seguire le istruzioni
sullo schermo e scegliere [English (Inglese)] come lingua.
• L'installazione del driver richiede privilegi di amministratore. Per
l'installazione è quindi necessario registrarsi come
amministratore del computer.
• Se un altro programma di Windows è aperto, chiuderlo prima di
iniziare l'installazione del driver.
®
Home Basic, Windows Vista® Home Premium,
®
Ultimate, Windows Vista® Business,
®
XP Home Edition, Windows® XP Professional o
®
2000 Professional.
1 Avviare il computer e registrarsi con privilegi di
amministratore.
2 Caricare il CD-ROM in dotazione nell'unità CD/DVD del
computer.
3 Fare clic su [START]
poi aprire il CD-ROM e fare doppio clic sulla cartella [SEP-C1].
4 Aperta la cartella [SEP-C1] fare doppio clic sul programma di
installazione [MEP-7000[SEP-C1]_#.###.exe].
(#.### indica la versione del driver.)
5 Quando appare la schermata [Scelta della lingua], scegliere
[Italiano] e fare clic su [OK].
• Per interrompere il processo di installazione, fare clic sul
tasto [Annulla].
6 Quando appare la schermata [Licenza], leggere il “Contratto
di licenza d'uso del software”, fare clic sulla casella [Accetto]
e quindi su [OK].
[Risorse del computer (o Computer)],
Italiano
NOTE
• Prima di installare il driver, scollegare il cavo di
alimentazione ausiliaria USB ed il cavo USB che collega
questa unità al computer.
• Se questa unità viene collegata al computer senza
installare il driver, si possono avere problemi dipendenti dal
sistema operativo usato.
• Nel caso che l'installazione del driver venga interrotta a
metà, seguire le procedure seguenti e reinstallare il driver
dal principio.
• Se non si è d'accordo con i termini del “Contratto di licenza
d'uso del software”, fare clic sul tasto [Annulla] per
terminare l'installazione.
17
It
Page 96

IL DRIVER
7 Seguire le istruzioni che appaiono sullo schermo.
• Se la schermata [Protezione di Windows] appare durante
l'installazione, fare clic su [Installa il software del driver]
per continuare l'installazione.
<Per Windows XP>
• Se la schermata [Installazione hardware] appare durante
l'installazione, fare clic su [Continua] per continuare
l'installazione.
8 Ad installazione completa appare il messaggio
[L'installazione è stata completata]. Fare clic sul pulsante
[Fine] per completare il processo.
Collegamento di quest'unità ad un computer
1 Collegare il cavo di alimentazione ausiliaria USB a questa
unità ed al computer.
2 Collegare il cavo USB a questa unità ed al computer.
Nel collegare per la prima volta questa unità al computer e
nello scollegare o collegare un cavo alla porta USB del
computer, questo può visualizzare il messaggio [Installazione
driver di dispositivo in corso]. In tal caso, attendere che
appaia il messaggio [È ora possibile utilizzare i dispositivi].
<Per Windows XP>
• Se durante l'installazione il computer visualizza il messaggio
[Consentire la connessione a Windows Update per la
ricerca di software?] scegliere [No, non ora], poi fare clic
su [Avanti] per continuare l'installazione.
<Per Windows 2000>
• Se la schermata [Firma digitale non trovata] appare
durante l'installazione, fare clic su [Sì] per continuare
l'installazione.
• Se durante l'installazione il computer visualizza il messaggio
[Scegliere una delle seguenti opzioni:] scegliere [Installa
il software automaticamente (scelta consigliata)], poi
fare clic su [Avanti] per continuare l'installazione.
18
It
Page 97

IL DRIVER
• Se la schermata [Installazione hardware] appare durante
l'installazione, fare clic su [Continua] per continuare
l'installazione.
<Per Windows 2000>
• Se la schermata [Firma digitale non trovata] appare
durante l'installazione, fare clic su [Sì] per continuare
l'installazione.
Controllo della versione del driver
Per controllare la versione installata del driver, in Windows fare
clic su [START] [Tutti i programmi] [Pioneer] [MEP-
7000[SEP-C1]] [Utilità di visualizzazione della versione del
MEP-7000[SEP-C1]].
PROMEMORIA
• Questa schermata permette anche di controllare la versione
del firmware installata. Tenere presente però che la versione
del firmware non viene visualizzata se l'SEP-C1 non è collegato
al computer o se il computer non comunica correttamente con
l'SEP-C1.
Versione più recente del driver
Per sapere quale sia la versione più recente del driver, consultare
il seguente sito Web:
http://www.prodjnet.com/support/
Se si usa quest'unità per controllare il software DJS
Leggere le sezioni “USO DI SOFTWARE DJ” (pag. 20) e la “Guida ai
comandi di DJS” (file PDF) prima di tentare di controllare DJS con
questa unità. La “Guida ai comandi di DJS” può venire trovata sotto
il nome [manual_SEP-C1_control_it.pdf] nella cartella [SEP-
C1\Italian] del CD-ROM in dotazione.
Italiano
19
It
Page 98

USO DI SOFTWARE DJ
USO DI SOFTWARE DJ
Caricando il software DJS in dotazione o un altro software per DJ in un computer collegato a questa unità via cavo USB, essa diviene in
grado di controllare il software DJ.
Software DJ supportato
DJS Accessorio standard dell'SEP-C1, il programma all-in-one “DJS” permette l'uso immediato di software DJ.
Software DJ con
supporto della
comunicazione
Software DJ con
supporto MIDI
Stile di riproduzione
Questa unità può venire usata per controllare il software DJ. Se l'SEP-C1 viene usato come manipolatore, potete controllare il vostro
software DJ senza mouse o tastiera con solo i comandi, le funzioni e la comodità della serie CDJ di Pioneer.
I programmi DJ disponibili in commercio che supportano il protocollo di comunicazione dell'SEP-C1 possono
venire usati anche senza un disco di controllo. Per le informazioni più recenti sul software DJ supportato,
consultare il seguente sito Pioneer:
http://www.prodjnet.com/support/
L'SEP-C1 emette dati sulla posizione dei tasti e dei cursori TEMPO in formato MIDI universale, di modo che i
software DJ che supportano MIDI possano venire usati per assegnare i messaggi MIDI dell'unità, emettendo
quindi segnale MIDI di controllo.
Cavo di alimentazione
ausiliaria USB
Computer
Cavo USB
20
It
Page 99

USO DI SOFTWARE DJ
PREPARAZIONE DEL PROPRIO SOFTWARE DJ
Prima di poter usare il software DJ, dovete preparare il vostro computer ed il software DJ. Non collegare l'SEP-C1 al computer se non se
ne è installato il driver!
Software DJ
Operazione DJS
Controllare le impostazioni e l’ambiente
operativo del computer.
Accendere il computer.
Installare il driver.
Collegamento di alimentazione via bus fra
quest'unità ed il computer.
Confermare il “Corretto collegamento USB
col computer?”
Installare il software DJ. Vedi pag. 13 di questo manuale (“IL
Avviare il software DJ. Vedi il Manuale dell’utente del software DJS
Iniziare la riproduzione DJ.
Vedi pag. 13 di questo manuale (“IL
SOFTWARE DJS”).
I sistemi operativi supportati sono solo
Windows Vista, Windows XP, Windows 2000 e
successivi. DJS supporta solo il sistema
operativo Microsoft Windows.
Vedi la pag. 17 di questo manuale (“IL DRIVER”).
Vedi pag. 9 di questo manuale (“COLLEGAMENTI”).
Vedi la pag. 19 di questo manuale (“IL DRIVER, Controllo della versione del driver”).
SOFTWARE DJS”).
(file PDF contenuto nel CD-ROM allegato).
Per quanto riguarda le operazioni di
controllo fondamentali, consultare la Guida
ai comandi del software DJS.
apposito con
supporto della
comunicazione
Consultare il manuale d’istruzioni del proprio
software DJ.
I sistemi operativi supportati sono solo
Windows Vista, Windows XP, Windows 2000 o
Mac OS versione 10.3.9 e successivi.
Consultare il manuale d’istruzioni del proprio
software DJ.
Consultare il manuale d’istruzioni del
proprio software DJ.
PROMEMORIA
• L'installazione di un driver è necessaria per poter usare un software DJ (un driver per Windows è presente nel CD-ROM in dotazione).
Dal sito di Pioneer è possibile scaricare driver aggiornati e driver per MAC OS.
http://www.prodjnet.com/support/
Software DJ
con supporto MIDI
Italiano
CONTROLLO DEL COMPUTER
ATTRAVERSO IL PROTOCOLLO DI
CONTROLLO DEDICATO
L'SEP-C1 può venire usato per controllare non solo il software DJS
accessorio, ma anche altri software DJ che supportano il
protocollo di comunicazione speciali dell'SEP-C1.
1 Collegarsi al computer.
Sul display centrale appare il logo [PRO DJ].
2 Avviare il software DJ.
Se la comunicazione viene stabilita con il software DJ, i tasti,
la manopola di comando ed il cursore di regolazione TEMPO
possono venire usati per il controllo e il display centrale
dell'SEP-C1 ed i display A/B mostrano i tempi ed il titolo del
brano attuale insieme al nome dell'artista.
PROMEMORIA
• Alcuni software DJ non supportano la visualizzazione delle
informazioni menzionate.
21
It
Page 100

USO DI SOFTWARE DJ
Per DJS:
Il controllo può venire fatto durante la visione delle schermata
BROWSE, EFFECT e MIX del display centrale. Per dettagli in
proposito, consultare il capitolo sullo “stile manipolatore” della
Guida ai comandi di DJS dell'SEP-C1 (file PDF del CD-ROM
allegato).
PROMEMORIA
• Se la schermata UTILITY è visualizzata nel display centrale, i
pulsanti del display centrale e la manopola selettrice non
possono venire usati per controllare il software DJ.
USO DI MIDI PER IL CONTROLLO DEL
COMPUTER
MIDI (Musical Instrument Digital Interface) è un protocollo
standardizzato per governare la trasmissione di dati fra strumenti
elettronici e computer.
L'SEP-C1 usa MIDI per emettere i suoi dati e stato operativi ad un
computer collegato ad esso via cavo USB. Se il software DJ
supporta l'uso di MIDI via USB per gestire le trasmissioni MIDI da
parte dell'SEP-C1, l'SEP-C1 può venire usato per controllare il
software DJ.
Per maggiori informazioni sui messaggi emessi dall'SEP-C1,
consultare la sezione “TABELLA DEI MESSAGGI MIDI” (pag. 23).
Impostazione di un canale MIDI
L'impostazione del canale MIDI va fatta nella schermata UTILITY.
1 Premere il tasto UTILITY.
2 Premere il tasto [PC].
Il display centrale mostra il menu di impostazione del canale
MIDI.
• Il controller A usa lo stesso canale del display centrale,
mentre il controller B ne usa uno differente. (Le
impostazioni predefinite hanno il controller A ed il display
centrale regolati sul canale 1 e il controller B sul canale 2).
3 Premere la manopola selettrice o il tasto di selezione verso il
basso (
L'icona si sposta verso destra.
4 Girare la manopola selettrice per cambiare il valore.
Si possono impostare valori fra 1 a 16.
5 Premere la manopola selettrice per confermare il valore
scelto.
• Premere il tasto di selezione verso l'alto () per cancellare
).
l'operazione e tornare alla schermata UTILITY.
1 Collegarsi al computer.
Sul display centrale appare il logo [PRO DJ].
2 Avviare il software DJ.
Se la comunicazione col programma DJ viene stabilita, l'SEPC1 funziona come un controller MIDI e lo stato del controller
A/B e dei pulsanti e controlli del display centrale viene emesso
sotto forma di messaggi MIDI.
PROMEMORIA
• Mentre la schermata UTILITY è visualizzata nel display centrale,
questo non emette messaggi MIDI.
22
It
 Loading...