

Page 1

ENGLISH ESPAÑOL DEUTSCH FRANÇAIS
ITALIANO NEDERLANDS
SYSTEM CONTROL TUNER/CD
OPTICAL DIGITAL REFERENCE SYSTEM
Owner’s Manual
RS-D7R
Page 2

1
Contents
Key Finder .................................................... 4
Head Unit .......................................................... 4
Remote Control ................................................ 4
Opening and Closing
the Remote Control Cover ........................ 5
-
When the Cover is Closed
-
When the Cover is Open
Remote Control and Care .......................... 7
Using the Remote Control ................................ 7
Batteries ............................................................ 8
Before Using This Product ...................... 9
About This Product .......................................... 9
About This Manual ............................................ 9
Resetting the Microprocessor ............................ 9
Precaution ........................................................ 10
In Case of Trouble .......................................... 10
Detaching and Replacing
the Front Panel .................................. 11
Theft Protection .............................................. 11
-
Detaching the Front Panel
-
Replacing the Front Panel
-
Warning Tone
Setting Up the Environment
for Use ................................................ 13
Setting Up the Environment for Use .............. 13
Operation at the Initial Setting Screen ............ 13
-
Accessing the Initial Setting Screen
-
Exit from the Initial Setting Screen
Setting the Clock ............................................ 15
-
Switching to the Clock Adjustment Screen
-
Setting the Clock
-
Setting the Clock by Time Signal
-
Off Clock
-
Returns to the Initial Setting Screen
Setting the Display .......................................... 17
-
Switching to the Display Setting Screen
-
Setting the Brightness
-
Setting the Dimmer
-
Selecting the Wallpaper
-
Selecting the Reverse Mode
-
Returns to the Initial Setting Screen
Setting the General Environment .................... 19
-
Switching to the General Environment
Setting Screen
-
Switching the AUX Mode
-
Setting the Warning Tone
-
Turning the Confirmation Sound ON/OFF
-
Setting the DAB Priority
-
Switching the Auto PI Seek
-
Changing the FM Tuning Step
-
Returns to the Initial Setting Screen
Setting the Menu Lock .................................... 22
-
About the Menu Lock
-
Switching to the Menu Lock ON/OFF
Basic Operation ...................................... 23
To Listen to Music .......................................... 23
Switching Power OFF .................................... 24
Page 3

Tuner Operation ...................................... 25
Basic Operation of Tuner ................................ 25
Operation at the Tuner Setting Screen ............ 26
-
Accessing the Tuner Setting Screen
-
Exit from the Tuner Setting Screen
Operating Each function .................................. 27
-
Best Stations Memory
-
Local Seek Tuning
-
Switching to the Preset Tuning Screen
-
Preset Tuning
Using the RDS Functions ........................ 29
What is RDS? .................................................. 29
Alternative Frequency function ...................... 29
-
Activating/Deactivating the AF function
PI Seek function .............................................. 30
-
PI Seek
-
Auto PI Seek (for preset station)
PTY function .................................................. 31
-
Searching the PTY
-
News Program Interruption Setting
-
PTY Alarm
-
Canceling Announcements
-
PTY List
Traffic Announcement Standby function ........ 34
-
Activating/Deactivating the TA function
-
Canceling Traffic Announcements
-
Adjusting the TA Volume
-
TP Alarm function
Regional function ............................................ 36
-
Activating the Regional function
Radio Text ...................................................... 37
-
Radio Text Display
-
Storing Radio Text in Memory
-
Recalling Preset Radio Text
Built-in CD Player Operation ................ 39
Basic Operation of Built-in CD Player .......... 39
Operation at the Built-in CD
Setting Screen .......................................... 41
-
Accessing the Built-in CD Setting Screen
-
Exit from the Built-in CD Setting Screen
Operating Each function .................................. 42
-
Repeat Play
-
Random Play
-
Scan Play
-
Pause
-
Changing the Display Mode
-
Disc Title Input
Multi-CD Player Operation .................... 45
Basic Operation of Multi-CD Player .............. 45
Operation at the Multi-CD Setting Screen ...... 46
-
Accessing the Multi-CD Setting Screen
-
Exit from the Multi-CD Setting Screen
Operating Each function .................................. 47
-
Repeat Play
-
Random Play
-
Scan Play
-
Pause
-
Changing the Display Mode
-
Disc Number Search
Disc Title ........................................................ 50
-
Disc Title Input
-
Selecting Discs by Disc Title List
2
ENGLISH ESPAÑOL DEUTSCH FRANÇAIS
ITALIANO NEDERLANDS
Page 4

Contents
3
DVD Player Operation ............................ 53
Basic Operation of DVD Player ...................... 53
Operation at the DVD Setting Screen ............ 54
-
Accessing the DVD Setting Screen
-
Exit from the DVD Setting Screen
Operating Each function .................................. 55
-
Repeat Play
-
Random Play
-
Scan Play
-
Pause
-
Changing the Display Mode
-
Disc Number Search
-
Disc Title Input
DAB Tuner Operation .............................. 58
Basic Operation of DAB Tuner ...................... 58
Operation at
the DAB Tuner Setting Screen ................ 59
-
Accessing the DAB Tuner Setting Screen
-
Exit from the DAB Tuner Setting Screen
Operating Each function .................................. 60
-
Switching to the Preset Tuning Screen
-
Preset Tuning
-
Announcement Support function
-
Service Component function
-
Dynamic Label function
-
Available PTY function
-
Service Follow function
TV Tuner Operation .................................. 69
Basic Operation of TV Tuner .......................... 69
Operation at
the TV Tuner Setting Screen .................... 70
-
Accessing the TV Tuner Setting Screen
-
Exit from the TV Tuner Setting Screen
Operating Each function .................................. 71
-
Best Stations Sequential Memory
-
Switching to the Preset Tuning Screen
-
Preset Tuning
Other Functions ........................................ 73
Using the AUX Source .................................... 73
-
Selecting the AUX Source
-
AUX Title Input
Cellular Telephone Muting .............................. 73
Turn OFF the Display Indication .................... 74
CD Player and Care .................................. 75
CD player and care .......................................... 75
CD-R/CD-RW discs ........................................ 75
Built-in CD Player’s Error Message .............. 76
Connecting the Units .............................. 77
Setting Examples ............................................ 78
Power Cable Connection ................................ 79
Attaching the Noise Filter .............................. 80
System Connection .......................................... 81
System Example .............................................. 82
Installation ................................................ 84
Installation with the rubber bush .................... 84
Removing the unit .......................................... 85
Installing the Remote Control Unit ...... 86
Fitting the Remote Control Unit ...................... 86
-
Fitting horizontally
-
Fitting vertically
Installation Using Only the Mounting Base .... 86
Installation Using the Mounting Base
and the Bracket ........................................ 87
-
Method A
-
Method B
Specifications .......................................... 89
Page 5
4
ENGLISH ESPAÑOL DEUTSCH FRANÇAIS
ITALIANO NEDERLANDS
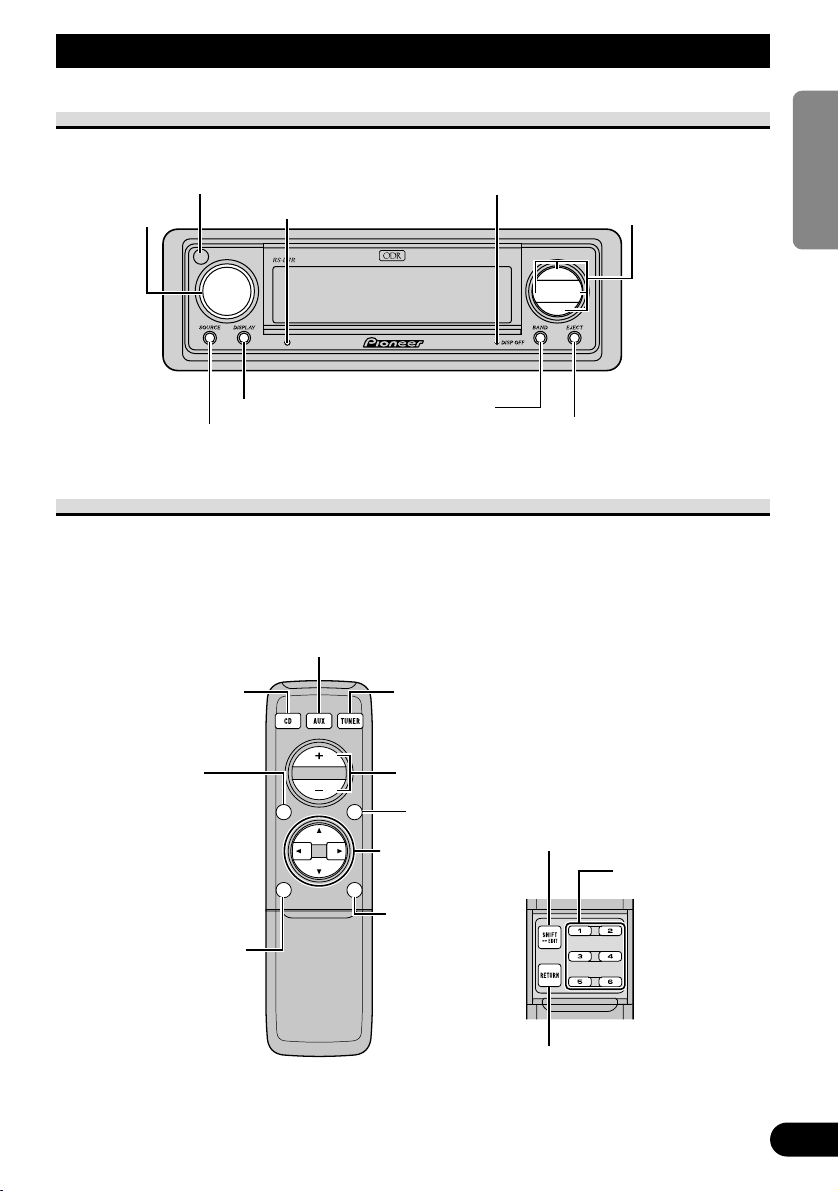
Key Finder
Head Unit
Remote Control
In this system, the available functions and the menu display vary depending on the
condition of the remote controller in use. Opening the cover enables the SHIFT, RETURN
and FUNCTION buttons 1–6 inside the unit. For more details, refer to the page 5.
• When operating the remote control, be sure to point it to the signal receiver on the head unit. If not,
it may not operate properly.
FUNCTION
buttons 1–6
BAND button
RETURN button
MENU button
VOLUME
SHIFT button
Closed state Open state
AUX button
5/∞/2/3 buttons
TUNER button
CD button
TA button
ATT button
This lets you quickly
lower volume level
(by about 90%). Press
once more to return to
the original volume
level.
BAND button
DISPLAY button
SOURCE button
RESET button
VOLUME
5/∞/2/3 buttons
EJECT/OPEN button
DISPLAY OFF indicator
Signal receiver
Page 6
5
Key Finder
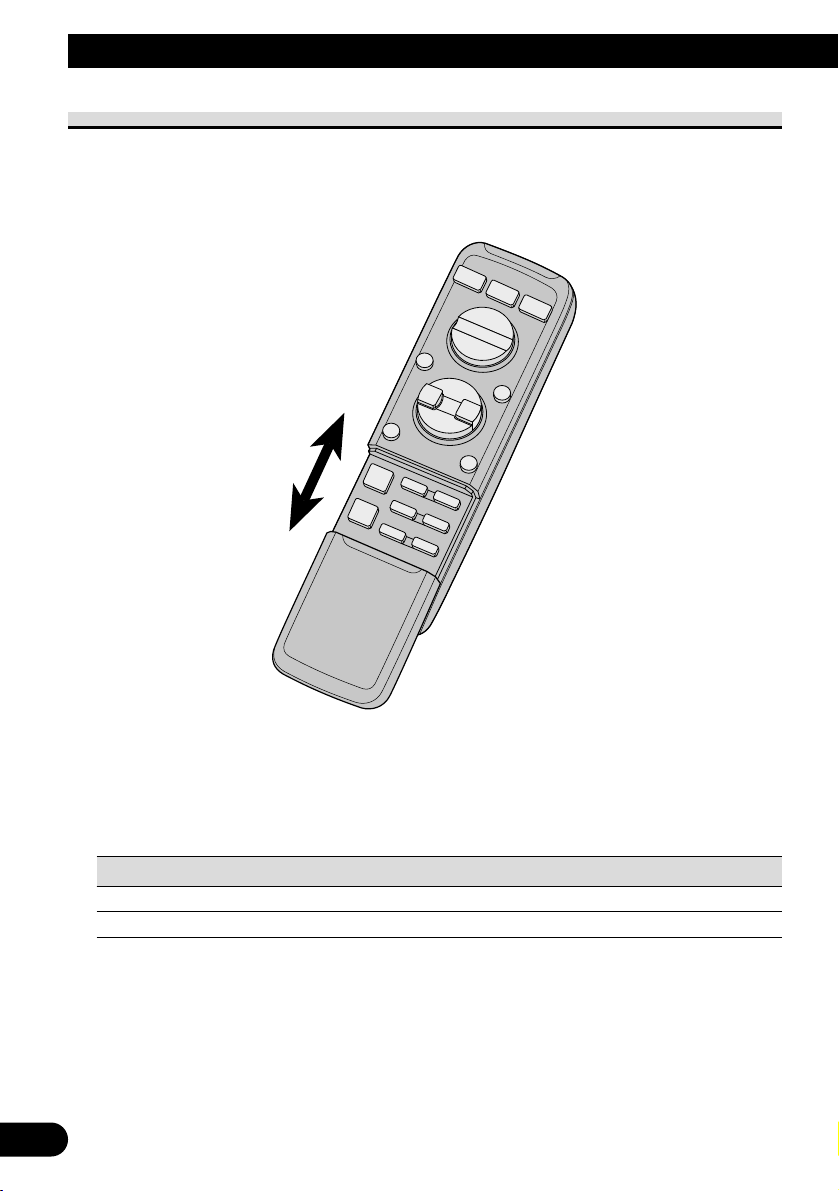
Opening and Closing the Remote Control Cover
When the remote control is opening the cover enables to operate the SHIFT, RETURN and
FUNCTION buttons 1–6 inside the unit.
Menu displays with cover open and closed in this system, the available functions and the
menu display vary depending on the condition of the remote control in use.
Remote control Menu display
Cover closed Closed State
Cover open Open State
Page 7
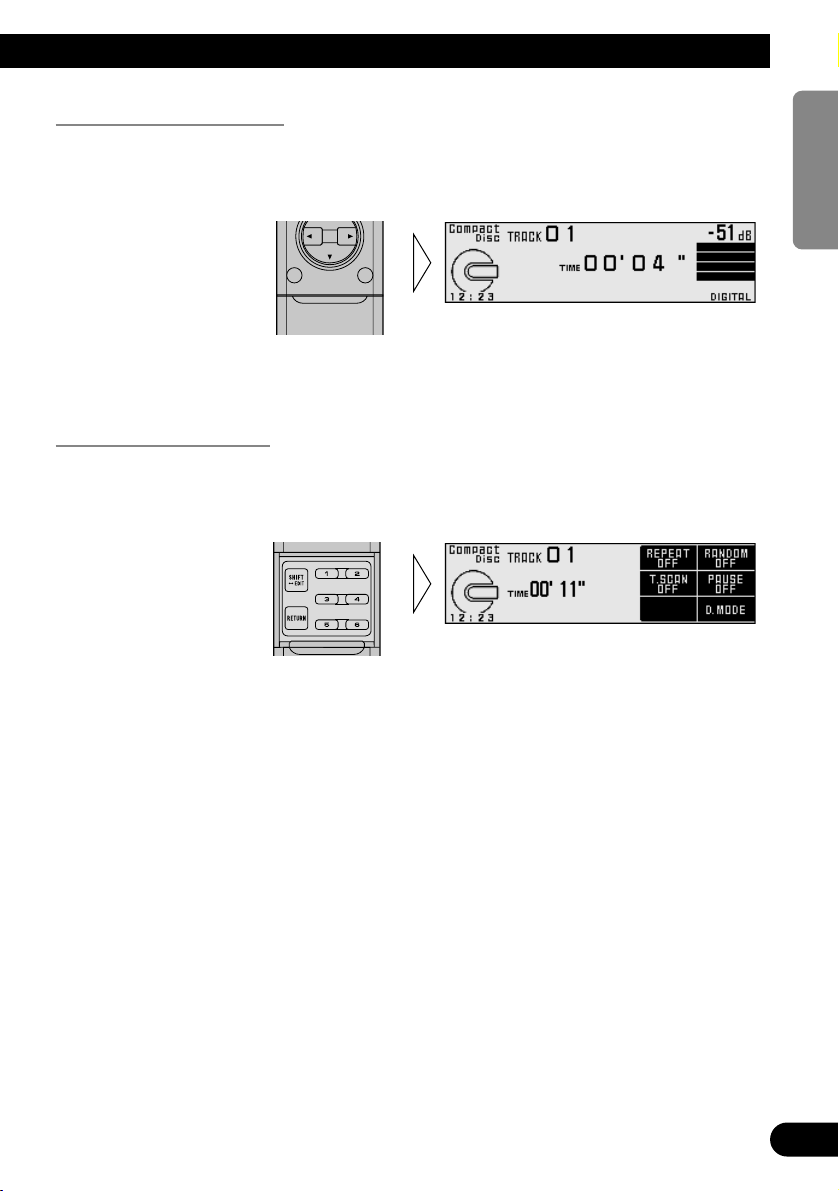
When the Cover is Closed
Closing the cover of the remote control makes the menu display to the closed state.
Menu display in closed state
Example: Built-in CD Screen
Note:
• Menu display in closed state: Current mode and functions which are ON are displayed.
When the Cover is Open
Opening the cover of the remote control makes the menu display to the open state.
Menu display in open state
Example: Built-in CD Setting Screen
Note:
• Positions of menu items on the display correspond to the positions of FUNCTION buttons 1–6.
• Menu display in open state: Using FUNCTION buttons 1–6, operable functions are displayed.
When the cover is closed in the middle of operation
• Closing the cover during operation releases the previous operation and returns the menu display to
the closed mode.
6
ENGLISH ESPAÑOL DEUTSCH FRANÇAIS
ITALIANO NEDERLANDS
Page 8

7
Remote Control and Care
Using the Remote Control
This product is equipped with a remote control.
You can perform some operations with the head unit, however, most of operations can be
conducted with the remote control.
• Point the remote control in the direction of the signal receiver to operate.
• When the remote control is not in use, attach it firmly to the provided mounting base.
Precaution:
• Do not store the remote control in high temperatures or direct sunlight.
• The remote control may not function properly in direct sunlight.
• Do not let the remote control fall onto the floor, where it may become jammed under the brake or
accelerator pedal.
Page 9
8
ENGLISH ESPAÑOL DEUTSCH FRANÇAIS
ITALIANO NEDERLANDS
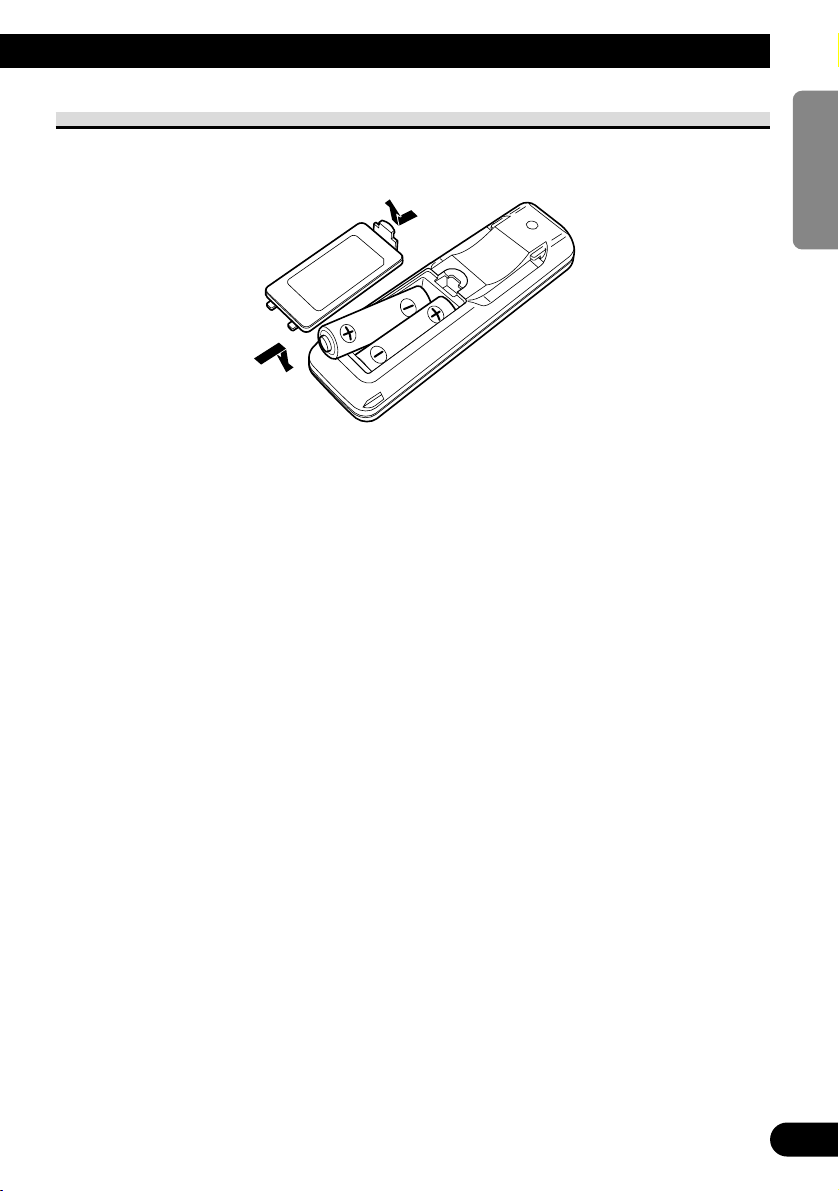
Batteries
• Remove the cover on the back of the remote control and insert the batteries
with the (+) and (–) poles pointing in the proper direction.
Precaution:
• Use only AAA or IEC R03 1.5 V batteries.
• Remove the batteries if the remote control is not used for a month or longer.
• Do not attempt to recharge the supplied batteries.
• Do not mix new and used batteries.
• In the event of battery leakage, wipe the remote control completely clean and install new
batteries.
• When disposing of used batteries, please comply with governmental regulations or environmental
public institution’s rules that apply in your country/area.
Page 10

9
Before Using This Product
About This Product
The tuner frequencies on this product are allocated for use in Western Europe, Asia, the
Middle East, Africa and Oceania. Use in other areas may result in improper reception. The
RDS function operates only in areas with FM stations broadcasting RDS signals.
About This Manual
This product features a number of sophisticated functions ensuring superior reception and
operation. All are designed for the easiest possible use, but many are not self-explanatory.
This operation manual is intended to help you benefit fully from their potential and to
maximize your listening enjoyment.
We recommend that you familiarize yourself with the functions and their operation by
reading through the manual before you begin using this product. It is especially important
that you read and observe the “Precaution” on page 10 and in other sections.
This manual mainly explains the remote control operation. In some functions, you can perform the same operations with the head unit, however, the remote control offers a number
of buttons such as ATT, TA, SHIFT, MENU, RETURN and FUNCTION buttons 1–6
which are not provided on the head unit. And most of operations can be conducted with the
remote control.
Resetting the Microprocessor
The microprocessor must be reset under the following conditions:
When using this product for the first time after installation.
When the machine fails to operate properly.
When strange (incorrect) messages appear on the display.
• To reset the microprocessor, press the RESET button on the head unit with a
pen tip or other pointed instrument.
Page 11

10
ENGLISH ESPAÑOL DEUTSCH FRANÇAIS
ITALIANO NEDERLANDS
Precaution
• A “CLASS 1 LASER PRODUCT” label is affixed to the bottom of the player.
• The Pioneer CarStereo-Pass is for use only in Germany.
• Keep this manual handy as a reference for operating procedures and precautions.
• Always keep the volume low enough for outside sounds to be audible.
• Protect the product from moisture.
• If the battery is disconnected, the preset memory will be erased and must be reprogrammed.
In Case of Trouble
Should this product fail to operate properly, contact your dealer or nearest authorized
Pioneer Service Station.
CLASS 1
LASER PRODUCT
Page 12
11
Detaching and Replacing the Front Panel
Theft Protection
The front panel of the head unit is detachable to discourage theft.
Precaution:
• Never use force or grip the display tightly when removing or replacing the front panel.
• Avoid subjecting the front panel to excessive shocks.
• Keep the front panel out of direct sunlight and high temperatures.
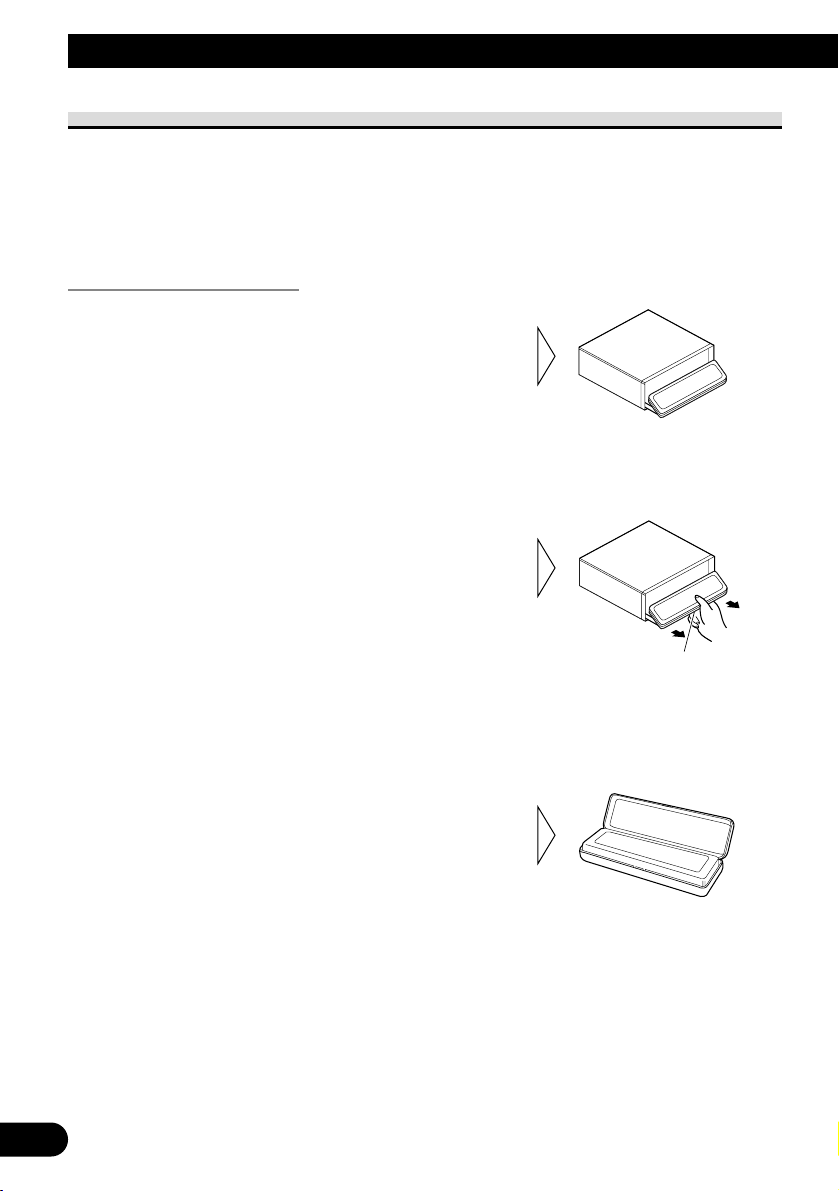
Detaching the Front Panel
Precaution:
• A few seconds after turning the ignition switch to ON/OFF, the front panel automatically moves.
When this happens, your fingers may become jammed in the panel, so keep your hands away from
it.
Note:
• When removing the front panel, be sure to hold the corrugated release section on the rear of the
front panel while pulling.
3. Use the protective case provided to store/carry the
detached front panel.
2. Slide and remove the front
panel toward you.
Take care not to grip the front
panel tightly or drop it.
1. Open the front panel.
Release Section
Page 13

Replacing the Front Panel
1. Make sure the inner cover is closed.
Warning Tone
If the front panel is not detached within 5 seconds after the ignition is turned off, a warning
tone will sound.
Note:
• You can cancel the Warning Tone function. (Refer to page 19.)
2. Replace the front panel by
clipping it into place.
12
ENGLISH ESPAÑOL DEUTSCH FRANÇAIS
ITALIANO NEDERLANDS
Page 14
13
Setting Up the Environment for Use
Setting Up the Environment for Use
Choose the way to use the head unit, including adjustment of clock and selection of
wallpaper. Some functions are not available unless their setting is selected. Set up the environment to suit the system to be used.
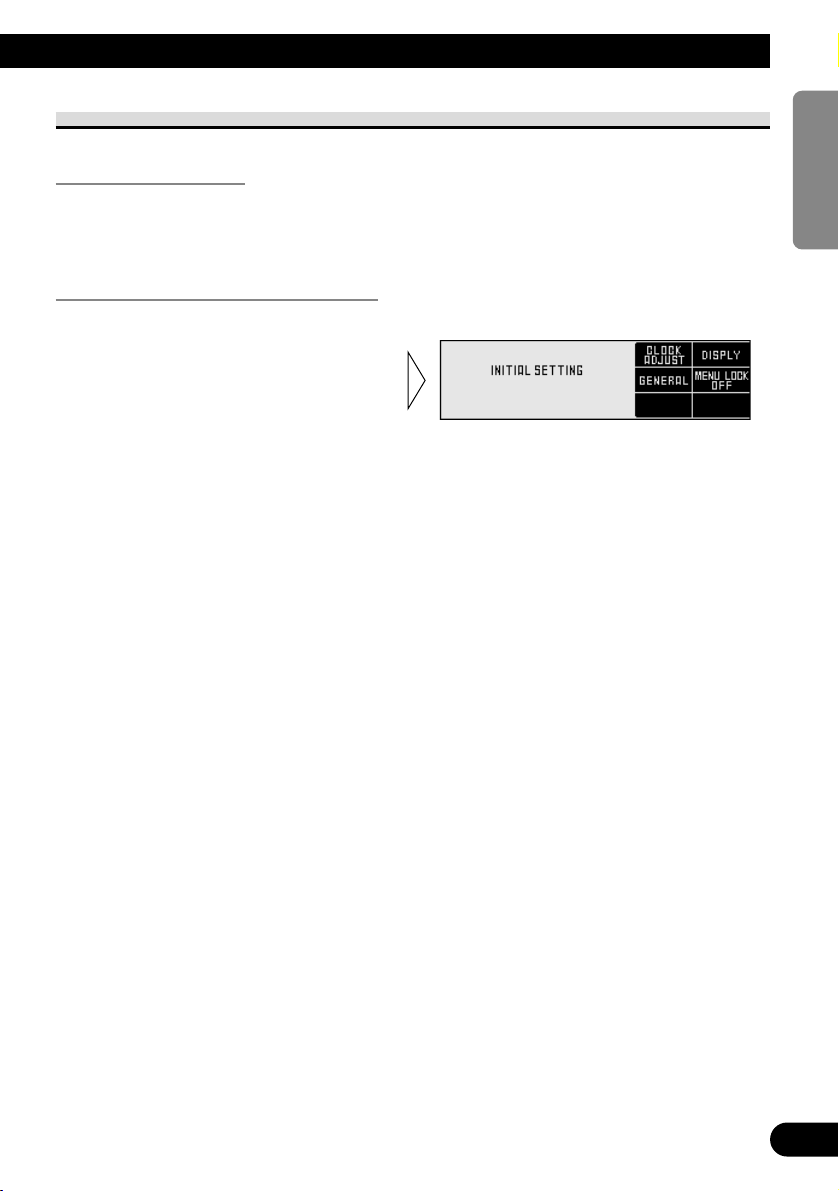
Operation at the Initial Setting Screen
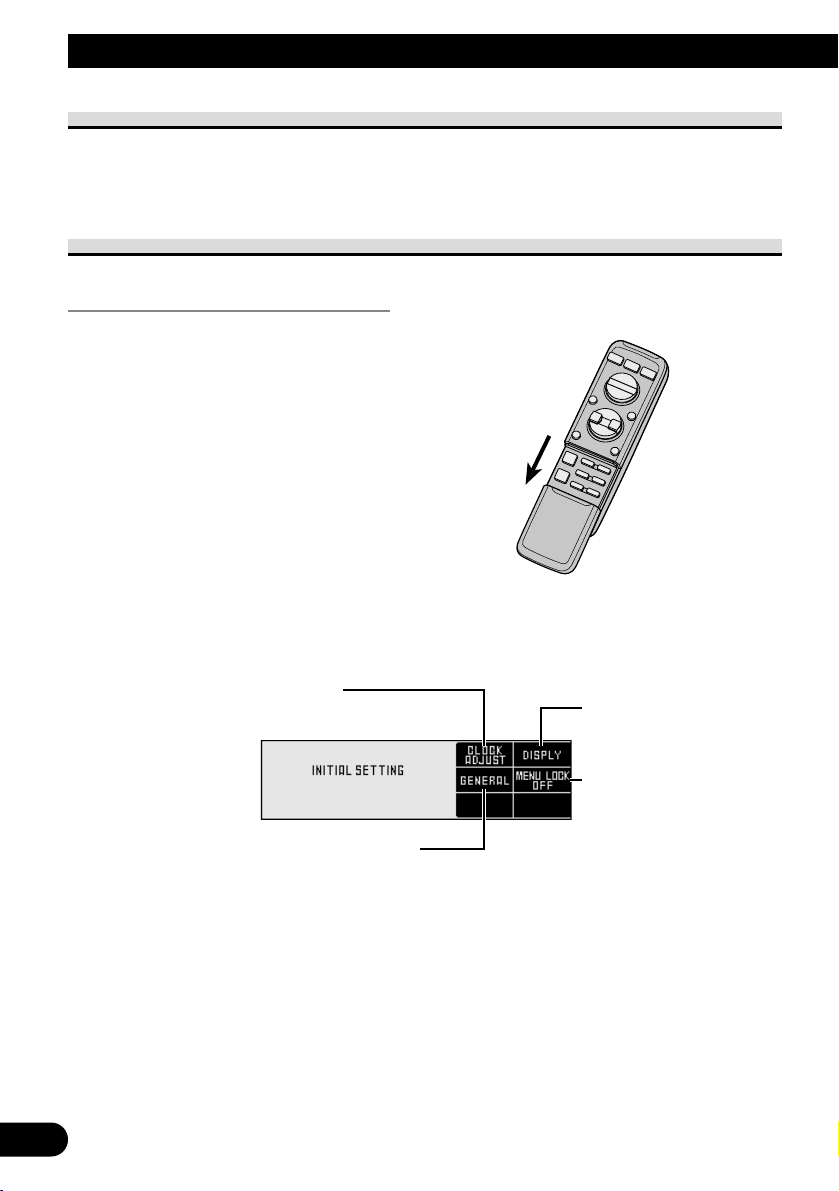
Accessing the Initial Setting Screen
7 Initial Setting Screen
1. Open the cover of the remote
control.
2. Press the SHIFT button.
This switches to Initial Setting Screen.
3. Select the function by pressing
the FUNCTION buttons 1–4.
Setting the Clock
(See page 15.)
Setting the Display
(See page 17.)
Setting the General Environment
(See page 19.)
Setting the Menu Lock
(See page 22.)
Page 15
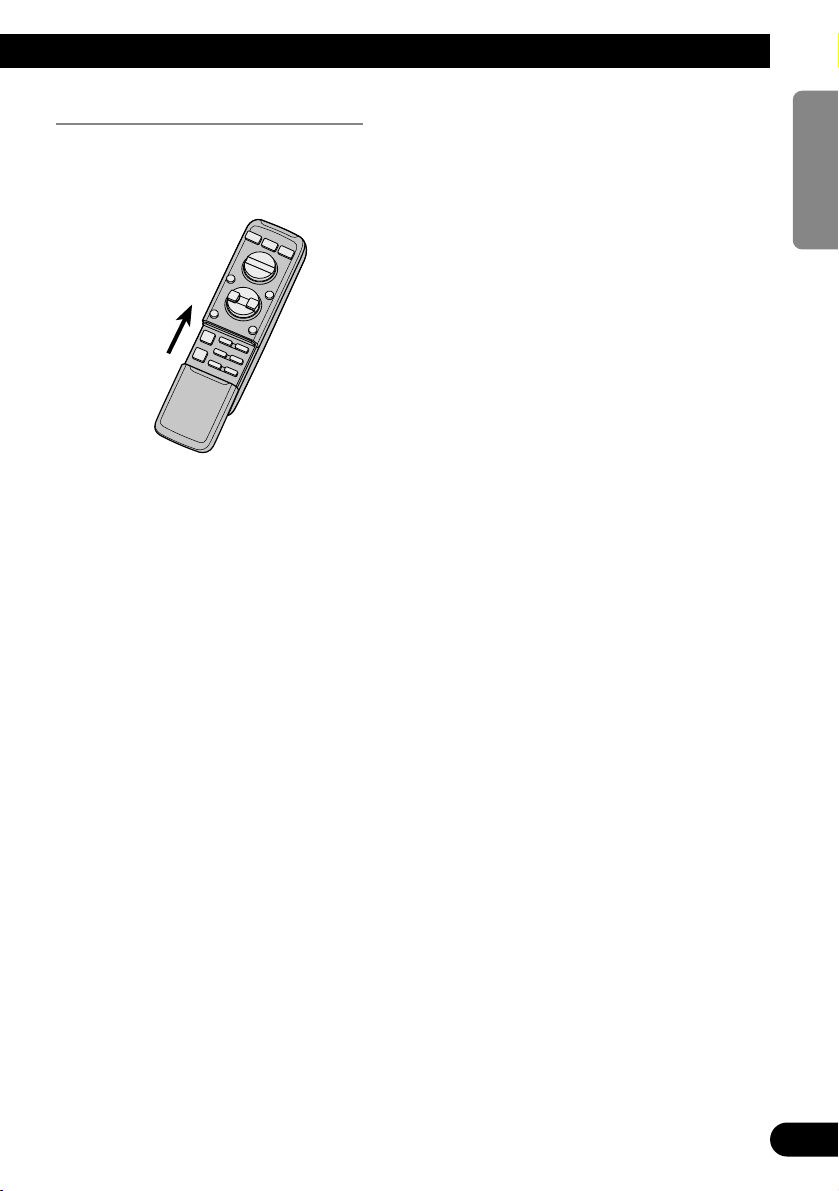
Exit from the Initial Setting Screen
• Close the cover of the remote control.
14
ENGLISH ESPAÑOL DEUTSCH FRANÇAIS
ITALIANO NEDERLANDS
Page 16
15
Setting Up the Environment for Use
Setting the Clock
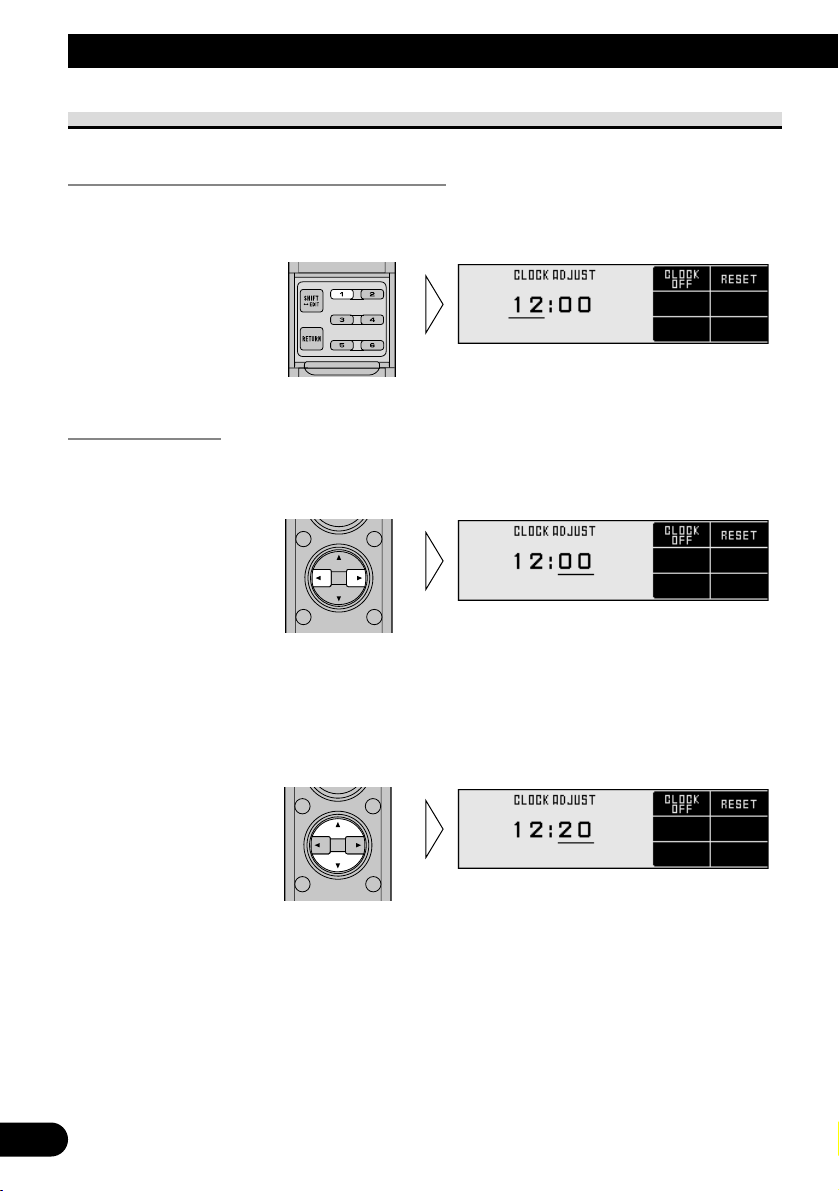
Switching to the Clock Adjustment Screen
• Press the FUNCTION button 1 on Initial Setting Screen.
This switches to Clock Adjustment Screen and enables clock setting.
Setting the Clock
1. Press the 2/3 buttons and move the cursor to the section (hour, minute) to
be adjusted.
2. Press the 5/∞ buttons to set the clock.
Holding these buttons down extends the operations continuously.
Note:
• Seconds are not displayed. However, when releasing the buttons after setting the time, the clock
starts from zero second.
Page 17
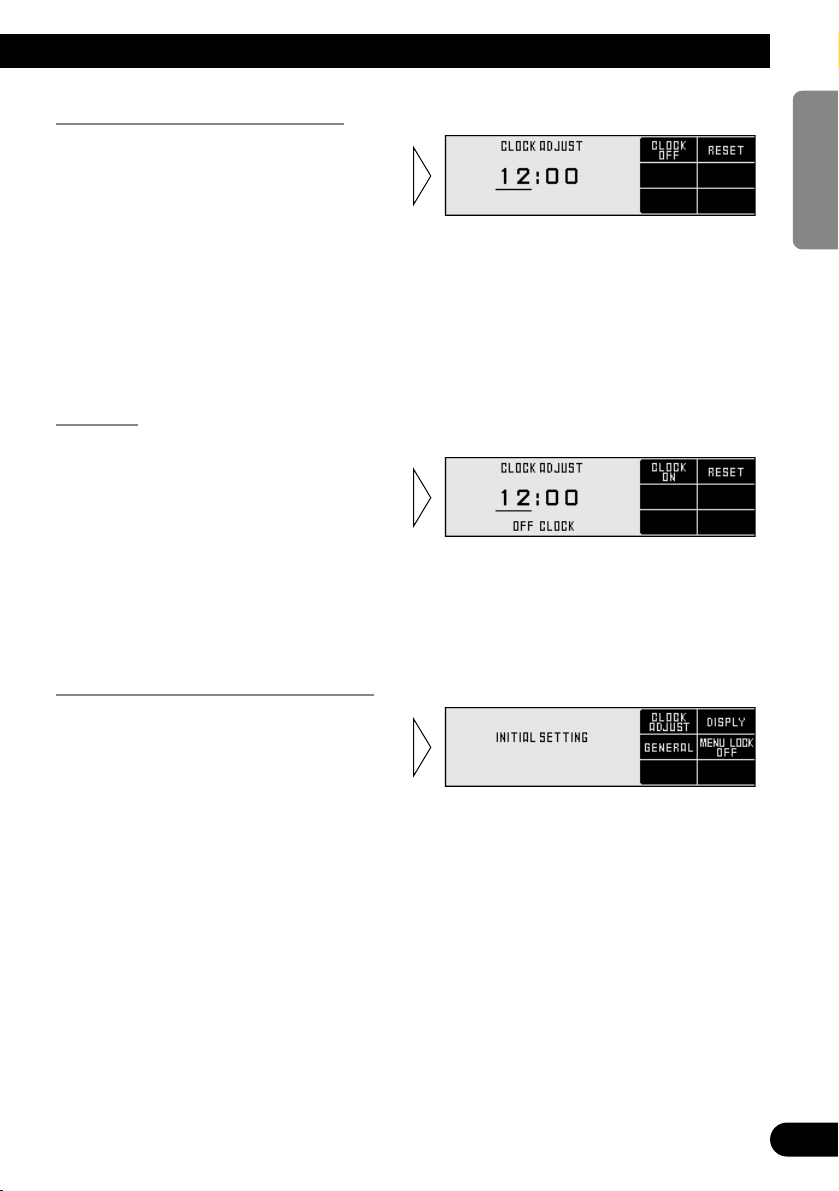
Setting the Clock by Time Signal
Note:
• From 00 to 29 minutes, the hour remains the same, making the minute display “00”. From 30 to 59
minutes, it is rounded up to the next hour.
Off Clock
When the sources are OFF, the Time appears on the display.
Note:
• When the display shows the operation screen of each source, the clock time is always displayed on
the screen.
Returns to the Initial Setting Screen
• Press the RETURN button.
The display returns to Initial Setting
Screen.
• Press the FUNCTION button 1
on Clock Adjustment Screen
switches the Clock Display
ON/OFF.
The minute display is reset to 00.
• Press the FUNCTION button 2
on Clock Adjustment Screen to
reset the minute display.
As the clock starts from zero seconds
when pressing the button, the clock can
be set using the time signal (radio, telephone, etc).
16
ENGLISH ESPAÑOL DEUTSCH FRANÇAIS
ITALIANO NEDERLANDS
Page 18
17
Setting Up the Environment for Use
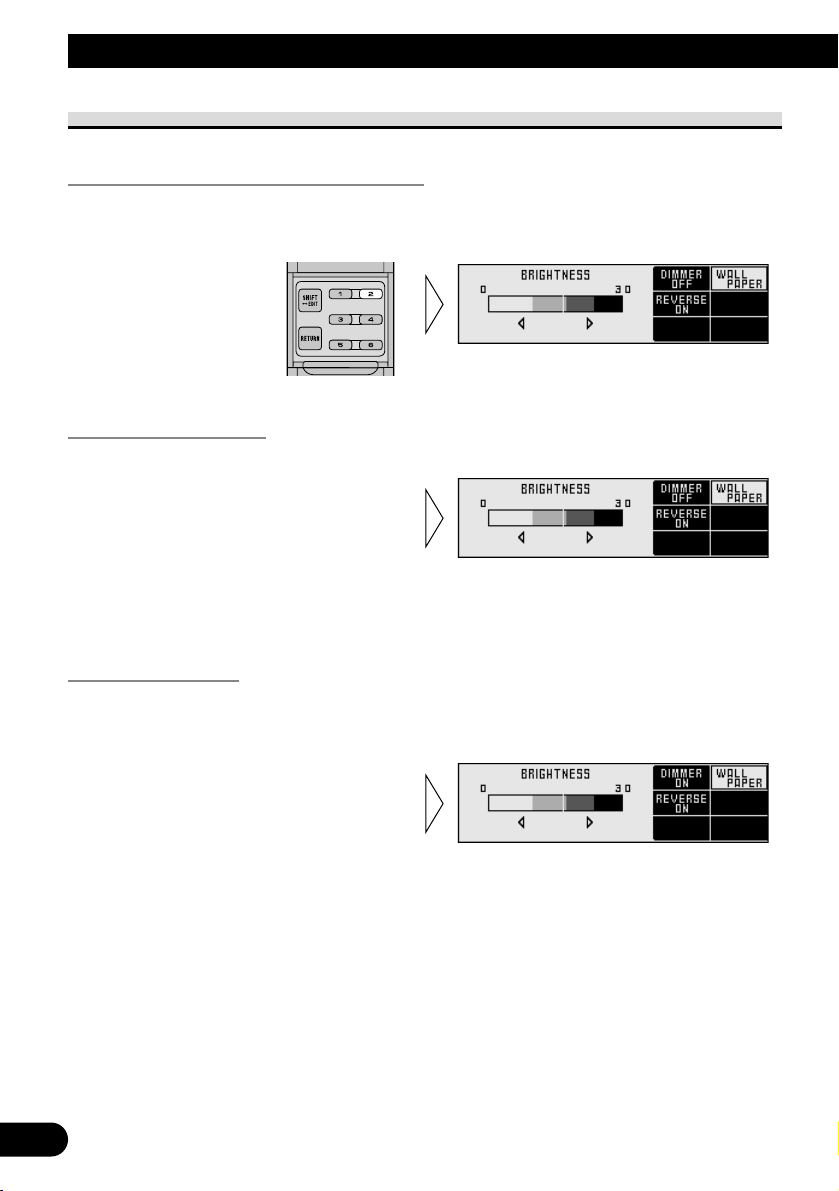
Setting the Display
Switching to the Display Setting Screen
• Press the FUNCTION button 2 on Initial Setting Screen.
This switches to Display Setting Screen and enables display setting.
Setting the Brightness
If it is hard to read the display, you can adjust the brightness for better legibility.
Setting the Dimmer
To enable this product’s display from being too bright at night, when the vehicle’s head
lights are turned ON the display is dimmed.
You can switch this function ON/OFF.
• Press the FUNCTION button 1
on Display Setting Screen
switches the Dimmer ON/OFF.
• Press the 2/3 buttons on
Display Setting Screen adjusts
the brightness.
The display shows “0” – “30”.
Page 19
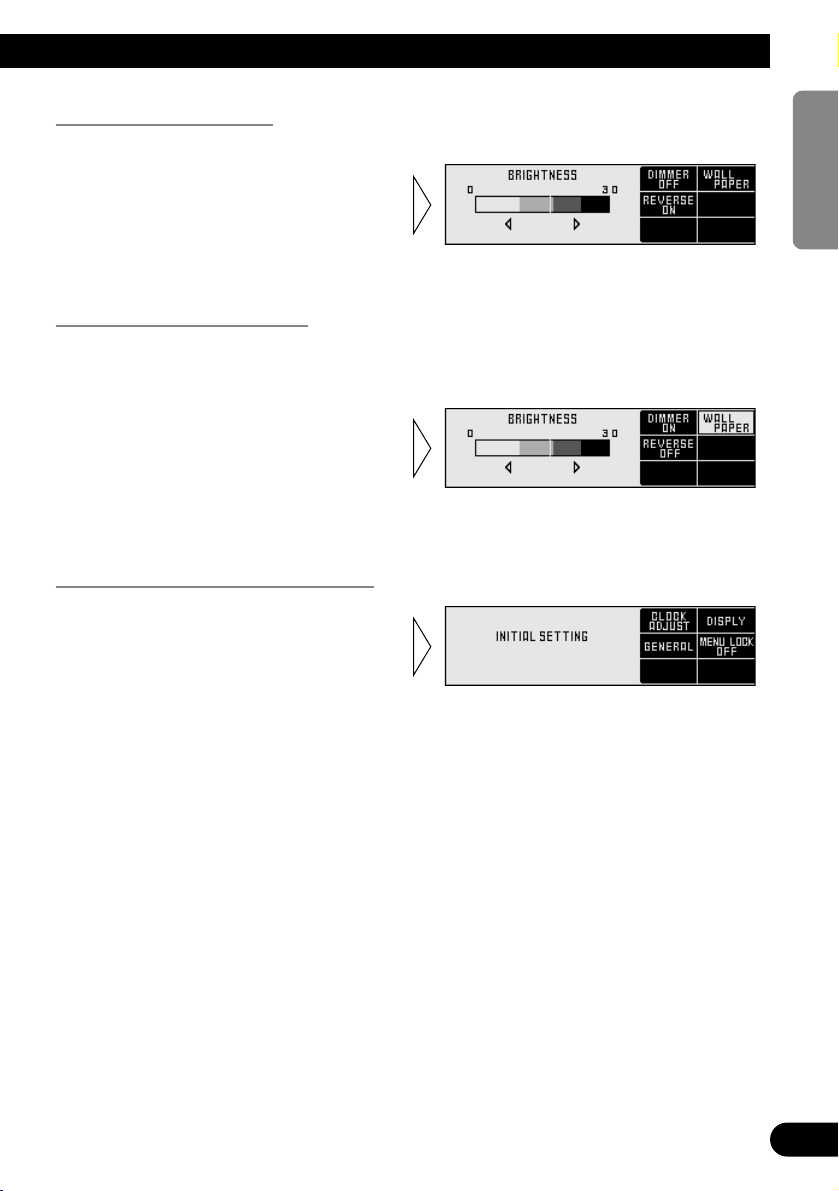
Selecting the Wallpaper
This product is equipped with three types of wallpaper.
Selecting the Reverse Mode
If you do not perform an operation within about 30 seconds, screen indications start to
reverse, and then continue reversing every 10 seconds. The initial setup is Reverse Mode
ON.
Returns to the Initial Setting Screen
• Press the RETURN button.
The display returns to Initial Setting
Screen.
• Press the FUNCTION button 3
on Display Setting Screen
switches the Reverse Mode
ON/OFF.
• Press the FUNCTION button 2
on Display Setting Screen
switches the Wallpaper.
18
ENGLISH ESPAÑOL DEUTSCH FRANÇAIS
ITALIANO NEDERLANDS
Page 20
19
Setting Up the Environment for Use
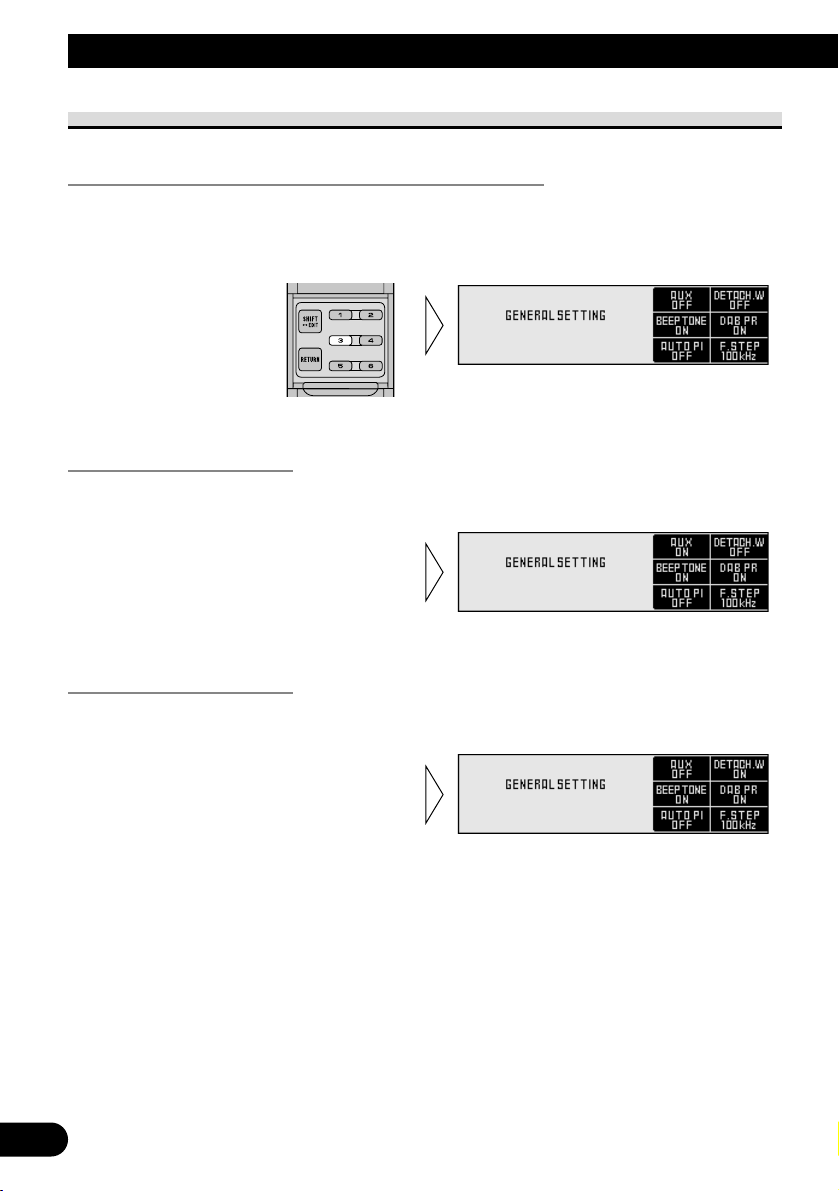
Setting the General Environment
Switching to the General Environment Setting Screen
• Press the FUNCTION button 3 on Initial Setting Screen.
This switches to General Environment Setting Screen and enables general environment
setting.
Switching the AUX Mode
It is possible to use auxiliary (AUX) equipment with this product.
Activate the AUX mode when using external equipment with this product.
Setting the Warning Tone
You can switch the Warning Tone function ON/OFF. (Refer to “Warning Tone” on
page 12.)
• Press the FUNCTION button 2
on General Environment Setting
Screen switches the Warning
Tone ON/OFF.
• Press the FUNCTION button 1
on General Environment Setting
Screen switches the AUX
ON/OFF.
Page 21
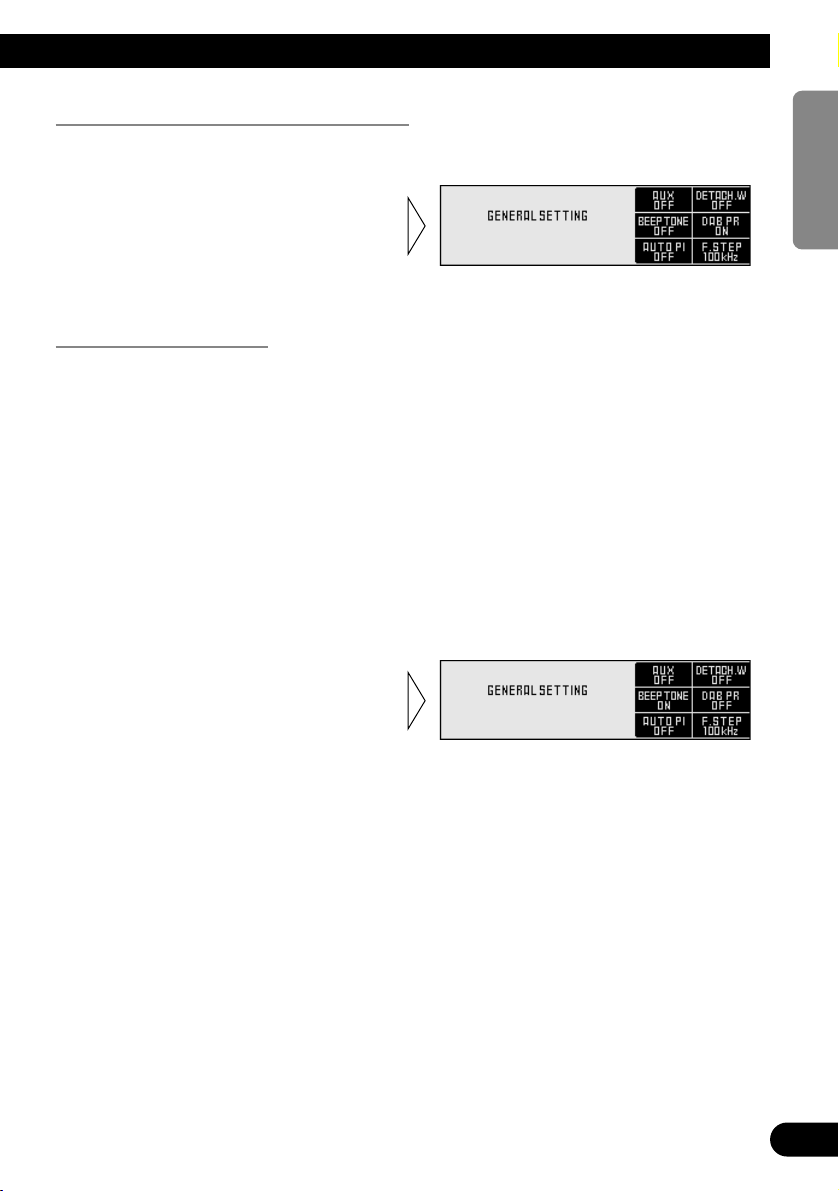
Turning the Confirmation Sound ON/OFF
The beep that sounds when buttons are pressed can be enabled or disabled (ON/OFF). The
initial setting is ON.
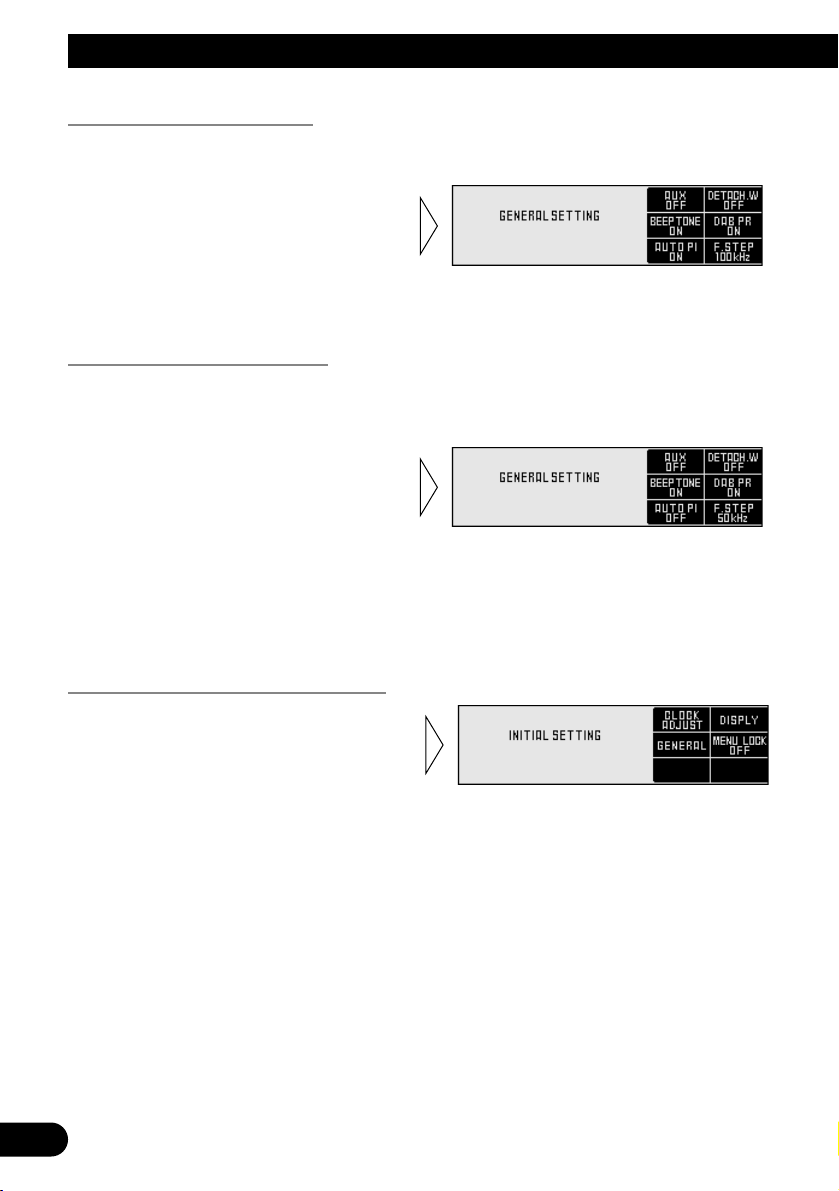
Setting the DAB Priority
When a Hide-away DAB tuner (e.g. GEX-P700DAB) is connected, you can set the
product in this mode so that the interruption of traffic information from the Hide-away
DAB tuner takes precedence over this product’s RDS Traffic Announcement (TA)
function.
7 When it is ON
During DAB reception, when the selected Service Component supports Road Traffic
Flashes and Transport Flashes, reception is not interrupted by this product’s RDS Traffic
Announcement (TA).
7 When it is OFF
Interruption is by the first received news flash from among this product’s RDS and the
Hide-away DAB traffic information broadcasts.
Note:
• You can only select to the DAB Priority Setting mode when a separately sold Hide-away DAB
tuner (e.g. GEX-P700DAB) is connected.
• Press the FUNCTION button 4
on General Environment Setting
Screen switches the DAB
Priority ON/OFF.
• Press the FUNCTION button 3
on General Environment Setting
Screen switches the
Confirmation Sound ON/OFF.
20
ENGLISH ESPAÑOL DEUTSCH FRANÇAIS
ITALIANO NEDERLANDS
Page 22
21
Setting Up the Environment for Use
Switching the Auto PI Seek
During Preset Station PI Seek operation, you can switch the Auto PI Seek function
ON/OFF. (Refer to “PI Seek function” on page 30.)
Changing the FM Tuning Step
Normally set at 50 kHz during Seek tuning in the FM mode, the tuning step changes to
100 kHz when the AF or TA mode is activated.
It may be preferable to set tuning step to 50 kHz in the AF mode.
Note:
• The tuning step remains set at 50 kHz during Manual tuning.
• The tuning step returns to 100 kHz if the battery is temporarily disconnected.
Returns to the Initial Setting Screen
• Press the RETURN button.
The display returns to Initial Setting
Screen.
• Press the FUNCTION button 6
on General Environment Setting
Screen selects the desired tuning
step.
• Press the FUNCTION button 5
on General Environment Setting
Screen switches the Auto PI
Seek ON/OFF.
Page 23
Setting the Menu Lock
About the Menu Lock
If you switch the Menu Lock ON, it is possible to refuse the opened remote controller
operation to adjust the Audio Adjustment.
It is useful when you do not want to readjust the data by mistake.
Switching to the Menu Lock ON/OFF
It is possible to switch ON/OFF the Menu Lock.
• Press the FUNCTION button 4
on Initial Setting Screen
switches the Menu Lock
ON/OFF.
22
ENGLISH ESPAÑOL DEUTSCH FRANÇAIS
ITALIANO NEDERLANDS
Page 24
23
Basic Operation
To Listen to Music
The following explains the initial of operations required before you can listen to music.
Note:
• Loading a disc in this product. (Refer to page 40.)
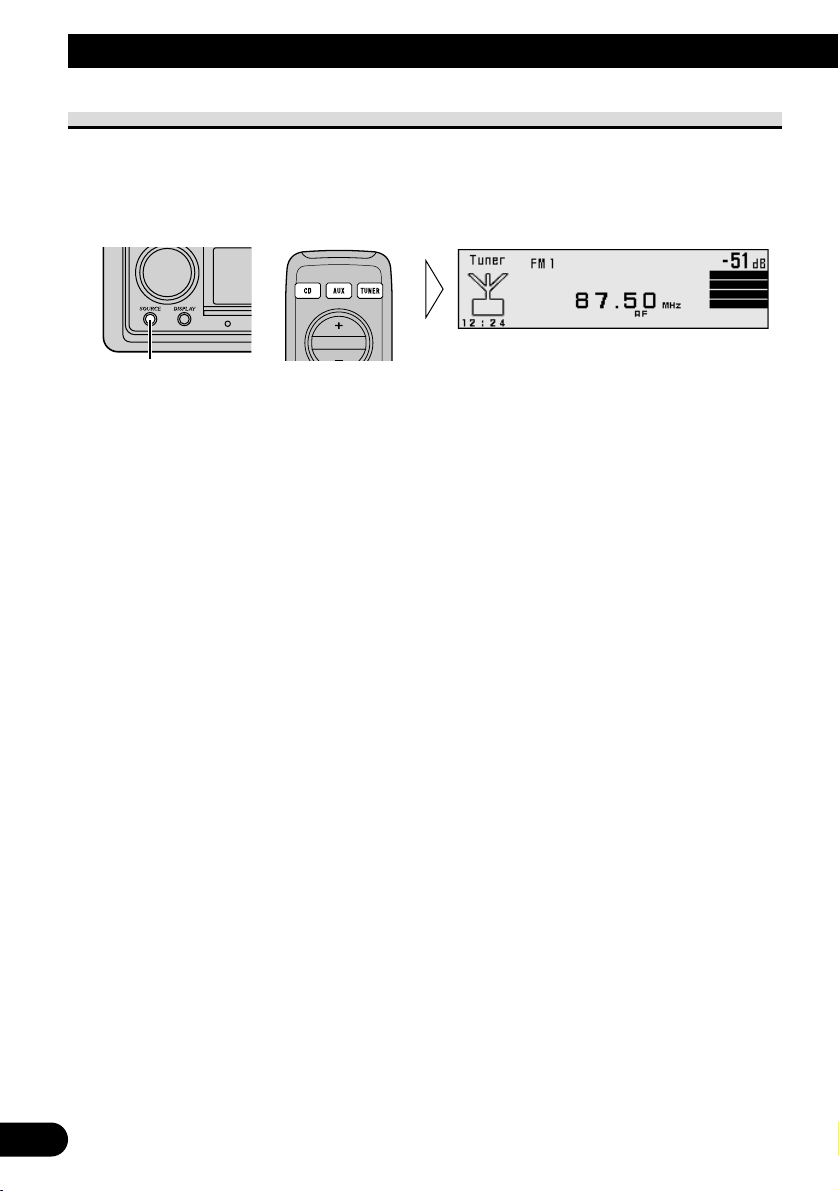
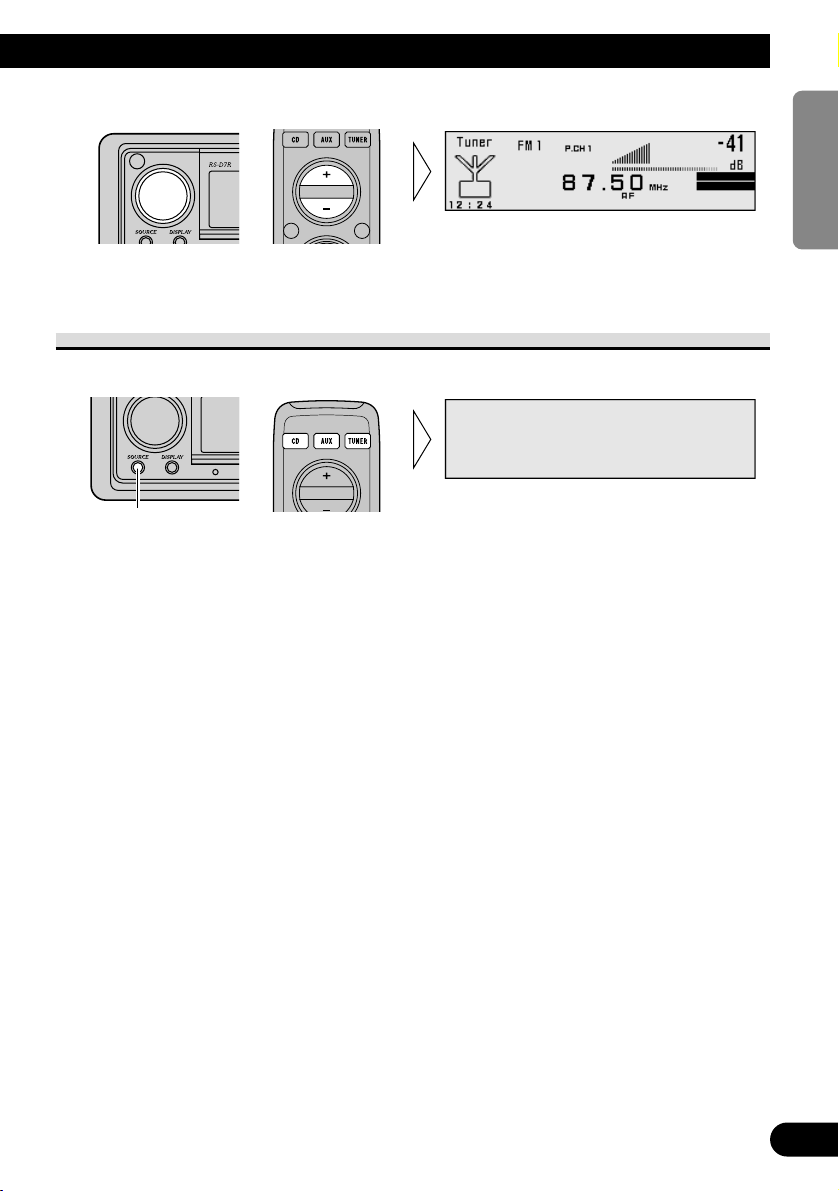
1. Select the desired source (e.g. tuner).
7 Head Unit
Each press of the SOURCE button selects the desired source in the following order:
Built-in CD player = Multi-CD player = DVD player = TV = Tuner
= DAB (Digital Audio Broadcasting) Tuner = External Unit 1 = External Unit 2
= AUX
7 Remote Control
Each press of the button selects the desired source in the following order:
CD button : Built-in CD player = Multi-CD player = DVD player = OFF
AUX button : External Unit 1 = External Unit 2 = AUX = OFF
TUNER button : TV = Tuner = DAB (Digital Audio Broadcasting) Tuner = OFF
Note:
• External Unit refers to a Pioneer product (such as one available in the future) that, although incompatible as a source, enables control of basic functions by this product. Two External Units can be
controlled by this product, although “External” is displayed whether you select External Unit 1 or
External Unit 2. When two External Units are connected, the allocation of them to External Unit 1
or External Unit 2 is automatically set by this product.
• In the following cases, the sound source will not change:
* When a product corresponding to each source is not connected to this product.
* No disc is set in this product.
* No magazine is set in the Multi-CD player.
* No magazine is set in the Multi-DVD player.
* AUX (external input) is set to OFF. (Refer to page 19.)
• When this product’s blue/white lead is connected to the car’s Auto-antenna relay control terminal,
the car’s Auto-antenna extends when this product’s source is switched ON. To retract the antenna,
switch the source OFF.
Each press changes the Source ...
Page 25
24
ENGLISH ESPAÑOL DEUTSCH FRANÇAIS
ITALIANO NEDERLANDS
2. Raise or lower the volume.
The display shows “--- dB” – “00 dB”.
Switching Power OFF
• Turn the source OFF.
7 Head Unit
To switch the sources OFF, hold down the SOURCE button for 1 second.
7 Remote Control
Press the button and select the source OFF.
CD button : Built-in CD player = Multi-CD player = DVD player = OFF
AUX button : External Unit 1 = External Unit 2 = AUX = OFF
TUNER button : TV = Tuner = DAB (Digital Audio Broadcasting) Tuner = OFF
Hold for 1 second
Page 26
25
Tuner Operation
Basic Operation of Tuner
This product’s AF function can be switched ON and OFF. AF should be switched OFF for
normal tuning operations. (Refer to page 29.)
Manual and Seek Tuning
• You can select the tuning method by changing the length of
time you press the 2/3 button.
Manual Tuning (step by step) 0.5 seconds or less
Seek Tuning 0.5 seconds or more
Note:
• If you continue pressing the button for longer than 0.5 seconds, you can skip
broadcast stations. Seek Tuning starts as soon as you release the button.
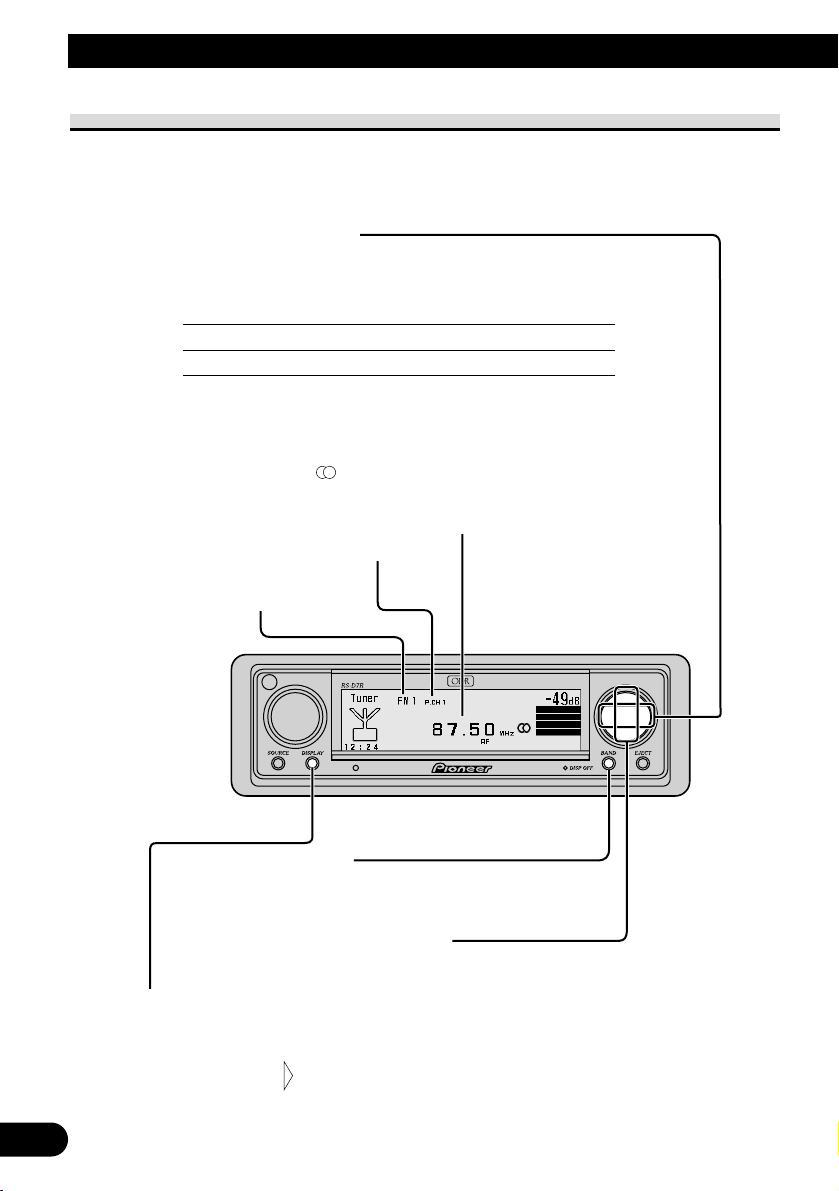
• Stereo indicator “ ” lights when a stereo station is selected.
Band
FM-1 = FM-2 = FM-3 = MW/LW
Preset Number Indicator
Band Indicator
Frequency Indicator
Changing the Display
Each press of the DISPLAY button changes the display in the following order:
Program Service Name
Frequency
Program Service Name
PTY Label
Preset Tuning
You can recall memorized stations by 5/∞ buttons.
Page 27
Operation at the Tuner Setting Screen
Accessing the Tuner Setting Screen
1. Open the cover of the remote controller.
This switches to the Tuner Setting Screen.
2. Select the function by pressing the FUNCTION buttons 1–6.
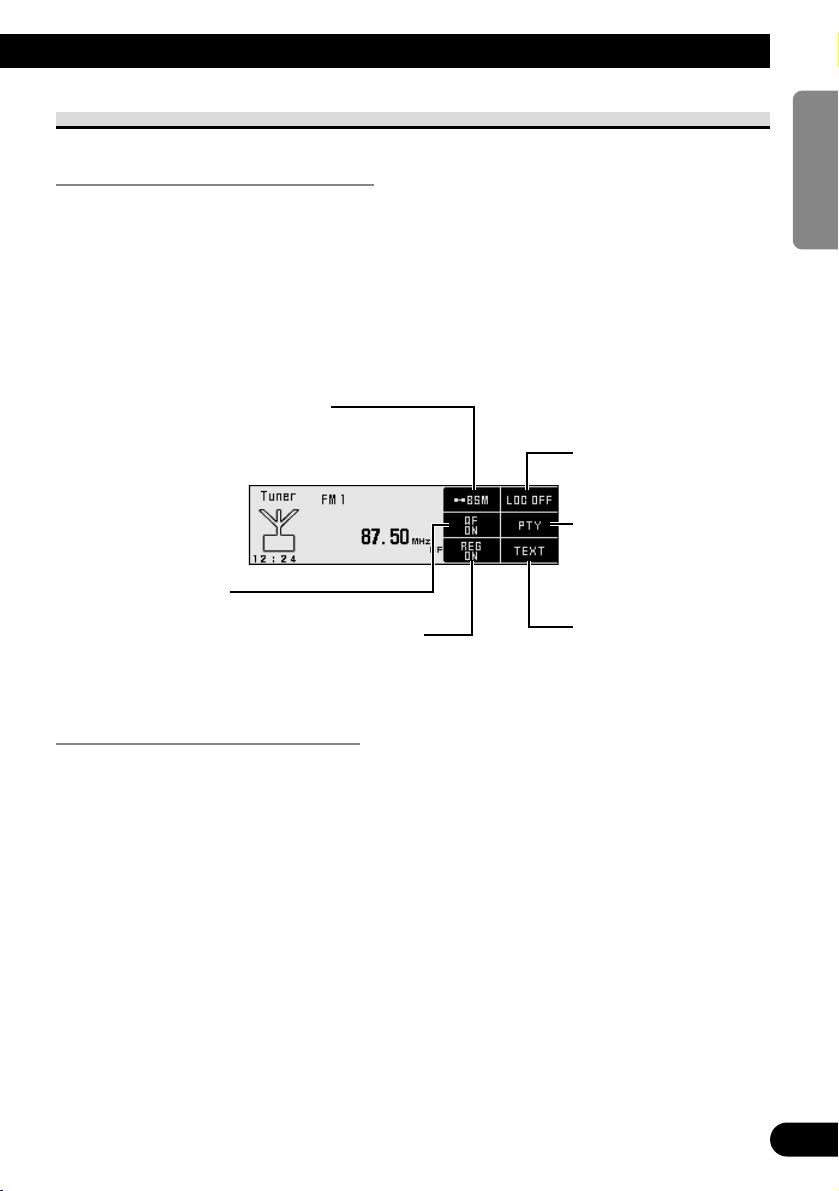
7 Tuner Setting Screen
Exit from the Tuner Setting Screen
• To return to Tuner Screen, close the cover of the remote controller.
26
ENGLISH ESPAÑOL DEUTSCH FRANÇAIS
ITALIANO NEDERLANDS
Local Seek Tuning
(See page 27.)
PTY function
(See page 31.)
Radio Text
(See page 37.)
Best Stations Memory
(See page 27.)
AF function
(See page 29.)
Regional function
(See page 36.)
Page 28
27
Tuner Operation
Operating Each function
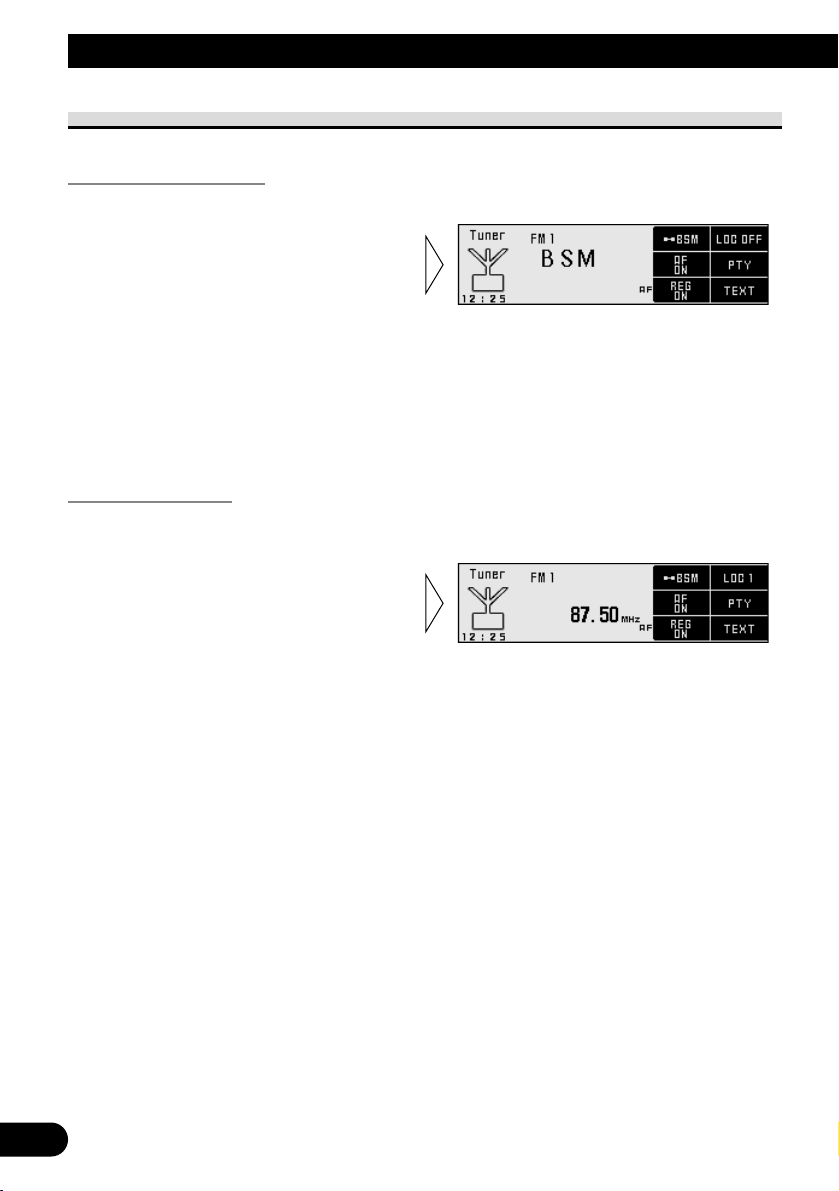
Best Stations Memory
The BSM (Best Stations Memory) function stores stations in memory automatically.
• To cancel the process, press the FUNCTION button 1 again before
memorization is complete.
Local Seek Tuning
When Local mode is ON (“LOC.S” displays), you can only select broadcast stations providing strong reception.
The Local sensitivity switches as follows:
FM : LOC 1 = LOC 2 = LOC 3 = LOC 4 = LOC OFF
MW/LW : LOC 1 = LOC 2 = LOC OFF
Note:
• The LOC 4 setting allows reception of only the strongest stations, while lower settings let you
receive progressively weaker stations.
• Press the FUNCTION button 2
on Tuner Setting Screen switches
the Local sensitivity.
• Press the FUNCTION button 1 for
two seconds on Tuner Setting
Screen switches the Best Stations
Memory (BSM) ON.
The stations with the strongest signals
will be stored under FUNCTION buttons
1–6 and in order of their signal strength.
Page 29

Switching to the Preset Tuning Screen
• Press the SHIFT button on Tuner Setting Screen.
This switches to Preset Tuning Screen and enables to preset the stations.
• To return to Tuner Setting Screen, press the SHIFT button again.
Preset Tuning
You can memorize broadcast stations in FUNCTION button 1 through 6 for easy,
one-touch station recall.
7 Broadcast station preset memory
7 Preset broadcast station recall
Note:
• Up to 18 FM stations (6 in FM-1, FM-2 and FM-3) and 6 MW/LW stations can be stored in memory.
• Press the FUNCTION button 1
through 6 on Preset Tuning
Screen to recall the broadcast
stations memorized in
corresponding buttons.
• Press the FUNCTION button 1
through 6 for two seconds on
Preset Tuning Screen to
memorize the broadcast stations
in corresponding buttons.
28
ENGLISH ESPAÑOL DEUTSCH FRANÇAIS
ITALIANO NEDERLANDS
Page 30

29
Using the RDS Functions
What is RDS?
RDS (Radio Data System) is a system for transmitting data along with FM programs. This
data, which is inaudible, provides a variety of features such as: program service name, program type display, traffic announcement standby, automatic tuning and program type tuning, intended to aid radio listeners in tuning to a desired station.
Note:
• RDS service may not be provided by all stations.
• RDS functions, like AF (Alternative Frequencies search) and TA (Traffic Announcement standby),
are only active when your radio is tuned to RDS stations.
Alternative Frequency function
The AF (Alternative Frequencies search) function is used to search for other frequencies in
the same network as the currently tuned station. It automatically retunes the receiver to
another frequency in the network which is broadcasting a stronger signal when there are
problems with reception of the currently tuned station or better reception is possible on
a different frequency.
Note:
• AF tunes the receiver only to RDS stations when you use Seek tuning or BSM Auto Memory with
the “AF” indicator ON.
• When you recall a preset station, the tuner may update the preset station with a new frequency from
the station’s AF list. (This is only available when using presets on the FM-1 and FM-2 bands.) No
preset number appears on the display if the RDS data for the station received differs from that for
the originally stored station.
• Sound may be temporarily interrupted by another program during an AF frequency search.
• When the tuner is tuned to a non-RDS station, the “AF” indicator flashes.
• AF can be switched ON or OFF independently for each FM band.
Activating/Deactivating the AF function
AF is set to ON by default.
• Press the FUNCTION button 3
on Tuner Setting Screen switches
the AF ON/OFF while in an FM
band .
Page 31

PI Seek function
The tuner searches for another frequency broadcasting the same programming. “PI Seek”
appears on the display and the radio volume is muted during a PI Seek. The muting is discontinued after completion of the PI Seek, whether or not the PI seek has succeeded. If the
PI Seek is unsuccessful, the tuner returns to the previous frequency.
PI Seek
If the tuner fails to locate a suitable alternative frequency or if the broadcasting signal is
too weak for proper reception, the PI Seek will automatically start.
Auto PI Seek (for preset station)
When preset stations cannot be recalled, as when traveling long distances, the product can
be set to perform PI Seek also during preset recall.
The default setting for Auto PI Seek is OFF.
Note:
• Refer to “Setting Up the Environment for Use” for details on how to switch Auto PI Seek ON/OFF.
30
ENGLISH ESPAÑOL DEUTSCH FRANÇAIS
ITALIANO NEDERLANDS
Page 32

31
Using the RDS Functions
PTY function
A PTY search is performed by program type as indicated in the PTY list (the program
types are: News&Inf, Popular, Classics, Others). It also provides automatic tuning to emergency broadcasts (PTY alarm).
Note:
• There’s no need to perform PTY Search settings again if they have previously been set. After
switching to the PTY Search Setting mode in Step 1, just perform PTY Search in Step 3.
Searching the PTY
The tuner searches for a station broadcasting the desired PTY.
• To cancel the PTY Search, press the ∞∞ button.
Note:
• The program of some stations may differ from that indicated by the transmitted PTY.
• If no station broadcasting the selected programming type is found, “NOT FOUND” is displayed for
about 2 seconds, and the tuner returns to the original station.
3. Press the 5 button starts the
PTY search.
2. Select one from among PTY with
the 2/3 buttons.
1. Press the FUNCTION button 4
on Tuner Setting Screen switches
the PTY Search Setting display.
Page 33

News Program Interruption Setting
You can switch automatic reception of PTY code news programs ON/OFF. When a
received news program ends, reception of the previous program resumes.
• Set interruption to ON or OFF.
Note:
• When “N” in “NEWS” indicator is displayed, it indicates that you have set interruption ON.
• When “3” is displayed on the left side of indicator, it indicates that the news program is received.
PTY Alarm
PTY Alarm is a special PTY code for announcements regarding emergencies such as natural disasters. When the tuner receives the radio alarm code, “ALARM” appears on the
display and the volume adjusts to the TA volume. When the station stops broadcasting the
emergency announcement, the system returns to the previous source.
Canceling Announcements
• Press the TA button during announcement reception to cancel the announcement and return to the previous source.
Hold for 2 seconds
32
ENGLISH ESPAÑOL DEUTSCH FRANÇAIS
ITALIANO NEDERLANDS
Page 34

33
Using the RDS Functions
PTY List
Wide Narrow Details
News&Inf News News.
Affairs Current affairs.
Info General information and advice.
Sport Sports programs.
Weather Weather reports/Meteorological information.
Finance Stock market reports, commerce, trading, etc.
Popular Pop Mus Popular music.
Rock Mus Contemporary modern music.
Easy Mus Easy listening music.
Oth Mus Other types of music, which can’t be
categorized.
Jazz Jazz music based programs.
Country Country music based programs.
Nat Mus National music based programs.
Oldies Oldies music, ‘Golden age’ based programs.
Folk Mus Folk music based programs.
Classics L. Class Light classical music.
Classic Serious classical music.
Others Educate Educational programs.
Drama All radio plays and serials.
Culture Programs concerned with any aspect of national
or regional culture.
Science Programs about nature, science and technology.
Varied Light entertainment programs.
Children Children’s programs.
Social Social affairs programs.
Religion Religion affairs programs or services.
Phone In Phone in based programs.
Touring Travel programs, not for announcements about
traffic problem.
Leisure Programs about hobbies and recreational
activities.
Document Documentary programs.
Page 35

Traffic Announcement Standby function
The TA (Traffic Announcement standby) function lets you receive traffic announcements
automatically, no matter what source you are listening to. The TA function can be activated for either a TP station (a station that broadcasts traffic information) or an enhanced
other network’s TP station (a station carrying information which cross-references TP stations).
Activating/Deactivating the TA function
1. Tune in a TP or enhanced other network’s TP station.
The TP indicator “TRAFFIC” lights when the tuner is tuned to a TP station or an enhanced
other network’s TP station.
2. Activate the TA function.
The “3TRAFFIC” indicator lights, indicating that the tuner is waiting for traffic
announcements.
Note:
• If you switched TA function ON when you are tuned in to neither a TP nor enhanced other net-
work’s TP station, only “T” in “TRAFFIC” indicator is displayed.
Repeat the preceding operation when no traffic announcement is being received to deactivate the TA function.
Note:
• The system switches back to the original source following traffic announcement reception.
• The TA function can be activated from sources other than tuner if the tuner was last set to the FM
band but not if it was last set to the MW/LW band.
• If the tuner was last set to FM, turning on the TA function lets you operate other tuning functions
while listening to sources other than tuner.
• Only TP or enhanced other network’s TP stations are tuned in during the Seek Tuning mode when
the “3TRAFFIC” or “T” indicator is ON.
• Only TP or enhanced other network’s TP stations are stored by BSM when the “3TRAFFIC” or
“T” indicator is ON.
34
ENGLISH ESPAÑOL DEUTSCH FRANÇAIS
ITALIANO NEDERLANDS
Page 36

35
Using the RDS Functions
Canceling Traffic Announcements
• Press the TA button while a traffic announcement is being received to cancel
the announcement and return to the original source.
The announcement is canceled but the tuner remains in the TA mode until the TA button is
pressed again.
Adjusting the TA Volume
When a traffic announcement begins, the volume adjusts automatically to a preset level to
enable you to hear the announcement clearly.
• Set the volume by adjusting it during reception of a traffic announcement.
The newly set volume is stored in memory and recalled for subsequent traffic announcements.
TP Alarm function
About 30 seconds after the “3TRAFFIC” indicator turns to “T” due to a weak signal, a 5
second beep sounds to remind you to select another TP or enhanced other network’s TP
station.
• If you are listening to the tuner, tune in another TP station or enhanced
other network’s TP station.
In sources other than tuner, the tuner automatically seeks out the TP station with the
strongest signal in the current area 10 (or 30)* seconds after the “
3TRAFFIC” indicator
turns to “T”.
* Time taken before Seek begins.
TA function ON 10 seconds
TA, AF functions ON 30 seconds
Page 37

Regional function
When AF is used to retune the tuner automatically, the Regional function limits the selection to stations broadcasting regional programs.
Note:
• Regional programming and regional networks are organized differently depending on the country
(i.e., they may change according to the hour, state or broadcast area).
• The preset number may disappear on the display if the tuner tunes in a regional station which differs from the originally set station.
Activating the Regional function
The Regional function can be turned ON independently for each FM band.
• Press the FUNCTION button 5
on Tuner Setting Screen switches
the Regional function ON/OFF.
36
ENGLISH ESPAÑOL DEUTSCH FRANÇAIS
ITALIANO NEDERLANDS
Page 38

37
Using the RDS Functions
Radio Text
This tuner can display Radio Text data transmitted by RDS stations, such as station information, the name of the currently broadcast song and the name of the artist.
Note:
• When Radio Text is received, the “RT” indicator lights.
• The tuner automatically memorizes the three latest Radio Text broadcasts received, replacing text
from the least recent reception with new text when it is received.
• You can store data from up to six Radio Text transmissions in FUNCTION buttons 1–6.
Radio Text Display
Note:
• When no Radio Text is currently being received, “NO TEXT” is displayed.
Pressing the button switches between the four Radio Text data displays.
• To return to Tuner Setting Screen, press the RETURN button.
Note:
• If there is no Radio Text data stored in the tuner, this button does not operate.
2. Recalling the three latest Radio
Text broadcasts from the tuner’s
memory with the 2/3 buttons.
1. Press the FUNCTION button 6
on Tuner Setting Screen switches
the Radio Text display.
Page 39

Storing Radio Text in Memory
Recalling Preset Radio Text
2. Press the FUNCTION button 1
through 6 to recall the Radio
Text memorized in corresponding buttons (e.g. Press the
FUNCTION button 4).
1. Switch to the Radio Text display.
2. Press the FUNCTION button 1
through 6 for two seconds to
memorize the Radio Text in corresponding buttons (e.g. Press
the FUNCTION button 4 for two
seconds).
1. Perform “Radio Text Display” steps 1 and 2, and then select the Radio
Text you want to store in memory.
38
ENGLISH ESPAÑOL DEUTSCH FRANÇAIS
ITALIANO NEDERLANDS
Page 40

39
Built-in CD Player Operation
Basic Operation of Built-in CD Player
Switching the Display (only for CD TEXT Discs)
Each press of the DISPLAY button changes the display in the following order:
With text longer than 20 letters, you can scroll to see the rest of the text by pressing the
DISPLAY button for 2 seconds.
Note:
• A CD TEXT disc is a CD featuring recorded text information such as Disc Title, Artist Name
and Track Title.
• If certain text information is not recorded on a CD TEXT disc, “No ~” (e.g. “No Title”) is
displayed.
Play Time
Track Artist
Play Time
Track Title
Play Time
Disc Artist
Play Time
Disc Title
Track Number Indicator
Play Time Indicator
Eject
Press the EJECT/OPEN button one time, the front panel
opens and then the disc is ejected.
In case of opening the front panel, you can just eject a CD.
Note:
• The CD function can be turned ON/OFF with the disc remaining
in this product. (Refer to page 23.)
• A disc left partially inserted after ejection may incur damage or
fall out.
• You can eject the CD by pressing and holding EJECT/OPEN
button with opening the front panel when the CD loading or
ejecting cannot operate properly.
Page 41

40
ENGLISH ESPAÑOL DEUTSCH FRANÇAIS
ITALIANO NEDERLANDS
Track Search and Fast Forward/Reverse
• You can select between Track Search or Fast Forward/Reverse by pressing
the 2/3 button for a different length of time.
Track Search 0.5 seconds or less
Fast Forward/Reverse Continue pressing
CD Loading Slot
If a CD is inserted, the front panel is closed automatically.
The Built-in CD player plays one standard 12 cm or 8 cm
(single) CD at a time. Do not use an adapter when playing 8 cm CD.
Note:
• If a disc cannot be inserted fully or playback fails, make sure the
recorded side is down. Push the EJECT/OPEN button and check the
disc for damage before reinserting it.
• If the Built-in CD player cannot operate properly, an error message
(such as “ERROR-14”) appears on the display. Refer to “Built-in CD
Player’s Error Message” on page 76.
• Do not insert anything other than a CD into the CD Loading Slot.
Open
Press the EJECT/OPEN button for 2 seconds, and you can open
the front panel without ejecting a CD.
In case of opening the front panel, you can close it.
WARNING:
• Do not use with the front panel left open. If you do leave it open,
it may result in injury in the event of an accident.
Page 42

41
Built-in CD Player Operation
Operation at the Built-in CD Setting Screen
Accessing the Built-in CD Setting Screen
1. Open the cover of the remote controller.
This switches to the Built-in CD Setting Screen.
2. Select the function by pressing the FUNCTION buttons 1, 2, 3, 4 and 6.
7 Built-in CD Setting Screen
Exit from the Built-in CD Setting Screen
• To return to Built-in CD Screen, close the cover of the remote controller.
Random Play
(See page 42.)
Pause
(See page 43.)
Display Mode
(See page 44.)
Repeat Play
(See page 42.)
Scan Play
(See page 43.)
Page 43

Operating Each function
Repeat Play
Repeat Play plays the same track repeatedly.
Note:
• If you perform Track Search or Fast Forward/Reverse, Repeat Play is automatically canceled.
Random Play
Random Play plays the tracks on a CD in random order for variety.
• Press the FUNCTION button 2
on Built-in CD Setting Screen
switches the Random Play
ON/OFF.
• Press the FUNCTION button 1
on Built-in CD Setting Screen
switches the Repeat Play
ON/OFF.
42
ENGLISH ESPAÑOL DEUTSCH FRANÇAIS
ITALIANO NEDERLANDS
Page 44

43
Built-in CD Player Operation
Scan Play
Scan Play plays the first 10 seconds or so of each track on a CD in succession.
Note:
• Scan Play is canceled automatically after all the tracks on a disc have been scanned.
Pause
Pause pauses the currently playing track.
• Press the FUNCTION button 4
on Built-in CD Setting Screen
switches the Pause ON/OFF.
2. When you find the desired track,
cancel the Scan Play with the
FUNCTION button 3.
1. Press the FUNCTION button 3
on Built-in CD Setting Screen
switches the Scan Play ON.
Page 45

44
ENGLISH ESPAÑOL DEUTSCH FRANÇAIS
ITALIANO NEDERLANDS
Changing the Display Mode
Disc Title Input
You can input up to 48 disc titles for CDs in the Built-in CD player. (Refer to “Disc Title
Input” on page 50 under “Multi-CD Player Operation”.)
Note:
• After the title for 48 discs have been entered, data for a new disc will overwrite the oldest one.
• If you connect a Multi-CD player, you can input disc titles for up to 100 discs.
• When playing a CD TEXT disc on this product, you cannot switch to this mode.
• Press the FUNCTION button 6
on Built-in CD Setting Screen
switches the Display Mode in the
following order:
Normal Display += Simple Display
Page 46

45
Multi-CD Player Operation
Play Time Indicator
Disc Search
Disc Number Indicator
Track Number Indicator
Basic Operation of Multi-CD Player
This product can control a Multi-CD player (sold separately).
Switching the Display (When playing a CD TEXT disc on a CD TEXT compatible
Multi-CD Player)
Each press of the DISPLAY button changes the display in the following order:
With text longer than 20 letters, you can scroll to see the rest of the text by pressing the
DISPLAY button for 2 seconds.
Note:
• A CD TEXT disc is a CD featuring recorded text information such as Disc Title, Artist Name
and Track Title.
• If certain text information is not recorded on a CD TEXT disc, “No ~” (e.g. “No Title”) is
displayed.
Play Time
Track Artist
Play Time
Track Title
Play Time
Disc Artist
Play Time
Disc Title
Track Search and Fast Forward/Reverse
• You can select between Track Search or
Fast Forward/Reverse by pressing the 2/3
button for a different length of time.
Track Search 0.5 seconds or less
Fast Forward/Reverse Continue pressing
Page 47

Operation at the Multi-CD Setting Screen
Accessing the Multi-CD Setting Screen
1. Open the cover of the remote controller.
This switches to the Multi-CD Setting Screen.
2. Select the function by pressing the FUNCTION buttons 1–6.
7 Multi-CD Setting Screen
Exit from the Multi-CD Setting Screen
• To return to Multi-CD Screen, close the cover of the remote controller.
46
ENGLISH ESPAÑOL DEUTSCH FRANÇAIS
ITALIANO NEDERLANDS
Random Play
(See page 48.)
Repeat Play
(See page 47.)
Pause
(See page 49.)
Display Mode
(See page 49.)
Scan Play
(See page 48.)
Disc List
(See page 52.)
Page 48

47
Multi-CD Player Operation
Operating Each function
Repeat Play
There are three repeat play ranges: One-track Repeat, Disc Repeat and Multi-CD player
Repeat. Default repeat play range is Multi-CD player Repeat.
MAGA = REPEAT = D.REPEAT
7 Play Mode
Display Play range
MAGA Multi-CD player Repeat
REPEAT One-Track Repeat
D.REPEAT Disc Repeat
Note:
• If you select other discs during the repeat play, the repeat play range changes to Multi-CD player
Repeat.
• If you perform Track Search or Fast Forward/Reverse during One-track Repeat, the repeat play
range changes to Disc Repeat.
• Press the FUNCTION button 1
on Multi-CD Setting Screen
switches the repeat play range as
follows:
Page 49

Random Play
Tracks are played at random within the selected repeat play range as explained in “Repeat
Play” on page 47.
Note:
• One-track Repeat changes to the Disc Repeat when you switch the Random Play ON.
Scan Play
In the Disc Repeat, the beginning of each track on the selected disc is scanned for about 10
seconds. In the Multi-CD player Repeat, the beginning of the first track on each disc is
scanned for about 10 seconds.
Display Play range
T. Scan Disc Repeat
D. Scan Multi-CD player Repeat
Note:
• Scan Play is canceled automatically after all the tracks or discs have been scanned.
• One-track Repeat changes to the Disc Repeat when you switch the Scan Play ON.
2. When you find the desired track
(or disc), cancel the Scan Play
with the FUNCTION button 3.
1. Press the FUNCTION button 3 on Multi-CD Setting Screen switches the
Scan Play ON.
After selecting the desired repeat play range from those referred to in “Repeat Play” on
page 47, switch Multi-CD Player Scan Play ON.
• Press the FUNCTION button 2
on Multi-CD Setting Screen
switches the Random Play
ON/OFF.
After selecting the desired repeat play
range from those referred to in “Repeat
Play” on page 47, switch Multi-CD
Player Random Play ON.
48
ENGLISH ESPAÑOL DEUTSCH FRANÇAIS
ITALIANO NEDERLANDS
Page 50

49
Multi-CD Player Operation
Pause
Pause pauses the currently playing track.
Changing the Display Mode
Disc Number Search
You can select discs directly with the FUNCTION buttons 1–6. Just press the number corresponding to the disc you want listen to.
2. Select the desired disc with the FUNCTION button 1 through 6.
• When a 12-Disc Multi-CD Player is connected and you want to select disc 7
to 12, press the SHIFT button again on the disc number search screen.
1. Press the SHIFT button on
Multi-CD Setting Screen.
This switches to disc number search
screen and enables select the disc.
• Press the FUNCTION button 6
on Multi-CD Setting Screen
switches the Display Mode in the
following order:
Normal Display += Simple Display
• Press the FUNCTION button 4
on Multi-CD Setting Screen
switches the Pause ON/OFF.
Page 51

Disc Title
Disc Title Input
You can input Titles up to 20 letters long for up to 100 discs. Using this function lets you
easily search for and select a desired disc for play.
Note:
• You can input Titles up to 10 letters long depending on the combined Multi-CD player.
Note:
• If you press the SHIFT button for 2 seconds on disc number search screen or disc title list screen,
this switches to disc title input screen.
• When playing a CD TEXT disc on a CD TEXT compatible Multi-CD player, you cannot switch to
this mode.
• A CD TEXT disc is a CD featuring recorded text information such as Disc Title, Artist Name and
Track Title.
Note:
• You can select to input Numbers and Symbols by pressing FUNCTION button 2.
Continued overleaf.
5. Move the box left and right with
the 2/3 buttons.
4. Select letters, numbers and
symbols with the 5/∞ buttons.
To insert a space, skip the box with
the 3 button.
3. Switch the desired character
type with FUNCTION button 1.
Each press of FUNCTION button 1
changes the Character type in the following order:
Upper case alphabet (Capital Letter),
Numbers and Symbols = Lower case
alphabet (Small Letter) = European letters (European Character), such as those
with accents (e.g. á, à, ä, ç)
2. Press the SHIFT button for two
seconds on the Multi-CD Setting
Screen.
This switches to disc title input screen.
1. Play the disc you wish to input the disc title.
50
ENGLISH ESPAÑOL DEUTSCH FRANÇAIS
ITALIANO NEDERLANDS
Page 52

51
Multi-CD Player Operation
Note:
• Titles remain in memory, even after the disc has been removed from the magazine, and are recalled
when the disc is reinserted.
• After the titles for 100 discs have been entered, data for a new disc will overwrite the oldest one.
• To return to Multi-CD Setting Screen, press the FUNCTION button 6.
6. When you have completed title
input, memorize by pressing the
FUNCTION button 5.
Page 53

Selecting Discs by Disc Title List
Follow the procedures below to play a disc for which you have input the title in a MultiCD player or a CD TEXT disc on a CD TEXT compatible Multi-CD player.
• To return to Multi-CD Setting Screen, press the RETURN button.
3. Play the selected disc with the 5
button.
2. Select the desired disc title with
the 2/3 buttons.
When no disc is set in the magazine
(disc tray), the disc number is automatically skipped.
1. Press the FUNCTION button 5
on Multi-CD Setting Screen
switches the disc title list screen.
52
ENGLISH ESPAÑOL DEUTSCH FRANÇAIS
ITALIANO NEDERLANDS
Page 54

53
DVD Player Operation
Basic Operation of DVD Player
This product can control a DVD player (sold separately).
Chapter (Track) Search and Fast Forward/Reverse
• You can select between Chapter (Track) Search or
Fast Forward/Reverse by pressing the 2/3 button
for a different length of time.
Chapter (Track) Search 0.5 seconds or less
Fast Forward/Reverse Continue pressing
Chapter Indicator
Disc Number Indicator
Title Indicator
Disc Search
Play Time Indicator
Note:
• When this product is connected to a DVD player through an optical cable, “DIGITAL” appears on
the display.
Page 55

Operation at the DVD Setting Screen
Accessing the DVD Setting Screen
1. Open the cover of the remote controller.
This switches to DVD Setting Screen.
2. Select the function by pressing the FUNCTION buttons 1, 2, 3, 4 and 6.
7 DVD Setting Screen
Exit from the DVD Setting Screen
• To return to DVD Screen, close the cover of the remote controller.
54
ENGLISH ESPAÑOL DEUTSCH FRANÇAIS
ITALIANO NEDERLANDS
Random Play
(See page 56.)
Repeat Play
(See page 55.)
Pause
(See page 57.)
Display Mode
(See page 57.)
Scan Play
(See page 56.)
Page 56

55
DVD Player Operation
Operating Each function
Repeat Play
You can select the desired repeat mode play range from the chapter (track), title or disc
currently in play.
When DVD player is playing DVD : DISC = CHAPTER = TITLE
When DVD player is playing CDs : DISC = REPEAT
7 DVD
Display Play range
DISC Disc Repeat
CHAPTER Chapter Repeat
TITLE Title Repeat
7 Video-CD and CD
Display Play range
DISC Disc Repeat
REPEAT Track Repeat
Note:
• If you select other discs during the repeat play, the repeat play range changes to Disc Repeat.
• If you perform Chapter (Track) Search or Fast Forward/Reverse during Title Repeat or Chapter
Repeat, the repeat play range changes to Disc Repeat.
• Press the FUNCTION button 1
on DVD Setting Screen switches
the repeat play range as follows:
Page 57

Random Play
Operable only when DVD Player is playing CDs.
Random Play plays the tracks on a CD in random order for variety.
Scan Play
Operable only when DVD Player is playing CDs.
Scan Play plays the first 10 seconds or so of each track on a CD in succession.
Note:
• Scan Play is canceled automatically after all the tracks on a discs have been scanned.
2. When you find the desired track,
cancel the Scan Play with the
FUNCTION button 3.
1. Press the FUNCTION button 3
on DVD Setting Screen switches
the Scan Play ON.
• Press the FUNCTION button 2
on DVD Setting Screen switches
the Random Play ON/OFF.
After selecting the desired repeat play
range from those referred to in “Repeat
Play” on page 55, switch DVD Player
Random play ON.
56
ENGLISH ESPAÑOL DEUTSCH FRANÇAIS
ITALIANO NEDERLANDS
Page 58

57
DVD Player Operation
Pause
Pause pauses the currently playing track.
Changing the Display Mode
Disc Number Search
You can select discs directly with the FUNCTION buttons 1–6. Just press the number corresponding to the disc you want listen to.
2. Select the desired disc with the FUNCTION button 1 through 6.
Disc Title Input
You can input up to 100 disc titles for CDs in the DVD player. (Refer to “Disc Title Input”
on page 50 under “Multi-CD Player Operation”.)
Note:
• After the title for 100 discs have been entered, data for a new disc will overwrite the oldest one.
• You can input Titles up to 10 letters long.
1. Press the SHIFT button on DVD
Setting Screen.
This switches to disc number search
screen and enables select the disc.
• Press the FUNCTION button 6
on DVD Setting Screen switches
the Display Mode in the following order:
Normal Display += Simple Display
• Press the FUNCTION button 4
on DVD Setting Screen switches
the Pause ON/OFF.
Page 59

DAB Tuner Operation
58
ENGLISH ESPAÑOL DEUTSCH FRANÇAIS
ITALIANO NEDERLANDS
Basic Operation of DAB Tuner
This product can control a DAB Tuner (sold separately).
Band Indicator
Band
DAB1 = DAB2 = DAB3
PTY Label
Selecting the Ensemble or Service
When you first switch to DAB, Auto Seek is performed to find a DAB
Ensemble.
(Auto Seek is also performed in the same way each time you switch
bands.)
Once Ensemble is received, Auto Seek ends.
Select a desired Service 0.5 seconds or less
Tune to a high or low frequency (Ensemble) 0.5 seconds or more*
* By pressing the same button, search stops and the unit switches to standby for
reception of that Ensemble frequency.
Changing the Display
Each press of the DISPLAY button changes the display in the following order:
Dynamic LabelService Label
Ensemble Label
Service Label
Service Component Label
Service Label
PTY Label
Service Label
Preset Tuning
You can recall memorized services by 5/∞ buttons.
Page 60

Operation at the DAB Tuner Setting Screen
Accessing the DAB Tuner Setting Screen
1. Open the cover of the remote controller.
This switches to the DAB Tuner Setting Screen.
2. Select the function by pressing the FUNCTION buttons 1–5.
7 DAB Tuner Setting Screen
Note:
• When you connected GEX-P900DAB (II) to this product, operable functions are different. For
more details, refer to GEX-P900DAB (II) operation manual.
Exit from the DAB Tuner Setting Screen
• To return to DAB Tuner Screen, close the cover of the remote controller.
59
DAB Tuner Operation
Service Follow
(See page 68.)
Announcement Support
(See page 61.)
Dynamic Label
(See page 65.)
Available PTY
(See page 67.)
Service Component
(See page 64.)
Page 61

60
ENGLISH ESPAÑOL DEUTSCH FRANÇAIS
ITALIANO NEDERLANDS
Operating Each function
Switching to the Preset Tuning Screen
• Press the SHIFT button on DAB Tuner Setting Screen.
This switches to Preset Tuning Screen and enables to preset the stations.
• To return to DAB Tuner Setting Screen, press the SHIFT button again.
Preset Tuning
You can memorize services in FUNCTION button 1 through 6 for easy,
one-touch station recall.
7 Broadcast station preset memory
7 Preset broadcast station recall
Note:
• Up to 18 services can be stored in memory.
• Press the FUNCTION button 1
through 6 on Preset Tuning
Screen to recall the services
memorized in corresponding
buttons.
• Press the FUNCTION button 1
through 6 for two seconds on
Preset Tuning Screen to
memorize the services in corresponding buttons.
Page 62

61
DAB Tuner Operation
Announcement Support function
Even when listening to non-DAB sources, the Announcement Support function lets you
automatically listen to set Announcement Support. When the interrupting announcement
ends, play returns to the original source.
When listening to a DAB broadcast, you can switch setting for announcement interruption
ON/OFF, except for Alarm announcements. Switching between Announcements is as follows:
Announcement that is always ON:
• Alarm (Alarm)
Announcements operated by the TA button:
• Road Traffic Flash (“TRAFFIC” indicator) • Transport Flash (“TRAFFIC” indicator)
Announcements operated with DAB Tuner Setting Screen:
• News Flash (News) • Weather Flash (Weather)
• Warning/Service (Warning) • Event Announcement (Event)
• Special Event (Special Event) • Finance (Finance)
• Sports (Sports) • Information (Information)
7 Announcements operated by the TA button
Each time you press the TA button, the announcement is switched ON/OFF.
Note:
• When the Service Component supporting Road Traffic Flash and Transport Flash is selected,
“3TRAFFIC” lights.
• When the Service Component doesn’t support Road Traffic Flash and Transport Flash, only
“T” in “TRAFFIC” lights.
• When listening to FM, turning ON/OFF the RDS TA function will simultaneously turn ON/OFF
the DAB Road Traffic Flash and Transport Flash.
• Press the TA button on the
Remote Controller switches
Road Traffic Flash and
Transport Flash ON/OFF.
Page 63

• To cancel a Road Traffic Flash or Transport Flash interruption and return
to the original source, press the TA button during an Announcement interruption.
Note:
• You can also switch in order between interrupting Announcements. (Refer to “Switching
Interrupting Announcements” on page 64.)
7 TP Alarm function
When the following conditions arise, the “3TRAFFIC” indicator turns to “T”, and after 30
seconds, the TP Alarm beeps for 10 seconds, reminding you to select a Service Component
supporting Road Traffic Flash and Transport Flash.
• When Road Traffic Flash and Transport Flash interruption setting is ON.
• When the Service Follow Function is ON.
• When this unit (during DAB reception) cannot clearly receive a Service Component
supporting Road Traffic Flash and Transport Flash.
• When this unit RDS cannot receive a TP or enhanced other network’s TP station broad-
cast.
• When listening to a DAB broadcast, after hearing the TP Alarm, you should
re-tune to a Service that supports Road Traffic Flash and Transport Flash if
you want to continue the possibility to receive them.
When listening to any other sources, 30 seconds after the “3TRAFFIC” indicator turns to
“T”, search automatically starts for a Service Component in that area that supports Road
Traffic Flash and Transport Flash.
62
ENGLISH ESPAÑOL DEUTSCH FRANÇAIS
ITALIANO NEDERLANDS
Page 64

63
DAB Tuner Operation
7 Operating Announcements with DAB Tuner Setting Screen
FUNCTION button 1 : “NEWS” (News) ON/OFF
FUNCTION button 2 : “WEATHER” (Weather) ON/OFF
FUNCTION button 3 : “ANNOUNCE” (Announce) ON/OFF
Note:
• When “NEWS”, “WEATHER” or “ANNOUNCE” is displayed, it indicates that Announcement
Support is provided by the current Service Component.
• When the initial of each Announcement indicator is displayed, it indicates that you have selected
the Announcement Support. (e.g. “N” in “NEWS”.)
• When “3” is displayed on the left side of indicator, it indicates that Announcement corresponding
to the Announcement Support you have selected is supported by the current Service Component.
• When “ANNOUNCE” is ON, “Warning/Service”, “Event Announcement”, “Special Event”,
“Finance”, “Sports” and “Information” are also switched ON.
• To return to DAB Tuner Setting Screen, press the RETURN button.
2. Select the announcement by
pressing the FUNCTION buttons
1–3.
1. Press the FUNCTION button 1 on DAB Tuner Setting Screen switches the
Announcement Support setting screen.
Page 65

7 Switching Interrupting Announcements
When there are multiple Announcements in standby waiting to interrupt, and you are
listening to an Announcement, you can switch between them in order.
Each time you press the SOURCE button, you move to the next Announcement. When
there are no more Announcements, you return to the original one.
Service Component function
If the currently received Service has a Secondary Service Component (“EXTRA” lights),
Service Component switching is possible.
• Press the FUNCTION button 2
on DAB Tuner Setting Screen
switches the Service Component.
Each press changes the Announcement ...
• Switch to the next Announcement.
64
ENGLISH ESPAÑOL DEUTSCH FRANÇAIS
ITALIANO NEDERLANDS
Page 66

65
DAB Tuner Operation
Dynamic Label function
Dynamic Label provides character information concerning the Service Component you’re
currently listening to. You can scroll the displayed information.
Note:
• When Dynamic Label is received, the “TEXT” indicator lights.
• The tuner automatically memorizes the three latest Dynamic Label received, replacing text from the
least recent reception with new text when it is received.
• You can store data from up to six Dynamic Label transmissions in FUNCTION buttons 1–6.
7 Dynamic Label Display
Note:
• When no Dynamic Label is currently being received, “NO TEXT” is displayed.
Pressing the button switches between the four Dynamic Label data displays.
Note:
• If there is no Dynamic Label data stored in the tuner, this button does not operate.
Note:
• When viewing Dynamic Label, do not operate until you have parked your car safely.
• If you press the 5 button, you return to the first line.
• If you select the Dynamic Label mode again after having canceled it, the information may switch to
the latest available.
• You can also view the Dynamic Label by pressing the DISPLAY button. In this case, the headline
of the data that is currently displayed is always updated. For more details, refer to “Changing the
Display” on page 58.
3. Scroll the Dynamic Label with the the ∞ button.
2. Recalling the three latest
Dynamic Label broadcasts from
the tuner’s memory with the
2/3 buttons.
1. Press the FUNCTION button 3
on DAB Tuner Setting Screen
switches the Dynamic Label
display.
Page 67

7 Storing Dynamic Label in Memory
7 Recalling Preset Dynamic Label
• To return to DAB Tuner Setting Screen, press the RETURN button.
2. Press the FUNCTION button 1
through 6 to recall the Dynamic
Label memorized in
corresponding buttons (e.g. Press
the FUNCTION button 4).
1. Switch to the Dynamic Label display.
2. Press the FUNCTION button 1
through 6 for two seconds to
memorize the Dynamic Label in
corresponding buttons (e.g. Press
the FUNCTION button 4 for two
seconds).
1. Perform “Dynamic Label Display” steps 1 and 2, and then select the
Dynamic Label you want to store in memory.
66
ENGLISH ESPAÑOL DEUTSCH FRANÇAIS
ITALIANO NEDERLANDS
Page 68

67
DAB Tuner Operation
Available PTY function
Lists of PTY that is in the Current Ensemble can be displayed. You can select the desired
PTY from the list.
DAB PTY functions are slightly different from RDS PTY functions. Do not confuse DAB
PTY functions and RDS PTY functions.
7 Searching the PTY
DAB receives the desired PTY Service.
Note:
• The PTY method displayed is Narrow. The Wide method cannot be selected when using DAB as
source. (Refer to page 33.)
7 Canceling the PTY Search Setting mode
• To cancel the PTY Search Setting mode part way through, press the
FUNCTION button 4.
3. Press the 5 button starts the
PTY search.
2. Select one from among PTY with
the 2/3 buttons.
1. Press the FUNCTION button 4
on DAB Tuner Setting Screen
switches the PTY search setting
display.
Page 69

Service Follow function
If reception of the selected Service worsens, this automatically searches for other
Ensemble supporting the same Service. Depending on conditions, an Ensemble supporting
Alarm and Road Traffic Flash is received.
7 Service Follow function (FM)
When an Ensemble that supports the same Service can’t be found, or when reception
conditions are poor, the Service Follow function switches to an identical FM broadcast.
However, switching is not possible if reception of a station broadcasting an identical FM
transmission is poor, doesn’t exist or is not cross-referenced by the DAB station.
During FM reception, if DAB finds a Service identical to the original Service, and
reception is better, DAB reception resumes. Selection is then performed in line with the
Service Component selected with the first Service.
Note:
• Switch the Service Follow function ON, and the Service Follow function (FM) is automatically
switched ON.
• The Service Follow function (FM) is a DAB function. If the initial source you listen to is RDS
(FM), there’s no switching to DAB.
• Even if you switch to an FM broadcast, the button only functions during DAB operation.
7 When the “NET” indicator flashes
When the selected Service does not have broadcast station information for an identical FM
broadcast, if reception conditions for that Service worsen, the “NET” indicator flashes to
indicate the Service Follow function (FM) cannot operate.
• Press the FUNCTION button 5
on DAB Tuner Setting Screen
switches the Service Follow
ON/OFF.
68
ENGLISH ESPAÑOL DEUTSCH FRANÇAIS
ITALIANO NEDERLANDS
Page 70

69
TV Tuner Operation
Basic Operation of TV Tuner
This product can control a TV Tuner (sold separately).
Manual and Seek Tuning
• You can select the tuning method by changing the length of
time you press the 2/3 button.
Manual Tuning (step by step) 0.5 seconds or less
Seek Tuning 0.5 seconds or more
Note:
• If you continue pressing the button for longer than 0.5 seconds, you can skip
broadcast stations. Seek Tuning starts as soon as you release the button.
Band
TV-1 = TV-2
Channel Indicator
Band Indicator
Preset Tuning
You can recall memorized stations by 5/∞ buttons.
Preset Number Indicator
Page 71

Operation at the TV Tuner Setting Screen
Accessing the TV Tuner Setting Screen
1. Open the cover of the remote controller.
This switches to the TV Tuner Setting Screen.
2. Select the function by pressing the FUNCTION button 1.
7 TV Tuner Setting Screen
Exit from the TV Tuner Setting Screen
• To return to TV Tuner Screen, close the cover of the remote controller.
70
ENGLISH ESPAÑOL DEUTSCH FRANÇAIS
ITALIANO NEDERLANDS
Best Stations Sequential Memory
(See page 71.)
Page 72

71
TV Tuner Operation
Operating Each function
Best Stations Sequential Memory
The BSSM (Best Stations Sequential Memory) function automatically memorizes strongly
transmitted broadcast stations in order from the lowest channel up.
• To cancel the process, press the FUNCTION button 1 again before
memorization is complete.
Note:
• Up to 6 stations can be memorized in one Band.
• In regions where reception of less than 6 station is possible, previously memorized stations may remain
in memory.
• Press the FUNCTION button 1 for
two seconds on TV Tuner Setting
Screen switches the Best Stations
Sequential Memory (BSSM) ON.
Page 73

Switching to the Preset Tuning Screen
• Press the SHIFT button on TV Tuner Setting Screen.
This switches to Preset Tuning Screen and enables to preset the stations.
• To return to TV Tuner Setting Screen, press the SHIFT button again.
Preset Tuning
You can memorize broadcast stations in FUNCTION button 1 through 6 for easy,
one-touch station recall.
7 Broadcast station preset memory
7 Preset broadcast station recall
Note:
• Up to 12 stations (6 in TV1 and TV2) can be stored in memory.
• Press the FUNCTION button 1
through 6 on Preset Tuning
Screen to recall the broadcast
stations memorized in
corresponding buttons.
• Press the FUNCTION button 1
through 6 for two seconds on
Preset Tuning Screen to
memorize the broadcast stations
in corresponding buttons.
72
ENGLISH ESPAÑOL DEUTSCH FRANÇAIS
ITALIANO NEDERLANDS
Page 74

73
Other Functions
Using the AUX Source
An IP-BUS-RCA Interconnector such as CD-RB20 or CD-RB10 (sold separately) enables
you to connect this product to auxiliary equipment featuring an RCA output.
For more details, refer to the IP-BUS-RCA Interconnector’s Owner’s Manual.
Selecting the AUX Source
• Select AUX. (Refer to page 23.)
AUX Title Input
The display title for AUX Source can be changed.
Cellular Telephone Muting
Sound from this system is muted automatically when a call is made or received using a
cellular telephone connected to this product.
• The sound is turned off, “MUTE” is displayed and no audio adjustment is possible.
Operation returns to normal when the phone connection is ended.
3. Input the AUX Title.
Refer to “Disc Title Input” on page 50, and perform procedures 3 to 6 in the same way.
2. Press the SHIFT button for two
seconds on the AUX setting
screen.
1. Open the cover of the remote controller.
This switches to AUX setting screen.
Each press changes the Source ...
Page 75

Turn OFF the Display Indication
You can turn off the display indication. If you press any button while the display indication is off, it will light up for 5 seconds and then turn off again.
Note:
• While the display indication is turning off, DISPLAY OFF indicator lights up (refer to page 4).
• Press the BAND button for two seconds switches the display indication
ON/OFF.
74
ENGLISH ESPAÑOL DEUTSCH FRANÇAIS
ITALIANO NEDERLANDS
Page 76

75
CD Player and Care
CD player and care
• Use only CDs that have either of the two Compact
Disc Digital Audio marks as shown below.
• Use only normal, round CDs. If you insert irregular, non-round, shaped CDs they may jam in the
CD player or not play properly.
• Check all CDs for cracks, scratches or warping
before playing. CDs that have cracks, scratches or
are warped may not play properly. Do not use such
discs.
• Avoid touching the recorded (non-printed) surface
when handling the disc.
• Store discs in their cases when not in use.
• Keep discs out of direct sunlight and do not expose
the discs to high temperatures.
• Do not attach labels, write on or apply chemicals
to the surface of the discs.
• To clean a CD, wipe the disc with a soft cloth outward from the center.
• If the heater is used in cold weather, moisture may
form on components inside the CD player.
Condensation may cause the CD player to malfunction. If you think that condensation is a problem turn off the CD player for an hour or so to
allow it to dry out and wipe any damp discs with a
soft cloth to remove the moisture.
• Road shocks may interrupt CD playback.
CD-R/CD-RW discs
• When CD-R/CD-RW discs are used, playback is
possible only for discs which have been finalized.
• It may not be possible to play back CD-R/CD-RW
discs recorded on a music CD recorder or a personal computer because of disc characteristics,
scratches or dirt on the disc, or dirt, condensation,
etc., on the lens of this unit.
• Playback of discs recorded on a personal computer
may not be possible, depending on the application
settings and the environment. Please record with
the correct format. (For details, contact the manufacturer of the application.)
• Playback of CD-R/CD-RW discs may become
impossible in case of direct exposure to sunlight,
high temperatures, or the storage conditions in the
car.
• Titles and other text information recorded on a
CD-R/CD-RW disc may not be displayed by this
unit.
• This unit conforms to the track skip function of the
CD-R/CD-RW disc. The tracks containing the
track skip information are skipped automatically .
• If you insert a CD-RW disc into this unit, time to
playback will be longer than when you insert a
conventional CD or CD-R disc.
• Read the precautions with CD-R/CD-RW discs
before using them.
COMPACT
DIGITAL AUDIO
Page 77

Built-in CD Player’s Error Message
When problems occur with CD playback, an error message appears on the display. Refer
to the table below to identify the problem, then take the suggested corrective action. If the
error persists, contact your dealer or your nearest PIONEER Service Center.
Message Possible cause Recommended action
ERROR- 11, 12, 17, 30 Dirty disc. Clean the disc.
ERROR- 11, 12, 17, 30 Scratched disc. Replace the disc.
ERROR- 14 Unrecorded CD. Check the disc.
ERROR- 10, 11, 12, 14, Electrical or mechanical Turn the ignition ON and OFF, or
17, 30, A0 problem. switch to a different source, then back
to the CD player.
ERROR- 44 All tracks are setting track skip. Replace the disc.
HEAT CD player overheating. Discontinue play until the machine
temperature drops.
76
ENGLISH ESPAÑOL DEUTSCH FRANÇAIS
ITALIANO NEDERLANDS
Page 78

77
Connecting the Units
Note:
• This unit is for vehicles with a 12-volt battery and
negative grounding. Before installing it in a recreational vehicle, truck, or bus, check the battery
voltage.
• To avoid shorts in the electrical system, be sure to
disconnect the ≠ battery cable before beginning
installation.
• Refer to the owner’s manual for details on connecting the power amp and other units, then make
connections correctly.
• Secure the wiring with cable clamps or adhesive
tape. To protect the wiring, wrap adhesive tape
around them where they lie against metal parts.
• Route and secure all wiring so it cannot touch any
moving parts, such as the gear shift, handbrake,
and seat rails. Do not route wiring in places that
get hot, such as near the heater outlet. If the insulation of the wiring melts or gets torn, there is a
danger of the wiring short-circuiting to the vehicle
body.
• Don’t pass the yellow lead through a hole into the
engine compartment to connect to the battery.
This will damage the lead insulation and cause a
very dangerous short.
• Do not shorten any leads. If you do, the protection
circuit may fail to work when it should.
• Never feed power to other equipment by cutting
the insulation of the power supply lead of the unit
and tapping into the lead. The current capacity of
the lead will be exceeded, causing overheating.
• When replacing a fuse, be sure to use only fuses
of the rating prescribed on the fuse holder.
• The black lead is ground. Please ground this lead
separately from the ground of high-current products such as power amps.
If you ground the products together and the
ground becomes detached, there is a risk of damage to the products or fire.
• When this product’s source is switched ON, a
control signal is output through the blue/white
lead. Connect to an external power amp’s system
remote control or the car’s Auto-antenna relay
control terminal (max. 300 mA 12 V DC). If the
car features a glass antenna, connect to the antenna booster power supply terminal.
• When an external power amp is being used with
this system, be sure not to connect the blue/white
lead to the amp’s power terminal. Likewise, do
not connect the blue/white lead to the power terminal of the auto-antenna. Such connection could
cause excessive current drain and malfunction.
• To avoid short-circuiting, cover the disconnected
lead with insulating tape. There is a possibility of
short-circuiting if the leads are not insulated.
• To prevent incorrect connection, the input side of
the IP-BUS connector and Optical connector is
blue, and the output side is black. Connect the
connectors of the same colors correctly.
• Connection of this system requires optical cables
and IP-BUS cables. Consult your nearest dealer
for more detail.
• Set GPS antenna away from this unit. If you set
them too close, it may fail to operate properly.
• This unit can not be installed in a vehicle that
does not have an ACC (accessory) position on
the ignition switch. (Fig. 1)
Fig. 1
• Cords for this product and those for other products may be different colors even if they have the
same function. When connecting this product to
another product, refer to the supplied Installation
manuals of both products and connect cords that
have the same function.
No ACC positionACC position
C
C
A
O
F
F
O
N
S
T
A
R
T
O
F
N
F
O
S
T
A
R
T
Page 79

Setting Examples
System Example with Multi-CD Player
Fig. 2
System Example with DVD Player
Fig. 3
SYSTEM CONTROL
TUNER/CD
“RS-D7R (This unit)”
Audio Unit
“RS-A9”
“RS-A7”
(Sold separately)
Speakers
IP-BUS cable
Analog signal
Optical cable
DVD player
(e.g., “XDV-P9—”
(sold separately))
Display unit
(e.g., “AVX-7600”
(sold separately))
IP-BUS-RCA Interconnector
(e.g., “CD-RB20” (sold separately))
Multi-CD Player
Auxiliary equipment
Multi-CD Player
SYSTEM CONTROL
TUNER/CD
“RS-D7R (This unit)”
Audio Unit
“RS-A9”
“RS-A7”
(Sold separately)
Speakers
IP-BUS cable
Analog signal
Optical cable
78
ENGLISH ESPAÑOL DEUTSCH FRANÇAIS
ITALIANO NEDERLANDS
Page 80

79
Connecting the Units
This Product
Clear
To terminal always supplied
with power regardless of
ignition switch position.
Red
To electric terminal controlled
by ignition switch (12 V DC)
ON/OFF.
Clear/black (ground)
To vehicle (metal) body.
Orange/white
To lighting switch terminal.
Yellow/black
If you use a cellular telephone, connect it via the
Audio Mute lead on the cellular telephone. If not,
keep the Audio Mute lead free of any connections.
IP-BUS cable
Antenna jack
IP-BUS output (Black)
15 cm
15 cm
IP-BUS input (Blue)
15 cm
Blue/white
To system control terminal of the power
amp or Auto-antenna relay control terminal
(max. 300 mA 12 V DC).
Multi-CD player
(sold separately)
Fuse holder
Fuse resistor
Fuse resistor
Optical input (Blue)
Optical output (Black)
Power Cable Connection
Fig. 4
Page 81

80
ENGLISH ESPAÑOL DEUTSCH FRANÇAIS
ITALIANO NEDERLANDS
Attaching the Noise Filter
To prevent the noise, use the supplied noise filter correctly.
This Product
IP-BUS output (Black)
15 cm
IP-BUS input (Blue)
15 cm
Noise filter (small)
Noise filter (large)
Lock tie
Blue/white
Noise filter
(large)
Lock tie
1. Attach the supplied noise filter to each of the groups of cables as shown
below.
Fig. 5
Page 82

81
Connecting the Units
This Product
Tweeter Mid-range Speaker Low-range Speaker Subwoofer
IP-BUS output (Black)
IP-BUS input (Blue)
Black
Black
Black
Blue
Blue
Blue
Black
Blue
Black
Blue
Black
Multi-CD player
(sold separately)
Auxiliary equipment
*1 IP-BUS cable
*2 Optical cable
*3 RCA cable (sold separately)
*1
*1
*1
*1
*1
*2
*2
*2
*3
*3
Optical input (Blue)
Optical output (Black)
Digital Integrated Amplifier
“RS-A9”
(Sold separately)
DVD player
(e.g., “XDV-P9—”
(sold separately))
Display unit
(e.g., “AVX-7600”
(sold separately))
IP-BUS-RCA Interconnector
(e.g., “CD-RB20” (sold separately))
Digital Amplifier
“RS-A7”
(Sold separately)
Fig. 6
System Connection
Page 83

82
ENGLISH ESPAÑOL DEUTSCH FRANÇAIS
ITALIANO NEDERLANDS
System Example
System with a Digital Integrated Amplifier “RS-A9”
Fig. 7
System with a Digital Integrated Amplifier “RS-A9” and a Digital Amplifier ”RS-A7“
Fig. 8
IP-BUS cable
Analog signal
Optical cable
Digital Integrated Amplifier
“RS-A9”
(Sold separately)
Mode:HIGH/MID
Digital Amplifier
“RS-A7”
(Sold separately)
Address:2
Mode:LOW
Tweeter Mid-range Speaker Low-range Speaker
Digital Integrated Amplifier
“RS-A9”
(Sold separately)
Mode:HIGH/LOW
IP-BUS cable
Analog signal
Optical cable
Tweeter Low-range Speaker
Page 84

83
Connecting the Units
System with a Digital Integrated Amplifier “RS-A9” and a Digital Amplifier ”RS-A7“
Fig. 9
System with a Digital Integrated Amplifier “RS-A9”
and Three Digital Amplifiers ”RS-A7“
—Full Balanced Pure Digital System—
Fig. 10
IP-BUS cable
Analog signal
Optical cable
Digital Integrated Amplifier
“RS-A9”
(Sold separately)
Mode:HIGH/HIGH
Digital Amplifier
“RS-A7”
(Sold separately)
Address:2
Mode:MID/MID
Digital Amplifier
“RS-A7”
(Sold separately)
Address:3
Mode:LOW/LOW
Digital Amplifier
“RS-A7”
(Sold separately)
Address:4
Mode:S.W/S.W
Tweeter Mid-range Speaker Low-range Speaker Subwoofer
IP-BUS cable
Analog signal
Optical cable
Digital Integrated Amplifier
“RS-A9”
(Sold separately)
Mode:HIGH/MID
Digital Amplifier
“RS-A7”
(Sold separately)
Address:2
Mode:LOW
Tweeter Mid-range Speaker Low-range Speaker Subwoofer
Page 85

Installation
84
ENGLISH ESPAÑOL DEUTSCH FRANÇAIS
ITALIANO NEDERLANDS
Note:
• Before finally installing the unit, connect the
wiring temporarily, making sure it is all connected
up properly, and the unit and the system work
properly.
• Use only the parts included with the unit to ensure
proper installation. The use of unauthorized parts
can cause malfunction.
• Consult with your nearest dealer if installation
requires the drilling of holes or other modifications
of the vehicle.
• Install the unit where it does not get in the driver’s
way and cannot injure the passenger if there is a
sudden stop, like an emergency stop.
• The semiconductor laser will be damaged if it
overheats, so don’t install the unit anywhere hot
— for instance, near a heater outlet.
• If installation angle exceeds 60° from horizontal,
the unit might not give its optimum performance.
(Fig. 11)
Fig. 11
Installation with the rubber bush
Fig. 12
Holder
After inserting the holder into the dashboard, then select the appropriate tabs
according to the thickness of the dashboard material and bend them.
(Install as firmly as possible using the
top and bottom tabs. To secure, bend
the tabs 90 degrees.)
182
53
Rubber
bush
Screw
Dashboard
60°
Page 86

85
Installation
Removing the Unit
Fig. 13
Fig. 14
Frame
Pull out to remove the frame.
(When reattaching the frame, point the
side with a groove downwards and
attach it.)
Insert the supplied extraction keys
into the unit, as shown in the figure,
until they click into place. Keeping
the keys pressed against the sides of
the unit, pull the unit out.
Page 87

Installing the Remote Control Unit
86
ENGLISH ESPAÑOL DEUTSCH FRANÇAIS
ITALIANO NEDERLANDS
Fitting the Remote Control Unit
Precaution:
• Press the remote controller unit onto the mounting base until it clicks into place.
Fitting horizontally
Fitting vertically
Note:
• If the remote controller is installed vertically, you can not open the remote controller cover.
Installation Using Only the Mounting Base
Precaution:
• To avoid it being a hindrance to driving, always install the remote control unit to the passenger’s side —
not the driver’s side.
• Before using double-sided tape, clean off any dirt on the surface to which the double-sided tape is to be
attached.
Mounting
Base
Passenger
Double-sided tape
Used
Not used
Fig. 15
Fig. 16
Fig. 17
Page 88

87
Installing the Remote Control Unit
Installation Using the Mounting Base and the Bracket
Precaution:
• To avoid it being a hindrance to driving, always install the remote control unit to the passenger’s
side – not the driver’s side.
• Install the mounting base so that the remote control unit is slanting upwards at an angle when
fitted.
• Before using double-sided tape, clean off any dirt on the surface to which the double-sided tape is
to be attached.
• Before drilling any mounting holes, confirm that the screws will not interfere with any of the cars operating systems (such as the fuel line, brake lines, electrical wiring, etc.).
Method A
This example is for when the console is wide enough to have installation space for the mounting base.
Method B
This example is for when the console is not wide enough to have installation space for the
mounting base.
Note:
• Install the mounting base in such a way that it will not hit the seat when the seat is adjusted.
Fig. 18
Fig. 19
Page 89

88
ENGLISH ESPAÑOL DEUTSCH FRANÇAIS
ITALIANO NEDERLANDS
1. Install the bracket to the mounting base.
2. Install the mounting base to the vehicle.
Eg. 1: Installation with double-sided tape.
Eg. 2: Installation with the screws.
Drill holes 2 – 2.5 mm
in diameter.
Screws
(4 × 12 mm)
Passenger seat
Passenger seat
Double-sided tape
Mounting base
Bracket
Screws (3 × 10 mm)
Fig. 20
Fig. 21
Fig. 22
Page 90

89
Specifications
General
Power source .......... 14.4 V DC (10.8 – 15.1 V allowable)
Grounding system ........................................ Negative type
Max. current consumption ........................................ 4.0 A
Dimensions
(mounting size) ...... 178 (W) × 50 (H) × 160 (D) mm
(front face) .............. 188 (W) × 58 (H) × 20 (D) mm
Weight ...................................................................... 1.6 kg
Maximum preout output level .................................. 4.0 V
Digital input .................................................. Optical input
Sampling frequency .................................... 44.1 – 96 kHz
Digital output .............................................. Optical output
CD player
System .................................... Compact disc audio system
Usable discs .................................................. Compact disc
Signal format .................... Sampling frequency: 44.1 kHz
Number of quantization bits: 16; linear
Frequency characteristics .............. 5 – 20,000 Hz (±1 dB)
Signal-to-noise ratio .... 107 dB (1 kHz) (IEC-A network)
Dynamic range ............................................ 98 dB (1 kHz)
Number of channel .............................................. 2 (stereo)
FM tuner
Frequency range ...................................... 87.5 – 108 MHz
Usable sensitivity ...................................................... 9 dBf
(0.8 µV/75 Ω, mono, S/N: 30 dB)
50 dB quieting sensitivity .... 15 dBf (1.5 µV/75 Ω, mono)
Signal-to-noise ratio ...................... 70 dB (IEC-A network)
Distortion .......................... 0.3% (at 65 dBf, 1 kHz, stereo)
Frequency response ...................... 30 – 15,000 Hz (±3 dB)
Stereo separation .......................... 40 dB (at 65 dBf, 1 kHz)
MW tuner
Frequency range ........................ 531 – 1,602 kHz (9 kHz)
Usable sensitivity .............................. 18 µV (S/N: 20 dB)
Selectivity .................................................. 50 dB (±9 kHz)
LW tuner
Frequency range ........................................ 153 – 281 kHz
Usable sensitivity .............................. 30 µV (S/N: 20 dB)
Selectivity .................................................. 50 dB (±9 kHz)
Note:
• Specifications and the design are subject to possi-
ble modification without notice due to improvements.
Page 91

Published by Pioneer Corporation.
Copyright © 2004 by Pioneer Corporation.
All rights reserved.
Publication de Pioneer Corporation.
Copyright © 2004 Pioneer Corporation.
Tous droits de reproduction et de traduction
réservés.
Printed in Japan
Imprimé au Japon
<CRB1960-A> EW<KSNNF> <04D00000>
PIONEER CORPORATION
4-1, MEGURO 1-CHOME, MEGURO-KU, TOKYO 153-8654, JAPAN
PIONEER ELECTRONICS (USA) INC.
P.O. Box 1540, Long Beach, California 90801-1540, U.S.A.
TEL: (800) 421-1404
PIONEER EUROPE NV
Haven 1087, Keetberglaan 1, B-9120 Melsele, Belgium
TEL: (0) 3/570.05.11
PIONEER ELECTRONICS ASIACENTRE PTE. LTD.
253 Alexandra Road, #04-01, Singapore 159936
TEL: 65-6472-1111
PIONEER ELECTRONICS AUSTRALIA PTY. LTD.
178-184 Boundary Road, Braeside, Victoria 3195, Australia
TEL: (03) 9586-6300
PIONEER ELECTRONICS OF CANADA, INC.
300 Allstate Parkway, Markham, Ontario L3R OP2, Canada
TEL: 1-877-283-5901
PIONEER ELECTRONICS DE MEXICO, S.A. de C.V.
Blvd.Manuel Avila Camacho 138 10 piso
Col.Lomas de Chapultepec, Mexico, D.F. 11000
TEL: 55-9178-4270
 Loading...