

Page 1
English
Special red battery wire
RD-228 (sold separately)
After completing all other amplifier connections, finally
connect the battery wire terminal of the amplifier to the
positive () battery terminal.
Ground wire (Black)
RD-228 (sold separately)
Connect to a clean,
paint-free metal location.
Car stereo with RCA
output jacks
(sold separately)
RS-P99
(sold separately)
External output
If only one input plug is used, do not
connect anything to RCA input jack B.
Connecting wire with RCA
pin plugs
(sold separately)
RCA input jack A
RCA input jack B
Speaker output terminals
Refer to "Connecting the speaker
output terminals" in the owner’s
manual.
Fuse (25 A)
System remote control wire (sold separately)
Connect male terminal of this wire to the system remote control
terminal of the car stereo. The female terminal can be connected to
the auto-antenna relay control terminal. If the car stereo lacks a
system remote control terminal, connect the male terminal to the
power terminal via the ignition switch.
Fuse (40 A) X 2
Grommet
Left side
Right side
Left
Left
Right
Right
Speaker out B
Speaker out A
Left Right
Speaker out B (Mono)
Speaker out A
Speaker (Left)
Speaker (Right)
Speaker (Mono)
Speaker (Mono)
RCA input jack A
RCA input jack B
From RS-P99 (sold separately) etc. (RCA output)
If only one input plug is used, connect the plug to
RCA input jack A rather than B.
Connecting wires with
RCA plugs
(sold separately)
RCA input jack A
For two-channel output,
connect the RCA plugs
to the RCA input jack A.
Connecting wire with
RCA pin plugs
(sold separately)
From RS-P99 (sold separately) etc. (RCA output)
1
2 3 4 4 3 2
Optical Digital Reference System
BRIDGEABLE FOUR-CHANNEL POWER AMPLIFIER
Système numérique optique de référence
AMPLIFICATEUR DE PUISSANCE PONTABLE A QUATRE VOIES
Sistema ottico digitale di riferimento
AMPLIFICATORE DI POTENZA A QUATTRO CANALI COLLEGABILE A PONTE
Sistema de Referencia Digital Óptico
AMPLIFICADOR DE POTENCIA DE CUATRO CANALES EN PUENTE
Optisches Digital-Referenzsystem
BRÜCKBARER 4-KANAL-LEISTUNGSVERSTÄRKER
Optisch digitaal referentiesysteem
SCHAKELBARE 4-KANAALSVERSTERKER
Оптическая цифровая справочная система
ЧЕТЫРЕХКАНАЛЬНЫЙ УСИЛИТЕЛЬ МОЩНОСТИ С ВОЗМОЖНОСТЬЮ МОСТОВОГО ВКЛЮЧЕНИЯ
RS-A99
Quick start guide
Guida rapida all’uso
Schnellstartanleitung
Snelstartgids
Printed in Japan
Imprimé au Japon
<CRD4504-A> EW
Guide de démarrage rapide
Guía de iniciación rápida
Быстрый запуск проводника
<KOKZF> <10D00000>
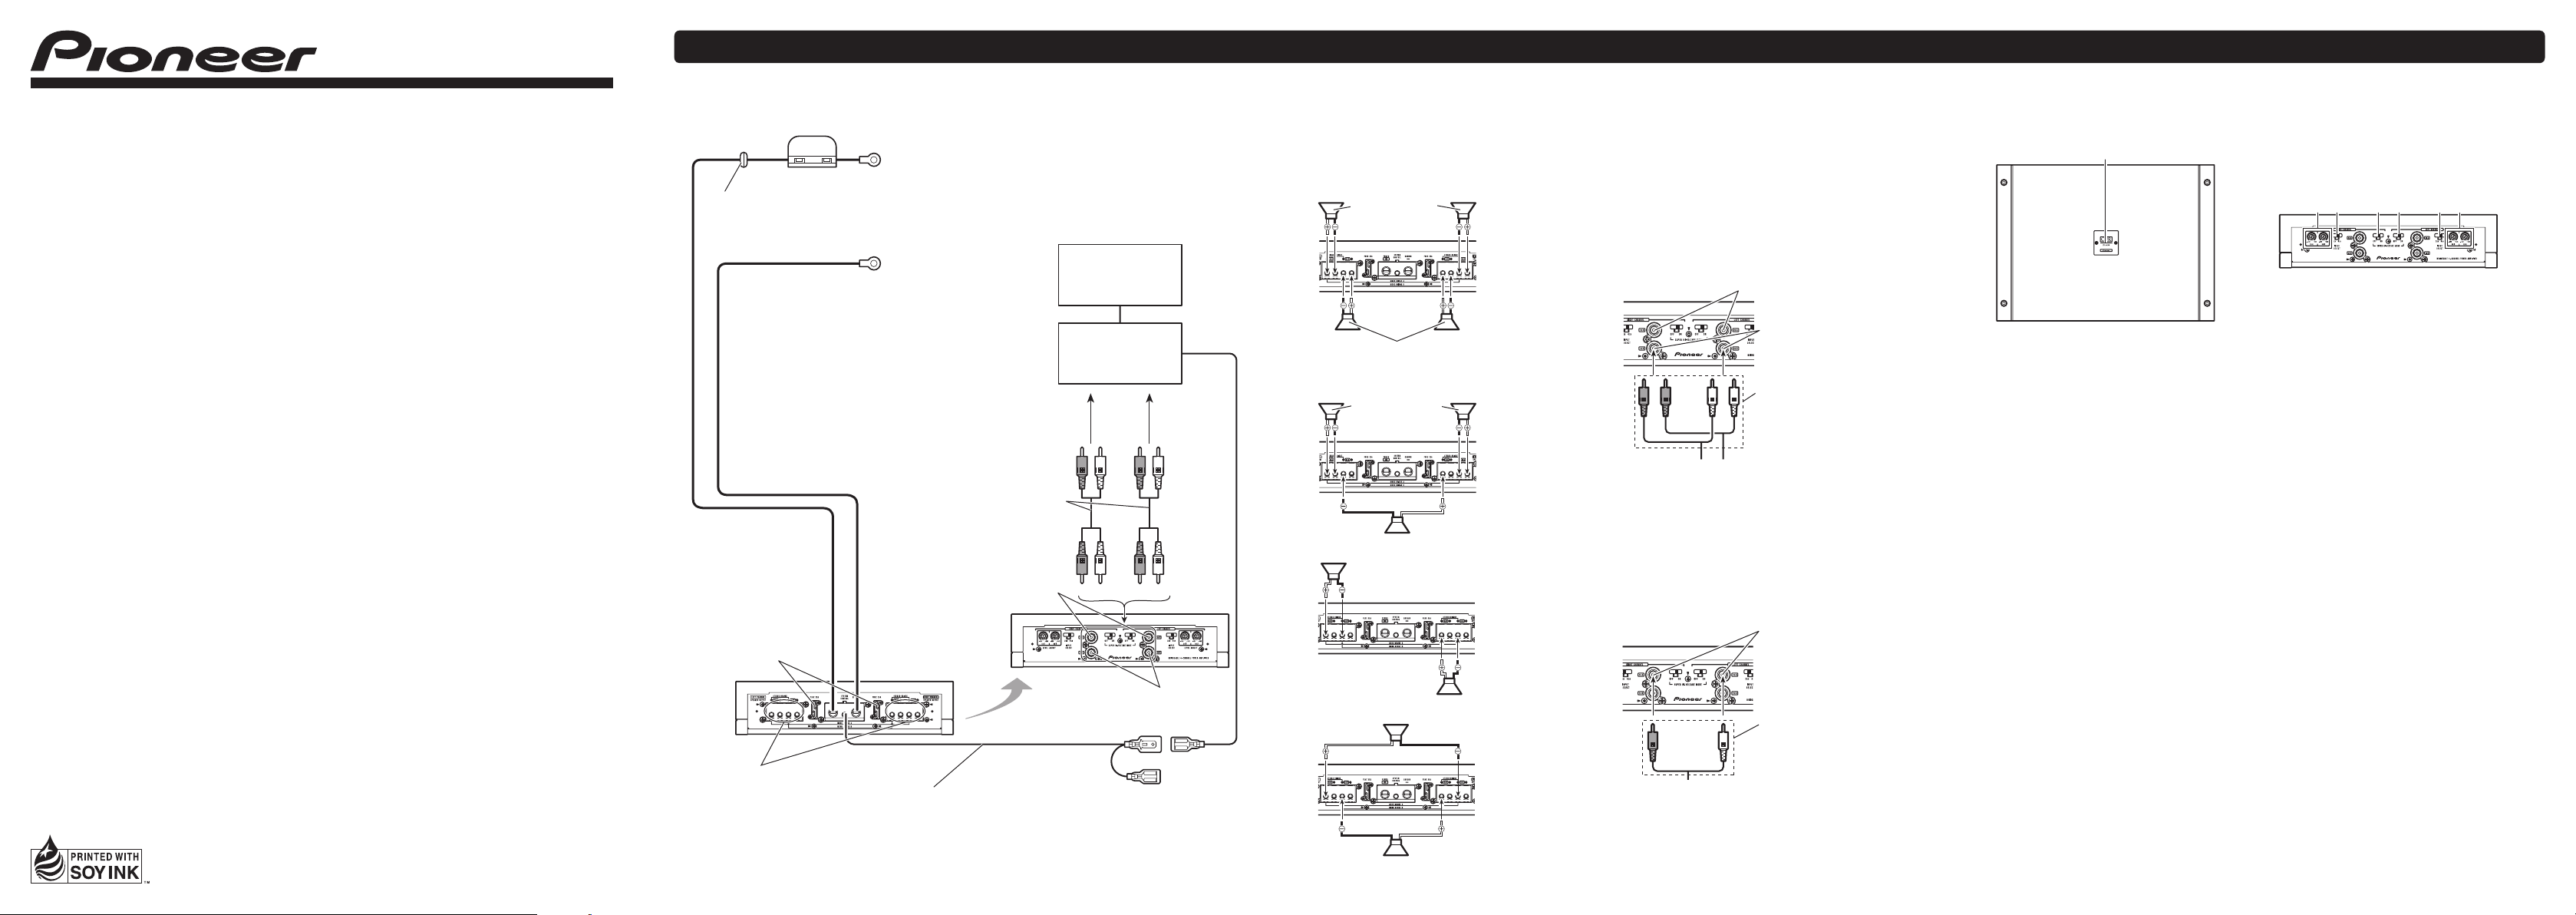
Connection diagram Connecting the speakers
The speaker output mode can be four-channel,
three-channel (stereo and mono) or two-channel
(stereo or mono). Connect the speaker leads
based on the mode and the figures shown below.
Four-channel output
Three-channel output
Two-channel output (Stereo)
Two-channel output (Mono)
Connections when using the
RCA input jack
Connect the car stereo RCA output jack and the
RCA input jack of the amplifier.
Four-channel / Three-channel
output
Slide INPUT SELECT (input select) switch to 4CH
position.
Set the LEFT CHANNEL (left channel) and RIGHT
CHANNEL (right channel) switches to the same
position.
Two-channel output (Stereo) / (Mono)
Slide INPUT SELECT (input select) switch to 2CH
position.
Set the LEFT CHANNEL (left channel) and RIGHT
CHANNEL (right channel) switches to the same
position.
What’s what
1 Power indicator
The power indicator lights up to indicate
power ON.
2 LEVEL ADJUST (level adjustment)
control
LEVEL ADJUST (level adjustment) control
helps align the input level of each channel.
Both LEFT CHANNEL (left channel) and RIGHT
CHANNEL (right channel) are available for CH
A (channel A) and CH B (channel B).
To increase the level, turn LEVEL ADJUST
(level adjustment) clockwise. To decrease the
level, turn LEVEL ADJUST (level adjustment)
counterclockwise.
- In case of a bridge connection of speakers,
set the speakers’ LEVEL ADJUST (level
adjustment) switches to the same position.
- When connecting to a car stereo that outputs
high power, if you turn up the volume of the
car stereo and distortion is increased, turn
down the car stereo volume.
3 INPUT SELECT (input select) switch
Select 2CH for two-channel input and 4CH for
four–channel input.
- Set the LEFT CHANNEL (left channel) and
RIGHT CHANNEL (right channel) switches to
the same position.
4 SUPER HI-VOLTAGE MODE (super
high-voltage mode) switch
When connecting to RS-P99 (sold separately),
turn on the SUPER HI-VOLTAGE MODE (super
high-voltage mode) switch.
- Set the LEFT CHANNEL (left channel) and
RIGHT CHANNEL (right channel) switches to
the same position.
- When connecting to devices other than RSP99, turn the switch to off. If you turn it on,
the volume may decrease.
Page 2
Français
Fil de batterie rouge spécial
RD-228 (vendu séparément)
Une fois toutes les autres connexions de l’amplificateur
effectuées, connectez la borne du fil de batterie de
l’amplificateur à la borne positive () de la batterie.
Fil de terre (noir)
RD-228 (vendu séparément)
Connectez sur un endroit
métallique propre, non
recouvert de peinture.
Système stéréo de
véhicule avec jacks
de sortie RCA
(vendu séparément)
RS-P99
(vendu séparément)
Sortie externe
Si une seule prise d’entrée est utilisée,
ne connectez rien au jack d’entrée
RCA B.
Fil de connexion avec
prises RCA
(vendu séparément)
Jack d’entrée RCA A
Jack d’entrée RCA B
Bornes de sortie des
haut-parleurs
Reportez-vous à “Connexion des
bornes de sortie des
haut-parleurs” dans le mode
d’emploi.
Fusible (25 A)
Fil de la télécommande du système (vendu séparément)
Connectez la borne mâle du fil à la borne de la télécommande du système
stéréo du véhicule. La borne femelle peut être connectée à la prise de
commande du relais de l’antenne motorisée. Si le système stéréo du
véhicule ne dispose pas d’une borne de télécommande, connectez la
borne mâle à la borne d’alimentation via le contact d’allumage.
Fusible (40 A) × 2
Rondelle
Côté gauche
Côté droit
Gauche
Gauche
Droite
Droite
Sortie B du haut-parleur
Sortie A du
haut-parleur
Gauche Droite
Sortie B du haut-parleur (mono)
Sortie A du
haut-parleur
Haut-parleur (gauche)
Haut-parleur (droit)
Haut-parleur (mono)
Haut-parleur (mono)
Jack d’entrée RCA A
Jack d’entrée RCA B
De RS-P99 (vendu séparément) etc. (Sortie RCA)
Si une seule prise d’entrée est utilisée, connectez
la prise sur le jack d’entrée RCA A (plutôt que sur
le jack d’entrée RCA B).
Fils de connexion avec
prises RCA
(vendus séparément)
Jack d’entrée RCA A
Pour la sortie deux
canaux, connectez les
prises RCA au jack
d’entrée RCA A.
Fils de connexion
avec prises RCA
(vendus séparément)
De RS-P99 (vendu séparément) etc. (Sortie RCA)
1
2 3 4 4 3 2
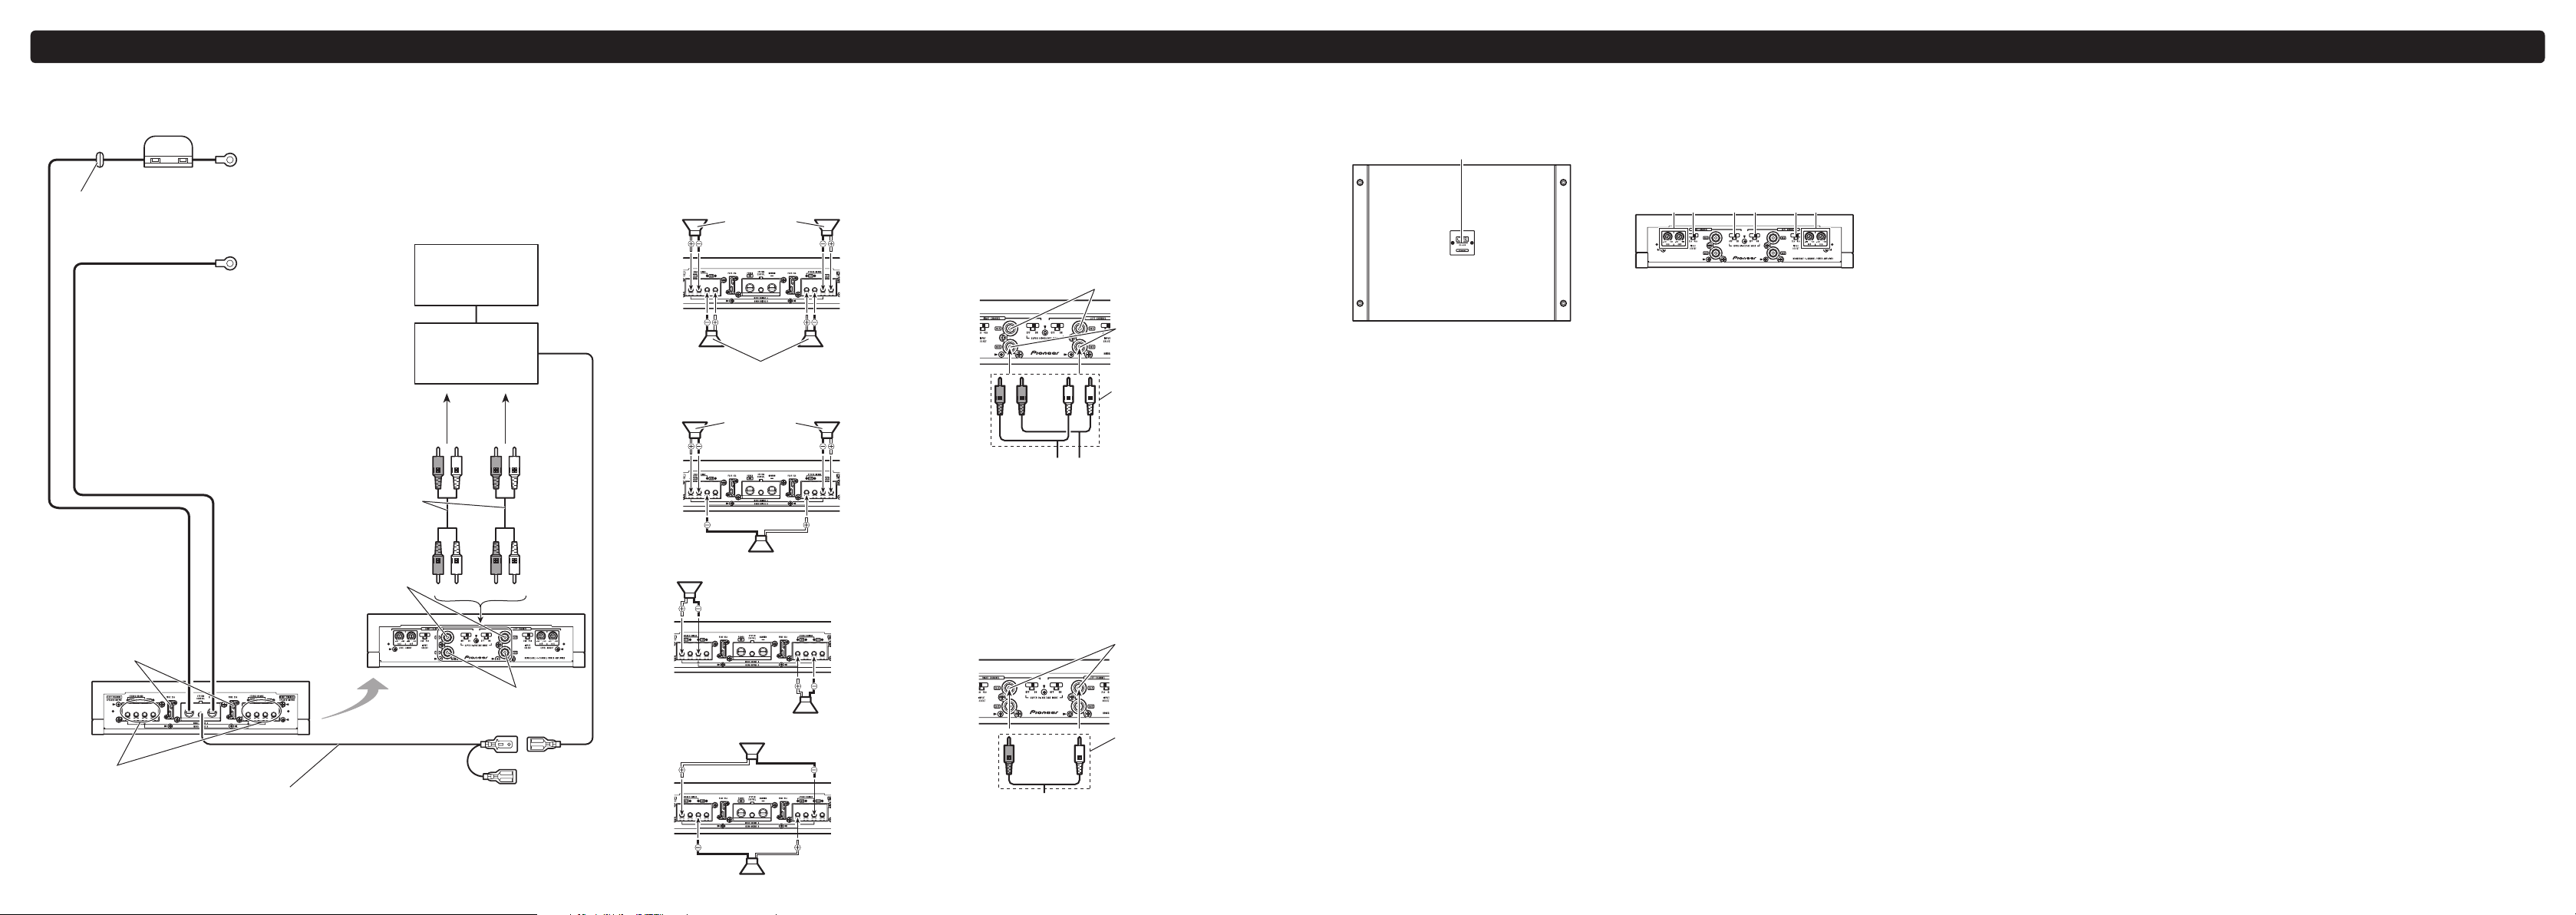
Schéma de connexion Connexion des haut-parleurs
Le mode de sortie des haut-parleurs peut être
quatre canaux, trois canaux (stéréo et mono) ou
deux canaux (stéréo ou mono). Connectez les
fils des haut-parleurs en fonction du mode et des
illustrations ci-dessous.
Sortie quatre canaux
Sortie trois canaux
Sortie deux canaux (stéréo)
Sortie deux canaux (mono)
Connexions lors de l’utilisation
du jack d’entrée RCA
Connectez le jack de sortie RCA du système
stéréo du véhicule et le jack d’entrée RCA de
l’amplificateur.
Sortie quatre/trois canaux
Faites glisser le commutateur INPUT SELECT
(sélection de l’entrée) en position 4CH.
Mettez les commutateurs LEFT CHANNEL (canal
gauche) et RIGHT CHANNEL (canal droit) sur la
même position.
Sortie deux canaux (stéréo) / (mono)
Faites glisser le commutateur INPUT SELECT
(sélection de l’entrée) en position 2CH.
Mettez les commutateurs LEFT CHANNEL (canal
gauche) et RIGHT CHANNEL (canal droit) sur la
même position.
Description de l’appareil
1 Indicateur de mise sous tension
L’indicateur de mise sous tension s’allume
pour indiquer la mise sous tension.
2 Contrôle LEVEL ADJUST (réglage de
niveau)
Le contrôle LEVEL ADJUST (réglage de niveau)
aide à aligner les niveaux d’entrée de chacun
des canaux. LEFT CHANNEL (canal gauche)
et RIGHT CHANNEL (canal croit) peuvent tous
deux être choisis pour CH A (canal A) et CH B
(canal B).
Pour augmenter le niveau, tournez LEVEL
ADJUST (réglage du niveau) dans le sens
des aiguilles d’une montre. Pour diminuer
le niveau, tournez LEVEL ADJUST (réglage
du niveau) dans le sens inverse des aiguilles
d’une montre.
- Dans le cas d’une connexion en pont des
haut-parleurs, réglez les commutateurs
LEVEL ADJUST (réglage de niveau) des hautparleurs sur la même position.
- Dans le cas d’une connexion à un système
stéréo de voiture de puissance de sortie
élevée, si la distorsion augmente quand vous
augmentez le volume, baissez le volume.
3 Commutateur INPUT SELECT
(sélection de l’entrée)
Sélectionnez 2CH pour l’entrée deux canaux et
4CH pour l’entrée quatre canaux.
- Mettez les commutateurs LEFT CHANNEL
(canal gauche) et RIGHT CHANNEL (canal
droit) sur la même position.
4 Commutateur SUPER HI-VOLTAGE
MODE (mode super haute tension)
Lorsque que vous connectez cet appareil
à RS-P99 (vendu séparément), activez le
commutateur SUPER HI-VOLTAGE MODE
(super haute tension).
- Mettez les commutateurs LEFT CHANNEL
(canal gauche) et RIGHT CHANNEL (canal
droit) sur la même position.
- Dans le cas d’une connexion à des appareils
autres que RS-P99, mettez le commutateur en
position OFF (hors service). Si vous le mettez
sur ON (en service), le volume pourrait
diminuer.
Page 3
Italiano
Cavo batteria rosso speciale
RD-228 (venduto a parte)
Dopo aver eseguito tutti gli altri collegamenti
all’amplificatore, collegare il terminale del cavo batteria
al terminale positivo () della batteria.
Cavo di messa a terra (nero)
RD-228 (venduto a parte)
Collegare ad una parte
metallica pulita e non
verniciata.
Car stereo con
connettori di uscita
RCA (venduta a parte)
RS-P99
(venduto a parte)
Uscita esterna
Se si usa una sola spina di ingresso,
non collegare nulla al connettore di
ingresso RCA B.
Cavi di collegamento con
spine RCA
(venduti a parte)
Connettore di
ingresso RCA A
Connettore di
ingresso RCA B
Terminali di uscita altoparlanti
Vedere ‘Collegamento dei
terminali di uscita altoparlanti’
nel Manuale utente.
Fusibile (25 A)
Cavo telecomando sistema (venduto a parte)
Collegare il terminale maschio di questo cavo al terminale del
telecomando del sistema car stereo. Il terminale femmina può essere
collegato al terminale di controllo del relè dell’antenna automatica. Se
il car stereo non è dotato di terminale per il telecomando del sistema,
collegare il terminale maschio al terminale di alimentazione tramite
l’interruttore della chiave di avviamento.
Fusibile (40 A) × 2
Anello
Lato sinistro
Lato destro
Sinistra
Sinistra
Destra
Destra
Uscita altoparlante B
Uscita
altoparlante A
Sinistra Destra
Uscita altoparlante B (mono)
Uscita
altoparlante A
Altoparlante (sinistro)
Altoparlante (destro)
Altoparlante (mono)
Altoparlante (mono)
Connettore di ingresso
RCA A
Connettore di ingresso
RCA B
Dal preamplificatore RS-P99 (venduto a parte),
ecc. (uscita RCA)
Se si usa una sola spina di ingresso, collegare la
spina al connettore di ingresso RCA A, non al
connettore B.
Cavi di collegamento con
spine RCA
(venduti a parte)
Connettore di ingresso
RCA A
Per l’uscita a due canali,
collegare le spine RCA
al connettore di ingresso
RCA A.
Cavi di collegamento
con spine RCA
(venduti a parte)
Dal preamplificatore RS-P99 (venduto a parte),
ecc. (uscita RCA)
1
2 3 4 4 3 2
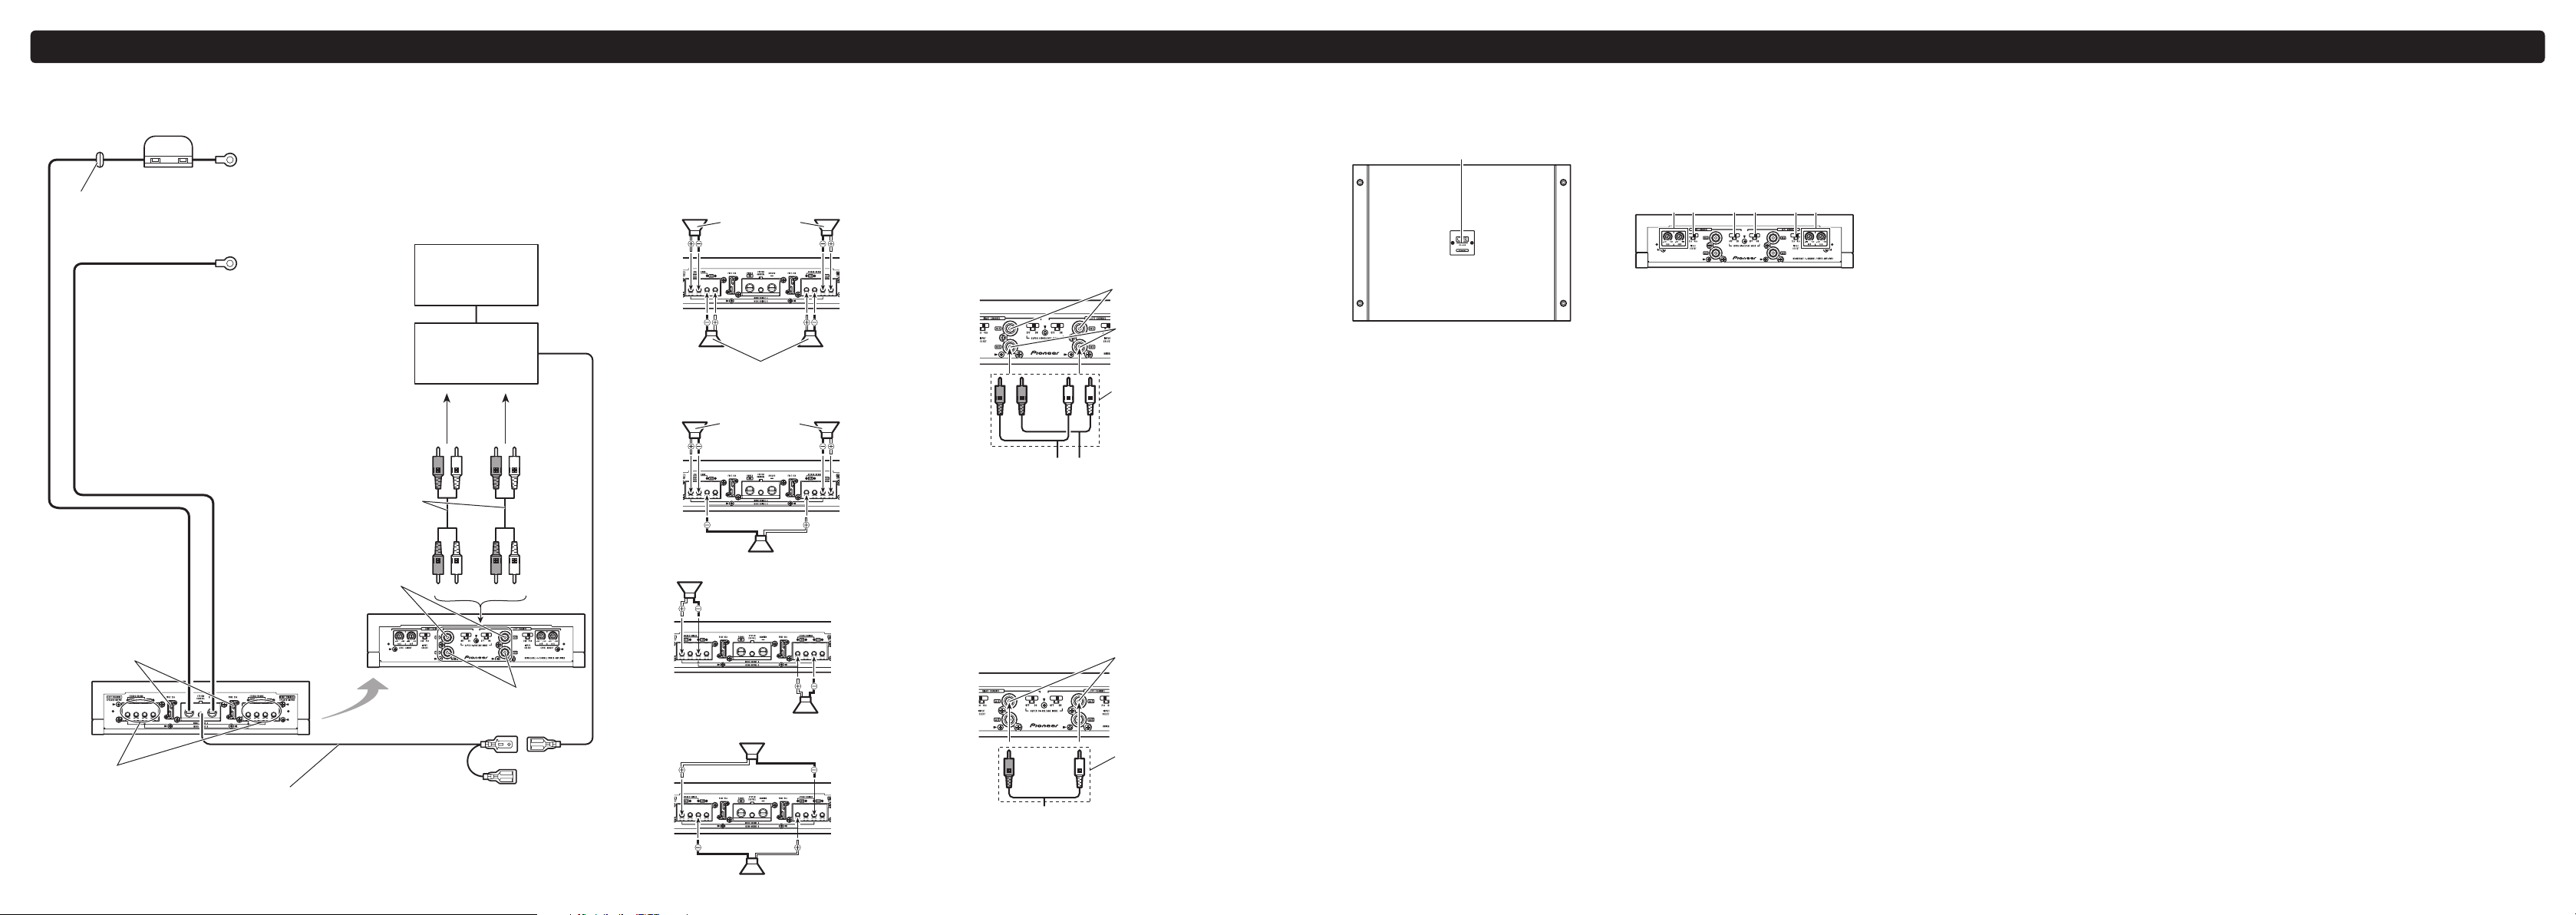
Schema di collegamento Collegamento degli altoparlanti
La modalità di uscita degli altoparlanti può essere
a quattro, a tre (stereo e mono) o a due canali
(stereo o mono). Collegare i conduttori degli
altoparlanti in base alla modalità e alle figure
mostrate in basso.
Uscita a quattro canali
Uscita a tre canali
Uscita a due canali (stereo)
Uscita a due canali (mono)
Collegamenti utilizzando un
connettore di ingresso RCA
Collegare il connettore di uscita RCA del car
stereo e il connettore di ingresso RCA
dell’amplificatore.
Uscita a quattro canali / a tre canali
Far scorrere l’interruttore INPUT SELECT
(selezione ingresso) sulla posizione 4CH.
Regolare gli interruttori LEFT CHANNEL (canale
sinistro) e RIGHT CHANNEL (canale destro) sulla
stessa posizione.
Uscita a due canali (stereo) / (mono)
Far scorrere l’interruttore INPUT SELECT
(selezione ingresso) sulla posizione 2CH.
Regolare gli interruttori LEFT CHANNEL (canale
sinistro) e RIGHT CHANNEL (canale destro) sulla
stessa posizione.
Nomenclatura
1 Indicatore di accensione
L’indicatore di accensione si illumina per
indicare che l’alimentazione è collegata.
2 Regolatore LEVEL ADJUST
(regolazione del livello)
Il regolatore LEVEL ADJUST (regolazione
del livello) contribuisce ad allineare il livello
di ingresso di ogni canale. LEFT CHANNEL
(canale sinistro) e RIGHT CHANNEL (canale
destro) sono entrambi disponibili per CH A
(canale A) e CH B (canale B).
Per aumentare il livello, ruotare LEVEL
ADJUST (regolazione del livello) in senso
orario. Per diminuirlo, ruotare LEVEL ADJUST
(regolazione del livello) in senso antiorario.
- Nel caso di collegamenti a ponte di
altoparlanti, assicurarsi che gli interruttori
LEVEL ADJUST (regolazione del livello) degli
altoparlanti si trovino nella stessa posizione.
- Quando si collega a un car stereo con uscita
ad alta potenza, se aumentando il volume del
car stereo il suono risulta distorto, abbassare
il volume del car stereo.
3 Interruttore INPUT SELECT (selezione
ingresso)
Selezionare 2CH per l’ingresso a due canali o
selezionare 4CH per l’ingresso a quattro canali.
- Regolare gli interruttori LEFT CHANNEL
(canale sinistro) e RIGHT CHANNEL (canale
destro) sulla stessa posizione.
4 Interruttore SUPER HI-VOLTAGE
MODE (modalità alta tensione)
Quando si collega l’unità a un preamplificatore
RS-P99 (venduto separatamente), impostare
l’interruttore SUPER HI-VOLTAGE MODE
(modalità alta tensione) su ON.
- Regolare gli interruttori LEFT CHANNEL
(canale sinistro) e RIGHT CHANNEL (canale
destro) sulla stessa posizione.
- Quando si collega l’unità a dispositivi diversi
da RS-P99, impostare l’interruttore su OFF.
Se l’interruttore è impostato su ON, il volume
potrebbe diminuire.
Page 4

Español
Cable de batería rojo especial
RD-228 (se vende por separado)
Tras completar el resto de conexiones del amplificador,
finalmente conecte el terminal del cable de la batería del
amplificador al terminal positivo () de la batería.
Cable de puesta a tierra
(negro)
RD-228 (se vende por
separado)
Conéctelo a una parte
metálica limpia, sin pintura.
Estéreo del vehículo con
tomas de salida RCA
(se venden por separado)
RS-P99
(se vende por separado)
Salida externa
Si sólo se utiliza un conector de
entrada, no conecte nada a la toma de
entrada RCA B.
Conexión de cable con
conectores de terminal RCA
(se venden por separado)
Toma de entrada RCA A
Toma de entrada RCA B
Terminales de salida del
altavoz
Consulte ‘Conexión de los
terminales de salida del altavoz’
en el manual de instrucciones.
Fusible (25 A)
Cable de control a distancia del sistema (se vende por separado)
Conecte el terminal macho de este cable al terminal del control a
distancia del sistema en el estéreo del vehículo. El terminal hembra
se puede conectar al terminal del control de relé de la antena del
automóvil. Si el estéreo del vehículo no dispone de un terminal para el
control a distancia del sistema, conecte el terminal macho al terminal
de potencia a través de la llave de encendido.
Fusible (40 A) × 2
Ojal
Lado izquierdo
Lado derecho
Izquierda
Izquierda
Derecha
Derecha
Salida de altavoz B
Salida de
altavoz A
Izquierda Derecha
Salida de altavoz B (monoaural)
Salida de
altavoz A
Altavoz (izquierdo)
Altavoz (derecho)
Altavoz (monoaural)
Altavoz (monoaural)
Toma de entrada RCA A
Toma de entrada RCA B
Desde RS-P99 (vendido por separado) etc. (salida RCA)
Si sólo se utiliza un conector de entrada, conéctelo
a la toma de entrada RCA A, no a la B.
Conexión de los cables
con conectores RCA
(se venden por separado)
Toma de entrada RCA A
Para la salida de dos
canales, conecte los
conectores RCA a la
toma de entrada RCA A.
Conexión de los cables
con conectores RCA
(se venden por separado)
Desde RS-P99 (vendido por separado) etc.
(salida RCA)
1
2 3 4 4 3 2
Diagrama de conexión Conexión de altavoces
El modo de salida del altavoz puede ser de
cuatro, tres (estéreo y monoaural) o dos canales
(estéreo o monoaural). Conecte los conectores del
altavoz según el modo y las figuras detalladas a
continuación.
Salida de cuatro canales
Salida de tres canales
Salida de dos canales (estéreo)
Salida de dos canales (monoaural)
Conexiones al utilizar una
toma de entrada RCA
Conecte la toma de salida RCA del estéreo
del vehículo y la toma de entrada RCA del
amplificador.
Salida de cuatro canales / tres
canales
Deslice el interruptor INPUT SELECT (selector de
entrada) a la posición 4CH.
Ajuste los interruptores del LEFT CHANNEL (canal
izquierdo) y del RIGHT CHANNEL (canal derecho)
a la misma posición.
Salida de dos canales (estéreo) /
(monoaural)
Deslice el interruptor INPUT SELECT (selector de
entrada) a la posición 2CH.
Ajuste los interruptores del LEFT CHANNEL (canal
izquierdo) y del RIGHT CHANNEL (canal derecho)
a la misma posición.
Qué es cada cosa
1 Indicador de encendido
El indicador de encendido se ilumina para
indicar que está activado (ON).
2 Control LEVEL ADJUST (ajuste de
nivel)
El control LEVEL ADJUST (ajuste de nivel)
ayuda a asignar el nivel de entrada de cada
canal. Tanto el LEFT CHANNEL (canal
izquierdo) como el RIGHT CHANNEL (canal
derecho) están disponibles para el CH A (canal
A) y el CH B (canal B).
Para aumentar el nivel, gire el LEVEL ADJUST
(ajuste de nivel) en el sentido de las agujas
del reloj. Para disminuir el nivel, gire el
LEVEL ADJUST (ajuste de nivel) en el sentido
contrario a las agujas del reloj.
- En caso de que los altavoces tengan conexión
de puente , coloque los interruptores del
LEVEL ADJUST (ajuste de nivel) en la misma
posición.
- Si, al conectar un equipo de audio para
automóvil que emite a alta potencia, sube
el volumen y aumenta la distorsión, baje el
volumen del equipo.
3 Interruptor de INPUT SELECT
(selección de entrada)
Seleccione 2CH para la entrada de dos canales
y 4CH para la entrada de cuatro canales.
- Ajuste los interruptores del LEFT CHANNEL
(canal izquierdo) y del RIGHT CHANNEL
(canal derecho) a la misma posición.
4 Interruptor de SUPER HI-VOLTAGE
MODE (modo de alto voltaje súper)
Para conectar un RS-P99 (se vende por
separado), encienda el interruptor de SUPER
HI-VOLTAGE MODE (modo de alto voltaje
súper).
- Ajuste los interruptores del LEFT CHANNEL
(canal izquierdo) y del RIGHT CHANNEL
(canal derecho) a la misma posición.
- Al conectar dispositivos que no sean RS-P99,
apague el interruptor (OFF). Si lo enciende
(ON), es posible que baje el volumen.
Page 5

Deutsch
Kabel der roten Spezialbatterie
RD-228 (als Sonderzubehör erhältlich)
Wenn Sie alle anderen Verstärkeranschlüsse vorgenommen
haben, schließen Sie die Batteriekabelklemme des
Verstärkers am positiven Pol () der Batterie an.
Erdungskabel (schwarz)
RD-228 (als Sonderzubehör
erhältlich)
An ein sauberes, farbfreies
Gehäuseteil aus Metall
anschließen.
Kfz-Stereoanlage mit
Cinch-Ausgängen
(als Sonderzubehör
erhältlich)
RS-P99
(getrennt erhältlich)
Externer Ausgang
Wenn nur ein Eingang verwendet wird,
darf nichts an den Cinch-Eingang B
angeschlossen werden.
Anschlusskabel mit
Cinch-Steckanschlüssen
(als Sonderzubehör
erhältlich)
Cinch-Eingang A
Cinch-Eingang B
Lautsprecherausgangsklemmen
Siehe hierzu „Anschließen der
Lautsprecherausgangsklemmen“
in der Bedienungsanleitung.
Sicherung (25 A)
Kabel der Systemfernbedienung (als Sonderzubehör erhältlich)
Verbinden Sie den Klemmenstecker dieses Kabels mit der Klemme
der Systemfernbedienung der Kfz-Stereoanlage. Die Klemmenbuchse
kann mit der Automatikantennenrelais-Steuerklemme verbunden
werden. Wenn die Kfz-Stereoanlage über keine
Systemfernbedienungsklemme verfügt, verbinden Sie den
Klemmenstecker über die Zündung mit der Stromklemme.
Sicherung (40 A) 2×
Durchführungsdichtung
Linke Seite
Rechte Seite
Links
Links
Rechts
Rechts
Lautsprecherausgang B
Lautsprecherausgang A
Links Rechts
Lautsprecherausgang B (Mono)
Lautsprecherausgang A
Lautsprecher (Links)
Lautsprecher (Rechts)
Subwoofer (Mono)
Subwoofer (Mono)
Cinch-Eingang A
Cinch-Eingang B
Vom RS-P99 (Als Sonderzubehör erhältlich) etc.
(Cinch-Ausgang)
Wird nur ein Eingang verwendet, sollte das Kabel
besser mit dem Cinch-Eingang A als B
angeschlossen werden.
Anschlusskabel mit
Cinch-Steckanschlüssen
(als Sonderzubehör
erhältlich)
Cinch-Eingang A
Für einen
Zweikanal-Ausgang
schließen Sie die
Cinch-Stecker an
Cinch-Eingang A an.
Anschlusskabel mit
Cinch-Steckanschlüssen
(als Sonderzubehör
erhältlich)
Vom RS-P99 (Als Sonderzubehör erhältlich) etc.
(Cinch-Ausgang)
1
2 3 4 4 3 2
Anschlussschema Anschließen der Lautsprecher
Der Lautsprecherausgangsmodus kann wahlweise
vierkanal, dreikanal (Stereo und Mono) oder
zweikanal (Stereo oder Mono) sein. Schließen Sie die
Lautsprecherkabel je nach Modus und entsprechend
den nachstehenden Anschlussschemata an.
Vierkanal-Ausgang
Dreikanal-Ausgang
Zweikanal-Ausgang (Stereo)
Zweikanal-Ausgang (Mono)
Anschlüsse bei Verwendung
des Cinch-Eingangs
Verbinden Sie den Cinch-Ausgang der KfzStereoanlage mit dem Cinch-Eingang des
Verstärkers.
Vierkanal-/Dreikanal-Ausgang
Stellen Sie den INPUT SELECT-Schalter
(Eingangsauswahl) auf die Position 4CH.
Stellen Sie die Schalter für den LEFT CHANNEL
(linken Kanal) und RIGHT CHANNEL (rechten
Kanal) auf dieselbe Position.
Zweikanal-Ausgang (Stereo) /
(Mono)
Stellen Sie den INPUT SELECT-Schalter
(Eingangsauswahl) auf die Position 2CH.
Stellen Sie die Schalter für den LEFT CHANNEL
(linken Kanal) und RIGHT CHANNEL (rechten
Kanal) auf dieselbe Position.
Die einzelnen Teile
1 Betriebsanzeige
Die Betriebsanzeige leuchtet bei
eingeschalteter Stromzufuhr.
2 LEVEL ADJUST-Schalter
(Pegeleinstellung)
Über den LEVEL ADJUST-Schalter
(Pegeleinstellung) kann der Eingangspegel
jedes Kanals angepasst werden. Für die Kanäle
CH A (Kanal A) und CH B (Kanal B) sind
die beiden Optionen LEFT CHANNEL (linker
Kanal) und RIGHT CHANNEL (rechter Kanal)
verfügbar.
Drehen Sie den LEVEL ADJUST-Schalter
(Pegeleinstellung) im Uhrzeigersinn, um den
Pegel zu erhöhen. Drehen Sie den LEVEL
ADJUST-Schalter (Pegeleinstellung) entgegen
dem Uhrzeigersinn, um den Pegel zu verringern.
- Stellen Sie im Falle einer
Lautsprecherbrückenverbindung die LEVEL
ADJUST-Schalter (Pegeleinstellung) aller
Lautsprecher auf dieselbe Position.
- Beim Anschluss an ein Hochleistungs-KfzAudiosystem muss die Lautstärke der KfzStereoanlage verringert werden, wenn die
Lautstärke erhöht wird und sich dabei die
Entzerrung erhöht.
3 INPUT SELECT-Schalter
(Eingangsauswahl)
Wählen Sie 2CH für einen Zweikanal-Eingang
und 4CH für einen Vierkanal-Eingang.
- Stellen Sie die Schalter für den LEFT
CHANNEL (linken Kanal) und RIGHT
CHANNEL (rechten Kanal) auf dieselbe
Position.
4 SUPER HI-VOLTAGE MODE-Schalter
(Super-Hochspannungsmodus)
Bei Anschluss an das Gerät RS-P99
(separat erhältlich), muss der SUPER
HI-VOLTAGE MODE-Schalter (SuperHochspannungsmodus) eingeschaltet, d. h.
auf ON gestellt werden.
- Stellen Sie die Schalter für den LEFT
CHANNEL (linken Kanal) und RIGHT
CHANNEL (rechten Kanal) auf dieselbe
Position.
- Bei Anschluss an andere Gerät als der RSP99, muss dieser Schalter ausgeschaltet,
d. h. auf OFF gestellt werden. Ist der Schalter
auf ON gestellt, verringert sich ggf. die
Lautstärke.
Page 6

Nederlands
Speciale rode accukabel
RD-228 (apart verkrijgbaar)
Pas nadat u alle andere aansluitingen op de versterker
hebt voltooid, verbindt u het aansluitpunt op de
versterker met de positieve () accupool.
Aardkabel (zwart)
RD-228 (apart verkrijgbaar)
Aansluiten op een schone,
ongeverfde metalen locatie.
Autoradio met
RCA-uitgangen
(apart verkrijgbaar)
RS-P99
(los verkrijgbaar)
Externe uitgang
Als u maar één ingang gebruikt, mag
u niets anders aansluiten op
RCA-ingang B.
Aansluitkabel met
RCA-stekkers
(apart verkrijgbaar)
RCA-ingang A
RCA-ingang B
Luidsprekeraansluiting
Raadpleeg voor meer informatie
‘De luidsprekeraansluitingen’ in
de handleiding.
Zekering (25 A)
Kabel systeemafstandsbediening (apart verkrijgbaar)
Verbind het mannelijke aansluitpunt van deze kabel met het aansluitpunt
voor de systeemafstandsbediening van de autoradio. Het vrouwelijke
aansluitpunt kan worden verbonden met de bedieningsaansluiting van de
automatische antenne. Indien de autoradio niet is voorzien van een
aansluiting voor de systeemafstandsbediening, verbindt u het mannelijke
aansluitpunt via de contactschakelaar met de voedingsaansluiting.
Zekering (40 A) × 2
Doorvoerring
Linkerzijde
Rechterzijde
Links
Links
Rechts
Rechts
Luidsprekeruitgang B
Luidsprekeruitgang A
Links Rechts
Luidsprekeruitgang B (mono)
Luidsprekeruitgang A
Luidspreker (links)
Luidspreker (rechts)
Luidspreker (mono)
Luidspreker (mono)
RCA-ingang A
RCA-ingang B
Van RS-P99 (apart verkrijgbaar) enz. (RCA-uitgang)
Als u maar één stekker gebruikt, sluit u deze aan
op RCA-ingang A (niet op B).
Aansluitkabels met
RCA-stekkers
(apart verkrijgbaar)
RCA-ingang A
Bij een 2-kanaalsuitgang
sluit u de RCA-stekkers
aan op RCA-ingang A.
Aansluitkabels met
RCA-stekkers
(apart verkrijgbaar)
Van RS-P99 (apart verkrijgbaar) enz.
(RCA-uitgang)
1
2 3 4 4 3 2
Aansluitschema De luidsprekers aansluiten
De luidsprekeruitgang kan 4, 3 (stereo en mono)
of 2 (stereo of mono) kanalen hebben. Sluit
de luidsprekerdraden aan volgens het aantal
gebruikte kanalen en de volgende afbeeldingen.
4-kanaalsuitgang
3-kanaalsuitgang
2-kanaalsuitgang (stereo)
2-kanaalsuitgang (mono)
Aansluiting via de RCA-ingang
Sluit de RCA-uitgang van de autoradio aan op de
RCA-ingang van de versterker.
4- of 3-kanaalsuitgang
Zet schakelaar INPUT SELECT (ingangsselectie)
op positie 4CH.
Stel LEFT CHANNEL (linker kanaal) en RIGHT
CHANNEL (rechter kanaal) op dezelfde stand af.
2-kanaalsuitgang (stereo) / (mono)
Zet schakelaar INPUT SELECT (ingangsselectie)
op positie 2CH.
Stel LEFT CHANNEL (linker kanaal) en RIGHT
CHANNEL (rechter kanaal) op dezelfde stand af.
Wat is wat
1 Voedingslampje
Het voedingslampje brandt wanneer de
voeding is ingeschakeld (ON).
2 LEVEL ADJUST-bediening (niveau
aanpassen)
Met het bedieningselement LEVEL ADJUST
(niveau aanpassen) kunt u het ingangsniveau
van elk kanaal aanpassen. Zowel LEFT
CHANNEL (linker kanaal) als RIGHT
CHANNEL (rechter kanaal) zijn beschikbaar
voor CH A (kanaal A) en CH B (kanaal B).
Draai LEVEL ADJUST (niveau aanpassen) met
de wijzers van de klok mee om het niveau te
verhogen. Draai LEVEL ADJUST tegen de klok
in om het niveau te verlagen.
- Als de luidsprekers bruggeschakeld zijn,
zet u de schakelaar LEVEL ADJUST (niveau
aanpassen) van de luidsprekers in dezelfde
stand.
- Als u het toestel aansluit op een autoradio
die veel vermogen afgeeft en de vervorming
toeneemt als u het volume van de autoradio
verhoogt, stelt u het volume van de autoradio
lager af.
3 INPUT SELECT-schakelaar
(ingangsselectie)
Selecteer 2CH voor een tweekanaalsingang en
4CH voor een vierkanaalsingang.
- Stel LEFT CHANNEL (linker kanaal) en RIGHT
CHANNEL (rechter kanaal) op dezelfde stand
af.
4 SUPER HI-VOLTAGE MODE-schakelaar
(stand voor extra hoge spanning)
Als u verbinding maakt met RS-P99 (los
verkrijgbaar), schakelt u SUPER HI-VOLTAGE
MODE (stand voor extra hoge spanning) in.
- Stel LEFT CHANNEL (linker kanaal) en RIGHT
CHANNEL (rechter kanaal) op dezelfde stand
af.
- Als u aansluiting maakt met andere
apparaten dan RS-P99, zet u de schakelaar
uit. Als u hem aanzet, kan het volume
afnemen.
Page 7

Русский
Специальный красный провод для подключения к аккумулятору
RD-228 (продается отдельно)
После подключения всех проводов усилителя последним подключите
провод, идущий от клеммы усилителя к положительной () клемме
аккумулятора.
Провод заземления (черный)
RD-228 (приобретается отдельно)
Подсоедините к чистой
неокрашенной металлической
поверхности.
Автомобильная аудиосистема
с выходными гнездами для
подключения кабеля RCA
(приобретается отдельно)
RS-P99
(продается отдельно)
Внешний выход
Если используется только один входной
штекер, не подключайте ничего к входному
гнезду В, предназначенному для RCA.
Соединительный провод с
штекерами RCA
(приобретается отдельно)
Входное гнездо А для RCA
Входное гнездо В для RCA
Выходные клеммы для
подключения
громкоговорителей
См. ‘Подключение проводов к
выходным клеммам
громкоговорителей’ в руководстве
пользователя.
Плавкий
предохранитель
(25 A)
Провод для подключения системы дистанционного управления
(приобретается отдельно)
Подключите штекерный вывод провода к разъему системы дистанционного
управления автомобильной аудиосистемой. Гнездовой вывод можно подключить к
разъему реле управления антенной аудиосистемы. Если у автомобильной
аудиосистемы отсутствует разъем для подключения системы дистанционного
управления, подключите штекерный вывод к клемме питания через замок зажигания.
Плавкий
предохранитель
(40 A) × 2
Проходная
изолирующая
втулка
Левая сторона
Правая сторона
Слева
Слева
Справа
Справа
Выход В громкоговорителя
Выход А громкоговорителя
Слева Справа
Выход А громкоговорителя
Выход В громкоговорителя (моно)
Громкоговоритель (левый)
Громкоговоритель (правый)
Громкоговоритель (моно)
Громкоговоритель (моно)
Входное гнездо А
для RCA
Входное гнездо В
для RCA
От RS-P99 (приобретается отдельно) и т.п. (выход RCA)
Если используется только один входной штекер RCA,
подключайте его к гнезду A, а не к гнезду B.
Соединительные провода
со штекерами RCA
(приобретаются отдельно)
Входное гнездо А для RCA
Для двухканального
выхода подключите
штекеры RCA к входному
гнезду А для RCA.
Соединительные провода
со штекерами RCA
(приобретаются отдельно)
От RS-P99 (приобретается отдельно) и т.п.
(выход RCA)
1
2 3 4 4 3 2
Схема подключения
Подключение громкоговорителей
Режим выхода на громкоговоритель может быть
четырех-, трех- (стерео и моно) или двухканальным
(стерео или моно). Подключите выводы
громкоговорителей согласно выбранному режиму,
руководствуясь приведенными ниже схемами.
Четырехканальный выход
Трехканальный выход
Двухканальный выход (стерео)
Двухканальный выход (моно)
Подключение с использованием
входного гнезда RCA
Соедините кабелем RCA выходное гнездо
автомобильной аудиосистемы и входное гнездо RCA
усилителя.
Четырехканальный / трехканальный
выход
Установите переключатель INPUT SELECT (выбор
входа) в положение 4CH.
Установите переключатели LEFT CHANNEL (левого
канала) и RIGHT CHANNEL (правого канала) в
одинаковое положение.
Двухканальный выход (стерео) /
(моно)
Установите переключатель INPUT SELECT (выбор
входа) в положение 2CH.
Установите переключатели LEFT CHANNEL (левого
канала) и RIGHT CHANNEL (правого канала) в
одинаковое положение.
Описание элементов устройства
1
Индикатор питания
При включении питания загорается индикатор
питания.
2
Регулятор LEVEL ADJUST (регулировка
уровня)
С помощью регулятора LEVEL ADJUST
(регулировка уровня) можно настроить уровень
мощности входного сигнала для каждого канала.
В качестве CH A (канал А) и CH B (канал B)
доступны оба канала, LEFT CHANNEL (левый) и
RIGHT CHANNEL (правый).
Чтобы увеличить уровень, поворачивайте
регулятор LEVEL ADJUST (регулировка уровня)
по часовой стрелке. Чтобы уменьшить уровень,
поворачивайте регулятор LEVEL ADJUST
(регулировка уровня) против часовой стрелки.
- В случае мостового соединения
громкоговорителей установите регуляторы
LEVEL ADJUST (регулировка уровня)
громкоговорителей в одинаковое положение.
- Если устройство подключено к аудиосистеме с
высокой выходной мощностью, и при увеличении
громкости основного устройства искажения
усиливаются, необходимо уменьшить уровень
громкости аудиосистемы.
3
Переключатель INPUT SELECT (вход)
Выберите 2CH для двухканального входа и 4CH
для четырехканального входа.
- Установите переключатели LEFT CHANNEL
(левого канала) и RIGHT CHANNEL (правого
канала) в одинаковое положение.
4
Переключатель SUPER HI-VOLTAGE MODE
(режим повышенного напряжения)
При подключении RS-P99 (продается отдельно)
включите SUPER HI-VOLTAGE MODE (режим
повышенного напряжения) с помощью данного
переключателя.
- Установите переключатели LEFT CHANNEL
(левого канала) и RIGHT CHANNEL (правого
канала) в одинаковое положение.
- При подключении других устройств, кроме
RS-P99 переключатель должен находиться
в положении ВЫКЛ. Если перевести его в
положение ВКЛ, уровень громкости может
упасть.
Page 8

Notepad / Bloc-notes / Appunti / Bloc de notas Notepad / Notities / Блокнот
English
This guide is intended to guide you through the basic functions of this unit.
For details, please refer to the Operation manual stored on the CD-ROM.
Furthermore, manuals are available on the website.
http://www.pioneer.eu
Français
Ce guide a pour but de vous présenter les fonctions de base de cet appareil.
Pour les détails, veuillez vous reporter au mode d’emploi qui se trouve sur le CD-ROM.
Des manuels supplémentaires sont aussi disponible sur notre site web.
http://www.pioneer.eu
Italiano
Questa guida illustra le funzioni principali dell’apparecchio.
Per informazioni particolareggiate s’invita a consultare il manuale d’uso fornito nel CD-ROM.
I manuali sono inoltre disponibili presso il sito
http://www.pioneer.eu
Español
Se ha diseñado esta guía con la intención de guiarle a través de las funciones básicas de esta unidad.
Para los detalles, consulte el Manual de instrucciones que se encuentra almacenado en el CD-ROM.
Además, los manuales están disponibles en el sitio Web.
http://www.pioneer.eu
Deutsch
Diese Anleitung führt Sie durch die grundlegenden Funktionen dieses Geräts.
Einzelheiten finden Sie in der Bedienungsanleitung, die auf der CD-ROM enthalten ist.
Außerdem sind die Bedienungsanleitungen auch auf unserer Website verfügbar.
http://www.pioneer.eu
Nederlands
Deze gids is bedoeld om u bekend te maken met de basisfuncties van dit toestel.
Raadpleegt u voor details de handleiding op de CD-ROM.
Handleidingen zijn ook verkrijgbaar op onze website.
http://www.pioneer.eu
Русский
Этот проводник предназначен, чтобы провести Вас через основные функции данного устройства.
За деталями, пожалуйста, обращайтесь к Рабочей инструкции, хранящейся на CD-ROM.
Кроме того, инструкция доступна на вебсайте.
http://www.pioneer.eu
 Loading...