

Page 1

RMX-1000
REMIX STATION
TABLE DE REMIXAGE
REMIX-STATION
http://pioneerdj.com/support/
The Pioneer website shown above offers FAQs, information on software and various other types of information
and services to allow you to use your product in greater comfort.
Le site Pioneer ci-dessus offre une FAQ, des informations sur le logiciel et divers types d’informations et de
services permettant de tirer le meilleur parti de ce produit.
Die oben gezeigte Pioneer-Website enthält häufig gestellte Fragen, Informationen über Software und andere
wichtige Informationen und Dienste, die Ihnen helfen, Ihr Produkt optimal zu verwenden.
Operating Instructions
Mode d’emploi
Bedienungsanleitung
Page 2
Thank you for buying this Pioneer product. Please read through these operating instructions so you will know how to operate your model properly. After
you have finished reading the instructions, put them away in a safe place for future reference.
In some countries or regions, the shape of the power plug and power outlet may sometimes differ from that shown in the explanatory drawings.
However the method of connecting and operating the unit is the same.
IMPORTANT
CAUTION
RISK OF ELECTRIC SHOCK
DO NOT OPEN
The lightning flash with arrowhead symbol,
within an equilateral triangle, is intended to
alert the user to the presence of uninsulated
“dangerous voltage” within the product’s
enclosure that may be of sufficient
magnitude to constitute a risk of electric
shock to persons.
If you want to dispose this product, do not mix it with general household waste. There is a separate collection system for used
electronic products in accordance with legislation that requires proper treatment, recovery and recycling.
Private households in the member states of the EU, in Switzerland and Norway may return their used electronic products free of charge to
designated collection facilities or to a retailer (if you purchase a similar new one).
For countries not mentioned above, please contact your local authorities for the correct method of disposal.
By doing so you will ensure that your disposed product undergoes the necessary treatment, recovery and recycling and thus prevent potential
negative effects on the environment and human health.
WARNING
This equipment is not waterproof. To prevent a fire or
shock hazard, do not place any container filled with
CAUTION:
TO PREVENT THE RISK OF ELECTRIC
SHOCK, DO NOT REMOVE COVER (OR
BACK). NO USER-SERVICEABLE PARTS
INSIDE. REFER SERVICING TO QUALIFIED
SERVICE PERSONNEL.
Before making or changing the connections,
switch off the power and disconnect the power
cord from the AC outlet.
liquid near this equipment (such as a vase or flower
pot) or expose it to dripping, splashing, rain or
moisture.
D3-4-2-1-3_A1_En
WARNING
Before plugging in for the first time, read the following
section carefully.
The voltage of the available power supply differs
according to country or region. Be sure that the
power supply voltage of the area where this unit
will be used meets the required voltage (e.g., 230 V
or 120 V) written on the AC adapter’s label.
D3-4-2-1-4*_A1_En
WARNING
POWER-CORD CAUTION
Handle the power cord by the plug. Do not pull out the
plug by tugging the cord and never touch the power
cord when your hands are wet as this could cause a
short circuit or electric shock. Do not place the unit, a
piece of furniture, etc., on the power cord, or pinch the
cord. Never make a knot in the cord or tie it with other
cords. The power cords should be routed such that they
are not likely to be stepped on. A damaged power cord
can cause a fire or give you an electrical shock. Check
the power cord once in a while. When you find it
damaged, ask your nearest PIONEER authorized
service center or your dealer for a replacement.
To prevent a fire hazard, do not place any naked flame
sources (such as a lighted candle) on the equipment.
D3-4-2-1-7a_A1_En
Operating Environment
Operating environment temperature and humidity:
+5 °C to +35 °C (+41 °F to +95 °F); less than 85 %RH
(cooling vents not blocked)
Do not install this unit in a poorly ventilated area, or in
locations exposed to high humidity or direct sunlight (or
strong artificial light)
D3-4-2-1-7c*_A1_En
The exclamation point within an equilateral
triangle is intended to alert the user to the
presence of important operating and
maintenance (servicing) instructions in the
literature accompanying the appliance.
D3-4-2-1-1_A1_En
K058b_A1_En
D44-9-3_A1_En
S002*_A1_En
En
2
Page 3

If the AC plug of this unit does not match the AC
outlet you want to use, the plug must be removed
and appropriate one fitted. Replacement and
mounting of an AC plug on the power supply cord of
this unit should be performed only by qualified
service personnel. If connected to an AC outlet, the
cut-off plug can cause severe electrical shock. Make
sure it is properly disposed of after removal.
The equipment should be disconnected by removing
the mains plug from the wall socket when left unused
for a long period of time (for example, when on
vacation).
D3-4-2-2-1a_A1_En
CAUTION
The ON, STANDBY switch on this unit will not
completely shut off all power from the AC outlet.
Since the power cord serves as the main disconnect
device for the unit, you will need to unplug it from the
AC outlet to shut down all power. Therefore, make
sure the unit has been installed so that the power
cord can be easily unplugged from the AC outlet in
case of an accident. To avoid fire hazard, the power
cord should also be unplugged from the AC outlet
when left unused for a long period of time (for
example, when on vacation).
D3-4-2-2-2a*_A1_En
When using this product, confirm the safety
information shown on the bottom of the unit.
D3-4-2-2-4_B1_En
En
3
Page 4

Contents
How to read this manual
The names of displays, menus, and buttons in this manual are enclosed
in brackets. (e.g. [MASTER] channel, [ON/OFF], [File] menu)
Quick Start Guide
Features ....................................................................................................... 5
Operation overview ..................................................................................... 5
What’s in the box ........................................................................................ 5
Connecting the input/output terminals .................................................... 6
Preparations for using the effects ............................................................. 8
Using the SCENE FX function ................................................................... 8
Using the ISOLATE FX function ................................................................. 8
Using the X-PAD FX function ..................................................................... 8
Using the RELEASE FX function ............................................................... 8
Operation
Adjusting the input and output levels ..................................................... 10
Making the BPM and QUANTIZE settings ............................................. 10
SCENE FX section ..................................................................................... 11
ISOLATE FX section .................................................................................. 12
X-PAD FX section ...................................................................................... 12
RELEASE FX section ................................................................................. 14
FX SOURCE section .................................................................................. 14
FX SETTING section .................................................................................. 14
Types of effects
Types of SCENE FX effects ....................................................................... 15
Types of ISOLATE FX effects .................................................................... 16
Types of X-PAD FX effects ........................................................................ 17
Types of RELEASE FX effects ................................................................... 17
Using the included software
Software end user license agreement .................................................... 18
Using remixbox ......................................................................................... 19
Checking the latest information on the included software .................. 20
Changing this unit’s settings
Changing the MIDI settings ..................................................................... 21
Using the update function ....................................................................... 21
MIDI assignment map
Additional information
Troubleshooting ........................................................................................ 24
Block Diagram .......................................................................................... 25
About trademarks and registered trademarks ...................................... 25
Cautions on copyrights ............................................................................ 25
Disclaimer ................................................................................................. 25
Specifications............................................................................................ 25
En
4
Page 5

Quick Start Guide
English
Features
This unit is a remixing station for DJs consisting of four effect sections. It
allows tracks to be arranged in real time with intuitive operation.
SCENE FX
Through the operation of turning the control, new sounds can be added
to the currently playing track and breaks can be created at the desired
positions to achieve a new sound for the track. Ten types of effects and
two sub parameters can be combined to achieve highly individualistic
DJ remixing performances.
ISOLATE FX
The sounds of specific instruments can be isolated and their rhythm and
tone changed in the same way as a DJ mixer’s EQ controls are operated.
One of four effects can be selected and applied at separate rates for the
low, mid and high frequencies.
X-PAD FX
By operating the touchpad, new sounds can be added to the original
track in beat with the track’s rhythm. Various sounds can be added to
tracks and remixed using four preset internal sound sources or by loading sampled sound sources from SD memory cards.
RELEASE FX
The currently playing track and the effect sound can be transitioned
smoothly simply by operating the lever. Three types of effects and a lever
switch allow you to create highly individualistic arrangements.
Operation overview
1 What’s in the box
= page 5
2 Connecting the input/output terminals
= page 6
3 Preparations for using the effects
= page 8
4 Using the SCENE FX function
= page 8
5 Using the ISOLATE FX function
= page 8
6 Using the X-PAD FX function
= page 8
7 Using the RELEASE FX function
= page 8
What’s in the box
! CD-ROM
! USB cable
! AC adapter
! Power cord
! Warranty card
! Operating instructions (this document)
QUANTIZE
The track’s beat positions are analyzed in real time and the timing for
producing the effects and the X-PAD FX sounds is adjusted automatically. The sounds can be played in tempo with the track, even when
operated roughly.
remixbox
The included dedicated application software can be used to change
the parameter values and types of this unit, letting you customize it to
achieve an effect machine suiting your personal tastes.
RMX-1000 Plug-in
A VST/AU Plug-in letting you launch the functions of this unit on a computer is provided. With it, the RMX-1000 can be used as a controller.
En
5
Page 6
Connecting the input/output terminals
Be sure to turn off the power and unplug the power cord from the power outlet whenever making or changing connections.
Connect the power cord after all the connections between devices have been completed.
Be sure to use the power cord and AC adapter included with this product.
Connect this unit and the computer directly using the included USB cable.
Refer to the operating instructions for the component to be connected.
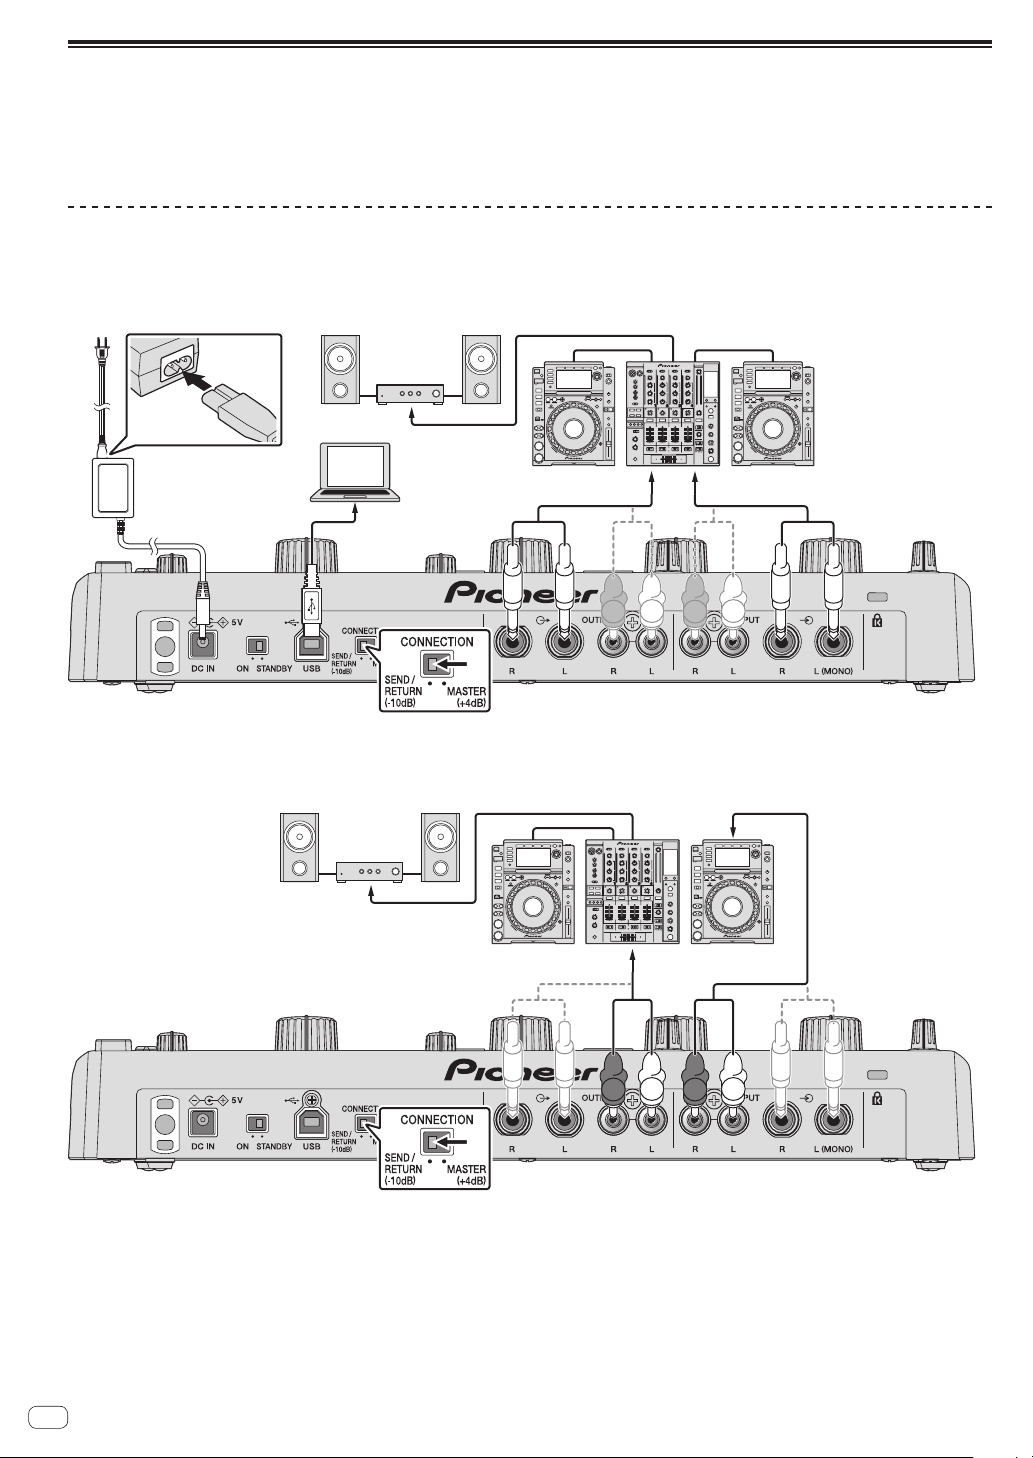
Example of connections
To connect to the [SEND] and [RETURN] terminals on the DJ mixer
To power outlet
Computer
Power amplifier and speakers
To connect between the DJ player and DJ mixer
Power amplifier and speakers
DJ Mixer
DJ player
To RETURN terminal To SEND terminal
L
R
R
DJ Mixer
DJ player
L
To audio output terminals
DJ player
To audio input terminals
R
En
6
DJ player
L
L
R
Page 7
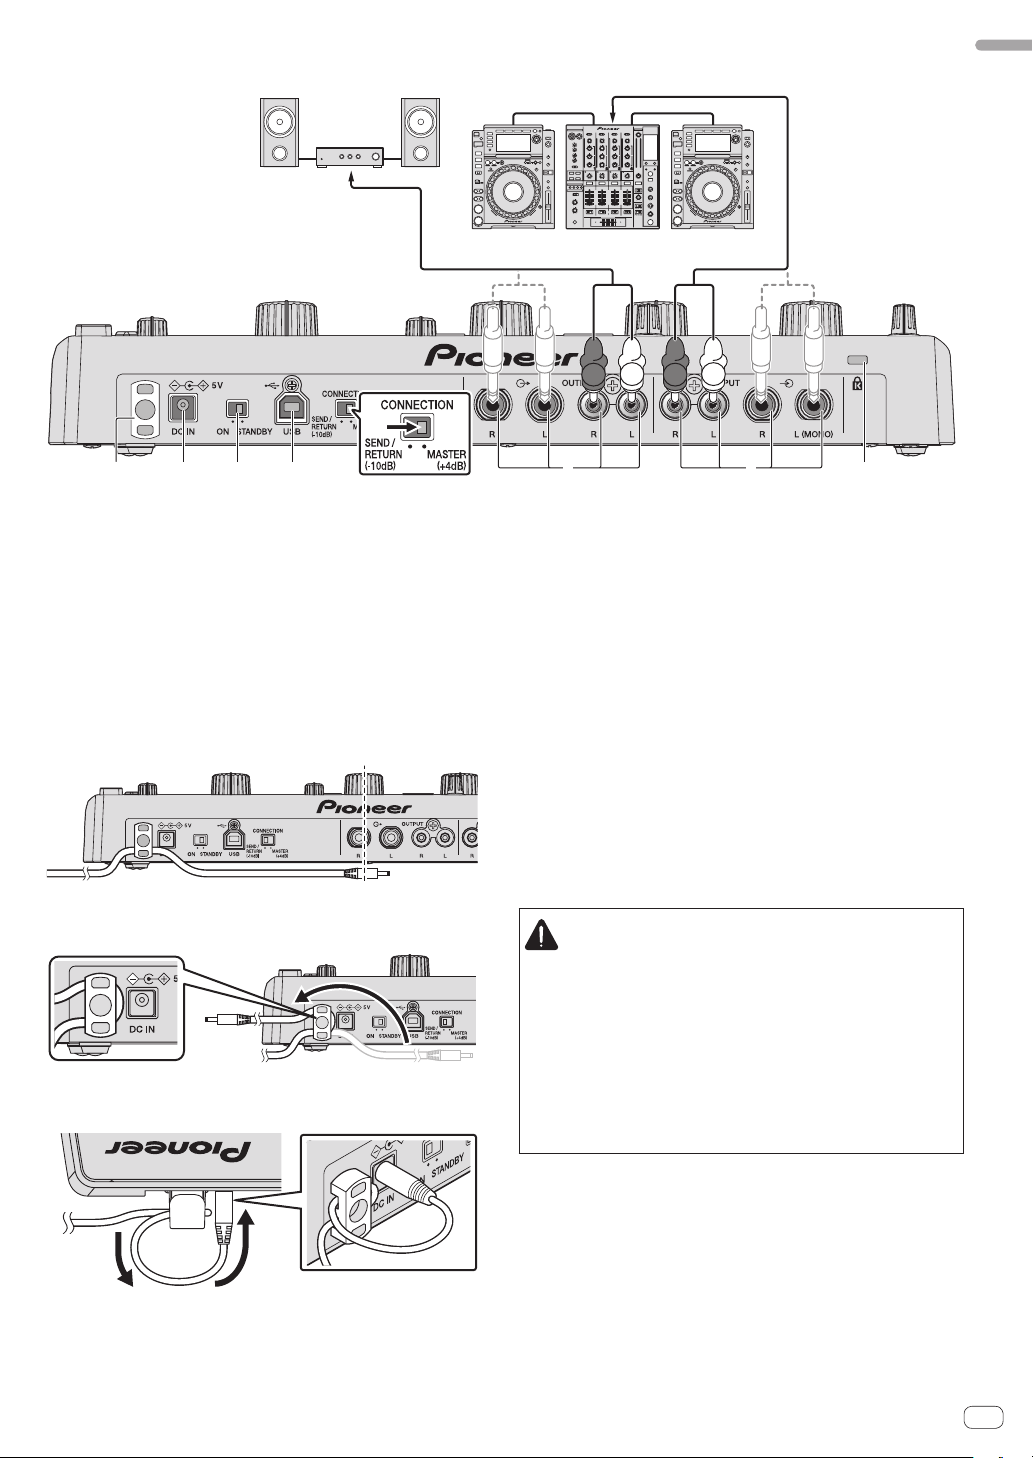
To connect to the DJ mixer’s [MASTER OUT] terminals
To MASTER OUT terminal
Power amplifier and speakers
To audio input terminals
English
DJ playerDJ player DJ Mixer
1 2 3 4 75 6
1 Cord hook
Hook the AC adapters’ power cord here.
! The sound will be interrupted if the AC adapter’s power cord is
disconnected from the unit during playback.
Using the cord hook
Hook the AC adapter’s power cord onto the cord hook to fasten it in
place. This prevents the power cord from being accidentally pulled, causing the plug to get disconnected from the terminal.
! The sound will be interrupted if the AC adapter’s power cord is dis-
connected from the unit during playback.
1 As shown on the diagram below, extend the tip of the power cord to
approximately the center of the rear panel of this unit and hook the
power cord onto the bottom side of the cord hook.
2 As shown on the diagram below, move the tip of the power cord back
in the opposite direction past the top of the cord hook, and hook the
power cord onto the top side of the cord hook.
3 Turn the tip of the power cord so that it is facing towards you, then
turn it back to create a ring as shown in the diagram and insert it into
the [DC IN] terminal of this unit.
L
R
L
R
2 DC IN terminal
Connect the included AC adapter’s DC plug here. Wait until all connections of the equipment are completed before connecting the
power cord.
Be sure to use the power cord and AC adapter included with this
product.
3 ON, STANDBY switch
This switches this unit’s power between on and standby.
4 USB port
Connect to a computer.
! Connect this unit and the computer directly using the included
USB cable.
! A USB hub cannot be used.
5 OUTPUT terminals
Connect these to the external input terminals on a mixer, etc.
6 INPUT terminals
Connect these to the external output terminals on a mixer, etc. When
only [L (MONO)] is connected, the sound input to [L (MONO)] is
also input to [R].
CAUTION
When connecting audio cables, only connect either RCA pin jacks or
phone jacks, not both.
Interconnect the equipment in such a way that the flow of the audio
signals does not loop. If looped connections are made, the circuitry
could produce oscillations that may damage the speakers, etc.
Examples of looped connections to be avoided
! Connecting a DJ mixer’s output to this unit’s input terminals then
inputting this unit’s output to the same DJ mixer’s input terminals.
! Connecting the output from a DJ mixer’s [SEND] terminals to this
unit’s input terminals then inputting this unit’s output to input terminals other than the [RETURN] terminals on the same DJ mixer.
7 Kensington security slot
En
7
Page 8
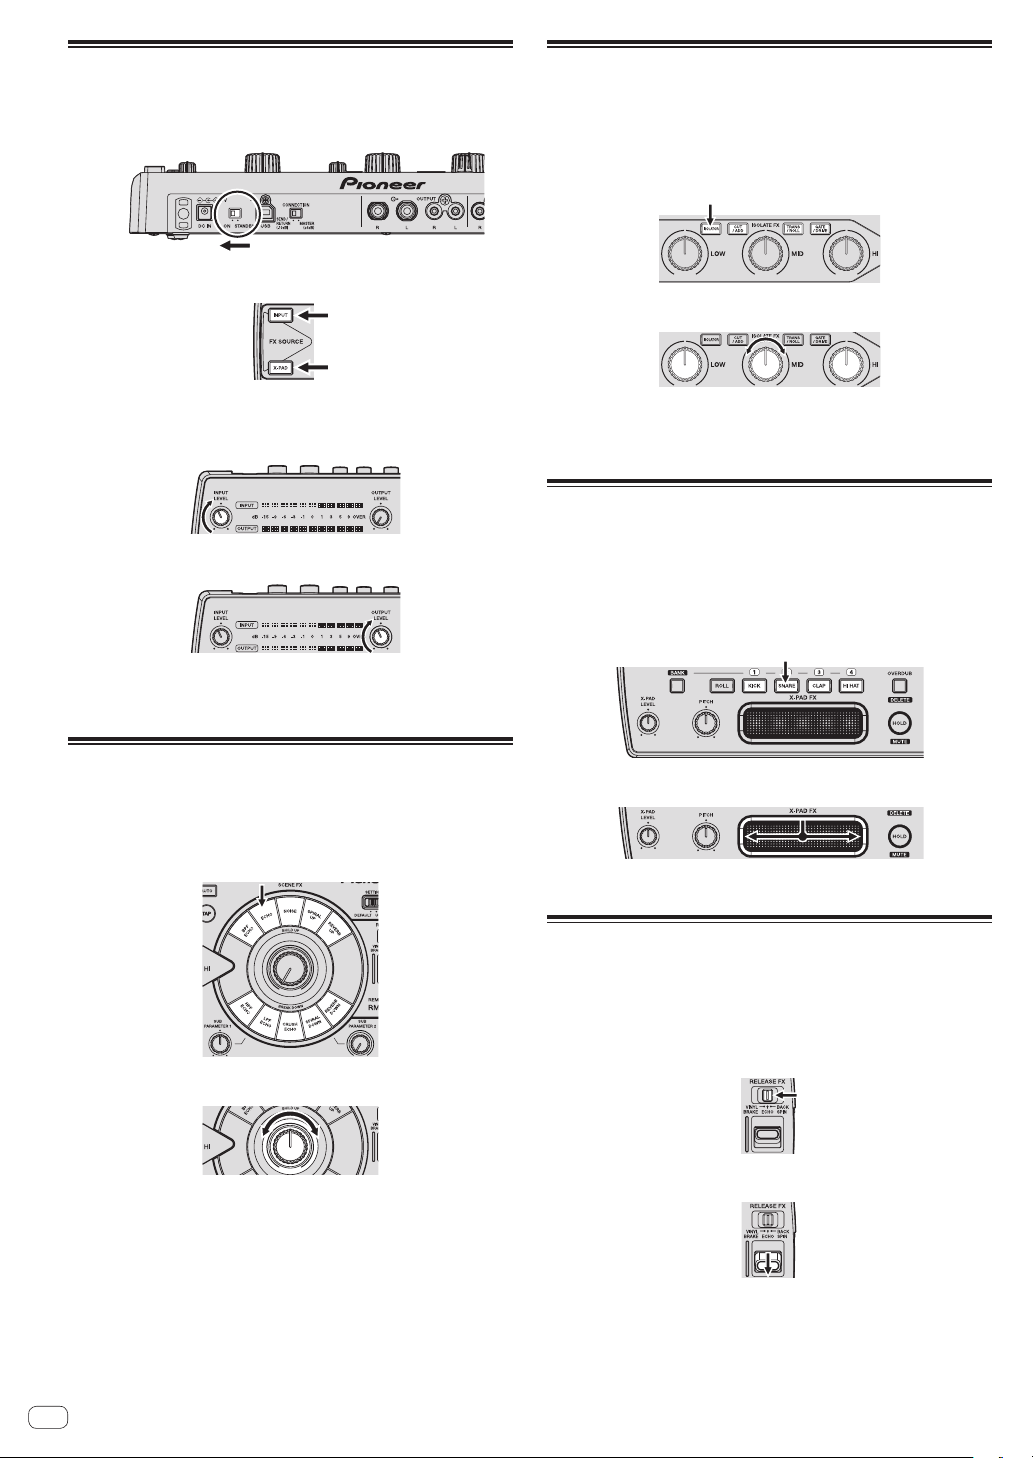
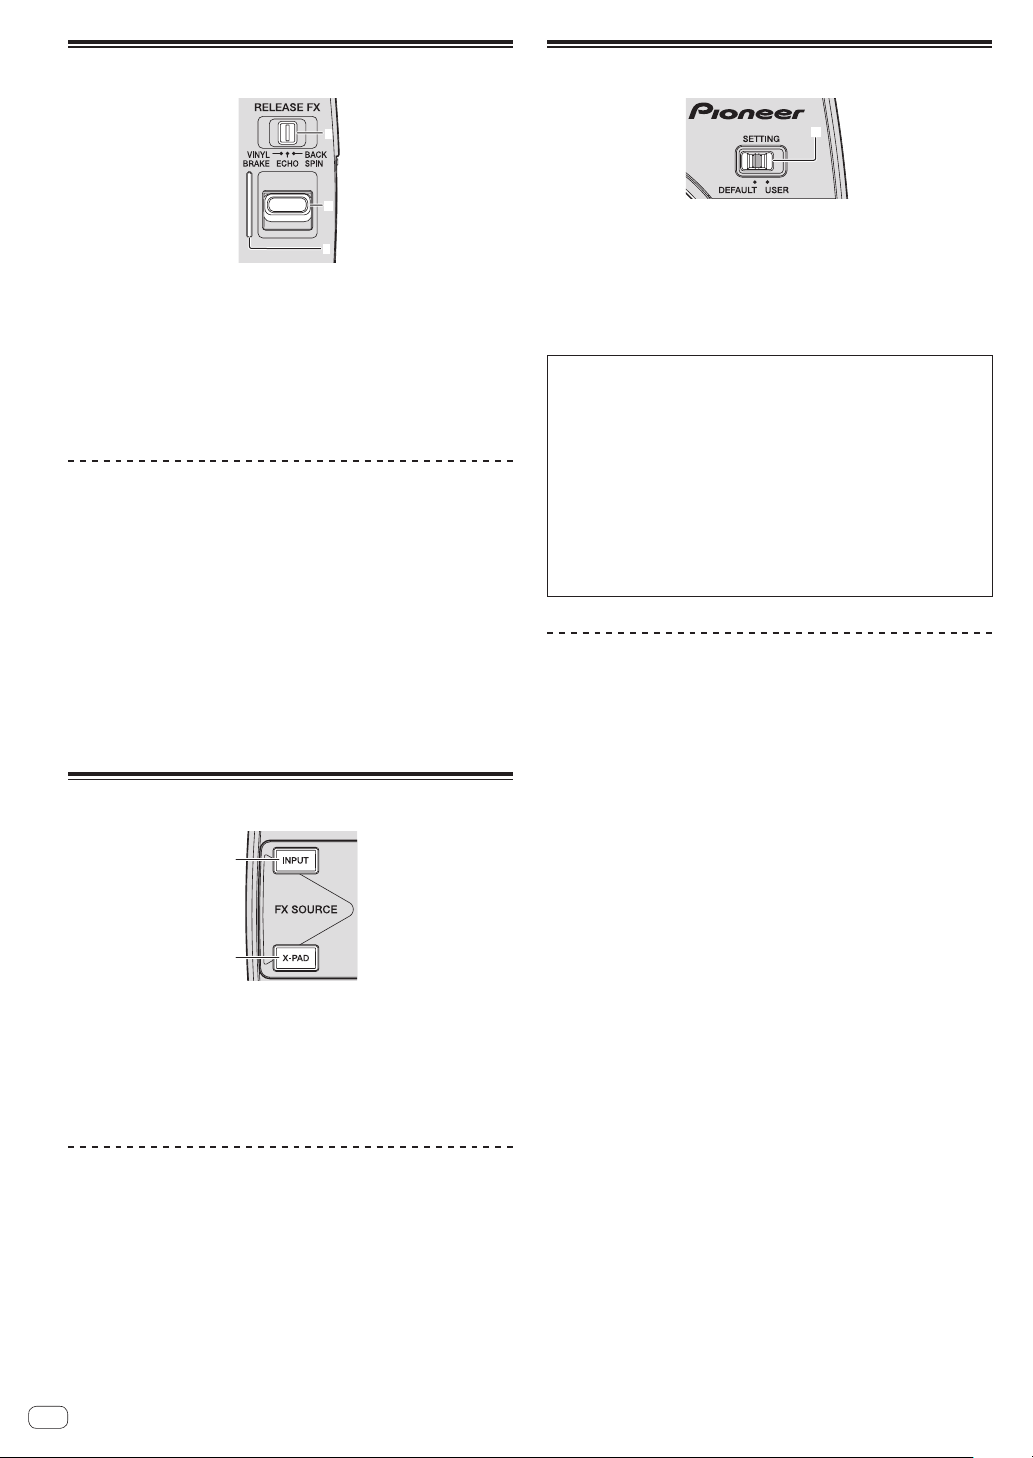
Preparations for using the effects
1 Slide the [ON, STANDBY] switch on the rear panel of
this unit to the [ON] position.
2 Check that the [INPUT] and [X-PAD] buttons are lit.
Using the ISOLATE FX function
When the [LOW], [MID] or [HI] control is turned, the strength of the low,
mid or high frequency effect increases or decreases. It is also possible
to isolate the sound of specific instruments in the low, mid or high frequency ranges and increase or decrease the number of sounds.
1 Press one of the [ISOLATE FX] buttons.
2 Turn the [LOW], [MID] or [HI] control.
! If the [INPUT] and [X-PAD] buttons are not lit, press the buttons to
light them.
3 Turn the [INPUT LEVEL] control.
4 Turn the [OUTPUT LEVEL] control.
5 Use the effects.
For instructions on using the various effects, see the sections below.
Using the SCENE FX function
When the control at the center is turned, an effect adding new sound
to the track or removing sound from the track is applied. This lets you
achieve a new sound for the track.
1 Press one of the [SCENE FX] buttons.
2 Turn the [SCENE FX] control.
When the control is turned clockwise or counterclockwise, the selected
ISOLATE FX effect changes.
When the control is set to the center position, the ISOLATE FX effect is
not applied; only the original sound is output.
Using the X-PAD FX function
With this function, effects can be applied to this unit’s internal sound
sources and added to the currently playing track. Instead of the internal sound sources, it is also possible to load and use sampled sound
sources prepared on SD memory cards and to sample and use the currently playing sound.
1 Press one of the [X-PAD FX] buttons.
2 Touch the [X-PAD].
The selected X-PAD FX effect changes depending on the position on the
[X-PAD] that is touched.
Using the RELEASE FX function
When the [RELEASE FX] lever is moved towards you, the original sound
disappears and only the effect sound is output. Move the lever is back to
its original position to transition smoothly from the effect sound to the
original sound.
1 Switch the [RELEASE FX] selector switch.
When the control is turned clockwise, the selected SCENE FX effect
changes greatly.
When the control is turned fully counterclockwise, the SCENE FX effect
is not applied; only the original sound is output.
En
8
2 Move the [RELEASE FX] lever towards you.
The selected RELEASE FX effect changes according to the position of
the lever.
When the lever is moved back to its original position, the effect turns off.
Any SCENE FX, ISOLATE FX or X-PAD FX effects that were on before are
also turned off.
Page 9

Operation
English
1
21 8 6
745
1 Adjusting the input and output levels (page 10)
2 Making the BPM and QUANTIZE settings (page 10)
3 SCENE FX section (page 11)
4 ISOLATE FX section (page 12)
5 X-PAD FX section (page 12)
6 RELEASE FX section (page 14)
7 FX SOURCE section (page 14)
8 FX SETTING section (page 14)
3
5
En
9
Page 10
Adjusting the input and output
levels
Making the BPM and QUANTIZE
settings
2
1
5
4
3
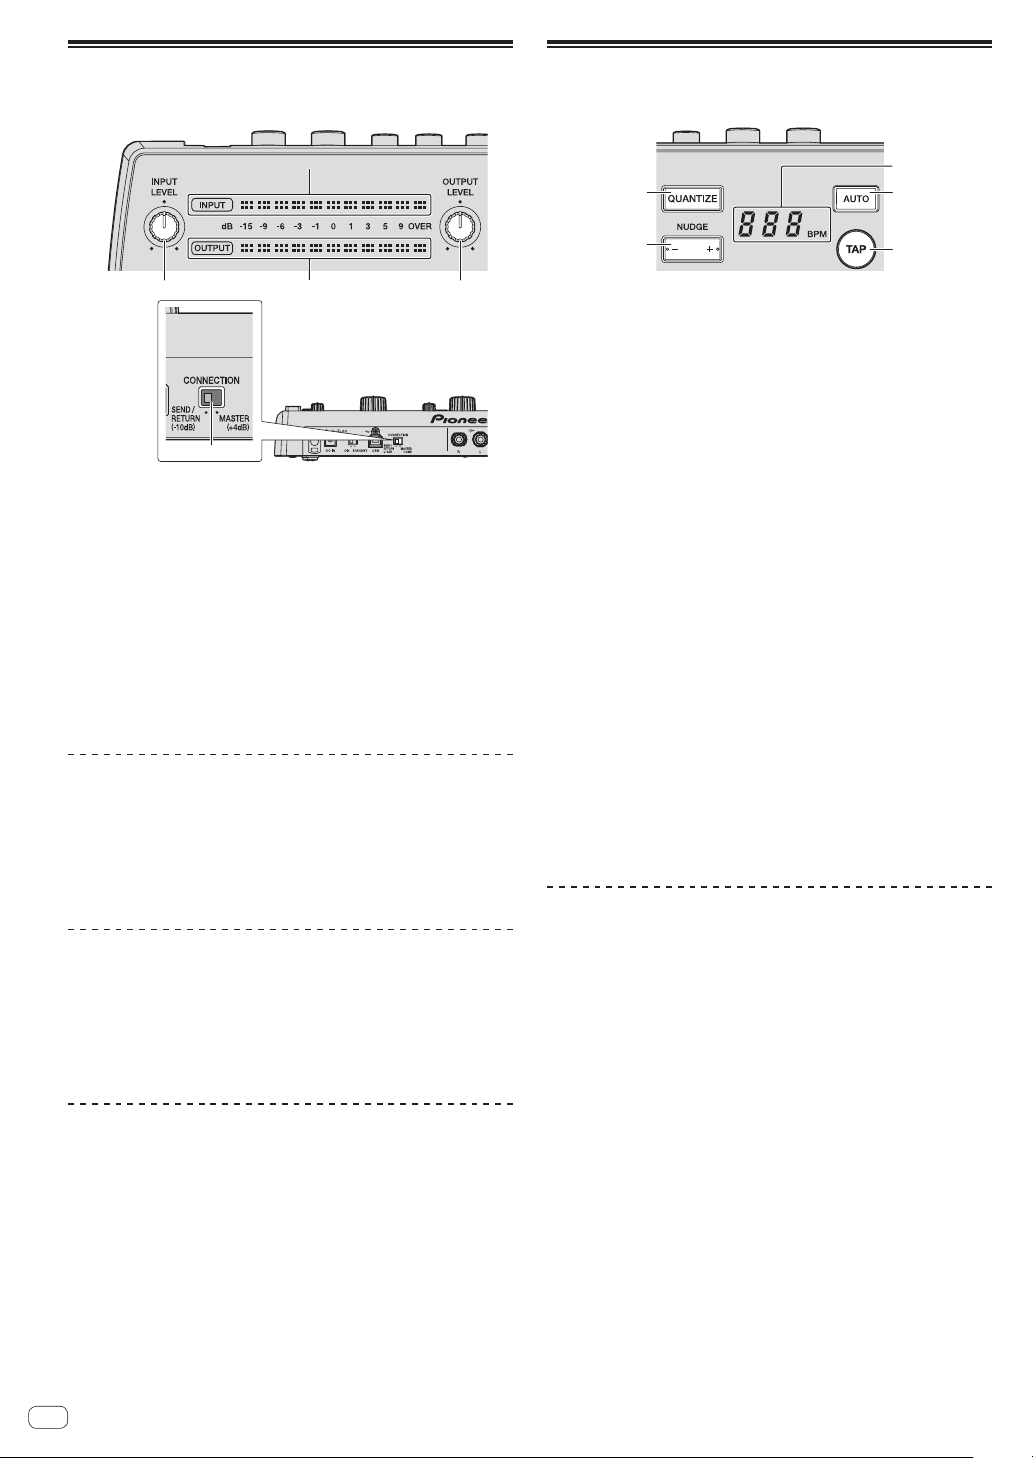
1 INPUT LEVEL control
This adjusts the audio level input to this unit.
2 INPUT level indicator
This displays the audio level input to this unit.
3 OUTPUT LEVEL control
This adjusts the audio level output from this unit.
4 OUTPUT level indicator
This displays the audio level output from this unit.
5 CONNECTION selector switch
This switches this unit’s input/output gain.
Adjusting the input level
Turn the [INPUT LEVEL] control.
The audio level input to this unit increases as the control is turned clockwise, decreases as the control is turned counterclockwise.
The [INPUT] level indicator lights when sound is properly being input to
this unit.
Adjusting the output level
Turn the [OUTPUT LEVEL] control.
The audio level output from this unit increases as the control is turned
clockwise, decreases as the control is turned counterclockwise.
The [OUTPUT] level indicator lights according to the audio level being
output from this unit.
Switching the input/output gain
On this unit, the input/output gain can be switched according to the
connected equipment.
Slide the [CONNECTION] selector switch on the rear
panel of this unit.
— [SEND/RETURN (–10 dB)]: Select this when connecting to a DJ
mixer’s [SEND] and [RETURN] terminals or when connecting to a
DJ player’s audio output terminals.
— [MASTER (+4 dB)]: Select this when connecting to a DJ mixer’s
[MASTER OUT] terminals.
3
1
2
4
5
1 QUANTIZE button
This turns the QUANTIZE function on and off.
The cycle and timing of the sound output from the X-PAD FX section
is synchronized with the tempo of the currently playing track.
2 NUDGE (+, –) button
Use this to fine-adjust the cycle and timing of the sound output from
the X-PAD FX section.
3 BPM display
When the BPM measurement mode is set to auto, this displays the
automatically detected BPM value. If the value cannot be detected,
the previously detected BPM value flashes.
When the BPM measurement mode is set to manual, this displays
the manually input BPM value.
4 AUTO button
Switches the BPM measurement mode.
— [AUTO]: The BPM is measured automatically from the audio sig-
nal that is being input. The [AUTO] mode is set when this unit’s
power is turned on.
— [TAP]: The BPM is input manually by tapping the [TAP] button
with a finger.
! The [AUTO] BPM measurement range is BPM = 70 to 180. With
some tracks it may not be possible to measure the BPM correctly. If the BPM cannot be measured, the BPM value on the
display flashes. In such cases, use the [TAP] button to input the
BPM manually.
5 TAP button
When the BPM measurement mode is set to the manual input mode,
tap this button with a finger to input the BPM manually.
Using the QUANTIZE function
This function analyzes the tempo of the currently playing track in real
time and synchronizes the sound produced from the X-PAD FX section
with the tempo of the currently playing track.
1 Press the [QUANTIZE] button.
The QUANTIZE function turns on.
2 Operate the X-PAD FX section.
The cycle and timing of the sound produced from the X-PAD FX section
is synchronized with the tempo of the currently playing track.
! The cycle of the effect of the [TRANS/ROLL] in the ISOLATE FX sec-
tion is also synchronized with the tempo of the currently playing
track.
! The one-shot sound produced when the [KICK], [SNARE], [CLAP] or
[HI HAT] button is pressed is produced immediately, regardless of
whether the QUANTIZE function is on or off.
! When the [QUANTIZE] button is pressed again, the QUANTIZE func-
tion turns off.
10
En
Page 11
Using the NUDGE function
The [NUDGE (+, –)] button can be used to fine-adjust the cycle and timing of the sound output from the X-PAD FX section.
Press the [+] or [–] side of the [NUDGE (+, –)] button.
— [+]: The cycle and timing of the sound output from the X-PAD
FX section are advanced. When pressed and held, the cycle and
timing of the sound are advanced continuously until the button is
released.
— [–]: The cycle and timing of the sound output from the X-PAD
FX section are delayed. When pressed and held, the cycle and
timing of the sound are delayed continuously until the button is
released.
Inputting the BPM manually
Tap the [TAP] button at least 2 times in rhythm with the
beat (in quarter notes) of the sound being played.
The average value of the interval at which the [TAP] button was tapped
by finger is set as the BPM.
! The BPM can be set manually by pressing the [NUDGE (+, –)] button
while pressing the [TAP] button.
! The BPM can be set in steps of 0.1 by pressing the [AUTO] button
while pressing the [TAP] button, then pressing the [NUDGE (+, –)]
button while pressing the [AUTO] and [TAP] buttons.
SCENE FX section
312
4 5
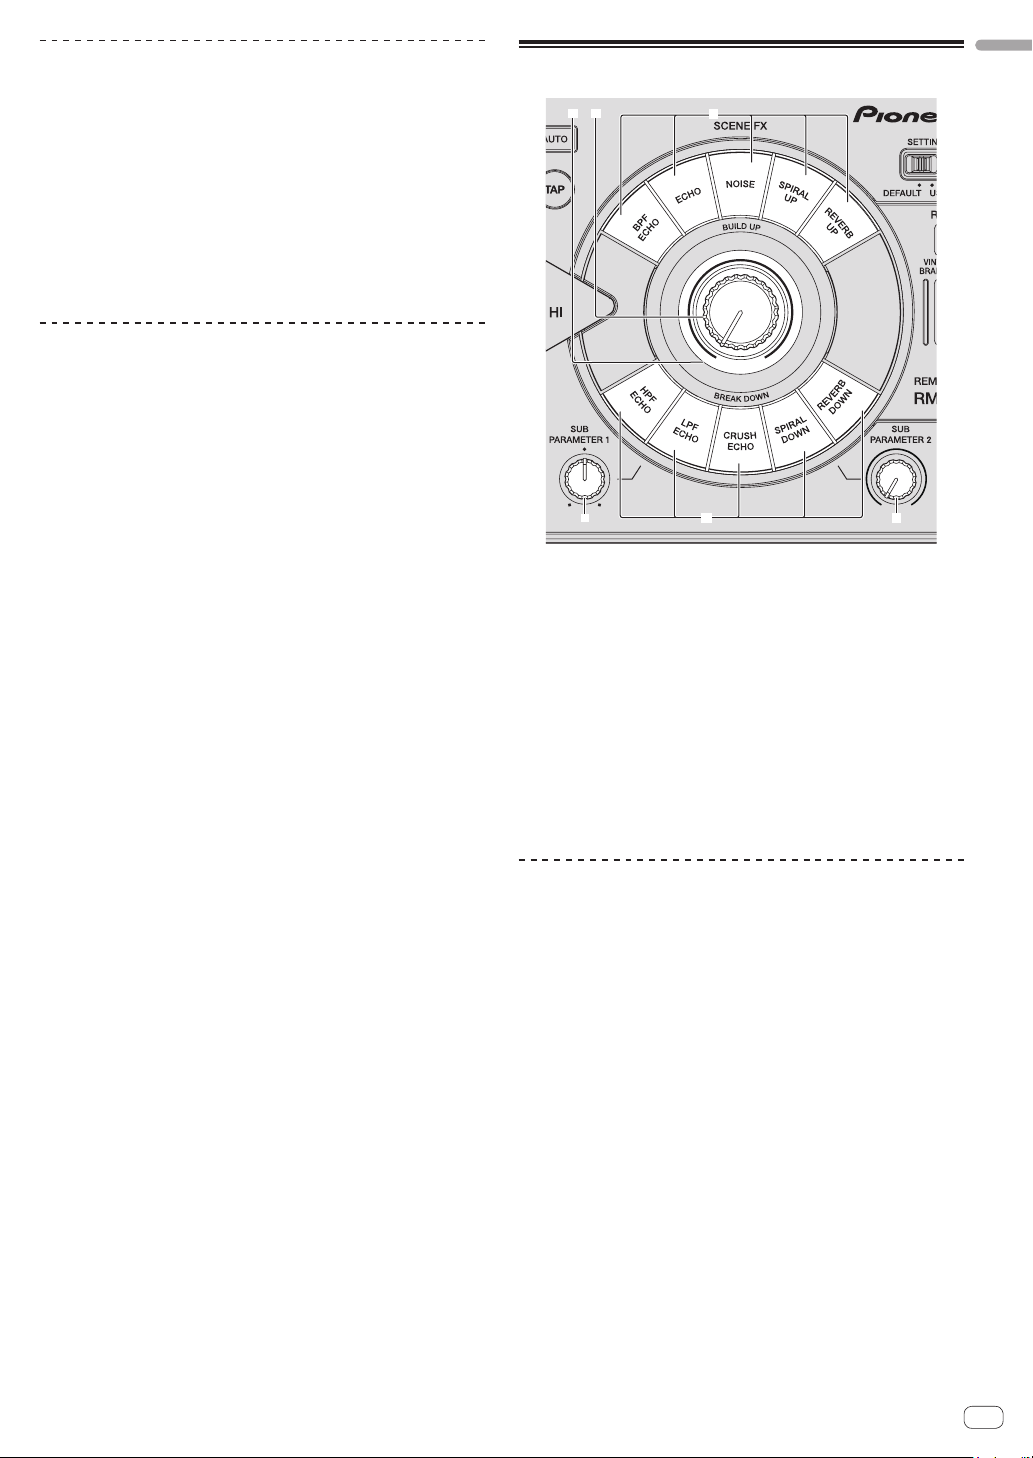
1 SCENE FX indicator
This lights when the effect is on. The color changes according to the
type of [SCENE FX] button.
2 SCENE FX control
This adjusts the selected SCENE FX effect.
3 SCENE FX buttons
These turn the SCENE FX effects on and off.
4 SUB PARAMETER 1 control
This adjusts SCENE FX sub parameter 1.
5 SUB PARAMETER 2 control
This adjusts SCENE FX sub parameter 2.
3
English
Using the SCENE FX function
1 Press one of the [SCENE FX] buttons.
Select the SCENE FX effect type.
The button that was pressed flashes.
! For details on the types of effects, see Types of SCENE FX effects on
page 15.
! When the selected [SCENE FX] button is pressed again, the effect
turns off.
2 Turn the [SCENE FX] control.
The selected effect is applied to the sound selected in the FX SOURCE
section.
— The strength of the effect increases when the control is turned
clockwise. The strength of the effect is maximum when the control is turned fully clockwise.
— The strength of the effect decreases when the control is turned
counterclockwise. When turned fully counterclockwise, the
original sound is output, with no effect applied.
3 Turn the [SUB PARAMETER 1] control.
This adjusts the strength of the selected effect’s sub parameter 1.
— The strength of the effect increases as the control is turned
clockwise from the center. The strength of the effect is maximum
when the control is turned fully clockwise.
En
11
Page 12
— The strength of the effect decreases as the control is turned
counterclockwise from the center. The strength of the effect is
minimum when the control is turned fully counterclockwise.
4 Turn the [SUB PARAMETER 2] control.
This adjusts the strength of the selected effect’s sub parameter 2.
— The further the control is turned clockwise, the more the effect is
stressed.
— When turned all the way counterclockwise, the effect is
minimum.
ISOLATE FX section
1
X-PAD FX section
21 5
34
987
6
a
2
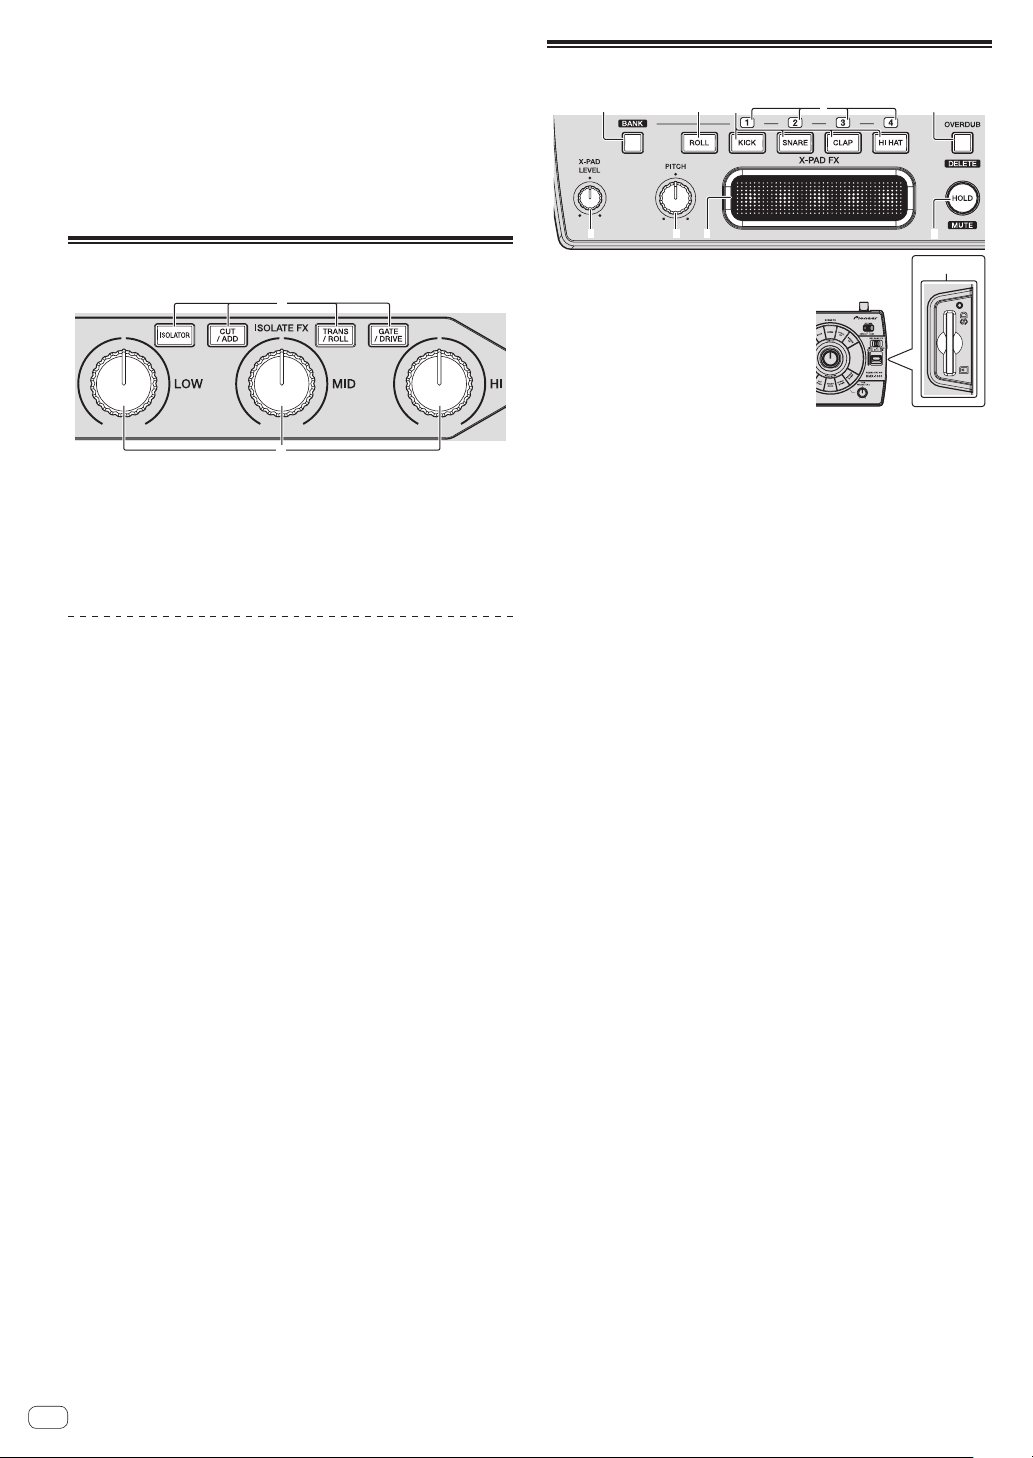
1 ISOLATE FX button
These turn the ISOLATE FX effects on and off.
2 LOW, MID, and HI controls
These adjust the strength of the low, mid and high frequencies of the
selected ISOLATE FX effect.
Using the ISOLATE FX function
1 Press one of the [ISOLATE FX] buttons.
Select the ISOLATE FX effect type.
The button that was pressed flashes.
! For details on the types of effects, see Types of ISOLATE FX effects on
page 16.
! When the selected [ISOLATE FX] button is pressed again, the effect
turns off.
2 Turn the [LOW], [MID] or [HI] control.
The selected effect is applied to the sound selected in the FX SOURCE
section.
— The strength of the effect enhancing the sound increases as the
control is turned clockwise from the center. The strength of the
effect is maximum when the control is turned fully clockwise.
— The strength of the effect diminishing the sound increases as
the control is turned counterclockwise from the center. The
strength of the effect is maximum when the control is turned fully
counterclockwise.
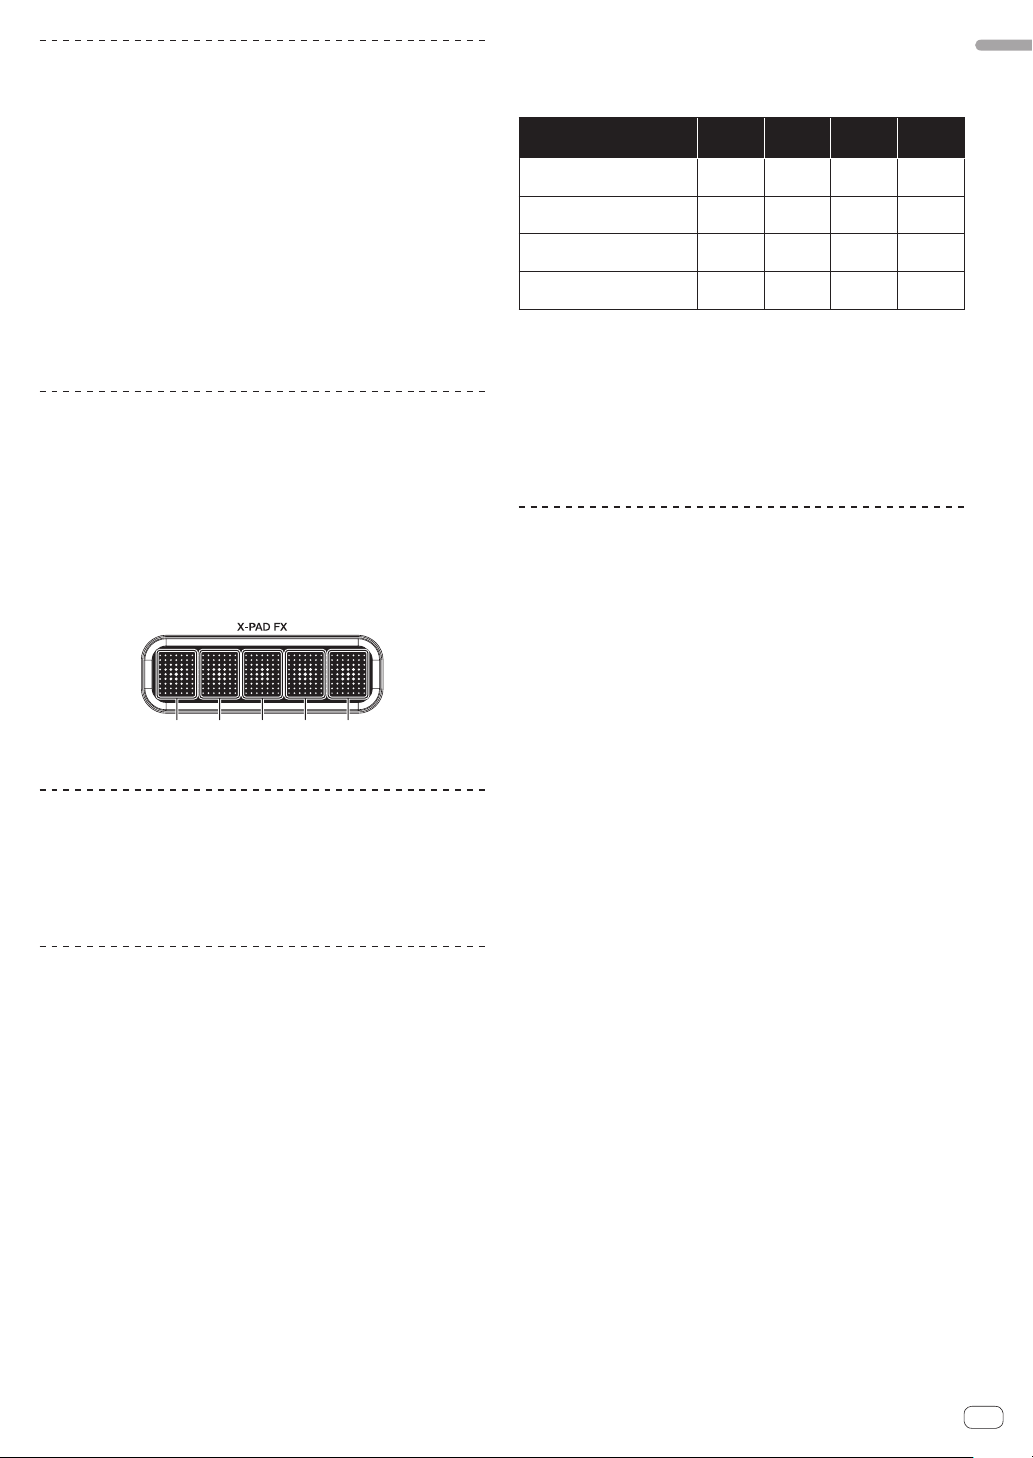
1 BANK button
Use this to load sampled sound sources from SD memory cards.
2 ROLL button
Use this to sample the sound input to this unit and play it as a loop.
3 X-PAD FX buttons
One of this unit’s internal sound sources or one of the sampled
sound sources loaded from SD memory cards is selected and output. When a button is pressed, the sound is produced immediately
(“one-shot sound”).
4 BANK indicator
When loading sampled sound sources from SD memory cards, the
numbers of the loadable BANKs light.
5 OVERDUB (DELETE) button
This turns the OVERDUB function on and off.
When the OVERDUB function is on, this button is used to delete
sounds.
6 HOLD (MUTE) button
Press this to hold the X-PAD FX effect.
When the OVERDUB function is on, this button is used to mute
sounds.
7 X-PAD
Use this to adjust the X-PAD FX effect.
8 PITCH control
Use this to adjust the pitch of this unit’s internal sound sources,
sampled sound sources loaded from SD memory cards or sounds
being played in a loop.
9 X-PAD LEVEL control
Use this to adjust the audio level of this unit’s internal sound sources
or sampled sound sources loaded from SD memory cards.
When the [ROLL] button has been pressed, this control adjusts the
balance of the volume between the audio level of the currently playing track and the sampled sound.
a SD memory card insertion slot
Load SD memory cards here.
! Be sure to load SD memory cards in the proper front/back
direction.
! Do not forcibly insert or remove SD memory cards. Doing so
could damage the SD memory card or this unit.
! Do not insert any objects other than SD memory cards into
the SD memory card insertion slot. Inserting coins or other
metal objects could damage the internal circuitry, resulting in
malfunction.
! Only SD memory cards or SDHC memory cards conforming to
SD standards can be used on this unit.
12
En
Page 13
Using the X-PAD FX function
1 Press one of the [X-PAD FX] buttons.
One of this unit’s internal sound sources or one of the sampled sound
sources loaded from SD memory cards is selected and output. When a
button is pressed, the sound is produced immediately.
The pressed button lights.
! Internal sound sources are preset at the [KICK], [SNARE], [CLAP]
and [HI HAT] buttons, respectively.
! To select a sampled sound source stored on an SD memory card,
press the [X-PAD FX] button while pressing the [BANK] button.
2 Touch the [X-PAD].
This turns the effect on.
The effect changes according to the position on the [X-PAD] that is
touched.
! The effect turns off when you release your finger from the [X-PAD].
Sampling the currently playing sound
and using the X-PAD FX function
1 Press the [ROLL] button.
The [ROLL] button lights.
2 Touch the [X-PAD].
The sound at the time the [X-PAD] is touched is sampled and loop playback starts.
The number of beats sampled depends on the position on the [X-PAD]
that is touched.
1/81/4 1/21/1 2/1
! The effect turns off when you release your finger from the [X-PAD].
Using the hold function
Press the [HOLD (MUTE)] button.
When the hold mode is turned on, the X-PAD FX effect applied directly
before your finger was released from the [X-PAD] is held.
! Press the [HOLD (MUTE)] button again to turn the hold mode off.
3 Press one of the [X-PAD FX] buttons ([KICK], [SNARE],
[CLAP] or [HI HAT]) while pressing the [BANK] button.
The sampled sound sources stored on the SD memory card are loaded
into [SLOT1] to [SLOT4] for the selected BANK.
[KICK]
button
[BANK] button + [KICK] button
[BANK] button + [SNARE]
button
[BANK] button + [CLAP]
button
[BANK] button + [HI HAT]
button
! The maximum number of sampled sound sources that can be loaded
is 4BANK x 4SLOT.
! The maximum length of the sampled sounds that can be set in the
BANK (the total for the 4SLOT) is 16 seconds.
! 48 kHz/24-bit or 48 kHz/16-bit WAV files are supported as sound
sources.
! When a lit [X-PAD FX] button is pressed while again pressing the
[BANK] button, this unit’s internal sound source is selected and
produced.
BANK1
SLOT1
BANK2
SLOT1
BANK3
SLOT1
BANK4
SLOT1
[SNARE]
button
BANK1
SLOT2
BANK2
SLOT2
BANK3
SLOT2
BANK4
SLOT2
[CLAP]
button
BANK1
SLOT3
BANK2
SLOT3
BANK3
SLOT3
BANK4
SLOT3
[HI HAT]
button
BANK1
SLOT4
BANK2
SLOT4
BANK3
SLOT4
BANK4
SLOT4
Using the OVERDUB function
Recording sounds and playing them
This function records four beats of the sounds stored at the [X-PAD FX]
buttons and plays the sounds in a loop.
1 Press the [OVERDUB (DELETE)] button.
The OVERDUB function turns on.
The standby mode is set until one of the [X-PAD FX] buttons is operated.
2 Press one of the [X-PAD FX] buttons.
When one of the [X-PAD FX] buttons is pressed, recording starts and a
4-beat loop starts playing.
! The sound of an [X-PAD FX] button can be added by pressing that
button during loop playback.
! When the [OVERDUB (DELETE)] button is pressed again, the
OVERDUB function turns off and playback and recording stop. The
recorded sound is deleted.
Muting recorded sounds
English
Using the BANK function
When one of the [X-PAD FX] buttons ([KICK], [SNARE], [CLAP] or
[HI HAT]) is pressed while pressing the [BANK] button, the [BANK1],
[BANK2], [BANK3] or [BANK4] sampled sound sources are loaded
into the corresponding [X-PAD FX] button from the SD memory card
inserted into the SD memory card slot of this unit.
! When loading sampled sound sources from SD memory cards into
the [X-PAD FX] section, first use remixbox to store the sampled
sound sources on the SD memory card. For details, see the remixbox’s operating instructions.
1 Insert the SD memory card on which the sampled
sound sources are stored into the SD memory card slot
of this unit.
2 Press the [BANK] button to check which BANK can be
loaded.
When the [BANK] button is pressed, the [BANK] indicators flash for the
BANKs at which sampled sound sources can be loaded.
Press one of the [X-PAD FX] buttons while pressing the
[HOLD (MUTE)] button.
The sound of the [X-PAD FX] button that was pressed is muted from the
recorded sound.
! When the muted [X-PAD FX] button is pressed again while pressing
the [HOLD (MUTE)] button, the mute mode is canceled.
Deleting recorded sounds
Press one of the [X-PAD FX] buttons while pressing the
[OVERDUB (DELETE)] button.
The sound of the [X-PAD FX] button that was pressed is deleted from the
recorded sound.
! Deleted sounds cannot be retrieved.
En
13
Page 14
RELEASE FX section
FX SETTING section
1
2
3
1 RELEASE FX selector switch
This switches the type of RELEASE FX effect.
2 RELEASE FX lever
Use this to adjust the RELEASE FX effect.
3 RELEASE FX indicator
This lights when the effect is turned on. It lights according to the
position of the [RELEASE FX] lever.
Using the RELEASE FX function
1 Switch the [RELEASE FX] selector switch.
Select the RELEASE FX effect.
! For details on the types of effects, see Types of RELEASE FX effects on
page 17.
2 Move the [RELEASE FX] lever towards you.
This turns the effect on.
The selected effect is applied to the sound selected in the FX SOURCE
section.
! The effect changes according to the position of the lever.
! When the lever is moved back to its original position, the effect turns
off. Any SCENE FX, ISOLATE FX or X-PAD FX effects that were on
before are also turned off.
FX SOURCE section
1
2
1
1 SETTING selector switch
This switches this unit’s effect parameter data between the
[DEFAULT] and [USER] modes.
— [DEFAULT] mode: This unit can be used with the default param-
eter data set upon shipment from the factory.
— [USER] mode: Parameter data created using remixbox can be
loaded into this unit and used.
What you can do using remixbox
By using the “remixbox” application included with this unit, you can
change the settings shown below.
! Effect parameters: The parameters of the different effects can be
customized.
! Types of effects: The effect assigned to the [ROLL] in the X-PAD FX
section can be changed to a different effect.
! Button sensitivity: The sensitivity of the [SCENE FX] and [ISOLATE FX]
buttons can be adjusted.
! Management of sampled sound sources: Sampled sound sources
loadable into this unit can be saved and managed.
For details, refer to the remixbox’ help menu.
For instructions on installing remixbox, see Using remixbox on page 19.
Using this unit in the USER mode
! Create the customized parameter data beforehand using remixbox.
! Upon shipment from the factory, the same parameter data as for the
[DEFAULT] mode is set for the [USER] mode.
Writing the customized parameter data from
remixbox into this unit
1 Connect the computer on which remixbox is installed
to this unit by USB cable.
2 Send the customized parameter data from remixbox
to this unit.
3 Slide the [SETTING] selector switch to the [USER]
position.
1 INPUT button
The sound input to this unit’s [INPUT] terminals is routed to this
unit’s SCENE FX, ISOLATE FX and RELEASE FX sections.
2 X-PAD button
The sound output from the X-PAD FX section is routed to this unit’s
SCENE FX, ISOLATE FX and RELEASE FX sections.
Switching the audio signal path
Switch whether or not to route the sound input to this unit and the sound
generated internally to this unit’s SCENE FX, ISOLATE FX and RELEASE
FX sections.
Press the [INPUT] or [X-PAD] button.
The selected audio signal is input to this unit’s SCENE FX, ISOLATE FX
and RELEASE FX sections.
! It is also possible to select the [INPUT] and [X-PAD] button
simultaneously.
! The [NOISE] effect in the SCENE FX section is applied regardless of
the status of the [INPUT] and [X-PAD] buttons.
En
14
Loading customized parameter data stored on
an SD memory card
1 Store the customized parameter data on the SD
memory card using remixbox.
2 Insert the SD memory card used in step 1 into this
unit’s SD memory card slot.
3 Slide the [SETTING] selector switch to the [USER]
position.
! Customized parameter data stored on an SD memory card is
reflected on this unit simply by inserting that SD memory card into
this unit.
Page 15

Types of effects
Input sound turned off
Input sound turned off
Direct sound
English
Types of SCENE FX effects
BPF ECHO
This function superimposes the input sound that has passed through the
band pass filter onto the original input sound and passes this through
the echo circuit before outputting the sound.
The echo is output several times according to the multiplying factor of
the input sound’s beat, with the delay sound gradually attenuating.
Input sound that has passed
through the band pass filter
Input sound
SCENE FX
control
SCENE FX control Sets the band pass filter’s cutoff frequency.
SUB PARAMETER 1
control
SUB PARAMETER 2
control
Sets the echo sound’s delay time.
Applies a modulation effect to the output.
ECHO
The echo is output several times according to the multiplying factor of
the input sound’s beat, with the delay sound gradually attenuating.
1 beat
SCENE FX control
SUB PARAMETER 1
control
SUB PARAMETER 2
control
Use this to set the balance between the original sound
and the echo sound.
Sets the echo sound’s delay time.
Sets the filter’s cut-off frequency.
NOISE
This function passes white noise generated internally through the band
pass filter and echo before outputting it.
SCENE FX
control
SCENE FX control
SUB PARAMETER 1
control
SUB PARAMETER 2
control
Sets the cutoff frequency of the filter through which the
white noise passes.
Sets the volume of the white noise.
Applies a modulation effect to the white noise.
Frequency
Fade-out
Time
Frequency
SPIRAL UP
This function adds a reverberation effect to the input sound.
When the delay time is changed, the pitch changes simultaneously.
Fade-out
1 beat
SCENE FX control Sets the SPIRAL’s delay time.
SUB PARAMETER 1
control
SUB PARAMETER 2
control
Sets the echo sound’s delay time.
Sets the amount of pitch shifting by which the pitch is
raised.
Time
REVERB UP
This function adds a reverberation effect to the input sound.
Level
SCENE FX control Use this to set the degree of the reverb effect.
SUB PARAMETER 1
control
SUB PARAMETER 2
control
Early reflected sound
Reverberations
Time
Use this to set the degree of the reverb effect.
Sets the cutoff frequency of the high pass filter.
HPF ECHO
This function passes the input sound through the high pass filter and
echo before outputting it.
The echo is output several times according to the multiplying factor of
the input sound’s beat, with the delay sound gradually attenuating.
Frequency
SCENE FX control Sets the cutoff frequency of the high pass filter.
SUB PARAMETER 1
control
SUB PARAMETER 2
control
Sets the echo sound’s delay time.
Applies a modulation effect to the output.
LPF ECHO
This function passes the input sound through the low pass filter and
echo before outputting it.
The echo is output several times according to the multiplying factor of
the input sound’s beat, with the delay sound gradually attenuating.
En
15
Page 16
Frequency
Input sound turned off
1 beat
SCENE FX control Sets the cutoff frequency of the low pass filter.
SUB PARAMETER 1
control
SUB PARAMETER 2
control
Sets the echo sound’s delay time.
Applies a modulation effect to the output.
CRUSH ECHO
This function creates a sound as if the input sound were crushed and
passes it through the filter and echo before outputting it.
The echo is output several times according to the multiplying factor of
the input sound’s beat, with the delay sound gradually attenuating.
SCENE FX
control
Cycle
Time
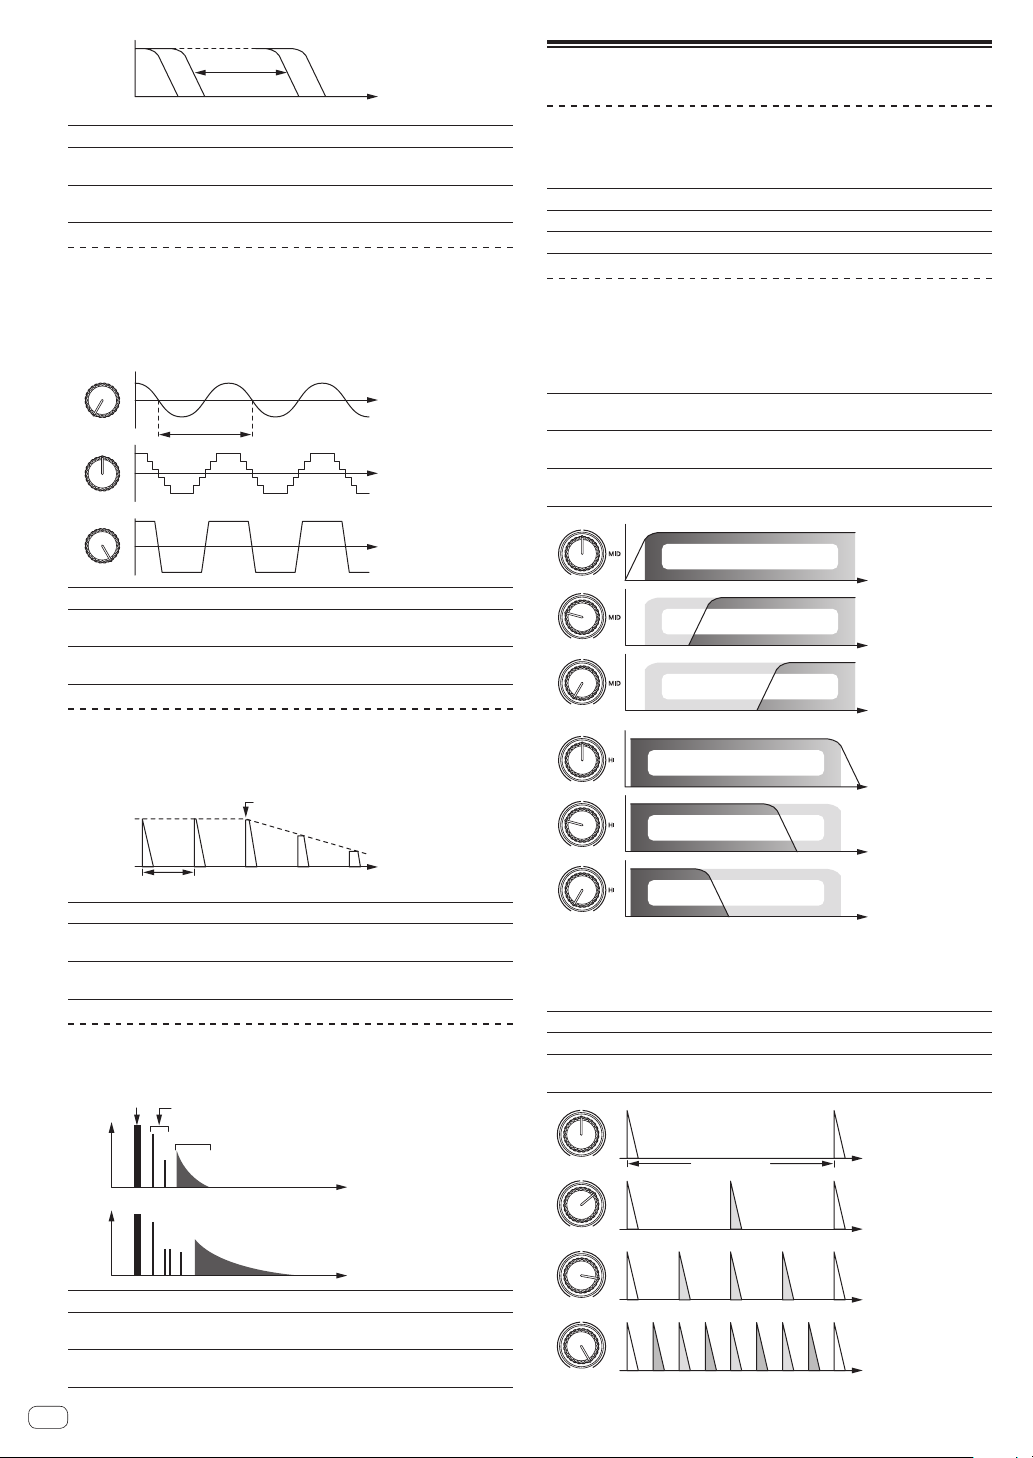
Types of ISOLATE FX effects
ISOLATOR
This function allows you to split the input sound into three bands – low,
mid, and high – and adjust the audio level for the respective bands.
LOW control Adjusts the audio level of the low frequencies.
MID control Adjusts the audio level of the mid frequencies.
HI control Adjusts the audio level of the high frequencies.
CUT/ADD
CUT: When turned counterclockwise
This function allows you to adjust the audio level of the bass drum
detected in the input sound and the manual filter’s cutoff frequency.
LOW control
MID control
HI control
Adjusts the audio level of the bass drum detected in the
input sound.
Applies the sound other than the bass drum detected in
the input sound to the high pass filter.
Applies the sound other than the bass drum detected in
the input sound to the low pass filter.
SCENE FX control Sets the degree by which the input sound is crushed.
SUB PARAMETER 1
control
SUB PARAMETER 2
control
Sets the echo sound’s delay time.
Applies a modulation effect to the output.
SPIRAL DOWN
This function adds a reverberation effect to the input sound.
When the delay time is changed, the pitch changes simultaneously.
Fade-out
Time
SCENE FX control Sets the SPIRAL’s delay time.
SUB PARAMETER 1
control
SUB PARAMETER 2
control
Sets the echo sound’s delay time.
Sets the amount of pitch shifting by which the pitch is
decreased.
REVERB DOWN
This function adds a reverberation effect to the input sound.
Direct sound
Level
Early reflected sound
Reverberations
Time
Bass drum
Bass drum
Bass drum
Bass drum
Bass drum
Bass drum
Frequency
ADD: When turned clockwise
This function lets you apply a 1/8-beat delay sound according to the
multiplying factor of the input sound’s beat.
LOW control Adjusts the audio level of the low frequency delay sound.
MID control Adjusts the audio level of the mid frequency delay sound.
HI control
Adjusts the audio level of the high frequency delay
sound.
1/1 beat
Time
SCENE FX control Use this to set the degree of the reverb effect.
SUB PARAMETER 1
control
SUB PARAMETER 2
control
En
16
Use this to set the degree of the reverb effect.
Sets the cutoff frequency of the low pass filter.
1/2 beat
1/4 beat
1/8 beat
Page 17

TRANS/ROLL
TRANS: When turned counterclockwise
This function cuts the input sound according to the multiplying factor of
the beat set at the position of the control.
LOW control
MID control
HI control
1/2 beat
Adjusts the amount by which the low frequency sound
is cut.
Adjusts the amount by which the mid frequency sound
is cut.
Adjusts the amount by which the high frequency sound
is cut.
1/1 beat
Time
Level
Threshold
Threshold
Threshold
DRIVE: When turned clockwise
This function distorts the input sound.
LOW control
MID control
HI control
Adjusts the amount by which the low frequency sound
is distorted.
Adjusts the amount by which the mid frequency sound
is distorted.
Adjusts the amount by which the high frequency sound
is distorted.
English
Time
1/4 beat
ROLL: When turned clockwise
This function records the input sound starting from the point when the
[LOW], [MID] or [HI] control is turned and outputs the recorded sound
repeatedly according to the multiplying factor of the beat set at the position of the control.
LOW control
MID control
HI control
Original
1/1 roll
1/2 roll
Adjusts the cycle at which the low frequency sound is
output repeatedly.
Adjusts the cycle at which the mid frequency sound is
output repeatedly.
Adjusts the cycle at which the high frequency sound is
output repeatedly.
Effect turned on
Repeated
Repeated
GATE/DRIVE
GATE: When turned counterclockwise
This function outputs the portion of the input sound that has a level
higher than the threshold level, cutting the portion of the input sound
with a lower level.
LOW control Adjusts the threshold level of the low frequency sound.
MID control Adjusts the threshold level of the mid frequency sound.
HI control Adjusts the threshold level of the high frequency sound.
Cycle
Time
Types of X-PAD FX effects
Records the input sound starting from the point when
ROLL
KICK
SNARE
CLAP
HI HAT
SAMPLER
the [X-PAD] is touched and outputs the recorded sound
repeatedly according to the multiplying factor of the beat
set with the [X-PAD].
Outputs this unit’s internal “KICK” sound source.
Outputs this unit’s internal “SNARE” sound source.
Outputs this unit’s internal “CLAP” sound source.
Outputs this unit’s internal “HI HAT” sound source.
Outputs the sampled sound recorded on an SD memory
card.
Types of RELEASE FX effects
VINYL BRAKE
ECHO
BACK SPIN
Achieves the effect of the input sound’s playing speed
gradually slowing and finally stopping.
The echo is output several times in beat with the input
sound, with the delay sound gradually attenuating.
Achieves the effect of the currently playing input sound
being played in reverse at high speed.
En
17
Page 18

Using the included software
Software end user license
agreement
This Software End User License Agreement (“Agreement”) is between
you (both the individual installing the Program and any single legal
entity for which the individual is acting) (“You” or “Your”) and PIONEER
CORPORATION (“Pioneer”).
TAKING ANY STEP TO SET UP OR INSTALL THE PROGRAM MEANS
THAT YOU ACCEPT ALL OF THE TERMS OF THIS LICENSE AGREEMENT.
PERMISSION TO DOWNLOAD AND/OR USE THE PROGRAM IS
EXPRESSLY CONDITIONED ON YOUR FOLLOWING THESE TERMS.
WRITTEN OR ELECTRONIC APPROVAL IS NOT REQUIRED TO MAKE
THIS AGREEMENT VALID AND ENFORCEABLE. IF YOU DO NOT
AGREE TO ALL OF THE TERMS OF THIS AGREEMENT, YOU ARE NOT
AUTHORIZED TO USE THE PROGRAM AND MUST STOP INSTALLING IT
OR UNINSTALL IT, AS APPLICABLE.
1 Definitions
1 “Documentation” means written documentation, specifications
and help content made generally available by Pioneer to aid in
installing and using the Program.
2 “Program” means all or any part of Pioneer’s software licensed to
You by Pioneer under this Agreement.
2 Program license
1 Limited License. Subject to this Agreement’s restrictions,
Pioneer grants to You a limited, non-exclusive, nontransferable,
license (without the right to sublicense):
a To install a single copy of the Program on the hard disk
drive of Your computer, to use the Program only for Your
personal purpose complying with this Agreement and the
Documentation (“Authorized Use”);
b To use the Documentation in support of Your Authorized Use;
and
c To make one copy of the Program solely for backup pur-
poses, provided that all titles and trademark, copyright and
restricted rights notices are reproduced on the copy.
2 Restrictions. You will not copy or use the Program or
Documentation except as expressly permitted by this Agreement.
You will not transfer, sublicense, rent, lease or lend the Program,
or use it for third-party training, commercial time-sharing or
service bureau use. You will not Yourself or through any third
party modify, reverse engineer, disassemble or decompile the
Program, except to the extent expressly permitted by applicable
law, and then only after You have notified Pioneer in writing of
Your intended activities. You will not use the Program on multiple
processors without Pioneer’s prior written consent.
3 Ownership. Pioneer or its licensor retains all right, title and
interest in and to all patent, copyright, trademark, trade secret
and other intellectual property rights in the Program and
Documentation, and any derivative works thereof. You do not
acquire any other rights, express or implied, beyond the limited
license set forth in this Agreement.
4 No Support. Pioneer has no obligation to provide support,
maintenance, upgrades, modifications or new releases for the
Program or Documentation under this Agreement.
3 Warranty disclaimer
THE PROGRAM AND DOCUMENTATION ARE PROVIDED “AS IS”
WITHOUT ANY REPRESENTATIONS OR WARRANTIES, AND YOU
AGREE TO USE THEM AT YOUR SOLE RISK. TO THE FULLEST EXTENT
PERMISSIBLE BY LAW, PIONEER EXPRESSLY DISCLAIMS ALL
WARRANTIES OF ANY KIND WITH RESPECT TO THE PROGRAM AND
DOCUMENTATION, WHETHER EXPRESS, IMPLIED, STATUTORY,
OR ARISING OUT OF COURSE OF PERFORMANCE, COURSE OF
DEALING OR USAGE OF TRADE, INCLUDING ANY WARRANTIES
OF MERCHANTABILITY, FITNESS FOR A PARTICULAR PURPOSE,
SATISFACTORY QUALITY, ACCURACY, TITLE OR NON-INFRINGEMENT.
4 Damages and remedies for breach
You agree that any breach of this Agreement’s restrictions would cause
Pioneer irreparable harm for which money damages alone would be
inadequate. In addition to damages and any other remedies to which
Pioneer may be entitled, You agree that Pioneer may seek injunctive
relief to prevent the actual, threatened or continued breach of this
Agreement.
5 Termination
Pioneer may terminate this Agreement at any time upon Your breach of
any provision. If this Agreement is terminated, You will stop using the
Program, permanently delete it from the computer where it resides, and
destroy all copies of the Program and Documentation in Your possession, confirming to Pioneer in writing that You have done so. Sections
2.2, 2.3, 2.4, 3, 4, 5 and 6 will continue in effect after this Agreement’s
termination.
6 General terms
1 Limitation of Liability. In no event will Pioneer or its subsidiaries
be liable in connection with this Agreement or its subject matter,
under any theory of liability, for any indirect, incidental, special,
consequential or punitive damages, or damages for lost profits,
revenue, business, savings, data, use, or cost of substitute procurement, even if advised of the possibility of such damages or if
such damages are foreseeable. In no event will Pioneer’s liability
for all damages exceed the amounts actually paid by You to
Pioneer or its subsidiaries for the Program. The parties acknowledge that the liability limits and risk allocation in this Agreement
are reflected in the Program price and are essential elements of
the bargain between the parties, without which Pioneer would
not have provided the Program or entered into this Agreement.
2 The limitations or exclusions of warranties and liability contained
in this Agreement do not affect or prejudice Your statutory rights
as consumer and shall apply to You only to the extent such limitations or exclusions are permitted under the laws of the jurisdiction where You are located.
3 Severability and Waiver. If any provision of this Agreement is held
to be illegal, invalid or otherwise unenforceable, that provision
will be enforced to the extent possible or, if incapable of enforcement, deemed to be severed and deleted from this Agreement,
and the remainder will continue in full force and effect. The
waiver by either party of any default or breach of this Agreement
will not waive any other or subsequent default or breach.
4 No Assignment. You may not assign, sell, transfer, delegate or
otherwise dispose of this Agreement or any rights or obligations
under it, whether voluntarily or involuntarily, by operation of law
or otherwise, without Pioneer’s prior written consent. Any purported assignment, transfer or delegation by You will be null and
void. Subject to the foregoing, this Agreement will be binding
upon and will inure to the benefit of the parties and their respective successors and assigns.
5 Entire Agreement. This Agreement constitutes the entire agree-
ment between the parties and supersedes all prior or contemporaneous agreements or representations, whether written or
oral, concerning its subject matter. This Agreement may not be
modified or amended without Pioneer’s prior and express written
consent, and no other act, document, usage or custom will be
deemed to amend or modify this Agreement.
6 You agree that this Agreement shall be governed and construed
by and under the laws of Japan.
18
En
Page 19

Using remixbox
When the remixbox application installed on a computer is used, the settings of the parameters of this unit’s effects can be customized to your
liking. The remixbox can also be used to load sampled sound sources
into the X-PAD FX section.
Use remixbox on the computer to prepare the effects’ customized
parameter data and the sampled sound sources ahead of time. The customized parameter data and the sampled sound sources can be stored
on an SD memory card and loaded into this unit. It can also be loaded
directly onto this unit when this unit and computer are connected by
USB cable.
Cautions on Installation
! If installation of remixbox is interrupted before it is completed, follow
the procedure below to install again from the beginning.
! Read the “Software end user license agreement” carefully before
installing remixbox.
! If there are any programs running on the computer, quit them before
installing remixbox.
! remixbox is supported on the following operating systems:
Supported operating systems
Windows
Intel
Mac
1 A hotfix program provided by Microsoft must be installed. The customer is
responsible for installation of the hotfix program.
1 Access the Microsoft support site (http://support.microsoft.com/).
2 At the site’s search window, search for document number “2182039” and
download the hotfix.
! Because Microsoft has stopped providing support for the operating systems
below, Pioneer offers no guarantees when using these operating systems.
— Windows Vista
earlier)
— Windows® XP Home Edition/Professional (SP2 and earlier)
Installing remixbox
Installation procedure (Windows)
Read Cautions on Installation carefully before installing remixbox.
! Authorization of the computer’s administrator is required to install
and uninstall remixbox.
Log on as the user which was set as the computer’s administrator
before installing.
1 Insert the remixbox CD-ROM into the computer’s CD
drive.
The CD-ROM menu is displayed.
®
Windows
7 Home Premium/Professional/
Ultimate
Windows Vista
Home Premium/Business/Ultimate (SP2
or later)
Windows
(SP3 or later)
Mac OS X 10.7
Mac OS X 10.6
Mac OS X 10.5 32-bit version
®
Home Basic/
®
XP Home Edition/Professional
®
Home Basic/Home Premium/Business/Ultimate (SP1 and
32-bit version
64-bit version
32-bit version
64-bit version
32-bit version
64-bit version
32-bit version
64-bit version
32-bit version
64-bit version
1
1
1
1
3
1
3
1
1
1
1
1
! If the CD-ROM menu does not appear when the CD-ROM is inserted,
open the CD drive from [Computer (or My Computer)] in the [Start]
menu, then double-click the [CD_menu.exe] icon.
2 When the CD-ROM’s menu is displayed, select
[remixbox: Install remixbox], then click [Start].
! To close the CD-ROM menu, click [Quit].
3 When the language selection screen appears, select
[English] and click [OK].
! You can select the one you desire from multiple languages as long
as the language is supported by the system environment of your
computer.
4 When the license agreement screen appears, read the
Software end user license agreement carefully. If you
agree to the Software end user license agreement, click
[Agree].
! If you do not consent to the provisions of the Software end user
license agreement, click [Cancel] and stop installation.
5 Install remixbox by following the instructions on the
screen.
! Click [Cancel] to cancel installation after it has started.
Installation procedure (Mac OS X)
Read Cautions on Installation carefully before installing remixbox.
! Authorization of the computer’s administrator is required to install
and uninstall remixbox.
Log on as the user which was set as the computer’s administrator
before installing.
1 Insert the remixbox CD-ROM into the computer’s CD
drive, and then double-click the [CD_menu.app] icon
once it is displayed in a window.
! If the window containing the [CD_menu.app] icon is not displayed
when the CD-ROM is inserted, use Finder to open the CD drive
manually and double-click the [CD_menu.app] icon.
2 When the CD-ROM’s menu is displayed, select
[remixbox: Install remixbox], then click [Start].
! To close the CD-ROM menu, click [Quit].
3 When the license agreement screen appears, select
[English], read the Software end user license agreement
carefully, then click [Continue].
! You can select the one you desire from multiple languages as long
as the language is supported by the system environment of your
computer.
4 If you agree to the Software end user license
agreement, click [Agree].
! If you do not consent to the provisions of the Software end user
license agreement, click [Disagree] and stop installation.
5 Install remixbox by following the instructions on the
screen.
English
En
19
Page 20

Launching remixbox/Viewing the
Operating Instructions
Log on as the user which was set as the computer’s administrator before
using remixbox.
The operating instructions can be viewed by launching remixbox then
clicking [Manual] from the remixbox [Help] menu.
For Windows® 7, Windows Vista® and Windows®
XP
Click on the Windows [Start] menu button, then [All
Programs] > [Pioneer] > [remixbox 1.x.x] > [remixbox
1.x.x].
! The 1.x.x indicates the remixbox version.
For Mac OS X
Open the [Application] folder with Finder, then doubleclick [remixbox 1.x.x.app].
! The 1.x.x indicates the remixbox version.
Connecting this unit and computer
1 Slide the [ON, STANDBY] switch on the rear panel of
this unit to the [ON] position.
Turn on the power of this unit.
2 Connect this unit to your computer via a USB cable.
! This operation does not work with computers that do not support
USB 2.0.
! When using Windows XP, if another USB-MIDI device is connected
simultaneously to the computer, it may not operate properly or may
not be recognized. Only connect the computer and this unit.
! Connect this unit and the computer directly using the included USB
cable.
Checking the latest information on
the included software
For the latest information on the included software and supported operating systems, see the website below.
http://pioneerdj.com/support/
! Operation cannot be guaranteed when multiple units of this mixer
are connected to a single computer.
20
En
Page 21
Changing this unit’s settings
English
Changing the MIDI settings
The following buttons are used to change the MIDI settings:
— [TAP] button: Used as the Enter button.
— [AUTO] button: Used as the Cancel button.
— [NUDGE (+, –)] button: Used to select items.
1 Turn on this unit’s power while pressing the
[QUANTIZE] button.
This unit starts up in the mode for changing the MIDI settings.
The setting items are displayed on the BPM display.
2 Press the [+] or [–] side of the [NUDGE (+, –)] button.
Select whether to change the MIDI channel or MIDI button type.
— If [CH] or numbers are displayed: MIDI channel changing mode
— If [btn] or letters are displayed: MIDI button type changing mode
3 Press the [TAP] button.
Switch to the mode for changing the MIDI channel or the one for changing the MIDI button type.
The MIDI channel number or MIDI button type flashes on the BPM
display.
4 Press the [+] or [–] side of the [NUDGE (+, –)] button.
Select and change the MIDI channel or MIDI button type. The values
below can be selected for each of these.
— MIDI channel: [1] to [16]
— MIDI button type: [tGL (toggle)] or [trG (trigger)]
5 Press the [TAP] button.
The selected setting is stored.
The stored setting flashes rapidly on the BPM display.
! When this unit’s power is turned off, the mode for changing the MIDI
settings is quit.
! The settings on this unit upon shipment from the factory are as
follows:
— MIDI channel: [1]
— MIDI button type: [tGL (toggle)]
Using the update function
! Do not turn off this unit’s power during the updating procedure.
1 Turn on this unit’s power while pressing the
[HOLD (MUTE)] and [TAP] buttons.
This unit starts up in the updating mode.
The current firmware version number is displayed on the BPM display,
and the right edge of the [OUTPUT] level indicator flashes.
2 Insert the SD memory card on which the update file is
stored into the SD memory card slot of this unit.
Updating starts.
The [OUTPUT] level indicator lights to indicate the progress of updating.
Once all segments of the [OUTPUT] level indicator are lit, updating is
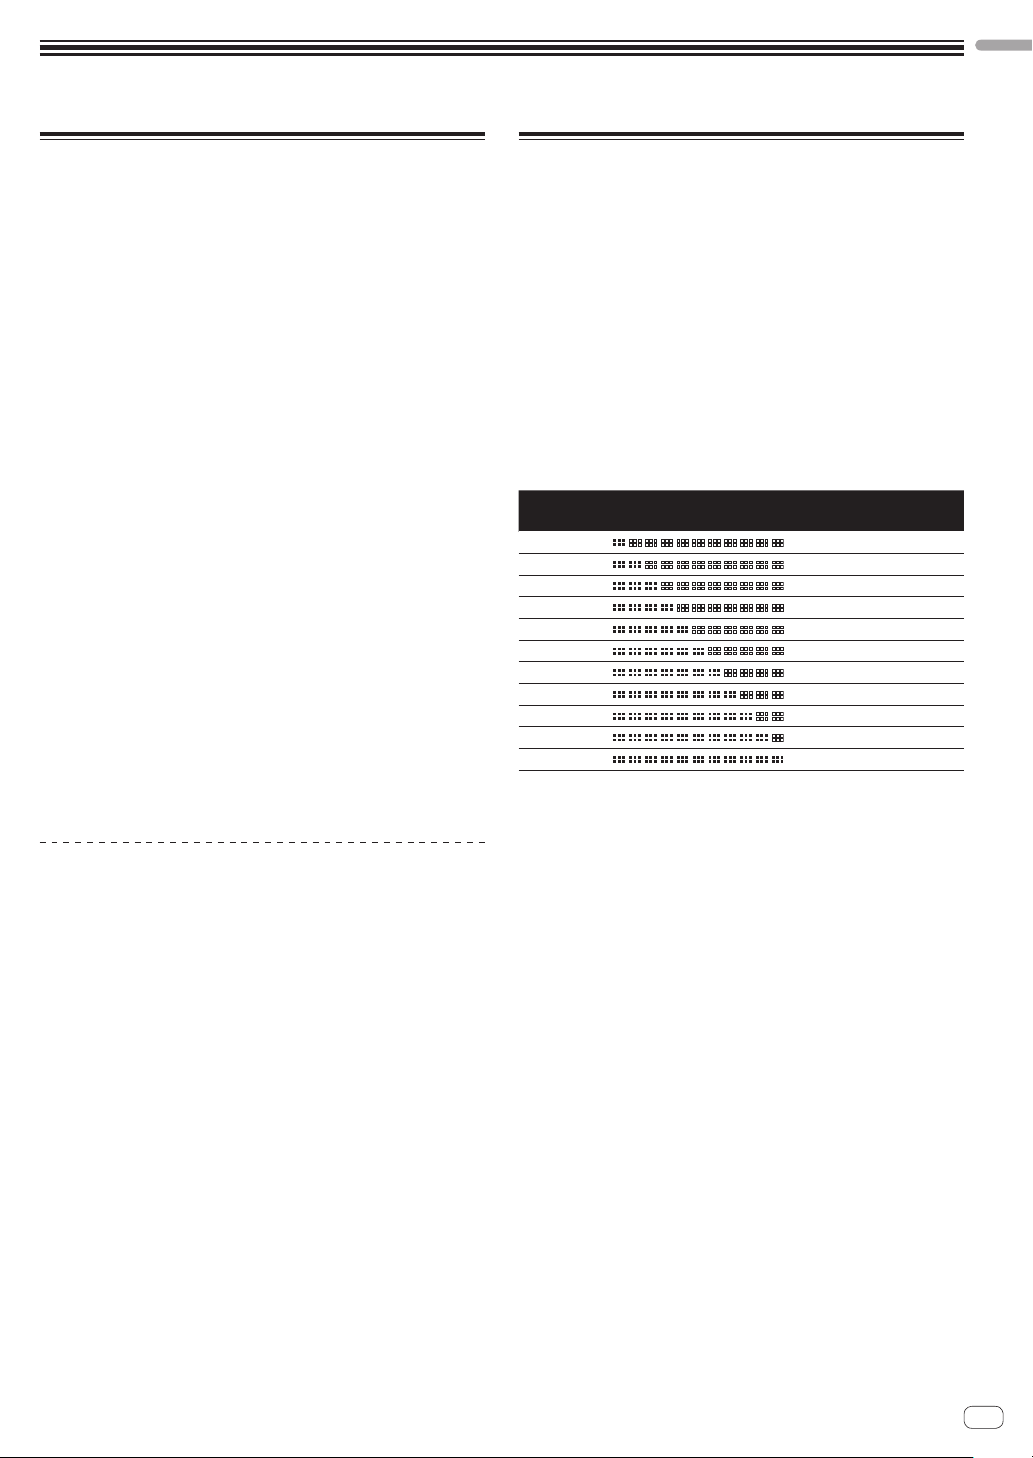
completed.
! If an error occurs during updating, the type of error is indicated by
the BPM display and the number of segments of the [INPUT] level
indicator that are lit.
BPM
display
E00
E10
E20
E30
E40
E50
E60
E70
E80
E90
3-digit number
Lit segments of the
[INPUT] level indicator
Type of error
Updating error
Updating error
Updating error
Updating file not detected
Updating file corrupt
SD memory card reading error
Memory clearing error
Memory writing error
Memory verification error
SD memory card error
Updating completed normally
Temporarily changing the MIDI channel
for the RMX-1000 Plug-in
Even when this unit is not in the mode for changing the MIDI settings, it
is possible to temporarily change the MIDI channel.
1 Press the [+] or [–] side of the [NUDGE (+, –)] button
while pressing the [BANK] button.
The MIDI channel number appears on the BPM display.
2 Release the [BANK] button.
! The MIDI channel changed in this way is reflected on this unit until
the power is turned off.
En
21
Page 22
MIDI assignment map
! “CC” is the abbreviation of “control change”. A control change is a type of MIDI signal used to transmit various types of control information, such as
timbre, volume, etc.
! “Note” is a MIDI term used when pressing or releasing notes on a piano or other keyboard.
On this unit, values from 0 to 127 are output as CCs when controls or the [X-PAD] are operated. Also, when buttons or switches are operated, val-
ues from 0 to 127 are output as Notes.
Category SW Name SW Type MIDI Messages
LEVEL OUTPUT LEVEL control VR CC 000 — 0-127
QUANTIZE button BTN Note 000
AUTO button BTN Note 001
BPM/QUANTIZE
FX SOURCE
ISOLATE FX
X-PAD FX
SCENE FX
RELEASE FX
FX SETTING
TAP button BTN Note 002 Trigger only OFF=0, ON=127
NUDGE(–) button BTN Note 003 Trigger only OFF=0, ON=127
NUDGE(+) button BTN Note 004 Trigger only OFF=0, ON=127
INPUT button BTN Note 005
X-PAD button BTN Note 006
LOW control VR CC 001 — 0-127
MID control VR CC 002 — 0-127
HI control VR CC 003 — 0-127
ISOLATOR button BTN Note 007
CUT/ADD button BTN Note 008
TRANS/ROLL button BTN Note 009
GATE/DRIVE button BTN Note 010
BANK button BTN Note 011 Trigger only OFF=0, ON=127
ROLL button BTN Note 012 Trigger only OFF=0, ON=127
KICK button BTN Note 013 Trigger only OFF=0, ON=127
SNARE button BTN Note 014 Trigger only OFF=0, ON=127
CLAP button BTN Note 015 Trigger only OFF=0, ON=127
HI HAT button BTN Note 016 Trigger only OFF=0, ON=127
OVERDUB (DELETE) button BTN Note 017 Toggle only OFF=0, ON=127
HOLD (MUTE) button BTN Note 018 Toggle only OFF=0, ON=127
X-PAD LEVEL control VR CC 004 — 0-127
PITCH control VR CC 005 — 0-127
X-PAD (position) VR CC 006 —
X-PAD (touch) BTN Note 019 Trigger only
SCENE FX control VR CC 007 — 0-127
SUB PARAMETER 1 control VR CC 008 — 0-127
SUB PARAMETER 2 control VR CC 009 — 0-127
BPF ECHO button BTN Note 020
ECHO button BTN Note 021
NOISE button BTN Note 022
SPIRAL UP button BTN Note 023
REVERB UP button BTN Note 024
HPF ECHO button BTN Note 025
LPF ECHO button BTN Note 026
CRUSH ECHO button BTN Note 027
SPIRAL DOWN button BTN Note 028
REVERB DOWN button BTN Note 029
RELEASE FX selector switch 1 (VINYL
BRAKE)
RELEASE FX selector switch 2 (ECHO) SW Note 031 Trigger only
RELEASE FX selector switch 3 (BACK
SPIN)
RELEASE FX lever VR CC 010 — 0-127
SETTING selector switch 1 (DEFAULT) SW Note 033 Trigger only
SETTING selector switch 2 (USER) SW Note 034 Trigger only
SW Note 030 Trigger only
SW Note 032 Trigger only
MIDI button type
Trigger/Toggle
1
1
1
1
1
1
1
1
1
1
1
1
1
1
1
1
1
1
1
1
1
1
1
Notes
OFF=0, ON=127
OFF=0, ON=127
OFF=0, ON=127
OFF=0, ON=127
OFF=0, ON=127
OFF=0, ON=127
OFF=0, ON=127
OFF=0, ON=127
0-127
Sends the [X-PAD]
position information.
OFF (when not touched)
= 0, ON (when
touched) =127
OFF=0, ON=127
OFF=0, ON=127
OFF=0, ON=127
OFF=0, ON=127
OFF=0, ON=127
OFF=0, ON=127
OFF=0, ON=127
OFF=0, ON=127
OFF=0, ON=127
OFF=0, ON=127
OFF=0, ON=127
OFF=0, ON=127
OFF=0, ON=127
OFF=0, ON=127
OFF=0, ON=127
22
En
Page 23

Category SW Name SW Type MIDI Messages
OVERDUB (DELETE) button + ROLL
button
OVERDUB (DELETE) button + KICK
button
OVERDUB (DELETE) button + SNARE
button
OVERDUB (DELETE) button + CLAP
button
OVERDUB (DELETE) button + HI HAT
Plug-in control
1 When the [RELEASE FX] selector switch and the [SETTING] selector switch are slid, “OFF” is sent from the switch that has not yet been switched, “ON” from the switch that
has been switched.
button
OVERDUB (DELETE) button + X-PAD
(touch)
HOLD (MUTE) button + ROLL button BTN Note 041 Trigger only OFF=0, ON=127
HOLD (MUTE) button + KICK button BTN Note 042 Trigger only OFF=0, ON=127
HOLD (MUTE) button + SNARE button BTN Note 043 Trigger only OFF=0, ON=127
HOLD (MUTE) button + CLAP button BTN Note 044 Trigger only OFF=0, ON=127
HOLD (MUTE) button + HI HAT button BTN Note 045 Trigger only OFF=0, ON=127
HOLD (MUTE) button + X-PAD (touch) BTN Note 046 Trigger only OFF=0, ON=127
BTN Note 035 Trigger only OFF=0, ON=127
BTN Note 036 Trigger only OFF=0, ON=127
BTN Note 037 Trigger only OFF=0, ON=127
BTN Note 038 Trigger only OFF=0, ON=127
BTN Note 039 Trigger only OFF=0, ON=127
BTN Note 040 Trigger only OFF=0, ON=127
MIDI button type
Trigger/Toggle
Notes
English
En
23
Page 24

Additional information
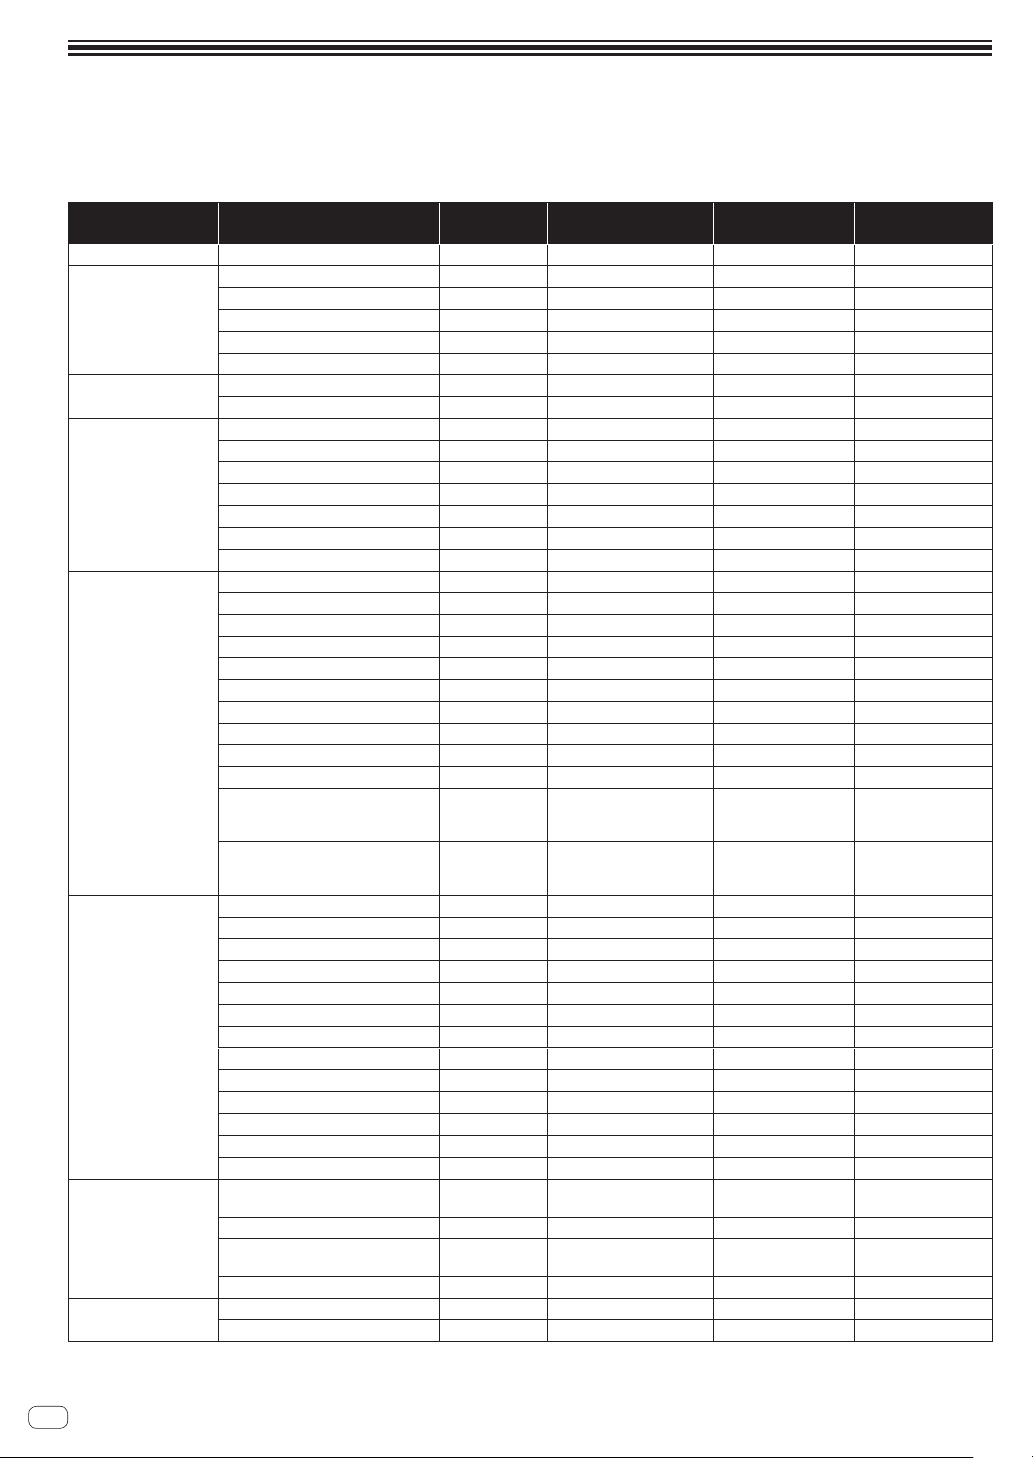
Troubleshooting
! Incorrect operation is often mistaken for trouble or malfunction. If you think that there is something wrong with this component, check the points
below. Sometimes the trouble may lie in another component. Inspect the other components and electrical appliances being used. If the trouble
cannot be rectified after checking the items below, ask your nearest Pioneer authorized service center or your dealer to carry out repair work.
! The player may not operate properly due to static electricity or other external influences. In such cases, normal operation may be restored by
unplugging the power cord then plugging it back in.
Problem Check Remedy
The power is not turned on. Are the included power cord and AC adapter
No sound or small sound. Are the connection cables properly connected? Connect the connection cables properly. (page 6)
Distorted sound. Is the audio level output from the [OUTPUT]
Tempo (BPM) cannot be measured or
measurement value of tempo (BPM) is
implausible.
Value of the measured tempo (BPM)
differs from value recorded on CD, or
tempo (BPM) values displayed on DJ
player, DJ mixer, DJ software and this
unit differ.
This unit is not recognized after it has
been connected to a computer.
SD memory card is not recognized. Is the SD memory card properly inserted? Insert the SD memory card securely all the way in. (Page 12)
Much time is required to load data
from an SD memory card.
Effects are not applied. Is the [INPUT] or [X-PAD] button lit? Press the [INPUT] or [X-PAD] button. (Page 14)
ISOLATE FX effects are not applied. Is the [ISOLATE FX] control set to an appropriate
X-PAD FX effects are not applied. Is the [X-PAD LEVEL] control set to an appropriate
SCENE FX effects are not applied. Is the [SCENE FX] control set to an appropriate
MIDI sequencer does not synchronize. Is the MIDI sequencer’s sync mode set to Slave? Set the MIDI sequencer’s sync mode to Slave.
MIDI control does not work. Are the MIDI settings properly set? To operate DJ software with this unit, this unit’s MIDI messages must be
properly connected?
Is the [ON, STANDBY] switch for power supply
set to [ON]?
Are the terminals and plugs dirty? Clean the terminals and plugs before making connections.
Is the [CONNECTION] selector switch on the rear
panel of this unit properly set?
terminals appropriately set?
Is the audio level input to the [INPUT] terminals
appropriately set?
Is the audio input level too high or too low? Adjust the [INPUT LEVEL] control so that the [INPUT] level indicator lights up to
— The values may differ slightly due to the different ways in which the BPM is
Is the included USB cable properly connected? Connect this unit and computer directly, not via a USB hub.
Is the SD memory card one that is usable on this
unit?
Are there a large number of folders or files
recorded on the SD memory card?
Have you stored files other than setting files and
sampled data on the SD memory card?
position?
position?
position?
Does the MIDI sequencer you are using support
MIDI timing clocks?
Properly connect the included power cord to a power outlet.
Properly connect the power cord to the included AC adapter. (page 6)
Connect the included AC adapter’s DC plug properly to this unit.
Set the [ON, STANDBY] switch for power supply to [ON].
Switch the [CONNECTION] selector switch according to the connected device.
(page 10)
Adjust the [OUTPUT LEVEL] control so that the [OUTPUT] level indicator lights
up to about [0 dB] at the peak level. (Page 10)
Adjust the [INPUT LEVEL] control so that the [INPUT] level indicator lights up to
about [0 dB] at the peak level. (page 10)
about [0 dB] at the peak level. (page 10)
For some tracks, it may not be possible to measure the tempo (BPM). Use the
[TAP] button to input the tempo manually. (page 11)
measured.
SD memory cards have a front and back. Be sure to insert them in the proper
direction.
Only SD memory cards or SDHC memory cards can be used on this unit. Some
cards may not be usable.
When there are many folders or files, some time may be required for loading.
If the folder contains files other than setting files and sampled data, some time
will be required for loading. Do not put files other than setting files and sampled
data in the folder.
Turn the [ISOLATE FX] control clockwise or counterclockwise. (Page 12)
Turn the [X-PAD LEVEL] control clockwise. (Page 12)
Turn the [SCENE FX] control clockwise. (Page 11)
MIDI sequencers not supporting MIDI timing clocks cannot be synchronized.
assigned to the DJ software you are using. For instructions on assigning messages, see your DJ software’s operating instructions.
24
En
Page 25

Block Diagram
English
About trademarks and registered
trademarks
! Pioneer is a registered trademark of PIONEER CORPORATION.
! Microsoft®, Windows Vista®, Windows® and Internet Explorer® are
either registered trademarks or trademarks of Microsoft Corporation
in the United States and/or other countries.
! Apple, Macintosh, Mac OS, Safari, iTunes, and Finder are trade-
marks of Apple Inc., registered in the U.S. and other countries.
! Intel and Pentium are trademarks of Intel Corporation in the U.S. and
other countries.
! VST is a trademark of Steinberg Media Technologies GmbH.
! The Audio Units logo is a trademark of Apple Inc.
The names of companies and products mentioned herein are the trademarks of their respective owners.
This product has been licensed for nonprofit use. This product has not
been licensed for commercial purposes (for profit-making use), such
as broadcasting (terrestrial, satellite, cable or other types of broadcasting), streaming on the Internet, Intranet (a corporate network) or other
types of networks or distributing of electronic information (online digital music distribution service). You need to acquire the corresponding
licenses for such uses. For details, see http://www.mp3licensing.com.
Cautions on copyrights
Recordings you have made are for your personal enjoyment and according to copyright laws may not be used without the consent of the copyright holder.
! Music recorded from CDs, etc., is protected by the copyright laws of
individual countries and by international treaties. It is the full responsibility of the person who has recorded the music to ensure that it is
used legally.
! When handling music downloaded from the Internet, etc., it is the
full responsibility of the person who has downloaded the music to
ensure that it is used in accordance with the contract concluded
with the download site.
Disclaimer
Please note that Pioneer will accept no responsibility whatsoever for
legality, morality or certainty of operation concerning use of the included
software by the customer. Depending on the operating environment of
the customer’s computer and the included software and combinations
with other software, problems may arise in the operation of the included
software.
Please note that Pioneer will accept no responsibility for loss of information registered by the customer using the included software. Please
make a separate note, etc., of contents you register.
Specifications
AC adapter
Power ............................................................ AC 100 V to 240 V, 50 Hz/60 Hz
Rated current ......................................................................................... 0.4 A
Rated output ................................................................................. DC 5 V, 2 A
General – Main Unit
Power consumption ............................................................................... 1.4 A
Main unit weight ................................................................................... 1.3 kg
Max. external dimensions .............334 mm (W) x 57 mm (H) x 157 mm (D)
Tolerable operating temperature ........................................ +5 °C to +35 °C
Tolerable operating humidity ...................... 5 % to 85 % (no condensation)
Audio Section
Sampling rate .......................................................................................48 kHz
A/D, D/A converter ...............................................................................24 bits
Frequency response.............................................................. 20 Hz to 20 kHz
S/N ratio (rated output)
When CONNECTION is set to "SEND/RETURN (–10 dB)" ......... 102 dB
When CONNECTION is set to "MASTER (+4 dB)" ........................ 98 dB
Total harmonic distortion ..................................................................0.005 %
Headroom .............................................................................................. 20 dB
Input level / Input impedance
When CONNECTION is set to "SEND/RETURN (–10 dB)"
........................................................................ –10 dBV/22 kW or greater
When CONNECTION is set to "MASTER (+4 dB)"
.........................................................................+4 dBu/22 kW or greater
Output level / Load impedance / Output impedance
When CONNECTION is set to "SEND/RETURN (–10 dB)"
.....................................................................–10 dBV/10 kW/1 kW or less
When CONNECTION is set to "MASTER (+4 dB)"
..................................................................... +4 dBu/10 kW/1 kW or less
Input / Output terminals
INPUT terminals
RCA pin jacks ....................................................................................1 set
Phone jack (Ø 6.3 mm) ..................................................................... 1 set
OUTPUT terminals
RCA pin jacks ....................................................................................1 set
Phone jack (Ø 6.3 mm) ..................................................................... 1 set
USB terminal
B type .................................................................................................1 set
— The specifications and design of this product are subject to
change without notice.
— The software screens used in these operating instructions are
from the development stage and may differ from the actual
screens.
! © 2012 PIONEER CORPORATION. All rights reserved.
En
25
Page 26

Nous vous remercions d’avoir acquis un produit Pioneer. Veuillez lire attentivement ce mode d’emploi afin de connaître la manière d’utiliser l’appareil
comme il convient. Cela fait, conservez le mode d’emploi de façon à pouvoir vous y référer en cas de nécessité.
Dans certains pays ou certaines régions, la forme de la fiche et de la prise d’alimentation est un peu différente de ce qui est montré dans les illustrations. Toutefois, l’appareil se raccorde et fonctionne de la même façon.
IMPORTANT
ATTENTION
DANGER D´ELECTROCUTION
NE PAS OUVRIR
Ce symbole de l’éclair, placé dans un
triangle équilatéral, a pour but d’attirer
l’attention de l’utilisateur sur la présence, à
l’intérieur du coffret de l’appareil, de
“tensions dangereuses” non isolées d’une
grandeur suffisante pour représenter un
risque d’électrocution pour les êtres
humains.
Si vous souhaitez vous débarrasser de cet appareil, ne le mettez pas à la poubelle avec vos ordures ménagères. Il existe un système de
collecte séparé pour les appareils électroniques usagés, qui doivent être récupérés, traités et recyclés conformément à la législation.
Les habitants des états membres de l’UE, de Suisse et de Norvège peuvent retourner gratuitement leurs appareils électroniques usagés aux
centres de collecte agréés ou à un détaillant (si vous rachetez un appareil similaire neuf).
Dans les pays qui ne sont pas mentionnés ci-dessus, veuillez contacter les autorités locales pour savoir comment vous pouvez vous débarrasser
de vos appareils.
Vous garantirez ainsi que les appareils dont vous vous débarrassez sont correctement récupérés, traités et recyclés et préviendrez de cette façon
les impacts néfastes possibles sur l’environnement et la santé humaine.
AVERTISSEMENT
Cet appareil n’est pas étanche. Pour éviter les risques
d’incendie et de décharge électrique, ne placez près de
ATTENTION :
POUR ÉVITER TOUT RISQUE
D’ÉLECTROCUTION, NE PAS ENLEVER LE
COUVERCLE (NI LE PANNEAU ARRIÈRE).
AUCUNE PIÈCE RÉPARABLE PAR
L’UTILISATEUR NE SE TROUVE À
L’INTÉRIEUR. CONFIER TOUT ENTRETIEN À
UN PERSONNEL QUALIFIÉ UNIQUEMENT.
Avant d’effectuer les raccordement, ou de les
modifier, veillez à couper l’alimentation et à
débrancher la fiche du cordon d’alimentation.
lui un récipient rempli d’eau, tel qu’un vase ou un pot
de fleurs, et ne l’exposez pas à des gouttes d’eau, des
éclaboussures, de la pluie ou de l’humidité.
D3-4-2-1-3_A1_Fr
AVERTISSEMENT
Avant de brancher l’appareil pour la première, lisez
attentivement la section suivante.
La tension de l’alimentation électrique disponible
varie selon le pays ou la région. Assurez-vous que
la tension du secteur de la région où l’appareil sera
utilisé correspond à la tension requise (par ex. 230
V ou 120 V), indiquée sur l’étiquette de
l’adaptateur secteur.
D3-4-2-1-4*_A1_Fr_PSV
NOTE IMPORTANTE SUR LE CABLE
D’ALIMENTATION
Tenir le câble d’alimentation par la fiche. Ne pas
débrancher la prise en tirant sur le câble et ne pas
toucher le câble avec les mains mouillées. Cela risque
de provoquer un court-circuit ou un choc électrique. Ne
pas poser l’appareil ou un meuble sur le câble. Ne pas
pincer le câble. Ne pas faire de noeud avec le câble ou
l’attacher à d’autres câbles. Les câbles d’alimentation
doivent être posés de façon à ne pas être écrasés. Un
câble abîmé peut provoquer un risque d’incendie ou un
choc électrique. Vérifier le câble d’alimentation de
temps en temps. Contacter le service après-vente
AVERTISSEMENT
Pour éviter les risques d’incendie, ne placez aucune
PIONEER le plus proche ou le revendeur pour un
remplacement.
flamme nue (telle qu’une bougie allumée) sur
l’appareil.
D3-4-2-1-7a_A1_Fr
Ce point d’exclamation, placé dans un
triangle équilatéral, a pour but d’attirer
l’attention de l’utilisateur sur la présence,
dans les documents qui accompagnent
l’appareil, d’explications importantes du
point de vue de l’exploitation ou de
l’entretien.
D3-4-2-1-1_A1_Fr
K058b_A1_Fr
D44-9-3_A1_Fr
S002*_A1_Fr
Milieu de fonctionnement
Température et humidité du milieu de fonctionnement :
De +5 °C à +35 °C (de +41 °F à +95 °F) ; Humidité
relative inférieure à 85 % (orifices de ventilation non
obstrués)
N’installez pas l’appareil dans un endroit mal ventilé ou
un lieu soumis à une forte humidité ou en plein soleil
(ou à une forte lumière artificielle).
Fr
2
D3-4-2-1-7c*_A1_Fr
Page 27

Si la fiche d’alimentation secteur de cet appareil ne
convient pas à la prise secteur à utiliser, la fiche doit
être remplacée par une appropriée. Ce
remplacement et la fixation d’une fiche secteur sur le
cordon d’alimentation de cet appareil doivent être
effectués par un personnel de service qualifié. En cas
de branchement sur une prise secteur, la fiche de
coupure peut provoquer une sérieuse décharge
électrique. Assurez-vous qu’elle est éliminée
correctement après sa dépose.
L’appareil doit être déconnecté en débranchant sa
fiche secteur au niveau de la prise murale si vous
prévoyez une période prolongée de non utilisation
(par exemple avant un départ en vacances).
D3-4-2-2-1a_A1_Fr
ATTENTION
L’interrupteur ON, STANDBY de cet appareil ne
coupe pas complètement celui-ci de sa prise secteur.
Comme le cordon d’alimentation fait office de
dispositif de déconnexion du secteur, il devra être
débranché au niveau de la prise secteur pour que
l’appareil soit complètement hors tension. Par
conséquent, veillez à installer l’appareil de telle
manière que son cordon d’alimentation puisse être
facilement débranché de la prise secteur en cas
d’accident. Pour éviter tout risque d’incendie, le
cordon d’alimentation sera débranché au niveau de
la prise secteur si vous prévoyez une période
prolongée de non utilisation (par exemple avant un
départ en vacances).
D3-4-2-2-2a*_A1_Fr
Lorsque vous utilisez ce produit, vérifiez les
informations concernant la sécurité sous l’appareil.
D3-4-2-2-4_B1_Fr
Fr
3
Page 28

Sommaire
Comment lire ce manuel
Les noms d’écrans, de menus et de touches sont entre crochets dans ce
manuel. (ex. canal [MASTER], menu [ON/OFF], [File])
Guide de démarrage rapide
Caractéristiques .......................................................................................... 5
Aperçu des opérations ............................................................................... 5
Contenu du carton d’emballage ............................................................... 5
Raccordement des prises d’entrée/sortie ................................................ 6
Préparatifs pour l’emploi des effets .......................................................... 8
Utilisation de la fonction SCENE FX.......................................................... 8
Utilisation de la fonction ISOLATE FX ....................................................... 8
Utilisation de la fonction X-PAD FX ........................................................... 8
Utilisation de la fonction RELEASE FX ..................................................... 8
Fonctionnement
Réglage des niveaux des sons entrant et sortant .................................. 10
Réglage des paramètres BPM et QUANTIZE ......................................... 10
Section SCENE FX .................................................................................... 11
Section ISOLATE FX .................................................................................. 12
Section X-PAD FX ..................................................................................... 12
Section RELEASE FX ................................................................................ 14
Section FX SOURCE ................................................................................. 14
Section FX SETTING .................................................................................. 14
Types d’effets
Types d’effets SCENE FX .......................................................................... 15
Types d’effets ISOLATE FX ....................................................................... 16
Types d’effets X-PAD FX ........................................................................... 17
Types d’effets RELEASE FX ...................................................................... 17
Utilisation du logiciel fourni
Accord de licence du logiciel .................................................................. 18
Utilisation de remixbox ............................................................................. 19
Vérification des toutes dernières informations concernant
l’application fournie .................................................................................. 20
Changement des réglages de cet appareil
Changement des réglages MIDI ............................................................. 21
Utilisation de la fonction de mise à jour ................................................. 21
Tableau des attributions MIDI
Informations supplémentaires
En cas de panne ....................................................................................... 24
Schéma fonctionnel ................................................................................. 25
À propos des marques commerciales et des marques déposées ....... 25
Précautions concernant les droits d’auteur .......................................... 25
Avis de non responsabilité ....................................................................... 25
Spécifications............................................................................................ 25
Fr
4
Page 29

Guide de démarrage rapide
Caractéristiques
Cet appareil est une table de remixage pour DJ consistant en quatre
sections effets. Il permet d’arranger les morceaux en temps réel de
manière intuitive.
SCENE FX
Par une rotation de la commande, de nouveaux sons peuvent être ajoutés au morceau en cours de lecture et des coupures peuvent être introduites aux endroits souhaités pour obtenir un nouveau son à partir d’un
morceau. La combinaison des dix types d’effets et de deux paramètres
secondaires permet d’obtenir des remixages DJ extrêmement originaux.
ISOLATE FX
Les sons de certains instruments peuvent être isolés et leur rythme
et sonorité changés comme avec les commandes EQ d’une table de
mixage DJ. Un des quatre effets peut être sélectionné et appliqué à des
rapports différents pour les basses, moyennes et hautes fréquences.
X-PAD FX
Par le pad tactile, de nouveaux sons peuvent être ajoutés au morceau
original selon le rythme du morceau. Différents sons peuvent être ajoutés aux morceaux et remixés avec les quatre sources sonores internes
préréglées ou avec des échantillons sonores provenant de cartes
mémoire SD.
Aperçu des opérations
Français
1 Contenu du carton d’emballage
= page 5
2 Raccordement des prises d’entrée/sortie
= page 6
3 Préparatifs pour l’emploi des effets
= page 8
4 Utilisation de la fonction SCENE FX
= page 8
5 Utilisation de la fonction ISOLATE FX
= page 8
6 Utilisation de la fonction X-PAD FX
= page 8
7 Utilisation de la fonction RELEASE FX
= page 8
Contenu du carton d’emballage
! CD-ROM
! Câble USB
! Adaptateur secteur
! Cordon d’alimentation
! Carte de garantie
! Mode d’emploi (ce document)
RELEASE FX
Une transition douce entre le morceau en cours de lecture et le son
traité peut être obtenue à l’aide du poussoir. Trois types d’effets permettent avec un poussoir de créer des arrangements originaux.
QUANTIZE
Les positions des temps du morceau sont analysées en temps réel et le
moment où les effets et les sons X-PAD FX doivent être produits s’ajuste
automatiquement. Les sons suivent le tempo du morceau, même si les
manipulations ne sont pas très précises.
remixbox
L’application fournie peut être utilisée pour changer les valeurs et les
types de paramètres de cet appareil et permet donc de transformer
celui-ci en un générateur d’effets correspondant à vos goûts personnels.
RMX-1000 Plug-in
Un VST/AU Plug-in est fourni pour pouvoir lancer les fonctions de
cet appareil depuis un ordinateur. Ceci permet d’utiliser le RMX-1000
comme un contrôleur.
Fr
5
Page 30

Raccordement des prises d’entrée/sortie
Amplificateur de puissance et enceintes
Aux prises de sortie audio
Veillez à toujours éteindre les appareils et à débrancher le cordon d’alimentation de la prise secteur avant de raccorder un appareil ou de changer les
liaisons.
Lorsque tous les appareils ont été raccordés, vous pouvez brancher le cordon d’alimentation.
Veillez à utiliser le cordon d’alimentation et l’adaptateur secteur fourni avec ce produit.
Raccordez cet appareil et l’ordinateur directement avec le câble USB fourni.
Reportez-vous au mode d’emploi de l’appareil devant être raccordé.
Exemple de raccordements
Pour le raccordement aux prises [SEND] et [RETURN] de la table de mixage DJ
À une prise d’ alimentation
Ordinateur
Amplificateur de puissance et enceintes
Lecteur DJ
À la prise RETURN À la prise SEND
Pour le raccordement du lecteur DJ et de la table de mixage DJ
R
Table de mixage DJ
L
R
Table de
mixage DJ
Lecteur DJ
L
Lecteur DJ
Aux prises d’ entrée audio
R
Fr
6
Lecteur DJ
L
L
R
Page 31

Pour le raccordement aux prises [MASTER OUT] de la table de mixage DJ
Amplificateur de puissance et enceintes
Aux prises d’ entrée audio
1 2 3 4 75 6
1 Crochet de cordon
Accrochez le cordon d’alimentation de l’adaptateur secteur ici.
! Le son sera interrompu si le cordon d’alimentation de l’adapta-
teur secteur est débranché de cet appareil pendant la lecture.
Utilisation du crochet de cordon
Enroulez le cordon d’alimentation de l’adaptateur secteur autour du
crochet de cordon pour le maintenir en place. Ceci empêche le cordon
d’alimentation d’être accidentellement tiré et la fiche d’être débranchée
de la prise.
! Le son sera interrompu si le cordon d’alimentation de l’adaptateur
secteur est débranché de cet appareil pendant la lecture.
1 Comme indiqué sur le schéma suivant, tirez l’extrémité du cordon
d’alimentation jusqu’au centre du panneau arrière de cet appareil et
faites passer le cordon d’alimentation sous le bas du crochet.
2 Comme indiqué sur le schéma suivant, tirez l’extrémité du cordon
d’alimentation dans le sens opposé en passant sur le crochet de
cordon et crochetez le cordon d’alimentation sur le haut du crochet
de cordon.
3 Tournez l’extrémité du cordon d’alimentation vers vous puis retour-
nez-le pour former une boucle comme indiqué sur le schéma, puis
insérez la fiche dans la prise [DC IN] de cet appareil.
À la prise MASTER OUT
Table de
mixage DJ
R
Lecteur DJLecteur DJ
L
L
R
2 Prise DC IN
Branchez la fiche CC de l’adaptateur secteur fourni sur cette prise.
Avant de brancher le cordon d’alimentation, attendez que tous les
autres appareils soient raccordés.
Veillez à utiliser le cordon d’alimentation et l’adaptateur secteur
fourni avec ce produit.
3 Commutateur ON, STANDBY
Sert à mettre cet appareil en marche et en veille.
4 Port USB
Pour raccorder un ordinateur.
! Raccordez cet appareil et l’ordinateur directement avec le câble
USB fourni.
! Un concentrateur USB ne peut pas être utilisé.
5 Prises OUTPUT
Reliez celles-ci aux prises d’entrée externe d’une table de mixage,
etc.
6 Prises INPUT
Reliez celles-ci aux prises de sortie externe d’une table de mixage,
etc. Si [L (MONO)] seulement est relié, le son entrant par [L
(MONO)] sera également fourni à [R].
ATTENTION
Lorsque vous raccordez des câbles audio, branchez seulement des
fiches RCA ou des jacks, mais pas les deux à la fois.
Les liaisons doivent être telles que le sens des signaux audio ne
doivent pas former de boucle. Si les liaisons forment une boucle, le
circuit risque de produire des oscillations susceptibles d’endommager
les haut-parleurs, etc.
Exemples de liaisons en boucle à éviter
! Relier la sortie de la table de mixage DJ aux prises d’entrée de
cet appareil puis transmettre la sortie de cet appareil aux prises
d’entrée de la même table de mixage DJ.
! Relier la sortie des prises [SEND] de la table de mixage DJ aux
prises d’entrée de cet appareil puis transmettre la sortie de cet
appareil à d’autres prises d’entrée que les prises [RETURN] de la
même table de mixage DJ.
Français
7 Fente de sécurité Kensington
Fr
7
Page 32

Préparatifs pour l’emploi des effets
1 Poussez l’interrupteur d’alimentation [ON, STANDBY]
sur le panneau arrière de cet appareil pour le mettre en
position [ON].
2 Assurez-vous que les touches [INPUT] et [X-PAD] sont
éclairées.
Utilisation de la fonction ISOLATE FX
Lorsque la commande [LOW], [MID] ou [HI] est tournée, la puissance de
l’effet des basses, moyennes ou hautes fréquences augmente ou diminue. Il est également possible d’isoler le son d’instruments particuliers
dans les plages des basses, moyennes ou hautes fréquences et d’augmenter ou de diminuer le nombre de sons.
1 Appuyez sur une des touches [ISOLATE FX].
2 Tournez la commande [LOW], [MID] ou [HI].
! Si les touches [INPUT] et [X-PAD] ne sont pas éclairées, appuyez
dessus pour les éclairer.
3 Tournez la commande [INPUT LEVEL].
4 Tournez la commande [OUTPUT LEVEL].
5 Utilisez les effets.
Pour les instructions sur les différents effets, reportez-vous aux sections
suivantes.
Utilisation de la fonction SCENE FX
Lorsque la commande au centre est tournée, l’effet ajoutant du son
au morceau ou retirant du son du morceau est appliqué. Ceci permet
d’obtenir un nouveau son pour la même plage.
1 Appuyez sur une des touches [SCENE FX].
Lorsque la commande est tournée dans le sens horaire ou antihoraire,
l’effet ISOLATE FX sélectionné change.
Lorsque la commande est au centre, l’effet ISOLATE FX n’est pas appliqué ; seul le son original est restitué.
Utilisation de la fonction X-PAD FX
Avec cette fonction, les effets peuvent être appliqués aux sources
sonores internes de cet appareil et ajoutés au morceau en cours de lecture. À la place des sources sonores internes, il est également possible
de charger et d’utiliser des sources sonores échantillonnées, enregistrées sur des cartes mémoire SD pour échantillonner et utiliser le son en
cours de lecture.
1 Appuyez sur une des touches [X-PAD FX].
2 Touchez le [X-PAD].
L’effet X-PAD FX sélectionné change selon la position sur le [X-PAD]
touché.
Utilisation de la fonction RELEASE FX
Lorsque le poussoir [RELEASE FX] est bougé vers vous, le son original
disparaît et seul le son traité est restitué. Remettez le poussoir dans
sa position originale pour revenir lentement du son traité au son original.
1 Commutez le sélecteur [RELEASE FX].
2 Tournez la commande [SCENE FX].
Lorsque la commande est tournée dans le sens horaire, l’effet SCENE FX
sélectionné change considérablement.
Lorsque la commande est tournée complètement dans le sens antihoraire, l’effet SCENE FX n’est pas appliqué ; seul le son original est
restitué.
Fr
8
2 Déplacez le poussoir [RELEASE FX] vers vous.
L’effet RELEASE FX sélectionné change selon la position du poussoir.
Lorsque le poussoir est remis à sa position originale, l’effet s’arrête. Les
effets SCENE FX, ISOLATE FX ou X-PAD FX qui étaient activés s’arrêtent
également.
Page 33

Fonctionnement
1
Français
21 8 6
745
1 Réglage des volumes des sons entrant et sortant (page 10)
2 Réglage des paramètres BPM et QUANTIZE (page 10)
3 Section SCENE FX (page 11)
4 Section ISOLATE FX (page 12)
5 Section X-PAD FX (page 12)
6 Section RELEASE FX (page 14)
7 Section FX SOURCE (page 14)
8 Section FX SETTING (page 14)
3
5
Fr
9
Page 34

Réglage des niveaux des sons
entrant et sortant
Réglage des paramètres BPM et
QUANTIZE
2
1
5
4
3
1 Commande INPUT LEVEL
Sert à ajuster le niveau sonore à l’entrée de cet appareil.
2 Indicateur de niveau INPUT
Sert à indiquer le niveau sonore à l’entrée de cet appareil.
3 Commande OUTPUT LEVEL
Sert à ajuster le niveau sonore à la sortie de cet appareil.
4 Indicateur de niveau OUTPUT
Sert à indiquer le niveau sonore à la sortie de cet appareil.
5 Sélecteur CONNECTION
Sert à commuter le gain d’entrée/sortie de cet appareil.
Réglage du niveau d’entrée
Tournez la commande [INPUT LEVEL].
Le niveau sonore à l’entrée de cet appareil augmente lorsque la commande est tournée dans le sens horaire et diminue lorsque la commande est tournée dans le sens antihoraire.
L’indicateur de niveau [INPUT] s’éclaire lorsque le son est transmis
correctement à l’entrée de cet appareil.
3
1
2
4
5
1 Touche QUANTIZE
Cette touche active et désactive la fonction QUANTIZE.
Le cycle et le timing du son provenant de la section X-PAD FX se
synchronisent sur le tempo du morceau en cours de lecture.
2 Touche NUDGE (+, –)
Utilisez cette touche pour ajuster finement le cycle et le timing du
son provenant de la section X-PAD FX.
3 Affichage du BPM
En mode de mesure automatique du BPM, cet affichage donne la
valeur du BPM détectée automatiquement. Lorsque la valeur du
BPM ne peut pas être détectée, la valeur détectée antérieurement
clignote.
En mode de mesure manuelle du BPM, cet affichage donne la valeur
du BPM saisie manuellement.
4 Touche AUTO
Commute le mode de mesure du BPM.
— [AUTO] : Le BPM est automatiquement mesuré à l’entrée du
signal audio. Le mode [AUTO] est spécifié lorsque l’appareil est
allumé.
— [TAP] : Le BPM est spécifié en tapant du doigt sur la touche
[TAP].
! La plage de mesure du BPM [AUTO] va de BPM = 70 à 180. Avec
certains morceaux, il peut être impossible de mesurer correctement le BPM. Si le BPM ne peut pas être mesuré correctement,
la valeur du BPM clignote sur l’écran. Dans ce cas, utilisez la
touche [TAP] pour spécifier le BPM manuellement.
5 Touche TAP
Lorsque le mode de mesure du BPM est le mode de saisie manuelle,
il faut taper sur cette touche avec le doigt pour saisir le BPM
manuellement.
Réglage du niveau de sortie
Tournez la commande [OUTPUT LEVEL].
Le niveau du son à la sortie de cet appareil augmente lorsque la commande est tournée dans le sens horaire et diminue lorsque la commande est tournée dans le sens antihoraire.
L’indicateur de niveau [OUTPUT] s’éclaire selon le niveau du son à la
sortie de cet appareil.
Commutation du gain d’entrée/sortie
Sur cet appareil, le gain d’entrée/sortie peut être commuté en fonction
de l’appareil raccordé.
Poussez le sélecteur [CONNECTION] sur le panneau
arrière de cet appareil.
— [SEND/RETURN (–10 dB)] : Sélectionnez ceci lors du raccorde-
ment aux prises [SEND] et [RETURN] d’une table de mixage DJ
ou aux prises de sortie audio d’un lecteur DJ.
— [MASTER (+4 dB)] : Sélectionnez ceci lors du raccordement aux
prises [MASTER OUT] d’une table de mixage DJ.
Fr
10
Utilisation de la fonction QUANTIZE
Cette fonction analyse en temps réel le tempo du morceau en cours de
lecture et synchronise le son provenant de la section X-PAD FX sur le
tempo du morceau en cours de lecture.
1 Appuyez sur la touche [QUANTIZE].
La fonction QUANTIZE est activée.
2 Agissez sur la section X-PAD FX.
Le cycle et le timing du son produit la section X-PAD FX se synchronisent sur le tempo du morceau en cours de lecture.
! Le cycle de l’effet de [TRANS/ROLL] dans la section ISOLATE FX se
synchronise sur le tempo du morceau en cours de lecture.
! Le son unique obtenu lorsque la touche [KICK], [SNARE], [CLAP]
ou [HI HAT] est pressée est immédiatement émis que la fonction
QUANTIZE soit activée ou désactivée.
! La fonction QUANTIZE se désactive par une nouvelle pression sur la
touche [QUANTIZE].
Page 35

Utilisation de la fonction NUDGE
La touche [NUDGE (+, –)] être utilisée pour ajuster finement le cycle et
le timing du son provenant de la section X-PAD FX.
Appuyez sur le côté [+] ou [–] de la touche
[NUDGE (+, –)].
— [+]: Le cycle et le timing du son provenant de la section X-PAD
FX sont avancés. Quand la touche est maintenue enfoncée, le
cycle et le timing du son sont avancés jusqu’à ce que la touche
soit relâchée.
— [–]: Le cycle et le timing du son provenant de la section X-PAD FX
sont retardés. Quand la touche est maintenue enfoncée, le cycle
et le timing du son sont retardés jusqu’à ce que la touche soit
relâchée.
Saisie manuelle du BPM
Tapez au moins 2 fois sur la touche [TAP] au rythme du
battement (noires) du son reproduit.
La valeur moyenne de l’intervalle auquel la touche [TAP] est frappée par
le doigt est spécifiée comme BPM.
! Le BPM peut être réglé manuellement en maintenant la touche
[NUDGE (+, –)] enfoncée et appuyant sur la touche [TAP].
! Le BPM peut être réglé par incréments de 0,1 en appuyant simulta-
nément sur la touche [AUTO] quand la touche [TAP] est pressée,
puis en appuyant sur la touche [NUDGE (+, –)] quand les touches
[AUTO] et [TAP] sont pressées.
Section SCENE FX
312
4 5
1 Indicateur SCENE FX
Il s’allume lorsque l’effet est activé. La couleur change selon le type
de la touche [SCENE FX].
2 Commande SCENE FX
Elle ajuste l’effet SCENE FX sélectionné.
3 Touches SCENE FX
Elles activent et désactivent les effets SCENE FX.
4 Commande SUB PARAMETER 1
Elle ajuste le paramètre secondaire SCENE FX 1.
5 Commande SUB PARAMETER 2
Elle ajuste le paramètre secondaire SCENE FX 2.
3
Français
Utilisation de la fonction SCENE FX
1 Appuyez sur une des touches [SCENE FX].
Sélectionnez le type d’effet SCENE FX.
La touche sur laquelle une pression a été exercée clignote.
! Pour le détail sur les types d’effets, reportez-vous à la page 15, Types
d’effets SCENE FX.
! L’effet se désactive par une nouvelle pression sur la touche
[SCENE FX] sélectionnée.
2 Tournez la commande [SCENE FX].
L’effet sélectionné s’applique au son sélectionné dans la section FX
SOURCE.
— La puissance de l’effet augmente lorsque la commande est tour-
née dans le sens horaire. La puissance de l’effet est maximale
lorsque la commande est tournée complètement dans le sens
horaire.
— La puissance de l’effet diminue lorsque la commande est tournée
dans le sens antihoraire. Lorsqu’elle est tournée complètement
dans le sens antihoraire, le son original est reproduit sans aucun
effet.
3 Tournez la commande [SUB PARAMETER 1].
Elle ajuste la puissance du paramètre secondaire 1 de l’effet sélectionné.
— La puissance de l’effet augmente lorsque la commande est
tournée dans le sens horaire depuis la position centrale. La puissance de l’effet est maximale lorsque la commande est tournée
complètement dans le sens horaire.
Fr
11
Page 36

— La puissance de l’effet diminue lorsque la commande est tournée
dans le sens antihoraire depuis la position centrale. La puissance
de l’effet est minimale lorsque la commande est tournée complètement dans le sens antihoraire.
4 Tournez la commande [SUB PARAMETER 2].
Elle ajuste la puissance du paramètre secondaire 2 de l’effet sélectionné.
— Plus la commande est tournée dans le sens horaire, plus l’effet
est marqué.
— Lorsque la commande est tournée complètement dans le sens
antihoraire, l’effet est minimal.
Section X-PAD FX
21 5
34
987
6
Section ISOLATE FX
1
2
1 Touche ISOLATE FX
Elles activent et désactivent les effets ISOLATE FX.
2 Commandes LOW, MID et HI
Elles ajustent la puissance des basses, moyennes et hautes fréquences de l’effet ISOLATE FX sélectionné.
Utilisation de la fonction ISOLATE FX
1 Appuyez sur une des touches [ISOLATE FX].
Sélectionnez le type d’effet ISOLATE FX.
La touche sur laquelle une pression a été exercée clignote.
! Pour le détail sur les types d’effets, reportez-vous à la page 16, Types
d’effets ISOLATE FX.
! L’effet se désactive par une nouvelle pression sur la touche
[ISOLATE FX] sélectionnée.
2 Tournez la commande [LOW], [MID] ou [HI].
L’effet sélectionné s’applique au son sélectionné dans la section FX
SOURCE.
— La puissance de l’effet accentuant le son augmente lorsque la
commande est tournée dans le sens horaire depuis la position
centrale. La puissance de l’effet est maximale lorsque la commande est tournée complètement dans le sens horaire.
— La puissance de l’effet diminuant le son augmente lorsque la
commande est tournée dans le sens antihoraire depuis la position centrale. La puissance de l’effet est maximale lorsque la
commande est tournée complètement dans le sens antihoraire.
a
1 Touche BANK
Utilisez cette touche pour charger des sources sonores échantillonnées depuis des cartes mémoire SD.
2 Touche ROLL
Utilisez cette touche pour échantillonner le son transmis à cet appareil et le reproduire en boucle.
3 Touches X-PAD FX
Une des sources sonores internes de cet appareil ou une des
sources sonores échantillonnées chargées de cartes mémoire SD
est sélectionnée et restituée. Lorsqu’une touche est pressée, le son
est immédiatement produit (“son unique”).
4 Indicateur SELECT
Lorsque des sources sonores échantillonnées sont chargées depuis
des cartes mémoire SD, les numéros des BANK pouvant être chargées s’éclairent.
5 Touche OVERDUB (DELETE)
Cette touche active et désactive la fonction OVERDUB.
Lorsque la fonction OVERDUB est activée, cette touche sert à supprimer des sons.
6 Touche HOLD (MUTE)
Appuyez sur cette touche pour maintenir l’effet X-PAD FX.
Lorsque la fonction OVERDUB est activée, cette touche sert à couper
des sons.
7 X-PAD
Utilisez-le pour ajuster l’effet X-PAD FX.
8 Commande PITCH
Utilisez cette commande pour ajuster la hauteur du son des sources
sonores internes de cet appareil, des sources sonores échantillonnées chargées depuis des cartes mémoire SD ou des sons reproduits en boucle.
9 Commande X-PAD LEVEL
Utilisez cette commande pour ajuster le niveau du son des sources
sonores internes de cet appareil ou des sources sonores échantillonnées chargées depuis des cartes mémoire SD.
Lorsque la touche [ROLL] a été pressée, cette commande ajuste la
balance du volume entre le son du morceau en cours de lecture et le
son échantillonné.
a Fente d’insertion de carte mémoire SD
Chargez les cartes mémoire SD ici.
! Veillez à insérer les cartes mémoire SD dans la bonne direction
avant/arrière.
! Ne pas forcer en insérant ou retirant une carte mémoire SD. La
carte mémoire SD ou cet appareil pourraient être endommagés.
! Ne pas insérer d’objets autres qu’une carte mémoire SD dans la
fente d’insertion de carte mémoire SD. L’insertion d’une pièce ou
12
Fr
Page 37

d’un objet métallique pourrait endommager le circuit interne et
provoquer une panne.
! Seules les cartes mémoire SD ou les cartes mémoire SDHC
conformes aux normes SD peuvent être utilisées sur cet appareil.
Utilisation de la fonction X-PAD FX
1 Appuyez sur une des touches [X-PAD FX].
Une des sources sonores internes de cet appareil ou une des sources
sonores échantillonnées chargées de cartes mémoire SD est sélectionnée et restituée. Lorsqu’une touche est pressée, le son est immédiatement produit.
La touche pressée s’éclaire.
! Les sources sonores internes sont préréglées respectivement sur les
touches [KICK], [SNARE], [CLAP] et [HI HAT].
! Pour sélectionner une source sonore échantillonnée enregistrée sur
une carte mémoire SD, appuyez sur la touche [X-PAD FX] tout en
tenant la touche [BANK] enfoncée.
2 Touchez le [X-PAD].
L’effet est mis en service.
L’effet change selon la position sur le [X-PAD] touché.
! L’effet s’arrête lorsque vous relâchez le doigt de [X-PAD].
Échantillonnage du son en cours de
lecture et utilisation de la fonction X-PAD
FX
1 Appuyez sur la touche [ROLL].
La touche [ROLL] s’éclaire.
2 Touchez le [X-PAD].
Le son au moment où le [X-PAD] est touché est échantillonné et la
lecture en boucle commence.
Le nombre de temps échantillonnés dépend de la position sur le
[X-PAD] touché.
1/81/4 1/21/1 2/1
! L’effet s’arrête lorsque vous relâchez le doigt de [X-PAD].
Utilisation de la fonction de maintien
Appuyez sur la touche [HOLD (MUTE)].
Lorsque le mode de maintien est activé, l’effet X-PAD FX appliqué directement avant de relâcher le doigt du [X-PAD] est maintenu.
! Appuyez une nouvelle fois sur la touche [HOLD (MUTE)] pour désac-
tiver le mode de maintien.
Utilisation de la fonction BANK
Lorsqu’une des touches [X-PAD FX] ([KICK], [SNARE], [CLAP] ou
[HI HAT]) est pressée pendant que la touche [BANK] est maintenue
enfoncée, les sources sonores échantillonnées [BANK1], [BANK2],
[BANK3] ou [BANK4] sont chargées sur la touche [X-PAD FX] appropriée depuis la carte mémoire SD insérée dans le slot de carte mémoire
SD de cet appareil.
! Pour charger dans la section [X-PAD FX] des sources sonores
échantillonnées depuis des cartes mémoire SD, utilisez d’abord
remixbox pour sauvegarder les sources sonores échantillonnées sur
la carte mémoire SD. Pour le détail, reportez-vous au mode d’emploi
de remixbox.
1 Insérez la carte mémoire SD sur laquelle les sources
sonores échantillonnées sont enregistrées dans le slot de
carte mémoire SD de cet appareil.
2 Appuyez sur la touche [BANK] pour vérifier quelle
BANK peut être chargée.
Lorsque la touche [BANK] est pressée, les indicateurs [BANK] des
BANK où des sources sonores échantillonnées peuvent être chargées
clignotent.
3 Appuyez sur une des touches [X-PAD FX] ([KICK],
[SNARE], [CLAP] ou [HI HAT]) tout en appuyant sur la
touche [BANK].
Les sources sonores échantillonnées enregistrées sur la carte mémoire
SD sont chargées dans les [SLOT1] à [SLOT4] de la BANK sélectionnée.
Touche
[KICK]
Touche [BANK] + touche
[KICK]
Touche [BANK] + touche
[SNARE]
Touche [BANK] + touche
[CLAP]
Touche [BANK] + touche [HI
HAT]
! Le nombre maximal de sources sonores échantillonnées pouvant
être chargées est 4BANK x 4SLOT.
! La durée maximale des sons échantillonnés pouvant être spécifiée
mis dans la BANK (les 4SLOT) est 16 secondes.
! Les fichiers WAV de 48 kHz/24 bits ou 48 kHz/16 bits sont pris en
charge comme sources sonores.
! Lorsqu’une touche [X-PAD FX] éclairée est pressée pendant que
la touche [BANK] est de nouveau maintenue enfoncée, la source
sonore interne de cet appareil est sélectionnée et reproduite.
BANK1
SLOT1
BANK2
SLOT1
BANK3
SLOT1
BANK4
SLOT1
Touche
[SNARE]
BANK1
SLOT2
BANK2
SLOT2
BANK3
SLOT2
BANK4
SLOT2
Touche
[CLAP]
BANK1
SLOT3
BANK2
SLOT3
BANK3
SLOT3
BANK4
SLOT3
Touche
[HI HAT]
BANK1
SLOT4
BANK2
SLOT4
BANK3
SLOT4
BANK4
SLOT4
Utilisation de la fonction OVERDUB
Enregistrement et lecture de sons
Cette fonction sert à enregistrer quatre temps des sons sauvegardés
sous les touches [X-PAD FX] et à les reproduire en boucle.
1 Appuyez sur la touche [OVERDUB (DELETE)].
La fonction OVERDUB est activée.
Le mode d’attente est valide tant qu’une des touches [X-PAD FX] est
utilisée.
2 Appuyez sur une des touches [X-PAD FX].
Lorsqu’une des touches [X-PAD FX] est pressée, l’enregistrement commence et une boucle de 4 temps est jouée.
! Le son d’une touche [X-PAD FX] peut être ajouté en appuyant sur
cette touche pendant la lecture de la boucle.
! Une nouvelle pression sur la touche [OVERDUB (DELETE)] désactive
la fonction OVERDUB et arrête la lecture et l’enregistrement. Le son
enregistré est supprimé.
Coupure de sons enregistrés
Appuyez sur une des touches [X-PAD FX] tout en tenant
la touche [HOLD (MUTE)] enfoncée.
Le son de la touche [X-PAD FX] pressée est coupé du son enregistré.
! Une nouvelle pression de la touche [X-PAD FX] quand la touche
[HOLD (MUTE)] est maintenue enfoncée, annule le mode de coupure du son.
Suppression de sons enregistrés
Appuyez sur une des touches [X-PAD FX] tout en tenant
la touche [OVERDUB (DELETE)] enfoncée.
Le son de la touche [X-PAD FX] pressée est supprimé du son enregistré.
! Les sons supprimés ne peuvent pas être restitués.
Français
Fr
13
Page 38

Section RELEASE FX
Section FX SETTING
1
2
3
1 Sélecteur RELEASE FX
Il sélectionne le type d’effet RELEASE FX.
2 Poussoir RELEASE FX
Utilisez-le pour ajuster l’effet RELEASE FX.
3 Indicateur RELEASE FX
Il s’éclaire lorsque l’effet est activé. Il s’éclaire selon la position du
poussoir [RELEASE FX].
Utilisation de la fonction RELEASE FX
1 Commutez le sélecteur [RELEASE FX].
Sélectionnez l’effet RELEASE FX.
! Pour le détail sur les types d’effets, reportez-vous à la page 17, Types
d’effets RELEASE FX.
2 Déplacez le poussoir [RELEASE FX] vers vous.
L’effet est mis en service.
L’effet sélectionné s’applique au son sélectionné dans la section FX
SOURCE.
! Le nombre change selon la position du poussoir.
! Lorsque le poussoir est remis à sa position originale, l’effet s’arrête.
Les effets SCENE FX, ISOLATE FX ou X-PAD FX qui étaient activés
s’arrêtent également.
Section FX SOURCE
1
2
1 Touche INPUT
Le son entrant par les prises [INPUT] de cet appareil est dirigé vers
les sections SCENE FX, ISOLATE FX et RELEASE FX de cet appareil.
2 Touche X-PAD
Le son provenant de la section X-PAD FX est dirigé vers les sections
SCENE FX, ISOLATE FX et RELEASE FX de cet appareil.
Commutation du chemin du signal audio
Commutez le chemin selon que le son entrant dans cet appareil et le son
généré internement doit être dirigé ou non vers les sections SCENE FX,
ISOLATE FX et RELEASE FX de cet appareil.
Appuyez sur la touche [INPUT] ou [X-PAD].
Le signal audio sélectionné est dirigé vers les sections SCENE FX,
ISOLATE FX et RELEASE FX de cet appareil.
! Il n’est pas possible de sélectionner simultanément la touche
[INPUT] et [X-PAD].
! L’effet [NOISE] dans la section SCENE FX s’applique quel que soit
l’état des touches [INPUT] et [X-PAD].
1
1 Sélecteur SETTING
Il commute les données paramétrées des effets de cet appareil entre
les modes [DEFAULT] et [USER].
— Mode [DEFAULT] : Cet appareil peut être utilisé avec le paramé-
trage effectué par défaut en usine.
— Mode [USER] : Le paramétrage effectué avec remixbox peut être
chargé et utilisé sur cet appareil.
Ce que vous pouvez faire avec remixbox
L’application “remixbox” livrée avec cet appareil permet de changer les
réglages suivants.
! Les paramètres des effets : Pour personnaliser les paramètres des
différents effets.
! Les types d’effets : Pour remplacer l’effet affecté à [ROLL] dans la
section X-PAD FX par un autre effet.
! La sensibilité des touches : Pour ajuster la sensibilité des touches
[SCENE FX] et [ISOLATE FX].
! La gestion des sources sonores échantillonnées : Pour sauvegar-
der et gérer les sources sonores échantillonnées chargeables sur
cet appareil.
Pour le détail, reportez-vous au menu d’aide de remixbox.
Pour les instructions sur l’installation de remixbox, reportez-vous à la
page 19, Utilisation de remixbox.
Lorsque cet appareil est dans le mode
USER
! Personnalisez au préalable le paramétrage avec remixbox.
! En usine, le mode [DEFAULT] et le mode [USER] sont paramétrés de
la même façon.
Enregistrement du paramétrage personnalisé de
remixbox sur cet appareil
1 Raccordez cet appareil à l’ordinateur sur lequel
remixbox est installé à l’aide d’un câble USB.
2 Envoyez le paramétrage personnalisé de remixbox à
cet appareil.
3 Mettez le sélecteur [SETTING] en position [USER].
Chargement du paramétrage personnalisé
sauvegardé sur une carte mémoire SD
1 Chargez le paramétrage personnalisé sauvegardé sur
la carte mémoire SD avec remixbox.
2 Insérez la carte mémoire SD utilisée au point 1 dans le
slot de carte mémoire SD de cet appareil.
3 Mettez le sélecteur [SETTING] en position [USER].
! Il suffit d’insérer la carte mémoire SD dans cet appareil pour réper-
cuter sur cet appareil le paramétrage personnalisé qu’elle contient.
14
Fr
Page 39

Types d’effets
Coupure du son entrant
Coupure du son entrant
Son direct
Types d’effets SCENE FX
BPF ECHO
Cette fonction superpose le son entrant transitant par le filtre passe-bas
au son entrant original et fait transiter celui-ci par le circuit de l’écho
avant de restituer le son.
L’écho est émis plusieurs fois selon la fraction de temps du son entrant
tout en s’atténuant graduellement.
Son entrant ayant transité
par le filtre passe-bas
Son entrée
Commande
SCENE FX
Commande SCENE FX Règle la fréquence de coupure du filtre passe-bande.
Commande SUB
PARAMETER 1
Commande SUB
PARAMETER 2
Règle le retard du son de l’écho.
Applique un effet de modulation sur la sortie.
ECHO
L’écho est émis plusieurs fois selon la fraction de temps du son entrant
tout en s’atténuant graduellement.
1 temps
Commande SCENE FX Sert à régler la balance entre le son original et l’écho.
Commande SUB
PARAMETER 1
Commande SUB
PARAMETER 2
Règle le retard du son de l’écho.
Régle la fréquence de coupure du filtre.
NOISE
Cette fonction fait passer le bruit blanc se produisant internement par le
filtre passe-bande et l’écho avant de le restituer.
Fréquence
Fondu
Temps
SPIRAL UP
Cette fonction ajoute un effet de réverbération au son entrant.
Lorsque le retard change, la hauteur du son change simultanément.
Fondu
1 temps
Commande SCENE FX Règle le retard du son de SPIRAL.
Commande SUB
PARAMETER 1
Commande SUB
PARAMETER 2
Règle le retard du son de l’écho.
Règle le niveau de décalage du pitch dans le sens d’une
élévation.
Temps
REVERB UP
Cette fonction ajoute un effet de réverbération au son entrant.
Niveau
Commande SCENE FX Sert à régler le degré de réverbération.
Commande SUB
PARAMETER 1
Commande SUB
PARAMETER 2
Premières réflexions
Réverbérations
Temps
Sert à régler le degré de réverbération.
Règle la fréquence de coupure du filtre passe-haut.
HPF ECHO
Cette fonction fait passer le son entrant par le filtre passe-haut et l’écho
avant de le restituer.
L’écho est émis plusieurs fois selon la fraction de temps du son entrant
tout en s’atténuant graduellement.
Français
Commande
SCENE FX
Commande SCENE FX
Commande SUB
PARAMETER 1
Commande SUB
PARAMETER 2
Fréquence
Règle la fréquence de coupure du filtre par lequel le bruit
blanc passe.
Règle le volume du bruit blanc.
Applique un effet de modulation sur le bruit blanc.
Fréquence
Commande SCENE FX Règle la fréquence de coupure du filtre passe-haut.
Commande SUB
PARAMETER 1
Commande SUB
PARAMETER 2
Règle le retard du son de l’écho.
Applique un effet de modulation sur la sortie.
LPF ECHO
Cette fonction fait passer le son entrant par le filtre passe-bas et l’écho
avant de le restituer.
L’écho est émis plusieurs fois selon la fraction de temps du son entrant
tout en s’atténuant graduellement.
Fr
15
Page 40

Fréquence
Commande SCENE FX Règle la fréquence de coupure du filtre passe-bas.
Commande SUB
PARAMETER 1
Commande SUB
PARAMETER 2
Règle le retard du son de l’écho.
Applique un effet de modulation sur la sortie.
CRUSH ECHO
Cette fonction crée un son comme si le son entrant s’écrasait et le fait
passer par le filtre et l’écho avant de le restituer.
L’écho est émis plusieurs fois selon la fraction de temps du son entrant
tout en s’atténuant graduellement.
Commande
SCENE FX
Commande SCENE FX Régle le degré d’aplanissement du son entrant.
Commande SUB
PARAMETER 1
Commande SUB
PARAMETER 2
Cycle
Règle le retard du son de l’écho.
Applique un effet de modulation sur la sortie.
Temps
Commande SUB
PARAMETER 2
Règle la fréquence de coupure du filtre passe-bas.
Types d’effets ISOLATE FX
ISOLATOR
Cette fonction permet de diviser le son entrant en trois bandes – basse,
moyenne et haut – et d’ajuster le niveau audio de chaque bande.
Commande LOW Ajuste le niveau sonore des basses fréquences.
Commande MID Ajuste le niveau sonore des moyennes fréquences.
Commande HI Ajuste le niveau sonore des hautes fréquences.
CUT/ADD
CUT : Rotation dans le sens antihoraire
Cette fonction permet d’ajuster le niveau sonore de la grosse caisse
détectée dans le son entrant et la fréquence de coupure du filtre manuel.
Commande LOW
Commande MID
Commande HI
Ajuste le niveau sonore de la grosse caisse détectée
dans le son entrant.
Applique au filtre passe-haut les autres sons que la
grosse caisse détectée dans le son entrant.
Applique au filtre passe-bas les autres sons que la
grosse caisse détectée dans le son entrant.
Grosse caisse
Fréquence
SPIRAL DOWN
Cette fonction ajoute un effet de réverbération au son entrant.
Lorsque le retard change, la hauteur du son change simultanément.
Coupure du son entrant
Fondu
1 temps
Commande SCENE FX Règle le retard du son de SPIRAL.
Commande SUB
PARAMETER 1
Commande SUB
PARAMETER 2
Règle le retard du son de l’écho.
Règle le niveau de décalage du pitch dans le sens d’un
abaissement.
Temps
REVERB DOWN
Cette fonction ajoute un effet de réverbération au son entrant.
Son direct
Niveau
Premières réflexions
Réverbérations
Temps
Grosse caisse
Grosse caisse
Grosse caisse
Grosse caisse
Grosse caisse
ADD : Rotation horaire
Cette fonction permet d’appliquer un écho de 1/8e de temps selon la
fraction de temps du son entrant.
Commande LOW
Commande MID
Commande HI
Ajuste le niveau sonore de l’écho dans les basses
fréquences.
Ajuste le niveau sonore de l’écho dans les moyennes
fréquences.
Ajuste le niveau sonore de l’écho dans les hautes
fréquences.
Commande SCENE FX Sert à régler le degré de réverbération.
Commande SUB
PARAMETER 1
16
Fr
Sert à régler le degré de réverbération.
Page 41

1/4 temps
Niveau
1/1 temps
1/2 temps
Temps
GATE/DRIVE
GATE : Rotation dans le sens antihoraire
Cette fonction restitue la partie du son entrant dont le niveau est supérieur au seuil, en coupant la partie du son entrant dont le niveau est
inférieur.
Commande LOW Ajuste le seuil du son dans les basses fréquences.
Commande MID Ajuste le seuil du son dans les moyennes fréquences.
Commande HI Ajuste le seuil du son dans les hautes fréquences.
Français
1/8 temps
TRANS/ROLL
TRANS : Rotation dans le sens antihoraire
Cette fonction coupe le son entrant selon la fraction de temps spécifiée
par la position de la commande.
Commande LOW Ajuste le degré de coupure dans les basses fréquences.
Commande MID
Commande HI Ajuste le degré de coupure dans les hautes fréquences.
1/2 temps
1/4 temps
ROLL : Rotation horaire
Cette fonction enregistre le son entrant à partir du point où la commande [LOW], [MID] ou [HI] est tournée et restitue le son enregistré de
manière répétée selon la fraction de temps spécifiée par la position de
la commande.
Commande LOW
Commande MID
Commande HI
Original
Roulement
1/1
Roulement
1/2
Ajuste le degré de coupure dans les moyennes
fréquences.
1/1 temps
Ajuste le cycle auquel le son des basses fréquences est
répété.
Ajuste le cycle auquel le son des moyennes fréquences
est répété.
Ajuste le cycle auquel le son des hautes fréquences est
répété.
Effet activé
Répété
Répété
Temps
Seuil
Temps
Seuil
Seuil
DRIVE : Rotation horaire
Cette fonction déforme le son entrant.
Commande LOW Ajuste le degré de distorsion dans les basses fréquences.
Commande MID
Commande HI Ajuste le degré de distorsion dans les hautes fréquences.
Ajuste le degré de distorsion dans les moyennes
fréquences.
Cycle
Temps
Types d’effets X-PAD FX
Enregistre le son entrant à partir du point où le [X-PAD]
ROLL
KICK
SNARE
CLAP
HI HAT
SAMPLER
est touché et restitue le son enregistré de manière
répétée selon la fraction de temps spécifiée par la position de [X-PAD].
Restitue la source sonore “KICK” interne de cet appareil.
Restitue la source sonore “SNARE” interne de cet
appareil.
Restitue la source sonore “CLAP” interne de cet appareil.
Restitue la source sonore “HI HAT” interne de cet
appareil.
Restitue le son échantillonné enregistré sur une carte
mémoire SD.
Types d’effets RELEASE FX
VINYL BRAKE
ECHO
BACK SPIN
Applique l’effet consistant à ralentir la vitesse de lecture
du son entrant graduellement jusqu’à l’arrêt.
L’écho est émis plusieurs fois au rythme du son entrant
tout en s’atténuant graduellement.
Applique l’effet consistant à reproduire le son entrant en
cours de lecture en sens inverse et très rapidement.
Fr
17
Page 42

Utilisation du logiciel fourni
Accord de licence du logiciel
Cet accord de licence du logiciel (“accord”) est entre vous (aussi bien
la personne installant le programme que toute entité légale unique
pour laquelle cette personne agit) (“vous” ou “votre”) et PIONEER
CORPORATION (“Pioneer”).
TOUTE MESURE PRISE EN VUE DE CONFIGURER OU D’INSTALLER LE
PROGRAMME SIGNIFIE QUE VOUS ACCEPTEZ TOUS LES TERMES DE
CET ACCORD DE LICENCE. L’AUTORISATION DE TÉLÉCHARGER ET/
OU D’UTILISER LE PROGRAMME EST EXPRESSÉMENT CONDITIONNÉE
À VOTRE RESPECT DE CES TERMES. AUCUNE APPROBATION ÉCRITE
OU ÉLECTRONIQUE N’EST NÉCESSAIRE POUR VALIDER ET EXÉCUTER
CET ACCORD. SI VOUS N’ACCEPTEZ PAS LA TOTALITÉ DES TERMES
DE CET ACCORD, VOUS N’ÊTES PAS AUTORISÉ À UTILISER LE
PROGRAMME ET VOUS DEVEZ ARRÊTER SON INSTALLATION OU LE
DÉSINSTALLER, COMME APPLICABLE.
1 Définitions
1 Le mot “documentation” signifie la documentation écrite, les
spécifications et l’aide fournies par Pioneer pour aider à installer
et à utiliser le programme.
2 Le mot “programme” signifie la totalité ou toute partie du logiciel
Pioneer et dont Pioneer vous concède la licence par cet accord.
2 Licence de programme
1 Licence limitée. Sous réserve des restrictions stipulées dans cet
accord, Pioneer vous concède une licence limitée, nonexclusive,
non-transférable (sans le droit de sous-licencier) :
a Pour installer une seule copie du programme sur le disque
dur de votre ordinateur, pour utiliser le programme seulement pour votre besoin personnel conformément à cet
accord et à la documentation (“Utilisation autorisée”) ;
b Pour utiliser la documentation d’assistance à votre utilisation
autorisée ; et
c Pour faire une copie du programme seulement à des fins de
sauvegarde, pourvu que tous les titres et marques, copyright
et avertissements de droits limités soient reproduits sur cette
copie.
2 Restrictions. Vous ne pouvez pas copier ou utiliser le programme
ou la documentation de façon autre que celle expressément
permise par cet accord. Vous ne pouvez pas transférer, souslicencier, louer, louer à crédit bail ou prêter le programmme, ou
l’utiliser pour la formation d’une tierce partie, dans une activité
commerciale de service informatique en temps partagé ou
d’assistance. Vous ne pouvez pas, vous-même ou par l’intermédiaire d’une tierce partie, modifier, désosser, désassembler
ou décompiler le programme, sauf dans la limite expressément
permise par la loi en vigueur et, le cas échéant, seulement après
que vous ayez informé Pioneer par écrit de vos intentions. Vous
ne pouvez pas utiliser le programme sur plusieurs processeurs
sans le consentement écrit préalable de Pioneer.
3 Propriété. Pioneer ou son concédant garde tout droit, titre et inté-
rêt dans et sur tout brevet, copyright, marque, secret commercial
et autres droits de propriété intellectuelle liés au programme et à
la documentation, ainsi qu’à tout produit qui en dérive. Vous ne
faites l’acquisition d’aucun droit, explicite ou implicite, hors de la
licence limitée décrite dans cet accord.
4 Pas d’assistance. Pioneer n’a aucune obligation de fournir une
assistance, une maintenance, des mises à niveau, des modifications ou des nouvelles versions pour le programme ou la documentation liés à cet accord.
3 Exclusion de garantie
LE PROGRAMME ET LA DOCUMENTATION SONT FOURNIS “TELS
QUELS” SANS CONDITION OU GARANTIE D’AUCUNE SORTE, ET
VOUS ACCEPTEZ DE LES UTILISER À VOS RISQUES ET PÉRILS.
DANS LA MESURE PERMISE PAR LA LOI, PIONEER EXCLUT
EXPLICITEMENT TOUTE GARANTIE DE TOUTE SORTE DU PROGRAMME
ET DE LA DOCUMENTATION, EXPRESSE, IMPLICITE, OFFICIELLE,
OU ÉMANANT DE L’UTILISATION, DE LA TRANSACTION OU DE
Fr
18
L’ÉCHANGE, Y COMPRIS LES GARANTIES DE QUALITÉ MARCHANDE,
D’ADÉQUATION À UN USAGE PARTICULIER, DE QUALITÉ, DE
PRÉCISION, DE TITRE OU DE NONCONTREFACON.
4 Dommages-intérêts et recours pour infraction
Vous acceptez que toute infraction aux restrictions de cet accord causerait à Pioneer un mal irréparable pour lequel des dommages-intérêts
seuls seraient inadéquats. En plus des dommages-intérêts et autres
recours auxquels Pioneer peut avoir droit, vous acceptez que Pioneer
puisse saisir la justice pour empêcher toute infraction ou tout risque
d’infraction ou pour faire cesser toute infraction à cet accord.
5 Résiliation
Pioneer peut résilier cet accord à tout moment sur votre infraction à
n’importe quelle de ses clauses. Si cet accord est résilié, vous devez
arrêter d’utiliser le programme, le supprimer définitivement de l’ordinateur où il réside, et détruire toutes les copies du programme et de la
documentation en votre possession, avec confirmation écrite à Pioneer
de l’exécution de ces obligations. Les sections 2.2, 2.3, 2.4, 3, 4, 5 et 6
resteront en vigueur après la résiliation de cet accord.
6 Conditions générales
1 Limitation de responsabilité. En aucun cas Pioneer ou ses
filiales ne seront responsables au sujet de cet accord ou de
son contenu, quel que soit le fondement invoqué, de quelque
dommage que ce soit, indirect, direct, spécial, induit ou à valeur
répressive, ou de dommages en raison de perte de bénéfices,
de revenu, d’affaires, d’économies, de données, d’utilisation,
ou de coût d’acquisition d’un produit de substitution, même
s’ils sont prévenus de la possibilité de tels dommages ou si ces
dommages sont prévisibles. En aucun cas la responsabilité de
Pioneer pour tous dommages ne dépassera le montant que vous
avez payé à Pioneer ou à ses filiales pour le programme. Les parties admettent que les limites de responsabilité et l’affectation de
risque dans cet accord sont reflétées dans le prix du programme
et sont des éléments intrinsèques du marché entre les parties,
sans lesquels Pioneer n’aurait pas fourni le programme et n’aurait pas été partie prenante de cet accord.
2 Les limitations ou exclusions de garantie et de responsabilité
contenues dans cet accord n’affectent ni n’entravent vos droits
légaux comme consommateur et vous seront applicables seulement dans la mesure où de telles limitations ou exclusions sont
permises sous les lois de la juridiction où vous êtes situé.
3 Si une clause de cet accord s’avère être illégale, invalide ou inap-
plicable d’une manière ou d’une autre, elle sera appliquée dans
la mesure du possible ou, si elle est totalement inapplicable,
sera considérée comme coupée et supprimée de cet accord, et le
reste continuera d’être en vigueur. La renonciation par une partie
ou l’autre à tout défaut ou manquement de cet accord ne donnera pas lieu à la suppression d’un défaut ou manquement autre
ou ultérieur.
4 Pas de cession. Vous ne pouvez pas céder, vendre, transférer,
déléguer ou altérer d’une manière ou d’une autre cet accord ou
tous droits ou obligations qui s’y rapportent, que ce soit volontairement ou involontairement, par action légale ou autre, sans
le consentement écrit préalable de Pioneer. Toute cession, tout
transfert ou toute délégation émanant de votre part sera nul et
non avenant. Sujet aux faits précités, cet accord engagera et liera
les parties et leurs successeurs et délégués respectifs.
5 Accord complet. Cet accord constitue l’intégralité de l’accord
entre les parties et remplace tous les accords ou propositions
antérieurs ou actuels, écrits ou verbaux, en ce qui concerne son
contenu. Cet accord ne peut pas être modifié ou amendé sans
le consentement écrit préalable de Pioneer, et aucun autre acte,
document, usage ou convention ne pourra amender ou modifier
cet accord.
6 Vous acceptez que cet Accord soit régi par les lois du Japon et
interprété selon celles-ci.
Page 43

Utilisation de remixbox
Lorsque l’application remixbox installée sur un ordinateur est utilisée, le
paramétrage des effets de cet appareil peut être personnalisé. Le remixbox peut aussi être utilisé pour charger les sources sonores échantillonnées dans la section X-PAD FX.
Utilisez remixbox sur l’ordinateur pour préparer au préalable le paramétrage personnalisé des effets et les sources sonores échantillonnées.
Le paramétrage personnalisé et les sources sonores échantillonnées
peuvent être sauvegardés sur une carte mémoire SD pour être chargés
sur cet appareil. Ils peuvent aussi être chargés directement sur cet appareil si celui-ci est raccordé à un ordinateur par un câble USB.
Précautions à prendre lors de
l’installation
! Si l’installation de remixbox est interrompue avant la fin, réinstallez
l’application depuis le début en procédant de la façon suivante.
! Lisez attentivement l’Accord de licence du logiciel avant d’installer
remixbox.
! Si des programmes sont ouverts sur l’ordinateur, fermez-les avant
d’installer remixbox.
! remixbox est pris en charge par les systèmes d’exploitation suivants :
Systèmes d’exploitation pris en charge
Windows
Intel
Mac
1 Un programme hotfix fourni par Microsoft doit être installé. Le client est respon-
sable de l’installation du programme hotfix.
1 Accédez au site de support de Microsoft (http://support.microsoft.com/).
2 Sur la fenêtre de recherche du site, recherchez le numéro de document
“2182039” et téléchargez le hotfix.
! Comme Microsoft a cessé de fournir un support pour les systèmes d’exploitation
suivants, Pioneer ne peut pas garantir le fonctionnement avec ces systèmes
d’exploitation.
— Windows Vista
Intégrale (SP1 ou ultérieur)
— Windows® XP Édition Familiale/Édition Professionnelle (SP2 ou ultérieur)
Installation de remixbox
Marche à suivre (Windows)
Lisez attentivement Précautions à prendre lors de l’installation avant
d’installer remixbox.
! L’autorisation de l’administrateur de l’ordinateur est nécessaire pour
pouvoir installer et désinstaller remixbox.
Connectez-vous sous le nom de l’utilisateur spécifié comme admi-
nistrateur de l’ordinateur avant l’installation.
1 Insérez le CD-ROM de remixbox dans le lecteur CD de
l’ordinateur.
Le menu du CD-ROM apparaît.
! Si le menu du CD-ROM n’apparaît pas après l’insertion du CD-ROM,
ouvrez le lecteur CD dans [Ordinateur (ou Poste de travail)]
®
Windows
7 Édition Familiale Premium/
Professionnel/Édition Intégrale
Windows Vista
Familiale Premium/Professionnel/
Intégrale (SP2 ou ultérieur)
Windows
Édition Professionnelle (SP3 ou ultérieur)
Mac OS X 10.7
Mac OS X 10.6
Mac OS X 10.5 Version à 32 bits
®
Familiale Basique/
®
XP Édition Familiale/
®
Familiale Basique/Familiale Premium/Professionnel/
Version à 32 bits
Version à 64 bits
Version à 32 bits
Version à 64 bits
Version à 32 bits
Version à 64 bits
Version à 32 bits
Version à 64 bits
Version à 32 bits
Version à 64 bits
1
1
1
1
3
1
3
1
1
1
1
1
à partir du menu [Démarrer], puis double-cliquez sur l’icône
[CD_menu.exe].
2 Lorsque le menu du CD-ROM apparaît, sélectionnez
[remixbox : Installer remixbox], puis cliquez sur
[Démarrer].
! Pour fermer le menu du CD-ROM, cliquez sur [Fermer].
3 Lorsque l’écran de sélection de la langue apparaît,
sélectionnez [Français] et cliquez sur [OK].
! Vous pouvez sélectionner la langue souhaitée parmi les nombreuses
langues proposées dans la mesure où elle est prise en charge par
l’environnement système de votre ordinateur.
4 Lorsque l’écran de l’accord de licence apparaît, lisez
l’Accord de licence du logiciel attentivement. Si vous
acceptez l’Accord de licence du logiciel, cliquez sur
[Accepte].
! Si vous n’acceptez pas les conditions de l’Accord de licence du logi-
ciel, cliquez sur [Annuler] et arrêtez l’installation.
5 Installez remixbox en suivant les instructions qui
apparaissent à l’écran.
! Cliquez sur [Annuler] pour annuler l’installation lorsqu’elle a
démarré.
Marche à suivre (Mac OS X)
Lisez attentivement Précautions à prendre lors de l’installation avant
d’installer remixbox.
! L’autorisation de l’administrateur de l’ordinateur est nécessaire pour
pouvoir installer et désinstaller remixbox.
Connectez-vous sous le nom de l’utilisateur spécifié comme admi-
nistrateur de l’ordinateur avant l’installation.
1 Insérez le CD-ROM remixbox dans le lecteur CD
de votre ordinateur, puis double-cliquez sur l’icône
[CD_menu.app] lorsqu’elle apparaît sur une fenêtre.
! Si la fenêtre contenant l’icône [CD_menu.app] n’apparaît pas
lorsque le CD-ROM est inséré, utilisez le Finder pour ouvrir le lecteur
CD et double-cliquez sur l’icône [CD_menu.app].
2 Lorsque le menu du CD-ROM apparaît, sélectionnez
[remixbox : Installer remixbox], puis cliquez sur
[Démarrer].
! Pour fermer le menu du CD-ROM, cliquez sur [Fermer].
3 Lorsque l’écran du contrat de licence apparaît,
sélectionnez [Français], lisez l’Accord de licence du
logiciel attentivement, puis cliquez sur [Continuer].
! Vous pouvez sélectionner la langue souhaitée parmi les nombreuses
langues proposées dans la mesure où elle est prise en charge par
l’environnement système de votre ordinateur.
4 Si vous acceptez l’Accord de licence du logiciel, cliquez
sur [Accepter].
! Si vous n’acceptez pas les conditions de l’Accord de licence du logi-
ciel, cliquez sur [Refuser] et arrêtez l’installation.
5 Installez remixbox en suivant les instructions qui
apparaissent à l’écran.
Français
Fr
19
Page 44

Lancement de remixbox/Affichage du
Mode d’emploi
Connectez-vous sous le nom de l’utilisateur spécifié comme administrateur de l’ordinateur avant d’utiliser remixbox.
Le mode d’emploi peut être ouvert en lançant remixbox puis cliquant sur
[Manual] dans le menu remixbox [Help].
Pour Windows® 7, Windows Vista® et Windows®
XP
Cliquez sur le bouton du menu [Démarrer] de Windows,
puis sur [Tous les programmes] > [Pioneer] > [remixbox
1.x.x] > [remixbox 1.x.x].
! 1.x.x indique la version de remixbox.
Pour Mac OS X
Ouvrez le dossier [Application] avec le Finder, puis
double-cliquez sur [remixbox 1.x.x.app].
! 1.x.x indique la version de remixbox.
Raccordement de cet appareil à un
ordinateur
1 Poussez l’interrupteur d’alimentation [ON, STANDBY]
sur le panneau arrière de cet appareil pour le mettre en
position [ON].
Allumez cet appareil.
2 Raccordez cet appareil à votre ordinateur avec un
câble USB.
! Cette opération ne fonctionne pas avec les ordinateurs ne prenant
pas en charge l’USB 2.0.
! Lorsque Windows XP est utilisé, un autre dispositif USB-MIDI rac-
cordé en même temps à l’ordinateur risque de ne pas fonctionner
correctement ou de ne pas être reconnu. Ne raccordez que l’ordinateur et cet appareil.
! Raccordez cet appareil et l’ordinateur directement avec le câble USB
fourni.
Vérification des toutes dernières
informations concernant
l’application fournie
Pour les toutes dernières informations sur l’application fournie et les
systèmes d’exploitation pris en charge, consultez le site suivant.
http://pioneerdj.com/support/
! Le fonctionnement ne peut pas être garanti lorsque plusieurs
modèles de cette console de mixage sont raccordés à un seul
ordinateur.
Fr
20
Page 45

Changement des réglages de cet appareil
Changement des réglages MIDI
Les touches suivantes sont utilisées pour changer les réglages MIDI :
— Touche [TAP] : Sert de touche de validation.
— Touche [AUTO] : Sert de touche d’annulation.
— Touche [NUDGE (+, –)] : Sert à sélectionner des éléments.
1 Allumez cet appareil tout en appuyant sur la touche
[QUANTIZE].
Cet appareil se met en mode de changement des réglages MIDI.
Les éléments à régler apparaissent dans l’affichage du BPM.
2 Appuyez sur le côté [+] ou [–] de la touche
[NUDGE (+, –)].
Précisez si le canal MIDI ou le type de touche MIDI doit être changé.
— Si [CH] ou des nombres apparaissent : Mode de changement du
canal MIDI
— Si [btn] ou des lettres apparaissent : Mode de changement du
type de touche MIDI
3 Appuyez sur la touche [TAP].
Basculez sur le mode de changement du canal MIDI ou du type de
touche MIDI.
Le numéro de canal MIDI ou le type de touche MIDI clignote dans l’affichage du BPM.
4 Appuyez sur le côté [+] ou [–] de la touche
[NUDGE (+, –)].
Sélectionnez et changez le canal MIDI ou le type de touche MIDI. Les
valeurs suivantes peuvent être sélectionnées pour chacun d’eux.
— Canal MIDI : [1] à [16]
— Type de touche MIDI : [tGL (basculement)] ou [trG
(déclenchement)]
5 Appuyez sur la touche [TAP].
Le réglage sélectionné est sauvegardé.
Le réglage sauvegardé clignote rapidement dans l’affichage du BPM.
! Le mode de changement des réglages MIDI se désactive à l’extinc-
tion de cet appareil.
! Les réglages par défaut de cet appareil au départ d’usine sont les
suivants :
— Canal MIDI : [1]
— Type de touche MIDI : [tGL (basculement)]
Changement temporaire du canal MIDI
pour le RMX-1000 Plug-in
Même si cet appareil n’est pas en mode de changement des réglages
MIDI, il est possible de changer temporairement de canal MIDI.
1 Appuyez sur le côté [+] ou [–] de la touche
[NUDGE (+, –)] tout en appuyant sur la touche [BANK].
Le numéro du canal MIDI apparaît dans l’affichage du BPM.
2 Relâchez la touche [BANK].
! Le canal MIDI changé de cette façon reste valide sur cet appareil
jusqu’à son extinction.
Utilisation de la fonction de mise à
jour
! Ne coupez pas l’alimentation de cet appareil pendant la mise à jour.
1 Allumez cet appareil tout en appuyant sur les touches
[HOLD (MUTE)] et [TAP].
Cet appareil se met en mode de mise à jour.
Le numéro de version du microprocesseur actuel apparaît dans l’affichage du BPM et le côté droit de l’indicateur de niveau [OUTPUT]
clignote.
2 Insérez la carte mémoire SD sur laquelle se trouve le
fichier de mise à jour dans le slot de carte mémoire SD de
cet appareil.
La mise à jour commence.
L’indicateur de niveau [OUTPUT] s’éclaire pour indiquer la progression
de la mise à jour.
Lorsque tous les segments de l’indicateur de niveau [OUTPUT] sont
éclairés, la mise à jour est terminée.
! Si une erreur se produit pendant la mise à jour, le type d’erreur est
indiquée dans l’affichage du BPM et un certain nombre de segments
de l’indicateur de niveau [INPUT] sont éclairés.
Affichage
du BPM
E00
E10
E20
E30
E40
E50
E60
E70
E80
E90
Nombre à
trois chiffres
Segments éclairés de
l’indicateur de niveau
[INPUT]
Type d’erreur
Erreur de mise à jour
Erreur de mise à jour
Erreur de mise à jour
Fichier de mise à jour pas
détecté
Altération du fichier de mise
à jour
Erreur de lecture de carte
mémoire SD
Erreur de vidage de la mémoire
Erreur d’écriture dans la
mémoire
Erreur de vérification de la
mémoire
Erreur de carte mémoire SD
Mise à jour terminée
normalement
Français
Fr
21
Page 46

Tableau des attributions MIDI
! “CC” est l’abréviation de “control change”. Un changement de commande est un type de signal MIDI utilisé pour transmettre les différents types
d’informations de commande, concernant par exemple le timbre, le volume, etc.
! “Note” est le terme MIDI utilisé pour indiquer les touches pressées ou relâchées d’un piano ou clavier.
Sur cet appareil, des valeurs de 0 à 127 sont transmises sous forme de CC lorsque des commandes ou le [X-PAD] sont actionnés. De même,
lorsque des touches ou commutateurs sont actionnés, des valeurs de 0 à 127 sont transmises sous forme de Note.
Catégorie Nom SW Type SW Messages MIDI
LEVEL
BPM/QUANTIZE
FX SOURCE
ISOLATE FX
X-PAD FX
SCENE FX
RELEASE FX
Commande OUTPUT
LEVEL
Touche QUANTIZE BTN Note 000
Touche AUTO BTN Note 001
Touche TAP BTN Note 002 Déclenchement seulement OFF=0, ON=127
Touche NUDGE(–) BTN Note 003 Déclenchement seulement OFF=0, ON=127
Touche NUDGE(+) BTN Note 004 Déclenchement seulement OFF=0, ON=127
Touche INPUT BTN Note 005
Touche X-PAD BTN Note 006
Commande LOW VR CC 001 — 0-127
Commande MID VR CC 002 — 0-127
Commande HI VR CC 003 — 0-127
Touche ISOLATOR BTN Note 007
Touche CUT/ADD BTN Note 008
Touche TRANS/ROLL BTN Note 009
Touche GATE/DRIVE BTN Note 010
Touche BANK BTN Note 011 Déclenchement seulement OFF=0, ON=127
Touche ROLL BTN Note 012 Déclenchement seulement OFF=0, ON=127
Touche KICK BTN Note 013 Déclenchement seulement OFF=0, ON=127
Touche SNARE BTN Note 014 Déclenchement seulement OFF=0, ON=127
Touche CLAP BTN Note 015 Déclenchement seulement OFF=0, ON=127
Touche HI HAT BTN Note 016 Déclenchement seulement OFF=0, ON=127
Touche OVERDUB
(DELETE)
Touche HOLD (MUTE) BTN Note 018 Basculement seulement OFF=0, ON=127
Commande X-PAD
LEVEL
Commande PITCH VR CC 005 — 0-127
X-PAD (position) VR CC 006 —
X-PAD (toucher) BTN Note 019 Déclenchement seulement
Commande SCENE FX VR CC 007 — 0-127
Commande SUB
PARAMETER 1
Commande SUB
PARAMETER 2
Touche BPF ECHO BTN Note 020
Touche ECHO BTN Note 021
Touche NOISE BTN Note 022
Touche SPIRAL UP BTN Note 023
Touche REVERB UP BTN Note 024
Touche HPF ECHO BTN Note 025
Touche LPF ECHO BTN Note 026
Touche CRUSH ECHO BTN Note 027
Touche SPIRAL DOWN BTN Note 028
Touche REVERB DOWN BTN Note 029
Sélecteur RELEASE FX 1
(VINYL BRAKE)
Sélecteur RELEASE FX 2
(ECHO)
Sélecteur RELEASE FX 3
(BACK SPIN)
Poussoir RELEASE FX VR CC 010 — 0-127
VR CC 000 — 0-127
BTN Note 017 Basculement seulement OFF=0, ON=127
VR CC 004 — 0-127
VR CC 008 — 0-127
VR CC 009 — 0-127
SW Note 030 Déclenchement seulement
SW Note 031 Déclenchement seulement
SW Note 032 Déclenchement seulement
Type de touche MIDI
Déclenchement/Basculement
1
1
1
1
1
1
1
1
1
1
1
1
1
1
1
1
1
1
1
1
1
Remarques
OFF=0, ON=127
OFF=0, ON=127
OFF=0, ON=127
OFF=0, ON=127
OFF=0, ON=127
OFF=0, ON=127
OFF=0, ON=127
OFF=0, ON=127
0-127
Envoie les infos de position du
[X-PAD].
OFF (si non touché) = 0, ON (si
touché) =127
OFF=0, ON=127
OFF=0, ON=127
OFF=0, ON=127
OFF=0, ON=127
OFF=0, ON=127
OFF=0, ON=127
OFF=0, ON=127
OFF=0, ON=127
OFF=0, ON=127
OFF=0, ON=127
OFF=0, ON=127
OFF=0, ON=127
OFF=0, ON=127
22
Fr
Page 47

Catégorie Nom SW Type SW Messages MIDI
Sélecteur SETTING 1
FX SETTING
Commandes Plug-in
1 Lorsque le sélecteur [RELEASE FX] et le sélecteur [SETTING] sont bougés, “OFF” est envoyé par le sélecteur qui n’a pas encore changé de position et “ON” par le sélecteur
qui a changé de position.
(DEFAULT)
Sélecteur SETTING 2
(USER)
Touche OVERDUB
(DELETE) + touche ROLL
Touche OVERDUB
(DELETE) + touche KICK
Touche OVERDUB
(DELETE) + touche
SNARE
Touche OVERDUB
(DELETE) + touche CLAP
Touche OVERDUB
(DELETE) + touche HI
HAT
Touche OVERDUB
(DELETE) + X-PAD
(toucher)
Touche HOLD (MUTE) +
touche ROLL
Touche HOLD (MUTE) +
touche KICK
Touche HOLD (MUTE) +
touche SNARE
Touche HOLD (MUTE) +
touche CLAP
Touche HOLD (MUTE) +
touche HI HAT
Touche HOLD (MUTE) +
X-PAD (toucher)
SW Note 033 Déclenchement seulement
SW Note 034 Déclenchement seulement
BTN Note 035 Déclenchement seulement OFF=0, ON=127
BTN Note 036 Déclenchement seulement OFF=0, ON=127
BTN Note 037 Déclenchement seulement OFF=0, ON=127
BTN Note 038 Déclenchement seulement OFF=0, ON=127
BTN Note 039 Déclenchement seulement OFF=0, ON=127
BTN Note 040 Déclenchement seulement OFF=0, ON=127
BTN Note 041 Déclenchement seulement OFF=0, ON=127
BTN Note 042 Déclenchement seulement OFF=0, ON=127
BTN Note 043 Déclenchement seulement OFF=0, ON=127
BTN Note 044 Déclenchement seulement OFF=0, ON=127
BTN Note 045 Déclenchement seulement OFF=0, ON=127
BTN Note 046 Déclenchement seulement OFF=0, ON=127
Type de touche MIDI
Déclenchement/Basculement
1
1
Remarques
OFF=0, ON=127
OFF=0, ON=127
Français
Fr
23
Page 48

Informations supplémentaires
En cas de panne
! Une erreur de commande est souvent prise pour une anomalie de fonctionnement ou une panne. Si vous estimez que cet appareil ne fonctionne
pas correctement, vérifiez les points ci-dessous. Parfois, le problème peut provenir d’un autre composant. Examinez les autres composants et les
appareils électriques utilisés. Si le problème persiste malgré les vérifications des points suivants, confiez les réparations au service après-vente
Pioneer le plus proche ou à votre revendeur.
! De l’électricité statique ou des interférences externes ont peut être déréglé le lecteur. Dans ce cas, il suffit probablement de débrancher puis de
rebrancher le cordon d’alimentation pour que le lecteur fonctionne de nouveau.
Problème Vérification Solution
L’appareil ne s’allume pas. Est-ce que le cordon d’alimentation et l’adaptateur
Aucun son ou son faible. Est-ce que les câbles de liaison sont correctement
Distorsion du son. Est-ce que le niveau du son provenant des prises
Le tempo (BPM) ne peut pas être
mesuré ou la valeur obtenue (BPM)
n’est pas plausible.
La valeur du tempo mesuré (BPM)
diffère de la valeur enregistrée sur
le CD, ou bien les valeurs du tempo
(BPM) indiquées sur le lecteur DJ, la
table de mixage DJ, le logiciel DJ et
cet appareil diffèrent.
Cet appareil n’est pas reconnu après
avoir été raccordé à un ordinateur.
La carte mémoire SD n’est pas
reconnue.
Il faut beaucoup de temps pour
charger les données d’une carte
mémoire SD.
Les effets ne sont pas appliqués. Est-ce que la touche [INPUT] ou [X-PAD] est
Les effets ISOLATE FX ne sont pas
appliqués.
Les effets X-PAD FX ne sont pas
appliqués.
Les effets SCENE FX ne sont pas
appliqués.
Le séquenceur MIDI ne se synchronise pas.
La commande MIDI ne fonctionne
pas.
secteur fournis sont raccordés correctement ?
Est-ce que l’interrupteur d’alimentation
[ON, STANDBY] est réglé sur [ON] ?
raccordés ?
Est-ce que les prises et fiches sont sales ? Nettoyez les prises et les fiches avant d’effectuer les raccordements.
Est-ce que le sélecteur [CONNECTION] sur le
panneau arrière de cet appareil est réglé correctement ?
[OUTPUT] est réglé convenablement ?
Est-ce que le niveau du son transmis aux prises
[INPUT] est réglé convenablement ?
Est-ce que le niveau d’entrée audio est trop élevé
ou trop faible ?
— Les valeurs peuvent être légèrement différentes selon la façon dont le BPM est
Est-ce que le câble USB fourni est correctement
raccordé ?
Est-ce que la carte mémoire SD est insérée correctement ?
Est-ce que la carte mémoire SD peut être lue sur
cet appareil ?
Est-ce qu’un grand nombre de dossiers ou fichiers
sont enregistrés sur la carte mémoire SD ?
Avez-vous enregistré d’autres fichiers que ceux de
paramétrage et de données échantillonnées sur la
carte mémoire SD ?
éclairée ?
Est-ce que la commande [ISOLATE FX] est à la
position appropriée ?
Est-ce que la commande [X-PAD LEVEL] est à la
position appropriée ?
Est-ce que la commande [SCENE FX] est à la
position appropriée ?
Est-ce que le mode sync du séquenceur MIDI est
le mode Slave ?
Est-ce que le séquenceur MIDI utilisé prend en
charge les horloges de synchronisation MIDI ?
Est-ce que les réglages MIDI sont corrects ? Pour employer un logiciel DJ avec cet appareil, les messages MIDI de cet appa-
Branchez correctement le cordon d’alimentation fourni sur une prise
d’alimentation.
Branchez correctement le cordon d’alimentation sur l’adaptateur secteur fourni.
(page 6)
Raccordez la fiche CC de l’adaptateur secteur fourni correctement à cet
appareil.
Réglez l’interrupteur d’alimentation [ON, STANDBY] sur [ON].
Raccordez correctement les câbles de liaison. (page 6)
Réglez le sélecteur [CONNECTION] selon le dispositif raccordé. (page 10)
Réglez la commande [OUTPUT LEVEL] de sorte que l’indicateur de niveau
[OUTPUT] s’éclaire jusqu’à peu près [0 dB] au niveau de crête. (Page 10)
Réglez la commande [INPUT LEVEL] de sorte que l’indicateur de niveau [INPUT]
s’éclaire jusqu’à peu près [0 dB] au niveau de crête. (page 10)
Réglez la commande [INPUT LEVEL] de sorte que l’indicateur de niveau [INPUT]
s’éclaire jusqu’à peu près [0 dB] au niveau de crête. (page 10)
Pour certains morceaux, il peut être impossible de mesurer le tempo (BPM).
Utilisez la touche [TAP] pour spécifier manuellement le tempo. (la page 11)
mesuré.
Raccordez cet appareil et l’ordinateur directement, pas par un concentrateur
USB.
Insérez la carte mémoire SD à fond. (Page 12)
Les cartes mémoire SD ont une face avant et une face arrière. Veillez à bien les
insérer dans le bon sens.
Seules les cartes mémoire SD ou les cartes mémoire SDHC peuvent être utilisées sur cet appareil. Certaines cartes ne pourront pas être utilisées.
Le chargement peut durer un certain temps si la quantité de dossiers ou de
fichiers est importante.
Si le dossier contient d’autres fichiers que les fichiers de paramétrage et de
données échantillonnées, le chargement prendra un certain temps. Ne mettez
que les fichiers de paramétrage et de données échantillonnées dans le dossier.
Appuyez sur la touche [INPUT] ou [X-PAD]. (Page 14)
Tournez la commande [ISOLATE FX] dans le sens horaire ou antihoraire. (Page
12)
Tournez la commande [X-PAD LEVEL] dans le sens horaire. (Page 12)
Tournez la commande [SCENE FX] dans le sens horaire. (Page 11)
Réglez le mode sync du séquenceur MIDI sur le mode Slave.
Les séquenceurs MIDI ne prenant pas en charge les horloges de synchronisation MIDI ne peuvent pas être synchronisés.
reil doivent être affectés au logiciel DJ utilisé. Pour les instructions sur l’affectation des messages, reportez-vous au mode d’emploi de votre logiciel DJ.
24
Fr
Page 49

Schéma fonctionnel
Français
À propos des marques commerciales
et des marques déposées
! Pioneer est une marque déposée de PIONEER CORPORATION.
! Microsoft®, Windows Vista®, Windows® et Internet Explorer® sont
des marques déposées ou des marques commerciales de Microsoft
Corporation aux États-Unis et/ou dans d’autres pays.
! Apple, Macintosh, Mac OS, Safari , iTunes et Finder sont des
marques commerciales d’Apple Inc. déposées aux États-Unis et
dans d’autres pays.
! Intel et Pentium sont des marques commerciales d’Intel Corporation
aux États-Unis et dans d’autres pays.
! VST est une marque commerciale de Steinberg Media Technologies
GmbH.
! Le logo Audio Units est une marque commerciale d’Apple Inc.
Les noms de sociétés et de produits mentionnés ici sont des marques
commerciales de leurs détenteurs respectifs.
La licence de ce produit a été accordée pour un usage non lucratif. La
licence n’a pas été accordée à ce produit pour un usage commercial
(but lucratif), comme la diffusion radiotélévision (terrestre, satellite,
câblée ou autre), la diffusion sur Internet ou Intranet (réseau d’entreprise) ou sur tout autre type de réseaux ou de services de distribution
d’informations électroniques (services de distribution de musique
numérique en ligne). Pour de tels usages vous devez acquérir les
licences appropriées. Pour le détail, consultez le site: http://www.
mp3licensing.com.
Précautions concernant les droits
d’auteur
Les enregistrements effectués sont destinés à votre usage personnel et,
conformément aux lois sur les droits d’auteur, il se peut que leur utilisation soit soumise au consentement du détenteur des droits.
! La musique enregistrée à partir de CD, etc. est protégée par les lois
sur les droits d’auteur de divers pays et par des traités internatio-
naux. La personne qui effectue des enregistrements de musique est
responsable de leur utilisation légale.
! Lorsque de la musique est téléchargée d’Internet, etc., la personne
qui a effectué le téléchargement est responsable de l’utilisation
de cette musique conformément à l’accord conclus avec le site de
téléchargement.
Avis de non responsabilité
Veuillez noter que Pioneer décline toute responsabilité quant à la légalité, la moralité ou la fiabilité de l’emploi de ce logiciel par la clientèle.
Selon l’environnement opérationnel de l’ordinateur utilisé et du logiciel
fourni et les logiciels associés, des problèmes peuvent surgir lors de
l’emploi du logiciel fourni.
Veuillez noter que Pioneer décline toute responsabilité quant à la perte
d’informations enregistrées par le client au moyen du logiciel fourni.
Veuillez noter sur papier, etc. les informations enregistrées.
Spécifications
Adaptateur secteur
Alimentation .................................................. CA 100 V à 240 V, 50 Hz/60 Hz
Courant nominal .................................................................................... 0,4 A
Sortie nominale .............................................................................CC 5 V, 2 A
Caractéristiques générales – Appareil principal
Consommation ....................................................................................... 1,4 A
Poids de l’appareil principal ................................................................. 1,3 kg
Dimensions maximales ................334 mm (L) × 57 mm (H) × 157 mm (P)
Température de fonctionnement tolérée ............................. +5 °C à +35 °C
Humidité de fonctionnement tolérée .......5 % à 85 % (sans condensation)
Section audio
Fréquence d’échantillonnage .............................................................48 kHz
Convertisseur A/N, N/A ......................................................................24 bits
Réponse en fréquence ........................................................... 20 Hz à 20 kHz
Rapport S/B (sortie nominale)
Lorsque CONNECTION est réglé sur "SEND/RETURN (–10 dB)"
...................................................................................................... 102 dB
Lorsque CONNECTION est réglé sur "MASTER (+4 dB)"
........................................................................................................ 98 dB
Distorsion harmonique totale ...........................................................0,005 %
Marge ..................................................................................................... 20 dB
Niveau d’entrée / Impédance d’entrée
Lorsque CONNECTION est réglé sur "SEND/RETURN (–10 dB)"
............................................................................ –10 dBV/22 kW ou plus
Lorsque CONNECTION est réglé sur "MASTER (+4 dB)"
.............................................................................+4 dBu/22 kW ou plus
Niveau de sortie / Impédance de charge / Impédance de sortie
Lorsque CONNECTION est réglé sur "SEND/RETURN (–10 dB)"
................................................................–10 dBV/10 kW/1 kW ou moins
Lorsque CONNECTION est réglé sur "MASTER (+4 dB)"
................................................................ +4 dBu/10 kW/1 kW ou moins
Prises d’entrée/sortie
Prises INPUT
Prises RCA ........................................................................................1 jeu
Jack (Ø 6,3 mm) ................................................................................1 jeu
Prises OUTPUT
Prises RCA ........................................................................................1 jeu
Jack (Ø 6,3 mm) ................................................................................1 jeu
Prise USB
Type B ...............................................................................................1 jeu
— Les caractéristiques et la présentation peuvent être modifiées,
sans avis préalable, dans un souci d’amélioration.
— Les écrans de logiciel utilisés dans ce mode d’emploi sont en
stade de développement et peuvent différer des écrans réels.
! © 2012 PIONEER CORPORATION. Tous droits de reproduction et de
traduction réservés.
Fr
25
Page 50

Vielen Dank, dass Sie sich für dieses Pioneer-Produkt entschieden haben. Bitte lesen Sie diese Bedienungsanleitung gründlich durch, um sich mit der
Bedienung des Geräts vertraut zu machen. Nachdem Sie die Bedienungsanleitung gelesen haben, legen Sie sie griffbereit zum Nachschlagen ab.
In manchen Ländern oder Regionen können sich die Formen von Netzstecker und Netzsteckdose von denen in den Erklärungszeichnungen unterscheiden. Das Verfahren zum Anschließen und Bedienen des Geräts sind aber gleich.
WICHTIG
CAUTION
RISK OF ELECTRIC SHOCK
DO NOT OPEN
Das Blitzsymbol in einem Dreieck weist den
Benutzer darauf hin, dass eine
Berührungsgefahr mit nicht isolierten Teilen
im Geräteinneren, die eine gefährliche
Spannung führen, besteht. Die Spannung
kann so hoch sein, dass sie die Gefahr eines
elektrischen Schlages birgt.
Mischen Sie dieses Produkt, wenn Sie es entsorgen wollen, nicht mit gewöhnlichen Haushaltsabfällen. Es gibt ein getrenntes
Sammelsystem für gebrauchte elektronische Produkte, über das die richtige Behandlung, Rückgewinnung und Wiederverwertung
gemäß der bestehenden Gesetzgebung gewährleistet wird.
Privathaushalte in den Mitgliedsstaaten der EU, in der Schweiz und in Norwegen können ihre gebrauchten elektronischen Produkte an
vorgesehenen Sammeleinrichtungen kostenfrei zurückgeben oder aber an einen Händler zurückgeben (wenn sie ein ähnliches neues Produkt
kaufen).
Bitte wenden Sie sich in den Ländern, die oben nicht aufgeführt sind, hinsichtlich der korrekten Verfahrensweise der Entsorgung an die örtliche
Kommunalverwaltung.
Auf diese Weise stellen Sie sicher, dass das zu entsorgende Produkt der notwendigen Behandlung, Rückgewinnung und Wiederverwertung
unterzogen wird, und so mögliche negative Einflüsse auf die Umwelt und die menschliche Gesundheit vermieden werden.
WARNUNG
Dieses Gerät ist nicht wasserdicht. Zur Vermeidung der
Gefahr von Brand und Stromschlag keine Behälter mit
Flüssigkeiten (z.B. Blumenvasen und -töpfe) in die
ACHTUNG:
UM SICH NICHT DER GEFAHR EINES
ELEKTRISCHEN SCHLAGES
AUSZUSETZEN, DÜRFEN SIE NICHT DEN
DECKEL (ODER DIE RÜCKSEITE)
ENTFERNEN. IM GERÄTEINNEREN
BEFINDEN SICH KEINE VOM BENUTZER
REPARIERBAREN TEILE. ÜBERLASSEN SIE
REPARATUREN DEM QUALIFIZIERTEN
KUNDENDIENST.
Bevor irgendwelche Anschlüsse hergestellt oder
geändert werden, unbedingt die Stromzufuhr
ausschalten und den Netzstecker aus der
Netzsteckdose ziehen.
Nähe des Gerätes bringen und dieses vor Tropfwasser,
Spritzwasser, Regen und Nässe schützen.
D3-4-2-1-3_A1_De
WARNUNG
Vor dem erstmaligen Anschluss des Gerätes an das
Stromnetz bitte den folgenden Hinweis sorgfältig
beachten.
Die Netzspannung ist je nach Land verschieden.
Vor der Inbetriebnahme des Gerätes sicherstellen,
dass die örtliche Netzspannung mit der auf dem
Ty penschild des Netzteils angegebenen
Nennspannung (z.B. 230 V oder 120 V)
übereinstimmt.
D3-4-2-1-4*_A1_De_PSV
WARNUNG
Keine Quellen offener Flammen (z.B. eine brennende
Kerze) auf dieses Gerät stellen.
D3-4-2-1-7a_A1_De
VORSICHT MIT DEM NETZKABEL
Fassen Sie das Netzkabel immer am Stecker. Ziehen Sie
nicht am Kabel selbst, und fassen Sie das Netzkabel
niemals mit nassen Händen an, da dies einen
Kurzschluss oder elektrischen Schlag verursachen
kann. Stellen Sie nicht das Gerät, Möbelstücke o.ä. auf
das Netzkabel; sehen Sie auch zu, dass es nicht
eingeklemmt wird. Machen Sie niemals einen Knoten
in das Netzkabel, und binden Sie es nicht mit anderen
Kabeln. Das Netzkabel sollte so gelegt werden, dass
niemand darauf tritt. Ein beschädigtes Netzkabel kann
einen Brand oder elektrischen Schlag verursachen.
Prüfen Sie das Netzkabel von Zeit zu Zeit. Sollte es
beschädigt sein, wenden Sie sich an Ihre nächste
autorisierte PIONEER-Kundendienststelle oder Ihren
Händler, um es zu ersetzen.
Betriebsumgebung
Betriebstemperatur und Betriebsluftfeuchtigkeit:
+5 °C bis +35 °C, 85 % rel. Feuchte max.
(Ventilationsschlitze nicht blockiert)
Eine Aufstellung dieses Gerät an einem unzureichend
belüfteten, sehr feuchten oder heißen Ort ist zu
vermeiden, und das Gerät darf weder direkter
Sonneneinstrahlung noch starken Kunstlichtquellen
ausgesetzt werden.
D3-4-2-1-7c*_A1_De
Ein Ausrufezeichen in einem Dreieck weist
den Benutzer auf wichtige Bedienungs- und
Wartungsanweisungen in den Dokumenten
hin, die dem Gerät beiliegen.
D3-4-2-1-1_A1_De
K058b_A1_De
D44-9-3_A1_De
S002*_A1_De
De
2
Page 51

Falls der Netzstecker des Netzkabels dieses Gerätes
nicht in die Zusatzsteckdose einer anderen
Komponente passt, muss er gegen einen Netzstecker
der geeigneten Ausführung ausgewechselt werden.
Ein derartiger Austausch des Netzsteckers muss vom
Kundendienstpersonal vorgenommen werden. Wenn
der vom Netzkabel abgeschnittene ursprüngliche
Netzstecker in eine Netzsteckdose eingesteckt wird,
besteht akute Stromschlaggefahr! Daher ist
unbedingt dafür zu sorgen, dass der abgeschnittene
Netzstecker sofort vorschriftsmäßig entsorgt wird.
Vor einem längeren Nichtgebrauch des Gerätes,
beispielsweise während des Urlaubs, sollte der
Netzstecker aus der Netzsteckdose gezogen werden,
um das Gerät vollständig vom Netz zu trennen.
D3-4-2-2-1a_A1_De
ACHTUNG
Der ON, STANDBY-Schalter dieses Gerätes trennt
das Gerät nicht vollständig vom Stromnetz. Um das
Gerät vollständig vom Netz zu trennen, muss der
Netzstecker aus der Netzsteckdose gezogen werden.
Daher sollte das Gerät so aufgestellt werden, dass
stets ein unbehinderter Zugang zur Netzsteckdose
gewährleistet ist, damit der Netzstecker in einer
Notsituation sofort abgezogen werden kann. Um
Brandgefahr auszuschließen, sollte der Netzstecker
vor einem längeren Nichtgebrauch des Gerätes,
beispielsweise während des Urlaubs, grundsätzlich
von der Netzsteckdose getrennt werden.
D3-4-2-2-2a*_A1_De
Bei Verwendung dieses Produktes machen Sie sich
bitte mit der Sicherheitsinformationen auf der
Unterseite des Gerätes vertraut.
D3-4-2-2-4_B1_De
De
3
Page 52

Inhalt
Zum Lesen dieser Anleitung
Die Namen von Anzeigen, Menüs und Tasten sind in dieser Anleitung in
eckigen Klammern angegeben. (z.B. Kanal [MASTER], Menü [ON/OFF],
[File])
Kurzanleitung
Merkmale ..................................................................................................... 5
Bedienungsübersicht ................................................................................. 5
Lieferumfang ............................................................................................... 5
Anschließen an die Eingangs-/Ausgangsbuchsen ................................. 6
Vorbereitungen zur Verwendung der Effekte ........................................... 8
Verwendung der SCENE FX-Funktion ....................................................... 8
Verwendung der ISOLATE FX-Funktion .................................................... 8
Verwendung der X-PAD FX-Funktion ........................................................ 8
Verwendung der RELEASE FX-Funktion ................................................... 8
Bedienung
Anpassen der Eingangs- und Ausgangspegel ...................................... 10
Vornehmen der Einstellungen BPM und QUANTIZE ............................ 10
SCENE FX Sektion .................................................................................... 11
ISOLATE FX Sektion .................................................................................. 12
X-PAD FX Sektion ...................................................................................... 12
RELEASE FX Sektion ................................................................................ 14
FX SOURCE Sektion ................................................................................. 14
FX SETTING Sektion .................................................................................. 14
Typen von Effekten
Typen von SCENE FX-Effekten ................................................................. 15
Typen von ISOLATE FX-Effekten .............................................................. 16
Typen von X-PAD FX-Effekten .................................................................. 17
Typen von RELEASE FX-Effekten ............................................................. 17
Verwendung der mitgelieferten Software
Software-Lizenzvereinbarung .................................................................. 18
Verwendung von remixbox ...................................................................... 19
Prüfen der neuesten Informationen
über die mitgelieferte Software ............................................................... 20
Ändern der Einstellungen dieses Geräts
Ändern der MIDI-Einstellungen .............................................................. 21
Verwendung der Aktualisierungsfunktion ............................................. 21
MIDI-Zuweisungskarte
Zusätzliche Informationen
Störungssuche .......................................................................................... 24
Blockdiagramm ........................................................................................ 25
Über Markenzeichen und eingetragene Markenzeichen ..................... 25
Hinweise zum Urheberrechte.................................................................. 25
Haftungsausschluss ................................................................................ 25
Technische Daten ..................................................................................... 26
De
4
Page 53

Kurzanleitung
Merkmale
Diese Einheit ist eine Remix-Station für DJs, bestehend aus vier EffektSektionen. Sie erlaubt es, Tracks in Echtzeit mit intuitiver Bedienung zu
arrangieren.
SCENE FX
Durch Drehen des Reglers können neue Sounds zum aktuell spielenden
Track hinzugefügt werden, und Breaks können an gewünschten Stellen
eingefügt werden, um einen neuen Sound für den Track zu erzielen.
Zehn Typen von Effekten und zwei Nebenparameter können kombiniert
werden, um sehr individualistische DJ-Remix-Auftritte zu erzielen.
ISOLATE FX
Die Sounds spezifischer Instrumente können isoliert werden, und ihre
Rhythmen und Töne können auf gleiche Weise wie mit den EQ-Reglern
eines DJ-Mixers geändert werden. Einer von vier Effekten kann gewählt
und mit separaten Raten für niedrige, mittlere und hohe Frequenzen
angelegt werden.
X-PAD FX
Durch Bedienung des Touchpads können neue Sounds zum
Originaltrack im Beat mit dem Rhythmus des Tracks hinzugefügt
werden. Verschiedene Sounds können zu Tracks hinzugefügt werden
und mit vier voreingestellten internen Soundquellen oder durch Laden
gesampelter Soundquellen von SD-Speicherkarten umgemischt werden.
Bedienungsübersicht
1 Lieferumfang
= Seite 5
2 Anschließen an die Eingangs-/Ausgangsbuchsen
= Seite 6
3 Vorbereitungen zur Verwendung der Effekte
= Seite 8
4 Verwendung der SCENE FX-Funktion
= Seite 8
5 Verwendung der ISOLATE FX-Funktion
= Seite 8
6 Verwendung der X-PAD FX-Funktion
= Seite 8
7 Verwendung der RELEASE FX-Funktion
= Seite 8
Lieferumfang
! CD-ROM
! USB-Kabel
! Netzteil
! Netzkabel
! Garantiekarte
! Bedienungsanleitung (dieses Dokument)
Deutsch
RELEASE FX
Der aktuell spielende Track und glatter Übergang des Effektsounds
kann durch einfaches Betätigen des Hebels erzielt werden. Drei Typen
von Effekten und ein Hebelschalter erlauben Ihnen, hoch individuelle
Arrangements zu erzielen.
QUANTIZE
Die Beatpositionen des Tracks werden in Echtzeit analysiert, und das
Timing zum Produzieren der Effekte und der X-PAD FX-Sounds wird
automatisch angepasst. Die Sounds können im Tempo mit dem Track
abgespielt werden, auch bei grober Bedienung.
remixbox
Die mitgelieferte dedizierte Anwendungssoftware kann verwendet
werden, um die Parameterwerte und -typen dieser Einheit zu ändern,
wodurch Sie persönliche Anpassungen vornehmen können, um
eine Effektmaschine zu erzielen, die Ihrem persönlichen Geschmack
entspricht.
RMX-1000 Plug-in
Ein VST/AU Plug-in ist vorhanden, das es Ihnen erlaubt, die Funktionen
dieser Einheit auf einem Computer zu starten. Damit kann der RMX-1000
als Controller verwendet werden.
De
5
Page 54

Anschließen an die Eingangs-/Ausgangsbuchsen
Schalten Sie die Stromversorgung aus und ziehen Sie das Netzkabel aus der Netzsteckdose, bevor Sie Geräte anschließen oder die Anschlüsse ändern.
Schließen Sie das Netzkabel an, nachdem alle Anschlüsse zwischen den Geräten vorgenommen wurden.
Verwenden Sie immer das mit diesem Produkt mitgelieferte Netzkabel und Netzteil.
Verbinden Sie dieses Gerät und den Computer direkt mit dem mitgelieferten USB-Kabel.
Beachten Sie die Bedienungsanleitung der angeschlossenen Komponente.
Anschlussbeispiel
Zum Anschließen an die Buchsen [SEND] und [RETURN] am DJ-Mixer
Zur Netzsteckdose
Endstufenverstärker und Lautsprecher
Computer
DJ-Player
Zu RETURN-Buchse Zu SEND-Buchse
Zum Anschließen zwischen dem DJ-Player und dem DJ-Mixer
Endstufenverstärker und Lautsprecher
R
L
DJ Mixer
DJ Mixer
DJ-Player
L
R
Zu den Audio-Ausgangsbuchsen
DJ-Player
Zu den Audio-Eingangsbuchsen
R
De
6
DJ-Player
L
L
R
Page 55

Zum Anschließen an die Buchsen [MASTER OUT] des DJ-Mixers
Zu MASTER OUT-Buchse
Endstufenverstärker und Lautsprecher
Zu den Audio-Eingangsbuchsen
1 2 3 4 75 6
1 Kabelhaken
Haken Sie das Netzkabel des Netzteils hier an.
! Der Sound wird unterbrochen, wenn das Netzkabel des Netzteils
während der Wiedergabe von dem Gerät abgetrennt wird.
Verwendung des Kabelhakens
Haken Sie das Netzkabel des Netzteils auf den Kabelhaken, um es zu
befestigen. Dadurch wird verhindert, dass das Netzkabel versehentlich
gezogen wird und der Stecker vom Anschluss getrennt wird.
! Der Sound wird unterbrochen, wenn das Netzkabel des Netzteils
während der Wiedergabe von dem Gerät abgetrennt wird.
1 Ziehen Sie wie in der Abbildung unten gezeigt die Spitze des
Netzkabels etwa zur Mitte der Rückseite dieses Geräts und haken Sie
das Netzkabel auf die Unterseite des Kabelhakens.
2 Bewegen Sie wie in der Abbildung unten gezeigt die Spitze des
Netzkabels zurück in Gegenrichtung hinter die Oberseite des
Kabelhakens und haken Sie das Netzkabel auf die Oberseite des
Kabelhakens.
3 Drehen Sie die Spitze des Netzkabels so, dass sie zu Ihnen weist,
und drehen Sie sie dann zurück, um einen Ring zu erzeugen, wie in
der Zeichnung dargestellt und stecken Sie es dann in die Buchse
[DC IN] dieses Geräts.
DJ Mixer
R
DJ-PlayerDJ-Player
L
L
R
2 DC IN-Buchse
Schließen Sie den Gleichstromstecker des mitgelieferte Netzteils
hier an. Warten Sie, bis alle Verbindungen der Geräte hergestellt
sind, bevor Sie das Netzkabel anschließen.
Verwenden Sie immer das mit diesem Produkt mitgelieferte
Netzkabel und Netzteil.
3 ON, STANDBY Schalter
Dies schaltet die Stromversorgung dieses Geräts zwischen ein und
Standby um.
4 Buchse USB
Schließen Sie einen Computer an.
! Verbinden Sie dieses Gerät und den Computer direkt mit dem
mitgelieferten USB-Kabel.
! Ein USB-Hub kann nicht verwendet werden.
5 OUTPUT-Buchsen
Schließen Sie diese an die externen Eingangsbuchsen an einem
Mixer usw. an.
6 INPUT-Buchsen
Schließen Sie dies an die externen Ausgangsbuchsen an einem
Mixer usw. an. Wenn nur [L (MONO)] angeschlossen ist, wird der an
[L (MONO)] angelegte Sound auch an [R] angelegt.
ACHTUNG
Beim Anschließen von Audiokabeln schließen Sie nur RCACinchbuchsen oder Klinkenbuchsen an, aber nicht beide.
Verbinden Sie Geräte auf solche Weise, dass der Fluss der
Audiosignale keine Schleife bildet. Wenn Schleifenverbindungen
hergestellt werden, kann die Schaltung Oszillationen verursachen, die
zu Schäden an den Lautsprechern usw. führen.
Beispiele für Schleifenverbindungen, die vermieden werden müssen
! Anschließen des Ausgangs eines DJ-Mixers an die
Eingangsbuchsen dieser Einheit und dann Anlegen des Ausgangs
dieser Einheit an die gleichen Eingangsbuchsen des DJ-Mixers.
! Anschließen des Ausgangs von den Buchsen [SEND] des
DJ-Mixers an die Eingangsbuchsen dieser Einheit und dann
Anlegen des Ausgangs dieser Einheit an andere Eingangsbuchsen
als die Buchsen [RETURN] am gleichen DJ-Mixer.
Deutsch
7 Kensington-Diebstahlsicherung
De
7
Page 56

Vorbereitungen zur Verwendung
der Effekte
1 Schieben Sie den Schalter [ON, STANDBY] an der
Rückseite dieser Einheit in Stellung [ON].
Verwendung der ISOLATE FX-Funktion
Wenn der Regler [LOW], [MID] oder [HI] gedreht wird, nimmt die Stärke
des Effekts der niedrigen, mittleren oder hohen Frequenzen zu oder
ab. Es ist auch möglich, den Sound spezifischer Instrumente in den
niedrigen, mittleren oder hohen Frequenzbereichen zu isolieren und die
Anzahl der Sounds zu steigern oder zu senken.
1 Drücken Sie eine der Tasten [ISOLATE FX].
2 Prüfen Sie, ob die Tasten [INPUT] und [X-PAD]
leuchten.
! Wenn die Tasten [INPUT] und [X-PAD] nicht leuchten, drücken Sie
die Tasten, damit sie aufleuchten.
3 Drehen Sie den Regler [INPUT LEVEL].
4 Drehen Sie den Regler [OUTPUT LEVEL].
5 Verwenden Sie die Effekte.
Anweisungen zur Verwendung der verschiedenen Effekte siehe folgende
Abschnitte.
Verwendung der SCENE FX-Funktion
Wenn der Regler in der Mitte gedreht wird, wird ein Effekt zum
Hinzufügen neuen Sounds zu dem Track oder Entfernen des Sounds von
dem Track angewendet. Dadurch können Sie einen neuen Sound für den
Track erzielen.
1 Drücken Sie eine der Tasten [SCENE FX].
2 Drehen Sie den Regler [LOW], [MID] oder [HI].
Wenn der Regler im Uhrzeigersinn oder gegen den Uhrzeigersinn
gedreht wird, ändert sich der gewählte ISOLATE FX-Effekt wesentlich.
Wenn der Regler auf Mittenposition gestellt ist, wird der ISOLATE
FX-Effekt nicht angelegt und nur der Originalsound ausgegeben.
Verwendung der X-PAD FX-Funktion
Mit dieser Funktion können Effekte an die internen Soundquellen
dieser Einheit angelegt und zum aktuell spielenden Track hinzugefügt
werden. Anstelle der internen Soundquellen können auch gesampelte
Soundquellen nach Vorbereitung auf SD-Speicherkarten geladen und
verwendet werden, oder der aktuell spielenden Sound kann gesampelt
und verwendet werden.
1 Drücken Sie eine der Tasten [X-PAD FX].
2 Berühren Sie das [X-PAD].
Der gewählte X-PAD FX-Effekt ändert sich je nach der Position auf dem
berührten [X-PAD].
Verwendung der RELEASE FX-Funktion
Wenn der [RELEASE FX]-Regler ganz zu Ihnen hin gedreht wird, verschwindet der Originalsound und nur der Effektsound wird ausgegeben.
Stellen Sie den Regler ganz in Ausgangsstellung zurück, um glatten
Übergang vom Effektsound zum Originalsound zu erzielen.
1 Schalten Sie den [RELEASE FX]-Wahlschalter um.
2 Drehen Sie den Regler [SCENE FX].
Wenn der Regler im Uhrzeigersinn gedreht wird, ändert sich der
gewählte SCENE FX-Effekt wesentlich.
Wenn der Regler ganz gegen den Uhrzeigersinn gedreht wird, wird der
SCENE FX-Effekt nicht angelegt und nur der Originalsound ausgegeben.
De
8
2 Bewegen Sie [RELEASE FX]-Hebel zu Ihnen hin.
Der gewählte RELEASE FX-Effekt wechselt entsprechend der Position des Hebels.
Wenn der Hebel zurück in Ausgangsstellung gestellt wird, schaltet der
Effekt aus. Jegliche SCENE FX, ISOLATE FX oder X-PAD FX-Effekte, die
vorher aktiviert waren, werden ebenfalls ausgeschaltet.
Page 57

Bedienung
1
21 8 6
745
1 Anpassen der Eingangs- und Ausgangspegel (Seite 10)
2 Die Einstellungen von BPM und QUANTIZE vornehmen (Seite 10)
3 Abschnitt SCENE FX (Seite 11)
4 Abschnitt ISOLATE FX (Seite 12)
5 Abschnitt X-PAD FX (Seite 12)
6 Abschnitt RELEASE FX (Seite 14)
7 Abschnitt FX SOURCE (Seite 14)
8 Abschnitt FX SETTING (Seite 14)
3
Deutsch
5
De
9
Page 58

Anpassen der Eingangs- und
Ausgangspegel
Vornehmen der Einstellungen BPM
und QUANTIZE
2
1
5
4
3
1 INPUT LEVEL-Regler
Dies stellt die Audiopegeleingabe zu dieser Einheit ein.
2 INPUT-Pegelanzeige
Dies zeigt die Audiopegeleingabe zu dieser Einheit an.
3 OUTPUT LEVEL-Regler
Dies passt die Audiopegelausgabe von dieser Einheit ein.
4 OUTPUT-Pegelanzeige
Dies zeigt die Audiopegelausgabe von dieser Einheit an.
5 CONNECTION-Wahlschalter
Dies schaltet die Eingang/Ausgang-Verstärkung der Einheit um.
Anpassen des Eingangspegels
Drehen Sie den Regler [INPUT LEVEL].
Der an dieser Einheit anliegende Audiopegel nimmt zu, wenn der Regler
im Uhrzeigersinn gedreht wird und nimmt ab, wenn der Regler gegen
den Uhrzeigersinn gedreht wird.
Die Pegelanzeige [INPUT] leuchtet auf, wenn der Sound richtig an diese
Einheit angelegt wird.
3
1
2
4
5
1 QUANTIZE-Taste
Dies schaltet die Funktion QUANTIZE ein und aus.
Der Zyklus und das Timing des von der Sektion X-PAD FX ausgegebenen Sounds wird mit dem Tempo des aktuell spielenden Tracks
synchronisiert.
2 NUDGE (+, –)-Taste
Verwenden Sie dies, um den Zyklus und das Timing der SoundAusgabe von der Sektion X-PAD FX fein anzupassen.
3 BPM-Anzeige
Wenn der BPM-Messungsmodus auf Auto gestellt ist, wird hier der
automatisch erkannte BPM-Wert angezeigt. Wenn der Wert nicht
erkannt werden kann, blinkt der vorher erkannte BPM-Wert.
Wenn der BPM-Messmodus auf Manuell gestellt ist, wird hier der
manuell eingegebene BPM-Wert angezeigt.
4 AUTO-Taste
Schaltet den BPM-Messungsmodus um.
— [AUTO]: Der BPM wird automatisch von dem angelegten
Audiosignal gemessen. Der Modus [AUTO] ist eingestellt, wenn
die Stromversorgung dieses Geräts eingeschaltet wird.
— [TAP]: Der BPM wird manuell durch Antippen der Taste [TAP]
mit einem Finger eingeben.
! Der [AUTO] BPM-Messbereich beträgt BPM = 70 bis 180. Bei
manchen Tracks kann es unmöglich sein, den BPM richtig zu
messen. Wenn der BPM nicht gemessen werden kann, blinkt der
BPM-Wert im Display. In solchen Fällen verwenden Sie die Taste
[TAP] zur manuellen Eingabe des BPM.
5 TAP-Taste
Wenn der BPM-Messmodus auf manuelle Eingabe gestellt ist,
tippen Sie diese Taste mit einem Finger an, um den BPM manuell
einzugeben.
Anpassen des Ausgangspegels
Drehen Sie den Regler [OUTPUT LEVEL].
Der von dieser Einheit ausgegebene Audiopegel nimmt zu, wenn der
Regler im Uhrzeigersinn gedreht wird und nimmt ab, wenn der Regler
gegen den Uhrzeigersinn gedreht wird.
Die Pegelanzeige [OUTPUT] leuchtet entsprechend dem an diese
Einheit angelegten Audiopegel auf.
Umschalten der Eingang/
Ausgang-Verstärkung
Auf dieser Einheit kann die Eingang/Ausgang-Verstärkung entsprechend dem angeschlossenen Gerät umgeschaltet werden.
Schieben Sie den Wahlschalter [CONNECTION] an der
Rückseite dieser Einheit.
— [SEND/RETURN (–10 dB)]: Wählen Sie dies beim Anschließen
an die Buchsen [SEND] und [RETURN] des DJ-Mixers oder beim
Anschließen an die Audio-Ausgangsbuchsen eines DJ-Players.
— [MASTER (+4 dB)]: Wählen Sie dies beim Anschließen an die die
Buchsen [MASTER OUT] eines DJ-Mixers.
De
10
Verwendung der QUANTIZE-Funktion
Diese Funktion analysiert das Tempo des aktuell spielenden Tracks in
Echtzeit und synchronisiert den von der Sektion X-PAD FX produzierten
Sound mit dem Tempo des aktuell spielenden Tracks.
1 Drücken Sie die Taste [QUANTIZE].
Die QUANTIZE-Funktion schaltet sich ein.
2 Bedienen Sie die X-PAD FX-Sektion.
Der Zyklus und das Timing des von der Sektion X-PAD FX produzierten Sounds wird mit dem Tempo des aktuell spielenden Tracks
synchronisiert.
! Der Zyklus des Effekts von [TRANS/ROLL] in der Sektion ISOLATE
FX wird ebenfalls mit dem Tempo des aktuell spielenden Tracks
synchronisiert.
! Der One-Shot-Sound, der produziert wird, wenn die Taste [KICK],
[SNARE], [CLAP] oder [HI HAT] gedrückt wird, wird sofort produziert,
ungeachtet ob die Funktion QUANTIZE aktiviert oder deaktiviert ist.
! Wenn die Taste [QUANTIZE] erneut gedrückt wird, wird die Funktion
QUANTIZE ausgeschaltet.
Page 59

Verwendung der NUDGE-Funktion
Die Taste [NUDGE (+, –)] kann verwendet werden, um den Zyklus
und das Timing der Sound-Ausgabe von der Sektion X-PAD FX fein
anzupassen.
Drücken Sie die Seite [+] oder [–] der Taste
[NUDGE (+, –)].
— [+]: Der Zyklus und das Timing der Soundausgabe von der
Sektion X-PAD FX werden vorgestellt. Wenn die Taste gedrückt
gehalten wird, werden der Zyklus und das Timing des Sounds
kontinuierlich vorgestellt, bis die Taste losgelassen wird.
— [–]: Der Zyklus und das Timing der Soundausgabe von der
Sektion X-PAD FX werden verzögert. Wenn die Taste gedrückt
gehalten wird, werden der Zyklus und das Timing des Sounds
kontinuierlich verzögert, bis die Taste losgelassen wird.
Manuelle Eingabe des BPM
Tippen Sie mindestens zweimal im Rhythmus mit dem
Beat (in Viertelnoten) des aktuell spielenden Sounds auf
die Taste [TAP].
Der Durchschnittswert des Intervalls, bei dem die Taste [TAP] angetippt
wurde, wird als BPM eingestellt.
! Der BPM kann manuell durch Drücken der Taste [NUDGE (+, –)]
eingestellt werden, während gleichzeitig die Taste [TAP] gedrückt
wird.
! Der BPM kann in Schritten von 0,1 durch Drücken der Taste [AUTO]
eingestellt werden, während gleichzeitig die Taste [TAP] gedrückt
wird, und durch anschließendes Drücken der Taste [NUDGE (+, –)],
während die Tasten [AUTO] und [TAP] gedrückt werden.
SCENE FX Sektion
312
4 5
1 SCENE FX-Anzeige
Leuchtet auf, wenn der Effekt aktiviert ist. Die Farbe wechselt ent-
sprechend dem Typ der Taste [SCENE FX].
2 SCENE FX-Regler
Dies passt den gewählten SCENE FX-Effekt an.
3 SCENE FX-Tasten
Diese schalten die SCENE FX-Effekte ein und aus.
4 SUB PARAMETER 1-Regler
Dies justiert den SCENE FX Nebenparameter 1.
5 SUB PARAMETER 2-Regler
Dies justiert den SCENE FX Nebenparameter 2.
3
Deutsch
Verwendung der SCENE FX-Funktion
1 Drücken Sie eine der Tasten [SCENE FX].
Wählen Sie den SCENE FX-Effekttyp.
Die Taste, die gedrückt wurde, blinkt.
! Einzelheiten über die Typen der Effekte siehe Typen von SCENE
FX-Effekten auf Seite 15.
! Wenn die gewählte Taste [SCENE FX] erneut gedrückt wird, wird der
Effekt ausgeschaltet.
2 Drehen Sie den Regler [SCENE FX].
Der gewählte Effekt wird auf den in der Sektion FX SOURCE gewählten
Sound angelegt.
— Die Stärke des Effekts nimmt zu, während der Regler im
Uhrzeigersinn gedreht wird. Die Stärke des Effekts ist maximal,
während der Regler ganz im Uhrzeigersinn gedreht wird.
— Die Stärke des Effekts nimmt ab, während der Regler gegen
den Uhrzeigersinn gedreht wird. Wenn vollständig gegen den
Uhrzeigersinn gedreht, wird nur der Originalsound ausgegeben,
ohne dass ein Effekt angelegt ist.
3 Drehen Sie den Regler [SUB PARAMETER 1].
Dies stellt die Stärke des Nebenparameters 1 des gewählten Effekts ein.
— Die Stärke des Effekts nimmt zu, während der Regler von der
Mitte im Uhrzeigersinn gedreht wird. Die Stärke des Effekts ist
maximal, während der Regler ganz im Uhrzeigersinn gedreht
wird.
— Die Stärke des Effekts nimmt ab, während der Regler von
der Mitte gegen den Uhrzeigersinn gedreht wird. Die Stärke
De
11
Page 60

des Effekts ist minimal, während der Regler ganz gegen den
Uhrzeigersinn gedreht wird.
4 Drehen Sie den Regler [SUB PARAMETER 2].
Dies stellt die Stärke des Nebenparameters 2 des gewählten Effekts ein.
— Je weiter der Regler im Uhrzeigersinn gedreht wird, desto mehr
wird der Effekt betont.
— Wenn ganz gegen den Uhrzeigersinn gedreht, ist der Effekt auf
Minimum gestellt.
X-PAD FX Sektion
21 5
34
ISOLATE FX Sektion
1
2
1 ISOLATE FX-Taste
Diese schalten die ISOLATE FX-Effekte ein und aus.
2 Regler LOW, MID und HI
Diese stellen die Stärke der niedrigen, mittleren und hohen
Frequenzen des gewählten ISOLATE FX-Effekts ein.
Verwendung der ISOLATE FX-Funktion
1 Drücken Sie eine der Tasten [ISOLATE FX].
Wählen Sie den ISOLATE FX-Effekttyp.
Die Taste, die gedrückt wurde, blinkt.
! Einzelheiten über die Typen der Effekte siehe Typen von ISOLATE
FX-Effekten auf Seite 16.
! Wenn die gewählte Taste [ISOLATE FX] erneut gedrückt wird, wird
der Effekt ausgeschaltet.
2 Drehen Sie den Regler [LOW], [MID] oder [HI].
Der gewählte Effekt wird auf den in der Sektion FX SOURCE gewählten
Sound angelegt.
— Die Stärke des den Sound verbessernden Effekts nimmt zu,
während der Regler von der Mitte im Uhrzeigersinn gedreht wird.
Die Stärke des Effekts ist maximal, während der Regler ganz im
Uhrzeigersinn gedreht wird.
— Die Stärke des den Sound verringernden Effekts nimmt zu, wäh-
rend der Regler von der Mitte gegen den Uhrzeigersinn gedreht
wird. Die Stärke des Effekts ist maximal, während der Regler
ganz gegen den Uhrzeigersinn gedreht wird.
987
6
1 BANK-Taste
Verwenden Sie dies, um die gesampelten Soundquellen von
SD-Speicherkarten zu laden.
2 ROLL-Taste
Verwenden Sie dies, um den Soundeingang zu dieser Einheit zu
sampeln und als Loop abzuspielen.
3 X-PAD FX-Tasten
Eine der internen Soundquellen oder eine der gesampelten
Soundquellen, geladen von SD-Speicherkarten, wird gewählt und
ausgegeben. Wenn eine Taste gedrückt wird, wird der Sound sofort
produziert (“One-Shot-Sound”).
4 BANK-Anzeige
Beim Laden gesampelter Soundquellen von SD-Speicherkarten
leuchten die Nummern der ladbaren BANK auf.
5 OVERDUB (DELETE)-Taste
Dies schaltet die Funktion OVERDUB ein und aus.
Wenn die Funktion OVERDUB aktiviert ist, dient diese Taste zum
Löschen von Sounds.
6 HOLD (MUTE)-Taste
Drücken Sie hier, um den X-PAD FX-Effekt zu halten.
Wenn die Funktion OVERDUB aktiviert ist, dient diese Taste zum
Stummschalten von Sounds.
7 X-PAD
Verwenden Sie dies, um den X-PAD FX-Effekt einzustellen.
8 PITCH-Regler
Verwenden Sie dies, um die Tonlage der internen Soundquellen
dieses Geräts, gesampelter Soundquellen, geladen von
SD-Speicherkarten, oder von in einem Loop gespielter Sounds
anzupassen.
9 X-PAD LEVEL-Regler
Verwenden Sie dies, um den Audiopegel der internen Soundquellen
dieses Geräts oder gesampelter Soundquellen, geladen von
SD-Speicherkarten, anzupassen.
Wenn die Taste [ROLL] gedrückt wurde, stellt dieser Regler die
Balance der Lautstärke zwischen dem Audiopegel des aktuell spielenden Tracks und dem gesampelten Sound ein.
a SD-Speicherkarten-Einsetzschacht
Setzen Sie hier SD-Speicherkarten ein.
! Stellen Sie sicher, dass Sie die SD-Speicherkarte in der richtigen
Vorne/Hinten-Richtung einsetzen.
! SD-Speicherkarten dürfen nicht gewaltsam eingesetzt oder
herausgezogen werden. Dadurch könnte die SD-Speicherkarte
oder diese Einheit beschädigt werden.
! Setzen Sie keine anderen Objekte als SD-Speicherkarten in
den SD-Speicherkarte-Einsetzschacht. Wenn hier Münzen oder
a
12
De
Page 61

Metallgegenstände eingesteckt werden können die internen
Schaltungen beschädigt und Fehlfunktionen verursacht werden.
! Nur SD-Speicherkarten oder SDHC-Speicherkarten, die den
SD-Standards entsprechen, können mit dieser Einheit verwendet
werden.
Verwendung der X-PAD FX-Funktion
1 Drücken Sie eine der Tasten [X-PAD FX].
Eine der internen Soundquellen oder eine der gesampelten
Soundquellen, geladen von SD-Speicherkarten, wird gewählt und ausgegeben. Wenn eine Taste gedrückt wird, wird der Sound sofort produziert.
Die gedrückte Taste leuchtet.
! Interne Soundquellen werden jeweils an den Tasten [KICK],
[SNARE], [CLAP] und [HI HAT] voreingestellt.
! Zum Wählen einer gesampelten Soundquelle, die auf
SD-Speicherkarte gespeichert ist, drücken Sie die Taste [X-PAD FX],
während Sie die Taste [BANK] gedrückt halten.
2 Berühren Sie das [X-PAD].
Dadurch wird der Effekt eingeschaltet.
Der Effekt wechselt entsprechend der Position am berührten [X-PAD].
! Der Effekt wird deaktiviert, wenn Sie Ihren Finger vom [X-PAD]
loslassen.
Sampeln des aktuell spielenden Sounds
und Verwendung der X-PAD FX-Funktion
1 Drücken Sie die Taste [ROLL].
Die Taste [ROLL] leuchtet.
2 Berühren Sie das [X-PAD].
Der Sound zu dem Zeitpunkt, wo [X-PAD] berührt wird, wird gesampelt,
und die Loop-Wiedergabe startet.
Die Anzahl der gesampelten Beats hängt von der Position des berührten
[X-PAD] ab.
1/81/4 1/21/1 2/1
! Der Effekt wird deaktiviert, wenn Sie Ihren Finger vom [X-PAD]
loslassen.
Verwendung der Halten-Funktion
Drücken Sie die Taste [HOLD (MUTE)].
Wenn der Hold-Modus aktiviert wird, wird der X-PAD FX-Effekt, der
anlag, bevor Ihr Finger vom [X-PAD] losgelassen wurde, gehalten.
! Drücken Sie die Taste [HOLD (MUTE)] erneut, um den Hold-Modus
auszuschalten.
Verwendung der BANK-Funktion
Wenn eine der Tasten [X-PAD FX] ([KICK], [SNARE], [CLAP] oder
[HI HAT]) gedrückt wird, während die Taste [BANK] gedrückt wird,
werden die gesampelten Sounds [BANK1], [BANK2], [BANK3]
oder [BANK4] in die entsprechende Taste [X-PAD FX] von der im
SD-Speicherkarten-Slot dieses Geräts eingesetzten SD-Speicherkarte
geladen.
! Beim Laden gesampelter Soundquellen von SD-Speicherkarten
in die Sektion [X-PAD FX] verwenden Sie zuerst remixbox zum
Speichern der gesampelten Soundquellen von der SD-Speicherkarte.
Einzelheiten siehe Bedienungsanleitung des remixbox.
1 Setzen Sie die SD-Speicherkarte, auf der die
gesampelten Soundquellen gespeichert sind, in den SDSpeicherkarten-Slot dieser Einheit ein.
2 Drücken Sie die Taste [BANK], um zu prüfen, welcher
BANK geladen werden kann.
Wenn die Taste [BANK] gedrückt wird, blinken die Anzeigen [BANK] für
die BANK, bei denen Soundquellen geladen werden können.
3 Drücken Sie eine der [X-PAD FX]-Tasten ([KICK],
[SNARE], [CLAP] oder [HI HAT]), während Sie die Taste
[BANK] drücken.
Die gesampelten Soundquellen, die auf der den SD-Speicherkarte gespeichert sind, werden in [SLOT1] bis [SLOT4] für die gewählte BANK geladen.
[KICK]-
Taste
[BANK]-Taste + [KICK]-Taste
[BANK]-Taste + [SNARE]-Taste
[BANK]-Taste + [CLAP]-Taste
[BANK]-Taste + [HI HAT]-Taste
! Die Maximalzahl der gesampelten Soundquellen, die geladen wer-
den können, beträgt 4BANK x 4SLOT.
! Die Maximallänge der gesampelten Sounds, die in der BANK ein-
gestellt werden können (die Gesamtzahl für die 4SLOT) beträgt 16
Sekunden.
! 48 kHz/24-Bit oder 48 kHz/16-Bit WAV-Dateien werden als
Soundquellen unterstützt.
! Wenn eine leuchtende [X-PAD FX]-Taste gedrückt wird, während
die Taste [BANK] erneut gedrückt wird, wird die interne Soundquelle
dieser Einheit gewählt und produziert.
BANK1
SLOT1
BANK2
SLOT1
BANK3
SLOT1
BANK4
SLOT1
[SNARE]-
Taste
BANK1
SLOT2
BANK2
SLOT2
BANK3
SLOT2
BANK4
SLOT2
[CLAP]-
Taste
BANK1
SLOT3
BANK2
SLOT3
BANK3
SLOT3
BANK4
SLOT3
[HI HAT]-
Taste
BANK1
SLOT4
BANK2
SLOT4
BANK3
SLOT4
BANK4
SLOT4
Verwendung der OVERDUB-Funktion
Aufnehmen und Abspielen von Sounds
Diese Funktion nimmt vier Beats der unter den Tasten [X-PAD FX]
gespeicherten Sounds auf und spielt die Sounds in einem Loop ab.
1 Drücken Sie die Taste [OVERDUB (DELETE)].
Die OVERDUB-Funktion schaltet sich ein.
Der Standby-Modus wird eingestellt, bis eine der [X-PAD FX]-Tasten
betätigt wird.
2 Drücken Sie eine der Tasten [X-PAD FX].
Wenn eine der [X-PAD FX]-Tasten gedrückt wird, beginnt die Aufnahme
und ein 4-Beat-Loop beginnt zu spielen.
! Der Sound einer [X-PAD FX]-Taste kann hinzugefügt werden, indem
diese Taste während der Loop-Wiedergabe gedrückt wird.
! Wenn die Taste [OVERDUB (DELETE)] erneut gedrückt wird, wird
die Funktion OVERDUB ausgeschaltet, und die Wiedergabe und
Aufnahme stoppen. Der aufgenommene Sound wird gelöscht.
Stummschalten aufgenommener Sounds
Drücken Sie eine der [X-PAD FX]-Tasten, während Sie die
[HOLD (MUTE)]-Taste drücken.
Der Sound von der [X-PAD FX]-Taste, die gedrückt wurde, wird vom
aufgenommenen Sound stummgeschaltet.
! Wenn die stummgeschaltete Taste [X-PAD FX] erneut gedrückt
wird, während die Taste [HOLD (MUTE)] gedrückt wird, wird der
Stummschalt-Modus aufgehoben.
Löschen aufgenommener Sounds
Drücken Sie eine der [X-PAD FX]-Tasten, während Sie die
[OVERDUB (DELETE)]-Taste drücken.
Der Sound von der [X-PAD FX]-Taste, die gedrückt wurde, wird vom
aufgenommenen Sound gelöscht.
! Gelöschte Sounds können nicht wiederhergestellt werden.
Deutsch
De
13
Page 62

RELEASE FX Sektion
FX SETTING Sektion
1
2
3
1 RELEASE FX-Wahlschalter
Dies schaltet den Typ des RELEASE FX-Effekts um.
2 RELEASE FX-Hebel
Verwenden Sie dies, um den RELEASE FX-Effekt einzustellen.
3 RELEASE FX-Anzeige
Leuchtet auf, wenn der Effekt eingeschaltet wird. Leuchtet entsprechend der Position des [RELEASE FX]-Hebels.
Verwendung der RELEASE FX-Funktion
1 Schalten Sie den [RELEASE FX]-Wahlschalter um.
Wählen Sie den RELEASE FX-Effekt.
! Einzelheiten über die Typen der Effekte siehe Typen von RELEASE
FX-Effekten auf Seite 17.
2 Bewegen Sie [RELEASE FX]-Hebel zu Ihnen hin.
Dadurch wird der Effekt eingeschaltet.
Der gewählte Effekt wird auf den in der Sektion FX SOURCE gewählten
Sound angelegt.
! Der Effekt wechselt entsprechend der Position des Hebels.
! Wenn der Hebel zurück in Ausgangsstellung gestellt wird,
schaltet der Effekt aus. Jegliche SCENE FX, ISOLATE FX oder
X-PAD FX-Effekte, die vorher aktiviert waren, werden ebenfalls
ausgeschaltet.
FX SOURCE Sektion
1
1 SETTING-Wahlschalter
Dies schaltet die Effektparameter-Daten dieser Einheit zwischen den
Modi [DEFAULT] und [USER] um.
— [DEFAULT]-Modus: Diese Einheit kann mit den werkseitig einge-
stellten Standardparameter-Daten verwendet werden.
— [USER]-Modus: Mit remixbox erzeugte Parameter-Daten können
in diese Einheit geladen und verwendet werden.
Was Sie mit remixbox tun können
Durch Verwenden der mit dieser Einheit mitgelieferten Anwendung
“remixbox” können Sie die unten aufgeführten Einstellungen ändern.
! Effektparameter: Die Parameter der unterschiedlichen Effekte
können benutzerangepasst werden.
! Typen von Effekten: Der zu [ROLL] in der Sektion X-PAD FX zuge-
wiesene Effekt kann auf einen anderen Effekt umgestellt werden.
! Tastenempfindlichkeit: Die Empfindlichkeit der Tasten [SCENE FX]
und [ISOLATE FX] kann eingestellt werden.
! Verwaltung gesampelter Soundquellen: Gesampelte Soundquellen,
die in dieser Einheit geladen werden können, können gespeichert
und verwaltet werden.
Weitere Einzelheiten dazu finden Sie im remixbox Hilfe-Menü.
Anweisungen zum Installieren von remixbox finden Sie in Verwendung
von remixbox auf Seite 19.
Verwendung dieser Einheit im Modus
USER
! Erzeugen Sie die benutzerangepassten Parameterdaten im Voraus
mit remixbox.
! Werkseitig sind die gleichen Parameterdaten wie für den Modus
[DEFAULT] auf für den Modus [USER] eingestellt.
1
2
1 INPUT-Taste
Die Soundeingabe zu den Buchsen [INPUT] dieser Einheit wird
zu den Sektionen SCENE FX, ISOLATE FX und RELEASE FX dieser
Einheit geleitet.
2 X-PAD-Taste
Die Soundausgabe von der Sektion X-PAD FX wird zu den Sektionen
SCENE FX, ISOLATE FX und RELEASE FX geleitet.
Umschalten des Audiosignalpfads
Schaltet um, ob die Soundeingabe zu dieser Einheit und der intern
erzeugte Sound zu den Sektionen SCENE FX, ISOLATE FX und RELEASE
FX dieser Einheit geleitet wird.
Drücken Sie die Taste [INPUT] oder [X-PAD].
Das gewählte Audiosignal wird an die Sektionen SCENE FX, ISOLATE FX
und RELEASE FX dieser Einheit angelegt.
! Es ist auch möglich, die Taste [INPUT] und [X-PAD] gleichzeitig zu wählen.
! Der Effekt [NOISE] in der Sektion SCENE FX wird ungeachtet des
Status der Tasten [INPUT] und [X-PAD] angelegt.
De
14
Schreiben der benutzerangepassten
Parameterdaten von remixbox in diese Einheit
1 Schließen Sie den Computer, auf dem remixbox
installiert ist, über ein USB-Kabel an diese Einheit an.
2 Senden Sie die benutzerangepassten Parameterdaten
von remixbox zu dieser Einheit.
3 Schieben Sie den [SETTING]-Wahlschalter zur Position
[USER].
Laden benutzerangepasster Parameterdaten, die
auf einer SD-Speicherkarte gespeichert sind
1 Laden Sie die benutzerangepassten Parameterdaten
auf der SD-Speicherkarte mit remixbox.
2 Setzen Sie die in Schritt 1 verwendete SDSpeicherkarte in den SD-Speicherkarten-Slot dieser
Einheit ein.
3 Schieben Sie den [SETTING]-Wahlschalter zur Position
[USER].
! Benutzerangepasste und auf einer SD-Speicherkarte gespeicherte
Parameterdaten werden in dieser Einheit reflektiert, indem einfach
die betreffende SD-Speicherkarte in diese Einheit eingesetzt wird.
Page 63

Typen von Effekten
Eingabeton ausgeschaltet
Eingabeton ausgeschaltet
Direkt-Ton
Typen von SCENE FX-Effekten
BPF ECHO
Diese Funktion überlagert den Eingabesound, der durch den
Bandpassfilter gelaufen ist, über den Originaleingabesound und führt
dies durch die Echoschaltung, bevor der Sound ausgegeben wird.
Das Echo wird mehrfach entsprechend dem Multiplikationsfaktor des
Beats des Eingabesounds ausgegeben, wobei der Verzögerungssound
allmählich gedämpft wird.
Sound anlegen, der durch den
Bandpassfilter geführt wurde
Eingangssound
SCENE FX
Regler
SCENE FX-Regler Stellt die Schwellenfrequenz des Bandpassfilters ein.
SUB PARAMETER
1-Regler
SUB PARAMETER
2-Regler
Stellt die Verzögerungszeit des Echosounds ein.
Legt einen Modulationseffekt auf die Ausgabe an.
ECHO
Das Echo wird mehrfach entsprechend dem Multiplikationsfaktor des
Beats des Eingabesounds ausgegeben, wobei der Verzögerungssound
allmählich gedämpft wird.
Frequenz
SPIRAL UP
Diese Funktion fügt einen Nachhalleffekt zum Eingabeton hinzu.
Wenn sich die Verzögerungszeit ändert, ängert sich die Tonlage
entsprechend.
Fade-out
1 Beat
SCENE FX-Regler Stellt die Verzögerungszeit des SPIRAL ein.
SUB PARAMETER
1-Regler
SUB PARAMETER
2-Regler
Stellt die Verzögerungszeit des Echosounds ein.
Stellt den Betrag der Tonlagenverschiebung zum
Steigern der Tonlage ein.
Zeit
REVERB UP
Diese Funktion fügt einen Nachhalleffekt zum Eingabeton hinzu.
Pegel
Früh reflektierter Ton
Nachhal
Zeit
Deutsch
Fade-out
1 Beat
SCENE FX-Regler
SUB PARAMETER
1-Regler
SUB PARAMETER
2-Regler
Verwenden Sie dies, um die Balance zwischen
Originalsound und Echosound einzustellen.
Stellt die Verzögerungszeit des Echosounds ein.
Stellt die Schwellenfrequenz für den Filter ein.
Zeit
NOISE
Diese Funktion führt vor der Ausgabe intern erzeugtes weißes Rauschen
durch den Bandpassfilter und die Echoschaltung.
SCENE FX
Regler
SCENE FX-Regler
SUB PARAMETER
1-Regler
SUB PARAMETER
2-Regler
Stellt die Schwellenfrequenz des Filters ein, durch den
das weiße Rauschen läuft.
Stellt die Lautstärke für das weiße Rauschen ein.
Legt einen Modulationseffekt auf das weiße Rauschen
an.
Frequenz
SCENE FX-Regler
SUB PARAMETER
1-Regler
SUB PARAMETER
2-Regler
Verwenden Sie dies, um den Grad des Nachhalleffekts
einzustellen.
Verwenden Sie dies, um den Grad des Nachhalleffekts
einzustellen.
Stellt die Schwellenfrequenz des Hochpassfilters ein.
HPF ECHO
Diese Funktion führt den Eingabesound vor der Ausgabe durch den
Hochpassfilter und die Echoschaltung.
Das Echo wird mehrfach entsprechend dem Multiplikationsfaktor des
Beats des Eingabesounds ausgegeben, wobei der Verzögerungssound
allmählich gedämpft wird.
Frequenz
SCENE FX-Regler Stellt die Schwellenfrequenz des Hochpassfilters ein.
SUB PARAMETER
1-Regler
SUB PARAMETER
2-Regler
Stellt die Verzögerungszeit des Echosounds ein.
Legt einen Modulationseffekt auf die Ausgabe an.
LPF ECHO
Diese Funktion führt den Eingabesound vor der Ausgabe durch den
Tiefpassfilter und die Echoschaltung.
Das Echo wird mehrfach entsprechend dem Multiplikationsfaktor des
Beats des Eingabesounds ausgegeben, wobei der Verzögerungssound
allmählich gedämpft wird.
De
15
Page 64

Frequenz
Eingabeton ausgeschaltet
Direkt-Ton
SCENE FX-Regler Stellt die Schwellenfrequenz des Tiefpassfilters ein.
SUB PARAMETER
1-Regler
SUB PARAMETER
2-Regler
Stellt die Verzögerungszeit des Echosounds ein.
Legt einen Modulationseffekt auf die Ausgabe an.
SCENE FX-Regler
SUB PARAMETER
1-Regler
SUB PARAMETER
2-Regler
Verwenden Sie dies, um den Grad des Nachhalleffekts
einzustellen.
Verwenden Sie dies, um den Grad des Nachhalleffekts
einzustellen.
Stellt die Schwellenfrequenz des Tiefpassfilters ein.
Typen von ISOLATE FX-Effekten
CRUSH ECHO
Diese Funktion erzeugt einen Sound gecrusht würde und führt ihn vor
der Ausgabe durch den Filter und die Echoschaltung.
Das Echo wird mehrfach entsprechend dem Multiplikationsfaktor des
Beats des Eingabesounds ausgegeben, wobei der Verzögerungssound
allmählich gedämpft wird.
SCENE FX
Regler
SCENE FX-Regler
SUB PARAMETER
1-Regler
SUB PARAMETER
2-Regler
Zyklus
Stellt den Grad ein, um den der Eingabeton gecrusht
wird.
Stellt die Verzögerungszeit des Echosounds ein.
Legt einen Modulationseffekt auf die Ausgabe an.
Zeit
SPIRAL DOWN
Diese Funktion fügt einen Nachhalleffekt zum Eingabeton hinzu.
Wenn sich die Verzögerungszeit ändert, ängert sich die Tonlage
entsprechend.
ISOLATOR
Diese Funktion erlaubt es Ihnen, den Eingabesound in drei Bänder zu
spalten – tief, mittel und hoch – und den Audiopegel für die einzelnen
Bänder einzustellen.
LOW-Regler Stellt den Audiopegel der niedrigen Frequenzen ein.
MID-Regler Stellt den Audiopegel der mittleren Frequenzen ein.
HI-Regler Stellt den Audiopegel der hohen Frequenzen ein.
CUT/ADD
CUT: Beim Drehen gegen den Uhrzeigersinn
Diese Funktion erlaubt es Ihnen, den Audiopegel der Basstrommel
einzustellen, die im Eingabesound erkannt wird, ebenso wie die
Schwellenfrequenz des manuellen Filters.
LOW-Regler
MID-Regler
HI-Regler
Stellt den Audiopegel der im Eingabesound erkannten
Basstrommel ein.
Legt einen anderen Sound als die im Eingabesound
erkannte Basstrommel an den Hochpassfilter an.
Legt einen anderen Sound als die im Eingabesound
erkannte Basstrommel an den Tiefpassfilter an.
Basstrommel
Basstrommel
Frequenz
Fade-out
1 Beat
SCENE FX-Regler Stellt die Verzögerungszeit des SPIRAL ein.
SUB PARAMETER
1-Regler
SUB PARAMETER
2-Regler
Stellt die Verzögerungszeit des Echosounds ein.
Stellt den Betrag der Tonlagenverschiebung zum Senken
der Tonlage ein.
REVERB DOWN
Diese Funktion fügt einen Nachhalleffekt zum Eingabeton hinzu.
Pegel
16
De
Früh reflektierter Ton
Nachhal
Zeit
Zeit
Basstrommel
Basstrommel
Basstrommel
Basstrommel
ADD: Beim Drehen im Uhrzeigersinn
Diese Funktion erlaubt es Ihnen, einen 1/8-Beat-Verzögerungssound
entsprechend dem Multiplikationsfaktor des Beats des Eingabesounds
anzuwenden.
LOW-Regler
MID-Regler
HI-Regler
Stellt den Audiopegel des Verzögerungssounds mit
niedrigen Frequenzen ein.
Stellt den Audiopegel des Verzögerungssounds mit
mittleren Frequenzen ein.
Stellt den Audiopegel des Verzögerungssounds mit
hohen Frequenzen ein.
Page 65

1/1 Beat
1/2 Beat
1/4 Beat
1/8 Beat
Zeit
TRANS/ROLL
TRANS: Beim Drehen gegen den Uhrzeigersinn
Diese Funktion schneidet den Eingabesound entsprechend dem
Multiplikationsfaktor des bei der Reglerstellung eingestellten Beats ab.
LOW-Regler
MID-Regler
HI-Regler
Stellt den Betrag ein, um den der Niederfrequenz-Sound
abgeschnitten wird.
Stellt den Betrag ein, um den der Mittenfrequenz-Sound
abgeschnitten wird.
Stellt den Betrag ein, um den der Hochfrequenz-Sound
abgeschnitten wird.
1/1 Beat
Zeit
GATE/DRIVE
GATE: Beim Drehen gegen den Uhrzeigersinn
Diese Funktion gibt den Teil des Eingabesounds aus, der einen höheren
Pegel als der Schwellenpegel hat, wobei der Eingabesound abgeschnitten wird, der einen Pegel unter dem Schwellenpegel hat.
LOW-Regler
MID-Regler
HI-Regler
Pegel
DRIVE: Beim Drehen im Uhrzeigersinn
Diese Funktion verzerrt den Eingabesound.
LOW-Regler
MID-Regler
HI-Regler
Stellt den Schwellenpegel des Sounds mit niedrigen
Frequenzen ein.
Stellt den Schwellenpegel des Sounds mit mittleren
Frequenzen ein.
Stellt den Schwellenpegel des Sounds mit hohen
Frequenzen ein.
Schwelle
Zeit
Schwelle
Schwelle
Stellt den Betrag ein, um den der Niederfrequenz-Sound
verzerrt wird.
Stellt den Betrag ein, um den der Mittenfrequenz-Sound
verzerrt wird.
Stellt den Betrag ein, um den der Hochfrequenz-Sound
verzerrt wird.
Deutsch
1/2 Beat
1/4 Beat
ROLL: Beim Drehen im Uhrzeigersinn
Diese Funktion schneidet den Eingabesound beginnend von dem Punkt,
wo der Regler [LOW], [MID] oder [HI] gedreht wird, ab und gibt den aufgenommenen Sound wiederholt entsprechend dem Multiplikationsfaktor
des bei der Position des Reglers eingestellten Beats aus.
LOW-Regler
MID-Regler
HI-Regler
Original
1/1 Roll
1/2 Roll
Stellt den Zyklus ein, bei dem der Niederfrequenz-Sound
wiederholt ausgegeben wird.
Stellt den Zyklus ein, bei dem der Mittenfrequenz-Sound
wiederholt ausgegeben wird.
Stellt den Zyklus ein, bei dem der Hochfrequenz-Sound
wiederholt ausgegeben wird.
Effekt eingeschaltet
Wiederholt
Wiederholt
Zyklus
Zeit
Typen von X-PAD FX-Effekten
Zeichnet den Eingabesound beginnend von dem
ROLL
KICK
SNARE
CLAP
HI HAT
SAMPLER
Punkt, wo [X-PAD] berührt wird, auf und gibt den aufgenommenen Sound wiederholt entsprechend dem
Multiplikationsfaktor des mit [X-PAD] eingestellten Beats
aus.
Gibt die interne Soundquelle “KICK” aus.
Gibt die interne Soundquelle “SNARE” aus.
Gibt die interne Soundquelle “CLAP” aus.
Gibt die interne Soundquelle “HI HAT” aus.
Gibt den gesampelten und auf SD-Speicherkarte aufgezeichneten Sound aus.
Typen von RELEASE FX-Effekten
VINYL BRAKE
ECHO
BACK SPIN
Erzielt den Effekt des allmählichen Sinkens der
Wiedergabegeschwindigkeit des Eingabesounds bis zum
Stoppen.
Das Echo wird mehrfach im Beat des Eingabesounds
ausgegeben, wobei der Verzögerungssound allmählich
gedämpft wird.
Erzielt den Effekt der Wiedergabe des aktuell spielenden Eingabesounds in Reverse-Richtung mit hoher
Geschwindigkeit.
De
17
Page 66

Verwendung der mitgelieferten Software
Software-Lizenzvereinbarung
Diese Software-Lizenzvereinbarung („Vereinbarung“) wird zwischen
Ihnen (sowohl einem Einzelbenutzer, der das Programm installiert,
und einer einzigen juristischen Person, für die der Einzelbenutzer handelt) („Sie“ oder „Ihr“) und der PIONEER CORPORATION („Pioneer“)
abgeschlossen.
FALLS SIE SCHRITTE DURCHFÜHREN, DAS PROGRAMM
EINZURICHTEN ODER ZU INSTALLIEREN, BEDEUTET DIES, DASS SIE
ALLEN BESTIMMUNGEN DIESER LIZENZVEREINBARUNG ZUSTIMMEN.
DIE ERLAUBNIS, DAS PROGRAMM HERUNTERZULADEN UND/ODER
ZU BENUTZEN, HÄNGT AUSDRÜCKLICH VON IHRER BEFOLGUNG
DIESER BESTIMMUNGEN AB. ES IST KEINE GESCHRIEBENE ODER
ELEKTRONISCHE GENEHMIGUNG ERFORDERLICH, DAMIT DIESE
VEREINBARUNG IN KRAFT TRITT UND DURCHSETZBAR IST. FALLS SIE
NICHT ALLEN BESTIMMUNGEN DIESER VEREINBARUNG ZUSTIMMEN,
IST ES IHNEN NICHT ERLAUBT, DIESES PROGRAMM ZU BENUTZEN
UND SIE MÜSSEN DIE INSTALLATION ABBRECHEN BZW. DAS
PROGRAMM DEINSTALLIEREN.
1 Definitionen
1 „Dokumentierung“ bedeutet die schriftliche Dokumentierung,
die technischen Daten und der Hilfe-Inhalt, die von Pioneer
allgemein zur Verfügung gestellt werden, um Ihnen bei den
Installation und dem Gebrauchs des Programms behilflich zu
sein.
2 „Programm“ bedeutet die gesamte Pioneer-Software, oder einen
Teil davon, die Sie gemäß dieser Vereinbarung unter Lizenz von
Pioneer erhalten.
2 Programmlizenz
1 Beschränkte Lizenz. Entsprechend den Einschränkungen dieser
Vereinbarung erteilt Ihnen Pioneer eine beschränkte, nicht ausschließliche, nicht übertragbare Lizenz (ohne das Recht auf eine
Unterlizenz):
a Zur Installation einer einzigen Kopie dieses Programms auf
der Festplatte Ihres Computers, um das Programm ausschließlich für Ihren persönlichen Gebrauch entsprechend
dieser Vereinbarung und der Dokumentierung („Autorisierter
Gebrauch“) zu verwenden;
b Zur Verwendung der Dokumentierung für die Unterstützung
des autorisierten Gebrauchs; und
c Zur Anfertigung einer Programmkopie ausschließlich
für Sicherungszwecke, vorausgesetzt, dass alle Titel und
Warenzeichen, das Copyright und alle Hinweise auf eingeschränkte Rechte auf der Kopie reproduziert werden.
2 Einschränkungen. Sie dürfen das Programm oder die
Dokumentierung nicht kopieren oder verwenden, außer wie
ausdrücklich durch diese Vereinbarung erlaubt. Sie dürfen das
Programm nicht übertragen, unterlizenzieren, mieten, vermieten
oder verleihen bzw. für das Training von Dritten, das kommerzielle Timesharing oder die Verwendung in einem Service-Büro
gebrauchen. Sie dürfen das Programm weder selbst noch durch
Dritte abändern, rekonstruieren, auseinander nehmen oder
dekompilieren, außer bis zu dem vom geltenden Gesetz zugelassenen Ausmaß, und auch dann nur, nachdem Sie Pioneer
schriftlich von ihren beabsichtigten Tätigkeiten informiert haben.
Sie dürfen das Programm nicht auf mehreren Prozessoren installieren, ohne vorher die schriftliche Zustimmung von Pioneer
eingeholt zu haben.
3 Eigentum. Pioneer oder sein Lizenzgeber behält sich alle Rechte,
Titel und Anteile am gesamten Patent, das Urheberrecht,
Warenzeichen, Geschäftsgeheimnis und die Rechte des geistigen Eigentums am Programm und der Dokumentierung, sowie
allen Derivaten davon, vor. Sie erwerben keine weiteren Rechte,
weder ausdrücklich noch impliziert, die über die beschränkte
Lizenz, die in dieser Vereinbarung angeführt ist, hinausgehen.
4 Keine Unterstützung. Pioneer ist nicht verpflichtet, das
Programm oder die Dokumentierung unter dieser Vereinbarung
zu unterstützen, warten, aktualisieren, verändern oder neue
Veröffentlichungen bekanntzugeben.
3 Garantie-Verzichtserklärung
DAS PROGRAMM UND DIE DOKUMENTIERUNG WERDEN „WIE
VORHANDEN“ ANGEBOTEN, OHNE JEGLICHE DARSTELLUNGEN
ODER GARANTIEN, UND SIE STIMMEN DAMIT ÜBEREIN, SIE AUF
EIGENES RISIKO ZU VERWENDEN. BIS ZU DEM VOM GESETZ
ZUGELASSENEN MASS STREITET PIONEER AUSDRÜCKLICH ALLE
GARANTIEN JEGLICHER ART MIT BEZUG AUF DAS PROGRAMM UND
DIE DOKUMENTIERUNG AB, SEIEN SIE AUSDRÜCKLICH, IMPLIZIERT,
SATZUNGSGEMÄSS ODER SICH AUS EINEM LEISTUNGSKURS
ERGEBEND, BZW. EINEM HANDELSKURS ODER GEBRAUCH,
EINSCHLIESSLICH ALLER GARANTIEN DER VERMARKTBARKEIT,
EIGNUNG FÜR EINEN BESTIMMTEN ZWECK, AUSREICHENDER
QUALITÄT, GENAUIGKEIT, DES TITELS ODER DER NICHTVERLETZUNG.
4 Schadensersatz und Rechtsbehelfe für Vertragsbruch
Sie stimmen damit überein, dass jede Verletzung der Einschränkungen
dieser Vereinbarung Pioneer irreparable Schäden zufügen würde, für
die eine monetäre Entschädigung allein unzureichend wäre. Zusätzlich
zu den Schadensersatzforderungen und anderen Rechtbehelfen, zu
denen Pioneer berechtigt sein kann, stimmen Sie damit überein, dass
Pioneer das Recht hat, eine richterliche Verfügung einzureichen, um
den tatsächlichen, drohenden oder wiederholten Vertragsbruch dieser
Vereinbarung zu verhindern.
5 Beendigung
Pioneer kann diese Vereinbarung jederzeit beenden, falls Sie irgendwelche Bestimmungen verletzt haben. Falls diese Vereinbarung beendet
wird, dürfen Sie das Programm nicht weiter verwenden und müssen
es von dem Computer, auf dem es installiert ist, dauerhaft löschen
sowie alle in Ihrem Besitz befindlichen Kopien des Programms und der
Dokumentierung zerstören und Pioneer dann schriftlich davon informieren. Die Abschnitte 2.2, 2.3, 2.4, 3, 4, 5 und 6 bleiben auch nach der
Beendigung dieser Vereinbarung weiterhin in Kraft.
6 Allgemeine Bestimmungen
1 Beschränkung der Haftbarkeit. Unter keinen Umständen sind
Pioneer oder seine Tochtergesellschaften in Zusammenhang
mit dieser Vereinbarung oder ihrem Inhalt, unter keiner Haftbarkeitstheorie, haftbar für indirekte Schäden,
Folgeschäden, spezielle oder nachfolgende Schäden sowie
verschärften Schadensersatz oder für Schadensersatz für
verlorene Profite, Einkommen, Geschäfte, Ersparnisse,
Daten, den Gebrauch oder die Kosten für den Erwerb eines
Ersatzprogramms, selbst wenn Pioneer auf die Möglichkeit einer
solchen Schadensersatzforderung aufmerksam gemacht wurde
bzw. eine solche Schadensersatzforderung vorhersehbar ist.
Unter keinen Umständen wird die Haftbarkeit von Pioneer für alle
Schadensersatzforderungen den Betrag überschreiten, den Sie
Pioneer oder seinen Tochtergesellschaften für den Erwerb des
Programms bezahlt haben. Die Vertragsparteien geben zu, dass
die Haftbarkeitsgrenzen und die Risikoverteilung, die in dieser
Vereinbarung angeführt sind, im Programmpreis widerspiegelt
sind und einen wesentlichen Teil des Abkommens zwischen den
Parteien darstellen, da Pioneer dieses Programm anderenfalls
nicht angeboten noch auch diese Vereinbarung abgeschlossen
hätte.
2 Die in dieser Vereinbarung enthaltenen Beschränkungen oder
Ausschlüsse der Garantien und Haftbarkeit betreffen oder beeinträchtigen Ihre gesetzlichen Rechte als Kunde nicht und gelten
für Sie nur in dem Maße, in dem solche Beschränkungen oder
Ausschlüsse unter den Gesetzen der Gerichtsbarkeit an Ihrem
Wohnort erlaubt sind.
3 Trennbarkeit und Verzicht. Falls irgendeine Bestimmung dieser
Vereinbarung als illegal, ungültig oder auf andere Weise nicht
durchsetzbar eingestuft wird, wird diese Bestimmung bis zum
erlaubten Maße durchgesetzt oder, falls eine Durchsetzung
nicht möglich ist, als trennbar angesehen und daher aus
18
De
Page 67

dieser Vereinbarung ausgeschlossen, während die restlichen
Bestimmungen der Vereinbarung weiterhin voll in Kraft bleiben.
Der Verzicht einer der Parteien im Falle eines Versäumnisses
oder Vertragsbruchs dieser Vereinbarung bedeutet nicht, dass
im Falle eines späteren Versäumnisses oder Vertragsbruchs
ebenfalls ein Verzicht erfolgt.
4 Keine Übereignung. Sie dürfen diese Vereinbarung oder
irgendwelche darin enthaltenen Rechte oder Pflichten nicht
übereignen, verkaufen, übertragen, delegieren oder sich ihrer auf
andere Weise entledigen, weder gewollt noch ungewollt, sei es
gesetzmäßig oder auf andere Weise, ohne vorher die schriftliche
Zustimmung von Pioneer eingeholt zu haben. Jede angebliche Übereignung, Übertragung oder Delegation durch Sie ist
null und nichtig. Vorbehaltlich des Obengenannten ist diese
Vereinbarung für die Parteien und ihre jeweiligen Nachfolger und
Rechtsnachfolger bindend.
5 Gesamte Vereinbarung. Diese Vereinbarung stellt die gesamte
Vereinbarung zwischen den Parteien dar und löst alle vorherigen
oder gleichzeitigen Vereinbarungen oder Vertretungen bezüglich des Inhalts, seien sie schriftlich oder mündlich, ab. Diese
Vereinbarung darf ohne die vorherige und ausdrückliche schriftliche Zustimmung von Pioneer nicht modifiziert oder berichtigt
werden, und keine weitere Akte, kein Dokument, Verwendung
oder Gewohnheitsrecht kann diese Vereinbarung berichtigen
oder modifizieren.
6 Sie erklären Ihr Einverständnis damit, dass diese Vereinbarung
durch japanische Gesetzgebung geregelt und gemäß dieser
ausgelegt wird.
Verwendung von remixbox
Wenn die auf einem Computer installierte Anwendung remixbox verwendet wird, können die Einstellungen der Parameter der Effekte dieser
Einheit nach Wunsch benutzerangepasst werden. Die remixbox kann
auch verwendet werden, um gesampelte Soundquellen in die Sektion
X-PAD FX zu laden.
Verwenden Sie remixbox auf dem Computer, um die benutzerangepassten Parameterdaten der Effekte und die gesampelten Soundquellen im
Voraus vorzubereiten. Die benutzerangepassten Parameterdaten und die
gesampelten Soundquellen können auf einer SD-Speicherkarte gespeichert und in diese Einheit geladen werden. Sie können auch direkt in
diese Einheit geladen werden, wenn diese Einheit und der Computer
über USB-Kabel verbunden sind.
Vorsichtshinweise zur Installation
! Wenn die Installation von remixbox vor der Fertigstellung unterbro-
chen wird, verfahren Sie wie folgt, um die Installation von Anfang an
neu auszuführen.
! Bitte lesen Sie vor der Installation von remixbox die
“Software-Lizenzvereinbarung”.
! Falls andere Programme auf dem Computer laufen, beenden Sie
diese vor der Installation von remixbox.
! remixbox wird auf den folgenden Betriebssystemen unterstützt:
Unterstützte Betriebssysteme
Windows
Intel
Mac
1 Ein von Microsoft bereitgestelltes Hotfix-Programm muss installiert werden. Der
Kunde ist für die Installation des Hotfix-Programms verantwortlich.
1 Gehen Sie zu der Support-Site von Microsoft (http://support.microsoft.
com/).
2 Im Suchfenster der Site suchen Sie nach der Dokumentnummer „2182039“
und laden Sie den Hotfix herunter.
! Weil Microsoft die unten aufgeführten Betriebssysteme nicht mehr unterstützt,
kann Pioneer die richtige Funktion bei Verwendung dieser Betriebssysteme
nicht gewährleisten.
— Windows Vista
niedriger)
— Windows® XP Home Edition/Professional (SP2 und niedriger)
®
Windows
7 Home Premium/Professional/
Ultimate
Windows Vista
Home Premium/Business/Ultimate (SP2
oder höher)
Windows
Professional (SP3 oder höher)
Mac OS X 10.7
Mac OS X 10.6
Mac OS X 10.5 32-Bit-Version
®
Home Basic/
®
XP Home Edition/
®
Home Basic/Home Premium/Business/Ultimate (SP1 und
32-Bit-Version
64-Bit-Version
32-Bit-Version
64-Bit-Version
32-Bit-Version
64-Bit-Version
32-Bit-Version
64-Bit-Version
32-Bit-Version
64-Bit-Version
1
1
1
1
3
1
3
1
1
1
1
1
Deutsch
Installieren von remixbox
Installationsverfahren (Windows)
Lesen Sie den Abschnitt Vorsichtshinweise zur Installation vor der
Installation von remixbox sorgfältig durch.
! Genehmigung des Computer-Administrators ist für die Installation
und Deinstallation von remixbox erforderlich.
Melden Sie sich vor der Installation als der als Benutzer an, der als
Administrator des Computers registriert war.
1 Setzen Sie die mitgelieferte remixbox CD-ROM in das
CD-Laufwerk Ihres Computers ein.
Die CD-ROM-Menü wird angezeigt.
! Wenn das CD-ROM-Menü nicht angezeigt wird, wenn die CD-ROM
eingesetzt wird, öffnen Sie das CD-Laufwerk von [Computer (oder
De
19
Page 68

Arbeitsplatz)] im Menü [Start], und doppelklicken Sie auf das
[CD_menu.exe]-Icon.
2 Wenn das CD-ROM-Menü angezeigt wird, wählen Sie
[remixbox: Installieren Sie remixbox] und klicken dann
auf [Start].
! Zum Schließen des CD-ROM-Menüs klicken Sie auf [Beenden].
3 Wenn der Sprachenauswahlbildschirm erscheint,
wählen Sie [Deutsch] und klicken auf [OK].
! Sie können die gewünschte unter mehreren Sprachen wählen,
solange die betreffende Sprache von der Systemumgebung Ihres
Computers unterstützt wird.
4 Wenn der Bildschirm mit der Lizenzvereinbarung
erscheint, lesen Sie die Software-Lizenzvereinbarung
sorgfältig durch. Wenn Sie der Software-
Lizenzvereinbarung zustimmen, klicken Sie auf [Ich
stimme zu].
! Wenn Sie den Bedingungen der Software-Lizenzvereinbarung
nicht zustimmen, klicken Sie auf [Abbrechen] und brechen die
Installation ab.
5 Installieren Sie remixbox entsprechend den
Anweisungen auf dem Bildschirm.
! Klicken Sie auf [Abbrechen], um die Installation nach dem Start
abzubrechen.
Installationsverfahren (Mac OS X)
Lesen Sie den Abschnitt Vorsichtshinweise zur Installation vor der
Installation von remixbox sorgfältig durch.
! Genehmigung des Computer-Administrators ist für die Installation
und Deinstallation von remixbox erforderlich.
Melden Sie sich vor der Installation als der als Benutzer an, der als
Administrator des Computers registriert war.
1 Setzen Sie die remixbox CD-ROM in das CD-Laufwerk
des Computers und doppelklicken dann auf das Icon
[CD_menu.app], wenn es in einem Fenster erscheint.
! Wenn das Fenster mit dem Icon [CD_menu.app] nicht erscheint,
wenn die CD-ROM eingesetzt wird, verwenden Sie den Finder, um
das CD-Laufwerk manuell zu öffnen und klicken Sie auf das Icon
[CD_menu.app].
2 Wenn das CD-ROM-Menü angezeigt wird, wählen Sie
[remixbox: Installieren Sie remixbox] und klicken dann
auf [Start].
! Zum Schließen des CD-ROM-Menüs klicken Sie auf [Beenden].
3 Wenn der Bildschirm mit der Lizenzvereinbarung
erscheint, wählen Sie [Deutsch], lesen Sie die Software-
Lizenzvereinbarung sorgfältig durch und klicken dann
auf [Fortfahren].
! Sie können die gewünschte unter mehreren Sprachen wählen,
solange die betreffende Sprache von der Systemumgebung Ihres
Computers unterstützt wird.
4 Wenn Sie den Bestimmungen der SoftwareLizenzvereinbarung zustimmen, klicken Sie auf
[Akzeptieren].
! Wenn Sie den Bedingungen der Software-Lizenzvereinbarung nicht
zustimmen, klicken Sie auf [Ablehnen] und brechen die Installation
ab.
5 Installieren Sie remixbox entsprechend den
Anweisungen auf dem Bildschirm.
Starten remixbox/Betrachten der
Bedienungsanleitung
Melden Sie sich vor der Verwendung von remixbox als der als Benutzer
an, der als Administrator des Computers registriert war.
Die Bedienungsanleitung kann durch Starten von remixbox und
anschließendes Klicken auf [Manual] vom remixbox [Help]-Menü aus
geöffnet werden.
Für Windows® 7, Windows Vista® und Windows®
XP
Klicken Sie auf die Windows [Start]-Menü-Schaltfläche,
und dann auf [Alle Programme] > [Pioneer] > [remixbox
1.x.x] > [remixbox 1.x.x].
! Die Kennzeichnung 1.x.x zeigt die Version von remixbox an.
Für Mac OS X
Öffnen Sie den [Anwendung]-Ordner mit Finder und
doppelklicken Sie auf [remixbox 1.x.x.app].
! Die Kennzeichnung 1.x.x zeigt die Version von remixbox an.
Verbinden dieses Geräts mit dem
Computer
1 Schieben Sie den Schalter [ON, STANDBY] an der
Rückseite dieser Einheit in Stellung [ON].
Schalten Sie die Stromversorgung dieses Geräts ein.
2 Schließen Sie dieses Gerät über ein USB-Kabel an
Ihren Computer an.
! Dieses Verfahren funktioniert nicht mit Computern, die nicht USB
2.0 unterstützen.
! Wenn Windows XP verwendet wird und ein anderes USB-MIDI-Gerät
gleichzeitig an den Computer angeschlossen ist, kann es nicht richtig arbeiten oder erkannt werden. Schließen Sie nur den Computer
und dieses Gerät an.
! Verbinden Sie dieses Gerät und den Computer direkt mit dem mitge-
lieferten USB-Kabel.
Prüfen der neuesten Informationen
über die mitgelieferte Software
Für die neuesten Informationen über die mitgelieferte Software und
unterstützte Betriebssysteme siehe unten angegebene Website.
http://pioneerdj.com/support/
! Betrieb kann nicht garantiert werden, wenn mehrere Einheiten
dieses Mixers an einen einzigen Computer angeschlossen sind.
20
De
Page 69

Ändern der Einstellungen dieses Geräts
Ändern der MIDI-Einstellungen
Die folgenden Tasten werden zum Ändern der MIDI-Einstellungen
verwendet:
— [TAP]-Taste: Dient als Enter-Taste.
— [AUTO]-Taste: Dient als Cancel-Taste.
— [NUDGE (+, –)]-Taste: Dient zum Wählen von Elementen.
1 Schalten Sie das Gerät ein, während Sie die Taste
[QUANTIZE] gedrückt halten.
Diese Einheit startet in dem Modus zum Ändern der MIDI-Einstellungen.
Die Einstellelemente werden in der BPM-Anzeige angezeigt.
2 Drücken Sie die Seite [+] oder [–] der Taste
[NUDGE (+, –)].
Wählen Sie, ob Sie den MIDI-Kanal oder den MIDI-Tastentyp ändern
wollen.
— Wenn [CH] oder Zahlen angezeigt werden:
MIDI-Kanal-Änderungsmodus
— Wenn [btn] oder Buchstaben angezeigt werden:
MIDI-Tastentyp-Änderungsmodus
3 Drücken Sie die Taste [TAP].
Schalten Sie den Modus zum Ändern des MIDI-Kanals oder zum Ändern
des MIDI-Tastentyps um.
Die MIDI-Kanalnummer oder der MIDI-Tastentyp blinken in der
BPM-Anzeige.
4 Drücken Sie die Seite [+] oder [–] der Taste
[NUDGE (+, –)].
Wählen und ändern Sie den MIDI-Kanal oder den MIDI-Tastentyp. Die
untenstehenden Werte können für beide gewählt werden.
— MIDI-Kanal: [1] bis [16]
— MIDI-Tastentyp: [tGL (Toggle)] oder [trG (Trigger)]
5 Drücken Sie die Taste [TAP].
Die gewählte Einstellung wird gespeichert.
Die gewählte Einstellung blinkt schnell in der BPM-Anzeige.
! Wenn diese Einheit ausgeschaltet wird, wird der Modus zum Ändern
der MIDI-Einstellungen beendet.
! Die Einstellungen dieses Geräts bei Auslieferung ab Werk sind wie
folgt:
— MIDI-Kanal: [1]
— MIDI-Tastentyp: [tGL (Toggle)]
Verwendung der
Aktualisierungsfunktion
! Schalten Sie nicht während der Aktualisierung die Stromversorgung
aus.
1 Schalten Sie diese Einheit ein, während Sie die Tasten
[HOLD (MUTE)] oder [TAP] gedrückt halten.
Diese Einheit startet im Aktualisierungsmodus.
Die aktuelle Firmware-Versionsnummer wird in der BPM-Anzeige angezeigt, und der rechte Rand der [OUTPUT]-Pegelanzeige blinkt.
2 Setzen Sie die SD-Speicherkarte, auf der die
Aktualisierungsdatei gespeichert ist, in den SDSpeicherkarten-Slot dieser Einheit ein.
Aktualisierung beginnt.
Die [OUTPUT]-Pegelanzeige leuchtet auf, um den Fortschritt der
Aktualisierung anzuzeigen.
Wenn alle Segmente der [OUTPUT]-Pegelanzeige leuchten, ist die
Aktualisierung beendet.
! Wenn während der Aktualisierung ein Fehler auftritt, wird der
Fehlertyp von der BPM-Anzeige und der Anzahl der leuchtenden
Segmente der [INPUT]-Pegelanzeige angezeigt.
BPMAnzeige
E00
E10
E20
E30
E40
E50
E60
E70
E80
E90
3-stellige Zahl
Leuchtende
Segmente in der
[INPUT]-Pegelanzeige
Fehlertyp
Aktualisierungsfehler
Aktualisierungsfehler
Aktualisierungsfehler
Aktualisierungsdatei nicht
erkannt
Aktualisierungsdatei
korrumpiert
SD-Speicherkarten-Lesefehler
Speicherlöschfehler
Speicherschreibfehler
Speicherverifikationsfehler
SD-Speicherkarten-Fehler
Aktualisierung normal fertig
gestellt
Deutsch
Kurzzeitiges Ändern des MIDI-Kanals für
RMX-1000 Plug-in
Auch wenn diese Einheit nicht in dem Modus zum Ändern der MIDIEinstellungen ist, ist es möglich, den MIDI-Kanal kurzzeitig zu ändern.
1 Drücken Sie die Seite [+] oder [–] der Taste
[NUDGE (+, –)], während Sie die Taste [BANK] drücken.
Die MIDI-Kanalnummer erscheint in der BPM-Anzeige.
2 Lassen Sie die [BANK]-Taste los.
! Der auf diese Weise geänderte MIDI-Kanal wird in dieser Einheit
reflektiert, bis die Stromversorgung ausgeschaltet wird.
De
21
Page 70

MIDI-Zuweisungskarte
! “CC” ist die Abkürzung von “control change”. Eine Steueränderung ist ein Typ von MIDI-Signal, das zum Übertragen verschiedener Arten von
Steuerinformationen, wie Timbre, Lautstärke usw. verwendet wird.
! “Note” ist ein MIDI-Ausdruck, der beim Drücken oder Loslassen von Noten auf einem Klavier oder anderen Tastaturinstrument verwendet wird.
Bei diesem Gerät werden Werte von 0 bis 127 hauptsächlich als CC ausgegeben, wenn Regler oder das [X-PAD] bedient werden. Außerdem werden
beim Betätigen von Schaltflächen oder Schaltern Werte von 0 bis 127 als Note ausgegeben.
Kategorie SW Name SW Typ MIDI-Meldungen
LEVEL OUTPUT LEVEL-Regler VR CC 000 — 0-127
QUANTIZE-Taste BTN Note 000
AUTO-Taste BTN Note 001
BPM/QUANTIZE
FX SOURCE
ISOLATE FX
X-PAD FX
SCENE FX
RELEASE FX
FX SETTING
TAP-Taste BTN Note 002 Nur Trigger OFF=0, ON=127
NUDGE(–)-Taste BTN Note 003 Nur Trigger OFF=0, ON=127
NUDGE(+)-Taste BTN Note 004 Nur Trigger OFF=0, ON=127
INPUT-Taste BTN Note 005
X-PAD-Taste BTN Note 006
LOW-Regler VR CC 001 — 0-127
MID-Regler VR CC 002 — 0-127
HI-Regler VR CC 003 — 0-127
ISOLATOR-Taste BTN Note 007
CUT/ADD-Taste BTN Note 008
TRANS/ROLL-Taste BTN Note 009
GATE/DRIVE-Taste BTN Note 010
BANK-Taste BTN Note 011 Nur Trigger OFF=0, ON=127
ROLL-Taste BTN Note 012 Nur Trigger OFF=0, ON=127
KICK-Taste BTN Note 013 Nur Trigger OFF=0, ON=127
SNARE-Taste BTN Note 014 Nur Trigger OFF=0, ON=127
CLAP-Taste BTN Note 015 Nur Trigger OFF=0, ON=127
HI HAT-Taste BTN Note 016 Nur Trigger OFF=0, ON=127
OVERDUB (DELETE)-Taste BTN Note 017 Nur Umschalten OFF=0, ON=127
HOLD (MUTE)-Taste BTN Note 018 Nur Umschalten OFF=0, ON=127
X-PAD LEVEL-Regler VR CC 004 — 0-127
PITCH-Regler VR CC 005 — 0-127
X-PAD (Position) VR CC 006 —
X-PAD (berühren) BTN Note 019 Nur Trigger
SCENE FX-Regler VR CC 007 — 0-127
SUB PARAMETER 1-Regler VR CC 008 — 0-127
SUB PARAMETER 2-Regler VR CC 009 — 0-127
BPF ECHO-Taste BTN Note 020
ECHO-Taste BTN Note 021
NOISE-Taste BTN Note 022
SPIRAL UP-Taste BTN Note 023
REVERB UP-Taste BTN Note 024
HPF ECHO-Taste BTN Note 025
LPF ECHO-Taste BTN Note 026
CRUSH ECHO-Taste BTN Note 027
SPIRAL DOWN-Taste BTN Note 028
REVERB DOWN-Taste BTN Note 029
RELEASE FX-Wahlschalter
1 (VINYL BRAKE)
RELEASE FX-Wahlschalter
2 (ECHO)
RELEASE FX-Wahlschalter
3 (BACK SPIN)
RELEASE FX-Hebel VR CC 010 — 0-127
SETTING-Wahlschalter 1
(DEFAULT)
SETTING-Wahlschalter 2
(USER)
SW Note 030 Nur Trigger
SW Note 031 Nur Trigger
SW Note 032 Nur Trigger
SW Note 033 Nur Trigger
SW Note 034 Nur Trigger
MIDI-Tastentyp
Trigger/Toggle
1
1
1
1
1
1
1
1
1
1
1
1
1
1
1
1
1
1
1
1
1
1
1
Hinweise
OFF=0, ON=127
OFF=0, ON=127
OFF=0, ON=127
OFF=0, ON=127
OFF=0, ON=127
OFF=0, ON=127
OFF=0, ON=127
OFF=0, ON=127
0-127
Sendet die [X-PAD]Positionsinformation.
AUS (wenn nicht berührt)
= 0, EIN (wenn berührt)
=127
OFF=0, ON=127
OFF=0, ON=127
OFF=0, ON=127
OFF=0, ON=127
OFF=0, ON=127
OFF=0, ON=127
OFF=0, ON=127
OFF=0, ON=127
OFF=0, ON=127
OFF=0, ON=127
OFF=0, ON=127
OFF=0, ON=127
OFF=0, ON=127
OFF=0, ON=127
OFF=0, ON=127
22
De
Page 71

Kategorie SW Name SW Typ MIDI-Meldungen
OVERDUB (DELETE)-Taste
+ ROLL-Taste
OVERDUB (DELETE)-Taste
+ KICK-Taste
OVERDUB (DELETE)-Taste
+ SNARE-Taste
OVERDUB (DELETE)-Taste
+ CLAP-Taste
OVERDUB (DELETE)-Taste
+ HI HAT-Taste
OVERDUB (DELETE)-Taste
Plug-In Steuerung
1 Wenn der Wahlschalter [RELEASE FX] und der Wahlschalter [SETTING] geschoben werden, wird “OFF” von dem Schalter gesendet, der noch nicht umgeschaltet wurde
und “ON” von dem Schalter, der umgeschaltet wurde.
+ X-PAD (berühren)
HOLD (MUTE)-Taste +
ROLL-Taste
HOLD (MUTE)-Taste +
KICK-Taste
HOLD (MUTE)-Taste +
SNARE-Taste
HOLD (MUTE)-Taste +
CLAP-Taste
HOLD (MUTE)-Taste + HI
HAT-Taste
HOLD (MUTE)-Taste +
X-PAD (berühren)
BTN Note 035 Nur Trigger OFF=0, ON=127
BTN Note 036 Nur Trigger OFF=0, ON=127
BTN Note 037 Nur Trigger OFF=0, ON=127
BTN Note 038 Nur Trigger OFF=0, ON=127
BTN Note 039 Nur Trigger OFF=0, ON=127
BTN Note 040 Nur Trigger OFF=0, ON=127
BTN Note 041 Nur Trigger OFF=0, ON=127
BTN Note 042 Nur Trigger OFF=0, ON=127
BTN Note 043 Nur Trigger OFF=0, ON=127
BTN Note 044 Nur Trigger OFF=0, ON=127
BTN Note 045 Nur Trigger OFF=0, ON=127
BTN Note 046 Nur Trigger OFF=0, ON=127
MIDI-Tastentyp
Trigger/Toggle
Hinweise
Deutsch
De
23
Page 72

Zusätzliche Informationen
Störungssuche
! Bedienungsfehler werden oft irrtümlich für Störungen oder Ausfälle gehalten. Wenn Sie den Eindruck haben, dass diese Komponente nicht
ordnungsgemäß funktioniert, überprüfen Sie bitte die folgenden Punkte. Manchmal wird eine Störung auch durch ein externes Gerät verursacht.
Überprüfen Sie die anderen verwendeten Komponenten und elektrischen Geräte. Wenn Sie die Störung nicht beheben können, wenden Sie sich an
die nächste Pioneer-Kundendienststelle oder an Ihren Händler.
! Der Spieler kann möglicherweise aufgrund von statischer Elektrizität oder anderen externen Einflüssen nicht richtig arbeiten. In solchen Fällen
kann normaler Betrieb durch Abziehen des Netzsteckers und erneutes Einstecken wieder hergestellt werden.
Problem Prüfen Abhilfe
Das Gerät schaltet nicht ein. Sind das mitgelieferte Netzkabel und das Netzteil
Es wird kein oder nur sehr schwacher
Ton erzeugt.
Verzerrter Ton. Ist der Audiopegelausgang von den Buchsen
Tempo (BPM) kann nicht gemessen
werden, oder der Messwert des
Tempos (BPM) ist implausible.
Wert des gemessenen Tempos
(BPM) unterscheidet sich von dem
auf CD aufgenommenen Wert, oder
die Tempo (BPM) Werte wie auf dem
DJ-Player, DJ-Mixer, der DJ-Software
und dieser Einheit angezeigt unterscheiden sich.
Dieses Gerät wird nach dem
Anschluss an einen Computer nicht
erkannt.
SD-Speicherkarte wird nicht erkannt. Ist die SD-Speicherkarte richtig eingesetzt? Setzen Sie die SD-Speicherkarte fest und vollständig ein. (Seite 12)
Das Laden von Daten von einer
SD-Speicherkarte kann einige Zeit in
Anspruch nehmen.
Effekte werden nicht angewendet. Leuchtet die Taste [INPUT] oder [X-PAD]? Drücken Sie die Taste [INPUT] oder [X-PAD]. (Seite 14)
ISOLATE FX-Effekte werden nicht
angewendet.
X-PAD FX-Effekte werden nicht
angewendet.
SCENE FX-Effekte werden nicht
angewendet.
Der MIDI-Sequenzer synchronisiert
nicht.
MIDI Control arbeitet nicht. Sind die MIDI-Einstellungen richtig eingestellt? Zum Betreiben von DJ-Software mit diesem Gerät müssen die MIDI-Meldungen
richtig angeschlossen?
Ist der Schalter [ON, STANDBY] für die
Stromversorgung auf [ON] gestellt?
Sind die Verbindungskabel richtig angeschlossen? Schließen Sie die Verbindungskabel richtig an. (Seite 6)
Sind Buchsen und Stecker verschmutzt? Reinigen Sie Buchsen und Stecker vor dem Herstellen von Verbindungen.
Ist der Wahlschalter [CONNECTION] an der
Rückseite dieser Einheit richtig eingestellt?
[OUTPUT] richtig eingestellt?
Ist der Audiopegeleingang zu den Buchsen
[INPUT] richtig eingestellt?
Ist der Audio-Eingangspegel zu hoch oder zu
niedrig?
— Die Werte können sich aufgrund der unterschiedlichen Messweisen für BPM
Ist das mitgelieferte USB-Kabel richtig
angeschlossen?
Ist die SD-Speicherkarte eine für diese Einheit
geeignete?
Gibt es eine große Anzahl von Ordnern oder
Dateien auf der SD-Speicherkarte?
Haben Sie andere Dateien als Einstellungsdateien
und Sample-Daten auf der SD-Speicherkarte
gespeichert?
Ist der Regler [ISOLATE FX] in eine geeignete
Stellung gestellt?
Ist der Regler [X-PAD LEVEL] in eine geeignete
Stellung gestellt?
Ist der Regler [SCENE FX] in eine geeignete
Stellung gestellt?
Ist der Sync-Modus des MIDI-Sequenzers auf
Slave gestellt?
Unterstützt der von Ihnen verwendete MIDISequenzer Timing Clocks?
Schließen Sie das mitgelieferte Netzkabel richtig an eine Steckdose an.
Schließen Sie das Netzkabel richtig an das mitgelieferte Netzteil an. (Seite 6)
Schließen Sie den Gleichstromstecker des mitgelieferte Netzteils richtig an
diesem Gerät an.
Stellen Sie den Schalter [ON, STANDBY] für die Stromversorgung auf [ON].
Schalten Sie den Wahlschalter [CONNECTION] entsprechend dem angeschlossenen Gerät ein. (Seite 10)
Stellen Sie den Regler [OUTPUT LEVEL] so ein, dass die [OUTPUT]Pegelanzeige bei etwa [0 dB] beim Spitzenpegel aufleuchtet. (Seite 10)
Stellen Sie den Regler [INPUT LEVEL] so ein, dass die [INPUT]-Pegelanzeige bei
etwa [0 dB] beim Spitzenpegel aufleuchtet. (Seite 10)
Stellen Sie den Regler [INPUT LEVEL] so ein, dass die [INPUT]-Pegelanzeige bei
etwa [0 dB] beim Spitzenpegel aufleuchtet. (Seite 10)
Bei einigen Tracks kann es umöglich sein, das Tempo (BPM) richtig zu messen.
Verwenden Sie die Taste [TAP] zur manuellen Eingabe des Tempos. (Seite 11)
unterscheiden.
Verbinden Sie dieses Gerät und den Computer und nicht über einen USB-Hub.
SD-Speicherkarten haben eine Vorder- und Rückseite. Stellen Sie sicher, dass
sie in richtiger Richtung eingesetzt werden.
Nur SD-Speicherkarten oder SDHC-Speicherkarten können mit dieser Einheit
verwendet werden. Einige Karten können möglicherweise nicht verwendbar sein.
Wenn es viele Ordner oder Dateien gibt, kann einige Zeit kann für das Laden
erforderlich sein.
Wenn der Ordner andere Dateien als Einstellungsdateien und Sample-Daten
enthält, wird zum Laden einige Zeit benötigt. Sie sollten keine anderen Dateien
als Einstellungsdateien und Sample-Daten in diesem Ordner speichern.
Drehen Sie den Regler [ISOLATE FX] im Uhrzeigersinn oder gegen den
Uhrzeigersinn. (Seite 12)
Drehen Sie den Regler [X-PAD LEVEL] im Uhrzeigersinn. (Seite 12)
Drehen Sie den Regler [SCENE FX] im Uhrzeigersinn. (Seite 11)
Stellen Sie den Sync-Modus des MIDI-Sequenzers auf Slave.
MIDI-Sequenzer, die nicht MIDI Timing Clocks unterstützen, können nicht
synchronisiert werden.
dieses Geräts zur verwendeten DJ-Software zugewiesen werden. Anweisungen
zum Zuweisen von Meldungen siehe Bedienungsanleitung für Ihre DJ-Software.
24
De
Page 73

Blockdiagramm
Deutsch
Über Markenzeichen und
eingetragene Markenzeichen
! Pioneer ist ein eingetragenes Markenzeichen der PIONEER
CORPORATION.
! Microsoft®, Windows Vista®, Windows® und Internet Explorer® sind
entweder eingetragene Markenzeichen oder Markenzeichen von
Microsoft Corporation in den USA und/oder anderen Ländern.
! Apple, Macintosh, Mac OS, Safari, iTunes und Finder sind einge-
tragene Markenzeichen von Apple Inc. in den USA und anderen
Ländern.
! Intel und Pentium sind Warenzeichen der Intel Corporation in den
USA und anderen Ländern.
! VST ist ein Markenzeichen von Steinberg Media Technologies GmbH.
! Das Audio Units-Logo ist ein Markenzeichen von Apple Inc.
Die hier erwähnten Produkt- oder Firmennamen sind Markenzeichen der
jeweiligen Eigentümer.
Dieses Produkt wurde für Nonprofit-Verwendung lizensiert. Dieses
Produkt ist nicht zu den Handelszwecken (für Gewinn bringenden Gebrauch), wie Sendung (terrestrisch, Satelliten-, Kabel oder
andere Arten von Sendungen), streaming im Internet, Intranet
(ein privates Kommunikationsnetz) oder anderen Typen von
Netzwerken oder zum Vertrieb elektronischer Information (online
digitale Musikvertriebsdienste) lizensiert worden. Für derartige
Verwendungszwecke müssen sie die entsprechenden Lizenzen erhalten. Für Einzelheiten besuchen Sie http://www.mp3licensing.com.
Hinweise zum Urheberrechte
Aufnahmen, die Sie vornehmen, sind für persönlichen Genuss gedacht
und dürfen nach dem Urheberrecht nicht ohne Zustimmung des
Urheberrechtsinhabers anderweitig verwendet werden.
! Musik, die von CDs, usw. aufgenommen wurde, ist durch die
Urheberrechtsgesetze der einzelnen Länder sowie durch internationale Abkommen geschützt. Es liegt in der vollen Verantwortung der
Person, die die Musik aufgenommen hat, sicherzustellen, dass die
Aufnehmen nicht gesetzwidrig verwendet werden.
! Beim Umgang mit Musik, die aus dem Internet heruntergeladen
wurde usw., liegt es in der vollen Verantwortung der Person, die
den Musik-Download ausgeführt hat, sicherzustellen, dass die
aufgenommenen Inhalte entsprechend den Vorschriften auf der
Download-Site verwendet werden.
Bitte beachten Sie, dass Pioneer keine Haftung für den Verlust von
Informationen übernehmen kann, die vom Kunden mit der mitgelieferten Software registriert wurden. Bitte notieren Sie sich die Inhalte des
Registers separat.
Haftungsausschluss
Bitte beachten Sie, dass Pioneer keine Verantwortung für die
Rechtmäßigkeit, die Sittlichkeit oder die Zuverlässigkeit des Betriebs im
Hinblick auf die Verwendung dieser Software durch den Kunden übernehmen kann. Je nach der Betriebsumgebung des Kunden-Computers
und der mitgelieferten Software und Kombinationen mit anderer
Software können Probleme beim Betrieb der mitgelieferten Software
entstehen.
De
25
Page 74

Technische Daten
Netzteil
Stromversorgung .............100 V bis 240 V Wechselspannung, 50 Hz/60 Hz
Nennstrom ............................................................................................. 0,4 A
Nenn-Ausgang .......................................................Gleichspannung 5 V, 2 A
Allgemein – Haupteinheit
Leistungsaufnahme ............................................................................... 1,4 A
Gewicht des Hauptgeräts ..................................................................... 1,3 kg
Max. Abmessungen ......................334 mm (B) × 57 mm (H) × 157 mm (T)
Betriebstemperatur ........................................................... +5 °C bis +35 °C
Betriebsluftfeuchtigkeit ........................ 5 % bis 85 % (keine Kondensation)
Audio-Sektion
Abtastrate .............................................................................................48 kHz
A/D-, D/A-Wandler ...............................................................................24 bits
Frequenzgang ......................................................................20 Hz bis 20 kHz
Signalrauschabstand (Nennausgang)
Wenn CONNECTION auf "SEND/RETURN (–10 dB)" gestellt ist
...................................................................................................... 102 dB
Wenn CONNECTION auf "MASTER (+4 dB)" gestellt ist ............. 98 dB
Gesamtklirrfaktor ...............................................................................0,005 %
Headroom .............................................................................................. 20 dB
Eingangspegel / Eingangsimpedanz
Wenn CONNECTION auf "SEND/RETURN (–10 dB)" gestellt ist
...................................................................... –10 dBV/22 kW oder höher
Wenn CONNECTION auf "MASTER (+4 dB)" gestellt ist
.......................................................................+4 dBu/22 kW oder höher
Ausgangspegel / Lastimpedanz / Ausgangsimpedanz
Wenn CONNECTION auf "SEND/RETURN (–10 dB)" gestellt ist
........................................................–10 dBV/10 kW/1 kW oder niedriger
Wenn CONNECTION auf "MASTER (+4 dB)" gestellt ist
........................................................ +4 dBu/10 kW/1 kW oder niedriger
Eingangs- / Ausgangsbuchsen
INPUT-Buchsen
Cinch-Buchsen ...............................................................................1 Satz
Klinkenbuchse (Ø 6,3 mm) ............................................................1 Satz
OUTPUT-Buchsen
Cinch-Buchsen ...............................................................................1 Satz
Klinkenbuchse (Ø 6,3 mm) ............................................................1 Satz
USB-Buchse
B-Typ ................................................................................................1 Satz
— Änderungen der technischen Daten und das Design dieses
Geräts ohne vorherige Ankündigung bleiben vorbehalten.
— Die in dieser Bedienungsanleitung gezeigten Software-
Bildschirmansichten stammen aus der Entwicklungsstufe
und können sich von den tatsächlich erscheinenden
Bildschirmansichten unterscheiden.
! © 2012 PIONEER CORPORATION. Alle Rechte vorbehalten.
26
De
Page 75

Page 76

© 2012 PIONEER CORPORATION.
All rights reserved.
PIONEER CORPORATION
1-1, Shin-ogura, Saiwai-ku, Kawasaki-shi, Kanagawa 212-0031, Japan
Корпорация Пайонир
1-1, Син-Огура, Сайвай-ку, г. Кавасаки, префектура Канагава, 212-0031, Япония
Импортер: ООО "ПИОНЕР РУС"
125040, Россия, г. Москва, ул. Правды, д.26 Тел.: +7(495) 956-89-01
PIONEER EUROPE NV
Haven 1087, Keetberglaan 1, B-9120 Melsele, Belgium TEL: 03/570.05.11
K002_PSV_SY
Printed in / Imprimé
Tous droits de reproduction et de traduction réservés.
© 2012 PIONEER CORPORATION.
<DRB1587-A>
 Loading...