

Page 1
Editing Software for RMX-1000
remixbox
http://pioneerdj.com/support/
The Pioneer website shown above offers FAQs, information on software and various other types of information
and services to allow you to use your product in greater comfort.
Operating Instructions
Page 2
Contents
How to read this manual
The names of displays, menus, and buttons in this manual are enclosed
in brackets. (e.g. [MASTER] channel, [ON/OFF], [File] menu)
Before start
Loading the customized parameter data onto the RMX-1000 ................ 3
Loading the customized parameter data onto an SD memory card...... 3
Part names and functions
Loading customized parameter data onto the RMX-1000 (Sync)........... 5
Importing customized parameter data
loaded in the RMX-1000 (Update Setting) ................................................ 5
Exporting the customized parameter data and
sampled sound sources to an SD memory card (Export) ....................... 5
Importing customized parameter data and
sampled sound sources from an SD memory card (Import) .................. 6
Managing the customized parameter data and
sampled sound source ............................................................................... 6
Editing Effects
SCENE FX section ....................................................................................... 7
ISOLATE FX section .................................................................................... 8
X-PAD FX section ........................................................................................ 9
RELEASE FX section ................................................................................. 10
SAMPLER editing ..................................................................................... 11
Effect parameter adjustment ranges
SCENE FX .................................................................................................. 12
ISOLATE FX ................................................................................................ 13
X-PAD FX ................................................................................................... 14
RELEASE FX .............................................................................................. 14
Others
Menu list .................................................................................................... 15
About trademarks and registered trademarks ...................................... 15
Cautions on copyrights ............................................................................ 15
Using the support site .............................................................................. 16
En
2
Page 3
Before start
remixbox is an editing software for changing the various parameters of effects on the RMX-1000 and creating your own customized parameter data. A
computer is used to create the customized parameter data.
remixbox can also be used to store sampled sound sources to be loaded in the [X-PAD FX] buttons onto SD memory cards.
! When connecting the RMX-1000 and the computer, do so directly using the included USB cable. Do not use a USB hub.
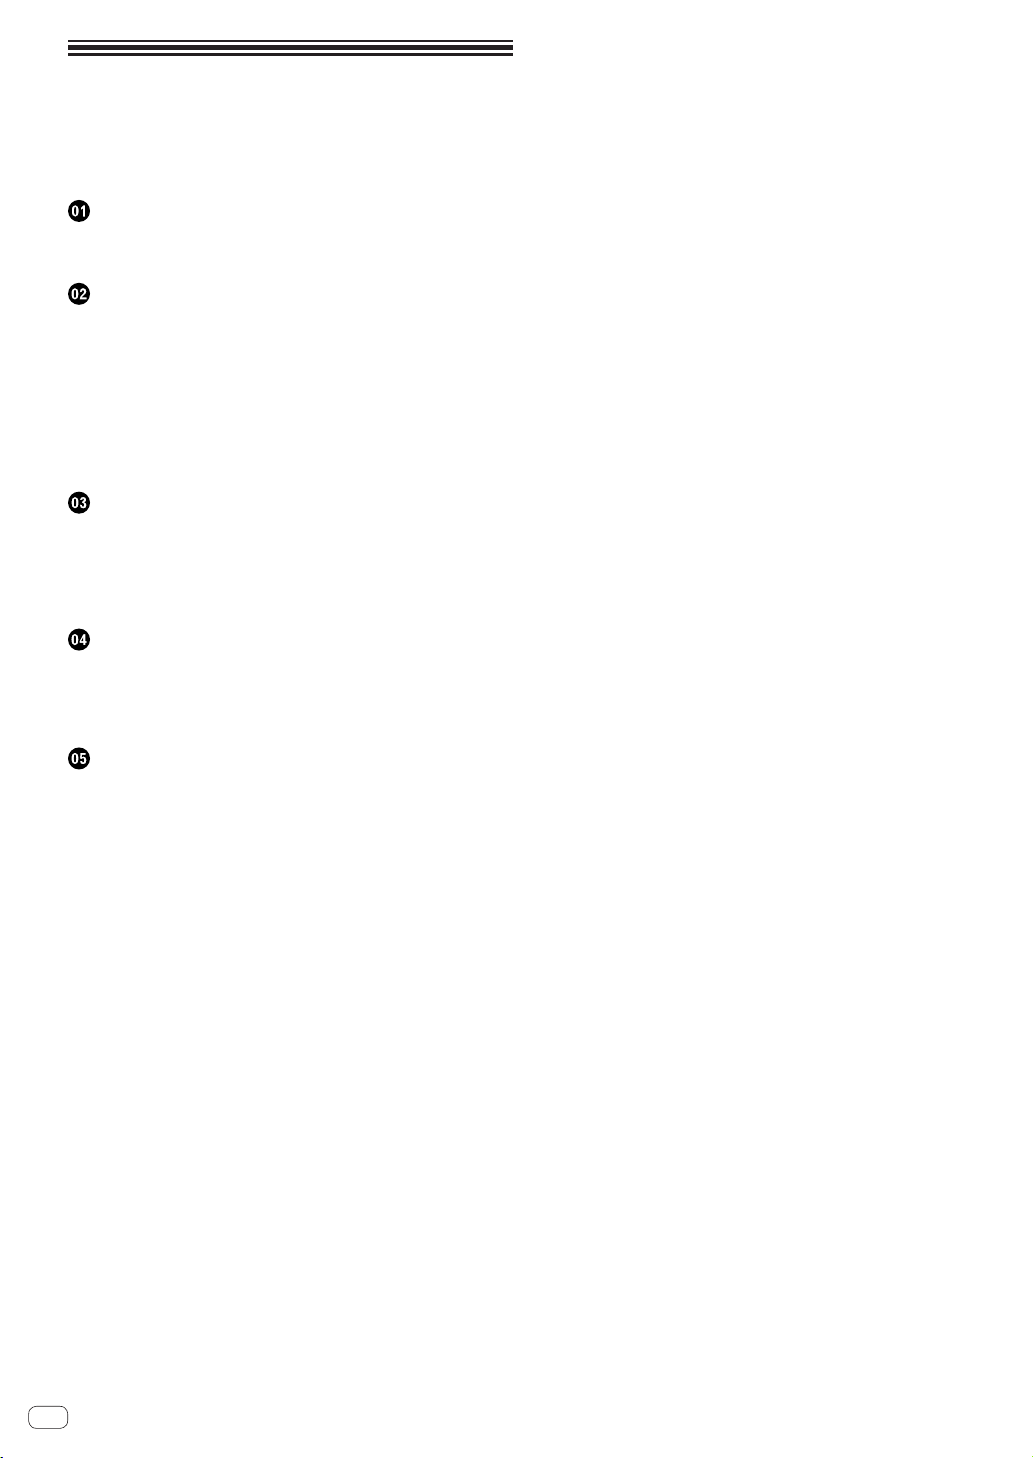
Loading the customized parameter data onto the RMX-1000
The customized parameter data created with remixbox can be loaded onto the RMX-1000.
To load the customized parameter data, connect the computer and RMX-1000 directly using the USB cable.
The RMX-1000 on which the customized parameter data is loaded can be taken to a club and used for more personal DJ performances with your preferred settings.
The customized parameter data loaded on the RMX-1000 can also be imported to remixbox.
remixbox
Loading the customized parameter data onto an SD memory card
The customized parameter data created with remixbox can be loaded onto an SD memory card.
The SD memory card on which the customized parameter data is loaded can be taken to a club where an RMX-1000 is installed so you can load your
preferred settings onto the club’s RMX-1000 whenever you want.
The customized parameter data loaded on the SD memory card can also be imported to remixbox.
The sampled sound sources to be loaded into the [X-PAD FX] buttons can also be stored on the SD memory card.
Home
Before start
SD memory card inserted in the RMX-1000 connected
directly to the computer with the included USB cable.
remixbox
SD memory card inserted
remixbox
into computer.
Club / Studio
En
3
Page 4
Part names and functions
9
a
1
2 3 4 5 6 7
8
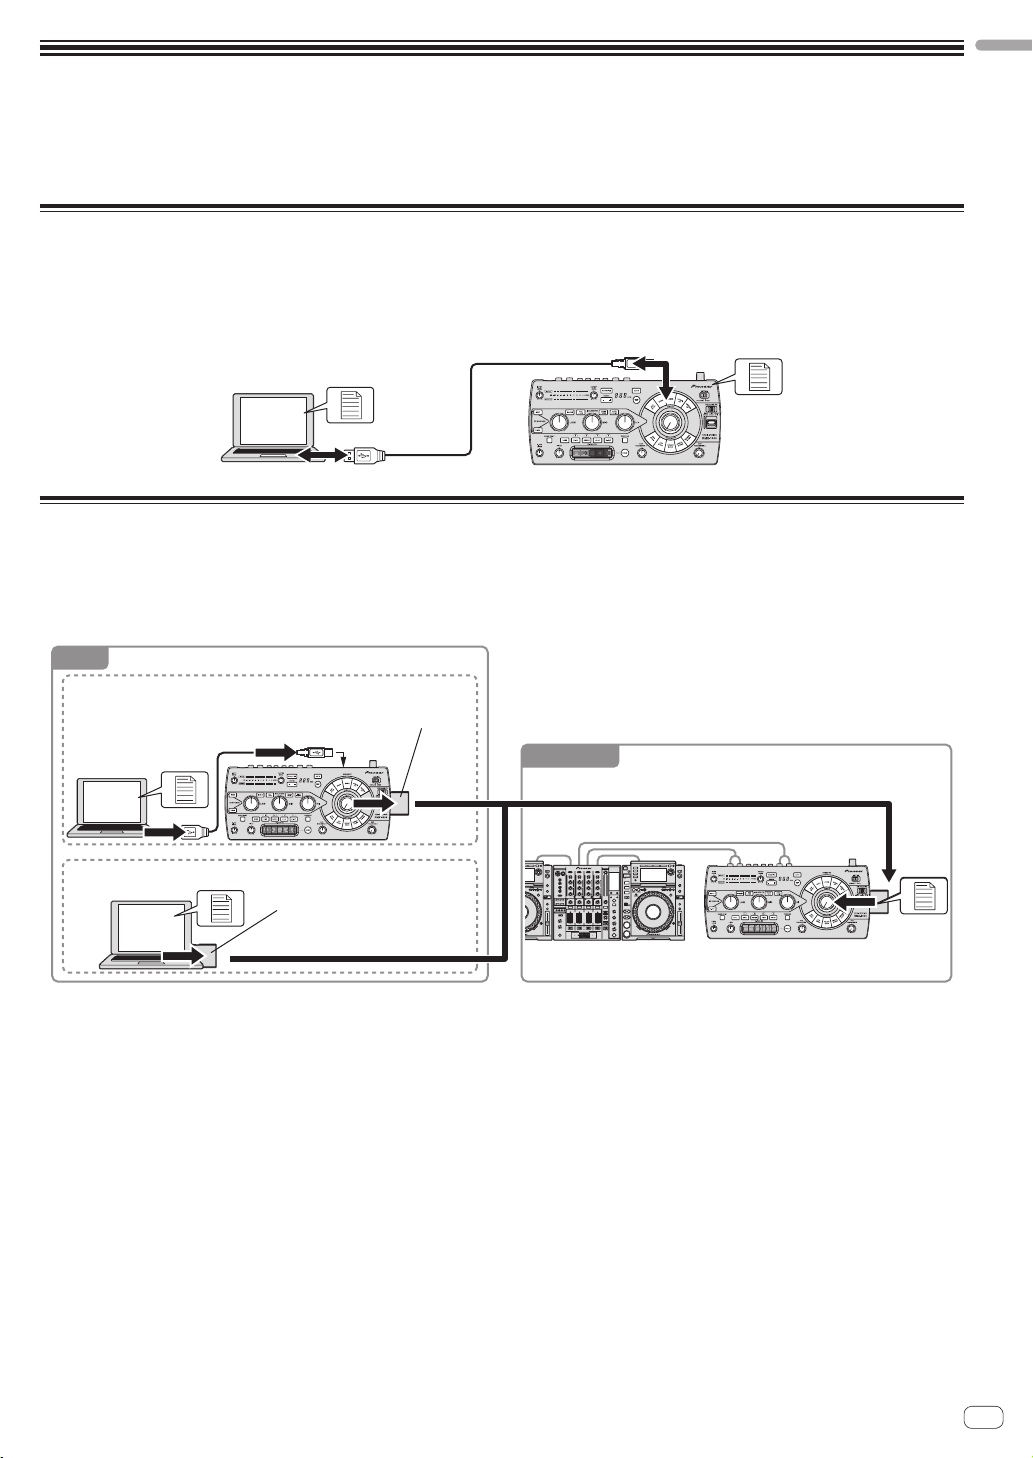
1 Menu items
The menus are displayed here.
2 Sync button
This is used to load customized parameter data set with remixbox
onto the RMX-1000.
! The [Sync] button can only be used when the computer and
RMX-1000 are connected by USB cable.
! Sampled sound sources are not loaded.
3 Import button
This is used to import the customized parameter data and sampled
sound sources exported onto an SD memory card with the [Export]
button.
Customized parameter data and sampled sound sources can also be
imported into remixbox from an SD memory card inserted into the
computer or RMX-1000.
4 Export button
This is used to export the customized parameter data and sampled
sound sources to an SD memory card inserted into the computer or
RMX-1000.
! SD memory cards include a lock mechanism. Be sure to unlock it
when using the SD memory card.
5 Load button
This is used to open RSD files saved using the [Save] button and
load the customized parameter data.
If there is a sampled sound source folder in the same location as
where the RSD file is stored, the sampled sound sources are also
loaded.
! RSD is a file format exclusive to remixbox.
! RSD files include the customized parameter data and informa-
tion on the file paths to the sampled sound sources’ WAV files
and on the playback start and end positions.
6 Save button
This is used to store the data in an RSD file in a specified location.
When sampled sound sources are assigned to the sampler slots, the
sampled sound sources are saved simultaneously.
7 Effect Browser button
This is used to switch the display of the effect browser on and off.
With the effect browser, the effect parameter editing screen for a
settable effect item can be opened instantaneously by clicking on
the item.
8 Settings button
This is used to open the remixbox preference settings screen.
The preferences set when remixbox is launched can be changed
here.
9 Line browser
The level currently being edited is displayed here.
a Effect select area
When the mouse cursor is over the effect whose parameters you
want to edit, that effect section pops out.
When clicked, the effect section is selected and the parameter settings screen appears.
The current parameter values are displayed on the parameter settings screen.
! SCENE FX section (page 7)
! ISOLATE FX section (page 8)
! X-PAD FX section (page 9)
! RELEASE FX section (page 10)
En
4
Page 5
Loading customized parameter data
onto the RMX-1000 (Sync)
Use this procedure to load customized parameter data created with
remixbox onto the RMX-1000.
1 Connect the RMX-1000 and computer by USB cable,
then launch remixbox.
! The [Sync] button cannot be used unless the RMX-1000 and com-
puter are connected by USB cable.
2 Create the customized parameter data on remixbox.
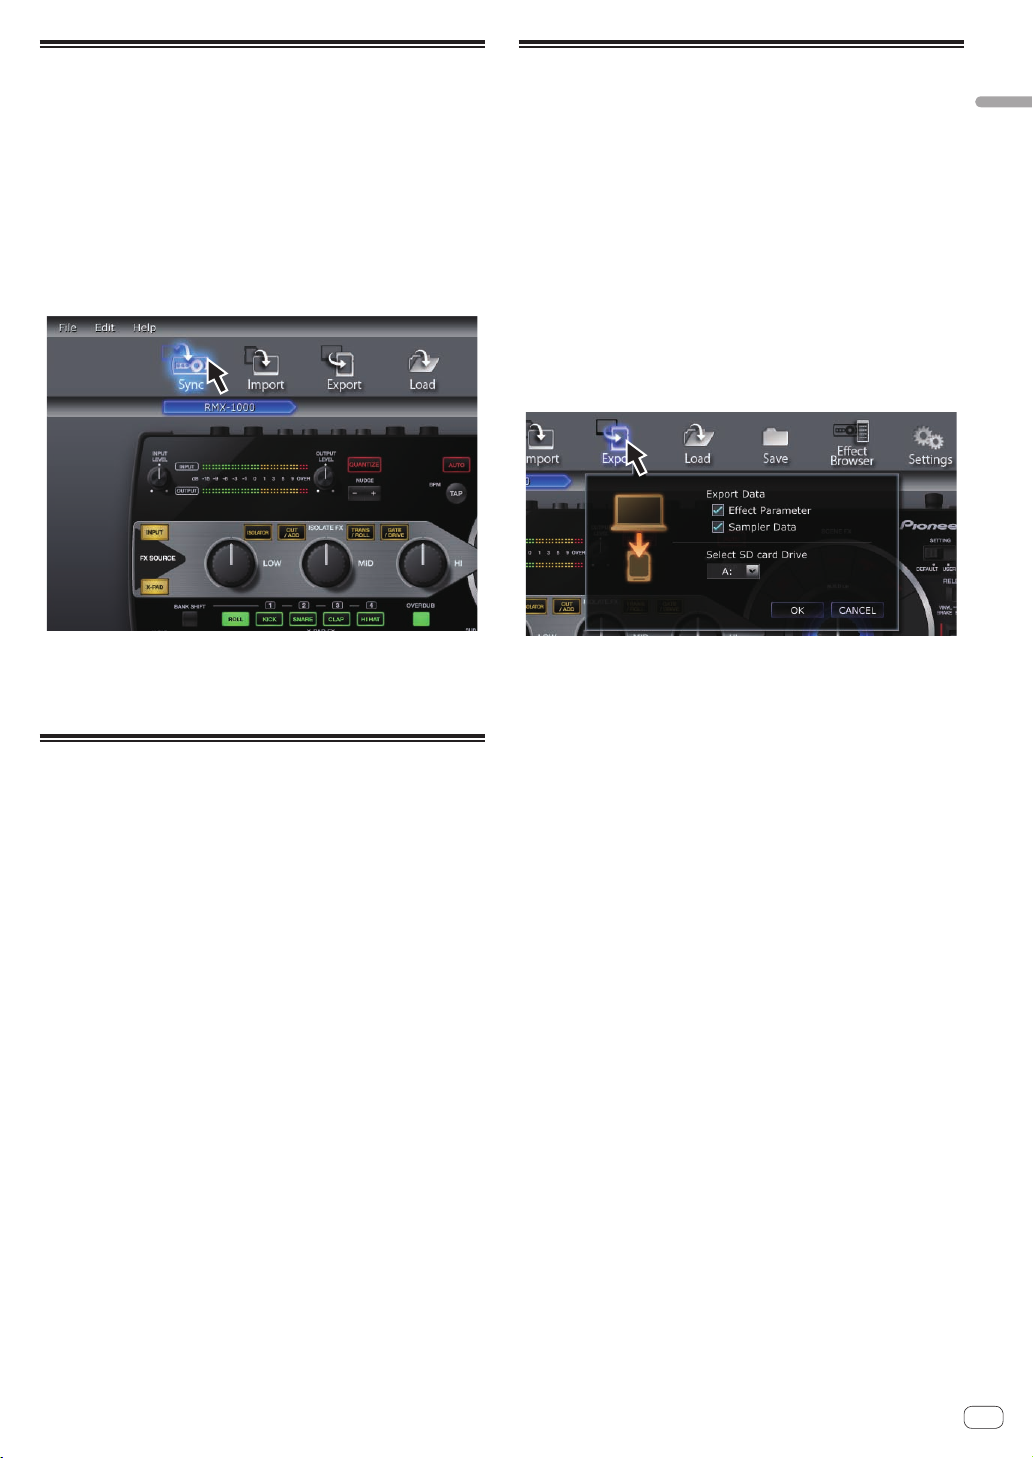
3 Click the [Sync] button.
Exporting the customized
parameter data and sampled sound
sources to an SD memory card
(Export)
Use this procedure to export the customized parameter data and sampled sound sources created with remixbox to an SD memory card.
1 Insert the SD memory card into the RMX-1000
connected to the computer by USB cable.
! If the computer is equipped with an SD memory card slot, it is
also possible to perform this procedure with the SD memory card
inserted into this slot.
2 Create the customized parameter data and sampled
sound sources on remixbox.
3 Click the [Export] button.
Part names and functions
The customized parameter data is loaded onto the RMX-1000.
After loading, [Syc] appears on the RMX-1000’s BPM display section.
The loaded customized parameter data can be checked when the RMX1000’s [SETTING] selector switch is set to the [USER] side.
Importing customized parameter
data loaded in the RMX-1000
(Update Setting)
Use this procedure to import the customized parameter data loaded in
the RMX-1000 to remixbox.
1 Connect the RMX-1000 and computer by USB cable,
then launch remixbox.
2 From remixbox’s menu items, click [Edit]>[Update
Setting].
The customized parameter data loaded in the RMX-1000 is imported to
remixbox.
! When the RMX-1000 is shipped from the factory, the same param-
eters are loaded for the [DEFAULT] and [USER] modes.
The [Export] window opens.
4 Select the type of data to be exported to the SD
memory card.
5 Select the drive to which the SD memory card is
connected.
6 Click the [OK] button.
The customized parameter data loaded on the SD memory card can be
checked when the SD memory card is inserted in the RMX-1000 and the
RMX-1000’s [SETTING] selector switch is set to the [USER] side.
! The sampled sound sources can be used whether the [SETTING]
selector switch is set to the [DEFAULT] or [USER] side.
En
5
Page 6

Importing customized parameter
data and sampled sound sources
from an SD memory card (Import)
Use this procedure to import the customized parameter data and sampled sound sources loaded on an SD memory card to remixbox.
1 Insert the SD memory card containing the customized
parameter data and sampled sound sources into the
RMX-1000 connected to the computer by USB cable.
! If the computer is equipped with an SD memory card slot, it is
also possible to perform this procedure with the SD memory card
inserted into this slot.
2 Click the [Import] button.
The [Import] window opens.
3 Select the type of data to be imported from the SD
memory card.
4 Select the drive to which the SD memory card is
connected.
5 Click the [OK] button.
The customized parameter data and sampled sound sources loaded on
the SD memory card are imported to remixbox.
Managing the customized
parameter data and sampled sound
source
This procedure can be used to manage multiple sets of customized parameter data and sampled sound sources on the computer as RSD files.
Saving RSD files (Save)
1 Create the customized parameter data and sampled
sound sources on remixbox.
2 Click the [Save] button.
— For Windows: Explorer opens.
— For Mac OS X: Finder opens.
3 Select the location in which the RSD file is to be
saved, give it the desired filename and save it.
! RSD files saved on SD memory cards by clicking the [Save] button
cannot be imported to an RMX-1000.
In this case, use the [Load] button to load the RSD file into remixbox,
then either use the [Sync] button to load the data onto the RMX-1000
or use the [Export] button to export the data onto an SD memory card.
Loading RSD files (Load)
1 Click the [Load] button.
— For Windows: Explorer opens.
— For Mac OS X: Finder opens.
2 Select the RSD file and open it.
The customized parameter data and sampled sound sources in the RSD
file are loaded into remixbox.
En
6
Page 7

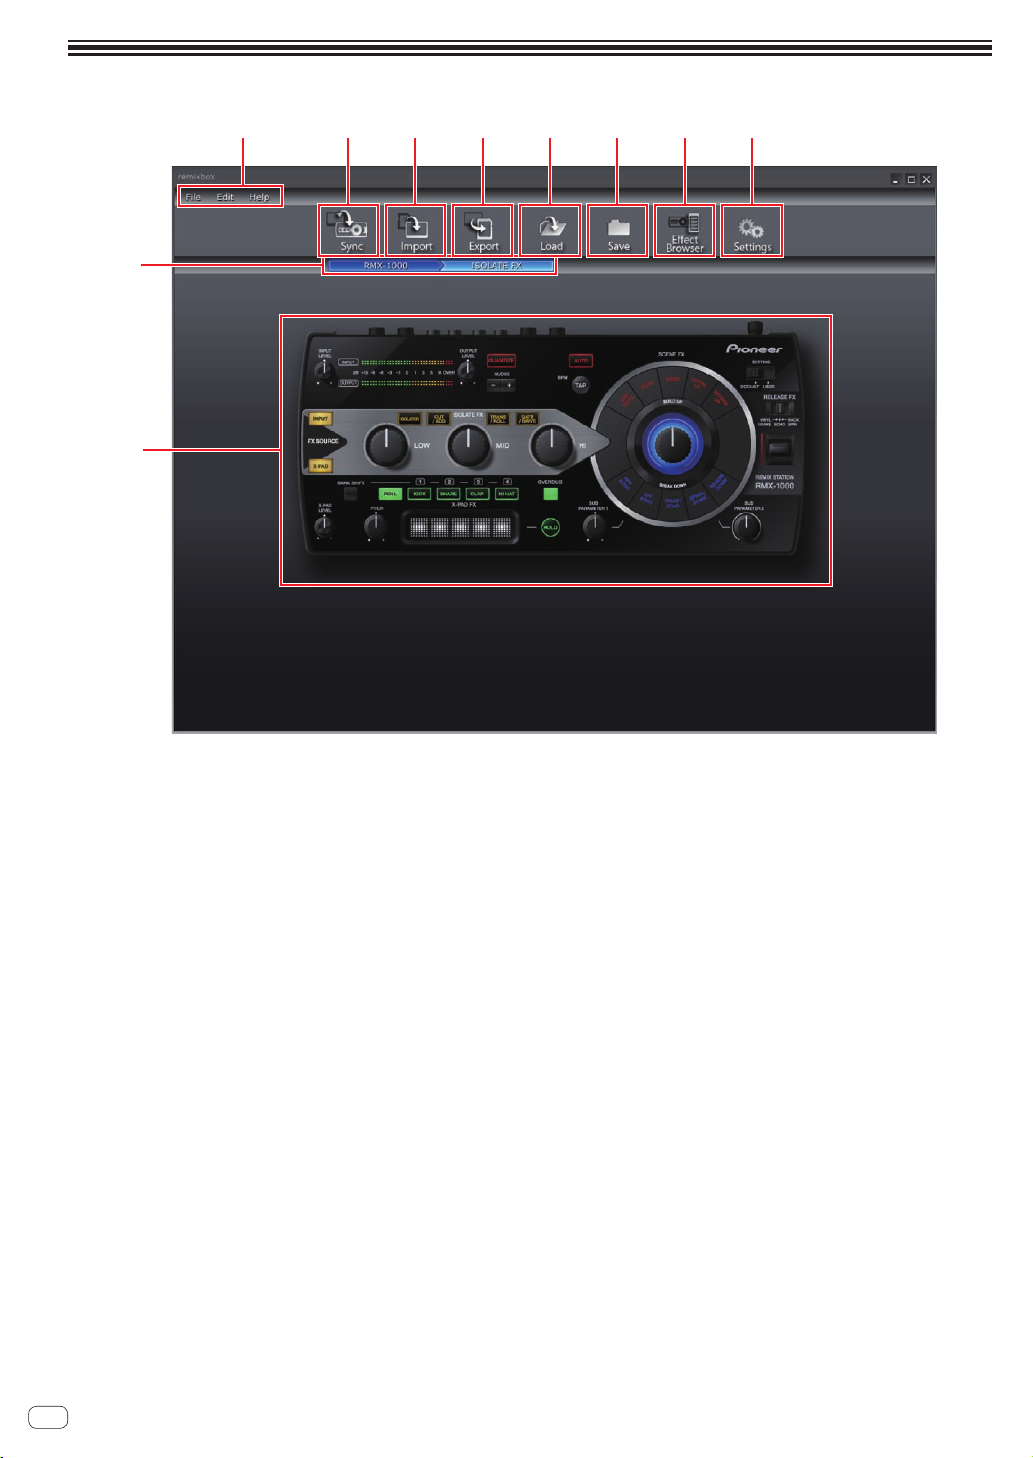
Editing Effects
SCENE FX section
1
4
Editing Effects
2
3
5
! The contents displayed on the screen differ according to the effect type.
1 FX LOCK button
This is used to select whether or not to use the effect type selection
buttons’ accidental operation prevention function.
2 Effect type selection buttons
These are used to select the type of effect to be edited.
3 SCENE FX control section
This is used to adjust the [SCENE FX] control’s parameters.
4 SUB PARAMETER 1 control section
This is used to adjust the [SUB PARAMETER 1] control’s parameters.
5 SUB PARAMETER 2 control section
This is used to adjust the [SUB PARAMETER 2] control’s parameters.
Editing the parameters
1 Click one of the effect type selection buttons.
Select the type of effect to be edited.
2 Operate the pull-down menus, etc., to select the
setting value.
Change the effect’s parameters.
! For details on the parameters’ adjustment range, see SCENE FX
under Effect parameter adjustment ranges at 12.
Using the effect type selection buttons’
accidental operation prevention function
Click the [FX LOCK] button.
The [FX LOCK] button lights.
When the accidental operation prevention function is enabled, effects
can be turned on and off by pressing and holding the effect type selection buttons on the RMX-1000.
En
7
Page 8

ISOLATE FX section
1
2
3
4
! The contents displayed on the screen differ according to the effect type.
1 Effect type selection buttons
These are used to select the type of effect to be edited.
2 ISOLATE FX control pull-down menus
These are used to adjust the parameters of the respective controls.
3 FREQUENCY pull-down menus
These are used to select the frequencies between the [LOW] and
[MID] controls and between the [MID] and [HI] controls.
4 FX LOCK button
This is used to select whether or not to use the effect type selection
buttons’ accidental operation prevention function.
Editing the parameters
1 Click one of the effect type selection buttons.
Select the type of effect to be edited.
2 Operate the pull-down menus, etc., to select the
setting value.
Change the effect’s parameters.
! For details on the parameters’ adjustment range, see ISOLATE FX
under Effect parameter adjustment ranges at 13.
Using the effect type selection buttons’
accidental operation prevention function
Click the [FX LOCK] button.
The [FX LOCK] button lights.
When the accidental operation prevention function is enabled, effects
can be turned on and off by pressing and holding the effect type selection buttons on the RMX-1000.
En
8
Page 9

X-PAD FX section
1
2
Editing Effects
! The contents displayed on the screen differ according to the type of item.
1 Parameter display section
The contents for editing the parameters are displayed here.
2 Item selection buttons
These are used to select the items to be edited.
! For instructions on [SAMPLER] editing, see SAMPLER editing on
page 11.
Editing the parameters
1 Click one of the item selection buttons.
Select the item to be edited.
2 Operate the pull-down menus, etc., to select the
setting value.
Change the item’s parameters.
! For details on the parameters’ adjustment range, see X-PAD FX
under Effect parameter adjustment ranges at 14.
En
9
Page 10

RELEASE FX section
1
2
1 Effect type selection buttons
These are used to select the type of effect to be edited.
2 Effect selection pull-down menu
Select individually whether or not the SCENE FX, ISOLATE FX and
X-PAD FX effects continue when RELEASE FX is turned off (when the
lever is set back to its original position).
3 RELEASE FX lever pull-down menu
This is used to adjustment the parameters when the lever is pulled.
3
Editing the parameters
1 Click one of the effect type selection buttons.
Select the type of effect to be edited.
2 Operate the pull-down menus, etc., to select the
setting value.
Change the effect’s parameters.
10
! For details on the parameters’ adjustment range, see RELEASE FX
under Effect parameter adjustment ranges at 14.
En
Page 11

SAMPLER editing
This procedure can be used to edit the sampled sound sources loaded in
the RMX-1000’s [X-PAD FX] buttons.
Prepare the sampled sound sources in WAV file format beforehand.
! When using rekordbox Version 1.5.3 or later, sampled sound sources
can be prepared easily.
For details, see the rekordbox operating instructions.
1 Open the parameter settings screen in the X-PAD FX
section and click the [SAMPLER] button.
The sampler slot screen opens.
2 Drag the sampled sound sources to the sampler slots.
Open Finder when using Mac OS, Explorer when using Windows, and
assign the sampled sound sources to the sampler slots.
! Sampled sound sources can be deleted from the sampler slots by
dragging them to [DELETE].
! The sampler slot details windows can also be used to assign the
sampled sound sources to the sampler slots.
! The maximum length of the sampled sounds that can be set in the
BANK (the total for the 4 SLOT) is 16 seconds.
About the sampler slot details windows
When a sampler slot is double-clicked, the sampler slot details window
opens.
The sampler slot details windows can be used to listen to the sampled
sound sources and set the playing range, loop mode, etc.
1
7
2
3
4
8
6
9
5
6
1 Editing box
When loading sampled sound sources from a computer, specify the
sampled sound source’s file path here.
2 d button
This is used to play the sampled sound source. The sampled sound
source is output from the audio device selected on the computer.
3 BPM
This is used to set the sampled sound source’s BPM.
! BPM values between 70 and 200 are valid.
4 Playing mode selector buttons
These are used to switch the sampled sound source’s playing mode.
— [ONE-SHOT] mode: The sampled sound source is played to the
end then stops.
— [LOOP] mode: The sampled sound source is played to the end,
then playback returns to the beginning and continues.
Only the sampled sound sources in [SLOT1] of the respective
BANKs can be set to the [LOOP] mode.
If you switch to the [LOOP] mode, the BPM value must be input
ahead of time.
5 START
The time of the sampled sound source’s playback start position is
displayed here.
6 –, + button
These are used to increase or decrease the sampled sound source’s
playing range in units of 10 msec (1/100th of a second).
7 DELETE button
This is used to delete the sampled sound source assigned to the
sampler slot.
8 END
The time of the sampled sound source’s playback end position is
displayed here.
9 Slider
This is used to change the sampled sound source’s playback start
and end positions in large increments.
Editing Effects
En
11
Page 12

Effect parameter adjustment ranges
SCENE FX
Types of effects Place Position Type Adjustable parameters Adjustable range
Main control Right Pull-down menu Filter pass width NARROW, NORMAL, WIDE
Bottom left Pull-down menu Range 1 echo time beat 1/16, 1/8, 1/4, 1/2, 3/4, 1/1, 2/1
Top left Pull-down menu Range 2 echo time beat 1/16, 1/8, 1/4, 1/2, 3/4, 1/1, 2/1
Top right Pull-down menu Range 3 echo time beat 1/16, 1/8, 1/4, 1/2, 3/4, 1/1, 2/1
Bottom right Pull-down menu Range 4 echo time beat 1/16, 1/8, 1/4, 1/2, 3/4, 1/1, 2/1
Bottom Pull-down menu Feedback amount MILD, DEFAULT, WILD
Bottom Sliders x 2 Range to which echo is applied
Top Button [SUB PARAMETER 2] type MODULATION, RESONANCE
Bottom Pull-down menu [SUB PARAMETER 2] waveform/effect
Bottom left Slider
Bottom right Slider
Top Button [SUB PARAMETER 2] type MODULATION, RESONANCE
Bottom Pull-down menu [SUB PARAMETER 2] waveform/effect
Bottom left Pull-down menu Range 1 echo time beat 1/16, 1/8, 1/4, 1/2, 3/4, 1/1, 2/1
Top left Pull-down menu Range 2 echo time beat 1/16, 1/8, 1/4, 1/2, 3/4, 1/1, 2/1
Top right Pull-down menu Range 3 echo time beat 1/16, 1/8, 1/4, 1/2, 3/4, 1/1, 2/1
Bottom right Pull-down menu Range 4 echo time beat 1/16, 1/8, 1/4, 1/2, 3/4, 1/1, 2/1
Bottom Pull-down menu Pitch variation type LINEAR, KEY
Bottom Pull-down menu Reverb time SHORT, DEFAULT, LONG
Bottom Pull-down menu Filter type
Bottom left Pull-down menu Range 1 echo time beat
Top left Pull-down menu Range 2 echo time beat
Top right Pull-down menu Range 3 echo time beat
Bottom right Pull-down menu Range 4 echo time
Bottom Pull-down menu Filter type NARROW, NORMAL, WIDE
Bottom left Pull-down menu Range 1 echo time beat 1/16, 1/8, 1/4, 1/2, 3/4, 1/1, 2/1
Top left Pull-down menu Range 2 echo time beat 1/16, 1/8, 1/4, 1/2, 3/4, 1/1, 2/1
Top right Pull-down menu Range 3 echo time beat 1/16, 1/8, 1/4, 1/2, 3/4, 1/1, 2/1
Bottom right Pull-down menu Range 4 echo time beat 1/16, 1/8, 1/4, 1/2, 3/4, 1/1, 2/1
Bottom Pull-down menu Feedback amount MILD, DEFAULT, WILD
Bottom Pull-down menu Modulation type
Minimum value of noise’s acoustic
pressure level
Maximum value of noise’s acoustic
pressure level
beat
LOW, DEFAULT, HI (settable for each
slider.)
TRIANGLE, SAW, SQUARE,
RANDOM, SIDE-CHAIN (when
MODULATION is selected)
DEFAULT, MILD, NONE (when
RESONANCE is selected)
–∞dB, –18 dB, –12 dB, –6 dB
0 dB, +3 dB, +6 dB, +9 dB
TRIANGLE, SAW, SQUARE,
RANDOM, SIDE-CHAIN (when
MODULATION is selected)
DEFAULT, MILD, NONE (when
RESONANCE is selected)
LOW PASS FILTER, BAND PASS
FILTER, HIGH PASS FILTER
1/16, 1/8, 1/4, 1/2, 3/4, 1/1, 2/1,
4/1, 8/1
1/16, 1/8, 1/4, 1/2, 3/4, 1/1, 2/1,
4/1, 8/1
1/16, 1/8, 1/4, 1/2, 3/4, 1/1, 2/1,
4/1,
8/1
1/16, 1/8, 1/4, 1/2, 3/4, 1/1, 2/1,
4/1, 8/1
TRIANGLE, SAW, SQUARE,
RANDOM, SIDE-CHAIN
HPF ECHO
BPF ECHO
LPF ECHO
NOISE
SPIRAL UP
SPIRAL DOWN
REVERB UP
REVERB DOWN
ECHO
CRUSH ECHO
SUB PARAMETER
1 control
SUB PARAMETER
2 control
Main control Right Pull-down menu Filter pass width MILD, DEFAULT, WILD
SUB PARAMETER
1 control
SUB PARAMETER
2 control
Main control Right Pull-down menu SPIRAL’s delay time. MILD, DEFAULT, WILD
SUB PARAMETER
1 control
SUB PARAMETER
2 control
Main control Right Pull-down menu Room size LARGE, SMALL
SUB PARAMETER
1 control
SUB PARAMETER
2 control
Main control Right Pull-down menu Echo feedback amount HOLD, DJM
SUB PARAMETER
1 control
SUB PARAMETER
2 control
Main control Right Pull-down menu Echo depth (DEPTH) MILD, DEFAULT, WILD
SUB PARAMETER
1 control
SUB PARAMETER
2 control
12
En
Page 13

ISOLATE FX
Types of effects Place Position Type Adjustable parameters Adjustable range
Bottom left Pull-down menu Minimum value of gain –6 dB, –12 dB, –18 dB,–∞dB
Bottom right Pull-down menu Maximum value of gain 0 dB, +3 dB, +6 dB, +9 dB
Between
[LOW]
and [MID]
controls
Bottom left Pull-down menu Minimum value of gain –6 dB, –12 dB, –18 dB,–∞dB
Bottom right Pull-down menu Maximum value of gain 0 dB, +3 dB, +6 dB, +9 dB
Between
[MID] and
[HI] controls
Bottom left Pull-down menu Minimum value of gain –6 dB, –12 dB, –18 dB,–∞dB
Bottom right Pull-down menu Maximum value of gain 0 dB, +3 dB, +6 dB, +9 dB
Bottom left Pull-down menu
Bottom right Pull-down menu Multi-tap delay pattern PATTERN1, PATTERN2, PATTERN3
Bottom left Pull-down menu High pass filter resonance OFF, ON
Bottom right Pull-down menu Multi-tap delay pattern PATTERN1, PATTERN2, PATTERN3
Bottom left Pull-down menu Low pass filter resonance OFF, ON
Bottom right Pull-down menu Multi-tap delay pattern PATTERN1, PATTERN2, PATTERN3
Bottom left Pull-down menu TRANS LFO pattern PATTERN1, PATTERN2, PATTERN3
Bottom right Pull-down menu ROLL beat number pattern PATTERN1, PATTERN2, PATTERN3
Between
[LOW]
and [MID]
controls
Bottom left Pull-down menu TRANS LFO pattern PATTERN1, PATTERN2, PATTERN3
Bottom right Pull-down menu ROLL beat number pattern PATTERN1, PATTERN2, PATTERN3
Between
[MID] and
[HI] controls
Bottom left Pull-down menu TRANS LFO pattern PATTERN1, PATTERN2, PATTERN3
Bottom right Pull-down menu ROLL beat number pattern PATTERN1, PATTERN2, PATTERN3
Bottom left Pull-down menu GATE depth MILD, DEFAULT, WILD
Bottom right Pull-down menu DRIVE depth MILD, DEFAULT, WILD
Bottom left Pull-down menu GATE depth MILD, DEFAULT, WILD
Bottom right Pull-down menu DRIVE depth MILD, DEFAULT, WILD
Bottom left Pull-down menu GATE depth MILD, DEFAULT, WILD
Bottom right Pull-down menu DRIVE depth MILD, DEFAULT, WILD
Pull-down menu
Pull-down menu Frequency between [MID] and [HI] controls LOW, DEFAULT, HI
Pull-down menu
Pull-down menu Frequency between [MID] and [HI] controls LOW, DEFAULT, HI
Frequency between [LOW] and [MID]
controls
Amount by which bass drum sound is
reduced
Frequency between [LOW] and [MID]
controls
LOW, DEFAULT, HI
MILD, DEFAULT, WILD
LOW, DEFAULT, HI
ISOLATOR
CUT/ADD
TRANS/ROLL
GATE/DRIVE
LOW control
MID control
HI control
LOW control
MID control
HI control
LOW control
MID control
HI control
LOW control
MID control
HI control
Effect parameter adjustment ranges
En
13
Page 14

X-PAD FX
Item selection
buttons
ROLL
OSC
1
SAMPLER
PITCH
X-PAD
1 For instructions on [SAMPLER] editing, see SAMPLER editing on page 11.
2 Select the number of beats to be assigned to the [X-PAD] from the adjustable ranges and drag and drop it onto the [X-PAD].
Setting item 1 Setting item 2 Adjusted parameter Adjustable range
— — [ROLL] button function ROLL, SLIP ROLL, DIVIDE ROLL
GAIN
KICK
SNARE
CLAP
HI HAT
— — — —
Slider (left) — Pitch bend width in minus direction From –1 SEMITONE to –12 SEMITONE
Slider (right) — Pitch bend width in plus direction From +1 SEMITONE to +12 SEMITONE
— —
DECAY
ENVELOPE
GAIN
DECAY
ENVELOPE
GAIN
DECAY
ENVELOPE
GAIN
DECAY
ENVELOPE
Gain
Decay time SHORT, DEFAULT, LONG
Envelope type TYPE1, TYPE2
Gain
Decay time SHORT, DEFAULT, LONG
Envelope type TYPE1, TYPE2
Gain
Decay time SHORT, DEFAULT, LONG
Envelope type TYPE1, TYPE2
Gain
Decay time SHORT, DEFAULT, LONG
Envelope type TYPE1, TYPE2
Layout of number of beats assigned to
2
[X-PAD]
–3 dB, –2 dB, –1 dB, 0 dB, +1 dB, +2 dB,
+3 dB
–3 dB, –2 dB, –1 dB, 0 dB, +1 dB, +2 dB,
+3 dB
–3 dB, –2 dB, –1 dB, 0 dB, +1 dB, +2 dB,
+3 dB
–3 dB, –2 dB, –1 dB, 0 dB, +1 dB, +2 dB,
+3 dB
1/2, 2/3, 3/4, 1/1, 3/2, 2/1, 4/1, 8/1, 1/32,
1/24, 1/16, 1/12, 1/8, 1/6, 1/4, 1/3
RELEASE FX
Types of effects Place Position Type Adjustable parameters Adjustable range
RELEASE FX lever
VINYL BRAKE
ISOLATE FX
SCENE FX
X-PAD FX
RELEASE FX lever
BACK SPIN
ISOLATE FX
SCENE FX
X-PAD FX
RELEASE FX lever
ECHO
ISOLATE FX
SCENE FX
X-PAD FX
Bottom
(upper tier)
Bottom
(middle tier)
Bottom (bottom tier)
Center Pull-down menu
Center Pull-down menu
Center Pull-down menu
Bottom
(upper tier)
Bottom
(middle tier)
Bottom (bottom tier)
Center Pull-down menu
Center Pull-down menu
Center Pull-down menu
Top Pull-down menu Echo feedback amount HOLD, DJM
Bottom
(upper tier)
Bottom
(middle tier)
Bottom (bottom tier)
Center Pull-down menu
Center Pull-down menu
Center Pull-down menu
Pull-down menu Range 1 beat 1/4, 1/2, 3/4, 1/1, 2/1, 4/1, 8/1, 12/1, 16/1
Pull-down menu Range 2 beat 1/4, 1/2, 3/4, 1/1, 2/1, 4/1, 8/1, 12/1, 16/1
Pull-down menu Range 3 beat 1/4, 1/2, 3/4, 1/1, 2/1, 4/1, 8/1, 12/1, 16/1
Select whether or not to hold the ISOLATE
FX effect when RELEASE FX is turned off.
Select whether or not to hold the SCENE FX
effect when RELEASE FX is turned off.
Select whether or not to hold the X-PAD FX
effect when RELEASE FX is turned off.
Pull-down menu Range 1 beat 1/2, 3/4, 1/1, 2/1, 4/1, 8/1, 12/1, 16/1, 32/1
Pull-down menu Range 2 beat 1/2, 3/4, 1/1, 2/1, 4/1, 8/1, 12/1, 16/1, 32/1
Pull-down menu Range 2 beat 1/2, 3/4, 1/1, 2/1, 4/1, 8/1, 12/1, 16/1, 32/1
Select whether or not to hold the ISOLATE
FX effect when RELEASE FX is turned off.
Select whether or not to hold the SCENE FX
effect when RELEASE FX is turned off.
Select whether or not to hold the X-PAD FX
effect when RELEASE FX is turned off.
Pull-down menu Range 1 beat 1/16, 1/8, 1/4, 1/2, 3/4, 1/1, 2/1, 4/1, 8/1
Pull-down menu Range 2 beat 1/16, 1/8, 1/4, 1/2, 3/4, 1/1
Pull-down menu Range 3 beat 1/16, 1/8, 1/4, 1/2, 3/4, 1/1
Select whether or not to hold the ISOLATE
FX effect when RELEASE FX is turned off.
Select whether or not to hold the SCENE FX
effect when RELEASE FX is turned off.
Select whether or not to hold the X-PAD FX
effect when RELEASE FX is turned off.
OFF, ON
OFF, ON
OFF, ON
OFF, ON
OFF, ON
OFF, ON
OFF, ON
OFF, ON
OFF, ON
14
En
Page 15

Others
Menu list
Menu items Description
File
Edit
Help
Load
Save
Settings
Quit
Undo
Redo
Sync
Import
Export
Update Setting
Effect Browser
Load Default Settings
Launch rekordbox
Version
Manual
English Opens the remixbox manual (in English).
Français Opens the remixbox manual (in French).
Deutsch Opens the remixbox manual (in German).
Español Opens the remixbox manual (in Spanish).
Italiano Opens the remixbox manual (in Italian).
Nederlands Opens the remixbox manual (in Dutch).
Русский
Português Opens the remixbox manual (in Portuguese).
简体中文
繁體中文
한국어
日本語
Functions in the same way as the [Load] button.
Functions in the same way as the [Save] button.
Functions in the same way as the [Settings] button.
Quits remixbox.
Undoes the last parameter change made.
Restores the parameter change undone with the [Undo] command.
Functions in the same way as the [Sync] button.
Functions in the same way as the [Import] button.
Functions in the same way as the [Export] button.
Imports the customized parameter data loaded in the RMX-1000.
Functions in the same way as the [Effect Browser] button.
Loads the factory default parameter data. The sampled sound source settings are not changed.
Launches rekordbox installed on the computer.
Displays the version information of remixbox and the RMX-1000 connected to the computer.
Opens the remixbox manual (in Russian).
Opens the remixbox manual (in simplified Chinese).
Opens the remixbox manual (in traditional Chinese).
Opens the remixbox manual (in Korean).
Opens the remixbox manual (in Japanese).
Others
About trademarks and registered
trademarks
! Pioneer is a registered trademark of PIONEER CORPORATION.
! Microsoft®, Windows Vista®, Windows® and Internet Explorer® are
either registered trademarks or trademarks of Microsoft Corporation
in the United States and/or other countries.
! Apple, Macintosh, Mac OS, Safari, iTunes, and Finder are trade-
marks of Apple Inc., registered in the U.S. and other countries.
! Intel and Pentium are trademarks of Intel Corporation in the U.S. and
other countries.
The names of companies and products mentioned herein are the trademarks of their respective owners.
This product has been licensed for nonprofit use. This product has not
been licensed for commercial purposes (for profit-making use), such
as broadcasting (terrestrial, satellite, cable or other types of broadcasting), streaming on the Internet, Intranet (a corporate network) or other
types of networks or distributing of electronic information (online digital music distribution service). You need to acquire the corresponding
licenses for such uses. For details, see http://www.mp3licensing.com.
Cautions on copyrights
Recordings you have made are for your personal enjoyment and according to copyright laws may not be used without the consent of the copyright holder.
! Music recorded from CDs, etc., is protected by the copyright laws of
individual countries and by international treaties. It is the full responsibility of the person who has recorded the music to ensure that it is
used legally.
! When handling music downloaded from the Internet, etc., it is the
full responsibility of the person who has downloaded the music to
ensure that it is used in accordance with the contract concluded
with the download site.
En
15
Page 16

Using the support site
Please read the remixbox’s operating instructions before making inquiries about remixbox operating procedures and technical issues. Also
check the RMX-1000 FAQ provided on the Pioneer DJ Global site.
<Pioneer DJ Global site>
http://pioneerdj.com/support/
! PIONEER CORPORATION collects your personal information for the
following purposes:
1 To provide customer support for your purchased product
2 To inform you of product or event information by e-mail
3 To obtain feedback collected by survey for product planning
purposes
— Your personal information is kept confidential corresponding to
the privacy policy set forth by our company.
— For Pioneer’s privacy protection policy, see the Pioneer DJ Global
site.
! When making inquiries regarding remixbox, please be sure to fur-
nish your computer type and specifications (CPU, installed memory,
other connected peripherals, etc.), the operating system and version
used, as well as concrete information regarding the issue at hand.
— To inquire about configuring your computer with non-Pioneer
peripheral devices and to obtain the corresponding technical
support, contact the specific manufacturer or retailer.
! Update programs will be available from the remixbox support site.
We strongly recommend you upgrade your software on a regular
basis to keep the latest updates on your system.
© 2012 PIONEER CORPORATION.
All rights reserved.
PIONEER CORPORATION
1-1, Shin-ogura, Saiwai-ku, Kawasaki-shi, Kanagawa 212-0031, Japan
<DRQ1001-A-EN>
16
En
 Loading...