

Page 1

Thank you for purchasing this PIONEER
product. It is designed to give you many
years of enjoyment.
PIONEER SUGGESTS USING A PROFESSIONAL INSTALLER DUE TO THE
COMPLEXITY OF THIS PRODUCT.
Please read all instructions and WARN-
INGS in this manual before attempting
operation. Should you have any questions,
contact your nearest Pioneer authorized
dealer or installation specialist.
Information to User
Alteration or modifications carried out
without appropriate authorization may
invalidate the user’s right to operate the
equipment.
Important
The serial number of this amplifier is written on the bottom of the unit. For your
own security and convenience, write it
down on the enclosed warranty card. Keep
the card handy for future reference.
Before Using This Product
After-sales service for Pioneer
products
Please contact the dealer or distributor from where
you purchased the product for its after-sales service (including warranty conditions) or any other
information. In case the necessary information is
not available, please contact the companies listed
below:
Please do not ship your product to the companies
at the addresses listed below for repair without
advance contact.
7 U.S.A.
Pioneer Electronics (USA) Inc.
CUSTOMER SUPPORT DIVISION
P.O. Box 1760
Long Beach, CA 90801-1760
800-421-1404
7 CANADA
Pioneer Electronics of Canada, Inc.
CUSTOMER SATISFACTION
DEPARTMENT
300 Allstate Parkway
Markham, Ontario L3R OP2
1-877-283-5901
For warranty information please see the Limited
Warranty sheet included with your product.
Published by Pioneer Corporation.
Copyright © 2004 by Pioneer Corporation.
All rights reserved.
Publication de Pioneer Corporation.
Copyright © 2004 Pioneer Corporation.
Tous droits de reproduction et de traduction
réservés.
Printed in U.S.A.
Imprimé aux Etats-Unis
<HRD0242-A> UC<KMINX> <04L00000>
CLASS D MONO AMPLIFIER
AMPLIFICATEUR MONO DE CLASSE D
Owner’s Manual
PRS-D3000SPL
Mode d’emploi
PIONEER CORPORATION
4-1, MEGURO 1-CHOME, MEGURO-KU, TOKYO 153-8654, JAPAN
PIONEER ELECTRONICS (USA) INC.
P.O. Box 1540, Long Beach, California 90801-1540, U.S.A.
TEL: (800) 421-1404
PIONEER EUROPE NV
Haven 1087, Keetberglaan 1, B-9120 Melsele, Belgium
TEL: (0) 3/570.05.11
PIONEER ELECTRONICS ASIACENTRE PTE. LTD.
253 Alexandra Road, #04-01, Singapore 159936
TEL: 65-6472-7555
PIONEER ELECTRONICS AUSTRALIA PTY. LTD.
178-184 Boundary Road, Braeside, Victoria 3195, Australia
TEL: (03) 9586-6300
PIONEER ELECTRONICS OF CANADA, INC.
300 Allstate Parkway, Markham, Ontario L3R OP2, Canada
TEL: 1-877-283-5901
PIONEER ELECTRONICS DE MEXICO, S.A. de C.V.
Blvd.Manuel Avila Camacho 138 10 piso
Col.Lomas de Chapultepec, Mexico, D.F. 11000
TEL: 55-9178-4270
Product registration
Visit us at the following site:
1 Register your product. We will keep the details of
your purchase on file to help you refer to this
information in the event of an insurance claim
such as loss or theft.
2 Receive updates on the latest products and tech-
nologies.
3 Download owner’s manuals, order product cata-
logues, research new products, and much more.
About This Product
This product is a class D amplifier for the
subwoofer. If both L (left) and R (right)
channels are connected to the RCA input
of this product, output is mixed because
this product is a mono amplifier.
CAUTION
Never replace the fuse with one of greater
value or rating than the original fuse. Use
of an improper fuse could result in overheating and smoke and could cause damage to the product and injury including
burns.
WARNING
• Handling the cord on this product or cords associated with accessories sold with the product will
expose you to lead, a chemical known to the State
of California and other governmental entities to
cause cancer and birth defects or other reproductive harm. Wash hands after handling.
• Always use the recommended battery wire and
ground wire, which is sold separately. Connect the
battery wire directly to the car battery positive terminal (+) and the ground wire to the car body.
• Do not touch the amplifier with wet hands.
Otherwise you may get an electric shock. Also, do
not touch the amplifier when it is wet.
• For traffic safety and to maintain safe driving
conditions, keep the volume low enough so that
you can still hear normal traffic sound.
• Check the connections of the power supply and
subwoofer if a fuse for the separately sold battery
wire blows. Detect the cause and solve the problem, then replace the fuse with another one of the
same size and rating.
• To prevent malfunction of the amplifier and subwoofer, the protective circuit will cut the power
supply to the amplifier (sound will stop) when an
abnormal condition occurs. In such a case, switch
the power to the system OFF and check the
connection of the power supply and subwoofer.
Detect the cause and solve the problem.
• Contact the dealer if you cannot detect the cause.
• To prevent an electric shock or short-circuit
during connection and installation, be sure to
disconnect the negative (–) terminal of the battery
beforehand.
• Confirm that no parts are behind the panel when
drilling a hole for installation of the amplifier. Be
sure to protect all cables and important equipment
such as fuel lines, brake lines and the electrical
wiring from damage.
• DO NOT allow amplifier to come into contact
with liquids due to, for example, the location
where the amplifier is installed. Electrical shock
could result. Also, amplifier and speaker damage,
smoke, and overheating could result from contact
with liquids. In addition, the amplifier surface and
the surface of any attached speakers could become
hot to the touch and minor burns could result.
Page 2
CAUTION:
To prevent damage and/or injury
• Do not ground the speaker wire directly or connect a negative (–) lead wire for several speakers.
• This unit is for vehicles with a 12-volt battery and
negative grounding. Before installing it in a recreational vehicle, truck or bus, check the battery
voltage.
• If the car stereo is kept on for a long time while
the engine is at rest or idling, the battery may go
dead. Turn the car stereo off when the engine is at
rest or idling.
• If the system remote control wire of the amplifier
is connected to the power terminal through the
ignition switch (12 V DC), the amplifier will
always be on when the ignition is on— regardless
of whether the car stereo is on or off. Because of
this, the battery could go dead if the engine is at
rest or idling.
• DO NOT connect a subwoofer with a lower
impedance than specified in the “Connecting the
Unit” section. Amplifier damage, smoke, and
overheating could result from a non-specified connection. The amplifier surface could also become
hot to the touch and minor burns could result.
• Connect either of two subwoofers to the amplifier;
1: a subwoofer with a 500 W or larger nominal
input and an impedance 4 Ω, or 2: a subwoofer
with a 1,000 W or larger nominal input and an
impedance 2 Ω. If the nominal input and impedance are out of the above ranges, the subwoofer
may catch fire, emit smoke or become damaged.
• Install and route the separately sold battery wire
as far away as possible from the speaker wires.
Install and route the separately sold battery wire,
ground wire, speaker wires and the amplifier as
far away as possible from the antenna, antenna
cable and tuner.
• Cords for this product and those for other products may be different colors even if they have the
same function. When connecting this product to
another product, refer to the supplied Installation
manuals of both products and connect cords that
have the same function.
Connecting the Unit
CAUTION
• Disconnect the negative (–) terminal of the battery
to avoid the risk of short-circuit and damage to
the unit.
• Secure the wiring with cable clamps or adhesive
tape. To protect the wiring, wrap adhesive tape
around it where they lie against metal parts.
• Do not route wires where they will get hot, for
example where the heater will blow over them. If
the insulation heats up, it may become damaged,
resulting in a short-circuit through the vehicle
body.
• Make sure that wires will not interfere with moving parts of the vehicle, such as the gearshift,
handbrake or seat sliding mechanism.
• Never feed power to other equipment by cutting
the insulation of the power supply wire to tap
from the wire. The current capacity of the wire
will be exceeded, causing overheating.
• Never replace the fuse with one of greater value
or rating than the original fuse. Use of an improper fuse could result in overheating and smoke and
could cause damage to the product and injury
including burns.
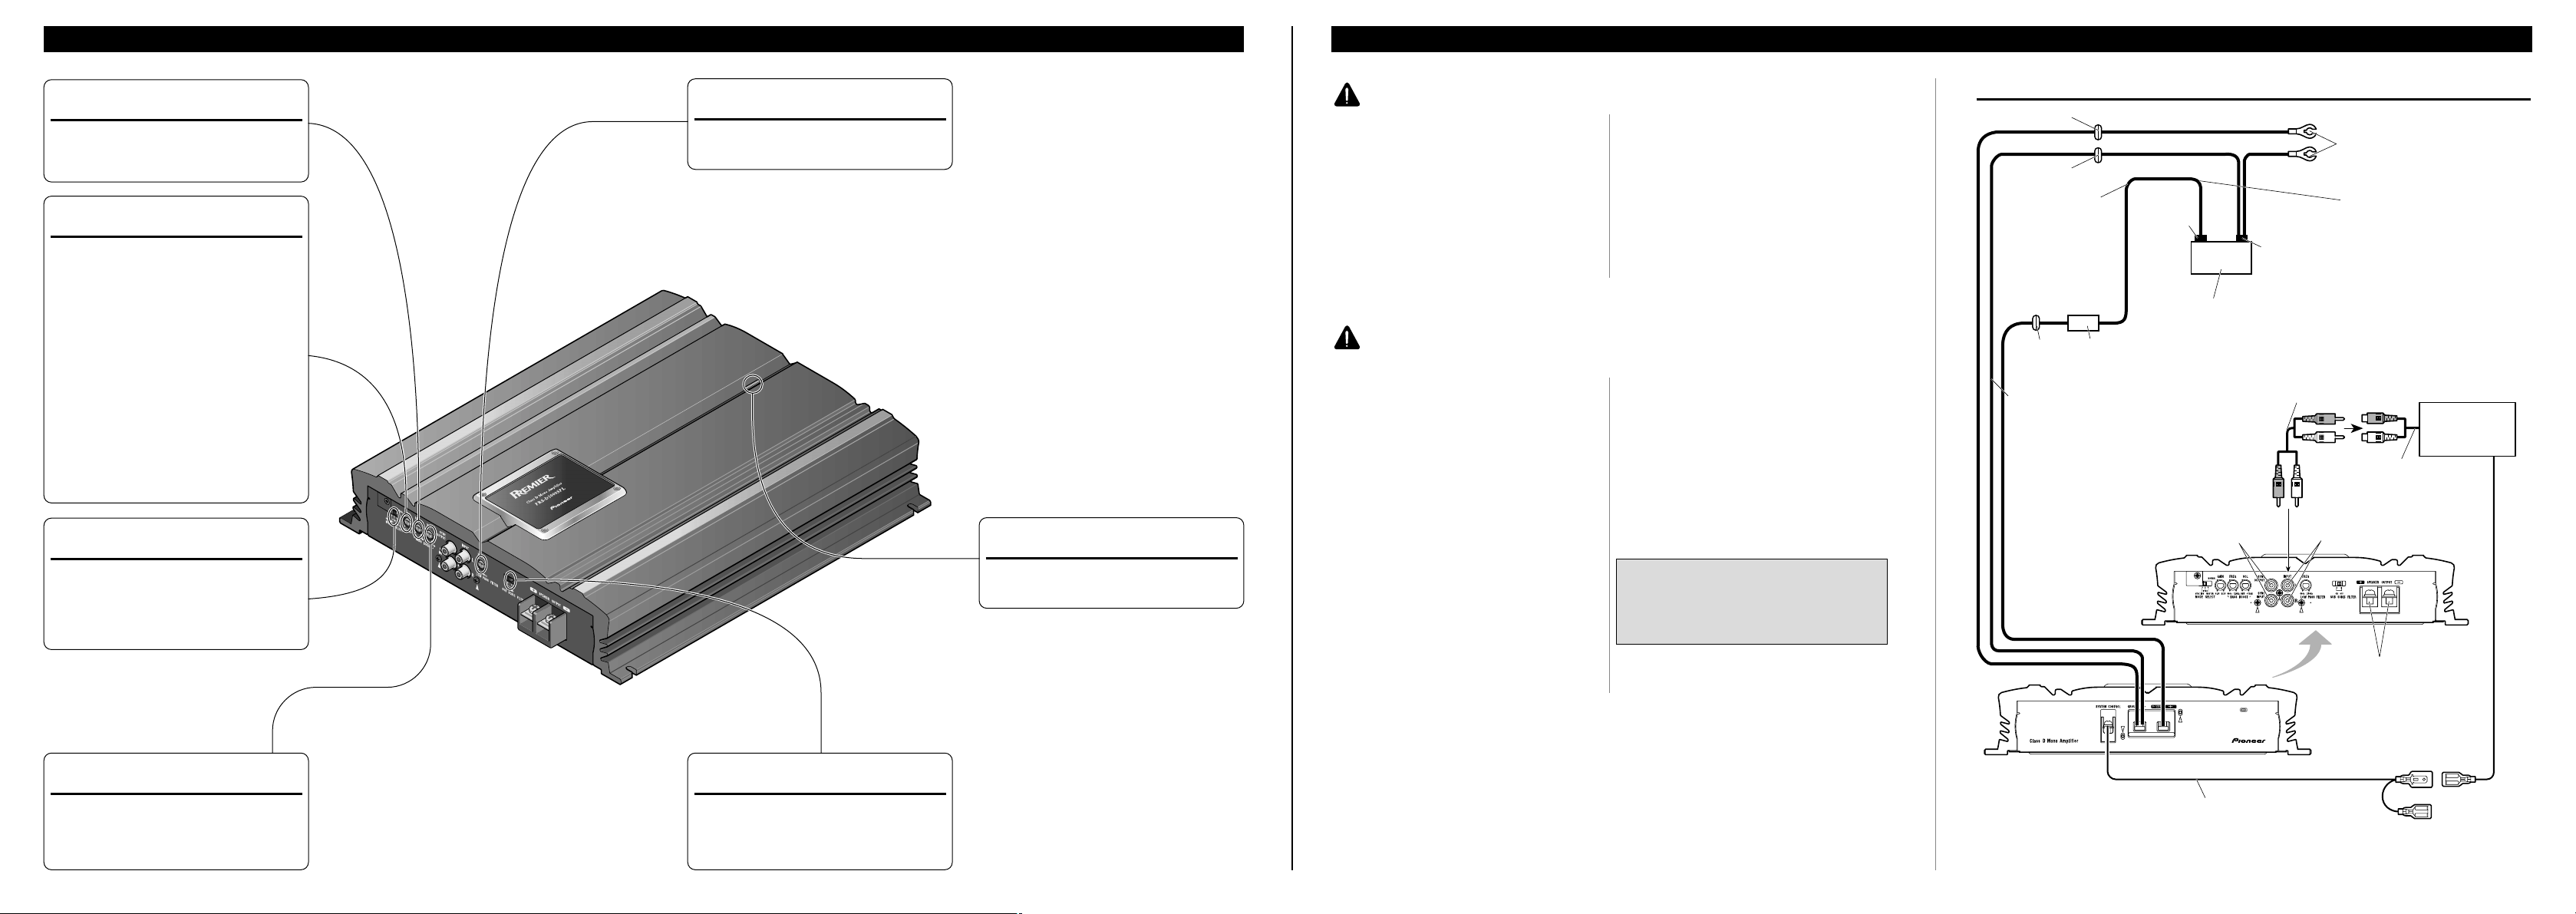
Setting the Unit
Connection Diagram
Bass Boost Frequency Control
You can select a bass boost frequency
from 40 to 120 Hz with the bass boost
control.
Power Indicator
The power indicator lights when the
power is switched on.
Bass Boost Level Control
Bass boost level control can boost the
level around the frequency selected by
the bass boost frequency control from 0
to 12 dB.
Cut Off Frequency Control for LPF
You can select a cut off frequency from
40 to 240 Hz.
Gain Control
If the sound level is too low, even when
the volume of the car stereo used along
with this power amplifier is turned up,
turn gain control on the front of the
power amplifier clockwise. If the sound
distorts when the volume is turned up,
turn the gain control counter-clockwise.
• When using with an RCA equipped car
stereo (standard output of 500 mV), set
to the NORMAL position. When using
with an RCA equipped Pioneer car
stereo with max. output of 4 V or
more, adjust level to match the car
stereo output level.
• For synced amplifier’s gain control,
see the “Setting the Gain for Synced
Amplifier” section.
Subsonic Select Switch
The subsonic filter cuts inaudible frequencies below 20 Hz to eliminate
unwanted vibrations and minimize
power loss.
MODE SELECT Switch
You can select amplifier’s sync mode
from MASTER, SYNC and SYNC INV.
For the position of the MODE SELECT
switch, see the “Connecting the Speaker
Wires” section.
Grommet
Battery wire (sold separately)
For the wire size, see the
“Connecting the Power Terminal”
section. The battery wire, the ground
wire and the optional direct ground
wire must be same size.
After making all other connections
at the amplifier, connect the battery
wire terminal of the amplifier to the
positive (+) terminal of the battery.
Ground wire (sold separately)
The ground wires must be same size
as the battery wire.
Connect to metal body or chassis.
Car stereo with
RCA output
jacks
External Output
(Subwoofer output)
Connecting wire with RCA
pin plugs (sold separately).
RCA input jack
Speaker terminal
See the “Connecting the
Speaker Wires” section for
speaker connection instructions.
System remote control wire (sold separately)
Connect the male terminal of this wire to the system remote control terminal of the car stereo (SYSTEM REMOTE CONTROL). The female terminal can be connected to the auto-antenna relay control terminal. If the car
stereo does not have a system remote control terminal, connect the male terminal to the power terminal through the ignition switch.
Grommet
Reverse side
The maximum length
of the wire between the
fuse and the positive
(+) terminal of the battery is 45 cm (18 in.).
Positive (+)
terminal
Negative (–)
terminal
Battery
Optional direct ground
wire (sold separately)
When chassis grounding is not sufficient,
direct grounding
should be used. The
wire size should be
same size as the battery wire.
Fuse (100 A)
Each amplifier must be SEPARATELY
fused at 100 A.
SYNC OUTPUT /
SYNC INPUT jack
See the “Connecting the
Speaker Wires” section
for SYNC OUTPUT /
SYNC INPUT jack connection instructions.
Grommet
Page 3
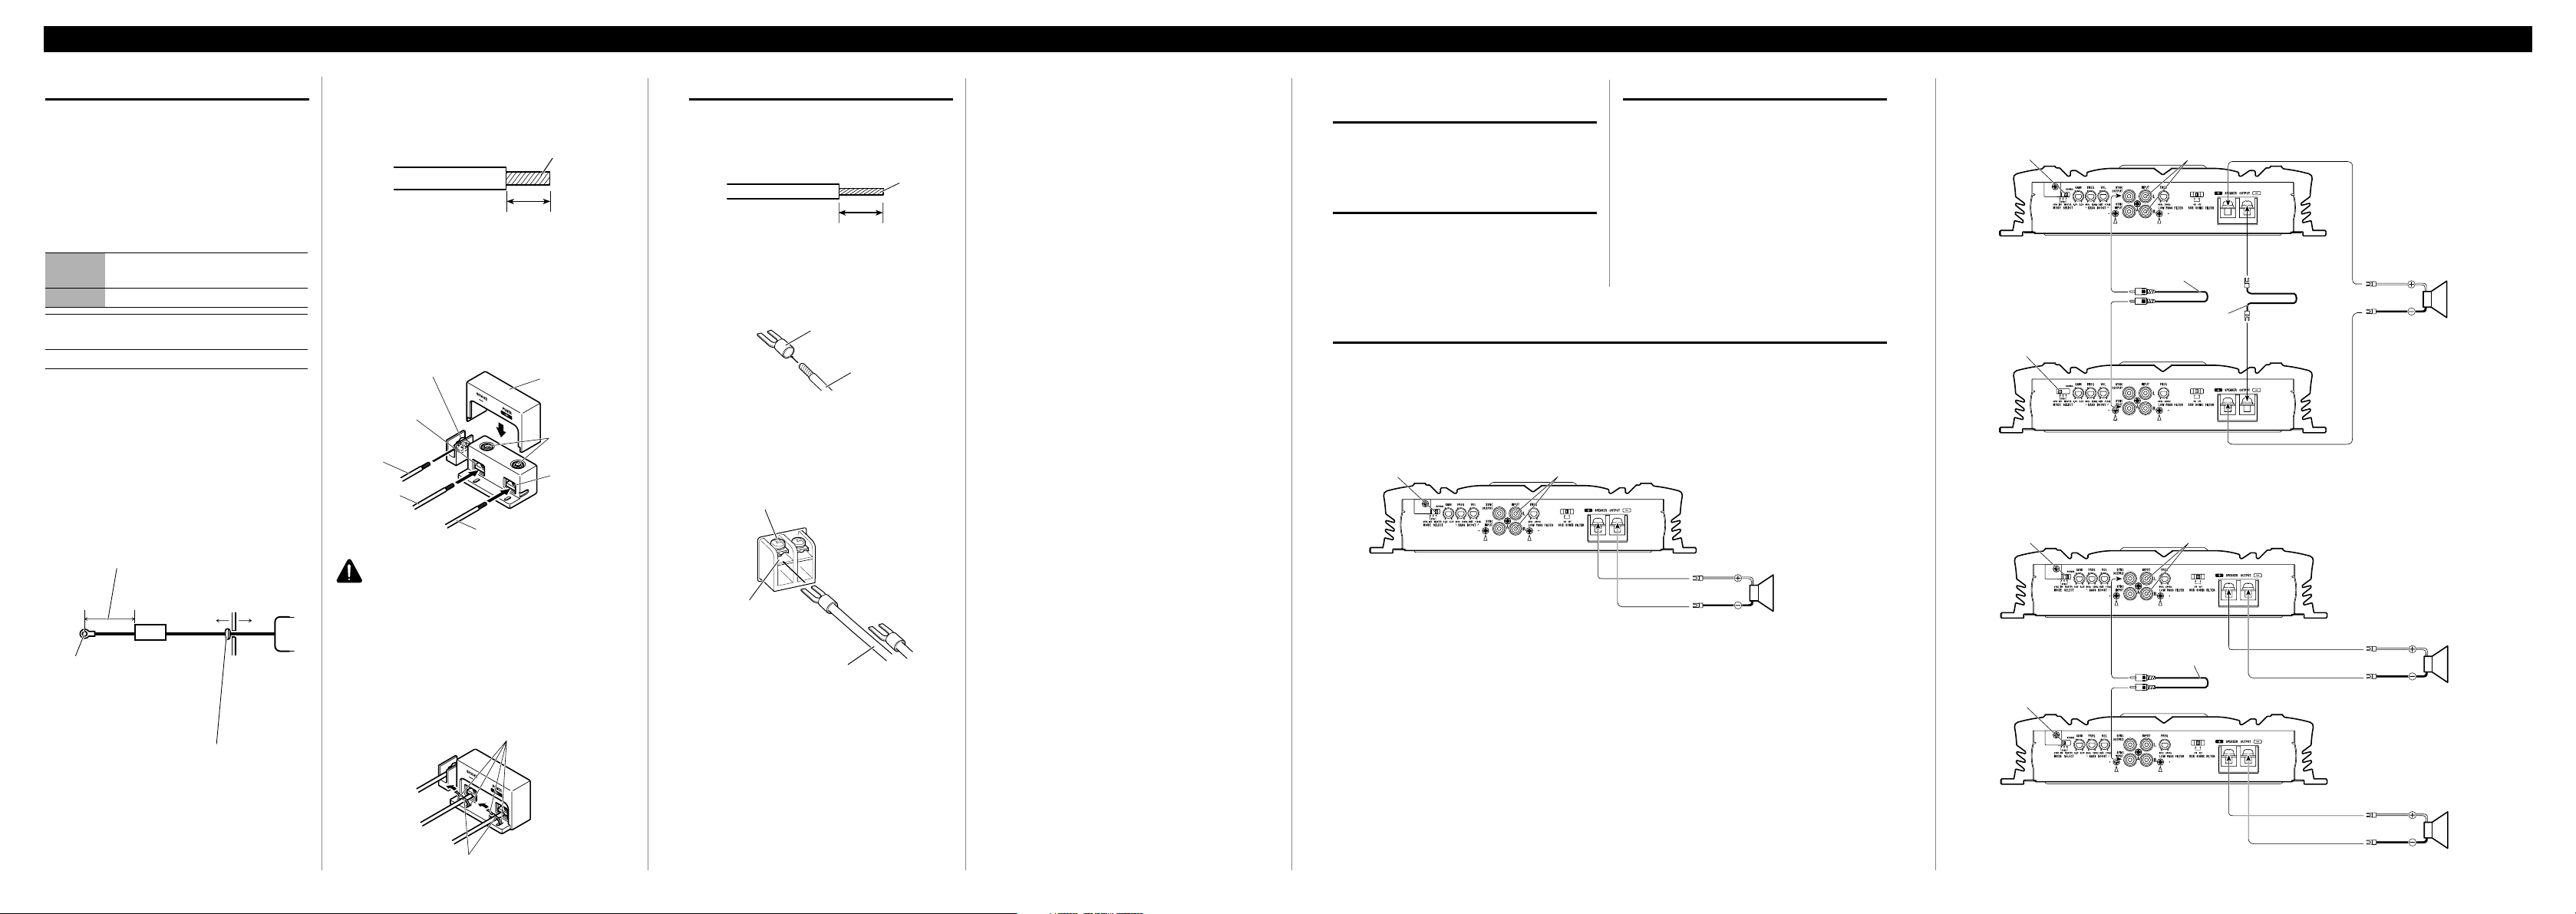
Connecting the Speaker Terminals
1. Expose the end of the speaker wires
using nippers or a cutter by about
10 mm (3/8 in.) and twist.
2. Attach lugs to speaker wire ends.
Lugs not supplied.
• Use pliers, etc., to crimp lugs to wires.
3. Connect the speaker wires to the
speaker terminals.
• Fix the speaker wires securely with the termi-
nal screws.
10 mm
Connecting the Unit
Connecting the Power Terminal
• Always use the recommended battery and ground
wire, which is sold separately. Connect the battery
wire directly to the car battery positive terminal
(+) and the ground wire to the car body.
• Recommended wires size (AWG: American Wire
Gauge) is as follows. The battery wire, the ground
wire and the optional direct ground wire must be
same size.
Battery Wire and Ground Wire Size
Wire Length less than 4 ft 4—7 ft 7—10 ft
less than 1.2 m 1.2—2.1 m 2.1—3.0 m
Wi re S ize 6 AW G 6 AWG 6 AW G
10—13 ft 13—16 ft 16—19 ft 19—22 ft
3.0—3.9 m 3.9—4.8 m 4.8—5.7 m 5.7—6.7 m
6 AW G 4 AW G 4 AW G 4 AW G
1. Pass the battery wire from the
engine compartment to the interior
of the vehicle.
• After making all other connections to the
amplifier, connect the battery wire terminal of
the amplifier to the positive (+) terminal of
the battery.
2. Expose the end of the battery wire
and ground wire using nippers or a
cutter by about 15–20 mm (5/8–3/4
in.) and twist.
3. Connect the wires to the terminal.
• Before connecting the wires to the terminals,
remove the endcap. After connecting the
wires to the terminals, attach the endcap.
• Fix the wires securely with the terminal
screws.
WARNING
Failure to securely fasten the battery wire to the terminal using the terminal screws could cause the terminal area to overheat and could result in damage
and injury including minor burns.
4. Put the wire ties in the slits and
wrap the wire ties around the wires.
• Wrap the wire tie around the wire insulation,
not the stripped wire.
15–20 mm
Engine
compartment
Interior of
the vehicle
Drill a 14
mm (1/2 in.)
hole into the
vehicle body.
Insert the O-ring rubber
grommet into the vehicle
body.
Positive (+)
terminal
GND terminal
Power
terminal
Battery wire
System remote
control terminal
System remote
control wire
Ground wire
Fuse 100 A
Each amplifier must
be SEPARATELY
fused at 100 A.
The maximum length of the wire between
the fuse and the positive (+) terminal of the
battery is 45 cm (18 in.).
Endcap
Terminal
screw
Setting the Gain for
Synced Amplifier
After connecting the speaker wires, adjust each
synced amplifier’s gain control. All synced amplifiers follow the master amplifier’s settings.
Quick Setup of the Gain
Set each synced amplifier’s gain control to the NORMAL position. This setting will balance output volumes sufficiently for most applications.
Advanced Setup of the Gain
Starting with the master amplifier, adjust the gain
control on each amplifier in order.
1. Output sin wave through this system at low output
level.
2. Use volt meter to measure the master amplifier’s
output voltage level.
3. Use volt meter to measure the synced amplifier’s
output voltage level.
4. Match the synced amplifier’s output to the master’s output using the gain control on the synced
amplifier.
5. Repeat for the each synced amplifier in the proper
order.
Connecting the Speaker Wires
Connect the speaker leads to suit the configuration according to the figures shown below and the next page.
Single Amplifier
• Speaker wire size must be 12 AWG minimum.
• Load may be any combination of speakers but impedance must be 2 Ω or larger.
MODE SELECT switch must be in
MASTER position.
2 Ω
minimum
1,000 W
Two Amplifier Bridged
• Speaker wire size must be 12 AWG minimum.
• Load may be any combination of speakers but impedance must be 4 Ω or larger.
Two Amplifier
• Speaker wire size must be 12 AWG minimum.
• Load may be any combination of speakers but impedance must be 2 Ω or larger.
MODE SELECT switch
must be in MASTER position.
4 Ω
minimum
2,000 W
MODE SELECT switch
must be in SYNC INV
position. Before setting
to the position, remove
the screw and the stopper.
Connecting wire with
RCA pin plugs (sold
separately).
Connecting speaker
wire (sold separately).
2 Ω
minimum
1,000 W
2 Ω
minimum
1,000 W
MODE SELECT switch
must be in MASTER position.
Connecting wire with
RCA pin plugs (sold
separately).
MODE SELECT
switch must be in
SYNC position.
Wire tie
Slit
Twist
Speaker wire
Lug
(3/8 in.)
Twist
(5/8–3/4 in.)
Speaker
terminal
Terminal screw
Speaker wire
Connect to a car stereo.
For details, see the “Connection Diagram” section.
Connect to a car stereo.
For details, see the “Connection Diagram” section.
Connect to a car stereo.
For details, see the “Connection Diagram” section.
Page 4

Power source .............................................................................................................. 14.4 V DC (10.8 — 15.1 V allowable)
Grounding system ............................................................................................................................................ Negative type
Current consumption .......................................................................................................... 42 A (at continuous power, 4 Ω)
Average current drawn* ............................................................................................................ 8.3 A (4 Ω for one channel)
9.0 A (2 Ω for one channel)
Fuse (external) .............................................................................................................................................................. 100 A
Dimensions ........................................................................................................................ 300 (W) × 64 (H) × 279 (D) mm
[12 (W) × 3 (H) × 11 (D) in.]
Weight ........................................................................................................ 5.9 kg (13 lbs.) (Leads for wiring not included)
Maximum power output ........................................................................................ 1,000 W × 1 (4 Ω) / 2,000 W × 1 (2 Ω)
Continuous power output .................................................................. 500 W × 1 (at 14.4 V, 4 Ω, 20 —240 Hz 1.0% THD)
1,000 W × 1 (at 14.4 V, 2 Ω, 20 —240 Hz 2.0% THD)
Load impedance .................................................................................... 4 Ω (2 — 8 Ω allowable), (Ex. Bridge 4 — 16 Ω)
Frequency response ................................................................................................................ 10 — 240 Hz (+0 dB, –1 dB)
S/N ratio ............................................................................................................................................ 90 dB (IHF-A network)
Distortion .......................................................................................................................................... 0.05 % (50 W, 100 Hz)
Low pass filter .................................................................................................................... Cut off frequency: 40 — 240 Hz
Cut off slope: –24 dB/oct
Subsonic filter (HPF) ................................................................................................................................ Frequency: 20 Hz
Slope: –18 dB
Bass boost .................................................................................................................................................. Level: 0 — 12 dB
Frequency: 40 — 120 Hz
Phase control .......................................................................................................................................... SYNC, SYNC INV
Gain control ................................................................................................................................................ 200 mV — 6.5 V
Maximum input level / impedance ........................................................................................................ RCA: 6.5 V / 22 kΩ
Note:
• Specifications and the design are subject to possible modification without notice
due to improvements.
*Average current drawn
• The average current drawn is nearly the maximum current drawn by this unit
when an audio signal is input. Use this value when working out total current
drawn by multiple power amplifiers.
Specifications
CAUTION
• Do not install in:
—Places where it could injure the driver or pas-
sengers if the vehicle stops suddenly.
—Places where it may interfere with the driver,
such as on the floor in front of the driver’s seat.
• Make sure that wires are not caught in the sliding
mechanism of the seats, resulting in a short-circuit.
• Confirm that no parts are behind the panel when
drilling a hole for installation of the amplifier. Protect
all cables and important equipment such as fuel lines,
brake lines and electrical wiring from damage.
• Install tapping screws in such a way that the
screw tip does not touch any wire. This is important
to prevent wires from being cut by vibration of the
car, which can result in fire.
• DO NOT allow amplifier to come into contact
with liquids due to, for example, the location
where the amplifier is installed. Electrical shock
could result. Also, amplifier and speaker damage,
smoke, and overheating could result from contact
with liquids. In addition, the amplifier surface and
the surface of any attached speakers could become
hot to the touch and minor burns could result.
• To ensure proper installation, use the supplied parts
in the manner specified. If any parts other than the
supplied ones are used, they may damage internal
parts of the amplifier, or they may become loose
causing the amplifier to shut down.
• Never replace the fuse with one of greater value
or rating than the original fuse. Use of an improper fuse could result in overheating and smoke and
could cause damage to the product and injury
including burns.
CAUTION:
To prevent malfunction and/or injury
• To ensure proper heat dissipation of the amplifier,
be sure of the following during installation.
—Allow adequate space above the amplifier for
proper ventilation.
—Do not cover the amplifier with a floor mat or
carpet.
• DO NOT allow amplifier to come into contact
with liquids due to, for example, the location
where the amplifier is installed. Electrical shock
could result. Also, amplifier and speaker damage,
smoke, and overheating could result from contact
with liquids. In addition, the amplifier surface and
the surface of any attached speakers could become
hot to the touch and minor burns could result.
• Do not install the amplifier on unstable places such
as the spare tire board.
• The best location for installation differs with the car
model and installation location. Secure the amplifier
at a sufficiently rigid location.
• Make temporary connections first and check that the
amplifier and the system operate properly.
• After installing the amplifier, confirm that the spare
tire, jack and tools can be easily removed.
Example of installation on the floor
mat or on the chassis
1. Place the amplifier where it is to be
installed. Insert the supplied tapping
screws (4 × 18 mm) into the screw
holes. Push on the screws with a
screwdriver so they make marks
where the installation holes are to be
located.
2. Drill 2.5 mm (1/8 in.) diameter holes
at the point marked, and install the
amplifier, either on the carpet or
directly to the chassis.
Installation
Drill a 2.5 mm (1/8 in.)
diameter hole
Tapping-screws
(4 × 18 mm)
Floor mat
or chassis
Connecting the Unit
Four Amplifier
• Speaker wire size must be 12 AWG minimum.
• Load may be any combination of speakers but impedance must be 2 Ω or larger.
2 Ω
minimum
1,000 W
2 Ω
minimum
1,000 W
2 Ω
minimum
1,000 W
2 Ω
minimum
1,000 W
Connecting wire with
RCA pin plugs (sold
separately).
Connecting wire with
RCA pin plugs (sold
separately).
Connecting wire with
RCA pin plugs (sold
separately).
MODE SELECT switch must
be in SYNC position.
MODE SELECT switch must
be in SYNC position.
MODE SELECT switch must
be in SYNC position.
MODE SELECT switch
must be in MASTER position.
Four Amplifier Bridged
• Speaker wire size must be 12 AWG minimum.
• Load may be any combination of speakers but impedance must be 4 Ω or larger.
MODE SELECT switch
must be in MASTER position.
Connecting wire with
RCA pin plugs (sold
separately).
Connecting wire with
RCA pin plugs (sold
separately).
Connecting wire with
RCA pin plugs (sold
separately).
Connecting
speaker wire
(sold separately).
4 Ω
minimum
2,000 W
4 Ω
minimum
2,000 W
MODE SELECT switch
must be in SYNC INV
position. Before setting
to the position, remove
the screw and the stopper.
MODE SELECT switch
must be in SYNC INV
position. Before setting
to the position, remove
the screw and the stopper.
MODE SELECT switch
must be in SYNC INV
position. Before setting
to the position, remove
the screw and the stopper.
Connecting
speaker wire
(sold separately).
Power output ........................................................................................ 500 W RMS × 1 channel
(4 Ω and 1 % THD+N)
1,000 W RMS × 1 channel
(2 Ω and 1 % THD+N, 240 Hz)
S/N ratio .............................................................................. 60 dBA (Reference: 1 W into 4 Ω)
Connect to a car stereo.
For details, see the “Connection Diagram” section.
Connect to a car stereo.
For details, see the “Connection Diagram” section.
Page 5

ATTENTION
• Utilisez le câble de liaison à la batterie et le câble
de masse conseillés; ils sont vendus séparément.
Reliez le câble rouge à la borne positive (+) de la
batterie et le câble de masse à la carrosserie du
véhicule.
• Ne touchez pas l’amplificateur quand vous avez
les mains mouillées, faute de quoi vous risquez de
ressentir une secousse électrique. Pareillement, ne
touchez pas l’amplificateur s’il est mouillé.
• Pour votre sécurité et celles des autres usagers de
la route, maintenez le niveau d’écoute à une
valeur telle que les bruits de la circulation
demeurent nettement perceptibles.
• Vérifiez les raccordements de l’alimentation et du
haut-parleur d’extrêmes graves si le fusible du
câble de liaison (vendu séparément) à la batterie
vient à griller. Recherchez la cause de l’anomalie
puis corrigez-la; enfin, remplacez le fusible grillé
par un fusible de même taille et de même calibre.
• Pour éviter d’endommager l’amplificateur et du
haut-parleur d’extrême grave, le circuit de
protection coupe l’alimentation de l’amplificateur
(les sons ne sont plus émis) dès que survient une
situation anormale. Dans ce cas, mettez
l’ensemble des appareils hors tension et contrôlez
les liaisons entre l’amplificateur et du haut-parleur
d’extrême grave. Le cas échéant, recherchez la
cause de l’anomalie et corrigez-la.
• Consultez le revendeur si vous n’êtes pas en
mesure de résoudre le problème qui se pose à
vous.
• Pour éviter toute secousse électrique et tout risque
de court-circuit au cours des opérations de
raccordement et d’installation, n’oubliez pas de
débrancher le câble relié au pôle négatif de la
batterie (–) avant d’effectuer quelque opération
que ce soit.
• Avant d’effectuer un perçage requis par
l’installation de l’amplificateur, assurez-vous que
vous pouvez le faire sans danger pour les câbles,
canalisations, flexibles, etc., qui sont placés
derrière le panneau que vous devez percer.
• NE LAISSEZ PAS l’amplificateur entrer en
contact avec des liquides à cause, par exemple, de
l’emplacement où il a été placé. Cela pourrait
entraîner une secousse électrique. De plus, le
contact avec un liquide pourrait endommager
l’amplificateur et les enceintes, produire de la
fumée ou surchauffer l’appareil. Enfin, la surface
de l’amplificateur et des enceintes connectées peut
devenir chaude au toucher et entraîner de légères
brûlures.
Nous vous remercions d’avoir porté votre
choix sur un appareil PIONEER. Il a été
conçu et fabriqué pour vous apporter de
nombreuses années de satisfaction.
En raison des problèmes posés par
l’installation de cet appareil, Pioneer vous
conseille de consulter un professionnel.
Avant d’utiliser l’appareil, prenez
connaissance de ce mode d’emploi et tout
spécialement des AVERTISSEMENTS.
Pour toute question concernant cet
appareil, veuillez vous adresser au
revendeur ou à l’installateur.
Enregistrement du produit
Rendez-nous visite sur le site suivant:
1 Enregistrez votre produit. Nous conserverons sur
fichier les détails de votre achat pour vous
permettre de vous reporter à ces informations en
cas de déclaration de sinistre à votre assurance
pour perte ou vol.
2 Recevez les mises à jour sur les derniers produits
et les plus récentes technologies.
3 Téléchargez les manuels de l’utilisateur,
commandez les catalogues des produits,
recherchez de nouveaux produits, et bien plus.
Quelques mots concernant cet
appareil
Cet appareil est un amplificateur de classe
D pour haut-parleur d’extrême grave. Si les
deux canaux, L (gauche) et R (droit), sont
connectés à l’entrée cinch (RCA) de cet
appareil, la sortie est mixée parce que cet
appareil est un amplificateur monaural.
PRÉCAUTION
Ne remplacez pas le fusible par un fusible
de plus grande valeur ou de plus grand
calibre. L’utilisation d'un fusible inadapté
peut entraîner une surchauffe et de la
fumée, et peut provoquer l’endommagement de l’appareil et des blessures, y
compris des brûlures.
Avant d’utiliser cet appareil
Service après-vente pour un
produit Pioneer
Pour toute question, et en particulier pour toute
question relative au service après-vente (y compris
celles qui relèvent de la garantie), veuillez vous
adresser au revendeur ou au distributeur auprès de
qui vous avez acquis ce produit. Dans l’hypothèse
où vous ne pourriez pas être renseigné comme
vous le désirez, consultez l’une des sociétés
mentionnées ci-dessous.
N’expédiez pas le produit à l’une de ces sociétés,
quelle qu’en soit la raison, avant d’y avoir été
expressément invité.
7 Etats-Unis
Pioneer Electronics (USA) Inc.
CUSTOMER SUPPORT DIVISION
P.O. Box 1760
Long Beach, CA 90801-1760
800-421-1404
7 Canada
Pioneer électroniques du Canada, Inc.
Département de service aux consommateurs
300 Allstate Parkway
Markham, Ontario L3R OP2
1-877-283-5901
Pour toute question concernant la garantie,
veuillez consulter le document Garantie Limitée
qui accompagne le produit.
Réglage de l’appareil
Commande de fréquence de
l’accentuation des graves
Cette commande permet de choisir la
fréquence, entre 40 Hz et 120 Hz, autour
de laquelle doit s’effectuer
l’accentuation.
Témoin d’alimentation
Ce témoin s’éclaire lorsque
l’amplificateur est sous tension.
Commande d’amplitude de
l’accentuation des graves
Après avoir choisie la fréquence grave à
accentuer au moyen de la commande de
fréquence, il est possible de faire varier,
dans la plage de 0 à 12 dB, l’amplitude
des signaux au voisinage de cette
fréquence en agissant sur la commande
d’amplitude.
Commande de la fréquence
de coupure pour LPF
La fréquence de coupure peut être
choisie entre 40 et 240 Hz.
Commande du gain
Si le niveau d’écoute est faible même
lorsque la commande de l’autoradio est
sur la position correspondant au
maximum, tournez la commande de gain,
placée à l’avant de l’amplificateur, dans le
sens des aiguilles d’une montre.
Inversement, si vous constatez de la
distorsion lorsque vous augmentez le
niveau de sortie de l’autoradio, tournez
cette commande dans le sens contraire
des aiguilles d’une montre.
• Choisissez la position NORMAL si
l’autoradio stéréo est équipé de prises
Cinch (RCA) (niveau de sortie standard à
500 mV). Si cet appareil est utilisé
conjointement avec un autoradio stéréo
Pioneer pourvu de prises Cinch (RCA) sur
lesquelles peuvent se trouver une tension
de sortie de 4 V ou plus, réglez le niveau
en fonction du niveau de sortie de
l’autoradio.
• Pour la commande de gain de
l’amplificateur associé, reportez-vous à la
section “Réglage du gain de l’amplificateur
associé”.
Sélecteur infrasonore
Le filtre infrasonore coupe les
fréquences inférieures à 20 Hz afin de
supprimer les vibrations indésirables et
de réduire les pertes de puissance.
Commutateur MODE SELECT
Vous pouvez sélectionner le mode de
synchronisation de l’amplificateur, à
savoir MASTER, SYNC et SYNC INV.
Pour ce qui concerne la position du
commutateur MODE SELECT, reportezvous à la section “Connexion des câbles
des haut-parleurs”.
Page 6

PRÉCAUTION:
Pour éviter toute anomalie ou blessure
• Ne reliez pas à la masse le câble (–) d’un
haut-parleur; ne reliez pas ensemble plusieurs
câbles négatifs de haut-parleurs.
• Cet appareil est conçu pour les véhicules
alimentés par une batterie 12 V dont le pôle
négatif est à la masse. Avant d’installer cet
appareil, contrôlez la tension de la batterie.
• Si vous conservez l’autoradio en fonctionnement
alors que le moteur est arrêté ou tourne au ralenti,
la batterie peut être déchargée au bout d’un
certain temps. Pour éviter cela, mettez l’autoradio
hors tension.
• Si le câble de commande à distance de
l’amplificateur est relié à la borne d’alimentation
par l’intermédiaire du contacteur d’allumage (12
V CC), l’amplificateur sera sous tension dès que
vous mettrez le contact, et cela quelle que soit la
situation de l’autoradio. En conséquence, la
batterie peut être rapidement déchargée si le
moteur ne tourne pas, ou tourne au ralenti.
• NE RACCORDEZ PAS un haut-parleur
d’extrêmes graves dont l’impédance serait
inférieure à celle prescrite dans la section
“Raccordement de l’appareil”. Il pourrait en
résulter un endommagement de l’amplificateur,
voire de la production de fumée accompagnée de
surchauffe. La surface de l’amplificateur pourrait
s’échauffer au point de causer des brûlure légères.
• Reliez l’un de ces deux caissons de graves à
l’amplificateur; 1: un caisson de graves ayant une
puissance admissible de 500 W ou mieux et une
impédance de 4 Ω, ou 2: un caisson de graves
ayant une puissance admissible de 1.000 W ou
mieux et une impédance de 2 Ω. Si l’entrée
nominale et l’impédance sont au-dessus de ces
plages, le haut-parleur d’extrême grave risque de
prendre feu, d’émettre de la fumée ou d’être
endommagé.
• Installez le câble de liaison à la batterie, vendu
séparément, et faites-le cheminer aussi loin que
possible des câbles de liaison aux haut-parleurs.
Installez le câble de liaison à la batterie, vendu
séparément, le câble de masse, les câbles de
liaison aux haut-parleurs et l’amplificateur aussi
loin que possible de l’antenne, du câble d’antenne
et du syntoniseur.
• Les câbles de cet appareil et ceux d’autres
appareils peuvent fort bien ne pas être de la
même couleur bien que remplissant la même
fonction. Pour relier cet appareil à un autre
appareil, utilisez le manuel d’installation de chacun et effectuez les raccordements en ne tenant
compte que de la fonction de chaque câble.
Raccordement de l’appareil
PRÉCAUTION
• Pour éviter tout risque de court-circuit ou
d’endommager cet appareil, débranchez le câble
relié à la borne négative (–) de la batterie, au
niveau de cette borne.
• Fixez les câbles au moyen de colliers ou du ruban
adhésif. Lorsque l’isolant du câble peut être
endommagé par une pièce métallique, assurez sa
protection en le gainant de ruban adhésif.
• Faites cheminer les câbles en évitant les zones
chaudes telles que les bouches du chauffage. La
chaleur peut endommager l’isolant et il peut en
résulter un court-circuit si l’âme du câble vient en
contact avec la carrosserie.
• Assurez-vous que les câbles ne gênent en rien la
manoeuvre des organes mobiles tels que rails de
siège mais aussi levier de frein de stationnement,
pédale de frein, etc.
• N’alimentez pas un appareil par un piquage sur le
câble qui alimente un autre appareil. Ce câble n’a
peut-être pas la section suffisante pour supporter
sans danger l’intensité consommée par les deux
appareils.
• Ne remplacez pas le fusible par un fusible de plus
grande valeur ou de plus grand calibre.
L’utilisation d'un fusible inadapté peut entraîner
une surchauffe et de la fumée, et peut provoquer
l’endommagement de l’appareil et des blessures, y
compris des brûlures.
Schéma de raccordement
Passe-câble caoutchouté
Câble de batterie (vendu séparément)
Pour en connaître la section, reportezvous à la section “Raccordement de la
borne d’alimentation”. Le câble de
batterie, le câble de masse et le câble
de mise à la masse directe (en option),
doivent avoir la même section.
Après avoir effectué tous les autres
raccordements de l’amplificateur, reliez
ce câble à la borne positive (+) de la
batterie.
Câble de masse (vendu séparément)
Le câble de masse doit avoir la même
section que le câble de batterie.
Reliez ce câble à la carrosserie du
véhicule.
Prises Cinch
(RCA) de sortie
de l’autoradio
Sortie extérieure
(sortie de haut-parleur
d’extrême grave)
Connexion de câble munis de prises
Cinch (RCA) (vendus séparément).
Prises d’entrée Cinch (RCA)
Borne des haut-parleur
Reportez-vous à la section
“Connexion des câbles des
haut-parleurs”.
Câble de commande à distance d’alimentation (vendu séparément)
Reliez la fiche mâle de ce câble à la borne de commande à distance de
l’autoradio (SYSTEM REMOTE CONTROL). La fiche femelle doit être
reliée à la prise de commande de l’antenne motorisée. Si l’autoradio ne
possède par de prise pour commande à distance de la mise sous tension,
reliez la fiche mâle à une borne d’alimentation en passant par le
contacteur d’allumage.
Passe-câble
caoutchouté
Autre face
La longueur maximale
du câble entre le
fusible et la borne
positive (+) de la batterie, est de 45 cm.
Borne
positive (+)
Borne
négative (–)
Batterie
Câble de mise à la
masse directe
(vendu séparément)
Si la masse offerte
par le châssis est
insuffisante, une mise
à la masse directe
doit être employée.
La section du câble
doit être la même que
celle du câble de batterie.
Fusible (100 A)
Chaque amplificateur doit être
SÉPARÉMENT protégé par un fusible
de 100 A.
Prise SYNC OUTPUT /
SYNC INPUT
Pour connaître la
manière de raccorder la
prise SYNC OUTPUT /
SYNC INPUT, reportezvous à la section
“Connexion des câbles
des haut-parleurs”.
Raccordement de la borne
d’alimentation
• Utilisez le câble de liaison à la batterie et le câble
de masse conseillés; ils sont vendus séparément.
Reliez le câble rouge à la borne positive (+) de la
batterie et le câble de masse à la carrosserie du
véhicule.
• La section conseillée des câbles est la suivante
(suivant AWG, American Wire Gauge). Le câble
de batterie, le câble de masse et le câble de mise à
la masse directe doivent avoir la même section.
Section de câble de la batterie et le câble de masse
Longueur moins de
1,2—2,1 m 2,1—3,0 m
du câble 1,2 m
Section
6 AWG 6 AWG 6 AWG
du câble
3,0—3,9 m 3,9—4,8 m 4,8—5,7 m 5,7—6,7 m
6 AW G 4 AW G 4 AW G 4 AW G
1. Faites passer le câble de liaison à la
batterie du compartiment moteur
vers l’intérieur du véhicule.
• Après avoir effectué tous les autres
raccordements de l’amplificateur, reliez la
borne d’alimentation de l’amplificateur à la
borne positive (+) de la batterie.
2. Dénudez l’extrémité du câble de la
batterie et du câble de masse par
une pince ou un couteau sur 15–20
mm environ et torsadez les brins des
câbles.
3. Reliez les câbles aux bornes.
• Avant de relier les câbles aux bornes, retirez le
cache de protection. Lorsque le raccordement
est terminé, replacez le cache de protection.
• Serrez soigneusement les câbles au moyen
des vis.
ATTENTION
Faute de serrer soigneusement le câble de batterie
sur la borne au moyen d’une vis de borne, une
élévation importante de température de la borne peut
se produire et provoquer dommages et blessures, y
compris brûlures légères.
4. Engagez les colliers de câble dans les
fentes et liez les câbles au moyen des
colliers.
• Le collier doit entourer les câbles au niveau
de leur isolant et non pas à hauteur de la
partie dénudée.
15–20 mm
Compartiment
moteur
Intérieur du
véhicule
Percez un
trou de 14
mm dans le
tablier.
Engagez le passe-câble en
caoutchouc dans le perçage
pour assurer la protection
du câble.
Borne
positive (+)
Torsadez
Borne de
masse (GND)
Borne
d’alimentation
Câble de la batterie
Borne de commande à
distance d’alimentation
Câble de
commande
à distance
d’alimentation
Câble de masse
Fusible 100 A
Chaque amplificateur
doit être
SÉPA RÉMENT
protégé par un fusible
de 100 A.
La longueur maximale du câble entre
le fusible et la borne positive (+) de
la batterie, est de 45 cm.
Cache de
protection
Vis de
borne
Fente
Collier pour câble
Raccordement des bornes des
haut-parleurs
1. Dénudez l’extrémité des câbles de
liaison aux haut-parleurs par une
pince ou un couteau sur 10 mm
environ et torsadez les brins des
câbles.
2. Fixez une cosse à l’extrémité de
chaque câble de haut-parleur. Les
cosses ne sont pas fournies.
• Utilisez un outil spécial, etc., pour sertir la
cosse sur le câble.
3. Reliez les câbles de liaisons aux
haut-parleurs aux bornes des hautparleurs.
• Serrez soigneusement les cosses au moyen
des vis.
10 mm
Torsadez
Borne des un
haut-parleur
Câble de liaison à un haut-parleur
Vis de borne
Câble de liaison
au haut-parleur
Cosse
Passe-câble caoutchouté
Page 7

Raccordement de l’appareil
Réglage du gain de l’amplificateur
associé
Après avoir relié les câbles des haut-parleurs, réglez
la commande de gain de l’amplificateur associé. Les
amplificateurs associés suivent les réglages de
l’amplificateur maître.
Réglage sommaire du gain
Réglez la commande de gain de chaque
amplificateur sur la position NORMAL. Ce réglage
est suffisant pour obtenir une sortie équilibrée dans
la majeure partie des cas.
Réglage fin du gain
Réglez la commande de gain de chaque
amplificateur associé, en commençant par
l’amplificateur maître.
1. À l’aide de ce système, générez une sinusoïde de
basse amplitude.
2. Au moyen d’un voltmètre, mesurez l’amplitude de
la tension de sortie de l’amplificateur maître.
3. Au moyen d’un voltmètre, mesurez l’amplitude de
la tension de sortie de l’amplificateur associé.
4. Au moyen de la commande de gain de
l’amplificateur associé. réglez la tension de sortie
de l’amplificateur associé au même niveau que
celle de l’amplificateur maître.
5. Répétez les mêmes opérations, dans l’ordre, pour
tous les amplificateurs associés.
Deux amplificateurs pontés
• La section du câble doit être au moins égale à 12 AWG.
• La charge peut être constituée par une combinaison quelconque de haut-parleurs mais l’impédance doit être
au moins égale à 4 Ω.
Deux amplificateurs
• La section du câble doit être au moins égale à 12 AWG.
• La charge peut être constituée par une combinaison quelconque de haut-parleurs mais l’impédance doit être
au moins égale à 2 Ω.
Le commutateur MODE SELECT
doit être sur la position MASTER.
4 Ω
minimum
2.000 W
MODE SELECT doit
être sur la position
SYNC INV position.
Avant de le placer sur
cette position, retirez la
vis et la butée.
Connexion de câble munis
de prises Cinch (RCA)
(vendus séparément).
Connexion des câbles des haut-parleurs
Reliez les câbles de liaison aux haut-parleurs en fonction de la configuration et en vous inspirant des figures
ci-dessous et de celles de la page qui suit.
Amplificateur unique
• La section du câble doit être au moins égale à 12 AWG.
• La charge peut être constituée par une combinaison quelconque de haut-parleurs mais l’impédance doit être
au moins égale à 2 Ω.
Le commutateur MODE SELECT
doit être sur la position MASTER.
2 Ω
minimum
1.000 W
Connexion des câbles
des haut-parleurs
(vendus séparément).
2 Ω
minimum
1.000 W
2 Ω
minimum
1.000 W
Le commutateur MODE SELECT
doit être sur la position MASTER.
Le commutateur MODE
SELECT doit être sur la
position SYNC.
Connexion de câble
munis de prises Cinch
(RCA) (vendus
séparément).
Quatre amplificateurs pontés
• La section du câble doit être au moins égale à 12 AWG.
• La charge peut être constituée par une combinaison quelconque de haut-parleurs mais l’impédance doit être
au moins égale à 4 Ω.
Le commutateur MODE SELECT
doit être sur la position MASTER.
Connexion de câble munis
de prises Cinch (RCA)
(vendus séparément).
Connexion de câble munis
de prises Cinch (RCA)
(vendus séparément).
Connexion de câble munis
de prises Cinch (RCA)
(vendus séparément).
Connexion des câbles
des haut-parleurs
(vendus séparément).
4 Ω
minimum
2.000 W
4 Ω
minimum
2.000 W
MODE SELECT doit être
sur la position SYNC
INV position. Avant de le
placer sur cette position,
retirez la vis et la butée.
MODE SELECT doit être
sur la position SYNC
INV position. Avant de le
placer sur cette position,
retirez la vis et la butée.
MODE SELECT doit être
sur la position SYNC
INV position. Avant de le
placer sur cette position,
retirez la vis et la butée.
Connexion des câbles
des haut-parleurs
(vendus séparément).
Quatre amplificateurs
• La section du câble doit être au moins égale à 12 AWG.
• La charge peut être constituée par une combinaison quelconque de haut-parleurs mais l’impédance doit être
au moins égale à 2 Ω.
2 Ω
minimum
1.000 W
2 Ω
minimum
1.000 W
2 Ω
minimum
1.000 W
2 Ω
minimum
1.000 W
Le commutateur MODE
SELECT doit être sur la
position SYNC.
Le commutateur MODE
SELECT doit être sur la
position SYNC.
Le commutateur MODE
SELECT doit être sur la
position SYNC.
Le commutateur MODE SELECT
doit être sur la position MASTER.
Connexion de câble
munis de prises Cinch
(RCA) (vendus
séparément).
Connexion de câble
munis de prises Cinch
(RCA) (vendus
séparément).
Connexion de câble
munis de prises Cinch
(RCA) (vendus
séparément).
Connectez à un autoradio.
Pour les détails, référez-vous à la section
“Schéma de raccordement”.
Connectez à un autoradio.
Pour les détails, référez-vous à la section
“Schéma de raccordement”.
Connectez à un autoradio.
Pour les détails, référez-vous à la section
“Schéma de raccordement”.
Connectez à un autoradio.
Pour les détails, référez-vous à la section
“Schéma de raccordement”.
Connectez à un autoradio.
Pour les détails, référez-vous à la section
“Schéma de raccordement”.
Page 8

Caractéristiques techniques
PRÉCAUTION
• N’installez pas l’appareil:
—dans un endroit où il pourrait blesser un
occupant du véhicule en cas d’arrêt brusque;
—dans un endroit où il pourrait gêner le
conducteur, par exemple devant son siège.
• Veillez à ce que les câbles ne puissent pas être
pincés et endommagés par les sièges, ce qui peut
conduire à un court-circuit.
• Avant d’effectuer un perçage requis par
l’installation de l’amplificateur, assurez-vous que
vous pouvez le faire sans danger pour les câbles,
canalisations, flexibles, etc., qui sont placés
derrière le panneau que vous devez percer.
• Posez les vis autotaraudeuses de manière que leur
extrémité ne puisse pas endommager les câbles. Il
est important que l’isolant d’un câble ne soit pas
endommagé par le frottement sur une pièce, ce
qui pourrait ultérieurement entraîner un courtcircuit.
• NE LAISSEZ PAS l’amplificateur entrer en
contact avec des liquides à cause, par exemple, de
l’emplacement où il a été placé. Cela pourrait
entraîner une secousse électrique. De plus, le
contact avec un liquide pourrait endommager
l’amplificateur et les enceintes, produire de la
fumée ou surchauffer l’appareil. Enfin, la surface
de l’amplificateur et des enceintes connectées peut
devenir chaude au toucher et entraîner de légères
brûlures.
• Pour effectuer convenablement l’installation,
utilisez les pièces fournies et procédez comme il
est indiqué. L’utilisation de pièces autres que
celles fournies peut endommager l’amplificateur.
• Ne remplacez pas le fusible par un fusible de plus
grande valeur ou de plus grand calibre.
L’utilisation d'un fusible inadapté peut entraîner
une surchauffe et de la fumée, et peut provoquer
l’endommagement de l’appareil et des blessures, y
compris des brûlures.
PRÉCAUTION:
Pour éviter toute anomalie de
fonctionnement ou blessure
• Pour que la chaleur puisse se dissiper sans mal,
respectez ce qui suit:
—veillez à ce qu’un espace dégagé existe au-
dessus de l’amplificateur;
—ne recouvrez pas l’amplificateur d’un tapis ou
d’une moquette.
• NE LAISSEZ PAS l’amplificateur entrer en
contact avec des liquides à cause, par exemple, de
l’emplacement où il a été placé. Cela pourrait
entraîner une secousse électrique.
De plus, le contact avec un liquide pourrait
endommager l’amplificateur et les enceintes,
produire de la fumée ou surchauffer l’appareil.
Enfin, la surface de l’amplificateur et des
enceintes connectées peut devenir chaude au
toucher et entraîner de légères brûlures.
• N’installez pas l’amplificateur sur une surface
instable telle que le tapis amovible cachant la roue
de secours.
• Le meilleur emplacement d’installation dépend du
véhicule, mais, quoi qu’il en soit, doit être rigide et
solide.
• Effectuez tout d’abord des raccordements
temporaires pour vous assurer que l’amplificateur et
les autres appareils fonctionnent correctement.
• Choisissez un emplacement qui permette le retrait
sans peine de la roue de secours, du cric et de la
boîte à outils.
Exemple d’installation sur le tapis
de sol ou sur le châssis
1. Posez l’amplificateur à
l’emplacement choisi. Introduisez les
vis autotaraudeuses fournies (4 × 18
mm) dans les perçages. Appuyez
fermement sur les vis au moyen
d’un tournevis pour marquer les
points de perçage.
2. Percer des trous de 2,5 mm de
diamètre aux emplacements
marqués puis fixez l’amplificateur
soit à travers le tapis, soit
directement sur le châssis.
Installation
Percer un trou de 2,5 mm de
diamètre
Vis autotaraudeuses
(4 × 18 mm)
Tapis ou
châssis
Alimentation .................................................................................................................. 14,4 V CC (10,8 — 15,1 V permis)
Mise à la masse .............................................................................................................................. Pôle négatif de la batterie
Consommation de courant ............................................................................................ 42 A (à la puissance continue, 4 Ω)
Consommation moyenne de courant* .......................................................................................... 8,3 A (4 Ω pour une voie)
9,0 A (2 Ω pour une voie)
Fusible (externe) ............................................................................................................................................................ 100 A
Dimensions .......................................................................................................................... 300 (L) × 64 (H) × 279 (P) mm
Poids .................................................................................................................................................. 5,9 kg (sans les câbles)
Puissance maximale de sortie .................................................................................. 1.000 W × 1 (4 Ω) / 2.000 W × 1 (2 Ω)
Puissance continue de sortie .............................................................. 500 W × 1 (à 14,4 V, 4 Ω, 20 —240 Hz 1,0% THD)
1.000 W × 1 (à 14,4 V, 2 Ω, 20 —240 Hz 2,0% THD)
Impédance de charge ...................................................................................... 4 Ω (2 — 8 Ω permis), (Ex. Pont 4 — 16 Ω)
Réponse en fréquence ............................................................................................................ 10 — 240 Hz (+0 dB, –1 dB)
Rapport signal/bruit ............................................................................................................................ 90 dB (Réseau IHF-A)
Distorsion .......................................................................................................................................... 0,05 % (50 W, 100 Hz)
Filtre passe-bas ............................................................................................................ Fréquence de coupure: 40 — 240 Hz
Pente: –24 dB/oct
Filtre infrasonore (HPF) ............................................................................................................................ Fréquence: 20 Hz
Pente: –18 dB
Accentuation des graves .......................................................................................................................... Niveau: 0 — 12 dB
Fréquence: 40 — 120 Hz
Commande de phase .............................................................................................................................. SYNC, SYNC INV
Commande de gain .................................................................................................................................... 200 mV — 6,5 V
Niveau maximale / impédance d’entrée ................................................................................................ RCA: 6,5 V / 22 kΩ
Remarque:
• Les caractéristiques et la présentation peuvent être modifiées sans avis préalable à
fin d’amélioration.
*Consommation moyenne de courant
• Le courant moyen est proche du courant maximal lorsqu’un signal audio est
appliqué à l’entrée de l’amplificateur. Utilisez cette valeur lorsque vous désirez
calculer le courant total consommé par plusieurs amplificateurs de puissance.
Puissance de sortie ...................................................................................... 500 W eff. × 1 voie
(4 Ω et 1 % DHT+N)
1.000 W eff. × 1 voie
(2 Ω et 1 % DHT+N, 240 Hz)
Rapport signal/bruit .............................................................. 60 dBA (Référence: 1 W sur 4 Ω)
 Loading...