

Page 1
DVD-R/RW WRITER UNIT
GRAVEUR DE DVD-R/RW
DVD-R/RW-SCHREIBEINHEIT
DVD-R/RWライターユニット
PRA-DW11
English
Français
Deutsch
Operating Instructions
Mode d’emploi
Bedienungsanleitung
Page 2
LASER DIODE – This product contains a laser diode. To assure continued safety, DO
NOT remove any convers or attempt to gain access to the inside of the product.
CAUTION: USE OF CONTROLS OR ADJUSTMENTS OR PERFORMANCE OF PROCEDURES
OTHER THAN THOSE SPECIFIED HEREIN MAY RESULT IN HAZARDOUS
RADIATION EXPOSURE.
CAUTION: USE OF OPTICAL INSTRUMENTS WITH THIS PRODUCT WILL INCREASE EYE
HAZARD.
For U.S. model
INFORMATION COMPLYING DHHS
RULES IS MARKED ON THE TOP COVER
AS FOLLOWS:
DANDER – VISIBLE AND
INVISIBLE LASER RADIATION
WHEN OPEN.
AVOID DIRECT EXPOSURE TO
BEAM.
[For Canadian model]
This Class A digital apparatus complies with
Canadian ICES-003.
[Pour le modèle Canadien]
Cet appareil numérique de la Classe A est
conforme à la norme NMB-003 du Canada.
2
PRA-DW11
Page 3

Information to User
Alteration or modifications carried out without appropriate authorization may invalidate the user’s right to
operate the equipment.
This equipment has been tested and found to comply with the limits for a Class A digital device,
pursuant to Part 15 of the FCC Rules. These limits are designed to provide reasonable protection
against harmful interference when the equipment is operated in a commercial environment. This
equipment generates, uses, and can radiate radio frequency energy and, if not installed and used
in accordance with the instruction manual, may cause harmful interference to radio
communications. Operation of this equipment in a residential area is likely to cause harmful
interference in which case the user will be required to correct the interference at his own expense.
This product complies with the EMC Directives (89/336/EEC, 92/31/EEC) and CE Marking
Directive (93/68/EEC).
Ce produit est conforme aux directives relatives à la compatibilité électromagnétique (89/336/
CEE, 92/31/CEE) et à la directive CE relative aux marquages (93/68/CEE).
Dieses Produkt entspricht den EMV-Richtlinien (89/336/EEC, 92/31/EEC) und CEMarkierungsrichtlinien (93/68/EEC).
Questo prodotto è conforme alle direttive EMC (89/336/CEE, 92/31/CEE) e alla direttiva sul
marchio CE (93/68/CEE).
Dit produkt voldoet aan de EMC-richtlijnen (89/336/EEC en 92/31/EEC) en de CEmarkeringsrichtlijn (93/68/EEC).
Denna produkt uppfyller föreskrifterna i EMC-direktiv (89/336/EEC, 92/31/EEC) och CEmärkningsdirektiv (93/68/EEC).
Este producto cumple con las Directivas EMC (89/336/CEE, 92/31/CEE) y Directiva de Marcación
CE (93/68/CEE).
Este produto cumpre com as Directivas EMC (89/336/CEE, 92/31/CEE) e Directiva da Marcação
CE (93/68/CEE).
Dette produkt er i overensstemmelse med direktiverne vedrørende elektromagnetisk
kompatibilitet (89/336/EEC, 92/31/EEC) og CE-direktivet vedrørende mærkning (93/68/EEC).
VARNING!
Om apparaten används på annat sätt än i denna bruksanvisning spacificerats, kan användaren
utsättas för osynling laserstrålning som överskrider gränsen för laserklass 1.
ADVARSEL:
Usynlig laserstråling ved åbning når sikkerhedsafbrydere er ude af funktion. Undgå udsaettelse
for stråling.
VAROITUS!
Laitten käyttäminen muulla kuin tässä käyttöohjeessa mainitulla tavalla saattaa altistaa käuttäjän
turvallisuusluokan 1 ylittävälle näkymättömälle lasersäteilylle.
WARNING:
Handling the cord on this product or cords associated with accessories sold with the product will
expose you to lead, a chemical known to the State of California and other governmental entities to
cause cancer and birth defects or other reproductive harm.
Wash hands after handling.
PRA-DW11
3
Page 4

FOR ENGLAND
Warning
This is a class A product. In a domestic environment this product may cause radio
interference in which case the user may be required to take adequate measures.
FOR FRANCE
Attention
Ce produit est de classe A. Dans un environnement domestique, il peut entraîner des interférences
et l’utilisateur peut alors être améne à prendre les mesures qui s’imposent.
FOR GERMANY
Warnung
Dies ist ein Produkt der Klasse A. In einer häuslichen Umgebung kann dieses Produkt
Störgeräusche (Funkstörungen) verursachen. In diesem Fall kann es erforderlich sein, geeignete
Maßnahmen zu ergreifen.
FOR ITALY
Avvertenza
Questo è un prodotto di classe A. In ambiente domestico, questo prodotto può provocare
interferenze radio per le quali l’utente deve adottare contromisure adeguate.
FOR SPAIN
Advertencia
Éste es un producto de clase A. En un entorno doméstico, este producto Puede causar
radiointerferencias internas que obliguen al usuario a tomar las medidas adecuadas.
FOR PORTUGAL
Aviso
Este produto pertence à classe A. Quando num ambiente doméstico este produto pode provocar
rádio interferências para as quais o utilizador pode ter que tomar medidas adequadas.
FOR BELGIUM AND NETHERLANDS
Waarschuwing
Dit is een product dat tot klasse A behoort. In woningen kan dit product radiostoringen
veroorzaken. In voorkomend geval moet de gebruiker gepaste maatregelen nemen.
FOR DENMARK
Advarsel
Dette er et klasse A-produkt, som kan forårsage radiointerferens ved brug i hjemmet. Hvis det
er tilfældet, kan brugeren blive nødt til tage passende forholdsregler.
FOR SWEDEN
Varning
Det här är en klass A-produkt. I hemmiljö kan radiostörningar uppstå och användaren bör då vidta
lämpliga åtgärder.
[For Australian and New Zealander models]
Warning
This is a class A product. In a domestic environment this product may cause radio interference in
which case the user may be required to take adequate measures.
[For Korean model]
[For Taiwanese model]
4
PRA-DW11
Page 5

Thank you for buying this Pioneer product.
Please read through these operating instructions so you will know how to operate your
model properly.
This product is an optional drive designed for model PRV-LX1 DVD recorder.
This means that this unit cannot be used alone or connected to other equipment than
specified.
Installation Precautions
7 Installation of this device requires a high level of technological expertise; to
assure proper operation and personal safety, installation is to be performed
by a Pioneer Service representative. For details, consult your dealer.
Precautions Regarding Use
7 Pioneer may not be held liable for the loss of any data or any other direct or
indirect damage suffered as the result of the use or breakdown of this product.
It is strongly recommended that regular backups be taken of all critical data.
7 Care must be taken not to infringe copyright restrictions under the laws of
each country.
If this device is used to record copyrighted materials, approval must be
obtained from the respective copyright holders. The recording of copyrighted
materials without the express approval of the respective copyright holders
may result in legal penalties. Pioneer disclaims any and all responsibility for
any legal damages resulting from the use of this device in the unauthorized
copying of copyrighted materials.
7 All names of corporations, products, and systems listed herein, even when
the (™) or (®) symbols are omitted, should be considered the registered
trademarks of their respective owners.
English
CAUTION
This product contains a laser diode of higher
class than 1. To ensure continued safety,
do not remove any covers or attempt to
gain access to the inside of the product.
Refer all servicing to qualified personnel.
The following caution label appears on your
unit.
Location: on top of the cover
CLASS 1 LASER PRODUCT
LASER KLASSE 1
The Generation of Acoustical Noise Is Less
Than 70dB.(ISO7779/DIN45635)
[For U.S. model]
IMPORTANT NOTICE
The serial number for this equipment is
located on the top panel. Please write this
serial number on your enclosed warranty
card and keep it in a secure area. This is for
your security.
H006AEn
Table of Contents
Confirm Accessories ........................ 6
Precautions Regarding Use ............. 6
Connectors
Installation ........................................ 9
Specifications ................................. 14
(rear panel of drive unit) ..
PRA-DW11
En
8
5
Page 6

Confirm Accessories
Heat sink (with heat dissipation sheet) (1)
Tray panel 2 (1)
Drive 2 frame (1)
Screws (for heat sink installation) (2)
Flange screws (black, for drive installation) (4)
Warranty card for USA (1)
Warranty card for Japan (1)
Operating Instructions (1)
÷ Consult your dealer regarding missing accessories.
Precautions Regarding Use
÷ Be sure to read and thoroughly understand the operating instructions for the main unit
(PRV-LX1) before use.
÷ Be sure to store these Operating Instructions in a safe and convenient place, where
they can be consulted easily if necessary.
÷ Do not install or use this unit in locations exposed to high temperature, high humidity,
or high concentrations of dust.
÷ Do not subject the unit to impacts or vibrations during use, and do not disconnect the
power while the unit is operating.
÷ When installing this unit to the DVD recorder PRV-LX1, always detach all cables and
the power cord to the DVD recorder before beginning (except when performing
operating confirmation).
÷ Take care not to allow foreign objects or liquids to enter the unit.
÷ Take precautions to avoid condensation. If condensation occurs, disconnect power to
the PRV-LX1 and allow to rest unused until completely dry.
÷ Do not attempt to inspect or modify internal parts.
÷ If unusual smells or sounds are detected from the unit during use, immediately
disconnect power to the PRV-LX1 and have the component inspected by professional
service personnel.
Recording to DVD-R/RW discs in the "video" mode is a new standard recognized in
2000 by the DVD Forum. Support for this standard, however, is optional on the part
of each manufacturer, with the result that depending on the DVD player or DVDROM drive involved, some may not play back such DVD-R/RW discs.
Also, depending on the condition of the player's pickup and the specific combination
of discs and players used, some players that support the video recording standard
may not be able to play back all discs.
6
PRA-DW11
En
Page 7
Precautions Regarding Use
Disc Precautions
7 Recommended Discs
÷ Use only recommended disc media in
order to assure stable recording and
playback.
÷ Consult the Operating Instructions for
the main unit PRV-LX1 regarding
recommended disc media.
7 Handling of Discs
Discs may become incapable of recording
and playback when scratched, or when
soiled with fingerprints or dust. Always
handle discs as noted below:
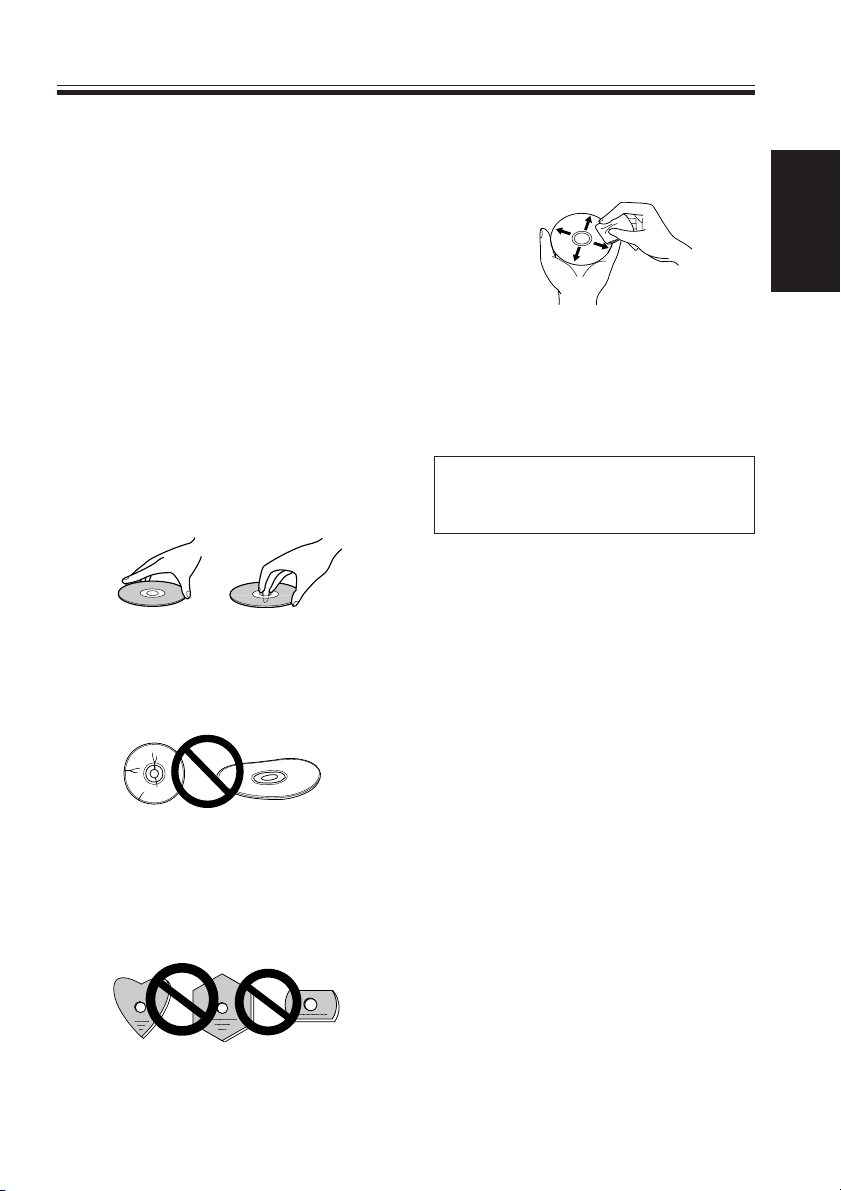
÷ Never touch the recording surface
(mirror surface) when handling discs.
Hold discs between their edges, or
between one edge and one finger in
the center hole.
÷ Do not apply adhesive tapes or labels
to discs.
÷ Do not use cracked or warped discs,
since they may shatter dangerously at
high rotation speeds.
÷ Do not use non-standard discs, since
they may cause adverse affects to the
player and other components.
÷ Do not use discs shaped in non-circular
shapes (hearts, polygons, etc.), since
they may cause malfunctions.
÷ To clean fingerprints from a soiled disc,
wipe gently from the center hole
radially toward the circumference. Do
not wipe in a circular motion.
English
÷ Do not use anti-static or other record
sprays. Also, never use benzene,
thinner or toher volatile cleaners to
clean the surface of discs, since such
chemicals may melt or otherwise
damage the surface.
Always store discs in their protective
cases; before use, check the recording
surface for fingerprints or other soiling.
Disc Problem Checklist
7 Data recording errors or
inability to record
÷ Was a recommended disc used ?
÷ Was sufficient recording area on the
disc?
÷ Had the disc been finalized after
previous recording sessions?
÷ Was the disc loaded properly,
recording surface down and label up?
÷ Was the disc soiled or scratched?
7 Playback errors
÷ Was a recommended disc used ?
÷ Was the disc properly recorded (not
empty)?
÷ Was the disc soiled or scratched?
÷ Condensation of moisture on the
player's optical parts or disc surface is
also a possibility; allow the disc and
player to sit for 1-2 hours before
attempting to use again.
PRA-DW11
En
7
Page 8

Connectors (rear panel of drive unit)
4 1 32
56
MASTER
SLAVE
CABLE SELECT
ANLOG AUDIO
SC
M
39
ALS
40
IDE INTERFACE
1 Device configuration jumpers
Placing the jumper on a pair of pins turns the pair ON. Confirm that pin set 2 is set for
ON (jumper connected).
2 Host IDE interface
Connect to the PRV-LX1's IDE interface cable (see installation instructions, step 9).
3 DC INPUT connectors
Connect to the PRV-LX1's power cable (see installation instructions, step 9).
Connectors 4, 5, and 6 are not used with the PRV-LX1.
1
2
DC INPUT
5V G G 12V
8
PRA-DW11
En
Page 9
Installation
Precautions Regarding Static Electricity
7 When handling this unit, be very cautious never to touch any of the connectors
or terminals, to prevent damage due to electrostatic discharge.
NOTE:
÷ Installation of this unit requires a high level of technical expertise; for this reason, and
to assure safe operation, installation is to be performed by authorized Pioneer service
personnel. For details, consult your dealer.
÷ Loose mounting screws may allow disc rotation to cause sound distortion, or the unit
may fall, leading to personal injuries and physical damages to the unit or other materials.
Be sure that all mounting screws are fastened securely.
÷ Use only the designated mounting screws. Use of threaded fasteners other than those
designated may result in damage to the unit and DVD recorder PRV-LX1.
÷ To prevent hazard of fire, electrical shock, and potential electronic damage to the unit, be
sure to detach all cables and the power cord connected to the main unit PRV-LX1 before
beginning installation.
English
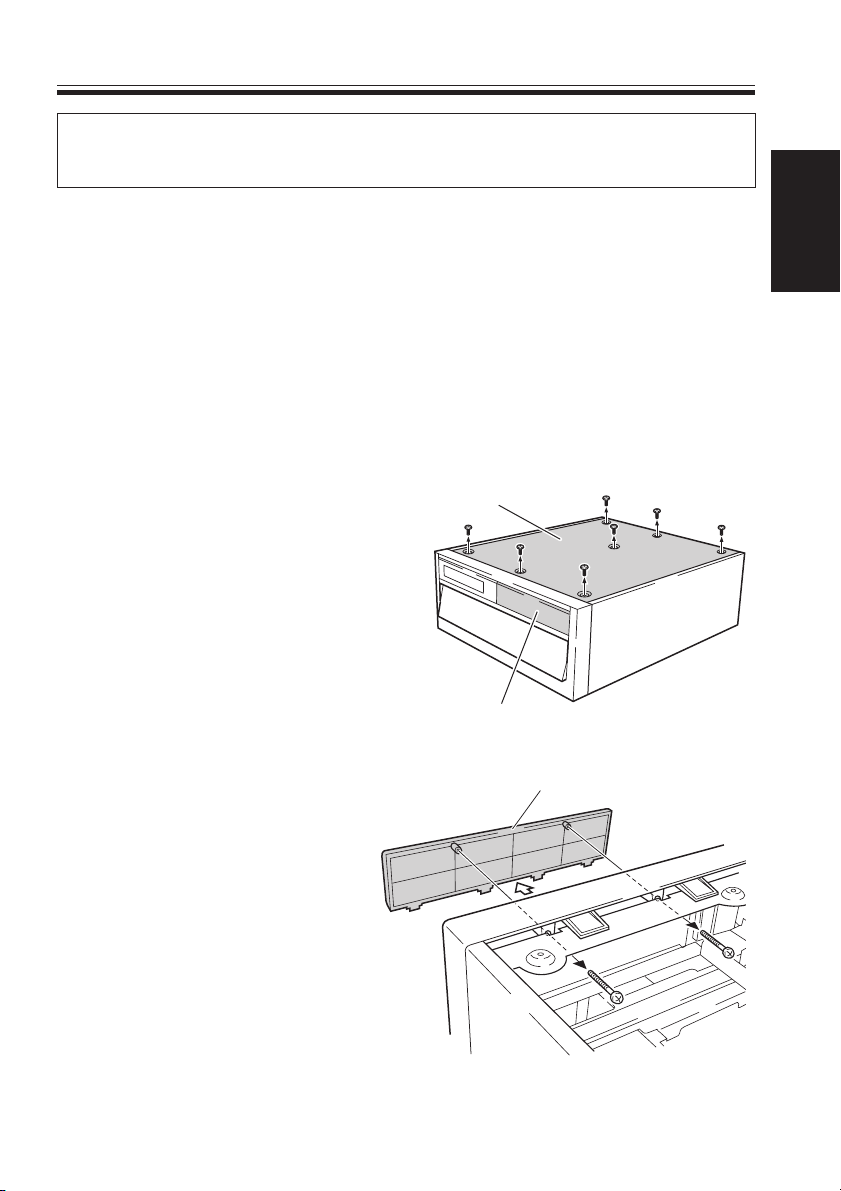
1. Remove PRV-LX1's top panel.
÷ Remove the top panel’s 7 screws,
then the top panel itself.
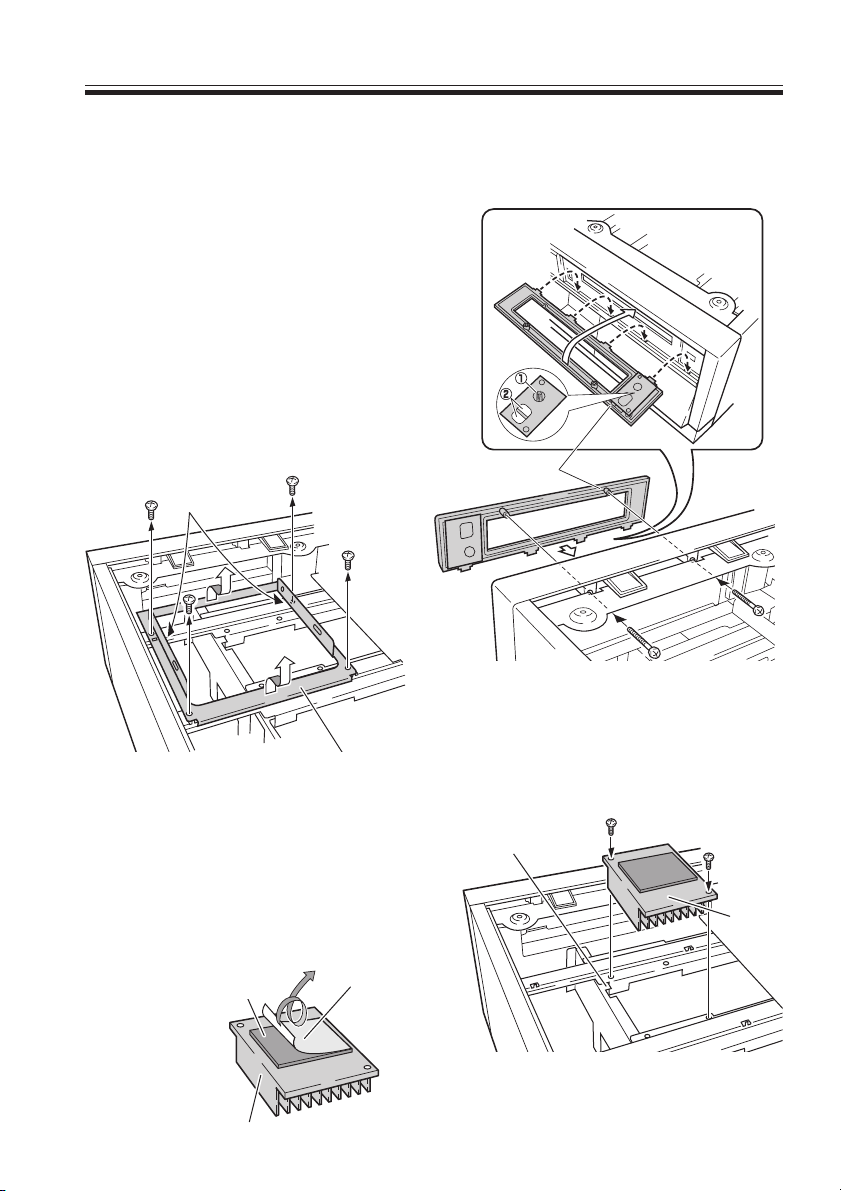
2. Remove the drive 2 cosmetic
panel.
÷ To prevent the cosmetic panel
from dropping, hold it in place
while removing the two panel
installation screws (the two
screws will be used to install the
drive 2 frame in step 3).
* When removing the two screws,
work carefully to avoid dropping the
screws inside the unit.
Top panel
Drive 2 cosmetic panel
Drive 2 cosmetic panel
PRA-DW11
En
9
Page 10
Installation
3. Install the accessory drive 2 frame.
÷ Insert the tabs of the accessory drive 2
frame into the square holes (4) beneath the
drive 2 opening on the front panel of the
PRV-LX1, then press the frame into the
opening. While holding the drive 2 frame
carefully to prevent it from dropping, use
the two screws (those removed in previous
step 2) to secure the drive 2 frame in place.
4. Remove the drive 2 mounting fixture.
÷ Remove the four mounting screws and take
off the drive 2 mounting fixture (the
screws will be used in step 8 to reinstall
the mounting fixture).
NOTE:
Take care to avoid touching sharp edges(*)
(do not hold by edges).
(*)
Drive 2 mounting fixture
5. Remove the protective paper from
the head dissipation sheet.
÷ Remove the protective paper from
the accessory heat sink's heat-
dissipation sheet.
NOTE:
If the heat-dissipation sheet is applied without
removing the protective paper, necessary heat
dissipation effects will not be produced, leading to
possible damage or malfunctions.
Heat-dissipation
sheet
Protective
paper
(remove)
NOTE 1. Do not hold or press
against the cross-ribs.
NOTE 2. Do not touch the lens
area.
Drive 2 frame
6. Install the heat sink.
÷ With the fins toward the front, align
the accessory heat sink with the
guide, then use the 2 accessory
screws (without collars) to fasten
into place.
Guide
Heat
sink
10
PRA-DW11
En
Heat sink
Page 11
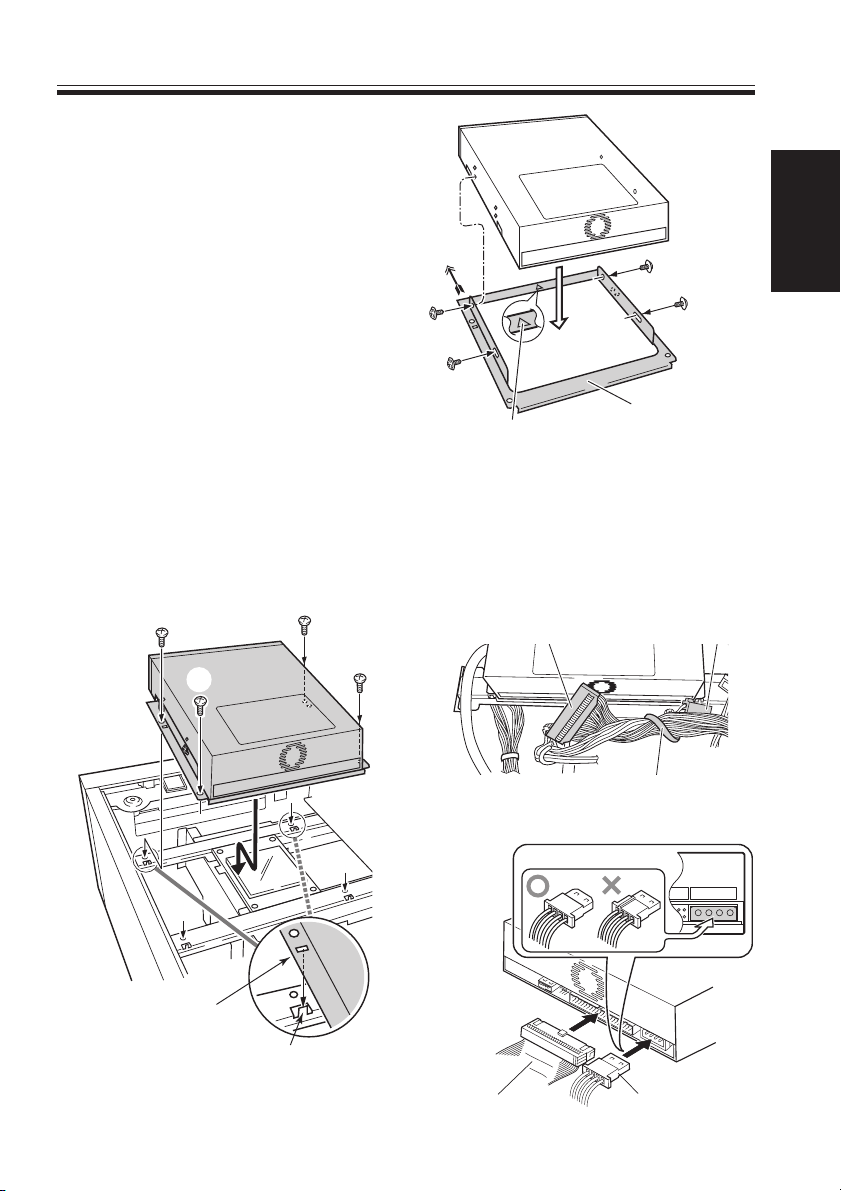
7. Fasten the drive 2 mounting fixture
to the DVD-R/RW unit.
÷ Attach the drive 2 mounting fixture
to the DVD-R/RW unit so that the %
mark on the fixture is oriented
toward the front.
÷ Fasten the fixture in place by using
the four accessory flange screws
(black) and tightening in the order
1= 2= 3= 4.
8. Once the mounting fixture has been
fastened to the DVD-R/RW unit,
install the DVD-R/RW unit together
with its mounting fixture to the
DVD recorder PRV-LX1.
÷ Align the two square holes on the
drive 2 mounting fixture with the
tabs on the PRV-LX1, then use the
4 screws removed in step 4 to
fasten the drive in place (fasten
screws in order 1= 2= 3= 4).
②
①
③
④
Installation
Towards
front
②
④
% mark
mounting fixture
9. Attach the IDE cable and power
cable
÷ Remove the IDE cable and power
cable from the cable binder.
NOTE:
Beware of all surrounding sharp edges when
connecting and arranging cables.
IDE cable
connector
①
③
Drive 2
Power cable
connector
English
Square holes
Tabs
Binder strap
÷ Align the connectors correctly and
connect securely.
DC INPUT
1
5V G G 12V
2
IDE cable
Power cable
PRA-DW11
11
En
Page 12

Installation
10. Reinstall the top panel of the PRVLX1.
÷ Use the 7 screws removed in step
1 to reinstall the top panel.
Top panel
11. Confirm proper operation.
1 Connect the PRV-LX1’s power plug to
a power outlet, and turn on the power
switch (on rear panel of main unit). Then
press the front-panel’s STANDBY/ON
button to turn on the power.
2 Wait until the main unit recognizes the
newly added DVD-R/RW unit.
3 When the PRV-LX1 enters idling status
(see PRV-LX1 operating instructions),
press the FUNCTION button on the
front panel.
4 The function menu will appear on the
TV monitor; confirm that the “DVD2”
indicator is displayed on the screen
(see accompanying image).
STANDBY/ON button FUNCTION button
12
PRA-DW11
En
Function menu
Indicates that Drive 2 is connected.
Page 13
Installation
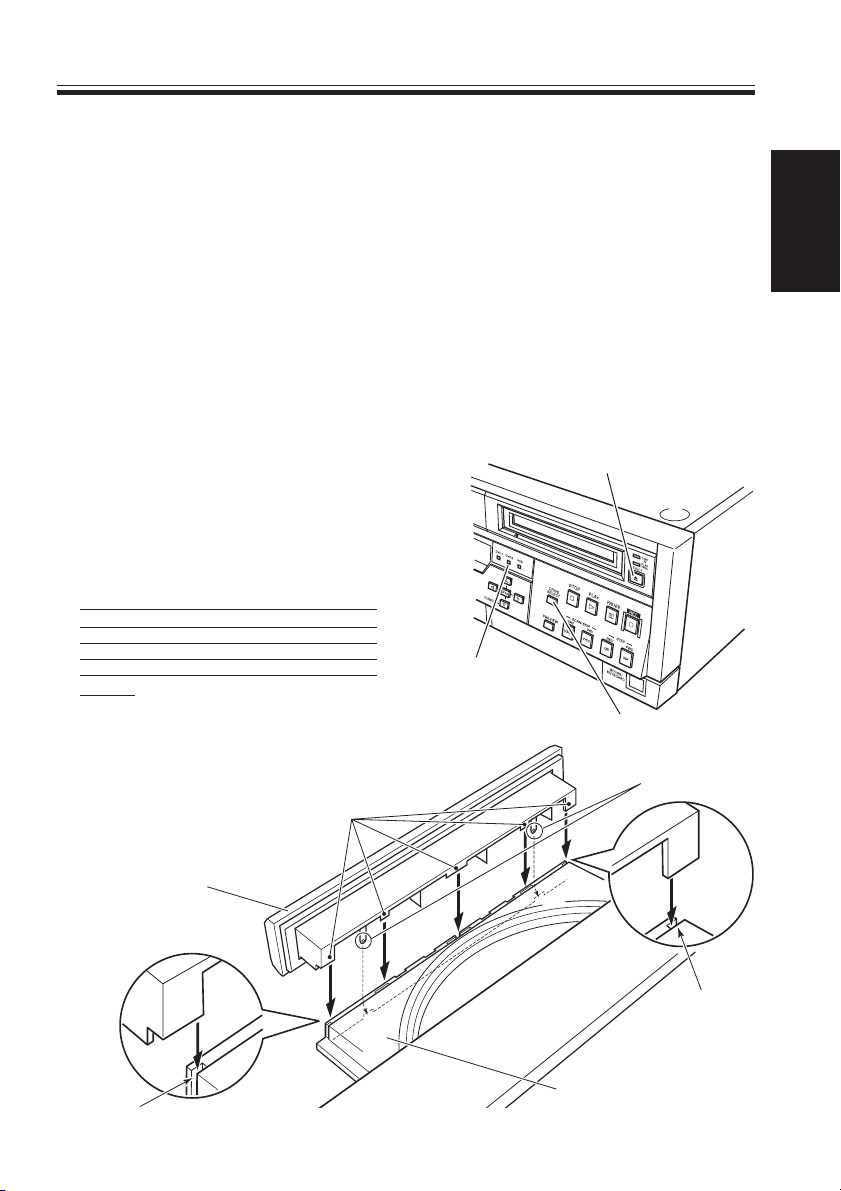
12. Install tray panel 2 on the drive 2
disc table.
1 Press the DRIVE SELECT button to
select DVD2.
÷ Press the DRIVE SELECT button
several times until the DVD2
indicator lights.
2 Press the drive 2 EJECT button.
The DVD2 disc table will emerge.
3 Insert the ribs of the accessory tray
panel 2 into the grooves along the
front edge of the disc table that
emerged in step 2. Then press down
until the two hooks engage securely
as shown.
NOTE:
When installing tray panel 2, take care not to
press the disc table in the closing direction, since
the automatic disc loading mechanism will cause
the disc table to be pulled back in. If you
accidentally press the disc table so that it is
pulled back in, allow it to close naturally without
touching it, then press the drive 2 EJECT button
once again to open the disc table.
NEVER turn off the power during this
operation or attempt to pull the disc
table out, since the main unit (PRV-LX1)
and this unit (PRA-DW11) may be
damaged, and internal data may be
erased.
4 When the tray panel 2 is installed,
press the drive 2 EJECT button to
close the DVD2 disc table.
Ribs
13. Completion of installation
1 Press the main unit's front panel
STANDBY/ON button and wait until
the unit enters the standby mode.
2 Once the main unit is in the standby
mode, set the unit's main power
switch (on rear panel) to OFF, then
disconnect the power cord from its
power outlet.
NOTE:
Do not leave the power to the unit turned
on when tray panel 2 is not installed (see
step 12 for installation instructions). If tray
panel 2 is not installed, dust may be pulled
into the unit more easily, leading to
malfunctions in recording and playback.
Drive 2 EJECT button
DVD 2 indicator
DRIVE SELECT button
English
Hooks
Tray panel 2
Slit
Slit
Disc table
13
PRA-DW11
En
Page 14

Specifications
[Disc size]
12 cm, 8 cm
[Miscellaneous]
Dimensions: 148 (W) x 42.3 (H) x 198 (D) mm (drive body only)
Weight: 1.8 kg (including packaging)
Ambient operating temperature: +5 °C – +35 °C (PRV-LX1 installed)
Ambient operating humidity: 5 % – 85 % (PRV-LX1 installed) (without condensation)
Ambient storage temperature: –40 °C – +60 °C
Ambient storage humidity: 5 % – 90 % (without condensation)
[Accessories]
Heat sink (with heat dissipation sheet): 1
Tray panel 2: 1
Drive 2 frame: 1
Screws
Flange screws (black, for drive installation): 4
Warranty card for USA: 1
Warranty card for Japan: 1
Operating Instructions: 1
• Specifications and appearance are subject to change without notice.
(for heat sink installation)
:2
14
PRA-DW11
En
Published by Pioneer Corporation.
Copyright © 2003 Pioneer Corporation.
All rights reserved.
Page 15

Nous vous remercions de votre achat de cet appareil Pioneer.
Veuillez lire attentivement les explications de ce mode d’emploi afin de pouvoir utiliser
correctement votre appareil.
Cet appareil est un lecteur optique, conçu pour l’enregistreur de DVD de
modèle PRV-LX1.
Autrement dit, cet appareil ne peut pas être utilisé seul ou raccordé à un équipement autre
que ceux qui sont spécifiés.
Précautions d’installation
7 L’installation de cet appareil nécessite un savoir-faire technologique de haut
niveau. Pour garantir votre sécurité personnelle et un fonctionnement adéquat,
l’installation doit être effectuée par un représentant du réseau de service
Pioneer. Pour les détails, consultez votre revendeur.
Précautions relatives à l’utilisation
7 Pioneer ne sera aucunement responsable de la perte de données ou de tout
autre dommage, direct ou indirect, subi du fait de l’utilisation ou d’une panne
de cet appareil. Nous recommandons vivement d’effectuer régulièrement la
sauvegarde de toutes les données essentielles.
7 Veillez à ne pas enfreindre les restrictions sur les copyrights, définies dans la
législation de votre pays.
Avant d’enregistrer des données protégées par des copyrights avec cet
appareil, l’autorisation doit en être obtenue au préalable auprès des détenteurs
de ces droits. L’enregistrement de données protégées par des copyrights sans
l’approbation expresse des détenteurs de leurs droits peut entraîner des
poursuites légales. Pioneer décline toute responsabilité en cas de dommages
légaux quels qu’ils soient, résultant de l’utilisation de cet appareil pour la
copie non autorisée de données protégées par des copyrights.
7 Tous les noms d’entreprises, de produits et de systèmes apparaîssant dans
cette brochure, même si les symboles [™] et [®] sont omis, doivent être
considérés comme indiquant les marques déposées de leurs propriétaires
respectifs.
English
Français
ATTENTION
Ce produit renferme une diode à laser d’une
catégorie supérieure à 1. Pour garantir une
sécurité constante, ne pas retirer les
couvercles ni essayer d’accéder à l’intérieur
de l’appareil.
Pour toute réparation, s’adresser à un
personnel qualifié.
L’étiquette d’avertissement suivante
apparaît sur votre appareil.
Emplacement: sur le dessus du
couvercle.
CLASS 1 LASER PRODUCT
LASER KLASSE 1
Sommaire
Vérifier la présence des
accessoires ................................. 16
Précautions relatives à
l’utilisation ................................. 16
Connecteurs
(Panneau arrière du lecteur) ..... 18
Installation ...................................... 19
Fiche technique .............................. 24
La production de bruits acoustiques est
inférieure à 70 dB. (ISO7779/DIN45635)
15
PRA-DW11
Fr
Page 16

Vérifier la présence des accessoires
Dissipateur thermique (avec feuille de dissipation thermique) (1)
Panneau de plateau 2 (1)
Cadre de lecteur 2 (1)
Vis (pour installation du dissipateur thermique) (2)
Vis à colliers (noires, pour installation de lecteur) (4)
Carte de garantie pour les États-Unis (1)
Carte de garantie pour le Japon (1)
Mode d’emploi (1)
÷ Contactez votre revendeur si des accessoires devaient manquer.
Précautions relatives à l’utilisation
• Prenez soin de lire attentivement et de comprendre le mode d’emploi pour l’unité
principale (PRV-LX1) avant son utilisation.
• Rangez ce mode d’emploi dans un endroit sûr de manière à pouvoir le consulter en
cas de besoin.
• N’installez pas et n’utilisez pas cet appareil dans un endroit soumis à une température
élevée, à une forte humidité ou très poussiéreux.
• Ne soumettez pas l’appareil à des chocs ou des vibrations pendant son utilisation et
ne débranchez-le jamais du secteur pendant qu’il fonctionne.
• Au moment d'installer cet appareil sur l'enregistreur DVD PRV-LX1, débrancher
systématiquement tous les câbles et le cordon d'alimentation à l'enregistreur DVD
avant de commencer (excepté quand une confirmation de fonctionnement est
exécutée).
• Veillez à ne pas introduire des corps étrangers ou des liquides dans l’appareil.
• Prenez des précautions pour éviter une condensation. Si une condensation se produit,
débranchez l’alimentation au PRV-LX1 et n’utilisez pas celui-ci tant qu’il n’est pas
complètement sec.
• N’essayez pas d’inspecter ou de modifier les composants internes.
• Si l’appareil produit une odeur ou des sons inhabituels pendant son utilisation,
débranchez immédiatement l’alimentation au PRV-LX1 et faites inspecter le composant
par un spécialiste du service.
L’enregistrement sur disques DVD-R/RW en mode “vidéo” est une nouvelle norme, reconnue
par le Forum DVD en 2000. Cependant, la prise en compte de cette norme est laissée à
l’appréciation de chaque fabricant, ce qui signifie que, selon le lecteur DVD ou le lecteur DVDROM concerné, vous ne puissiez pas reproduire de tels disques DVD-R/RW.
De même, en fonction des conditions du capteur du lecteur et l’association particulière de disques
et de lecteurs, certains lecteurs, n’acceptant pas cette norme d’enregistrement vidéo, ne
permettront pas de lire tous les disques.
16
PRA-DW11
Fr
Page 17

Précautions relatives à l’utilisation
Précautions relatives
aux disques
7 Disques recommandés
• Utilisez uniquement les disques
recommandés afin de garantir un
enregistrement et une lecture stables.
• Se reporter à la notice d'instructions
de l'appareil principal PRV-LX1 en ce
qui concerne le support disque
recommandé.
7 Manipulation des disques
L’enregistrement et la lecture des disques
deviendront impossibles s’ils sont souillés
par des traces de doigts, de la poussière
ou s’ils sont griffés, Manipulez les
disques en tenant compte des points
suivants :
• Ne touchez jamais la surface
d’enregistrement (surface brillante) lors
du maniement des disques. Tenez-les
par leur bord ou en introduisant un doigt
dans l’orifice central et en tenant le bord.
• Ne collez pas de bandes ou d’étiquettes
sur les disques.
• N’utilisez pas de disques fissurés ou
gondolés, car ils pourraient se briser
en tournant à grande vitesse.
• N’utilisez par de disques non standards,
car ils pourraient endommager le lecteur
et les autres composants.
N’utilisez pas de disques non circulaires
•
(en forme de cœur, de polygone, etc.) car
ils peuvent provoquer des défaillances.
• Pour nettoyer un disque souillé par des
traces de doigts, frottez-le délicatement
du centre vers la circonférence. Ne
frottez pas dans le sens circulaire.
• N ’ utilisez pas de vaporisateurs
antiélectricité statique, destinés à
d’autres disques. Pour le nettoyage de
la surface des disques, n’utilisez pas de
benzène, de diluant ou d’autres produits
de nettoyage volatils car ces produits
chimiques pourraient endommager la
surface de vos disques.
Rangez toujours vos disques dans leur
étui de protection. Avant de les utiliser,
assurez-vous que leur surface n’est pas
souillée par des traces de doigts.
Examen des problèmes
de disque
7 Erreurs d’enregistrement des
données ou impossibilité
d’enregistrer
•
Avez-vous utilisé un disque recommandé ?
•
Restait-il assez d’espace d’enregistrement
sur le disque ?
•
Le disque avait-il été finalisé après la
dernière séance d’enregistrement ?
• Le disque est-il installé correctement,
sa surface enregistrée vers le bas et son
étiquette vers le haut ?
• Le disque est-il souillé ou griffé ?
7 Erreurs de lecture
•
Avez-vous utilisé un disque recommandé ?
•
Le disque a-t-il été correctement enregistré
(n’est-il pas vide) ?
•
Le disque est-il souillé ou griffé ?
•
La condensation d’humidité sur les
composants optiques du lecteur ou sur
la surface du disque est une possibilité.
Laissez le disque et le lecteur dans la
pièce pendant 1 ou 2 heures avant de les
utiliser.
Français
17
PRA-DW11
Fr
Page 18

Connecteurs (panneau arrière du lecteur)
4 1 32
56
MASTER
SLAVE
CABLE SELECT
ANLOG AUDIO
39
SC
M
40
ALS
IDE INTERFACE
1 Cavaliers de configuration de dispositif
Le placement du cavalier sur une paire de broches active (ON) la paire en question.
Assurez-vous que la paire de broches 2 est activée (cavalier branché).
2 Interface hôte IDE
Raccordez au câble d’interface IDE du PRV-LX1 (Reportez-vous aux instructions
d’installation, étape 9).
3 Connecteurs d’entrée CD (DC INPUT)
Raccordez au câble d’alimentation du PRV-LX1 Reportez-vous aux instructions
d’installation, étape 9).
Les connecteurs 4, 5 et 6 ne sont pas utilisés avec le PRV-LX1.
1
2
DC INPUT
5V G G 12V
18
PRA-DW11
Fr
Page 19

Installation
Précautions au sujet de l’électricité statique
7 Lorsque vous manipulez l’appareil, ne touchez jamais les connecteurs ou les
bornes afin d’éviter des dégâts que causerait une décharge d’électricité statique.
Remarques :
• L’installation de cet appareil nécessite un savoir-faire technologique de haut niveau.
Pour garantir votre sécurité personnelle et un fonctionnement adéquat, l’installation
doit être effectuée par un représentant du réseau de service Pioneer. Pour les détails,
consultez votre revendeur.
• Un relâchement des vis de montage peut être la cause de distorsions du son pendant
la rotation d’un disque ou d’une chute de l’appareil, entraînant des blessures ou des
dégâts matériels à l’appareil ou à d’autres objets.
• Utilisez uniquement les vis de montage désignées. L’emploi d’attaches filetées autres
que celles qui sont désignées peut entraîner des dégâts sur l’appareil et l’enregistreur
de DVD PRV-LX1.
• Pour éviter tout risque d'incendie, électrocution ou endommagement électronique
potentiel, débrancher systématiquement tous les câbles et le cordon d'alimentation
raccordés à l'appareil principal PRV-LX1 avant de commencer l'installation.
Français
1. Déposez le panneau supérieur du
PRV-LX1.
Déposez les 7 vis du panneau supérieur,
÷
puis le panneau proprement dit.
2. Déposez le panneau décoratif du
lecteur 2.
÷ Pour éviter la chute du panneau
décoratif, maintenez-le en place
tandis que vous déposez les deux
vis d’installation du panneau (ces
deux vis serviront pour installer le
cadre du lecteur 2 à l’étape 3).
* Lors de la dépose des deux vis,
travaillez avec précaution pour
éviter de les laisser tomber à
l’intérieur de l’appareil.
Panneau supérieur
Panneau décoratif du lecteur 2
Panneau décoratif du lecteur 2
19
PRA-DW11
Fr
Page 20

Installation
3. Installez le cadre accessoire du lecteur 2.
÷ Insérez les taquets du cadre accessoire du
lecteur 2 dans les orifices carrés (4) sous
Remarque 1 . Ne tenez pas par les
Remarque 2. Ne touchez pas la zone de
l’ouverture du lecteur 2 sur le panneau avant
du PRV-LX1, puis poussez le cadre dans
l’ouverture. En maintenant avec soin le
cadre du lecteur 2 pour éviter qu’il ne
tombe, servez-vous des deux vis (déposées
à l’étape 2 ci-avant) pour immobiliser le
cadre de lecteur 2.
4.
Déposez l’armature de fixation du lecteur 2.
÷ Déposez les 4 vis de montage et retirez
l’armature de fixation du lecteur 2 (les
vis serviront à l’étape 8 pour réinstaller
l’armature de fixation).
Remarque :
Veillez à éviter de toucher les bords tranchants (*)
(ne tenez pas l’appareil par ces bords).
Cadre du lecteur 2
(*)
6. Installez le dissipateur thermique.
Armature de fixation du lecteur 2
5. Enlevez le papier protecteur prévu sur la
feuille de dissipation thermique.
÷
Enlevez le papier protecteur accessoire,
prévu sur la feuille de dissipation thermique
du dissipateur.
Remarque :
Si vous placez la feuille de dissipation thermique sans
enlever son papier protecteur, l’effet de dissipation voulu
ne sera pas obtenu, ce qui pourrait provoquer des dégâts
ou une défaillance.
Feuille de dissipation
thermique
Papier
protecteur
(à enlever)
nervures en croix et n’y appuyez pas.
l’objectif.
÷
Les ailettes étant tournées vers
l’avant, alignez le dissipateur
thermique avec le guide, puis
servez-vous des 2 vis fournies
comme accessoires (sans collier)
pour l’immobiliser.
Guide
Dissipateur
thermique
20
PRA-DW11
Fr
Dissipateur thermique
Page 21

7. Fixez les 2 vis de fixation du lecteur
2 sur l’unité DVD-R/RW.
÷ Fixez l’armature de fixation du
lecteur 2 sur le lecteur de DVD-R/
RW de sorte que le repère “%” de
l’armature soit orienté vers l’avant.
÷ Immobilisez l’armature en vous
servant des 4 vis à colliers (noires)
fournies comme accessoires et
serrez ces vis dans l’ordre 1= 2=
3= 4.
Vers
l’avant
②
Installation
①
③
8. Une fois que l’armature de fixation
est immobilisée sur ll’unité DVD-R/
RW, installez l’unité DVD-R/RW
avec son armature de fixation sur
l’enregistreur de DVD PRV-LX1.
÷ Alignez les deux orifices carrés de
l’armature de fixation du lecteur
2 sur les taquets du PRV-LX1, puis
servez-vous des 4 vis déposées à
l’étape 4 pour immobiliser le lecteur
en place (serrez les vis dans l’ordre
1= 2= 3= 4).
②
①
③
④
④
Armature de
Repère “%”
fixation du lecteur 2
9. Fixez le câble IDE et le câble
d’alimentation.
÷ Retirez le câble IDE et le câble
d’alimentation hors du serre-fils.
Remarque :
Prenez garde à tous les bords tranchants lors du
branchement et de l’aménagement des câbles.
Connecteur
du câble IDE
Connecteur du câble
d’alimentation
Attache du serre-fils
Alignez correctement les connecteurs
÷
et insérez-les à fond.
DC INPUT
1
5V G G 12V
2
Français
Orifices carrés
Taquet
Câble IDE Câble d’alimentation
21
PRA-DW11
Fr
Page 22

Installation
10. Replacez le panneau supérieur du
PRV-LX1.
÷ Servez-vous des 7 vis déposées à
l’étape 1 pour réinstaller le panneau
supérieur.
Panneau supérieur
11. Assurez-vous que l’appareil
fonctionne correctement.
1 Branchez la fiche du câble
d’alimentation du PRV-LX1 sur une
prise du secteur, puis appuyez sur
l’interrupteur d’alimentation (à l’arrière
de l’unité principale). Appuyez ensuite
sur la touche STANDBY/ON du
panneau avant pour mettre l’appareil
sous tension.
2 Attendez jusqu’à ce que l’unité
principale reconnaisse l’unité de DVDR/RW qui vient d’être ajoutée.
3 Lorsque le PRV-LX1 passe en état
d’attente (reportez-vous au mode
d’emploi du PRV-LX1), appuyez sur la
touche FUNCTION du panneau avant.
4 Le menu de fonction apparaît sur le
moniteur de télévision. Assurez-vous
que le voyant “DVD2” (lecteur 2) est
affiché à l’écran (voir l’image qui
accompagne).
22
PRA-DW11
Fr
Menu de fonction
Touche STANDBY/ON
Indique que le Lecteur 2 est raccordé.
Touche FUNCTION
Page 23

Installation
12. Installez le panneau du plateau 2
sur le plateau de disque du lecteur
2.
1 Appuyez sur la touche DRIVE SELECT
pour sélectionner DVD2.
• Appuyez plusieurs fois sur la touche
DRIVE SELECT jusqu’à ce que le
voyant DVD2 s’allume.
2 Appuyez sur la touche EJECT de
lecteur 2.
Le plateau de disque DVD2 ressort.
3 Insérez les côtes du panneau du
plateau accessoire 2 dans les rainures
sur le bord avant du plateau de disque,
ressorti à l’étape 2. Poussez ensuite
vers le bas de sorte que les deux
crochets soient fermement
enclenchés, comme illustré.
Remarque:
Lors de l’installation du panneau 2 de plateau,
veillez à ne pas pousser le panneau de disque
dans le sens de la fermeture, car le mécanisme
de chargement automatique du disque ferait
rentrer le panneau de disque. Si vous poussez
accidentellement sur le panneau de disque de
sorte qu’il soit rentré à l’intérieur, laissez-le se
refermer sans le toucher, puis appuyez une
nouvelle fois sur la touche EJECT du lecteur 2
pour ouvrir le panneau du disque.
NE coupez JAMAIS l’alimentation
pendant cette opération et n’essayez
pas de retirer le plateau de disque, car
l’unité principale (PRV-LX1) et cette
unité (PRA-DW11) pourraient en être
endommagés et les données pourraient
en être effacées.
4 Lorsque le panneau 2 du plateau est
installé, appuyez sur la touche EJECT
du lecteur 2 pour refermer le panneau
de disque DVD2.
Pattes
13. Fin de l’installation
1 Appuyez sur l’interrupteur STANDBY/
ON du panneau avant de l’unité
principale et attendez que l’unité passe
en mode Veille.
2 Lorsque l’unité est en mode Veille,
réglez son interrupteur principal (sur le
panneau arrière) à la position OFF
(coupé), puis débranchez le cordon
d’alimentation au niveau de la prise
secteur.
Remarque :
Ne laissez pas l’unité sous tension lorsque le
panneau 2 de plateau n’est pas installé (voir
l’étape 12 pour les instructions d’installation).
Si le panneau 2 de plateau n’est pas installé,
de la poussière peut être attirée plus facilement
à l’intérieur, ce qui pourrait entraîner des
dysfonctionnements lors de l’enregistrement et
de la lecture.
Touche EJECT de lecteur 2
Voyant DVD2
Touche DRIVE SELECT
Crochets
Français
Panneau de plateau 2
Fente
Fente
Panneau du disque
23
PRA-DW11
Fr
Page 24

Fiche technique
[Taille de disque]
12 cm, 8 cm
[Données générales]
Dimensions : 148 x 42,3 x 198 mm (L x H x P)
(corps de lecteur seulement)
Poids : 1,8 kg (emballage compris)
Température ambiante pour fonctionnement :
De + 5 à +35 °C (PRV-LX1 installé)
Humidité ambiante pour fonctionnement :
De 5 à 85% (PRV-LX1 installé) (sans condensation)
Température ambiante pour entreposage :
De –40 à +60 °C
Humidité ambiante pour entreposage :
De 5 à 90% (sans condensation)
[Accessoires]
Dissipateur thermique (avec feuille de dissipation thermique) : 1
Panneau de plateau 2 : 1
Cadre de lecteur 2 : 1
Vis (pour installation du dissipateur thermique) : 2
Vis à colliers (noires, pour installation de lecteur) : 4
Carte de garantie pour les États-Unis : 1
Carte de garantie pour le Japon : 1
Mode d’emploi : 1
• Les spécifications et l’aspect sont sujets à des modifications sans préavis.
Publication de Pioneer Corporation.
© 2003 Pioneer Corporation.
Tous droits de reproduction et de traduction réservés.
24
PRA-DW11
Fr
Page 25

Wir danken Ihnen für den Kauf dieses Pioneer-Produktes.
Bitte lesen Sie diese Bedienungsanleitung vollständig durch, damit Sie Ihr neues Gerät
fehlerfrei bedienen können.
Bei diesem Gerät handelt es sich um ein optionales Laufwerk für den DVDRecorder PRV-LX1.
Dies bedeutet, dass dieses Gerät nicht unabhängig betrieben oder an ein anderes als das
dafür vorgesehene Gerät angeschlossen werden kann.
Vorsichtshinweise zur Installation
7
Die Installation dieses Gerätes erfordert technische Spezialkenntnisse und muss von
Pioneer-Kundendienstpersonal ausgeführt werden, um einen einwandfreien Betrieb des
Gerätes und die Sicherheit des Benutzers zu gewährleisten. Weitere Informationen hierzu
sind von Ihrem Fachhändler erhältlich.
Vorsichtshinweise zum Betrieb
7
Pioneer übernimmt keinerlei Haftung für Datenverluste oder irgendwelche anderen
direkten oder Folgeschäden, die auf den Gebrauch oder eine Funktionsstörung dieses
Gerätes zurückzuführen sind. Es wird dringend angeraten, in regelmäßigen Abständen
Sicherungskopien von allen wichtigen Daten zu erstellen.
7
Bitte beachten Sie unbedingt die in Ihrem Land geltenden gesetzlichen Bestimmungen
zum Schutz der Urheberrechte.
Bevor dieses Gerät zur Aufzeichnung von urheberrechtlich geschütztem Material
verwendet wird, muss die Genehmigung des Inhabers der Urheberrechte eingeholt
werden. Die Aufzeichnung von urheberrechtlich geschütztem Material ohne
ausdrückliche Genehmigung des Inhabers der Urheberrechte ist möglicherweise strafbar.
Pioneer übernimmt keine Haftung für Schadenersatzforderungen, die auf einen Gebrauch
dieses Gerätes zum unbefugten Kopieren von urheberrechtlich geschütztem Material
zurückzuführen sind.
7
Auch wenn diese nicht durch die Symbole "™" bzw. "®" ausgewiesen sind, handelt es
sich bei allen in dieser Anleitung erwähnten Firmennamen, Produkt- und
Systembezeichnungen um eingetragene Warenzeichen der betreffenden Unternehmen.
Français
Deutsch
VORSICHT
Dieses Gerät enthält eine Laserdiode mit
einer höheren Klasse als 1. Um einen stets
sicheren Betrieb zu gewährleisten, weder
irgendwelche Abdeckungen entfernen,
noch versuchen, sich zum Geräteinneren
Zugang zu verschaffen.
Alle Wartungsarbeiten sollten qualifiziertem
Kundendienstpersonal überlassen werden.
Das nachstehende Hinweisschild befindet
sich am Gerät.
Anbringstelle: auf der
Deckeloberseite.
CLASS 1 LASER PRODUCT
LASER KLASSE 1
Das Geräuschaufkommen beträgt weniger
als 70 dB. (ISO 7779/DIN 45635)
Inhaltsverzeichnis
Überprüfen des mitgelieferten
Zubehörs .................................... 26
Vorsichtshinweise zum
Gebrauch .................................... 26
Buchsen (an der Rückseite der
Laufwerkeinheit) ........................ 28
Installation ...................................... 29
Technische Daten ........................... 34
Warnung:
Dieses Produkt entspricht dem EMVStandard der Klasse A.Produkte dieser
Klasse sind nur für den industriellen
Einsatz geeignet und dürfen in Wohnund Gewerbegebieten nicht ohne
ausreichende Entstörungsmaßnahmen
betrieben werden.
25
PRA-DW11
Ge
Page 26

Überprüfen des mitgelieferten Zubehörs
Kühlkörper (mit Wärmeableitungsbogen) (1)
Platte für Disc-Fach 2 (1)
Rahmen für Laufwerk 2 (1)
Schrauben (für Montage des Kühlkörpers) (2)
Flanschschrauben (schwarz, für Laufwerk-Installation) (4)
Garantiekarte für die USA (1)
Garantiekarte für Japan (1)
Bedienungsanleitung (1)
÷
Bitte setzen Sie sich mit Ihrem Fachhändler in Verbindung, falls irgendein Zubehörartikel fehlt.
Vorsichtshinweise zum Gebrauch
÷ Bitte lesen Sie vor der Inbetriebnahme dieses Gerätes die Bedienungsanleitung des
Hauptgerätes (PRV-LX1) vollständig durch.
÷ Bitte bewahren Sie diese Bedienungsanleitung für spätere Bezugnahme griffbereit an
einem sicheren Ort auf.
÷ Dieses Gerät darf nicht an einem Ort aufgestellt oder betrieben werden, der hoher
Temperatur, Luftfeuchtigkeit oder Staubkonzentration ausgesetzt ist.
÷ Schützen Sie das Gerät beim Betrieb vor Erschütterungen und mechanischen
Schwingungen, und trennen Sie das Gerät auf keinen Fall vom Netz, während es in
Betrieb ist.
÷ Achten Sie vor der Installation dieses Gerätes im DVD-Recorder PRV-LX1 unbedingt
darauf, alle Anschlusskabel und das Netzkabel vom DVD-Recorder abzutrennen (außer
beim Überprüfen auf einwandfreien Betrieb).
÷ Sorgen Sie unbedingt dafür, dass keinerlei Fremdgegenstände oder Flüssigkeiten in
das Innere des Gerätes eindringen.
÷ Treffen Sie geeignete Maßnahmen, um Kondensatbildung zu vermeiden. Falls sich
Kondensat gebildet hat, trennen Sie den PRV-LX1 vom Netz, bis die Kondensfeuchtigkeit
vollständig verdunstet ist.
÷ Versuchen Sie auf keinen Fall, Bauteile im Geräteinneren zu überprüfen oder zu
modifizieren.
÷ Falls das Gerät beim Betrieb ungewöhnliche Gerüche oder Geräusche abgibt, trennen
Sie den PRV-LX1 unverzüglich vom Netz, und bringen Sie das Gerät zur Untersuchung
zu einer Pioneer-Kundendienststelle.
Bei der Aufzeichnung auf DVD-R/RW-Discs im sog. "Videomodus" handelt es sich um
eine neue Norm, die im Jahre 2000 vom DVD Forum aufgestellt wurde. Die
Unterstützung dieser Norm ist jedoch jedem Hersteller freigestellt, so dass je nach
Fabrikat vorkommen kann, dass ein DVD-Player oder DVD-ROM-Laufwerk derartige
DVD-R/RW-Discs nicht abspielen kann.
Außerdem ist es in Abhängigkeit vom Zustand des Abtasters des Players und der
jeweiligen Kombination von Disc und Player möglich, dass selbst ein Player, der die
Videoaufzeichnungs-Norm unterstützt, bestimmte Discs nicht abspielen kann.
26
PRA-DW11
Ge
Page 27

Vorsichtshinweise zum Gebrauch
Vorsichtshinweise zum
Gebrauch von Discs
7 Empfohlene Discs
÷ Verwenden Sie ausschließlich die
empfohlenen Disc-Datenträger, damit bei
Aufzeichnung und Wiedergabe stets eine
stabile Leistung gewährleistet ist.
÷ Informationen über die empfohlenen Disc-
Datenträger finden Sie in der
Bedienungsanleitung des Hauptgerätes
PRV-LX1.
7 Handhabung von Discs
Discs, die mit Fingerabdrücken oder Staub
verschmutzt sind oder Kratzer aufweisen
können u.U. nicht mehr zur Aufzeichnung und
Wiedergabe verwendet werden. Bitte beachten
Sie bei der Handhabung von Discs die folgenden
Hinweise:
÷ Vermeiden Sie unbedingt eine Berührung
der Aufzeichnungsfläche (der farbig
schillernden Seite der Disc). Halten Sie die
Disc stets am Rand oder mit einem Finger
im Mittelloch und dem anderen am Rand.
÷ Bringen Sie keinerlei Aufkleber oder
Etiketten an Discs an.
÷ Verwenden Sie keine gesprungenen oder
verwellten Discs, da diese bei hohen
Drehzahlen zerspringen und gefährliche
Verletzungen oder eine Beschädigung des
Gerätes verursachen können.
÷ Verwenden Sie keine nicht normgerechten
Discs, da dies zu einer Beschädigung oder
Funktionsstörung des Players und anderer
Geräte führen kann.
÷
Verwenden Sie keine anderen als kreisförmige
Discs (z.B. herzförmige oder achteckige), da
dies Funktionsstörungen verursachen.
÷ Reiben Sie Fingerabdrü cke von der
Oberfläche einer Disc ab, indem Sie ein
weiches, trockenes Tuch sacht in einer
geraden Bewegung vom Mittelloch zum
Außenrand hin führen. Wischen Sie Discs
nicht mit einer kreisförmigen Bewegung ab.
÷
Verwenden Sie keine Antistatik-Sprays oder
andere für Schallplatten bestimmte
Reinigungsmittel. Benzol, Farbverdünner und
andere leichtflüchtige Lösungsmittel dürfen
ebenfalls auf keinen Fall zur Reinigung von
Discs verwendet werden, da derartige
Chemikalien die Oberfläche anlösen oder auf
andere Weise beschädigen können.
Bewahren Sie Discs stets in ihren
Schutzbehältern auf; untersuchen Sie die
Aufzeichnungsfläche vor dem Gebrauch auf
Fingerabdrücke und andere Verschmutzung.
Störungen im
Zusammenhang mit Discs
7
Fehler treten bei der
Datenaufzeichnung auf, oder
Aufzeichnung ist nicht möglich.
÷ Wurde eine empfohlene Disc zur
Aufzeichnung verwendet?
÷ Reichte die verbleibende Aufnahmekapazität
der Disc für die Aufzeichnung aus?
÷ Wurde die Disc nach früheren
Aufzeichnungssitzungen finalisiert?
÷ War die Disc einwandfrei mit der Etikettseite
nach oben und der Aufzeichnungsfläche
nach unten weisend in das Gerät eingelegt?
÷ Ist die Disc verschmutzt oder zerkratzt?
7 Störungen bei Wiedergabe
÷ Wurde eine empfohlene Disc zur
Wiedergabe verwendet?
÷ Ist die Disc einwandfrei bespielt (nicht leer)?
÷ Ist die Disc verschmutzt oder zerkratzt?
÷ Möglicherweise hat sich Kondensat auf der
Optik des Players oder der Oberfläche der
Disc gebildet; warten Sie ca. 1-2 Stunden,
bevor Sie den Betrieb fortsetzen, damit die
Kondensfeuchtigkeit vollständig verdunsten
kann.
27
PRA-DW11
Ge
Deutsch
Page 28

Buchsen (an der Rückseite der Laufwerkeinheit)
4 1 32
56
MASTER
SLAVE
CABLE SELECT
ANLOG AUDIO
M
39
SC
ALS
40
IDE INTERFACE
1 Überbrückungsstecker für Gerätekonfiguration
Durch Einsetzen eines Überbrückungssteckers auf ein Paar Stifte werden diese
eingeschaltet. Vergewissern Sie sich, dass Stiftpaar 2 eingeschaltet
(Überbrückungsstecker eingesetzt) ist.
2 Host-IDE-Schnittstelle
Schließen Sie das IDE-Schnittstellenkabel des PRV-LX1 an diese Buchse an (siehe
Schritt 9 der Installationsanleitung).
3 DC INPUT-Buchsen
Schließen Sie das Spannungsversorgungskabel des PRV-LX1 an diese Buchsen an
(siehe Schritt 9 der Installationsanleitung).
1
2
DC INPUT
5V G G 12V
Die Buchsen 4, 5 und 6 werden nicht mit dem PRV-LX1 verwendet.
28
PRA-DW11
Ge
Page 29

Installation
Vorsichtshinweis zur statischen Aufladung
7 Vermeiden Sie bei der Handhabung dieses Gerätes sorgfältig jede Berührung
von Buchsen oder Klemmen, um eine Beschädigung aufgrund von
elektrostatischer Ableitung zu verhindern.
HINWEIS:
÷ Die Installation dieses Gerätes erfordert technische Spezialkenntnisse; aus diesem Grund
sowie zur Gewährleistung eines sicheren Betriebs muss die Installation von PioneerKundendienstpersonal ausgeführt werden. Weitere Informationen hierzu sind von Ihrem
Fachhändler erhältlich.
÷ Lockere Befestigungsschrauben können eine unregelmäßige Disc-Drehung verursachen,
so dass Klangverzerrungen auftreten oder das Gerät sogar herunterfällt, was zu
Verletzungen und einer Beschädigung des Gerätes und anderer Gegenstände führen
kann. Vergewissern Sie sich daher, dass alle Befestigungsschrauben fest angezogen
sind.
÷ Verwenden Sie ausschließlich die vorgeschriebenen Befestigungsschrauben. Der
Gebrauch von anderen als den vorgeschriebenen Befestigungsteilen mit Gewinde kann
eine Beschädigung des Gerätes und des DVD-Recorders PRV-LX1 verursachen.
÷ Achten Sie zur Vermeidung von Brand, elektrischem Schlag und einer Beschädigung der
elektronischen Schaltkreise des Gerätes unbedingt darauf, alle Anschlusskabel und das
Netzkabel vom Hauptgerät PRV-LX1 abzutrennen, bevor Sie mit der Installation beginnen.
1. Entfernen Sie die obere Platte des
PRV-LX1.
÷ Entfernen Sie die 7 Schrauben der
oberen Platte, und nehmen Sie die
obere Platte dann ab.
Obere Platte
Deutsch
2. Entfernen Sie die Blende von
Laufwerk 2.
÷ Halten Sie die Blende fest, während
Sie die beiden
Befestigungsschrauben entfernen,
damit die Blende nicht herunterfällt
(diese beiden Schrauben werden
in Schritt 3 erneut zur Befestigung
des Rahmens von Laufwerk 2
verwendet).
* Achten Sie beim Entfernen der beiden
Schrauben sorgfältig darauf, diese nicht
in das Geräteinnere fallen zu lassen.
Blende von Laufwerk 2
Blende von Laufwerk 2
29
PRA-DW11
Ge
Page 30

Installation
3. Montieren Sie den mitgelieferten Rahmen
von Laufwerk 2.
÷
Führen Sie die Nasen des mitgelieferten
Rahmens von Laufwerk 2
in die 4 rechteckigen
Löcher unterhalb des Schachtes von Laufwerk
2 an der Vorderseite des PRV-LX1 ein, und
schieben Sie den Rahmen in den Schacht ein.
Halten Sie dann den
Rahmen von Laufwerk 2
sorgfältig fest, damit er nicht herunterfällt, und
verwenden Sie die beiden in Schritt 2
entfernten Schrauben, um den
Laufwerk 2
in Arbeitsstellung zu sichern.
Rahmen von
4. Entfernen Sie die Montagehalterung
von Laufwerk 2.
÷
Entfernen Sie die 4 Befestigungsschrauben,
und nehmen Sie die Montagehalterung
von Laufwerk 2 ab (diese Schrauben
werden in Schritt 8 erneut zur Befestigung
der Montagehalterung verwendet).
HINWEIS:
Vermeiden Sie eine Berührung der scharfen
Kanten (*) (nicht an den Kanten halten).
(*)
Montagehalterung von Laufwerk 2
5. Entfernen Sie das Schutzpapier vom
Wärmeableitungsbogen.
÷ Entfernen Sie das Schutzpapier vom
Wärmeableitungsbogen des
mitgelieferten Kühlkörpers.
HINWEIS:
Falls der
Wärmeableitungsbogen am
Kühlkörper angebracht wird,
ohne das Schutzpapier von
diesem zu entfernen, kann die
erforderliche
Wärmeableitungswirkung nicht
erhalten werden, so dass die
Gefahr von Beschädigung und
Funktionsstörungen besteht.
Wärmeableitungsbogen
Schutzpapier
(entfernen)
HINWEIS 1. Halten Sie die Querrippen
nicht fest, und üben Sie keinen
Druck darauf aus.
HINWEIS 2. Vermeiden Sie eine
Berührung des Linsenbereichs.
Rahmen von
Laufwerk 2
6. Montieren Sie den Kühlkörper.
Richten Sie den mitgelieferten
÷
Kühlkörper mit nach vorn weisenden
Kühlrippen auf die Führung aus, und
verwenden Sie dann die 2 mitgelieferten
Schrauben (ohne Hülsen), um den
Kühlkörper in Arbeitsstellung zu sichern.
Führung
Kühlkörper
30
PRA-DW11
Ge
Kühlkörper
Page 31

7.
Befestigen Sie die Montagehalterung
von Laufwerk 2 an der DVD-R/RWEinheit.
÷ Befestigen Sie die
von Laufwerk 2
Montagehalterung
so an der DVD-R/RWEinheit, dass die Markierung % auf
der Montagehalterung nach vorn
weist.
÷ Verwenden Sie die vier mitgelieferten
Flanschschrauben (schwarz), um die
Montagehalterung in Arbeitsstellung
zu sichern, wobei die Schrauben in
der Reihenfolge 1= 2= 3= 4
anzuziehen sind.
8. Nachdem die Montagehalterung an
der DVD-R/RW-Einheit befestigt
worden ist, installieren Sie die DVDR/RW-Einheit gemeinsam ihrer
Montagehalterung in den DVDRecorder PRV-LX1.
÷ Richten Sie die beiden rechteckigen
Löcher in der Montagehalterung
von Laufwerk 2 auf die Nasen am
PRV-LX1 aus, und verwenden Sie
dann die in Schritt 4 entfernten 4
Schrauben, um das Laufwerk in
Arbeitsstellung zu sichern (befestigen
Sie die Schrauben in der Reihenfolge
1= 2= 3= 4).
②
①
Installation
Nach vorn
weisend
②
④
Markierung %
Montagehalterung
von Laufwerk 2
9. Schließen Sie das IDE-Kabel und das
Spannungsversorgungskabel an.
÷ Entfernen Sie das IDE-Kabel und das
Spannungsversorgungskabel aus der
Kabelschelle.
HINWEIS:
Achten Sie beim Anschließen und Verlegen der Kabel
darauf, sich nicht an den scharfen Kanten im Umfeld
zu verletzen.
Steckverbinder
des IDE-Kabels
Spannungsversorgungskabels
①
Steckverbinder des
③
Deutsch
④
Rechteckige
Löcher
Nasen
③
÷ Richten Sie die Steckverbinder korrekt
Kabelschelle
auf die Form der Buchsen aus, und
schieben Sie sie dann bis zum
Anschlag in die Buchsen.
DC INPUT
1
5V G G 12V
2
IDE-Kabel
Spannungsversorgungskabel
31
PRA-DW11
Ge
Page 32

Installation
10. Bringen Sie die obere Platte des
PRV-LX1 wieder an.
÷ Verwenden Sie die in Schritt 1
entfernten 7 Schrauben, um die
obere Platte wieder anzubringen.
Obere Platte
11. Überprüfen Sie das Gerät auf
einwandfreie Funktion.
1 Schließen Sie den Netzstecker des
PRV-LX1 an eine Netzsteckdose an,
und schalten Sie den Netzschalter
(an der Rückwand des Hauptgerätes)
ein. Drücken Sie dann die
-Taste an der Frontplatte, um die
ON
Stromzufuhr einzuschalten.
2 Warten Sie, bis das Hauptgerät die
soeben installierte DVD-R/RWEinheit erkannt hat.
3 Sobald der PRV-LX1 auf
Leerlaufbetrieb umgeschaltet hat
(siehe die Bedienungsanleitung des
PRV-LX1), drücken Sie die
FUNCTION-Taste an der Frontplatte.
4 Daraufhin erscheint das
Funktionsmenü auf dem Bildschirm
des angeschlossenen
Fernsehgerätes; vergewissern Sie
sich, dass die Anzeige “DVD2”
erscheint (siehe Abbildung).
STANDBY/
32
PRA-DW11
Ge
Funktionsmenü
STANDBY/ON-Taste
Zeigt an, dass Laufwerk 2
angeschlossen ist.
FUNCTION-Taste
Page 33

12.
Befestigen Sie die Platte von Disc-
Fach 2 am Disc-Fach von Laufwerk 2.
1
Betätigen Sie die DRIVE SELECT-Taste zur
Wahl von "DVD2".
÷ Betätigen Sie die DRIVE SELECT-Taste
so oft, bis die
2
Drücken Sie die EJECT-Taste von
DVD2
-Anzeige aufleuchtet.
Laufwerk 2.
Das Disc-Fach von Laufwerk 2 wird
ausgefahren.
3
Passen Sie die Rippen an der mitgelieferten
Platte von Disc-Fach 2
Vorderkante des in Schritt
in die Nuten an der
2 ausgefahrenen
Disc-Fachs ein. Drücken Sie die Platte dann
ein, bis die beiden Haken wie in der
Abbildung gezeigt fest eingreifen.
HINWEIS:
Achten Sie beim Einbau der Platte von DiscFach 2 darauf, das Disc-Fach nicht in Richtung
des Schließens zu drücken, da der automatische
Disc-Lademechanismus das Disc-Fach
anderenfalls nach innen zieht. Falls Sie
versehentlich gegen das Disc-Fach gedrückt
haben und dieses daraufhin eingezogen wird,
warten Sie sein vollständiges Schließen ab, ohne
das Disc-Fach zu berühren, und drücken Sie
dann die EJECT-Taste von Laufwerk 2 erneut,
um das Disc-Fach wieder auszufahren.
Während dieses Vorgangs darf AUF KEINEN
FALL die Stromzufuhr ausgeschaltet oder
versucht werden, das Disc-Fach von Hand
herauszuziehen, da dies eine Beschädigung
des Hauptgerätes (PRV-LX1) und dieses
Gerätes (PRA-DW11) sowie ein Löschen
interner Daten verursachen kann.
4 Nach beendeter Montage der Platte von
Disc-Fach 2 drücken Sie die EJECT-Taste
von Laufwerk 2, um das Disc-Fach von
Laufwerk 2 zu schließen.
Rippen
Installation
13. Abschluss der Installation
1 Drücken Sie die STANDBY/ON-Taste
an der Frontplatte des Hauptgerätes,
und warten Sie, bis das Gerät in den
Bereitschaftsmodus umschaltet.
2 Sobald sich das Hauptgerät im
Bereitschaftszustand befindet,
schalten Sie den Hauptschalter des
Gerätes (an der Rückwand) aus, und
trennen Sie dann das Netzkabel von
der Netzsteckdose.
HINWEIS:
Lassen Sie das Gerät nicht im eingeschalteten
Zustand, wenn die Platte von Disc-Fach 2 nicht
installiert ist (siehe Schritt 12 der
Installationsanweisungen). Wenn die Platte von
Disc-Fach 2 nicht installiert ist, kann Staub
leichter in das Geräteinnere eindringen, was zu
Funktionsstörungen bei Aufzeichnung und
Wiedergabe führen kann.
EJECT-Taste von Laufwerk 2
DVD2-Anzeige
DRIVE SELECT-Taste
Haken
Deutsch
Platte von
Disc-Fach 2
Schlitz
Disc-Fach
Schlitz
33
PRA-DW11
Ge
Page 34

Technische Daten
[Disc-Durchmesser]
12 cm, 8 cm
[Sonstiges]
Abmessungen: 148 (B) x 42,3 (H) x 198 (T) mm (nur Laufwerkgehäuse)
Masse: 1,8 kg (einschließlich Verpackung)
Umgebungstemperatur beim Betrieb:
5 °C bis 35 °C (PRV-LX1 installiert)
Umgebungsluftfeuchtigkeit beim Betrieb:
5 % bis 85 % (PRV-LX1 installiert)
(ohne Kondensatbildung)
Umgebungstemperatur bei Lagerung:
–40 °C bis 60 °C
Umgebungsluftfeuchtigkeit bei Lagerung:
5 % bis 90 % (ohne Kondensatbildung)
[Mitgeliefertes Zubehör]
Kühlkörper (mit Wärmeableitungsbogen): 1
Platte für Disc-Fach 2: 1
Rahmen für Laufwerk 2: 1
Schrauben (für Montage des Kühlkörpers): 2
Flanschschrauben (schwarz, für Laufwerk-Installation): 4
Garantiekarte für die USA: 1
Garantiekarte für Japan: 1
Bedienungsanleitung: 1
Änderungen der technischen Daten und äußeren Aufmachung bleiben jederzeit vorbehalten.
•
Veröffentlicht von Pioneer Corporation.
Urheberrechtlich geschützt © 2003 Pioneer
34
PRA-DW11
Ge
Corporation. Alle Rechte vorbehalten.
Page 35

このたびは、パイオニアの製品をお買い求めいただきましてまことにありがとうございます。本
機の性能を十分に発揮させて効果的にご利用いただくために、この取扱説明書をよくお読みにな
り、正しくお使いください。特に「安全上のご注意」は必ずお読みください。なお、「取扱説明
書」は「保証書」と一緒に、必ず保管してください。
本機はDVDレコーダー「PRV-LX1」専用オプションドライブです。
本機単体での使用や、PRV-LX1以外の機器に取り付けての使用はできません。
取り付け上の注意
■ 本機の取り付けは高度な専門知識が必要です。また安全のため、取り付けは弊社サービス
が行います。詳しくは本機の取扱店にお尋ねください。
使用上の注意
■ 本製品の使用により、または故障により生じたデータの損失ならびに、その他直接、間接
の損害につきましては、当社は一切責任を負いかねますので、あらかじめご了承ください。
重要なデータに関しては、万一に備えてバックアップ(複製)を行ってください。
■ ご使用にあたっては、各国の著作権法に抵触しないようご注意ください。
本機を使用して著作物の記録を行う場合には、各著作権者・著作隣接権者の許諾を得る必
要があります。
各権利者の許諾なくして著作物の記録を行った場合には、処罰の対象となる場合がありま
す。(この場合の権利者とのトラブルについては、弊社は一切の責任を負いかねます。)
■ 本書に記載されている会社名、製品名およびシステム名は各社の登録商標 ™、® マークは
明記しておりません。
Deutsch
付属品の確認
□ヒートシンク
□トレイパネル2(1枚)
□ドライブ2パネル(1枚)
□ネジ(ヒートシンク取付用)(2本)
□つば付ネジ
□保証書(日本国内用)(1枚)
□保証書(米国内用)(1枚)
□取扱説明書(本書)(1冊)
÷同梱されていない付属品がありました
ら、本機の取扱店へご連絡ください。
(放熱シート付き)
(黒色)(ドライブ取付用)
(1個)
(4本)
目 次
安全上のご注意 ........................36
使用上のご注意 ........................37
仕 様 .......................................38
コネクター部
(
ドライブユニット後面部
取り付けかた............................ 39
) .........39
PRA-DW11
35
Ja
Page 36

安全上のご注意
絵表示について
この取扱説明書および製品への表示は、製品を
安全に正しくお使いいただき、あなたや他の
人々への危害や財産への損害を未然に防止する
ために、いろいろな絵表示をしています。その
表示と意味は次のようになっています。
内容をよく理解してから本文をお読みください。
警告
この表示を無視して、誤った取り扱いをする
と、人が死亡または重傷を負う可能性が想定
される内容を示しています。
注意
この表示を無視して、誤った取り扱いをする
と、人が損害を負う可能性が想定される内容
および物的損害のみの発生が想定される内容
を示しています。
絵表示の例
記号は注意(警告を含む)しなけ
れば
ならない内容であることを示して
います。
図の中に具体的な注意内容(左図の場
合は感電注意)が描かれています。
記号は禁止(やってはいけないこ
と)を示しています。
図の中や近くに具体的な禁止内容(左
図の場合は分解禁止)が描かれていま
す。
●記号は行動を強制したり指示す
る内容を示しています。
図の中に具体的な指示内容(左図の
場合は電源プラグをコンセントから
抜く)が描かれています。
警告
÷ 本機を使用するときは、警告、注意表
示を厳守してください。
厳守
÷ 本機を分解したり、改造したりしな
いでください。金属類や燃えやすい
ものなどが入ると火災・感電の原因
分解禁止
となります。内部の点検・整 備・修 理
は販売店にご依頼ください。
プラグを抜く
プラグを抜く
プラグを抜く
水ぬれ禁止
プラグを抜く
確実固定
注意
警告
÷ 万一煙が出ている、変なにおいや音
がするなどの異常状態のまま使用す
ると火災・感電の原因となります。
すぐに機器本体の電源スイッチを切
り、必ず電源プラグをコンセントか
ら抜いてください。煙が出なくなる
のを確認して販売店に修理をご依頼
ください。お客様による修理は危険
ですから絶対おやめください。
÷ 万一内部に水や異物等が入った場合
は、まず機器本体の電源スイッチを
切り、電源プラグをコンセントから
抜いて販売店にご連絡ください。そ
のまま使用すると火災・感電の原因
となります。
÷ 万一本機を落としたり、カバーを破
損した場合は、機器本体の電源ス
イッチを切り、電源プラグをコンセ
ントから抜いて販売店にご連絡くだ
さい。そのまま使用すると火災・感
電の原因となります。
÷ この機器に水が入ったり、ぬらさない
ようにご注意ください。火災・感電の
原因となります。
注意
÷ 本機の取り付けは本体(PRV-LX1)
のコンセントを抜いてから行ってく
ださい。
÷ 取付ねじにゆるみ等があるとディス
クの回転による振動でビリつき音が
発生することがあるので確実に取り
付けてください。
÷ 本機を使用中にデータなどが消失し
た場合でも、データなどの保証はい
たしかねます。故障に備えてバック
アップをしてください。
36
PRA-DW11
Ja
Page 37

使用上のご注意
÷ 本機を操作する前に、必ず本体(PRV-LX1)の取扱説明書をお読みください。
÷ 本書は、必ず保管してください。使用中にわからないことや不具合が生じたとき、きっとお役にたち
ます。
÷ ホコリの多い場所や、高温・多湿の場所では使用しないでください。
÷ 動作中に衝撃や振動を加えたり、電源スイッチを切らないでください。
÷ 本機をDVDレコーダー「PRV-LX1」に組み込む際は、必ずDVDレコーダーに接続されている全ての
ケーブルおよび電源コードを抜いた状態で行ってください(動作確認時を除く)。
÷ 異物や水が入らないよう注意してください。
÷
結露に注意してください。結露させてしまった場合は、必ず
放置し、完全に乾くのを待ってから電源を入れてください。
÷ 内部点検や改造はお止めください。
÷ ご使用中に本機から異常な音やにおいがしたときは、必ず本体(PRV-LX1)の電源を切ってから、点
検を受けてください。
DVD-R/RW へのビデオモード(ビデオフォーマット)による録画は 2000年に DVD フォーラ
ムで承認された新しい規格です。この規格への対応は DVD 再生機メーカー各社の任意であり、
DVDプレーヤーまたはDVD-ROMドライブによってはDVD-R/RWを再生しないモデルがあり
ます。
また、ピックアップの状態やご使用のディスクとプレーヤーの相性の問題により、上記規格に対
応しているモデルでも再生できない場合があります。
ディスクについてのご注意
■推奨ディスクについて
÷ 安定した記録・再生のために推奨ディスクを
ご使用ください。
÷ 推奨ディスクについては本体(PRV-LX1)
の取扱説明書にてご確認ください。
■ディスクの取り扱い
ディスクに傷や指紋、ほこりが付くとデータの
記録や再生ができなくなります。以下に示すこ
とをよく読んで取り扱ってください。
÷ ディスクを持つときは信号面(光沢面)に触
らないようにしてください。両端をはさむよ
うにして持つか、中央の孔と端をはさんでく
ださい。
本体(PRV-LX1)の
÷ 規格外のディスクを使用しないでください。
使用した場合、本機および他の機器に悪影響
をおよぼす場合があります。
÷ 特殊な形のディスク(ハート形や六角形等)
を使用しないでください。故障の原因となる
ことがあります。
÷ ディスクが汚れていたらディスクの内側から
外側に向かって軟らかい布で拭いてくださ
い。円周に沿って拭かないでください。
電源を切った状態で
÷ ディスクに紙やシールなどを貼らないでくだ
さい。
÷ ひびが入っていたり、反ったディスクは使用
しないでください。(ディスクは高速回転す
るために危険です)
÷ レコードスプレーや帯電防止剤は使用できま
せん。また、ベンジンやシンナーなどの揮発
性の薬品をかけると表面が侵されることがあ
るので使用しないでください。
ディスクを保管する際は、必ずディスクケー
スに入れ、使用する前に記録面に汚れやほこ
りが付いていないことを確認してください。
37
PRA-DW11
Ja
Page 38

使用上のご注意
記録用ディスクについて
■ データを記録できない/記録中にエラーになる
÷ 推奨ディスクを使用していますか?
÷ 記録できるエリアは十分確保されていますか?
÷ ディスクファイナライズ(これ以上記録できないようにすること)したディスクを使用していません
か?
÷ ディスクはレーベル面を上に、記録面を下にして正しくセットしましたか?
÷ ディスクが汚れたり、傷ついたりしていませんか?
■ 記録したディスクが読めない
÷ 推奨ディスクを使用していますか?
÷ 未記録のディスクを使用していませんか?
÷ ディスクが汚れたり、傷ついたりしていませんか?
÷ 光学部品およびディスクが結露していることも考えられるので、1〜 2 時間程度放置してから使用し
てみてください。
仕 様
[ディスクサイズ]
12cm、8cm
[その他]
外形寸法(ドライブ本体のみ) 148(幅)x42.3(高さ)x198(奥行)mm
質量 1.8kg(梱包材を含む)
動作温度 +5℃〜+35℃(PRV-LX1取付時)
動作湿度 5%〜85%(PRV-LX1取付時)(結露のないこと)
保存温度 −40℃〜+60℃
保存湿度 5%〜90%(結露のないこと)
[付属品]
ヒートシンク(放熱シート付) ×1
トレイパネル2 ×1
ドライブ2パネル ×1
ネジ(ヒートシンク取付用) ×2
つば付ネジ(黒色)(ドライブ取付用)
保証書(日本国内用) ×1
保証書(米国内用) ×1
取扱説明書(本書) ×1
÷ 仕様および外観は改良のため予告なく変更する場合があります。
×4
38
PRA-DW11
Ja
Page 39

コネクター部(ドライブユニット後面部)
4 1 32
56
2 ホストIDEインターフェース
PRV-LX1のIDEインターフェイス
ケーブル(「取り付けかた」手順9
CABLE SELECT
ANLOG AUDIO
MASTER
SLAVE
M
39
SC
ALS
40
IDE INTERFACE
1
2
DC INPUT
5V G G 12V
参照)を接続します。
3DCINPUT端子
PRV-LX1の電源ケーブル(「取
1
デバイスコンフィギュレーションジャンパー
短絡ソケットを取り付けるとONに設定されま
す。ピン2がON(ソケットが取り付けられて
いる)になっていることを確認してください。
り付けかた」手順9参照)を接続
します。
4、5、6はPRV-LX1では使用し
ません。
取り付けかた
静電気に関する注意
■ 本機を取り扱う際は、各コネクター端子部分には絶対に触れないでください。
<注意>
÷ 本機の取り付けは高度の専門知識が必要なこと、および安全のため、取り付けは弊社サービスが
行います。詳しくは本機の取扱店にご相談ください。
÷ 取り付けネジに緩み等があると、ディスクの回転による振動でビリつき音が発生したり部材が脱
落して、思わぬケガや機材を破損させてしまう場合がありますので、確実に取り付けてください。
÷ 取り付けネジは、指定されたものを必ず使用してください。指定されたネジ以外のものを使用す
ると、本機や DVD レコーダー PRV-LX1 が損傷を受ける場合があります。
÷ 取り付けを始める前に本体(PRV-LX1)に接続されている全てのケーブルおよび電源コードを
必ず抜いてください。火災・感電の原因、もしくは製品が損傷を受ける場合があります。
1. PRV-LX1 の天板をはずす。
÷ PRV-LX1上面のネジ7本をはずし、天
板をはずします。
天板
ドライブ 2 隠しパネル
2. ドライブ 2 隠しパネルをはずす。
÷
ドライブ2隠しパネルが落下しないように
前面を押さえながら止めネジ2本をはずし
ます(はずしたネジは手順3でドライブ2
パネルを取り付けるときに使用します)。
ドライブ 2 隠しパネル
※ ネジ2本を外す際に、ネジを
製品内部に落とさないように
注意して作業してください。
39
PRA-DW11
Ja
Page 40

取り付けかた
3. ドライブ 2 パネルを取り付ける。
÷ PRV-LX1 の前面パネルのドライブ 2 開
口部の下側の角穴(4個)に付属のドライ
ブ 2 パネルのツメを差し込んでから、開
口部に押し込み、ドライブ2 パネルが落
下しないように前面を押さえながらネジ
2 本(手順 2 ではずすしたもの)でドラ
イブ 2 パネルを固定します。
4. ドライブ 2 固定金具をはずす。
÷ 止めネジ4本をはずし、ドライブ2固
定金具をはずします(はずしたネジ
は手順 8 で再びドライブ 2 固定金具
を取り付けるときに使用します)。
注)シャープエッジ(※)に注意してく
ださい(エッジ部を持たないでくだ
さい)。
(※)
注① 十字形状のリブを持ったり押したりし
ないでください。
注② レンズ面に触れないでください。
ドライブ 2 パネル
ドライブ 2 固定金具
5. 放熱シートの保護シートをはがす。
÷ 付属のヒートシンクの放熱シートか
ら保護シートをはがします。
注)保護シートをはがさないで取り付
けると、必要な放熱効果が得られず、
故障の原因となります。
放熱シート
保護シート
(取り去る)
ヒートシンク
40
PRA-DW11
Ja
6. ヒートシンクを取り付ける。
÷ 付属のヒートシンクを、フィンを前後方向
にしてガイドに沿わせて置き、付属のネジ
2 本(つば無し)で固定します。
ガイド
ヒート
シンク
Page 41

7. DVD-R/RW ライターユニット
(本機)にドライブ 2 固定金具を
取り付ける。
÷ DVD-R/RW ライターユニット
に、ドライブ 2 固定金具の△マー
クが前側になる向きに取り付けま
す。
÷ 付属のつば付ネジ(黒色)4本で①
→②→③→④の順番で取り付けま
す。
8. 手順 7 でドライブ 2 固定金具を
取り付けた DVD-R/RW ライ
ターユニット(本機)を DVD レ
コーダー PRV-LX1 に取り付け
る。
÷ ドライブ 2 固定金具の四角穴(左
右 2ヵ所)を PRV-LX1 のツメ部
に差し込んで置き、ネジ 4 本(手
順 4 ではずしたもの)で①→②→
③→④の順番で取り付けます。
②
①
④
取り付けかた
前側
②
④
ドライブ2固定金具
△マーク
9. IDE ケーブルと電源ケーブルを接続する。
÷ ケーブルバインダーからIDEケーブルと電源
ケーブルをはずします。
注) 各ケーブルの接続時およびスタイリング時
に、周囲のシャープエッジに注意してくだ
さい。
IDE ケーブル
コネクター
③
①
③
電源ケーブル
コネクター
四角穴
ツメ部
バインダー
÷ コネクターの向きを合わせて確実に接続しま
す。
DC INPUT
1
5V G G 12V
2
IDE ケーブル
電源ケーブル
41
PRA-DW11
Ja
Page 42

取り付けかた
10.PRV-LX1 のボンネット(天板)を
取り付ける。
÷ ネジ7 本(手順1 ではずしたもの)で天
板を取り付けます。
天板
ファンクションメニュー
11. 動作確認を行う。
① PRV-LX1の電源プラグをコンセントに差
し込み、電源スイッチ(本体後面部)をON
にして、前面部の STANDBY/ON ボタ
ンを押して電源を入れます。
② 増設したDVD-R/RWライターユニットの
認識を行いますのでしばらくそのままお待
ちください。
③ 本体(PRV-LX1)がアイドル状態になり
ましたら(PRV-LX1 取扱説明書参照)、
PRV-LX1 前面部の FUNCTION ボタン
を押してください。
④ TV モニター上にファンクションメニュー
が表示されますので、その画面に
「DVD2」が表示(下図参照)されている
ことを確認してください。
STANDBY/ON ボタン FUNCTION ボタン
42
PRA-DW11
Ja
ドライブ 2 が接続されているときに
表示されます。
Page 43

取り付けかた
12.ドライブ2のディスクテーブルにト
レイパネル 2 を取り付ける。
① DRIVESELECTボタンを押してDVD2
を選択します。
÷ DVD2インジケーターが点灯するよ
うに、DRIVESELECTボタンを何
回か押してください。
② ドライブ 2EJECT ボタンを押して、
DVD2 のディスクテーブルを出します。
③前項2 で出したディスクテーブルの前面
のスリット部に付属のトレイパネル 2 の
リブを差し込んで、2ヵ所のフックが掛か
るまで押し込みます。
注)トレイパネル 2 を取り付ける時、ディ
スクテーブルを閉じる方向に押さないよ
うにしてください(押すとローディング
機構が働いてディスクテーブルが本体に
引き込まれます)。もしディスクテーブ
ルを閉じる方向に押してしまった場合
は、そのまま手を触れずに閉じさせてか
ら、ドライブ 2EJECT ボタンを押し
て、ディスクテーブルを出してくださ
い。
本体の電源を切ったり、ディスクテーブ
ルを引っ張ったりすると、本体(PRVLX1)および本機(PRA-DW11)が損
傷を受けたり、内部のデータを破壊する
ことがありますので、絶対に行わないで
ください。
④ ドライブ 2EJECT ボタンを押して、
DVD2 のディスクテーブルを閉じます。
リブ
13. 取付作業をを終了する。
① 本体前面の STANDBY/ON ボタンを押
して、本体がスタンバイ状態になるまで、
しばらくお待ちください。
② 本体がスタンバイ状態になったら電源ス
イッチ(本体後面部)を OFF にして、電源
プラグをコンセントから抜いてください。
注)トレイパネル 2(取り付けかたは手順
12参照)を取り付けていない状態で、本
体の電源を入れたまま放置しないでくだ
さい。(トレイパネル 2 が取り付けてい
ないと内部にほこり等が入りやすく、
ディスクへの記録または再生に不具合を
生じます。)
ドライブ 2EJECT ボタン
DVD2
インジケーター
DRIVESELECT ボタン
フック
トレイパネル 2
スリット
スリット
ディスクテーブル
43
PRA-DW11
Ja
Page 44

この取扱説明書の印刷には
しています。
植物性大豆油インキを使用
本機の接続、操作、技術相談に関するお問い合わせは
テクニカルサポートセンター 03-3763-2936
受付時間:10:00〜18:00
(ただし、土曜日、日曜日、祝日、弊社休日は除く)
E-mail : omr_tsc@post.pioneer.co.jp
この取扱説明書は再生紙を使用しています。
C2003
Published by Pioneer Corporation.
Copyright © 2003 Pioneer Corporation.
All rights reserved.
パイオニア株式会社 禁無断転載
153-8654東京都目黒区目黒1丁目4番1号
PIONEER CORPORATION 4-1, Meguro 1-Chome, Meguro-ku, Tokyo 153-8654, Japan
PIONEER ELECTRONICS (USA) INC.
Business Solutions Division: 2265 East 220th Street, Long Beach, CA 90810, U.S.A. TEL: +1-310-952-2111
Customer Support Division: 1925 East Dominguez St. Long Beach, CA 90810, U.S.A. TEL: +1-310-952-2820
PIONEER EUROPE NV
Multimedia Division:
PIONEER ELECTRONICS OF CANADA, INC.
Industrial Products Department:
PIONEER ELECTRONICS AUSTRALIA PTY. LTD.
PIONEER ELECTRONICS ASIACENTRE PTE. LTD.
PIONEER ELECTRONICS (CHINA) LTD.
Suite 901-906, 9th floor, World Commerce Centre, Harbour City 11 Carton Road, Tsim Sha Tsui, Kowloon, Hong Kong TEL: +852-2848-6488
<TSZZF/03D00000> Printed in Japan/Imprimé au Japon <DRC1196-A>
PIONEER House, Hollybush Hill Stoke Poges, Slough SL2 4QP U.K. TEL: +44-1753-789-789
300 Allstate Parkway, Markham, Ontario L3R OP2, Canada TEL: +1-905-479-4411
178-184 Boundary Road, Braeside, Victoria 3195, Australia TEL:+61-39-586-6300
253 Alexandra Road, #04-01, Singapore 159936 TEL: +65-6472-1111
 Loading...