

Page 1
TURNTABLE
PLATINE VINYLE
PLATTENSPIELER
GIRADISCHI
PLX-500-K
DRAAITAFEL
GIRADISCOS
PLX-500-W
GIRADISCOS
ПРОИГРЫВАТЕЛЬ
ВИНИЛОВЫХ ДИСКОВ
http://pioneerdj.com/support/
The Pioneer DJ site shown above offers FAQs, information on software, and various other types of information
and services to allow you to use your product in greater comfort.
Le site Pioneer DJ indiqué ci-dessus propose une FAQ, des informations sur le logiciel et divers types
d’informations et de services qui permettent une utilisation plus confortable de ce produit.
Die oben angegebene Pioneer DJ-Website enthält häufig gestellte Fragen, Informationen über Software und
andere wichtige Informationen und Dienste, die Ihnen helfen, Ihr Produkt optimal zu verwenden.
Il sito Pioneer DJ indicato qui sopra offre una sezione FAQ, informazioni sul software ed informazioni e servizi
di vario tipo, per permettere un uso più confortevole dei nostri prodotti.
Op bovengenoemde Pioneer DJ website vindt u FAQ’s, informatie over software, en andere informatie en
diensten voor nog meer gebruiksgemak van uw product.
El sitio de Pioneer DJ indicado más arriba tiene una sección con las preguntas más frecuentes, y además
ofrece información del software y varios tipos de información y servicios para que usted pueda usar su
producto con la mayor comodidad.
O site da Pioneer DJ mostrado acima oferece FAQs, informações sobre o software e outros tipos de
informações e serviços para permitir utilizar o produto com um maior conforto.
Указанный выше сайт Pioneer DJ содержит ответы на часто задаваемые вопросы, информацию о
программном обеспечении и различную другую информацию, а также предлагает услуги, чтобы вы
могли с большим комфортом пользоваться приобретенным изделием.
FrançaisDeutsch ItalianoEnglish Nederlands
РусскийPortuguêsEspañol
Operating Instructions
Mode d’emploi
Bedienungsanleitung
Istruzioni per l’uso
Handleiding
Manual de instrucciones
Manual de instruções
Инструкции по эксплуатации
Page 2
If you want to dispose this product, do not mix it with general household waste. There is a separate collection system for used
prevent fire hazard,
electronic products in accordance with legislation that requires proper treatment, recovery and recycling.
Private households in the member states of the EU, in Switzerland and Norway may return their used electronic products free of charge to
designated collection facilities or to a retailer (if you purchase a similar new one).
For countries not mentioned above, please contact your local authorities for the correct method of disposal.
By doing so you will ensure that your disposed product undergoes the necessary treatment, recovery and recycling and thus prevent potential
negative effects on the environment and human health.
K058b_A1_En
CAUTION
TO PREVENT THE RISK OF ELECTRIC SHOCK, DO NOT
REMOVE COVER (OR BACK). NO USER-SERVICEABLE
PARTS INSIDE. REFER SERVICING TO QUALIFIED
SERVICE PERSONNEL.
D3-4-2-1-1_B1_En
WARNING
This equipment is not waterproof. To prevent a fire or
shock hazard, do not place any container filled with
liquid near this equipment (such as a vase or flower
pot) or expose it to dripping, splashing, rain or
moisture.
D3-4-2-1-3_A1_En
WARNING
To prevent a fire hazard, do not place any naked flame
sources (such as a lighted candle) on the equipment.
D3-4-2-1-7a_A1_En
Operating Environment
Operating environment temperature and humidity:
+5 °C to +35 °C (+41 °F to +95 °F); less than 85 %RH
(cooling vents not blocked)
Do not install this unit in a poorly ventilated area, or in
locations exposed to high humidity or direct sunlight (or
strong artificial light).
D3-4-2-1-7c*_A2_En
CAUTION
The POWER switch on this unit will not completely
shut off all power from the AC outlet. Since the power
cord serves as the main disconnect device for the
unit, you will need to unplug it from the AC outlet to
shut down all power. Therefore, make sure the unit
has been installed so that the power cord can be
easily unplugged from the AC outlet in case of an
accident. To avoid fire hazard, the power cord should
also be unplugged from the AC outlet when left
unused for a long period of time (for example, when
on vacation).
D3-4-2-2-2a*_A1_En
This product is for general household purposes. Any
failure due to use for other than household purposes
(such as long-term use for business purposes in a
restaurant or use in a car or ship) and which requires
repair will be charged for even during the warranty period.
K041_A1_En
Voltage selector
You can find the voltage selector switch on the top
panel of multi-voltage models.
The factory setting for the voltage selector is
220-240 V. Please set it to the correct voltage for
your country or region.
Before changing the voltage, disconnect the AC power
cord. Use a medium size screwdriver to change the
voltage selector switch.
D3-4-2-1-5*_A2_En
POWER-CORD CAUTION
Handle the power cord by the plug. Do not pull out the
plug by tugging the cord and never touch the power
cord when your hands are wet as this could cause a
short circuit or electric shock. Do not place the unit, a
piece of furniture, etc., on the power cord, or pinch the
cord. Never make a knot in the cord or tie it with other
cords. The power cords should be routed such that they
are not likely to be stepped on. A damaged power cord
can cause a fire or give you an electrical shock. Check
the power cord once in a while. When you find it
damaged, ask your nearest service center or your
dealer for a replacement. S002*_A1_En
VENTILATION CAUTION
When installing this unit, make sure to leave space around
the unit for ventilation to improve heat radiation (at least
15 cm at top, 5 cm at rear, and 5 cm at each side).
WARNING
Slots and openings in the cabinet are provided for
ventilation to ensure reliable operation of the product,
and to protect it from overheating. To
the openings should never be blocked or covered with
items (such as newspapers, table-cloths, curtains) or by
operating the equipment on thick carpet or a bed.
En
2
D3-4-2-1-7b*_A1_En
Page 3

NOTE:
For other areas
This equipment has been tested and found to comply with the limits for a Class B digital device, pursuant to Part 15
of the FCC Rules. These limits are designed to provide reasonable protection against harmful interference in a
residential installation. This equipment generates, uses, and can radiate radio frequency energy and, if not installed
and used in accordance with the instructions, may cause harmful interference to radio communications. However,
there is no guarantee that interference will not occur in a particular installation. If this equipment does cause
harmful interference to radio or television reception, which can be determined by turning the equipment off and on,
the user is encouraged to try to correct the interference by one or more of the following measures:
— Reorient or relocate the receiving antenna.
— Increase the separation between the equipment and receiver.
— Connect the equipment into an outlet on a circuit different from that to which the receiver is connected.
— Consult the dealer or an experienced radio/TV technician for help.
Information to User
Alterations or modifications carried out without appropriate authorization may invalidate the user’s right to operate
the equipment.
FEDERAL COMMUNICATIONS COMMISSION DECLARATION OF CONFORMITY
This device complies with part 15 of the FCC Rules. Operation is subject to the following two conditions: (1) This
device may not cause harmful interference, and (2) this device must accept any interference received, including
interference that may cause undesired operation.
Product Name: TURNTABLE
Model Number: PLX-500-K, PLX-500-W
Responsible Party Name: PIONEER ELECTRONICS (USA) INC.
SERVICE SUPPORT DIVISION
Address: 1925 E. DOMINGUEZ ST. LONG BEACH, CA 90810-1003, U.S.A.
Phone: 1-800-421-1404
URL: http://www.pioneerelectronics.com
English
D8-10-1-2_A1_En
D8-10-2_A1_En
D8-10-4*_C1_En
En
3
Page 4

Contents
How to read this manual
! Thank you for buying this Pioneer DJ product.
Be sure to read this booklet, which includes important information
that you must understand before using this product.
After you have finished reading the instructions, put them away in a
safe place for future reference.
! In this booklet, the names of the buttons and terminals of the main
unit appear in square brackets ([ ]).
Examples:
Press the [START/STOP] button.
Before start
Features ....................................................................................................... 5
What’s in the box ........................................................................................ 5
Before you start
Installing rekordbox (Mac/Windows) ........................................................ 6
Assembly ..................................................................................................... 6
Part names and functions
Top panel ..................................................................................................... 8
Rear panel ................................................................................................... 9
Adjustment
Adjusting the tone arm balance .............................................................. 10
Adjusting the stylus pressure .................................................................. 10
Adjusting anti-skating .............................................................................. 11
Adjusting the arm lifter height ................................................................ 11
Adjusting the arm height ......................................................................... 11
Connections
Connecting to powered speakers............................................................ 12
Connecting to a pre-main amplifier and component ............................ 12
Connecting to a DJ mixer ......................................................................... 13
Connecting with a computer ................................................................... 13
Place of installation .................................................................................. 13
Adjusting the height of the main unit ..................................................... 13
Operation
Turning the power on ............................................................................... 14
Turning the power off ............................................................................... 14
Playback .................................................................................................... 14
Pausing playback...................................................................................... 14
Finishing playback .................................................................................... 14
Adjusting the pitch ................................................................................... 14
Displaying a record jacket ....................................................................... 14
To play a standard EP record ................................................................... 15
Illuminating the stylus tip ........................................................................ 15
Recording .................................................................................................. 15
Replacing the stylus ................................................................................. 15
Changing the cartridge ............................................................................ 15
Additional information
Troubleshooting ........................................................................................ 16
Cautions on use ........................................................................................ 16
Maintenance of each part ........................................................................ 16
About trademarks and registered trademarks ...................................... 17
Specifications............................................................................................ 17
En
4
Page 5

Before start
WARNING
Store small parts out of the reach of children and
infants. If accidentally swallowed, contact a doctor
immediatel
D41-6-4_A1_En
English
Features
This unit is a high-torque direct drive turntable that can be enjoyed in a
variety of applications ranging from home listening to DJing.
High-quality analog record sound
The path from the stylus tip to the PHONO/LINE output has been
designed as the shortest to faithfully reproduce the original sound quality of analog records.
Furthermore, since not only PHONO output but also LINE output is supported, you can easily enjoy high quality analog record sound by simply
directly connecting with powered speakers.
Easy digital recording
A USB-B terminal is provided so you can directly connect this unit and
a PC or Mac and then record analog record sound sources to the PC or
Mac by converting them to data. Digital recording with simple operation
can be performed by using the recording function of the free music management application “rekordbox” (Ver.4.2.1 or later) when recording.
DJ performance capable direct-drive
turntable
The adoption of a high-torque direct-drive system means you can perform track mixing, scratching, and other DJ performances by combining
two of these units with a DJ mixer.
What’s in the box
! Turntable
! Slip mat
! Dust cover
! Adapter for EP record
! Balance weight
! Headshell (cartridge included)
! Shell weight
! Power cord
! USB cable
! Audio adapter cable (Stereo pin plug (female) to stereo mini plug
(male))
! Warranty (for some regions)
! Operating instructions (this document)
1 The included warranty is for the European region.
y.
1
Dust cover that can serve as a stand for a
record jacket
A record jacket can be displayed on the dust cover while the dust cover
is in an open state. This allows you to enjoy analog record sound while
looking at the record jacket.
En
5
Page 6
Before you start
Installing rekordbox (Mac/Windows)
1 Access rekordbox.com.
https://rekordbox.com/en/store/
! The page content is subject to change without notice.
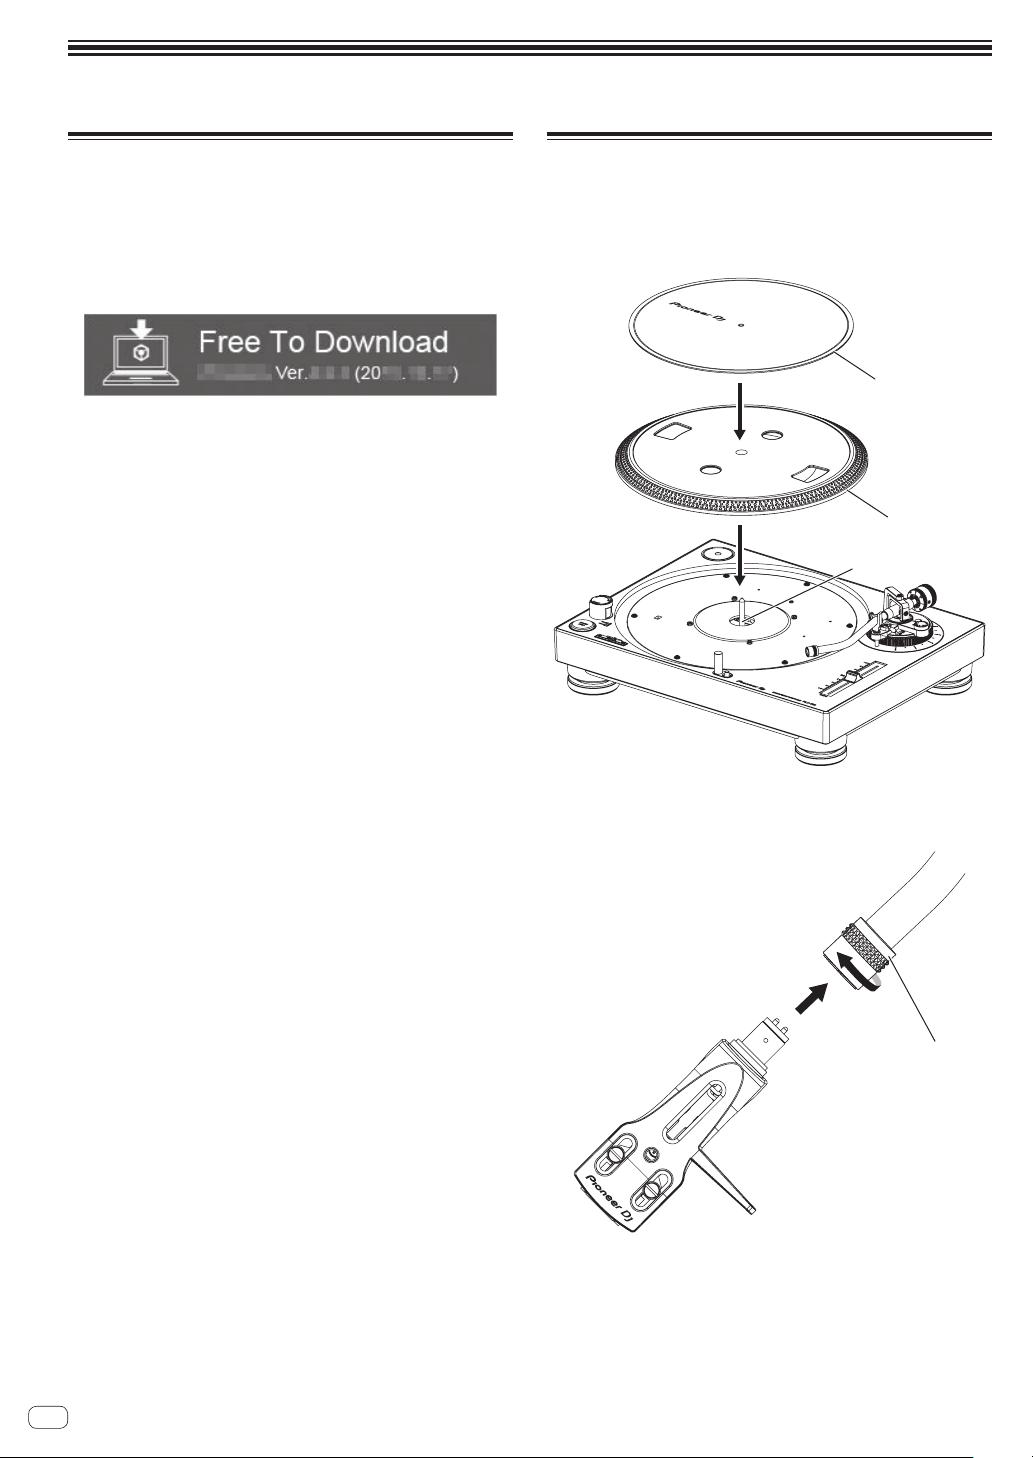
2 Check the Get Started guide and then click [Free to
Download].
3 Carefully read the Software End User License
Agreement and select the [Agree] check box if you
agree.
When you select the check box, [Download] becomes clickable.
4 Click [Download].
Downloading of rekordbox (Mac/Windows) starts.
5 Double-click the downloaded file to unzip it.
6 Double-click the unzipped file to launch the installer.
7 Carefully read the Software End User License
Agreement, and continue with the installation according
to the instructions on the screen if you agree.
! If you do not agree to the contents of the Software End User License
Agreement, cancel the installation.
8 When the installation completion screen appears,
follow the instructions on the screen to close the
installer.
The installation is now complete.
! To use rekordbox dj, rekordbox dvs, and rekordbox video, activation
(license authentication) is required. For details, see the rekordbox
Operating Instructions.
https://rekordbox.com/en/support/manual.php
Assembly
1 Attach the turntable and slip mat.
Set the turntable on the center spindle and place the slip mat on top of
the turntable.
! Be careful not to hit the turntable on the main unit or drop it.
Slip mat
Turntable
Center spindle
2 Attach the headshell.
Insert the headshell with attached cartridge into the tone arm. Next,
while keeping the headshell horizontal, tighten the lock nut.
②
①
Lock nut
En
6
Page 7

! Before use, remove the stylus cover without touching the stylus tip.
Balance weight
Stylus cover
3 Attach the balance weight.
Attach the balance weight to the rear shaft of the tone arm.
English
Attach the dust cover.
Insert the hinges of the dust cover into the holders at
the rear panel of this unit.
When removing the dust cover, pull the hinges up outward while the
dust cover is in an open state.
Hinge
Holder
En
7
Page 8

Part names and functions
1
2 3 45 6
ghij
Top panel
f
e
d
c
b
8
7
a9
1 POWER switch
When turning the switch to the [ON] side, the power is turned on and
the strobe illuminator on the side lights.
= Turning the power on (p. 14 )
Turning the power off (p. 14 )
2 START/STOP button
Pressing the button starts or stops rotation of the turntable.
= Playback (p. 14 )
3 Speed change button
Changes the speed according to the record to be played.
! For a 33 1/3 rpm record, press the [33] button.
! For a 45 rpm record, press the [45] button.
! For a 78 rpm record, press the [33] button and [45] button at the
same time.
= Playback (p. 14 )
4 Stylus illuminator
Lights to illuminate the stylus tip.
= Illuminating the stylus tip (p. 15 )
5 Stylus illuminator switch
The stylus illuminator lights in white and ascends to the position at
which the stylus tip is illuminated.
= Illuminating the stylus tip (p. 15 )
6 Headshell
7 TEMPO slider
You can slide back and forth to perform fine adjustment of the rota-
tion speed.
= Adjusting the pitch (p. 14 )
8 Tone arm
= Adjustment (p. 10 )
9 Arm clamper
Clamps the tone arm.
a Arm rest
Serves as the support base for the tone arm.
b Lifter lever
The tone arm goes up when the lever is pulled up. The tone arm goes
down when the lever is pushed down.
c Arm lifter
This device is used to move the tone arm up and down. It is operated
by the lifter lever.
d ANTI SKATING dial
When a record is played, there is power to pull the stylus tip toward
the inner perimeter. By matching this dial to the stylus pressure
value, that power is eliminated.
= Adjusting anti-skating (p. 11 )
e HEIGHT ADJUST lock
Locks the adjusted height of the arm.
= Adjusting the arm height (p. 11 )
f HEIGHT ADJUST dial
Used to adjust the height of the tone arm.
= Adjusting the arm height (p. 11 )
g Balance weight
Used to balance the tone arm and adjust the stylus pressure.
= Adjustment (p. 10 )
h Stylus pressure adjustment ring
Used to match to the appropriate stylus pressure of the cartridge.
= Adjusting the stylus pressure (p. 10 )
i Headshell stand
Used to stand the headshell up.
j Adapter for EP record
Used to play standard EP records.
= To play a standard EP record (p. 15 )
En
8
Page 9

Rear panel
English
12
1 PHONO/LINE switch
Switches the level of the sound output from the unit.
— [PHONO]: Select this when the unit is connected with a device
that supports phono level input, such as a pre-main amplifier or
component.
— [LINE]: Select this when the unit is connected with a device that
supports line level input, such as a powered speakers.
CAUTION
Do not connect the unit with a device that supports phono level input
while the PHONO/LINE switch is in the [LINE] state.
2 USB terminal
Connect the USB cable (included) here.
= Connecting with a computer (p. 13 )
3 Audio cable
= Connections (p. 12 )
4 AC IN
Connects to a power outlet using the included power cord. Wait until
all connections between the equipment are completed before connecting the power cord.
! Be sure to use the included power cord.
5 Insulator
Suppresses the effect of outside vibration. Turning the insulator
adjusts the turntable height.
= Adjusting the height of the main unit (p. 13 )
3
4 5
En
9
Page 10

Adjustment
Center line
Center line
Adjusting the tone arm balance
Because the cartridge and headshell weights differ depending on the
product, the balance of the tone arm is adjusted.
Prepare as follows.
! Remove the stylus cover and arm clamper while paying attention not
to touch the stylus tip.
! Push down the lifter lever.
! Set the [ANTI SKATING] dial to “0”.
Keep the tone arm from the arm rest and adjust the
balance so it is horizontal.
Turn the balance weight until the tone arm becomes almost horizontal.
! When moving the tone arm, make sure that the stylus tip does not
directly touch the turntable and the like.
Adjusting the stylus pressure
To prevent stylus jumping or sound distortion, the stylus pressure is
adjusted to the appropriate stylus pressure value determined for each
cartridge.
The appropriate stylus pressure value for the included cartridge is from
3.0 g to 4.0 g.
Prepare as follows.
! Return the tone arm to the arm rest and secure with the arm clamp.
1 Match the “0” on the stylus pressure adjustment ring
to the center line of the arm rear shaft.
While using your finger to hold the balance weight to keep it from moving, turn only the stylus pressure adjustment ring so that the number “0”
comes to the black center line of the tone arm rear shaft.
2 Adjust the stylus pressure.
Turn the balance weight to adjust to the appropriate stylus pressure
value for your cartridge.
! When turning the balance weight, the stylus pressure adjustment
ring turns together. While observing the adjustment ring, adjust the
stylus pressure to the appropriate value.
10
En
Page 11

Adjusting anti-skating
Screw
Arm lifter
Unlock
Adjust so that the tone arm becomes horizontal.
This adjustment is made to prevent stylus jumping.
Match to the same scale position as the stylus pressure
value.
Turn the [ANTI SKATING] dial to match the reference line to the same
value as the cartridge stylus pressure value.
Adjusting the arm height
English
When using the included cartridge, the “0” position is appropriate.
When using other than the included cartridge, adjust this to match the
cartridge to be used.
1 Turn the [HEIGHT ADJUST] lock to unlock the lock.
When scratch play is performed
To prevent stylus jumping, adjust the scale position to match the play
action.
Adjusting the arm lifter height
When using other than the included cartridge, adjust this to match the
cartridge to be used.
Prepare as follows.
! A record is placed on a slip mat.
! Remove the stylus cover and arm clamper while paying attention not
to touch the stylus tip.
! Pull up the lifter lever and move the tone arm onto the record.
Adjust the height by turning the screw while the arm
lifter is pushed down.
— Turing clockwise narrows the distance between the record and
stylus.
— Turing counterclockwise widens the distance between the record
and stylus.
! The arm lifter height (the distance between the record and stylus
when the lifter lever is pulled up) is factory-adjusted in a range
between approximately 8 mm and 13 mm.
2 Push down the lifter lever and place the stylus on the
record, then adjust the [HEIGHT ADJUST] dial to make
the tone arm and record parallel.
HEIGHT ADJUST
[
] dial
3 Turn the [HEIGHT ADJUST] lock to fix the height of
the arm.
After adjusting height of the arm, always turn the [HEIGHT ADJUST]
lock to fix the arm.
En
11
Page 12

Connections
! Be sure to turn off the power and unplug the power cord from the power outlet whenever making or changing connections.
! Refer to the operating instructions for the component to be connected.
! Connect the power cord after all the connections between devices have been completed.
Connecting to powered speakers
Powered speakers
2
Rear panel
3
1
Audio cable
1 Set the [PHONO/LINE] switch to [LINE].
2 Connect the audio cable to the [LINE] input terminal of the powered speakers, etc.
! If necessary, use the included audio adapter cable.
3 Connect the power cord.
Connects to a power outlet using the included power cord. Wait until all connections between the equipment are completed before connecting the
power cord.
Power cord
To power outlet
Connecting to a pre-main amplifier and component
Rear panel
Pre-main amplifier, component, etc.
2
1
Audio cable
1 Set the [PHONO/LINE] switch to [PHONO].
2 Connect the audio cable to the [PHONO] input terminal of the pre-main amplifier or other component.
! If this product is connected to a pre-main amplifier or component that does not have a [PHONO] terminal, sufficient volume and sound quality
cannot be obtained. In that case, set the [PHONO/LINE] switch of this unit to [LINE] and then connect this unit to the [LINE] input terminal of the
pre-main amplifier or component or use a phono equalizer.
3 Connect the power cord.
Connects to a power outlet using the included power cord. Wait until all connections between the equipment are completed before connecting the
power cord.
En
12
3
Power cord
To power outlet
Page 13

Connecting to a DJ mixer
Audio cable
Turntable
DJ Mixer
English
Rear panel
2
Audio cable
1
Power cord
3
To power outlet
1 Set the [PHONO/LINE] switch to [PHONO].
2 Connect the audio cable to the [PHONO] input terminal of the DJ mixer.
! If this product is connected to a DJ mixer that does not have a [PHONO] input terminal, sufficient volume and sound quality cannot be obtained. In
that case, set the [PHONO/LINE] switch of this unit to [LINE] and then connect the unit to the [LINE] input terminal of the DJ mixer.
3 Connect the power cord.
Connects to a power outlet using the included power cord. Wait until all connections between the equipment are completed before connecting the
power cord.
Connecting with a computer
USB driver software is not required for this unit.
= Recording (p. 15 )
Rear panel
Computer
USB cable
1
2
Power cord
To power outlet
1 Connect the USB cable to a USB port on the computer.
2 Connect the power cord.
Connects to a power outlet using the included power cord. Wait until all connections between the equipment are completed before connecting the
power cord.
Place of installation
Place the unit on a level surface that is free of external vibration.
! To the extent possible, keep the unit away from the speaker system.
! When the unit is very close to a radio (AM/FM broadcasting), the
radio could generate noise. Keep the distance as far away from the
unit as possible.
Adjusting the height of the main
unit
Adjust the height by turning the insulator in a way that the main unit is
horizontal.
En
13
Page 14

Operation
①
②
③
④
Turning the power on
1 Make all the connections, then plug the power cord
into a power outlet.
= Connections (p. 12 )
2 Change the [POWER] switch to the [ON] side to turn
on the power of the unit.
This unit’s indicators light and the power turns on.
Turning the power off
Change the [POWER] switch to the [OFF] side to turn off
the power of the unit.
This unit’s power turns off.
Playback
Prepare as follows.
! Place a record on the turntable.
! Remove the stylus cover and arm clamper.
1 Change the [POWER] switch to the [ON] side to turn
on the power of the unit.
2 Select the rotation speed to match the record to be
played by pressing a speed change button.
3 Press the [START/STOP] button.
The turntable rotates.
4 Pull up the lifter lever and move the tone arm onto
the record.
5 Push down the lifter lever.
The tone arm slowly descends and playback begins.
Adjusting the pitch
Move the [TEMPO] slider forward or backward.
Moving the slider forward increases the rotation speed and moving it
backward decreases the rotation speed.
! When the [TEMPO] slider is at the center, the indicator lights in
yellow-green and the rotation speed becomes the specified rpm
(33 1/3 rpm, 45 rpm, or 78 rpm).
! The scale of the [TEMPO] slider is a rough value. Please use it as a
guide.
! You can confirm that the rotation speed has become the specified
rpm by looking at the four rows of strobe patterns inscribed around
the turntable.
Strobe pattern
1 When the strobe pattern appears stopped, 33 1/3 rpm (50 Hz power
supply)
2 When the strobe pattern appears stopped, 45 rpm (50 Hz power
supply)
3 When the strobe pattern appears stopped, 33 1/3 rpm (60 Hz power
supply)
4 When the strobe pattern appears stopped, 45 rpm (60 Hz power
supply)
! A strobe illuminator (red LED light) is used to illuminate the strobe
pattern of this unit. When checking the pitch, always use the strobe
illuminator light.
Pausing playback
Pull up the lifter lever.
The stylus of the cartridge lifts away from the record.
! To resume playback, push down the lifter lever.
Displaying a record jacket
Place the record jacket behind the stoppers attached to the dust cover
as shown in the figure.
StoppersRecord jacket
Finishing playback
1 Pull up the lifter lever to return the tone arm to the
arm rest and then push down the lifter lever.
2 Press the [START/STOP] button.
The turntable stops smoothly.
3 Change the [POWER] switch to the [OFF] side to turn
off the power of the unit.
Use the arm clamper to secure the tone arm.
To protect the stylus tip, attach the stylus cover.
Close the dust cover.
En
14
! Do not place anything other than a record jacket.
! Place the record jacket secured behind the stoppers properly.
! When using this feature during playback, be careful that the record
jacket does not fall. The record or stylus may be damaged.
! Be careful not to close the dust cover while a record jacket is placed
on it.
Page 15

To play a standard EP record
Lead wire
Shell weight
53 mm
Attach the EP record adapter to the center spindle and press the [45]
button.
Illuminating the stylus tip
When the stylus illuminator switch is pressed, the stylus illuminator
lights in white and ascends to the position at which the stylus tip is
illuminated.
! If it is not needed, press the stylus illuminator switch to lower it. The
stylus illuminator switch goes off.
! Do not look directly at the light while the stylus illuminator is lit.
Recording
Analog records can be digitally recorded by connecting with a computer
that has the music management software “rekordbox” installed.
For details, access the rekordbox product site below and see the rekordbox Operating Instructions in [Support].
https://rekordbox.com/en/store/
Replacing the stylus
Check that the power is not on before performing the following
procedure.
1 Hold the cartridge with one hand.
Removing the cartridge
1 Remove the screws, nuts, and washers attached to
the headshell.
2 Disconnect the lead wires connected to the cartridge.
Attaching the cartridge
1 Connect the cartridge while matching the colors of
the lead wires of the headshell and the symbols on the
cartridge terminals.
Match the colors of the lead wires of the headshell and the symbols on
the cartridge terminals as follows.
When looking from the front, the top left is L+: white, the bottom left is
L-: blue, the top right is R+: red, and the bottom right is R-: green.
! Connect the lead wires securely using tweezers or the like.
2 Attach the cartridge to the headshell using the
screws, nuts, and washers included with the cartridge.
Headshell
English
2 Remove the cartridge in the direction of the arrow
while holding the stylus holder part with your other
hand.
Changing the cartridge
This unit is not compatible with MC cartridges. Use a VM cartridge or an
MM cartridge.
Cartridge
! When attaching the cartridge to the headshell, attach it properly.
! When using a cartridge between 5 g or less, use the supplied shell
weight.
Adjusting the overhang
Use the following overhang adjustment scale to adjust the position
using the cartridge attaching screw so that the stylus tip comes to a
position 53 mm from the tone arm attachment part.
Overhang adjustment scale
53 mm
012345
En
15
Page 16

Additional information
Troubleshooting
! Incorrect operation is often mistaken for trouble or malfunction. If you think that there is something wrong with this component, check the points
below and the [FAQ] for the [PLX-500] on the Pioneer DJ support site.
http://pioneerdj.com/support/
Sometimes the problem may lie in another component. Inspect the other components and electrical appliances being used. If the problem cannot
be rectified, ask your nearest service center or your dealer to carry out repair work.
! This unit may not operate properly due to static electricity or other external influences. In this case, proper operation may be restored by turning the
power off, waiting 1 minute, then turning the power back on.
Problem Check Remedy
The power is not turned on. Is the power cord properly connected? Properly connect the included power cord to a power outlet.
Is the [POWER] switch for power supply set to
[ON]?
No sound or small sound. Are the audio cables properly connected? Connect the audio cables properly.
Are the terminals and plugs dirty? Clean the terminals and plugs before making connections.
Is the headshell attached properly? Attach the headshell property.
The left and right sound are reversed. Are the left and right connections for each piece of
There is a low hum sound (humming
or buzzing sound) during playback.
The stylus tip does not come down on
the record.
Stylus jumping occurs. Is the stylus pressure adjusted property? Match the balance weight to the appropriate stylus pressure value for your
The arm stops along the way and does
not go ahead.
Sound volume is low or loud
(distorted).
The rotating turntable shakes a lot. Dirt, etc. is adhered to the attachment parts of the
equipment reversed?
Is there an electric device such as a fluorescent
lamp or its power cord near the connection cord?
Is the stylus pressure adjusted property? Match the balance weight to the appropriate stylus pressure value for your
Is the arm horizontally balanced? Turn the balance weight until the tone arm becomes horizontal state.
Is the record warped or does it have scratches? Check the condition of the record.
Does the stylus tip have a lot of dust on it? Remove the shell with cartridge and use a soft tip brush or writing brush to care-
Is anti-skating adjusted correctly? Adjust anti-skating correctly.
Is the arm height adjusted correctly? Adjust the arm height correctly.
Does the record have scratches? Check the condition of the record.
Is the arm coming into contact with something? Check around the arm. If there is an obstacle, remove it.
Is the connection to the amplifier appropriate for
the cartridge type (output)?
Is the setting of the [PHONO/LINE] switch correct? Set the [PHONO/LINE] switch correctly according to the input terminal of the
turntable and center spindle.
Set the [POWER] switch for power supply to [ON].
Correctly connect the audio cable and the lead wires of headshell part.
Place the power cord of the fluorescent lamp or other device as far away as
possible.
cartridge.
cartridge.
fully remove dust, etc. from the stylus tip.
Connect the connection cables properly.
connected device.
Remove the dirt.
Cautions on use
About condensation
Water droplets (condensation) may form inside the unit (on operating
parts and lenses) in the winter, for example, if the unit is moved from a
cold place into a warm room or if the temperature in the room in which
the unit is installed rises suddenly (through heating, etc.). The unit will
not operate properly and will not be playable with condensation inside.
Let the unit stand for 1 to 2 hours at room temperature (though this
time depends on the conditions of the condensation) without turning on
the power. The water droplets will evaporate and the unit will become
playable. Condensation can occur in the summer as well if the unit is
exposed to the direct wind from an air-conditioner, etc. If this happens,
move the unit to a different location.
When transporting the unit to another
location
Use the original packing materials to pack the unit.
If the original packing materials are not available, be sure to perform the
following.
En
16
! Detach the slip mat and turntable before packing.
! Detach the headshell and balance weight from the arm and pack
carefully.
! Use the arm clamper to secure the tone arm and use tape to secure
it so that it does not move.
! Wrap the main unit in a blanket or soft paper so that it will not be
damaged.
! Pack so that a force will not be applied to the tone arm.
Maintenance of each part
When attaching and detaching the headshell, turn off the power of the
amplifier.
If you attempt to do so while the volume is loud, the speaker could be
damaged.
! Remove the shell with cartridge and use a soft tip brush or writing
brush to carefully remove dust, etc. from the stylus tip.
! Use a good quality record cleaner to clean records.
! Use a soft cloth or something similar to clean the headshell terminal
and then reattach it to the tone arm.
Page 17

Cleaning the dust cover, etc.
Use a soft cloth to clean the dust cover and cabinet
! Do not clean the dust cover while playing. Static electricity could
cause the tone arm to be pulled by the dust cover.
About trademarks and registered
trademarks
! "Pioneer DJ" is a trademark of PIONEER CORPORATION, and is used
under license.
! rekordbox is a trademark or registered trademark of the Pioneer DJ
Corporation.
The names of companies and products mentioned herein are trademarks or registered trademarks of their respective owners.
Specifications
Power requirements ........AC 110 V to 120 V or 220 V to 240 V, 50 Hz/60 Hz
Power consumption ............................................................................... 11 W
Main unit weight ................................................................................. 10.7 kg
Max. external dimensions ...
Tolerable operating temperature ........................................ +5 °C to +35 °C
Tolerable operating humidity ...................... 5 % to 85 % (no condensation)
Turntable part
Drive method ..............................................................Servo type direct drive
Motor ...............................................................3-phase brushless DC motor
Braking system ................................................................... Electronic brake
Rotation speed ...................................................33 1/3 rpm, 45 rpm, 78 rpm
Rotation speed adjustment range ........................................................±8 %
Wow and flutter ........................................................... 0.15 % or less WRMS
S/N ratio .................................................................................50 dB or higher
Turntable.................................... Aluminum die-casting Diameter: 332 mm
Starting torque ................................................................ 1.6 kg·cm or more
Starting time ............................................... 1 second or less (at 33 1/3 rpm)
Tone arm part
Arm type .................................................. Universal type S-shape tone arm,
gimbal-supported type bearing structure, static balance type
Effective length............................................................................... 230.5 mm
Overhang ............................................................................................. 16 mm
Tracking error .................................................................................. Within 3°
Arm height adjustment range .............................................................. 6 mm
Stylus pressure variable range .............................0 g to 4.0 g (1 scale 0.1 g)
Proper cartridge weight ................................ 9.5 g or less (single cartridge)
Cartridge type ............................................................................................ VM
Output voltage
PHONO ...................................................................................... 2.5 mV/1 kHz
LINE ...........................................................................................150 mV/1 kHz
— The specifications and design of this product are subject to
change without notice.
! © 2016 Pioneer DJ Corporation. All rights reserved.
450 mm (W) × 158.5 mm (H) × 367.5 mm (D)
English
En
17
Page 18

ATTENTION
POUR ÉVITER TOUT RISQUE D’ÉLECTROCUTION, NE
PA
ARRIÈRE). A
L
CONFIER TOUT ENTRETIEN À UN PERSONNEL
QU
AVER
Cet appareil
d’incendie et de décharge électrique, ne placez près de
lui un récipient rempli d’eau, tel qu’un vase ou un pot
de fleurs, et ne l’exposez pas à des gouttes d’eau, des
éclaboussures, de la pluie ou de l’humidité.
Milieu de fonctionnement
Te
De +5 °C à +35 °C (de +41 °F à +95 °F) ; Humidité
relative inférieure à 85 % (orifices de ventilation non
obstrués
N’installez pas l’appareil dans un endroit mal ventilé ou
un lieu soumis à une forte humidité ou en plein soleil
(ou à une forte lumière artificielle).
câble abîmé peut provoquer un risque d’incendie ou un
AVER
P
flamme nue (telle qu’une bougie allumée) sur
l’appareil.
Si vous souhaitez vous débarrasser de cet appareil, ne le mettez pas à la poubelle avec vos ordures ménagères. Il existe un système de
Les habitants des états membres de l’UE, de Suisse et de Nor
centres de collecte agréés ou à un détaillant (si vous rachetez un appareil similaire neuf).
Dans les pays qui ne sont pas mentionnés ci-dessus, veuillez contacter les autorités locales pour savoir comment vous pouvez vo
de vos appareils.
V
les impacts néfastes possibles sur l’environnement et la santé humaine.
PRÉCAUTION DE VENTILATION
Lors de l’installation de l’appareil, veillez à laisser un
espace suffisant autour de ses parois de manière à
améliorer la dissipation de chaleur (au moins 15 cm sur
le dessus, 5 cm à l’arrière et 5 cm de chaque côté).
AVER
Les fentes et ouvertures du coffret sont prévues pour la
ventilation
l’appareil et pour éviter sa surchauffe. P
risques d’incendie, ne bouchez jamais les ouvertures et
ne les recouvrez pas d’objets, tels que journaux, nappes
ou rideaux, et
épais ou un lit
collecte séparé pour les appareils électroniques usagés, qui doivent être récupérés, traités et recyclés conformément à la législation.
vège peuvent retourner gratuitement leurs appareils électroniques usagés aux
ous garantirez ainsi que les appareils dont vous vous débarrassez sont correctement récupérés, traités et recyclés et préviendrez de cette façon
S ENLEVER LE COUVERCLE (NI LE PANNEAU
UCUNE PIÈCE RÉPARABLE PAR
’UTILISATEUR NE SE TROUVE À L’INTÉRIEUR.
ALIFIÉ UNIQUEMENT.
D3-4-2-1-1_B1_Fr
TISSEMENT
n’est pas étanche. Pour éviter les risques
TISSEMENT
our éviter les risques d’incendie, ne placez aucune
D3-4-2-1-3_A1_Fr
mpérature et humidité du milieu de fonctionnement :
)
D3-4-2-1-7a_A1_Fr
D3-4-2-1-7c*_A1_Fr
Ce produit est destiné à une utilisation domestique
générale. Toute panne due à une utilisation autre qu'à
des fins privées (comme une utilisation à des fins
commerciales dans un restaurant, dans un autocar
ou sur un bateau) et qui nécessite une réparation
sera aux frais du client, même pendant la période de
garantie.
NOTE IMPORTANTE SUR LE CABLE
D’ALIMENTATION
Tenir le câble d’alimentation par la fiche. Ne pas
débrancher la prise en tirant sur le câble et ne pas
toucher le câble avec les mains mouillées. Cela risque
de provoquer un court-circuit ou un choc électrique. Ne
pas poser l’appareil ou un meuble sur le câble. Ne pas
pincer le câble. Ne pas faire de noeud avec le câble ou
l’attacher à d’autres câbles. Les câbles d’alimentation
doivent être posés de façon à ne pas être écrasés. Un
choc électrique. Vérifier le câble d’alimentation de
temps en temps. Contacter le service après-vente le
plus proche ou le revendeur pour un remplacement.
Sélecteur de tension
Le sélecteur de tension se trouve sur le panneau
supérieur des modèles multi-tension.
Le réglage d’usine du sélecteur de tension est
220-240 V. Réglez-le sur la tension adaptée à votre
pays ou région.
Avant de changer la tension, débranchez le cordon
d’alimentation secteur. Utilisez un tournevis de taille
moyenne pour changer le sélecteur de tension.
TISSEMENT
, pour assurer un fonctionnement stable de
our éviter les
n’utilisez pas l’appareil posé sur un tapis
.
D3-4-2-1-7b*_A1_Fr
us débarrasser
K058b_A1_Fr
K041_A1_Fr
S002*_A1_Fr
D3-4-2-1-5*_A2_Fr
Fr
2
 Loading...