

Page 1

Operating Instructions
Mode d’emploi
Bedienungsanleitung
Istruzioni per l’uso
Handleiding
Manual de instrucciones
Инструкции по эксплуатации
English Français Deutsch Italiano Nederlands Español
STEREO TURNTABLE
PLATINE STEREOPHONIQUE
STEREO PLATTENSPIELER
GIRADISCHI STEREOFONICO
STEREO DRAAITAFEL
GIRADISCOS ESTEREOFÓNICO
СТЕРЕОПРОИГРЫВАТЕЛЬ
Русский
Page 2
WARNING
This equipment is not waterproof
fire or shock hazard, do not place any container
filled with liquid near this equipment (such as a
vase or flower pot) or expose it to dripping,
splashing, rain or moisture.
WARNING
To
flame sources (such as a lighted candle) on the
equipment.
Operating Envir
Operating environment temperature and
humidit
+5 °C to +35 °C (+41 °F to +95 °F); less than 85
%RH (cooling vents not blocked)
Do not install this unit in a poorly ventilated
area, or in locations exposed to high humidity
or direct sunlight (or strong artificial light).
If you want to dispose this product, do not mix it with general household waste. There is a separate collection
P
products free of charge to designated collection facilities or to a retailer (if you purchase a similar new one).
Fo
By doing so you will ensure that your disposed product undergoes the necessa
thus prevent potential negative effects on the environment and human health
VENTILATION CAUTION
When installing this unit, make sure to leave
space around the unit for ventilation to improve
heat radiation (at least 15 cm at top, 5 cm at
rear
WARNING
Store small parts out of the reach of children
and infants. If accidentally swallowed, contact a
doctor immediatel
system for used electronic products in accordance with legislation that requires proper treatment, recovery
and recycling.
rivate households in the member states of the EU, in Switzerland and Norway may return their used electronic
r countries not mentioned above, please contact your local authorities for the correct method of disposal.
ry treatment, recovery and recycling and
.
CAUTION
D3-4-2-1-3_A1_En
. To prevent a
Since the power cord serves as the main
disconnect device for the unit, you will need
to unplug it from the AC outlet to shut down
all power. Therefore, make sure the unit has
been installed so that the power cord can be
easily unplugged from the AC outlet in case
of an accident. To avoid fire hazard, the power
prevent a fire hazard, do not place any naked
onment
y:
D3-4-2-1-7c*_A2_En
D3-4-2-1-7a_A1_En
cord should also be unplugged from the AC
outlet when left unused for a long period of
time (for example, when on vacation).
CAUTION
TO PREVENT THE RISK OF ELECTRIC SHOCK,
DO NOT REMOVE COVER (OR BACK). NO
USER-SERVICEABLE PARTS INSIDE. REFER
SERVICING TO QUALIFIED SERVICE
PERSONNEL.
POWER-CORD CAUTION
Handle the power cord by the plug. Do not pull
out the plug by tugging the cord and never
touch the power cord when your hands are wet
as this could cause a short circuit or electric
shock. Do not place the unit, a piece of
furniture, etc., on the power cord, or pinch the
cord. Never make a knot in the cord or tie it with
other cords. The power cords should be routed
such that they are not likely to be stepped on. A
damaged power cord can cause a fire or give
you an electrical shock. Check the power cord
once in a while. When you find it damaged, ask
your nearest PIONEER authorized service center
or your dealer for a replacement.
K058b_A1_En
D3-4-2-2-2a*_A1_En
D3-4-2-1-1_B1_En
S002*_A1_En
y.
D41-6-4_A1_En
, and 5 cm at each side).
D3-4-2-1-7d*_A1_En
This product is for general household
purposes. Any failure due to use for other
than household purposes (such as long-term
use for business purposes in a restaurant or
use in a car or ship) and which requires
repair will be charged for even during the
warranty period.
K041_A1_En
2
Page 3

Thank you for buying this Pioneer product. Please read through these operating instructions so you will know how to operate your model properly.
Contents
01 Before you start
Features ............................................................................................................................................................................... 4
Checking what’s in the box ................................................................................................................................................ 4
Assembly ............................................................................................................................................................................. 4
02 Operation
Part names and functions ................................................................................................................................................. 6
Adjustment .......................................................................................................................................................................... 6
Connecting your equipment .............................................................................................................................................. 7
Playback ..............................................................................................................................................................................8
Pausing playback ...............................................................................................................................................................8
Finishing playback .............................................................................................................................................................. 8
Additional information ....................................................................................................................................................... 8
03 Others
Troubleshooting ................................................................................................................................................................10
Cautions on use ................................................................................................................................................................10
Maintenance of each part ................................................................................................................................................10
About trademarks and registered trademarks ..............................................................................................................10
Specifications ...................................................................................................................................................................11
English
3
Page 4

01
WARNING
Store small parts out of the reach of children and
infants. If accidentally swallowed, contact a doctor
immediatel
D41-6-4_A1_En
Features
Simple to use, fully automatic record player
Once you select the record size, all you have to do is press the [START] button to start playing a record. When the
record is done, the player’s fully automatic function returns the tone arm to its position.
Before you start
y.
Stable record playing due to low center of gravity chassis
The bottom of the player has a metal plate to give the entire chassis a low center of gravity. That makes it stable
while playing records even when there are external vibrations.
Equipped with a phono equalizer that can be switched ON/OFF
Being equipped with its own phono equalizer means the player can be connected directly to amps that don’t have
a PHONO terminal. If an amp does have a phono equalizer, this function can be turned off.
Comes with a high-performance MM cartridge
Because it comes with a cartridge, you can use it right away.
Comes with a moderately thick rubber mat
The 5 mm thick rubber mat suppresses external vibration while improving the grip between the record and the
turntable–for stable record playing.
Unobtrusive design
Its appearance and finish engender a composed ambience so it harmonizes with your components as well as
your interior.
Detachable power cord
Cables are not obstacles when the player is moved, thus preventing disconnection problems.
Checking what’s in the box
Please check that you’ve received the following supplied accessories:
! Turntable
! Turntable sheet
! Dust cover with removable hinges
! Adapter for EP record
! Balance weight
! Headshell with cartridge
! Spare lead wires
! Power cord
! Operating instructions (this document)
! Warranty sheet
Assembly
! Do not remove the twist tie for clamping the tone arm until assembly is completed.
! Connect the power cord after player assembly and all the connections between other devices have been
completed.
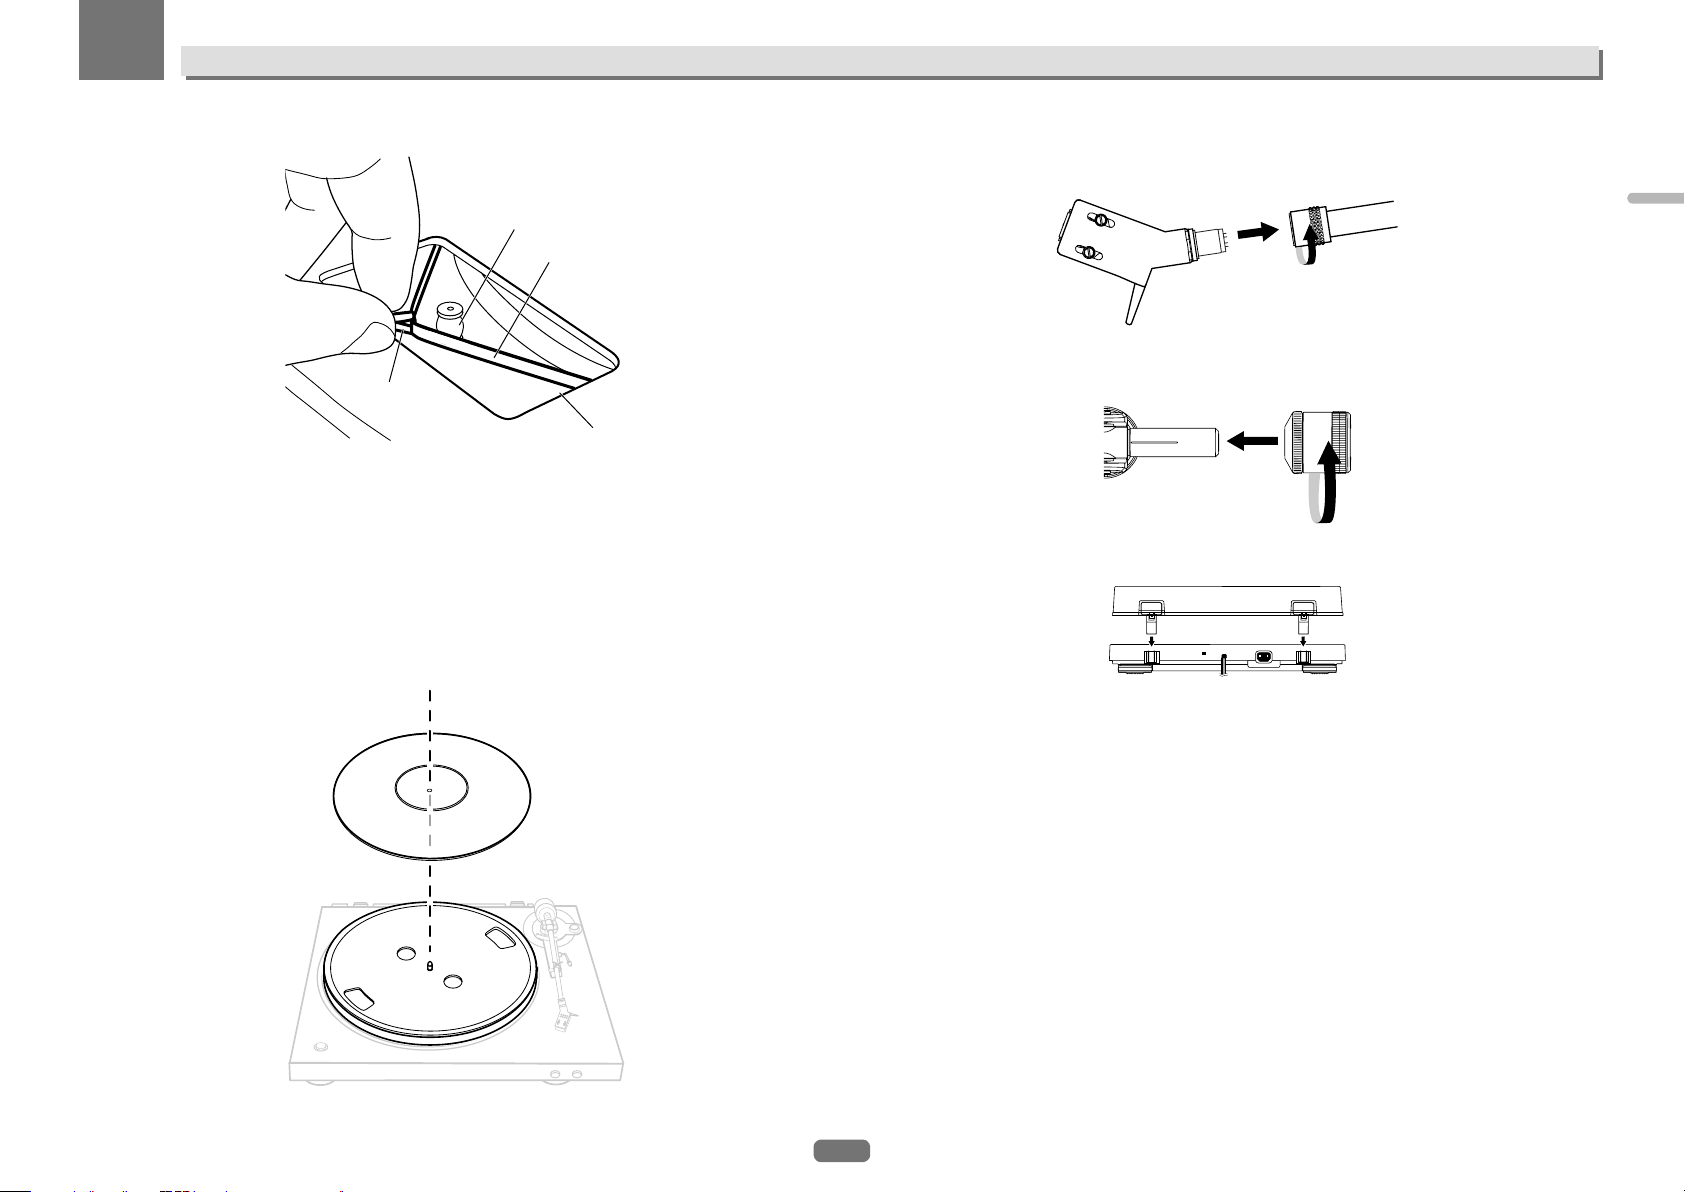
1 Set the turntable.
Set the turntable on the center spindle.
! Be careful not to hit the turntable on the main unit or drop it.
2 Turn the turntable so that the roller is visible through the square hole with the ribbon tape
for catching the belt.
4
Page 5

01
Before you start
English
3 Pinch the ribbon tape and catch the belt on the outer center of the roller.
1
2
3
4
1 Roller
2 Belt
3 Ribbon tape
4 Square hole
4 Remove the ribbon tape.
5 Turn turntable slowly five or six turns.
Check that the belt is properly caught at the center of the roller.
6 Set the turntable sheet.
! The turntable mat has a top and a bottom side. Put the mat on the turntable so the bottom, which has the
Pioneer logo, faces down.
7 Attach the headshell.
Insert the headshell with attached cartridge into the tone arm. Next, while keeping the headshell horizontal,
tighten the lock nut.
8 Attach the balance weight.
Attach the balance weight to the rear shaft of the tone arm.
9 Mount the dust cover.
Insert the hinges of the dust cover securely into their holders on the back of the turntable.
PHONO LINE
! Insert both hinges fully.
! When removing the dust cover, open the dust cover fully then pull out upward with holding the dust cover
near the hinge retainer sections.
AC IN
10 Remove the twist tie for clamping the tone arm.
Once assembly is finished, remove the twist tie for clamping the tone arm.
5
Page 6

02
23
Operation
Part names and functions
Top panel
e
1
1 SPEED button
Changes the speed according to the record to be played.
2 START button
Pressing the button starts rotation of the turntable.
3 STOP button
Pressing the button stops rotation of the turntable.
4 SIZE SELECT lever
Changes the size according to the record to be played.
5 Headshell
Used with a cartridge attached.
6 Lock nut
Holds the cartridge attached.
7 Tone arm
8 Arm rest
Serves as the support base for the tone arm.
9 Lifter lever
The tone arm goes up when the lever is pulled up. The tone arm goes down when the lever is pushed down.
a Arm lifter
This device is used to move the tone arm up and down. It is operated by the lifter lever.
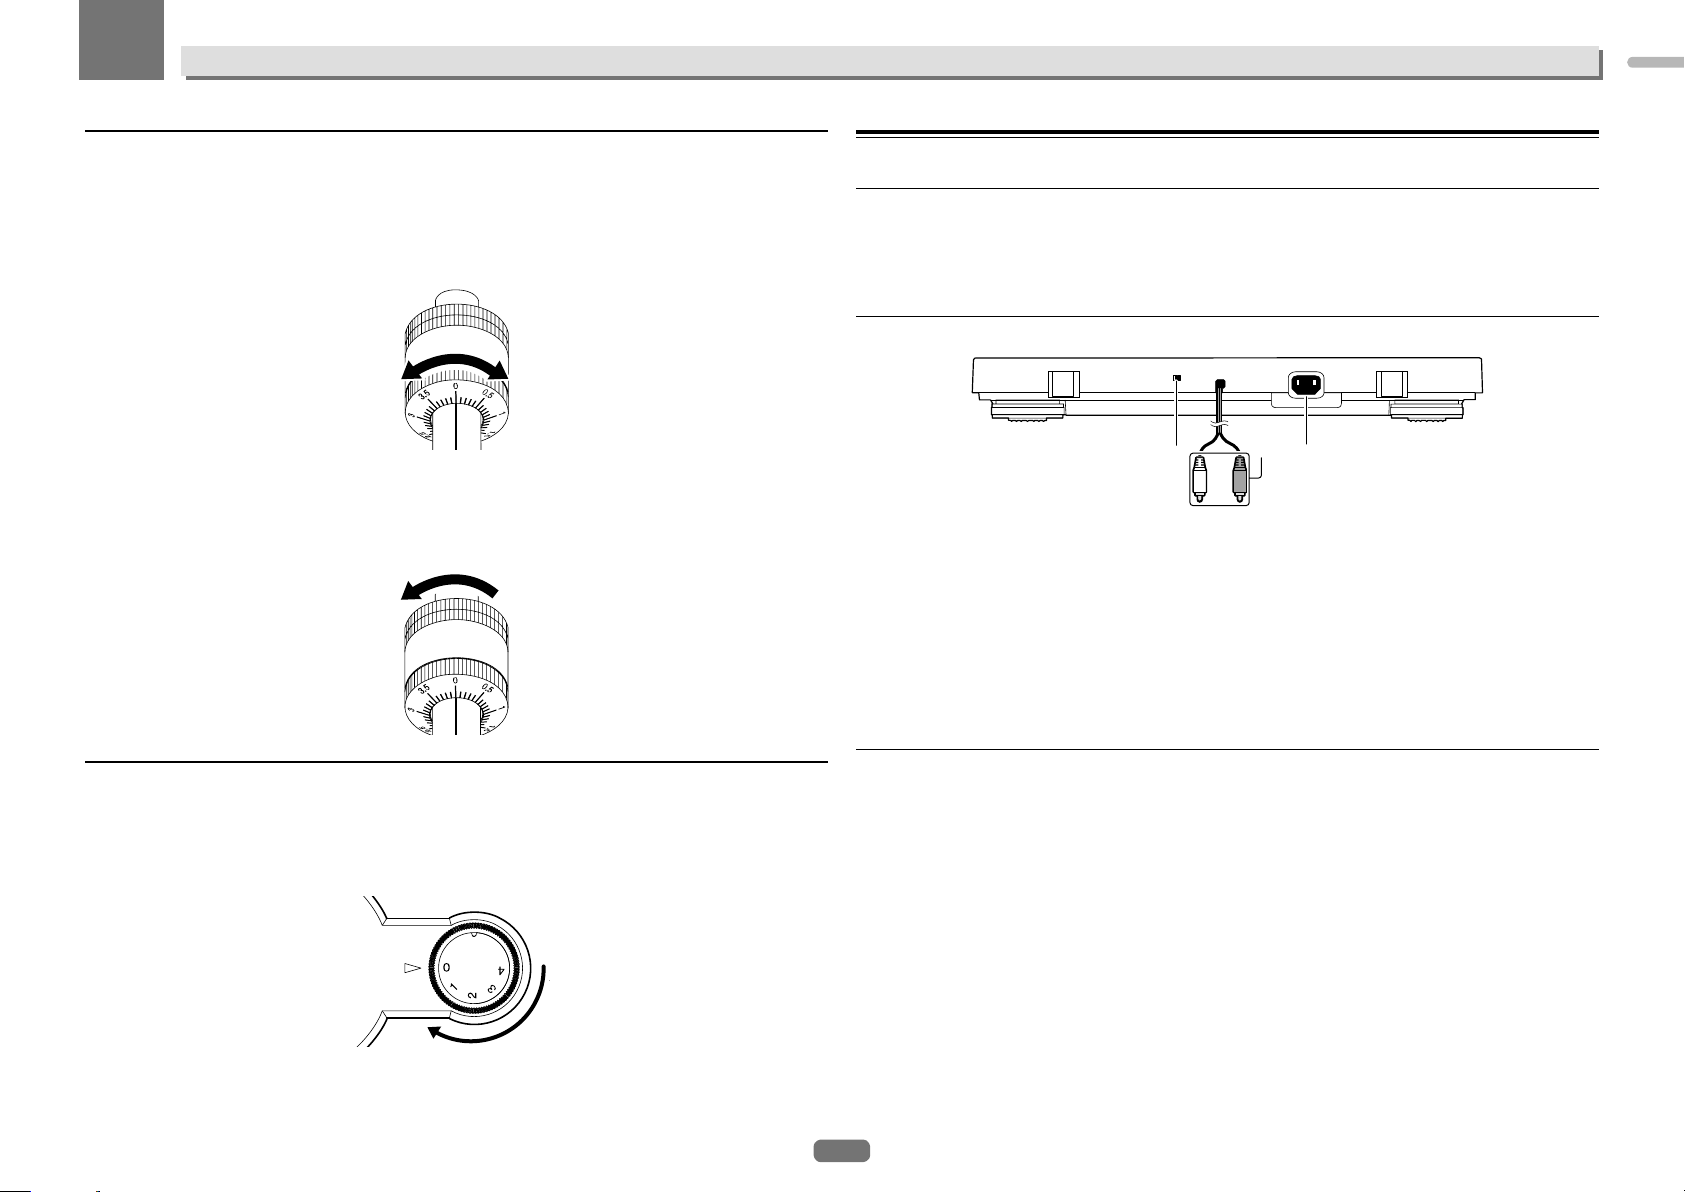
b ANTI-SKATING dial
When a record is played, there is power to pull the stylus tip toward the inner perimeter. By matching this dial
to the stylus pressure value, that power is eliminated.
d
K
A
S
-
T
I
I
T
N
N
G
A
c
b
a
9
8
c Stylus pressure adjustment ring
Used to match to the appropriate stylus pressure of the cartridge.
d Balance weight
Used to balance the tone arm and adjust the stylus pressure.
e Adapter for EP record
Used to play standard EP records.
7
Adjustment
6
5
4
Adjusting the tone arm balance
Prepare as follows;
! For cartridges with removable stylus covers, remove the stylus cover.
! Push down the lifter lever.
1 Set the [ANTI-SKATING] dial to “0”.
2 Keep the tone arm from the arm rest and adjust the balance so it is horizontal.
Turn the balance weight until the tone arm becomes almost horizontal.
! When moving the tone arm, make sure that the stylus tip does not directly touch the turntable and the like.
Balance weight too far to the back Balance weight too far to the front
6
Page 7
02
Operation
English
Adjusting the stylus pressure
1 Return the tone arm to the arm rest.
2 Match the “0” on the stylus pressure adjustment ring to the center line of the arm rear
shaft.
While using your finger to hold the balance weight to keep it from moving, turn only the stylus pressure adjustment ring so that the number “0” comes to the black center line of the tone arm rear shaft.
3 Adjust the stylus pressure.
Turn the balance weight to adjust to the appropriate stylus pressure value for your cartridge.
! When turning the balance weight, the stylus pressure adjustment ring turns together. While observing the
adjustment ring, adjust the stylus pressure to the appropriate value.
! The appropriate stylus pressure for the included cartridge is 3.5 g. Set to “3.5”.
Connecting your equipment
Connecting your equipment
! Be sure to turn off the power and unplug the power cord from the power outlet whenever making or changing
connections.
! Refer to the operating instructions for the component to be connected.
! Connect the power cord after all the connections between devices have been completed.
Descriptions of terminals
PHONO LINE
1 Equalizer switch
Move this switch to appropriate position according to the audio input terminal of the pre-main amplifier or
other component.
2 RCA output terminals
Connects to the audio input terminal of the pre-main amplifier or other component.
3 AC IN terminal
Connects to a power outlet using the included power cord. Wait until all connections between the equipment
are completed before connecting the power cord.
! Be sure to use the included power cord.
AC IN
31 2
Adjusting anti-skating
This adjustment is made to prevent stylus jumping.
1 Match to the same scale position as the stylus pressure value.
2 Turn the [ANTI-SKATING] dial to match the reference mark to the same value as the
cartridge stylus pressure value.
A
K
T
S
-
I
I
N
T
G
N
A
Connecting to a pre-main amplifier and component
1 Set the equalizer switch to appropriate position.
PHONO: When connecting to the PHONO input terminal (the built-in equalizer of record player is not used.)
LINE: When connecting a terminal other than the PHONO input terminal (the built-in equalizer of record player is
used.)
2 Connect the RCA output terminal to the input terminal of the pre-main amplifier or other
component.
3 Connect the power cord.
Connects to a power outlet using the included power cord. Wait until all connections between the equipment are
completed before connecting the power cord.
! Before connecting to the outlet (AC outlet) mounted on the connected equipment, check the wattage dis-
played on the outlet. (This unit consumes 2 W of power.)
! If the player starts operating when the power cord is plugged in, press the [STOP] button.
7
Page 8
02
Operation
Place of installation
Place the unit on a level surface that is free of external vibration.
! To the extent possible, keep the unit away from the speaker system.
! When the unit is very close to a radio (AM/FM broadcasting), the radio could generate noise. Keep the distance
as far away from the unit as possible.
Playback
Prepare as follows;
! Place a record on the turntable.
! Remove the stylus cover while paying attention not to touch the stylus tip.
1 Press the [SPEED] button to set the record’s playing speed.
To play 45’s, set the button to the raised position [v]; for 33 1/3 records, the button must be in the depressed
position [w].
! To play a standard EP record, attach the EP record adapter to the center spindle and play the EP record.
2 Move the [SIZE SELECT] lever to set the record size.
To play 17 cm records, set the lever position to [17]; for 30 cm records, set the lever position to [30].
! To play a standard EP record, attach the EP record adapter to the center spindle and play the EP record.
3 Press the [START] button for over 1 second.
The turntable starts turning and playback starts automatically.
! Once the record is played, the tone arm returns to its original position and the turntable automatically stops
turning.
! Once you have finished playing records, attach the stylus cover to protect the stylus tip.
! This set has an auto return function by which the tone arm automatically returns to its original position once
a specific point is reached after a record finishes playing. Though there is no problem with records of normal
size, with records including grooves up to this point, the auto return function may be activated before playback is finished.
Notes
! Do not touch the tone arm or turntable or turn off the power while a record is playing.
! The auto play system cannot be used for 25 cm records. In this case operate manually. If the tone arm does not
return to its original position after playback stops, press the [STOP] button.
Additional information
Replacing the stylus
The included stylus has a service life of about 400 hours. To avoid damaging valuable records, replace the stylus
without delay. Purchase a replacement stylus at the store where you purchased the record player or your nearest
repair and inquiry outlet. Specify that you want the replacement stylus exclusively for PL-30-K.
! Turn off the amplifier’s power before replacing the stylus, and unplug the player’s power cord.
! The stylus tip is an extremely delicate part, so handle it very carefully. Use a soft brush to gently remove any
dust from the stylus tip.
! Removing the headshell makes it easy to replace the stylus.
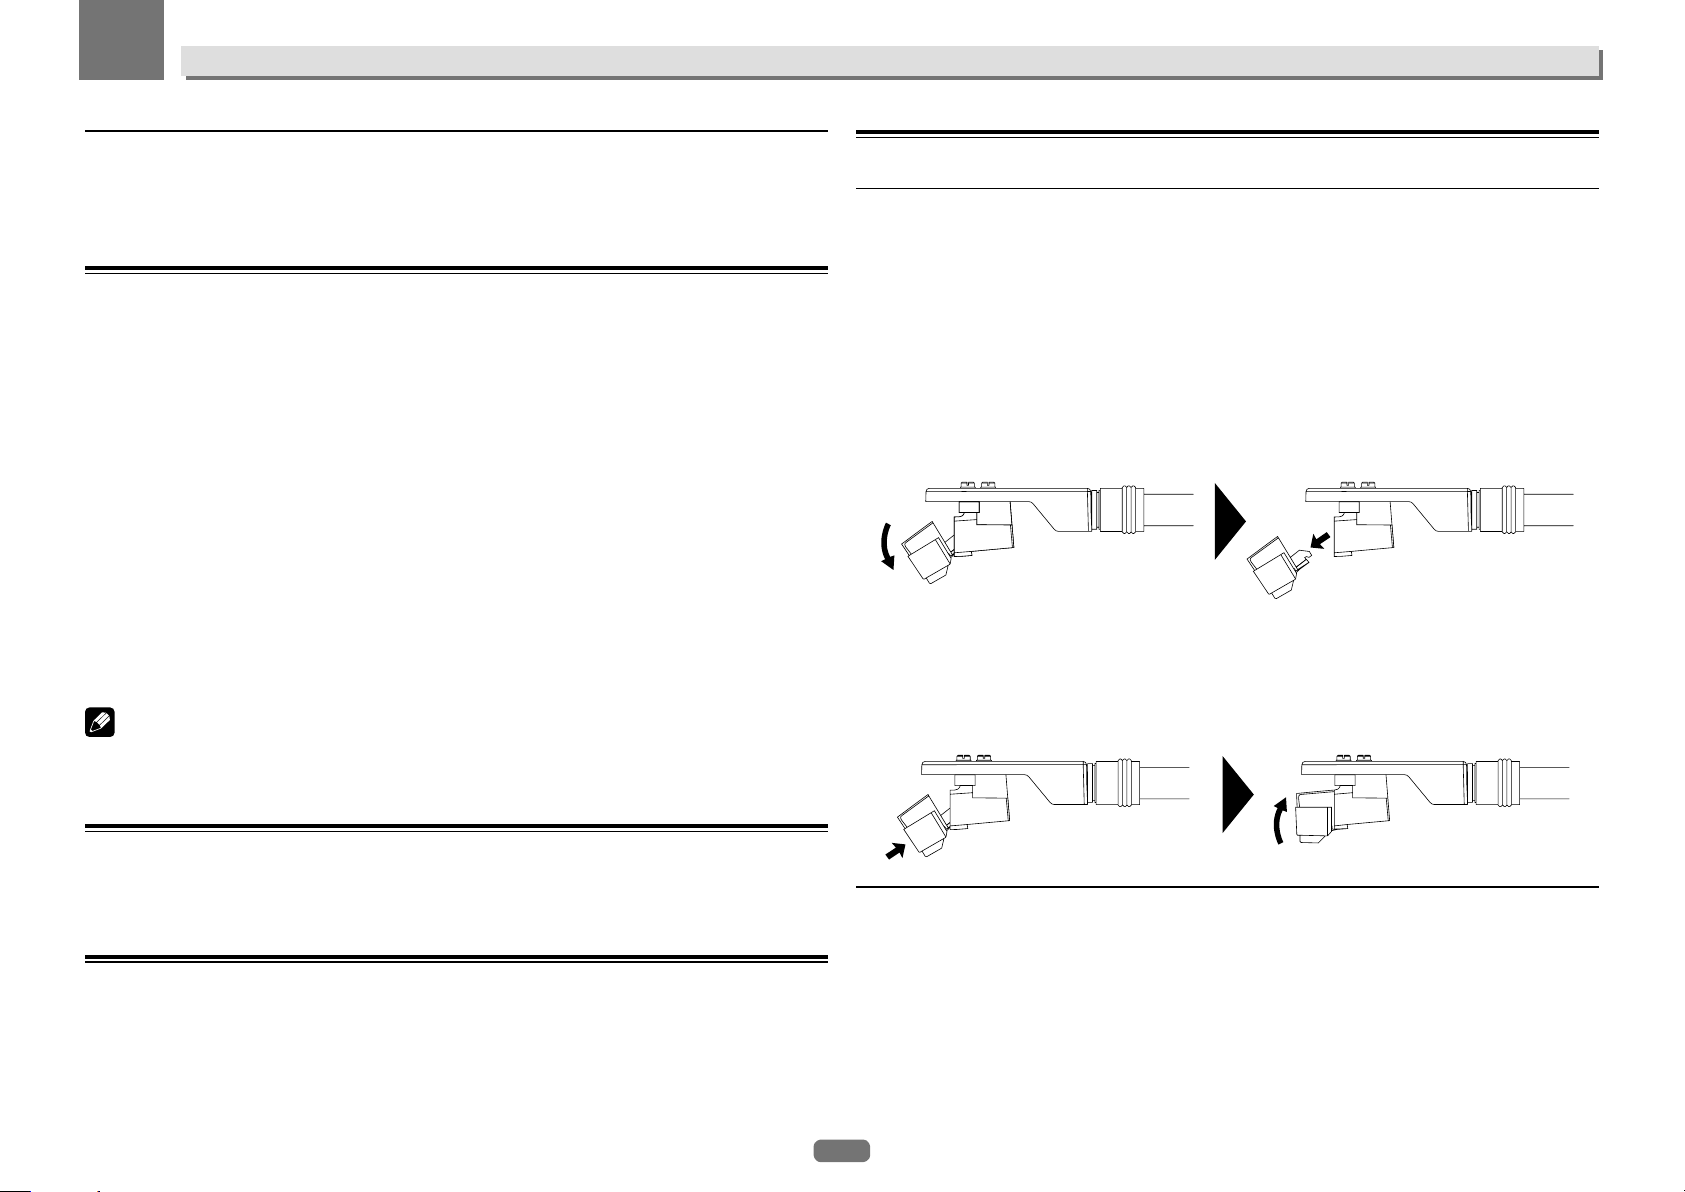
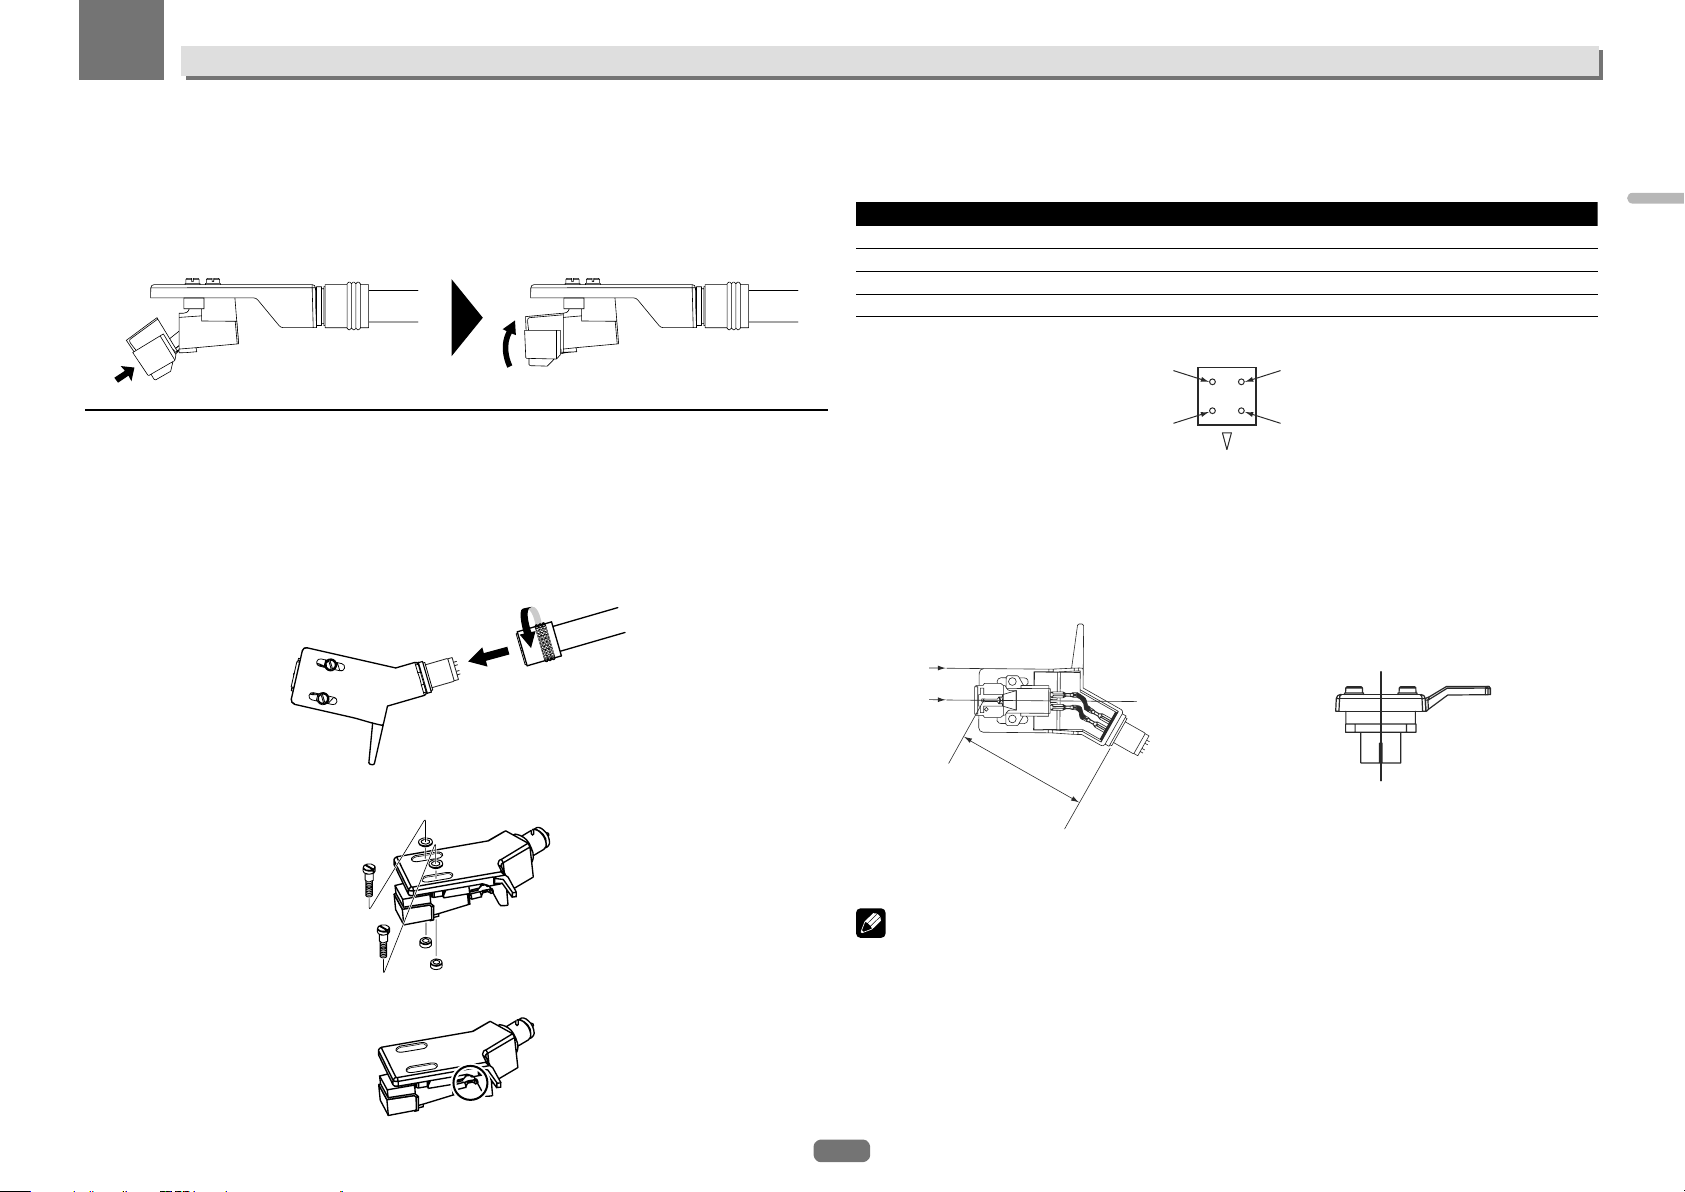
Removing the replaceable stylus
1 Holding the cartridge steady with one hand, grasp the replaceable stylus with the other
hand, and then push down it.
2 Pull the stylus off gently in the direction of arrow.
Attaching the replaceable stylus
1 Holding the cartridge steady with one hand, grasp the replaceable stylus with the other
hand, point the catch on the replaceable stylus, insert it all the way into the long hole in the
cartridge.
2 Push up in the direction of arrow until a click is heard.
Pausing playback
Pull up the lifter lever.
The stylus of the cartridge lifts away from the record.
! To resume playback, push down the lifter lever.
Finishing playback
1 Pull up the lifter lever to return the tone arm to the arm rest and then push down the lifter
lever.
2 Press the [STOP] button.
! Once you have finished playing records, attach the stylus cover to protect the stylus tip.
Replacing the cartridge
If you wish to mount a different cartridge on this player, use one weighing approximately 4.5 g to 9.5 g.
To purchase a headshell only, ask for one exclusively for PL-30-K at your store of purchase or nearest repair and
inquiry outlet.
8
Page 9
02
RL
RGLG
Operation
English
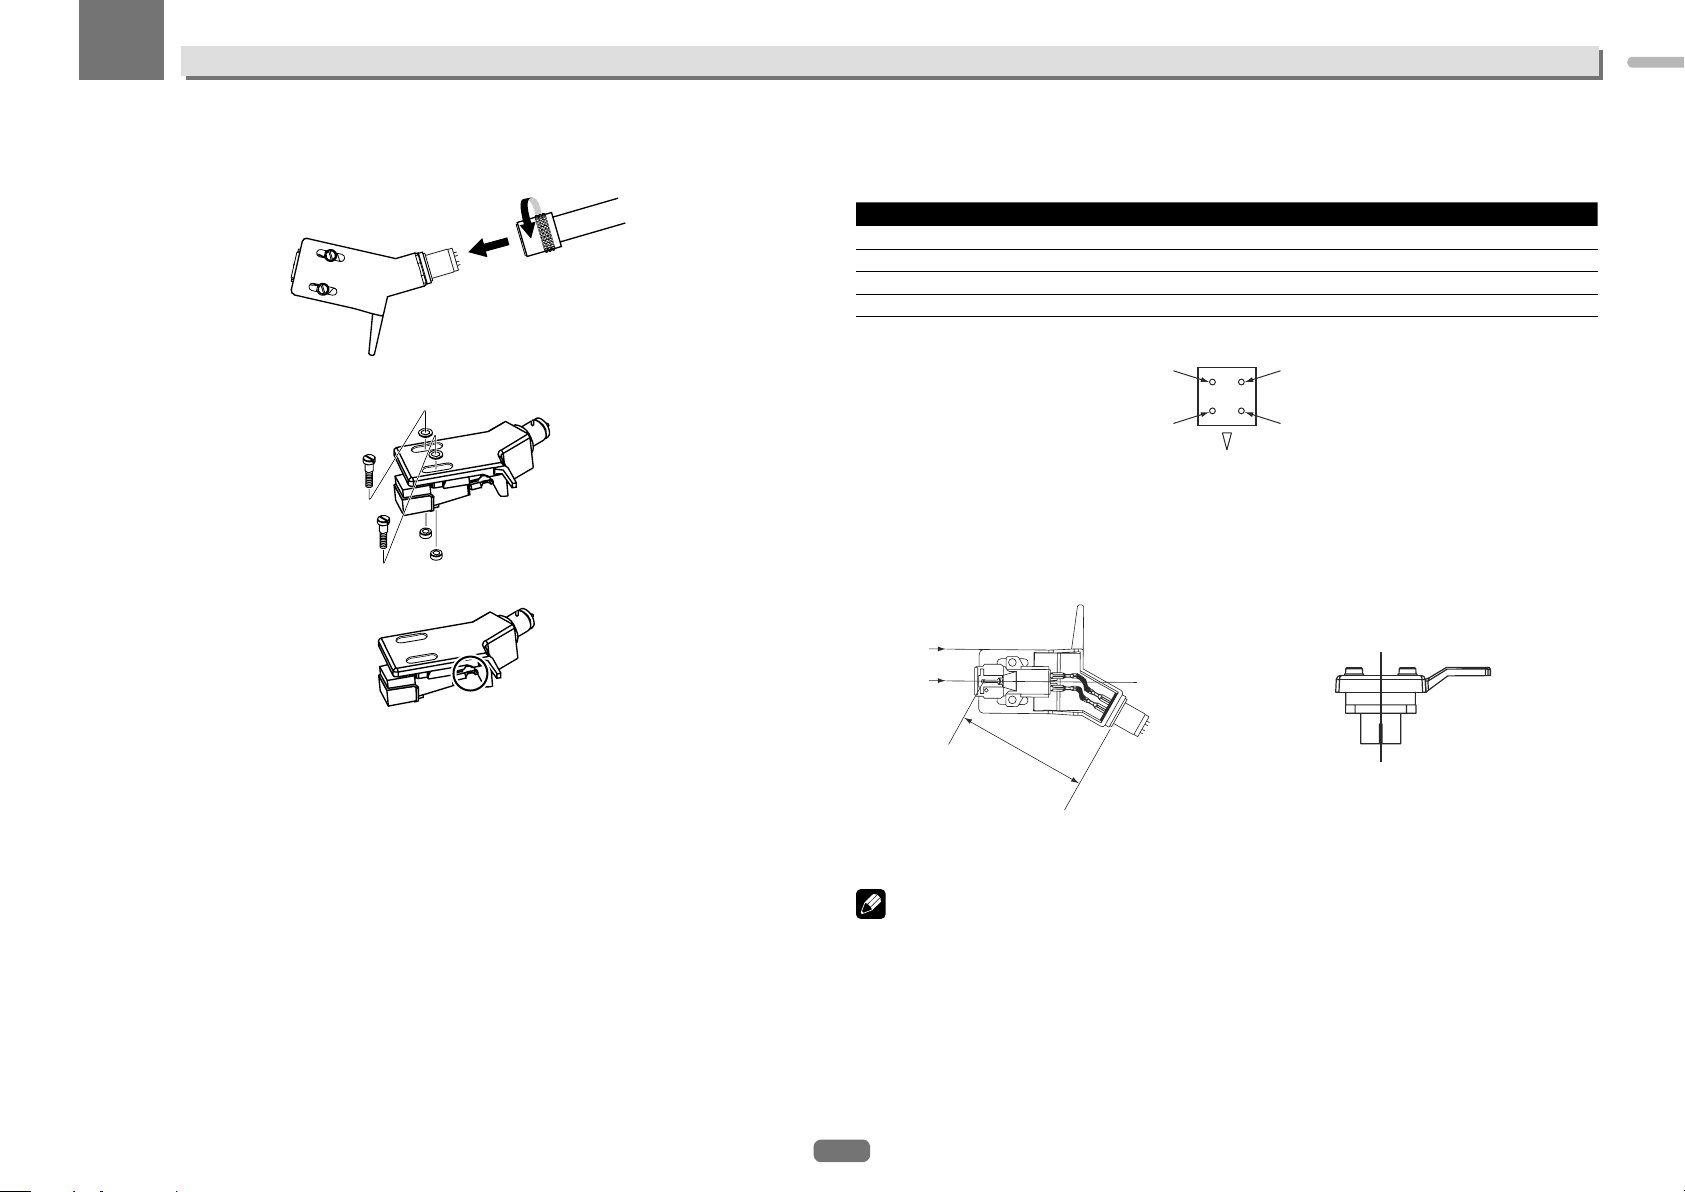
Removing the cartridge
1 Turn the headshell lock nut and remove the headshell.
2 Loosen the cartridge mount screws and remove them.
3 Disconnect the lead wires on the cartridge side.
Attaching the cartridge
1 Connect the lead wires.
They are color-coded as shown below. Be careful to connect them properly.
Color Function
Red Right channel (R)
White Left channel (L)
Green Right channel ground (RG)
Blue Left channel ground (LG)
Upside
(Backside of cartridge)
2 Attach the cartridge.
To achieve the required overhang, mount in such a way that the stylus tip is positioned about 45 mm from the
edge of the headshell’s mount surface (the rubber washer), as shown on the diagram below.
! The overhang for this player should be 19 mm.
Back side
Front side
45 mm
Mount parallel.
Mount perpendicular.
3 Tighten the cartridge mount screws to mount the cartridge.
Notes
! After replacing the cartridge, be sure to readjust the horizontal balance, stylus pressure, and anti-skating
value.
! The thickness of the terminal depends on the replacement cartridge, and some may not connect securely. In
this case, use the included spare lead wire.
9
Page 10
03
Others
Troubleshooting
! If your player is not working properly, use the table below for troubleshooting.
If you cannot resolve the problem, please contact our service center or your sales outlet.
Problem Check Remedy
The power is not turned on. Is the power cord properly con-
The turntable does not turn. Is the belt in place? Check the belt and rollers. If the belt has slipped off the
No sound or small sound. Are the audio cables properly con-
The sound is distorted. Is the equalizer switch in its [LINE]
The sound is extremely
quiet.
The left and right sound are
reversed.
There is a low hum sound
(humming or buzzing
sound) during playback.
The stylus tip does not
come down on the record.
Stylus jumping occurs. Is the stylus pressure adjusted
The arm stops along the
way and does not go ahead.
Sound volume is low or
loud.
nected?
Has the belt been cut? Check the belt and roller. If the belt has been cut, replace it
nected?
Are the terminals and plugs dirty? Clean the terminals and plugs before making connections.
Is the headshell attached properly? Attach the headshell property.
position, even though the player is
connected to your amp’s PHONO
terminal?
Is the equalizer switch in its
[PHONO] position, even though the
player is connected to your amp’s
AUX terminal?
Are the left and right connections for
each piece of equipment reversed?
Is there an electric device such as a
fluorescent lamp or its power cord
near the connection cord?
Is the stylus pressure adjusted
property?
Is the arm horizontally balanced? Turn the balance weight until the tone arm becomes hori-
property?
Is the record warped or does it have
scratches?
Does the stylus tip have a lot of dust
on it?
Is anti-skating adjusted correctly? Adjust anti-skating correctly.
Is the arm height adjusted correctly? Adjust the arm height correctly.
Does the record have scratches? Check the condition of the record.
Is the arm coming into contact with
something?
Is the connection to the amplifier
appropriate for the cartridge type
(output)?
Properly connect the included power cord to a power
outlet.
turntable, mount it according to the instructions in Assembly. (Page 4 )
with a new one.
Connect the audio cables properly.
When the player is connected to a PHONO terminal, put
the equalizer switch in the [PHONO] position.
When connected to the AUX terminal, put the equalizer
switch in the [LINE] position. (Be sure to turn the volume
on your amp to its minimum before changing the position
of the equalizer switch.)
Correctly connect the audio cable and the lead wires of
headshell part.
Place the power cord of the fluorescent lamp or other
device as far away as possible.
Match the balance weight to the appropriate stylus pressure value for your cartridge.
zontal state.
Match the balance weight to the appropriate stylus pres-
sure value for your cartridge.
Check the condition of the record.
Remove the shell with cartridge and use a soft tip brush
or writing brush to carefully remove dust, etc. from the
stylus tip.
Check around the arm. If there is an obstacle, remove it.
Connect the connection cables properly.
Cautions on use
About condensation
Water droplets (condensation) may form inside the unit (on operating parts and lenses) in the winter, for example, if the unit is moved from a cold place into a warm room or if the temperature in the room in which the unit
is installed rises suddenly (through heating, etc.). The unit will not operate properly and will not be playable with
condensation inside. Let the unit stand for 1 to 2 hours at room temperature (though this time depends on the
conditions of the condensation) without turning on the power. The water droplets will evaporate and the unit will
become playable. Condensation can occur in the summer as well if the unit is exposed to the direct wind from an
air-conditioner, etc. If this happens, move the unit to a different location.
When transporting the unit to another location
Use the original packing materials to pack the unit.
If the original packing materials are not available, be sure to perform the following.
! Detach the turntable sheet and turntable and pack carefully.
! Detach the headshell and balance weight from the arm and pack carefully.
! Use the arm clamper to secure the tone arm and use tape to secure it so that it does not move.
! Wrap the main unit in a blanket or soft paper so that it will not be damaged.
Maintenance of each part
When attaching and detaching the headshell, turn off the power of the amplifier.
If you attempt to do so while the volume is loud, the speaker could be damaged.
! Remove the shell with cartridge and use a soft tip brush or writing brush to carefully remove dust, etc. from the
stylus tip.
! Use a good quality record cleaner to clean records.
! Use a soft cloth or something similar to clean the headshell terminal and then reattach it to the tone arm.
Cleaning the dust cover, etc.
Use a soft cloth to clean the dust cover and cabinet.
! Do not clean the dust cover while playing. Static electricity could cause the tone arm to be pulled by the dust
cover.
About trademarks and registered trademarks
! Pioneer is a registered trademark of PIONEER CORPORATION.
The names of companies and products mentioned herein are the trademarks of their respective owners.
10
Page 11

03
Specifications
Power requirements ........................................................................................................ AC 220 V to 240 V, 50 Hz/60 Hz
Power consumption ......................................................................................................................................................2 W
Main unit weight ....................................................................................................................................................... 5.6 kg
Max. dimensions ........................................................................................ 435 mm (W) × 110 mm (H) × 372.6 mm (D)
Tolerable operating temperature ............................................................................................................ +5 °C to +35 °C
Tolerable operating humidity .......................................................................................... 5 % to 85 % (no condensation)
Turntable part
Drive method .......................................................................................................................................... Belt drive system
Motor .........................................................................................................................................................DC servo motor
Rotation speed .....................................................................................................................................33 1/3 rpm, 45 rpm
Wow and flutter ................................................................................................................0.1 % or less WRMS (JIS WTD)
S/N ratio ........................................................................................................................................................60 dB (DIN-B)
Turntable ........................................................................................................................................Aluminum die-casting
Tone arm part
Arm type ................................................................................................................Static balance straight type tone arm
Effective length................................................................................................................................................... 221.5 mm
Overhang ................................................................................................................................................................. 19 mm
Stylus pressure variable range ................................................................................................. 0 g to 4.0 g (1 scale 0.1 g)
Proper cartridge weight ................................................................................................... 4.5 g to 9.5 g (single cartridge)
Cartridge type ....................................................................................................................................................... MM type
Headshell weight ...................................................................................................... 10.0 g (including screws and nuts)
Output voltage
PHONO .....................................................................................................................................................................2.5 mV
LINE..........................................................................................................................................................................150 mV
! The specifications and design of this product are subject to change without notice.
! © 2014 PIONEER HOME ELECTRONICS CORPORATION. All rights reserved.
Others
English
11
Page 12
Si vous souhaitez vous débarrasser de cet appareil, ne le mettez pas à la poubelle avec vos ordures
Les habitants des états membres de l’UE, de Suisse et de Nor
électroniques usagés aux centres de collecte agréés ou à un détaillant (si vous rachetez un appareil similaire neuf).
Dans les pays qui ne sont pas mentionnés ci-dessus, veuillez contacter les autorités locales pour savoir comment vous
pouvez vous débarrasser de vos appareils.
V
préviendrez de cette façon les impacts néfastes possibles sur l’environnement et la santé humaine.
AVER
Cet appareil
risques d’incendie et de décharge électrique,
ne placez près de lui un récipient rempli d’eau,
tel qu’un vase ou un pot de fleurs, et ne
l’exposez pas à des gouttes d’eau, des
éclaboussures, de la pluie ou de l’humidité.
AVER
P
aucune flamme nue (telle qu’une bougie
allumée) sur l’appareil.
Milieu de fonctionnement
Te
fonctionnement
De +5 °C à +35 °C (de +41 °F à +95 °F) ;
Humidité relative inférieure à 85 % (orifices de
ventilation non obstrués
N’installez pas l’appareil dans un endroit mal
ventilé ou un lieu soumis à une forte humidité
ou en plein soleil (ou à une forte lumière
artificielle).
CONFIER TOUT ENTRETIEN À UN PERSONNEL
NOTE IMPORTANTE SUR LE CABLE
D’ALIMENT
Te
pas débrancher la prise en tirant sur le câble et
ne pas toucher le câble avec les mains
mouillées. Cela risque de provoquer un
court-circuit ou un choc électrique. Ne pas
poser l’appareil ou un meuble sur le câble. Ne
pas pincer le câble. Ne pas faire de noeud avec
le câble ou l’attacher à d’autres câbles. Les
câbles d’alimentation doivent être posés de
façon à ne pas être écrasés. Un câble abîmé
peut provoquer un risque d’incendie ou un
choc électrique. Vérifier le câble d’alimentation
de temps en temps. Contacter le se
après-vente PIONEER le plus proche ou le
revendeur pour un remplacement
AVER
Gardez les pièces de petite taille hors de la
portée des bébés et des enfants. En cas
d’ingestion accidentelle, veuillez contacter
immédiatement un médecin
PRÉCAUTION DE VENTILATION
Lors de l’installation de l’appareil, veillez à
laisser un espace suffisant autour de ses parois
de manière à améliorer la dissipation de
chaleur (au moins 15 cm sur le dessus, 5 cm à
l’arrière et 5 cm de chaque côté).
ménagères. Il existe un système de collecte séparé pour les appareils électroniques usagés, qui doivent être
récupérés, traités et recyclés conformément à la législation.
vège peuvent retourner gratuitement leurs appareils
ous garantirez ainsi que les appareils dont vous vous débarrassez sont correctement récupérés, traités et recyclés et
TISSEMENT
n’est pas étanche. Pour éviter les
TISSEMENT
our éviter les risques d’incendie, ne placez
mpérature et humidité du milieu de
:
)
D3-4-2-1-3_A1_Fr
D3-4-2-1-7a_A1_Fr
D3-4-2-1-7c*_A1_Fr
ATTENTION
Comme le cordon d’alimentation fait office
de dispositif de déconnexion du secteur, il
devra être débranché au niveau de la prise
secteur pour que l’appareil soit
complètement hors tension. Par conséquent,
veillez à installer l’appareil de telle manière
que son cordon d’alimentation puisse être
facilement débranché de la prise secteur en
cas d’accident. Pour éviter tout risque
d’incendie, le cordon d’alimentation sera
débranché au niveau de la prise secteur si
vous prévoyez une période prolongée de non
utilisation (par exemple avant un départ en
vacances).
ATTENTION
POUR ÉVITER TOUT RISQUE
D’ÉLECTROCUTION, NE PAS ENLEVER LE
COUVERCLE (NI LE PANNEAU ARRIÈRE).
AUCUNE PIÈCE RÉPARABLE PAR
L’UTILISATEUR NE SE TROUVE À L’INTÉRIEUR.
QUALIFIÉ UNIQUEMENT.
K058b_A1_Fr
D3-4-2-2-2a*_A1_Fr
D3-4-2-1-1_B1_Fr
ATION
nir le câble d’alimentation par la fiche. Ne
rvice
.
S002*_A1_Fr
TISSEMENT
.
D41-6-4_A1_Fr
D3-4-2-1-7d*_A1_Fr
Ce produit est destiné à une utilisation
domestique générale. Toute panne due à une
utilisation autre qu'à des fins privées
(comme une utilisation à des fins
commerciales dans un restaurant, dans un
autocar ou sur un bateau) et qui nécessite
une réparation sera aux frais du client,
même pendant la période de garantie.
K041_A1_Fr
2
Page 13

Nous vous remercions d’avoir acheté ce produit Pioneer. Veuillez lire soigneusement ce
mode d’emploi. Vous saurez ainsi comment utiliser votre appareil correctement.
Table des matières
01 Avant de commencer
Caractéristiques..................................................................................................................................................................4
Vérification du contenu de la boîte ................................................................................................................................... 4
Montage ..............................................................................................................................................................................4
02 Fonctionnement
Noms et fonctions des éléments ......................................................................................................................................6
Réglage ................................................................................................................................................................................ 6
Raccordement de votre équipement ................................................................................................................................ 7
Lecture ................................................................................................................................................................................. 8
Pause de la lecture ............................................................................................................................................................. 8
Fin de la lecture ................................................................................................................................................................... 8
Informations supplémentaires .......................................................................................................................................... 8
03 Divers
Guide de dépannage ........................................................................................................................................................10
Précautions d’emploi .......................................................................................................................................................10
Entretien de chaque élément ..........................................................................................................................................11
À propos des marques commerciales et des marques déposées ...............................................................................11
Spécifications ...................................................................................................................................................................11
Français
3
Page 14

01
AVERTISSEMENT
Gardez les pièces de petite taille hors de la portée des
bébés et des enfants. En cas d’ingestion accidentelle,
veuillez contacter immédiatement un médecin
D41-6-4_A1_Fr
Caractéristiques
Avant de commencer
Platine entièrement automatique et simple d’emploi
Après avoir sélectionné le format du disque, il vous suffit d’appuyer sur la touche [START] pour lancer la lecture.
À la fin du disque, le bras de lecture reprend automatiquement sa place.
Lecture stable des disques grâce au centre de gravité bas du châssis
Une plaque de métal installée à la base de la platine abaisse le centre de gravité du châssis. Ceci lui confère une
grande stabilité pendant la lecture des disques, même en présence de vibrations externes.
Égaliseur phono intégré commutable
Équipée de son propre égaliseur phono, la platine peut être raccordée directement à des amplis ne disposant pas
d’une prise PHONO. Si vous utilisez un ampli doté d’un égaliseur phono, cette fonction peut être désactivée.
Platine livrée avec une cellule MM hautes performances
La platine étant livrée avec une cellule, vous pouvez l’utiliser tout de suite.
Platine livrée avec un tapis caoutchouc d’épaisseur moyenne
D’une épaisseur de 5 mm, le tapis en caoutchouc supprime les vibrations externes tout en améliorant l’adhérence entre le disque et le plateau, pour une lecture stable.
Design discret
L’apparence et la finition de cette platine créent une ambiance sereine qui s’harmonisera avec vos appareils
ainsi qu’avec votre intérieur.
Cordon d’alimentation amovible
Les câbles ne sont pas des obstacles lorsque l’on déplace la platine, empêchant ainsi des problèmes de
déconnexion.
.
Montage
! Ne retirez pas le lien qui maintient le bras de lecture immobile avant d’avoir terminé le montage.
! Lorsque le montage de la platine est terminé et que tous les autres appareils ont été raccordés, vous pouvez
brancher le cordon d’alimentation.
1 Positionnez le plateau.
Positionnez le plateau sur l’axe central.
! Veillez à ne pas heurter le plateau sur l’appareil principal ou à ne pas le laisser tomber.
Vérification du contenu de la boîte
Veuillez vérifier que vous avez reçu tous les accessoires suivants :
! Plateau
! Couvre-plateau
! Capot anti-poussière avec charnières amovibles
! Adaptateur pour disque 45 tours
! Contrepoids d’équilibrage
! Porte-cellule avec cellule
! Fils conducteurs de rechange
! Cordon d’alimentation
! Mode d’emploi (ce document)
! Feuille de garantie
2 Tournez le plateau de telle sorte que le galet soit visible à travers le trou carré sur lequel se
trouve le ruban permettant d’accrocher la courroie.
4
Page 15
01
Avant de commencer
3 Pincez le ruban et accrochez la courroie à l’extérieur du galet, au centre de celui-ci.
1
2
3
4
1 Galet
2 Courroie
3 Ruban
4 Trou carré
4 Retirez le ruban.
5 Faites tourner le plateau lentement de cinq ou six tours.
Vérifiez que la courroie est bien accrochée au centre du galet.
6 Positionnez le couvre-plateau.
! Le tapis du plateau présente deux faces. Posez le tapis sur le plateau de telle sorte que la face inférieure, qui
porte le logo Pioneer, soit tournée vers le bas.
7 Fixez le porte-cellule.
Insérez le porte-cellule avec la cellule installée dans le bras de lecture. Ensuite, serrez l’écrou de blocage tout en
maintenant le porte-cellule à l’horizontale.
8 Fixez le contrepoids d’équilibrage.
Fixez le contrepoids d’équilibrage sur l’arbre arrière du bras de lecture.
9 Montez le capot anti-poussière.
Insérez fermement les charnières du capot anti-poussière dans leurs supports à l'arrière de la platine.
PHONO LINE
! Insérez entièrement les deux charnières.
! Pour retirer le capot anti-poussière, ouvrez-le entièrement puis soulevez-le en le tenant près des guides de
retenue des charnières.
AC IN
10 Retirez le lien qui maintient le bras de lecture immobile.
Après avoir terminé le montage, retirez le lien qui maintient le bras de lecture immobile.
Français
5
Page 16

02
23
Fonctionnement
Noms et fonctions des éléments
Panneau supérieur
e
1
1 Touche SPEED
Change la vitesse en fonction du disque à lire.
2 Touche START
L’appui sur cette touche démarre la rotation du plateau.
3 Touche STOP
L’appui sur cette touche arrête la rotation du plateau.
4 Levier SIZE SELECT
Change le format en fonction du disque à lire.
5 Porte-cellule
Utilisé avec une cellule installée.
6 Écrou de blocage
Maintient la cellule en place.
7 Bras de lecture
8 Repose-bras
Sert de support pour le bras de lecture.
9 Levier de levage
Le bras de lecture monte lorsque l’on tire le levier vers le haut. Le bras de lecture descend lorsque l’on pousse
le levier vers le bas.
a Système de levage du bras
Ce dispositif est utilisé pour déplacer le bras de lecture de haut en bas. Il est commandé par le levier de
levage.
b Molette ANTI-SKATING
d
K
A
S
-
T
I
I
T
N
N
G
A
c
b
a
9
8
7
Pendant la lecture d’un disque, une force attire l’extrémité de la pointe de lecture vers l’intérieur du disque.
En faisant correspondre cette molette à la valeur de la pression de la pointe de lecture, on supprime cette
force.
c Bague de réglage de la pression de la pointe de lecture
Permet de faire correspondre la pression de la pointe de lecture appropriée de la cellule.
d Contrepoids d’équilibrage
Permet d’équilibrer le bras de lecture et de régler la pression de la pointe de lecture.
e Adaptateur pour disque 45 tours
Permet de lire des disques 45 tours standard.
6
5
4
Réglage
Réglage de l’équilibre du bras de lecture
Préparez comme suit :
! Pour les cellules avec couvercles de pointe de lecture amovibles, retirez le couvercle de la pointe de lecture.
! Poussez le levier de levage vers le bas.
1 Réglez la molette [ANTI-SKATING] sur “0”.
2 Éloignez le bras de lecture du repose-bras et réglez l’équilibre pour qu’il soit horizontal.
Tournez le contrepoids d’équilibrage jusqu’à ce que le bras de lecture devienne presque horizontal.
! Lors du déplacement du bras de lecture, assurez-vous que l’extrémité de la pointe de lecture ne touche pas
directement le plateau ou autre chose.
Contrepoids d’équilibrage trop reculé Contrepoids d’équilibrage trop avancé
6
Page 17

02
Fonctionnement
Réglage de la pression de la pointe de lecture
1 Replacez le bras de lecture sur le repose-bras.
2 Faites correspondre le “0” sur la bague de réglage de la pression de la pointe de lecture
avec la ligne médiane de l’arbre arrière du bras de lecture.
Tournez uniquement la bague de réglage de la pression de la pointe de lecture de sorte que le chiffre “0” soit sur
la ligne médiane noire de l’arbre arrière du bras de lecture tout en maintenant le contrepoids d’équilibrage avec
votre doigt pour l’empêcher de bouger.
3 Réglez la pression de la pointe de lecture.
Tournez le contrepoids d’équilibrage pour faire le réglage sur la valeur de la pression de la pointe de lecture
appropriée pour votre cellule.
! Lorsque vous tournez le contrepoids d’équilibrage, la bague de réglage de la pression de la pointe de lecture
tourne en même temps. Tout en observant la bague de réglage, réglez la pression de la pointe de lecture à la
valeur appropriée.
! La pression de la pointe de lecture appropriée pour la cellule fournie est de 3,5 g. Le réglage à retenir est donc
“3,5”.
2 Tournez la molette [ANTI-SKATING] pour faire coïncider le repère avec la même valeur que
la pression de la pointe de lecture de la cellule.
A
K
T
S
-
I
I
N
T
G
N
A
Raccordement de votre équipement
Raccordement de votre équipement
! Veillez à toujours éteindre les appareils et à débrancher le cordon d’alimentation de la prise secteur avant de
raccorder un appareil ou de changer les connexions.
! Reportez-vous au mode d’emploi de l’appareil devant être raccordé.
! Lorsque tous les appareils ont été raccordés, vous pouvez brancher le cordon d’alimentation.
Descriptions des prises
PHONO LINE
AC IN
31 2
Français
Réglage de l’antipatinage
Ce réglage permet d’empêcher la pointe de lecture de sauter.
1 Faites correspondre à la même position de la graduation que la valeur de la pression de la
pointe de lecture.
1 Commutateur de l’égaliseur
Placez ce commutateur dans la position appropriée en fonction de la prise d’entrée audio du préamplificateur
principal ou de l’autre composant utilisé.
2 Prises de sortie RCA
À relier à la prise d’entrée audio du préamplificateur principal ou de l’autre composant utilisé.
3 Prise AC IN
À relier à une prise d’alimentation avec le cordon d’alimentation fourni. Avant de brancher le cordon d’alimentation, assurez-vous que tous les autres appareils sont raccordés.
! Veillez à utiliser le cordon d’alimentation fourni.
7
Page 18
02
Fonctionnement
Raccordement à un préamplificateur principal et à un composant
1 Placez le commutateur de l’égaliseur dans la position appropriée.
PHONO : pour une connexion à la prise d’entrée PHONO (l’égaliseur intégré à la platine n’est pas utilisé).
LINE : pour une connexion à une prise autre que la prise d’entrée PHONO (l’égaliseur intégré à la platine est
utilisé).
2 Reliez la prise de sortie RCA à la prise d’entrée du préamplificateur principal ou de l’autre
composant utilisé.
3 Branchez le cordon d’alimentation.
À relier à une prise d’alimentation avec le cordon d’alimentation fourni. Avant de brancher le cordon d’alimentation, assurez-vous que tous les autres appareils sont raccordés.
! Avant de raccorder à la prise (prise secteur) de l’équipement raccordé, vérifiez la puissance affichée sur la
prise. (Cet appareil consomme 2 W de puissance.)
! Si la platine commence à fonctionner lorsque vous branchez le cordon d’alimentation, appuyez sur la touche
[STOP].
Emplacement de l’appareil
Placez l’appareil sur une surface plane qui n’est pas soumise aux vibrations externes.
! Dans la mesure du possible, gardez l’appareil éloigné du système de haut-parleurs.
! Lorsque l’appareil est très proche d’une radio (radiodiffusion AM/FM), celle-ci pourrait générer du bruit.
Gardez l’appareil le plus éloigné possible.
Lecture
Préparez comme suit :
! Placez un disque sur le plateau.
! Retirez le couvercle de la pointe de lecture tout en veillant à ne pas toucher l’extrémité de la pointe de lecture.
1 Appuyez sur la touche [SPEED] pour choisir la vitesse de lecture du disque.
Pour lire des 45 tours, placez la touche en position haute [v] ; pour les disques 33 1/3 tours, la touche doit être en
position enfoncée [w].
! Pour lire un disque 45 tours standard, placez l’adaptateur pour disque 45 tours sur l’axe central.
2 Utilisez le levier [SIZE SELECT] pour choisir le format du disque.
Pour lire des disques de 17 cm, placez le levier en position [17] ; pour les disques de 30 cm, placez le levier en
position [30].
! Pour lire un disque 45 tours standard, placez l’adaptateur pour disque 45 tours sur l’axe central.
3 Appuyez sur la touche [START] pendant au moins 1 seconde.
Le plateau commence à tourner et la lecture démarre automatiquement.
! À la fin du disque, le bras de lecture reprend sa position d’origine et le plateau cesse automatiquement de
tourner.
! Dès que vous avez fini d’écouter des disques, mettez en place le couvercle de la pointe de lecture pour proté-
ger l’extrémité de la pointe de lecture.
! Cet appareil possède une fonction de retour automatique qui renvoie automatiquement le bras de lecture
dans sa position d’origine dès qu’un point spécifique est atteint à la fin de la lecture d’un disque. Ceci ne
pose pas de problèmes avec les disques de format habituel. Toutefois, avec certains disques qui comportent
des sillons jusqu’à cet endroit, la fonction de retour automatique peut s’enclencher avant que la lecture ne
soit terminée.
Remarques
! Ne touchez pas au bras de lecture ou au plateau et n’éteignez pas l’appareil pendant la lecture d’un disque.
! Le système de lecture automatique ne fonctionne pas pour les disques de 25 cm. Dans ce cas, utilisez l’appa-
reil manuellement. Si le bras de lecture ne reprend pas sa position d’origine à la fin de la lecture, appuyez sur
la touche [STOP].
Pause de la lecture
Tirez le levier de levage vers le haut.
La pointe de lecture de la cellule se soulève du disque.
! Pour reprendre la lecture, poussez le levier de levage vers le bas.
Fin de la lecture
1 Tirez le levier de levage vers le haut pour ramener le bras de lecture sur le repose-bras, puis
poussez le levier de levage vers le bas.
2 Appuyez sur la touche [STOP].
! Dès que vous avez fini d’écouter des disques, mettez en place le couvercle de la pointe de lecture pour proté-
ger l’extrémité de la pointe de lecture.
Informations supplémentaires
Remplacement de la pointe de lecture
La pointe de lecture fournie a une durée de vie utile d’environ 400 heures. Pour éviter d’endommager de précieux
disques, remplacez la pointe de lecture sans tarder. Achetez une pointe de lecture de rechange dans le magasin
où vous avez fait l’acquisition de la platine ou chez le réparateur le plus proche. Précisez que vous voulez une
pointe de lecture de rechange exclusivement prévue pour PL-30-K.
! Avant de procéder au remplacement de la pointe de lecture, éteignez l’amplificateur et débranchez le cordon
d’alimentation de la platine.
! L’extrémité de la pointe de lecture est une pièce extrêmement délicate : manipulez-la avec grand soin. Utilisez
un pinceau souple pour enlever doucement les éventuelles poussières de l’extrémité de la pointe de lecture.
! Le retrait du porte-cellule facilitera le remplacement de la pointe de lecture.
Retrait de la pointe de lecture remplaçable
1 D’une main, tenez fermement la cellule. De l’autre, saisissez la pointe de lecture
remplaçable et poussez-la vers le bas.
2 Retirez doucement la pointe de lecture dans le sens indiqué par la flèche.
8
Page 19
02
RL
RGLG
Fonctionnement
Mise en place de la pointe de lecture remplaçable
1 D’une main, tenez fermement la cellule. De l’autre, saisissez la pointe de lecture
remplaçable, orientez la fixation de la pointe de lecture remplaçable dans la rainure de la
cellule et insérez-la à fond.
2 Poussez vers le haut dans le sens indiqué par la flèche jusqu’à ce que vous entendiez un
déclic.
Remplacement de la cellule
Si vous souhaitez équiper cette platine d’une cellule différente, choisissez une cellule pesant entre 4,5 g et 9,5 g
environ.
Pour acheter un porte-cellule seul, adressez-vous au magasin où vous avez fait l’acquisition de votre platine ou
au réparateur le plus proche et demandez une pièce exclusivement prévue pour PL-30-K.
Retrait de la cellule
1 Tournez l’écrou de blocage et retirez le porte-cellule.
Mise en place de la cellule
1 Raccordez les fils conducteurs.
Ces fils comportent un code couleur, comme indiqué ci-dessous. Veillez à les raccorder correctement.
Couleur Fonction
Rouge Canal droit (R)
Blanc Canal gauche (L)
Vert Masse du canal droit (RG)
Bleu Masse du canal gauche (LG)
Haut
(Arrière de la cellule)
2 Fixez la cellule.
Pour obtenir le surplomb voulu, fixez la cellule de telle sorte que l’extrémité de la pointe de lecture soit positionnée à 45 mm environ du bord de la surface de montage du porte-cellule (la rondelle en caoutchouc), comme le
montre le schéma ci-dessous.
! Sur cette platine, le surplomb doit être de 19 mm.
Arrière
Avant
Français
2 Desserrez les vis de fixation de la cellule et ôtez-les.
3 Débranchez les fils conducteurs du côté de la cellule.
45 mm
Montez parallèlement.
Montez perpendiculairement.
3 Serrez les vis de fixation de la cellule.
Remarques
! Après avoir remplacé la cellule, n’oubliez pas de régler l’équilibre horizontal, la pression de la pointe de lecture
et la valeur de l’antipatinage.
! L’épaisseur de la borne dépend de la cellule de rechange. Certaines cellules peuvent ne pas se connecter
correctement. Dans ce cas, utilisez le fil conducteur de rechange fourni.
9
Page 20
03
Divers
Guide de dépannage
! Si votre platine ne fonctionne pas correctement, utilisez le tableau ci-dessous pour déterminer l’origine de la
panne.
Si vous ne parvenez pas à résoudre le problème, adressez-vous à notre service après-vente ou à votre
revendeur.
Problème Vérification Solution
L’appareil ne s’allume pas. Est-ce que le cordon d’alimentation
Le plateau ne tourne pas. La courroie est-elle bien en place ? Vérifiez la courroie et le galet. Si la courroie a glissé et s’est
Aucun son ou son faible. Est-ce que les câbles audio sont
Le son est déformé. Est-ce que le commutateur de l’égali-
Le son est à peine perceptible.
Les sons de droite et de
gauche sont inversés.
Il y a un faible bruit de fond
(bourdonnement) pendant
la lecture.
L’extrémité de la pointe de
lecture ne s’abaisse pas sur
le disque.
est correctement raccordé ?
La courroie est-elle coupée ? Vérifiez la courroie et le galet. Si la courroie est coupée,
correctement raccordés ?
Est-ce que les prises et fiches sont
sales ?
Est-ce que le porte-cellule est correc-
tement fixé ?
seur est en position [LINE] alors que
la platine est reliée à la prise PHONO
de votre ampli ?
Est-ce que le commutateur de l’égaliseur est en position [PHONO] alors
que la platine est reliée à la prise
AUX de votre ampli ?
Les connexions gauche et droite de
chaque appareil sont-elles inversées ?
Y a-t-il un appareil électrique, tel
qu’une lampe fluorescente, ou son
cordon d’alimentation près du câble
de connexion ?
La pression de la pointe de lecture
est-elle correctement réglée ?
Le bras est-il équilibré horizontalement ?
Branchez correctement le cordon d’alimentation fourni sur
une prise d’alimentation.
détachée, remontez-la comme indiqué au paragraphe
Montage. (Page 4 )
remplacez-la par une courroie neuve.
Raccordez correctement les câbles audio.
Nettoyez les prises et les fiches avant d’effectuer les raccordements.
Fixez correctement le porte-cellule.
Si la platine est reliée à une prise PHONO, placez le commutateur de l’égaliseur en position [PHONO].
Si la platine est reliée à une prise AUX, placez le commutateur de l’égaliseur en position [LINE]. (Veillez à régler le
volume de votre ampli au minimum avant de changer la
position du commutateur de l’égaliseur.)
Raccordez correctement le câble audio et les fils conducteurs du porte-cellule.
Placez le cordon d’alimentation de la lampe fluorescente
ou tout autre appareil aussi loin que possible.
Faites correspondre le contrepoids d’équilibrage avec la
valeur de la pression de la pointe de lecture appropriée
pour votre cellule.
Tournez le contrepoids d’équilibrage jusqu’à ce que le bras
de lecture devienne horizontal.
Problème Vérification Solution
La pointe de lecture saute. La pression de la pointe de lecture
Le bras s’arrête en cours de
lecture et n’avance plus.
Le volume sonore est faible
ou fort.
est-elle correctement réglée ?
Le disque est-il déformé ou a-t-il des
rayures ?
L’extrémité de la pointe de lecture
est-elle très poussiéreuse ?
L’antipatinage est-il réglé correctement ?
La hauteur du bras est-elle réglée
correctement ?
Y a-t-il des rayures sur le disque ? Vérifiez l’état du disque.
Le bras est-il en contact avec
quelque chose ?
La connexion à l’amplificateur
est-elle appropriée pour le type de
cellule (sortie) ?
Faites correspondre le contrepoids d’équilibrage avec la
valeur de la pression de la pointe de lecture appropriée
pour votre cellule.
Vérifiez l’état du disque.
Retirez le porte-cellule avec la cellule installée et utilisez
une petite brosse souple ou un pinceau pour enlever
soigneusement la poussière, etc. de l’extrémité de la pointe
de lecture.
Réglez l’antipatinage correctement.
Réglez la hauteur du bras correctement.
Vérifiez autour du bras. Retirez l’obstacle, le cas échéant.
Raccordez correctement les câbles de liaison.
Précautions d’emploi
À propos de la condensation
Des gouttelettes d’eau (condensation) peuvent se former à l’intérieur de l’appareil (sur les pièces et les lentilles)
en hiver, par exemple, si vous transportez sans transition l’appareil d’un endroit froid dans une pièce chaude,
ou si la température de la pièce où se trouve l’appareil augmente rapidement (un appareil de chauffage, par
exemple, est mis en marche). Cet appareil ne fonctionne pas correctement et la lecture n’est pas possible si de la
condensation s’est formée à l’intérieur. Laissez l’appareil éteint pendant 1 ou 2 heures à la température ambiante
(selon l’intensité de la condensation). Les gouttelettes d’eau s’évaporeront et la lecture sera de nouveau possible.
De la condensation peut aussi se former en été si l’appareil est exposé à l’air d’un climatiseur, etc. Dans ce cas,
installez l’appareil à un autre endroit.
Lors du transport de l’appareil à un autre endroit
Utilisez les matériaux d’emballage d’origine pour emballer l’appareil.
Si vous ne disposez pas des matériaux d’emballage d’origine, effectuez sans faute les opérations suivantes.
! Démontez le couvre-plateau et le plateau et emballez-les soigneusement.
! Démontez le porte-cellule et le contrepoids d’équilibrage du bras et emballez-les soigneusement.
! Utilisez le serre-bras pour fixer le bras de lecture et utilisez du ruban adhésif pour le maintenir fermement en
place.
! Enveloppez l’appareil principal dans une couverture ou du papier souple pour ne pas l’endommager.
10
Page 21

03
Divers
Entretien de chaque élément
Lors du montage et du démontage du porte-cellule, éteignez l’amplificateur.
Tenter d’effectuer une telle opération alors que le volume est fort pourrait provoquer l’endommagement du
haut-parleur.
! Retirez le porte-cellule avec la cellule installée et utilisez une petite brosse souple ou un pinceau pour enlever
soigneusement la poussière, etc. de l’extrémité de la pointe de lecture.
! Utilisez un nettoyant pour disques de bonne qualité pour nettoyer les disques.
! Utilisez un chiffon doux ou quelque chose de similaire pour nettoyer la borne du porte-cellule, puis fixez-le à
nouveau au bras de lecture.
Nettoyage du capot anti-poussière, etc.
Utilisez un chiffon doux pour nettoyer le capot anti-poussière et le boîtier.
! Ne nettoyez pas le capot anti-poussière pendant la lecture. Le bras de lecture pourrait être attiré par le capot
anti-poussière à cause de l’électricité statique.
À propos des marques commerciales et des marques déposées
! Pioneer est une marque déposée de PIONEER CORPORATION.
Les noms de sociétés et de produits mentionnés ici sont des marques commerciales de leurs détenteurs
respectifs.
Spécifications
Alimentation ...................................................................................................................... CA 220 V à 240 V, 50 Hz/60 Hz
Consommation ..............................................................................................................................................................2 W
Poids de l’appareil principal ..................................................................................................................................... 5,6 kg
Dimensions maximales ............................................................................... 435 mm (L) × 110 mm (H) × 372,6 mm (P)
Température de fonctionnement tolérée ................................................................................................. +5 °C à +35 °C
Humidité de fonctionnement tolérée ...........................................................................5 % à 85 % (sans condensation)
Plateau
Méthode d’entraînement ..................................................................................... Système d’entraînement par courroie
Moteur ............................................................................................................................ Servomoteur à courant continu
Vitesse de rotation ........................................................................................................................33 1/3 tr/min, 45 tr/min
Fluctuation de vitesse ................................................................................................. 0,1 % ou moins WRMS (JIS WTD)
Rapport S/B ..................................................................................................................................................60 dB (DIN-B)
Plateau ...................................................................................................................................................Aluminium moulé
Bras de lecture
Type de bras...................................................................................... Bras de lecture de type droit, équilibrage statique
Longueur effective ............................................................................................................................................. 221,5 mm
Surplomb ................................................................................................................................................................. 19 mm
Plage variable de la pression de la pointe de lecture .....................................................0 g à 4,0 g (1 graduation 0,1 g)
Poids de la cellule approprié .................................................................................................... 4,5 g à 9,5 g (une cellule)
Type de cellule ......................................................................................................................................................Type MM
Poids du porte-cellule ................................................................................................10,0 g (y compris les vis et écrous)
Tension de sortie
PHONO .....................................................................................................................................................................2,5 mV
LINE..........................................................................................................................................................................150 mV
! Les caractéristiques et la présentation peuvent être modifiées, sans avis préalable, dans un souci
d’amélioration.
! © 2014 PIONEER HOME ELECTRONICS CORPORATION. Tous droits de reproduction et de traduction
réservés.
Français
11
Page 22
Mischen Sie dieses Produkt, wenn Sie es entsorgen wollen, nicht mit gewöhnlichen Haushaltsabfällen. Es
P
elektronischen P
zurückgeben (wenn sie ein ähnliches neues P
Bitte wenden Sie sich in den Ländern
Entsorgung an die örtliche K
Auf diese W
und W
Gesundheit vermieden werden
WARNUNG
Dieses Gerät ist nicht wasserdicht. Zur
Ve
Stromschlag keine Behälter mit Flüssigkeiten
(z.B. Blumenvasen und -töpfe) in die Nähe des
Gerätes bringen und dieses vor
Spritzwasse
WARNUNG
Keine Quellen offener Flammen (z.B. eine
brennende Ke
Betriebsumgebung
Betriebstemperatur und
Betriebslu
+5 °C bis +35 °C, 85 % rel.
(V
Eine Aufstellung dieses Gerät an einem
unzureichend belü
heißen Ort ist zu vermeide
weder direkter Sonneneinstrahlung noch
starken K
zschluss oder elektrischen
WARNUNG
Kleine
Kleinkindern und Kindern aufbewahre
unbeabsichtigtem
unver
e
VORSICHTSHINWEIS ZUR BELÜFTUNG
Bei der Aufstellung dieses Gerätes muss für
einen ausreichenden
,
um eine einwandfreie Wärmeabfuhr zu
gewährleisten (mindestens 15 cm oberhalb des
Gerätes, 5 cm hinter dem Gerät und jeweils 5
cm an der Seite des Gerätes)
gibt ein getrenntes Sammelsystem für gebrauchte elektronische Produkte, über das die richtige
Behandlung, Rückgewinnung und Wiederverwertung gemäß der bestehenden Gesetzgebung gewährleistet
wird.
rivathaushalte in den Mitgliedsstaaten der EU, in der Schweiz und in Norwegen können ihre gebrauchten
iederverwertung unterzogen wird, und so mögliche negative Einflüsse auf die Umwelt und die menschliche
rmeidung der Gefahr von Brand und
rodukte an vorgesehenen Sammeleinrichtungen kostenfrei zurückgeben oder aber an einen Händler
, die oben nicht aufgeführt sind, hinsichtlich der korrekten Verfahrensweise der
ommunalverwaltung.
eise stellen Sie sicher, dass das zu entsorgende Produkt der notwendigen Behandlung, Rückgewinnung
.
Tropfwasser,
r, Regen und Nässe schützen.
rze) auf dieses Gerät stellen.
entilationsschlitze nicht blockiert)
ftfeuchtigkeit:
unstlichtquellen ausgesetzt werden.
ACHTUNG
Daher sollte das Gerät so aufgestellt werden,
dass stets ein unbehinderter Zugang zur
Netzsteckdose gewährleistet ist, damit der
Netzstecker in einer Notsituation sofort
abgezogen werden kann. Um Brandgefahr
auszuschließen, sollte der Netzstecker vor
einem längeren Nichtgebrauch des Gerätes,
beispielsweise während des Urlaubs,
grundsätzlich von der Netzsteckdose
getrennt werden.
Feuchte max.
fteten, sehr feuchten oder
n, und das Gerät darf
D3-4-2-1-7c*_A1_De
D3-4-2-2-2a*_A1_De
rodukt kaufen).
D3-4-2-1-3_A1_De
D3-4-2-1-7a_A1_De
K058b_A1_De
ACHTUNG
UM SICH NICHT DER GEFAHR EINES
ELEKTRISCHEN SCHLAGES AUSZUSETZEN,
DÜRFEN SIE NICHT DEN DECKEL (ODER DIE
RÜCKSEITE) ENTFERNEN. IM
GERÄTEINNEREN BEFINDEN SICH KEINE
VOM BENUTZER REPARIERBAREN TEILE.
ÜBERLASSEN SIE REPARATUREN DEM
QUALIFIZIERTEN KUNDENDIENST.
D3-4-2-1-1_B1_De
VORSICHT MIT DEM NETZKABEL
Fassen Sie das Netzkabel immer am Stecker.
Ziehen Sie nicht am Kabel selbst, und fassen
Sie das Netzkabel niemals mit nassen Händen
an, da dies einen Kur
Schlag verursachen kann. Stellen Sie nicht das
Gerät, Möbelstücke o.ä. auf das Netzkabel;
sehen Sie auch zu, dass es nicht eingeklemmt
wird. Machen Sie niemals einen Knoten in das
Netzkabel, und binden Sie es nicht mit anderen
Kabeln. Das Netzkabel sollte so gelegt werden,
dass niemand darauf tritt. Ein beschädigtes
Netzkabel kann einen Brand oder elektrischen
Schlag verursachen. Prüfen Sie das Netzkabel
von Zeit zu Zeit. Sollte es beschädigt sein,
wenden Sie sich an Ihre nächste autorisierte
PIONEER-Kundendienststelle oder Ihren
Händler, um es zu ersetzen.
S002*_A1_De
Teile außerhalb der Reichweite von
n. Bei
Verschlucken ist
züglich ein Arzt aufzusuchen.
D41-6-4_A1_D
Freiraum gesorgt werden
.
D3-4-2-1-7d*_A1_De
Dieses Gerät ist für den Heimgebrauch
vorgesehen. Falls bei Einsatz zu einem
anderem Zweck (z.B. Langzeitgebrauch zu
gewerblichen Zwecken in einem Restaurant
oder Betrieb in einem Fahrzeug bzw. Schiff)
eine Funktionsstörung auftritt, die eine
Reparatur des Gerätes erforderlich macht,
werden die Reparaturkosten dem Kunden
selbst dann in Rechnung gestellt, wenn die
Garantiefrist noch nicht abgelaufen ist.
K041_A1_De
2
Page 23

Herzlichen Glückwunsch zum Kauf dieses Pioneer-Produkts. Lesen Sie sich diese
Bedienungshinweise sorgfältig durch, um sich mit der Bedienung Ihres Geräts vertraut
zu machen.
Inhaltsverzeichnis
01 Vor der Inbetriebnahme
Merkmale.............................................................................................................................................................................4
Überprüfung des Verpackungsinhalts ............................................................................................................................. 4
Montage ..............................................................................................................................................................................4
02 Bedienung
Bezeichnungen und Funktionen der Bauteile ................................................................................................................. 6
Einstellung ..........................................................................................................................................................................6
Anschluss der Geräte ......................................................................................................................................................... 7
Wiedergabe ......................................................................................................................................................................... 8
Anhalten der Wiedergabe .................................................................................................................................................. 8
Beenden der Wiedergabe .................................................................................................................................................. 8
Zusätzliche Informationen ................................................................................................................................................. 8
03 Sonstiges
Fehlersuche .......................................................................................................................................................................10
Vorsichtshinweise ............................................................................................................................................................10
Wartung der einzelnen Teile ............................................................................................................................................10
Warenzeichen und eingetragene Warenzeichen ..........................................................................................................11
Technische Daten .............................................................................................................................................................11
Deutsch
3
Page 24

01
WARNUNG
Kleine
und Kindern aufbewahre
Ve
e
Vor der Inbetriebnahme
Merkmale
Einfach zu bedienender, vollautomatischer Plattenspieler
Sie wählen die Größe der Schallplatte aus und starten mit der [START]-Taste den Abspielvorgang. Der Tonarm
kehrt nach dem Abspielen der Schallplatte vollautomatisch in die Ausgangsstellung zurück.
Stabile Wiedergabe durch niedrigen Gehäuseschwerpunkt
Eine Metallplatte im Gehäuseboden senkt den Schwerpunkt des gesamten Gehäuses und stabilisiert den
Abspielvorgang auch dann, wenn Schwingungen von außen an das Gerät getragen werden.
Mit zuschaltbarem Equalizer
Der Equalizer ermöglicht den direkten Anschluss des Plattenspielers an Verstärker ohne PHONO-Buchse. Die
Funktion ist abschaltbar für den Fall, dass der Verstärker selbst eine entsprechende Vorstufe besitzt.
Mit hochwertigem MM-Tonabnehmer
Durch den beinhalteten Tonabnehmer ist Ihr Plattenspieler sofort einsatzbereit.
Mit mittelstarker Gummimatte
Die 5 mm starke Gummimatte unterdrückt äußere Schwingungen und stabilisiert die Wiedergabe, indem sie die
Haftung zwischen Schallplatte und Plattenteller verbessert.
Unaufdringliches Design
Das in Optik und Flächengestaltung in sich ausgewogene und dezente Design des Plattenspielers harmoniert
unschwer mit anderen Komponenten Ihrer Anlage und Objekten im Raum.
Abtrennbares Netzkabel
Gegen umständliches Kabelwirrwarr – das Kabel kann zum Versetzen des Plattenspielers direkt am Gerät
getrennt werden.
Teile außerhalb der Reichweite von Kleinkindern
n. Bei unbeabsichtigtem
rschlucken ist unverzüglich ein Arzt aufzusuchen.
D41-6-4_A1_D
Montage
! Entfernen Sie den Drahtbinder am Tonarm erst, nachdem der Plattenspieler fertig zusammengebaut ist.
! Schließen Sie das Netzkabel erst an, nachdem der Plattenspieler zusammengebaut und alle Anschlüsse zu
anderen Geräten hergestellt wurden.
1 Montieren Sie den Plattenteller.
Setzen Sie den Plattenteller auf den Plattenstift.
! Setzen Sie den Plattenteller sanft auf dem Hauptgerät ab, und lassen Sie den Plattenteller auch sonst nicht
fallen.
Überprüfung des Verpackungsinhalts
Überprüfen Sie bitte, ob Sie das folgende mitgelieferte Zubehör vollständig erhalten haben:
! Plattenteller
! Plattentellerauflage
! Abdeckhaube mit abnehmbaren Scharnieren
! Adapter für EPs
! Gegengewicht
! Tonabnehmerkopf mit Tonabnehmer
! Ersatzkabeldrähte
! Netzkabel
! Bedienungsanleitung (dieses Dokument)
! Garantieblatt
2 Drehen Sie den Plattenteller so, dass durch das viereckige Loch mit dem Bändchen zum
Greifen des Riemens die Rolle sichtbar ist.
4
Page 25

01
Vor der Inbetriebnahme
3 Greifen Sie mit dem Bändchen den Riemen, und setzen Sie den Riemen mittig außen um
die Rolle.
1
2
3
4
1 Rolle
2 Riemen
3 Bändchen
4 Viereckiges Loch
4 Nehmen Sie das Bändchen ab.
5 Drehen Sie den Plattenteller langsam fünf oder sechs Umdrehungen.
Prüfen Sie, dass der Riemen richtig in der Mitte der Rolle sitzt.
6 Legen Sie die Plattentellerauflage auf.
! Die Matte hat eine Ober- und eine Unterseite. Legen Sie die Matte mit dem Pioneer-Logo nach unten auf den
Plattenteller.
7 Bringen Sie den Tonabnehmerkopf an.
Bauen Sie den Tonabnehmerkopf mit Tonabnehmer an den Tonarm. Richten Sie den Tonabnehmerkopf dann
gerade, und ziehen Sie die Gegenmutter an.
8 Bringen Sie das Gegengewicht an.
Befestigen Sie das Gegengewicht am hinteren Schaft des Tonarms.
9 Bringen Sie die Abdeckhaube an.
Setzen Sie die Abdeckhaube mit den Scharnieren in die Halter an der Rückseite des Plattenspielers.
PHONO LINE
! Schieben Sie beide Scharniere ganz ein.
! Zum Abnehmen öffnen Sie die Abdeckhaube ganz, fassen in der Nähe der Scharnieraufnahmen an und
ziehen die Abdeckhaube von den Scharnieren.
AC IN
10 Entfernen Sie den Drahtbinder am Tonarm.
Nachdem der Plattenspieler zusammengebaut ist, entfernen Sie den Drahtbinder am Tonarm.
Deutsch
5
Page 26
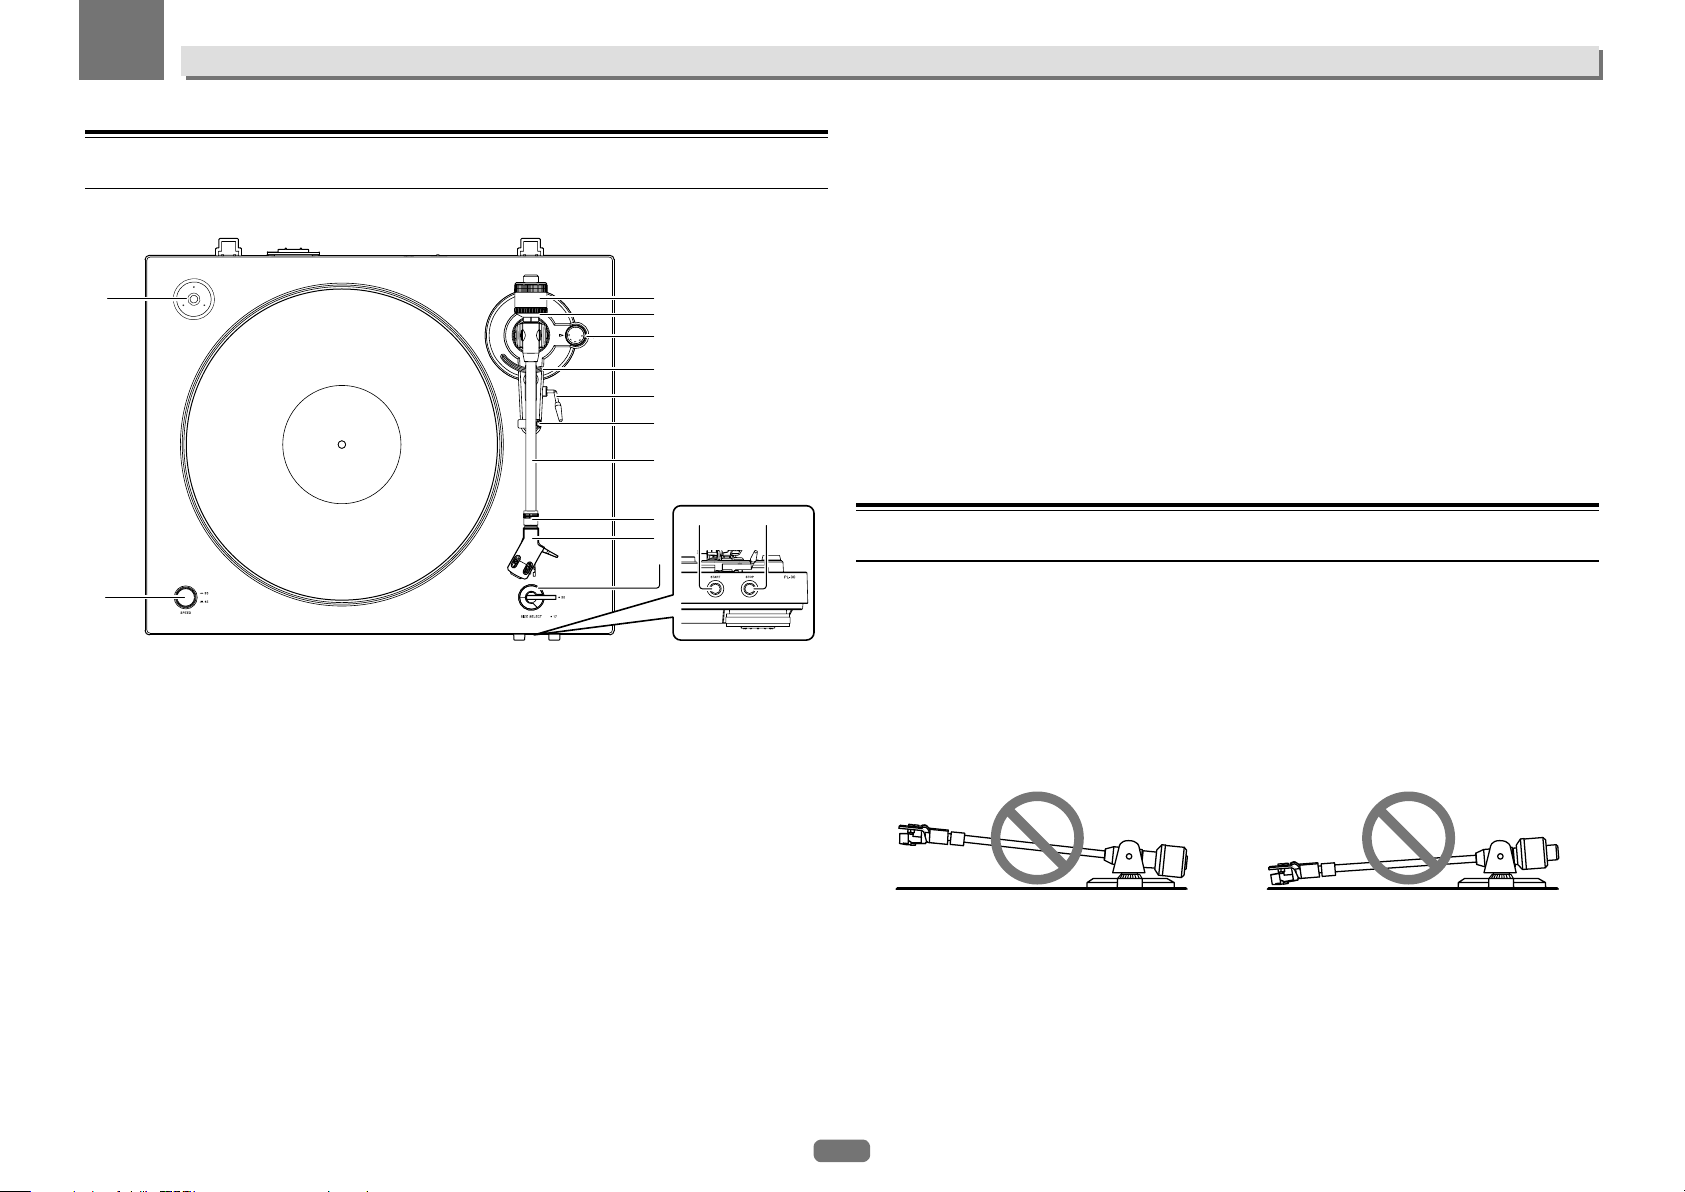
02
23
Bedienung
Bezeichnungen und Funktionen der Bauteile
Oberseite
e
1
1 SPEED-Taste
Stellt die Drehgeschwindigkeit auf die abzuspielende Schallplatte ein.
2 START-Taste
Startet die Drehung des Plattentellers.
3 STOP-Taste
Hält die Drehung des Plattentellers an.
4 SIZE SELECT-Hebel
Wählt die Größe der abzuspielenden Schallplatte an.
5 Tonabnehmerkopf
Wird mit angebrachtem Tonabnehmer verwendet.
6 Gegenmutter
Hält den angebrachten Tonabnehmer.
7 Tonarm
8 Tonarmstütze
Stützt den Tonarm.
9 Tonarmhebel
Wenn der Hebel nach oben gezogen wird, geht der Tonarm nach oben. Wenn der Hebel nach unten gedrückt
wird, geht der Tonarm nach unten.
a Tonarmheber
Diese Vorrichtung hebt und senkt den Tonarm und wird mit dem Tonarmhebel bedient.
b ANTI-SKATING-Drehregler
Beim Abspielen einer Schallplatte wird die Nadelspitze durch die sogenannte Skating-Kraft in Richtung
d
K
A
S
-
T
I
I
T
N
N
G
A
c
b
a
9
8
7
6
5
Plattenmitte gezogen. Zum Ausgleich dieser Kraft stellen Sie den Drehregler entsprechend dem Auflagedruck
der Nadel ein.
c Nadeldruckeinstellring
Dient zur Anpassung auf den Nadeldruck des Tonabnehmers.
d Gegengewicht
Gleicht das Gewicht des Tonarms aus und gleicht den Nadeldruck an.
e Adapter für EPs
Wird zum Abspielen von normalen EPs benutzt.
Einstellung
4
Einstellen des Tonarmgewichts
Vorbereitung:
! Bei Tonabnehmern mit abnehmbarer Nadelabdeckung entfernen Sie die Abdeckung.
! Drücken Sie den Tonarmhebel nach unten.
1 Stellen Sie den [ANTI-SKATING]-Drehregler auf „0“.
2 Heben Sie den Tonarm von der Tonarmstütze, und stellen Sie das Gegengewicht so ein,
dass der Tonarm waagerecht steht.
Drehen Sie das Gegengewicht, bis der Tonarm annähernd waagerecht steht.
! Achten Sie beim Bewegen des Tonarms darauf, dass die Nadelspitze nicht mit dem Plattenteller oder ande-
rem in Berührung kommt.
Gegengewicht zu weit zurückgedreht Gegengewicht zu weit vorgedreht
6
Page 27

02
Bedienung
Einstellen des Nadeldrucks
1 Setzen Sie den Tonarm auf die Tonarmstütze zurück.
2 Stellen Sie die „0“ am Nadeldruckeinstellring auf die Mittellinie am hinteren Tonarmschaft.
Verhindern Sie mit dem Finger, dass sich das Gegengewicht bewegt, und drehen Sie den Nadeldruckeinstellring
so, dass die Zahl „0“ auf der schwarzen Mittellinie am hinteren Tonarmschaft steht.
3 Stellen Sie den Nadeldruck ein.
Zur Einstellung des Nadeldrucks entsprechend Ihrem Tonabnehmer drehen Sie das Gegengewicht.
! Zusammen mit dem Gegengewicht dreht der Nadeldruckeinstellring. Stellen Sie den Nadeldruck anhand der
Anzeige am Einstellring passend ein.
! Der passende Nadeldruck für den beinhalteten Tonabnehmer ist 3,5 g. Stellen Sie die „3,5“ ein.
Anschluss der Geräte
Anschluss der Geräte
! Schalten Sie das Gerät aus, und trennen Sie das Netzkabel von der Netzsteckdose, bevor Sie Verbindungen
herstellen oder ändern.
! Beachten Sie die Bedienungsanleitung der anzuschließenden Komponente.
! Schließen Sie das Netzkabel an, nachdem alle Anschlüsse zwischen Geräten hergestellt sind.
Beschreibung der Buchsen
PHONO LINE
1 Equalizer-Schalter
Stellen Sie diesen Schalter je nach Audio-Eingangsbuchse des Vor-/Hauptverstärkers oder einer anderen
Komponente ein.
2 Cinch-Ausgangsstecker
Zum Anschluss an die Audio-Eingangsbuchse des Vor-/Hauptverstärkers oder einer anderen Komponente.
3 AC IN-Buchse
Stellt die Verbindung zum Stromnetz mit dem mitgelieferten Netzkabel her. Schließen Sie das Netzkabel erst
an, nachdem alle Verbindungen zwischen Geräten hergestellt sind.
! Verwenden Sie immer das mitgelieferte Netzkabel.
AC IN
31 2
Deutsch
Einstellen der Anti-Skating-Funktion
Diese Einstellung soll verhindern, dass die Nadel springt.
1 Stellen Sie die gleiche Position auf der Skala wie für den Nadeldruck ein.
2 Drehen Sie den [ANTI-SKATING]-Drehregler, bis die Bezugsmarkierung auf demselben
Wert steht, den Sie als Auflagedruck der Tonabnehmernadel eingestellt haben.
A
K
T
S
-
I
I
N
T
G
N
A
Anschließen an Vor-/Hauptverstärker und Komponenten
1 Bewegen Sie den Equalizer-Schalter in die entsprechende Stellung.
PHONO: Beim Anschluss an eine PHONO-Eingangsbuchse (der eingebaute Equalizer des Plattenspielers wird
nicht benutzt)
LINE: Beim Anschluss an eine andere als PHONO-Eingangsbuchse (der eingebaute Equalizer des Plattenspielers
wird benutzt)
2 Verbinden Sie den Cinch-Ausgangsstecker mit der Eingangsbuchse des Vor-/
Hauptverstärkers oder anderen Komponente.
3 Schließen Sie das Netzkabel an.
Stellt die Verbindung zum Stromnetz mit dem mitgelieferten Netzkabel her. Schließen Sie das Netzkabel erst an,
nachdem alle Verbindungen zwischen Geräten hergestellt sind.
! Prüfen Sie vor dem Anschluss an den Netzanschluss eines anderen Geräts die angegebene Wattleistung.
(Dieses Gerät hat eine Leistungsaufnahme von 2 W.)
! Wenn der Plattenspieler beim Einstecken des Netzkabels anläuft, drücken Sie die [STOP] Taste.
7
Page 28
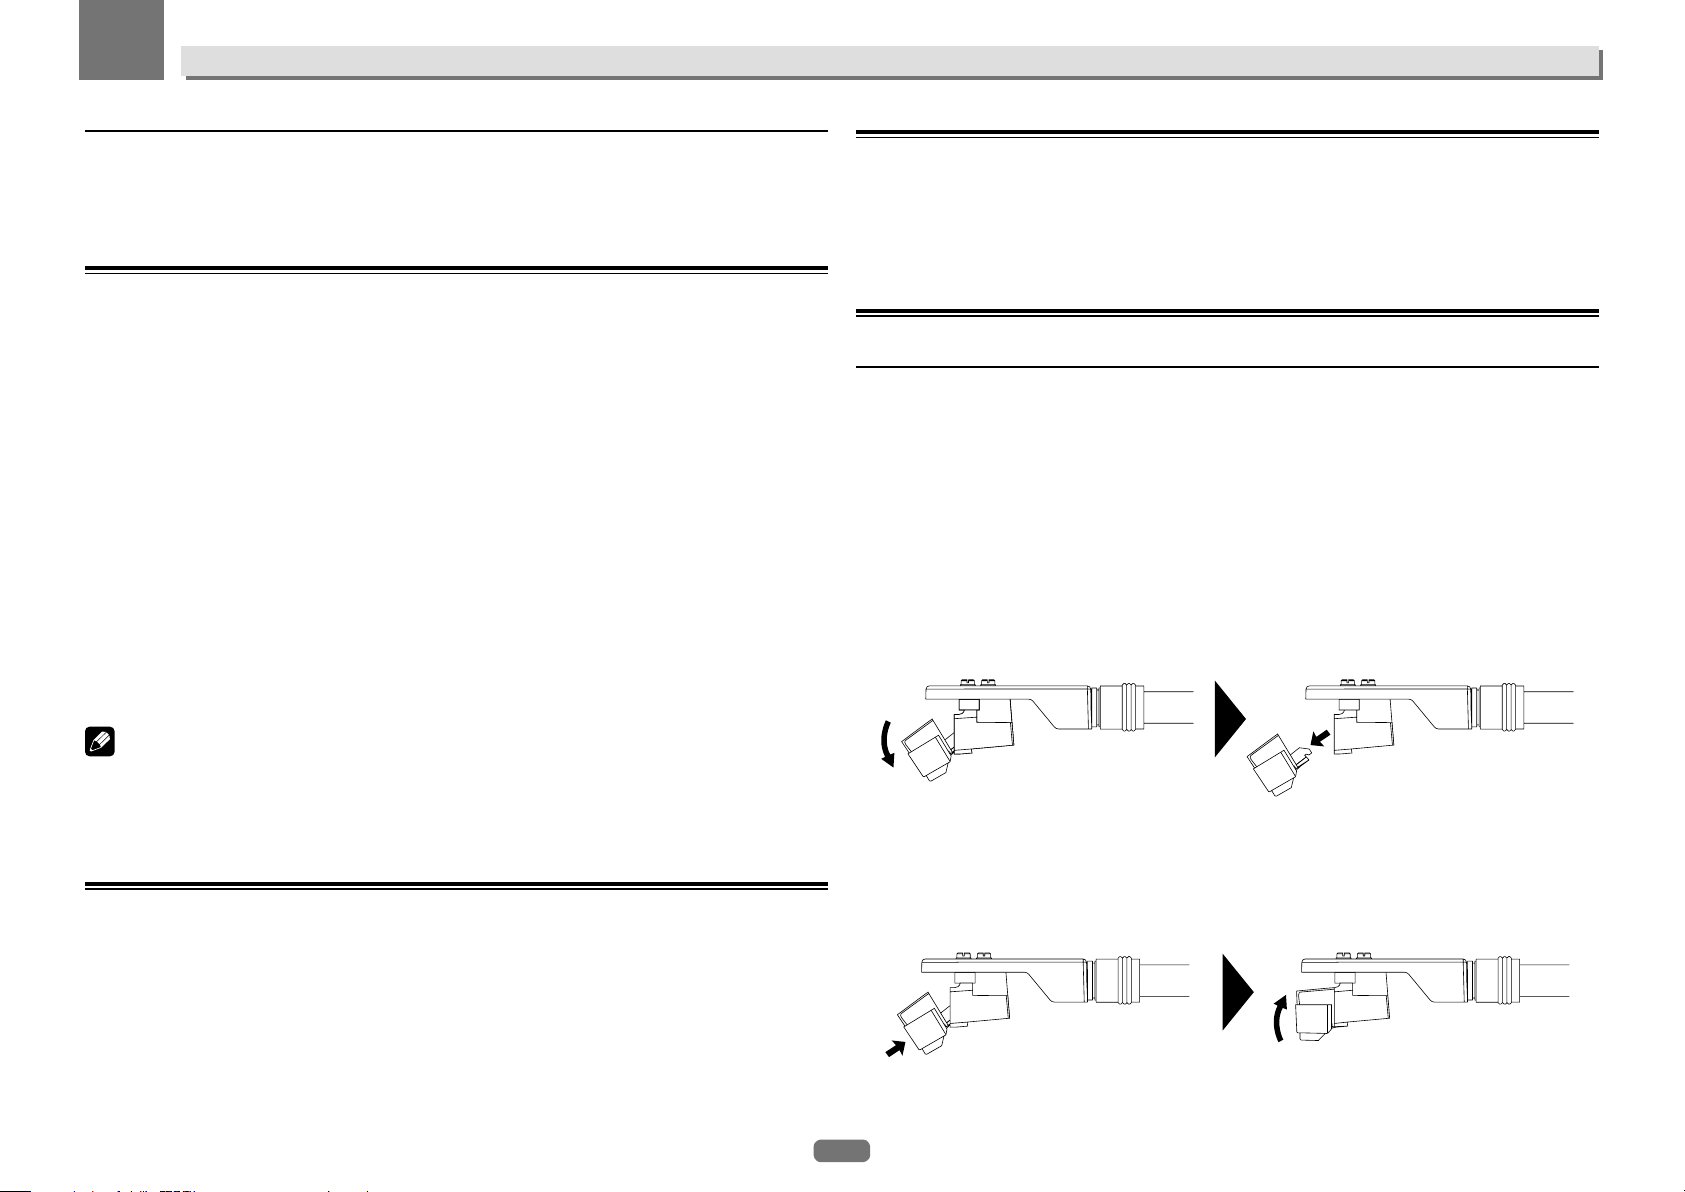
02
Bedienung
Aufstellort
Stellen Sie das Gerät auf eine ebene, erschütterungsfreie Fläche.
! Ein Aufstellort möglichst weit vom Lautsprechersystem entfernt ist ideal.
! Wenn das Gerät sehr nah an einem Radio (mit MW/UKW-Empfang) steht, kann das Radio Rauschen verursa-
chen. Halten Sie den Abstand möglichst groß.
Wiedergabe
Vorbereitung:
! Legen Sie eine Schallplatte auf den Plattenteller.
! Entfernen Sie die Nadelabdeckung, und achten Sie darauf, die Nadelspitze nicht zu berühren.
1 Drücken Sie zum Einstellen der Abspielgeschwindigkeit die [SPEED]-Taste.
Zum Abspielen einer 45-U/min-Schallplatte ist die Taste nicht eingedrückt [v], für 33 1/3-U/min-Schallplatten
drücken Sie die Taste ein [w].
! Zum Abspielen einer normalen EP verwenden Sie den EP-Schallplattenadapter auf dem Plattenstift.
2 Wählen Sie mit dem [SIZE SELECT]-die Schallplattengröße aus.
Zum Abspielen von 17 cm-Schallplatten stellen Sie den Hebel auf [17], für 30 cm-Schallplatten auf [30].
! Zum Abspielen einer normalen EP verwenden Sie den EP-Schallplattenadapter auf dem Plattenstift.
3 Drücken Sie die Taste [START] länger als 1 Sekunde.
Der Plattenteller läuft an, und die Wiedergabe startet automatisch.
! Nach der Wiedergabe kehrt der Tonarm in die Ausgangsstellung zurück, und der Plattenteller hält automa-
tisch an.
! Wenn der Plattenspieler nicht mehr in Benutzung ist, bringen Sie zum Schutz der Nadelspitze die
Nadelabdeckung an.
! Dieses Gerät besitzt eine Funktion, die den Tonarm automatisch in seine Ausgangsstellung zurückkehren
lässt, sobald er nach dem Abspielen der Schallplatte einen bestimmten Punkt erreicht. Bei Schallplatten in
Standardgrößen funktioniert dies normal, während es bei Schallplatten, die bis an diesen Punkt Rillen haben,
sein kann, dass die Rückkehrfunktion ausgelöst wird, bevor die Wiedergabe beendet ist.
Beenden der Wiedergabe
1 Ziehen Sie den Tonarmhebel nach oben, bewegen Sie den Tonarm über die Tonarmstütze,
und drücken Sie den Tonarmhebel nach unten.
2 Drücken Sie die [STOP]-Taste.
! Wenn der Plattenspieler nicht mehr in Benutzung ist, bringen Sie zum Schutz der Nadelspitze die
Nadelabdeckung an.
Zusätzliche Informationen
Austauschen der Nadel
Die beinhaltete Nadel hat eine Lebensdauer von etwa 400 Stunden. Um Schäden an wertvollen Schallplatten
zu vermeiden, tauschen Sie die Nadel rechtzeitig aus. Ersatznadeln erhalten Sie dort, wo Sie den Plattenspieler
gekauft haben, oder von einer Reparaturwerkstätte. Geben Sie ausdrücklich an, dass Sie eine Ersatznadel für den
PL-30-K benötigen.
! Schalten Sie zum Austausch der Nadel den Verstärker aus, und trennen Sie das Netzkabel des Plattenspielers.
! Die Nadelspitze ist sehr empfindlich, gehen Sie bitte vorsichtig vor. Staub auf der Nadelspitze können Sie mit
einem weichen Pinsel entfernen.
! Bei ausgebautem Tonabnehmer fällt das Austauschen der Nadel leichter.
Ausbauen der austauschbaren Nadel
1 Halten Sie mit einer Hand den Tonabnehmer fest, und drücken Sie mit der anderen Hand
die austauschbare Nadel nach unten.
2 Ziehen Sie die Nadel vorsichtig in Pfeilrichtung ab.
Hinweise
! Während der Wiedergabe sollen der Tonarm und der Plattenteller nicht berührt und das Gerät nicht ausge-
schaltet werden.
! Das automatische Abspielsystem ist nicht für 25 cm-Schallplatten geeignet. In dem Fall bedienen Sie das
Gerät manuell. Wenn der Tonarm nach der Wiedergabe nicht in die Ausgangsstellung zurückkehrt, drücken
Sie die [STOP]-Taste.
Anhalten der Wiedergabe
Ziehen Sie den Tonarmhebel nach oben.
Die Nadel des Tonabnehmers hebt von der Schallplatte ab.
! Um die Wiedergabe fortzusetzen, drücken Sie den Tonarmhebel nach unten.
Einbauen der austauschbaren Nadel
1 Halten Sie mit einer Hand den Tonabnehmer fest, und schieben Sie mit der anderen Hand
die Befestigungsschiene der austauschbaren Nadel bis zum Anschlag in das Langloch des
Tonabnehmers.
2 Rasten Sie die Nadel nach oben hörbar ein.
8
Page 29

02
RL
RGLG
Bedienung
Austauschen des Tonabnehmers
Andere Tonabnehmer, mit denen Sie diesen Plattenspieler wahlweise ausstatten können, sollen ein Gewicht von
ca. 4,5 g bis 9,5 g haben.
Beim Kauf des Tonabnehmerkopfs als Einzelteil fragen Sie bei Ihrem Händler oder der Reparaturwerkstätte bitte
nach einem Tonabnehmerkopf speziell für den PL-30-K.
Ausbauen des Tonabnehmers
1 Lösen Sie die Gegenmutter, und nehmen Sie den Tonabnehmerkopf ab.
2 Lösen und entnehmen Sie die Befestigungsschrauben des Tonabnehmers.
Abringen des Tonabnehmers
1 Verbinden Sie die Kabeldrähte.
Achten Sie auf die richtige Zuordnung der farblich gekennzeichneten Kabel wie unten angegeben.
Farbe Funktion
Rot Rechter Kanal (R)
Weiß Linker Kanal (L)
Grün Rechter Kanal Masse (RG)
Blau Linker Kanal Masse (LG)
Oberseite
(Rückseite des Tonabnehmers)
2 Bringen Sie den Tonabnehmer an.
Um den nötigen Überstand zu erzielen, bauen Sie den Tonabnehmer so ein, dass die Nadelspitze die in der
Abbildung unten gezeigten ca. 45 mm Abstand von der Kante der Einbaufläche des Tonabnehmerkopfs (der
Gummischeibe) hat.
! Bei diesem Plattenspieler soll der Überstand 19 mm sein.
Rückseite
Vorderseite
Deutsch
3 Trennen Sie die Kabeldrähte tonabnehmerseitig.
45 mm
Parallel montieren.
Senkrecht montieren.
3 Befestigen Sie den Tonabnehmer mit den Befestigungsschrauben.
Hinweise
! Stellen Sie nach dem Auswechseln des Tonabnehmers Tonarm, Nadeldruck und Anti-Skating ein.
! Wenn, je nach Austausch-Tonabnehmer, Kabelschuh und Kabeldraht keine richtige Verbindung herstellen,
verwenden Sie die enthaltenen Ersatzkabeldrähte.
9
Page 30
03
Sonstiges
Fehlersuche
! Ziehen Sie die Tabelle unten hinzu, wenn Ihr Plattenspieler nicht normal funktioniert.
Wenn Sie das Problem nicht beheben können, wenden Sie sich bitte an unsere Kundendienstzentrale oder an
Ihren örtlichen Händler.
Problem Prüfen Abhilfe
Gerät schaltet nicht ein Ist das Netzkabel richtig angeschlos-
Plattenteller dreht nicht Ist der Riemen angelegt? Prüfen Sie Riemen und Rollen. Montieren Sie einen vom
Kein Ton oder schwacher
Ton
Klang verzerrt Steht der Equalizer-Schalter auf
Klang extrem leise Steht der Equalizer-Schalter auf
Linker und rechter Ton
vertauscht
Tieftöniges Brummen
(Summen oder Surren)
während der Wiedergabe
Nadelspitze setzt nicht auf
der Schallplatte auf
Nadel springt Ist der Nadeldruck richtig einge-
sen?
Ist der Riemen rissig oder gerissen? Prüfen Sie Riemen und Rollen. Tauschen Sie einen rissi-
Sind die Audiokabel richtig angeschlossen?
Sind Buchsen oder Stecker verschmutzt?
Ist der Tonabnehmerkopf richtig
montiert?
[LINE], obwohl der Plattenspieler an
die PHONO-Buchse eines Verstärkers angeschlossen ist?
[PHONO], wenn der Plattenspieler
an die AUX-Buchse eines Verstärkers angeschlossen ist?
Sind die Anschlüsse für links und
rechts an irgendeiner Komponente
vertauscht?
Befindet sich ein elektrisches Gerät
wie eine Neonlampe oder das zugehörige Netzkabel in der Nähe des
Anschlusskabels?
Ist der Nadeldruck richtig eingestellt?
Ist der Tonarm waagerecht ausgerichtet?
stellt?
Ist die Schallplatte verzogen oder
zerkratzt?
Hat sich an der Nadelspitze viel
Staub angesammelt?
Ist das Anti-Skating richtig eingestellt?
Ist die Tonarmhöhe richtig eingestellt?
Schließen Sie das mitgelieferte Netzkabel richtig an eine
Steckdose an.
Plattenteller gerutschten Riemen wie unter Montage
beschrieben. (Seite 4 )
gen oder gerissenen Riemen aus.
Schließen Sie die Audiokabel richtig an.
Reinigen Sie Buchsen und Stecker vor dem Herstellen von
Verbindungen.
Montieren Sie den Tonkopf richtig.
Wenn der Plattenspieler an eine PHONO-Buchse angeschlossen ist, stellen Sie den Equalizer-Schalter auf
[PHONO].
Zum Anschluss an eine AUX-Buchse stellen Sie den Equalizer-Schalter in die Stellung [LINE]. (Vor dem Versetzen
des Equalizer-Schalters die Lautstärke am Verstärker auf
ganz leise stellen.)
Verbinden Sie das Audiokabel und die Kabeldrähte des
Tonabnehmerkopfs vorschriftsmäßig.
Verlegen Sie das Netzkabel der Neonlampe, oder platzieren
Sie das anderes Gerät so weit wie möglich entfernt.
Stellen Sie das Gegengewicht auf den passenden Nadeldruck für Ihren Tonabnehmer ein.
Drehen Sie das Gegengewicht, bis der Tonarm waagerecht
steht.
Stellen Sie das Gegengewicht auf den passenden Nadeldruck für Ihren Tonabnehmer ein.
Überprüfen Sie den Zustand der Schallplatte.
Nehmen Sie den Kopf mit Tonabnehmer ab, und entfernen
Sie mit einer weichen Bürste oder einem Pinsel vorsichtig
Staub usw. von der Nadelspitze.
Stellen Sie das Anti-Skating richtig ein.
Stellen Sie die Tonarmhöhe richtig ein.
Problem Prüfen Abhilfe
Tonarm bleibt während der
Wiedergabe stehen
Lautstärke zu leise oder
zu laut
Ist die Schallplatte zerkratzt? Überprüfen Sie den Zustand der Schallplatte.
Stößt der Tonarm an ein Hindernis? Prüfen Sie den Bereich um den Tonarm, und entfernen Sie
Stimmt der Anschluss (die Ausgabe)
an den Verstärker für diesen Tonabnehmer?
ein etwaiges Hindernis.
Schließen Sie die Verbindungskabel richtig an.
Vorsichtshinweise
Kondensation
Wenn das Gerät im Winter von einem kalten Ort in einen warmen Raum gebracht wird oder die Temperatur
in dem Raum, in dem das Gerät steht, rasch steigt (durch Heizung oder dgl.), können sich im Gerät (auf
Funktionsteilen und Linsen) Wassertröpfchen (Kondensation) absetzen. Kondensation im Geräteinneren bedeutet, dass das Gerät nicht normal funktioniert und nicht einsetzbar ist. Lassen Sie das Gerät uneingeschaltet 1
bis 2 Stunden bei Raumtemperatur stehen (die genaue erforderliche Zeit ist je Ausmaß der Kondensation unterschiedlich). Die Wassertröpfchen verdunsten, und das Gerät wird einsatzbereit. Kondensation kann auch im
Sommer auftreten, z. B. wenn das Gerät dem direkten Luftstrom aus einer Klimaanlage oder dgl. ausgesetzt ist.
In dem Fall stellen Sie das Gerät an einem anderen Ort auf.
Transport des Geräts an einen anderen Ort
Verpacken Sie das Gerät in seiner Originalverpackung.
Wenn die Originalverpackung nicht mehr vorhanden ist:
! Bauen Sie Plattentellerauflage und Plattenteller aus, und verpacken Sie beide sorgfältig.
! Bauen Sie Tonabnehmerkopf und Gegengewicht vom Tonarm, und verpacken Sie beide sorgfältig.
! Sichern Sie den Tonarm mit der Tonarmhalterung, und verschließen Sie die Halterung mit Klebeband.
! Wickeln Sie das Hauptgerät zum Schutz vor Beschädigung in eine Decke oder weiches Papier.
Wartung der einzelnen Teile
Schalten Sie zum Anbringen und Abnehmen des Tonabnehmerkopfs den Verstärker aus.
Wenn Sie diesen Vorgang bei hoher Lautstärke vornehmen, kann der Lautsprecher Schaden nehmen.
! Nehmen Sie den Kopf mit Tonabnehmer ab, und entfernen Sie mit einer weichen Bürste oder einem Pinsel
vorsichtig Staub usw. von der Nadelspitze.
! Reinigen Sie Schallplatten mit einem geeigneten und hochwertigen Schallplattenreiniger.
! Reinigen Sie den Anschluss des Tonabnehmerkopfs mit einem weichen Tuch o. ä., und bauen Sie den
Tonabnehmer wieder an den Tonarm.
Reinigen der Abdeckhaube usw.
Reinigen Sie die Abdeckhaube und das Gehäuse mit einem weichen Tuch.
! Reinigen Sie die Abdeckhaube nicht während der Wiedergabe. Es kann sich statische Elektrizität aufbauen,
die den Tonarm gegen die Abdeckhaube zieht.
10
Page 31

03
Warenzeichen und eingetragene Warenzeichen
! Pioneer ist ein eingetragenes Warenzeichen der PIONEER CORPORATION.
Die hier erwähnten Produkt- oder Firmennamen sind Warenzeichen ihrer jeweiligen Eigentümer.
Technische Daten
Netzanschluss ................................................................................... 220 V bis 240 V Wechselspannung, 50 Hz / 60 Hz
Leistungsaufnahme ......................................................................................................................................................2 W
Gewicht des Hauptgeräts ......................................................................................................................................... 5,6 kg
Höchstabmessungen .................................................................................. 435 mm (B) × 110 mm (H) × 372,6 mm (T)
Betriebstemperaturbereich ................................................................................................................... +5 °C bis +35 °C
Zulässige Luftfeuchtigkeit ........................................................................................ 5 % bis 85 % (keine Kondensation)
Plattentellereinheit
Antriebsart ..................................................................................................................................................Riemenantrieb
Motor ..........................................................................................................................................Gleichstrom-Servomotor
Drehgeschwindigkeit ................................................................................................................... 33 1/3 U/min, 45 U/min
Gleichlaufschwankungen .....................................................................................0,1 % oder weniger WRMS (JIS WTD)
Signalrauschabstand ..................................................................................................................................60 dB (DIN-B)
Plattenteller .................................................................................................................................... Aluminiumdruckguss
Tonarmeinheit
Tonarm ...........................................................................................Gerader Tonarm mit statischem Gewichtsausgleich
Effektive Länge ................................................................................................................................................... 221,5 mm
Überstand ................................................................................................................................................................ 19 mm
Variabler Nadeldruckbereich ..................................................................................... 0 g bis 4,0 g (1 Skalenstrich 0,1 g)
Geeignetes Tonabnehmergewicht ................................................................... 4,5 g bis 9,5 g (einzelner Tonabnehmer)
Tonabnehmer ..................................................................................................................................................MM-System
Tonabnehmerkopfgewicht ..............................................................................10,0 g (einschl Schrauben und Muttern)
Ausgangsspannung
PHONO .....................................................................................................................................................................2,5 mV
LINE..........................................................................................................................................................................150 mV
! Technische Änderungen und Designänderungen dieses Produkts vorbehalten
! © 2014 PIONEER HOME ELECTRONICS CORPORATION. Alle Rechte vorbehalten.
Sonstiges
Deutsch
11
Page 32

Se si vuole eliminare questo prodotto, non gettarlo insieme ai rifiuti domestici. Esiste un sistema di raccolta
I privati cittadini dei paesi membri dell’UE, di Svizzera e Nor
elettronici usati ad appositi ser
Pe
In questo modo
prevenire gli effetti potenzialmente negativi sull’ambiente e sulla vita dell’uomo
ATTENZIONE
Questo apparecchio non è impermeabile.
prevenire pericoli di incendi o folgorazioni, non
posizionare nelle vicinanze di questo
apparecchio contenitori pieni di liquidi (quali
vasi da fiori, o simili), e non esporre
l’apparecchio a sgocciolii, schizzi, pioggia o
umidità.
ATTENZIONE
Pe
posizionare sull’apparecchio dispositivi con
fiamme vive (ad esempio una candela accesa, o
simili)
Condizioni ambientali di
funzionamento
Gamma ideale della temperatura ed umidità
dell’ambiente di funzionamento:
da +5 °C a +35 °C, umidità relativa inferiore
all‘85 % (fessure di ventilazione non bloccate
Non installare l’apparecchio in luoghi poco
ventilati, o in luoghi esposti ad alte umidità o
alla diretta luce del sole (o a sorgenti di luce
artificiale molto forti)
AMENTE A PERSONALE DI SERVIZIO
AVVERTIMENTO RIGUARDANTE IL
FILO DI ALIMENT
Pr
spina. Non tiratelo mai agendo per il filo stesso
e non toccate mai il filo con le mani bagnati,
perchè questo potrebbe causare cortocircuiti o
scosse elettriche. Non collocate l’unità, oppure
dei mobili sopra il filo di alimentazione e
controllate che lo stesso non sia premut
annodate mai il filo di alimentazione nè
collegatelo con altri fili. I fili di alimentazione
devono essere collocati in tal modo che non
saranno calpestati. Un filo di alimentazione
danneggiato potrebbe causare incendi o
scosse elettriche. Controllate il filo di
alimentazione regolarmente. Quando
localizzate un eventuale danno
più vicino centro assistenza autorizzato della
PIONEER oppure al vostro rivenditore per la
sostituzione del filo di alimentazione
ATTENZIONE
Conser
dei bambini e dei bebé. Se inghiottiti
accidentalmente, recarsi immediatemente dal
medic
AVVER
Installare l’apparecchio avendo cura di lasciare
un certo spazio all’intorno dello stesso per
consentire una adeguata circolazione dell’aria
e migliorare la dispersione del calore (almeno
15 cm sulla parte superiore, 5 cm sul retr
cm su ciascuno dei lati).
differenziata in conformità alle leggi che richiedono appositi trattamenti, recupero e riciclo.
vizi di raccolta o a un rivenditore (se si desidera acquistarne uno simile).
r i paesi non citati qui sopra, si prega di prendere contatto con le autorità locali per il corretto metodo di smaltimento.
, si è sicuri che il proprio prodotto eliminato subirà il trattamento, il recupero e il riciclo necessari per
vegia, possono restituire senza alcun costo i loro prodotti
r evitare il pericolo di incendi, non
.
.
Per
D3-4-2-1-3_A1_It
D3-4-2-1-7a_A1_It
)
D3-4-2-1-7c*_A1_It
.
K058b_A1_It
AVVERTENZA
Dal momento che il cavo di alimentazione
costituisce l’unico dispositivo di distacco
dell’apparecchio dalla sorgente di
alimentazione, il cavo stesso deve essere
staccato dalla presa di corrente alternata di
rete per sospendere completamente
qualsiasi flusso di corrente. Verificare quindi
che l’apparecchio sia stato installato in modo
da poter procedere con facilità al distacco del
cavo di alimentazione dalla presa di corrente,
in caso di necessità. Per prevenire pericoli di
incendi, inoltre, il cavo di alimentazione deve
essere staccato dalla presa di corrente
alternata di rete se si pensa di non utilizzare
l’apparecchio per periodi di tempo
relativamente lunghi (ad esempio, durante
una vacanza).
D3-4-2-2-2a*_A1_It
ATTENZIONE
PER EVITARE IL RISCHIO DI SCOSSE
ELETTRICHE, NON RIMUOVERE IL
COPERCHIO (O IL RETRO). NON CI SONO
PARTI INTERNE LA CUI MANUTENZIONE
POSSA ESSERE EFFETTUATA DALL’UTENTE. IN
CASO DI NECESSITÀ, RIVOLGERSI
ESCLUSIV
QUALIFICATO.
D3-4-2-1-1_B2_It
AZIONE
endete sempre il filo di alimentazione per la
o. Non
, rivolgetevi al
.
S002*_A1_It
vare i piccoli ricambi fuori dalla portata
o.
D41-6-4_A1_It
TENZA PER LA VENTILAZIONE
o, e 5
D3-4-2-1-7d*_A1_It
Questo prodotto è destinato esclusivamente
all'uso domestico. Eventuali disfunzioni
dovute ad usi diversi (quali uso prolungato a
scopi commerciali, in ristoranti, o uso in
auto o su navi) e che richiedano particolari
riparazioni, saranno a carico dell'utente,
anche se nel corso del periodo di garanzia.
K041_A1_It
2
Page 33

Grazie per aver acquistato questo prodotto Pioneer. Leggere attentamente questo
manuale di istruzioni per familiarizzarsi con l’uso dell’apparecchio.
Contenuto
01 Prima di iniziare
Funzionalità ......................................................................................................................................................................... 4
Controllo del contenuto della scatola ............................................................................................................................... 4
Montaggio ........................................................................................................................................................................... 4
02 Funzionamento
Nomi e funzioni dei componenti ....................................................................................................................................... 6
Regolazione ......................................................................................................................................................................... 6
Collegamento dell’apparecchio ........................................................................................................................................ 7
Riproduzione ....................................................................................................................................................................... 8
Pausa della riproduzione ................................................................................................................................................... 8
Arresto della riproduzione .................................................................................................................................................8
Informazioni aggiuntive .....................................................................................................................................................8
03 Altri
Risoluzione dei problemi .................................................................................................................................................10
Precauzioni per l’uso ........................................................................................................................................................10
Manutenzione delle parti .................................................................................................................................................10
Marchi di fabbrica e marchi di fabbrica registrati .........................................................................................................11
Specifiche ..........................................................................................................................................................................11
Italiano
3
Page 34

01
ATTENZIONE
Conser
bambini e dei bebé. Se inghiottiti accidentalmente,
recarsi immediatemente dal medico
D41-6-4_A1_It
Prima di iniziare
Funzionalità
Un giradischi completamente automatico e semplice da utilizzare
Una volta selezionata la dimensione del disco, è sufficiente premere il pulsante [START] per iniziare la riproduzione del disco stesso. Al termine, la funzione automatica del giradischi consente il ritorno del braccio alla posizione iniziale.
Stabile riproduzione dei dischi grazie al basso baricentro del telaio
La parte inferiore del giradischi presenta una piastra in metallo che conferisce al telaio un baricentro basso e lo
rende stabile durante la riproduzione dei dischi anche in presenza di vibrazioni esterne.
Dotato di un equalizzatore del suono che può essere attivato e disattivato
La presenza di questo equalizzatore del suono consente di collegare il giradischi direttamente ad amplificatori
non dotati di terminali PHONO. Se un amplificatore non possiede un equalizzatore del suono, questa funzione
può essere disattivata.
Fornito di una testina MM ad elevate prestazioni
Poiché la testina è già presente, puoi utilizzarlo immediatamente.
Dotato di un tappetino di medio spessore
Il tappetino avente spessore pari a 5 mm elimina le vibrazioni esterne e migliora il contatto tra il disco e la piastra,
consentendo una stabile riproduzione del disco stesso.
Stile sobrio
Il design e le finiture caratterizzano il suo profilo sobrio, che si armonizza sia con gli oggetti sia con l’ambiente
circostanti.
vare i piccoli ricambi fuori dalla portata dei
.
Montaggio
! Non rimuovere il laccio metallico che fissa il braccio finché il montaggio non è stato completato.
! Collegare il cavo di alimentazione dopo il montaggio del giradischi e dopo aver completato tutti i collegamenti
tra gli altri dispositivi.
1 Posizionare il piatto.
Posizionare il piatto sull’alberino centrale.
! Non urtare il piatto dell’unità principale e non farlo cadere.
Cavo di alimentazione rimovibile
I cavi non impediscono lo spostamento del giradischi, eliminando in questo modo eventuali problemi in fase di
scollegamento.
Controllo del contenuto della scatola
Controllare che siano stati inclusi i seguenti accessori in dotazione:
! Piatto
! Piastra del piatto
! Coperchio antipolvere con cerniere rimovibili
! Adattatore per dischi EP
! Contrappeso
! Portatestina con testina
! Cavi elettrici di ricambio
! Cavo di alimentazione
! Istruzioni per l’uso (questo documento)
! Foglio di garanzia
2 Ruotare il piatto in modo che il rullo sia visibile attraverso il foro quadrato con il nastro
adesivo per il fissaggio della fascia.
4
Page 35

01
Prima di iniziare
3 Pizzicare il nastro adesivo e posizionare la fascia oltre il rullo.
1
2
3
4
1 Rullo
2 Fascia
3 Nastro adesivo
4 Foro quadrato
4 Rimuovere il nastro adesivo.
5 Ruotare il piatto lentamente di cinque o sei giri.
Controllare che la fascia sia fissata correttamente al centro del rullo.
6 Posizionare la piastra del piatto.
! Il tappetino del piatto presenta un lato superiore ed uno inferiore. Posizionare il tappetino in modo che il lato
inferiore, sui cui è presente il logo Pioneer, sia rivolto verso il basso.
7 Fissare il portatestina.
Inserire il portatestina con la testina installata nel braccio. Quindi, mantenendo il portatestina in posizione orizzontale, serrare il controdado.
8 Fissare il contrappeso.
Fissare il contrappeso sull’asta posteriore del braccio.
9 Installare il coperchio antipolvere.
Inserire saldamente le cerniere del coperchio antipolvere nei supporti sulla parte inferiore del piatto.
PHONO LINE
! Inserire completamente entrambe le cerniere.
! Quando si rimuove il coperchio antipolvere, aprirlo completamente ed estrarlo tirandolo verso l’alto tenen-
dolo in corrispondenza delle parti di fissaggio.
AC IN
10 Rimuovere il laccio metallico che fissa il braccio.
Al termine del montaggio, rimuovere il laccio metallico che fissa il braccio.
Italiano
5
Page 36

02
23
Funzionamento
Nomi e funzioni dei componenti
Pannello superiore
e
1
1 Pulsante SPEED
Cambia la velocità in base al disco da riprodurre.
2 Pulsante START
Premere il pulsante per avviare la rotazione del piatto.
3 Pulsante STOP
Premere il pulsante per interrompere la rotazione del piatto.
4 Levetta SIZE SELECT
Cambia le dimensioni in base al disco da riprodurre.
5 Portatestina
Da utilizzare in presenza della testina inserita.
6 Controdado
Blocca la testina in posizione.
7 Braccio
8 Poggiabraccio
Funge da base di supporto per il braccio.
9 Leva di sollevamento
Tirare questa leva per alzare il braccio e spingerla per abbassarlo.
a Alzabraccio
Questo dispositivo viene utilizzato per alzare e abbassare il braccio ed è azionato dalla leva di sollevamento.
b Manopola ANTI-SKATING
Quando viene riprodotto un disco, viene generata una forza rotatoria che spinge la puntina verso il perimetro
interno. Facendo corrispondere questa manopola al valore della pressione della puntina, questo tipo di forza
d
K
A
S
-
T
I
I
T
N
N
G
A
c
b
a
9
8
7
6
viene eliminato.
c Anello di regolazione della pressione della puntina
Consente di impostare la pressione appropriata della puntina della testina.
d Contrappeso
Consente di bilanciare il braccio e di regolare la pressione della puntina.
e Adattatore per dischi EP
Utilizzato per riprodurre dischi EP standard.
Regolazione
5
4
Regolazione del bilanciamento del braccio
Effettuare i seguenti preparativi:
! Per le testine dotate di copripuntina rimovibili, rimuovere i copripuntina.
! Spingere la leva di sollevamento verso il basso.
1 Impostare la manopola [ANTI-SKATING] su “0”.
2 Sollevare il braccio dal poggiabraccio e regolarne il bilanciamento in modo che si trovi in
posizione orizzontale.
Ruotare il contrappeso finché il braccio non rimane in posizione quasi completamente orizzontale.
! Quando si sposta il braccio, prestare attenzione perché l’estremità della puntina non tocchi direttamente il
piatto.
Contrappeso eccessivamente spostato verso la parte posteriore Contrappeso eccessivamente spostato verso la parte anteriore
6
Page 37

02
Funzionamento
Regolazione della pressione della puntina
1 Riportare il braccio sul poggiabraccio.
2 Far corrispondere lo “0” sull’anello di regolazione per la pressione della puntina con la
linea centrale dell’asta posteriore del braccio.
Utilizzando un dito per tenere fermo il contrappeso evitandone lo spostamento, ruotare l’anello di regolazione
per la pressione della puntina in modo che il numero “0” si trovi sulla linea centrale nera dell’asta posteriore del
braccio.
3 Regolare la pressione della puntina.
Ruotare il contrappeso per impostare il valore corretto per la pressione della puntina in base alla testina in uso.
! Quando si ruota il contrappeso, ruota anche l’anello di regolazione per la pressione della puntina. Mentre si
osserva l’anello di regolazione, impostare la pressione della puntina al valore appropriato.
! La pressione della puntina corretta per la testina in dotazione è 3,5 g. Impostare su “3,5”.
Collegamento dell’apparecchio
Collegamento dell’apparecchio
! Prima di effettuare o modificare collegamenti, assicurarsi di spegnere l’apparecchio e di scollegare il cavo di
alimentazione.
! Consultare le istruzioni per l’uso del componente da collegare.
! Collegare il cavo di alimentazione dopo aver effettuato tutti i collegamenti tra i dispositivi.
Descrizione dei terminali
PHONO LINE
1 Interruttore equalizzatore
Portare l’interruttore sulla posizione appropriata in base al terminale di ingresso del preamplificatore principale o degli altri componenti.
2 Terminali di uscita RCA
Si collega al terminale di ingresso del preamplificatore principale o degli altri componenti.
3 Terminale di ingresso presa di corrente
Si collega ad una presa di corrente col cavo di alimentazione in dotazione. Collegare il cavo di alimentazione
solamente dopo aver completato i collegamenti tra le unità.
! Utilizzare solo il cavo di alimentazione in dotazione.
AC IN
31 2
Italiano
Regolazione dell’antiskating
Questa regolazione consente di impedire eventuali salti della puntina.
1 Far corrispondere la posizione della scala con il valore della pressione della puntina.
2 Ruotare la manopola [ANTI-SKATING] in modo da far corrispondere il contrassegno di
riferimento con lo stesso valore della pressione della testina.
A
K
T
S
-
I
I
N
T
G
N
A
Collegamento a un preamplificatore e a un componente
1 Posizionare correttamente l’interruttore dell’equalizzatore.
PHONO: In fase di collegamento al terminale di ingresso PHONO (l’equalizzatore integrato del giradischi non
viene utilizzato).
LINE: In fase di collegamento ad un terminale diverso dal terminale di ingresso PHONO (l’equalizzatore integrato
del giradischi viene utilizzato).
2 Collega il terminale di uscita RCA al terminale di ingresso del preamplificatore principale o
degli altri componenti.
3 Collegare il cavo di alimentazione.
Si collega ad una presa di corrente col cavo di alimentazione in dotazione. Collegare il cavo di alimentazione
solamente dopo aver completato i collegamenti tra le unità.
! Prima di collegare l’unità alla presa di corrente presente sull’apparecchiatura collegata, controllare la
potenza elettrica. (Questa unità consuma 2 W di energia elettrica.)
! Se il giradischi inizia a funzionare quando il cavo di alimentazione è collegato, premere il pulsante [STOP].
7
Page 38

02
Funzionamento
Posizione di installazione
Posizionare l’unità su una superficie piana, in modo che non sia soggetta a vibrazioni esterne.
! Per quanto possibile, tenere l’unità lontana dagli altoparlanti.
! Se l’unità è molto vicina ad una radio che trasmette nelle frequenze AM/FM, questa potrebbe generare
disturbi. Tenere l’unità quanto più possibile lontana dalla radio.
Riproduzione
Effettuare i seguenti preparativi:
! Posizionare un disco sul piatto.
! Rimuovere il copripuntina facendo attenzione a non toccare l’estremità della puntina.
1 Premere il pulsante [SPEED] per impostare la velocità di riproduzione del disco.
Per riprodurre i dischi a 45 giri, portare il pulsante in posizione sollevata [v]; per i dischi a 33 giri e 1/3, il pulsante
deve essere premuto [w].
! Per riprodurre un disco EP standard, collocare l’adattatore per dischi EP nell’alberino centrale e riprodurre il
disco.
2 Spostare la leva [SIZE SELECT] per impostare la dimensione del disco.
Per i dischi da 17 cm, posizionare la leva su [17]; per i dischi da 30 cm, posizionare la leva su [30].
! Per riprodurre un disco EP standard, collocare l’adattatore per dischi EP nell’alberino centrale e riprodurre il
disco.
3 Premere il pulsante [START] per almeno 1 secondo.
Il piatto inizia a ruotare e la riproduzione inizia automaticamente.
! Al termine della riproduzione del disco, il braccio ritorna nella posizione originale e si interrompe automatica-
mente la rotazione del piatto.
! Al termine della riproduzione dei dischi, fissare il copripuntina per proteggere la puntina.
! Questo apparecchio è dotato di una funzione di ritorno automatico, grazie alla quale il braccio ritorna
nella posizione originale dopo aver raggiunto un punto specifico al termine della riproduzione del disco.
Nonostante non vi siano problemi con i dischi di dimensioni normali, per i dischi di dimensioni superiori la
funzione di ritorno automatico deve essere attivata prima del completamento della riproduzione.
Arresto della riproduzione
1 Alzare la leva di sollevamento per riportare il braccio sul poggiabraccio, quindi spingere la
leva di sollevamento verso il basso.
2 Premere il pulsante [STOP].
! Al termine della riproduzione dei dischi, fissare il copripuntina per proteggere la puntina.
Informazioni aggiuntive
Sostituzione della puntina
La vita utile della puntina in dotazione è pari a circa 400 ore. Per evitare di danneggiare dischi di grande valore,
sostituire la puntina non oltre tale periodo. Acquistare la puntina nuova presso il punto vendita nel quale è stato
acquistato il giradischi oppure presso il centro di riparazione più vicino. Specificare che il tipo di puntina desiderato è esclusivamente per PL-30-K.
! Spegnere l’amplificatore prima di sostituire la puntina e scollegare il cavo di alimentazione.
! L’estremità della puntina è una parte estremamente delicata, quindi maneggiarla con cura. Utilizzare una
spazzola morbida per rimuovere con delicatezza la polvere dall’estremità della puntina.
! La rimozione del portatestina semplifica la sostituzione della puntina.
Rimozione della puntina
1 Bloccare saldamente la testina con una mano, afferrare la puntina con l’altra mano e
spingerla verso il basso.
2 Tirare delicatamente la puntina nella direzione della freccia.
Note
! Non toccare il braccio o il piatto né scollegare l’alimentazione durante la riproduzione di un disco.
! Il sistema di riproduzione automatica non è utilizzabile con dischi da 25 cm. In questi casi, la procedura deve
essere effettuata manualmente. Se il braccio non ritorna nella posizione originale al termine della riproduzione
del disco, premere il pulsante [STOP].
Pausa della riproduzione
Tirare la leva di sollevamento verso l’alto.
La puntina della testina si stacca dal disco.
! Per riprendere la riproduzione, spingere la leva di sollevamento verso il basso.
Fissaggio della puntina
1 Bloccare saldamente la testina con una mano, afferrare la nuova puntina con l’altra mano,
individuare il gancio sulla puntina nuova e inserirlo completamente nel foro lungo della
testina.
2 Spingere verso l’alto nella direzione della freccia finché non si avverte uno scatto.
8
Page 39

02
RL
RGLG
Funzionamento
Sostituzione della testina
Se si desidera installare una testina diversa s questo giradischi, utilizzarne una avente un peso compreso tra
circa 4,5 g e 9,5 g.
Per l’acquisto del solo portatestina, specificare che il tipo di componente desiderato è esclusivamente per
PL-30-K presso il punto vendita nel quale è stato acquistato il giradischi oppure presso il centro di riparazione più
vicino.
Rimozione della testina
1 Ruotare il controdado del portatestina e rimuovere il portatestina.
2 Allentare le viti di fissaggio della testina e rimuoverle.
Fissaggio della testina
1 Collegare i cavi elettrici.
Sono contrassegnati da un colore come indicato nella tabella seguente. Prestare attenzione a collegarli
correttamente.
Colore Funzione
Rosso Canale destro (R)
Bianco Canale sinistro (L)
Verde Massa canale destro (RG)
Blu Massa canale sinistro (LG)
Lato anteriore
(Lato posteriore della testina)
2 Fissare la testina.
Per ottenere la sporgenza desiderata, effettuare l’installazione in modo che l’estremità della puntina si trovi
a 45 mm dal bordo della superficie di montaggio del portatestina (la rondella di gomma) come indicato nella
seguente figura.
! La sporgenza per questo giradischi deve essere pari a 19 mm.
Lato posteriore
Lato anteriore
Italiano
3 Scollegare i cavi elettrici sul lato della testina.
45 mm
Montare parallelamente.
Montare perpendicolarmente.
3 Serrare le viti di fissaggio della testina per installare la testina.
Note
! Dopo aver sostituito la testina, regolare nuovamente il bilanciamento orizzontale, la pressione della puntina e il
valore dell’antiskating.
! Lo spessore del terminale dipende dalla testina nuova ed alcuni terminali potrebbero non collegarsi corretta-
mente. In questo caso, utilizzare il cavo elettrico di ricambio in dotazione.
9
Page 40

03
Altri
Risoluzione dei problemi
! Se il giradischi non funziona correttamente, consultare la seguente tabella di ricerca guasti.
Se non è possibile risolvere il problema, contattare il proprio centro di assistenza oppure il proprio punto
vendita.
Problema Controllare Rimedio
L’apparecchio non è
acceso.
Il piatto non ruota. La fascia è in posizione? Controllare la fascia e i rulli. Se la fascia è fuoriuscita dal
Audio assente o insufficiente.
I suoni sono distorti. L’interruttore dell’equalizzatore si
I suoni sono eccessivamente bassi.
L’audio del lato sinistro
e del lato destro sono
invertiti.
Durante la riproduzione
si avvertono dei rumori di
sottofondo (brusii o ronzii).
La puntina non scende sul
disco.
La puntina salta. La pressione della puntina è stata
Il cavo di alimentazione è collegato
correttamente?
La fascia presenta dei tagli? Controllare la fascia e il rullo. Se la fascia presenta dei
I cavi audio sono collegati correttamente?
I terminali e gli spinotti sono sporchi?
Il portatestina è collegato correttamente?
trova in posizione [LINE], anche se
il giradischi è collegato al terminale
PHONO dell’amplificatore?
L’interruttore dell’equalizzatore si
trova in posizione [PHONO], anche
se il giradischi è collegato al terminale AUX dell’amplificatore?
I collegamenti per i canali sinistro e
destro di ogni apparecchiatura sono
invertiti?
Vicino al cavo di collegamento è
presente un dispositivo elettronico
come una lampada fluorescente o
il corrispondente cavo di alimentazione?
La pressione della puntina è stata
regolata in modo corretto?
Il braccio è bilanciato orizzontalmente?
regolata in modo corretto?
Il disco è deformato o graffiato? Controllare le condizioni del disco.
Sulla puntina è presente molta
polvere?
L’antiskating è regolato correttamente?
L’altezza del braccio è regolata
correttamente?
Collegare correttamente il cavo di alimentazione in dotazione ad una presa di corrente.
piatto, installarla seguendo le istruzioni riportate in Montaggio. (Pagina 4 )
tagli, sostituirla con una nuova.
Collegare correttamente i cavi audio.
Pulire i terminali e gli spinotti prima di procedere al collegamento.
Collegare correttamente il portatestina.
Quando il giradischi è collegato al terminale PHONO, portare l’interruttore dell’equalizzatore in posizione [PHONO].
Quando il giradischi è collegato al terminale AUX, portare
l’interruttore dell’equalizzatore in posizione [LINE]. (Assicurarsi che il volume dell’amplificatore sia al minimo prima di
modificare la posizione dell’interruttore dell’equalizzatore.)
Collegare correttamente i cavi audio e i cavi elettrici del
portatestina.
Spostare il più lontano possibile il cavo di alimentazione
della lampada fluorescente o di qualsiasi altro dispositivo.
Far corrispondere il contrappeso al valore adeguato per la
pressione della puntina a seconda della testina in uso.
Ruotare il contrappeso finché il braccio non rimane in
posizione orizzontale.
Far corrispondere il contrappeso al valore adeguato per la
pressione della puntina a seconda della testina in uso.
Rimuovere il portatestina con la testina e utilizzare un pennellino con punta morbida per rimuovere polvere e residui
simili dalla puntina.
Regolare correttamente l’antiskating.
Regolare correttamente l’altezza del braccio.
Problema Controllare Rimedio
Il braccio si ferma e non
avanza.
Il volume è troppo basso o
troppo alto.
Il disco è graffiato? Controllare le condizioni del disco.
Il braccio entra in contatto con altri
oggetti?
Il collegamento all’amplificatore è
adeguato al tipo di testina (uscita)?
Controllare la zona del braccio e, se è presente qualche
ostacolo, rimuoverlo.
Collegare correttamente i cavi di collegamento.
Precauzioni per l’uso
La condensa
In inverno, all’interno dell’unità (sulle parti in funzione e sulle lenti) si potrebbero formare delle goccioline di
acqua (condensa), ad esempio se l’unità viene spostata da un luogo freddo ad una stanza calda oppure se la
temperatura della stanza in cui l’unità è installata sale improvvisamente (per l’impianto di riscaldamento, ecc.).
Con della condensa all’interno, l’unità non sarà in grado di funzionare in modo corretto e la riproduzione risulterà
impossibile. Lasciare l’unità a riposo da 1 a 2 ore a temperatura ambiente (per quanto questo tempo dipenda
dalle condizioni di condensa) senza inserire l’alimentazione. Le goccioline d’acqua evaporeranno e la riproduzione sull’unità diverrà nuovamente possibile. La condensa può formarsi anche in estate se l’unità viene esposta
direttamente al flusso d’aria di un condizionatore, ecc. Se ciò dovesse accadere, spostare l’unità in una posizione
diversa.
Spostamento e trasporto dell’unità
Utilizzare il materiale originale per imballare l’unità.
Se il materiale di imballaggio originale non è disponibile, effettuare le seguenti operazioni.
! Staccare la piastra del piatto e il piatto e imballarli con cura.
! Staccare il portatestina e il contrappeso e imballarli con cura.
! Utilizzare il bloccabraccio per tenere fermo il braccio e applicare anche del nastro adesivo in modo che non si
muova.
! Avvolgere l’unità principale con un panno o un foglio di carta morbida in modo che non venga danneggiato.
Manutenzione delle parti
Quando si collega e si scollega il portatestina, spegnere l’amplificatore.
Se si dovessero eseguire queste operazioni mentre il volume è alto, gli altoparlanti potrebbero danneggiarsi.
! Rimuovere il portatestina con la testina e utilizzare un pennellino con punta morbida per rimuovere polvere e
residui simili dalla puntina.
! Utilizzare un prodotto di buona qualità per pulire i dischi.
! Utilizzare un panno morbido o un altro prodotto simile per pulire il terminale del portatestina, quindi fissarlo
nuovamente al braccio.
Pulizia del coperchio antipolvere e di altre parti.
Utilizzare un panno morbido per pulire il coperchio antipolvere e il cabinet.
! Non pulire il coperchio antipolvere durante la riproduzione di un disco. L’elettricità statica potrebbe far sì che il
braccio venga attratto verso il coperchio antipolvere.
10
Page 41

03
Marchi di fabbrica e marchi di fabbrica registrati
! Pioneer è un marchio di fabbrica registrato della PIONEER CORPORATION.
I nomi delle aziende e dei prodotti riportati sono marchi di fabbrica dei rispettivi proprietari.
Specifiche
Requisiti di alimentazione ........................................................................................... CA da 220 V a 240 V, 50 Hz/60 Hz
Consumo di corrente ....................................................................................................................................................2 W
Peso unità principale ................................................................................................................................................ 5,6 kg
Dimensioni massime ................................................................................... 435 mm (L) × 110 mm (A) × 372,6 mm (P)
Temperature di funzionamento tollerabili ..........................................................................................Da +5 °C a +35 °C
Umidità di funzionamento tollerabile ..........................................................................Da 5 % a 85 % (senza condensa)
Piatto
Metodo di azionamento ........................................................................................................................................ A fascia
Motore.......................................................................................................................................................Servomotore CC
Velocità di rotazione ............................................................................................................................ 33 giri e 1/3, 45 giri
Wow and flutter ..........................................................................................................0,1 % o inferiore WRMS (JIS WTD)
Rapporto S/N ................................................................................................................................................60 dB (DIN-B)
Piatto ............................................................................................................................................ In alluminio pressofuso
Braccio
Tipo di braccio ..................................................................................... Braccio diritto con tipo di bilanciamento statico
Lunghezza effettiva ............................................................................................................................................ 221,5 mm
Sporgenza ................................................................................................................................................................ 19 mm
Intervallo variabile di pressione della puntina ............................................................... Da 0 g a 4,0 g (1 scala di 0,1 g)
Peso adatto alla testina Da ................................................................................................4,5 g a 9,5 g (singola testina)
Tipo di testina ............................................................................................................................................................... MM
Peso portatestina .................................................................................................................. 10,0 g (compresi viti e dadi)
Tensione in uscita
PHONO .....................................................................................................................................................................2,5 mV
LINE..........................................................................................................................................................................150 mV
! I dati tecnici ed il design di questo prodotto sono soggetti a modifiche senza preavviso.
! © 2014 PIONEER HOME ELECTRONICS CORPORATION. Tutti i diritti riservati.
Altri
Italiano
11
Page 42
Deponeer dit product niet bij het gewone huishoudelijk afval wanneer u het wilt verwijderen. Er bestaat een
In de lidstaten van de EU, Zwitserland en Noor
gratis bij de daar
product k
Indien u zich in een ander dan bovengenoemd land bevindt kunt u contact opnemen met de plaatselijke overheid voor
informatie over de juiste ver
Zodoende zorgt u er
gemaakt, t gerecycleerd en het niet schadelijk is voor de gezondheid en het milieu.
WAARSCHUWIN
Dit apparaat is niet waterdicht. Om brand of
een elektrische schok te voor
geen voor
van het apparaat zetten (bijvoorbeeld een
bloemenvaas) of het apparaat op andere wijze
blootstellen aan waterdruppels, opspattend
water
WAARSCHUWIN
Om brand te voor
(zoals een brandende kaars) op de apparatuur
zette
Gebruiksomgeving
Te
van gebruik:
+5 °C tot +35 °C, minder dan 85 % RH
(ventilatieopeningen niet afgedekt
Zet het apparaat niet op een slecht
geventileerde plaats en stel het apparaat ook
niet bloot aan hoge vochtigheid of direct
zonlicht (of sterke kunstmatige verlichting)
BEVINDEN ZICH GEEN ELEMENTEN DIE DOOR
UNNEN BEDIEND WORDEN.
WAARSCHUWING NETSNOER
P
stekker er niet uit door aan het snoer te trekken
en trek nooit aan het netsnoer met natte
handen aangezien dit
elektrische schok tot gevolg kan hebbe
geen toestel, meubelstuk
en klem het niet vast. Maak er nooit een knoop
in en en verbind het evenmin met andere
snoere
geleid dat er niet per ongeluk iemand op gaat
staan
een elektrische schok veroor
het netsnoer af en toe.
krijgt dat het beschadigd is, dient u bij uw
dichtstbijzijnde erkende PIONEER
onderhoudscentrum of uw dealer een nieuw
snoer te k
WAARSCHUWIN
Berg kleine onderdelen op buiten het bereik van
kinderen en peuters. R
een arts indien kleine onderdelen per ongeluk
worden ingeslikt.
BELANGRIJKE INFORMATIE
BETREFFENDE DE VENTILATI
Let er bij het installeren van het apparaat op dat
er voldoende vrije ruimte rondom het apparaat
is om een goede doorstroming van lucht te
waarborgen (tenminste 15 cm boven
achter en 5 cm aan de zijkanten van het
apparaat).
speciaal wettelijk voorgeschreven verzamelsysteem voor de juiste behandeling, het opnieuw bruikbaar
maken en de recycling van gebruikte elektronische producten.
voor bestemde verzamelplaatsen of een verkooppunt (indien u aldaar een gelijkwaardig nieuw
oopt) inleveren.
wegen kunnen particulieren hun gebruikte elektronische producten
werp dat vloeistof bevat in de buurt
, regen of vocht.
n.
mperatuur en vochtigheidsgraad op de plaats
wijdering van het product.
voor dat het verwijderde product op de juiste wijze wordt behandeld, opnieuw bruikbaar wordt
G
komen, mag u
LET OP
Aangezien er na het uitschakelen van het
apparaat nog een kleine hoeveelheid stroom
blijft lopen, moet u de stekker uit het
D3-4-2-1-3_A1_Nl
G
komen, mag u geen open vuur
stopcontact halen om het apparaat volledig
van het lichtnet los te koppelen. Plaats het
apparaat zodanig dat de stekker in een
noodgeval gemakkelijk uit het stopcontact
kan worden gehaald. Om brand te
voorkomen, moet u de stekker uit het
stopcontact halen wanneer u het apparaat
langere tijd niet denkt te gebruiken (bijv.
wanneer u op vakantie gaat).
D3-4-2-1-7a_A1_Nl
LET OP
OM HET GEVAAR VOOR EEN ELEKTRISCHE
)
.
D3-4-2-1-7c*_A1_Nl
SHOCK TE VOORKOMEN, DEKSEL (OF RUG)
NIET VERWIJDEREN. AAN DE BINNENZIJDE
DE GEBRUIKER K
ENKEL DOOR GEKWALIFICEERD PERSONEEL
TE BEDIENEN.
K058b_A1_Nl
D3-4-2-2-2a*_A1_Nl
D3-4-2-1-1_B2_Nl
ak het netsnoer beet bij de stekker. Trek de
kortsluiting of een
n. Plaats
o.i.d. op het netsnoer,
n. De netsnoeren dienen zo te worden
. Een beschadigd netsnoer kan brand of
zaken. Kontroleer
Wanneer u de indruk
open.
S002*_A1_Nl
G
aadpleeg onmiddellijk
D41-6-4_A1_Nl
E
, 5 cm
D3-4-2-1-7d*_A1_Nl
Dit apparaat is bestemd voor normaal
huishoudelijk gebruik. Indien het apparaat
voor andere doeleinden of op andere
plaatsen wordt gebruikt (bijvoorbeeld
langdurig gebruik in een restaurant voor
zakelijke doeleinden, of gebruik in een auto
of boot) en als gevolg hiervan defect zou
raken, zullen de reparaties in rekening
gebracht worden, ook als het apparaat nog
in de garantieperiode is.
K041_A1_Nl
2
Page 43

Hartelijk dank voor uw aankoop van dit Pioneer product. Lees deze gebruiksaanwijzing
aandachtig door, zodat u vertrouwd raakt met de bediening van dit apparaat.
Inhoud
01 Voordat u begint
Kenmerken .......................................................................................................................................................................... 4
De inhoud van de verpakking controleren .......................................................................................................................4
Montage ..............................................................................................................................................................................4
02 Bediening
Namen van onderdelen en functies .................................................................................................................................. 6
Afstellen ............................................................................................................................................................................... 6
De apparatuur aansluiten .................................................................................................................................................. 7
Afspelen ............................................................................................................................................................................... 8
Het afspelen pauzeren ....................................................................................................................................................... 8
Het afspelen beëindigen .................................................................................................................................................... 8
Bijkomende informatie.......................................................................................................................................................8
03 Overige
Problemen oplossen ........................................................................................................................................................10
Voorzorgen bij het gebruik ...............................................................................................................................................10
Onderhoud van de onderdelen........................................................................................................................................10
Over handelsmerken en gedeponeerde handelsmerken .............................................................................................10
Specificaties ......................................................................................................................................................................11
Nederlands
3
Page 44

01
WAARSCHUWING
Berg kleine onderdelen op buiten het bereik van
kinderen en peuters. R
indien kleine onderdelen per ongeluk worden ingeslikt.
l
Kenmerken
Volledig automatische platenspeler, eenvoudig in gebruik
Als u de grootte van de plaat hebt geselecteerd, hoeft u alleen nog maar op de [START]-toets te drukken om een
plaat af te spelen. Als de plaat is afgespeeld, zet de platenspeler de toonarm volledig automatisch terug in de
uitgangspositie.
Stabiele platenspeler vanwege het lage zwaartepunt van de kast
De onderkant van de platenspeler bestaat uit een stalen plaat, zodat de volledige kast een laag zwaartepunt heeft.
Hierdoor speelt de platenspeler de platen stabiel af, zelfs als er trillingen van buitenaf optreden.
Uitgerust met een phono-equalizer, die AAN/UIT kan worden geschakeld
Vanwege de eigen phono-equalizer kan de platenspeler rechtstreeks op een versterker zonder PHONOaansluiting worden aangesloten. Als de versterker wel een phono-equalizer heeft, kan deze functie worden
uitgeschakeld.
Geleverd met een high-performance MM-element
Aangezien de platenspeler met element wordt geleverd, kunt u hem meteen gebruiken.
Geleverd met een rubbermat van gemiddelde dikte
De 5 mm dikke rubbermat onderdrukt trillingen van buitenaf en verbetert tevens de grip tussen de plaat en de
draaitafel, zodat de platen stabiel worden afgespeeld.
Voordat u begint
aadpleeg onmiddellijk een arts
D41-6-4_A1_N
Montage
! Verwijder de bevestigingsdraad waarmee de toonarm is vastgezet pas nadat de platenspeler helemaal is
gemonteerd.
! Sluit het stroomsnoer pas aan nadat de montage van de platenspeler en alle aansluitingen op andere appara-
tuur zijn voltooid.
1 Plaats de draaitafel.
Plaats de draaitafel op de middenas.
! Wees voorzichtig dat u de draaitafel niet laat vallen of er niet mee tegen het hoofdapparaat stoot.
Discreet ontwerp
Het uiterlijk en de afwerking zorgen voor een rustige uitstraling waardoor de platenspeler goed past bij uw andere
onderdelen en bij uw interieur.
Afneembaar stroomsnoer
Bij het verplaatsen van de platenspeler zitten geen kabels in de weg; het loskoppelen van de platenspeler vormt
dus geen probleem.
De inhoud van de verpakking controleren
Controleer of u de volgende bijgeleverde toebehoren hebt ontvangen:
! Draaitafel
! Draaitafelblad
! Stofdeksel met afneembare scharnieren
! Adapter voor EP-platen
! Contragewicht
! Headsnell met element
! Reservekabeltje
! Netsnoer
! Handleiding (dit document)
! Garantiebewijs
2 Draai de draaitafel zodanig dat het wieltje zichtbaar is door het vierkante gat met de tape
waarmee de snaar wordt gegrepen.
4
Page 45
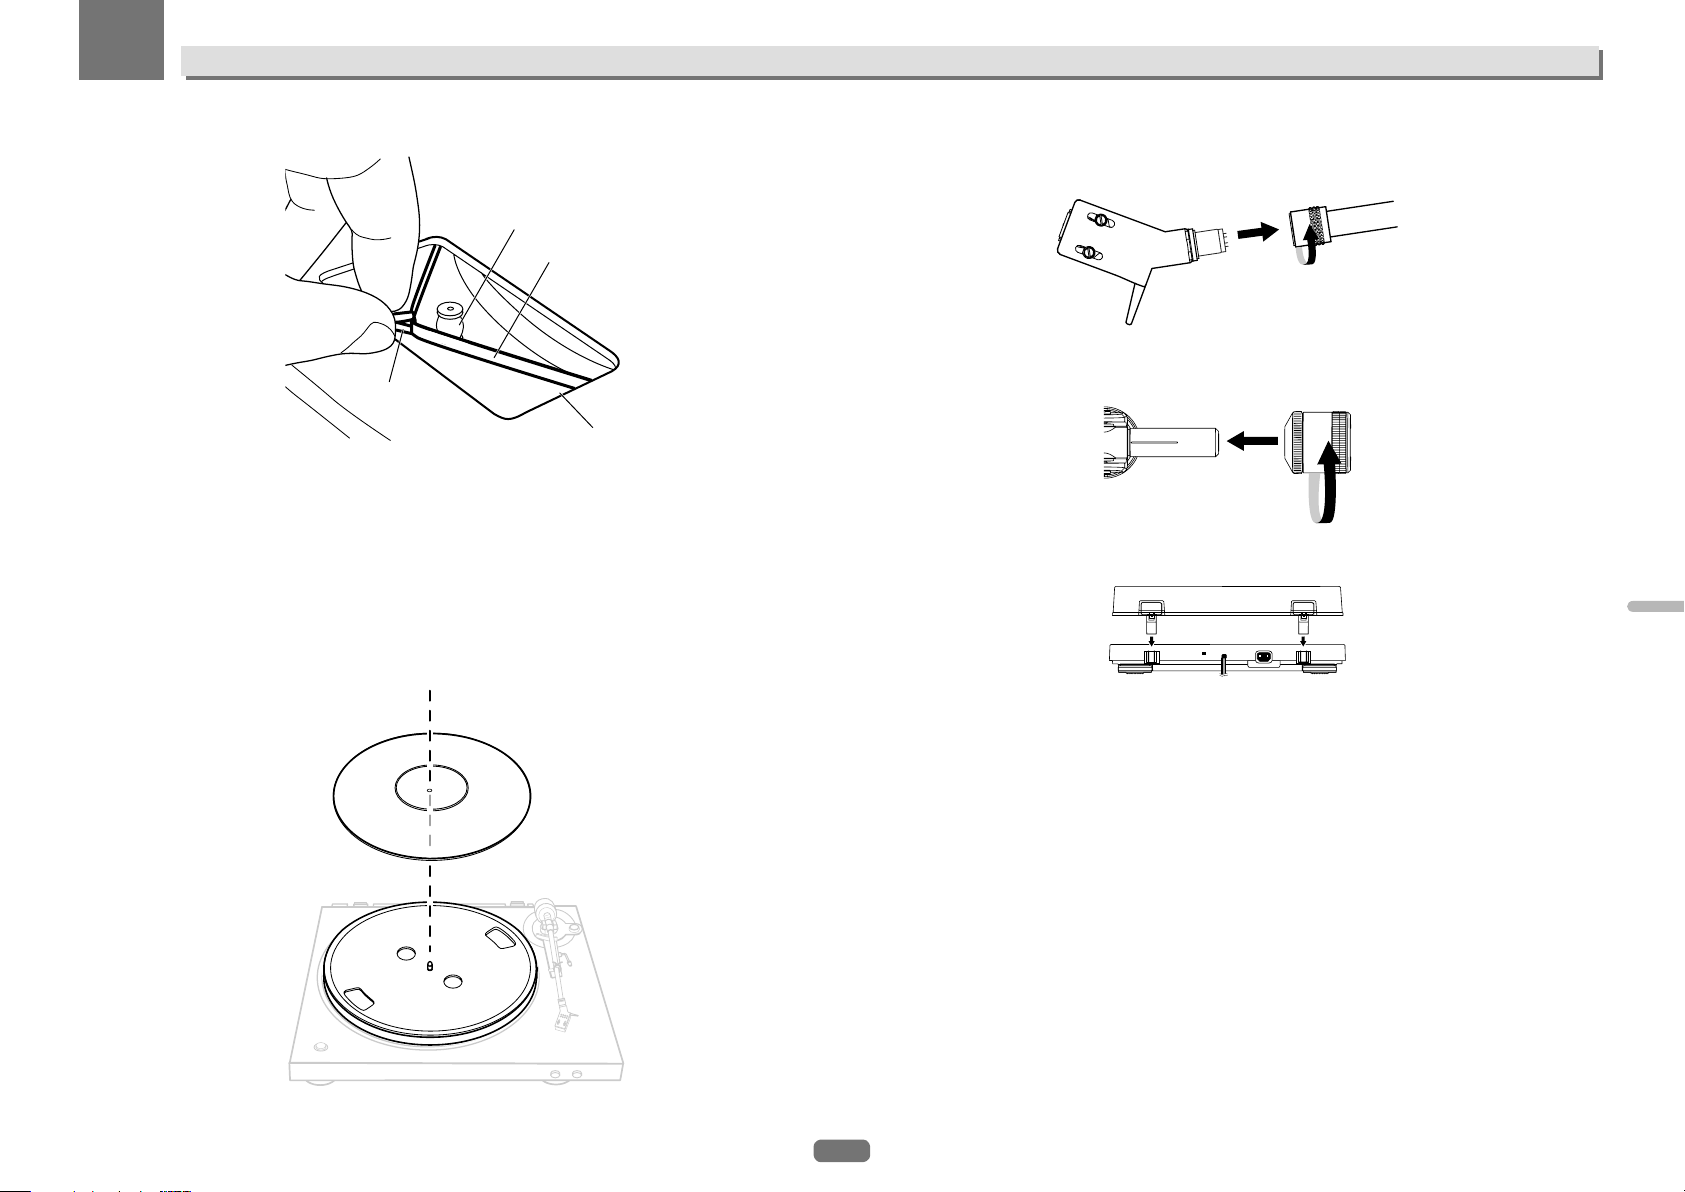
01
Voordat u begint
3 Knijp in de tape en vang de snaar in het midden op de buitenkant van het wieltje.
1
2
3
4
1 Wieltje
2 Snaar
3 Tape
4 Vierkant gat
4 Verwijder de tape.
5 Draai de draaitafel vijf of zes keer langzaam rond.
Controleer of de snaar goed in het midden van het wieltje zit.
6 Plaats het draaitafelblad.
! De mat van de draaitafel heeft een boven- en onderkant. Leg de mat op de draaitafel met de onderkant,
waarop het logo van Pioneer staat, naar beneden.
7 Bevestig de headshell.
Steek de headshell met het hieraan bevestigde element in de toonarm. Draai vervolgens de borgmoer aan, terwijl
u de headshell horizontaal houdt.
8 Bevestig het contragewicht.
Bevestig het contragewicht aan de achterkant van de toonarm.
9 Breng de stofkap aan.
Steek de scharnieren van het stofdeksel goed in hun houders op de achterzijde van de draaitafel.
PHONO LINE
! Steek beide scharnieren er goed in.
! Voor het verwijderen van de stofkap opent u de stofkap helemaal en trekt u deze omhoog terwijl u de stofkap
bij de scharnierklemmen vasthoudt.
AC IN
10 Verwijder de bevestigingsdraad waarmee de toonarm is vastgezet.
Verwijder de bevestigingsdraad waarmee de toonarm is vastgezet pas nadat de montage is voltooid.
Nederlands
5
Page 46

02
23
Bediening
Namen van onderdelen en functies
Bovenpaneel
e
1
1 SPEED -toets
Hiermee wijzigt u de snelheid volgens de af te spelen plaat.
2 START -toets
Wanneer u op deze toets drukt, gaat de draaitafel draaien.
3 STOP -toets
Wanneer u op deze toets drukt, stopt de draaitafel.
4 SIZE SELECT -hendel
Hiermee wijzigt u de grootte volgens de af te spelen plaat.
5 Headshell
Wordt gebruikt met een element eraan bevestigd.
6 Borgmoer
Hiermee wordt het element vastgezet.
7 Toonarm
8 Armsteun
Ondersteunt de toonarm.
9 Lifthendel
De toonarm gaat omhoog wanneer de hendel omhoog wordt getrokken. De toonarm gaat omlaag wanneer de
hendel omlaag wordt geduwd.
a Armlift
Hiermee beweegt u de toonarm omhoog en omlaag. De armlift wordt bediend met de lifthendel.
b ANTI-SKATING -draaiknop
Wanneer een plaat wordt afgespeeld, wordt de punt van de naald naar het midden getrokken. Wanneer deze
d
K
A
S
-
T
I
I
T
N
N
G
A
c
b
a
9
8
7
6
draaiknop wordt ingesteld op de naalddruk, wordt deze kracht opgeheven.
c Afstelring voor de naalddruk
Wordt gebruikt om de juiste naalddruk in te stellen voor het element.
d Contragewicht
Wordt gebruikt om de balans van de toonarm en de naalddruk aan te passen.
e Adapter voor EP-platen
Wordt gebruikt om standaard EP-platen af te spelen.
Afstellen
5
4
De balans van de toonarm afstellen
Ga als volgt te werk:
! Bij elementen met afneembare naaldkap verwijdert u de naaldkap.
! Duw de lifthendel omlaag.
1 Zet de [ANTI-SKATING]-draaiknop op “0”.
2 Neem de toonarm van de armsteun weg en stel de balans zo af dat de toonarm
horizontaal staat.
Draai aan het contragewicht tot de toonarm bijna horizontaal staat.
! Let bij het verplaatsen van de toonarm goed op dat de naaldpunt niet rechtstreeks in aanraking komt met de
draaitafel en dergelijke.
Contragewicht te ver naar achteren Contragewicht te ver naar voren
6
Page 47

02
Bediening
De naalddruk afstellen
1 Plaats de toonarm weer op de armsteun.
2 Breng de “0” op de afstelring voor de naalddruk naar de middenlijn op het achterstuk van
de toonarm.
Houd het contragewicht met uw vinger tegen zodat het niet beweegt en draai alleen de afstelring voor de naalddruk zodat het cijfer “0” op de zwarte middenlijn van het achterstuk van de toonarm komt te staan.
3 Stel de naalddruk af.
Draai aan het contragewicht om de juiste naalddruk in te stellen voor het gebruikte element.
! Wanneer u aan het contragewicht draait, draait de afstelring voor de naalddruk mee. Houd de afstelring in de
gaten en stel de naalddruk af op de juiste waarde.
! De juiste naalddruk voor het meegeleverde element is 3,5 g. Stel in op “3,5”.
De apparatuur aansluiten
De apparatuur aansluiten
! Schakel altijd eerst de stroom uit en trek de stekker van het stroomsnoer uit het stopcontact alvorens aanslui-
tingen te maken of te wijzigen.
! Zie tevens de handleiding van de aan te sluiten apparatuur.
! Sluit het stroomsnoer pas aan nadat alle aansluitingen tussen de apparatuur zijn voltooid.
Beschrijving van de aansluitingen
PHONO LINE
1 Equalizerschakelaar
Zet deze schakelaar in de juiste stand volgens de audio-ingangsaansluiting van de pre-hoofdversterker of een
andere component.
2 RCA-uitgangsaansluitingen
Deze worden aangesloten op de audio-ingangsaansluiting van de pre-hoofdversterker of een andere
component.
3 AC IN-aansluiting
Deze wordt aangesloten op een stopcontact met het meegeleverde stroomsnoer. Wacht tot alle aansluitingen
tussen de apparatuur zijn gemaakt voordat u het stroomsnoer aansluit.
! Gebruik alleen het meegeleverde stroomsnoer.
AC IN
31 2
Nederlands
Anti-skating aanpassen
Met deze aanpassing wordt voorkomen dat de naald springt.
1 Zet de meetschaal op dezelfde waarde als de naalddruk.
2 Draai aan de [ANTI-SKATING]-draaiknop zodat de referentiemarkering overeenkomt met
de waarde van de naalddruk voor het element.
A
K
T
S
-
I
I
N
T
G
N
A
Aansluiten op een pre-hoofdversterker en component
1 Zet de equalizerschakelaar in de juiste stand.
PHONO: wanneer u de platenspeler aansluit op de PHONO-ingangsaansluiting (de ingebouwde equalizer van de
platenspeler wordt niet gebruikt).
LINE: wanneer u de platenspeler aansluit op een andere dan de PHONO-ingangsaansluiting (de ingebouwde
equalizer van de platenspeler wordt gebruikt).
2 Sluit de RCA-uitgangsaansluiting aan op de ingangsaansluiting van de pre-hoofdversterker
of een andere component.
3 Sluit het stroomsnoer aan.
Deze wordt aangesloten op een stopcontact met het meegeleverde stroomsnoer. Wacht tot alle aansluitingen
tussen de apparatuur zijn gemaakt voordat u het stroomsnoer aansluit.
! Controleer de wattage vermeld bij de uitgang voordat u het apparaat aansluit op de uitgang (netstroomuit-
gang) van de aangesloten apparatuur. (Dit apparaat heeft een stroomverbruik van 2 W.)
! Als de platenspeler begint af te spelen wanneer het stroomsnoer wordt aangesloten, drukt u op de
[STOP]-toets.
7
Page 48
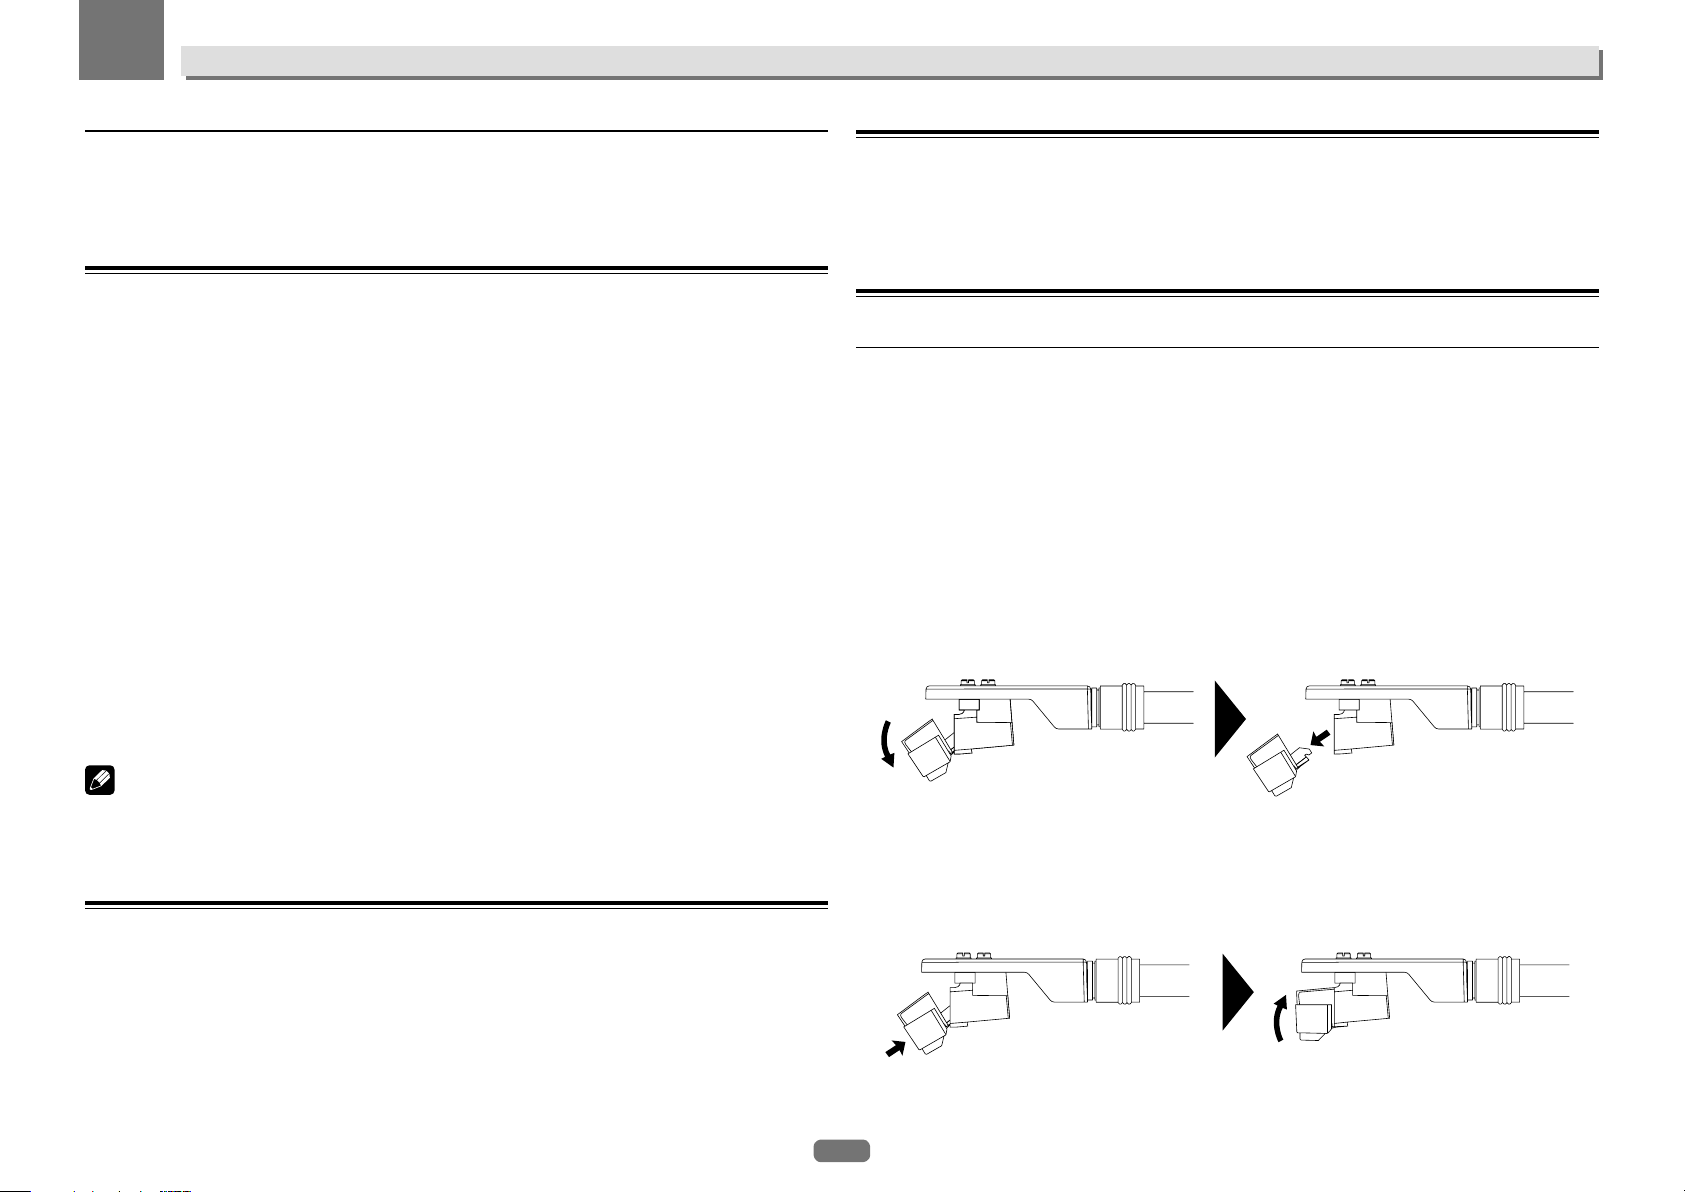
02
Bediening
Geschikte opstelling
Plaats het apparaat op een vlak oppervlak zonder externe trillingen.
! Houd het apparaat zo ver mogelijk uit de buurt van het luidsprekersysteem.
! Als het apparaat erg dicht bij een radio (AM/FM) staat, kan de radio ruis veroorzaken. Houd de afstand zo groot
mogelijk.
Afspelen
Ga als volgt te werk:
! Plaats een plaat op de draaitafel.
! Verwijder de naaldkap en let daarbij op dat u de naaldpunt niet aanraakt.
1 Druk op de [SPEED]-toets om de afspeelsnelheid van de plaat in te stellen.
Om 45-toerenplaten af te spelen, stelt u de toets in op de verhoogde stand [v]; voor 33 1/3-toerenplaten moet de
toets in de ingedrukte stand [w] staan.
! Om een standaard EP-plaat af te spelen, bevestigt u de EP-adapter op de middenas. Nu kunt u de EP-plaat
afspelen.
2 Zet de [SIZE SELECT]-hendel in de stand die past bij de grootte van de plaat.
Om platen van 17 cm af te spelen, zet u de hendel in de stand [17]; om platen van 30 cm af te spelen, zet u de
hendel in de stand [30].
! Om een standaard EP-plaat af te spelen, bevestigt u de EP-adapter op de middenas. Nu kunt u de EP-plaat
afspelen.
3 Druk de [START]-toets langer dan 1 seconde in.
De draaitafel begint te draaien en het afspelen begint automatisch.
! Als de plaat is afgespeeld, keert de toonarm terug naar zijn oorspronkelijke stand en stopt de draaitafel auto-
matisch met draaien.
! Als u klaar bent met platen draaien, moet u de naaldkap weer aanbrengen om de naaldpunt te beschermen.
! Dit toestel heeft een automatische terugkeerfunctie waarmee de toonarm automatisch terugkeert naar zijn
oorspronkelijke stand wanneer een bepaald punt is bereikt nadat een plaat is afgespeeld. Hoewel er geen
problemen zijn bij platen van een normale grootte die tot dit punt groeven hebben, kan de automatische
terugkeerfunctie worden geactiveerd voordat het afspelen is voltooid.
Het afspelen beëindigen
1 Duw de lifthendel omhoog, beweeg de toonarm naar de armsteun en duw de lifthendel
omlaag.
2 Druk op de [STOP]-toets.
! Als u klaar bent met platen draaien, moet u de naaldkap weer aanbrengen om de naaldpunt te beschermen.
Bijkomende informatie
De naald vervangen
De meegeleverde naald heeft een levensduur van ongeveer 400 uren. Om te voorkomen dat uw waardevolle platen worden beschadigd, moet u de naald tijdig vervangen. Koop een vervangende naald in de winkel waar u de
platenspeler hebt gekocht of het dichtstbijzijnde service- en reparatiepunt. Leg uit dat u de vervangende naald
nodig hebt voor PL-30-K.
! Schakel de versterker uit voordat u de naald vervangt en haal de stekker van het stroomsnoer van de platenspe-
ler uit het stopcontact.
! De punt van de naald is zeer kwetsbaar; ga hier zorgvuldig mee om. Gebruik een zacht borsteltje om eventueel
stof voorzichtig van de naaldpunt te verwijderen.
! Als u de headshell verwijdert, kunt u de naald gemakkelijker vervangen.
De verwisselbare naald verwijderen
1 Houd het element met één hand stevig vast, neem de verwisselbare naald met de andere
hand vast en duw hem naar beneden.
2 Trek de naald voorzichtig los in de richting van de pijl.
Opmerkingen
! Raak tijdens het afspelen de toonarm of de draaitafel niet aan, en zet de stroom niet uit.
! Het automatische afspeelsysteem kan niet worden gebruikt bij platen van 25 cm. In dit geval dient u de bedie-
ning handmatig uit te voeren. Druk op de [STOP]-toets als de toonarm na het afspelen niet naar zijn oorspronkelijke stand terugkeert.
Het afspelen pauzeren
Duw de lifthendel omhoog.
De naald van het element wordt van de plaat getild.
! Duw de lifthendel omlaag om het afspelen te hervatten.
De verwisselbare naald aanbrengen
1 Houd het element met één hand vast, neem de verwisselbare naald met de andere hand
vast, richt het lipje op de verwisselbare naald en steek hem helemaal in het lange gat op het
element.
2 Duw hem in de richting van de pijl omhoog totdat u een klik hoort.
8
Page 49

02
RL
RGLG
Bediening
Het element vervangen
Als u een ander element op deze platenspeler wilt gebruiken, moet dit ongeveer 4,5 g tot 9,5 g wegen.
Als u uitsluitend een headshell wilt kopen, moet u bij uw winkel van aankoop of het dichtstbijzijnde service- en
reparatiepunt vragen naar een headshell voor PL-30-K.
Het element verwijderen
1 Draai aan de borgmoer van de headshell en haal de headshell eraf.
2 Draai de bevestigingsschroeven van het element los en verwijder deze.
3 Koppel de bedrading aan de zijkant van het element los.
Het element aanbrengen
1 Sluit de bedrading aan.
De kleurcodering staat hieronder afgebeeld. Zorg ervoor dat u ze correct aansluit.
Kleur Functie
Rood Rechterkanaal (R)
Wit Linkerkanaal (L)
Groen Aardekabel rechterkanaal (RA)
Blauw Aardekabel linkerkanaal (LA)
Bovenkant
(Achterkant van het element)
2 Bevestig het element.
Om de vereiste overhang te verkrijgen, monteert u het zodanig dat de naaldpunt ongeveer 45 mm uitsteekt
vanaf de rand van het montagevlak (de rubberen sluitring) van de headshell, zoals getoond in de onderstaande
afbeelding.
! De overhang voor deze platenspeler moet 19 mm zijn.
Achterkant
Voorkant
Nederlands
45 mm
Parallel gemonteerd.
Loodrecht gemonteerd.
3 Draai de bevestigingsschroeven van het element aan om het element te monteren.
Opmerkingen
! Nadat u het element hebt vervangen, moet u de horizontale balans, de naalddruk en de anti-skatingwaarde
opnieuw afstellen.
! De dikte van de aansluiting is afhankelijk van het vervangende element; sommige kunnen niet stevig worden
aangesloten. In dat geval dient u het meegeleverde reservekabeltje te gebruiken.
9
Page 50

03
Overige
Problemen oplossen
! Als uw platenspeler niet correct werkt, kunt u onderstaande tabel gebruiken om de storing te vinden.
Als u het probleem niet kunt oplossen, kunt u contact opnemen met onze klantenservice of uw verkooppunt.
Probleem Controle Oplossing
De stroom wordt niet ingeschakeld.
De draaitafel draait niet. Zit de snaar op de goede plek? Controleer de snaar en wieltjes. Als de snaar van de
Er klinkt geen of nauwelijks
geluid.
Het geluid wordt vervormd. Staat de equalizerschakelaar in de
Het geluid is zeer zacht. Staat de equalizerschakelaar in de
Het geluid links en rechts is
verwisseld.
Er klinkt een laag zoemgeluid (zoemend of brommend
geluid) tijdens het afspelen.
De naaldpunt komt niet
omlaag op de plaat.
De naald springt. Is de naalddruk correct ingesteld? Stel het contragewicht af voor de juiste naalddruk voor het
De arm stopt halverwege en
gaat niet verder.
Het geluid is te zacht of
te luid.
Is het stroomsnoer naar behoren
aangesloten?
Is de snaar kapot? Controleer de snaar en het wieltje. Als de snaar kapot is,
Zijn de audiokabels juist aangesloten?
Zijn de aansluitingen en stekkers
vuil?
Is de headshell correct bevestigd? Bevestig de headshell op de juiste wijze.
stand [LINE], maar is de platenspeler
aangesloten op de PHONO-aansluiting van uw versterker?
stand [PHONO], maar is de platenspeler aangesloten op de AUX-aansluiting van uw versterker?
Zijn de aansluitingen voor links
en rechts op elk onderdeel van de
apparatuur correct?
Bevindt er zich in de buurt van het
aansluitsnoer een ander elektrisch
apparaat zoals een tl-lamp of het
stroomsnoer ervan?
Is de naalddruk correct ingesteld? Stel het contragewicht af voor de juiste naalddruk voor het
Is de toonarm horizontaal in evenwicht?
Is de plaat krom of vertoont hij
krassen?
Zit er veel stof aan de naaldpunt? Verwijder de shell met het element, en gebruik een borstel-
Is anti-skating correct ingesteld? Stel anti-skating correct in.
Is de armhoogte correct ingesteld? Stel de armhoogte correct in.
Vertoont de plaat krassen? Controleer de staat van de plaat.
Raakt de arm iets? Controleer de omgeving rond de arm. Verwijder een even-
Is de aansluiting met de versterker
correct voor het type element (uitgang)?
Sluit het meegeleverde stroomsnoer op de juiste manier
aan op een stopcontact.
draaitafel is gegleden, brengt u deze weer aan volgens de
instructies in Montage. (Pagina 4 )
moet u hem door een nieuwe vervangen.
Zorg dat de audiokabels juist zijn aangesloten.
Maak de aansluitingen en stekkers schoon voordat u de
kabels aansluit.
Als de platenspeler is aangesloten op een PHONO-aansluiting, zet u de equalizerschakelaar in de stand [PHONO].
Als de platenspeler is aangesloten op een AUX-aansluiting,
zet u de equalizerschakelaar in de stand [LINE]. (Zorg
ervoor dat u het volume op de versterker in de laagste stand
zet voordat u de stand van de equalizerschakelaar wijzigt.)
Sluit de audiokabel en de draden van de headshell correct
aan.
Plaats het stroomsnoer van de tl-lamp of een ander apparaat zo ver mogelijk uit de buurt.
gebruikte element.
Draai aan het contragewicht tot de toonarm horizontaal
staat.
gebruikte element.
Controleer de staat van de plaat.
tje met een zachte punt of een penseel om stof en dergelijke voorzichtig van de naaldpunt te verwijderen.
tueel obstakel.
Zorg dat de aansluitsnoeren juist zijn aangesloten.
Voorzorgen bij het gebruik
Over condensvorming
Aan de binnenkant van het apparaat (op de werkende onderdelen en lenzen) kunnen in de winter waterdruppels
(condensvorming) ontstaan, bijvoorbeeld als het apparaat van een koude plek naar een warme kamer wordt
verplaatst, of als de temperatuur van de ruimte waarin het apparaat staat plotseling stijgt (door de verwarming
enz.). Het apparaat functioneert niet goed en kan geen plaat afspelen als zich binnenin condens bevindt. Laat het
apparaat 1 tot 2 uur bij kamertemperatuur staan (deze tijd is afhankelijk van de toestand van de condensvorming)
zonder dat u de stroom aansluit. De waterdruppels verdampen en het apparaat zal weer kunnen afspelen. In de
zomer kan eveneens condensvorming optreden als het apparaat wordt blootgesteld aan de rechtstreekse luchtstroom van bijvoorbeeld een airconditioner. In dit geval moet u het apparaat verplaatsen.
Transport van het apparaat naar een andere locatie
Gebruik het oorspronkelijke verpakkingsmateriaal om het apparaat in te pakken.
Als het oorspronkelijke verpakkingsmateriaal niet meer beschikbaar is, let dan zeker op de volgende punten.
! Verwijder het draaitafelblad en de draaitafel en pak ze voorzichtig in.
! Verwijder de headshell en het contragewicht van de arm en pak ze zorgvuldig in.
! Zet de toonarm vast met de armklem, en maak hem met tape vast zodat hij niet kan bewegen.
! Wikkel het hoofdapparaat in een deken of zacht papier zodat het niet wordt beschadigd.
Onderhoud van de onderdelen
Zet de stroom van de versterker uit wanneer u de headshell bevestigt en verwijdert.
Als u dit doet terwijl het volume hoog staat, kan de luidspreker beschadigd worden.
! Verwijder de shell met het element, en gebruik een borsteltje met een zachte punt of een penseel om stof en
dergelijke voorzichtig van de naaldpunt te verwijderen.
! Reinig platen met een platenreiniger van goede kwaliteit.
! Reinig de aansluiting van de headshell met een zachte doek of gelijkaardig materiaal en bevestig hem weer
aan de toonarm.
De stofkap e.d. reinigen.
Reinig de stofkap en de kast met een zachte doek.
! Reinig de stofkap niet tijdens het afspelen. Door statische elektriciteit zou de toonarm naar de stofkap kunnen
worden toegetrokken.
Over handelsmerken en gedeponeerde handelsmerken
! Pioneer is een gedeponeerd handelsmerk van PIONEER CORPORATION.
De hierin vermelde namen van bedrijven en producten zijn de handelsmerken van hun respectieve eigenaars.
10
Page 51

03
Specificaties
Voedingsvereisten ........................................................................................................... AC 220 V tot 240 V, 50 Hz/60 Hz
Stroomverbruik .............................................................................................................................................................2 W
Gewicht hoofdapparaat ............................................................................................................................................ 5,6 kg
Buitenafmetingen .........................................................................................435 mm (b) × 110 mm (h) × 372,6 mm (d)
Toegestane bedrijfstemperatuur............................................................................................................+5 °C tot +35 °C
Toegestane luchtvochtigheid .................................................................................... 5 % tot 85 % (zonder condensatie)
Draaitafel
Aandrijfmethode .................................................................................................................................... Snaaraandrijving
Motor ..........................................................................................................................................................DC servomotor
Draaisnelheid .......................................................................................................................................33 1/3 tpm, 45 tpm
Wow en flutter .............................................................................................................0,1 % of minder WRMS (JIS WTD)
S/R-verhouding ............................................................................................................................................60 dB (DIN-B)
Draaitafel ............................................................................................................................................Gegoten aluminium
Toonarm
Type arm ...............................................................................................................Rechte toonarm met statische balans
Effectieve lengte ................................................................................................................................................. 221,5 mm
Overhang ................................................................................................................................................................. 19 mm
Variabel bereik naalddruk ......................................................................................0 g tot 4,0 g (1 schaalverdeling 0,1 g)
Aangewezen gewicht van element ...................................................................................4,5 g tot 9,5 g (enkel element)
Type element ........................................................................................................................................................ MM-type
Gewicht headshell .............................................................................................10,0 g (inclusief schroeven en moeren)
Uitgangsspanning
PHONO .....................................................................................................................................................................2,5 mV
LINE..........................................................................................................................................................................150 mV
! De technische gegevens en het ontwerp van dit product kunnen zonder voorafgaande kennisgeving worden
gewijzigd.
! © 2014 PIONEER HOME ELECTRONICS CORPORATION. Alle rechten voorbehouden.
Overige
Nederlands
11
Page 52

Si desea deshacerse de este producto, no lo mezcle con los residuos generales de su hogar. De conformidad
Las viviendas privadas en los estados miembros de la UE, en Suiza y Noruega pueden devolver gratuitamente sus
productos electrónicos usados en las instalaciones de recolección previstas o bien en las instalaciones de minoristas
(si adquieren un producto similar nuevo).
En el caso de los países que no se han mencionado en el párrafo anterio
locales a fin de conocer el método de eliminación correcto
Al actuar siguiendo estas instrucciones, se asegurará de que el producto de desecho se somete a los procesos de
tratamiento
entorno y la salud humana.
ADVER
Este aparato no es impermeable.
riesgo de incendio y de descargas eléctricas,
no ponga ningún recipiente lleno de líquido
(como pueda ser un vaso o un florero) cerca del
aparato ni lo exponga a gote
lluvia o humedad
ADVER
Pa
nada con fuego encendido (como pueda ser
una vela) encima del aparat
Entor
Te
funcionamient
+5 °C a +35 °C; menos del 85 % de humedad
relativa (rejillas de refrigeración no obstruidas
No instale este aparato en un lugar mal
ventilado
humedad o a la luz directa del sol (o de otra luz
artificial potente).
D3-4-2-1-1_B2_Es
PRECAUCIONES CONCERNIENTES A
, solicite el reemplazo
PRECAUCIÓN P
Cuando instale este aparat
dejar espacio en torno al mismo para la
ventilación con el fin de mejorar la disipación
de calor (por lo menos 15 cm encima, 5 cm
detrás, y 5 cm en cada lado)
con la legislación
vigente, existe un sistema de recogida distinto para los productos electrónicos que requieren un
procedimiento adecuado de tratamiento, recuperación y reciclado.
r, póngase en contacto con sus autoridades
PRECAUCIÓN
Puesto que el cable de alimentación hace las
, recuperación y reciclaje necesarios, con lo que se previenen los efectos negativos potenciales para el
TENCIA
.
Para evitar el
funciones de dispositivo de desconexión de la
corriente para el aparato, para desconectar
o, salpicaduras,
TENCIA
ra evitar el peligro de incendio, no ponga
no de funcionamiento
.
o.
D3-4-2-1-3_A1_Es
D3-4-2-1-7a_A1_Es
mperatura y humedad del entorno de
o
toda la alimentación del aparato deberá
desenchufar el cable de la toma de corriente
de CA. Por lo tanto, asegúrese de instalar el
aparato de modo que el cable de
alimentación pueda desenchufarse con
facilidad de la toma de corriente de CA en
caso de un accidente. Para evitar correr el
peligro de incendio, el cable de alimentación
también deberá desenchufarse de la toma de
corriente de CA cuando no se tenga la
intención de utilizarlo durante mucho tiempo
seguido (por ejemplo, antes de irse de
vacaciones).
)
, ni en lugares expuestos a alta
D3-4-2-1-7c*_A1_Es
PRECAUCIÓN
PARA PREVENIR EL PELIGRO DE CHOQUE
ELÉCTRICO NO REMOVER LA TAPA NI LAS
PARTES DENTRO NO UTILIZADAS, LLAMAR
UNA PERSONA CUALIFICADA.
K058b_A1_Es
D3-4-2-2-2a*_A1_Es
LA MANIPULACIÓN DEL CABLE DE
ALIMENTACIÓN
Tome el cable de alimentación por la clavija. No
extraiga la clavija tirando del cable. Nunca
toque el cable de alimentación cuando sus
manos estén mojadas, ya que esto podría
causar cortocircuitos o descargas eléctricas.
No coloque la unidad, algún mueble, etc.,
sobre el cable de alimentación. Asegúrese de
no hacer nudos en el cable ni de unirlo a otros
cables. Los cables de alimentación deberán ser
dispuestos de tal forma que la probabilidad de
que sean pisados sea mínima. Una cable de
alimentación dañado podrá causar incendios o
descargas eléctricas. Revise el cable de
alimentación está dañado
del mismo al centro de servicio autorizado
PIONEER más cercano, o a su distribuidor.
S002*_A1_Es
ADVERTENCIA
Guarde las piezas pequeñas fuera del alcance
de los niños. Si las ingirieran accidentalmente,
póngase de inmediato en contacto con un
médico.
D41-6-4_A1_Es
ARA LA VENTILACIÓN
o, asegúrese de
.
D3-4-2-1-7d*_A1_Es
Este producto es para tareas domésticas
generales. Cualquiera avería debida a otra
utilización que tareas domésticas (tales
como el uso a largo plazo para motivos de
negocios en un restaurante o el uso en un
coche o un barco) y que necesita una
reparación hará que cobrarla incluso
durante el período de garantía.
K041_A1_Es
2
Page 53

Gracias por comprar este producto Pioneer. Lea detenidamente este manual de instrucciones para saber cómo operar este modelo adecuadamente.
Contenido
01 Antes de comenzar
Características .................................................................................................................................................................... 4
Comprobación del contenido de la caja ........................................................................................................................... 4
Montaje ................................................................................................................................................................................ 4
02 Operación
Nombres y funciones de los controles ............................................................................................................................. 6
Ajuste ................................................................................................................................................................................... 6
Conexión del equipo ........................................................................................................................................................... 7
Reproducción .....................................................................................................................................................................8
Pausa de la reproducción .................................................................................................................................................. 8
Final de la reproducción ....................................................................................................................................................8
Información adicional ........................................................................................................................................................ 8
03 Otros
Solución de problemas ....................................................................................................................................................10
Cuidados para el uso ........................................................................................................................................................10
Mantenimiento de cada parte .........................................................................................................................................10
Acerca de las marcas comerciales y marcas comerciales registradas ......................................................................11
Especificaciones ...............................................................................................................................................................11
Español
3
Page 54

01
ADVERTENCIA
Guarde las piezas pequeñas fuera del alcance de los
niños. Si las ingirieran accidentalmente, póngase de
inmediato en contacto con un médico
D41-6-4_A1_Es
Características
Reproductor totalmente automático de uso muy sencillo
Una vez seleccionado el tamaño del disco, todo lo que tiene que hacer es presionar el botón [START] para
comenzar la reproducción. Cuando ha terminado la reproducción, su funcionamiento totalmente automático
devuelve el brazo fonocaptor a su posición.
Reproducción estable gracias al centro de gravedad bajo del chasis
La parte inferior del reproductor cuenta con una placa metálica que proporciona al chasis un centro de gravedad
bajo que lo estabiliza durante la reproducción, incluso cuando existen vibraciones externas.
Equipado con un ecualizador fonográfico que se puede ACTIVAR/
DESACTIVAR
Al disponer de su propio ecualizador fonográfico el reproductor se puede conectar directamente a amplificadores que no cuenten con un terminal PHONO. Si el amplificador cuenta con un ecualizador fonográfico esta
función se puede desactivar.
El reproductor incluye un cartucho MM de alto rendimiento
Por este motivo, usted lo puede utilizar inmediatamente.
También se incluye una alfombrilla de goma de grosor moderado
La alfombrilla de goma de 5 mm de grosor suprime la vibración externa a la vez que mejora el agarre entre el
disco y el giradiscos, para proporcionar una reproducción más estable.
Antes de comenzar
.
Montaje
! No retire la la brida de sujeción del brazo fonocaptor hasta que haya finalizado la instalación.
! Conecte el cable de alimentación después de terminar la instalación y las conexiones entre los aparatos.
1 Coloque el giradiscos.
Coloque el giradiscos en el eje central.
! Tenga cuidado de no golpear el giradiscos contra la unidad principal ni dejarlo caer.
Diseño discreto
Su aspecto y acabado se adaptan al ambiente combinando perfectamente con el resto de dispositivos y decoración interior.
Cable de alimentación desenchufable
Los cables no representan un obstáculo cuando se desplaza el reproductor por lo que se evitan así problemas de
desconexión.
Comprobación del contenido de la caja
Compruebe que ha recibido todos los accesorios siguientes:
! Giradiscos
! Plato giradiscos
! Funda guardapolvo con bisagras desmontables
! Adaptador para discos EP
! Contrapeso
! Portacápsula con cartucho
! Cables de repuesto
! Cable de alimentación
! Manual de Instrucciones (este manual)
! Hoja de garantía
2 Gire el giradiscos de forma que el rodillo sea visible a través del orificio cuadrado
utilizando la cinta para coger la correa.
4
Page 55

01
Antes de comenzar
3 Pince la cinta y capture la correa sobre el centro exterior del rodillo.
1
2
3
4
1 Rodillo
2 Correa
3 Cinta
4 Orificio cuadrado
4 Retire la cinta.
5 Gire el giradiscos lentamente cinco o seis vueltas.
Compruebe que la correa está colocada de forma correcta en el centro del rodillo.
6 Coloque el plato.
! La alfombrilla del giradiscos dispone de una parte superior y una inferior. Coloque la alfombrilla en el giradis-
cos de forma que la parte inferior, con el logotipo de Pioneer, quede orientada hacia abajo.
7 Monte el portacápsula.
Inserte el portacápsula con el cartucho montado en el brazo fonocaptor. A continuación, apriete la contratuerca
mientras mantiene el portacápsula horizontal.
8 Monte el contrapeso.
Fije el contrapeso al eje trasero del brazo fonocaptor.
9 Monte la cubierta guardapolvo.
Introduzca firmemente las bisagras de la funda guardapolvo en sus suportes de la parte trasera del giradiscos.
PHONO LINE
! Introduzca ambas bisagras totalmente.
! Al retirar la funda guardapolvo ábrala totalmente y, a continuación, tire de ella hacia arriba sujetando la
funda guardapolvo junto a las secciones del fiador de las bisagras.
AC IN
10 Retire la abrazadera de sujeción del brazo fonocaptor.
Una vez finalizada la instalación, retire la abrazadera de sujeción del brazo fonocaptor.
Español
5
Page 56

02
23
Operación
Nombres y funciones de los controles
Panel superior
e
1
1 Botón SPEED
Cambia la velocidad de acuerdo con el disco que se vaya a reproducir.
2 Botón START
Al pulsar el botón se inicia la rotación del giradiscos.
3 Botón STOP
Al pulsar el botón se detiene la rotación del giradiscos.
4 Palanca SIZE SELECT
Cambia el tamaño de acuerdo con el disco que se vaya a reproducir.
5 Portacápsula
Se utiliza con un cartucho montado.
6 Contratuerca
Sujeta el cartucho montado.
7 Brazo fonocaptor
8 Apoyo del brazo
Sirve como base de soporte para el brazo fonocaptor.
9 Palanca elevadora
El brazo fonocaptor asciende cuando se tira hacia arriba de la palanca. El brazo fonocaptor desciende cuando
se aprieta la palanca hacia abajo.
a Elevador del brazo
Este dispositivo se utiliza para mover el brazo fonocaptor hacia arriba y abajo. Se maneja mediante la palanca
elevadora.
b Dial ANTI-SKATING
d
K
A
S
-
T
I
I
T
N
N
G
A
c
b
a
9
8
7
6
5
Cuando se reproduce un disco, hay una fuerza que tira de la punta de la aguja hacia el perímetro interior. Al
hacer coincidir este dial con el valor de presión de la aguja, se elimina esta fuerza.
c Anillo de ajuste de presión de la aguja
Se utiliza para hacer coincidir con la presión adecuada de aguja del cartucho.
d Contrapeso
Se utiliza para equilibrar el brazo fonocaptor y ajustar la presión de la aguja.
e Adaptador para discos EP
Se utiliza para reproducir discos EP estándar.
Ajuste
4
Ajuste del equilibrio del brazo fonocaptor
Realice la preparación del siguiente modo:
! Para cartuchos con cubiertas de aguja desmontables, retire la cubierta de aguja.
! Apriete hacia abajo la palanca elevadora.
1 Ajuste el dial [ANTI-SKATING] a “0”.
2 Mantenga el brazo fonocaptor lejos del apoyo del brazo y ajuste el equilibrio de modo que
esté horizontal.
Gire el contrapeso hasta que el brazo esté casi en horizontal.
! Al mover el brazo fonocaptor, asegúrese de que la punta de la aguja no toca directamente el giradiscos y
similares.
Contrapeso demasiado inclinado hacia la parte trasera Contrapeso demasiado inclinado hacia la parte delantera
6
Page 57
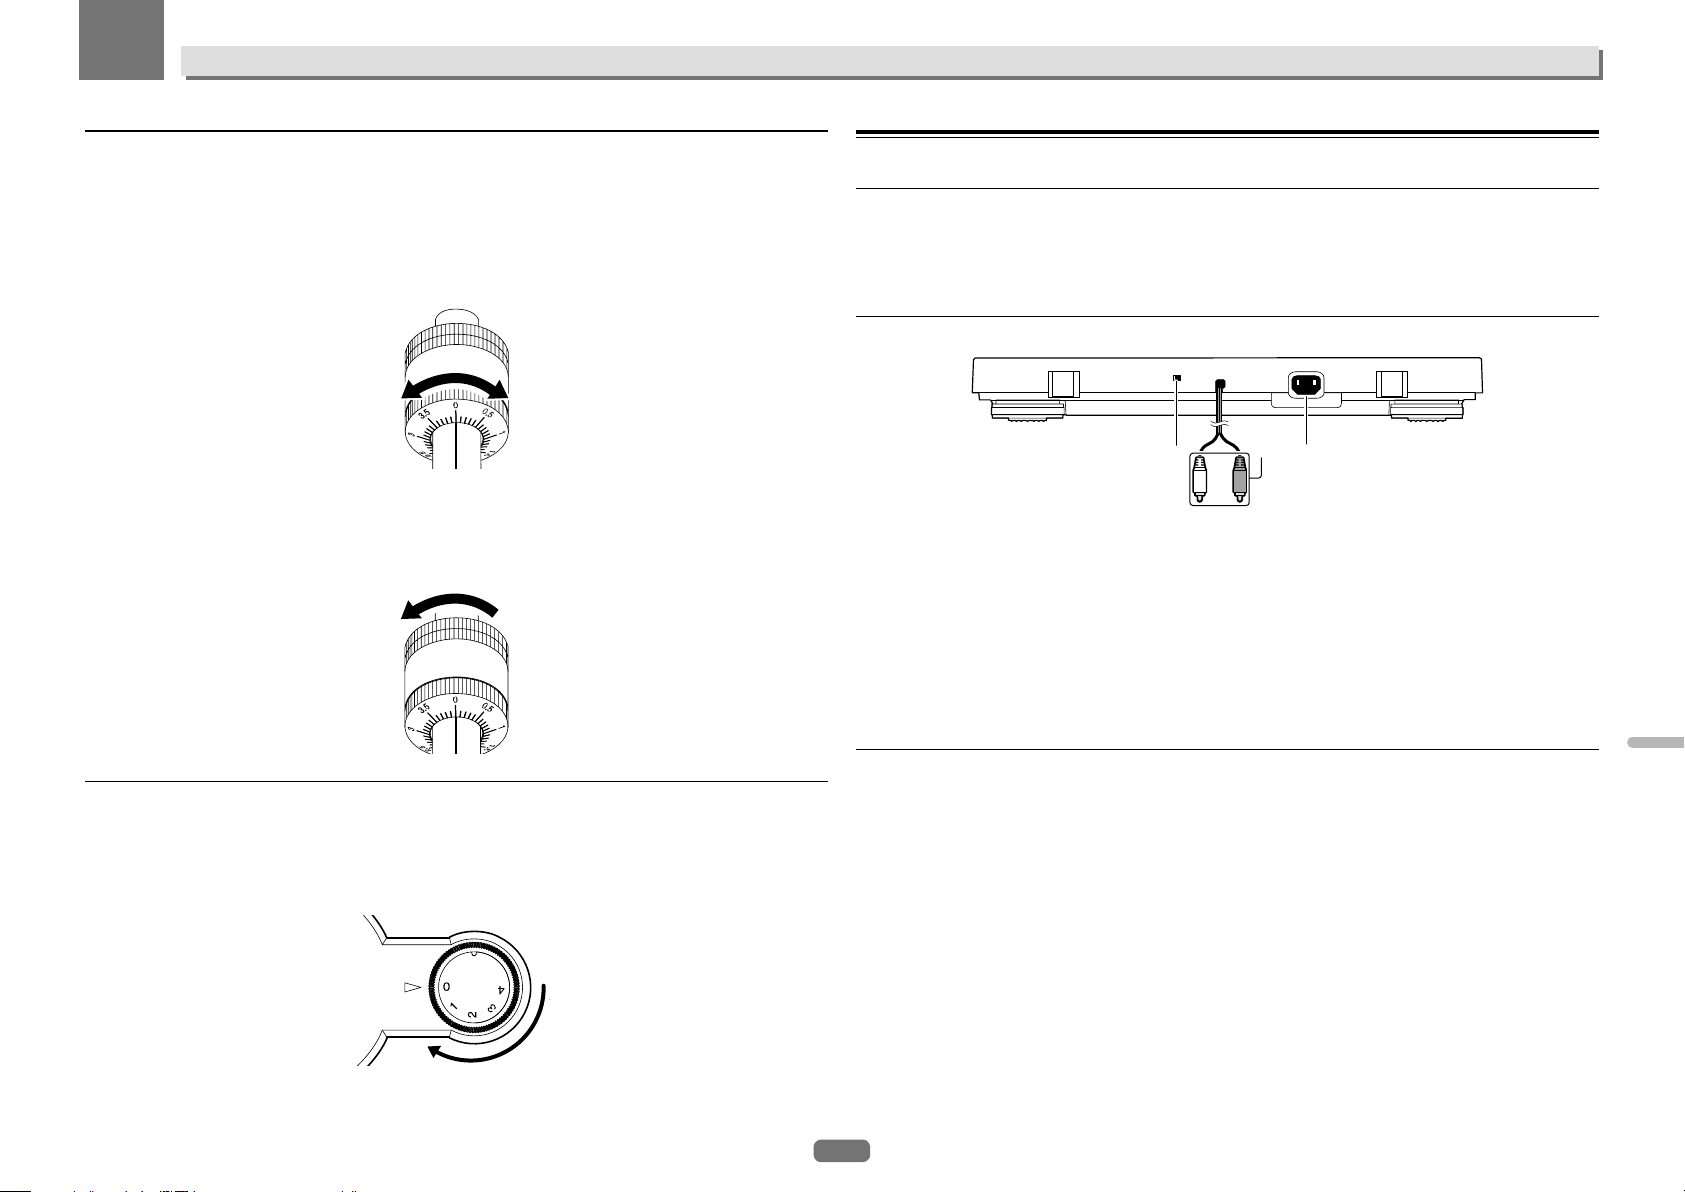
02
Operación
Ajuste de la presión de la aguja
1 Devuelva el brazo fonocaptor al apoyo del brazo.
2 Haga coincidir el “0” en el anillo de ajuste de presión de la aguja con la línea central del eje
trasero del brazo.
Mientras utiliza su dedo para mantener el contrapeso de modo que no se mueva, ajuste sólo el anillo de ajuste
de presión de la aguja de modo que el número “0” coincida con la línea central negra del eje trasero del brazo
fonocaptor.
3 Ajuste de la presión de la aguja.
Gire el contrapeso para ajustarlo al valor apropiado de la presión de la aguja para su cartucho.
! Al girar el contrapeso, se gira conjuntamente el anillo de ajuste de presión de la aguja. Mientras observa el
anillo de ajuste, ajuste la presión de la aguja al valor adecuado.
! La presión correcta de la aguja para el cartucho incluido es de 3,5 g. En posición “3,5”.
Ajuste de anti-skating
Este ajuste se realiza para evitar los saltos de la aguja.
1 Ha de coincidir con la misma posición de la escala que el valor de presión de la aguja.
2 Gire el dial [ANTI-SKATING] para que coincida con la marca de referencia del mismo valor
que el valor de presión de la aguja del cartucho.
A
K
T
S
-
I
I
N
T
G
N
A
Conexión del equipo
Conexión del equipo
! Asegúrese de desconectar la alimentación y desenchufar el cable de alimentación de la toma de corriente
siempre que haga o cambie conexiones.
! Consulte el manual de instrucciones del componente que va a ser conectado.
! Conecte el cable de alimentación después de terminar las conexiones entre los aparatos.
Descripciones de los terminales
PHONO LINE
1 Interruptor del ecualizador
Mueva este interruptor a la posición correcta según el terminal de entrada de audio del pre-amplificador u
otro componente análogo.
2 Terminales con salida RCA
Conecta el terminal de entrada de audio al pre-amplificador u otro componente análogo.
3 Terminal AC IN
Conecta a una toma de corriente con el cable de alimentación incluido. Espere hasta que todas las conexiones entre el equipo estén terminadas antes de conectar el cable de alimentación.
! Asegúrese de usar el cable de alimentación incluido.
Conexión a un preamplificador y a un componente
1 Coloque el interruptor del ecualizador en la posición correcta.
PHONO: Al conectar el terminal de entrada PHONO (el ecualizador integrado del reproductor de discos no se
utiliza).
LINE: Al conectar un terminal de entrada distinto de PHONO (se utiliza el ecualizador integrado del reproductor
de discos).
2 Conecte el terminal de salida RCA al terminal de entrada del pre-amplificador u otro
componente análogo.
3 Conecte el cable de alimentación.
Conecta a una toma de corriente con el cable de alimentación incluido. Espere hasta que todas las conexiones
entre el equipo estén terminadas antes de conectar el cable de alimentación.
! Antes de conectarse a la fuente de alimentación (salida de corriente alterna) montada en el equipo conec-
tado, compruebe la potencia en vatios mostrada en la fuente de alimentación. (Esta unidad consume 2 W de
potencia.)
! Si el reproductor comienza a funcionar cuando se conecta el cable de alimentación pulse el botón [STOP].
AC IN
31 2
Español
7
Page 58

02
Operación
Lugar de instalación
Coloque la unidad sobre una superficie plana que esté libre de vibraciones externas.
! Dentro de lo posible, mantenga la unidad alejada del sistema de altavoces.
! Si la unidad está muy cerca de una radio (emisiones AM/FM), la radio puede generar ruidos. Mantenga la
distancia máxima posible con la unidad.
Reproducción
Realice la preparación del siguiente modo:
! Coloque un disco en el giradiscos.
! Retire la cubierta de la aguja teniendo cuidado de no tocar la punta de la aguja.
1 Pulse el botón [SPEED] para configurar la velocidad de reproducción del disco.
Para reproducir discos de 45 revoluciones coloque el botón en la posición elevada [v]; para discos de 33 1/3
revoluciones el botón debe encontrarse en posición pulsada [w].
! Para reproducir un disco EP estándar, coloque el adaptador de disco EP en el eje central y reproduzca el
disco EP.
2 Mueva la palanca [SIZE SELECT] para configurar el tamaño del disco.
Para reproducir discos de 17 cm coloque la palanca en posición [17]; para discos de 30 cm coloque la palanca
en posición [30].
! Para reproducir un disco EP estándar, coloque el adaptador de disco EP en el eje central y reproduzca el
disco EP.
3 Pulse el botón [START] durante 1 segundo.
El giradiscos comienza a girar y la reproducción se inicia automáticamente.
! Una vez finaliza la reproducción del disco, el brazo fonocaptor vuelve a su posición original y el giradiscos se
detiene automáticamente.
! Una vez que haya finalizado la reproducción de discos, coloque la cubierta de la aguja para proteger la punta
de la aguja.
! Este aparato cuenta con una función de retorno automático, el brazo fonocaptor vuelve a su posición origi-
nal automáticamente una vez alcanza un punto específico después de finalizar la reproducción del disco.
Aunque esto no es un problema con discos de tamaño normal, con discos que incluyen surcos hasta ese
punto la función de retorno automático se puede activar antes de que finalice la reproducción.
Final de la reproducción
1 Tire hacia arriba de la palanca para devolver el brazo fonocaptor al apoyo del brazo y
después apriete hacia abajo la palanca elevadora.
2 Pulse el botón [STOP].
! Una vez que haya finalizado la reproducción de discos, coloque la cubierta de la aguja para proteger la punta
de la aguja.
Información adicional
Sustitución de la aguja
La aguja incluida tiene una vida útil de unas 400 horas. Para evitar dañar sus valiosos discos, sustituya la aguja al
finalizar su vida útil. Adquiera una aguja de repuesto en la tienda donde adquirió su reproductor o en el centro de
reparación más cercano. Especifique que desea una aguja de repuesto exclusivamente para PL-30-K.
! Desactive la corriente del amplificador antes de sustituir la aguja y desenchufe el cable de alimentación del
reproductor.
! La punta de la aguja es una pieza extremadamente delicada, manipúlela con cuidado. Utilice un cepillo suave
para limpiar el polvo de la punta de la aguja con mucha delicadeza.
! Desmontar el portacápsula facilita la sustitución de la aguja.
Desmontaje de la aguja sustituible
1 Sujetando el cartucho firmemente con una mano, agarre la aguja con la otra mano y, a
continuación, presiónela hacia abajo.
2 Tire de la aguja suavemente en la dirección de la flecha para extraerla.
Notas
! No toque el brazo fonocaptor o el giradiscos ni desactive la corriente mientras se está reproduciendo un disco.
! El sistema de reproducción automática no se puede utilizar con discos de 25 cm. En este caso deberá reali-
zar la operación manualmente. Si el brazo fonocaptor no vuelve a su posición original después de detener la
reproducción, pulse el botón [STOP].
Pausa de la reproducción
Tire de la palanca elevadora hacia arriba.
La aguja del cartucho se eleva alejándose del disco.
! Para volver a la reproducción, apriete hacia abajo la palanca elevadora.
Montaje de la aguja sustituible
1 Sujetando firmemente el cartucho con una mano, agarre la aguja con la otra mano y
apuntando la parte insertable hacia la aguja, introdúzcala en todo su recorrido dentro del
orificio más largo del cartucho.
2 Presione hacia arriba en la dirección de la flecha hasta que se escuche un “clic”.
8
Page 59

02
RL
RGLG
Operación
Sustitución del cartucho
Si desea montar un cartucho diferente en este reproductor utilice uno con un peso de 4,5 g a 9,5 g.
Para comprar solo un portacápsula, pida uno específico para PL-30-K en la tienda donde adquirió el giradiscos o
en su centro de reparación más cercano.
Desmontaje del cartucho
1 Gire la contratuerca del portacápsula y desmonte el mismo.
2 Afloje los tornillos de fijación del cartucho y extráigalos.
3 Desconecte los cables del lado del cartucho.
Fijación del cartucho
1 Conecte los cables.
Están codificados por colores como se indica a continuación. Tenga cuidado para conectarlos correctamente.
Color Función
Rojo Canal derecho (R)
Blanco Canal izquierdo (L)
Verde Toma de tierra del canal derecho (RG)
Azul Toma de tierra del canal izquierdo (LG)
Parte superior
(Parte posterior del cartucho)
2 Monte el cartucho.
Para conseguir el saliente necesario realice el montaje de tal forma que la punta de la aguja quede colocada a
unos 45 mm del borde de la superficie de fijación del portacápsula (la arandela de goma), como se muestra en el
diagrama siguiente.
! El saliente para este reproductor debe ser de 19 mm.
Parte posterior
Parte delantera
Español
45 mm
Montaje en paralelo.
Montaje perpendicular.
3 Apriete los tornillos de fijación del cartucho para montar el mismo.
Notas
! Después de sustituir al cartucho asegúrese de reajustar el equilibrio horizontal, la presión de la guja y el valor
anti-skating.
! El grosor del terminal depende del cartucho de repuesto y puede que algunos no conecten correctamente. En
este caso, utilice el cable de repuesto incluido.
9
Page 60
03
Otros
Solución de problemas
! Si su reproductor no funciona correctamente utilice la tabla siguiente para realizar el proceso de resolución de
problemas.
Si no puede resolver el problema, contacte con nuestro centro de atención al cliente o con la tienda de
adquisición.
Problema Verificación Remedio
La alimentación no se
conecta.
El giradiscos no gira. ¿Está bien colocada la correa? Compruebe la correa y los rodillos. Si la correa se ha salido
No hay sonido o éste está
muy bajo.
El sonido sufre distorsiones.
El sonido es extremadamente bajo.
Los sonidos izquierdo y
derecho están invertidos.
Se produce un zumbido
grave (sonido tipo ronquido
o zumbido) durante la
reproducción.
La punta de la aguja no
desciende hasta alcanzar
el disco.
Se producen saltos de la
aguja.
¿Está bien conectado el cable de
alimentación?
¿La correa está cortada? Compruebe la correa y el rodillo. Si la correa está cortada,
¿Están bien conectados los cables
de audio?
¿Están sucios los terminales y las
clavijas?
¿Está montado correctamente el
portacápsula?
¿Está el interruptor del ecualizador
en posición [LINE] incluso aunque esté conectado a su terminal
PHONO del amplificador?
¿Está el interruptor del ecualizador
en posición [PHONO] incluso aunque esté conectado al terminal AUX
del amplificador?
¿Están invertidas las conexiones
izquierda y derecha para cada parte
del equipo?
¿Hay un dispositivo eléctrico como
una lámpara fluorescente o su cable
de alimentación cerca del cable de
alimentación de la unidad?
¿Está ajustada la presión de la aguja
correctamente?
¿Está equilibrado el brazo horizontalmente?
¿Está ajustada la presión de la aguja
correctamente?
¿Está alabeado el disco o está
rayado?
¿Se ha acumulado en la punta de la
aguja una gran cantidad de polvo?
¿Está ajustado correctamente el
anti-skating?
¿Está ajustada correctamente la
altura del brazo?
Conecte bien el cable de alimentación incluido a una toma
de corriente.
de su posición, colóquela según las instrucciones que se
indican en Montaje. (Página 4 )
sustitúyala por una nueva.
Conecte correctamente los cables de audio.
Limpie los terminales y las clavijas antes de hacer conexiones.
Monte correctamente el portacápsula.
Cuando el reproductor está conectado a un terminal
PHONO, coloque el interruptor del ecualizador en posición
[PHONO].
Cuando conectó el reproductor al terminal AUX, colocó el
interruptor del ecualizador en posición [LINE]. (Asegúrese
de colocar el volumen de su amplificador al mínimo antes
de modificar la posición del interruptor del ecualizador).
Conecte correctamente el cable de audio y los conductores
de la pieza portacápsula.
Coloque el cable de alimentación de la lámpara fluorescente o del otro dispositivo lo más lejos posible.
Haga coincidir el contrapeso al valor apropiado de la
presión de la aguja para su cartucho.
Gire el contrapeso hasta que el brazo fonocaptor se
encuentre en estado horizontal.
Haga coincidir el contrapeso al valor apropiado de la
presión de la aguja para su cartucho.
Compruebe el estado del disco.
Retire el portacápsula con el cartucho y utilice un pincel
de punta suave o un pincel de escritura para eliminar con
cuidado el polvo, etc. de la punta de la aguja.
Ajuste el anti-skating correctamente.
Ajuste correctamente la altura del brazo.
Problema Verificación Remedio
El brazo se detiene a lo
largo del camino y no sigue
adelante.
El volumen de sonido es
bajo o alto.
¿Está rayado el disco? Compruebe el estado del disco.
¿Tiene contacto el brazo con algún
obstáculo?
¿Es adecuada la conexión con el
amplificador para el tipo de cartucho
(salida)?
Compruebe alrededor del brazo. Si hay algún obstáculo,
retírelo.
Conecte correctamente los cables de conexión.
Cuidados para el uso
Acerca de la condensación
En invierno pueden formarse gotas de agua (condensación) dentro de la unidad (en las partes de funcionamiento
o en la lente), por ejemplo, si ésta se pasa de un lugar frío a otro caliente o si la temperatura de la habitación
donde está instalada la unidad aumenta repentinamente (empleando una calefacción, etc.). La unidad no funcionará correctamente o no funcionará en absoluto con condensación en su interior. Deje la unidad a la temperatura ambiental de la habitación durante 1 ó 2 horas (aunque este tiempo depende de las condiciones de la
condensación) sin conectar su alimentación. Las gotas de agua se evaporarán y la unidad podrá reproducir. La
condensación también se puede producir en verano si la unidad se expone a la salida directa de aire procedente
de un acondicionador de aire, etc. Si pasa esto, ponga la unidad en una posición diferente.
Al transportar la unidad a otra ubicación
Utilice los materiales de embalaje originales para empaquetar la unidad.
Si los materiales de embalaje originales no están disponibles, asegúrese de realizar lo siguiente.
! Desmonte el plato y el giradiscos y empaquételos con cuidado.
! Desmonte el portacápsula y el contrapeso del brazo y empaquételos con cuidado.
! Utilice el agarre del brazo para asegurar el brazo fonocaptor y utilice cinta adhesiva para fijarlo sin que pueda
moverse.
! Envuelva la unidad central en una manta o un papel suave de modo que no se dañe.
Mantenimiento de cada parte
Al montar y desmontar el portacápsula, apague la alimentación del amplificador.
Si lo hace mientras el volumen es alto, se pueden dañar los altavoces.
! Retire el portacápsula con el cartucho y utilice un pincel de punta suave o un pincel de escritura para eliminar
con cuidado el polvo, etc. de la punta de la aguja.
! Utilice un limpiador de buena calidad para limpiar los discos.
! Utilice un paño suave o similar para limpiar el terminal del portacápsula y vuelva a montarlo en el brazo
fonocaptor.
Limpieza de la cubierta guardapolvo, etc.
Utilice un paño suave para limpiar la cubierta guardapolvo y el mueble.
! No limpie la cubierta guardapolvo durante la reproducción. La energía estática puede provocar que el brazo
fonocaptor sea empujado por la cubierta guardapolvo.
10
Page 61

03
Acerca de las marcas comerciales y marcas comerciales registradas
! Pioneer es una marca registrada de PIONEER CORPORATION.
Los nombres de compañías y productos mencionados aquí son marcas comerciales de sus respectivos
propietarios.
Especificaciones
Requisitos de alimentación eléctrica .............................................................................. 220 V CA a 240 V, 50 Hz/60 Hz
Consumo de energía.....................................................................................................................................................2 W
Peso de la unidad principal ...................................................................................................................................... 5,6 kg
Dimensiones máximas ........................................................................... 435 mm (An) × 110 mm (Al) × 372,6 mm (Pr)
Temperatura de funcionamiento tolerable .............................................................................................. +5 °C a +35 °C
Humedad de funcionamiento tolerable .........................................................................5 % a 85 % (sin condensación)
Parte del giradiscos
Método de accionamiento ...................................................................................Sistema de accionamiento por correa
Motor ....................................................................................................................................................Servo motor de CC
Velocidad de rotación ..........................................................................................................................33 1/3 rpm, 45 rpm
Lloro y fluctuación.....................................................................................................0,1 % o inferior a WRMS (JIS WTD)
Relación señal/ruido ....................................................................................................................................60 dB (DIN-B)
Giradiscos ......................................................................................................... Caja de fundición a presión de aluminio
Parte del brazo fonocaptor
Tipo de brazo ...........................................................................Brazo fonocaptor de tipo recto con equilibrado estático
Longitud efectiva ................................................................................................................................................ 221,5 mm
Saliente .................................................................................................................................................................... 19 mm
Rango variable de presión de la aguja ...................................................................................0 g a 4,0 g (1 escala 0,1 g)
Peso propio del cartucho ................................................................................................ 4,5 g a 9,5 g (cartucho simple)
Tipo de cartucho .................................................................................................................................................. Tipo MM
Peso del portacápsula ......................................................................................... 10,0 g (incluyendo tornillos y tuercas)
Tensión de salida
PHONO .....................................................................................................................................................................2,5 mV
LINE..........................................................................................................................................................................150 mV
! Las especificaciones y diseño de este producto están sujetos a cambios sin previo aviso.
! © 2014 PIONEER HOME ELECTRONICS CORPORATION. Todos los derechos reservados.
Otros
Español
11
Page 62

Если вы желаете утилизировать данное изделие, не выбрасывайте его вместе с обычным бытовым
Чacтные клиенты-в странах-членах ЕС, в Швейцарии и Норв
испо
нов
В странах, не пере
обращайт
Пост
обра
для ок
ПРЕД
Данное обор
во
или поражения э
помещайте рядом с обор
с жидк
(например,
допу
брызг
ПРЕД
Во и
обор
(например, зажженные св
Ус
Из
те
+5 °C до +35 °C; в
засл
Не у
пров
выс
со
иску
u
МЕРЫ ПРЕДОСТОРОЖНОСТИ ПРИ
ОБР
ШНУР
Держит
выт
ни
Ваши р
привести к к
поражению э
ст
се
за
св
Се
на них не
Повре
причиной возникновения пожара или
пора
от
случае обна
обра
официальный сервисный ц
PIONEER или к Вашем
ПРЕД
Хранит
де
неме
ОБ
При
дост
во
внутри
см сзади и по 5 см слев
мусором. Существует отдельная система сбора использованных электронных изделий в
соответствии с законодательством, которая предполагает соответствующее обращение, возврат и
переработку.
льзованные электронные изделия в соответствующие пункты сбора или дилеру (при покупке сходного
ого изделия).
упая таким образом, вы можете быть уверены в том, что утилизируемый продукт будет соответствующим
зом обработан, передан в соответствующий пункт и переработан без возможных негативных последствий
ружающей среды и здоровья людей.
численных выше, для получения информации о правильных способах утилизации
есь в cooтветcтвующие учреждения.
УПРЕЖДЕНИЕ
удование не является
донепроницаемым. Во избежание пожара
лектрическим током не
удованием емкости
остями
вазы, цветочные горшки) и не
скайте попадания на него капель,
, дождя или влаги.
D3-4-2-1-3_A1_Ru
УПРЕЖДЕНИЕ
збежание пожара не приближайте к
удованию источники открытого огня
ечи).
D3-4-2-1-7a_A1_Ru
ловия эксплуатации
делие эксплуатируется при следующих
мпературе и влажности:
лажность менее 85 % (не
оняйте охлаждающие вентиляторы)
станавливайте изделие в плохо
етриваемом помещении или в месте с
окой влажностью, открытом для прямого
лнечного света (или сильного
сственного света).
D3-4-2-1-7c*_A1_Ru
егии могут бесплатно возвращать
K058b_A1_Ru
ВНИМАНИЕ
Чтобы полностью отключить питание
устройства, вытащите вилку кабеля
питания из электророзетки. Поэтому
устройство следует устанавливать так,
чтобы вилку кабеля питания можно было
легко вытащить из розетки в
чрезвычайных обстоятельствах. Во
избежание пожара следует извлекать
вилку кабеля питания из розетки, если
устройство не будет использоваться в
течение долгого времени (например, если
вы уезжаете в отпуск).
D3-4-2-2-2a*_A1_Ru
ВНИМАНИЕ
ВО ИЗБЕЖАНИЕ ПОРАЖЕНИЯ
ЭЛЕКТРИЧЕСКИМ ТОКОМ НЕ СНИМАЙТЕ
КРЫШКУ (ИЛИ ЗАДНЮЮ СТЕНКУ).
ВНУТРИ НЕ СОДЕРЖАТСЯ ДЕАТЛИ,
ПРЕДНАЗНАЧЕННЫЕ ДЛЯ РЕМОНТА
ПОЛЬЗОВАТЕЛЕМ. ДЛЯ ОБСЛУЖИВАНИЯ
ОБРАТИТЕСЬ К КВАЛИФИЦИРОВАННОМУ
СОТРУДНИКУ СЕРВИСНОЙ СЛУЖБЫ.
D3-4-2-1-1_B1_R
АЩЕНИИ С СЕТЕВЫМ
ОМ
е сетевой шнур за вилку. Не
аскивайте вилку, взявшись за шнур, и
когда не касайтесь сетевого шнура, если
уки влажные, так как это может
ороткому замыканию или
лектрическим током. Не
авьте аппарат, предметы мебели и т.д. на
тевой шнур, не зажимайте его. Не
вязывайте узлов на шнуре и не
язывайте его с другими шнурами.
тевые шнуры должны лежать так, чтобы
льзя было наступить.
жденный сетевой шнур может стать
зить Вас электрическим током. Время
времени проверяйте сетевой шнур. В
ружения повреждения
титесь за заменой в ближайший
ентр фирмы
у дилеру.
УПРЕЖДЕНИЕ
е небольшие детали вне доступа
тей. При случайном заглатывании,
дленно обращайтесь к врачу.
ЯЗАТЕЛЬНАЯ ВЕНТИЛЯЦИЯ
установке устройства обеспечьте
аточное пространство для вентиляции
избежание повышения температуры
устройства (не менее 15 см сверху, 5
а и справа).
D3-4-2-1-7d*_A1_Ru
2
S002*_A1_Ru
D41-6-4_A1_Ru
K041_A1_Ru
Page 63

Благодарим вас за покупку этого изделия марки Pioneer. Полностью прочтите
настоящие инструкции по эксплуатации, чтобы знать, как правильно обращаться с этой моделью.
Содержание
01 Перед началом работы
Особенности ....................................................................................................................................................... 4
Проверка комплекта поставки ........................................................................................................................... 4
Сборка ................................................................................................................................................................. 4
02 Управление
Названия деталей и функции ............................................................................................................................ 6
Регулировка ........................................................................................................................................................ 6
Подключение оборудования ............................................................................................................................. 7
Воспроизведение ............................................................................................................................................... 8
Приостановка воспроизведения ....................................................................................................................... 8
Завершение воспроизведения .......................................................................................................................... 8
Дополнительная информация .......................................................................................................................... 8
03 Другие неисправности
Устранение неполадок ..................................................................................................................................... 10
Предостережения по использованию ............................................................................................................ 10
Техническое обслуживание каждого узла...................................................................................................... 11
Торговые марки и зарегистрированные торговые марки ............................................................................. 11
Технические характеристики ........................................................................................................................... 11
Русский
3
Page 64

01
ПРЕДУПРЕЖДЕНИЕ
Хранит
случайном заг
обращай
Перед началом работы
Особенности
Простой в использовании, полностью автоматический проигрыватель
грампластинок
Выбрав размер грампластинки, достаточно просто нажать кнопку [START], чтобы начать ее воспроизведение. По завершении воспроизведения тонарм автоматически вернется в исходное положение.
Стабильное воспроизведение грампластинок благодаря корпусу с низким
центром тяжести
В нижней части проигрывателя находится металлическая плита, придающая низкий центр тяжести
всему корпусу, что обеспечивает стабильное воспроизведение грампластинок даже при внешних
вибрациях.
Возможность включения и выключения эквалайзера проигрывателя
Этот проигрыватель снабжен собственным эквалайзером, поэтому его можно напрямую подключать к
усилителям, не имеющим вывода PHONO. При подключении к усилителю, у которого есть эквалайзер,
эту функцию можно выключить.
Поставляется с высококачественным картриджем ММ
Поставка проигрывателя вместе с картриджем позволяет сразу же начать пользоваться им.
Поставляется с достаточно толстой резиновой накладкой
Резиновая накладка толщиной 5 мм подавляет внешние вибрации, а также улучшает сцепление между
грампластинкой и диском, обеспечивая стабильное воспроизведение.
Ненавязчивый дизайн
Сдержанный внешний вид и отделка проигрывателя обеспечат его гармоничное сочетание с другими
компонентами аудиосистемы и интерьером.
Съемный шнур питания
При перемещении проигрывателя кабели не мешают, что устраняет проблемы с отсоединением.
е небольшие детали вне доступа детей. При
латывании, немедленно
тесь к врачу.
D41-6-4_A1_Ru
Сборка
! Не снимайте зажим-закрутку, фиксирующий тонарм, до завершения сборки.
! После сборки проигрывателя и подключения к другим устройствам подсоедините шнур питания.
1 Установите диск.
Установите диск на центральный шпиндель.
! Действуйте осторожно, чтобы не ударить диском по основному блоку и не уронить его.
2 Поверните диск так, чтобы ролик был виден в квадратном отверстии с отрывной
лентой для захвата ремня.
Проверка комплекта поставки
Проверьте наличие перечисленных ниже принадлежностей:
! Диск
! Накладка диска
! Пылезащитная крышка со съемными петлями
! Адаптер для долгоиграющих пластинок
! Противовес
! Головка звукоснимателя с картриджем
! Запасные проволочные выводы
! Кабель питания
! Инструкция по эксплуатации (этот документ)
! Гарантийный талон
4
Page 65

01
Перед началом работы
3 Возьмитесь за отрывную ленту и захватите ремень снаружи по центру ролика.
1
2
3
4
1 Ролик
2 Ремень
3 Отрывная лента
4 Квадратное отверстие
4 Удалите отрывную ленту.
5 Медленно проверните диск на пять или шесть оборотов.
Убедитесь, что ремень хорошо зацепился за центральную часть ролика.
6 Установите накладку на диск.
! Накладка диска имеет верхнюю и нижнюю стороны. Установите накладку на диск нижней частью с
логотипом Pioneer вниз.
7 Установите головку звукоснимателя.
Вставьте головку звукоснимателя с установленным картриджем в тонарм. Затем затяните стопорную
гайку, удерживая головку звукоснимателя в горизонтальном положении.
8 Установите противовес.
Установите противовес на заднюю часть ручки тонарма.
9 Установите пылезащитную крышку.
Хорошо вставьте петля пылезащитной крышки в захваты на задней части проигрывателя.
PHONO LINE
! Полностью вставьте обе петли.
! При снятии пылезащитной крышки полностью откройте ее, а затем потяните вверх, удерживая
крышку рядом с замками петель.
AC IN
10 Снимите зажим-закрутку, фиксирующий тонарм.
По завершении сборки снимите зажим-закрутку, фиксирующий тонарм.
Русский
5
Page 66

02
23
Управление
Названия деталей и функции
Верхняя панель
e
K
A
S
-
T
I
I
T
N
N
G
A
1
1 Кнопка SPEED
Предназначена для изменения скорости в соответствии с воспроизводимой грампластинкой.
2 Кнопка START
Нажмите, чтобы запустить диск.
3 Кнопка STOP
Нажмите, чтобы остановить диск.
4 Ручка SIZE SELECT
Переключите, чтобы изменить размер в соответствии с воспроизводимой грампластинкой.
5 Головка звукоснимателя
Используется при установленном картридже.
6 Контргайка
Удерживает установленный картридж.
7 Тонарм
8 Упор тонарма
Служит опорой тонарма.
d
c
b
a
9
8
7
6
5
4
9 Рычаг микролифта
При подъеме рычага тонарм поднимается. При опускании рычага тонарм опускается.
a Микролифт тонарма
Это устройство предназначено для перемещения тонарма вверх и вниз. Управление им осуществляется рычагом микролифта.
b Ручка регулировки ANTI-SKATING
При воспроизведении грампластинки на иглу звукоснимателя действует сила, направленная к внутреннему периметру. Чтобы компенсировать эту силу, установите ручку регулировки на значение,
равное прижимной силе звукоснимателя.
c Кольцо регулировки прижимной силы звукоснимателя
Используется для настройки необходимой прижимной силы звукоснимателя картриджа.
d Противовес
Используется для балансировки тонарма и регулировки прижимной силы звукоснимателя.
e Адаптер для долгоиграющих пластинок
Используется для воспроизведения стандартных долгоиграющих грампластинок.
Регулировка
Регулировка баланса тонарма
Порядок подготовки:
! На картриджах со съемными защитными колпачками звукоснимателя снимите колпачок.
! Опустите рычаг микролифта.
1 Установите регулятор [ANTI-SKATING] на “0”.
2 Снимите тонарм с упора и отрегулируйте баланс таким образом, чтобы тонарм
располагался горизонтально.
Вращайте противовес, пока тонарм не примет почти горизонтальное положение.
! При перемещении тонарма обращайте внимание на то, чтобы игла звукоснимателя не касалась
диска и других частей.
Противовес расположен слишком близко к концу Противовес расположен слишком близко к началу
6
Page 67

02
Управление
Регулировка прижимной силы звукоснимателя
1 Верните тонарм на упор.
2 Совместите метку “0” на кольце регулировки прижимной силы звукоснимателя с
осевой линией на задней части ручки тонарма.
Удерживая противовес пальцем, чтобы он не перемещался, поверните только кольцо регулировки
прижимной силы звукоснимателя так, чтобы метка “0” совпала с черной осевой линией на задней части
ручки тонарма.
3 Отрегулируйте прижимную силу звукоснимателя.
Поверните противовес, чтобы отрегулировать прижимную силу звукоснимателя в соответствии с
используемым картриджем.
! При вращении противовеса вращается и кольцо регулировки прижимной силы звукоснимателя.
Следя за кольцом, отрегулируйте необходимую прижимную силу.
! Правильная прижимная сила звукоснимателя для поставляемого картриджа – 3,5 г. Выберите значе-
ние “3,5”.
Подключение оборудования
Подключение оборудования
! При выполнении или изменении подключений обязательно выключайте питание и отсоединяйте шнур
питания от розетки.
! Справьтесь с инструкцией по эксплуатации на подключаемое устройство.
! После подключения всех устройств подключите шнур питания.
Описание выводов
PHONO LINE
1 Переключатель эквалайзера
Установите переключатель в положение, соответствующее входному аудиовыводу основного предусилителя или другого устройства.
2 Выходные выводы RCA
Используются для подключения к входному аудиовыводу основного предусилителя или другого
устройства.
3 Терминал AC IN
Подключается к розетке через поставляемый шнур питания. Подключайте шнур питания только
после завершения всех подключений между оборудованием.
! Используйте только поставляемый шнур питания.
AC IN
31 2
Регулировка компенсации скатывающей силы
Эта регулировка выполняется для предотвращения скачков звукоснимателя.
1 Установите то же значение на шкале, что и для прижимной силы звукоснимателя.
2 Поверните ручку [ANTI-SKATING] так, чтобы установить контрольную метку на то же
самое значение, что и прижимная сила звукоснимателя картриджа.
A
K
T
S
-
I
I
N
T
G
N
A
Подключение к основному предусилителю и другим устройствам
1 Установите переключатель эквалайзера в необходимое положение.
PHONO: для подключения к входному выводу PHONO (встроенный эквалайзер проигрывателя не
используется).
LINE: для подключения к выводу, отличному от входного вывода PHONO (встроенный эквалайзер проигрывателя используется).
2 Подключите выходной вывод RCA к входному выводу основного предусилителя
или другого устройства.
3 Подключите шнур питания.
Подключается к розетке через поставляемый шнур питания. Подключайте шнур питания только после
завершения всех подключений между оборудованием.
! Перед подключением к розетке (розетке переменного тока), установленной на подключенном обору-
довании, проверьте мощность, указанную на розетке. (Проигрыватель потребляет 2 Вт.)
! Если проигрыватель начинает работать при подключении шнура питания к розетке, нажмите кнопку
[STOP].
7
Русский
Page 68

02
Управление
Место установки
Установите проигрыватель на горизонтальную поверхность, которая не подвергается воздействию
внешних вибраций.
! Устанавливайте проигрыватель на максимальном возможном расстоянии от акустической системы.
! При установке вблизи радиоприемника (диапазона AM/FM) радиоприемник может создавать помехи.
Устанавливайте проигрыватель как можно дальше от радиоприемника.
Воспроизведение
Порядок подготовки:
! Установите грампластинку на диск.
! Снимите защитный колпачок звукоснимателя, не касаясь иглы.
1 Нажмите кнопку [SPEED], чтобы выбрать скорость воспроизведения грампластинки.
Для воспроизведения “сорокапяток” отожмите кнопку [v]; для воспроизведения грампластинок со скоростью 33 1/3 нажмите кнопку [w].
! Для воспроизведения стандартных долгоиграющих грампластинок установите адаптер долгоиграю-
щих пластинок на центральный шпиндель и начните воспроизведение.
2 Рычагом [SIZE SELECT] выберите размер грампластинки.
Для воспроизведения 17 см грампластинок установите рычаг в положение [17]; для воспроизведения
30 см грампластинок установите рычаг в положение [30].
! Для воспроизведения стандартных долгоиграющих грампластинок установите адаптер долгоиграю-
щих пластинок на центральный шпиндель и начните воспроизведение.
3 Держите кнопку [START] нажатой более 1 секунды.
Опорный диск начнет вращаться и воспроизведение начнется автоматически.
! По завершении воспроизведения грампластинки тонарм вернется в исходное положение, а диск
перестанет вращаться автоматически.
! По завершении воспроизведения установите защитный колпачок звукоснимателя, чтобы защитить
иглу.
! Этот проигрыватель снабжен функцией, автоматически возвращающей тонарм в исходное положе-
ние при достижении определенной точки после завершения воспроизведения грампластинки. При
воспроизведении грампластинок стандартного размера эта функция срабатывает правильно, однако
при воспроизведении грампластинок с канавками записи, доходящими до этой точки, функция может
активироваться до завершения воспроизведения.
Завершение воспроизведения
1 Поднимите рычаг микролифта, чтобы вернуть тонарм на упор, а затем опустите
рычаг микролифта.
2 Нажмите кнопку [STOP].
! По завершении воспроизведения установите защитный колпачок звукоснимателя, чтобы защитить
иглу.
Дополнительная информация
Замена звукоснимателя
Срок службы поставляемой иглы звукоснимателя составляет 400 часов. Во избежание повреждения
ценных грампластинок своевременно заменяйте иглу звукоснимателя. Покупайте иголки звукоснимателя в том же самом магазине, в котором приобрели проигрыватель, или же в ближайшем пункте технической поддержки. При покупке указывайте, что приобретаете иглу звукоснимателя для PL-30-K.
! Перед заменой иглы звукоснимателя выключите питание усилителя и отключите шнур питания прои-
грывателя от розетки.
! Игла звукоснимателя – очень хрупкая деталь, поэтому обращайтесь с ней очень осторожно. Для уда-
ления пыли с иглы используйте мягкую щетку.
! Снимите головку звукоснимателя, чтобы было легче заменить звукосниматель.
Снятие сменного звукоснимателя
1 Неподвижно удерживая картридж одной рукой, возьмитесь другой рукой за
звукосниматель и потяните его вниз.
2 Осторожно подайте звукосниматель в направлении, указанном стрелкой.
Примечания
! Не касайтесь тонарма или диска и не выключайте питание во время воспроизведения грампластинки.
! Систему автоматического воспроизведения использовать с 25 см грампластинками нельзя. Если
тонарм не возвращается в исходное положение после завершения воспроизведения, нажмите кнопку
[STOP].
Приостановка воспроизведения
Поднимите рычаг микролифта.
Игла звукоснимателя картриджа поднимется с грампластинки.
! Для возобновления воспроизведения опустите рычаг микролифта.
Установка сменного звукоснимателя
1 Неподвижно удерживая картридж одной рукой, возьмитесь другой рукой за
звукосниматель, правильно направьте защелку на сменном звукоснимателе и до упора
вставьте его в длинное отверстие в картридже.
2 Поднимите звукосниматель в направлении, указанном стрелкой, до щелчка.
8
Page 69

02
RL
RGLG
Управление
Замена картриджа
Чтобы установить на проигрыватель другой картридж, используйте картридж весом 4,5–9,5 г.
При покупке в магазине или ближайшем пункте технической поддержки только головки звукоснимателя,
укажите что покупаете ее для PL-30-K.
Снятие картриджа
1 Поверните контргайку головки звукоснимателя и снимите его.
2 Выкрутите и извлеките крепежные винты картриджа.
3 Отсоедините проволочные выводы на стороне картриджа.
Установка картриджа
1 Подсоедините проволочные выводы.
Они имеют разные цвета, как указано ниже. Подсоединяйте их правильно.
Цвет Назначение
Красный Правый канал (R)
Белый Левый канал (L)
Зеленый Масса правого канала (RG)
Синий Масса левого канала (LG)
Верхняя часть
(Задняя часть картриджа)
2 Установите картридж.
Чтобы получить необходимый выступ, выполняйте установку так, чтобы игла звукоснимателя располагалась примерно на 45 мм от края установочной поверхности (резиновая шайба) головки звукоснимателя, как показано на рисунке ниже.
! Выступ на этом проигрывателе должен быть 19 мм.
Задняя часть
Передняя часть
45 mm
Установите параллельно.
3 Затяните крепежные винты картриджа, чтобы установить его.
Примечания
! После замены картриджа обязательно повторно отрегулируйте горизонтальный баланс, прижимная
сила звукоснимателя и компенсацию скатывающей силы.
! Толщина клемм зависит от запасного картриджа, и некоторые из них могут плохо подключаться. В
этом случае используйте поставляемые запасные проволочные выводы.
Установите перпендикулярно.
Русский
9
Page 70

03
Другие неисправности
Устранение неполадок
! При нарушении работоспособности проигрывателя используйте таблицу ниже для поиска и устране-
ния неисправностей.
При невозможности устранить неисправность самостоятельно, обратитесь в центр техобслуживания
или точку продажи.
Неисправность Проверка Способ устранения
Не включается питание. Шнур питания подключен пра-
Диск не вращается. Ремень на месте? Проверьте ремень и ролики. Если ремень соскочил с
Нет звука или тихий звук. Аудиокабели подключены пра-
Искажение звука. Переключатель эквалайзера уста-
Очень тихий звук. Переключатель эквалайзера
Звук левого и правого
канала поменяны
местами.
Во время воспроизведения слышен тихий гудящий звук (гудение или
жужжание).
Игла звукоснимателя не
опускается на грампластинку.
вильно?
Ремень целый? Проверьте ремень и ролики. Если ремень порван,
вильно?
Терминалы и штекеры чистые? Перед подключением очистите выводы и штекеры.
Головка звукоснимателя установлена правильно?
новлен в положение [LINE] даже
при подключении проигрывателя
к выводу PHONO усилителя?
установлен в положение [PHONO]
даже при подключении проигрывателя к выводу AUX усилителя?
Соединения левого и правого
каналов каждого устройства
поменяны местами?
Возле соединительного шнура
есть флуоресцентная лампа или
ее шнур питания?
Прижимная сила звукоснимателя
отрегулирована правильно?
Горизонтальная балансировка
тонарма выполнена?
Правильно подключите поставляемый шнур питания
к розетке.
диска, установите его на место согласно инструкциям
в Сборка. (Стр 4 )
замените его новым.
Правильно подключите аудиокабели.
Правильно установите головку звукоснимателя.
Если проигрыватель подключен к выводу PHONO,
установите переключатель эквалайзера в положение
[PHONO].
При подключении к выводу AUX к выводу PHONO,
установите переключатель эквалайзера в положение
[LINE]. (Перед изменением положения переключателя
эквалайзера обязательно установите громкость усилителя на минимум.)
Правильно подсоедините аудиокабель и проволочные
выводы головки звукоснимателя.
Проложите шнур питания флуоресцентной лампы
или другое устройство на максимальном возможном
расстоянии.
Отрегулируйте противовес, чтобы установить прижимную силу звукоснимателя, соответствующую используемому картриджу.
Поверните противовес до достижения горизонтального положения тонарма.
Неисправность Проверка Способ устранения
Происходят скачки звукоснимателя.
Тонарм останавливается и не перемещается
дальше.
Звук тихий или громкий. Подключение к усилителю
Прижимная сила звукоснимателя
отрегулирована правильно?
Грампластинка деформирована
или на ней есть царапины?
На игле скопилась пыль? Снимите головку звукоснимателя с картриджем и осто-
Компенсация скатывающей силы
отрегулирована правильно?
Высота тонарма отрегулирована
правильно?
На грампластинке есть царапины?
Тонарм соприкасается с чемлибо?
соответствует типу картриджа
(выходу)?
Отрегулируйте противовес, чтобы установить прижимную силу звукоснимателя, соответствующую используемому картриджу.
Проверьте состояние грампластинки.
рожно удалите пыль или другие загрязнения с иглы
звукоснимателя мягкой щеткой или кисточкой.
Правильно отрегулируйте компенсацию скатывающей
силы.
Правильно отрегулируйте высоту тонарма.
Проверьте состояние грампластинки.
Проверьте область вокруг тонарма. Если есть какое-либо препятствия, удалите его.
Правильно подключите соединительные кабели.
Предостережения по использованию
Конденсат
В зимнее время внутри проигрывателя (на рабочих деталях или линзе) могут образоваться водяные капли (конденсат), например если проигрыватель был перенесен из холодного место в теплую
комнату или при резком повышении температуры в комнате, где он установлен (обогревание, др.).
Проигрыватель будет работать неправильно и не будет воспроизводить, пока внутри него есть конденсат. Оставьте проигрыватель выключенным на 1 или 2 часа при комнатной температуре (необходимое
время зависит от состояния конденсата). Водяные капли испарятся, и проигрыватель будет работать
снова. Конденсат может образовываться в летнее время, если на проигрыватель прямо дует кондиционер. В таком случае установите проигрыватель в другое место.
При транспортировке проигрывателя в другое место
Для упаковки проигрывателя используйте оригинальные упаковочные материалы.
Если оригинальных упаковочных материалов нет, сделайте следующее:
! Снимите и хорошо упакуйте накладку и диск.
! Снимите и хорошо упакуйте головку звукоснимателя и противовес с тонарма.
! Зажимом зафиксируйте тонарм и закрепите его изолентой так, чтобы он не перемещался.
! Заверните основной блок в одеяло или мягкую бумагу, чтобы не повредить его.
10
Page 71
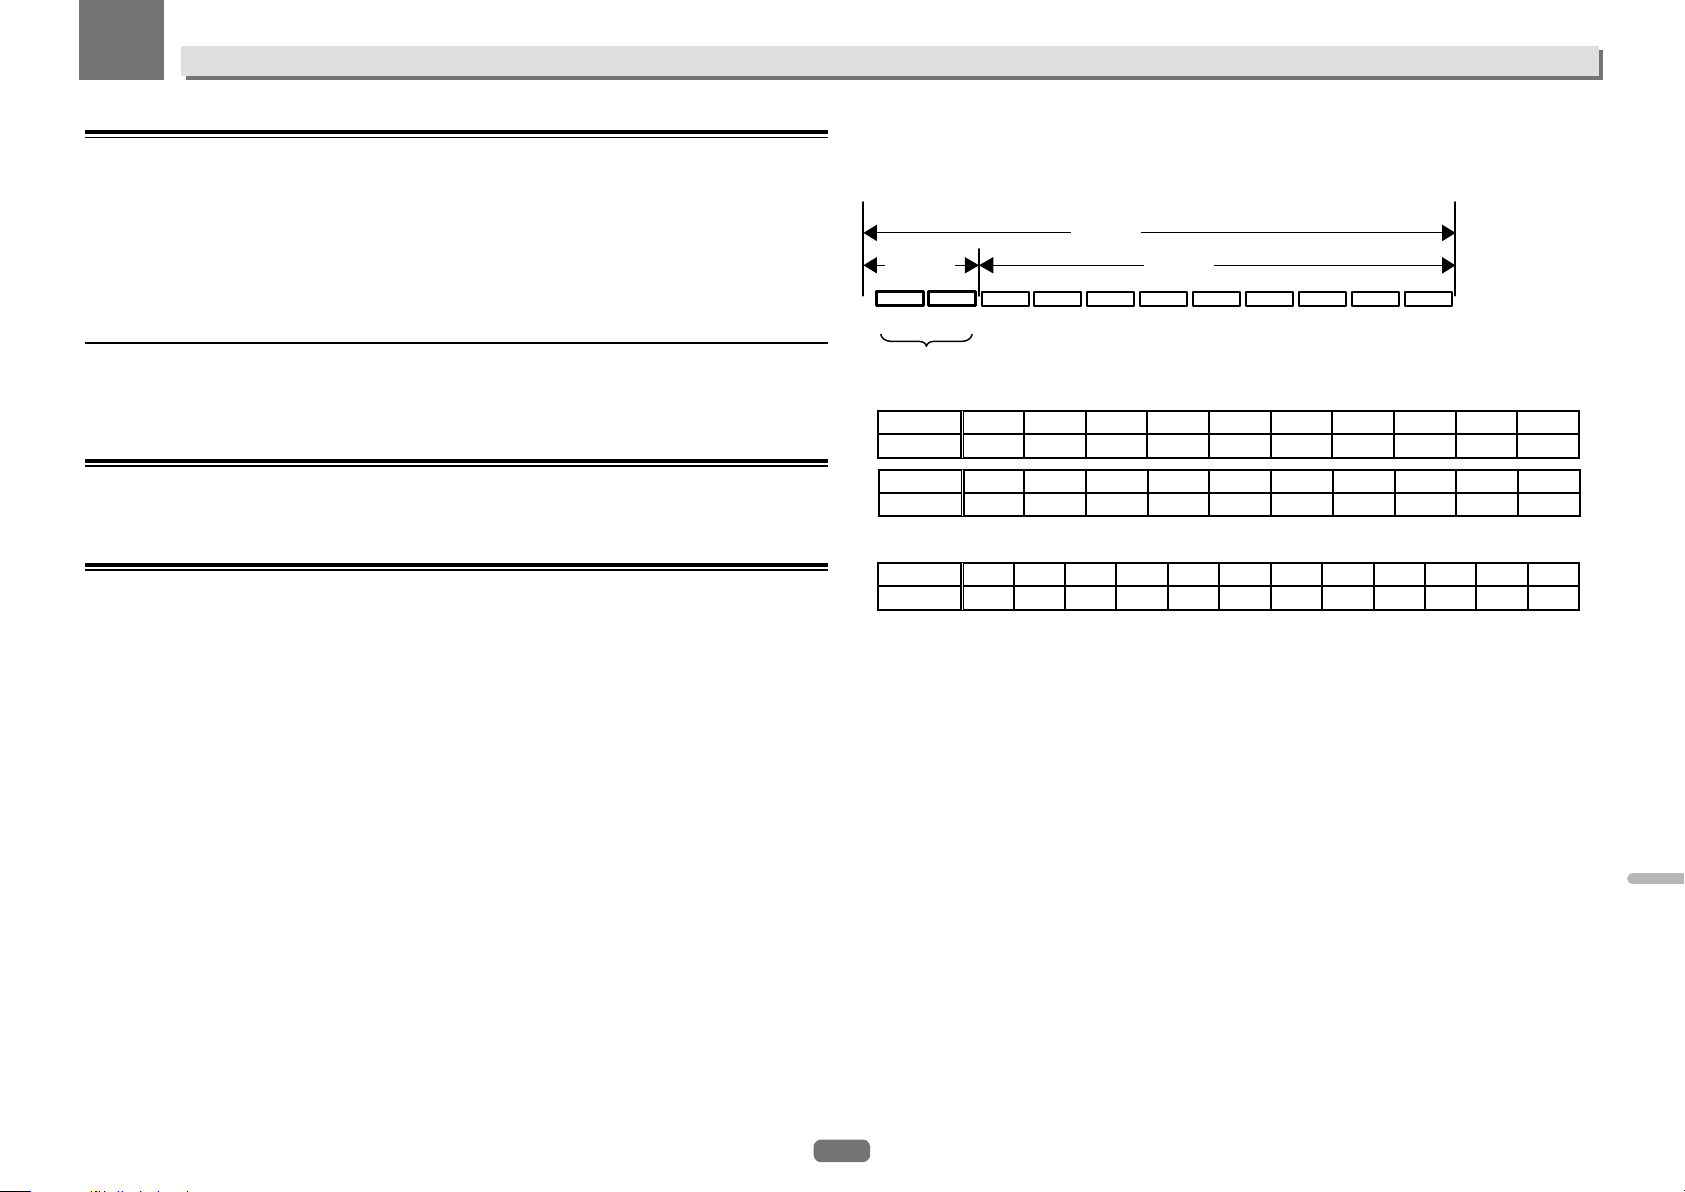
03
Дату изготовления оборудования можно определить по серийному номеру, который содержит информацию о
D3-7-10-7_A1_Ru
Другие неисправности
Техническое обслуживание каждого узла
При установке и снятии головки звукоснимателя отключайте питание усилителя.
Выполнение этих операции при установленной высокой громкости может вызвать повреждение
громкоговорителя.
! Снимите головку звукоснимателя с картриджем и осторожно удалите пыль или другие загрязнения с
иглы звукоснимателя мягкой щеткой или кисточкой.
! Чистите грампластинки высококачественным специальным средством.
! Мягкой тканью или аналогичным материалом очистите выводы головки звукоснимателя, а затем уста-
новите ее на тонарм.
Очистка пылезащитной крышки и других деталей.
Для очистки пылезащитной крышки и корпуса используйте мягкую ткань.
! Не очищайте пылезащитную крышку во время воспроизведения. Статическое электричество может
привести к притягиванию тонарма к пылезащитной крышке.
Торговые марки и зарегистрированные торговые марки
! Pioneer является зарегистрированной торговой маркой PIONEER CORPORATION.
Указанные здесь названия компаний и изделий являются торговыми марками соответствующих владельцев.
Технические характеристики
Требования по питанию ..................................................................... 220 В до 240 В перем. тока, 50 Гц/60 Гц
Потребляемая мощность............................................................................................................................. 2 Вт
Вес основного блока ...................................................................................................................................5,6 кг
Макс. размеры ...................................................................................... 435 (Ш) мм × 110 (В) мм × 372,6 (Г) мм
Допустимая рабочая температура ....................................................................................... от +5 °C до +35 °C
Допустимая рабочая влажность ..............................................от 5 % до 85 % (без образования конденсата)
Узел диска
Привод ................................................................................................................................................ Ременный
Эл. двигатель ..............................................................................................Серводвигатель постоянного тока
Скорость вращения .....................................................................................................33 1/3 об/мин, 45 об/мин
Коэффициент детонации ............................................................................. Не более 0,1 % WRMS (JIS WTD)
Соотношение сигнал/шум ............................................................................................................. 60 дБ (DIN-B)
Диск .......................................................................................................................................... Литой алюминий
Узел тонарма
Тип тонарма ....................................................................................... Статически сбалансированный, прямой
Полезная длина ....................................................................................................................................221,5 мм
Выступ ........................................................................................................................................................19 мм
Диапазон регулировки прижимной силы звукоснимателя ...............От 0 г до 4,0 г (1 деление шкалы – 0,1 г)
Собственная масса картриджа .....................................................................От 4,5 г до 9,5 г (один картридж)
Тип картриджа ............................................................................................................................................... MM
Вес головки звукоснимателя ............................................................................ 10,0 г (включая винты и гайки)
Выходное напряжение
PHONO.......................................................................................................................................................2,5 мВ
LINE ...........................................................................................................................................................150 мВ
! Технические характеристики и конструкция данного изделия могут быть изменены без предваритель-
ного уведомления.
месяце и годе производства.
Серийный номер
12 цифр
2 цифры
10 цифр
P1 P2
Дата изготовления оборудования
P1 - Год изготовления
Год 2001A2002B2003C2004D2005E2006F2007G2008H2009I2010
Символ
Год 2011K2012L2013M2014N2015O2016P2017Q2018R2019S2020
Символ
P2 - Месяц изготовления
Месяц 1
Символ
! © PIONEER HOME ELECTRONICS CORPORATION, 2014. Все права защищены.
2
3
A
B
C4D
5
6
7
8
9I10J11K12
E
F
G
H
J
T
L
Русский
11
Page 72

Примечание:
В соответствии со статьей 5 Закона Российской Федерации “О защите прав
потребителя” и Указанием Правительства Российской Федерации № 720 от 16
июня 1997 года корпорация Pioneer Europe NV устанавливает условие на
следующую продолжительность срока службы официально поставляемых на
Российский рынок товаров.
Аудио и видеооборудование: 7 лет
Переносное аудиооборудование: 6 лет
Другое оборудование (наушники, микрофон и т.д.): 5 лет
Автомобильная электроника: 6 лет
D3-7-10-6_A1_Ru
PIONEER HOME ELECTRONICS CORPORATION
1-1, Shin-ogura, Saiwai-ku, Kawasaki-shi, Kanagawa 212-0031, Japan
Корпорация Пайонир Хоум Электроникс
1-1, Син-Огура, Сайвай-ку, г. Кавасаки, префектура Канагава, 212-0031, Япония
Импортер: ООО "ПИОНЕР РУС"
125040, Россия, г. Москва, ул. Правды, д.26 Тел.: +7(495) 956-89-01
PIONEER ELECTRONICS (USA) INC.
P. O. BOX 1540, Long Beach, California 90801-1540, U.S.A. TEL: (800) 421-1404
PIONEER ELECTRONICS OF CANADA, INC.
340 Ferrier Street, Unit 2, Markham, Ontario L3R 2Z5, Canada TEL: 1-877-283-5901, 905-479-4411
PIONEER EUROPE NV
Haven 1087, Keetberglaan 1, B-9120 Melsele, Belgium TEL: 03/570.05.11
PIONEER ELECTRONICS ASIACENTRE PTE. LT D.
253 Alexandra Road, #04-01, Singapore 159936 TEL: 65-6472-7555
PIONEER ELECTRONICS AUSTRALIA PTY. LTD.
5 Arco Lane, Heatherton, Victoria, 3202, Australia, TEL: (03) 9586-6300
PIONEER ELECTRONICS DE MEXICO S.A. DE C.V.
Blvd.Manuel Avila Camacho 138 10 piso Col.Lomas de Chapultepec, Mexico, D.F. 11000 TEL: 55-9178-4270
K002*_B5_Ru
Зарегистрируйте Ваше изделие на
http://www.pioneer.eu
http://www.pioneer-rus.ru
© 2014 PIONEER HOME ELECTRONICS CORPORATION.
All rights reserved.
<502-PL30KB-3432A>
© 2014 PIONEER HOME ELECTRONICS CORPORATION.
Tous droits de reproduction et de traduction réservés.
Сделано в Китае
Printed in China / Imprimé en Chine
 Loading...