

Page 1
The lightning flash with arrowhead symbol, within an
equilateral triangle, is intended to alert the user to the
presence of uninsulated "dangerous voltage" within the
product's enclosure that may be of sufficient magnitude
to constitute a risk of electric shock to persons.
RISK OF ELECTRIC SHOCK
DO NOT OPEN
CAUTION
IMPORTANT
CAUTION:
TO PREVENT THE RISK OF ELECTRIC SHOCK, DO
NOT REMOVE COVER (OR BACK). NO USERSERVICEABLE PARTS INSIDE. REFER SERVICING
TO QUALIFIED SERVICE PERSONNEL.
The exclamation point within an equilateral triangle is
intended to alert the user to the presence of important
operating and maintenance (servicing) instructions in
the literature accompanying the appliance.
English
Français
Deutsch
IMPORTANT NOTICE:
RECORD THE MODEL NUMBER
AND SERIAL NUMBER OF THIS
EQUIPMENT BELOW . THE NUMBERS ARE ON THE TOP PANEL.
MODEL NO. DR-A14S
SERIAL NO.
KEEP THESE NUMBERS FOR
FUTURE USE.
CD-ROM DRIVE UNIT
UNITE DE LECTEUR DE CD-ROM
CD-ROM –LAUFWERK
LETTORE DI CD-ROM
Italiano
Operating instructions
Mode d’emploi
Bedienungsanleitung
Istruzioni per l'uso
Thank you for buying this PIONEER
product. Please read through these
operating instructions so you will
know how to operate your unit properly. After you have finished reading the instructions, put them away
in a safe place for future reference.
W ARNING: TO PREVENT FIRE
OR SHOCK HAZARD, DO NOT EXPOSE THIS APPLIANCE TO RAIN
OR MOISTURE.
DR-A14S
BUSYPHONES
CD-ROM DRIVE
Page 2

2
<DRC1085>
En
This product complies with the EMC Directives (89/336/EEC, 92/31/EEC) and CE
Marking Directive (93/68/EEC).
Ce produit est conforme aux directives relatives à la compatibilité électromagnétique
(89/336/CEE, 92/31/CEE) et à la directive CE relative aux marquages (93/68/CEE).
Dieses Produkt entspricht den EMV-Richtlinien (89/336/EEC, 92/31/EEC) und CEMarkierungsrichtlinien (93/68/EEC).
Questo prodotto è conforme alle direttive EMC (89/336/CEE, 92/31/CEE) e alla
direttiva sul marchio CE (93/68/CEE).
Dit produkt voldoet aan de EMC-richtlijnen (89/336/EEC en 92/31/EEC) en de CEmarkeringsrichtlijn (93/68/EEC).
Denna produkt uppfyller föreskrifterna i EMC-direktiv (89/336/EEC, 92/31/EEC) och
CE-märkningsdirektiv (93/68/EEC).
Este producto cumple con las Directivas EMC (89/336/CEE, 92/31/CEE) y Directiva
de Marcación CE (93/68/CEE).
Este produto cumpre com as Directivas EMC (89/336/CEE, 92/31/CEE) e Directiva
da Marcação CE (93/68/CEE).
Dette produkt er i overensstemmelse med direktiverne vedrørende
elektromagnetisk kompatibilitet (89/336/EEC, 92/31/EEC) og CE-direktivet
vedrørende mærkning (93/68/EEC).
VARNING!
Om apparaten används på annat sätt än i denna bruksanvisning spacificerats, kan
användaren utsättas för osynling laserstrålning som överskrider gränsen för
laserklass 1.
ADVARSEL:
Usynlig laserstråling ved åbning når sikkerhedsafbrydere er ude af funktion. Undgå
udsaettelse for stråling.
VAROITUS!
Laitten käyttäminen muulla kuin tässä käyttöohjeessa mainitulla tavalla saattaa
altistaa käuttäjän turvallisuusluokan 1 ylittävälle näkymättömälle lasersäteilylle.
Page 3

<DRC1085>
En
3
SAFETY INSTRUCTIONS
To ensure your personal safety and to maximize the full operating potential of your Drive, read
and follow these safety precautions:
ENVIRONMENT - Please do not use the unit at places with much dust, high temperature, or
high humidity. Please use the unit at a place wher e it is not subjected to vibrations or shocks.
POWER - Power-off your system and attached hardware devices before installation.
READ INSTRUCTIONS - Read all safety and operating instructions before the Drive is operated.
RETAIN INSTRUCTIONS - Retain the safety and operating instructions for future reference.
FOLLOW INSTRUCTIONS - Follow all operating and use instructions.
HEED WARNINGS - All warnings must be adhered to.
CLEANING - DO NOT use liquid, aerosol cleaners, or alcohol. Use only a damp cloth to clean
the exterior housing.
WATER AND MOISTURE - DO NOT use this product near water.
POWER SOURCES - Operate this product from the type of power source indicated on the
marking label. If you are not sure of the type of power available, consult your Authorized Pioneer
Dealer .
OVERLOADING - DO NOT overload wall outlets and extension cords. Doing so can result in
fire or electric shock.
OBJECT AND LIQUID ENTRY - Never push objects of any kind into this product. Touching
dangerous voltage points may cause a short resulting in fire or electric shock. Do not spill liquid
of any kind on this product.
CONDENSATION - Moisture will form in the operating section of the product causing
performance to be impaired if it is brought from cool surroundings into a warmer environment.
If you are moving the unit to a location with a warmer temperature, let the product stand for 12 hours in the new location before turning it back on.
SERVICING - Do not attempt to repair this product yourself. Opening or removing covers may
expose you to dangerous voltage or other hazards. Refer all servicing to qualified service
personnel. (Refer to the enclosed Service and Support Card.)
IMPORTANT
CAUTION
This product contains a laser diode of higher class than
1. To ensure continued safety, do not remove any
covers or attempt to gain access to the inside of the
product.
Refer all servicing to qualified personnel.
The following caution label appears
on your unit.
Location: on top of the cover
For pluggable equipment the socket-outlet shall be installed near
the equipment and shall be easily accessible.
CLASS 1 LASER PRODUCT
LASER KLASSE 1
Page 4
4
<DRC1085>
En
SAFETY INSTRUCTIONS
[For Canadian model]
This Class B digital apparatus meets all requirements of the Canadian Interference-Causing
Equipment Regulations.
RADIO SIGNAL INTERFERENCE - This equipment has been tested and found
to comply with the limits for a Class B digital device, pursuant to Part 15 of the
FCC Rules. These limits are designed to provide reasonable protection against
harmful interference in a residential installation. This equipment generates, uses,
and can radiate radio frequency energy and, if not installed and used in accordance
with the instructions, may cause harmful interference to radio communications.
However, ther e is no guarantee that interference will not occur in a particular
installation. If this equipment does cause harmful interference to radio or television
reception, which can be determined by turning the equipment off and on, the
user is encouraged to try to correct the interference by one or more of the
following measures:
] Reorient or relocate the receiving antenna.
] Increase the separation between the equipment and receiver.
] Connect the equipment into an outlet on a circuit different
from that to which the receiver is connected.
] Consult the dealer or an experienced radio/TV technician for help.
LASER DIODE - This product contains a laser diode. To assure continued safety,
DO NOT remove any convers or attempt to gain access to the inside of the product.
CAUTION:
USE OF CONTROLS OR ADJUSTMENTS OR PERFORMANCE OF
PROCEDURES OTHER THAN THOSE SPECIFIED HEREIN MAY RESULT IN
HAZARDOUS RADIATION EXPOSURE.
CAUTION:
USE OF OPTICAL INSTRUMENTS WITH THIS PRODUCT WILL INCREASE EYE
HAZARD.
Information to User
Alteration or modifications carried out without appropriate authorization may invalidate the
user’s right to operate the equipment.
The Generation of Acoustical Noise Is Less Than 70dB.
(ISO7779/DIN45635)
[Pour le modèle Canadien]
Cet appareil numérique de la Classe B respecte toutes les exigences du Règlement sur le
matériel brouilleur du Canada.
Page 5
<DRC1085>
En
5
SAFETY INSTRUCTIONS
The enclosed device driver is for use with MS-DOS/Windows 3.XX. This driver is
not required for use with Windows 95.
* MS-DOS and Windows are trademarks of Microsoft Corporation.
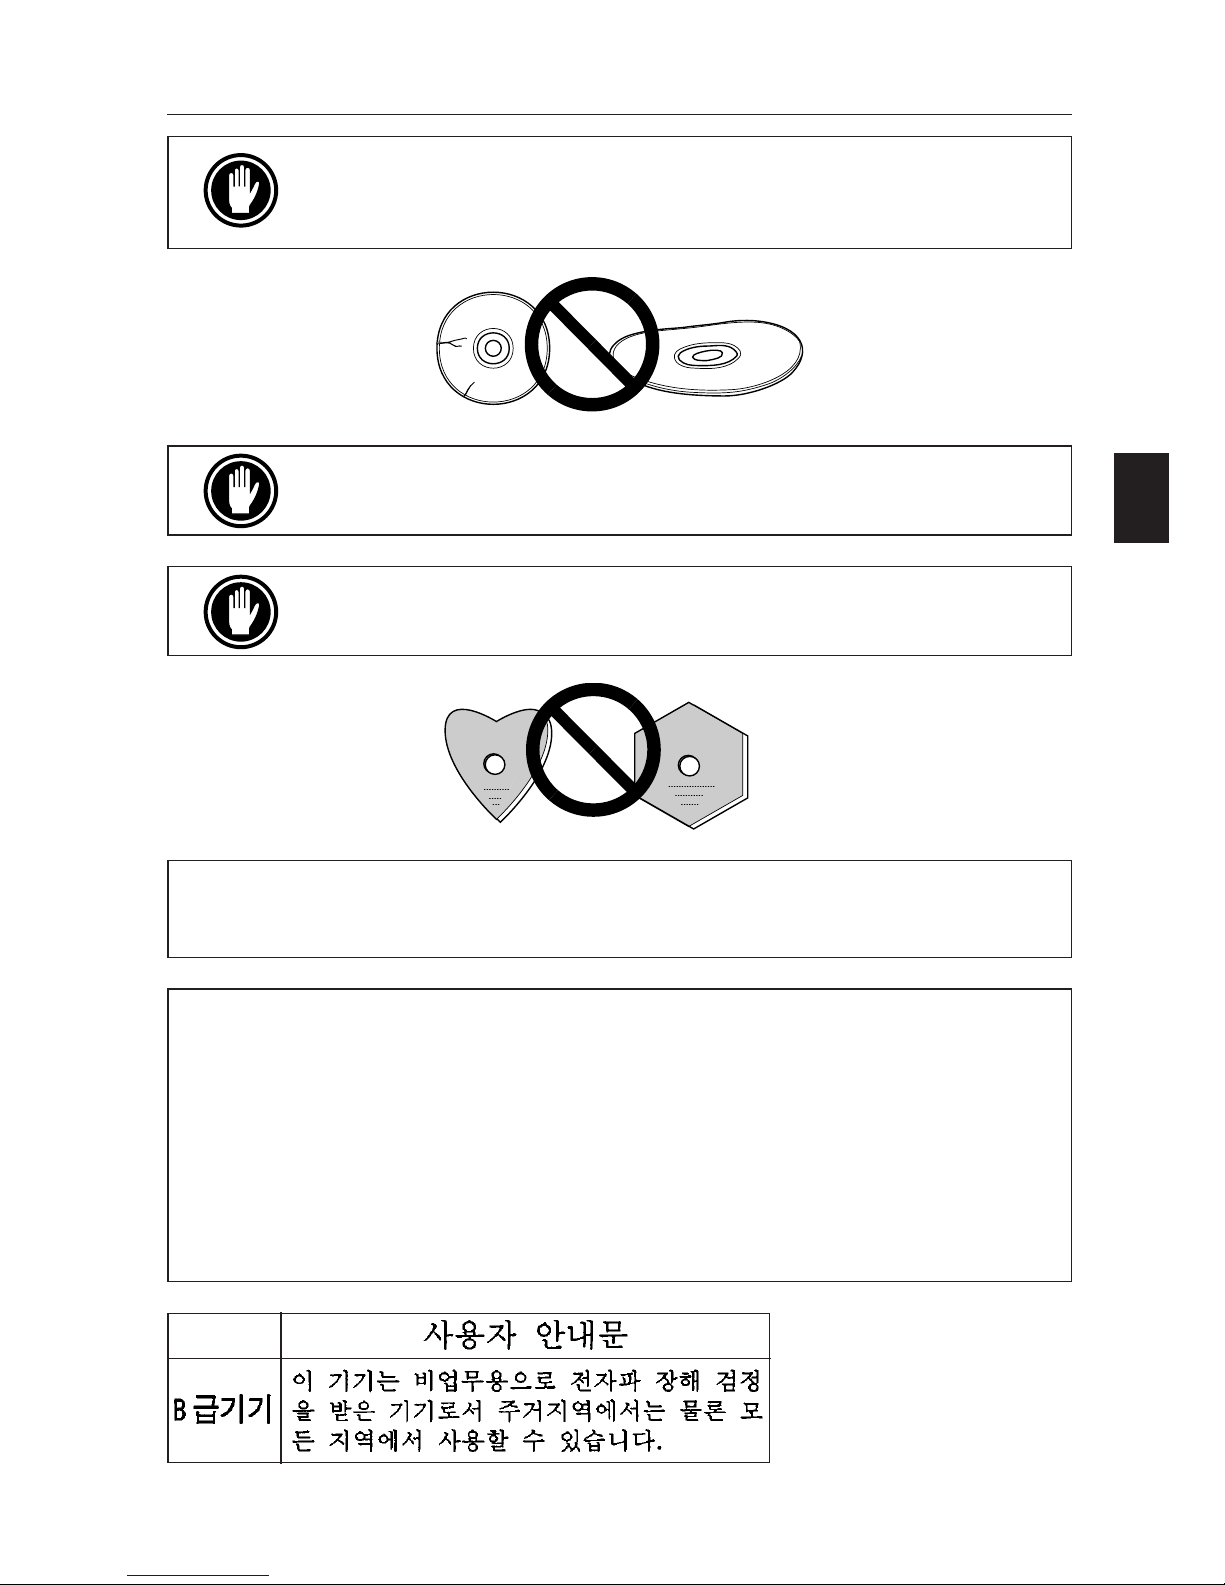
DO NOT use non-standard discs, as these may adversely influence
this unit and other equipment.
DO NOT use damaged,cracked, or warped discs. If they break inside
the unit, they may damage the optics. Discs rotate at high speed inside the changing mechanism.
DO NOT play a CD having other shape than a circular disc, such as
heart shaped disc. Otherwise malfunction may occur.
FEDERAL COMMUNICATIONS COMMISSION
DECLARATION OF CONFORMITY
This device complies with part 15 of the FCC Rules. Operation is subject to the following
two conditions: (1) This device may not cause harmful interference, and (2) this device must
accept any interference received, including interference that may cause undesired operation.
Product Name: CD-ROM DRIVE UNIT
Model Number: DR-A14S
Responsible Party Name: PIONEER ELECTRONICS SERVICE, INC.
Address: 1925 E. DOMINGUEZ ST. LONG BEACH, CA 90810 U.S.A.
Phone: (310) 952-2359
Page 6

6
<DRC1085>
En
FEATURES
÷ High-speed reading
Transfer rate (sustained):
2,100 kBytes/sec. – 5,400 kBytes/sec. (CAV 36X max)
÷ High-speed access
Random average: 70 ms
÷ Low vibration mechanism
÷ ATAPI correspondence
÷ Buffer size: 128 kBytes
÷ Applicable discs
CD-ROM Mode 1
CD-ROM XA Mode 2 (Form 1, 2)
CD-DA (Digital audio output)
CD Extra, Video CD, CD-I Ready and CD-XA Ready support
CD-RW disc reading
NOTES:
This product can read out CD-RW disc data. Note the following:
(1) A little longer time is needed to sense a CD-RW disc when the operation starts, compared
with normal CD-ROM discs.
(2) The read-out speed of CD-RW discs is usually 4 times higher than that of normal discs.
However, according to the quality of the disc or under extremely hot or cold conditions,
the player may reduce the speed of rotation of the disc during read-out. (Because the
reproduced signal level from CD-RW discs is lower than that of normal discs.)
(3) Blank discs, discs where you failed to write data or discs where session close processing
has not been made - these discs cannot be used.
(4) The operations may not start or the data may not be read out under the following conditions:
The quality of the recorded signal has deteriorated due to the dirt or scratches on the
disc, or frequently rewrote discs.
If you fail to start the operation, take out the disc and reinsert it to try again to start.
÷ Correspondence to Kodak Photo CD (single and multisession)
÷ Conforming to MPC-3 specifications
÷ Half-height size
÷ Slot in loading
÷ Windows 95 and Windows 98 (Plug and Play) supported
*Windows is a trademark of Microsoft Corporation.
Precautions on plying CD singles (8 cm Discs)
(1) When playing CD singles (8 cm discs), always use the adapter for 8 cm discs. Before loading
the disc into the CD-ROM drive unit, be sure to check that it is secured properly by the
catches of the adapter. If discs have been inserted without the adapter by mistake, remove
the disc immediately by pressing the eject button. If the disc does not come out with one
press, press another time.
(2) Use 8 cm disc adapters labeled with the
'
mark (recommended standard product). Do
not use adapters which cause the disc to idle, nor adapters which are bent or curved.
Page 7
<DRC1085>
En
7
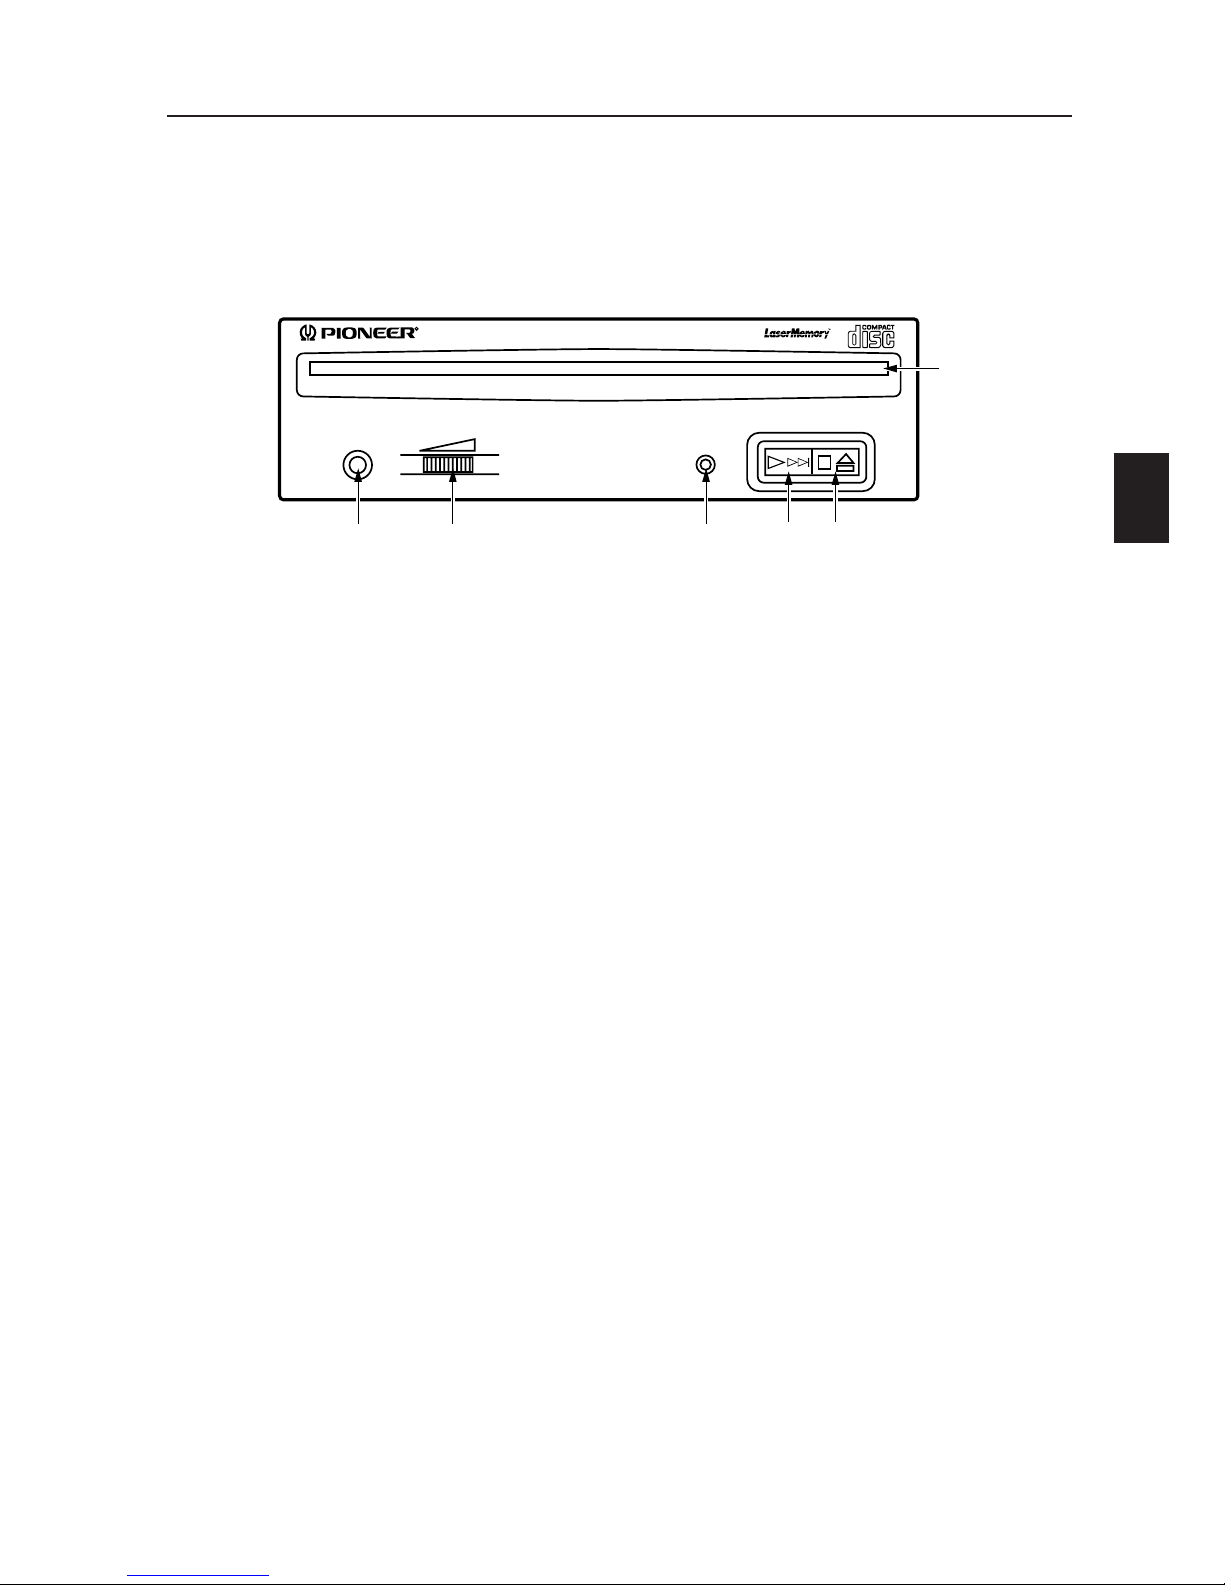
A HARDW ARE TOUR
1 Disc loading slot
Insert the CD-ROM with the label facing up.
When using 8 cm discs, attach a CD adapter (available at stores) to the disc, and
insert the disc into the disc loading slot.
2 Stop (7)/Eject (0) button
This button is used to eject the disc. When this button is pressed once during
playback of an audio disc, the playback will be stopped, and when it is pressed in
stopped condition, the disc will be ejected.
3 Play (3)/Skip (¢) button
This is used for direct playback of audio discs. When an audio disc is inserted and
this button is pressed, play status will be reached, and when this button is pressed
in play status, the playback will skip to the next track. Data discs will not be played
back.
4 BUSY indicator
This flashes during data access.
5 Volume Control (headphone level)
This is used to adjust the volume level of the headphone jack.
6 Headphone jack (PHONES)
This is a stereo minijack for headphones.
Fig. 1
Illustrations are provided in this chapter as a visual introduction to the Drive.
Please Familiarize yourself with these illustrations and refer to them when necessary
to complete the installation and operation of the unit.
BUSYPHONES
6 5 4
1
CD-ROM DRIVE
23
FRONT VIEW
Page 8

8
<DRC1085>
En
7 DC Input
This is the power supply input for DC +5 V and +12 V.
A HARDWARE TOUR
REAR VIEW
Fig. 2
1
2
39
401145
21
- 0 9 8
7
41
Pin Name Function
1 +12 Power supply input for DC +12 V.
2 G Ground.
3 G Ground.
4 +5 Power supply input for DC +5 V.
Pin Name Function
1 L Left channel audio output.
2 G Ground.
3 G Ground.
4 R Right channel audio output.
Pin Name Function
1 GND Ground.
2 Digital Out Digital audio signal output.
8 Host IDE Interface
This is a 40 pin I/O connector according to the ATA specifications.
9 Device Configuration Jumper
This is the jumper switch for selection of the drive use mode and supporting PC.
Short-circuit socket is attached for the setting
attached : on not attached : off
* Only MASTER is ON at the time of shipping from the plant.
0 Audio Output
This is a connector for output of analog audio.
As a Molex 70553 type connecter is used, select a matching connection cable.
- Digital Audio Output
This is a connector for output of digital audio signal.
Pin Name Function
1 MASTER* on The drive is used in master mode.
2 SLAVE on The drive is used in slave mode.
3 CABLE on Mode for drive setting by CABLE
SELECT SELECT of the IDE interface.
4 Reserved.
5 Reserved.
Page 9
<DRC1085>
En
9
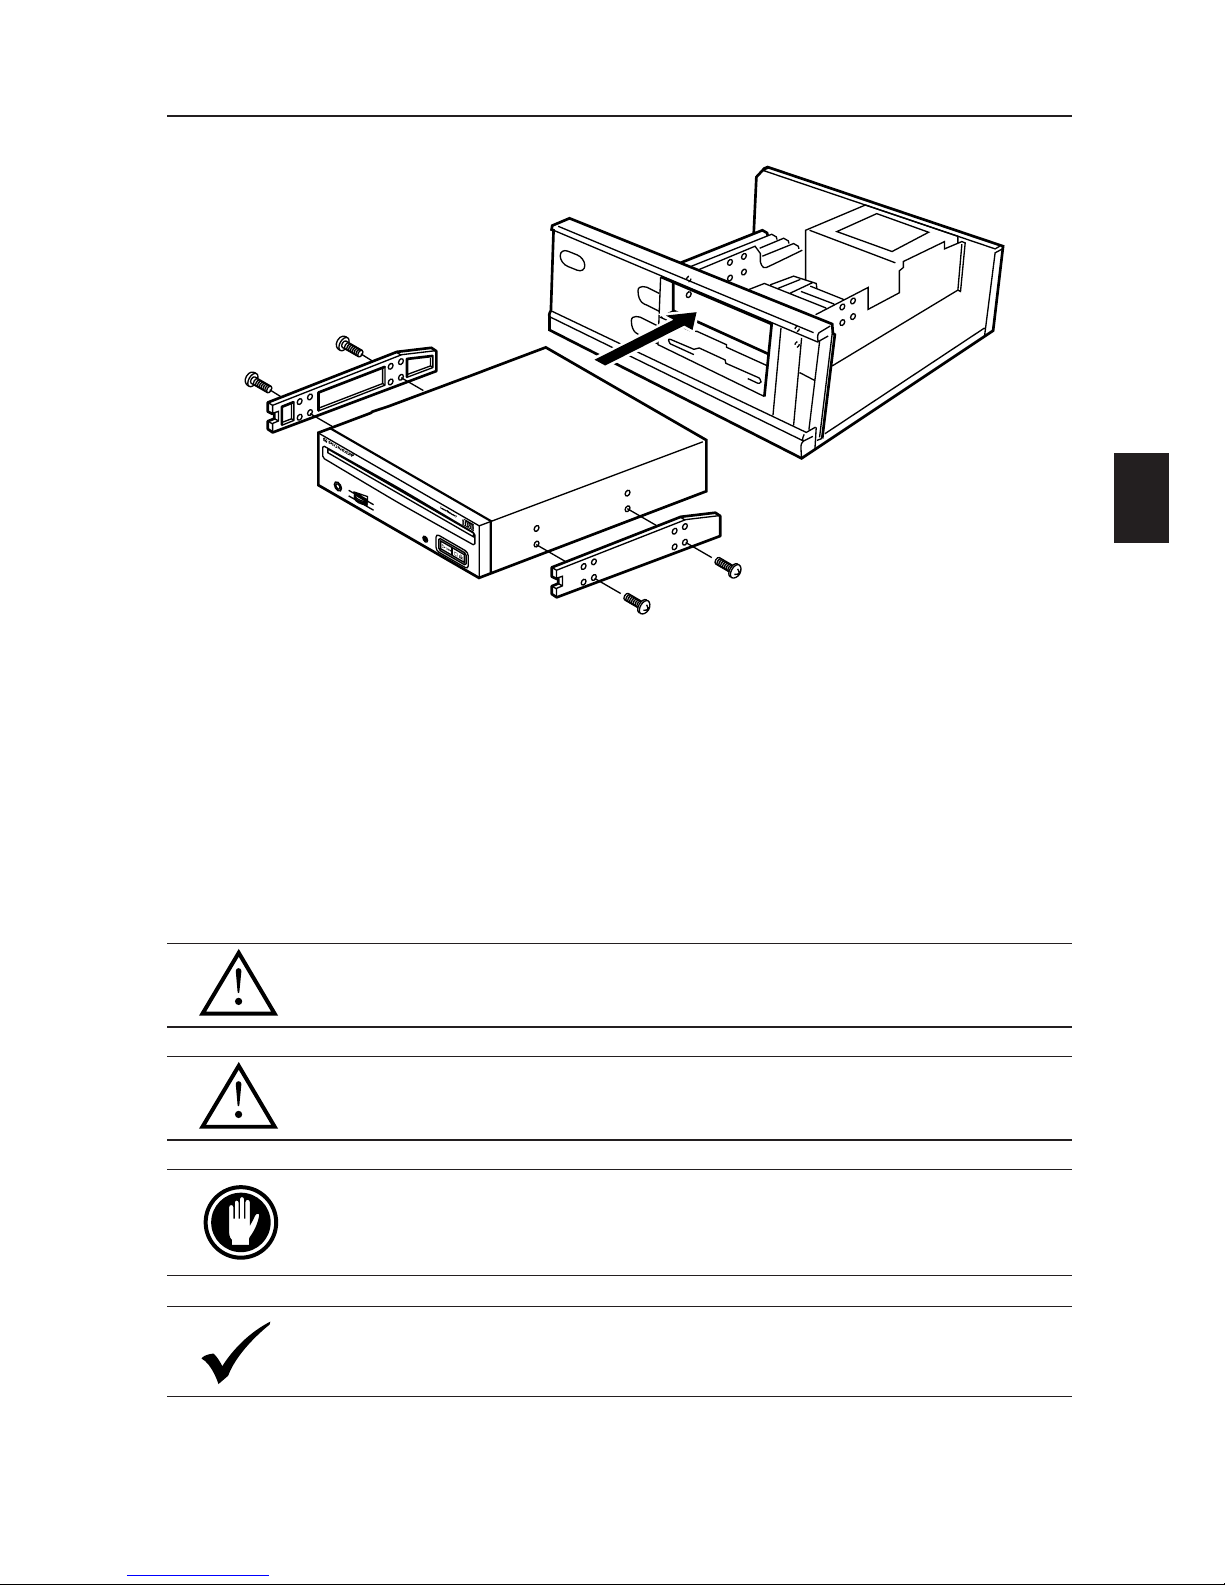
TO INSTALL THE DRIVE
÷ Switch off the power of the personal computer and remove the cover or the front
panel.
÷ Remove the blank panel installed at the front of the 5.25 inch slot.
Installation is not possible when there is no empty slot.
÷ Install the fixation slide rails on the drive. (If slide rails are required, contact the
shop where you bought the computer or the computer manufacturer.)
÷ Insert the drive into the slot.
÷ If fixing is requir ed, fix the drive according to the instruction manual for the computer .
Fig. 3
BUSY
PHONES
CD-ROM DRIVE
Use mounting screws with a length of 5 mm (3/16 in.) or less.
Use of long screws may damage the drive.
Install the drive after the power supply of the personal computer has
been switched off.
When the mounting screws are loose etc., the vibrations from disc
rotation can generate a ripping noise, so that the screws should be
tightened securely.
The drive installation method differs according to the computer type.
For details, please refer to the manuals of your computer.
Page 10
10
<DRC1085>
En
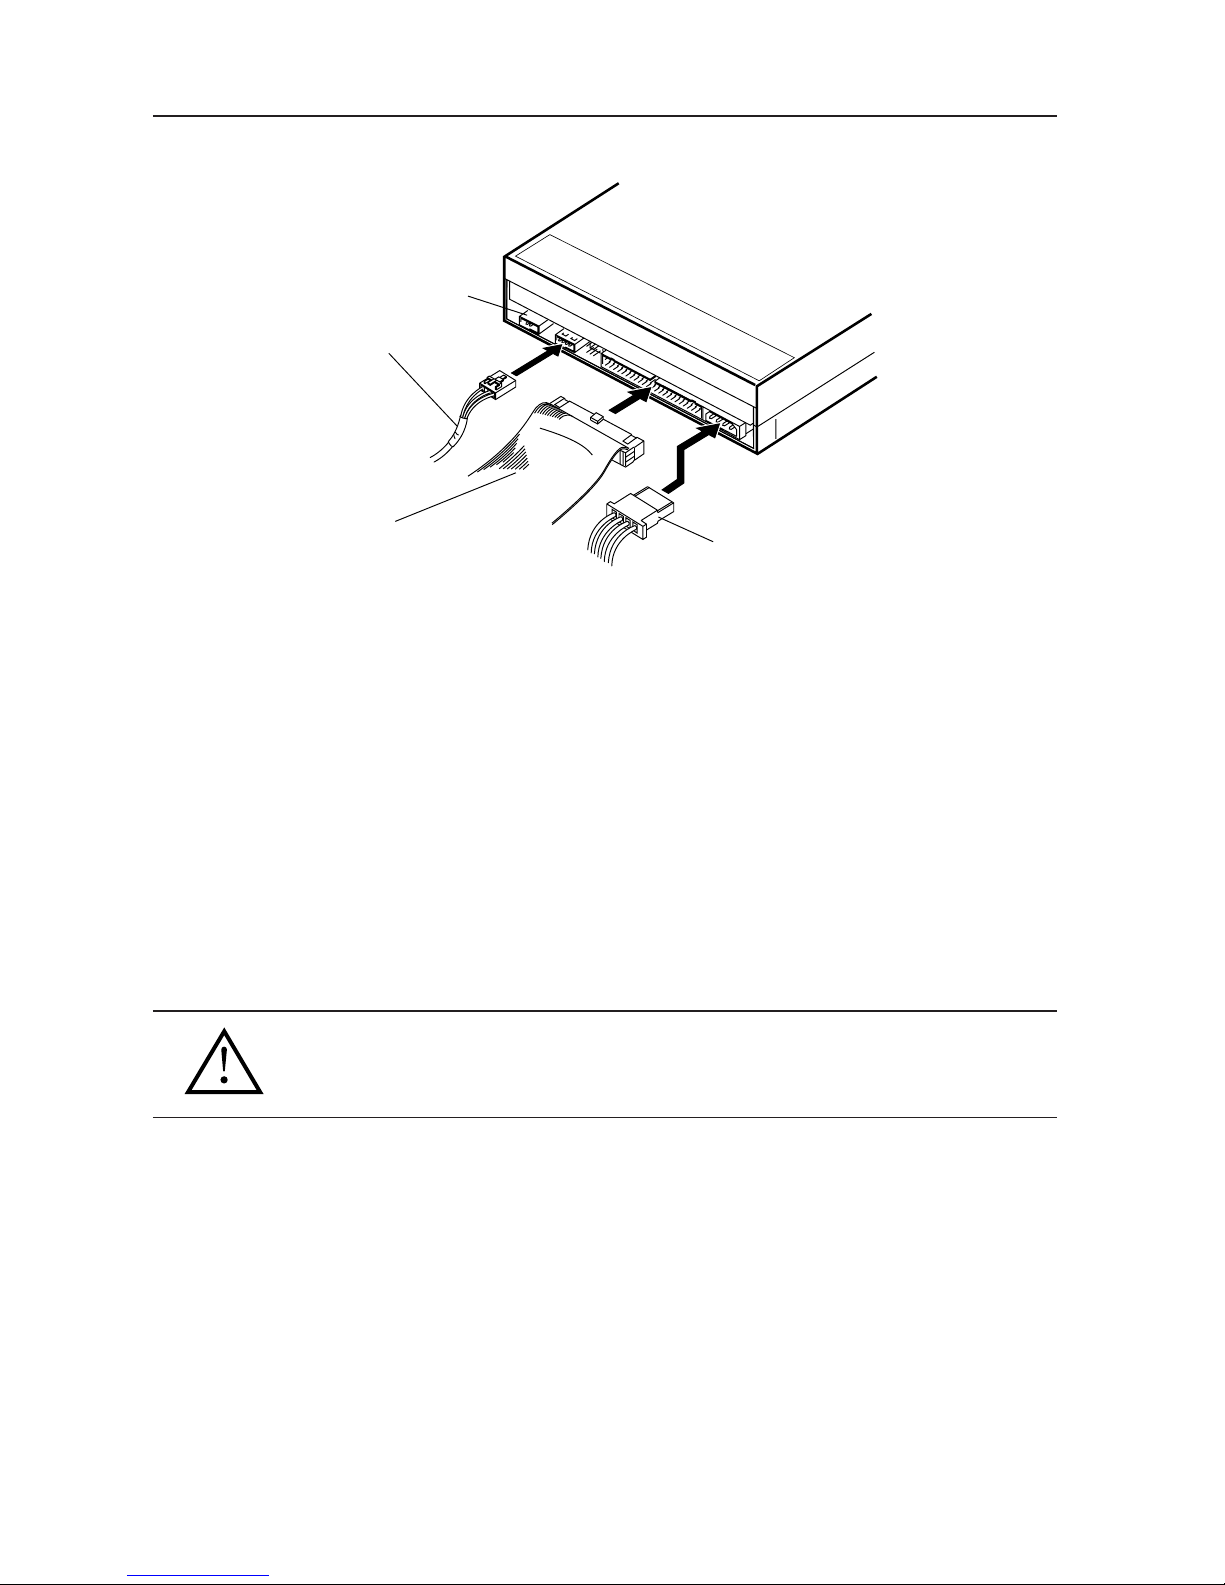
CONNECTION
÷ Switch off the power supply of the personal computer.
÷ Connect the power supply cable from the personal computer. At the time of
connection, please pay attention to the cable polarity.
÷ Connect the IDE interface cable. At this time, confirm that the pin 1 of the IDE
connector is connected correctly to pin 1 of the cable.
÷ When a sound board is used, connect the audio output with an audio cable to the
sound board.
IDE Interface cable
Power cable
Audio Cable
Fig. 4
Pin 1
Digital Audio Output
WARNING
The power supply of the personal computer always must be switched
off before cables are connected.
Page 11

<DRC1085>
En
11
SPECIFICATIONS
Published by Pioneer Electronic Corporation.
Copyright C 1998 Pioneer Electronic Corporation.
All rights reserved.
[General functions]
Disc diameter 12 cm (4.72 in), 8 cm (3.15 in)
Transfer rate
Sustained 2,100 – 5,400 kBytes/sec*
* The data transfer rate may not be output for some disc conditions (scratches, etc.).
Seek time
Random (average) 60 ms
Access time
Random (average) 70 ms
Data buffer capacity 128 kBytes
[Audio output part]
Line 0.7 Vrms ± 0.1 Vrms (at 10 kΩ load)
[Others]
Power supply DC +12 V, 0.9 A (peak), 0.55 A (normal)
(With the built-in terminator) DC +5 V, 1.2 A (peak), 0.75 A (normal)
External dimensions 148 (W) x 42.3 (H) x 207.5 (D) mm
5-27/32 (W) x 1-11/16 (H) x 8-6/32 (D) in
Weight 0.97 kg (2.1 lb)
Operation temperature +5°C to +45°C (41°F to 113°F)
Operation humidity 5% to 85% (no condensation)
Storage temperature –40°C to +60°C (–40°F to 140°F)
Storage humidity 5% to 90% (no condensation)
[Accessories]
÷ Software device drive disk x 1
÷ Short-circuit socket x 2
÷ Audio cable x 1
÷ Mounting screw x 4
÷ Operating instructions x 1
÷ Installation instructions x 1
NOTE:
Specifications and design subject to possible modifications without notice, due to improvements.
Page 12

12
<DRC1085>
Fr
INSTRUCTIONS DE SECURITE
Pour garantir votre sécurité personnelle et obtenir le maximum de votre lecteur, lire et suivre
ces consignes de sécurité:
ENVIRONNEMENT - Ne pas utiliser cet appareil dans des endroits avec beaucoup de poussière,
une température ou une humidité élevée. Utiliser l’appareil à un endroit où il n’est pas soumis à
des vibrations ou des chocs.
PUISSANCE - Couper l’alimentation du système et des dispositifs joints avant l’installation.
LIRE LES INSTRUCTIONS - Lire toutes les instructions de sécurité et d’utilisation avant
d’actionner le lecteur.
CONSERVER LES INSTRUCTIONS - Gar der les instructions de sécurité et d’utilisation pour
une future référence.
SUIVRE LES INSTRUCTIONS - Suivre toutes les instructions de fonctionnement et d’utilisation.
ATTENTION AUX AVERTISSEMENTS - Observer tous les avertissements.
NETTOYAGE - NE PAS utiliser de liquides, de détachants en aérosol ou de l’alcool. N’utilisez
qu’un chiffon humide pour nettoyer les surfaces extérieures du boîtier.
EAU ET HUMIDITE - NE PAS utiliser ce produit à proximité d’eau.
SOURCES D’ALIMENTATION - Utiliser ce produit avec le type d’alimentation indiqué sur
l’étiquette de fabrication. En cas de doute à propos du type d’alimentation disponible, consulter
un revendeur Pioneer agréé.
SURCHARGE - NE PAS surcharger les prises murales et les rallonges pour ne pas entraîner
d’incendie ou de secousse électrique.
PENETRATION D’OBJETS ET DE LIQUIDES - Ne jamais enfoncer d’objet de toute sorte dans
ce produit. Le contact avec des points de tension dangereux peut provoquer un court-circuit,
entraînant un incendie ou une secousse électrique. Ne pas verser de liquide de toute sorte sur
ce produit.
CONDENSATION - De l’humidité se forme sur la section opération du produit entraînant une
baisse de performances s’il est amené d’un endroit frais vers un environnement plus chaud. En
cas de déplacement de l’appareil vers un endroit ayant une température plus chaude, laisser le
produit pendant 1 à 2 heures dans le nouvel endroit avant de le remettre sous tension.
ENTRETIEN - Ne pas essayer de réparer soi-même ce produit. L’ouverture ou le retrait des
capots peut vous exposer àune tension dangereuse ou d’autres dangers. Pour tout entretien,
demander à un personnel d’entretien qualifié. (Se reporter à la carte d’entretien et de support
jointe.)
Page 13

<DRC1085>
Fr
13
INSTRUCTIONS DE SECURITE
Le lecteur de dispositif joint est pour une utilisation avec MS-DOS/Windows 3.XX.
Il n’est pas nécessaire pour une utilisation de cet appareil avec Windows 95.
* MS-DOS et Windows sont des marques déposées de Microsoft Corporation.
NE PAS utiliser de disques non standard, car ils peuvent avoir une
mauvaise influence sur cet appareil et d’autres équipements.
NE P AS utiliser de disques endommagés, fissurés ou déformés. S’ils
se cassent à l’intérieur de l’appareil, ils risquent d’endommager la
lentille. Les disques tournent à grande vitesse à l’intérieur du
mécanisme de changement.
L’étiquette d’avertissement suivante
apparaît sur votre appareil.
Emplacement: sur le dessus du de
couvercle
Dans le cas d’appareils enfichables, la prise doit être facilement
accessible et placée le plus près possible de l’appareil.
CLASS 1 LASER PRODUCT
LASER KLASSE 1
La production de bruits acoustiques est inférieure à 70 dB.
(ISO7779/DIN45635)
ATTENTION
Ce produit renferme une diode à laser d’une
catégorie supérieure à 1. Pour garantir une
sécurité constante, ne pas retirer les couvercles
ni essayer d’accéder à l’intérieur de l’appareil.
Pour toute réparation, s’adresser à un personnel
qualifié.
Sous peine de provoquer des défaillances, ne reproduisez pas de CD
ayant une forme autre que circulaire, telle que des disques en forme
de coeur.
Page 14

14
<DRC1085>
Fr
CARACTERISTIQUES PRINCIPALES
÷ Lecture à haute vitesse
Vitesse de transfert (continue):
2.100 KO/sec. – 5.400 KO/sec. (CAV maximale: 36X)
÷ Accès à haute vitesse
Moyenne aléatoire: 70 ms
÷ Mécanisme à vibrations réduites
÷ Correspondance avec ATAPI
÷ Tampon de données: 128 koctets
÷ Disques utilisables
Disque optique CD-ROM Mode 1
Disque optique CD-ROM XA Mode 2 (Forme 1, 2)
CD-DA (Sortie audionumérique)
Support CD extra, CD vidéo, CD-I Ready et CD-XA Ready
Lecture de disque CD-RW
REMARQUES:
Cet appareil peut lire les données inscrites sur les CD-RW. Toutefois, veillez noter ce qui suit.
(1) L'examen initial d'un CD-RW exige un temps légèrement plus long que celui d'un CD-
ROM.
(2) La vitesse de lecture des disques CD-RW est généralement 4 fois plus élevée que celle
des disques ordinaires. Le lecteur peut toutefois réduire la vitesse de lecture, si la qualité
du disque n'est pas bonne ou s'il fait très chaud ou très froid. (Cela tient à ce que le
niveau des signaux fournis par les CD-RW est plus faible que celui des disques habituels.)
(3) Vous ne pouvez pas utiliser les disques vierges, les disques sur lesquels l'écriture des
données a été infructueuse et les disques qui n'ont pas fait l'objet d'une fermeture de
session.
(4) Dans les cas suivants, le fonctionnement peut être impossible et il peut en être de même
de la lecture des données.
La qualité du signal enregistré est altérée en raison des poussières ou des rayures que
porte le disque, ou bien le disque a fait l'objet de trop nombreuses réécritures.
Si le fonctionnement n'est pas possible, retirez le disque du lecteur puis réintroduisez-le
et effectuez une nouvelle tentative.
÷ Correspondance avec CD Kodak Photo (session simple et multisession)
÷ Conforme aux spécifications MPC-3
÷ Format demi-hauteur
÷ Lecteur en charge
÷ Windows 95 et Windows 98 (prêt à l’emploi) soutenu
* Window est un marque déposée de Microsoft Corporation.
Precautions a prendre lors de la lecture de CD singles (Disques de 8 cm)
(1) Lors de la lecture de CD singles (disques de 8 cm), toujours utiliser l'adaptateur pour ce
type de disques. Avant de charger le disque dans l'unité de lecture de CD-ROM, vérifier
qu'il est bien maintenu en place par les encoches de l'adaptateur. Si des disques ont été
insérés par erreur sans utiliser l'adaptateur, il faut enlever ces disques immédiatement en
poussant sur le bouton d'éjection. Si le disque ne réussit pas à sortir sous l'effet de la
pression, répéter la manoeuvre.
(2) Utiliser des adaptateurs pour disques de 8 cm portant la marque
'
(produit standard
recommandé). Ne pas utiliser d'adaptateurs qui entraîne une rotation à vide du disque, ni
non plus des adaptateurs ondulés ou pliés.
Page 15

<DRC1085>
Fr
15
TOUR DU MATERIEL
Des illustrations sont fournies dans ce chapitre comme introduction visuelle au lecteur .
Nous vous prions de vous familiariser avec ces illustrations et de vous y reporter en
cas de nécessité pour compléter l’installation et l’opération de l’appareil.
VUE AVANT
1 Chargeur de disque
Insérez le CD-ROM l’étiquette vers le haut.
En utilisant des disques de 8 cm, montez un adaptateur CD (disponible dans le
commerce) sur le disque, puis insérez le disque dans le chargeur de disque.
2 Touche d’éjection (0) /arrêt (7)
Cette touche sert à éjecter le disque. Lorsque cette touche est enfoncée pendant
la lecture d’un disque audio, la lecture est arrêtée, et lorsqu’elle est enfoncée à
l’état d’arrêt, le disque est éjecté.
3 Touche de lecture (3) /saut (¢)
Cette touche est utilisée pour la lecture directe de disques audio. Lorsqu’un disque
audio est inséré et que cette touche est enfoncée, l’état de lecture est atteint, et
lorsque cette touche est enfoncée à l’état de lecture, la lecture saute à la piste
suivante. Les disques de données ne sont pas reproduits.
4 Témoin occupé (BUSY)
Ce témoin s’allume pendant l’accès des données.
5 Commande de volume (niveau de casque d’écoute)
Cette commande est utilisée pour régler le niveau de volume de la prise de casque
d’écoute.
6 Prise de casque d’écoute (PHONES)
Cette prise est une mini prise stéréo pour casque d’écoute.
Fig. 1
BUSYPHONES
6 5 4
1
CD-ROM DRIVE
23
Page 16

16
<DRC1085>
Fr
7 Prise d'entrée CC (DC INPUT)
Entrée d'alimentation CC de 5 V et 12 V.
TOUR DU MATERIEL
VUE DE LA FACE ARRIERE
Fig. 2
1
2
39
401145
21
- 0 9 8
7
41
Broche
Nom Fonction
1 +12 Entree d'alimentation pour +12 V C.C.
2 Terre Mise à la masse.
3 Terre Mise à la masse.
4 +5 Entree d'alimentation pour +5 V C.C.
Broche
Nom Fonction
1
Gauche
Sortie audio canal gauche.
2 Terre Mise à la masse.
3 Terre Mise à la masse.
4 Droite Sortie audio canal droit.
Broche
Nom Fonction
1 GND Mise à la masse.
2 Digital Out Sortie audionumérique.
8 Interface IDE hôte
Connecteur d'entrée/sortie à 40 broches conforme aux spécifications ATA.
9 Commutateur de configuration
Commutateur à cavalier permettant la sélection du mode de fonctionnement du
lecteur et acceptant le PC.
La prise court-circuitée est fixée pour le réglage
fixée : active non fixée : désactive
* Au moment de l'expé ition de l'usine, seul MASTER est activé (ON).
0 Sortie audio
Connecteur de sortie du signal audio analogique.
Du fait qu'un Molex 70553 est utilisé, sélectionner un câble de raccordement correspondant.
- Sortie audionumérique
Il s'agit d'un connecteur pour la sortie des signaux audionumériques.
Broche
Nom Fonction
1 MASTER* on Le lecteur est utilisé en mode maître.
2 SLA VE on Le lecteur est utilisé en mode asservi.
3 CABLE on Pour permettre le réglage du lecteur
SELECT par CABLE SELECT de l'interface IDE.
4 Réservé.
5 Réservé.
Page 17

<DRC1085>
Fr
17
POUR INSTALLER LE LECTEUR
÷ Couper l’alimentation de l’ordinateur personnel, et déposer le couvercle du panneau
avant.
÷ Déposer le panneau vierge installé à l’avant de la fente de 5,25 pouces.
L’installation n’est pas possible s’il n’y a pas de fente vide.
÷ Installer les rails coulissants de fixation sur le lecteur. (Si des rails coulissants sont
nécessaires, contacter le magasin où a été acheté l’ordinateur ou le fabricant
d’ordinateur.)
÷ Insérer le lecteur dans la fente.
÷ Si la fixation est nécessaire, fixer le lecteur en fonction du mode d’emploi de
l’ordinateur.
Fig. 3
BUSY
PHONES
CD-ROM DRIVE
Utiliser des vis de fixation ayant une longueur inférieure ou égale à 5
mm.
L’utilisation de longues vis peut endommager le lecteur.
Installer le lecteur après avoir coupé l’alimentation de l’ordinateur
personnel.
Lorsque les vis de fixation ne sont pas suffisamment serrées, etc., les
vibrations émises par la rotation du disque peuvent générer un bruit de
déchirure et il faut donc resserrer les vis solidement.
La méthode d’installation du lecteur varie selon le type d’ordinateur.
Pour les détails, se reporter aux manuels de votre ordinateur.
Page 18

18
<DRC1085>
Fr
RACCORDEMENT
÷ Couper l’alimentation de l’ordinateur personnel.
÷ Connecter le câble d’alimentation de l’ordinateur personnel. Au moment de la
connexion, faire attention à la polarité des câbles.
÷ Connecter le connecteur d’interface IDE. A ce moment, confirmer que la broche 1
du connecteur IDE est correctement connectée à la broche 1 du câble.
÷ Lorsqu’une plaque sonore est utilisée, connecter la sortie audio avec un câble audio
à la plaque sonore.
Câble d'interface IDE
Cordon d'alimentation
Câble audio
Fig. 4
Broche1
Sortie audionumérique
AVERTISSEMENT
L ’alimentation de l’ordinateur personnel doit toujours êtr e coupée avant
la connexion des câbles.
Page 19

<DRC1085>
Fr
19
FICHE TECHNIQUE
Publication de Pioneer Electronic Corporation.
C 1998 Pioneer Elctronic Corporation.
Tour droits de reproduction et de traduction réservés.
[Généralités]
Diamètre du disque 12 cm, 8 cm
Vitesse de transmission
Continu 2.100 à 5.400 KO/s *
* Il se peut que le taux de transfert de données ne soit pas affiché à cause de l’état du disque
(rayures, etc.).
Temps de recherche
Aléatoire (moyenne) 60 ms
Durée d’accès
Aléatoire (moyenne) 70 ms
Capacité de mémoire tampon de données 128 KO
[Sortie audio]
Ligne 0,7 Vrms (efficace) ± 0,1 Vr ms
(à charge de 10 kΩ)
[Divers]
Alimentation CC +12 V, 0,9 A (crête), 0,55 A
(normal)
(Avec la terminaison incorporé) CC +5 V, 1,2 A (crête), 0,75 A
(normal)
Dimensions externes 148 (L) x 42,3 (H) x 207,5 (P) mm
Poids 0,97 kg
Température de fonctionnement +5°C à 45°C
Humidité de fonctionnement 5% à 85% (sans condensation)
Température de rangement –40°C à +60°C
Humidité de rangement 5% à 90% (sans condensation)
[Accessoires]
÷ Disquette programme logiciel x 1
÷ Cavalier x 2
÷ Câble audio x 1
÷ Vis de fixation x 4
÷ Mode d’emploi x 1
÷ Instructions d’installation x 1
REMARQUE :
Aux fins d’amélioration, les caractéristiques techniques et la conception sont susceptibles de
modification sans préavis.
Page 20

20
<DRC1085>
Ge
SICHERHEITSANWEISUNGEN
Um Ihre eigene Sicherheit sicherzustellen, und um die volle Funktion Ihres CD-ROM-Laufwerks
zu maximieren, lesen Sie diese Sicherheitsvorschriften bitte sorgfältig durch:
BETRIEBSBEDINGUNGEN - Betreiben Sie das Gerät nicht an Orten, wo starkes
Staubaufkommen, hohe Temperaturen und hohe Luftfeuchtigkeiten vorherrschen. Wählen Sie
einen Ort, wo keine Vibrationen bzw. starke Erschütterungen auf das Gerät einwirken können.
SPANNUNG - Vor dem Einbau des CD-ROM-Laufwerks sind der Computer und sämtliche
angeschlossenen Peripheriegeräte auszuschalten.
LESEN SIE DIE ANLEITUNGSSCHRITTE - Vor der Inbetriebnahme des CD-ROM-Laufwerks
sind alle Sicherheits- und Betriebsanleitungen durchzulesen.
AUFBEWAHRUNGSHINWEISE - Bewahren Sie die Sicherheits- und Betriebsanleitungen für
zukünftige Benutzung griffbereit auf.
BEFOLGUNG DER ANLEITUNGSSCHRITTE - Befolgen Sie bitte alle Bedienungs- und
Handhabungshinweise.
BEACHTUNG ALLER WARNUNGEN - Sämtliche Warnhinweise müssen sorgfältig beachtet
werden.
REINIGUNG - KEIN flüssiges Reinigungsmittel, Reinigungssprühmittel oder Alkohol verwenden.
Benutzen Sie zum Reinigen des äußeren Gehäuses ausschließlich einen feuchten Lappen.
W ASSER UND FEUCHTIGKEIT - Betr eiben Sie das Gerät NIEMALS in unmittelbarer Nähe von
W asser!
STROMVERSORGUNG - Betreiben Sie das Gerät nur mit dem Stromversorgungstyp, der auf
dem Aufkleber angegeben ist. Wenn Sie sich über die vorliegenden Netzspannung nicht sicher
sind, sprechen Sie bitte mit Ihrem autorisierten Pioneer-Händler.
NETZÜBERLASTUNG - NIEMALS Wandsteckdosen und Verlängerungskabel überlasten! Ein
Brand oder Stromschlag können die Folge sein.
EINDRINGEN VON FLÜSSIGKEITEN UND FREMDKÖRPERN - Niemals Fremdkörper in das
Geräteinnere eindringen lassen. Das Berühren von unter Spannung stehenden Kontakten kann
zu einem Kurzschluß führen, was einen Brand oder Stromschlag auslösen kann. V orsicht, damit
keine Flüssigkeiten auf dem Gerät verschüttet werden.
KONDENSATION - Wenn das Gerät von einem kalten in einen warmen Raum gebracht wird,
verursacht der Feuchtigkeitsniederschlag in Gerät eine merkliche Leistungsminderung. Betreiben
Sie das Gerät deshalb nicht für ca. 1 bis 2 Stunden, bis sich die Bauteile der
Umgebungstemperatur angeglichen haben.
WARTUNG - Nicht den Versuch unternehmen, das Gerät selbst zu reparieren! Das Öffnen oder
Entfernen von Abdeckungen kann einen Stromschlag sowie andere Gefahren auslösen.
Überlassen Sie sämtliche Wartungsarbeiten unserem qualifizierten Kundendienstpersonal.
(Beziehen Sie sich bitte auf das miteingeschlossene Kundendienstverzeichnis.)
Page 21

<DRC1085>
Ge
21
SICHERHEITSANWEISUNGEN
Der mitgelieferte Gerätetreiber ist zur Ver wendung mit MS-DOS/Windows 3.XX
bestimmt. Dieser Treiber ist bei W indows 95 nicht erforderlich.
* MS-DOS und Windows sind geschützte Warenzeichen der Microsoft Corporation.
Verwenden Sie keine nicht standardisierten Disketten, da diese einen
nachteiligen Einfluß auf die Funktion dieses Geräts und anderer
Komponenten ausüben können.
Verwenden Sie keine beschädigten, gesprungenen oder verzogenen
CD-ROMs. Wenn eine CD-ROM im Gerät zerbricht, können die
optischen T eile beschädigt werden. Die CD-ROMs rotieren mit hoher
Drehzahl im Wechsler-Mechanismus.
Das nachstehende Hinweisschild
befindet sich am Gerät.
Anbringstelle: auf der Deckeloberseite.
Bei Geräten mit Steckern sollte sich der Ausgangsstecker nahe
dem anderen Gerät befinden und einfach zugänglich sein.
CLASS 1 LASER PRODUCT
LASER KLASSE 1
Das Geräuschaufkommen beträgt weniger als 70 dB.
(ISO 7779/DIN 45635)
VORSICHT
Dieses Gerät enthält eine Laserdiode mit einer
höheren Klasse als 1. Um einen stets sicheren
Betrieb zu gewährleisten, weder irgendwelche
Abdeckungen entfernen, noch versuchen, sich
zum Geräteinneren Zugang zu verschaffen. Alle
Wartungsarbeiten sollten qualifiziertem
Kundendienstpersonal überlassen werden.
Keine nicht kreisförmigen CDs (herzförmige, achteckige Discs)
abspielen. Anderenfalls kann eine Funktionsstörung auftreten.
Page 22

22
<DRC1085>
Ge
MERKMALE
÷ Datenabruf mit hoher Geschwindigkeit
Datentransferrate (Dauerbetrieb): 2.100 kBytes/sec – 5.400 kBytes/sec
(Maximum für CAV 36X)
÷ Zugriff mit hoher Geschwindigkeit
Zufallszugriff (durchschn.): 70 ms
÷ Mechanismus zur Vibrationsreduzierung
÷ Entspricht dem ATAPI-Standard
÷ Datenpufferkapazität: 128 kBytes
÷ Verwendbare CD-ROMs
CD-ROM (Modus 1)
CD-ROM (XA-Modus 2; Form 1, 2)
CD-DA (Digital-Audioausgang))
CD Extra-, Video CD-, CD-I Ready und CD-XA Ready-Unterstützung
CD-RW-Lesemodus
HINWEISE:
Dieses Gerät ist in der Lage, Daten auf CD-RW-Discs zu lesen. Hierzu sind folgende Hinweise
zu beachten:
(1) Im Vergleich zu herkömmlichen CD-ROM-Discs wird zum Erkennen der Disc bei
Arbeitsbeginn für CD-RW-Discs etwas mehr Zeit benötigt.
(2) Die Auslesegeschwindigkeit von CD-RW-Disks ist normalerweise viermal höher als die
normaler Disks. Jedoch kann der Spieler je nach Qualität der Disk oder bei extremer Hitze
oder Kälte die Geschwindigkeit der Disk beim Auslesen reduzieren. (Dies ist durch den
im Ver gleich zu Standard-Discs niedrigeren W iedergabesignal-Pegel von CD-R W-Discs
bedingt.)
(3) Die folgenden Discs können nicht verwendet werden:
Leere Discs; Discs, bei denen keine Datenübertragung möglich war oder bei denen das
Abschlußverzeichnis nicht eingegeben wurde.
(4) In den folgenden Fällen ist unter Umständen kein Zugriff oder ein Auslesen der Daten
möglich:
Die Qualität des aufgenommenen Signals hat sich durch Verschmutzung oder Kratzer der
Disc verschlechtert, oder die Disc wurde häufig erneut beschrieben.
Falls kein Zugriff möglich ist, die Disc herausnehmen, wieder einlegen und den Computer
erneut starten.
÷ Entspricht dem Kodak Photo CD-Standard (Einfach und Multisession)
÷ Konform mit MPC-3-Spezifikationen
÷ Halbe Einbauhöhe
÷ Disk-Schlitz
÷ Unterstützung für Windows 95 und Windows 98 (Plug & Play)
* Windows ist ein eingetragenes Warenzeichen der Microsoft Corporation.
Vorsichtmassnahmen beim abspielen von CD-Singles (8 cm CDs)
(1) Benutzen Sie immer den Adapter für 8 cm CDs wenn Sie CD-Singles (8 cm CDs) abspielen.
Bevor Sie die CD in das CD-ROM Laufwerk einlegen, prüfen Sie bitte, ob sie ordnungsgemäß
von den Haltern des Adapters festgeklemmt wird. Wenn irrtümlich CDs eingelegt wurden
ohne den Adapter , nehmen Sie sie sofort heraus indem Sie die drücken Sie ein zweites Mal.
(2) Benutzen Sie 8 cm CD-Adapter, die mit der
'
Marke gekennzeichnet sind (empfohlener
Standard). Benutzen Sie weder Adapter die die CD im Leerlauf lassen, noch krumme oder
verbogene Adapter.
Page 23

<DRC1085>
Ge
23
BESCHREIBUNG DER HARDWARE
In diesem Abschnitt wird das Laufwerk vorgestellt.
Bitte verwenden Sie die Abbildungen und die zugehörigen Erläuterungen, um sich
mit dem Gerät vertraut zu machen, damit Sie es richtig installieren und bedienen
können.
VORDERANSICHT
1 Disk-Schlitz
Die CD-ROM mit der Beschriftung nach oben einführen.
Bei der Verwendung von 8 cm-Disks, einen Adapter (im Handel erhältlich) an der
Disk befestigen und die Disk in den Schlitz einführen.
2 Auswurf-/Stopptaste (0/7)
Mit dieser Taste wird die Disk ausgeworfen. Wird diese Taste während der
Wiedergabe einer Audio-CD gedrückt, stoppt die Wiedergabe. Durch Betätigung
im Stoppzustand wird die CD-ROM-Lade herausgefahren.
3 Wiedergabe-/Überspringtaste (3/¢)
Diese Taste dient ausschließlich für die direkte Wiedergabe von Audio-CDs. Wenn
diese Taste gedrückt wird, nachdem eine Audio-CD eingelegt wurde, erfolgt
Wiedergabe. Durch Betätigung während der Wiedergabe wird der nächste Titel
angewählt. Daten-CD-ROMs können nicht auf diese Weise verwendet werden.
4 Betriebsanzeige (BUSY)
Diese Anzeige blinkt während der Suchzeit.
5 Lautstärkeregler (für Kopfhörer)
Mit diesem Regler wird der Lautstärkepegel der Kopfhörerbuchse eingestellt.
6 Kopfhörerbuchse (PHONES)
Diese Stereo-Minibuchse dient zum Anschließen eines Kopfhörers.
Abb. 1
BUSYPHONES
6 5 4
1
CD-ROM DRIVE
23
Page 24

24
<DRC1085>
Ge
7 Gleichspannungseingang
Hier handelt es sich um den Eingangsstecker für Gleichstromversor gung von +5 V und +12 V.
BESCHREIBUNG DER HARDWARE
RÜCKANSICHT
Abb. 2
1
2
39
401145
21
- 0 9 8
7
41
8IDE-Schnittstelle des Host-Computers
Hier handelt es sich um einen 40poligen E/A-Anschlußstecker nach AT A-Spezifikationen.
9 Überbrückungsstecker für Gerätekonfiguration
Hier handelt es sich um den Überbrückungsstecker für die Wahl des Laufwerkmodus
sowie für PC-Unterstützung.
Eine Kurzschlußbuchse für die Einstellung ist vorhanden (angebracht).
angebracht: on nicht angebracht: off
* Bei der Auslieferung ab Werk steht nur MASTER auf ON.
0 Audioausgang
Dieser Stecker ist für Analog-Ausgang vorgesehen.
Da hier ein Stecker des Typs Molex 70553 verwendet wird, muß ein passendes
Anschlußkabel gewählt werden.
- Digital-Audioausgang
Hier handelt es sich um einen Anschluß für ein digitales Audioausgangssignal.
Stift
Bezeichnung
Funktion
1 +12 Gleichstromversorgung für +12 V.
2 G Masse.
3 G Masse.
4 +5 Gleichstromversorgung für +5 V.
Stift
Bezeichnung
Funktion
1 L Audioausgang für linken Kanal.
2 G Masse.
3 G Masse.
4 R Audioausgang für rechten Kanal.
Stift
Bezeichnung
Funktion
1 GND Masse.
2 Digital Out Digital-Audioausgang.
Stift
Bezeichnung
Funktion
1 MASTER* on Laufwerk wird im Hauptmodus benutzt.
2 SLAVE on Laufwerk wird im Hilfsmodus benutzt.
3 CABLE on Modus für Laufwerkeinstellung bei
SELECT CABLE SELECT der IDE-Schnittstelle.
4 Reserviert.
5 Reserviert.
Page 25

<DRC1085>
Ge
25
INSTALLATION DES LAUFWERKS
÷ Schalten Sie die Spannungsversorgung des Personal-Computers aus und nehmen
Sie die Abdeckung oder die Frontplatte ab.
÷ Entfernen Sie die Blende von einem leeren 5,25-Zoll-Laufwerkschacht. Die
Installation ist nur möglich, wenn ein freier Laufwerkschacht vorhanden ist.
÷ Befestigen Sie die Klemmschiebeschienen an das Laufwerk. (Wenn
Schiebeschienen benötigt werden, wenden Sie sich an das Geschäft, wo Sie den
Computer erworben haben, oder an den Hersteller des Computers.)
÷ Schieben Sie das Laufwerk in den Schacht ein.
÷ Wenn eine Befestigung erforderlich ist, befestigen Sie das Laufwerk gemäß den
Anweisungen im Handbuch des Computers.
Abb. 3
Verwenden Sie Montageschrauben mit einer Länge von höchstens 5
mm.
Durch längere Schrauben kann das Laufwerk beschädigt werden.
Schalten Sie vor der Installation des Laufwerks unbedingt die
Spannungsversorgung des Computers aus.
Bei lockeren Befestigungsschrauben erzeugen die Vibrationen durch
die rotierende CD ein störendes Geräusch. Die Schrauben müssen daher
gut festgezogen werden.
Das Verfahren zur Installation des Laufwerks ist vom Computer
abhängig. Informationen hierzu finden Sie im Handbuch Ihres
Computers.
BUSY
PHONES
CD-ROM DRIVE
Page 26

26
<DRC1085>
Ge
ANSCHLÜSSE
÷ Schalten Sie die Spannungsversorgung des Computers aus.
÷ Schließen Sie das Spannungskabel vom Computer an. Achten Sie dabei auf die
richtige Ausrichtung des Steckers.
÷ Schließen Sie das IDE-Schnittstellenkabel an. Vergewissern Sie sich, daß der Stift
1 des IDE-Anschlusses richtig mit dem Stift 1 des Steckers verbunden ist.
÷ Wenn ein Soundboard vorhanden ist, verbinden Sie den Audio-Ausgang über ein
Audiokabel mit der Soundboard.
IDE-Schnittstellenkabel
Spannungskabel
Audiokabel
Abb. 4
Stift1
Digital-Audioausgang
WARNUNG
Die Spannungsversorgung des Computers muß unbedingt
ausgeschaltet werden, bevor Kabel angeschlossen werden.
Page 27

<DRC1085>
Ge
27
TECHNISCHE DATEN
Veröffentlicht von Pioneer Electronic Corporation.
Urheberrechtlich geschützt C 1998 Pioneer Electronic
Corporation. Alle Rechte vorbehalten.
[Allgemeine Funktionen]
CD-ROM-Durchmesser 12 cm, 8 cm
Datentransferrate
Dauerbetrieb 2.100 – 5.400 kBytes/s*
* Die Datentransferrate kann möglicherweise bei einer Beeinträchtigung der Disc (Kratzer
usw.) nicht eingehalten werden.
Suchzeit
Zufallszugriff (durchschn.) 60 ms
Zugriffszeit
Zufallszugriff (durchschn.) 70 ms
Datenpufferkapazität 128 KByte
[Audio-Ausgang]
Hochpegel 0,7 Vrms ± 0,1 Vrms (bei 10 kΩ Last)
[Sonstiges]
Spannungsversorgung Gleichstrom +12 V, 0,9 A (Spitze), 0,55 A
(normal)
(Mit eingebautem Abschlußteil) Gleichstrom +5 V, 1,2 A (Spitze), 0,75 A
(normal)
Außenabmessungen 148 (B) x 42,3 (H) x 207,5 (T) mm
Gewicht 0,97 kg
Betriebstemperatur +5˚C bis +45˚C
Betriebsluftfeuchtigkeit 5% bis 85% (keine Kondensation)
Lagertemperatur –40˚C bis +60˚C
Lagerluftfeuchtigkeit 5% bis 90% (keine Kondensation)
[Zubehör]
÷ 1 Disketten mit Software-Gerätetreiber
÷ 2 Kurzschlußstecker
÷ 1 Audiokabel
÷ 4 Montageschraube
÷ 1 Bedienungsanleitung
÷ 1 Installationsanleitung
HINWEIS:
T echnische Änderungen zum Zweck der Produktverbesserung ohne vorherige Bekanntmachung
vorbehalten.
Page 28

28
<DRC1085>
It
ISTRUZIONI PER LA SICUREZZA
Leggere e seguire queste precauzioni per la sicurezza, per garantire la sicurezza personale e per
sfruttare al massimo le capacità di funzionamento del Lettore.
AMBIENTE - Si raccomanda di non usare l’unità in un luogo con molta polvere, a temperatura
elevata o molto umido. Si raccomanda inoltre di utilizzarla in un posto dove non sia soggetta a
vibrazioni o colpi violenti.
ALIMENTAZIONE - Prima dell’installazione accendere il sistema e i dispositivi har dware collegati.
LEGGERE LE ISTRUZIONI - Prima di far funzionare il Lettore leggere tutte le istruzioni di sicurezza
e di funzionamento.
CONSERVARE LE ISTRUZIONI - Per un riferimento futuro conservare le istruzioni di sicurezza
e di funzionamento.
SEGUIRE LE ISTRUZIONI - Osservare scrupolosamente tutte le istruzioni d’impiego e
funzionamento.
ATTENZIONE AGLI AVVERTIMENTI - Osservar e scrupolosamente tutti gli avvertimenti.
PULIZIA - NON usare detergenti liquidi, spray o alcol per pulire il corpo esterno, usare solo un
panno umido.
ACQUA E UMIDITA’ - NON usare questo prodotto in prossimità di contenitori con acqua.
ALIMENTAZIONE - Far funzionare questo prodotto con il tipo di alimentazione elettrica indicata
dalla targhetta con i dati caratteristici. Se non si è sicuri del tipo di alimentazione elettrica da
usare, consultare il Rivenditore Autorizzato Pioneer.
SOVRACCARICARE - NON sovraccaricare la presa di corrente a muro e i cavi di prolunga. Per
evitare rischi di incendio o di scossa elettrica.
INTRODUZIONE DI OGGETTI E LIQUIDI - Mai introdurre nel prodotto oggetti di alcun tipo. Il
contatto con pericolosi punti percorsi da corrente elettrica può causare un cortocircuito con
rischi d’incendio o scossa elettrica. Non far cadere sul prodotto sostanze liquide di nessun tipo.
CONDENSAZIONE - Se il prodotto viene trasferito da un luogo in condizioni ambientali fresche
in un ambiente più caldo, nella sezione operativa si può formare dell’umidità che ne compromette
le prestazioni. Se l’unità viene spostata in un locale a temperatura più calda, prima di riaccendere
il prodotto lasciarlo per 1 - 2 ore nella nuova posizione.
ASSISTENZA - Non tentare di riparare da soli questo prodotto. L’apertura e la rimozione delle
coperture può esporre a corrente elettrica pericolosa o ad altri rischi. Per la manutenzione far
riferimento a personale di assistenza qualificato. (Far riferimento al Certificato di Supporto e
Assistenza acclusa.)
Page 29

<DRC1085>
It
29
ISTRUZIONI PER LA SICUREZZA
Il driver di periferica incluso, è compatibile con MS-DOS/Windows 3.XX. Questo
driver non è necessario per l’uso con Windows 95.
* MS-DOS e Windows sono marchi di fabbrica di Microsoft Corporation.
NON usare dischi non standard, potrebbero influenzare avversamente
questa unità e le altre apparecchiature.
NON usare dischi danneggiati, incrinati, o deformati. Rompendosi
all’interno dell’unità potrebbero danneggiarne l’ottica. I dischi ruotano
ad alta velocità all’interno del meccanismo di cambio.
La seguente etichetta di avvertimento
appare sul lettore.
Posizione: sul coperchio superiore.
La presa di corrente dere essere vicina all’unità e facilimente
accessibile.
CLASS 1 LASER PRODUCT
LASER KLASSE 1
La Produzione di Disturbo Acustico di Fondo è
Minore di 70 dB. (ISO7779/DIN45635)
PRECAUZIONE
Questo prodotto contiene un diodo al laser di
classe superiore alla classe 1. Per motivi di
sicurezza, non smontare i coperchi e non
procedere ad interventi sulle parti interne.
Per qualsiasi riparazione rivolgersi a personale
qualificato.
Non riprodurre compact disc di forme diverse da quella circolare
convenzionale, quali, ad esempio, dischi a forma di cuore o simili.
Questi tipi di dischi possono causare disfunzioni.
Page 30

30
<DRC1085>
It
CARATTERISTICHE PECULIARI
÷ Lettura ad alta velocità
Velocità di trasmissione dati (sostenuta):
2.100 kByte/sec. – 5.400 kByte/sec. (CAV 36X max)
÷ Accesso ad alta velocità
Tempo medio di accesso casuale: 70 ms
÷ Meccanismo a basse vibrazioni
÷ Corrispondenza ATAPI
÷ Memoria di transito (Buffer): 128 kBytes
÷ Dischi utilizzabili
CD-ROM Modo 1
CD-ROM XA Modo 2 (Forma 1, 2)
CD-DA (Uscita audio digitale)
Supporto CD Extra, CD Video, CD-I Ready e CD-XA Ready
Lettura dischi CD-RW
NOTE:
Questo prodotto può leggere dischi CD-RW. Tenere presente però quanto segue:
(1) Un CD-RW richiede più tempo di un normale CD-ROM per venire rilevato quando il prodotto
viene attivata, ma ciò è normale.
(2) La velocità di lettura dei dischi CD-RW è solitamente 4 volte maggiore rispetto a quella
dei dischi normali. T uttavia, a seconda della qualità dei dischi, o in presenza di temperature
estremamente basse o elevate, il lettore può ridurre la velocità del disco in fase di lettura.
(Perché il livello dei segnali riprodotti da questi ultimi è inferiore a quello dei dischi normali.)
(3) I dischi non registrati, quelli la cui scrittura è fallita e quelli in cui la procedura di chiusura
di seduta non è stata fatta non sono utilizzabili.
(4) L’operazione potrebbe non iniziare o i dati potr ebbero non venire letti nel caso in cui:
la qualità del segnale registrato sia scesa a causa di sporcizia o danni al disco, o se un
disco è stato riscritto troppe volte.
Se un disco non funziona, provare ad estrarlo e reinserirlo.
÷ Corrispondente a Photo CD Kodak (singolo e multisessione).
÷ Conforme ai dati caratteristici di MPC-3
÷ Formato Half-Height
÷ Caricamento nella fessura
÷ Supportato da Windows 95 e Windows 98 (Plug and Play) [collega e usa]
* Windows è un marchio di fabbrica di Microsoft Corporation.
Precauzioni per la riproduzione di CD single (CD da 8 cm)
(1) In sede di riproduzione di CD single (CD da 8 cm), utilizzare sempre l'adattatore per CD da 8
cm. Prima di inserire il CD-ROM nel lettore, accertarsi che sia fissato saldamente dai fermi
dell'adattatore. Nel caso in cui il CD sia stato inavvertitamente inserito senza adattatore,
togliere immediatamente il CD premendo il pulsante di espulsione. Nel caso in cui il CD non
esca, premere nuovamente il pulsante.
(2) Utilizzare adattatori per CD da 8 cm con il marchio
'
(prodotto standard raccomandato).
Non utilizzare adattatori che provocano la rotazione a vuoto del CD, piegati oppure curvati.
Page 31

<DRC1085>
It
31
UN’ESCURSIONE NELL’HARDWARE
Le illustrazioni fornite in questo capitolo sono da intendersi come una descrizione
visiva del Lettore.
Si prega di comprendere bene queste illustrazioni e far riferimento ad esse quand’è
necessario per completare l’installazione e per il funzionamento dell’unità.
VISTA FRONTALE
1 Fessura per il caricamento del disco
Inserire il disco CD-ROM con l’etichetta rivolta in alto.
Se s’impiega un disco da 8 cm. applicare un adattatore CD (reperibile nei negozi) al
disco ed inserire il disco nella fessura di caricamento.
2 Tasto Espulsione (0)/Arresto (7)
Questo tasto s’impiega per espellere il disco. Premendolo una volta durante la
riproduzione di un disco audio, la riproduzione si arresta, premendolo invece in
condizione di arresto, il disco viene espulso.
3 Tasto Riproduzione (3)/Salto (¢)
Viene usato per la riproduzione diretta di dischi audio. Inserendo un disco audio e
premendo questo tasto, l’unità entra nel modo di riproduzione, premendolo invece
durante la riproduzione si salta alla riproduzione del brano successivo. I dischi di
dati non possono essere letti con salti all’indietro.
4 Indicatore di occupato (BUSY)
Questo indicatore lampeggia durante il trasferimento dei dati.
5 Controllo Volume (livello cuffia)
Viene usato per regolare il livello del volume del jack della cuffia.
6 Presa a jack per cuffia (PHONES)
Questa è una minipresa stereo per cuffia.
Fig. 1
BUSYPHONES
6 5 4
1
CD-ROM DRIVE
23
Page 32

32
<DRC1085>
It
7 Ingresso in c.c.
Ingresso di alimentazione +5 Vcc e +12 Vcc.
UN’ESCURSIONE NELL’HARDWARE
VISTA POSTERIORE
Fig. 2
1
2
39
401145
21
- 0 9 8
7
41
Pin Nome Funzione
1 +12 Ingresso di alimentazione +12 Vcc.
2 G Massa.
3 G Massa.
4 +5 Ingresso di alimentazione +5 Vcc.
Pin Nome Funzione
1
Gauche
Uscita audio canale sinistro.
2 Terre Massa.
3 Terre Massa.
4 Droite Uscita audio canale destro.
Pin Nome Funzione
1 MASTER* on Il lettore viene usato nel modo di unità principale.
2 SLAVE on Il lettore viene usato nel modo di unità asservita.
3 CABLE on
Modo per il settaggio del lettore mediante CABLE
SELECT SELECT dell’interfaccia IDE.
4 Riservato.
5 Riservato.
Pin Nome Funzione
1 GND Massa.
2 Digital Out Uscita di segnale audio digitale.
8 Interfaccia Host IDE
Connettore I/O a 40 pin conforme alle specifiche ATA.
9 Ponte di Configurazione Periferica
Interruttore a ponte per la selezione del modo d’uso del lettore e per il supporto
PC. La presa di cortocircuito viene collegata per il settaggio.
Collegata: on Non collegata: off
* Solo MASTER è ON come impostazione di fabbrica.
0 Uscita Audio
Connettore per uscita audio analogica.
Usato come connettore tipo Molex 70553, scegliere un cavo di collegamento adatto.
- Uscita audio digitale
Questo è un connettore per l'uscita di segnale audio digitale.
Page 33

<DRC1085>
It
33
INSTALLAZIONE DEL LETTORE
÷ Spegnere il personal computer e rimuovere il coperchio o il pannello anteriore.
÷ Rimuovere il pannello finto installato a copertura dell’alloggiamento di 5,25 pollici.
L’installazione non si può eseguir e se non c’è un alloggiamento libero.
÷ Installare i binari guida di fissaggio sul lettore. (Se i binari guida sono necessari,
contattare il negozio dove è stato comprato il computer o il fabbricante del computer .)
÷ Inserire il lettore nell’alloggiamento.
÷ Se il fissaggio è necessario, fissare il lettore attenendosi al manuale d’istruzione
del computer.
Fig. 3
BUSY
PHONES
CD-ROM DRIVE
Usare viti di montaggio di lunghezza 5 mm (3/16 poll.) o più corte.
L’uso di viti più lunghe può danneggiare il lettore.
Installare il lettore dopo avere tolto l’alimentazione elettrica del computer .
Se le viti di montaggio non sono bene avvitate ecc., le vibrazioni dovute
alla rotazione del disco possono produrre un rumore metallico, per cui
le viti devono essere avvitate strettamente.
Il metodo d’installazione del lettore varia a seconda del tipo di computer .
Per i dettagli, si prega di far riferimento ai manuali del computer.
Page 34

34
<DRC1085>
It
COLLEGAMENTO
÷ Disconnettere l’alimentazione elettrica del personal computer.
÷ Collegare il cavo di alimentazione al personal computer. Al momento di collegare,
si prega di fare attenzione alla polarità del cavo.
÷ Collegare il cavo di interfaccia IDE. A questo punto, assicurarsi che il pin 1 del
connettore IDE sia collegato correttamente al pin 1 del cavo.
÷ Se si usa una scheda audio, collegare l’uscita audio alla scheda audio con un cavo
audio.
Cavo d’Interfaccia IDE
Cavo di alimentazione
Cavo Audio
Fig. 4
Pin 1
Uscita audio digitale
ATTENZIONE
L’alimentazione elettrica del personal computer deve essere sempre
disconnessa prima di collegare i cavi.
Page 35

<DRC1085>
It
35
DATI CARATTERISTICI
[Funzioni generali]
Diametro disco 12 cm, 8 cm
Velocità di trasmissione dati
Sostenuta 2.100 – 5.400 kByte/sec*
* La velocità di trasferimento dati può non essere raggiunta a causa di particolari condizioni
dei dischi (graffi ecc.).
Tempo di ricerca
Casuale (medio) 60 ms
Tempo di accesso
Casuale (medio) 70 ms
Capacità di memorizzazione temporanea dei dati
128 kBytes
[Parte uscita audio]
Linea 0,7 Vrms ± 0,1 Vrms (carico di 10 kΩ)
[Altri]
Alimentazione +12 Vcc, 0,9 A (picco), 0,55 A (normale)
(Con terminale incorporato) +5 Vcc, 1,2 A (picco), 0,75 A (normale)
Dimensioni esterne 148 (L) x 42,3 (H) x 207,5 (P) mm
Peso 0,97 kg
Temperatura di funzionamento da +5˚C a +45˚C
Umidità di funzionamento da 5% a 85% (senza condensazione)
Temperatura di immagazzinamento da –40˚C a +60˚C
Umidità di immagazzinamento da 5% a 90% (senza condensazione)
[Accessori]
÷ 1 Disco con driver di periferica (software)
÷ 2 Prese di cortocircuito
÷ 1 Cavo audio
÷ 4 Viti di montaggio
÷ 1 Istruzioni per l'uso
÷ 1 Manuale d’installazione
NOTA:
Per miglioramento prodotto, dati tecnici e design sono soggetti a variazioni senza preavviso.
Pubblicato da Pioneer Electronic Corporation.
Copyright © 1998 Pioneer Electronic Corporation.
Tutti i diritti reservati.
Page 36

36
<DRC1085>
It
<98D00SF0W00> Printed in Japan /Imprimé au Japon <DRC1085-B>
AFTER-SALES SERVICE FOR PIONEER PRODUCTS
Please contact the dealer or distributor from where you purchased the
product for its after-sales service (including war ranty conditions) or any
other information. In case the necessary information is not available,
please contact the Pioneer's subsidiaries (regional service
headquarters) listed below:
PLEASE DO NOT SHIP YOUR PRODUCT TO THE COMPANIES at the
addresses listed below for repair without advance contact, for these
companies are not repair locations.
Published by Pioneer Electronic Corporation.
Copyright © 1998 Pioneer Electronic Corporation.
All rights reserved.
France: tapez 36 15 PIONEER
AMERICA
PIONEER ELECTRONICS SERVICE, INC.
CUSTOMER SUPPORT DIVISION
P.O. BOX 1760, LONG BEACH, CA 90801-1760, U.S.A.
EUROPE
PIONEER ELECTRONIC (EUROPE) N.V.
EUROPEAN SERVICE DIVISION
HAVEN 1087, KEETBERGLAAN 1, 9120 MELSELE, BELGIUM
ASEAN
PIONEER ELECTRONICS ASIACENTRE PET. LTD.
SERVICE DEPARTMENT
501 ORCHARD ROAD, #10-00
WHEELOCK PLACE, SINGAPORE 238880
JAPAN AND OTHERS
PIONEER ELECTRONIC CORPORATION (HEAD OFFICE)
CUSTOMER SUPPORT CENTER
4-1, MEGURO 1-CHOME, MEGURO-KU, TOKYO 153-8654 JAPAN
PIONEER ELECTRONIC CORPORATION
Business Systems Company, Overseas Sales Department: 4-1, Meguro 1-Chome, Meguro-ku, Tokyo 153-8654, Japan
PIONEER NEW MEDIA TECHNOLOGIES, INC.
Multimedia and Mass Storage Division: 2265 East 220th Street, Long Beach, CA 90810, U.S.A. TEL:800-444-OPTI (6784)
PIONEER ELECTRONICS SERVICE, INC. 1925 East Dominguez St. Long Beach, CA 90810, U.S.A. TEL: 310-952-2820
PIONEER ELECTRONIC [EUROPE] N.V.
Multimedia Division: PIONEER House, Hollybush Hill, Stoke Poges, Slough SL2 4QP, U.K. TEL: +44-1753-789-789
PIONEER ELECTRONICS OF CANADA, INC.
Industrial Products Department: 300 Allstate Parkway, Markham, Ontario L3R 0P2, Canada TEL: 905-479-4411
PIONEER ELECTRONICS AUSTRALIA PTY. LTD. 178-184 Boundary Road, Braeside, Victoria 3195, Australia TEL:+61-3-9586-6300
PIONEER ELECTRONICS ASIACENTRE PTE. LTD. 501 Orchard Road, #10-00, Lane Crawford Place, Singapore 0923 TEL: +65-735-9011
 Loading...