

Pioneer LaserDisc CLD-S104, LaserDisc CLD-S370, LaserDisc CLD-S304, LaserDisc CLD-S270 Operating Instructions Manual
Page 1
DIGITAL AUDIO IASERD/SC
/ Illlillqlfl ll_'ll_llll.
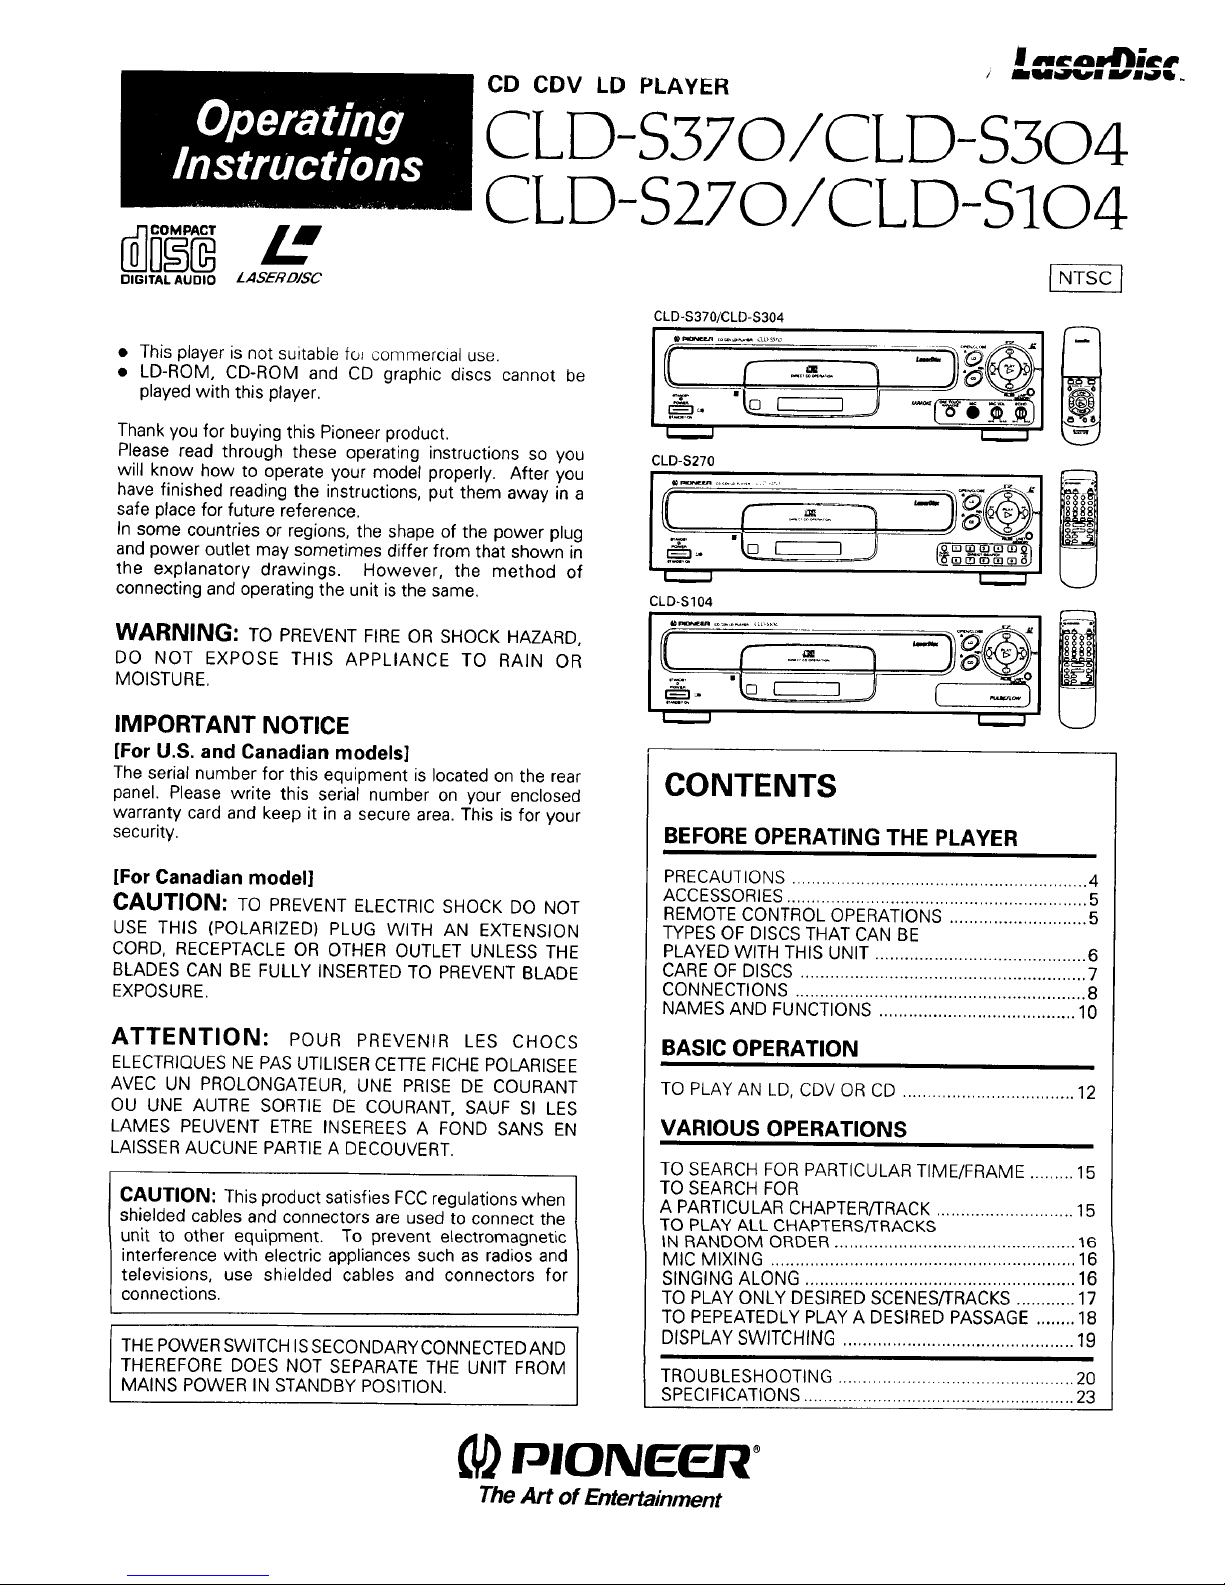
CD CDV LD PLAYER
CLD-S370/CLD-S304
CLD-S270/CLD-S104
• This player is not suitable fo_ commercial use.
• LD-ROM, CD-ROM and CD graphic discs cannot be
played with this player.
Thank you for buying this Pioneer product.
Please read through these operating instructions so you
will know how to operate your model properly. After you
have finished reading the instructions, put them away in a
safe place for future reference.
In some countries or regions, the shape of the power plug
and power outlet may sometimes differ from that shown in
the explanatory drawings. However, the method of
connecting and operating the unit is the same.
WARNING: TO PREVENT FIRE OR SHOCK HAZARD,
DO NOT EXPOSE THIS APPLIANCE TO RAIN OR
MOISTURE.
IMPORTANT NOTICE
[For U.S. and Canadian models]
The serial number for this equipment is located on the rear
panel. Please write this serial number on your enclosed
warranty card and keep it in a secure area. This is for your
security.
[For Canadian model]
CAUTION: TO PREVENT ELECTRIC SHOCK DO NOT
USE THIS (POLARIZED) PLUG WITH AN EXTENSION
CORD, RECEPTACLE OR OTHER OUTLET UNLESS THE
BLADES CAN BE FULLY INSERTED TO PREVENT BLADE
EXPOSURE.
ATTENTION: POUR PREVENIR LES CHOCS
ELECTRIQUES NE PAS UTILISER CE-I-rE FICHE POLARISEE
AVEC UN PROLONGATEUR, UNE PRISE DE COURANT
OU UNE AUTRE SORTIE DE COURANT, SAUF Sl LES
LAMES PEUVENT ETRE INSEREES A FOND SANS EN
LAISSER AUCUNE PARTIE A DECOUVERT.
CAUTION: This product satisfies FCC regulations when
shielded cables and connectors are used to connect the
unit to other equipment. To prevent electromagnetic
interference with electric appliances such as radios and
televisions, use shielded cables and connectors for
connections.
THE POWER SWITCH ISSECONDARY CONNECTED AND
THEREFORE DOES NOT SEPARATE THE UNIT FROM
MAINS POWER IN STANDBY POSITION.
CLD-S370/CLD-S304
CLD-S270
CLD-S104
....,,_
CONTENTS
BEFORE OPERATING THE PLAYER
PRECAUTIONS ............................................................ 4
ACCESSORIES ............................................................. 5
REMOTE CONTROL OPERATIONS ............................ 5
TYPES OF DISCS THAT CAN BE
PLAYED WITH THIS UNIT ........................................... 6
CARE OF DISCS .......................................................... 7
CONNECTIONS ........................................................... 8
NAMES AND FUNCTIONS ........................................ 10
BASIC OPERATION
TO PLAY AN LD, CDV OR CD ................................... 12
VARIOUS OPERATIONS
TO SEARCH FOR PARTICULAR TIME/FRAME ......... 15
TO SEARCH FOR
A PARTICU LAR CHAPTER/TRACK ............................ 15
TO PLAY ALL CHAPTERS/TRACKS
tN RANDOM ORDER ................................................. 16
MIC MIXING .............................................................. 16
SINGING ALONG ....................................................... 16
TO PLAY ONLY DESIRED SCENES/TRACKS ............ 17
TO PEPEATEDLY PLAY A DESIRED PASSAGE ........ 18
DISPLAY SWITCHING ............................................... 19
TROUBLESHOOTING ................................................ 20
SPECIFICATIONS ....................................................... 23
PIONEER
The Art of Entertainment
Page 2
IMPORTANT
The lightning flash with arrowhead, within an equilateral
triangle, is intended to alert the user to the presence of
uninsulated "dangerous voltage' within the product's
enclosure that may be of sufficient magnitude to
constitute a risk of electric shock to persons.
CAUTION
CAUTION:
TO PREVENT'tHE RISK OF ELECIRIC SHOCK, DO NOI
REMOVE COVER {OR SACK). NO USER-SERVICEABLE
PARTS INSIDE. REFER SERVICING TO QUALIFIED
SERVICE PERSONNEL.
Ihe exclanlatlon point within an equilateral triangle is
intended to alert the user to the presence of important
operating and maintenance (servicing) instructions in the
literature accompanying the appliance,
SAFETY INSTRUCTIONS
READ INSTRUCTIONS - All the safety and operating
instructions should be read before the appliance is
operated.
RETAIN INSTRUCTIONS - The safety and operating in-
structions should be retained for future reference,
HEED WARNINGS - All warnings on the appliance and
in the operating instructions should be adhered to.
FOLLOW INSTRUCTIONS -All operating and use in-
structions should be followed.
CLEANING - Unplug this video product from the wall
outlet before cleaning. Do not use liquid cleaners or
aerosol cleaners. Use a damp cloth for cleaning.
ATrACHMENITS - Do not use attachments not recom-
mended by the video product manufacturer as they
may cause hazards.
WATER AND MOISTURE - Do not use this video pro-
duct near water - for example, near a bathtub,
wash bowl, kitchen sink, or laundry tub, in a wet
basement, or near a swimming pool, etc.
ACCESSORIES - Do not place this video product on an
unstable cart, stand, tripod, bracket, or table. The
video product may fall, causing serious injury to a
child or adult, and serious damage to the ap-
pliance. Use only with a cart, stand, tripod, bracket,
or table recommended by the manufacturer, or
sold with the video product, Any mounting of the
appliance should follow the manufacturer's in-
structions, and should use a mounting accessory
recommended by the manufacturer.
CART - An appliance and cart combination should be
moved with care. Quick stops, excessive force, and
uneven surfaces may cause the appliance and cart
combination to overturn.
VENTILATION - SIo_sand openings in the cabinet are
provided for ventilation and to ensure reliable
operation of the video product and to protect it
from overheating. These openings must not be
blocked or covered, They should never be blocked
by placing the video product on a bed, sofa, rug, or
other similar surface. This video product should
never be placed near or over a radiator or heat reg-
ister. This video product should not be placed in a
built-in installation such as a bookcase or rack un-
less proper ventilation is provided or the manufac-
turer's instructions have been adhered to.
POWER SOURCES - This video product should be
operated only from the type of power source indi-
cated on the marking label. If you are not sure of the
type of power supply to your home, consult your
appliance dealer or local power company. For
video products intended to operate from batte_
power, or other sources, refer to the operating in-
structions.
POWER-CORD PROTECTION
Power-supply cords should be routed so that they
are not likely to be walked on or pinched by items
placed upon or against them. Pay particular atten-
tion to cords at plugs, convenience receptacles,
and the point where they exit from the appliance.
POLARIZATION - This video produc[ is equipped with
a polarized alternating current line plug (a plug hav-
ing one blade wide rthan the other). This plug will fit
into the power outlet only one way. This is a safety
feature, If you are unable to insert the plug fully into
the outlet, try reversing the plug, If the plug should
still fail to fit. contact your electrician to replace your
obsolete outlet. Do not defeat the safety purpose of
the polarized plug.
UGHTNING - For added protection for this video pro-
duct receiver during a lightning storm, or when it is
left unattended and unused for long periods of time,
unplug it from the wall outlet and disconnect the
antenna or cable system, This will prevent damage
to the video product due to lightning and power-line
surges.
POWER UNES- An outside antenna system should not
be located in the vicinity of overhead power lines or
other electric light or power circuits, orwhere it can
fall into such power lines or circuits. When install-
ing an outside antenna system, extreme care should
be taken to keep from touching such power lines or
circuits as contact with them might be fatal,
OVERLOADING - Do not overload wall outlets and ex-
tension cords as this can result in the risk of fire or
electric shock,
OBJECT AND LIQUID ENTRY - Never push objects of
any kind into this video product through openings as
they may touch dangerous voRage points or short-
out parts that could result ina fire or electric shock.
Never spill liquid of any kind on the video product.
SERVICING - Do not attempt to service this video pro-
duct yourself as opening or removing covers may
expose you to dangerous voltage or other hazards,
Refer all servicing to qualified service personnel.
DAMAGE REQUIRING SERVICE
Unplug this video product from the wall outlet and
refer servicing to qualified service personnel under
the following conditions:
a. When the power-supply cord or plug is dam-
aged.
b. If liquid has been spilled, or objects have fallen
into the video product.
c. If the video product has been exposed to rain or
water.
d. If the video product does not operate normally
by following the operating instructions. Adjust only
those controls that are covered by the operating in-
structions. Improper adjustment of other controls
may result in damage and will often require exten-
sive work by a qualified technician to restore the
video product to its normal operation.
e. If the video product has been dropped or the
cabinet has been damaged,
f. When the video product exhibits a distinct
change in performance - this indicates a need for
service.
REPLACEMENT PARTS-When replacement parts are
required, be sure the service technician has used
replacement parts specified by the manufacturer
or having the same characteristics as the original
part, Unauthorized substitutions may result in fire,
electric shock or other hazards.
SAFETY CHECK - Upon completion of any service or
repairs to this video product, ask the service techni-
cian to perform safety checks to determine that the
video product is in proper operating condition.
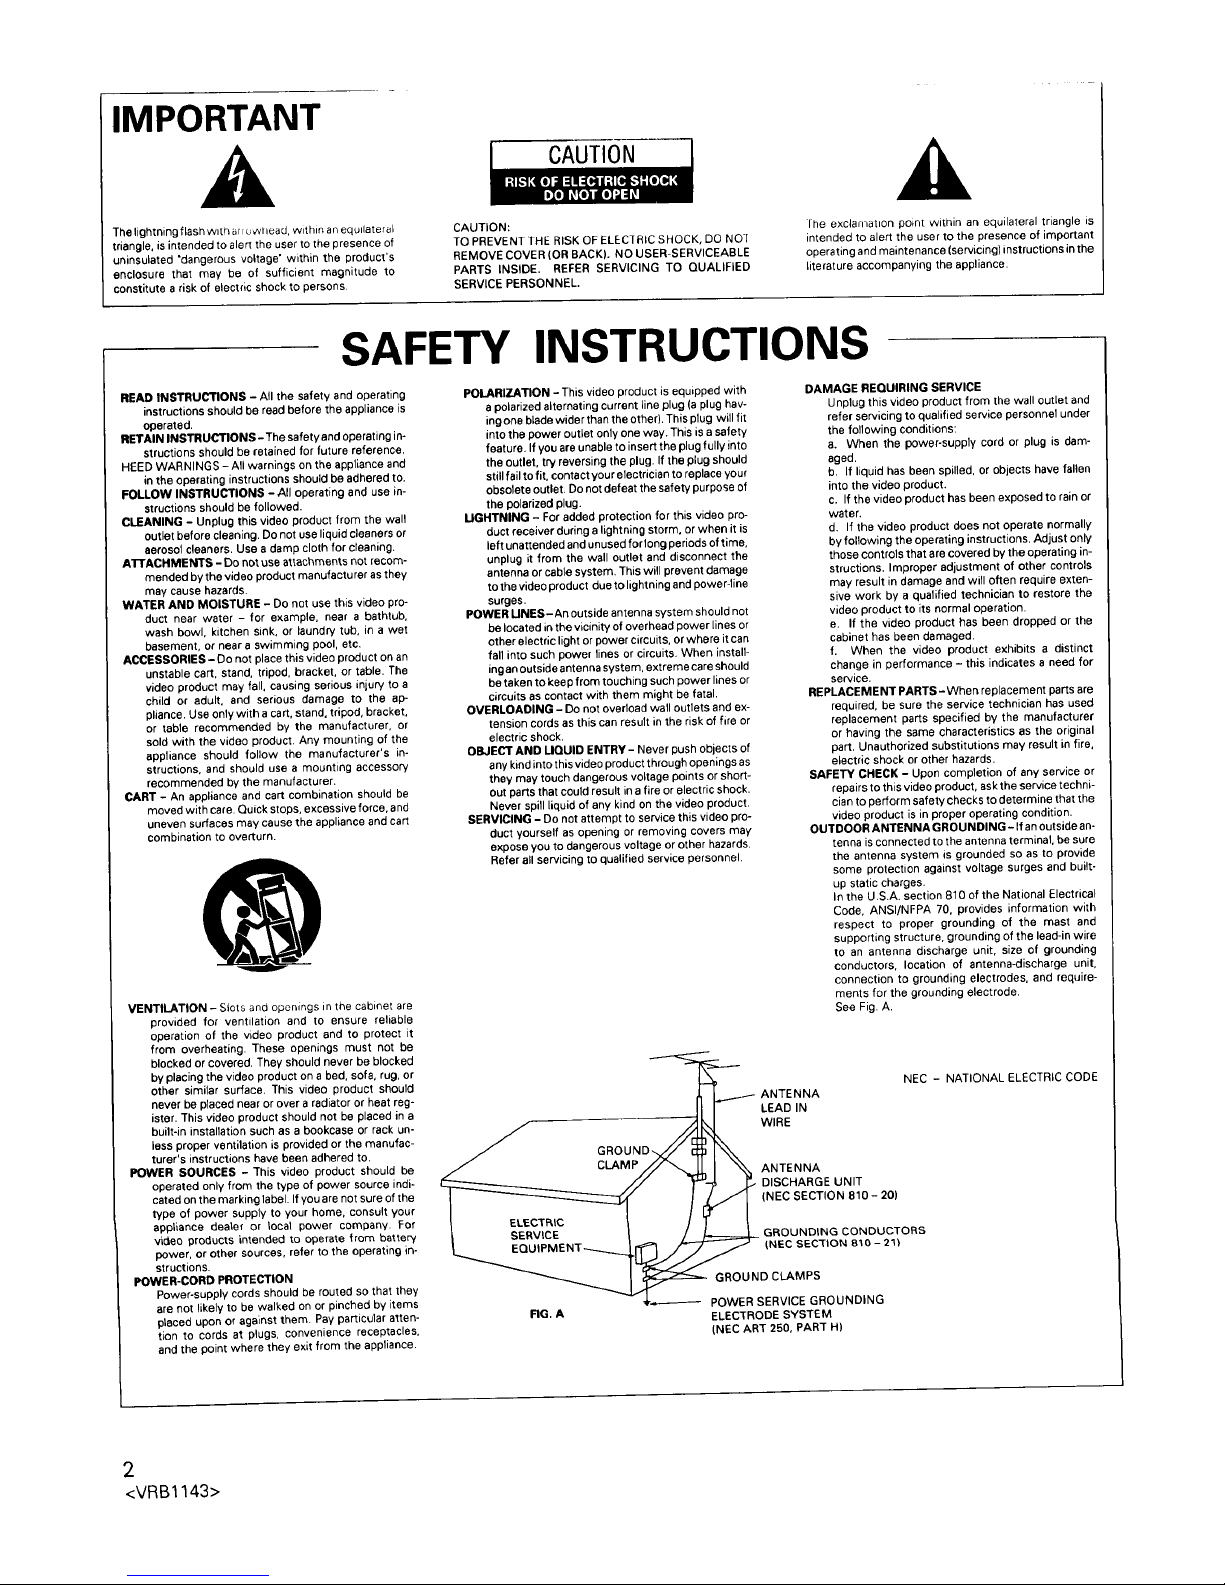
OUTDOOR ANTENNA GROUNDING- tf an outside an-
tenna is connected to the antenna terminal, be sure
the antenna system is grounded so as to provide
some protection against voltage surges and built-
up static charges,
In the U.SA. section 810 of the National Electrical
Code, ANSI/NFPA 70, provides information with
respect to proper grounding of the mast and
supporting structure, grounding of the lead-in wire
to an antenna discharge unit, size of grounding
conductors, location of antenna-discharge unit,
connection to grounding electrodes, and require-
ments for the grounding electrode.
See Fig. A.
ANTENNA
LEAD IN
WIRE
GROUND.
ANTENNA
DISCHARGE UNIT
(NEC SECTION 810 - 20)
GROUND CLAMPS
FIG. A
NEC - NATIONAL ELECTRIC CODE
GROUNDING CONDUCTORS
(NEC SECTION 810 - 23)
POWER SERVICE GROUNDING
ELECTRODE SYSTEM
(NEC ART 250, PART H)
2
<VRB1143>
Page 3
[his equipment has been tested and found to comply with the limits fo_ a Class Bdigi_aldevice, pu_suantto Part 15of the FCC Hules. lhese
limits are designed to provide reasonable protection against harmful interference in a residential installation. This equipment generates,
uses, and can radiate radio frequency energy and, if not installed and used in accordance with the instructions, may cause harmful
interference to radio communications. However, there is no guarantee that interference will not occur in a particular installation. If this
equipment does cause harmful interference to radio or television reception, which can be determined by turning the equipment off and
on, the user is encouraged to try to correct the interference by one or more of the following measures:
- Reorient or relocate the receiving antenna.
- Increase the separation between the equipment and receiver.
- Connect the equipment into an outlet on a circuit different from that to which the receiver is connected.
- Consult the dealer or an experienced radio/TV technician for help.
Information to User
Alteration or modifications carried out without appropriateauthorizationmay invalidatethe user's right to operatethe equipment.
CAUTION
• Use of controls or adjustments or performance of procedures other than those specified herein may result in hazardous radiation
exposure.
• The use of optical instruments with this product will increase eye hazard.
[For Canadian model]
This digital apparatus does not exceed the Class B limits for radio noise emissions from digital apparatus set out in the Radio
Interference Regulations of the Canadian Department of Communications.
Note to CATV system installer
This reminder is provided to call the CATV system installer's attention to Article 820-40 of the NEC that provides guidelines for
proper grounding and, in particular, specifies that the cable ground shall be connected to the grounding system of the building,
as close to the point of cable entry as practical.
_iNG
F A LIW.,
We Want You Listening For A Lifetime
Used wisely, your new sound equipment will provide alifetime of
fun and enjoyment. Since hearing damage from loud noise is often
undetectable until it is too late, this manufacturer and the Electronic
Industries Association's Consumer Electronics Group recommend
you avoid prolonged exposure to excessive noise. This list of sound
levels is included for your protection.
Selecting fine audio equipment such as the unit you've just Decibel
purchased is only the start of your musical enjoyment. Now it's time Level
to consider how you can maximize the fun and excitement your 30
equipment offers. This manufacturer and the Electronic Industries 40
Association's Consumer Electronics Group want you to get the most 50
out of your equipment by playing it at a safe level. One that lets the 60
sound come through loud and clear without annoying blaring or 70
distortion--and, most importantly, without affecting your sensitive 80
hearing.
Sound can be deceiving. Over time your hearing "comfort level"
adapts to higher volumes of sound. So what sounds "normal" can
actually be loud and harm[u\ to _yourhearing. Guard against this by
setting your equipment at asafe level BEFORE _jourhearing adapts.
To establish a safe level:
• Start your volume control at a low setting.
• Slowly increase the sound until you can hear it comfortably and
clearly, and without distortion.
Once you have established a comfortable sound level:
• Set the dial and leave it there.
Taking a minute to do this now will help to prevent hearing
damage or loss in the future. After all, we want you listening for a
lifetime.
Examp_
Quiet library, soft whispers
Living room, refrigerator, bedroom away from traffic
Light traffic, normal conversation, quiet office
Air conditioner at 20 feet, sewing machine
Vacuum cleaner, hair dryer, noisy restaurant
Average city traffic, garbage disposals, alarm clock
at two feet.
THE FOLLOWING NOISES CAN BE DANGEROUS
UNDER CONSTANT EXPOSURE
90 Subway, motorcycle, truck traffic, lawn mower
100 Garbage truck, chain saw, pneumatic drill
120 Rock band concert in front of speakers, thunderclap
140 Gunshot blast, jet plane
180 Rocket launching pad
Information courtesy of the Deafness Research Foundation.
3
<VRBl143>
Page 4
I PRECAUTIONS
If it becomes necessary to transport or ship this unit
in the future, be sure to first remove the disc (if
loaded), and retract the disc table to its closed position.
Then turn the power off, and, after the "OFF" display
goes out blinking on the display, disconnect the power
cord.
INSTALLING THE PLAYER
• Place the player on a stable platform next to the television
and stereo system to be used with the player.
• Do not place heavy objects such as a television or TV
monitor on top of the player.
• Do not place the player on top of your TV set or TV
monitor. Also, keep the player away from devices such
as cassette decks which are sensitive to magnetic fields.
DO NOT INSTALL THE PLAYER IN THE FOLLOWING
LOCATIONS
• In a place subject to direct sunlight.
• In humid or poorly ventilated places.
• In extremely hot or cold places.
• In a place subject to vibrations.
• In a dusty place.
• In a place subject to soot, steam or heat (in a kitchen, etc.)
AVOID SOURCES OF HEAT
Do not put the player on sources of heat, such as an
amplifier. When installing with audio components on a rack,
avoid components that generate heat, by placing the player
below such components where there is adequate ventilation
and not much dust. Avoid placing the player on surfaces
such as shaggy carpets, beds, and sofas which may block
ventilation under the player and cause damage.
CAUTION
Even when the player is in the pause mode, the disc-drive
motor is still revolving. Since leaving the player inthis condition
can shorten the lifetime of the motor, do not leave the player
in the pause mode for long periods of time. Also, to prevent
the damage to the screen, do not use the unit for long periods
of time under conditions in which the screen display (monitor)
has been displayed characters (for example, power-ON mode,
CD PLAY, PAUSE). With LD disc, if playback is paused for
about 20 minutes, the player will automatically enter stop
mode.
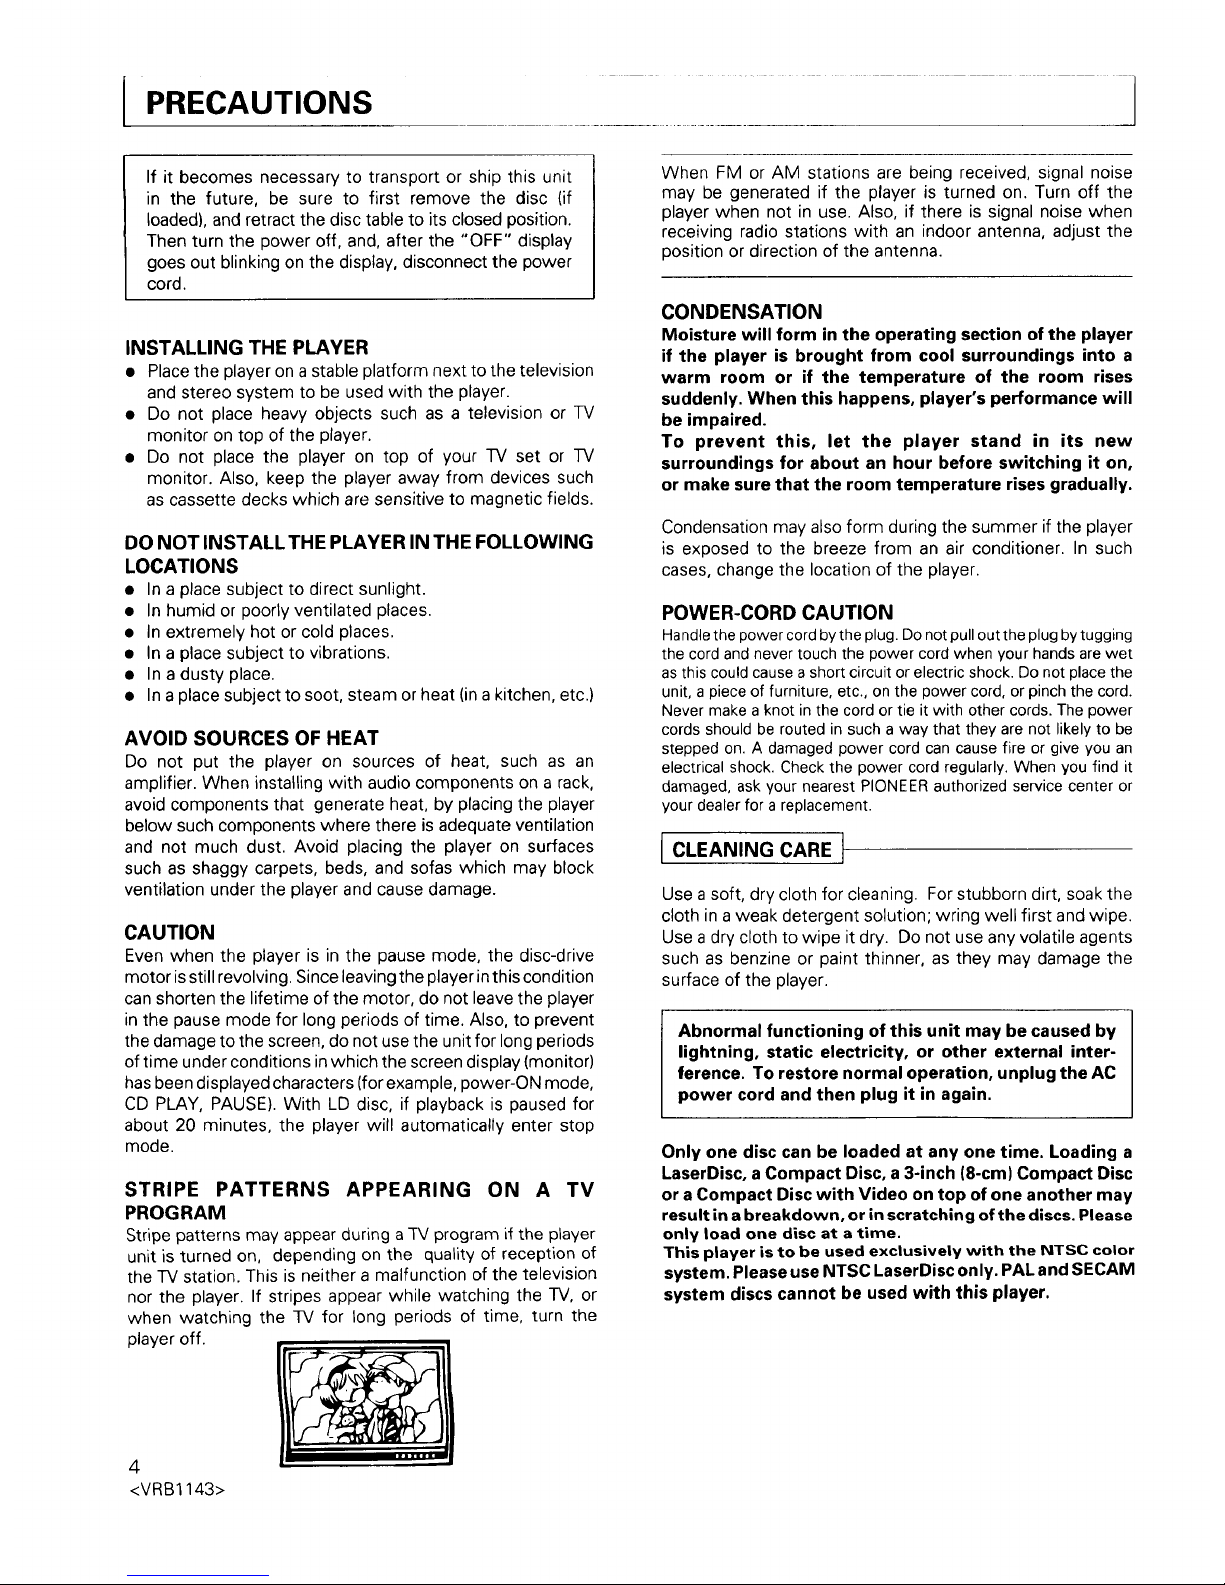
STRIPE PATTERNS APPEARING ON A TV
PROGRAM
Stripe patterns may appear during a TV program if the player
unit is turned on, depending on the quality of reception of
the TV station. This is neither a malfunction of the television
nor the player. If stripes appear while watching the TV, or
when watching the TV for long periods of time, turn the
player off.
When FM or AM stations are being received, signal noise
may be generated if the player is turned on. Turn off the
player when not in use. Also, if there is signal noise when
receiving radio stations with an indoor antenna, adjust the
position or direction of the antenna.
CONDENSATION
Moisture will form in the operating section of the player
if the player is brought from cool surroundings into a
warm room or if the temperature of the room rises
suddenly. When this happens, player's performance will
be impaired.
To prevent this, let the player stand in its new
surroundings for about an hour before switching it on,
or make sure that the room temperature rises gradually.
Condensation may also form during the summer if the player
is exposed to the breeze from an air conditioner. In such
cases, change the location of the player.
POWER-CORD CAUTION
Handlethepower cordbythe plug. Do notpull outthe plugbytugging
the cord and never touch the power cord when your handsarewet
asthis could cause a short circuit or electric shock. Do not place the
unit, apiece of furniture, etc., on the power cord, or pinch the cord.
Never make a knot in the cord ortie it with other cords. The power
cords should be routed in such a way that they are not likely to be
stepped on. A damaged power cord can causefire or give you an
electrical shock. Check the power cord regularly. When you find it
damaged, ask your nearest PIONEERauthorized service center or
your dealer for a replacement.
CLEANING CARE
Use a soft, dry cloth for cleaning. For stubborn dirt, soak the
cloth in aweak detergent solution; wring well first and wipe.
Use a dry cloth to wipe it dry. Do not use any volatile agents
such as benzine or paint thinner, as they may damage the
surface of the player.
Abnormal functioning of this unit may be caused by
lightning, static electricity, or other external inter-
ference. To restore normal operation, unplug the AC
power cord and then plug it in again.
Only one disc can be loaded at any one time. Loading a
LaserDisc, a Compact Disc, a 3-inch (8-cm) Compact Disc
or a Compact Disc with Video on top of one another may
result in a breakdown, or in scratching of the discs. Please
only load one disc at a time.
This player isto be used exclusively with the NTSC color
system. Please use NTSC LaserDisc only. PAL and SECAM
system discs cannot be used with this player.
4
<VRB1143>
Page 5
ACCESSORIES
........ r
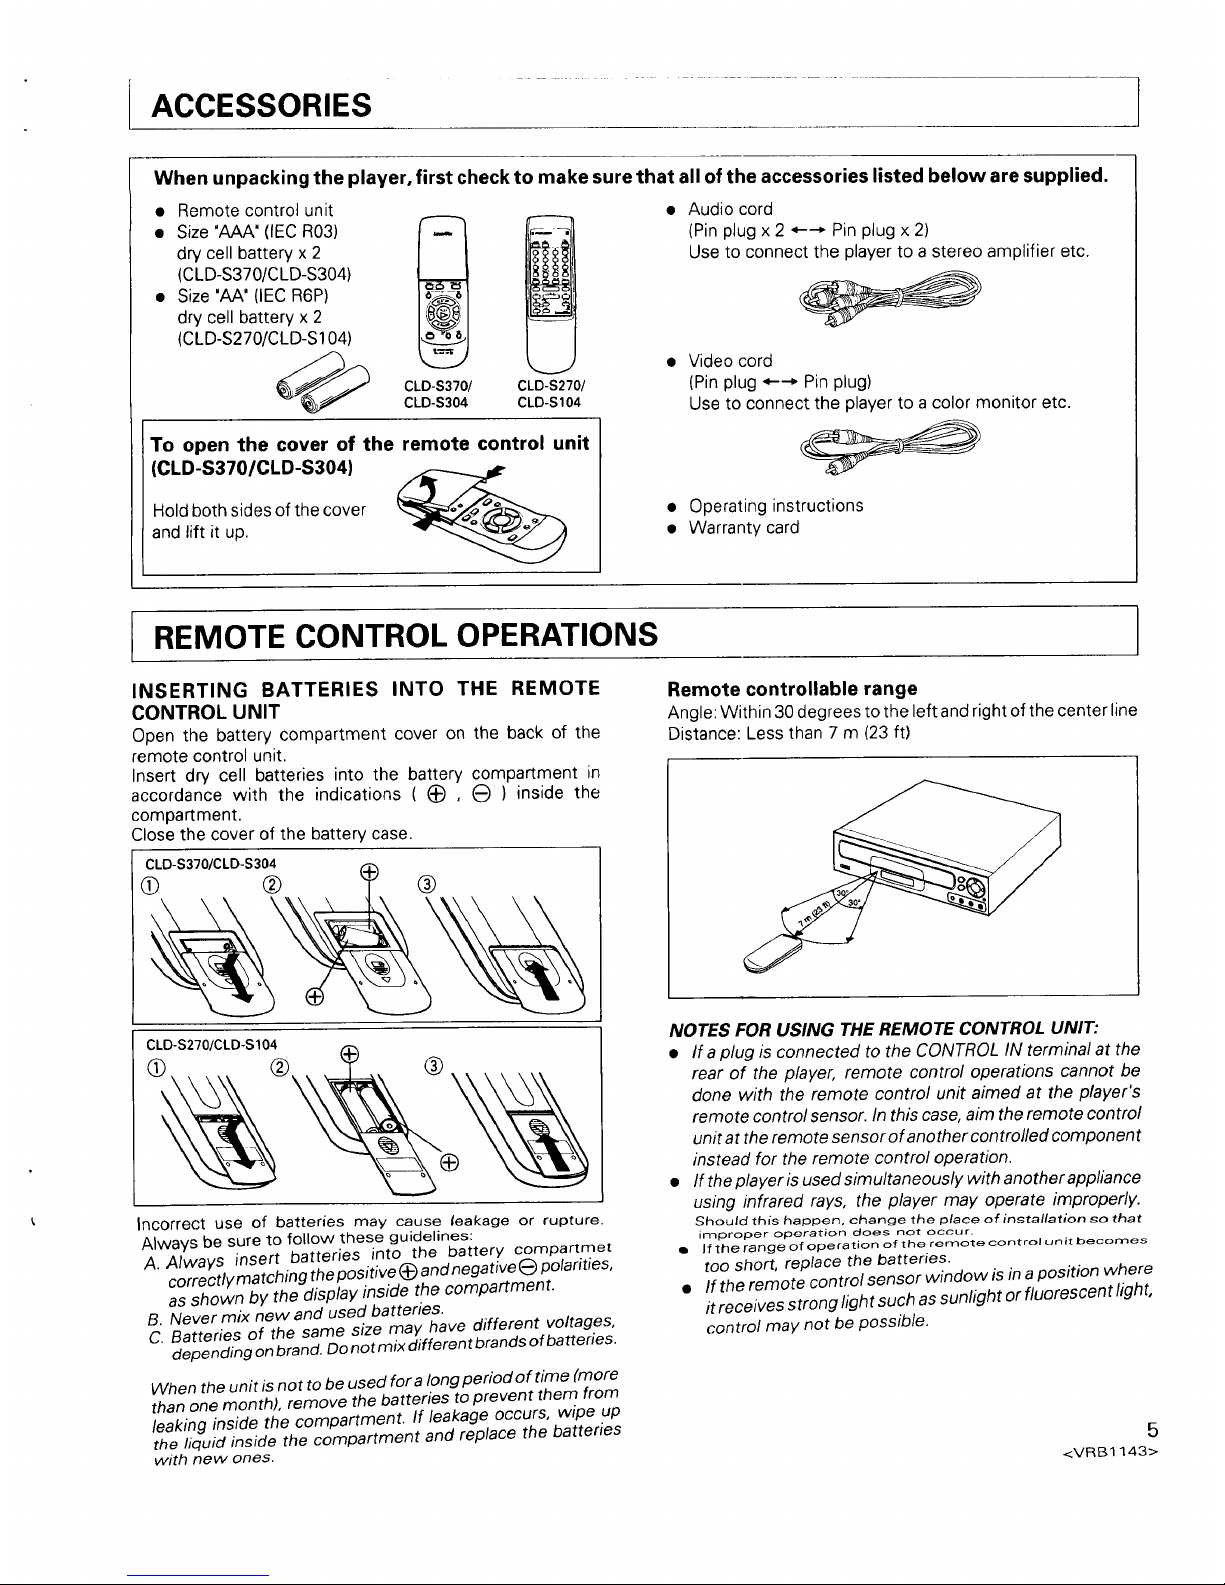
When unpacking the player, first check to make sure that all of the accessories listed below are supplied.
Remote control unit
Size "AAA"(IEC R03) [_1
dry cell battery x 2
(CLD-S370/CLD-S304)
Size 'AA" (IEC R6P)
dry cell battery x 2
(CLD-S270/CLD-S104)
__ CLD-S370/
CLD-S304
@
CLD-S270/
CLD-S104
;To open the cover of the remote control unit
(CLD-S370/CLD-S304)
Holdbothsides ofthe cover
and lift it up.
• Audio cord
(Pin plug x 2 *---* Pin plug x 2)
Use to connect the player to a stereo amplifier etc.
• Video cord
(Pin plug *---* Pin plug)
Use to connect the player to a color monitor etc.
• Operating instructions
• Warranty card
REMOTE CONTROL OPERATIONS
INSERTING BATTERIES INTO THE REMOTE
CONTROL UNIT
Open the battery compartment cover on the back of the
remote control unit.
Insert dry cell batteries into the battery compartment in
accordance with the indications ((_) , _) ) inside the
compartment.
Close the cover of the battery case.
CLD-S370/CLD-S304
O @ ®
Remote controllable range
Angle: Within 30 degrees to the left and right of the center line
Distance: Less than 7 m (23 ft)
CLD-S270/CLD-S 104
Incorrect use of batteries may cause leakage or rupture.
Always be sure to follow these guidelines:
A. Always insert batteries into the battery compartmet
correctly matching the positive _) and negative _ polarities,
as shown by the display inside the compartment.
B. Never mix new and used batteries.
C. Batteries of the same size may have different voltages,
depending on brand. Do not mix different brands of batteries.
When the unit is not to be used for a long period of time (more
than one month), remove the batteries to prevent them from
leaking inside the compartment. If leakage occurs, wipe up
the liquid inside the compartment and replace the batteries
with new ones.
NOTES FOR USING THE REMOTE CONTROL UNIT:
• Ifa plug is connected to the CONTROL IN terminal at the
rear of the player, remote control operations cannot be
done with the remote control unit aimed at the player's
remote control sensor. In this case, aim the remote control
unit at the remote sensor of another controlled component
instead for the remote control operation.
• If the player is used simultaneously with anotherappliance
using infrared rays, the player may operate improperly.
£hould this happen, change the place o{in_tallatlon so that
improper operation does not ocour.
• Jftherangeofoperationoftherem°tec°ntr°lunitbec°mes
too short, replace the batteries.
• If the remote control sensor window is in a position where
it receives strong light such as sunlight or fluorescent light,
control may not be possible.
5
<VRB1143>
Page 6

TYPES OF DISCS THAT CAN BE PLAYED WITH THIS UNIT
This unit isa CDVIDEO SYSTEM compatible player which can
play CDs, CDV discs, and LDs.
• The marks shown in the right column are printed on the
labels and jackets of the corresponding discs.
This player can play the following seven types of discs without
using an adapter.
CD Single (one-side recording)
8cmt
13 in.)_ Digital audio(max. 20 rain,)
CD (one-side recording)
12 cm _' t,"(--_,, ____ Digital audio
(5 in.) _ (max. 74 min.)
CDV (one-side recording)
Digital audio
(max. 20 rain.)
12 cm _ i (Audio part)
(5 in.)' Digital audio +
t Video (max. 5
min.) (Video
part)
VSD (Video Single Disc)
(one-side recording)
12 cm
(5 in.)
i
(__ Digital audio +
Video (max. 5
rain.)
• In the operating instructions in this manual,
the VSD is treated as a kind of CDV.
LD Single (one-side recording)
' _ Digital/analog
20 cm audio + Video
(8 in.) -- (CAV: Max. 14
rain.
CLV: Max, 20
min.)
DIOIIAL AUDIO
CD VIDEO
VIDEO roll, I
DISC V
I.ASERDISC
LD (two-side or one-side recording)
20 cm
(8 in.)
Digital/analog
audio + Video
__ (CAV: Max. 14
min. per side
CLV: Max. 20
rain. per side)
LD (two-side or one-side recording)
_ Digital/analog
30 cm I (" F-_ \ \\ audio +Video
{12in.I I ( _ I "----e- (cAv-Max.30
\ V /' /] rain. per side
_ ,// CLV: Max, 60
I _ min-P ersida'
CD V DEO
There are some discs marked with the _/-_ mark instead of
the _"'-"-"-"_omark.
There are some disc without the co_,-'_)_oL°mark.
6
<VRB1143>
HOW TO PLACE A DISC
Place the disc in the correct position by using the appropriate
disc guide groove.
OPEN/CLOSE
LD disc table: _A_..)--
8 cm (3 in.)
CD, CDV: 12 cm (5 in.)
LD single: 20 cm (8 in.)
-- LD: 30 cm (12 in,)
CD disc table:
8 cm (3 in.)
CDV: 12 cm (5 in.)
LD GLOSSARY
Chapter number
Chapter numbers are used to indicate the boundaries of the
sections on adisc. If chapter numbers are recorded on adisc,
it is so indicated on the jacket of the disc, etc.
Frame number
Frame numbers are the numbers assigned to each picture
frame on a CAV disc.
Time number
Time numbers indicate the time elapsed from the beginning
of a CLV disc.
CDV/CD GLOSSARY
Track number
Track numbers indicate the boundaries of the sections, or
"tracks", on a disc. Track numbers are assigned consistently
throughout the audio part and video part of a CDV disc.
TOC
The TOC (Table of Contents) section is just like the table of
contents of abook, and contains information on the contents
(number of tracks, playing time, etc.) of the disc.
• Some LD discs are not provided with a TOC section.
3his iS the unified symbol mark of LASERE)ISC {LaserVision
videodisc).
LaserDisc players and discs which bear this symbol and use the
same television system, are mutually compatible.
A Digital Audio with Multi Audio Disc (CD VIDEO LD) and a CDV
(COVideo CDV)arereferred to as CDVideodisc& CDVideodiscs
are recordedwith subcodes, which arethe non-audiorecordings
Of "TOG [3"able of Contents) data such as track numbers, index
numbers,etc. However,therearesome discs without these
marks,
Page 7
CD VIDEO SYSTEM
The CD VIDEO SYSTEM is the standard name for the "optical video
disc with digital audio" system that encompasses both LDs and CDV
discs.
The following mark is the standard mark for the CD VIDEO SYSTEM
and is found on all players and discs which conform to the CD VIDEO
SYSTEM format.
The following systems are included in the CD VIDEO SYSTEM:
CD Vl DEO
• CDV (CD VIDEO CDV) discs
• LaserVision Discs (CD VIDEO LDs) containing digital sound with
sub codes
• Compatible p_ayers which can play CDs and CDV discs
• Compatible players which can play CDs, CDV discs, and LDs
CD VIDEO LDs
A CD VIDEO LD is an LD with digital audio which is encoded with
sub codes (data such as TOC and track number data, excluding
audio and video signals).
LDs (LASERDISCS)
Two types of standard LaserDisc are available -- standard play (CAV)
discs and extended play (CLV) discs -- which differ with respect to
their signal recording systems.
CAM DISCS
The jackets and labels of these discs are marked with a 'Standard Play
Disc CAV' or 'Standard Play" indication.
CLV DISCS
The jackets and labels of these discs are marked with a 'Extended
Play Disc CLV" or "Extended Play" indication.
LASERVISION DISCS WITH DIGITAL AUDIO
The jackets and labels of these discs bear the following mark.
dir,iLnL or dieital
mu,-,,_ SOUND
These are LaserDiscs which contain digital audio signals in addition to
conventional analog audio signals. This feature allows the high image
quality of LaserDiscs to be enjoyed together with the superior quality
of digital sound.
LASERVISION MULTI AUDIO DISCS WITH DIGITAL AUDIO
The jackets and labels of these discs bear the following mark.
disital
dir,itaL and MULTI AUDiO or eou_oI_ULTIAUDIO
I_n-IC3 U_
These are LaserDiscs in which the recorded digital and analog audio
signals differ incontent. This allows the user to enjoy two different
audio soundtracks by switching between the digital and analog
sound.
CDV (COMPACT DISC WITH VIDEO) DISCS
These are compact discs which also contain video signals. Of the
total 25-minute playback time of a CDV disc, 20 minutes is encoded
with conventional CD digital audio signals (the "audio part"). The
remaining 5 minutes is encoded with both video and digital audio
signals (the "video part").
In normal palyback mode, the unit plays the audio part after the video
part is played back.
CAREoF Discs ............ 1
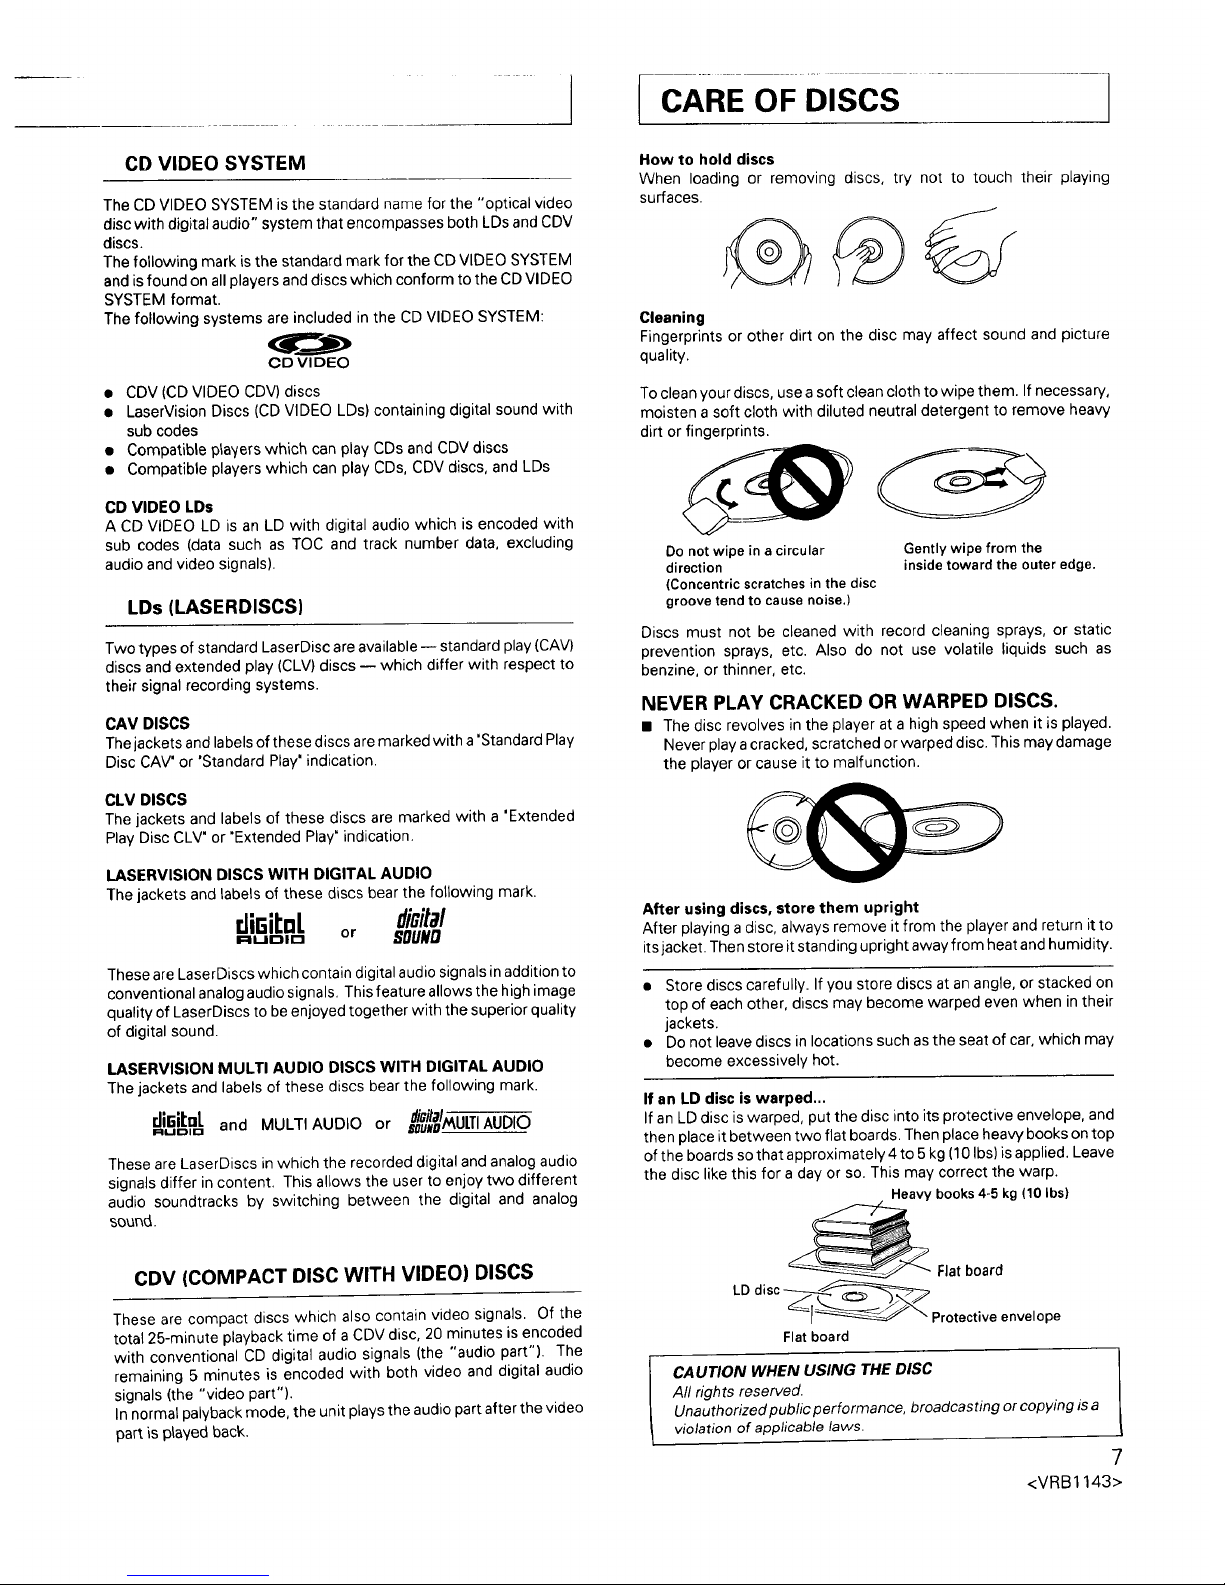
How to hold discs
When loading or removing discs, try not to touch their playing
surfaces.
Cleaning
Fingerprints or other dirt on the disc may affect sound and picture
quality.
To clean your discs, use a soft clean cloth to wipe them. If necessary,
moisten a soft cloth with diluted neutral detergent to remove heaw
dirt or fingerprints.
Do not wipe in a circular Gently wipe from the
direction inside toward the outer edge.
(Concentric scratches in the disc
groove tend to cause noise.)
Discs must not be cleaned with record cleaning sprays, or static
prevention sprays, etc. Also do not use volatile liquids such as
benzine, or thinner, etc.
NEVER PLAY CRACKED OR WARPED DISCS.
• The disc revolves in the player at a high speed when it is played.
Never play a cracked, scratched orwarped disc. This may damage
the player or cause it to malfunction.
After using discs, store them upright
After playing a disc, always remove it from the player and return it to
its jacket. Then store it standing upright away from heat and humidity.
• Store discs carefully. If you store discs at an angle, or stacked on
top of each other, discs may become warped even when in their
jackets.
• Do not leave discs in locations such as the seat of car, which may
become excessively hot.
If an LD disc is warped...
If an LD disc is warped, put the disc into its protective envelope, and
then place it between two flat boards. Then place heaw books on top
of the boards so that approximately 4 to 5 kg (10 Ibs) is applied. Leave
the disc like this for a day or so. This may correct the warp.
Heavy books 4-5 kg (10 Ibs)
_Flat board
LD disc _-_--__._
--[__" Protectiveenvelope
Flat board
CAUTION WHEN USING THE DISC
All rights reserved.
Unauthorized public performance, broadcasting or copying is a
violation of applicable laws.
7
<VRB1143>
Page 8
[
CONNECTIONS
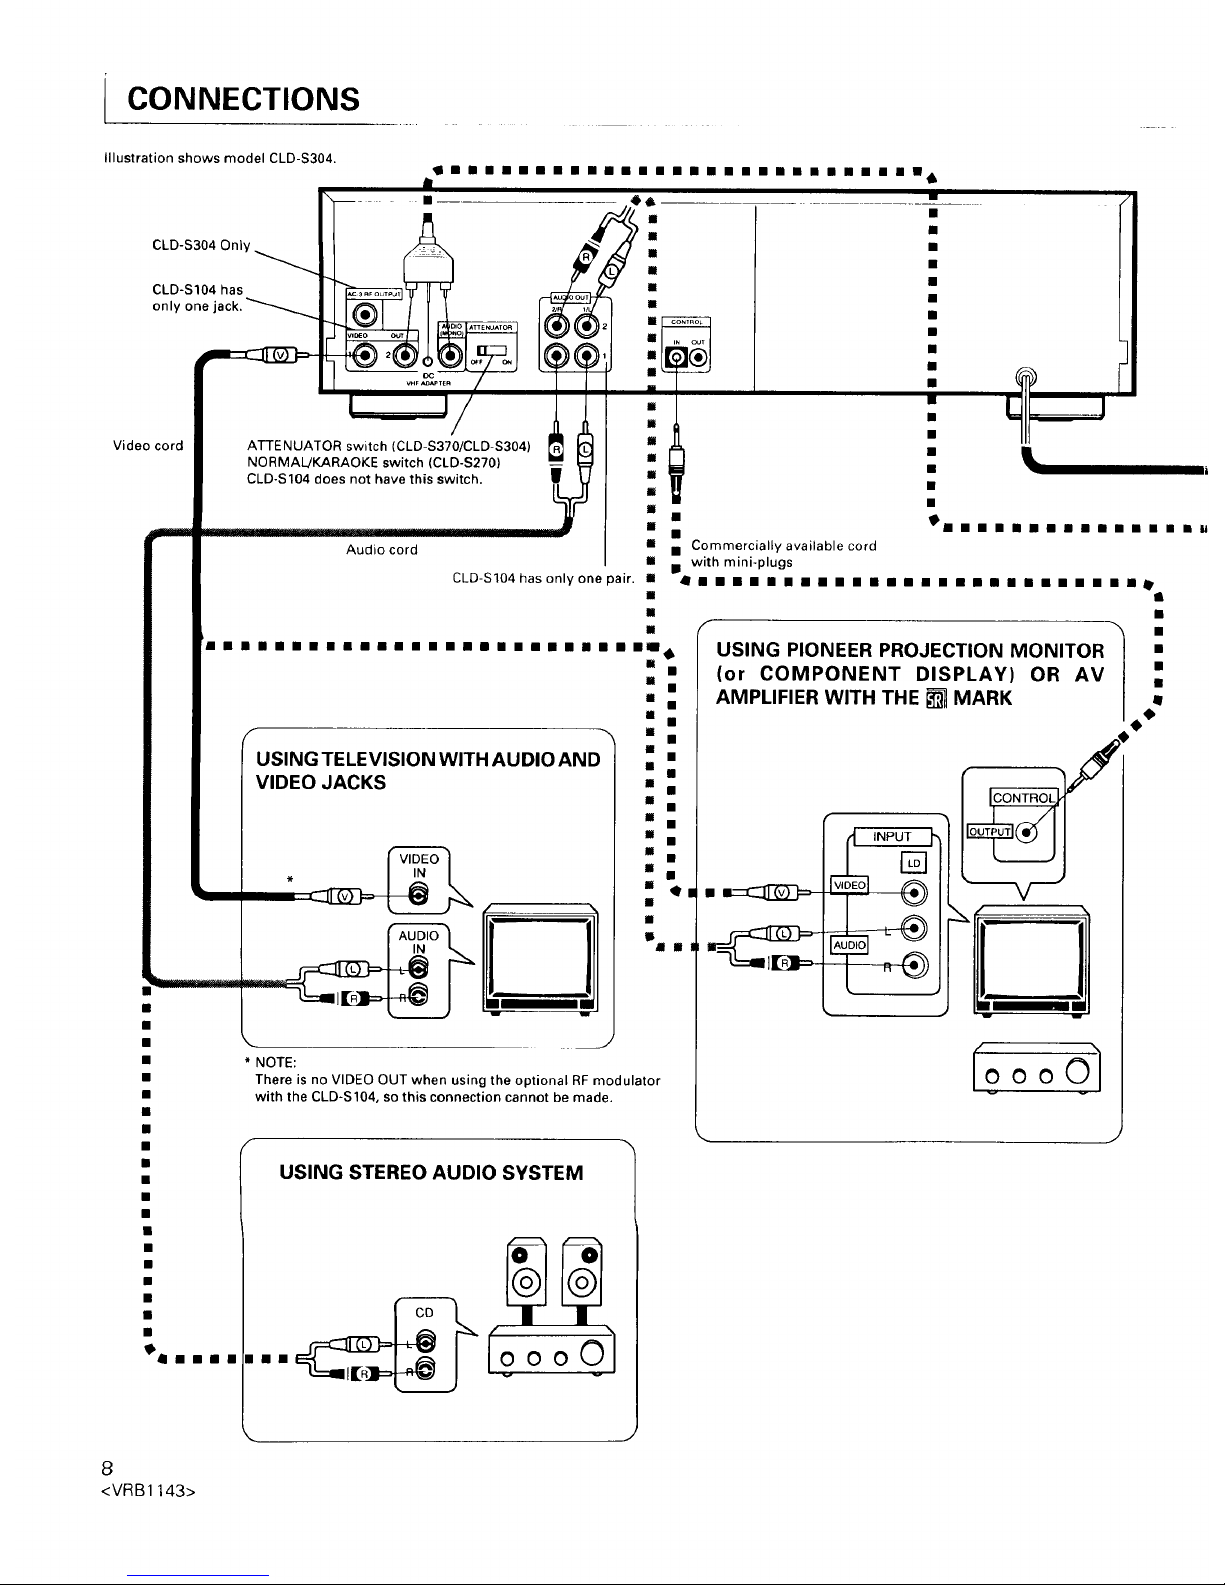
Illustration shows model CLD-S304.
g•••illllli•ili•ii•••m•i•i••l 6
• ........ L
CLD-Sl04 has
Video cord
•
CLD-S304 Only • •
• •
CLD-S104 ha= • •
only one jack " • •
L •
i T
i •
cord i ATTENUATOR switch (CLD-S370/CLD-S304) ii •
l NORMAL/KARAOKE switch (OLD-S270) : : •
i
l CLD-S104 does not have this switch, i •
i i l i • l i • • • II • il
...................IIDIII "" " ""
• • Commercially available cord
• m with mini-plugs
4 has only one panr • _ • • • • • • • • • • •lll l l mR lid l l l l l
• II
• • • • • • • • • • • • • • • • • • • • • • • =11 I_ USING PIONEER PROJECTION MONITOR / •
==• (or COMPONENT DISPLAY) OR AV| ;
I _" AMPLIFIER WITH THE _ MARK /
: '_lri U
l HI
• NOTE: / Olj
• 'h,!r* is no VIDEO OUT when usin{I the optio lal RF too( O O O
• vilh le CLD-S104, so this connect on cannot be made. w _
i I. SING STEREO AUDI C)SYS'I EM
•
mn•i••liei•i••iail••ii••aal
USING TELEVISION WITH AUDIO AND
VIDEO JACKS
There is no VIDEO OUT when using the optional RF modulator
with the CLD-S104, so this connection cannot be made.
USING STEREO AUDIO SYSTEM
8
<VRB1143>
Page 9

lip
iL.
f
PLUG THE POWER CORDS INTO AN AC OUTLET
Plug the AC power cords of the player, stereo amplifier and TV set into an AC outlet.
When the power cord of this unit is connected to an AC outlet, power is supplied to the unit's
internal memory (such as the last memory) even when the POWER switch is off (STANDBY).
Therefore, be sure to connect the power cord directly to a wall outlet. If the power cord is
connected to an outlet such as a switched outlet on an amplifier, the various memory contents
will be erased whenever the amplifier's power switch is turned off.
%. J
4mmmm
/
USING TELEVISION WITHOUT AUDIO AND
VIDEO JACKS
Optional
RF modulator
mm
mm
VHF
television
antenna
RF antenna cable
UHF
television
antenna
1. Detach the VHF antenna cable from the VHF antenna
terminal of your TV set, and connect the cable to the
VHF IN terminal of the RF modulator.
2. Connect the VHF OUT terminal of the RF modulator to
the VHF antenna terminal of your TV set.
3. Connect the socket (3-pin) of the RF modulator to the
VHF ADAPTER OUTPUT jacks.
NOTE:
Push theplug in firmly. If the plug is not properly inserted,
it may result in snow or noise on the screen.
When the sound from a LaserDisc or Compact Disc is
output through atelevision speaker it becomes monaural
50u_6 {,lhis is the same _or a stereo te_evisionl.
NOTES:
• Stripepattemsmayapp earwhenaLaserDiscisplayed
on a television. Move the antenna cable away from the
power cord to avoid this.
• Be sure to turn off the power of this player when you
watch a IV broadcast.
fCONNECTING "IV AND STEREO AMPLIFIER
• Connect the VIDEO OUT jack of the player to the video
input jack of the monitor television.
• Connect the AUDIO OUT jacks to the stereo amplifier
AUX, CD, LD, VDP or other jacks, except the PHONO
input jacks. The television speakers can also be used
by connecting the television audio input jacks and the
player AUIDO OUT jacks. However, connection to a
stereo amplifier is recommended to obtain superior
audio playback quality for Compact Discs and
LaserDiscs.
Do not change the television antenna and VCR
connections.
J
STHE _ MARK
System control can be performed when the player is
combined with an optional AV amplifier, which can_rovide
centralized control of Pioneer products with the [] mark.
Connect the VIDEO OUT jack of the player to the video
disc video input jack of the AV amplifier and connect the
AUDIO OUT jacks of the player to the audio input jacks of
the AV amplifier.
Connect the CONTROL IN jack of the player to the
CONTROL OUT jack of the AV amplifier using a
commercially available cord with mini-plugs.
• For details concerning the connection and operation
methods, please refer to the operating instructions for
the AV amplifier.
J
ATTENUATOR switch : CLD-S370/CLD-S304 _1
hen the television speakers are used, the sound may
e distorted. In this case, set the ATTENUATOR switch
o ON (CLD-S370) to reduce the distortion. .,
NORMAL/KARAOKE switch : OLD-S270 o_
hen this switch is set to KARAOKE position, the Aut
ause functions.
AMhC-3RF OUTPUT TERMINAL : CLD-S304is terminal is for intended for use with AC-3 (Digital
U_li-AUd_O Format) components p\anned ior future
release. With this terminal, you will be able to connect
/_C-3 RE err_9\k_\ets and sutro_r_ 9_oces -%Ors • a_,d _31avback
laser discs formatted with Digital Mu_ti-Audio.
• You cannot playback with currently available laser
discs, laser disc players, AV amplifiers, etc., with this
terminal.
• Do notconnect this terminal tothe audioinputterminals
ol norma\ stereo or AV a_r_li{'_ers.
9
<VRB1143>
Page 10

NAMES AND FUNCTIONS
Front panel:
A detailed description is provided on the indicated page(s).
I
c_ c#v Lo pc*¥_PlONEF-.JI_
_WER
ST_oeY/oN
! !
CLD-S370/CLD-S304
,, qq
_REC_ co o_no_
'1 'J
678l
OPEN/OLOSE $ P r La
KARAOKE Io_
....011
_OKE MIC MIC VOL
L ;i
PlONE _cov_ Pu,_
OPEN/OLOSE S
CLD-S270/CLD-S 104
@ @ -@ -@ -@@
* NOTE:
The CLD-104 does not have these buttons.
(_) POWER STANDBY/ON switch and STANDBY indicator
Press to turn the power on and off.
(_ Disc table ... p. 6
(_ CD Disc table ... p. 6
(_ CD OPEN/CLOSE (--&)button ... p. 12
(_ LD OPEN/CLOSE (_&)button ... p. 12
(_ Track/manual search (_1<, <1_1)button ... p. 13, 14
(_ Stop (111button ... p. 12
(_ Play (1_) button ... p. 12
(_ Track/manual search (1_1_,IH_I) button ... p. 13, 14
(_ Pause (11)button ... p. 12
LAST MEMORY button ,.. p. 14
@ ECHO level control ... p. 16
@ MIC VOL control ... p, 16
(_ MIC jack ... p. 16
_) ONE-TOUCH KARAOKE button ... p. 16
(_ Display window ... p, 11
(_) Remote sensor .., p. 5
(_ PGM button ... p. 17
(_ DIRECT SEARCH/digit buttons ... p. 12, 15, 17
(_ CLEAR button ... p. 15, 16, 17, 18
(_) AUDIO button ... p. 13
10
Page 11

Display window
..
II
(_ ,,iiiiii,,: Open/close of a disc table
Iil:l:sls:
illll_,,
IF' :Play
iiiiiiii: Pause
(_ Track number or chapter number is displayed.
(_) Lights when total playback time (TOTAL) is displayed.
Lights when remaining playback time is displayed.
(_ Audio output channel lights.
(_ Lights when ONE-TOUCH KARAOKE is activated
(CLD-S370 only)
(_ Lights when a microphone plug is inserted into the MIC
jack. (CLD-S370)
Lights when the NORMAL/KARAOKE switch on the rear
panel is set to KARAOKE position. (CLD-S270)
(_ Frame number or elapsed playback time is displayed.
• Currently activated function, etc. is displayed.
I--I 1--t !'- P.I
I i t-' I-,,,_ t 11
t-- i t--i CI '_
I I_. tJ _. i-'
t ,"dT '-"-'
I--t I I
i t I I t T
I I I I I I
_- T'E ETa
!"_I .L.I I i i
Jl._Ji- m
I,i Ill
i--i i--i T
t'_ t-- i
'-,- ',::'T
i-'i r'i i"i 3"
..... _-_ _-..
,, _'"\ .;,,,..._.
_-_- C.
-" IJI- { -"
: T'I
i L.L
i-- T"I
t j.,I
L, JJ i'_
hill I- t"
"[he disc table is opened or being opened.
The disc table is closed or being closed.
Start of disc playback
End of disc playback
Inrto scan
Hi-lite scan
Random playback
Program playback
Repeat playback
One-side repeat playback
Program repeat playback
: The power is turned off.
• LaserDisc
: Compact disc
: Compact disc with video
: No disc loaded
Remote control unit:
Remote control buttons with the same names or marks as
buttons on the front panel of the player control.
O-
llt}.,,""
( d _,--,-
cu.c_o ,0_•
CLD-S370/ CLD-S270/
CLD-S304 CLD-S104
I"--'L I_))
J r-_l_
_,,,,,_ | ii
®
(_) POWER button .., p. 12
(_ PAUSE (el) button ... p. 12
(_) Scan (<<1/1_1_) buttons ... p. 14
(_) PLAY (1_) button ... p. 12
(_) Skip (1<_1/_1) buttons ... p. 13
(_) REPEAT button ... p. 18
(_) REPEAT A-B button ... p. 18
(_) MULTI-SPEED (_/_) buttons ... p. 13
(_) STEP (,1111/111,-)buttons ... p. 13
(_ Digit buttons ,.. p. 12, 15, 17
_) DISPLAY button ... p. 19
(_) RANDOM button ... p. 16
(_ HILITE/INTRO button ... p. 15
_) CLEAR button ... p. 15, 16, 17, 18
(_) PGM (Program) button .,. p. 17
(_ CHP/TM (Chapter/Time) button ... p. 15
(_) OPEN/CLOSE button ... p. 12
STOP (m) button ... p. 12
(_ AUDIO button ... p, 13
11
<VRB1143>
Page 12

I TO PLAY AN LD. CDV OR CD
1 3
The illustration shows model CLD-S370/CLD-S304.
2 4
CLD-S370/CLD-S304
c_:_ _--- 2
u_
CLD-S270/
CLD-S104
__
Operations indicated by the [ _ ] mark are performed with the remote control unit. II PAUSE
OOOO
OOOO
OOOO
OOOO
c5 C:::_ c2_
-2
-4
1
Turn on the power of this unit.
POWER _ POWER
If A on the front panel is pressed in the
STANDBY mode, the power is automatically
turned on and the disc table is opened.
2
Open the disc table.
OPEN/CLOSE
_.A _ OPEN/CLOSE
Q
-- CLOSE
When loading an LD
3
Place a disc along the proper disc
guide groove.
CD/CDV: With the labeled side up
LD: With the desired side's label up
When loading a CD/COV
4
Start playback.
) PLAY i_
• When _ is pressed in STANDBY
mode with a disc loaded in the
player, the power is turned on
automatically and playback starts.
To play from the desired chapter or track
<Direct search>
Press the digit button of the chapter/track number
to be played first.
(Example) To play from chapter/track No. 3
(CLD-S270)_
To search for chaper or track number 10 or above:
Use _ button
(Example) To enter 1
To enter 30: i-+-_ , 7_1_, [_ , _-I
3
cL
<Normal search>
C,,_a£te_scar_a\so be searc_',e_ us_r_¢3C_£_M.
(Example) 3-0 search chapter No. 17
ICHP/TMIIOHPiTM//-_ _
The _ button cannot be used in this case.
To pause playback temporarily
PAUSE to
Press _,-or || again to resume playback.
• STOP
To stop playback
STOP
STOP
%
__ OPEN/CLOSE
To stop playback and take out the
disc
OPEN/CLOSE
!Q p OP_N_ /OPEN/CLOSE
-- CLOSE
After removing the disc from the disc
* Precautions concerning disc loading
• Do not place more than one disc on the disc table. If two discs are
placed one on top of the other on the disc table, discs may be
scratched and/or a malfunction may occur.
• Playback is not possible unless the disc is placed properly.
12
<VRB1143>
To avoid malfunctions, be especially careful about the following
points,
• Do not place any object other than a disc on the disc table.
• Do not move the player while a disc is playing. This will cause the
disc to be scratched.
• Be careful not to catch your finger in the disc table section while
the disc table is being retracted into the unit. Also, be careful that
children do not put their hands into the inside of the unit while the
disc table is open. This may cause injury.
Page 13

LD/CDV/(;IJ
Switching audio
Each time AUDIO is pressed during playback, audio output
is switched. For example;
• to hear only the analog audio of a disc with digital audio
• to hear only one channel of stereo disc
• to select audio of the multiplex disc
LD
LD with digital audio
Audio source can be switched between digital audio,
analog audio, L channel and R channel of stereo audio.
digital audio ._analog audio _..._L channel of
(stereo) (stereo) analog audio q
/
channel of_ L channel _ R channel of4d
digital audio of digital audio analog audio
LD with analog audio
• With a disc encoded with CX auto-switching signals
stereo audio _ L channel ,----._R channel .-1
/
With a disc not encoded with CX auto-switching signals
_CX CX off ._ CXon ._ CX on
(stereo) (stereo) (L channel)
off _ CXoff _ CXon 1__1
(R channel) (L channel) (R channel)
CD or CDV
-_stereo audio _ L channel_R channelq
/
With a Multi Audio disc (an LD bearing the _i_p_, mark and the
MULTI AUDIO mark or the _f/_ mark), you can listen to
the various audio tracks recorded on the disc by using AUDIO to
select between the analog and digital tracks, and to select between
the left (l/L) and right (2/R) channels.
_ Chapter (Track) Skip - To search for the beginning of a chapter/track LD/CD/CDV
Searching for the
beginning of the __
chapter (track)
currently playing.
REV FWC
_ -- SKIP-- _1
D© ©
CD--
Searches for
the beginning
-- of the next
chapter (track)
Press a button repeatedly or hold itdepressed (only with the
remote control unit); the chapters (tracks) will be skipped
successively.
• When 144 _ or I_ _ on the front panel is pressed
in stop mode, playback starts.
4 II II I_ Still frame and Frame -by-Frame advance function (CAV disc only) LD
Reverse --
STEP
_'_ <11 II1_
_ _411 S_EP U__ FOrward
Press repeatedly for frame-by-frame advance.
MULTI SPEED To vary the playback direction or speed (CAV disc only) LD
Press for reverse --
playback.
MULTI-SPEED
_ _MU LTI'S'_EEDO_ Press f°r f°rwa re E
_ _ playback
When MULTI-SPEED is pressed once, playback speed
becomes 1/8 of the normal playback. Each time the same
button is pressed, playback speed changes as showing the
table.
speeddisplay
1/8
1/2
x2
1/2
1/8
1/30
Playback speed
1/8 of the normal playback
half the normal playback
twice the normal playback
half the normal playback
1/8 of the normal playback
1/30 of the normal playback
During Multi-speed playback:
Sound is not output.
With CLV discs:
Multi-speed, Frame-by-frame and Still Frame operations cannot be
performed. If MULTI-SPEED or STEP is pressed during playback
of a CLk/disc, the warnir_ 9 message "CL'V" wil_ be d_sptayed on the
screen for about 3 seconds.
Discs marked with the CIS_<mark
Discs marked IC)_(are recorded with the CX noise reduction system
for powerful audio reproduction with little noise. (Analog audio only)
However, some discs marked 0,,_4are not encoded with the signals
necessary to instruct the unit to automatically switch on the CX
system. If sound is noisy or undulates when a disc with a ID,_4mark
is played, press AUDIO on the remote control unit.
• D,,_( is a trademark of CBS Inc. This player meets the CX
EXPANDING SPECIFICATION.
Automatic picture stop
Some of discs contain a recording of a special code called the "picture
stop code', which turns normal play or slow play automatically into
still frame display.
To cancel the automatic picture stop operation, press and hold _ for
more than 2 seconds until "PSC ON" (picture stop cancel ON) is
displayed on the screen. To re-activate, press and hold I_ for more
than2secondsagainuntil "PSCOFF"isdisplayed,
13
<VRB1143>
Page 14
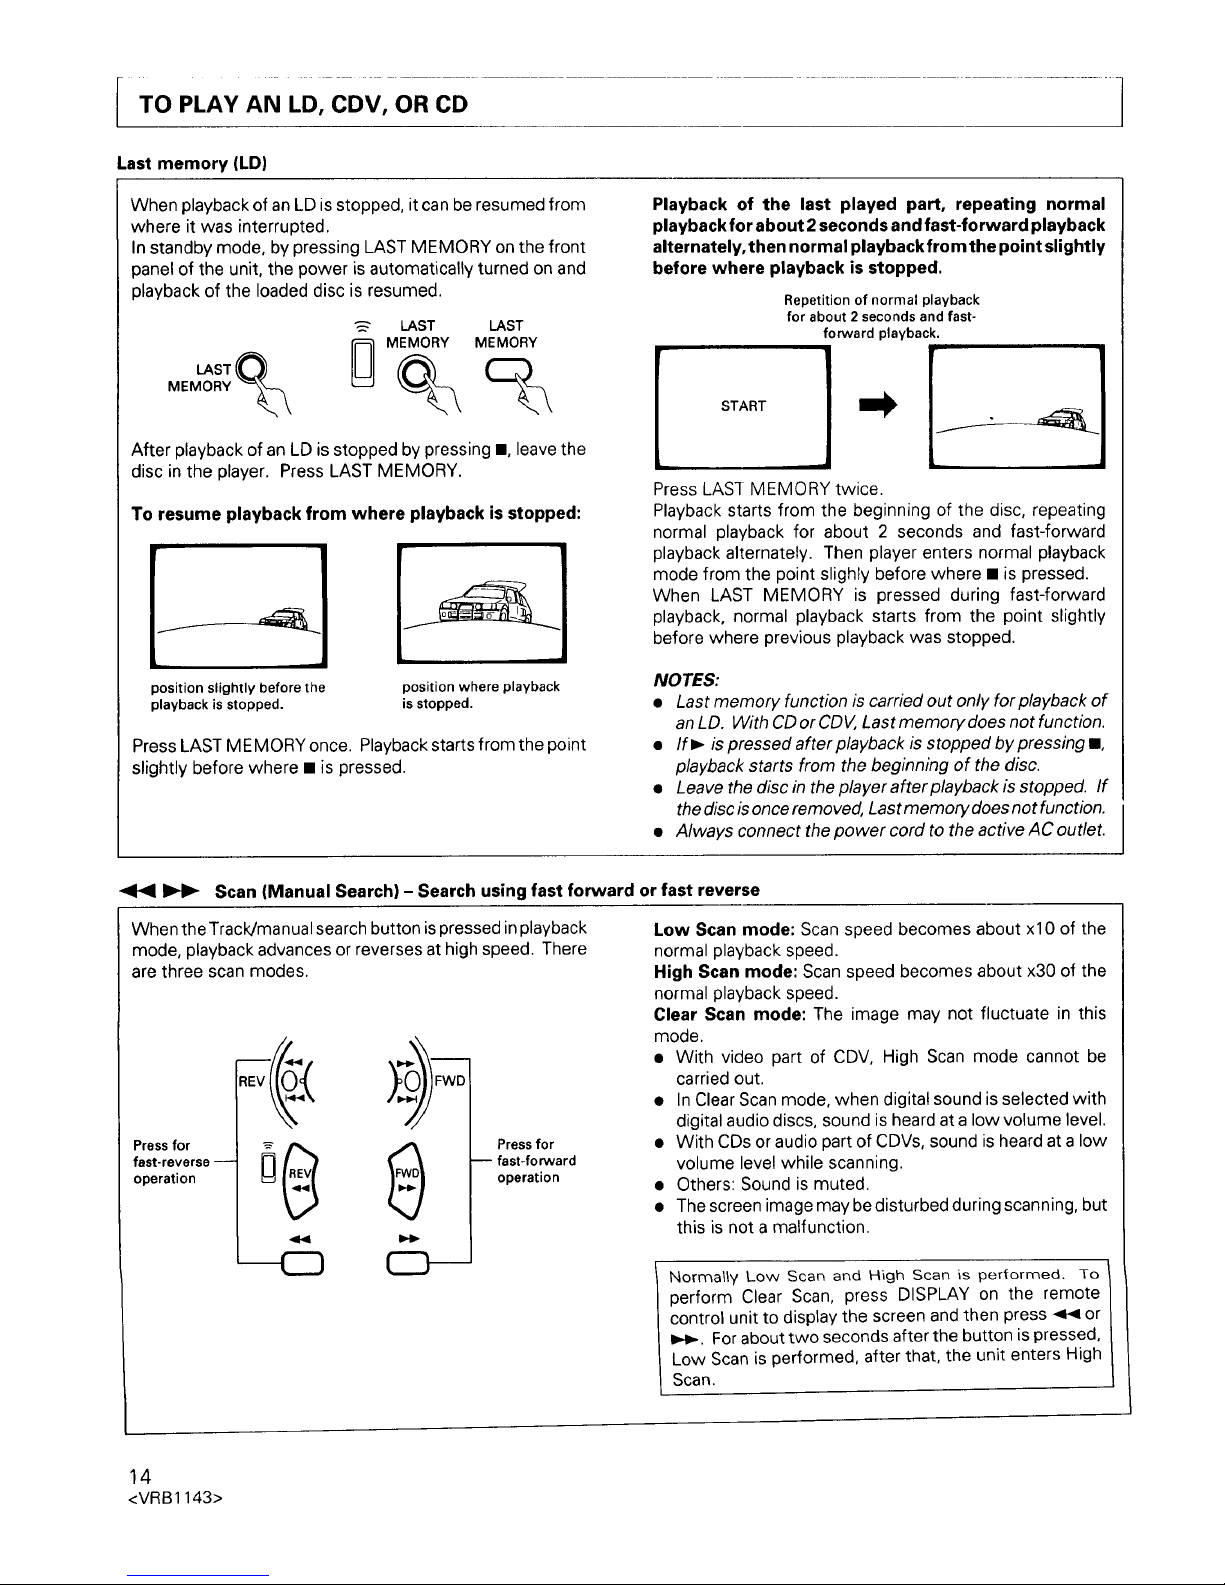
Last memory (LD)
When playback of an LD is stopped, it can be resumed from
where it was interrupted.
In standby mode, by pressing LAST MEMORY on the front
panel of the unit, the power is automatically turned on and
playback of the loaded disc is resumed.
LAST LAST
_ MEMORY MEMORY
MEMORY
After playback of an LD is stopped by pressing •, leave the
disc in the player. Press LAST MEMORY.
To resume playback from where playback is stopped:
position slightly before the
playback is stopped.
position where playback
is stopped.
Press LAST ME MORY once. Playback starts from the point
slightly before where • is pressed.
Playback of the last played part, repeating normal
playback for about 2 seconds and fast-forward playback
alternately, then normal playback from the point slightly
before where playback is stopped.
START
Repetition of normal playback
for about 2 seconds and fast-
forward playback.
Press LAS] MEMORY twice.
Playback starts from the beginning of the disc, repeating
normal playback for about 2 seconds and fast-forward
playback alternately. Then player enters normal playback
mode from the point slighly before where • is pressed.
When LAST MEMORY is pressed during fast-forward
playback, normal playback starts from the point slightly
before where previous playback was stopped.
NOTES:
• Last memory function is carried out only forplayback of
an LD. With CDor CDV, Last memory does not function.
• Ifl_ is pressed afterplayback is stopped bypressing •,
playback starts from the beginning of the disc.
• Leave the disc in the playerafterplayback is stopped. If
the disc isonce removed, Last memory does not function.
• Always connect the power cord to the active AC outlet.
_ Scan (Manual Search) - Search using fast forward or fast reverse
When the Track/manual search button is pressed in playback
mode, playback advances or reverses at high speed. There
are three scan modes.
Press for
fast-reverse --
operation
REV FWD
CD--
Press for
-- fast-forward
operation
Low Scan mode: Scan speed becomes about xlO of the
normal playback speed.
High Scan mode: Scan speed becomes about x30 of the
normal playback speed.
Clear Scan mode: The image may not fluctuate in this
mode.
• With video part of CDV, High Scan mode cannot be
carried out.
• In Clear Scan mode, when digital sound is selected with
digital audio discs, sound is heard at a low volume level.
• With CDs or audio part of CDVs, sound is heard at a low
volume level while scanning.
• Others: Sound is muted.
• The screen image may be disturbed during scanning, but
this is not a malfunction.
Normally Low Scan and High Scan is performed. To
perform Clear Scan, press DISPLAY on the remote
control unit to display the screen and then press _ or
_,,_. For about two seconds after the button is pressed,
Low Scan is performed, after that, the unit enters High
Scan.
14
<VRB1143>
Page 15

i ....
Time Number Search/Frame Number Search
TO SEARCH FOR A PARTICULAR TIME/FRAME
LD/CDV/CD
Frame Number Search (CAV discs only)
- To searchby designating the frame number
Any desired frame can be searched for by specifying its frame
number.
1. Press CHP/TM during playback.
2. Enterthe requiredframenumberwith thedigitbuttons
(0 - 9).
3. Press _.
Time Number Search (CLV disc only)
- Example: To search for the scene located at 12
min. 34 sec
1. Press CHP/TM during playback.
2. Enter [], [], _ and [] with the digit buttons.
3. Press )-.
CAUTION:
If a disc does not contain information in seconds, specify the
time number only in the minutes.
When _ on the remote control unit is pressed to start search
operation:
A still frame is displayed (CAV). To start normal playback, press
again.
Notes on searching for a chapter:
• If you make a mistake in pressing the digit buttons, press CLEAR
and press the correct digit buttons.
• The +lObutton does not function.
To exit search mode:
Press CLEAR. Normal playback starts.
TO SEARCH FOR A PARTICULAR CHAPTER/TRACK
Hi-Lite Scan/Intro Scan
Press HILITE/INTRO.
HILl]rE HILITE
/INTRO /INTRO
LD/CDV/CD
[Hi-Lite scan (CD or audio part of CDV)
Press in stop mode to play an 8-second period from 1 minute
O0seconds to 1minute 8 seconds of every track in sequence.
• i 'T N
The ,-', _,',.. ', , is displayed during this operation.
When the desired track is played, press m,-.The unit enters
play mode.
NOTE:
If the button is pressed in play mode, the 8-second Hi-Lite
scan starts from that moment. For example, if the button is
pressed at 1minute 30 seconds of track No. 2, 8seconds from
1 minute 30 seconds to 1 minute 38 seconds of every
remaining track will be played.
I Intro Scan (LD or video part of CDV) J
1
When HILITE/INTRO is pressed, the beginning., of each
chapter is played for about 8 seconds. The "i _J i i'_i i ' is
displayed in the Intro Scan mode.
When the desired chapter or track is played, press I_. The
unit enters play mode.
• With CDV0 Intro Scan starts with the video part, and then
the audio part will be played with Hi-Lite Scan.
NOTE:
With discs which do not contain chapter numbers, Intro scan
cannot be operated.
15
<VBB1143>
Page 16

LD with TOC/CD/CDV
TO PLAY ALL CHAPTERS/TRACKS IN RANDOM ORDER
Random Playback
Random Playback allows all chapters/tracks to be played in
random order.
• If RANDOM is pressed during Random playback, the
current playing order is canceled and Random playback
starts in another order.
• In LD which contains TOC, first press _ and then press
RANDOM.
Press RANDOM on the remote control unit.
RANDOM RANDOM
D
NOTES:
• With Random Playback, chapter No. 0 will not be played.
• It is notpossible to playback the programmedcontents in random
order.
To stop Random Playback:
Press II
During Random playback:
• When _ is pressed the playback order of chapters/tracks is
changed.
• When _ is pressed, playback returns to the beginning of the
chapter or track being played.
• Random playback is canceled by pressing CLEAR. Playback
continues in normal playback mode.
MIC MIXING (CLD-S370/CLD-S304 only)
The microphone input sound can be mixed with the disc •
playback sound.
1,
2,
Connect a microphone to the MIC jack.
• When a michrophone is connected, the player enters
auto pause mode.
MiC
Adjust the microphone volume and the echo level
with the MIC VOL control and ECHO level control.
MIC VOL ECHO
MIN MAX MIN MAX
If "howling" (microphone feedback) occurs:
During use of the microphone, if a high-pitched howling
sound comes from the speakers, do one of the following:
(_Ptace the microphone as far from the speakers as
(_ possible.
Lower the sound volume.
NOTE:
While CDs orthe audio part of CDV discs isplayed, connecting
amicrophone to the MICjack mayslightlyreduces the volume
16
<VRB1143>
NOTES:
• No effect can be obtain with some discs.
• Sound is not heard with monaural sources.
SINGING ALONG t
9(e,_{etenters auto Oause made.
KARAOKE
CLD-S370/CLD-S304:
This function reduces the volume of the original vocals.
As a result, when the ONE-TOUCH KARAQKE button is
pressed and a microphone is used for singing, you can easily
enjoy the mood of karaoke musical accompaniment.
Begin playback, and press the ONE-TOUCH KARAOKE
button.
• When a michrophone is connected to the MIC jack, the
OLD-S270: NORMAL KARAOKE
When the NORMAL/KARAOKE switch on the rear panel is set
to KARAOKE position, the player enters auto pause mode.
Auto pause mode
When a chapter/track is selected with the digit buttons or
does not enter auto pause mode.
To cancel the auto pause mode
1. Keep • on the front panel pressed for more than 2 seconds.
Even if a microphone is connected to the MIC jack (CLD-
$370) orthe NORMALJKARAO KEswitch is set to KARAO KE
position (CLD-S270), auto pause function will not be
activated. In this case, the indicators (_) in the display
window {"-'_see page 111 go off.
2. When I_ on the front panel is kept pressed for more than
2 seconds during program playback or random playback,
the player will not enter auto pause mode.
level.
However, this is not a malfunction.
Page 17

LD/CDV/CD
TO PLAY ONLY DESIRED SCENES/TRACKS- ProgramPlayback 1
]
Selected chapters (LD) or tracks (CDV/CD) can be played in
any desired order (max. 24 chapters or tracks).
Example: To play CD tracks No. 9, No. 7, and No.
18 respectively:
1. Press PGM.
PGI
(CLD-S270)
PGM
b
%
Display with a CD/CDV
1
2. Enter [_],[_, [_], andE_with the digit buttons.
(CLD-S270)
%[_ _[_ After approx, lsecond
_____ | Total Time Progla4m ]
!;oo
9 7 +10 8
D
A pause between tracks/chapters can also be programmed
by pressing II instead of the digit buttons.
If you make a mistake during entry:
Press CLEAR on the remote control unit and enter the
correct number with the digit buttons.
3. Press •.
0
Q
PLAY
• You can view the state of programming on the monitor
TV screen.
To modify the program contents ]
To delete or change a programmed chapter/track or pause:
1. Press PGM.
2. Press I_ or _ to place the cursor (_) on the left side
of the chapter/track or pause to be changed.
3. To delete it, press CLEAR. To replace it with another
chapter/track, enter the new chapter/track number with
the digit buttons.
Press II to enter a pause.
4. Press PGM to complete programming. Pressing • also
completes programming and starts program playback
with the new program contents.
• Programmed chapter/track being played cannot be erased
or changed.
• Programmed pause being engaged cannot be erased or
changed.
I To clear the program playback I
Press CLEAR to return to normal playback.
To clear the program contents:
• Open the disc table.
• Press CLEAR while in stop mode.
NOTES:
• If I,_ is held depressed during Program Playback, the
playback position will move to another chapter/track, but
when I_ is released, the next chapter/track in the
program will be played. If ._1 is held depressed, the
playback position returns to the beginning of the current
chapter or track being played, but it will not go beyond it
to a previous chapter or track in the program.
• During program playback, t_ and _ can be used to
skip the programmed chapters/tracks or pause.
To check the program contents /
During program playback or in stop mode, press PGM to
clisota_/the 0rogram contents on the monitor screen. When
PGM is pressec_aga'_n,typepTogram co_te_ts d_\sa_ea_.
17
<VRB1143>
Page 18

I
LD/CDV/CD
TO REPEATEDLY PLAY A DESIRED PASSAGE - Repeat Playback
/ f
Memory To to return to later I I A-B Repeat - To repeat a specified section
Repeat specify
a point
_ A-B _ A-B A-B
_- REPEAT _ _- REPEAT ---_ REPEAT
A-B L_j A-B A-B
V V V V
P,ayOackJ P,avOook
Press REPEAT A-B on the remote When you wish to return to point A,
control unit at the point you want to press I_ on the remote control unit.
see or listen to again (point A).
Press REPEAT A-B on the remote
control unit at the start point of the
section to be repeated.
Press REPEAT A-B on the remote
control unit at the end point of the
section to be repeated, Playback
returns to the beginning of the section
and the section is repeated
continuously.
l Chapter/Track Repeat - To repeat the current chapteror track
-_" REPEAT _ REPEAT
Press R EPEAT on the remote control unit while the chapter/track
to be repeated is playing.
When the end of the chapter/track is reached, the player returns
to the beginning of the chapter/track and the chapter/track is
played back repeatedly.
I Program Repeat - To repeat a program
With the program repeat function, you can repeatedly play
programmed chapters or tracks in their programmed order.
Press REPEAT on the remote control unit while the program
is being played.
• See page 17 for details on programming.
I Random Repeat - repeat a I
To
random
play
Press REPEAT on the remote control unit during random
playback.
With the random repeat function, you can repeatedly play the
chapters or tracks in random order.
• See page 16 for details on Random playback.
One Side Repeat - To repeat an entire side of a disc I
REPEAT _ REPEAT
Press REPEAT on the remote control unit twice.
When playback reaches the end of the playback side, the player
returns to the beginning of the disc and the same side is played
back repeatedly,
To exit repeat mode:
Press CLE_,P_on the remote controt unit.
To specify a different point in Memory Repeat mode:
Press CLEAR to cancel the previously memorized point, and repeat
the same operation as shown above. The previously memorized
point is erased and replaced with the new point.
Memory Repeat and A-B Repeat with CDV discs:
"[hese repeat functions can only be carried out within the video
_att ot w_th_r_ the audio t3a_t, an_ cannot be carr_e_ out between
the two parts.
With LDs which have no chapter numbers:
Chapter repeat cannot be carried out.
18
<VRB1143>
Page 19

DISPLAY SWITCHING
DISPLAY on the remote control unit allows you to display information including the play mode and disc playing time on the screen.
Each press of DISPLAY switches the screen display as shown below.
CDV or CD
®
LD (CAV) with TOC
LD (CLV) with TOC
I I I Etapsed playing time °f the disc I
(_ Elapsed playing time of track Frame number being played
being played being played
r-- Remain Time TRK r-- Disc Time r--- Remain Time ALL I
(_) ItracklRemaining playing time of each 1 IbeginninglElapsed playingofthetimediscfrom the I IendlRemainingofthe discPlayingtime until the
I_- Remain Time ALL r-- Remain Time ALL I i'm Total Time
(_ I Remainingplayingtimeuntilthe I Remainingplayingtimeuntilthe I Totalplaying time of the disc
lend of the disc I end of the disc
TOtalTime F-- Total Time Off (No display)
tel playing time of the disc I Total playing time of the disc
Off (No display) Off (No display)
The actual screen display is as shown below.
Chapter/track No.
Disc Time
TRK 3.12
LD discs without TOO:
Frame number (CAV)/Elapsed playing time (CLV) and Display-off
mode are switched alternately on the display.
Time or frame number
display
Play mode
Disc Time: Elapsed time from the beginning of the disc
Remain Time: Remaining playing time
Total Time: Total playing time
ALL: Of disc (remaining playing time)
TRK: Of current track (remaining playing time)
A: Audio part (CDV)
V: Video part (CDV)
l The screen display disappears automatically ifyou leave
it for along time (for about 80 minutes or more) without
any operation. In this case, press any button on the
remote control unit so that the screen display will
appear on the screen.
19
<VRB1143>
Page 20

TROUBLESHOOTING
Incorrect operations are often mistaken for trouble and malfunctions. If you think that there is something wrong with this
component, check the points below. Sometimes the trouble may lie in another component. Inspect the other components and
electrical appliances being used. If the trouble cannot be rectified even after exercising the checks listed below, ask your
nearest PIONEER authorized service center or your dealer to carry out repair work.
Common to LD and CD
Symptom Possible Causes Reference Page
Operation 1. Thedisccomesoutevenwhen • The disc is dirty or warped, p. 7, 12
the disc table is closed. • The disc is not placed properly on the disc table, p. 6
• Condensation formed inside the player, p. 4
Remote control 2.
Audio
Remote control operation is not
possible.
3. Improper operation of TV set,
etc., occurs.
4. Audio isnot output or distorted.
• The control input jacks are in use.
• The remote control unit is too far from the
player.
• The batteries are exhausted.
Improper operation may occur with some TV
sets.
• The connection between the player and amplifier
is erroneous or the plugs are not inserted fully
into the jacks.
• The connection plug of the jack is dirty.
• The player is in pause mode.
• A wrong input is selected on the amplifier.
_> Refer to the operating instructions of the
amplifier.
• The audio output is connected to the PHONO
input jacks of the amplifier.
p. 8,9
p. 5
p. 5
p. 8,9
p. 12
p. 8,9
LD
Possible Causes
5.
Video, picture
quality
Audio (LD)
,
Symptom
TV programs cannot be viewed.
The video cannot be viewed,
the picture quality is poor or
noise interferes with the video.
7. A part of the still frame image
shakes.
8. Audio sound is undulating.
9. Audio is not output.
• The VHF antenna is not connected.
• The power of the player is left on.
• A cable supplying the mixed signal of VHF and
UHF signals is connected to the adapter.
• The disc is dirty or warped.
• The power of the TV is turned off.
• The connection is erroneous or the plugs are not
inserted fully into the jacks.
• The still frame image may shake if it shows a
dynamic scene.
• A disc which does not carry the CX mark is
played while the CX system is ON.
i
• The player is in the multi-speed, still frame or
frame-by-frame advance mode.
Reference Page
3.8,9
3.8,9
p. 7
p. 8,9
p. 13
p. 13
p. 13
20
<VRB1143>
Page 21

I
Skip search
Symptom
10. Skip, programming and search
operations do not function
properly.
11. The search takes a long time
(more than 40 seconds).
12. The start takes time.
13. A different time number than
specified is searched.
Possible Causes
• The disc does not contain chapter number
information. (The functions utilizing the chapter
numbers cannot be used in this case.)
• Some discs require much time for readout of
data.
Some discs tend to cause subcode readout
error. (This is not a malfunction.)
==;,Try pressing the stop and play buttons
repeatedly to stop and restart p_ayback. This
repetition may sometimes make normal playback
possible.
• Some discs tend to cause subcode readout
error. (This is not a malfunction.)
Reference Page
p. 6,7
p. 6,7
p. 15
CD
Operation (CD)
Symptom
14. Playback stops immediately
after it has been started.
Possible Causes
Reference Page
• The disc is dirty, p. 7
• The disc is placed upside down. p. 12
• The disc is not placed properly on the disc table, p. 6, 12
ONE-TOUCH KARAOKE
Symptom Reference Page
p. 1615. The voice of the singer is not
muted even when ONE
TOUCH KARAOKE is pressed.
16. Playback will not stop when
one chapter or track isfinished.
Possible Causes
• The voice of the singer is not muted unless it is
located on the center of the acoustic image.
• Chapters or tracks are not selected with the digit
buttons.
t CAUTION: 1
Abnormalfunctioning of this unit may be caused by lightning, static electricity, or other external interfere .... TO rest ........... I
operation, unplug the AC power cord and then plug it in again.
21
<VRB1143>
Page 22

When troubles occur:
When some troubles occur during use of the player, the following display (service number) appears on the display of the player and
the TV screen. If you are in those trouble, follow the "Remedy" below.
Display window of the player
"IV screen
!...I !
Displayed number
U1
U2
F5
P2
L3
E4
H0
H1
H2
Condition of the player
A disc is not loaded correctly on the disc
table. Or, a disc is dirty.
Two discs are loaded on the disc table. Or,
a disc is dirty.
(Thedisplayed number after P, F, L, Ediffers
depending on the condition of the player.)
The player is in abnormal condition.
Remedy
Reload adisc corresponding to a disc guide on the disc
table.
Wipe a disc with a soft cloth.
Open the disc table and press t,- again.
Load only one disc on the disc table.
Wipe a disc with a soft cloth.
Open the disc table and press _- again.
If the same service number is displayed, the player is in
abnormal condition. When requesting service, please
notify the displayed number on the display of the player
or on the "IV screen (for example, 'service number E 4').
When requesting service, please notify the displayed
number on the display of the player or on the TV screen
(for example, 'service number H 1').
22
<VRB1143>
Page 23

I SPECIFICATIONS
]
General
System ................................... LaserVision Disc system and
Compact Disc digital audio system
Laser .................... Semiconductor laser wavelength 780 nm
Power requirements
CLD-S370, CLD-S270 ............... AC 110- 240 V, 50/60 Hz
CLD-S304, CLD-S104 ............................. AC 120 V, 60 Hz
Power consumption
CLD-S370/CLD-S304 ............................................... 30 W
CLD-S270/CLD-S104 ............................................... 30 W
Weight
CLD-S370/CLD-S304 .......................... 5.9 kg (13 Ibs 0 oz)
CLD-S270/CLD-S104 .......................... 5.7 kg (12 Ibs 9 oz)
Dimensions
CLD-S370/CLD-S304 ..... 420 (W) x 384 (D) x 120 (H) mm
16-9/16 (W) x 15-1/8 (D) x 4-3/4 (H) in
CLD-S270/CLD-S104 ..... 420 (W) x 381 (D) x 120 (H) mm
16-9/16 (W) x 15 (D)x 4-3/4 (H)in
Operating temperature ................................. +5 °C ~ +35 °C
(41 °F ~ 95 °F)
Operating humidity ............................................ 5 % ~ 85 %
(There should be no condensation of moisture.)
Other terminals
Control input/output ............................. Both miniature jacks
VHF adapter output (Video/Audio) ............... Both RCA jacks
with DC jack
Accessories
Remote control unit ............................................................ 1
Size "AAA" (IEC R03) dry cell batteries
(CLD-S370/C LD-S304) ........................................................ 2
Size "AA" (IEC R6P) dry cell batteries
(CLD-S270/CLD-S104) ........................................................ 2
Video cord .......................................................................... 1
Audio cord .......................................................................... 1
Operating instructions ........................................................ 1
Warranty card ..................................................................... 1
NOTE:
The specifications and design of this product are subject to
change without notice, due to improvement.
Video characteristics
Format .................................................. NTSC specifications
Video output
Level ............. 1 Vp-p nominal, sync. negative, terminated
Impedance ............................................. 75 _ unbalanced
Jack ................................................................... RCA jack
Audio characteristics
Output level
During analog audio output ............................ 200 mVrms
(1 kHz, 40 %)
During digital audio output ............................. 200 mVrms
(1 kHz, -20 dB)
Jacks ............................................................ Both RCA jacks
Number of channels .............................................. 2 (Stereo)
Digital Audio Characteristics
CLD-S370/CLD-S304:
Frequency response
SN ratio
Dynamic range
Total harmonic distortion
Wow and flutter
4 Hz - 20 kHz
115 dB (EIAJ)
96 dB (EIAJ)
0.0035 % (EIAJ)
Limit of measurement (EIAJ)
CLD-S270/CLD-S104:
Frequency response
SN ratio
Dynamic range
Total harmonic distortion
Wow and flutter
4 Hz - 20 kHz
98 dB (EIAJ)
94 dB (EIAJ)
0.0045 % (EIAJ)
Limit of measurement (EIAJ)
23
<VRB1143>
Page 24

HubhshucJ by _'lol_uu_ Lle_Ll_r_lc _,Ol_J_j[d[IOf I
Copyright © 1994 Pioneer Electronic Corporatlof,
All rights reserved.
|w..,,_4_e,. _s d L_Jdel_drk _f Pioneer Electronic Corporation.
dimqlJlu,,_PlU_m_l,_MU, _
PIONEER ELECTRONIC CORPORATION 4 1, Meguro 1-Chome, Meguro-ku, Tokyo 153, Japan
PIONEER ELECTRONICS [USA] INC. 2265 East 220th Street, Long Beach, California 90810, USA,
P.O. BOX 1720, Long Beach. California 90801, U.S.A.
PIONEER ELECTRONICS OF CANADA, INC. 300 Allstate Parkway Markham, Ontario L3R 0P2, Canada
PIONEER ELECTRONIC [EUROPE] N.V, Haven 1087 Keetberglaan 1, 9120 Melsete, Belgium, TEL: 03/570.05.11
PIONEER ELECTRONICS AUSTRALIA PrY. LTD. 178-184 Boundary Road, Braeside, Victoria 3195, Australia, TEL: [031 580-9911
PIONEER ELECTRONICS DE MEXICO S.A. DE C.V. Augusto Rodin No.128 P6 Col. San Juan Mixcoac Mexico D.F. CP.03730 TEL: 52-5-598-3950
<94J 03WFOD01 > Printed in Japan <VRB1143-A>
 Loading...