

Page 1
G)
.:ilQN6,t!R8
""'~
TheArtal
EI~
.
C
to
. S J.,() I
,~,
,---
. .
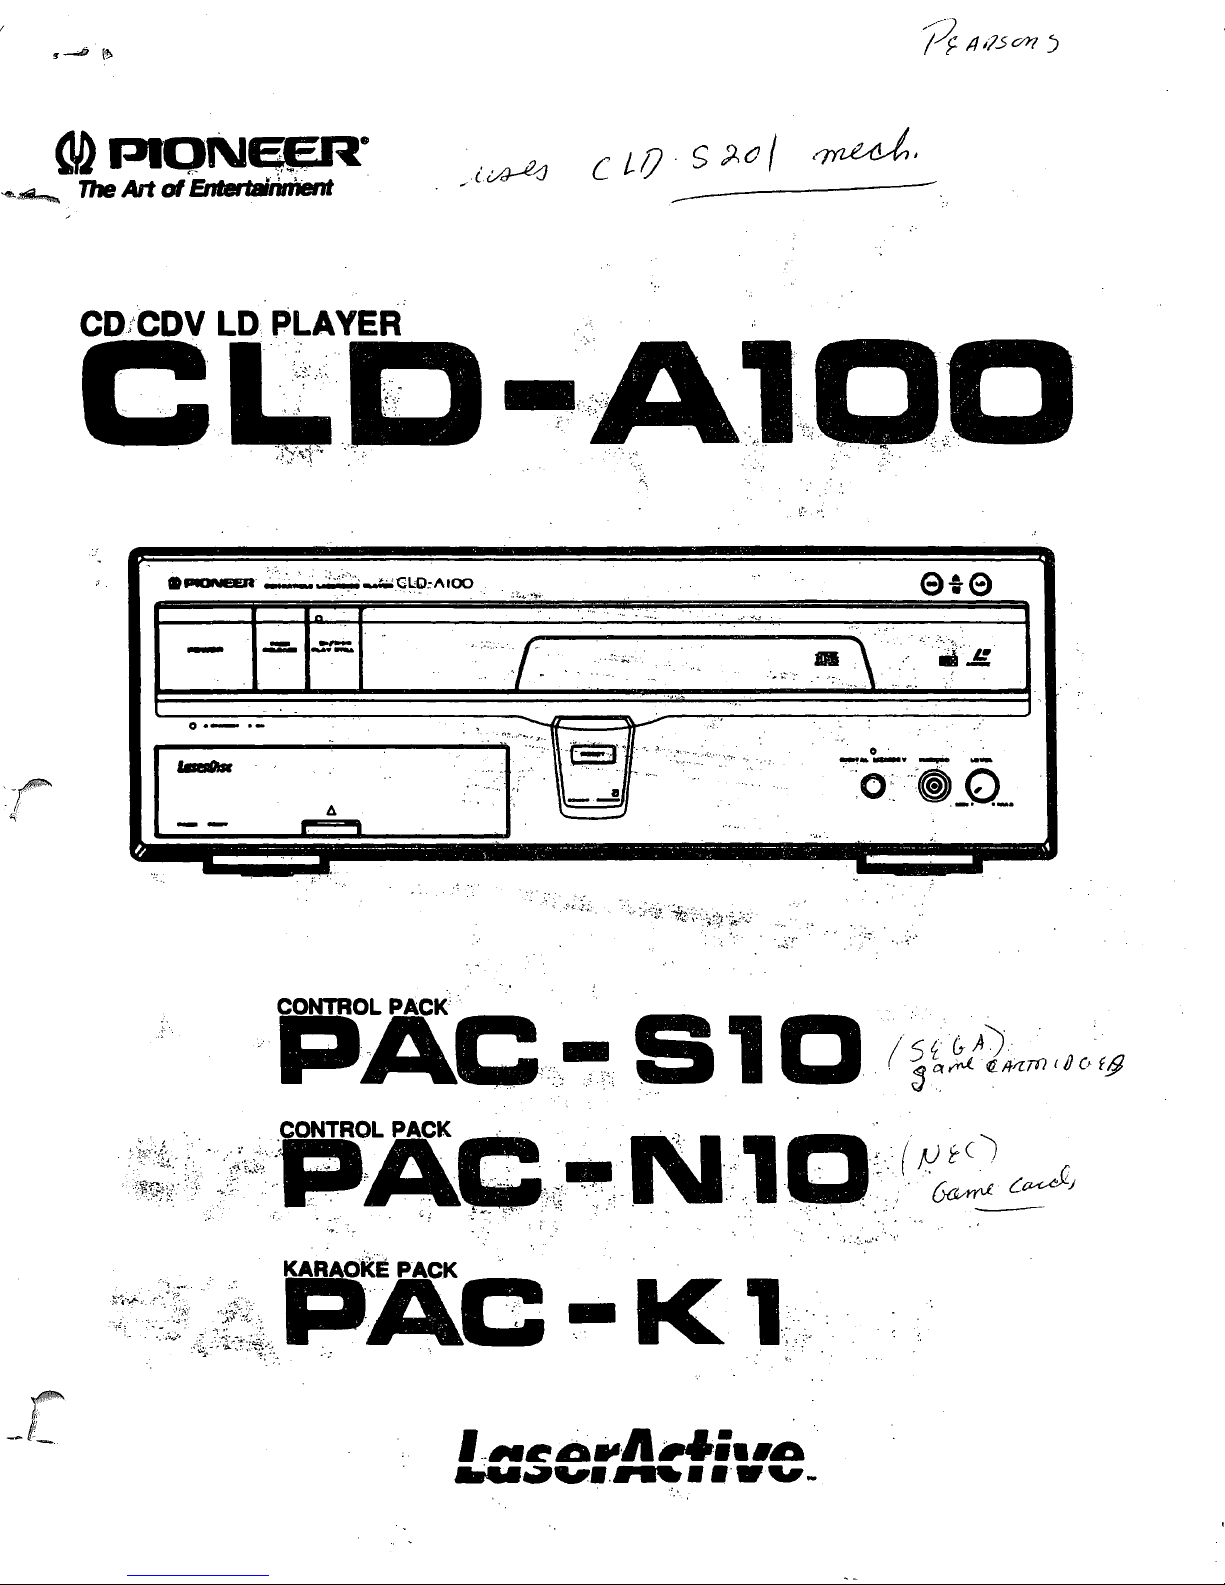
CD/COY
LD
PLAYER
CL;
······D
.
',"
."
. ' .'.:;:
':";.,
: .
.~--.:;
.
~.'.
-
..
-"
, "
..,
" . .
.....,'
. " . ,
..
I{·~·-'~~r·"
'.'
;.,
.
CPiOIIEER
~.
::"';""~C~O="IOO
.
. :
i'~~
.• ~ ...
...
.
'.
.
...
'~,.'
.
.... 1'.
-,'
._/
~
".-
..
",,,"
0·--
--
" ..... .
o . '
~!-
......................
'O·:":®J~t.
~.~
I.,
~
1
-
---~-----"l
':
··t;:::l'~
...... , ..
::
"*"
......•..
~.....
.
___
.
__
11
"".",
.
--
------
--
-
--
- -
--
~
--
- --
-~-
- - - - -
--
..
~
'.'
t:t4c
-K
1
...
~·.
Page 2
I
/
r
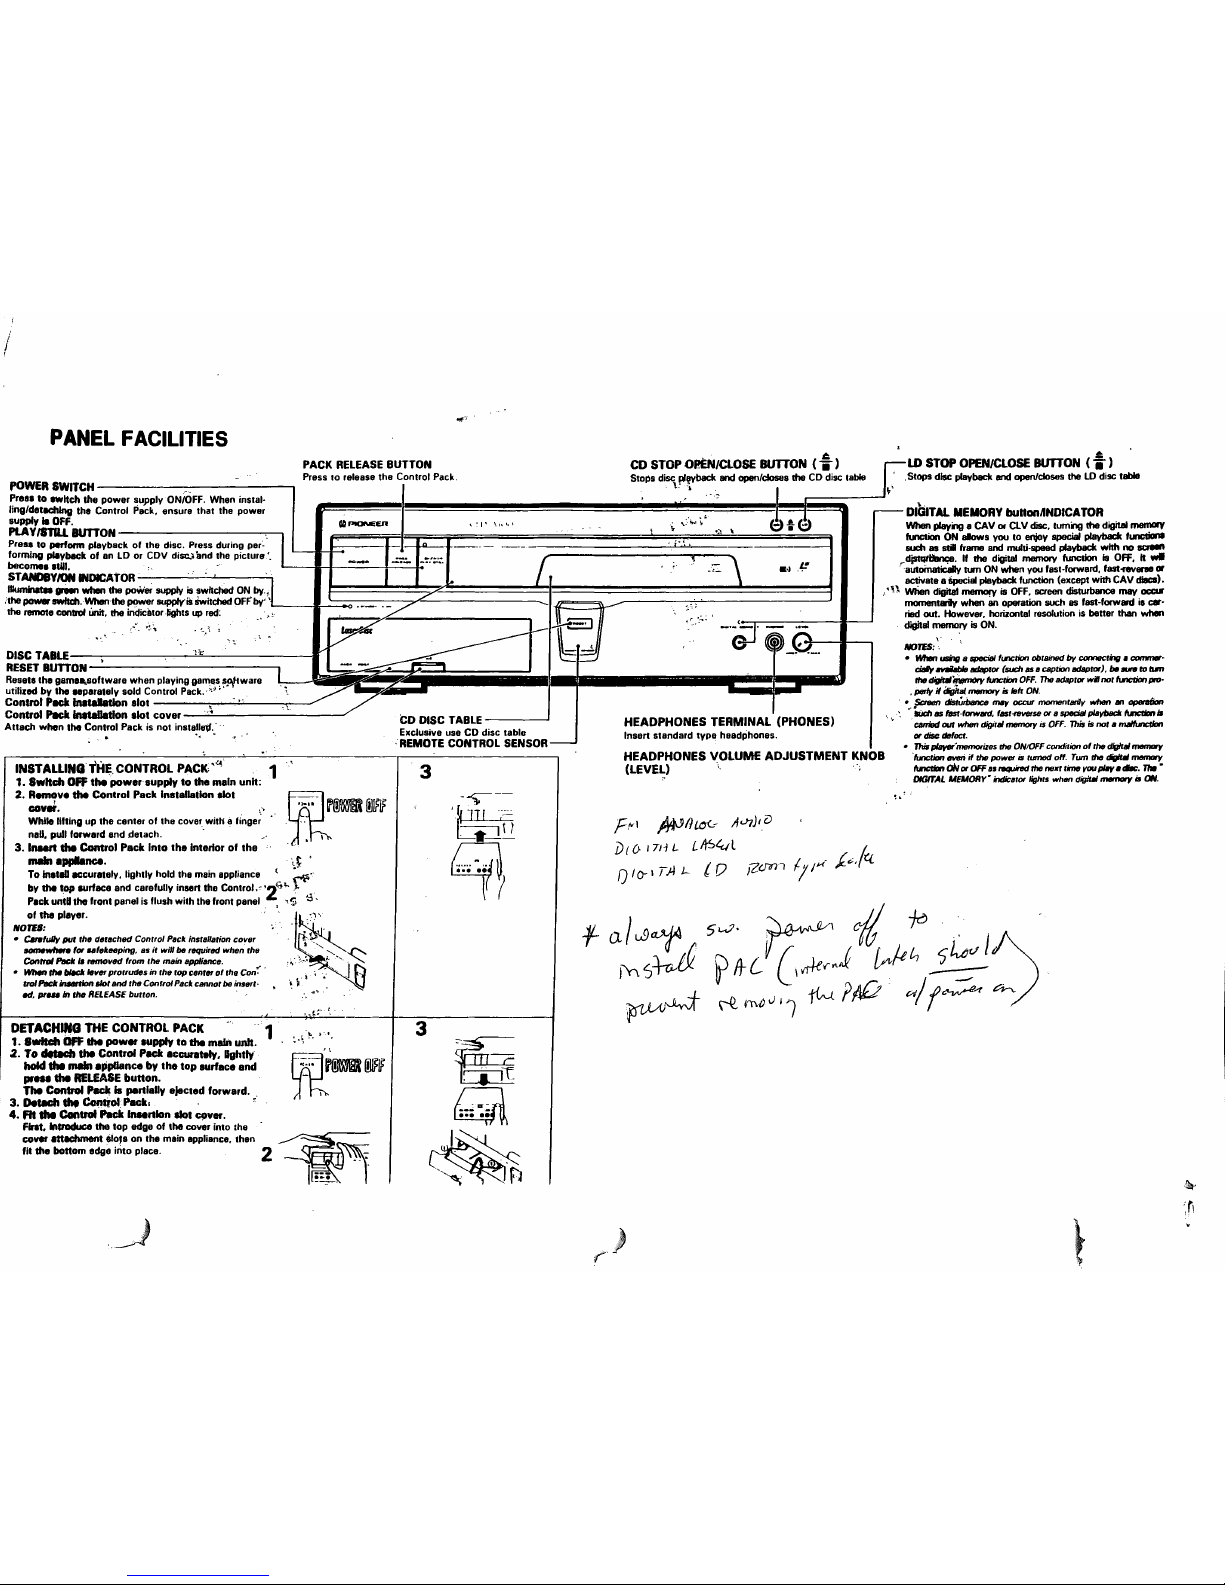
PANEL
FACILITIES
PACK
RELEASE
BUTTON
Press to
release the Control Pack.
~
LD
STOP
OPEN/CLOSE BUTTON (
..
)
CD
STOP
OPEN/CLOSE BUTTON ( : )
Stops
disc
plfYback
and
open/closes
the
CO
disc
table
Stops disc
playback
and open/closes the LD disc table
POWER
SWITCH
'.
. .
\:
,"
'0
I f
Pre
••
to
_Itch
!he power
su.pPly
ON/OFF,
When
instal,
.iI!!!!!'!!!!!!'!!!!!!'!!!!!!'!!!!!~I!!'!!!!!!'!!!!!!'!!!!!!'!!!!!!'!!!!!!'!!!!!!'!!!!!!'!!!!!!'!!!!!!'!!!!!!'!!!!!!!!!!"!!!!!!"!!!!!!"!!!!!!"!!!!!!"!!!!!!!!!!!"!!!'!~!!!!!"!~!!'!'!!!'!'!!!!!!"!~~~F-!!!!!ijI-;=:~'
ling/detRhing the Control Pack, ensure that the power
,...-
Dlo.TAL MEMORY buUonl1NDICATOR
supply"
OFF
GD
PIONEER
,
'"
",','
\
..
,:'
..
i'
cb t cb
When playing 8
CA
V
or
Cl
V disc, turning
the
digital
memory
PlAY/ST1lL
BUTTON .
Il-I~~==F~:f~l=~==~=~~~~~~~~~~~~~~"~~\~=====~
function
ON
Blows you to enjoy special playback funcIionI
Presa to
.....
orm playback
01
the disc. Press
d.urin
g
per:
. '
i"',
such as stillrama
end
multi,speed playback with no
~
becom81
.tIII·
'--
__
+--=-=-=-=-+--=.:::-=-t4~.'
-.,
,.J
.
IU
.~
autoinatically
It.m
ON
when
you
fast·forward,
fast'fOll_
01
forming p!8ybeck of an
LO
or
COV
dim.. and the picture', I
..
'';''
\
.rdjstqtll'anc;e,
If
the
digital
memory function
is
OFF,
It wi!
STAND8Y/ON
INDICAtOR'
,,'
'~.
activate a
Special
playback
lunction (except with
CAY
discs),
~~~the~~is_~ON~.I
___
l~~~~~;~~~~~~~~~~~~~~~~~~~~~~~~~~~~~~
:"~~memoryis~~~~~
ithe~IIWItch,WhenthepowersupplyiSSwitc;hedOFf'by'l
,,, .
'/
./
.....
~
" ;',;
momentarily
when an operation such as fast,forward
i._'
the
remote control
Unit,
the
;ic::orlights
~-,ed:",
~'
~_
.
_____
<--
t~~
!.,
-a:r
E~
_:-ol._f-.-----,
=~f~:'o~rizontal
resolution
is
bener than
when
DISC
TABLE--..,-.----..,--_..l·,.:!;:i'_________
~
~r=::-j
•
When
"""'"
a speciB/ flllCtion oblainBd by
co""e,"...,.
comrrw·
~~B~N------------~l~~.~-~i-~~!~·~~~~~~~~~~~~~.~
••••••••••
I::~:P
•• ,
~~~~~.6~tion~~~_~~
Reset. the game,software when playing
gam~~
~pftware
I IhtI
diJitalliWmclry
function
OFF.
The
/Jdaplor
wil
not
functionptD,
utilized by the
..
parataly sold Control Pack.' "
'.
./
. perIy
if
ilitihBl.
memory is
Ie"
ON.
Control
PIICk
InltaIIatIon alot
..
,.
"
./"
/ •
Sa-.
~
mtly
occur
momenlarily
when
.,
---.
Control PIck InIteDatlon
llot
covar-....:.:.:!..------·,-·
---.../
CD DISC
TABLE----....J
HEADPHONES
TERMINAL
(PHONES)'
~
-=:=:':=;O~:=:S:"=
Attach when the
Con~'
Pack
is
not insta!lef." . Exclusive use
CD
disc table Insert standard type headphones. or disc defect.
INSTALLlNClTH~.CONTROL
PACK<'~
. 1
1. Switch
OFf
the
power'
supply
to
the main unh:
2.
R~ve
the Control Pack Inetallatlon alot
cov.,.
,-
WhIle lifting up the center
01
the
cover.
with a li'nge;
nad.
pull
f_ard
and detach. '
3.
In
...
the
Control Pack Into
the
Intarlor
of
the
rMIn
appllnce. S .
To
inetd
accurately. lightly
hold
the
main
appliance
~,
~.:
by
the
top IUrface and carefully insert the
Control'·'2
......
;. .
Pick
untU
the front panel
is
flush with the front panel
's
'J,
of the player.
NOTES:
• Carefully
put
,he detached Control
P.cIc
installarion
CO~8'
SOfIMwItere
tOl safelcfllJping.
as
it wi"
be
lequired
when
rhe
ContrrJll'IICIt
,.
temOved from lhe rrnJin spp/iBnce. ~ .
•
~!he
IJ/sdI
hI_
plolrude.
in Ihe top
c""ter
of
Ihe Can,
I1OII'ac1r
"-tIon
0101
end
lhe
Control
Pact cannol
be
inserl'
ed,
pi'"
In
the RELEASE
bUllon.
DETACHING
THE
CONTROL
PACK
'1
.•
>'
1. Switch
OfF
the
pow.,
supply
to
the
main unit.
;.\"
2.
To
.....
the
Control
Paell aCCllrlltely. Dghtly
~"
hold
....
main
appliance
by
the
top
surfece
and
~;;-,
room
OOIFIF
pr_
....
RELEASE
button.
The
Control PacIl
II
panlaUy ejected forward,
3.
Detach
tt.,
~oIPac.,
4.
AI
....
Control
PacIllnHnlon
IIot ClIver,
Fht.
InInlCluce
the top edge
of
the cover into Ihe '
cover
.nlChment
elo~s
on the
main
appliance, then
~
fit
the bottom edge into place. 2 . . .
-;:
1
_--
.
!~.
:REMOTE CONTROL
SENSOR-
•
Thisplsrermemorize.IhtIONIOFFcondirionoflhedlr1hrJI.--r
HEADPHONES
VOLUME
ADJUSTMENT
KNOB 'function _
if
IhtI
pow",
is
lumed
off.
Tum
IhtI digit •
.--r
3
.~--
'.~"""
.-
~
.~~
.....
(
3
(LEVEL) .
function
oNrxOFF
so
required
IhtI"".lIime
youp/By.dIIc,
JIIe.
OIGITAL
MEMORY·
indieslor lighls whtrn
digMI
momory is ON,
r",l
I/IJfILC&
11'-'7)1')
U((j.17I1L
L~0l
I)lo-ITJ-I1-
tD
,.
Page 3
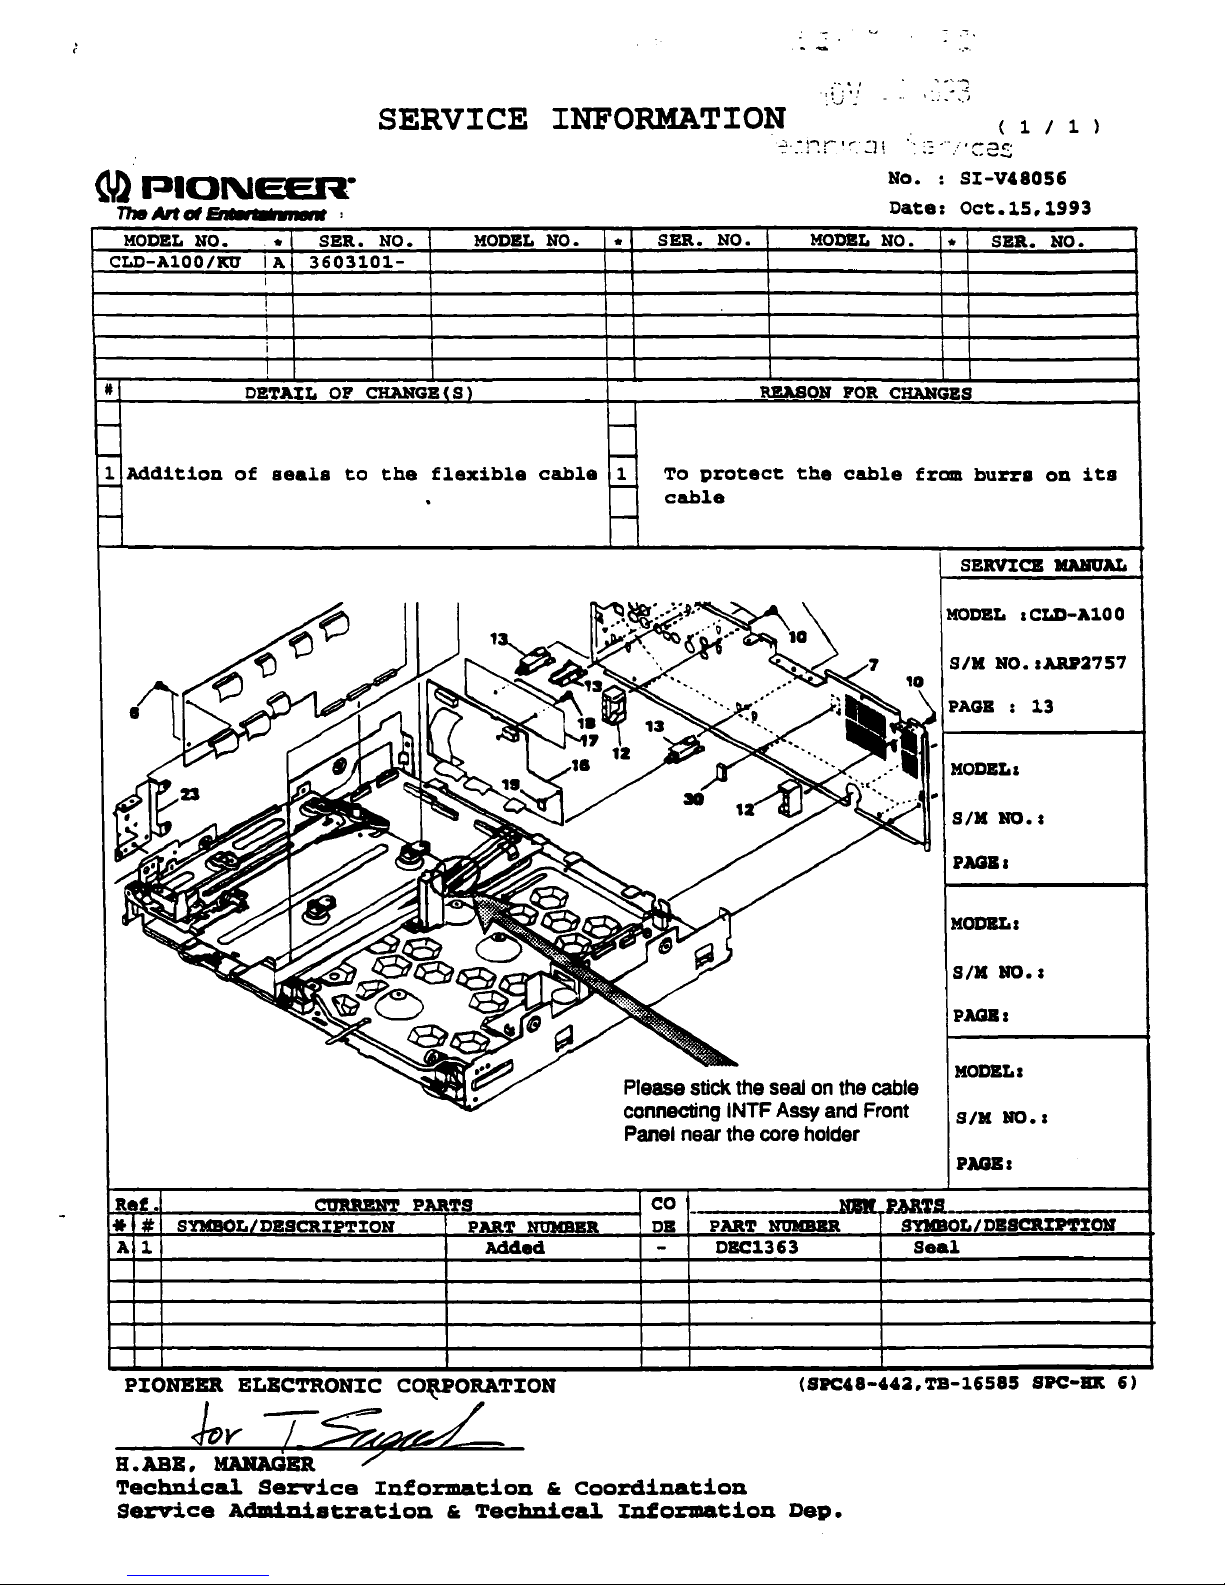
SERVICE INFORMATION
:.'
..
~r:r I ~
..•
]
~
.....
-,
......
.
..
'.::
, _
..
~
~.
J
( 1 I 1
No.
:
SX-V48056
Date:
Oct.1S,1993
MODBL
NO.
. •
SU.
NO.
MODEL
NO. •
SU.
NO.
MODIIL
NO. •
SER.
NO.
CLD-A100/KU
IA
3603101-
DZTAXL
OP
CHANGZ
S
RZASON
POR
CHANGES
1
Addition
of
se.~8
to
the
flexible
cable
1
To
protect
the
cable
from
burr.
on
ita
cable
MODIIL
I
CL!)-Al0
0
SIK
NO. I AlUJ27
57
13
MODZLa
SIH
NO.1
PMBa
MODBLa
SIH
NO.1
PAQBa
MODZLa
Please stick the seal on the cable
connecting
INTF
Assy
and Front
SIH
NO.1
Panel near the core holder
PAGBI
C1JlUUIH'1'
PARTS
L
DZSCRIPTION
PAR
__________
~~~TA
____________
~
SYMBOL/DBSCRr.PT%OH
CO
DB PART
HtIIIBBlt
Added
DBC1363
Seal
PXONBBB. ELBC'l'RONXC
CO~ORATXON
(SItC48-442,TB-16585
SPC:-BIt
6)
B.ABB~~~£
TechDica1
Service
Xnformation
&
Coordination
Service
Administration
&
TechDica1
Xnformation
Dep.
Page 4
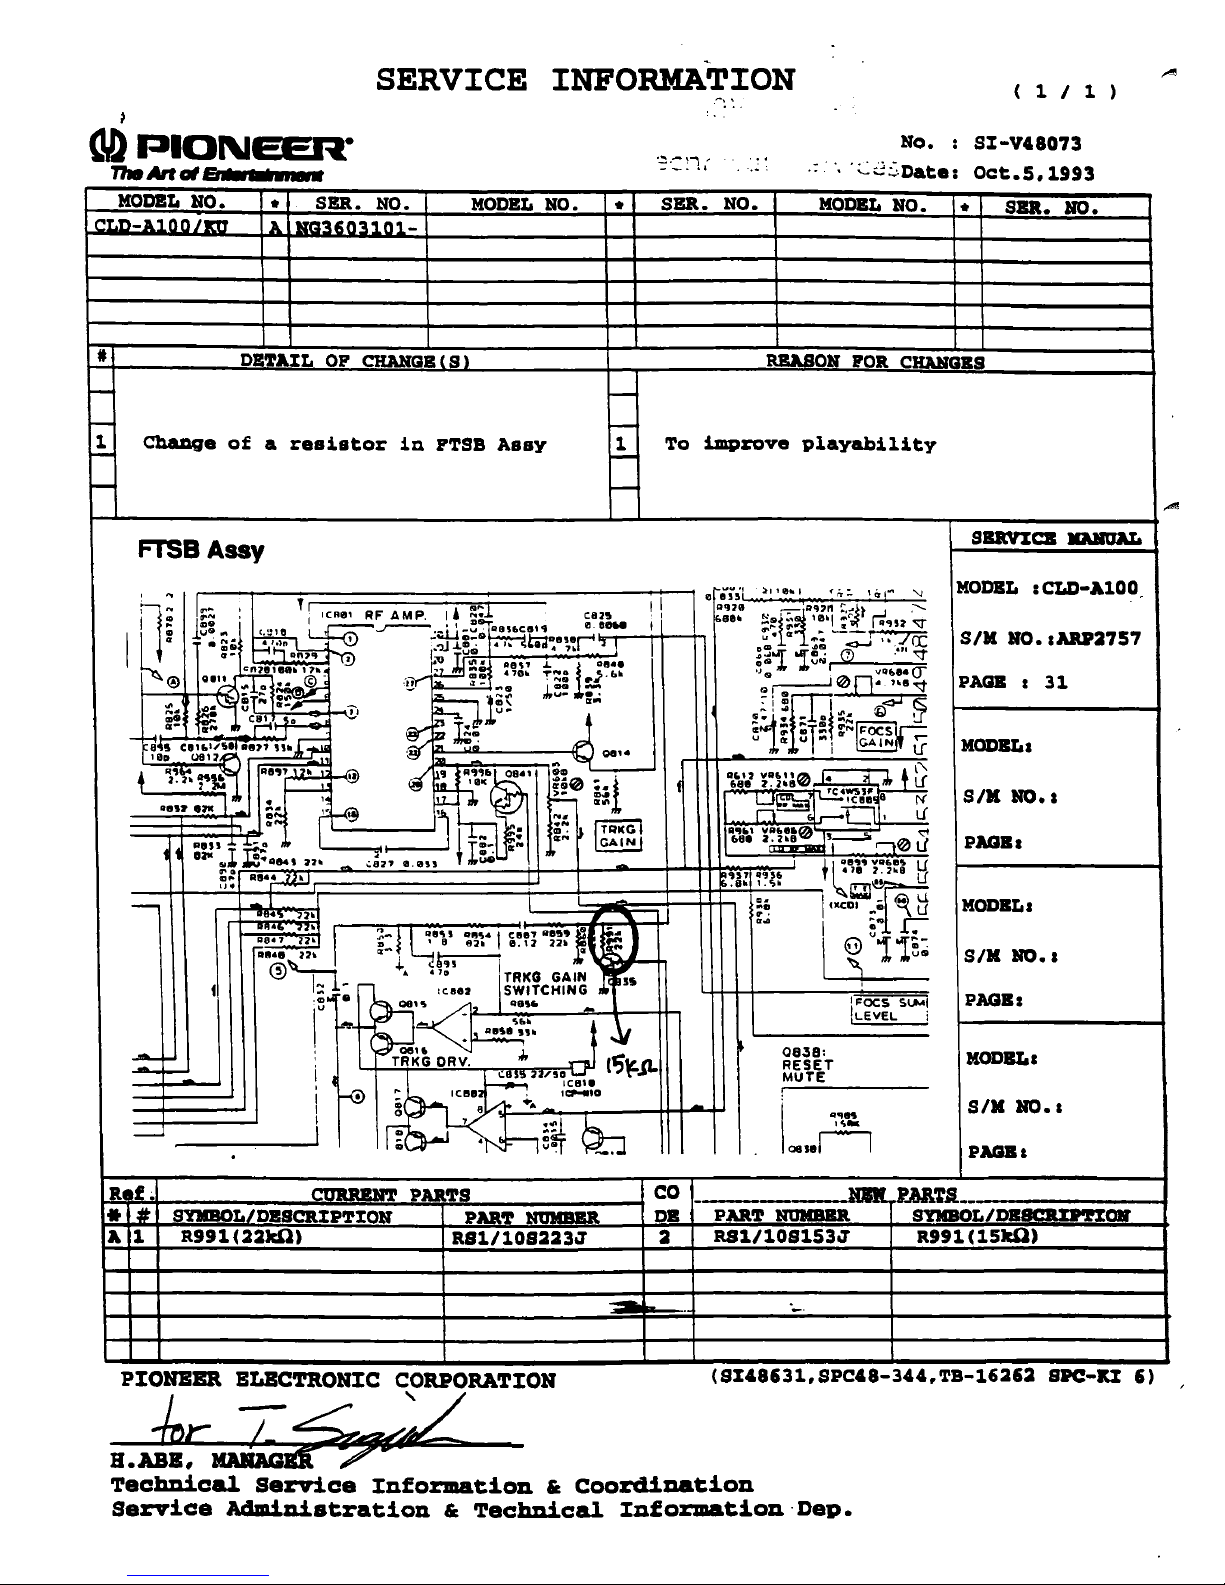
SERVICE INFORMATION
( 1 I 1
MOOBL
NO.
*
SO.
NO.
MODZL
NO.
CLD-A100/m
A.NG3603101-
DETAIL OP CHANGE(S}
-
-
~
Change
of a resistor
in
PTSB
Assy
r-
:-.
,
*
so.
NO.
r-
-
NO. :
SI-V48073
....
,
·~2~Date:
Oct.S.1993
MOOBL
NO.
*
SD.
NO.
RZASON POR
CHAHGBS
.!..
To
improve
playability
-
~--------------------------------~~--------------------r------------4
FTSBAssy
-
0838:
RESET
MUTE
IFOCS
Sl.Mi
.LEVEL
i
I
!
·'OK
...
Q81.rI
MOOBL : CLD-Al00
SIM
HO.
:ARJI2757
PAGB : 31
McmBL:
SIM
NO.:
PAGB.
MODBL:
SIM
NO.:
PAGB:
MODKL:
SIM
NO.:
PAGB:
"'"
~R~f~.~~~~~~~~~~~P~AR~~&IS
__________
~CO
* # SYMBOL/DESCRIPTION PART
NUHBBR
DB
____
.
__
NBW
......
~.'A&':JL------_f
PART
NUHBBR
SYHBOL/OBlIC:R%Pnmr
A 1
a991
(22kO)
aSl/10S223J
2
RSl/10S1S3J
a991
(lSkO)
-
PIONED.
ELECTRONIC CORPORATION
(SI48631.SPC48-344.TB-16262
S~-ltI
6)
H.Jr.-~;L
Technical
Service
Information
•
Coordination
Service
Administration
&
Technical
Information·Dep.
Page 5
--c~,
SERVICE INFORMATION
( 1 / 2 )
MODEL
NO. *
sn.
NO.
MODBL
NO.
*
SEll.
NO.
No.
:
SI-V48117-G
Date:
Dec.
21,
1993
HODBL NO.
*
SEll.
NO.
ICLD-A100/KO A
tm3606101-
ICLD-A100/KO ,B
NI3614001-
t
f-
1
r-
f-
~
~
DETAIL
OF
CHANGE(S)
Change
of
Change
of
stay,
and
the
shape
of
Chassis
Rear
panel
and
Front
deletion
of
spacers
I--
~
To
prevent
mechanical
noise
from
being
audible
when
an
LD
I--
disc
is
played
-
r-
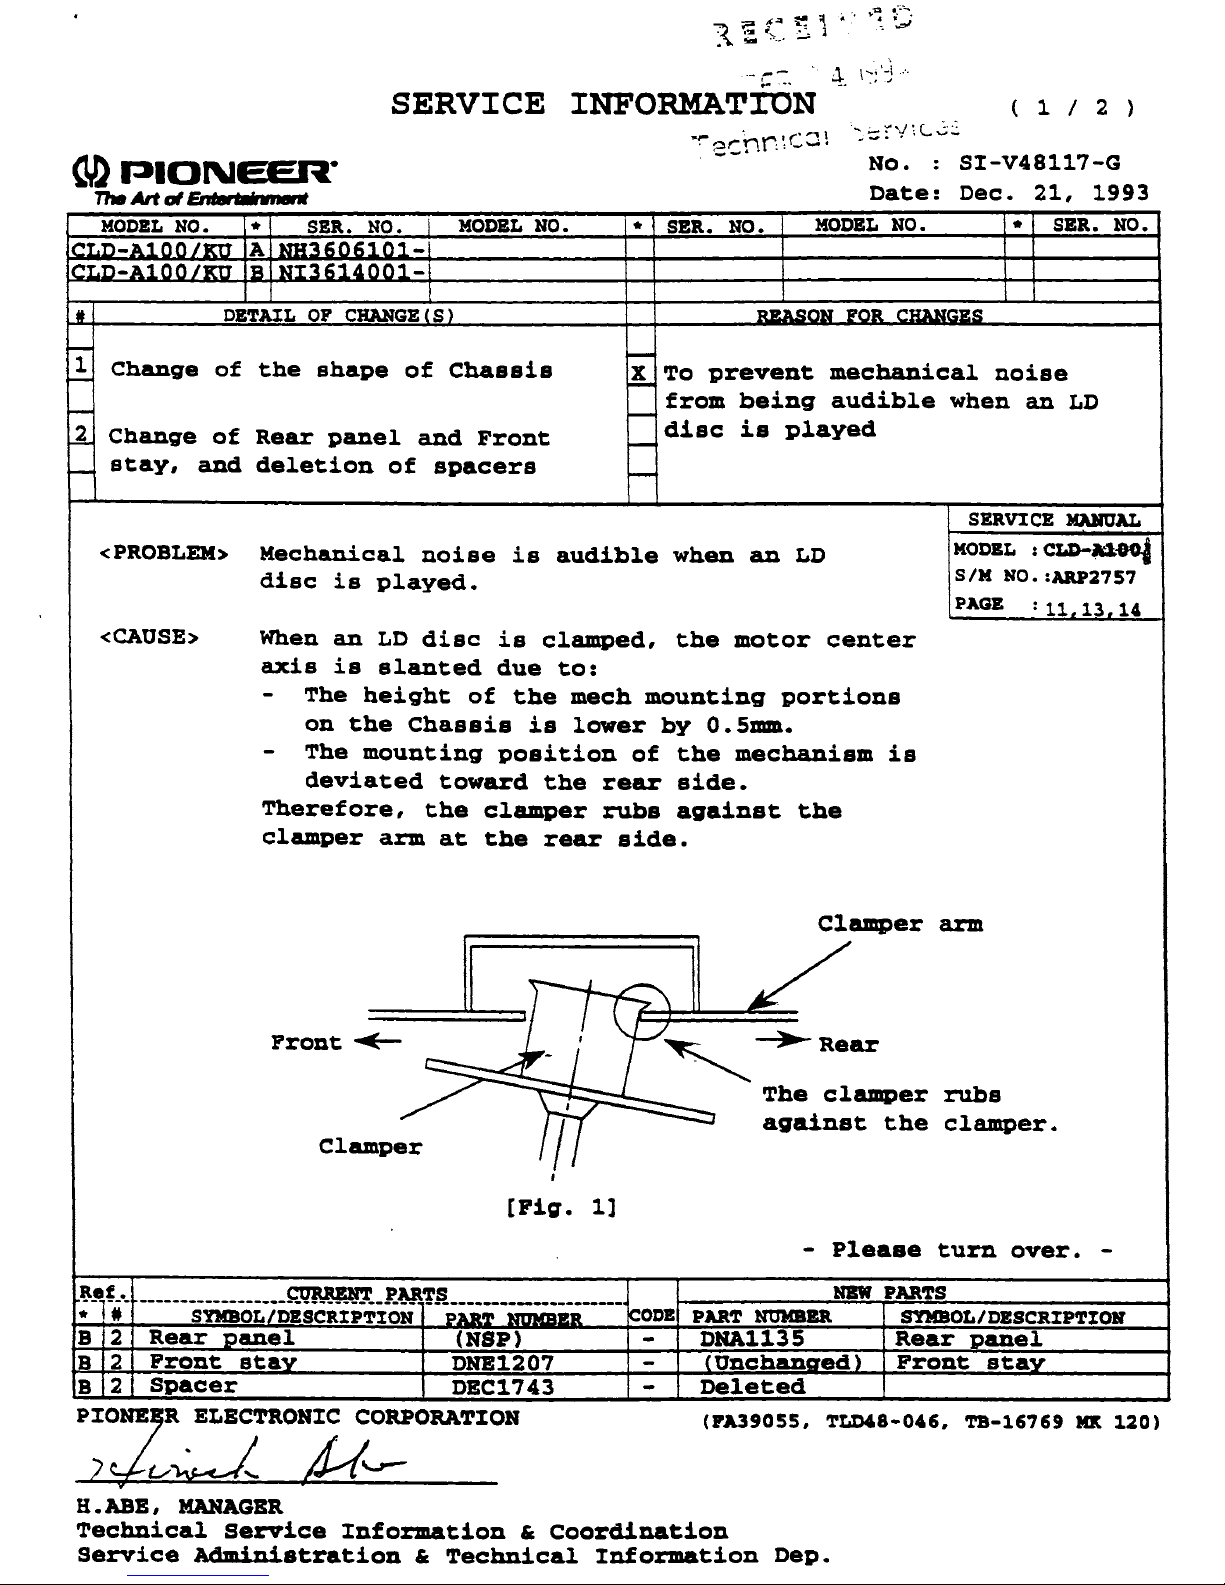
<PROBLEM>
Mechanical
noise
is
audible
when
an
LD
disc
is
played.
snv'[CE
HAHtJAL
MODEL
:
CLI)-~'"-4
S/H
NO. :ARP27S7
<CAUSE>
When
an
LD
disc
is
clamped,
the
motor
center
axis
is
slanted
due
to:
-
The
height
of
the
mech
mounting
portions
on
the
Chassis
is
lower
by
O.Smm.
-
The
mounting
position
of
the
mechanism
is
deviated
toward
the
rear
side.
Therefore,
the
clamper
rubs
against
the
clamper
arm
at
the
rear
side.
PAGE :
11
13
14
Clamper
arm
Front
~
C1amper
=:~,
-+-Rear
~
f'
The
"l_er
Iff
- =
against
the
I
[Fig.
1]
rubs
clamper.
-
Please
turn
over.
-
Ref.
C'01UlBH'l'
PUTS
;-
-j-
------smoi.-iDBscRIP-TIOH
---pAR;---------------
~ODB
NBW
PUTS
PUT
mnmn
SYMBOL/DESCRIPTIOH
B 2
Rear
panel
(NSP) -
DNAl13S
Rear
~anel
B 2
Front
stay
DNE1207-
(Unchanged~
Front
stay
B 2
Spacer
DEC1743-
Deleted
CORPORATION
(PA39055.
TLD48-046.
TB-16769
MK
120)
H.
ABE,
MANAGBR
Technical
Service
Information
«
Coordination
Service
Administration
«
Technical
Information
Dep.
Page 6
<
sunCE
REMEDY>
When
you
encounter
the
above
problem:
1.
Stick
1
or
2
spacers
(DBC1743)
to
the
mech
mounted
portions
of
the
chassis.
(See
Fig.
2)
(One
spacer
has
already
been
stuck
there
from
the
1st
production.)
2.
If
mechanical
noise
remains
after
the
spacers
are
stuck.
replace
the
rear
panel
and
the
front
stay
with
the
new
parts
(DHAl135 & DRE1207).
( 2 / 2 )
* As
to
the
rear
panel
and
the
front
stay,
only
the
new
parts
are
available.
Chassis
[Fig.
21
Stick
on.
or
two
spacers
(DBC1743)
to
thes.
portions.
<COUNTBRACTION
IN
FACTORY>
1)
Improved
the
shape
of
the
chasais.
2)
Changed
Rear
panel
and
Front
stay,
and
deleted
spacers
from
the
chaaais.
Rear
pan.l:
N.S.P.
--->
Front
stay:
DNB1207
--->
Spacers
(x4):
DBC1743
--->
*
Although
the
part
number
for
the
front
stay
has
not
b.en
changed.
only
the
new
part
is
available.
DHAll35
DRE1207*
Deleted
Page 7

SI-V48169
(3/4)
MODEL
[ SfM NO.1
CLD-A100 80
[ARP275i)
FCS SERVO LOOP GAIN
X:
Y:
DC
PAGE
200mvtdlv
20mv/div
mode
i CN807
!
FCSIN
FCS ERR
INCORRECT
ADJUSTMENT
~
...............
.
1.7kHZ 6Vpep
(10:1)
X-V
mode
8
x
Adjust until the
CORRECT
y
c
lissaJOus'
figure IS
SiYmlNII_
TRKG SERVO LOOP GAIN ADJUSTMENT
X:
200mv/div
Y:
10mv/div
Demode
,.
...............
47k
:
'\M
~.-
..........
10VP;::'
TRKIN
TRK ERR
CN807
@
GkHZ
9
'"
~
(10:1)
0-
e
I
?7
(10:1)
3.0kHZ
I
\0
/probe
"
Adjust
6Vp·p
X-Y
mode
8
X
y
0
I
I
I
until the lissajous' figure IS
~
I
,
c::::
symmetncal
~
r
Page 8

SERVICE
INFORMATIORhr.'CGI~e:-'.IICeS(
1/
2)
"l
(.1J.)
PIONEER-
The
Art
at
En'"
MODEL
CLD-A100/KU A
#
~
1
I-
I--
NO.
DETAIL
ADDITION
ASS'Y
-
<PROBLEM>
<CAUSE>
FIG.1
DUE
IN
MOUNTED
SHOCK
CIRCULAR
,.a.iIMt
,.
SER. NO.
3620701
OF
SPACER
THE
12
TO
CLOSE
THE
DISC
IS
....
-.~
.
..
'
...
I
. . ,
to.!
\
....... _ ....
OF
CHANGE(S)
INCH
CLAMPED
ON
VIDEO
APPLIED
SCRATCH
'.
CIRCULAR
.1
PADS
ON
DISC
GETS
DISTANCE
ASS'Y
TO
ON
SCRATCH
MODEL
VIDEO
SCRATCHED
BETWEEN
STATUS,
CONTACT
THE
UNIT
THE
DISC.
FIG.2
NO.
,.
SER.
-
X
TO
-
FROM
r--
r-
WITH
THE
DISC
PARTS
(CAPACITORS,ETC.)
WITH
DURING
UI
DEO
Ilea',
I
EJ"':':"';;';"
NO.
REASON
PREVENT
BEING
A CIRCULAR
AND
VIDEO
THE
DISC
PLAYBACK,
PARTS
;;1:.
..
"
...
-'"
MODEL
THE
SCRATCHED
WHEN
CAUSING A
(CAPACITORS)
FOR
12
MARK.
ASS'Y
A
I
NO.
CHANGES
INCH
No. : SI-V48194-G
Date:
MAR.25,1994
,. I
SER.
I
i
DISC
SERVICE
i
I
MODEL
SIM
PAGE : 40
MODEL:
SIM
PAGE:
:CLD-A100
NO.
NO.:
NO.
MANU~_
:ARP2757
1
"
INCH
DISC
PLEASE
MOUNTED
SIGNAL
SCRATCHED
DISC
CURRENT
ADD
FOUR
SIDE
RECORDED
WITH
EDGE
WITH
---PLEASE
PARTS
PART
OF
ADD
< SERVICE
Ref.
#
*
A 1
12
REMEDY>
SYMBOL/DESCRIPTION
PIONEER ELECTRONIC CORPORATION
W .
(-;J!-n'l.Gll1
, ')1- L
SPACER
VIDEO
AREA
A PROTECTIVE
THE
TURN
NUMBER
PADS
ASS'Y
OF
THE
SPACER PADS.
OVER---
ON
THE
PARTS
TO
PREVENT A
DISC
FROM
CONTACT
___________________
CO
PART
DE
-
OF
NUMBER
GXX1089
BEING
THE
NJIlN.
MODEL:
SIM
NO.:
PAGE:
MODEL:
SIM
NO.:
PAGE:
~M'r~
__________________________
SYMBOLIDESCRIPTION
SPACER
PAD
KIT
TLD48-082
KI,\
Page 9
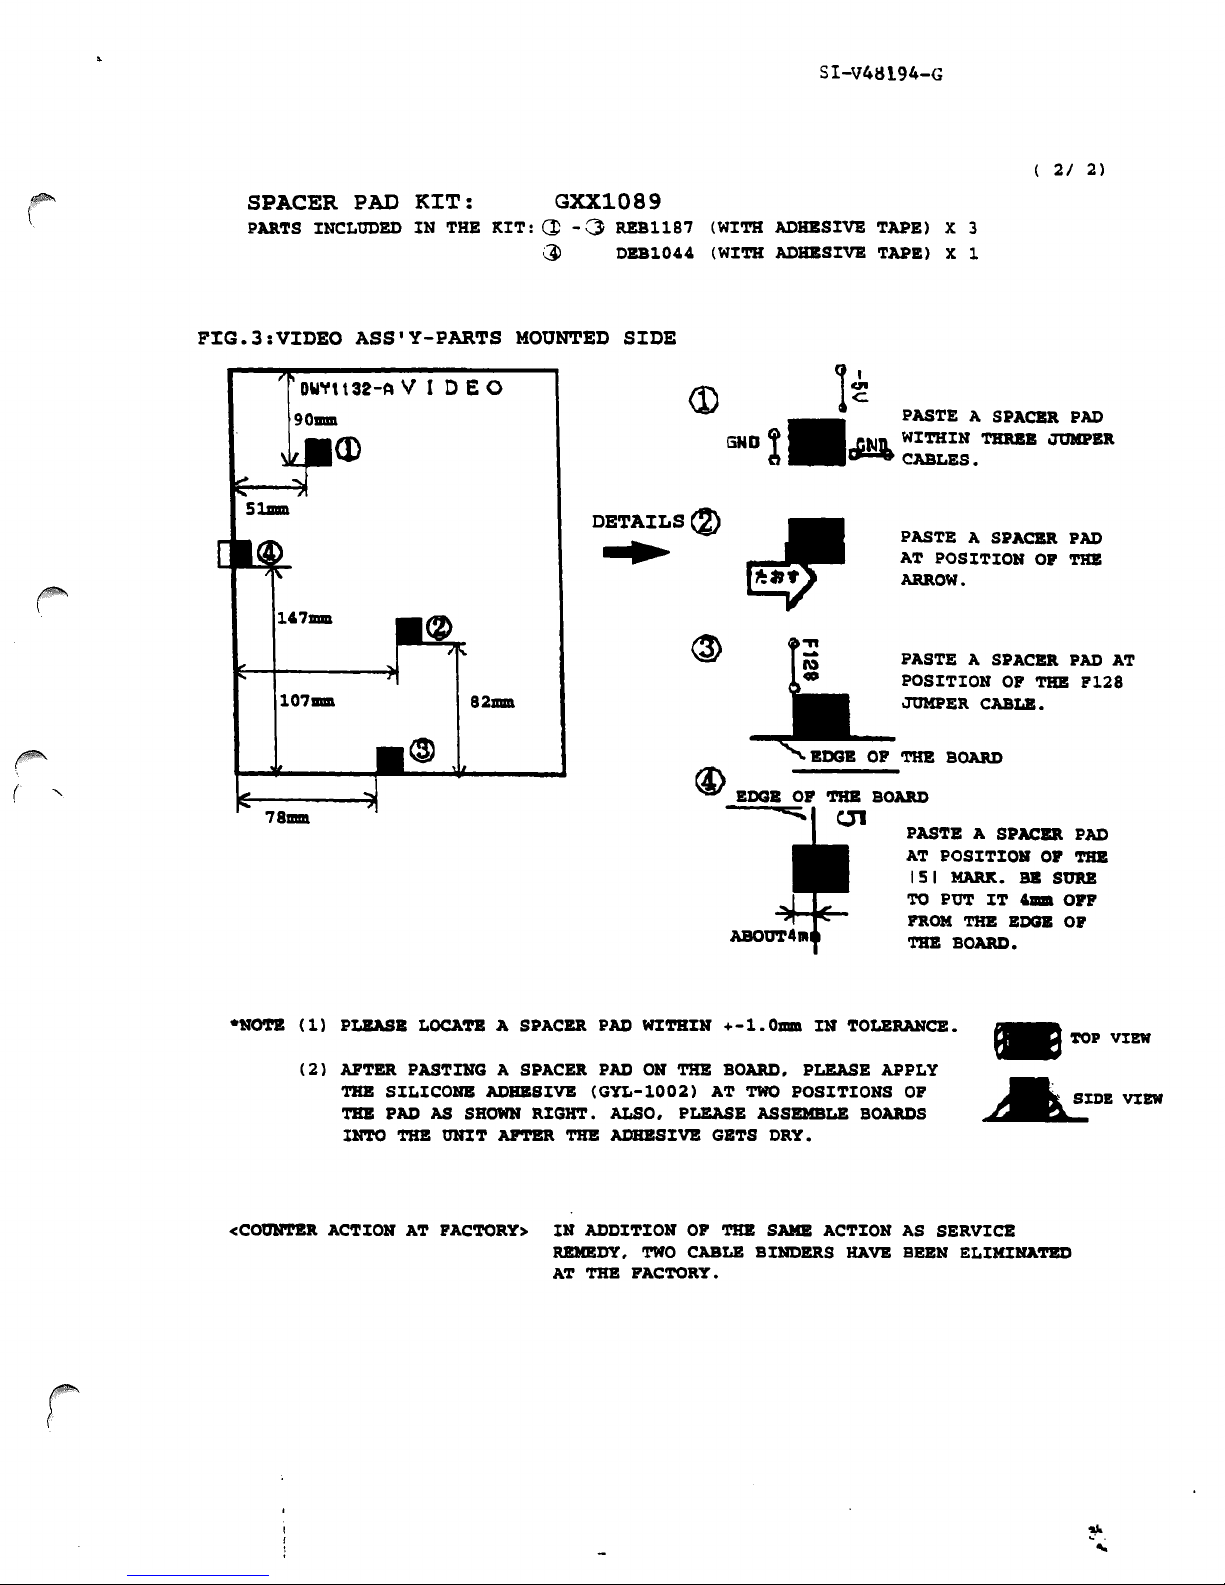
SI-V41:J194-G
(
21
2)
SPACER
PARTS INCLUDED
FIG.3:VIDEO
OW
...
14
7mm
107I11III
PAD
KIT:
IN
ASS'Y-PARTS
, t
32-A
V
IDE
THE
82mm
KIT: ~ -
(j)
MOONTED
0
GXX1089
()
DBl187
001044
SIDE
DETAILS
•
(WITH
(WITH
(2)
GND
ADHESIVE
ADHESIVE
I
BDGB
TAPE)
TAPE)
OF 'l'HB BOARD
X 3
X 1
PASTE A SPACBa
WITHIN
CABLES.
PASTE A SPACBa
AT
ARROW.
PASTE
POSITION
JOKPER
THRBB
POSITION
A SPACER
CABLE.
JUMPBR
OF THE
OF THE
PAD
PAD
PAD
F128
AT
( "
78I11III
(1)
*NOTB
PLEASB LOCA'l'B A SPACER PAD WITHZN +
(2)
AFTBR PASTZHG A SPACER PAD
THE
'l'HB PAD AS
INTO
<COOHTBR ACTION
SZLZCOHB
SHOWN
'l'HB
UNIT
AT FACTORY>
ADRBSIVE
RIGHT.
AP"1'BR
IN
RBHBDY,
AT
ON
'l'HB BOARD,
(GYL-l002)
ALSO,
'l'HB ADHBSZVB
ADDITION
TBB FACTORY.
TWO
PLEASB
OF 'l'HB
CABLE
@ EDGB
-1.
AT
TWO
ASSBMBLE BOARDS
GETS
SAME
BINDBRS
OF
'l'HB BOARD
Omm
IN
PLEASE
POSZTIONS
DRY.
ACTZON AS
c.:n
HAVE
PASTE
AT
I 5 I
TO
PROM
'l'HB BOARD.
TOLERANCE.
APPLY
OF
BEEN ELIHZHATBD
A SPACBR
POSITION
MAlUt.
PUT
IT
'l'HB
_
SERVICE
OF
BB
4mm
BDGB
PAD
THE
StJRB
on
OF
'1'OP
'Inti
r
" .
'"
Page 10

RECE~"/r;O
"U",
,
C,
.!......
jon.:.:.
....j
~,!(r
~
";
echr.:cGI Se"v:ces
(.1J.)
PIONEER-
The
Art
of
MODEL
CLD-A100/KU
PAC-S10/ZU
*
f-
1
CHANGE
-
-
CHANGE
2-
OF
PAC-SlO
<PROBLEM>
<CAUSE>
En"""",.",
NO.
DETAIL
OF
INTF ASS'Y
OF
IC23 IN
IN
NOTICEABLE
LD
WHEN
AXOONT
PROM
STATUS
SER.
•
A
NJ3615501
··3615501
B
OF
CASE
DISC
CLD-A100
IC6
SERVICE INFORMATION
NO.
CHANGE(S)
OF
SHAIN
CLD-A100
APTER
IS
PLAYED.
OF
NOISE
IN
SMAIN
OF
CLD-A100.
MODEL
CLD-A100
ASS' Y
IS
USED
POWER
IS
CONNECTED
ALWAYS
ASS'Y
NO.
WITH
TURNS
WITH
RUNS
OF
PAC-S1O,
•
-
X
-
r-
r-
PAC-S1O,
ON
OR
PAC-SlO,
INTO
PH
SER.
TO
ACTIVATE
MODIFYING
OO
AND
WHEN A REGULAR
AUDIO
REGARDLESS
NO.
REASON
BIOS-ROM
AUDIO
SLIGHT
A
GENERATED
No. :
Date:
MODEL
MUTE
MODE-CONTROL
NOISE
OF
NO.
FOR
CHANGES
FUNCTION
OF
PAC-N10.
IS
CDI
THE
(
1/1
SI-V49002-G
APR.12,1994
SER.
NO
*
BY
ROM
OF
SERVICE
MODEL
S/M
NO.
PAGE
:P.53
MODEL:PAC-SlO
.
CLD-A1
MANUAL
:CLD-A1OO
:ARP2757
...
.~
'
<COUNTERACTION
MODE-CONTROL
Ref.
*
2
B
#
SHAIN
AGAINST
MUTED
WILL
PLAYED.
(1
ASS'Y
APTER
BE
)
CLD-A1OO/KU:
·PART
ROM
(2)
PAC-S1O/ZU:
SYMBOL/DESCRIPTION
IC23
PIONEER EJZLCT
?
.
f!'.
Y.
IJlAlaZO,
HE
Engineering
service
Dep.
IN
FACTORY>
ROM
IN
INTF ASS'Y
OF
PAC-S10
THE
NOISE.
POWER
MUTED
NUMBER
(DYW1326),
CURRENT
(PAC-S10)
AUDIO
TURNS
WHEN A REGULAR
INTF ASS'Y
DWH1341,
OF
REMAJ:NS
IC23
ONIC
~
.
:
~/h'L~/
MANAGER
V
Section
OF
CLD-A100
HAVE
IN
PARTS
BEEN
OUTPUT
ON,
AND
HAS
SAKE"
SHAIN
PART
PDJ008D
CHARGED
GENERATED
PH
DISC,
BEEN
INCLUDING A MODIFIED
ASS'Y
NUMBER
CORPORATION
,ft~
AND
BIOS-ROM
TO
ACTIVATE
FROM
AUDIO
EXCEPT A GAME
GENERATED
CHANGED
HAS
BEEN
CO
DE
CLD-A100
BY
CHARGED
------------------~-
PART
1
MUTE
FROM
SOFTWARE,
DWH1341.
MODE
CONTROL
BY
NUMBER
PDJ008E
IN
FUNCTION
WILL
BE
PAC-S10
IS
PDJOO8E.
S/M
NO.
:ARP2779
PAGE
:P.2
MODEL:
S/M
NO.:
PAGE:
MODEL:
S/M
NO.:
PAGE:
p~~~--------------------------
SYMBOL I DESCRIPTION
IC23
(PAC-SlO)
TLD48-088,
,
I
8148201-
Page 11

MODBL
PAC-S10/ZU
NO.
•
A.
SER.
6919901-
SERVICE
NO.
MODEL
INFORMATION
NO
•
•
SBR. NO.
R E
eEl
;1
\\:\
v
'/
:;'::>~
"
EO
'.:.
Technical ~ . .2"·\/!ces
MODEL
No. :
NO
Date:
SI-V49016-G
HAY.6,199'
,
*
SD.
( 11
NO.
2)
..
-
CHARGE
1
-
!-
l-
<PROBLJDb
<CAUSB>
<NOTB>
Ref.
#
*
A 1
A 1
A 1
A 1
A 1
A 1
A 1
A 1
A 1
A 1
A 1
A 1
A 1
A 1
A 1
A 1
A 1
A 1
1
A
A 1
PIONBBlt.
DE'l'AIL
OP
AUDIO
snaIOL/DBSC1U:P'l'IOH
JUl
al2
1\58
1\59
al3
al4
1\38
1\40
al9
Ul
1\42
1\131
e33
e34
C16
C17
e117
C118
e21
C140
OP
MIX
WRBH
A CERTAIN
HIGH
PRBQtJBHCY
IN
CASE
HIGH
IN
IS
DISTOR'l'BD
MIX
CIRCUIT.
SINCE
'l'BB SERVICE
CUSTOJIBR
YOU
CtJlUUDft'
CHANGB
'l'BB
AUDIO.
• S COHPLAIH'l'
(S)
CIRCUIT
SEGA
AUDIO
RECORDING
AUDIO
DUB
HAVE
NO
RBIIBDY
PAR'!'S
PAR'!'
'1'0 HIGH ct7RREI1'l' OPERATION
lfOIIBBR
RSl/l0S332J
RSl/10S332J
RSl/10S332J
RSl/10S332J
l\S1/10S103J
l\S1/10S103J
l\S1/10S222J
l\S1/10S222J
l\S1/10S331J
l\S1/10S331J
l\S1/10S272J
l\S1/1OS272J
CCSQCB822J50
CCSQCB822J50
CCSQCB122J50
CCSQCB122J50
CBV100K16
CBVlOOK16
GAlIB
SCBBJIATICS
IN
CBV100K16
CBVl00K16
SOP'l'WAlU!l
IS
DISTORTED.
LBVBL
0lJ'l'PtJ'l'
'l'BB
ON
A CBRTAIH
~
TO
X
GAXB
-
-
I--
IS
OP A SBGA.
PROK
OP-Al!IP (SSOB ASSY:IC1O)
IN
'1'HB
POLLOWJ:NO
SBGA
CO
DB
1
1
1
1
1
1
1
1
1
1
1
1
1
1
1
1
1
1
1
1
REASON
PRBYBNT
SOPTWARB
PLAYED,
GAXB
SERVICE
PAGB
_______
PAll'!' HUII8BR
RSl/l0S333J
RSl/l0S333J
RSl/l0S333J
RSl/l0S333J
RSl/10S104J
RSl/10S104J
RSl/10B223J
RS1/10S223J
RSl/10S332J
RSl/10S332J
RSl/10S273J
RSl/10S273J
CCSQCB821J50
C:C:SQCB821J50
CCSQCB121J50
CCSQCB121J50
CZV010KSO
CBV010KSO
eZV010KSO
Ml!Vn~nM
SOP'l'WARB
OP
AS
GAIIB
!UGH
MANUAL,
YOUR
POR
PRBQUBNCY
PROM
BBING
IS
THE
AUDIO
IJIlPORJlATIOH
SOP'l'WARB.
!!!!.'_!..A!.'!'~
.. n
CHANGES
AUDIO
DISTORTBD
SBRVICE
MODEL : PAC-slO
S/M
PAGE
PLEASE JUST
_________
SYHBOL/DBSCR%PrIOR
NO.
:2
TAD
POR
JUl
al2
1\58
1\59
JU3
JU4
JU8
1\40
JUt
Ul
1\42
1\131
e33
C34
C16
e17
e117
C118
e21
C140
OP
:ARP2779
'1'l1lI
KAHUAL
Cd
Y.
lIB
Page 12
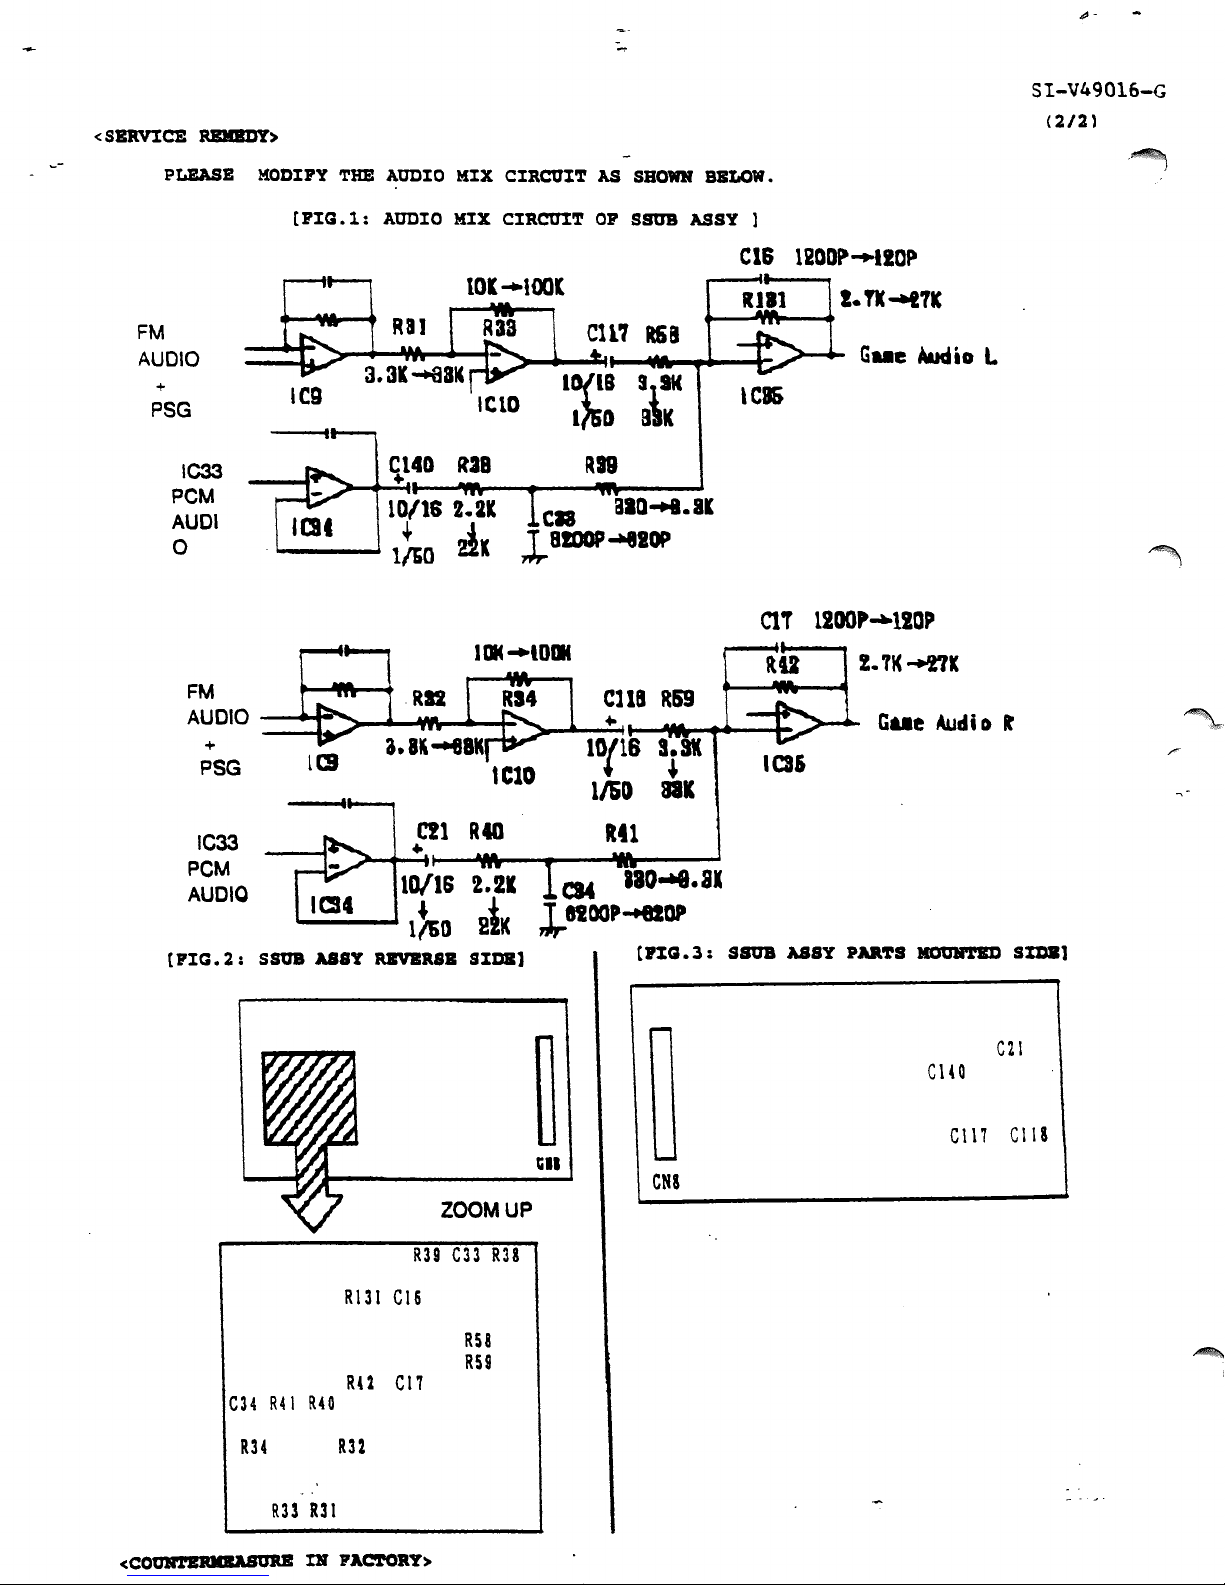
< SBRVl:CE RBIIBDY>
S!-V49016-G
(2/2)
PLEASE
FM
AUDIO
+
PSG
1033
PCM
AUDI
a
FM
AUDIO
PCM
AUDIO
{PIG.2:
+
PSG
IC33
MODXPY
[PIG.l:
leg
----t
lei
.--..
SSOB
ABSY
THE
AUDIO
RBVB1tSB
AUDIO
RU
C140
+
lOllS
~
11&0
RI2
CIt
+
10/18
tho
MXX
CIRCOXT
MXX
CXRCOXT
to("lOO(
IC1D
R38
2.2K
dl
l.
1000"lOlIC
R40
2.21
slK
SIDa)
CII
8100P
CI4
J,.
8100'
AS
SHOWN
OP
SSDB
S~SY.
a "
RS9
BID
....
-a.eIOP
ClIB
R59
+
1°/18
1/S0
I.SI
~
81K
Rtt
laO..a.81
....
DP
&BLOW.
ASSY
CIS
IUlt
lCBS
81
]
12DDP
I.Tk~11C
CIT
12oo""120P
R U 2.
105
....
IIOP
Gue
Gue
'lK
Audio
-+!"ll
Aud
i 0
L
l'
RI31
CI6
RU
C
17
C34
R41
R40
RH
R33
<coUR'1'B1QlBAS1JR
R32
R3t
DI
PAC'fOltY>
R39
ZOOM
C33
R58
R59
UP
R38
lill
CNI
C140
CI17
ell
clla
Page 13

..
..
1
CLDAI00
06/18/94
SI-BULLETIN
SEARCH
F1 -Help
SI-PG93010
Importance 0
To
ASC
YES
Fiche
Yr
93
~LASER
ACTIVE
SERVICE
PROGRAM
t
PROCEDURES
REGARDING
FIELD
SERVICE
OF
PIONEER
CLDA100
LASER
ACTIVE
SYSTEM
c
( "
r
SI-V48090-G
Importance 1
To
ASC
YES
Fiche
Yr
93
CHANGE
OF
EJECT
LEVER
INCREASE
STRENGTH
OF
EJECT
LEVER
AGAINST
EXTERNAL
STRESS
SI-V48117-G
Importance 1
To
ASC
YES
Fiche
Yr
93
CHANGE
OF
CHASSIS
SHAPE,
REAR
PANEL
AND
FRONT
STAY,
DELETION
OF
SPACERS
PREVENT
MECHANICAL
NOISE
FROM
BEING
AUDIBLE
WHEN
AND
LD
DISC
IS
PLAYED
SI-V48194-G
Importance
1
To
ASC
YES
Fiche
Yr
94
ADDITION
OF
SPACER
PADS
ON
VIDEO
ASSY
PREVENT
12
INCH
DISC
FROM
BEING
SCRATCHED
SI-V480123
Importance
3
To
ASC
NO
Fiche
Yr
0
CIRCUIT
CHANGE
OF
VIDEO
ASSY
PREVENT
ELECTRICAL
LEAKAGE
SI-V48056
Importance 3
To
ASC
YES
Fiche
Yr
93
ADDITION
OF
SEALS
TO
THE
FLEXIBLE
CABLE
PROTECT
THE
CABLE
FROM
BURRS
ON
ITS
CABLE
Page 14

CLDA100
06/18/94
SI-BULLETIN
SEARCH
SI-V48072
Importance
3
To
ASC
YES
CORRECTION
TO
SERVICE
MANUAL
SEE
SERVICE
BULLETIN
SI-V48073
Importance
3
To
ASC
YES
CHANGE
OF A RESISTOR
IN
FTSB
ASSY
IMPROVE
PLAYABILITY
2
F1 -Help
Fiche
Yr
93
Fiche
Yr
93
SI-V48076
Importance
3
To
ASC
NO
Fiche
Yr
0
ADDITION
OF
SHIELD
SHEET
ASSY
ON
PATTERN
SIDE
OF
RGBB
ASSY
SUPRESS
BEAT
NOISE
WHEN
BLACK
PICTURE
APPEARS
ON
SCREEN
SI-V48116
Importance
4
To
ASC
NO
Fiche
Yr
0
CORRECTION
TO
SERVICE
MANUAL
SEE
SERVICE
BULLETIN
SI-V48169
Importance
4
To
ASC
NO
Fiche
Yr
0
CORRECTION
TO
SERVICE
MANUAL
SEE
SERVICE
BULLETIN
Page 15

, .
,-
)
----
CHAPTER VII
CLD-AIOO LaserActive
t
he
LaserActive
format
represents
Pioneer's
latest
extension
of
the
LaserDisc
family
of
products.
LaserActive is a specialized application of
LD-ROM
technology
in
a consumer oriented
product. The Pioneer
CLD-AlOO
is a
com-
paratively
high-end
combination
COl
LaserDisc player with
an
expansion slot
that
can accept a variety
of
add-on modules. One
module adds compatibility with the Sega
Genesis/CD video game system. A second
supports all NEC Duo Soft game programs,
while a third supporisLaserKaraoke
singalong discs. Additional modules can be developed for
future
applications. The LaserActive
system will, with the appropriate module
installed, play Pioneer LaserActive software,
Sega or NEC. Duo Soft (TurboGrafx)
CD-
ROM
or game cartridges, as well
as
all stan-
dard Laser Discs,
,CD
audio Discs,
COG,
and
Karaoke discs.
See'software groups.
Since LaserACtive,holds more digital information
than
CDs,
there
is enormous poteri-
tial and versatility. The graphics provided
by
the add-on modules are equal to their video -
game counterparts,
but
include the sharp
fun-motion video quality of a LaserDisc.
CLD-AlOO
has the capability to accommo-
date
up to ten different software platforms in
the same system. Currently there
are
thou-
sands
of
existing entertainment and educa-
tionai
LD
titles, Sega CD's, and NEC Turbo
games, and' LaserKaraoke programs.
New
"
, ,
-,
~)I,~...,
C==.f~-Jt..I'JI'f
___________________
""'
__
~
t . ,
programs currently being developed for the
Mega-LD and
LD-ROMJ
formats will
oWer
even more vaiiety.
With
the
expansion capabilities
of
the
LaserActive system, the CW-AlOO is de-
signed as a true interactive home player to be
e~oyed
immediately, and grow as multime-
dia technology
offers new horizons.
Player Features
and
Functions
• LaserActive compatibility is accessible
by
installing a separately sold game
pack.
See section on software groups.
• Lasel' Karaoke compatibilities when
mated with the control pack (PAC-Kl).
• Convenient search functions available
to find a desired scene or chapter; ,
•
•
Center
CD
disc table mechanism and
direct
CD
circuitry similar to the
OLD-
8201.
Even as a stand alone unit the
Crn-
AlOO
has multiple disc compatibility.
Not only normal
Ws,
CDs,
and
CLVs
can
be
used, but also thin-type 8-inch
.
LD
and 3-inch
CDs
can be played with-
out
an
adapter.
Page 16

Software Groups
With
the
PAC-SIO,
customers
can
play
the
Sega cartridges
and
discs marked with
the
logos shown below.
CD
COV
o
-0
~
c.rtrld_
p
____
_
CD
(linch.
3 Inch)
By installing
PAC-NIO,
the
CLD-AlOO
be-
comes compatible with TurboGrafx-16 chips
and
discs.
LO-ADM'
LD
00@M@@@
S TurboChip
•
Only
Iho'oIowlng
TurboChIp
•••
o"oiloble
wllh
Ih' L ....
AcIIvt.
CD
(linch.
3 Inch)
•
OnIy.hI
following Cortrldge end
dllC'
.. , .",H.·
We
wldt the LootrActlvt.
~C
..
trldll.
Wlm
(GRAPHiCS)
CD
IIrlphlc.
A
I.
\
~
• Tho
10110
....
dllC'
con
bo
uled
by
pI.ying
b.ck
TurboChip
(9RAPHB)
CO
g,ophIc.
lO
(12 Inch. I Inch)
•
The
followlnll
diSCI
con be uNcI
by
ploylng beet
wIdt the
CD
CDV
lD
pl.y,r
compotlblt whh
....
ActIve.
COV
(CD
VIDEO)
CD
VId.o
Slnlli.
J-
",ilh
I""
CD
COY
LO
plIY"
compotibll
..
hh
~
l."rAcllv
••
aE<lAlZt!I
SEGA
CD
~
.
MEGALD
"
'
(12
Inch.
linch),>"
'.
"-,
j-{\
-\<--NvVtl
v
-+;r-LD
COY!
0
~\
\{\
lDwhhTOC
t
~.
(CD
VIDEO
lO)
,\J
\'
(12
Inch.
linch)
~
-/
j)
~~
.0'
Y
t-:
II
~~l
U~J...
~
~
0'\
Lv..,
.}
~v
'"
,.~
l
--/~
t
J.~
fI
NOTE:
':()
'\1
)/)'
v,
I
L,"\
\',
).~V)
CD-I
game
discs
of
other
models
and electronic
book
discs
can
not
be
\,;:,0
used
wlth either
game
packe.
LaeerActive
Ie
not
compatible with
CD
'\
~
graphlce
marked
with:
EXTENDED
\J
\t
~.
CO·Rom
..
Tu,bo
Gr.'.'
CD
CD·ROM
TurboDuo
lD
ROM'
(12
inch. • inch)
-
5il:
LD
lO
(12
hoh.
linch)
COV
(CO
VIDEO)
CDV
....
S
....
LOwllh
TOC
(CD
VlDED
lO)
(12
Inch. • Inch)
)
Page 17

BLOCK DIAGRAM
I
G
'7p':';,
~--
,
..."
«II
I,,,,
~
"-~"{§I~
It~.r"OI'
0 '
1
'
•
~'~L
__
........
___
_
SPOL SERVO
Ie
- -
_L-_.=-:_
--T-------.!.I_~-.--.J-.~-,:
-=---""J~
r:----L:.:'---.-.
IAIIII:: -
.!:mI!l!!!1&i-----
Page 18

(M).
PIONEER·
The
Art
of
Entertainment
SERVICE
INFORMATION
POLICY GUIDE
...:.
..
-.
No. : SI-PG93010
Date:
.."".
..
,~
,,,.
(1/2 )
OCT. 21.1993
Effective
of Pioneer
Model Number
CLD-AIOO
PAC-NIO
PAC-SIO
PAC-KI
To:
From:
Subject:
immediately,
CLD-AIOO
LaserActive Systems.
All Authorized LaserDisc
National
LaserActive Service
following
Service Operations
Program
are
the
procedures regarding field service
Description
Combinatien CDILDlLaser Active
"LD-ROM " Game Pack (with
"MEGA-LD" Game Pack (with
Karaoke
Pack
Service Companies
Player
hand
controller)
hand
controller)
~
Limjted
The
manufacturing defects for
controllers used
Please refer to
Warranty
Pioneer LaserActive
with
the
the
warranty
System
the
game packs have a
details.
When a Consumer Requests
Advise
any
software
the
consumer to bring
game packs or Karaoke packs
they
normally use, or
problem.
In
cases where
only,
it
may
it
is obvious a normal
not
be necessary to have
software.
has
a one
CLD-AIOO
(1)
and
year
all
ninety
document enclosed
Seryice
in
all elements of
they
own
with
the
specific game
CD
or
LD
the
consumer bring
Limited
three
with
their
with
packs. The
(90)
the
system:
the
hand
which
day
symptom
Warranty
against
hand
Limited
Warranty.
product for complete
the
CLD-AIOO;
controllers;
there
relates
in
the
to
packs
may
the
game
be a
player
or
game
~
)
POST
OFFICe
BOX
LONG
BEACH.
PHONE:
(310)
1710
CALIFORNIA
83M177
FAX:
lIII01·1780
(310)
952·201
12
PIONEER
TRAINING
ELECTRONICS
AND
PUBLICATIONS
SERVICE.
DEPARTMENT
INC.
Page 19

(212
)
SI-PG93010
GamelKaraoke Packs
The
game
If
a problem
and
Karaoke packs,
is
diagnosed
following procedure to
1.
Contact
your
Zone Office
exchange Service
question. Provide all information
2.
An
exchange pack/controller should
OTS
if
delivery
3.
The exchange
copy for your records
the
defective pack/controller,
return
to
DO
Pioneer
NOT
and
Hand
as
obtain
Return
is
delayed.
paperwork
Controllers
as
well
as
possibly
an
of
due
in-warranty
Technical Service (OTS)
Authorization," (SRA), for
will
arrive
if
necessary. Place
mark
Electronics Service, Inc.,
LIST
THE
EXCHANGED
WARRANTY CLAIM FORM!
their
to
hand
pack
replacement.
they
request.
arrive
by mail
the
the
SRA #
ITEMS
controllers
or
controller failure,
and
request
the
within
five (5)
independent
paperwork
on
the
outside
at
the
address
MODEL
are
not
field serviceable.
please
use
a "product
pack/controller
working
of
the
(yellow copy
listed
NUMBER
days. Contact lh(>
product. Make a
of
of
the
carton
on
the
ON
the
in
SRA) with
box
and
SRA fonn
THE
4.
Failure
billed for
Should you
Office
Thank
-
of
Technical Service covering
you for your continued contribution to
National
to
return
the
have
any
Service
the
defective
exchanged
questions
Operations
pack
item.
or
require
your
Division
or controller will
further
assistance,
location.
quality
Pioneer
result
please
Service.
in
your
contact
account
the
Zon.'
ht'l~
Page 20

SERVICE
TIPS
06/18/94
1
CLDA100
Importance
SYMPTOM:
TRAY
INDICATOR.
CAUSE:
NOTE:
OFFSET
IC202
CHECK
IN
TRACKING
2
DOESN1T
(ICPN50)
TRACKING
OPEN.
OPEN.
COIL
SERVO.
Author
ALAN
CD,
NO
ON
PICKUP.
Date
93
DEC
30
LD
INDICATOR
5V
(SW).
OPEN
Distribute
Y
OK
BUT
IC202
WILL
F1 -Help
NO
RESET
CAUSE
MAX
1
 Loading...