

Page 1
1 2
3
4
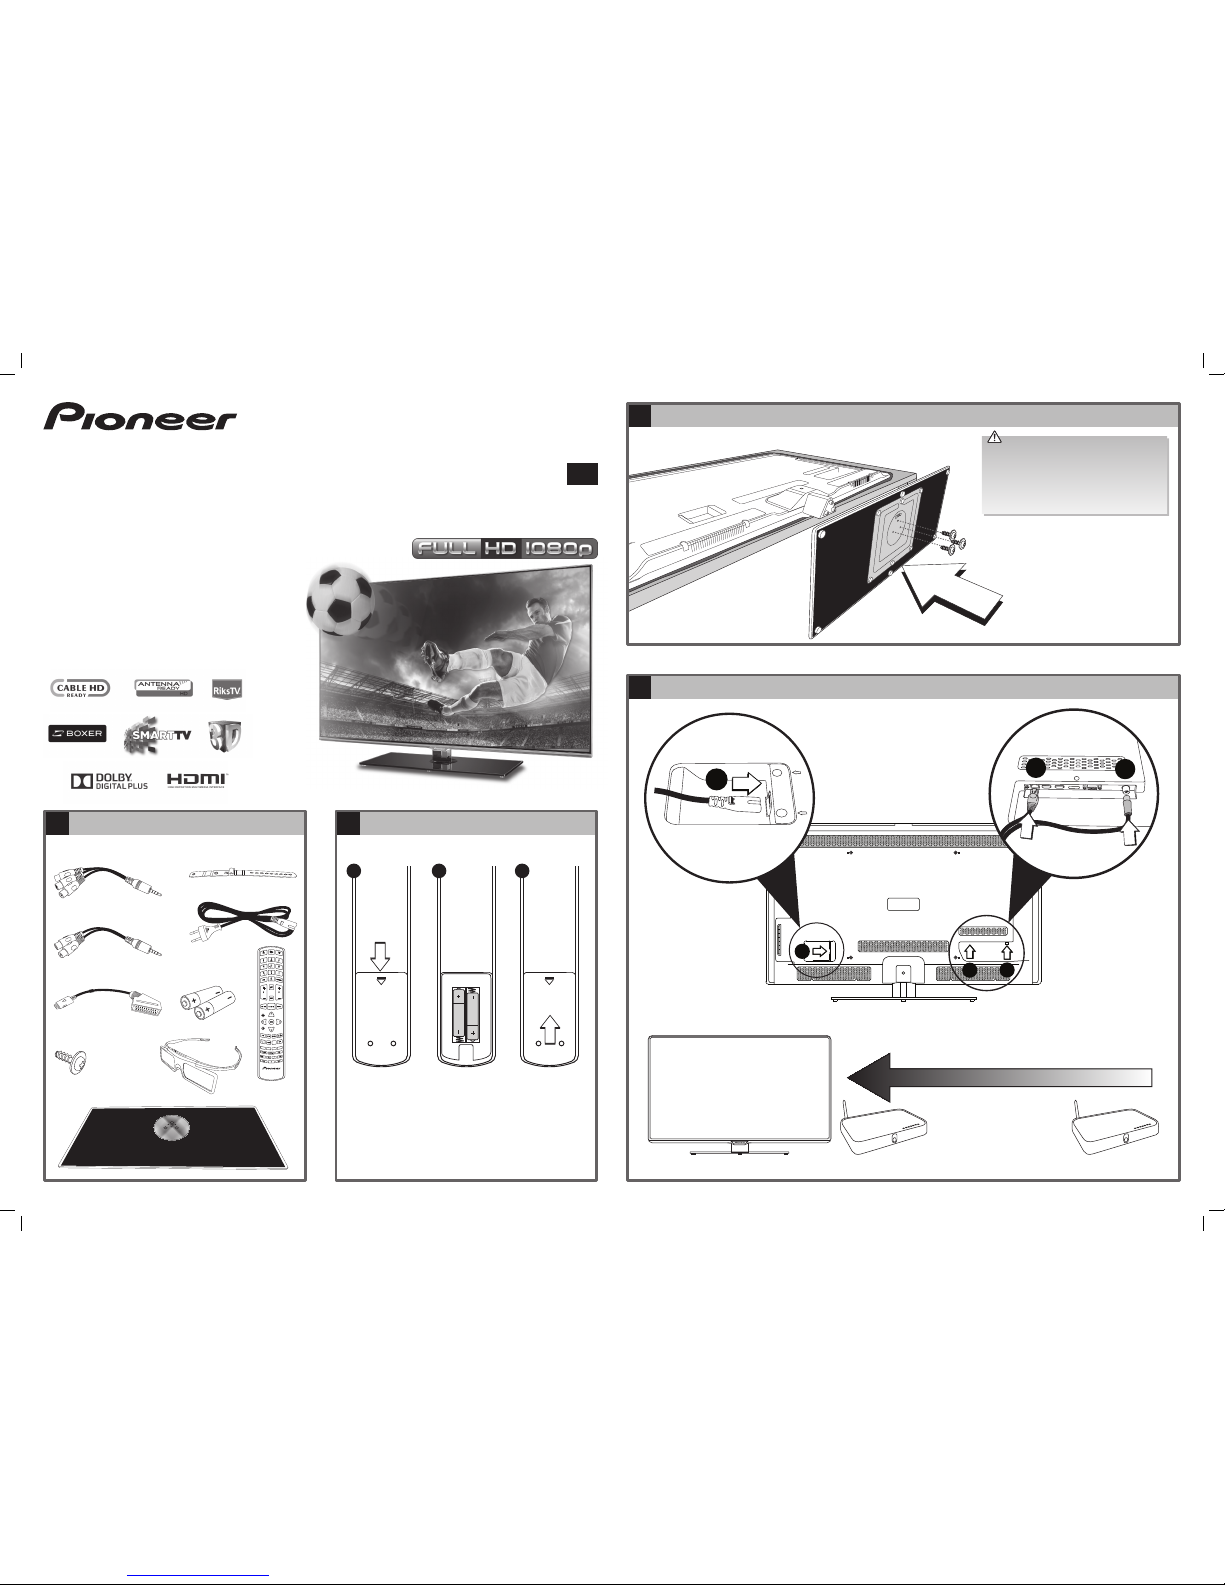
Unpacking
Remove all packaging from the unit. Retain the packaging.
If you dispose of it please do so according to any local regulations.
Batteries in the remote control
Attaching the TV stand
Connecting the TV
Quick Start Guide
46” & 55” Smart 3D TV
L46S3D13N / L55S3D13N
1 2 3
Best connection
speed
Wireless Router Wireless Router
Wireless Connection
3
1
2
Your TV has a wireless connection
built in, so connecting an ethernet
cable is optional, however this
will give you the quickest internet
connection.
AC IN ~
3
1
2
1. Slide the battery
cover to open
the battery
compartment
of the remote
control.
2. Insert two AAA
size batteries.
Make sure the
(+) and ( - ) ends
of the batteries
match the (+) and
( - ) ends indicated
in the battery
compartment.
3. Slide the battery
cover back onto
the remote
control to close
the battery
compartment.
The LCD display is very fragile, and must be
protected at all times when installing and removing
the TV stand. Be sure that no hard or sharp object,
or anything that could scratch or damage the LCD
display, comes into contact with it. DO NOT exert
pressure on the front of the TV at any time because
the screen could crack.
1. Disconnect all cables connected to the TV.
2. Lay the TV down on a flat surface
preferably a table with the back side
facing up. Make sure the neck of the
TV stand over hangs the edge of the
table. Please make sure a soft cushioned
material (such as a pillow or thick piece of
foam) is placed beneath the screen.
3. Carefully place the glass stand onto the
neck of the stand. Then fix into position
using the 3 screws provided as shown.
1x YPbPr adapter cable
1x Audio in adapter cable
1x Scart adapter cable
3 x TV stand screws
2 x 3D glasses
1 x power cable
1 x cable tidy strap
2 x AAA batteries
1 x Remote
control
1 x TV stand
Thank you for purchasing your new Pioneer TV.
Your new TV incorporates the latest technology to
enhance your viewing experience. We would suggest
that you allow about 20 mins for initial setup.
Please follow this guide for a successful rst time
installation.
GB
Image for indication only
1. Connect the Aerial cable.
2. Connect the Ethernet cable
(optional).
3. Connect the Power cable and
switch on at the mains.
Make sure you remove all protective tape and film from the TV and stand, before using your TV.
L55S3D13N_QSG.indd 1 27/11/2013 12:16
Page 2
6
Smart TV
• Press the SMART TV button on the remote control.
To navigate around the Smart TV screen
• A red box will highlight the area of the screen that is
currently selected. Press the
buttons to move
around the screen.
• Press the OK button to select an app.
• To exit Smart TV and return back to normal TV press the
TV button, or select the TV picture on the Smart screen
and press OK.
To surf the internet
• Select the brows ‘n’ app. A keyboard will appear on the
screen. Press the
buttons to select the letters
and press OK to confirm.
• When the page loads, brows the page using the
and OK button.
• To scroll up and down a page press the P +/- button.
• To exit a web page and return to the main Smart screen
press
twice. The first press will take you back to the
keyboard, the second press will take you back to the
SMART screen.
Please be patient it may take a minute or two for the
Smart page to load. The smart symbol will be animated
while smart pages are loading.
For more instructions on how to use the Smart
function of your TV please refer to your instruction CD.
5
Initial setup
• Press the STANDBY button to switch the TV on. Please be
patient this may take a few second.
To setup the internet and tune in you TV follow the on screen
menus. For detailed instructions please refer to your
instruction book on the CD provided.
• To confirm a selection press the
button.
• To select menu items press the
buttons.
The Initial Setup will take a few minutes, please be
patient.
If you have a digital cable box that connects via a HDMI cable, skip the tuning
section, you do not need to tune in your TV. You just need to select the HDMI
source to view digital cable channels.
Recommendations - Internet connection:
• Connect your TV via an Ethernet cable.
Recommendations - Tuning in TV stations:
• If you receive your TV via an aerial choose the Antenna
option.
• If you have cable box connected by an RF cable to your
TV, choose the Cable option.
Your TV is a Smart TV. To use Smart you will have to be connected to the internet. To enjoy Smart functionality you will need a fast broadband connection,
you may need to check your speed with your internet provider. In Smart mode you can search the internet or browse the pre-installed apps.
7
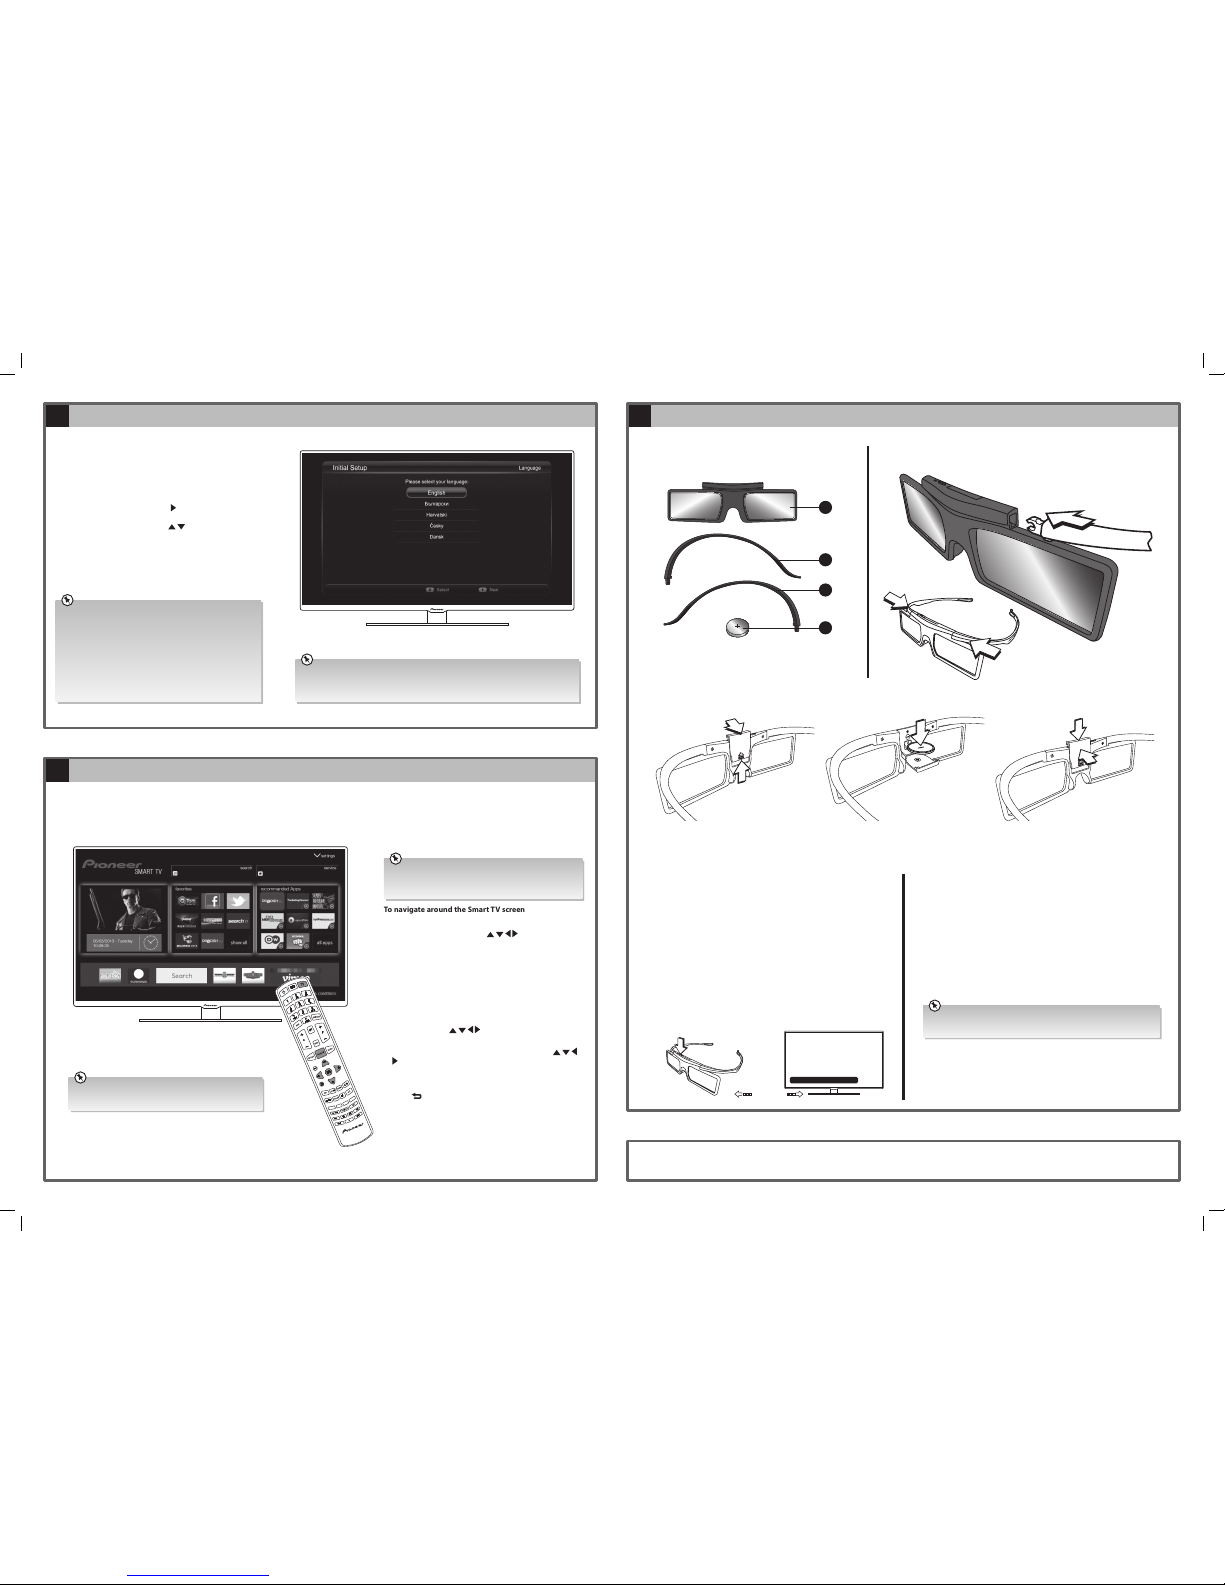
3D Glasses
Unpacking the glasses
Inserting the batteries
Pairing the 3D glasses Using the 3D glasses
Connecting the arms
Gently push each arm into the main body
of the glasses as shown below.
1
2
3
4
1. 3D glasses frame x2
2. Right arm x2
3. Left arm x2
4. Battery (CR2025) x2
1. Slide the battery compartment up.
2. Open the battery compartment.
3. Insert the supplied battery (CR2025)
making sure that the ‘+’ symbol is facing
down.
4. Close the battery compartment.
5. Slide the battery compartment closed.
You will need to pair your 3D glasses with your TV when you want to
view your TV in 3D mode. The glasses will only work when your TV is in
3D mode.
1. Turn you TV on, then press the 3D button on your TV remote control
to switch your TV into 3D mode.
2. Make sure you are within 1m of the TV then press and hold the
STANDBY button on the 3D glasses for 6 seconds. The button will
flash red. When the glasses are connected the message ‘Connection
established between TV and 3D glasses. You should notice the
lenses change shade.
TV in 3D mode
Press & hold for 6 seconds
Within 1m
Connection established between TV and 3D glasses
Your 3D glasses have 3 modes - Normal 3D mode, Right eye mode and
Left eye mode. Right and left eye modes are for when you are gaming
in a split screen mode.
1. Press and hold the STANDBY button for 6 seconds to switch the 3D
glasses on.
2. To switch the glasses back into standby press and hold the STANDBY
button for 6 seconds. Your 3D glasses will also go into standby 30
seconds after you switch 3D mode off on your TV.
Make sure the TV is in 3D mode and all other TVs close to the
glasses are switched off before pairing.
Well done, your new TV is now ready to use. You will find that there are many exciting features available. To get to know all these features, please take
some time to read the instruction manual (provided on CD) with your TV.
QSG-L46S3D13N/L55S3D13N-GB-131127V2
L55S3D13N_QSG.indd 2 27/11/2013 12:16
 Loading...