

Page 1
Operation Manual
DVD AV RECEIVER
DVH-875AVBT
English
Page 2
En
Contents
Thank you for purchasing this PIONEER product.
To ensure proper use, please read through this manual before using this product. It is
especially important that you read and observe WARNINGs and CAUTIONs in this manual.
Please keep the manual in a safe and accessible place for future reference.
Precautions ...................................................3
IMPORTANT SAFEGUARDS ......................3
To ensure safe driving ...................................3
To avoid battery exhaustion ..........................4
Information to User ........................................4
Before you start ............................................5
Operating this unit .......................................6
Basic operations .........................................9
Removing the front panel to protect
your unit from theft ........................................9
Re-attaching the front panel ..........................9
Turning the unit on ........................................9
Turning the unit off ........................................9
Selecting a source .........................................9
Adjusting the volume .....................................9
Use and care of the remote control .........10
Using the remote control .............................10
Replacing the battery ..................................10
Basic menu operations .............................10
Source (selecting a source) ........................11
List (operating a list menu) ..........................10
Audio/Video (setting an audio menu) ..........10
System (setting a system menu) .................10
Radio ..........................................................11
Radio menu .................................................11
Band selecting .............................................11
Manual tuning (step by step) .......................11
Seeking .......................................................11
Storing and recalling stations ......................11
LOC/DX (local / distant seek tuning) ...........11
USB playback ...........................................12
Playing les on a USB storage device ........12
Stopping playback of les on a USB
storage device .............................................12
List menu .....................................................12
Selecting le category .................................12
Selecting a folder ........................................12
Selecting a le (chapter) .............................12
Playing audio les .......................................12
Playing photo les .......................................13
Playing video les .......................................13
Playing DivX® VOD content ........................13
Disc playback ............................................14
Insert a disc .................................................14
Eject the disc ...............................................14
Disc playback ..............................................14
Stop playback temporarily ...........................14
Stop playback entirely .................................14
Select desired track .....................................14
Fast forward/backward during playback ......14
Random track playback
(for CD/VCD/MP3/WMA Only) ....................14
Repeat .........................................................14
Repeat A - B ................................................15
GOTO ..........................................................15
PBC - Playback control ( for VCD 2.0 or up)... 15
DVD audio select ........................................15
VCD audio select ........................................15
DVD subtitle select ......................................15
DVD title select ...........................................15
DVD angle select ........................................15
Zoom ...........................................................15
Bluetooth Operation ................................16
Pairing .........................................................16
Main menu ..................................................16
Making a call ...............................................17
Answering a call ..........................................17
Transfer the call ..........................................17
Call from Phonebook ...................................17
Audio Streaming Operations .......................17
What is audio streaming? ............................17
Play / Pause a track ....................................17
Selecting a track ..........................................17
APP Operation ..........................................18
System setup .............................................19
Audio setting .............................................21
Video setting ..............................................21
Other Function ..........................................21
Using an AUX source ..................................21
Using an AV source ....................................21
Installation ..................................................22
Connecting the unit ..................................22
Wiring diagram ............................................24
Installation .................................................25
Before installing this unit .............................25
Mounting sleeve installation ........................25
Kit installation ..............................................26
ISO installation ............................................27
Fuse ............................................................27
Reconnect battery .......................................27
Remove the Unit ........................................27
Additional information ...............................28
Troubleshooting .......................................28
Error messages .........................................29
Handling guidelines ..................................30
Specications ............................................34
2
Page 3
01
English
Section
En
Precautions
IMPORTANT SAFEGUARDS
Please read all of these instructions
regarding your display and retain them for
future reference.
1 Read this manual fully and carefully
before operating your display.
2 Keep this manual handy as a
reference for operating procedures
and safety information.
3 Pay close attention to all warnings
in this manual and follow the
instructions carefully.
4 Do not allow other persons to use
this system until they have read
and understood the operating
instructions.
5 Do not install the display where it
may (i) obstruct the driver’s vision,
(ii) impair the performance of any of
the vehicle’s operating systems or
safety features, including air bags,
hazard lamp buttons or (iii) impair
the driver’s ability to safely operate
the vehicle.
6 Do not operate this display if doing
so in any way will divert your
attention from the safe operation of
your vehicle. Always observe safe
driving rules and follow all existing
trafc regulations. If you experience
difficulty in operating the system
or reading the display, park your
vehicle in a safe location and make
necessary adjustments.
7 Please remember to fasten your
seat belt at all times while operating
your vehicle. If you are ever in
an accident, your injuries can be
considerably more severe if your
seat belt is not properly buckled.
8 Never use headphones while driving.
9 To promote safety, certain functions
are disabled unless the parking
brake is on, and the vehicle is not in
motion.
10 Never set the volume of your display
so high that you cannot hear outside
trafc and emergency vehicles.
WARNING
Do not attempt to install or service
your display by yourself. Installation
or servicing of the display by persons
without training and experience in
electronic equipment and automotive
accessories may be dangerous and
could expose you to the risk of electric
shock or other hazards.
To ensure safe driving
WARNING
• LIGHT GREEN LEAD AT POWER
CONNECTOR IS DESIGNED TO
DETECT PARKED STATUS AND
MUST BE CONNECTED TO THE
POWER SUPPLY SIDE OF THE
PARKING BRAKE SWITCH. IMPROPER
CONNECTION OR USE OF THIS LEAD
MAY VIOLATE APPLICABLE LAW AND
MAY RESULT IN SERIOUS INJURY OR
DAMAGE.
• To avoid the risk of damage and injury
and the potential violation of applicable
laws, this unit is not for use with video
that is visible to the driver.
• To avoid the risk of accident and the
potential violation of applicable laws, no
viewing of front seat video should ever
occur while the vehicle is being driven.
• In some countries or states the viewing
of images on a display inside a vehicle
even by persons other than the driver
may be illegal. Where such regulations
apply, they must be obeyed.
When you attempt to watch a video image
while driving, the warning "Viewing of front
seat video source while driving is strictly
prohibited." will appear on the front display.
To watch a video image on the front display,
park your vehicle in a safe place and apply
the parking brake.
3
Page 4
Section
En
01
Precautions
To avoid battery exhaustion
Keep the vehicle engine running when
using this unit to avoid draining the battery
power.
• When no power is supplied to this unit,
such as when the vehicle battery is
being replaced, the microcomputer of
this unit returns to its initial condition. We
recommend that you transcribe the audio
adjustment data.
WARNING
Do not use with vehicles that do not feature
an ACC position.
CAUTION: USE OF CONTROLS OR
ADJUSTMENTS OR PERFORMANCE OF
PROCEDURES OTHER THAN THOSE
SPECIFIED HEREIN MAY RESULT IN
HAZARDOUS RADIATION EXPOSURE.
CAUTION: THE USE OF OPTICAL
INSTRUMENTS WITH THIS PRODUCT
WILL INCREASE EYE HAZARD.
CAUTION
This product is a class 1 laser product
classified under the Safety of laser
products, IEC 60825-1:2007.
Information to User
This device complies with part 15 of the
FCC Rules. Operation is subject to the
following two conditions: (1) This device
may not cause harmful interference,
and (2) this device must accept any
interference received, including
interference that may cause undesired
operation.
This transmitter must not be co-located
or operated in conjunction with any other
antenna or transmitter.
4
This equipment complies with FCC
radiation exposure limits set forth for an
uncontrolled environment and meets
the FCC radio frequency (RF) Exposure
Guidelines in Supplement C to OET65.
This equipment has very low levels of RF
energy that it deemed to comply without
maximum permissive exposure evaluation
(MPE). But it is desirable that it should
be installed and operated keeping the
radiator at least 20cm or more away from
person’s body (excluding extremities:
hands, wrists, feet and ankles).
Information to User - Alteration or
modifications carried out without
appropriate authorization may invalidate
the user's right to operate the equipment.
NOTE: This equipment has been tested
and found to comply with the limits for
a Class B digital device, pursuant to
Part 15 of the FCC Rules. These limits
are designed to provide reasonable
protection against harmful interference in
a residential installation. This equipment
generates, uses and can radiate radio
frequency energy and, if not installed and
used in accordance with the instructions,
may cause harmful interference to radio
communications. However, there is no
guarantee that interference will not occur
in a particular installation. If this equipment
does cause harmful interference to radio
or television reception, which can be
determined by turning the equipment off
and on, the user is encouraged to try to
correct the interference by one or more of
the following measures:
- Reorient or relocate the receiving
antenna.
- Increase the separation between the
equipment and receiver.
- Connect the equipment into an outlet on
a circuit different from that to which the
receiver is connected.
- Consult the dealer or an experienced
radio/TV technician for help.
- Consult the dealer or an experienced
radio/TV technician for help.
About this manual
• The screen display language is used
in English to the explanations in this
manual. You can change the display
language. For details, see Language on
page 20.
Page 5
02
English
Section
En
Before you start
About this unit
CAUTION
• Do not allow this unit to come into
contact with liquids. Electrical shock
could result. Also, damage to this unit,
smoke, and overheating could result from
contact with liquids.
• Always keep the volume low enough to
hear outside sounds.
• Avoid exposure to moisture.
Note
Function setting operations are completed
even if the menu is cancelled before the
operations are conrmed.
In case of trouble
Should this product fail to operate properly,
please contact your dealer or nearest
authorized Pioneer Service Station.
Resetting the microprocessor
The microprocessor must be reset in the
following situations:
• Before using this unit for the first time
after installation
• If the unit fails to operate properly
• When strange or incorrect messages
appear on the display
Disable the demonstration mode
The demonstration mode should be turned
off as in the following process.
- Press the SRC key to turn on this unit.
- Press and hold the SEL key to display
SETTING menu.
- Select General menu and then choose
DEMO menu.
- Select Off and then press the center of
Multi Control to set the DEMO mode off.
- Press the ESC key to deselect the
SETTING menu.
The demonstration mode is also disabled
automatically by turning ignition key on and
off.
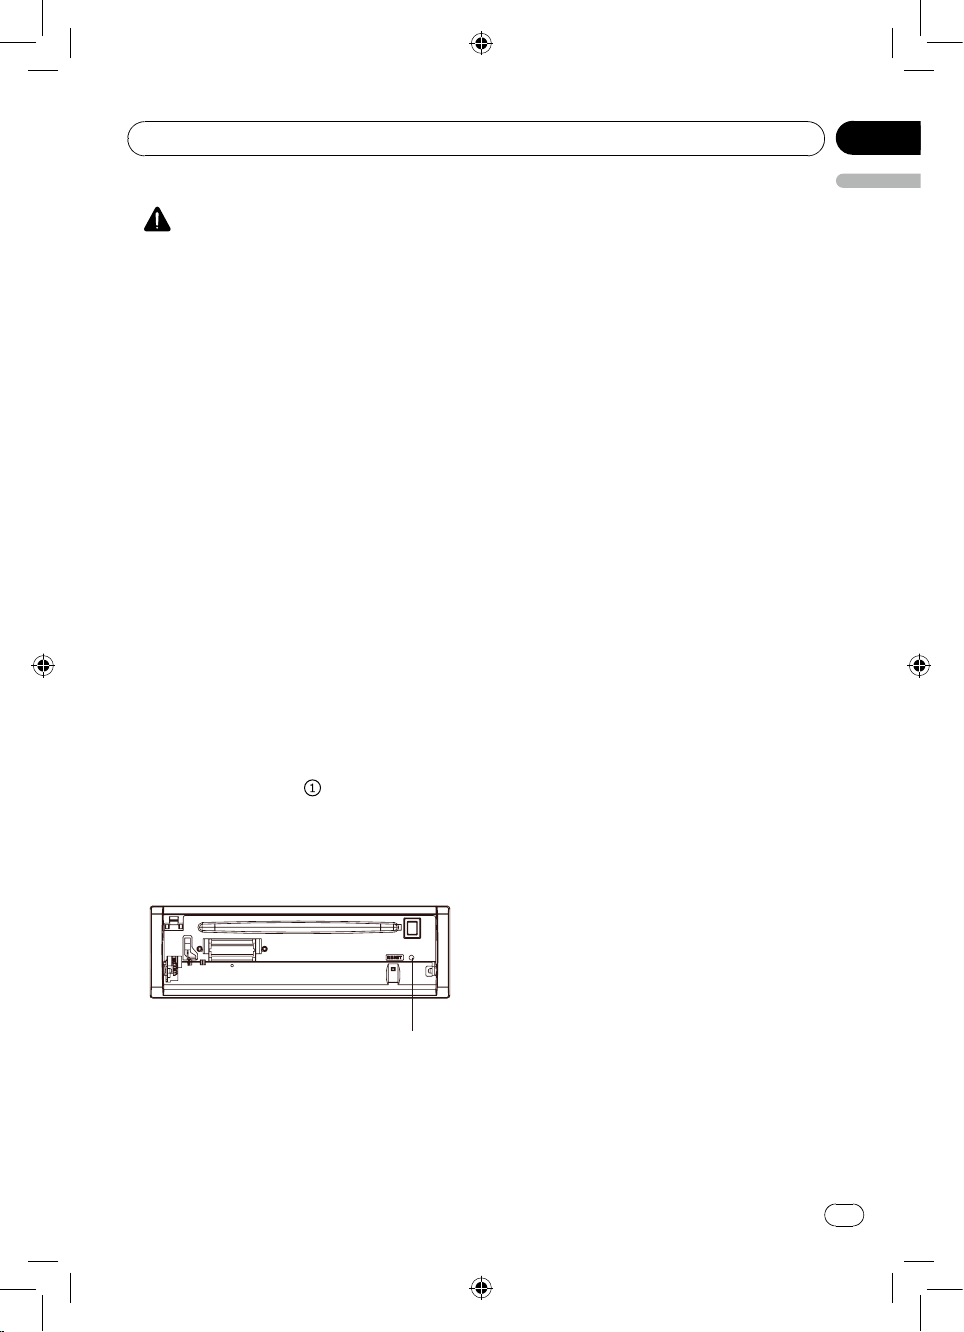
1 Press the (page 6,
right of the front panel to ip down it.
2 Press [RESET] with a pen tip or other
pointed instrument.
) button on the top
RESET
5
Page 6
Section
En
03
Operating this unit
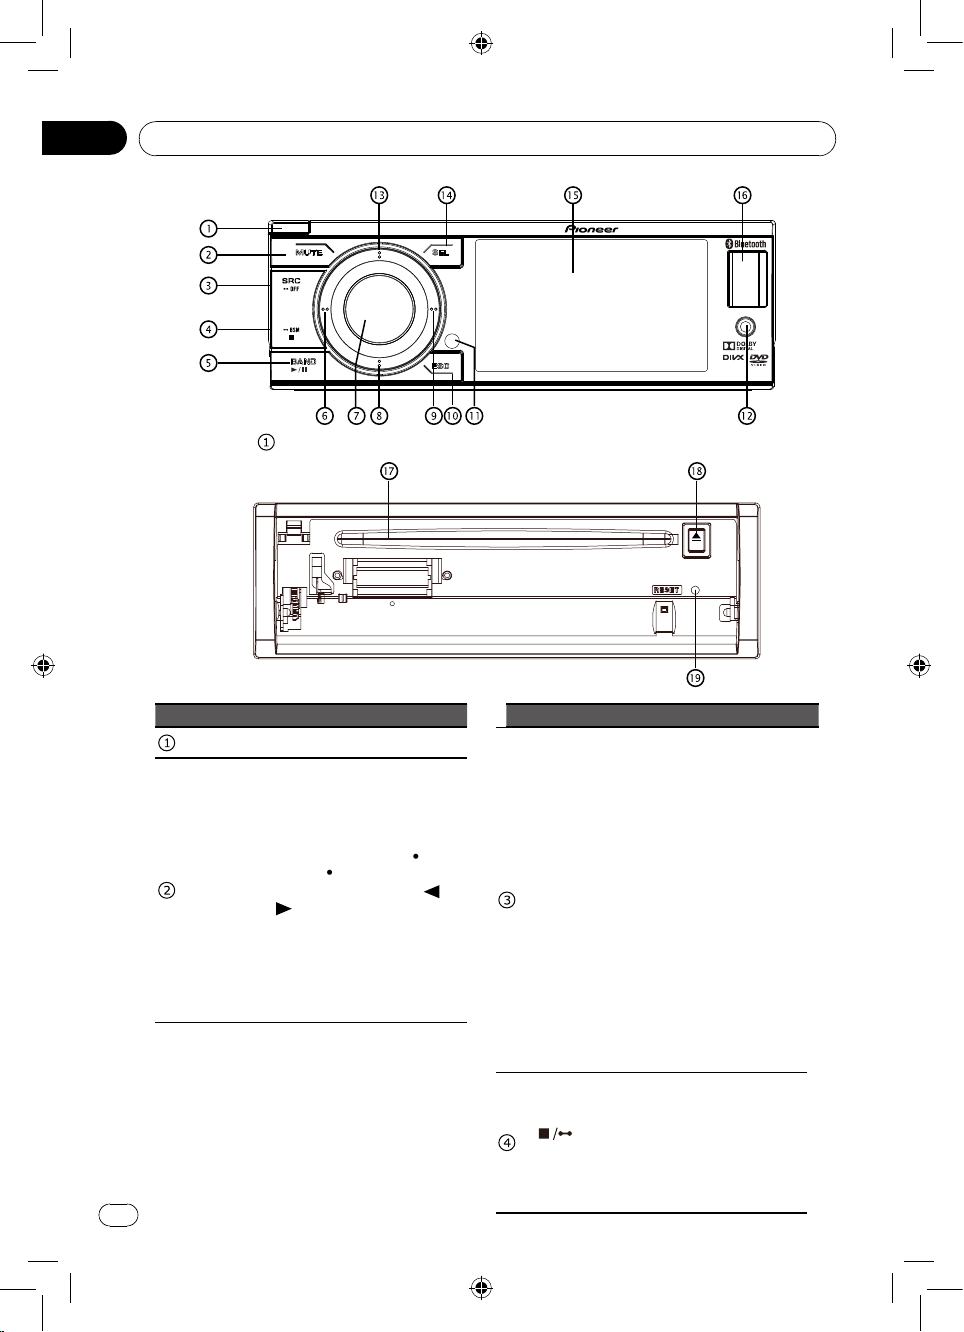
Press the [ ] button to ip down the front panel.
Part Operation Part Operation
• Panel open
• Mute on/off
• Enter the source menu (2
sec.)
• Return to main source
menu (2 sec.), use [ • ]
MUTE
6
(Left) / [ • ] (Right) button
on the front panel or [
[
] button on the remote
control to select the desired
mode, and press [M.C.]
button on the front panel
or [ENTER] button on the
remote control to conrm.
] /
• Power off (2 sec.)
• Select playing mode:
• RADIO
• DISC (when disc inserted)
• USB (when USB
connected)
• AUX-IN (front audio
& video input. External
peripheral devices with
SRC
BSM
RCA audio and video
outputs can be connected
with the unit.)
• AV Input (rear audio
& video input. External
peripheral devices with
RCA audio and video
outputs can be connected
with the unit.)
• BT
• APP
• Preset scan (in Radio
mode)
• Best Stations Memory (2
sec.) (in Radio mode)
• Stop playback
• Reject the incoming call
or hang up the current
conversation
Page 7
03
English
Section
En
Operating this unit
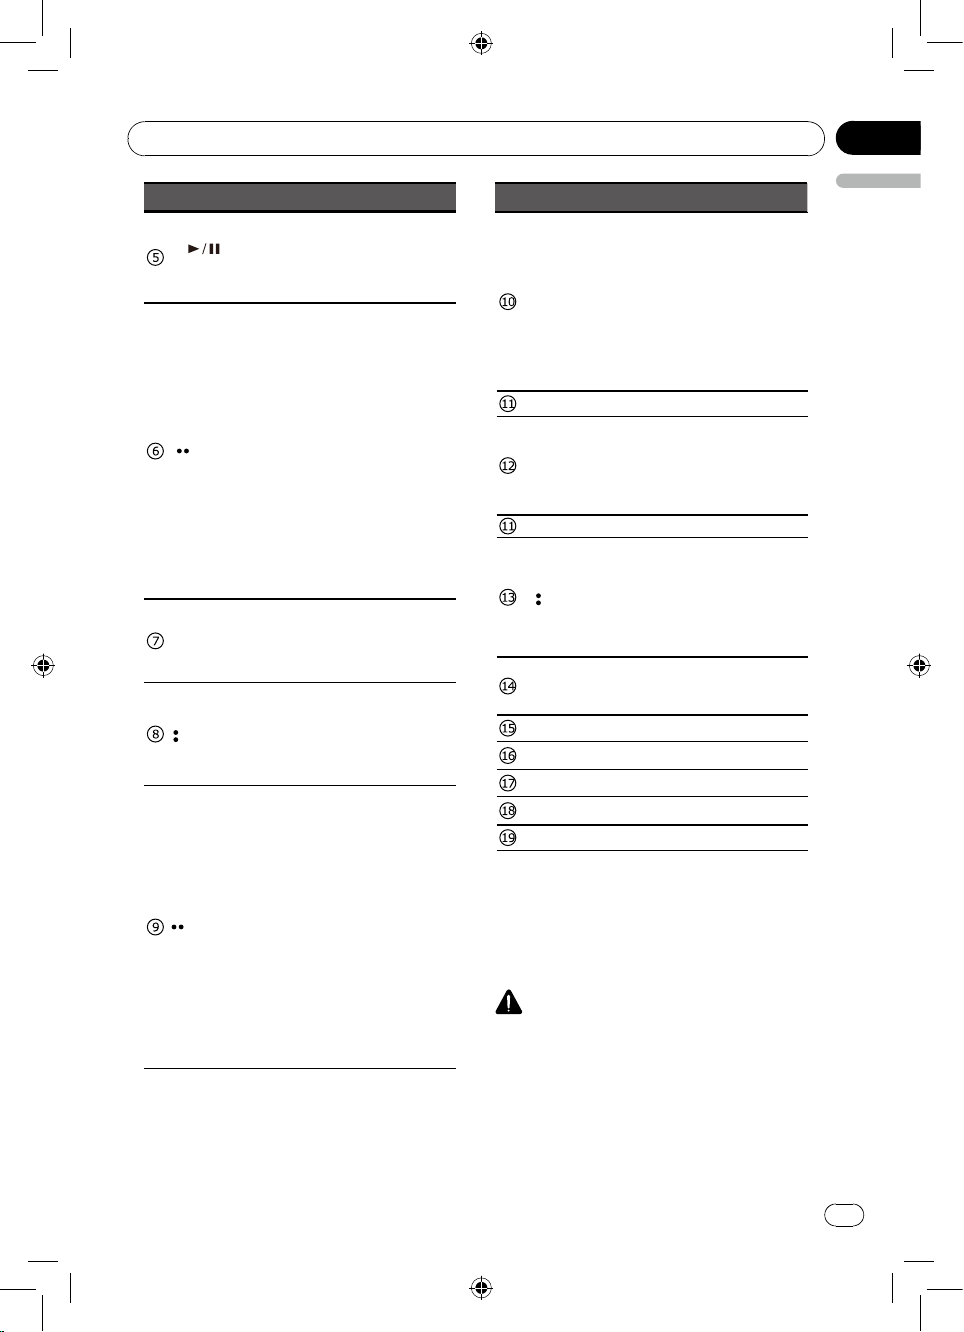
Part Operation
• Play/Pause (in DVD, CD
BAND
(Left)
MULTI-
CONTROL
(M.C.)
(Down)
(Right)
and MP3/WMA modes)
• Band switch (in Radio
mode)
• Search the previous station
automatically (press more
than 2 seconds) (in Radio
mode).
• Search the previous station
manually (in Radio mode).
• Search the previous track
or chapter (in CD, MP3/
WMA, and DVD video
mode).
• Fast backward by 2, 4, 8,
16 step (2 sec.) (in CD,
MP3/WMA and DVD video
mode).
• Navigate left among option
items
• Adjust volume level (rotate).
• Conrm operation (press).
• Stop auto seeking (in Radio
mode) (press).
• Navigate down among
option items (in DVD, CD
and MP3/WMA modes)
• Play the next preset radio
station (in Radio mode)
• Search the next station
automatically (press more
than 2 seconds) (in Radio
mode).
• Search the next station
manually (in Radio mode).
• Search the next track or
chapter (in CD, MP3/WMA,
and DVD video mode).
• Fast forward by 2, 4, 8,
16 step (2 sec.) (in CD,
MP3/WMA and DVD video
mode).
• Navigate right among
option items
Part Operation
• Cancel source select menu
and return to previous
menu
• When play back videos,
ESC
press to show information.
• Display off (press 2 sec.)
Press any button to
resume.
• Remote sensor
• AV in
AUX input jack (3.5mm
stereo/video jack)
Use to connect an auxiliary
device.
• USB port
• Navigate up among option
items (in DVD, CD and
(Up)
MP3/WMA modes)
• Play the previous preset
radio station (in Radio
mode)
• Audio/video Setting (press).
SEL
• Setting menu (press 2
sec.).
• 3.5 inch TFT display
• USB port
• Disc loading slot
• Eject button
• RESET
CAUTION
• Use an optional Pioneer USB cable (CD-
U50E) to connect the USB audio player/
USB memory as any device connected
directly to the unit will protrude out from
the unit and may be dangerous.
• Connect the USB port to the USB
connector on the front of the panel, and
insert the video-out line in the AV-in jack.
• Do not use unauthorized products.
7
Page 8
Section
En
03
Operating this unit
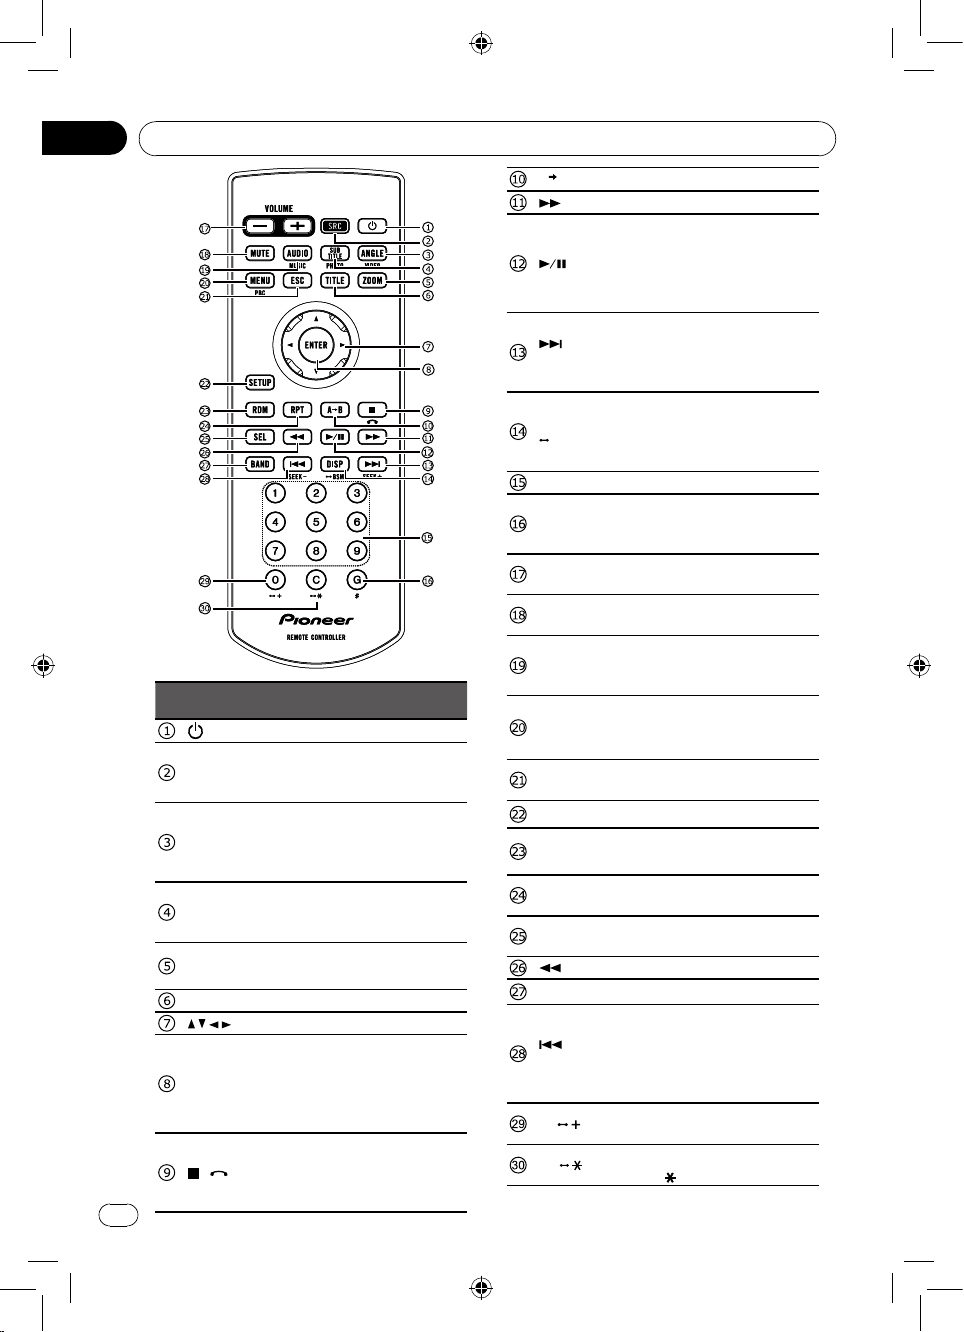
Part
• Power on/off.
SRC
ANGLE/
VIDEO
SUB
TITLE/
PHOTO
ZOOM
TITLE
ENTER
8
• Play source selection.
• Return to main source
• Select a difference angle/
• Show video list.
• Select DVD or DivX subtitle
• Show photo list.
• Enlarge or reduce picture
• Enter DVD title menu.
• Menu cursor.
• Enter
• Connect or disconnect
• Answer the incoming call.
• Dial out
• Press to stop playback.
• Reject the incoming call
/
Operation
menu (2 sec.).
version of the current DVD
scene.
language.
or active image size.
HFP/A2DP. (press 2 sec.)
or hang up the current
conversation.
A B
/
SEEK +
DISP/
BSM
1-9
G / #
VOLUME
+/-
MUTE
AUDIO/
MUSIC
MENU/
PBC
ESC
SETUP
RDM
RPT
SEL
BAND
/
SEEK -
0 /
C /
• Repeat A-B
• Fast forward
• Press to pause or resume
playback.
• Switch the HFP voice
between unit and HFP
device.
• Next track/chapter.
• Seek station by step.
• Seek the next available
station. (2 sec.)
• Display playback
information.
• Radio preset scan / Radio
auto preset.
• Digit buttons
• Goto search
• "#" there is no function in
this model.
• Press to increase or
decrease volume.
• Press to mute. Press again
to unmute.
• Switch audio channel.
• Switch DVD audio language
• Show music list.
• Access DVD menu.
• Access PBC menu (for
VCD 2.0 or up)
• Exit the current menu, and
return to last menu.
• Enter setting menu.
• Enable/disable random
playback.
• Enable/disable repeat
playback.
• Enter audio/video setting
menu
• Fast reverse
• Select tuner band.
• Previous track/chapter.
• Press to seek the previous
station.
• Seek the previous available
station. (2 sec.)
• Input number "0".
• Input "+".
• Clear the input number.
• Input " ".
Page 9
03
English
Section
En
Operating this unit
Basic operations
Important
• Handle gently when removing or
attaching the front panel.
• Avoid subjecting the front panel to
excessive shock.
• Keep the front panel out of direct sunlight
and high temperatures.
• To avoid damaging the device or vehicle
interior, remove any cables and devices
attached to the front panel before
detaching it.
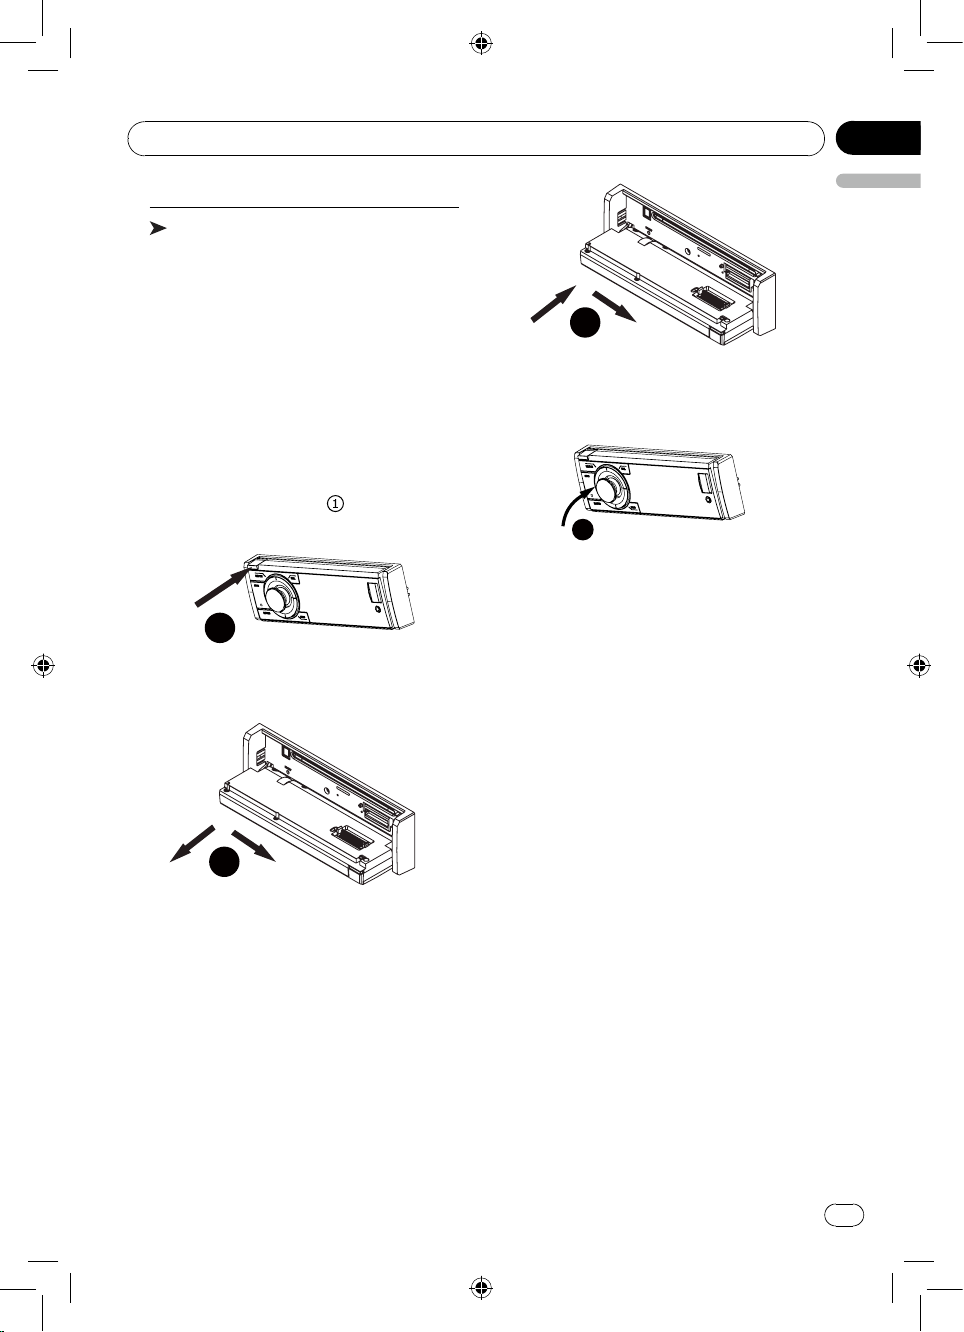
Removing the front panel to
protect your unit from theft
1 Press the (page 6, ) button to flip
down the front panel.
1
1
Make sure that the front panel has been
properly connected to the main unit.
2 Press the upper right end of the front
panel until it is rmly seated.
2
• If you can’t attach the front panel to the
main unit successfully, try again. Forcing
the front panel into place may result in
damage.
2 Grab the left side of the front panel, push
it to the right, then pull it out.
2
* The indicator light ashes after the panel
removed.
3 Always keep the detached front panel in
a protection device such as a protection
case.
Re-attaching the front panel
1 Grab the left side of the front panel, push
it to the right, then push it in until it clicks.
Turning the unit on
Press [SRC] button to turn the unit on.
Turning the unit off
Press and hold [SRC] until the unit turns
off.
Selecting a source
Press [SRC] to cycle between:
RADIO (tuner)—DISC (when disc
inserted)—USB (when USB connected)—
AUX (AUX-IN cannot carry out a source
selection, unless it turns ON AUX by
Setting menu.)—AV Input (AV-IN cannot
carry out a source selection, unless it
turns ON AV Input by Setting menu. )—
BT (Bluetooth)—APP
Adjusting the volume
Turn [M.C.] to adjust the volume. Turn
counterclockwise to decrease and
clockwise to increase the volume.
9
Page 10
Section
En
03
Operating this unit
Use and care of the remote
control
Using the remote control
Point the remote control in the direction of
the front panel to operate.
When using for the rst time, pull out the
lm protruding from the tray.
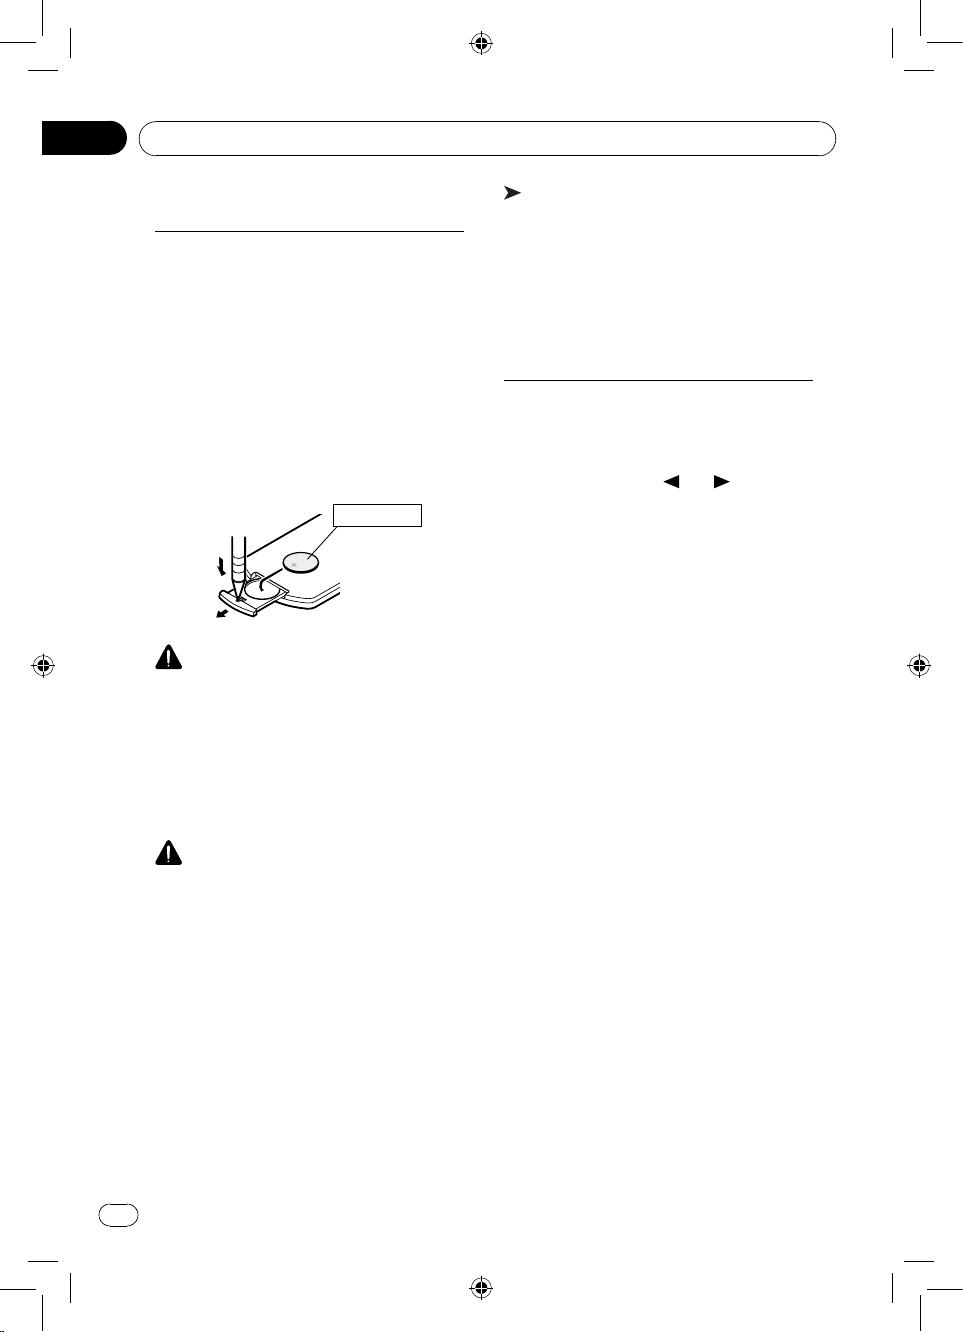
Replacing the battery
Slide the tray on the back of the remote
control out and insert the battery with
the plus (+) and minus (–) poles aligned
properly.
• When using for the rst time, pull out the
lm protruding from the tray.
CR2025(3V)
WARNING
• Keep the battery out of the reach of
children.
Should the battery be swallowed, consult
a doctor immediately.
• Batteries (battery pack or batteries
installed) must not be exposed to
excessive heat such as sunshine, re or
the like.
CAUTION
• Remove the battery if the remote control
is not used for a month or longer.
• There is a danger of explosion if the
battery is incorrectly replaced. Replace
only with the same or equivalent type.
• Do not handle the battery with metallic
tools.
• Do not store the battery with metallic
objects.
• If the battery leaks, wipe the remote
control completely clean and install a
new battery.
• When disposing of used batteries,
comply with governmental regulations or
environmental public institutions’ rules
that apply in your country/area.
Important
• Do not store the remote control in high
temperatures or direct sunlight.
• The remote control may not function
properly in direct sunlight.
• Do not let the remote control fall onto
the oor, where it may become jammed
under the brake or accelerator pedal.
Basic menu operations
Source (selecting a source)
1 Press and hold [SRC] button to display
the home menu.
2 Use [ • • ] (Left) / [ • • ] (Right) button on
the front panel or [ ] / [ ] button on
the remote control to select the desired
source.
Press [M.C.] button on the front panel or
[ENTER] button on the remote control to
select.
List (operating a list menu)
Press [ESC] to display the list menu (in
MP3/WMA/CD-DA mode) (page 12).
Audio/Video (setting an audio
menu)
Press [SEL] to display the audio/Video
menu.
Refer to Audio Adjustments (page 20).
System (setting a system menu)
Press and hold [SEL] more than 2 seconds
to display the system menu.
Refer to System settings (page 19).
10
Page 11
03
English
Section
En
Operating this unit
Radio
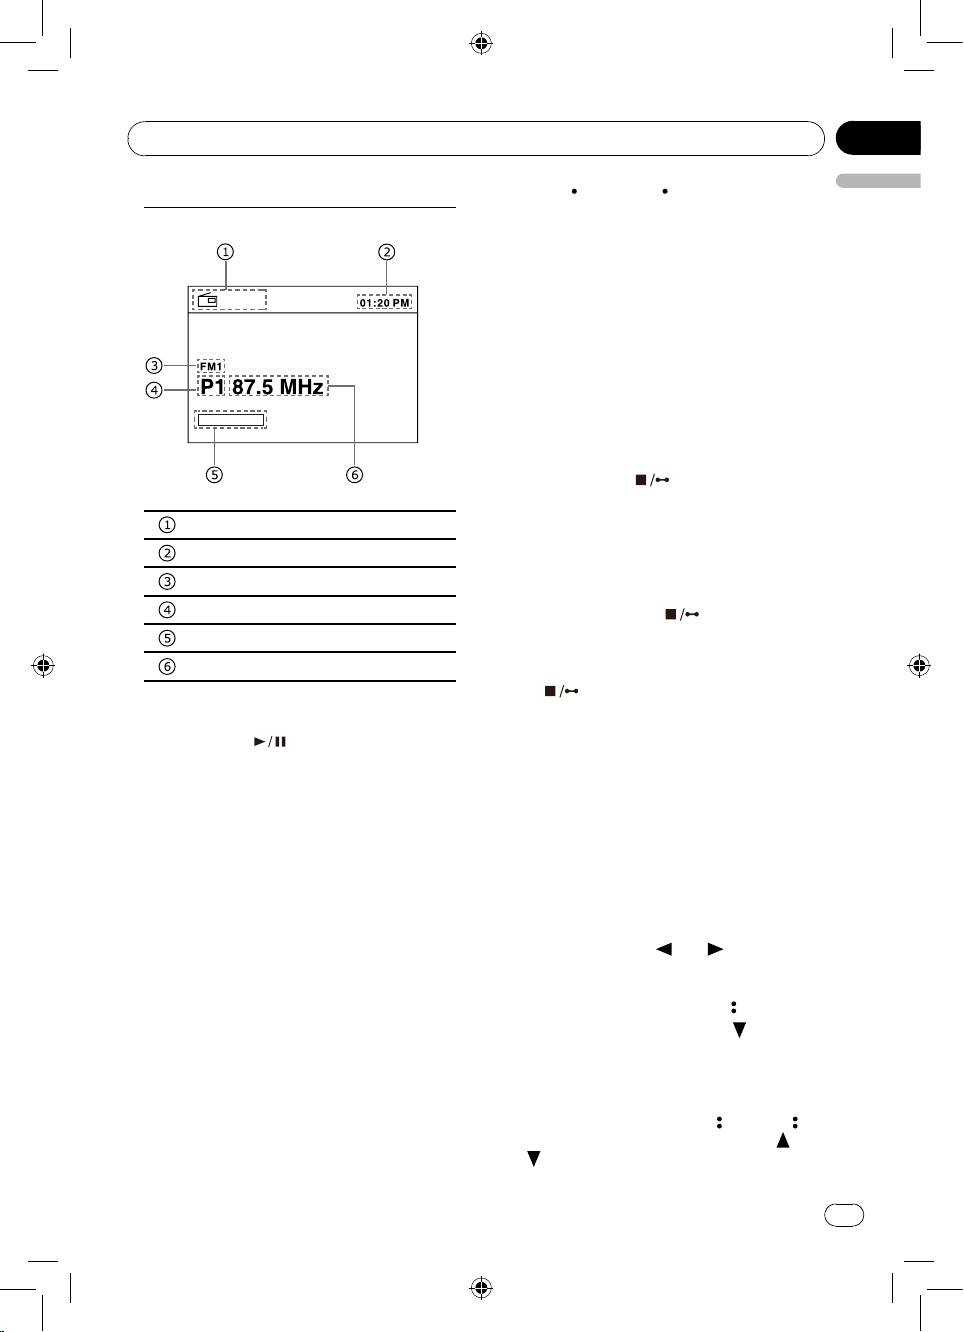
Radio menu
RADIO
POWERFUL
press [ • ] (Up) or [ • ] (Down) button to
select a preset number, then press [M.C.]
button to store it.
You may also do the operation by the
remote control as following step:
Press and hold a number button (1-6) on
the remote control, the current station will
be stored in the memory.
Storing a preset station automatically
BSM (best stations memory) automatically
stores the 6 strongest stations of each
band, the unit can store 18 stations in total.
Source indicator
Time
Band
Preset station No.
Sound effect indicator
Frequency
Band selecting
Press [BAND ] button repeatedly to
select desired band. The band indicator
(FM1, FM2, FM3 or AM) will be displayed.
Manual tuning (step by step)
Press the [ • • ] (Left) or [ • • ] (Right) button
to tune step by step.
Seeking
1 Press and hold the [ • • ] (Left) or [ • • ]
(Right) button more than 2 seconds to
seek previous/next available station.
2 You can cancel seek tuning by press
[M.C.] or [ • • ] (Left) / [ • • ] (Right) button.
Storing and recalling stations
You can easily store up to six stations for
each band as presets.
Storing a preset station manually
1 Tune to a desired station as above
method.
2 Press and hold [M.C.] button until the
preset station flashes on the screen,
Best stations memory
1 Press and hold [
than 2 seconds to search and store
stations. During searching and storing,
"BSM" appears on the display.
2 The unit will scan play the preset stations
automatically and "AMS-" appears on the
display.
• To cancel, press [ BSM] button
again.
Recalling preset stations
Press [ BSM] button to scan play all the
preset stations.
BSM] button more
LOC/DX (local / distant seek
tuning)
Local seek tuning lets you tune to only
those radio stations with sufciently strong
signals for good reception.
Distant seek tuning allows to receive all the
signals.
1 Press and hold the [SEL] button to
display the setting mode.
2 Press [ • • ] (Left) / [ • • ] (Right) button on
the front panel or [ ] / [ ] button on
the remote control to select Radio setting
menu.
3 Rotate the [M.C.] or press [ ] (Down)
button on the front panel or [ ] button
on the remote control to move the cursor
to LOC DX option.
4 Press [M.C.] or [ENTER] button to spread
the sub-menu.
5 Rotate the [M.C.] or press [ ] (Up) / [ ]
(Down) button on the front panel or [ ] /
[ ] button on the remote control to
select desired option.
6 Press [M.C.] or [ENTER] button to conrm.
11
Page 12
Section
En
03
Operating this unit
USB playback
Playing les on a USB storage
device
1 Open the USB port cover.
2 Plug in the USB storage device using a
USB cable.
3 The unit will switch to USB mode
and load the files in the USB device
automatically.
Stopping playback of les on a
USB storage device
• Switch to other mode.
• Disconnect the USB storage device.
List menu
The unit will enter list menu after connecting
the USB storage, it will enter playing audio
files automatically after 15 seconds, press
[ESC] button to return to list menu.
control to select file category (Audio, Photo,
Video), press [M.C.] or [ENTER] to conrm.
Selecting a folder
1 Press [ ] (Up) / [ ] (Down) or [ ] / [ ]
button to select a folder (if there are
folders in the storage), press [M.C.] or
[ENTER] to conrm.
2 To nd a sub-folder, repeat above step.
Selecting a le (chapter)
In le list menu, press [ ] (Up) / [ ] (Down)
or [ ] / [ ] button to select a le, press
[M.C.] or [ENTER] button, the unit will load
the le and start playback.
Selecting a le of other folder:
1. If there are more than 1 folder in the
storage, a folder icon appears upon the
le’s names, press [ ] (Up) / [ ] (Down)
or [ ] / [ ] button to select it and press
[M.C.] or [ENTER] button to show all the
folders.
2. Press [ ] (Up) / [ ] (Down) or [ ] / [ ]
button to select a folder and press [M.C.]
or [ENTER] button to show the files in
the folder.
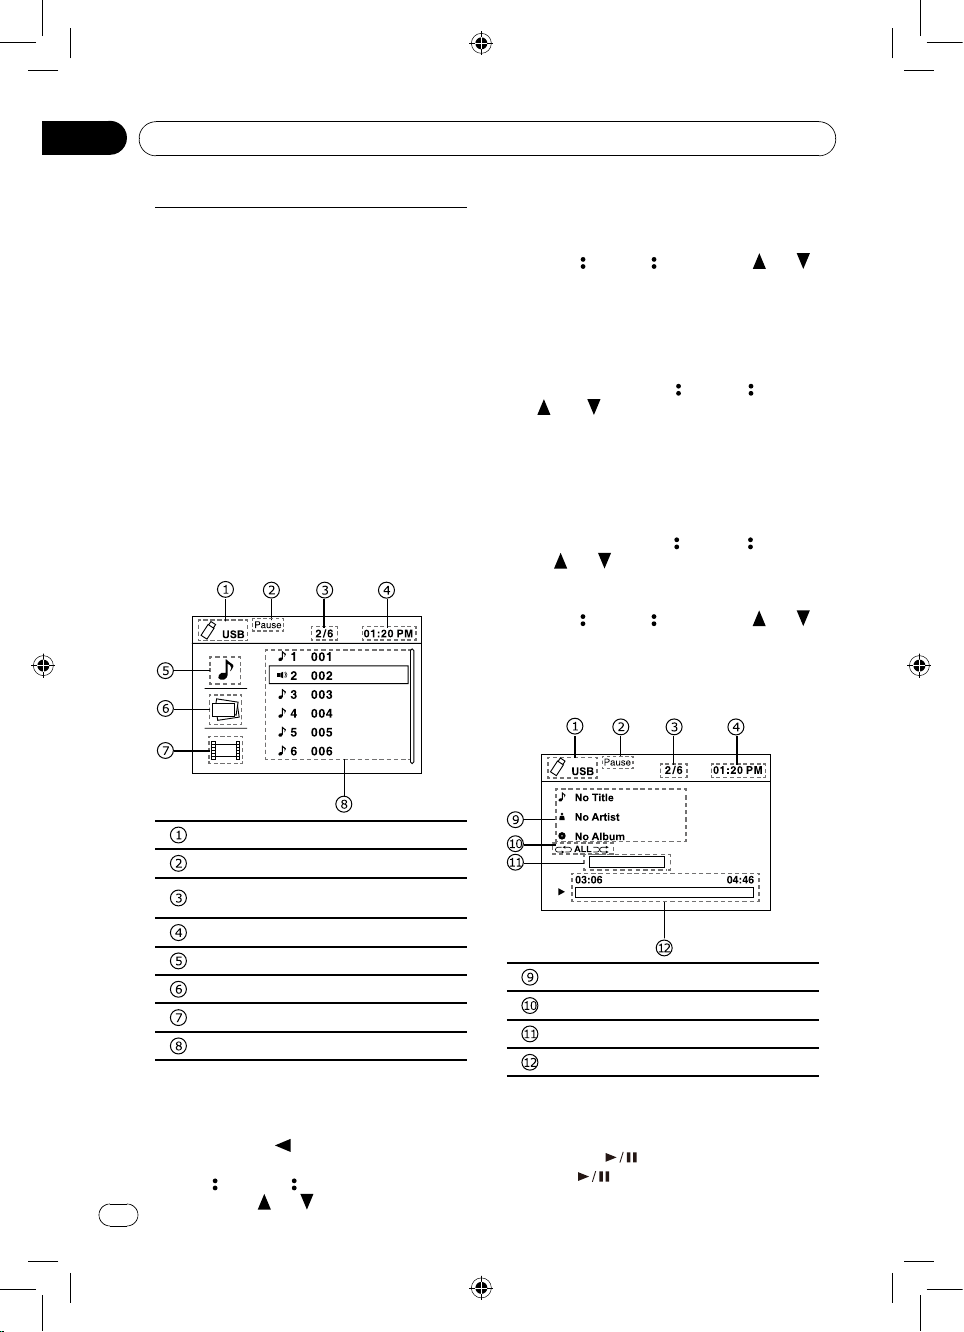
Playing audio les
Source indicator
Playback status indicator
Current track number/Total track
number
Time
Audio list indicator
Photo list indicator
Video list indicator
File list
Selecting le category
The unit will enter le list after loading the
storage, press [ • • ] (Left) button on the
front panel or [ ] button on the remote
control to return to le type selecting.
Press [ ] (Up) / [ ] (Down) button on the
front panel or [ ] / [ ] button on the remote
12
POWERFUL
Track information
Repeat and Random information
Sound effect indicator
Elapsed time/Total time of the track
• In playback menu, press [ESC] button to
return to upper category.
Play/Pause
Press [BAND
panel or [ ] button on the remote
control to play/pause.
] button on the front
Page 13
03
English
Section
En
Operating this unit
Previous/next track
Press [ • • ] (Left) or [ • • ] (Right) button to
go to previous or next track.
Fast forwarding or reversing
Press and hold [ • • ] (Left) or [ • • ] (Right)
button more than 2 seconds to fast
backward/forward by 2, 4, 8, 16 step.
Back to list menu
Press [ESC] button to back to list menu.
Playing photo les
Play/Pause
Press [BAND ] or [ ] button to play/
pause.
Previous/next photo
Press [ • • ] (Left) or [ • • ] (Right) button to
go to previous or next photo.
Rotating photo
Press [ ] button to rotate the photo 270°
-> 180° -> 90°, press [ ] button to rotate
the photo 90° -> 180° -> 270°, each press
to rotate the photo 90°, press [ ] (Up) / [ ]
(Down) or [ ] / [ ] button to rotate the
photo 180°.
Back to list menu
Press [ BSM] button to back to list
menu.
Playing video les
Play/Pause
Press [BAND ] or [ ] button to play/
pause.
Previous/next chapter
Press [ • • ] (Left) or [ • • ] (Right) button to
go to previous or next chapter.
Fast forwarding or reversing
Press and hold [ • • ] (Left) or [ • • ] (Right)
button more than 2 seconds to fast
backward/forward by 2, 4, 8, 16 step.
Back to list menu
Press [ BSM] button to back to list
menu.
Notes
• Disconnect USB storage devices from
the unit when not in use.
• It will take several minutes when playing
external storage devices that contain a
mixture of various media le types.
• Use an optional Pioneer USB cable (CD-
U50E) to connect the USB audio player/
USB memory as any device connected
directly to the unit will protrude out from
the unit and may be dangerous.
• Do not use unauthorized products.
Playing DivX® VOD content
Some DivX® VOD (video on demand)
content may only be playable a fixed
number of times.
When you attempt to play back this type of
content saved on an external storage
device, the remaining number of times it
can be played is shown on-screen. You can
then decide whether or not to play back the
contents of the external storage device.
• If there is no limit to the number of times
the DivX
then you may insert the external storage
device into your player and play the
content as often as you like, and no
message will be displayed.
• You can conrm the number of times that
the content can be played by checking
the number displayed after Remaining
Views.
Important
• In order to play DivX® VOD contents
on this unit, you first need to register
the unit with your DivX® VOD contents
provider. For details on your registration
code, refer to Displaying the DivX® VOD
registration code .
• DivX® VOD content is protected by
a DRM (Digital Rights Management)
system. This restricts playback of content
to specic, registered devices.
If a message is displayed after inserting the
external storage device containing DivX®
VOD content, use M.C. to select a desired
mode.
Turn to change the mode. Press to select.
• Play – Playback of the DivX® VOD
content
• Next Play – Skip to the next le
• Stop – If you do not want to play the
DivX® VOD content
®
VOD content can be viewed,
13
Page 14
Section
En
03
Operating this unit
Disc playback
Insert a disc
1 Press (page 6, ) button to ip down the
panel.
2 Insert a disc into the disc loading slot
(page 6,
3 Close the panel, and the unit will change
to disc mode automatically.
Notes
• Please conrm whether there is a disc in
the unit before you insert another one.
• The unit will exit current playing source
and enter DVD mode when one disc is
inserted.
• The following format disc will be support:
CD-R,CD-RW, DVD-R, DVD+R, DVDRW,DVD + RW .
Eject the disc
1 Press (page 6, ) button to ip down the
panel.
2 Press [
the disc.
3 Close the panel.
Notes
• After ejecting the disc, the unit reverts to
other mode automatically.
• You can eject a disc when the unit
powered off. The unit remains off after
the disc ejected.
• If the disc is not removed from the
unit within 10 seconds, the disc will be
reloaded to prevent accidental damage.
Disc playback
1 When a disc is inserted, display shows
"Loading". For MP3/WMA or disc with
mixed files, reading time may exceed 1
minute.
2 While audio/photo/video files playback,
list menu will appear on the display. The
list menu and operations are the same
with USB playback (page 12).
Stop playback temporarily
- During playback, press [BAND ] or
[
- The sound will be muted.
- Display shows "PAUSE".
14
).
] button (page 6, ) to eject
] to pause playback.
Press [BAND
continue playback.
To resume normal play, repeat the
operation.
] or [ ] again to
Stop playback entirely
1 During playback, press [ BSM]
button once to stop the playback and
the relevant location on the disc is
saved, press [BAND ] or [ ] to
resume the playback from the saved disc
location.
2 Press [ BSM] twice to cease the
playback. Press [BAND ] or [ ]
to start the playback from the very
beginning the Title page of the DVD or
the rst track of VCD / CD.
Select desired track
- Press [ • • ] (Left) or [ • • ] (Right) button
to skip to the previous/next track.
Fast forward/backward during
playback
Press [ • • ] (Left) or [ • • ] (Right) button for
more than 2 seconds repeatedly to select
X2, X4, X8, X16 to fast backward or forward
track during playback.
- During the fast forward or backward
operation, press [BAND ] or [ ]
briey to playback again.
- During the fast forward or backward
operation, the volume will be muted.
Random track playback (for CD/
VCD/MP3/WMA Only)
You can play all the tracks in random order.
1 During playback, press [RDM] button on
the remote control unit to select random
playback.
2 Press [RDM] button again to select
normal playback.
Repeat
During playback, press [RPT] button on
the remote control unit to select repeat
playback.
Page 15
03
English
Section
En
Operating this unit
Repeat A - B
Select desired passage to repeat playback.
- Press [A->B] on the remote control once
to select starting point.
- Press [A->B] again to select ending point,
selected passage start to replay.
- Press [A->B] once again to exit.
GOTO
Goto desired title/chapter or time point
directly of video.
1 Press [ G ](GOTO) button on the remote
control, search menu display on top of
the screen.
2 Use [ ] (Up) / [ ] (Down) button on the
front panel or [ ] / [ ] button on the
remote control to select Title, Chapter or
Time, if necessary.
The options of the search menu depends
on the video type, it maybe display only
one or two of the options.
3 Use [ ] or [ ] button to select desired
title/chapter or input the number by digit
buttons.
4 Press [M.C.] or [ENTER] button to conrm.
PBC - Playback control ( for VCD
2.0 or up)
1 If you insert a VCD with PBC, press
[ MENU/PBC ] button to set the PBC On/
Off.
2 When PBC is set to Off, playback starts
from the beginning of the 1st track
automatically.
3 When PBC is set to On, the PBC
menu will be displayed, use navigation
buttons or digit buttons to select
desired track, press [M.C.] or [ENTER]
button to confirm the playback, then the
PBC will be set to Off automatically.
DVD subtitle select
Press [SUBTITLE/PHOTO] button to select
the subtitle language to show if the DVD
has multiple language subtitles.
DVD title select
Press [TITLE] button to display title or
chapter list, use [ ] (Up) / [ ] (Down) button
on the front panel or [ ] / [ ] / [ ] / [ ]
button on the remote control or digit number
to select, press [M.C.] or [ENTER] button to
play.
DVD angle select
Press [ANGLE/VIDEO] button to select
different angle to view if the DVD has
multiple-angle views.
Zoom
Press [ZOOM] button, the picture will be
zoomed accordingly.
DVD audio select
Press [AUDIO/MUSIC] button to select
audio language to listen if the DVD has
multiple audio languages.
VCD audio select
Press [AUDIO/MUSIC] button to select
audio channel to listen (L, R, Stereo).
15
Page 16
Section
En
03
Operating this unit
Bluetooth Operation
The Bluetooth allows you to utilize your car’s
built-in audio system for wireless mobile
phone or music handsfree communication.
Some Bluetooth mobile phones have the
audio features, and some portable audio
players support Bluetooth feature. This
system can play audio data stored in a
Bluetooth audio device. The car stereo with
Bluetooth will be able to retrieve phonebook
contacts, received call, dialled call, missed
call, incoming calls, outgoing call and listen
to music.
Notes
• Do not leave the microphone of Bluetooth
handsfree in the places with wind passing
such as air outlet of the air conditioner,
etc. This may cause a malfunction.
• If leave it in the places subjected to
direct sun, high temperature can cause
distortion, discoloration which may result
in a malfunction.
• This system will not operate or may
operate improperly with some Bluetooth
audio players.
• The unit cannot guarantee the
compatibility of all mobile phones
together with the unit.
Pairing
1 Switch the Bluetooth on in the system
setting menu. (see page 20 <System
setup> <Bluetooth>)
2 Turn on Bluetooth function of your mobile
phone.
3 Enter mobile phone’s Bluetooth setup
menu.
4 Search for new Bluetooth devices.
5 Select DVH-870AVBT from the pairing
list on the mobile phone, and paired
automatically.
6 After pairing successfully, the unit
will show "HFP: Connected", "A2DP:
Connected".
If the connection doesn't establish after
pairing, Use [ ] (Up) / [ ] (Down) button
on the front panel or [ ] / [ ] button
on the remote control to select HFP or
A2DP, then press and hold [M.C.] button
to connect it manually.
Notes
• The unit only pair one mobile phone, and
only memry the last pair device.
When power on, only search the last pair
device.
• All HFP function sources can connect;
A2DP function only can connect the BT
source and APP source, enter other
source will disconnect automatically,
and switch BT source again will paired
automatically.
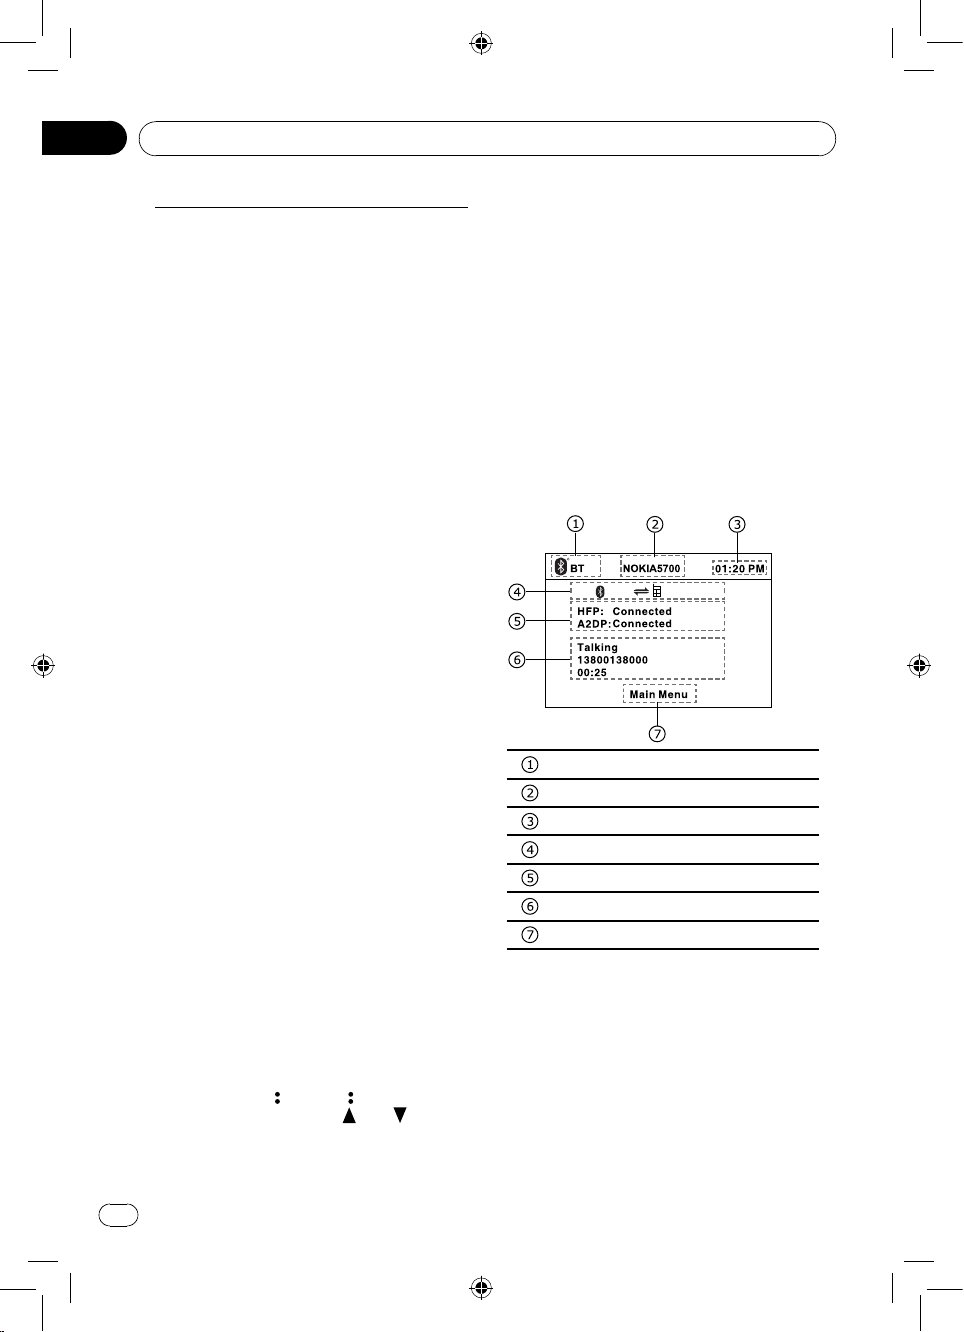
Main menu
Press the [SRC] button to switch the source
to "BT".
"BLUETOOTH" must be ON to access to
the BT source.
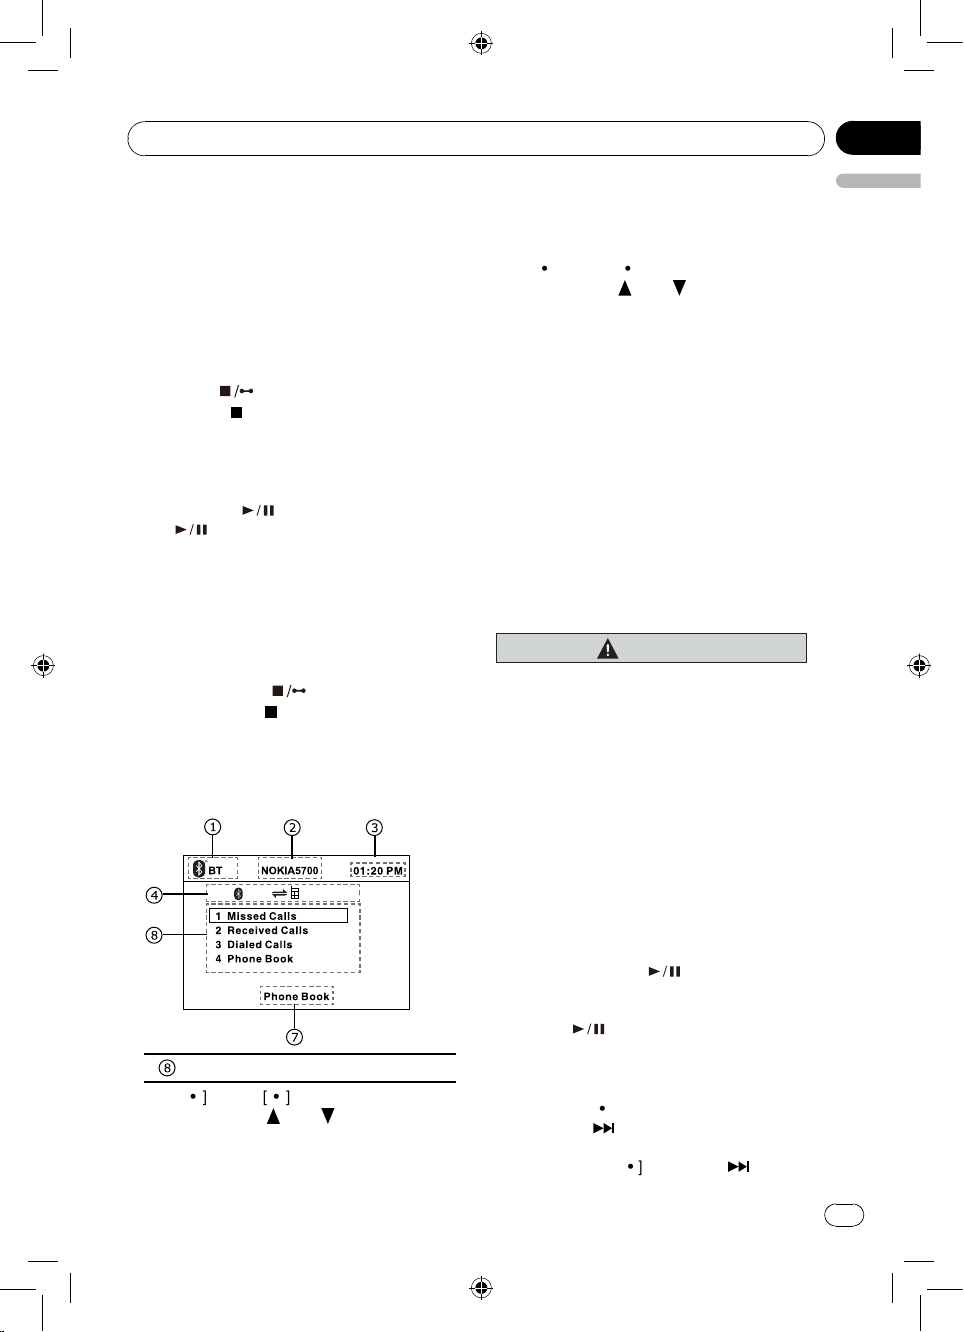
Source indicator
Device name
Time
Status indicator
HFP/A2DP status
Device Information
Indication message
Music display
On BT main menu, press the [ESC] button
to display the music interface, press [ESC]
again to return the BT main menu.
Note
• The display information only includ:
Char Title、Char Artist、Char Album、
Total time、Play time.
16
Page 17
03
English
Section
En
Operating this unit
Making a call
Press the [SRC] button to switch the source
to "BT". Input numbers by remote control
then press [M.C.] button on the front panel
or [ENTER] button on the remote control to
dial out.
Answering a call
You can answer an incoming call by
pressing the [M.C.] or [ENTER] button.
* Press [ BSM] button on the front
panel or [ ] button on the remote control
to hang up the current conversation or
reject an incoming call.
Transfer the call
Press [BAND ] button on the front panel
or [ ] button on the remote control to
switch the HFP voice between unit and HFP
device.
Note
Some cellular phones may not be able to
transfer the Phone Book data.
Call from Phonebook
Press and hold [ BSM] button on the
front panel or [ ] button on the remote
control will toggle between BT main menu
and phone book menu when BT device is
connected, if BT is not connected, the menu
could not be switched to phone book menu.
Press [M.C.] button on the front panel or
[ENTER] button on the remote control to
loading the data, then the numbers list on
the display.
Use [ • ] (Up) / [ • ] (Down) button on the
front panel or [
remote control to select a number, press
[M.C.] button on the front panel or [ENTER]
button on the remote control to dial out.
] / [ ] button on the
Audio Streaming Operations
What is audio streaming?
Audio streaming is a technique for
transferring audio data such that it can be
processed as a steady and continuous
stream. Users can stream music from their
external audio player to their car stereo
wirelessly and listen to the tracks through
the car’s speakers. Please consult your
nearest dealer for more information on
the product of wireless audio streaming
transmitter offered.
CAUTION
Please avoid operating your connected
mobile phone while audio streaming as
this may cause noise or sound choppy
on the song playback.
Audio streaming may or may not resume
after telephone interrupt as this is
dependent on mobile phone.
System will always return to Radio mode
if audio streaming is disconnected.
Phone book list
Use [ • ] (Up) / [ • ] (Down) button on the
front panel or [
remote control to select from:
1 Missed Calls
2 Received Calls
3 Dialed Calls
4 Phone Book
] / [ ] button on the
Note
Be sure to read the chapter "Pairing" before
proceeding.
Play / Pause a track
1. Press the [ BAND ] button to pause
audio playback.
2. To resume audio playback, press the
[ BAND ] button again.
Selecting a track
Track-up
1. Press the [ • ] (Right) button on the front
panel or [ ] button on the remote to
move to the beginning of the next track.
2. Each time the [ • ] (Right) or [ ] button
is pressed, playback proceeds to another
track in the advancing direction.
17
Page 18
Section
En
03
Operating this unit
Track-down
1. Press the [ • ] (Left) on the front panel or
[
] button on the remote to move the
to beginning of the previous track.
2. Each time the [ • ] (Left) or [ ] button is
pressed, playback proceeds to previous
track in the reverse direction.
Note
Playing order will depend on Bluetooth
audio player. When [ • ] (Left) or [ ]
button is pressed, some A2DP devices will
restart the current track depends on the
duration of playback.
APP Operation
Starting procedure for Android
device users
Connect your Android device to this unit
using Bluetooth wireless technology.
To use the CarMediaPlayer with the
compatible Pioneer product, AppRadio app
should be installed.
AppRadio app can be downloaded from
Google Play.
Main menu
1 Press the [SRC] button to switch the
source to "APP".
"BLUETOOTH" must be ON to access to
the BT source.
2 Select [CarMediaPlayer] to enter.
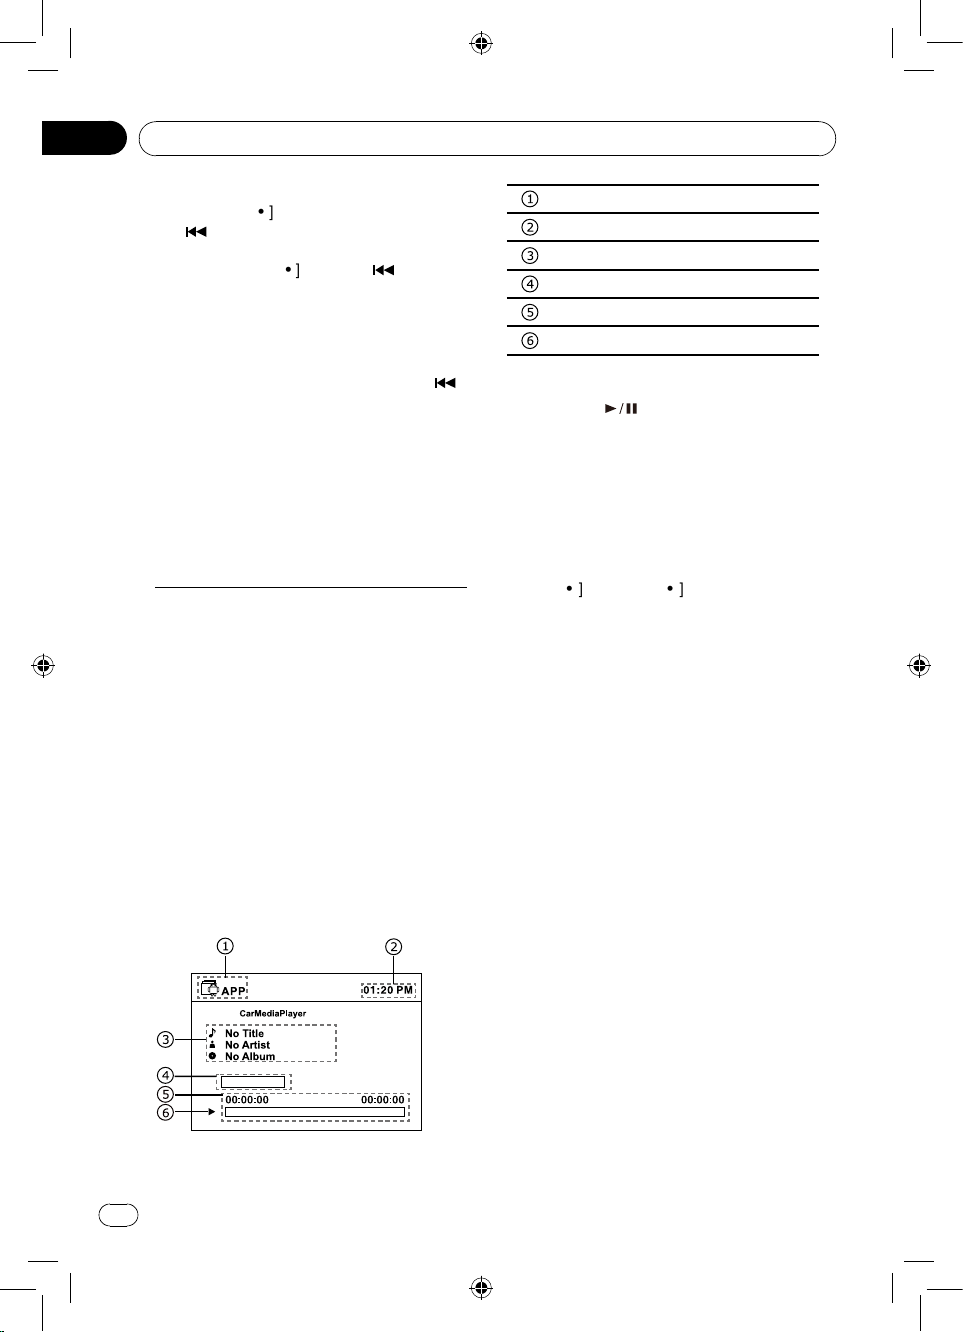
Source indicator
Time
Track information
Sound effect indicator
Elapsed time/Total time of the track
Play/Pause
Play/Pause
Press [BAND
to play/pause.
] button on the front panel
Select desired track
Press [ • ] (Left) or [ • ] (Right) button to skip
to the previous/next track.
Fast forward/backward during
playback
Press [ • ] (Left) or [ • ] (Right) button for
more than 2 seconds repeatedly to select
X2, X4, X8, X16 to fast backward or forward
track during playback.
- During the fast forward or backward
operation, undo the button to playback
again.
Information for compatibility of
connected devices
The following is the detailed information
regarding the terminals required to use the
application for smartphone on this unit.
For smartphone users
• The device has Android OS 2.3 or later.
• The device supports Bluetooth SPP
(Serial Port Prole) and A2DP (Advanced
Audio Distribution Prole).
The device is connected to this unit via
Bluetooth.
• Compatibility with all Android devices is
not guaranteed.
18
Notes
POWERFUL
• Pioneer is not liable for any issues that
may arise from incorrect or awed app-
based content.
• The content and functionality of
the supported applications are the
responsibility of the App providers.
Page 19
03
English
Section
En
Operating this unit
System setup
In all mode, press and hold [SEL] to enter
system setting menu.
The unit could not enter the setting menu
when the system is busy, such as loading
disc or USB.
1 Press [ • ] (Left) / [ • ] (Right) or [
button to select category.
2 Rotate [M.C.] or press [ • ] (Up) / [ • ]
(Down) or [ ] / [ ] button to select a
number, press [M.C.] or [ENTER] button
to select options, then press the [M.C.] or
[ENTER] button to spread the sub-menu.
3 Rotate the [M.C.] or press [ • ] (Up) / [ • ]
(Down) or [ ] / [ ] button to highlight
the desired selection, press [M.C.] or
[ENTER] to conrm.
• Pressing [ ] will return to upper
catalog.
Setting menu
] / [ ]
®
Deactivation
DivX
Display the DivX
In order to play DivX
®
activation information.
®
VOD (video on
demand) contents on this unit, the unit
must first be registered with a DivX® VOD
contents provider.
®
Registration
DivX
To show the DivX
®
registration code and
web site.
Parental control
1 When "Enter password" appears on
the display, input a 4-digit password
by remote control (Original password:
8888), press [M.C.] or [ENTER] button to
conrm and "Correct Password" appears.
2 Press [M.C.] or [ENTER] , then rotate
[M.C.] or press [ • ] (Up) / [ • ] (Down) or [
] button to select a rating level.
/ [
The rating is from 1 to 8:
(1) with the most limits when playing.
(8) with the least limits when playing.
3 Press the [M.C.] or [ENTER] button to
conrm.
]
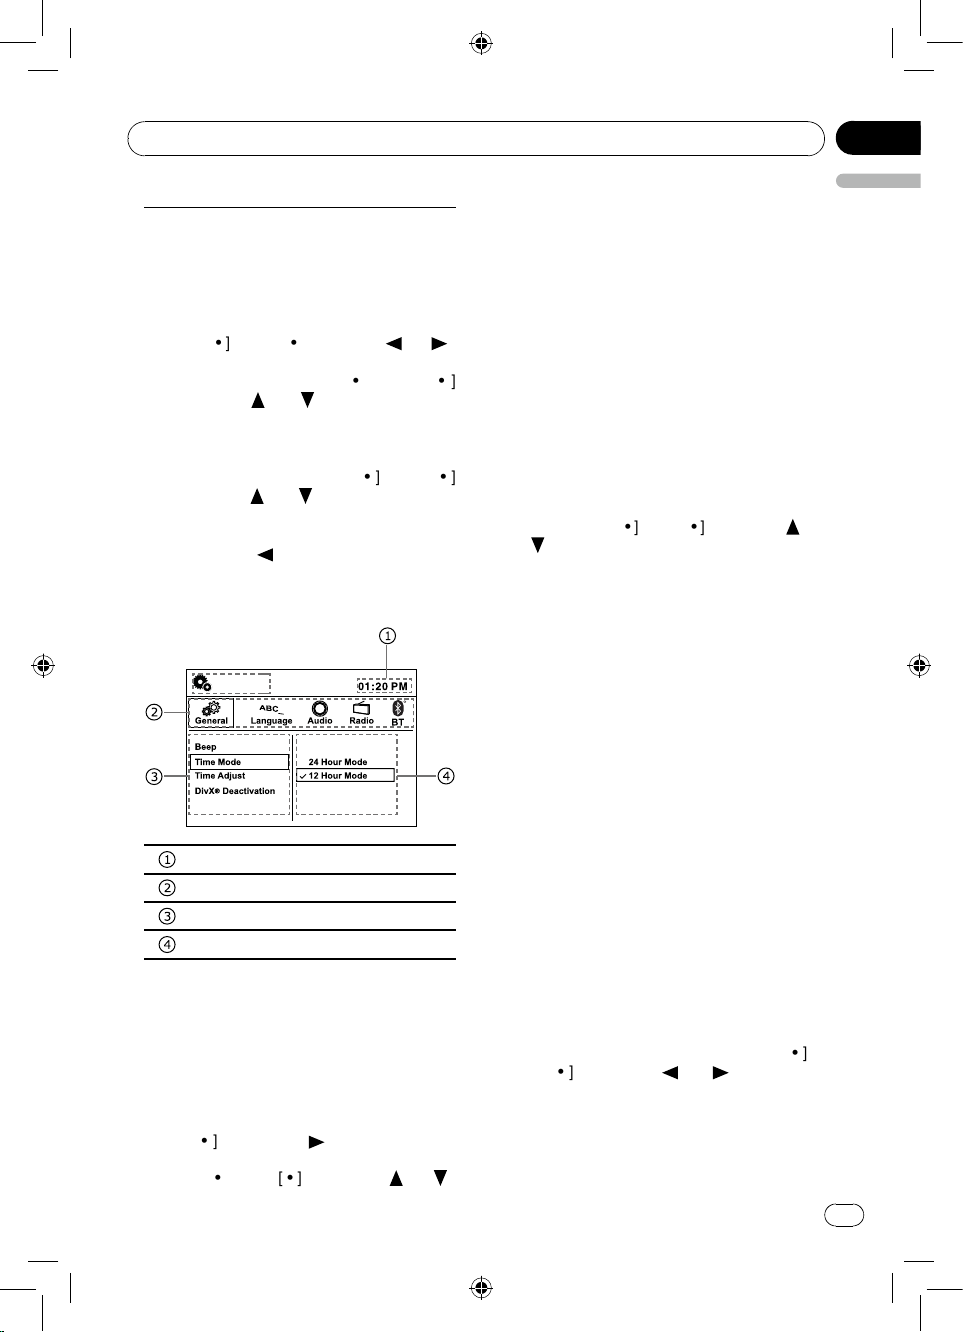
SETTING
Time
Category
Options
Sub-menu
General
Beep:
Turn on or off the beep sound.
Time Mode:
Select 12 Hour or 24 Hour Mode.
Time Adjust:
Press [ • ] (Right) or [
between hour and minute, rotate the [M.C.]
or press [ • ] (Up) / [ • ] (Down) or [
button to adjust.
] button to switch
] / [ ]
Set Password
1 When "Enter password" appears on
the display, input the old password by
remote control, press [M.C.] or [ENTER]
button to conrm and "Correct Password"
appears.
2 Press the [M.C.] or [ENTER], enter a new
4-digit password by the remote control,
press the [M.C.] or [ENTER] button to
conrm.
3 Then input the new password again
for double confirm, press the [M.C.] or
[ENTER] button and "Set Password
Successful" appears.
• Original password: 8888
• If you forget your password, enter original
password to unlock.
Default Settings
Load the default settings.
When the selection menu appears, press [ • ]
(Left) / [ • ] (Right) or [
] / [ ] button to
select Yes or No, press [M.C.] or [ENTER]
button to conrm.
Color Key
Select the key backlight color Blue or Red.
19
Page 20
Section
En
03
Operating this unit
Aspect Ratio:
4:3: For 4:3 TV picture.
16:9: For 16:9 wide screen TV.
Note
There is no 16:9 specication for VCD; for
VCD the video output only in 4:3 format; in
our setting menu, 4:3 or 16:9 setting is for
video monitor setting, but not mean that
DVD will output video signal in 4:3 or 16:9
format; which means current our TFT is in
16:9, when we play VCD, if we want to keep
the video signal without distortion, the video
should not be set to full screen like 16:9.
Mirror:
When select "Mirror on", the video of
camera is mirror image.
Camera Polarity
Select Camera Polarity Battery, Ground or
Off.
Battery: When the polarity of the connected
lead is positive while the gear shift is in
REVERSE (R) position
Ground: When the polarity of the connected
lead is negative while the gear shift is in
REVERSE (R) position
Off: The camera polarity is disabled.
AV Input
Select Av Input on or off.
AUX
Select auxiliary device on or off.
Demo
Select Demo, press [M.C.] or [ENTER] to
run. "Demo" will be ashed on the top right
corner, then DEMO mode is engaged.
Text Scroll
Select Text Scroll on or off.
Language
Setting on screen display, Subtitle, Audio,
DVD Menu Language.
If the DVD disc has the audio file in the
selected language, the dialogues you
listened to will be in the selected language.
Audio
Loudness:
Turn on or off the loudness.
SubWoofer:
Selecting 80Hz, 120Hz or 160Hz to activate
subwoofer-out.
Selecting subwoofer off to activate rear lineout.
Sub Volume:
Select subwoofer volume: 0 to 33.
• Sub Volume couldn't be adjusted when
SubWoofer Off is selected.
Radio
LOC DX:
Select radio local or distant.
LOC: Only stations with strong signal can
be received.
DX: Stations with strong and weak signals
can be received.
Stereo / Mono:
Select FM stereo or mono.
FM Step(FM tuning step):
Select FM step 50kHz or 100kHz
seek tuning step
• The tuning step remains at 50kHz during
manual tuning.
AM Step:
Select AM step 9kHz or 10kHz
The AM tuning step can be switched
between 9kHz and 10kHz.
Bluetooth
Bluetooth:
If the Bluetooth is setting is On, then the
BT will be available , otherwise the BT will
never work and in disable status.
Connect:
If the Connect is set to Auto, then BT of
the unit will connect automatically with the
HFP device which is already paired in every
disconnect status (Bluetooth must be "On").
Auto Answer:
If the Auto Answer is set to Auto, then
BT of the unit will answer the in-coming
call automatically when the BT is already
connected with your HFP device( Bluetooth
must be "On"), otherwise you have to
answer the in-coming call by press answer
button of the remote or panel.
20
Page 21
03
English
Section
En
Operating this unit
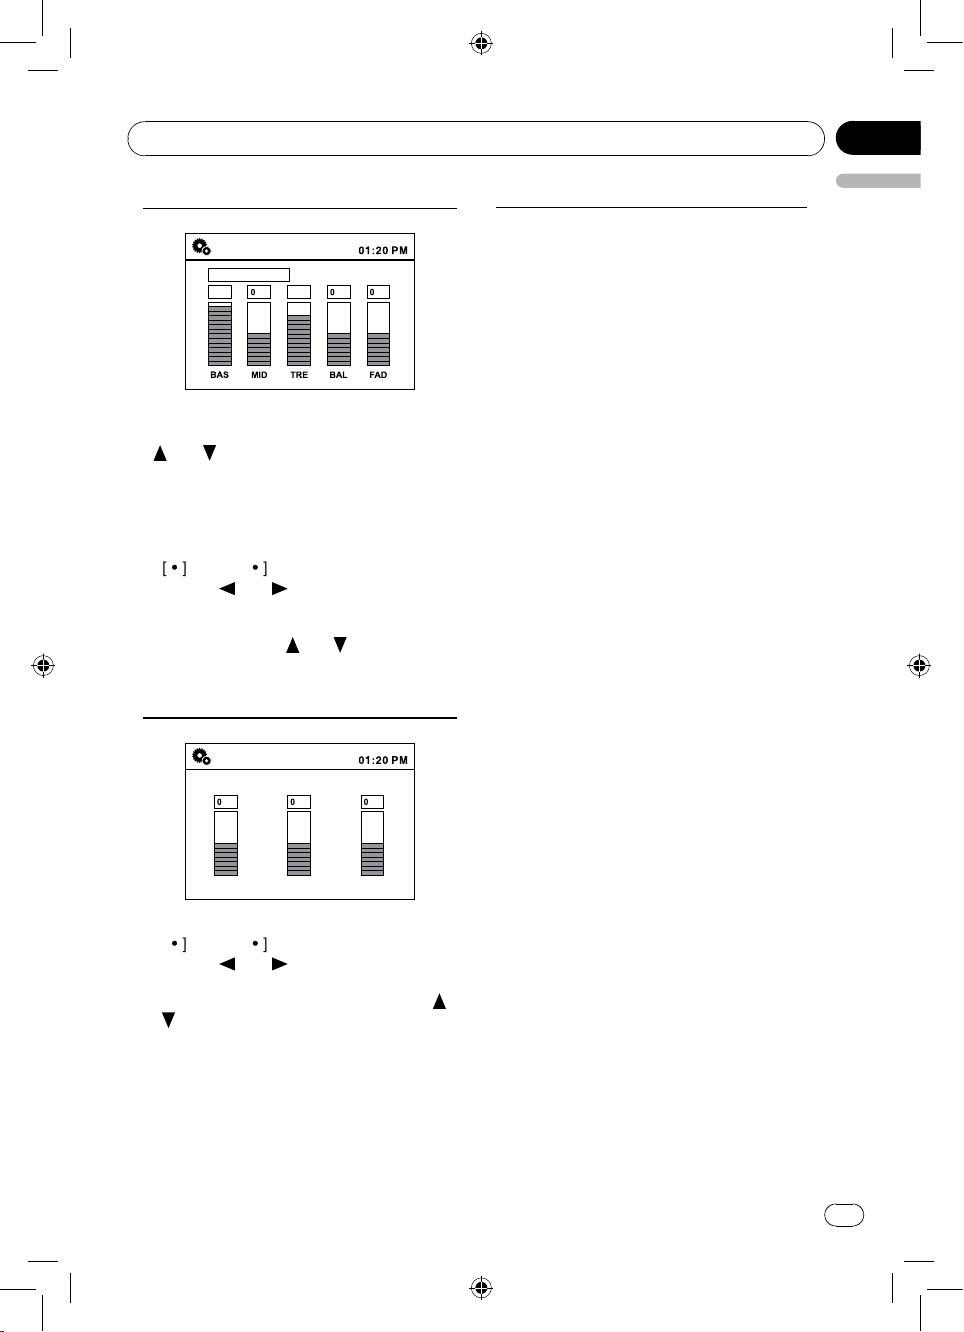
Audio setting
AUDIO SETTING
POWERFUL
+6 +4
Press the [SEL] button to enter audio setting
menu. First press shows current EQ. Press
[ ] / [ ] button on the remote control to
changes EQ in this order:
POWERFUL -> NATURAL -> VOCAL
-> CUSTOM -> FLAT->SUPERBASS
To set user definition, press [SEL] button
or [ • ] (Left) / [ • ] (Right) button on the front
panel or [ ] / [ ] button on the remote
control to select it including: BAS(bass)/
MID(middle)/TRE(treble)/BAL(balance)/
FAD(fader), press [ ] / [ ] button on the
remote control to adjust value.
Video setting
VIDEO SETTING
BRI CON SAT
Other Function
Using an AUX source
A separately sold auxiliary device such as a
VCR or portable device can be connected
to this unit.
When connecting auxiliary device using the
front AUX input.
• You need to activate the AUX function in
the initial setting menu. Refer to previous
page.
• A portable audio/video player can be
connected by using a 3.5mm plug
(4 pole) with an RCA cable (sold
separately). However, depending on the
cable, a reverse connection between the
red (right side audio) cable and yellow
(video) cable may be required in order
for the sound and video image to be
reproduced correctly.
Using an AV source
When connecting auxiliary device using the
rear AV input.
• You need to activate the AV function in
the initial setting menu. Refer to previous
page.
• A portable audio/video player can be
connected by using a standard plug
with an RCA cable (sold separately).
However, depending on the cable, a
reverse connection between the red/
white (right/left side audio) cable and
yellow (video) cable may be required in
order for the sound and video image to
be reproduced correctly.
At Audio setting menu, press [SEL] button
or [ • ] (Left) / [ • ] (Right) button on the front
panel or [ ] / [ ] button on the remote
control to select it including: BRI(brightness)/
CON(contrast)/SAT(saturation), press [ ]
/ [ ] button on the remote control to adjust
value.
* Rear monitor is not adjustable.
Note
Video setting is adjustable for this product
display only, it is not adjustable when video
output to the other devices display.
21
Page 22
Section
En
Ground wire
s body
POWER AMP
Other devices
(Another electr
device in the car)
04
Installation
Connecting the unit
WARNING
• To avoid the risk of accident and the
potential violation of applicable laws, no
viewing of front seat video should ever
occur while the vehicle is being driven.
• In some countries or states the viewing
of images on a display inside a vehicle
even by persons other than the driver
may be illegal. Where such regulations
apply, they must be obeyed.
WARNING
LIGHT GREEN LEAD AT POWER
CONNECTOR IS DESIGNED TO DETECT
PARKED STATUS AND MUST BE
CONNECTED TO THE POWER SUPPLY
SIDE OF THE PARKING BRAKE SWITCH.
IMPROPER CONNECTION OR USE OF
THIS LEAD MAY VIOLATE APPLICABLE
LAW AND MAY RESULT IN SERIOUS
INJURY OR DAMAGE.
CAUTION
• PIONEER does not recommend that
you install or service your display unit
yourself. Installing or servicing the
product may expose you to risk of electric
shock or other hazards.
Refer all installation and servicing of your
display unit to authorized Pioneer service
personnel.
• Secure all wiring with cable clamps or
electrical tape. Do not allow any bare
wiring to remain exposed.
• Do not drill a hole into the engine
compartment to connect the yellow
cable of the display unit to the vehicle
battery. Engine vibration may eventually
cause the insulation to fail at the
point where the wire passes from
the passenger compartment into the
engine compartment. Take extra care in
securing the wire at this point.
• It is extremely dangerous to allow the
microphone lead to become wound
around the steering column or gearstick.
Be sure to install the unit in such a way
that it will not obstruct driving.
22
• Make sure that cables will not interfere
with moving parts of the vehicle, such
as the gearshift, parking brake or seat
sliding mechanism.
• Do not shorten any cables. If you do,
the protection circuit may fail to work
properly.
WARNING
• Use speakers over 50 W (output value)
and between 4 Ω to 8 Ω (impedance
value). Do not use 1 Ω to 3 Ω speakers
for this unit.
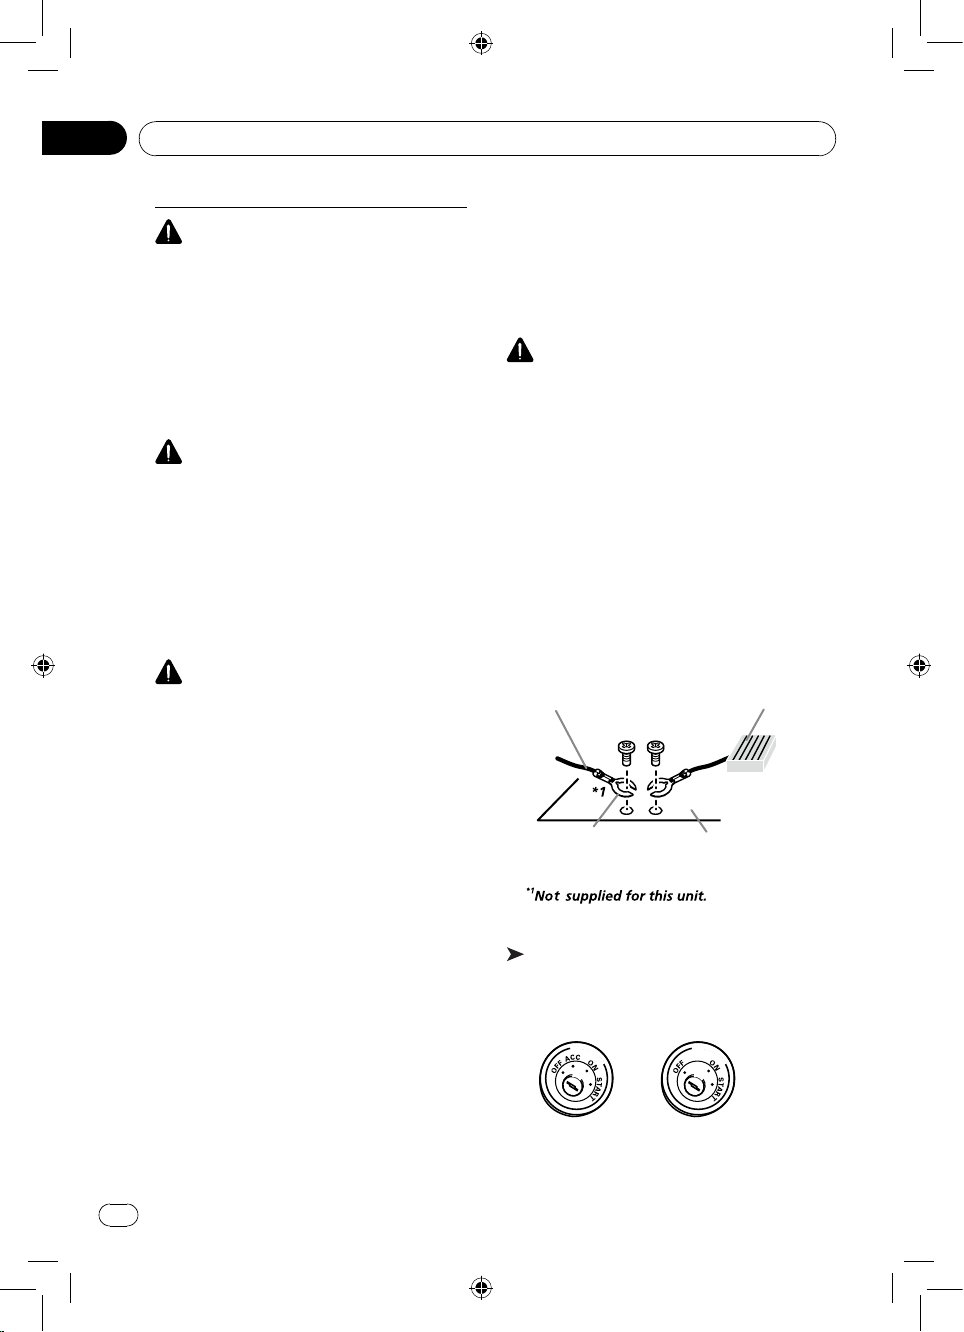
• The black cable is ground. When
installing this unit or power amp (sold
separately), make sure to connect the
ground wire rst. Ensure that the ground
wire is properly connected to metal parts
of the car’s body. The ground wire of the
power amp and the one of this unit or
any other device must be connected to
the car separately with different screws. If
the screw for the ground wire loosens or
falls out, it could result in re, generation
of smoke or malfunction.
Metal parts of car’
onic
Important
• This unit cannot be installed in a vehicle
without ACC (accessory) position on the
ignition switch.
ACC position No ACC position
• Use this unit with a 12-volt battery and
negative grounding only. Failure to do so
may result in a re or malfunction.
Page 23
Section
04
English
En
Installation
• To prevent a short-circuit, overheating
or malfunction, be sure to follow the
directions below.
— Disconnect the negative terminal of
the battery before installation.
— Secure the wiring with cable clamps
or adhesive tape. Wrap adhesive
tape around wiring that comes into
contact with metal parts to protect the
wiring.
— Place all cables away from moving
parts, such as the gear shift and seat
rails.
— Place all cables away from hot
places, such as near the heater
outlet.
— Do not connect the yellow cable to
the battery by passing it through the
hole to the engine compartment.
— Cover any disconnected cable
connectors with insulating tape.
— Do not shorten any cables.
— Never cut the insulation of the power
cable of this unit in order to share the
power with other devices. The current
capacity of the cable is limited.
— Use a fuse of the rating prescribed.
— Never wire the negative speaker
cable directly to ground.
— Never band together negative cables
of multiple speakers.
• When this unit is on, control signals
are sent through the blue/white cable.
Connect this cable to the system remote
control of an external power amp or the
vehicle’s auto-antenna relay control
terminal (max. 300 mA 12 V DC).
If the vehicle is equipped with a glass
antenna, connect it to the antenna
booster power supply terminal.
• Never connect the blue/white cable to
the power terminal of an external power
amp.
Also, never connect it to the power
terminal of the auto antenna. Doing
so may result in battery drain or a
malfunction.
23
Page 24
Section
En
04
Installation
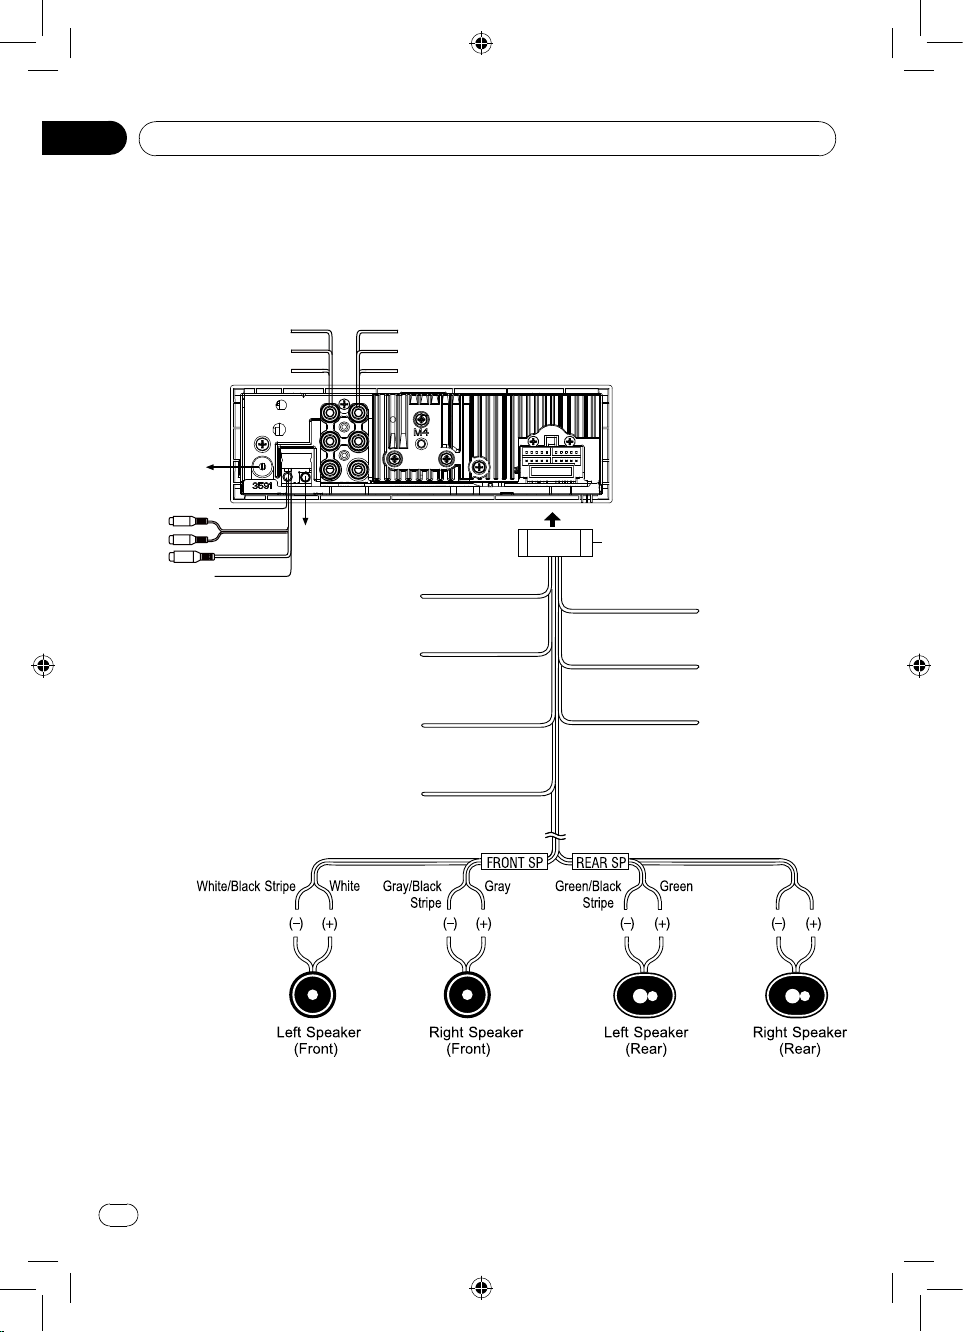
Wiring diagram
RADIO ANT
R(Red)
L(White)
Yellow
Front Line out R
Rear Subwoofer out R
CAMERA IN
MIC
AUDIO IN (AV)
VIDEO IN (AV)
BT ANT
SWC (Steering Wheel Control)
To car battery(+)
Continuous +12V DC
Ignition key +12V DC
when ON/ACC
Ground lead
Connected to a clean,
paint-free metal location
Motor/Electric antenna relay
control lead
Amplifier relay control lead
Front Line out L
Rear Subwoofer out L
VEDIO OUT
Yellow
Red
Black
Blue/White
Connector
Orange
Green/White
Violet/White
Illumination
PARKING SW
REVERSE SW
Violet/Black
Stripe
Violet
24
Page 25
Section
04
English
En
Installation
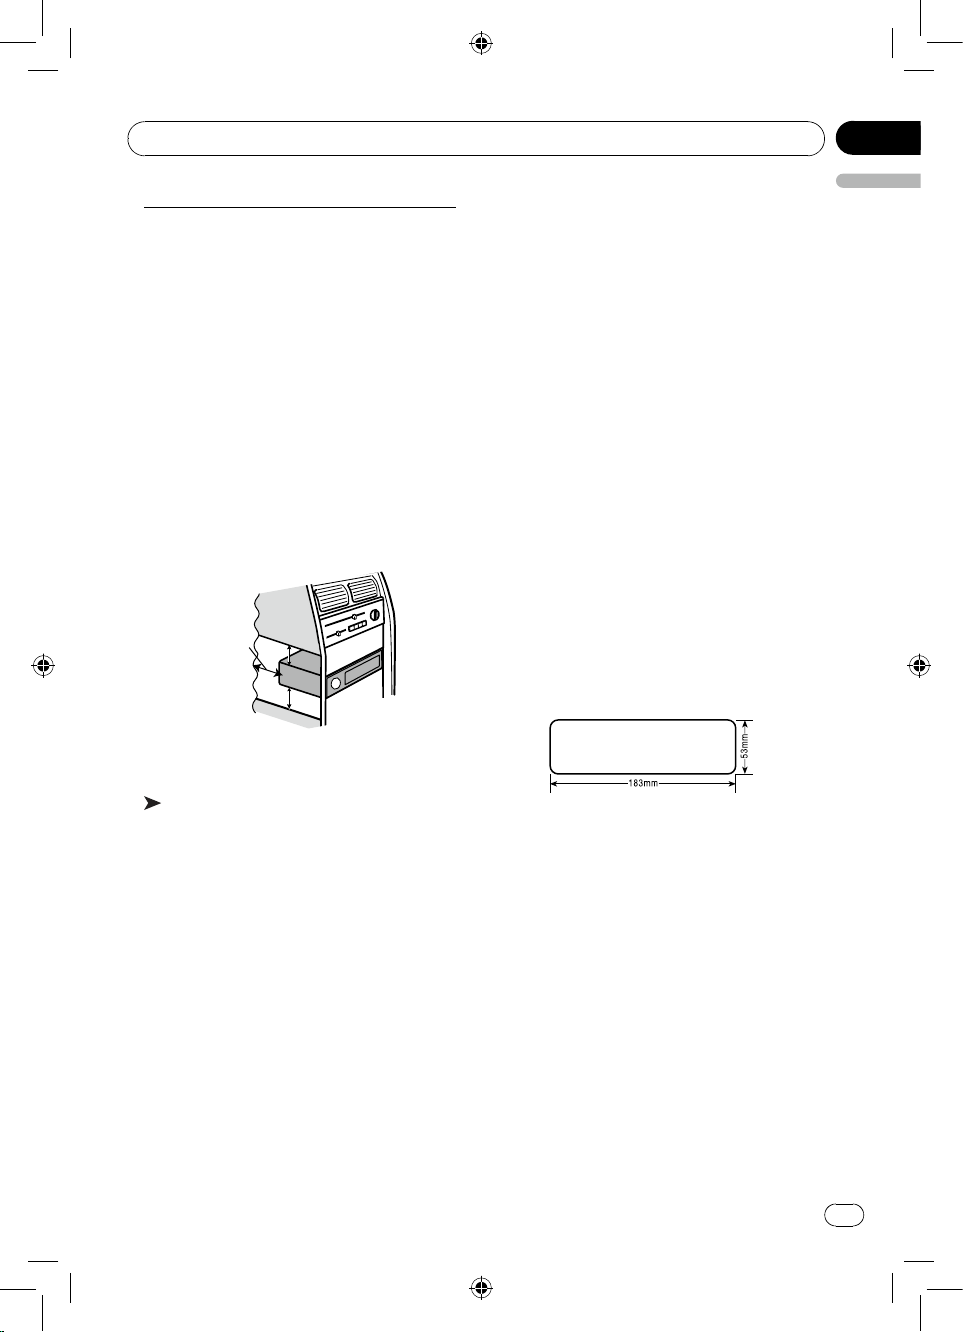
5cm
Leave ample
space
Installation
Before installing this unit
1 Disconnect battery
Before you begin, always disconnect the
battery negative terminal.
Notes
• If the unit is to be installed in a car
equipped with an on-board drive or
navigation computer, if the battery cable
is disconnected, the computer memory
may be lost. Under these conditions, use
extra caution during installation to avoid
causing a short circuit.
• When installing, to ensure proper heat
dispersal when using this unit, make sure
you leave ample space behind the rear
panel and wrap any loose cables so they
are not blocking the vents.
5 cm
5 cm
Reverse Driving
If a rear view camera is connected with
the unit, the playing source switches to
CAMERA automatically when you start
reverse driving.
As the reverse driving is done, the playing
source switches to the previous.
Parking Brake
1 If "PARKING SW" cable is connected to
hand brake switch, video display on the
TFT monitor will be controlled by this
function. Parking cable function ceases
when the playing source is CAMERA.
2 The monitor displays the black screen
with warning information to prevent the
driver watching video contents during
driving, but the passengers at the rear
seat can watch video contents normally.
Mounting sleeve installation
1 Slide the mounting sleeve off the
chassis. If it is locked into position, use
the removal tools (supplied) to disengage
it.
2 Check the dashboard opening size by
sliding the mounting sleeve into it.
2 Remove transport screws
Important
Remove these two transport screws before
installation. Otherwise, the DVD player will
not work.
3 Remove unit from sleeve
Lift latches on both sides of sleeve to
remove half-sleeve from the unit.
Control Cables
Auto Brightness Control
To avoid the display being too bright at night
time, if the headlight cable is connected to
ILLUMI, turning on the headlight will dim the
backlight of the TFT LCD and vice versa.
Telephone Mute
If the MUTE cable is connected to a car
phone, other audio outputs mute when one
call is received by the car phone.
If the opening is too small, carefully cut or
file as necessary until the sleeve easily
slides into the opening. Do not force
the sleeve into the opening or cause
it to bend or bow. Check for sufficient
space behind the dashboard for the unit
chassis.
This unit can be installed in any
dashboard with a suitable 183 mm (W) x
53 mm (H) opening as shown above. The
dashboard should be 4.75 mm to 5.56
mm thick in order to be able to support
the unit.
3 Locate the series of bend tabs along the
top, bottom, and sides of the mounting
sleeve. With the sleeve fully inserted into
the dashboard opening, bend as many of
the tabs outward as necessary to rmly
secure the sleeve to the dashboard (page
26).
25
Page 26
Section
En
04
Installation
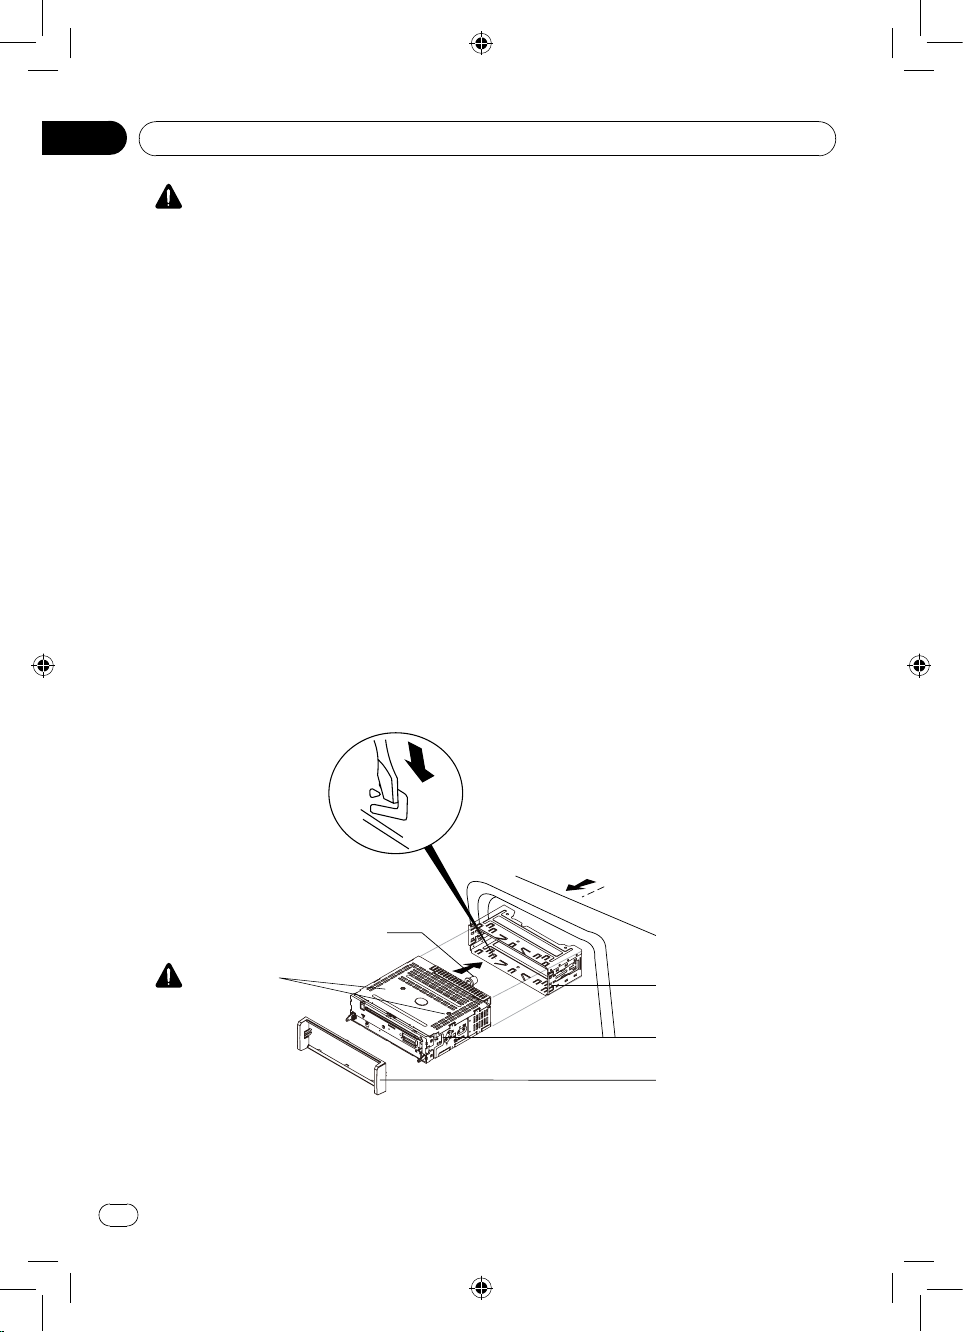
CAUTION
For proper operation of the DVD player,
the chassis must be mounted within
30° of horizontal. Make sure the unit is
mounted within this limitation.
4 Place the unit in front of the dashboard
opening so the wiring can be brought
through the mounting sleeve. Follow
the wiring diagram carefully and make
certain all connections are secure and
insulated with wire nuts or electrical tape.
After completing the wiring connections,
turn the unit on to confirm operation
(vehicle ignition must be on). If the unit
does not operate, re-check all wiring until
the problem is corrected.
5 Make sure the radio is right-side up, then
carefully slide the radio into the mounting
sleeve until it is fully seated and the
spring clips lock it into place.
Optimum performance is obtained when
the unit is installed at an angle of less
than 20°.
Screwdriver
6 Secure the rear of the unit to the car
body using the mounting bolt and rubber
cushion.
7 Test the unit using the "Operation"
instructions that follow.
Kit installation
If your vehicle requires the use of an
installation kit to mount this unit, follow the
instructions included with the installation
kit to attach the unit to the mounting plate
supplied with the kit.
1 Wire and test the unit as outlined in the
Mounting Sleeve Installation instructions.
2 Install the radio/mounting plate assembly
to the sub-dashboard according to the
instructions in the installation kit.
3 Replace the dashboard trim panel.
Mounting bolt
rubber cushion
Transport
screws
When not removing
transport screws,
the disk player
does not work
properly.
Please installation
after removing
transport screws.
Note
Fix the trim plate at proper direction, the upper side is thicker than lower side.
26
Mounting sleeve
The rear of the unit
Trim plate
Page 27
Section
04
English
En
Installation
ISO installation
This unit has threaded holes in the chassis
side panels which may be used with the
original factory mounting brackets of
some vehicles to mount the radio to the
dashboard. Please consult with your local
car stereo shop for assistance on this type
of installation.
1 Remove the existing factory radio
from the dashboard or center console
mounting. Save all hardware and
brackets as they will be used to mount
the new radio.
2 Carefully unsnap the plastic frame from
the front of the new unit chassis. Remove
and discard the frame.
3 Remove the factory mounting brackets
and hardware from the existing unit
and attach them to the new unit. Do not
exceed M5 x 6mm maximum screw size.
Longer screws may damage components
inside the chassis.
4 Wire the new unit as outlined in the
Mounting Sleeve Installation instructions.
5 Mount the new unit assembly to the
dashboard or center console using the
reverse procedure of step 1.
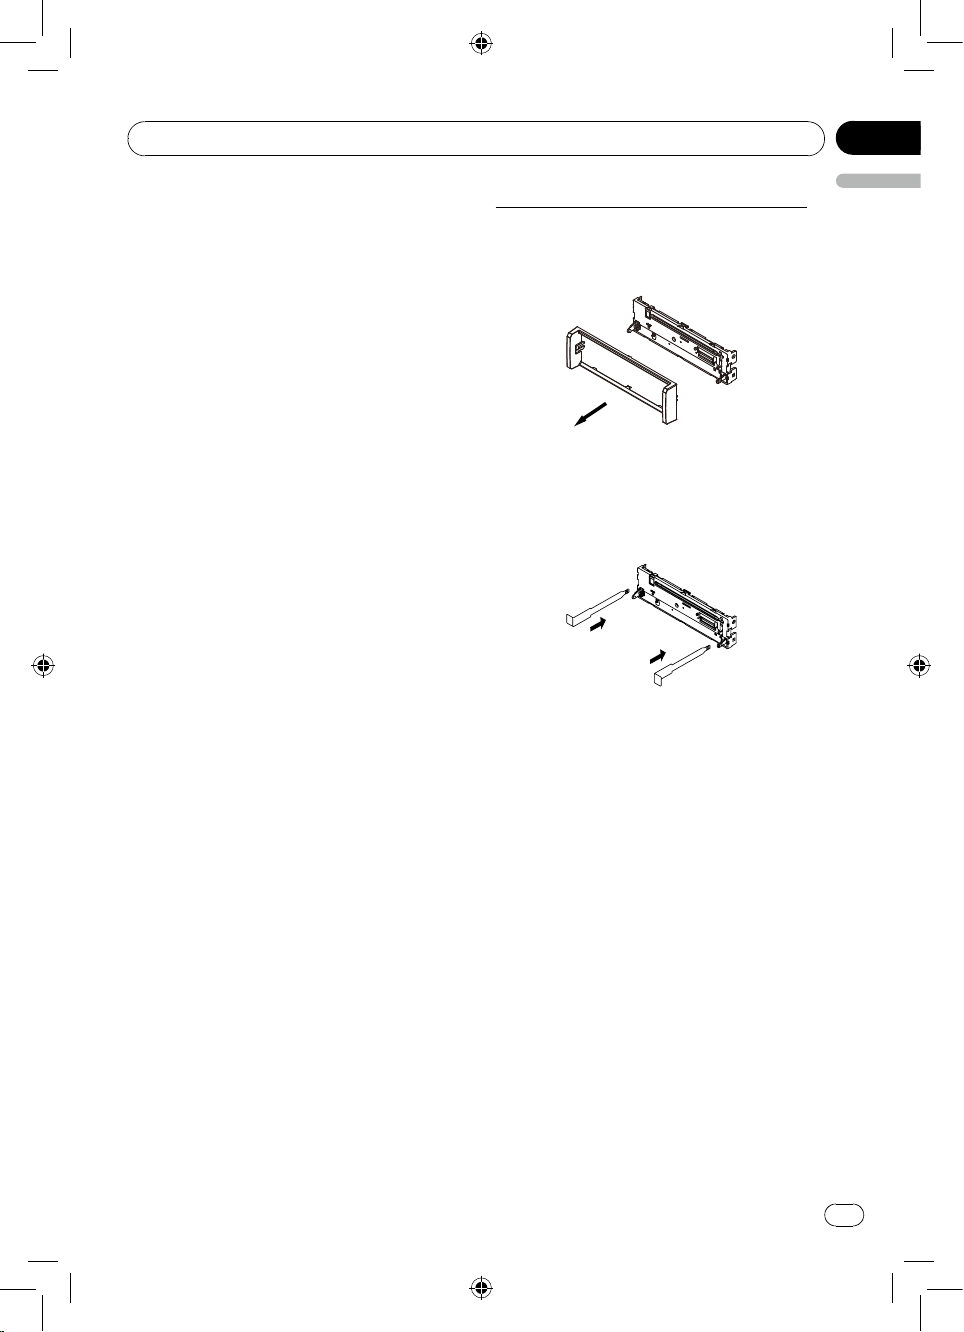
Remove the Unit
1 Remove the panel (Reference page 9).
2 Remove the trim ring by rmly grasping
one side and pulling.
3 Insert the removal keys straight back
until they lock, then pull the radio out.
If the removal keys are inserted at an
angle, they will not lock properly and will
not release the unit.
Fuse
When replacing a fuse, make sure the new
fuse is the correct type and amperage.
Using an incorrect fuse could damage the
radio.
Reconnect battery
When wiring is complete, reconnect the
battery negative terminal.
27
Page 28
Appendix
En
05
Additional information
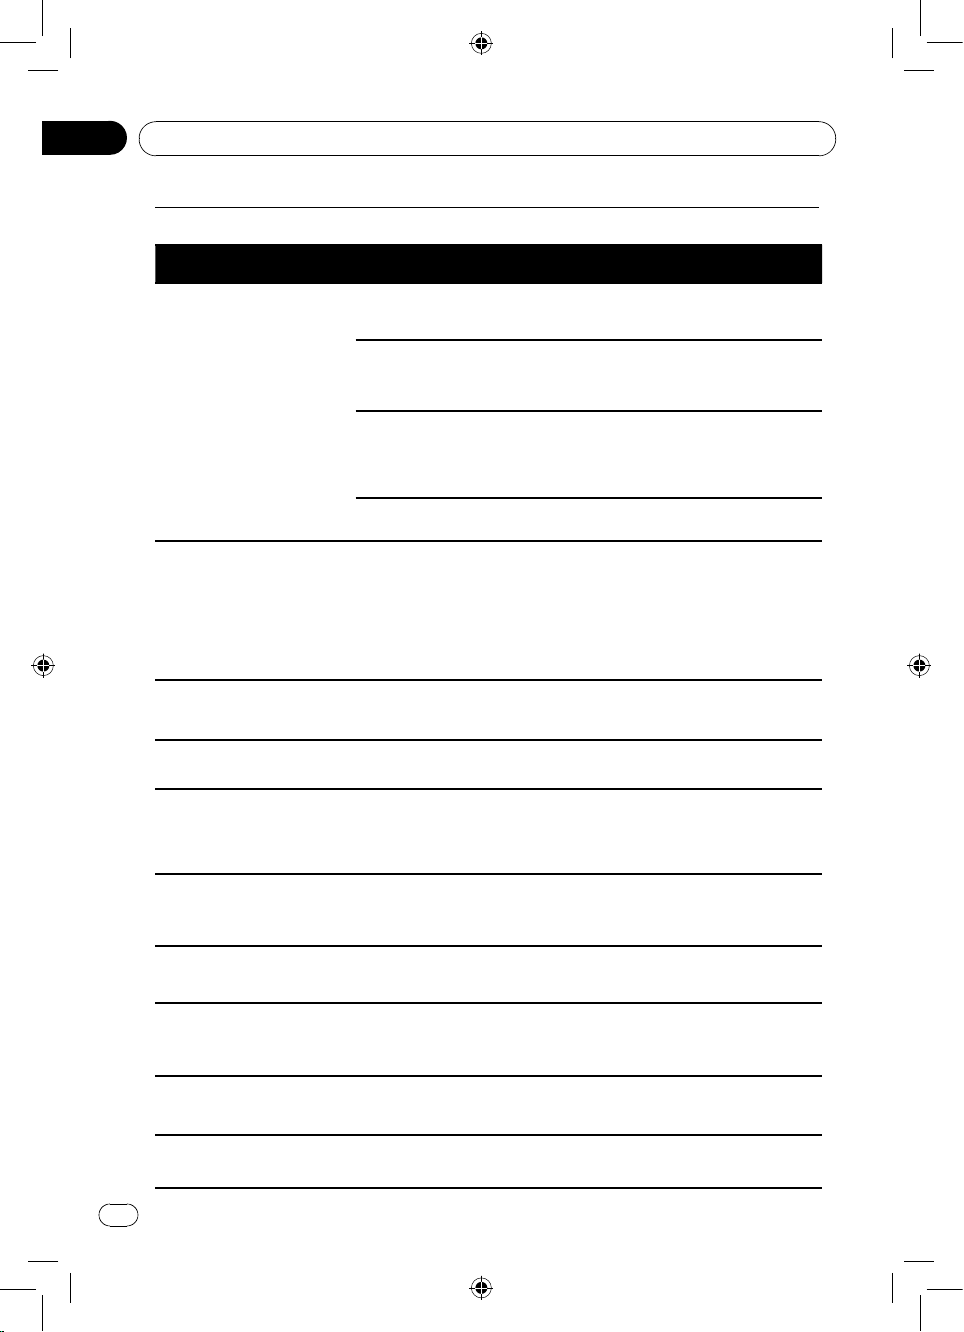
Troubleshooting
Common
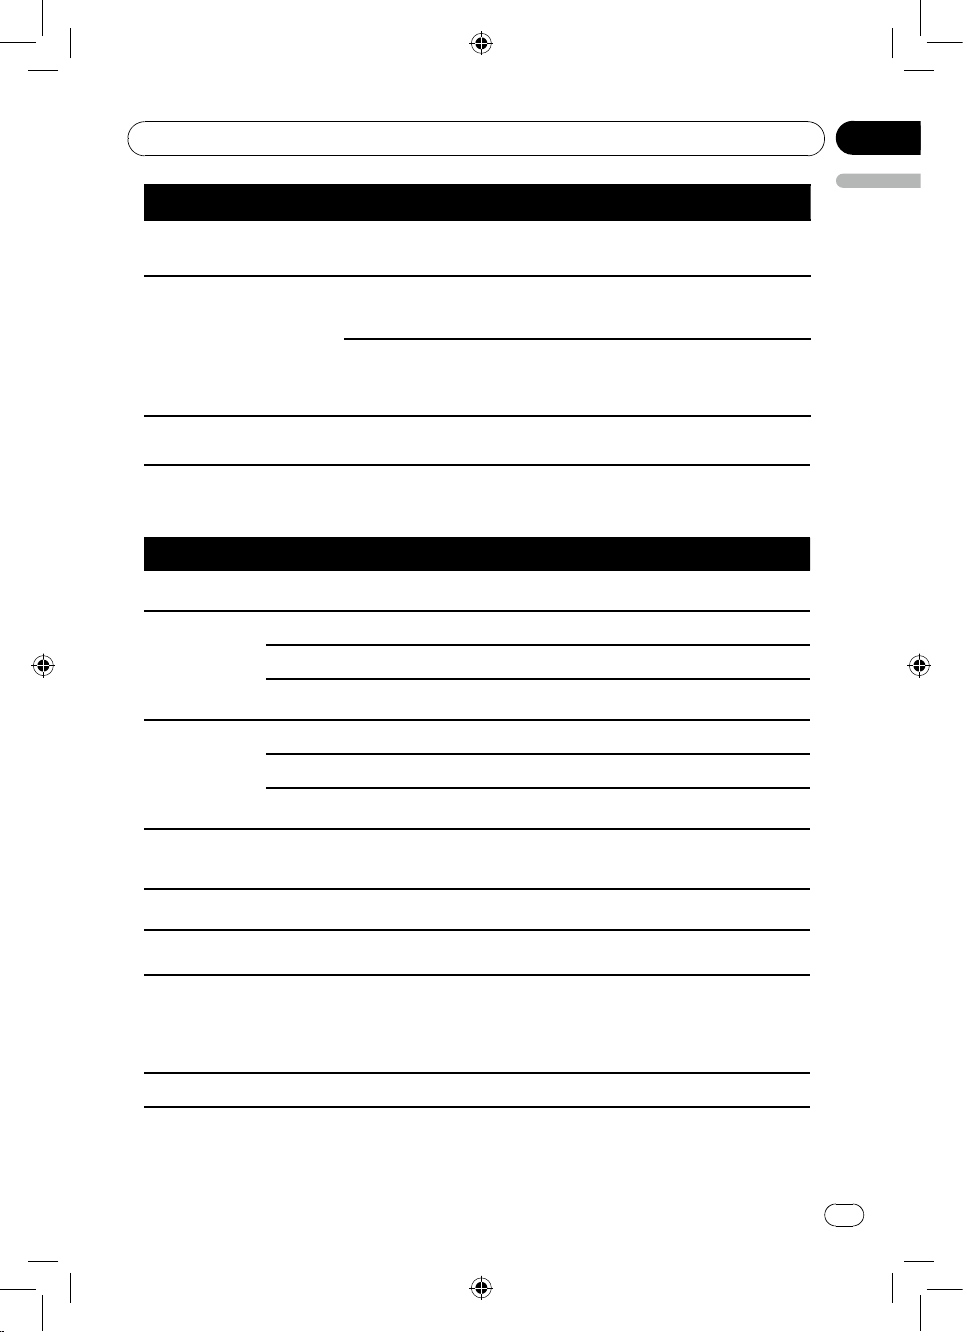
Symptom Cause Action
The power will not turn
on. The unit will not
operate.
Operation with the remote
control is not possible.
The unit does not operate
correctly even when
the appropriate remote
control buttons are
pressed.
There is no sound.
The volume level will not
rise.
There is no sound.
Demo mode always
starts.
System setting returns to
initial state.
The aspect ratio is
incorrect and the image is
stretched.
There is no
image displayed.
The image displayed
stops (pauses) and the
unit cannot be operated.
Leads and connectors are
incorrectly connected.
The fuse is blown.
Noise and/or other factors
are causing the built-in
microprocessor to operate
incorrectly.
The power isn’t enabled
correctly.
Battery power is low. Load a new battery.
Cables are not
connected correctly.
Mute is On at the time of
the source of "AV/AUX."
Wiring of "ACC+" and
"Battery" are reversed
each other.
The aspect ratio setting is
incorrect for the display.
The parking
brake cable is
not connected.
The data could no longer
be read during playback.
Conrm once more that all
connections are correct.
Rectify the cause and then replace
the fuse. Be sure to install a fuse
with the same rating.
Press [RESET].
Press [SRC] button to turn on the
unit.
Connect the cables
correctly.
Press [MUTE].
Please conrm wiring of "Battery"
and "ACC+".
Refer to "Wiring diagram" (page
24)
Select the appropriate setting for
your display.
Connect the parking
brake cable, and apply the parking
brake.
Stop playback once, and start
playback again.
There is no sound.
The volume level is low.
The sound and video
skip.
28
The volume level is low. Adjust the volume level.
The unit is not rmly
secured.
Firmly secure the unit.
Page 29
Appendix
English
En
05
Additional information
Symptom Cause Action
Sub-folders cannot be
played back.
The repeat range
changes automatically.
Folder repeat play has
been selected.
Another folder was
selected during repeat
play.
Track search or fast
forward/reverse was
performed during le
repeat play.
Select the repeat range again.
Select the repeat range again.
Select the repeat range again.
Error messages
When you contact your dealer or your nearest
Pioneer Service Center, be sure to note the error message.
Message Cause Action
Loading Disc is being read.
Disc is dirty. Clean disc with soft cloth.
Please wait, it may take several minutes
for some disc or storage device.
No Disc
ERROR DISC
Video
resolution not
supported
WRONG
REGION
Error Illegal mechanism operation.
AMP ERROR
Check USB The USB over rated current.
Disc is upside down. Insert disc with label side up.
Disc not present in loading
compartment.
Disc is dirty. Clean disc with soft cloth.
Disc is upside down. Insert disc with label side up.
Disc format is not compatible
with this unit.
The video resolution exceeds
720X576.
DVD is not compatible with
region code of unit.
Unit fails to operate or speaker
connection is incorrect;
protective circuit is activated.
Insert disc.
Change another disc.
Change to a supported le.
Use discs with corresponding regional
code.
Press EJECT key for 5 seconds to reset
loading mechanism.
Check the speaker connection. If the
message fails to disappear even after the
engine is switched off/on, contact your
dealer or an authorized Pioneer Service
Station for assistance.
Check the USB device or change the USB
device.
29
Page 30

Appendix
En
05
Additional information
Handling guidelines
Disc
— New discs may have some roughness
around the edges. If such discs are used,
the player may not work or the sound may
skip. Use a ball-point pen or the like to
remove any roughness from the edge of
the disc.
— Never stick labels on the surface of the
disc or mark the surface with a pencil or
pen.
— Never play a disc with any cellophane
tape or other glue on it or with peeling off
marks. If you try to play such a disc, you
may not be able to get it back out of the
player or it may damage the player.
— Do not use discs that have large scratches,
are misshapen, cracked, etc. Use of
such discs may cause misoperation or
damage.
— To remove a disc from its storage case,
press down on the center of the case and
lift the disc out, holding it carefully by the
edges.
— Do not use commercially available disc
protection sheets or discs equipped with
stabilizers, etc. These may damage the
disc or cause breakdown of the internal
mechanism.
— This unit is not compatible with discs
recorded in AVCHD (Advanced Video
Codec High Denition) format. Do not
insert AVCHD discs. If inserted, the disc
may not be ejected.
— When using discs that can be printed
on label surfaces, check the instructions
and the warnings of the discs. Depending
on the discs, inserting and ejecting may
not be possible. Using such discs may
result in damage to this equipment. Do
not attach commercially available labels
or other materials to the discs. The discs
may warp making the disc unplayable.
The labels may come off during playback
and prevent ejection of the discs, which
may result in damage to the equipment.
— Do not attach commercially available
labels or other materials to the discs.
- The discs may warp making the disc
unplayable.
30
- The labels may come off during
playback and prevent ejection of the
discs, which may result in damage to
the equipment.
DualDisc
DualDiscs are two-sided discs that have a
recordable CD for audio on one side and a
recordable DVD for video on the other.
Playback of the DVD side is possible with
this unit.
However, since the CD side of DualDiscs is
not physically compatible with the general
CD standard, it may not be possible to play
the CD side with this unit.
Frequent loading and ejecting of a DualDisc
may result in scratches on the disc.
Serious scratches can lead to playback
problems on this unit. In some cases, a
DualDisc may become stuck in the disc
loading slot and will not eject.
To prevent this, we recommend you refrain
from using DualDisc with this unit.
Please refer to the information from the disc
manufacturer for more detailed information
about DualDiscs.
USB storage device
— Address any questions you have about
your external storage device (USB) to
the manufacturer of the device.
— Do not leave the external storage device
(USB) in places with high temperatures.
— Depending on the external storage
device (USB), the following problems
may occur.
- Operations may vary.
- The storage device may not be
recognized.
- Files may not be played back properly.
— Connections via USB hub are not
supported.
— Do not connect anything other than a
USB storage device.
— Firmly secure the USB storage device
when driving. Do not let the USB storage
device fall onto the floor, where it may
become jammed under the brake or
accelerator pedal.
— Firmly secure the USB storage device
when driving. Do not let the USB storage
Page 31
Appendix
English
En
05
Additional information
device fall onto the floor, where it may
become jammed under the brake or
accelerator pedal.
— Depending on the USB storage device,
the device may cause noise to occur in
the radio.
- The device may generate noise in the
radio.
— This unit can play back les in the USB
portable audio player/USB memory that
is USB Mass Storage Class. However,
copyright protected les that are stored in
the USB devices cannot be played back.
— You cannot connect a USB portable
audio player/USB memory to this unit via
USB hub.
— Partitioned USB memory is not
compatible with this unit.
— Depending on the kind of USB portable
audio player/USB memory you use, the
device may not be recognized or audio
les may not be played back properly.
— Do not leave the USB portable audio
player/USB memory in direct sunlight for
extended amounts of time. Doing so may
cause the device to malfunction from the
extreme rise in temperature.
— Up to 1 000 folders and 1 500 les can
be recognized.
— There may be a slight delay at the start
of playback of audio les embedded with
image data or audio files stored on a
USB storage device that has numerous
folder hierarchies.
JPEG picture les
— JPEG is short for Joint Photographic
Experts Group and refers to a still image
compression technology standard.
— There is no progressive JPEG
compatibility.
— EXIF format not support.
Important
— When naming a JPEG image le, add the
corresponding filename extension (.jpg,
.jpeg, .jpe or .jf).
— This unit plays back files with these
filename extensions (.jpg, .jpeg, .jpe
or .jfif) as a JPEG image file. To
prevent malfunctions, do not use these
extensions for files other than JPEG
image les.
CAUTION
Pioneer accepts no responsibility for data
lost on the USB memory/USB portable
audio player even if that data is lost while
using this unit.
Compressed audio compatibility
(Disc, USB)
WMA
File extension: .wma
Bit rate: 32 kbps to 320 kbps (CBR), VBR
Sampling frequency: 32 kHz to 48 kHz
Windows Media™ Audio Professional,
Lossless, Voice/DRM Stream/Stream with
video: Not compatible
MP3
File extension: .mp3
Bit rate: 8 kbps to 320 kbps (CBR), VBR
Sampling frequency: 8 kHz to 48 kHz
Compatible ID3 tag version: 1.0, 2.3
(ID3 tag Version 2.3 is given priority over
Version 1.0.)
M3u playlist: Not compatible
MP3i (MP3 interactive), mp3 PRO: Not
compatible
DivX compatibility
Compatible format: DivX video format
implemented in relation to DivX standards.
File extensions: .avi or .divx
DivX UItra format: Not compatible
DivX HD format: Not compatible
DivX files without video data: Not
compatible
DivX plus: Not compatible
Compatible audio codec: MP2, MP3, Dolby
Digital
LPCM: Compatible
Bit rate: 8 kbps to 320 kbps (CBR), VBR
Sampling frequency: 8 kHz to 48 kHz
Compatible external subtitle le extension:
.srt, .txt
31
Page 32
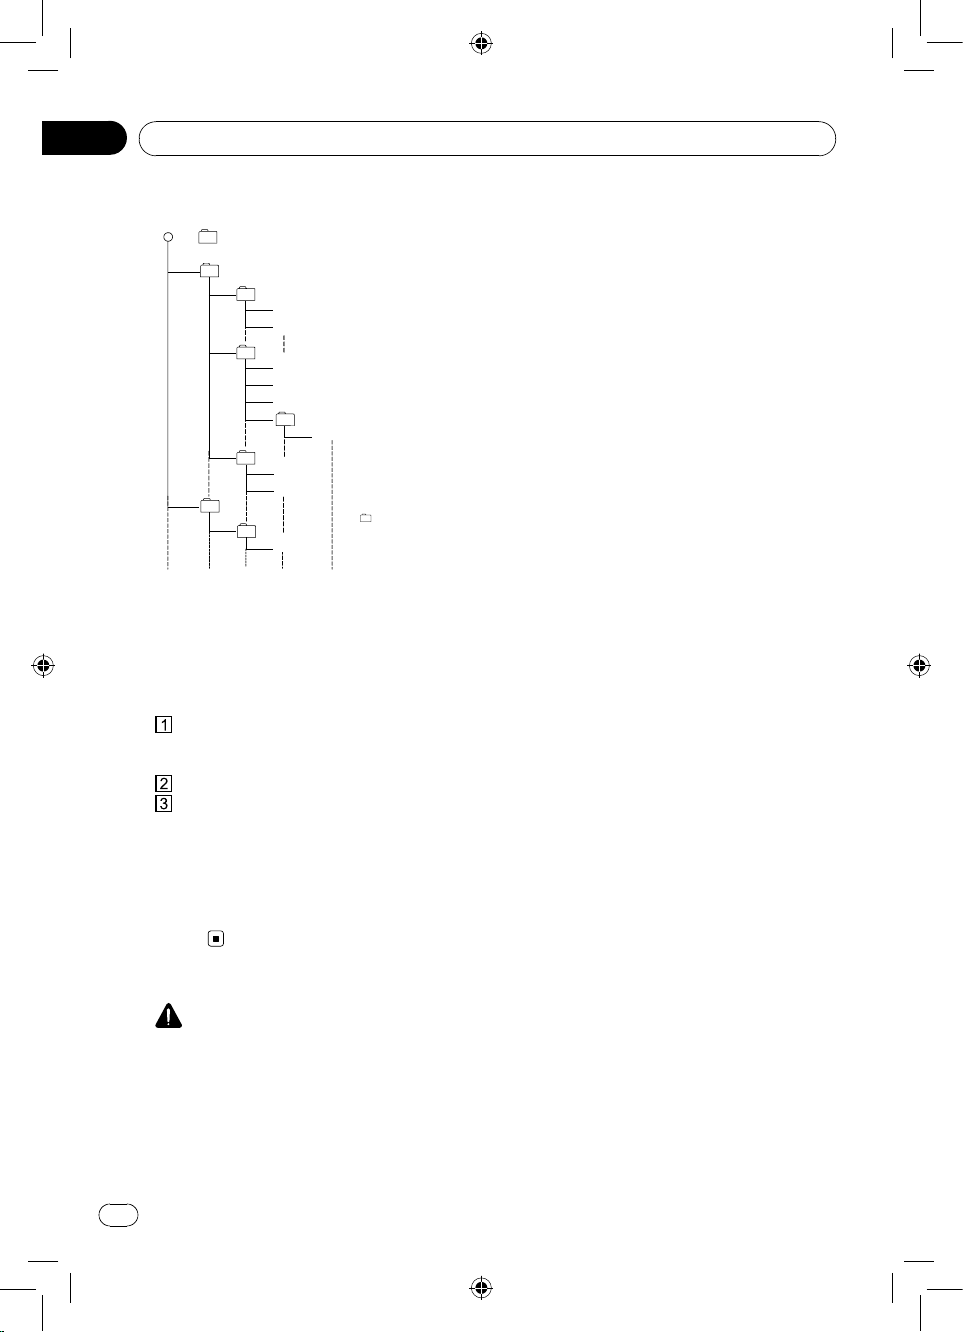
Appendix
En
05
( )
0
1
2
♪①
♪②
5
♪⑧
♪⑦
6
7
⑨
♪③
3
4
♪④
♪⑤
♪⑥
Layer1 Layer2 Layer3 Layer5Layer4
○ Root Folde
r
Folder
♪ File
♪
Additional information
Example of a hierarchy
External storage device (USB)
The playback sequence is the same as the
recorded sequence in the external storage
device (USB).
To specify the playback sequence, the
following method is recommended.
Create a le name that includes numbers
that specify the playback sequence (e.g.,
01xxx.mp3 and 099yyy.mp3).
Put those les into a folder.
Save the folder that contains the les to
the external storage device (USB).
However, depending on the system
environment, you may not be able to specify
the playback sequence.
For USB portable audio players, the
sequence is different and depends on the
player.
Using the display correctly
CAUTION
•
If liquid or foreign matter should get
inside this unit, turn off the power
immediately and consult your dealer
or the nearest authorized PIONEER
Service Station. Do not use the unit in
this condition because doing so may
result in fire, electric shock, or other
failure.
32
• If you notice smoke, a strange noise
or smell, or any other abnormal signs
from the display, turn off the power
immediately and consult your dealer
or the nearest authorized PIONEER
Service Station. Using this unit in this
condition may result in permanent
damage to the system.
• Do not disassemble or modify this unit,
as there are high-voltage components
inside which may cause electric
shock. Be sure to consult your dealer
or the nearest authorized PIONEER
Service Station for internal inspection,
adjustments, or repairs.
Handling the display
•
When the display is subjected to direct
sunlight for a long period of time, it will
become very hot resulting in possible
damage to the LCD screen. You should
avoid exposing the display unit to direct
sunlight as much as possible.
• The display should be used within the
temperature range of –20°C to +60°C.
At temperatures higher or lower than this
operating temperature range, the display
may not operate normally.
Liquid crystal display (LCD) screen
• Heat from the heater may damage the
LCD screen, and cool air from the cooler
may cause moisture to form inside the
display resulting in possible damage.
Also, if the display is cooled down by the
cooler, the screen may become dark,
or the life span of the small uorescent
tube used inside the display may be
shortened.
• Small black dots or white dots (bright
dots) may appear on the LCD screen.
These are due to the characteristics of
the LCD screen and do not indicate a
malfunction.
• When using a cellular phone, keep
the antenna away from the display to
prevent disruption of the video image by
the appearance of spots, colored stripes,
etc.
LED (light-emitting diode) backlight
• At low temperatures, using the LED
backlight may increase image lag and
Page 33
Appendix
English
En
05
Additional information
degrade the image quality due to the
characteristics of the LCD screen. Image
quality will improve with an increase in
temperature.
• To protect the LED backlight, the display
will darken in the following environments:
— In the direct sunlight
— Near the heater vent
• The product lifetime of the LED
backlight is more than 10 000 hours.
However, it may decrease if used in high
temperatures.
• If the LED backlight reaches the end
of its product lifetime, the screen will
become dark and the image will no
longer be projected. In such cases,
please consult your dealer or the nearest
authorized PIONEER Service Station.
Copyright and trademark
DVD video
is a trademark of DVD Format/Logo.
Rovi
This item incorporates copy protection
technology that is protected by U.S. patents
and other intellectual property rights of
Rovi Corporation. Reverse engineering and
disassembly are prohibited.
This item incorporates copy protection
technology that is protected by U.S. patents
and other intellectual property rights of
Rovi Corporation. Reverse engineering and
disassembly are prohibited.
MP3
Supply of this product only conveys a
license for private, non-commercial use and
does not convey a license nor imply any
right to use this product in any commercial
(i.e. revenuegenerating) real time
broadcasting (terrestrial, satellite, cable and/
or any other media), broadcasting/streaming
via internet, intranets and/or other networks
or in other electronic content distribution
systems, such as pay-audio or audio-ondemand applications. An independent
license for such use is required. For details,
please visit
http://www.mp3licensing.com.
Windows Media is either a registered
trademark or trademark of Microsoft
Corporation in the United States and/or
other countries.
This product includes technology owned
by Microsoft Corporation and cannot be
used or distributed without a license from
Microsoft Licensing, Inc.
®
DivX
“DivX®, DivX Certified® and associated
logos are trademarks of Rovi Corporation or
its subsidiaries and are used under license.
ABOUT DIVX VIDEO: DivX® is a digital
video format created by DivX, LLC, a
subsidiary of Rovi Corporation. This is
an official DivX Certified® device that
plays DivX video. Visit divx.com for more
information and software tools to convert
your les into DivX video.
ABOUT DIVX VIDEO-ON-DEMAND: This
DivX Certified® device must be registered
in order to play purchased DivX Video-onDemand (VOD) movies. To obtain your
registration code, locate the DivX VOD
section in setting menu. Go to vod.divx.com
for more information on how to complete
your registration.
Dolby Digital
Manufactured under license from Dolby
Laboratories. "Dolby" and the double-D
symbol are trademarks of Dolby
Laboratories.
Bluetooth
The Bluetooth® word mark and logos are
registered trademarks owned by Bluetooth
SIG, Inc. and any use of such marks
by PIONEER CORPORATION is under
license. Other trademarks and trade names
are those of their respective owners.
Android
Android and Google Play are trademarks of
Google Inc.
TM
& Google Play
WMA
33
Page 34
Appendix
En
05
Additional information
Specications
General
Rated power source: ............................... 14.4 V cc (12.0 V to 14.4 V allowable)
Grounding system ......................................Negative type
Maximum current consumption: .............. 10.0 A
Dimensions (W × H × D):
Chassis ............................................ 178 mm × 50 mm × 165 mm
Nose ................................................ 188 mm × 58 mm × 22 mm
Weight: .................................................... 1.4 kg
Display
Screen size/aspect ratio: ......................... 3.5 inch wide/16:9 (effective display area: 76.80 mm
× 43.20 mm)
Pixels: ...................................................... 320 × (RGB) × 240
Display method: ..................................... TFT active matrix
Durable temperature range (power off) ... –20 °C to + 60 °C
DVD Player
System..................................................... DVD video, Video CD, CD,WMA, MP3, DivX, JPEG
system
Usable discs ............................................ DVD video, Video CD, CD, CD-R/RW, DVD±R/RW/
R DL
Region number ........................................ 4 for Latin America models
2 for Middle East Asian models
Frequency response ................................ 20 Hz to 20 kHz (with DVD, at sampling frequency
96 kHz)
Signal-to-noise ratio................................. 75 dB (1 kHz) (IEC-A network) (RCA level)
Output level:
Video ............................................... 1.0 Vp-p/75 Ω (±0.2 V)
Number of channels ................................ 2 (stereo)
MP3 decoding format .............................. MPEG-1 & 2 Audio Layer 3
WMA decoding format ............................. Ver. 7, 7.1, 8, 9, 10, 11 (2ch audio) (Windows Media
Player)
DivX decoding format .............................. Home Theater Ver. 3, 4, 5.2, 6 (.avi, .divx)
DVD video output .................................... NTSC
Audio
Maximum power output: .......................... 50 W × 4
Continuous power output ... .................... 22 W × 4 (50 Hz to 15 000 Hz, 5 %THD, 4 Ω load,
Load impedance: ..................................... 4 Ω (4 Ω to 8 Ω allowable)
Preout maximum output level .................. 4.0 V
Equalizer (3-Band Graphic Equalizer):
Frequency ....................................... 100Hz/1kHz/10kHz
Gain ................................................. -14 to +14 dB
both channels driven)
34
Page 35
Appendix
English
En
05
Additional information
Subwoofer (mono):
Frequency ....................................... 80 Hz/120 Hz/160 Hz
Gain ................................................. -79 dB to 0 dB
USB
USB standard specication: .................... USB 1.1, USB 2.0 full speed
Maximum current supply ......................... 500 mA
File system: ............................................. FAT16, FAT32
FM tuner
Frequency range: .................................... 87.5 MHz to 108.0 MHz)
Usable sensitivity ..................................... 10 dBμ (S/N: 30 dB)
AM tuner
Frequency range: .................................... 531 kHz to 1 602 kHz (9 kHz)
.................................... 530 kHz to 1 640 kHz (10 kHz)
Usable sensitivity: .................................... 30 dBμ (S/N: 20 dB)
Bluetooth
Version .................................................... Bluetooth 2.0 certied
Output power ........................................... +4 dBm Maximum(Power class 2)
Note
Specications and the design are subject to modications without notice.
35
Page 36
Visit us on the World Wide Web at
http://pioneer.jp/group/index-e.html
<Middle East & Africa>
Pioneer Gulf.FZE http://www.pioneer-uae.com
<Oceania>
Pioneer Electronics Australia. Pty. Ltd. http://www.pioneer.com.au/
<Asia>
Pioneer Electronics Asiacentre.Pte http://www.pioneer.com.sg
Pioneer (HK) Ltd. http://www.pioneerhongkong.com.hk
Pioneer High Fidelity Taiwan Co., Ltd. http://www.pioneer-twn.com.tw
<Latin>
Pioneer International Latin America S.A. http://www.pioneer-latin.com
PIONEER CORPORATION
1-1, Shin-ogura, Saiwai-ku, Kawasaki-shi,
Kanagawa 212-0031, JAPAN
PIONEER ELECTRONICS (USA) INC.
P.O. Box 1540, Long Beach, California 90801-1540, U.S.A.
TEL: (800) 421-1404
PIONEER EUROPE NV
Haven 1087, Keetberglaan 1, B-9120 Melsele, Belgium/Belgique
TEL: (0) 3/570.05.11
PIONEER ELECTRONICS ASIACENTRE PTE. LTD.
253 Alexandra Road, #04-01, Singapore 159936
TEL: 65-6472-7555
PIONEER ELECTRONICS AUSTRALIA PTY. LTD.
5 Arco Lane, Heatherton, Victoria, 3202 Australia
TEL: (03) 9586-6300
PIONEER ELECTRONICS OF CANADA, INC.
340 Ferrier Street, Unit 2, Markham, Ontario L3R 2Z5, Canada
TEL: 1-877-283-5901
TEL: 905-479-4411
PIONEER ELECTRONICS DE MEXICO, S.A. de C.V.
Blvd.Manuel Avila Camacho 138 10 piso
Col.Lomas de Chapultepec, Mexico, D.F. 11000
TEL: 55-9178-4270
先鋒股份有限公司
台北市內湖區瑞光路407號8樓
電話: 886-(0)2-2657-3588
先鋒電子(香港)有限公司
香港九龍長沙灣道909號5樓
電話: 852-2848-6488
2014 PIONEER CORPORATION.
All rights reserved.
P/N:127075005861
XERD & XERI
 Loading...