

Page 1

Hide-away TV tuner
Operation Manuai
GEX-P
7000
TVP
Page 2

Contents
Before Using This Product
About This Product ..............................................2
• Video system of a connected component
About This Manual...............................................3
Precaution.............................................................3
In Case of Trouble ...............................................3
Resetting the Microprocessor...............................3
To Ensure Safe Driving .......................................4
MODE Switeh Setting .........................................5
Key Finder
......................................
• Remote Controller
• The Head Unit Remote Controller
(e.g. AVM-P7000R)
Using the Remote Controller
• Battery
Operating with Head Unit
• Head Unit Group 1
• Head Unit Group 2
• Head Unit Group 3
Function Compatibility Charts
• Preset Memory
• Direct Recall
• Entering the Function Menu
• Preset Scan
• Swithcing the Tuning Mode
• Using the PGM Button
Basic Operation
Switching the Source ..........................................13
• AV MASTER MODE and
IP-BUS MODE
• ADD-ON MODE
Basic Operation of TV Tuner.............................15
• Manual and Seek Tuning
• Preset Tuning
• Band
BSSM (Best Station Sequential Memory)
• AV MASTER MODE and
IP-BUS MODE
Confirming Current Channel and
Other Settings .............................................17
Switching the Video Source Only .....................18
Switching the Audio Source Only
• AV MASTER MODE and IP-BUS MODE
• ADD-ON MODE
Switehing Rear Display Source
..............................
..................
...............
..................
...........................
.........
....................
.........................
13
19
Operating the Setting Menu
2
6
7
9
10
Entering the Setting Menu .................................22
Selecting the Country Group .............................23
• Country Group List and Channel Name
Adjusting the Picture (IP-BUS MODE and
ADD-ON MODE) ......................................24
• Color (COLOR)
• Sharpness (SHARPNESS)
EM MODULATOR Setting
(ADD-ON MODE)
• Frequency (FREQUENCY)
• Level (LEVEL)
Switching the VTR Mode (VTR 1/2)
TV Antenna Setting ...........................................27
Using Multi-CD Player
Basic Operation of Multi-CD Player
• Track Search and Fast Forward/Reverse
• Disc Search
• Pause
Repeat Modes ....................................................29
Random Play
CD Sound Quality Adjustment
.....................................................
....................................
.......................
Using CD Player (one disc only)
Basic Operation of CD Player
(one disc only)
• Track Search and Fast Forward/Reverse
• Pause
Repeat Play
Random Play
............................................
........................................................33
.....................................................
Using Multi-MD Player ......................35
Basic Operation of Multi-MD Player
• Track Search and Fast Forward/Reverse
• Disc Search
Repeat Play.........................................................36
16
21
Random Play
Combining Random Play and Repeat Play .... 37
Specifications
.....................................................
................................
..............
................
................
.........................
..........
................
22
25
26
28
28
30
31
32
32
34
35
37
38
Page 3

Before Using This Product
About This Product
This product complies with the EMC Directives (89/336/EEC, 92/31/EEC) and CE Marking
Directive (93/68/EEC).
This product is a TV tuner for reception of TV broadeasts. Combining it with a separately
sold display lets you enjoy TV entertainment. The tuner frequencies on this product are
alloeated for use in Western and Eastern Europe. Use in other areas may result in improper
reception. (This product is not compatible with channels in France.)
This product features VTRl and VTR2 inputs, so you ean watch playback from an external
video component (sold separately). It also features a Rear Display output, letting you
watch TV as well as playback from a connected external video component on a Rear
Display (sold separately).
Video system of a connected component
This product is PAL/SECAM system compatible. When conneeting an external component to
this product’s VTRl or VTR2 input, or Rear Display output, be sure the eomponent is com
patible with the same video systems. If it is not, images will not be correctly reproduced.
WARNING
A
Be sure to stop driving and park your car in a safe place before watching the TV or VTR.
Watehing the TV or VTR while driving is dangerous and could result in an accident.
This product’s Rear Display output is for eonnection of a display to enable passengers in
the rear seats to watch the TV or VTR. Do not install the rear display in a location that
enables the driver to watch the TV or VTR while driving.
Page 4

Before Using This Product
About This Manual
This product features a number of sophisticated functions ensuring superior reception and
operation. All are designed for the easiest possible use, but many are not self-explanatory.
This operation manual is intended to help you benefit fully from their potential and to
maximize your listening enjoyment.
We recommend that you familiarize yourself with the functions and their operation by
reading through the manual before you begin using this product. It is especially important
that you read and observe the “Precaution” on this page and in other sections.
Precaution
Keep this manual handy as a reference for operating procedures and precautions.
Always keep the volume low enough for outside sounds to be audible.
Protect this product from moisture.
If the battery is disconnected, the preset memory will be erased and must be
reprogrammed.
In Case of Trouble
Should this product fail to operate properly, contact your dealer or nearest authorized
PIONEER Service Station.
Resetting the Microprocessor
The microprocessor must be reset under the following conditions:
When using this product for the first time after installation.
When the machine fails to operate properly.
When strange (incorrect) messages appear on the display.
When setting the position of the MODE switch on the bottom of this product.
If you reset the microprocessor, memorized broadcast stations and other information is
erased, and this product returns to its initial settings.
To reset the microprocessor, press the RESET button on the unit with a pen tip or other pointed instrument.
Page 5

To Ensure Safe Driving
To ensure safe vehicle operation, complicated functions are not operable during driving. If
any of these complicated functions are selected while driving, “YOU CANNOT USE
THIS FUNCTION WHILE DRIVING” is temporarily displayed on the display. To use
these functions, please stop your vehicle and engage the parking brake.
ATTENTION
YOU CANNOT USE THIS
FUNCTION WHILE DRIVING
Once you have stopped your vehicle and engaged the parking brake, the system may
ignore this fact and display the “YOU CANNOT USE THIS FUNCTION WHILE
DRIVING” message. This may occur when:
- The ignition is turned ON or OFF.
- The ignition switch is turned to the ACC position, and the engine started in order to
use the system.
- The RESET button is pressed.
In the above cases it can be assumed that the system has not detected that the parking
brake is engaged. In this case, release the parking brake and then re-engage it.
On some vehicles, when the ignition is set to the OFF or ACC position, the condition of
the parking brake cannot be detected. In order to use the system while the ignition
switch is in the ACC position, first turn the ignition switch to the ON position, engage
the parking brake, and then return the ignition switch to the ACC position.
Page 6
Before Using This Product
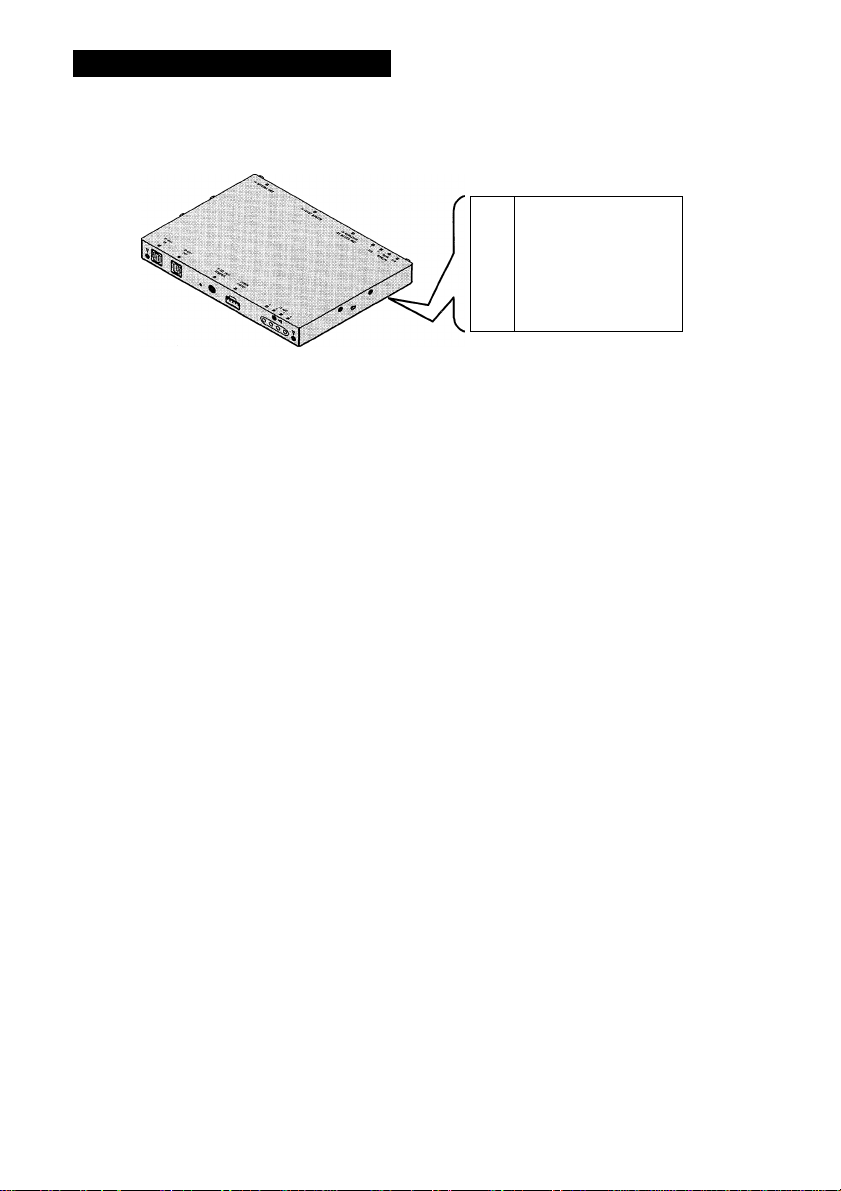
MODE Switch Setting
FM MODULATOR ^
u
IP-BUS MAIN UNIT
A
IP-BUS AV MASTER
________________
Set the MODE switch on the bottom of this product to the appropriate position with a pen
tip or other pointed instrument, for the component you are combining it with. Operations
may differ slightly in each MODE.
(1) AV MASTER MODE (IP-BUS AV MASTER)
When combining with a PIONEER Audio Visual Master Unit (e.g. AVM-P7000R):
• Audio is output from the Audio Visual Master Unit’s TV source.
• Perform operations with this product and the Audio Visual Master Unit.
(Refer to page 9 for details concerning operation with the Audio Visual Master Unit.)
(2) IP-BUS MODE (IP-BUS MAIN UNIT)
When combining with a PIONEER Head Unit featuring an IP-BUS input:
• Audio is output from the Head Unit’s TV source.
• Perform operations with this product and the Head Unit.
(Refer to page 9 for details concerning operation with the Head Unit.)
J
(3) ADD-ON MODE (FM MODULATOR)
When combining with a car stereo with FM reception capability and using an FM
MODULATOR (supplied):
• Audio is output from the car stereo’s FM source.
• Perform all operations with this product.
Page 7
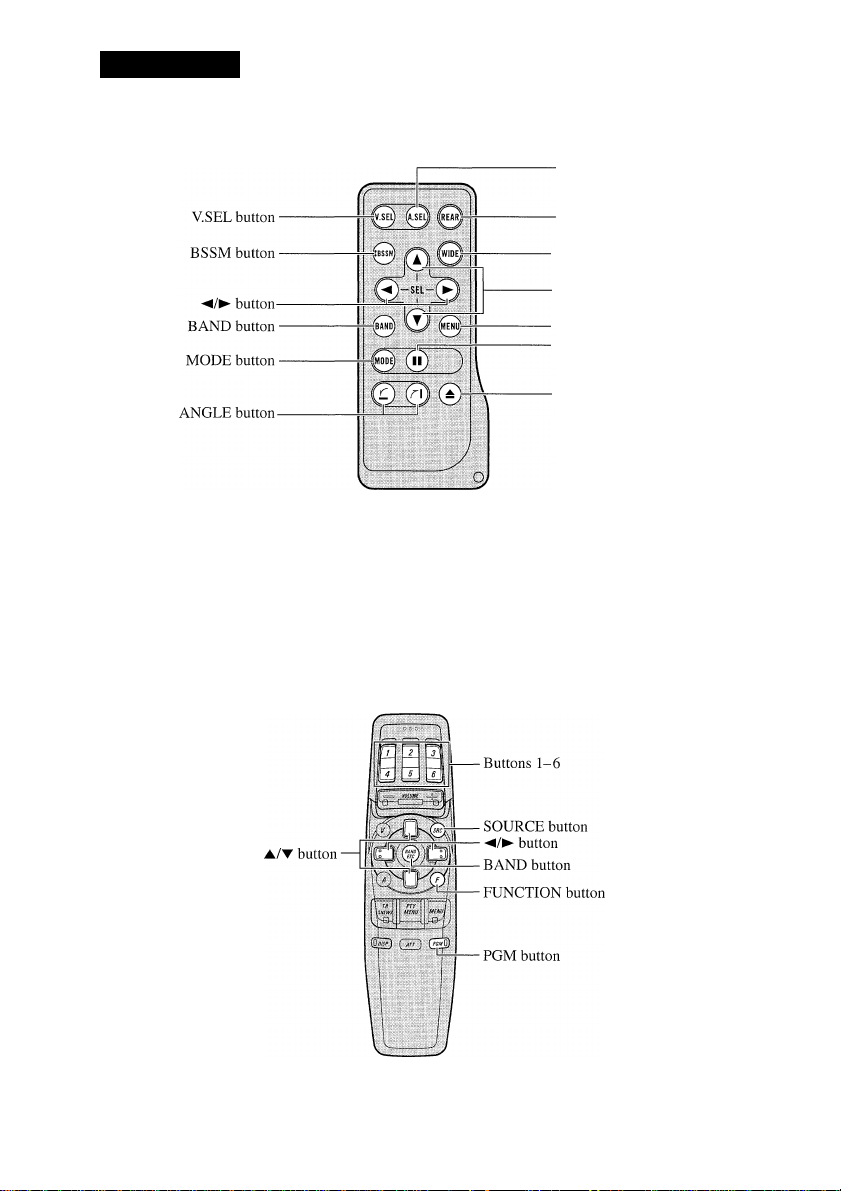
Key Finder
Remote Controller
A.SEL button
" REAR button
- WIDE button
- A/T
button
- MENU button
-PAUSE button
-OPEN/CLOSE button
Note:
• Depending on the display connected, you can use the following buttons, (e.g. AVX-P7000CD etc.)
* ANGLE button: Lets you adjust display angle.
* OPEN/CLOSE button: Lets you open/close the display by holding down this button for 2
* WIDE button: Lets you switch between wide screen display modes.
• You can use the PAUSE and MODE buttons only when using this product with ADD-ON MODE.
seconds.
The Head Unit Remote Controller (e.g. AVM-P7000R)
Page 8
Using the Remote Controller
This product is equipped with a remote controller for convenient operation.
• Point the controller in the direction of the signal receptor on the color display (sold
separetely) to operate.
Precaution:
• Do not store the remote controller in high temperatures or direct sunlight.
• The controller may not function properly in direct sunlight.
• Do not let the remote controller fall onto the floor, where it may become jammed under the brake or
accelerator pedal.
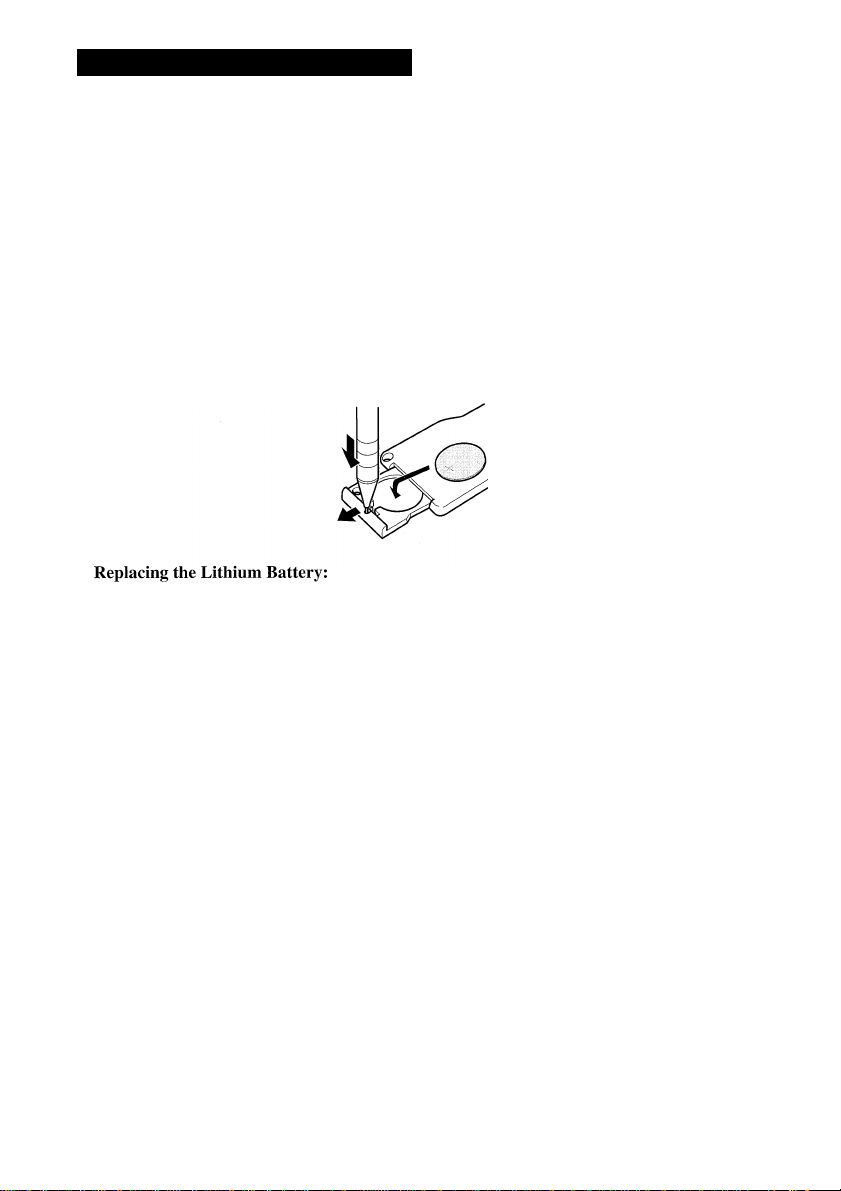
Battery
Slide the tray out of the back of the remote controller and insert the battery with the (+) and (-) poles pointing in the proper direction.
• Use only lithium battery “CR2032”, 3 V.
Precaution;
• Remove the battery if the remote controller is not used for a month or longer.
• If the event of battery leakage, wipe the remote controller completely clean and install a new
battery.
Page 9

A
WARNING
Keep the lithium battery out of reach of children. Should the battery be swallowed,
immediately consult a doctor.
A CAUTION
Do not recharge, disassemble, heat or dispose of battery in a fire.
Use a CR2032 (3 V) Lithium battery only. Never use other types of battery with this
unit.
Do not handle the battery with metallic tools.
Do not store the Lithium battery with metallic materials.
Dispose of the used Lithium battery, in compliance with applicable laws and regula
tions.
Always check carefully that you are loading the battery with its (-I-) and (-) poles facing
in the proper directions.
Page 10

Operating with Head Unit
These instructions explain how to operate this product with a connected Head Unit. Some
Head Units control this product as a TV source, while others control it as an External Unit.
Among Head Units that control this product as an External Unit, some do it using a
FUNCTION button and some do not.
Note:
• External Unit refers to a component that cannot be controlled by a Head Unit as a source.
• When connected to a Head Unit that cannot control a TV as a source, this product (TV) is
controlled as an External Unit.
• PIONEER Head Units are designed for connection to a single External Unit only.
■ Head Unit Group 1
Head Units that control this product as a TV source.
■ Head Unit Group 2
Head Units that control this product as an External Unit using a FUNCTION button to
operate functions.
■ Head Unit Group 3
Head Units that control this product as an External Unit, not using a FUNCTION button to
operate functions.
Head Unit Group 1
When using the unit with one of these Head Units, operate while referring to Head Unit
Group 1 in the Function Compatibility Charts.
AVM-P7000R
DEH-P7000R (-W) DEH-P6000R
Head Unit Group 2
When using the unit with one of these Head Units, operate while referring to Head Unit
Group 2 in the Function Compatibility Charts.
DEH-P9000R
DEH-P3000R
DEH-P645R (-W)
DEH-P544R
DEX-P88R
KEH-P8800R (-W) KEH-P7800R
KEH-P2830R
KEH-P9700R
KEH-P4530R
KEH-P3700R KEH-P27R
KEH-P8600RS KEH-P7600R
KEH-P6600RS
KEH-P4600R
KEH-P26R
MEH-P9000R
DEH-P8000R
DEH-P945R DEX-P99R
DEH-P645RS
DEH-P443R
DEH-P735R
KEH-P2800R KEH-P28R
KEH-P5730R
KFH-P4500R
KEX-P66R KEH-P4630R
KEH-P3630R
KEH-P16
MEH-P5000R (-11)
DEH-P4000R-B
DEH-P545R
DEH-P835R
KEH-P6800R (-B, -W)
KEH-P5700R
KEH-P3730R
KEH-P8600R (-W)
KEH-P6600R (-W)
KEH-P3600R
Page 11

Head Unit Group 3
When using the unit with one of these Head Units, operate while referring to Head Unit
Group 3 in the Funetion Compatibility Charts.
KEH-P4830R KEH-P4800R
Function Compatibility Charts
Operate using buttons with the same on the Head Unit itself or
the remote eontroller.
Head Unit Group 1
Function
Switehing the Source
Manual Tuning (Step by Step) ◄/► (0.5 seeonds or less) : Select
Seek Tunig
Preset Tuning A/T
Changing the Band
Preset Memory
Direct Recall 1-6
BSSM A/T
Using the PGM Button
Button
SOURCE, SOURCE/OFF
◄/► (0.5 seconds or more) :Select
BAND, : Select
1-6 (Hold for 2 seeonds)
PGM (Hold for 2 seconds) :BSSM
Note:
• For TV, you cannot memorize functions other than BSSM in the PGM button.
Operation Page
:Select
: Select
:Memory
: Select
:ON/OFF
ON/OFF
13
15
15
15
15
11
12
16
—
Page 12

Operating with Head Unit
Head Unit Group 2
Function
Switching the Source
Manual or Seek Tuning
Preset Tuning
Changing the Band
Preset Memory
Direct Recall
Entering the Function Menu
Preset Scan (FUNC 1)
BSSM (FUNC 1)
Switching the Tuning Mode
(AUTO/MANUAF)
Setting the PGM Button
Using the PGM Button
Head Unit Group 3
Function
Switching the Source
Switching the Tuning Mode
Manual or Seek Tuning ◄/►
Preset Tuning
Changing the Band
Preset Memory
Direct Recall
BSSM
Preset Scan
Button
SOURCE, SOURCE/OFF
◄/►
A/T
BAND,
1-6 (Hold for 2 seconds)
1-6
FUNCTION
AIT
A/T
FUNCTION (Hold for 2 seconds)
AITIMI>^
PGM/DSP, PGM
Button
SOURCE, SOURCE/OFF
PTY button
A/T
BAND,
1-6 (Hold for 2 seconds)
1-6
DISPLAY button
(Hold for 2 seconds)
DISPLAY button
(Hold for 2 seconds)
Operation Page
: Select 13
: Select
: Select 15
: Select 15
Memory
: Select 12
: Select
:ON/OFF
:ON/OFF 16
: Select
: Select
:ON/OFF 12
12
11
12
12
12
—
Operation Page
: Select 13
: Select
: Select
: Select 15
: Select 15
Memory 11
: Select
:ON/OFF 16
: Select
12
12
12
12
Preset Memory
The Preset Memory function stores stations in memory manually.
1. Select the station whose channel you want to store in memory.
2. Press one of buttons 1-6 for 2 seconds or longer to store the desired stations.
Note:
• The station is stored in memory under the selected button.
• You cannot memorize in Preset channels 7-12 with this function.
Page 13

Direct Recall
• Press one of buttons 1-6 to recall a station preset under that button.
Note:
• To recall Preset channels 7-12, perform Preset Tuning with
A/T
buttons.
Entering the Function Menu
• Press the FUNCTION button to select the desired mode in the Function Menu.
Each press of the FUNCTION button selects the mode in the following order:
FUNC 1 (Preset Scan/BSSM) -► FUNC 2 -► FUNC 3 -► FUNC 4
-► AUTO/MANUAF (Switching the Tuning Mode)
Note:
• In FUNC 1, Preset Scan or BSSM is selected by changing the length of time you press the
button.
• There are no functions in FUNC 2, FUNC 3 or FUNC 4.
Preset Scan
This lets you view up to 12 stations stored in the Preset Channels one after the other.
Switching the Tuning Mode
You can select between Manual Tuning (MANUAF) and Seek Tuning (AUTO). Press the
◄/► button and tuning is performed in the selected tuning mode.
Using the PGM Button
The PGM (PGM/DSP) button operates in a different way depending on the function
programmed (memorized). (For details concerning programming the PGM (PGM/DSP)
button, refer to the Head Unit’s operation manual.)
• Press the PGM (PGM/DSP) button.
Function
Preset Scan/BSSM (FUNCl)
Switching the Tuning Mode Select
(AUTO/MANUAL)
Press
Preset Scan ON/OFF
Hold for 2 seconds
BSSM ON/OFF
A/T
<1
Page 14

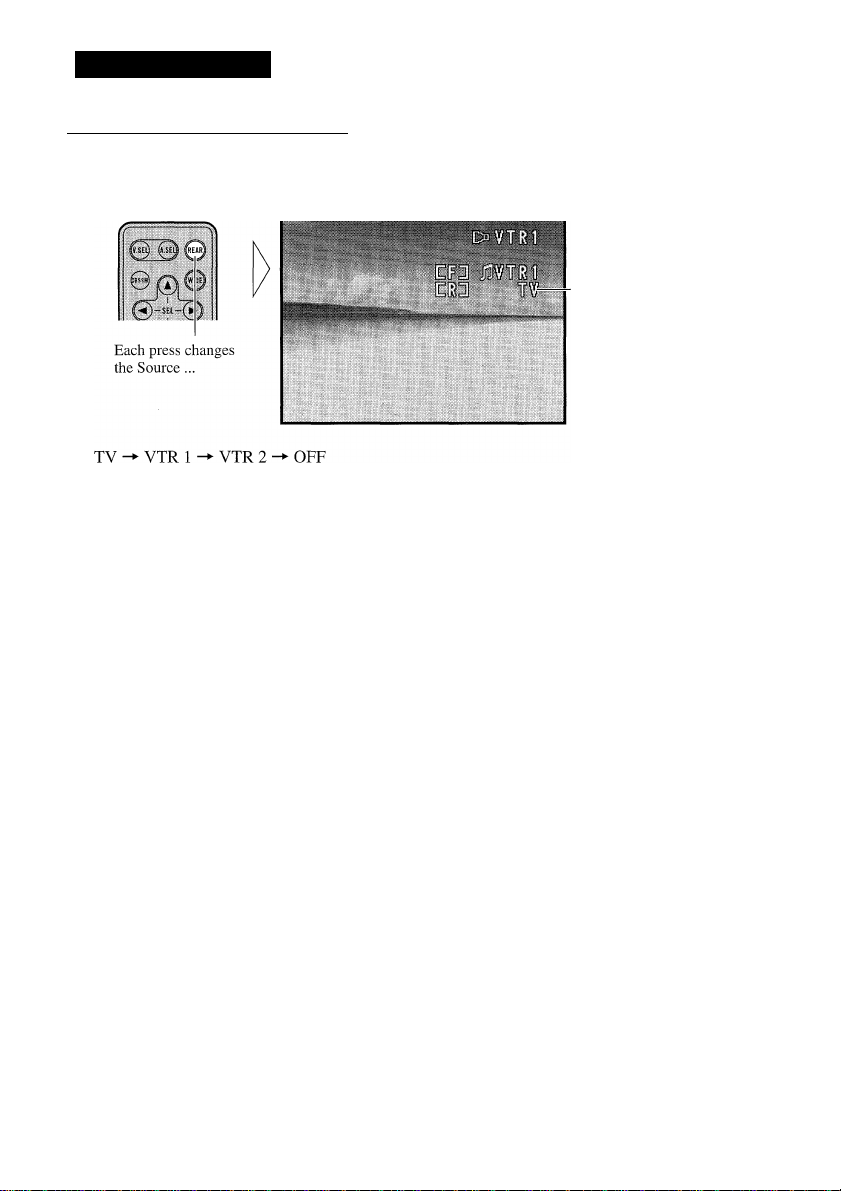
Basic Operation
Switching the Source
Perform appropriate “Selecting the Country Group” for your region. (Refer to page 23.)
AV MASTER MODE and iP-BUS MODE
1. Select the TV source on the Head Unit.
Audio source
Video source (Front)
Band
Each press changes
the Source ...
(e.g. AVM-P7000R)
CD player (one disc only) -► TV -► VIDEO A -► VIDEO B -► Tuner -► DAB (Digital
Audio Broadcasting) -► Multi-CD player -► AUX -► Speaker Input
To switch the sources OFF, hold down the SOURCE button for 1 second or more.
2. Select the desired source in the following order:
Country group
Audio linked mark
Each press changes
the Source ...
TV “► VTRl -► VTR2
Note:
• You can switch VTRl or VTR2 only when “SELECT” is selected in the Setting Menu. (Refer to
page 26.)
• If you press the V.SEL button on this product’s remote controller, you can switch between just
video sources.
• If you cannot switch audio and video sources together, switch using the V.SEL button until the
Audio linked mark is displayed.
• If the output audio is TV, channel indications are displayed at the audio source.
Page 15

ADD-ON MODE
When using this product for the first time, refer to “FM MODULATOR Setting”, and set
the frequency. (Refer to page 25.)
1. Select the desired source in the following order:
Audio source
Video source (Front)
E®3 m¥
Band
Wf
Each press changes
the Source ...
TV -► VTRl “► VTR2 CD player (one disc only) -► Multi-CD player
-► Multi-MD player -► OFF
2. Switch to an FM source on your car stereo with FM reception capability, and tune to the frequency set in MODULATOR Setting”.
Note:
• You cannot switch to a source not connected to this product.
• You can switch VTRl or VTR2 only when “SELECT” is selected in the Setting Menu. (Refer to
page 26.)
• If you press the V.SEL button, you can switch between just video sources.
• If you cannot switch audio and video sources together, switch using the V.SEL button until the
Audio linked mark is displayed.
• To switch this product OFF, switch video sources until the Audio linked mark is displayed, and
then press the A.SEE button OFF.
• If it is hard to hear the output sound, it may be due to interference from a strong FM broadcast.
Refer to “FM MODULATOR Setting”, and change the setting. (Refer to page 25.)
• Even if you switch this product OFF, the FM car stereo remains switched ON.
Country group
Page 16
Basic Operation
Basic Operation of TV Tuner
Perform appropriate “Selecting the Country Group” for your region. (Refer to page 23.)
.— Manual and Seek Tuning
• You can select the tuning method by changing the length of time you press the ◄/► button.
Manual Tuning (step by step)
Seek Tuning
Note:
• If you continue pressing the button for longer than 0.5 seconds, you can skip broadcasting
stations. Seek Tuning starts as soon as you stop pressing the button.
0.5 seconds or less
0.5 seconds or more
Audio source
— Video source (Front)
Source (Rear)
Band
Country group
Preset Tuning
• You can recall memorized stations.
IP-BUS MODE and AV MASTER MODE:
You can memorize and recall stations using buttons 1-6 in the same
way as with Head Unit tuner Preset Tuning. (Refer to page 12.)
Band
TVl TV2
IP-BUS MODE and AV MASTER MODE:
Operation is possible only with the Head Unit’s BAND (◄►) button.
Page 17

BSSM (Best Station Sequential Memory)
The BSSM function automatically memorizes strongly transmitted broadcast stations in
order from the lowest channel up.
Switch the BSSM ON.
BSSM
Hold for 2 seconds
• To cancel the process, press the BSSM button again before memorization is
complete.
Note:
• Up to 12 stations can be memorized in 1 Band.
• In regions where reception of no more than 12 station is possible, previously memorized stations
may remain in memory.
AV MASTER MODE and IP-BUS MODE
You can also perform BSSM with the Head Unit combined this product.
1. Press the FUNCTION button and select the BSSM mode (BSSM) in the
Function Menu.
2. To Switch the BSSM ON, press the ▲ button.
• To cancel the process, press the T button in the Function Menu before
memorization is complete.
■ Head Unit Group 2
1. Press the FUNCTION button and select the Preset Scan/BSSM mode
(FUNC 1) in the Function Menu.
2. To Switch the BSSM ON, press the ▲ button for 2 seconds.
• To cancel the process, press the T button in the Function Menu before
memorization is complete.
a
Page 18
Basic Operation
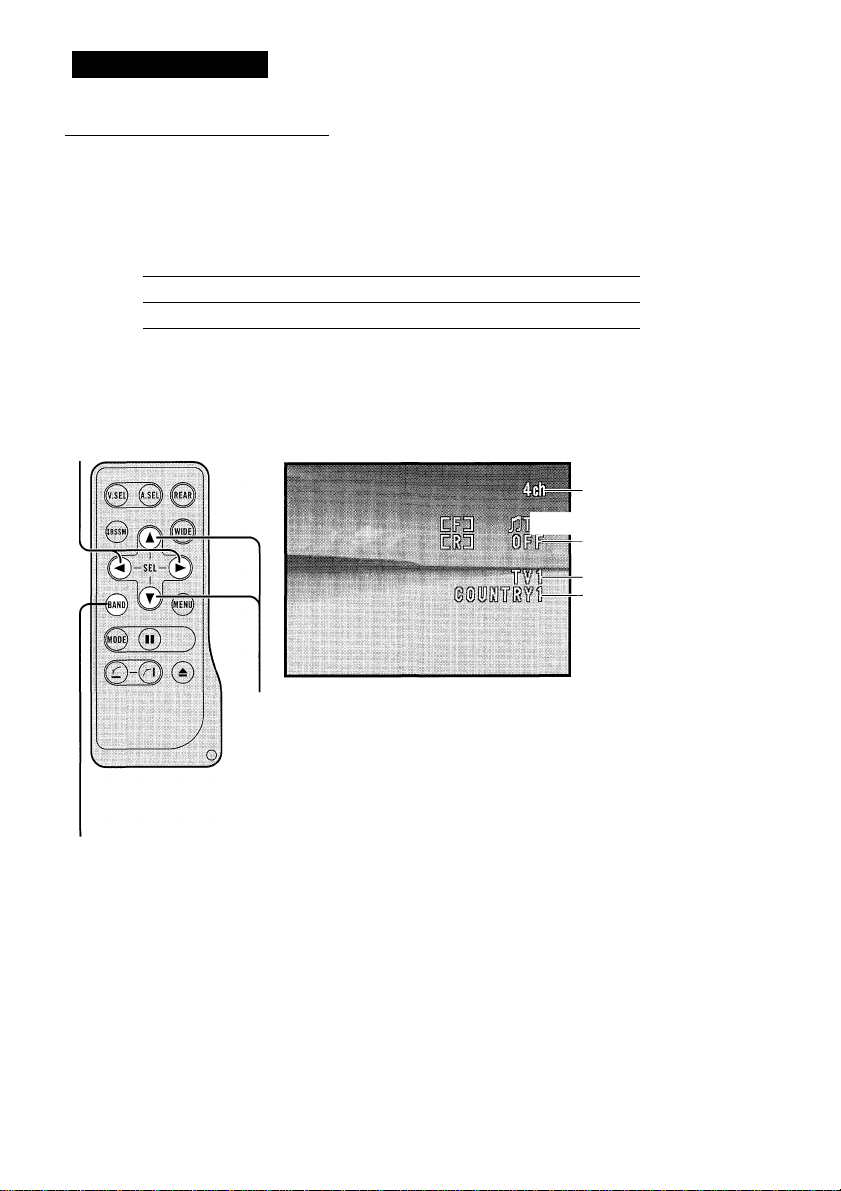
Confirming Current Channel and Other Settings
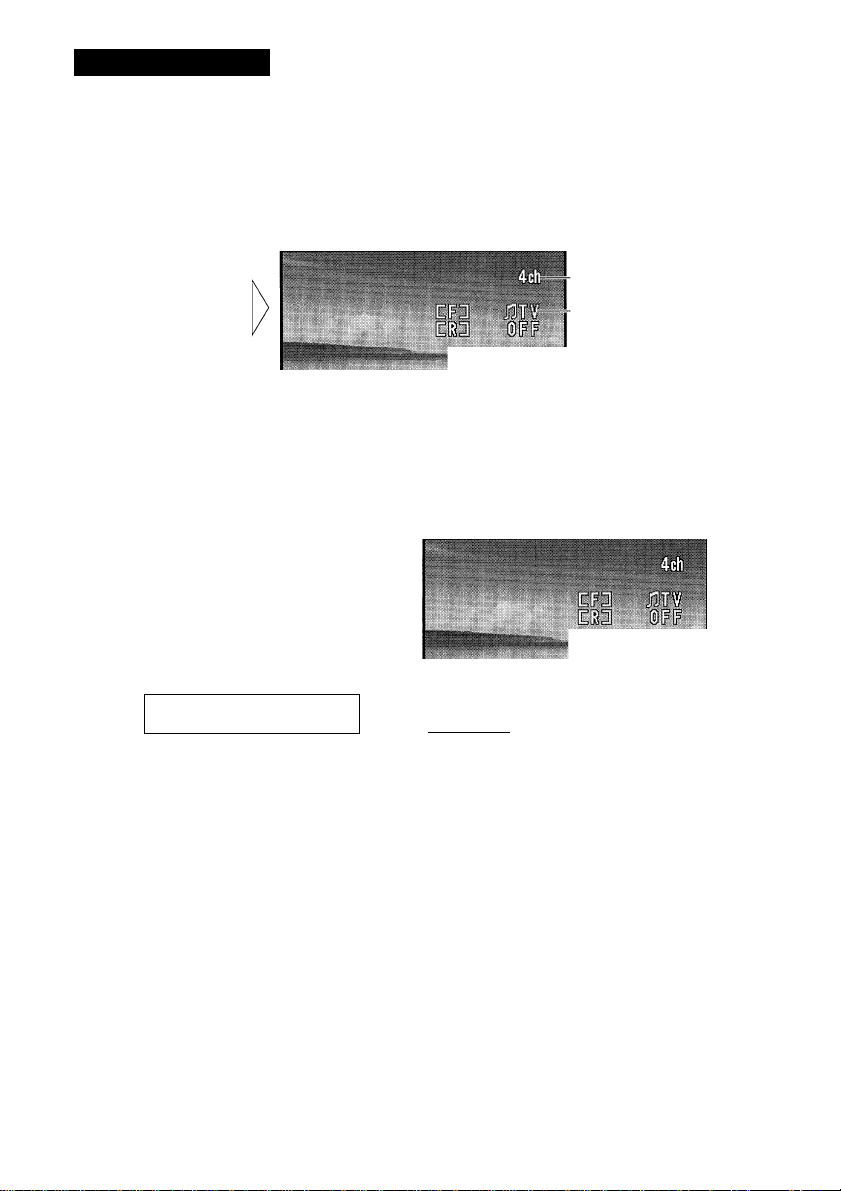
If the current audio source is TV, reception information such as the channel and band is
displayed. You can also display to the preset channel list.
Select the desired mode in the following order:
(Chanel Recall)
.SEL) (A^ {(pear))
<)-SEL-(i
Each Press changes
the Mode ...
Ì®®G0ÌOT11—
Channel Recall -► Preset channel list Country list -► Indication OFF
(Preset channel list) (Country list)
EPS jlfW
ES3
■ wr
r-as-ii
i a g 0
m Si S0 fag gg
Channels memorized (preset) in that Band
Frequency set with the FM MODULATOR
u
00
Note:
• Recalled indications are displayed for 8 seconds.
• In the following cases, you can recall that source’s indication.
* When the audio or video souree is VTRl or VTR2.
* When the video source is TV or the Navigation System.
m ® IE ffl 8 §P ,18
a a 8E 8L ica m an :
IB irs i Fiffl
Country names in COUNTRY 1
_______________
Audio source
Video source (Front)
Band
Country group
MEZUrB'i?1l
j
Page 19
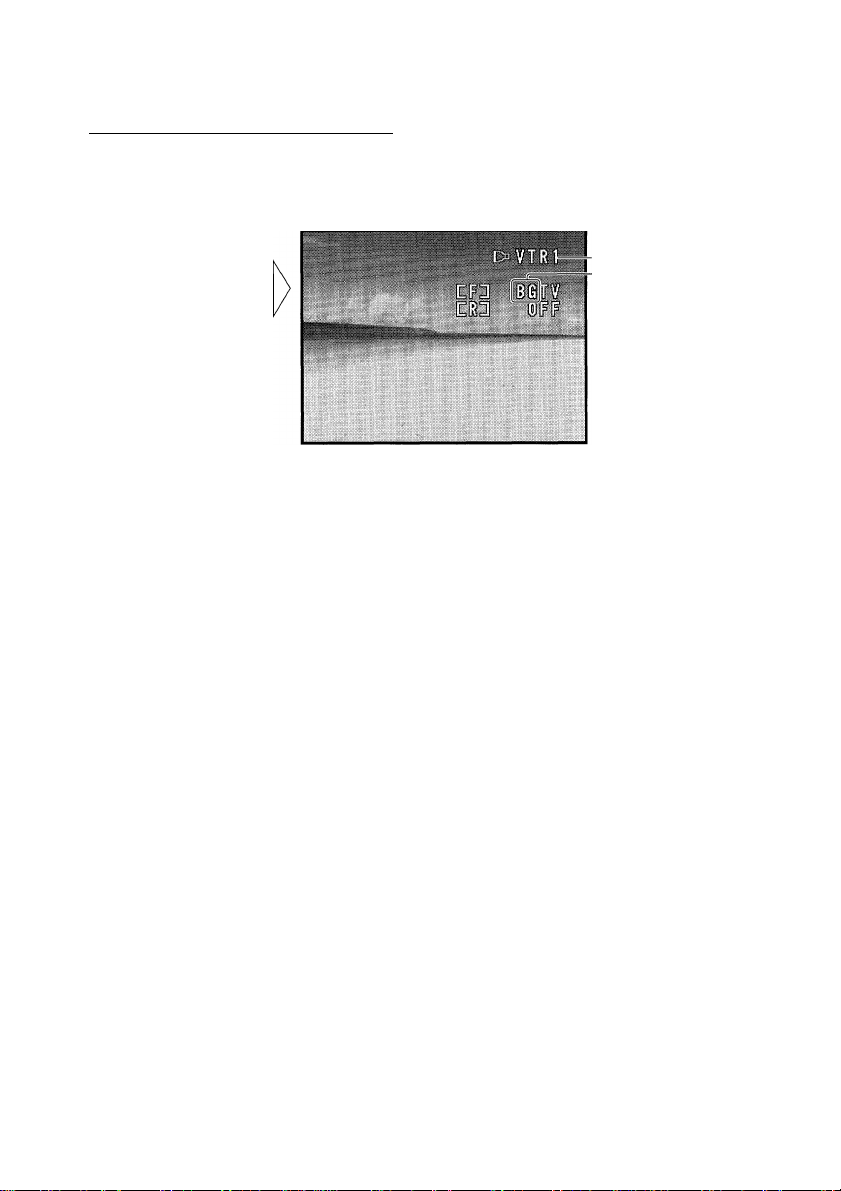
Switching the Video Source Only
While continuing to listen to the current audio source, you can set the video source to
“Background Display”, and switch just the video source as desired.
Select the desired picture in the following order:
Audio source
“Background Display”
Each Press changes
the Picture ...
Navigation System video (BGNAVI) TV video (BGTV) VTRl video (BGVTRl)
-► VTR2 video (BGVTR2) Current audio source video (Audio linked mark)
Note:
• If the output audio is TV, channel indications are displayed at the audio source.
• If the Navigation System is not connected, you cannot switch to Navigation System video.
• You can switch VTRl or VTR2 only when “SELECT” is selected in the Setting Menu. (Refer to
page 26.)
• If you switch to just video, audio and video indications are displayed for 8 seconds.
AV MASTER MODE
• Even when a Navigation System is connected, you cannot switch to Navigation System
video (BGNAVI) with this product. Switch with the Audio Visual Master Unit.
• If you switch to “Current audio source video”, “TV” is displayed as the Video source
(Front), and a TV picture unrelated to the audio being output is displayed.
IP-BUS MODE
• When no Navigation System is connected to this product, you cannot switch to
Navigation System video (BGNAVI).
• If you switch to “Current audio source video”, no picture is displayed.
• If reception is interrupted by a traffic or other announcement when using the Head
Unit’s RDS function, the source automatically switches to the tuner. If “Current audio
source video” is selected, no picture is displayed.
ADD-ON MODE
• When no Navigation System is connected to this product, you cannot switch to
Navigation System video (BGNAVI).
• When this product is switched OFF, pressing the V.SEF button selects “Background
Display”.
Page 20

Basic Operation
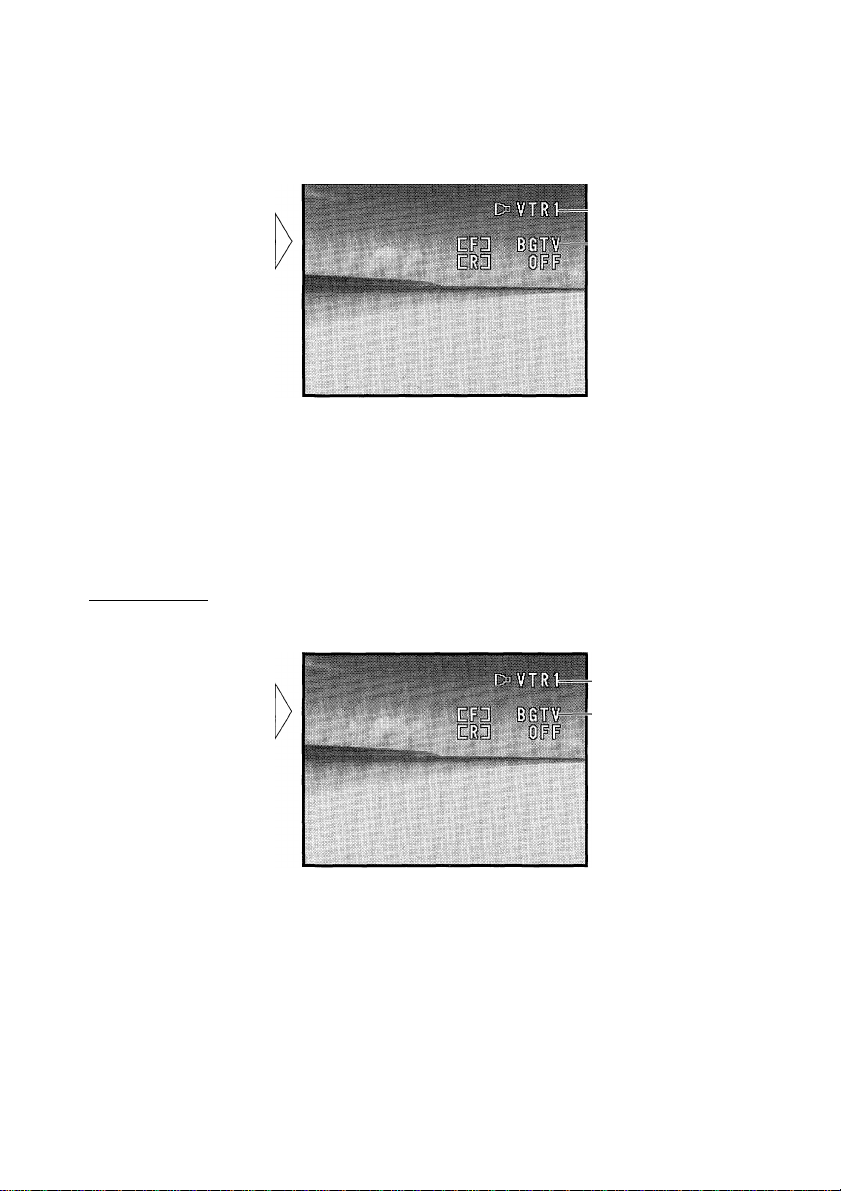
Switching the Audio Source Only
If the Audio link mark is OFF, you can switch just the audio source as desired while con
tinuing to watch the current video source. If the Audio link mark is ON, the video source
also switches. In this case, refer to “Switching the Video Source Only”, select
“Background Display” for the desired source (e.g. BGTV), and switch the Audio link mark
OFF.
Audio linked mark
AV MASTER MODE and IP-BUS MODE
Switching to audio of the source connected to the Head Unit
Select the desired audio source.
Each press changes
the Source ...
Audio of the source connected to the Head Unit switches in order.
Page 21
Switching to audio of the source connected to this product
Select the desired audio source in the following order:
(VSEL)
ft:
Each press changes
the Source ...
Audio source
Video source (Front)
“Background Display”
TV VTRl -► VTR2
Note:
• If the output audio is TV, ehannel indications are displayed at the audio source.
• To listen to this product’s audio, switch the Head Unit’s source to TV. (This operation is not possi
ble if a source other than TV is selected with the Head Unit.)
• You can switch VTRl or VTR2 only when “SELECT” is selected in the Setting Menu. (Refer to
page 26.)
ADD-ON MODE
• Select the desired audio source in the following order:
iUli) (A,S^ ^
5l©
Audio source
Video source (Front)
“Background Display”
Each press changes
the Source ...
TV -► VTRl -► VTR2 -► CD player (one disc only) -► Multi-CD player
“► Multi-MD player -► OFF
Note:
• You cannot switch to a source not conneeted to this product.
Page 22
Basic Operation
Switching Rear Display Source
If a rear display is connected, you can switch the Rear Display Source.
Select the desired source in the following order:
Note:
• You cannot switch rear display source audio and video separately.
Source (Rear)
Page 23
Operating the Setting Menu
Entering the Setting Menu
Perform TV setting with this menu.
1. Select the TV source. (Refer to page 13.)
2. Select the desired mode in the following order:
Current mode
D NL B D K N S SF I S
Each press changes
the Mode ...
COUNTRY LIST -► PICTURE ADJUST* FM MODULATOR** -► VIDEO
SELECT DIVER SELECT -► MENU OFF
• When using in the AV MASTER MODE, you cannot select this mode. Adjust with the Audio
Visual Master Unit.
** Only when using the ADD-ON MODE, you can select this mode.
To cancel the Setting Menu, press the BAND button
Note:
• After entering the Setting Menu, if you do not perform an operation within about 30 seconds, the
Setting Menu is automatically canceled.
• If TV is not selected as the audio source, video source (Front) or source (Rear), you cannot select
“COUNTRY FIST”.
• If TV, VTRl or VTR2 is not selected as the audio souree, video source (Front) or souree (Rear),
you cannot select “PICTURE ADJUST”.
CH A SK SL BH YU AL
GR TR E P M
D J
Page 24
Operating the Setting Menu
Selecting the Country Group
In this product, channels are preset for each country group. Selecting the appropriate
country group for your reception area enables reception of multiple channels.
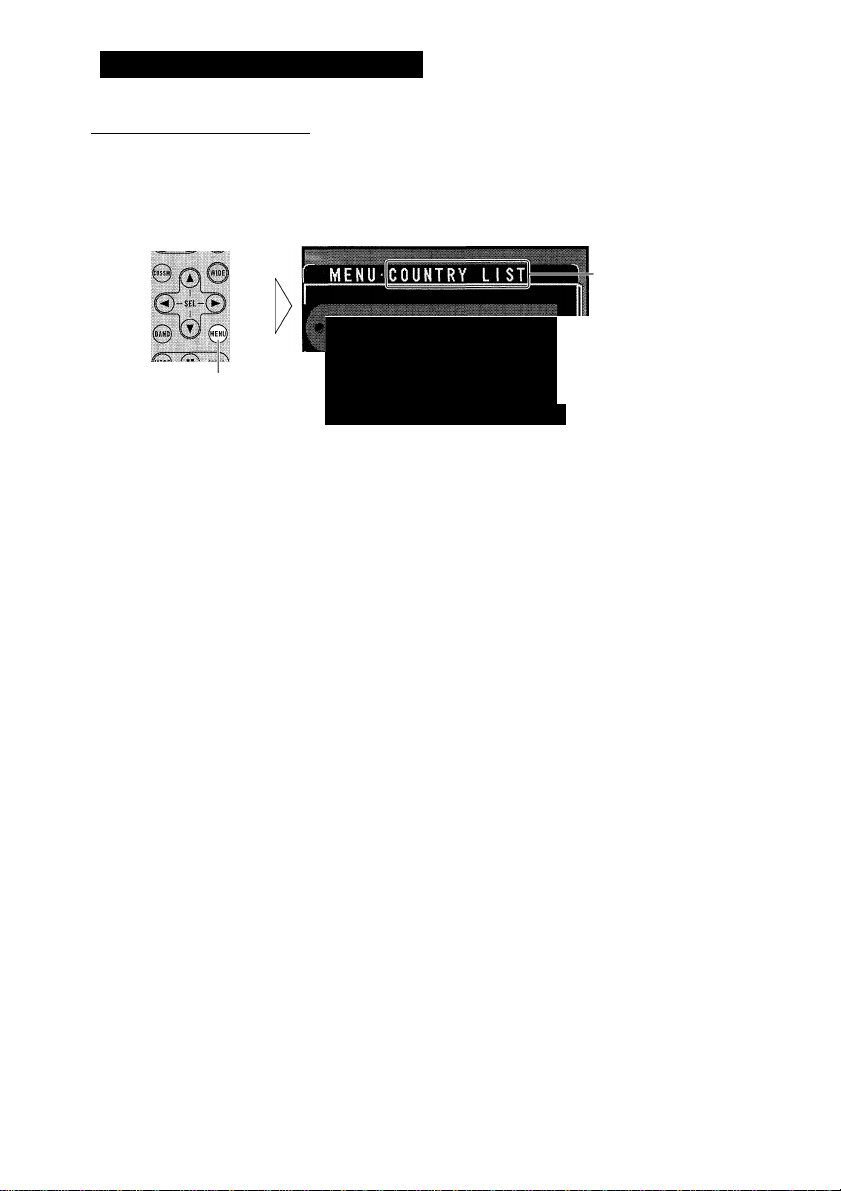
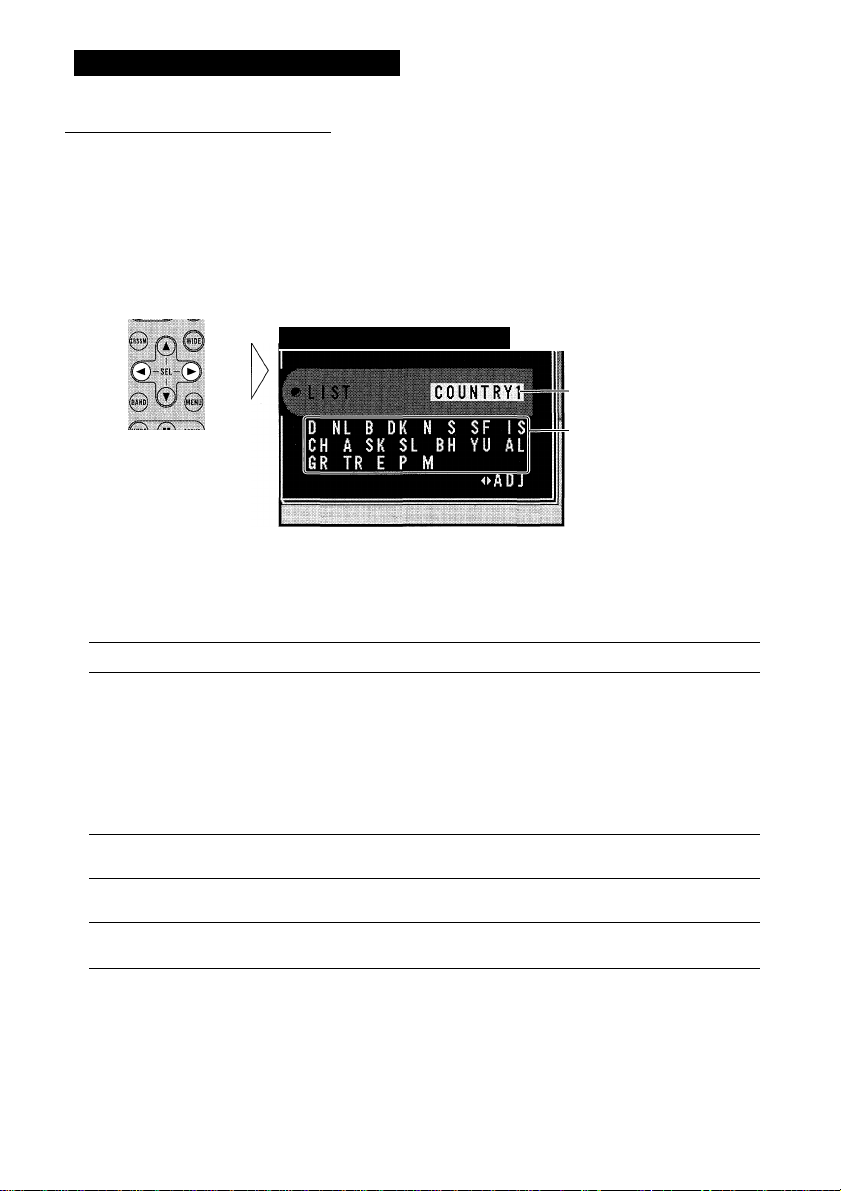
1. Press the MENU button and select the Country List mode (COUNTRY LIST) in the Setting Menu.
2. Select the country group containing the country you are currently in to the following order.
r MENU-COUNTRY LIST
Country group
Country List
COUNTRY 1 -► COUNTRY2 -► COUNTRY3 -► COUNTRY4
Country Group List and Channel Name
Coutry group
COUNTRYl
(CCIR Channel)
COUNTRY2
(ITALY Channel)
COUNTRY3
(U.K. Channel)
COUNTRY4
(OIRT Channel)
Display (Country name)
D (GERMANY)
DK (DENMARK)
SF (FINLAND)
CH (SWITZERLAND)
SL (SLOVENIA)
YU (YUGOSLAVIA)
TR (TURKEY)
M (MALTA)
I (ITALY)
GB (U.K.)
SU (RUSSIA)
H (HUNGARY)
NL (NETHERLANDS)
N (NORWAY)
IS (ICELAND)
A (AUSTRIA)
BH (BOSNIA)
AL (ALBANIA)
E (SPAIN)
RSM (REPUBLIC OF SAN MARINO)
PL (POLAND)
ROM (ROMANIA)
B (BELGIUM)
S (SWEDEN)
SK (SLOVAKIA)
GR (GREECE)
P (PORTUGAL)
CZ (CZECH)
BG (BULGARIA)
Note:
• You can use BSSM and other methods to memorize broadcast stations in each of the Country
groups.
• This product is not compatible with channels in France.
• Broadcast channels and broadcast systems may vary from country to country. If reception is not
possible with the appropriate country group listed above, try reception using another country group.
Page 25
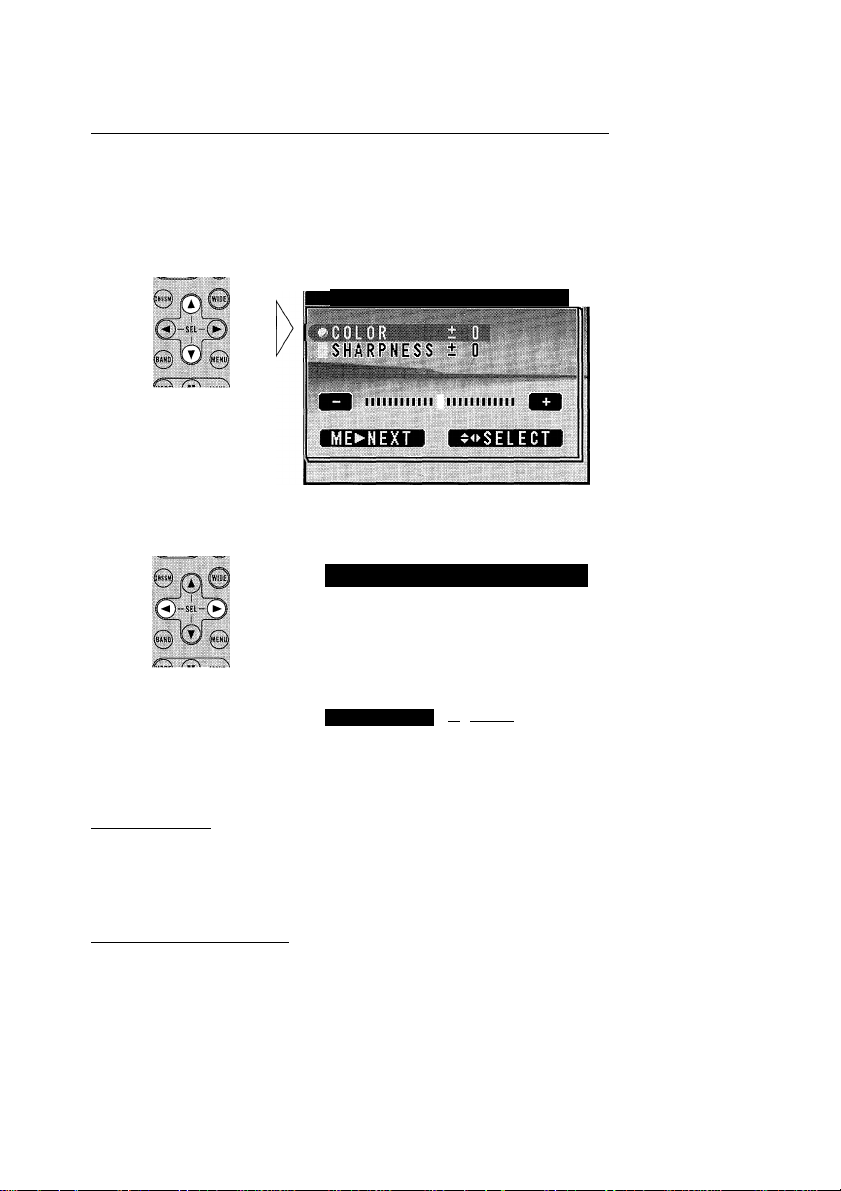
Adjusting the Picture (IP-BUS MODE and ADD-ON MODE)_________
With this Menu, you can adjust the picture.
1. Press the MENU button and select the Picture Adjust mode (PICTURE ADJUST) in the Setting Menu.
2. Select the desired item.
MENU-PICTURE ADJUST
3. Adjust the selected item.
MENU-PICTURE ADJUST 1
SHARPNESS i 0
iiiiiiiiiiii I iiiiiiiiii
MEi-NEXT
KEFfH™
Color (COLOR)
You can adjust the color of the picture.
• The display changes within a range from -24 to +24 as the distinction of the picture
changes from light to dark.
Sharpness (SHARPNESS)
You can adjust the sharpness of the picture.
• The display changes within a range from -7 to +7 as the distinction of the picture
changes from sharp to dull.
Page 26
Operating the Setting Menu
FM MODULATOR Setting (ADD-ON MODE)
You can adjust FM MODULATOR frequency and output level. When FREQUENCY
display is switched “OFF”, you cannot switch to LEVEL.
1. Press the MENU button and select the FM Modulator mode (FM MODULATOR) in the Setting Menu.
2. Select the desired item.
mi
IL EVE L i O
ME i^N EXT
goaOoag
^^^SELECT
3. Adjust the selected item.
ILEVEL +0
ME^ NEXT
0 D □ 0 0
^<^ SELECT
Frequency (FREQUENCY)
If output from the FM MODULATOR is hard to hear due to interference from a strong
broadcast station transmission, you can switch to another frequency.
You can adjust FREQUENCY between 87.9 and 90.1MHz.
Level (LEVEL)
If the output sound is too quiet, too loud or distorted, you can adjust FM MODULATOR
output LEVEL.
You can adjust LEVEL between -3 and +3.
Page 27
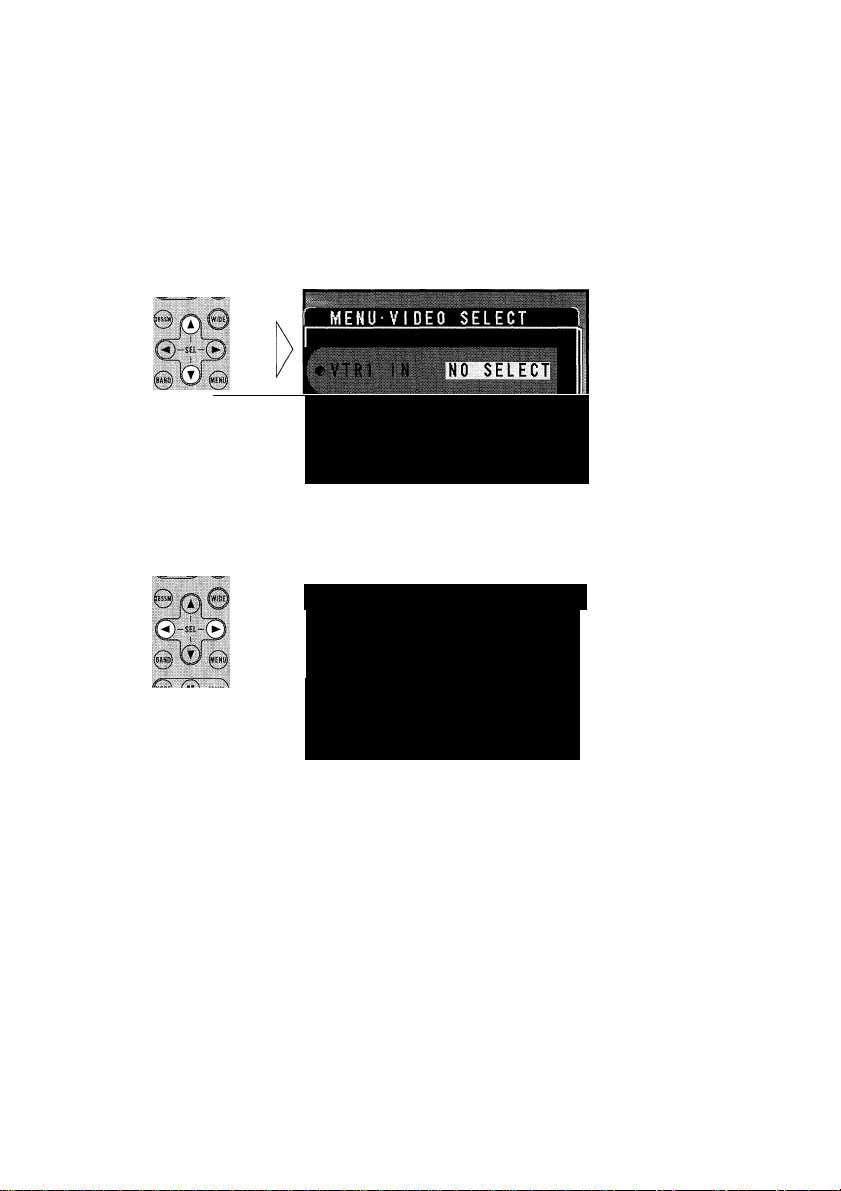
Switching the VTR Mode (VTR1/2)
When connecting external video components, set “SELECT” for external video compo
nents.
1. Press the MENU button and select the Video Select mode (VIDEO SELECT) in the Setting Menu.
2. Select the desired item.
IV TR2 I N NO SE LEC T
ME ^NE XT
^^ ^SE LEC T
3. Switch the selected item SELECT/NO SELECT.
r MENU-VI DEO SELECT 1
IVTRZ IN NO SELECT
ME^NEXT i^SELECT
Note;
• Even if external video components are connected, if “SELECT” is not selected in the Setting Menu,
you cannot switch the source to VTRl or VTR2.
Page 28
Operating the Setting Menu
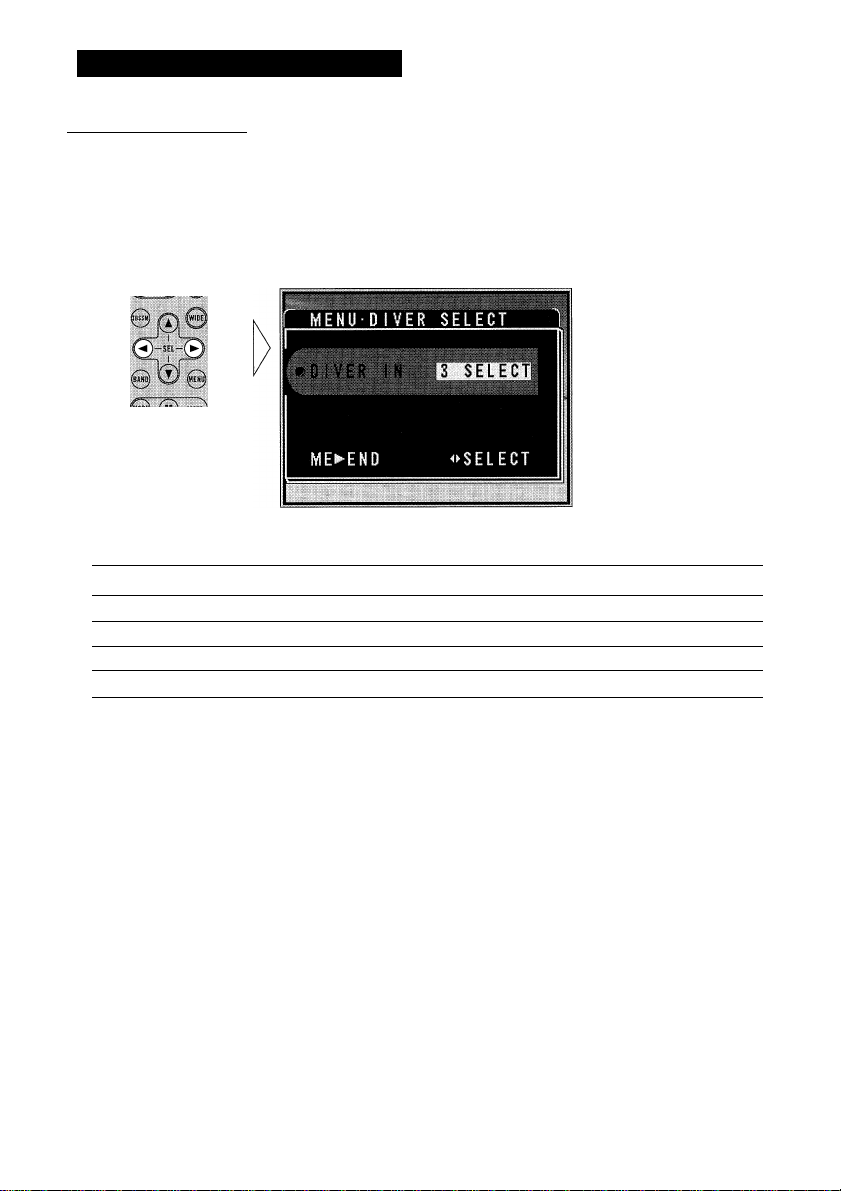
TV Antenna Setting
This product features 4 TV antenna terminals. Seleet the same TV antenna setting number
as the number of antennas aetually conneeted.
1. Press the MENU button and select the Diver Select mode (DIVER SELECT) in the Setting Menu.
2. Select the number of TV antennas connected in the following order:
1 SELECT ^ 2 SELECT ^ 3 SELECT ^ 4 SELECT
»
Indication
4 SELECT
3 SELECT
2 SELECT
1 SELECT
Connection method
Antennas connected to all terminals 1-4
Antennas connected to terminals 1-3
Antennas connected to terminals 1 and 2
Antenna connected to 1 terminal only
Page 29
Using Multi-CD Player
(ADD-ON MODE)
Basic Operation of Mutti-CD Player
In the ADD-ON MODE, you can control a Multi-CD player with this product.
— Track Search and Fast Forward/Reverse
• You can select between Track Search or Fast Forward/Reverse by pressing the ◄/► button for a different length of time.
Track Search
Fast forward/Reverse Continue pressing
Note:
• The multi-CD player may perform a preparatory operation, sueh as verifying the pres
ence of a disc or reading disc information, when the power is turned ON or a new disc is
selected for playback. “READY” is displayed.
• If the multi-CD player cannot operate properly, an eiTor message such as “ERROR-14” is
displayed. Refer to the multi-CD player owner’s manual.
• If there are no discs in the multi-CD player magazine, “NO DISC” is displayed.
Disc Number Indicator
Track Number Indicator
I
0.5 seconds or less
Elapsed Play Time Indicator
CD MULTI I
S) 18® 1!
11 Tfllffli Slg.g
ES ®lFiF tm ®|FF
N(/i) a
o) Disc Search
Video source (Eront) Source (Rear)
Pause
• Switch the Pause ON / OFF.
€
Page 30

Using Multi-CD Player
Repeat Modes
Multi-CD players offer three play modes: One-track Repeat, Disc Repeat and Multi-CD
player Repeat. Multi-CD player Repeat is the default mode (normal play).
Select the desired Repeat mode in the following order:
dil (@!
Q ® )
Each press changes
the Mode ...
Multi-CD player Repeat (MAG RPT) ■
-► Disc Repeat (DISC RPT)
Note:
• If you go beyond the play range of the selected repeat mode by performing Track Search, Fast
forward/Reverse or selecting another disc, the mode changes to an applicable Repeat mode.
rCD MULTI 1
TOii
lora
ES EE^
One-track Repeat (TRK RPT)
Current Repeat mode
Page 31

(ADD-ONMODE)
Random Play
Tracks are played at random within the selected repeat mode play range as explained in
“Repeat Modes” on page 29.
Switch the Random Play ON/OFF.
ft tel i
rCD MULTI 1
:md
BIS® 1
Current Play Type
Glia® iPT
Hold for 2 seconds
1
EH ®IF[F El
After selecting the desired repeat mode play range from those referred to in “Repeat
Modes” on page 29, switch Multi-CD Player Random Play ON.
Note:
• One-track Repeat mode returns to the Disc Repeat mode when you switch the Random Play ON.
Display
DISC-RPT
MAG-RPT
RDM Disc Repeat and Random Play
RDM
Play Type
Multi-CD player Repeat and Random play
Page 32

Using Multi-CD Player
(ADD-ON MODE)
CD Sound Quality Adjustment
Using the CMP (Compression) and DBE (Dynamic Bass Emphasis) functions enables CD
player sound quality adjustment. Both of the functions enable adjustment on two levels.
CMP
The CMP (Compression) function eliminates distortions caused by imbalances between
loud and subdued sounds at higher volumes.
DBE
DBE (Dynamic Bass Emphasis) boosts bass levels to give a fuller sound.
Each press of the PAUSE button for 2 seconds, the setting changes in the following order:
(0) 101
Q 00
5©
Hold for 2 seconds
CMPOFF -► CMPl -► CMP2 -► CMPOFF DBEl -► DBE2
Note:
• You can use these functions with CD players that have them. If the player does not feature the
CMP/DBE functions, “NO CMP” is displayed if you try to use them.
rCD MULTI 1
Page 33

Using CD Player (one disc only)
(ADD-ON MODE)
Basic Operation of CD Player (one disc only)
In the ADD-ON MODE, you can control a CD player (one disc only) with this product.
— Track Search and Fast Forward/Reverse
• You can select between Track Search or Fast forward/Reverse by pressing the ◄/► button for a different length of time.
Track Search
Fast forward/Reverse Continue pressing
Note:
• If the CD player cannot operate properly, an error message such as “ERROR-14” is
displayed. Refer to the CD player owner’s manual.
• “NO CMP” or “CMPOFF” are displayed, but these are indications for Multi-CD player.
Track Number Indicator Elapsed Play Time Indicator
Video source (Front) Source (Rear)
0.5 seconds or less
Pause
• Switch the Pause ON / OFF.
Page 34

Using CD Player (one disc only)
Repeat Play
Repeat Play plays the same track repeatedly
Switch the Repeat Play ON.
0 09 y
“TRK RPT”
To cancel the Repeat Play, repeat the preceding operation.
Note:
• If you perform Random Play or Fast forward/Reverse, Repeat Play is automatieally eanceled.
Page 35

Random Play
Random Play plays the tracks on a CD in random order for variety.
Switch the Random Play ON.
s©
Hold for 2 seconds
To cancel the Random Play, repeat the preceding operation.
(ADD-ONMODE)
"RDM”
Page 36

Using Multi-MD Player
Basic Operation of Multi-MD Player
In the ADD-ON MODE, you can control a Multi-MD player with this product.
— Track Search and Fast Forward/Reverse
• You can select between Track Search or Fast forward/Reverse by
pressing the ◄/► button for a different length of time.
Track Search
Fast forward/Reverse
Note:
• If the multi-MD player cannot operate properly, an en'or message such as “ERROR-14”
is displayed. Refer to the multi-MD player owner’s manual.
Disc Number Indicator
Track Number Indicator
V.SEL) A.SEL3 (REAR
I
MD MULTI 1
0.5 seconds or less
Continue pressing
Elapsed Play Time Indicator
iO§i i
fsaiB 1 Till fflg.g
ifi® EPT
^ C' D )
0^®
Disc Search
Video source (Front) Source (Rear)
Page 37

(ADD-ON MODE)
Repeat Play
There are two Repeat Play modes: One-track Repeat and Disc Repeat.
Select the desired Repeat mode in the following order:
^ Q
W D
iS5©
■ “TRK RPT"
Each press changes
the Mode ...
One-track Repeat (TRK RPT) -► Disc Repeat (DISC RPT) -► OFF (MAG RPT)
Mode
One-track Repeat
Disc Repeat
Operation
The track currently playing is repeated.
The disc currently playing is repeated.
€
Page 38

1 Using MultUMD Player
(ADD-ON MODE)
Random Play
There are two Random Play modes: Random 1 and Random 2.
Select the desired Random Play in the following order:
m
rMD MULTI 1
6HSZZ)
B©
“RDMl”
Hold for 2seconds
Each press of the button for 2 seconds, the setting changes in the following order:
Random 1 (RDMl) -► Random 2 (RDM2) -► OFF
Mode
Random 1 Tracks on the disc that’s playing are played in random order. When all the
Random 2 All tracks on all the discs are played in random order.
Operation
tracks on the disc that’s playing have been played, Random Play begins on
the next disc.
Combining Random Play and Repeat Play
You can combine Random mode and Repeat mode play as follows.
Display
MAG RPT
DISC RPT
MAG RPT
TRK RPT
DISC RPT
MAG RPT
RDM 1
RDM 1
RDM 2
Play Fype
Random 1
Random 1 and Disc Repeat
Random 2
One Track Repeat
Disc Repeat
Off
9
Page 39

Specifications
General
Power source .................................................................................................14.4 V DC (10.8 — 15.1 V allowable)
Grounding system..................................................................................................................................Negative type
Max. cun'ent consumption......................................................................................................................................2 A
Dimensions ............................................................................................................. 237 (W) x 28 (H) x 171 (D) mm
Weight ................................................................................................................................................................1-1 kg
TV tuner
Reception channel/TV system
Color system........................................................................................................................PAL/SECAM compatible
Usable sensitivity .............................................................................................................................................26 dBp.
Video S/N ..................................................................................Over 35 dB (59 dBp RF input, White Peak 100%)
Video S/N 30 dB usable sensitivity .................................................................................................................50 dBp.
Video input level ........................................................................................................................Sound: 1 Vrms/5 kQ
Video output impedance
FM modulator.............................................................................Frequency: 87.9 — 90.1 MHz (200 kHz, 12 steps)
Antenna input ...........................................................................................4 ch Diversity (({) 3.5 mm Mini plug type)
Rear display output
Video ....................................................................................................1 Vp-p/75 Q (TV: White 100% Modulated)
Sound .......................................................................................500 mViTns/Less than 1 kO (TV: 100% Modulated)
................
COUNTRY 1: (CCIR/B, G, H, K); VHP 2 — 12 eh, UHF 21 — 69 eh
COUNTRY 2: (ITALY/B, G, H, K): VHP A — H2 eh, UHP 21 — 69 ch
COUNTRY 4: (OIRT/G, H, D, K) : VHP R1 — R12 ch, UHF 21 — 69 ch
...............................................................
PAL/SECAM/NTSC compatible through outputs from TV/VTR 1/VTR 2
COUNTRY 3: (UKA): UHF 21 — 69 ch
Video: 1 Vp-p/75 Q
1 Vp-p/75 Q unbalanced, synchronized negative
Level: ±3 (7 steps)
Note:
• Specifications and the design are subject to possible modification without notice due to improvements.
Page 40

Contenido
^ Sistema de video de un eomponente
conectado
Reposición del microprocesador
...............
Para asegurar una conducción segura
Ajuste del interruptor MODE
Guía de botones
........................
.....................
• Controlador remoto
• Controlador remoto de la unidad
principal (ej. AVM-P7000R)
Uso del controlador remoto
..........
• Pila
Operación de la unidad principal .
• Grupo de unidades principales 1
• Grupo de unidades principales 2
• Grupo de unidades principales 3
Cuadros de compatibilidad de funciones
• Memoria preajustada
• Recuperación directa
• Ingresando el menú de funciones
• Exploración preajustada
• Cambio del modo de sintonización
• Uso del botón PGM
• MODO AV MASTER y
MODO IP-BUS
• MODO ADD-ON
Operación básica del sintonizador de TV
• Sintonización de búsqueda y manual
• Sintonización de emisoras preajustadas
• Banda
BSSM (Memoria secuencial
de mejor emisora) ....................................
• MODO AV MASTER y
MODO IP-BUS
Confirmación del canal actual
• MODO AV MASTER y
MODO IP-BUS
• MODO ADD-ON
Cambio a la fuente de presentación
visual trasera
...............................................
........
........
..2
.. .2
... 3
... 3
...3
...3
...4
...5
..6
..7
..9
. 10
. 13
. 15
. 16
. 17
. 18
. 19
21
Operación del menú de ajustes .... .... 22
Ingreso al menú de ajustes .....................................
Selección de grupo de países ................................
• Lista de grupo de países y nombre
de canal
Ajuste de la imagen (MODO IP-BUS
y MODO ADD-ON)
• Color (COLOR)
• Nitidez (SHARPNESS)
Ajuste del MODULADOR DE EM
(MODO ADD-ON)
• Frecuencia (FREQUENCY)
• Nivel (LEVEL)
Cambio al modo de VTR (VTR 1/2)
Ajuste de la antena de TV ......................................
Uso de reproductor de Multi-CD
Operación básica del reproductor de
Multi-CD ...............................................................
• Búsqueda de pista y avance
rápido/retroceso
• Búsqueda de disco
• Pausa
Modos de repetición ..................................................
Reproducción aleatoria
Ajuste de la calidad sonido de CD
Uso de reproductor de CD
(solamente un disco)
Operación básica del reproductor de CD
(solamente un disco) .......................................
13
• Búsqueda de pista y avance
rápido/retroceso
• Pausa
Reproducción repetida .............................................
Reproducción aleatoria
Uso de reproductor de Multí-MD
operación básica del reproductor de
Multi-MD ..............................................................
• Búsqueda de pista y avance
rápido/retroceso
• Búsqueda de disco
Reproducción repetida .............................................
Reproducción aleatoria
Combinación de reproducción aleatoria
y reproducción repetida..........................
Especificaciones
.......................................
.........................................
............
..............
.............................................
....................
...................................
.............................................
...............
..................................
..........................
......
22
......23
......
24
....
25
......
26
......
27
.... 28
......
28
......
29
......30
......31
.... 32
......32
.....
33
......34
.... 35
......
35
....
36
....
37
....
37
.... 38
Page 41

Antes de usar este producto
Sobre este producto
Este producto cumple con las Directivas EMC (89/336/CEE, 92/31/CEE) y Directiva de
Marcación CE (93/68/CEE).
Este producto es un sintonizador de TV para la recepción de emisiones de TV.
Combinándolo con una presentación visual vendida separadamente le permite disfrutar de
programas de entretenimiento de TV. Las frecuencias del sintonizador en este producto se
fijan para usarse en Europa Occidental y Oriental. El uso en otras áreas puede resultar en
una recepción inadecuada. (Este producto no es compatible con los canales de Francia).
Este producto presenta entradas VTRl y VTR2, de modo que puede ver la reproducción de
un componente de video externo (vendido separadamente). También presenta una salida de
presentación visual trasera, permitiéndole ver la TV así como también reproducir desde un
componente de video externo en la presentación visual trasera (vendida separadamente).
Sistema de video de un componente conectado
Este producto es un sistema compatible con PAL/SECAM. Cuando se conecta un
componente externo a la entrada VTRl o VTR2 de este producto, o a la salida de la
presentación visual trasera, asegúrese de que el componente sea compatible con mismo
sistema de video. Si no lo es, las imágenes no se reproducirán correctamente.
ADVERTENCIA
A
Asegúrese de parar de conducir y estacionar su automóvil en un lugar seguro antes de
ver la TV o la videograbadora VTR.
Ver la TV o videograbadora VTR mientras maneja es peligroso y puede resultar en un
accidente.
La salida de la presentación visual trasera de este producto es para la conexión de una
presentación visual, que permite a los pasajeros en los asientos traseros ver la TV o
VTR. No instale la presentación visual trasera en un lugar que permita al conductor ver
la TV o VTR mientras conduce.
Page 42

Antes de usar este producto
Sobre este manual
Este producto viene con diversas funciones sofisticadas que aseguran una recepción y
operación superior. El producto ha sido proyectado para uso lo más fácil posible, pero
muchas funciones requieren explicación. El propósito de este manual de operación es
ayudarle a beneficiarse completamente del potencial del producto y maximizar su disfrute
de audición.
Se recomienda familiarizarse con las funciones y operaciones leyendo completamente el
manual antes de usar el producto. Es especialmente importante que lea y observe la
“Precaución” en esta página y otras secciones.
Precaución
Guarde este manual a mano como referencia para los procedimientos de operación y
precauciones.
Mantenga siempre el volumen bajo lo suficiente para oír los sonidos de tráfico.
Proteja el producto contra la humedad.
Si la batería del automóvil se desconecta por alguna razón, la memoria programada será
apagada y deberá ser programada nuevamente.
En caso de problema
Cuando este producto no funciona correctamente, comuniqúese con su concesionario o
centro de servicio PIONEER autorizado.
Reposición del microprocesador
El microprocesador se debe reposicionar en las siguientes condiciones:
Cuando utilice este producto por la primera vez después de la instalación.
Cuando el aparato no funciona apropiadamente.
Cuando mensajes extraños (incorrectos) aparecen en el visualizador.
Cuando ajuste a la posición del interruptor MODE en la parte inferior de este producto.
Si reposiciona el microprocesador, las radioemisoras memorizadas y otras informaciones
serán borradas, y este producto retorna a sus ajustes iniciales.
Para reposicionar el microprocesador, presione el botón RESET en la unidad con la punta de una pluma u otro instrumento puntiagudo.
Page 43

Para asegurar una conducción segura
Para asegurar una operación del vehículo segura, las funciones complicadas no pueden
operarse durante la conducción. Si se selecciona cualquiera de estas funciones complicadas
durante la conducción, en el visualizador se visualiza “YOU CANNOT USE THIS
FUNCTION WHILE DRIVING”. Para usar estas funciones, pare su vehículo y aplique el
freno de estacionamiento.
ATTENTION
YOU CANNOT USE THIS
FUNCTION WHILE DRIVING
Una vez que haya parado el vehículo y aplicado el freno de estacionamiento, el sistema
puede ignorar este hecho y visualizar el mensaje “YOU CANNOT USE THIS
FUNCTION WHILE DRIVING”. Esto puede ocurrir cuando:
-El encendido está activado (ON) o desactivado (OFF).
-El interruptor del encendido está girado a la posición ACC, y el motor ha arrancado
para usar el sistema.
- Se presiona el botón RESET.
En los casos anteriores puede suponerse que el sistema no ha detectado que el freno de
estacionamiento se encuentra aplicado. En este caso, suelte el freno de estacionamiento
y luego vuelva a aplicarlo de nuevo.
En algunos vehículos, cuando el encendido está ajustado a la posición OFF o ACC, la
condición del freno de estacionamiento no puede detectarse. Para usar el sistema
mientras el interruptor de encendido se encuentra en la posición ACC, primero gire el
interruptor del encendido a la posición ON, aplique el freno de estacionamiento, y luego
retorne el interruptor del encendido a la posición ACC.
Page 44

Antes de usar este producto
Ajuste del interruptor MODE
FM MODULATOR^
□
IP-BUS MAIN UNIT
i
k
IP-BUS AV MASTER
________________
Ajuste el interruptor MODE en la parte inferior de este producto a la posición apropiada
con la punta de un lapicero u otro elemento, al componente al que está combinando. Las
operaciones pueden diferir ligeramente en cada modo (MODE).
(1) MODO AV MASTER (IP-BUS AV MASTER)
Cuando se combina con una unidad maestra audiovisual PIONEER (ej. AVM-P7000R):
• El audio se genera desde la fuente de TV de la unidad maestra audiovisual.
• Realice las operaciones con este producto y la unidad maestra audiovisual.
(Para los detalles relacionados a la operación con la unidad maestra audiovisual, refiérase
a la página 9.)
(2) MODO IP-BUS (IP-BUS MAIN UNIT)
Cuando se combina con una unidad principal PIONEER que presenta una entrada
IP-BUS:
• El audio se genera desde la fuente de TV de la unidad principal.
• Realice las operaciones con este producto y la unidad principal.
(Para los detalles relacionados a la operación con la unidad principal, refiérase a la
página 9.)
J
(3) MODO ADD-ON (FM MODULATOR)
Cuando se combina con un estéreo de automóvil con capacidad de recepción de FM y
utiliza un modulador de FM (suministrado):
• El audio se genera desde la fuente de FM del estéreo del automóvil.
• Realice todas las operaciones con este producto.
Page 45

Guía de botones
Controlador remoto
Nota:
• Dependiendo en la presentación visual conectada, puede usar los botones siguientes.
(ej. AVX-P7000CD, etc.)
* Botón ANGLE: Le permite ajustar el ángulo de la presentación visual.
* Botón OPEN/CLOSE: Le permite abrir/cerrar la presentación visual mediante la presión de este
* Botón WIDE: Le permite cambiar entre los modos de presentación visual amplia.
• Puede usar los botones PAUSE y MODE solamente cuando utiliza este producto con el modo
ADD-ON.
botón por 2 segundos.
Controlador remoto de la unidad principal (ej. AVM-P7000R)
Page 46

Uso del controlador remoto
Este producto se equipa con un controlador remoto para conveniencia en su operación.
• Apunte el controlador en la dirección del receptor de señal en el visualizador en color
(en venta por separado) para operarlo.
Precaución:
• No almacene el controlador remoto en altas temperaturas o a la luz directa del sol.
• El controlador puede no funcionar adecuadamente a la luz directa del sol.
• No permita que el controlador remoto se caiga al piso, en donde puede quedar aprisionado debajo
del pedal de freno o acelerador.
Pila
Deslice la bandeja hacia afuera desde la parte trasera del controlador
remoto e inserte la pila con los polos (+) y (-) hacia las direcciones
apropiadas.
Reemplazo de la pila de litio:
• Utilice solamente pila de litio “CR2032” de 3 V.
Precaución:
• Retire la pila cuando no utilice el controlador remoto durante un mes o más tiempo.
• En el caso de fuga de líquido de la pila, limpie completamente el controlador remoto y coloque una
pila nueva.
Page 47

A ADVERTENCIA
• Mantenga la pila de litio fuera del alcance de los niños. Si la pila fuese tragada, consulte
un médico inmediatamente.
PRECAUCION
A
No recargue, desarme, caliente ni tire la pila al fuego.
Utilice solamente una pila de litio CR2032 (3 V). No utilice otros tipos de pilas con este
producto.
No toque la pila con instrumentos metálicos.
No guarde la pila de litio con materiales metálicos.
Cuando tire la pila de litio usada, hágalo en cumplimiento con las leyes y reglamentos
aplicables.
Siempre revise cuidadosamente que está cargando la pila con los polos (+) y (-)
dirigidos en las direcciones correctas.
Page 48

Operación de la unidad principal
Estas instrucciones explican cómo operar este producto con una unidad principal
conectada. Algunas unidades principales controlan este producto como una fuente de TV,
mientras otras controlan como una unidad externa. Entre las unidades prineipales que
controlan este producto como una unidad externa, algunas lo hacen usando un botón
FUNCTION y otras no.
Nota:
• La unidad externa se refiere a un componente que no puede ser controlada por una unidad principal
como una fuente.
• Cuando se conecta a una unidad principal que no puede controlar un TV como una fuente, este
producto (TV) es controlado como una unidad externa.
• Las unidades principales PIONEER están diseñadas para la conexión a una sola unidad externa.
■ Grupo de unidades principales 1
Unidades principales que controlan este producto como una fuente de TV.
■ Grupo de unidades principales 2
Unidades principales que controlan este producto como una unidad externa usando un
botón FUNCTION para operar las funciones.
■ Grupo de unidades principales 3
Unidades principales que controlan este producto como una unidad externa, sin usar un
botón FUNCTION para operar las funciones.
Grupo de unidades principales 1
Cuando se usa la unidad con una de estas unidades principales, opere mientras hace refer
encia al grupo de unidades principales 1 en los cuadros de compatibilidad de funciones.
AVM-P7000R
DEH-P7000R (-W) DEH-P6000R
Grupo de unidades principales 2
Cuando se usa la unidad con una de estas unidades principales, opere mientras hace refer
encia al grupo de unidades principales 2 en los euadros de compatibilidad de funciones.
DEH-P9000R
DEH-P3000R
DEH-P645R (-W)
DEH-P8000R
DEH-P945R DEX-P99R
DEH-P645RS DEH-P545R
DEH-P4000R-B
DEH-P544R DEH-P443R DEH-P835R
DEX-P88R
KEH-P8800R (-W)
KEH-P2830R
KEH-P9700R
KEH-P4530R
KEH-P3700R
KEH-P8600RS
KEH-P6600RS
KEH-P4600R
KEH-P26R
MEH-P9000R
DEH-P735R
KEH-P7800R KEH-P6800R (-B,-W)
KEH-P2800R KEH-P28R
KEH-P5730R
KEH-P4500R
KEH-P27R
KEH-P5700R
KEH-P3730R
KEH-P8600R (-W)
KEH-P7600R KEH-P6600R (-W)
KEX-P66R
KEH-P3630R
KEH-P4630R
KEH-P3600R
KEH-P16
MEH-P5000R (-11)
Page 49

Grupo de unidades principales 3
Cuando se usa la unidad con una de estas unidades principales, opere mientras hace refer
encia al grupo de unidades principales 3 en los cuadros de compatibilidad de funciones.
KEH-P4830R KEH-P4800R
Cuadros de compatibilidad de funciones
________________________
Opere usando estos botones con los mismos en la unidad principal propiamente dicha o el
controlador remoto.
Grupo de unidades principales 1
Función
Cambiando la fuente
Sintonización manual
(paso por paso)
Sintonización de búsqueda
(automática)
Sintonización de emisoras
preajustada
Cambiando la banda
Memoria preajustada 1-6
Recuperación directa 1-6
BSSM
Uso del botón PGM PGM
Botón
SOURCE, SOURCE/OFF
(0,5 segundos o menos)
(0,5 segundos o más)
A/T
BAND,
(Sostenga durante 2 segundos)
A/T
(sostenga durante 2 segundos)
Nota:
• Para el TV, en el botón PGM no se pueden memorizar funciones que no sean BSSM.
Operación Página
:Seleccione
:Seleccione
:Seleccione 15
:Seleccione
:Seleccione
: Memoria
: Seleccione 12
:Activación/desactivación
: Activación/desactivación
de BSSM
13
15
15
15
11
16
—
Page 50

Operación de la unidad principal
Grupo de unidades principales 2
Función
Cambiando la fuente
Sintonización manual o de búsqueda ◄/►
Sintonización de emisoras preajustada
Cambiando la banda
Memoria preajustada 1-6
Recuperación directa 1-6
Ingresando el menú de función
Exploración preajustada (FUNC 1)
BSSM (FUNC 1)
Cambio del modo de sintonización
(AUTO/MANUAL)
Ajustando el botón PGM
Uso del botón PGM
Grupo de unidades principales 3
Función
Cambiando la fuente
Cambio del modo de sintonización
(AUTO/MANUAL)
Sintonización manual o de búsqueda
Sintonización de emisoras preajustada
Cambiando la banda BAND,
Memoria preajustada 1-6
Recuperación directa
BSSM
Exploración preajustada
Botón
SOURCE, SOURCE/OFF
A/T
BAND,
(Sostenga durante 2 segundos)
FUNCTION
A/T
A/T
(Sostenga durante 2 segundos)
FUNCTION
(sostenga durante 2 segundos)
AITIMI^
PGM/DSP, PGM
Botón
SOURCE, SOURCE/OFF
Botón PTY
◄/►
A/T
(Sostenga durante 2 segundos)
1-6
Botón DISPLAY
(Sostenga durante 2 segundos)
Botón DISPLAY :Seleccione
Operación
:Seleccione 13
iSeleccione
:Seleccione 15
iSeleccione 15
.•Memoria 11
iSeleccione
: Seleccione
: Activación/
desactivación
: Activación/
desactivación
: Seleccione
: Seleccione
: Activación/
desactivación
Operación
: Seleccione 13
: Seleccione
: Seleccione
: Seleccione 15
: Seleccione 15
: Memoria
: Seleccione
:Activación/
desactivación
Página
Página
12
12
12
12
16
12
12
12
12
11
12
16
12
Memoria preajustada
La función de memoria preajustada almacena manualmente las emisoras en la memoria.
1. Seleccione la emisora cuyo canal desea almacenar en la memoria.
Page 51

2. Presione uno de los botones 1-6 durante 2 segundos o más tiempo para almacenar las emisoras deseadas.
Nota:
• La emisora queda almacenada en la memoria bajo el botón seleccionado.
• No se puede memorizar en los canales preajustados 7-12 con esta función.
Recuperación directa
• Presione uno de los botones 1-6 para recuperar una emisora preajustada bajo ese botón.
Nota:
• Para recuperar los canales preajustados 7-12, realice la sintonización preajustada con los botones
A/T.
Ingresando el menú de funciones
• Presione el botón FUNCTION para seleccionar el modo deseado en el menú de funciones.
A cada presión del botón FUNCTION selecciona el modo en el orden siguiente:
FUNC 1 (Exploración preajustada/BSSM) -► FUNC 2 -> FUNC 3 -► FUNC 4
-► AUTO/MANUAL (Cambio del modo de sintonización)
Nota:
• En FUNC 1, la exploración preajustada o BSSM se selecciona cambiando la longitud del tiempo
que presiona los botones
• No hay funciones en FUNC 2, FUNC 3 o FUNC 4.
A/T.
Exploración preajustada
Esto le permite ver hasta 12 emisoras almacenadas en los canales preajustados uno después de otro.
Cambio del modo de sintonización
El automóvil puede seleccionar entre sintonización manual (MANUAL) y sintonización
por búsqueda (AUTO). Presione el botón ◄/► y la sintonización se realiza en el modo de
sintonización seleccionada.
Uso del botón PGM
El botón PGM (PGM/DSP) opera en una manera diferente dependiendo en la función
programada (memorizada). (Para los detalles relacionados a la programación del botón
PGM (PGM/DSP), refiérase al manual de operación de la unidad principal.)
• Presione el botón PGM (PGM/DSP).
Fundón Presione Sostenga durante 2 segundos
Exploración preajustada/
BSSM (FUNGI)
Cam biando el m odo de sintonización
(AU TO/MA NUAL)
Activación/desactivació n
de exploración p reajustada
Seleccione
Activación/desactivació n de BS SM
—
<1
Page 52

Operación básica
Cambiando la fuente
Realice la “Selección de grupo de países” apropiada para su región (refiérase a la
página 23).
MODO AV MASTER y MODO IP-BUS
1. Seleccione la fuente de TV en la unidad principal.
Fuente de audio
Fuente de video
(Delantera)
Banda
A cada presión la
fuente cambia...
(ej. AVM-P7000R)
Reproductor de CD (solamente un disco) -► TV -► VIDEO A -► VIDEO B
-► Sintonizador -► DAB (Emisión de audio digital) -► Reproductor de Multi-CD
—► AUX -► Entrada de altavoces
Para desactivar las fuentes, sostenga presionado el botón SOURCE durante 1 o más
segundos.
2. Seleccione la fuente deseada en el orden siguiente:
Grupo de países
Marca de audio vinculado
A
A cada presión la
fuente cambia ...
TV VTRl VTR2
Nota:
• Puede cambiar a VTRl o VTR2 solamente cuando se selecciona “SELECT” en el menú de ajustes
(refiérase a la página 26).
• Si presiona el botón V.SEL en el controlador remoto de este producto, puede cambiar entre las
fuentes de video.
• Si no puede cambiar las fuentes de audio y video juntas, cambie usando el botón V.SEL hasta que
se visualice la marca de audio vinculado.
• Si la salida de audio es TV, las indicaciones de canal se visualizan en la fuente de audio.
Page 53

MODO ADD-ON
Cuando se usa este producto por primera vez, refiérase al “Ajuste del MODULATOR DE
FM” y ajuste la frecuencia (refiérase a la página 25).
1. Seleccione la fuente deseada en el orden siguiente;
Fuente de audio
EIF3 JSW-
Fuente de video
(Delantera)
■
A cada presión la
fuente cambia ...
- Banda
Grupo de países
TV -► VTRl -► VTR2 -► Reproductor de CD (solamente un disco)
-► Reproductor de Multi-CD -► Reproductor de Multi-MD -► Desactivado
2. Cambie a una fuente de FM en su estéreo de automóvil con capacidad de recepción de FM, y sintonice la frecuencia ajustada en ‘‘Ajuste del MODULATOR DE FM”.
Nota;
• No puede cambiar a una fuente que no se encuentre conectada a este producto.
• Puede cambiar a VTRl o VTR2 solamente cuando se selecciona “SELECT” en el menú de ajustes
(refiérase a la página 26).
• Si presiona el botón V.SEL, puede cambiar entre las fuentes de video.
• Si no puede cambiar las fuentes de audio y video juntas, cambie usando el botón V.SEL hasta que
se visualice la marca de audio vinculado.
• Para desactivar este producto, cambie las fuentes de video hasta que se visualice la marca de audio
vinculado, y luego presione el botón A.SEL desactivando.
• Si es difícil escuchar el sonido generado, puede deberse a interferencias desde una emisión de EM.
Refiérase a “Ajuste del MODULATOR DE EM” y cambie el ajuste (refiérase a la página 25).
• Aun si desactiva este producto, el estéreo del automóvil permanece activado.
Page 54

Operación básica
Operación básica del sintonizador de TV
Realice la “Selección de grupo de países” apropiada para su región (refiérase a la
página 23).
— Sintonización de búsqueda y manual
• Se puede seleccionar el método de sintonización cambiando el lapso de tiempo de presión del botón ◄/►.
Sintonización manual (paso por paso) 0,5 segundos o menos
Sintonización de búsqueda (automática) 0,5 segundos o más
Nota:
• Si se presiona el botón durante más de 0,5 segundos, se puede saltar las emisoras.
La sintonización de búsqueda comienza así que se para de presionar el botón.
Fuente de audio
Fuente de video
(Delantera)
Fuente (Trasera)
Banda
Grupo de países
Sintonización de emisoras preajustadas
Se puede memorizar emisoras.
MODO IP-BUS y MODO AV MASTER:
Puede memorizar y recuperar todas las emisoras usando los
botones 1-6, de la misma manera que con la sintonización
preajustada del sintonizador de la unidad principal (refiérase a
Banda
TVl -► TV2
MODO IP-BUS y MODO AV MASTER:
La operación es posible solamente con el botón BAND (◄►) de la unidad
principal.
la página 12).
Page 55

BSSM (Memoria secuencial de mejor emisora)
La función BSSM memoriza automáticamente las emisiones de las emisoras que
transmiten más poderosamente en orden desde el canal más bajo hacia arriba.
Active la función BSSM.
(fX*
BSSM
Sostenga durante
2 segundos.
• Para cancelar el proceso, presione de nuevo el botón BSSM antes de
completar la memorización.
Nota;
• En la banda 1 se pueden memorizar hasta 12 emisoras.
• En las regiones en donde es posible la recepción de más de 12 emisoras, las emisoras previamente
memorizadas en la memoria permanecen en la memoria.
MODO AV MASTER y MODO IP-BUS
También puede realizar la función BSSM en la unidad principal combinada con este
producto.
1. Presione el botón FUNCTION y seleccione el modo BSSM (BSSM) en el
menú de funciones.
2. Para activar la función BSSM, presione el botón
A.
• Para cancelar el proceso, presione el botón T en el menú de función antes de
completar la memorización.
■ Grupo de unidades principales 2
1. Presione el botón FUNCTION y seleccione el modo de exploración
preajustada/BSSM (FUNC 1) en el menú de funciones.
2. Para activar la función BSSM, presione el botón A durante 2 segundos.
• Para cancelar el proceso, presione el botón ▼ en el menú de función antes de
completar la memorización.
Page 56

operación básica
Confirmación del canal actual y otros ajustes
Si la fuente de audio actual es TV, se visualiza la información de recepción tal como la
banda y canal. También puede visualizar la lista de canal es preajustados.
Seleccione el modo deseado en el orden siguiente:
(Recuperación de canal)
Fuente de audio
Fuente de video
(Delantera)
Banda
A cada presión el
modo cambia...
Recuperación de canal -► Lista de canales preajustados -► Lista de países
-► Desactivación de indicación
(Lista de canales preajustados)
(Lista de países)
Grupo de países
„ Cfll ® M i §
& m §1 m
IfB 1 [? Guü
Nombres de países en COUNTRY 1
Frecuencia ajustada con el modulador FM
MODULATOR
Nota:
• Las indicaeiones recuperadas se visualizan durante 8 segundos.
• Se puede reeuperar la indicación de fuente, en los casos siguientes:
* Cuando la fuente de audio o video es VTRl o VTR2.
* Cuando la fuente de video es TV o el sistema de navegación.
siìiimCTii
___________
m
Page 57

Cambio de solamente la fuente de video
Mientras continúa escuchando la fuente de audio actual, puede ajustar la fuente de video a
“Presentación visual de fondo”, y cambiar la fuente de video de la manera deseada.
Seleccione la imagen deseada en el orden siguiente:
Fuente de audio
(Presentación visual de
fondo)
A cada presión la
imagen cambia...
Video de sistema de navegación (BGNAVI) -► Video de TV (BGTV) -► Video de VTRl
(BGVTRl) -► Video de VTR2 (BGVTR2) -► Video de fuente de audio actual (Marca de
audio vinculado)
Nota:
• Si la salida de audio generado es TV, las indicaciones de canal se visualizan en la fuente de audio.
• Si el sistema de navegación no está conectado, no puede cambiar al video de sistema de
navegación.
• Puede cambiar a VTRl o VTR2 solamente cuando se selecciona “SELECT” en el menú de ajustes
(refiérase a la página 26).
• Si cambia solo el video, las indicaciones de audio y video se visualizan durante 8 segundos.
MODO AV MASTER
• Aun cuando se conecta un sistema de navegación, con este producto no puede cambiar
al video de sistema de navegación (BGNAVI). Cambie con la unidad maestra
audiovisual.
• Si cambia al “Video de fuente de audio actual”, se visualiza “TV” como la fuente de
video (Delantera), y se visualiza una imagen de TV sin relación al audio que se está
generando.
MODO IP-BUS
• Cuando no se encuentra conectado ningún sistema de navegación a este producto, no
puede cambiar al video de sistema de navegación (BGNAVI).
• Si cambia al “Video de fuente de audio actual”, no se visualiza ninguna imagen.
• Si la recepción es interrumpida por un anuncio de tráfico u otro anuncio al usarse la
función RDS de la unidad principal, la fuente cambia automáticamente al sintonizador.
Si se selecciona “Video de fuente de audio actual”, no se visualiza ninguna imagen.
MODO ADD-ON
• Cuando no se encuentra conectado ningún sistema de navegación a este producto, no
puede cambiar al video de sistema de navegación (BGNAVI).
• Cuando este producto se encuentra desactivado, presionando el botón V.SEL selecciona
la “Presentación visual de fondo”.
Page 58

Operación básica
Cambio de solamente la fuente de audio
Si la marca de audio vinculado está desactivada, puede cambiar la fuente de audio de la
manera deseada mientras continúa observando la fuente de video actual. Si la marca de
audio vinculado está activada, también cambia la fuente de video. En este caso, refiérase a
“Cambio de solamente la fuente de video”, seleccione “Presentación visual de fondo” para
la fuente deseada (ej. BGTV), y desactive la marca de audio vinculado.
Marca de audio vinculado
MODO AV MASTER y MODO IP-BUS
Cambio al audio de la fuente conectada a la unidad principal
Seleccione la fuente de audio deseada.
A cada presión la
fuente cambia...
6 G 24" ,
CORVETTE
El audio de la fuente conectada a la unidad principal cambia en orden.
Page 59

Cambio al audio de la fuente conectada a este producto
Seleccione la fuente de audio deseada en el orden siguiente:
5©
5j©
Se
^-0
A cada presión la
fuente cambia ...
Fuente de audio
Fuente de video
(Parte delantera)
“Presentación visual de
fondo”
TV -► VTRl -► VTR2
Nota;
• Si el audio generado es TV, las indicaciones de canal se visualizan en la fuente de audio.
• Para escuchar el audio de este producto, cambie la fuente de la unidad principal a TV. (La
operación no es posible si se selecciona una fuente que no sea TV con la unidad principal.)
• Puede cambiar a VTRl o VTR2 solamente cuando se selecciona “SELECT” en el menú de ajustes
(refiérase a la página 26).
MODO ADD-ON
Seleccione la fuente de audio deseada en el orden siguiente:
Fuente de audio
Fuente de video
(Parte delantera)
“Presentación visual de
fondo”
A cada presión la
fuente cambia...
TV -► VTRl -► VTR2 -► Reproductor de CD (solamente un disco)
-► Reproductor de Multi-CD Reproductor de Multi-MD -► Desactivado
Nota;
• No puede cambiar a una fuente que no se encuentre conectada a este producto.
Page 60

Operación básica
Cambio a la fuente de presentación visual trasera
Si una presentación visual trasera se encuentra conectada, puede cambiar la fuente de
presentación visual trasera.
• Seleccione la fuente deseada en el orden siguiente:
fMÚ (A,SEl| BREARÍ
A cada presión la
fuente cambia...
TV -► VTRl VTR2 -► Desactivado
Nota:
• No puede cambiar el audio y video de la fuente de la presentación visual trasera separadamente.
_____________
Fuente (Parte trasera)
»
Page 61

Operación del menú de ajustes
Ingreso al menú de ajustes
Realice el ajuste del TV con este menú.
1. Seleccione la fuente de TV (refiérase a la página 13).
2. Seleccione la fuente deseada en el orden siguiente:
ilwiiH'üiíai'iEnl
D NL B DK N S SF IS
A cada presión el
modo cambia...
COUNTRY LIST -► PICTURE ADJUST* -► EM MODULATOR**
-► VIDEO SELECT -► DIVER SELECT -► MENU OFF
• Cuando se usa el MODO AV MASTER, no puede seleccionar este modo. Ajuste con la
unidad maestra audiovisual.
** Puede seleccionar este modo, solamente cuando se usa el MODO ADD-ON.
Para cancelar el menú de ajustes, presione el botón BAND.
Nota:
• Luego de ingresar el menú de ajustes, si no realiza ninguna operación durante unos 30 segundos, el
menú de ajustes se cancela automáticamente.
• Si no se selecciona TV como la fuente de audio, fuente de video (delantera) o fuente (trasera), no
puede seleccionar “COUNTRY LIST”.
• Si no se selecciona TV, VTRl o VTR2 como la fuente de audio, fuente de video (delantera) o
fuente (trasera), no puede seleccionar “PICTURE ADJUST”.
CH A SK SL BH YU AL
GR TR E P M
■ Modo actual
Page 62

Operación del menú de ajustes
Selección de grupo de países
En este producto, los canales están preajustados para cada grupo de países. Seleccionando
el grupo de países adecuado para su área de recepción permite la recepción de múltiples
canales.
1. Presione el botón MENU y seleccione el modo de lista de países (COUNTRY LIST) en el menú de ajustes.
2. Seleccione el grupo de países que contiene el país que se encuentra actualmente, en el orden siguiente:
r MENU-COUNTRY LIST 1
Grupo de países
Lista de países
COUNTRY 1 -► COUNTRY2 -► COUNTRY3 -► COUNTRY4
Lista de grupo de países y nombre de canal
Grupo de países
COUNTRY 1
(Canales CCIR)
COUNTRY2
(Canales de ITALIA)
COUNTRY3
(Canales del Reino Unido)
COUNTRY4
(Canales OIRT)
Presentación visual (Nombre de países)
D (ALEMANIA)
DK (DINAMARCA)
SF (FINLANDIA)
CH (SUIZA)
SL (ESLOVENIA)
YU (YUGOESLAVIA)
TR (TURQUIA)
M (MALTA)
I (ITALIA)
GB (REINO UNIDO)
SU (RUSIA)
H (HUNGRIA)
NL (PAISES BAJOS)
N (NORUEGA)
IS (ISLANDIA)
A (AUSTRIA)
BH (BOSNIA)
AL (ALBANIA)
E (ESPAÑA)
RSM (REPUBLICA DE SAN MARINO)
PL (POLONIA)
ROM (RUMANIA)
B (BELGICA)
S (SUECIA)
SK (ESLOVAQUIA)
GR (GRECIA)
P (PORTUGAL)
CZ (REP. CHECA)
BG (BULGARIA)
Nota:
• Puede usar BSSM y los otros métodos para memorizar las emisoras en cada uno de los grupos de
países.
• Este producto no es compatible con lo canales franceses.
• Los sistemas de emisión y canales de emisión pueden variar de país a país. Si la recepción no es
posible con el grupo de países listados anteriormente, intente la recepción usando otro grupo de
países.
Page 63

Ajuste de la imagen (MODO IP-BUS y MODO ADD-ON)
Con este menú, puede ajustar la imagen.
_______
1. Presione el botón MENU y seleccione el modo de ajuste de imagen (PICTURE ADJUST) en el menú de ajuste.
2. Seleccione el ítem deseado.
SHARPNESS ± 0
^ ^
iiiiiiiiiiii iiiiiiiiiiii
MEi^NEXT
^^SELECT
3. Ajuste el ítem deseado.
MENU-PICTURE ADJUST I
SHARPNESS ± 0
iiiiiiiiiiiiI iiiiiiiiii
MEi-NEXT
^^SELECT
Color (COLOR)
El color de la imagen puede ajustarse.
• La presentación visual cambia dentro de una gama de -24 a +24 a medida que la sombra
de color de la imagen cambia de claro a oscuro.
Nitidez (SHARPNESS)
El brillo de la imagen puede ajustarse.
• La presentación visual cambia dentro de una gama de -7 a +7 a medida que la sombra
de nitidez de la imagen cambia de suave a oscuro.
Page 64

Operación del menú de ajustes
Ajuste del MODULADOR DE FM (MODO ADD-ON)
Puede ajustar el nivel de salida y la frecuencia FM MODULATOR. Cuando la
presentación visual FREQUENCY se encuentra desactivada (OFF), no puede cambiar a
LEVEL.
_________________
1. Presione el botón MENU y seleccione el modo de modulador de FM (FM MODULATOR) en el menú de ajustes.
2. Seleccione el ítem deseado.
r MENÜ-FM MODULATOR
3. Ajuste el ítem deseado.
r MENU-FM MODULATOR
ILEVEL ±0 BooflDaB
ME^HEXT í<»SELECT
Frecuencia (FREQUENCY)
Si la salida desde el modulador de FM (FM MODULATOR) es difícil de escuchar debido
a interferencias de una transmisión de una emisora poderosa, puede cambiar a otra
frecuencia.
La frecuencia puede ajustarse entre 87,9 a 90,1 MHz.
Nivel (LEVEL)
Si el sonido generado es demasiado bajo, demasiado fuerte o distorsionado, puede ajustar
el nivel (LEVEL) de salida del modulador de FM (FM MODULATOR).
Puede ajustar el nivel entre -3 y +3.
Page 65

Cambio al modo de VTR (VTR1/2)
Cuando conecte un componente de video externo, ajuste “SELECT” para los componentes
de video externo.
Presione el botón MENU y seleccione el modo de selección de video (VIDEO
SELECT) en el menú de ajustes.
Seleccione el ítem deseado.
MENU-VIDEO SELECT
IVTRZ IN
MEi^NEXT
N0 SELECT
«^►SELECT
3. Cambie el ítem seleccionado SELECT/NO SELECT.
Nota:
• Aun si no hay componentes de video externo conectados, si no selecciona “SELECT” en el menú
de ajustes, no podrá cambiar la fuente a VTRl o VTR2.
Page 66

Operación del menú de ajustes
Ajuste de la antena de TV
Este producto presenta 4 terminales de antena de TV. Seleccione el mismo número de
ajuste de antena de TV como el número de antenas conectadas realmente.
1. Presione el botón MENU y seleccione el modo de selección de navegador (DIVER SELECT) en el menú de ajustes.
2. Seleccione el número de antenas de TV conectadas en el orden siguiente:
MENU-DIVE!ì SELECT 1
1 SELECT <»-► 2 SELECT ^ 3 SELECT 4 SELECT
Indicación
4 SELECT
3 SELECT Antenas conectadas a todos los terminales 1-3.
2 SELECT
1 SELECT
Método de conexión
Antenas conectadas a todos los terminales 1^.
Antenas conectadas a todos los terminales 1 y 2.
Antena conectad al terminal 1 solamente.
»
Page 67

Uso de reproductor de Multi-CD (MODO ADD-ON)
Operación básica del reproductor de Multi-CD
En el MODO ADD-ON, con este producto puede controlar un reproductor de Multi-CD
Búsqueda de pista y avance rápido/retroceso
• Se puede seleccionar entre la búsqueda de pista o el avance rápido/retroceso presionando el botón ◄/► durante un lapso diferente de tiempo.
Búsqueda de pista
Avance rápido/retroceso
0,5 segundos o menos
Continúe presionando
Nota:
• El reproductor de Multi-CD puede realizar una operación preparatoria, tal como verificar la
presencia de un disco o como leer las informaciones de un disco, cuando se enciende el
reproductor o cuando se selecciona un nuevo disco para reproducción. Se visualiza “READY”
• Si un reproductor de Multi-CD no funciona adecuadamente, se visualiza un mensaje de error
tal como “ERROR-14”. Consulte el manual del propietario del reproductor de Multi-CD.
• Si no hay discos en el cargador de CD del reproductor de Multi-CD, se visualiza “NO
DISC”.
Indicador de número de disco Indicador de tiempo
Indicador de número de pista
Búsqueda de disco
transcurrido de reproducción
Fuente
(Trasera)
Pausa
• Activa y desactiva la pausa.
Page 68

Uso de reproductor de Multi-CD
Modos de repetición
Los reproductores de Multi-CD ofrecen tres modos de reproducción: repetición de una
pista, repetición de disco y repetición de reproductor de Multi-CD. El modo fijado por
omisión (reproducción normal) es el modo de repetición de reproductor de Multi-CD.
Seleccione el modo de repetición deseado en el orden siguiente:
rCD MULTI Ì
:md
Modo de repetición actual
A cada presión la
fuente cambia...
Repetición de reproductor de Multi-CD (MAC RPT) ■
(TRK RPT) -► Repetición de disco (DISC RPT)
Nota:
• Si va más allá de la gama de reproducción del modo de repetición seleccionado realizando la
búsqueda de pista, avance rápido/retroceso o seleccionando otro disco, el modo cambia a un modo
de reproducción aplicable.
Repetición de una pista
Page 69

(MODOADD-ON)
Reproducción aleatoria
Las pistas se reproducen aleatoriamente dentro de la gama de reproducción del modo de
repetición seleccionado como se describe en “Modos de repetición” en la página 29.
Active o desactive la reproducción aleatorio.
rCD MULTI 1
■ Tipo de repetición actual
Sostenga durante
2 segundos.
Después de seleccionar la gama de reproducción del modo de repetición deseado entre las
mencionadas en “Modos de repetición” en la página 29, active la reproducción aleatoria
del reproductor de Multi-CD.
Nota:
• El modo de repetición de una pista retorna al modo de repetición de disco cuando activa la
reproducción aleatoria.
Visualización
DISC-RPT RDM
MAG-RPT RDM
Tipo de reproducción
Repetición de disco y Reproducción aleatoria
Repetición de reproductor de Multi-CD y Reproducción aleatoria
Page 70

Uso de reproductor de Multi-CD (MODO ADD-ON)
Ajuste de la calidad sonido de CD
El uso de las funciones CMP (Compression) y DBE (Dynamic Bass Emphasis) le
permite ajustar la calidad sonora del reproductor de CD. Ambas las funciones le permiten
ajustar en dos niveles.
CMP
La función CMP (Compression) elimina las distorsiones causadas por desequilibrios entre
los sonidos altos y bajos en volúmenes más altos.
DBE
La función DBE (Dyanamic Bass Emphasis) intensifica los niveles de graves para producir
un sonido más fuerte.
.
......................
A cada presión del botón PAUSE durante 2 segundos, el ajuste cambia en el
orden siguiente:
50
©
rCD MULTI
ii]§e í
1Tí^^í§{E H
1
M® SI?? liilPIll
Sostenga durante
2 segundos.
CMPOEE -► CMPl -► CMP2 CMPOEE -► DBEl -► DBE2
Nota:
• Estas funciones pueden usarse con los reproductores de CD que tengan dichas funciones. Si el
reproductor no presenta las funciones CMP/DBE, se visualizará “NO CMP” si intenta usarlas.
EP3 ®IFIF EB3
.
Page 71

Uso de reproductor de CD (solamente un disco) (MODO ADD-ON)
Operación básica del reproductor de CD (solamente un disco)
En el MODO ADD-ON, con este produeto puede eontrolar un reproduetor de CD
(solamente un disco).
— Búsqueda de pista y avance ràpido/retroceso
• Se puede seleccionar entre la búsqueda de pista o el avance
ràpido/retroceso presionando el botón ◄/► durante un lapso
diferente de tiempo.
Búsqueda de pista
Avance rápido/retroceso
Nota:
• Si el reproductor de CD no puede operar adecuadamente, se visualiza un mensaje de
error tal como “ERROR-14”. Refiérase al manual del usuario del reproductor de CD.
• Se visualiza “NO CMP” o “CMPOFF”, pero estas son indicaciones para el reproductor
de Multi-CD.
Indicador de número de pista
0,5 segundos o menos
Continúe presionando
Fuente de video
(Delantera)
Indicador de tiempo
transcurrido de reproducción
Fuente
(Trasera)
Pausa
• Activa y desactiva la pausa.
Page 72

Uso de reproductor de CD (solamente un disco)
Reproducción repetida
La reproducción repetida reproduee la misma pista repetidamente.
Active la reproducción repetida.
(JD ~):
rCD SINGLE 1
II muU
“TRK RPT”
EE ®[F[F
Para cancelar la reproduceión repetida, repita la operaeión anterior.
Nota:
• Si realiza una operación de reproducción aleatoria o avance rápido/retroceso, la reproducción
repetida se cancela automáticamente.
Page 73

(MODO ADD-ON)
Reproducción aleatoria
La reproducción aleatoria reproduce las pistas de un CD en un orden aleatorio para
proporcionar variación.
Active la reproducción aleatoria.
rCD SINGLE 1
©
“RDM”
Sostenga durante
2 segundos.
Para cancelar la reproducción aleatoria, repita la operación anterior.
Page 74

Uso de reproductor de Multi-MD
Operación básica del reproductor de Multi-MD
En el MODO ADD-ON, con este producto puede controlar un reproductor de Multi-MD.
— Búsqueda de pista y avance rápido/retroceso
• Se puede seleccionar entre la búsqueda de pista o el avance
rápido/retroceso presionando el botón ◄/► durante un lapso difer
ente de tiempo.
Búsqueda de pista
Avance rápido/retroceso
Nota:
• Si el reproductor de Multi-MD no puede operar adecuadamente, se visualiza un mensaje
de eiTor tal como “ERROR-14”. Refiérase al manual del usuario del reproductor de
Multi-MD.
Indicador de número de disco Indicador de tiempo
Indicador de número de pista
Búsqueda de disco
0,5 segundos o menos
Continúe presionando
I
transcurrido de repreducción
Fuente
(Trasera)
Page 75

(MODO ADD-ON)
Reproducción repetida
Existen dos modos de reproducción repetida: Repetición de una pista y repetición de disco.
Seleccione el modo de repetición deseada en el orden siguiente:
rMD MULTI i
W D
“TRK RPT”
A cada presión el
modo cambia ...
Repetición de una pista (TRK RPT)
(MAG RPT)
Modo
Repetición de una pista Se repite la pista que se está reproduciendo actualmente.
Repetición de disco
Operación
Se repite el disco que se está reproduciendo actualmente.
" Repetición de disco (DISC RPT) -► Desactivado
Page 76

Uso de reproductor de Multi-MD (MODO ADD-ON)
Reproducción aleatoria
Existen dos modos de reproducción aleatoria: Aleatoria 1 y Aleatoria 2.
Seleccione la reproducción aleatoria deseada en el orden siguiente:
<ji) )
Sostenga durante
2 segundos
A cada presión del botón durante 2 segundos, el ajuste cambia en el orden siguiente:
Aleatorio 1 (RDMl) -► Aleatorio 2 (RDM2) -► Desactivado
Modo
Aleatorio 1
Aleatorio 2
i|]§® í
1 TDEai
“RDMl”
Ollñ® EPT I
EH El
Operación
Las pistas en el disco que se está reproduciendo se reproducen en orden
aleatorio. Cuando todas las pistas en el disco que se está reproduciendo
se hayan reproducido, la reproducción aleatoria comienza en el disco
siguiente.
Todas las pista de todos los discos se reproducen en orden aleatorio.
Combinación de reproducción aleatoria y reproducción repetida
Se puede combinar el modo aleatorio y modo de repetición de la manera siguiente:
rMD MULTI 1
Presentación visual
MAC RPT
DISC RPT
MAC RPT
TRK RPT
DISC RPT
MAC RPT
RDM 1 Aleatorio 1
RDM 1
RDM 2 Aleatorio 2
Tipo de reproducción
Aleatorio 2 y repetición de disco
Repetición de una pista
Repetición de disco
Desactivado
»
Page 77

Especificaciones
General
Fuente de alimentación
..................................................................................................................... 14,4 V CC (10,8 - 15,1 V peimisible)
Sistema de conexión a tierra....................................................................................................................Tipo negativo
Consumo de comente máx......................................................................................................................................2 A
Dimensiones..................................................................................................................237 (An) x 28 (Al) x 171 (Pr) mm
Peso ..................................................................................................................................................................... 1,1 kg
Sintonizador de TV
Canal de recepción/sistema de TV
Sistema de color...............................................................................................................Compatible con PAL/SECAM
Sensibilidad usable ............................................................................................................................................26 dBp
Relación S/R de video..............................................................sobre 35 dB (entrada de RF 59 dBp, cresta blanca 100%)
Sensibilidad usable en 30 dB de relación S/R de video ...................................................................................50 dBp
Nivel de entrada de video..............................................................................................................Sonido: 1 ViTns/5 kO
Impedancia de salida de video
Modulador de FM ........................................................................Frecuencia: 87,9 a 90,1 MHz (200 kHz, 12 intervalos)
Entrada de antena
.........................................................
Salida de presentación visual trasera
Video............................................................................................................1 Vp-p/75 Q (TV: Blanco 100% modulado)
Sonido............................................................................................... 500 mVrms/Menos de 1 kí2 (TV: 100% modulado)
..................
..................................................1 Vp-p/75 Ü sin equilibrio, sincronizado negativamente
Compatible con PAL/SECAM/NTSC a través de las salidas desde TV/VTR 1/VTR 2
PAIS 1; (CCIR/B, G, H, K): canales 2 — 12 VHF, canales 21 — 69 UHF
PAIS 2; (ITALIA/B, G, H, K): canales A — H2 VHF, canales 21 — 69 UHF
PAIS 3; (REINO UNIDO/I): canales 21 — 69 UHF
PAIS 4; (OIRT/G, H, D, K): canales 1 — R12 VHF, canales 21 — 69 UHF
Video: 1 Vp-p/75 O
Nivel: ±3 (7 intervalos)
Diversidad de 4 canales (tipo de miniclavija de 3,5 mm de diám.)
Nota:
• Las especificaciones y el diseño están sujetos a posibles modificaciones sin previo aviso debido a
mejoramientos.
Page 78

Inhalt
Vor Gebrauch dieses Produkts..............2
über dieses Produkt ..............................................2
• Videosystem einer angeschlossenen
Komponente
Über dieses Handbuch .........................................3
Zur besonderen Beachtung...................................3
Im Störungsfalle
Rückstellen des Mikroprozessors.........................3
Sicherer Fährbetrieb
Einstellung des Betriebsartenschalters
(MODE)
...................................................
.............................................
.......................................................
Tastenübersicht ...............................6
• Fernbedienung
• Hauptgerät-Fernbedienung
(z.B. AVM-P7000R)
Gebrauch der Fernbedienung
• Batterie
..............
Bedienungsweise mit Hauptgerät..........9
• Hauptgerät Gruppe 1
• Hauptgerät Gruppe 2
• Hauptgerät Gruppe 3
Funktionskompatibilitätstabellen
• Senderspeicher
• Direktabruf
• Aufrufen des Funktionsmenüs
• Vorwahl-Scan
• Umschalten der Abstimmbetriebsart
• Gebrauch der PGM-Taste
Grundlegender Betrieb
Umschalten der Programmquelle
• AV-HAUPT- und
IP-BUS-BETRIEBSART
• ZUSATZ-BETRIEBSART
Grundlegender TV-Tuner-Betrieb
• Manulle Abstimmung und
Suchlauf-Abstimmung
• Vorwahl-Abstimmung
• Band
BSSM (Best-Sender-Sequential-Memory)
• AV-HAUPT- und
IP-BUS-BETRIEBSART
Kontrollieren des momentanen Kanals
und anderer Einstellungen
Ausschließliches Umschalten der
Video-Programmquelle
Ausschließliches Umschalten der
Audio-Programmquelle...............................19
• AV-HAUPT- und
IP-BUS-BETRIEBSART
• ZUSATZ-BETRIEBSART
Umschalten der Programmquelle
B des hinteren Displays
.............................................
......................
....................
.......................
.....................
.........
..........................
...............................
13
Bedienungsweise des
Aufrufen des Einstellmenüs
Wahl der Landesgruppe
3
4
5
7
10
Einstellen des Bilds (IP-BUS-BETRIEBSART
FM-MODULATOR-Einstellung
Umschalten der VTR-Betriebsart
Fernsehantennen-Einstellung
Gebrauch von Multi-CD-Playern
Grundlegender Betrieb von
Wiederholbetriebsarten
Zufallsgesteuerte Wiedergabe
CD-Klangqualitätseinstellung ...........................31
Gebrauch des CD-Player
Grundlegender Betrieb von CD-Playern
13
15
16
17
18
21
Wiederhol-Wiedergabe
Zufallsgesteuerte Wiedergabe
Gebrauch des Multi-MD-Player.............35
Grundlegender Betrieb von
Wiederhol-Wiedergabe
Zufallsgesteuerte Wiedergabe
Kombinieren von zufallsgesteuerter
Technische Daten............................38
Einstellmenüs
• Landesgruppenliste und Kanalname
und ZUSATZ-BETRIEBSART)
• Farbe (COLOR)
• Schärfe (SHARPNESS)
(ZUSATZ-BETRIEBSART)
• Frequenz (FREQUENCY)
• Pegel (LEVEL)
(VTRl/2) .....................................................26
...........................
..............................
....................................
...............
......................
............................
.........
Multi-CD-Playern
• Titelsuche und Schnellvorlauf/Rücklauf
• Disc-Suche
• Pause
(nur eine Disc)
(nur eine Disc).............................................32
• Titelsuche und Schnellvorlauf/Rücklauf
• Pause
Multi-MD-Playern
• Titelsuche und Schnellvorlauf/Rücklauf
• Disc-Suche
Wiedergabe und
Wiederhol-Wiedergabe
....................................
.....................................
...........................
...........................
.....................................
...........................
......................................
.....................................
...........................
..............................
22
22
23
24
25
27
28
28
29
30
32
33
34
35
36
37
37
Page 79

Vor Gebrauch dieses Produkts
Über dieses Produkt
Dieses Produkt entspricht den EMC-Richtlinien (89/336/EEC, 92/31/EEC) und CEMarkierungsrichtlinien (93/68/EEC).
Bei diesem Produkt handelt es sich um einen TV-Tuner zum Empfang von
Fernsehsendungen. Durch Kombination mit einem getrennt erhältlichen Display können
Sie sich Fernsehprogramme ansehen. Die Tuner-Frequenzen dieses Produkts sind für
West- und Ost-Europa bestimmt. Gebrauch in anderen Gebieten kann zu falschem
Empfang führen. (Dieses Produkt ist mit Kanälen in Frankreich nicht kompatibel.)
Dieses Produkt besitzt die Eingänge VTRl und VTR2, so daß die Wiedergabe von einer
externen Video-Komponente (getrennt erhältlich) betrachtet werden kann. Es zeichnet sich
auch durch einen Ausgang für ein hinteres Display aus, so daß sowohl TV als auch die
Wiedergabe von einer angeschlossenen externen Video-Komponente auf einem hinteren
Display (getrennt erhältlich) gesehen werden kann.
Videosystem einer angeschlossenen Komponente
Dieses Produkt ist PAL/SECAM-System-kompatibel. Bei Anschluß einer externen
Komponente an den Eingang VTRl oder VTR2 bzw. an den Ausgang für hinteres Display
unbedingt auf Video-System-Kompatibilität der entsprechenden Geräte achten. Im Falle einer
Unstimmigkeit wird das Bild nicht richtig reproduziert.
A WARNUNG
Während Sie fahren, sollten Sie sich auf keinen Fall Fernsehsendungen oder ein
Videoprogramm ansehen. Parken Sie hierzu Ihren Wagen an einer sicheren Stelle.
Eine Nichtbeachtung dieser Vorsichtsmaßregel kann zu einem Unfall führen.
Der Ausgang für das hintere Display dieses Produkts ist zum Anschluß eines Displays
vorgesehen, damit Mitfahrer auf den Rücksitzen Fernsehsendungen oder Video sehen
können. Das hintere Display nicht an einer Stelle installieren, an der es vom Fahrer
während der Fahrt betrachtet werden kann.
Page 80

Vor Gebrauch dieses Produkts
Über dieses Handbuch
Dieses Produkt zeichnet sich durch zahlreiche fortschrittliche Funktionen aus, die hervor
ragenden Empfang und Betrieb gewährleisten. Bei der Entwicklung wurde größter Wert
auf Bedienungsfreundlichkeit gelegt, jedoch nicht alle Funktionen können ohne weiteres
sofort genutzt werden. Diese Bedienungsanleitung möchte dazu beitragen, daß Sie alle
Möglichkeiten des Geräts voll nutzen können, um Ihr Hörvergnügen zu maximieren.
Wir empfehlen, daß Sie sich mit den Funktionen des Geräts und deren Bedienungs
verfahren vertraut machen, indem Sie die Bedienungsanleitung lesen, bevor Sie mit dem
tatsächlichen Betrieb beginnen. Besonders wichtig ist, daß Sie die Anweisungen unter
“Zur besonderen Beachtung” auf dieser Seite und an anderen Stellen beachten.
Zur besonderen Beachtung
Bewahren Sie dieses Handbuch zum Nachschlagen stets griffbereit auf.
Halten Sie die Lautstärke stets auf einem Pegel, bei dem Sie Außengeräusche noch gut
wahrnehmen können.
Setzen Sie das Gerät keiner Eeuchtigkeit aus.
Durch Abtrennen der Batterie wird der Stationsspeicher gelöscht und muß in diesem
Fall neu programmiert werden.
Im Störungsfalle
Falls dieses Gerät nicht richtig funktionieren sollte, wenden Sie sich bitte an Ihren Händler
oder an eine PIONEER-Kundendienststelle in Ihrer Nähe.
Rückstellen des Mikroprozessors
In den folgenden Situationen muß der Mikroprozessor zurückgestellt werden:
Bei der erstmaligen Inbetriebnahme nach dem Einbau dieses Produkts.
Wenn das Gerät nicht einwandfrei funktioniert.
Wenn ungewöhnliche (fehlerhafte) Meldungen im Display erscheinen.
Beim Einstellen der Position des Betriebsartenschalters (MODE) an der Unterseite dieses
Produkts.
Durch Rückstellung des Mikroprozessors werden gespeicherte Rundfunksender sowie
andere Informationen gelöscht, und dieses Produkt wird auf die Werkseinstellung
zurückgestellt.
Um den Mikroprozessor zurückzustellen, drücken Sie den Taste RESET am Gerät mit der Spitze eines Kugelschreibers oder ähnlichen Gegenstands.
Page 81

Sicherer Fährbetrieb
Um sicheren Fährbetrieb zu gewährleisten, sind komplizierte Funktionen während der
Fahrt gesperrt, d.h. können nicht ausgeführt werden. In einem solchen Fall erscheint
“YOU CANNOT USE THIS FUNCTION WHILE DRIVING” kurz auf dem Display. Um
eine derartige Funktion ausführen zu können, muß das Fahrzeug angehalten und die
Feststellbremse arretiert werden.
ATTENTION
YOU CANNOT USE T HIS
FUNCTION WHILE DRIVING
Nachdem das Fahrzeug angehalten und die Feststellbremse arretiert worden ist, kann
dennoch die Anzeige “YOU CANNOT USE THIS FUNCTION WHILE DRIVING”
erscheinen. Dies kann in den folgenden Fällen auftreten:
-Zündung ein- oder ausgeschaltet (ON/OFF).
-Zündschalter auf ACC gestellt und Motor gestartet, um das System benutzen zu
können.
-Taste RESET gedrückt.
In den obigen Eällen kann angenommen werden, daß das System die Arretierung der
Feststellbremse nicht erkannt hat. Zur Abhilfe die Feststellbremse lösen und dann
wieder anziehen.
Wenn der Zündschalter auf OFF oder ACC gestellt ist, kann es bei gewissen Fahrzeugen
Vorkommen, daß der Zustand der Feststellbremse nicht erkannt werden kann. Um das
System benutzen zu können, während der Zündschalter auf ACC gestellt ist, diesen
zuerst auf ON drehen, die Feststellbremse arretieren, und dann den Zündschalter auf
ACC zurückdrehen.
Page 82

Vor Gebrauch dieses Produkts
Einstellung des Betriebsartenschaiters (MODE)
FM MODULATOR ^
IP-BUS MAIN UNIT
IP-BUS AV MASTER
Den Betriebsartenschalter (MODE) an der Unterseite dieses Produkts mit der Spitze eines
Kugelschreibers oder eines anderen spitzen Gegenstands auf die entsprechende Position
für die Komponente einstellen, mit der es kombiniert wird. Der Betrieb kann von
Betriebsart zu Betriebsart (MODE) etwas verschieden sein.
(1) AV-HAUPTGERÄT-BETRIEBSART (IP-BUS AV MASTER)
Bei Kombination mit einem audiovisuelle Haupteinheit von PIONEER
(z.B. AVM-P7000R):
• Audio-Ausgabe erfolgt über die TV-Programmquelle des audiovisuelle Haupteinheit.
• Bedienungsschritte mit diesem Produkt und dem audiovisuelle Haupteinheit durch
führen.
(Bezüglich Einzelheiten zum Betrieb mit dem audiovisuellen Hauptgerät siehe Seite 9.)
(2) IP-BUS-BETRIEBSART (IP-BUS MAIN UNIT)
Bei Kombination mit einem PIONEER-Hauptgerät mit IP-BUS-Eingang:
• Audio-Ausgabe erfolgt über die TV-Programmquelle des Hauptgeräts.
• Bedienungsschritte mit diesem Produkt und dem Hauptgerät durchführen.
(Bezüglich Einzelheiten zum Betrieb mit dem Hauptgerät siehe Seite 9.)
(3) ZUSATZ-BETRIEBSART (FM MODULATOR)
Bei Kombination mit einer Auto-Stereoanlage mit UKW-Empfangsmöglichkeit und bei
Gebrauch eines EM-MODULATORS (mitgeliefert):
• Audio-Ausgabe erfolgt über die UKW-Programmquelle der Auto-Stereoanlage.
• Bedienungsschritte mit diesem Produkt durchführen.
J
Page 83

Tastenübersicht
Fernbedienung
Taste A.SEL
■ Taste REAR
-Taste WIDE
- Taste
A/T
-Taste MENU
-Taste PAUSE
-Taste OPEN/CLOSE
Je nach angeschlossenem Display können die folgenden Tasten verwendet werden.
(z.B. AVX-P7000CD usw.)
* Taste ANGLE: Hiermit kann der Winkel des Displays eingestellt werden.
* Taste OPEN/CLOSE: Zum Öffnen/Schließen des Displays diese Taste 2 Sekunden lang
* Taste WIDE: Zum Umschalten zwischen Breitschirm-Anzeigearten.
Die Tasten PAUSE und MODE sind nur wirksam, wenn dieses Produkt auf ZUSATZ
BETRIEBSART geschaltet ist.
gedrückt halten.
Hauptgerät-Fernbedienung (z.B. AVM-P7000R)
Page 84

Gebrauch der Fernbedienung
Zum Liefemmfang dieses Produkts gehört eine Fernbedienung, die einen bequemen
Betrieb des Geräts ermöglicht.
• Zur Bedienung die Fernbedienung in die Richtung des Signalempfängers am
Farbdisplay (Sonderzubehör) weisen lassen.
Zur besonderen Beachtung:
• Vermeiden Sie eine Aufbewahrung der Fernbedienung in hohen Temperaturen und direkter
Sonneneinstrahlung.
• Wenn die Fernbedienung starkem Sonnenlicht ausgesetzt wird, arbeitet sie u.U. nicht einwandfrei.
• Lassen Sie die Fernbedienung nicht auf den Boden fallen, wo sie unter dem Brems- oder Gaspedal
eingeklemmt werden könnte.
Batterie
• Das Fach aus der Rückseite der Fernbedienung herausschieben, und die Batterie polaritätsrichtig (+) und (-) einlegen.
Aus wechseln der Lithiumbatterie:
• Nur eine Lithiumbatterie “CR2032”, 3 V, verwenden.
Zur besonderen Beachtung:
• Die Batterie entnehmen, wenn die Fernbedienung voraussichtlich einen Monat oder länger nicht
benutzt wird.
• Falls Batterieflüssigkeit ausgelaufen ist, die Fernbedienung vollständig sauberwischen, und eine
neue Batterie einlegen.
Page 85

WARNUNG
A
Die Lithiumbatterie außer Reichweite kleiner Kinder halten. Sollte die Batterie
verschluckt werden, sofort einen Arzt aufsuchen.
VORSICHT
A
Die Batterie nicht aufladen, auseinandernehmen, erhitzen oder ins Feuer werfen.
Nur eine Lithiumbatterie vom Typ CR2032 (3 V) verwenden. Niemals einen anderen
Batterietyp für dieses Gerät verwenden.
Die Batterie nicht mit Metallwerkzeugen handhaben.
Die Batterie nicht zusammen mit Metallgegenständen lagern.
Die verbrauchte Lithiumbatterie gemäß den geltenden gesetzlichen Bestimmungen
entsorgen.
Beim Einsetzen der Batterie immer darauf achten, daß Pluspol (+) und Minuspol (-) in
die richtige Richtung weisen.
Page 86

Bedienungsweise mit Hauptgerät
Diese Anweisungen erläutern die Bedienung dieses Produkts mit einem angeschlossenen
Hauptgerät. Bestimmte Hauptgeräte steuern dieses Produkt als TV-Programmquelle,
andere als externes Gerät. Unter den Hauptgeräten, die dieses Gerät als externe Einheit
steuern, wird bei einigen eine Taste FUNCTION verwendet, bei anderen nicht.
Hinweis:
• Unter externer Einheit ist eine Komponente zu verstehen, die von einem Hauptgerät nicht als
Programmquelle gesteuert werden kann.
• Bei Anschluß an einem Hauptgerät, das einen Fernseher nicht als Programmquelle steuern kann,
wird dieses Produkt (TV) als externe Einheit gesteuert.
• PIONEER-Hauptgeräte sind nur für die Verbindung mit einem einzelnen externen Gerät konzipiert.
Hauptgerät Gruppe 1
Hauptgeräte, die dieses Produkt als TV-Programmquelle steuern.
Hauptgerät Gruppe 2
Hauptgeräte, die dieses Produkt als externe Einheit mit einer taste FUNCTION zur
Ausführung von Funktionen steuern.
■ Hauptgerät Gruppe 3
Hauptgeräte, die dieses Produkt als externe Einheit ohne taste FUNCTION zur
Ausführung von Funktionen steuern.
Hauptgerät Gruppe 1
Bei Gebrauch des Geräts zusammen mit einem dieser Hauptgeräte gehen Sie bitte unter
Bezugnahme auf die Hauptgeräte-Gruppe 1 in den Funktionskompatibilitätstabellen vor.
AVM-P7000R
DEH-P7000R (-W) DEH-P6000R
Hauptgerät Gruppe 2
Bei Gebrauch des Geräts zusammen mit einem dieser Hauptgeräte gehen Sie bitte unter
Bezugnahme auf die Hauptgeräte-Gruppe 2 in den Funktionskompatibilitätstabellen vor.
DEH-P9000R DEH-P8000R
DEH-P4000R-B
DEH-P3000R DEH-P945R DEX-P99R
DEH-P645R (-W)
DEH-P544R
DEX-P88R
KEH-P8800R (-W)
KEH-P2830R
KEH-P9700R
KEH-P4530R
DEH-P645RS
DEH-P443R DEH-P835R
DEH-P735R
KEH-P7800R KEH-P6800R (-]
KEH-P2800R
KEH-P5730R
KEH-P4500R KEH-P3730R
KEH-P3700R KEH-P27R
KEH-P8600RS
KEH-P6600RS
KEH-P7600R
KEX-P66R
KEH-P4600R KEH-P3630R
KEH-P26R
MEH-P9000R
KEH-P16
MEH-P5000R (-11)
DEH-P545R
KEH-P28R
KEH-P5700R
KEH-P8600R {-
KEH-P6600R {-
KEH-P4630R
KEH-P3600R
Page 87

Hauptgerät Gruppe 3
Bei Gebrauch des Geräts zusammen mit einem dieser Hauptgeräte gehen Sie bitte unter
Bezugnahme auf die Hauptgeräte-Gruppe 3 in den Funktionskompatibilitätstabellen vor.
KEH-P4830R KEH-P4800R
Funktionskompatibilitätstabellen
____________________________
Entsprechende Tasten am Hauptgerät und an der Fernbedienung haben dieselben
Funktionen.
Hauptgerät Gruppe 1
Funktion
Umschalten der Programmquelle
Manuelle Abstimmung
(Schritt für Schritt)
Suchlauf-Abstimmung
V orwahl-Abstimmung
Wechseln des Bands
Senderspeicher
Direktabruf
BSSM
Gebrauch der PGM-Taste
Hinweis:
• Für TV können keine anderen Funktionen als BSSM unter der PGM-Taste gespeichert werden.
Taste Operation
SOURCE, SOURCE/OFF :Wahl 13
◄/► (0,5 Sekunden oder weniger) :
◄/► (0,5 Sekunden oder mehr)
A/T
BAND,
1-6 (2 Sekunden lang gedrückt halten)
1-6
A/T
PGM (2 Sekunden lang gedrückt halten)
Wahl 15
Seite
Wahl 15
Wahl 15
Wahl
Speicher
Wahl 12
ON/OFF
BSSM —
ON/OFF
15
11
16
Page 88

Bedienungsweise mit Hauptgerät
Hauptgerät Gruppe 2
Funktion
Umschalten der Programmquelle SOURCE, SOURCE/OFF
Manuelle Abstimmung oder
Suchlauf-Abstimmung
Vorwahl-Abstimmung
Wechseln des Bands
Senderspeicher
Direktabruf
Aufrufen des Funktionsmenüs
Vorwahl-Sean (FUNC 1)
BSSM (FUNC 1)
Umschalten der Abstimmbetriebsart
(AUTO/MANUAF)
Einstellen der PGM-Taste
Gebrauch der PGM-Taste PGM/DSP, PGM
Hauptgerät Gruppe 3
Funktion
Umschalten der Programmquelle
Umsehalten der Abstimmbetriebsart
Manuelle Abstimmung oder
Suchlauf-Abstimmung
V orwahl-Abstimmung
Wechseln des Bands
Senderspeieher
Direktabruf
BSSM
Vorwahl-Scan
Taste
A/T
BAND,
1-6 (2 Sekunden lang gedrückt halten)
1-6
FUNCTION Wahl
A/T
A/T (2 Sekunden lang gedrückt halten)
◄/►
FUNCTION (2 Sekunden lang gedrückt halten)
A/T/^/^
Taste
SOURCE, SOURCE/OFF
Programmtyptaste (PTY)
◄/►
A/T
BAND,
1-6 (2 Sekunden lang gedrückt halten)
1-6
Taste DISPLAY
(2 Sekunden lang gedrüekt halten)
Taste DISPLAY
Operation Seite
:Wahl
:Wahl 12
Wahl 15
Wahl 15
Speieher
Wahl 12
ON/OFF 12
ON/OFF
Wahl
:Wahl
:ON/OFF 12
13
11
12
16
12
—
Operation Seite
Wahl 13
Wahl
Wahl
Wahl 15
Wahl 15
Speicher 11
Wahl
ON/OFF
:Wahl 12
12
12
12
16
Senderspeicher
Bei Gebrauch der Senderspeicherfunktion werden Sender manuell gespeichert.
1. Den Sender wählen, dessen Kanal gespeichert werden soll.
2. Eine der Tasten 1-6 2 Sekunden oder länger drücken, um den gewünschten Sender zu speichern.
Hinweis:
• Der Sender wird unter der gewählten Taste gespeichert.
• Unter den Vorwahlkanälen 7-12 können keine Speicherungen mit dieser Funktion vorgenommen
werden.
Page 89

Direktabruf
• Eine der Tasten 1-6 drücken, um den Sender abzurufen, der dieser Taste zugeordnet ist.
Hinweis:
• Zum Abrufen der Vorwahlkanäle 7-12 Vorwahl-Abstimmung mit den Tasten A/T durchführen.
Aufrufen des Funktionsmenüs
• Die Taste FUNCTION drücken, um die gewünschte Betriebsart im Funktionsmenü zu wählen.
Mit jedem Druck auf die Taste FUNCTION wird die Betriebsart in der nachstehenden
Reihenfolge gewählt:
FUNC 1 (Vorwahl-Scan/BSSM) -► FUNC 2 -► FUNC 3 -► FUNC 4
-► AUTO/MANUAL (Umschalten der Abstimmbetriebsart)
Hinweis:
• Bei FUNC 1 wird Vorwahl-Scan oder BSSM durch die Dauer des Drückens der Taste
gewählt.
• FUNC 2, FUNC 3 und FUNC 4 haben keine Funktionen.
A/T
Vorwahl-Scan
Hiermit können bis zu 12 in den Vorwahlkanälen gespeicherte Sender der Reihe nach
angezeigt werden.
Umschalten der Abstimmbetriebsart
Es kann zwischen manueller Abstimmung (MANUAL) und Suchlauf-Abstimmung
(AUTO) gewählt werden. Die Taste ◄/► drücken, und die Abstimmung wird in der
gewählten Abstimmbetriebsart durchgeführt.
Gebrauch der PGM-Taste
Die PGM-Taste (PGM/DSP) funktioniert je nach programmierter (gespeicherter) Funktion
unterschiedlich. (Bezüglich Einzelheiten zur Programmierung die PGM-Taste (PGM/DSP)
siehe Bedienungsanleitung für das Hauptgerät.)
• Die PGM-Taste (PGM/DSP) drücken.
Funktion
Vorwahl-Scan/BSSM (FUNC 1)
Umschalten der Abstimmbetriebsart Wahl
(AUTO/MANUAL)
Drücken
Vorwahl-Scan ON/OFF
2 Sekunden lang gedrückt halten
BSSM ON/OFF
€
Page 90

Grundlegender Betrieb
Umschaiten der Programmquelle
Die entsprechende “Wahl der Landesgruppe” für Ihr Gebiet durchführen. (Siehe Seite 23.)
AV-HAUPT- und IP-BUS-BETRIEBSART
1. Die TV-Programmquelle am Hauptgerät wählen.
Audio-Programmquelle
Video-Programmquelle
(vorne)
Band
Die Programmquelle
ändert sich mit jedem
Druck...
(z.B. AVM-P7000R)
CD-Player (nur eine Disc) -► TV -► VIDEO A -► VIDEO B -► Tuner -► DAB (DigitalAudio-Rundfunk) —► Multi-CD-Player -► AUX -► Lautsprecher-Eingang
Zum Ausschalten der Programmquellen die Taste SOURCE mindestens 1 Sekunde lang
gedrückt halten.
2. Die gewünschte Programmquelle in der nachstehenden Reihenfolge wählen:
■ Landesgruppe
AudioSynchronisierzeichen
Hinweis
• Es kann nur auf VTRl oder VTR2 geschaltet werden, wenn “SELECT” im Einstellmenü gewählt
ist. (Siehe Seite 26.)
• Durch Drücken der Taste V.SEL an der Eernbedienung dieses Produkts kann nur zwischen VideoProgrammquellen umgeschaltet werden.
• Audio- und Video-Programmquellen können nicht synchronisiert mit der Taste V.SEL umgeschal
tet werden, solange das Audio-Synchronisierzeichen nicht angezeigt ist.
• Bei TV-Audio-Ausgang erscheinen die Kanalanzeigen an der Audio-Programmquelle.
Page 91

ZUSATZ-BETRIEBSART
Beim erstmaligen Gebrauch dieses Produkts siehe unter “FM-MODULATOREinstellung”, und die Frequenz einstellen. (Siehe Seite 25.)
1. Die gewünschte Programmquelle in der nachstehenden Reihenfolge wählen:
Audio-Programmquelle
Video-Programmquelle
(vorne)
Band
Landesgruppe
Die Programmquelle
ändert sich mit jedem
Druck...
SSMTß'yi-
TV -► VTRl -► VTR2 -► CD-Player (nur eine Disc) -► Multi-CD-Player
-► Multi-MD-Player -► OFF
2. Auf eine UKW-Programmquelle an Ihrer Auto-Stereoanlage mit UKWEmpfangsmöglichkeit schalten, und die unter “FM-MODULATOR-
Einstellung” eingestellte Frequenz abstimmen.
Hinweis:
• Es kann nicht auf eine Programmquelle geschaltet werden, die nicht an diesem Produkt
angeschlossen ist.
• Es kann nur auf VTRl oder VTR2 geschaltet werden, wenn “SELECT” im Einstellmenü gewählt
ist. (Siehe Seite 26.)
• Durch Drücken der Taste V.SEL kann nur zwischen Video-Programmquellen umgeschaltet werden.
• Audio- und Video-Programmquellen können nicht synchronisiert mit der Taste V.SEL umgeschal
tet werden, solange das Audio-Synchronisierzeichen nicht angezeigt ist.
• Zum Ausschalten dieses Produkts die Video-Programmquellen umschalten, bis das AudioSynchronisierzeichen erscheint, dann die Taste A.SEL ausschalten.
• Falls der Ausgabeton nicht richtig zu hören ist, kann dies an einer Störung durch einen starken
UKW-Sender liegen. Siehe “FM-MODULATOR-Einstellung”, und die Einstellung ändern. (Siehe
Seite 25.)
• Auch wenn dieses Produkt ausgeschaltet wird, bleibt die UKW-Auto-Stereoanlage eingeschaltet.
Page 92

Grundlegender Betrieb
Grundlegender TV-Tuner-Betrieb
Die entsprechende “Wahl der Landesgruppe” für Ihr Gebiet durchführen. (Siehe Seite 23.)
— Manulle Abstimmung und Suchlauf-Abstimmung
• Das Abstimm verfahren kann geändert werden, je nachdem, wie lange die Taste ◄/► gedrückt wird.
Manuelle Abstimmung (Schritt für Schritt) 0,5 Sekunden oder weniger
Suchlauf-Abstimmung (automatisch) 0,5 Sekunden oder mehr
Hinweis:
• Wenn die Taste länger als 0,5 Sekunden gedrückt gehalten wird, werden Sender über
sprungen. Die Suchlauf-Abstimmung beginnt, sobald die Taste losgelassen wird.
Audio-Programmquelle
Video-Programmquelle
(vorne)
Programmquelle (hinten)
Band
Landesgruppe
Vorwahl-Abstimmung
• Sender können zugeordnet.
IP-BUS- und AV-HAUPT-BETRIEBSART:
Sender können mit den Tasten 1-6 auf gleiche Weise gespe
ichert und abgerufen werden als mit der VorwahlAbstimmung des Tuners des Hauptgeräts. (Siehe Seite 12.)
Band
TVl TV2
IP-BUS- und AV-HAUPT-BETRIEBSART:
Betrieb ist nur mit der Taste BAND (◄►) des Hauptgeräts möglich.
Page 93

BSSM (Best-Sender-Sequential-Memory)
Die BSSM-Funktion speichert automatisch Rundfunksender mit den stärksten
Sendesignalen vom tiefsten Kanal nach oben hin.
BSSM einschalten (ON).
BSSM
2 Sekunden lang
gedrückt halten
• Zum Aufheben des Prozesses die Taste BSSM erneut drücken, bevor die
Speicherung abgeschlossen ist.
Hinweis:
• Bis zu 12 Sender pro Band können gespeichert werden.
• Falls in einem Gebiet nicht mehr als 12 Sender empfangen werden können, verbleiben unter
Umständen früher gespeicherte Sender im Speicher.
AV-HAUPT- und IP-BUS-BETRIEBSART
BSSM kann auch mit dem mit diesem Produkt kombinierten Hauptgerät durchgeführt
werden.
1. Die Taste FUNCTION drücken, und BSSM im Funktionsmenü wählen.
2. Zum Einschalten von BSSM die Taste A drücken.
• Zum Aufheben des Prozesses, bevor die Speicherung abgeschlossen ist, die
Taste T im Funktionsmenü drücken.
■ Hauptgerät Gruppe 2
1. Die Taste FUNCTION drücken, und die Vorwahl-Scan/BSSM-Betriebsart
(FUNC 1) im Funktionsmenü wählen.
2. Zum Einschalten von BSSM die Taste A 2 Sekunden lang drücken.
• Zum Aufheben des Prozesses, bevor die Speicherung abgeschlossen ist, die
Taste T im Funktionsmenü drücken.
Page 94

Grundlegender Betrieb
Kontrollieren des momentanen Kanals und anderer Einstellungen
Wenn die momentane Audio-Programmquelle TV ist, werden Empfangsinformationen wie
z.B. Kanal und Band angezeigt. Auch die Vorwahl-Kanalliste kann angezeigt werden.
• Wählen Sie die gewünschte Betriebsart in der nachstehenden Reihenfolge:
(Kanal-Abruf)
Audio-Programmquelle
Video-Programmquelle
(vorne)
Band
Die Betriebsart ändert
sich mit jedem Dmck ...
Kanal-Abruf -► Vorwahl-Kanalliste -► Landesliste Anzeige aus
(V orwahl-Kanalliste) (Landesliste)
EIF3 JtW
EB3
Landesgruppe
r35!-H
g § I 3
m
In diesem Band gespeicherte Kanäle (Vorwahl) Landesnamen in COUNTRY 1
Mit dem FM-MODULATOR eingestellte Frequenz
Hinweis:
• Abgerufene Informationen werden 8 Sekunden lang angezeigt.
• In den folgenden Fällen kann die Anzeige der entsprechenden Programmquelle abgerufen werden.
* Wenn die Audio- oder Video-Programmquelle VTRl oder VTR2 ist.
* Wenn es sich bei der Video-Programmquelle um TV oder das Navigationssystem handelt.
m @3
Hg
ID
a §
\m ¥E 1 f
Page 95

Ausschließliches Umschalten der Video-ProgrammqueHe
__________
Unter Weiterhören der momentanen Audio-Programmquelle kann die VideoProgrammquelle auf “Hintergrund-Anzeige” gestellt und nur die Video-Programmquelle
wunschgemäß umgeschaltet werden.
• Das gewünschte Bild in der nachstehenden Reihenfolge wählen:
Audio-Programmquelle
“Hintergrund-Anzeige”
0^0
Das Bild ändert sich
mit jedem Druck...
Navigationssystem-Video (BGNAVI) TV-Video (BGTV) -► VTRl-Video (BGVTRl)
VTR2-Video (BGVTR2) -► Video der momentanen Audio-Programmquelle (Audio-
S y nchronisierung)
Hinweis:
• Bei TV-Audio-Ausgang erscheinen die Kanalanzeigen an der Audio-Programmquelle.
• Wenn das Navigationssystem nicht angeschlossen ist, kann nicht auf Navigationssystem-Video
geschaltet werden.
• Es kann nur auf VTRl oder VTR2 geschaltet werden, wenn “SELECT” im Einstellmenü gewählt
ist. (Siehe Seite 26.)
• Wenn nur auf Video geschaltet wird, erscheinen die Audio- und Video-Anzeigen 8 Sekunden lang.
AV-HAUPT-BETRIEBSART
• Auch wenn ein Navigationssystem angeschlossen ist, kann mit diesem Produkt nicht auf
Navigationssystem-Video (BGNAVI) geschaltet werden. Mit dem audiovisuellen
Hanpteinheit umschalten.
• Wenn auf “Video der momentanen Audio-Programmquelle” geschaltet wird, erscheint
“TV” als Video-Programmquelle (vorne), und ein Fernsehbild, das keinen
Zusammenhang mit der Audio-Programmquelle hat, wird angezeigt.
IP-BUS-BETRIEBSART
• Wenn kein Navigations system an diesem Produkt angeschlossen ist, kann nicht auf
Navigationssystem-Video (BGNAVI) geschaltet werden.
• Wenn auf “Video der momentanen Audio-Programmquelle” geschaltet wird, erscheint
kein Bild.
• Wenn der Empfang durch eine Verkehrsinformation oder andere Durchsage bei
Gebrauch der RDS-Funktion des Hauptgeräts unterbrochen wird, erfolgt automatische
Umschaltung auf den Tuner. Bei Wahl von “Video der momentanen AudioProgrammquelle” wird kein Bild angezeigt.
ZUSATZ-BETRIEBSART
• Wenn kein Navigationssystem an diesem Produkt angeschlossen ist, kann nicht auf
Navigationssystem-Video (BGNAVI) geschaltet werden.
• Wenn dieses Produkt ausgeschaltet ist, wird durch Drücken der Taste V.SEL
“Hintergrund-Anzeige” gewählt.
Page 96

Grundlegender Betrieb
Ausschließliches Umschalten der Audio-Programmguelle
Bei ausgeschalteter Audio-Synchronisierung kann nur die Audio-Programmquelle
wunschgemäß umgeschaltet werden, während die momentane-Video-Programmquelle
aktiv bleibt. Bei aktivierter Audio-Synchronisierung ändert sich auch die VideoProgrammquelle. In diesem Fall siehe “Ausschließliches Umschalten der VideoProgrammquelle”, die “Hintergrund-Anzeige” für die gewünschte Programmquelle
(z.B. BGTV) wählen, und die Audio-Synchronisierung ausschalten.
_________
Audio-
Synchronisierzeichen
AV-HAUPT- und IP-BUS-BETRIEBSART
Umschalten auf Audio der am Hauptgerät angeschlossenen Programmquelle
Die gewünschte Audio-Programmquelle wählen.
Die Programmquelle
ändert sich mit jedem
Druck...
Audio der am Hauptgerät angeschlossenen Programmquelle wird der Reihe nach
umgeschaltet.
'fe BüW
iiiiisiii!iii»ioa
CORVltTE
Page 97

Umschalten auf Audio der an diesem Produkt angeschlossenen Programmquelle
Die gewünschte Audio-Programmquelle in der nachstehenden Reihenfolge wählen:
Audio-Programmquelle
V ideo-Programmquelle
(vorne)
“Hintergrund-Anzeige”
Die Programmquelle
ändert sich mit jedem
Druck...
TV -► VTRl -► VTR2
Hinweis:
• Bei TV-Audio-Ausgang erscheinen die Kanalanzeigen an der Audio-Programmquelle.
• Für Audio-Wiedergabe von diesem Produkt als Programmquelle des Hauptgeräts TV wählen.
(Betrieb ist nicht möglich, wenn beim Hauptgerät eine andere Programmquelle als TV gewählt ist.)
• Es kann nur auf VTRl oder VTR2 geschaltet werden, wenn “SELECT” im Einstellmenü gewählt
ist. (Siehe Seite 26.)
ZUSATZ-BETRIEBSART
Die gewünschte Audio-Programmquelle in der nachstehenden Reihenfolge wählen:
Audio-Programmquelle
0 ^
0-s
Die Programmquelle
ändert sich mit jedem
Druck...
V ideo-Programmquelle
(vorne)
“Hintergrund-Anzeige”
TV -► VTRl VTR2 -► CD-Player (nur eine Disc) -► Multi-CD-Player
“► Multi-MD-Player -► OFF
Hinweis:
• Es kann nicht auf eine Programmquelle geschaltet werden, die nicht an diesem Produkt
angeschlossen ist.
Page 98

Grundlegender Betrieb
Umschalten der ProgrammqueUe des hinteren Displays
____________
Wenn ein hinteres Display angeschlossen ist, kann dessen Programmquelle umgeschaltet
werden.
• Die gewünschte Programmquelle in der nachstehenden Reihenfolge wählen:
[V.SfÜ mm BREARt
Programmquelle (hinten)
Die Programmquelle
ändert sich mit jedem
Druck...
TV -► VTR 1 -► VTR 2 -► OFF
Hinweis:
• Audio- und Video-Programmquelle des hinteren Displays können nicht getrennt umgeschaltet
werden.
Page 99

Bedienungsweise des Einstellmenüs
Aufrufen des Einstellmenüs
Die TV-Einstellung über dieses Menü vornehmen.
1. Die TV-Programmquelle wählen. (Siehe Seite 13.)
2. Wählen Sie die gewünschte Betriebsart in der nachstehenden Reihenfolge:
r MEN U-C OUN TRY LI ST
- Momentane Betriebsart
D NL B D K N S S F IS
Die Betriebsart ändert
sich mit jedem Druck ...
CH A SK SL BH YU AL
GR TR E P M
^►AD J
COUNTRY LIST PICTURE ADJUST* FM MODULATOR** -► VIDEO
SELECT -► DIVER SELECT -► MENU OFF
Bei Gebrauch unter AV-HAUPT-BETRIEBSART kann diese Betriebsart nicht gewählt werden.
Mit dem audiovisuellen Haupteinheit einstellen.
Nur bei Gebrauch von ZUSATZ-BETRIEBSART kann diese Betriebsart gewählt werden.
Zum Verlassen des Einstellmenüs die Taste BAND drücken.
Hinweis:
• Das Einstellmenü erlischt automatisch, wenn innerhalb von etwa 30 Sekunden kein
Bedienungsschritt vorgenommen wird.
• Wenn TV nicht als Audio-Programmquelle, Video-Programmquelle (vorne) oder Programmquelle
(hinten) eingestellt ist, kann “COUNTRY LIST” nicht gewählt werden.
• Wenn TV, VTRl oder VTR2 nicht als Audio-Programmquelle, Video-Programmquelle (vorne)
oder Programmquelle (hinten) eingestellt ist, kann “PICTURE ADJUST” nicht gewählt werden.
Page 100

Bedienungsweise des Einstellmenüs
Wahl der Landesgruppe
Bei diesem Produkt sind Kanäle für jede Landesgruppe vorprogrammiert. Wahl der
entspreehenden Landesgruppe für den jeweiligen Empfangsbereich ermöglicht den
Empfang mehrerer Kanäle.
1. Die Taste MENU drücken, und die Landeslisten-Betriebsart (COUNTRY LIST) im Einstellmenü wählen.
2. Die Landesgruppe mit dem Land wählen, in dem Sie sich zur Zeit befinden, und zwar in der nachstehenden Reihenfolge.
r MENU-COUNTRY LIST 1
Landesgruppe
Landesliste
COUNTRYl -► COUNTRY2 -► COUNTRY3 -► COUNTRY4
Landesgruppenliste und Kanalname
Laiidesgruppe
COUNTRYl
(CCIR-Kanal)
COUNTRY2
(ITALIEN-Kanal)
COUNTRY3
(UK-Kanal)
COUNTRY4
(OIRT-Kanal)
Anzeige (Landesnaine)
D (DEUTSCHLAND)
DK (DÄNEMARK)
SF (FINNLAND)
CH (SCHWEIZ)
SL (SLOVENIEN)
YU (JUGOSLAWIEN)
TR (TÜRKEI)
M (MALTA)
I (ITALIEN)
GB (UK)
SU (RUSSLAND)
H (UNGARN)
NL (NIEDERLANDE)
N (NORWEGEN)
IS (ISLAND)
A (ÖSTERREICH)
BH (BOSNIEN)
AL (ALBANIEN)
E (SPANIEN)
RSM (REPUBLIK SAN MARINO)
PL (POLEN)
ROM (RUMÄNIEN)
B (BELGIEN)
S (SCHWEDEN)
SK (SLOVAKEI)
GR (GRIECHENLAND)
P (PORTUGAL)
CZ (TSCHECHOSLOWAKEI)
BG (BULGARIEN)
Hinweis;
• BSSM und andere Verfahren können zur Speicherung von Rundfunksendern in jeder der
Landesgruppen verwendet werden.
• Dieses Produkt ist mit Kanälen in Frankreich nicht kompatibel.
• Rundfunkkanäle und Rundfunksysteme können von Land zu Land verschieden sein. Falls Empfang
mit der entsprechenden oben aufgeführten Landesgruppe nicht möglich ist, den Empfang mit einer
anderen Landesgruppe versuchen.
 Loading...