

Page 1
CD RDS RECEIVER
RECEPTOR DE CD CON RDS
CD PLAYER COM RDS
FH-S725BT
FH-S525BT
DIGITAL MEDIA RECEIVER
RECEPTOR DE MEDIOS DIGITALES
DIGITAL MEDIA RECEIVER
Manual de operación
Manual de Operações
MVH-S425BT
English Español Português (B)
Operation Manual
Page 2

English
About this manual:
Table of Contents
Getting Started........................................................................................ 3
Radio....................................................................................................... 11
CD/USB/iPhone®/AUX.......................................................................... 13
Bluetooth............................................................................................... 15
Spotify® .................................................................................................. 19
Using Pioneer Smart Sync/APP.......................................................... 21
Using the Karaoke Function............................................................... 25
Audio Adjustments .............................................................................. 26
Settings .................................................................................................. 27
FUNCTION settings ............................................................................... 28
AUDIO settings ...................................................................................... 29
SYSTEM settings.................................................................................... 32
ILLUMINATION settings........................................................................ 35
MIXTRAX settings.................................................................................. 36
MICROPHONE settings......................................................................... 37
Additional Information ....................................................................... 38
• In the following instructions, a USB memory or USB audio player are referred to as
“USB device”.
- 2 -
Page 3
English
Getting Started
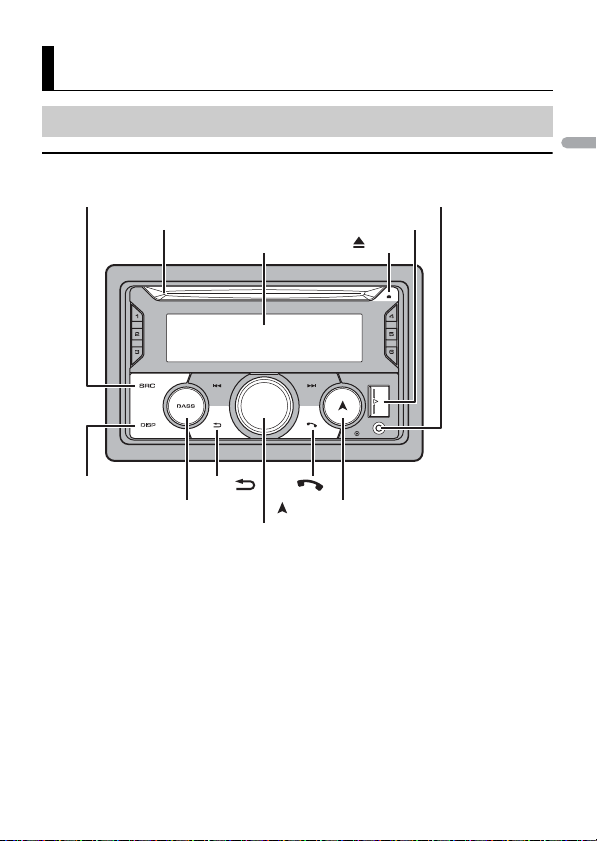
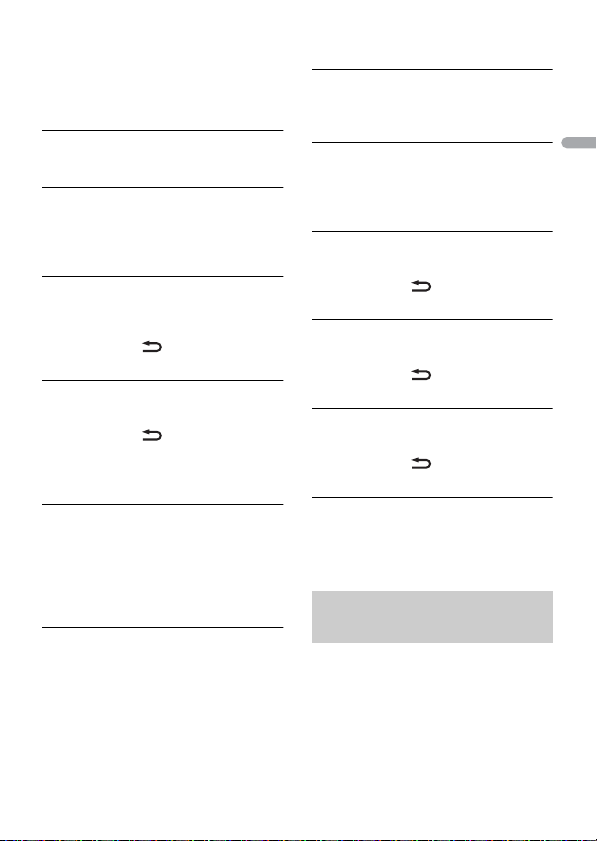
SRC (source)/OFF
Display window
M.C. (multi-control) dial
BAND/
DISP (display)/
DISP OFF
(navigation)/LIST
USB port
AUX input jack (3.5 mm stereo jack)
(eject)
Disc loading slot
BASS
Basic operation
FH-S725BT
- 3 -- 3 -
Page 4
English
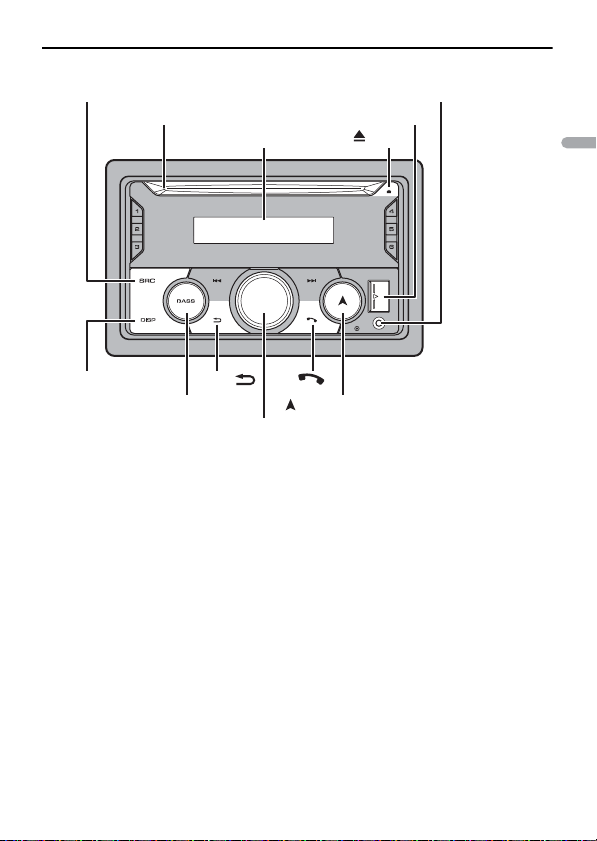
FH-S525BT
M.C. (multi-control) dial
BAND/
(navigation)/LIST
USB port
AUX input jack (3.5 mm stereo jack)
(eject)
Disc loading slot
BASS
DISP (display)/
DISP OFF
Display window
SRC (source)/OFF
- 4 -
Page 5
English
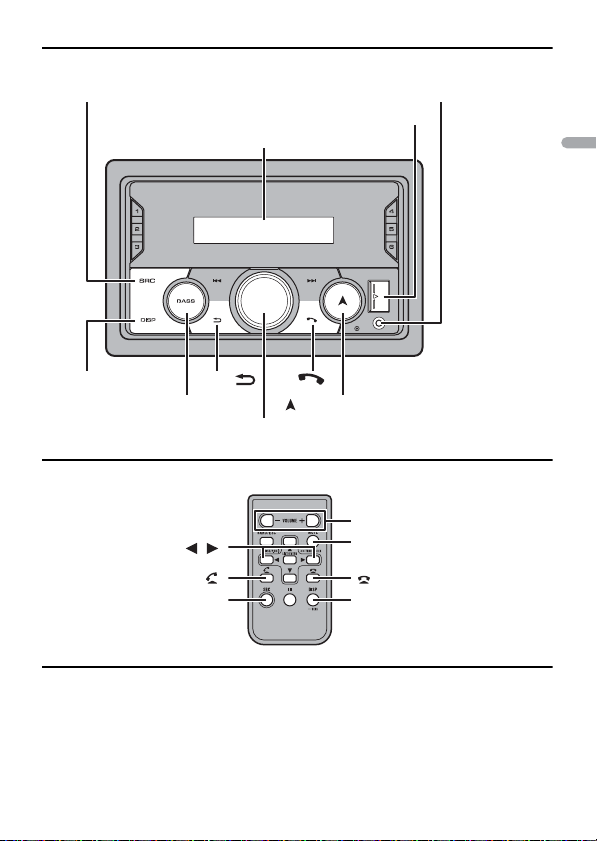
MVH-S425BT
M.C. (multi-control) dial
BAND/
(navigation)/LIST
USB port
AUX input jack (3.5 mm stereo jack)
BASS
DISP (display)/
DISP OFF
Display window
SRC (source)/OFF
/
SRC (source)
VOLUME +/–
MUTE
DISP (display)
Remote Control
Frequently used operations
The available buttons vary depending on the unit.
- 5 -- 5 -
Page 6
English
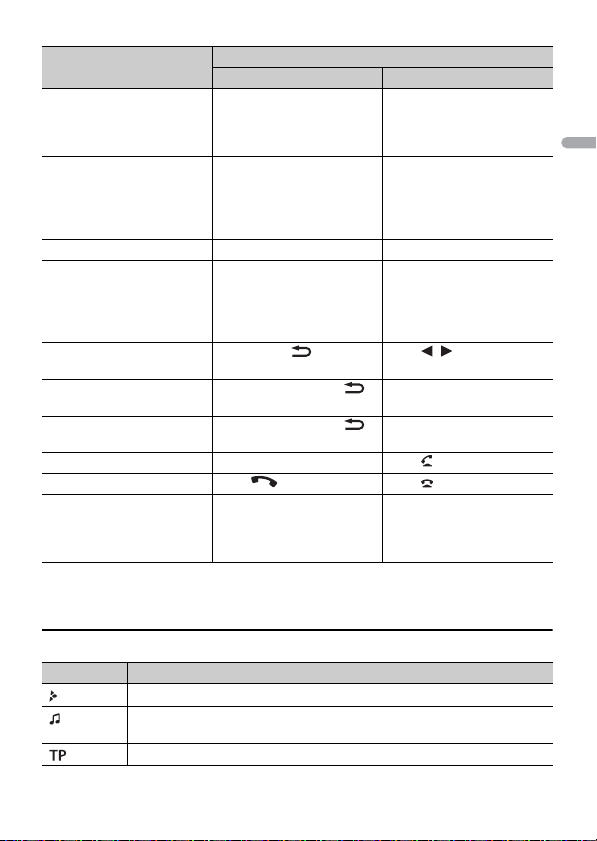
Purpose
Turn on the power* Press SRC/OFF to turn on
Adjust the volume Turn the M.C. dial. Press VOLUME + or –.
Select a source Press SRC/OFF repeatedly. Press SRC repeatedly.
Change the display
information
Return to th e previous
display/list
Return to the normal display
from the menu
Change the display
brightness
Answering a call Press any button. Press .
Ending a call Press . Press .
Boost the bass level Press BASS.
* When this unit ’s blue/white lead is connected to the vehicle’s auto-anten na relay control terminal,
the vehicle’s antenn a extends when this unit’s source is turned on. To retract the antenna , turn the
source off.
Head Unit Remote Control
the power.
Press and hold SRC/OFF to
turn off the power.
Press DISP/DISP OFF
repeatedly.
Press and hold DISP/DISP
OFF to turn off the display
information.
Press BAND/ . Press / to select the
Press and hold BAND / .
Press and hold BAND / .
• Yo u ca n sel ect t he b ass
level ([HI] or [LOW]) in
[D.BASS] (page 31).
Operation
Press SRC to turn on the
power.
Press and hold SRC to turn
off the power.
Press MUTE to mute the
unit. Press MUTE again or
press VOLUME + or – to
unmute.
Press DISP re peatedly.
next/previous folder.
–
–
–
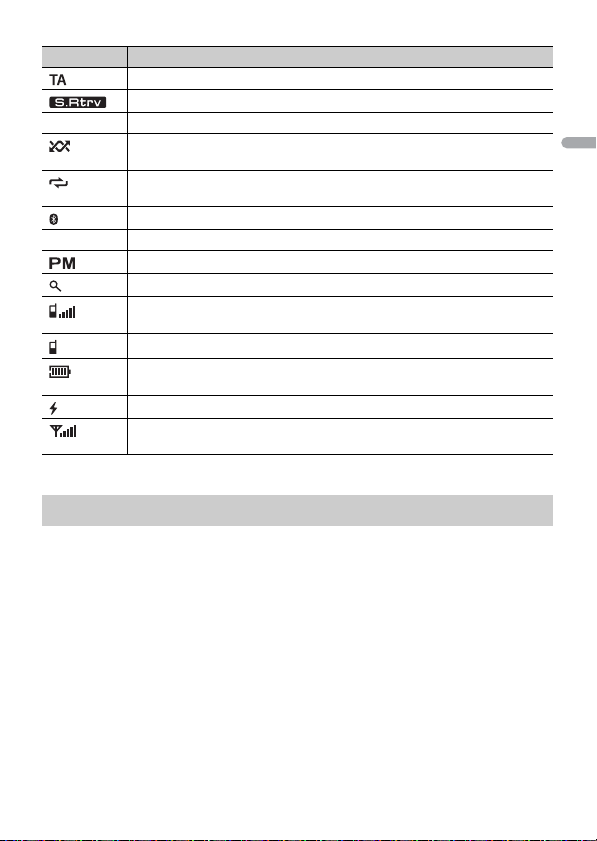
Display indication
Indication Description
Appears when a lower tier of the menu or folder exists.
* Appears when a Bluetooth audio player is connected to this unit by A2DP
Appears when a traffic program is received.
(Advanced Audio Distribution Profile) (page 15).
- 6 -
Page 7
English
Indication Description
* Appears when the TA (traffic announcements) function is set (page 28).
* Appears when the sound retriever function is set (page 32).
BASS Appears when the BASS function is activated.
Appears when random/shuffle play is set (except when BT AUDIO is
selected as the source).
Appears when repeat play is set (except when BT AUDIO is selected as the
source).
Appears when a Bluetooth connection is made (page 15).
APP Appears when a Pioneer Smart Sync connection is made (page 21).
* Appears when [CLOCK SET] is set to [12H] (page 32).
* Appears when the list menu is displayed.
* Appears when a Bluetooth telephone is connected to this unit.
Indicates the antenna level.
* Appear s when a second Bluetooth telephone is connected to th is unit.
* Appears when a Bluetooth telephone is connected to th is unit.
Indicates the battery level.
* Appears when a device is being connected to the unit for charging.
* Appears when a radio signal is received.
Indicates the antenna level.
* Only for FH-S72 5BT
Resetting the microprocessor
The microprocessor must be reset in the following situations:
– Before using this unit for the first time after installation
– If the unit fails to operate properly
– When strange or incorrect messages appear on the display
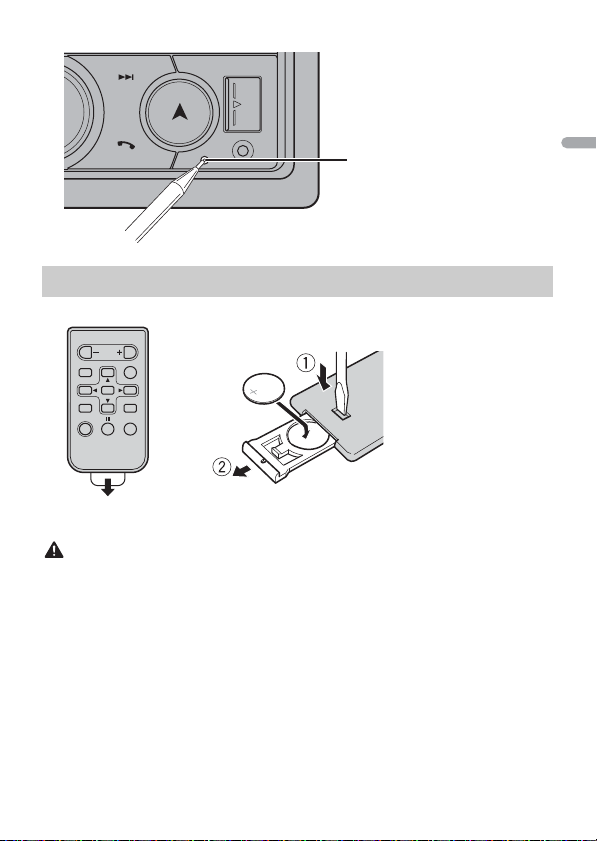
1 Press the RESET button with a pen tip or other pointed instrument.
- 7 -- 7 -
Page 8
English
WAR NIN G
Preparing the remote control
RESET button
How to replace the battery
Insert the CR2025 (3 V) battery with the plus (+) and
minus (–) poles orientated properly.
Remove the insulation sheet before use.
• Do not ingest the battery, Chemical Burn Hazard.
(The remote con trol supplied with) This product contains a coi n/button cell battery. If the coin/
button cell battery is swallowed, it can cause severe internal burns in just 2 hours and can lead to
death.
Keep new and used batteries away from children.
If the battery compartment does not close securely, stop using the product and keep it away from
children.
If you think batteries might have been swallowed or placed inside any part of the body, seek
immediate medical attention.
• Batter ies (battery pack or batteries installed) must not be exposed to excessive heat such as sunshine,
fire or the like.
- 8 -
Page 9
English
CAUTION
• There is a danger of explosion if the battery is incorrectly replaced. Replace only with the same or
Important
WAR NIN G
equivalent type.
• Do not handle or store the battery with metallic tools or objects.
• I f the battery leaks, remove the battery and wipe the remote control completely clean. Then install a
new battery.
• When disposing of used batteries, please comply with governmental regulations or environmental
public in stitution’s rules that ap ply in your countr y/area.
• Do not store the remote control in high temperatures or direct sunlight.
• Do not let the remote control fall onto the floor, where it may become jammed under the brake or
accelerat or pedal.
Setup menu
When you turn the ignition switch to ON af ter installation, the setup menu appears in
the display.
(Only for FH-S725BT)
Do not use the unit in standard mode when a speaker system for network mode is connected to the
unit. Do not use the unit in network mode when a speaker system for standard mode is connected to
the unit. Thi s may cause damage to the speakers.
1 Turn the M.C. dial to select the options, then press to confirm.
To proceed to the next menu option, you need to confirm your selection.
Menu Item Description
LANGUAGE Select the language to display the text information from a
[ENG](English),
[ESP](Spanish)
CLOCK SET Set the clock.
FM STEP Select the FM tuning step from 100 kHz or 50 kHz.
[100], [50]
AM STEP Select the AM tuning step from 10 kHz or 9 kHz.
[10], [9]
compressed audio file.
1 Turn t he M.C. dial to adjust th e hour, then press to confirm.
The indicator moves to the minute setting automatically.
2 Turn t he M.C. dial to adjust the minute, then press to confirm.
- 9 -- 9 -
Page 10
English
NOTE
NOTE
Menu Item Description
SPEAKER MODE (O nly
for FH-S725BT)
Switch between two operation modes: the 2-way network mode
(NETWORK) and the standard mode (STANDARD) according to
the connections you have established.
After selecting the appropriate mode, turn the M.C. dial to
select [YES], then press to confirm.
• You cannot complete the setup menu without setting the
[SPEAKER MODE].
2 [QUIT :YES] appears.
To return to the first item of the setup menu, turn the M.C. dial to select [QUIT :NO],
then press to confirm.
3 Press the M.C. dial to confirm the settings.
These settings other than [SPEAKER MODE] can be made at any time from the SYSTEM settings
(page 32) and INITIAL settings (pa ge 10).
Canceling the demonstration display (DEMO OFF)
1 Press the M.C. dial to display the main menu.
2 Turn the M.C. dial to select [SYSTEM], then press to confirm.
3 Turn the M.C. dial to select [DEMO OFF], then press to confirm.
4 Turn the M.C. dial to select [YES], then press to confirm.
INITIAL settings
1 Press and hold SRC/OFF until the unit turns off.
2 Press the M.C. dial to display the main menu.
3 Turn the M.C. dial to select [INITIAL], then press to confirm.
4 Turn the M.C. dial to select an option, then press to confirm.
The options var y depending on the unit.
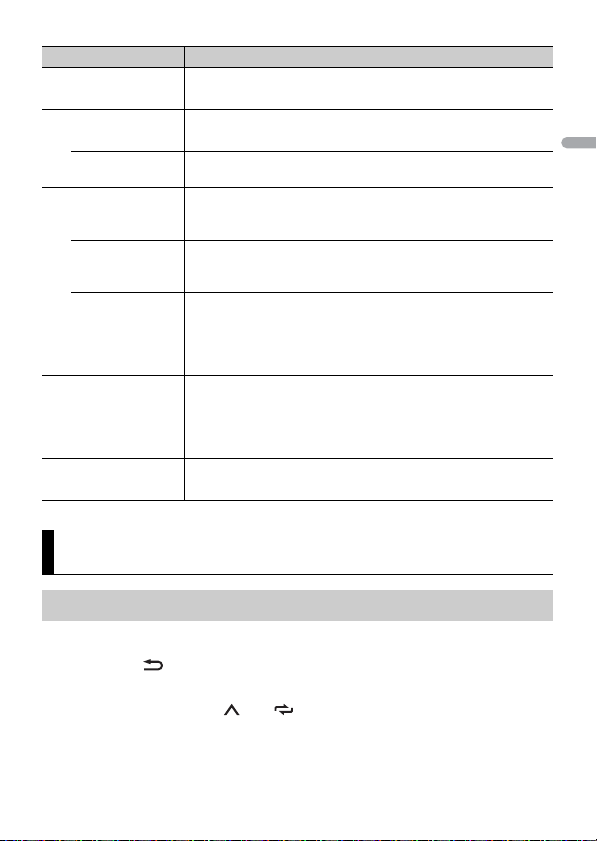
Menu Item Description
FM STEP Select the FM tuning step from 100 kHz or 50 kHz.
[100], [50]
- 10 -
Page 11
English
Menu Item Description
AM STEP Select the AM tuning step from 10 kHz or 9 kHz.
[10], [9]
REAR-SP Select when there is a full-range speaker connected to the rear
[FUL]
[SW] Select when there is a subwoofer connected directly to the rear
SP-P/O MODE Select when there is a full-range speaker connected to the rear
[REAR/SUB.W]
[SUB.W/SUB.W] Select when there is a passive subwoofer connected directly to
[REAR/REAR] Select when there are full-range speakers connected to the rear
SYSTEM UPDATE Select [SYSTEM INFO] to confirm the latest system information
[SYSTEM INFO], [S/
W UPDATE]
SYSTEM RESET Select [YES] to initialize the unit settings. The unit will be
[YES], [NO]
speaker output leads.
speaker output leads without any auxiliary amplifier.
speaker output leads and there is a subwoofer connected to the
RCA output.
the rear speaker output leads and there is a subwoofer
connected to the RCA output.
speaker output leads and RCA output. If there is a full-range
speaker connected to the rear speaker output le ads, and the
RCA output is not used, you may select either [REAR/SUB.W] or
[REAR/REAR].
on the unit.
Select [S/W UPDATE] to update the unit to the latest soft ware
and initialize the unit settings. For details on the latest software
and updating, visit our website.
restarted automatically.
Radio
Receiving preset stations
1 Press SRC/OFF to select [RADIO].
2 Press BAND/ to select the band from [FM1], [FM2], [FM3], [AM] , [SW1] or
[SW2].
3 Press a number button (1/ to 6/).
- 11 -- 11 -
Page 12
English
TIP
The / buttons can be also used to select a preset station when [SEEK] is set to [PCH] in the
NOTE
NOTES
FUNCTION settings (page29).
Best stations memory (BSM)
The six strongest stations are stored on the number buttons (1/ to 6/).
1 After selecting the band, press the M.C. dial to display the main menu.
2 Turn the M.C. dial to select [FUNCTION], then press to confirm.
3 Turn the M.C. dial to select [BSM], then press to confirm.
To seek a station manually
1
After selecting the band, press / to select a station.
Press and hold / then release to seek an available station. Scanning stops
when the unit receives a station. To cancel seek tuning, press / .
[SEEK] needs to be set to [MAN] in the FUNCTION settings (page 29).
To store stations manually
1
While receiving the station you want to store, press and hold one of the number
buttons (1/ to 6/ ) until it stops flashing.
Using PTY functions
The unit searches for a station by PTY (program type) information.
1 Press and hold during FM reception.
2 Turn the M.C. dial to select a program type from [NEWS/INFO], [POPULAR],
[CLASSICS] or [OTHERS].
3 Press the M.C. dial.
The unit begins to search for a station. When it is found, its program service name is
displayed.
• To cancel the search, press the M.C. dial.
• T he program of some s tations may differ f rom that indicated by t he transmitted PT Y.
• I f no station is broadcasting the type of program you searched for, [NOT FOUND] is displayed for
about two seco nds and then the tuner returns to th e original station.
- 12 -
Page 13
English
NOTES
NOTE
CAUTION
NOTE
CD/USB/iPhone®/AUX
(iPhone source is not available when [USB MTP] is set to [ON] in the SYSTEM settings
(page 33).)
• C D function is not available for MVH-S425BT .
• iPhone function is not available for FH-S525BT.
Playing back
Disconnect headphones from the device before connecting it to the unit.
CD
1
Insert a disc into the disc loading slot with the label side up.
To eject a disc, stop playback first then press .
USB devices (including Android™)/iPhone
1
Open the USB port cover.
2 Plug in the USB device/iPhone using an appropriate cable.
To automatically switch to USB source when a USB device/i Phone is connected to the unit, s et [USB
AUTO] to [ON] in the SYSTEM settings (page 34).
Use a USB cable (sold separately) to connect the USB device as any device connected directly to the
unit will protrud e out from the unit, which could be dan gerous.
Before removing the device, stop playback.
AOA connections
A device running Android OS 4.1 or later installed and also supports AOA (Android Open
Accessory) 2.0 can be connected to the unit via AOA, using the cable supplied with the
device.
If you use an AOA connection, [APP CONTROL] needs to be set to [WIRED] (page 33) and [USB MTP]
needs to be set to [OFF] (page33) in the SYSTEM settings.
MTP connection
A device installed with Android OS 4.0 or most of later versions can be connected to the unit via MTP,
using the cable supplied with the device. However, depending on the connected device, OS version or
- 13 -- 13 -
Page 14
English
the numbers of the files in the device, audio files/songs may not be able to be played back via MTP.
NOTE
NOTE
Note that MTP connection is not compatible with WAV file formats and FLAC file formats, and cannot be
used with the MIXTRAX function.
If you use an MTP connection, [USB MTP] needs to be set to [ON] in the SYSTEM settings (page33).
AUX
1
Insert the stereo mini plug into the AUX input jack.
2 Press SRC/OFF to select [AUX IN] as the source.
If [AUX] is set to [OFF] in the SYSTEM settings, [AUX IN] cannot be selected as a source (page 33).
Operations
You can make adjustments in the FUNCTION settings (page 28) (except for AUX IN/CD/
USB source).
Note that the following operations do not work for an AUX device. To operate an AUX
device, use the device itself.
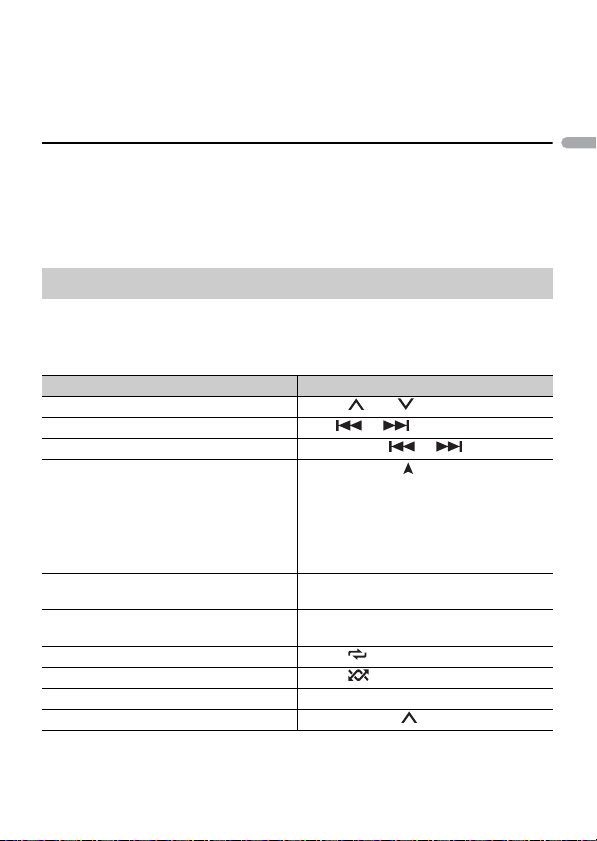
Purpose Operation
Select a folder*1 Press 1/ or 2/.
Select a track/song (chapter) Press or .
Fast forward or reverse*2 Press and hold or .
Search for a file from a list (CD/ USB only) 1 Press and hold to display the list.
View a list of the files in the selected folder/
category*1
Play a song in the selected folder/
category*1
Repeat play Press 6/.
Random/shuffle play Press 5/.
Pause/resume playback Press 4/PAUS E.
Return to root folder (CD/USB only)*1 Press and hold 1/.
2 Tur n the M.C. dial to select the desired
file (folder) name or category, then press
to confirm.
3 Tur n the M.C. dial to select the desired
file, then press to confirm.
Playback starts.
Press the M.C. dial when a folder/category
is selected.
Press and hold the M.C. dial when a folder/
category is selected.
- 14 -
Page 15
English
NOTES
Important
TIP
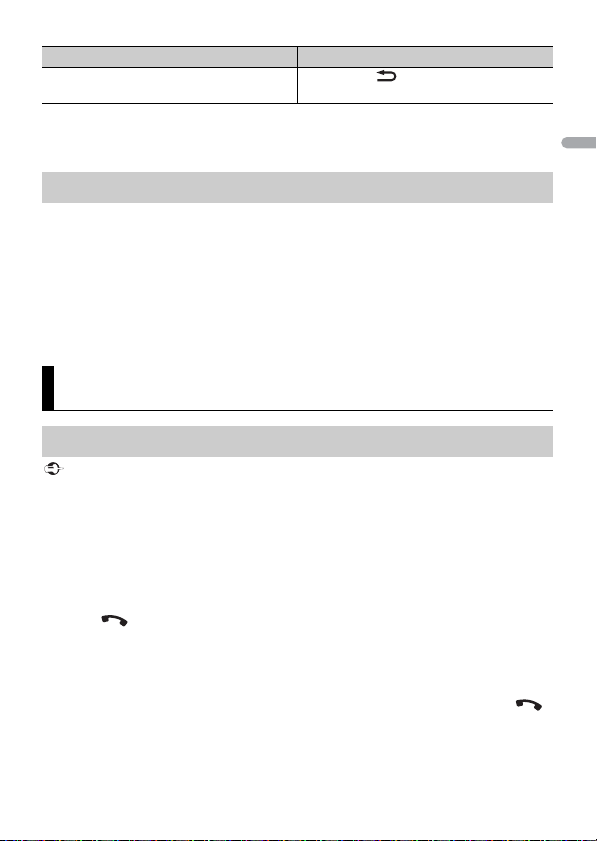
Purpose Operation
Switch between compressed audio and CDDA (CD o nly)
*1 Compressed a udio files only
*2 When you use the fast forward or reverse function while playing a VBR file, the playback time may
be not correct.
Press BAND/.
About MIXTRAX (USB/iPhone only)
The MIXTRAX function creates a non-stop mix of your music library, accompanied by
illumination effects. For details on MIXTRAX settings, see page 36.
• iPho ne needs to be connected with Pioneer Smart Sync via USB for using this function (page 21).
• D epending on the file/song, sound effects may not be available.
• Turn the MIXTRAX function off if the illumination effects it produces interfere with driving.
1 Press 3/MIX to turn MIXTRAX on/off.
Bluetooth
Bluetooth connection
If ten or more Bluetooth devices (e.g. a phone and separate audio player) are connected, they may not
work properly.
The next connection to the unit is performed automatically if the Bluetooth device has been connected
previously in the following steps.
1 Turn on the Bluetooth function of the device.
If you make a Bluetooth connection from the device, proceed to step 4.
2 Press to display the [ADD DEVICE] setting.
The unit starts to search for available devices, then displays them in the device list.
• To cancel searching, press the M.C. dial.
• If the desired device is not in the list, select [RE-SEARCH].
• If there is no device available, [NOT FOUND] appears in the display.
• If there is already a connected device, the phone menu appears by pressing .
3 Turn the M.C. dial to select a device from the device list, then press to confirm.
- 15 -- 15 -
Page 16
English
Press and hold the M.C. dial to switch the displayed de vice information between the
Important
TIP
Bluetooth device address and device name.
If you make a Bluetooth connection from the unit, proceed to step 5.
4 Select the unit name shown in the device display.
5 Make sure the same 6-digit number appears on this unit and the device, then
select [YES] if the 6-digit numbers displayed on this unit and the device are the
same.
Bluetooth telephone
First, make a Bluetooth connection with the Bluetooth telephone (page 15). Up to two
Bluetooth telephones can be connected simultaneously.
• Leaving the unit on standby to connect to your phone via Bluetooth while the engine is not running
can drain the vehicle’s battery.
• B e sure to park your ve hicle in a safe plac e and apply the park ing brake before operat ion.
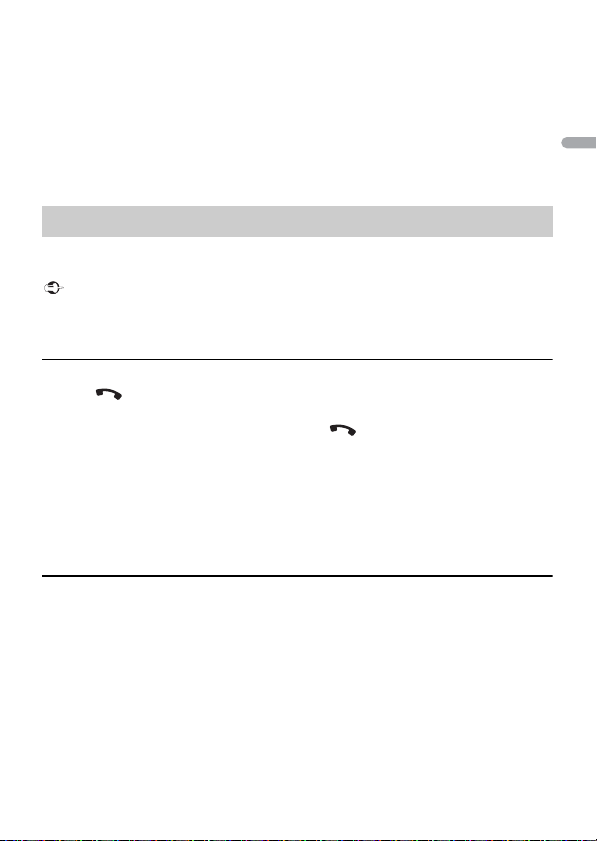
To ma ke a ph one cal l
1
Press to display the phone menu.
When two phones are connected, a phone name appears first then a phone menu
will display. To switch to another phone, press again.
2 Tu rn the M.C. dial to select [RECENTS] or [PHONE BOOK], then press to confirm.
If you select [PHONE BOOK], proceed to step 4.
3 Tu rn the M.C. dial to select [MISSED], [DIALLED] or [RECEIVED], then press to
confir m.
4 Tu rn the M.C. dial to select a name or phone number, then press to confirm.
The phone call starts.
To answer an incoming call
1
Press any button when a call is received.
When two phones are connected to the unit via Bluetooth and there is an incoming call while one
phone is being used for a call, a message will appear in the display. To answer that incoming call, you
need to end the existing call.
- 16 -
Page 17
English
Basic operations
NOTE
TIP
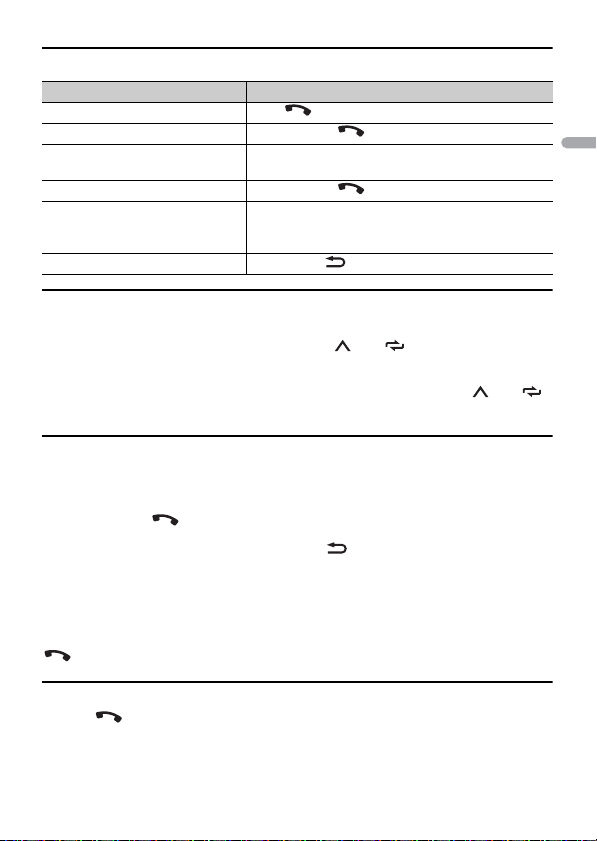
Purpose Operation
End a call Press .
Reject an incoming call Press and hold when a call is received.
Switch between the current caller
and a caller on hold
Cancel a caller on hold Press and hold .
Adjust the volume of the caller’s
voice (When private mode is on,
this function is not available.)
Turn the private mode on or off Press BAND/ during the call.
Press the M.C. dial.
Tur n the M.C. dial during the call.
To preset phone numbers
1
Select a phone number from a phone book or call history.
2 Press and hold one of the number buttons (1/ to 6/).
The contact is stored in the selected preset number.
To make a call using a preset number, press one of the number buttons (1/ to 6/),
then press the M.C. dial, while the phone menu is displayed.
Voice recognition
(iPhone function is not available for FH-S525BT.)
This function is only available when an iPhone/Android device equipped with voice
recognition is connected to the unit via Bluetooth.
1 Press and hold and then talk into the microphone to input voice commands.
To exit the voice recognition mode, press BAND/.
For details on the voice recognition features, refer to the manual supplied with your device.
When a Pioneer Smart Sync connection is made (page 21), you can also use the voice recognition
function from Pioneer Smart Sync installed on your iPhone/Android device by pressing and holding
. For details on the voice recognition features, see the application’s help section.
Phone menu
1
Press to display the phone menu.
- 17 -- 17 -
Page 18
English
Important
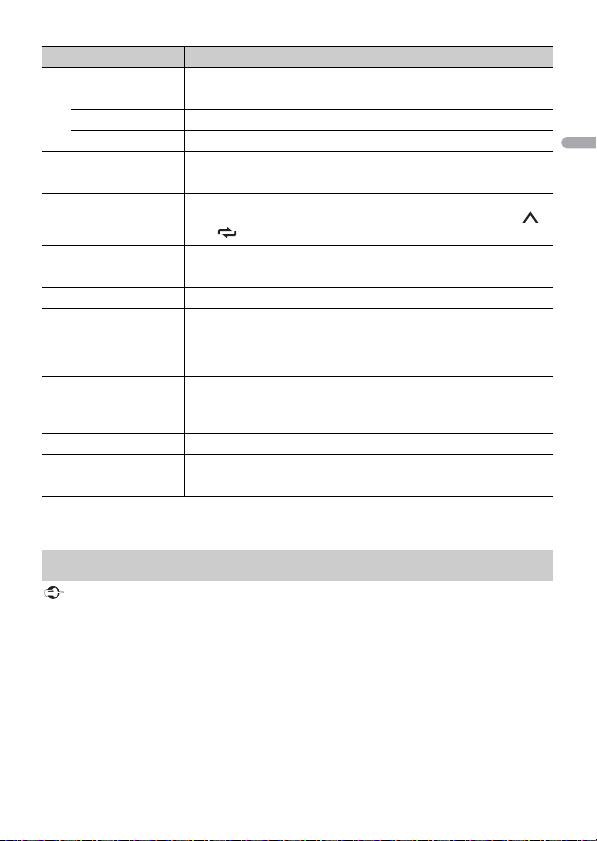
Menu Item Description
RECENTS Display the missed call history.
[MISSED]
[DIALLED] Display the dialed call history.
[RECEIVED] Display the received call history.
PHONE BOOK Display the contacts in your phone.
PRESET 1-6 Recall the preset phone numbers. You can also recall the preset
phone numbers by pressing one of the number buttons (1/
to 6/).
A.ANSR* Select [ON] to answer an incoming call automatically.
[ON], [OFF]
PB INVT Invert the order of names in the phone book (name view).
DEVICELIST Display the list of paired Bluetooth devices. “*” appears on the
device name when the Bluetooth connection is established.
When no device is selected in the device list, this function is not
available.
DEL DEVICE Delete the device information.
[DELETE YES],
[DELETE NO]
ADD DEVICE Register a new device.
DEV. INFO Switch the device information on the display between the
* If two phones are connected, this function does not work on incoming calls that are received while
one of the phones is being used for a call.
device name and Bluetooth device address.
Bluetooth audio
• D epending on the Bluetooth audio playe r connected to this unit, the available operations will be
limited to the following two levels:
– A2DP (Advanced Audio Dist ribution Profile) can only play back songs on you r audio player.
– AVRCP (Audio/Video Remote Control Profile) can perform functions such as playback, pause, select
song, etc.
• The sound of the Bluetooth audio player will be muted when the phone is in use.
• When the Bluetooth audio player is in use, you cannot connect to a Bluetooth telephone
automatically.
• Depending on the type of Bluetooth audio player you have connected to this unit, operation and
information displayed may vary based on availability and functionality.
- 18 -
Page 19
English
1 Make a Bluetooth connection with the Bluetooth audio player.
NOTE
TIP
NOTE
2 Press SRC/OFF to select [BT AUDIO] as the source.
3 Press BAND/ to start playback.
You must reconnect the Bluetooth connection when the source is switched or the unit is turned off.
When more than two and up to five devices are registered to the unit via Bluetooth, you can switch the
Bluetooth device by playing back son gs on the device. By doing so, playing back a song from the
Bluetooth device of each passenger is easily available. However, depending on the usage conditions,
multiple connections may not be available and the audio files/songs may not be able to be played back
properly.
Basic operations
You can make various adjustments in the FUNCTION settings (page 28).
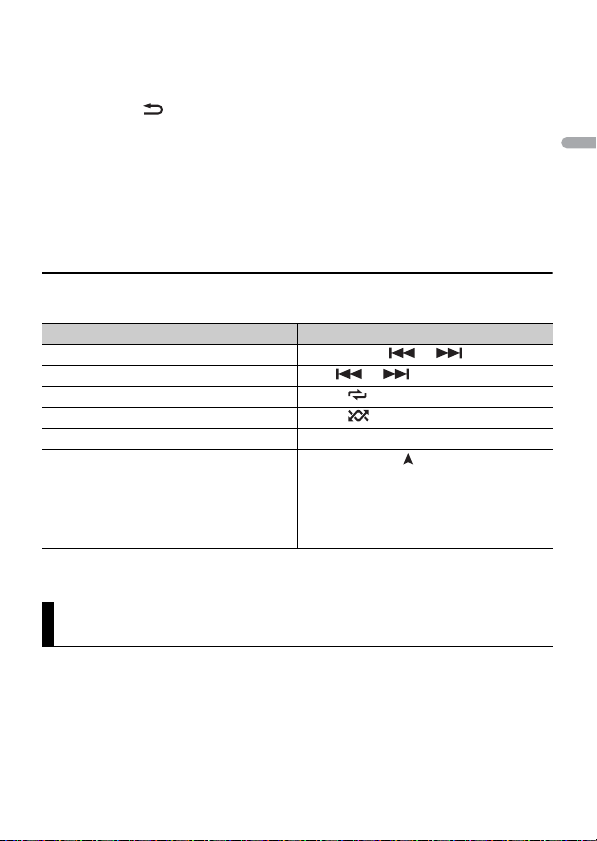
Purpose Operation
Fast forward or reverse Press and hold or .
Select a track Press or .
Repeat play* Press 6/.
Random play* Press 5/.
Pause/resume playback Press 4/PAUS E.
Search for a file from a list 1 Press and hold to display a list.
* Depending on the connected device, these operations may not be available.
2 Tur n the M.C. dial to select the desired
folder name, then press to confirm.
3 Tur n the M.C. dial to select the desired
file, then press to confirm.
Playback starts.
Spotify®
(Not available when [USB MTP] is set to [ON] in the SYSTEM settings (page 33).)
iPhone function is not available for FH-S525BT.
Spotify is a music streaming distribution service not affiliated with Pioneer. More
information is available at http://www.spotify.com.
- 19 -- 19 -
Page 20
English
The Spotify application is available for compatible smartphones, please visit https://
Important
NOTE
NOTE
support.spotify.com/ for the latest compatibility information.
To enjoy Spotify as you drive, first download the Spotify app to your iPhone or Android
device. You can download it on the iTunes® App Store® or Google Play™. Choose a free
account or a paid Premium account, either in the app or at spotify.com. A Premium
account gives you more features, like offline listening.
• This product incorporates Spotify software which is subject to 3rd party licenses found here:
www.spotify.com/connect/third-party-licenses.
• For in formation on the countries a nd regions where Spotify can be us ed, take a look at https://
spotify.com/us/select-your-country/.
Listening to Spotify
Update the firmware of the Spotify application to the latest version before use.
1 Connect this unit with the mobile device.
• iPhone via USB (page 13)
• iPhone/Android device via Bluetooth (page 15)
2 Press SRC/OFF to select [SPOTIFY].
3 Press and hold 1/ to display [APP CONTROL].
4 Turn the M.C. dial to select one of the below.
• Select [WIRED] for the USB connection.
• Select [BLUETOOTH] for the Bluetooth connection.
5 Press SRC/OFF to select [SPOTIFY].
6 Launch the Spotify application on the mobile device and start playback.
When you connect a mobile device other than an iPhone/Android device, it may not operate correctly
depending on your mobile device.
Basic operations
You can make various adjustments in the FUNCTION settings (page 28).
The available operations may vary according to the type of contents (track/album/artist/playlist/radio)
you want to play.
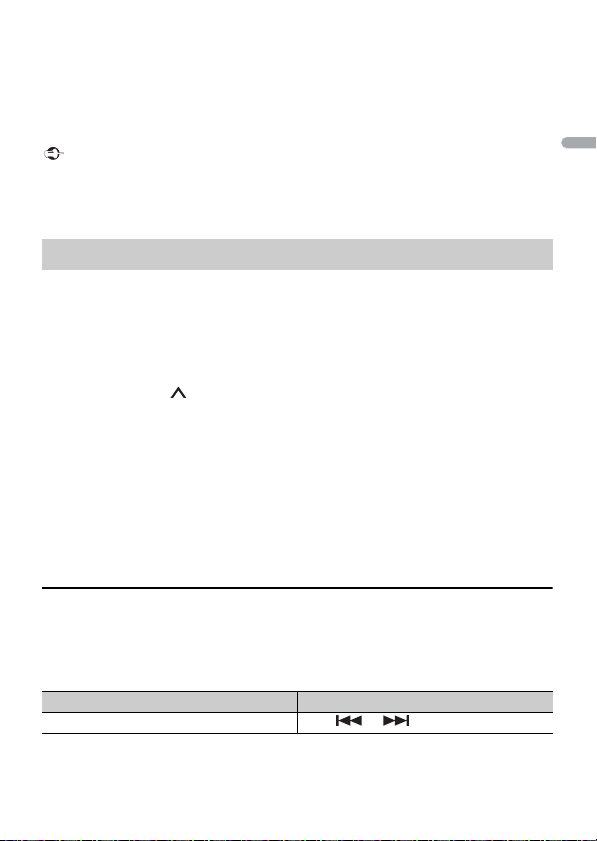
Purpose Operation
Skip a track Press or .
- 20 -
Page 21
English
NOTE
NOTE
NOTE
WAR NIN G
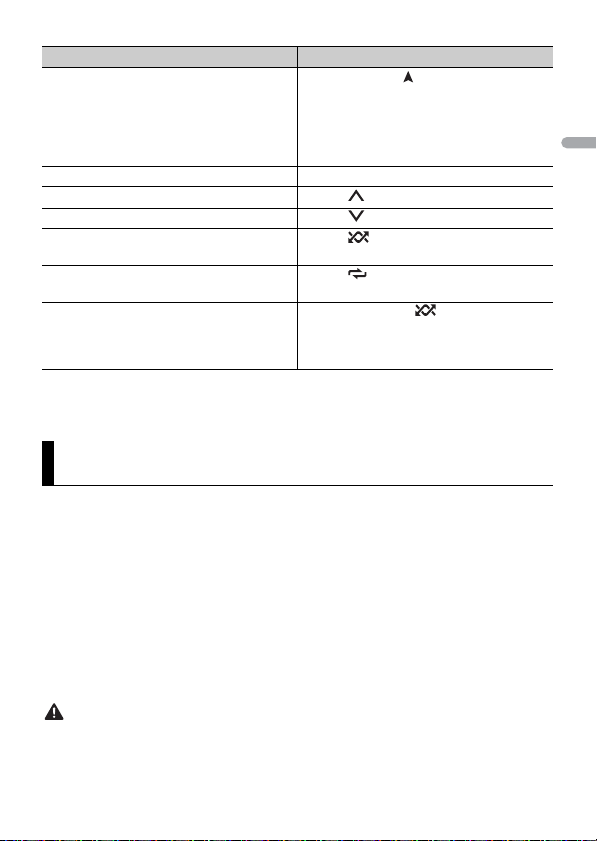
Purpose Operation
Search for a track from a list 1 Press and hold to display the list.
Pause/resume playback Press 4/PAUSE.
Thumbs Up (Only for radio) Press 1/.
Thumbs Down (Only for radio) Press 2/.
Random play (Only for track/album/artist/
playlist)
Repeat play (Only for track/album/artist/
playlist)
Start a radio channel based on the song
currently being played.
Some functions of Spotify may not be operated from the unit.
2 Tur n the M.C. dial to select the desired
category, then press to confirm.
3 Tur n the M.C. dial to select the desired
file, then press to confirm.
Playback starts.
Press 5/.
Press 6/.
1 Press and hold 5/ to start a radio.
2 Press the M.C. dial.
• This function may not be available
depending on the selected song.
Using Pioneer Smart Sync/APP
iPhone function is not available for FH-S525BT.
Pioneer Smart Sync is the application that intelligently brings your maps, messages, and
music together in the vehicle.
You can operate the unit from Pioneer Smart Sync installed on an iPhone/Android
device. In some cases, you can control aspects of the application, such as source
selection, pause, etc., by using the unit.
For details on what operations are available on the application , see the application’s help
section.
The APP source is not available when a Pioneer Smart Sync connection is not made or [USB MTP] is set
to [ON] in the SYSTEM settings (page 33).
Do not attempt to op erate the application while dr iving. Make sure to pull off the road and pa rk your
vehicle in a safe location before attempting to use the controls on the application.
- 21 -- 21 -
Page 22
English
For iPhone users
NOTE
This function is compatible with iOS 10.3 or later.
You can download Pioneer Smart Sync on iTunes App Store.
For Android device users
For Bluetooth connections, this function is compatible with devices that have Android
OS 5.0 or later installed.
For USB connections, this function is compatible with a phone that runs Android 5.0 or
later up to 7.1.2 and also supports AOA (Android Open Accessory) 2.0. However, the
compatibility depends on the smartphone.
You can download Pioneer Smart Sync on Google Play.
Some Android devices connected via AOA 2.0 may not work properly or emit sounds due to their own
software design , regardless of the OS version.
What kind of function does the application have?
Promoting the use of the unit
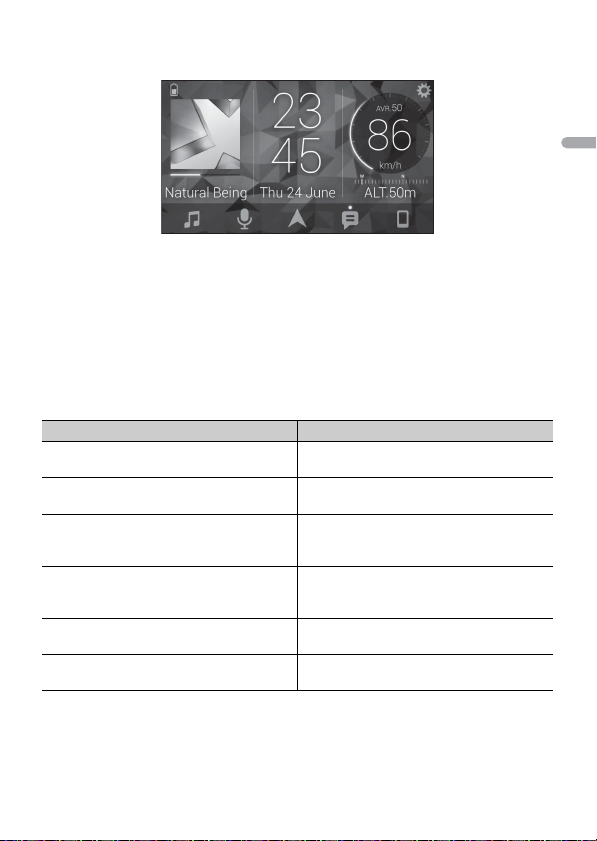
The interface of the unit can be evolved by using your iPhone/Android device.
- 22 -
Page 23
English
Image (example):
NOTES
Examples:
– Selecting a source of the unit
– Listening to the music on your iPhone/Android device
– Controlling the sound field intuitively
– Setting the illumination color (Only for FH-S725BT)
– Controlling your connected Bluetooth device
Extending the functions of the unit by using the application
The following functions, which are unavailable on the unit alone, are available by
making a Pioneer Smart Sync connection.
Menu Item (examp le) Description
Using a navigation application You can specify and start the navigation
Message reading You can read messages received from the
31 Band EQ setting You can select an equalizer band from the
Super "Todoroki" Sound You can boost the bass level more
Easy Sound Fit You can perform the time alignment setting
Theme setting (Only for FH-S725BT) You can set the wall paper and the theme
application installed on your device.
apps installed on your device.
31-band graphic equalizer (13-band for not
using the Pioneer Smart Sync connection).
dynamically than when not using the
Pioneer Smart Sync connection.
easily by selecting your vehicle type.
color (display/keys/characters) at once.
• Some functions may be restricted depending on the connection conditions with the application.
• The 31 Band EQ setting is converted into 13 bands when a music source from this product is engaged.
- 23 -- 23 -
Page 24
English
TIP
It is recommended to enter the search term "Pioneer Smart Sync" in the search field to search for the
NOTE
NOTES
application.
Making a connection with Pioneer Smart Sync
1 Press the M.C. dial to display the main menu.
2 Turn the M.C. dial to select [SYSTEM], then press to confirm.
3 Turn the M.C. dial to select [APP CONTROL], then press to confirm.
4 Turn the M.C. dial to select one of the below.
• Select [WIRED] for the USB connection.
• Select [BLUETOOTH] for the Bluetooth connection.
5 Turn the M.C. dial to select [AUTO APP CONN], then press to confirm.
6 Turn the M.C. dial to select [ON], then press to confirm.
7 Connect this unit with the mobile device.
• iPhone/Android device via USB (page 13)
• iPhone/Android device via Bluetooth (page 15)
Pioneer Smart Sync on the device starts automatically.
Regardless of whether the [AUTO APP CONN] setting is set to [ON] or [OFF], you can
also perform the following to start Pioneer Smart Sync.
• For devices other than the USB-connecte d Android device, press SRC/OFF to select
any source and press and hold the M.C. dial.
• For iPhone, launch Pioneer Smart Sync on the mobile device.
• When you connect a mobile device other than an iPhone/Android device, it may not operate
correctly de pending on your mob ile device.
• I f Pioneer Smart Sync has not been ins talled on your iPhone/Androi d device yet, a message that
prompts you to install the application will appear on your iPhone/Android device (except for the
Android device connected via Bluetooth). Select [OFF] in [AUTO APP CONN] to clear the message
(page 34).
- 24 -
Page 25
English
WAR NIN G
CAUTION
NOTES
NOTE
Listening to music on your device
1 Press SRC/OFF to select [APP].
Using the Karaoke Function
• A driver should never sing with a microphone while driving. Doing so may result in an accident.
• D o not carelessly leave a microphone for preventing an accident.
It is extremely dangerous to allow the microphone lead to become wound around the steering column,
brake pedal or shift lever, which may cause an accident. Be sure to install the microphone in such a way
that it will no t obstruct driving.
• Use a commercially available dynamic mic and not the supplied microphone.
• This function is not available when the selected source is the following.
–RADIO
–AUX IN
1 Insert the stereo mini plug of your microphone into the AUX input jack.
2 Press the M.C. dial to display the main menu.
3 Turn the M.C. dial to select [MICROPHONE].
4 Press the M.C. dial to select [ON].
When the karaoke mode is activated, the volume on the unit is muted. Adjust the
microphone volume on the [MIC VOL] setting.
To adjust the microphone volume
1
Press the M.C. dial to display the main menu.
2 Tu rn the M.C. dial to select [MICROPHONE], then press to confirm.
3 Tu rn the M.C. dial to select [MIC VOL].
4 Tu rn the M.C. dial to adjust the volume level.
If howling occurs when using the microphone, keep the microphone away from the speaker or lower
the microphone volume.
- 25 -- 25 -
Page 26

English
To reduce the level of the vocals in a song
NOTE
1
Press the M.C. dial to display the main menu.
2 Tu rn the M.C. dial to select [MICROPHONE] then press to confirm.
3 Tu rn the M.C. dial to select [VOCAL].
4 Press the M.C. dial to select [OFF].
Depending on the recording condition of songs, the level of vocals may not be reduced effectively.
Audio Adjustments
(Network mode is only available for FH-S725BT.)
You can also make various adjustments in the AUDIO settings (page 29).
Operation modes
This unit features two operation modes: network mode and standard mode. You can
switch between modes as desired (page 10).
Network mode
You can create a 2-way + SW multi-amp and multi-speaker system with high range
speaker, middle range speaker and subwoofer for reproduction of high, middle and low
frequencies (bands).
Standard mode
You can create a 4-speaker system with front and rear speakers or front speakers and
subwoofers, or a 6-speaker system with front and rear speakers and subwoofers.
Adjusting the cut-off frequency value and the slope
value
You can adjust the cut-off frequency value and the slope value of each speaker.
The following speakers can be adjusted.
Network mode:
[HIGH] (high-range speaker HPF), [MID HPF] (middle-range speaker HPF), [MID LPF]
(middle-range speaker LPF), [SUBWOOFER]
Standard mode:
[FRONT], [REAR], [SUBWOOFER]
- 26 -
Page 27

English
NOTE
[SUBWOOFER] can only be selected when [ON] is selected in [SUBWOOFER] (page 30).
1 Press the M.C. dial to display the main menu.
2 Turn the M.C. dial to select [AUDIO], then press to confirm.
3 Turn the M.C. dial to select [CROSSOVER], then press to confirm.
4 Turn the M.C. dial to select the speaker unit (filter) to be adjusted, then press to
confirm.
5 Turn the M.C. dial to select [HPF] or [LPF] according to the speaker unit (filter),
then press to confirm.
6 Turn the M.C. dial to select an appropriate cut-off frequency for the speaker unit
(filter) selected in step 4, then press to confirm.
Network mode:
[1.25K] to [12.5K] (if you choose [HIGH] or [MID LPF])
[25] to [250] (if you choose [MID HPF] or [SUBWOOFER])
Standard mode:
[25HZ] to [250HZ]
7 Turn the M.C. dial to select an appropriate slope for the speaker unit (filter)
selected in step 4.
Network mode:
[–6] to [–24] (if you choose [HIGH], [MID HPF] or [MID LPF])
[–12] to [–36] (if you choose [SUBWOOFER])
Standard mode:
[–6] to [–24] (if you choose [FRONT] or [REAR])
[–6] to [–36] (if you choose [SUBWOOFER])
Settings
You can adjust various settings in the main menu.
1 Press the M.C. dial to display the main menu.
2 Turn the M.C. dial to select one of the categories below, then press to confirm.
• FUNC TION settings (page 28)
• AUDIO settings (page 29)
• SYSTEM settings (page 32)
• ILLUMINATION settings (page 35)
- 27 -- 27 -
Page 28
English
• MIXTRAX settings (page 36)
NOTE
• MICROPHONE settings (page 37)
3 Turn the M.C. dial to select the options, then press to confirm.
iPhone-related menu items in the following tables are not available for FH-S525BT.
FUNCTION settings
The menu items vary according to the source.
Menu Item Description
BSM
Store the six strongest stations on the number
buttons (1/ to 6/ ) automatically.
REGIONAL
[ON], [OFF] Limit the reception to the specific regional
LOC AL
FM: [OFF], [LV1], [LV2], [LV3], [LV4]
AM/SW: [OFF], [LV1], [LV2]
TA
[ON], [OFF] Receive current traffic information if available.
AF
[ON], [OFF] Allow the unit to retune to a different frequency
NEWS
[ON], [OFF] Interrupt the currently selected source with
ALARM
[ON], [OFF] Interrupt the currently selected source with
programs when AF (alternative frequencies
search) is selected. (Available only when FM
band is selected.)
Restrict the tuning station a ccording to the
signal strength.
(Available only when FM band is selected.)
providing the same station. (Available only when
FM band is selected.)
news programs. (Available only when FM band is
selected.)
emergency announcements. Select [OFF] to
disable this function.
- 28 -
Page 29
English
NOTE
Menu Item Description
iPhone
SEEK
[MAN], [PCH] Assign or buttons to seek the stations
SAVE
UNSAVE
SEL DEVICE
PLAY
STOP
one by one (manual tuning) or select a station
from the preset channels.
Store the information about the song currently
being played to your music list on Spotify.
Remove the song information stored in [SAVE].
Connect a Bluetooth device in the list.
Start playback.
Stop playback.
AUDIO settings
Network mode is only available for FH-S725BT.
[CHK APP SETTG.] may be displayed when the setting is performed from Pioneer Smar t Sync.
- 29 -- 29 -
Page 30

English
Menu Item Description
EQ SETTING
[SUPER BASS], [POWERFUL],
[DYNAMIC], [NATURAL], [VOCAL],
[VIVID], [SET BY APP]*,
[CUSTOM1], [CUSTOM2], [FLAT]
* [SET BY APP] is displayed when
the preset equalizer curve that is
not available in the unit has bee n
set from Pioneer Smart Sync.
Select an equalizer band and
level for further customizing.
Equalizer band: [50HZ] to
[12.5kHZ]
Equalizer level: [–6] to [+6]
FAD ER *1*2 (Only for standard mode)
BALANC E
SUBWOOFER
[ON], [OFF] Set to [ON] when using a subwoofer speaker.
SUBWOOFER*3
[NOR], [REV] Select the subwoofer phase.
SPEAKER LEVEL
Network mode: [HIGH L], [HIGH
R], [MID L], [MID R], [SUBWOOFER]
Standard mode: [FRONT L],
[FRONT R], [REAR L], [REAR R],
[SUBWOOFER]
Output level: [–24] to [10]
CROSSOVER
Select or customize the equalizer curve.
• When you select a setting other than
[CUSTOM1], [CUSTOM2] and [SET BY APP], you
can also customize the equalizer curve by
pressing and holding the M.C. dial, then store
the customized equalizer curve in [CUSTOM1].
Adjust the front and rear speaker balance.
Adjust the left and right speaker balance.
Select a speaker unit (filter) and adjust the
output level.
• Each value you have adjusted changes when
you change the [POSITION] setting (page 31).
Select a speaker unit (filter) to adjust the HPF or
LPF cut-off frequency and the slope for each
speaker unit.
For details on the [CROSSOVER] setting, see
page 26.
- 30 -
Page 31

English
Menu Item Description
POSITION
[OFF], [FRONT LEFT] (front seat
left), [FRONT RIGHT] (front seat
right), [FRONT] (front seats), [ALL]*
* Only for standard mode
TIME ALGNMNT
[INITIAL], [OFF], [CUSTOM]
Select a type of speaker and
adjust the speaker distance for
further customizing in [CUSTOM].
Network mode: [HIGH L], [HIGH
R], [MID L], [MID R], [SUBWOOFER]
Standard mode: [FRONT L],
[FRONT R], [REAR L], [REAR R],
[SUBWOOFER]
Speaker distance (cm): [350] to
[0.0]
SAVE SETTINGS
[YES], [NO] Save to later recall the following sound settings
LOAD SET TING S
D.BA SS
[OFF], [LOW], [HI] Boost the bass level dynamically to offer an
LOU DNES S
[OFF], [LOW], [MID], [HI] Compensate for clear sound at low volume.
Select a listening posit ion to adjust the speakers'
output levels automatically and add a delay time
that corresponds to the number and locations of
occupied seats.
Select or customize the time alignment settings
to reflect the distance between the listener’s
position and each speaker.
• Select [INITIAL] to initialize the setting value.
• Select [OFF] to reset all setting values to 0.
• The [CUSTOM] setting is available when
[FRONT LEFT] or [FRONT RIGHT] is selected in
[POSITION] (page 31).
• The [CUSTOM] setting is not available when
[OFF] is selected in [SUBWOOFER] (page 30).
at their current values: [CROSSOVER], [SPEAKER
LEVEL], [EQ SETTING], [POSITION], [TIME
ALGNMNT], [D.BASS], [SUBWOOFER].
• The settings that can be saved differ when a
Pioneer Smart Sync connection is made.
Load the sound settings, when you have already
performed [SAVE SETTINGS].
effect as if a subwoofer was added to the system.
- 31 -- 31 -
Page 32
English
Menu Item Description
SLA
[+4] to [–4] Adjust the volume level for each source except
S.RTRV
[1] (effective for low compression
rates),
[2] (effective for high
compression rates),
[OFF]
*1 Not available when [SW] is selected in [REAR-SP] in the INITIAL settings (page 11).
*2 Not available when [SUB.W/SUB.W] is selected in [SP-P/O MODE] in the INITIAL settings (page 11).
*3 Not available when [REAR/REAR] is selected in [SP-P/O MODE] in the INITIAL settings (page 11).
FM.
Each of the below combinations are set to the
same setting automatically.
• When making a USB connection, set USB,
iPhone, APP, and SPOTIFY.
• When making a Bluetooth connection, set BT
AUDIO, iPhone, APP, and SPOTIFY.
Enhance compressed audio and restore rich
sound.
• This setting is not available when [OFF] is
selected in [VOCAL] in the MICROPHONE
settings (page 37).
SYSTEM settings
You can also access to these menus when the unit is turned off.
Menu Item Description
LANGUAGE
[ENG](English), [ESP](Spanish) Select the language to display the text
CLOCK SET
[12H], [24H] Set the clock (page 9).
SCROLL SET
[ONCE], [LOOP], [OFF] Select the way to scroll the text in the display
BEEP TONE
[ON], [OFF] A beep can be heard when any button is pushed.
information from a compressed audio file.
• This setting is not available when a Pioneer
Smart Sync connection is made.
window.
Select [OFF] to disable this function.
- 32 -
Page 33

English
Menu Item Description
INFO DISPLAY (Only for FH-S725BT)
[SPEANA/CLOCK], [LIVE FX/
CLOCK], [CLOCK], [SPEANA],
[LEVEL METER], [OFF]
INFO DISPLAY (Only for FH-S525BT/MVH-S425BT)
[SOURCE/SPEANA], [CLOCK/
SPEANA], [SRC/LIVE FX], [CLOCK/
LIVE FX], [SOURCE], [SPEANA],
[OFF]
AUTO PI
[ON], [OFF] Search for a different station with the same
AUX
[ON], [OFF] Set to [ON] when using an auxiliary device
BT AUDIO
[ON], [OFF] Set the Bluetooth signal on/off.
SPOTIFY
[ON], [OFF] Set to [ON] when using the Spotify function.
BT MEM CLEAR
[YES], [NO] Clear the Bluetooth device data (device list, PIN
APP CONTROL
[WIRED], [BLUETOOTH] Select the appropriate connection method
USB MTP
[ON], [OFF] Set to [ON] when using the MTP connection.
Display the item on the sub information display.
Display the item on the sub information display.
• When [SOU RCE/SPEANA] or [CLOCK/SPEANA] is
selected, display the antenna instead of the
speana on the radio source.
programming, even if using a preset station.
connected to the unit.
• This setting is not available when [ON] is
selected in [MICROPHONE] in the
MICROPHONE settings (page 37).
code, call history, phone book, preset phone
numbers) stored in the unit.
[CLEARED] appears when data is successfully
deleted.
according to your device.
See page 34 for details on the connections for
each device.
The following sources are not available w hen the
setting is set to [ON].
• APP, SPOTIFY, iPhone, and USB (AOA)
- 33 -- 33 -
Page 34
English
NOTE
Menu Item Description
AUTO APP CONN
[ON], [OFF] Select [ON] to automatically launch Pioneer
S.REMOTE*1*2
[OFF], [PIONEER], [PRESET] Select [PIONEER] or [PRESET] according to your
USB AUTO
[ON], [OFF] Select [ON] to automatically switch to USB
*1 Depending on your car, this function may not work properly. In this case, contact your dealer or an
authorized PI ONEER Service Station.
*2 Please use a commercially available wiring harness for each car model when [PRESET] mode is
engaged, and use a commercially available adapter when in [PIONEER].
Smart Sync when the iPhone/Android device is
connected to the unit.
wired remote control.
source when a USB device/iPhone is connected
to the unit.
Select [OFF] when a USB device/iPhone is being
connected to the unit just for charging.
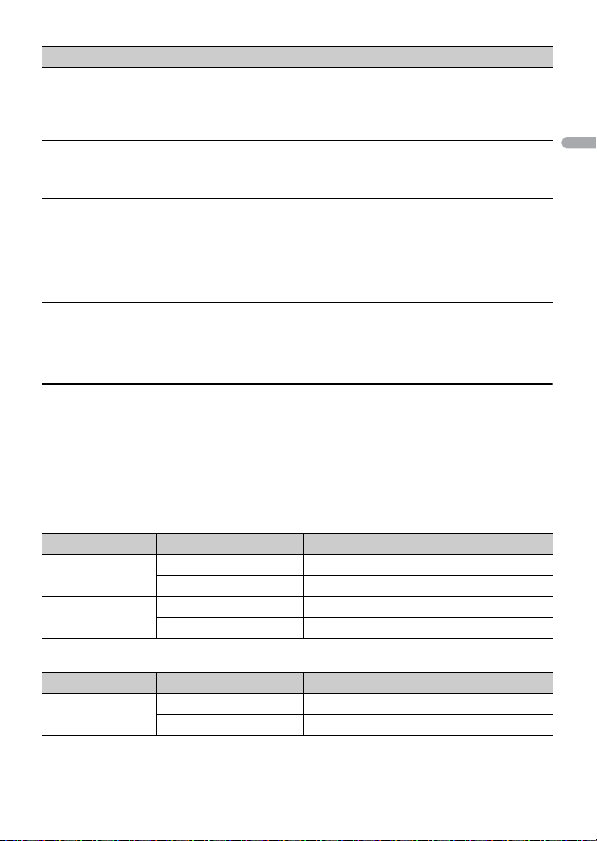
Information on the connections for each device
The available sources differ depending on the setting value.
Please set [APP CONTROL] according to the table for the source you want to use.
For details on Pioneer Smart Sync connection, see page 21.
iPhone-related menu items in the following tables are not available for FH-S525BT.
When Pioneer Smart Sync connection is NOT performed
Setting Value Device Available source(s)
[WIRED] iPhone iPhone, SPOTIFY
Android USB (AOA)
[BLUETOOTH] iPhone iPhone, SPOTIFY
Android SPOTIFY
When Pioneer Smart Sync connection is performed
Setting Value Device Available source(s)
[WIRED] iPhone APP, SPOTIFY
Android APP
- 34 -
Page 35

English
Setting Value Device Available source(s)
[BLUETOOTH] iPhone APP, SPOTIFY
Android APP, SPOTIFY
ILLUMINATION settings
Menu Item Description
COLOR (Only for FH-S725BT)
[KEY COLOR], [DISP COLOR],
[BOTH COLOR]
DIM SETTING
[SYNC ILLUMI]*, [SYNC CLOCK],
[MANUAL]
* Only for FH-S725BT
BRIGHTNESS (Only for FH-S725BT)
[KEY], [DISP] Select the brightness for the keys/display of the
BRIGHTNESS (Only for FH-S525BT/MVH-S425BT)
[1] to [10] Change the display brightness.
Select color for the keys/display of the unit from 12
preset colors, [SCAN] or [CUSTOM]*.
• [SCAN]: Cycle through a variety of colors
automatically.
• [CUSTOM]*:
1 Press and hold the M.C. dial until the color
setting display appears.
2 Set the primary color (R (red)/G (green)/B
(blue)) and brightness level ([0] to [60]).
You cannot select a level below 10 for all three
of R (red), G (green), B (blue) at the same time.
You can also customize the preset colors. Select
one of the preset colors, then press and hold the
M.C. dial until the color setting display appears.
* The CUSTOM setting is only available for [KEY
COLOR] and [DISP COLOR].
Select the way to change the display brightness.
unit from [1] to [10].
The available setting ranges differ depending on
[DIM SETTING].
The available setting ranges differ depending on
[DIM SETTING].
- 35 -- 35 -
Page 36

English
Menu Item Description
PHONE COLOR (Only for FH-S725BT)
Select the key color when a call is received.
[FLASHING] Applies the color set by [KEY COLOR].
[FLASH FX1] to [FLASH FX6] Cycle through a varie ty of colors automatically.
[OFF] No change in key color made.
ILLUMI FX (Only for FH-S725BT)
[ON], [OFF] The illumination effect can be seen when:
• The illumination effect differs depending on
the selection of [ON] or [OFF] in [ILLUMI FX].
– there is an incoming call when [FLASHING] is
selected in [PHONE COLOR]
– you are on a phone call
– the message received on the device is being
read when a Pioneer Smart Sync connection is
made
– a CD is inserted/ejected
The illumination effect will activate when the
ACC power is turned on/off regardless of this
setting.
MIXTRAX settings
Menu Item Description
SHORT PLAYBCK
[1.0 MIN], [1.5 MIN], [2.0 MIN],
[2.5 MIN], [3.0 MIN], [OFF]
FLASH AREA (Only for FH-S725BT)
[KEY/DISPLAY], [KEY], [OFF] Select the area for the illumination effect.
Select the length of the playback time.
When [OFF] is selected, the color set under the
ILLUMINATION settings (page 35) is used as the
display color.
- 36 -
Page 37

English
Menu Item Description
FLASH PATTERN (Only for FH-S725BT)
[SOUND LEVEL 1] to [SOUND LEVEL 6]Change the illumination effect according to
[LOW PASS 1] to [LOW PASS 6] The flash pattern changes according to the
[RANDOM1] The flash pattern changes randomly accordin g
[RANDOM2] The flash pattern changes randomly accordin g
[RANDOM3] The flash pattern changes randomly accordin g
MIX PATTERN (Only for FH-S525BT/MVH-S425BT)
[SOUND LEVEL] Change the MIXTRAX special e ffects according
[LOW PASS] The mix pattern changes according to the bass
[RANDOM] The mix pattern changes randomly according
DISPLAY FX
[ON], [OFF] Set the MIXTRAX special effects on/off.
CUT IN FX
[ON], [OFF] Turn the MIXTRAX sound effects on/off while
the sound and bass level.
The flash pattern changes according to the
sound level.
bass level.
to the sound level mode and low pass mode.
to the sound level mode.
to the low pass mode.
to the audio level.
The mix pattern changes according to the
sound level.
level.
to the sound level mode and low pass mode.
manually changing the tracks.
MICROPHONE settings
Menu Item Description
MICROPHONE
[ON], [OFF] Set to [ON] when using the karaoke function.
MIC VOL Adjust the microphone volume.
VOCAL
[ON], [OFF] Set to [OFF] when reducing the level of the
vocals in a song.
- 37 -- 37 -
Page 38

English
Additional Information
Troubleshooting
The display automatically return s to the
normal display.
→ No operations have been made for
about 30 seconds.
– Perform an operation.
The repeat play range changes
unexpectedly.
→ Depending on the repeat play range,
the selected range may change when
another folder or track is being selected
or during fast forwarding/reversing.
– Select the repeat play range again.
A subfolder is not played back.
→ Subfolders cannot be played when
[FLD] (folder repeat) is selected.
– Select another repeat play range.
The sound is intermittent.
→ You are using a device, such as a cellular
phone, that may cause audible
interference.
– Move electrical devices that may be
causing the interference away from
the unit.
The sound from the Bluetooth audio
source is not played back .
→ There is a call in progress on a
Bluetooth-connected cellular phone.
– The sound will be played back when
the call is terminated.
→ A Bluetooth-connected cellular phone
is currently being operated.
– Stop using the cellular phone.
→ The connection between the unit and
the cellular phone is not established
correctly after a call made by a
Bluetooth-connected cellular phone.
– Make a Bluetooth connection
between the unit and the cellular
phone again.
Error messages
Common
AMP ERROR
→ This unit fails to operate or the speaker
connection is incorrect.
→ The protective circuit is activated.
– Check the speaker connection.
– Turn the ignition switch OFF and back
to ON again. If the message remains,
contact your dealer or an authorized
Pioneer Service Station for assistance.
NO XXXX (NO TITLE, for example)
→ There is no embedded text information.
– Switch the display or play another
track/file.
CD player
ERROR-07, 11, 12, 17, 30
→ The di sc is dirty.
–Clean the disc.
→ The disc is scratched.
– Replace the disc.
ERROR-07, 10, 11, 12, 15, 17, 30, A0
→ There is an electrical or mechanical
error.
– Turn the ignition switch OFF and back
to ON, then back to the CD player.
ERROR-15
→ The inserted disc is blank.
– Replace the disc.
ERROR-23
→ Unsupported CD format.
– Replace the disc.
- 38 -
Page 39

English
FORMAT READ
→ Sometimes there is a delay between the
start of playback and when you start to
hear any sound.
– Wait until the message disappears and
you hear sound.
NO AUDIO
→ The inserted disc does not contain any
playable files.
– Replace the disc.
SKIPPED
→ The inserted disc contains DRM
protected files.
– The protected files are skipped.
PROTECT
→ All the files on the inserted disc are
embedded with DRM.
– Replace the disc.
USB device/iPhone
FORMAT READ
→ Sometimes there is a delay between the
start of playback and when you start to
hear any sound.
– Wait until the message disappears and
you hear sound.
NO AUDIO
→ There are no songs.
– Transfer the audio files to the USB
device and connect.
→ The connected USB device has security
enabled.
– Follow the USB device instructions to
disable the security.
SKIPPED
→ The connected USB device contains
DRM protected files.
– The protected files are skipped.
PROTECT
→ All the f iles on the connected USB
device are embedded with DRM.
– Replace the USB device.
N/A USB
→ The connected USB device is not
supported by this unit.
– Disconnect your device and replace it
with a compatible USB device.
HUB ERROR
→ The USB device connected via a USB
hub is not supported by this unit.
– Connect the USB device directly to this
unit using a USB cable.
CHECK USB
→ The USB connector or USB cable has
short-circuited.
– Check that the USB connector or USB
cable is not caught in something or
damaged.
→ The connected USB device consumes
more than maximum allowable current.
– Disconnect the USB device and do not
use it. Turn the ignition switch OFF
and back to ACC or ON. Connect only
compliant USB devices.
ERROR-19
→ Communication failed.
– Perform one of the following
operations, then return to the USB
source.
• Disconnect the USB device.
• Change to a different source.
→ iPhone failure.
– Disconnect the cable from the iPhone.
Once the iPhone’s main menu is
displayed, reconnect the iPhone and
reset it.
ERROR-23
→ USB device was not formatted properly.
– Format the USB device with FAT12,
FAT1 6 or FAT 32.
ERROR-16
→ The iPhone firmware version is old.
– Update the iPhone version.
- 39 -
Page 40
English
→ iPhone failure.
– Disconnect the cable from the iPhone.
Once the iPhone’s main menu is
displayed, reconnect the iPhone and
reset it.
STOP
→ There are no songs in the current list.
– Select a list that contains songs.
NO BT DEVICE GO TO BT MENU TO
REGISTER
→ No Bluetooth device found.
– Connect the unit and iPhone via
Bluetooth (page 15).
CONN. FAILED PRESS BAND KEY TO
RETRY
→ Bluetooth connection with iPhone
failed.
–Press BAN D/ to make a
connection again.
DISCONNECTED PRESS BAND KEY TO
RETRY
→ Bluetooth connection lost.
–Press BAN D/ to make a
connection again.
Bluetooth device
ERROR-10
→ The power failed for the Bluetooth
module of the unit.
– Turn the ignition switch OFF and back
to ACC or ON.
APP
CONNECT APP
→ Pioneer Smart Sync connection is not
made.
– Make a connection with Pioneer Smart
Sync (page 21).
Spotify
NOT FOUND
→ The Spotify application has not started
running yet.
– Start up the Spotify application.
NO BT DEVICE GO TO BT MENU TO
REGISTER
→ No Bluetooth device found.
– Connect the unit and the device via
Bluetooth (page 15).
CONN. FAILED PRESS BAND KEY TO
RETRY
→ Bluetooth connection failed.
–Press BAN D/ to make a
connection again.
CHECK APP PRESS BAND KEY TO RETRY
→ Connection to the Spotify application
failed.
–Press BAN D/ to make a
connection again.
DISCONNECTED PRESS BAND KEY TO
RETRY
→ Bluetooth connection lost.
–Press BAN D/ to make a
connection again.
CHECK APP
→ An unknown error (including
communication error) has occurred.
– Follow the instructions that appear on
the screen.
Compressed audio
compatibility
• Only the first 32 characters can be
displayed as a file name (including the file
extension) or a folder name.
• The unit may not work properly
depending on the application used to
encode WMA files.
- 40 -
Page 41
English
• There may be a slight delay at the start of
CAUTION
the playback of audio files embedded
with image data, or audio files stored on a
USB device with numerous folder
hierarchies.
• Pioneer cannot guarantee compatibility
with all USB mass storage devices, and
assumes no responsibility for any loss of
data on media players, smartphones, or
other devices while using this product.
• Do not leave discs or a USB storage
device in any place that is subject to high
temperatures.
WMA files
File extension .wma
Bit rate 48 kbps to 320 kbps
Sampling frequency 32 kHz, 44.1 kHz, 48
Windows Media™
Audio Professional,
Lossless, Voice/DRM
Stream/Stream with
video
(CBR), 48 kbps to 384
kbps (VBR)
kHz
Not compatible
MP3 files
File extension .mp3
Bit rate 8 kbps to 320 kbps
Sampling frequency 8 kHz to 48 kHz (32
Compatible ID3 tag
version
M3u playlist Not compatible
MP3i (MP3
interactive), mp3 PRO
(CBR) , VBR
kHz, 44.1 kHz, 48 kHz
for emphasis)
1.0, 1.1, 2.2, 2.3, 2.4
(ID3 tag Version 2.x is
given priority over
Versi on 1.x .)
Not compatible
WAV files
• WAV file formats cannot be connected via
MTP.
File extension .wav
Quantization bits 8 and 16 (LPCM)
Sampling f requency 16 kHz to 48 kHz
(LPCM)
AAC files (FH-S725BT/MVHS425BT only)
Compatible for mat AAC encoded by
File extension .m4a
Sampling fre quency 11. 025 kHz to 48 kHz
Stereo Bit Rate 16 kbps to 320 kbps,
Apple Lossless Not compatible
AAC file bou ght from
the iTunes Store (.m4p
file extension)
iTunes
VBR
Not compatible
FLAC files
• FLAC file formats cannot be connected
via MTP.
• FLAC files may not be playable,
depending on the encoder.
File extension .flac, .fla
Sampling frequency 8/11.025/12/16/22.05/
Quantization bi t rate 8/16/2 4 bit
Channel mode 1/2 ch
24/32/44.1 /48/96 kHz
Disc (FH-S725BT/S525BT only)
• Regardless of the length of the blank
section between the songs from the
original recording, compressed audio
discs play with a short pause between
songs.
Playable folder
hierarchy
Up to eight tiers (A
practical hie rarchy is
less than two tiers.)
- 41 -
Page 42
English
CAUTION
Playable folde rs Up to 99
Folder
Compressed
audio file
to : Playback sequence
01 to 05: Folde r number
Playable fil es Up to 999
File system ISO 9660 Level 1 and
Multi-session
playback
Packet write data
transfer
2, Romeo, Jo liet
Compati ble
Not compatible
USB device
• There may be a slig ht delay when starting
playback of audio files on a USB storage
device with numerous folder hierarchies.
Playable folder
hierarchy
Playable folde rs Up to 1 50 0
Playable files Up to 15 000
Playback of copyright -
protected files
Partitioned USB
device
Up to eight tiers (A
practical hierarchy is
less than two ti ers.)
Not compatible
Only the first par tition
can be played.
iPhone compatibility
This unit supports only the following iPhone
models. Older versions may not be supported.
Made for
–iPhone XR
–iPhone XS Max
–iPhone XS
–iPhone X
–iPhone 8
–iPhone 8 Plus
–iPhone 7
–iPhone 7 Plus
–iPhone SE
–iPhone 6s
–iPhone 6s Plus
–iPhone 6
–iPhone 6 Plus
–iPhone 5s
• Operations may vary depending on the
generation and/or software version of
the iPhone.
• Users of iPhone with the Lightning®
Connector should use the Lightning to
USB Cable (supplied with iPhone).
• Refer to the iPhone manuals for
information about the file/format
compatibility.
• Audiobook, Podcast: Compatible
Pioneer accepts no responsibility for data
lost on the iPhone, even if that data is lost
while this unit is used.
Sequence of audio files
The user cannot assign folder numbers and
specify playback sequences with this unit.
Sequence of audio file depends on the
connected device.
Note that the hidden files in a USB device
cannot be played back.
Example of a hierarchy
Copyright and trademark
Bluetooth
The Bluetooth® word mark and logos are
registered trademarks owned by Bluetooth SIG,
- 42 -
Page 43

English
Inc. and any use of su ch marks by PION EER
CORPORATION is under license. Other
trademarks and trade names are those of their
respective owners.
iTunes
Apple and iTunes are trademarks of Apple
Inc., registered in the U.S. and other
countries.
WMA
Windows Media is either a registered
trademark or trademark of Microsoft
Corporation in the United States and/or
other countries.
This product includes technology owned
by Microsoft Corporation and cannot be
used or distributed without a license from
Microsoft Licensing, I nc.
FLAC
Copyright © 2000-2009 Josh Coalson
Copyright © 2011-2014 Xiph.Org
Founda tion
Redistribution and use in source and
binary forms, with or without modification,
are permitted provided that the following
conditions are met:
– Redistributions of source code must
retain the above copyright notice, this list
of conditions and the following
disclaimer.
– Redistributions in binary form must
reproduce the above copyright notice,
this list of conditions and the following
disclaimer in the documentation and/or
other materials provided with the
distribution.
– Neither the name of the Xiph.org
Foundation nor the names of its
contributors may be used to endorse or
promote products derived from this
software without specific prior written
permission.
THIS SOFT WARE IS PROVIDED BY THE
COPYRIGHT H OLDERS AN D
CONTRIBUTORS “AS IS” AND ANY EXPRESS
OR IMPLIED WARRANTIES, INCLUDING, BUT
NOT LIMITED TO, THE IMPLIED
WARRANTIES OF MERCHANTABILITY AND
FITNESS FOR A PARTICULAR PURPOSE ARE
DISCLAIMED. IN NO EVENT SHALL THE
FOUNDATION OR CONTRIBUTORS BE
LIABLE FOR ANY DIREC T, INDIRECT,
INCIDENTAL, SPECIAL, EXEMPLARY, OR
CONSEQUENTIAL DAMAGES (INCLUDING,
BUT NOT LIMITED TO, PROCUREMENT OF
SUBSTITUTE GOODS OR SERVICES; LOSS OF
USE, DATA, OR PROFITS; OR BUSINESS
INTERRUPTION) HOWEVER CAUSED AND
ON ANY THEORY OF LIABILITY, WHETHER
IN CONTRACT, STRIC T LIABILITY, OR TORT
(INCLUDING NEGLIGENCE OR OTHERWISE)
ARISING IN ANY WAY OUT OF THE USE OF
THIS SOFTWARE, EVEN IF ADVISED OF THE
POSSIBILIT Y OF SUCH DAMAGE.
iPhone and Lightning
Use of the Made for Apple badge means
that an accessory has been designed to
connect specifically to the Apple
product(s) identified in the badge, and has
been certified by the developer to meet
Apple performance standards. Apple is not
responsible for the operation of this device
or its compliance with safety and
regulatory standards.
Please note that the use of this accessory
with an Apple product may affect wireless
performance.
iPhone and Lightning are trademarks of
Apple Inc., registered in the U.S. and other
countries.
Siri®
Works with Siri through the microphone.
Google™, Google Play, Android
Google, Google Play and Android are
trademarks of Google LLC.
MIXTRAX
MIXTRAX is a trademark of the PIONEER
CORPO RATION.
- 43 -
Page 44

English
Spotify®
SPOTIFY and the Spotify logo are among
the registered trademarks of Spotify AB.
Compatible mobile digital devices and
premium subscription required, where
available, see https://www.spotify.com.
T-Kernel 2.0
This product uses the source code of TKernel 2.0 under T-License 2.0 granted by
T-Engine Forum (www.tron.org).
MP3
Copyright (C) 1998-2009 PacketVideo
Licensed under the Apache License,
Version 2.0 (the "License"); you may not use
this file except in compliance with the
License.
You may obtain a copy of the License at
http://www.apache.org/licenses/LICENSE-
2.0
Unless required by applicable law or
agreed to in writing, software distributed
under the License is distributed on an "AS
IS" BASIS, WITHOUT WARRANTIES OR
CONDITIONS OF ANY KIND, either express
or implied.
See the License for the specific language
governing permissions and limitations
under the License.
- 44 -
Page 45

Español
Acerca de este manual:
Índice
Introducción............................................................................................. 3
Radio....................................................................................................... 11
CD/USB/iPhone®/AUX.......................................................................... 13
Bluetooth............................................................................................... 16
Spotify® .................................................................................................. 20
Uso de Pioneer Smart Sync/APP........................................................ 22
Cómo usar la función de karaoke...................................................... 26
Ajustes de audio................................................................................... 27
Ajustes.................................................................................................... 28
Ajustes de FUNCTION........................................................................... 29
Ajustes de AUDIO.................................................................................. 30
Ajustes de SYSTEM................................................................................ 33
Ajustes de ILLUMINATION ................................................................... 37
Ajustes de MIXTRAX ............................................................................. 38
Ajustes de MICROPHONE..................................................................... 39
Información adicional.......................................................................... 41
• En las instrucciones siguientes, una memoria USB o un reproductor de audio USB se
denominan “dispositivo USB”.
- 2 -
Page 46
Español
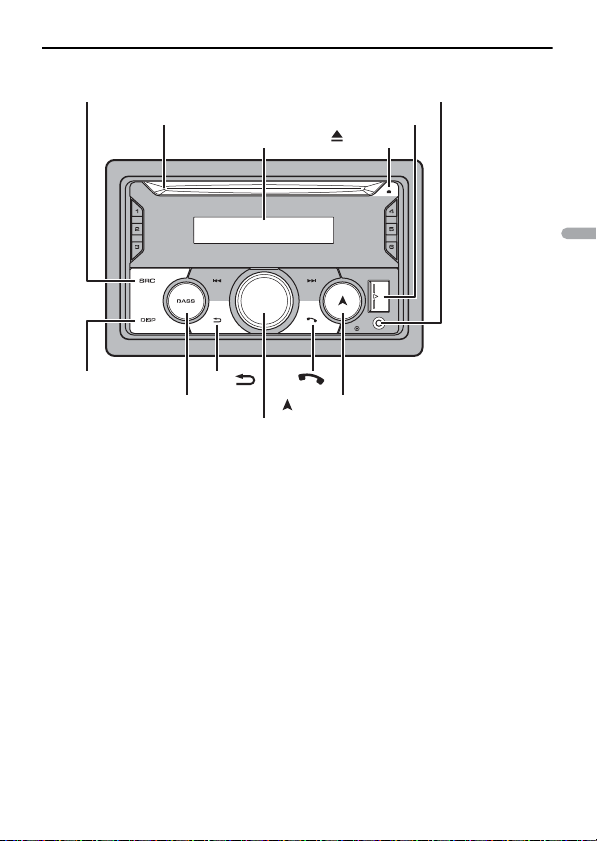
Introducción
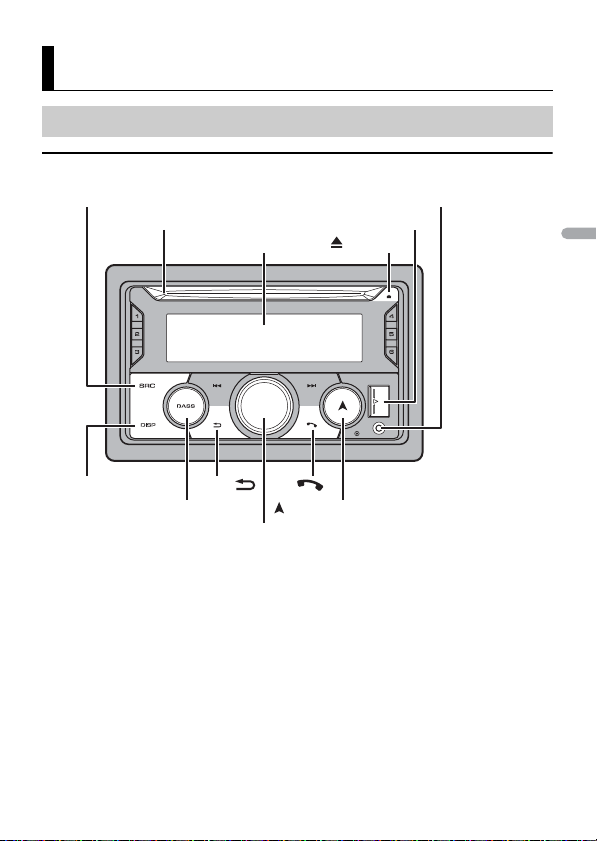
SRC (fuente)/OFF
Pantalla
Dial M.C. (multicontrol)
BAND/
DISP (visualizar)/
DISP OFF
(navegación)/LIST
Puerto USB
Toma de entrada AUX (toma estéreo de 3,5 mm)
(expulsar)
Ranura de carga de discos
BASS
Funcionamiento básico
FH-S725BT
- 3 -- 3 -
Page 47
Español
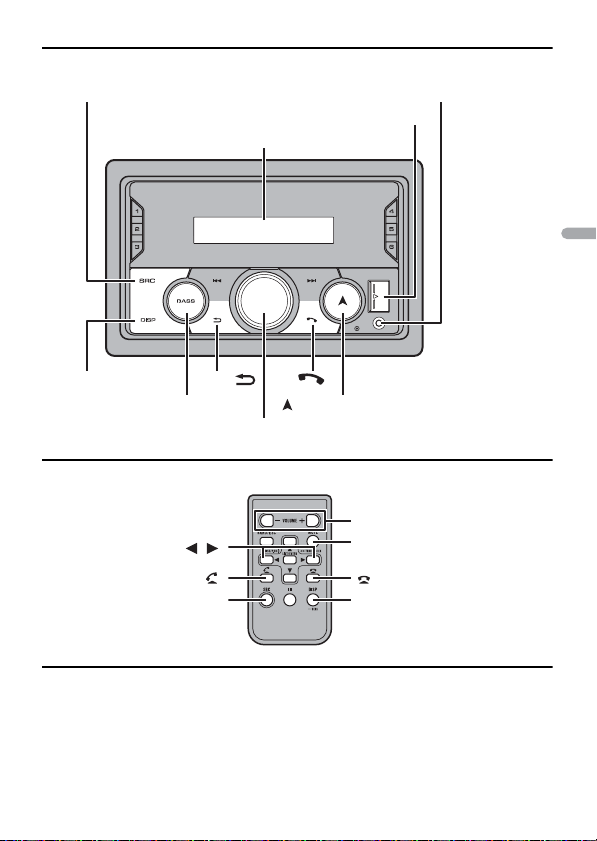
FH-S525BT
Dial M.C. (multicontrol)
BAND/
(navegación)/LIST
Puerto USB
Toma de entrada AUX (toma estéreo de 3,5 mm)
(expulsar)
Ranura de carga de discos
BASS
DISP (visualizar)/
DISP OFF
Pantalla
SRC (fuente)/OFF
- 4 -
Page 48
Español
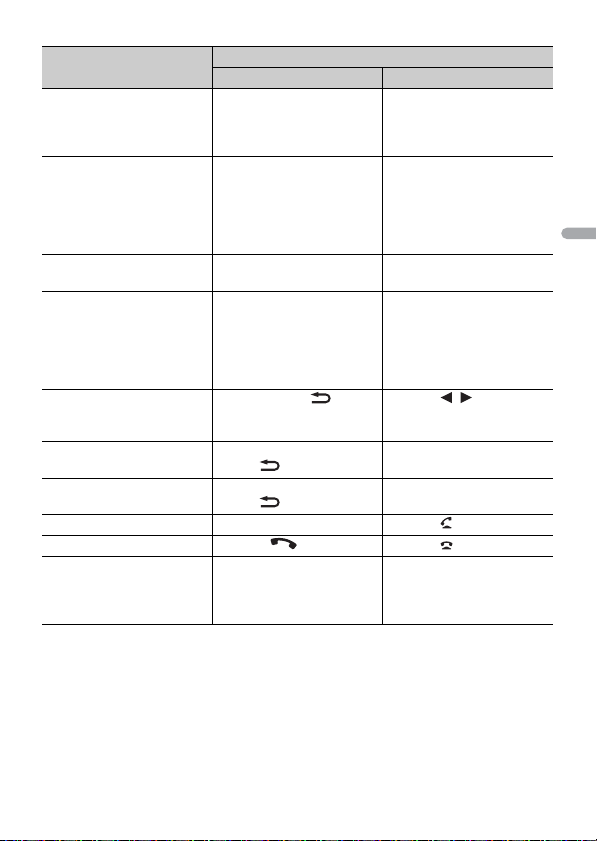
MVH-S425BT
Dial M.C. (multicontrol)
BAND/
(navegación)/LIST
Puerto USB
Toma de entrada AUX (toma estéreo de 3,5 mm)
BASS
DISP (visualizar)/
DISP OFF
Pantalla
SRC (fuente)/OFF
/
SRC (fuente)
VOLUME +/–
MUTE
DISP (visualizar)
Control remoto
Operaciones frecuentes
Los botones disponibles varían según la unidad.
- 5 -- 5 -
Page 49
Español
Objetivo
Encender la uni dad* Presione SRC/OFF para
Unidad principal Control remoto
encender la unidad.
Mantenga presionado SRC/
OFF para apagar la unidad.
Ajustar el volumen Gire el dial M.C..Presione VOLUME + o –.
Seleccionar un origen Presione SRC/OFF varias
Cambiar la información de
visualización
Volver a la visualización/lista
anterior
Volver a la visualización
normal desde el menú
Cambia el brillo de la
pantalla
veces.
Presione DISP/DISP OFF
varias veces.
Mantenga presionado DISP/
DISP OFF para desactivar la
información de
visualización.
Presione BAND/ . Presione / para
Mantenga presionado
BAND/ .
Mantenga presionado
BAND/ .
Método
Presione SRC para encender
la unidad.
Mantenga presionado SRC
para apagar la unidad.
Presione MUTE para
silenciar la unidad. Presione
MUTE nuevamente o
presione VOLUME + o –
para activar el sonido.
Presione SRC varias veces.
Presione DISP varias veces.
seleccionar la carpeta
siguiente/anterior.
–
–
Responder una llamada Presione cualquier botón. Presione .
Finalizar una llamada Presione . Presione .
Intensificar el nivel de
graves
* Cuando el cable azul/blanco de la unidad está conectado al terminal de control del relé de la antena
automática del vehículo, la antena del vehículo se extiende cuando se enciende el origen de la
unidad. Para retraer la antena, apague el or igen.
Presione BASS.
• Puede seleccionar el nivel
de graves ([HI] o [LOW]) en
.BASS] (página 33).
[D
–
- 6 -
Page 50
Español
Indicación de visualización
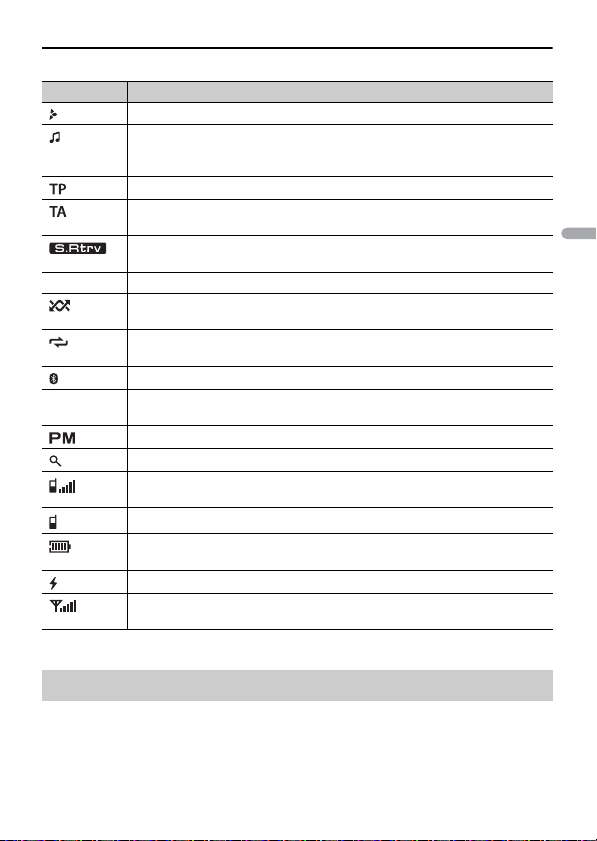
Indicación Descripción
Aparece cuando existe un nivel inferior del menú o la carpeta.
* Aparece cuando un reproductor de audio Bluetooth se conecta a esta
Aparece cuando se recibe un programa de tráfico.
* Aparece cuando la función TA (anuncios de tráfico) está definida
BASS Aparece cuando la función BASS está activada.
APP Aparece cuando se establece una conexión Pioneer Smart Sync
* Aparece cuando se muestra el menú de lista.
* Aparece cuando se conecta un segundo teléfono Bluetooth a la unidad.
* Aparece cuando un dispositivo esté conectado a la unidad para cargarlo.
* Solo para FH-S725BT
unidad por medio de A2DP (perfil de distribución de audio avanzado)
(página 16).
(página 29).
* Aparece cuando está definida la función de recuperador de sonido
(página 33).
Aparece cuando está definida la reproducción aleatoria (excepto cuando
seleccionó BT AUDIO como origen).
Aparece cuando está definida la repetición de reproducción (excepto
cuando seleccionó BT AUDIO como origen).
Aparece cuando se establece una conexión Bluetooth (página 16).
(página 22).
* Aparece cuando [CLOCK SET] se define en [12H] (página 34).
* Aparece cuando se conecta un teléfono Bluetooth a la unidad.
Indica el nivel de la antena.
* Aparece cuando se conecta un teléfono Bluetooth a la unidad.
Indica el nivel de la batería.
* Aparece cuando se recibe una señal de radio.
Indica el nivel de la antena.
Restablecer el microprocesador
Se debe reiniciar el microprocesador en las siguientes situaciones:
– Antes de usar esta unidad por primera vez, tras al instalación
– Si la unidad no funciona correctamente
- 7 -- 7 -
Page 51
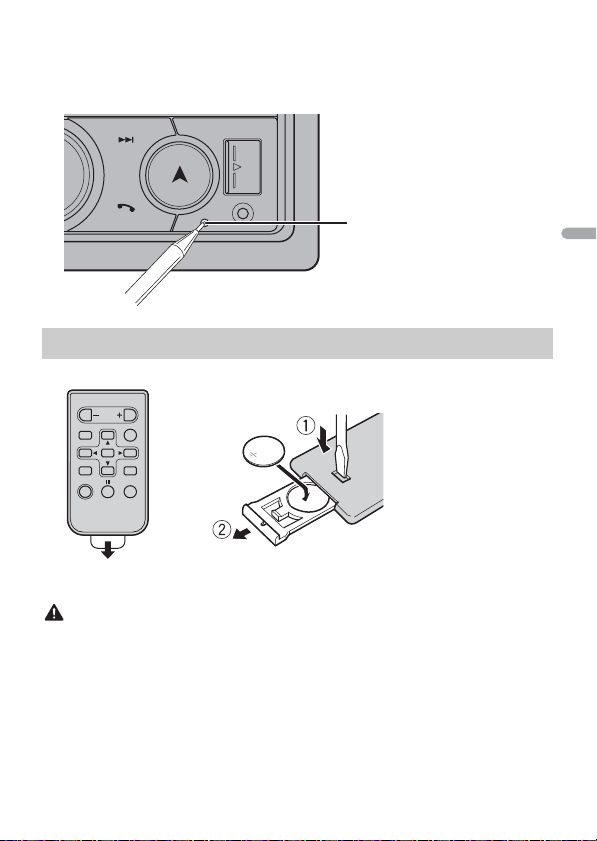
Español
– Cuando aparecen mensajes incorrectos o extraños en la pantalla
ADVERTENCIA
Botón RESET
Cómo sustituir la batería
Inserte la batería CR2025 (3 V) con los polos de más
(+) y menos (-) en la orientación correcta.
1 Presione el botón RESET con la punta de un lapicero u otro instrumento
puntiagudo.
Preparación del control remoto
Quite la lámina de aislamiento antes de usarlo.
• No ingiera la batería; hay peligro de una quemadura química.
(El control remoto pro porcionado) Este producto contien e una pila de botón. Si la pila de botón es
tragada, puede causar severas quemaduras internas en solo dos horas y puede llevar a la muerte.
Mantenga las baterías nuevas y usadas lejos del alcance de los niños.
Si el compartimento de la batería no se cierra con seguridad, deje de utilizar el producto y
manténgalo alejado de los niños.
Si cree que la batería fue tragada o colocada dentro de cualquier parte del cuerpo, busque atención
médica inmediatamente.
- 8 -
Page 52
Español
• L as baterías (el paquete de baterías o las baterías instaladas) no deben exponerse al calor excesivo
PRECAUCIÓN
Importante
ADVERTENCIA
como los rayos solares, incendios o fuentes de calor semejantes.
• Si la batería se sustituye de forma incorrecta, existe el riesgo de una explosión. Sustituya las baterías
solo con el mismo ti po de batería o uno equivalente.
• No manipule ni almacene la pila con herramientas ni objetos metálicos.
• Si la pila tiene una fuga, quite la pila y limpie el control remoto por completo. Luego, instale una pila
nueva.
• Al desechar las baterías usadas, atienda las disposiciones gubernamentales o los reglamentos de las
instituciones públicas medioambientales vigentes en su país/área.
• No almacene el control remoto a altas temperaturas ni bajo la luz solar directa.
• No deje caer el control remoto al piso, donde pueda quedar atascado bajo el pedal del freno o el
acelerador.
Menú de configuración
Después de la instalación, gire la llave de encendido hasta la posición ON y aparecerá el
menú de configuración en la pantalla.
(Solo para FH-S72 5BT)
No utilice la unidad en el modo estándar cuando tenga conectad o un sistema de altavoces para el
modo de red. No utilice la unidad en el modo de red cuando tenga conectado un sistema de altavoces
para el modo estándar. Esto podría dañar los altavoces.
1 Gire el dial M.C. para seleccionar las opciones y presione para confirmar.
Para avanzar a la siguiente opción de menú, debe confirmar la selección.
Elemento del menú Descripción
LANGUAGE Seleccione el idioma en el que apa recerá la información de texto
[ENG](Inglés),
[ESP](Español)
CLOCK SET Ajuste el reloj.
FM STEP Seleccione el incremento de sintonización de FM entre 100 kHz
[100], [50]
AM STEP Seleccione el incremento de sintonización de AM entre 10 kH z o
[10], [9]
de un archivo de audio comprimido.
1 Gire el dial M.C. para ajustar la hora y presione para confirmar.
El indicador se mueve al ajuste de minutos automáticamente.
2 Gire el dial M.C. para ajustar los minutos y presione para
confirmar.
o 50 kHz.
9kHz.
- 9 -- 9 -
Page 53

Español
NOTA
NOTA
Elemento del menú Descripción
SPEAKER MODE (solo
para FH-S725BT)
Cambie entre dos modos de operación —el modo de red
bidireccional (NETWORK) y el modo estándar (STANDARD)—
según las conexiones que haya establecido.
Después de seleccionar el modo ade cuado, gire el dial M.C. para
seleccionar [YES] y presione para confirmar.
• No puede completar el menú de configuración sin ajustar el
[SPEAKER MODE].
2 Aparece [QUIT :YES].
Para volver al primer elemento del menú de configuración, gire el dial M.C. para
seleccionar [QUIT :NO] y presione para confirmar.
3 Presione el dial M.C. para confirmar los ajustes.
Este ajuste, a excepción de [SPEAKER MODE], se pueden definir en cualquier momento desde los
ajustes de SYSTEM (página 33) y los ajustes de INITIAL (página 10).
Cancelación de la pantalla de demostración (DEMO
OFF)
1 Presione el dial M.C. para mostrar el menú principal.
2 Gire el dial M.C. para seleccionar [SYSTEM] y presione para confirmar.
3 Gire el dial M.C. para seleccionar [DEMO OFF] y presione para confirmar.
4 Gire el dial M.C. para seleccionar [YES] y presione para confirmar.
Ajustes de INITIAL
1 Mantenga presionado SRC/OFF hasta que la unidad se apague.
2 Presione el dial M.C. para mostrar el menú principal.
3 Gire el dial M.C. para seleccionar [INITIAL] y presione para confirmar.
4 Gire el dial M.C. para seleccionar una opción y presione para confirmar.
Las opciones varí an según la unidad.
- 10 -
Page 54
Español
Elemento del menú Descripción
FM STEP Seleccione el incremento de sintonización de FM entre 100 kHz
[100], [50]
AM STEP Seleccione el incremento de sintonización de AM entre 10 kH z o
[10], [9]
REAR-SP Seleccione esta opción cuando haya un altavoz de gama
[FUL]
[SW] Seleccione esta opción cuando haya un subwoofer conectado
SP-P/O MODE Seleccione esta opción cuando haya un altavoz de gama
[REAR/SUB.W]
[SUB.W/SUB.W] Seleccione esta opción cuando haya un subwoofer pasivo
[REAR/REAR] Seleccione esta opción cuando haya altavoces de gama
SYSTEM UPDATE Seleccione [SYSTEM INFO] para confirmar la información más
[SYSTEM INFO], [S/
W UPDATE]
SYSTEM RESET Seleccione [YES] para inicializar los ajustes de la unidad. La
[YES], [NO]
o 50 kHz.
9kHz.
completa conectado a los cables de sali da de los altavoces
traseros.
directamente a los cables de salida de los altavoces traseros sin
un amplificador auxiliar.
completa conectado a los cables de sali da de los altavoces
traseros y haya un subwoofer conectado a la salida RCA.
conectado directamente a los cables de salida de los altavoces
traseros y haya un subwoofer conectado a la salida RCA.
completa conectados a los cables de salida de los altavoces
traseros y la salida RCA. Si hay un altavoz de gama completa
conectado a los cables de salida de los altavoces traseros y la
salida RCA no se usa, puede seleccionar [REAR/SUB.W] o [REAR/
REAR].
reciente del sistema en la unidad.
Seleccione [S/W UPDATE] para actualizar la unidad con el
software más reciente e inicializar los ajustes en la unidad. Para
obtener la información más reciente sobre el software y la
actualización, visite nuestro sitio web.
unidad se reiniciará automáticamente.
Radio
Recepción de estaciones predefinidas
1 Presione SRC/OFF para seleccionar [RADIO].
- 11 -- 11 -
Page 55
Español
2 Presione BAND/ para seleccionar la ban da entre [FM1], [FM2], [FM3], [AM]
SUGERENCIA
NOTA
[SW1] o [SW2].
3 Presione un botón de número (de 1/ a 6/).
Los botones / también se pueden usar para seleccionar una estación predefinida cuando
[SEEK] está definido en [PCH] en los ajustes de FUNCTION (página 30).
Memoria de mejores estaciones (BSM)
Las seis estaciones con mejor recepción se almacenan en los botones de números (de 1/
a 6/).
1 Después de seleccionar la banda, presione el dial M.C. para mostrar el menú
principal.
2 Gire el dial M.C. para seleccionar [FUNCTION] y presione para confirmar.
3 Gire el dial M.C. para seleccionar [BSM] y presione para confirmar.
Para buscar una estación manualmente
1
Después de seleccionar la banda, presione / para seleccionar una
estación.
Mantenga presionado / y suéltelo para buscar una estación disponible. La
exploración se detiene cuando la unidad recibe una estación. Para cancelar la
sintonización por búsqueda, presione / .
[SEEK] se debe definir en [MAN] en los ajustes de FUNCTION (página 30) .
Para almacenar estaciones manualmente
1
Mientras recibe la estación que desea almacenar, mantenga presionado uno de los
botones de número (de 1/ a 6/ ) hasta que deje de parpadear.
Uso de las funciones PTY
La unidad busca una estación mediante la información de PTY (tipo de programa).
1 Mantenga presionado durante la recepción de FM.
2 Gire el dial M.C. para seleccionar un tipo de programa entre [NEWS/INFO],
[POPULAR], [CLASSICS] u [OTHERS].
- 12 -
Page 56
Español
3 Presione el dial M.C..
NOTAS
NOTAS
NOTA
PRECAUCIÓN
La unidad comienza a buscar una estación. Cuando la encuentra, aparece el nombre
del servicio del programa.
• Para cancelar la búsqueda, presione el dial M.C..
• El programa de algunas estaciones puede ser diferente del que indica el PTY transmitido.
• Si ninguna estación transmite el tipo de programa que busca, aparece [NOT FOUND] durante dos
segundos aproximadamente, y el sintonizador vuelve a la estación original.
CD/USB/iPhone®/AUX
(El origen iPhone no está disponible cuando [USB MTP] está establecido en [ON] en los
ajustes de SYSTEM (página 35)).
• La función CD no está disponible para MVH-S425BT.
• La función iPhone no está disponible para FH-S525BT.
Reproducción
Desconecte los auriculares del dispositivo antes de conectarlo a la unidad.
CD
1
Inserte un disco en la ranura de carga de discos con el lado de la etiqueta hacia
arriba.
Para expulsar un disco, primero detenga la reproducción y luego presione .
Dispositivos USB (incluidos Android™)/iPhone
1
Abra la tapa del puerto USB.
2 Conecte el dispositivo USB/iPhone mediante un cable apropiado.
Para cambiar automáticamente al origen USB cuando haya un dispositivo USB/iPhone conectado a la
unidad, ajuste [USB AUTO] en [ON] en la configuración de SYSTEM (página 35).
Use un cable USB (se vende por separado) para con ectar el dispositivo USB, ya que si conecta un
dispositivo direc tamente a la unidad, este quedará sobresa liendo, lo que podría ser peligroso.
Antes de quitar el dispositivo, detenga la reproducción.
- 13 -- 13 -
Page 57
Español
Conexión AOA
NOTA
NOTA
NOTA
Un dispositivo con el sistema operativo Android 4.1 o posterior instalado que también
sea compatible con AOA (Android Open Accessory) 2.0 puede conectarse a la unidad
mediante AOA usando el cable que se proporciona con el dispositivo.
Si utiliza una conexión AOA, debe definir [APP CONTROL] en [WIRED] (página 35) y [USB MTP] en [OFF]
(página 35) en los ajustes de SYSTEM.
Conexión MTP
Un dispositivo instalado con Android OS 4.0 o la mayoría de las versiones posteriores puede conectarse
a la unidad a través de MTP mediante el cable que se suministra con el dispositivo. No obstante, según
el dispositivo conectado, la versión de sistema operativo y el número de archivos en el dispositivo, es
posible que n o se puedan reproducir arch ivos de audio/cancione s mediante MTP. Tenga en cuenta qu e
la co nexión MTP no e s comp atible con los format os de ar chivo WAV y FLAC, y no se p uede u tiliza r con la
función MIXTRAX.
Si utiliza un a conexión MTP, debe defin ir [USB MTP] en [ON] en la co nfiguración de SYSTEM ( página 35).
AUX
1
Inserte la miniclavija estéreo en la toma de entrada AUX.
2 Presione SRC/OFF para seleccionar [AUX IN] como origen.
Si [AUX] se define en [OFF] en los ajustes de SYSTEM, no puede seleccionar [AUX IN] como origen
(página 34).
Operaciones
Puede realizar modificaciones en los ajustes de FUNC TION (página 29) (excepto el origen
AUX IN /CD/USB).
Tenga en cuenta que las operaciones siguientes no funcionan para un dispositivo AUX.
Para operar un dispositivo AUX, utilice el dispositivo mismo.
Objetivo Método
Seleccione una carpeta*1 Presione 1/ o 2/.
Seleccionar una pista/canción (capítulo) Presione o .
Adelantar o atrasar*2 Mantenga presionado o .
- 14 -
Page 58
Español
NOTAS
Objetivo Método
Busque un archivo en una lista (solo CD/
USB)
Ver una lista de los archivos en la carpeta/
categoría seleccionada*1
Reproducir una canción en la carpeta/
categoría seleccionada*1
Repetición de reproducción Presione 6/.
Reproducción aleatoria Presione 5/.
Pausa/reanudación de reproducción Presione 4/PAUS E.
Volver a la carpeta raíz (solo CD/USB)*1 Mantenga presionado 1/.
Cambiar entre audio comprimido y CD-DA
(solo CD)
*1 Archivos de audio comprimido únicamente
*2 Cuando use la función de avance o retroceso mientras se reproduce un archivo VBR, el tiempo de
reproducción podría no ser correcto.
1 Mantenga presionado para mostrar la
lista.
2 Gire el dial M.C. para seleccionar el
nombre o la categoría deseados del
archivo (carpeta) y presione para
confirmar.
3 Gire el dial M.C. para seleccionar el
archivo deseado y presione para
confirmar.
Se inicia la reproducción.
Presione el dial M.C. cuando haya
seleccionado una carpeta/categoría.
Mantenga presionado el dial M.C. cuando
haya seleccionado una carpeta/categoría.
Presione BAND/.
Acerca de MIXTRAX (solo USB/iPhone)
La función MIXTRAX crea una mezcla ininterrumpida de su biblioteca de música,
acompañada por efectos lumínicos. Para obtener información sobre los ajustes de
MIXTRAX, consulte la página 38.
• iPho ne necesita conectarse con Pioneer Smart Sync a través de una conexión USB para usar esta
función (página 22).
• Segú n el archivo/canción, es posible que los efectos sonoros no estén disponibles.
• Apague la función MIXTRAX si los efectos lumínicos que genera interfiere n con la conducción.
1 Presione 3/MIX para activar/desactivar MIXTR AX.
- 15 -- 15 -
Page 59
Español
Importante
SUGERENCIA
Importante
Bluetooth
Conexión Bluetooth
Si hay conectados diez dispositivos Bluetooth o más (por ejemplo, un teléfono y un reproductor de
audio independiente), es posible que no funcionen correctamente.
En los pasos a continuación, la siguiente conexión a la unidad se realizará automáticamente si el
dispositivo Blueto oth se conectó anteriormente.
1 Active la función Bluetooth del dispositivo.
Si selecciona una conexión Bluetooth desde el dispositivo, avance hasta el paso 4.
2 Presione para mostrar el ajuste [ADD DEVICE].
La unidad comienza a buscar los dispositivos disponibles y los muestra en la lista de
dispositivos.
• Para cancelar la búsqueda, presione el dial M.C..
• Si el dispositivo deseado no aparece en la lista, seleccione [RE-SEARCH].
• Si no hay ningún dispositivo disponible, aparece [NOT FOUND] en la pantalla.
• Si ya hay un dispositivo conectado, el menú del teléfono aparece al presionar .
3 Gire el dial M.C. para seleccionar un dispositivo de la lista de dispositivos y
presione para confirmar.
Mantenga presionado el dial M.C. para cambiar la información del dispositivo
mostrado entre la dirección del dispositivo Bluetooth y el nombre del dispositivo.
Si realiza una conexión Bluetooth desde la unidad, avance hasta el paso 5.
4 Seleccione el nombre de la unidad en la pantalla del dispositivo.
5 Asegúrese de que el mismo número de 6 dígitos aparezca en esta unidad y en el
dispositivo, luego seleccione [YES] si los números de 6 dígitos que aparecen en
esta unidad y en el dispositivo son los mismos.
Teléfono Bluetooth
En primer lugar, establezca una conexión Bluetooth con el teléfono Bluetooth
(página 16). Se pueden conectar hasta dos teléfonos Bluetooth a la vez.
• D ejar la unidad en espera para conectarla al teléfono a través de Bluetooth m ientras el motor no está
en marcha puede agotar la batería del vehículo.
- 16 -
Page 60
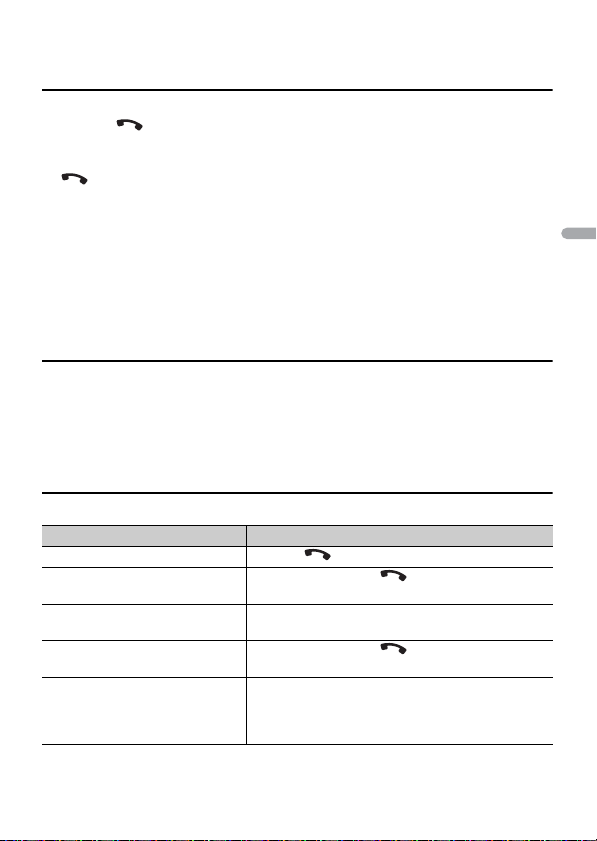
Español
• Asegúrese de estacionar el vehículo en un lugar seguro y colocar el freno de mano antes de la
SUGERENCIA
operación.
Para realizar una llamada telefónica
1
Presione para mostrar el menú del teléfono.
Cuando se conectan dos teléfonos, primero aparece el nombre de un teléfono y, a
continuación, el menú del teléfono. Para cambiar al otro teléfono, vuelva a presionar
.
2 Gire el dial M.C. para seleccionar [RECENTS] o [PHONE BOOK] y presione para
confir mar.
Si selecciona [PHONE BOOK], avance al paso 4.
3 Gire el dial M.C. para seleccionar [MISSED], [DIALLED] o [RECEIVED] y presione
para confirmar.
4 Gire el dial M.C. para seleccionar un nombre o número telefónico y presione para
confir mar.
Comienza la llamada telefónica.
Para responder una llamada entrante
1
Mantenga presionado cualquier botón cuando reciba una llamada.
Cuando hay dos teléfonos conectados a la unidad mediante Bluetooth y hay una llamada entrante
mientras usa un teléfono en otra llamada, aparece un mensaje en la pantalla. Para responder esa
llamada entrante, debe finalizar la llamada existente.
Funcionamiento básico
Objetivo Funcionamiento
Finalizar una llamada Presione .
Rechazar una llamada entrante Mantenga presionado cuando reciba una
Cambiar entre el interlocutor
actual y un interlocutor en espera
Cancelar a un interlocutor en
espera
Ajustar el volumen de la voz del
interlocutor (cuando el modo
privado está activado, esta función
no está disponible)
llamada.
Presione el dial M.C..
Mantenga presionado .
Gire el dial M.C. durante la llamada.
- 17 -- 17 -
Page 61
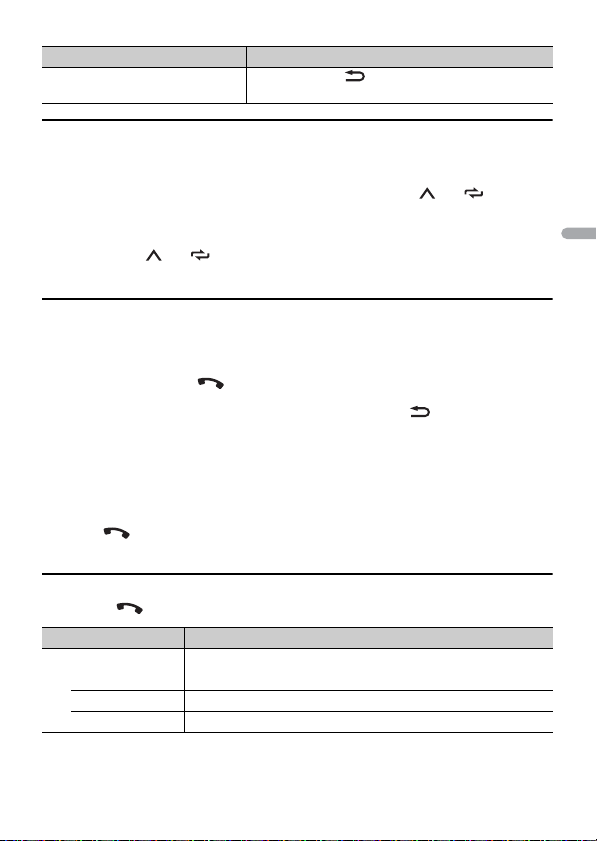
Español
NOTA
SUGERENCIA
Objetivo Funcionamiento
Activar o desactivar el modo
privado
Presione BAND/ durante la llamada.
Para predefinir números telefónicos
1
Seleccione un número telefónico de una libreta telefónica o del historial de
llamadas.
2 Mantenga presionado uno de los botones de número (de 1/ a 6/).
El contacto se almacena en el número predefinido seleccionado.
Para realizar una llamada mediante un número predefinido, presione uno de los botones
de número (de 1/ a 6/ ) y presione el dial M.C. mientras se muestra el menú del
teléfono.
Reconocimiento de voz
(La función iPhone no está disponible para FH-S525BT).
Esta función solo estará disponible cuando haya conectado a la unidad un iPhone/
dispositivo Android equipado con reconocimiento de voz mediante Bluetooth.
1 Mantenga presionado y hable al micrófono para dar los comandos de voz.
Para salir del modo de reconocimiento de voz, presione BAND/.
Para obtener información sobre las características d el reconocimiento de voz, cons ulte el manual que
se entrega con el dispositivo.
Cuando se realiza una conexión Pioneer Smart Sync (página 22), también puede usar la función de
reconocimiento de voz de Pioneer Smart Sync instalada en el iPhone/dispositivo Android al mantener
presionado . Para obtener detalles sobre las funciones de reconocimiento de voz, consulte la
sección de ayuda de la aplicación.
Menú del teléfono
1
Presione para mostrar el menú del teléfono.
Elemento del menú Descripción
RECENTS Muestra el historial de llamadas perdidas.
[MISSED]
[DIALLED] Muestra el historial de llamadas realizadas.
[RECEIVED] Muestra el historial de llamadas recibidas.
- 18 -
Page 62
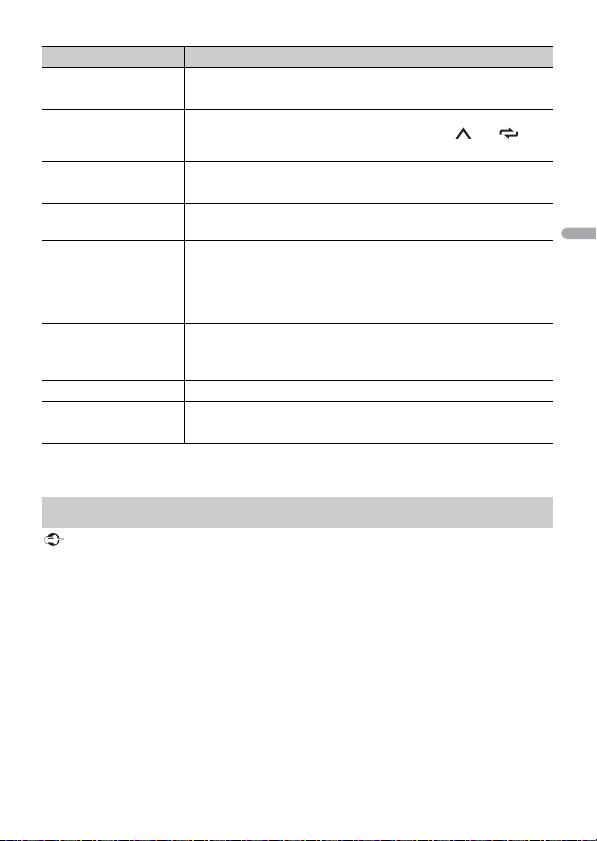
Español
Importante
Elemento del menú Descripción
PHONE BOOK Muestra los contactos en su teléfono.
PRESET 1-6 Recupera los números telefónicos predefinidos. También puede
A.ANSR* Seleccione [ON] para responder una llamada entrante
[ON], [OFF]
PB INVT Invierte el orden de los nombres en la libreta telefónica (vista de
DEVICELIST Muestra la lista de dispositivos Bluetooth emparejados. Aparece
DEL DEVICE Elimine la información del dispositivo.
[DELETE YES],
[DELETE NO]
ADD DEVICE Regist re un nuevo dispositivo.
DEV. INFO Cambie la información del dispositivo en pantalla entre el
* Si hay dos teléfonos conectados, esta función no se activa para las llamadas entrantes que se reciben
mientras está usando los teléfonos para una llamada.
presionar uno de los botones de número (de 1/ a 6/)
para recuperar los números telefónicos predefinidos.
automáticamente.
nombres).
“*” en el nombre del dispositivo cuando se establece la co nexión
Bluetooth.
Cuando no hay ningún dispositivo seleccionado en la lista, esta
función no está disponible.
nombre del dispositivo y la dirección del dispositivo Bluetooth.
Audio Bluetooth
• S egún el reproductor de audio Bluetooth conec tado a la unidad, las operaciones disponi bles estarán
limitadas a los siguientes dos niveles:
– A2DP (perfil de distribución de audio avanzada) solo puede reproducir canciones de su reproductor
de audio.
– AVRCP (perfil de control remoto de audio/vídeo) puede realizar funciones como reproducción,
pausa, selección de ca nción, etc.
• E l sonido del reproductor de audio Bluetooth se silenciará cu ando el teléfono esté en uso.
• C uando el reproductor de audio Blue tooth está en uso, no puede conectar un teléfono Bluetooth
automáticamente.
• S egún el tipo de reproductor de audio Bluetooth que haya conectado a la unidad, el funcionamiento
y la información que se muestre pueden variar según la disponibilidad y la funcionalidad.
1 Realice una conexión Bluetooth con el reproductor de audio Bluetooth.
2 Presione SRC/OFF para seleccionar [BT AUDIO] como origen.
- 19 -- 19 -
Page 63
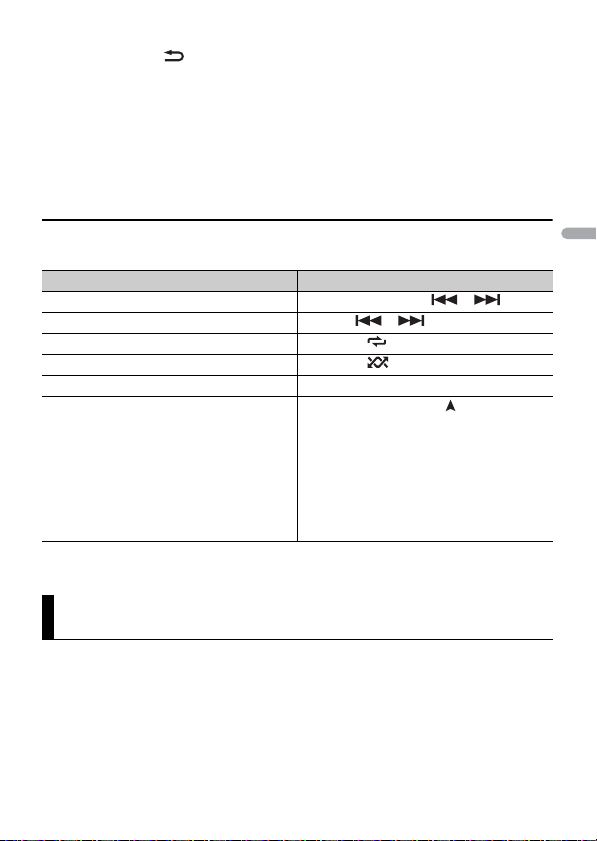
Español
3 Presione BAND/ para comenzar la reproducción.
NOTA
SUGERENCIA
NOTA
Debe volver a conectar la conexión de Bluetooth cuando se cambia la fuente o se apaga la unidad.
Cuando haya registrado entre dos y hasta cinco dispositivos en la unidad mediante Bluetooth, puede
reproducir canci ones en el dispositivo Bluetooth para ca mbiar de dispositivo. Al hacer esto, resulta
sencilla la reproducción de una canción desde el disp ositivo Bluetooth de cada pasajero. No obstante,
dependiendo de las condiciones de uso, es posible que no haya disponibles varias conexiones y que los
archivos de audio/canciones no puedan reproducirse correctamente.
Funcionamiento básico
Puede realizar varias modificaciones en los ajustes de FUNCTION (página 29).
Objetivo Funcionamiento
Adelantar o atrasar Mantenga presionado o .
Seleccionar una pista Presione o .
Repetición de reproducción* Presione 6/.
Reproducción aleatoria* Presione 5/.
Pausa/reanudar reproducción Presione 4/PAU SE .
Buscar un archivo en una lista 1 Mantenga presionado para mostrar
* Según el dispositivo conectado, es posible que estas operaciones no estén disponibles.
una lista.
2 Gire el dial M.C. para seleccionar el
nombre de carpeta deseado y presione
para confirmar.
3 Gire el dial M.C. para seleccionar el
archivo deseado y presione para
confirmar.
Comienza la reproducción.
Spotify®
(No está disponible cuando [USB MTP] est á establecido en [ON] en los ajustes de SYSTEM
(página 35)).
La función iPhone no está disponible para FH-S525BT.
Spotify es un servicio de distribución de música no afiliado a Pioneer. Puede obtener
más información en http://www.spotify.com.
- 20 -
Page 64
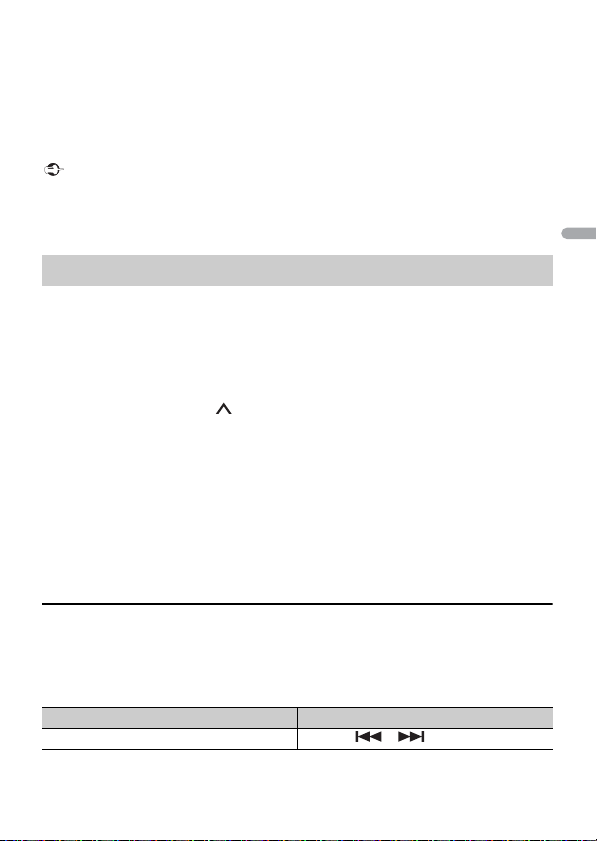
Español
La aplicación Spotify está disponible para teléfonos compatibles, ingrese a https://
Importante
NOTA
NOTA
support.spotify.com/ para consultar la información más reciente de compatibilidad.
Para disfrutar de Spotify mientras conduce, descargue primero la aplicación Spotify a su
dispositivo iPhone o Android. Puede descargarla en iTunes® App Store® o Google Play™.
Seleccione una cuenta gratuita o una cuenta Premium paga desde la aplicación o
spotify.com. Una cuenta Premium le proporciona más funciones, como escuchar sin
conexión.
• E ste producto incorpora softwa re Spotify sujeto a licencias de terceros que puede encontrar aquí:
www.spotify.com/connect/third-party-licenses.
• Para obtener información sobre los países y regiones donde se puede usar Spotify, ingrese a https://
spotify.com/us/select-your-country/.
Escuchar Spotify
Actualice el firmware de la aplicación Spotify a la versión más reciente antes de usarla.
1 Conecte la unidad al dispositivo móvil.
• iPhone mediante USB (página 13)
• Dispositivo iPhone/Android mediante Bluetooth (página16)
2 Presione SRC/OFF para seleccionar [SPOTIFY].
3 Mantenga presionado 1/ para mostrar [APP CONTROL].
4 Gire el dial M.C. para seleccionar una de las opciones siguientes.
• Seleccione [WIRED] para la conexión USB.
• Seleccione [BLUETOOTH] para la conexión Bluetooth.
5 Presione SRC/OFF para seleccionar [SPOTIFY].
6 Inicie la aplicación Spotify en el dispositivo móvil y comience la reproducción.
Al conectar un dispositivo móvil distinto a un iPhone/dispositivo Android, es posible que no funcione
correctame nte según su dis positivo móvil.
Funcionamiento básico
Puede realizar varias modificaciones en los ajustes de FUNCTION (página 29).
Las operaciones disponibles pueden variar según el tipo de contenido (pista/álbum/artista/lista de
reproducción/radio) que quiera reproducir.
Objetivo Funcionamiento
Saltar una pista Presione o .
- 21 -- 21 -
Page 65
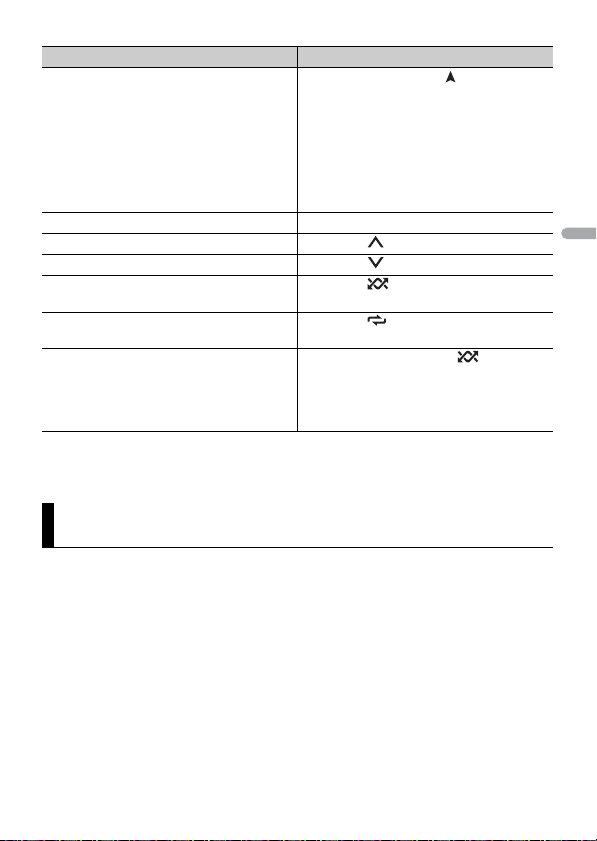
Español
NOTA
NOTA
NOTA
Objetivo Funcionamiento
Busque una pista en una lista 1 Mantenga presionado para mostrar la
Pausa/reanudar reproducción Presione 4/PAUSE.
Pulgar arriba (solo para radio) Presione 1/.
Pulgar abajo (solo para radio) Presione 2/.
Reproducción aleatoria (solo para pista/
álbum/artista/lista de reproducción)
Reproducción repetida (solo para pista/
álbum/artista/lista de reproducción)
Inicia un canal de radio basado en la
canción que se está reproduciendo.
Es posible que no pueda operar algunas funciones de Spotify en esta unidad.
lista.
2 Gire el dial M.C. para seleccionar la
categoría deseada y presione para
confirmar.
3 Gire el dial M.C. para seleccionar el
archivo deseado y presione para
confirmar.
Se inicia la reproducción.
Presione 5/.
Presione 6/.
1 Mantenga presionado 5/ para iniciar
una radio.
2 Presione el dial M.C..
• Es posible que esta función no esté
disponible, según la canción selecci onada.
Uso de Pioneer Smart Sync/APP
La función iPhone no está disponible para FH-S525BT.
Pioneer Smart Sync es la aplicación que le ofrece de manera inteligente mapas,
mensajes y música, todo en el vehículo.
Puede operar la unidad desde la Pioneer Smart Sync instalada en un dispositivo iPhone/
Android. En algunas ocasiones, puede controlar los aspectos de la aplicación, como la
selección de origen, la pausa, etc. usando la unidad.
Para obtener más detalles sobre las funciones disponibles de la aplicación, consulte la
ayuda de la aplicación.
El origen APP no está disponible si no se ha realizado la conexión de Pioneer Smart Sync, o bien [USB
MTP] está establecido en [ON] en los ajustes de SYSTEM (página 35).
- 22 -
Page 66
Español
ADVERTENCIA
No intente operar la aplicación mientras conduce. Asegúrese de orillarse y estacionar el vehículo en un
NOTA
lugar seguro antes de intentar usar los controles de la aplicación.
Para usuarios de iPhone
Esta función es compatible con iOS 10.3 o posterior.
Puede descargar la Pioneer Smart Sync en iTunes App Store.
Para usuarios de dispositivos Android
Para conexiones Bluetooth, esta función es compatible con dispositivos que tengan
instalado el sistema operativo Android 5.0 o posterior.
Para conexiones USB, esta función es compatible con un teléfono que funcione con
Android 5.0 o posterior hasta 7.1.2, y también admite AOA (Android Open Accessory)
2.0. Sin embargo, la compatibilidad depende del teléfono.
Puede descargar la Pioneer Smart Sync en Google Play.
Algunos disposit ivos Android conectados a través de AOA 2.0 podrí an no funcionar correctamente o
emitir sonidos debido a su propio diseño de software, sin importar la versión del sistema operativo.
¿Qué tipo de función tiene la aplicación?
Promover el uso de la unidad
La interfa z de la unidad puede evolucionar usando el dispositivo iPhone/Android.
- 23 -- 23 -
Page 67
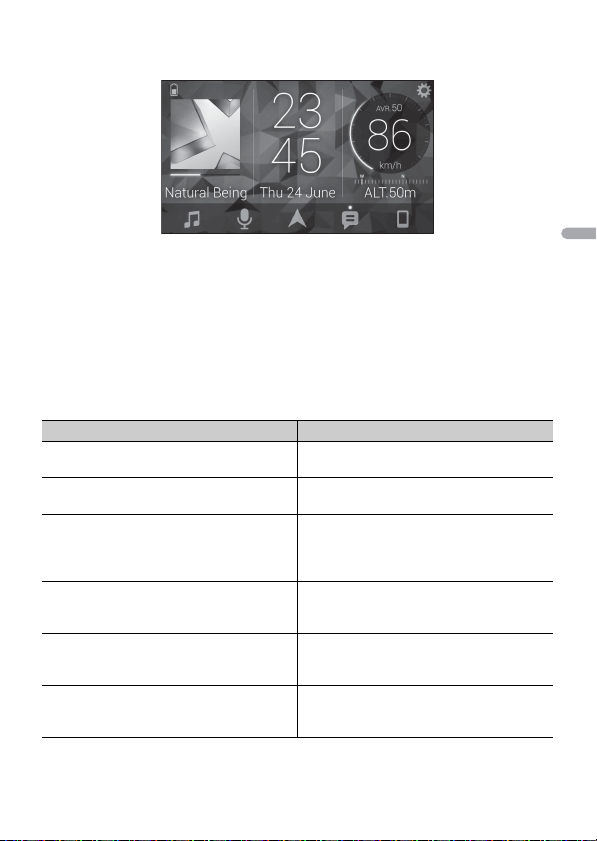
Español
Imagen (ejemplo):
Ejemplos:
– Seleccionar un origen de la unidad
– Escuchar música en el dispositivo iPhone/Android
– Controlar el campo de sonido de manera intuitiva
– Ajustar el color de iluminación (solo para FH-S725BT)
– Controlar el dispositivo Bluetooth conectado
Ampliar las funciones de la unidad usando la aplicación
Las siguientes funciones, que no están disponibles en la unidad por sí sola, están
disponibles con una conexión Pioneer Smart Sync.
Elemento del menú (ejemplo) Descripción
Usar una aplicación de navegación Puede especificar e iniciar la aplicación de
Lectura de mensajes Puede leer mensajes recibidos de las
Ajuste del EQ de 31 bandas Puede seleccionar una banda de
Supersonido “Todoroki” Puede aumentar el nivel de bajos de forma
Fácil ajuste de sonido Puede seleccionar el tipo de vehículo para
Ajuste del tema (solo para FH-S725BT) Puede definir el papel tapiz y el color del
navegación instalada en el dispositivo.
aplicaciones instaladas en el dispositivo.
ecualización del ecualizador gráfico de 31
bandas (13 bandas para no usar la conexión
Pioneer Smart Sync).
más dinámica que cuando no usa la
conexión Pioneer Smart Sync.
realizar cualquier tipo de ajuste de
alineación de manera sencilla.
tema (pantalla/teclas/caracteres) de una
sola vez.
- 24 -
Page 68
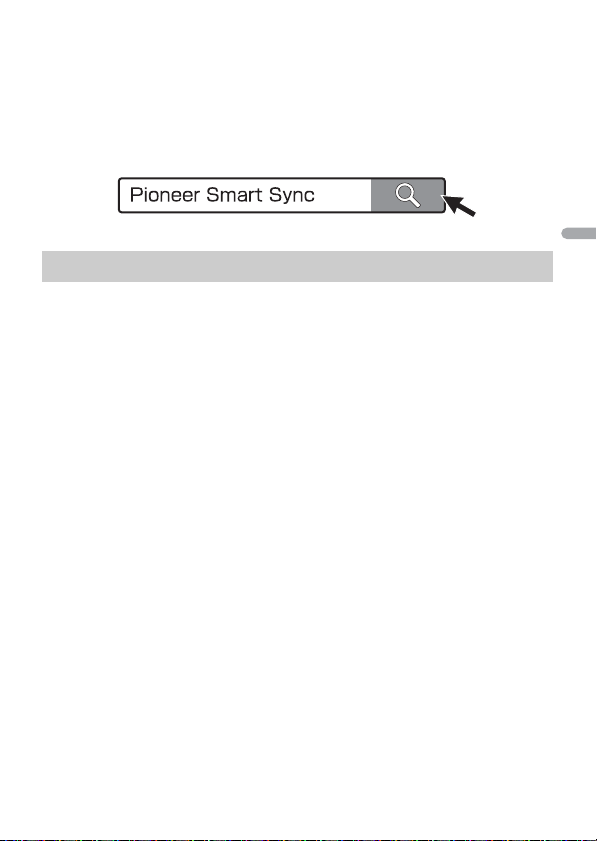
Español
NOTAS
• Algunas funciones pueden estar restringidas según las condiciones de conexión con la aplicación.
SUGERENCIA
NOTA
NOTAS
• L a configuración de 31 bandas de EQ se convierte a 13 ban das cuando se usa una fuente de música
de este prod ucto.
Se recomienda ingresar el término de búsqueda “Pioneer Smart Sync”en el campo de búsqueda para
buscar la aplicación.
Realizar una conexión con Pioneer Smart Sync
1 Presione el dial M.C. para mostrar el menú principal.
2 Gire el dial M.C. para seleccionar [SYSTEM] y presione para confirmar.
3 Gire el dial M.C. para seleccionar [APP CONTROL] y luego presione para confirmar.
4 Gire el dial M.C. para seleccionar una de las opciones siguientes.
• Seleccione [WIRED] para la conexión USB.
• Seleccione [BLUETOOTH] para la conexión Bluetooth.
5 Gire el dial M.C. para seleccionar [AUTO APP CONN] y luego presione para
confirmar.
6 Gire el dial M.C. para seleccionar [ON] y presione para confirmar.
7 Conecte la unidad al dispositivo móvil.
• Dispositivo iPhone/Android mediante USB (página 13)
• Dispositivo iPhone/Android mediante Bluetooth (página16)
Pioneer Smart Sync en el dispositivo se inicia automáticamente.
Sin importar si los ajustes de [AUTO APP CONN] están establecidos en [ON] o [OFF],
también puede realizar lo siguiente para iniciar Pioneer Smart Sync.
• Para los dispositivos distintos de un dispositivo Android conectado por USB,
presione SRC/OFF para seleccionar cualquier origen y mantenga presionado el dial
M.C..
• Para iPhone, inicie Pioneer Smart Sync en el dispositivo móvil.
• A l conectar un dispos itivo móvil distinto a un iPhone/dispositi vo Android, es posible que no funcione
correctamente según su dispositivo móvil.
- 25 -- 25 -
Page 69
Español
• Si todavía no ha instalado Pioneer Smart Sync en su iPhone/dispositivo Android, aparecerá un
ADVERTENCIA
PRECAUCIÓN
NOTAS
mensaje que le pedirá que instale la aplicación en su iPhone/dispositivo Android (excepto el
dispositivo Android conectado por Bluetooth). Seleccione [OFF] en [AUTO APP CONN] para quitar el
mensaje (página 35).
Escuchar música en el dispositivo
1 Presione SRC/OFF para seleccionar [APP].
Cómo usar la función de karaoke
• Nunca se debe usar un micrófono mientras se conduce un vehículo. Hacer esto puede provocar
accidentes.
• E vite dejar un micrófono por descuido para prevenir un accidente.
Puede ser sumamente peligroso que el cable del micrófono se enrosque en la columna de dirección o
la palanca de cambios, ya que esto puede provocar un accidente. Asegúrese de instalar el micrófono de
modo que no obs truya la conducción.
• Us e un micrófono disponible en comercio s y no el micrófono proporci onado.
• Esta función no está disponible cuando la fuente seleccionada es la siguiente.
–RADIO
–AUX IN
1 Inserte la miniclavija estéreo de su micrófono en la toma de entrada AUX.
2 Presione el dial M.C. para mostrar el menú principal.
3 Gire el dial M.C. para seleccionar [MICROPHONE].
4 Presione el dial M.C. para seleccionar [ON].
Cuando el modo de karaoke está activado, se silenciará la unidad. Modifique el
volumen del micrófono en el ajuste [MIC VOL].
Cómo ajustar el volumen del micrófono
1
Presione el dial M.C. para mostrar el menú principal.
2 Gire el dial M.C. para seleccionar [MICROPHONE] y luego presione para confirmar.
3 Gire el dial M.C. para seleccionar [MIC VOL].
4 Gire el dial M.C. para ajustar el nivel de volumen.
- 26 -
Page 70

Español
NOTA
Si escucha “aullidos” cuando usa el micrófono, manténgalo lejos del altavoz o disminuya el volumen
NOTA
del micrófono.
Para reducir el nivel de las voces en una canción
1
Presione el dial M.C. para mostrar el menú principal.
2 Gire el dial M.C. para seleccionar [MICROPHONE] y luego presione para confirmar.
3 Gire el dial M.C. para seleccionar [VOCAL].
4 Presione el dial M.C. para seleccionar [OFF].
Según las condiciones de grabación de las canciones, es posible que el nivel de las voces no se reduzca
de manera ef icaz.
Ajustes de audio
(El modo de red solo está disponible para FH-S725BT.)
También puede realizar varias modificaciones en los ajustes de AUDIO (página 30).
Modos de operación
Esta unidad posee dos modos de operación: modo de red y modo estándar. Puede
cambiar de modo según lo desee (página 10).
Modo de red
Puede crear un sistema bidireccional de varios altavoces y amplificadores subwoofer con
un altavoz de rango alto, uno de rango medio y un subwoofer para la reproducción de
frecuencias altas, medias y bajas (bandas).
Modo estándar
Puede crear un sistema de 4 altavoces con altavoces delanteros y traseros o delanteros y
subwoofers, o un sistema de 6 altavoces con altavoces delanteros, traseros y subwoofers.
Ajustar el valor de frecuencia de corte y el valor de
la pendiente
Puede ajustar el valor de frecuencia de corte y el valor de la pendiente de cada altavoz.
Se pueden ajustar los siguientes altavoces.
- 27 -- 27 -
Page 71

Español
Modo de red:
NOTA
[HIGH] (altavoz de rango alto HPF), [MID HPF] (altavoz de rango medio HPF), [MID LPF]
(altavoz de rango medio LPF), [SUBWOOFER]
Modo estándar:
[FRONT], [REAR], [SUBWOOFER]
[SUBWOOFER] solo se puede seleccionar cuando se selecciona [ON] en [SUBWOOFER] (página 31).
1 Presione el dial M.C. para mostrar el menú principal.
2 Gire el dial M.C. para seleccionar [AUDIO] y presione para confirmar.
3 Gire el dial M.C. para seleccionar [CROSSOVER] y presione para confirmar.
4 Gire el dial M.C. para seleccionar la unidad de altavoz (filtro) que va a ajustar y
presione para confirmar.
5 Gire el dial M.C. para seleccionar [HPF] o [LPF] según la unidad de altavoz (filtro) y
presione para confirmar.
6 Gire el dial M.C. para seleccionar una frecuencia de corte adecuada para la unidad
de altavoz (filtro) seleccionada en el paso 4 y presione para confirmar.
Modo de red:
De [1.25K] a [12.5K] (si selecciona [HIGH] o [MID LPF])
De [25] a [250] (si selecciona [MID HPF] o [SUBWOOFER])
Modo estándar:
De [25HZ] a [250HZ]
7 Gire el dial M.C. para seleccionar una pendiente adecuada para la unidad de
altavoz (filtro) seleccionada en el paso 4.
Modo de red:
De [–6] a [–24] (si selecciona [HIGH], [MID HPF] o [MID LPF])
De [–12] a [–36] (si selecciona [SUBWOOFER])
Modo estándar:
De [–6] a [–24] (si elige [FRONT] o [REAR])
De [–6] a [–36] (si selecciona [SUBWOOFER])
Ajustes
Puede ajustar distintos valores de configuración en el menú principal.
1 Presione el dial M.C. para mostrar el menú principal.
- 28 -
Page 72
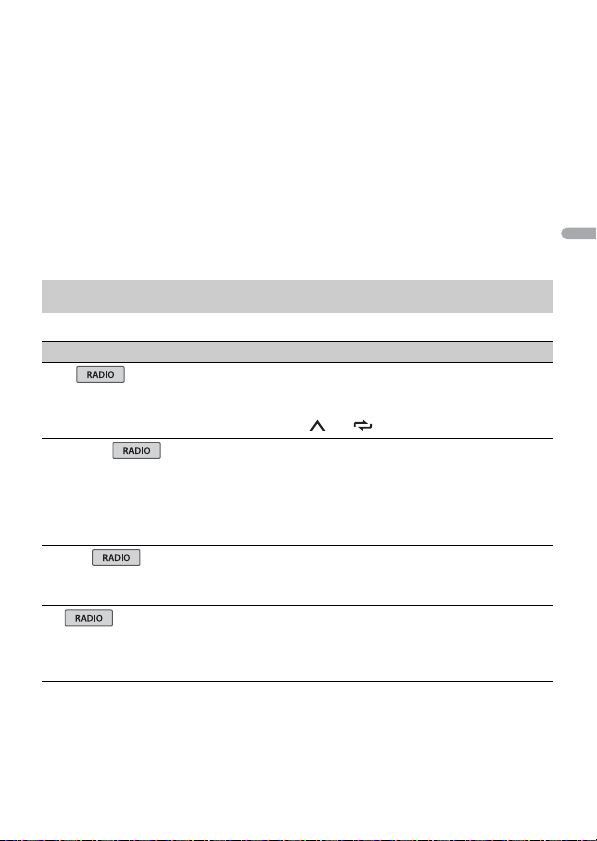
Español
2 Gire el dial M.C. para seleccionar una de las categorías siguientes y presione para
NOTA
confirmar.
• Ajustes de FUNCTION (página 29)
• Aju stes de AUDIO (página 30)
• Ajustes de SYSTEM (página 33)
• Ajustes de ILLUMINATION (página 37)
• Ajustes de MIXTRAX (página 38)
• Ajustes de MICROPHONE (página 39)
3 Gire el dial M.C. para seleccionar las opciones y presione para confirmar.
Los elementos del menú relacionados con iPhone en las siguientes tablas no están disponibles para
FH-S525BT.
Ajustes de FUNCTION
Los elementos del menú varían según el origen.
Elemento del menú Descripción
BSM
Almacena automáticamente las seis estaciones
con mejor recepción en los botones de números
(de 1/ a 6/).
REGIONAL
[ON], [OFF] Limita la recepción a los programas regionales
LOC AL
FM: [OFF], [LV1], [LV2], [LV3], [LV4]
AM/SW: [OFF], [LV1], [LV2]
TA
[ON], [OFF] Recibe la información de tráfico actual si está
específicos cuando tiene seleccionado AF
(búsqueda de frecuencias alternativas).
(Disponible solo cuando se selecciona una
banda de FM.)
Restringe la estación de sintonización según la
intensidad de la señal.
disponible. (Disponible solo cuando se
selecciona una banda de FM.)
- 29 -- 29 -
Page 73
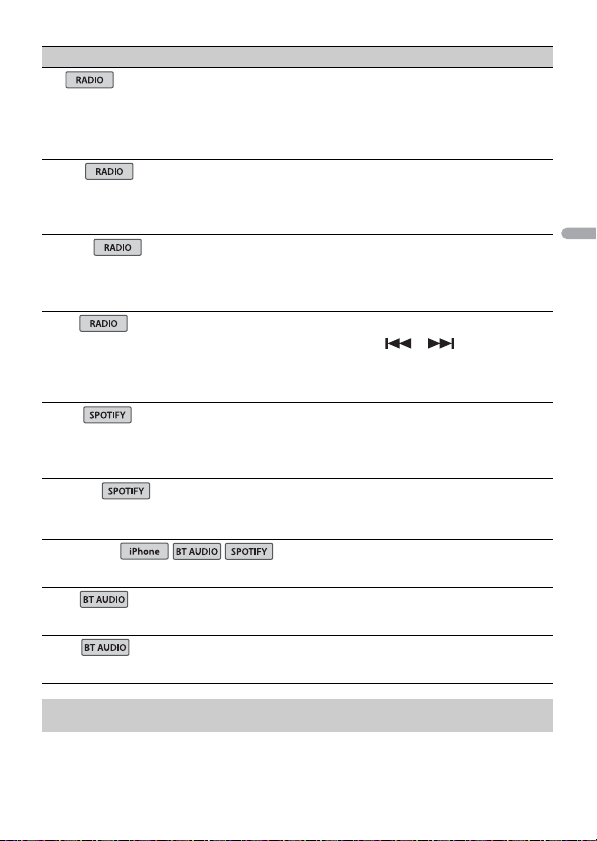
Español
Elemento del menú Descripción
iPhone
AF
[ON], [OFF] Permite que la unidad vuelva a sintonizar otra
NEWS
[ON], [OFF] Interrumpe el origen seleccionado actualmente
ALARM
[ON], [OFF] Interrumpe el origen seleccionado actualmente
SEEK
[MAN], [PCH] Asigna los botones o para buscar
SAVE
UNSAVE
SEL DEVICE
PLAY
STOP
frecuencia que emite la misma estación.
(Disponible solo cuando se selecciona una
banda de FM.)
por nuevos programas. (Disponible solo cuando
se selecciona una banda de FM.)
por anuncios de emergencia. Seleccione [OFF]
para desactivar esta función.
estaciones una a una (sintonización manual) o
selecciona una estación de los canales
predefinidos.
Almacene la información sobre l a canción que se
está reproduciendo en la lista de música de
Spotify.
Quite la información de la canción almacenada
en [SAVE].
Conecte un dispositivo Bluetooth de la lista.
Comienza la reproducción.
Detiene la reproducción.
Ajustes de AUDIO
El modo de red solo está disponible para FH-S725BT.
- 30 -
Page 74

Español
NOTA
[CHK APP SETTG.] puede aparecer cuando el ajuste se establece desde Pioneer Smart Sync.
Elemento del menú Descripción
EQ SETTING
[SUPER BASS], [POWERFUL],
[DYNAMIC], [NATURAL], [VOCAL],
[VIVID], [SET BY APP]*,
[CUSTOM1], [CUSTOM2], [FLAT]
* [SET BY APP] se visualiza cuand o
la curva del ecualizador
predeterminada que no está
disponible en la unidad ha sido
ajustada desde Pioneer Smart
Sync.
Selecciona una banda y un nivel
de ecualización para una mayor
personalización.
Banda de ecualizador: de
[50HZ] a [12.5kHZ]
Nivel de ecualizador: de [–6] a
[+6]
FAD ER *1*2 (solo para modo estándar)
BALANC E
SUBWOOFER
[ON], [OFF] Establecido en [ON] al usar un altavoz subwoofer.
SUBWOOFER*3
[NOR], [REV] Selecciona la fase del subwoofer.
SPEAKER LEVEL
Modo de red: [HIGH L], [HIGH R],
[MID L], [MID R], [SUBWOOFER]
Modo estándar: [FRONT L],
[FRONT R], [REAR L], [REAR R],
[SUBWOOFER]
Nivel de salida: de [–24] a [10]
Seleccione o personalice la cur va del ecualizador.
• Cuando seleccione un ajuste, excepto
[CUSTOM1], [CUSTOM2] y [SET BY APP], para
personalizar la curva del ecualizador puede
mantener presionado el dial M.C. y almacenar
la curva de ecualizador personalizada en
[CUSTOM1].
Ajusta el balance de los altavoces delanteros y
traseros.
Ajusta el balance de los altavoces izquierdos y
derechos.
Seleccione una unidad de altavoz (filtro) y ajuste
el nivel de salida.
• Cada valor que haya ajustado cambia cuando
cambia el ajuste [POSITION] (página 32).
- 31 -- 31 -
Page 75

Español
Elemento del menú Descripción
CROSSOVER
POSITION
[OFF], [FRONT LEFT] (asiento
delantero izquierdo), [FRONT
RIGHT] (asiento delantero
derecho), [FRONT] (asientos
delanteros), [ALL]*
* Solo para modo estándar
TIME ALGNMNT
[INITIAL], [OFF], [CUSTOM]
Seleccione un tipo de altavoz y
ajuste la distancia del altavoz
para mayor personalización en
[CUSTOM].
Modo de red: [HIGH L], [HIGH R],
[MID L], [MID R], [SUBWOOFER]
Modo estándar: [FRONT L],
[FRONT R], [REAR L], [REAR R],
[SUBWOOFER]
Distancia al altavoz (cm): de
[350] a [0.0]
SAVE SETTINGS
[YES], [NO] Guarda para recuperar más tarde los siguientes
LOAD SET TING S
Seleccione una unidad de altavoz (filtro) para
ajustar la frecuencia de corte HPF o LPF y la
pendiente de cada unidad de altavoz.
Para obtener información sobre el ajuste
[CROSSOVER], consulte página 27.
Seleccione una posición de audición para ajustar
automáticamente los niveles de salida de los
altavoces y agregar tiempo de demora que
corresponda al número y ubicaciones de los
asientos ocupados.
Seleccione o personalice los ajustes de
alineación temporal para que refleje la distancia
entre la posición de la persona y la de cada
altavoz.
• Seleccione [INITIAL] para inicializar el valor del
ajuste.
• Seleccione [OFF] para restablecer todos los
valores en 0.
• El ajuste [CUSTOM] está disponible cuando se
selecciona [FRONT LEFT] o [FRONT RIGHT] en
[POSITION] (página 32).
• El ajuste [CUSTOM] no está disponible cuando
se selecciona [OFF] en [SUBWOOFER]
(página 31).
ajustes de sonido en sus valores actuales:
[CROSSOVER], [SPEAKER LEVEL], [EQ SETTING],
[POSITION], [TIME ALGNMNT], [D.BASS],
[SUBWOOFER].
• El ajuste que puede guardarse difiere cuando
se establece una conexión Pioneer Smart Sync.
Carga los ajustes de sonido cuando ya haya
realizado [SAVE SETTINGS].
- 32 -
Page 76

Español
Elemento del menú Descripción
D.BA SS
[OFF], [LOW], [HI] I ntensifique el nivel de graves de forma dinámica
LOU DNES S
[OFF], [LOW], [MID], [HI] Compensa deficiencias para lograr un sonido
SLA
De [+4] a [–4] Ajusta el nivel de volumen de cada origen,
S.RTRV
[1] (eficaz para tasas de
compresión bajas)
[2] (eficaz para tasas de
compresión altas)
[OFF]
*1 No está disponible cuando [SW] está seleccionado en [REAR-SP] en los ajustes de INITIAL
(página 11).
*2 No está disponible cuando [SUB.W/SUB.W] está seleccionado en [SP-P/O MODE] en los ajustes de
INITIAL (página 11).
*3 No está disponible cuando [REAR/REAR] está seleccionado en [SP-P/O MODE] en los ajustes de
INITIAL (página 11).
para dar un efecto de subwoofer al sistema.
claro a volumen bajo.
excepto FM.
Cada una de las combinaciones siguientes se
define en los mismos ajustes automáticamente.
• Al establecer una conexión USB, establezca
USB, iPhone, APP y SPOTIFY.
• Al establecer una conexión Bluetooth,
establezca BT AUDIO, iPhone, APP y SPOTIFY.
Mejora el audio comprimido y restaura el sonido
óptimo.
• El ajuste no está disponible cuando [OFF] está
seleccionado en [VOCAL] en los ajustes de
MICROPHONE (página 40).
Ajustes de SYSTEM
También puede acceder a estos menús cuando la unidad está apagada.
Elemento del menú Descripción
LANGUAGE
[ENG](Inglés), [ESP](Español) Seleccione el idioma en el que aparecerá la
información de texto de un archivo de audio
comprimido.
- 33 -- 33 -
Page 77

Español
Elemento del menú Descripción
CLOCK SET
[12H], [24H] Ajuste el reloj (página 9).
SCROLL SET
[ONCE], [LOOP], [OFF] Seleccione la forma en la que desea desplazar el
BEEP TONE
[ON], [OFF] Se puede oír un sonido cuando se presiona
INFO DISPLAY (solo para FH-S725BT)
[SPEANA/CLOCK], [LIVE FX/
CLOCK], [CLOCK], [SPEANA],
[LEVEL METER], [OFF]
INFO DISPLAY (solo para FH-S525BT/MVH-S425BT)
[SOURCE/SPEANA], [CLOCK/
SPEANA], [SRC/LIVE FX], [CLOCK/
LIVE FX], [SOURCE], [SPEANA],
[OFF]
AUTO PI
[ON], [OFF] Busca una estación diferente con la misma
AUX
[ON], [OFF] Se define en [ON] cuando se utiliza un
BT AUDIO
[ON], [OFF] Active/desactive la señal Bluetooth.
SPOTIFY
[ON], [OFF] Se define en [ON] cuando se usa la función
• Este ajuste no está disponible cuando se hace
una conexión Pioneer Smart Sync.
texto en la pantalla.
cualquier botón. Seleccione [OFF] para
desactivar esta función.
Muestra el elemento en la pantalla de
información secundaria.
Muestra el elemento en la pantalla de
información secundaria.
• Cuando [SOURCE/SPEANA] o [CLOCK/SPEANA]
está seleccionado, muestra la antena en lugar
del analizador de espectro en la fuente de
radio.
programación, incluso si usa una estación
predefinida.
dispositivo auxiliar conectado a la unidad.
• El ajuste no está disponible cuando [ON] está
seleccionado en [MICROPHONE] en los ajustes
de MICROPHONE (página 39).
Spotify.
- 34 -
Page 78

Español
Elemento del menú Descripción
BT MEM CLEAR
[YES], [NO] Borra los datos de dispositivos Bluetooth (lista de
APP CONTROL
[WIRED], [BLUETOOTH] Seleccione el método de conexión apropiado
USB MTP
[ON], [OFF] Se ajusta en [ON] cuando se usa la conexión MTP.
AUTO APP CONN
[ON], [OFF] Seleccione [ON] para iniciar automáticamente
S.REMOTE*1*2
[OFF], [PIONEER], [PRESET] Seleccione [PIONEER] o [PRESET] según su
USB AUTO
[ON], [OFF] Seleccione [ON] para cambiar automáticamente
*1 Es posible que esta función no se active correctamente, según su automóvil. En cuyo caso, pida
asistencia a l concesionario o a un centro de servic io PIONEER autorizado.
*2 Utilice un arnés para cables disponible en el mercado para cada modelo de vehículo cuando el
modo [PRESET] esté activado, y utilice un adaptador disponible en el mercado cuando esté en
[PIONEER].
dispositivos, código PIN, historial de llamadas,
libreta telefónica, números telefónicos
predefinidos) almacenados en la unidad.
[CLEARED] aparece cuando los datos se eliminan
satisfactoriamente.
según su dispositivo.
Para obtener información sobre las conexiones
para cada dispositivo, consulte página 35.
Los orígenes siguientes no están disponible
cuando el ajuste está establecido en [ON].
• APP, SPOTIFY, iPhone y USB (AOA)
Pioneer Smart Sync cuando haya un iPhone/
dispositivo Android conectado a la unidad.
control remoto cableado.
al origen USB cuando haya un dispositivo USB/
iPhone conectado a la unidad.
Seleccione [OFF] cuando un dispositivo USB/
iPhone esté conectado a la unidad solo para
cargarlo.
Información sobre las conexiones para cada dispositivo
Los orígenes disponibles difieren según el valor de los ajustes.
- 35 -- 35 -
Page 79
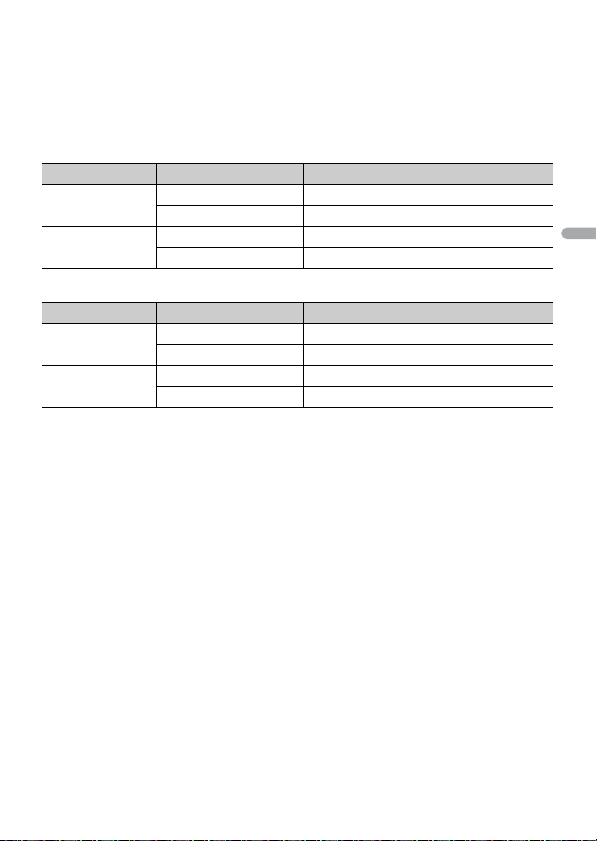
Español
Ajuste [APP CONTROL] de acuerdo con la tabla para el origen que desee usar.
NOTA
Para obtener información sobre la conexión Pioneer Smart Sync, consulte página 22.
Los elementos del menú relacionados con iPhone en las siguientes tablas no están disponibles para
FH-S525BT.
Cuando NO se realiza la conexión Pioneer Smart Sync
Valor de ajus te Dispositivo Orígenes disponibles
[WIRED] iPhone iPhone, SPOTIFY
Android USB (AOA)
[BLUETOOTH] iPhone iPhone, SPOTIFY
Android SPOTIFY
Cuando se realiza la conexión Pioneer Smart Sync
Valor de ajus te Dispositivo Orígenes disponibles
[WIRED] iPhone APP, SPOTIFY
Android APP
[BLUETOOTH] iPhone APP, SPOTIFY
Android APP, SPOTIFY
- 36 -
Page 80

Español
Ajustes de ILLUMINATION
Elemento del menú Descripción
COLOR (solo para FH-S725BT)
[KEY COLOR], [DISP COLOR],
[BOTH COLOR]
DIM SETTING
[SYNC ILLUMI]*, [SYNC CLOCK],
[MANUAL]
* Solo para FH-S725BT
BRIGHTNESS (solo para FH-S725BT)
[KEY], [DISP] Seleccione el brillo para las teclas o la pantalla d e
BRIGHTNESS (solo para FH-S525BT/MVH-S425BT)
De [1] a [10] Cambia el brillo de la pantalla.
Seleccione el color para las teclas o la pantalla de
la unidad a partir de los 12 colores predefinidos,
[SCAN] o [CUSTOM]*.
• [SCAN]: Pasa automáticamente por una
variedad de colores.
• [CUSTOM]*:
1 Mantenga presionado el dial M.C. hasta que
aparezca la pantalla de ajuste del color.
2 Ajuste el color primario (R (rojo)/G (verde)/B
(azul)) y el nivel de brillo (de [0] a [60]).
No puede seleccionar un nivel por debajo de
10 para R (rojo), G (verde) y B (azul) a la vez.
También puede personalizar los colores
predefinidos. Seleccione uno de los colores
predefinidos y mantenga presionado el dial M.C.
hasta que aparezca la pantalla de ajuste del
color.
* El ajuste de CUSTOM solo está disponible para [KEY
COLOR] y [ DISP COLOR].
Seleccione la forma en la que desea cambiar el
brillo de la pantalla.
la unidad entre [1] y [10].
Los rangos de ajuste disponibles difieren según
[DIM SETTING].
Los rangos de ajuste disponibles difieren según
[DIM SETTING].
- 37 -- 37 -
Page 81

Español
Elemento del menú Descripción
PHONE COLOR (solo para FH-S725BT)
Seleccione el color de las teclas para cuando
recibe una llamada.
[FLASHING] Aplica el color definido por [KEY COLOR].
De [FLASH FX1] a [FLASH FX6] Pasa automáticamente por una variedad de
[OFF] El color de las teclas no cambia.
ILLUMI FX (solo para FH-S725BT)
[ON], [OFF] El efecto lumínico se puede ver cuando:
• El efecto de iluminación difiere según la
selección de [ON] o [OFF] en [ILLUMI FX].
colores.
– hay una llamada entrante cuando [FLASHING]
está seleccionado en [PHONE COLOR]
– está haciendo una llamada telefónica
– el mensaje recibido en el dispositivo se lee
cuando se estableció una conexión Pioneer
Smart Sync
– se inserta/expulsa un CD
El efecto lumínico se activará cuando se
encienda/apague la corriente de ACC,
independientemente de este ajuste.
Ajustes de MIXTRAX
Elemento del menú Descripción
SHORT PLAYBCK
[1.0 MIN], [1.5 MIN], [2.0 MIN],
[2.5 MIN], [3.0 MIN], [OFF]
FLASH AREA (solo para FH-S725BT)
[KEY/DISPLAY], [KEY], [OFF] Seleccione el área del efecto lumínico.
Seleccione la duración de la reproducción.
Cuando [OFF] está seleccionado, la definición
de color en los ajustes de ILLUMINATION
(página 37) se usa como color de pantalla.
- 38 -
Page 82
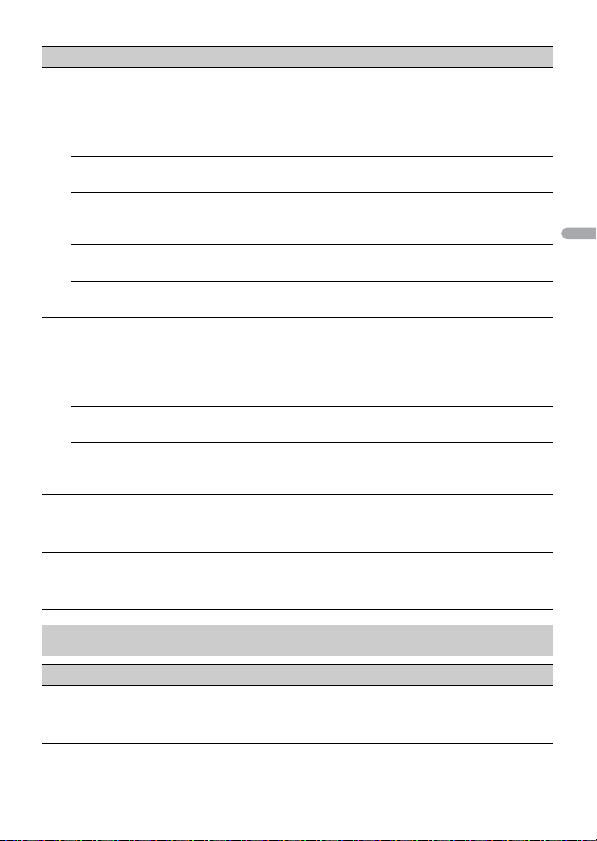
Español
Elemento del menú Descripción
FLASH PATTERN (solo para FH-S725BT)
De [SOUND LEVEL 1] a [SOUND
LEVEL 6]
De [LOW PASS 1] a [LOW PASS 6] El patrón intermitente cambia según el nivel
[RANDOM1] El patrón intermitente cambia al azar según el
[RANDOM2] El patrón intermitente cambia al azar según el
[RANDOM3] El patrón intermitente cambia al azar según el
MIX PATTERN (solo para FH-S525BT/MVH-S425BT)
[SOUND LEVEL] Cambia los efectos especiales MIXTRAX según
[LOW PASS] El patrón de mezcla cambia según el nivel de
[RANDOM] El patrón de mezcla cambia al azar según el
DISPLAY FX
[ON], [OFF] Active/desactive los efectos especiales
CUT IN FX
[ON], [OFF] Active/desactive los efectos sonoros MIXTRAX
Cambia el efecto lumínico según el nivel de
sonido y de graves.
El patrón intermitente cambia según el nivel
de sonido.
de graves.
modo de nivel de sonido y el modo de paso
bajo.
modo de nivel de sonido.
modo de paso bajo.
el nivel de audio.
El patrón de mezcla cambia según el nivel de
sonido.
graves.
modo de nivel de sonido y el modo de paso
bajo.
MIXTRAX.
mientras cambia las pistas manualmente.
Ajustes de MICROPHONE
Elemento del menú Descripción
MICROPHONE
[ON], [OFF] Se define en [ON] cuando se usa la función de
karaoke.
- 39 -- 39 -
Page 83

Español
Elemento del menú Descripción
MIC VOL Ajuste el volumen del micrófono.
VOCAL
[ON], [OFF] Establezca en [OFF] al reducir el nivel de las
voces en una canción.
- 40 -
Page 84
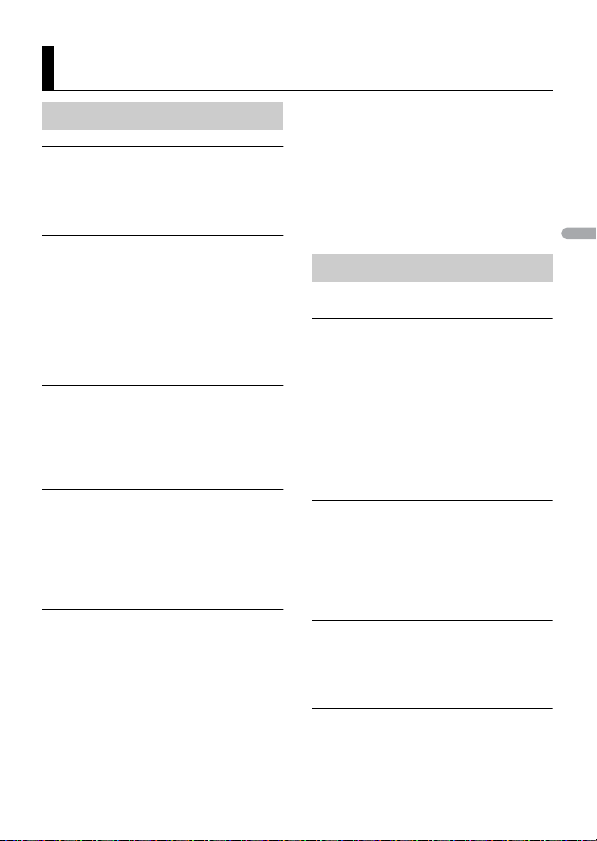
Español
Información adicional
Solución de problemas
La pantalla vuelve automáticamente a la
pantalla normal.
→ No se ha efectuado ninguna operación
en 30 segundos aproximadamente.
– Realice una operación.
El rango de repetición de reproducción
cambia inesperadamente.
→ Según el rango de repetición de
reproducción, el rango seleccionado
puede cambiar cuando selecciona otra
carpeta o pista, o cuando adelanta/
atrasa.
– Vuelva a seleccionar el rango de
repetición de reproducción.
No se reproduce una subcarpeta.
→ Las subcarpetas no se reproducen
cuando [FLD] (repetición de carpeta)
está seleccionado.
– Seleccione otro rango de repetición
de reproducción.
El sonido es intermitente.
→ Utiliza un dispositivo, como un teléfono
celular, que puede causar interferencia
audible.
–Aleje de la unidad los dispositivos
eléctricos que puedan causar
interferencia.
El sonido del origen de audio Bluetooth
no se reproduce.
→ Hay una llamada en curso en un
teléfono celular conectado por
Bluetooth.
– El sonido se reproducirá cuando
finalice la llamada.
→ Se está utilizando un teléfono celular
conectado por Bluetooth.
– Deje de usar el teléfono celular.
→ La conexión entre la unidad y el
teléfono celular no se estableció
correctamente después de una llamada
hecha por un teléfono celular
conectado por Bluetooth.
– Vuelva a establecer la conexión
Bluetooth entre la unidad y el teléfono
celular.
Mensajes de error
Comunes
AMP ERROR
→ Esta unidad no funciona o la conexión
con los altavoces es incorrecta.
→ El circuito de protección está activado.
– Compruebe la conexión de los
altavoces.
– Gire la llave de encendido a la posición
OFF y nuevamente a ON. Si el mensaje
se mantiene, pida asistencia al
concesionario o a un centro de
servicio Pioneer autorizado.
NO XXXX (NO TITLE, por ejemplo)
→ No hay información de texto
incorporada.
– Cambie la pantalla o reproduzca otra
pista/archivo.
Reproductor de CD
ERROR-07, 11, 12, 17, 30
→ El disco está sucio.
– Limpie el disco.
→ El di sco está rayado.
– Sustituya el disco.
ERROR-07, 10, 11, 12, 15, 17, 30, A0
→ Hay un error eléc trico o mecánico.
- 41 -
Page 85

Español
– Gire la llave de encendido a la posición
OFF y nuevamente a ON, y vuelva al
reproductor de CD.
ERROR-15
→ El disco que introd ujo está vacío.
– Sustituya el disco.
ERROR-23
→ El formato del CD no es compatible.
– Sustituya el disco.
FORMAT READ
→ En ocasiones, hay una demora entre el
comienzo de la reproducción y el
momento en que empieza a oír el
sonido.
– Espere hasta que desaparezca el
mensaje y oiga el sonido.
NO AUDIO
→ El disco que introdujo no contiene
archivos que se puedan reproducir.
– Sustituya el disco.
SKIPPED
→ El disco que introdujo contiene archivos
con protección DRM.
– Se omiten los archivos protegidos.
PROTECT
→ Todos los archivos del disco que
introdujo están protegidos por DRM.
– Sustituya el disco.
Dispositivo USB/iPhone
FORMAT READ
→ En ocasiones, hay una demora entre el
comienzo de la reproducción y el
momento en que empieza a oír el
sonido.
– Espere hasta que desaparezca el
mensaje y oiga el sonido.
NO AUDIO
→ No hay canciones.
– Transfiera los archivos de audio al
dispositivo USB y conéctelo.
→ El dispositivo USB conectado tiene
activada la seguridad.
– Siga las instrucciones del dispositivo
USB para desactivar la seguridad.
SKIPPED
→ El dispositivo USB conectado contiene
archivos con protección DRM.
– Se omiten los archivos protegidos.
PROTECT
→ Todos los archivos del dispositivo USB
conectado están protegidos por DRM.
– Sustituya el dispositivo USB.
N/A USB
→ Esta unidad no admite el dispositivo
USB conectado.
– Desconecte el dispositivo y sustitúyalo
por un dispositivo USB compatible.
HUB ERROR
→ El dispositivo USB conectado a través de
concentradores USB no es compatible
con esta unidad.
– Conecte el dispositivo USB
directamente a la unidad usando un
cable USB.
CHECK USB
→ El conector USB o el cable USB están en
cortocircuito.
– Compruebe que el conector USB o el
cable USB no estén atrapados por algo
o dañados.
→ El dispositivo USB conectado consume
por encima de la corriente máxima
permitida.
– Desconecte el dispositivo USB y no lo
use. Gire la llave de encendido a la
posición OFF y nuevamente a ACC u
ON. Conecte únicamente dispositivos
USB aptos.
ERROR-19
→ Error de comunicación.
- 42 -
Page 86

Español
– Realice una de las operaciones
siguientes y vuelva al origen USB.
• Desconecte el dispositivo USB.
• Cambie a otro origen.
→ Error del iPhone.
– Desconecte el cable del iPhone. Una
vez que aparezca el menú principal
del iPhone, vuelva a conectar el
iPhone y reinícielo.
ERROR-23
→ El dispositivo USB no se formateó
correctamente.
– Formatee el dispositivo USB con
FAT1 2, FAT1 6 o FAT 32.
ERROR-16
→ La versión de firmware del iPhone es
antigua.
–Actualice la versión del iPhone.
→ Error del iPhone.
– Desconecte el cable del iPhone. Una
vez que aparezca el menú principal
del iPhone, vuelva a conectar el
iPhone y reinícielo.
STOP
→ No hay canciones en la lista actual.
– Seleccione una lista que contenga
canciones.
NO BT DEVICE GO TO BT MENU TO
REGISTER
→ No se encontró ningún dispositivo
Bluetooth.
– Conecte la unidad y el iPhone
mediante Bluetooth (página 16).
CONN. FAILED PRESS BAND KEY TO
RETRY
→ Error de conexión Bluetooth con
iPhone.
–Presione BAND/ para volver a
establecer una conexión.
DISCONNECTED PRESS BAND KEY TO
RETRY
→ Se perdió la conexión Bluetooth.
–Presione BAND/ para volver a
establecer una conexión.
Dispositivo Bluetooth
ERROR-10
→ Error de alimentación del módulo
Bluetooth de la unidad.
– Gire la llave de encendido a la posición
OFF y nuevamente a ACC u ON.
APP
CONNECT APP
→ No se establece la conexión de Pioneer
Smart Sync.
– Realizar una conexión con Pioneer
Smart Sync (página 22).
Spotify
NOT FOUND
→ La aplicación Spotify aún no comenzó a
ejecutarse.
– Inicie la aplicación Spotify.
NO BT DEVICE GO TO BT MENU TO
REGISTER
→ No se encontró ningún dispositivo
Bluetooth.
– Conecte la unidad y el dispositivo
mediante Bluetooth (página 16).
CONN. FAILED PRESS BAND KEY TO
RETRY
→ Error de conexión Bluetooth.
–Presione BAND/ para volver a
establecer una conexión.
CHECK APP PRESS BAND KEY TO RETRY
→ Error de conexión a la aplicación
Spotify.
–Presione BAND/ para volver a
establecer una conexión.
DISCONNECTED PRESS BAND KEY TO
RETRY
→ Se perdió la conexión Bluetooth.
- 43 -
Page 87
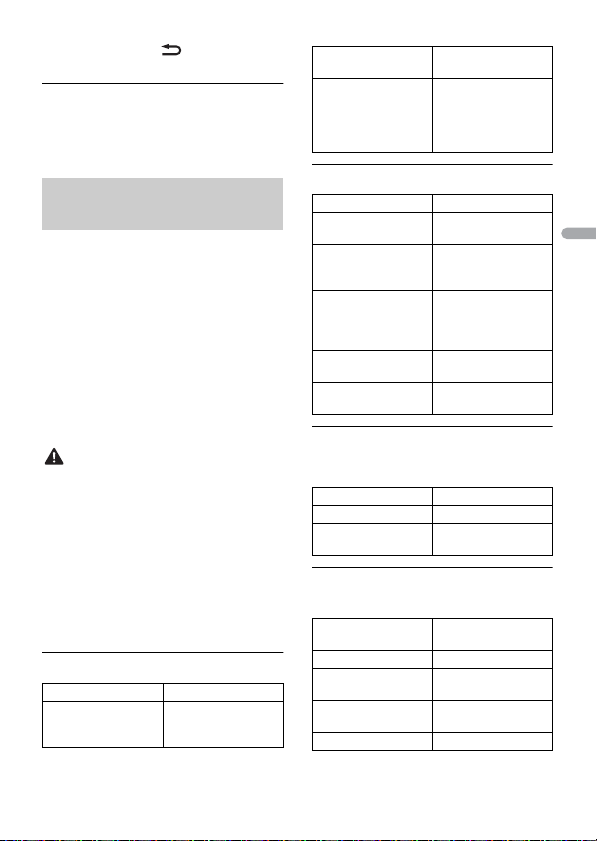
Español
–Presione BAND/ para volver a
PRECAUCIÓN
establecer una conexión.
CHECK APP
→ Se produjo un error desconocido
(incluido un error de comunicación).
– Siga las instrucciones que aparecen en
pantalla.
Compatibilidad de audio
comprimido
• Solo se pueden mostrar los primeros 32
caracteres del nombre de archivo
(incluida la extensión del archivo) o el
nombre de la carpeta.
• Es posible que la unidad no funcione
correctamente según la aplicación usada
para codificar los archivos WMA.
• Puede existir un leve retraso al comienzo
de la reproducción de archivos de audio
que contienen datos de imagen, o
archivos de audio almacenados en un
dispositivo USB con vari as jerarquías de
carpeta.
• Pioneer no puede garantizar la
compatibilidad con todos los dispositivos
de almacenamiento masivo USB y no
asume responsabilidad por ninguna
pérdida de datos en los reproductores
multimedia, teléfonos inteligentes ni
demás dispositivos mientras se use este
producto.
• No deje los discos ni un dispositivo de
almacenamiento USB en un lugar
sometido a altas temperaturas.
Archivos WMA
Extensión de archivos .wma
Velocidad de bits De 48 kbps a 320kbps
(CBR), de 48 kbps a
384 kbps ( VBR)
Frecue ncia de
muestreo
Windows Media™
Audio Profession al,
Lossless, transmisión
de voz/DRM/
transmisión con video
32 kHz, 44,1 kHz,
48 kHz
No compatible
Archivos MP3
Extensión de archivos .mp3
Velocidad de bits De 8 kbps a 320kbps
Frecue ncia de
muestreo
Versión de etiqueta
ID3 compatible
Lista de reproducción
M3u
MP3i (MP3
interactivo), mp3 PRO
(CBR) , VBR
De 8 kHz a 48 kHz
(32 kHz, 44,1 kHz,
48 kHz para énfasis)
1.0, 1.1, 2.2, 2.3, 2.4 (la
versió n de etiqueta
ID3 2.x tiene prioridad
sobre la versión 1.x.)
No compatible
No compatible
Archivos WAV
• Los formatos de archivo WAV no se
pueden conectar mediante MTP.
Extensión de archivos .wav
Bits de cuantificación 8 y 16 (LPCM)
Frecue ncia de
muestreo
De 16 kHz a 48 kHz
(LPCM)
Archivos AAC (solo FH-S725BT/
MVH-S425BT)
Formato compatible AAC codificado por
Extensión de archivos .m4a
Frecue ncia de
muestreo
Velocidad de bits
estéreo
Apple Lossless No compatible
iTunes
De 11,025 kHz a 48
kHz
De 16 kbps a 320
kbps, VBR
- 44 -
Page 88
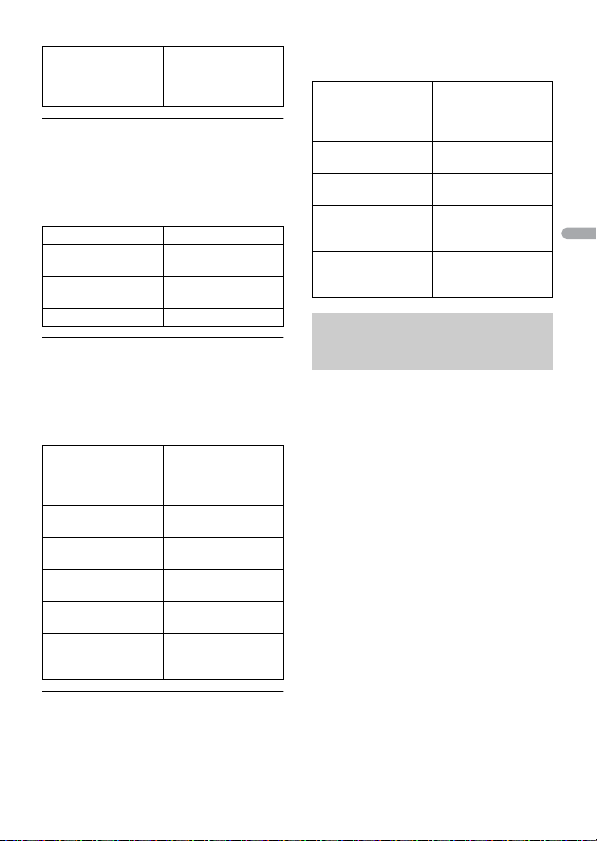
Español
Archivo AAC
comprado en iTunes
Store (extensión de
archivo .m4p)
No compatible
Archivos FLAC
• Los formatos de archivo FLAC no se
pueden conectar mediante MTP.
• Es posible que los archivos FLAC no
puedan reproducirse, según el
codificador.
Extensión de archivos .flac, .fla
Frecuen cia de
muestreo
Velocidad de bits de
cuantificación
Modo de canal 1/2 canales
8/11,025/1 2/16/22,05/
24/32/44,1 /48/96 kHz
8/16/24 bit s
Disco (solo FH-S725BT/S525BT)
• I ndepe ndien temen te de l a dura ción de la
sección en blanco entre las canciones de
la grabación original, los discos de audio
comprimido se reproducen con una
breve pausa entre las canciones.
Jerarquía de carpetas
reprod ucible
Carpeta s
reprod ucibles
Archivos
reprod ucibles
Sistema de archivos ISO 9660 nivel 1 y 2,
Reproducción
multisesión
Transferencia de datos
de escritura en
paquetes
Hasta ocho niveles
(una jerarquía práctica
tiene menos de dos
niveles).
Hasta 99
Hasta 999
Romeo, Joliet
Compati ble
No compatible
Dispositivo USB
• Puede haber un leve retraso al comenzar
a reproducir archivos de audio en un
dispositivo de almacenamiento USB con
varias jerarquías de carpetas.
Jerarquía de carpetas
reproducible
Carpeta s
reproducibles
Archivos
reproducibles
Reproducción de
archivos protegido s
por derechos de au tor
Dispositivo USB
particionado
Hasta ocho niveles
(una jerarquía práctica
tiene menos de dos
niveles).
Hasta 1 500
Hasta 15 000
No compatible
Solo se puede
reproducir la primera
partició n.
Compatibilidad con
iPhone
Esta unidad es compatible con los modelos de
iPhone siguientes. Es posible que las versiones
anteriores no sean compatibles.
Fabricado para
–iPhone XR
–iPhone XS Max
–iPhone XS
–iPhone X
–iPhone 8
–iPhone 8 Plus
–iPhone 7
–iPhone 7 Plus
–iPhone SE
–iPhone 6s
– iPhone 6s Plus
–iPhone 6
–iPhone 6 Plus
–iPhone 5s
• Las operaciones pueden variar según la
generación y/o la vers ión de software del
iPhone.
• Los usuarios de iPhone con el conector
Lightning® deben usar el cable de
Lightning a USB (se suministra con el
iPhone).
- 45 -
Page 89
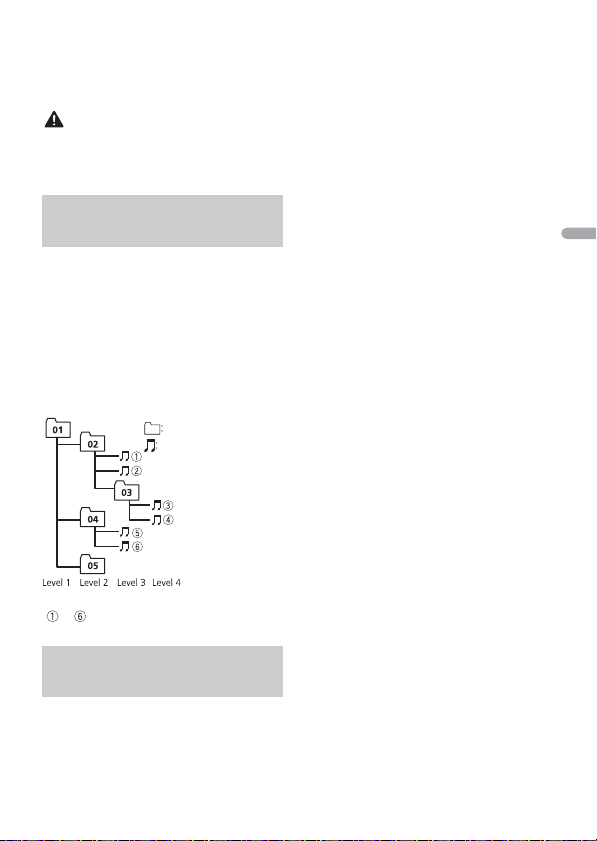
Español
• Consulte los manuales del iPhone para
PRECAUCIÓN
Carpeta
Archivo de audio
comprimido
a : secuencia de reproducción
01 a 05: nú mero de carpeta
obtener información sobre la
compatibilidad de archivos/formatos.
• Audiolibro, Podcast: compatible
Pioneer no acepta responsabilidad por la
pérdida de datos en el iPhone, incluso si los
datos se pierden mientras se usa la unidad.
Secuencia de archivos de
audio
El usuario no puede asignar los números
de carpeta y especificar las secuencias de
reproducción con esta unidad. La
secuencia de los archivos de audio
depende del dispositivo conectado.
Tenga en cuenta que no se pueden
reproducir los archivos ocultos en un
dispositivo USB.
Ejemplo de una jerarquía
Copyright y marcas
comerciales
Bluetooth
La marca literal y los logotipos Bluetooth® son
marcas registradas propiedad de Bluetooth SIG,
Inc., y cualquier uso de dichas marcas por
PIONEER CORPORATION se hace bajo licencia.
Otras marcas y nombres comerci ales son
propiedad de sus respectivos propietarios.
iTunes
Apple e iTunes son marcas comerciales de
Apple Inc., registradas en los EE.UU. y en
otros países.
WMA
Windows Media es una marca registrada o
una marca de fábrica de Microsoft
Corporation en los Estados Unidos y/u
otros países.
Este producto incluye tecnología
propiedad de Microsoft Corporation, y no
se puede usar ni distribuir sin una licencia
de Microsoft Licensing, Inc.
FLAC
Copyright © 2000-2009 Josh Coalson
Copyright © 2011-2014 Xiph.Org
Founda tion
La redistribución y el uso en formas de
código fuente y binaria, con y sin
modificaciones, se permiten siempre que
se cumplan las condiciones siguientes:
– Las redistribuciones de código fuente
deben conservar el aviso anterior de
derechos de autor, esta lista de
condiciones y el siguiente descargo de
responsabilidad.
–Las redistribuciones en forma binaria
deben reproducir el aviso anterior de
derechos de autor, esta lista de
condiciones y el siguiente descargo de
responsabilidad y/o los dem ás materiales
entregados con la distribución.
– No se podrán usar el nomb re de Xiph.org
Foundation ni los nombres de sus
contribuyentes para avalar o
promocionar productos generados a
partir de este software sin el permiso
específico previo por escrito.
LOS TITULARES DE LOS DERECHOS DE
AUTOR Y LOS CONTRIBUYENTES
ENTREGAN ESTE SOFTWARE “TAL CUAL”, Y
- 46 -
Page 90

Español
SE RECHAZAN LAS GARANTÍAS EXPRESAS
O TÁCITAS, INCLUIDAS, ENTRE OTRAS, LAS
GARANTÍAS IMPLÍCITAS DE
COMERCIABILIDAD Y APTITUD PARA UN
FIN EN PARTICULAR EN NINGÚN CASO, LA
FUNDACIÓN NI LOS CONTRIBUYENTES
SERÁN RESPONSABLES POR DAÑOS
DIRECTOS, INDIREC TOS, INCIDENTALES,
ESPECIALES, EJEMPLARES O
CONSECUENTES (INCLUIDA, ENTRE OTRAS,
LA ADQUISICIÓN DE BIENES O SER VICIOS
SUSTITUTOS; PÉRDIDA DE USO, DATOS O
LUCRO CESANTE; NI INTERRUPCIÓN
COMERCIAL) INDEPE NDIENTEMENTE DE LA
CAUSA O LA TEORÍA DE
RESPONSABILIDAD, YA SE DEBA A
OBLIGACIÓN CONTRACTUAL,
EXTRACONTRACTUAL O
RESPONSABILIDAD ESTRICTA (SEA POR
NEGLIGENCIA O NO) QUE SURJA EN
ALGUNA MEDIDA POR EL USO DE ESTE
SOFTWARE, INCLUSO SI SE HA ADVERTIDO
DE LA POSIBILIDAD DE DICHO DAÑO.
iPhone y Lightn ing
El uso de la insignia Made for Apple
significa que un accesorio se diseñó para
conectarlo específicamente a los
productos Apple identificados por la
insignia, y que el desarrollador cer tificó
que cumple con las normas de
rendimiento de Apple. Apple no es
responsable del funcionamiento de este
dispositivo o de su cumplimiento con la
seguridad y las normas regulatorias.
Observe que el uso de este accesorio con
un producto Apple podría afectar al
rendimiento inalámbrico.
iPhone y Lightning son marcas comerciales
de Apple Inc., registradas en los EE. UU. y
en otro países.
Siri®
Funciona con Siri a través del micrófono.
Google™, Google Play, Android
Google, Google Play y Android son marcas
comerciales de Google LLC.
MIXTRAX
MIXTRAX es una marca comercial de
PIONEER CORPORATION.
Spotify®
SPOTIFY y el logotipo de Spotify son
marcas comerciales registradas de Spotify
AB. Es necesario tener dispositivos
digitales móviles compatibles y una
suscripción premium, cuando estén
disponibles, consulte https://
www.spotify.com.
T-K erne l 2. 0
Este producto usa el código fuente de TKernel 2.0 bajo T-License 2.0 otorgada por
T-Engine Forum (www.tron.org).
MP3
Copyright (C) 1998-2009 PacketVideo
Bajo licencia de Apache, versión 2.0 (la
“Licencia”); no puede usar este archivo a
menos que cumpla con la licencia.
Puede obtener una copia de la licencia en
http://www.apache.org/licenses/LICENSE-
2.0
A menos que lo solicite la ley o esté
acordado por escrito, el software
distribuido bajo la Licencia se distribuye A
BASE “TAL COMO ES”, SIN GARANTÍAS NI
CONDICIONES DE NINGÚN TIPO, expresas
o implícitas.
Consulte la Licencia para conocer los
permisos específicos del idioma y las
limitaciones bajo la Licencia.
- 47 -
Page 91

Português (B)
Sobre este manual:
Índice
Primeiros passos...................................................................................... 3
Rádio....................................................................................................... 11
CD/USB/iPhone®/AUX.......................................................................... 13
Bluetooth............................................................................................... 15
Spotify® .................................................................................................. 20
Usar o Pioneer Smart Sync/APP......................................................... 22
Usando a função Karaoke................................................................... 25
Ajustes de áudio................................................................................... 27
Configurações ....................................................................................... 28
Configurações FUNCTION ................................................................... 29
Configurações de AUDIO ..................................................................... 30
Configurações SYSTEM........................................................................ 33
Configurações ILLUMINATION............................................................ 37
Configurações de MIXTRAX................................................................. 38
Configurações de MICROPHONE........................................................ 40
Informações adicionais ....................................................................... 41
• Nas instruções a seguir, uma memória USB ou reprodutor de áudio USB serão referidos
como “dispositivo USB”.
- 2 -
Page 92
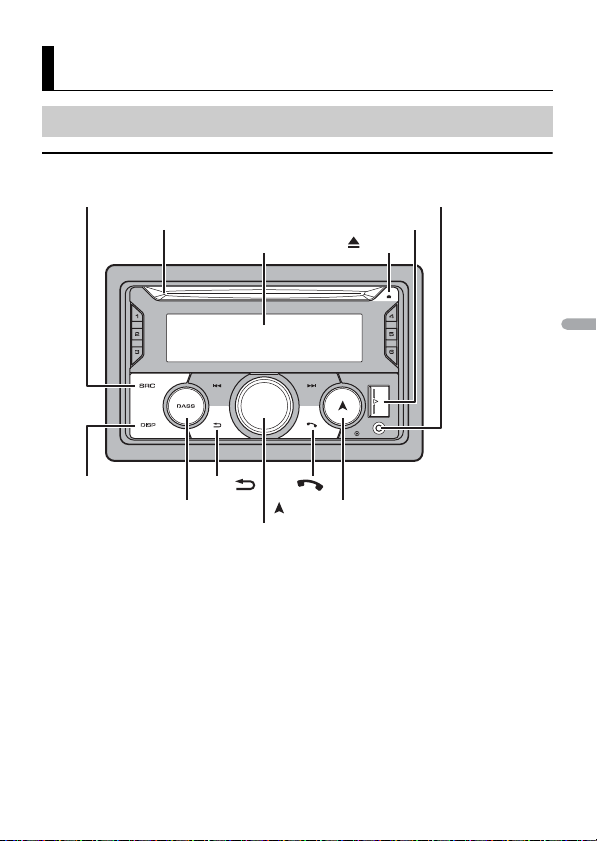
Português (B)
Primeiros passos
SRC (fonte)/OFF
Janela de visualização
Seletor M.C. (multicontrole)
BAND/
DISP (visualização)/
DISP OFF
(navegação)/LIST
Porta USB
Tomada de entrada AUX (tomada estéreo de 3,5 mm)
(ejetar)
Abertura de carregamento de disco
BASS
Operação básica
FH-S725BT
- 3 -- 3 -
Page 93
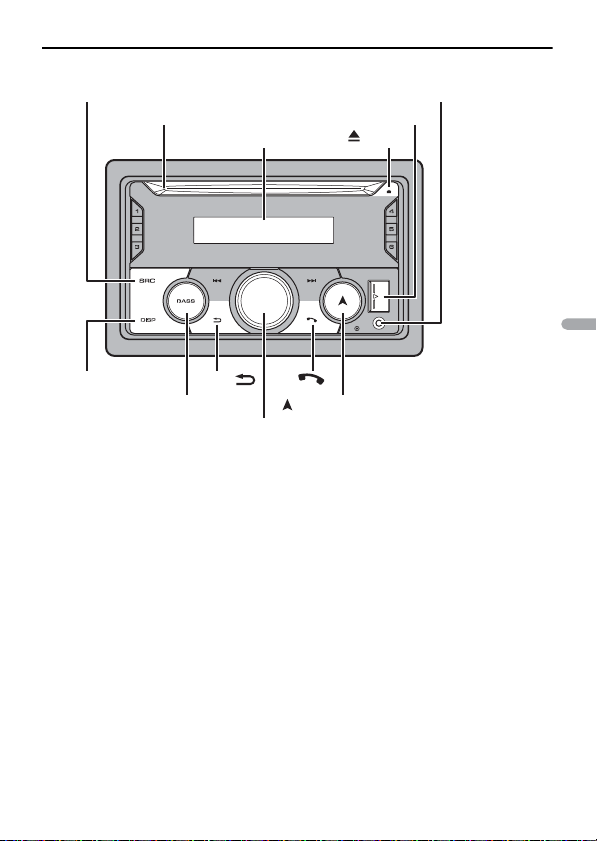
Português (B)
FH-S525BT
Seletor M.C. (multicontrole)
BAND/
(navegação)/LIST
Porta USB
Tomada de entrada AUX (tomada estéreo de 3,5 mm)
(ejetar)
Abertura de carregamento de disco
DISP (visualização)/
DISP OFF
Janela de visualização
SRC (fonte)/OFF
BASS
- 4 -
Page 94
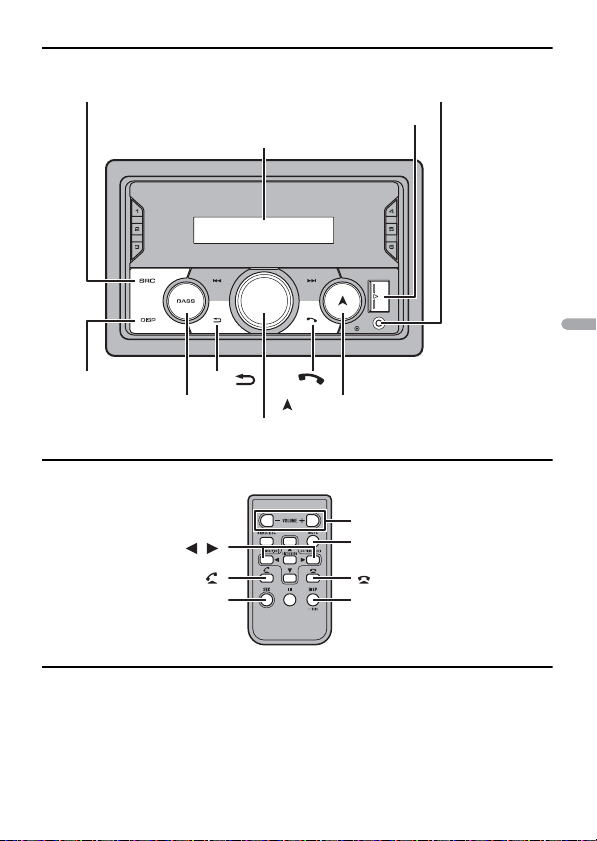
Português (B)
MVH-S425BT
Seletor M.C. (multicontrole)
BAND/
(navegação)/LIST
Porta USB
Tomada de entrada AUX (tomada estéreo de 3,5 mm)
DISP (visualização)/
DISP OFF
Janela de visualização
SRC (fonte)/OFF
BASS
/
SRC (fonte)
VOLUME +/–
MUTE
DISP (visualização)
Controle Remoto
Operações mais usadas
Os botões disponíveis variam dependendo da unidade.
- 5 -- 5 -
Page 95
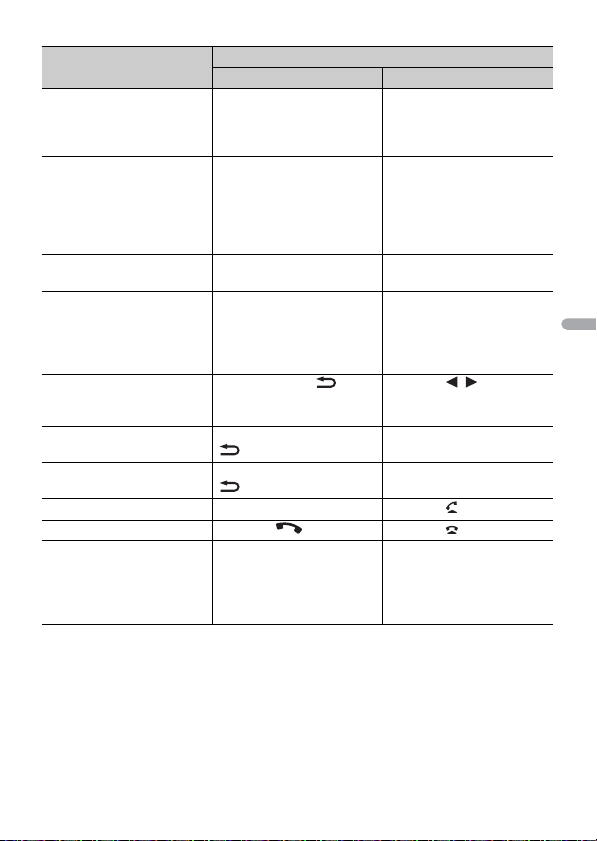
Português (B)
Propósito
Ligue o aparelho* Pressione SRC/OFF para
Unidade Principal Controle Remoto
ligar a energia.
Pressione e segure SRC/OFF
para desligar a energia.
Ajuste o volume Gire o seletor M.C..Pressione VO LUME + ou –.
Selecione uma fonte Pressione SRC/OFF
Altere as informações de
exibição
Voltar para a visualização/
lista anterior
Voltar para a visualização
normal do menu
Alterar o brilho da tela Pressione e segure BAND/
repetidamente.
Pressione DISP/DISP OFF
repetidamente.
Pressione e segure DISP/
DISP OFF para desligar a
informação da visualização.
Pressione BAND/ . Pressione / para
Pressione e segure BAND/
.
.
Operação
Pressione SRC para ligar a
energia.
Pressione e segure SRC para
desligar a energia.
Pressione MUTE para
silenciar o aparelho.
Pressione MUTE novamente
ou pressione VOLUME + ou
– para ativar o som.
Pressione SRC
repetidamente.
Pressione DISP
repetidamente.
selecionar a pasta seguinte/
anterior.
–
–
Atender uma chamada Pressione qualquer botão. Pressione .
Terminar uma chamada Pressione . Pressione .
Reforçar o nível de graves Pressione BASS.
* Quando o fio condutor azul/branco desta unidade é conectado ao terminal de controle do relé da
antena automática do veículo, a antena do veículo se estende quando a fonte da unidade é ligada.
Para retrair a antena, desligue a fonte.
• Você pode selecionar o
nível de graves ([HI] ou
[LOW]) em [D.BASS]
(página 33).
–
- 6 -
Page 96
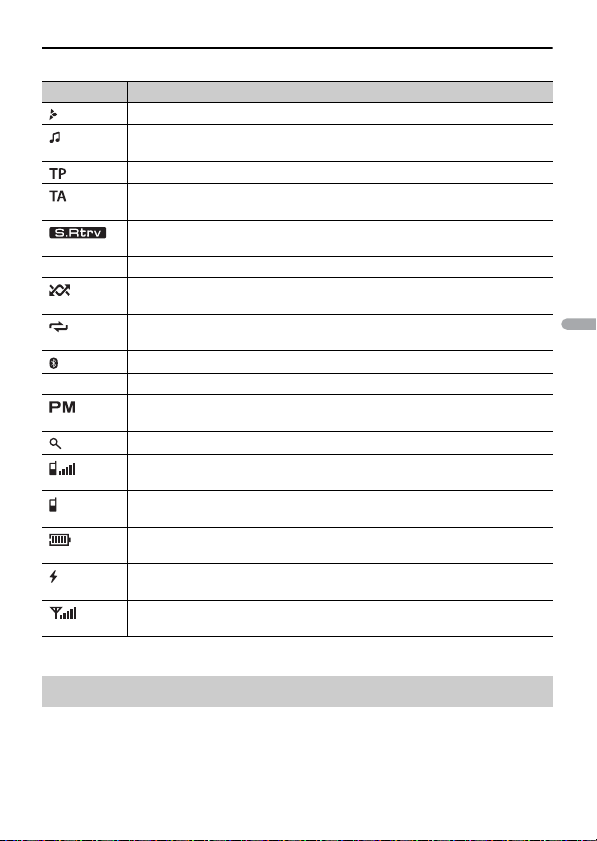
Português (B)
Indicação de visualização
Indicação Descrição
É visualizado quando há uma camada inferior do menu ou pasta.
* Aparece quando um leitor de áudio Bluetooth é conectado nesta unidade
Aparece quando um programa de trânsito é recebido.
* Aparece quando a função TA (anúncios de tráfego) está definida
BASS Aparece quando a função BASS é ativada.
APP Aparece quando uma conexão Pioneer Smart Sync é efetuada (página 22).
* Aparece quando o menu de listagem é exibido.
* Aparece quando um segundo telefone Bluetooth está conectado nesta
* Aparece quando um dispositivo está sendo conectado na unidade para
* Somente para FH-S725BT
por A2DP (Advanced Audio Distribution Profile) (página 15).
(página 29).
* Aparece quando a função de recuperador de som está definida
(página 33).
Aparece quando a reprodução aleatória está definida (exceto quando BT
AUDIO está selecionado como fonte).
Aparece quando a reprodução em repetição está definida (exceto quando
BT AUDIO está selecionado como fonte).
Aparece quando uma conexão Bluetooth é feita (página 15).
* Aparece quando a função [CLOCK SET] está definida como [12H]
(página 33).
* Aparece quando um telefone Bluetooth está conectado nesta unidade.
Indica o n ível da antena.
unidade.
* Aparece quando um telefone Bluetooth está conectado nesta unidade.
Indica o n ível da bateria.
carregamento.
* Aparece quando um sinal de rádio é recebido.
Indica o n ível da antena.
Redefinindo o microprocessador
O microprocessador deve ser redefinido nas seguintes situações:
– Antes de usar este aparelho pela primeira vez, após a instalação
– Se a unidade não funcionar corretamente
- 7 -- 7 -
Page 97
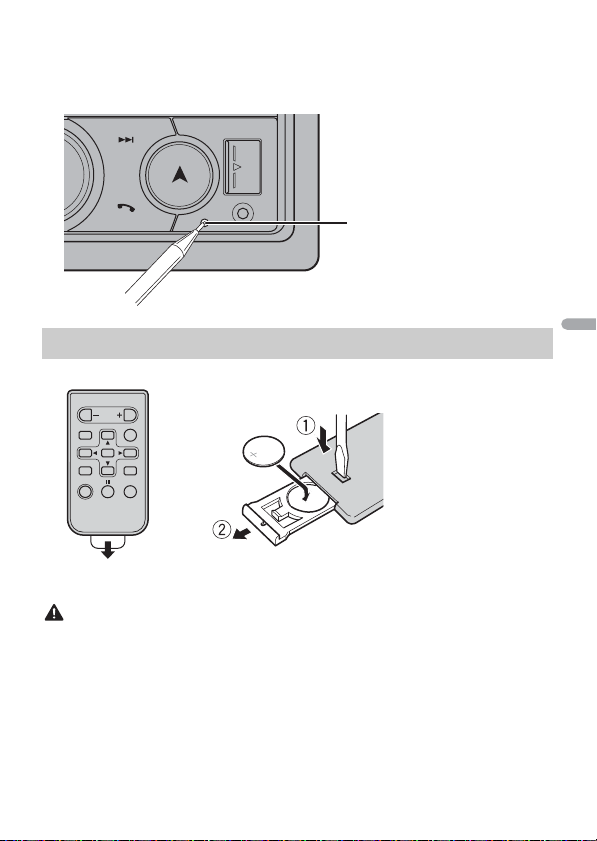
Português (B)
– Quando mensagens estranhas ou incorretas aparecerem no visor
ADVERTÊNCIA
Botão RESET
Como substituir a bateria
Insira a bateria CR2025 (3 V) com os polos positivo (+) e
negativo (-) orie ntados corretamente.
1 Pressione o botão RESET com a ponta de uma caneta ou com outro instrumento
pontiagudo.
Preparando o controle remoto
Remova a folha de isolamento antes de usar.
• Não ingira a bateria, perigo de queimadura por produto químico
(O controle remoto fornecido com) Este produto contém bateria de célula d o tipo moeda/botão. Se a
bateria de célula do tipo moeda/botão for engolida, ela poderá provocar severa queimadura interna
em apenas duas horas e poderá causar até a morte.
Mantenha as baterias novas e usadas longe do alcance de crianças.
Se o compar timento da bateria não fechar bem, pare de us ar o produto e mantenha- o longe do
alcance de crianças.
Se achar que as baterias podem ter sido engolidas ou introduzidas em qualquer parte do corpo,
consulte um m édico imediatamente.
- 8 -
Page 98
Português (B)
• As baterias (tanto o pacote quanto as instaladas) não sevem ser expostas a calor excessivo como luz
CUIDADO
Importante
ADVERTÊNCIA
solar, fogo ou similares.
• H á perigo de explos ão da bateria caso s eja substituída i ncorretamente. Substit ua somente com o
mesmo tipo ou equ ivalente.
• Não manuseie ou armazene a bateria com ferramentas ou objetos metálicos.
• Em caso de vazamento da bateria, remova a bateria e limpe o controle remoto completamente. Em
seguida, instale uma bateria nova.
• Ao s e desfazer das baterias usadas, faça-o segundo as normas governamentais ou os regulamentos
de instituições ambientais públicas que sejam aplicáveis em seu país/região.
• Não guarde o controle remoto em altas temperaturas ou luz solar direta.
• Não deixe o controle remoto cair no chão, onde pode ficar preso embaixo do pedal do freio ou
acelerador.
Menu de configuração
Quando você vira o interruptor de ignição para ON após a instalação, o menu de
configuração é exibido no visor.
(Somente para FH-S725BT)
Não use a unidade em modo padrão quando houver um sistema de alto-falantes em modo de rede
conectado à unidade. Não use a unidade em modo de rede quando houver um sistema de alto-falantes
em modo padrão conectado à un idade. Isso pode causar danos aos alto-falantes.
1 Gire o seletor M.C. para selecionar as opções, e então pressione para confirmar.
Para avançar para a próxima opção do menu, você precisa confirmar a sua seleção.
Item do Menu Descriçã o
LANGUAGE Selecione o idioma para exibir as informações do texto de um
[ENG](Inglês),
[ESP](Espanhol)
CLOCK SET Configure o relógio.
FM STEP Selecione o passo de sintonia FM de 100 kHz ou 50 kHz.
[100], [50]
arquivo de áudio comprimido.
1 Gire o seletor M.C. para ajustar a hora e pressione para
confirmar.
O indicador se move para a configuração dos segundos
automaticamente.
2 Gire o seletor M.C. para ajustar os minutos e pressione para
confirmar.
- 9 -- 9 -
Page 99

Português (B)
NOTA
NOTA
Item do Menu Descriçã o
AM STEP Selecione o passo de sintonia AM de 10 kHz ou 9 kHz.
[10], [9]
SPEAKER MODE
(Somente para FHS725BT)
Alterne entre dois modos de operação: o modo de rede
bidirecional (NETWORK) e o modo padrão (STANDARD), de
acordo com as conexões realizadas por você.
Após selecionar o modo apropriado, gire o seletor M.C. para
selecionar [YES] e pressione para confirmar.
• O men u de configuração não se conclui sem a configuração de
[SPEAKER MODE].
2 [QUIT :YES] aparece.
Para retornar ao primeiro item do menu de configuração, gire o seletor M.C. para
selecionar [QUIT :NO], e então pressione para confirmar.
3 Pressione o seletor M.C. para confirmar as configurações.
Essas configurações, exceto [SPEAKER MODE], podem ser ajustadas sempre que se quiser, nas
configurações do SYSTEM (página 33) e nas configurações INITIAL (página 10).
Cancelamento da visualização de demonstração
(DEMO OFF)
1 Pressione o seletor M.C. para exibir o menu principal.
2 Gire o seletor M.C. para selecionar [SYSTEM], e então pressione para confirmar.
3 Gire o seletor M.C. para selecionar [DEMO OFF], e então pressione para confirmar.
4 Gire o seletor M.C. para selecionar [YES], e então pressione para confirmar.
Configurações INITIAL
1 Pressione e segure SRC/OFF até desligar a unidade.
2 Pressione o seletor M.C. para exibir o menu principal.
3 Gire o seletor M.C. para selecionar [INITIAL], e então pressione para confirmar.
4 Gire o seletor M.C. para selecionar uma opção, e então pressione para confirmar.
As opções var iam dependendo da unid ade.
- 10 -
Page 100
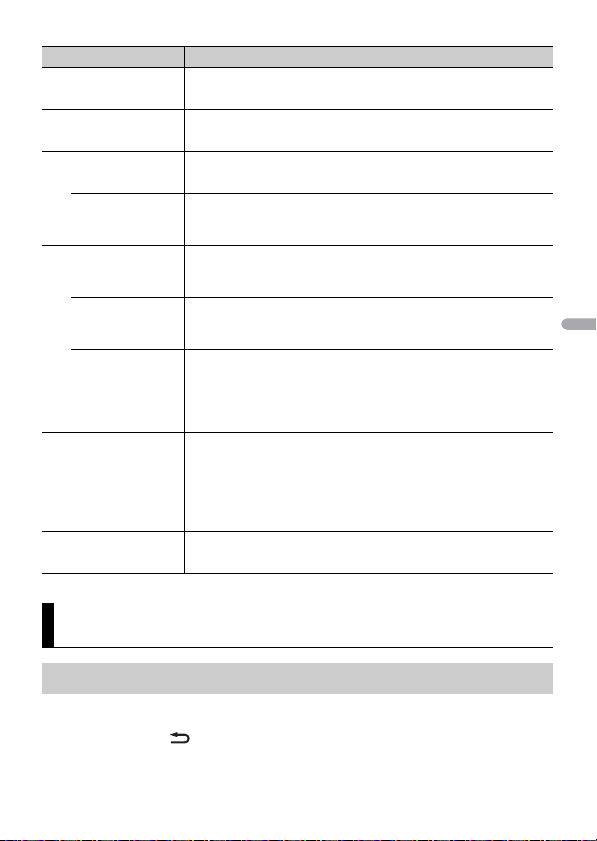
Português (B)
Item do Menu Descriçã o
FM STEP Selecione o passo de sintonia FM de 100 kHz ou 50 kHz.
[100], [50]
AM STEP Selecione o passo de sintonia AM de 10 kHz ou 9 kHz.
[10], [9]
REAR-SP Selecione quando há um alto-falante full range conectado à
[FUL]
[SW] Selecione quando há um subwoofer conectado diretamente à
SP-P/O MODE Selecione quando há um alto-falante tipo full range conectado à
[REAR/SUB.W]
[SUB.W/S UB.W] Selecione quando há um su bwoofer passivo ligado diretam ente
[REAR/REAR] Selecione quando há alto-falantes tipo full range ligados aos
SYSTEM UPDATE Selecione [SYSTEM INFO] para confirmar as informações de
[SYSTEM INFO], [S/
W UPDATE]
SYSTEM RESET Selecione [YES] para inicializar as configurações da unidade. A
[YES], [NO]
saída de ligações do alto-falante traseiro.
saída de ligações do alto-falante traseiro sem qualquer
amplificador auxiliar.
saída de ligações do alto-falante traseiro e há um subwoofer
conectado à saída RCA.
à saída de ligações do alto-falante traseiro e há um subwoofer
conectado à saída RCA.
condutores de saída de alto-falante traseiro e uma saída RCA. Se
houver um alto-falante tipo full range conectado à saída de
ligações do alto-falante traseiro, e a saída RCA não é usad a, você
pode selecionar [REAR/SUB.W] ou [REAR/REAR].
sistema mais recentes na unidade.
Selecione [S/W UPDATE] para atualizar o aparelho com o
software mais recente e inicializar as configurações do aparelho.
Para detalhes sobre o software mais recente e como atualizar,
visite nosso site.
unidade será reiniciada automaticamente.
Rádio
Recebendo estações memorizadas
1 Pressione SRC/OFF para selecionar [RADIO].
2 Pressione BAND/ para selecionar a faixa de [FM1], [FM2], [FM3], [AM], [SW1]
ou [SW2].
- 11 -- 11 -
 Loading...