

Page 1

Multi-CD control DSP High power CD Cassette player
with RDS tuner
Operation Manual
FH-P4000R
English
Italiano
Español
Français
Italiano
Nederlands
Page 2
Before You Start
About this unit 4
About this manual 4
Precautions 4
In case of trouble 4
Protecting your unit from theft 4
• Removing the front panel 5
• Attaching the front panel 5
Resetting the microprocessor 5
What’s What
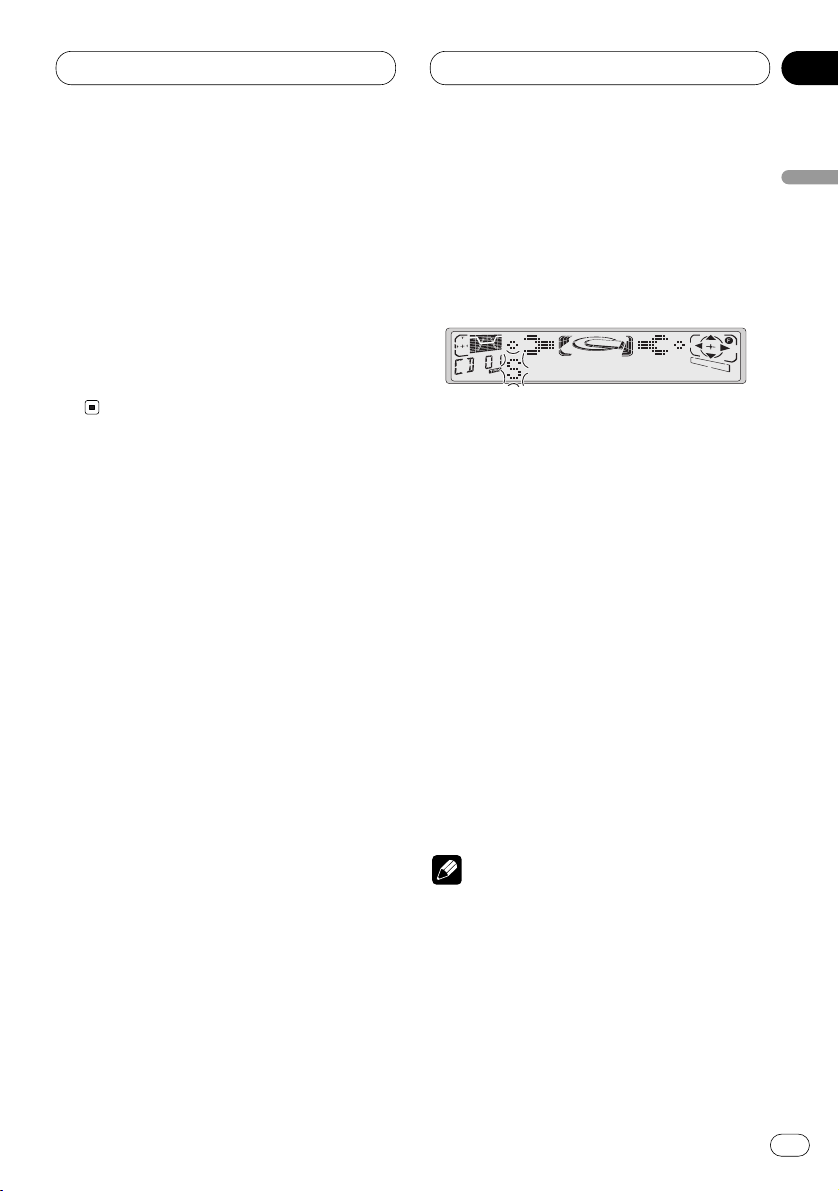
Head unit 6
Optional remote control 7
• Using the remote control with PGM
button 7
Power ON/OFF
Turning the unit on 8
Selecting a source 8
Turning the unit off 8
Tuner
Listening to the radio 9
Introduction of advanced tuner
operation 11
Storing and recalling broadcast
frequencies 12
Tuning in strong signals 12
Storing the strongest broadcast
frequencies 13
RDS
Introduction of RDS operation 14
Switching the RDS display 15
Selecting alternative frequencies 15
• Using PI Seek 16
• Using Auto PI Seek for preset
stations 16
• Limiting stations to regional program-
ming 16
Receiving traffic announcements 17
• Responding to the TP alarm 17
Using PTY functions 18
• Searching for a RDS station by PTY
information 18
• Using news program interruption 18
• Receiving PTY alarm broadcasts 18
Using radio text 19
• Displaying radio text 19
• Storing and recalling radio text 19
PTY list 20
Cassette Player
Playing a tape 21
Introduction of advanced cassette player
operation 23
Repeating play 23
Skipping blank tape sections 24
Using Dolby noise reduction 24
Built-in CD Player
Playing a CD 25
Introduction of advanced built-in CD player
operation 27
Repeating play 28
Playing tracks in a random order 28
Scanning tracks of a CD 28
Pausing CD playback 28
Using disc title functions 29
• Entering disc titles 29
• Displaying disc titles 30
Using CD TEXT functions 30
• Displaying titles on CD TEXT discs 30
• Scrolling titles in the display 30
Thank you for buying this Pioneer product.
Please read through these operating instructions so you will know how to operate your model properly. After you have finished reading the instructions, put them
away in a safe place for future reference.
Contents
En
2
00
Section
Page 3
Multi-CD Player
Playing a CD 31
Introduction of advanced multi-CD player
operation 33
Repeating play 34
Playing tracks in a random order 34
Scanning CDs and tracks 34
Pausing CD playback 35
Using ITS playlists 35
• Creating a playlist with ITS program-
ming 35
• Playback from your ITS playlist 36
• Erasing a track from your ITS
playlist 36
• Erasing a CD from your ITS playlist 36
Using disc title functions 37
• Entering disc titles 37
• Displaying disc titles 38
• Selecting discs from the disc
title list 38
Using CD TEXT functions 38
• Displaying titles on CD TEXT disc 39
• Scrolling titles in the display 39
Using compression and bass emphasis 39
50-disc multi-CD player 39
Audio Adjustments
Introduction of audio adjustments 40
Using balance adjustment 41
Adjusting loudness 41
Adjusting source levels 41
Digital Signal Processor
Using the digital signal processor 43
Using the graphic equalizer 44
• Recalling equalizer curves 44
• Adjusting equalizer curves 45
• Adjusting 9-band graphic equalizer 45
Using sound field control, octaver and BBE
sound 46
• Recalling sound field programs 46
• Adjusting BBE sound level 46
Using the position selector 47
Using subwoofer output 47
• Adjusting subwoofer settings 48
Using the high pass filter 48
Initial Settings
Adjusting initial settings 49
Setting the FM tuning step 50
Switching Auto PI Seek 50
Setting the warning tone 50
Switching the auxiliary setting 50
Switching the dimmer setting 51
Switching the rear output setting 51
Selecting the digital attenuator 51
Adjusting display contrast 52
Other Functions
Introduction of other functions 53
Using the demonstration 53
Using different entertainment displays 53
Cellular telephone muting 54
Using the AUX source 54
• Selecting AUX as the source 54
• Setting the AUX title 54
Additional Information
Cassette tapes 55
Cleaning the playback head 55
Music search and repeat functions 55
CD player and care 55
CD-R discs 56
Understanding built-in CD player error mes-
sages 56
Specifications 57
Contents
En
3
00
Section
English
Español
Deutsch
Français
Italiano
Nederlands
Page 4
En
4
01
Section
Before You Start
About this unit
The tuner frequencies on this unit are allocated
for use in Western Europe, Asia, the Middle
East, Africa and Oceania. Use in other areas
may result in improper reception. The RDS function operates only in areas with FM stations
broadcasting RDS signals.
About this manual
This unit features a number of sophisticated
functions ensuring superior reception and operation. All the functions have been designed for
the easiest possible use, but many are not selfexplanatory. This operation manual will help you
benefit fully from this product’s potential and to
maximize your listening enjoyment.
We recommend that you familiarize yourself
with the functions and their operation by reading through the manual before you begin using
this unit. It is especially important that you read
and observe precautions on this page and in
other sections.
This manual explains head unit operation. You
can perform the same operations with the steering remote control (sold separately).
Precautions
•A CLASS 1 LASER PRODUCT label is affixed
to the top of this unit.
• The Pioneer CarStereo-Pass is for use only in
Germany.
• Keep this manual handy as a reference for
operating procedures and precautions.
• Always keep the volume low enough so you
can hear sounds outside of the car.
• Protect this product from moisture.
• If the battery is disconnected or discharged,
the preset memory will be erased and must be
reprogrammed.
In case of trouble
Should this product fail to operate properly,
contact your dealer or nearest authorized
Pioneer Service Station.
Protecting your unit from theft
The front panel can be detached from the head
unit and stored in the protective case provided
to discourage theft.
• If the front panel is not detached from the
head unit within five seconds of turning off
the ignition, a warning tone will sound.
• You can turn off the warning tone. See
Switching the warning tone on page 50.
Important
• Never use force or grip the display and the
buttons tightly when removing or attaching.
• Avoid subjecting the front panel to excessive
shocks.
• Keep the front panel out of direct sunlight and
high temperatures.
This product complies with the EMC
Directives (89/336/EEC, 92/31/EEC) and
CE Marking Directive (93/68/EEC).
CLASS 1
LASER PRODUCT
Page 5
Before You Start
En
5
01
Section
English
Español
Deutsch
Français
Italiano
Nederlands
Removing the front panel
1 Press DETACH to release the front panel.
Press DETACH and the left side of the panel is
released from the head unit.
DETACH button
2 Grab the front panel and remove.
Grab the left side of the front panel and pull
away to the right. The front panel will be
detached from the head unit.
3 Put the front panel into the protective case
provided for safe keeping.
Attaching the front panel
1 Place the front panel flat against the head
unit.
2 Press the front panel into the face of the
head unit until it is firmly seated.
Resetting the microprocessor
The microprocessor must be reset under the
following conditions:
• Prior to using this unit for the first time after
installation
• If the unit fails to operate properly
• When strange or incorrect messages appear
on the display
1 Remove the front panel.
See Removing the front panel on this page.
2 Press
RESET on the head unit with a pen
tip or other pointed instrument.
RESET button
Page 6
En
6
02
Section
What’s What
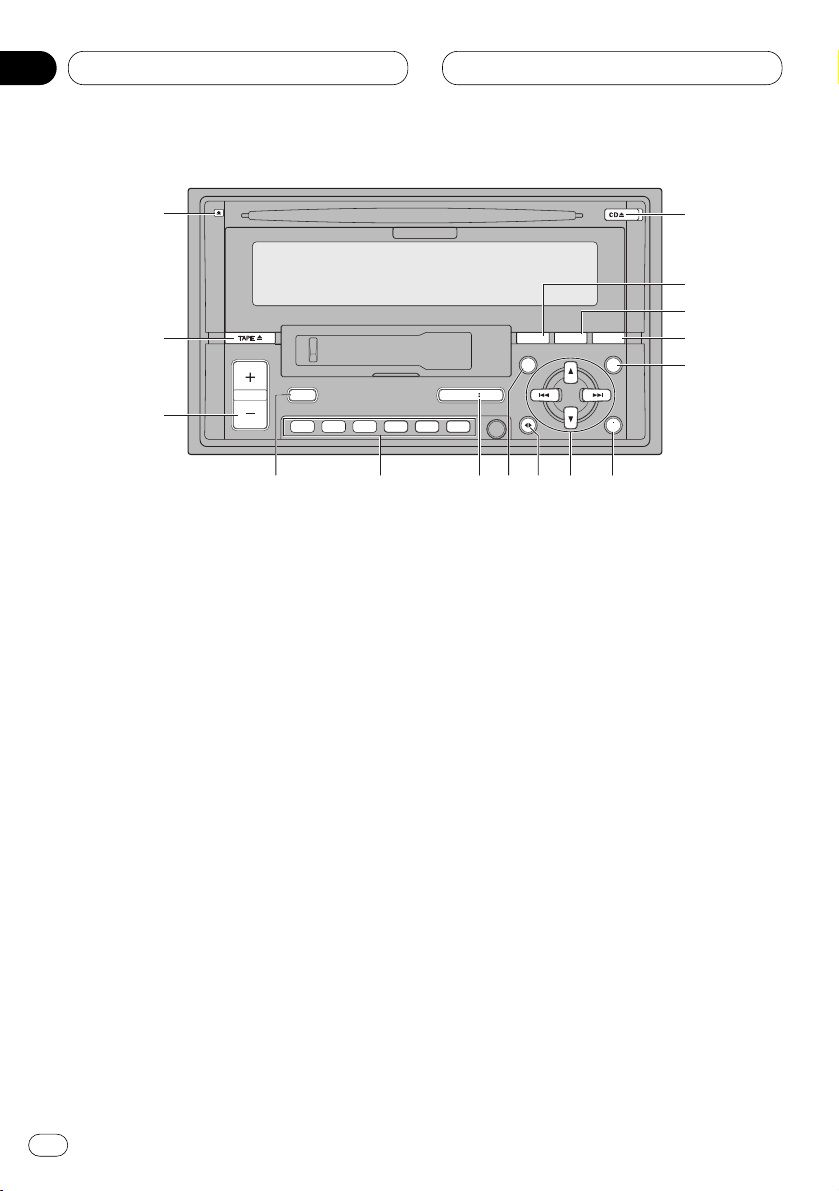
Head unit
1 CD EJECT button
Press to eject a CD from your built-in CD
player.
2 ENTERTAINMENT button
Press to change to the entertainment display.
3 DISPLAY button
Press to select different displays.
4 TEXT button
Press to switch radio text function on or off.
5 FUNCTION button
Press to select functions.
6 AUDIO button
Press to select various sound quality controls.
7 5/∞/2/3 buttons
Press to do manual seek tuning, fast forward, reverse and track search controls. Also
used for controlling functions.
8 BAND/ESC button
Press to select among three FM or MW/LW
bands and cancel the control mode of functions.
9 DSP button
Press to select sound field functions.
0 SOURCE/OFF button
This unit is switched on by selecting a
source. Press to cycle through all of the
available sources.
- 1–6 buttons
Press for preset tuning and disc number
search when using a multi-CD player.
= TA button
Press to switch traffic announcements function on or off.
~
VOLUME button
Press to increase or decrease the volume.
! TAPE EJECT button
Press to eject a tape from your cassette
player.
ENTENT DISPDISP TEXTTEXT
TATA SOURCESOURCE/ OFF/ OFF
654321
FD
A
1
5
!
76908
~
3
-
4
=
@
2
Page 7
What’s What
En
7
02
Section
English
Español
Deutsch
Français
Italiano
Nederlands
~
#
7
5
6
0
8
@ DETACH button
Press to remove the front panel from the
head unit.
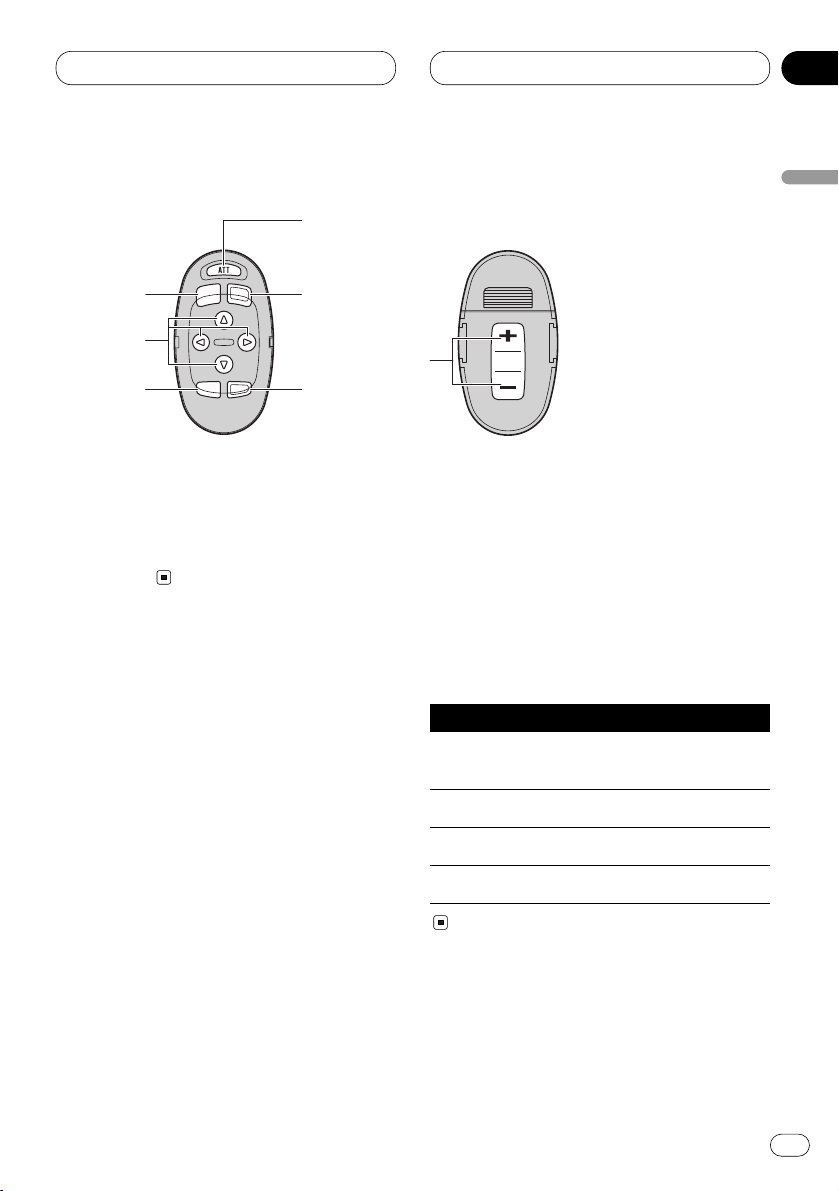
Optional remote control
The steering remote control CD-SR80 is sold
separately. Operation is the same as when
using the button on the head unit. See the
explanation of the head unit about the operation
of each button with the exception of ATT , which
is explained below.
# ATT button
Press to quickly lower the volume level, by
about 90%. Press once more to return to the
original volume level.
Using the remote control with PGM
button
The remote control CD-R600, which is sold separately, can also operate this unit. It has a PGM
(program) button in which frequently used functions are preprogrammed for each source.
Press PGM to active functions as follows:
Source Function name Page
Tuner BSM (on/off) 13
(Hold for 2 seconds)
Cassette player Blank skip (on/off) 24
Built-in CD player Pause (on/off) 28
Multi-CD player Pause (on/off) 35
Page 8
En
8
03
Section
Power ON/OFF
Turning the unit on
Press SOURCE/OFF to turn the unit on.
When you select a source the unit is turned on.
Selecting a source
You can select a source you want to listen to. To
switch to the built-in CD player, load a disc in
this unit (refer to page 25). To switch to the cassette player, load a cassette tape in this unit
(refer to page 21).
Press SOURCE/OFF to select a source.
Press SOURCE/OFF repeatedly to switch
between the following sources:
Built-in CD player—Tuner—Cassette player—
Multi-CD player—External unit 1—
External unit 2 —AUX
Notes
• In the following cases, the sound source will
not change:
— When a product corresponding to each
source is not connected to this unit.
— When no disc is set in this unit.
— When no cassette is set in this unit.
— When no magazine is set in the multi-CD
player.
— When the AUX (external input) is set to off
(refer to page 50).
• External unit refers to a Pioneer product (such
as one available in the future) that, although
incompatible as a source, enables control of
basic functions by this unit. Two external units
can be controlled by this unit. When two external units are connected, the allocation of
them to external unit 1 or external unit 2 is
automatically set by this unit.
• When this unit’s blue/white lead is connected
to the car’s auto-antenna relay control terminal, the car’s antenna extends when this
unit’s source is switched on. To retract the
antenna, switch the source off.
Turning the unit off
Press
SOURCE/OFF and hold for at least one
second to turn the unit off.
Page 9
Tuner
En
9
04
Section
English
Español
Deutsch
Français
Italiano
Nederlands
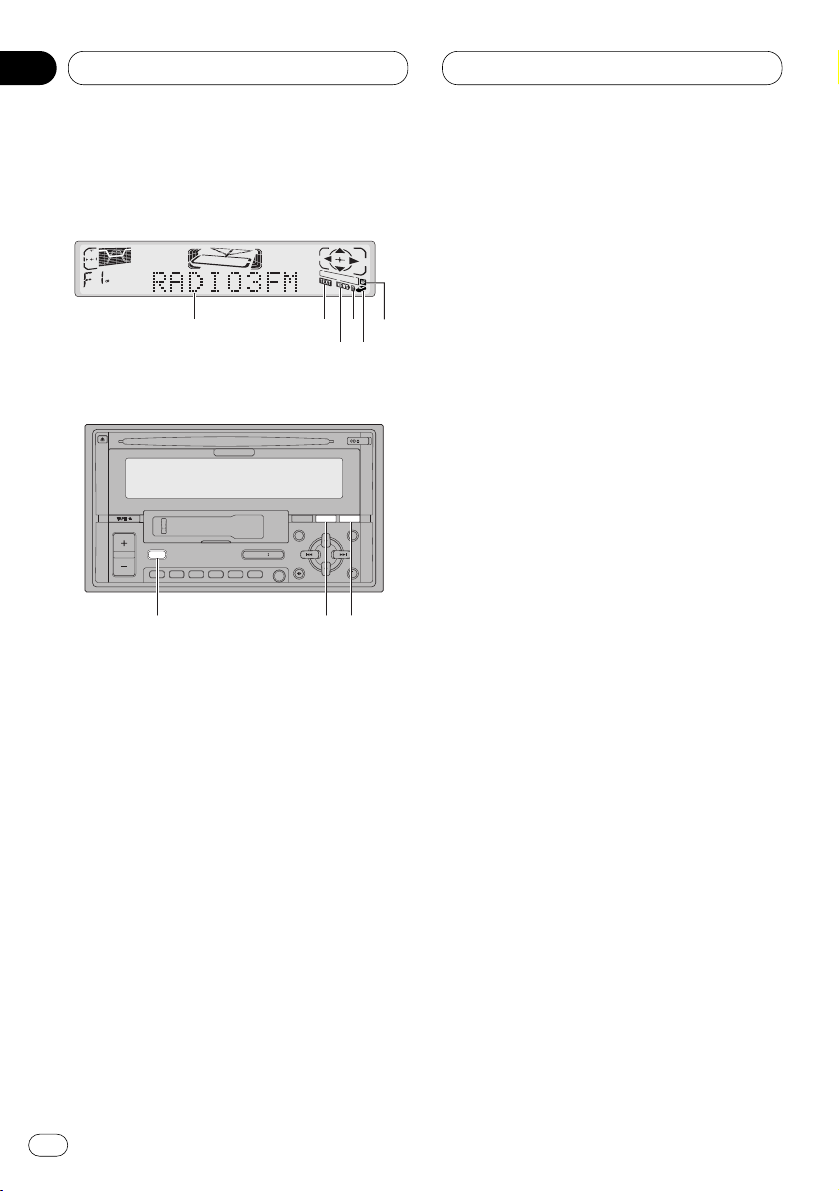
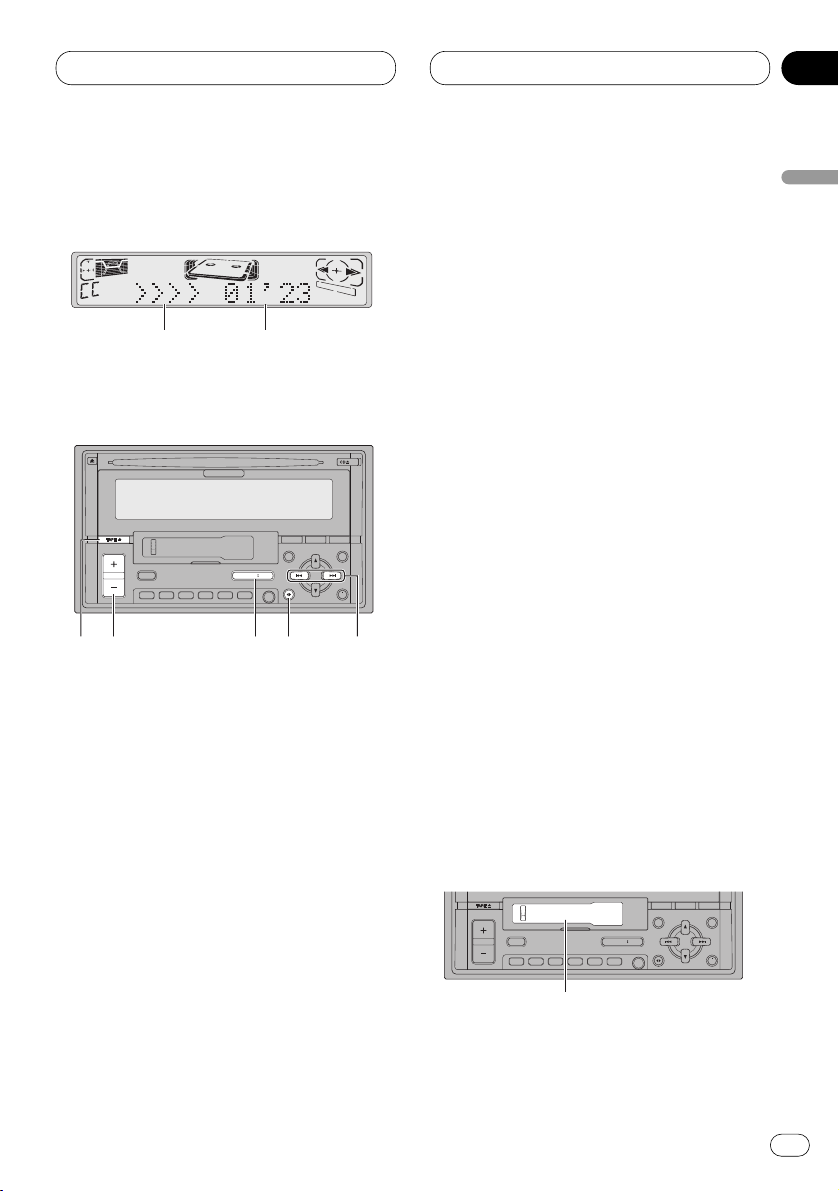
Listening to the radio
These are the basic steps necessary to operate
the radio. More advanced tuner operation is
explained starting on page 11.
This unit’s AF (alternative frequencies search)
function can be switched on and off. AF should
be off for normal tuning operation (refer to page
15).
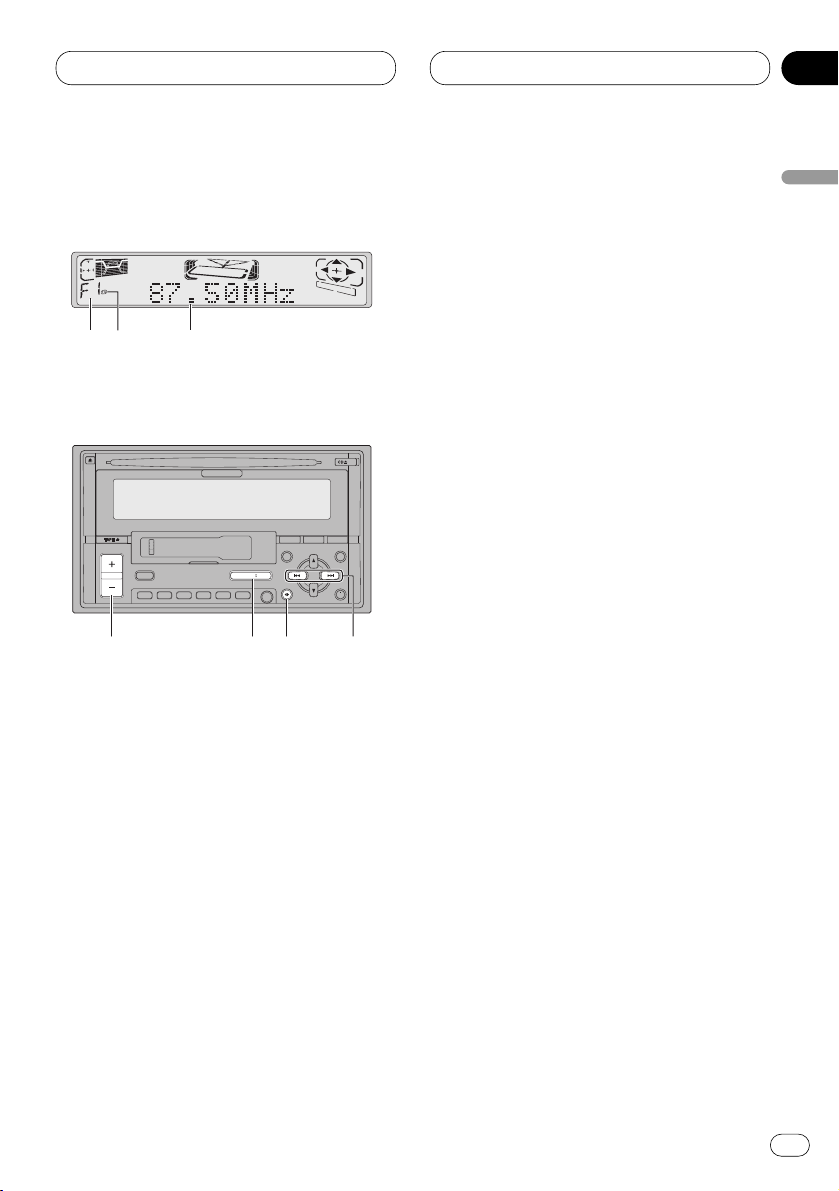
1 BAND indicator
Shows which band the radio is tuned to, MW,
LW or FM.
2 STEREO () indicator
Shows that the frequency selected is being
broadcast in stereo.
3 FREQUENCY indicator
Shows to which frequency the tuner is
tuned.
4 2/3 buttons (Manual or seek tuning)
Press to tune in a radio station.
5 BAND/ESC
button
Press to select among three FM or MW/LW
bands.
6
VOLUME button
Press to increase or decrease the volume.
7 SOURCE/OFF button
Press to select the tuner as the source.
1 Press SOURCE/OFF to select the tuner.
Press SOURCE/OFF until you see Tuner
displayed.
2Use VOLUME to adjust the sound level.
When you press VOLUME up/+, the volume is
raised and when pressed down/–, the volume is
lowered.
ENTENT DISPDISP TEXTTEXT
TATA SOURCESOURCE/ OFF/ OFF
654321
FD
A
756 4
1 3
2
Page 10

En
10
04
Section
Tuner
3 Press BAND/ESC to select a band.
Press BAND/ESC until the desired band is dis-
played, F1, F2, F3 for FM or MW/LW.
4 To perform manual tuning, press 2 or 3
with quick presses.
The frequencies move up or down step by step.
5 To perform seek tuning, press and hold 2
or 3 for about one second and release.
The tuner will scan the frequencies until a
broadcast strong enough for good reception is
found.
• You can cancel seek tuning by pressing either
2 or 3 with a quick press.
• If you press and hold 2 or 3 you can skip
broadcasting stations. Seek tuning starts as
soon as you release the buttons.
Note
• When the frequency selected is being broadcast in stereo the STEREO () indicator will
light.
Page 11
Tuner
En
11
04
Section
English
Español
Deutsch
Français
Italiano
Nederlands
Introduction of advanced tuner
operation
1 FUNCTION display
Shows the function status.
2 PRESET NUMBER indicator
Shows what preset has been selected.
3 FUNCTION button
Press to select an advanced function.
4 5/∞ buttons
Press to select frequencies stored in memory and turn the selected function on/off.
5 2/3 buttons
Press to choose the item (mode) of the
selected function.
6 BAND/ESC button
Press to return to the frequency display.
7 1–6 (PRESET TUNING) buttons
Press for one-button selection of radio stations you have entered into memory. To store
a radio station, press and hold.
Press FUNCTION to display the function
names.
Press FUNCTION repeatedly to switch between
the following functions:
BSM (best stations memory)—REG (regional)—
LOCAL (local seek tuning)—PTY SELECT (pro-
gram type selection)—TA (traffic announcement standby)—NEWS (news program
interruption)—AF (alternative frequencies
search)
• To return to the frequency display, press
BAND/ESC.
• If MW/LW band is selected, you can only
select BSM or LOCAL.
Note
• If you do not operate the function within about
30 seconds, the display is automatically
returned to the frequency display.
ENTENT DISPDISP TEXTTEXT
TATA SOURCESOURCE/ OFF/ OFF
654321
FD
A
4
3
7 6 5
2
1
Page 12
En
12
04
Section
Tuner
Storing and recalling broadcast
frequencies
If you press any of the PRESET TUNING buttons
you can easily store up to six broadcast frequencies for later recall with the touch of a button.
When you find a frequency that you want to
store in memory press a PRESET TUNING button and hold until the preset number stops
flashing.
The number you have pressed will flash in the
PRESET NUMBER indicator and then remain lit.
The selected radio station frequency has been
stored in memory.
The next time you press the same PRESET TUN-
ING button the radio station frequency is
recalled from memory.
Notes
• Up to 18 FM stations, 6 for each of the three
FM bands, and 6 MW/LW stations can be
stored in memory.
• You can also use 5 and ∞ to recall radio station frequencies assigned to PRESET TUNING
buttons.
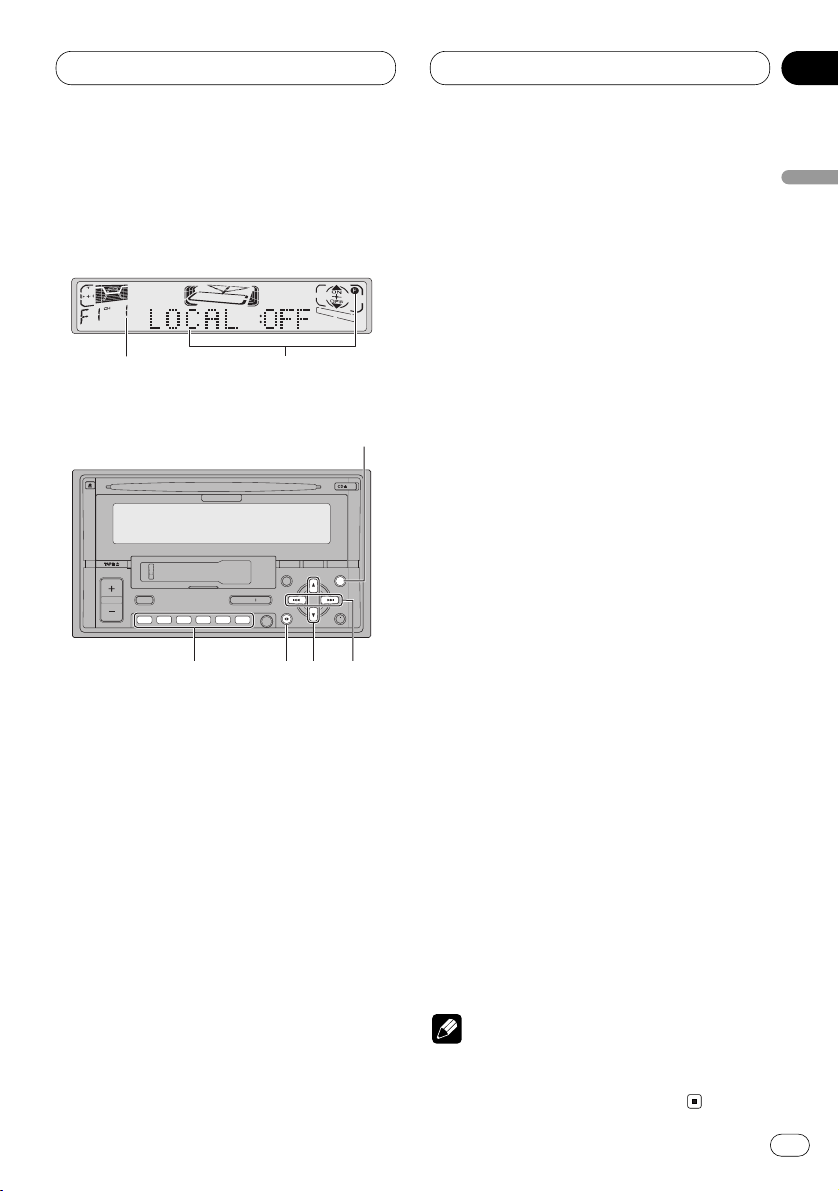
Tuning in strong signals
Local seek tuning lets you tune in only those
radio stations with sufficiently strong signals for
good reception.
1 Press
FUNCTION to select LOCAL.
Press
FUNCTION until LOCAL appears in the
display.
2 Press 5 to turn local seek tuning on.
Local seek sensitivity (e.g., LOCAL 2) appears in
the display.
3 Press 2 or 3 to set the sensitivity.
There are four levels of sensitivity for FM and
two levels for MW/LW:
FM: LOCAL 1—LOCAL 2—LOCAL 3—LOCAL 4
MW/LW: LOCAL 1—LOCAL 2
The LOCAL 4 setting allows reception of only the
strongest stations, while lower settings let you
receive progressively weaker stations.
4 When you want to return to normal seek
tuning, press ∞ to turn local seek tuning off.
LOCAL :OFF appears in the display.
Page 13
Tuner
En
13
04
Section
English
Español
Deutsch
Français
Italiano
Nederlands
Storing the strongest broadcast
frequencies
BSM (best stations memory) lets you automatically store the six strongest broadcast frequencies under PRESET TUNING buttons 1–6 and
once stored there you can tune in to those frequencies with the touch of a button.
1 Press FUNCTION to select BSM.
Press FUNCTION until BSM appears in the dis-
play.
2 Press 5 to turn BSM on.
BSM begins to flash. While BSM is flashing the
six strongest broadcast frequencies will be
stored under PRESET TUNING buttons in order
of their signal strength. When finished, BSM
stops flashing.
• To cancel the storage process, press ∞.
Note
• Storing broadcast frequencies with BSM may
replace broadcast frequencies you have saved
using PRESET TUNING.
Page 14
En
14
05
Section
RDS
Introduction of RDS operation
RDS (radio data system) is a system for providing information along with FM broadcasts. This
inaudible information provides such features as
program service name, program type, traffic
announcement standby, automatic tuning and
program type tuning, intended to aid radio listeners in finding and tuning in to a desired station.
1 AF indicator
Shows when AF (alternative frequencies
search) function is on.
2 TEXT indicator
Shows when radio text is broadcast from a
RDS station.
3 NEWS indicator
Shows when NEWS (news program interruption) function is on.
4 T indicator
Shows when TA (traffic announcement
standby) function is on.
5 TP indicator
Shows when a TP station is tuned in.
6 Program service name
Shows the type of broadcast program.
7 TA button
Press to switch TA function on or off. Press
and hold to switch NEWS function on or off.
8 TEXT button
Press to switch radio text function on or off.
9 DISPLAY button
Press to change the display.
ENTENT DISPDISP TEXTTEXT
TATA SOURCESOURCE/ OFF/ OFF
654321
FD
A
9
7 8
6 2 4
53
1
Page 15

RDS
En
15
05
Section
English
Español
Deutsch
Français
Italiano
Nederlands
Press FUNCTION to display the function
names.
Press FUNCTION repeatedly to switch between
the following functions:
BSM (best stations memory)—REG (regional)—
LOCAL (local seek tuning)—PTY SELECT (pro-
gram type selection)—TA (traffic announcement standby)—NEWS (news program
interruption)—AF (alternative frequencies
search)
• To return to the frequency display, press
BAND/ESC.
• If MW/LW band is selected, you can only
select BSM or LOCAL.
Notes
• If you do not operate the function within about
30 seconds, the display is automatically
returned to the frequency display.
• RDS service may not be provided by all stations.
• RDS functions like AF and TA are only active
when your radio is tuned to a RDS station.
Switching the RDS display
When you tune in a RDS station its program
service name is displayed. If you want to know
the frequency you can.
Press DISPLAY
.
Press
DISPLAY repeatedly to switch between
the following settings:
Program service name—PTY information—
Frequency
PTY (program type ID code) information is listed
on page 20.
• PTY information and the frequency of the
current station appears on the display for eight
seconds.
• If a PTY code of zero is received from a station,
NONE is displayed. This indicates that the sta-
tion has not defined its program contents.
• If the signal is too weak for this unit to pick up
the PTY code, NO PTY is displayed.
Selecting alternative frequencies
If you are listening to a broadcast and the reception becomes weak or there are other problems,
the unit will automatically search for a different
station in the same network which is broadcasting a stronger signal.
• AF is on as a default.
1 Press FUNCTION to select AF.
Press FUNCTION until AF appears in the dis-
play.
2 Press 5 to turn AF on.
Press 5 and AF :ON is displayed.
3 Press ∞ to turn AF off.
Press ∞ and AF :OFF is displayed.
Page 16
En
16
05
Section
RDS
Notes
• Only RDS stations are tuned in during seek
tuning or BSM when AF is on.
• When you recall a preset station, the tuner
may update the preset station with a new
frequency from the station’s AF list. (This is
only available when using presets on the F1 or
F2 bands.) No preset number appears on the
display if the RDS data for the station received
differs from that for the originally stored station.
• Sound may be temporarily interrupted by
another program during a AF frequency
search.
• When the tuner is tuned to a non-RDS station
the AF indicator flashes.
• AF can be switched on or off independently
for each FM band.
Using PI Seek
If the unit fails to find a suitable alternative frequency, or if you are listening to a broadcast
and the reception becomes weak, the unit will
automatically search for a different station with
the same programming. During the search, PI
Seek is displayed and the output is muted. The
muting is discontinued after completion of the
PI seek, whether or not a different station is
found.
Using Auto PI Seek for preset stations
When present stations cannot be recalled, as
when travelling long distances, the unit can be
set to perform PI Seek during preset recall.
• The default setting for Auto PI Seek is off. See
Switching Auto PI Seek on page 50.
Limiting stations to regional programming
When AF is used to automatically retune frequencies, the regional function limits the selection to stations broadcasting regional
programs.
1 Press
FUNCTION to select REG.
Press FUNCTION until REG appears in the dis-
play.
2 Press 5 to turn the regional function on.
Press 5 and REG :ON is displayed.
3 Press ∞ to turn the regional function off.
Press ∞ and REG :OFF is displayed.
Notes
• Regional programming and regional networks
are organized differently depending on the
country (i.e., they may change according to
the hour, state or broadcast area).
• The preset number may disappear on the
display if the tuner tunes in a regional station
which differs from the originally set station.
• REG can be turned on or off independently for
each FM band.
Page 17

RDS
En
17
05
Section
Receiving traffic announcements
TA (traffic announcement standby) lets you
receive traffic announcements automatically,
no matter what source you are listening to. TA
can be activated for both a TP station (a station
that broadcasts traffic information) or an
enhanced other network’s TP station (a station
carrying information which cross-references TP
stations).
1 Tune in a TP or enhanced other network’s
TP station.
When you are tuned into a TP or enhanced other
network’ s TP station the TP indicator ( ) will
light.
2 Press TA to turn traffic announcement
standby on.
Press TA and the TA indicator appears in the
display. The tuner will standby for traffic
announcements.
• To turn traffic announcements standby off,
press TA again.
3Use VOLUME to adjust the TA volume when
a traffic announcement begins.
When you press VOLUME up/+, the volume is
raised and when pressed down/–, the volume is
lowered.
The newly set volume is stored in memory and
recalled for subsequent traffic announcements.
4 Press TA while a traffic announcement is
being received to cancel the announcement.
The tuner returns to the original source but
remains in the standby mode until TA is pressed
again.
Notes
• You can also turn the
TA function on or off by
pressing FUNCTION.
• The system switches back to the original
source following traffic announcement reception.
• TA can be activated from sources other than
the tuner if the tuner was last set to the FM
band but not if it was last set to the MW/LW
band.
• If the tuner was last set to FM, turning on TA
lets you operate other tuning functions while
listening to sources other than the tuner.
• Only TP and enhanced other network’s TP
stations are tuned in during seek tuning or
BSM when TA is on.
Responding to the TP alarm
When a TP or enhanced other network’s TP
station is lost due to a weak signal the T indicator is extinguished and a series of short beeps,
about five seconds long, sound to remind you to
select another TP or enhanced other network‘s
TP station.
When listening to the tuner, tune in another
TP or enhanced other network’s TP station.
• When listening to sources other than the
tuner the unit will automatically seek out a TP
station with the strongest signal after a 10- or
30-second delay. The delay is 10 seconds if TA is
on and 30 seconds if TA and AF are on.
English
Español
Deutsch
Français
Italiano
Nederlands
Page 18

RDS
Using PTY functions
You can tune in a station by using PTY information.
Searching for a RDS station by PTY
information
You can search for general types of broadcasting programs, such as those listed on page 20.
1 Press FUNCTION to select PTY SELECT.
Press FUNCTION until PTY SELECT appears in
the display.
2 Press 2 or 3 to select a program type.
There are four program types:
News&Inf—Popular—Classics—Other
3 Press 5 to begin the search.
When you press 5 the program type name in
the display begins to flash. The unit searches for
a station broadcasting that program type. When
a station is found its program service name is
displayed.
Notes
• The program of some stations may differ from
that indicated by the transmitted PTY.
• If no station is broadcasting the type of program you searched for, NOT FOUND is displayed for about two seconds and then the
tuner returns to the original station.
Using news program interruption
When a news program is broadcast from a PTY
code news station the unit can switch from any
station to the news broadcast station. When the
news program ends, reception of the previous
program resumes.
Press TA and hold to turn on news program
interruption.
Press TA until NEWS appears in the display.
• To turn off news program interruption, press
TA and hold until NEWS disappears from the
display.
Note
• You can also turn on or off news program
interruption by pressing FUNCTION.
Receiving PTY alarm broadcasts
PTY alarm is a special PTY code for announcements regarding emergencies such as natural
disasters. When the tuner receives the radio
alarm code, ALARM appears on the display and
the volume adjusts to the TA volume. When the
station stops broadcasting the emergency
announcement, the system returns to the previous source.
• An emergency announcement can be can-
celled by pressing TA.
En
18
05
Section
Page 19
RDS
En
19
05
Section
Using radio text
This tuner can display radio text data transmitted by RDS stations, such as station information, the name of the currently broadcast song
and the name of the artist.
Notes
• When radio text is received, TEXT is
displayed.
• The tuner automatically memorizes the three
latest radio text broadcasts received, replacing text from the least recent reception with
new text when it is received.
Displaying radio text
You can display the currently received radio text
and the three most recent radio text.
1 Press TEXT to display radio text.
Radio text for the currently broadcasting station
is displayed and is automatically scrolled in the
display.
• You can cancel radio text display by pressing
TEXT.
• When no radio text is received, NO TEXT is
displayed and the display of radio text is cancelled after two seconds.
2 Press 2 or 3 to control scrolling.
Pressing 2 or 3 stops scrolling of the radio
text data. Each additional press scrolls the radio
text data one character at a time.
3 Press 5 or ∞ to recall the three most recent
radio text.
Pressing 5 or ∞ switches between the current
and the three radio text data displays.
• If there is no radio text data in memory the
display will not change.
Notes
• Display of radio text is cancelled after text
data has scrolled three times through the
display.
• If you do not perform an operation within
eight seconds, the radio text mode is cancelled.
Storing and recalling radio text
You can store data from up to six radio text
transmissions at buttons 1–6.
1 Display the radio text you want to store in
memory.
Refer to Displaying radio text on this page.
2 Press any of 1–6 and hold to store the
selected radio text.
The memory number will display and the
selected radio text has been stored in memory.
The next time you press the same 1–6 button in
the radio text display the stored text is recalled
from memory.
English
Español
Deutsch
Français
Italiano
Nederlands
Page 20
RDS
En
20
05
Section
General Specific Type of program
News & Info News News
Affairs Current affairs
Info General information and advice
Sport Sports
Weather Weather reports/meteorological information
Finance Stock market reports, commerce, trading, etc.
Popular Pop Mus Popular music
Rock Mus Contemporary modern music
Easy Mus Easy listening music
Oth Mus Non categorized music
Jazz Jazz
Country Country music
Nat Mus National music
Oldies Oldies music, golden oldies
Folk mus Folk music
Classics L. Class Light classical music
Classic Serious classical music
Others Educate Educational programs
Drama All radio plays and serials
Culture National or regional culture
Science Nature, science and technology
Varied Light entertainment
Children Children’s
Social Social affairs
Religion Religion affairs or services
Phone In Phone in
Touring Travel programs, not for announcements about traffic prob-
lems
Leisure Hobbies and recreational activities
Document Documentaries
PTY list
Page 21
Cassette Player
En
21
06
Section
English
Español
Deutsch
Français
Italiano
Nederlands
Playing a tape
These are the basic steps necessary to play a
tape with your cassette player. More advanced
cassette player operation is explained starting
on page 23.
1 TAPE DIRECTION indicator
Shows the direction of the tape transport.
2 PLAY TIME indicator
Shows the elapsed playing time of the current side of the tape.
3 TAPE EJECT button
Press to eject a tape from your cassette
player.
4 2/3 buttons
Press to fast forward or rewind the tape.
5 BAND/ESC
button
Press to change the direction of the tape
transport and return to playback after fast
forward or rewind.
6
VOLUME button
Press to increase or decrease the volume.
7 SOURCE/OFF button
Press to select the cassette player as the
source.
1 Insert a cassette tape into the cassette
loading slot.
Playback will automatically start.
Cassette loading slot
ENTENT DISPDISP TEXTTEXT
TATA SOURCESOURCE/ OFF/ OFF
654321
FD
A
ENTENT DISPDISP TEXTTEXT
TATA SOURCESOURCE/ OFF/ OFF
654321
FD
A
5746
3
1
2
Page 22

En
22
06
Section
Cassette Player
• You can eject a cassette tape by pressing
TAPE EJECT.
• When a metal or chrome tape is inserted MTL
is lit on the display. Nothing is displayed for a
normal tape.
2 After a cassette tape has been inserted,
press SOURCE/OFF to select the cassette
player.
Press SOURCE/OFF until you see Cassette displayed.
3Use VOLUME to adjust the sound level.
When you press VOLUME up/+, the volume is
raised and when pressed down/–, the volume is
lowered.
4 To perform fast forward or rewind, press 2
or 3.
FF or REW appears in the display.
• To cancel fast forward or rewind and return to
playback, press BAND/ESC.
• You can cancel fast forward or rewind by
pressing 2 or 3 in the same direction twice.
5 To perform forward or rewind music
search, press 2 or 3 twice.
F-MS (forward music search) or R-MS (rewind
music search) appears in the display. The cassette player will fast forward or rewind to the
next or previous blank spot on the tape and
begin to play.
• To cancel music search and return to playback, press BAND/ESC.
• You can cancel music search by pressing 2
or 3 in the same direction again.
6 To change the direction of the tape transport, press BAND/ESC.
Notes
• Do not insert anything other than a cassette
tape into the cassette loading slot.
• PLAY TIME indicator starts from 00’00 in the
following cases:
— When a tape is inserted
— When the tape direction is changed
— When you rewind the tape to the beginning
• PLAY TIME indicator is halted when fast forward, rewind or music search is operating.
Page 23
Cassette Player
En
23
06
Section
English
Español
Deutsch
Français
Italiano
Nederlands
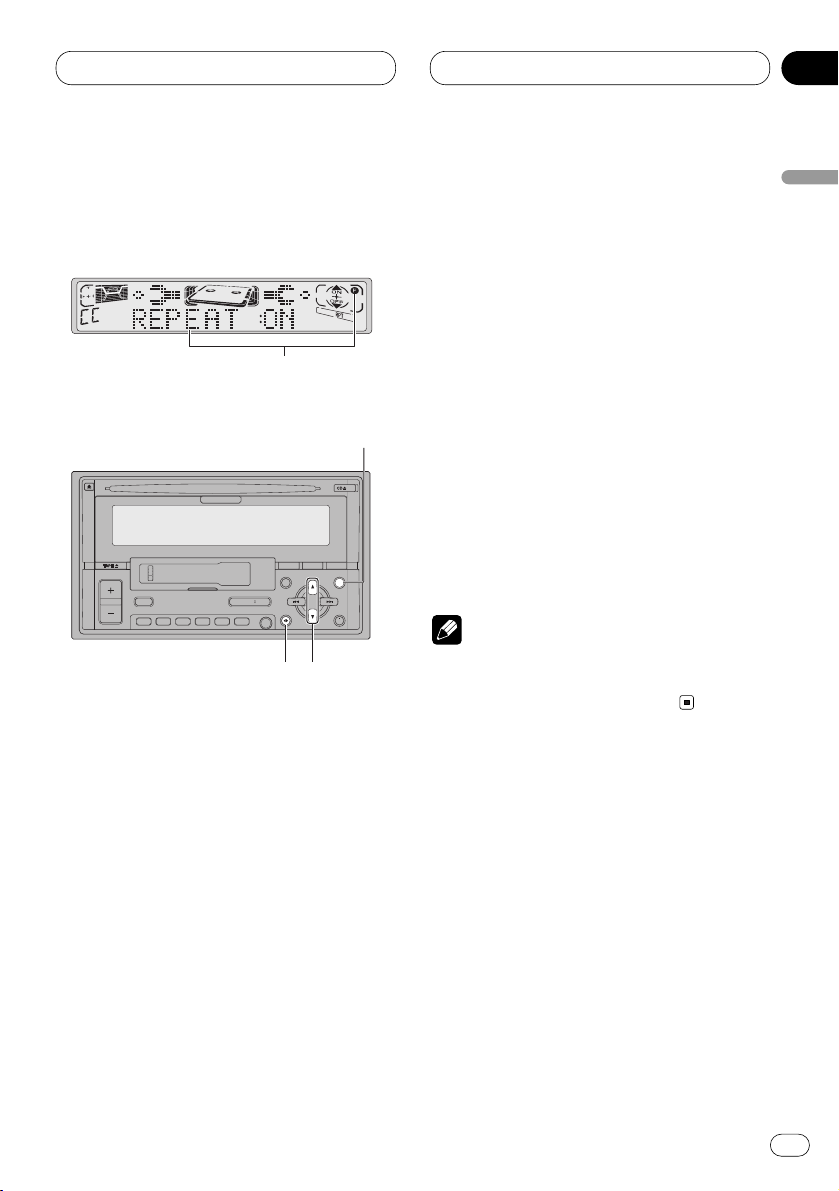
Introduction of advanced
cassette player operation
1 FUNCTION display
Shows the function status.
2 FUNCTION button
Press to select an advanced function.
3 5/∞ buttons
Press to turn the selected function on/off.
4 BAND/ESC button
Press to return to the playback display.
Press FUNCTION to display the function
names.
Press FUNCTION repeatedly to switch between
the following functions:
REPEAT (repeat play)—B.SKIP (blank skip)—NR
(Dolby B NR)
• To return to the playback display, press
BAND/ESC.
Note
• If you do not operate the function within about
30 seconds, the display is automatically
returned to the playback display.
Repeating play
Repeat play lets you hear the same track over
again.
1 Press FUNCTION to select REPEAT.
Press FUNCTION until REPEAT appears in the
display.
2 Press 5 to turn repeat play on.
REPEAT :ON appears in the display. The track
presently playing will play and then repeat.
ENTENT DISPDISP TEXTTEXT
TATA SOURCESOURCE/ OFF/ OFF
654321
FD
A
4
3
2
1
Page 24

En
24
06
Section
Cassette Player
3 Press ∞ to turn repeat play off.
REPEAT :OFF appears in the display. The track
presently playing will continue to play and then
play the next track.
Skipping blank tape sections
Blank skip automatically fast forwards to the
next song if there is a long period of silence (12
seconds or longer) between songs.
1 Press FUNCTION to select B.SKIP.
Press FUNCTION until B.SKIP appears in the
display.
2 Press 5 to turn blank skip on.
B.SKIP :ON appears in the display. Long periods
of silence between songs will be skipped.
3 Press ∞ to turn blank skip off.
B.SKIP :OFF appears in the display. The com-
plete cassette tape will play.
Using Dolby noise reduction
When you listen to tapes that have been
recorded with Dolby B NR, turn Dolby B NR on.
1 Press FUNCTION to select NR.
Press FUNCTION until NR appears in the dis-
play.
2 Press 5 to turn Dolby B NR on.
B NR :ON appears in the display. The tape will
play with Dolby B NR on.
3 Press ∞ to turn Dolby B NR off.
NR :OFF appears in the display. The tape will
play without Dolby B NR.
Notes
• Manufactured under license from Dolby
Laboratories. “Dolby” and the double-D symbol are trademarks of Dolby Laboratories.
• The ∂Bindicator lights when Dolby B NR is
turned on.
Page 25
Built-in CD Player
En
25
07
Section
English
Español
Deutsch
Français
Italiano
Nederlands
Playing a CD
These are the basic steps necessary to play a
CD with your built-in CD player. More advanced
CD operation is explained starting on page 27.
1 TRACK NUMBER indicator
Shows the track currently playing.
2 PLAY TIME indicator
Shows the elapsed playing time of the current track.
3 CD EJECT button
Press to eject a CD from your built-in CD
player.
4 2/3 buttons (Track search and FF/REV)
Press to select a track from the current CD
and for fast forward and reverse.
5 VOLUME
button
Press to increase or decrease the volume.
6
SOURCE/OFF button
Press to select the built-in CD player as the
source.
1 Insert a CD into the CD loading slot.
Playback will automatically start.
CD loading slot
• You can eject a CD by pressing
CD EJECT.
2 After a CD has been inserted, press
SOURCE/OFF to select the built-in CD player.
Press SOURCE/OFF until you see CompactDisc
displayed.
ENTENT DISPDISP TEXTTEXT
TATA SOURCESOURCE/ OFF/ OFF
654321
FD
A
3
4
6
5
1 2
Page 26
En
26
07
Section
Built-in CD player
3Use VOLUME to adjust the sound level.
When you press VOLUME up/+, the volume is
raised and when pressed down/–, the volume is
lowered.
4 To perform fast forward or reverse, press
and hold 2 or 3.
5 To skip back or forward to another track,
press 2 or 3.
Pressing 3 skips to the start of the next track.
Pressing 2 once skips to the start of the current
track. Pressing again will skip to the previous
track.
Notes
• The built-in CD player plays one, standard,
12-cm or 8-cm (single) CD at a time. Do not
use an adapter when playing 8-cm CDs.
• Do not insert anything other than a CD into
the CD loading slot.
• If you cannot insert a disc completely or if
after you insert a disc the disc does not play,
check that the label side of the disc is up.
Press CD EJECT to eject the disc, and check
the disc for damage before inserting the disc
again.
• If the built-in CD player does not operate properly, an error message such as CD ERR-14 may
be displayed. Refer to Understanding built-in
CD player error messages on page 56.
Page 27
Built-in CD Player
En
27
07
Section
English
Español
Deutsch
Français
Italiano
Nederlands
Introduction of advanced built-in
CD player operation
1 FUNCTION display
Shows the function status.
2 FUNCTION button
Press to select an advanced function.
3 5/∞ buttons
Press to turn the selected function on/off
and select numbers, letters or spaces to
input track titles.
4 2/3 buttons
Press to choose the item (mode) of the
selected function.
5 BAND/ESC button
Press to return to the playback display.
6 1–2 buttons
Press to change between letters or
number/symbol input.
7 DISPLAY button
Press to change the display.
Press FUNCTION to display the function
names.
Press FUNCTION repeatedly to switch between
the following functions:
REPEAT (repeat play)—RANDOM (random
play)—T.SCAN (scan play)—PAUSE (pause)
• To return to the playback display, press
BAND/ESC.
Note
• If you do not operate the function within about
30 seconds, the display is automatically
returned to the playback display.
ENTENT DISPDISP TEXTTEXT
TATA SOURCESOURCE/ OFF/ OFF
654321
FD
A
45
36
27
1
Page 28
En
28
07
Section
Built-in CD player
Repeating play
Repeat play lets you hear the same track over
again.
1 Press
FUNCTION to select REPEAT.
Press
FUNCTION until REPEAT appears in the
display.
2 Press 5 to turn repeat play on.
REPEAT :ON appears in the display. The track
presently playing will play and then repeat.
3 Press ∞ to turn repeat play off.
REPEAT :OFF appears in the display. The track
presently playing will continue to play and then
play the next track.
Note
• If you perform track search or fast
forward/reverse, repeat play is automatically
cancelled.
Playing tracks in a random order
Random play lets you play back tracks on the
CD in a random order.
1 Press FUNCTION to select RANDOM.
Press FUNCTION until RANDOM appears in the
display.
2 Press 5 to turn random play on.
RANDOM :ON appears in the display. Tracks will
play in a random order.
3 Press ∞ to turn random play off.
RANDOM :OFF appears in the display. Tracks
will continue to play in order.
Scanning tracks of a CD
Scan play lets you hear the first 10 seconds of
each track on the CD.
1 Press FUNCTION to select T. S C A N .
Press FUNCTION until T.SCAN appears in the
display.
2 Press 5 to turn scan play on.
T.SCAN :ON appears in the display. The first 10
seconds of each track is played.
3 When you find the desired track press ∞ to
turn scan play off.
T.SCAN :OFF appears in the display. The track
will continue to play.
• If the display has automatically returned to
the playback display, select T.SCAN again by
pressing FUNCTION.
Note
• After scanning of a CD is finished, normal
playback of the tracks will begin again.
Pausing CD playback
Pause lets you temporarily stop playback of the
CD.
Page 29
Built-in CD Player
En
29
07
Section
English
Español
Deutsch
Français
Italiano
Nederlands
1 Press FUNCTION to select PAUSE.
Press FUNCTION until PAUSE appears in the
display.
2 Press 5 to turn pause on.
PAUSE :ON appears in the display. Play of the
current track pauses.
3 Press ∞ to turn pause off.
PAUSE :OFF appears in the display. Play will
resume at the same point that you turned pause
on.
Using disc title functions
You can input CD titles and display the title. The
next time you insert a CD for which you have
entered a title, the title of that CD will be displayed.
Entering disc titles
Disc title input lets you input CD titles up to 10
letters long and up to 48 disc titles into the builtin CD player.
1 Play a CD that you want to enter the title.
2 Press FUNCTION and hold until TITLE IN
appears in the display.
• When playing a CD TEXT disc, you cannot
switch to TITLE IN. The disc title will have
already been recorded on a CD TEXT disc.
3 Press 5 or ∞ to select a letter of the alphabet.
Each press of 5 will display a letter of the alphabet in A B C ... X Y Z, numbers and symbols in 1 2
3 ... @ # < order. Each press of ∞ will display a
letter in the reverse order, such as Z Y X ... C B A
order.
To change between upper case and lower case
letters (e.g., a b c ... x y z) press the 1 numbered
button. To change to only numbers and symbols
(e.g., 1 2 3 ... @ # <) press the 2 numbered button.
4 Press 3 to move the cursor to the next
character position.
When the letter you want is displayed, press 3
to move the cursor to the next position and then
select the next letter. Press 2 to move backwards in the display.
5 Move the cursor to the last position by
pressing 3 after entering the title.
When you press 3 one more time, the entered
title is stored in memory.
6 Press BAND/ESC to return to the playback
display.
Notes
• Titles remain in memory, even after the disc
has been removed from built-in CD player, and
are recalled when the disc is reinserted.
• After data for 48 discs has been stored in
memory, data for a new disc will overwrite the
oldest one.
Page 30
Built-in CD player
Displaying disc titles
You can display the title of any disc that has had
a disc title entered.
Press DISPLAY.
Press DISPLAY repeatedly to switch between
the following settings:
PLAY TIME (playback time)—DISC TITLE (disc
title)
When you select DISC TITLE, the title of the
currently playing disc is shown in the display.
• If no title has been entered for the currently
playing disc, NO TITLE is displayed.
Using CD TEXT functions
Some discs have certain information encoded
on the disc during manufacture. These discs
may contain such information as the CD title,
track title, artist’s name and playback time and
are called CD TEXT discs. Only these specially
encoded CD TEXT discs support the functions
listed below.
Displaying titles on CD TEXT discs
Press DISPLAY when playing a CD TEXT disc.
Press DISPLAY repeatedly to switch between
the following settings:
PLAY TIME (playback time)—DISC TITLE (disc
title)—D.ARTIST (disc artist)—TRK TITLE
(track title)—T.ARTIST (track artist)
• If specific information has not been recorded
on a CD TEXT disc, NO XXXX will be displayed
(e.g., NO D-TITLE).
Scrolling titles in the display
This unit can display the first 10 letters only of
DISC TITLE, D.ARTIST, TRK TITLE and
T.ARTIST. When the recorded information is
longer than 10 letters, you can scroll the text to
the left so that the rest of the title can be seen.
Press DISPLAY
and hold until the title begins
to scroll to the left.
The rest of the title will appear in the display.
En
30
07
Section
Page 31

Multi-CD Player
En
31
08
Section
English
Español
Deutsch
Français
Italiano
Nederlands
Playing a CD
You can use this unit to control a multi-CD player,
which is sold separately.
These are the basic steps necessary to play a
CD with your multi-CD player. More advanced
CD operation is explained starting on page 33.
1 DISC NUMBER indicator
Shows the disc currently playing.
2 TRACK NUMBER indicator
Shows the track currently playing.
3 PLAY TIME indicator
Shows the elapsed playing time of the current track.
4 5/∞ buttons (Disc search)
Press to select a disc from the multi-CD
player.
5 2/3 buttons (Track search and
FF/REV)
Press to select a track from the current CD
and for fast forward and reverse.
6
VOLUME button
Press to increase or decrease the volume.
7 1–6 buttons (Disc number search)
Press to select a disc from the multi-CD
player.
8 SOURCE/OFF button
Press to select the multi-CD player as the
source.
1 Press SOURCE/OFF to select the multi-CD
player.
Press SOURCE/OFF until you see Multi-CD displayed.
ENTENT DISPDISP TEXTTEXT
TATA SOURCESOURCE/ OFF/ OFF
654321
FD
A
84 56 7
1
2 3
Page 32

Multi-CD Player
En
32
08
Section
2Use VOLUME to adjust the sound level.
When you press VOLUME up/+, the volume is
raised and when pressed down/–, the volume is
lowered.
3 Select a disc you want to listen to with the
1 to 6 buttons.
For discs located at 1 to 6, press the corresponding number button.
If you want to select a disc located at 7 to 12,
press and hold the corresponding numbers
such as 1 for disc 7, until the disc number
appears in the display.
• You can also sequentially select a disc by
pressing 5/∞.
4 To perform fast forward or reverse, press
and hold 2 or 3.
5 To skip back or forward to another track,
press 2 or 3.
Pressing 3 skips to the start of the next track.
Pressing 2 once skips to the start of the current
track. Pressing again will skip to the previous
track.
Notes
• When the multi-CD player performs the
preparatory operations, READY is displayed.
• If the multi-CD player does not operate properly, an error message such as CD ERR-14 may
be displayed. Refer to the multi-CD player
owner’s manual.
• If there are no discs in the multi-CD player
magazine, NO DISC is displayed.
Page 33

Multi-CD Player
En
33
08
Section
English
Español
Deutsch
Français
Italiano
Nederlands
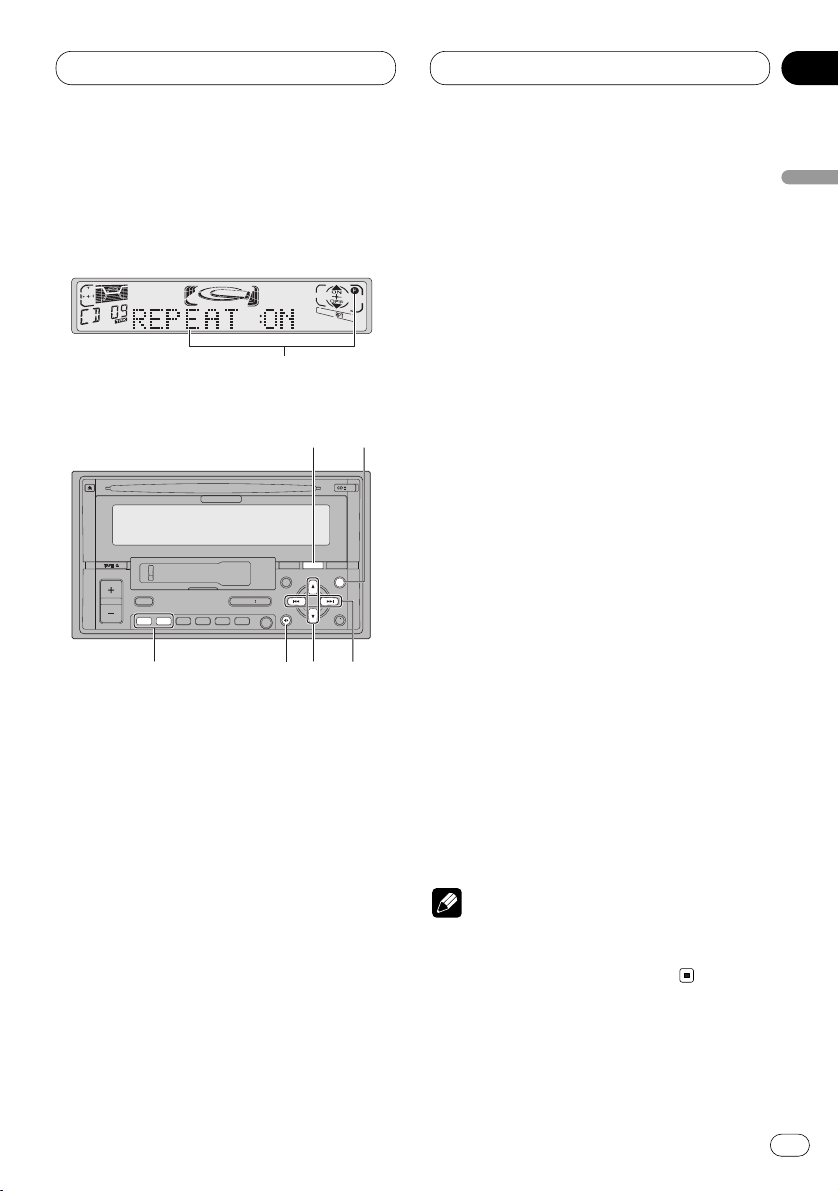
Introduction of advanced multiCD player operation
1 FUNCTION display
Shows the function status.
2 FUNCTION button
Press to select an advanced function.
3 5/∞ buttons
Press to turn the selected function on/off
and select numbers, letters or spaces to
input track titles.
4 2/3 buttons
Press to choose the item (mode) of the
selected function.
5 BAND/ESC button
Press to return to the playback display.
6 1–2 buttons
Press to change between letters or
number/symbol input.
7 DISPLAY button
Press to change the display.
Press FUNCTION to display the function
names.
Press FUNCTION repeatedly to switch between
the following functions:
REPEAT (repeat play)—TITLE LIST (disc title
list)—RANDOM (random play)—SCAN (scan
play)—ITS.P (ITS play)—PAUSE (pause)—
COMP (compression and DBE)
• To return to the playback display, press
BAND/ESC.
Note
• If you do not operate the function within about
30 seconds, the display is automatically
returned to the playback display.
ENTENT DISPDISP TEXTTEXT
TATA SOURCESOURCE/ OFF/ OFF
654321
FD
A
3
2
5
6 4
7
1
Page 34

Multi-CD Player
En
34
08
Section
Repeating play
There are three repeat play ranges for the multiCD player: MCD (multi-CD player repeat), TRK
(one-track repeat), and DSC (disc repeat).
1 Press
FUNCTION to select REPEAT.
Press
FUNCTION until REPEAT appears in the
display.
2 Press 2 or 3 to select the repeat range.
Press 2 or 3 until the desired repeat range
appears in the display.
• MCD — Repeat all discs in the multi-CD
player
• TRK — Repeat just the current track
• DSC — Repeat the current disc
Notes
• If you select other discs during repeat play,
the repeat play range changes to MCD (multiCD player repeat).
• If you perform track search or fast
forward/reverse during TRK (one-track
repeat), the repeat play range changes to DSC
(disc repeat).
Playing tracks in a random order
Random play lets you play back tracks in a random order within the repeat range, MCD (multiCD player repeat) and DSC (disc repeat).
1 Select the repeat range.
Refer to Repeating play on this page.
2 Press
FUNCTION to select RANDOM.
Press FUNCTION until RANDOM appears in the
display.
3 Press 5 to turn random play on.
RANDOM :ON appears in the display. Tracks will
play in a random order within the previously
selected MCD (multi-CD player repeat) or DSC
(disc repeat) ranges.
4 Press ∞ to turn random play off.
RANDOM :OFF appears in the display. Tracks
will continue to play in order.
Scanning CDs and tracks
While you are using DSC (disc repeat), the
beginning of each track on the selected disc
plays for about 10 seconds. When you are using
MCD (multi-CD player repeat), the beginning of
the first track of each disc is played for about 10
seconds.
1 Select the repeat range.
Refer to Repeating play on this page.
2 Press FUNCTION to select SCAN.
Press FUNCTION until SCAN appears in the
display.
Page 35

Multi-CD Player
En
35
08
Section
English
Español
Deutsch
Français
Italiano
Nederlands
3 Press 5 to turn scan play on.
SCAN :ON appears in the display. The first 10
seconds of each track of the present disc (or the
first track of each disc) is played.
4 When you find the desired track (or disc)
press ∞ to turn scan play off.
SCAN :OFF appears in the display. The track (or
disc) will continue to play.
• If the display has automatically returned to
the playback display, select SCAN again by
pressing FUNCTION.
Note
• After track or disc scanning is finished, normal playback of the tracks will begin again.
Pausing CD playback
Pause lets you temporarily stop playback of the
CD.
1 Press FUNCTION to select PAUSE.
Press FUNCTION until PAUSE appears in the
display.
2 Press 5 to turn pause on.
PAUSE :ON appears in the display. Play of the
current track pauses.
3 Press ∞ to turn pause off.
PAUSE :OFF appears in the display. Play will
resume at the same point that you turned pause
on.
Using ITS playlists
ITS (instant track selection) lets you make a
playlist of favorite tracks from those in the multiCD player magazine. After you have added your
favorite tracks to the playlist you can turn on ITS
play and play just those selections.
Creating a playlist with ITS programming
You can use ITS to enter and playback up to 24
tracks per disc, up to 100 discs (with the disc
title).
1 Play a CD that you want to program.
Press 5 or ∞ to select a CD.
2 Press
FUNCTION and hold until TITLE IN
appears in the display, then press FUNCTION
to select ITS.
After TITLE IN is displayed, press FUNCTION
repeatedly, the following functions appear in the
display:
TITLE IN (disc title input)—ITS (ITS program-
ming)
3 Select a desired track by pressing 2 or 3.
4 Press 5 to store the currently playing track
in the playlist.
ITS IN is displayed briefly and the currently
playing selection is added to your playlist. The
display then shows ITS again.
5 Press BAND/ESC to return to the playback
display.
Page 36

Multi-CD Player
En
36
08
Section
Note
• After data for 100 discs has been stored in
memory, data for a new disc will overwrite the
oldest one.
Playback from your ITS playlist
ITS play lets you listen to the tracks that you
have entered into your ITS playlist. When you
turn on ITS play, tracks from your ITS playlist in
the multi-CD player will begin to play.
1 Select the repeat range.
Refer to Repeating play on page 34.
2 Press FUNCTION to select ITS.P.
Press FUNCTION until ITS.P appears in the
display.
3 Press 5 to turn ITS play on.
ITS.P :ON appears in the display. Playback
begins of those tracks from your playlist within
the previously selected MCD (multi-CD player
repeat) or DSC (disc repeat) ranges.
• If no tracks in the current range are
programmed for ITS play then ITS EMPTY is
displayed.
4 Press ∞ to turn ITS play off.
ITS.P :OFF appears in the display. Playback will
continue in normal order from the currently
playing track and CD.
Erasing a track from your ITS playlist
When you want to delete a track from your ITS
playlist, you can if ITS play is on.
If ITS play is already on, skip to step 2. If ITS play
is not already on, press FUNCTION.
1 Play a CD you want to delete a track from
your ITS playlist, and turn ITS play on.
Refer to Playback from your ITS playlist on this
page.
2 Press FUNCTION and hold until TITLE IN
appears in the display, then press FUNCTION
to select ITS.
After TITLE IN is displayed, press FUNCTION
until ITS appears in the display.
3 Select a desired track by pressing 2 or 3.
4 Press ∞ to erase a track from your ITS
playlist.
The currently playing selection is erased from
your ITS playlist and playback of the next track
from your ITS playlist begins.
• If there are no tracks from your playlist in the
current range, ITS EMPTY is displayed and
normal play resumes.
5 Press BAND/ESC to return to the playback
display.
Erasing a CD from your ITS playlist
When you want to delete all tracks of a CD from
your ITS playlist, you can if ITS play is off.
Page 37

Multi-CD Player
En
37
08
Section
English
Español
Deutsch
Français
Italiano
Nederlands
1 Play a CD that you want to delete.
Press 5 or ∞ to select a CD.
2 Press FUNCTION and hold until TITLE IN
appears in the display, then press FUNCTION
to select ITS.
After TITLE IN is displayed, press FUNCTION
until ITS appears in the display.
3 Press ∞ to erase all tracks on the currently
playing CD from your ITS playlist.
All tracks on the currently playing CD are erased
from your playlist and ITS CLEAR is displayed.
4 Press BAND/ESC to return to the playback
display.
Using disc title functions
You can input CD titles and display the title.
Then you can easily search for and select a
desired disc for play.
Entering disc titles
Disc title input lets you input CD titles up to 10
letters long and up to 100 disc titles (with ITS
playlist) into the multi-CD player.
1 Play a CD that you want to enter the title.
Press 5 or ∞ to select a CD.
2 Press FUNCTION and hold until TITLE IN
appears in the display.
After TITLE IN is displayed, press FUNCTION
repeatedly, the following functions appear in the
display:
TITLE IN (disc title input)—ITS (ITS program-
ming)
• When playing a CD TEXT disc on a CD TEXT
compatible multi-CD player, you cannot switch
to TITLE IN. The disc title will have already been
recorded on a CD TEXT disc.
3 Press 5 or ∞ to select a letter of the alphabet.
Each press of 5 will display a letter of the alphabet in A B C ... X Y Z, numbers and symbols in 1 2
3 ... @ # < order. Each press of ∞ will display a
letter in the reverse order, such as Z Y X ... C B A
order.
To change between upper case and lower case
letters (e.g., a b c ... x y z) press the 1 numbered
button. To change to only numbers and symbols
(e.g., 1 2 3 ... @ # <) press the 2 numbered button.
4 Press 3 to move the cursor to the next
character position.
When the letter you want is displayed, press 3
to move the cursor to the next position and then
select the next letter. Press 2 to move backwards in the display.
Page 38

Multi-CD Player
En
38
08
Section
5 Move the cursor to the last position by
pressing 3 after entering the title.
When you press 3 one more time, the entered
title is stored in memory.
6 Press BAND/ESC
to return to the playback
display.
Notes
• Titles remain in memory, even after the disc
has been removed from the magazine, and
are recalled when the disc is reinserted.
• After data for 100 discs has been stored in
memory, data for a new disc will overwrite the
oldest one.
Displaying disc titles
You can display the title of any disc that has had
a disc title entered.
Press DISPLAY.
Press DISPLAY repeatedly to switch between
the following settings:
PLAY TIME (playback time)—DISC TITLE (disc
title)
When you select DISC TITLE, the title of the
currently playing disc is shown in the display.
• If no title has been entered for the currently
playing disc, NO TITLE is displayed.
Selecting discs from the disc title list
Disc title list lets you see the list of disc titles
that have been entered into the multi-CD player
and select one of them to playback.
1 Press FUNCTION to select
TITLE LIST.
Press
FUNCTION until TITLE LIST appears in
the display.
2 Press 2 or 3 to scroll through the list of
titles that have been entered.
• If no title has been entered for a disc, NO
TITLE will be displayed.
3 Press 5 to play your favorite CD title.
That selection will begin to play.
Using CD TEXT functions
You can use these functions only with a CD TEXT
compatible multi-CD player.
Some discs have certain information encoded
on the disc during manufacture. These discs
may contain such information as the CD title,
track title, artist’s name and playback time and
are called CD TEXT discs. Only these specially
encoded CD TEXT discs support the functions
listed below.
Page 39

Multi-CD Player
En
39
08
Section
Displaying titles on CD TEXT discs
Press DISPLAY when playing a CD TEXT disc
from the multi-CD player.
Press DISPLAY repeatedly to switch between
the following settings:
PLAY TIME (playback time)—DISC TITLE (disc
title)—D.ARTIST (disc artist)—TRK TITLE
(track title)—T.ARTIST (track artist)
• If specific information has not been recorded
on a CD TEXT disc, NO XXXX will be displayed
(e.g., NO D-TITLE).
Scrolling titles in the display
This unit can display the first 10 letters only of
DISC TITLE, D.ARTIST, TRK TITLE and
T.ARTIST. When the recorded information is
longer than 10 letters, you can scroll the text to
the left so that the rest of the title can be seen.
Press DISPLAY and hold until the title begins
to scroll to the left.
The rest of the title will appear in the display.
Using compression and bass
emphasis
You can use these functions only with a multi-CD
player that supports them.
Using COMP (compression) and DBE (dynamic
bass emphasis) functions let you adjust the
sound playback quality of the multi-CD player.
Each of the functions have a two-step adjustment. The COMP function balances the output
of louder and softer sounds at higher volumes.
DBE boosts bass levels to give playback a fuller
sound. Listen to each of the effects as you select
through them and use the one that best
enhances the playback of the track or CD that
you are listening to.
1 Press FUNCTION to select COMP.
Press FUNCTION until COMP appears in the
display.
• If the multi-CD player does not support
COMP/DBE, NO COMP is displayed when you
attempt to select it.
2 Press 5 or ∞ to select your favorite setting.
Press 5 or ∞ repeatedly to switch between the
following settings:
COMP OFF—COMP 1—COMP 2—COMP OFF—
DBE 1—DBE 2
50-disc multi-CD player
Only those functions described in this manual
are supported for 50-disc multi-CD players.
English
Español
Deutsch
Français
Italiano
Nederlands
Page 40

En
40
09
Section
Audio Adjustments
Introduction of audio
adjustments
1 AUDIO display
Shows the audio adjustments status.
2 LOUD indicator
Appears in the display when loudness is
turned on.
3 AUDIO button
Press to select an audio function.
4 5/∞ buttons
Press to adjust the selected audio function
and turn it on/off.
5 2/3 buttons
Press to adjust the selected audio function.
6 BAND/ESC button
Press to return to the display of each source.
Press AUDIO to display the audio function
names.
Press AUDIO repeatedly to switch between the
following audio functions:
FADER (balance adjustment)—LOUD (loud-
ness)—SLA (source level adjustment)
• When selecting the FM tuner as the source,
you cannot switch to SLA.
• To return to the display of each source, press
BAND/ESC.
Note
• If you do not operate the audio function within
about 30 seconds, the display is automatically
returned to the source display.
ENTENT DISPDISP TEXTTEXT
TATA SOURCESOURCE/ OFF/ OFF
654321
FD
A
3456
2
1
Page 41

Audio Adjustments
En
41
09
Section
English
Español
Deutsch
Français
Italiano
Nederlands
Using balance adjustment
You can select a fader/balance setting that provides an ideal listening environment in all occupied seats.
1 Press
AUDIO to select FADER.
Press
AUDIO until FADER appears in the dis-
play.
• If the balance setting has been previously
adjusted, BAL will be displayed.
2 Press 5 or ∞ to adjust front/rear speaker
balance.
Each press of 5 or ∞ moves the front/rear
speaker balance towards the front or the rear.
• FADER :F25 – FADER :R25 is displayed as the
front/rear speaker balance moves from front to
rear.
• FADER : 0 is the proper setting when only two
speakers are used.
• When the rear output setting is subwoofer,
you cannot adjust front/rear speaker balance.
Refer to Switching the rear output setting on
page 51.
3 Press 2 or 3 to adjust left/right speaker
balance.
When you press 2 or 3, BAL : 0 is displayed.
Each press of 2 or 3 moves the left/right
speaker balance towards the left or the right.
• BAL :L25 – BAL :R25 is displayed as the
left/right speaker balance moves from left to
right.
Adjusting loudness
Loudness compensates for deficiencies in the
low- and high-sound ranges at low volume.
1 Press
AUDIO to select LOUD.
Press
AUDIO until LOUD appears in the display.
2 Press 5 to turn loudness on.
LOUD :ON appears in the display.
3 Press ∞ to turn loudness off.
LOUD :OFF appears in the display.
Adjusting source levels
SLA (Source level adjustment) lets you adjust
the volume level of each source to prevent radical changes in volume when switching between
sources.
• Settings are based on the volume level of the
FM tuner, which remains unchanged.
1 Compare the FM tuner volume level with
the level of the source you wish to adjust (e.g.,
built-in CD player).
2 Press AUDIO to select SLA.
Press AUDIO until SLA appears in the display.
3 Press 5 or ∞ to adjust the source volume.
Each press of 5 or ∞ increases or decreases
the source volume.
• SLA :+4 – SLA :–4 is displayed as the source
volume is increased or decreased.
Page 42

Audio Adjustments
Notes
• Since the FM tuner volume is the control, it is
not possible to apply source level adjustments
to the FM tuner.
• The MW/LW tuner volume level can also be
adjusted with source level adjustments.
• The built-in CD and the multi-CD players are
both set to the same source level adjustment
volume automatically.
En
42
09
Section
Page 43

Digital Signal Processor
En
43
10
Section
English
Español
Deutsch
Français
Italiano
Nederlands
Using the digital signal processor
The digital signal processor lets you control
many aspects of sound output including equalization, sound field control and listening position.
1 POSI (position selector) indicator
Shows which listening position is presently
selected.
2 PRESET EQ indicator
Shows which equalizer preset is presently
selected.
3 FUNCTION display
Shows the function status.
4 DSP button
Press to select digital signal processor functions.
5 1–6 buttons
Press to recall equalization curves and
sound field programs.
6 2/3 buttons
Press to choose the item (mode) of the
selected function.
7 5/∞ buttons
Press to adjust the selected function and
turn it on/off.
8 BAND/ESC button
Press to return to the display of each source.
ENTENT DISPDISP TEXTTEXT
TATA SOURCESOURCE/ OFF/ OFF
654321
FD
A
745 68
1
2
3
Page 44

Digital Signal Processor
En
44
10
Section
Press DSP to display the DSP function
names.
Press DSP repeatedly to switch between the
following functions:
PWFL (graphic equalizer)—SFC (sound field
control)—POSI (position selector)
• To return to the display of each source, press
BAND/ESC.
• Depending on the graphic equalizer and sub-
woofer adjustments, pressing DSP repeatedly
switches between the following functions:
CUSTOM (graphic equalizer)—50Hz (9-band
graphic equalizer)—SFC (sound field control)—
POSI (position selector)—SUB.W (subwoofer)—
80Hz (subwoofer setting)—HPF (high pass filter)
Use the following instructions for more detail.
Note
• If you do not operate the DSP function within
about 30 seconds, the display is automatically
returned to the source display.
Using the graphic equalizer
The graphic equalizer lets you adjust the equalization to match car interior acoustic characteristics as desired.
Recalling equalizer curves
There are six stored equalizer curves which you
can easily recall at any time. Here is a list of the
equalizer curves:
Button Display Equalizer curve
1 S-BASS Super bass
2PWFLPowerful
3 NTRL Natural
4 VOCAL Vocal
5 CUSTOM Custom
6FLATFlat
• CUSTOM is an adjusted equalizer curve that
you create. Adjustments can be made with an 9band graphic equalizer.
• When FLAT is selected no supplement or
correction is made to the sound. This is useful
to check the effect of the equalizer curves by
switching alternatively between FLAT and a set
equalizer curve.
1 Press DSP to select the graphic equalizer.
Press DSP until PWFL appears in the display.
• If the graphic equalizer has been previously
set to an equalizer curve other than PWFL then
the title of that previously selected equalizer
curve will be displayed, such as S-BASS, NTRL,
VOCAL, CUSTOM, or FLAT.
2 Select a equalizer curve by pressing 1–6.
Select the desired equalizer curve by pressing
one of the numbered buttons, from 1–6, which
correspond to the different equalizer curves as
listed above.
• You can also sequentially select an equalizer
curve by pressing 2 or 3.
Page 45

Digital Signal Processor
En
45
10
Section
English
Español
Deutsch
Français
Italiano
Nederlands
Adjusting equalizer curves
The factory supplied equalizer curves, with the
exception of FLAT, can be adjusted to a fine
degree (nuance control).
1 Press DSP to select the graphic equalizer.
Press DSP until PWFL appears in the display.
• If the graphic equalizer has been previously
set to an equalizer curve other than PWFL then
the title of that previously selected equalizer
curve will be displayed, such as S-BASS, NTRL,
VOCAL, CUSTOM, or FLAT.
2 Select a equalizer curve by pressing 1–6.
3 Press 5 or ∞ to adjust the equalizer curve.
Each press of 5 or ∞ increases or decreases
the equalizer curve respectively.
• +6 – –5 (or –6) is displayed as the equalizer
curve is increased or decreased.
• The actual range of the adjustments are different depending on which equalizer curve is
selected.
Note
• You can store the adjusted equalizer curve in
CUSTOM by pressing and holding button 5
until MEMORY appears in the display.
Adjusting 9-band graphic equalizer
For CUSTOM equalizer curve, you can adjust
the level of each band.
1 Recall CUSTOM equalizer curve.
See Recalling equalizer curves on the previous
page.
2 Press DSP to select 9-band graphic equalizer.
9-band graphic equalizer can only be selected
when you have selected CUSTOM equalizer
curve. Press DSP until 50Hz appears in the display.
• If 9-band graphic equalizer has been previously adjusted, the frequency of that previously
selected will be displayed instead of 50Hz.
3 Press 2 or 3 to select the equalizer band
to adjust.
Each press of 2 or 3 selects equalizer bands in
the following order:
50—100—200—400—800—1.6 k—3.2 k—6.3 k—
12.5 k (Hz).
Press 2 or 3 until the desired equalizer band
appears in the display.
4 Press 5 or ∞ to adjust the level of the
equalizer band.
Each press of 5 or ∞ increases or decreases
the level of the equalization band.
• +6 – –6 is displayed as the level is increased or
decreased.
• You can then select another band and adjust
the level.
Notes
• You can create different CUSTOM curves for
different sources.
• The built-in CD player and the multi-CD player
are set to the same equalizer adjustment
setting automatically.
Page 46

Digital Signal Processor
En
46
10
Section
Using sound field control,
octaver and BBE
®
sound
SFC (sound field control) incorporate three
programs for reproducing typical sound fields of
a studio, jazz or club. This function makes it
possible to reproduce the realistic sound fields
of the three programs in your car.
Octaver makes the bass sound louder. OCT2 is
more effective than OCT1.
With BBE sound processing technology, music
has great “live presence”. Highs are clearer,
naturally brilliant and more finely detailed. Lows
are tight, well defined and harmonically rich.
Note
• Manufactured under license from BBE
Sound, Inc. The mark BBE is a trademark of
BBE Sound, Inc.
Recalling sound field programs
Here is a list of the sound field programs:
Button Display Effect
1 STUDIO Studio
2JAZZJazz
3CLUBClub
4 OCT1 Octaver 1
5 OCT2 Octaver 2
6 BBE BBE
1 Press DSP to select the sound field control.
Press DSP until SFC appears in the display.
• If the sound field control has been previously
set to a sound field program then the title of that
previously selected sound field program will be
displayed, such as STUDIO, JAZZ, CLUB, OCT1,
OCT2, or BBE.
2 Select a sound field program by pressing
1–6.
Select the desired sound field program by pressing one of the numbered buttons, from 1–6,
which correspond to the different sound field
programs as listed above.
• You can also sequentially select a sound field
program by pressing 2 or 3.
Adjusting BBE sound level
For BBE sound processing technology, you can
adjust the level of BBE.
1 Recall BBE.
See Recalling sound field programs on this page.
2 Press 5 or ∞ to adjust the level of BBE.
Each press of 5 or ∞ increases or decreases
the level of BBE.
• +4 – –4 is displayed as the level is increased or
decreased.
Page 47

Digital Signal Processor
En
47
10
Section
English
Español
Deutsch
Français
Italiano
Nederlands
Using the position selector
One way to assure a more natural sound is to
clearly position the stereo image, putting you
right in the center of the sound field. The position selector adjusts the volume level of sound
from each speaker to match seat positions and
the number of people in the car and lets you
recall settings at the touch of a button. The
result is a natural sound regardless of where
you are seated. Here is a list of the positions:
Button Display Indicator Position
5 FRONT Front seat
∞ ALL All seats
2 FRONT-L Front seat left
3 FRONT-R Front seat right
1 Press DSP to select the position selector.
Press DSP until POSI appears in the display.
• If the position selector has been previously set
to a listening position then the title of that previously selected listening position will be
displayed, such as FRONT, ALL, FRONT-L or
FRONT-R.
2 Press
2/3/5/∞ to select a listening posi-
tion.
Press one of these, 2/3/5/∞, to select a listening position as listed in the table.
• To cancel the selected listening position,
press the same button again.
• When the rear output setting is subwoofer,
you cannot select ALL. Refer to Switching the
rear output setting on page 51.
Using subwoofer output
This unit is equipped with a subwoofer output
which can be switched on or off. When a subwoofer is connected to the rear output, first,
switch the rear output setting to subwoofer,
then turn the subwoofer output on. For more
details, see Switching the rear output setting on
page 51.
1 Press DSP to select SUB.W.
When the rear output setting is subwoofer, you
can select SUB.W. Press DSP until SUB.W
appears in the display.
2 Press 5 to turn subwoofer output on.
SUB.W :ON appears in the display. Subwoofer
output is now on.
• You can turn off subwoofer output by pressing
∞.
Page 48

En
48
10
Section
Digital Signal Processor
3 Press 2 or 3 to select the phase of subwoofer output.
Press 2 to select reverse phase and appears
in the display. Press 3 to select normal phase
and appears in the display.
Adjusting subwoofer settings
When the subwoofer output is on, you can
adjust the cut-off frequency and the output level
of the subwoofer.
1 Press DSP to select the subwoofer setting.
When the subwoofer output is on, you can
select the subwoofer setting. Press DSP until
80Hz appears in the display.
• If the subwoofer setting has been previously
adjusted, the frequency of that previously
selected will be displayed, such as 50Hz or
125Hz.
2 Press 2 or 3 to select cut-off frequency.
Press 2 and 50Hz is displayed. Press 3 and
125Hz is displayed. Only frequencies lower than
those in the selected range are output from the
subwoofer.
3 Press 5 or ∞ to adjust the output level of
the subwoofer.
Each press of 5 or ∞ increases or decreases
the level of the subwoofer (e.g., +6 to –15).
Press 5 or ∞ until you see the desired value
displayed.
Using the high pass filter
When you do not want low sounds from the
subwoofer output frequency range to play from
the front speakers, switch the HPF (high pass
filter) on. Only frequencies higher than those in
the selected range are output from the front
speakers.
1 Press DSP to select HPF.
When the rear output setting is subwoofer, you
can select HPF. Press DSP until HPF appears in
the display.
2 Press 5 to turn high pass filter on.
HPF 80Hz appears in the display. High pass filter
is now on.
• To turn high pass filter off, press ∞.
3 Press 2 or 3 to select a high pass filter
range.
Press 2 and HPF 50Hz is displayed. Press 3
and 125Hz is displayed. Only frequencies higher
than those in the selected range are output
from the front speakers.
Page 49

Initial Settings
En
49
11
Section
English
Español
Deutsch
Français
Italiano
Nederlands
Adjusting initial settings
Initial settings lets you perform initial set up of
different settings for this unit.
1 FUNCTION display
Shows the function status.
2 SOURCE/OFF button
Press and hold to turn off the unit.
3 FUNCTION button
Press to select a function of the initial settings.
4 2/3 buttons
Press to choose the item (mode) of the
selected function.
5 5/∞ buttons
Press to adjust the selected function and
turn it on/off.
6 BAND/ESC
button
Press to cancel initial settings.
1 Press SOURCE/OFF and hold until the unit
turns off.
2 Press
FUNCTION and hold until FM STEP
appears in the display.
3 Press FUNCTION to select one of the initial
settings.
Press FUNCTION repeatedly to switch between
the following settings:
FM STEP—A-PI—WARN—AUX—DIMMER —
REAR SP—DIG.ATT—CONTRAST
Use the following instructions to operate each
particular setting.
• To cancel initial settings, press BAND/ESC.
• You can also cancel initial settings by holding
down FUNCTION until the unit turns off.
ENTENT DISPDISP TEXTTEXT
TATA SOURCESOURCE/ OFF/ OFF
654321
FD
A
46
52
3
1
Page 50

En
50
11
Section
Initial Settings
Setting the FM tuning step
Normally the FM tuning step employed by seek
tuning is 50 kHz. When AF or TA are on the tuning step automatically changes to 100 kHz. It
may be preferable to set the tuning step to 50
kHz when AF is on.
1 Press FUNCTION to select FM STEP.
Press FUNCTION repeatedly until FM STEP
appears in the display.
2 Select the FM tuning step with 2/3.
Pressing 2/3 will switch the FM tuning step
between 50 kHz and 100 kHz while AF or TA is
on. The selected FM tuning step will appear in
the display.
Note
• The tuning step remains at 50 kHz during
manual tuning.
Switching Auto PI Seek
The unit can automatically search for a different
station with the same programming, even during preset recall.
1 Press FUNCTION to select A-PI.
Press FUNCTION repeatedly until A-PI appears
in the display.
2 Select A-PI on or off with 5/∞.
Pressing 5/∞ will switch A-PI between on and
off and that status will be displayed (e.g.,
A-PI :ON).
Switching the warning tone
If the front panel is not detached from the head
unit within five seconds of turning off the ignition, a warning tone will sound. You can turn off
this warning tone.
1 Press
FUNCTION to select WARN.
Press
FUNCTION repeatedly until WARN
appears in the display.
2 Select WARN on or off with 5/∞.
Pressing 5/∞ will switch WARN between on
and off and that status will be displayed (e.g.,
WARN :ON).
Switching the auxiliary setting
It is possible to use auxiliary equipment with
this unit. Activate the auxiliary setting when
using external equipment connected to this
unit.
1 Press FUNCTION to select AUX.
Press FUNCTION repeatedly until AUX appears
in the display.
2 Select AUX on or off with 5/∞.
Pressing 5/∞ will switch AUX between on and
off and that status will be displayed (e.g.,
AUX :ON).
Page 51

Initial Settings
En
51
11
Section
English
Español
Deutsch
Français
Italiano
Nederlands
Switching the dimmer setting
To prevent the display from being too bright at
night, the display is automatically dimmed
when the car’s headlights are turned on. You
can switch dimmer on or off.
1 Press
FUNCTION to select DIMMER.
Press
FUNCTION repeatedly until DIMMER
appears in the display.
2 Select DIMMER on or off with 5/∞.
Pressing 5/∞ will switch DIMMER between on
and off and that status will be displayed (e.g.,
DIMMER :ON).
Switching the rear output setting
This unit’s rear output (rear speaker leads output and RCA rear output) can be used for fullrange speaker or subwoofer connection. If you
switch the rear output setting to the subwoofer,
you can connect a rear speaker lead directly to a
subwoofer without using an auxiliary amp.
• If you connect a subwoofer to the rear output,
set the output setting to subwoofer.
• Even if you change this setting, there is no
output unless you switch the subwoofer output on (refer to Using subwoofer output on
page 47).
• Both rear speaker leads output and RCA rear
output are switched simultaneously in this
setting.
1 Press
FUNCTION to select REAR SP.
Press FUNCTION repeatedly until REAR SP
appears in the display.
2 Select full-range speaker or subwoofer
with 2/3.
Pressing 2/3 will switch between REAR SP
:FUL (full-range speaker) and REAR SP :S/W
(subwoofer) and that status will be displayed.
Selecting the digital attenuator
When listening to a CD or other source on
which the recording level is high, setting the
equalizer curve level to high may result in distortion. You can switch the digital attenuator to low
to reduce distortion.
• Sound quality is better at the high setting so
this setting is usually used.
1 Press
FUNCTION to select
DIG.ATT.
Press
FUNCTION repeatedly until DIG.ATT
appears in the display.
2 Select DIG.ATT high or low with 2/3.
Pressing 2/3 will switch DIG.ATT between
high and low and that status will be displayed
(e.g., DIG.ATT :H).
Page 52

Initial Settings
Adjusting display contrast
Display contrast adjustment lets you adjust the
display for easier viewing when lighting conditions change.
1 Press
FUNCTION to select CONTRAST.
Press
FUNCTION repeatedly until CONTRAST
appears in the display.
2 Press 2 or 3 to adjust the contrast.
Each press of 2 or 3 increases or decreases
the contrast.
• +7 – –7 is displayed as the contrast is
increased or decreased.
En
52
11
Section
Page 53

Other Functions
En
53
12
Section
English
Español
Deutsch
Français
Italiano
Nederlands
Introduction of other functions
1 FUNCTION button
Press to select an advanced function.
2 2/3 buttons
Press to move the cursor in the display to the
next position.
3 5/∞ buttons
Press to select letters and numbers.
4 BAND/ESC button
Press to return to normal display.
5 6 button
Press to turn on the demonstration mode.
6 SOURCE/OFF button
Press to select a source.
7 1–2 buttons
Press to change between letters or
number/symbol input.
8 ENTERTAINMENT button
Press to change to the entertainment display.
Using the demonstration
Demonstration can be shown in the display
when the unit is off.
1 Press SOURCE/OFF to turn off the unit.
Press SOURCE/OFF and hold until the unit turns
off.
2 Press 6 to start the demonstration.
• The demonstration can be cancelled by press-
ing 6 again.
Using different entertainment
displays
You can enjoy entertainment displays while
listening to each sound source.
• These are different ways of displaying the
spectrum and do not affect sound output.
Press ENTERTAINMENT.
Each time you press ENTERTAINMENT the
display changes in the following order:
ENTERTAINMENT MODE1 (default)—SPECTRUM ANALYZER—LEVEL INDICATOR—
ENTERTAINMENT MODE2—ENTERTAINMENT
MODE3—NON-MOVE ICON
ENTENT DISPDISP TEXTTEXT
TATA SOURCESOURCE/ OFF/ OFF
654321
FD
A
3
1
4
7 25
8
6
Page 54

En
54
12
Section
Other Functions
Cellular telephone muting
Sound from this unit is muted automatically
when a call is made or received using a connected cellular telephone.
• The sound is turned off, MUTE is displayed
and no audio adjustments, except volume
control, are possible. Operation returns to
normal when the phone call is ended.
Using the AUX source
An IP-BUS-RCA Interconnector such as the
CD-RB20 or CD-RB10 (sold separately) lets you
connect this unit to auxiliary equipment featuring RCA output. For more details, refer to the
IP-BUS-RCA Interconnector owner‘s manual.
Selecting AUX as the source
Press SOURCE/OFF to select AUX as the
source.
Press SOURCE/OFF until AUX appears in the
display.
• If the auxiliary setting is not switched on, AUX
cannot be selected. For more details, see
Switching the auxiliary setting on page 50.
Setting the AUX title
The title displayed for the AUX source can be
changed.
1 After you have selected
AUX as the source,
press FUNCTION and hold until TITLE IN
appears in the display.
2 Press 5 or ∞ to select a letter of the alphabet.
Each press of 5 will display a letter of the alphabet in A B C ... X Y Z, numbers and symbols in 1 2
3 ... @ # < order. Each press of ∞ will display a
letter in the reverse order, such as Z Y X ... C B A
order.
To change between upper case and lower case
letters (e.g., a b c ... x y z) press the 1 numbered
button. To change to only numbers and symbols
(e.g., 1 2 3 ... @ # <) press the 2 numbered button.
3 Press 3 to move the cursor to the next
character position.
When the letter you want is displayed, press 3
to move the cursor to the next position and then
select the next letter. Press 2 to move backwards in the display.
4 Move the cursor to the last position by
pressing 3 after entering the title.
When you press 3 one more time, the entered
title is stored in memory.
5 Press BAND/ESC to return to the playback
display.
Page 55

Additional Information
En
55
13
Section
English
Español
Deutsch
Français
Italiano
Nederlands
Cassette tapes
• A loose, torn or warped label on a cassette
tape can jam the cassette player. Do not use
cassette tapes with loose, torn or warped
labels.
• Cassette tapes longer than C-90 (90-minute
tapes) can cause the tape to jam in the cassette player. Do not use tapes longer than
C-90.
• Cassette tapes exposed to high temperatures
may warp and jam the cassette player. Keep
cassettes out of direct sunlight or places
where there are high temperatures.
• Store unused tapes in a tape case where there
is no danger of them becoming loose, dirty or
dusty.
Cleaning the playback head
If the head becomes dirty, the sound quality will
get bad and there will be sound dropouts and
other problems. If you have any of these problems the head may need cleaning.
Music search and repeat
functions
Music search and repeat functions may not
work with these tapes:
• A tape with a gap of 4 seconds or less
between songs
• A tape containing dialog or other non-musical
content, with pauses lasting 4 seconds or
longer
• A tape with an extremely quiet passage in the
music lasting for 4 seconds or longer
CD player and care
• Use only CDs that have either of the two
Compact Disc Digital Audio marks as show
below.
• Use only normal, round CDs. If you insert
irregular, non-round, shaped CDs they may
jam in the CD player or not play properly.
• Check all CDs for cracks, scratches or warped
discs before playing. CDs that have cracks,
scratches or are warped may not play properly. Do not use such discs.
• Avoid touching the recorded (non-printed
side) surface when handling the disc.
• Store discs in their cases when not in use.
• Keep discs out of direct sunlight and do not
expose the discs to high temperatures.
COMPACT
DIGITAL AUDIO
Page 56

En
56
13
Section
Additional Information
Message Cause Action
CD ERR-11, 12,
17, 30
Dirty disc Clean disc.
CD ERR-11, 12,
17, 30
Scratched disc Replace disc.
CD ERR-14 Blank disc Check the disc.
CD ERR-10, 11,
12, 14, 17, 30,
A0
Electrical or
mechanical
Turn the ignition
ON and OFF, or
switch to a
different source,
then back to the
CD player.
CD ERR-44 All tracks are
skip tracks
Replace disc.
HEAT CD player over-
heated
Turn off the CD
player until the
CD player cools
down.
• Do not attach labels, write on or apply chemicals to the surface of the discs.
• To clean dirt from a CD, wipe the disc with a
soft cloth outward from the center of the disc.
• If the heater is used in cold weather, moisture
may form on components inside the CD
player. Condensation may cause the CD
player to not operate properly. If you think that
condensation is a problem turn off the CD
player for an hour or so to allow the CD player
to dry out and wipe any damp discs with a soft
cloth to remove the moisture.
• Road shocks may interrupt CD playback.
CD-R discs
• CD-R (CD-Recordable) discs recorded on
CD-R units other than a music CD recorder
may not play properly on this CD player.
• Music CD-R discs, even recorded on a music
CD recorder, may not play properly on this CD
player due to differing disc characteristics,
scratches or dirt on the disc. Dirt or condensation on the lens inside this unit may also
prevent playback.
• Titles and other text information recorded on a
CD-R disc may not be displayed by this unit.
• This unit conforms to the track skip function
of the CD-R disc. The tracks containing the
track skip information are skipped automatically.
• Read the precautions with CD-R discs before
using them.
Understanding built-in CD player
error messages
When problems occur during CD play an error
message may appear on the display. If an error
message appears on the display refer to the
table below to see what the problem is and the
suggested method of correcting the problem. If
the error cannot be corrected, contact your
dealer or your nearest Pioneer Service Center.
Page 57

Additional Information
En
57
13
Section
English
Español
Deutsch
Français
Italiano
Nederlands
Specifications
General
Power source ...................... 14.4 V DC (10.8 – 15.1 V
allowable)
Grounding system .............. Negative type
Max. current consumption
............................................. 10.0 A
Dimensions (W × H × D):
Chassis ........................ 178 × 100 × 160 mm
Nose ............................ 170 × 94 × 13 mm
Weight ................................. 2.0 kg
Audio/DSP
Maximum power output ..... 50 W × 4, 50 W × 2/4 Ω +
70 W × 1/2 Ω (for
subwoofer)
Continuous power output .. 27 W × 4 (DIN 45324,
+B=14.4 V)
Load impedance ................. 4 Ω (4 – 8 Ω [2 Ω for 1 ch]
allowable)
Preout max output level/output impedance
............................................. 2.2 V/1 kΩ
Loudness contour .............. +10 dB (100 Hz), +7 dB
(10 kHz) (volume: –30 dB)
Equalizer (9-Band Graphic Equalizer):
Frequency .................... 50/100/200/400/800 Hz
1.6/3.15/6.3/12.5 kHz
Equalization range ...... ±12 dB
Network:
HPF:
Frequency ............ 50/80/125 Hz
Slope .................... –12 dB/oct
Subwoofer:
Frequency ............ 50/80/125 Hz
Slope .................... –18 dB/oct
Gain ..................... +6 — –15 dB
Phase ................... Normal/Reverse
CD player
System ................................ Compact disc audio
system
Usable discs ....................... Compact disc
Signal format:
Sampling frequency ... 44.1 kHz
Number of quantization bits
..................................... 16; linear
Frequency characteristics
............................................. 5 – 20,000 Hz (±1 dB)
Signal-to-noise ratio ........... 94 dB (1 kHz) (IEC-A
network)
Dynamic range ................... 92 dB (1 kHz)
Number of channels .......... 2 (stereo)
Cassette player
Tape ..................................... Compact cassette tape
(C-30 – C-90)
Tape speed .......................... 4.8 cm/sec
Fast forward/rewinding time
............................................. Approx. 100 sec (C-60)
Wow & flutter ...................... 0.09% (WRMS)
Frequency response:
Metal ........................... 30 – 19,000 Hz (±3 dB)
Stereo separation ............... 45 dB
Signal-to-noise ratio:
Metal:
Dolby B NR IN ..... 67 dB (IEC-A network)
Dolby NR OUT ..... 61 dB (IEC-A network)
FM tuner
Frequency range ................. 87.5 – 108.0 MHz
Usable sensitivity ............... 9 dBf (0.8 µV/75 Ω, mono,
S/N: 30 dB)
50 dB quieting sensitivity ... 15 dBf (1.5 µV/75 Ω, mono)
Signal-to-noise ratio ........... 70 dB (IEC-A network)
Distortion ............................ 0.3% (at 65 dBf, 1 kHz,
stereo)
Frequency response ........... 30 – 15,000 Hz (±3 dB)
Stereo separation ............... 40 dB (at 65 dBf, 1 kHz)
MW tuner
Frequency range ................. 531 – 1,602 kHz (9 kHz)
Usable sensitivity ............... 18 µV (S/N: 20 dB)
Selectivity ............................ 50 dB (±9 kHz)
LW tuner
Frequency range ................. 153 – 281 kHz
Usable sensitivity ............... 30 µV (S/N: 20 dB)
Selectivity ............................ 50 dB (±9 kHz)
Note
• Specifications and the design are subject to
possible modifications without notice due to
improvements.
Page 58

Prima di iniziare
Informazioni sull’unità 4
Informazioni su questo manuale 4
Precauzioni 4
In caso di problemi 4
Protezione antifurto dell’unità 4
• Rimozione del frontalino 5
• Montaggio del frontalino 5
Ripristino del microprocessore 5
Nomenclatura
Unità principale 6
Telecomando opzionale 7
• Uso del telecomando con il tasto
PGM 7
Accensione/spegnimento
Accensione dell’unità 8
Selezione di una sorgente 8
Spegnimento dell’unità 8
Sintonizzatore
Ascolto della radio 9
Introduzione alle funzioni avanzate del
sintonizzatore 11
Memorizzazione e richiamo delle
frequenze di trasmissione 12
Sintonizzazione di segnali forti 12
Memorizzazione delle frequenze di
trasmissione più forti 13
RDS
Introduzione al funzionamento del
sistema RDS 14
Scorrimento del display RDS 15
Selezione di frequenze alternative 15
• Uso della ricerca PI 16
• Uso della funzione di ricerca automatica
PI per le stazioni preselezionate 16
• Limitazione delle stazioni alla
programmazione regionale 16
Ricezione dei notiziari sul traffico 17
• Risposta a un allarme TP 17
Uso delle funzioni PTY 18
• Ricerca di una stazione RDS tramite le
informazioni PTY 18
• Uso dell’interruzione dei programmi
per i notiziari 18
• Ricezione della trasmissione di
allarme PTY 18
Uso del testo radio 19
• Visualizzazione del testo radio 19
• Memorizzazione e richiamo di testo
radio 19
Elenco PTY 20
Lettore di cassette
Riproduzione di un nastro 21
Introduzione alle funzioni avanzate del
lettore di cassette 23
Riproduzione ripetuta 23
Salto di sezioni di nastro vuote 24
Uso della riduzione di rumore Dolby 24
Lettore CD incorporato
Riproduzione di un CD 25
Introduzione alle funzioni avanzate del
lettore CD incorporato 27
Riproduzione ripetuta 28
Riproduzione di brani in ordine casuale 28
Scansione dei brani di un CD 28
Pausa della riproduzione di un CD 29
Uso della funzione del titolo del disco 29
• Immissione dei titoli dei dischi
• Visualizzazione dei titoli dei dischi 30
Uso della funzione CD TEXT 30
• Visualizzazione di titoli sui dischi CD
TEXT 30
• Scorrimento dei titoli sul display 30
Lettore multi-CD
Riproduzione di un CD 31
Introduzione alle funzioni avanzate del
lettore multi-CD 33
Riproduzione ripetuta 34
Riproduzione di brani in ordine casuale 34
Scansione di CD e di brani 34
Pausa della riproduzione di un CD 35
Uso della lista di riproduzione ITS 35
Grazie di aver acquistato questo prodotto Pioneer.
Leggere attentamente queste istruzioni operative, in modo da imparare come
azionare correttamente il modello. Dopo aver terminato la lettura delle istruzioni,
metterle da parte in un posto sicuro, per consultazione futura.
Sommario
It
2
00
Sezione
Page 59

• Creazione di una lista di riproduzione
con la programmazione ITS 35
• Riproduzione a partire dalla lista di
riproduzione ITS 36
• Cancellazione di un brano dalla lista di
riproduzione ITS 36
• Cancellazione di un CD dalla lista di
riproduzione ITS 37
Uso della funzione del titolo del disco 37
• Immissione dei titoli dei dischi 37
• Visualizzazione dei titoli dei dischi 38
• Selezione di un disco dalla lista dei
titoli dei dischi 38
Uso della funzione CD TEXT 38
• Visualizzazione di titoli sui dischi CD
TEXT 39
• Scorrimento dei titoli sul display 39
Uso della compressione e
dell’enfatizzazione dei bassi 39
Lettore multi-CD da 50 dischi 39
Regolazione dell’audio
Introduzione alla regolazione dell’audio 40
Uso della regolazione del bilanciamento 41
Regolazione del livello sonoro 41
Regolazione dei livelli delle sorgenti 41
Processore di segnale digitale
Uso del processore digitale di segnale 43
Uso dell’equalizzatore grafico 44
• Richiamo delle curve
d’equalizzatore 44
• Regolazione delle curve
d’equalizzatore 45
• Regolazione dell’equalizzatore grafico
a 9 bande 45
Uso del controllo del campo sonoro,
dell’octaver e del suono BBE 46
• Richiamo dei programmi di campo
sonoro 46
• Regolazione del livello sonoro BBE 46
Uso del selettore di posizione 47
Uso dell’uscita subwoofer 47
• Regolazione delle impostazioni del
subwoofer 48
Uso del filtro di passo alto 48
Impostazioni iniziali
Regolazione delle impostazioni iniziali 49
Impostazione del passo di sintonizzazione
FM 50
Attivazione/disattivazione della sintoniz-
zazione automatica PI 50
Attivazione/disattivazione del tono di
avvertenza 50
Attivazione/disattivazione dell’impostazione
di un apparecchio ausiliario 50
Attivazione/disattivazione del varialuce 51
Attivazione/disattivazione
dell’impostazione dell’uscita
posteriore 51
Selezione dell’attenuatore digitale 51
Regolazione del contrasto del display 52
Altre funzioni
Introduzione alle altre funzioni 53
Uso della dimostrazione 53
Uso dei diversi display di
intrattenimento 53
Silenziamento del telefono cellulare 54
Uso della sorgente AUX 54
• Selezione di AUX come sorgente 54
• Impostazione del titolo AUX 54
Informazioni supplementari
Le cassette 55
Pulizia della testina di riproduzione 55
Funzioni di ricerca e di ripetizione di
un brano musicale 55
Cura del lettore CD 55
Dischi CD-R 56
Spiegazione dei messaggi di errore del
lettore CD incorporato 56
Dati tecnici 57
Sommario
It
3
00
Sezione
English
Italiano
Deutsch
Français
Italiano
Nederlands
Page 60

It
4
01
Sezione
Prima di iniziare
Informazioni sull’unità
Le frequenze del sintonizzatore di questa unità
sono destinate all’uso in Europa occidentale, in
Asia, nel Medio Oriente, in Africa e in Oceania.
L’uso in altre aree può dare come risultato una
ricezione non corretta. La funzione RDS è operativa solo nelle aree in cui esistono stazioni FM
che trasmettono segnali RDS.
Informazioni su questo manuale
Questa unità è dotata di diverse funzioni sofisticate che garantiscono una migliore ricezione e
un miglior funzionamento. Tutte le funzioni sono
state progettate per semplificare al massimo
l’uso, ma molte non sono comprensibili immediatamente. Questo manuale operativo vuole
essere un aiuto affinché l’utente possa beneficiare completamente delle potenzialità di
questo prodotto e massimizzare l’esperienza
dell’ascolto.
Raccomandiamo di familiarizzarsi con le funzioni e il loro significato leggendo completamente il manuale prima di iniziare a usare
l’unità. È particolarmente importante leggere e
osservare le precauzioni contenute in questa
pagina e nelle altre sezioni.
Questo manuale illustra il funzionamento
dell’unità principale. È possibile eseguire le
stesse operazioni con il telecomando sullo
sterzo (venduto a parte).
Precauzioni
• Nella parte superiore dell’unità è affissa
l’etichetta CLASS 1 LASER PRODUCT.
• Il CarStereo-Pass Pioneer può essere usato
solo in Germania.
• Tenere questo manuale a portata di mano
come riferimento per le procedure e le precauzioni operative.
• Mantenere sempre il volume abbastanza
basso, in modo da poter i suoni provenienti
dall’esterno dell’automobile.
• Proteggere questo prodotto dall’umidità.
• Se la batteria viene scollegata o si scarica, la
memoria delle preselezioni viene cancellata e
deve essere riprogrammata.
In caso di problemi
Nel caso che questo prodotto non funzioni
correttamente, contattare il rivenditore o il
Centro di assistenza autorizzato Pioneer più
vicino.
Protezione antifurto dell’unità
Il frontalino può essere staccato dall’unità principale e conservato nella custodia protettiva,
fornita per scoraggiare i furti.
• Se il frontalino non viene staccato dall’unità
principale entro cinque secondi dallo spegnimento del motore dell’automobile, viene
emesso un segnale di avvertenza.
• È possibile disattivare il segnale di avvertenza.
Vedere Attivazione/disattivazione del tono di
avvertenza a pagina 50.
Questo prodotto è conforme alle direttive
EMC (89/336/CEE, 92/31/CEE) e alla direttiva sul marchio CE (93/68/CEE).
CLASS 1
LASER PRODUCT
Page 61

Prima di iniziare
It
5
01
Sezione
English
Italiano
Deutsch
Français
Italiano
Nederlands
Importante
• Non fare mai forza e non afferrare il display e i
tasti strettamente quando si rimuove o si
installa il frontalino.
• Evitare di assoggettare il frontalino a urti
eccessivi.
• Mantenere il frontalino lontano dalla luce
solare diretta e dalle alte temperature.
Rimozione del frontalino
1 Premere DETACH per sganciare il
frontalino.
Premendo DETACH il lato sinistro del frontalino
viene sganciato dall’unità principale.
Tasto DETACH
2 Afferrare il frontalino e rimuoverlo.
Afferrare il lato sinistro del frontalino e tiralo via
verso destro. Il frontalino viene staccato
dall’unità principale.
3 Inserire il frontalino nella custodia
protettiva fornita per conservarlo in sicurezza.
Montaggio del frontalino
1 Posizionare il frontalino in piano contro
l’unità principale.
2 Spingere il frontalino nella parte anteriore
dell’unità principale fino a quando è saldamente installato.
Ripristino del microprocessore
È necessario ripristinare il microprocessore
nelle condizioni seguenti:
• Prima di usare quest’unità per la prima volta
dopo l’installazione
• Se l’unità non funziona correttamente
• Quando sul display vengono visualizzati messaggi strani o non corretti
1 Rimuovere il frontalino.
Vedere Rimozione del frontalino, in questa
pagina.
2 Premere RESET sull’unità principale con la
punta di una penna o un altro strumento
appuntito.
Tasto
RESET
Page 62

It
6
02
Sezione
Nomenclatura
Unità principale
1 Tasto CD EJECT
Premere questo tasto per espellere un CD
dal lettore CD incorporato.
2 Tasto ENTERTAINMENT
Premere questo tasto per cambiare il display
dell’intrattenimento.
3 Tasto DISPLAY
Premere questo tasto per selezionare diversi
display.
4 Tasto TEXT
Premere questo tasto per attivare o
disattivare la funzione di testo radio.
5 Tasto FUNCTION
Premere questo tasto per selezionare le
funzioni.
6 Tasto AUDIO
Premere questo tasto per selezionare vari
controlli della qualità audio.
7 Tasti 5/∞/2/3
Premere questi tasti per eseguire la sintonizzazione manuale, l’avanzamento rapido, il
riavvolgimento e i controlli della ricerca del
brano. Essi vengono utilizzati anche per
controllare alcune funzioni.
8 Tasto
BAND/ESC
Premere questo tasto per selezionare tra le
tre bande FM o MW/LW e per annullare la
modalità di controllo delle funzioni.
9 Tasto DSP
Premere questo tasto per selezionare le
funzioni del campo sonoro.
0 Tasto SOURCE/OFF
Questa unità viene accesa selezionando una
sorgente. Premere questo tasto per passare
in rassegna tutte le sorgenti disponibili.
- Tasti 1–6
Premere questi tasti per la sintonizzazione
delle preselezioni e per la ricerca del numero
di disco quando si usa un lettore multi-CD.
ENTENT DISPDISP TEXTTEXT
TATA SOURCESOURCE/ OFF/ OFF
654321
FD
A
1
5
!
76908
~
3
-
4
=
@
2
Page 63

Nomenclatura
It
7
02
Sezione
English
Italiano
Deutsch
Français
Italiano
Nederlands
= Tasto TA
Premere questo tasto per attivare o disattivare la funzione del notiziario del traffico.
~ Tasto VOLUME
Premere questo tasto per aumentare o
diminuire il volume.
! Tasto TAPE EJECT
Premere questo tasto per espellere una
cassetta dal lettore di cassette.
@ Tasto DETACH
Premere questo tasto per rimuovere il
frontalino dall’unità centrale.
Telecomando opzionale
Il telecomando per lo sterzo CD-SR80 viene
venduto a parte. Il funzionamento è lo stesso di
quando si usano i tasti dell’unità principale.
Vedere la spiegazione del funzionamento di
ognuno dei tasti dell’unità principale con
l’eccezione del tasto ATT , che viene illustrato di
seguito.
# Tasto ATT
Premendo questo tasto si abbassa rapidamente il livello del volume, di circa il 90%.
Premere il tasto ancora una volta per tornare
al livello di volume originale.
Uso del telecomando con il tasto PGM
Anche il telecomando CD-R600, venduto a
parte, può azionare questa unità. È dotato di un
tasto PGM (programma) nel quale sono preprogrammate le funzioni usate di frequente per
ogni sorgente. Premere PGM per attivare le
funzioni nel modo seguente:
Sorgente Nome funzione Pagina
Sintonizzatore BSM (on/off) 13
(Tenere premuto
per 2 secondi)
Lettore di cassette Salto degli spazi vuoti 24
(on/off)
Lettore CD Pausa (on/off) 29
incorporato
Lettore multi-CD Pausa (on/off) 35
~
#
7
5
6
0
8
Page 64

It
8
03
Sezione
Accensione/spegnimento
Accensione dell’unità
Premere SOURCE/OFF per accendere l’unità.
Quando si sceglie una sorgente l’unità si
accende.
Selezione di una sorgente
È possibile selezionare una sorgente che si
desidera ascoltare. Per passare al lettore CD
incorporato, caricare un disco in questa unità
(consultare pagina 25). Per passare al lettore di
cassette, caricare una cassetta in questa unità
(consultare pagina 21).
Premere SOURCE/OFF per selezionare una
sorgente.
Premere ripetutamente SOURCE/OFF per
passare a una delle sorgenti seguenti:
Lettore CD incorporato—Sintonizzatore—Lettore
di cassett—Lettore multi-CD—Unità esterna 1—
Unità esterna 2—AUX
Note
• Nei casi seguenti, la sorgente sonora non
cambia:
— Quando il prodotto corrispondente alla
sorgente non è collegato all’unità.
— Quando nell’unità non è stato inserito
nessun disco.
— Quando nell’unità non è stata inserita
nessuna cassetta.
— Quando nel lettore multi-CD non è stato
inserito nessun caricatore.
— Quando AUX (ingresso esterno) è disatti-
vato (off) (consultare pagina 50).
• Un’unità esterna è un prodotto Pioneer (ad
esempio un prodotto disponibile in futuro)
che, sebbene incompatibile come sorgente,
consente il controllo delle funzioni di base da
parte questa unità. Con questa unità possono
essere controllate due unità esterne. Quando
si collegano due unità esterne, la loro
assegnazione all’unità esterna 1 o all’unità
esterna 2 viene impostata automaticamente
da questa unità.
• Quando il conduttore isolato blu/bianco di
questa unità viene collegato al terminale di
controllo del relè dell’antenna automatica,
l’antenna dell’automobile si estende quando
si accende l’unità. Per ritirare l’antenna,
spegnere la sorgente.
Spegnimento dell’unità
Premere e tenere premuto per almeno un
secondo SOURCE/OFF
per spegnere l’unità.
Page 65

Sintonizzatore
It
9
04
Sezione
English
Italiano
Deutsch
Français
Italiano
Nederlands
Ascolto della radio
Ecco i passaggi di base per azionare la radio. Le
operazioni più avanzate con il sintonizzatore
vengono illustrate a partire da pagina 11.
È possibile attivare e disattivare (on/off) la funzione AF (ricerca delle frequenze alternative) di
questa unità. Per le operazioni normali di
sintonizzazione la funzione AF deve essere
disattivata (consultare pagina 15).
1 Indicatore BAND
Mostra su quale banda è sintonizzata la
radio, MW, LW o FM.
2 Indicatore STEREO ()
Mostra che la frequenza selezionata viene
trasmessa in stereo.
3 Indicatore FREQUENCY
Mostra su quale frequenza è sintonizzato il
sintonizzatore.
4 Tasti 2/3 (Sintonizzazione manuale o
automatica)
Premere questi tasti per sintonizzarsi su una
stazione radio.
5 Tasto BAND/ESC
Premere questo tasto per selezionare una
delle tre bande FM o MW/LW.
6 Tasto VOLUME
Premere questo tasto per aumentare o
diminuire il volume.
7 Tasto SOURCE/OFF
Premere questo tasto per selezionare il
sintonizzatore come sorgente.
1 Premere SOURCE/OFF per selezionare il
sintonizzatore.
Premere SOURCE/OFF fino a quando si vede
visualizzata l’indicazione Tuner.
ENTENT DISPDISP TEXTTEXT
TATA SOURCESOURCE/ OFF/ OFF
654321
FD
A
756 4
1 3
2
Page 66

It
10
04
Sezione
Sintonizzatore
2 Usare VOLUME per regolare il livello
sonoro.
Quando si preme VOLUME su/+, il volume viene
aumentato e quando si preme giù/–, il volume
viene abbassato.
3 Premere BAND/ESC
per selezionare una
banda.
Premere
BAND/ESC fino a quando è visualizzata
la banda desiderata, F1, F2, F3 per FM o MW/LW.
4 Per eseguire la sintonizzazione manuale,
premere 2 o 3 con pressioni rapide.
Le frequenze si spostano verso l’alto o verso il
basso, passo dopo passo.
5 Per eseguire la sintonizzazione
automatica, premere e tenere premuto 2 o 3
per circa un secondo e poi rilasciare.
Il sintonizzatore eseguire la scansione delle
frequenze fino a quando trova un segnale
abbastanza forte per una buona ricezione.
• È possibile annullare la sintonizzazione automatica premendo sia 2 che 3 con una pressione rapida.
• Se si tiene o si tiene premuto 2 o 3, è
possibile saltare delle stazioni radio. La
sintonizzazione automatica viene avviata non
appena si rilasciano i tasti.
Nota
• Se la frequenza selezionata viene trasmessa
in stereo si accende l’indicatore STEREO ().
Page 67

Sintonizzatore
It
11
04
Sezione
English
Italiano
Deutsch
Français
Italiano
Nederlands
Introduzione alle funzioni
avanzate del sintonizzatore
1 Display FUNCTION
Mostra lo stato della funzione.
2 Indicatore PRESET NUMBER
Mostra le preselezione selezionata.
3 Tasto FUNCTION
Premere questo tasto per selezionare una
funzione avanzata.
4 Tasti 5/∞
Premere questi tasti per selezionare le
frequenze memorizzate e per attivare/
disattivare la funzione selezionata.
5 Tasti 2/3
Premere questi tasti per selezionare
l’elemento (la modalità) della funzione
selezionata.
6 Tasto BAND/ESC
Premere questo tasto per tornare al display
della frequenza.
7 Tasti 1–6 (PRESET TUNING)
Premere questi tasti per la selezione tramite
tasto delle stazioni radio immesse in memoria. Per memorizzare una stazione radio,
premere e tenere premuto uno dei tasti.
Premere FUNCTION per visualizzare i nomi
delle funzioni.
Se si preme ripetutamente FUNCTION, sul
display vengono visualizzate le funzioni
seguenti:
BSM (memoria delle stazioni migliori)—REG
(regionale)—LOCAL (sintonizzazione
automatica locale)—PTY SELECT (selezione del
tipo di programma)—TA (standby per i notiziari
sul traffico)—NEWS (interruzione dei
programmi per i notiziari)—AF (ricerca delle
frequenze alternative)
• Per tornare al display della frequenza, premere BAND/ESC.
• Se è selezionata la banda MW/LW, è possibile
selezionare solo BSM o LOCAL.
ENTENT DISPDISP TEXTTEXT
TATA SOURCESOURCE/ OFF/ OFF
654321
FD
A
4
3
7 6 5
2
1
Page 68

It
12
04
Sezione
Sintonizzatore
Nota
• Se non si attiva la funzione entro circa 30
secondi, il display torna automaticamente alla
visualizzazione della frequenza.
Memorizzazione e richiamo delle
frequenze di trasmissione
Se si preme uno dei tasti PRESET TUNING è
possibile memorizzare facilmente fino a sei
frequenze di trasmissione, per richiamarle in
seguito con la pressione di un tasto.
Quando si individua una frequenza che si
desidera memorizzare, premere uno dei tasti
PRESET TUNING e tenerlo premuto fino a
quando il numero della preselezione smette
di lampeggiare.
Il numero premuto lampeggerà nell’indicatore
PRESET NUMBER e rimarrà acceso.
La frequenza della stazione radio selezionata è
stata memorizzata.
La volta successiva che si preme lo stesso tasto
PRESET TUNING la frequenza della corrispon-
dente stazione radio viene richiamata dalla
memoria.
Note
• È possibile memorizzare fino a 18 stazioni FM,
6 per ognuna delle tre bande FM e 6 stazioni
MW/LW.
• È anche possibile utilizzare 5 e ∞ per richiamare le frequenze delle stazioni radio assegnate ai tasti PRESET TUNING.
Sintonizzazione di segnali forti
La sintonizzazione automatica locale consente
di sintonizzare solo le stazioni radio con segnali
radio sufficientemente forti per una buona
ricezione.
1 Premere
FUNCTION per selezionare LOCAL.
Premere
FUNCTION fino a quando sul display
viene visualizzata l’indicazione LOCAL .
2 Premere 5 per attivare la sintonizzazione
manuale locale.
Sul display viene visualizzata la sensibilità automatica locale (ad esempio, LOCAL 2).
3 Premere 2 o 3 per impostare la
sensibilità.
Sono disponibili quattro livelli di sensibilità per
FM e due livelli per MW/LW:
FM: LOCAL 1—LOCAL 2—LOCAL 3—LOCAL 4
MW/LW: LOCAL 1—LOCAL 2
L’impostazione LOCAL 4 consente la ricezione
solo delle stazioni più forti, mentre le
impostazioni più basse consentono di ricevere
stazioni sempre più deboli.
4 Quando si desidera tornare alla sintonizzazione automatica normale, premere ∞ per
disattivare la sintonizzazione locale.
Sul display viene visualizzata l’indicazione
LOCAL :OFF.
Page 69

Sintonizzatore
It
13
04
Sezione
English
Italiano
Deutsch
Français
Italiano
Nederlands
Memorizzazione delle frequenze
di trasmissione più forti
La funzione BSM (memorizzazione delle stazioni
migliori) consente di memorizzare automaticamente le sei frequenze di trasmissione più forti
nei tasti PRESET TUNING 1–6 e, quando sono
state memorizzate, è possibile sintonizzarsi su
quelle frequenze con la sola pressione di un
tasto.
1 Premere FUNCTION per selezionare BSM.
Premere FUNCTION fino a quando sul display
viene visualizzata l’indicazione BSM.
2 Premere 5 per attivare la funzione BSM.
L’indicazione BSM inizia a lampeggiare. Mentre
lampeggia l’indicazione BSM, le sei frequenze
di trasmissione più forti vengono memorizzate
nei tasti PRESET TUNING nell’ordine di forza
del segnale. Terminata l’operazione,
l’indicazione BSM smette di lampeggiare.
• Per annullare il processo di memorizzazione,
premere ∞.
Nota
• La memorizzazione di frequenze di trasmissione tramite la funzione BSM può sostituire
le frequenze di trasmissione salvate utilizzando PRESET TUNING.
Page 70

It
14
05
Sezione
RDS
Introduzione al funzionamento
del sistema RDS
RDS (radio data system, cioè sistema dati radio)
è un sistema che consente di fornire
informazioni insieme alle trasmissioni in FM.
Queste informazioni impercettibili forniscono
elementi come il nome di servizio del
programma, il tipo di programma, lo standby
per i notiziari sul traffico, la sintonizzazione
automatica e la sintonizzazione su un certo tipo
di programma, con lo scopo di aiutare gli
ascoltatori della radio nella ricerca e nella
sintonizzazione della stazione desiderata.
1 Indicatore AF
Mostra se è attivata la funzione AF (ricerca
delle frequenze alternative).
2 Indicatore TEXT
Mostra quando da una stazione RDS viene
trasmesso testo radio.
3 Indicatore
NEWS
Mostra se è attivata la funzione NEWS
(interruzione dei programmi per i notiziari).
4 Indicatore T
Mostra se è attivata la funzione TA (standby
per i notiziari sul traffico).
5 Indicatore TP
Mostra quando si è sintonizzata una stazione
TP.
6 Nome di servizio del programma
Mostra il tipo di programma trasmesso.
7 Tasto TA
Premere questo tasto per attivare o disattivare la funzione TA. Premere questo tasto e
tenerlo premuto per attivare o disattivare la
funzione NEWS.
8 Tasto TEXT
Premere questo tasto per attivare o disattivare la funzione di testo radio.
9 Tasto DISPLAY
Premere questo tasto per cambiare il display.
ENTENT DISPDISP TEXTTEXT
TATA SOURCESOURCE/ OFF/ OFF
654321
FD
A
9
7 8
6 2 4
53
1
Page 71

RDS
It
15
05
Sezione
English
Italiano
Deutsch
Français
Italiano
Nederlands
Premere FUNCTION per visualizzare i nomi di
funzione.
Se si preme ripetutamente FUNCTION, sul
display vengono visualizzate le funzioni
seguenti:
BSM (memoria delle stazioni migliori)—REG
(regionale)—LOCAL (sintonizzazione
automatica locale)—PTY SELECT (selezione del
tipo di programma)—TA (standby per i notiziari
sul traffico)—NEWS (interruzione dei
programmi per i notiziari)—AF (ricerca delle
frequenze alternative)
• Per tornare al display della frequenza, pre-
mere BAND/ESC.
• Se è selezionata la banda MW/LW, è possibile
selezionare solo BSM o LOCAL.
Note
• Se non si attiva la funzione entro circa 30
secondi, il display torna automaticamente alla
visualizzazione della frequenza.
• Il servizio RDS non viene fornito da tutte le
stazioni.
• Le funzioni RDS del tipo di AF e TA sono attive
solo quando la radio è sintonizzata su una
stazione RDS.
Scorrimento del display RDS
Quando ci si sintonizza su una stazione RDS, ne
viene visualizzato il nome di servizio. Se si
desidera, è possibile conoscerne la frequenza.
Premere DISPLAY.
Se si preme ripetutamente DISPLAY, sul display
vengono visualizzate le impostazioni seguenti:
Nome di servizio del programma—Informazioni
PTY—Frequenza
Le informazioni PTY (codice ID del tipo di programma) sono elencate a pagina 20.
• Le informazioni PTY e la frequenza della
stazione corrente vengono visualizzate sul
display per otto secondi.
• Se da una stazione viene ricevuto un codice
PTY 0, viene visualizzata l’indicazione NONE. Ciò
indica che la stazione non ha definito il contenuto del suo programma.
• Se il segnale è troppo debole perché questa
unità possa estrarre il codice PTY, viene visualizzata l’indicazione NO PTY.
Selezione di frequenze alternative
Se si sta ascoltando una trasmissione e la
ricezione si indebolisce o se si verificano altri
problemi, l’unità ricerca automaticamente una
stazione diversa della stessa rete che trasmetta
un segnale più forte.
• Per impostazione predefinita, la funzione AF è
attivata.
1 Premere
FUNCTION
per selezionare AF.
Premere FUNCTION fino a quando sul display
viene visualizzata l’indicazione AF.
2 Premere 5 per attivare la funzione AF.
Premere 5 e viene visualizzata l’indicazione AF
:ON.
3 Premere ∞ per disattivare la funzione AF.
Premere ∞ e viene visualizzata l’indicazione AF
:OFF.
Page 72

It
16
05
Sezione
RDS
Note
• Quando la funzione AF è attivata, solo le
stazioni RDS vengono sintonizzate durante
una sintonizzazione automatica o BSM.
• Quando si richiama una stazione
preselezionata, il sintonizzatore può
aggiornare la stazione preselezionata con una
nuova frequenza tratta dall’elenco AF delle
stazioni. (Questa funzione è disponibile solo
quando si usano le preselezioni delle bande
F1 o F2). Sul display non viene visualizzato
nessun numero di preselezione se i dati RDS
relativi alla stazione ricevuta differiscono da
quelli relativi alla stazione memorizzata in
origine.
• Durante una ricerca di frequenza AF, l’audio
può essere temporaneamente interrotto da un
altro programma.
• Quando il sintonizzatore è sintonizzato su una
stazione non RDS, l’indicatore AF lampeggia.
• È possibile attivare o disattivare la funzione AF
in modo indipendente per ogni banda FM.
Uso della ricerca PI
Se l’unità non riesce a trovare una frequenza
alternativa adatta o se si sta ascoltando una
trasmissione e la ricezione si indebolisce,
l’unità ricerca automaticamente una stazione
diversa con la stessa programmazione. Durante
la ricerca, viene visualizzata l’indicazione PI
Seek e l’uscita viene silenziata. Il silenziamento
viene interrotto dopo il completamento della
ricerca PI, sia che venga trovata sia che non
venga trovata una stazione diversa.
Uso della funzione di ricerca automatica
PI per le stazioni preselezionate
Quando non è possibile richiamare le stazioni
preselezionate, come quando si fanno lunghi
viaggi, è possibile impostare l’unità in modo che
esegua la ricerca PI durante il richiamo delle
preselezioni.
• L’impostazione predefinita della ricerca auto-
matica PI è disattivata. Vedere Attivazione/
disattivazione della sintonizzazione automatica
PI, a pagina 50.
Limitazione delle stazioni alla
programmazione regionale
Quando si utilizza la funzione AF per risintonizzare automaticamente le frequenze, la funzione
regionale limita la selezione a stazioni che
trasmettono programmi regionali.
1 Premere FUNCTION per selezionare REG.
Premere FUNCTION fino a quando sul display
viene visualizzata l’indicazione REG.
2 Premere 5 per attivare la funzione
regionale.
Premere 5 e viene visualizzata l’indicazione
REG :ON.
3 Premere ∞ per disattivare la funzione
regionale.
Premere ∞ e viene visualizzata l’indicazione
REG :OFF.
Note
• I programmi regionali e le reti regionali sono
organizzati in modo diverso a seconda del
Paese (cioè, possono cambiare a seconda
dell’ora, dello Stato o dell’area di trasmissione).
• Il numero della preselezione può scomparire
dal display se il sintonizzatore si sintonizza su
una stazione regionale diversa dalla stazione
selezionata in origine.
• La funzione REG può essere attivata o disattivata in modo indipendente per ogni banda
FM.
Page 73

RDS
It
17
05
Sezione
Ricezione dei notiziari sul traffico
La funzione TA (standby per i notiziari sul
traffico) consente di ricevere automaticamente i
notiziari sul traffico, indipendentemente dalla
sorgente che si sta ascoltando. È possibile attivare la funzione TA sia per una stazione TP (una
stazione che trasmette informazioni sul traffico)
sia a una stazione TP con estensione alle altre
stazioni del network (una stazione che
trasmette informazioni che fornisce rinvii a
stazioni TP).
1 Sintonizzarsi su una stazione TP o su una
stazione TP con estensione alle altre stazioni
del network.
Quando si è sintonizzati su una stazione TP o su
una stazione TP con estensione alle altre
stazioni del network, si accende l’indicatore TP
().
2 Premere TA per attivare lo standby per i
notiziari sul traffico.
Quando si preme TA sul display viene visualizzato l’indicatore TA. Il sintonizzatore entra in
modalità di standby per i notiziari sul traffico.
• Per disattivare la modalità di standby per i
notiziari sul traffico, premere di nuovo TA.
3 Usare VOLUME per regolare il volume TA
quando inizia un notiziario sul traffico.
Quando si preme VOLUME su/+, il volume viene
aumentato e quando si preme giù/–, il volume
viene abbassato.
Il volume appena impostato viene memorizzato
e richiamato per i notiziari sul traffico successivi.
4 Per annullare il notiziario sul traffico, premere TA mentre è in corso la ricezione del
notiziario sul traffico.
Il sintonizzatore torna alla sorgente originale ma
resta in modalità di standby fino a quando si
preme di nuovo TA.
Note
• È anche possibile attivare o disattivare la funzione
TA premendo FUNCTION.
• Dopo la ricezione di un notiziario sul traffico, il
sistema torna alla sorgente originale.
• È possibile attivare la funzione TA da altre
sorgenti diverse dal sintonizzatore se il sintonizzatore è stato appena impostato sulla
banda FM ma non se è stato impostato sulla
banda MW/LW.
• Se si è appena impostato il sintonizzatore
sulla banda FM, l’attivazione della funzione TA
consente di attivare altre funzioni di sintonizzazione ascoltando sorgenti diverse dal sintonizzatore.
• Quando la funzione TA è attivata, solo le
stazioni TP e le stazioni TP con estensione alle
altre stazioni del network vengono sintonizzate durante una sintonizzazione automatica
o BSM.
Risposta a un allarme TP
Quando una stazione TP o una stazione TP con
estensione alle altre stazioni del network viene
perduta a causa di un segnale debole,
l’indicatore T si spegne e si ode una serie di
brevi segnali acustici, della durata di circa
cinque secondi, per ricordare di selezionare
un’altra stazione TP o una stazione TP con
estensione alle altre stazioni del network.
Durante l’ascolto del sintonizzatore, sintonizzarsi su un’altra stazione TP o su una stazione
TP con estensione alle altre stazioni del network.
• Quando si ascoltano sorgenti diverse dal
sintonizzatore l’unità ricerca automaticamente
la stazione TP con il segnale più forte dopo un
ritardo di 10 o 30 secondi. Il ritardo è di 10
secondi se la funzione TA è attivata e di 30
secondi se sono attivate le funzioni TA e AF.
English
Italiano
Deutsch
Français
Italiano
Nederlands
Page 74

RDS
Uso delle funzioni PTY
È possibile sintonizzarsi su una stazione usando
le informazioni PTY.
Ricerca di una stazione RDS tramite le
informazioni PTY
È possibile ricercare programmi di trasmissioni
di tipo generali, come quelli elencati a pagina
20.
1 Premere FUNCTION per selezionare PTY
SELECT.
Premere FUNCTION fino a quando sul display
viene visualizzata l’indicazione PTY SELECT.
2 Premere 2 o 3 per selezionare un tipo di
programma.
Esistono quattro tipi di programmi:
News&Inf—Popular—Classics—Other
3 Premere 5 per avviare la ricerca.
Quando si preme 5, il nome del tipo di
programma visualizzato sul display inizia a lampeggiare. L’unità ricerca una stazione che
trasmette il tipo di programma selezionato.
Quando viene trovata una stazione, viene
visualizzato il nome di servizio del programma.
Note
• Il programma di alcune stazioni può essere
diverso da quello indicato dal PTY (Tipo di
programma) trasmesso.
• Se nessuna stazione trasmette il tipo di programma ricercato, per circa due secondi viene
visualizzata l’indicazione NOT FOUND e poi il
sintonizzatore torna alla stazione originale.
Uso dell’interruzione dei programmi
per i notiziari
Quando viene trasmesso un programma di
notizie da una stazione di notizie del codice PTY,
l’unità può passare da qualsiasi stazione alla
stazione che trasmette notizie. Quando il programma di notizie è terminato, viene ripresa la
ricezione del programma precedente.
Premere e tenere premuto TA per attivare
l’interruzione dei programmi per i notiziari.
Premere TA fino a quando sul display viene
visualizzata l’indicazione NEWS.
• Per disattivare l’interruzione dei programmi
per i notiziari, premere TA e tenerlo premuto
fino a quando l’indicazione NEWS scompare dal
display.
Nota
• È anche possibile attivare o disattivare
l’interruzione dei programmi per i notiziari
premendo FUNCTION.
Ricezione della trasmissione di
allarme PTY
L’allarme PTY è un codice PTY speciale per gli
annunci riguardanti emergenze come i disastri
naturali. Quando il sintonizzatore riceve il
codice di allarme della radio, sul display viene
visualizzata l’indicazione ALARM e il volume
viene regolato su quello TA. Quando la stazione
termina la trasmissione dell’annuncio di
emergenza, il sistema torna alla sorgente precedente.
• È possibile annullare un annuncio di
emergenza premendo TA.
It
18
05
Sezione
Page 75

RDS
It
19
05
Sezione
Uso del testo radio
Il sintonizzatore può visualizzare i dati di testo
radio trasmessi dalle stazioni RDS, come le
informazioni sulla stazione, il titolo della canzone correntemente in trasmissione e il nome
dell’artista.
Note
• Quando viene ricevuto testo radio, viene
visualizzata l’indicazione TEXT.
• Il sintonizzatore memorizza automaticamente
le ultime tre trasmissioni di testo radio ricevute, sostituendo il testo della ricezione meno
recente con nuovo testo, appena viene ricevuto.
Visualizzazione del testo radio
È possibile visualizzare il testo radio correntemente in corso di ricezione e i tre testi radio più
recenti.
1 Premere TEXT per visualizzare il testo
radio.
Il testo radio della stazione che sta trasmettendo correntemente viene visualizzato e viene
automaticamente fatto scorrere sul display.
• È possibile annullare il display del testo radio
premendo TEXT.
• Se non viene ricevuto nessun testo radio, sul
display viene visualizzata l’indicazione NO TEXT
e il display del testo radio viene annullato dopo
due secondi.
2 Premere 2 o 3 per controllare lo scorrimento.
Premendo
2 o 3 si arresta lo scorrimento dei
dati del testo radio. A ogni pressione ulteriore si
scorrono i dati del testo radio un carattere per
volta.
3 Premere 5 o ∞ per richiamare i tre testi
radio più recenti.
Premendo 5 o ∞ si alterna il display del testo
radio corrente con quello e dei dati dei tre testi
radio più recenti.
• Se in memoria non ci sono dati di testi radio, il
display non cambia.
Note
• Il display del testo radio viene annullato dopo
che i dati di testo sono stati fatti scorrere tre
volte sul display.
• Se non si esegue nessuna operazione entro
otto secondi, la modalità testo radio viene
annullata.
Memorizzazione e richiamo di testo
radio
È possibile memorizzare dati fino a un massimo
di sei trasmissioni di testo radio nei tasti 1–6.
1 Visualizzare il testo radio che si desidera
salvare in memoria.
Consultare la sezione Visualizzazione del testo
radio, in questa pagina.
2 Premere e tenere premuto uno dei tasti 1–6
per memorizzare il testo radio selezionato.
Viene visualizzato il numero di memoria e il
testo radio selezionato viene memorizzato. La
volta successiva che si preme lo stesso tasto 1–6
nel display del testo radio, il testo memorizzato
viene richiamato dalla memoria.
English
Italiano
Deutsch
Français
Italiano
Nederlands
Page 76

RDS
It
20
05
Sezione
Generale Specifico Tipo di programma
News & Info News Notizie
Affairs Problemi attuali
Info Informazioni e consigli generali
Sport Sport
Weather Previsioni del tempo/informazioni meteorologiche
Finance Indici di Borsa, commercio, affari, ecc.
Popular Pop Mus Musica popolare
Rock Mus Musica moderna contemporanea
Easy Mus Musica rilassante
Oth Mus Musica varia
Jazz Jazz
Country Musica country
Nat Mus Musica nazionale
Oldies Musica di altri tempo, vecchi successi
Folk mus Musica folk
Classics L. Class Musica classica di facile ascolto
Classic Musica classica per appassionati
Others Educate Programmi educativi
Drama Commedie e serie radiofoniche
Culture Cultura nazionale o regionale
Science Natura, scienza e tecnologia
Varied Intrattenimento leggero
Children Bambini
Social Questioni sociali
Religion Problemi o servizi religiosi
Phone In Chiamate in diretta
Touring Programmi di viaggi, non per notiziari sul traffico
Leisure Hobby e attività ricreative
Document Documentari
Elenco PTY
Page 77

Lettore di cassette
It
21
06
Sezione
English
Italiano
Deutsch
Français
Italiano
Nederlands
Riproduzione di un nastro
Di seguito vengono illustrati i passaggi di base
necessari per riprodurre un nastro con il lettore
di cassette. Le funzioni più avanzate del lettore
di cassette vengono illustrate a partire da
pagina 23.
1 Indicatore TAPE DIRECTION
Mostra la direzione di trasporto del nastro.
2 Indicatore PLAY TIME
Mostra il tempo di riproduzione trascorso del
lato corrente del nastro.
3 Tasto TAPE EJECT
Premere questo tasto per espellere il nastro
dal lettore di cassette.
4 Tasti 2/3
Premere questi tasti per l’avanzamento
rapido o per il riavvolgimento del nastro.
5 Tasto
BAND/ESC
Premere questo tasto per cambiare la
direzione di trasporto del nastro e tornare
alla riproduzione dopo l’avanzamento rapido
o il riavvolgimento.
6 Tasto VOLUME
Premere questo tasto per aumentare o
diminuire il volume.
7 Tasto SOURCE/OFF
Premere questo tasto per selezionare il lettore di cassette come sorgente.
1 Inserire una cassetta nel vano
d’inserimento della cassetta.
La riproduzione viene avviata automaticamente.
Vano d’inserimento della cassetta
ENTENT DISPDISP TEXTTEXT
TATA SOURCESOURCE/ OFF/ OFF
654321
FD
A
ENTENT DISPDISP TEXTTEXT
TATA SOURCESOURCE/ OFF/ OFF
654321
FD
A
5746
3
1
2
Page 78

It
22
06
Sezione
Lettore di cassette
• È possibile espellere una cassetta premendo
TAPE EJECT.
• Quando si inserisce una cassetta al metallo o
al cromo, sul display si accende l’indicazione
MTL. Nel caso di un nastro normale, non viene
visualizzata nessuna indicazione.
2 Dopo che si è inserita una cassetta, premere SOURCE/OFF per selezionare il lettore di
cassette.
Premere SOURCE/OFF fino a quando viene
visualizzata l’indicazione Cassette.
3 Usare VOLUME per regolare il livello
sonoro.
Quando si preme VOLUME su/+, il volume viene
aumentato e quando si preme giù/–, il volume
viene abbassato.
4 Per eseguire l’avanzamento rapido o il
riavvolgimento, premere 2 o 3.
Sul display viene visualizzata l’indicazione FF o
REW.
• Per annullare l’avanzamento rapido o il
riavvolgimento e tornare alla riproduzione, premere BAND/ESC.
• È possibile annullare l’avanzamento rapido o
il riavvolgimento premendo due volte 2 o 3
nella stessa direzione.
5 Per eseguire la ricerca di un brano musicale in avanti o all’indietro, premere due volte
2 o 3.
Sul display viene visualizzata l’indicazione F-MS
(ricerca musicale in avanti) o R-MS (ricerca
musicale all’indietro). Il lettore di cassette
esegue un avanzamento rapido o un riavvolgimento fino allo spazio vuoto successivo o precedente sul nastro e avvia la riproduzione.
• Per annullare la ricerca di un brano musicale
e tornare alla riproduzione, premere BAND/ESC.
• È possibile annullare la ricerca di un brano
musicale premendo di nuovo 2 o 3 nella
stessa direzione.
6 Per cambiare la direzione del trasporto del
nastro, premere BAND/ESC.
Note
• Nel vano d’inserimento della cassetta non
inserire niente di diverso da una cassetta.
• L’indicatore PLAY TIME viene avviato da 00’00
nei casi seguenti:
— Quando si inserisce un nastro
— Quando si cambia la direzione del nastro
— Quando si riavvolge un nastro fino all’inizio
• L’indicatore PLAY TIME viene arrestato
quando è in corso un avanzamento veloce, un
riavvolgimento o la ricerca di un brano musicale.
Page 79

Lettore di cassette
It
23
06
Sezione
English
Italiano
Deutsch
Français
Italiano
Nederlands
Introduzione alle funzioni
avanzate del lettore di cassette
1 Display FUNCTION
Mostra lo stato della funzione.
2 Tasto FUNCTION
Premere questo tasto per selezionare una
funzione avanzata.
3 Tasti 5/∞
Premere questi tasti per attivare/disattivare
la funzione selezionata.
4 Tasto BAND/ESC
Premere questo tasto per tornare al display
della riproduzione.
Premere FUNCTION per visualizzare i nomi
delle funzioni.
Se si preme ripetutamente FUNCTION, sul
display vengono visualizzate le funzioni
seguenti:
REPEAT (riproduzione ripetuta)—B.SKIP (salto
degli spazi vuoti)—NR (Dolby B NR)
• Per tornare al display della riproduzione, premere BAND/ESC.
Nota
• Se non si attiva la funzione entro circa 30
secondi, il display torna automaticamente alla
visualizzazione della riproduzione.
Riproduzione ripetuta
La riproduzione ripetuta consente di ascoltare
diverse volte lo stesso brano.
1 Premere FUNCTION per selezionare
REPEAT.
Premere FUNCTION fino a quando sul display
viene visualizzata l’indicazione REPEAT.
ENTENT DISPDISP TEXTTEXT
TATA SOURCESOURCE/ OFF/ OFF
654321
FD
A
4
3
2
1
Page 80

It
24
06
Sezione
Lettore di cassette
2 Premere 5 per attivare la riproduzione
ripetuta.
Sul display viene visualizzata l’indicazione
REPEAT :ON. Il brano correntemente in ripro-
duzione viene riprodotto e poi ripetuto.
3 Premere ∞ per disattivare la riproduzione
ripetuta.
Sul display viene visualizzata l’indicazione
REPEAT :OFF. Il brano correntemente in ripro-
duzione viene riprodotto fino alla fine e poi viene
riprodotto il brano successivo.
Salto di sezioni di nastro vuote
La funzione di salto degli spazi vuoti avanza
automaticamente in modo rapido al brano
successivo se tra i brani c’è un lungo periodo di
silenzio (12 secondi o più).
1 Premere FUNCTION per selezionare B.SKIP.
Premere FUNCTION fino a quando sul display
viene visualizzata l’indicazione B.SKIP.
2 Premere 5 per attivare la funzione di salto
degli spazio vuoti.
Sul display viene visualizzata l’indicazione
B.SKIP :ON. I lunghi periodi di silenzio tra i
brani vengono saltati.
3 Premere ∞ per disattivare la funzione di
salto degli spazi vuoti.
Sul display viene visualizzata l’indicazione
B.SKIP :OFF. La cassetta viene riprodotta per
intero.
Uso della riduzione di rumore
Dolby
Quando si ascoltano nastri registrati con Dolby
B NR, attivare la funzione Dolby B NR.
1 Premere FUNCTION per selezionare NR.
Premere FUNCTION fino a quando sul display
viene visualizzata l’indicazione NR.
2 Premere 5 per attivare la funzione Dolby B
NR.
Sul display viene visualizzata l’indicazione B NR
:ON. Il nastro viene riprodotto con la funzione
Dolby B NR attivata.
3 Premere ∞ per disattivare la funzione
Dolby B NR.
Sul display viene visualizzata l’indicazione NR
:OFF. Il nastro viene riprodotto senza la funzione
Dolby B NR.
Note
• Prodotto sotto licenza dalla Dolby
Laboratories. “Dolby” ed il simbolo doppia D
sono marchi registrati della Dolby
Laboratories.
• Quando si attiva la funzione Dolby B NR, si
accende l’indicatore ∂B.
Page 81

Lettore CD incorporato
It
25
07
Sezione
English
Italiano
Deutsch
Français
Italiano
Nederlands
Riproduzione di un CD
Di seguito vengono illustrati i passaggi di base
necessari per riprodurre un CD con il lettore CD
incorporato. Le funzioni più avanzate del CD
vengono illustrate a partire da pagina 27.
1 Indicatore TRACK NUMBER
Mostra il brano correntemente in
riproduzione.
2 Indicatore PLAY TIME
Mostra il tempo di riproduzione trascorso del
brano corrente.
3 Tasto CD EJECT
Premere questo tasto per espellere un CD
dal lettore CD incorporato.
4 Tasti 2/3 (Ricerca brano e FF/REV)
Premere questi tasti per selezionare un
brano del CD corrente e per l’avanzamento
rapido e il ritorno.
5 Tasto
VOLUME
Premere questo tasto per aumentare o
diminuire il volume.
6 Tasto SOURCE/OFF
Premere questo tasto per selezionare il CD
incorporato come sorgente.
1 Inserire un CD nel vano d’inserimento dei
CD.
La riproduzione viene avviata automaticamente.
Vano d’inserimento dei CD
• È possibile espellere un CD premendo
CD
EJECT.
ENTENT DISPDISP TEXTTEXT
TATA SOURCESOURCE/ OFF/ OFF
654321
FD
A
3
4
6
5
1 2
Page 82

It
26
07
Sezione
Lettore CD incorporato
2 Dopo che si è inserito un CD, premere
SOURCE/OFF per selezionare il lettore CD
incorporato.
Premere SOURCE/OFF fino a quando viene
visualizzata l’indicazione CompactDisc.
3 Usare VOLUME
per regolare il livello
sonoro.
Quando si preme
VOLUME su/+, il volume viene
aumentato e quando si preme giù/–, il volume
viene abbassato.
4 Per eseguire l’avanzamento rapido o il
ritorno, premere e tenere premuto 2 o 3.
5 Per saltare a un altro brano all’indietro o in
avanti, premere 2 o 3 .
Premendo 3 si salta all’inizio del brano successivo. Premendo una volta 2 si salta all’inizio del
brano corrente. Premendo di nuovo lo stesso
tasto si salta al brano precedente.
Note
• Il lettore CD incorporato riproduce un CD,
standard, da 12 cm o da 8 cm (singolo) per
volta. Non usare un adattatore quando si
usano CD da 8 cm.
• Nel vano d’inserimento dei CD non inserire
nient’altro che CD.
• Se non si riesce a inserire completamente un
disco o se dopo l’inserimento di un disco il
disco non viene riprodotto, controllare che il
lato del disco con l’etichetta sia rivolto verso
l’alto. Premere CD EJECT per espellere il
disco e controllare eventuali danni del disco
prima di inserirlo di nuovo.
• Se il lettore CD incorporato non funziona
correttamente, può essere visualizzato un
messaggio di errore del tipo CD ERR-14.
Consultare la sezione Spiegazione dei mes-
saggi di errore del lettore CD incorporato a
pagina 56.
Page 83

Lettore CD incorporato
It
27
07
Sezione
English
Italiano
Deutsch
Français
Italiano
Nederlands
Introduzione alle funzioni
avanzate del lettore CD
incorporato
1 Display FUNCTION
Mostra lo stato della funzione.
2 Tasto FUNCTION
Premere questo tasto per selezionare una
funzione avanzata.
3 Tasti 5/∞
Premere questi tasti per attivare/disattivare
la funzione selezionata e selezionare numeri,
lettere o spazi per immettere i titoli dei brani.
4 Tasti 2/3
Premere questi tasti per scegliere un elemento (una modalità) della funzione
selezionata.
5 Tasto BAND/ESC
Premere questo tasto per tornare al display
della riproduzione.
6 Tasti 1–2
Premere questi tasti per alternare
l’immissione di lettere e di numeri/simboli.
7 Tasto DISPLAY
Premere questo tasto per cambiare il display.
Premere FUNCTION per visualizzare i nomi
delle funzioni.
Se si preme ripetutamente FUNCTION, sul
display vengono visualizzate le funzioni
seguenti:
REPEAT (riproduzione ripetuta)—RANDOM
(riproduzione casuale)—T.SCAN (lettura con
scansione)—PAUSE (pausa)
• Per tornare al display della riproduzione, premere BAND/ESC.
Nota
• Se non si attiva la funzione entro circa 30
secondi, il display torna automaticamente alla
visualizzazione della riproduzione.
ENTENT DISPDISP TEXTTEXT
TATA SOURCESOURCE/ OFF/ OFF
654321
FD
A
45
36
27
1
Page 84

It
28
07
Sezione
Lettore CD incorporato
Riproduzione ripetuta
La riproduzione ripetuta consente di ascoltare
più volte lo stesso brano.
1 Premere
FUNCTION per selezionare
REPEAT.
Premere FUNCTION fino a quando sul display
viene visualizzata l’indicazione REPEAT.
2 Premere 5 per attivare la riproduzione
ripetuta.
Sul display viene visualizzata l’indicazione
REPEAT :ON. Il brano correntemente in ripro-
duzione viene riprodotto e poi ripetuto.
3 Premere ∞ per disattivare la riproduzione
ripetuta.
Sul display viene visualizzata l’indicazione
REPEAT :OFF. Il brano correntemente in ripro-
duzione viene riprodotto fino alla fine e poi viene
riprodotto il brano successivo.
Nota
• Se si esegue la ricerca di un brano o
l’avanzamento rapido/il riavvolgimento, la
riproduzione ripetuta viene automaticamente
annullata.
Riproduzione di brani in ordine
casuale
La riproduzione casuale consente di riprodurre i
brani di un CD in ordine casuale.
1 Premere
FUNCTION per selezionare
RANDOM.
Premere
FUNCTION fino a quando sul display
viene visualizzata l’indicazione RANDOM.
2 Premere 5 per attivare la funzione di riproduzione casuale.
Sul display viene visualizzata l’indicazione
RANDOM :ON. I brani vengono riprodotti in
ordine casuale.
3 Premere ∞ per disattivare la riproduzione
casuale.
Sul display viene visualizzata l’indicazione
RANDOM :OFF. I brani vengono riprodotti in
ordine.
Scansione dei brani di un CD
La lettura con scansione consente di ascoltare i
primi 10 secondi di ogni brano di un CD.
1 Premere FUNCTION per selezionare
T.SCAN.
Premere FUNCTION fino a quando sul display
viene visualizzata l’indicazione T.SCAN.
2 Premere 5 per attivare la funzione di lettura con scansione.
Sul display viene visualizzata l’indicazione
T.SCAN :ON. Vengono riprodotti i primi
10 secondi di ogni brano.
3 Quando si trova il brano desiderato, premere ∞ per disattivare la lettura con scansione.
Sul display viene visualizzata l’indicazione
T.SCAN :OFF. Continua l’esecuzione del brano.
• Se il display è tornato automaticamente alla
visualizzazione della riproduzione, selezionare
di nuovo T.SCAN premendo FUNCTION.
Nota
• Dopo che la scansione del CD è terminata,
viene ripresa la riproduzione normale dei
brani.
Page 85

Lettore CD incorporato
It
29
07
Sezione
English
Italiano
Deutsch
Français
Italiano
Nederlands
Pausa della riproduzione di un
CD
La pausa consente di arrestare temporaneamente la riproduzione di un CD.
1 Premere FUNCTION per selezionare PAUSE.
Premere FUNCTION fino a quando sul display
viene visualizzata l’indicazione PAUSE.
2 Premere 5 per attivare la pausa.
Sul display viene visualizzata l’indicazione
PAUSE :ON. La riproduzione del brano corrente
viene messa in pausa.
3 Premere ∞ per disattivare la pausa.
Sul display viene visualizzata l’indicazione
PAUSE :OFF. La riproduzione riprende dallo
stesso punto nel quale si è attivata la pausa.
Uso della funzione del titolo del
disco
È possibile immettere i titoli dei CD e poi
visualizzarli. La volta successiva che si inserisce
un CD del quale si è immesso il titolo, il titolo
del CD viene visualizzato.
Immissione dei titoli dei dischi
La funzione di immissione del titolo del disco
consente di immettere titoli di CD lunghi al
massimo 10 lettere e fino a un massimo di 48
titoli di dischi nel lettore CD incorporato.
1 Riprodurre un CD del quale si desidera
immettere il titolo.
2 Premere e tenere premuto
FUNCTION fino a
quando sul display viene visualizzata
l’indicazione TITLE IN.
• Quando si riproduce un disco CD TEXT, non è
possibile passare alla funzione TITLE IN. Sul
disco CD TEXT il titolo del disco è già stato registrato.
3 Premere 5 o ∞ per selezionare una lettera
dell’alfabeto.
A ogni pressione di 5 viene visualizzata una
lettera dell’alfabeto nell’ordine A B C ... X Y Z,
numeri e simboli nell’ordine 1 2 3 ... @ # <. A
ogni pressione di ∞ viene visualizzata una lettera in ordine inverso, cioè Z Y X ... C B A.
Per passare dalle lettere maiuscole alle minuscole e viceversa (ad esempio, a b c ... x y z) premere il tasto con il numero 1. Per passare ai soli
numeri e simboli (ad esempio, 1 2 3 ... @ # <)
premere il tasto con il numero 2.
4 Premere 3 per spostare il cursore sulla
posizione del carattere successivo.
Quando è visualizzata la lettera che si desidera,
premere 3 per spostare il cursore sulla
posizione successiva e poi selezionare la lettera
seguente. Premere 2 per spostarsi all’indietro
sul display.
5 Spostare il cursore sull’ultima posizione
premendo 3 dopo l’immissione del titolo.
Quando si preme 3 una o più volte, il titolo
immesso viene memorizzato.
6 Premere BAND/ESC per tornare al display
della riproduzione.
Page 86

Lettore CD incorporato
Note
• I titoli rimangono in memoria, anche dopo
che il disco è stato rimosso dal lettore CD
incorporato, e vengono richiamati quando il
disco viene reinserito.
• Dopo che sono stati inseriti in memoria i dati
relativi a 48 dischi, i dati relativi a un nuovo
disco sovrascrivono quelli più vecchi.
Visualizzazione dei titoli dei dischi
È possibile visualizzare il titolo di qualsiasi disco
del quale si è immesso il titolo.
Premere DISPLAY.
Se si preme ripetutamente DISPLAY, sul display
vengono visualizzate le impostazioni seguenti:
PLAY TIME (tempo di riproduzione)—DISC
TITLE (titolo del disco)
Quando si seleziona DISC TITLE, sul display
viene visualizzato il titolo del disco correntemente in riproduzione.
• Se non è stato immesso nessun titolo per il
disco correntemente in riproduzione, viene
visualizzata l’indicazione NO TITLE.
Uso della funzione CD TEXT
Certi dischi contengono alcune informazioni
codificate sul disco durante le produzione.
Questi dischi possono contenere informazioni
come titolo del CD, titolo del brano, nome
dell’artista e tempo di riproduzione e vengono
chiamati dischi CD TEXT. Solo questi dischi con
codifica speciale CD TEXT supportano le funzioni elencate di seguito.
Visualizzazione di titoli sui dischi CD
TEXT
Premere DISPLAY mentre si riproduce un
disco CD TEXT.
Se si preme ripetutamente DISPLAY, sul display
vengono visualizzate le impostazioni seguenti:
PLAY TIME (tempo di riproduzione)—DISC
TITLE (titolo del disco)—D.ARTIST (artista del
disco)—TRK TITLE (titolo del brano) —
T.ARTIST (artista del brano)
• Se su un disco CD TEXT non è stata registrata
nessuna informazione specifica, viene visualizzata l’indicazione NO XXXX (ad esempio,
NO D-TITLE).
Scorrimento dei titoli sul display
Questa unità può visualizzare solo le prime 10
lettere di DISC TITLE, D.ARTIST, TRK TITLE
and T.ARTIST. Quando le informazioni regis-
trate sono più lunghe di 10 lettere, è possibile
far scorrere il testo verso sinistra, in modo da
poter visualizzare anche il resto del titolo.
Premere DISPLAY e tenerlo premuto fino a
quando il titolo inizia a scorrere verso sinistra.
Sul display viene visualizzato il resto del titolo.
It
30
07
Sezione
Page 87

Lettore multi-CD
It
31
08
Sezione
English
Italiano
Deutsch
Français
Italiano
Nederlands
Riproduzione di un CD
È possibile usare quest’unità per controllare un
lettore multi-CD, venduto a parte.
Di seguito vengono illustrati i passaggi di base
necessari per riprodurre un CD con un lettore
multi-CD. Le funzioni avanzate del CD vengono
illustrate a partire da pagina 33.
1 Indicatore DISC NUMBER
Mostra il disco correntemente in
riproduzione.
2 Indicatore TRACK NUMBER
Mostra il brano correntemente in
riproduzione.
3 Indicatore PLAY TIME
Mostra il tempo di riproduzione trascorso del
brano corrente.
4 Tasti 5/∞ (Ricerca disco)
Premere questi tasti per selezionare un disco
dal lettore multi-CD.
5 Tasti 2/3 (Ricerca brano e
FF/REV)
Premere questi tasti per selezionare un
brano del CD corrente e per l’avanzamento
rapido e il ritorno.
6 Tasto
VOLUME
Premere questo tasto per aumentare o
diminuire il volume.
7 Tasti 1–6 (Ricerca numero disco)
Premere questi tasti per selezionare un disco
dal lettore multi-CD.
8 Tasto SOURCE/OFF
Premere questo tasto per selezionare il lettore multi-CD come sorgente.
1 Premere SOURCE/OFF per selezionare il
lettore multi-CD.
Premere SOURCE/OFF fino a quando viene
visualizzata l’indicazione Multi-CD .
ENTENT DISPDISP TEXTTEXT
TATA SOURCESOURCE/ OFF/ OFF
654321
FD
A
84 56 7
1
2 3
Page 88

Lettore multi-CD
It
32
08
Sezione
2 Usare VOLUME per regolare il livello
sonoro.
Quando si preme VOLUME su/+, il volume viene
aumentato e quando si preme giù/–, il volume
viene abbassato.
3 Selezionare il disco che si desidera
ascoltare con i tasti da 1 a 6
.
Per i dischi situati nelle posizioni da 1 a 6, premere il corrispondente tasto numerico.
Se si desidera selezionare un disco situato nelle
posizioni da 7 a 12, premere e tenere premuto il
numero corrispondente, come
1 per il disco 7,
fino a quando il numero del disco viene visualizzato sul display.
• È anche possibile selezionare un disco in
sequenza, premendo 5/∞.
4 Per eseguire l’avanzamento rapido o il
ritorno, premere e tenere premuto 2 o 3.
5 Per saltare a un altro brano all’indietro o in
avanti, premere 2 o 3.
Premendo 3 si salta all’inizio del brano successivo. Premendo una volta 2 si salta all’inizio del
brano corrente. Premendo di nuovo lo stesso
tasto si salta al brano precedente.
Note
• Quando il lettore multi-CD esegue le operazioni preparatorie, viene visualizzata
l’indicazione READY.
• Se il lettore multi-CD non funziona correttamente, può essere visualizzato un messaggio
di errore del tipo CD ERR-14. Consultare il
Manuale del proprietario del lettore multi-CD.
• Se non ci sono dischi nel caricatore del lettore
multi-CD, viene visualizzata l’indicazione NO
DISC.
Page 89

Lettore multi-CD
It
33
08
Sezione
English
Italiano
Deutsch
Français
Italiano
Nederlands
Introduzione alle funzioni
avanzate del lettore multi-CD
1 Display FUNCTION
Mostra lo stato della funzione.
2 Tasto FUNCTION
Premere questo tasto per selezionare una
funzione avanzata.
3 Tasti 5/∞
Premere questi tasti per attivare/disattivare
la funzione selezionata e selezionare numeri,
lettere o spazi per immettere i titoli dei brani.
4 Tasti 2/3
Premere questi tasti per un elemento (una
modalità) della funzione selezionata.
5 Tasto BAND/ESC
Premere questo tasto per tornare al display
della riproduzione.
6 Tasti 1–2
Premere questi tasti per alternare
l’immissione di lettere o di numeri/simboli.
7 Tasto DISPLAY
Premere questo tasto per cambiare il display.
Premere FUNCTION per visualizzare i nomi
delle funzioni.
Se si preme ripetutamente FUNCTION, sul
display vengono visualizzate le funzioni
seguenti:
REPEAT (riproduzione ripetuta)—TITLE LIST
(elenco dei titoli dei dischi)—RANDOM (riproduzione casuale)—SCAN (lettura con scansione)—ITS.P (lettura ITS)—PAUSE (pausa)—
COMP (compressione e DBE)
• Per tornare al display della riproduzione, premere BAND/ESC.
Nota
• Se non si attiva una funzione entro circa 30
secondi, il display torna automaticamente alla
visualizzazione della riproduzione.
ENTENT DISPDISP TEXTTEXT
TATA SOURCESOURCE/ OFF/ OFF
654321
FD
A
3
2
5
6 4
7
1
Page 90

Lettore multi-CD
It
34
08
Sezione
Riproduzione ripetuta
Il lettore multi-CD dispone di tre intervalli di
riproduzione ripetuta: MCD (ripetizione del lettore multi-CD), TRK (ripetizione di un brano) e
DSC (ripetizione di un disco).
1 Premere
FUNCTION per selezionare
REPEAT.
Premere FUNCTION fino a quando sul display
viene visualizzata l’indicazione REPEAT.
2 Premere 2 o 3 per selezionare l’intervallo
di ripetizione.
Premere 2 o 3 fino a quando l’intervallo di
ripetizione viene visualizzato sul display.
• MCD — Ripete tutti i dischi contenuti nel
lettore multi-CD
• TRK — Ripete solo il brano corrente
• DSC — Ripete il disco corrente
Note
• Se durante la riproduzione ripetuta si selezionano altri dischi, l’intervallo di riproduzione
ripetuta cambia in MCD (ripetizione del lettore
multi-CD).
• Se si esegue la ricerca di un brano o
l’avanzamento rapido/il ritorno durante TRK
(ripetizione di un brano), l’intervallo di riproduzione ripetuta cambia in DSC (ripetizione
del disco).
Riproduzione di brani in ordine
casuale
La riproduzione casuale consente di riprodurre
brani in ordine casuale all’interno dell’intervallo
di riproduzione,
MCD (ripetizione del lettore
multi-CD) e DSC (ripetizione del disco).
1 Selezionare l’intervallo di ripetizione.
Consultare la sezione Riproduzione ripetuta in
questa pagina.
2 Premere
FUNCTION
per selezionare
RANDOM.
Premere FUNCTION fino a quando sul display è
visualizzata l’indicazione RANDOM.
3 Premere 5 per attivare la riproduzione
casuale.
Sul display viene visualizzata l’indicazione
RANDOM :ON. I brani vengono riprodotti in
ordine casuale all’interno dell’intervallo MCD
(ripetizione del lettore multi-CD) o DSC (ripetizione del disco) selezionato in precedenza.
4 Premere ∞ per disattivare la riproduzione
casuale.
Sul display viene visualizzata l’indicazione
RANDOM :OFF. I brani continuano a essere
riprodotti in ordine.
Scansione di CD e di brani
Quando si usa l’intervallo DSC (ripetizione del
disco), l’inizio di ogni brano del disco
selezionato viene riprodotto per circa 10
secondi. Quando si usa l’intervallo MCD (ripetizione del lettore multi-CD), l’inizio del primo
brano di ogni disco viene riprodotto per circa 10
secondi.
1 Selezionare l’intervallo di ripetizione.
Consultare la sezione Riproduzione ripetuta in
questa pagina.
2 Premere FUNCTION per selezionare SCAN.
Premere FUNCTION fino a quando sul display
viene visualizzata l’indicazione SCAN.
Page 91

Lettore multi-CD
It
35
08
Sezione
English
Italiano
Deutsch
Français
Italiano
Nederlands
3 Premere 5 per attivare la lettura con
scansione.
Sul display viene visualizzata l’indicazione
SCAN :ON. Vengono riprodotti i primi 10
secondi di ogni brano del disco corrente (o il
primo brano di ogni disco).
4 Quando si trova il brano (o il disco)
desiderato premere ∞ per disattivare la lettura
con scansione.
Sul display viene visualizzata l’indicazione
SCAN :OFF. Viene continuata la riproduzione
del brano (o del disco).
• Se il display è tornato automaticamente alla
visualizzazione della riproduzione, selezionare
di nuovo SCAN premendo FUNCTION.
Nota
• Dopo il termine della scansione del brano o
del disco, viene avviata nuovamente la riproduzione dei brani.
Pausa della riproduzione di un
CD
La pausa consente di arrestare temporaneamente la riproduzione di un CD.
1 Premere FUNCTION per selezionare PAUSE.
Premere FUNCTION fino a quando sul display
viene visualizzata l’indicazione PAUSE.
2 Premere 5 per attivare la pausa.
Sul display viene visualizzata l’indicazione
PAUSE :ON. La riproduzione del brano corrente
viene messa in pausa.
3 Premere ∞ per disattivare la pausa.
Sul display viene visualizzata l’indicazione
PAUSE :OFF. La riproduzione riprende dallo
stesso punto nel quale si è attivata la pausa.
Uso della lista di riproduzione
ITS
La funzione ITS (selezione istantanea di brani)
consente di creare una lista di riproduzione dei
brani preferiti tra quelli contenuti nel caricatore
del lettore multi-CD. Dopo aver aggiunto i brani
preferiti alla lista di riproduzione, è possibile
attivare la riproduzione ITS e riprodurre solo i
brani selezionati.
Creazione di una lista di riproduzione
con la programmazione ITS
È possibile utilizzare la funzione ITS per immettere e riprodurre fino a 24 brani per disco, fino a
100 dischi (con il titolo del disco).
1 Riprodurre il CD che si desidera programmare.
Premere 5 o ∞ per selezionare il CD.
2 Premere FUNCTION e tenerlo premuto fino
a quando sul display viene visualizzata l’indicazione TITLE IN, quindi premere FUNCTION
per selezionare ITS.
Dopo che è stata visualizzata l’indicazione
TITLE IN, premere ripetutamente FUNCTION,
sul display vengono visualizzate le funzioni
seguenti:
TITLE IN (immissione del titolo del disco)—ITS
(programmazione ITS )
3 Selezionare il brano desiderato premendo
2 o 3.
4 Premere 5 per memorizzare il brano correntemente in riproduzione nella lista di riproduzione.
Viene visualizzata brevemente l’indicazione ITS
IN e la selezione correntemente in riproduzione
viene aggiunta alla lista di riproduzione. Quindi,
il display visualizza di nuovo l’indicazione ITS.
Page 92

Lettore multi-CD
It
36
08
Sezione
5 Premere BAND/ESC per tornare la display
della riproduzione.
Nota
• Dopo che sono stati inseriti in memoria i dati
relativi a 100 dischi, i dati relativi a un nuovo
disco sovrascrivono quelli più vecchi.
Riproduzione a partire dalla lista di
riproduzione ITS
La funzione di riproduzione ITS consente di
ascoltare i brani immessi nella lista di riproduzione ITS. Quando si attiva la riproduzione
ITS, viene avviata la riproduzione dei brani della
lista di riproduzione ITS contenuti nel lettore
multi-CD.
1 Selezionare l’intervallo di ripetizione.
Consultare la sezione Riproduzione ripetuta a
pagina 34.
2 Premere FUNCTION per selezionare ITS.P.
Premere FUNCTION fino a quando sul display
viene visualizzata l’indicazione ITS.P.
3 Premere 5 per attivare la riproduzione
ITS.
Sul display viene visualizzata l’indicazione
ITS.P:ON. Viene avviata la riproduzione dei
brani della lista di riproduzione contenuti negli
intervalli MCD (ripetizione del lettore multi-CD)
o DSC (ripetizione del disco) selezionati in
precedenza.
• Se nessun brano dell’intervallo corrente è
programmato per la riproduzione ITS, viene
visualizzata l’indicazione ITS EMPTY.
4 Premere ∞ per disattivare la riproduzione
ITS.
Sul display viene visualizzata l’indicazione
ITS.P:OFF. La riproduzione continua nell’ordine
normale a partire dal brano e dal CD correntemente in riproduzione.
Cancellazione di un brano dalla lista di
riproduzione ITS
Se si desidera eliminare un brano dalla lista di
riproduzione ITS, è possibile farlo se la funzione
ITS è attivata.
Se la funzione ITS è già attivata, saltare al punto
2. Se la funzione ITS non è ancora attivata, premere FUNCTION.
1 Riprodurre il CD del quale si desidera
eliminare un brano dalla lista di riproduzione
ITS e attivare la riproduzione ITS.
Consultare la sezione Riproduzione a partire
dalla lista di riproduzione ITS in questa pagina.
2 Premere FUNCTION e tenerlo premuto fino
a quando sul display viene visualizzata
l’indicazione TITLE IN, quindi premere
FUNCTION per selezionare ITS.
Dopo che è stata visualizzata l’indicazione
TITLE IN, premere FUNCTION finché sul display
viene visualizzata l’indicazione ITS.
3 Selezionare il brano desiderato premendo
2 o 3.
4 Premere ∞ per eliminare il brano dalla lista
di riproduzione ITS.
La selezione correntemente in riproduzione
viene cancellata dalla lista di riproduzione ITS e
viene avviata la riproduzione del brano successivo della lista di riproduzione ITS.
• Se non ci sono brani della lista di riproduzione
nell’intervallo corrente, viene visualizzata
l’indicazione ITS EMPTY e viene ripresa la
riproduzione normale.
5 Premere BAND/ESC per tornare al display
della riproduzione.
Page 93

Lettore multi-CD
It
37
08
Sezione
English
Italiano
Deutsch
Français
Italiano
Nederlands
Cancellazione di un CD dalla lista di
riproduzione ITS
Se si desidera eliminare tutti i brani di un CD
dalla lista di riproduzione ITS, è possibile farlo
se la riproduzione ITS è disattivata.
1 Riprodurre il CD che si desidera eliminare.
Premere 5 o ∞ per selezionare il CD.
2 Premere FUNCTION e tenerlo premuto fino
a quando sul display viene visualizzata
l’indicazione TITLE IN, quindi premere
FUNCTION per selezionare ITS.
Dopo che è stato visualizzata l’indicazione
TITLE IN, premere FUNCTION fino a quando sul
display viene visualizzata l’indicazione ITS.
3 Premere ∞ per cancellare tutti i brani del
CD correntemente in riproduzione dalla lista
di riproduzione ITS.
Tutti i brani del CD correntemente in
riproduzione vengono cancellati dalla lista di
riproduzione e viene visualizzata l’indicazione
ITS CLEAR.
4 Premere BAND/ESC per tornare al display
della riproduzione.
Uso della funzione del titolo del
disco
È possibile immettere il titolo del CD e visualizzarlo. Quindi, è semplice ricercare e selezionare
il disco desiderato per riprodurlo.
Immissione dei titoli dei dischi
La funzione di immissione del titolo del disco
consente di immettere nel lettore multi-CD titoli
di CD lunghi fino a 10 lettere e fino a 100 titoli di
dischi (con la lista di riproduzione ITS).
1 Riprodurre il CD del quale si desidera
immettere il titolo.
Premere 5 o ∞ per selezionare il CD.
2 Premere FUNCTION e tenerlo premuto fino
a quando sul display viene visualizzata
l’indicazione TITLE IN.
Dopo che è stato visualizzata l’indicazione
TITLE IN, premere ripetutamente FUNCTION,
sul display vengono visualizzate le funzioni
seguenti:
TITLE IN (immissione del titolo del disco)—ITS
(programmazione ITS)
• Quando si riproduce un disco CD TEXT su un
lettore multi CD compatibile con il formato CD
TEXT, non è possibile passare alla funzione
TITLE IN. Sul disco CD TEXT il titolo del disco è
già stato registrato.
3 Premere 5 o ∞ per selezionare una lettera
dell’alfabeto.
A ogni pressione di 5 viene visualizzata una
lettera dell’alfabeto nell’ordine A B C ... X Y Z,
numeri e simboli nell’ordine 1 2 3 ... @ # <. A
ogni pressione di ∞ viene visualizzata una lettera in ordine inverso, cioè Z Y X ... C B A.
Per passare dalle lettere maiuscole alle minuscole e viceversa (ad esempio, a b c ... x y z) premere il tasto con il numero 1. Per passare ai soli
numeri e simboli (ad esempio, 1 2 3 ... @ # <)
premere il tasto con il numero 2.
Page 94

Lettore multi-CD
It
38
08
Sezione
4 Premere 3 per spostare il cursore sulla
posizione del carattere successivo.
Quando è visualizzata la lettera che si desidera,
premere 3 per spostare il cursore sulla
posizione successiva e poi selezionare la lettera
seguente. Premere 2 per spostarsi all’indietro
sul display.
5 Spostare il cursore sull’ultima posizione
premendo 3 dopo l’immissione del titolo.
Quando si preme 3 una o più volte, il titolo
immesso viene memorizzato.
6 Premere BAND/ESC per tornare al display
della riproduzione.
Note
• I titoli rimangono in memoria, anche dopo
che il disco è stato rimosso dal caricatore, e
vengono richiamati quando il disco viene
reinserito.
• Dopo che sono stati inseriti in memoria i dati
relativi a 100 dischi, i dati relativi a un nuovo
disco sovrascrivono quelli più vecchi.
Visualizzazione dei titoli dei dischi
È possibile visualizzare il titolo di qualsiasi disco
del quale si è immesso il titolo.
Premere DISPLAY.
Se si preme ripetutamente DISPLAY sul display
vengono visualizzate le impostazioni seguenti:
PLAY TIME (tempo di riproduzione)—DISC
TITLE (titolo del disco)
Quando si seleziona DISC TITLE, sul display
viene visualizzato il titolo del disco correntemente in riproduzione.
• Se non è stato immesso nessun titolo per il
disco correntemente in riproduzione, viene
visualizzata l’indicazione NO TITLE.
Selezione di un disco dalla lista dei
titoli dei dischi
La lista dei titoli dei dischi consente di visualizzare l’elenco dei titoli dei dischi immessi nel
lettore multi-CD e di selezionarne uno per la
riproduzione.
1 Premere FUNCTION per selezionare TITLE
LIST.
Premere FUNCTION fino a quando sul display
viene visualizzata l’indicazione TITLE LIST .
2 Premere 2 o 3 per far scorrere la lista dei
titoli immessi.
• Se per un disco non è stato immesso nessun
titolo, viene visualizzata l’indicazione NO TITLE.
3 Premere 5 per riprodurre il titolo di CD
preferito.
Viene avviata la riproduzione della selezione.
Uso della funzione CD TEXT
È possibile utilizzare questa funzione solo con un
CD TEXT compatibile con il lettore multi-CD.
Certi dischi contengono alcune informazioni
codificate sul disco durante le produzione.
Questi dischi possono contenere informazioni
come titolo del CD, titolo del brano, nome
dell’artista e tempo di riproduzione e vengono
chiamati dischi CD TEXT. Solo questi dischi con
codifica speciale CD TEXT supportano le funzioni elencate di seguito.
Page 95

Lettore multi-CD
It
39
08
Sezione
Visualizzazione di titoli sui dischi CD
TEXT
Premere DISPLAY mentre si riproduce un
disco CD TEXT sul lettore multi-CD.
Se si preme ripetutamente DISPLAY, sul display
vengono visualizzate le impostazioni seguenti:
PLAY TIME (tempo di riproduzione)—DISC
TITLE (titolo del disco)—D.ARTIST (artista del
disco)—TRK TITLE (titolo del brano)—
T.ARTIST (artista del brano)
• Se su un disco CD TEXT non è stata registrata
nessuna informazione specifica, viene visualizzata l’indicazione NO XXXX (ad esempio, NO D-
TITLE).
Scorrimento dei titoli sul display
Questa unità può visualizzare solo le prime 10
lettere di DISC TITLE, D.ARTIST, TRK TITLE e
T.ARTIST. Quando le informazioni registrate
sono più lunghe di 10 lettere, è possibile far
scorrere il testo verso sinistra, in modo da poter
visualizzare anche il resto del titolo.
Premere DISPLAY e tenerlo premuto fino a
quando il titolo inizia a scorrere verso sinistra.
Sul display viene visualizzato il resto del titolo.
Uso della compressione e
dell’enfatizzazione dei bassi
È possibile utilizzare queste funzioni solo con un
lettore multi-CD che le supporta.
L’uso delle funzioni COMP (compressione) e
DBE (enfatizzazione dinamica dei bassi) consente di regolare la qualità della riproduzione
audio del lettore multi-CD.
Ognuna delle funzioni consente una
regolazione in due fasi. La funzione COMP
bilancia l’uscita dei suoni più pesanti e più leggeri ai volumi più alti. La funzione DBE aumenta
il livello dei bassi per dare alla riproduzione un
suono più pieno. Ascoltare ognuno degli effetti
dopo averli selezionati e utilizzare quello che
migliora al meglio la riproduzione del brano del
CD che si sta ascoltando.
1 Premere FUNCTION per selezionare COMP.
Premere FUNCTION fino a quando sul display
viene visualizzata l’indicazione COMP.
• Se il lettore multi-CD non supporta le funzioni
COMP/DBE, quando si tenta di selezionarle,
viene visualizzata l’indicazione NO COMP.
2 Premere 5 o ∞ per selezionare
l’impostazione preferita.
Se si preme ripetutamente 5 o ∞ sul display
vengono visualizzate le impostazioni seguenti:
COMP OFF—COMP 1—COMP 2—COMP OFF—
DBE 1—DBE 2
Lettore multi-CD da 50 dischi
Solo le funzioni descritte in questo manuale
sono supportate per i lettori multi-CD da 50
dischi.
English
Italiano
Deutsch
Français
Italiano
Nederlands
Page 96

It
40
09
Sezione
Regolazione dell’audio
Introduzione alla regolazione
dell’audio
1 Display AUDIO
Mostra lo stato della regolazione dell’audio.
2 Indicatore LOUD
Viene visualizzato sul display quando è attivata la funzione di livello sonoro.
3 Tasto AUDIO
Premere questo tasto per selezionare una
funzione audio.
4 Tasti 5/∞
Premere questi tasti per regolare la funzione
audio selezionata e attivarla/disattivarla.
5 Tasti 2/3
Premere questi tasti per regolare la funzione
audio selezionata.
6 Tasto BAND/ESC
Premere questo tasto per tornare al display
di ogni sorgente.
Premere AUDIO per visualizzare i nomi delle
funzioni audio.
Se si preme ripetutamente AUDIO, sul display
vengono visualizzate le funzioni audio seguenti:
FADER (regolazione del bilanciamento)—LOUD
(livello sonoro)—SLA (regolazione del livello
della sorgente)
• Quando si seleziona il sintonizzatore FM come
sorgente, non è possibile passare alla funzione
SLA.
• Per tornare al display di ogni sorgente, premere BAND/ESC.
Nota
• Se non si attiva una funzione entro circa 30
secondi, il display torna automaticamente alla
visualizzazione della sorgente.
ENTENT DISPDISP TEXTTEXT
TATA SOURCESOURCE/ OFF/ OFF
654321
FD
A
3456
2
1
Page 97

Regolazione dell’audio
It
41
09
Sezione
English
Italiano
Deutsch
Français
Italiano
Nederlands
Uso della regolazione del
bilanciamento
È possibile selezionare un’impostazione della
dissolvenza/del bilanciamento che fornisce un
ambiente di ascolto ideale in tutte le sedie occupate.
1 Premere AUDIO per selezionare FADER.
Premere AUDIO fino a quando sul display è
visualizzata l’indicazione FADER.
• Se l’impostazione del bilanciamento è stata
regolata in precedenza, viene visualizzata
l’indicazione BAL.
2 Premere 5 o ∞ per regolare il
bilanciamento dell’altoparlante anteriore/posteriore.
A ogni pressione di 5 o ∞ il bilanciamento dell’altoparlante anteriore/posteriore viene
spostato verso la parte anteriore o quella posteriore.
• FADER :F25 – FADER :R25 viene visualizzato
intanto che il bilanciamento dell’altoparlante
anteriore/posteriore si sposta dalla parte
anteriore a quella posteriore.
• FADER : 0 è l’impostazione corretta quando si
usano solo due altoparlanti.
• Quando l’impostazione dell’uscita posteriore
è un subwoofer, non è possibile regolare il bilanciamento dell’altoparlante anteriore/posteriore.
Consultare la sezione Attivazione/disattivazione
dell’impostazione dell’uscita posteriore a pagina
51.
3 Premere 2 o 3 per regolare il
bilanciamento dell’altoparlante
sinistro/destro.
Quando si preme 2 o 3, viene visualizzata
l’indicazione
BAL : 0. A ogni pressione di 2 o 3
il bilanciamento dell’altoparlante sinistro/destro
si sposta verso sinistra o verso destra.
•
BAL :L25 – BAL :R25 viene visualizzato intanto
che il bilanciamento dell’altoparlante
sinistro/destro si sposta da sinistra a destra.
Regolazione del livello sonoro
Il livello sonoro compensa le deficienze nelle
gamme dei suoni bassi e alti a basso volume.
1 Premere AUDIO per selezionare LOUD.
Premere AUDIO fino a quando sul display viene
visualizzata l’indicazione LOUD.
2 Premere 5 per attivare il livello sonoro.
Sul display viene visualizzata l’indicazione
LOUD :ON.
3 Premere ∞ per disattivare il livello sonoro.
Sul display viene visualizzata l’indicazione
LOUD :OFF.
Regolazione dei livelli delle
sorgenti
La funzione SLA (Regolazione del livello della
sorgente) consente di regolare il livello di
volume di ogni sorgente per prevenire cambiamenti radicali di volume quando si passa da
una sorgente all’altra.
• Le impostazioni sono basate sul livello di
volume del sintonizzatore FM, che rimane
immutato.
1 Confrontare il livello di volume del sintonizzatore FM con il livello della sorgente
che si desidera regolare (ad esempio, quello
del lettore CD incorporato).
Page 98

Regolazione dell’audio
2 Premere AUDIO per selezionare SLA.
Premere AUDIO fino a quando sul display viene
visualizzata l’indicazione SLA.
3 Premere 5 o ∞ per regolare il volume della
sorgente.
Ogni pressione di 5 o ∞ aumenta o diminuisce
il volume della sorgente.
• A seconda se il volume della sorgente viene
aumentato o diminuito, viene visualizzata
l’indicazione SLA :+4 – SLA :–4 .
Note
• Poiché il volume del sintonizzatore FM è il
controllo, non è possibile applicare le regolazioni del livello della sorgente al sintonizzatore FM.
• Con le regolazioni del livello della sorgente è
anche possibile regolare il livello di volume
del sintonizzatore MW/LW.
• Il lettore CD incorporato e il lettore multi-CD
sono entrambi impostati automaticamente
allo stesso volume di regolazione del livello
della sorgente.
It
42
09
Sezione
Page 99

Processore di segnale digitale
It
43
10
Sezione
English
Italiano
Deutsch
Français
Italiano
Nederlands
Uso del processore digitale di
segnale
Il processore di segnale digitale consente di
controllare molti aspetti dell’uscita audio compresi l’equalizzazione, il controllo del campo
sonoro e la posizione di ascolto.
1 Indicatore POSI (selettore di posizione)
Mostra quale posizione di ascolto è attualmente selezionata.
2 Indicatore PRESET EQ
Mostra quale preimpostazione dell’equalizzatore è attualmente selezionata.
3 Display FUNCTION
Mostra lo stato della funzione.
4 Tasto DSP
Premere questo tasto per selezionare le
funzioni del processore digitale di segnale.
5 Tasti
1–6
Premere questi tasti per richiamare le curve
di equalizzazione e i programma del campo
sonoro.
6 Tasti 2/3
Premere questi tasti per scegliere l’elemento
(la modalità) della funzione selezionata.
7 Tasti 5/∞
Premere questi tasti per regolare la funzione
selezionata e per attivarla/disattivarla.
8 Tasto BAND/ESC
Premere questo tasto per tornare al display
di ogni sorgente.
ENTENT DISPDISP TEXTTEXT
TATA SOURCESOURCE/ OFF/ OFF
654321
FD
A
745 68
1
2
3
Page 100

Processore di segnale digitale
It
44
10
Sezione
Premere DSP per visualizzare i nomi delle
funzioni DSP.
Se si preme ripetutamente DSP, sul display
vengono visualizzate le funzioni seguenti:
PWFL (equalizzatore grafico)—SFC (controllo
del campo sonoro)—POSI (selettore di
posizione)
• Per tornare al display di ogni sorgente, pre-
mere BAND/ESC.
• A seconda delle regolazioni dell’equalizzatore
grafico e del subwoofer, premendo ripetutamente DSP vengono visualizzate le funzioni
seguenti:
CUSTOM (equalizzatore grafico)—50Hz (equaliz-
zatore grafico a 9 bande)—SFC (controllo del
campo sonoro)—POSI (selettore di posizione)—
SUB.W (subwoofer)—80Hz (impostazione del
subwoofer)—HPF (filtro passo alto)
Per ulteriori dettagli, vedere le istruzioni
seguenti.
Nota
• Se non si attiva una funzione DSP entro circa
30 secondi, il display torna automaticamente
alla visualizzazione della sorgente.
Uso dell’equalizzatore grafico
L’equalizzatore grafico consente di regolare
l’equalizzazione in modo che corrisponda nel
modo desiderato alle caratteristiche acustiche
dell’interno dell’automobile.
Richiamo delle curve d’equalizzatore
Sono disponibili sei curve d’equalizzatore
memorizzate che si possono richiamare in
qualsiasi momento. Ecco la lista delle curve
d’equalizzatore:
Tasto Display Curva d’equalizzatore
1 S-BASS Super bassi
2PWFLPotente
3 NTRL Naturale
4 VOCAL Vocale
5 CUSTOM Personalizzata
6FLATPiatta
• CUSTOM è una curva d’equalizzatore regolata
creata dall’utente. Le regolazioni possono
essere effettuate con un equalizzatore grafico a
9 bande.
• Quando si seleziona FLAT non viene effettuata
nessuna aggiunta o correzione al suono. Questa
opzione è utile per controllare l’effetto delle
curve di equalizzazione alternando l’opzione
FLAT con una serie di curve d’equalizzatore.
1 Premere DSP per selezionare l’equalizzatore grafico.
Premere DSP fino a quando sul display viene
visualizzata l’indicazione PWFL.
• Se l’equalizzatore grafico è stato precedentemente impostato su una curva d’equalizzatore
diversa da PWFL viene visualizzato il titolo della
curva d’equalizzatore selezionata in
precedenza, come S-BASS, NTRL, VOCAL,
CUSTOM o FLAT.
2 Selezionare una curva d’equalizzatore
premendo i tasti 1–6.
Selezionare la curva d’equalizzatore desiderata
premendo uno dei tasti numerici, 1–6, che corrispondono alle diverse curve d’equalizzatore
elencate sopra.
• È anche possibile scegliere una curva
d’equalizzatore in sequenza premendo 2 o 3.
 Loading...