

Page 1
Owner’s Manual
Manual de instrucciones
Manual do proprietário
CD RECEIVER
RADIO CD
CD PLAYER
DEH-3150UB
English
Español
Português (B)
CRD4365A_cover.indd 1 2008/08/18 7:46:23
Page 2
Black plate (2,1)
/
Contents
Thank you for purchasing this PIONEER product.
Please read through this manual before using the product for the first time, to ensure proper use. After reading, please keep the manual in a safe and accessible place
for future reference.
Before You Start
About this unit 4
Portable audio player compatibility 4
Visit our website 4
Protecting your unit from theft 4
– Removing the front panel 4
– Attaching the front panel 5
Use and care of the remote control 5
– Installing the battery 5
– Using the remote control 5
Operating this unit
What’s what 6
– Head unit 6
– Remote control 7
– Display indication 7
Basic Operations 8
– Power ON/OFF 8
– Selecting a source 8
– Adjusting the volume 8
Tuner 8
– Basic Operations 8
– Storing and recalling broadcast
frequencies 9
– Introduction to advanced
operations 9
– Storing the strongest broadcast
frequencies 9
– Tuning in strong signals 9
Built-in CD Player 9
– Basic Operations 9
– Displaying text information on disc 10
– Selecting tracks from the track title
list 11
– Selecting files from the file name
list 11
– Introduction to advanced
operations 11
– Selecting a repeat play range 12
– Playing tracks in random order 12
– Scanning folders and tracks 12
– Pausing playback 12
– Using Sound Retriever 12
Playing songs on USB portable audio player/
USB memory 12
– Basic Operations 12
– Displaying text information of an audio
file 13
– Selecting files from the file name
list 13
– Introduction to advanced
operations 13
Audio Adjustments 14
– Introduction of audio adjustments 14
– Using balance adjustment 14
– Using the equalizer 14
– Adjusting equalizer curves 15
– Adjusting loudness 15
– Adjusting source levels 15
Initial Settings 15
– Adjusting initial settings 15
– Setting the clock 16
– Setting the FM tuning step 16
– Setting the AM tuning step 16
– Switching the auxiliary setting 16
Other Functions 17
– Using the AUX source 17
– Turning the clock display on or off 17
Connections
Connection diagram 19
Installation
DIN front/rear mount 20
– DIN Front-mount 20
– DIN Rear-mount 21
Additional Information
Error messages 22
2
En
<CRD4365-A
N>2
Page 3
/
Contents
Handling guideline of discs and player 23
Dual Discs 23
Compressed audio compatibility 24
Handling guideline and supplemental
information 24
– Compressed audio files on the
disc 24
– USB audio player/USB memory 24
Example of a hierarchy 25
– The sequence of audio files on the
disc 25
– The sequence of audio files on USB
memory 25
Copyright and trademark notice 26
Specifications 27
Black plate (3,1)
English
<CRD4365-A
N>3
En
3
Page 4
Section
01
Black plate (4,1)
Before You Start
About this unit
CAUTION
! Do not allow this unit to come into contact
with liquids. Electrical shock could result.
Also, damage to this unit, smoke, and overheating could result from contact with liquids.
! “CLASS 1 LASER PRODUCT”
This product contains a laser diode of higher
class than 1. To ensure continued safety, do
not remove any covers or attempt to gain access to the inside of the product. Refer all servicing to qualified personnel.
! Keep this manual handy as a reference for op-
erating procedures and precautions.
! Always keep the volume low enough so that
you can hear sounds from outside the vehicle.
! Protect this unit from moisture.
! If the battery is disconnected or discharged,
the preset memory will be erased and must be
reprogrammed.
! Should this unit fail to operate properly, please
contact your dealer or nearest authorized
PIONEER Service Station.
Portable audio player
compatibility
Inquire at the manufacturer about your USB
portable audio player/USB memory.
This unit corresponds to the following.
— USB MSC (Mass Storage Class) compliant
portable audio player and memory
— WMA, MP3 and WAV file playback
http://pioneer.jp/group/index-e.html
! We offer the latest information about
Pioneer Corporation on our website.
Protecting your unit from
theft
The front panel can be detached to deter theft.
Important
! Handle gently when removing or attaching
the front panel.
! Avoid subjecting the front panel to excessive
shock.
! Keep the front panel out of direct sunlight and
high temperatures.
! Before detaching, be sure to remove the AUX/
USB cable and USB device from the front
panel. Otherwise, this unit, connected device
or vehicle interior may be damaged.
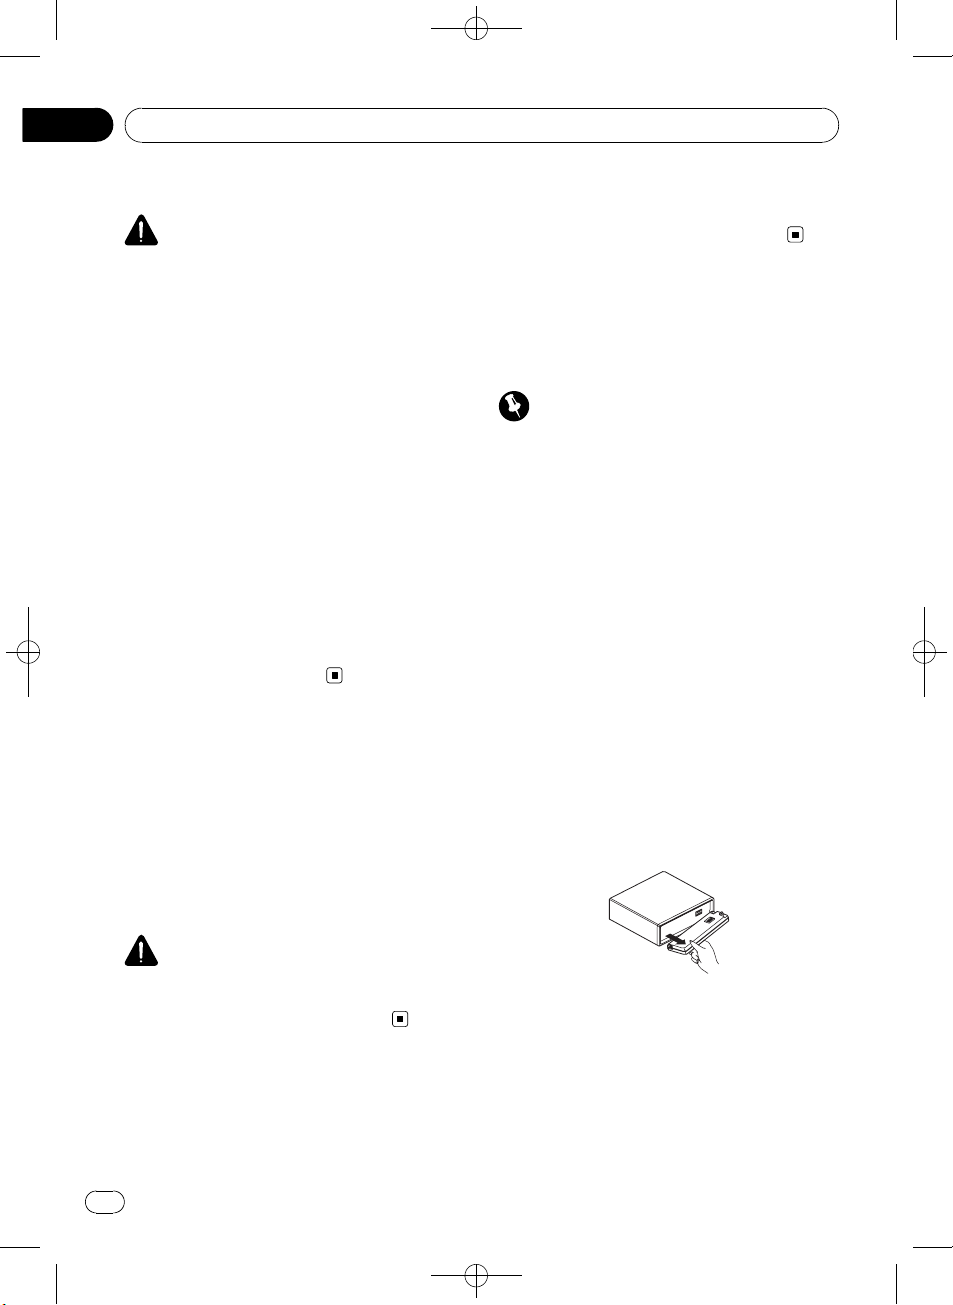
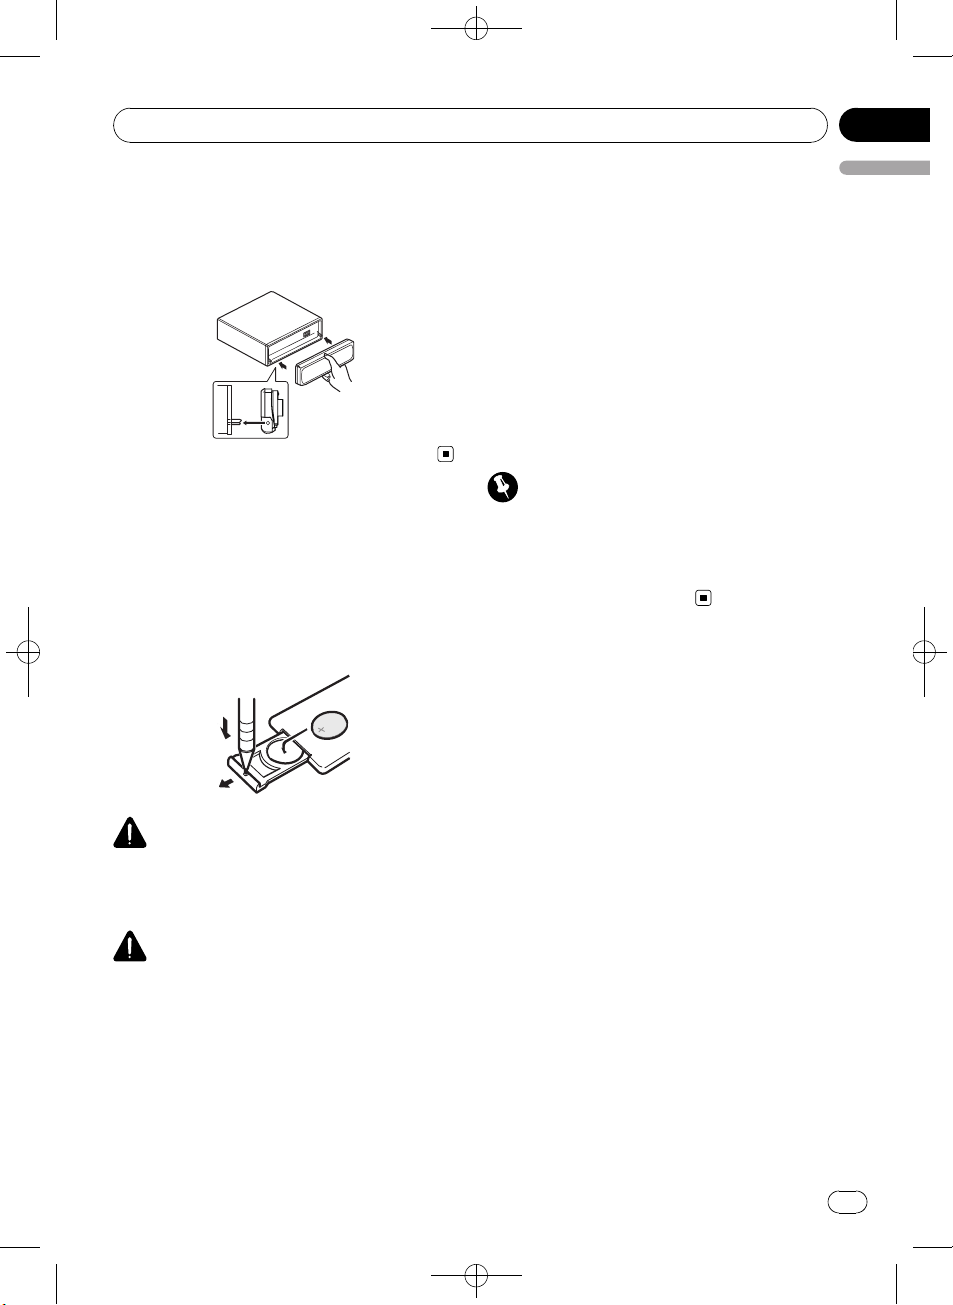
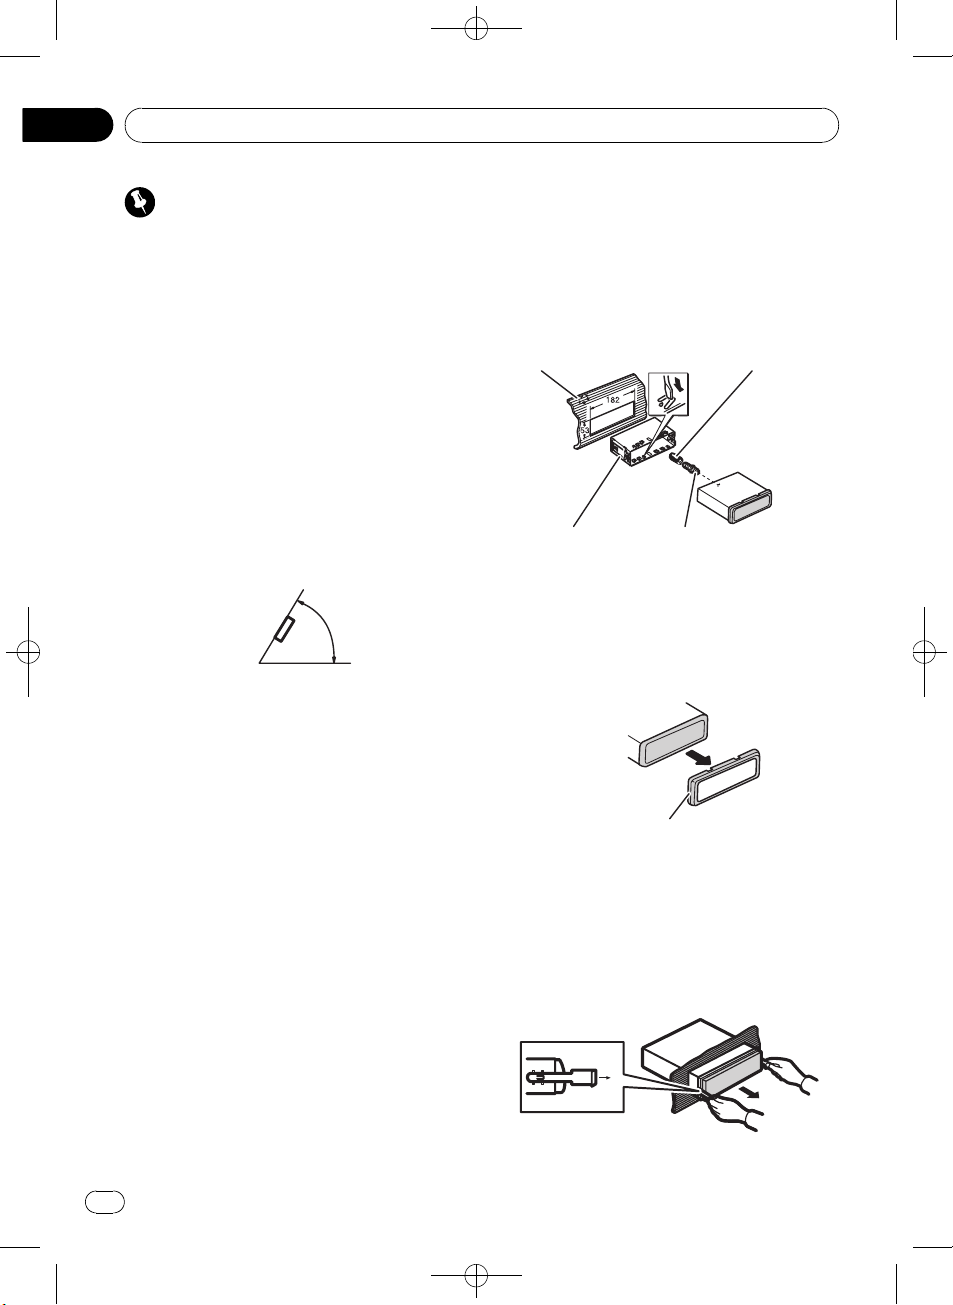
Removing the front panel
1 Press OPEN to open the front panel.
2 Grip the left side of the front panel and
pull it gently outward.
Take care not to grip it too tightly or to drop
the front panel and protect it from contact
with water or other fluids to prevent permanent damage.
CAUTION
Pioneer accepts no responsibility for data lost on
the USB portable audio player/USB memory even
if that data is lost while using this unit.
Visit our website
Visit us at the following site:
4
En
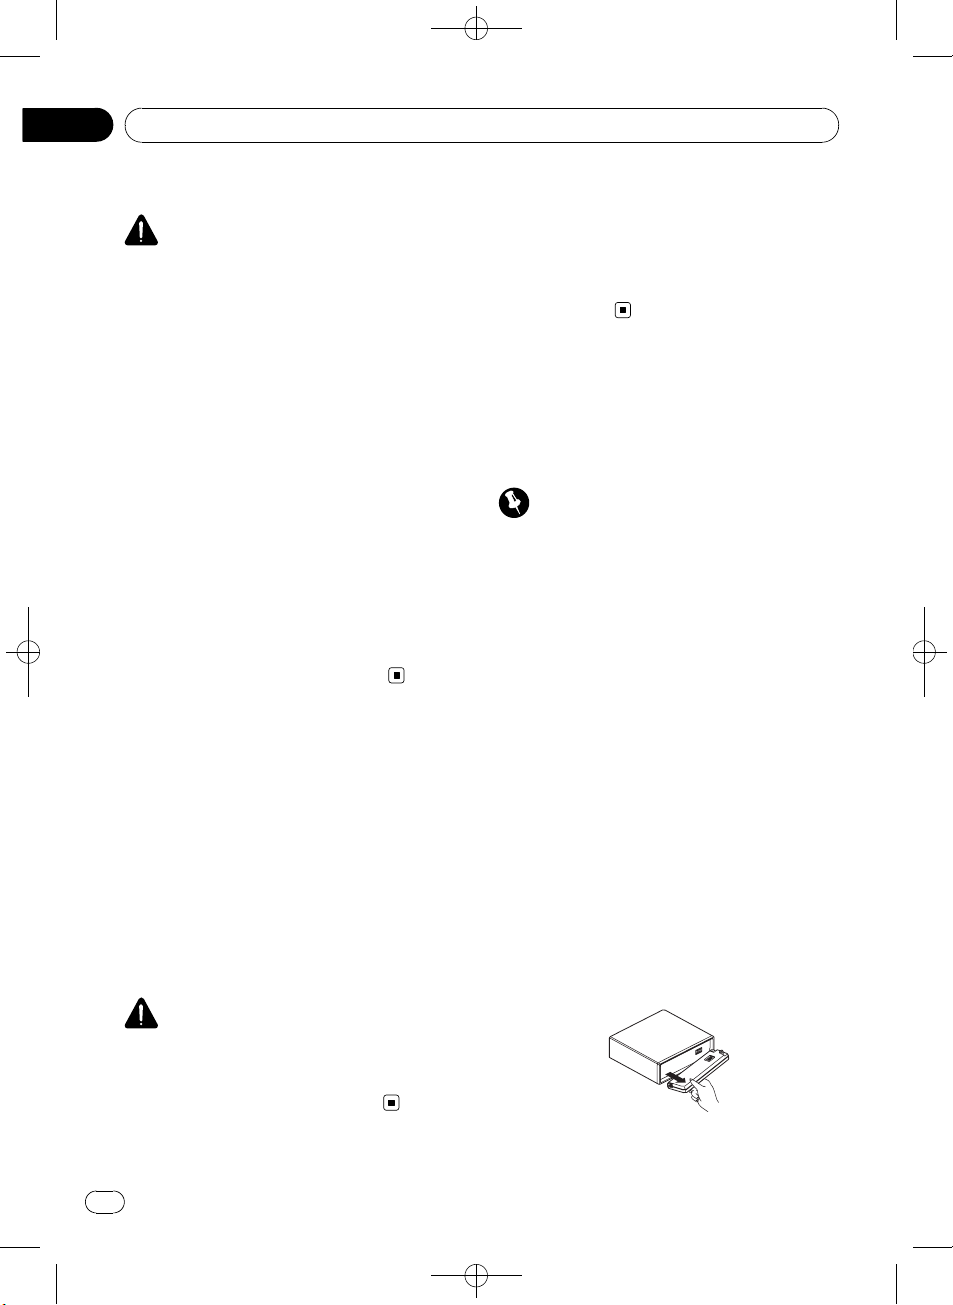
3 Put the front panel into the provided
protective case for safe keeping.
<
CRD4365-A/N>4
Page 5
/
Before You Start
Black plate (5,1)
Section
01
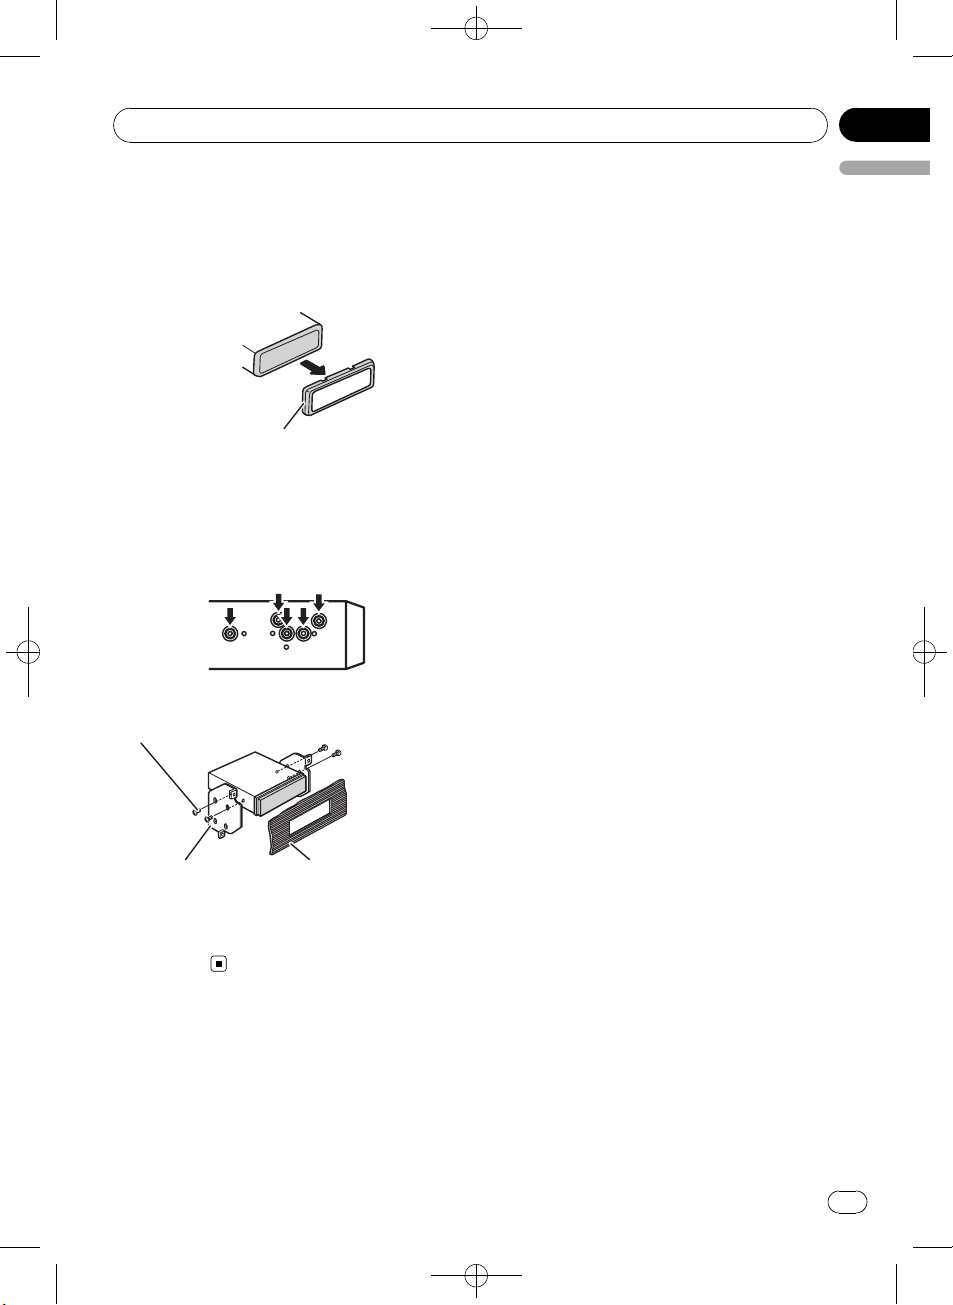
Attaching the front panel
% Reattach the front panel by holding it
upright to the unit and clipping it securely
into the mounting hooks.
Use and care of the remote
control
Installing the battery
Slide the tray on the back of the remote control out and insert the battery with the plus (+)
and minus (–) poles aligned properly.
! If the battery leaks, wipe the remote control
English
completely clean and install a new batter y.
! When disposing of used batteries, comply
with governmental regulations or environmental public institutions’ rules that apply in your
country/area.
Using the remote control
Point the remote control in the direction of the
front panel to operate.
! The remote control may not function prop-
erly in direct sunlight.
Important
! Do not store the remote control in high tem-
peratures or direct sunlight.
! Do not let the remote control fall onto the
floor, where it may become jammed under the
brake or accelerator pedal.
WARNING
Keep the battery out of the reach of children.
Should the battery be swallowed, consult a doctor immediately.
CAUTION
! Use one CR2025 (3 V) lithium battery.
! Remove the battery if the remote control is not
used for a month or longer.
! There is a danger of explosion if the battery is
incorrectly replaced. Replace only with the
same or equivalent type.
! Do not handle the battery with metallic tools.
! Do not store the battery with metallic objects.
<CRD4365-A
N>5
En
5
Page 6
4
5
8
9
b
1
3
a26
7
Section
02
Black plate (6,1)
Operating this unit
What’s what
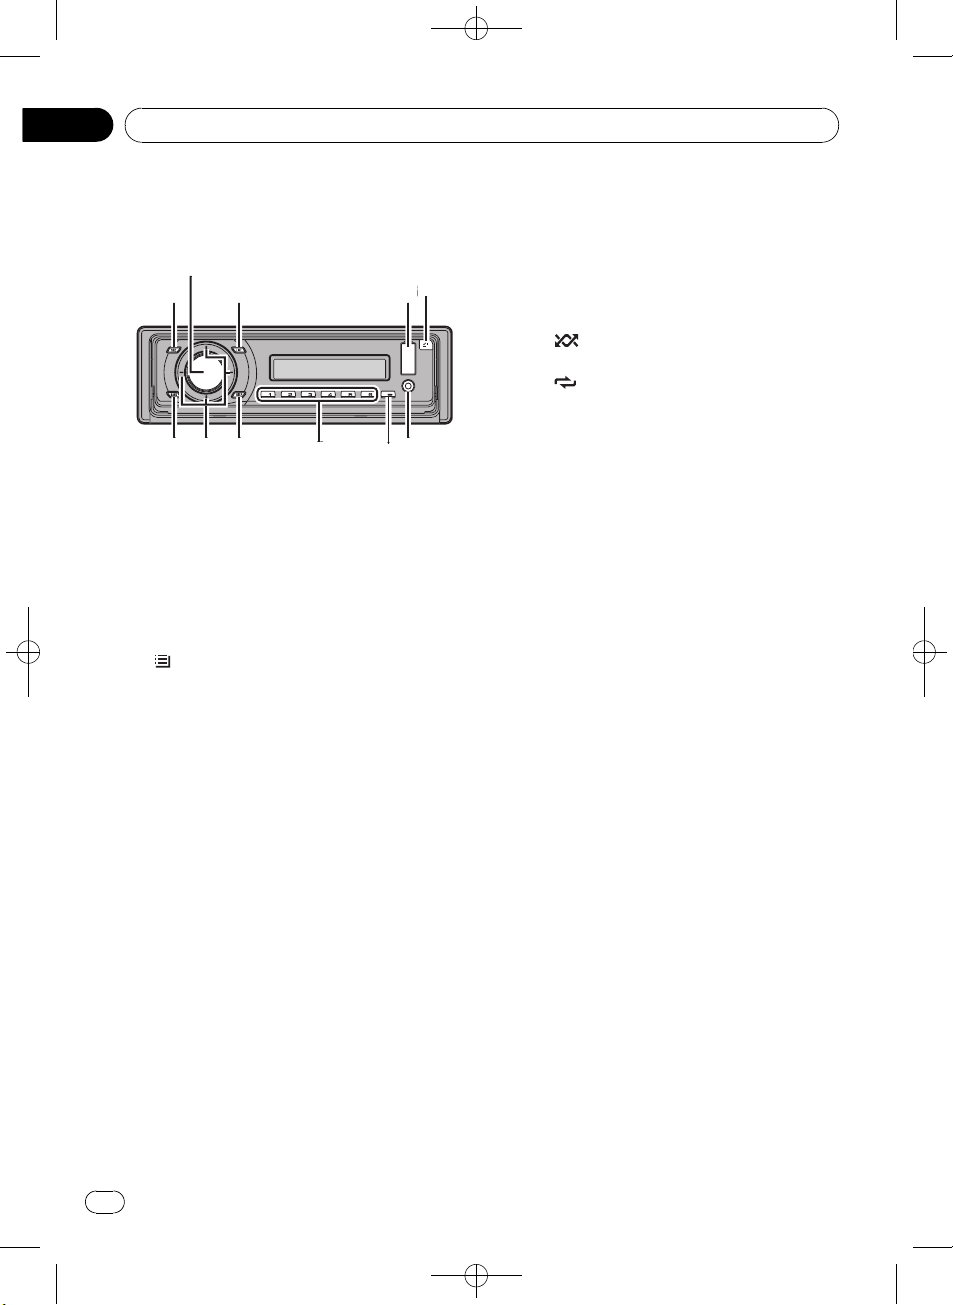
Head unit
1 SRC/OFF button
This unit is turned on by selecting a source.
Press to cycle through all the available
sources.
2 MULTI-CONTROL
Turn to increase or decrease the volume.
Also used for controlling functions.
3
/LIST button
Press to display the disc title list, track title
list, folder list or file list.
4 USB port
Use to connect a USB audio player/USB
memory.
! When connecting, open up the USB con-
nector lid.
! Use a USB cable to connect the USB
audio player/USB memory to the USB
port. Since the USB audio player/USB
memory is projected forward from the
unit, it is dangerous to connect directly.
Pioneer CD-U50E USB cable is also available. For details, consult your dealer.
5 OPEN button
Press to open the front panel.
6 AUX input jack (3.5 mm stereo jack)
Use to connect an auxiliary device.
7 CLOCK button
Press to change to the clock display.
8 1 to 6 buttons
Press for preset tuning. Also used for controlling functions.
! 1/S.Rtrv can be used to control S.RTRV
(sound retriever).
! 2/PAUSE can be used to control PAUSE
(pause).
! 5/
! 6/
9 DISP/BACK/SCRL button
Press to select different displays.
Press and hold to scroll through the text information.
Press to return to the previous display when
operating the menu.
Press and hold to return to the main menu
when operating the menu.
a a/b/c/d buttons
Press to perform manual seek tuning, fast
forward, reverse and track search controls.
Also used for controlling functions.
! When operating menus
! When operating lists
can be used to control RANDOM
(random).
can be used to control REPEAT (re-
peat).
— Pressing a is the same function as
turning MULTI-CONTROL right.
— Pressing b is the same function as
turning MULTI-CONTROL left.
— Pressing c is the same function as
pressing DISP/BACK/SCRL.
— Pressing and holding c is the same
function as pressing and holding
DISP/BACK/SCRL.
— Pressing d is the same function as
pressing MULTI-CONTROL.
— Pressing and holding d is the same
function as pressing and holding
MULTI-CONTROL.
— Pressing a is the same function as
turning MULTI-CONTROL left.
— Pressing b is the same function as
turning MULTI-CONTROL right.
— Pressing c is the same function as
pressing DISP/BACK/SCRL.
6
En
<
CRD4365-A/N>6
Page 7
c
h
f
1
b
d
9
e
g
a
6
8
4
Operating this unit
Black plate (7,1)
Section
02
— Pressing and holding c is the same
function as pressing and holding
DISP/BACK/SCRL.
— Pressing d is the same function as
pressing MULTI-CONTROL.
— Pressing and holding d is the same
function as pressing and holding
MULTI-CONTROL.
b BAND/ESC button
Press to select among three FM bands and
one AM band.
Press to return to the ordinary display when
operating the menu.
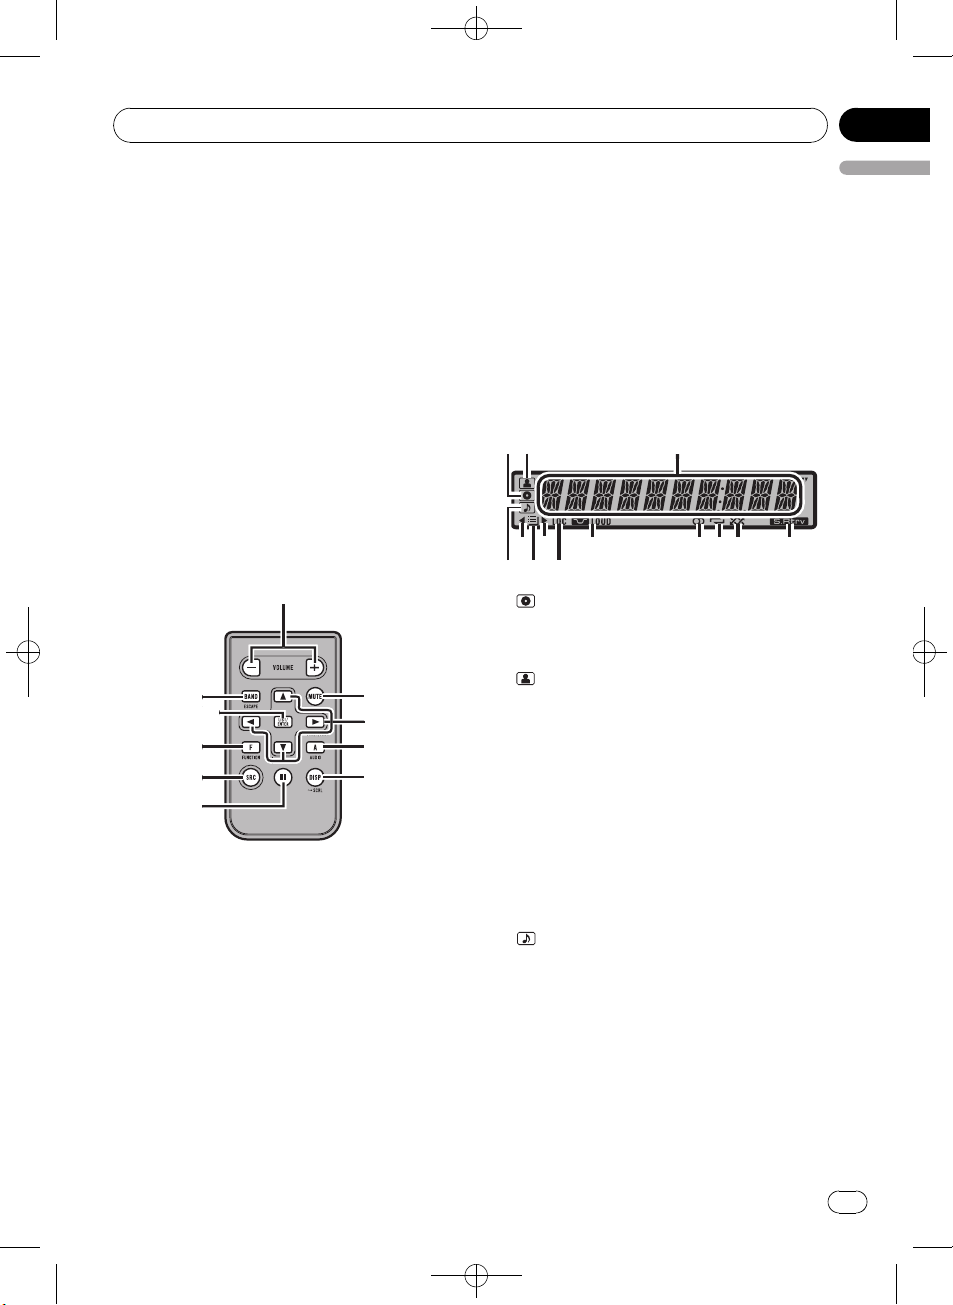
Remote control
Operation is the same as when using the buttons on the head unit.
Press and hold to recall the initial setting
menu when the sources are off.
h LIST/ENTER button
Press to display the disc title list, track title
list, folder list or file list depending on the
source.
While in the operating menu, press to control functions.
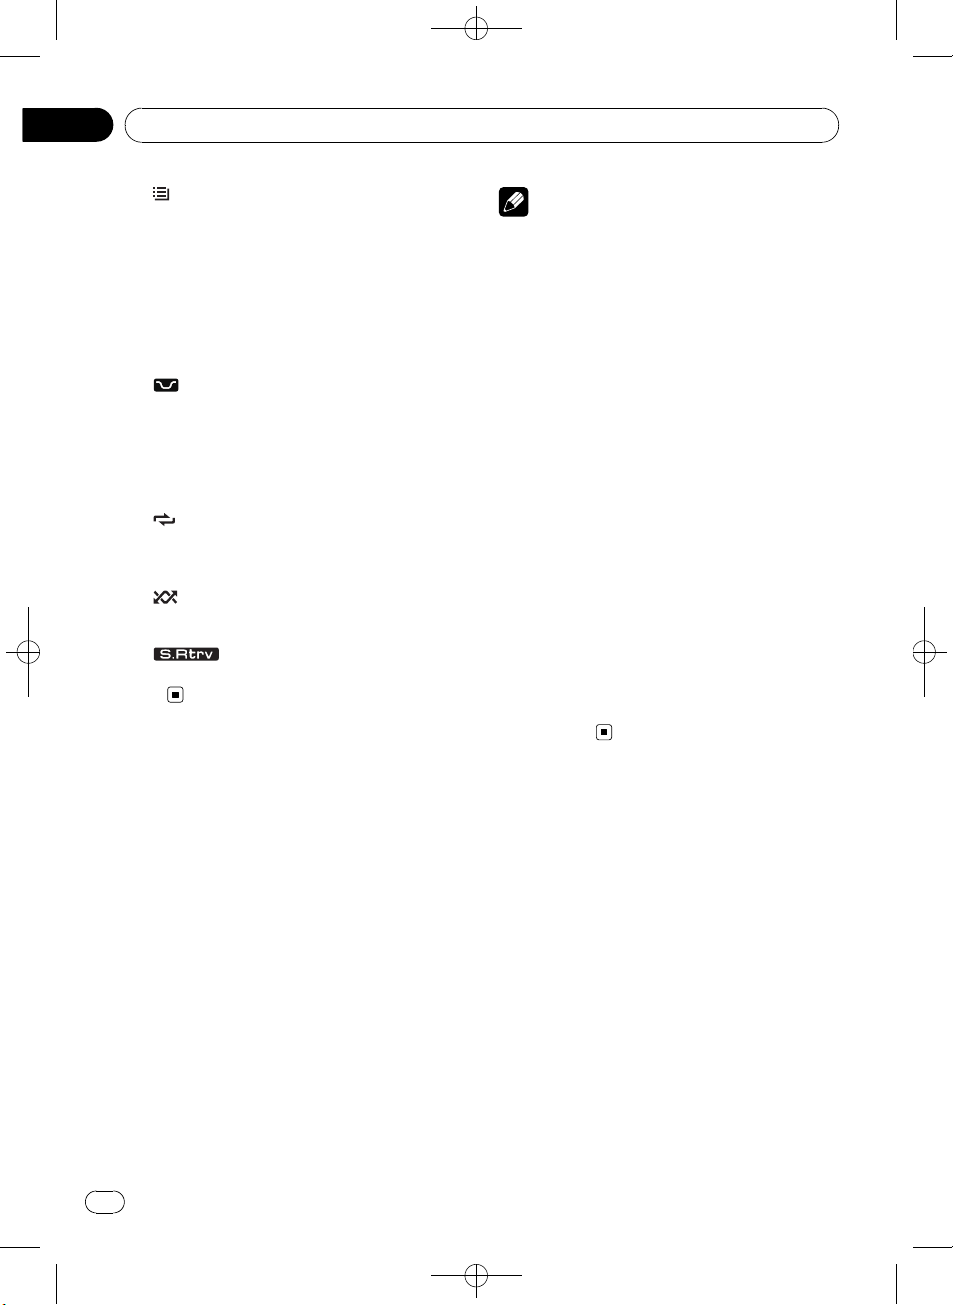
Display indication
12
9 abc d
7
5
1 (disc) indicator
Appears when the disc (album) name is displayed on the main display section.
2
(artist) indicator
Appears when the disc (track) artist name is
displayed on the main display section.
3
English
c VOLUME buttons
Press to increase or decrease the volume.
d MUTE button
Press to turn off the sound. To turn on the
sound, press again.
e AUDIO button
Press to select an audio function.
f e button
Press to turn pause on or off.
g FUNCTION button
Press to select functions.
3 Main display section
Displays band, frequency, elapsed playback
time and other settings.
! Tuner
Band and frequency are displayed.
! Built-in CD player and USB
Elapsed playback time and literal information are displayed.
4
(song) indicator
Appears when the track (song) name is displayed on the main display section.
Also, appears when a playable audio file is
selected while operating the list.
5 c indicator
Appears when an upper tier of folder or
menu exists.
<
CRD4365-A/N>7
En
7
Page 8
/
Section
02
Black plate (8,1)
Operating this unit
6 (folder) indicator
Appears when operating list function.
7 d indicator
Appears when a lower tier of folder or menu
exists.
8 LOC indicator
Appears when local seek tuning is on.
9
LOUD (loudness) indicator
Appears when loudness is on.
a 5 (stereo) indicator
Appears when the selected frequency is
being broadcast in stereo.
b
(repeat) indicator
Shows when track repeat is turned on.
Also, shows when folder repeat is on.
c
(random) indicator
Shows when random play is on.
d
Appears when Sound Retriever function is
on.
(Sound Retriever) indicator
Basic Operations
Power ON/OFF
Turning the unit on
% Press SRC/OFF to turn the unit on.
Turning the unit off
% Press SRC/OFF and hold until the unit
turns off.
Selecting a source
You can select a source you want to listen to.
% Press SRC/OFF repeatedly to switch between the following sources.
TUNER (tuner)—CD (built-in CD player)—USB
(USB)—AUX (AUX)
Notes
! In the following cases, the sound source will
not change.
— When there is no disc in the unit.
— When AUX (auxiliary input) is set to off
(refer to page 16).
! When the USB portable audio player/USB
memory is not connected to the USB port of
this unit, NO DEVICE is displayed.
! AUX is set to on by default. Turn off the AUX
when not in use (refer to Switching the auxili-
ary setting on page 16).
! Charging the portable audio player using
car’s DC power source while connecting it to
AUX input may generate noise. In this case,
stop charging.
! When this unit’s blue/white lead is connected
to the vehicle’s auto-antenna relay control
terminal, the vehicle’s antenna extends when
this unit’s source is turned on. To retract the
antenna, turn the source off.
Adjusting the volume
% Turn MULTI-CONTROL to adjust the
sound level.
Tuner
Basic Operations
% Select a band
Press BAND/ESC.
# Press BAND/ESC until the desired band (F1,
F2, F3 for FM or AM) is displayed.
% Manual tuning (step by step)
Press c or d.
% Seek tuning
Press and hold c or d, and then release.
# You can cancel seek tuning by briefly pressing
c or d.
# While pressing and holding c or d, you can
skip stations. Seek tuning starts as soon as you
release c or d.
8
En
<CRD4365-A
N>8
Page 9
Operating this unit
Storing and recalling broadcast
frequencies
You can easily store up to six broadcast frequencies for later recall.
! Six stations for each band can be stored in
memory.
% When you find a frequency that you
want to store in memory, press one of preset tuning buttons 1 to 6 and hold until the
preset number stops flashing.
Memorized radio station frequency can be recalled by pressing the preset tuning button.
# You can also recall radio station frequencies
assigned to preset tuning numbers by pressing a
or b during the frequency display.
Black plate (9,1)
Section
02
English
Storing the strongest broadcast
frequencies
BSM (best stations memory) automatically
stores the six strongest broadcast frequencies
in the order of their signal strength.
1 Use MULTI-CONTROL to select BSM in
the function menu.
2 Press MULTI-CONTROL to turn BSM on.
# To cancel, press MULTI-CONTROL again.
Tuning in strong signals
Local seek tuning lets you tune in only those
radio stations with sufficiently strong signals
for good reception.
Introduction to advanced
operations
1 Press MULTI-CONTROL to display the
main menu.
2 Use MULTI-CONTROL to select
FUNCTION.
Turn to change the menu option. Press to select.
3 Turn MULTI-CONTROL to select the
function.
BSM (best stations memory)—LOCAL (local
seek tuning)
Notes
! To return to the previous display, press
DISP/BACK/SCRL.
! To return to the main menu, press and hold
DISP/BACK/SCRL.
! To return to the ordinary display, press
BAND/ESC.
! If you do not operate functions within about
30 seconds, the display automatically returns
to the ordinary display.
1 Use MULTI-CONTROL to select LOCAL in
the function menu.
2 Press MULTI-CONTROL to display the
setting mode.
3 Turn MULTI-CONTROL to select the desired setting.
FM: OFF—LEVEL 1—LEVEL 2—LEVEL 3—
LEVEL 4
AM: OFF—LEVEL 1—LEVEL 2
The LEVEL 4 setting allows reception of only
the strongest stations, while lower settings let
you receive progressively weaker stations.
4 Press MULTI-CONTROL to determine
the selection.
# Even if the menu has been cancelled before
determination, operation is settled.
Built-in CD Player
Basic Operations
% Open the front panel
Press OPEN .
Disc loading slot appears.
<
CRD4365-A/N>9
En
9
Page 10
/
Section
02
Black plate (10,1)
Operating this unit
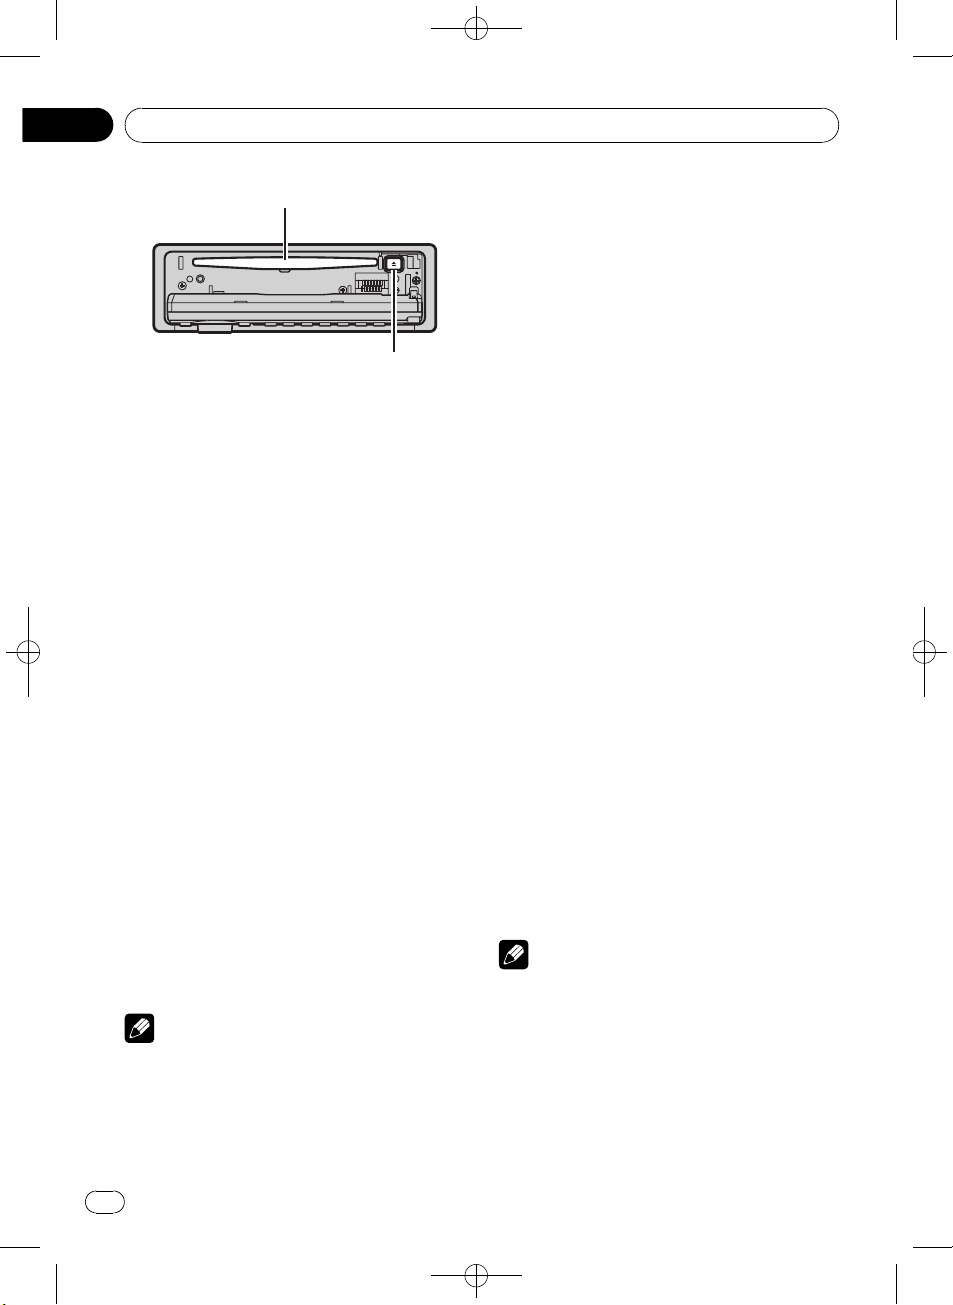
Disc loading slot
EJECT button
# When loading a disc, face the label side of
a disc up.
# To avoid a malfunction, make sure that no
metal objects come into contact with the terminals when the front panel is open.
% Eject a CD (CD-ROM)
Press h (eject).
% Select a folder
Press a or b.
% Select a track
Press c or d.
% Fast forward or reverse
Press and hold c or d.
# When playing compressed audio, there is no
sound on fast forward or reverse.
% Return to root folder
Press and hold BAND/ESC.
% Switch between compressed audio and
CD-DA
Press BAND/ESC.
# This operation is available only when playing
CD-EXTRA or MIXED-MODE CDs.
# If you have switched between compressed
audio and CD-DA, playback starts at the first
track on the disc.
Notes
! The built-in CD player can play back audio CD
and compressed audio recorded on a CDROM. (Please see the following section for
files that can be played back. Refer to page
24)
! Read the precautions for discs and player on
page 23.
! A disc has already been inserted, press
SRC/OFF to select the built-in CD player.
! There is sometimes a delay between starting
up disc playback and the sound being issued.
When being read, FRMT READ is displayed.
! If an error message is displayed, refer to Error
messages on page 22.
! Playback is carried out in order of file number.
Folders are skipped if they contain no files. (If
folder 01 (ROOT) contains no files, playback
commences with folder 02.)
Displaying text information on
disc
% Press DISP/BACK/SCRL to select the desired text information.
For CD TEXT discs
Play time—DISC TITLE (disc title)—
ARTISTNAME (disc artist name)—
TRACKTITLE (track title)—ARTISTNAME
(track artist name)
For WMA/MP3
Play time—FLD NAME (folder name)—
FILE NAME (file name)—TRACKTITLE (track
title)—ARTISTNAME (artist name)—
ALBUMTITLE (album title)—COMMENT
(comment)—bit rate—folder and track numbers
For WAV
Play time—FLD NAME (folder name)—
FILE NAME (file name)—sampling frequency
—folder and track numbers
Notes
! You can scroll to the left of the title by pressing
and holding DISP/BACK/SCRL.
! Audio CD that contains certain information
such as text and/or number is CD TEXT.
! If the characters recorded on the audio file are
not compatible with this unit, those characters will not be displayed.
10
En
<CRD4365-A
N>10
Page 11
/
Operating this unit
Black plate (11,1)
Section
02
! If specific information is not recorded on a
disc, NO XXXX will be displayed (e.g.,
NO TITLE).
! The text information of some audio files may
not be correctly displayed.
! Depending on the version of iTunes used to
write MP3 files onto a disc, comment information may not be correctly displayed.
! Depending on the version of Windows
Media™ Player used to encode WMA files,
album names and other text information may
not be correctly displayed.
! When playing back VBR (variable bit rate)-re-
corded WMA files, the average bit rate value is
displayed.
! When playing back VBR (variable bit rate)-re-
corded MP3 files, VBR is displayed instead of
bit rate value.
! The sampling frequency shown in the display
may be abbreviated.
Selecting tracks from the track
title list
Track title list lets you see the list of track titles
on a CD TEXT disc and select one of them to
play back.
1 Press
list mode.
2 Use MULTI-CONTROL to select the desired track title.
Turn to change the track title. Press to play.
# To return to the ordinary display, press
BAND/ESC or
# If you do not operate the list within about 30
seconds, the display automatically returns to the
ordinary display.
/LIST to switch to the track title
/LIST.
1 Press
/LIST to switch to the file name
list mode.
Names of files and folders appear in the display.
2 Use MULTI-CONTROL to select the desired file name (or folder name).
Turn to change the name of file or folder.
— when a file is selected, press to play.
— when a folder is selected, press to see a list
of files (or folders) in the seleted folder.
— when a folder is selected, press and hold to
play a song in the selected folder.
# To return to the previous list (the folder one
level higher), press DISP/BACK/SCRL.
# To return to the top tier of list, press and hold
DISP/BACK/SCRL.
# To return to the ordinary display, press
BAND/ESC or
# If you do not operate the list within about 30
seconds, the display automatically returns to the
ordinary display.
/LIST.
Introduction to advanced
operations
1 Press MULTI-CONTROL to display the
main menu.
2 Use MULTI-CONTROL to select
FUNCTION.
Turn to change the menu option. Press to select.
3 Turn MULTI-CONTROL to select the
function.
REPEAT (repeat play)—RANDOM (random
play)—SCAN (scan play)—PAUSE (pause)—
S.RTRV (sound retriever)
English
Selecting files from the file
name list
File name list lets you see the list of file names
(or folder names) and select one of them to
playback.
Notes
! To return to the previous display, press
DISP/BACK/SCRL.
! To return to the main menu, press and hold
DISP/BACK/SCRL.
! To return to the ordinary display, press
BAND/ESC.
<CRD4365-A
N>11
En
11
Page 12

Section
02
Black plate (12,1)
Operating this unit
! If you do not operate functions within about
30 seconds, the display automatically returns
to the ordinary display.
Selecting a repeat play range
% Press 6/ repeatedly to select the de-
sired setting.
! DISC – Repeat all tracks
! TRACK – Repeat the current track
! FOLDER – Repeat the current folder
# If you select another folder during repeat play,
the repeat play range changes to disc repeat.
# Performing track search or fast forward/reverse during TRACK (track repeat) changes the
repeat play range to disc/folder.
# When FOLDER (folder repeat) is selected, it is
not possible to play back a subfolder of that
folder.
# You can also perform this operation in the
menu that appears by using MULTI-CONTROL.
Playing tracks in random order
Tracks in a selected repeat range are played in
random order.
% Press 5/
Tracks play in a random order.
# To turn random play off, press 5/ again.
# You can also perform this operation in the
menu that appears by using MULTI-CONTROL.
to turn random play on.
Scanning folders and tracks
Scan play searches the song within the selected repeat range.
3 When you find the desired track press
MULTI-CONTROL to turn scan play off.
# If the display has automatically returned to
the playback display, select SCAN again by using
MULTI-CONTROL.
# After scanning of a disc (folder) is finished,
normal playback of the tracks begins.
Pausing playback
% Press 2/PAUSE to turn pause on.
Playback of the current track pauses.
# To turn pause off, press 2/PAUSE again.
# You can also perform this operation in the
menu that appears by using MULTI-CONTROL.
Using Sound Retriever
Sound Retriever function automatically enhances compressed audio and restores rich
sound.
% Press 1/S.Rtrv repeatedly to select the
desired setting.
OFF (off)—1—2
# 2 is more effective than 1.
# You can also perform this operation in the
menu that appears by using
MULTI-CONTROL.
Playing songs on USB portable
audio player/USB memory
For details about the supported device, refer to
Portable audio player compatibility on page 4.
1 Use MULTI-CONTROL to select SCAN in
the function menu.
2 Press MULTI-CONTROL to turn scan play
on.
The first 10 seconds of each track is played.
12
En
Basic Operations
% Select a folder
Press a or b.
% Select a track
Press c or d.
% Fast forward or reverse
Press and hold c or d.
<
CRD4365-A/N>12
Page 13
/
Operating this unit
Black plate (13,1)
Section
02
% Return to root folder
Press and hold BAND/ESC.
Notes
! Optimum performance of this unit may not be
obtained depending on the connected USB
portable audio player/USB memory.
! If folder 01 (ROOT) contains no files, playback
commences with folder 02.
! When the USB portable audio player having
battery charging function is connected to this
unit and the ignition switch is set to ACC or
ON, the battery is charged.
! You can disconnect the USB portable audio
player/USB memory anytime you want to finish listening to it.
! If you do not use an USB device, disconnect it
from this unit.
! When the USB portable audio player/USB
memory is disconnected from this unit during
playback, NO DEVICE is displayed.
Displaying text information of
an audio file
The operation is the same as that of the compressed audio on the built-in CD player. (Refer
to Displaying text information on disc on page
10.)
Selecting files from the file
name list
The operation is the same as that of the builtin CD player. (Refer to Selecting files from the
file name list on page 11.)
2 Use MULTI-CONTROL to select
FUNCTION.
Turn to change the menu option. Press to select.
3 Turn MULTI-CONTROL to select the
function.
REPEAT (repeat play)—RANDOM (random
play)—SCAN (scan play)—PAUSE (pause)—
S.RTRV (sound retriever)
Function and operation
REPEAT, RANDOM, SCAN, PAUSE and
S.RTRV operations are basically the same as
that of the built-in CD player.
Function name Operation
Refer to Selecting a repeat play
range on the previous page.
However, the repeat play ranges
you can select are different from
that of the built-in CD player. The
repeat play ranges of the USB por-
REPEAT
RANDOM
SCAN
PAUSE
S.RTRV
table audio player/USB memory
are:
! TRACK – Repeat just the cur-
rent file
! FOLDER – Repeat the current
folder
! ALL – Repeat all files
Refer to Playing tracks in random
order on the previous page.
Refer to Scanning folders and
tracks on the previous page.
Refer to Pausing playback on the
previous page.
Refer to Using Sound Retriever on
the previous page.
English
Introduction to advanced
operations
1 Press MULTI-CONTROL to display the
main menu.
Notes
! To return to the previous display, press
DISP/BACK/SCRL.
! To return to the main menu, press and hold
DISP/BACK/SCRL.
! To return to the ordinary display, press
BAND/ESC.
<CRD4365-A
N>13
En
13
Page 14
Section
02
Black plate (14,1)
Operating this unit
! If you do not operate the function within about
30 seconds, the screen automatically returns
to the ordinary display.
! If you select another folder during repeat play,
the repeat play range changes to ALL.
! If you perform track search or fast forward/re-
verse during TRACK, the repeat play range
changes to FOLDER.
! After file or folder scanning is finished, nor-
mal playback of the files begins again.
Audio Adjustments
Introduction of audio adjustments
1 Press MULTI-CONTROL to display the
main menu.
2 Use MULTI-CONTROL to select AUDIO.
Turn to change the menu option. Press to select.
3 Turn MULTI-CONTROL to select the
audio function.
FAD/BAL (balance adjustment)—EQUALIZER
(equalizer recall)—TONE CTRL (equalizer adjustment)—LOUDNESS (loudness)—SLA
(source level adjustment)
Notes
! To return to the previous display, press
DISP/BACK/SCRL.
! To return to the main menu, press and hold
DISP/BACK/SCRL.
! To return to the ordinary display, press
BAND/ESC.
! When selecting FM as the source, you cannot
switch to SLA.
! If you do not operate functions within about
30 seconds, the display automatically returns
to the ordinary display.
Using balance adjustment
You can change the fader/balance setting so
that it can provide the ideal listening environment in all occupied seats.
1 Use MULTI-CONTROL to select FAD/BAL
in the audio function menu.
2 Press MULTI-CONTROL to display the
setting mode.
3 Press MULTI-CONTROL to select the segment you wish to set.
Press MULTI-CONTROL repeatedly to switch
between fader and balance.
4 Turn MULTI-CONTROL to adjust speaker
balance.
Front/rear speaker balance can be adjusted
between F15 and R15.
Left/right speaker balance can be adjusted between L15 and R15.
# FR 0 is the proper setting when only two
speakers are used.
Using the equalizer
There are six stored equalizer settings such as
DYNAMIC, VOCAL, NATURAL, CUSTOM,
FLAT and POWERFUL that can easily be re-
called at any time.
! CUSTOM is an adjusted equalizer curve
that you create.
! When FLAT is selected no supplement or
correction is made to the sound.
Recalling equalizer curves
1 Use MULTI-CONTROL to select
EQUALIZER in the audio function menu.
2 Press MULTI-CONTROL to display the
setting mode.
14
En
3 Turn MULTI-CONTROL to select the
equalizer.
DYNAMIC—VOCAL—NATURAL—CUSTOM
—FLAT—POWERFUL
<
CRD4365-A/N>14
Page 15

Operating this unit
Black plate (15,1)
Section
02
4 Press MULTI-CONTROL to determine
the selection.
# Even if the menu has been cancelled before
determination, operation is settled.
Adjusting equalizer curves
You can adjust the currently selected equalizer
curve setting as desired. Adjusted equalizer
curve settings are memorized in CUSTOM.
Adjusting bass/mid/treble
You can adjust the bass/mid/treble level.
1 Use MULTI-CONTROL to select
TONE CTRL in the audio function menu.
2 Press MULTI-CONTROL to display the
setting mode.
3 Press MULTI-CONTROL to select BASS/
MID/TREBLE.
4 Turn MULTI-CONTROL to adjust the
level.
+6 to –6 is displayed as the level is increased
or decreased.
5 Press MULTI-CONTROL to determine
the selection.
# Even if the menu has been cancelled before
determination, operation is settled.
Adjusting loudness
Loudness compensates for deficiencies in the
low- and high-sound ranges at low volume.
1 Use MULTI-CONTROL to select
LOUDNESS in the audio function menu.
2 Press MULTI-CONTROL to display the
setting mode.
3 Turn MULTI-CONTROL to select the desired setting.
LOW (low)—HIGH (high)—OFF (off)
4 Press MULTI-CONTROL to determine
English
the selection.
# Even if the menu has been cancelled before
determination, operation is settled.
Adjusting source levels
Source level adjustment (SLA) lets you adjust
the volume level of each source to prevent radical changes in volume when switching between sources.
! Settings are based on the FM volume level,
which remains unchanged.
! The AM volume level can also be adjusted
with source level adjustments.
1 Compare the FM volume level with the
level of the source you wish to adjust.
2 Use MULTI-CONTROL to select SLA in
the audio function menu.
3 Press MULTI-CONTROL to display the
setting mode.
4 Turn MULTI-CONTROL to adjust the
source volume.
+4 to –4 is displayed as the source volume is
increased or decreased.
5 Press MULTI-CONTROL to determine
the selection.
# Even if the menu has been cancelled before
determination, operation is settled.
Initial Settings
Adjusting initial settings
1 Press SRC/OFF and hold until the unit
turns off.
2 Press MULTI-CONTROL and hold until
CLOCK SET appears in the display.
<
CRD4365-A/N>15
En
15
Page 16
Section
02
Black plate (16,1)
Operating this unit
3 Turn MULTI-CONTROL to select one of
the initial settings.
CLOCK SET (clock)—FM STEP (FM tuning
step)—AM STEP (AM tuning step)—AUX
(auxiliary input)
# To return to the previous display, press
DISP/BACK/SCRL.
# To return to the main menu, press and hold
DISP/BACK/SCRL.
# To cancel initial settings, press BAND/ESC.
Setting the clock
Use these instructions to set the clock.
1 Use MULTI-CONTROL to select
CLOCK SET in the initial setting menu.
Refer to Adjusting initial settings on the previous page.
2 Press MULTI-CONTROL to display the
setting mode.
# To return to the previous display, press
DISP/BACK/SCRL.
3 Press MULTI-CONTROL to select the segment of the clock display you wish to set.
Each time you press MULTI-CONTROL, one
segment of the clock display is selected.
Hour—Minute
As you select segments of the clock display,
the selected segment blinks.
4 Turn MULTI-CONTROL to put a clock
right.
Setting the FM tuning step
The FM tuning step employed by seek tuning
can be switched between 100 kHz, the preset
step, and 50 kHz.
! If seek tuning is performed in 50 kHz steps,
stations may be tuned in imprecisely. Tune
in the stations with manual tuning or use
seek tuning again.
! The tuning step remains at 50 kHz during
manual tuning.
1 Use MULTI-CONTROL to select FM STEP
in the initial setting menu.
Refer to Adjusting initial settings on the previous page.
2 Press MULTI-CONTROL to display the
setting mode.
3 Turn MULTI-CONTROL to select the FM
tuning step.
50 KHZ (50 kHz)—100 KHZ (100 kHz)
4 Press MULTI-CONTROL to determine
the selection.
# Even if the menu has been cancelled before
determination, operation is settled.
Setting the AM tuning step
The AM tuning step can be switched between
9 kHz, the preset step, and 10 kHz. When
using the tuner in North, Central or South
America, reset the tuning step from 9 kHz (531
kHz to 1 602 kHz allowable) to 10 kHz (530 kHz
to 1 640 kHz allowable).
1 Use MULTI-CONTROL to select AM STEP
in the initial setting menu.
Refer to Adjusting initial settings on the previous page.
2 Press MULTI-CONTROL to display the
setting mode.
3 Turn MULTI-CONTROL to select the AM
tuning step.
10 KHZ (10 kHz)—9 KHZ (9 kHz)
4 Press MULTI-CONTROL to determine
the selection.
# Even if the menu has been cancelled before
determination, operation is settled.
Switching the auxiliary setting
It is possible to use auxiliary device with this
unit. Activate the auxiliary setting when using
auxiliary device connected to this unit.
16
En
<
CRD4365-A/N>16
Page 17

/
Operating this unit
Black plate (17,1)
Section
02
1 Use MULTI-CONTROL to select AUX in
the initial setting menu.
Refer to Adjusting initial settings on page 15.
2 Press MULTI-CONTROL to turn AUX on.
# To turn AUX off, press MULTI-CONTROL
again.
Other Functions
Using the AUX source
You can connect an auxiliary device to this
unit using a stereo mini plug cable.
% Insert the stereo mini plug into the
input jack on this unit.
Selecting AUX as the source
% Press SRC/OFF to select AUX as the
source.
# If the auxiliary setting is not turned on, AUX
cannot be selected. For more details, see Switch-
ing the auxiliary setting on the previous page.
Turning the clock display on or off
You can turn the clock display on or off.
! Even when the sources are off, the clock
display appears on the display.
English
% Press CLOCK to turn the clock display
on or off.
Each press of CLOCK turns the clock display
on or off.
# The clock display disappears temporarily
when you perform other operations, but the clock
display appears again after 25 seconds.
<CRD4365-A
N>17
En
17
Page 18
/
Section
03
Black plate (18,1)
Connections
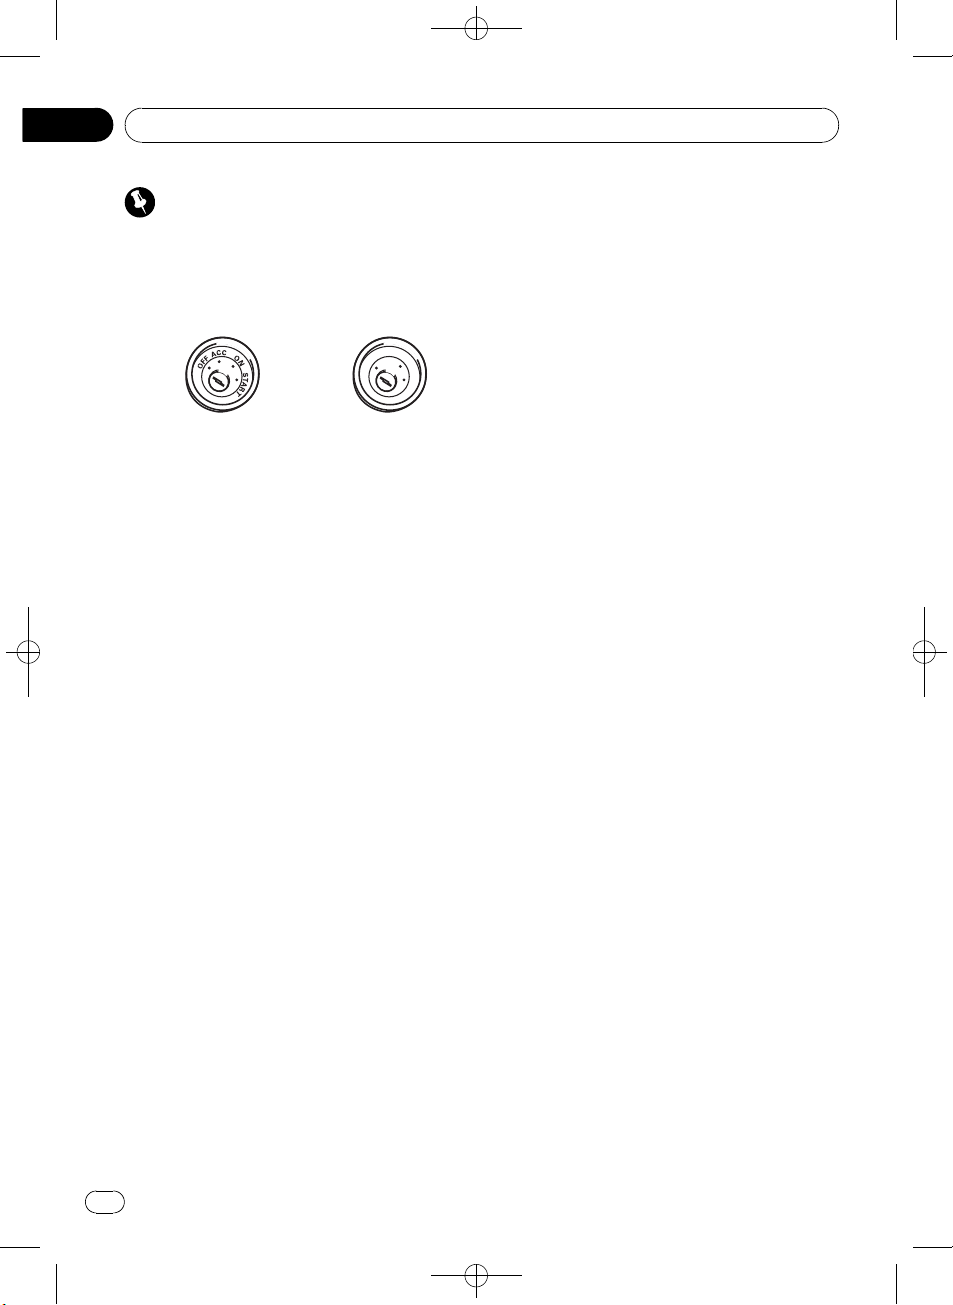
Important
! When this unit is installed in a vehicle without
ACC (accessory) position on the ignition
switch, red cable must be wired to the terminal that can detect the operation of the ignition key. Otherwise, battery drain may result.
O
F
N
F
O
S
T
A
R
T
ACC position No ACC position
! Use of this unit in conditions other than the
following could result in fire or malfunction.
— Vehicles with a 12-volt battery and negative
grounding.
— Speakers with 50 W (output value) and 4
ohm to 8 ohm (impedance value).
! To prevent a short-circuit, overheating or mal-
function, be sure to follow the directions
below.
— Disconnect the negative terminal of the
battery before installation.
— Secure the wiring with cable clamps or ad-
hesive tape. To protect the wiring, wrap adhesive tape around them where they lie
against metal parts.
— Place all cables away from moving parts,
such as gear shift and seat rails.
— Place all cables away from hot places,
such as near the heater outlet.
— Do not pass the yellow cable through a
hole into the engine compartment to connect to a battery.
— Cover any disconnected cable connectors
with insulating tape.
— Do not shorten any cables.
— Never cut the insulation of the power cable
of this unit in order to share the power
with other devices. Current capacity of the
cable is limited.
— Use a fuse of the rating prescribed.
— Never wire the speaker negative cable di-
rectly to ground.
— Never band together multiple speaker’s ne-
gative cables.
! Control signal is output through blue/white
cable when this unit is powered on. Connect it
to an external power amp’s system remote
control or the vehicle’s auto-antenna relay
control terminal (max. 300 mA 12 V DC). If the
vehicle is equipped with a glass antenna, connect it to the antenna booster power supply
terminal.
! Never connect blue/white cable to external
power amp’s power terminal. Also, never connect it to the power terminal of the auto antenna. Otherwise, battery drain or malfunction
may result.
! Black cable is ground. This cable and other
product’s ground cable (especially, high-current products such as power amp) must be
wired separately. Otherwise, fire or malfunction may result if they are accidentally detached.
18
En
<CRD4365-A
N>18
Page 19
Connections
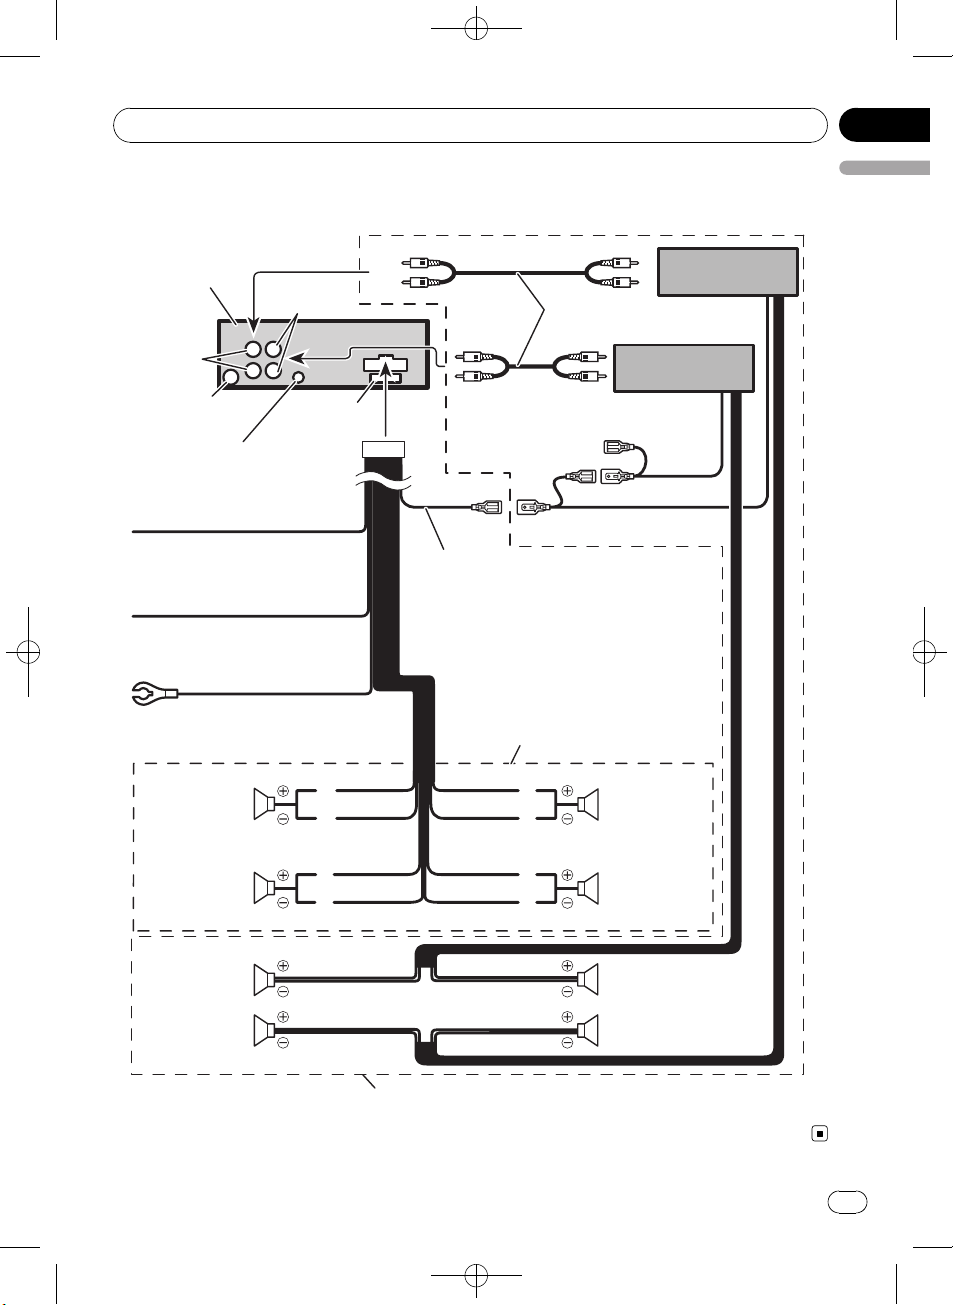
Connection diagram
Black plate (19,1)
Section
03
English
This product
Front output
Rear output
Antenna jack
Wired remote input
Hard-wired remote control adaptor
can be connected (sold separately).
Yellow
Connect to the constant 12 V
supply terminal.
Red
Connect to terminal controlled
by ignition switch (12 V DC).
Black (chassis ground)
Connect to a clean, paint-free
metal location.
Front speaker Front speaker
Left Right
Rear speaker Rear speaker
Fuse (10 A)
White
White/black
Green
Green/black
Blue/white
Connect to system control terminal of the
power amp or auto-antenna relay control
terminal (max. 300 mA 12 V DC).
With a 2 speaker system, do not connect
anything to the speaker leads that are not
connected to speakers.
Gray/black
Violet
Violet/black
Connect with RCA cables
(sold separately)
System remote control
Gray
Power amp
(sold separately)
Power amp
(sold separately)
Front speaker Front speaker
Rear speaker Rear speaker
Perform these connections when using
the optional amplifier.
<CRD4365-A/N>19
En
19
Page 20
/
Section
04
Black plate (20,1)
Installation
Important
! Check all connections and systems before
final installation.
! Do not use unauthorized parts. Use of un-
authorized parts may cause malfunctions.
! Consult your dealer if installation requires dril-
ling of holes or other modifications to the vehicle.
! Do not install this unit where :
— it may interfere with operation of the vehi-
cle.
— it may cause injury to a passenger as a re-
sult of a sudden stop.
! The semiconductor laser will be damaged if it
overheats. Install this unit away from hot
places such as near the heater outlet.
! Optimum performance is obtained when the
unit is installed at an angle of less than 60°.
60°
! When installing, to ensure proper heat disper-
sal when using this unit, make sure you leave
ample space behind the rear panel and wrap
any loose cables so they are not blocking the
vents.
space behind the unit, use factory supplied
mounting sleeve.
2 Secure the mounting sleeve by using a
screwdriver to bend the metal tabs (90°)
into place.
3 Install the unit.
Dashboard Rubber bush
Mounting sleeve Screw
Removing the unit
1 Extend top and bottom of the trim ring
outwards to remove the trim ring. (When
reattaching the trim ring, point the side
with a groove downwards and attach it.)
DIN front/rear mount
This unit can be properly installed either from
“Front” (conventional DIN front-mount) or
“Rear” (DIN rear-mount installation, utilizing
threaded screw holes at the sides of unit chassis). For details, refer to the following installation methods.
DIN Front-mount
Installation with the rubber bush
1 Insert the mounting sleeve into the
dashboard.
When installing in a shallow space, use a supplied mounting sleeve. If there is enough
20
En
Trim ring
! It becomes easy to remove the trim ring if
the front panel is released.
2 Insert the supplied extraction keys into
both sides of the unit until they click into
place.
3 Pull the unit out of the dashboard.
<CRD4365-A
N>20
Page 21
/
Installation
DIN Rear-mount
1 Extend top and bottom of the trim ring
outwards to remove the trim ring. (When
reattaching the trim ring, point the side
with a groove downwards and attach it.)
Trim ring
! It becomes easy to remove the trim ring if
the front panel is released.
2 Determine the appropriate position
where the holes on the bracket and the
side of the unit match.
Black plate (21,1)
Section
04
English
3 Tighten two screws on each side.
Screw
Mounting bracket Dashboard or console
! Use either truss screws (5 mm × 8 mm) or
flush surface screws (5 mm × 9 mm), depending on the shape of screw holes in the
bracket.
<CRD4365-A
N>21
En
21
Page 22
/
Appendix
Black plate (22,1)
Additional Information
Error messages
When you contact your dealer or your nearest
Pioneer Service Center, be sure to have the
error message recorded.
Built-in CD Player
Message Cause Action
ERROR-11, 12,
17, 30
ERROR-10, 11,
12, 15, 17, 30,
A0
ERROR-15 The inserted disc
ERROR-22, 23 The CD format
NO AUDIO The inserted disc
SKIPPED The inserted disc
PROTECT All the files on
USB audio player/USB memory
Message Cause Action
NO AUDIO No songs Transfer the audio
Dirty disc Clean disc.
Scratched disc Replace disc.
Electrical or me-
chanical
does not contain
any data
cannot be played
back
does not contain
any files that can
be played back
contains WMA
files that are protected by DRM
the inserted disc
are secured by
DRM
USB memory
with security enabled is connected
Turn the ignition
switch OFF and
back ON, or switch
to a different
source, then back
to the CD player.
Replace disc.
Replace disc.
Replace disc.
Replace disc.
Replace disc.
files to the USB
portable audio
player/USB memory and connect.
Follow the USB
memory instructions to disable the
security.
The connected
SKIPPED
PROTECT All the files on
N/A USB The USB device
CHECK USB The USB connec-
USB portable
audio player/
USB memory
contains WMA
files that are protected by
Windows
Media™ DRM 9/
10
the connected
USB portable
audio player/
USB memory are
protected by
Windows Media
DRM 9/10
connected to is
not supported by
this unit.
tor or USB cable
is short-circuited.
The connected
USB portable
audio player/
USB memory
consumes more
than 500 mA
(maximum allowable current).
Play an audio file
not protected by
Windows Media
DRM 9/10.
Transfer audio files
not protected by
Windows Media
DRM 9/10 to the
USB portable
audio player/USB
memory and connect.
Connect a USB
portable audio
player or USB
memory that is
USB Mass Storage
Class compliant.
Confirm that the
USB connector or
USB cable is not
caught in something or damaged.
Disconnect the
USB portable
audio player/USB
memory and do
not use it. Turn the
ignition switch to
OFF, then to ACC
or ON and then
connect the compliant USB portable audio player/
USB memory.
22
En
<CRD4365-A
N>22
Page 23
Additional Information
Black plate (23,1)
Appendix
Communication
ERROR-19
ERROR-23 USB device is
failure
not formatted
with FAT16 or
FAT32
Perform one of the
following operations.
–Turn the ignition
switch OFF and
back ON.
–Disconnect the
USB portable
audio player/USB
memory.
–Change to a different source.
Then, return to the
USB portable
audio player/USB
memory.
USB device should
be formatted with
FAT16 or FAT32.
Handling guideline of discs
and player
! Use only discs featuring either of following
two logos.
! Unfinalized CD-R/CD-RW disc playback is
English
not possible.
! Do not touch the recorded surface of the
discs.
! Store discs in their cases when not in use.
! Avoid leaving discs in excessively hot envir-
onments including under direct sunlight.
! Do not attach labels, write on or apply che-
micals to the surface of the discs.
! To clean a CD, wipe the disc with a soft
cloth outward from the center.
! Condensation may temporarily impair the
player’s performance. Leave it to adjust to
the warmer temperature for about one
hour. Also, wipe any dump discs with a soft
cloth.
! Playback of discs may not be possible be-
cause of disc characteristics, disc format,
recorded application, playback environment, storage conditions, and so on.
! Text information may not be correctly dis-
played depending on the recorded environment.
! Road shocks may interrupt disc playback.
! Read the precautions for discs before
using them.
! Use only conventional, fully circular discs.
Do not use shaped discs.
! Use 12-cm or 8-cm CD. Do not use an
adapter when playing 8-cm CDs.
! Do not insert anything other than a CD into
the CD loading slot.
! Do not use cracked, chipped, warped, or
otherwise damaged discs as they may damage the player.
Dual Discs
! Dual Discs are two-sided discs that have a
recordable CD for audio on one side and a
recordable DVD for video on the other.
! Since the CD side of Dual Discs is not phy-
sically compatible with the general CD
standard, it may not be possible to play the
CD side with this unit.
! Frequent loading and ejecting of a Dual
Disc may result in scratches on the disc.
Serious scratches can lead to playback problems on this unit. In some cases, a Dual
Disc may become stuck in the disc loading
slot and will not eject. To prevent this, we
recommend you refrain from using Dual
Disc with this unit.
En
<
CRD4365-A/N>23
23
Page 24
Appendix
Black plate (24,1)
Additional Information
! Please refer to the information from the
disc manufacturer for more detailed information about Dual Discs.
Compressed audio
compatibility
WMA
! Compatible format: WMA encoded by
Windows Media Player
! File extension: .wma
! Bit rate: 48 kbps to 320 kbps (CBR), 48 kbps
to 384 kbps (VBR)
! Sampling frequency: 32 kHz, 44.1 kHz, 48
kHz
! Windows Media Audio 9 Professional, Loss-
less, Voice: No
MP3
! File extension: .mp3
! Bit rate: 8 kbps to 320 kbps (CBR), VBR
! Sampling frequency: 16 kHz to 48 kHz (32,
44.1, 48 kHz for emphasis)
! Compatible ID3 tag version: 1.0, 1.1, 2.2,
2.3, 2.4 (ID3 tag Version 2.x is given priority
than Version 1.x.)
! M3u playlist: No
! MP3i (MP3 interactive), mp3 PRO: No
WAV
! Compatible format: Linear PCM (LPCM),
MS ADPCM
! File extension: .wav
! Quantization bits: 8 and 16 (LPCM), 4 (MS
ADPCM)
! Sampling frequency: 16 kHz to 48 kHz
(LPCM), 22.05 kHz to 44.1 kHz (MS ADPCM)
Handling guideline and
supplemental information
! There may be a slight delay when starting
playback of audio files encoded with image
data.
! Only 32 characters from beginning can be
displayed as a file name (including the file
extension) or a folder name.
! The text information of some audio files
may not be correctly displayed.
! This unit may not operate correctly depend-
ing on the application used to encode
WMA files.
Compressed audio files on the disc
! ISO 9660 Level 1 and 2 compliant. Romeo
and Joliet file systems are both compatible
with this player.
! Multi-session playback is possible.
! Compressed audio files are not compatible
with packet write data transfer.
! Regardless of the length of blank section
between the songs of original recording,
compressed audio discs play with a short
pause between songs.
USB audio player/USB memory
! This unit can play back files in the USB por-
table audio player/USB memory that is
USB Mass Storage Class. However, copyright protected files that are stored in
above-mentioned USB devices cannot be
played back.
! You cannot connect a USB portable audio
player/USB memory to this unit via a USB
hub.
! Partitioned USB memory is not compatible
with this unit.
! Depending on the kind of USB portable
audio player/USB memory you use, this
unit may not recognize the USB audio
player/USB memory or audio files may not
be played back properly.
! Do not leave the USB portable audio
player/USB memory in direct sunlight for
extended amounts of time. Extended exposure to direct sunlight can result in USB
portable audio player/USB memory malfunction due to the resulting high temperature.
24
En
<
CRD4365-A/N>24
Page 25
1
2
5
6
/
Additional Information
Black plate (25,1)
Appendix
! Do not leave the USB portable audio
player/USB memory in high temperature.
! Firmly secure the USB portable audio
player/USB memory when driving. Do not
let the USB portable audio player/USB
memory fall onto the floor, where it may become jammed under the brake or accelerator pedal.
! Depending on the USB devices connected
to this unit, it may generate noise in the
radio.
! The text information of some audio files
may not be correctly displayed.
! There may be a slight delay when starting
playback of audio files on a USB portable
audio player/USB memory with numerous
folder hierarchies.
! Do not connect anything other than the
USB portable audio player/USB memory.
! Operations may vary depending on the
kind of USB audio player and a USB memory.
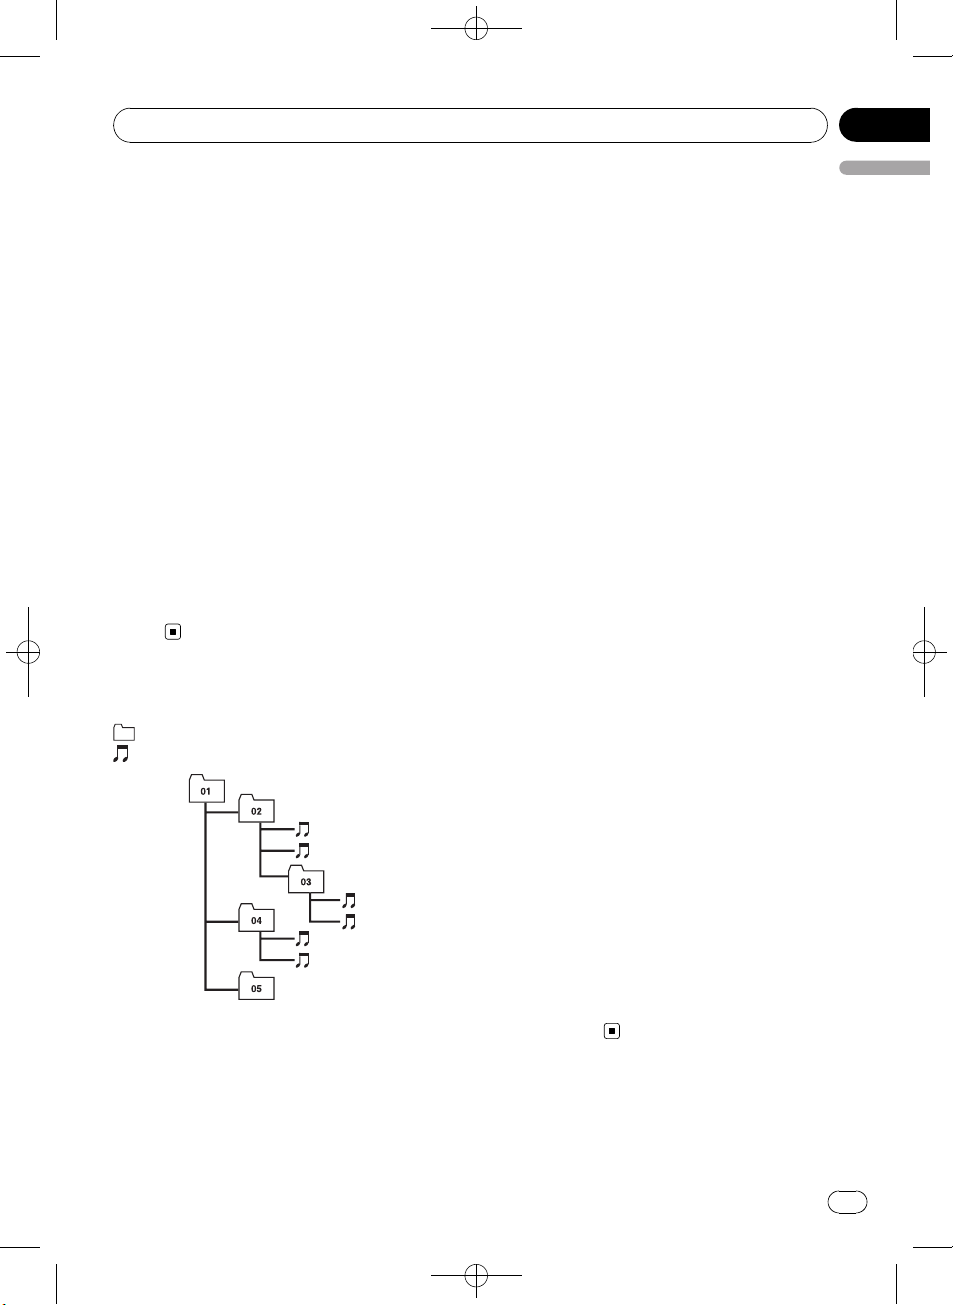
Example of a hierarchy
: Folder
: Compressed audio file
3
4
Level 1 Level 2 Level 3 Level 4
! Folder selection sequence or other opera-
English
tion may be altered depending on the encoding or writing software.
! Folder hierarchy is allowed up to eight tiers.
However, a practical hierarchy of folder is
less than two tiers.
! Up to 99 folders on a disc can be played
back.
The sequence of audio files on
USB memory
For USB portable audio players, the sequence is
different from that of USB memory and depends on the player.
! 01 to 05 represent assigned folder num-
bers. 1 to 6 represent the playback sequence. The user cannot assign folder
numbers and specify the playback sequence with this unit.
! Playback sequence of the audio file is the
same as recorded sequence in the USB device.
! To specify the playback sequence, the fol-
lowing method is recommended.
1 Create the file name including numbers
that specify the playback sequence (e.g.,
001xxx.mp3 and 099yyy.mp3).
2 Put those files into a folder.
3 Record the folder containing files into the
USB device.
However, depending on the system environment, you cannot specify the file playback
sequence.
! Up to 15 000 files on a USB portable audio
player/USB memory can be played back.
! Up to 500 folders on a USB portable audio
player/USB memory can be played back.
! Up to eight tiers directory on a USB porta-
ble audio player/USB memory can be
played back.
The sequence of audio files on
the disc
! This unit assigns folder numbers. The user
cannot assign folder numbers.
25
En
<CRD4365-A
N>25
Page 26
/
Appendix
Additional Information
Copyright and trademark
notice
WMA
Windows Media and the Windows logo are trademarks or registered trademarks of Microsoft
Corporation in the United States and/or other
countries.
MP3
Supply of this product only conveys a license
for private, non-commercial use and does not
convey a license nor imply any right to use
this product in any commercial (i.e. revenuegenerating) real time broadcasting (terrestrial,
satellite, cable and/or any other media), broadcasting/streaming via internet, intranets and/
or other networks or in other electronic content distribution systems, such as pay-audio or
audio-on-demand applications. An independent license for such use is required. For details, please visit
http://www.mp3licensing.com.
Black plate (26,1)
iTunes
iTunes is a trademark of Apple Inc., registered
in the U.S. and other countries.
26
En
<CRD4365-A
N>26
Page 27
/
Additional Information
Black plate (27,1)
Appendix
Specifications
General
Rated power source ............... 14.4 V DC
(allowable voltage range:
12.0 V to 14.4 V DC)
Grounding system ................... Negative type
Max. current consumption
..................................................... 10.0 A
Dimensions (W × H × D):
DIN
Chassis ..................... 178 mm × 50 mm × 162
mm
Nose ........................... 188 mm × 58 mm × 22 mm
D
Chassis ..................... 178 mm × 50 mm × 162
mm
Nose ........................... 170 mm × 48 mm × 22 mm
Weight .......................................... 1.3 kg
Audio
Maximum power output ....... 50 W × 4
Continuous power output ... 22 W × 4 (50 Hz to 15 000
Hz, 5% THD, 4 W load, both
channels driven)
Load impedance ...................... 4 W (4 W to 8 W allowable)
Preout max output level ....... 2.0 V
Tone controls:
Bass
Frequency ................ 100 Hz
Gain ............................ ±13dB
Mid
Frequency ................ 1 kHz
Gain ............................ ±12 dB
Treble
Frequency ................ 10 kHz
Gain ............................ ±12 dB
Maximum amount of memory
..................................................... 250 GB
Minimum amount of memory
..................................................... 256 MB
USB Class ................................... MSC (Mass Storage Class)
File system .................................. FAT16, FAT32
MP3 decoding format ........... MPEG-1 & 2 Audio Layer 3
WMA decoding format ......... Ver. 7, 7.1, 8, 9, 10, 11 (2ch
audio)
(Windows Media Player)
WAV signal format .................. Linear PCM & MS ADPCM
(Non-compressed)
FM tuner
Frequency range ...................... 87.5 MHz to 108.0 MHz
Usable sensitivity ..................... 11 dBf (0.7 µV/75 W, mono,
S/N: 30 dB)
Signal-to-noise ratio ............... 72 dB (IEC-A network)
AM tuner
Frequency range ...................... 531 kHz to 1 602 kHz (9 kHz)
530 kHz to 1640 kHz (10
kHz)
Usable sensitivity ..................... 25 µV (S/N: 20 dB)
Signal-to-noise ratio ............... 62 dB (IEC-A network)
Infrared remote control
Wavelength ................................. 940 nm ±50 nm
Output ........................................... typ; 12 mw/sr per Infrared
LED
Note
Specifications and the design are subject to modifications without notice due to improvements.
English
CD player
System .......................................... Compact disc audio system
Usable discs .............................. Compact disc
Signal-to-noise ratio ............... 94 dB (1 kHz) (IEC-A net-
work)
Number of channels .............. 2 (stereo)
MP3 decoding format ........... MPEG-1 & 2 Audio Layer 3
WMA decoding format ......... Ver. 7, 7.1, 8, 9, 10, 11 (2ch
audio)
(Windows Media Player)
WAV signal format .................. Linear PCM & MS ADPCM
(Non-compressed)
USB
Specification .............................. USB 2.0 full speed
Supply current .......................... 500 mA
<CRD4365-A
N>27
En
27
Page 28
Black plate (28,1)
/
Contenido
Gracias por haber comprado este producto PIONEER.
Lea con detenimiento este manual antes de utilizar el producto por primera vez,
para que pueda darle el mejor uso posible. Una vez leído, guarde este manual en un
lugar seguro y a mano para consultarlo en el futuro.
Antes de comenzar
Acerca de esta unidad 30
Compatibilidad con reproductores de
audio 30
Visite nuestro sitio Web 30
Protección del producto contra robo 30
– Extracción de la carátula 30
– Colocación de la carátula 31
Uso y cuidado del mando a distancia 31
– Instalación de la batería 31
– Uso del mando a distancia 31
Utilización de esta unidad
Qué es cada cosa 32
– Unidad principal 32
– Mando a distancia 33
– Indicaciones de pantalla 33
Funciones básicas 34
– Encendido y apagado 34
– Selección de una fuente 34
– Ajuste del volumen 35
Sintonizador 35
– Funciones básicas 35
– Almacenamiento y recuperación de
frecuencias 35
– Introducción a las funciones
avanzadas 35
– Almacenamiento de las frecuencias de
radio más fuertes 36
– Sintonización de señales fuertes 36
Reproductor de CD incorporado 36
– Funciones básicas 36
– Visualización de información de texto
en el disco 37
– Selección de pistas de la lista de títulos
de las pistas 38
– Selección de ficheros de la lista de
nombres de ficheros 38
– Introducción a las funciones
avanzadas 38
– Selección de una gama de repetición
de reproducción 38
– Reproducción de las pistas en orden
aleatorio 39
– Exploración de carpetas y pistas 39
– Pausa de la reproducción 39
– Utilización del Sound Retriever 39
Reproducción de canciones en el
reproductor de audio portátil USB/
memoria USB 39
– Funciones básicas 39
– Visualización de información de texto
de un fichero de audio 40
– Selección de ficheros de la lista de
nombres de ficheros 40
– Introducción a las funciones
avanzadas 40
Ajustes de audio 41
– Introducción a los ajustes de audio 41
– Uso del ajuste del balance 41
– Uso del ecualizador 41
– Ajuste de las curvas de
ecualización 42
– Ajuste de la sonoridad 42
– Ajuste de los niveles de la fuente 42
Ajustes iniciales 43
– Configuración de los ajustes
iniciales 43
– Ajuste del reloj 43
– Ajuste del paso de sintonía de FM 43
– Ajuste del paso de sintonía de AM 44
– Cambio del ajuste de un equipo
auxiliar 44
Otras funciones 44
– Uso de la fuente AUX 44
– Activación y desactivación de la
visualización del reloj 44
Conexiones
Diagrama de conexión 46
28
Es
<CRD4365-A
N>28
Page 29
/
Contenido
Instalación
Montaje delantero/posterior DIN 47
– Montaje delantero DIN 47
– Montaje trasero DIN 48
Información adicional
Mensajes de error 49
Pautas para el manejo de discos y del
reproductor 50
Discos dobles 51
Compatibilidad con audio comprimido 51
Pautas para el manejo e información
complementaria 51
– Archivos de audio comprimidos en el
disco 52
– Reproductor de audio USB/memoria
USB 52
Ejemplo de una jerarquía 53
– Secuencia de ficheros de audio en el
disco 53
– Secuencia de archivos de audio en la
memoria USB 53
Aviso de copyright y marca registrada 53
Especificaciones 55
Black plate (29,1)
Español
<CRD4365-A
N>29
29
Es
Page 30
/
Sección
01
Black plate (30,1)
Antes de comenzar
Acerca de esta unidad
PRECAUCIÓN
! No permita que esta unidad entre en contacto
con líquidos. ya que ello puede producir una
descarga eléctrica. Además, el contacto con
líquidos puede causar daños en la unidad,
humo y recalentamiento.
! Conserve este manual a mano para que
pueda consultar los procedimientos de operación y las precauciones cuando sea necesario.
! Mantenga siempre el volumen lo suficiente-
mente bajo como para que pueda escuchar
los sonidos que provienen del exterior del vehículo.
! Proteja esta unidad de la humedad.
! Si se desconecta o se descarga la batería, la
memoria preajustada se borrará y deberá ser
reprogramada.
! En caso de que esta unidad no funcione co-
rrectamente, póngase en contacto con su
concesionario o con el centro de servicio
PIONEER autorizado más cercano.
Compatibilidad con
reproductores de audio
Póngase en contacto con el fabricante para
obtener información sobre su reproductor de
audio portátil USB/memoria USB.
La unidad corresponde a lo siguiente.
— Memoria y reproductor de audio portátil
compatible USB MCS (clase de almacenamiento masivo)
— Reproducción de archivos WMA, MP3 y
WAV
Visite nuestro sitio Web
Visítenos en el siguiente sitio:
http://pioneer.jp/group/index-e.html
! En nuestro sitio Web ofrecemos la informa-
ción más reciente acerca de Pioneer
Corporation.
Protección del producto
contra robo
Se puede extraer la carátula como medida
antirrobo.
Importante
! Proceda con cuidado al retirar o colocar la ca-
rátula.
! Evite someter la carátula a impactos excesi-
vos.
! Mantenga la carátula fuera del alcance de la
luz solar directa y no la exponga a altas temperaturas.
! Antes de extraer la carátura, asegúrese de re-
tirar de la misma el cable AUX/USB y el dispositivo USB. De lo contrario, puede dañarse la
unidad, el dispositivo conectado o el interior
del vehículo.
Extracción de la carátula
1 Presione OPEN para abrir la carátula.
2 Sujete el lado izquierdo de la carátula y
retírela con cuidado.
No sujete la carátula con fuerza ni permita
que caiga. Evite que entre en contacto con
agua u otros líquidos para que no sufra daños
permanentes.
PRECAUCIÓN
Pioneer no asume ninguna responsabilidad por
la pérdida de datos en el reproductor de audio
portátil USB/memoria USB, incluso si la pérdida
ocurre durante el uso de esta unidad.
30
Es
<CRD4365-A
N>30
Page 31

/
Antes de comenzar
Black plate (31,1)
Sección
01
3 Coloque la carátula en la funda protectora provista para guardarla de manera segura.
Colocación de la carátula
% Vuelva a colocar la carátula; para ello,
sujétela verticalmente respecto a la unidad
y encájela con firmeza en los ganchos de
montaje.
Uso y cuidado del mando a
distancia
Instalación de la batería
Deslice y extraiga la bandeja de la parte posterior del mando a distancia e inserte la pila con
los polos positivo (+) y negativo (–) en la dirección correcta.
! Extraiga la batería si no piensa utilizar el
mando a distancia durante un mes o más
tiempo.
! Si la pila se sustituye de forma incorrecta exis-
te riesgo de explosión. Reemplácela sólo con
una del mismo tipo, o equivalente.
! No manipule la batería con herramientas me-
tálicas.
! No guarde la pila junto a objetos metálicos.
! En el caso de que se produzcan fugas de la
pila, limpie completamente el mando a distancia e instale una pila nueva.
! Para desechar las pilas usadas, cumpla con
los reglamentos gubernamentales o las normas ambientales pertinentes de las instituciones públicas aplicables en su país/zona.
Uso del mando a distancia
Apunte el mando a distancia hacia la carátula
para hacer funcionar la unidad.
! Es posible que el mando a distancia no
funcione correctamente si lo expone a la
luz solar directa.
Importante
! No guarde el mando a distancia en lugares ex-
puestos a altas temperaturas o a la luz solar
directa.
! No deje caer el mando a distancia al suelo, ya
que puede quedar atascado debajo del freno
o del acelerador.
Español
ADVERTENCIA
Mantenga la batería fuera del alcance de los
niños. En caso de ingestión accidental de ésta,
consulte a un médico de inmediato.
PRECAUCIÓN
! Utilice una sola batería de litio CR2025 (3 V).
<CRD4365-A
N>31
31
Es
Page 32

4
5
8
9
b
1
3
a26
7
Sección
02
Black plate (32,1)
Utilización de esta unidad
Qué es cada cosa
Unidad principal
1 Botón SRC/OFF
Esta unidad se enciende al seleccionar una
fuente. Presione este botón para visualizar
todas las fuentes disponibles.
2 MULTI-CONTROL
Gire el control para aumentar o disminuir el
volumen.
También se usan para controlar las funciones.
3 Botón
Presione para visualizar la lista de títulos de
los discos, la de títulos de las pistas, la de
carpetas o la de archivos.
4 Puerto USB
Utilícelo para conectar un reproductor de
audio USB/memoria USB.
! Al conectar, abra la tapa del conector
! Utilice un cable USB para conectar el re-
5 Botón OPEN
Presione este botón para abrir la carátula.
/LIST
USB.
productor de audio USB/memoria USB
al puerto USB. Puesto que el reproductor
de audio USB/memoria USB se proyecta
hacia fuera de la unidad, es peligroso conectarlo directamente.
El cable USB CD-U50E de Pioneer también está disponible. Para obtener información, consulte con su proveedor.
6 Conector de entrada AUX (conector estéreo de 3,5 mm)
Utilícelo para conectar un dispositivo auxiliar.
7 Botón CLOCK
Pulse este botón para cambiar a la visualización del reloj.
8 Botones 1 a 6
Presione para la sintonización preajustada.
También se usan para controlar las funciones.
! 1/S.Rtrv pueden utilizarse para controlar
S.RTRV (sound retriever).
! 2/PAUSE pueden utilizarse para contro-
lar PAUSE (pausa).
! 5/
! 6/
9 Botón DISP/BACK/SCRL
Presione este botón para seleccionar las diferentes visualizaciones.
Manténgalo presionado para desplazarse
por la información de texto.
Presione este botón para volver a la pantalla
anterior cuando utilice el menú.
Presione este botón durante varios segundos para volver al menú principal cuando
utilice el menú.
a Botones a/b/c/d
Presione estos botones para utilizar los controles de sintonización por búsqueda manual, avance rápido, retroceso y búsqueda
de pista. También se usan para controlar las
funciones.
! Al manejar los menús
pueden utilizarse para controlar
RANDOM (reproducción aleatoria).
pueden utilizarse para controlar
REPEAT (repetición de reproducción).
— Presionar a es la misma función que
girar MULTI-CONTROL a la derecha.
— Presionar b es la misma función que
girar MULTI-CONTROL a la izquierda.
— Presionar c es la misma función que
presionar DISP/BACK/SCRL.
32
Es
<
CRD4365-A/N>32
Page 33

c
h
f
1
b
d
9
e
g
a
6
8
4
Utilización de esta unidad
Black plate (33,1)
Sección
02
— Mantener presionado c es la misma
función que mantener presionado
DISP/BACK/SCRL.
— Presionar d es la misma función que
presionar MULTI-CONTROL.
— Mantener presionado d es la misma
función que mantener presionado
MULTI-CONTROL.
! Al manejar listas
— Presionar a es la misma función que
girar MULTI-CONTROL a la izquierda.
— Presionar b es la misma función que
girar MULTI-CONTROL a la derecha.
— Presionar c es la misma función que
presionar DISP/BACK/SCRL.
— Mantener presionado c es la misma
función que mantener presionado
DISP/BACK/SCRL.
— Presionar d es la misma función que
presionar MULTI-CONTROL.
— Mantener presionado d es la misma
función que mantener presionado
MULTI-CONTROL.
b Botón BAND/ESC
Presione este botón para seleccionar entre
tres bandas FM y una banda AM.
Presione este botón para volver a la visualización normal cuando utilice el menú.
c Botones VOLUME
Presione este botón para aumentar o disminuir el volumen.
d Botón MUTE
Presione para desactivar el sonido. Para volver a activar el sonido, presione de nuevo.
e Botón AUDIO
Presione para seleccionar una función de
audio.
f Botón e
Presione este botón para activar o desactivar la pausa.
g Botón FUNCTION
Presione este botón para seleccionar las
funciones.
Mantenga presionado este botón para acceder al menú de ajustes iniciales si las fuentes están desactivadas.
h Botón LIST/ENTER
Presione para visualizar la lista de títulos del
disco, la lista de títulos de pistas, la lista de
carpetas o la lista de archivos según la fuente.
Cuando esté en el menú de funcionamiento,
presione para controlar las funciones.
Español
Mando a distancia
Las funciones se utilizan de la misma manera
que al usar los botones de la unidad principal.
Indicaciones de pantalla
12
9 abc d
7
5
1 Indicador (disco)
Aparece cuando se muestra el nombre del
disco (álbum) en la sección principal de la
pantalla.
<
CRD4365-A/N>33
3
33
Es
Page 34

/
Sección
02
Black plate (34,1)
Utilización de esta unidad
2 Indicador (intérprete)
Aparece cuando se muestra el nombre del
artista del disco (pista) en la sección principal de la pantalla.
3 Sección principal de la pantalla
Muestra la banda, frecuencia, tiempo de reproducción transcurrido y otros ajustes.
! Sintonizador
Se muestran la banda y la frecuencia.
! Reproductor de CD incorporado y USB
Se muestra el tiempo de reproducción
transcurrido e información de texto.
4 Indicador
Aparece cuando se muestra el nombre de la
pista (canción) en la sección principal de la
pantalla.
Además, aparece cuando se selecciona un
archivo de audio reproducible mientras se
examina la lista.
5 Indicador c
Aparece cuando existe un nivel, carpeta o
menú superior.
6 Indicador
Aparece cuando utiliza la función de lista.
7 Indicador d
Aparece cuando existe un nivel, carpeta o
menú inferior.
8 Indicador LOC
Aparece cuando la sintonización por búsqueda local está activada.
9 Indicador
Aparece cuando la sonoridad está activada.
a Indicador (estéreo) 5
Aparece cuando la frecuencia seleccionada
se está transmitiendo en estéreo.
b Indicador
Aparece cuando la función repetición de
pista está activada.
Además, aparece cuando la repetición de
carpeta está activada.
(canción)
(carpeta)
LOUD (sonoridad)
(repetir)
c Indicador
Aparece cuando la reproducción aleatoria
está activada.
d Indicador
Aparece cuando la función de Sound Retriever está activada.
(aleatorio)
(Sound Retriever)
Funciones básicas
Encendido y apagado
Encendido de la unidad
% Presione SRC/OFF para encender la unidad.
Apagado de la unidad
% Mantenga presionado SRC/OFF hasta
que se apague la unidad.
Selección de una fuente
Puede seleccionar una fuente que desee escuchar.
% Presione SRC/OFF varias veces para
cambiar entre las siguientes fuentes.
TUNER (sintonizador)—CD (reproductor de
CD incorporado)—USB (USB)—AUX (AUX)
Notas
! En los siguientes casos, la fuente sonora no
cambiará.
— Cuando no hay un disco cargado en la uni-
dad.
— Cuando AUX (entrada auxiliar) está apaga-
da (consulte la página 44).
! Cuando el reproductor de audio portátil USB/
memoria USB no está conectado al puerto
USB de la unidad, se visualiza NO DEVICE.
! AUX está activada de forma predeterminada.
Desactive AUX cuando no la utilice (consulte
Cambio del ajuste de un equipo auxiliar en la
página 44).
34
Es
<CRD4365-A
N>34
Page 35

/
Utilización de esta unidad
Black plate (35,1)
Sección
02
! Si el reproductor de audio portátil se carga
mediante la fuente de alimentación CC del vehículo mientras se conecta a la entrada AUX,
puede generarse ruido. En este caso, detenga
la carga.
! Si el cable azul/blanco de esta unidad está co-
nectado al terminal de control del relé de la
antena automática del vehículo, la antena se
extiende cuando se enciende el equipo. Para
retraer la antena, apague la fuente.
Ajuste del volumen
% Gire MULTI-CONTROL para ajustar el
nivel de sonido.
Sintonizador
Funciones básicas
% Seleccione una banda
Presione BAND/ESC.
# Presione BAND/ESC hasta que se visualice la
banda deseada (F1, F2, F3 para FM o AM).
% Sintonización manual (paso a paso)
Presione c o d.
% Sintonización por búsqueda
Mantenga presionado c o d y luego suelte.
# Se puede cancelar la sintonización por búsqueda presionando brevemente c o d.
# Al mantener presionado c o d se pueden
saltar las emisoras. La sintonización por búsqueda comienza inmediatamente después de que
suelte c o d.
Almacenamiento y
recuperación de frecuencias
Se pueden almacenar con facilidad hasta seis
frecuencias de emisoras para recuperarlas
posteriormente.
! Se pueden almacenar en la memoria seis
emisoras de cada banda.
% Cuando encuentre la frecuencia que
desea almacenar en la memoria, presione
uno de los botones de ajuste de presintonías 1 a 6 y manténgalo presionado hasta
que el número de presintonía deje de destellar.
Una frecuencia de emisora de radio memorizada se puede recuperar presionando el botón
de ajuste de presintonías.
# También se pueden recuperar las frecuencias
de las emisoras de radio asignadas a los números de ajuste de presintonías presionando a o b
durante la visualización de frecuencias.
Introducción a las funciones
avanzadas
1 Presione MULTI-CONTROL para visualizar el menú principal.
2 Utilice MULTI-CONTROL para seleccionar FUNCTION.
Gire el control para cambiar la opción de
menú. Presione para seleccionar.
3 Gire MULTI-CONTROL para seleccionar
la función.
BSM (memoria de las mejores emisoras)—
LOCAL (sintonización por búsqueda local)
Notas
! Para volver a la pantalla anterior, presione
DISP/BACK/SCRL.
! Para volver al menú principal, presione duran-
te varios segundos DISP/BACK/SCRL.
! Para volver a la visualización normal, presione
BAND/ESC.
! Si no se utiliza ninguna función en aprox. 30
segundos, la pantalla volverá automáticamente a la visualización normal.
Español
<CRD4365-A
N>35
35
Es
Page 36

/
Sección
02
Black plate (36,1)
Utilización de esta unidad
Almacenamiento de las
frecuencias de radio más fuertes
BSM (memoria de las mejores emisoras) guarda automáticamente las seis frecuencias de
las emisoras más fuertes según el orden de
fuerza de la señal.
1 Utilice MULTI-CONTROL para seleccionar BSM en el menú de funciones.
2 Presione MULTI-CONTROL para activar
la función BSM.
# Para cancelar, presione MULTI-CONTROL de
nuevo.
Sintonización de señales fuertes
La sintonización por búsqueda local le permite
sintonizar sólo las emisoras de radio con señales lo suficientemente fuertes como para asegurar una buena recepción.
1 Utilice MULTI-CONTROL para seleccionar LOCAL en el menú de funciones.
2 Presione MULTI-CONTROL para mostrar
el modo de ajuste.
3 Active MULTI-CONTROL para seleccionar el ajuste deseado.
FM: OFF—LEVEL 1—LEVEL 2—LEVEL 3—
LEVEL 4
AM: OFF—LEVEL 1—LEVEL 2
El ajuste LEVEL 4 sólo permite recibir las emisoras con las señales más fuertes, mientras
que los ajustes más bajos permiten recibir de
manera progresiva las emisoras con las señales más débiles.
4 Presione MULTI-CONTROL para determinar la selección.
# Aunque se haya cancelado el menú antes de
determinar, la operación se lleva a cabo.
Reproductor de CD
incorporado
Funciones básicas
% Abrir la carátula
Presione OPEN.
Aparece la ranura de carga de discos.
Ranura de carga de discos
Botón EJECT
# Cuando inserte un disco, coloque el lado
de la etiqueta hacia arriba.
# Para evitar fallos en el funcionamiento, asegúrese de que ningún objeto metálico entre en contacto con los terminales mientras la carátula está
abierta.
% Expulsar un CD (CD-ROM)
Presione h (expulsar).
% Seleccionar una carpeta
Presione a o b.
% Selección de una pista
Presione c o d.
% Avance rápido o retroceso
Mantenga presionado c o d.
# Al reproducir audio comprimido, no hay sonido en el avance rápido o en el retroceso.
% Regreso a la carpeta raíz
Mantenga presionado BAND/ESC.
% Cambio entre audio comprimido y CDDA
Presione BAND/ESC.
# Esta operación sólo está disponible cuando
reproduce un CD-EXTRA o CD de MODO MIXTO.
36
Es
<CRD4365-A
N>36
Page 37

/
Utilización de esta unidad
Black plate (37,1)
Sección
02
# Si se cambia entre audio comprimido y CDDA, la reproducción comienza en la primera pista
del disco.
Notas
! El reproductor de CD incorporado puede re-
producir CD de audio y audio comprimido grabado en CD-ROM. (Consulte la sección
siguiente para los archivos que se pueden reproducir. Consulte la página 52)
! Lea las precauciones sobre los discos y el re-
productor en la página 50.
! Después de insertar un disco, presione
SRC/OFF para seleccionar el reproductor de
CD incorporado.
! A veces se produce una demora entre el co-
mienzo de la reproducción de un disco y la
emisión del sonido. Durante la lectura inicial,
se visualiza FRMT READ.
! Si aparece un mensaje de error, consulte Men-
sajes de error en la página 49.
! Los discos se reproducen según el orden del
número de archivo. Se saltan las carpetas que
no tienen ficheros. (Si la carpeta 01 (RAÍZ) no
contiene ficheros, la reproducción comienza
en la carpeta 02.)
Visualización de información
de texto en el disco
% Presione DISP/BACK/SCRL para seleccionar la información de texto deseado.
Para discos CD TEXT
Tiempo de reproducción—DISC TITLE (título
del disco)—ARTISTNAME (nombre del artista
del disco)—TRACKTITLE (título de la pista)—
ARTISTNAME (nombre del artista de la pista)
Para WMA/MP3
Tiempo de reproducción—FLD NAME (nombre de la carpeta)—FILE NAME (nombre del fichero)—TRACKTITLE (título de la pista)—
ARTISTNAME (nombre del artista)—
ALBUMTITLE (título del álbum)—COMMENT
(comentarios)—Velocidad de grabación—números de carpeta y pista
Para WAV
Tiempo de reproducción—FLD NAME (nombre de carpeta)—FILE NAME (nombre de archivo)—frecuencia de muestreo—números de
carpeta y archivo
Notas
! Puede desplazarse hacia la izquierda del título
manteniendo presionado DISP/BACK/SCRL.
! Un CD de audio que contiene determinada in-
formación como texto y/o números es un CD
TEXT.
! Si los caracteres grabados en el archivo de
audio no son compatibles con esta unidad, no
aparecerán en el display.
! Si determinada información no está grabada
en un disco, se visualizará NO XXXX (p. ej.,
NO TITLE).
! Es posible que la información de texto de al-
gunos archivos de audio no se visualice correctamente.
! Según sea la versión de iTunes utilizada para
grabar archivos MP3 en un disco, es posible
que no se visualice correctamente la información de los comentarios.
! Según la versión del Windows Media™ Player
utilizada para codificar los ficheros WMA, es
posible que no se visualicen correctamente
los nombres de álbumes y demás información
de texto.
! Al reproducir ficheros WMA grabados como
VBR (velocidad de grabación variable), se visualizará el valor promedio de la velocidad de
grabación.
! Al reproducir ficheros MP3 grabados con VBR
(velocidad de grabación variable), aparece
VBR en lugar del valor de velocidad de grabación.
! La frecuencia de muestreo que se visualiza en
el display puede estar abreviada.
Español
<CRD4365-A
N>37
37
Es
Page 38

/
Sección
02
Black plate (38,1)
Utilización de esta unidad
Selección de pistas de la lista
de títulos de las pistas
Esta función le permite ver la lista de los títulos de las pistas en un disco CD TEXT y seleccionar uno de ellos para su reproducción.
1 Presione
de lista de títulos de las pistas.
2 Utilice MULTI-CONTROL para seleccionar el título de la pista deseada.
Haga girar el control para cambiar el título de
la pista. Presione para iniciar la reproducción.
# Para volver a la visualización normal, presione
BAND/ESC o
# Si no se utiliza la lista en aprox. 30 segundos,
la pantalla volverá automáticamente a la visualización normal.
/LIST para cambiar al modo
/LIST.
Selección de ficheros de la lista
de nombres de ficheros
Esta función le permite ver la lista de los nombres de los ficheros (o de las carpetas) y seleccionar uno de ellos para su reproducción.
1 Presione
de lista de nombres de ficheros.
Los nombres de los ficheros y las carpetas
aparecen en el display.
2 Utilice MULTI-CONTROL para seleccionar el nombre del archivo deseado (o de la
carpeta deseada).
Haga girar el control para cambiar el nombre
del archivo o carpeta.
— tras seleccionar un archivo, presione para
reproducirlo.
— presione para ver una lista de archivos (o
carpetas) de una carpeta seleccionada.
— cuando se selecciona una carpeta, manten-
ga presionado para reproducir una canción
en la carpeta seleccionada.
# Para volver a la lista anterior (la carpeta de un
nivel superior), presione DISP/BACK/SCRL.
# Para volver al nivel superior de la lista, mantenga presionado DISP/BACK/SCRL.
/LIST para cambiar al modo
# Para volver a la visualización normal, presione
BAND/ESC o
# Si no se utiliza la lista en aprox. 30 segundos,
la pantalla volverá automáticamente a la visualización normal.
/LIST.
Introducción a las funciones
avanzadas
1 Presione MULTI-CONTROL para visualizar el menú principal.
2 Utilice MULTI-CONTROL para seleccionar FUNCTION.
Gire el control para cambiar la opción de
menú. Presione para seleccionar.
3 Gire MULTI-CONTROL para seleccionar
la función.
REPEAT (repetición de reproducción)—
RANDOM (reproducción aleatoria)—SCAN
(reproducción con exploración)—PAUSE
(pausa)—S.RTRV (sound retriever)
Notas
! Para volver a la pantalla anterior, presione
DISP/BACK/SCRL.
! Para volver al menú principal, presione duran-
te varios segundos DISP/BACK/SCRL.
! Para volver a la visualización normal, presione
BAND/ESC.
! Si no se utiliza ninguna función en aprox. 30
segundos, la pantalla volverá automáticamente a la visualización normal.
Selección de una gama de
repetición de reproducción
% Presione 6/ varias veces para selec-
cionar el ajuste deseado.
! DISC – Repite todas las pistas
! TRACK – Repite la pista actual
! FOLDER – Repite la carpeta actual
# Si selecciona otra carpeta durante la repeti-
ción de reproducción, la gama de repetición cambia a repetición de disco.
38
Es
<CRD4365-A
N>38
Page 39

Utilización de esta unidad
Black plate (39,1)
Sección
02
# Si realiza una búsqueda de pista o utiliza la
función de avance rápido/retroceso durante
TRACK (repetición de pista), la gama de repetición de reproducción cambiará a disco/carpeta.
# Cuando se selecciona FOLDER (repetición de
carpeta), no se puede reproducir una subcarpeta
de esa carpeta.
# También puede realizar esta operación en el
menú que aparece al utilizar el
MULTI-CONTROL.
Reproducción de las pistas en
orden aleatorio
Las pistas de una gama de repetición seleccionada se reproducen en orden aleatorio.
% Presione 5/
ción aleatoria.
Las pistas se reproducirán en orden aleatorio.
# Vuelva a presionar 5/ para desactivar la re-
producción aleatoria.
# También puede realizar esta operación en el
menú que aparece al utilizar el
MULTI-CONTROL.
para activar la reproduc-
Exploración de carpetas y pistas
La reproducción con exploración busca la
canción dentro de la gama de repetición seleccionada.
1 Utilice MULTI-CONTROL para seleccionar SCAN en el menú de funciones.
2 Presione MULTI-CONTROL para activar
la reproducción con exploración.
Se reproducirán los primeros 10 segundos de
cada pista.
3 Cuando encuentre la pista deseada,
presione MULTI-CONTROL para desactivar
la reproducción con exploración.
# Si el display vuelve automáticamente a la visualización de reproducción, seleccione SCAN
de nuevo usando MULTI-CONTROL.
# Una vez finalizada la exploración de un disco
(carpeta), comenzará la reproducción normal de
las pistas.
Pausa de la reproducción
% Presione 2/PAUSE para activar la pausa.
Se detiene temporalmente la reproducción de
la pista actual.
# Para desactivar la pausa, vuelva a presionar 2/
PAUSE.
# También puede realizar esta operación en el
menú que aparece al utilizar el
MULTI-CONTROL.
Utilización del Sound Retriever
La función Sound Retriever mejora automáticamente el audio comprimido y restaura el sonido óptimo.
% Presione 1/S.Rtrv varias veces para seleccionar el ajuste deseado.
OFF (desactivado)—1—2
# 2 es más eficaz que 1.
# También puede realizar esta operación en el
menú que aparece al utilizar el
MULTI-CONTROL.
Reproducción de canciones
en el reproductor de audio
portátil USB/memoria USB
Para obtener detalles sobre dispositivos compatibles, consulte Compatibilidad con reproductores de audio en la página 30.
Funciones básicas
% Seleccionar una carpeta
Presione a o b.
% Selección de una pista
Presione c o d.
Español
<
CRD4365-A/N>39
39
Es
Page 40

/
Sección
02
Black plate (40,1)
Utilización de esta unidad
% Avance rápido o retroceso
Mantenga presionado c o d.
% Regreso a la carpeta raíz
Mantenga presionado BAND/ESC.
Notas
! Es posible que esta unidad no ofrezca un ren-
dimiento óptimo dependiendo del reproductor
de audio portátil USB/memoria USB que se
conecte.
! Si la carpeta 01 (RAÍZ) no contiene archivos,
la reproducción comienza en la carpeta 02.
! Si el reproductor de audio portátil USB tiene
una función de carga de la batería y se conecta a esta unidad, la batería se cargará al
poner el contacto para el arranque en su posición ACC o en ON.
! Podrá desconectar el reproductor de audio
portátil USB/memoria USB en cualquier momento para dejar de escucharlo.
! Si no utiliza un dispositivo USB, desconéctelo
de esta unidad.
! Al desconectar el reproductor de audio portá-
til USB/memoria USB de esta unidad durante
la reproducción, se visualizará NO DEVICE.
Visualización de información
de texto de un fichero de audio
Es la misma operación que la de reproducción
de audio comprimido en el reproductor de CD
incorporado (consulte Visualización de informa-
ción de texto en el disco en la página 37).
Selección de ficheros de la lista
de nombres de ficheros
Es la misma operación que la del reproductor
de CD incorporado. (Consulte Selección de fi-
cheros de la lista de nombres de ficheros en la
página 38.)
Introducción a las funciones
avanzadas
1 Presione MULTI-CONTROL para visualizar el menú principal.
2 Utilice MULTI-CONTROL para seleccionar FUNCTION.
Gire el control para cambiar la opción de
menú. Presione para seleccionar.
3 Gire MULTI-CONTROL para seleccionar
la función.
REPEAT (repetición de reproducción)—
RANDOM (reproducción aleatoria)—SCAN
(reproducción con exploración)—PAUSE
(pausa)—S.RTRV (sound retriever)
Función y operación
Las operaciones REPEAT, RANDOM, SCAN,
PAUSE y S.RTRV son básicamente las mismas
que las del reproductor de CD incorporado.
Nombre de la función Operación
Consulte Selección de una
gama de repetición de reproducción en la página 38.
Sin embargo, las gamas de
repetición de reproducción
que puede seleccionar son
diferentes a las de un reproductor de CD incorpora-
REPEAT
RANDOM
SCAN
do. Las gamas de
repetición para el reproductor de audio portátil USB/
memoria USB son:
! TRACK – Sólo repite el
fichero actual
! FOLDER – Repite la car-
peta actual
! ALL – Repite todos los
ficheros
Consulte Reproducción de
las pistas en orden aleatorio
en la página anterior.
Consulte Exploración de car-
petas y pistas en la página
anterior.
40
Es
<CRD4365-A
N>40
Page 41

Utilización de esta unidad
Black plate (41,1)
Sección
02
PAUSE
S.RTRV
Notas
! Para volver a la pantalla anterior, presione
DISP/BACK/SCRL.
! Para volver al menú principal, presione duran-
te varios segundos DISP/BACK/SCRL.
! Para volver a la visualización normal, presione
BAND/ESC.
! Si no utiliza la función en aprox. 30 segundos,
la pantalla volverá automáticamente a la visualización normal.
! Si se selecciona otra carpeta durante la repeti-
ción de reproducción, la gama de repetición
cambia a ALL.
! Si se realiza una búsqueda de pistas o un
avance/retroceso rápido durante TRACK,la
gama de repetición de reproducción cambia a
FOLDER.
! Una vez finalizada la exploración de archivos
o carpetas, volverá a comenzar la reproducción normal de los archivos.
Consulte Pausa de la repro-
ducción en la página 39.
Consulte Utilización del
Sound Retriever en la página 39.
Ajustes de audio
Introducción a los ajustes de audio
1 Presione MULTI-CONTROL para visualizar el menú principal.
2 Utilice MULTI-CONTROL para seleccionar AUDIO.
Gire el control para cambiar la opción de
menú. Presione para seleccionar.
3 Haga girar MULTI-CONTROL para seleccionar la función de audio.
FAD/BAL (ajuste del balance)—EQUALIZER
(recuperación de ecualizador)—TONE CTRL
(ajuste del ecualizador)—LOUDNESS (sonoridad)—SLA (ajuste del nivel de fuente)
Notas
! Para volver a la pantalla anterior, presione
DISP/BACK/SCRL.
! Para volver al menú principal, presione duran-
te varios segundos DISP/BACK/SCRL.
! Para volver a la visualización normal, presione
BAND/ESC.
! Al seleccionar FM como fuente, no se puede
cambiar a SLA.
! Si no se utiliza ninguna función en aprox. 30
segundos, la pantalla volverá automáticamente a la visualización normal.
Uso del ajuste del balance
Se puede cambiar el ajuste de fader/balance,
de manera que proporcione un entorno de
audio ideal en todos los asientos ocupados.
1 Utilice MULTI-CONTROL para seleccionar FAD/BAL en el menú de funciones de
audio.
2 Presione MULTI-CONTROL para mostrar
el modo de ajuste.
3 Presione MULTI-CONTROL para seleccionar el segmento que desea ajustar.
Presione MULTI-CONTROL varias veces para
cambiar entre fader y balance.
4 Gire MULTI-CONTROL para ajustar el
balance entre los altavoces.
El balance entre los altavoces delanteros y traseros se puede ajustar entre F15 y R15.
El balance entre los altavoces de la parte izquierda y derecha se puede ajustar entre L15
y R15.
# FR 0 es el ajuste apropiado cuando se usan
sólo dos altavoces.
Uso del ecualizador
Hay seis ajustes de ecualización almacenados, a saber: DYNAMIC, VOCAL, NATURAL,
CUSTOM, FLAT y POWERFUL, que se pueden
utilizar con facilidad en cualquier momento.
Español
<
CRD4365-A/N>41
41
Es
Page 42

Sección
02
Black plate (42,1)
Utilización de esta unidad
! CUSTOM es una curva de ecualización
ajustada creada por el usuario.
! Cuando se selecciona FLAT no se introdu-
ce ningún suplemento ni corrección en el
sonido.
Recuperación de las curvas de
ecualización
1 Utilice MULTI-CONTROL para seleccionar EQUALIZER en el menú de funciones de
audio.
2 Presione MULTI-CONTROL para mostrar
el modo de ajuste.
3 Haga girar el MULTI-CONTROL para seleccionar el ecualizador.
DYNAMIC—VOCAL—NATURAL—CUSTOM
—FLAT—POWERFUL
4 Presione MULTI-CONTROL para determinar la selección.
# Aunque se haya cancelado el menú antes de
determinar, la operación se lleva a cabo.
Ajuste de las curvas de
ecualización
Puede configurar el ajuste de la curva de
ecualización seleccionado según lo desee. Los
ajustes de la curva de ecualización configurados se memorizan en CUSTOM.
Ajuste de graves/medios/agudos
Se puede ajustar el nivel de graves/medios/
agudos.
1 Utilice MULTI-CONTROL para seleccionar TONE CTRL en el menú de funciones de
audio.
2 Presione MULTI-CONTROL para mostrar
el modo de ajuste.
3 Presione MULTI-CONTROL para seleccionar BASS/MID/TREBLE.
4 Haga girar MULTI-CONTROL para
ajustar el nivel.
Se visualiza +6 a –6 mientras se aumenta o
disminuye el nivel.
5 Presione MULTI-CONTROL para determinar la selección.
# Aunque se haya cancelado el menú antes de
determinar, la operación se lleva a cabo.
Ajuste de la sonoridad
La sonoridad compensa las deficiencias en
las gamas de sonido bajas y altas cuando se
escucha a un volumen bajo.
1 Utilice MULTI-CONTROL para seleccionar LOUDNESS en el menú de funciones de
audio.
2 Presione MULTI-CONTROL para mostrar
el modo de ajuste.
3 Active MULTI-CONTROL para seleccionar el ajuste deseado.
LOW (bajo)—HIGH (medio)—OFF (desactiva-
do)
4 Presione MULTI-CONTROL para determinar la selección.
# Aunque se haya cancelado el menú antes de
determinar, la operación se lleva a cabo.
Ajuste de los niveles de la fuente
El ajuste del nivel de fuente (SLA) le permite
ajustar el nivel de volumen de cada fuente
para evitar cambios radicales en el volumen
cuando se cambia entre las fuentes.
! Los ajustes se basan en el nivel de volumen
de FM, que se mantiene inalterado.
! El nivel del volumen de AM también se
puede regular con el ajuste del nivel de
fuente.
1 Compare el nivel de volumen de FM
con el de la fuente que desea ajustar.
42
Es
<
CRD4365-A/N>42
Page 43

Utilización de esta unidad
Black plate (43,1)
Sección
02
2 Utilice MULTI-CONTROL para seleccionar SLA en el menú de funciones de audio.
3 Presione MULTI-CONTROL para mostrar
el modo de ajuste.
4 Haga girar MULTI-CONTROL para
ajustar el volumen de la fuente.
Se visualiza +4 a –4 mientras se aumenta o
disminuye el volumen de la fuente.
5 Presione MULTI-CONTROL para determinar la selección.
# Aunque se haya cancelado el menú antes de
determinar, la operación se lleva a cabo.
Ajustes iniciales
Configuración de los ajustes
iniciales
1 Mantenga presionado SRC/OFF hasta
que se apague la unidad.
2 Mantenga presionado MULTI-CONTROL
hasta que CLOCK SET aparezca en el display.
3 Gire MULTI-CONTROL para seleccionar
uno de los ajustes iniciales.
CLOCK SET (reloj)—FM STEP (paso de sintoni-
zación de FM)—AM STEP (paso de sintonización de AM)—AUX (entrada auxiliar)
# Para volver a la pantalla anterior, presione
DISP/BACK/SCRL.
# Para volver al menú principal, presione durante varios segundos DISP/BACK/SCRL.
# Para cancelar los ajustes iniciales, presione
BAND/ESC.
Ajuste del reloj
Siga estas instrucciones para ajustar el reloj.
1 Utilice MULTI-CONTROL para seleccionar CLOCK SET en el menú de ajustes iniciales.
Consulte Configuración de los ajustes iniciales
en esta página.
2 Presione MULTI-CONTROL para mostrar
el modo de ajuste.
# Para volver a la pantalla anterior, presione
DISP/BACK/SCRL.
3 Presione MULTI-CONTROL para seleccionar el segmento de la pantalla del reloj que
desea ajustar.
Cada vez que se presiona MULTI-CONTROL,
se selecciona un solo segmento de la pantalla
del reloj.
Hora—Minuto
Al seleccionar las horas o los minutos del
reloj, el segmento seleccionado parpadeará.
4 Haga girar MULTI-CONTROL para poner
el reloj en hora.
Ajuste del paso de sintonía de FM
El paso de sintonía de FM que utiliza la sintonización por búsqueda se puede cambiar
entre 100 kHz, el paso predefinido, y 50 kHz.
! Si la sintonización por búsqueda se realiza
en pasos de 50 kHz, es posible que las emisoras se sintonicen de manera imprecisa.
En ese caso, sintonícelas manualmente o
vuelva a utilizar la función de sintonización
por búsqueda.
! El paso de sintonía es de 50 kHz durante la
sintonización manual.
1 Utilice MULTI-CONTROL para seleccionar FM STEP en el menú de ajustes iniciales.
Consulte Configuración de los ajustes iniciales
en esta página.
2 Presione MULTI-CONTROL para mostrar
el modo de ajuste.
Español
<
CRD4365-A/N>43
43
Es
Page 44

/
Sección
02
Black plate (44,1)
Utilización de esta unidad
3 Haga girar MULTI-CONTROL para seleccionar el paso de sintonía de FM.
50 KHZ (50 kHz)—100 KHZ (100 kHz)
4 Presione MULTI-CONTROL para determinar la selección.
# Aunque se haya cancelado el menú antes de
determinar, la operación se lleva a cabo.
Ajuste del paso de sintonía de AM
El paso de sintonía de AM se puede cambiar
entre 9 kHz, el paso predefinido, y 10 kHz. Si
se utiliza el sintonizador en América del Norte,
América Central o América del Sur, se deberá
cambiar el paso de sintonía de 9 kHz (531 a
1 602 kHz permisibles) a 10 kHz (530 a 1 640
kHz permisibles).
1 Utilice MULTI-CONTROL para seleccionar AM STEP en el menú de ajustes iniciales.
Consulte Configuración de los ajustes iniciales
en la página anterior.
2 Presione MULTI-CONTROL para mostrar
el modo de ajuste.
3 Gire MULTI-CONTROL para seleccionar
el paso de sintonía de AM.
10 KHZ (10 kHz)—9 KHZ (9 kHz)
4 Presione MULTI-CONTROL para determinar la selección.
# Aunque se haya cancelado el menú antes de
determinar, la operación se lleva a cabo.
Cambio del ajuste de un equipo
auxiliar
Se puede utilizar un dispositivo auxiliar con
esta unidad. Active el ajuste auxiliar si utiliza
un dispositivo auxiliar conectado a esta unidad.
1 Utilice MULTI-CONTROL para seleccionar AUX en el menú de ajustes iniciales.
Consulte Configuración de los ajustes iniciales
en la página anterior.
2 Pulse MULTI-CONTROL para activar
AUX.
# Para desactivar la función AUX, vuelva a presionar MULTI-CONTROL.
Otras funciones
Uso de la fuente AUX
Puede conectar un dispositivo auxiliar a esta
unidad utilizando un cable miniconector estéreo.
% Inserte el miniconector estéreo en el conector de entrada de esta unidad.
Selección de AUX como la fuente
% Presione SRC/OFF para seleccionar AUX
como la fuente.
# Si el ajuste auxiliar no está activado, no es posible seleccionar AUX. Para obtener más detalles, consulte Cambio del ajuste de un equipo
auxiliar en esta página.
Activación y desactivación de la
visualización del reloj
Se puede activar y desactivar la visualización
del reloj.
! Aunque las fuentes estén apagadas, la vi-
sualización del reloj aparece en el display.
% Presione CLOCK para activar o desactivar la visualización del reloj.
Cada vez que se presiona CLOCK, se activa o
desactiva la visualización del reloj.
# La visualización del reloj desaparece momentáneamente cuando se utilizan otras funciones,
pero vuelve a aparecer después de 25
segundos.
44
Es
<CRD4365-A
N>44
Page 45

/
Conexiones
Black plate (45,1)
Sección
03
Importante
! Cuando esta unidad se instala en un vehículo
sin posición ACC (accesorio) en la llave de encendido, el cable rojo se debe conectar al terminal que pueda detectar la operación de la
llave de encendido. De lo contrario, puede
descargarse la batería.
O
F
N
F
O
S
T
A
R
T
Posición ACC Sin posición ACC
! El uso de esta unidad en unas condiciones
distintas de las indicadas a continuación podría causar incendios o fallos de funcionamiento.
— Vehículos con una batería de 12 voltios y
conexión a tierra negativa.
— Altavoces con 50 W (valor de salida) y 4 oh-
mios a 8 ohmios (valor de impedancia).
! Para evitar cortocircuitos, sobrecalentamiento
o fallos de funcionamiento, asegúrese de seguir las siguientes instrucciones.
— Desconecte el terminal negativo de la bate-
ría antes de la instalación.
— Asegure el cableado con pinzas para ca-
bles o cinta adhesiva. Para proteger el cableado, envuelva con cinta adhesiva las
partes en donde esté en contacto con piezas metálicas.
— Coloque todos los cables alejados de las
partes móviles, como la palanca de cambios y los rieles de los asientos.
— Coloque todos los cables alejados de luga-
res calientes, como cerca de la salida del
calefactor.
— No pase el cable amarillo a través de un
orificio en el compartimiento del motor
para conectarlo a la batería.
— Cubra con cinta aislante los conectores de
cables que queden desconectados.
— No acorte ningún cable.
— Nunca corte el aislamiento del cable de ali-
mentación de esta unidad para compartir
la corriente con otros equipos. La capacidad de corriente del cable es limitada.
— Utilice un fusible con la tensión nominal
indicada.
— Nunca conecte el cable negativo de los al-
tavoces directamente a tierra.
— Nunca empalme los cables negativos de
varios altavoces.
! Cuando se enciende esta unidad, se emite
una señal de control a través del cable azul/
blanco. Conecte la unidad a un mando a distancia del amplificador de potencia externo o
al terminal de control del relé de la antena
automática del vehículo (máx. 300 mA 12 V
CC). Si el vehículo posee una antena integrada en el cristal del parabrisas, conecte la unidad al terminal de la fuente de alimentación
del amplificador de la antena.
! Nunca conecte el cable azul/blanco al termi-
nal de potencia del amplificador de potencia
externo. Ni tampoco lo conecte al terminal de
potencia de la antena automática. De lo contrario, puede descargarse la batería o producirse un fallo de funcionamiento.
! El cable negro es el cable a tierra. Este cable y
el cable a tierra de otros productos (especialmente productos de alta tensión, como amplificadores de potencia) se deben conectar por
separado. De lo contrario, puede producirse
un incendio o un fallo de funcionamiento si
se desconectan por accidente.
Español
<CRD4365-A
N>45
45
Es
Page 46

/
Sección
03
Conexiones
Diagrama de conexión
Este producto
Salida delantera
Salida
trasera
Conector de
antena
Entrada remota por cable
Es posible conectar un adaptador
de mando a distancia por cable
(se vende por separado).
Amarillo
Conectar al terminal de alimentación
constante 12 V.
Rojo
Conectar al terminal controlado por
la llave de encendido (12 V CC).
Fusible (10 A)
Black plate (46,1)
Amplificador de
potencia (se vende
por separado)
Conectar con cables RCA
(se venden por separado)
Amplificador de
potencia (se vende
por separado)
Control remoto del sistema
Azul/blanco
Conectar al terminal de control del sistema del
amplificador de potencia o al terminal de control
del relé de la antena (máx. 300 mA 12 V CC).
Negro (toma de tierra del chasis)
Conectar a una parte metálica limpia,
sin pintura.
Blanco
Altavoz delantero Altavoz delantero
Blanco/negro
Izquierda Derecha
Altavoz trasero Altavoz trasero
Altavoz delantero Altavoz delantero
Altavoz trasero Altavoz trasero
46
Es
Verde
Verde/negro
Con un sistema de 2 altavoces, no conecte
ningún otro aparato a las salidas de cable que
no estén conectadas a los altavoces.
Gris
Gris/negro
Violeta
Violeta/negro
Realice estas conexiones cuando utilice
el amplificador opcional.
<CRD4365-A
N>46
Page 47

Instalación
Black plate (47,1)
Sección
04
Importante
! Compruebe todas las conexiones y sistemas
antes de la instalación final.
! No utilice piezas no autorizadas. El uso de pie-
zas no autorizadas puede causar fallos de funcionamiento.
! Consulte a su concesionario si para la instala-
ción es necesario taladrar orificios o hacer
otras modificaciones al vehículo.
! No instale esta unidad en un lugar donde:
— pueda interferir con la conducción del ve-
hículo.
— pueda lesionar a un pasajero como conse-
cuencia de un frenazo brusco.
! El láser semiconductor se dañará si se sobre-
calienta. Instale esta unidad alejada de zonas
que alcancen altas temperaturas, como cerca
de la salida del calefactor.
! Se logra un rendimiento óptimo si la unidad
se instala en un ángulo inferior a 60°.
60°
! Cuando instale, para asegurar la dispersión
apropiada del calor durante el uso de esta unidad, asegúrese de dejar un amplio espacio
por detrás del panel trasero y enrolle los cables sueltos de modo que no bloqueen las
aberturas de ventilación.
Montaje delantero DIN
Instalación en la arandela de goma
1 Inserte el manguito de montaje en el
salpicadero.
Si realiza la instalación en un espacio poco
profundo, utilice un manguito de montaje suministrado. Si hay suficiente espacio detrás de
la unidad, utilice un manguito de montaje suministrado de fábrica.
2 Fije el manguito de montaje utilizando
un destornillador para doblar las pestañas
metálicas (90°) y colocarlas en su lugar.
3 Instale la unidad.
Salpicadero Arandela de goma
Manguito de montaje Tornillo
Retirada de la unidad
1 Extienda hacia afuera la parte superior
e inferior del aro de guarnición para retirarlo. (Al volver a colocar el anillo de guarnición, oriente el lado que tiene una ranura
hacia abajo y colóquelo.)
Español
Montaje delantero/
posterior DIN
Esta unidad se puede instalar adecuadamente
ya sea de manera “delantera” (montaje delantero convencional DIN) o “posterior” (instalación de montaje posterior DIN, utilizando
agujeros roscados para tornillos en los laterales del bastidor de la unidad). Para obtener detalles, consulte los siguientes métodos de
instalación.
Anillo de guarnición
! Resulta más fácil retirar el anillo de guarni-
ción si se suelta la carátula.
2 Inserte en ambos lados de la unidad las
llaves de extracción provistas hasta que se
escuche un ligero chasquido.
Es
<
CRD4365-A/N>47
47
Page 48

/
Sección
04
Black plate (48,1)
Instalación
3 Extraiga la unidad del salpicadero.
Montaje trasero DIN
1 Extienda hacia afuera la parte superior
e inferior del aro de guarnición para retirarlo. (Al volver a colocar el anillo de guarnición, oriente el lado que tiene una ranura
hacia abajo y colóquelo.)
Anillo de guarnición
! Resulta más fácil retirar el anillo de guarni-
ción si se suelta la carátula.
2 Determine la posición correcta, de
modo que los orificios del soporte y del lateral de la unidad coincidan.
mm × 9 mm), según la forma de los orificios roscados del soporte.
3 Apriete los dos tornillos en cada lado.
Tornillo
Carcasa Salpicadero o consola
! Utilice tornillos de cabeza redonda (5 mm
× 8 mm) o tornillos de cabeza embutida (5
48
Es
<CRD4365-A
N>48
Page 49

/
Información adicional
Black plate (49,1)
Apéndice
Mensajes de error
Cuando contacte con su proveedor o con el
servicio técnico Pioneer más cercano, asegúrese de haber anotado el mensaje de error.
Reproductor de CD incorporado
Mensaje Causa Acción
ERROR-11, 12,
17, 30
ERROR-10, 11,
12, 15, 17, 30,
A0
ERROR-15 El disco inser-
ERROR-22, 23 No se puede re-
NO AUDIO El disco que se
SKIPPED El disco que se
PROTECT Todos los fiche-
Disco sucio Limpie el disco.
Disco rayado Reemplace el
Problema eléctrico o mecánico
tado no contiene
datos
producir el formato del CD
ha colocado no
contiene ficheros
que se puedan
reproducir
ha colocado contiene ficheros
WMA protegidos
con DRM
ros del disco
están protegidos
con DRM
disco.
Cambie la llave de
encendido del
automóvil a la posición de desactivación y luego pase
de nuevo a activación, o cambie a
una fuente diferente, y después vuelva a activar el
reproductor de CD.
Reemplace el
disco.
Reemplace el
disco.
Reemplace el
disco.
Reemplace el
disco.
Reemplace el
disco.
Reproductor de audio USB/memoria USB
Mensaje Causa Acción
NO AUDIO No hay cancio-
nes
La memoria USB
está conectada
con la seguridad
activada
SKIPPED El reproductor de
audio portátil
USB/memoria
USB conectado
contiene ficheros
WMA protegidos
con Windows
Media™ DRM 9/
10
PROTECT Todos los fiche-
ros del reproductor de audio
portátil USB/memoria USB conectado están
protegidos con
Windows Media
DRM 9/10
N/A USB El dispositivo
USB conectado
no es compatible
con esta unidad.
Transfiera ficheros
de audio al reproductor de audio
portátil USB/memoria USB y conéctelo.
Para desactivar la
seguridad, siga las
instrucciones de la
memoria USB.
Reproduzca un fichero de audio que
no esté protegido
con Windows
Media DRM 9/10.
Transfiera ficheros
de audio no protegidos con
Windows Media
DRM 9/10 al reproductor de audio
portátil USB/memoria USB y conéctelo.
Conecte un reproductor de audio
portátil USB o una
memoria USB que
cumpla con la
clase de almacenamiento masivo
USB.
Español
<CRD4365-A
N>49
49
Es
Page 50

Apéndice
Black plate (50,1)
Información adicional
El conector USB
CHECK USB
ERROR-19 Fallo de comuni-
ERROR-23 El dispositivo
o el cable USB
está cortocircuitado.
El reproductor de
audio portátil
USB/memoria
USB conectado
consume más de
500 mA (corriente máxima admisible).
cación
USB no está formateado con
FAT16 o FAT32
Verifique que no
esté enganchado
en algo ni dañado
el conector USB o
el cable USB.
Desconecte el reproductor de audio
portátil USB/memoria USB y no lo
utilice. Coloque la
llave de encendido
del automóvil en
posición OFF,
luego en ACC u
ON y, a continuación, conecte el reproductor de audio
portátil USB/memoria USB compatible.
Realice una de las
siguientes operaciones.
–Cambie la llave de
encendido del
automóvil a la posición de desactivación y luego pase
de nuevo a activación.
–Desconecte el reproductor de audio
portátil USB/memoria USB.
–Cambie a una
fuente diferente.
Después, vuelva al
reproductor de
audio portátil USB/
memoria USB.
El dispositivo USB
debe formatearse
con FAT16 o FAT32.
Pautas para el manejo de
discos y del reproductor
! Use únicamente discos que tengan uno de
los siguientes dos logos.
! Utilice sólo discos convencionales y com-
pletamente circulares. No use discos con
formas irregulares.
! Utilice un CD de 12 cm u 8 cm. No utilice
un adaptador cuando reproduzca un CD de
8 cm.
! No coloque ningún otro elemento que no
sea un CD en la ranura de carga de CD.
! No use discos con roturas, picaduras, de-
formados o dañados de otro modo, ya que
pueden causar daños al reproductor.
! No es posible reproducir discos CD-R/CD-
RW no finalizados.
! No toque la superficie grabada de los dis-
cos.
! Almacene los discos en sus cajas cuando
no los utilice.
! Evite dejar discos en ambientes excesiva-
mente calientes o expuestos a la luz solar
directa.
! No fije etiquetas, no escriba ni aplique sus-
tancias químicas en la superficie de los
discos.
! Para limpiar un CD, pásele un paño suave
desde el centro hacia afuera.
50
Es
<
CRD4365-A/N>50
Page 51

Información adicional
Black plate (51,1)
Apéndice
! La condensación puede afectar temporal-
mente el rendimiento del reproductor. Deje
que se adapte a la temperatura más cálida
durante aproximadamente una hora. Además, si los discos tienen humedad, séquelos con un paño suave.
! Quizás no pueda reproducir algunos discos
debido a sus características, formato, aplicación grabada, entorno de reproducción,
condiciones de almacenamiento u otras
causas.
! Dependiendo del entorno en que se grabó
la información de texto, puede que no se visualice correctamente.
! Las vibraciones en las carreteras pueden
interrumpir la reproducción de un disco.
! Lea las advertencias de los discos antes de
utilizarlos.
Discos dobles
! Los discos dobles son discos de dos caras
que incluyen CD grabable de audio en una
cara y DVD grabable de vídeo en la otra
cara.
! Debido a que la cara CD de los discos do-
bles no es físicamente compatible con el
estándar CD general, es posible que no se
pueda reproducir la cara CD en esta unidad.
! La carga y expulsión frecuente de un disco
doble puede producir rayaduras en el
disco. Las rayaduras graves pueden producir problemas de reproducción en esta unidad. En algunos casos, un disco doble
pueden atascarse en la ranura de carga del
disco y no se expulsará. Para evitarlo, recomendamos que no utilice un disco doble
en esta unidad.
! Consulte la información del fabricante del
disco para obtener más información sobre
los discos dobles.
Compatibilidad con audio
comprimido
WMA
! Formato compatible: WMA codificado con
Windows Media Player
! Extensión de fichero: .wma
! Velocidad de grabación: 48 kbps a 320 kbps
(CBR), 48 kbps a 384 kbps (VBR)
! Frecuencia de muestreo: 32 kHz, 44,1 kHz,
48 kHz
! Windows Media Audio 9 Professional, Loss-
less, Voice: no
MP3
! Extensión de fichero: .mp3
! Velocidad de grabación: 8 kbps a 320 kbps
(CBR), VBR
! Frecuencia de muestreo: 16 kHz a 48 kHz
(32; 44,1; 48 kHz para énfasis)
! Versiones de etiqueta ID3 compatibles: 1.0,
1.1, 2.2, 2.3, 2.4 (la etiqueta ID3 Versión 2.x
tiene prioridad sobre la Versión 1.x.)
! Lista de reproducción M3u: no
! MP3i (MP3 interactivo), mp3 PRO: no
WAV
! Formato compatible: Lineal PCM (LPCM),
MS ADPCM
! Extensión de fichero: .wav
! Bits de cuantificación: 8 y 16 (LPCM), 4
(MS ADPCM)
! Frecuencia de muestreo: 16 kHz a 48 kHz
(LPCM), 22,05 kHz a 44,1 kHz (MS
ADPCM)
Pautas para el manejo e
información complementaria
! La reproducción de archivos de audio codi-
ficados con datos de imagen puede tardar
varios minutos en comenzar.
! Se pueden visualizar sólo 32 caracteres
desde el principio como nombre de fichero
(incluida la extensión) o nombre de carpeta.
Español
<
CRD4365-A/N>51
51
Es
Page 52

/
Apéndice
Black plate (52,1)
Información adicional
! Es posible que la información de texto de
algunos archivos de audio no se visualice
correctamente.
! Esta unidad puede no funcionar correcta-
mente, dependiendo de la aplicación utilizada para codificar ficheros WMA.
Archivos de audio comprimidos
en el disco
! Conforme con ISO 9660 Nivel 1 y 2. Los sis-
temas de archivo Romeo y Joliet son compatibles con este reproductor.
! Es posible la reproducción multi-sesión.
! Los ficheros de audio comprimidos no son
compatibles con la transferencia de datos
en formato Packet Write.
! Independientemente de la longitud de la
sección en blanco que haya entre las canciones de la grabación original, los discos
de audio comprimidos se reproducirán con
una breve pausa entre canciones.
Reproductor de audio USB/
memoria USB
! La unidad puede reproducir archivos de
una reproductor de audio portátil USB/memoria USB que cumpla con la clase de almacenamiento masivo USB. Sin embargo,
no se podrán reproducir los archivos protegidos almacenados en dichos dispositivos
USB.
! No se puede conectar el reproductor de
audio portátil USB/memoria USB a esta
unidad a través de un concentrador USB.
! La memoria USB particionada no es com-
patible con esta unidad.
! Según el tipo de reproductor de audio por-
tátil USB/memoria USB que utilice, es posible que esta unidad no reconozca el
reproductor de audio USB/memoria USB o
que los archivos de audio no puedan ser reproducidos correctamente.
! No deje el reproductor de audio portátil
USB/memoria USB expuesto a la luz solar
directa durante un largo periodo de tiempo.
La exposición prolongada a la luz solar directa puede causar un fallo de funcionamiento del reproductor de audio portátil
USB/memoria USB como consecuencia de
la alta temperatura generada.
! No exponga el reproductor de audio portátil
USB/memoria USB a altas temperaturas.
! Asegure bien el reproductor de audio portá-
til USB/memoria USB al conducir. No deje
caer el reproductor de audio portátil USB/
memoria USB al suelo, ya que puede quedar atascado debajo del freno o del acelerador.
! En función de los dispositivos USB que se
conecten a esta unidad, se puede generar
ruido en la radio.
! Es posible que la información de texto de
algunos archivos de audio no se visualice
correctamente.
! Puede producirse una pequeña demora
cuando se inicie la reproducción de archivos de audio en un reproductor de audio
portátil USB/memoria USB con numerosas
jerarquías de carpetas.
! No conecte otro dispositivo que no sea un
reproductor de audio portátil USB/memoria
USB.
! Las operaciones pueden variar según el
tipo de reproductor de audio USB y el tipo
de memoria USB.
52
Es
<CRD4365-A
N>52
Page 53

1
2
5
6
Información adicional
Black plate (53,1)
Apéndice
Ejemplo de una jerarquía
: Carpeta
: Archivo de audio comprimido
3
4
Nivel 1 Nivel 2 Nivel 3 Nivel 4
Secuencia de ficheros de audio
en el disco
! Esta unidad asigna los números de carpe-
tas. El usuario no puede asignarlos.
! La secuencia de selección de carpetas u
otras operaciones pueden cambiar, dependiendo del código de codificación o escritura.
! Se permite una jerarquía de carpetas de
hasta ocho niveles. Sin embargo, la jerarquía práctica de carpetas es de menos de
dos niveles.
! Es posible reproducir hasta 99 carpetas en
un disco.
! La secuencia de reproducción del archivo
de audio es la misma que la secuencia grabada en el dispositivo USB.
! Para especificar la secuencia de reproduc-
ción, se recomienda el siguiente método.
1 Cree el nombre del archivo incluyendo nú-
meros que especifiquen la secuencia de
reproducción (p. ej., 001xxx.mp3 y
099yyy.mp3).
2 Coloque esos archivos en una carpeta.
3 Grabe la carpeta que contiene los archivos
en el dispositivo USB.
Sin embargo, dependiendo del entorno del
sistema, tal vez no pueda especificar la secuencia de reproducción del archivo.
! Pueden reproducirse hasta 15 000 ficheros
en un reproductor de audio portátil USB/
memoria USB.
! Pueden reproducirse hasta 500 carpetas en
un reproductor de audio portátil USB/memoria USB.
! Puede reproducirse un directorio de hasta
ocho niveles en un reproductor de audio
portátil USB/memoria USB.
Aviso de copyright y marca
registrada
WMA
Español
Secuencia de archivos de audio
en la memoria USB
Para los reproductores de audio portátiles USB,
la secuencia es diferente de la hallada en la memoria USB y depende del tipo de reproductor.
! 01 a 05 representan los números de carpe-
ta asignados. 1 a 6 representan la secuencia de reproducción. El usuario no
puede asignar números de carpeta ni especificar la secuencia de reproducción con
esta unidad.
Windows Media y el logo de Windows son
marcas comerciales o registradas de
Microsoft Corporation en los EE.UU. y/o en
otros países.
<
CRD4365-A/N>53
53
Es
Page 54

/
Apéndice
Información adicional
MP3
La venta de este producto sólo otorga una licencia para su uso privado, no comercial. No
otorga ninguna licencia ni concede ningún
derecho a utilizar este producto en transmisiones comerciales (es decir, lucrativas) en tiempo real (terrestres, vía satélite, por cable y/o
por cualquier otro medio), transmisiones/
streaming por Internet, intranets y/u otras
redes o en otros sistemas de distribución de
contenido electrónico, como por ejemplo, aplicaciones de pago por escucha (pay-audio) o
audio bajo demanda (audio-on-demand). Se
necesita una licencia independiente para su
uso comercial. Para obtener más información,
visite
http://www.mp3licensing.com.
iTunes
iTunes es una marca comercial de Apple Inc.,
registrada en los EE.UU. y otros países.
Black plate (54,1)
54
Es
<CRD4365-A
N>54
Page 55

/
Información adicional
Black plate (55,1)
Apéndice
Especificaciones
Generales
Fuente de alimentación nominal
..................................................... 14,4 V CC
(gama de tensión permisible: 12,0 V a 14,4 V CC)
Sistema de conexión a tierra
..................................................... Tipo negativo
Consumo máximo de corriente
..................................................... 10,0 A
Dimensiones (An × Al × Pr):
DIN
Bastidor .................... 178 mm × 50 mm × 162
mm
Cara anterior .......... 188 mm × 58 mm × 22 mm
D
Bastidor .................... 178 mm × 50 mm × 162
mm
Cara anterior .......... 170 mm × 48 mm × 22 mm
Peso ............................................... 1,3 kg
Audio
Potencia de salida máxima
..................................................... 50 W × 4
Potencia de salida continua
..................................................... 22 W × 4 (50 a 15 000 Hz,
5% THD, 4 W de carga,
ambos canales activados)
Impedancia de carga ............. 4 W (4 W a8W permisible)
Nivel de salida máx. del preamplificador (Pre-out)
..................................................... 2,0 V
Controles de tono:
Graves
Frecuencia .............. 100 Hz
Ganancia ................. ±13 dB
Media
Frecuencia .............. 1 kHz
Ganancia ................. ±12 dB
Agudos
Frecuencia .............. 10 kHz
Ganancia ................. ±12 dB
Reproductor de CD
Sistema ........................................ Sistema de audio de discos
compactos
Discos utilizables .................... Disco compacto
Relación de señal a ruido .... 94 dB (1 kHz) (red IEC-A)
Número de canales ................ 2 (estéreo)
Formato de decodificación MP3
..................................................... MPEG-1 & 2 Audio Layer 3
Formato de decodificación WMA
..................................................... Ver. 7, 7.1, 8, 9, 10, 11 (audio
2 canales)
(Windows Media Player)
Formato de señal WAV ......... PCM lineal & MS ADPCM
(No comprimido)
USB
Especificación .......................... USB 2.0 velocidad máxima
Corriente suministrada ......... 500 mA
Cantidad máxima de memoria
..................................................... 250 GB
Cantidad mínima de memoria
..................................................... 256 MB
Clase USB ................................... MSC (Clase de almacena-
miento masivo)
Sistema de archivos ............... FAT16, FAT32
Formato de decodificación MP3
..................................................... MPEG-1 & 2 Audio Layer 3
Formato de decodificación WMA
..................................................... Ver. 7, 7.1, 8, 9, 10, 11 (audio
2 canales)
(Windows Media Player)
Formato de señal WAV ......... PCM lineal & MS ADPCM
(No comprimido)
Sintonizador de FM
Gama de frecuencias ............ 87,5 MHz a 108,0 MHz
Sensibilidad utilizable ........... 11 dBf (0,7 µV/75 W, mono,
Señal/ruido: 30 dB)
Relación de señal a ruido .... 72 dB (red IEC-A)
Sintonizador de AM
Gama de frecuencias ............ 531 kHz a 1 602 kHz (9 kHz)
530 kHz a 1640 kHz (10 kHz)
Sensibilidad utilizable ........... 25 µV (Señal/ruido: 20 dB)
Relación de señal a ruido .... 62 dB (red IEC-A)
Nota
Las especificaciones y el diseño están sujetos a
posibles modificaciones, para incorporar mejoras, sin previo aviso.
Español
<CRD4365-A
N>55
55
Es
Page 56

Black plate (56,1)
/
Conteúdo
Agradecemos por você ter adquirido este produto
PIONEER.
Leia este manual antes de utilizar o produto pela primeira vez a fim de garantir seu
uso adequado. Em seguida, guarde-o em um local seguro e acessível para referência
futura.
Antes de utilizar este produto
Sobre esta unidade 58
Compatibilidade com o áudio player
portátil 58
Visite o nosso website 58
Proteção da sua unidade contra roubo 58
– Extração do painel frontal 58
– Colocação do painel frontal 59
Utilização e cuidados do controle
remoto 59
– Instalação da bateria 59
– Utilização do controle remoto 59
Funcionamento desta unidade
Introdução aos botões 60
– Unidade principal 60
– Controle remoto 61
– Indicação no display 62
Operações básicas 62
– Ligar e desligar 62
– Seleção de uma fonte 62
– Ajuste do volume 63
Sintonizador 63
– Operações básicas 63
– Armazenamento e chamada das
freqüências de transmissão da
memória 63
– Introdução às operações
avançadas 63
– Armazenamento das freqüências mais
fortes de transmissão 64
– Sintonia em sinais fortes 64
CD player incorporado 64
– Operações básicas 64
– Visualização de informações de texto
do disco 65
– Seleção de faixas na lista de títulos de
faixa 66
– Seleção de arquivos na lista de nomes
de arquivo 66
– Introdução às operações
avançadas 66
– Seleção de uma série de reprodução
com repetição 66
– Reprodução de faixas em ordem
aleatória 67
– Procura de pastas e faixas 67
– Pausa na reprodução 67
– Utilização da Recuperação de som 67
Reprodução de músicas no áudio player
portátil USB/memória USB 68
– Operações básicas 68
– Exibição de informações de texto de
um arquivo de áudio 68
– Seleção de arquivos na lista de nomes
de arquivo 68
– Introdução às operações
avançadas 68
Ajustes de áudio 69
– Introdução aos ajustes de áudio 69
– Utilização do ajuste do equilíbrio 69
– Utilização do equalizador 69
– Ajuste das curvas do equalizador 70
– Ajuste da sonoridade 70
– Ajuste de níveis de fonte 70
Ajustes iniciais 71
– Definição dos ajustes iniciais 71
– Ajuste da hora 71
– Ajuste do passo de sintonia FM 71
– Ajuste do passo de sintonia AM 71
– Ativação do ajuste auxiliar 72
Outras funções 72
– Utilização da fonte AUX 72
– Ativação ou desativação do display de
hora 72
Conexões
Diagrama de conexão 74
Instalação
Montagem dianteira/traseira DIN 75
– Montagem dianteira DIN 75
56
Ptbr
<CRD4365-A
N>56
Page 57

/
Conteúdo
– Montagem traseira DIN 76
Informações adicionais
Mensagens de erro 77
Tratamento das diretrizes dos discos e do
player 78
Discos duais 78
Compatibilidade com compressão de
áudio 79
Orientações de manuseio e informações
suplementares 79
– Arquivos de áudio compactados no
disco 79
– Áudio player USB/memória USB 80
Exemplo de uma hierarquia 80
– Seqüência de arquivos de áudio no
disco 80
– Seqüência de arquivos de áudio na
memória USB 80
Nota sobre direitos autorais e marcas
comerciais 81
Especificações 82
Black plate (57,1)
Português (B)
<CRD4365-A
N>57
Ptbr
57
Page 58

/
Seção
01
Black plate (58,1)
Antes de utilizar este produto
Sobre esta unidade
CUIDADO
! Não permita que esta unidade entre em con-
tato com líquidos. Há risco de choque elétrico. Além disso, o contato com líquidos pode
causar danos, fumaça e superaquecimento
desta unidade.
! Mantenha este manual acessível como refe-
rência para os procedimentos de operação e
precauções.
! Deixe sempre o volume baixo para que possa
ouvir os sons do tráfego.
! Proteja esta unidade contra umidade.
! Se a bateria do carro estiver desconectada ou
descarregada, a memória programada será
apagada e deverá ser reprogramada.
! Se esta unidade não funcionar corretamente,
entre em contato com o revendedor ou a central de serviços autorizada da PIONEER mais
próxima.
Compatibilidade com o
áudio player portátil
Entre em contato com o fabricante para obter
informações sobre seu áudio player portátil
USB/memória USB.
Esta unidade corresponde ao seguinte:
— Áudio player portátil e memória compatí-
veis com USB MSC (Mass Storage Class)
— Reprodução de arquivos WMA, MP3 e
WAV
CUIDADO
A Pioneer não se responsabilizará pela perda dos
dados no áudio player portátil USB/memória
USB, mesmo se esses dados tiverem sido perdidos durante a utilização desta unidade.
http://pioneer.jp/group/index-e.html
! Oferecemos as últimas informações sobre
a Pioneer Corporation em nosso site da
Web.
Proteção da sua unidade
contra roubo
O painel frontal pode ser extraído para deter o
roubo.
Importante
! Ao remover ou colocar o painel frontal, manu-
seie-o com cuidado.
! Evite sujeitar o painel frontal a impactos ex-
cessivos.
! Mantenha o painel frontal distante da luz dire-
ta do sol e não o exponha a temperaturas
altas.
! Antes de desconectar, certifique-se de remo-
ver o cabo AUX/USB e o dispositivo USB do
painel frontal. Do contrário, esta unidade, o
dispositivo conectado ou o interior do veículo
podem ser danificados.
Extração do painel frontal
1 Pressione OPEN para abrir o painel
frontal.
2 Segure com firmeza o lado esquerdo do
painel frontal e puxe-o cuidadosamente
para fora.
Cuidado para não segurá-lo com muita força
ou deixá-lo cair e impeça o seu contato com
água ou outros líquidos para evitar danos permanentes.
Visite o nosso website
Visite-nos no seguinte site:
58
Ptbr
<CRD4365-A
N>58
Page 59

/
Antes de utilizar este produto
Black plate (59,1)
Seção
01
3 Coloque o painel frontal na caixa protetora fornecida para mantê-lo em segurança.
Colocação do painel frontal
% Recoloque o painel frontal segurando-o
verticalmente diante da unidade e encaixando-o com firmeza nos ganchos de fixação.
Utilização e cuidados do
controle remoto
Instalação da bateria
Deslize para fora a bandeja localizada na
parte posterior do controle remoto e insira a
bateria com os pólos positivo (+) e negativo
(–) alinhados corretamente.
! Se a bateria for substituída incorretamente,
haverá perigo de explosão. Substitua-a apenas
por uma do mesmo tipo ou equivalente.
! Não manuseie a bateria com ferramentas me-
tálicas.
! Não armazene a bateria com objetos metáli-
cos.
! Em caso de vazamento da bateria, limpe com-
pletamente o controle remoto e instale uma
nova bateria.
! Ao descartar baterias usadas, certifique-se de
estar em conformidade com as regulamentações governamentais ou com as normas das
instituições públicas do meio ambiente que
se aplicam ao seu país/região.
Utilização do controle remoto
Aponte o controle remoto para a direção do
painel frontal para operá-lo.
! O controle remoto poderá não funcionar
corretamente se ficar exposto à luz direta
do sol.
Importante
! Não deixe o controle remoto exposto a tempe-
raturas altas ou à luz direta do sol.
! Não deixe o controle remoto cair no chão,
onde pode ficar preso embaixo do pedal do
freio ou acelerador.
Português (B)
ADVERTÊNCIA
Mantenha a bateria fora do alcance de crianças.
Caso ela seja ingerida, consulte um médico imediatamente.
CUIDADO
! Utilize uma bateria de lítio CR2025 (3 V).
! Remova a bateria se não for utilizar o controle
remoto por um mês ou mais.
<CRD4365-A
N>59
Ptbr
59
Page 60

4
5
8
9
b
1
3
a26
7
Seção
02
Black plate (60,1)
Funcionamento desta unidade
Introdução aos botões
Unidade principal
1 Botão SRC/OFF
Esta unidade será ligada ao selecionar uma
fonte. Pressione para percorrer todas as fontes disponíveis.
2 MULTI-CONTROL
Gire para aumentar ou diminuir o volume.
Também utilizado para controlar funções.
3 Botão
Pressione para visualizar a lista de títulos de
disco, lista de títulos de faixa, lista de pastas
ou lista de arquivos.
4 Porta USB
Utilize para conectar o áudio player/memória USB.
! Ao conectar, abra a tampa do conector
! Utilize um cabo USB para conectar o
5 Botão OPEN
Pressione para abrir o painel frontal.
/LIST
USB.
áudio player/memória USB à porta USB.
Uma vez que o áudio player/memória
USB é projetado para a frente na unidade, é perigoso conectá-lo diretamente.
O cabo USB da Pioneer CD-U50E também está disponível. Para obter mais detalhes, entre em contato com o seu
fornecedor.
6 Conector de entrada AUX (conector estéreo de 3,5 mm)
Utilize para conectar um dispositivo auxiliar.
7 Botão CLOCK
Pressione para alterar para o display de
hora.
8 Botões 1 a 6
Pressione para sintonia das emissoras programadas. Também utilizado para controlar
funções.
! 1/S.Rtrv pode ser utilizado para contro-
lar S.RTRV (Recuperação de som).
! 2/PAUSE pode ser utilizado para contro-
lar PAUSE (Pausa).
! 5/
! 6/
9 Botão DISP/BACK/SCRL
Pressione para selecionar diferentes displays.
Pressione e segure para rolar pelas informações de texto.
Pressione para retornar ao display anterior
durante a operação do menu.
Pressione e segure para retornar ao menu
principal durante a operação do menu.
a Botões a/b/c/d
Pressione para enviar comandos de sintonia
por busca manual, avanço rápido, retrocesso e busca por faixa. Também utilizado para
controlar funções.
! Operação de menus
pode ser utilizado para controlar
RANDOM (Reprodução aleatória).
pode ser utilizado para controlar
REPEAT (Reprodução com repetição).
— Pressionar a desempenha a mesma
função que girar MULTI-CONTROL
para a direita.
— Pressionar b desempenha a mesma
função que girar MULTI-CONTROL
para a esquerda.
— Pressionar c desempenha a mesma
função que pressionar
DISP/BACK/SCRL.
60
Ptbr
<
CRD4365-A/N>60
Page 61

c
h
f
1
b
d
9
e
g
a
Funcionamento desta unidade
Black plate (61,1)
Seção
02
— Pressionar e segurar c desempenha
a mesma função que pressionar e segurar DISP/BACK/SCRL.
— Pressionar d desempenha a mesma
função que pressionar
MULTI-CONTROL.
— Pressionar e segurar d desempenha
a mesma função que pressionar e segurar MULTI-CONTROL.
! Operação de listas
— Pressionar a desempenha a mesma
função que girar MULTI-CONTROL
para a esquerda.
— Pressionar b desempenha a mesma
função que girar MULTI-CONTROL
para a direita.
— Pressionar c desempenha a mesma
função que pressionar
DISP/BACK/SCRL.
— Pressionar e segurar c desempenha
a mesma função que pressionar e segurar DISP/BACK/SCRL.
— Pressionar d desempenha a mesma
função que pressionar
MULTI-CONTROL.
— Pressionar e segurar d desempenha
a mesma função que pressionar e segurar MULTI-CONTROL.
b Botão BAND/ESC
Pressione para selecionar entre três bandas
FM e uma banda AM.
Pressione para retornar ao display normal
durante a operação do menu.
Controle remoto
A operação é a mesma que ao utilizar os botões na unidade principal.
Português (B)
c Botões VOLUME
Pressione para aumentar ou diminuir o volume.
d Botão MUTE
Pressione para desativar o som. Para ativar
o som, pressione novamente.
e Botão AUDIO
Pressione para selecionar uma função de
áudio.
f Botão e
Pressione para ativar ou desativar a pausa.
g Botão FUNCTION
Pressione para selecionar as funções.
Pressione e segure para chamar da memória o menu de ajuste inicial quando as fontes estiverem desligadas.
h Botão LIST/ENTER
Pressione para visualizar a lista de títulos de
disco, lista de títulos de faixa, lista de pastas
ou lista de arquivos dependendo da fonte.
Enquanto opera o menu, pressione para
controlar as funções.
<
CRD4365-A/N>61
Ptbr
61
Page 62

6
8
4
Seção
02
Black plate (62,1)
Funcionamento desta unidade
Indicação no display
12
9 abc d
7
5
1 Indicador (Disco)
É visualizado quando o nome do disco
(álbum) aparece na seção principal do display.
2 Indicador
É visualizado quando o nome do artista
(faixa) aparece na seção principal do display.
3 Seção principal do display
Exibe a banda, freqüência, o tempo de reprodução decorrido e outros ajustes.
! Sintonizador
A banda e a freqüência são visualizadas.
! CD player incorporado e USB
O tempo de reprodução decorrido e as
informações de texto são visualizados.
4 Indicador
É visualizado quando o nome da faixa (música) aparece na seção principal do display.
Também aparece quando um arquivo de
áudio, que pode ser reproduzido, é selecionado ao operar a lista.
5 Indicador c
É visualizado quando há uma camada superior da pasta ou do menu.
3
(Artista)
(Música)
8 Indicador LOC
É visualizado quando a sintonia por busca
local está ativada.
9 Indicador
É visualizado quando a sonoridade está ativada.
a Indicador 5 (Estéreo)
É visualizado quando a freqüência selecio nada está sendo transmitida em estéreo.
b Indicador
Mostra quando Repetição de faixa está ativada.
Também aparece quando a repetição de
pasta está ativada.
c Indicador
É visualizado quando a reprodução aleatória
está ativada.
d Indicador
som)
É visualizado quando a função Recuperação
de som está ativada.
LOUD (Sonoridade)
(Repetição)
(Reprodução aleatória)
(Recuperação de
Operações básicas
Ligar e desligar
Como ligar a unidade
% Pressione SRC/OFF para ligar a unidade.
Como desligar a unidade
% Pressione e segure SRC/OFF até desligar
a unidade.
6 Indicador
É visualizado durante a operação da função
de listagem.
7 Indicador d
É visualizado quando há uma camada inferior da pasta ou do menu.
62
Ptbr
(Pasta)
Seleção de uma fonte
Você pode selecionar uma fonte que deseja
ouvir.
% Pressione SRC/OFF várias vezes para alternar entre as seguintes fontes:
TUNER (Sintonizador)—CD (CD player incor-
porado)—USB (USB)—AUX (AUX)
<
CRD4365-A/N>62
Page 63

Funcionamento desta unidade
Black plate (63,1)
Seção
02
Notas
! Nos seguintes casos, a fonte de áudio não
mudará:
— Quando não houver um disco na unidade.
— Quando AUX (Entrada auxiliar) estiver de-
sativada (consulte a página 72).
! Quando um áudio player portátil USB/memó-
ria USB não estiver conectado à porta USB
desta unidade, NO DEVICE será visualizado.
! AUX é definido como ON (ativado) por padrão.
Desative o AUX quando não estiver em uso
(consulte Ativação do ajuste auxiliar na página
72).
! Carregar o áudio player portátil usando a
fonte de alimentação CC do carro, enquanto
conectado a uma entrada AUX, poderá gerar
ruído. Nesse caso, interrompa a carga.
! Quando o fio condutor azul/branco desta uni-
dade é conectado ao terminal de controle do
relé da antena automática do veículo, a antena se estende quando a fonte da unidade é ligada. Para retrair a antena, desligue a fonte.
Ajuste do volume
% Gire MULTI-CONTROL para ajustar o
nível do som.
# Enquanto você pressiona e segura c ou d,
poderá pular as emissoras. A sintonia por busca
começará assim que c ou d for liberado.
Armazenamento e chamada
das freqüências de transmissão
da memória
Você pode facilmente armazenar até seis freqüências de transmissão a serem chamadas
posteriormente da memória.
! Seis emissoras para cada banda podem
ser armazenadas na memória.
% Ao encontrar uma freqüência que deseja armazenar na memória, pressione e segure um dos botões de sintonia de
emissora programada de 1 a 6, até o número programado parar de piscar.
A freqüência da emissora de rádio memorizada pode ser chamada da memória ao pressionar o botão de sintonia de emissora
programada.
# Você também pode chamar da memória as
freqüências das emissoras de rádio atribuídas
aos números de sintonia de emissora programada ao pressionar a ou b durante o display de freqüência.
Português (B)
Sintonizador
Operações básicas
% Selecionar uma banda
Pressione BAND/ESC.
# Pressione BAND/ESC até visualizar a banda
desejada (F1, F2, F3 para FM ou AM).
% Sintonia manual (passo a passo)
Pressione c ou d.
% Sintonia por busca
Pressione e segure c ou d e solte.
# Você pode cancelar a sintonia por busca ao
pressionar c ou d rapidamente.
Introdução às operações
avançadas
1 Pressione MULTI-CONTROL para visualizar o menu principal.
2 Utilize MULTI-CONTROL para selecionar
FUNCTION.
Gire para alterar a opção de menu. Pressione
para selecionar.
3 Gire MULTI-CONTROL para selecionar a
função.
BSM (Memória das melhores emissoras)—
LOCAL (Sintonia por busca local)
Ptbr
<
CRD4365-A/N>63
63
Page 64

/
Seção
02
Black plate (64,1)
Funcionamento desta unidade
Notas
! Para retornar ao display anterior, pressione
DISP/BACK/SCRL.
! Para retornar ao menu principal, pressione e
segure DISP/BACK/SCRL.
! Para retornar ao display normal, pressione
BAND/ESC.
! Se você não operar as funções em aproxima-
damente 30 segundos, o display retornará automaticamente ao normal.
Armazenamento das freqüências
mais fortes de transmissão
A BSM (Memória das melhores emissoras) armazena automaticamente as seis freqüências
de transmissão mais fortes na ordem da intensidade do sinal.
1 Utilize MULTI-CONTROL para selecionar
BSM no menu de função.
2 Pressione MULTI-CONTROL para ativar
BSM.
# Para cancelar, pressione MULTI-CONTROL
novamente.
Sintonia em sinais fortes
A sintonia por busca local permite que você
sintonize apenas as emissoras de rádio com
sinais suficientemente fortes para boa recepção.
1 Utilize MULTI-CONTROL para selecionar
LOCAL no menu de função.
2 Pressione MULTI-CONTROL para visualizar o modo de ajuste.
3 Gire MULTI-CONTROL para selecionar o
ajuste desejado.
FM: OFF—LEVEL 1—LEVEL 2—LEVEL 3—
LEVEL 4
AM: OFF—LEVEL 1—LEVEL 2
O ajuste LEVEL 4 permite a recepção apenas
das emissoras mais fortes, enquanto os ajus-
tes inferiores permitem que você receba progressivamente as emissoras mais fracas.
4 Pressione MULTI-CONTROL para determinar a seleção.
# Mesmo que o menu tenha sido cancelado
antes da determinação, a operação será
estabelecida.
CD player incorporado
Operações básicas
% Abrir o painel frontal
Pressione OPEN.
O slot de carregamento de disco aparece.
Slot de carregamento de disco
Botão EJECT
# Ao carregar um disco, coloque o lado da
etiqueta voltado para cima.
# Para evitar o mau funcionamento, certifique-
-se de que nenhum objeto metálico entre em contato com os terminais, enquanto o painel frontal
estiver aberto.
% Ejetar um CD (CD-ROM)
Pressione h (Ejetar).
% Selecionar uma pasta
Pressione a ou b.
% Selecionar uma faixa
Pressione c ou d.
% Avanço rápido ou retrocesso
Pressione e segure c ou d.
# Ao reproduzir um áudio compactado, não há
som nas operações de avanço rápido ou retrocesso.
64
Ptbr
<CRD4365-A
N>64
Page 65

/
Funcionamento desta unidade
Black plate (65,1)
Seção
02
% Retornar à pasta raiz
Pressione e segure BAND/ESC.
% Alternar entre áudio compactado e CD-
-DA
Pressione BAND/ESC.
# Essa operação está disponível apenas ao reproduzir CD-EXTRA ou CDs com MODO MISTO.
# Se você tiver alternado entre áudio compactado e CD-DA, a reprodução começará na primeira
faixa do disco.
Notas
! O CD player incorporado pode reproduzir CD
de áudio e áudio compactado gravado em um
CD-ROM. (Consulte a seção a seguir quanto
aos arquivos que podem ser reproduzidos.)
Consulte a página 79)
! Leia as precauções sobre os discos e o player
na página 78.
! Um disco já foi inserido, pressione SRC/OFF
para selecionar o CD player incorporado.
! Às vezes, ocorre um atraso entre o início da
reprodução de um disco e o som emitido. Durante a leitura, FRMT READ é visualizado.
! Se uma mensagem de erro for visualizada,
consulte Mensagens de erro na página 77.
! A reprodução é realizada seguindo a ordem
do número dos arquivos. As pastas que não
têm arquivos são puladas. Se a pasta 01
(ROOT) não tiver arquivos, a reprodução começará com a pasta 02.
Visualização de informações de
texto do disco
% Pressione DISP/BACK/SCRL para selecionar as informações de texto desejadas.
Para discos com CD TEXT
Tempo de reprodução—DISC TITLE (Título do
disco)—ARTISTNAME (Nome do artista do
disco)—TRACKTITLE (Título da faixa)—
ARTISTNAME (Nome do artista da faixa)
Para WMA/MP3
Tempo de reprodução—FLD NAME (Nome da
pasta)—FILE NAME (Nome do arquivo)—
TRACKTITLE (Título da faixa)—ARTISTNAME
(Nome do artista)—ALBUMTITLE (Título do
álbum)—COMMENT (Comentário)—Taxa de
bit—Números da pasta e da faixa
Para WAV
Tempo de reprodução—FLD NAME (Nome da
pasta)—FILE NAME (Nome do arquivo)—Freqüência de amostragem—Números da pasta
e da faixa
Notas
! Você pode rolar para a esquerda do título ao
pressionar e segurar DISP/BACK/SCRL.
! O CD de áudio que contém certas informa-
ções, como texto e/ou número, é conhecido
por CD TEXT.
! Se os caracteres gravados no arquivo de
áudio não forem compatíveis com esta unidade, eles não serão visualizados.
! Se não tiverem sido gravadas informações
específicas em um disco, NO XXXX será visualizado (por exemplo, NO TITLE).
! As informações de texto de alguns arquivos
de áudio podem não ser corretamente visualizadas.
! Dependendo da versão do iTunes utilizada
para gravar arquivos MP3 em um disco, informações de comentários podem não ser visualizadas corretamente.
! Dependendo da versão do Windows Media™
Player utilizada para codificar arquivos WMA,
os nomes dos álbuns e outras informações de
texto podem não ser visualizados corretamente.
! Ao reproduzir arquivos WMA gravados como
VBR (Taxa de bit variável), o valor da taxa de
bit médio é exibido.
! Ao reproduzir arquivos MP3 gravados por
VBR (Taxa de bit variável), VBR é visualizado e
não o valor da taxa de bit.
! A freqüência de amostragem visualizada no
display pode ser abreviada.
Português (B)
<CRD4365-A
N>65
Ptbr
65
Page 66

/
Seção
02
Black plate (66,1)
Funcionamento desta unidade
Seleção de faixas na lista de
títulos de faixa
A lista de títulos de faixa permite que você
veja a lista de títulos de faixa em um disco
com CD TEXT e selecione um deles para reprodução.
1 Pressione
modo de lista de títulos de faixa.
2 Utilize MULTI-CONTROL para selecionar
o título da faixa desejado.
Gire para alterar o título da faixa. Pressione
para reproduzir.
# Para retornar ao display normal, pressione
BAND/ESC ou
# Se você não operar a lista em aproximadamente 30 segundos, o display retornará automaticamente ao normal.
/LIST para alternar para o
/LIST.
Seleção de arquivos na lista de
nomes de arquivo
A lista de nomes de arquivo permite que você
veja a lista de nomes de arquivo (ou nomes de
pasta) e selecione um deles para reprodução.
1 Pressione
modo de lista de nomes de arquivo.
Os nomes de arquivos e pastas são visualizados no display.
2 Utilize MULTI-CONTROL para selecionar
o nome do arquivo desejado (ou nome da
pasta).
Gire para alterar o nome do arquivo ou da
pasta.
— quando um arquivo estiver selecionado,
pressione para reproduzir.
— quando uma pasta estiver selecionada,
pressione para ver uma lista de arquivos
(ou pastas) na pasta selecionada.
— quando uma pasta estiver selecionada,
pressione e segure para reproduzir uma
música na pasta selecionada.
# Para retornar à lista anterior (a pasta que está
a um nível acima), pressione DISP/BACK/SCRL.
/LIST para alternar para o
# Para retornar à camada superior da lista, pressione e segure DISP/BACK/SCRL.
# Para retornar ao display normal, pressione
BAND/ESC ou
# Se você não operar a lista em aproximadamente 30 segundos, o display retornará automaticamente ao normal.
/LIST.
Introdução às operações
avançadas
1 Pressione MULTI-CONTROL para visualizar o menu principal.
2 Utilize MULTI-CONTROL para selecionar
FUNCTION.
Gire para alterar a opção de menu. Pressione
para selecionar.
3 Gire MULTI-CONTROL para selecionar a
função.
REPEAT (Reprodução com repetição)—
RANDOM (Reprodução aleatória)—SCAN
(Reprodução resumida)—PAUSE (Pausa)—
S.RTRV (Recuperação de som)
Notas
! Para retornar ao display anterior, pressione
DISP/BACK/SCRL.
! Para retornar ao menu principal, pressione e
segure DISP/BACK/SCRL.
! Para retornar ao display normal, pressione
BAND/ESC.
! Se você não operar as funções em aproxima-
damente 30 segundos, o display retornará automaticamente ao normal.
Seleção de uma série de
reprodução com repetição
% Pressione 6/ várias vezes para sele-
cionar o ajuste desejado.
! DISC – Repete todas as faixas
! TRACK – Repete a faixa atual
! FOLDER – Repete a pasta atual
66
Ptbr
<CRD4365-A
N>66
Page 67

/
Funcionamento desta unidade
Black plate (67,1)
Seção
02
# Se você selecionar outra pasta durante a reprodução com repetição, a série de reprodução
com repetição mudará para repetição do disco.
# Ao executar a busca por faixa ou o avanço/retrocesso rápido durante TRACK (repetição de
faixa), a série de reprodução com repetição mudará para o disco/pasta.
# Quando FOLDER (repetição de pasta) for sele-
cionado, não será possível reproduzir uma subpasta dessa pasta.
# Você também pode executar essa operação
no menu visualizado ao utilizar
MULTI-CONTROL.
Reprodução de faixas em
ordem aleatória
As faixas em uma série de repetição selecionada são reproduzidas em ordem aleatória.
% Pressione 5/
ção aleatória.
As faixas são reproduzidas em ordem aleatória.
# Para desativar a reprodução aleatória, pressione 5/
# Você também pode executar essa operação
no menu visualizado ao utilizar
MULTI-CONTROL.
novamente.
para ativar a reprodu-
Procura de pastas e faixas
A reprodução resumida procura a música
dentro da série de repetição selecionada.
3 Ao encontrar a faixa desejada, pressione MULTI-CONTROL para desativar a reprodução resumida.
# Se o display retornou automaticamente para
reprodução, selecione SCAN novamente ao utilizar MULTI-CONTROL.
# Depois que a procura de um disco (pasta) for
concluída, a reprodução normal das faixas começará.
Pausa na reprodução
% Pressione 2/PAUSE para ativar a pausa.
Ocorre uma pausa na reprodução da faixa
atual.
# Para desativar a pausa, pressione 2/PAUSE
novamente.
# Você também pode executar essa operação
no menu visualizado ao utilizar
MULTI-CONTROL.
Utilização da Recuperação de som
A função Recuperação de som aprimora automaticamente o áudio compactado e restaura
um som rico.
% Pressione 1/S.Rtrv várias vezes para selecionar o ajuste desejado.
OFF (Desativado)—1—2
# 2 é mais eficiente do que 1.
# Você também pode executar essa operação
no menu visualizado ao utilizar
MULTI-CONTROL.
Português (B)
1 Utilize MULTI-CONTROL para selecionar
SCAN no menu de função.
2 Pressione MULTI-CONTROL para ativar
a reprodução resumida.
Os primeiros 10 segundos de cada faixa são
reproduzidos.
<CRD4365-A
N>67
Ptbr
67
Page 68

/
Seção
02
Black plate (68,1)
Funcionamento desta unidade
Reprodução de músicas no
áudio player portátil USB/
/memória USB
Para obter detalhes sobre o dispositivo suportado, consulte Compatibilidade com o áudio
player portátil na página 58.
Operações básicas
% Selecionar uma pasta
Pressione a ou b.
% Selecionar uma faixa
Pressione c ou d.
% Avanço rápido ou retrocesso
Pressione e segure c ou d.
% Retornar à pasta raiz
Pressione e segure BAND/ESC.
Notas
! O ótimo desempenho desta unidade pode não
ser obtido dependendo do áudio player portátil USB/memória USB conectado.
! Se a pasta 01 (ROOT) não tiver arquivos, a re-
produção começará com a pasta 02.
! Quando o áudio player portátil USB com a
função de recarga da bateria estiver conectado a esta unidade e a chave de ignição estiver
na posição ACC ou ON, a bateria será recarregada.
! Você pode desconectar o áudio player portátil
USB/memória USB sempre que quiser parar
de ouvi-lo.
! Se você não for utilizar um dispositivo USB,
desconecte-o desta unidade.
! Quando o áudio player portátil USB/memória
USB for desconectado desta unidade durante
a reprodução, NO DEVICE será visualizado.
Exibição de informações de
texto de um arquivo de áudio
A operação é a mesma que a de um áudio
compactado no CD player incorporado. (Consulte Visualização de informações de texto do
disco na página 65.)
Seleção de arquivos na lista de
nomes de arquivo
A operação é a mesma que a do CD player incorporado. (Consulte Seleção de arquivos na
lista de nomes de arquivo na página 66.)
Introdução às operações
avançadas
1 Pressione MULTI-CONTROL para visualizar o menu principal.
2 Utilize MULTI-CONTROL para selecionar
FUNCTION.
Gire para alterar a opção de menu. Pressione
para selecionar.
3 Gire MULTI-CONTROL para selecionar a
função.
REPEAT (Reprodução com repetição)—
RANDOM (Reprodução aleatória)—SCAN
(Reprodução resumida)—PAUSE (Pausa)—
S.RTRV (Recuperação de som)
Função e operação
As operações REPEAT, RANDOM, SCAN,
PAUSE e S.RTRV são basicamente as mesmas
que as do CD player incorporado.
Nome da função Operação
Consulte Seleção de uma série de
reprodução com repetição na pá-
gina 66.
No entanto, as séries de reprodução com repetição que podem
ser selecionadas são diferentes
daquelas do CD player incorpo-
REPEAT
RANDOM
rado. As séries de reprodução
com repetição do áudio player
portátil USB/memória USB são:
! TRACK – Repete apenas o ar-
quivo atual
! FOLDER – Repete a pasta
atual
! ALL – Repete todos os arqui-
vos
Consulte Reprodução de faixas
em ordem aleatória na página anterior.
68
Ptbr
<CRD4365-A
N>68
Page 69

Funcionamento desta unidade
Black plate (69,1)
Seção
02
SCAN
PAUSE
S.RTRV
Notas
! Para retornar ao display anterior, pressione
DISP/BACK/SCRL.
! Para retornar ao menu principal, pressione e
segure DISP/BACK/SCRL.
! Para retornar ao display normal, pressione
BAND/ESC.
! Se você não operar a função em aproximada-
mente 30 segundos, a tela retornará automaticamente ao normal.
! Se você selecionar outra pasta durante a re-
produção com repetição, a série de reprodução com repetição mudará para ALL.
! Se você executar a busca por faixa ou o avan-
ço/retrocesso rápido durante TRACK, a série
de reprodução com repetição mudará para
FOLDER.
! Depois que a procura de um arquivo ou pasta
for concluída, a reprodução normal dos arquivos começará novamente.
Consulte Procura de pastas e fai-
xas na página 67.
Consulte Pausa na reprodução na
página 67.
Consulte Utilização da Recupera-
ção de som na página 67.
Ajustes de áudio
Introdução aos ajustes de áudio
1 Pressione MULTI-CONTROL para visualizar o menu principal.
2 Utilize MULTI-CONTROL para selecionar
AUDIO.
Gire para alterar a opção de menu. Pressione
para selecionar.
3 Gire MULTI-CONTROL para selecionar a
função de áudio.
FAD/BAL (Ajuste do equilíbrio)—EQUALIZER
(Recuperação do equalizador)—TONE CTRL
(Ajuste do equalizador)—LOUDNESS (Sonoridade)—SLA (Ajuste do nível de fonte)
Notas
! Para retornar ao display anterior, pressione
DISP/BACK/SCRL.
! Para retornar ao menu principal, pressione e
segure DISP/BACK/SCRL.
! Para retornar ao display normal, pressione
BAND/ESC.
! Ao selecionar FM como a fonte, você não
pode alternar para SLA.
! Se você não operar as funções em aproxima-
damente 30 segundos, o display retornará automaticamente ao normal.
Português (B)
Utilização do ajuste do equilíbrio
Você pode modificar o ajuste do potenciômetro/equilíbrio de modo a fornecer um ambiente sonoro ideal para todas as pessoas que
estiverem no veículo.
1 Utilize MULTI-CONTROL para selecionar
FAD/BAL no menu de funções de áudio.
2 Pressione MULTI-CONTROL para visualizar o modo de ajuste.
3 Pressione MULTI-CONTROL para selecionar o segmento que deseja ajustar.
Pressione MULTI-CONTROL várias vezes para
alternar entre potenciômetro e equilíbrio.
4 Gire MULTI-CONTROL para ajustar o
equilíbrio do alto-falante.
O equilíbrio dos alto-falantes dianteiros/traseiros pode ser ajustado entre F15 e R15.
O equilíbrio dos alto-falantes esquerdos/direitos pode ser ajustado entre L15 e R15.
# FR 0 será o ajuste apropriado, quando apenas
dois alto-falantes forem utilizados.
Utilização do equalizador
Existem seis ajustes do equalizador armazenados, como DYNAMIC, VOCAL, NATURAL,
CUSTOM, FLAT e POWERFUL, que podem ser
facilmente chamados da memória a qualquer
momento.
! CUSTOM corresponde a uma curva do
equalizador ajustada que você cria.
CRD4365-A/N>69
<
Ptbr
69
Page 70

Seção
02
Black plate (70,1)
Funcionamento desta unidade
! Quando FLAT for selecionado, não será
feito nenhum acréscimo ou correção no
som.
Chamada das curvas do equalizador
da memória
1 Utilize MULTI-CONTROL para selecionar
EQUALIZER no menu de funções de áudio.
2 Pressione MULTI-CONTROL para visualizar o modo de ajuste.
3 Gire MULTI-CONTROL para selecionar o
equalizador.
DYNAMIC—VOCAL—NATURAL—CUSTOM
—FLAT—POWERFUL
4 Pressione MULTI-CONTROL para determinar a seleção.
# Mesmo que o menu tenha sido cancelado
antes da determinação, a operação será estabelecida.
Ajuste das curvas do equalizador
Você pode definir o ajuste da curva do equalizador atualmente selecionada, conforme desejado. Os ajustes das curvas do equalizador
definidas são memorizados em CUSTOM.
Ajuste de graves/médios/agudos
Você pode ajustar o nível de graves/médios/
/agudos.
1 Utilize MULTI-CONTROL para selecionar
TONE CTRL no menu de funções de áudio.
2 Pressione MULTI-CONTROL para visualizar o modo de ajuste.
3 Pressione MULTI-CONTROL para selecionar BASS/MID/TREBLE.
4 Gire MULTI-CONTROL para ajustar o
nível.
+6 a –6 é visualizado à medida que o nível au-
menta ou diminui.
5 Pressione MULTI-CONTROL para determinar a seleção.
# Mesmo que o menu tenha sido cancelado
antes da determinação, a operação será estabelecida.
Ajuste da sonoridade
A sonoridade compensa as deficiências das
faixas de áudio baixas e altas com volume
baixo.
1 Utilize MULTI-CONTROL para selecionar
LOUDNESS no menu de funções de áudio.
2 Pressione MULTI-CONTROL para visualizar o modo de ajuste.
3 Gire MULTI-CONTROL para selecionar o
ajuste desejado.
LOW (Baixa)—HIGH (Alta)—OFF (Desativada)
4 Pressione MULTI-CONTROL para determinar a seleção.
# Mesmo que o menu tenha sido cancelado
antes da determinação, a operação será estabelecida.
Ajuste de níveis de fonte
O ajuste de nível de fonte (SLA) permite ajustar o nível de volume de cada fonte para evitar
mudanças radicais de volume ao alternar
entre as fontes.
! Os ajustes são baseados no nível de volu-
me de FM, que permanece inalterado.
! O nível de volume de AM também pode ser
ajustado com os ajustes de nível de fonte.
1 Compare o nível de volume de FM com
o nível da fonte que deseja ajustar.
2 Utilize MULTI-CONTROL para selecionar
SLA no menu de funções de áudio.
3 Pressione MULTI-CONTROL para visualizar o modo de ajuste.
4 Gire MULTI-CONTROL para ajustar o volume da fonte.
+4 a –4 é visualizado à medida que o volume
da fonte é aumentado ou diminuído.
70
Ptbr
CRD4365-A/N>70
<
Page 71

Funcionamento desta unidade
Black plate (71,1)
Seção
02
5 Pressione MULTI-CONTROL para determinar a seleção.
# Mesmo que o menu tenha sido cancelado
antes da determinação, a operação será
estabelecida.
Ajustes iniciais
Definição dos ajustes iniciais
1 Pressione e segure SRC/OFF até desligar
a unidade.
2 Pressione e segure MULTI-CONTROL até
visualizar CLOCK SET no display.
3 Gire MULTI-CONTROL para selecionar
um dos ajustes iniciais.
CLOCK SET (Hora)—FM STEP (Passo de sinto-
nia FM)—AM STEP (Passo de sintonia AM)—
AUX (Entrada auxiliar)
# Para retornar ao display anterior, pressione
DISP/BACK/SCRL.
# Para retornar ao menu principal, pressione e
segure DISP/BACK/SCRL.
# Para cancelar os ajustes iniciais, pressione
BAND/ESC.
Ajuste da hora
Utilize estas instruções para ajustar a hora.
1 Utilize MULTI-CONTROL para selecionar
CLOCK SET no menu de ajuste inicial.
Consulte Definição dos ajustes iniciais nesta
página.
2 Pressione MULTI-CONTROL para visualizar o modo de ajuste.
# Para retornar ao display anterior, pressione
DISP/BACK/SCRL.
3 Pressione MULTI-CONTROL para selecionar o segmento da hora visualizada que
deseja ajustar.
Cada vez que você pressionar
MULTI-CONTROL, um segmento da hora visualizada será selecionado:
Horas—Minutos
Ao selecionar um dos segmentos da hora visualizada, ele piscará.
4 Gire MULTI-CONTROL para acertar a
hora do relógio.
Ajuste do passo de sintonia FM
O passo de sintonia FM empregado pela sintonia por busca pode ser alternado entre 100
kHz, o passo predefinido e 50 kHz.
! Se a sintonia por busca for executada em
passos de 50 kHz, as emissoras poderão
ser sintonizadas de forma imprecisa. Sintonize as emissoras utilizando a sintonia manual ou utilize novamente a sintonia por
busca.
! O passo de sintonia permanece a 50 kHz
durante a sintonia manual.
1 Utilize MULTI-CONTROL para selecionar
FM STEP no menu de ajuste inicial.
Consulte Definição dos ajustes iniciais nesta
página.
2 Pressione MULTI-CONTROL para visualizar o modo de ajuste.
3 Gire MULTI-CONTROL para selecionar o
passo de sintonia FM.
50 KHZ (50 kHz)—100 KHZ (100 kHz)
4 Pressione MULTI-CONTROL para determinar a seleção.
# Mesmo que o menu tenha sido cancelado
antes da determinação, a operação será estabelecida.
Ajuste do passo de sintonia AM
O passo de sintonia AM pode ser alternado
entre 9 kHz, o passo predefinido e 10 kHz. Ao
utilizar o sintonizador na América do Norte,
Central ou do Sul, reajuste o passo de sintonia
de 9 kHz (531 a 1 602 kHz permissível) para 10
kHz (530 a 1 640 kHz permissível).
1 Utilize MULTI-CONTROL para selecionar
AM STEP no menu de ajuste inicial.
Consulte Definição dos ajustes iniciais nesta
página.
2 Pressione MULTI-CONTROL para visualizar o modo de ajuste.
Português (B)
CRD4365-A/N>71
<
Ptbr
71
Page 72

/
Seção
02
Black plate (72,1)
Funcionamento desta unidade
3 Gire MULTI-CONTROL para selecionar o
passo de sintonia AM.
10 KHZ (10 kHz)—9 KHZ (9 kHz)
4 Pressione MULTI-CONTROL para determinar a seleção.
# Mesmo que o menu tenha sido cancelado
antes da determinação, a operação será estabelecida.
Ativação do ajuste auxiliar
É possível utilizar o dispositivo auxiliar com
esta unidade. Ative o ajuste auxiliar ao utilizar
o dispositivo auxiliar conectado a esta unidade.
1 Utilize MULTI-CONTROL para selecionar
AUX no menu de ajuste inicial.
Consulte Definição dos ajustes iniciais na página anterior.
2 Pressione MULTI-CONTROL para ativar
AUX.
# Para desativar AUX, pressione
MULTI-CONTROL novamente.
Outras funções
Utilização da fonte AUX
Você pode conectar um dispositivo auxiliar a
esta unidade utilizando um cabo com miniplugue estéreo.
% Insira o miniplugue estéreo no conector
de entrada desta unidade.
Ativação ou desativação do
display de hora
Você pode ativar ou desativar o display de
hora.
! Mesmo quando as fontes estiverem desli-
gadas, a hora será visualizada no display.
% Pressione CLOCK para ativar ou desativar o display de hora.
Cada vez que pressionar CLOCK, o display de
hora será ativado ou desativado.
# O display de hora desaparece temporariamente quando se executa outra operação, mas
retorna depois de 25 segundos.
Seleção de AUX como a fonte
% Pressione SRC/OFF para selecionar AUX
como a fonte.
# Se o ajuste auxiliar não for ativado, AUX não
poderá ser selecionado. Para obter mais detalhes,
consulte Ativação do ajuste auxiliar nesta página.
72
Ptbr
<CRD4365-A
N>72
Page 73

/
Conexões
Black plate (73,1)
Seção
03
Importante
! Quando esta unidade estiver instalada em um
veículo sem a posição ACC (acessório) na
chave de ignição, o cabo vermelho deve ser
conectado ao terminal que possa detectar a
operação da chave de ignição. Do contrário, a
bateria poderá descarregar.
O
F
N
F
O
S
T
A
R
T
Posição ACC Sem posição ACC
! Utilizar esta unidade em condições diferentes
das seguintes pode causar incêndio ou problemas de funcionamento.
— Veículos com bateria de 12 volts e aterra-
mento negativo.
— Alto-falantes com 50 W (valor de saída) e 4
ohm a 8 ohm (valor de impedância).
! Para evitar curto-circuito, superaquecimento
ou problemas de funcionamento, certifique-se
de seguir as instruções abaixo.
— Desconecte o terminal negativo da bateria
antes da instalação.
— Fixe a fiação com presilhas para cabos ou
fita adesiva. Para proteger a fiação, utilize
a fita adesiva, envolvendo-a por onde ela
passar, de forma que não entre em contato
com peças metálicas.
— Coloque todos os cabos afastados de
peças em movimento, como marcha e trilhos do assento.
— Coloque todos os cabos afastados de luga-
res que possam aquecer, como perto da
saída do aquecedor.
— Não passe o cabo amarelo por um orifício
em direção ao compartimento do motor
para conectar a bateria.
— Cubra quaisquer conectores de cabo des-
conectados com fita isolante.
— Não encurte os cabos.
— Nunca corte o isolamento do cabo de ali-
mentação desta unidade para compartilhar a energia com outros dispositivos. A
capacidade de corrente do cabo é limitada.
— Utilize um fusível com a classificação pres-
crita.
— Nunca faça a conexão do cabo negativo
do alto-falante diretamente ao terra.
— Nunca conecte juntos os cabos negativos
de vários alto-falantes.
! O sinal de controle é emitido pelo cabo azul/
/branco quando esta unidade é ligada. Conecte a um controle remoto do sistema de
amplificador de potência externo ou terminal
de controle do relé da antena automática do
veículo (máx. 300 mA 12 V CC). Se o veículo
estiver equipado com uma antena acoplada
ao vidro, conecte-a ao terminal da fonte de alimentação do intensificador da antena.
! Nunca conecte o cabo azul/branco ao termi-
nal de potência do amplificador externo. Além
disso, nunca o conecte ao terminal de potência da antena automática. Do contrário, a bateria poderá descarregar ou apresentar
defeitos.
! O cabo preto é o terra. Esse cabo e o cabo
terra de outro produto (especialmente, produtos de alta tensão, como amplificadores de
potência) devem ser conectados separadamente. Do contrário, se eles forem desconectados acidentalmente, incêndio ou problemas
de funcionamento podem ser ocasionados.
Português (B)
<CRD4365-A
N>73
Ptbr
73
Page 74

/
Seção
03
Conexões
Diagrama de conexão
Black plate (74,1)
Este produto
Saída dianteira
Saída
traseira
Jaque de antena
Entrada do controle remoto fixo
Um adaptador de controle remoto
fixo pode ser conectado
(vendido separadamente).
Amarelo
Conecte ao terminal de fornecimento
de 12 V constante.
Vermelho
Conecte ao terminal controlado pelo
interruptor de ignição (CC 12 V).
Preto (terra do chassi)
Conecte a um lugar de metal limpo,
livre de pintura.
Alto-falante frontal
Da esquerda
Alto-falante traseiro
Fusível (10 A)
Branco
Branco/preto
Verd e
Verde/preto
Amplificador de potência
(vendido separadamente)
Conecte com cabos RCA
(vendidos separadamente)
Amplificador de potência
(vendido separadamente)
Controle remoto de sistema
Azul/branco
Conecte ao terminal de controle de sistema
do amplificador de potência ou ao terminal de
controle de relé de antena automática (máx.
300 mA, CC 12 V).
Com um sistema de 2 alto-falantes, não
conecte nada aos fios de alto-falante que não
estejam conectados a alto-falantes.
Cinza
Alto-falante frontal
Cinza/preto
Violeta
Violeta/preto
Da direita
Alto-falante traseiro
74
Ptbr
Alto-falante frontal
Alto-falante traseiro
Alto-falante frontal
Alto-falante traseiro
Realize estas conexões quando utilizar o
amplificador opcional.
<CRD4365-A
N>74
Page 75

Instalação
Black plate (75,1)
Seção
04
Importante
! Verifique todas as conexões e os sistemas
antes da instalação final.
! Não utilize peças não autorizadas. O uso de
peças não autorizadas pode causar defeitos.
! Consulte o revendedor se a instalação exigir a
perfuração de orifícios ou outras modificações no veículo.
! Não instale esta unidade onde:
— possa existir interferência com a operação
do veículo.
— possa causar danos a um passageiro,
como resultado de uma parada brusca.
! O laser semicondutor será danificado se supe-
raquecer. Instale esta unidade afastada de lugares que possam aquecer, como perto da
saída do aquecedor.
! O ótimo desempenho é obtido quando a uni-
dade é instalada a um ângulo inferior a 60°.
60°
! Na instalação, para assegurar a dispersão de
calor apropriada ao utilizar esta unidade, certifique-se de deixar um espaço amplo atrás do
painel traseiro e amarre os cabos soltos de
forma que não bloqueiem as saídas de ar.
Montagem dianteira DIN
Instalação com bucha de borracha
1 Insira a suporte do aparelho no painel.
Ao instalar em um espaço raso, utilize a suporte do aparelho fornecida. Se houver espaço
suficiente atrás da unidade, utilize a suporte
do aparelho fornecida pela fábrica.
2 Fixe a suporte do aparelho utilizando
uma chave de fenda para dirigir as lingüetas de metal (90°) ao local apropriado.
3 Instale a unidade.
Painel Bucha de borracha
Suporte do aparelho Parafuso
Remoção da unidade
1 Puxe as partes superior e inferior do
moldura para fora para removê-lo. (Ao recolocá-lo no lugar, direcione o lado com
uma ranhura para baixo e conecte-o.)
Português (B)
Montagem dianteira/
/traseira DIN
Esta unidade pode ser instalada apropriadamente na parte “Dianteira” (montagem dianteira DIN convencional) ou na parte “Traseira”
(montagem traseira DIN, utilizando orifícios
de parafusos rosqueados nas laterais do chassi da unidade). Para obter detalhes, consulte
os seguintes métodos de instalação.
Moldura
! É fácil remover o moldura se o painel fron-
tal está solto.
2 Insira as chaves de extração fornecidas
nas laterais da unidade até ouvir um clique
de encaixe.
Ptbr
<
CRD4365-A/N>75
75
Page 76

/
Seção
04
Instalação
3 Puxe a unidade para fora do painel.
Montagem traseira DIN
1 Puxe as partes superior e inferior do
moldura para fora para removê-lo. (Ao recolocá-lo no lugar, direcione o lado com
uma ranhura para baixo e conecte-o.)
Black plate (76,1)
Moldura
! É fácil remover o moldura se o painel fron-
tal está solto.
2 Determine a posição apropriada em
que os orifícios no suporte e a lateral da
unidade coincidem.
3 Aperte dois parafusos em cada lado.
Parafuso
Suporte de montagem Painel ou console
! Utilize parafusos de armação (5 mm × 8
mm) ou parafusos de cabeça embutida (5
mm × 9 mm), dependendo do formato do
orifício no suporte.
76
Ptbr
<CRD4365-A
N>76
Page 77

/
Informações adicionais
Black plate (77,1)
Apêndice
Mensagens de erro
Ao entrar em contato com o revendedor ou a
Central de Serviços da Pioneer mais próxima,
certifique-se de gravar a mensagem de erro.
CD player incorporado
Mensagem Causa Ação
ERROR-11, 12,
17, 30
ERROR-10, 11,
12, 15, 17, 30,
A0
ERROR-15 O disco inserido
ERROR-22, 23 CD com este for-
NO AUDIO O disco inserido
SKIPPED O disco inserido
PROTECT Todos os arqui-
Disco sujo Limpe o disco.
Disco riscado Substitua o disco.
Problema elétri-
co ou mecânico
não contém
dados
mato não pode
ser reproduzido
não contém arquivos que possam ser
reproduzidos
contém arquivos
WMA protegidos
por DRM
vos no disco inserido estão
protegidos por
DRM
Desligue a chave
de ignição (OFF) e
volte a ligá-la (ON),
ou alterne para
uma fonte diferente e, em seguida,
volte ao CD player.
Substitua o disco.
Substitua o disco.
Substitua o disco.
Substitua o disco.
Substitua o disco.
O áudio player
SKIPPED
PROTECT Todos os arqui-
N/A USB O dispositivo
CHECK USB O conector USB
portátil USB/memória USB conectado contém
arquivos WMA
protegidos pelo
Windows Media
DRM 9/10
vos no áudio
player portátil
USB/memória
USB conectado
estão protegidos
pelo Windows
Media DRM 9/10
USB conectado
não é suportado
por esta unidade.
ou cabo USB é
curto-circuitado.
O áudio player
portátil USB/memória USB conectado consome mais do que
500 mA (corrente
máxima permitida).
Reproduza um arquivo de áudio não
protegido pelo
Windows Media
DRM 9/10.
Transfira os arquivos de áudio não
protegidos pelo
Windows Media
DRM 9/10 para o
áudio player portátil USB/memória
USB e conecte-o.
Conecte um áudio
player portátil USB
ou memória USB
compatível com
USB Mass Storage
Class.
Confirme se o conector USB ou o
cabo USB não está
preso em alguma
coisa ou está danificado.
Desconecte o
áudio player portátil USB/memória
USB e não o utilize. Coloque a
chave de ignição
na posição OFF, depois em ACC ou
ON, e conecte o
áudio player portátil USB/memória
USB compatível.
Português (B)
Áudio player USB/memória USB
Mensagem Causa Ação
NO AUDIO Nenhuma músi-caTransfira os arqui-
A memória USB
com segurança
ativada está conectada
vos de áudio para
o áudio player portátil USB/memória
USB e conecte-o.
Siga as instruções
da memória USB
para desativar a segurança.
<CRD4365-A
N>77
Ptbr
77
Page 78

Apêndice
Black plate (78,1)
Informações adicionais
Falha de comuni-
ERROR-19
ERROR-23 O dispositivo
cação
USB não é formatado com
FAT16 ou FAT32
Execute uma das
seguintes operações.
–Desligue a chave
de ignição (OFF) e
volte a ligá-la (ON).
–Desconecte o
áudio player portátil USB/memória
USB.
–Alterne para uma
fonte diferente.
Em seguida, retorne para o áudio
player portátil
USB/memória
USB.
O dispositivo USB
deve ser formatado
com FAT16 ou
FAT32
Tratamento das diretrizes
dos discos e do player
! Utilize apenas os discos com os logotipos a
seguir.
! Utilize apenas discos convencionais, total-
mente circulares. Não utilize discos com
outros formatos.
! Utilize um CD de 12 cm ou 8 cm. Não utili-
ze um adaptador ao reproduzir CDs de 8
cm.
! Não insira nada além de CDs no slot de
carregamento de CD.
! Não utilize discos rachados, lascados, tor-
tos ou com defeitos, já que podem danificar o player.
! Não é possível reproduzir CD-R/CD-RW
não finalizados.
! Não toque na superfície gravada dos dis-
cos.
! Quando não for utilizá-los, guarde os dis-
cos em suas caixas.
! Evite deixar os discos em ambientes exces-
sivamente quentes nem expostos à luz direta do sol.
! Não cole etiquetas, escreva ou aplique pro-
dutos químicos à superfície dos discos.
! Para remover sujeiras de um CD, limpe-o
com um tecido macio do centro para fora.
! A condensação pode temporariamente pre-
judicar o desempenho do player. Não o utilize por aproximadamente uma hora para
que se ajuste à temperatura mais quente.
Além disso, seque os discos com um pano
macio.
! A reprodução de discos pode não ser possí-
vel devido às suas características, aos seus
formatos, ao aplicativo gravado, ao ambiente de gravação, às condições de armazenamento e assim por diante.
! As informações de texto podem não ser
corretamente visualizadas dependendo do
ambiente de gravação.
! Impactos nas estradas ao dirigir podem in-
terromper a reprodução do disco.
! Leia as precauções sobre discos antes de
utilizá-los.
Discos duais
! Discos duais são discos com dois lados
que possuem em um lado um CD de áudio
gravável e um DVD de vídeo gravável no
outro lado.
! Uma vez que o lado do CD dos Discos
duais não é compatível com o padrão dos
CDs comuns, poderá ser impossível repro duzir o lado do CD nesta unidade.
78
Ptbr
<
CRD4365-A/N>78
Page 79
Informações adicionais
Black plate (79,1)
Apêndice
! Inserir e ejetar um Disco dual com freqüên-
cia pode causar arranhões no disco. Arranhões profundos podem causar problemas
na reprodução com esta unidade. Em alguns casos, o Disco dual pode ficar preso
no slot de carregamento e não ser ejetado.
Para evitar isso, recomendamos que você
não use Discos duais nesta unidade.
! Consulte as informações fornecidas pelo
fabricante do disco para saber mais a respeito dos Discos duais.
Compatibilidade com
compressão de áudio
WMA
! Formato compatível: codificado por WMA
pelo Windows Media Player
! Extensão de arquivo: .wma
! Taxa de bit: 48 kbps a 320 kbps (CBR), 48
kbps a 384 kbps (VBR)
! Freqüência de amostragem: 32 kHz, 44,1
kHz, 48 kHz
! Windows Media Audio 9 Professional, Sem
perdas, Voz: Não
MP3
! Extensão de arquivo: .mp3
! Taxa de bit: 8 kbps a 320 kbps (CBR), VBR
! Freqüência de amostragem: 16 kHz a 48
kHz (32, 44,1, 48 kHz para ênfase)
! Versão de identificação ID3 compatível: 1.0,
1.1, 2.2, 2.3, 2.4 (a versão de identificação
ID3 2.x recebe prioridade em relação à versão 1.x.)
! Lista de reprodução M3u: Não
! MP3i (MP3 interativo), mp3 PRO: Não
WAV
! Formato compatível: PCM linear (LPCM),
MS ADPCM
! Extensão de arquivo: .wav
! Bits de quantização: 8 e 16 (LPCM), 4 (MS
ADPCM)
! Freqüência de amostragem: 16 kHz a 48
kHz (LPCM), 22,05 kHz a 44,1 kHz (MS
ADPCM)
Orientações de manuseio e
informações suplementares
! Pode ocorrer um pequeno atraso ao iniciar
a reprodução de arquivos de áudio codificados com dados de imagem.
! Apenas 32 caracteres do início podem ser
visualizados como um nome de arquivo (incluindo a extensão do arquivo) ou um
nome de pasta.
! As informações de texto de alguns arquivos
de áudio podem não ser corretamente visualizadas.
! Esta unidade pode não operar correta-
mente dependendo do aplicativo utilizado
para codificar arquivos WMA.
Arquivos de áudio
compactados no disco
! Compatível com ISO 9660 níveis 1 e 2. Os
sistemas de arquivo Romeo e Joliet são
compatíveis com este player.
! A reprodução de múltiplas sessões é possí-
vel.
! Os arquivos de áudio compactados não
são compatíveis com a transferência de
dados por gravação de pacotes.
! Independentemente da duração de uma
seção sem gravação entre as músicas da
gravação original, os discos de áudio compactado serão reproduzidos com uma
curta pausa entre as músicas.
Português (B)
<
CRD4365-A/N>79
Ptbr
79
Page 80

1
2
5
6
elvel
Apêndice
Black plate (80,1)
Informações adicionais
Áudio player USB/memória USB
! Esta unidade pode reproduzir arquivos no
áudio player portátil USB/memória USB
que é compatível com USB Mass Storage
Class. No entanto, arquivos protegidos por
direitos autorais armazenados nos dispositivos USB acima mencionados não podem
ser reproduzidos.
! Você não pode conectar um áudio player
portátil USB/memória USB a esta unidade
via um hub USB.
! Uma memória USB particionada não é
compatível com esta unidade.
! Dependendo do tipo de áudio player portá-
til USB/memória USB utilizado, esta unidade pode não reconhecê-lo ou os arquivos
de áudio podem não ser reproduzidos corretamente.
! Não deixe o áudio player portátil USB/me-
mória USB exposto à luz direta do sol por
um longo período de tempo. A exposição
prolongada à luz direta do sol pode resultar
em problemas de funcionamento do áudio
player portátil USB/memória USB devido à
alta temperatura.
! Não deixe o áudio player portátil USB/me-
mória USB em locais com alta temperatura.
! Fixe de forma segura o áudio player portátil
USB/memória USB enquanto você estiver
dirigindo. Não deixe o áudio player portátil
USB/memória USB cair no chão, onde
pode ficar preso embaixo do pedal do freio
ou do acelerador.
! Dependendo dos dispositivos USB conec-
tados a esta unidade, podem ocorrer ruídos
no rádio.
! As informações de texto de alguns arquivos
de áudio podem não ser corretamente visualizadas.
! Pode ocorrer um pequeno atraso ao iniciar
a reprodução de arquivos de áudio em um
áudio player portátil USB/memória USB
com várias hierarquias de pastas.
! Não conecte nada além do áudio player
portátil USB/memória USB.
! As operações podem variar dependendo do
tipo de áudio player USB e memória
USB.
Exemplo de uma hierarquia
: Pasta
: Arquivo de áudio compactado
3
4
vel 1
v
Seqüência de arquivos de áudio
no disco
! Esta unidade atribui os números de pastas.
O usuário não pode atribuir números de
pastas.
! A seqüência de seleção de pastas ou outra
operação pode ser alterada dependendo do
software de codificação ou gravação.
! A hierarquia de pastas pode ter até oito ca-
madas. No entanto, uma hierarquia de pastas prática tem menos do que duas
camadas.
! Até 99 pastas em um disco podem ser re-
produzidas.
Seqüência de arquivos de áudio
na memória USB
Para áudio players portáteis USB, a seqüência é
diferente daquela da memória USB e depende
do player.
3vel 4
80
Ptbr
<
CRD4365-A/N>80
Page 81

/
Informações adicionais
Black plate (81,1)
Apêndice
! 01 a 05 representam números de pasta atri-
buídos. 1 a 6 representam a seqüência
de reprodução. O usuário não pode atribuir
números de pasta e especificar a seqüência de reprodução com esta unidade.
! A seqüência de reprodução do arquivo de
áudio é a mesma que a seqüência gravada
no dispositivo USB.
! Para especificar a seqüência de reprodu-
ção, o método a seguir é recomendado.
1 Crie um nome de arquivo incluindo núme-
ros que especifiquem a seqüência de reprodução (por exemplo, 001xxx.mp3 e
099yyy.mp3).
2 Coloque esses arquivos em uma pasta.
3 Grave a pasta contendo os arquivos no dis-
positivo USB.
No entanto, dependendo do ambiente de
sistema, você não pode especificar a seqüência de reprodução de arquivos.
! Até 15 000 arquivos podem ser reproduzi-
dos em um áudio player portátil USB/memória USB.
! Até 500 pastas podem ser reproduzidas em
um áudio player portátil USB/memória
USB.
! Até oito camadas de diretório podem ser
reproduzidas em um áudio player portátil
USB/memória USB.
MP3
O fornecimento deste produto dá o direito a
apenas uma licença para uso particular e não
comercial, e não dá o direito a uma licença
nem implica qualquer direito de uso deste produto em qualquer transmissão em tempo real
(terrestre, via satélite, cabo e/ou qualquer
outro meio) comercial (ou seja, que gere receita), transmissão/reprodução via Internet, intranets e/ou outras redes ou em outros sistemas
de distribuição de conteúdo eletrônico, como
aplicativos de áudio pago ou áudio por demanda. É necessária uma licença independente para tal uso. Para obter detalhes, visite
http://www.mp3licensing.com.
iTunes
iTunes é uma marca comercial da Apple Inc.,
registrada nos Estados Unidos e em outros países.
Português (B)
Nota sobre direitos autorais
e marcas comerciais
WMA
Windows Media e o logotipo do Windows são
marcas comerciais ou registradas da
Microsoft Corporation nos Estados Unidos e/
/ou em outros países.
<CRD4365-A
N>81
Ptbr
81
Page 82
/
Apêndice
Black plate (82,1)
Informações adicionais
Especificações
Geral
Fonte de alimentação nominal
..................................................... 14,4 V CC
(faixa de tensão permissível:
12,0 V a 14,4 V CC)
Sistema de aterramento ...... Tipo negativo
Consumo máx. de energia
..................................................... 10,0 A
Dimensões (L × A × P):
DIN
Chassi ....................... 178 mm × 50 mm × 162
mm
Face ............................ 188 mm × 58 mm × 22 mm
D
Chassi ....................... 178 mm × 50 mm × 162
mm
Face ............................ 170 mm × 48 mm × 22 mm
Peso ............................................... 1,3 kg
Áudio
Potência de saída máxima
..................................................... 50 W × 4
Potência de saída contínua
..................................................... 22 W × 4 (50 a 15 000 Hz,
5% de THD, carga de 4 W,
ambos os canais aciona-
dos)
Impedância de carga ............. 4 W (4 W a8W permissível)
Nível de saída máx. pré-saída
..................................................... 2,0 V
Controles de tons:
Graves
Freqüência .............. 100 Hz
Ganho ....................... ±13dB
Médio
Freqüência .............. 1 kHz
Ganho ....................... ±12 dB
Agudos
Freqüência .............. 10 kHz
Ganho ....................... ±12 dB
CD player
Sistema ........................................ Sistema de áudio de CDs
Discos utilizáveis ..................... CDs
Relação do sinal ao ruído .... 94 dB (1 kHz) (rede IEC-A)
Número de canais .................. 2 (estéreo)
Formato de decodificação MP3
..................................................... MPEG-1 & 2 Camada de
áudio 3
Formato de decodificação WMA
..................................................... Ver. 7, 7.1, 8, 9, 10, 11 (áudio
de 2 canais)
(Windows Media Player)
Formato de sinal WAV ........... PCM linear & MS ADPCM
(Não compactado)
USB
Especificação ............................ USB 2.0 de velocidade total
Corrente de energia ............... 500 mA
Capacidade máxima de memória
..................................................... 250 GB
Capacidade mínima de memória
..................................................... 256 MB
Classe USB ................................ MSC (Mass Storage Class)
Sistema de arquivos ............... FAT16, FAT32
Formato de decodificação MP3
..................................................... MPEG-1 & 2 Camada de
áudio 3
Formato de decodificação WMA
..................................................... Ver. 7, 7.1, 8, 9, 10, 11 (áudio
de 2 canais)
(Windows Media Player)
Formato de sinal WAV ........... PCM linear & MS ADPCM
(Não compactado)
Sintonizador de FM
Faixa de freqüência ................ 87.5 MHz a 108.0 MHz
Sensibilidade utilizável ......... 11 dBf (0,7 µV/75 W, mono,
Sinal/Ruído: 30 dB)
Relação do sinal ao ruído .... 72 dB (rede IEC-A)
Sintonizador de AM
Faixa de freqüências .............. 531 kHz a 1 602 kHz (9 kHz)
530 kHz a 1640 kHz (10 kHz)
Sensibilidade utilizável ......... 25 µV (Sinal/Ruído: 20 dB)
Relação do sinal ao ruído .... 62 dB (rede IEC-A)
Nota
As especificações e o design estão sujeitos a modificações sem aviso prévio devido a
aperfeiçoamentos.
82
Ptbr
<CRD4365-A
N>82
Page 83

/
目錄
Black plate (83,1)
感謝您
購買本先鋒產品。
初次使用本產品之前,請詳讀本手冊以確保使用方式正確。
保存在安全及將來參考時方便取得的地方。
開始使用前
關於本機 84
可攜式音訊播放器相容性 84
歡迎至本公司網站 84
本機的防盜 84
– 拆卸前面板 84
– 安裝前面板 84
遙控器的使用與保養 85
– 安裝電池 85
– 使用遙控器 85
操作本機
按鈕功能 86
– 主機 86
– 遙控器 87
– 顯示指示 87
基本操作 88
– 電源ON/OFF 88
– 選擇播放來源 88
– 調整音量 88
調諧器 88
– 基本操作 88
– 儲存和調用廣播頻率 88
– 進階操作介紹 88
– 儲存最強的廣播頻率 89
– 調到強訊號 89
內置式CD播放器 89
– 基本操作 89
– 顯示碟片之文字資訊 90
– 從曲目標題清單中選擇曲目 90
– 從檔案名稱清單中選擇檔案 90
– 進階操作介紹 90
– 選擇重播範圍 91
– 依隨機順序播放曲目 91
– 掃描資料夾與曲目 91
– 暫停播放 91
– 使用數位音樂修補功能 91
播放USB可攜式音訊播放器/USB隨身碟的歌
曲 91
– 基本操作 91
– 顯示音訊檔案的文字資訊 92
– 從檔案名稱清單中選擇檔案 92
– 進階操作介紹 92
音訊調整 92
– 音訊調整的說明 92
– 使用平衡調整 92
– 使用等化器 93
– 調整等化器曲線 93
– 調整響度 93
– 調整音源電平 93
初始設定 94
– 調整初始設定 94
– 設定時鐘 94
– 設定FM調頻間隔 94
– 設定AM調頻間隔 94
– 切換輔助設定 94
其他功能 95
– 使用AUX播放來源 95
– 打開或關閉時鐘顯示 95
連接
接線圖 97
安裝
DIN前/後座 98
– DIN前座 98
– DIN後座 99
附加資訊
錯誤訊息 100
碟片與播放器的操作指南 100
雙面碟 101
壓縮音訊相容性 101
操作指南和補充資訊 101
– 碟片上的壓縮音訊檔案 101
– USB可攜式音訊播放器/USB隨身
碟 102
階層實例 102
– 碟片上的音訊檔案順序 102
– USB隨身碟上的音訊檔案順序 102
版權與商標宣告 103
規格 104
讀畢後,請將本手冊
中文
<CRD4365-A
N>83
Zhtw
83
Page 84

/
節
01
Black plate (84,1)
開始使用前
關於本機
注意
! 不可讓液體濺到本機,否則可能導致觸電。
此外,接觸液體還可能導致本機損壞、冒煙
和過熱。
! 「1級雷射產品」
本產品包含有1級以上的雷射二極管。為了保
證安全,切勿拆下任何機蓋或者試圖接觸本
機內部。 所有維修事宜應交由專業人員處
理。
! 請將本手冊保存於隨手可取得之處,以備查
閱操作步驟及注意事項。
! 請務必保持在適當的音量,確保車內能聽見
車外的聲響。
! 請注意本機的防潮。
! 如果電池未接通或電量用完,預設記憶將會
刪除且必須重新設定。
! 如果本機無法正常運作,請聯絡您的經銷商
或最近的先鋒授權服務站。
可攜式音訊播放器相容性
若要瞭解USB可攜式音訊播放器/USB隨身碟的
相關資訊,請洽詢製造商。
本機符合下列特點:
— USB MSC(大量儲存等級)相容可攜式音訊
播放器和記憶體
— 可播放WMA、MP3與WAV檔案
重要
! 拆卸或安裝前面板時動作要輕巧。
! 請避免使前面板受到劇烈撞擊。
! 請將前面板遠離光照和高溫。
! 卸下之前,確定從前面板上拔下AUX/USB連接
線和USB裝置。 否則本機的連接裝置或車子內
部可能會損壞。
拆卸前面板
1 按OPEN打開前面板。
2 抓住前面板左側,並將其輕輕往外拉。
請勿將前面板抓握過緊,或使其掉落,而且應
避免接觸水或其他液體,以免造成永久損壞。
3 將前面板放入隨附的防盜箱中安全保存。
安裝前面板
% 重新裝回前面板時,將其對著主機直立握
住,然後用力按入座鉤固定。
注意
若USB可攜式音訊播放器/USB隨身碟的資料遺
失,即使發生在使用本機時,先鋒概不負責。
歡迎至本公司網站
本公司網址如下:
http://pioneer.jp/group/index-e.html
! 本公司網站提供有關先鋒公司的最新資
訊。
本機的防盜
前面板可拆下,以防被盜。
84
Zhtw
<CRD4365-A
N>84
Page 85

/
開始使用前
遙控器的使用與保養
安裝電池
拉出遙控器電池背面的托盤,以對齊正極
(+)、負極(-)的方向裝入電池。
警告
請將電池存放在兒童無法拿取之處。若誤吞電
池,請立即就醫。
注意
! 請使用CR2025(3V)鋰電池。
! 至少一個月不使用遙控器時,請取出電池。
! 如果換用錯誤的電池,則會有爆炸的危險。
僅限換用相同或同類型的電池。
! 請勿使用金屬工具夾取電池。
! 請勿將電池存放於金屬置物盒中。
! 如果電池漏液,請將遙控器徹底擦拭乾淨並
裝上新電池。
! 處理用過的電池時,請遵循貴國或貴地區的
政府法規或環境公共組織的條例。
Black plate (85,1)
節
01
中文
使用遙控器
將遙控器對著前面板進行操作。
! 遙控器在光照下可能無法正常工作。
重要
! 請勿將遙控器存放於高溫或陽光直射的區域
中。
! 請勿讓遙控器掉落到地板上,否則可能卡在
煞車或油門踏板之下。
<CRD4365-A
N>85
Zhtw
85
Page 86

4
5
8
9
b
1
3
a26
7
節
02
Black plate (86,1)
操作本機
按鈕功能
主機
1 SRC/OFF按鈕
選擇一個播放來源,可開啟本機。按此按鈕
可在所有播放來源之間循環。
2 MULTI-CONTROL
轉動可調高或調低音量。
同樣也可用於控制功能。
3
/LIST按鈕
按此按鈕可顯示碟片標題清單、曲目標題清
單、資料夾清單或檔案清單。
4 USB埠
用於連接USB音訊播放器/USB隨身碟。
! 連接時,打開USB接頭蓋。
! 使用USB纜線將USB音訊播放器/USB隨身
碟連接至USB埠。由於USB音訊播放器/
USB隨身碟連接在本機前面,因此直接連
接相當危險。
也可以使用先鋒CD-U50EUSB纜線。相關
詳細資料請洽詢您的經銷商。
5 OPEN按鈕
按此按鈕可打開前面板。
6 AUX輸入插孔(3.5 mm立體聲插孔)
用來連接輔助裝置。
7 CLOCK按鈕
按該按鈕可換至時鐘顯示。
8 1至6按鈕
按該按鈕可進行預設調頻。 同樣也可用於
控制功能。
! 1/S.Rtrv可用於控制S.RTRV(數位音樂
修補)。
! 2/PAUSE可用於控制PAUSE(暫停)。
! 5/
! 6/
9 DISP/BACK/SCRL按鈕
按此按鈕可選擇不同的顯示模式。
按住可捲動文字資訊。
操作選單時,按下可返回前一顯示畫面。
操作選單時,按住可返回主選單。
a a/b/c/d按鈕
按下可手動搜尋調頻、快進、快倒和曲目搜
尋控制。同樣也可用於控制功能。
! 操作選單時
! 操作清單時
b BAND/ESC按鈕
按下可選擇三個FM頻段與一個AM頻段。
操作選單時,按下可返回普通顯示畫面。
可用於控制RANDOM(隨機)。
可用於控制REPEAT(重播)。
— 按下a的功能等同於向右轉動
MULTI-CONTROL。
— 按下b的功能等同於向左轉動
MULTI-CONTROL。
— 按下c的功能等同於按下
DISP/BACK/SCRL。
— 按住c的功能等同於按住
DISP/BACK/SCRL。
— 按下d的功能等同於按下
MULTI-CONTROL。
— 按住d的功能等同於按住
MULTI-CONTROL。
— 按下a的功能等同於向左轉動
MULTI-CONTROL。
— 按下b的功能等同於向右轉動
MULTI-CONTROL。
— 按下c的功能等同於按下
DISP/BACK/SCRL。
— 按住c的功能等同於按住
DISP/BACK/SCRL。
— 按下d的功能等同於按下
MULTI-CONTROL。
— 按住d的功能等同於按住
MULTI-CONTROL。
86
Zhtw
<
CRD4365-A/N>86
Page 87

c
h
f
1
b
d
9
e
g
a
6
8
4
操作本機
Black plate (87,1)
節
02
遙控器
其作用與主機上的按鈕相同。
c VOLUME按鈕
按此按鈕可調高或調低音量。
d MUTE按鈕
按下可關閉聲音。要開啟聲音,請再按一
次。
e AUDIO按鈕
按下可選擇音訊功能。
f e按鈕
按該按鈕可開關暫停。
g FUNCTION按鈕
按此按鈕可選擇各項功能。
播放源關閉時,按住該鍵可調出初始設定選
單。
h LIST/ENTER按鈕
按此按鈕可根據播放來源顯示碟片標題清
單、曲目標題清單、資料夾清單或檔案清
單。
在操作選單中,按下可控制功能。
顯示指示
12
9 abc d
7
5
1 (碟片)指示器
在主顯示幕顯示碟片(專輯)名稱時出現。
(作者)指示器
2
在主顯示幕顯示碟片(曲目)作者姓名時出
現。
3 主顯示幕部分
顯示頻段、頻率、經過的播放時間和其他設
定。
! 調諧器
顯示頻段與頻率。
! 內置式CD播放器和USB
顯示經過的播放時間與文字資訊。
(歌曲)指示器
4
在主顯示幕顯示曲目(歌曲)名稱時出現。
此外,在操作清單時選擇可播放的音訊檔案
也會出現。
5 c指示器
存在上一層資料夾或選單時出現。
(資料夾)指示器
6
在操作清單功能時出現。
7 d指示器
存在下一層資料夾或選單時出現。
8 LOC指示器
在本地頻道搜尋開啟時出現。
LOUD(響度)指示器
9
在響度開啟時出現。
a 5(立體聲)指示器
當所選擇的頻率以立體聲廣播出現。
(重播)指示器
b
在重播曲目開啟時出現。
在資料夾重播開啟時出現。
3
中文
CRD4365-A/N>87
<
Zhtw
87
Page 88

/
節
02
Black plate (88,1)
操作本機
c (隨機播放)指示器
在隨機播放開啟時出現。
d
在數位音樂修補功能開啟時出現。
(數位音樂修補)指示器
基本操作
電源ON/OFF
開啟本機電源
% 按SRC/OFF可開啟本機電源。
關閉本機電源
% 按住SRC/OFF直至本機關閉。
選擇播放來源
您可以選擇要收聽的音源。
% 反覆按SRC/OFF可在以下播放來源之間切
換。
TUNER (調諧器)-CD (內置式CD播放器)
-USB (USB)-AUX (AUX)
注意│注意
! 在下列情況時,音源不會改變。
— 本機中未裝入碟片時;
— 當AUX(輔助輸入)設為關時(請參閱第94
頁)。
! 當USB可攜式音訊播放器/USB隨身碟未連接至
本機的USB連接埠時,顯示NO DEVICE。
! AUX的預設值為開。不使用AUX時請將它關閉
(請參閱第94頁上
! 將可攜式音訊播放器連接至AUX輸入,同時使
用車用DC電源來充電時,可能會產生噪音。
在這種情況下,請停止充電。
! 當本機的藍色/白色引線連接至汽車自動天
線中繼控制端子時,汽車天線會在本機播放
來源啟動時伸出。收回天線時,請關閉播放
來源。
切換輔助設定
調整音量
% 轉動MULTI-CONTROL可調整音量。
)。
調諧器
基本操作
% 選擇波段
按BAND/ESC。
# 按BAND/ESC直至所需的波段(F1,F2,F3
為FM或AM)顯示。
% 手動調整(逐格)
按c或d。
% 搜尋調頻
按住c或d,然後放開。
# 搜尋調頻可透過快速按c或d取消。
# 按住c或d可以跳台。一放開c或d即立刻開
始搜尋調頻。
儲存和調用廣播頻率
本機可輕鬆儲存多達六個廣播頻率供以後調
用。
! 每個波段可記憶儲存六個電台。
% 找到要儲存於記憶體中的頻率時,按住1
至6其中一個預設調頻按鈕,直到預設號碼停
止閃爍。
按預設調頻按鈕可調出記憶的電台頻率。
# 在頻率顯示過程中,也可以按下a或b顯示預
設調頻號碼分配的廣播電台頻率。
進階操作介紹
1 按MULTI-CONTROL顯示主選單。
2 使用MULTI-CONTROL選擇FUNCTION。
轉動可切換選單選項。按下並進行選擇。
3 轉動MULTI-CONTROL選擇功能。
BSM(最佳電台記憶)-LOCAL(本地頻道
搜尋)
注意│注意
! 要返回前一顯示畫面,請按
DISP/BACK/SCRL。
! 要返回主選單,按住DISP/BACK/SCRL。
! 要返回一般顯示,請按BAND/ESC。
! 如果不在約30秒內操作該功能,顯示幕將自
動返回一般顯示。
88
Zhtw
<CRD4365-A
N>88
Page 89

/
操作本機
Black plate (89,1)
節
02
儲存最強的廣播頻率
BSM(最佳電台記憶)自動依電台的訊號強度
儲存六個最強的廣播頻率。
1 使用MULTI-CONTROL在功能選單中選擇
BSM。
2 按MULTI-CONTROL開啟BSM。
# 若要取消,請再按一次MULTI-CONTROL。
調到強訊號
本地頻道搜尋只能收聽訊號夠強,且接收效果
良好的廣播電台。
1 使用MULTI-CONTROL在功能選單中選擇
LOCAL。
2 按MULTI-CONTROL顯示設定模式。
3 轉動MULTI-CONTROL選擇所需的設定。
FM: OFF-LEVEL 1-LEVEL 2-LEVEL 3-
LEVEL 4
AM: OFF-LEVEL 1-LEVEL 2
LEVEL 4設定僅接收訊號最強的電台。隨著設
定降低,可接收的電台訊號將逐漸減弱。
4 按MULTI-CONTROL確定選擇。
# 即使在確定之前已取消選單,仍會完成操
作。
內置式CD播放器
基本操作
% 打開前面板
按OPEN。
碟片槽出現。
碟片槽
# 載入碟片時,碟片有標籤的那一側朝上。
# 為避免故障,前面板打開時,請勿使任何金
屬物品與端子接觸。
% 退出CD(CD-ROM)
按h(退出)。
% 選擇資料夾
按a或b。
% 選擇曲目
按c或d。
% 快速前進或快速倒轉
按住c或d。
# 播放壓縮音訊時,快速前進或快速倒轉時無
聲。
% 返回根資料夾
按住BAND/ESC。
% 切換壓縮音訊和CD-DA
按BAND/ESC。
# 此操作僅能在播放CD-EXTRA或MIXED-MODE CD
時執行。
# 如果已在壓縮音訊與CD-DA之間切換,則播放
從光碟第一個曲目開始。
注意│注意
! 內置式CD播放器可以播放音訊CD和錄製在CD-
ROM中的壓縮音訊。 (關於此可播放的檔案,
請參閱下一節。 請參閱第101頁)
! 閱讀第100頁上關於碟片與播放器的注意事
項。
! 插入碟片後,請按SRC/OFF選擇內置式CD播放
器。
! 有時開始播放碟片與發出聲音之間會有停
滯。讀碟時,會顯示FRMT READ。
! 如果顯示錯誤訊息,則請參閱第100頁上
。
訊息
! 依檔案編號的順序進行播放。跳過不含檔案
的資料夾。(如果資料夾01(ROOT)中不含
檔案,則從資料夾02開始播放。)
錯誤
中文
EJECT按鈕
<CRD4365-A
N>89
Zhtw
89
Page 90

/
節
02
Black plate (90,1)
操作本機
顯示碟片之文字資訊
% 按DISP/BACK/SCRL選擇所需文字資訊。
關於CD TEXT碟片
播放時間-DISC TITLE(光碟標題)-
ARTISTNAME(光碟作者姓名)-
TRACKTITLE(曲目標題)-ARTISTNAME
(曲目作者姓名)
使用於WMA/MP3時
播放時間-FLD NAME(資料夾名稱)-
FILE NAME(檔案名稱)-TRACKTITLE(曲
目標題)-ARTISTNAME(作者姓名)-
ALBUMTITLE(專輯標題)-COMMENT(註
解)-位元率-資料夾和曲目號碼
使用於WAV時
播放時間-FLD NAME(資料夾名稱)-
FILE NAME(檔案名稱)-取樣頻率-資料夾
和曲目號碼
注意│注意
! 按住DISP/BACK/SCRL可捲動至標題的左端。
! 含有如文字與/或數字等特定資訊的音訊CD
為CD TEXT。
! 如果音訊檔案上錄製的字元與本機不相容,
則此類字元將不會顯示。
! 如果iPod中未錄製特定資訊,則將顯示
NO XXXX(例如:NO TITLE)。
! 有些音訊檔案的文字資訊可能無法正確顯
示。
! 因用於將MP3檔案寫入碟片的iTunes版本之
故,註解資訊可能無法正常顯示。
! 需視使用於WMA檔案編碼的Windows Media™
Player版本而定,專輯名稱與其他文字資訊
可能無法正常顯示。
! 播放以VBR(可變位元率)錄製的WMA檔案
時,平均位元率值會顯示。
! 播放以VBR(可變位元率)錄製的MP3檔案
時,VBR而不是位元率值顯示。
! 顯示幕中顯示的取樣頻率可能縮寫。
從曲目標題清單中選擇曲目
曲目標題清單功能可顯示CD TEXT碟片上的曲
目標題清單,以供選擇播放。
1 按
/LIST切換至曲目標題清單模式。
2 使用MULTI-CONTROL選擇所需的曲目標
題。
轉動可改變曲目標題。按下可進行播放。
# 若要返回一般顯示,請按BAND/ESC或 /
LIST。
# 如果不在約30秒內操作清單,顯示幕將自動
返回一般顯示。
從檔案名稱清單中選擇檔案
檔案名稱清單功能可顯示檔案名稱(或資料夾
名稱)的清單,以供選擇播放。
1 按
/LIST切換至檔案名稱清單模式。
檔案與資料夾的名稱在顯示幕中出現。
2 使用MULTI-CONTROL選擇所需的檔案名
稱(或資料夾名稱)。
轉動可改變檔案或資料夾的名稱。
— 選擇檔案時,按下可進行播放。
— 選擇資料夾時,按下可查看所選擇資料夾
中的檔案(或資料夾)清單。
— 選擇資料夾時,按住播放所選擇資料夾中
的歌曲。
# 返回前一清單(上一層資料夾)時,請按
DISP/BACK/SCRL。
# 要返回清單的最上層,請按住
DISP/BACK/SCRL。
# 若要返回一般顯示,請按BAND/ESC或
LIST。
# 如果不在約30秒內操作清單,顯示幕將自動
返回一般顯示。
/
進階操作介紹
1 按MULTI-CONTROL顯示主選單。
2 使用MULTI-CONTROL選擇FUNCTION。
轉動可切換選單選項。按下並進行選擇。
3 轉動MULTI-CONTROL選擇功能。
REPEAT(重播)-RANDOM(隨機播放)-
SCAN(掃描播放)-PAUSE(暫停)-
S.RTRV(數位音樂修補)
注意│注意
! 要返回前一顯示畫面,請按
DISP/BACK/SCRL。
! 要返回主選單,按住DISP/BACK/SCRL。
90
Zhtw
<CRD4365-A
N>90
Page 91

/
操作本機
Black plate (91,1)
節
02
! 要返回一般顯示,請按BAND/ESC。
! 如果不在約30秒內操作該功能,顯示幕將自
動返回一般顯示。
選擇重播範圍
% 重複按6/ ,選擇所需設定。
! DISC-重播所有曲目
! TRACK-重播目前曲目
! FOLDER-重播目前資料夾
# 如果在重播過程中選擇其他資料夾,則重播
範圍會變為光碟重播。
# 在TRACK(曲目重播)過程中執行曲目搜尋
或快進/快倒會將重播範圍變為碟片/資料夾。
# 當選擇FOLDER(資料夾重播)時,該資料夾
中的子資料夾無法播放。
# 您也可以使用MULTI-CONTROL,在出現的選
單中執行此操作。
依隨機順序播放曲目
所選擇重播範圍中的曲目以隨機順序播放。
% 按5/
依隨機順序播放曲目。
# 關閉隨機播放時,請再按一次5/ 。
# 您也可以使用MULTI-CONTROL,在出現的選
單中執行此操作。
開啟隨機播放。
掃描資料夾與曲目
掃描播放搜尋在重播範圍內的歌曲。
1 使用MULTI-CONTROL在功能選單中選擇
SCAN。
2 按MULTI-CONTROL開啟掃描播放。
播放各曲目的前10秒鐘內容。
3 找到所需的曲目時按MULTI-CONTROL,
關閉掃描播放。
# 如果顯示幕已自動返回播放顯示,使用
MULTI-CONTROL可重新選擇SCAN。
# 在光碟(資料夾)掃描結束之後,曲目將正
常播放。
暫停播放
% 按2/PAUSE開啟暫停。
目前曲目的播放暫停。
# 關閉暫停時,請再按一次2/PAUSE。
# 您也可以使用MULTI-CONTROL,在出現的選
單中執行此操作。
使用數位音樂修補功能
數位音樂修補功能自動增強壓縮音訊並還原豐
富的聲音。
% 重複按1/S.Rtrv,選擇所需設定。
OFF(關閉)-1-2
# 2比1有效。
# 您也可以使用MULTI-CONTROL,在出現的選
單中執行此操作。
播放USB可攜式音訊播放器/USB
隨身碟的歌曲
有關支援裝置的詳細資料,請參閱第84頁上可
攜式音訊播放器相容性。
基本操作
% 選擇資料夾
按a或b。
% 選擇曲目
按c或d。
% 快速前進或快速倒轉
按住c或d。
% 返回根資料夾
按住BAND/ESC。
注意│注意
! 視所連接的USB可攜式音訊播放器/USB隨身碟
的不同,本機可能無法達到最佳效能。
! 如果資料夾01(ROOT)中不含檔案,則從資
料夾02開始播放。
! 當點火開關設定於ACC或ON位置時,如果有電
池充電功能的USB可攜式音訊播放器連接至本
機,則電池將充電。
中文
<CRD4365-A
N>91
Zhtw
91
Page 92

節
02
Black plate (92,1)
操作本機
! 您可隨時在想要結束收聽時,中斷與USB可攜
式音訊播放器/USB隨身碟的連接。
! 如果不使用USB裝置,請將它從本機上拔下。
! 如果在播放期間將USB可攜式音訊播放器/
USB隨身碟從本機上拔下,則顯示
NO DEVICE。
顯示音訊檔案的文字資訊
該操作與內置式CD播放器的壓縮音訊的操作方
式相同。 (請參閱第90頁上
。)
資訊
顯示碟片之文字
從檔案名稱清單中選擇檔案
該操作與內置式CD播放器的操作方式相同。
(請參閱第90頁上
。)
案
從檔案名稱清單中選擇檔
進階操作介紹
1 按MULTI-CONTROL顯示主選單。
2 使用MULTI-CONTROL選擇FUNCTION。
轉動可切換選單選項。按下並進行選擇。
3 轉動MULTI-CONTROL選擇功能。
REPEAT(重播)-RANDOM(隨機播放)-
SCAN(掃描播放)-PAUSE(暫停)-
S.RTRV(數位音樂修補)
功能與操作
REPEAT、RANDOM、SCAN、PAUSE以及
S.RTRV的操作基本與內置式CD播放器的操作
方式相同。
功能名稱 操作功能
請參閱上一頁上
但是您可選擇的重播範圍與內置式CD播
放器不同。USB可攜式音訊播放器/USB隨
REPEAT
RANDOM 請參閱上一頁上
SCAN 請參閱上一頁上
身碟的重播範圍如下:
! TRACK-僅重播目前檔案
! FOLDER-重播目前資料夾
! ALL-重播所有檔案
選擇重播範圍
依隨機順序播放曲目
掃描資料夾與曲目
。
。
。
PAUSE 請參閱上一頁上
S.RTRV
! 要返回前一顯示畫面,請按
DISP/BACK/SCRL。
! 要返回主選單,按住DISP/BACK/SCRL。
! 要返回一般顯示,請按BAND/ESC。
! 如果不在約30秒內操作功能,畫面將自動返
回一般顯示。
! 如果在重播過程中選擇其他資料夾,則重播
範圍會變為ALL。
! 如果在TRACK過程中進行曲目搜尋或快進/
快倒,則重播範圍會變為FOLDER。
! 在檔案或資料夾掃描結束之後,檔案將重新
開始正常播放。
請參閱上一頁上
能
注意│注意
。
暫停播放
。
使用數位音樂修補功
音訊調整
音訊調整的說明
1 按MULTI-CONTROL顯示主選單。
2 使用MULTI-CONTROL選擇AUDIO。
轉動可切換選單選項。按下並進行選擇。
3 轉動MULTI-CONTROL選擇音訊功能。
FAD/BAL(平衡調整)-EQUALIZER(等化
器調用)-TONE CTRL(等化器調整)-
LOUDNESS(響度)-SLA(音源電平調整)
注意│注意
! 要返回前一顯示畫面,請按
DISP/BACK/SCRL。
! 要返回主選單,按住DISP/BACK/SCRL。
! 要返回一般顯示,請按BAND/ESC。
! 選擇FM調諧器作為播放來源時,您無法切換
至SLA。
! 如果不在約30秒內操作該功能,顯示幕將自
動返回一般顯示。
使用平衡調整
可改變淡化器/平衡設定,為所有就座位置調
整至理想的聽覺環境。
92
Zhtw
CRD4365-A/N>92
<
Page 93

操作本機
Black plate (93,1)
節
02
1 使用MULTI-CONTROL在音訊功能選單中
選擇FAD/BAL。
2 按MULTI-CONTROL顯示設定模式。
3 按MULTI-CONTROL選擇您要設定的部
分。
反覆按MULTI-CONTROL可切換淡化和平衡。
4 轉動MULTI-CONTROL可調整揚聲器平
衡。
在F15和R15之間調整前置/後置揚聲器平
衡。
在L15和R15之間調整左置/右置揚聲器平
衡。
# FR 0為僅使用兩個揚聲器時的正確設定。
使用等化器
DYNAMIC,VOCAL,NATURAL,
CUSTOM,FLAT與POWERFUL等六種儲存的
等化器設定可隨時輕鬆調出。
! CUSTOM為所建立經調整之等化器曲線。
! 選擇FLAT時,對聲音不予補充或校正。
調用等化器曲線
1 使用MULTI-CONTROL在音訊功能選單中
選擇EQUALIZER。
2 按MULTI-CONTROL顯示設定模式。
3 轉動MULTI-CONTROL選擇等化器。
DYNAMIC-VOCAL-NATURAL-CUSTOM
-FLAT-POWERFUL
4 按MULTI-CONTROL確定選擇。
# 即使在確定之前已取消選單,仍會完成操
作。
調整等化器曲線
可按要求調整目前所選之等化器曲線。經調整
的等化器曲線會記憶在CUSTOM中。
調整低音/中音/高音
您可以調整低音/中音/高音等級。
1 使用MULTI-CONTROL在音訊功能選單中
選擇TONE CTRL。
2 按MULTI-CONTROL顯示設定模式。
3 按MULTI-CONTROL選擇BASS/MID/
TREBLE。
4 轉動MULTI-CONTROL可調整電平。
+6至 -6會隨著電平增大或減小而顯示。
5 按MULTI-CONTROL確定選擇。
# 即使在確定之前已取消選單,仍會完成操
作。
調整響度
響度可在低音量時補償低音及高音音域中的不
足。
1 使用MULTI-CONTROL在音訊功能選單中
選擇LOUDNESS。
2 按MULTI-CONTROL顯示設定模式。
3 轉動MULTI-CONTROL選擇所需的設定。
LOW(低)-HIGH(高)-OFF(關)
4 按MULTI-CONTROL確定選擇。
# 即使在確定之前已取消選單,仍會完成操
作。
調整音源電平
音源電平調整(SLA)可調整各播放來源的音
量電平,以免在播放來源之間切換時音量驟然
變化。
! 設定以FM調諧器的音量電平為依據,該音
量電平保持不變。
! AM調諧器的音量電平也可隨著音源電平的
調整而調整。
1 將FM調諧器音量電平與所需調整之播放來
源音量電平進行對比。
2 使用MULTI-CONTROL在音訊功能選單中
選擇SLA。
3 按MULTI-CONTROL顯示設定模式。
4 轉動MULTI-CONTROL調整播放來源音
量。
+4至–4隨著播放來源音量的調高或降低而顯
示。
中文
CRD4365-A/N>93
<
Zhtw
93
Page 94

節
02
Black plate (94,1)
操作本機
5 按MULTI-CONTROL確定選擇。
# 即使在確定之前已取消選單,仍會完成操
作。
初始設定
調整初始設定
1 按住SRC/OFF直至本機關閉。
2 按住MULTI-CONTROL直至CLOCK SET在
顯示幕中出現。
3 轉動MULTI-CONTROL選擇其中一個初始
設定。
CLOCK SET(時鐘)-FM STEP(FM調頻間
隔)-AM STEP(AM調頻間隔)-AUX(輔
助輸入)
# 要返回前一顯示畫面,請按
DISP/BACK/SCRL。
# 要返回主選單,按住DISP/BACK/SCRL。
# 取消初始設定時,請按BAND/ESC。
設定時鐘
請依照這些指示設定時鐘。
1 使用MULTI-CONTROL在初始設定選單中
選擇CLOCK SET。
請參閱本頁上
2 按MULTI-CONTROL顯示設定模式。
# 要返回前一顯示畫面,請按
DISP/BACK/SCRL。
3 按MULTI-CONTROL選擇所需設定之時鐘
顯示部分。
每次按下MULTI-CONTROL時,即選擇時鐘顯
示的某一個部分。
小時-分鐘
選擇某部分的時鐘顯示畫面時,所選部分閃
爍。
4 轉動MULTI-CONTROL正確設定時鐘。
調整初始設定
設定FM調頻間隔
搜尋調頻所用之FM調頻間隔可在100 kHz、預
設間隔及50 kHz之間進行切換。
。
! 如果搜尋調頻以50 kHz為間隔進行,則會
無法準確收聽電台。請用手動調頻或再次
使用搜尋調頻收聽電台。
! 在手動調頻期間,調頻間隔保持在50
kHz。
1 使用MULTI-CONTROL在初始設定選單中
選擇FM STEP。
請參閱本頁上
2 按MULTI-CONTROL顯示設定模式。
3 轉動MULTI-CONTROL選擇FM調頻間隔。
50 KHZ(50 kHz)-100 KHZ(100 kHz)
4 按MULTI-CONTROL確定選擇。
# 即使在確定之前已取消選單,仍會完成操
作。
調整初始設定
。
設定AM調頻間隔
AM調頻間隔可在9 kHz、預設間隔及10 kHz之間
切換。在北美、中美或南美使用調諧器時,請
將調頻間隔從9 kHz(容許範圍531 kHz至1 602
kHz)重設為10 kHz(容許範圍530 kHz至1 640
kHz)。
1 使用MULTI-CONTROL在初始設定選單中
選擇AM STEP。
請參閱本頁上
2 按MULTI-CONTROL顯示設定模式。
3 轉動MULTI-CONTROL選擇AM調頻間隔。
10 KHZ(10 kHz)-9 KHZ(9 kHz)
4 按MULTI-CONTROL確定選擇。
# 即使在確定之前已取消選單,仍會完成操
作。
調整初始設定
。
切換輔助設定
本機可以配合輔助裝置使用。 使用連接至本
機的輔助裝置時,啟動輔助設定。
1 使用MULTI-CONTROL在初始設定選單中
選擇AUX。
請參閱本頁上
調整初始設定
。
94
Zhtw
<
CRD4365-A/N>94
Page 95

/
操作本機
2 按MULTI-CONTROL開啟AUX。
# 關閉AUX時,請再按一次
MULTI-CONTROL。
其他功能
使用AUX播放來源
您可以使用立體聲迷你插頭連接線將輔助裝置
連接至本機。
% 將立體聲迷你插頭插入本機的輸入插孔。
選擇AUX做為播放來源
% 按SRC/OFF選擇AUX作為播放來源。
# 如果輔助設定未開啟,則無法選擇AUX。如
需詳細資料,請參閱上一頁上
切換輔助設定
打開或關閉時鐘顯示
可打開或關閉時鐘顯示。
! 即使播放來源關閉,時鐘顯示仍會在顯示
幕中出現。
% 按CLOCK可打開或關閉時鐘顯示。
每按一次CLOCK即打開或關閉時鐘顯示。
# 進行其他操作時,時鐘顯示會暫時消失;但
是在25秒後時鐘顯示會再次出現。
。
Black plate (95,1)
節
02
中文
<CRD4365-A
N>95
Zhtw
95
Page 96

/
節
03
連接
重要
! 當本機安裝在點火開關沒有 ACC(附加)位置
的車輛中時,紅色纜線必須接到可以偵測點
火開關運作的端子上。否則電池可能耗盡。
ACC位置 無ACC位置
! 如未能於以下條件中使用本機,將可能導致
火災或故障。
— 配備12伏特電池與負接地的車輛。
— 50 W(輸出值)與 4 ohm 至 8 ohm(阻抗
值)的揚聲器。
! 為防止短路,過熱或故障發生,請務必遵守
下列指示。
— 安裝之前請斷開電池的負極。
— 以纜線夾或膠帶固定纜線。為保護纜線,
請以膠帶包覆纜線與金屬部位接觸的部
分。
— 請勿將纜線置於活動部件上,比如汽車排
檔與座位扶手。
— 請勿將纜線置於受熱位置,比如暖風機出
口附近。
— 請勿將黃色纜線透過引擎室的孔連接至電
池。
— 以絕緣膠帶包覆任何未連接的纜線接頭。
— 請勿縮短纜線長度。
— 切勿為了與其他裝置共用電源而割開本機
電源線絕緣層。纜線的電流負載量有一定
限度。
— 請使用規定額定值的保險絲。
— 請勿將揚聲器負極線直接接地。
— 請勿將多個揚聲器的負極線綑紮在一起。
! 當本機電源開啟時,控制訊號會透過藍/白
色纜線輸出。請將其連接至外部功率放大器
系統遙控器或車輛的自動天線中繼控制端子
(最大300 mA 12 V DC)。若車輛配備有玻璃
天線,請將其連接至天線增強電源端子。
! 切勿將藍/白纜線連接到外部的變壓電源端
子。同時,請避免將其連接到自動天線的電
源端子。否則電池可能耗盡。
! 黑色纜線接地。此纜線與其他產品的接地纜
線(尤其是功率放大器等高強度電流產品)
必須分別佈線。否則,萬一它們斷開的話,
可能會造成火災或產生故障。
Black plate (96,1)
O
F
N
F
O
S
T
A
R
T
96
Zhtw
<CRD4365-A
N>96
Page 97

/
連接
接線圖
Black plate (97,1)
節
03
中文
<CRD4365-A
N>97
Zhtw
97
Page 98

/
節
04
Black plate (98,1)
安裝
重要
! 最後安裝之前,請檢查所有的連接和系統。
! 請勿操作未獲授權使用的部分。操作未獲授
權使用的部分可能導致故障。
! 若安裝需要在車輛上鑽孔或進行其他修改,
請洽詢您的經銷商。
! 請勿將本機安裝在:
— 可能會干擾車輛操作的位置。
— 因突然停車可能會傷及乘客的位置。
! 半導體雷射在過熱的狀況下可能會損壞。請
勿將本機安裝在受熱位置,例如暖風機出口
附近。
! 當本機以小於60°的角度安裝時,會獲得最
佳效能。
60°
! 為了確保在使用本機時能有適當的散熱,在
安裝時,請確認您有在後面板後方留下足夠
的空間,並纏住鬆散的纜線,以防其堵住出
風口。
ᮽӛ⭁᱿ἇ⿵
Ⴜኈ
DIN前座
使用橡皮套管安裝
1 將座套插入儀表板中。
在狹窄空間中安裝時,請使用隨附的座套。若
本機後方有足夠的空間,請使用原廠隨附的座
套。
2 使用螺絲起子折彎金屬突出部位(90°)
至定位,藉以固定座套。
3 安裝本機。
儀表板 橡皮套管
座套 螺絲
移除本機
1 將飾環的頂部及底部往外拉,以移除飾
環。(若您要重新裝上飾環,請對準有向下溝
槽的側邊並接上飾環。)
DIN前/後座
本機可由「前」(傳統DIN前座)或「後」
(DIN後座安裝,使用機身側的螺絲孔)方正
確安裝。有關詳情,請參閱以下的安裝方法。
98
Zhtw
飾環
! 當前面板卸除時,移除飾環會比較容易。
2 將隨附的抽取鑰匙插入本機的兩側,使其
卡至定位。
3 將本機拉出儀表板。
<CRD4365-A
N>98
Page 99

/
安裝
DIN後座
1 將飾環的頂部及底部往外拉,以移除飾
環。(若您要重新裝上飾環,請對準有向下溝
槽的側邊並接上飾環。)
飾環
! 當前面板卸除時,移除飾環會比較容易。
2 選定適當的位置,讓托架孔與本機側面密
合。
3 鎖緊各邊的兩顆螺絲。
螺絲
Black plate (99,1)
節
04
中文
托架 儀表板或操縱台
! 使用十字槽螺絲(5mm×8mm)或平面螺
絲(5mm×9mm),取決於托架上螺絲孔
的形狀。
<CRD4365-A
N>99
Zhtw
99
Page 100

附錄
Black plate (100,1)
附加資訊
錯誤訊息
與經銷商或就近的先鋒授權服務中心聯絡時,
請務必記錄錯誤訊息。
內置式CD播放器
訊息 原因 措施
ERROR-11, 12,
17, 30
ERROR-10, 11,
12, 15, 17, 30,
A0
ERROR-15 插入的碟片不含
ERROR-22, 23 CD格式無法播放 更換碟片。
NO AUDIO 插入的碟片中未
SKIPPED 插入的碟片中含
PROTECT 插入碟片上的所
USB可攜式音訊播放器/USB隨身碟
訊息 原因 措施
NO AUDIO 無歌曲 傳送音訊檔案到
SKIPPED 連接的USB可攜式
PROTECT 連接的可攜式音
N/A USB 本機不支援所連
碟片變髒 清潔碟片。
碟片有刮痕 更換碟片。
電氣或機械故障 關閉點火開關,然
任何資料
錄有任何可播放
的檔案
受DRM保護的WMA
檔案
有檔案受DRM保護
連接已啟用安全
功能的USB隨身碟
音訊播放器/USB
隨身碟含有受
Windows Media
DRM 9/10保護的
WMA檔案。
訊播放器/USB隨
身碟上的所有檔
案受Windows
Media DRM 9/10的
保護
接的USB裝置。
後再開啟,或切換
至其他播放來源,
然後再回到CD播放
器。
更換碟片。
更換碟片。
更換碟片。
更換碟片。
USB可攜式音訊播
放器/USB隨身碟並
連接。
依USB隨身碟的指
示停用安全功能。
播放未受到
Windows Media DRM
9/10保護的音訊檔
案。
傳送未受Windows
Media DRM 9/10保
護的檔案到USB可
攜式音訊播放器/
USB隨身碟並連
接。
連接USB可攜式音
訊播放器或USB大
量儲存等級相容的
USB隨身碟。
USB接頭或USB纜
CHECK USB
ERROR-19 通訊失敗 執行下列其中一項
ERROR-23 USB裝置未格式化
線短路。
連接的USB可攜式
音訊播放器/USB
記憶體消耗超過
500 mA(最大允
許電流)的功
率。
為FAT16或FAT32
檔案系統
確認USB接頭或USB
纜線未卡在某個物
品中或損壞。
中斷連接USB可攜
式音訊播放器/USB
隨身碟且不要使
用。將點火開關轉
到OFF,然後再轉
到ACC或ON,接著
連接相容的USB可
攜式音訊播放器/
USB隨身碟。
操作。
-將點火開關轉到
OFF,然後再轉回
ON。
-中斷連接USB可
攜式音訊播放器/
USB隨身碟。
-切換至不同的播
放來源。
然後返回USB可攜
式音訊播放器/USB
隨身碟。
USB裝置應該格式
化為FAT16或FAT32
檔案系統
碟片與播放器的操作指南
! 請僅使用具有以下兩種標誌之一的碟片。
! 僅限使用傳統的圓形碟片。不可使用其他
形狀的碟片。
! 使用12-cm或8-cm的CD。播放8cmCD時請勿
使用轉接器。
! CD槽中請勿插入CD以外的任何其他物品。
100
Zhtw
<
CRD4365-A/N>100
 Loading...