

Page 1

Digital Terrestrial Receiver
DBR-TF100GB
Operating Instructions
Page 2
SAFETY PRECAUTIONS
SAFETY PRECAUTIONS
Thank you for buying this Pioneer product.
Please read through these operating instructions so
you will know how to operate your model properly.
After you have finished reading the instructions, put
them away in a safe place for future reference.
2
Page 3

Contents
Contents
01 Getting ready ................... 4
Included accessories .............................. 4
Front view .............................................. 5
Rear view ............................................... 5
Remote control ...................................... 6
Putting batteries in the remote .............. 7
Setting TV codes .................................... 7
Caring for the remote ............................. 8
Remote operation range ........................ 8
02 Connections ..................... 9
Television and VCR with SCART
sockets ............................................... 9
Television and VCR with only standard
coaxial aerial input............................. 10
Connecting to a digital audio device..... 11
03 Starting up the first
time............................. 12
Choosing your TV type ......................... 12
Scanning for channels .......................... 12
04 Basic operation .............. 13
Turning on/off ....................................... 13
Changing channels ............................... 13
Selecting TV/DTV ................................. 14
Using the Info banner........................... 14
Using Teletext ...................................... 15
05 Advanced operation ....... 16
Using the on-screen programme
guide ................................................. 16
Using the timer .................................... 16
Freezing a frame .................................. 18
Taking snapshots .................................. 18
Viewing snapshots ............................... 19
Deleting snapshots .............................. 20
06 Using parental lock ........ 21
Set your PIN ......................................... 21
Setting parental controls ...................... 22
Locking/unlocking channels ................. 23
Watching locked channels ................... 23
07 Channel management .... 24
Favourites............................................. 24
Channel Skip ........................................ 25
Alerts .................................................... 25
Channel Options................................... 26
08 Other options ................. 27
User Preferences ................................. 27
TV Setup............................................... 28
Installation ............................................ 29
Software Update .................................. 31
Restore System Defaults ..................... 32
09 TV brand code ................ 33
10 Troubleshooting ............. 37
11 Specifications ................ 39
3
Page 4
Getting ready01
Chapter 1:
Getting ready
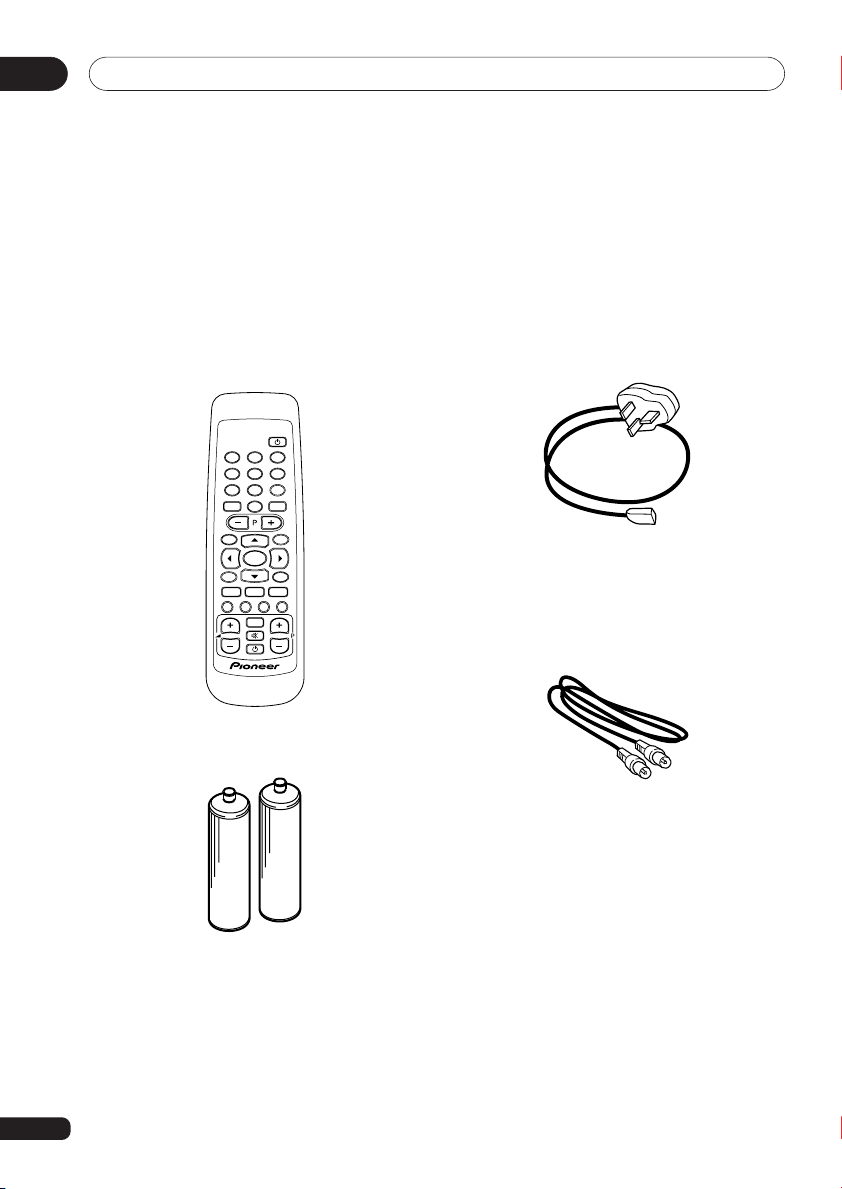
Included accessories
& Remote control
1
2 3
4 5 6
7
8 9
TV/DTV
RETURN
0
GUIDE
MENU
SELECT
INFO
EXIT
TEXT WIDE
SUBTITLE
AV
TV
& Two AA/R06 Batteries
& Mains lead
This is provided separately. Plug it into the
mains power supply.
& Aerial/RF lead
Connects the Digital Terrestrial Receiver
(DTR) box to the video or TV. (Refer to the
illustrations on the following pages.)
& Instruction manual
This document.
& Warranty card
Throughout this manual your Digital Terrestrial Receiver is abbreviated as DTR.
4
Page 5

Getting ready
Front view
01
1
*
2
1 LED (standby/on)
Shows the power status of the DTR; Red =
Standby, Green = On. When a programme
2 Infrared sensor
Receives the signal emitted from the remote
control.
set by the timer is playing, the LED turns
orange and it blinks when the remote is
operated.
* Dolby and the double-D symbol are trademarks of Dolby Laboratories.
Rear view
1 2 3 4 5 6
230V
50Hz
VCR TV
1 230V, 50 Hz mains lead socket*
2 SCART
3 SCART
1
socket for VCR
1
socket for TV
4 Optical digital audio output socket
5 UHF
6 UHF
1. SCART: Euroconnector
2. UHF: Ultra High Frequency
OPTICAL
2
aerial output for TV
2
aerial input
TV
AERIAL
* This product is for use in the UK only.
5
Page 6
Getting ready01
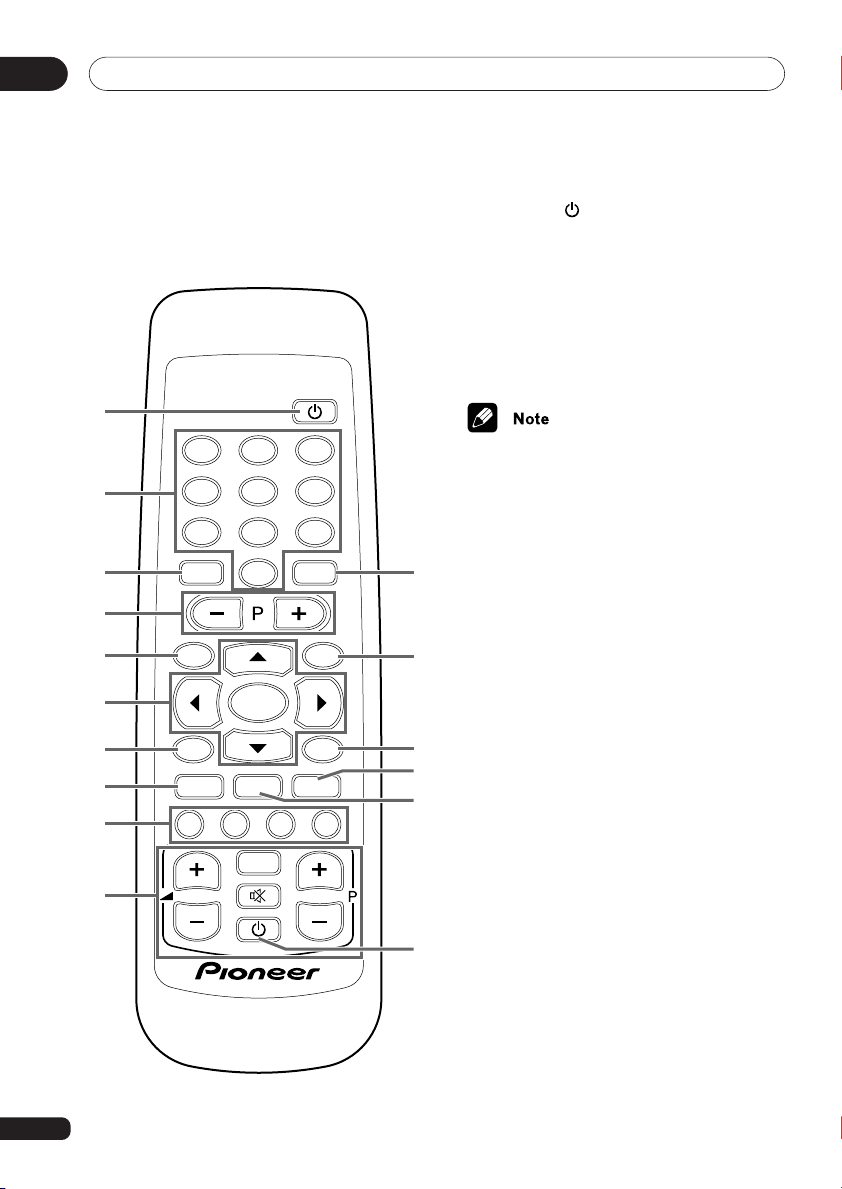
Remote control
1
2
3
4
5
6
7
8
9
0
6
1
2 3
4 5 6
7
8 9
TV/DTV
GUIDE
SELECT
INFO
TEXT WIDE
SUBTITLE
RETURN
0
AV
TV
MENU
EXIT
1 STANDBY button (P.13)
Press to switch the DTR between standby
and power-on mode.
2 0–9 (Numeral) buttons (P.13)
Press to directly select a channel.
3 TV/DTV button (P.14)
Press to switch between digital and analogue broadcasting.
• This button only works when your DTR
and TV are connected by a SCART lead.
• You may not be able to select some
analogue TVs even when connected by
a SCART.
4 P (Programme) +, – buttons (P.13)
@
Press to select a channel.
5 GUIDE button (P.16)
Press to display the Electronic Programme
!
Guide (EPG).
6 5, ∞, 2, 3 buttons
5/∞: Used for menu and programme
selections when the channel list is displayed.
~
2/3: Used for menu selections.
=
2: Used to take snapshots.
-
3: Press to turn alert on and off.
SELECT button (P.13)
• While watching a programme, used to
display the channel list.
• While the channel list is displayed, used
to select a programme.
• While a menu screen is displayed, used
A
to select menu items.
7 INFO button (P.14)
Press to display the Info banner.
8 TEXT button (P.15)
Press to select Text Mode.
9 RED, GREEEN, YELLOW, BLUE
buttons (P.15)
Used for Text Mode and on-screen operations.
Page 7

Getting ready
01
0 Refer to
This remote can directly control the TVs of
major manufacturers. At the time of shipment the remote is preset to operate
Pioneer TVs.
- SUBTITLE button (P.27)
Press to display subtitles.
= WIDE button (P.29)
Press to switch between wide-screen
viewing modes.
~ EXIT button
Press to remove on-screen displays.
! MENU button
Press to display the menu screen.
@ RETURN button (P.14)
• Press to select the last displayed
• Press to return to the previous menu
Setting TV codes
channel.
screen.
on the right.
Putting batteries in the
remote
To add or change the batteries, slide
open the battery compartment cover on
the back of the remote control by
pushing it down and sliding it open.
Setting TV codes
The remote can control the following seven
functions by entering a TV brand code from
the attached list.
• TV on/standby or off
• TV volume up/down
• TV channel up/down
• Sound mute on/off
• Switch between TV/AV input
1 Press and hold the TV STANDBY
button (A on the illustration), enter the 4digit TV brand code. (Refer to Chapter 9,
brand code
2 Pressing the TV STANDBY
on the illustration) again, should switch the
TV on/off.
3 If the TV fails to operate, repeat the
operation in Step 1 above, or enter a
different code for the same brand of TV.
• It might not be possible to use this
• If necessary, the remote can be reset to
, page 33.)
remote with some TV brands or models.
the factory default setting. While
pressing the TV STANDBY
enter the code 9999.
TV
button (A
button,
Add two new
AA batteries.
7
Page 8

Getting ready01
Caring for the remote
• Do not drop the remote.
• Do not get the remote wet.
• Do not use or store the remote in the
following locations:
In direct sunlight
Near hot objects
Areas with high humidity
• Do not mix new and used batteries.
Only add all new batteries.
• Do not mix battery brands. Different
battery brands may have different
voltages even if the same size.
• When not planning to use the remote
for a long period of time (over one
month), remove the batteries to prevent
battery fluid leaks inside the remote. If a
battery leak occurs inside the remote,
discard the old batteries, wipe out the
liquid from the case, and add new
batteries.
• The Pioneer batteries supplied with the
remote do not contain heavy metals,
such as mercury, nickel, or cadmium. In
many countries, however, the disposal
of batteries with household waste is not
allowed. Be sure to comply with local
regulations when disposing of batteries.
• The remote’s TV preset code setting
will only last for about one minute
without batteries, so to prevent the
inconvenience of losing the stored
settings, have ready a fresh set of
new batteries and add them immediately after removing the old batteries. However, if the remote’s buttons
are pressed while the batteries are
removed, the brand code setting will
be deleted. Please be careful not to
8
press the buttons while replacing the
batteries.
Remote operation range
30
°
30
• If an object is blocking the path between
the remote and the DTR signal sensor
the unit might not respond to the
remote commands. If this happens,
remove the obstacle or change your
position.
• As the batteries weaken, the range of
the remote becomes shorter. If the
operation range is too short for your
preference, replace the batteries.
7 m
°
Page 9
Connections
Chapter 2:
Connections
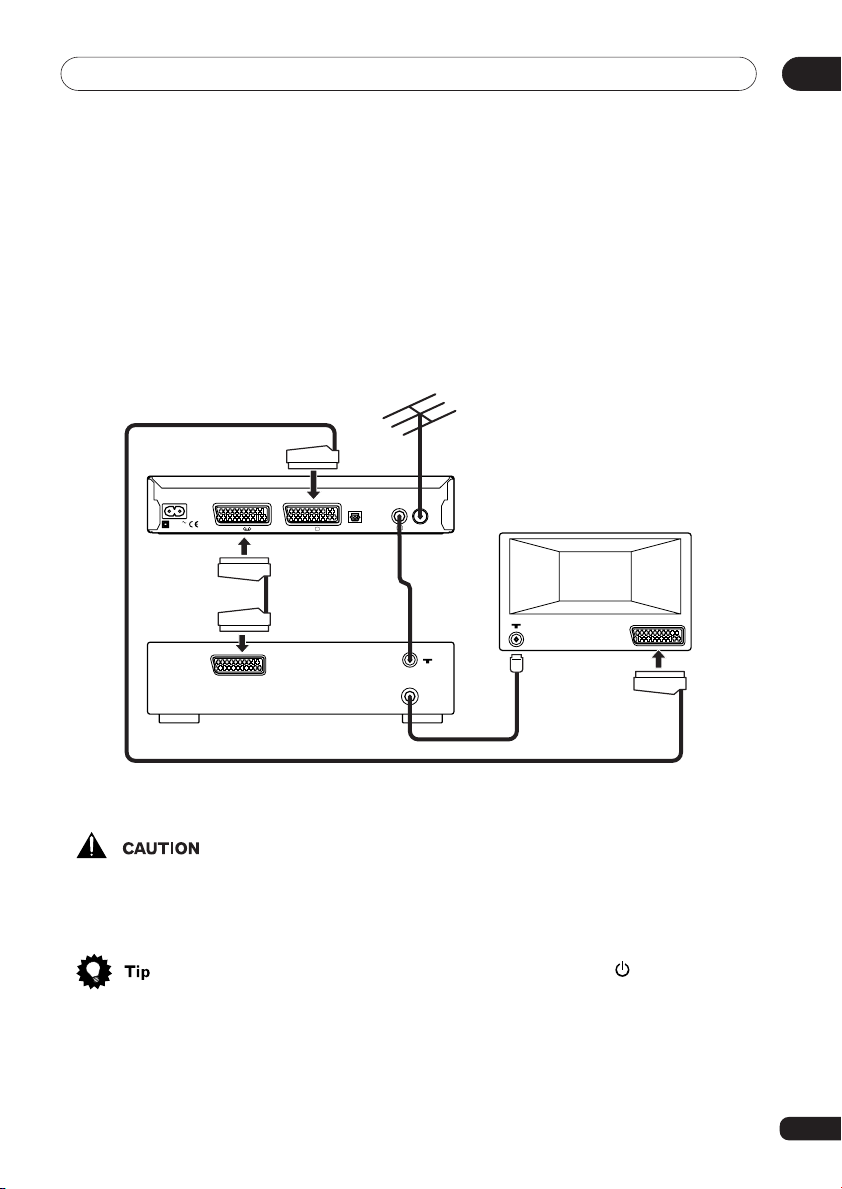
Television and VCR with SCART sockets
This connection provides the best recording and playback quality.
AERIAL
Digital
Terrestrial Receiver
02
230V
VIDEO
50Hz
VCR TV
EXT
OPTICAL
• Before making connections unplug all
equipment from the mains power
supply.
• To obtain the best picture quality and
have access to automatic EXT switching, connect to the TV’s first EXT AV1
socket.
TV
AERIAL
AERIAL
TV
TV set
AERIAL
EXT
1 Connect the equipment as shown in the
above diagram.*
2 Plug all of the equipment, including the
DTR, into the mains power supply.
3 Turn on the TV and select a channel.
4 Press the STANDBY
button on the
remote to wake up the DTR.
The DTR will display the “Welcome” screen.
Now go to the
Starting up the first time
page 12.
on
* SCART leads are sold separately.
9
Page 10
Connections02
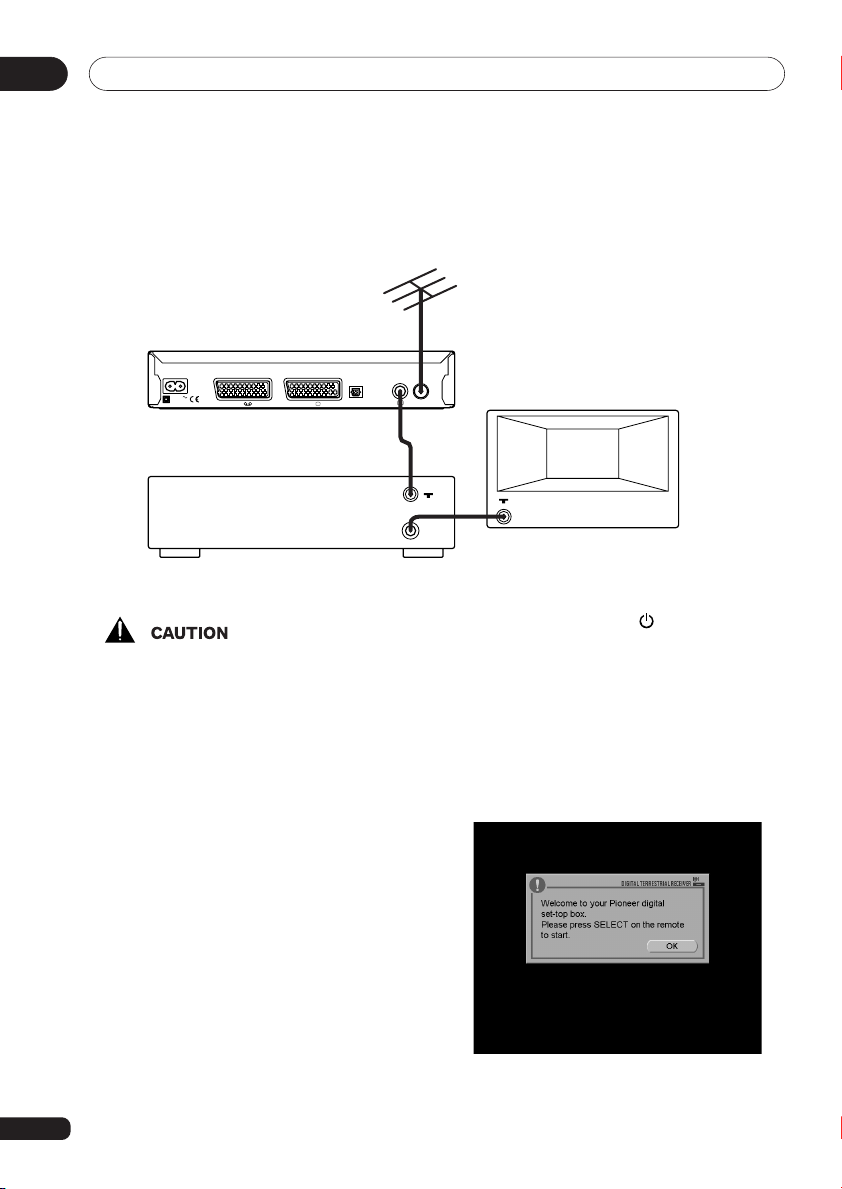
Television and VCR with only standard coaxial aerial input
AERIAL
Digital Terrestrial Receiver
230V
50Hz
VCR TV
OPTICAL
TV
AERIAL
TV set
VIDEO
• Before making connections unplug all
equipment from the mains power
supply.
1 Connect the equipment as shown in the
above diagram but do not yet connect the
aerial to the DTR.
2 When you have finished making the
connections, plug in the equipment. First
turn on the TV and select an unused channel
to use for watching digital programmes.
Next turn on the VCR (at this time it does not
matter to what channel the VCR is tuned).
AERIAL
TV
AERIAL
3 Press the STANDBY button on the
remote to wake up the DTR.
4 Tune the TV.
Now you need to tune the TV channel for
watching digital programmes. If you are not
sure how to do this, refer to the TV’s
operation guide. Store the channel when the
“Welcome” screen appears on the TV as
shown below.
10
5 Connect the aerial to the DTR and check
if the picture remains steady (no wobbling,
interference, or snow).
Page 11
Connections
02
6 Switch the TV to all the other tuned
channels, including the channel tuned for the
VCR, and check the picture quality.
If the picture quality is good, go to the
Starting up the first time
on page 12. If there
is a picture quality problem even though the
aerial is connected, follow the instructions
below after completing
on page 12.
time
Starting up the first
1Disconnect the aerial from the back of
the DTR.
4Select Setup from the HOME MENU
screen, TV Setup, and then RF Output
Channel using 5, ∞ and SELECT
buttons on the remote.
The default setting for this option, 38,
should be changed if there is interference. Select a channel that is far from
38. Press the MENU button (Exit) to exit
the menu and store the setting.
5Repeat from Step 4 to check if the
picture quality improves.
2Check to make sure the TV is tuned to
the channel selected for watching digital
programmes.
3Press the MENU button on the remote.
The HOME MENU screen is displayed.
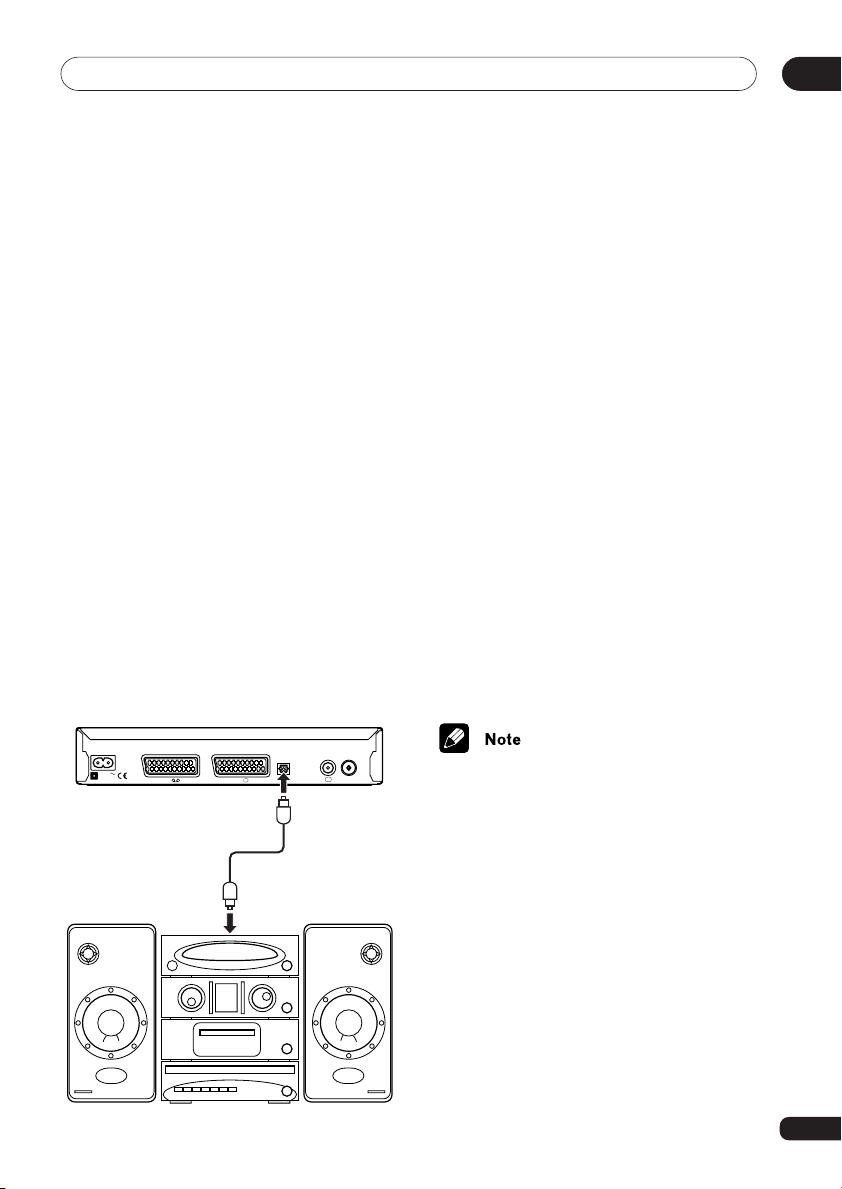
Connecting to a digital audio device
Connect an optical digital audio cable (sold seperately) between the optical digital audio output
socket on the DTR and an optical digital input on a sampling rate converter-equipped stereo
system, AV amp, etc.
Digital Terrestrial Receiver
230V
50Hz
Sampling rate
converter-equipped
stereo system,
AV amp, etc.
VCR TV
OPTICAL
TV
AERIAL
• If a Dolby Digital encoded audio stream
is output and you have a Dolby Digital
decoder equipped external digital audio
device, change your digital audio output
settings in User Preferences, Digital
Audio Out. (See pages 27 and 28.)
• If the external digital audio device does
not support the sampling rate at which
the digital audio is being broadcast, no
audio will be heard.
“Dolby” and the double-D symbol are
trademarks of Dolby Laboratories.
11
Page 12
Starting up the first time03
Chapter 3:
Starting up the first time
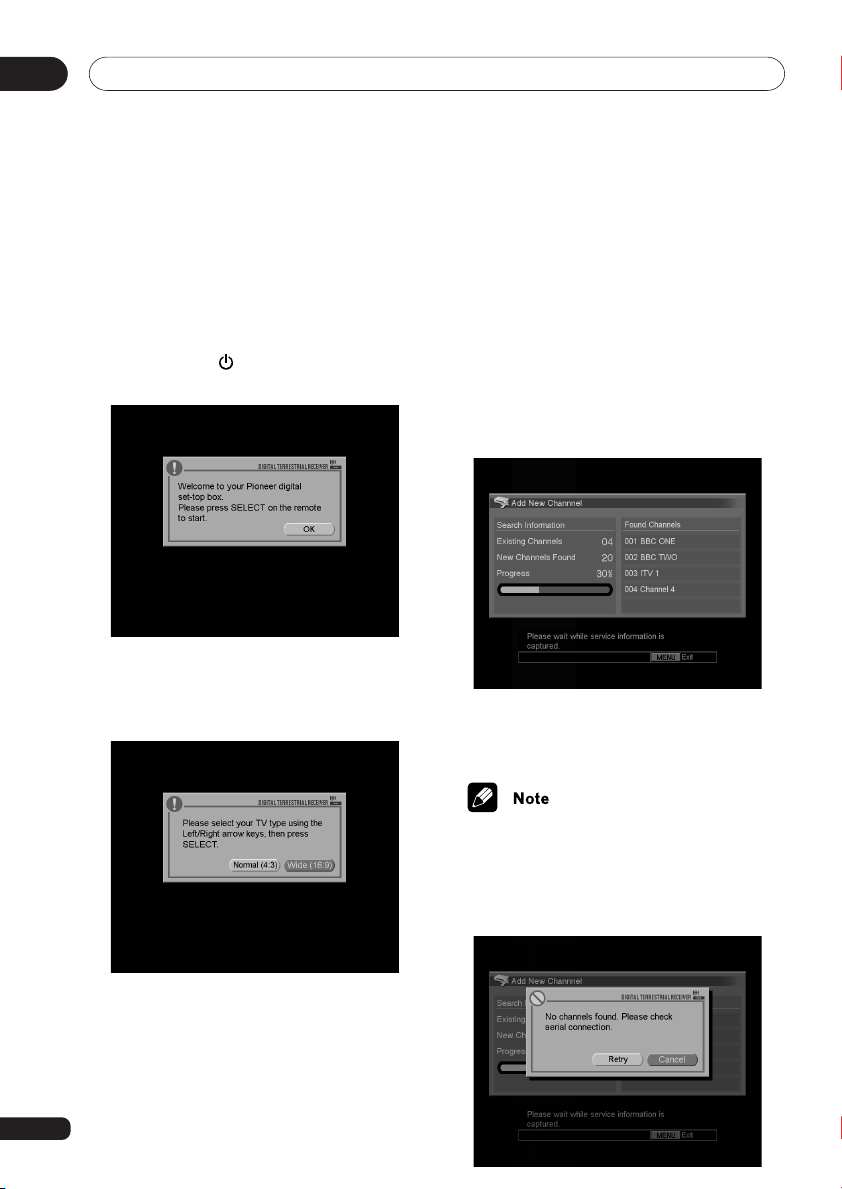
1 After all connections have been made
and the DTR is connected to the mains,
press STANDBY or any number button.
A welcome message is displayed.
2 Press SELECT.
Choosing your TV type
Scanning for channels
A message box is displayed, asking you to
confirm that your aerial is connected. After
you have confirmed your aerial connection,
press SELECT. Your DTR will scan for
channels and add all new channels found.
Scanning all channels will take a couple of
minutes. After scanning is done the lowest
numbered channel is displayed.
• If no channels are found, a warning
message is displayed. Check your aerial
connection again. You can scan again by
selecting Retry with 2/3 and pressing
SELECT.
A message box appears on the screen
instructing you to select your TV type. Press
2/3 to select Normal (4:3) or Wide (16:9),
then press SELECT.
12
Page 13

Basic operation
Chapter 4:
Basic operation
Turning on/off
To turn on, press STANDBY or any
number buttons. When you press
STANDBY
tuned in. When you press a number button,
the channel of the number button is tuned in.
Then the Info banner is displayed and
disappears after a few seconds.
• You can remove the Info banner
immediately by pressing EXIT.
, the channel last viewed is
Using the channel list
1 If you press SELECT while watching a
programme, a channel list of six channels,
including the present channel, is displayed.
04
• If a channel is not available for the
channel number input, ‘No service is
available on this channel’ is displayed for
a few seconds and the channel does not
change.
To turn off, press STANDBY
goes into standby mode.
. The DTR
Changing channels
Using the P +, – buttons
Press P +/– to change a channel up/down
from the list of available channels.
Hold down P +/– to rapidly move through the
channel numbers until the desired channel
number is reached then release the button.
The channel is displayed.
Using the number buttons
Enter a 3-digit number for the desired
channel. For example, if you want to tune in
channel 125, enter 1-2-5.
Or
Enter just the digits of the number of the
channel desired. For example, if you want to
tune in channel 5, enter 5.
2 Press 5/∞ to see lower or higher
channels on the list.
• Press 2/3 to move to the previous/
next list of channels.
3 Press SELECT again to select a channel
to tune in.
13
Page 14

Basic operation04
Using RETURN
If while watching a channel you press
RETURN, the channel last watched is tuned
in and displayed.
• The last channel viewed is cleared from
memory when the DTR is put into
standby mode.
Selecting TV/DTV
Use the TV/DTV button to switch between
analogue channels from the regular TV or
VCR and digital channels from the DTR.
• This button only works when your DTR
and TV are connected by a SCART lead.
• You may not be able to select some
analogue TVs even when connected by
a SCART.
• If you choose to view the DTR from the
analogue TV by selecting an external
source, the TV/DTV button on the
remote cannot be used to change
channels.
Using the Info banner
You can display information on the
programme you are watching or other
programmes on the screen.
1 Press INFO to turn on the Info banner.
The current channel number, channel name,
date and time are displayed. Also the current
programme name and beginning and ending
times are displayed along with the same
information for the next programme on the
same channel.
Now, you can:
• Press 2/3 to display the Info banner on
other channels.
• Press SELECT to tune in a channel.
• Press EXIT to remove the Info banner
from the screen.
14
• The Info banner also displays icons for
Favourites (
Teletext (
selected channel.
• Due to inaccurate information provided
by the broadcaster some icons may
appear or be absent in error.
), Subtitles ( ) and
) if they apply to the
Page 15

Basic operation
04
2 Press INFO again and detailed informa-
tion about the selected programme is
displayed.
Now, you can:
• Press 5/∞ to switch NOW and NEXT
programmes.
• Press 2/3 to display the detailed
information about programmes on other
channels.
• Press SELECT to discard the detailed
information and tune in the channel.
• Press the GREEN button to set the
timer for a selected programme. See
Using the timer
• Press RETURN to discard the detailed
information screen.
• Press EXIT to remove the on-screen
information from the screen.
on page 16.
Using Teletext
When programmes with Teletext content or
dedicated digital text channels broadcast, the
Teletext icon (
banner.
Press the TEXT or the RED buttons, then
follow instruction on-screen. Pages are
selected using the 5/∞/2/3, SELECT,
number or coloured buttons.
When you have finished viewing text
channels, select another channel by using
the P +/– buttons.
• From time to time other operating
instructions may be displayed. The
button used to enter text mode may
differ according to channel. Please
follow the on-screen instructions.
• Teletext and subtitles cannot be shown
at the same time. If subtitles are on and
you want to view a Teletext channel,
turn subtitles off by pressing
SUBTITLE.
• Due to inaccurate information provided
by the broadcaster Teletext icon may
appear or be absent in error.
• When Teletext is displayed you cannot
freeze a frame or take snapshots.
) is displayed on the Info
15
Page 16

Advanced operation05
Chapter 5:
Advanced operation
Using the on-screen
programme guide
You can use the on-screen programme guide
to quickly find and tune in a programme.
While searching, the last watched channel is
displayed in a small window except text and
radio channels.
Press GUIDE. The on-screen Programme
Guide is displayed.
Now you can:
• Press 5/∞ to scroll through the list.
• Press P +/– to show the next/previous 7
channels.
• Press 2/3 to switch between NOW
and NEXT listings.
• Press SELECT to tune in a channel.
• Press the YELLOW button to display
more information about a selected
programme if available.
• Press the GREEN button to set the
timer for a selected programme. See
Using the timer
• Press GUIDE again or EXIT to turn off
the on-screen Programme Guide.
16
, below.
Using the timer
By using the timer you can have the DTR
turn on and a selected programme tuned in
automatically. Up to 10 timers can be set.
Displaying the timer menu
1 While viewing a programme, press
MENU. The HOME MENU is displayed.
2 Press 5/∞ to select Programme Timer
and press SELECT. The Programme Timer
menu displays.
Page 17

Advanced operation
05
3 Input a new timer setting or move or
delete a setting. See
below.
Input timer settings
,
Or
While using the on-screen Programme Guide
select a programme and press the GREEN
button. The Programme Timer menu is
displayed and all the information for the
selected programme is automatically
entered. Press SELECT to set the
programme.
Input timer settings
1 Press 5/∞ to select an available timer
slot and press SELECT.
2 Enter the channel to be set by using the
number buttons or 5/∞.
3 Press 3 to move to the next item, Date.
4 Enter the date. The date is represented
by four digits. 10 September would be
entered as 1009.
Day: Enter 10 by pressing the number
buttons or 5/∞. Press 3 to move to Month.
Month: Enter 09 by pressing the number
buttons or 5/∞. Press 3 to move to the
next item, Start time.
5 Enter the time the programme is to start.
Use the 24-hour clock for time settings, such
as 10:15 pm would be 2215.
Hour: Enter 22 by pressing the number
buttons or 5/∞. Press 3 to move to
minutes.
Minute: Enter 15 by pressing the number
buttons or 5/∞. Press 3 to move to the
next item, Stop time.
6 Enter the time the programme is to stop.
Press 3 to move to the next item, Repeat.
7 Press 5/∞ to select a repeat setting.
The repeat settings are: None, Weekly,
Daily, Mon-Fr, Mon-Sat, Sat & Sun.
• If you make a mistake, press 2 to move
back to the previous item and correct
the setting.
8 Press SELECT to enter all the settings.
• If all entered setting are correct the
timer is saved.
• If an invalid setting was entered, a
warning is displayed. Correct the setting
info.
• When two programmes are set so that
they overlap, the programme which
starts first has priority and will be played
in its entirety.
When two programmes have the same
start time, the programme with the
highest number in the Programme
Timer slots has priority.
If you set a timer and the time slot is
overlapping another timer setting, and
the other timer setting has priority, a
warning is displayed.
9 Repeat Steps 1–8 to set additional
programme.
10 Press MENU to complete the setting
and exit the Programme Timer menu.
17
Page 18

Advanced operation05
Editing a timer setting (Cancel/
Modify/Move)
You can cancel/modify/move a timer setting.
1 Display the Programme Timer menu.
2 Press 5/∞ to select the timer slot to be
edited, then refer to the instruction below.
• To cancel the setting, press the RED
button. The setting is cancelled.
• To modify the setting, press SELECT.
You can modify the setting.
• To move the setting, press the BLUE
button. Press 5/∞ to move the
selected timer slot and then press the
BLUE button.
• If you are watching a digital programme
when a timer is about to start, an alert
will appear on the screen about one
minute before the timer starts. To view
the timer programme, press SELECT. To
cancel the timer programme press 2/3
to select CANCEL TIMER and press
SELECT. If you do not press any buttons
the timer will start at the programmed
time.
• When a programme set by the timer is
playing, the LED turns orange.
• If any button is pressed while a timer is
active an alert will appear on the screen.
Press EXIT to cancel the timer and
return the DTR to viewing a digital
programme or do nothing and the timer
will continue.
Freezing a frame
You can freeze display of a frame from a
programme.
1 While viewing a programme, Press 2.
The image freezes on screen.
2 To continue viewing the programme
press 3.
Taking snapshots
You can take snapshots of scenes from
programmes to save and view later.
1 While viewing a programme, Press 2.
The image freezes on screen.
18
2 Press SELECT to take a snapshot. The
snapshot is taken and the programme
resumes normal display.
Page 19

Advanced operation
• If memory is full, a warning message is
displayed. Press SELECT to resume
normal display.
• In order to free up memory to take more
snapshots, see
page 20.
• Sometimes attempts to take snapshots
will fail due to problems with the
programme data.
Deleting snapshots
on
Viewing snapshots
You can view the snapshots you have taken.
1 While viewing a programme, press
MENU. The HOME MENU is displayed.
Now you can:
• Press 2/3 to view the next/previous
snapshot.
• Press SELECT to hide snapshot
information. Press any button other
than 2/3, STANDBY
again display the snapshot information.
• Press MENU or EXIT to return to
normal programme viewing.
• Press RETURN to return to the HOME
MENU.
• Press the BLUE button to change the
display mode to the Movie Mode. This
mode is best suited for viewing
snapshots of less quickly changing
displays such as movies.
• If no snapshots have been stored when
Video Snapshot is selected a message
is displayed. Press SELECT to return to
the HOME MENU.
or EXIT to
05
2 Press 5/∞ to select Video Snapshots.
Press SELECT. The first snapshot stored in
memory is displayed.
19
Page 20

Advanced operation05
Deleting snapshots
You can delete snapshots from memory.
Deleting snapshots one by one
1 While viewing a snapshot, press the RED
button. A message appears asking you to
confirm that you want to delete the snapshot.
2 Press 2/3 to select Delete and press
SELECT. The snapshot is deleted and the
next snapshot, if any, is displayed.
Deleting all snapshots in memory
1 While viewing a snapshot, press the
YELLOW button. A message appears asking
you to confirm that you want to delete all the
snapshots from memory.
2 Press 2/3 to select Delete All and press
SELECT. All snapshots in memory are
deleted.
20
Page 21

Using parental lock
Chapter 6:
Using parental lock
06
The parental lock can be used to restrict
access to any channel. In order to view a
locked channel, the PIN (personal identity
number) must be entered. To be able to use
parental lock successfully, follow the
instructions below.
Set your PIN
Setting a PIN allows you to set/change the
PIN used for parental lock. A PIN has four
digits (0000 to 9999) and the default is 0000.
1 While viewing a programme, press
MENU. The HOME MENU is displayed.
2 Press 5/∞ to select Setup and press
SELECT. The Setup menu is displayed.
3 Press 5/∞ to select Set PIN and press
SELECT. The PIN Input screen displays.
21
Page 22

Using parental lock06
4 Use the number buttons to input your
PIN (the default is 0000). The Set PIN menu
displays.
• If the PIN you input is not correct, an
invalid PIN message appears and you
are returned to the Setup menu.
5 Use the number buttons to input your
new, 4-digit PIN and confirm by entering the
PIN again.
• If you make a mistake, press 2 to
backspace and erase a digit.
• If the PIN number is confirmed the new
PIN is registered and you are returned to
the Setup menu.
• Press MENU to exit the Set PIN screen
without setting a new PIN.
Setting parental controls
There are two types of parental lock; 1)
Normal, and 2) Watershed. When Normal is
used, locked channels are locked at all times.
When Watershed is used, locked channels
are only locked between the hours of 9 PM
to 4 AM. Watershed is a good way to lock
channels when they are most likely to
broadcast material not suitable for all
audiences.
1 While viewing a programme, press
MENU. The HOME MENU is displayed.
2 Press 5/∞ to select Channel Manage-
ment and press SELECT. The Channel
Management menu is displayed.
22
• If you forget your PIN you can reset it to
the default of 0000 by restoring system
defaults. See
on page 32.
Restore System Defaults
3 Press 5/∞ to select Parental Lock and
press 2/3.
Page 23

Using parental lock
06
4 Use the number buttons to input your
PIN.
5 Press 2/3 to switch between Off,
Normal or Watershed. Go on to the next
Locking/unlocking channels
• If you enter the wrong PIN a message is
displayed and you cannot set Parental
Lock options.
below.
Locking/unlocking channels
Channels must be locked/unlocked individually. Follow these steps to lock/unlock a
particular channel.
1 Press 5/∞ to select Channel Options
and press SELECT. The Channel Options
menu is displayed.
3 Repeat Step 2 to lock/unlock additional
channels.
4 Press MENU to complete the setting
and exit the menu.
• Enter your PIN if prompted.
Watching locked channels
When parental control is on and you select a
channel that is locked, a blank screen
displays with a channel banner that says,
“This channel is locked. Press Red to
unlock.”
1 Press the RED button. The PIN input
screen is displayed.
2 Use the number buttons to input your
PIN.
• If you unlock a channel in this way, all
channels are unlocked and remain
unlocked until the DTR again is put in
standby mode or a new channel is
locked.
2 Press 5/∞ to select the channel to lock/
unlock. Press 2/3 to move to the lock box
(the box with the padlock icon over it). Press
SELECT to place/remove a check in the box
and lock/unlock the channel.
23
Page 24

Channel management07
Chapter 7:
Channel management
The Channel Management menu allows you
to control access to channels and access
channels quickly.
1 While viewing a programme, press
MENU. The HOME MENU is displayed.
2 Press 5/∞ to select Channel Manage-
ment and press SELECT. The Channel
Management menu is displayed.
After the Channel Management menu is
displayed, continue with the settings below.
Favourites
With your DTR you’ll have access to many
digital channels but with some channels
registered as Favourites you can access
them quickly.
Setting channels as favourites
1 Press 5/∞ to select Channel Options
and press SELECT. The Channel Options
menu is displayed.
2 Press 5/∞ to select a channel. Press 2/
3 to highlight the area under the bookmark
icon (Favourite) and press SELECT to turn
favourites on/off. A check mark means that a
channel has been selected as a favourite.
3 Press RETURN to complete the setting
and return to the Channel Management
menu. Go on to the next
on/off
below.
Turning Favourites
24
Page 25

Channel management
Turning Favourites on/off
1 Press 5/∞ to select Favourites.
2 Press 2/3 to switch between On and
Off.
3 Press MENU to complete the setting
and exit the menu.
• At least two channel must be selected
as a favourite in order to turn on
Favourites. See
favourites
• When Favourites is turned on, only
those channels selected as Favourites
can be accessed using the P +/–
buttons. Other channels can still be
accessed through the number buttons.
• When Favourites is turned on, Channel
Skip cannot also be turned on.
Setting channels as
, above.
Channel Skip
You can turn on channel skip to automatically
skip channel types you do not wish to tune
in. The three types are: radio, text, or radio
and text.
1 Press 5/∞ to select Channel Skip.
2 Press 2/3 to switch between the four
settings:
Off - Skip Radio - Skip Text - Skip Radio &
Text
3 Press MENU to set the type to be
skipped and exit the menu.
07
• When Channel Skip is turned on, the
selected type of channel is automatically
bypassed when using the P+/– buttons.
Those channels can still be accessed
through the number buttons.
• When Channel Skip is turned on,
Favourites cannot also be turned on.
• Even when you set Channel Skip to Skip
Text or Skip Radio & Text, some text
channels may not be skipped.
Alerts
You can turn alerts on for a channel. Then
when a new programme starts on that
channel an alert will be displayed on the
screen.
Setting channels to display alerts
1 Press 5/∞ to select Channel Options
and press SELECT. The Channel Options
menu is displayed.
2 Press 5/∞ to select a channel. Press 2/
3 to highlight the area under the info icon
(Alert) and press SELECT to turn alerts on/
off. A check mark means that a channel has
been selected to display alerts.
25
Page 26

Channel management07
3 Press RETURN to complete the setting
and return to the Channel Management
menu. Go on to the next
off
below.
Turning Alerts on/
Turning Alerts on/off
1 Press 5/∞ to select Alerts.
2 Press 2/3 to switch between On and
Off.
3 Press MENU to complete the setting
and exit the menu.
• While a programme is displayed as the
result of a timer setting, alerts will not
display.
• If you record a programme without
using the timer setting, alerts may be
displayed and recorded onto your VCR.
To make sure that alerts do not get
recorded, set the desired programme to
play with a timer setting.
• Even if you turn alerts on, alerts are not
displayed if a broadcaster is not
broadcasting programme information.
• To turn alerts on or off while viewing a
programme, press 3.
Channel Options
You can enter Channel Options to set any
channel as a favourite, lock/unlock and
enable/disable alerts for any channel.
1 Press 5/∞ to select Channel Options
and press SELECT. The Channel Options
menu is displayed.
2 Press 5/∞ to select a channel. Press 2/
3 to move to the area you wish to select:
Favourite (bookmark icon), Lock/Unlock
(padlock icon), Alert (info icon).
3 Press SELECT to place/remove a
checkmark. When you place a checkmark,
option is on.
4 Press MENU to complete the setting
and exit the menu.
26
Page 27

Other options
Chapter 8:
Other options
User Preferences
You can customize the DTR by setting
options in the User Preferences menu as
follows:
1 While viewing a programme, press
MENU. The HOME MENU is displayed.
08
• Press MENU or EXIT to complete the
setting and exit the menu.
• Press RETURN to complete the setting
and return to the previous menu.
Audio Language
Press 2/3 to select English, Welsh or
Gaelic.
Subtitle Language
Press 2/3 to select English, Welsh or
Gaelic.
2 Press 5/∞ to select User Preferences
and press SELECT. The User Preferences
menu is displayed.
4 Press 5/∞ to select the preference you
wish to set, then refer to the instructions
below.
• English, Welsh and Gaelic are always
available for selection in Audio Language and Subtitle Language but may
not be available if the selected language
was not broadcast with the selected
programme.
Subtitles
Subtitles by default are off. Press 2/3 to
select On/Off.
• Subtitles can only be displayed if they
have been provided with the broadcast
programme.
• Pressing SUBTITLE on the remote will
override the setting here.
27
Page 28

Other options08
Screen Saver
Press 2/3 to switch between screen saver
modes. You can also select Off or Random.
If you select Random, the screen saver
mode used is selected randomly.
While listening to a radio channel and if no
buttons are pressed for one minute a screen
saver is displayed. Press any key other than
the STANDBY
saver.
Digital Audio Out
Press 2/3 to select PCM/Dolby.
If you have a Dolby Digital decoder-equipped
audio device connected to the optical digital
audio output socket on the DTR, select
Dolby. Otherwise, select PCM.
• When Dolby is selected and a
programme is broadcast in Dolby Digital,
audio is not output through the SCART
socket.
button to quit the screen
2 Press 5/∞ to select Setup and press
SELECT. The Setup menu is displayed.
Banner Timeout
When you change channels a banner
showing channel and programme information is displayed for a selected amount of
time or is not displayed, according to the
settings you make here. Press 2/3 to select
from No Banner or a time of 1 to 10
seconds.
TV Setup
The TV Setup menu allows you to select and
set TV and video options. To set any preference, go to the TV Setup menu as follows:
1 While viewing a programme, press
MENU. The HOME MENU is displayed.
28
3 Press 5/∞ to select TV Setup and press
SELECT. The TV Setup menu is displayed.
4 Press 5/∞ to select the preference you
wish to set, then refer to the instructions
below.
Page 29

Other options
08
• Press MENU or EXIT to complete the
setting and exit the menu.
• Press RETURN to complete the setting
and return to the previous menu.
Picture Format
Press 2/3 to select 16:9, 4:3 Letterbox or
4:3 Centre Cut.
If your DTR is connected to a 16:9 TV, select
16:9. If your DTR is connected to a 4:3 TV
and you wish to view a 16:9 programme, you
must select how that 16:9 programme is
displayed on your TV. If you select 4:3
Letterbox, the full width of the image is
displayed but areas above and below the
image are blank. If you select 4:3 Centre
Cut, the image fills the screen vertically but
the right and left ends of the image are not
displayed.
• Pressing WIDE on the remote will
override the setting here.
TV Video Output
This sets the video signal format for the TV
SCART only. Press 2/3 to select RGB,
Composite or S-Video.
• Check your VCR manual to see if it is
compatible with S-Video.
• In order to use S-Video with your VCR
you may need to change settings on
your VCR. See the user’s manual for
your VCR for information.
RF Output Channel
This selects an output channel for the RF
modulator. Press 2/3 to choose any
channel from 21 to 68 or Off.
Sound
This sets the audio output from the TV and
VCR SCART only. Press 2/3 to select
Mono or Stereo.
Volume
This adjusts the volume of the audio output
from the TV SCART from 1 (minimum) to 10
(maximum). Press 2/3 to choose a setting
from 1 to 10.
Installation
In the Installation menu you can scan for
new channels, delete channels no longer
available and check the signal strength of
each channel. To access these go to the
Installation menu as follows:
• Check your TV manual to see if it is
compatible with RGB or S-Video.
VCR Video Output
This sets the video signal format for the VCR
SCART only. Press 2/3 to select Compos-
ite or S-Video.
1 While viewing a programme, press
MENU. The HOME MENU is displayed.
29
Page 30

Other options08
2 Press 5/∞ to select Setup and press
SELECT. The Setup menu is displayed.
3 Press 5/∞ to select Installation and
press SELECT. The Installation menu is
displayed. Then, refer to the instructions
below.
Add New Channels
You can add new channels to the channel
list.
Press 5/∞ to select Add New Channels
and press SELECT. Scanning starts. If new
channels are found they are added to the
channel list. The number of new channels, if
any, are displayed.
• To cancel scanning once it has started,
press EXIT. Scanning stops and a
message is displayed stating that
scanning has stopped.
Replace Existing Channels
Use Replace Existing Channels to update
information on channels and delete channels
that are no longer available.
Press 5/∞ to select Replace Existing
Channels and press SELECT. Scanning
starts. If new information about a channel is
found, the channel information is updated. If
some channels are no longer available the
channels are deleted.
30
• Press MENU or EXIT to exit the menu.
• Press RETURN to return to the previous
menu.
• To cancel scanning once it has started,
press EXIT. Scanning stops and a
message is displayed stating that
scanning has stopped.
• If no channels were found, a message is
displayed asking you to check the aerial
connection.
Signal Check
1 Press 5/∞ to select Signal Check and
press SELECT.
2 Use the 2/3 buttons to select a
channel. The signal strength is displayed
numerically and with words and is updated
once every second.
3 Press MENU to leave.
Page 31

Other options
Software Update
The DTR can automatically download
software updates through the TV aerial. You
can set the options for the software update
in the Software Update menu. Follow these
steps to access the Software Update menu:
1 While viewing a programme, press
MENU. The HOME MENU is displayed.
2 Press 5/∞ to select Setup and press
SELECT. The Setup menu is displayed.
08
4 Press 5/∞ to select any of the following
four functions: Auto Update, Set Update
Time, Start Manual Update or Technical
Information and then follow the instructions
for each.
• Press MENU or EXIT to exit the menu.
• Press RETURN to return to the previous
menu.
3 Press 5/∞ to select Software Update
and press SELECT. The Software Update
menu is displayed.
Auto Update
Press 2/3 and choose Auto Update On/Off.
When Auto Update is on, a check for
available software updates and new
channels is accomplished daily at a time
specified in Set Update Time.
• So that you always have the latest
software and broadcasting channels, be
sure to turn Auto Update to on.
Set Update Time
Select to set the time at which the DTR will
check for updates on a daily basis. Press 5/
∞ to adjust the hour and then 3 to move to
minutes. Again, press 5/∞ to adjust the
minutes and then press MENU to set and
exit the menu.
31
Page 32

Other options08
Start Manual Update
Select to start an update immediately.
Technical Information
Selecting this will display technical information.
Restore System Defaults
It may be desirable to reset settings to their
factory defaults.
• Restoring system defaults resets all
settings including setting the channel
list to empty. All settings that you wish
to use will have to be entered again.
• The PIN is returned to 0000.
• All snapshots stored in memory are
erased.
1 While viewing a programme, press
MENU. The HOME MENU is displayed.
2 Press 5/∞ to select Setup then press
SELECT. The Setup menu is displayed.
3 Press 5/∞ to select Restore System
Defaults and press SELECT. A confirmation
alert is displayed.
32
4 Press 2/3 to choose Replace or Cancel
and press SELECT.
If you select Replace, the Welcome message is displayed. See
, page 12.
time
Starting up the first
Page 33

TV brand code
Chapter 9:
TV brand code
09
A.R. Systems 0556
AGB 0516
ASA 0104
AWA 0009
Acura 0009
Admiral 0163
Adyson 0216, 0217
Aiko 0264, 0217
Aiwa 0701
Akai 0361, 0548,
0037, 0480, 0602,
0371, 0208, 0072,
0433, 0556, 0009,
0163, 0218, 0516
Akib 0294
Akiba 0282, 0455,
0037, 0218, 0294
Akura 0037, 0264,
0218, 0009, 0282,
0412
Alba 0037, 0218,
0371, 0163, 0009,
0216, 0036, 0418,
0247, 0487, 0668
Allorgan 0217, 0206,
0294
Allstar 0037
Amplivision 0217,
0370
Amstrad 0037, 0371,
0433, 0218, 0412,
0516, 0009, 0264
Anam National 0650
Anglo 0264
Anitech 0009, 0037,
0264, 0282
Ansonic 0370, 0009,
0037, 0292
Arc En Ciel 0196
Arcam 0216, 0217
Aristona 0556, 0037
Asora 0009
Asuka 0217, 0218,
0264
Atlantic 0206
AudioTon 0217,
0486, 0264
Audiosonic 0337,
0486, 0370, 0009,
0037, 0109, 0217,
0218, 0264
Autovox 0206, 0217,
0247
BPL 0282, 0037
BSR 0294
BTC 0218
Baird 0193, 0190,
0208, 0343, 0072,
0073, 0217
Bang & Olufsen
0565
Basic Line 0009,
0218, 0374, 0455,
0037, 0217, 0282
Baur 0037, 0512,
0535, 0361, 0505,
0010
Bazin 0217
Beaumark 0178
Beko 0486, 0370,
0037, 0714, 0715
Beon 0037, 0418
Best 0337, 0370
Bestar 0370, 0037,
0374
Binatone 0217
Blaupunkt 0327,
0195, 0535, 0328,
0200
Blue Sky 0037, 0218,
0282, 0455, 0668,
1037
Blue Star 0282
Bondstec 0247
Boots 0217
Brandt 0196, 0287,
0198, 0109, 0335
Brinkmann 0418,
0519, 0037
Britannia 0216, 0217
Bush 0037, 0371,
0218, 0519, 0355,
0487, 0009, 0668,
0036, 0208, 0217,
0294, 0374, 1037,
0264, 0282, 0361,
0698
CCE 0037
CGE 0247, 0370,
0418
CS Electronics 0216,
0218, 0247
CTC 0247
Canton 0218
Carad 0610
Carena 0455, 0037
Carrefour 0036,
0037
Cascade 0009, 0037
Cathay 0037
Centurion 0037
Century 0247
Cimline 0009, 0218
City 0009
Clarivox 0037
Clatronic 0037,
0218, 0371, 0247,
0009, 0217, 0370
Condor 0370, 0037,
0009, 0247, 0282
Contec 0009, 0036,
0216
Continental Edison
0287, 0196, 0487,
0109, 0198
Cosmel 0037, 0337
Crosley 0247
Crown 0009, 0370,
0037, 0486, 0418,
0208
Curtis Mathes 0093,
0166
Cybertron 0218
DER 0193, 0190
Daewoo 0037, 0009,
0374, 0499, 0217,
0218
Dainichi 0216, 0218
Dansai 0037, 0036,
0216
Dantax 0486
Dayton 0009
Daytron 0374
De Graaf 0208, 0548
Decca 0516, 0072,
0037, 0217
Denko 0264
Denver 0037
Desmet 0037, 0009
Diamant 0037
Digatron 0037
Dixi 0009, 0037
Dual 0519, 0217,
0259, 0037
Dual Tec 0217
Dumont 0070
Elbe 0292, 0259,
0217, 0516
Elekta 0264
Elin 0548, 0009,
0037, 0104, 0361
Elite 0218
Elta 0009
Emco 0247
Emerson 0178,
0037, 0282, 0361,
0070, 0247, 0371
Emperor 0282
Erres 0012, 0037
Euroman 0037, 0264
Europa 0037
Europhon 0516,
0217
Expert 0206
Exquisit 0037
Fenner 0009, 0374
33
Page 34

09
TV brand code
Ferguson 0193,
0073, 0190, 0335,
0109, 0287, 0560,
0037, 0343, 0625
Fidelity 0216, 0193,
0264, 0361, 0371,
0163, 0412, 0512
Filsai 0217
Finlandia 0346,
0548, 0072, 0163,
0208
Finlux 0104, 0346,
0217, 0072, 0037,
0516, 0070
Firstline 0037, 0009,
0072, 0217, 0216,
0247, 0294, 0374,
0668
Fisher 0104, 0217,
0072, 0370, 0208,
0036
Flint 0455, 0037,
0072, 0218, 0264,
0610
Forgestone 0193
Formenti 0216, 0037
Fraba 0037, 0370
Friac 0370, 0499,
0009
Frontech 0217,
0163, 0247, 0009,
0264
Fujitsu 0206, 0072,
0217
Funai 0294, 0264
GBC 0009, 0218,
0374
GE 0560
GEC 0217, 0516,
0072, 0163, 0361,
0037
GPM 0218
Galaxi 0037
Galaxis 0037, 0370
Geloso 0009, 0374
General Technic
0009
Genexxa 0218, 0009,
0163
34
GoldStar 0037,
0247, 0217, 0290,
0178, 0216, 0109,
0163, 0361
Goldline 0337
Gooding 0487
Goodmans 0037,
0499, 0371, 0009,
0072, 0036, 0218,
0343, 0480, 0217,
0374, 0487, 0560,
0264, 0335, 0516,
0634
Gorenje 0370
Gradiente 0053,
0170
Graetz 0361, 0163
Granada 0516, 0037,
0072, 0208, 0108,
0217, 0226, 0473
Grandin 0455, 0037,
0282, 0610, 0009,
0163, 0374
Grundig 0070, 0535,
0195, 0487, 0037,
0009, 0556, 0587
HCM 0009, 0264,
0412, 0037, 0217,
0218, 0282, 0418
Halifax 0217
Hampton 0216, 0217
Hanimex 0294
Hanseatic 0009,
0037, 0519, 0282,
0361, 0217, 0556
Hantarex 0037, 0516
Hantor 0037
Harwood 0009,
0037, 0412
Havermy 0093
Hema 0217, 0009
Hifivox 0196, 0198
Hikona 0218
Hinari 0009, 0218,
0036, 0037, 0487,
0355
Hisawa 0455, 0282,
0610, 0218
Hitachi 0225, 0163,
0194, 0217, 0578,
0196, 0109, 0499,
0072, 0036, 0198,
0473, 0516, 0548,
0730, 0037
Hornyphone 0037
Huanyu 0216, 0374
Hyper 0216, 0009,
0247, 0217
Hypersonic 0361
Hypson 0037, 0264,
0282, 0455
ICE 0218, 0371,
0216, 0264, 0217,
0556
ICeS 0216, 0218
IR 0037, 0163, 0361,
0217, 0516, 0195,
0206, 0247, 0327,
0010, 0011, 0036,
0070, 0072, 0190,
0193, 0194, 0512,
0012, 0073, 0093,
0101, 0104, 0108,
0109, 0196, 0216,
0225, 0226, 0287,
0290, 0291, 0292,
0294, 0343, 0370,
0374, 0505, 0535,
0556
ITS 0264, 0216, 0371
ITT 0548, 0361,
0163, 0480, 0473,
0208, 0346, 0610
ITV 0037, 0264
Iberia 0037
Imperial 0247, 0418,
0370
Indiana 0037
Ingelen 0163
Ingersol 0009
Inno Hit 0072, 0217,
0290, 0516, 0009
Interbuy 0037, 0264
Interfunk 0361,
0037, 0163, 0012,
0512, 0327, 0247
Internal 0037
Intervision 0037,
0455, 0264, 0282,
0218, 0247, 0486,
0217, 0487, 0519
Irradio 0247, 0218,
0290, 0371
Isukai 0037, 0218,
0282, 0455
JVC 0053, 0094,
0371, 0190, 0036,
0193, 0218, 0606,
0653, 0418
KB Aristocrat 0163
KTV 0217
Kaisui 0218, 0282,
0037, 0216, 0455,
0217, 0009
Kamp 0216
Kapsch 0206, 0361,
0163, 0104
Karcher 0610, 0282
Kasui 0282
Kathrein 0556
Kendo 0610, 0037,
0247
Kennedy 0206
Kingsley 0216
Kneissel 0037, 0259,
0292, 0610, 0374
Kolster 0037
Konka 0371, 0218
Korpel 0037
Kosmos 0037
Koyoda 0009
Kyoshu 0412
Kyoto 0163
LG 0714, 0037
LaSAT 0486
Lenco 0104
Leyco 0072, 0037,
0264, 0294
Liesenk & Tter 0037
Liesenkotter 0037,
0327
Lifetec 0037, 0519,
0218, 0374
Loewe 0512, 0037,
0292
Logik 0011, 0193
Luma 0206, 0259
Lumatron 0217
Page 35

TV brand code
09
Luxor 0194, 0361,
0548, 0290, 0163,
0208
M Electronic 0346,
0374, 0104, 0009,
0037, 0217, 0109,
0216, 0287, 0163,
0247, 0480, 0512
MTC 0370, 0512
Magnadyne 0516,
0247
Magnafon 0216,
0516, 0073
Magnavox 0036
Magnum 0037, 0648
Manesth 0037, 0217,
0264, 0294
Marantz 0037, 0556
Mark 0037
Matsui 0487, 0009,
0037, 0011, 0355,
0217, 0371, 0208,
0195, 0036, 0335,
0433, 0516, 0294,
0072, 0163, 0455
Matsushita 0250,
0650
Mediator 0012, 0037
Medion 0037, 0668
Megas 0610
Megatron 0178
Memorex 0178,
0009, 0250, 1037
Memphis 0337
Metz 0367, 0447,
0535, 0037
Minerva 0535, 0070,
0487
Minoka 0412
Mitsubishi 0036,
0512, 0108, 0535,
0178, 0037
Mivar 0292, 0291,
0216, 0290, 0516
Monaco 0009
Motorola 0093
Multibroadcast
0193
Multitech 0486,
0009, 0216, 0217,
0247
Murphy 0072, 0163,
0216
Myryad 0556
NAD 0178, 0361
NEC 0170
NEI 0037, 0337, 0371
Naiko 0606
Nakimura 0037,
0374
Nakio 0480
Neckermann 0037,
0505, 0370, 0556,
0247, 0327, 0418
Nesco 0247
Network 0337
Neufunk 0037, 0556
New Tech 0217,
0343
Nikkai 0037, 0218,
0337, 0217, 0009,
0036, 0072, 0216,
0264
Nobliko 0070, 0216
Nogamatic 0196
Nokia 0361, 0548,
0163, 0480, 0473,
0208, 0346, 0374,
0606, 0610
Nordmende 0109,
0196, 0343, 0198,
0560, 0195, 0287
Novak 0012
Novatronic 0037
Oceanic 0163, 0361,
0208, 0548
Okano 0037, 0370,
0009, 0264
Omega 0264
Onwa 0433, 0371,
0218
Optimus 0650
Orion 0294, 0037,
0355, 0516, 0655
Orline 0037, 0218
Orsowe 0516
Osaki 0072, 0412,
0037, 0217, 0264,
0218, 0355, 0374
Osio 0037
Oso 0218
Osume 0072, 0036,
0037, 0218
Otto Versand 0037,
0505, 0109, 0294,
0535, 0512, 0093,
0226, 0010, 0556,
0343, 0247, 0217,
0036, 0361
Pael 0216
Palladium 0370,
0418
Panama 0264, 0217,
0247
Panasonic 0226,
0250, 0650, 0548,
0367, 0516, 0037,
0163, 0361
Panavision 0037
Pathe Cinema 0216,
0163
Pathe Marconi 0196,
0198
Pausa 0009
Perdio 0037, 0163
Philco 0247, 0418,
0370, 0037
Philips 0037, 0012,
0556, 0193, 0343,
0374
Phoenix 0216, 0486
Phonola 0037, 0012,
0193, 0216
Pioneer 0109, 0037,
0166, 0486, 0287,
0361, 0163
Plantron 0009
Playsonic 0217
Portland 0374
Prandoni-Prince
0516, 0361
Precision 0217
Prima 0264
Prinz 0194
Profex 0009, 0163,
0361
Profi 0009
Profitronic 0037
Proline 0072
Prosonic 0037
Protech 0037, 0337,
0418, 0009, 0668,
0217, 0247, 0264
Proton 0178
Pye 0037, 0012,
0556
Quasar 0250, 0247
Quelle 0037, 0535,
0070, 0512, 0010,
0011, 0104, 0200,
0327, 0361, 0328,
0505
Questa 0036
R-Line 0037
RBM 0070
RFT 0072
Radialva 0037, 0218,
0337
RadioShack 0037,
0178
Radiola 0037, 0012,
0217
Radiomarelli 0516,
0247, 0037
Radiotone 0037,
0009, 0264
Rank Arena 0036
Realistic 0178
Recor 0037
Rediffusion 0361,
0548
Redstar 0037
Reflex 0037
Reoc 0714
Revox 0037
Rex 0206, 0259,
0163, 0264
Roadstar 0009,
0264, 0037, 0218,
0418
Rowa 0698, 0712
Royal Lux 0412
SBR 0012, 0037,
0193
SEG 0037, 0217,
0009, 0264, 0668,
0036
SEI 0010, 0516,
0206, 0294
SEI-Sinudyne 0037
35
Page 36

09
TV brand code
Saba 0109, 0196,
0163, 0343, 0361,
0548, 0335, 0198,
0287, 0625, 0516,
0560
Sagem 0610, 0455
Saisho 0516, 0011,
0217, 0009, 0264
Salora 0361, 0548,
0194, 0516, 0290,
0163
Sambers 0516
Samsung 0009,
0217, 0556, 0072,
0290, 0370, 0264,
0519, 0037, 0208,
0216, 0587, 0618,
0644
Sandra 0217, 0216
Sansui 0655, 0037
Sanyo 0208, 0036,
0217, 0370, 0011,
0072, 0216, 0104,
0108
Schaub Lorenz 0361
Schneider 0037,
0012, 0519, 0247,
0218, 0259, 0371,
0217, 0361, 0556,
0668, 1137
Scotland 0163
Seleco 0206, 0259,
0163
Sencora 0009
Sentra 0218
Serino 0610, 0216,
0455
Sharp 0093, 0036,
1193, 0294, 0516
Shintoshi 0037
Shorai 0294
Siarem 0516
Siemens 0327, 0195,
0535, 0200, 0037,
0328
Silva 0216
Silver 0036, 0361
Sinudyne 0010,
0516, 0294, 0206
Solavox 0361, 0548,
0072, 0163
36
Sonitron 0370, 0208
Sonoko 0037, 0009,
0282
Sonolor 0163, 0208,
0361
Sontec 0037, 0009,
0294, 0370
Sony 0011, 0010,
0036, 0505, 1505,
0651, 1651
Sound & Vision
0374
Soundesign 0178
Soundwave 0418,
0037
Ssangyong 0009
Standard 0009,
0037, 0217, 0218,
0374
Stenway 0218, 0282
Stern 0206, 0259,
0163, 0264
Strato 0037, 0264
Stylandia 0217
Sunkai 0610, 0294,
0355, 0455
Sunstar 0037, 0009,
0371
Sunwood 0037
SuperTech 0009,
0037, 0216
Superla 0516
Supra 0009
Susumu 0218
Sysline 0037
Sytong 0216
T + A 0447
TMK 0178
TVTEXT 95 0556
Tandberg 0367
Tandy 0163, 0218,
0072, 0217, 0093
Tashiko 0217, 0036,
0163, 0216
Tatung 0516, 0072,
0037, 0217, 0011
Teac 1037, 0712,
0009, 0412, 0455,
0037, 0264, 0282,
0418, 0668, 0698
Tec 0217, 0259,
0247, 0337, 0009
Technics 0250, 0650
Teleavia 0196, 0343
Telefunken 0101,
0109, 0343, 0335,
0073, 0625, 0037,
0196, 0486
Telegazi 0037
Telemeister 0037
Telesonic 0037
Telestar 0037
Teletech 0037, 0009,
0337
Teleton 0206, 0036,
0217, 0259
Televideon 0216
Temco 0294
Tennessee 0037
Tensai 0371, 0374,
0037, 0009, 0217,
0104, 0294, 0218,
0247
Texet 0216, 0009,
0218, 0374
Thomson 0109,
0196, 0287, 0343,
0335, 0198, 0625,
0037, 0560
Thorn 0193, 0190,
0073, 0037, 0499,
0535, 0104, 0335,
0072, 0343, 0361,
0374, 0505, 0512
Thorn-Ferguson
0343
Tokai 0163, 0037,
0337, 0009
Tomashi 0282
Toshiba 0036, 0070,
0109, 0508, 0618,
0718
Trans Continens
0217
Transonic 0698,
0712
Trident 0516
Tristar 0193, 0218
Triumph 0346, 0516,
0556
Tsoschi 0282
Uher 0206, 0486,
0037, 0374, 0418
Ultravox 0037, 0216,
0247
Unic Line 0037, 0473
United 0037
Universum 0037,
0104, 0327, 0070,
0535, 0361, 0346,
0512, 0011, 0217,
0247, 0036, 0480,
0010, 0264, 0505,
0009, 0290, 0370,
0418, 0170, 0294,
0337
Univox 0037, 0163,
0337
Vestel 0037, 0217
Videologic 0218,
0216
Videosat 0247
Videotechnic 0217
Vision 0217
Vistar 0206
Voxson 0163, 0418
Waltham 0037,
0418, 0109, 0217
Wards 0178
Watson 0037, 0009,
0218, 0519
Watt Radio 0216
Wega 0036, 0037
Wegavox 0009
White Westinghouse
0216, 0037, 0337
Windstar 0282
Xrypton 0037
Yamishi 0455, 0217,
0282
Yapshe 0250
Yokan 0037
Yoko 0217, 0264,
0009, 0037, 0218
Zanussi 0206, 0217
Page 37

Troubleshooting
Chapter 10:
Troubleshooting
If you are having trouble with the DTR, check the following items to see if the problem can be
resolved. Sometimes another device is at fault, so be sure to also inspect the other devices
being used.
10
Condition
No sound, no picture.
Only the Setup menu
displays. No functions or
menus can be accessed.
Possible cause
• The DTR is not plugged into
the main power supply.
• The DTR is in standby.
• Non-digital television is being
viewed via the UHF aerial TV
connection.
• The SCART lead is connected
to the wrong sockets.
• The connections are correct
but the TV is not switched to an
external AV source (AV1 or EXT
1, etc.).
• The connection cables might
be defective (corroded, broken,
or damaged) or missing.
• A download list of (digital)
services is not stored in the
DTR’s memory.
Countermeasures
• Check the mains power supply
connection.
• Press one of the number
buttons or STANDBY button
on the remote to wake up the
DTR.
• Press the remote TV/DTV
button.
• Check the SCART connections.
• Check the TV setting.
• Check all connections.
• Check the aerial connection.
Choose Add New Channels
from the Installation menu and
scan for broadcast channels.
If no channels have been added,
other menu screens do not
display.
37
Page 38

Troubleshooting10
Condition
Only the HOME MENU, its
sub-menus, and the information bar are available. Service
selection is not possible.
Intermittent reception,
frozen image, or “mosaic”
effect.
The remote is not working
properly.
Possible cause
• The DTR is not correctly set up
for the aerial.
• The aerial is not receiving the
signal.
• The received signal is too
weak.
• The received signal is too
strong.
• The aerial is damaged.
• The cable links are defective
(corroded, broken, or damaged
connectors and/or wires).
• A poorly positioned or
unstable aerial is causing a poor
signal.
• There are no batteries in the
remote or the batteries are low
or dead.
Countermeasures
• Check if the analogue
channels are received properly
and then check the aerial
connection (aerial to the DTR,
and TV aerial input connected to
the DTR UHF input). Refer to
section
Signal Check
30.
• Check the aerial installation
and positioning.
• Check the aerial installation
and positioning or install a larger
aerial.
In unusual cases, the effect can
be caused by severe weather or
very heavy cloud cover.
• Install an attenuator at the
receiver UHF input.
• Replace the aerial.
• Check all the connections and
cables.
• Re-position the aerial and
fasten it securely.
• Check the batteries and
replace them if necessary.
on page
If the problem persists, please contact the dealer from whom it was purchased or Pioneer
customer service on 01753-789500.
You can check the coverage of Digital TV in your area as well as referring to Frequently Asked
Questions (FAQ’s) on the web sites listed below:
Digital TV Group: http://www.dtg.org.uk
Freeview: http://www.freeview.co.uk
• Any product related inquiries should be directed to the dealer or Pioneer.
• The addresses above are subject to change without prior notice.
38
Page 39

Specifications
Chapter 11:
Specifications
11
System capabilities
DVB compliant MPEG-2 reception of broadcasts up to Main Profile @ Main Level
Video decoding
• DVB compliant MPEG-2 reception of broadcasts up to MP @ ML
• Video bit rate: up to 15 Mbit/sec
• Video format: 4:3 and 16:9
• Resolution: up to 720 by 576 pixels
Audio decoding
MPEG layer I/II (excluding multichannel
management from one bit stream)
Operation/Features
• Automatic programme loading via scanning
installation
• Free to air reception
• DVB subtitles
• Programme parental lock with PIN code
• Full remote
• Menu controlled operation using on-screen
display
• Menu controlled installation using on-screen
display
• 10 events over 10 months programme timer
• Video still image capture
• Multibrand TV remote
Reception-Demodulation
Demodulation conforming to ETSI EN 300 744
(COFDM)
• supports FFT size 2k and 8k
• All non-hierarchical modes supported.
Connections
• RF input (for aerial) connector: female IEC
169-25
Tuner frequency range: 470-854 MHz (CH21
to 68)
• RF output (to TV) connector: male IEC 169-2
Loopthrough frequency range: 47-862 MHz
(VHF, UHF CH21 to 69)
RF modulator: Standard PAL I
Channel: selectable ch 21 to 68. (Default: ch
38)
• TV SCART
Output: CVBS, Controlled audio L/R, RGB,
S-VIDEO
• VCR SCART
Input: CVBS, Audio L/R, S-VIDEO, RGB
Output: CVBS, Audio L/R, S-VIDEO
• Optical digital audio output
Accessories
• Remote
• Aerial/RF lead
• Instruction manual
• Warranty card
• Batteries: 2 x 1.5V type AA/R06/UM-3
• Mains lead
Miscellaneous
• Operating Temperature: +5 ˚C to 40 ˚C
• Mains: 230 V +/–10%, 50 Hz
• Power consumption (W) 10 max
• Standby consumption (W) 4 max
• Weight (kg) 1.1
• Dimensions (w x h x d mm) 260 x 50 x 190
Specifications and design are subject to possible modifications without notice due to improvements.
This product is for use in the UK only.
39
Page 40

PIONEER CORPORATION
4-1, Meguro 1-Chome, Meguro-ku, Tokyo 153-8654, Japan
PIONEER EUROPE NV
Haven 1087, Keetberglaan 1, B-9120 Melsele, Belgium TEL: 03/570.05.11
Printed in <XRB1014-A>
Published by Pioneer Corporation.
Copyright C 2003 Pioneer Corporation.
All right reserved.
 Loading...