

Page 1
Page 2
SAFETY PRECAUTIONS
SAFETY PRECAUTIONS
Thank you for buying this Pioneer product.
Please read through these operating instructions so
you will know how to operate your model properly.
After you have finished reading the instructions, put
2
Page 3

Contents
Contents
01 Getting ready .....................4
Included accessories .............................. 4
Front view .............................................. 5
Rear view ............................................... 5
Remote control ....................................... 6
Putting batteries in the remote ............... 7
Setting TV codes .................................... 7
Caring for the remote ............................. 8
Remote operation range ......................... 8
02 Connections ......................9
Television and VCR with SCART
sockets ................................................ 9
Television and VCR with only standard
coaxial aerial input ............................. 10
Connecting to a digital audio device ..... 11
03 Starting up the first
time .............................. 12
04 Basic operation ................14
Turning on/off ....................................... 14
Changing channels ............................... 14
Selecting TV/DTV .................................. 15
Using the Info banner ........................... 15
Using Teletext .......................................
16
06 Using parental lock .........23
Set your PIN ......................................... 23
Turning parental lock on/off ..................
Locking/unlocking channels .................. 25
Watching locked channels ....................
24
25
07 Channel management ...... 26
Favourites ............................................. 26
Channel Skip ......................................... 27
Channel Sort ......................................... 28
Channel Options ................................... 29
08 Other options ..................30
User Preferences .................................. 30
TV Setup ............................................... 31
Installation ............................................ 33
Software Update .................................. 34
Quick User Guide ................................. 35
Restore System Defaults ..................... 36
09 TV brand code .................37
10 Troubleshooting ..............41
11 Specifications .................. 43
English
05 Advanced operation ........17
Using the on-screen programme
guide ................................................. 17
Using the timer ..................................... 19
Freezing a frame ................................... 20
Taking snapshots ..................................
Viewing snapshots ...............................
21
21
3
Page 4
Getting ready01
1
TV/DTV
RETURN
GUIDE
2
3
4
5
6
7
MENU
INFO
TEXT WIDE
SUBTITLE
AV
TV
EXIT
SELECT
8
9
0
Chapter 1:
Getting ready
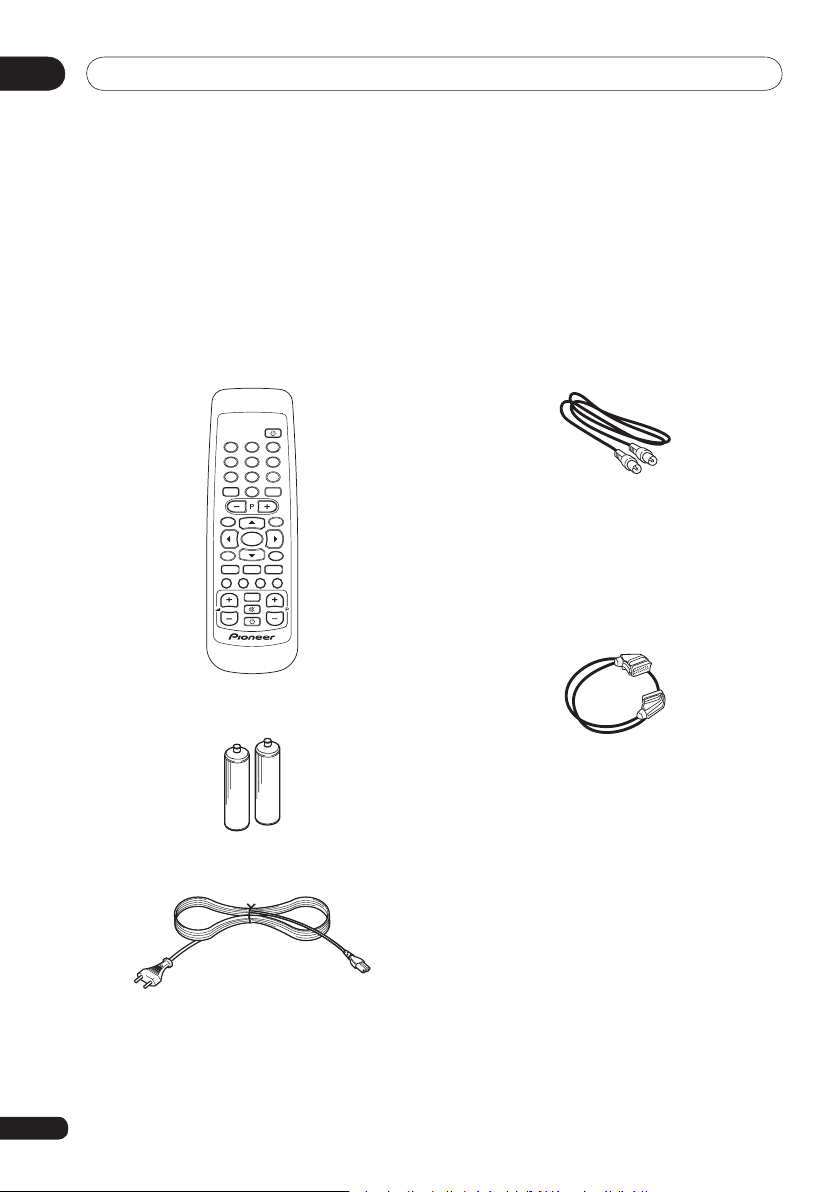
Included accessories
& Remote control
& Aerial/RF lead
Connects the Digital Terrestrial Receiver
(DTR) box to the video or TV. (Refer to the
illustrations on the following pages.)
& SCART lead
4
& Two AA/R06 Batteries
Connects the DTR SCART socket to the TV
SCART socket. (TV SCART sockets are usually labelled EXT or AV.)
& Mains lead
& Instruction manual
This document.
This is provided separately. Plug it into the
mains power supply.
& Warranty card
Throughout this manual your Digital Terrestrial Receiver is abbreviated as DTR.
Page 5
Getting ready
1
2
VCR TV
OPTICAL
AERIAL
TV
1
2
3
4
5
6
01
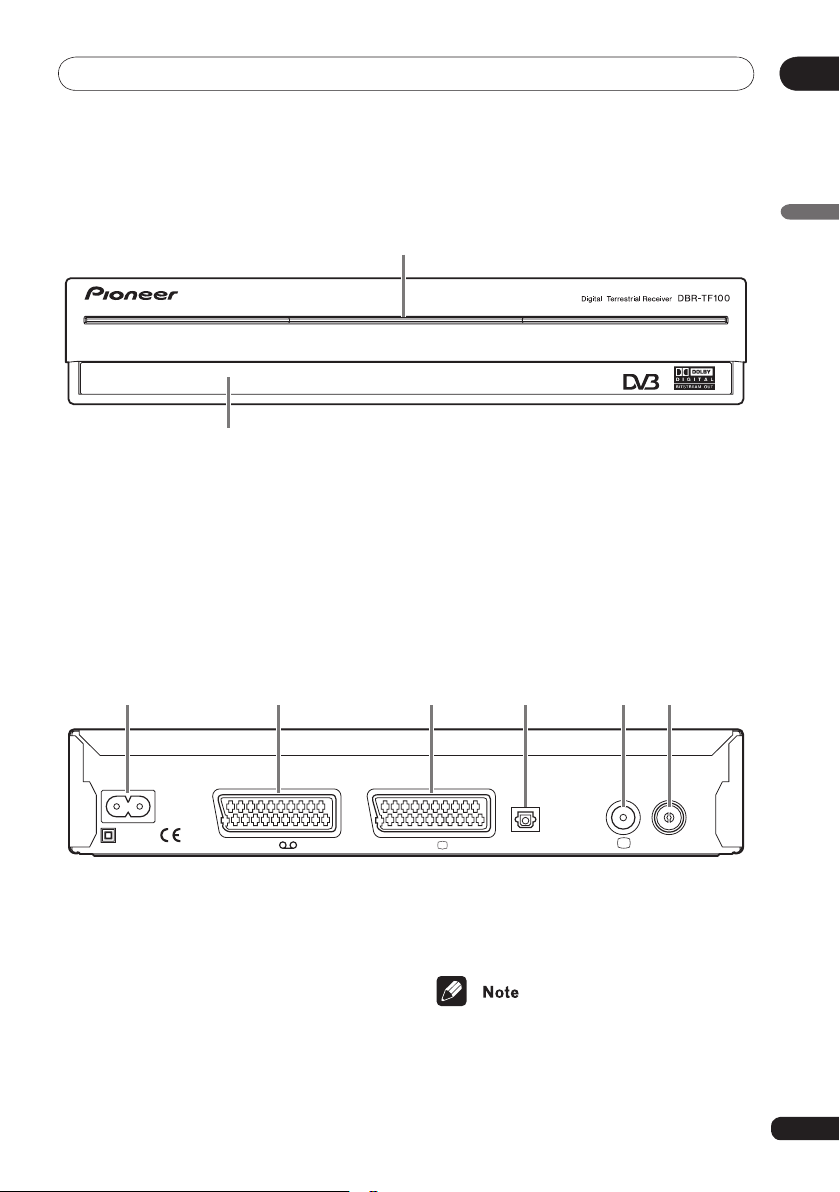
Front view
1 LED (standby/on)
Shows the power status of the DTR; Red =
Standby, Green = On. When a programme
set by the timer is playing, the LED turns
orange and it blinks when the remote is
operated.
* Dolby and the double-D symbol are trademarks of Dolby Laboratories.
2 Infrared sensor
Receives the signal emitted from the remote
control.
Rear view
English
*
1 Mains lead socket
2 SCART1 socket for VCR
3 SCART1 socket for TV
4 Optical digital audio output socket
5 VHF2 and UHF3 aerial output for TV
6 VHF2 and UHF3 aerial input
1. SCART: Euroconnector
2. VHF: Very High Frequency
3. UHF: Ultra High Frequency
5
Page 6
Getting ready01
1
TV/DTV
RETURN
GUIDE
2
3
4
5
6
7
MENU
INFO
TEXT WIDE
SUBTITLE
AV
TV
EXIT
SELECT
8
9
0
!
~
=
-
@
2
3
5
6
7
8
1
9
0
4
A
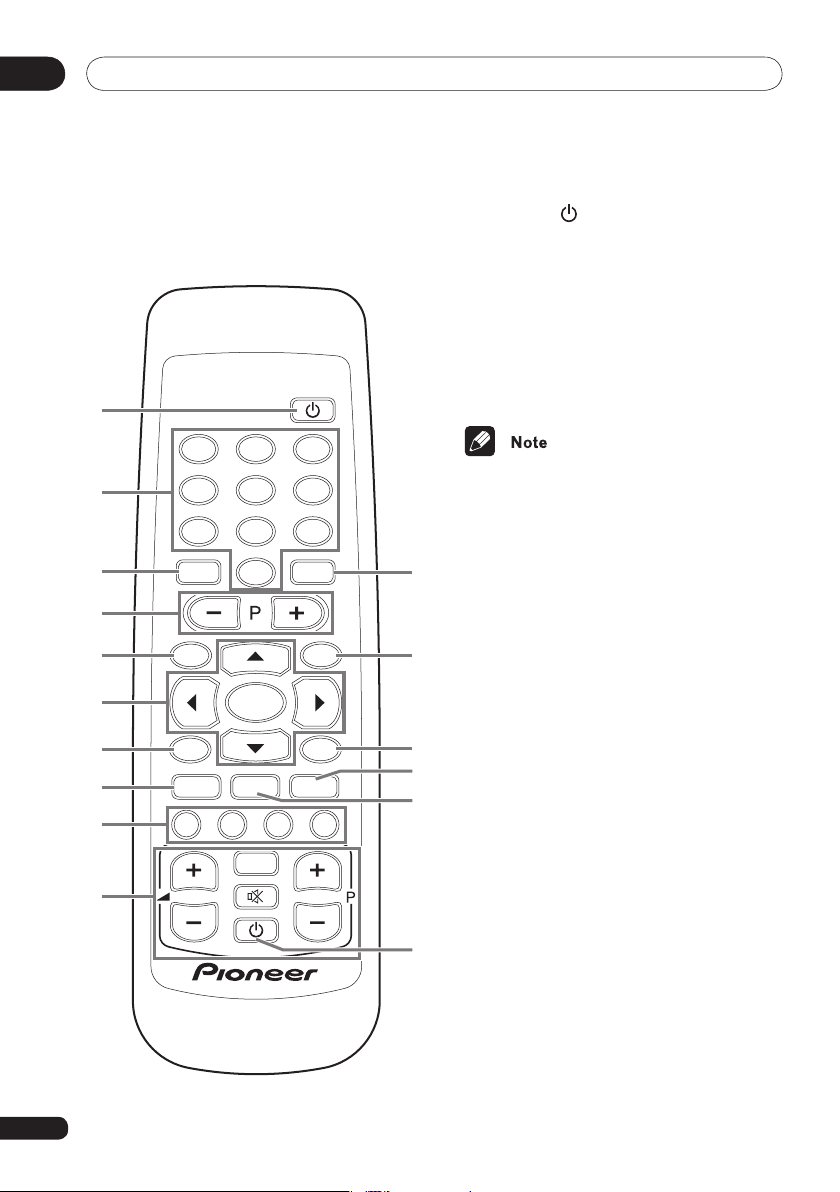
Remote control
1 STANDBY button (P.14)
Press to switch the DTR between standby
and power-on mode.
2 0–9 (Numeral) buttons (P.14, P.16)
• Press to directly select a channel.
• Used for Text Mode operations.
3 TV/DTV button (P.15)
Press to switch between digital and analogue broadcasting.
• This button only works when your DTR
and TV are connected by a SCART lead.
• You may not be able to select some
analogue TVs even when connected by
a SCART.
4 P (Programme) +, – buttons (P.14)
Press to select a channel.
5 GUIDE button (P.17)
Press to display the Electronic Programme
Guide (EPG).
6 5, ∞, 2, 3 buttons
5/∞/2/3: Used for menu selections, Text
Mode operations and when the channel list
is displayed for programme selections.
2: Used to take snapshots.
SELECT button (P.14)
• While watching a programme, used to
display the channel list.
• While the channel list is displayed, used
to select a programme.
• While a menu screen is displayed, used
to select menu items.
7 INFO button (P.15)
Press to display the Info banner.
8 TEXT button (P.16)
Press to select Text Mode.
6
Page 7
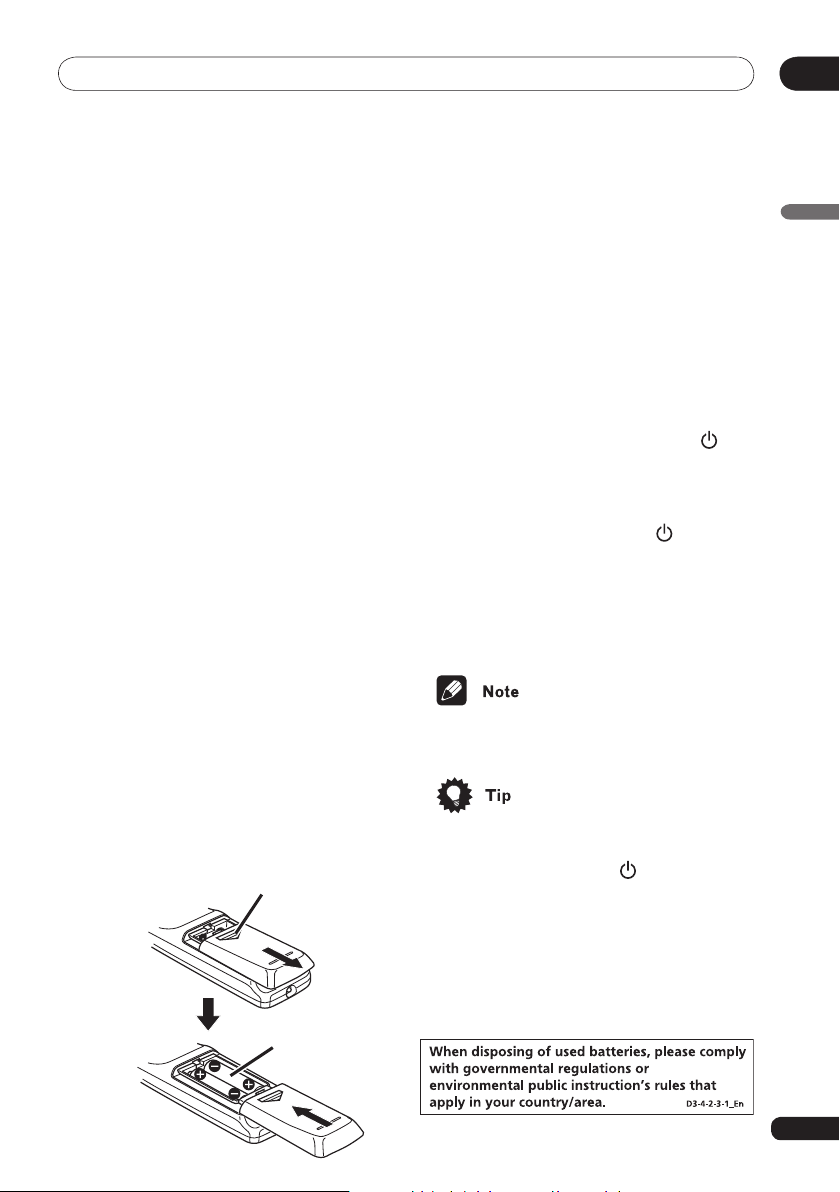
Getting ready
To add or change the batteries, slide open the
battery compartment cover on the back of the
remote control by pushing it down and sliding
it open.
Add two new
AA batteries.
01
9 RED, GREEEN, YELLOW, BLUE buttons
Used for Text Mode and on-screen
operations.
0 Refer to Setting TV codes on the right.
This remote can directly control the TVs
of major manufacturers. At the time of
shipment the remote is preset to operate
Pioneer TVs.
- SUBTITLE button (P.30)
Press to display subtitles.
= WIDE button (P.32)
Press to switch between wide-screen viewing modes.
~ EXIT button
Press to remove on-screen displays.
! MENU button
Press to display the menu screen.
@ RETURN button (P.15)
• Press to select the last displayed channel.
• Press to return to the previous menu
screen.
Putting batteries in the
remote
Setting TV codes
The remote can control the following five
functions by entering a TV brand code from
the attached list.
• TV on/standby or off
• TV volume up/down
• TV channel up/down
• Sound mute on/off
• Switch between TV/AV input
1 Press and hold the TV STANDBY but-
ton (A on the illustration), enter the 4-digit
TV brand code. (Refer to Chapter 9, TV brand
code, page 37.)
2 Pressing the TV STANDBY button (A
on the illustration) again, should switch the
TV on/off.
3 If the TV fails to operate, repeat the operation in Step 1 above, or enter a different
code for the same brand of TV.
• It might not be possible to use this
remote with some TV brands or models.
• If necessary, the remote can be reset to
the factory default setting. While pressing the TV STANDBY button, enter
the code 9999.
English
7
Page 8
Getting ready01
30
°
30
°
7
m
Caring for the remote
• Do not drop the remote.
• Do not get the remote wet.
• Do not use or store the remote in the
following locations:
In direct sunlight
Near hot objects
Areas with high humidity
• Do not mix new and used batteries.
Only add all new batteries.
• Do not mix battery brands. Different bat
tery brands may have different voltages
even if the same size.
• When not planning to use the remote
for a long period of time (over one
month), remove the batteries to prevent
battery fluid leaks inside the remote. If
a battery leak occurs inside the remote,
discard the old batteries, wipe out the
liquid from the case, and add new bat
teries.
• The Pioneer batteries supplied with the
remote do not contain heavy metals,
such as mercury, nickel, or cadmium. In
many countries, however, the disposal
of batteries with household waste is not
allowed. Be sure to comply with local
regulations when disposing of batteries.
• The remote’s TV preset code setting
will only last for about one minute
without batteries, so to prevent the
inconvenience of losing the stored
settings, have ready a fresh set of
new batteries and add them immedi
ately after removing the old batteries. However, if the remote’s buttons
are pressed while the batteries are
removed, the brand code setting will
be deleted. Please be careful not to
press the buttons while replacing the
batteries.
8
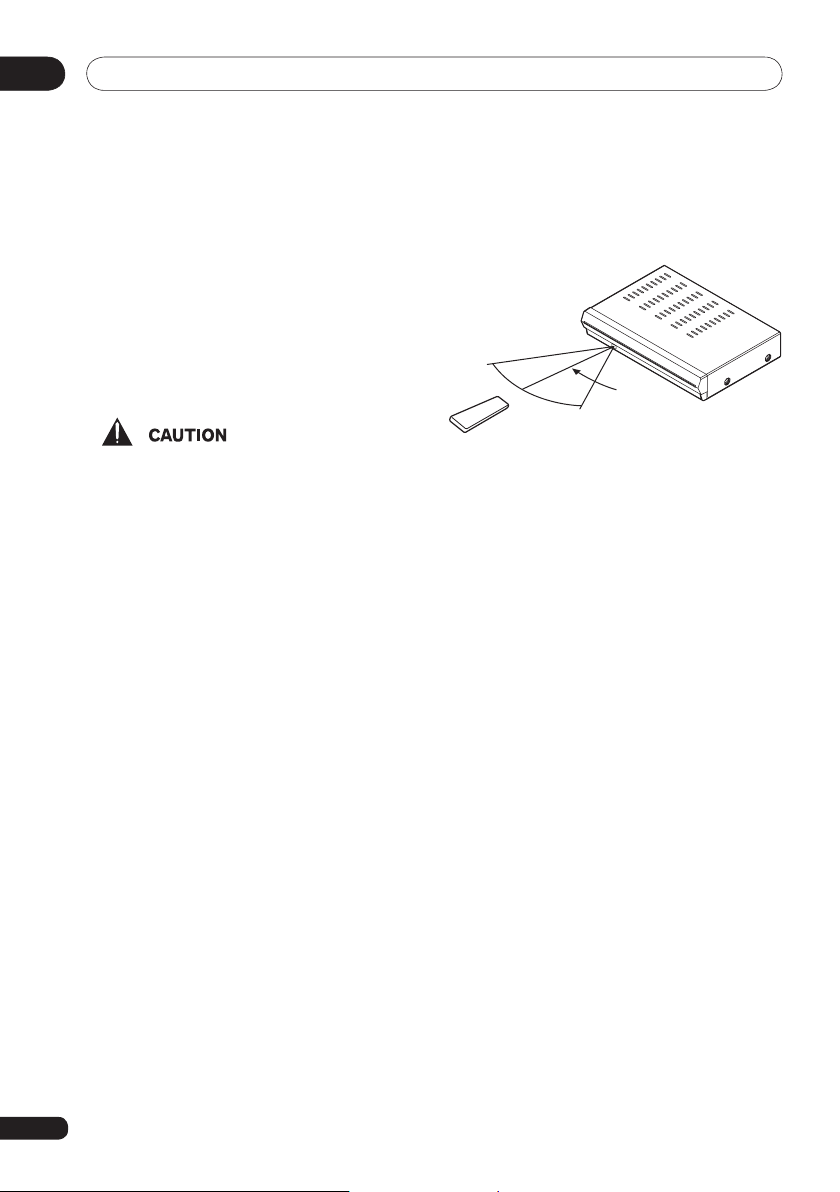
Remote operation range
• If an object is blocking the path between
the remote and the DTR signal sen-
-
-
-
sor the unit might not respond to the
remote commands. If this happens,
remove the obstacle or change your
position.
• As the batteries weaken, the range
of the remote becomes shorter. If the
operation range is too short for your
preference, replace the batteries.
Page 9
Connections
230V
VCR TV
OPTICAL
AERIAL
50Hz
TV
AERIAL
AERIAL
EXT
VIDEO
TV set
AERIAL
EXT
TV
Digital
Terrestrial Receiver
02
Chapter 2:
Connections
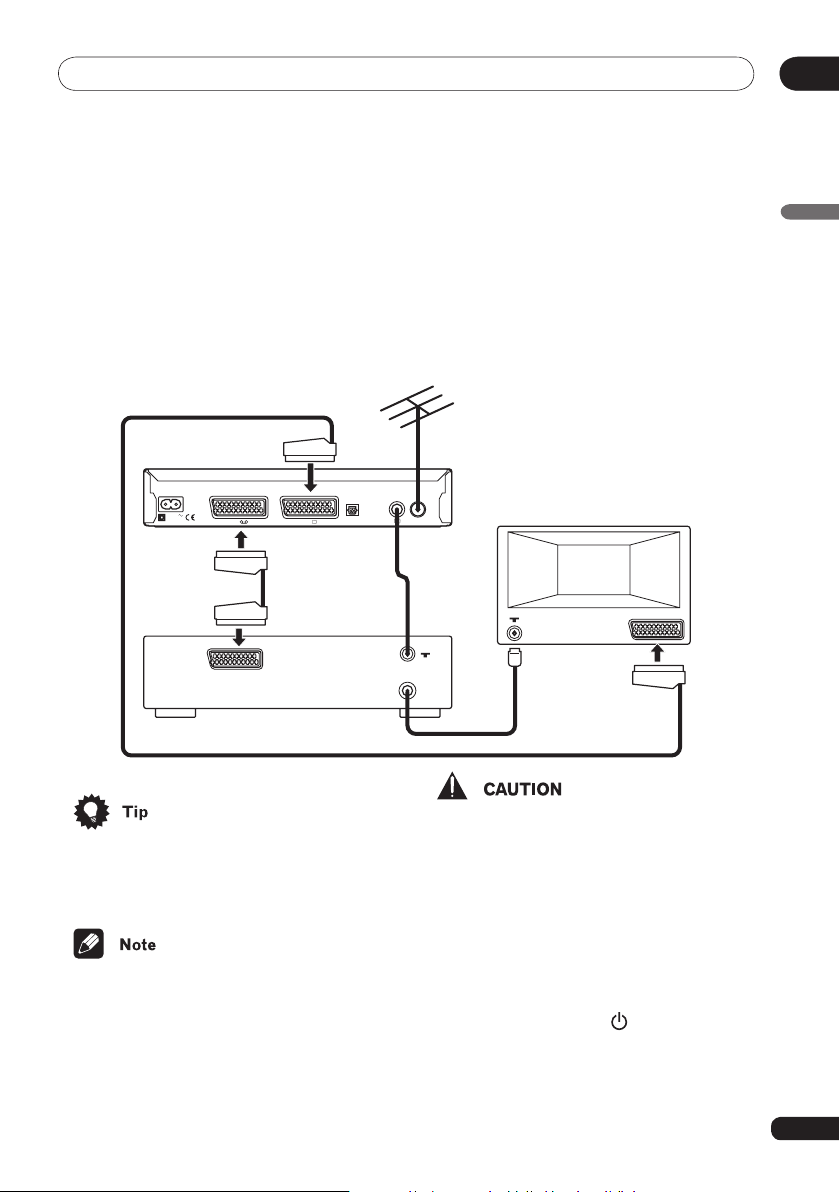
Television and VCR with SCART sockets
This connection provides the best recording and playback quality.
English
• To obtain the best picture quality and
have access to automatic EXT switching, connect to the TV’s first EXT AV1
socket.
• If you are using an optional equipment
aerial that requires power to be supplied
by the DTR, see additional instructions
on pages 13 and 33.
• Although you may use an indoor aerial it
may not provide the best reception.
• Before making connections unplug all
equipment from the mains power supply.
1 Connect the equipment as shown in the
above diagram.
2 Plug all of the equipment, including the
DTR, into the mains power supply.
3 Turn on the TV and select a channel.
4 Press the STANDBY button on the
9
remote to wake up the DTR.
The DTR will display the Pioneer logo and
then the Menu Language screen.
Now go to the Starting up the first time on
page 12.
Page 10
Connections02
VIDEO
AERIAL
TV set
230V
VCR TV
OPTICAL
AERIAL
50Hz
TV
AERIAL
TV
Digital Terrestrial Receiver
AERIAL
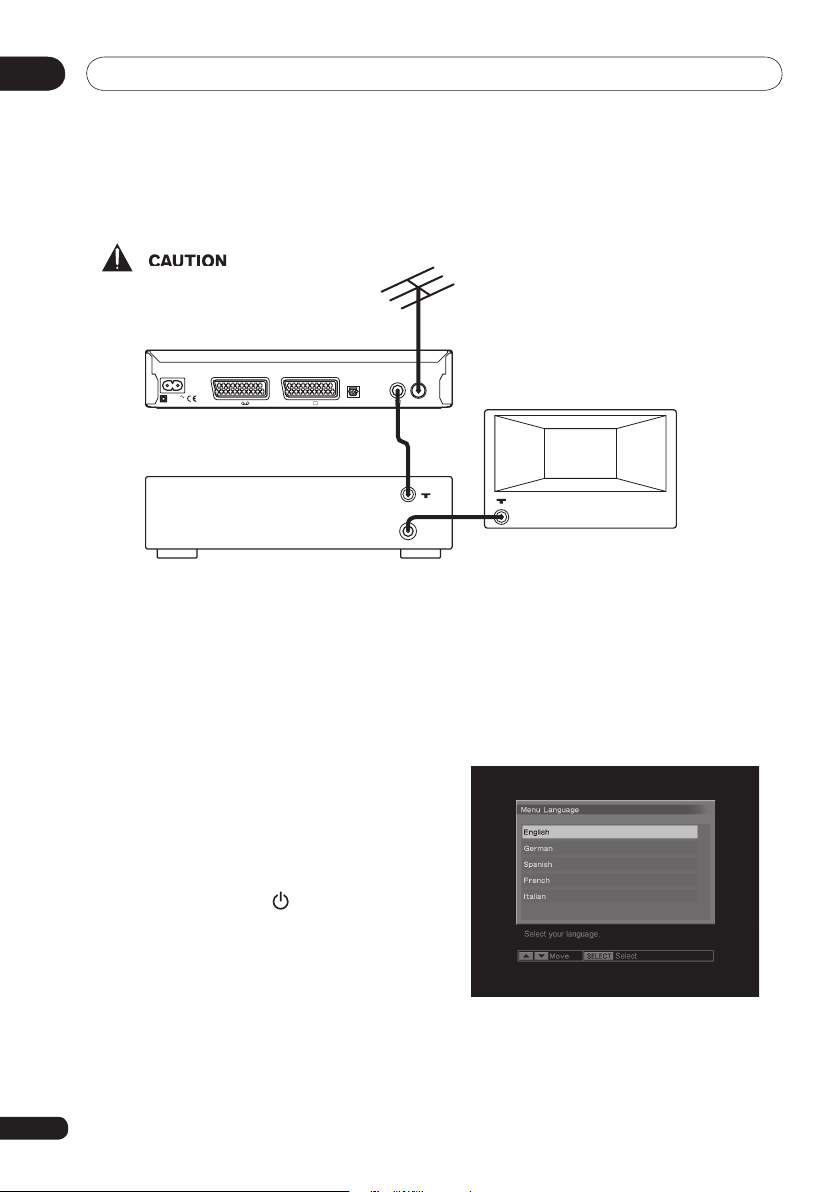
Television and VCR with only standard coaxial aerial input
• Before making connections unplug all
equipment from the mains power supply.
1 Connect the equipment as shown in the
above diagram but do not yet connect the
aerial to the DTR.
2 When you have finished making the connections, plug in the equipment. First turn on
the TV and select an unused channel to use
for watching digital programmes. Next turn
on the VCR (at this time it does not matter to
what channel the VCR is tuned).
3 Press the STANDBY button on the
remote to wake up the DTR.
10
4 Tune the TV.
Now you need to tune the TV channel for
watching digital programmes. If you are
not sure how to do this, refer to the TV’s
operation guide. Store the channel when the
Pioneer logo or the Menu Language screen
appears on the TV as shown below.
5 Connect the aerial to the DTR and check
if the picture remains steady (no wobbling,
interference, or snow).
Page 11
Connections
230V
VCR TV
OPTICAL
AERIAL
50Hz
TV
Digital Terrestrial Receiver
Sampling rate
converter-equipped
stereo system
,
AV amp, etc.
02
6 Switch the TV to all the other tuned
channels, including the channel tuned for the
VCR, and check the picture quality.
If the picture quality is good, go to the Start-
ing up the first time on page 12. If there is
a picture quality problem even though the
aerial is connected, follow the instructions
below after completing Starting up the first
time on page 12.
1 Disconnect the aerial from the back of
the DTR.
4 Select Setup from the HOME MENU
screen, Installation, and then RF Out-
put Channel using 5, ∞ and SELECT
buttons on the remote.
The default setting for this option, 43,
should be changed if there is interfer
ence. Select a channel that is far from
43. Press the MENU button (Exit) to exit
the menu and store the setting.
5 Repeat from Step 4 to check if the
picture quality improves.
2 Check to make sure the TV is tuned to
the channel selected for watching digital
programmes.
3 Press the MENU button on the remote.
The HOME MENU screen is displayed.
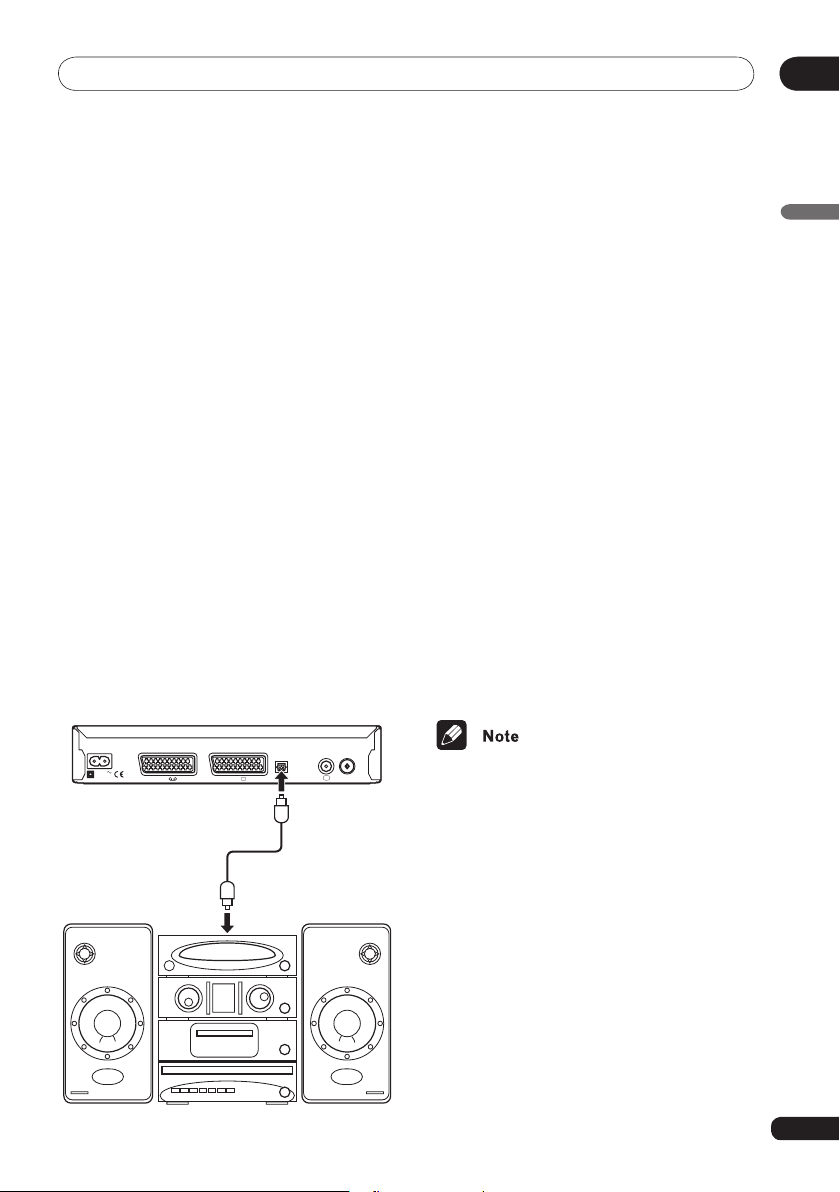
Connecting to a digital audio device
Connect an optical digital audio cable (sold seperately) between the optical digital audio output
socket on the DTR and an optical digital input on a sampling rate converter-equipped stereo
system, AV amp, etc.
• If a Dolby Digital encoded audio stream
is output and you have a Dolby Digital
decoder equipped external digital audio
device, change your digital audio output
settings in User Preferences, Digital
Audio Out. (See page 30.)
• If the external digital audio device does
not support the sampling rate at which
the digital audio is being broadcast, no
audio will be heard.
English
-
“Dolby” and the double-D symbol are trade
marks of Dolby Laboratories.
-
11
Page 12
02
Starting up the first time
Chapter 3:
Starting up the first time
After all connections have been made and
the DTR is connected to the mains, press
STANDBY or any number button.
The Pioneer logo is displayed and then the
Menu Language screen appears.
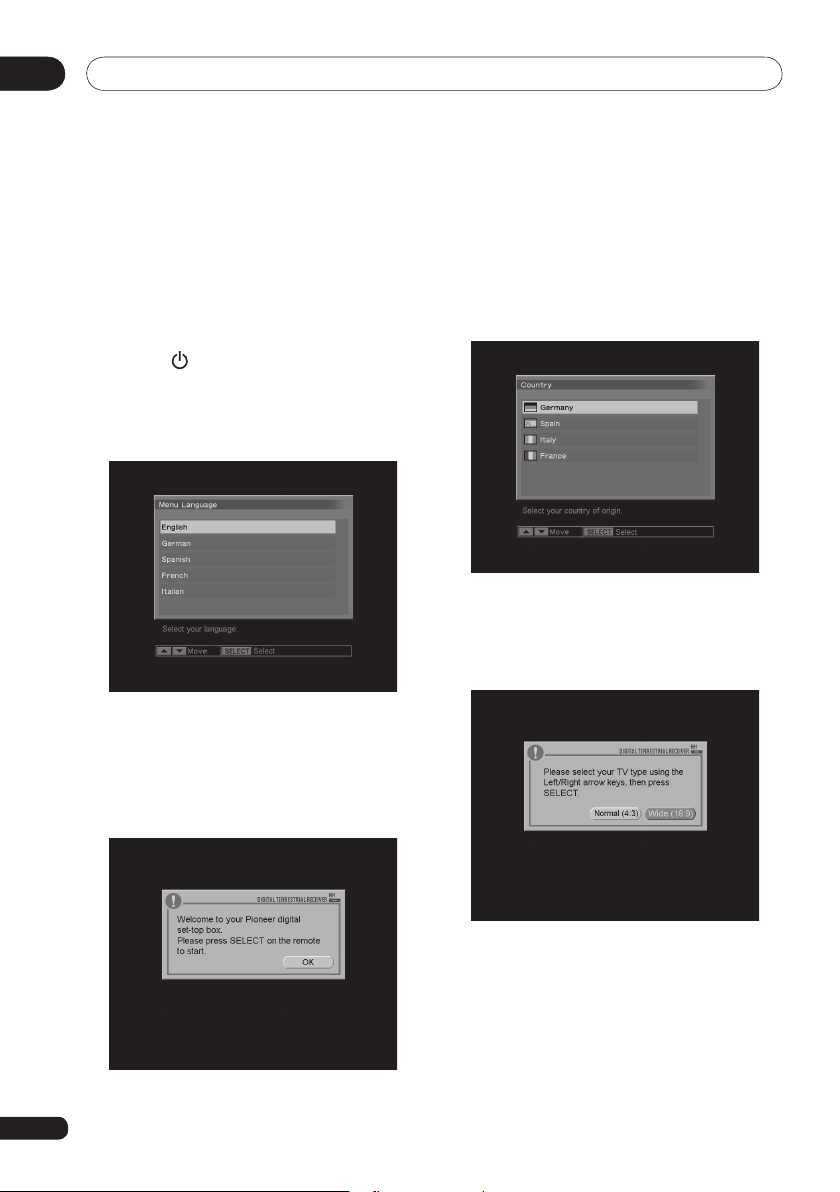
Selecting a Menu Language
You can select a language for menus.
1 Press 5/∞ to select the desired lan-
guage and press SELECT.
2 After selecting the Menu Language a
welcome message is displayed.
Selecting a Country
You select the country in which the DTR is
being used. Press 5/∞ to select a country
and press SELECT.
Choosing your TV type
12
A message box appears on the screen
instructing you to select your TV type. Press
2/3 to select Normal (4:3) or Wide (16:9),
then press SELECT.
3 Press SELECT.
Page 13
Starting up the first time
02
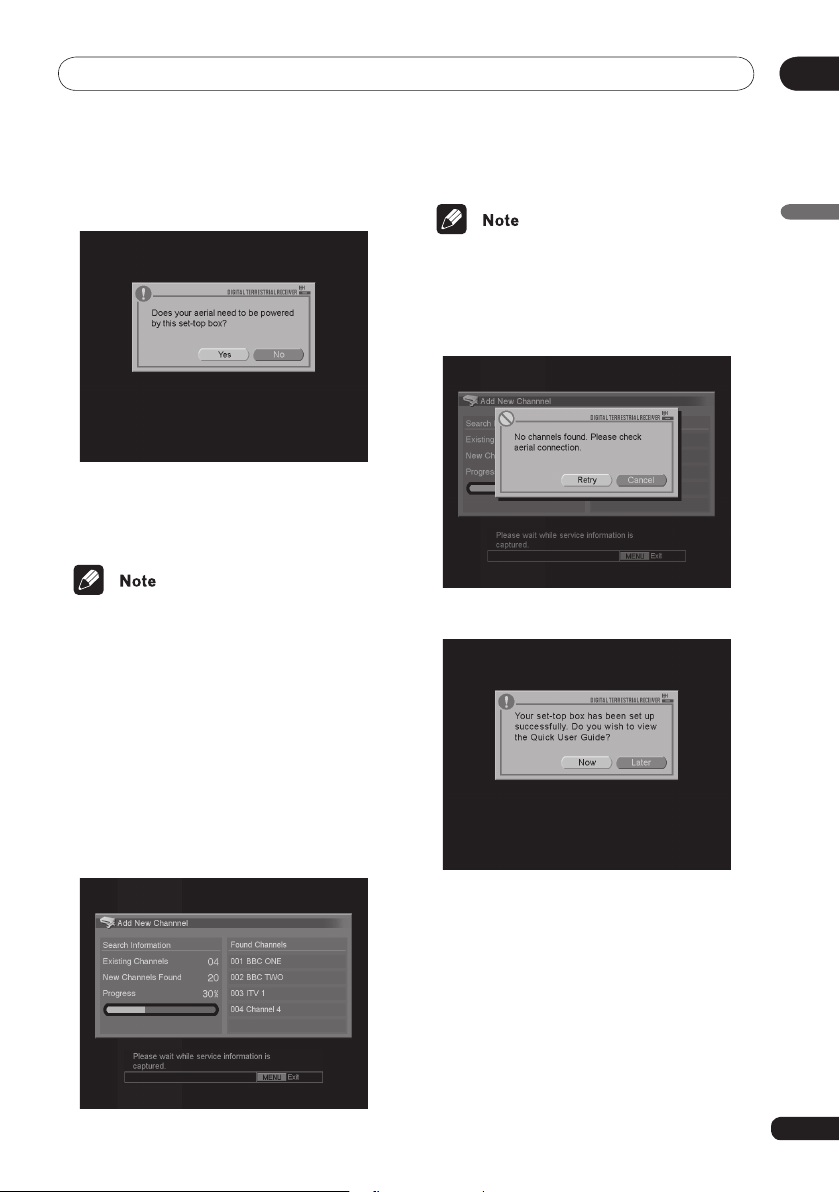
Selecting aerial power
A message box appears on the screen
asking if your aerial is to be powered by the
DTR. Press
press SELECT.
• Normally No is selected. Some optional
2/3 to select Yes or No and
equipment aerials require power to be
supplied by the DTR. If you have such
an aerial, select Yes. Refer to the user
manual for that product for further infor
mation.
Scanning for channels
A message box is displayed, asking you to
confirm that your aerial is connected. After
you have confirmed your aerial connection,
press SELECT. Your DTR will scan for chan
nels and add all new channels found.
• If no channels are found, a warning
message is displayed. Check your aerial
connection again. You can scan again by
selecting Retry with
SELECT.
Quick User Guide
-
-
English
2/3 and pressing
Scanning all channels will take a couple of
minutes.
At the end of the auto-setup process you are
asked if you want to see the Quick User Guide
explaining the main features of the DTR.
Press
2/3 to select Now or Later and press
SELECT.
If you select Now you can view the Quick
User Guide for the DTR. Press SELECT to
pause the guide and to continue the guide
after a pause. To exit from the guide , press
MENU or EXIT
If you select Later or at the end of the Quick
User Guide, the channel with the lowest
number is displayed.
.
13
Page 14
02
Basic operation
Chapter 4:
Basic operation
Turning on/off
To turn on, press STANDBY or any num-
ber buttons. When you press STANDBY
, the channel last viewed is tuned in. When
you press a number button, the channel of
the number button is tuned in. Then the Info
banner is displayed and disappears after a
few seconds.
• You can remove the Info banner immediately by pressing EXIT.
• If a channel is not available for the
channel number input, ‘No service is
available on this channel’ is displayed for
a few seconds and the channel does not
change.
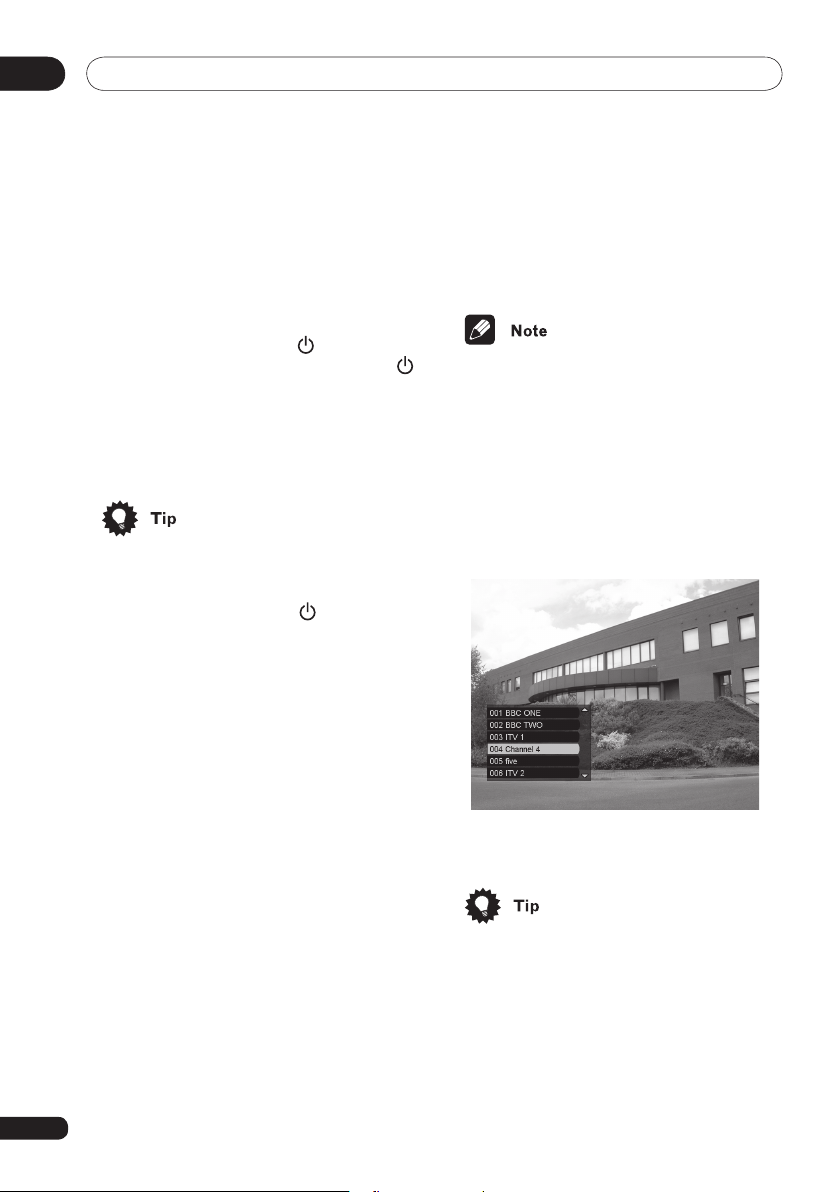
Using the channel list
1 If you press SELECT while watching a
programme, a channel list of six channels,
including the present channel, is displayed.
14
To turn off, press STANDBY
goes into standby mode.
. The DTR
Changing channels
Using the P +, – buttons
Press P +/– to change a channel up/down
from the list of available channels.
Hold down P +/– to rapidly move through the
channel numbers until the desired channel
number is reached then release the button.
The channel is displayed.
Using the number buttons
Enter a 3-digit number for the desired channel. For example, if you want to tune in channel 125, enter 1-2-5.
Or
Enter just the digits of the number of the
channel desired. For example, if you want to
tune in channel 5, enter 5.
2 Press 5/∞ to see lower or higher chan-
nels on the list.
• Press 2/3 to move to the previous/next
list of channels.
3 Press SELECT again to select a channel
to tune in.
Page 15
Basic operation
02
Using RETURN
If while watching a channel you press RETURN, the channel last watched is tuned in
and displayed.
• The last channel viewed is cleared
from memory when the DTR is put into
standby mode.
Selecting TV/DTV
Use the TV/DTV button to switch between
analogue channels from the regular TV or
VCR and digital channels from the DTR.
• This button only works when your DTR
and TV are connected by a SCART lead.
• You may not be able to select some
analogue TVs even when connected by
a SCART.
• If you choose to view the DTR from the
analogue TV by selecting an external
source, the TV/DTV button on the
remote cannot be used to change chan
nels.
Using the Info banner
You can display information on the programme you are watching or other programmes on the screen.
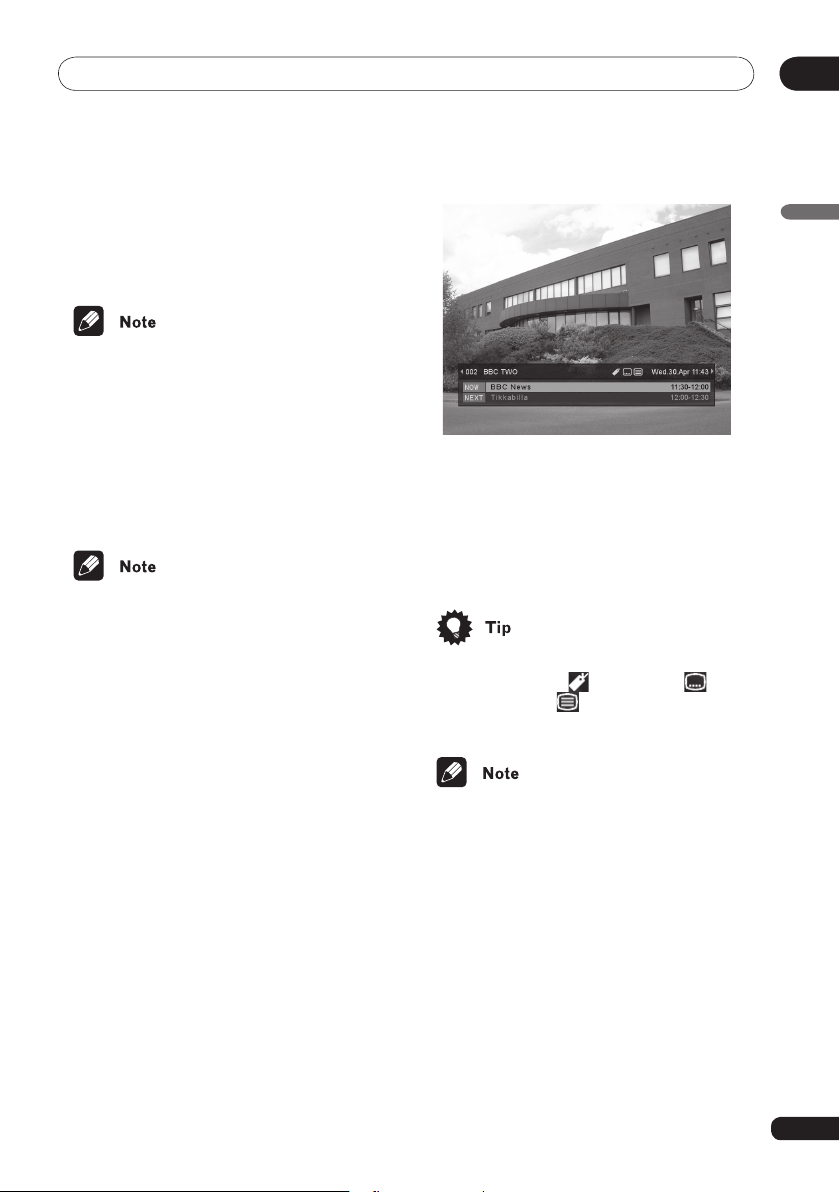
1 Press INFO to turn on the Info banner.
The current channel number, channel name,
date and time are displayed. Also the current
programme name and beginning and ending
times are displayed along with the same
information for the next programme on the
same channel.
Now, you can:
• Press 2/3 to display the Info banner on
other channels.
• Press SELECT to tune in a channel.
• Press EXIT to remove the Info banner
from the screen.
• The Info banner also displays icons
for Favourites ( ), Subtitles ( )
and Teletext ( ) if they apply to the
selected channel.
-
• Due to inaccurate information provided
by the broadcaster some icons may appear or be absent in error.
• On occasion, when using
play the info banner on other channels,
inaccurate or outdated information may
be presented.
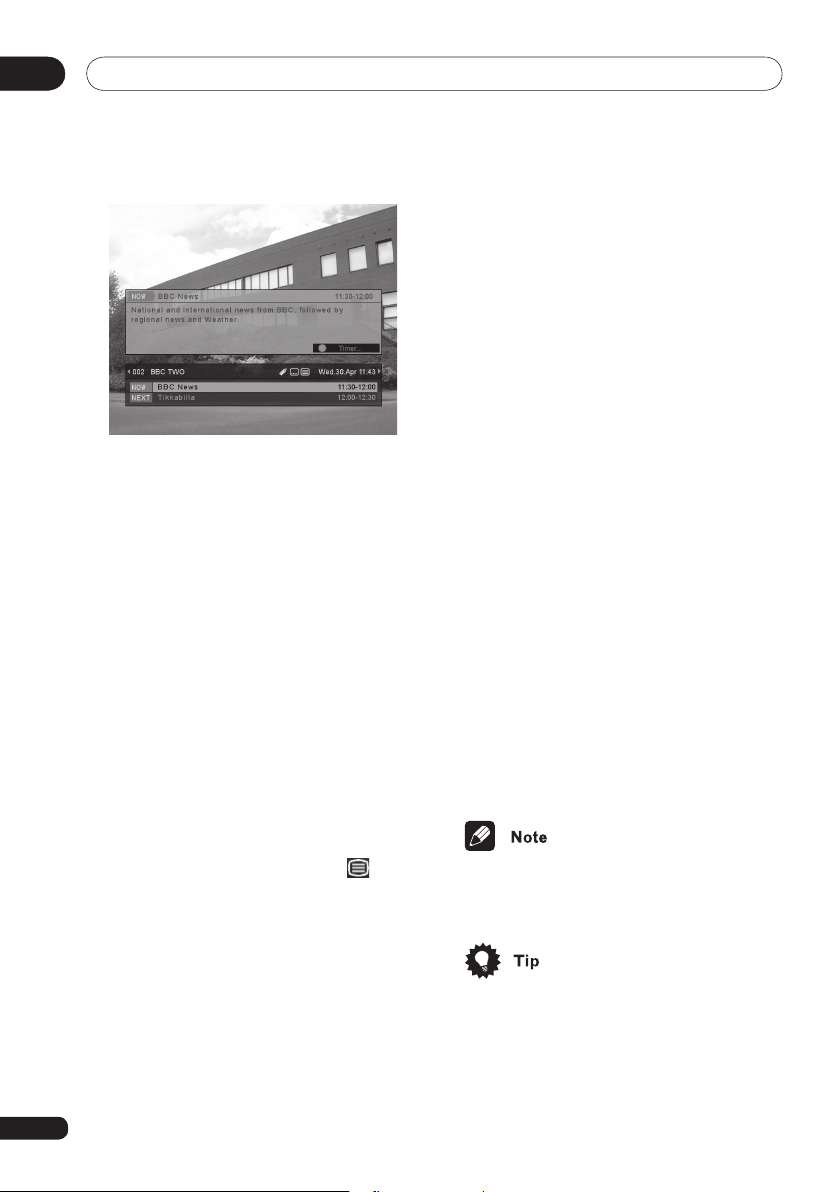
2 Press INFO again and detailed information about the selected programme is
displayed.
English
2/3 to dis-
15
Page 16
02
Basic operation
Now, you can:
• Press
• Press
• Press SELECT to discard the detailed
• Press the GREEN button to set the
• Press RETURN to discard the detailed
• Press EXIT to remove the on-screen
5/∞ to switch NOW and NEXT
programmes.
2/3 to display the detailed
information about programmes on other
channels.
information and tune in the channel.
timer for a selected programme. See
Using the timer on page 19.
information screen.
information from the screen.
You can also select a page to go to by press
ing one of the four coloured buttons; RED,
GREEN, YELLOW or BLUE. If a page is dis
played with one of the colors, pressing that
color will take you directly to that page.
When a red <<<< is displayed at the bottom
of the screen, pressing RED returns you to
the previous page. When a green Home icon
is displayed at the bottom of the screen,
pressing GREEN returns you to the Index
page.
At the bottom of some pages the pages
number of sub-pages are listed with twodigit numbers. Pressing
select and go to those sub-pages.
Teletext related buttons and their function
are listed below:
TEXT: Enter/Exit Teletext mode.
EXIT: Exit Teletext and display video only.
Number buttons, coloured buttons: Select
pages.
3: Display the next sub page. (When there is
a sub-page.)
2: Display the previous sub page. (When
there is a sub-page.)
5: Display the next page.
∞: Display the previous page.
2/3 allows you to
-
-
16
Using Teletext
When programmes with teletext content are
being broadcast, the teletext icon ( ) is
displayed on the Info banner.
Teletext broadcast bring to you news,
weather and programme information, sub
titles, and more.
When viewing a channel that provides Tele
text broadcasts, press TEXT. The Teletext
Index page is displayed. The Index page
lists content from other pages. From the
Index page select which page you wish to
view and input the three-digit page number
(100–899) using the number buttons
-
-
.
• Due to inaccurate information provided
by the broadcaster Teletext icon may
appear or be absent in error.
• If the television connected to your DTR
is capable of receiving and displaying
Teletext, you can also use the controls
on the TV or the remote control for the
TV. (If you display teletext broadcasts
using the remote control for the DTR
only the DTR remote control can be
used.)
Page 17
Advanced operation
05
Chapter 5:
Advanced operation
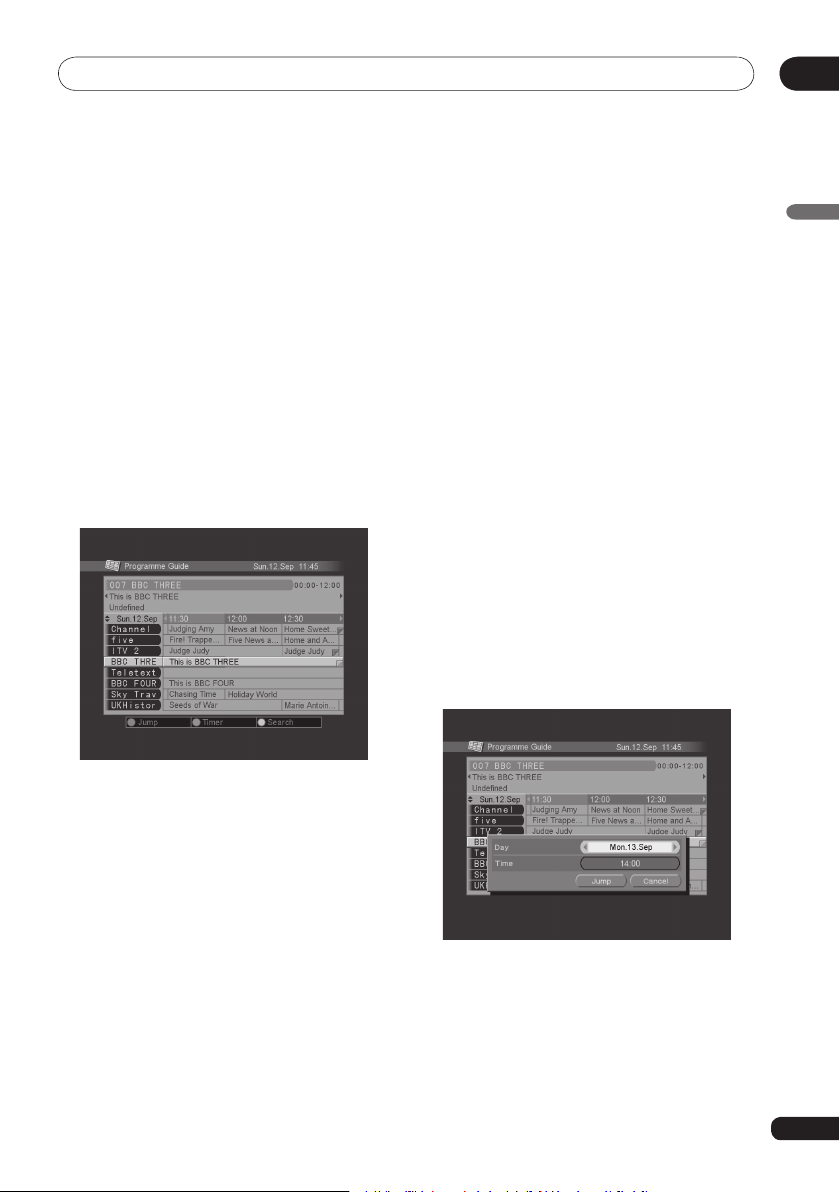
Using the on-screen programme guide
You can use the on-screen programme guide
to quickly find and tune in a programme. As
you scroll through the list of programmes the
programme information is displayed above
the list.
Press GUIDE. The on-screen Programme
Guide is displayed.
Now you can:
• Press
• Press P +/– to show the next/previous 8
• Press SELECT to watch a channel.
• Press INFO to get information on a pro
5/∞/2/3 to scroll through the
list.
channels.
gramme. Press INFO again or RETURN
to return to the listing. Press SELECT to
watch the program.
• Press the RED button to display programmes for a specified time and date.
See Jump Search, below.
• Press the GREEN button to set the
timer for a selected programme. See
Using the timer on page 19.
• Press the YELLOW button to display the
Search screen. See Programme Search
on page 18.
• Press GUIDE again or EXIT to turn off
the on-screen Programme Guide.
• In some areas limited or no programme
information may be available.
• Programme information for more than
a couple days in the future may take a
number of minutes to be displayed.
Jump Search
1 Press 5/∞ to select Day or Time.
2 Press 2/3 to select the date/time.
English
3 Press 5/∞/2/3 to select Jump and
press SELECT. Programmes broadcast at
that date and time are listed.
17
Page 18
Advanced operation05
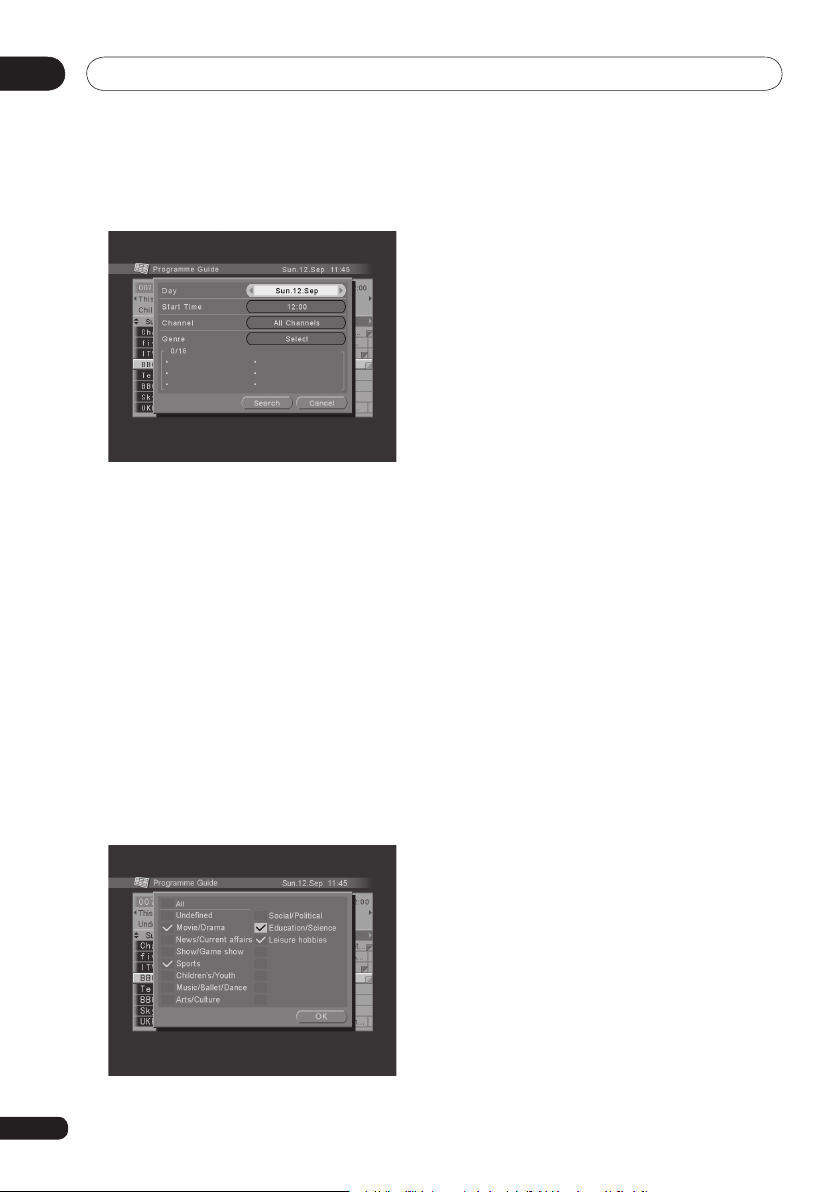
Programme Search
1 Press 5/∞ to select Day, Start Time or
Channel. To select Genre, press 5/∞ and
press SELECT.
2 Set the search fields.
Day: Press 2/3 to select up to seven days
in the future.
Start Time: Press
Channel: Press
or Favourites.
Genre: Press
and press SELECT to check or uncheck a
specific genre. You can also select All to
search without taking genre information into
account. When you have finished checking
the genre you want, select OK and press
SELECT to return to the Search screen.
2/3 to select the time.
2/3 to select All Channels
5/∞/2/3 to select a genre
3 Press 5/∞/2/3 to select Search and
press SELECT. Programmes matching the
criteria are listed.
Now you can:
• Press
• Press P +/– to show the next/previous 7
• Press SELECT to watch a channel.
• Press INFO to get information on a pro
• Press the YELLOW button to display the
• Press the GREEN button to set the timer
• Press GUIDE or EXIT to turn off the on-
5/∞ to scroll through the list.
programmes.
gramme. Press INFO again or RETURN
to return to the listing. Press SELECT to
watch the program.
Search screen again.
for a selected programme. See Using
the timer on page 19.
screen Programme Guide.
-
18
Page 19

Advanced operation
05
Using the timer
By using the timer you can have the DTR
turn on and a selected programme tuned in
automatically. Up to 10 timers can be set.
Displaying the timer menu
1 While viewing a programme, press
MENU. The HOME MENU is displayed.
2 Press 5/∞ to select Programme Timer
and press SELECT. The Programme Timer
menu displays.
While using the on-screen Programme Guide
select a programme and press the GREEN
button. A message is displayed asking if you
want to set a timer. Press
and press SELECT. The Programme Timer
menu is displayed and all the information for
the selected programme is automatically en
tered. Press SELECT to set the programme.
2/3 to select Yes
Input timer settings
1 Press 5/∞ to select an available timer
slot and press SELECT.
2 The present date is displayed. Press 5 to
select a date in the future. Press
a repeat interval. Press 3 to move to the
next item, Start time.
3 Enter the time the programme is to start.
Use the 24-hour clock for time settings, such
as 10:15 pm would be 2215.
Hour: Enter 22 by pressing the number but-
tons or
5/∞. Press 3 to move to minutes.
Minute: Enter 15 by pressing the number
buttons or
next item, Stop time.
4 Enter the time the programme is to stop.
Press 3 to move to the next item, Channel.
5 Enter the channel to be set by using the
number buttons or
5/∞. Press 3 to move to the
5/∞.
∞ to select
English
-
3 Input a new timer setting or move or
delete a setting. See Input timer settings,
below.
Or
• If you make a mistake, press 2 to move
back to the previous item and correct
the setting.
8 Press SELECT to enter all the settings.
• If all entered setting are correct the
timer is saved.
• If an invalid setting was entered, a warn
ing is displayed. Correct the setting info.
-
19
Page 20
Advanced operation05
• When two programmes are set so that
they overlap, the programme which
starts first has priority and will be played
in its entirety.
When two programmes have the same
start time, the programme with the
highest number in the Programme
Timer slots has priority.
If you set a timer and the time slot is
overlapping another timer setting, and
the other timer setting has priority, a
warning is displayed.
9 Repeat Steps 1–8 to set additional programme.
10 Press MENU to complete the setting
and exit the Programme Timer menu.
Editing a timer setting (Cancel/
Modify/Move)
You can cancel/modify/move a timer setting.
1 Display the Programme Timer menu.
2 Press 5/∞ to select the timer slot to be
edited, then refer to the instruction below.
• To cancel the setting, press the RED
button. The setting is cancelled.
• To modify the setting, press SELECT.
You can modify the setting.
• To move the setting, press the BLUE
button. Press 5/∞ to move the selected
timer slot and then press the BLUE but-
ton.
• If you are watching a digital programme
when a timer is about to start, an alert
will appear on the screen about one
minute before the timer starts. To view
the timer programme, press SELECT.
To cancel the timer programme press
2/3 to select CANCEL TIMER and
press SELECT. If you do not press any
buttons the timer will start at the pro
grammed time.
• When a programme set by the timer is
playing, the LED turns orange.
• If any button is pressed while a timer
is active an alert will appear on the
screen. Press EXIT to cancel the timer
and return the DTR to viewing a digital
programme or do nothing and the timer
will continue.
• When time changes because of switch
ing into or out of summer time there
are missing and extra hours. If you set
a start time or end time for recording
during one of these hours it may not
operate as planned.
Freezing a frame
You can freeze display of a frame from a
programme.
1 While viewing a programme, Press 2.
The image freezes on screen.
-
-
20
Page 21
Advanced operation
05
2 To continue viewing the programme
press 3.
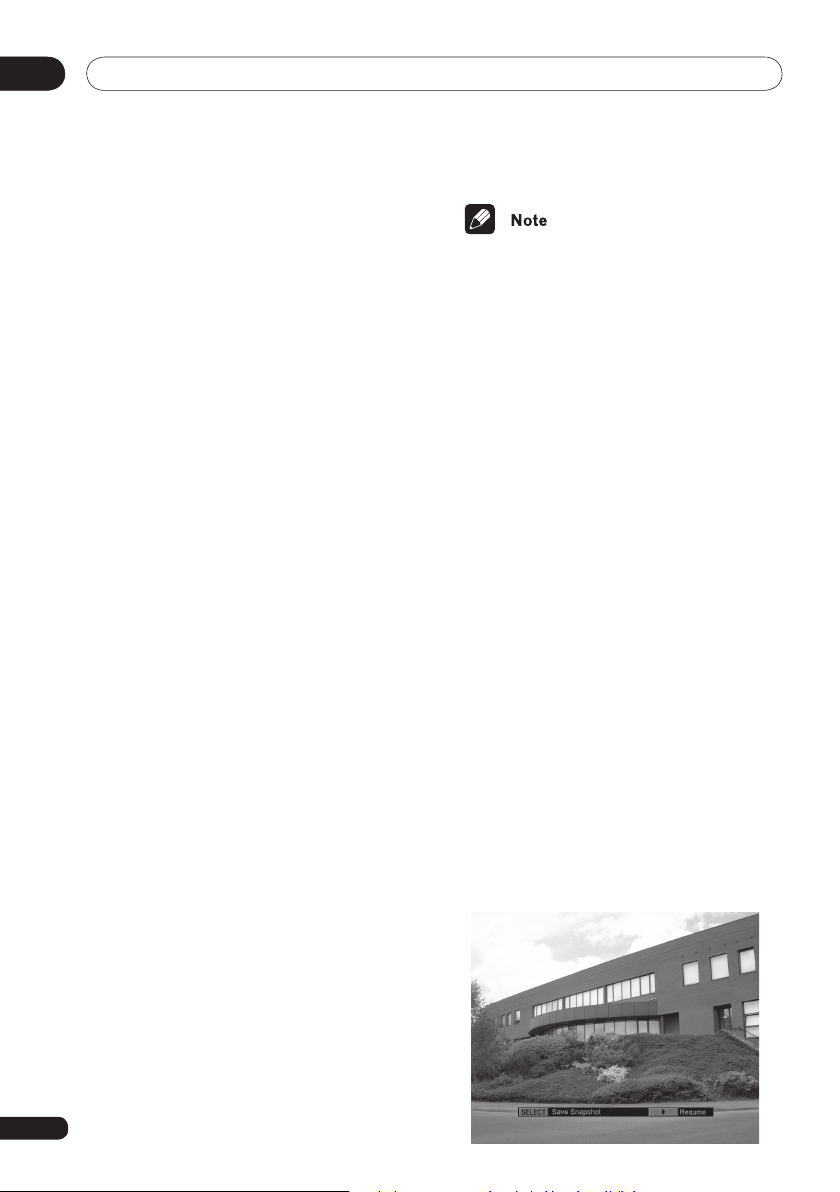
Taking snapshots
You can take snapshots of scenes from
programmes to save and view later.
1 While viewing a programme, Press 2.
The image freezes on screen.
2 Press SELECT to take a snapshot.
The snapshot is taken and the programme
resumes normal display.
• If memory is full, a warning message
is displayed. Press SELECT to resume
normal display.
• In order to free up memory to take more
snapshots, see Deleting snapshots on
page 22.
• Sometimes attempts to take snapshots
will fail due to problems with the pro
gramme data.
• When taking snapshots, only the raw
video picture will be stored. This is the
picture as received by the television
broadcaster and it excludes any graphics
or text which are shown on top of the
picture by the DTR such as subtitles or
teletext.
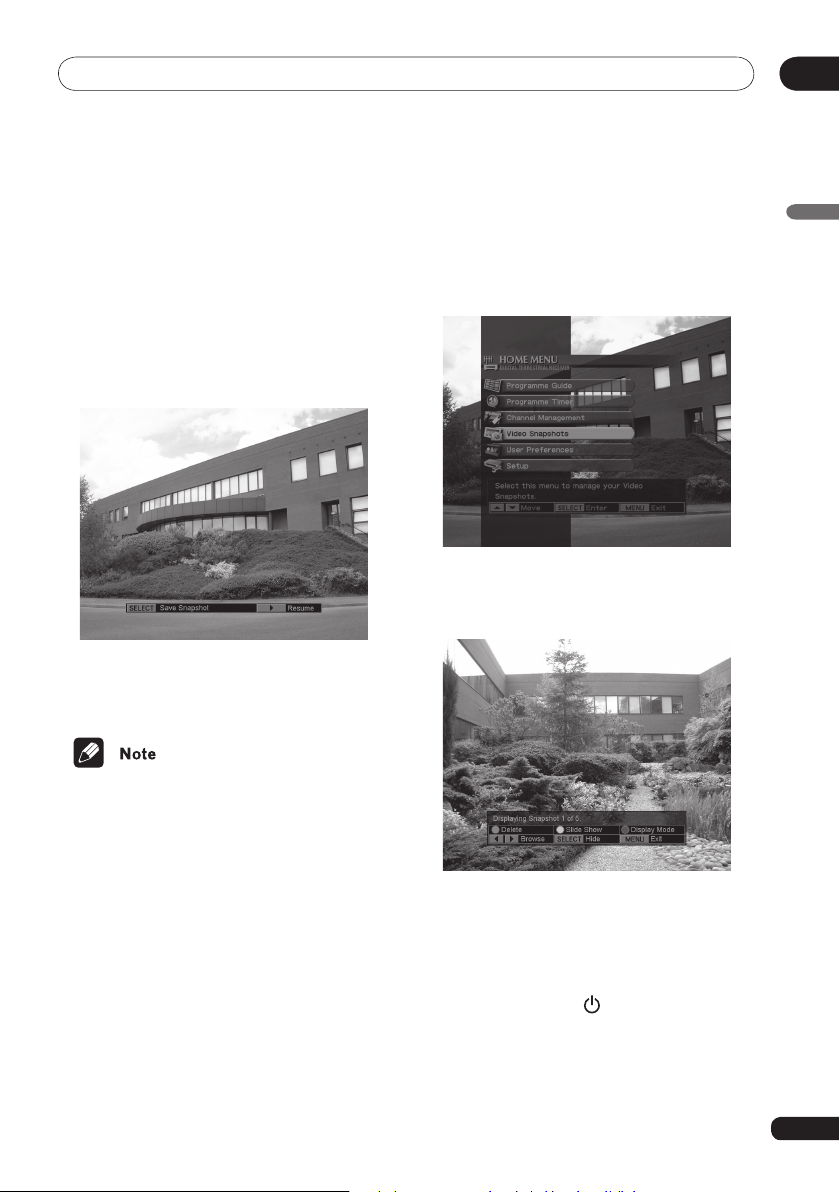
Viewing snapshots
You can view the snapshots you have taken.
1 While viewing a programme, press
MENU. The HOME MENU is displayed.
2 Press 5/∞ to select Video Snapshots.
Press SELECT. The first snapshot stored in
memory is displayed.
Now you can:
-
• Press 2/3 to view the next/previous
snapshot.
• Press SELECT to hide snapshot infor
mation. Press any button other than
2/3, STANDBY or EXIT to again
display the snapshot information.
• Press MENU or EXIT to return to nor
mal programme viewing.
• Press RETURN to return to the HOME
MENU.
English
-
-
21
Page 22
Advanced operation05
• Press the BLUE button to change the
display mode to the Movie Mode. This
mode is best suited for viewing snap
shots of less quickly changing displays
such as movies.
• Press the YELLOW button to start a
slideshow. See Viewing a slideshow,
below.
• Press the RED button to delete the
displayed snapshot. See Deleting snap
shots, below.
• If no snapshots have been stored when
Video Snapshot is selected a message
is displayed. Press SELECT to return to
the HOME MENU.
Viewing a slideshow
You can view all the snapshots stored,
presented one after the other, without the
button guide or help text displayed.
-
• Snapshots in a slideshow can be displayed for 1 to 10 seconds. This interval
is set in the User Preference menu. See
Slideshow Interval, page 31.
• A slideshow can only be displayed when
two or more snapshots have been
stored in memory.
-
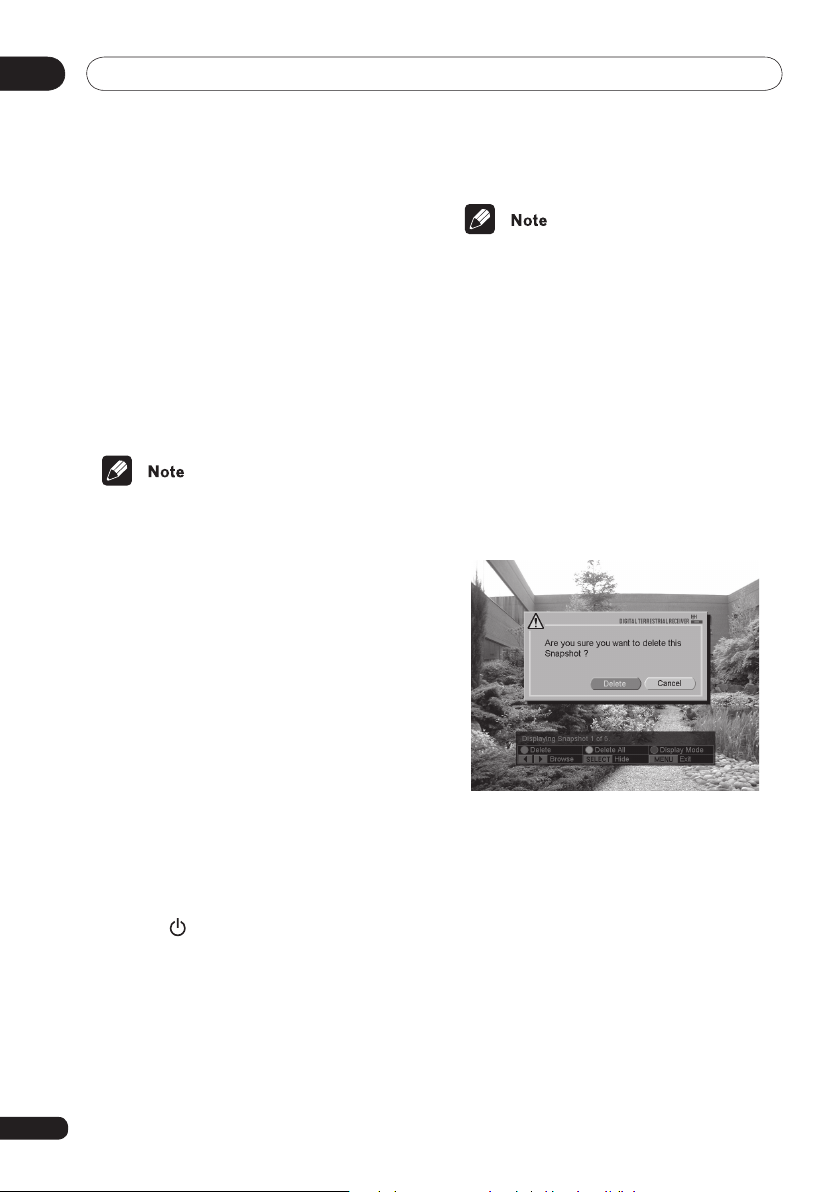
Deleting snapshots
You can delete snapshots from memory.
1 While viewing a snapshot, press the RED
button. A message appears asking you to
confirm that you want to delete the snap
shot.
-
22
1 To display the first snapshot follow the
steps 1 and 2 in, Viewing snapshots, page
21.
2 Press the YELLOW button. The but-
ton guide and help text disappear and the
slideshow begins. The next slide is displayed
after a set amount of seconds. Slides will
continue to display one after the other until
any button is pressed.
3 Press any button other than the
STANDBY and TV/DTV button to return
to viewing snapshots. The button guide and
help text are displayed.
4 Press MENU or EXIT to return to normal
programme viewing.
2 Press 2/3 to select Delete and press
SELECT. The snapshot is deleted and the
next snapshot, if any, is displayed.
Page 23
Using parental lock
06
Chapter 6:
Using parental lock
The parental lock can be used to restrict
access to any channel. In order to view a
locked channel, the PIN (personal identity
number) must be entered. To be able to use
parental lock successfully, follow the instruc
tions below.
Set your PIN
Setting a PIN allows you to set/change the
PIN used for parental lock. A PIN has four
digits (0000 to 9999) and the default is 0000.
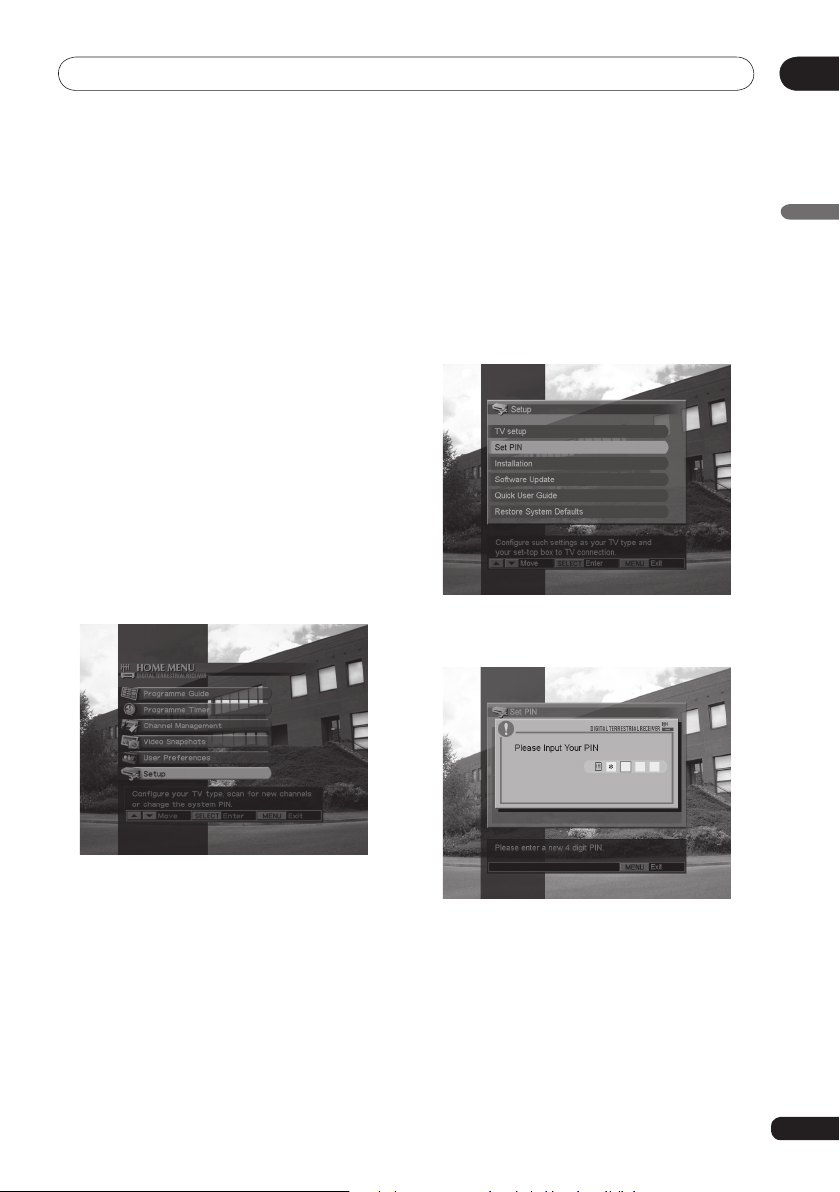
1 While viewing a programme, press
MENU. The HOME MENU is displayed.
2 Press 5/∞ to select Setup and press
SELECT. The Setup menu is displayed.
-
3 Press 5/∞ to select Set PIN and press
SELECT. The PIN Input screen displays.
English
23
Page 24
Using parental lock06
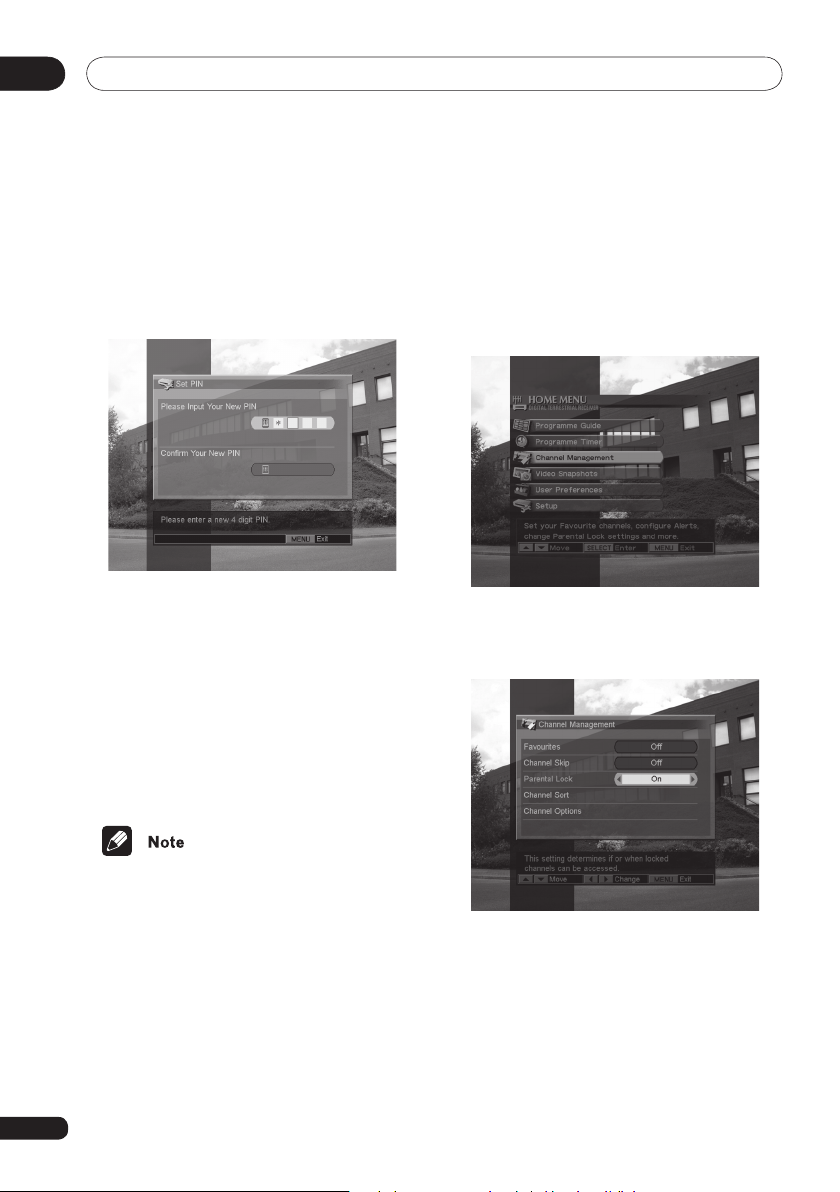
4 Use the number buttons to input your
PIN (the default is 0000). The Set PIN menu
displays.
• If the PIN you input is not correct, an
invalid PIN message appears and you
are returned to the Setup menu.
5 Use the number buttons to input your
new, 4-digit PIN and confirm by entering the
PIN again.
• If you make a mistake, press 2 to backspace and erase a digit.
• If the PIN number is confirmed the new
PIN is registered and you are returned to
the Setup menu.
• Press MENU to exit the Set PIN screen
without setting a new PIN.
Turning parental lock on/off
When you turn parental control on, locked
channels’ programmes are not displayed unless the PIN is entered.
1 While viewing a programme, press
MENU. The HOME MENU is displayed.
2 Press 5/∞ to select Channel Manage-
ment and press SELECT. The Channel
Management menu is displayed.
24
• If you forget your PIN you can reset it to
the default of 0000 by restoring system
defaults. See Restore System Defaults
on page 36.
3 Press 5/∞ to select Parental Lock and
press 2/3.
Page 25
Using parental lock
06
4 Use the number buttons to input your
PIN.
5 Press 2/3 to switch between On and
Off. Go on to the next Locking/unlocking
channels below.
• If you enter the wrong PIN a message
is displayed and you cannot set Parental
Lock options.
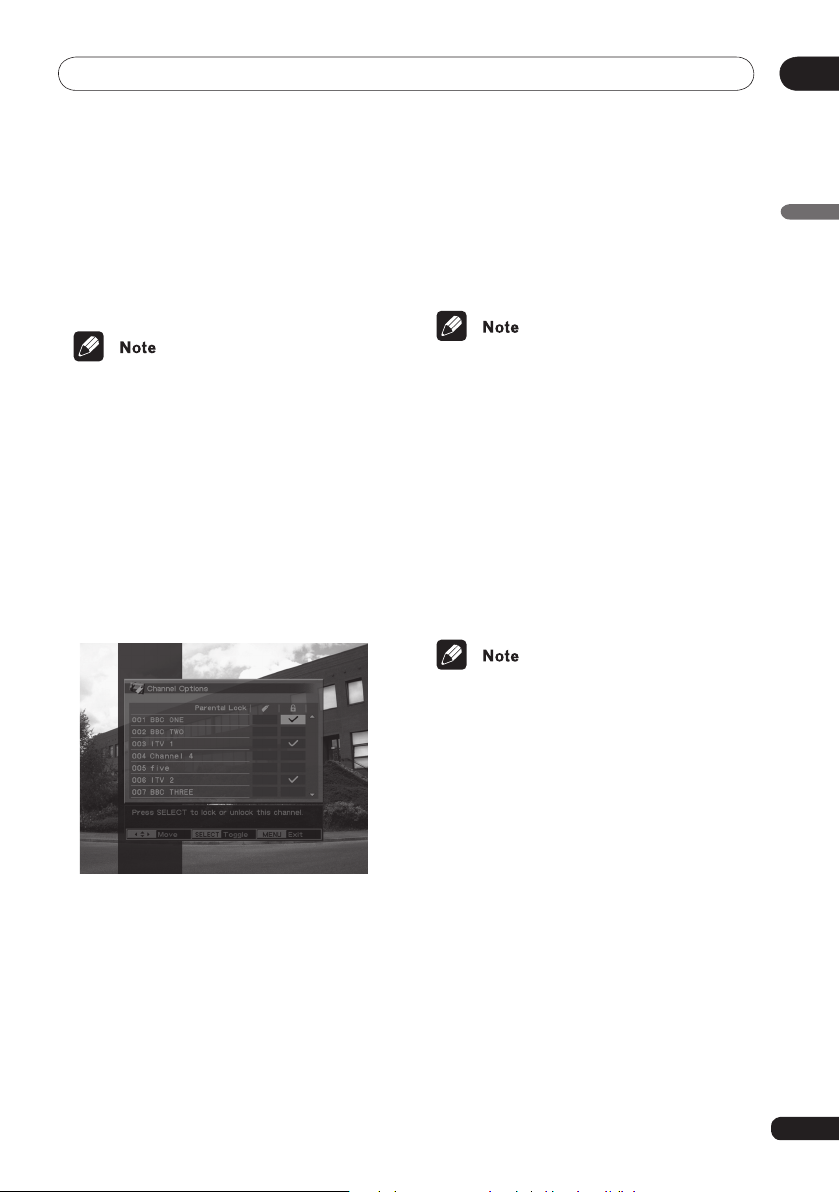
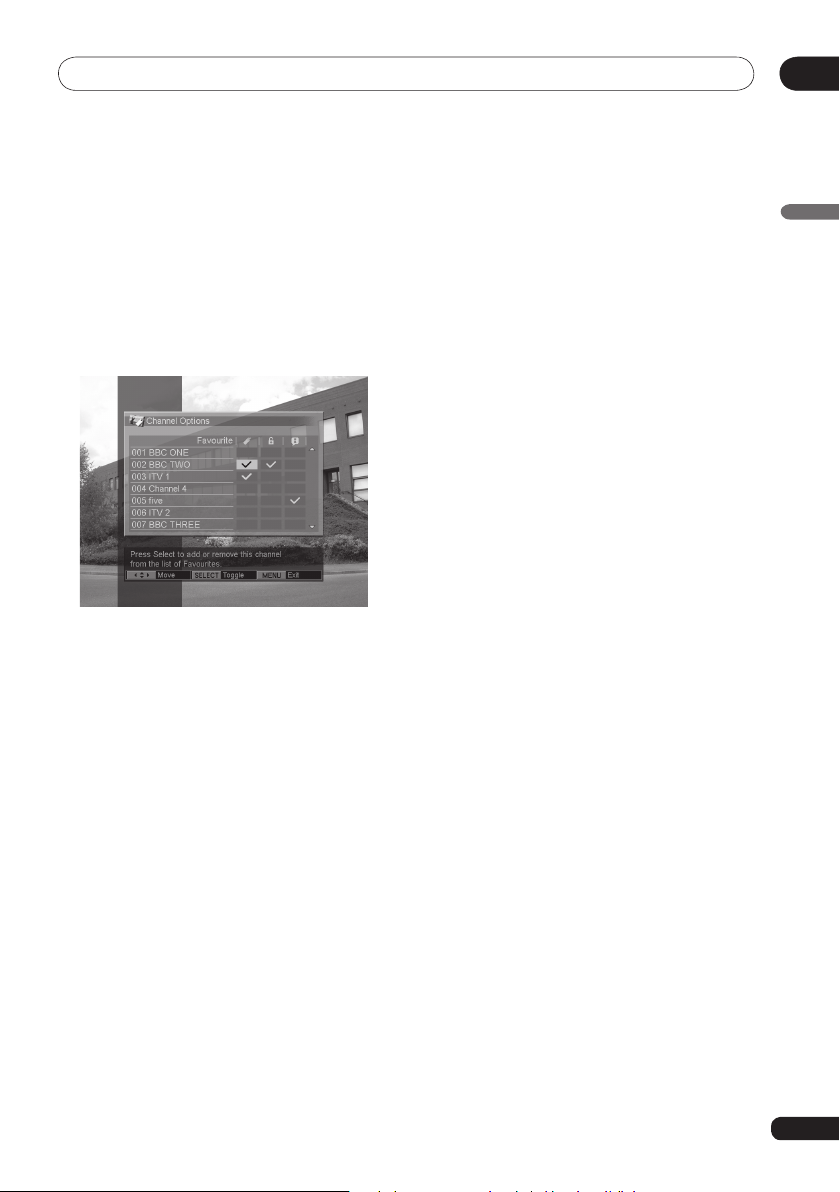
Locking/unlocking channels
Channels must be locked/unlocked individually. Follow these steps to lock/unlock a
particular channel.
1 Press 5/∞ to select Channel Options
and press SELECT. The Channel Options
menu is displayed.
3 Repeat Step 2 to lock/unlock additional
channels.
4 Press MENU to complete the setting
and exit the menu.
• Enter your PIN if prompted.
Watching locked channels
When parental control is on and you select
a channel that is locked, a blank screen displays with a channel banner that says, “This
channel is locked. Press Red to unlock.”
1 Press the RED button. The PIN input
screen is displayed.
2 Use the number buttons to input your
PIN.
• If you unlock a channel in this way,
all channels are unlocked and remain
unlocked until the DTR again is put
in standby mode or a new channel is
locked.
English
2 Press 5/∞ to select the channel to lock/
unlock. Press 2/3 to move to the lock box
(the box with the padlock icon over it). Press
SELECT to place/remove a check in the box
and lock/unlock the channel.
25
Page 26
Channel management07
Chapter 7:
Channel management
The Channel Management menu allows you
to control access to channels and access
channels quickly.
1 While viewing a programme, press
MENU. The HOME MENU is displayed.
2 Press 5/∞ to select Channel Manage-
ment and press SELECT. The Channel
Management menu is displayed.
After the Channel Management menu is
displayed, continue with the settings below.
Favourites
With your DTR you’ll have access to many
digital channels but with some channels
registered as Favourites you can access
them quickly.
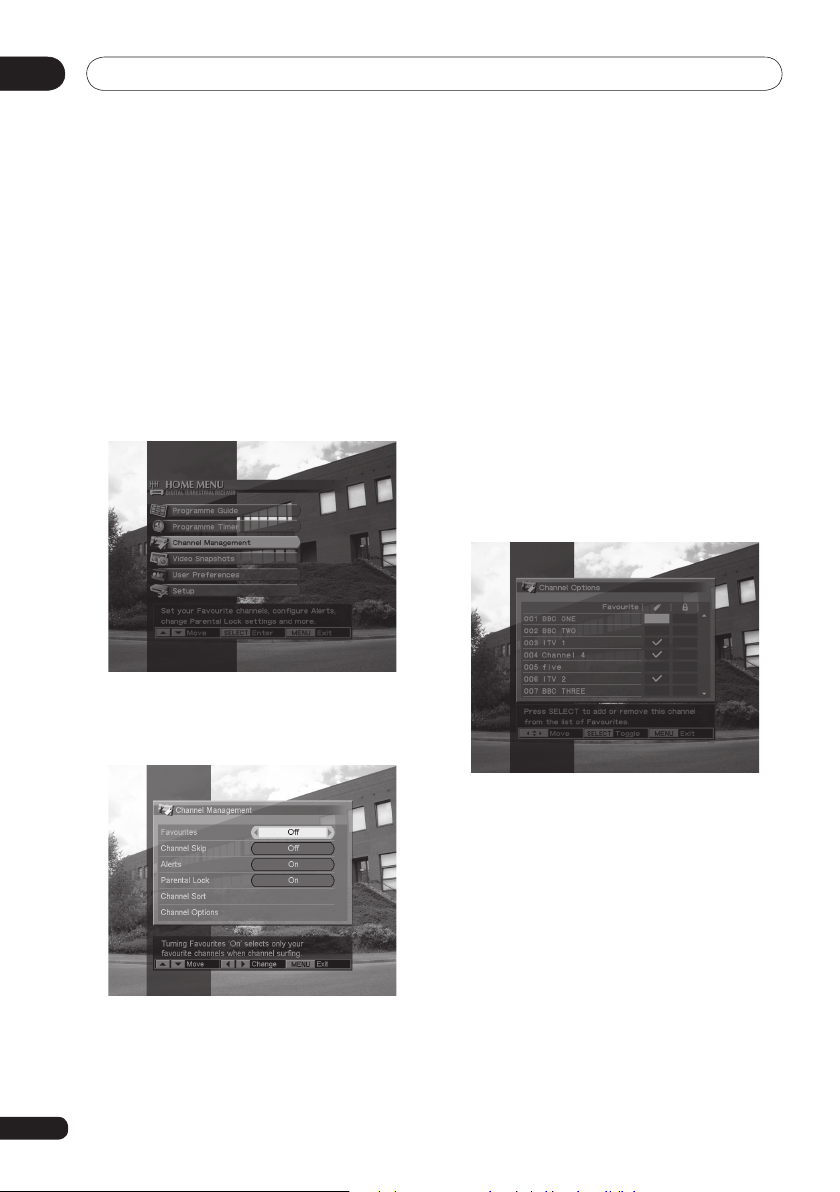
Setting channels as favourites
1 Press 5/∞ to select Channel Options
and press SELECT. The Channel Options
menu is displayed.
2 Press 5/∞ to select a channel. Press
2/3 to highlight the area under the book-
mark icon (Favourite) and press SELECT to
turn favourites on/off. A check mark means
that a channel has been selected as a favou
rite.
3 Press RETURN to complete the setting
and return to the Channel Management
menu. Go on to the next Turning Favourites
on/off below.
-
26
Page 27
Channel management
07
Turning Favourites on/off
1 Press 5/∞ to select Favourites.
2 Press 2/3 to switch between On and
Off.
3 Press MENU to complete the setting
and exit the menu.
• At least two channel must be selected
as a favourite in order to turn on Favourites. See Setting channels as favou-
rites, above.
• When Favourites is turned on, only
those channels selected as Favourites
can be accessed using the P +/– but
tons. Other channels can still be accessed through the number buttons.
• When Favourites is turned on, Channel
Skip cannot also be turned on.
-
Channel Skip
You can turn on channel skip to automatically
skip channel types you do not wish to tune
in.
1 Press 5/∞ to select Channel Skip.
2 Press 2/3 to switch between the set-
tings.
3 Press MENU to set the type to be
skipped and exit the menu.
• When Channel Skip is turned on, the
selected type of channel is automatically
bypassed when using the P+/– buttons.
Those channels can still be accessed
through the number buttons
• When Channel Skip is turned on, Favou
rites cannot also be turned on.
.
English
-
27
Page 28

Channel management07
Channel Sort
You can change the order in which the channels are displayed.
1 Press 5/∞ to select Channel Sort and
press SELECT. The Channel Sort screen is
displayed.
2 Press 5/∞/2/3 to highlight the channel
you want to move. You can move to other
screens of channels by highlighting the UP
or DOWN arrows on the screen and pressing
5/∞ once again or SELECT.
3 Press SELECT to select that channel.
4 Again press 5/∞/2/3 to move the
selected channel to the new position in the
list.
5 Press SELECT. The channel is moved to
the new location.
6 Press MENU to complete the setting
and exit the screen.
28
Page 29
Channel management
07
Channel Options
You can enter Channel Options to set any
channel as a favourite and lock/unlock for any
channel.
1 Press 5/∞ to select Channel Options
and press SELECT. The Channel Options
menu is displayed.
2 Press 5/∞ to select a channel. Press
2/3 to move to the area you wish to select:
Favourite (bookmark icon), Lock/Unlock
(padlock icon).
3 Press SELECT to place/remove a checkmark. When you place a checkmark, option
is on.
4 Press MENU to complete the setting
and exit the menu.
English
29
Page 30
Other options08
Chapter 8:
Other options
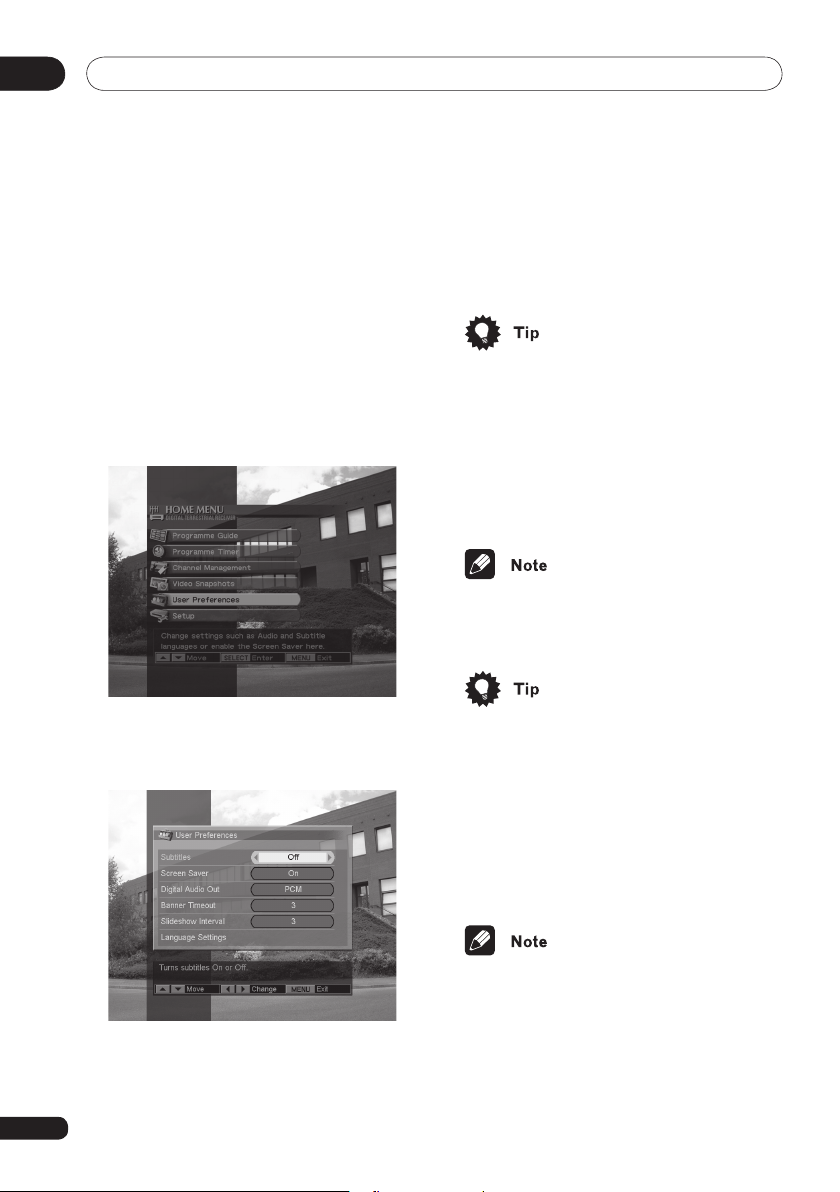
User Preferences
You can customize the DTR by setting
options in the User Preferences menu as
follows:
1 While viewing a programme, press
MENU. The HOME MENU is displayed.
• Press MENU or EXIT to complete the
setting and exit the menu.
• Press RETURN to complete the setting
and return to the previous menu.
Subtitles
Subtitles by default are off. Press 2/3 to
select On/Off.
• Subtitles can only be displayed if they
have been provided with the broadcast
programme.
30
2 Press 5/∞ to select User Preferences
and press SELECT. The User Preferences
menu is displayed.
3 Press 5/∞ to select the preference you
wish to set, then refer to the instructions
below.
• Pressing SUBTITLE on the remote will
override the setting here.
Digital Audio Out
Press 2/3 to select PCM/Dolby.
If you have a Dolby Digital decoder-equipped
audio device connected to the optical digital
audio output socket on the DTR, select
Dolby. Otherwise, select PCM
• When Dolby is selected and a programme is broadcast in Dolby Digital,
audio is not output through the SCART
socket.
.
Page 31

Other options
08
Banner Timeout
When you change channels a banner showing channel and programme information is
displayed for a selected amount of time or is
not displayed, according to the settings you
make here. Press
Banner or a time of 1 to 10 seconds.
2/3 to select from No
Slideshow Interval
This sets the number of seconds a snapshot is shown before advancing to the next
snapshot during a slideshow. Press
to change the interval between 1 and 10
seconds.
2/3
Language Settings
The sets the preferred language for various
options.
Menu Language: Selects the language used
for menu text on the screen.
Audio Language: Selects the language
broadcast in DVB-T MPEG streams.
Subtitle Language: Selects the language
for subtitles.
Teletext Language: Select the language for
Teletext.
1 Press 5/∞ to select a language setting
option; Menu, Audio, Subtitle or Teletext and
press SELECT.
2 Press 2/3 to choose a language and
press SELECT. The selected language is set
for that option.
3 Press MENU to leave.
TV Setup
The TV Setup menu allows you to select and
set TV and video options. To set any preference, go to the TV Setup menu as follows:
1 While viewing a programme, press
MENU. The HOME MENU is displayed.
2 Press 5/∞ to select Setup and press
SELECT. The Setup menu is displayed.
3 Press 5/∞ to select TV Setup and press
SELECT. The TV Setup menu is displayed.
English
• You may select any language for any language setting option but if that language
is not available it will not display nor be
audible in that language.
31
Page 32

Other options08
4 Press 5/∞ to select the preference you
wish to set, then refer to the instructions
below.
• Press MENU or EXIT to complete the
setting and exit the menu.
• Press RETURN to complete the setting
and return to the previous menu.
Picture Format
Press 2/3 to select 16:9, 4:3 Letterbox or
4:3 Centre Cut.
If your DTR is connected to a 16:9 TV, select
16:9. If your DTR is connected to a 4:3 TV
and you wish to view a 16:9 programme,
you must select how that 16:9 programme
is displayed on your TV. If you select 4:3
Letterbox, the full width of the image is dis
played but areas above and below the image
are blank. If you select 4:3 Centre Cut, the
image fills the screen vertically but the right
and left ends of the image are not displayed.
TV Video Output
This sets the video signal format for the
TV SCART only. Press 2/3 to select RGB,
Composite or S-Video.
• Check your TV manual to see if it is
compatible with RGB or S-Video.
VCR Video Output
This sets the video signal format for the VCR
SCART only. Press 2/3 to select Compos-
ite or S-Video.
• Check your VCR manual to see if it is
compatible with S-Video.
• In order to use S-Video with your VCR
you may need to change settings on
your VCR. See the user’s manual for
your VCR for information.
Sound
This sets the audio output from the TV and
VCR SCART only. Press 2/3 to select Mono
or Stereo.
Volume
This adjusts the volume of the audio output
from the TV SCART from 1 (minimum) to 10
-
(maximum). Press 2/3 to choose a setting
from 1 to 10.
32
• Pressing WIDE on the remote will override the setting here.
Page 33

Other options
08
Installation
In the Installation menu you can configure
setting for installation, scan for new channels, delete channels no longer available and
check the signal strength of each channel. To
access these go to the Installation menu as
follows:
1 While viewing a programme, press
MENU. The HOME MENU is displayed.
2 Press 5/∞ to select Setup and press
SELECT. The Setup menu is displayed.
4 Press 5/∞ to select the preference you
wish to set or the function you wish to use.
Then, refer to the instructions below.
• Press MENU or EXIT to exit the menu.
• Press RETURN to return to the previous
menu.
RF Output Channel
This selects an output channel for the RF
modulator. Press 2/3 to choose any channel from 21 to 69 or Off.
Aerial Power
If your DTR is to provide power to the aerial,
turn this option on. Press 2/3 to select On
or Off.
English
3 Press 5/∞ to select Installation and
press SELECT. The Installation menu is
displayed.
• Normally No is selected. Some optional
equipment aerials require power to be
supplied by the DTR. If you have such
an aerial, select Yes. Refer to the user
manual for that product for further infor
mation.
-
33
Page 34

Other options08
Country
You select the country in which the DTR is
being used. Press 2/3 to select a country.
• If you change the country selected, the
channels available must be scanned
again. An alert is displayed asking if you
want to scan the channels again. Press
2/3 to select Yes and press SELECT.
(See Scanning for channels, page 13.)
Add New Channels
Select to add new channels to the channel
list.
Scanning starts. If new channels are found
they are added to the channel list. The num
ber of new channels, if any, are displayed.
• To cancel scanning once it has started,
press EXIT. Scanning stops and a mes-
sage is displayed stating that scanning
has stopped.
Replace Existing Channels
Select to update information on channels
and delete channels that are no longer available.
Scanning starts. If new information about a
channel is found, the channel information
is updated. If some channels are no longer
available the channels are deleted.
Signal Check
Select to check the signal strength of each
channel. Press 2/3 to select a channel.
The signal strength is displayed numerically
and with words and is updated once every
second. Press MENU to leave.
Software Update
The DTR can automatically download
software updates through the TV aerial. You
can set the options for the software update
in the Software Update menu. Follow these
steps to access the Software Update menu:
1 While viewing a programme, press
MENU. The HOME MENU is displayed.
-
2 Press 5/∞ to select Setup and press
SELECT. The Setup menu is displayed.
34
• To cancel scanning once it has started,
press EXIT. Scanning stops and a mes-
sage is displayed stating that scanning
has stopped.
• If no channels were found, a message is
displayed asking you to check the aerial
connection.
Page 35

Other options
08
3 Press 5/∞ to select Software Update
and press SELECT. The Software Update
menu is displayed.
4 Press 5/∞ to select any of the following
four functions: Auto Update, Set Update
Time, Start Manual Update or Technical
Information and then follow the instructions
for each.
• Press MENU or EXIT to exit the menu.
• Press RETURN to return to the previous
menu.
Auto Update
Press 2/3 and choose Auto Update
On/Off. When Auto Update is on, a check
for available software updates and new
channels is accomplished daily at a time
specified in Set Update Time.
Set Update Time
Select to set the time at which the DTR will
check for updates on a daily basis. Press
5/∞ to adjust the hour and then 3 to move
to minutes. Again, press 5/∞ to adjust the
minutes and then press MENU to set and
exit the menu.
Start Manual Update
Select to start an update immediately.
Technical Information
Selecting this will display technical information.
Quick User Guide
You can view the demonstration of the DTR.
1 While viewing a programme, press
MENU. The HOME MENU is displayed.
2 Press 5/∞ to select Setup and press
SELECT. The Setup menu is displayed.
English
• So that you always have the latest
software and broadcasting channels, be
sure to turn Auto Update to on.
35
Page 36

Other options08
3 Press 5/∞ to select Quick User Guide
and press SELECT.
Pressing 3 or 2 moves to the next or previ-
ous pages. Press SELECT again to enter the
automatic Quick User Guide display. Press
SELECT once again to be able to manually
select next or previous pages with the
2 buttons.
To exit from the Quick User Guide, press
MENU or EXIT
The Quick User Guide is an artistic creation of Pioneer.
There is no connection between Pioneer and the structures/
buildings in any of the visuals used.
.
3 and
Restore System Defaults
It may be desirable to reset settings to their
factory defaults.
• Restoring system defaults resets all settings including setting the channel list to
empty. All settings that you wish to use
will have to be entered again.
• The PIN is returned to 0000.
• All snapshots stored in memory are
erased.
1 While viewing a programme, press
MENU. The HOME MENU is displayed.
2 Press 5/∞ to select Setup and press
SELECT. The Setup menu is displayed.
3 Press 5/∞ to select Restore System
Defaults and press SELECT. A confirmation
alert is displayed.
4 Press 2/3 to choose Replace or Cancel
and press SELECT
If you select Replace, the Menu language
screen is displayed. See Starting up the first
time, page 12.
.
36
Page 37

TV brand code
09
Chapter 9:
TV brand code
A.R. Systems 0556
AGB 0516
ASA 0104
AWA 0009
Acura 0009
Admiral 0163
Adyson 0216, 0217
Aiko 0264, 0217
Aiwa 0701
Akai 0361, 0548,
0037, 0480, 0602,
0371, 0208, 0072,
0433, 0556, 0009,
0163, 0218, 0516
Akib 0294
Akiba 0282, 0455,
0037, 0218, 0294
Akura 0037, 0264,
0218, 0009, 0282,
0412
Alba 0037, 0218,
0371, 0163, 0009,
0216, 0036, 0418,
0247, 0487, 0668
Allorgan 0217, 0206,
0294
Allstar 0037
Amplivision 0217,
0370
Amstrad 0037, 0371,
0433, 0218, 0412,
0516, 0009, 0264
Anam National 0650
Anglo 0264
Anitech 0009, 0037,
0264, 0282
Ansonic 0370, 0009,
0037, 0292
Arc En Ciel 0196
Arcam 0216, 0217
Aristona 0556, 0037
Asora 0009
Asuka 0217, 0218,
0264
Atlantic 0206
AudioTon 0217,
0486, 0264
Audiosonic 0337,
0486, 0370, 0009,
0037, 0109, 0217,
0218, 0264
Autovox 0206, 0217,
0247
BPL 0282, 0037
BSR 0294
BTC 0218
Baird 0193, 0190,
0208, 0343, 0072,
0073, 0217
Bang & Olufsen
0565
Basic Line 0009,
0218, 0374, 0455,
0037, 0217, 0282
Baur 0037, 0512,
0535, 0361, 0505,
0010
Bazin 0217
Beaumark 0178
Beko 0486, 0370,
0037, 0714, 0715
Beon 0037, 0418
Best 0337, 0370
Bestar 0370, 0037,
0374
Binatone 0217
Blaupunkt 0327,
0195, 0535, 0328,
0200
Blue Sky 0037, 0218,
0282, 0455, 0668,
1037
Blue Star 0282
Bondstec 0247
Boots 0217
Brandt 0196, 0287,
0198, 0109, 0335
Brinkmann 0418,
0519, 0037
Britannia 0216, 0217
Bush 0037, 0371,
0218, 0519, 0355,
0487, 0009, 0668,
0036, 0208, 0217,
0294, 0374, 1037,
0264, 0282, 0361,
0698
CCE 0037
CGE 0247, 0370,
0418
CS Electronics 0216,
0218, 0247
CTC 0247
Canton 0218
Carad 0610
Carena 0455, 0037
Carrefour 0036,
0037
Cascade 0009, 0037
Cathay 0037
Centurion 0037
Century 0247
Cimline 0009, 0218
City 0009
Clarivox 0037
Clatronic 0037,
0218, 0371, 0247,
0009, 0217, 0370
Condor 0370, 0037,
0009, 0247, 0282
Contec 0009, 0036,
0216
Continental Edison
0287, 0196, 0487,
0109, 0198
Cosmel 0037, 0337
Crosley 0247
Crown 0009, 0370,
0037, 0486, 0418,
0208
Curtis Mathes 0093,
0166
Cybertron 0218
DER 0193, 0190
English
Daewoo 0037, 0009,
0374, 0499, 0217,
0218
Dainichi 0216, 0218
Dansai 0037, 0036,
0216
Dantax 0486
Dayton 0009
Daytron 0374
De Graaf 0208, 0548
Decca 0516, 0072,
0037, 0217
Denko 0264
Denver 0037
Desmet 0037, 0009
Diamant 0037
Digatron 0037
Dixi 0009, 0037
Dual 0519, 0217,
0259, 0037
Dual Tec 0217
Dumont 0070
Elbe 0292, 0259,
0217, 0516
Elekta 0264
Elin 0548, 0009,
0037, 0104, 0361
Elite 0218
Elta 0009
Emco 0247
Emerson 0178,
0037, 0282, 0361,
0070, 0247, 0371
Emperor 0282
Erres 0012, 0037
Euroman 0037, 0264
Europa 0037
Europhon 0516,
0217
Expert 0206
Exquisit 0037
Fenner 0009, 0374
37
Page 38

TV brand code09
38
Ferguson 0193,
0073, 0190, 0335,
0109, 0287, 0560,
0037, 0343, 0625
Fidelity 0216, 0193,
0264, 0361, 0371,
0163, 0412, 0512
Filsai 0217
Finlandia 0346,
0548, 0072, 0163,
0208
Finlux 0104, 0346,
0217, 0072, 0037,
0516, 0070
Firstline 0037, 0009,
0072, 0217, 0216,
0247, 0294, 0374,
0668
Fisher 0104, 0217,
0072, 0370, 0208,
0036
Flint 0455, 0037,
0072, 0218, 0264,
0610
Forgestone 0193
Formenti 0216, 0037
Fraba 0037, 0370
Friac 0370, 0499,
0009
Frontech 0217,
0163, 0247, 0009,
0264
Fujitsu 0206, 0072,
0217
Funai 0294, 0264
GBC 0009, 0218,
0374
GE 0560
GEC 0217, 0516,
0072, 0163, 0361,
0037
GPM 0218
Galaxi 0037
Galaxis 0037, 0370
Geloso 0009, 0374
General Technic
0009
Genexxa 0218, 0009,
0163
GoldStar 0037,
0247, 0217, 0290,
0178, 0216, 0109,
0163, 0361
Goldline 0337
Gooding 0487
Goodmans 0037,
0499, 0371, 0009,
0072, 0036, 0218,
0343, 0480, 0217,
0374, 0487, 0560,
0264, 0335, 0516,
0634
Gorenje 0370
Gradiente 0053,
0170
Graetz 0361, 0163
Granada 0516, 0037,
0072, 0208, 0108,
0217, 0226, 0473
Grandin 0455, 0037,
0282, 0610, 0009,
0163, 0374
Grundig 0070, 0535,
0195, 0487, 0037,
0009, 0556, 0587
HCM 0009, 0264,
0412, 0037, 0217,
0218, 0282, 0418
Halifax 0217
Hampton 0216, 0217
Hanimex 0294
Hanseatic 0009,
0037, 0519, 0282,
0361, 0217, 0556
Hantarex 0037, 0516
Hantor 0037
Harwood 0009,
0037, 0412
Havermy 0093
Hema 0217, 0009
Hifivox 0196, 0198
Hikona 0218
Hinari 0009, 0218,
0036, 0037, 0487,
0355
Hisawa 0455, 0282,
0610, 0218
Hitachi 0225, 0163,
0194, 0217, 0578,
0196, 0109, 0499,
0072, 0036, 0198,
0473, 0516, 0548,
0730, 0037
Hornyphone 0037
Huanyu 0216, 0374
Hyper 0216, 0009,
0247, 0217
Hypersonic 0361
Hypson 0037, 0264,
0282, 0455
ICE 0218, 0371,
0216, 0264, 0217,
0556
ICeS 0216, 0218
IR 0037, 0163, 0361,
0217, 0516, 0195,
0206, 0247, 0327,
0010, 0011, 0036,
0070, 0072, 0190,
0193, 0194, 0512,
0012, 0073, 0093,
0101, 0104, 0108,
0109, 0196, 0216,
0225, 0226, 0287,
0290, 0291, 0292,
0294, 0343, 0370,
0374, 0505, 0535,
0556
ITS 0264, 0216, 0371
ITT 0548, 0361,
0163, 0480, 0473,
0208, 0346, 0610
ITV 0037, 0264
Iberia 0037
Imperial 0247, 0418,
0370
Indiana 0037
Ingelen 0163
Ingersol 0009
Inno Hit 0072, 0217,
0290, 0516, 0009
Interbuy 0037, 0264
Interfunk 0361,
0037, 0163, 0012,
0512, 0327, 0247
Internal 0037
Intervision 0037,
0455, 0264, 0282,
0218, 0247, 0486,
0217, 0487, 0519
Irradio 0247, 0218,
0290, 0371
Isukai 0037, 0218,
0282, 0455
JVC 0053, 0094,
0371, 0190, 0036,
0193, 0218, 0606,
0653, 0418
KB Aristocrat 0163
KTV 0217
Kaisui 0218, 0282,
0037, 0216, 0455,
0217, 0009
Kamp 0216
Kapsch 0206, 0361,
0163, 0104
Karcher 0610, 0282
Kasui 0282
Kathrein 0556
Kendo 0610, 0037,
0247
Kennedy 0206
Kingsley 0216
Kneissel 0037, 0259,
0292, 0610, 0374
Kolster 0037
Konka 0371, 0218
Korpel 0037
Kosmos 0037
Koyoda 0009
Kyoshu 0412
Kyoto 0163
LG 0714, 0037
LaSAT 0486
Lenco 0104
Leyco 0072, 0037,
0264, 0294
Liesenk & Tter 0037
Liesenkotter 0037,
0327
Lifetec 0037, 0519,
0218, 0374
Loewe 0512, 0037,
0292
Logik 0011, 0193
Luma 0206, 0259
Lumatron 0217
Page 39

TV brand code
09
Luxor 0194, 0361,
0548, 0290, 0163,
0208
M Electronic 0346,
0374, 0104, 0009,
0037, 0217, 0109,
0216, 0287, 0163,
0247, 0480, 0512
MTC 0370, 0512
Magnadyne 0516,
0247
Magnafon 0216,
0516, 0073
Magnavox 0036
Magnum 0037, 0648
Manesth 0037, 0217,
0264, 0294
Marantz 0037, 0556
Mark 0037
Matsui 0487, 0009,
0037, 0011, 0355,
0217, 0371, 0208,
0195, 0036, 0335,
0433, 0516, 0294,
0072, 0163, 0455
Matsushita 0250,
0650
Mediator 0012, 0037
Medion 0037, 0668
Megas 0610
Megatron 0178
Memorex 0178,
0009, 0250, 1037
Memphis 0337
Metz 0367, 0447,
0535, 0037
Minerva 0535, 0070,
0487
Minoka 0412
Mitsubishi 0036,
0512, 0108, 0535,
0178, 0037
Mivar 0292, 0291,
0216, 0290, 0516
Monaco 0009
Motorola 0093
Multibroadcast 0193
Multitech 0486,
0009, 0216, 0217,
0247
Murphy 0072, 0163,
0216
Myryad 0556
NAD 0178, 0361
NEC 0170
NEI 0037, 0337, 0371
Naiko 0606
Nakimura 0037,
0374
Nakio 0480
Neckermann 0037,
0505, 0370, 0556,
0247, 0327, 0418
Nesco 0247
Network 0337
Neufunk 0037, 0556
New Tech 0217,
0343
Nikkai 0037, 0218,
0337, 0217, 0009,
0036, 0072, 0216,
0264
Nobliko 0070, 0216
Nogamatic 0196
Nokia 0361, 0548,
0163, 0480, 0473,
0208, 0346, 0374,
0606, 0610
Nordmende 0109,
0196, 0343, 0198,
0560, 0195, 0287
Novak 0012
Novatronic 0037
Oceanic 0163, 0361,
0208, 0548
Okano 0037, 0370,
0009, 0264
Omega 0264
Onwa 0433, 0371,
0218
Optimus 0650
Orion 0294, 0037,
0355, 0516, 0655
Orline 0037, 0218
Orsowe 0516
Osaki 0072, 0412,
0037, 0217, 0264,
0218, 0355, 0374
Osio 0037
Oso 0218
Osume 0072, 0036,
0037, 0218
Otto Versand 0037,
0505, 0109, 0294,
0535, 0512, 0093,
0226, 0010, 0556,
0343, 0247, 0217,
0036, 0361
Pael 0216
Palladium 0370,
0418
Panama 0264, 0217,
0247
Panasonic 0226,
0250, 0650, 0548,
0367, 0516, 0037,
0163, 0361
Panavision 0037
Pathe Cinema 0216,
0163
Pathe Marconi 0196,
0198
Pausa 0009
Perdio 0037, 0163
Philco 0247, 0418,
0370, 0037
Philips 0037, 0012,
0556, 0193, 0343,
0374
Phoenix 0216, 0486
Phonola 0037, 0012,
0193, 0216
Pioneer 0109, 0037,
0166, 0486, 0287,
0361, 0163
Plantron 0009
Playsonic 0217
Portland 0374
Prandoni-Prince
0516, 0361
Precision 0217
Prima 0264
Prinz 0194
Profex 0009, 0163,
0361
Profi 0009
Profitronic 0037
Proline 0072
Prosonic 0037
Protech 0037, 0337,
0418, 0009, 0668,
0217, 0247, 0264
Proton 0178
Pye 0037, 0012, 0556
Quasar 0250, 0247
Quelle 0037, 0535,
0070, 0512, 0010,
0011, 0104, 0200,
0327, 0361, 0328,
0505
Questa 0036
R-Line 0037
RBM 0070
RFT 0072
Radialva 0037, 0218,
0337
RadioShack 0037,
0178
Radiola 0037, 0012,
0217
Radiomarelli 0516,
0247, 0037
Radiotone 0037,
0009, 0264
Rank Arena 0036
Realistic 0178
Recor 0037
Rediffusion 0361,
0548
Redstar 0037
Reflex 0037
Reoc 0714
Revox 0037
Rex 0206, 0259,
0163, 0264
Roadstar 0009,
0264, 0037, 0218,
0418
Rowa 0698, 0712
Royal Lux 0412
SBR 0012, 0037,
0193
SEG 0037, 0217,
0009, 0264, 0668,
0036
SEI 0010, 0516,
0206, 0294
SEI-Sinudyne 0037
English
39
Page 40

TV brand code09
40
Saba 0109, 0196,
0163, 0343, 0361,
0548, 0335, 0198,
0287, 0625, 0516,
0560
Sagem 0610, 0455
Saisho 0516, 0011,
0217, 0009, 0264
Salora 0361, 0548,
0194, 0516, 0290,
0163
Sambers 0516
Samsung 0009,
0217, 0556, 0072,
0290, 0370, 0264,
0519, 0037, 0208,
0216, 0587, 0618,
0644
Sandra 0217, 0216
Sansui 0655, 0037
Sanyo 0208, 0036,
0217, 0370, 0011,
0072, 0216, 0104,
0108
Schaub Lorenz 0361
Schneider 0037,
0012, 0519, 0247,
0218, 0259, 0371,
0217, 0361, 0556,
0668, 1137
Scotland 0163
Seleco 0206, 0259,
0163
Sencora 0009
Sentra 0218
Serino 0610, 0216,
0455
Sharp 0093, 0036,
1193, 0294, 0516
Shintoshi 0037
Shorai 0294
Siarem 0516
Siemens 0327, 0195,
0535, 0200, 0037,
0328
Silva 0216
Silver 0036, 0361
Sinudyne 0010,
0516, 0294, 0206
Solavox 0361, 0548,
0072, 0163
Sonitron 0370, 0208
Sonoko 0037, 0009,
0282
Sonolor 0163, 0208,
0361
Sontec 0037, 0009,
0294, 0370
Sony 0011, 0010,
0036, 0505, 1505,
0651, 1651
Sound & Vision
0374
Soundesign 0178
Soundwave 0418,
0037
Ssangyong 0009
Standard 0009,
0037, 0217, 0218,
0374
Stenway 0218, 0282
Stern 0206, 0259,
0163, 0264
Strato 0037, 0264
Stylandia 0217
Sunkai 0610, 0294,
0355, 0455
Sunstar 0037, 0009,
0371
Sunwood 0037
SuperTech 0009,
0037, 0216
Superla 0516
Supra 0009
Susumu 0218
Sysline 0037
Sytong 0216
T + A 0447
TMK 0178
TVTEXT 95 0556
Tandberg 0367
Tandy 0163, 0218,
0072, 0217, 0093
Tashiko 0217, 0036,
0163, 0216
Tatung 0516, 0072,
0037, 0217, 0011
Teac 1037, 0712,
0009, 0412, 0455,
0037, 0264, 0282,
0418, 0668, 0698
Tec 0217, 0259,
0247, 0337, 0009
Technics 0250, 0650
Teleavia 0196, 0343
Telefunken 0101,
0109, 0343, 0335,
0073, 0625, 0037,
0196, 0486
Telegazi 0037
Telemeister 0037
Telesonic 0037
Telestar 0037
Teletech 0037, 0009,
0337
Teleton 0206, 0036,
0217, 0259
Televideon 0216
Temco 0294
Tennessee 0037
Tensai 0371, 0374,
0037, 0009, 0217,
0104, 0294, 0218,
0247
Texet 0216, 0009,
0218, 0374
Thomson 0109,
0196, 0287, 0343,
0335, 0198, 0625,
0037, 0560
Thorn 0193, 0190,
0073, 0037, 0499,
0535, 0104, 0335,
0072, 0343, 0361,
0374, 0505, 0512
Thorn-Ferguson
0343
Tokai 0163, 0037,
0337, 0009
Tomashi 0282
Toshiba 0036, 0070,
0109, 0508, 0618,
0718
Trans Continens
0217
Transonic 0698,
0712
Trident 0516
Tristar 0193, 0218
Triumph 0346, 0516,
0556
Tsoschi 0282
Uher 0206, 0486,
0037, 0374, 0418
Ultravox 0037, 0216,
0247
Unic Line 0037, 0473
United 0037
Universum 0037,
0104, 0327, 0070,
0535, 0361, 0346,
0512, 0011, 0217,
0247, 0036, 0480,
0010, 0264, 0505,
0009, 0290, 0370,
0418, 0170, 0294,
0337
Univox 0037, 0163,
0337
Vestel 0037, 0217
Videologic 0218,
0216
Videosat 0247
Videotechnic 0217
Vision 0217
Vistar 0206
Voxson 0163, 0418
Waltham 0037,
0418, 0109, 0217
Wards 0178
Watson 0037, 0009,
0218, 0519
Watt Radio 0216
Wega 0036, 0037
Wegavox 0009
White Westinghouse
0216, 0037, 0337
Windstar 0282
Xrypton 0037
Yamishi 0455, 0217,
0282
Yapshe 0250
Yokan 0037
Yoko 0217, 0264,
0009, 0037, 0218
Zanussi 0206, 0217
Page 41

Troubleshooting
10
Chapter 10:
Troubleshooting
If you are having trouble with the DTR, check the following items to see if the problem can be
resolved. Sometimes another device is at fault, so be sure to also inspect the other devices
being used.
Condition
No sound, no picture.
Only the Setup menu
displays. No functions or
menus can be accessed.
Possible cause
•The DTR is not plugged into
the main power supply.
•The DTR is in standby.
•Non-digital television is being
viewed via the VHF/UHF aerial
TV connection.
•The SCART lead is connected
to the wrong sockets.
•The connections are correct
but the TV is not switched to an
external A V source (AV1 or EXT
1, etc.).
•The connection cables might
be defective (corroded, broken,
or damaged) or missing.
•A download list of (digital)
services is not stored in the
DTR’s memory.
Countermeasures
• Check the mains power supply
connection.
• Press one of the number
buttons or STANDBY button
on the remote to wake up the
DTR.
• Press the remote TV/DTV
button.
• Check the SCART connections.
• Check the TV setting.
• Check all connections.
• Check the aerial connection.
Choose Add New Channels
from the Installation menu and
scan for broadcast channels.
If no channels have been added,
other menu screens do not
display .
English
41
Page 42

Troubleshooting10
Condition
Only the HOME MENU, its
sub-menus, and the information bar are available. Service
selection is not possible.
Intermittent reception,
frozen image, or “mosaic”
effect.
The remote is not working
properly.
Possible cause
• The DTR is not correctly set up
for the aerial.
• The aerial is not receiving the
signal.
• The received signal is too
weak.
• The received signal is too
strong.
• The aerial is damaged.
• The cable links are defective
(corroded, broken, or damaged
connectors and/or wires).
• A poorly positioned or
unstable aerial is causing a poor
signal.
• There are no batteries in the
remote or the batteries are low
or dead.
Countermeasures
• Check if the analogue
channels are received properly
and then check the aerial
connection (aerial to the DTR
and TV aerial input connected to
the DTR TV output). Refer to
section
Signal Check
34.
• Check the aerial installation
and positioning.
• Check the aerial installation
and positioning or install a larger
aerial.
In unusual cases, the effect can
be caused by severe weather or
very heavy cloud cover .
• Install an attenuator at the
receiver VHF/UHF input.
• Replace the aerial.
• Check all the connections and
cables.
• Re-position the aerial and
fasten it securely.
• Check the batteries and
replace them if necessary.
on page
42
If the problem persists, please contact your Pioneer dealer or service center.
Page 43

Specifications
11
Chapter 11:
Specifications
System capabilities
DVB compliant MPEG-2 reception of broad
casts up to Main Profile @ Main Level
Video decoding
• DVB compliant MPEG-2 reception of broad
casts up to Main Profile @ Main Level
• Video bit rate: up to 15 Mbit/sec
• Video format: 4:3 and 16:9
• Resolution: up to 720 by 576 pixels
Audio decoding
MPEG layer I/II (excluding multichannel man
agement from one bit stream)
Operation/Features
• Automatic programme loading via scanning
installation
• Free to air reception
• DVB subtitles
• Programme parental lock with PIN code
• Full remote
• Menu controlled operation using on-screen
display
• Menu controlled installation using on-screen
display
• 10 events programme timer
• Video still image capture
• Multibrand TV remote
• 5 V Power to active indoor antenna; 100 mA
max
Reception-Demodulation
Demodulation conforming to ETSI EN 300 744
(COFDM)
• supports FFT size 2k and 8k, in 7 MHz and
8 MHz bandwidth.
• MFN and SFN network supported.
• All non-hierarchical modes supported.
-
-
-
Connections
• RF input (for aerial) connector: female IEC
169-25
Tuner frequency range: VHF Band III (170 to
230 MHz) and UHF Band IV, V (470 to 862
MHz)
• RF output (to TV) connector: male IEC 169-2
Loopthrough frequency range: 47-862 MHz
(VHF, UHF CH21 to 69)
RF modulator: Standard PAL I, G, K, L
Channel: selectable UHF ch 21 to 69. (De
fault: ch 43)
• TV SCART
Output: CVBS, Controlled audio L/R, RGB,
S-VIDEO
• VCR SCART
Input: CVBS, Audio L/R, S-VIDEO, RGB
Output: CVBS, Audio L/R, S-VIDEO
• Optical digital audio output
Accessories
• Remote control
• Aerial/RF lead
• SCART lead
• Instruction manual
• Warranty card
• Batteries: 2 x 1.5V type AA/R06/UM-3
• Mains lead
Miscellaneous
• Operating Temperature: +5 ˚C to 40 ˚C
• Mains: 220–240 V, 50 Hz
• Power consumption: 10 W max
• Standby consumption: 4 W max
• Weight: 1.1 kg
• Dimensions: 260 (W) x 50 (H) x 190 (D) mm
English
-
Specifications and design are subject to possible modifications without notice due to improvements.
43
Page 44

44
Page 45

45
Page 46

PRECAUTIONS DE SECURITE
PRECAUTIONS DE SECURITE
Nous vous remercions pour l’achat de ce produit Pioneer.
Veuillez lire l’ensemble de ces instructions d’utilisation
afin de bien savoir comment utiliser votre modèle. Une
fois que vous aurez fini de lire les instructions, placez
le manuel en lieu sûr afin de pouvoir y accéder en cas
ATTENTION: Ne placez aucune source de flamme nue,
telle que les bougies allumées, près de l’appareil. Si une
source de flamme nue devait tomber accidentellement
sur l’appareil, le feu se repandrait sur l’appareil et pour
rait causer un incendie.
ATTENTION: Les évents et les ouvertures dans la structure
sont prévus pour la ventilation et pour assurer le bon
fonctionnement du produit et pour la protéger des risques
de surchauffe, et des risques d’incendie, les ouvertures ne
doivent jamais etre bloquées ni couvertes par des matéri
aux tels que journaux, nappes, rideaux, etc. De même, ne
pas positionner l’appareil sur un tapis épais, lit, canapé ou
tout meuble possédant un rembourrage épais.
Conditions de Fonctionnement
Tempéraure et humidité ambiante lors du fonctionnement :
+5 ºC – +40 ºC; inférieur à 80 %RH
(events d’aération non obstrués)
Ne pas installer dans les lieux suivants
• Lieux exposés à la lumière direct du soleil ou lumière
artificielle forte
• Lieux exposés à une forte humidité ou lieux peu
ventilés
-
D3-4-2-1-7a_Fr
-
D3-4-2-1-7b_Fr
D3-4-2-1-7c_Fr
ATTENTION: Cet appareil n’est pas imperméable,
afin de prévenir tout risque de choc électrique ou
de début d’incendie, ne pas exposer cet appareil a
l’humidité ou a la pluie et ne placer auprès de lui
aucune source d’eau, tels que vases, pots de fleur,
cosmétiques, flacons de médicaments, etc.
ATTENTION:
AVANT DE BRANCHER L’APPAREIL POUR LA
PREMIERE FOIS, LIRE ATTENTIVEMENT LA SECTION
SUIVANTE.
Le voltage pour l’alimentation électrique est
différent selon les pays et régions, assurez vous
que l’alimentation électrique du lieu ou vous
utiliserez l’appareil possédé le voltage requis (e.g.,
230V ou 120V) indiqué sur le panneau antérieur.
Pour éteindre le récepteur, la télécommande est
équipée d’une touche VEILLE : en mode VEILLE,
l’appareil n’est pas hors tension. Par conséquent,
installez l’appareil de sorte à pouvoir facilement le
déconnecter du secteur en cas de problème. La
prise secteur doit être débranchée de la prise murale
si l’appareil reste inutilisé sur une longue période.
D3-4-2-1-4_Fr
2
Page 47

Table des matières
Table des matières
01 Préparation ..........................4
Accessoires fournis .....................................4
Vue avant ....................................................
Vue arrière ..................................................
Télécommande ............................................6
Insertion des piles dans
la télécommande .....................................7
Configuration des codes TV .........................
Entretien de la télécommande ....................8
Portée de la télécommande ........................8
5
5
7
02 Connexions ..........................9
Téléviseur et magnétoscope munis de
prises Péritel ............................................9
Téléviseur et magnétoscope munis de prises
d’antenne coaxiales uniquement
Connexion à un système
audio numérique ....................................11
.............
10
03 Première mise en service ... 12
04 Utilisation de base ............. 14
Marche/Arrêt .............................................14
Pour changer de chaîne .............................14
Sélection TV/DTV .......................................15
Utilisation du bandeau d’information .........15
Utilisation du télétexte ...............................16
05 Utilisation avancée ............17
Utilisation du guide des programmes à
l’écran ....................................................17
Utilisation du programmateur ....................19
Arrêt sur image ..........................................20
Captures d’écran .......................................21
Pour visionner des captures d’écran .........21
06 Utilisation du contrôle paren-
tal ................................... 23
Pour configurer votre code PIN .................23
Pour activer/désactiver le contrôle
parental ..................................................24
Verrouillage/Déverrouillage des chaînes ....
Pour regarder une chaîne verrouillée .........25
25
07 Gestion des chaînes ........... 26
Favoris .......................................................26
Saut de chaînes .........................................27
Tri des chaînes ...........................................
Options des chaînes ..................................29
28
08 Autres options ...................30
Préférences de l’utilisateur ........................30
Configuration téléviseur .............................
Installation .................................................33
Actualisation du logiciel .............................34
Guide d’utilisation rapide ...........................35
Restauration des valeurs par défaut ..........36
31
09 Codes des marques de télévi-
seurs ............................... 37
10 Problèmes et solutions ...... 41
11 Spécifications ....................
43
Français
3
Page 48

Préparation01
1
TV/DTV
RETURN
GUIDE
2
3
4
5
6
7
MENU
INFO
TEXT WIDE
SUBTITLE
AV
TV
EXIT
SELECT
8
9
0
Chapitre 1 :
Préparation
Accessoires fournis
& Télécommande
& Câble d’antenne/RF
Connecte le Récepteur Numérique Terrestre
(RNT) au magnétoscope ou au téléviseur.
(Reportez-vous aux illustrations des pages
suivantes.)
& Câble Péritel
4
& Deux piles AA/R06
Connecte la prise Péritel du RNT à la prise
Péritel du téléviseur. (Les prises Péritel de
téléviseur portent généralement l’indication
EXT ou AV.)
& Câble secteur
& Manuel d’instructions
Ce document.
Fourni séparément. Branchez-le sur
l’alimentation secteur.
& Carte de garantie
Dans ce manuel, l’abréviation RNT est utilisée pour désigner votre Récepteur Numérique Terrestre.
Page 49

Préparation
1
2
VCR TV
OPTICAL
AERIAL
TV
1
2
3
4
5
6
Vue avant
01
Français
*
1 Voyant (veille/on)
Indique le statut de l’alimentation du RNT
; Rouge = Veille, Vert = On. Lorsqu’une
programmation est en cours, le voyant devi
ent orange et il clignote lorsque la télécommande est actionnée.
* Dolby et le logo à deux D sont des marques commerciales de Dolby Laboratories.
2 Infrared sensor
Reçoit le signal émis par la télécommande.
-
Vue arrière
1 Prise du câble secteur
2 Prise Péritel1 du magnétoscope
3 Prise Péritel1 du téléviseur
4 Prise de sortie audio numérique
optique
5 Sortie d’antenne VHF2 et UHF3 du
téléviseur
6 Entrée d’antenne VHF2 et UHF
1. Péritel : Connecteur européen
2. VHF : “Very High Frequency” - Très
haute fréquence
3. UHF : “Ultra High Frequency” - Ultra
haute fréquence
3
5
Page 50

Préparation01
1
TV/DTV
RETURN
GUIDE
2
3
4
5
6
7
MENU
INFO
TEXT WIDE
SUBTITLE
AV
TV
EXIT
SELECT
8
9
0
!
~
=
-
@
2
3
5
6
7
8
1
9
0
4
A
Télécommande
1 Touche VEILLE (P.14)
Appuyez sur cette touche pour allumer le
RNT ou le mettre en veille.
2 Touches 0-9 (numériques) (P.14, P.16)
• Appuyez sur une de ces touches pour
sélectionner directement une chaîne.
•
Utilisées pour les opérations en mode texte.
3 Touche TV/DTV (P.15)
Appuyez sur cette touche pour commuter
entre les programmes analogiques et numéri
-
ques.
• Cette touche fonctionne uniquement
lorsque le RNT et le téléviseur sont
reliés par une prise Péritel.
• Même en cas de connexion par une
prise Péritel, il est possible que vous ne
parveniez pas à sélectionner certains
téléviseurs analogiques.
4 Touches P (Programme) +, - (P.14)
Appuyez sur une de ces touches pour sélec
tionner une chaîne.
5 Touche GUIDE (P.17)
Appuyez sur cette touche pour afficher le
-
Guide électronique des programmes.
6 Touches 5, ∞, 2, 3
5/∞/2/3: Utilisées pour les sélections dans
les menus, les opérations en mode texte et
lorsque la liste des chaînes s’affiche pour les
sélections de programmes.
2: Utilisée pour les captures d’écran.
Touche SELECT (P.14)
• En cours de programme, cette touche
permet d’afficher la liste des chaînes.
• En cours d’affichage de la liste des
chaînes, cette touche permet de sélec
-
tionner un programme.
• En cours d’affichage d’un menu, cette
touche permet de sélectionner les dif
-
férents éléments.
7 Touche INFO (P.15)
Appuyez sur cette touche pour afficher le
bandeau d’information.
8 Touche TEXT (P.16)
6
Appuyez sur cette touche pour sélectionner
le mode texte.
Page 51

Préparation
Pour insérer les piles ou les changer, ouvrez le
compartiment situé au dos de la
télécommande, en appuyant dessus et en le
faisant glisser.
Insérez deux
piles neuves.
9
Touches ROUGE, VERTE, JAUNE et
BLEUE
Utilisées pour le mode texte et les opérations à l’écran.
0 Reportez-vous aux codes de configu-
ration de téléviseur, à droite.
Cette télécommande est capable de con
trôler les téléviseurs des marques les plus
courantes. Elle est configurée en usine pour
les téléviseurs Pioneer.
- Touche SUBTITLE (P.30)
Appuyez sur cette touche pour afficher les
sous-titres.
= Touche WIDE (P.32)
Appuyez sur cette touche pour commuter
entre les modes d’affichage écran large.
~ Touche EXIT
Appuyez sur cette touche pour effacer les
informations affichées à l’écran.
! Touche MENU
Appuyez sur cette touche pour afficher
l’écran des menus.
@ Touche RETURN (P.15)
• Appuyez sur cette touche pour sélec
tionner la dernière chaîne affichée.
• Appuyez sur cette touche pour revenir
au menu précédent.
-
-
Configuration des codes TV
La télécommande peut contrôler les cinq
fonctions suivantes en indiquant un code de
marque de téléviseur provenant de la liste
ci-jointe.
• Téléviseur allumé/en veille/éteint
• Augmentation/réduction du volume du
téléviseur
• Chaîne +/-
• Sourdine on/off
• Commutation entrées TV/AV
1 Appuyez de manière prolongée sur la
touche VEILLE (A sur l’illustration), puis
indiquez le code de marque téléviseur à
quatre chiffres. (Reportez-vous au chapitre 9,
Codes des marques de téléviseurs, page 37.)
2 Appuyez à nouveau sur la touche VEILLE
(A sur l’illustration) pour allumer/éteindre
le téléviseur.
3
Si le téléviseur ne fonctionne pas correctement, répétez l’opération à partir de l’étape 1
ou indiquez un autre code correspondant à la
même marque de téléviseur.
01
Français
Insertion des piles dans la
télécommande
•
Cette télécommande est susceptible d’être
incompatible avec certaines marques ou
certains modèles de téléviseurs.
•
Il peut s’avérer souhaitable de restaurer
les paramètres par défaut de la télécommande. Tout en appuyant sur la touche
VEILLE
Respectez la législation en vigueur dans votre pays
pour le recyclage des piles usagées.
, indiquez le code 9999.
D3-4-2-3-1_Fr
7
Page 52

Préparation01
7
m
Entretien de la télécommande
• Ne faites pas tomber la télécommande.
• N’exposez pas la télécommande à
l’humidité.
• N’entreposez pas et n’utilisez pas la
télécommande dans les lieux suivants :
A la lumière directe du soleil
A proximité d’objets chauds
En zone humide
• N’utilisez pas simultanément des piles
neuves et usagées. Insérez uniquement
des piles neuves.
• Ne mélangez pas différentes marques
de piles. Même si elles sont de même
taille, différentes marques peuvent
présenter des variations de tension.
• Lorsque vous prévoyez de ne pas utiliser
la télécommande pendant une certaine
période (plus d’un mois), retirez les piles
afin d’éviter les fuites de liquide dans la
télécommande. En cas de fuite sur une pile
à l’intérieur de la télécommande, recyclez
les piles usées, nettoyez le liquide de la
télécommande et insérez des piles neuves.
• Les piles Pioneer fournies avec la télécommande ne contiennent pas de métaux
lourds (mercure, nickel, cadmium...).
Cependant, dans de nombreux pays, le
recyclage des piles est obligatoire. Assurezvous de respecter la législation en vigueur
lors du recyclage des piles.
• Le code de marque de téléviseur durera
seulement une minute sans piles dans
la télécommande. Pour éviter tout dés
agrément lié à la perte de ces informa
tions, assurez-vous de disposer de piles
neuves et insérez-les immédiatement
lorsque vous retirez les piles usées. Si
les touches de la télécommande sont
actionnées lorsque les piles sont reti
rées, le réglage de code de marque sera
effacé. Prenez soin de ne pas actionner
les touches lors du remplacement des
8
piles.
Portée de la télécommande
• Si un objet entrave la communication
entre la télécommande et le capteur
du RNT, ce dernier est susceptible de
ne pas réagir aux commandes de la
télécommande. En pareil cas, éliminez
l’obstacle ou changez de position.
• Lorsque les piles s’affaiblissent, la por
tée de la télécommande raccourcit. Si la
portée devient insuffisante, changez les
piles.
-
-
-
-
Page 53

Connexions
230V
VCR TV
OPTICAL
AERIAL
50Hz
TV
AERIAL
EXT
AERIAL
EXT
TV
Chapitre 2 :
Connexions
02
Téléviseur et magnétoscope munis de prises Péritel
Cette connexion permet d’obtenir la meilleure qualité d’enregistrement et de lecture.
• Pour obtenir la meilleure qualité d’image
et accéder à la commutation EXT automatique, effectuez la connexion sur la
première prise AV1 EXT du téléviseur.
• Si vous utilisez une antenne supplémentaire
en option nécessitant une alimentation par
le RNT, consultez les instructions supplé
mentaires pages 13 et 33.
• Il est possible d’utiliser une antenne intérieure, mais celle-ci ne fournira sans doute
pas la meilleure qualité de réception.
-
• Avant de réaliser des connexions, débranchez tout le matériel du secteur.
1 Connectez le matériel comme indiqué
dans le schéma ci-dessus.
2 Branchez tout le matériel, y compris le
RNT, sur l’alimentation secteur.
3 Mettez le téléviseur sous tension et
sélectionnez une chaîne.
4 Appuyez sur la touche VEILLE de la
télécommande pour mettre le RNT en service.
Le RNT affiche le logo Pioneer, puis l’écran
Menu Language.
Passez maintenant à Première mise en
service à la page 12.
Français
9
Page 54

Connexions02
AERIAL
230V
VCR TV
OPTICAL
AERIAL
50Hz
TV
AERIAL
TV
Téléviseur et magnétoscope munis de prises d’antenne coaxiales uniquement
4 Réglez le téléviseur.
• Avant de réaliser des connexions, débranchez tout le matériel du secteur.
1 Connectez le matériel comme indiqué
dans le schéma ci-dessus, mais ne branchez
pas encore l’antenne au RNT.
2 Une fois que vous avez réalisé les con
nexions, branchez le matériel. Commencez
par mettre le téléviseur sous tension et
sélectionnez une chaîne inutilisée pour
regarder les programmes numériques. Allu
mez ensuite le magnétoscope (la chaîne sur
laquelle le magnétoscope est réglé n’a pas
d’importance à ce stade).
3 Appuyez sur la touche VEILLE
de
la télécommande pour mettre le RNT en
service.
Vous devez maintenant régler la chaîne du
téléviseur sur laquelle vous regarderez les
programmes numériques. Si vous ne savez
pas comment le faire, reportez-vous au guide
d’utilisation de votre téléviseur. Mémorisez
la chaîne lorsque le logo Pioneer de l’écran
Menu Language screen (Langue des menus)
s’affiche sur le téléviseur comme indiqué
ci-dessous.
-
10
5 Connectez l’antenne au RNT et vérifiez
que l’image reste stable (pas de mouve
-
ments, d’interférences ou de neige).
Page 55

Connexions
230V
VCR TV
OPTICAL
AERIAL
50Hz
TV
02
6 Vérifiez toutes les autres chaînes du téléviseur, y compris la chaîne du magnétoscope, et
contrôlez la qualité d’image.
Si la qualité d’image est bonne, allez à
Première mise en service à la page 12. En
cas de problème de qualité d’image, même
lorsque l’antenne est connectée, suivez les
instructions ci-dessous après avoir effectué
la procédure décrite dans Première mise en
service, page 12.
1Déconnectez l’antenne au dos du RNT.
2 Vérifiez que le téléviseur est bien sur
la chaîne réglée pour les programmes
numériques.
4 Sélectionnez Configuration sur l’écran
ACCUEIL, Installation, puis RF Out put
Channel (Chaîne de sortie RF) avec les
touches
5, ∞ et SELECT de la télécom-
mande.
Le réglage par défaut de cette op
tion, 43, doit être modifié en cas
d’interférence. Sélectionnez une chaîne
éloignée de 43. Appuyez sur la touche
MENU (Exit) pour quitter le menu et
mémoriser le réglage.
5 Répétez la procédure depuis l’étape 4
afin de vérifier que la qualité d’image
s’améliore.
3Appuyez sur la touche MENU de la télé-
commande. L’écran ACCUEIL s’affiche.
Connexion à un système audio numérique
Connectez un câble audio numérique (vendu séparément) entre la prise de sortie audio numérique optique du RNT et l’entrée audio numérique optique d’un système stéréo, d’un ampli
AV, etc. à convertisseur de fréquence d’échantillonnage.
• Si le son produit est codé Dolby Digital
et que vous utilisez un système audio
externe équipé d’un décodeur Dolby
Digital, changez vos réglages de sortie
audio numérique dans Préférences,
Sortie audio numérique. (Voir page 30.)
• Si le système audio numérique externe
n’est pas compatible avec la fréquence
d’échantillonnage du son numérique,
aucun son ne sera audible.
-
Français
“Dolby” et le logo à deux D sont des
marques commerciales de Dolby Laborato
ries.
-
11
Page 56

03
Première mise en service
Chapitre 3 :
Première mise en service
Une fois toutes les connexions réalisées et
le RNT relié au secteur, appuyez sur VEILLE
ou sur une touche numérique.
Le logo Pioneer s’affiche, puis l’écran Menu
Language (Langue de Menu).
Sélection d’une langue
Il vous est possible de choisir la langue utilisée pour les menus.
1 Appuyez sur 5/∞ pour sélectionner la
langue requise, puis appuyez sur SELECT.
Une fois la langue des menus sélectionnée,
2
un message de bienvenue s’affiche.
Sélection d’un pays
Vous devez sélectionner le pays où le RNT
est utilisé. Appuyez sur 5/∞ pour sélectionner un pays et appuyez sur SELECT.
Sélection de votre type de téléviseur
12
3 Appuyez sur SELECT.
Un message s’affiche pour vous indiquer
de sélectionner votre type de téléviseur.
Appuyez sur
mal (4:3) ou Large (16:9), puis appuyez sur
SELECT
2/3 pour sélectionner Nor-
.
Page 57

Première mise en service
Sélection d’une puissance d’antenne
Un message s’affiche pour vous demander
si l’antenne doit être alimentée par le RNT.
Appuyez sur
(Oui) ou No (Non) et appuyez sur SELECT
2/3 pour sélectionner Yes
.
• Si aucune chaîne n’est trouvée, un message d’avertissement s’affiche. Vérifiez à
nouveau la connexion de l’antenne. Vous
pouvez effectuer un nouveau balayage en
sélectionnant Retry (Réessayer) avec
et en appuyant sur SELECT
.
2/3
03
Français
• La sélection habituelle est No (Non).
Certaines antennes en option néces
sitent une alimentation depuis le RNT.
Si vous utilisez ce type d’antenne,
sélectionnez Yes (Oui). Reportez-vous
au guide d’utilisation de ce produit pour
plus d’informations.
-
Recherche des chaînes
Un message s’affiche pour demander confirmation du fait que l’antenne est bien con
nectée. Une fois la connexion de l’antenne
confirmée, appuyez sur SELECT. Votre RNT
recherche les chaînes et les ajoute au fur et à
mesure qu’il les trouve.
La recherche de l’ensemble des chaînes
dure environ deux minutes.
-
Guide d’utilisation rapide
Une fois la procédure de configuration
automatique terminée, le système vous
demande si vous souhaitez visionner le guide
d’utilisation rapide décrivant les principales
fonctionnalités du RNT.
Appuyez sur
(Maintenant) ou Later (Plus tard) et appuyez
sur SELECT
Si vous sélectionnez Now (Maintenant), le guide
d’utilisation rapide du RNT s’affiche. Appuyez
sur SELECT pour effectuer une pause et pour
relancer le guide après une pause. Pour quitter
le guide, appuyez sur MENU ou sur EXIT
Lorsque le guide d’utilisation rapide se
termine, ou si vous sélectionnez Later (Plus
tard), la première chaîne de la liste s’affiche.
2/3 pour sélectionner Now
.
.
13
Page 58

04
Utilisation de base
Chapitre 4 :
Utilisation de base
Marche/Arrêt
Pour allumer, appuyez sur VEILLE ou
sur une touche numérique. En appuyant
sur VEILLE
s’affiche. En appuyant sur une touche
numérique, la chaîne correspondant à cette
touche s’affiche. Le bandeau d’information
s’affiche alors et il s’efface au bout de
quelques secondes.
• Vous pouvez effacer le bandeau
d’information immédiatement en appuyant sur EXIT.
, la dernière chaîne regardée
• Si aucune chaîne n’est disponible pour
la valeur saisie, le message “No service
is available on this channel” s’affiche
quelques secondes et la chaîne ne
change pas.
Utilisation de la liste des chaînes
1 Si vous appuyez sur SELECT tout en
regardant un programme, une liste de six
chaînes (y compris la chaîne actuellement
visionnée) s’affiche.
14
Pour éteindre, appuyez sur VEILLE
RNT passe en mode veille.
. Le
Pour changer de chaîne
Utilisation des touches P +, –
Appuyez sur P +/– pour monter/descendre
dans la liste des chaînes disponibles.
Appuyez de manière continue sur P +/– pour
faire défiler rapidement les chaînes et at
teindre celle de votre choix, puis relâchez la
touche. La chaîne s’affiche.
Utilisation des touches numériques
Indiquez un nombre à trois chiffres pour
atteindre la chaîne de votre choix. Si par
exemple, vous souhaitez regarder la chaîne
125, tapez 1-2-5.
Ou
Indiquez simplement le chiffre correspon
dant à la chaîne requise. Si par exemple,
vous souhaitez regarder la chaîne 5, tapez 5.
-
-
2 Appuyez sur 5/∞ pour afficher les dif-
férentes chaînes de la liste.
• Appuyez sur 2/3 pour passer à la liste
de chaînes précédente/suivante.
3 Appuyez à nouveau sur SELECT pour
sélectionner une chaîne.
Page 59

Utilisation de base
Utilisation de RETURN
Si, en regardant une chaîne, vous appuyez
sur RETURN, la chaîne précédemment
visionnée s’affiche.
• La dernière chaîne visionnée est effacée
de la mémoire lorsque le RNT est mis
en veille.
04
Français
Sélection TV/DTV
Utilisez la touche TV/DTV pour commuter en-
tre les chaînes analogiques ou le magnétoscope
et les chaînes numériques du RNT.
• Cette touche fonctionne uniquement
lorsquie le RNT et le téléviseur sont
reliés par une prise Péritel.
• Même en cas de connexion par une
prise Péritel, il est possible que vous ne
parveniez pas à sélectionner certains
téléviseurs analogiques.
• Si vous choisissez de visionner le RNT
depuis le téléviseur analogique en sélectionnant une source externe, la touche
TV/DTV de la télécommande ne pourra pas
être utilisé pour changer de chaîne.
Utilisation du bandeau
d’information
Vous pouvez afficher à l’écran des informations concernant le programme que vous
regardez ou encore d’autres programmes.
1 Appuyez sur INFO pour afficher le bandeau
d’information. Le numéro de chaîne en cours, le
nom de la chaîne, la date et l’heure s’affichent.
Le nom du programme, ainsi que les heures
de début et de fin s’affichent également. Les
mêmes informations s’affichent aussi pour le
programme suivant de la chaîne.
Vous pouvez ensuite :
• Appuyer sur 2/3 pour afficher le bandeau d’information pour d’autres chaînes.
• Appuyer sur SELECT pour sélectionner
une chaîne.
• Appuyer sur EXIT pour effacer le ban
deau d’information de l’écran.
• Si ces options sont disponibles sur
la chaîne en question, le bandeau
d’information affiche également des
icônes pour les Favoris (
titres ( ) et le Télétexte ( ).
• Il peut arriver que certaines icônes
s’affichent ou soient absentes en raison
d’informations inexactes fournies par le
diffuseur.
• Il peut également arriver que des
informations erronées s’affichent avec
l’utilisation des touches
l’affichage des informations concernant
d’autres chaînes.
2 Appuyez à nouveau sur INFO pour
afficher des informations détaillées sur le
programme sélectionné.
), les Sous-
2/3 pour
-
15
Page 60

04
Utilisation de base
Vous pouvez ensuite :
• Appuyer sur
programmes NOW (MAINTENANT) et
NEXT (SUIVANT).
• Appuyer sur
informations détaillées concernant les
programmes d’autres chaînes.
• Appuyer sur SELECT pour effacer les
informations détaillées et sélectionner la
chaîne.
• Appuyer sur la touche VERTE pour régler
l’horloge pour un programme sélection
né. Voir Utilisation du programmateur à la
page 19.
• Appuyer sur RETURN pour effacer les
informations détaillées.
• Appuyer sur EXIT pour effacer les infor
mations de l’écran.
5/∞ pour commuter en les
2/3 pour afficher les
Vous pouvez également sélectionner une
page en appuyant sur l’une des quatre touch
es de couleur : ROUGE, VERTE, JAUNE ou
BLEUE. Si une page s’affiche avec l’une des
touches de couleur, vous serez directement
amené à cette page.
Lorsque des flèches (<<<<) rouges s’affichent
en bas de l’écran, le fait d’appuyer sur la touche
ROUGE permet de revenir à la page précédente.
Lorsqu’une icône d’accueil verte s’affiche en bas
de l’écran, le fait d’appuyer sur la touche VERTE
permet de revenir à la page d’accueil.
Au bas de certaines pages, des numéros de
pages “internes” sont indiqués sous forme
de numéros à deux chiffres. Vous pouvez
sélectionner ces pages en appuyant sur
Les touches liées au télétexte et leurs fonctions sont indiquées ci-dessous :
TEXT : Sélectionner/Quitter le mode télétexte.
EXIT : Quitter le télétexte et afficher la vidéo
uniquement.
Touches numériques, touches de couleur :
-
Sélectionner les pages.
3 : Afficher la page “interne” suivante.
(lorsqu’il y en a une)
2 : Afficher la page “interne” précédente.
(lorsqu’il y en a une)
-
5 : Afficher la page suivante.
∞ : Afficher la page précédente.
-
2/3.
16
Utilisation du télétexte
Lorsque des programmes avec télétexte sont
diffusés, l’icône du télétexte (
dans le bandeau d’information.
Le télétexte peut fournir des informations sur
l’actualité, la météo, les programme, ou encore
des sous-titres et autres éléments pratiques.
Lorsque vous regardez une chaîne proposant
des contenus télétexte, appuyez sur TEXT.
La page d’accueil du télétexte s’affiche. La
page d’accueil (Index) indique le contenu des
autres pages. Sur cette page, sélectionnez la
page que vous souhaitez visionner et tapez
les trois chiffres du numéro de page (100–
899) au moyen des touches numériques
) s’affiche
.
• Il peut arriver que des icônes de télétexte s’affichent ou soient absentes en
raison d’informations inexactes fournies
par le diffuseur.
• Si le téléviseur relié à votre RNT est capable
de recevoir et d’afficher le télétexte, vous
pouvez également utiliser les commandes
ou la télécommande du téléviseur. (Si vous
affichez le télétexte au moyen de la télé
commande du RNT, seule la télécommande
du RNT peut être utilisée.)
-
Page 61

Utilisation avancée
Chapitre 5 :
Utilisation avancée
05
Utilisation du guide des programmes à l’écran
Vous pouvez utiliser le guide des programmes à l’écran afin de trouver rapidement un programme. Lorsque vous défilez
dans la liste des programmes, l’information
sur les programmes s’affiche au-dessus de
la liste.
Appuyez sur GUIDE. Le Guide des pro
grammes à l’écran s’affiche.
Vous pouvez ensuite :
• Appuyez sur
dans la liste.
• Appuyez sur P +/– pour afficher les 8
chaînes précédentes/suivantes.
• Appuyer sur SELECT pour regarder une
chaîne.
• Appuyer sur INFO pour obtenir les
informations concernant un programme.
Appuyer à nouveau sur INFO ou sur
RETURN pour revenir à la liste. Ap
puyer sur SELECT pour regarder le
programme.
5/∞/2/3 pour défiler
-
-
• Appuyer sur la touche ROUGE pour
afficher les programmes diffusés à
une heure/date précise. Voir la section
Recherche directe, ci-dessous.
• Appuyer sur la touche VERTE pour
régler le programmateur pour un pro
gramme sélectionné. Voir Utilisation du
programmateur à la page 19.
• Appuyer sur la touche JAUNE pour
afficher l’écran de recherche. Voir Re
cherche de programme à la page 18.
• Appuyer à nouveau sur GUIDE ou sur
EXIT pour désactiver le Guide des pro
grammes à l’écran.
• Dans certaines régions, il est possible
que les informations sur les programmes
soient limitées ou indisponibles.
• Les informations relatives aux programmes prévus dans plus de deux
jours peuvent prendre plusieurs minutes
avant de s’afficher.
-
-
-
Recherche directe
1 Appuyez sur 5/∞ pour sélectionner Day
(Jour) ou Time (Heure).
2 Appuyez sur 2/3 pour sélectionner
date/time.
3 Appuyez sur 5/∞/2/3 pour sélectionner
Jump (Saut) et appuyez sur SELECT. Les pro
grammes diffusés à cette date/heure s’affichent.
-
Français
17
Page 62

Utilisation avancée05
Recherche de programmes
1 Appuyez sur 5/∞ pour sélectionner
Day (Jour), Start Time (Heure de début) ou
Channel (Chaîne). Pour une sélection par
Genre, appuyez sur
2 Définissez les champs de recherche.
Day (Jour)
un jour parmi les sipt prochains jours.
Start Time (Heure de début) : Appuyez sur
2/3 pour sélectionner l’heure.
Channel (Chaîne): Appuyez sur
sélectionner All Channels (Toutes les
chaînes) ou Favourite (Favoris).
Genre : Appuyez sur 5/∞/2/3 pour sélec-
tionner un genre et appuyez sur SELECT pour
cocher ou décocher un genre spécifique. Vous
pouvez sélectionner All (Tous) pour effectuer
une recherche sans tenir compte des informa
tions de genre. Une fois que vous avez effec
tué une recherche sur le genre de votre choix,
sélectionnez OK et appuyez sur SELECT pour
revenir à l’écran des recherches.
: Appuyez sur 2/3 pour sélectionner
5/∞ puis sur SELECT.
2/3 pour
-
3 Appuyez sur 5/∞/2/3 pour sélection-
ner Search (Recherche) et appuyez sur
SELECT. Les programmes correspondant
aux critères s’affichent.
Vous pouvez ensuite :
• Appuyer sur
liste.
• Appuyez sur P +/– pour afficher les 7
programmes précédents/suivants.
• Appuyez sur SELECT pour regarder une
chaîne.
• Appuyer sur INFO pour obtenir des in
formations sur un programme. Appuyer
à nouveau sur INFO ou sur RETURN
pour revenir à la liste. Appuyer sur SE-
LECT pour regarder le programme.
• Appuyer sur la touche JAUNE pour af
ficher à nouveau l’écran de recherche.
• Appuyer sur la touche VERTE pour
régler le programmateur pour un pro
gramme sélectionné. Voir Utilisation du
programmateur à la page 19.
• Appuyer sur GUIDE ou sur EXIT pour
désactiver le Guide des programmes à
l’écran.
-
5/∞ pour défiler dans la
-
-
-
18
Page 63

Utilisation avancée
05
Utilisation du programmateur
Le programmateur vous permet de programmer la mise en marche du RNT et la sélec
tion automatique d’une chaîne. Il est possible
de prévoir 10 programmations.
Affichage du menu du programmateur
1 Lorsque vous regardez un programme, appuyez sur MENU. L’écran ACCUEIL s’affiche.
2 Appuyez sur 5/∞ pour sélectionner
Programme Timer (Programmation), puis
appuyez sur SELECT. Le menu Programme
Timer (Programmation des chaîns) s’affiche.
-
Lors de l’utilisation du Guide des programmes à
l’écran, sélectionnez un programme et appuyez
sur la touche VERTE. Un message s’affiche pour
demander si vous souhaitez utiliser le program
mateur. Appuyez sur
Yes (Oui) et appuyez sur SELECT. Le menu
Programmation s’affiche et toutes les informa
tions relatives au programme sélectionné sont
automatiquement saisies. Appuyez sur SELECT
pour définir le programme.
2/3 pour sélectionner
-
-
Saisie de réglages pour le programmateur
1 Appuyez sur 5/∞ pour sélectionner un
créneau du programmateur disponible, puis
appuyez sur SELECT
2 La date actuelle s’affiche. Appuyez sur
5 pour sélectionner une date à venir. Appuyez sur
de répétition. Appuyez sur
l’élément suivant : Heure de début.
3 Indiquez l’heure à laquelle le programme
doit commencer. Utilisez l’horloge sur 24
heures pour le réglage de l’heure : 10h15 du
soir sera ainsi 2215.
Heure : Indiquez 22 en utilisant les touches
numériques ou
passer aux minutes.
Minute : Indiquez 15 en utilisant les touches
numériques ou
passer à l’élément suivant : Heure de fin.
4 Indiquez l’heure à laquelle le programme
doit s’arrêter. Appuyez sur
l’élément suivant : Chaîne.
5 Indiquez la chaîne en utilisant les
touches numériques ou 5/∞.
∞ pour sélectionner un intervalle
.
3 pour passer à
5/∞. Appuyez sur 3 pour
5/∞. Appuyez sur 3 pour
3 pour passer à
Français
3 Indiquez un nouveau réglage de pro-
gramateur ou déplacez/effacez un réglage.
Voir la section Réglages du programmateur,
ci-dessous.
Ou
• En cas d’erreur, appuyez sur 2 pour revenir
à l’élément précédent et modifier le réglage.
6 Appuyez sur SELECT pour saisir tous les
réglages.
• Si tous les réglages sont corrects, le
programmateur les enregistre.
• Si un réglage incorrect a été saisi, un
message d’avertissement s’affiche.
Modifiez le réglage en fonction.
19
Page 64

Utilisation avancée05
• Lorsque deux programmes se chevauchent, le premier programme est
prioritaire et il est donc programmé dans
son intégralité.
Lorsque deux programmes commen
cent au même moment, le programme
enregistré sur le créneau le plus élevé
est prioritaire.
Si vous effectuez une programmation,
que le créneau déborde sur une autre
programmation, et que l’autre program
mation est prioritaire, un message
d’avertissement s’affiche.
7 Répétez les étapes 1–8 pour effectuer
des programmations supplémentaires.
8 Appuyez sur MENU pour terminer le
réglage et quitter le menu Programmation.
Modification d’une programmation
(Cancel/Modify/Move)
(Annuler/Modifier/Déplacer)
Vous pouvez annuler/modifier/déplacer une
programmation.
1 Affichez le Programme Timer Menu
(menu Programmation des chaîns).
2 Appuyez sur 5/∞ pour sélectionner le
créneau à modifier, puis suivez les instruc
tions ci-dessous.
• Pour annuler le réglage, appuyez sur la
touche ROUGE. Le réglage est annulé.
• Pour modifier le réglage, appuyez sur la
touche SELECT. Vous pouvez modifier
le réglage.
• Pour déplacer le réglage, appuyez sur la
touche BLEUE. Appuyez sur
déplacer le créneau sélectionné et ap
puyez sur la touche BLEUE.
-
-
5/∞ pour
-
• Si vous regardez un programme numérique
lorsqu’une programmation est sur le point
d’être lancée, une alerte s’affiche à l’écran
pendant environ une minute avant le lance
ment de la programmation. Pour visualiser
la programmation, appuyez sur SELECT.
Pour annuler la programmation, appuyez
2/3 pour sélectionner CANCEL TIMER
-
sur
(ANNULER PROGRAMMATION) et appuyez
sur SELECT. Si vous n’appuyez sur aucune
touche, la programmation sera déclenchée à
l’heure prévue.
• Lorsqu’une programmation est en
cours, le voyant devient orange.
• Si une touche est actionnée lorsqu’une
programmation est active, un mes
sage d’alerte s’affiche à l’écran. Vous
pouvez appuyer sur EXIT pour annuler
la programmation et remettre le RNT en
mode de visionnage d’un programme
numérique, ou ne rien faire, de sorte
que la programmation se poursuive.
• Lorsque l’heure change en raison du passage à l’heure d’été/d’hiver, une heure est
supprimée ou ajoutée. Si vous réglez une
date de début ou de fin d’enregistrement
dans ce type de contexte, le moment de
déclenchement risque d’être affecté.
Arrêt sur image
Vous pouvez effectuer un arrêt sur image
lors d’un programme.
1 Lorsque vous regardez un programme, appuyez sur
2. Un arrêt sur image est effectué.
-
-
20
Page 65

Utilisation avancée
05
2 Pour continuer le visionnage du programme, appuyez sur
3.
Captures d’écran
Vous pouvez effectuer des captures d’écran
que vous pouvez enregistrer et visionner
ultérieurement.
1 Lorsque vous regardez un programme, appuyez sur
2 Appuyez sur SELECT pour enregistrer
cet arrêt sur image. La capture d’écran est
enregistrée et le programme recommence
normalement.
2. Un arrêt sur image est effectué.
• Si la mémoire est pleine, un message
d’avertissement s’affiche. Appuyez sur
SELECT pour relancer le programme.
• Si vous souhaitez libérer de la mémoire
pour effectuer plus de captures d’écran,
consultez la section Supprimer des
captures d’écran à la page 22.
• Il peut arriver qu’une tentative de cap
ture d’écran ne réussisse pas en raison
de problèmes au niveau des données du
programme.
• Lors d’un capture d’écran, seule l’image
vidéo brute est enregistrée. Il s’agit de
l’image telle qu’elle est envoyée par le
diffuseur, à l’exclusion de tout élément
supplémentaire affiché par le RNT
(sous-titres, télétexte...).
-
Pour visionner des captures
d’écran
Vous pouvez visionner les captures d’écran
que vous avez enregistrées.
1 Lorsque vous regardez un programme, appuyez sur MENU. L’écran ACCUEIL s’affiche.
2 Appuyez sur 5/∞ pour sélectionner
Video Snapshots (Captures d’écran). Ap
puyez sur SELECT. La première capture
d’écran disponible en mémoire s’affiche.
Vous pouvez ensuite :
• Appuyer sur
ture d’écran précédente/suivante.
• Appuyer sur SELECT pour masquer les
informations relatives à la capture d’écran.
Appuyer sur une touche autre que
VEILLE ou EXIT pour afficher à nouveau les informations relatives à la capture
d’écran.
• Appuyer sur MENU ou EXIT pour
revenir à la diffusion normale des pro
grammes.
2/3 pour passer à la cap-
-
2/3,
-
Français
21
Page 66

Utilisation avancée05
22
• Appuyer sur RETURN pour revenir au
menu ACCUEIL.
• Appuyer sur la touche BLEUE pour
passer en Mode Film. Ce mode est celui
qui convient le mieux au visionnage des
captures d’écran des programmes dont
l’affichage ne change pas beaucoup,
comme les films.
• Appuyer sur la touche JAUNE pour
lancer un diaporama. Voir Visionner un
diaporama, ci-dessous.
• Appuyer sur la touche JAUNE pour
afficher l’écran de recherche. Voir la sec
tion Suppression de captures d’écran,
ci-dessous.
• Si aucune capture d’écran n’a été mémorisée, un message s’affiche lorsque Video
Snapshot (Capture d’écran)
Appuyez sur SELECT pour revenir au menu
ACCUEIL.
est sélectionné.
Visionner un diaporama
Vous pouvez visionner toutes les captures
d’écran mémorisées, présentées l’une après
l’autre, sans afficher le guide des touches ou
le texte d’aide.
1 Pour afficher la première capture d’écran,
suivez les étapes 1 et 2 de Pour visionner
des captures d’écran, page 21.
2 Appuyez sur la touche JAUNE. Le guide
des touches et le texte d’aide s’effacent,
et le diaporama commence. La diaposi
tive suivante s’affiche au bout de quelques
secondes. Les diapositives continuent de
s’afficher en succession jusqu’à ce qu’une
touche soit actionnée.
3 Appuyer sur une touche autre que
VEILLE
diapositives. Le guide des touches et le texte
d’aide s’affichent.
ou TV/DTV pour revenir aux
-
4 Appuyez sur MENU ou sur EXIT pour
revenir à la diffusion normale des programmes.
• Les diapositives d’un diaporama peuvent être affichées pour une durée de 1
à 10 secondes. Cet intervalle est défini
dans le menu Préférences. Voir Inter
valles des diaporamas à la page 31.
• Il est uniquement possible d’afficher
un diaporama lorsque deux captures
-
d’écran au moins sont mémorisées.
Pour effacer des captures d’écran
Vous pouvez effacer les captures d’écran de
la mémoire.
1 Lorsque vous visionnez une capture
d’écran, appuyez sur la touche ROUGE. Un
message s’affiche pour demander confirmation du fait que vous souhaitez effacer la
capture d’écran.
2 Appuyez sur 2/3 pour sélectionner
Delete (Effacer), puis appuyez sur SELECT.
La capture d’écran est effacée et la capture
suivante s’affiche.
-
Page 67

Utilisation du contrôle parental (PARENTAL LOCK)
Chapitre 6 :
Utilisation du contrôle parental
06
Le contrôle parental peut être utilisé pour
restreindre l’accès à toutes les chaînes. Pour
visionner une chaîne bloquée, le code PIN
doit être saisi. Pour utiliser efficacement
le contrôle parental, suivez les instructions
ci-dessous.
Pour configurer votre code PIN
La configuration d’un code PIN vous permet
de configurer/modifier le code PIN utilisé
pour le contrôle parental. Un code PIN
comporte quatre chiffres (0000 à 9999) et la
valeur par défaut est 0000.
1 Lorsque vous regardez un programme, appuyez sur MENU. L’écran ACCUEIL s’affiche.
2 Appuyez sur 5/∞ pour sélectionner
Setup (Configuration), puis appuyez sur
SELECT. Le menu Configuration s’affiche.
3 Appuyez sur 5/∞ pour sélectionner Set
PIN (Configurer le code PIN), puis appuyez
sur SELECT. L’écran Saisie PIN s’affiche.
Français
23
Page 68

06
Utilisation du contrôle parental (PARENTAL LOCK)
4 Utilisez les touches numériques pour
saisir votre code PIN (la valeur par défaut est
0000). Le menu Configurer le code PIN.
• Si le code PIN que vous saisissez n’est
pas valide, un message s’affiche pour
l’indiquer et vous êtes renvoyé au menu
Configuration.
5 Utilisez les touches numériques pour
saisir votre nouveau code PIN à 4 chiffres et
confirmez en l’indiquant une seconde fois.
• En cas d’erreur, appuyez sur 2 pour
revenir au chiffre précédent et l’effacer.
• Si le code PIN est confirmé, le nouveau
code PIN est enregistré et vous êtes
renvoyé au menu Configuration.
• Appuyez sur MENU pour quitter l’écran
Configurer le code PIN sans définir un
nouveau code PIN.
Pour activer/désactiver le
contrôle parental
Lorsque vous activez le contrôle parental, les
programmes des chaînes bloquées peuvent
uniquement s’afficher si le code PIN est
saisi.
1 Lorsque vous regardez un programme,
appuyez sur MENU. L’écran ACCUEIL
s’affiche.
2 Appuyez sur 5/∞ pour sélection-
ner Channel Management (Gestion des
chaînes), puis appuyez sur SELECT. Le
menu Gestion des chaînes s’affiche.
24
• Si vous oubliez votre code PIN, pour
pouvez le remettre à la valeur par défaut
(0000) en restaurant les valeurs par
défaut du système. Voir Restauration
des valeurs par défaut à la page 36.
3 Appuyez sur 5/∞ pour sélectionner
Parental Lock (Contrôle parental) et appuyez
sur 2/3.
Page 69

Utilisation du contrôle parental (PARENTAL LOCK)
06
4 Utilisez les touches numériques pour
saisir votre code PIN.
5 Appuyez sur
On (activer) et Off (désactiver). Passez à
la section Verrouillage/Déverrouillage des
chaînes ci-dessous.
• Si vous indiquez un code PIN erroné, un
message s’affiche et il n’est pas possible
de définir les options de contrôle parental.
2/3 pour commuter entre
Verrouillage/Déverrouillage
des chaînes
Les chaînes doivent être bloquées/débloquées individuellement. Suivez ces étapes
pour verrouiller/déverrouiller une chaîne
spécifique.
1 Appuyez sur 5/∞ pour sélectionner
Channel Options (Options des chaînes), puis
appuyez sur SELECT. Le menu Options des
chaînes s’affiche.
3 Répétez l’étape 2 pour verrouiller/déver
rouiller des chaînes supplémentaires.
4 Appuyez sur MENU pour terminer le
réglage et quitter le menu.
• Indiquez le code PIN si cela est demandé.
-
Pour regarder une chaîne verrouillée
Lorsque le contrôle parental est activé et
que vous sélectionnez une chaîne verrouillée, un écran vide s’affiche avec un bandeau
indiquant “Chaîne verrouillée. Appuyez sur la
touche rouge pour déverrouiller.”
1 Appuyez sur la touche ROUGE. L’écran
PIN Input s’affiche.
2 Utilisez les touches numériques pour
saisir votre code PIN.
• Si vous déverrouillez une chaîne de
cette manière, toutes les chaînes sont
déverrouillées et restent déverrouillées
jusqu’à ce que le RNT soit mis en veille
ou qu’une autre chaîne soit verrouillée.
Français
2 Appuyez sur 5/∞ pour sélectionner la
chaîne à verrouiller/déverrouiller. Appuyez
sur
2/3 pour passer à la case de verrouillage (la case présentant une icône de cadenas). Appuyez sur SELECT pour cocher/dé
cocher la case et verrouiller/déverrouiller la
chaîne.
-
25
Page 70

Gestion des chaînes07
Chapitre 7 :
Gestion des chaînes
26
Le menu Gestion des chaînes vous permet
de contrôler l’accès aux chaînes et à y ac
céder rapidement.
1 Lorsque vous regardez un programme,
appuyez sur MENU. L’écran ACCUEIL
s’affiche.
2 Appuyez sur 5/∞ pour sélectionner Chan-
nel Management (Gestion des chaînes), puis
appuyez sur SELECT. Le menu Gestion des
chaînes s’affiche.
Lorsque le menu Gestion des chaînes
s’affiche, poursuivez avec les réglages ci-
dessous.
-
Favoris
Votre RNT vous permet d’accéder à un très
grand nombre de chaînes numériques : les
Favoris vous permettent d’accéder rapide
ment à celles que vous préférez.
Pour sélectionner une chaîne parmi
les Favoris
1 Appuyez sur 5/∞ pour sélectionner
Channel Options (Options des chaînes),
puis appuyez sur SELECT. Le menu Options
des chaînes s’affiche.
2 Appuyez sur 5/∞ pour sélectionner une
chaîne. Appuyez sur
surbrillance la zone située sous l’icône du
signet (Favori) et appuyez sur SELECT pour
activer/désactiver les favoris. Une encoche
signifie que la chaîne est sélectionnée parmi
les favoris.
3 Appuyez sur RETURN pour terminer
le réglage et revenir au menu Options des
chaînes. Passez à la section Pour activer/dés
activer les favoris ci-dessous.
2/3 pour mettre en
-
-
Page 71

Gestion des chaînes
Pour activer/désactiver les favoris
1 Appuyez sur 5/∞ pour sélectionner Favou-
rites (Favoris).
2 Appuyez sur 2/3 pour commuter entre
On (activer) et Off (désactiver).
3 Appuyez sur MENU pour terminer le
réglage et quitter le menu.
• Au moins deux chaînes doivent être
sélectionnées parmi les favoris pour
pouvoir activer les favoris. Voir Pour sé
lectionner une chaîne parmi les Favoris,
ci-dessus.
• Lorsque les favoris sont activés, seules
les chaînes sélectionnées parmi les
favoris sont accessibles via les touches
P +/–. Les autres chaînes restent acces
sibles au moyen des touches numéri-
ques.
• Lorsque les favoris sont activés, la fonc
tion Saut de chaînes ne peut pas être
activée.
07
• Lorsque la fonction Saut de chaînes est
activée, les chaînes du type sélectionné
ne sont pas affichées lors de l’utilisation
des touches P +/–. Ces chaînes restent
accessibles au moyen des touches
numériques
• Lorsque la fonction Saut de chaînes est
activée, les favoris ne peuvent pas être
activés.
-
-
-
.
Français
Saut de chaînes
Vous pouvez activer la fonction de saut de
chaînes de sorte à ne pas afficher les types
de chaînes qui ne vous intéressent pas.
1 Appuyez sur
Channel Skip (Saut de chaînes).
2 Appuyez sur
les réglages.
3 Appuyez sur MENU pour définir le type
de chaînes à éviter et quitter le menu.
5/∞ pour sélectionner
2/3 pour commuter entre
27
Page 72

Gestion des chaînes07
Tri des chaînes
Vous pouvez modifier l’ordre d’affichage des
chaînes.
1 Appuyez sur 5/∞ pour sélectionner
Channel Sort (Tri des chaînes), puis ap-
puyez sur SELECT. L’écran Tri des chaînes
s’affiche.
2 Appuyez sur 5/∞/2/3 pour sélection-
ner la chaîne à déplacer. Vous pouvez passer
aux autres écrans de chaînes en mettant en
surbrillance les flèches vers le haut et vers le
bas sur l’écran, puis en appuyant à nouveau
sur 5/∞ ou sur SELECT.
3 Appuyez sur SELECT pour sélectionner
cette chaîne.
4 Appuyez à nouveau sur 5/∞/2/3 pour
déplacer la chaîne sélectionnée vers la nouvelle position de la liste.
5 Appuyez sur SELECT. La chaîne est
déplacée vers le nouvel emplacement.
6 Appuyez sur MENU pour terminer le
réglage et quitter cet écran.
28
Page 73

Gestion des chaînes
Options des chaînes
Vous pouvez entrer dans les options des
chaînes pour classer une chaîne parmi les favoris, ou verrouiller/déverrouiller une chaîne.
07
1 Appuyez sur 5/∞ pour sélectionner
Channel Options (Options des chaînes),
puis appuyez sur SELECT. Le menu Options
des chaînes s’affiche.
2 Appuyez sur 5/∞ pour sélectionner une
chaîne. Appuyez sur
zone que vous souhaitez sélectionner :
Favori (icône de signet), Verrouiller/Déverrouiller (icône de cadenas).
3 Appuyez sur SELECT pour cocher/déco-
cher. Le fait de cocher active l’option.
4 Appuyez sur MENU pour terminer le
réglage et quitter le menu.
2/3 pour passer à la
Français
29
Page 74

Autres options08
Chapitre 8 :
Autres options
Préférences de l’utilisateur
Vous pouvez personnaliser le RNT en réglage
les options du menu Préférences :
1 Lorsque vous regardez un programme,
appuyez sur MENU. L’écran MENU ACCUEIL s’affiche.
• Appuyez sur MENU ou sur EXIT pour
confirmer le réglage et quitter le menu.
• Appuyez sur RETURN pour terminer le
réglage et revenir au menu précédent.
Sous-titres
Les sous-titres sont désactiver par défaut.
Appuyez sur 2/3 pour sélectionner On/Off
(activer/désactiver).
• Les sous-titres peuvent uniquement
être affichés s’ils sont fournis par le
programme diffusé.
30
2 Appuyez sur 5/∞ pour sélectionner
User Preferences (Préférences), puis ap-
puyez sur SELECT. Le menu Préférences
s’affiche.
3 Appuyez sur 5/∞ pour sélectionner la
préférence à définir, puis suivez les instructions ci-dessous.
• Appuyez sur la touche SUBTITLE de la
télécommande pour modifier le réglage
des sous-titre.
Sortie audio numérique
Appuyez sur 2/3 pour sélectionner PCM/
Dolby.
Si vous utilisez un système audio muni d’un
décodeur Dolby Digital connecté à la prise de
sortie audio numérique optique du RNT, sé
lectionnez Dolby. Sinon, sélectionnez PCM.
• Lorsque Dolby est sélectionné et qu’un
programme est diffusé en Dolby Digital,
le son ne sort pas via la prise Péritel.
-
Page 75

Autres options
08
Durée d’affichage du bandeau
Lorsque vous changez de chaîne, un bandeau
s’affiche pendant une certaine durée, afin
d’indiquer la chaîne et de fournir des informa
tions sur le programme, ou il ne s’affiche pas,
suivant les réglages que vous effectuez ici.
Appuyez sur
ner (Pas de bandeau) ou une durée de 1 à 10
secondes.
2/3 pour sélectionner No Ban-
-
Intervalles des diaporamas
Cette option permet de définir la durée
d’affichage d’une image avant de passer à la
suivante dans un diaporama. Appuyez sur
2/3 pour modifier l’intervalle qui pourra durer
de 1 à 10 secondes.
�
Réglages de langues
Ce menu permet de définir la langue utilisée
pour différentes options.
Menu Language (Langue des menus):
Sélectionne la langue utilisée pour le texte des
menus.
Audio Language (Langue audio): Sélectionne
la langue diffusée sur les flux MPEG DVB-T.
Subtitle Language (Langue des sous-titres):
Sélectionne la langue des sous-titres.
Teletext Language (Langue télétexte): Sélec
tionne la langue du télétexte.
1 Appuyez sur 5/∞ pour sélectionner une
option de réglage de langue : Menu, Audio,
Sous-titres ou Télétexte, et appuyez sur SE
LECT
.
2 Appuyez sur 2/3 pour sélectionner une
langue et appuyez sur SELECT. La langue
sélectionnée est définie pour cette option.
3 Appuyez sur MENU pour quitter.
• Vous pouvez sélectionner une langue
pour chaque option. Ceci étant, si la
langue choisie n’est pas disponible, elle
ne s’affichera pas ou ne sera pas audible.
-
Configuration téléviseur
Le menu Configuration téléviseur permet
de sélectionner les options de la vidéo et du
téléviseur. Pour régler des préférences, allez
au menu Configuration téléviseur, comme
suit :
1 Lorsque vous regardez un programme,
appuyez sur MENU. L’écran ACCUEIL
s’affiche.
2 Appuyez sur 5/∞ pour sélectionner
Configuration, puis appuyez sur SELECT.
Le menu Configuration s’affiche.
-
3 Appuyez sur 5/∞ pour sélectionner TV
Setup (Configuration téléviseur), puis ap
puyez sur SELECT. Le menu Configuration
téléviseur s’affiche.
Français
-
31
Page 76

Autres options08
Sortie vidéo du téléviseur
Cette option définit le format du signal vidéo
pour la prise Péritel du téléviseur uniquement. Appuyez sur 2/3 pour sélectionner
RGB (RVB), Composite ou S-Vidéo.
• Consultez le manuel de votre téléviseur
pour vérifier s’il est compatible RVB ou
S-Vidéo.
4 Appuyez sur 5/∞ pour sélectionner la
préférence à définir, puis suivez les instruc
tions ci-dessous.
• Appuyez sur MENU ou sur EXIT pour
confirmer le réglage et quitter le menu.
• Appuyez sur RETURN pour terminer le
réglage et revenir au menu précédent.
Format de l’image
Appuyez sur 2/3 pour sélectionner 16:9,
4:3 Letterbox ou 4:3 Centre Cut (recadré).
Si votre RNT est connecté à un téléviseur
16:9, sélectionnez 16:9. Si votre RNT est
connecté à un téléviseur 4:3 et que vous
souhaitez visionner un programme 16:9,
vous devez sélectionner la manière dont ce
programme 16:9 s’affiche sur votre télévi
seur. Si vous sélectionnez 4:3 Letterbox,
l’image s’affiche sur toute sa largeur, mais
les zones situées au-dessus et au-dessous
de l’image sont vides. Si vous sélectionnez
4:3 Centre Cut (recadré), l’image remplit
l’écran à la verticale, mais les bords droit et
gauche ne s’affichent pas.
-
Sortie vidéo du magnétoscope
Cette option définit le format du signal
vidéo pour la prise Péritel du magnétoscope
uniquement. Appuyez sur
tionner Composite ou S-Vidéo.
• Consultez le manuel de votre magnétoscope pour vérifier s’il est compatible
S-Vidéo.
• Pour utiliser le format S-Vidéo avec
votre magnétoscope, il sera peut-être
nécessaire de modifier la configuration
du magnétoscope. Reportez-vous au
guide d’utilisation du magnétoscope
pour plus d’informations.
2/3 pour sélec-
Son
Cette option définit le format du signal audio
de la prise Péritel du magnétoscope uniquement. Appuyez sur 2/3 pour sélectionner
Mono ou Stéréo.
Volume
Cette option ajuste le volume de la sortie
sonore de la prise Péritel du téléviseur de
1 (minimum) à 10 (maximum). Appuyez sur
2/3 pour sélectionner un réglage de 1 à 10.
32
• Appuyez sur la touche WIDE de la télé-
commande pour annuler ce réglage.
Page 77

Autres options
08
Installation
Dans le menu Installation, vous pouvez configurer l’installation, rechercher de nouvelles
chaînes, effacer des chaînes devenues indis
ponibles et contrôler la puissance du signal
des différentes chaînes. Pour accéder à ces
options, allez au menu Installation :
1 Lorsque vous regardez un programme,
appuyez sur MENU. L’écran ACCUEIL
s’affiche.
2 Appuyez sur 5/∞ pour sélectionner
Configuration, puis appuyez sur SELECT.
Le menu Configuration s’affiche.
4 Appuyez sur 5/∞ pour sélectionner la
préférence à définir ou la fonction à utiliser.
Suivez ensuite les instructions ci-dessous
-
Français
• Appuyez sur MENU ou sur EXIT pour
quitter le menu.
• Appuyer sur RETURN pour revenir au
menu précédent.
Chaîne de sortie RF
Cette option sélectionne une chaîne pour
le modulateur RF. Appuyez sur 2/3 pour
sélectionner une chaîne de 21 à 69 ou Off.
3 Appuyez sur 5/∞ pour sélectionner
Installation, puis appuyez sur SELECT. Le
menu Installation s’affiche.
Alimentation de l’antenne
Si le RNT doit alimenter l’antenne, activez
cette option. Appuyez sur 2/3 pour sélectionner On ou Off.
• La sélection habituelle est Off. Cer-
taines antennes en option nécessitent
une alimentation depuis le RNT. Si vous
utilisez ce type d’antenne, sélectionnez
On. Reportez-vous au guide d’utilisation
de ce produit pour plus d’informations.
33
Page 78

Autres options08
Pays
Vous devez sélectionner le pays où le RNT est
utilisé. Appuyez sur
pays.
• Si vous modifiez le pays sélectionné, les
chaînes disponibles doivent à nouveau
être recherchées. Un message s’affiche
pour demander si vous souhaitez effectuer
à nouveau la recherche des chaînes. Ap
puyez sur
appuyez sur SELECT. Voir Intervalles des
diaporamas à la page 13.
2/3
pour sélectionner un
2/3 pour sélectionner Oui et
-
Ajouter des chaînes
Sélectionnez cette option pour ajouter des
chaînes à la liste.
La détection commence. Si de nouvelles chaînes
sont détectées, elles sont ajoutées à la liste.
Si des chaînes sont trouvées, leur nombre
s’affiche.
• Pour annuler la détection une fois lancée,
appuyez sur la touche EXIT. La détection
s’arrête et un message s’affiche pour
indiquer que la détection a été interrompue.
Vérification
Sélectionnez cette option pour verifier la
puissance du signal des différentes chaînes.
Appuyez sur
La puissance du signal s’affiche au moyen de
chiffres et de termes ; elle est actualisée toutes
les seconde. Appuyez sur MENU pour quitter.
du signal
2/3 pour sélectionner une chaîne.
Mise à jour du logiciel
Le RNT peut automatiquement télécharger
les mises à jour du logiciel via l’antenne du
téléviseur. Vous pouvez définir les options
d’actualisation du logiciel dans le menu
à jour
du logiciel. Suivez ces étapes pour ac-
céder au menu Actualisation du logiciel.
1 Lorsque vous regardez un programme,
appuyez sur MENU. L’écran ACCUEIL
s’affiche.
Mise
34
Remplacer les chaînes existantes
Sélectionnez cette option pour actualiser les
informations concernant les chaînes et ef
facer les chaînes qui ne sont plus disponibles.
La détection commence. Si de nouvelles informations concernant une chaîne sont détectées,
les informations concernant cette chaîne sont
actualisées. Si certaines chaînes ne sont sont
plus disponibles, elles sont effacées.
• Pour annuler la détection une fois lancée,
appuyez sur la touche EXIT. La détection
s’arrête et un message s’affiche pour
indiquer que la détection a été interrompue.
• Si aucune chaîne n’est trouvée, un message s’affiche pour vous demander de
contrôler la connexion de l’antenne.
-
2 Appuyez sur 5/∞ pour sélectionner
Configuration, puis appuyez sur SELECT.
Le menu Configuration s’affiche.
Page 79

Autres options
08
3 Appuyez sur 5/∞ pour sélectionner
Software Update (Mise à jour du logiciel),
puis appuyez sur SELECT. Le menu Mise à
jour du logiciel s’affiche.
4 Appuyez sur 5/∞ pour sélectionner l’une
des quatre fonctions suivantes: Auto Update
(
Mise à jour
l’heure de
(Lancer actualisation manuelle) ou Technical
Information (Information technique), puis
suivez les instructions.
• Appuyez sur MENU ou sur EXIT pour
• Appuyez sur RETURN pour revenir au
auto), Set Update Time (Définir
Mise à jour
quitter le menu.
menu précédent.
), Start Manual Update
Définir moment d’actualisation
Sélectionnez cette option pour définir le moment auquel le RNT recherche les actualisa
tions au quotidien. Appuyez sur
5/3 pour régler l’heure, puis sur 3 pour
passer aux minutes. Appuyez à nouveau
5/∞ pour régler les minutes, puis sur
sur
MENU confirmer et quitter ce menu.
�
Lancer la Mise à jour manuelle
Sélectionnez cette option pour lancer une
actualisation manuelle.
Informations techniques
La sélection de cette option affiche des
informations techniques.
Guide d’utilisation rapide
Vous pouvez visionner la présentation du
fonctionnement du RNT.
1 Lorsque vous regardez un programme, appuyez sur MENU. L’écran ACCUEIL s’affiche.
-
Français
Mise à jour auto
Appuyez sur 2/3 pour sélectionner Actualisation auto On/Off. Lorsque Actualisation
auto est activé, un contrôle des mises à
jour disponibles du logiciel et des nouvelles
chaînes est réalisé quotidiennement au mo
ment spécifié dans Définir l’heure de la Mise
à jour.
• Pour bénéficier des dernières actualisations, assurez-vous d’activer Actualisation auto.
-
2 Appuyez sur 5/∞ pour sélectionner
Configuration, puis appuyez sur SELECT.
Le menu Configuration s’affiche.
35
Page 80

Autres options08
3 Appuyez sur 5/∞ pour sélectionner Quick
User Guide (Guide d’utilisation rapide), puis
appuyez sur SELECT
Appuyez sur 3 ou 2 pour passer aux pages
précédentes/suivantes. Appuyez sur SELECT
pour passer dans le Guide d’utilisation rapide.
Appuyez à nouveau sur SELECT pour sélec
tionner les pages précédentes ou suivantes
avec les touches
Pour quitter le guide, appuyez sur MENU ou
sur EXIT.
Le Guide d’utilisation rapide est une création artistique Pioneer.
Il n’y a aucun rapport entre Pioneer et les structures/bâtiments
représentés dans les visuels.
.
-
3 et 2.
Restauration des valeurs par
défaut
Il peut s’avérer souhaitable de restaurer les
paramètres par défaut du RNT.
• La restauration des valeurs par défaut
réinitialise tous les réglages, y compris
la liste des chaînes, qui est donc vidée.
Tous les réglages que vous souhaitez
utiliser devront être redéfinis.
• Le code PIN redevient 0000.
• Toutes les captures d’écran disponible
en mémoire sont effacées.
1 Lorsque vous regardez un programme,
appuyez sur MENU. L’écran ACCUEIL
s’affiche.
2 Appuyez sur 5/∞ pour sélectionner
Configuration, puis appuyez sur SELECT.
Le menu Configuration s’affiche.
3 Appuyez sur 5/∞ pour sélectionner
Restore System Defaults (Restauration
des valeurs par défaut), puis appuyez sur
SELECT. Un message de confirmation
s’affiche.
4 Appuyez sur 2/3 pour sélectionner
Replace (Remplacer) ou Cancel (Annuler) et
appuyez sur SELECT.
Si vous sélectionnez Replace (Remplacer),
l’écran Langue des menus s’affiche. Reportez-vous à la section Première mise en
service, page 12.
36
Page 81

Codes des marques de téléviseurs
Chapitre 9 :
Codes des marques de téléviseurs
09
A.R. Systems 0556
AGB 0516
ASA 0104
AWA 0009
Acura 0009
Admiral 0163
Adyson 0216, 0217
Aiko 0264, 0217
Aiwa 0701
Akai 0361, 0548,
0037, 0480, 0602,
0371, 0208, 0072,
0433, 0556, 0009,
0163, 0218, 0516
Akib 0294
Akiba 0282, 0455,
0037, 0218, 0294
Akura 0037, 0264,
0218, 0009, 0282,
0412
Alba 0037, 0218,
0371, 0163, 0009,
0216, 0036, 0418,
0247, 0487, 0668
Allorgan 0217, 0206,
0294
Allstar 0037
Amplivision 0217,
0370
Amstrad 0037, 0371,
0433, 0218, 0412,
0516, 0009, 0264
Anam National 0650
Anglo 0264
Anitech 0009, 0037,
0264, 0282
Ansonic 0370, 0009,
0037, 0292
Arc En Ciel 0196
Arcam 0216, 0217
Aristona 0556, 0037
Asora 0009
Asuka 0217, 0218,
0264
Atlantic 0206
AudioTon 0217,
0486, 0264
Audiosonic 0337,
0486, 0370, 0009,
0037, 0109, 0217,
0218, 0264
Autovox 0206, 0217,
0247
BPL 0282, 0037
BSR 0294
BTC 0218
Baird 0193, 0190,
0208, 0343, 0072,
0073, 0217
Bang & Olufsen
0565
Basic Line 0009,
0218, 0374, 0455,
0037, 0217, 0282
Baur 0037, 0512,
0535, 0361, 0505,
0010
Bazin 0217
Beaumark 0178
Beko 0486, 0370,
0037, 0714, 0715
Beon 0037, 0418
Best 0337, 0370
Bestar 0370, 0037,
0374
Binatone 0217
Blaupunkt 0327,
0195, 0535, 0328,
0200
Blue Sky 0037, 0218,
0282, 0455, 0668,
1037
Blue Star 0282
Bondstec 0247
Boots 0217
Brandt 0196, 0287,
0198, 0109, 0335
Brinkmann 0418,
0519, 0037
Britannia 0216, 0217
Bush 0037, 0371,
0218, 0519, 0355,
0487, 0009, 0668,
0036, 0208, 0217,
0294, 0374, 1037,
0264, 0282, 0361,
0698
CCE 0037
CGE 0247, 0370,
0418
CS Electronics 0216,
0218, 0247
CTC 0247
Canton 0218
Carad 0610
Carena 0455, 0037
Carrefour 0036,
0037
Cascade 0009, 0037
Cathay 0037
Centurion 0037
Century 0247
Cimline 0009, 0218
City 0009
Clarivox 0037
Clatronic 0037,
0218, 0371, 0247,
0009, 0217, 0370
Condor 0370, 0037,
0009, 0247, 0282
Contec 0009, 0036,
0216
Continental Edison
0287, 0196, 0487,
0109, 0198
Cosmel 0037, 0337
Crosley 0247
Crown 0009, 0370,
0037, 0486, 0418,
0208
Curtis Mathes 0093,
0166
Cybertron 0218
DER 0193, 0190
Daewoo 0037, 0009,
0374, 0499, 0217,
0218
Dainichi 0216, 0218
Dansai 0037, 0036,
0216
Dantax 0486
Dayton 0009
Daytron 0374
De Graaf 0208, 0548
Decca 0516, 0072,
0037, 0217
Denko 0264
Denver 0037
Desmet 0037, 0009
Diamant 0037
Digatron 0037
Dixi 0009, 0037
Dual 0519, 0217,
0259, 0037
Dual Tec 0217
Dumont 0070
Elbe 0292, 0259,
0217, 0516
Elekta 0264
Elin 0548, 0009,
0037, 0104, 0361
Elite 0218
Elta 0009
Emco 0247
Emerson 0178,
0037, 0282, 0361,
0070, 0247, 0371
Emperor 0282
Erres 0012, 0037
Euroman 0037, 0264
Europa 0037
Europhon 0516,
0217
Expert 0206
Exquisit 0037
Fenner 0009, 0374
Français
37
Page 82

Codes des marques de téléviseurs09
38
Ferguson 0193,
0073, 0190, 0335,
0109, 0287, 0560,
0037, 0343, 0625
Fidelity 0216, 0193,
0264, 0361, 0371,
0163, 0412, 0512
Filsai 0217
Finlandia 0346,
0548, 0072, 0163,
0208
Finlux 0104, 0346,
0217, 0072, 0037,
0516, 0070
Firstline 0037, 0009,
0072, 0217, 0216,
0247, 0294, 0374,
0668
Finlandia 0346,
0548, 0072, 0163,
0208
Flint 0455, 0037,
0072, 0218, 0264,
0610
Forgestone 0193
Formenti 0216, 0037
Fraba 0037, 0370
Friac 0370, 0499,
0009
Frontech 0217,
0163, 0247, 0009,
0264
Fujitsu 0206, 0072,
0217
Funai 0294, 0264
GBC 0009, 0218,
0374
GE 0560
GEC 0217, 0516,
0072, 0163, 0361,
0037
GPM 0218
Galaxi 0037
Galaxis 0037, 0370
Geloso 0009, 0374
General Technic
0009
Genexxa 0218, 0009,
0163
GoldStar 0037,
0247, 0217, 0290,
0178, 0216, 0109,
0163, 0361
Goldline 0337
Gooding 0487
Goodmans 0037,
0499, 0371, 0009,
0072, 0036, 0218,
0343, 0480, 0217,
0374, 0487, 0560,
0264, 0335, 0516,
0634
Gorenje 0370
Gradiente 0053,
0170
Graetz 0361, 0163
Granada 0516, 0037,
0072, 0208, 0108,
0217, 0226, 0473
Grandin 0455, 0037,
0282, 0610, 0009,
0163, 0374
Grundig 0070, 0535,
0195, 0487, 0037,
0009, 0556, 0587
HCM 0009, 0264,
0412, 0037, 0217,
0218, 0282, 0418
Halifax 0217
Hampton 0216, 0217
Hanimex 0294
Hanseatic 0009,
0037, 0519, 0282,
0361, 0217, 0556
Hantarex 0037, 0516
Hantor 0037
Harwood 0009,
0037, 0412
Havermy 0093
Hema 0217, 0009
Hifivox 0196, 0198
Hikona 0218
Hinari 0009, 0218,
0036, 0037, 0487,
0355
Hisawa 0455, 0282,
0610, 0218
Hitachi 0225, 0163,
0194, 0217, 0578,
0196, 0109, 0499,
0072, 0036, 0198,
0473, 0516, 0548,
0730, 0037
Hornyphone 0037
Huanyu 0216, 0374
Hyper 0216, 0009,
0247, 0217
Hypersonic 0361
Hypson 0037, 0264,
0282, 0455
ICE 0218, 0371,
0216, 0264, 0217,
0556
ICeS 0216, 0218
IR 0037, 0163, 0361,
0217, 0516, 0195,
0206, 0247, 0327,
0010, 0011, 0036,
0070, 0072, 0190,
0193, 0194, 0512,
0012, 0073, 0093,
0101, 0104, 0108,
0109, 0196, 0216,
0225, 0226, 0287,
0290, 0291, 0292,
0294, 0343, 0370,
0374, 0505, 0535,
0556
ITS 0264, 0216, 0371
ITT 0548, 0361,
0163, 0480, 0473,
0208, 0346, 0610
ITV 0037, 0264
Iberia 0037
Imperial 0247, 0418,
0370
Indiana 0037
Ingelen 0163
Ingersol 0009
Inno Hit 0072, 0217,
0290, 0516, 0009
Interbuy 0037, 0264
Interfunk 0361,
0037, 0163, 0012,
0512, 0327, 0247
Internal 0037
Intervision 0037,
0455, 0264, 0282,
0218, 0247, 0486,
0217, 0487, 0519
Irradio 0247, 0218,
0290, 0371
Isukai 0037, 0218,
0282, 0455
JVC 0053, 0094,
0371, 0190, 0036,
0193, 0218, 0606,
0653, 0418
KB Aristocrat 0163
KTV 0217
Kaisui 0218, 0282,
0037, 0216, 0455,
0217, 0009
Kamp 0216
Kapsch 0206, 0361,
0163, 0104
Karcher 0610, 0282
Kasui 0282
Kathrein 0556
Kendo 0610, 0037,
0247
Kennedy 0206
Kingsley 0216
Kneissel 0037, 0259,
0292, 0610, 0374
Kolster 0037
Konka 0371, 0218
Korpel 0037
Kosmos 0037
Koyoda 0009
Kyoshu 0412
Kyoto 0163
LG 0714, 0037
LaSAT 0486
Lenco 0104
Leyco 0072, 0037,
0264, 0294
Liesenk & Tter 0037
Liesenkotter 0037,
0327
Lifetec 0037, 0519,
0218, 0374
Loewe 0512, 0037,
0292
Logik 0011, 0193
Luma 0206, 0259
Lumatron 0217
Page 83

Codes des marques de téléviseurs
09
Luxor 0194, 0361,
0548, 0290, 0163,
0208
M Electronic 0346,
0374, 0104, 0009,
0037, 0217, 0109,
0216, 0287, 0163,
0247, 0480, 0512
MTC 0370, 0512
Magnadyne 0516,
0247
Magnafon 0216,
0516, 0073
Magnavox 0036
Magnum 0037, 0648
Manesth 0037, 0217,
0264, 0294
Marantz 0037, 0556
Mark 0037
Matsui 0487, 0009,
0037, 0011, 0355,
0217, 0371, 0208,
0195, 0036, 0335,
0433, 0516, 0294,
0072, 0163, 0455
Matsushita 0250,
0650
Mediator 0012, 0037
Medion 0037, 0668
Megas 0610
Megatron 0178
Memorex 0178,
0009, 0250, 1037
Memphis 0337
Metz 0367, 0447,
0535, 0037
Minerva 0535, 0070,
0487
Minoka 0412
Mitsubishi 0036,
0512, 0108, 0535,
0178, 0037
Mivar 0292, 0291,
0216, 0290, 0516
Monaco 0009
Motorola 0093
Multibroadcast
0193
Multitech 0486,
0009, 0216, 0217,
0247
Murphy 0072, 0163,
0216
Myryad 0556
NAD 0178, 0361
NEC 0170
NEI 0037, 0337, 0371
Naiko 0606
Nakimura 0037,
0374
Nakio 0480
Neckermann 0037,
0505, 0370, 0556,
0247, 0327, 0418
Nesco 0247
Network 0337
Neufunk 0037, 0556
New Tech 0217,
0343
Nikkai 0037, 0218,
0337, 0217, 0009,
0036, 0072, 0216,
0264
Nobliko 0070, 0216
Nogamatic 0196
Nokia 0361, 0548,
0163, 0480, 0473,
0208, 0346, 0374,
0606, 0610
Nordmende 0109,
0196, 0343, 0198,
0560, 0195, 0287
Novak 0012
Novatronic 0037
Oceanic 0163, 0361,
0208, 0548
Okano 0037, 0370,
0009, 0264
Omega 0264
Onwa 0433, 0371,
0218
Optimus 0650
Orion 0294, 0037,
0355, 0516, 0655
Orline 0037, 0218
Orsowe 0516
Osaki 0072, 0412,
0037, 0217, 0264,
0218, 0355, 0374
Osio 0037
Oso 0218
Osume 0072, 0036,
0037, 0218
Otto Versand 0037,
0505, 0109, 0294,
0535, 0512, 0093,
0226, 0010, 0556,
0343, 0247, 0217,
0036, 0361
Pael 0216
Palladium 0370,
0418
Panama 0264, 0217,
0247
Panasonic 0226,
0250, 0650, 0548,
0367, 0516, 0037,
0163, 0361
Panavision 0037
Pathe Cinema 0216,
0163
Pathe Marconi 0196,
0198
Pausa 0009
Perdio 0037, 0163
Philco 0247, 0418,
0370, 0037
Philips 0037, 0012,
0556, 0193, 0343,
0374
Phoenix 0216, 0486
Phonola 0037, 0012,
0193, 0216
Pioneer 0109, 0037,
0166, 0486, 0287,
0361, 0163
Plantron 0009
Playsonic 0217
Portland 0374
Prandoni-Prince
0516, 0361
Precision 0217
Prima 0264
Prinz 0194
Profex 0009, 0163,
0361
Profi 0009
Profitronic 0037
Proline 0072
Prosonic 0037
Protech 0037, 0337,
0418, 0009, 0668,
0217, 0247, 0264
Proton 0178
Pye 0037, 0012,
0556
Quasar 0250, 0247
Quelle 0037, 0535,
0070, 0512, 0010,
0011, 0104, 0200,
0327, 0361, 0328,
0505
Questa 0036
R-Line 0037
RBM 0070
RFT 0072
Radialva 0037, 0218,
0337
RadioShack 0037,
0178
Radiola 0037, 0012,
0217
Radiomarelli 0516,
0247, 0037
Radiotone 0037,
0009, 0264
Rank Arena 0036
Realistic 0178
Recor 0037
Rediffusion 0361,
0548
Redstar 0037
Reflex 0037
Reoc 0714
Revox 0037
Rex 0206, 0259,
0163, 0264
Roadstar 0009,
0264, 0037, 0218,
0418
Rowa 0698, 0712
Royal Lux 0412
SBR 0012, 0037,
0193
SEG 0037, 0217,
0009, 0264, 0668,
0036
SEI 0010, 0516,
0206, 0294
SEI-Sinudyne 0037
Français
39
Page 84

Codes des marques de téléviseurs09
40
Saba 0109, 0196,
0163, 0343, 0361,
0548, 0335, 0198,
0287, 0625, 0516,
0560
Sagem 0610, 0455
Saisho 0516, 0011,
0217, 0009, 0264
Salora 0361, 0548,
0194, 0516, 0290,
0163
Sambers 0516
Samsung 0009,
0217, 0556, 0072,
0290, 0370, 0264,
0519, 0037, 0208,
0216, 0587, 0618,
0644
Sandra 0217, 0216
Sansui 0655, 0037
Sanyo 0208, 0036,
0217, 0370, 0011,
0072, 0216, 0104,
0108
Schaub Lorenz 0361
Schneider 0037,
0012, 0519, 0247,
0218, 0259, 0371,
0217, 0361, 0556,
0668, 1137
Scotland 0163
Seleco 0206, 0259,
0163
Sencora 0009
Sentra 0218
Serino 0610, 0216,
0455
Sharp 0093, 0036,
1193, 0294, 0516
Shintoshi 0037
Shorai 0294
Siarem 0516
Siemens 0327, 0195,
0535, 0200, 0037,
0328
Silva 0216
Silver 0036, 0361
Sinudyne 0010,
0516, 0294, 0206
Solavox 0361, 0548,
0072, 0163
Sonitron 0370, 0208
Sonoko 0037, 0009,
0282
Sonolor 0163, 0208,
0361
Sontec 0037, 0009,
0294, 0370
Sony 0011, 0010,
0036, 0505, 1505,
0651, 1651
Sound & Vision
0374
Soundesign 0178
Soundwave 0418,
0037
Ssangyong 0009
Standard 0009,
0037, 0217, 0218,
0374
Stenway 0218, 0282
Stern 0206, 0259,
0163, 0264
Strato 0037, 0264
Stylandia 0217
Sunkai 0610, 0294,
0355, 0455
Sunstar 0037, 0009,
0371
Sunwood 0037
SuperTech 0009,
0037, 0216
Superla 0516
Supra 0009
Susumu 0218
Sysline 0037
Sytong 0216
T + A 0447
TMK 0178
TVTEXT 95 0556
Tandberg 0367
Tandy 0163, 0218,
0072, 0217, 0093
Tashiko 0217, 0036,
0163, 0216
Tatung 0516, 0072,
0037, 0217, 0011
Teac 1037, 0712,
0009, 0412, 0455,
0037, 0264, 0282,
0418, 0668, 0698
Tec 0217, 0259,
0247, 0337, 0009
Technics 0250, 0650
Teleavia 0196, 0343
Telefunken 0101,
0109, 0343, 0335,
0073, 0625, 0037,
0196, 0486
Telegazi 0037
Telemeister 0037
Telesonic 0037
Telestar 0037
Teletech 0037, 0009,
0337
Teleton 0206, 0036,
0217, 0259
Televideon 0216
Temco 0294
Tennessee 0037
Tensai 0371, 0374,
0037, 0009, 0217,
0104, 0294, 0218,
0247
Texet 0216, 0009,
0218, 0374
Thomson 0109,
0196, 0287, 0343,
0335, 0198, 0625,
0037, 0560
Thorn 0193, 0190,
0073, 0037, 0499,
0535, 0104, 0335,
0072, 0343, 0361,
0374, 0505, 0512
Thorn-Ferguson
0343
Tokai 0163, 0037,
0337, 0009
Tomashi 0282
Toshiba 0036, 0070,
0109, 0508, 0618,
0718
Trans Continens
0217
Transonic 0698,
0712
Trident 0516
Tristar 0193, 0218
Triumph 0346, 0516,
0556
Tsoschi 0282
Uher 0206, 0486,
0037, 0374, 0418
Ultravox 0037, 0216,
0247
Unic Line 0037, 0473
United 0037
Universum 0037,
0104, 0327, 0070,
0535, 0361, 0346,
0512, 0011, 0217,
0247, 0036, 0480,
0010, 0264, 0505,
0009, 0290, 0370,
0418, 0170, 0294,
0337
Univox 0037, 0163,
0337
Vestel 0037, 0217
Videologic 0218,
0216
Videosat 0247
Videotechnic 0217
Vision 0217
Vistar 0206
Voxson 0163, 0418
Waltham 0037,
0418, 0109, 0217
Wards 0178
Watson 0037, 0009,
0218, 0519
Watt Radio 0216
Wega 0036, 0037
Wegavox 0009
White Westinghouse
0216, 0037, 0337
Windstar 0282
Xrypton 0037
Yamishi 0455, 0217,
0282
Yapshe 0250
Yokan 0037
Yoko 0217, 0264,
0009, 0037, 0218
Zanussi 0206, 0217
Page 85

Problèmes et solutions
Chapitre 10 :
Problèmes et solutions
10
Si vous rencontrez des problèmes au niveau de l’utilisation du RNT, contrôlez les points
suivants afin de déterminer si le problème peut être résolu. Il peut arriver que le problème
provienne d’un autre appareil : assurez-vous également d’inspecter vos autres équipements.
Problème
Pas de son, pas d’image.
Seul le menu Configura
tion s’affiche. Impossible
d’accéder aux fonctions et
aux menus.
-
Cause possible
• Le RNT n’est pas branché sur
le secteur.
• Le RNT est en veille.
• La télévision hertzienne est
diffusée via la connexion à
l’antenne VHF/UHF du télévi
seur.
• Le câble Péritel est connecté
aux mauvaises prises.
• Les connexions sont bonnes
mais le téléviseur n’est pas con
necté à une source AV externe
(AV1 ou EXT 1, etc.).
• Les câbles de connexion sont
peut-être défectueux (rouillés,
cassés ou endommagés) ou
absents.
• Aucune liste de télécharge
ments de services (numériques)
n’est stockée dans la mémoire
du RNT.
Solutions
• Vérifiez la connexion à
l’alimentation secteur.
• Appuyez sur l’une des touch
es numériques ou sur la touche
VEILLE
afin de mettre le RNT en ser
vice.
• Appuyez sur la touche TV/
DTV de la télécommande.
-
• Vérifiez les connexions Péritel.
• Vérifiez la configuration du
-
téléviseur.
• Vérifiez toutes les connexions.
-
• Vérifiez la connexion de
l’antenne. Sélectionnez Add
New Channels (Ajouter des
chaînes) dans le menu Installa
tion et recherchez les chaînes
diffusées.
Si aucune chaîne n’a été ajoutée, les autres écrans de menus
ne s’affichent pas.
de la télécommande,
-
Français
-
-
41
Page 86

Problèmes et solutions10
Problème
Seul le menu ACCUEIL,
ses sous-menus et la barre
d’informations sont disponibles. Impossible de
sélectionner un service.
Réception intermittente,
image “bloquée” ou effet
mosaïque.
La télécommande ne fonc
tionne pas correctement.
Cause possible
• Le RNT n’est pas correctement configuré pour l’antenne.
• L’antenne ne reçoit pas le
signal.
• Le signal reçu est trop faible.
• Le signal reçu est trop puis
sant.
• L’antenne est endommagée.
• Les câbles sont défectueux
(connecteurs et/ou fils rouillés,
cassés ou endommagés).
• Une antenne mal position
née ou instable provoque une
mauvaise qualité de signal.
• La télécommande ne contient
-
pas de piles ou les piles sont
usées.
Solutions
• Vérifiez si la réception des
chaînes analogiques est cor
recte, puis vérifiez la connexion
de l’antenne (antenne sur le
RNT et connexion de l’entrée
antenne du téléviseur sur sortie
l’entrée téléiseur du RNT).
Reportez-vous à la section
Contrôle du signal, à la page 34.
• Vérifiez l’installation et le
positionnement de l’antenne.
•
Vérifiez l’installation et le
positionnement de l’antenne, ou
installez une antenne plus grande.
De manière générale, cet ef
fet peut être entraîné par de
mauvaises conditions atmo
sphériques.
• Installez un atténuateur au
niveau de l’entrée VHF/UHF du
récepteur.
• Remplacez l’antenne.
• Vérifiez toutes les connexions
et tous les câbles.
• Repositionnez l’antenne et
fixez-la bien en place.
• Vérifiez les piles et changezles si nécessaire.
-
-
-
42
Si le problème persiste, veuillez contacter votre revendeur ou votre service après-vente Pioneer.
Page 87

Spécifications
Chapitre 11 :
Spécifications
11
Capacités du système
Réception MPEG-2 conforme DVB de diffu
sions jusqu’à MP@ML
Décodage vidéo
• Réception MPEG-2 conforme DVB de diffu
sions jusqu’à MP@ML
• Débit vidéo : jusqu’à 15 Mbps
• Format vidéo : 4:3 et 16:9
• Résolution : jusqu’à 720 x 576 pixels
Décodage audio
MPEG couches I/II (sauf gestion multicanaux
depuis un train de bits)
Fonctionnement/Fonctionnalités
• Chargement automatique des programmes
via balayage à l’installation
• Réception des chaînes en clair
• Sous-titres DVB
• Contrôle parental des programmes avec code
PIN
• Télécommande complète
• Utilisation via les menus présentés à l’écran
• Installation via les menus présentés à l’écran
• 10 programmations possibles
• Capture d’images vidéo fixes
• Télécommande téléviseur toutes marques
• Alimentation 5 V pour antenne intérieure ac
tive ; 100 mA maxi
Réception-Démodulation
Démodulation conforme ETSI EN 300 744
(COFDM)
• Compatibilité FFT 2k et 8k, sur bande pas
sante 7 MHz et 8 MHz.
• Compatibilité réseaux MFN et SFN.
• Compatibilité avec tous les modes non
hiérarchiques.
-
-
-
Connexions
• Connecteur d’entrée RF (pour antenne) : IEC
femelle 169-25
Plage de fréquences du tuner : Bande VHF
III (170 à 230 MHz) et Bande UHF IV, V (470
à 862 MHz)
• Connecteur de sortie RF (vers téléviseur) : IEC
mâle 169-2
Plage de fréquences en boucle : 47-862
MHz (VHF, UHF C. 21 à 69)
Modulateur RF : Standard PAL I, G, K, L
Chaîne : c. UHF 21 à 69. sélectionnable
(Défaut : c. 43)
• Péritel téléviseur
Sortie : CVBS, contrôle audio G/D, RVB,
S-VIDEO
• Péritel magnétoscope
Entrée : CVBS, audio G/D, S-VIDEO, RVB
Sortie : CVBS, audio G/D, S-VIDEO
• Sortie audio numérique optique
Accessoires
• Télécommande
• Câble d’antenne/RF
• Câble Péritel
• Manuel d’instructions
• Carte de garantie
• Batteries : 2 x 1,5 V type AA/R06/UM-3
• Câble secteur
Divers
• Température d’utilisation : +5 °C à 40 °C
• Secteur : 220–240 V, 50 Hz
-
• Consommation électrique : 10 W max
• Consommation en mode veille : 4 W maxi
• Poids : 1,1 kg
• Dimensions : 260 (W) x 50 (H) x 190 (D) mm
Français
Les spécifications et les caractéristiques sont sujettes à modifications sans préavis à des fins
d’amélioration.
43
Page 88

44
Page 89

45
Page 90

PRECAUZIONI D’USO
ATTENZIONE
PERICOLO DI SCOSSE ELETTRICHE
NON APRIRE
PRECAUZIONI D’USO
Vi ringraziamo per aver acquistato questo prodotto
Pioneer. Per il corretto utilizzo del prodotto raccoman
diamo di leggere attentamente le istruzioni per l’uso
contenute nel presente manuale. Una volta terminata
la lettura del manuale è opportuno conservarlo in un
AVVERTENZA: Questo appareccchio non e’ im-
-
permeabile. Non sistemare vicino ad esso nessun
oggetto contenente acqua, come vasi, contenitori
di prodotti di bellezza o flaconi di medicinali.
luogo sicuro per un utilizzo futuro.
Il simbolo del lampo con terminale a forma
di freccia situato all’interno di un triangolo
equilatero serve ad avvisare l’utilizzatore
della presenza di una “tensione pericolosa”
non isolata nella struttura del prodotto che
potrebbe essere di un’intensità tale da
provocare scosse elettriche all’utilizzatore.
ATTENZIONE:
PER EVITARE IL RISCHIO DI SCOSSE
ELETTRICHE, NON RIMUOVERE IL
COPERCHIO (O IL RETRO). NON CI SONO
PARTI INTERNE LA CUI MANUTENZIONE
POSSA ESSERE EFFETTUATA
DALL’UTENTE. IN CASO DI NECESSITÀ,
RIVOLGERSI ESCLUSIVAMENTE A
PERSONALE DI SERVIZIO QUALIFICATO.
AVVERTENZA: Non sistemate nessun oggetto con
fiamma viva, come candele accese, vicino
all’apparecchio. Se un tale oggetto dovesse cadere
accidentalmente sull’apparecchio, il fuoco potrebbe
espandersi sull’apparecchio con pericolo d’incendio.
D3-4-2-1-7a_It
AVVERTENZA:
PRIMA DI COLLEGARE L’UNITÀ PER LA PRIMA
VOLTA, LEGGERE LA SEZIONE SEGUENTE CON
ATTENZIONE.
Il voltaggio per l’alimentazione è diverso a secondo
dei paesi e delle regioni, quindi assicuratevi che
Il punto esclamativo in un triangolo
equilatero serve ad avvisare l’utilizzatore
della presenza di importanti istruzioni di
funzionamento e manutenzione riportate nel
libretto allegato al prodotto.
D3-4-2-1-1_It
l’alimentazione elettrica del posto dove l’unità sarà
AVVERTENZA: Feritoie ed aperture nella struttura sono previste solo per la ventilazione e, in
modo da assicurare il buon funzionamento del
prodotto, proteggerlo dal surriscaldamento, dai
rischi d’incendio, le aperture non devono mai es
sere ostruite o ricoperte da oggetti come giornali,
tovaglie, tende, ecc… Inoltre, non posizionare
l’apparecchio su tappetti spessi, letti, divani o
mobili aventi una spessa imbottitura.
D3-4-2-1-7b_It
utilizzata possiede il voltaggio richiesto (E.G., 230 V
o 120 V) indicato sul pannello anteriore.
Il telecomando è dotato solamente di un tasto
‘STANDBY/ON’ e pertanto non è in grado di effettuare
-
lo spegnimento del dispositivo interrompendo del tutto
l’alimentazione. Si raccomanda pertanto di collegare il
dispositivo in modo tale che la spina possa essere scollegata rapidamente dalla presa di alimentazione in caso
di incidente. La spina del CAVO DI ALIMENTAZIONE
D3-4-2-1-4_It
del dispositivo deve essere staccata dalla presa a muro
Condizioni ambientali di funzionamento
anche in caso di lungo periodo di inutilizzo del prodotto.
Umidità e temperatura di funzionamento:
5 ºC – +40 ºC (+41 ºF – +104 ºF); inferiore a 80 %RH
(feritoie di raffreddamento non ostruite)
Non posizionare nei seguenti luoghi:
• Luoghi esposti alla luce diretta del sole o a forti
sorgenti di luce artificiale
• Luoghi esposti a condizioni di alta umidità o scarsa
2
ventilazione
D3-4-2-1-7c_It
Questo prodotto è conforme al Decreto Legge del
1 Agosto 2003, nr. 259 in attuazione alla Direttiva
2002/21/EC del Parlamento europeo e del Consiglio
relativa all’impiego di norme per l’emissione di segnali
televisivi.
Page 91

Indice dei Contenuti
Indice dei Contenuti
01 Introduzione ......................4
Accessori acclusi nella confezione ......... 4
Vista frontale .........................................
Vista posteriore ......................................
Telecomando ..........................................
Inserimento delle batterie nel telecoman-
do ........................................................ 7
Impostazione dei codici TV ..................... 7
Manutenzione e precauzioni d’uso del
telecomando ....................................... 8
Portata d’uso del telecomando ............... 8
02 Schema Collegamenti ........9
Televisore e Videoregistratore con prese
SCART sockets ...................................
Televisori e videoregistratori dotati sola
mente di ingressi per antenna del tipo
coassiale standard ............................. 10
Connessione del ricevitore ad un disposi-
tivo audio digitale .............................. 11
-
03 Prima accensione del ricevi-
tore time ......................12
04 Funzioni di base ...............
Accensione/Spegnimento ..................... 14
Selezione dei canali .............................. 14
Selezione Modalità TV/DTV .................. 15
Utilizzo del banner informativo ............. 15
Utilizzo del Teletext ...............................
14
16
06 Utilizzo della funzione di
Blocco Parentale (Paren-
5
5
6
tal Lock) .......................23
Impostazione del PIN ............................ 23
Attivazione/Disattivazione della funzione
del Blocco Parentale .......................... 24
Blocco/Sblocco canali ........................... 25
Selezione e visione dei programmi bloc-
cati ..................................................... 25
07 Gestione canali ................ 26
Preferiti ................................................. 26
Salto Canale .......................................... 27
Ordinamento Canali .............................. 28
9
Opzioni Canale ...................................... 29
08 Altre opzioni .................... 30
Preferenze dell’Utente .......................... 30
Setup TV ............................................... 31
Installazione .......................................... 33
Aggiornamento del Software DTR ........ 34
Guida Rapida all’Uso ............................. 35
Ripristino Impostazioni di Default ......... 36
09 Codice marca TV .............37
10 Risoluzione Problemi ....... 41
11 Specifiche Tecniche .........
Italiano
43
05 Funzioni avanzate ............ 17
Utilizzo della videoguida ai programmi
guide ................................................. 17
Utilizzo del timer ................................... 19
Fermo immagine .................................. 20
Cattura di immagini istantanee ............. 21
Visualizzazione delle immagini catturate
.. 21
3
Page 92

Introduzione01
1
TV/DTV
RETURN
GUIDE
2
3
4
5
6
7
MENU
INFO
TEXT WIDE
SUBTITLE
AV
TV
EXIT
SELECT
8
9
0
Capitolo 1:
Introduzione
Accessori acclusi nella confezione
& Telecomando
�
& Cavi antenna/RF
Consente di collegare il Ricevitore Digitale Terrestre allo schermo o alla TV. (Fare
riferimento alle illustrazioni delle pagine
seguenti).
& Cavo SCART
4
& Due batterie AA/R06
Consente di collegare la presa SCART del
Ricevitore DTR alla corrispondente presa
SCART del Televisore. (Normalmente le
prese SCART per TV sono identificate dalla
sigla EXT o AV).
& Cavo di alimentazione
& Manuale d’istruzioni
Costituito dal presente documento.
Fornito separatamente. Collegare il cavo alla
fonte di alimentazione.
& Scheda di garanzia
All’interno del manuale il Ricevitore Digitale Terrestre verrà sempre chiamato nella sua forma
abbreviata, DTR.
Page 93

Introduzione
1
2
VCR TV
OPTICAL
AERIAL
TV
1
2
3
4
5
6
Vista frontale
01
*
Italiano
1 LED (Standby/Acceso)
La spia mostra lo stato del DTR; Rosso =
Standby, Verde = Acceso. Durante la trasmis-
2 Sensore a infrarossi
Riceve il segnale proveniente dal teleco-
mando.
sione di un programma impostato con il timer
il LED diventa di color arancio e lampeggia
ogniqualvolta viene utilizzato il telecomando.
* Prodotto su licenza dei Dolby Laboratories.
“Dolby” e il simbolo della doppia D sono marchi dei Dolby Laboratories.
Vista posteriore
1 Connettore alimentazione principale
2 Connettore SCART1 per videoregistra-
tore
3 Connettore SCART1 per TV
4
Connettore per uscite audio digitali ottiche
5 Uscita per antenna TV VHF2 e UHF
6 Ingresso per antenna VHF2 e UHF
1. SCART: Euroconnettore
2. VHF: Very High Frequency
3. UHF: Ultra High Frequency
3
3
5
Page 94

Introduzione01
1
TV/DTV
RETURN
GUIDE
2
3
4
5
6
7
MENU
INFO
TEXT WIDE
SUBTITLE
AV
TV
EXIT
SELECT
8
9
0
!
~
=
-
@
2
3
5
6
7
8
1
9
0
4
A
Telecomando
1 Tasto STANDBY (Pag. 14)
Premere questo tasto per commutare il Ricevitore DTR tra le modalità standby/acceso.
2 Tasti numerici 0-9 (Pagg. 14, 16)
• Premere uno di questi tasti per effettare
la selezione diretta di un canale.
•
Questi tasti sono utilizzati anche per il
controllo delle funzioni in Modalità Teletext.
3 Tasto commutazione TV/DTV (Pag.
15)
Premere questo tasto per commutare tra le
trasmissioni digitali e le normali trasmissioni
analogiche.
• Questo tasto funziona solamente se il
Ricevitore DTR e la TV sono collegati
mediante una presa SCART.
• Anche se collegate mediante presa
SCART, alcuni tipi di TV analogiche non
possono essere selezionate.
4 Tasti P (Programma) +, - (Pag. 14)
Premere questi tasti per selezionare un canale.
5 Tasto GUIDE (GUIDA)(Pag.17)
Premere questo tasto per visualizzare la
Guida Elettronica ai Programmi (Electronic
Programme Guide - EPG).
6 Tasti 5, ∞, 2, 3
5/∞/2/3: Used for menu selections, Text
Mode operations and when the channel list
is displayed for programme selections.
2: Utilizzato per catturare immagini istantanee del video.
3: Press to turn alert on and off.
Tasto SELECT (SELEZIONA) (Pag.14)
• Utilizzato per mostrare la lista dei canali
durante la visione di un dato programma.
• Utilizzato per selezionare un programma
mentre viene visualizzata la lista canali.
• Utilizzato per selezionare le varie voci
dei menù quando viene visualizzata una
delle schermate del menù.
7 Tasto INFO (INFORMAZIONI) (Pag.15)
Premere questo tasto per visualizzare il Ban
-
ner Informativo.
6
8 Tasto TEXT (TESTO) (Pag.16)
Premere questo tasto per selezionare la
modalità Teletext.
Page 95

Introduzione
Per aggiungere o sostituire le batterie é necessario far
scorrere il coperchio protettivo dell' alloggiamento
delle batterie, sulla posteriore del telecomando,
premendolo verso il basso e facendolo scorrere pre
aprire il coperchio
Inserire 2
batterie nuove
9 Tasti ROSSO, VERDE, GIALLO, BLU
Utilizzati per selezionre le varie funzioni nella modalità Teletext e per compiere operazioni a video.
0 Fare riferimento ai codici delle Im-
postazioni TV a destra dello schermo.
Il telecomando è in grado di controllare tutte
le TV prodotte dalle maggiori aziende. Al
momento della spedizione, il telecomando è
configurato per controllare i televisori Pioneer.
-
Tasto SUBTITLE (SOTTOTITOLI) (Pag.
30)
Premere questo tasto per visualizzare i sottotitoli.
=
Tasto WIDE (SCHERMO LARGO) (Pag.
32)
Premere questo tasto per commutare tra le
varie modalità di visualizzazione a schermo largo.
~ Tasto EXIT (ESCI)
Premere questo tasto per eliminare le scritte
presenti sullo schermo.
! Pulsante MENU
Premere questo tasto per visualizzare le
schermate del menù.
@ Tasto RETURN (INDIETRO) (Pag.15)
• Premere questo tasto per tornare
all’ultimo canale visualizzato.
• Premere questo tasto per tornare alla
schermata menù precedente.
Impostazione dei codici TV
Inserendo uno dei codici marchio TV, indicati
nella lista allegata, il telecomando è in grado
di controllare 5 diverse funzioni.
• Accensione/spegnimento/standby TV
• Incremento/decremento volume TV
• Selezione canale TV inferiore/superiore
Comando disattivazione audio (Mute) on/off
•
• Commutazione tra input TV/AV
1 Tenere premuto il tasto di STANDBY
della TV (Indicato dalla lettera A
nell’illustrazione) e inserire il codice marchio
TV composto di 4 cifre. (Fare riferimento al
Capitolo 9, “Codice Marchio TV”, Pag. 37).
2 Premendo nuovamente il tasto STAND-
della TV (Identificato dalla lettera A
BY
nell’illustrazione) è possibile accendere/speg
nere la TV.
3 Se la TV non dovesse funzionare è
necessario ripetere la procedura illustrata nel
Punto 1 o inserire un codice differente per la
stessa marca di Televisore.
01
Italiano
-
Inserimento delle batterie nel
telecomando
• Il telecomando del DTR potrebbe non
essere utilizzabile con alcuni modelli o
marchi di televisori.
•
Se necessario, la configurazione del
telecomando può essere riportata alle
impostazioni di default, definite in fabbrica.
Per effettuare il reset è sufficiente inserire
il codice 9999 mentre si tiene premuto il
tasto di STANDBY
Lo smaltimento delle batterie scariche deve essere
effettuato in con le normative governative o con le
leggi in materia di tutela ambientale in vigore nel
paese/area geographica in cui risiede l’utente.
della TV.
D3-4-2-3-1_It
7
Page 96

Introduzione01
7
m
Manutenzione e precauzioni
d’uso del telecomando
• Evitare urti e cadute al telecomando.
• Evitare che il telecomando venga a
contatto con l’acqua.
• Non utilizzare o conservare il telecoman
do nei seguenti luoghi:
Luoghi a contatto diretto coi raggi solari
In Prossimità di oggetti roventi
In luoghi con un elevato tasso di umidità
• Non utilizzare set composti da batterie
nuove e usate. Utilizzare solamente batterie nuove.
• Non utilizzare batterie di marchi diversi
nello stesso set sostituito. Le batterie di
marchi differenti possono avere voltaggi
operativi differenti, anche quando le di
mensioni tra i vari marchi sono le stesse.
• In caso di lunghi periodi di inutilizzo del
telecomando (oltre un mese), è oppor
tuno rimuovere le batterie per evitare
che il fluido in esse contenuto fuoriesca
all’interno dell’alloggiamento delle bat
terie del telecomando. Se si verifica un
perdita di fluido della batteria all’interno
del telecomando è necessario gettare
via le batterie vecchie, rimuovere il
liquido dall’alloggiamento e inserire il
nuovo set di batterie.
• Le batterie Pioneer fornite in dotazione
con il telecomando non contengono
metalli pesanti, come il mercurio, il nick
el o il cadmio. Tuttavia, in molti paesi è
vietato smaltire le batteire come normali
rifiuti domestici. Assicurarsi di effettuare
lo smaltimento delle batterie in confor
mità alle normative locali vigenti.
-
-
-
-
• Il codice TV predefinito, memorizzato
nel telecomando, resta in memoria
per circa un minuto dopo l’estrazione
delle batterie dallo stesso. Quindi,
onde evitare la perdita delle im
postazioni memorizzate sul teleco-
-
mando, è opportuno avere a portata
di mano un nuovo set di batterie per
effettuare la sostituzione immeadi
atamente dopo la rimozione del set di
batterie scariche. Tuttavia, se si pre
mono i tasti del telecomando mentre
si stanno rimuovendo le batterie, le
impostazioni relative al codice mar
chio TV verranno cancellate ugualmente. E’ pertanto importante non
premere alcun tasto del telecomando
durante la sostituzione delle batterie.
Portata d’uso del telecomando
• Se il campo di trasmissione tra il telecomando e il sensore del Ricevitore
DTR è ostruito da un ostacolo, questo
non risponderà ai comandi inviati dal
telecomando. Se si verifica un tale
-
inconveniente, è necessario rimuovere
o modificare la posizione dell’ostacolo.
• Al progressivo scaricamento delle
batterie corrisponde una progressiva
riduzione della portata del telecomando.
Se la portata operativa del telecomando
si riduce eccessivamente sostituire le
batterie.
-
-
-
-
8
Page 97

Schema Collegamenti
230V
VCR TV
OPTICAL
AERIAL
50Hz
TV
ANTENNA
AERIAL
EXT
VIDEO
TV
AERIAL
EXT
TV
Ricevitore
Digitale Terrestre
Capitolo 2:
Schema Collegamenti
Televisore e Videoregistratore con prese SCART
Lo schema di collegamento illustrato è quello che offre la migliore qualità di registrazione e di
riproduzione.
02
Italiano
• Connettere la TV al primo connettore
EXT AV1 per ottenere la migliore qualità
dell’immagine e per aver accesso alla
commutazione automatica della mo
dalità EXT.
•
Se si utilizza un’antenna aggiuntiva che
necessita di alimentazione separata fornita
dal DTR è necessario consultare le istruzioni
supplementari fornite alle pagine 13 e 33.
• Sebbene sia possibile utilizzare un’antenna
interna, tale soluzione potrebbe non assicurare la migliore ricezione.
•
Prima di effettuare i collegamenti è necessario scollegare tutti i dispositivi dalla rete
di alimentazione elettrica principale.
-
1 Collegare il ricevitore come mostrato nel
diagramma illustrato sopra.
2 Collegare tutti i dispositivi, incluso il DTR,
all’alimentazione elettrica principale.
3 Accendere il televisore e selezionare un canale.
4 Premere il tasto STANDBY dal teleco-
mando per attivare il Ricevitore DTR.
Una volta attivato, il Ricevitore DTR mostrerà
il logo Pioneer e successivamente la scher
-
mata del Menù Selezione Lingua.
Consultare la sezione Prima accensione del
ricevitore, a pagina 12.
9
Page 98

Schema Collegamenti02
VIDEO
AERIAL
TV
230V
VCR TV
OPTICAL
AERIAL
50Hz
TV
AERIAL
TV
Ricevitore Digitale Terrestre
ANTENNA
Televisori e videoregistratori dotati solamente di ingressi per
antenna del tipo coassiale standard
• Prima di effettuare i collegamenti è
necessario scollegare tutti i dispositivi
dalla rete di alimentazione elettrica
principale.
1 Collegare i dispositivi come mostrato nel
diagramma sopra, ma senza collegare ancora
l’antenna al Ricevitore DTR.
2 Una volta terminate le operazioni di collegamento, connettere i dispositivi. Accendere
la TV e selezionare un canale inutilizzato, per
consentire la visione dei programmi digitali.
Successivamente, accendere il videoreg
istratore (in questa fase non è importante
determinare il canale su cui è sintonizzato il
videoregistratore).
3 Premere il tasto STANDBY dal teleco-
mando per attivare il DTR.
4 Sintonizzazione della TV.
E’ ora necessario sintonizzare un canale TV
per consentire la ricezione dei programmi
digitali. Se non si è certi del modo in cui
eseguire tale operazione è opportuno fare
riferimento al manuale d’istruzioni del tele
visore. Memorizzare il canale quando sullo
schermo appare il logo Pioneer o il Select
Language (Menù Selezione Lingua) come
illustrato sotto.
-
10
5 Collegare il cavo dell’antenna al Ricevi-
tore DTR e verificare che l’immagine sullo
schermo sia chiara e stabile (assenza di
sfarfallii, interferenze o effetto neve).
Page 99

Schema Collegamenti
230V
VCR TV
OPTICAL
AERIAL
50Hz
TV
Ricevitore Digitale Terrestre
Impianto stereo dotato
di convertitore della
frequenza di
campionamento
AV amp, etc.
02
6 Sintonizzare la TV su tutti gli altri canali
memorizzati, incluso quello dedicato al
videoregistratore e verificare la qualità
dell’immagine su ciascun canale.
Se la qualità dell’immagine risulta buona,
passare alla sezione Prima accensione del
ricevitore, alla pagina 12 del manuale. Se, al
contrario, si riscontrano dei problemi nella
qualità dell’immagine anche con l’antenna
collegata, al completamento della procedura
definita alla pagina 12 Prima accensione del
ricevitore sarà necessario seguire le istruzi
-
oni riportate nella sezione sottostante.
1 Scollegare il cavo dell’antenna dal con-
nettore posteriore del Ricevitore DTR.
2 Accertarsi che la TV sia sintonizzata sul
4 Selezionare l’opzione Setup dalla
schermata del MENU DI AVVIO (HOME
MENU), seguito da Installation (Instal
lazione) e poi RF Output Channel
(Canale d’uscita RF) utilizzando i tasti
∞, e SELECT (SELEZIONA) dal teleco-
mando.
Se si riscontrano delle interferenze è op-
portuno cambiare il canale 43, impostato
per default. Selezionare un canale alter
nativo distante dal 43. Premere il tasto
(Exit) del MENU per uscire dal menù e
memorizzare il canale selezionato.
5 Se si riscontra un miglioramento
dell’immagine, ripetere la stessa proce
dura a partire dal Punto 4.
canale impostato per la ricezione dei
programmi digitali.
3 Premere il tasto MENU del telecomando.
Verrà visualizzata la schermata del MENU
DI AVVIO (HOME MENU).
Connessione del ricevitore ad un dispositivo audio digitale
Collegare un cavo audio digitale ottico (venduto separatamente) tra il connettore degli output
audio digitali del Ricevitore DTR e quello degli input digitali di un impianto stereo dotato di
convertitore della frequenza di campionamento AV amp, etc.
• Se uno degli output è costituito da un
segnale audio codificato col sistema
Dolby Digital e se si possiede un dis
positivo audio digitale esterno già dotato
di decoder Dolby Digital è necessario
modificare le impostazioni degli output
dal menù Preferenze Utente, Digital
Audio Out. (Vedi pagina 30.)
• Se il dispositivo audio digitale esterno
non supporta la frequenza di campi
onamento del segnale audio che viene
trasmesso, l’audio non potrà essere
udito.
-
5,
-
Italiano
-
-
-
Prodotto su licenza dei Dolby Laboratories.
“Dolby” e il simbolo della doppia D sono
marchi dei Dolby Laboratories.
11
Page 100

03
Prima accensione del ricevitore
Capitolo 3:
Prima accensione del ricevitore
Una volta effettuati tutti i collegamenti
e dopo aver collegato il Ricevitore DTR
all’alimentazione principale, premere il tasto
STANDBY
Sullo schermo apparirà il logo Pioneer seguito dal Menù Selezione Lingua.
o qualunque tasto numerico.
Selezione di una Lingua per i Menù
Da questa schermata è possibile selezionare
una lingua per i menù.
1 Premere i tasti 5/∞ per selezionare
la lingua desiderata e premere SELECT
(SELEZIONA).
2
Una volta selezionata la Lingua dei Menù
verrà visualizzato un messaggio di benvenuto.
Selezione del Paese
Da questa schermata è possibile selezionare
il paese in cui viene utilizzato il Ricevitore
DTR. Premere i tasti
un paese e in seguito premere SELECT
(SELEZIONA).
5/∞ per selezionare
Selezione del tipo di schermo TV
12
3 Premere SELECT (SELEZIONA).
Lo schermo visualizza una finestra di dialogo
che invita l’utente a selezionare il tipo di TV
posseduto. Premere i tasti
are Normale (4:3) o Wide (16:9) e premere
SELECT (SELEZIONA).
2/3 per selezion-
 Loading...