

Page 1

STEREO CASSETTE DECK
CT-L11
Operating Instructions
Page 2

panel.
Ces étiquettes se trouvent sur le fond de l’appareil.These labels can be found on the unit’s rear
CAUTION
RISK OF ELECTRIC SHOCK
DO NOT OPEN
ATTENTION
DANGER D'ELECTROCUTION
NE PAS OUVRIR
IMPORTANT
FOR USE IN THE
UNITED KINGDOM
The wires in this mains lead are
coloured in accordance with the
following code:
Blue : Neutral
Brown : Live
If the plug provided is unsuitable for
your socket outlets, the plug must be
cut off and a suitable plug fitted.
The cutoff plug should be disposed of and must
not be inserted into any 13 amp socket as this
can result in electric shock. The plug or adaptor
of the distribution panel should be provided
with a 5 amp fuse. As the colours of the wires
in the mains lead of this appliance may not
correspond with coloured markings identifying
the terminals in your plug, proceed as follows:
The wire which is coloured blue must be
connected to the terminal which is marked with
the letter N or coloured black.
The wire which is coloured brown must be
connected to the terminal which is marked with
the letter L or coloured red.
Do not connect either wire to the earth
terminal of a three-pin plug.
NOTE
After replacing or changing a fuse, the
fuse cover in the plug must be replaced
with a fuse cover which corresponds to
the colour of the insert in the base of the
plug or the word that is embossed on the
base of the plug, and the appliance must
not be used without a fuse cover. If lost,
replacement fuse covers can be obtained
from your dealer.
Only 5 A fuses approved by B.S.I. or
A.S.T.A. to B.S. 1362 should be used.
¶ When using this product follow the instructions written on the underside of the unit, which concern rated voltage, etc.
Thank you for buying this PIONEER product.
Please read through these operating instructions so you
will know how to operate your model properly. After you
have finished reading the instructions, put them away in
a safe place for future reference.
In some countries or regions, the shape of the power plug
and power outlet may sometimes differ from that shown
in the explanatory drawings. However, the method of
connecting and operating the unit is the same.
¶ This component cannot be operated alone; please use
Operating Environment H045 En
Operating environment temperature and humidity:
+5°C – +35°C (+41°F – +95°F); less than 85%RH (cooling
vents not blocked)
Do not install in the following locations
• Location exposed to direct sunlight or strong artificial
light
• Location exposed to high humidity, or poorly ventilated
location
in combination with the CD tuner XC-L11 or DVD/CD
tuner XV-DV77/DV88.
VENTILATION: When installing this unit, make
sure to leave space around the unit for ventilation to
improve heat radiation (at least 30 cm at top, 15 cm at
rear, and 15 cm at each side).
WARNING: Slot and openings in the cabinet are
provided for ventilation and to ensure reliable
operation of the product and to protect it from
overheating, to prevent fire hazard, the openings
should never be blocked and covered with items, such
as newspapers, table-cloths, curtains, etc. Also do not
put the apparatus on the thick carpet, bed, sofa, or
fabric having a thick pile. H040 En
2
En
Page 3

Contents
1 Connecting up
Connecting the system cable ...................................... 4
Connecting the power .................................................4
2 Controls and displays
Front panel ................................................................... 5
Display ..........................................................................5
3 Using the Tape Deck
Playing tapes ................................................................6
Setting the reverse mode .......................................... 7
Resetting the tape counter ....................................... 7
Using Dolby Noise Reduction................................... 7
Making tape recordings ............................................... 8
Automatically recording CDs and MDs ....................9
Recording other sources ......................................... 10
Changing the system information ............................. 10
Recording using the timer....................................... 11
Activating/deactivating the record timer .............. 12
4 Additional information
Using cassette tapes .................................................. 13
Tapes you should avoid ...........................................13
Protecting your recordings ..................................... 13
Cleaning the tape heads ......................................... 13
Demagnetizing the tape heads ...............................13
Troubleshooting ......................................................... 14
Specifications .............................................................14
3
En
Page 4
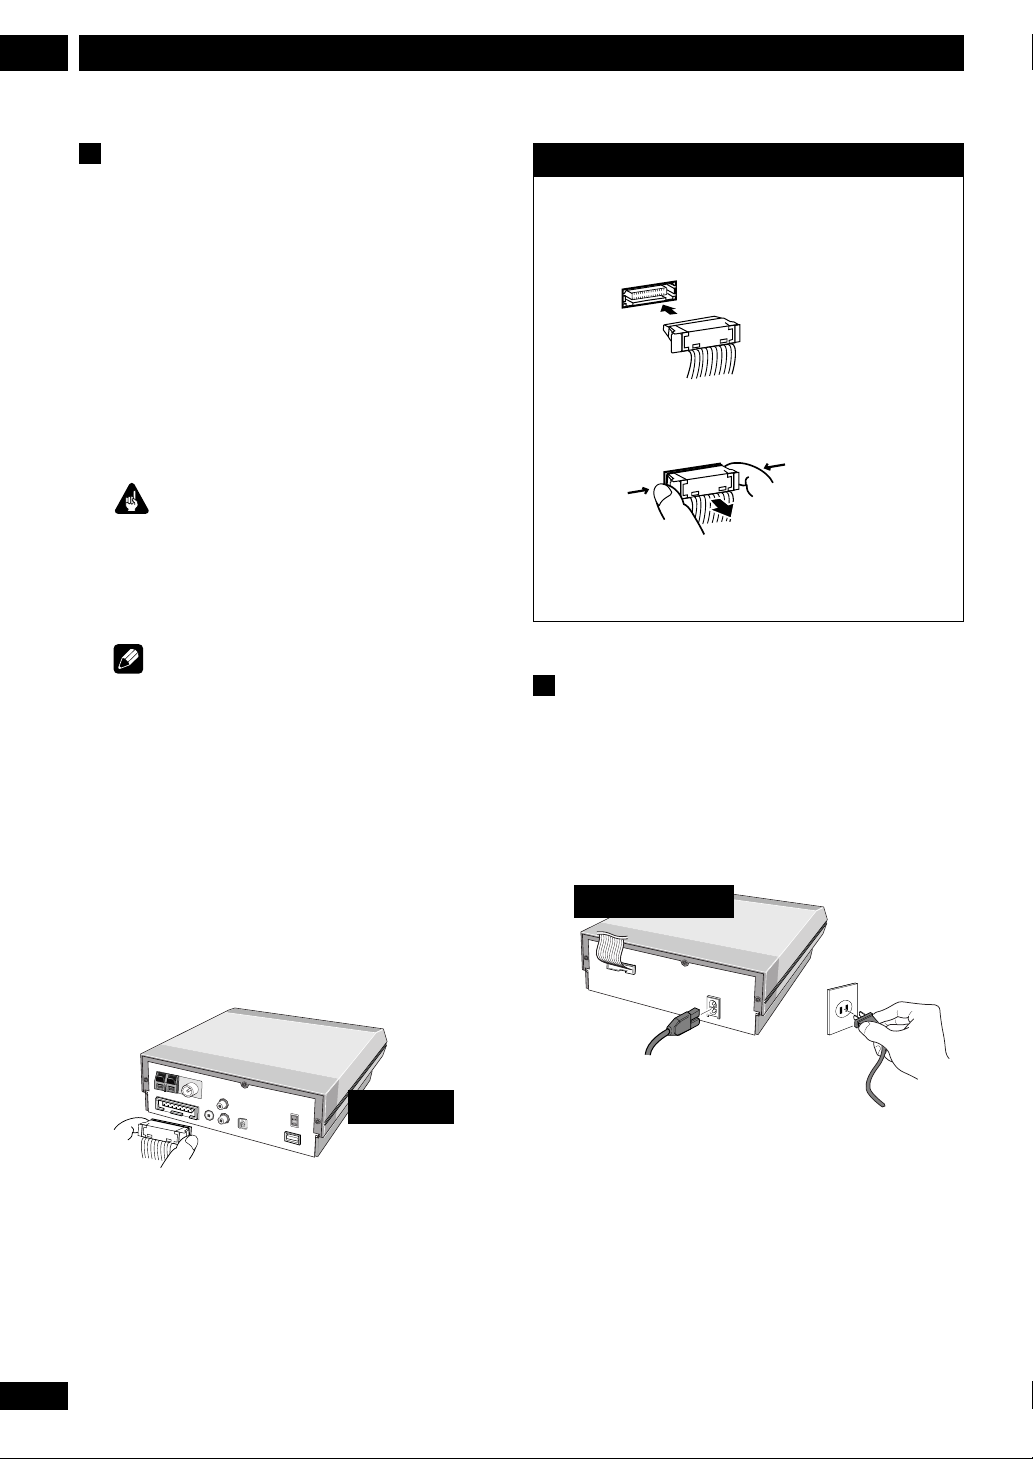
Connecting Up1
Connecting the system cable
If you don’t also own the optional MD recorder, this to
the CD tuner or DVD/CD tuner unit. If you want to
connect this unit and the optional MD recorder, connect
this unit to the MD recorder.
The CT-L11 connects directly to the XC-L11 CD (or XVDV77/DV88 DVD/CD) tuner or MJ-L11 (MD recorder). If
you are setting the whole system up for the first time, be
sure to also refer to the XC-L11 or XV-DV77/DV88 and
MJ-L11 manual for full installation and connection
details.
Important
Before making or changing any rear panel connections,
make sure that all the components are switched off and
unplugged from the power supply.
Note
The following illustrations are for the CD tuner rear
panel only. However, connections for the DVD/CD tuner
are the same.
Ribbon cables
IMPORTANT: Never connect or disconnect the system
ribbon cables while the power plug is connected to the
wall outlet. Doing so may damage the unit.
To insert, hold the connector and push firmly into the
socket until you hear it click home.
To remove, hold the connector securely on either side with
thumb and forefinger and pull out from the socket.
Connecting the power
1 Plug one end of the supplied power cord
into the AC INLET.
• Connect the cassette deck system cable to
the CD tuner or DVD/CD tuner or MD
recorder.
On the CD tuner and DVD/CD tuner, the socket is
FROM MODEL MJ-L11 OR CT-L11.
labelled
On the MD recorder, the socket is labelled
MODEL CT-L11.
FROM
CD tuner
2 Plug the other end into a household
power outlet.
Cassette deck
4
En
Page 5
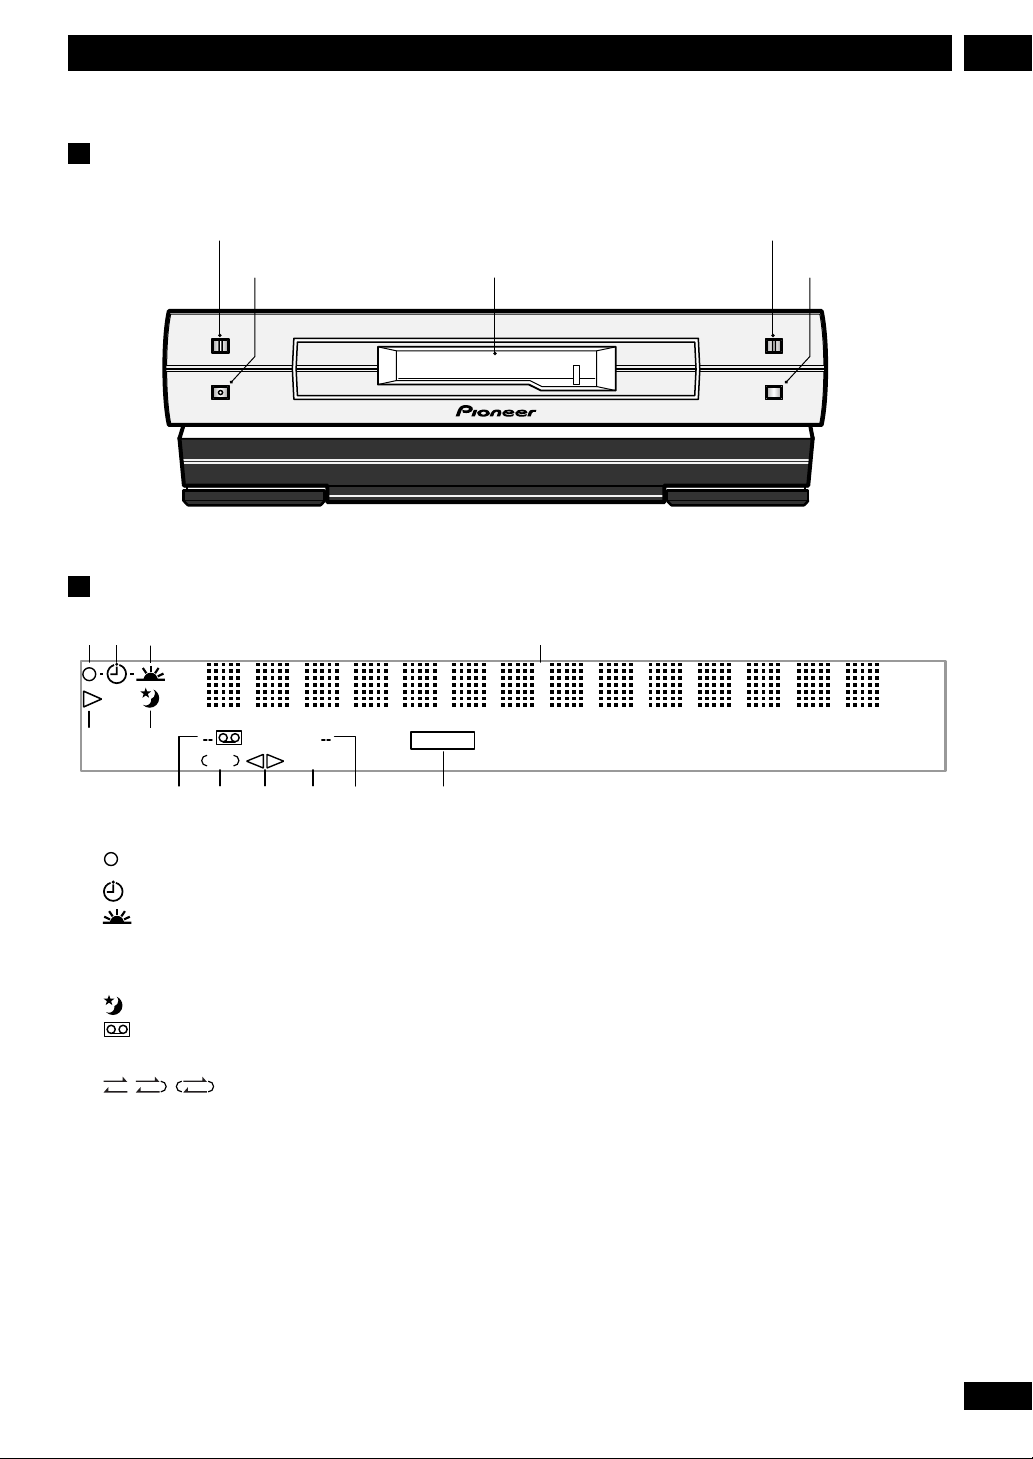
Front panel
23
PLAY (touch sensor)
2Controls & Displays
0 EJECT (touch sensor)
¶8 RECORD PAUSE
PLAY
23
¶8
REC PAUSE
!
Cassette loading slot
STEREO CASSETTE DECK
AUTO REVERSE
Display
1 2 4
5 6
3
REC
2
ALLNR
SYNCHRO
87 9 10 11 12
7 STOP
EJECT
STOP07
1 Record timer – page 11
2
Timer – page 11
3
Wake up timer page 11
4 Character display
5 # Lights when a tape is playing and blinks when in pause
Sleep timer – page 11
6
7
Lights when the optional tape deck is recording
(blinks when in record-pause)
8 Reverse mode – page 7
9 @# Tape direction – page 6
10 2
11
NR Dolby Noise Reduction – page 7
REC Lights when recording to the optional tape or MD
deck
12
SYNCHRO Synchro recording (page 9. See also the
operating instructions supplied with the optional MD deck)
• Manufactured under license from Dolby Laboratories. “Dolby” and the double-D symbol are
trademarks of Dolby Laboratories.
5
En
Page 6

Using the Tape Deck3
4 To rewind or fast forward the
tape, press 1 or ¡.
5 To skip back or forward a
track on the tape, press 4
or ¢.
¢ searches for the next blank space
between tracks on the side currently
playing (in other words, to the start of
the next track), then resumes playback.
4 searches for the previous blank
space between tracks on the side
currently playing (in other words, to
the start of the current track), then
resumes playback.
DIRECT PLAY 3
TAPE
ENTER
32
SYSTEM
67
1¡4¢
MENU
Playing tapes
The tape deck features auto-reverse,
Dolby B NR (noise reduction) and auto
tape select. The auto-reverse feature lets
you play or record both sides of the tape
without physically taking it out and
turning it over. Dolby B NR reduces tape
hiss on tapes recorded using Dolby NR
(which includes almost all commercially recorded tapes). Auto tape select
means that the deck automatically
detects the type of tape you're playing—normal (type I) or highposition/C
need to check the tape type and switch
rO2 (type II)—so there's no
manually.
By pressing 4 or ¢ more than
CD
DIRECT PLAY 3
MD TAPE
17¡
FM
AM
SOUND
AUX
TIMER
4¢
1 Switch on.
You can use the
STANDBY/ON button
on either the remote control or the
main unit to do this.
2 Load a cassette tape then
press TAPE to start playback.
Playback will start from the side facing
you when you load it.
If you’re using the front panel controls,
touch the 2 3 sensor to start
playback.
The side of the tape you'll hear is
whichever is facing toward you when
you load it. This is the 'forward' (3)
direction, while the other side is
'reverse' (2). The forward indicator is
shown in the display.
once, the tape deck will skip several
tracks at once (up to a maximum of
15). For example, press ¢ twice to
skip forward two tracks.
Note: Track search is unlikely to
work reliably in the following cases:
• if the space between tracks is less
than about 4 seconds
• if the recording is particularly noisy
so the spaces are not recognized
• if the recording contains frequent
silences, such as a language study
tape.
• if the recording contains sections of
very quiet material, such as some
classical music recordings
6 To stop the tape, press 7.
3 To play the other side of the
tape, press TAPE (remote) or
touch the 23 sensor (front
panel).
Each time you press
TAPE or 23
during playback, the other side of the
tape starts playing. Pressing
TAPE or
23 when the tape is stopped starts
playback on the side it was playing
previously.
Touch the 0 sensor on the front panel
to eject the tape.
Tip
If there's already a tape in the deck,
then pressing the TAPE button—even
when the system is in standby mode—
will switch the system on and start the
tape playing.
DISP
CANCEL
SET MENU
The current tape direction is indicated
6
En
in the display.
Page 7

3Using the Tape Deck
Setting the reverse mode
The tape deck can play both sides of a tape without you
having to take the cassette out and turning it over by
hand.
The reverse mode tells the deck what to do when it
reaches the end of the tape on the side it's playing. There
are three modes: endless, reverse and one-way.
1 Press SYSTEM MENU (MENU) and select
the TAPE MENU.
• DVD model: Use the 2 and 3 buttons to change
the currently displayed option; press
it.
• CD model: Use the 4 and ¢ buttons to
change the currently displayed option; press
select it.
2 Select REVERSE MODE from the TAPE
MENU.
3 Choose a reverse mode.
There are three reverse modes:
ENDLESS – Plays the tape round and round
•
continuously
ONE-WAY – Plays one side then stops
•
REVERSE – Stops after the end of the tape has been
•
reached in the reverse direction
Note: Actually, in endless mode, the deck will only
play the tape through 16 times before it stops
automatically.
ENTER to select
SET to
2 Select COUNTER RESET from the TAPE
MENU.
The counter is reset after pressing
ENTER (SET).
Using Dolby Noise Reduction
For best sound quality, tapes that are recorded with
Dolby NR should be played with Dolby NR switched on.
This includes virtually all commercially produced
tapes—look for the double–D symbol (2) on the
inlay card, or on the cassette tape itself.
1 Press SYSTEM MENU and select the TAPE
MENU.
• DVD model: Use the 2 and 3 buttons to change
the currently displayed option; press
it.
• CD model: Use the 4 and ¢ buttons to
change the currently displayed option; press
select it.
2 Select DOLBY NR from the TAPE MENU.
3 Switch Dolby NR on or off as required.
The dolby indicator on the display lights when Dolby NR
is on.
• Manufactured under license from Dolby Laboratories.
“Dolby” and the double-D symbol are trademarks of
Dolby Laboratories.
ENTER to select
SET to
Resetting the tape counter
The tape deck has a digital tape counter which resets to
zero each time you load a cassette or switch the power
off. You can reset the counter to zero at any other time
from the menu.
1 Press SYSTEM MENU and select the TAPE
MENU.
• DVD model: Use the 2 and 3 buttons to change
the currently displayed option; press
it.
• CD model: Use the 4 and ¢ buttons to
change the currently displayed option; press
select it.
ENTER to select
SET to
7
En
Page 8

Using the Tape Deck3
Making tape recordings
You can make tape recordings from any other component in the system, and also from an external component connected to the auxiliary inputs. If you're
recording from CD or MD, it’s usually most convenient
to use the synchro-recording feature (see Automatically
recording a CD or MD, opposite). For other sources, see
Recording other sources on page 10. To set the timer
for recording at a later time, see Recording using the
timer on page 11.
Once recording has started, you can't switch to another
component until either the recording has stopped, or
you pause the recording. So, for example, you can't
switch over to the tuner while you're recording a CD.
When recording, the volume, bass, treble and other
sound controls have no effect on the recording. This
means that you can record something with the volume
turned right down, if you want.
Before recording, check that the cassette erase tabs have
not been broken, and that the tape is either a type I
(normal position) or type II (high position/C
can't record on type IV (metal) tapes using this deck.
If you're recording from the start of a tape, it's a good
idea to wind the tape on a little so that you don't
accidently start recording over the leader tape. You can
either do this by hand, or load the tape into the deck and
play the tape for 5–6 seconds.
rO2)—you
8
En
Page 9

3Using the Tape Deck
67
CD
DIRECT PLAY 3
MD TAPE
17¡
CHARACTER
DISP
CD
DVD
MD
FM
CANCEL
SYSTEM
DISP
AM
SOUND
AUX
TIMER
SET MENU
Automatically recording
CDs and MDs
Synchro recording is designed to make
recording a CD or MD as simple as
possible. There are two modes: 1 track
synchro records just a single track, then
stops; all tracks synchro records the
whole disc.
Note that you can’t use synchro
recording to record DVDs.
1 Load a cassette into the tape
deck.
In order to follow these instructions
more easily, load the cassette with side A
facing you.
2 Check the recording direc-
tion.
If the tape direction indicator shows 3,
then recording will start from side A. If
it shows 2, then recording will start
from side B.
If you need to change the direction,
press TAPE twice, then 7.
3 Set the auto-reverse mode.
If you set this to one-way, then
recording will stop after reaching the
end of the current side. If it's set to
endless or reverse, then recording will
continue onto the other side of the tape.
However, if you start recording in the
reverse direction, (2) only that side of
the tape will be recorded.
• See page 7 for how to set the reverse
mode.
5 Press DVD/CD (CD) or MD
to select the recording
source.
6 Load the CD or MD you want
to record.
7 If you want to record just one
track, select the track using
the 4 and ¢ buttons.
8 Press ¶8 (front panel only).
The tape deck goes into record-pause.
9 Press DVD/CD (CD) or MD
to start the CD or MD
playing.
Recording starts automatically.
Once the track or disc has finished, the
tape deck goes back into record-pause
mode—press 7 to fully stop recording.
• If you want to stop recording before
the track/disc has finished playing,
press 7 any time during the
recording.
• If the recorder has to switch the side
of the tape half way through a track,
recording will start again on the
other side from the beginning of the
same track. This means you don't
get a single track spread over two
sides of a tape.
4 Turn Dolby NR on or off as
required.
• See page 7 for how to switch Dolby
NR on/off.
9
En
Page 10

Using the Tape Deck3
Recording other sources
Use this when recording from the built-in tuner, or from
a component connected to the auxiliary analog inputs.
1 Follow steps 1–4 of Automatically record-
ing CDs and MDs on page 9.
• Load a cassette
• Set the record direction
• Set the reverse mode
• Switch Dolby NR on/off.
2 Select the source you want to record.
For example, if you want to record from the tuner, press
FM/AM, and tune into a station.
If you are recording from another component, set it up
ready for playback.
3 Press ¶8 (front panel only).
The tape deck goes into record-pause.
4 Press TAPE to begin recording.
If you’re recording from a component that requires you
to start playback (a turntable or another cassette deck,
for example), start playback here.
• To pause recording, press ¶8. To resume, press
23.
5 When you want to finish the recording,
press 7.
Changing the system information
• Press SYSTEM DISP (DISP) to change the
information shown in the display.
TAPE OOO4
4:12 am
Tape counter
Time
10
En
Page 11

3Using the Tape Deck
V1/V2/V3
VIDEO
CD
MD TAPE
17¡
CHARACTER
DISP
ENTER
FM
DIRECT PLAY 3
CANCEL
TUNER
FM/AM
32
CLOCK/
TIMER
AM
SOUND
AUX
TIMER
4¢
SET MENU
Recording using the timer
You can set up the system to make a
recording from the built-in tuner or
from a component connected to the
VIDEO (
1 Select the source you want to
record.
Press
you’re recording from the built-in
tuner, or
recording from an external component.
2 Prepare the source.
If you’re recording from the radio, tune
in the station.
3 Press CLOCK/TIMER
(TIMER) and select TIMER
REC.
• DVD model: Use the 2 and 3
• CD model: Use the 4 and ¢
4 Select TIMER EDIT.
5 Set the switch on time.
• DVD model: Use the 2 and 3
• CD model: Use the 4 and ¢
AUX) input jacks.
TUNER FM/AM (AM or FM) if
VIDEO (AUX) if you’re
TIMER REC
buttons to change the currently
displayed option; press
ENTER to
select it.
buttons to change the currently
displayed option; press
SET to select
it.
TIMER EDIT
ON 1O:OO am
buttons to set the hour then press
ENTER. Set the minute in the same
way, pressing
ENTER to finish.
buttons to set the hour then press
SET. Set the minute in the same
way, pressing
SET to finish.
6 Set the switch off time.
OFF 11:OO am
Set in the same way as the switch on
time.
7 Select the tape or MD
recorder.
•
MD REC
•
TAPE REC
8 Check the settings you just
made.
The display shows the timer settings:
TIMER CHECK
ON 9:3O am
OFF 1O:3O am
FM 87.5OMHz
TAPE REC
CHECK END
9 Switch the system into
standby.
The timer will not work if the system is
left on!
The standby light on the front panel
lights green to indicate that the timer
has been set.
11
En
Page 12

Using the Tape Deck3
Activating/deactivating the record
timer
The record timer will only work once it has been
activated. To activate the record timer, set the timer to
ON. To deactivate it, set the timer to OFF.
1 Press CLOCK/TIMER (TIMER) and select
TIMER REC.
• DVD model: Use the 2 and 3 buttons to change
the currently displayed option; press
it.
• CD model: Use the 4 and ¢ buttons to
change the currently displayed option; press
select it.
2 Select TIMER ON or TIMER OFF.
ENTER to select
SET to
12
En
Page 13

4Additional Information
Using cassette tapes
The tape of a cassette is quite easily damaged and loose
tape can jam in the tape deck mechanism. If the tape
has become unwound, use a pen or pencil to wind it
back on to the spool.
When not using cassettes, always store in the case. Store
cassettes away from magnetic fields, excessive heat,
humidity, dust or oil.
Before recording on a tape, wind the tape on past the
leader tape (about the first 3 or 4 seconds of each side).
Tapes you should avoid
Since tapes longer than 90 minutes are so thin, they are
more susceptible to jamming in the tape deck mechanism and other trouble such as irregular winding. Avoid
using cassette tapes longer than 90 minutes.
Protecting your recordings
You can protect an important recording against
accidental erasure by breaking the erase-protect tab(s)
with a small screwdriver.
Erase-protect tab
(side A)
Cleaning the tape heads
To maintain good performance and sound quality, we
recommend that you clean the deck’s tape heads
periodically (once every 10 hours of use).
Use a commercially available wet-type head cleaning
cassette, following the instructions provided by the
manufacturer.
Note
• Make sure that the head cleaning cassette you buy is
compatible with auto-reverse decks. Check with a
Pioneer authorized service center for details.
• Do not use dry-type head cleaning cassettes.
• After cleaning, do not play a cassette for 2–3 minutes
to allow the cleaning liquid to dry.
Demagnetizing the tape heads
Through continued use, the playback/record tape head
becomes magnetized, resulting in loss of performance
and sound quality.
Use a commercially available head demagnetizer
periodically, following the instructions provided by the
manufacturer.
Caution
• When using a head demagnetizer, you should turn
the volume down to minimum and unplug any
headphones that are connected.
Erase-protect tab
(side B)
If you want to re-record on an erase-protected cassette,
cover the space left by the broken tab with self-adhesive
tape.
13
En
Page 14

Additional Information4
Troubleshooting
Incorrect operation is often mistaken for trouble or malfunction. If you think that there is something wrong with this
component, check the points below. Sometimes the trouble may lie in another component. Inspect the other components
and electrical appliances being used. If the trouble cannot be rectified after checking the items below, ask your nearest
Pioneer authorized service center or your dealer to carry out repair work.
Problem
Can’t record
Recordings are muddy or
distorted, or you can still hear
a previous recording under
the new one
Excessive tape hiss and overemphasized high frequencies
Dull, muffled sound
Recording made from the
VIDEO (AUX) input are
distorted
Recording made from the
VIDEO (AUX) input very quiet
Note
Remedy
• Check that the tape you want to record on still has the erase-protect tabs in place, or
that they are covered with tape, etc.
• Clean the tape heads.
• Make sure that Dolby NR is in the same position as when the tape was recorded.
• Make sure that Dolby NR is in the same position as when the tape was recorded.
• Set the VIDEO (AUX) input level to ATT ON.
• Set the VIDEO (AUX) input level to ATT OFF.
Static electricity or other external influences may cause
malfunctioning of this unit. In this case, unplug the
power cord and then plug back in. This will usually reset
the unit for proper operation. If this does not correct the
problem, please consult your nearest Pioneer service
center.
Specifications
Tracking method .......................... 4-track, 2-channel stereo
Frequency response
Type I (Normal) tape .................. 20 Hz - 16,000 Hz ± 6 dB
Type II (High/CrO2) tape ........... 20 Hz - 16,000 Hz ± 6 dB
(when recorded at –20 dB)
Signal-to-Noise Ratio.................................................. 56 dB
(EIAJ, peak recording level, audio compensation)
Dolby B NR ON ....................... 10 dB improvement at 5 kHz
Wow and Flutter................ 0.08 % WRMS +/−0.14 % (DIN)
Power requirements............................... AC 230 V, 50/60Hz
Power consumption......................................................... 12W
External dimensions .......... 220 (W) x 65 (H) x 313 (D) mm
Weight ........................................................................... 2.7 kg
Accessories
Operating Instructions......................................................... 1
Warranty Card ...................................................................... 1
14
En
Note
Specifications and design subject to possible modification
without notice, due to improvements.
Published by Pioneer Corporation.
Copyright © 2001 Pioneer Corporation.
All rights reserved.
Page 15

15
En
Page 16

Published by Pioneer Corporation.
Copyright © 2001 Pioneer Corporation.
All rights reserved.
PIONEER CORPORATION
PIONEER ELECTRONICS [USA] INC.
PIONEER ELECTRONICS OF CANADA, INC.
PIONEER EUROPE NV
PIONEER ELECTRONICS AUSTRALIA PTY. LTD.
PIONEER ELECTRONICS DE MEXICO S.A. DE C.V.
<TNGZW/01E00001>
4-1, Meguro 1-Chome, Meguro-ku, Tokyo 153-8654, Japan
P.O. BOX 1540, Long Beach, California 90801-1540, U.S.A.
300 Allstate Parkway, Markham, Ontario L3R OP2, Canada
Haven 1087, Keetberglaan 1, B-9120 Melsele, Belgium TEL: 03/570.05.11
178-184 Boundary Road, Braeside, Victoria 3195, Australia, TEL: [03] 9586-6300
San Lorenzo 1009 3er Piso Desp. 302 Col. Del Valle Mexico D.F. C.P. 03100
TEL: 5-688-52-90
Printed in
<ARB7244-A>
 Loading...